

Page 1
Monarch 9401®/ 9402
Thermal Printers
Operator’s Handbook
®
TC9401OH Rev. D 7/94 ©1989-1993 Monarch Marking Systems, Inc. All rights reserved.
Page 2

Each product and program carries a respective written
warranty, the only warranty on which the customer can rely.
Monarch reserves the right to make c hanges in the product
and the programs and their availability at any time and without
notice. Although Monarch has made every effort to provide
complete and accurate informat i on i n thi s manual, Monarch
shall not be liable for any omissions or inaccuracies. Any
update will be incorporated in a later edition of this manual.
WARNING
This equipment has been tested and f ound to comply with t he l i m its for
a Class A di gital device, pursuant to Part 15 of the FCC Rules. These
limits are des ig ned t o provide reasonable protection against har m ful
interfere nce when the equipment is operated i n a com m ercial
environment . This equipment gener at es, uses, and can ra di ate radio
frequency energy and, if no t in st al led and used in ac cor dance with the
instructi on m anual, may cause harmful int erference to r adi o
communicat i ons. O per ation of this equi pm ent in a residen tial area is
likely to cause harmf ul interfe re n c e in whic h case the user will be
required to cor rect the int erference at hi s own expense.
CANADIAN D.O.C. WARNING
This digital apparatus does not exceed the C la ss A li m its for radio
noise emissi ons from digita l apparatus set out in the Radio Interference
Regulations of the Canadian Department of Communications.
Le présent appa reil numériqu e n’ ém et pas de bruits radioélectriques
dépassant les limites appli cables aux appar ei l s num ériques de la
classe A prescrites dans le Réglement sur l e br ouillage ra dioélectrique
édicte par le m i ni stère des Commu nications du Ca nada.
WARNING
The power cor d i s in tended to serve as the disconnec t device. The
socket-outl et shal l be near the equip m ent and shall be easi l y
accessible.
WARNUG
Der Stromver sorgungskabel di ent al s abschaltvorr ic ht ung. D ie
Steckdose soll i n der Nahe der Einheit und liecht zunganglich liegen.
Trademarks
Monarch, 9401 and 9402 ar e regis tered trademar ks of Monarch Marking S ystems , Inc.
Page 3

Table of Contents
1. Introduction.....................................................................1-1
About This Manual .....................................................1-1
Menu Charts...................................................1-1
Returning to the Main Menu.......................................1-2
Terms You Should Know............................................1-3
2. Getting Started ................................................................2-1
Turning the Printer On................................................2-2
Startup........................................................................2-2
Using the Keys...........................................................2-3
On the Keypad...............................................2-4
On the Computer Keyboard.......................................2-5
Selecting a Function................................................... 2 - 6
Exiting an Option........................................................2-7
Table of Contents
3. Setting Supply Options.................................................. 3 -1
Ribbon........................................................................3-2
Separators.................................................................. 3 -3
Feed Mode.................................................................3-4
Print Position.............................................................. 3- 5
Supply Position ..........................................................3-7
Margin Position..........................................................3-8
4. Setting Communication V al ues.....................................4-1
Baud Rate ..................................................................4-3
Word Length...............................................................4-4
Stop Bits.....................................................................4-5
Parity..........................................................................4-6
Flow Control...............................................................4-7
Reset to Defaults........................................................4-8
i
Page 4

9401/9402 Operator’s Handbook
5. Setting the Contrast........................................................ 5 -1
6. Setting Defaults...............................................................6-1
Monetary Sign............................................................ 6- 2
Secondary Sign..........................................................6-3
Decimal Places..........................................................6-5
Power-Up Mode.........................................................6-6
Prompt Set.................................................................6-7
Re-Image All............................................................... 6-8
Overlapping Fields.........................................6-8
New Settings..................................................6-8
Setting Re-Image All ......................................6-9
7. Printing Online................................................................7-1
8. Printing Offline................................................................8-1
Using Data Entry Keys...............................................8-2
Entering Numbers..........................................8-2
Entering Letters..............................................8-4
Entering Symbols...........................................8-5
Using Bar Code 128.......................................8-6
About the Shift Key ....................................................8-7
Entering and Changin g Data......................................8-7
Ty pes of Data Entry....................................................8-9
Entering General Data...................................8-9
Entering a Price..............................................8-9
Entering "2-For" Price Data..............8-10
Prompts with Fixed Characters....................8-10
Entering a Batch.......................................................8-10
Interrupting a Batch..................................................8-13
Restarting a Batch....................................................8-14
Canceling a Paused Batch.......................................8-15
Canceling Batches Before Printing..........................8-17
Repeating a Batch....................................................8-18
Changing Supplies................................................... 8-19
Changing Supply Types ...............................8-19
ii
Page 5

Table of Contents
9. Using the Standard Formats..........................................9-1
FMT-1.........................................................................9-2
FMT-2.........................................................................9-4
FMT-3.........................................................................9-7
10. Memory Card ...............................................................10-1
11. Setting the Remote Diagnostics Values ................... 11-1
Baud Rate ................................................................11-3
Word Length.............................................................11-4
Stop Bits...................................................................11-5
Parity........................................................................11-6
Flow Control.............................................................11-7
Modem Control.........................................................11-8
Reset to Default Values ............................................11-9
12. Scanner........................................................................12-1
Appendix A ...........................................................................A-1
Table of Contents
Character Sets...........................................................A-1
Uppercase Letters..........................................A-2
Lowercase Letters..........................................A-3
Currency Symbols......................................................A-4
Punctuation and Symbo ls..............................A-5
International Charact ers.................................A-6
Code 128 Function Codes.............................A-7
Appendix B...........................................................................B-1
Standard Formats......................................................B-1
Permanent Formats...................................................B-2
Set A...............................................................B-2
Set B...............................................................B-3
Memory Card Formats...............................................B-4
Temporary Formats....................................................B-6
iii
Page 6

9401/9402 Operator’s Handbook
iv
Page 7
1. Introduction
The 9401® and 9402® printers enable you to print letters,
numbers, bar codes, and graphics on tags and labels. The
printer comes with three standard formats already designed for
you. You can also creat e and download formats from a
computer.
About This Manual
This manual explains how to begin using the printer and print a
batch of supplies. You can print online (sending data to the
printer from a computer), or offline (using the printer only).
The manual also explains how to enter dat a, using the 21-key
data entry keypad or the Monarch® computer keyboard.
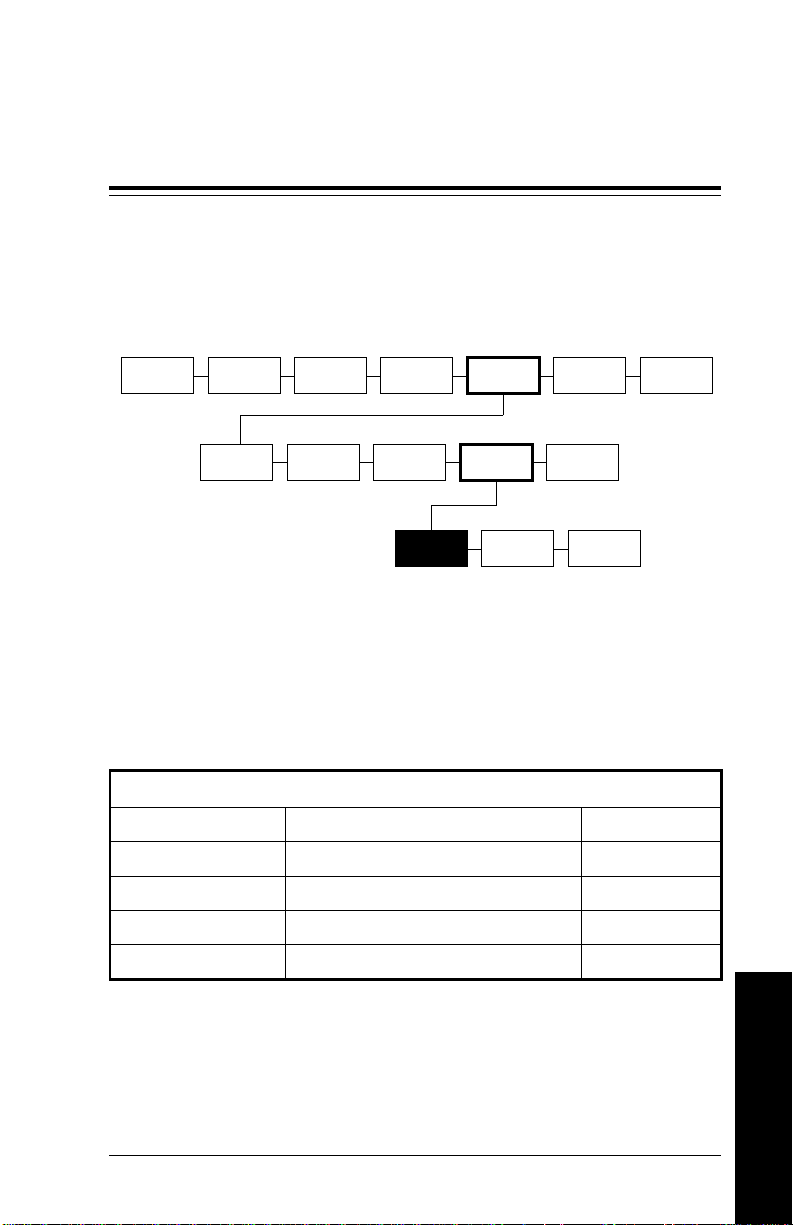
Menu Charts
Each sect i on of the manual has one or more charts showing
the printer’s menu structure. The example below is the chart
from "Setting the Contrast."
Introduction
MAIN MENU
CANCEL
ALL
PRINT
MODE
SUPPLY CONTRAST DEFAULTS
BATCH
ENTRY
REPEAT
BATCH
SETUP
PORT
SETTINGS
MEMORY
CARD
PASS-
WORDS
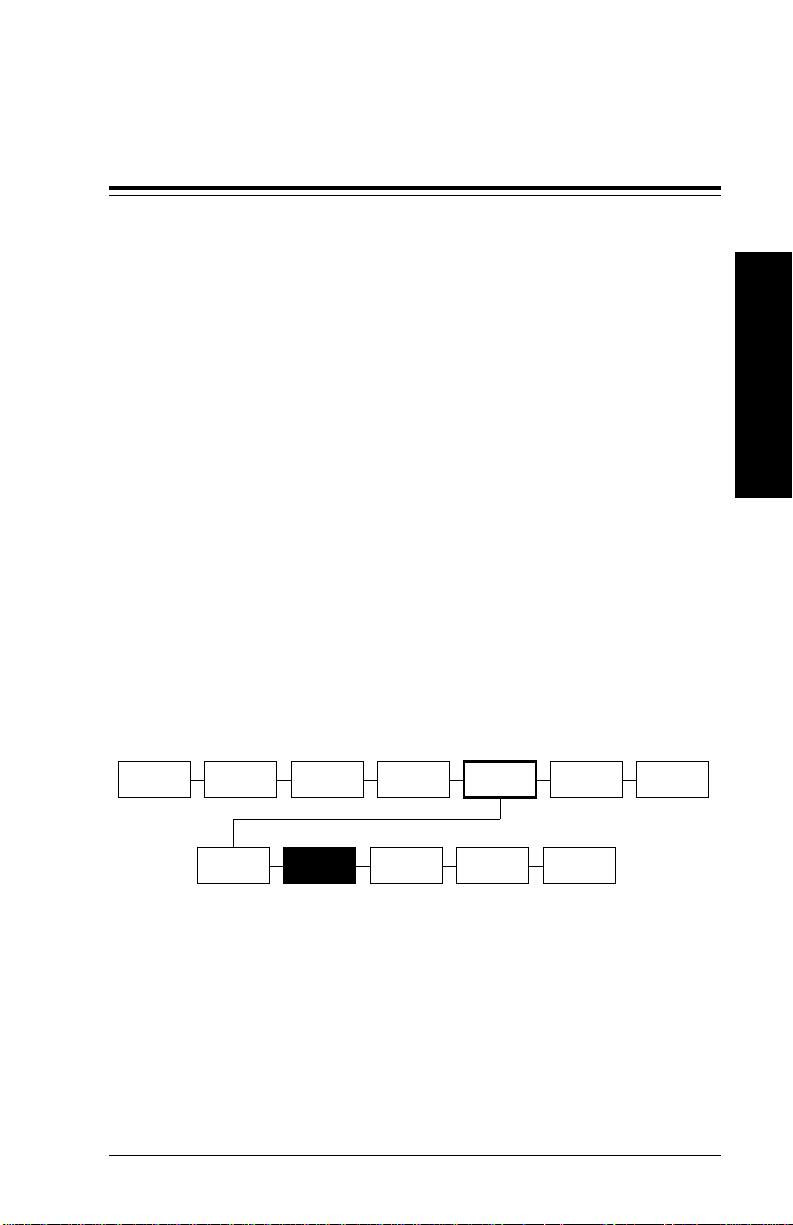
There are three styles of boxes in the charts.
• Boxes with normal borders show the menu options.
• Boxes with heavy borders (SETUP in the sample) show
selections
the
in the secti on.
you make to get to the function discussed
• Boxes with a bl ack ba ckg ro und (CON TRAST in the
sample) show the
functions
explained in the section.
DIAG.
1-1
Page 8

9401/9402 Operator’s Handbook
The black boxes show where you are; the bordered boxes
show how you got there.
Other manuals you might need are
Equipme nt M anual
System Administrator’s
Guide
Messages Manual
Contains general set-up and
maintenance procedures.
Explains communications and
message structures for sending
formats and batch data online.
Lists offline and online
messages and what action you
should take (if any).
Returning to the Main Menu
Be sure to return to the Main menu after making changes from
the Setup menu. The printer will not save any of your changes
if you turn the printer Off before returning to the Mai n m enu.
This requirement applies to the following options:
Supply Menu Defaults Menu
Ribbon Monetary Sign
Separators Secondary Sign
Feed Mode Decimal Places
Print Pos Powerup M ode
Supply Pos R e-image All
Margin Pos
Port Sett in gs Pa s swords Men u
Menu
User Comm Change
Diag Comm
Scanner
Contrast Menu
Contrast Setting
1-2
Page 9

1. Introduction
Terms You Should Know
batch Group of tags or l abel s that
contain the same data.
batch separator Extra tag between batches that
shows where one batch ends
and the next one begins.
character Letter, number, or symbol.
continuous Feed mode in which the printer
prints all the tags in a batch
without stopping.
cursor Underline symbol that shows
where you are on the screen.
data entry keypad 21-key keypad that includes
letters and numbers.
digits Numbers only .
Introduction
drawing Term that appears on the printer
to indicate bar code printing.
enter Type in data from the keypad.
field Area on the supply where data
prints.
format Arrangement of fields printed on
the supply.
imaging Term that appears on the printer
to indicate text printing.
offline E ntering data and printing
batches by using the printer
alone (without a computer).
1-3
Page 10

9401/9402 Operator’s Handbook
on demand Feed mode in which the printer
stops after ea ch l abe l to all o w
the operato r to rem ove it.
online Entering dat a and printing
batches by sending data from a
computer.
printing Term that appears on the printer
to indicate graphics printing.
queue Batches w ai ting to print (also
includes the batch that is
printing).
supplies Tags or labels used for pri nting.
1-4
Page 11

2. Getting Started
This chapter explains how to turn the printer on, start the
printer, use the keys on the keypad and computer keyboard,
select a function, and exit an opti on.
Before you use the 9401/9402 printer
• Install the printer. Refer to your
• Load supplies . Refer to your
Equipme nt M anual
Equipment Manual
.
.
• Set the supply options. See Chapter 3, "Setting Supply
Options".
• Set the communication options if you are printing
online. See Chapter 4, "Setting Communication
Values".
• Set the prin ter options (Monet ary Sign, Secondary Sign,
Decimal Places, Power-Up Mode, Prompt Set, and
Re-Image All).
Getting Started
2-1
Page 12
9401/9402 Operator’s Handbook
Turning the Printer On
Refer to your
Equipme nt M anual
for information abo ut
installing the printer and loadi ng supplies.
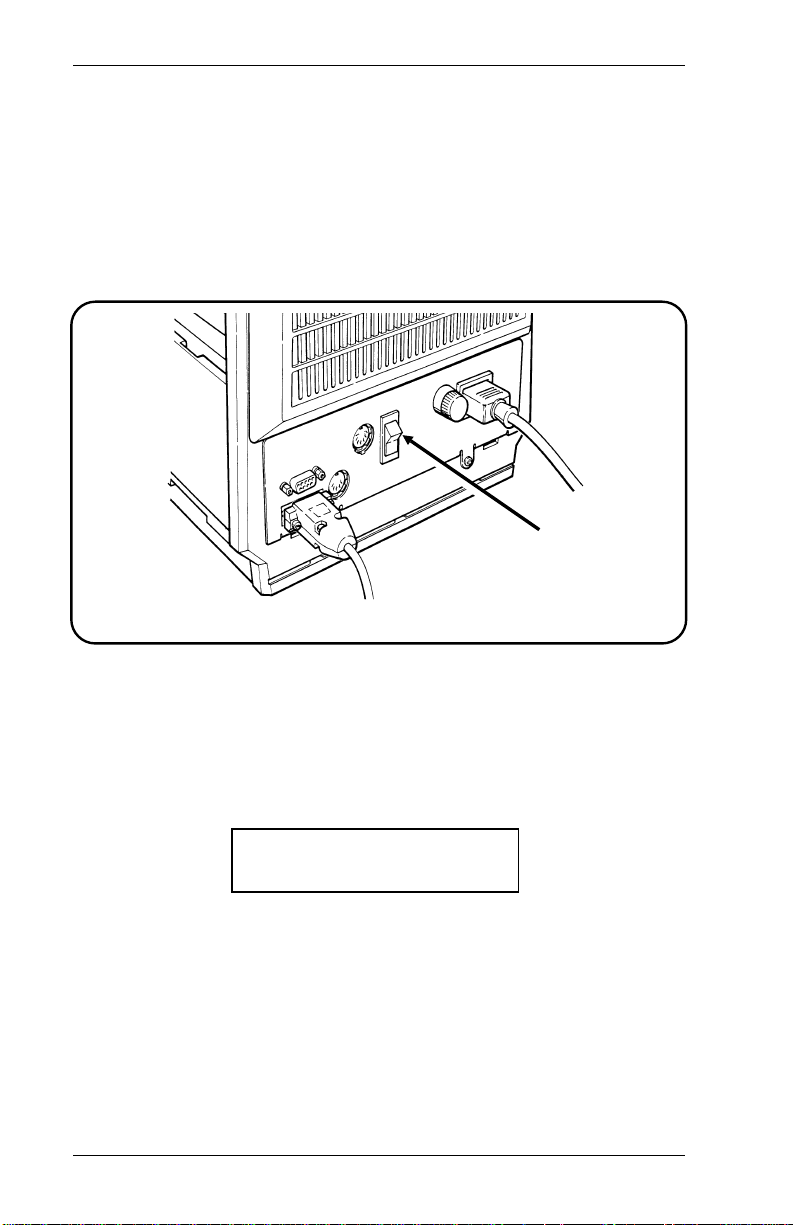
The power switch is on the back of the printer (as shown). To
turn the printer On, press the top of the power switch.
Power
Switch
Back of 9401/94 02 Pri nter
Startup
When you turn the printer On, the printer displays a copyright
message. You will see other messages as the printe r loads
formats. Then you will see
Calibrating...
as the printer checks the length of each tag.
2-2
Page 13
2. Getting Started
The next message depends on how your printer is set up.
• If your printer is set for
online
power-up mode, you will
see
PRINT MODE
Ready
• If your printer is set for
offline
power-up mode, you will
see
MAIN MENU
< Print Mode >
Using the Keys
If you have a 9402 or a 9401 with an optional computer
keyboard, you can enter data offline. If you have a 9402, you
can enter data offli ne using the keypad.
Data
Entry
Keys
Function
Keys
Getting Started
Keypad with Data Entry Keys
The 9401 printer has a 5-key keypad, consisting of various
functio n key s. These function ke ys are the minimum keys
necessary to print supplies online. No data entry keys appear
on this keypad. However, you have the option to connect a
computer keyboard, enabling this printer to operate offline.
2-3
Page 14
9401/9402 Operator’s Handbook
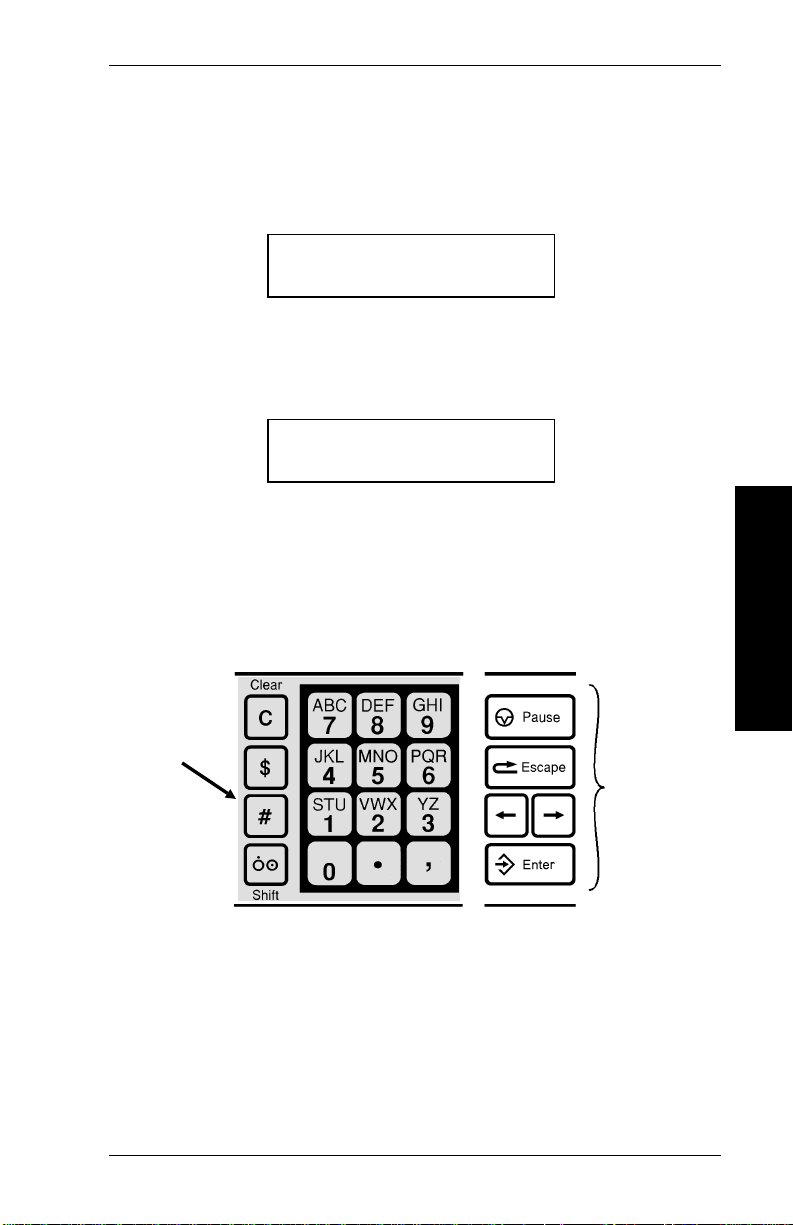
The 9402 printer has a 21-key keypad to allow offl i ne data
entry. This keypad include s 5 function keys, 10 numer i c keys,
4 symbol keys, a shift key ( 5 ), and a clear key ( 4 ). You
can also connect a computer keyboar d to this printer, but it is
not required to use this printer offline.
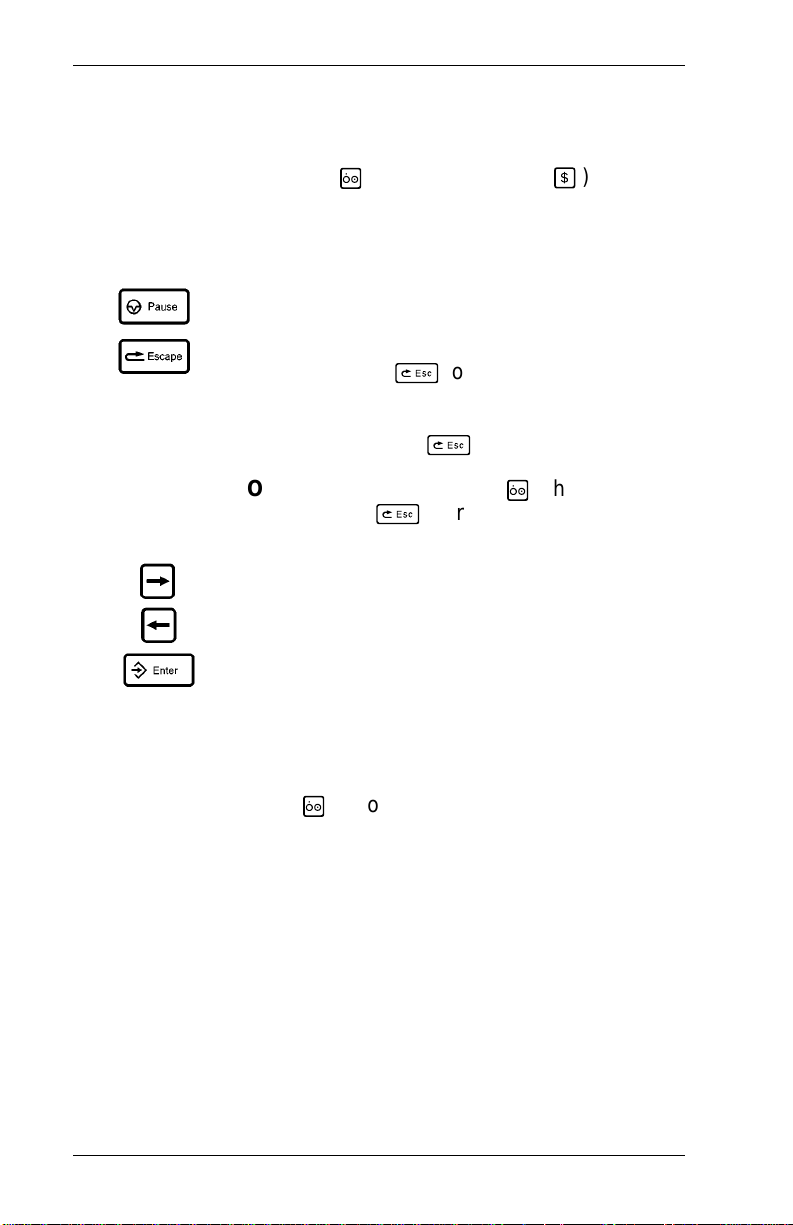
On the Keypad
Interr upts pri nting .
Returns th e di splay to the next higher menu ,
when y o u press
Returns the display to the Main menu, when
you press and hold
NOTE: In data entry, press 5 , then
press
Main menu.
Displays the next menu item.
8
once.
8
.
8
to return to the
Displays the previous menu item.
Selects the displayed menu item.
The data entry key s, located on the 9402 print er, are used to
enter batch data. To enter letters, you have to switch to
character mode (press 5 ). To enter numbers, you must not
be in character mode.
If your printer has data entry keys, you can print online and
offline batches. If your printer does not have data entry keys,
you can attach a Monarch computer keyboar d. For more
information about using the data entry keys, see Chapter 8,
"Printing Off l i ne."
2-4
Page 15

2. Getting Started
On the Computer Keyboard
Y ou can attach a computer keyboard to the 9401 or 9402
printers. The computer keyboard looks something like this:
Some of the func tion keys on a computer keyboard
correspond to the function keys on the printer keypad.
Function Key Printer Keypad Equivalent
F1 1
F2 2
F5 5 /
F6
F9 9
F10
6
7
8
Getting Started
In addition, the shift key on the computer keyboard works like
the 5 on the keypad. For more information about using the
computer keyboard, see Chapter 8, "Printing Offline."
2-5
Page 16
9401/9402 Operator’s Handbook
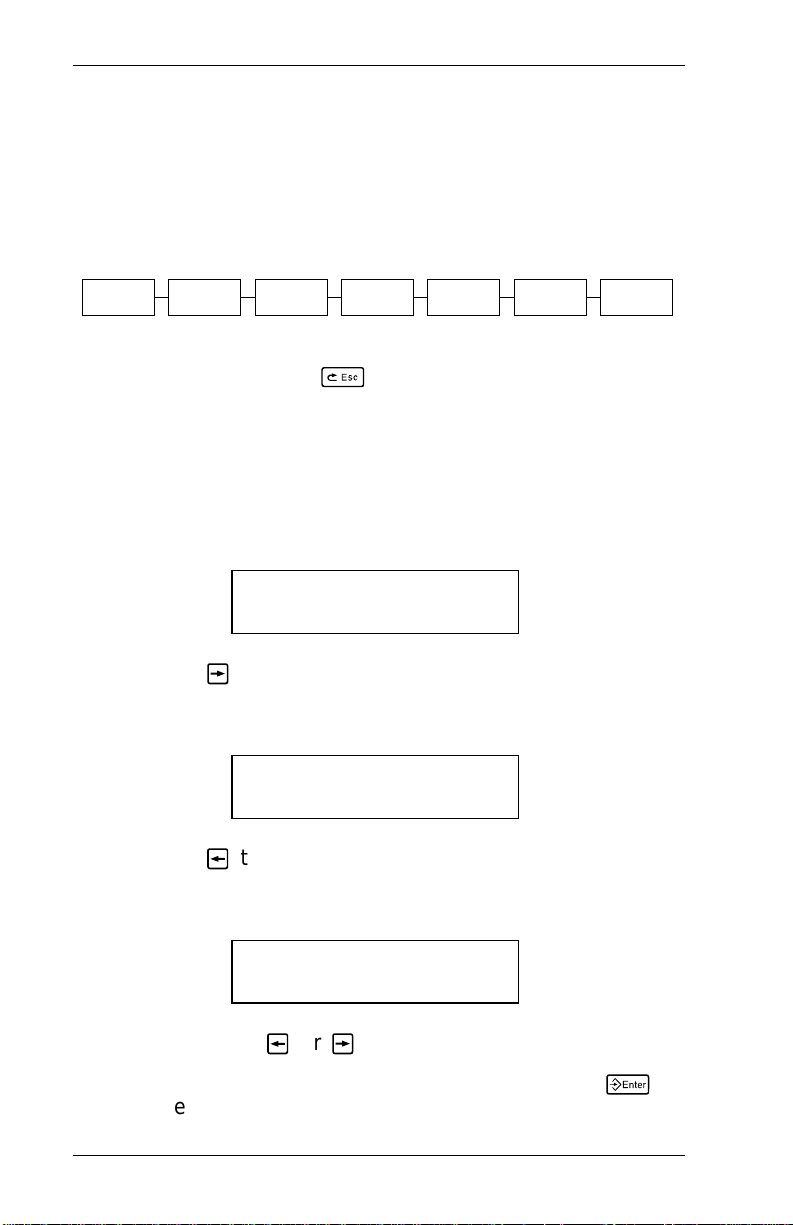
Select ing a Function
The Ma i n m e nu has sever al fu n c tions (oper ating m odes) .
These functions are shown in the chart below.
MAIN MENU
CANCEL
ALL
PRINT
MODE
BATCH
ENTRY
REPEAT
BATCH
SETUP
MEMORY
CARD
DIAG.
NOTE: If the printer displays PRINT MODE Ready when you
turn it on, press
8
to display the Main menu.
Y ou can display menu options by using arrow keys or option
numbers.
To use the arrow keys
• when the screen displays a right arrow,
MAIN MENU
Cancel All >
press 2 to display more options.
• when the screen displays a left arrow,
MAIN MENU
< Diagnostics
press 1 to display more opti ons.
• when the screen di splays a left and a right arrow.
MAIN MENU
< Print Mode >
press either 1 or 2 to display more opti ons.
• when you see the menu option you want, press
to select it.
2-6
6
Page 17

2. Getting Started
To use option numbers
1. Press the number of the menu option you want (options
are numbered from the left, starting at 1). The option
displays immediately.
2. Press
6
to select the option.
For examp l e, if PRINT MODE is displayed, you are at option 2
on the Main menu. If you want to use the Setup func tion,
1. Press 5 to display SETUP.
2. Press
6
to select it.
Exiting an Option
To exit an option, press
higher menu.
NOTE: When you press
have made since the last time you pressed
8
once. Yo u will exit to the next
8
, you lose any ent rie s yo u
6
.
Getting Started
2-7
Page 18

9401/9402 Operator’s Handbook
2-8
Page 19
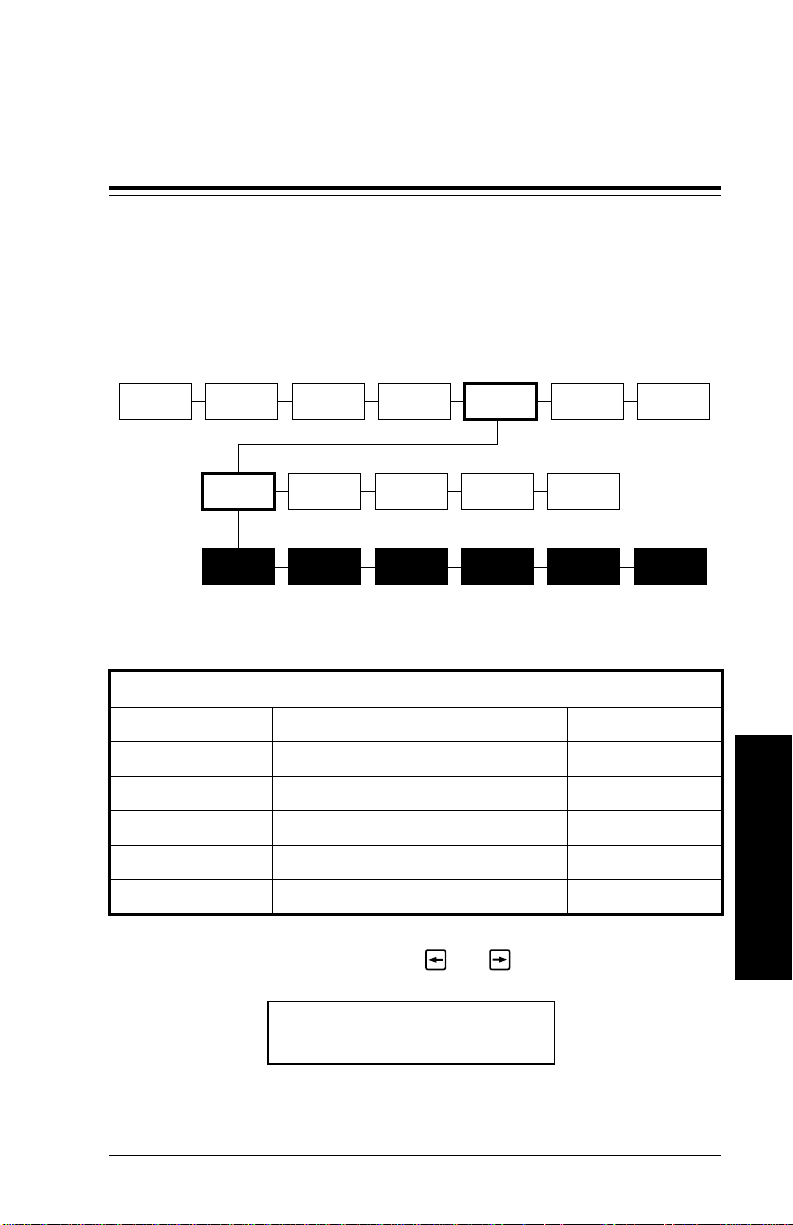
3. Setting Supply Options
This chapter explains how to set the supply options for the
ribbon, separators, feed mode, print position, supply position,
and the margin position.
MAIN MENU
CANCEL
ALL
PRINT
MODE
SUPPLY CONTRAST DEFAULTS
RIBBON
BATCH
ENTRY
SEPARA-
TORS
REPEAT
BATCH
FEED
MODE
SETUP
PORT
SETTINGS
PRINT
POS.
MEMORY
CARD
PASS-
WORDS
SUPPLY
POS.
DIAG.
MARGIN
POS.
You may need to set supply options often to adjust for different
supplies. The options are shown below.
Option Va lues Default
Ribbon Y es/ No No
Separators On/Off Off
Feed Mode On-Demand/Continuous Continuous
Print Position -99 to +999 dot s +0
Supp l y Po s i t i on -99 to +99 d ots +0
Margin Position -99 to +99 dots +0
1. From the Main menu, press 1 or 2 until you see
Setting Supply Options
MAIN MENU
<Setup>
3-1
Page 20
9401/9402 Operator’s Handbook
2. Press
3. Press
To change a supply option, follow the instructions under the
option name. T o exit an option without changing the setting,
press
8
6
. You will see
SETUP
Supply >
6
. You will see the first supply option.
SUPPLY
Ribbon >
.
Ribbon
Y ou can print with or without a ribbon. You must tell the printer
which option you want.
The default setting for Ribbon is No. To change the setting,
follow steps 1 through 3 at the beginn i ng of this chapter. Then
follow the steps below.
1. Press
previous setting, for example
2. Press 1 or 2 until you see the option you want. Then
press
NOTE: If you set the Ribbon option to Yes, be sure you
3-2
6
to set the ribbon option. You will see the
RIBBON
No >
6
. Y ou will see
SUPPLY
Ribbon >
install a ribbon before printing.
Page 21
3. Setting Supply Options
3. Press
8
twice to exit to the M ain menu and save your
changes.
NOTE: The printer will not save your changes if you turn
it Off before returning to th e Main menu.
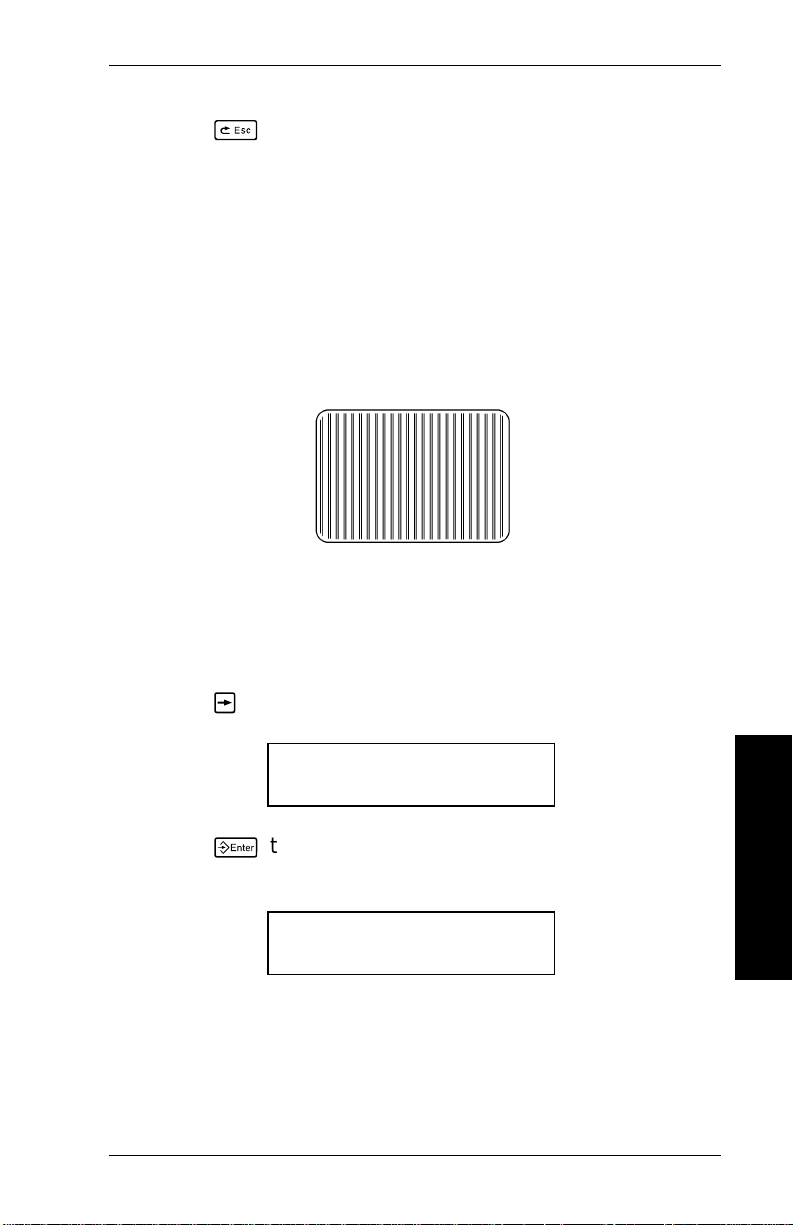
Separators
A batch separator is a tag printed between batches. The tag
has a pinstripe pattern to make it easy to find.
Batch Separator
The default setting for separators is Off. To change the
setting, follow steps 1 through 3 at the beginning of this
chapter. Then follow the steps below.
1. Press 2 until you see
SUPPLY
< Separators >
2. Press
6
to set the batch separators option. The
previous setting appears, for example
SEPARATORS
<On
Setting Supply Options
3-3
Page 22
9401/9402 Operator’s Handbook
3. Press 1 or 2 until you see the option you want. Then
press
6
. Y ou will see
< Separators >
SUPPLY
4. Press
changes.
NOTE: The printer will not save your changes if you turn
8
twice to exit to the M ain menu and save your
it Off before returning to th e Main menu.
Feed Mode
You can print suppli es one at a time (on
continuous
strip (
and dispenses one label each time you pre ss
To change the setting, fol l o w steps 1 through 3 at the
beginning of this chapter. Then follow the steps below.
1. Press 2 until you see
2. Press
). If you select on
SUPPLY
< Feed Mode >
6
. The previous setting appears, for example
demand
demand
) or in one
, the printer prints
6
.
FEED MODE
Continuous >
3. Press 1 or 2 until you see the option you want. Then
press
3-4
6
. Y ou will see
< Feed Mode >
SUPPLY
Page 23

3. Setting Supply Options
4. Press
changes.
NOTE: The printer will not save your changes if you turn
8
twice to exit to the M ain menu and save your
it Off before returning to th e Main menu.
Print Positi on
This function adjusts the vertical print posi tion on the supply.
Y ou can adjust the print if it is too close to the top or bottom of
the supply, or overtypes the pre-printed area ("MONARCH" in
the sample below). The adjustments are in dots (0.0052 inch),
which is the small est measurement the printer recognizes.
The range is from -999 to +999 (5.20 inches), and the default
is 0.
NOTE: When you adjust the print position, you need to check
and possibly adjust the supply position.
• If the data is too clo se to the bottom, inc r ease the
number.
• If the data is too close to the top, decre ase the number.
NOTE: Make sure Re-Image All is set to Yes when you
change this setting. See the secti on in Chapter 6,
"Re-Image All."
Setting Supply Options
3-5
Page 24
9401/9402 Operator’s Handbook
To change the setting, fol l o w steps 1 through 3 at the
beginning of this chapter. Then follow the steps below.
1. Press 2 until you see
SUPPLY
<Print Pos>
2. Press
6
. The previous setting appears, for example
Enter print pos
[+/-999]: +0
3. Press 9 to reset the print position to 0, or use the arrow
keys to change the print position. Pressing 2 increases
the value (moves the image up); 1 decreases it (mov es
the image down ) .
• Press the arrow key once to change by one number at
a time.
• Press and hold the arrow key to change rapidly .
4. Press
will see
5. Press
changes.
6
when the number you want is displayed. You
SUPPLY
<Print Pos>
8
twice to exit to the M ain menu and save your
NOTE: The printer will not save your changes if you turn
it Off before returning to th e Main menu.
3-6
Page 25

3. Setting Supply Options
Supply Position
This function adjusts how muc h supply feeds out of the exit
chute. You may need to adjust the supply in or out to allow
• tags and labels to be torn off.
• die cut labels to be removed easily, or to prevent them
from falling off.
NOTE: When you adjust the supply position, you need to
check and possibly adjust the print position.
The range is fr om -99 to +99, and the default is 0. The
adjustments are in dots (0.0052 inch).
• Increase the number to feed more supply out of the
chute.
• Decrease the number to feed les s s uppl y out of the
chute.
NOTE: Make sure Re-Image All is set to Yes when changing
this setting. See the section in Chapter 6, "Re-Image
All."
To change the setting, fol l o w steps 1 through 3 at the
beginning of this chapter. Then follow the steps below.
1. Press 2 until you see
SUPPLY
< S upply Pos >
2. Press
6
. The previous setting appears, for example
Enter supply pos
[+/-99]: +0
Setting Supply Options
3-7
Page 26

9401/9402 Operator’s Handbook
3. Press 9 to reset the supply position to 0, or use the
arrow keys to change the print posi ti on. Pressing 2
increases the value (feeds more su ppl y); 1 decreases it
(feeds less supply).
• Press the arrow key once to change by one number at
a time.
• Press and hold the arrow key to change rapidly .
4. Press
will see
5. Press
changes.
NOTE: The printer will not save your changes if you turn
6
when the number you want is displayed. You
SUPPLY
< S upply Pos >
8
twice to exit to the Main menu and save your
it Off before returning to th e Main menu.
Margin Position
This function adjusts the horizontal print pos i ti on on the supply.
The adjustments are in dots (0.0052 inch). The range is from
-99 to +99 (0.52 inches), and the default is 0.
Print too far to the left Print too far to the right
3-8
Page 27

3. Setting Supply Options
• If the data is too far to the
the number.
• If the data is too far to the
the number.
The maximum width of the print area is two inches. When you
move the image to the right or left on the supply , avoid moving
the image outs i de the two-inch print area.
left
on the supply,
right
on the supply,
increase
decrease
• As you move the format to the right, fields that move
past the two-inch location of the supply "wrap around"
and appear on the left side. Other fields move the full
length you specify. If your supply is less than two
inches, fields might move off the supply and not print.
• As you move the format to the left, it sto ps at the 0.0"
location of the supply. Other fields move the full length
you specify . This can change the relative position of the
fields.
NOTE: Make sure Re-Image All is set to Yes when changing
this setting. See the section in Chapter 6, "Re-Image
All".
To change the setting, fol l o w steps 1 through 3 at the
beginning of this chapter. Then follow the steps below.
1. Press 2 until you see
Setting Supply Options
2. Press
SUPPLY
< Margin Pos
6
. The previous setting appears, for example
Enter margin pos
[+/-99]: +0
3-9
Page 28
9401/9402 Operator’s Handbook
3. Y ou can press 9 to reset the margin position to 0, or use
the arrow keys to change the print position. Pressing 2
increases the value (moves the image to the right); 1
decreases it (moves the image to the left).
• Press the arrow key once to change by one number at
a time.
• Press and hold the arrow key to change rapidly .
4. Press
6
when the number you want is displayed. You
will see
SUPPLY
< Margin Pos
5. Press
8
twice to return to the Mai n m enu and save
your changes.
NOTE: The printer will not save your changes if you turn
it Off before returning to th e Main menu.
3-10
Page 29
4. Setting Communication Values
This chapter explains how to set the baud rate, word le ngth,
stop bits, parity , flow control, and reset values to the default.
MAIN MENU
CANCEL
ALL
PRINT
MODE
SUPPLY CONTRAST DEFAULTS
BATCH
ENTRY
REPEAT
BATCH
USER
COMM
SETUP
PORT
SETTINGS
COMM
DIAG
MEMORY
CARD
PASS-
WORDS
SCANNER
DIAG.
If your printer is connected to a computer, you need to set the
printer communication values to match your computer’s online
communications. Before entering the communication values,
see your programming consultant.
The co m m u ni cation val u es are sh o w n below.
Option Va lues Default
Baud rate 1200, 2400, 4800, 9600 2400
Word length 7, 8 8
Stop bi t s 1, 2 1
Parity Odd, Even, None None
Flow control None, Xon/Xoff, DTR DTR
Setting Communication
Values
4-1
Page 30
9401/9402 Operator’s Handbook
1. From the Main menu, press 1 or 2 until you see
MAIN MENU
<Setup>
2. Press
6
. You will see
SETUP
Supply >
3. Press 2 until you see
SETUP
< Port Settings >
4. Press
6
. You will see
PORT SE T TIN GS
User Comm >
5. Press
6
. You will see the first communications option.
USER COMM
Baud rate >
To change one of these options, follow the i nstructions unde r
the option name. To exit an opt i on without changing the
setting, press
8
.
4-2
Page 31

4. Setting Communication Values
Baud Rate
To change the setting, fol l o w steps 1 through 5 at the
beginning of this chapter. Then follow the steps below.
1. Press
6
to set the baud rate. You will see the previous
setting , for example
BAUD RATE
< 2400 >
The baud rate options are
1200
2400
4800
9600
2. Press 1 or 2 to display the baud rate you need, then
press
6
. Y ou will see
USER COMM
Baud rate >
3. Press
8
three times to return to the Main menu and
save your change s
NOTE: The printer will not save your changes if you turn
it Off before returning to th e Main menu.
4-3
Setting Communication
Values
Page 32

9401/9402 Operator’s Handbook
Word Length
To change the setting, fol l o w steps 1 through 5 at the
beginning of this chapter. Then follow the steps below.
1. Press 2 until you see
USER COMM
< Word Length >
2. Press
The word length options are
3. Press 1 or 2 to display the word length you need, then
press
4. Press
save your change s.
NOTE: The printer will not save your changes if you turn
6
. You will see the previous setting, for example
WORD LENGTH
<8
7
8
6
. Y ou will see
USER COMM
< Word Length >
8
three times to return to the Main menu and
it Off before returning to th e Main menu.
4-4
Page 33

4. Setting Communication Values
Stop Bits
To change the setting, fol l o w steps 1 through 5 at the
beginning of this chapter. Then follow the steps below.
1. Press 2 until you see
USER COMM
< Stopbits >
2. Press
6
. You will see the previous setting, for example
STOPBITS
1>
The st op bi t opti o n s ar e
1
2
3. Press 1 or 2 to display the number of stop bits you
need, then press
6
. Y ou will see
USER COMM
< Stopbits >
4. Press
8
three times to return to the Main menu and
save your change s.
NOTE: The printer will not save your changes if you turn
it Off before returning to th e Main menu.
4-5
Setting Communication
Values
Page 34

9401/9402 Operator’s Handbook
Parity
To change the setting, fol l o w steps 1 through 5 at the
beginning of this chapter. Then follow the steps below.
1. Press 2 until you see
USER COMM
<Parity>
2. Press
The parity options are
3. Press 1 or 2 to display the parity you need, then press
6
4. Press
save your change s.
NOTE: The printer will not save your changes if you turn
6
. You will see the previous setting, for example
PARITY
None >
None
Odd
Even
. You will see
USER COMM
<Parity>
8
three times to return to the Main menu and
it Off before returning to th e Main menu.
4-6
Page 35

4. Setting Communication Values
Flow Control
To change the setting, fol l o w steps 1 through 5 at the
beginning of this chapter. Then follow the steps below.
1. Press 2 until you see
USER COMM
< Flow Control >
2. Press
6
. You will see the previous setting, for example
FLOW CONTROL
<DTR
The flow control options are
None
XON/XOFF
DTR
3. Press 1 or 2 to display the flow control you need, then
press
6
.
NOTE: The XON character is 17. The XOFF character is
19. You must set flow control to DTR for IBM
personal computers (unless you have XON/XOFF
software).
You will see
USER COMM
< Flow Control >
Setting Communication
4-7
Values
Page 36

9401/9402 Operator’s Handbook
4. Press
save your change s
NOTE: The printer will not save your changes if you turn
8
three times to return to the Main menu and
it Off before returning to th e Main menu.
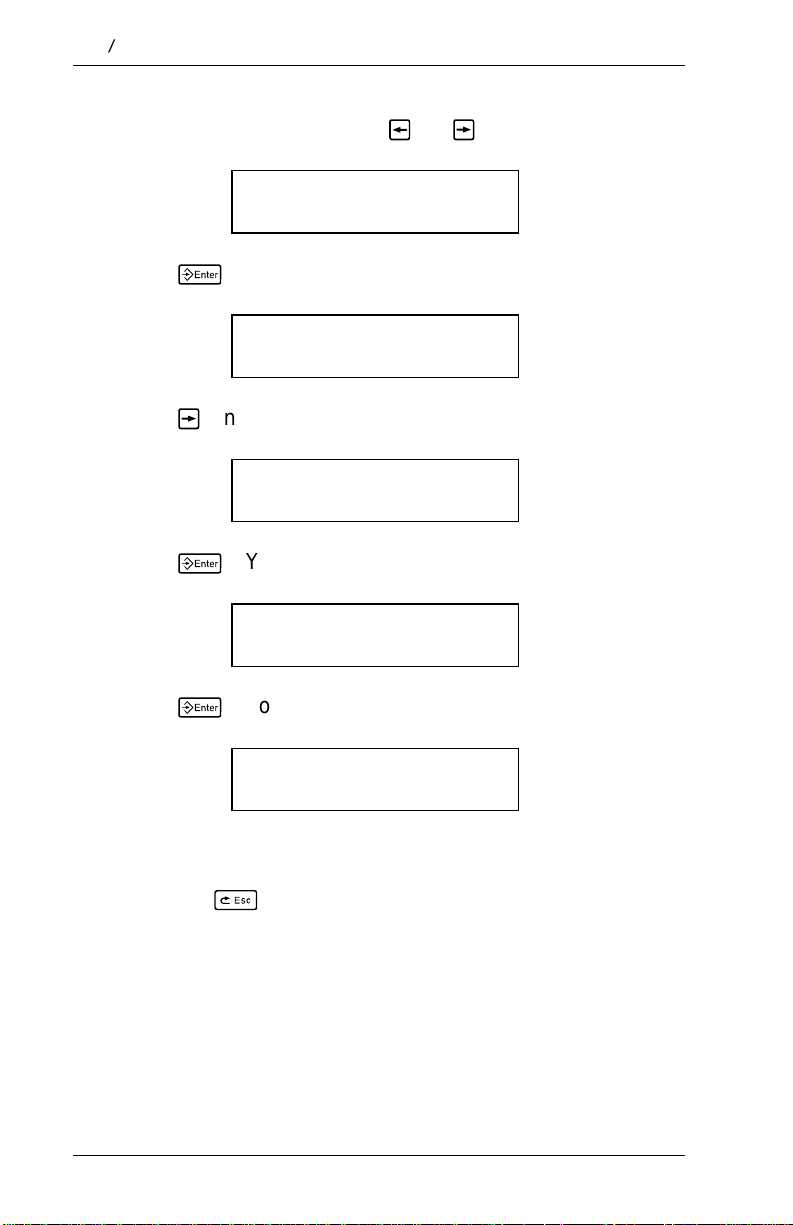
Reset to Defaults
To reset the communication values to th e defaults, follow steps
1 through 5 at the beginning of this chapter. Then follow the
steps below.
1. Press 2 until you see
USER COMM
< Reset
2. Press
6
. You will see
Are you sure?
No >
The Re set opti ons are
No
Yes
3. You can
• press
will return to the User Comm menu.
• press
You will see
4-8
6
2
then
to exit without changing the values. You
6
to set the values to the defaults.
USER COMM
< Reset
Page 37

4. Setting Communication Values
4. Press
8
three times to return to the Main menu and
save your change s.
NOTE: The printer will not save your changes if you turn
it Off before returning to th e Main menu.
4-9
Setting Communication
Values
Page 38

9401/9402 Operator’s Handbook
4-10
Page 39

5. Setting the Contrast
This chapt er explains how to adjust the contrast on your
supply. Contrast controls the darkness of the printing on your
supply. The range is -50 to +50, and the default is 0.
MAIN MENU
Setting the Contrast
CANCEL
ALL
PRINT
MODE
SUPPLY CONTRAST DEFAULTS
BATCH
ENTRY
REPEAT
BATCH
SETUP
PORT
SETTINGS
MEMORY
CARD
PASS-
WORDS
NOTE: The normal print contrast setting (+00) prints
accurate bar codes on most supplies. If you
change the print contrast, use a bar code verifier
to be sure your bar code s sca n corr ectl y.
• Darken the printing by increasing the number .
• Lighten the printing by decreasing the number.
1. From the Main menu, press 1 or 2 until you see
MAIN MENU
<Setup>
2. Press
6
. You will see
SETUP
Supply >
DIAG.
3. Press 2 until you see
< Contrast >
SETUP
5-1
Page 40

9401/9402 Operator’s Handbook
4. Press
6
. You will see the previous setting, for example
Enter contrast
[+/-50]: +0
5. Y ou can press 9 to reset the contrast to 0, or you can
use the arrow keys to change the contrast. Pressing 2
darkens the print; 1 lightens the print.
• Press the arrow key once to change by one number at
a time.
• Press and hold the arrow key to change rapidly .
6. Press
7. Press
changes.
NOTE: The printer will not save your changes if you turn
6
to select the displayed value. You will see
SETUP
< Contrast >
8
to exit to the Main menu and save your
it Off before returning to th e Main menu.
5-2
Page 41

6. Setting Defaults
This chapt er explains how to set defaults for monetary sign,
secondary sign, decimal places, power-up mode, prompt set,
and re-image all.
MAIN MENU
Setting Defau lts
CANCEL
ALL
PRINT
MODE
SUPPLY CONTRAST DEFAULTS
MONETARY
SIGN
BATCH
ENTRY
SECONDARY
SIGN
REPEAT
BATCH
DECIMAL
PLACES
SETUP
PORT
SETTINGS
POWERUP
MODE
MEMORY
CARD
PASS-
WORDS
PROMPT
SET
DIAG.
RE-IMAGE
ALL
Some printer options can be set to fit your daily operation. The
options are shown below.
Option Va lues Default
Monetary Sign None, USA, UK,
USA
Japan,Germany, France,
Spain, Italy , Sweden,
Finland,Austria, India
Secondary Sign Y es, No No
Decimal Places 0, 1, 2, 3 2
Power-up Mode Offline, Online Online
Prompt Set English English
Re-Image All No, Yes No
1. From the Main menu, press 1 or 2 until you see
MAIN MENU
<Setup>
6-1
Page 42

9401/9402 Operator’s Handbook
2. Press
3. Press 2 until you see
4. Press
To change one of these options, follow the i nstructions unde r
the option name. To exit an opt i on without changing the
setting, press
6
. You will see
< Defaults >
6
. You will see
8
SETUP
Supply >
SETUP
DEFAULTS
Monetary Sign >
.
Monetary Sign
The options for monetary sign are
Country Symbol Name
USA $ dollar
UK £ pound
Japan ¥ yen
Germany DM deutschemark
France F franc
Spain P peseta
Italy L. lira
Sweden Kr krona
Finland MK markka
Austria schilling
India Rs rupee
None No monetarysymbol
6-2
Page 43

6. Setting Defaults
To change the setting, fol l o w steps 1 through 4 at the
beginning of this chapter. Then follow the steps below.
1. Press
2. Press 1 or 2 until you see the country for the monetary
sign you want.
3. Press
4. Press
your changes.
NOTE: The printer will not save your changes if you turn
6
. You will see the previous setting, for example
MONET ARY SIGN
<USA>
6
. You will see
DEFAULTS
Monetary Sign >
8
twice to return to the Main menu and save
it Off before returning to th e Main menu.
Secondary Sign
If yo u select USA as the monetary sign, you can print amounts
less than $1.00 using either a dollar sign and decimal ($ .30),
or by using a cent sign (30¢).
Setting Defau lts
• If you set the Secondary Sign option to No, prices
under $1.00 will print like this $ .45.
• If you set the Secondary Sign option to Yes, prices
under $1.00 will print like this 45¢.
6-3
Page 44

9401/9402 Operator’s Handbook
The same option applies if you select UK as the monetary sign.
• If you set the Secondary Sign option to No, prices
under £1.00 (1 pound) will print like this £ .45.
• If you set the Secondary Sign option to Yes, prices
under £1.00 will print like this 45
To change the setting, fol l o w steps 1 through 4 at the
beginning of this chapter. Then follow the steps below.
1. Press 2 until you see
DEFAULTS
< Secondar y Sign >
P (pence).
2. Press
6
. You will see the previous setting, for example
SECONDARY SIGN
No >
3. Press 1 or 2 until you see the option you want. Then
press
6
. Y ou will see
DEFA ULTS
< Secondar y Sign >
4. Press
8
twice to return to the Mai n m enu and save
your changes.
NOTE: The printer will not save your changes if you turn
it Off before returning to th e Main menu.
6-4
Page 45

6. Setting Defaults
Decimal Places
Y ou can set the printer for 0, 1, 2, or 3 places after the decimal
in a price field. Be sure the setting you choose is appropri ate
for the currency you are using.
In U.S. cur r ency, you might want to pri nt prices like this
$24.00 (2 decimal places)
or like this...
$24 (0 decimal places)
To change the setting, fol l o w steps 1 through 4 at the
beginning of this chapter. Then follow the steps below.
1. Press 2 until you see
DEFAULTS
< Decimal Plac es >
2. Press
6
. You will see the previous setting, for example
DECIMAL PLACES
<2>
3. Press 1 or 2 until you see the number you want. Then
press
6
. Y ou will see
Setting Defau lts
DEFA ULTS
< Decimal Plac es >
4. Press
8
twice to return to the Main menu and save
your changes.
NOTE: The printer will not save your changes if you turn
it Off before returning to th e Main menu.
6-5
Page 46

9401/9402 Operator’s Handbook
Power-Up Mode
Power-up m ode l ets you decide how your printer starts each
time you turn it On.
• If you print most batches by sending batch data from a
computer, use the online power-up mode.
• If you print most batches using the printer alone, use
the offline power-up mode.
To change the setting, fol l o w steps 1 through 4 at the
beginning of this chapter. Then follow the steps below.
1. Press 2 until you see
DEFAULTS
< Powerup M ode >
2. Press
3. Press 1 or 2 until you see the option you want. Then
press
4. Press
your changes.
NOTE: The printer will not save your changes if you turn
6
. You will see the previous setting, for example
POWER UP
< Offline
6
. Y ou will see
DEFA ULTS
< Powerup M ode >
8
twice to return to the Mai n m enu and save
it Off before returning to th e Main menu.
6-6
Page 47

6. Setting Defaults
Prompt Se t
Prompt Set determines the language used to display prompts.
All printers have the English prompt set. Other languages are
available as options.
To change the setting, fol l o w steps 1 through 4 at the
beginning of this chapter. Then follow the steps below.
1. Press 2 until you see
DEFAULTS
<Prompt Set
2. Press
6
. You will see
PROMPT SET
English >
NOTE: The scr e en dis p l ays the r i ght arrow onl y i f you
have optional prompt sets.
3. Press 1 or 2 until you see the language you want.
Then pr ess
6
. You will see
DEFAULTS
<Prompt Set>
Setting Defau lts
NOTE: The prompt above (and all the prompts after it)
will be in the language you select.
4. Press
8
twice to return to the Main menu and save
your changes.
NOTE: The printer will not save your changes if you turn
it Off before returning to th e Main menu.
6-7
Page 48

9401/9402 Operator’s Handbook
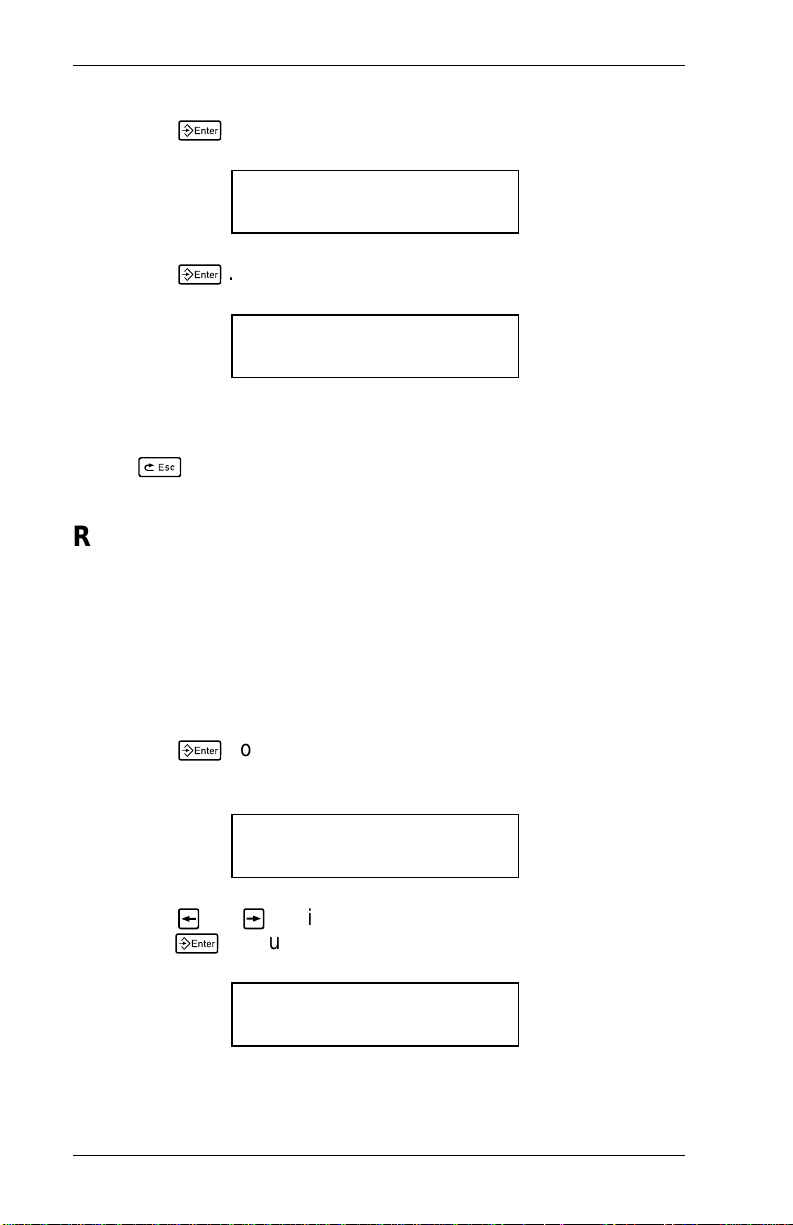
Re-Image All
You use the R e -Image All f eature in tw o s i t uations: w h en y o u
use overlapping fields on a format and when you change
setting s on the printer.
Overlapping Fields
Sometimes, you may use overlapping fields on your format.
For exampl e, a m arked-down price is often denoted by a
number with a line though it. In this case, the line and the
price fields overlap.
If you set Re-Image All to.. . The printer redraws...
Yes A l l fi el ds with each new batch.
No Only fields that have changed
since the last batch, which
saves processing time.
New Settings
While using your 9401 printer, you may change any of the
following position setti ngs:
• Supply posi tion
• Margin position
• Print posit ion setting.
Make sure Re-Image All’s setting is Yes. This setting ensures
that the new settings will take effect on later batches.
6-8
Page 49

Setting Re-Image All
V alues for Re-Image All are
Yes
No
6. Setting Defaults
The default is No. Y ou set this value on the Setup-Defaults
menu, as follows:
1. From the Main menu, press 1 or 2 until you see
MAIN MENU
Setup
2. Press
6
. You will see
SETUP
Supply
3. Press 2 until you see
SETUP
Defaults
4. Press
6
. You will see
DEFAULTS
Monetary Sign >
Setting Defau lts
5. Press 2 until you see
DEFAULTS
< Re-Image Al l
6-9
Page 50

9401/9402 Operator’s Handbook
6. Press
6
. You will see the previous setting. For
example,
RE-IMAGE ALL
No >
7. Press 1 or 2 until you see the option you want. Press
6
. Y ou will see
DEFA ULTS
< Re-Image Al l
8. Press
8
twice to return to the Mai n m enu and save
your changes.
NOTE: The printer will not save your changes if you turn
it Off before returning to th e Main menu.
6-10
Page 51

7. Printing Online
This chapt er explains how to prepare your printer for onlin e
printing.
MAIN MENU
CANCEL
ALL
PRINT
MODE
PRINT MODE
READY
BATCH
ENTRY
REPEAT
BATCH
SETUP
MEMORY
CARD
Y ou can send format, batch, and graphic data to the printer
from a host. When the printer receives the data, batches
begin printing automatically. The
tells how to create, store, and download data.
Guide
System Administrator’s
Before you print online, you must
• load the correct supply. Refer to your
Manual
.
Equipment
• connect the computer and printer. Refer to your
Equipmen t M anual
.
• set the communication values. See Chapter 4, "Setting
Communication Values".
• have format and batch data ready to download from the
host. Refer to your
System Administrator’s Guide
.
DIAG.
Printing Online
7-1
Page 52

9401/9402 Operator’s Handbook
If your printer is set for online power-up, it is ready to receive
and print batches when you turn it on. You will see
PRINT MODE
Ready
Printing begi ns as soon as you download the format and batch
data from the computer.
If your printer is set for
offline
power-up, you will see
MAIN MENU
< Print Mode >
Press
6
to display
PRINT MODE
Ready
Printi ng begi ns as soon as you download data from the host.
If there are offline batches in the print queue, the offline
batches will print after the downloaded batches have printed.
If you need to sto p pr inting after a batch has s tarted, press
7
. For information about c anceling or restarting a bat ch,
see the following sections in Chapter 8, "Canceling a Paused
Batch," or "Restarting a Batch."
NOTE: See Chapter 6, "Setting Defaults" for information on
selecting
online
or
offline
power-up mode.
7-2
Page 53

8. Printing Offline
This chapt er explains how to prepare your printer for offlin e
printing, use the data entry keys, enter data, how to enter and
cancel a batch. It also details how to change supplies.
MAIN MENU
CANCEL
ALL
Offline
PRINT
MODE
printing means entering batch data from the keypad (or
BATCH
ENTRY
REPEAT
BATCH
SETUP
MEMORY
CARD
DIAG.
optional keyboard) and printing batches. Y ou can print offline if
your printer has a data entry keypad or optional Monarch
computer keyboard. If your printer does not have either of
online
these options, you must print
(by sending batches from
a computer).
To print offline
1. Load the correct supply (refer to your
Equipmen t M anual
).
2. Select a format.
3. Enter data.
4. Enter the number of tags or labels you want to print.
Printing Of fli n e
8-1
Page 54

9401/9402 Operator’s Handbook
Using Data Entry Keys
The 21-key keypad, provided on the 9402 printer, contains
data entry key s. These data entry ke ys enable you to enter
alphanumeric data or symbols offline.
Data
Entry
Keys
(9402
only)
Keypad with Data Entry Keys
The 21-key keypad has 10 numeric keys, 4 symbol keys, a
shift key ( 5 ), and a clear key ( 9 ). You can enter numbers,
letters, and a variety of symbols (including punctua tion).
Function
Keys
(9401 and
9402)
Entering Numbers
You must be in numeric m ode to enter numbers. If a carat
appears in the upper right corner of the printer display, press
5
to remove. If no carat appears in the upper right corner,
you are ready to enter numbers.
To enter numeric data, pr ess the alphanumer i c key that shows
the number you want. The screen displays the number, and
the cursor mov es to the next position in the fi el d. This is also
how you enter a perio d (.) c om m a (,), dollar sign ($), or pound
sign (#).
NOTE: The computer keyboard does not have a 5 key. If
you are using a computer keyboard instead of the
keypad, use the shift key. It acts as a 5 key.
8-2
Page 55

8. Printing Offline
Y ou can switch back to character mode at any time by
pressing the 5 . Each time you press this key, the mode
switches from one mode to the other.
Here is an example of how to enter $23.00.
1. Press the $ key . The sym bol $ appears.
2. Press the 2 key. Th e n u m ber 2 appears.
3. Press the 3 key. Th e n u m ber 3 appears.
4. Press the . key (below the 2 key). The symbol . appears.
5. Press the 0 key twice. The numbers 00 appear.
6. Press
field.
6
when you have entered all the data for the
Printing Of fli n e
8-3
Page 56

9401/9402 Operator’s Handbook
Enterin g Letters
To enter character data, press 5 to switch to character
mode. A carat symbol appears in the upper right corner of the
printer display as follows:
Item: ^
_ _ _ _ _ _ _ _ _ _
Once character mode is active, press the alphanumeric key
that shows the letter you want. The first letter assigned to the
key appears in the field. Each time you press the same key ,
the next letter that is assigned appears. An alphanumeric key
may have up to six letters assigned, three in upper-case and
three in lower case. When the desired character appears,
press the right arrow to move the cursor to the next position in
the field.
NOTE: The computer keyboard does not have a 5 key. If
you are using a computer keyboard instead of the
keypad, press the shift key. It acts as a 5 key.
Y ou can switch back to numeric mode at any time by pressing
the 5 . Each time you press this key, the mode switches from
one mode to the other.
Some symbol characters are assigned to the dollar sign ($)
and pound sign (#). They work the same way the letters work,
switching between characters each time you press the same
key. They are (in the order assigned):
$ ¢
# ? @ & ! _ p \ ^ ~
Here is an example of how to enter the word Shirt.
1. Press 5 to switch to character mode.
2. Press the 1 key once. The letter S appears in upper case.
8-4
Page 57

8. Printing Offline
3. Press the right arrow to move the cursor to the next
position on the screen.
4. Press the 9 key five times. The le tter h appears in
lower-case.
5. Press the right arrow to move the cursor to the next
position on the screen.
6. Press the 9 key six times. The le tt er i appears in
lower-case.
7. Press the right arrow to move the cursor to the next
position on the screen.
8. Press the 6 key six times. The le tt er r appears in
lower-case.
9. Press the right arrow to move the cursor to the next
position on the screen.
10. Press the 1 key five time s. The le tt er t appears in
lower-case.
11. Press
6
when you have entered all the data for the
field.
Refer to Appendix A for information about entering characters.
Enterin g Symbols
Y ou can use character codes to enter symbols. Refer to
Appendix A for a list of symbols and their corresponding
character codes.
To enter a character code
1. Press
2. Use the data entry keys to enter the three-digit character
code. For example, enter 179 for ¥ .
3. Press
7
6
.
.
Printing Of fli n e
8-5
Page 58

9401/9402 Operator’s Handbook
Using Bar Code 128
Y ou can enter function codes 1 - 4 for code 128 bar codes.
These code s only function as cod e 128 data. They do not
print if you ent er them as data anywhere else. Refer to the
table be l ow fo r the function c o de y o u want.
To enter a function code
1. Press
7
.
2. Use the data entry keys to enter the function code you
want.
Function Key On-line Code Off-line Code
F1 ~201
F2 ~202
F3 ~203
F4 ~204
3. Press
6
.
7
7
7
7
201
202
203
204
8-6
Page 59

8. Printing Offline
About the Shift Key
When you use the 5 key on the printer keypad or the shift
key on an exte r na l computer key b oard, a carat s ym b ol
appears in the upper right corner of the printer display. This
indicates that you are in character mode.
Color: ^
__________
When you use the 5 key (or shift key), some characters may
become scrambled or overwrite each other on the display,
especial l y when you enter more than six extended characters.
If this problem occurs, the scrambling should appear only on
the display. If it occurs on the printed form at, re-enter the
batch data and print again. If scrambled data continues to
show up on printed formats, call your Monarch Technical
Support Representative.
Enter ing and Changing Data
When you need to enter data, the screen shows a prompt with
an underscore for each character you can enter.
DEPT:
JUNIOR _ _ _
For examp l e, this screen shows you can enter up to four
characters before pressing
four characters, the printer beeps . Your entry is not accepted
until you press
Some fields specifically require numeric or alphabetic data. If
you try to enter numeric data for an alpha field, or alphabetic
data for a numeric field, the printer beeps. Enter the correct
data and press
6
6
.
.
6
. If you try to enter more than
8-7
Printing Of fli n e
Page 60

9401/9402 Operator’s Handbook
To change data
• use
• press
1
to back up, type the new data over the old data
and then press
9
to clear all data, then re-enter the correct
data and press
6
6
, or
.
When you enter data incorrectly , the printer beeps and may
display a message. Following is a list of conditions that cause
an error tone and how to correct them . Som etimes a data
entry probl em ma y be a co m bi nation of these condit i ons.
Problem Correcti o n
The data you entered is
not accepted.
Refer to your format definition
for acceptabl e characters for this
field. Some fields accept only
letters, some accept only
numbers. Some accept only
specific ranges of letters or
numbers.
If you do not have a format
definition for this format, see
your system administrat or.
Your data was not
accepted; blanks still
showing.
This field requires data for all
underscores shown. Enter the
correct data and press
6
.
Y ou entered an incorrect
check digit.
You tried to skip a
required field.
8-8
The data and check digit must
be the correct combination.
Enter the correct data and press
6
.
This field requi res data before
continuing to the next field.
Enter data and press
6
.
Page 61

8. Printing Offline
Types of Data Entry
Following are samples of the prompts you will see when
entering data.
Entering General Data
When you see a prompt similar to the one below, you can
enter a character for each blank.
DEPT:
DEPT _ _ _ _
Entering a Price
At data entry, the price prompt inc l udes the pricing symbols
(unless you sele ct None for Monetary Sign). Your price
prompt may look like this
PRICE:
$0.00
...or like this
PRICE:
0¢
The difference between these prompts is the symbol used for
printing amounts less than $1.00. You can select the cent sign
for printing amounts less than $1.00 using the Defaults
function. The same option is available for other currencies.
Refer to Chapter 6, "Setting Defaults."
Y ou can enter and print: cent amounts, dollar and cent
amounts, or unit prices. For example: 3¢, 2/59¢, $.59,
3/$1.00, or $15.98.
8-9
Printing Of fli n e
Page 62

9401/9402 Operator’s Handbook
Entering "2-For" Price Data
Y ou can use any price field in a "2-for" pricing scheme. When
entering data for a price field offline (at the printer), use the #
key to separate the 2 and the price data in the "2-for" price.
For example, to enter the price "Two for $5.00," enter 2#500. If
you use field option 42 to format the field online as a price
field, enter the quantity, a slash, and the price dat a. For
example, to enter the price "Two for $5.00," enter 2/500.
Prompts with Fixed Characters
When a field has fix ed characters, they appear as part of the
data entry prompt. The fixed data stays the same, and prints
on every tag that uses the format. Only the data you enter can
be changed. In the example below, the first six digits are fixed
characters.
UPCA Barcode:
004156 _ _ _ _ _
The printed field contains both the fixed characters and the
data you enter.
Entering a Batch
Batch Entry lets you enter the data to print a batch (or
batches) of supplies. You can enter up to 3 batches before
you print.
1. Press
2. Press 1 or 2 until you see
8-10
8
until you see the Main menu.
MAIN MENU
Batch Entr y
Page 63

8. Printing Offline
3. Press
6
. You will see the last format type selected, for
example
Format Type:
< Standard
The options for format type are
Temporary
Memory Card
Permanent
Standard
NOTE: If your printer has the Memory Card option and
you plan to use a memory card format, be sure
the correct memory card is inserted in the printer.
See the instructions supplied with the Memory
Card op tion .
4. Press 1 or 2 until you see the type of format you want,
then press
6
. Y ou will see the last format that was
used, for example
Select Format:
FMT-1 96 >
5. Press 1 or 2 until you see the name of the format you
want, then press
6
.
8-11
Printing Of fli n e
Page 64

9401/9402 Operator’s Handbook
6. If this for m at has been used since the printer was turned
on (and you have not used another format in the
meantime), you will see
Clear Fields?
No >
• Press
with the previous data. You can press
the data, or change it and press
• Press
6
to keep the old data. Each field appears
6
6
.
2
then press
6
to erase the old data. Each
to accept
field appears with blanks (underscores). You have to
enter new data for each field.
7. You will see the first prompt for the format. Enter data and
press
6
for each prompt.
8. After you enter data for all the fields, you will see
Quantity:1-9999
_ _ _ _
9. Type the number of tags or labels you want to print in this
batch and press
6
. Y ou will see
MAIN MENU
< Print Mode >
8-12
Page 65

8. Printing Offline
10. Press
6
. The screen briefly displays Imaging, then
you will see
PRINT MODE
nnnn of nnnn
The first nnnn counts tags or labels as they print; the
second nnnn tells you how many tags or labels are in the
batch.
When all the batches have printed, you will see
PRINT MODE
Ready
Interrupting a Batch
PAUSE MENU
CANCEL
BATCH
CANCEL
ALL
PRINT
MODE
BATCH
ENTRY
RESTART
BATCH
SETUP DIAG.
Y ou can interrupt printing by pressing
7
. You may want to
interrupt a batch to make adjustments, such as
• loading a different roll of supply or a ribbon.
• adjusting the supply position or print position using the
Setup menu. See Chapter 3, "Setting Supply Options."
• canceling all batches or just the paused batch.
When you press
7
, you will see
P AUSE MENU
< Print Mode >
Printing Of fli n e
8-13
Page 66

9401/9402 Operator’s Handbook
You can
• press
• press
6
to resume printing.
1
or 2 to display the Paus e me nu options.
NOTE: Y ou cannot use memory cards from the Pause
menu.
Restarting a Batch
PAUSE MENU
CANCEL
BATCH
Y ou can reprint a paused batch from the beginning (using the
original quantity).
1. When you press
2. Press 2 until you see
CANCEL
ALL
PRINT
MODE
7
, you will see
BATCH
ENTRY
P AUSE MENU
< Print Mode >
RESTART
BATCH
SETUP DIAG.
3. Press
8-14
P AUSE MENU
< Restar t Batch >
6
. The batch starts printing from the beginning.
Page 67

Canceling a Paused B atch
PAUSE MENU
8. Printing Offline
CANCEL
BATCH
CANCEL
ALL
PRINT
MODE
BATCH
ENTRY
RESTART
BATCH
SETUP DIAG.
Y ou can cancel a paused batch or all the batches waiting to
print.
1. Press
7
to interrupt printing. You will see
P AUSE MENU
< Print Mode >
• If you want to canc el onl y the paused batch , sk i p step 3.
• If you want to cancel all the batches, skip step 2.
2. To cancel only the paused batch, press 1 until you see
P AUSE MENU
Cancel Batch >
then press
returns to Print Mode and prints any remaining batches.
6
. The batch is deleted and the printer
Printing Of fli n e
8-15
Page 68

9401/9402 Operator’s Handbook
3. To cancel all the batches (including the paus ed batch),
press 1 until you see
P AUSE MENU
<Cancel All>
and press
6
. You will see the last selection, for
example
Cancel n Batches?
No >
The
n
tells you how m any batches are in the print queue.
4. You can
• exit without canceling any batches. Press
press 1 to display No and then press
The printer returns to the Pause menu. Press 1 or
2
to select another function from the Pause menu.
• cancel all batches in the print queue. Press
display Yes, then press
PRINT MODE
6
Ready
. Y ou will see
8
6
.
2
or
to
8-16
Page 69

Canceling Batches Before Printing
MAIN MENU
8. Printing Offline
CANCEL
ALL
PRINT
MODE
BATCH
ENTRY
REPEAT
BATCH
SETUP
MEMORY
CARD
DIAG.
If you have entered batch data but have not started printing,
you can cancel all the batches. To cancel all batches waiting
to print, foll ow these steps.
1. When you finish entering batch data, you will see
MAIN MENU
< Print Mode >
2. Press 1 . Y ou will see
MAIN MENU
Cancel All >
3. Press
6
. You will see the last selection, for example
Cancel n Batches?
No >
Printing Of fli n e
The
n
tells you how m any batches are in the print queue.
8-17
Page 70

9401/9402 Operator’s Handbook
4. You can
• exit without canceling any batches. Press
press 1 to display No and then press
6
8
.
or
The printer returns to the Main menu. Press 2 to
select another function from the Main menu.
• cancel all batches in the print queue. Press
display Yes, then press
6
. Y ou will see
2
to
MAIN MENU
< Print Mode >
Repeating a Batch
MAIN MENU
CANCEL
ALL
PRINT
MODE
Before you start printing a new batch, you can reprint the last
batch. The bat ch can be one that you printed com pl etely, or
one that you canceled after starting to print.
BATCH
ENTRY
REPEAT
BATCH
SETUP
MEMORY
CARD
DIAG.
1. From the Mai n m enu, press 1 or 2 until you see
MAIN MENU
< Repeat Batch >
2. Press
6
. You will see
Quantity:1-9999
nnnn
8-18
Page 71

8. Printing Offline
3. The screen displays the quantity from the last batch. You
can
• press
6
to print the displayed quantity.
• type the number of tags or labels you want and press
6
.
The batch will begin printing. When it finishes, you will see
PRINT MODE
Ready
Changing Suppl ies
If you open the printhead , you will see
Load Supplies
Press ENT E R ._
If you are loadin g or changing supplies, refer to your
Equipme nt M anual
then press
6
. T o resume operation, close the printhead,
. Y ou will see
Fault Corrected?
<Yes
Printing Of fli n e
Press
Main menu (or the Pause menu, if you paused a batch).
6
. The printer will calibrate, and you will see the
Changing Supply Types
If you change from thermal tra n sfer supplies (printing with a
ribbon) to thermal direct supplies (printing without a ribbon) or
vice-versa, you must change the Ribbon supply option. Refer
to Chapter 3, "S etting Supply Opti ons" for information on
changing th e Ribbon option.
8-19
Page 72

9401/9402 Operator’s Handbook
8-20
Page 73

9. Using the Standard Formats
MAIN MENU
CANCEL
ALL
PRINT
MODE
BATCH
ENTRY
REPEAT
BATCH
SETUP
MEMORY
CARD
DIAG.
The 9401 and 9402 printers come with 3 standard formats.
These are examples of the standard formats with sample data.
The following pages show you how to enter the data and print
sample tags.
FMT-1
FMT-2
FMT-3
Using the Sta nda rd
Formats
9-1
Page 74

9401/9402 Operator’s Handbook
To enter data for a format , start from the Main me nu and follow
the directi ons under the name of the format you want to use.
To select a format, d o one of the followin g :
• press
press
1
or 2 to display the format you want, then
6
to select it.
• type the number of the format you want, then press
6
to select it. For more information, refer to
Appendix B.
FMT-1
To pri nt FMT-1 with the data shown in thi s example, load
supply th at is 1 3/8" long by 2" wide (35 mm long by 50.8 mm
wide). Then follow the steps below.
Screen Prompt What You Do
MAIN MENU
< Batch Entry >
9-2
Press
Selects the Batch Entry
operating mode. Y ou will see
the last format type that was
selected , such as Temporary.
6
.
Page 75

9. Using the Standard Formats
Screen Prompt What You Do
FORMA T TYPE
Temporary >
Select Format:
FMT-1 96 >
Line1:
_ _ _ _ _ _ _ _ _ _ _ _ _ _ _
Press 1 or 2 until you see
Standard, then press
6
.
This selects Standard as the
format type. Yo u will see the
last forma t tha t was sele ct ed,
such as FMT-1.
Press 1 until you see
FMT-1, then press
6
.
This selects FMT -1 . The
screen also displays the
format number assigned to
the format (96 for this format).
Type the data to print on line
1 of the format and press
6
. For example, type
GREEN 3041 091589
(remember to press 5 , then
0 when you want a space in
the data).
GREEN 3041 091589 will
print on line 1 of the tag.
UPCA Barcode:
_ _ _ _ _ _ _ _ _ _ _ _
Type the data for the bar
code and press
6
. For
example, type 0123456789 0
and press
6
.
This is the bar co de data.
Using the Sta nda rd
Formats
9-3
Page 76

9401/9402 Operator’s Handbook
Screen Prompt What You Do
Line2
_ _ _ _ _ _ _ _ _ _ _ _ _ _ _
Quantity:1-9999
_ _ _ _
FMT-2
Type the data to print on line
2 of the format and press
6
. For example, type
PERSONAL SIZE.
PERSONAL SIZE will print
on line 2 of the tag.
Type the number of tags you
want to print and press
For example, type 1.
One tag will print.
6
.
To pri nt FMT-2 with the data shown in thi s example, load
supplies that are 1 3/8" long by 2" wide (35 mm long by
50.8 mm wide). Then follow the steps below .
Screen Prompt What You Do
MAIN MENU
< Batch Entry >
9-4
Press
This selects the Batch Entry
operating mode. Y ou will see
the last format type that was
selected , such as Temporary.
6
.
Page 77

9. Using the Standard Formats
Screen Prompt What You Do
FORMA T TYPE
Temporary >
Select Format:
FMT-1 96 >
Line1:
_ _ _ _ _ _ _ _ _ _
Line2
_ _ _ _ _ _ _ _ _ _
Press 1 or 2 until you see
Standard, then press
6
.
This selects the s tandard
format type. Yo u will see the
last forma t tha t was sele ct ed,
such as FMT-1.
Press 1 or 2 until you see
FMT-2, then press
6
.
This selects FMT-2.
Type the data to print on line
1 of the format and press
6
. For example, type
86-73 CHEV and press
6
86-73 CHEV will print on line
1 of the tag.
Type the data to print on line
2 of the format and press
6
. For example, type
BLAZER (you can use
spaces to center the data).
.
Line3
_ _ _ _ _ _ _ _ _ _
BLAZER will print on line 2 of
the tag.
Type the data to print on line
3 of the format and press
6
. For example, type
1 #500-148.
1 #500-148 will print on line 3
of the tag.
9-5
Using the Sta nda rd
Formats
Page 78

9401/9402 Operator’s Handbook
Screen Prompt What You Do
Line4
_ _ _ _ _ _ _ _ _ _
Line5
_ _ _ _ _ _ _ _ _ _
Quantity: 1-9999
_ _ _ _
Type the data to print on line
4 of the format and press
6
. For example, type 1
#2200324.
1 #2200324 will print on line 4
of the tag.
Type the data to print on line
5 of the format and press
6
. For example, type
011690.
011690 will print on line 5 of
the tag.
Type the number of tags you
want to print and press
6
For example, type 1.
One tag will print.
.
9-6
Page 79

9. Using the Standard Formats
FMT-3
To pri nt FMT-3 with the data shown in thi s example, load
supplies that are 2 3/4" long by 1 1/2" wide (67 mm long by
38 mm wide). Then follow the steps below.
Screen Prompt What You Do
MAIN MENU
Press
6
.
< Batch Entry >
This selects the Batch Entry
operating mode. Y ou will see
the last format type that was
selected , such as Temporary.
FORMA T TYPE
Temporary >
Press 1 or 2 until you see
Standard, then press
This selects Standard for the
format type. Yo u will see the
last forma t tha t was sele ct ed,
such as FMT-1.
6
.
Using the Sta nda rd
Formats
9-7
Page 80

9401/9402 Operator’s Handbook
Screen Prompt What You Do
Select Format:
FMT-1 96
Number:
_ _ _ _ _
Color:
_ _ _ _ _ _ _ _ _ _
UPCA Barcode:
_ _ _ _ _ _ _ _ _ _ _ _
Size:
_ _ _ _ _ _ _ _
Press 1 or 2 until you see
FMT-3, then press
6
.
This selects FMT-3.
Type the data to print in this
field and press
6
. For
example, type 12455.
12455 will print on the tag.
Type the data to print in this
field and press
6
. For
example, type BLACK.
BLACK will print on the tag.
Type the data to print in the
bar code and press
6
.
For example, type
01234567890.
This is the bar co de data.
Type the data to print in this
field and press
6
. For
example, type 12.
Retail Price:
$0.00
9-8
12 will print next to "Size" on
the tag.
Type the data to print in this
field and press
6
. For
example, type 9500 (do not
type the $ or .).
$95.00 will print next to
"Reta i l Pri ce" on th e t ag .
Page 81

9. Using the Standard Formats
Screen Prompt What You Do
Our Price:
$0.0
0
Quantity: 1-9999
____
Type the data to print in this
field and press
6
. For
example, type 6950 (do not
type th e $ or .).
$69.50 will print next to "Our
Price" on the tag.
Type the number of tags you
want to print and press
6
For example, type 1.
One tag will print.
.
9-9
Using the Sta nda rd
Formats
Page 82

9401/9402 Operator’s Handbook
9-10
Page 83

10. Memory Card
The memory card function enables you to copy or delete
formats sto r ed on a m em ory card. If you have an optiona l
memory card, refer to the instructions that came with it.
MAIN MENU
Memory Card
CANCEL
ALL
PRINT
MODE
BATCH
ENTRY
REPEAT
BATCH
SETUP
MEMORY
CARD
DIAG.
You can place the memor y c ard i nstructions in this section, or
behind the "Optional Equipment" tab provided with the manual.
10-1
Page 84

9401/9402 Operator’s Handbook
10-2
Page 85

11. Setting the Remote
Diagnostics Values
This chapter explains how to set the baud rate, word le ngth,
stop bits, parity, flow control, and modem control remote
diagnost i cs values. It also descr i bes how to reset to the
default values.
MAIN MENU
Diagnostics Values
Setting the Remote
CANCEL
ALL
PRINT
MODE
SUPPLY CONTRAST DEFAULTS
BATCH
ENTRY
REPEAT
BATCH
USER
COMM
SETUP
PORT
SETTINGS
DIAG
COMM
MEMORY
CARD
PASS-
WORDS
DIAG.
SCANNER
To establish communications for rem ote diagnostic s, you need
to set the remote diagnostics communication values.
The communication values for remote diagnostics are shown
below.
Option Va lues Default
Baud rate 1200, 2400, 4800, 9600,
2400
2400
Word length 7, 8 8
Stop bi t s 1, 2 1
Parity Odd, Even, None None
Flow control None, Xon/Xoff, DTR Xon/Xoff
Modem Cont rol Yes, N o No
11-1
Page 86

9401/9402 Operator’s Handbook
1. From the Main menu, press 1 or 2 until you see
MAIN MENU
<Setup>
2. Press
6
. You will see
3. Press 2 until you see
< Port Settings >
4. Press
6
. You will see
PORT SE T TIN GS
User Comm >
5. Press 2 until you see
PORT SE T TIN GS
< Diag Comm >
6. Press
6
. You will see the first communication option.
SETUP
Supply >
SETUP
REMOTE DIAG
Baud rate >
To change one of these options, follow the i nstructions
under the correct heading. To exit an option without
changing the setting, press
8
.
11-2
Page 87

11. Setting the Remote Diagnostics Values
Baud Rate
To change the setting, fol l o w steps 1 through 6 at the
beginning of this chapter. Then follow the steps below.
1. Press
6
to set the baud rate. You will see the previous
setting , for example
BAUD RATE
< 2400 >
The baud rate options are
1200
2400
4800
9600
2. Press 1 or 2 to display the baud rate you need, then
press
6
. Y ou will see
DIAG COMM
Baud rate >
3. Press
8
three times to return to the Main menu and
save your change s.
NOTE: The printer will not save your changes if you turn
it Off before returning to th e Main menu.
Diagnostics Values
Setting the Remote
11-3
Page 88

9401/9402 Operator’s Handbook
Word Length
To change the setting, fol l o w steps 1 through 6 at the
beginning of this chapter. Then follow the steps below.
1. Press 2 until you see
DIAG COMM
< Word Length >
2. Press
The word length options are
3. Press 1 or 2 to display the word length you need, then
press
4. Press
save your change s.
NOTE: The printer will not save your changes if you turn
6
. You will see the previous setting, for example
WORD LENGTH
<8
7
8
6
. Y ou will see
DIAG COMM
< Word Length >
8
three times to return to the Main menu and
it Off before returning to th e Main menu.
11-4
Page 89

11. Setting the Remote Diagnostics Values
Stop Bits
To change the setting, fol l o w steps 1 through 6 at the
beginning of this chapter. Then follow the steps below.
1. Press 2 until you see
DIAG COMM
< Stopbits >
Diagnostics Values
Setting the Remote
2. Press
6
. You will see the previous setting, for example
STOPBITS
1>
The st op bi ts options a re
1
2
3. Press 1 or 2 to display the number of stop bits you
need, then press
6
. Y ou will see
DIAG COMM
< Stopbits >
4. Press
8
three times to return to the Main menu and
save your change s.
NOTE: The printer will not save your changes if you turn
it Off before returning to th e Main menu.
11-5
Page 90

9401/9402 Operator’s Handbook
Parity
To change the setting, fol l o w steps 1 through 6 at the
beginning of this chapter. Then follow the steps below.
1. Press 2 until you see
DIAG COMM
<Parity>
2. Press
The parity options are
3. Press 1 or 2 to display the parity you need, then press
6
4. Press
save your change s.
NOTE: The printer will not save your changes if you turn
6
. You will see the previous setting, for example
PARITY
None >
None
Odd
Even
. You will see
DIAG COMM
<Parity>
8
three times to return to the Main menu and
it Off before returning to th e Main menu.
11-6
Page 91

11. Setting the Remote Diagnostics Values
Flow Control
To change the setting, fol l o w steps 1 through 6 at the
beginning of this chapter. Then follow the steps below.
1. Press 2 until you see
DIAG COMM
< Flow Control >
Diagnostics Values
Setting the Remote
2. Press
6
. You will see the previous setting, for example
FLOW CONTROL
<DTR
The flow control options are
None
XON/XOFF
DTR
3. Press 1 or 2 to display the flow control you need, then
press
6
.
NOTE: The XON character is 17. The XOFF character is
19. Flow cont rol must be set to DTR for IB M
personal computers (unless you have software for
XON/XOFF).
You will see
DIAG COMM
< Flow Control >
4. Press
8
three times to return to the Main menu and
save your change s.
NOTE: The printer will not save your changes if you turn
it Off before returning to th e Main menu.
11-7
Page 92

9401/9402 Operator’s Handbook
Modem Co ntrol
To change the setting, fol l o w steps 1 through 6 at the
beginning of this chapter. Then follow the steps below.
1. Press 2 until you see
DIAG COMM
< Modem Control >
2. Press
The mo de m c o ntrol o ptions are
3. Press 1 or 2 to display the option you need, then
press
4. Press
save your change s.
NOTE: The printer will not save your changes if you turn
6
. You will see the previous setting, for example
MODEM CONTROL
No >
Yes
No
6
. Y ou will see
DIAG COMM
< Modem Control >
8
three times to return to the Main menu and
it Off before returning to th e Main menu.
11-8
Page 93

11. Setting the Remote Diagnostics Values
Reset to Default Values
To reset the remote diag nostics values to the defaults, follow
steps 1 through 6 at the beginning of this chapter. Then follow
the steps below.
1. Press 2 until you see
DIAG COMM
< Reset
Diagnostics Values
Setting the Remote
2. Press
The reset options are
3. You can
• press
• press
4. Press
save your change s.
6
. You will see
Are you sure?
No
Yes
6
to exit without changing the values. You
will exit to the Diag Comm menu.
2
, then
defaults. Y ou will see
8
three times to return to the Main menu and
6
DIAG COMM
< Reset
No >
to reset the values to the
NOTE: The printer will not save your changes if you turn
it Off before returning to th e Main menu.
11-9
Page 94

9401/9402 Operator’s Handbook
11-10
Page 95

12. Scanner
The Scanner option enables you to select the scanner you
want to use wi th your printer. If you have a scanner, refer to
the instructions that came with it.
MAIN MENU
CANCEL
ALL
PRINT
MODE
SUPPLY CONTRAST DEFAULTS
BATCH
ENTRY
REPEAT
BATCH
USER
COMM
SETUP
PORT
SETTINGS
DIAG
COMM
MEMORY
CARD
PASS-
WORDS
SCANNER
DIAG.
You can place the scanner instructions in this section, or
behind the "Optional Equipment" tab provided with the manual.
Scanner
12-1
Page 96

9401/9402 Operator’s Handbook
12-2
Page 97

Appendix A
Character Sets
The following lists show the c haracters availabl e in the four
fonts of the 9401 and 9402 printers.
Standard Font
Reduced Font
OCR-L ike Fo nt
Appendix A
Bold Font
A-1
Page 98

9401/9402 Operator’s Handbook
Uppercase Letters
You must be in Character M ode when you enter the offline
code. For more information, see the section in Chapter 8,
"Entering Letters".
Char. Online
Code
Offline Code Char. Online
Code
Offline Code
AA 7 NN 55
BB 77 OO 555
C C 777 P P 6
DD 8 QQ 66
EE 88 RR 666
F F 888 S S 1
GG 9 TT 11
HH 99 UU 111
I I 999 V V 2
JJ 4 WW 22
KK 44 XX 222
L L 444 Y Y 3
MM 5 Z Z 33
A-2
Page 99

Appendix A
Lowercase Letters
These lette r s are available only in the Standard and Reduced
fonts. You must be in Character Mode when you enter the
offline code. For more information see the sec tion in Chapter
8, "Entering Letters".
Char. Online
Code
Offline Code Char. Online
Code
Offline Code
a a 7777 n n 55555
b b 77777 o o 555555
c c 777777 p p 6666
d d 8888 q q 66666
e e 88888 r r 666666
f f 888888 s s 1111
g g 9999 t t 11111
h h 99999 u u 111111
i i 999999 v v 2222
j j 4444 w w 22222
k k 44444 x x 222222
l l 444444 y y 333
m m 5555 z z 3333
Appendix A
A-3
Page 100

9401/9402 Operator’s Handbook
Currency Sy mbols
You can enter inter national currency s ymbols offline by setting
the default monetary sign to the desired country setting and
pressin g the $ key.
The $ enters the monetary sign that is currently active. 5 /$
enters the secondary sign (for example, ¢ in U.S. curre n cy).
To change the monetar y s i gn, refer to Chapter 6, "Setting
Defaults."
Char. Online
Code
$$ $ ¢~155
£~178
¥~179
~180
F ~181
P ~182
Offline
Code
7
178 L. ~156
7
179 K
7
180 ~1 85
7
181 ~1 86
7
182 R
Char. Online
r
s
Code
~184
~187
Offline
Code
5
$
7
156
7
184
7
185
7
186
7
187
A-4
 Loading...