

Page 1
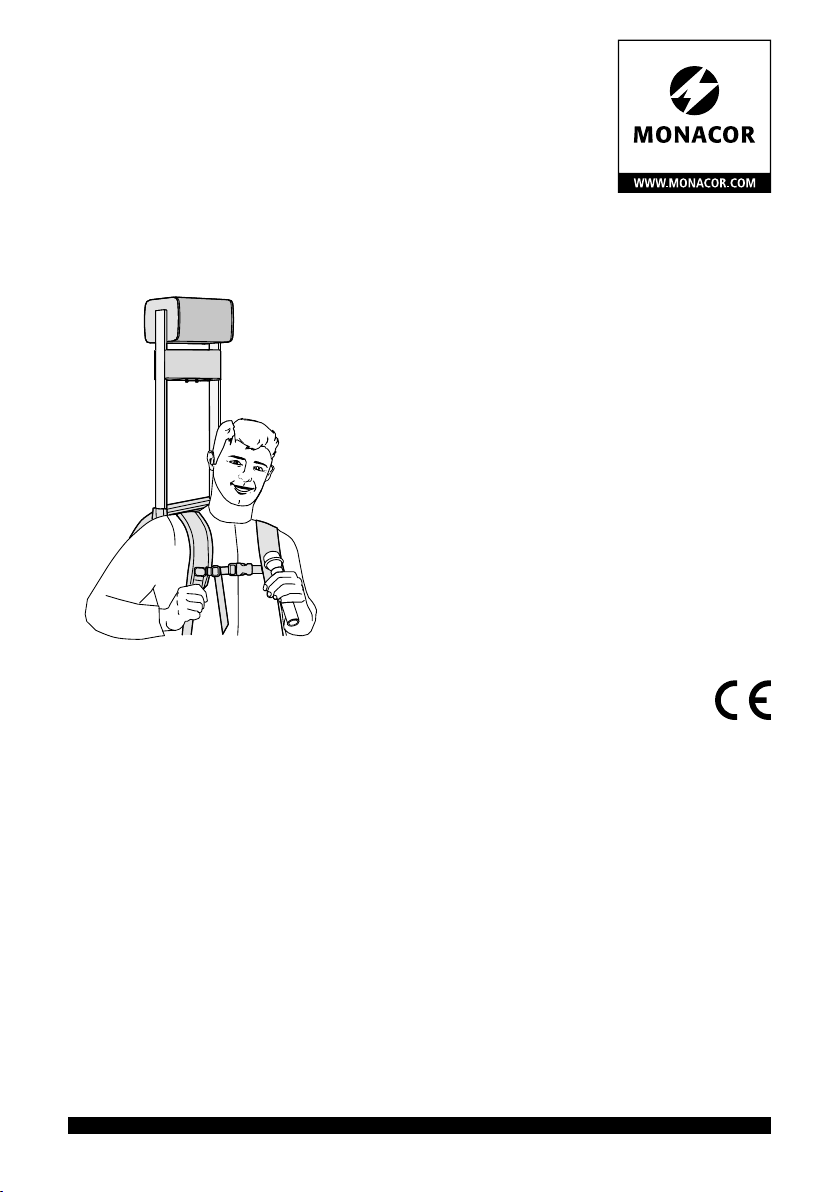
Tragbare Verstärkeranlage
Portable Amplifier System
PAS-254 D
Bestellnummer • Order No. 17.9240
BEDIENUNGSANLEITUNG
INSTRUCTION MANUAL
MODE D’EMPLOI
ISTRUZIONI PER L’USO
GEBRUIKSAANWIJZING
MANUAL DE INSTRUCCIONES
INSTRUKCJA OBSŁUGI
SIKKERHEDSOPLYSNINGER
SÄKERHETSFÖRESKRIFTER
TURVALLISUUDESTA
ELECTRONICS FOR SPECIALISTS ELECTRONICS FOR SPECIALISTS ELECTRONICS FOR SPECIALISTS ELECTRONICS FOR SPECIALISTS
Page 2
PORTABLE AMPLIFIER SYSTEM
PAS -254 D
5
9
10
20
EXT.
SPEAKER
1 MIC / LINE IN
JACK (LINE)
XLR (MIC)
2 1
3
3 LINE
IN
LINE LINK
1
2
OFF
SD/MMC
LEVEL
0 10
PLAYER
0 10
11
INTERNAL
SPEAKER
USB
6
ON
19
TF USB
2 WIRELESS
0 10
7
TONE
HILO
12
SCAN
VOL+ MODEVOL−
TONE
HILO
8
VOICE OVER
MUSIC
DEPTH
13
3
BATTERY
CHARGE
FULL
OK
LOW
LIMITER
PWR ON
15 V⎓/2 A
4
14
15
16
17
18
21
➊
2
Page 3

Deutsch .......... Seite 4
English ........... Page 12
Français .......... Page 20
Italiano........... Pagina 28
Nederlands ....... Pagina 36
Español .......... Página 44
Polski ............ Strona 52
Dansk ............ Sida 60
Svenska .......... Sidan 61
Suomi............ Sivulta 62
ELECTRONICS FOR SPECIALISTS ELECTRONICS FOR SPECIALISTS ELECTRONICS FOR SPECIALISTS ELECTRONICS FOR SPECIALISTS
3
Page 4

Tragbare Verstärkeranlage
Diese Anleitung richtet sich an Benutzer ohne
besondere Fachkenntnisse. Bitte lesen Sie die
Deutsch
Anleitung vor dem Betrieb gründlich durch und
heben Sie sie für ein späteres Nachlesen auf. Auf
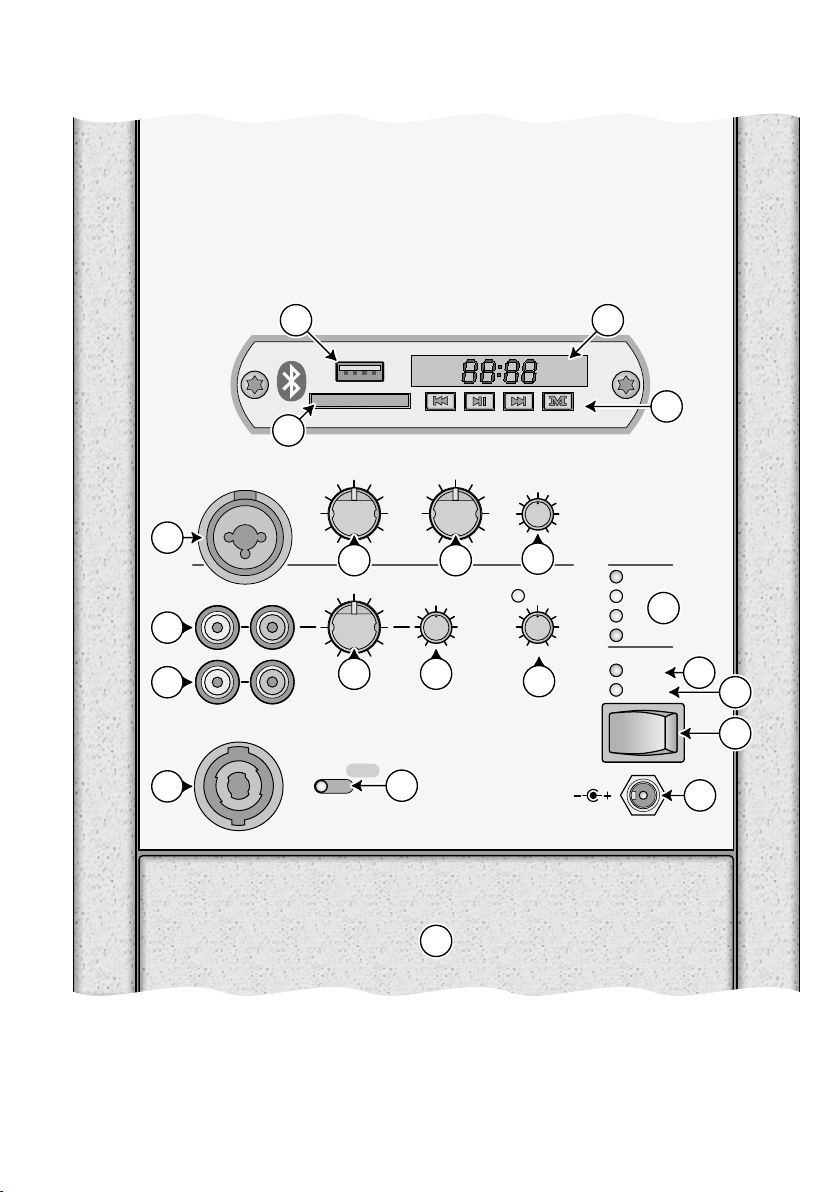
Seite 2 finden Sie alle beschriebenen Bedienelemente und Anschlüsse.
Inhalt
1 Übersicht . . . . . . . . . . . . . . . . . . . 4
2 Sicherheitshinweise. . . . . . . . . . . . . 5
3 Einsatzmöglichkeiten undZubehör . . . . 6
3.1 Funkmikrofone und Sender . . . . . . . . . . . 6
3.2 Konformität und Zulassung. . . . . . . . . . .6
4 Inbetriebnahme . . . . . . . . . . . . . . . 6
4.1 Akkumulator aufladen . . . . . . . . . . . . . 6
4.2 Audio-Anschlüsse herstellen . . . . . . . . . .6
4.2.1 Mikrofon . . . . . . . . . . . . . . . . . .6
4.2.2 Tonquelle mit Line-Pegel. . . . . . . . . . .6
4.2.3 Verstärker oder Aufnahmegerät . . . . . . . 7
4.2.4 Lautsprecher . . . . . . . . . . . . . . . . 7
4.3 Fernbedienung . . . . . . . . . . . . . . . . . 7
4.4 Zusätzlichen Akku anschließen . . . . . . . . . 7
5 Bedienung . . . . . . . . . . . . . . . . . . 7
5.1 Betrieb mit Funkmikrofonen . . . . . . . . . . 8
5.1.1 Übertragungskanäle einstellen. . . . . . . . 8
5.1.2 Lautstärke einstellen. . . . . . . . . . . . . 9
5.1.3 Squelch einstellen . . . . . . . . . . . . . . 9
5.2 Audiospieler . . . . . . . . . . . . . . . . . . 9
5.3 Bluetooth-Empfänger . . . . . . . . . . . . 10
5.4 Bedienübersicht für den Audiospieler/ Bluetooth-
Empfänger . . . . . . . . . . . . . . . . . . 11
6 Technische Daten . . . . . . . . . . . . . 11
1 Übersicht
1
USB-Buchse (Typ A) zum Anschluss eines
USB-Speichersticks für die Wiedergabe von
Audiodateien
2
Schlitz für eine SD-Speicherkarte für die Wiedergabe von Audiodateien
3 Display für die Anzeige der Bluetooth-Funk-
tion oder des gewählten Speichermediums
und der aktuellen Titelnummer oder verstrichenen Spieldauer des Titels
4
Bedientasten für den Audio spieler/ BluetoothEmpfänger (☞Kapitel 5.4)
5
Kombinierte XLR- / 6,3-mm-Klinkenbuchse
1 MIC / LINE IN zum Anschluss eines Mikrofons oder einer anderen Mono-Tonquelle
(z. B. Mischpult)
6 Lautstärkeregler LEVEL für ein an (5) ange-
schlossenes Mikrofon oder Audiogerät
7 Lautstärkeregler 2 WIRELESS für Funkmikro-
fone
8
Gemeinsamer Klangregler TONE für ein an (5)
angeschlossenes Mikrofon oder Audiogerät
und Funkmikrofone
9
Cinch-Buchsen 3 LINE IN zum Anschluss einer
Tonquelle (z. B. CD-Spieler); beim Anschluss
einer Stereo-Tonquelle wird im Verstärker ein
Monosignal gebildet
10
Cinch-Ausgänge LINE LINK zum Aufnehmen des Mischsignals oder zum Weiterleiten zu einer weiteren Verstärkeranlage; für
Stereo-Aufnahmegeräte sind zwei Buchsen
vorhanden.
11
Lautstärkeregler PLAYER für den Eingang
3 LINE IN (9) sowie den Audio spieler/Bluetooth-Empfänger
12
Klangregler TONE für den Eingang 3 LINE
IN (9) sowie den Audio spieler/ BluetoothEmpfänger
13
Funktion VOICE OVER zum Ausblenden
des Tons einer am Eingang 3 LINE IN angeschlossenen Tonquelle und des Audiospielers / Bluetooth- Empfängers, während
über ein Mikrofon gesprochen wird.
4
Page 5
LED MUSIC leuchtet, wenn der Ton aus-
geblendet wird
Regler DEPTH zum Einstellen der Empfind-
lichkeit für das Ausblenden
des Tons
14 Status-LEDs für den Akku
CHARGE Rot: während des Ladens
Grün: nach Beendigung des
Ladevorgangs
FULL Ladezustand: voll
OK Ladezustand: gut
LOW Ladezustand: gering
15
LED LIMITER leuchtet, wenn die Pegelbegrenzung aktiv ist
16 Betriebsanzeige PWR ON
17 Ein /Aus-Schalter
18
Anschlussbuchse zum Laden des Akkus;
nur das mitgelieferte Ladegerät verwenden
19
Schalter INTERNAL SPEAKER zum Ein- und
Ausschalten (ON /OFF) der eigenen Lautsprecherbox
20
Buchse EXT. SPEAKER für den Anschluss eines
(zusätzlichen) Lautsprechers
Hinweis: Um den Verstärker bei hohen Lautstärken nicht zu überlasten, wird empfohlen, die Lautsprecherbox der PAS-254D bei Anschluss eines
externen Lautsprechers mit dem Schalter INTERNAL
SPEAKER (19) auszuschalten.
21 Deckel für die Akkufächer
2 Sicherheitshinweise
Die Geräte (Verstärkeranlage und Ladegerät)
entsprechen allen relevanten Richtlinien der EU
und sind deshalb mit ge kennzeichnet.
WARNUNG
Das Ladegerät wird mit lebensgefähr licher Netzspannung
versorgt. Nehmen Sie deshalb
nie selbst Eingriffe daran vor.
Durch unsachgemäßes Vorgehen besteht die Gefahr eines
elektrischen Schlages.
Vermeiden Sie es, die Verstärkeranlage bei
•
starkem Regen zu verwenden und achten
Sie immer darauf, dass keine Feuchtigkeit in
die Anlage gelangt. Die mitgelieferte Haube
schützt die Lautsprecherbox vor Feuchtigkeit.
Verwenden Sie das Ladegerät nur im Innenbereich. Schützen Sie es vor Tropf- und
Spritzwasser sowie vor hoher Luftfeuchtigkeit.
Der zulässige Einsatztemperaturbereich für
die Geräte beträgt 0 – 40 °C.
Stellen Sie keine mit Flüssigkeit gefüllten
•
Gefäße, z. B. Trinkgläser, auf das Ladegerät.
Nehmen Sie die Geräte nicht in Betrieb und
•
ziehen Sie sofort den Netzstecker des Ladegeräts aus der Steckdose,
1.
wenn sichtbare Schäden an den Geräten
oder am Netzkabel vorhanden sind,
2.
wenn nach einem Sturz oder Ähnlichem der
Verdacht auf einen Defekt besteht,
3. wenn Funktionsstörungen auftreten.
Geben Sie die Geräte in jedem Fall zur Reparatur in eine Fachwerkstatt.
Ziehen Sie den Netzstecker des Ladegeräts
•
nie am Kabel aus der Steckdose, fassen Sie
immer am Stecker an.
Ein beschädigtes Netzkabel darf nur durch
•
eine Fachwerkstatt ersetzt werden.
Verwenden Sie für die Reinigung nur ein tro-
•
ckenes oder leicht angefeuchtetes, weiches
Tuch, auf keinen Fall Chemikalien oder aggressive Reinigungsmittel.
Werden die Geräte zweckentfremdet, nicht
•
richtig angeschlossen, falsch bedient oder
nicht fachgerecht repariert, kann keine Haftung für daraus resultierende Sach- oder Personenschäden und keine Garantie für die Geräte übernommen werden. Ebenso kann keine
Haftung für durch Fehlbedienung oder durch
einen Defekt entstandene Daten verluste und
deren Folgeschäden übernommen werden.
Sollen die Geräte endgültig aus dem
Betrieb genommen werden, übergeben
Sie sie zur umweltgerechten Entsorgung
einem ört lichen Recyclingbetrieb.
Deutsch
5
Page 6

3 Einsatzmöglichkeiten
undZubehör
Die PAS-254D ist eine akkubetriebene Ver-
Deutsch
stärkeranlage, die (z. B. bei Prozessionen) als
Rucksack getragen werden kann. Über dem
Verstärker befindet sich ein Gestell mit einer
Lautsprecherbox mit vier Breitbandlautsprechern, die den Schall nach vorn und hinten abstrahlen. Der Verstärker verfügt über mischbare
Eingänge für ein Mikrofon und eine (Stereo-)
Tonquelle, wie z. B. CD-Spieler, sowie über ein
Empfangsteil für zwei Funkmikrofone. Zusätzlich
lassen sich Audiodateien von einem USB-Speicherstick, einer SD/ MMC-Speicherkarte oder
über den eingebauten Bluetooth- Empfänger
(z. B. von einem Smartphone) wiedergeben.
Dabei kann, während über ein Mikrofon gesprochen wird, automatisch z. B. Musik ausgeblendet
werden. Die Verstärkeranlage kann mit voll geladenem Akku bis zu 7Stunden netzunabhängig
eingesetzt werden.
Ein zweiter, separat erhältlicher Akku
(NPA-12 / 7) ermöglicht eine Verlängerung der
Betriebsdauer. In den seitlichen Fächern des
Rucksacks lassen sich z. B. Mikrofone und Anschlusskabel verstauen.
3.1 Funkmikrofone und Sender
Aus dem Sortiment von MONACOR stehen folgende Geräte zur Verfügung:
Typ Modell
Funk-Handmikrofon TXA-800HT
Taschensender mit Krawatten- und
Kopfbügelmikrofon
Sender mit Line-Pegel-Eingang für Audiosignale TXA-800ST
Für die Beschallung größerer Bereiche können
die Funk signale der Sender auch gleichzeitig
von mehreren PAS-254D empfangen werden.
3.2 Konformität und Zulassung
Hiermit erklärt MONACOR INTERNATIONAL,
dass der Funkempfänger der PAS-254D der
Richtlinie 2014 / 53 / EU entspricht. Die EU-Konformitätserklärung ist im Internet verfügbar:
www.monacor.de
TXA-800HSE
Das Funksystem (Sender und Empfänger) ist
für den Be trieb in den EU- und EFTA-Staaten
allgemein zu gelassen und anmelde- und gebührenfrei.
4 Inbetriebnahme
4.1 Akkumulator aufladen
Zum Aufladen des eingebauten Akkus und eines
zusätzlich angeschlossenen Akkus das mitgelieferte Ladegerät an die Kleinspannungsbuchse
(18) und eine Netzsteckdose (230 V/ 50 Hz) anschließen. Über die Status-LEDs (14) wird der
Lade zustand angezeigt: FULL (voll), OK (gut)
oder LOW (niedrig). Während der Akku geladen wird, leuchtet die LED CHARGE rot. Der
Verstärker kann dabei ausgeschaltet sein.
Wenn der Akku aufgeladen ist (die LED
CHARGE leuchtet grün), das Ladegerät vom
Verstärker und vom Netz trennen.
4.2 Audio-Anschlüsse herstellen
4.2.1 Mikrofon
Ein Mikrofon mit einem XLR-Stecker an die
Buchse 1 MIC / LINE IN (5) anschließen.
Für Mikrofone, die eine Phantomspeisung
benötigen (z. B. Elektretmikrofone), steht an
den XLR-Kontakten der Buchse eine 12-V-Phantomspannung zur Verfügung.
Hinweis: Mikrofone oder andere Tonquellen mit asymmetrischem Ausgang dürfen nicht an die XLR-Buchse angeschlossen werden, weil diese durch die Phantomspannung
beschädigt werden könnten.
Mikrofone mit 6,3-mm-Klinkenstecker können
auch an die Buchse 1 MIC / LINE IN angeschlossen werden. Dieser Eingang ist jedoch etwas
unempfindlicher.
4.2.2 Tonquelle mit Line-Pegel
Eine Mono-Tonquelle mit Line-Signalpegel (z. B.
Mischpult, zusätzlicher Empfänger für Funkmikrofone) kann über einen 6,3-mm-Klinkenstecker
an die Buchse 1 MIC / LINE IN (5) angeschlossen
werden. Alternativ lässt sich diese Tonquelle
auch an eine der Cinch-Buchsen 3 LINE IN (9)
anschließen.
6
Page 7
Eine Stereo-Tonquelle (z. B. CD-/ MP3-Spieler, Radio, Mischpult) über die Buchsen 3 LINE IN
(9) anschließen. Da der Verstärker monofon
arbeitet, wird aus dem Stereosignal intern ein
Monosignal gebildet. Das Signal einer an diesen
Buchsen angeschlossenen Tonquelle kann beim
Sprechen über ein Mikrofon ausgeblendet werden (Funktion VOICE OVER ☞Kap. 5).
4.2.3 Verstärker oder Aufnahmegerät
Eine zusätzliche Verstärkeranlage oder ein Aufnahmegerät lässt sich an die Buchsen LINE LINK
(10) anschließen. Für Stereo-Aufnahmegeräte
sind zwei Buchsen vorhanden. Da der Verstärker
monofon arbeitet, sind die Signale an beiden
Buchsen identisch.
4.2.4 Lautsprecher
Über die Speakon®-kompatible Buchse EXT.
SPEA KER (20) kann ein zusätzlicher Lautsprecher angeschlossen werden. Dieser lässt sich
zusätzlich zu der vorhandenen Lautsprecherbox
oder alternativ betreiben.
Den Lautsprecherstecker nach dem Einstecken in die Buchse nach rechts drehen, bis
er einrastet. Zum späteren Herausziehen den
Sicherung sriegel am Stecker zurückziehen und
den Stecker nach links drehen.
Mit dem Schalter INTERNAL SPEAKER (19)
bei Bedarf die Lautsprecherbox der PAS-254D
ausschalten (Position „OFF“).
Hinweis: Um den Verstärker bei hohen Lautstärken nicht
zu überlasten, wird empfohlen, die Lautsprecherbox der
PAS-254D bei Anschluss eines externen Lautsprechers
auszuschalten.
4.3 Fernbedienung
Die Fernbedienung für die Bedienung des
Audio spielers / Bluetooth-Empfängers wird mit
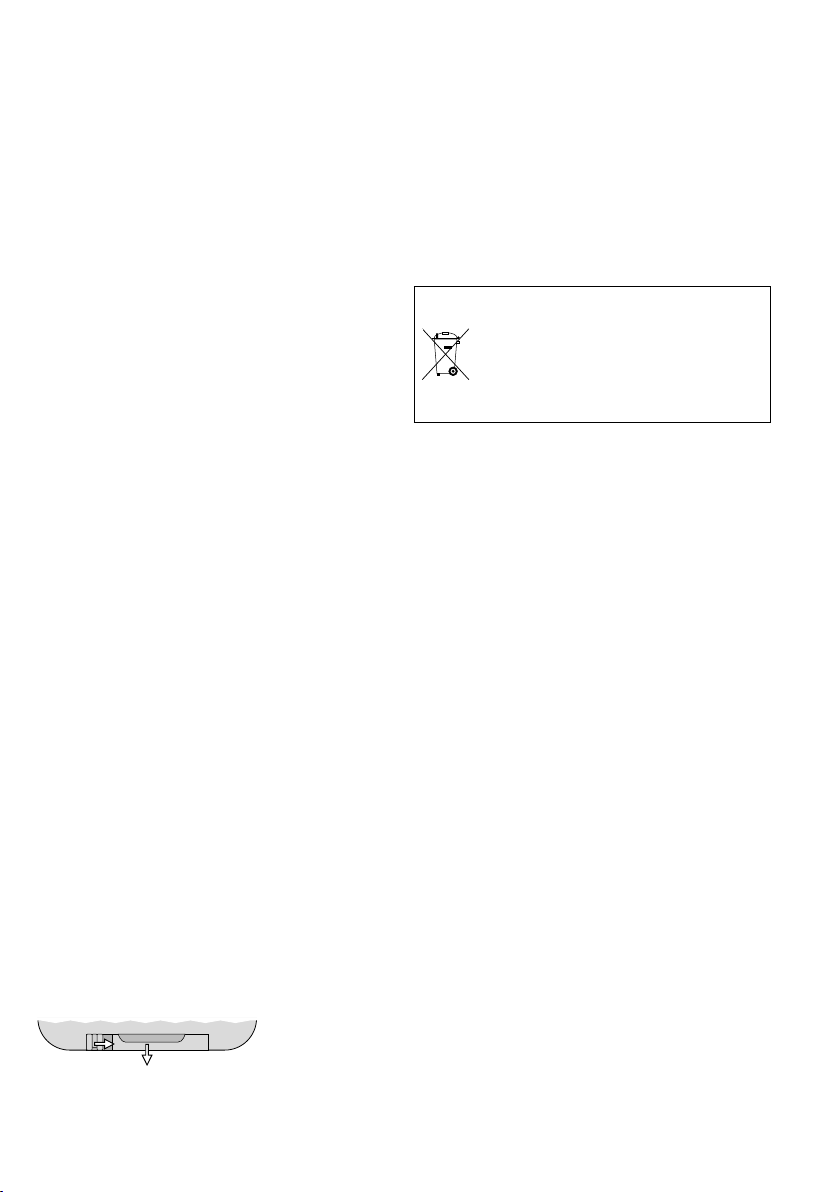
separater Batterie geliefert. Vor dem ersten Betrieb die Batterie einsetzen. Dazu auf der Rückseite der Fernbedienung den kleinen Riegel mit
der Kerbe nach rechts drücken und gleichzeitig
den Batteriehalter herausziehen.
1. 2.
Batteriehalter herausziehen
➋
Die Batterie wie auf der Fernbedienung angegeben in den Batteriehalter einlegen (Polung „+“
beachten!) und diesen wieder in die Fernbedienung zurückschieben.
Lässt die Reichweite der Fernbedienung
nach, die Batterie gegen eine neue Batterie
gleichen Typs auswechseln.
Bei längerem Nichtgebrauch die Batterie
herausnehmen, damit die Fernbedienung bei
einem eventuellen Auslaufen der Batterie nicht
beschädigt wird.
Verbrauchte Batterien dürfen nicht
in den Hausmüll geworfen werden.
Geben Sie sie zur umweltgerechten
Entsorgung nur in den Sondermüll
(z. B. Sammel behälter bei Ihrem Fachhändler).
4.4 Zusätzlichen Akku anschließen
Zur Verlängerung der Betriebsdauer kann ein
zusätzlicher, separat erhältlicher Akku vom Typ
NPA-12 / 7 angeschlossen werden. Wegen der
Gefahren bei falscher Handhabung sollte der Einbau des Akkus nur durch eine Fachkraft erfolgen.
1)
Sicherstellen, dass die PAS-254D ausgeschaltet und vom Ladegerät getrennt ist.
2)
Den Deckel (21) für die Akkufächer nach dem
Entfernen der zentralen Schraube öffnen.
3) Den Akku an die beiden Kabel im freien Fach
anschließen, dabei unbedingt auf die richtige
Polung achten (Rot =+).
Hinweis: Sollte der Akku nicht in das freie Fach passen, ggf. die Position und Anschlüsse der beiden Akkus
tauschen.
4) Den Deckel wieder schließen.
5 Bedienung
1) Vor dem ersten Einschalten alle Lautstärke-
regler (6, 7, 11) auf „0“ drehen, damit es
beim Einschalten nicht zu unerwartet hoher
Lautstärke kommen kann.
2)
Die angeschlossenen Tonquellen und /oder
Funksender einschalten.
3)
Den Verstärker mit dem Schalter (17) einschalten. Die Betriebsanzeige PWR ON (16)
Deutsch
7
Page 8
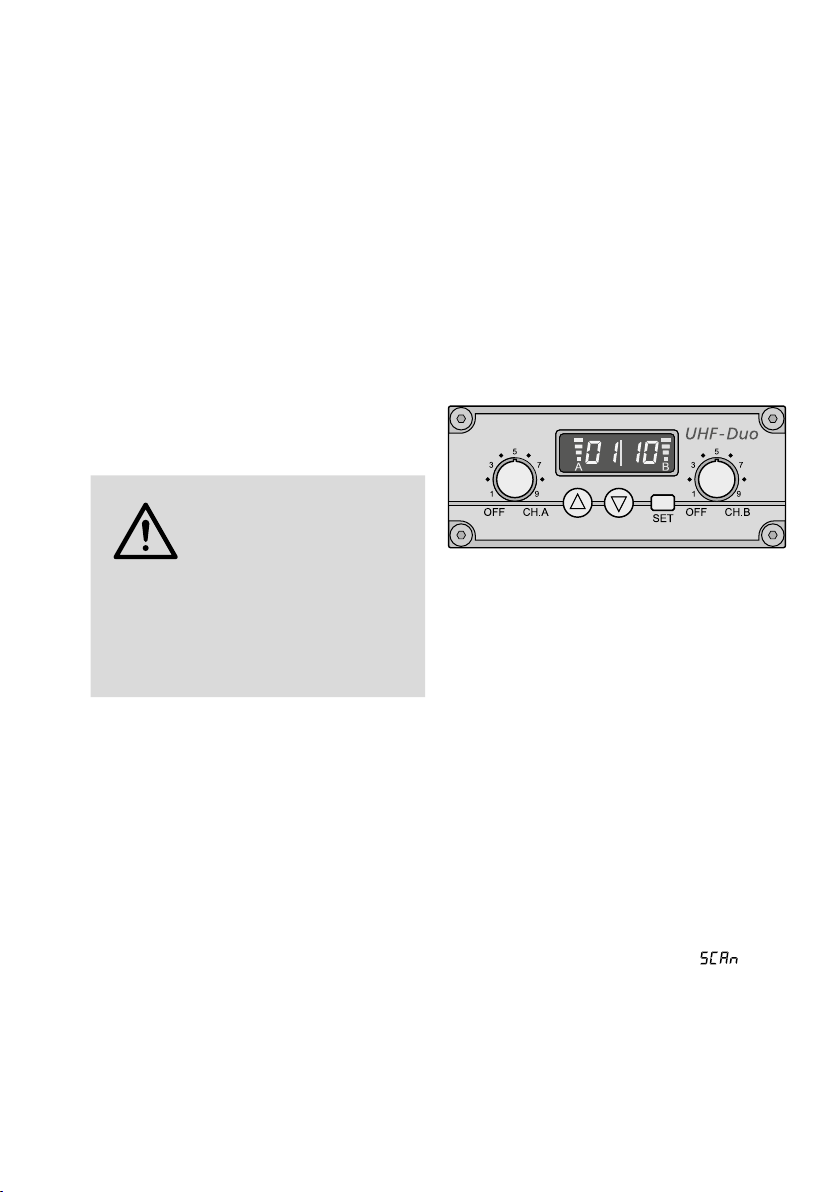
leuchtet. Zusätzlich wird mit einer LED (14)
der Ladezustand des Akkus angezeigt. Leuchtet die LED LOW, sollte der Akku aufgeladen
werden (☞Kapitel 4.1).
Deutsch
4)
Von einer angeschlossenen Tonquelle z. B.
Musik wiedergeben oder in ein per Kabel
oder Funk verbundenes Mikrofon sprechen.
(Bedienung des Audiospielers / Blue toothEmpfängers ☞Kapitel 5.2 bis 5.4).
5)
Die Lautstärke für die Tonquellen mit dem
jeweiligen Regler einstellen.
LEVEL (6): Tonquelle am Eingang
1 MIC / LINE IN
2 WIRELESS (7): Funkmikrofone, siehe auch
Kapitel 5.1.2
PLAYER (11): Tonquelle am Eingang
3 LINE IN und Audiospieler /
Blue tooth- Empfänger
WARNUNG Betreiben Sie das Gerät nie-
mals, wenn sich die Lautsprecher in Ohrnähe einer
Person befinden! Durch die
hohe Lautstärke kann das
Gehör geschädigt werden.
Vermeiden Sie eine akustische Rückkopplung (lauter Pfeifton), indem Sie die Lautsprecher nicht auf das Mikrofon richten und
genügend Abstand zum Mikrofon halten.
Eine Schaltung zur Pegelbegrenzung verhindert automatisch Verzerrungen bei hohen
Lautstärken. Ihre Aktivität wird durch die LED
LIMITER (15) signalisiert.
6)
Mit dem Regler TONE (8) den gewünschten Klang für die Mikrofone oder eine an
der Buchse (5) angeschlossene Tonquelle
einstellen. Mit dem Regler TONE (12) den
Klang für eine an den Buchsen 3 LINE IN angeschlossene Tonquelle sowie den Audiospieler/ Bluetooth- Empfänger einstellen. Für den
Audiospieler/ Bluetooth- Empfänger gibt es
auf der Fernbedienung weitere Klangeinstellmöglichkeiten (☞Kapitel 5.4, Taste „EQ“).
7)
Soll der Ton von einer an den Buchsen
3 LINE IN (9) angeschlossenen Tonquelle oder
dem Audiospieler/ Bluetooth- Empfänger beim
Sprechen über ein Mikrofon automatisch
ausgeblendet werden [VOICE OVER (13)],
8
den Regler DEPTH so einstellen, dass die LED
MUSIC beim Sprechen leuchtet.
8)
Um den Akku nicht unnötig zu entladen, den
Verstärker nach dem Betrieb und bei längeren Pausen mit dem Schalter (17) wieder
ausschalten.
Wird die Verstärkeranlage längere Zeit nicht benötigt, den Akku vor der Lagerung voll aufladen
und etwa alle 6 Monate nachladen, um die normale Selbstentladung auszugleichen.
5.1 Betrieb mit Funkmikrofonen
Die Verstärkeranlage ist mit einem Empfangsmodul für zwei Funkmikrofone / Sender ausgestattet. Dieses befindet sich unterhalb der
Lautsprecherbox.
Funkempfangsmodul
➌
Die Empfangseinheiten A und B haben jeweils
einen Regler zum Einstellen der Lautstärke und
zum Ein- /Ausschalten (Abb.3). Das Display ist
aufgeteilt für Empfangseinheit A (linke Hälfte)
und Empfangseinheit B (rechte Hälfte). Nach
dem Einschalten einer Empfangseinheit zeigt
das Display den Übertragungskanal. Zum kurzen
Anzeigen der Funkfrequenz die Taste (für
Einheit A) oder (für EinheitB) drücken.
5.1.1 Übertragungskanäle einstellen
Die Empfangseinheiten mit den Reglern ein
schalten. Die zugehörigen Funkmikro fone / Sender dabei vorerst noch ausgeschaltet lassen.
5.1.1.1 Kanalsuchlauf
Die Tasten und
gedrückt halten, bis das Display anzeigt.
Der Suchlauf startet: Die Empfangseinheiten
werden auf freie Kanäle eingestellt, die sich
gegenseitig nicht stören. Werden keine freien
Kanäle gefunden, werden die eingestellten beibehalten.
Hinweis: Der Suchlauf kann auch nur für eine Einheit
gestartet werden (Taste für Einheit A oder Taste
für Einheit B).
gleichzeitig ca. 1Sekunde
-
Page 9

5.1.1.2 Manuelle Kanalwahl
Wenn beide Empfangseinheiten A und B eingeschaltet sind:
1)
Die Taste SET gedrückt halten, bis im Display für Empfangseinheit A die Kanalanzeige
blinkt.
2)
Den Kanal für Empfangseinheit A mit der
Taste oder auswählen und mit der Taste
SET bestätigen.
3) Im Display blinkt für Empfangseinheit B die
Kanalanzeige. Den Kanal für Empfangseinheit B mit der Taste oder auswählen
und mit der Taste SET bestätigen.
Wenn nur eine Empfangseinheit A oder B eingeschaltet ist:
Die Taste SET gedrückt halten, bis im Display die
Kanalanzeige blinkt. Den Kanal mit der Taste
oder auswählen und mit der Taste SET
bestätigen.
Hinweise:
1. Die Empfangseinheiten lassen sich nicht auf den gleichen Kanal einstellen.
2. Wird ein Kanal nicht innerhalb von 10 Sekunden mit
der Taste SET bestätigt, wird der Einstellmodus verlassen und der vorher eingestellte Kanal beibehalten.
3.
Zeigt im Display die jeweilige Segmentanzeige A oder
B bei ausgeschaltetem Sender Empfang an, werden
Störsignale bzw. Signale an derer Sender empfangen.
In diesem Fall einen anderen Kanal auswählen.
5.1.2 Lautstärke einstellen
Die Funkmikrofone / Sender einschalten und
eines auf den Kanal von EmpfangseinheitA,
das andere auf den Kanal von Empfangseinheit
B einstellen. Im Display zeigt dann die jeweilige
Segmentanzeige die Stärke des Funkempfangs
an. Mit den Reglern für jede Empfangseinheit
die Lautstärke einstellen.
Die Gesamtlautstärke der empfangenen
Audiosignale mit dem Regler 2 WIRELESS (7)
einstellen.
Hinweis: Falls kein Signal vom Funkmikrofon empfangen
wird, sicherstellen, dass das Mikrofon auf der richtigen
Frequenz (Kanal) sendet und die Batterie des Mikrofons
überprüfen. Wenn nötig, den Abstand zwischen Verstärkeranlage und Mikrofon verringern.
5.1.3 Squelch einstellen
Die Rauschsperre (Squelch) sorgt für eine
Stummschaltung der jeweiligen Empfangseinheit, wenn der Pegel des Funksignals unter den
eingestellten Schwellwert sinkt. So wird verhindert, dass Störsignale zu einem Aufrauschen
führen, wenn der Sender ausgeschaltet oder
sein Funksignal zu schwach ist: Liegen die Pegel
der Störsignale unter dem Schwellwert, wird die
Empfangseinheit stummgeschaltet. Ein höherer Schwellwert bietet größere Störsicherheit,
reduziert allerdings auch die Übertragungsreichweite.
1) Erst beide Empfangseinheiten A und B ausschalten. Dann bei gedrückter Taste SET eine
Empfangseinheit einschalten. Das Display
zeigt oder , die Nummer blinkt.
2)
Zum Aufrufen des Squelch-Einstellmodus die
Taste SET drücken: Das Display zeigt (für
„Squelch“) und den aktuellen Wert (blinkt).
3) Mit der Taste oder den Wert einstellen
(Stufe 7 = höchster Schwellwert). Zum Verlassen des Squelch-Einstellmodus die Taste
SET drücken.
Hinweis: Die Einstellmodi werden nach 5 Sekunden
ohne Betätigung einer Taste auch automatisch verlassen.
Durchgeführte Einstellungen werden auch in diesem Fall
gespeichert.
5.2 Audiospieler
Der eingebaute Audiospieler kann Audio dateien
im MP3- oder WAV-Format wiedergeben. Als
Speichermedien lassen sich USB-Speichersticks
oder SD[HC]-Speicherkarten (auch MMCKarten) verwenden.
Hinweis: Aufgrund der Vielfalt von Speicher-Herstellern
und Gerätetreibern kann nicht garantiert werden, dass alle
Speichermedien mit dem Audiospieler kompatibel sind.
Einen USB-Speicherstick in die USB-Buchse (1)
stecken oder/und eine Speicherkarte (mit den
Kontakten nach oben zeigend) in den Schlitz
(2) schieben.
Mit dem Einschalten des Geräts wird die zuletzt abgespielte Audiodatei gewählt und der
Audiospieler steht auf Pause (Anzeige: ).
Dabei hat der USB-Speicher gegenüber der Speicherkarte Vorrang. Wird im Betrieb ein Speichermedium eingesteckt, ist dieses automatisch
ausgewählt.
Deutsch
9
Page 10
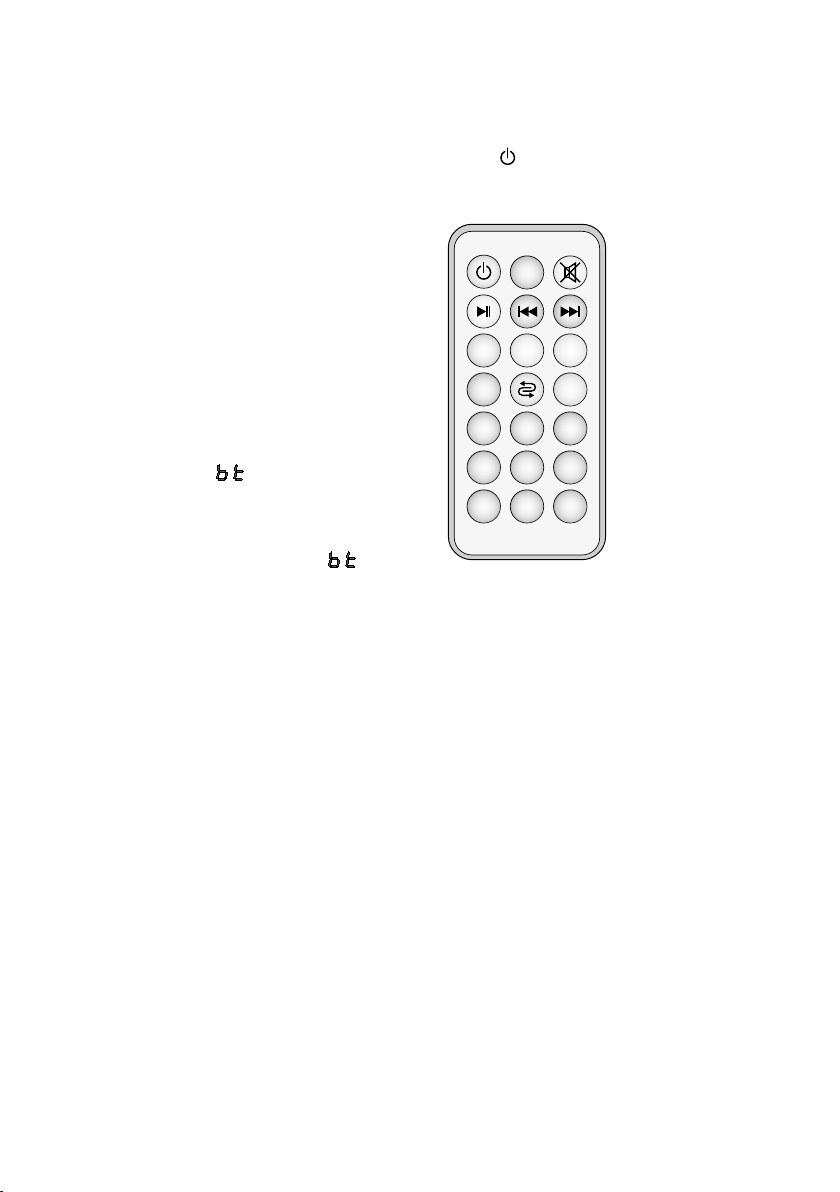
Die Bedienung des Audiospielers kann über die
8 97
5
64
2 31
0
EQ
+−
U/SD
SCAN
Mode
Tasten (4) oder die mitgelieferte Fernbedienung
(Abb. 4) erfolgen (☞Kapitel 5.4). Die Fernbedienung auf den Infrarotsensor rechts im Display
Deutsch
(3) richten.
Das Display zeigt die verstrichene Wiedergabezeit des laufenden Titels an. Die Lautstärke
der Wiedergabe hängt von den Einstellungen
am Audiospieler und am Regler PLAYER (11) ab.
5.3 Bluetooth-Empfänger
Alternativ zur Wiedergabe von einem USB-Speicher oder einer Speicherkarte kann sich der
eingebaute Bluetooth- Empfänger drahtlos mit
einer Bluetooth- Tonquelle (z. B. Smartphone
oder Tabletcomputer) verbinden.
1)
Ist kein USB-Speicher und keine Speicherkarte angeschlossen, befindet sich die PAS254D automatisch im Bluetooth-Modus: Das
Display (3) zeigt .
Bei angeschlossenem Speichermedium
die Taste M so oft drücken, bis links im Display
weder TF noch USB leuchten. Nach wenigen
Sekunden erscheint im Display .
2)
An der Bluetooth-Quelle die Bluetooth-Funktion einschalten. In der Liste der verfügbaren
Geräte erscheint dort die PAS-254D als „BTSPEAKER“.
3)
Die Quelle mit „BT- SPEAKER“ koppeln (siehe
dazu ggf. die Anleitung der BluetoothQuelle). Daraufhin folgt automatisch die
Verbindung der beiden Geräte.
Bei erfolgter Verbindung erklingt eine
Zweitonfolge.
Die Bedienung der Wiedergabe über Blue tooth
kann an der Bluetooth-Quelle oder über die Tasten (4) oder die mitgelieferte Fernbedienung
(Abb. 4) erfolgen (☞Kapitel 5.4). Die Fernbedienung auf den Infrarotsensor rechts im Display
(3) richten.
Die Lautstärke der Bluetooth-Wiedergabe
hängt von den Einstellungen an der Bluetooth-
Quelle, am Audiospieler/ Bluetooth-Empfänger
und am Regler PLAYER (11) ab.
Werden weder der Audiospieler noch der
Bluetooth-Empfänger genutzt, können diese
mit der Fernbedienung ausgeschaltet werden
(Taste ). Dadurch kann die Akkulaufzeit erhöht und ein ungewollter Bluetooth-Empfang
verhindert werden.
Fernbedienung
➍
10
Page 11
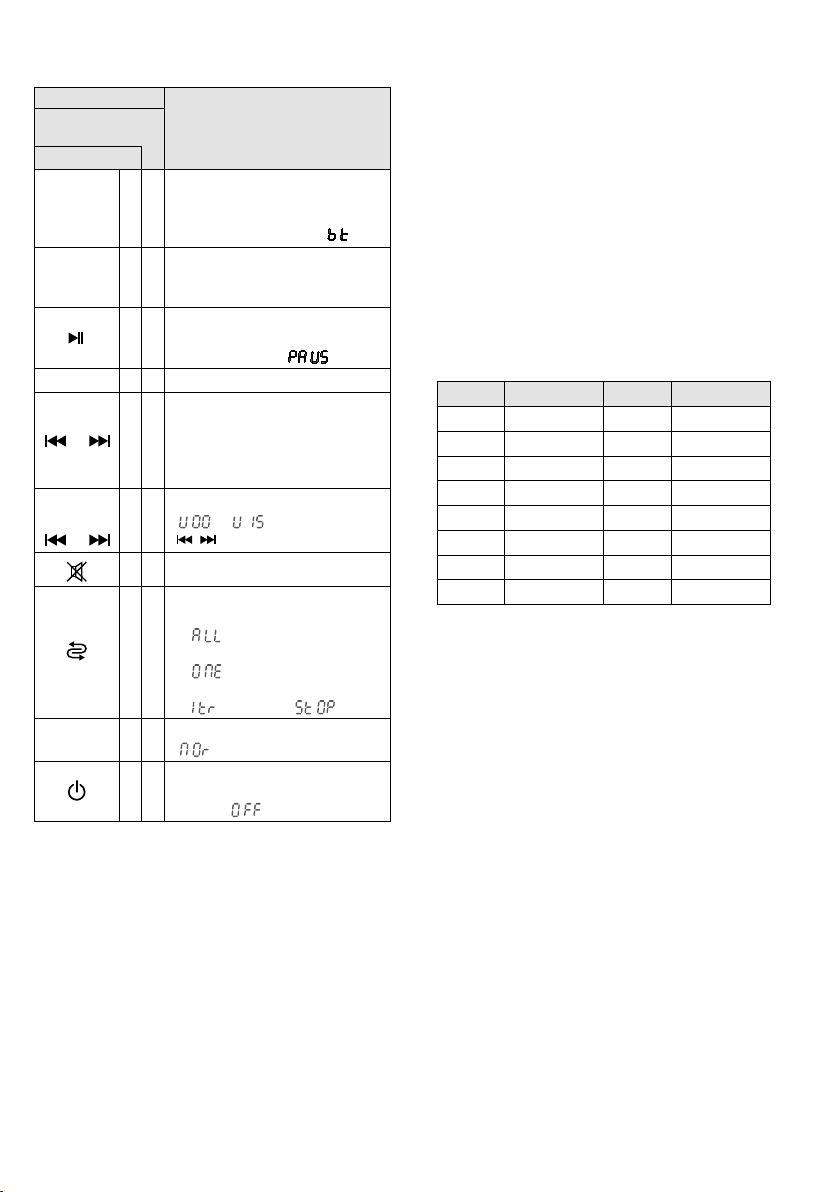
5.4 Bedienübersicht für den Audiospieler/ Bluetooth-Empfänger
Taste
auf der
Fernbedienung
am Gerät
Mode
M
U/SD
SCAN
1… 9, 0
/
− / +
/
EQ
*auch bei Bluetooth-Wiedergabe
Quelle umschalten*
✅
USB-Speicher „
Speicherkarte „
✅
Bluetooth-Empfänger „
Umschalten zwischen
✅
USB-Speicher „
Speicherkarte „
Wiedergabe starten und
✅ ✅
Umschalten zwischen Wiedergabe und Pause „
✅
Direktwahl eines Titels
vorheriger / nächster T itel*:
Taste kurz drücken
✅ ✅
schneller Vor- / Rücklauf (nur mit
Fernbedienung): Taste gedrückt
halten (Ton dabei stumm)
Lautstärke ändern*
✅
„
(
✅
✅
Ton aus- und einschalten*
Wiedergabemodus
– Wiederholung aller Titel
„
✅
– Wiederholung eines Titels
„ “
– Einzeltitelwiedergabe
„ “, danach „ “
6 Klangvoreinstellungen*
✅
„
Audiospieler/ Bluetooth-
✅
Empfänger
ein /aus „ “*
Funktion
USB“
TF“
USB“
TF“
“
…
/ gedrückt halten)
“
“ = neutral
“*
6 Technische Daten
Verstärker
Verstärkerklasse: . . . . . . . D
Sinusleistung an 2 Ω: . . .70 W
Spitzenleistung: . . . . . . . 80 W
Frequenzbereich: . . . . . . . . 80 – 20 000 Hz
Eingänge (Anschluss, Art, Empfindlichkeit)
Mikrofon: . . . . . . . . . . . .XLR, sym., 2 mV
“
mit Phantomspeisung 12 V
Line: . . . . . . . . . . . . . . . . Klinke, sym., 14 mV
Cinch, asym., 80 mV
Funkempfangseinheiten: . .2
Empfangsreichweite:
. . . . .ca. 30 m
Empfangsfrequenzen
Kanal Frequenz Kanal Frequenz
01 863,1 MHz 09 863,2 MHz
02 864,1 MHz 10 864,2 MHz
03 863,6 MHz 11 863,7 MHz
04 864,6 MHz 12 864,7 MHz
05 863,3 MHz 13 863,4 MHz
06 864,3 MHz 14 864,4 MHz
07 863,8 MHz 15 863,9 MHz
08 864,8 MHz 16 864,9 MHz
Speichermedien: . . . . . . . . USB-Speicher,
SD / SDHC / MMC-Karte
Audiodateiformate: . . . . . .MP3, WAV
Bluetooth-Profil:
. . . . . . . .A2DP
Ausgänge
Line Link: . . . . . . . . . . . .Cinch, 300 mV
Ext. Speaker: . . . . . . . . . .Speakon®-kompatibel,
min. 4
Ω
Stromversorgung: . . . . . . .Akku 12 V/ 7,2 Ah
Einsatztemperatur:. . . . . . .0 – 40 °C
Gesamthöhe: . . . . . . . . . . . 120 cm
Gewicht: . . . . . . . . . . . . . .7,7 kg
Deutsch
Änderungen vorbehalten.
Diese Bedienungsanleitung ist urheberrechtlich für MONACOR ® INTERNATIONAL GmbH & Co. KG geschützt.
Eine Reproduktion für eigene kommerzielle Zwecke – auch auszugsweise – ist untersagt.
11
Page 12

Portable Amplifier System
These instructions are intended for users without
any special technical knowledge. Please read
English
these instructions carefully prior to operation
and keep them for later reference. All operating elements and connections described can be
found on page 2.
Contents
1 Overview . . . . . . . . . . . . . . . . . . 12
2 Safety Notes . . . . . . . . . . . . . . . . 13
3 Applications and Accessories . . . . . . 14
3.1 Wireless microphones and transmitters . . . . 14
3.2 Conformity and approval . . . . . . . . . . . 14
4 Setting into Operation . . . . . . . . . . 14
4.1 Recharging the battery . . . . . . . . . . . . 14
4.2 Establishing audio connections . . . . . . . . 14
4.2.1 Microphone . . . . . . . . . . . . . . . . 14
4.2.2 Audio source with line level . . . . . . . . 14
4.2.3 Amplifier or recorder. . . . . . . . . . . . 15
4.2.4 Speakers . . . . . . . . . . . . . . . . . 15
4.3 Remote control. . . . . . . . . . . . . . . . 15
4.4 Connecting an additional battery . . . . . . . 15
5 Operation . . . . . . . . . . . . . . . . . 15
5.1 Operation with wirelessmicrophones. . . . . 16
5.1.1 Setting the transmission channels . . . . . 16
5.1.2 Adjusting the volume . . . . . . . . . . . 17
5.1.3 Setting the squelch . . . . . . . . . . . . 17
5.2 Audio player . . . . . . . . . . . . . . . . . 18
5.3 Bluetooth receiver . . . . . . . . . . . . . . 18
5.4 Operation overview of
audioplayer/Bluetoothreceiver . . . . . . . 19
6 Specifications . . . . . . . . . . . . . . . 19
1 Overview
1
USB port (type A) for the connection of a USB
flash drive to reproduce audio files
2
Slot for an SD memory card to reproduce
audio files
3 Display to indicate the Bluetooth function or
the storage medium selected and the current
title number or the time played of the title
4 Control buttons for the audio player/ Blue-
tooth receiver (
5 Combined XLR / 6.3 mm jack 1 MIC / LINE IN
for the connection of a microphone or of
another mono audio source (e. g. mixer)
6 Volume control LEVEL for a microphone or
audio unit connected to (5)
7
Volume control 2 WIRELESS for wireless
micro phones
8 Common sound control TONE for a micro-
phone or audio unit connected to (5) and for
wireless microphones
9 RCA jacks 3 LINE IN for the connection of an
audio source (e. g. CD player); when a stereo
audio source is connected, a mono signal will
be created in the amplifier
10 RCA outputs LINE LINK to record the mixed
signal or to route it to another amplifier
system; for stereo recorders, two jacks are
available
11 Volume control PLAYER for the input 3 LINE
IN (9) and for the audio player/ Bluetooth
receiver
12
Sound control TONE for the input 3 LINE
IN (9) and for the audio player/ Bluetooth
receiver
13
Function VOICE OVER to mute the sound
of an audio source connected to the input
3 LINE IN and of the audio player/ Bluetooth
receiver while speaking into the microphone
LED MUSIC will light up when the sound
Control DEPTH to adjust the sensitivity for
chapter 5.4)
☞
is muted
muting the sound
12
Page 13
14
LED status indicators for the rechargeable
battery
CHARGE Red: during the charge process
Green: when the charge pro-
cess has been termi-
nated
FULL charging state: full
OK charging state: sufficient
LOW charging state: low
15
LED indicator LIMITER; will light up when the
level limiter is active
16 Power indicator PWR ON
17 Power switch
18 Connection jack to charge the battery; only
use the charger provided
19 Switch INTERNAL SPEAKER to switch on / off
the speaker system of the amplifier
20 Jack EXT.SPEAKER for the connection of an
(additional) speaker
Note: To make sure that the amplifier will not be
overloaded when the volume is high and an external
speaker is connected, it is recommended to switch
off the speaker system of the amplifier PAS-254D by
means of the switch INTERNAL SPEAKER (19).
21 Cover for the battery compartments
2 Safety Notes
The units (amplifier system and charger) correspond to all relevant directives of the EU and are
therefore marked with .
WARNING
Never use the amplifier system in heavy rain
•
and always make sure that no moisture will
get into the system. The cover provided will
protect the speaker system against moisture.
The charger is suitable for indoor use only.
Protect it against dripping water, splash water
The charger uses dangerous
mains voltage. Leave servicing
to skilled personnel. Inexpert
handling may result in electric
shock.
and high air humidity. The admissible ambient
temperature range for the units is 0 – 40 °C.
Do not place any vessels filled with liquid, e. g.
•
drinking glasses, on the charger.
Do not operate the units and immediately
•
disconnect the mains cable of the charger
from the mains socket
1. if a unit or the mains cable is visibly damaged,
2. if a defect might have occurred after a unit
was dropped or suffered a similar accident,
3. if malfunctions occur.
In any case the units must be repaired by
skilled personnel.
Never pull the mains cable of the charger to
•
disconnect the mains plug from the socket,
always seize the plug.
A damaged mains cable must be replaced by
•
skilled personnel only.
For cleaning only use a soft cloth, dry or
•
slightly wet; never use chemicals or aggressive
detergents.
No guarantee claims for the units and no
•
liability for any resulting personal damage or
material damage will be accepted if the units
are used for other purposes than originally
intended, if they are not correctly connected or operated, or if they are not repaired in
an expert way. Likewise, no liability will be
accepted for data loss caused by a defect or
operating errors and for any consequential
damage of this data loss.
If the units are to be put out of operation definitively, take them to a local
recycling plant for a disposal which is
not harmful to the environment.
English
13
Page 14

3 Applications and Accessories
The amplifier system PAS-254D is powered by
a rechargeable battery and can be carried as
English
a backpack during processions, for example.
Above the amplifier, there is a frame with a
speaker system with four full-range speakers
that will radiate the sound in the forward and
backward direction. The amplifier is equipped
with mixable inputs for a microphone, a (stereo)
audio source (e. g. CD player) and a receiver
section for two wireless microphones. In addition, audio files can be reproduced from a USB
flash drive or an SD/ MMC memory card or via
the integrated Bluetooth receiver (e. g. from a
smartphone). It is possible to automatically mute
the music, for example, while speaking into the
microphone. With a fully charged battery, the
amplifier system can be operated for up to 7
hours.
A second rechargeable battery (NPA-12 / 7),
available as a separate accessory, can be used to
increase the operating time. Additional compart
ments on the left and right sides of the backpack
for items such as microphones and connection
cables are also provided.
3.1 Wireless microphones and
transmitters
The following units are available from
MONACOR:
Type Model
Hand-held wireless microphone TXA-800HT
Pocket transmitter with tie clip micro-
phone and headband microphone
Transmitter with line level input for
audio signals
To provide sound to larger areas, the radio signals of the transmitters can be simultaneously
received by multiple PAS-254D.
3.2 Conformity and approval
Herewith, MONACOR INTERNATIONAL declare
that the wireless receiver of the PAS-254D
complies with the directive 2014/53/EU. The
EU declaration of conformity is available on the
Internet:
www.monacor.com
14
TXA-800HSE
TXA-800ST
The wireless system (transmitter and receiver)
is generally approved for operation in EU and
EFTA countries, it is licence-free and requires
no registration.
4 Setting into Operation
4.1 Recharging the battery
To recharge the built-in battery and an additionally connected battery, connect the charger
provided to the low-voltage jack (18) and to
a mains socket (230 V/ 50 Hz). The LED status
indicators (14) will indicate the charging state:
FULL, OK and LOW. The LED indicator CHARGE
will light up in red while the battery is being
recharged. The amplifier may be switched off
during recharging.
Once the battery has been recharged (LED
indicator CHARGE lights up in green), disconnect the charger from the amplifier and the
mains.
-
4.2 Establishing audio connections
4.2.1 Microphone
Connect a microphone with an XLR plug to the
jack 1 MIC / LINE IN (5).
For microphones that require phantom
power supply (e. g. electret microphones), a
phantom power of 12 V is available at the XLR
contacts of the jack.
Note: Never connect microphones or other audio sources
with an unbalanced output to the XLR jack; they may be
damaged by the phantom power.
It also possible to connect microphones with
a 6.3 mm plug to the jack 1 MIC / LINE IN; this
input, however, is slightly less sensitive.
4.2.2 Audio source with line level
Via a 6.3 mm plug, a mono audio source with
line signal level (e. g. mixer, additional receiver
for wireless microphones) can be connected to
the jack 1 MIC / LINE IN (5). As an alternative, this
audio source can also be connected to one of
the RCA jacks 3 LINE IN (9).
Connect a stereo audio source (e. g. CD/ MP3
player, radio, mixer) to the jacks 3 LINE IN (9). The
amplifier is monophonic; therefore, the stereo
signals are internally transformed into a mono
Page 15
signal. It is possible to mute the signal of an
audio source connected to one of the jacks
3 LINE IN while speaking into the microphone
(function VOICE OVER ☞chapter 5).
4.2.3 Amplifier or recorder
An additional amplifier system or a recorder can
be connected to the jacks LINE LINK (10). For
stereo recorders, two jacks are available. The
amplifier is monophonic; therefore, the signals
at the two jacks are identical.
4.2.4 Speakers
It is possible to connect an additional speaker
to the Speakon®-compatible jack EXT. SPEAKER
(20). This speaker can be used in addition or as
an alternative to the existing speaker system.
Connect the speaker plug to the jack and
then turn the plug clockwise until it locks. To
remove the plug, pull back the safety latch on
the plug and turn the plug counter-clockwise.
If required, use the switch INTERNAL
SPEAKER (19) to switch off the speaker system
of the PAS-254D.
Note: To make sure that the amplifier will not be overloaded when the volume is high and an external speaker
is connected, it is recommended to switch off the speaker
system of the amplfier PAS-254D.
Never put discharged batteries in the
household waste. To protect the environment, always take them to a special
waste disposal, e. g. collection container at your retailer.
4.4 Connecting an additional battery
An additional rechargeable battery of the type
NPA-12 / 7 (separately available as an accessory) can be connected to increase the operating
time. Incorrect handling is hazardous; therefore,
the battery should only be connected by skilled
personnel.
1)
Make sure that the PAS-254D is switched off
and disconnected from the charger.
2) Remove the central screw of the cover (21)
for the battery compartments and then open
the cover.
3) Connect the battery to the two cables in the
empty compartment; make sure to observe
the correct polarity (red = +).
Note: If the battery does not fit into the empty compartment, you may exchange the position and connections of the two batteries.
4) Close the cover.
English
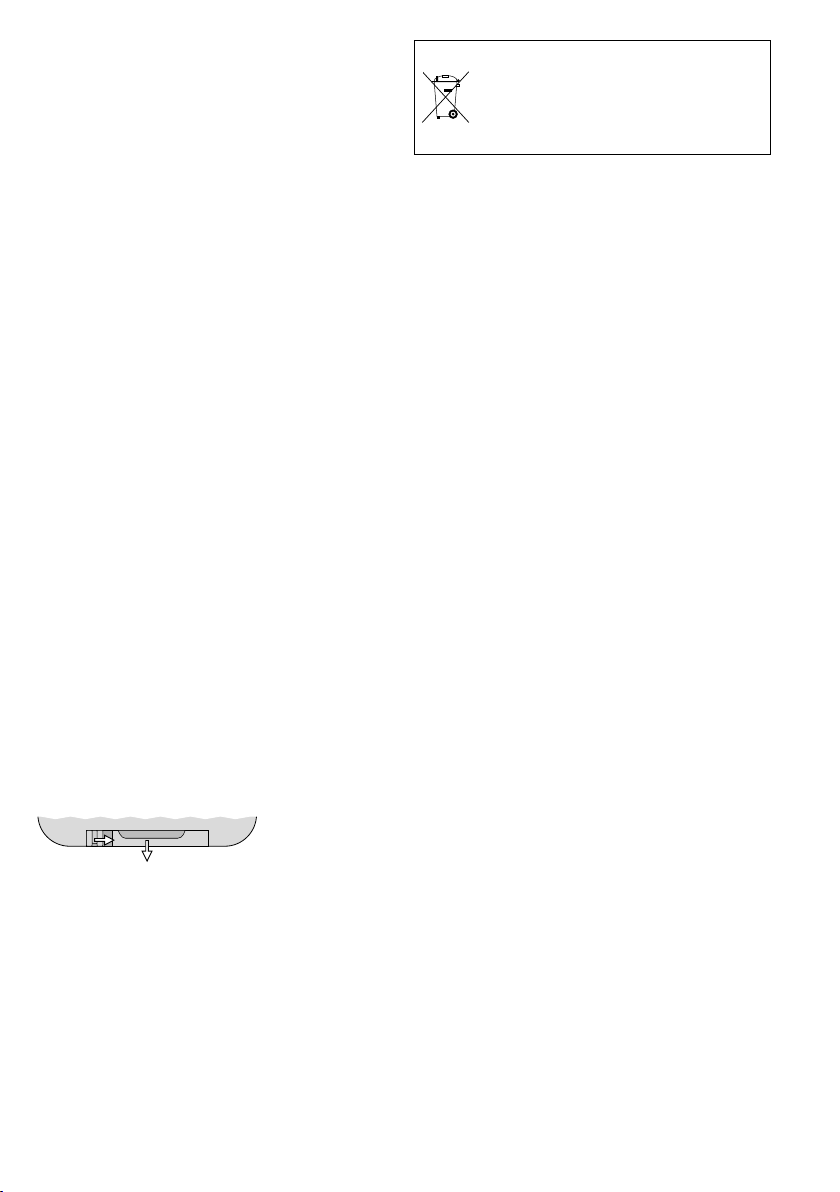
4.3 Remote control
The remote control for operation of the audio
player/ Bluetooth receiver is supplied with a separate battery. Prior to initial operation, insert the
battery: On the rear side of the remote control,
push the small latch with the groove to the right
and remove the battery support.
1. 2.
Removing the battery support
➋
Insert the battery in the battery support as indicated on the remote control (make sure to
observe the polarity “+”) and then push back
the battery holder into the remote control.
When the operating range of the remote
control decreases, replace the battery with a
battery of the same type.
If the remote control is not used for a longer
time, remove the battery as a precaution so that
the remote control will not be damaged in case
the battery should leak.
5 Operation
1)
Prior to initial switch-on, set all volume
controls (6, 7, 11) to “0” to avoid an unexpectedly high volume when the amplifier is
switched on.
2) Switch on the audio sources connected and/
or the wireless transmitters.
3) Use the power switch (17) to switch on the
amplifier. The LED power indicator PWR ON
(16) will light up. In addition, the appropriate
LED indicator (14) will indicate the current
charging state of the battery. When the LED
indicator LOW lights up, the battery must be
recharged (☞chapter 4.1).
4)
Replay music, for example, from an audio
source connected or speak into a wireless
microphone or a microphone connected
via a cable (operation of the audio player/
Bluetooth receiver ☞chapters 5.2 to 5.4).
15
Page 16
5) Adjust the volume of the audio sources with
the corresponding control.
LEVEL (6): Audio sour ce at the input
English
2 WIRELESS (7): Wireless microphones, also
PLAYER (11): Audio source at input
WARNING
To avoid acoustic feedback (loud howling),
never position the speaker towards the
microphone and always make sure that
there is a sufficient distance between the
speaker and the microphone.
A level limiter will automatically prevent distortions at high volumes. The LED indicator
LIMITER (15) will light up when the limiter
is active.
6)
Use the control TONE (8) to adjust the desired
sound for the microphones or for an audio
source connected to the jack (5). Use the
control TONE (12) to adjust the sound for an
audio source connected to the jacks 3 LINE IN
and for the audio player/ Bluetooth receiver. The remote control provides additional
sound adjustment options for the audio
player/ Bluetooth receiver (☞chapter 5.4,
button “EQ”).
7)
To automatically mute the sound of an audio
source connected to the jacks 3 LINE IN (9)
or of the audio player/ Bluetooth receiver
during announcements via the microphone
[VOICE OVER (13)], adjust the control DEPTH
in such a way that the LED indicator MUSIC
will light up while speaking into the microphone.
8)
To avoid unnecessary discharging of the battery, switch off the amplifier with the power
switch (17) after operation or during longer
pauses.
If the amplifier system is not used for a longer
period of time, completely charge the battery
16
1 MIC / LINE IN
refer to chapter 5.1.2
3 LINE IN and audio player /
Bluetooth receiver
Never operate the amplifier
when the speakers are close
to anybody’s ears! The high
volume may cause hearing
damage.
prior to storage and recharge it approx. every six
months to make up for normal self-discharge.
5.1 Operation with
wirelessmicrophones
The amplifier system is equipped with a receiver
module for two wireless microphones / transmitters. The receiver module is located beneath the
speaker system.
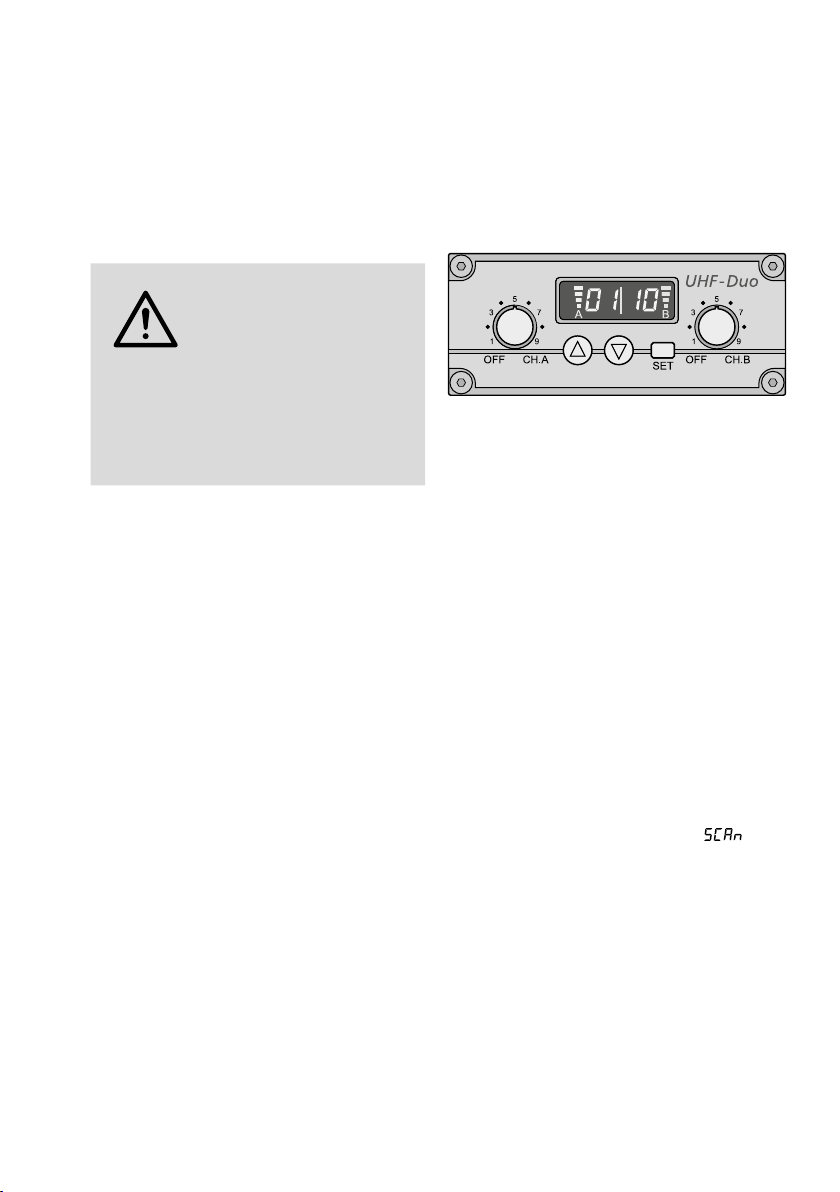
Wireless receiver module
➌
Each receiver section (A and B) is equipped with
a control to adjust the volume and to switch it
on and off (fig.3). The display is divided into two
parts: left half for receiver sectionA, right half
for receiver section B. When a receiver section
has been switched on, the display will indicate
the transmission channel. To briefly indicate the
radio frequency, press the button (for section
A) or
5.1.1 Setting the transmission channels
Use the controls to switch on the receiver sections. Do not switch on the corresponding
wireless microphones / transmitters for the time
being.
5.1.1.1 Channel scan
Keep the buttons and simultaneously
pressed for approx. 1 second until appears
on the display. The scan will start: The receiver
sections will be set to free channels without mutual interference. If no free channels are found,
the channels set will be kept.
Note: The channel scan can also be started for one section
only (button for section A or button for section B).
5.1.1.2 Manual channel selection
When both receiver sections A and B are
switched on:
1) Keep the button SET pressed until the chan-
(for section B).
nel indication for receiver section A starts
flashing on the display.
Page 17

2)
Select the channel for receiver section A with
the button or and then confirm with
the button SET.
3) The channel indication for receiver section B
starts flashing on the display. Select the channel for receiver section B with the button
and then confirm with the button SET.
or
When only one receiver section A or B is
switched on:
Keep the button SET pressed until the channel
indication starts flashing on the display. Select
the channel with the button or and then
confirm with the button SET.
Notes:
1.
The receiver sections cannot be set to the same
channel.
2. If a channel is not confirmed within 10 seconds with
the button SET, the setting mode will be exited and
the channel previously set will be kept.
3.
If, with the transmitter switched off, the respective
segment bar A or B on the display indicates reception,
interference signals or signals from other transmitters
are being received. In this case, use a different channel.
5.1.2 Adjusting the volume
Switch the wireless microphones / transmitters
on and set one to the channel of receiver section A and the other to the channel of receiver
section B. The respective segment bars on the
display will then indicate the strength of the
radio signals received. Use the controls to adjust
the desired volume for each receiver section.
Use the control 2 WIRELESS (7) to adjust the
volume of the audio signals received.
Note: If no signal is received from the wireless microphone, make sure that the microphone transmits on the
correct frequency (channel) and check the battery of the
microphone. If required, reduce the distance between the
amplifier system and the microphone.
5.1.3 Setting the squelch
The squelch function will mute the respective receiver section when the level of the radio signal
falls below the threshold value adjusted. Thus,
interference signals will not cause noise when
the transmitter is switched off or when its radio
signal is poor: If the levels of the interference
signals are below the threshold value, the receiver section will be muted. A high threshold
value offers high interference resistance, but it
will also reduce the transmission range.
1)
Switch off the receiver sections A and B. Then
keep the button SET pressed while switching
on a receiver section. The display will indicate
or , with the number flashing.
2) Press the button SET to activate the squelch
setting mode: (for “Squelch”) and the
current value (flashing) will appear on the
display.
3)
Use the button or to set the value
(level7 = highest threshold value). Press the
button SET to exit the squelch setting mode.
Note: The setting modes will be automatically exited
after 5 seconds if no button is pressed. Any settings made
will be saved.
English
17
Page 18
5.2 Audio player
8 97
5
64
2 31
0
EQ
+−
U/SD
SCAN
Mode
The integrated audio player can reproduce audio
files in the MP3 or WAV format. USB flash drives
English
or SD[HC] memory cards (also MMC cards) can
be used as storage media.
Note: Due to the large number of storage device manufacturers and device drivers, it cannot be guaranteed that
all storage media are compatible with the audio player.
Insert a USB flash drive into the USB port (1)
and /or insert a memory card (contacts facing
upwards) into the slot (2).
When the unit is switched on, the audio file
most recently replayed will be selected and the
audio player will be in the pause mode (indication: ). The USB flash drive will take
priority over the memory card. When a storage
medium is inserted during operation, it will be
automatically selected.
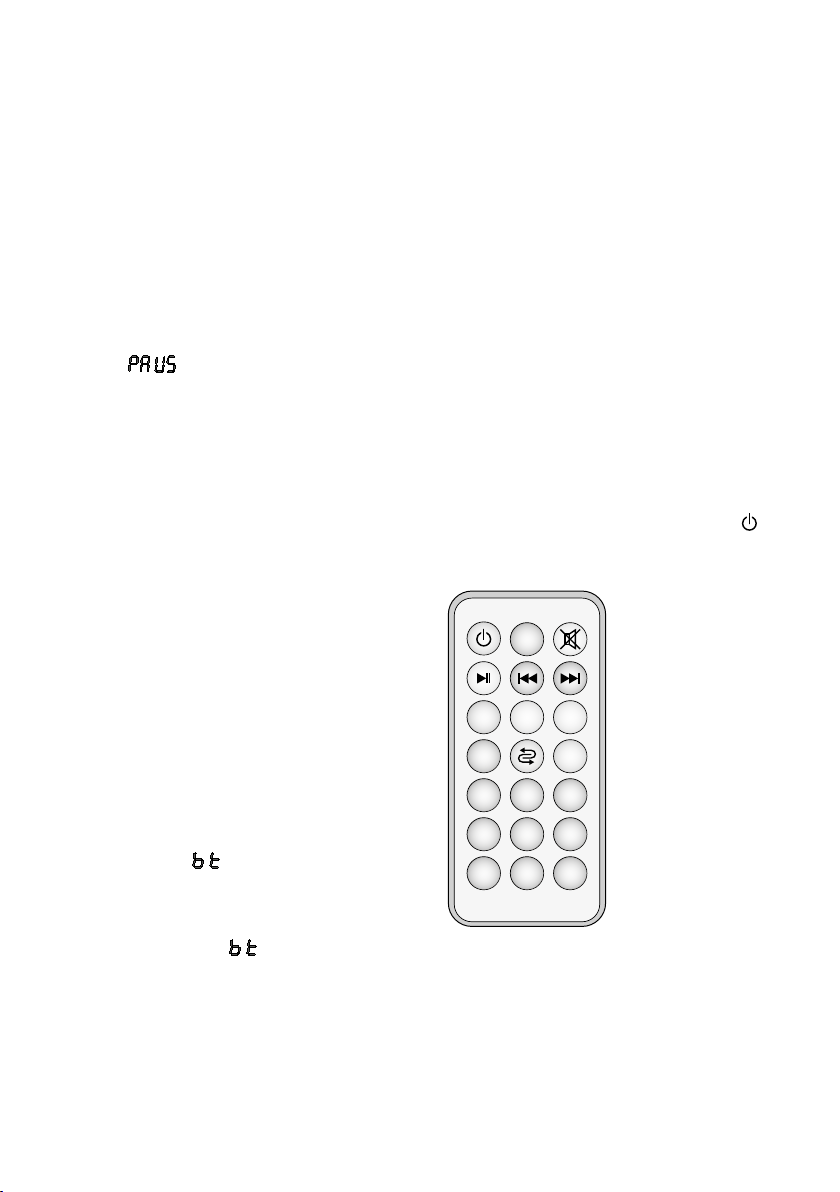
The audio player can be operated via the buttons (4) or the remote control provided (fig.4)
(☞chapter 5.4). Point the remote control to the
infrared sensor on the right of the display (3).
The display indicates the time played of the
current title. The volume of the replay depends
on the settings of the audio player and the control PLAYER (11).
2)
Activate the Bluetooth function at the
Bluetooth source. PAS-254D (designated
as “BT-SPEAKER”) will appear in the list of
available units.
3)
Pair the source with “BT-SPEAKER” (if required, see the instruction manual of the
Bluetooth source). The two units will then
be automatically connected.
Once the connection has been estab-
lished, a two-tone sequence will sound.
The replay via the Bluetooth receiver can be controlled by means of the buttons (4) or the remote
control provided (fig. 4) (☞chapter 5.4). Point
the remote control to the infrared sensor on the
right of the display (3).
The volume of the Bluetooth replay depends on the settings of the Bluetooth source,
the audio player / Bluetooth receiver and the
control PLAYER (11).
When neither the audio player nor the
Bluetooth receiver are used, switch them off by
means of the remote control (button ). This
will increase the operating time of the battery
and prevent any undesired Bluetooth reception.
5.3 Bluetooth receiver
As an alternative to the reproduction from a
USB flash drive or a memory card, the integrated Bluetooth receiver can be used for wireless
connection to a Bluetooth audio source (e. g.
smartphone or tablet computer).
1)
When no USB flash drive and no memory
card is connected, the PAS-254D will be automatically in the Bluetooth mode: The display
(3) will show
.
When a storage medium is connected,
press the button M repeatedly until neither TF
nor
USB
lights up on the left of the display. The
display will show after a few seconds.
18
Remote control
➍
Page 19
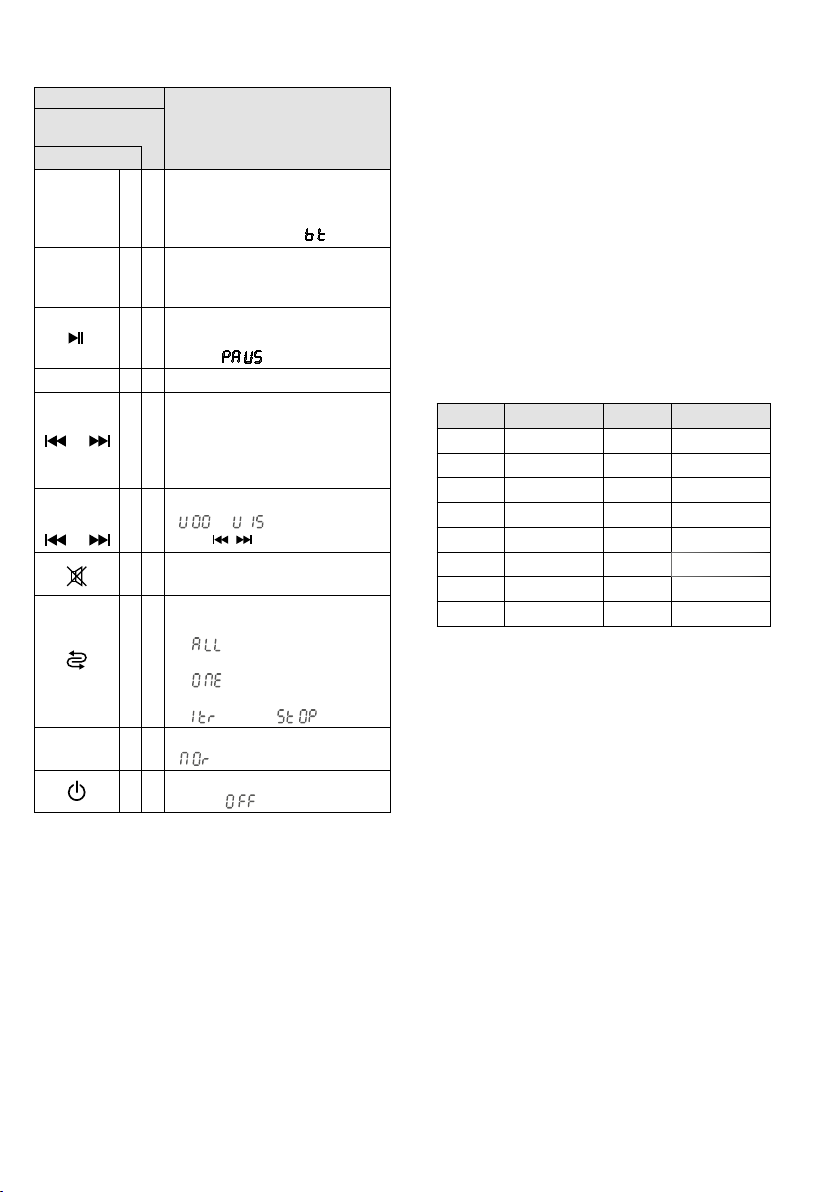
5.4 Operation overview of
audioplayer/Bluetoothreceiver
Button
on the
remote control
at the unit
Mode
M
U/SD
SCAN
1… 9, 0
/
− / +
/
EQ
*also for Bluetooth replay
to change the source*
✅
USB storage medium “
memory card “
✅
Bluetooth receiver “
to change between
✅
USB storage medium “
memory card “
to start the replay and
✅ ✅
to change between replay and
pause “
✅
direct title selection
previous / next title*:
press the button briefly
✅ ✅
fast forward/ fast reverse (only
with remote control): keep the
button pressed (sound muted)
to change the volume*
✅
“
(keep
✅
to mute and unmute
✅
the sound*
repeat mode
– repeat of all titles
“
✅
– repeat of a single title
“
– replay of a single title
“
6 sound presettings*
✅
“
audio player/ Bluetooth receiver
✅
on / off “ ”*
Function
TF”
TF”
”*
”
…
/ pressed)
”
”
”, then “ ”
” = neutral
USB”
”
USB”
6 Specifications
Amplifier
Amplifier class: . . . . . . . .D
RMS power at 2 Ω: . . . . .70 W
Peak power: . . . . . . . . . .80 W
Frequency range: . . . . . . . .80 – 20 000 Hz
Inputs (connections, type, sensitivity)
Microphone: . . . . . . . . . .XLR, bal., 2 mV
with 12 V phantom power
supply
Line: . . . . . . . . . . . . . . . . 6.3 mm, bal., 14 mV
RCA, unbal., 80 mV
Wireless receiver sections: .2
Reception range:
Received frequencies
Channel Frequency Channel Frequency
Storage media: . . . . . . . . . USB flash drive,
Audio file formats: . . . . . . .MP3, WAV
Bluetooth profile:
Outputs
Line Link: . . . . . . . . . . . .RCA, 300 mV
Ext. Speaker: . . . . . . . . . .Speakon®-compatible,
Power supply: . . . . . . . . . .rech. battery, 12 V/ 7.2 Ah
Ambient temperature: . . . .0 – 40 °C
Total height: . . . . . . . . . . . 120 cm
Weight: . . . . . . . . . . . . . . .7.7 kg
. . . . . . . .30 m approx.
01
863.1 MHz 09 863.2 MHz
02 864.1 MHz 10 864.2 MHz
03 863.6 MHz 11 863.7 MHz
04 864.6 MHz 12 864.7 MHz
05 863.3 MHz 13 863.4 MHz
06 864.3 MHz 14 864.4 MHz
07 863.8 MHz 15 863.9 MHz
08 864.8 MHz 16 864.9 MHz
SD / SDHC / MMC card
. . . . . . .A2DP
4 Ω min.
English
Subject to technical modification.
All rights reserved by MONACOR ® INTERNATIONAL GmbH & Co. KG. No part of this instruction manual may
be reproduced in any form or by any means for any commercial use.
19
Page 20

Système amplifié portable
Cette notice s’adresse aux utilisateurs sans
connaissances techniques particulières. Veuil-
Français
lez lire la présente notice avec attention avant
le fonctionnement et conservez-la pour pouvoir
vous y reporter ultérieurement. Vous trouverez
sur la page 2, dépliable, les éléments et branchements.
Table des matières
1 Vue d’ensemble . . . . . . . . . . . . . . 20
2 Conseils d’utilisation etdesécurité . . . 21
3 Possibilités d’utilisation etaccessoires . 22
3.1 Microphones sans fil et émetteurs . . . . . . 22
3.2 Conformité et autorisation . . . . . . . . . . 22
4 Fonctionnement . . . . . . . . . . . . . . 22
4.1 Recharger l’accumulateur . . . . . . . . . . 22
4.2 Branchements audio . . . . . . . . . . . . . 22
4.2.1 Microphone . . . . . . . . . . . . . . . . 22
4.2.2 Source audio avec niveau ligne . . . . . . 22
4.2.3 Amplificateur ou enregistreur . . . . . . . 23
4.2.4 Haut-parleur. . . . . . . . . . . . . . . . 23
4.3 Télécommande. . . . . . . . . . . . . . . . 23
4.4 Branchement
d’un accumulateur supplémentaire . . . . . . 23
5 Utilisation . . . . . . . . . . . . . . . . . 23
5.1 Fonctionnement avec des microphones sans fil 24
5.1.1 Réglage des canaux detransmission. . . . 24
5.1.2 Réglage du volume . . . . . . . . . . . . 25
5.1.3 Réglage du squelch . . . . . . . . . . . . 25
5.2 Lecteur audio . . . . . . . . . . . . . . . . 26
5.3 Récepteur Bluetooth . . . . . . . . . . . . . 26
5.4 Présentations éléments pour le lecteur
audio / récepteur Bluetooth . . . . . . . . . . 27
6 Caractéristiques techniques . . . . . . . 27
1 Vue d’ensemble
1
Port USB (type A) pour brancher une clé
mémoire USB pour lire des fichiers audio
2 Fente pour une carte mémoire SD pour lire
des fichiers audio
3 Affichage pour les indications de la fonction
Bluetooth ou du support de mémoire sélectionné et du numéro actuel du titre ou de la
durée écoulée du titre
4
Touches de commande pour le lecteur audio/
récepteur Bluetooth (☞chapitre 5.4)
5
Prise combo XLR / jack 6,35 1 MIC / LINE IN
pour brancher un microphone ou une autre
source audio mono (par exemple table de
mixage)
6
Réglage de volume LEVEL pour un microphone ou un appareil audio relié à (5)
7
Réglage de volume 2 WIRELESS pour des microphones sans fil
8
Réglage commun TONE pour un microphone
ou un appareil audio relié à (5) et pour des
microphones sans fil
9
Prises RCA 3 LINE IN pour brancher une
source audio (par exemple lecteur CD); si
une source audio stéréo est branchée, un
signal mono est créé dans l’amplificateur
10
Sorties RCA LINE LINK pour enregistrer le
signal de mixage ou le diriger vers un autre
système amplifié; pour des enregistreurs
stéréo, deux prises sont disponibles.
11
Réglage de volume PLAYER pour l’entrée
3 LINE IN (9) et pour le lecteur audio/ récepteur Bluetooth
12 Réglage égaliseur TONE pour l’entrée 3 LINE
IN (9) et pour le lecteur audio/ récepteur
Bluetooth
13
Fonction VOICE OVER pour couper le son
d’une source audio reliée à l’entrée 3 LINE IN
et du lecteur audio/ récepteur Bluetooth lors
qu’on parle dans un micro.
LED MUSIC brille si le son est coupé
Réglage DEPTH pour régler la sensibilité
pour couper le son
-
20
Page 21
14 LEDs d’état pour l’accumulateur
CHARGE rouge : pendant la charge
vert : lorsque le processus
de charge est terminé
FULL état de charge : plein
OK état de charge : bon
LOW état de charge : faible
15 LED LIMITER : brille lorsque la limitation de
niveau est activée
16 LED témoin de fonctionnement PWR ON
17 Interrupteur marche / arrêt
18
Prise de branchement pour charger l’accumulateur ; utilisez uniquement le chargeur livré
19
Interrupteur INTERNAL SPEAKER pour allumer et éteindre (ON / OFF) l’enceinte de l’amplificateur
20
Prise EXT. SPEAKER pour brancher une enceinte (supplémentaire)
Remarque : Pour ne pas surcharger l’amplificateur
dans le cas de volumes élevés, et si une enceinte externe est branchée, il est recommandé d’éteindre le
système haut-parleur de l’amplificateur du PAS-254D
avec l’interrupteur INTERNAL SPEAKER (19).
21 Couvercle pour le compartiment batterie
2 Conseils d’utilisation
etdesécurité
Les appareils (système amplifié et chargeur)
répondent à toutes les directives nécessaires
de l’Union européenne et portent donc le symbole .
AVERTISSEMENT
Evitez d’utiliser le système amplifié en cas de
•
pluie forte et veillez toujours à ce que l’humidité ne puisse pas pénétrer dans l’appareil. Le couvercle livré protège l’enceinte de
l’humidité.
Le chargeur n’est conçu que pour une utilisation en intérieur. Protégez-le des éclaboussures, de tout type de projections d’eau et
Le chargeur est alimenté par
une tension dangereuse. Ne
touchez pas l’intérieur de
l’appareil, il y a risque de
décharge électrique.
d’une humidité élevée de l’air. La température
ambiante admissible pour les appareils est de
0 – 40 °C.
En aucun cas, vous ne devez pas poser d’ob-
•
jet contenant du liquide ou un verre sur le
chargeur.
Ne faites pas fonctionner les appareils et dé-
•
branchez immédiatement la fiche secteur du
chargeur dans les cas suivants :
1.
les appareils ou le cordon secteur présentent des dommages visibles.
2. après une chute ou accident similaire, vous
avez un doute sur l’état de l’appareil.
3. des dysfonctionnements apparaissent.
Dans tous les cas, les dommages doivent être
réparés par un technicien spécialisé.
Ne débranchez jamais le chargeur en tirant
•
sur le cordon secteur, tenez-le toujours par
la fiche.
Tout cordon secteur endommagé doit impé-
•
rativement être remplacé par un technicien
habilité.
Pour le nettoyage, utilisez un chiffon sec et
•
doux, en aucun cas de produits chimiques ou
de produits de nettoyage abrasifs.
Nous déclinons toute responsabilité en cas de
•
dommages matériels ou corporels consécutifs
si les appareils sont utilisés dans un but autre
que celui pour lequel ils ont été conçus, s’ils
ne sont pas correctement branchés ou utilisés
ou s’ils ne sont pas réparés par une personne
habilitée ; en outre, la garantie deviendrait
caduque. De même, notre responsabilité ne
saurait être engagée en cas de pertes de données causées par une mauvaise manipulation
ou par un défaut et leurs conséquences.
Lorsque les appareils sont définitivement retirés du service, vous devez les
déposer dans une usine de recyclage
adaptée pour contribuer à leur élimination non polluante.
CARTONS ET EMBALLAGE
PAPIER À TRIER
Français
21
Page 22

3 Possibilités d’utilisation
etaccessoires
Le système amplifié PAS-254D fonctionne sur
Français
accumulateur, il peut être transporté comme sac
à dos (par exemple pendant une procession). Un
système avec quatre haut-parleurs large bande
qui diffusent le son vers l’avant et l’arrière se
trouve au-dessus de l’amplificateur. L’amplificateur dispose d’entrées mixables pour un micro,
d’une source audio (stéréo), par exemple lecteur
CD, et d’un élément de réception pour deux
microphones sans fil. Il est également possible
de lire des données audio depuis une clé USB,
une carte mémoire SD / MMC ou via le récepteur Bluetooth intégré (par exemple depuis un
smartphone). Ainsi, pendant qu’on parle dans
un micro, on peut couper automatiquement
par exemple la musique. Avec un accumulateur totalement chargé, le système amplifié peut
fonctionner jusqu’à 7heures indépendamment
du secteur.
Un second accumulateur (NPA-12 / 7) disponible séparément, permet d’augmenter la durée
de fonctionnement. Les microphones et câbles
de branchement, par exemple, se rangent dans
les compartiments latéraux du sac à dos.
2014 / 53 / UE. La déclaration de conformité est
téléchargeable sur le site :
www.monacor.com
Le système sans fil (émetteur et récepteur) est
autorisé pour un fonctionnement dans les pays
de l’Union européenne et de l’A.E.L.E. et ne
nécessite pas de déclaration.
4 Fonctionnement
4.1 Recharger l’accumulateur
Pour charger l’accumulateur intégré et un accumulateur supplémentaire, reliez le chargeur
livré à la prise d’alimentation (18) et à une prise
230 V/ 50 Hz. L’état de charge est indiqué par les
LEDs d’état (14) : FULL (plein), OK (bon) et LOW
(faible). Pendant la charge de l’accumulateur,
la LED CHARGE brille en rouge. L’amplificateur
peut être éteint pendant la charge.
Lorsque l’accumulateur est chargé (la LED
CHARGE brille en vert), débranchez le chargeur
de l’amplificateur et du secteur.
4.2 Branchements audio
3.1 Microphones sans fil et émetteurs
Dans la gamme MONACOR, les appareils suivants sont disponibles :
Type Modèle
Microphone main sans fil TXA-800HT
Emetteur de poche avec microphone
cravate et microphone serre-tête
Emetteur avec entrée niveau ligne pour
signaux audio
TXA-800HSE
TXA-800ST
Pour la sonorisation de plus grandes pièces, les
signaux radio des émetteurs peuvent être reçus
simultanément par plusieurs PAS-254D.
3.2 Conformité et autorisation
Par la présente, MONACOR INTERNATIONAL
déclare que le récepteur sans fil du PAS-254D
se trouve en conformité avec la directive
22
4.2.1 Microphone
Reliez un microphone avec une fiche XLR à la
prise 1 MIC / LINE IN (5).
Pour des microphones nécessitant une alimentation fantôme (par exemple microphones
électret), une alimentation fantôme 12 V est
disponible aux contacts XLR de la prise.
Remarque : il ne faut pas brancher de microphones ou
sources audio avec sortie asymétrique à la prise XLR, l’alimentation fantôme pourrait les endommager.
Il est possible de brancher des microphones avec
fiche jack 6,35 à la prise 1 MIC / LINE IN ; cependant, cette entrée est un peu moins sensible.
4.2.2 Source audio avec niveau ligne
En utilisant une fiche jack 6,35, vous pouvez
relier une source audio mono avec niveau ligne
(par exemple table de mixage ou récepteur supplémentaire pour microphone sans fil) à la prise
1 MIC / LINE IN (5). A la place, on peut brancher
Page 23
cette source audio à une des prises RCA 3 LINE
IN (9).
Vous pouvez relier une source audio stéréo
(par exemple lecteur CD / MP3, radio, table de
mixage) via les prises 3 LINE IN (9). L’amplificateur travaille en mono, les signaux stéréo sont
transformés en interne en un signal mono. Le
signal d’une source audio reliée à ces prises peut
être coupé lorsque vous parlez dans un micro
(fonction VOICE OVER, ☞chapitre 5).
Insérez la batterie dans le support de batterie
comme indiqué dans la télécommande (respectez la polarité «+») et remettez le support dans
la télécommande.
Lorsque la portée de la télécommande diminue, il faut remplacer la batterie par une neuve
de même type.
En cas de non utilisation prolongée, retirez
la batterie pour éviter qu’elle ne coule et n’endommage la batterie.
Français
4.2.3 Amplificateur ou enregistreur
On peut relier un système amplifié supplémentaire ou un enregistreur aux prises LINE LINK
(10). Pour les enregistreurs stéréo, deux prises
sont prévues. L’amplificateur travaille en mono,
les signaux sont identiques aux deux prises.
4.2.4 Haut-parleur
Via la prise compatible Speakon
®
EXT.SPEAKER
(20), il est possible de brancher un haut-parleur
supplémentaire. Elle peut fonctionner en plus de
l’enceinte existante ou à la place.
Reliez la fiche de l’enceinte à la prise et tournez la fiche vers la droite jusqu’à ce qu’elle s’enclenche. Pour retirer la fiche, poussez le levier
de sécurité sur la fiche vers l’arrière et tournez
la fiche vers la gauche.
Avec l’interrupteur INTERNAL SPEAKER (19),
éteignez si besoin l’enceinte du PAS-254D (position «OFF»).
Remarque : Pour ne pas surcharger l’amplificateur dans
le cas de volumes élevés, et si une enceinte externe est
branchée, il est recommandé d’éteindre le système hautparleur de l’amplificateur du PAS-254D.
4.3 Télécommande
La télécommande pour l’utilisation du lecteur
audio/ récepteur Bluetooth est livrée avec une
batterie distincte. Avant la première utilisation,
insérez la batterie. Sur la face arrière de la télécommande, poussez vers la droite le petit verrou avec l’encoche et retirez simultanément le
support de batterie.
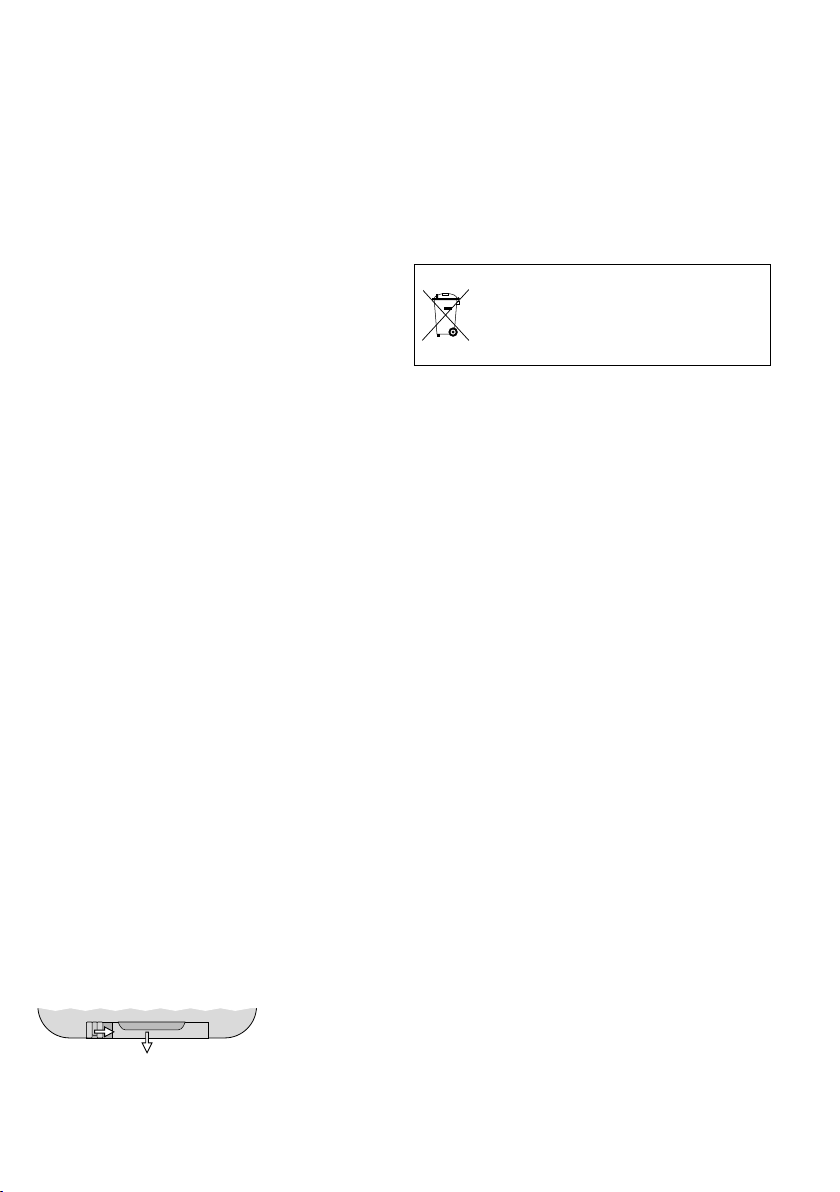
1. 2.
retrait du support batterie
➋
Ne jetez pas les batteries défectueuses
dans la poubelle domestique. Déposez-les dans un container spécifique
ou ramenez-les chez votre détaillant.
4.4 Branchement d’un accumulateur supplémentaire
Pour augmenter la durée de fonctionnement,
on peut brancher un accumulateur supplémentaire, optionnel, de type NPA-12 / 7. En raison des
dangers d’une mauvaise manipulation, seul un
personnel qualifié peut installer l’accumulateur.
1) Assurez-vous que le PAS-254D est éteint et
séparé du chargeur.
2) Retirez la vis centrale et ouvrez le couvercle
(21) des compartiments de l’accumulateur.
3)
Connectez l’accumulateur aux deux câbles
dans le compartiment libre en respectant la
polarité (rouge = +).
Remarque : si l’accumulateur ne va pas dans le compartiment vide, changez si besoin la position et les
branchements des deux accumulateurs.
4) Refermez le couvercle.
5 Utilisation
1)
Avant la première utilisation, tournez tous les
réglages de volume (6, 7, 11) sur «0» pour
éviter, lors de l’allumage, tout volume fort.
2)
Allumez les sources audio reliées et / ou les
émetteurs sans fil.
3)
Allumez l’amplificateur avec l’interrupteur
(17). Le témoin de fonctionnement PWR ON
(16) brille. En plus, l’état de charge de l’accumulateur est indiqué par une LED (14). Si la
23
Page 24
LED LOW brille, il faut recharger l’accumulateur (☞chapitre 4.1).
4) Lisez de la musique depuis une source audio
Français
reliée ou parlez dans un microphone filaire
ou sans fil (utilisation du lecteur audio /
récepteur Bluetooth, ☞chapitre 5.2 à 5.4).
5)
Réglez le volume pour les sources audio avec
le réglage correspondant.
LEVEL (6) : source audio à l’entrée
1 MIC / LINE IN
2 WIRELESS (7) : microphones sans fil, voir
également chapitre 5.1.2
PLAYER (11) : source audio à l’entrée
3 LINE IN et lecteur audio /
récepteur Bluetooth
AVERTISSEMENT Ne faites pas fonctionner
l’amplificateur lorsque
les haut-parleurs sont
à proximité des oreilles
d’une personne. Un volume trop élevé peut, à
long terme, générer des
troubles de l’audition.
Pour éviter tout effet de larsen, n’orientez
jamais les haut-parleurs vers le microphone,
assurez-vous toujours que la distance entre
le haut-parleur et le microphone est suffisante.
Un circuit de limitation de niveau empêche
automatiquement toute distorsion en cas
de volumes élevés. Son fonctionnement est
signalé par la LED LIMITER (15).
6)
Avec le réglage TONE (8), réglez la tonalité souhaitée pour les microphones ou une
source audio reliée à la prise (5) ; avec le réglage TONE (12), réglez la tonalité pour une
source audio reliée aux prises 3 LINE IN et pour
le lecteur audio/ récepteur Bluetooth. Pour le
lecteur audio/ récepteur Bluetooth, il existe
d’autres possibilités de tonalité sur la télécommande (☞chapitre 5.4, touche «EQ»).
7)
Si la musique, par exemple, d’une des sources
audio reliée aux prises 3 LINE IN (9), doit être
automatiquement coupée en cas d’annonce
via un micro [VOICE OVER (13)], réglez le réglage DEPTH de telle sorte que la LED MUSIC
brille lorsque vous parlez.
24
8)
Pour ne pas décharger inutilement l’accumulateur, éteignez l’amplificateur avec l’interrupteur (17) après le fonctionnent et en
cas de non utilisation prolongée.
Si le système amplifié n’est pas nécessaire pendant une longue période, chargez complètement l’accumulateur avant le stockage et rechargez-le tous les 6 mois environ pour compenser
l’auto-décharge normale.
5.1 Fonctionnement avec des
microphones sans fil
Le système amplifié est équipé d’un module
de réception pour deux microphones sans fil/
émetteurs. Le module de réception se trouve
au-dessous de l’enceinte.
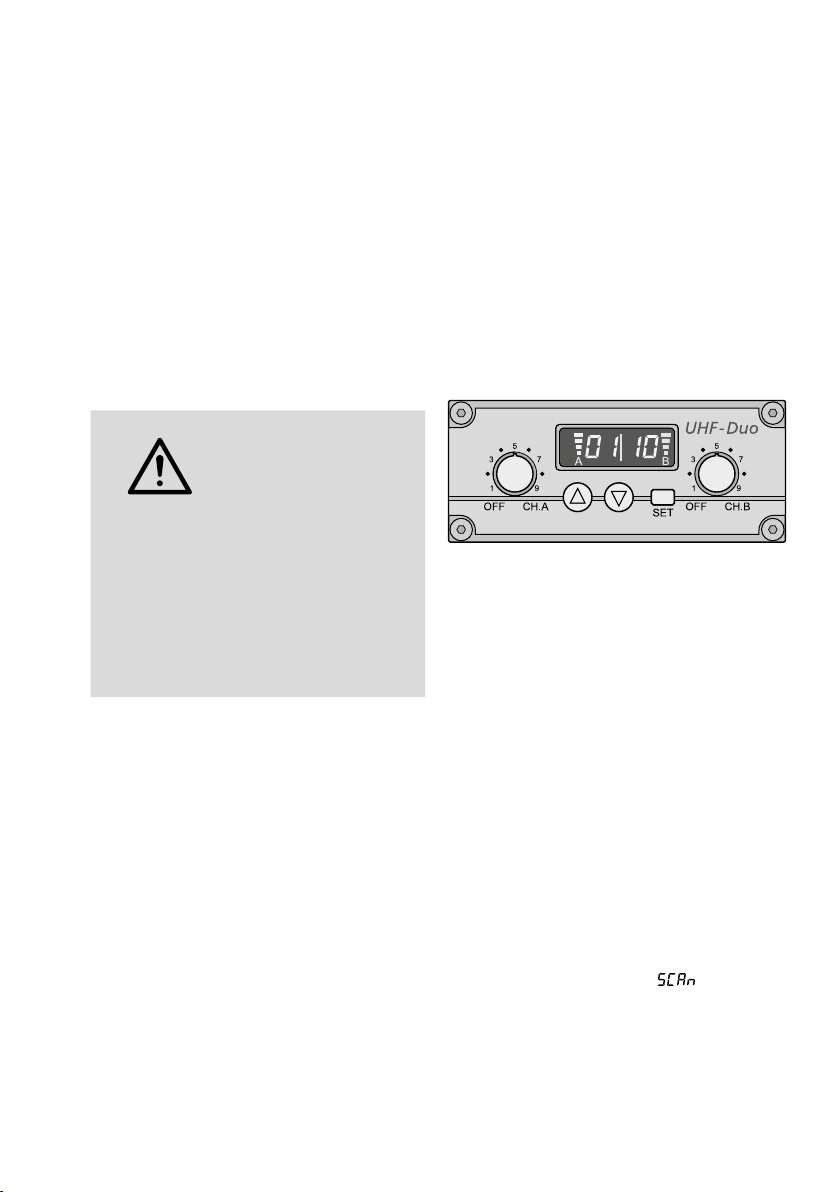
module de réception sans fil
➌
Les unités de réception A et B ont respectivement
un réglage pour le volume et pour allumer et
éteindre (schéma 3). L’affichage est divisé pour
l’unité de réception A (moitié gauche) et l’unité
de réception B (moitié droite). Une fois une unité
de réception allumée, l’affichage indique le canal
de transmission. Pour afficher brièvement la fré
quence radio, appuyez sur la touche (pour
l’unité A) ou sur (pour l’unité B).
5.1.1 Réglage des canaux detransmission
Allumez les unités de réception avec les
réglages. Laissez les microphones sans fil / émetteurs correspondants éteints pour l’instant.
5.1.1.1 Recherche de canal
Maintenez les touches et enfoncées simultanément pendant une seconde environ jusqu’à
ce que l’affichage indique . La recherche
démarre : les unités de réception sont réglées
sur des canaux libres qui n’interfèrent pas entre
eux. Si aucun canal libre n’est trouvé, les canaux
réglés sont conservés.
Remarque : La recherche ne peut être démarrée que
pour une seule unité (touche pour unité A ou touche
pour unité B).
-
Page 25

5.1.1.2 Recherche manuelle de canal
Lorsque les deux unités de réception A et B
sont allumées :
1)
Maintenez la touche SET enfoncée jusqu’à
ce que l’indication de canal clignote sur l’affichage pour l’unité de réception A.
2) Sélectionnez le canal pour l’unité de réception A avec la touche ou et confirmez
avec la touche SET.
3) Sur l’affichage, l’indication de canal clignote
pour l’unité de réception B. Sélectionnez le
canal pour l’unité de réception B avec la
touche ou et confirmez avec la touche
SET.
Si une seule unité de réception A ou B est allumée :
Maintenez la touche SET enfoncée jusqu’à ce
que l’indication de canal clignote sur l’affichage.
Sélectionnez le canal avec la touche ou et
confirmez avec la touche SET.
Remarques :
1. Il n’est pas possible de régler les unités de réception
sur le même canal.
2.
Si un canal n’est pas confirmé en l’espace de
10 secondes avec la touche SET, le mode de
réglage est quitté et le canal précédemment réglé
est conservé.
3. Si sur l’affichage, l’indication à segments A ouB correspondante indique une réception alors que l’émetteur est éteint, des interférences ou signaux d’autres
émetteurs sont reçus. Dans ce cas, sélectionnez un
autre canal.
5.1.3 Réglage du squelch
Le squelch permet de couper le son pour une
unité de réception correspondante lorsque
le niveau du signal radio passe sous le seuil
réglé. Ainsi, on évite que des interférences
ne génèrent du bruit lorsque l’émetteur est
éteint ou si son signal radio est trop faible :
si les niveaux des interférences sont sous le
seuil, le son de l’unité de réception est coupé.
Un seuil plus élevé offre une plus grande
sécurité par rapport aux interférences mais diminue la portée de transmission.
1)
Tout d’abord, éteignez les deux unités de
réception A et B. Ensuite, en maintenant la
touche SET enfoncée, allumez une unité de
réception. L’affichage indique ou , le
numéro clignote.
2)
Pour appeler le mode de réglage du
squelch, appuyez sur la touche SET : l’affichage indique (pour «squelch») et la
valeur actuelle (clignote).
3) Avec la touche ou, réglez la valeur (niveau 7 = seuil le plus élevé). Pour quitter le
mode de réglage du squelch, appuyez sur la
touche SET.
Remarque : Les modes de réglage sont automatiquement
quittés après 5 secondes sans activation d’une touche. Les
réglages effectués sont également mémorisés dans ce cas.
Français
5.1.2 Réglage du volume
Allumez les microphones sans fil / émetteurs et
réglez un sur le canal de l’unité de réceptionA,
l’autre sur le canal de l’unité de réception B.
Sur l’affichage, l’indication à segments correspondante indique la puissance de la réception
radio. Avec les réglages, réglez le volume pour
chaque unité de réception.
Réglez le volume général des signaux audio
reçus avec le réglage 2 WIRELESS (7).
Remarque : Si aucun signal du microphone sans fil n’est
reçu, assurez-vous que le microphone émette sur la bonne
fréquence (canal) et vérifiez la batterie du microphone.
Si besoin, diminuez la distance entre le système amplifiè
et le microphone.
25
Page 26
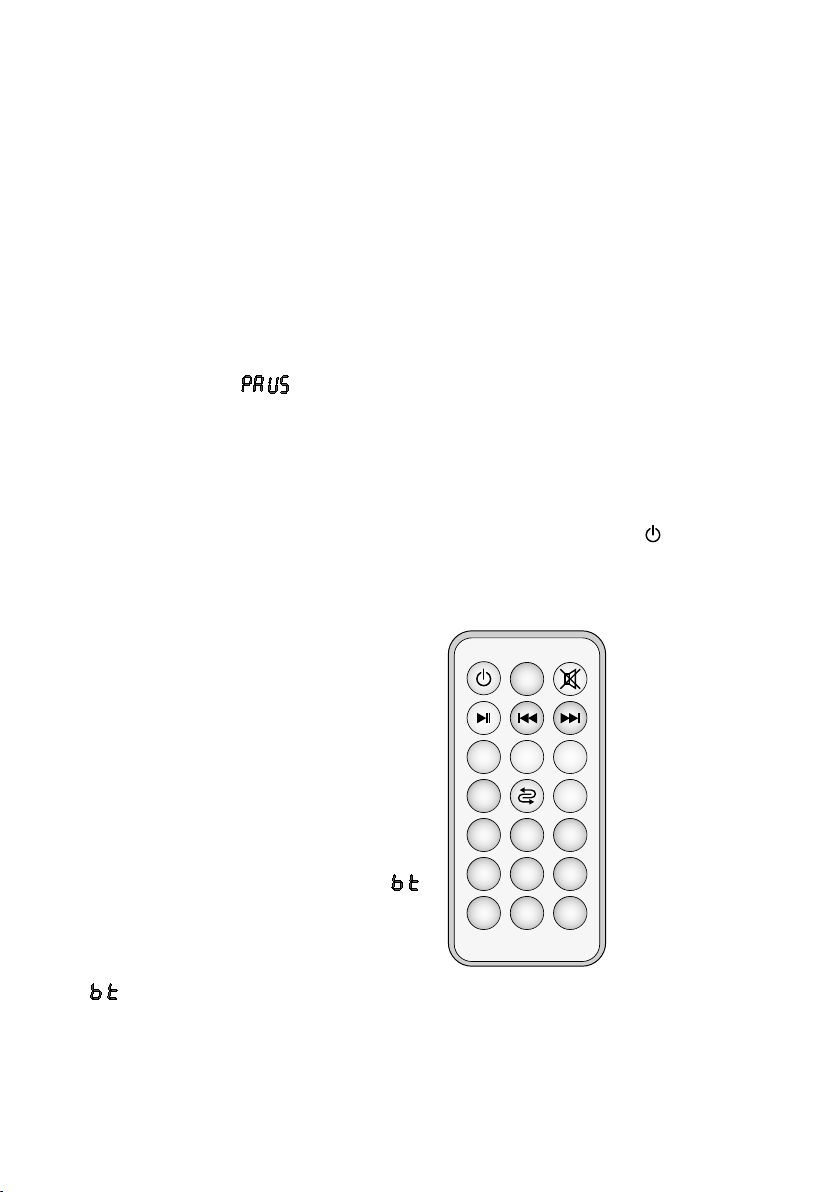
5.2 Lecteur audio
8 97
5
64
2 31
0
EQ
+−
U/SD
SCAN
Mode
Le lecteur audio intégré peut lire des fichiers
audio au format MP3 ou WAV. Vous pouvez
utiliser des clés mémoire USB ou cartes mémoire
Français
SD[HC] (cartes MMC également) comme supports de mémoire.
Remarque : en raison de la multitude de fabricants de
supports de mémoire et de drivers d’appareils, il n’est pas
possible de garantir que tous les supports de mémoire
soient compatibles avec le lecteur audio.
Mettez une clé mémoire USB dans le port USB(1)
et / ou une carte mémoire (avec les contacts vers
le haut) dans la fente (2).
Lorsque vous allumez l’appareil, le dernier fichier
audio lu est sélectionné et le lecteur audio est
sur pause (affichage : ). Le support USB
est prioritaire sur la carte mémoire. Si pendant
le fonctionnement, un support de mémoire est
inséré, il est automatiquement sélectionné.
L’utilisation du lecteur audio peut se faire via
les touches (4) ou la télécommande livrée
(schéma4) (☞chapitre 5.4). Orientez la télécommande vers le capteur infrarouge à droite
sur l’affichage (3).
L’affichage indique la durée écoulée du
titre en cours. Le volume de lecture dépend
des réglages sur le lecteur audio et du réglage
PLAYER(11).
2) Sur la source Bluetooth, activez la fonction
Bluetooth. Le PAS-254D s’affiche dans la liste
des appareils disponibles sous «BT-SPEAKER».
3) Appairez la source avec «BT-SPEAKER» (voir
si besoin la notice de la source Bluetooth).
La connexion entre les deux appareils se fait
automatiquement.
Lorsque la connexion est établie, une
suite de deux sons retentit.
La lecture via le récepteur Bluetooth peut être
gérée via les touches (4) ou avec la télécommande livrée (schéma 4) (☞ chapitre 5.4).
Orientez la télécommande vers le capteur infrarouge à droite de l’affichage (3).
Le volume de la lecture Bluetooth dépend
des réglages sur la source Bluetooth, sur le lecteur audio/ récepteur Bluetooth et du réglage
PLAYER (11).
Si vous n’utilisez ni le lecteur audio ni le
récepteur Bluetooth, ils peuvent être éteints avec
la télécommande (touche ). Ainsi, la durée de
fonctionnement de l’accumulateur est augmentée et on peut éviter toute réception Bluetooth
non souhaitée.
5.3 Récepteur Bluetooth
Au lieu de lire depuis un support USB ou une
carte mémoire, le récepteur Bluetooth intégré peut se connecter sans fil à une source
audio Bluetooth (par exemple smartphone ou
tablette).
1)
Si aucun support USB ou carte mémoire n’est
reliée, le PAS-254D est automatiquement en
mode Bluetooth : l’affichage (3) indique .
Si un support de mémoire est relié,
appuyez sur la touche M jusqu’à ce que, à
gauche sur l’affichage, ni TF ni USB ne brillent.
Après quelques secondes, l’affichage indique
.
26
Télécommande
➍
Page 27
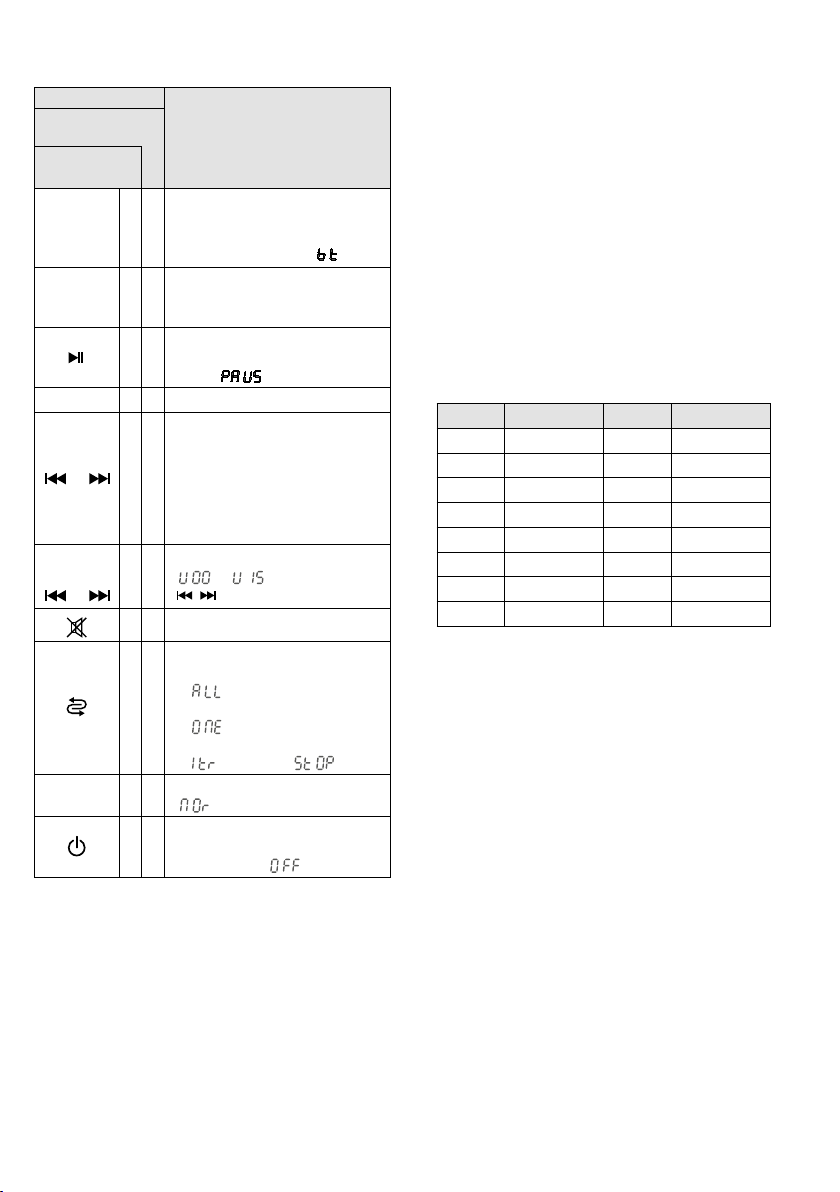
5.4 Présentations éléments pour le lecteur audio / récepteur Bluetooth
Touche
sur la
télécommande
sur
l’appareil
Mode
M
U/SD
SCAN
1… 9, 0
/
− / +
/
EQ
*également pour lecteur Bluetooth
Commuter la source*
✅
support de mémoire USB «
carte mémoire «
✅
récepteur Bluetooth «
Commuter entre
✅
support de mémoire USB «
carte mémoire «
Démarrer la lecture et
✅ ✅
commuter entre lecture et
Pause «
✅
Sélection directe d’un titre
Titre précédent / suivant* :
appuyez brièvement sur la
touche
✅ ✅
retour/ avance rapide (uniquement avec la télécommande) :
maintenez la touche enfoncée
(le son est alors coupé)
Modifier le volume*
✅
«
(
✅
✅
Son activé / désactivé*
Mode lecture
– Répétition de tous les titres
«
✅
– Répétition d’un titre
«
– Lecture titre par titre
«
6 réglages de tonalité*
✅
«
Lecteur audio / récepteur
✅
Bluetooth
Marche / arrêt « »*
Fonction
TF»
»
TF»
»*
»
…
/ maintenue enfoncée)
»
»
», ensuite « »
» = neutre
USB»
USB»
6 Caractéristiques techniques
Amplificateur
Classe amplificateur : . . .D
Puissance rms sous 2 Ω: .70 W
Puissance crête : . . . . . . .80 W
Bande passante : . . . . . . . .80 – 20 000 Hz
Entrées (connexion, type, sensibilité)
Microphone : . . . . . . . . .XLR, sym., 2 mV avec
alimentation fantôme 12 V
Line : . . . . . . . . . . . . . . .jack, sym., 14 mV
RCA, asym., 80 mV
Unités de réception
sans fil : . . . . . . . . . . . . . .2
Portée de réception :
Fréquences de réception
Canal Fréquence Canal Fréquence
01 863,1 MHz 09 863,2 MHz
02 864,1 MHz 10 864,2 MHz
03 863,6 MHz 11 863,7 MHz
04 864,6 MHz 12 864,7 MHz
05 863,3 MHz 13 863,4 MHz
06 864,3 MHz 14 864,4 MHz
07 863,8 MHz 15 863,9 MHz
08 864,8 MHz 16 864,9 MHz
Supports de mémoire : . . . . support USB,
Formats fichier audio : . . . .MP3, WAV
Profil Bluetooth :
Sorties
Line Link : . . . . . . . . . . . . RCA, 300 mV
HP externe : . . . . . . . . . .compatible Speakon®,
Alimentation : . . . . . . . . . .accu 12 V/ 7,2 Ah
Température fonc. : . . . . . .0 – 40 °C
Hauteur totale : . . . . . . . . . 120 cm
Poids : . . . . . . . . . . . . . . . . 7,7 kg
. . . . .30 m env.
carte SD / SDHC / MMC
. . . . . . . .A2DP
4 Ωmin.
Français
Tout droit de modification réservé.
Notice d’utilisation protégée par le copyright de MONACOR ® INTERNATIONAL GmbH & Co. KG. Toute reproduction même partielle à des fins commerciales est interdite.
27
Page 28

Impianto portatile d’amplificazione
Queste istruzioni sono rivolte agli utenti senza
conoscenze tecniche specifiche. Vi preghiamo
Italiano
di leggerle attentamente prima della messa in
funzione e di conservarle per un uso futuro. A
pagina 2 troverete tutto gli elementi di comando
e i collegamenti descritti.
Indice
1 Panoramica. . . . . . . . . . . . . . . . . 28
2 Avvertenze per l’uso sicuro. . . . . . . . 29
3 Possibilità d’impiego eaccessori . . . . 30
3.1 Radiomicrofoni e trasmettitori . . . . . . . . 30
3.2 Conformità e omologazione . . . . . . . . . 30
4 Messa in funzione . . . . . . . . . . . . . 30
4.1 Ricaricare la batteria . . . . . . . . . . . . . 30
4.2 Effettuare i collegamenti audio . . . . . . . . 30
4.2.1 Microfono . . . . . . . . . . . . . . . . . 30
4.2.2 Fonte audio con livello Line . . . . . . . . 30
4.2.3 Amplificatore o registratore . . . . . . . . 31
4.2.4 Altoparlanti . . . . . . . . . . . . . . . . 31
4.3 Telecomando. . . . . . . . . . . . . . . . . 31
4.4 Collegare una batteria supplementare . . . . 31
5 Funzionamento . . . . . . . . . . . . . . 31
5.1 Operazioni con radiomicrofoni . . . . . . . . 32
5.1.1 Settaggio die canali di trasmissione . . . . 32
5.1.2 Regolazione del volume . . . . . . . . . . 33
5.1.3 Settaggio dello squelch . . . . . . . . . . 33
5.2 Lettore audio. . . . . . . . . . . . . . . . . 33
5.3 Ricevitore Bluetooth . . . . . . . . . . . . . 34
5.4 Tasti funzione per il lettore audio /
ricevitore Bluetooth . . . . . . . . . . . . . 35
6 Dati tecnici. . . . . . . . . . . . . . . . . 35
1 Panoramica
1
Presa USB (tipo A) per il collegamento di una
chiavetta USB di memoria per la riproduzione
di file audio
2 Fessura per una scheda SD di memoria per
la riproduzione di file audio
3
Display per visualizzare la funzione Bluetooth
o il mezzo di memoria scelto nonché il
numero attuale del titolo o del tempo passato
del titolo
4 Tasti funzione per il lettore audio/ ricevitore
Bluetooth (☞Capitolo 5.4)
5
Presa combo XLR/jack 6,3 mm 1 MIC / LINE IN
per il collegamento di un microfono o di
un’altra fonte audio mono (p. es. mixer)
6 Regolatore volume LEVEL per un microfono
o dispositivo audio collegato alla presa (5)
7 Regolatore volume 2 WIRELESS per radiomi-
crofoni
8
Regolatore toni comune TONE per un microfono o dispositivo audio collegato alla presa
(5) e per radiomicrofoni
9
Prese RCA 3 LINE IN per il collegamento di
una fonte audio (p. es. lettore CD); collegando una fonte stereo, nell’amplificatore si crea
un segnale mono
10
Uscite RCA LINE LINK per registrare il segnale
miscelato o per l’inoltro a un impianto ulteriore d’amplificazione; per registratori stereo
sono presenti due prese.
11
Regolatore volume PLAYER per l’ingresso
3 LINE IN (9) nonché per il lettore audio /
ricevitore Bluetooth
12
Regolatore toni TONE per l’ingresso 3 LINE
IN (9) nonché per il lettore audio/ ricevitore
Bluetooth
13 Funzione VOICE OVER per mettere in muto
l’audio di una fonte audio collegata all’ingresso 3 LINE IN e del lettore audio/ ricevitore
Bluetooth mentre si parla con un microfono.
LED MUSIC è acceso quando l’audio
è messo in muto
Regolatore DEPTH per impostare la sensibi-
lità per la messa in muto
dell’audio
28
Page 29
14 LED di stato per la batteria
CHARGE rosso: durante la ricarica
verde: al termine della ricarica
FULL Stato di carica: pieno
OK Stato di carica: buono
LOW Stato di carica: scarso
15
LED LIMITER si accende quando è attivo i
limiter del livello
16 Spia di funzionamento PWR ON
17 Interruttore on / off
18 Presa di collegamento per ricaricare la batte-
ria; usare solo il caricatore in dotazione
19
Interruttore INTERNAL SPEAKER per attivare /
disattivare (ON /OFF) la cassa acustica dell’amplificatore
20
Presa EXT. SPEAKER per il collegamento di un
altoparlante (supplementare)
N. B.: Per non sovrapilotare il amplificatore quando il
volume è alto e un altoparlante esterno è connesso,
è raccomandabile spegnere la cassa acustica dell’amplificatore PAS-254D tramite il interruttore INTERNAL
SPEAKER (19).
21 Coperchio per i vani batterie
2 Avvertenze per l’uso sicuro
Gli apparecchi (impianto d’amplificazione e caricatore) sono conformi a tutte le direttive rilevanti
dell’UE e pertanto portano la sigla .
AVVERTIMENTO Il caricatore è alimentato con
pericolosa tensione di rete.
Non intervenire mai personalmente al suo interno. La
manipolazione scorretta può
provocare delle scosse elettri
che pericolose.
Fare in modo che l’impianto d’amplificazione
•
non venga usato durante una pioggia forte, e
stare sempre attenti che non entri dall’umidità
nell’impianto. Il coperchio in dotazione protegge la cassa acustica dall’umidità.
Usare il caricatore solo all’interno di locali. Proteggerlo dall’acqua gocciolante e dagli spruzzi
d’acqua nonché da alta umidità dell’aria. La
temperatura d’esercizio ammessa per gli apparecchi è 0 – 40 °C.
Non depositare sul caricatore dei contenitori
•
riempiti di liquidi, p. es. bicchieri.
Non mettere in funzione gli apparecchi e
•
staccare subito la spina rete del caricatore se:
1. gli apparecchi o il cavo rete presentano dei
danni visibili;
2. dopo una caduta o dopo eventi simili sussiste il sospetto di un difetto;
3.
gli apparecchi non funzionano correttamente.
Per la riparazione rivolgersi sempre ad un’officina competente.
Non staccare mai il cavo rete del caricatore
•
tirando il cavo, afferrare sempre il connettore.
Il cavo rete, se danneggiato, deve essere so-
•
stituito solo da un laboratorio specializzato.
Per la pulizia usare solo un panno morbi-
•
do, asciutto o leggermente inumidito; non
impiegare mai prodotti chimici e detergenti
aggressivi.
Nel caso d’uso improprio, di collegamenti
•
sbagliati, d’impiego scorretto o di riparazione
non a regola d’arte degli apparecchi, non si
assume nessuna responsabilità per eventuali
danni consequenziali a persone o a cose e non
si assume nessuna garanzia per l’apparecchio.
Nello stesso modo non si assume nessuna
responsabilità per la perdita di dati e per i
relativi danni consequenziali causati da impie
go sbagliato o da un difetto dell’apparecchio.
Se si desidera eliminare gli apparecchi
definitivamente, consegnarli per lo
smaltimento ad un’istituzione locale
per il riciclaggio.
-
Italiano
-
29
Page 30

3 Possibilità d’impiego
eaccessori
Il PAS-254D è un impianto d’amplificazione ali-
Italiano
mentato da una batteria ricaricabile ed è possibile portarlo come zaino (p. es. durante delle processioni). Nell’amplificatore, c’è un sistema con
quattro altoparlanti a larga banda che irradia il
suono anteriormente e posteriormente in modo
ottimale. L’amplificatore dispone di ingressi miscelabili per un microfono e per una fonte audio
(stereo), come p. es. un lettore CD, nonché di
un modulo ricevitore per due radiomicrofoni.
Inoltre si possono riprodurre dei file audio da
una chiavetta USB, da una scheda di memoria
SD / MMC o tramite il ricevitore Bluetooth integrato (p. es. da uno smartphone). Se necessario, si può mettere in muto automaticamente la
musica mentre si parla con un microfono. Con la
batteria completamente carico, l’impianto d’amplificazione può essere usato in modo autonomo
fino a 7 ore, indipendentemente dalla rete.
Una seconda batteria ricaricabile (NPA-12 / 7)
permette di allungare il periodo d’uso. Nei vani
laterali dello zaino si possono sistemare, p. es.,
microfoni e cavi di collegamenti.
3.1 Radiomicrofoni e trasmettitori
I seguenti prodotti sono reperibili presso
MONACOR:
Tipo Modello
Radiomicrofono a mano TXA-800HT
Trasmettitore tascabile con microfono
headset e microfono a cravata
Trasmettitore con ingresso con livello
Line per segnali audio
Per la sonorizzazione di ambienti più grandi,
i radiosegnali di trasmettitori possono essere
captati contemporaneamente da più PAS-254D.
3.2 Conformità e omologazione
Con la presente, la MONACOR INTERNATIONAL
dichiara che il radioricevitore PAS-254D è conforme alla Direttiva 2014 / 53 / UE. La dichiarazione di conformità UE è disponibile in rete:
www.monacor.com
I radiosistema (trasmettitore e ricevitore) è
omologato per l’impiego negli stati dell’UE e
dell’EFTA e non richiede né registrazione né pagamento di tasse.
30
TXA-800HSE
TXA-800ST
4 Messa in funzione
4.1 Ricaricare la batteria
Per ricaricare la batteria integrata e una batteria
collegata in più, collegare il caricatore in dotazione con la presa per piccole tensioni (18) e con
una presa di rete (230 V/ 50 Hz). I LED di stato
(14) indicano lo stato di carica: FULL (pieno),
OK (buono) o LOW (basso). Mentre la batteria
viene ricaricata, si accende il LED CHARGE rosso.
Non è necessario che l’amplificatore sia acceso.
Quando la batteria è carica (è acceso il LED
CHARGE verde), staccare il caricatore dall’amplificatore e dalla rete.
4.2 Effettuare i collegamenti audio
4.2.1 Microfono
Collegare un microfono con la presa 1 MIC /
LINE IN (5) per mezzo di un connettore XLR.
Per i microfoni che richiedono un’alimentazione phantom (p. es. microfoni a elettrete),
ai contatti XLR della presa è disponibile un’alimentazione phantom di 12 V.
N. B.: Microfoni o altre fonti audio con uscita sbilanciata non devono essere collegati con la presa XLR perché
potrebbero venire danneggiati dalla tensione phantom.
I microfoni con jack 6,3 mm possono essere collegati anche con la presa 1 MIC / LINE IN. Tuttavia,
questo ingresso è un po’ meno sensibile.
4.2.2 Fonte audio con livello Line
Una fonte audio mono con livello Line (p. es.
mixer, ulteriore ricevitore per radiomicrofoni)
può essere collegata con la presa 1 MIC / LINE
IN(5) per mezzo di un jack 6 3, mm. In alternativa, tale fonte audio può essere collegata anche
con una delle prese RCA 3 LINE IN (9).
Collegare una fonte audio stereo (p. es.
lettore CD/ MP3, radio, mixer) tramite le prese
3 LINE IN(9). Dato che l’amplificatore è previsto
per il funzionamento mono, dal segnale stereo
si crea internamente un segnale mono. Il se
gnale di una fonte audio collegata con queste
prese può essere messo in muto mentre si parla
tramite un microfono (funzione VOICE OVER
Cap. 5).
☞
-
Page 31
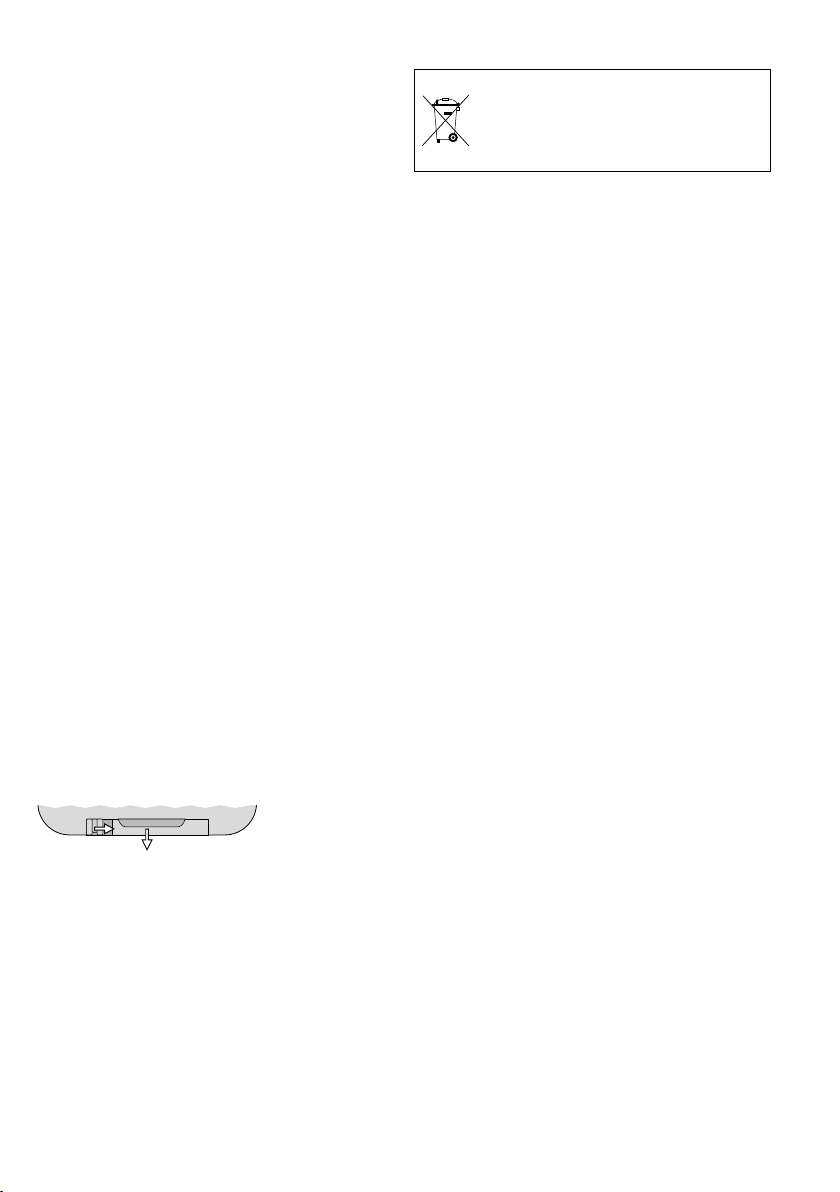
4.2.3 Amplificatore o registratore
Un impianto supplementare d’amplificazione
oppure un registratore possono essere collegati
con le prese LINE LINK (10). Per i registratori
stereo sono presenti due prese. Dato che l’amplificatore funziona in mono, i segnali alle due
prese sono identiche.
4.2.4 Altoparlanti
Tramite la presa EXT. SPEAKER (20) compatibile
Speakon®, si può collegare un altoparlante supplementare che può essere usato insieme alla
cassa acustica presente oppure in alternativa
con loro.
Dopo aver inserito nella presa il connettore
dell’altoparlante, girarlo a destra fino allo scatto. Per sfilarlo successivamente tirare indietro la
levetta di sicurezza e girare il connettore verso
sinistra.
Con l’interruttore INTERNAL SPEAKER (19)
disattivare, se necessario, la cassa acustica del
PAS-254D (posizione “OFF”).
N. B.: Per non sovrapilotare il amplificatore quando il
volume è alto e un altoparlante esterno è connesso, è
raccomandabile spegnere la cassa acustica dell’amplificatore PAS-254D.
4.3 Telecomando
Il telecomando per comandare il lettore audio/
ricevitore Bluetooth viene fornito con una batteria separata. Prima della messa in funzione
inserire la batteria. Per fare ciò, sul retro del
telecomando spingere a destra la piccola leva
con la tacca e contemporaneamente staccare
il portabatteria.
1. 2.
Sfilare il portabatteria
➋
Inserire la batteria nel portabatteria come indicato sul telecomando (rispettare la corretta
polarità “+”) e rimettere il portabatteria nel
telecomando.
Se la portata del telecomando diminuisce
sostituire la batteria con una nuova dello stesso
tipo.
In caso di mancato uso prolungato conviene
staccare la batteria per escludere che la batteria,
perdendo, possa danneggiare il telecomando.
Non gettare le batterie scariche o difettose nelle immondizie di casa bensì
negli appositi contenitori (p. es. presso
il vostro rivenditore).
4.4 Collegare una batteria supplementare
Per aumentare la durata dell’impianto è possibile
collegare una batteria supplementare del tipo
NPA-12 / 7, disponibile separatamente. Per via
dei pericoli in caso di sistemazione scorretta, il
montaggio della batteria dovrebbe essere realizzato solo da parte di un esperto.
1)
Assicurarsi che il PAS-254D sia spento e staccato dal caricatore.
2) Aprire il coperchio (21) dei vani per batterie
dopo aver svitato la vite centrale.
3) Collegare la batteria con i due cavi nel vano
libero, rispettando assolutamente la corretta
polarità (rosso = +).
N. B.: Se la batteria non dovesse entrare nel vano libero, scambiare eventualmente la posizione e i collegamenti delle due batterie.
4) Richiudere il coperchio.
5 Funzionamento
1) Prima della prima accensione portare tutti i
regolatori del volume (6, 7, 11) sullo “0” per
escludere dei volumi troppo alti al momento
dell’accensione.
2)
Accendere le fonti audio collegate e / o i radiotrasmettitori.
3)
Accendere l’amplificatore con l’interruttore
(17). Si accende la spia di funzionamento
PWR ON (16). In più, con un LED (14) viene
visualizzato lo stato di carica della batteria.
Se è acceso il LED LOW, occorre ricaricare la
batteria (☞Capitolo 4.1).
4) Da una fonte audio collegata riprodurre per
esempio della musica oppure parlare in un
microfono collegato via cavo o via radio.
(Funzionamento del lettore audio/ ricevitore
Bluetooth ☞Capitolo 5.2 a 5.4)
Italiano
31
Page 32

5) Impostare il volume per le fonti audio con il
relativo regolatore.
LEVEL (6): Fonti audio all’ingresso
Italiano
1 MIC / LINE IN
2 WIRELESS (7): Radiomicrofoni, vedi anche
capitolo 5.1.2
PLAYER (11): Fonte audio all’ingresso
3 LINE IN e lettore audio /
ricevitore Bluetooth
AVVERTIMENTO
Non usare l’apparecchio
mai se gli altoparlanti si
trovano vicino all’orecchio di una persona! Il
forte volume può dan-
neggiare l’udito.
Evitare il feedback acustico (fischio forte),
non orientando gli altoparlanti verso il
microfono e mantenendo una distanza
sufficiente dal microfono.
Un circuito di limitazione del livello esclude
automaticamente delle distorsioni con volumi
troppo alti. La sua attività viene segnalata dal
LED LIMITER (15).
6) Con il regolatore TONE (8) impostare i toni
per i microfoni oppure per una fonte collegata con la presa (5). Con il regolatore TONE
(12) impostare i toni per una fonte collegata
con le prese 3 LINE IN nonché per il lettore
audio/ ricevitore Bluetooth. Per il lettore
audio/ ricevitore Bluetooth si trovano ulteriori
possibilità di regolazione sul telecomando
(☞Capitolo 5.4, tasto “EQ”).
7) Se l’audio di una fonte audio collegata con
le prese 3 LINE IN (9) o del lettore audio/ricevitore Bluetooth deve essere messo automaticamente in muto mentre si parla tramite un
microfono [VOICE OVER (13)], impostare il
regolatore DEPTH in modo che il LED MUSIC
si accenda mentre si parla.
8)
Per non scaricare inutilmente la batteria, con
l’interruttore (17) spegnere l’amplificatore
dopo l’uso e durante delle pause lunghe.
Se l’impianto d’amplificazione non viene usato
per un periodo prolungato, ricaricare completamente la batteria prima dello stoccaggio e
ricaricarla ogni 6 mesi circa per compensare
l’autoscarica normale.
5.1 Operazioni con radiomicrofoni
Questo sistema è equipaggiato con un modulo
ricevente bicanale che permette l’accoppiamento di due trasmettitori / radiomicrofoni. Il modulo
ricevente è alloggiato nel cabinet dell’amplificatore.
Modulo ricevente
➌
Ogni sezione (A e B) è equipaggiata di proprio
regolatore di volume e switch on / off (fig. 3). Il
display è diviso in due sezioni: a sinistra per il
ricevitore sezione A, a destra per la sezioneB.
Quando una sezione ricevente è settata su ON,
il display indica il canale di trasmissione. Per
vedere indicata la radiofrequenza, premere il
tasto (per sezione A) o (per sezione B).
5.1.1 Settaggio die canali di trasmissione
Usare il regolatore per accendere le sezioni riceventi. Non accendere i corrispondenti trasmettitori radiomicrofoni per il momento.
5.1.1.1 Scansione Canali
Utilizzare entrambi i tasti e e simultaneamente mantenerli premuti per circa un secondo
finchè appare sul display. La scansione può
iniziare: La sezione ricevente sarà posta su canale
libero da altre trasmissioni o interferenze. Se
ci sono canali liberi, i canali saranno settati, al
contrario si uscirà dalla funzione
N. B.: La scansione canali può essere avviata anche per
una sola sezione (tasto per sezione A o tasto per
sezione B).
5.1.1.2 Selezione canali manuale
Quando entrambe le sezioni sono accese
(switched on):
1)
Tenere il tasto SET premuto finchè l’indicazione canale per la sezione A inizia a lampeggiare sul display.
2)
Selezionare il canale di ricezione nella sezione
A con il tasto o e poi conferma con il
tasto SET.
32
Page 33

3) L’indicazione canale del ricevitore sezione B
inizierà a lampeggiare sul display. Sezionare
il canale relativo a detta sezione con il tasto
o e confermare con il tasto SET.
Quando un solo ricevitore, A o B è acceso:
Tenere premuto il tasto SET finche’ l’indicazione
lampeggia sul display. Selezionare il canale con il
tasto o e terminare premendo il tasto SET.
N. B.:
1.
Le due sezioni riceventi non possono operare sullo
stesso canale.
2. Se un canale non viene confermato entro 10 secondi
col tasto SET, il settaggio avviene sul canale precedentemente selezionato e memorizzato e si esce dalla
funzione.
3.
Se, con trasmettitori spenti, i rispettivi bar meter di
sezione A e / o B indicano presenza RF in ricezione,
sono ricevute interferenze o i canali sono occupati da
altre emissioni. In questo caso selezionare differenti
canali, previo controllo sche siano puliti e liberi.
5.1.2 Regolazione del volume
Accendere i trasmettitori / radiomicrofoni e settare uno die canali disponibili alla sezione A,
operare allo stesso modo per la sezione B. Le
barre sul display indicheranno la percentuale
di radiofrequenza ricevuta del segnale radio.
Utilizzare i regolatori di volume per un ascolto
perfetto ed indistorto.
Utilizzare il regolatore 2 WIRELESS (7) per
regolare il volume del segnale ricevuto.
Note: Se non ricevete segnale dal trasmettitore, siate
sicuri che trasmettitore e ricevitore operino sullo stesso
canale, stessa frequenza poi controllate le batterie die
radiomicrofoni. Se necessario, riducete la distanza tra
trasmettitore e ricevitore in modo da garantirne la portata.
5.1.3 Settaggio dello squelch
Il controllo di squelch rende muto la rispettiva
sezione ricevente quando il segnale radio decade
o è assente. Tramite un controllo di soglia questo
effetto può essere regolato. Sebbene, interferenze di segnale non causino rumore quando il
trasmettitore è spento o quando il livello di ricezione è minimo, il rumore in ricezione può essere
eliminato operando sul controllo Squelch. Una
alta soglia elimina ogni rumore e / o interferenze
ma discrimina anche i segnali radio di ricezione
bassi e limita il range di ricezione.
1)
Controllare che i ricevitori A e B sdiano spenti
(Switch off. Poi tenere il tasto SET premuto mentre accendi una sezione ricevente. Il
display indicherà o , col numero lampeggiante.
2)
Premere il taso SET per attivare la funzione di
settaggio dello squelch: (per “Squelch”)
ed il valore corrente lampeggerà (flashing)
sul display.
3) Utilizzare il tasto o per settare il valore
(livello 7 = soglia massima). Premere il tasto
SET per uscire dalla funzione di settaggio
dello Squelch.
Note: La funzione di settaggio finirà se per 5 secondi non
verranno premuti pulsanti. Non si avrà quindi salvataggio
del dato impostato.
5.2 Lettore audio
Il lettore audio integrato può riprodurre dei file
audio nei formati MP3 o WAV. Come mezzi di
memoria si possono usare delle chiavette USB
oppure schede di memoria SD[HC] (anche schede MMC).
N. B.: Dato il gran numero di produttori di memorie e di
driver non si può garantire che tutti i mezzi di memoria
siano compatibili con il lettore audio.
Inserire una memoria USB nella presa USB (1) e /o
inserire una scheda di memoria (con i contatti
rivolti verso l’alto) nella fessura (2).
Accendendo l’apparecchio, viene scelto il file
audio riprodotto per ultimo e il lettore audio si
mette in pausa (indicazione: ). La memoria
USB ha la priorità rispetto alla scheda di memoria. Se durante il funzionamento si inserisce
un mezzo di memoria, tale mezzo viene scelto
automaticamente.
I comandi del lettore audio sono possibili tramite i tasti (4) oppure tramite il telecomando in
dotazione (fig. 4) (☞Capitolo 5.4). Orientare
il telecomando sul sensore infrarossi a destra
del display (3).
Il display indica il tempo passato della riproduzione del titolo attuale: Il volume della riproduzione dipende delle impostazioni sul lettore
audio e dal regolatore PLAYER (11).
Italiano
33
Page 34
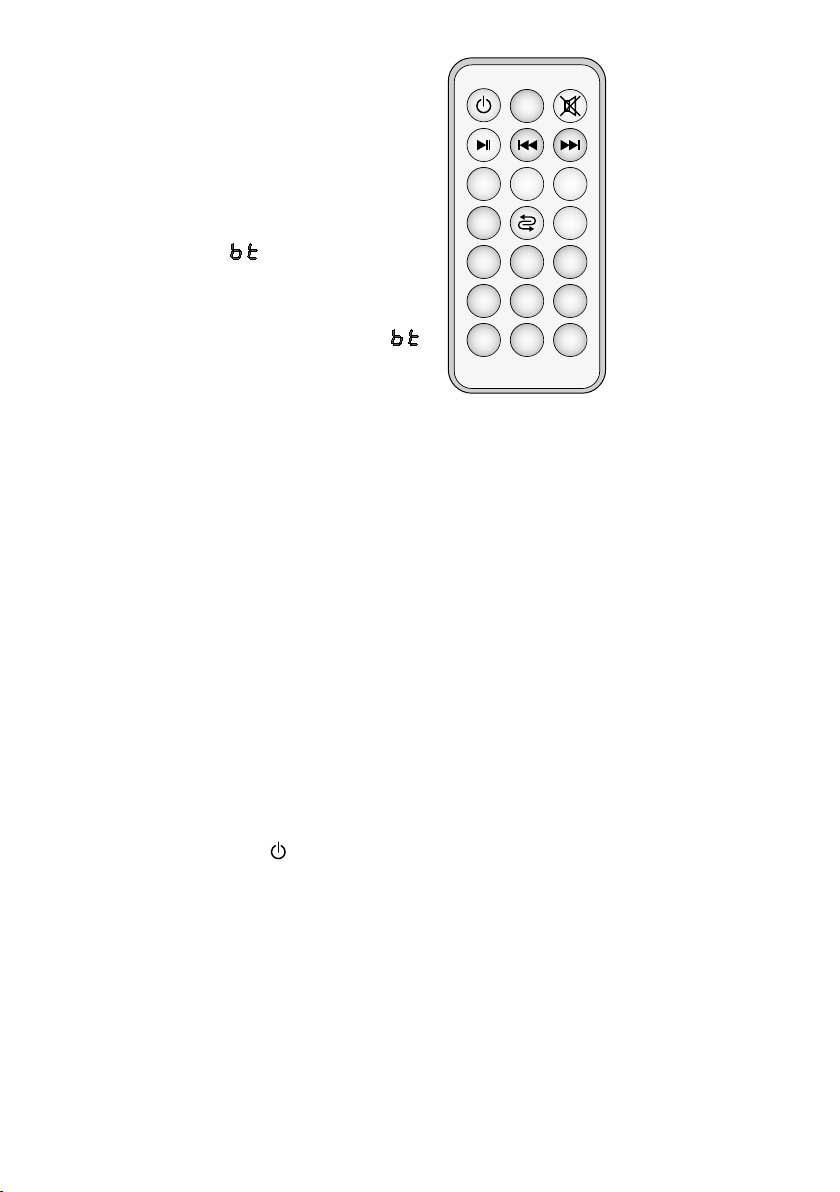
5.3 Ricevitore Bluetooth
8 97
5
64
2 31
0
EQ
+−
U/SD
SCAN
Mode
In alternativa alla riproduzione da una memoria USB o da una scheda di memoria, il ricevitore Bluetooth integrato si può collegare
Italiano
senza fili con una fonte audio Bluetooth (p. es.
smartphone o tablet).
1) Se non sono collegate né memoria USB né
scheda di memoria, il PAS-254D si trova
automaticamente nel modo Bluetooth: Il
display (3) mostra .
Con un mezzo di memoria collegato,
premere tante volte il tasto M, finché a si
nistra sul display siano accesi né TF né
Dopo pochi secondi, sul display si vede .
2)
Sulla fonte Bluetooth attivare la funzione Bluetooth. Nell’elenco degli apparecchi
disponibili, il PAS-254D appare come “BTSPEAKER”.
3)
Accoppiare la fonte con “BT-SPEAKER”
(vedere eventualmente le istruzioni della
fonte Bluetooth). Segue automaticamente il
collegamento dei due apparecchi.
Se il collegamento ha avuto successo, si
sente una sequenza di due toni.
Il comando della riproduzione tramite Bluetooth
può essere fatto sulla fonte Bluetooth oppure
per mezzo dei tasti (4) oppure con il telecomando in dotazione (fig. 4) (☞Capitolo 5.4).
Orientare il telecomando sul sensore infrarossi
a destra sul display (3).
Il volume della riproduzione Bluetooth dipende dalle impostazioni sulla fonte Bluetooth,
sul lettore audio/ ricevitore Bluetooth e dal regolatore PLAYER (11).
Se non si usano né il lettore audio né il ricevitore Bluetooth, questi possono essere spenti
con il telecomando (tasto ). In questo modo
si aumenta la durata della batteria e si esclude
una ricezione Bluetooth indesiderata.
USB
.
➍
Telecomando
34
Page 35
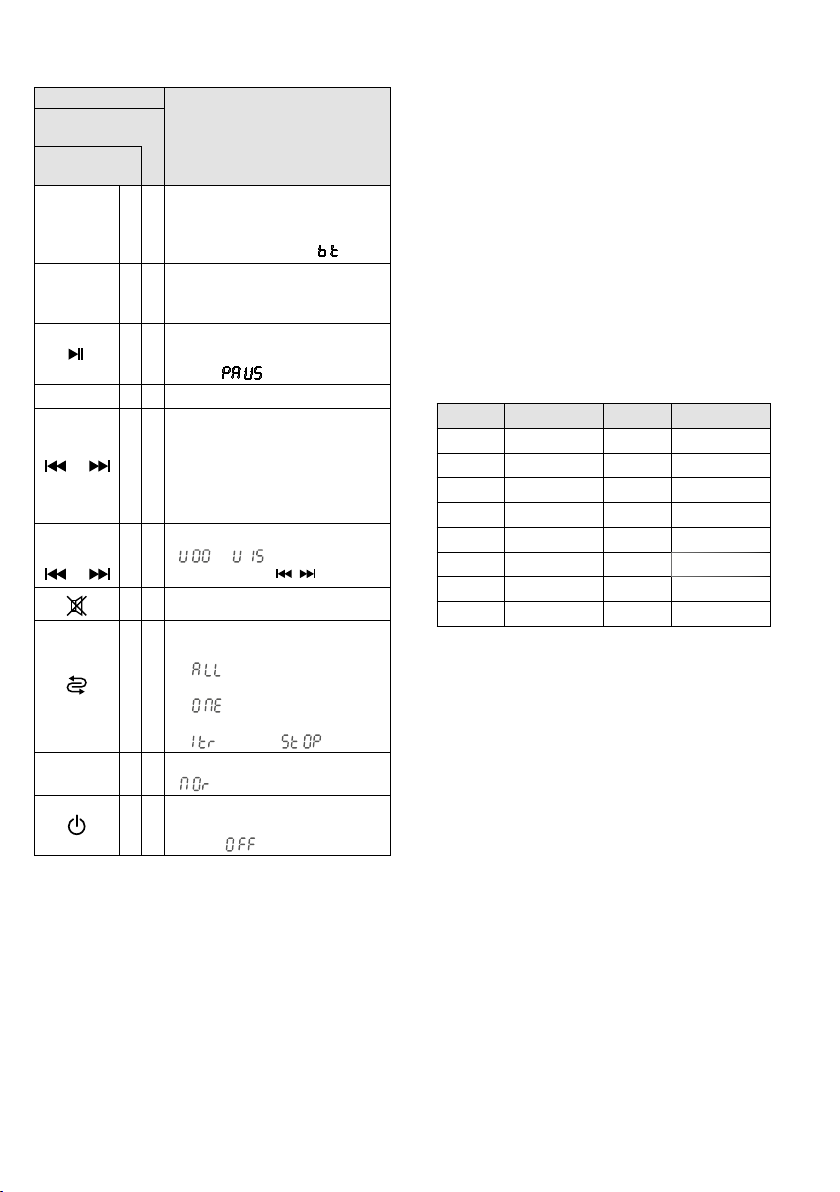
5.4 Tasti funzione per il lettore audio / ricevitore Bluetooth
Tasto
sul
telecomando
sull’appa-
recchio
Mode
M
U/SD
SCAN
1… 9, 0
/
− / +
/
EQ
*anche con riproduzione Bluetooth
Cambiare fonte*
✅
Memoria “
Scheda di memoria “
✅
Ricevitore Bluetooth “
Cambiare fra
✅
Memoria “
Scheda di memoria “
Avviare la riproduzione e
✅ ✅
cambiare fra riproduzione e
pausa “
✅
Scelta diretta di un titolo
Titolo precedente / successivo *:
Premere brevemente il tasto
Avanzamento / ritorno veloce
✅ ✅
(solo con il telecomando): tener
premuto il tasto (audio rimane
muto)
Cambiare volume*
✅
“
(tener premuto
✅
✅
Disattivare e attivare l’audio*
Modo di riproduzione
– Riproduzione di tutti i titoli
“
✅
– Riproduzione di un titolo
“
– Riproduzione di singoli titoli
“
6 preimpostazioni toni*
✅
“
Lettore audio / ricevitore
✅
Bluetooth
on / off “ ”*
Funzione
USB”
USB”
”*
”
…
”
”
”, dopo “ ”
” = neutro
/ )
TF”
”
TF”
6 Dati tecnici
Amplificatore
Classe amplificazione: . . .D
Potenza RMS con 2 Ω: . . .70 W
Potenza di picco: . . . . . . .80 W
Banda passante: . . . . . . . .80 – 20 000 Hz
Ingressi (contatto, tipo, sensibilità)
Microfono: . . . . . . . . . . .XLR, bil., 2 mV
con alimentazione phantom 12 V
Line: . . . . . . . . . . . . . . . . jack, bil., 14 mV
RCA, sbil., 80 mV
Sezione radioricevitore: . . .2
Range di ricezione:
Frequenze di ricezione
Canale Frequenza Canale Frequenza
01 863,1 MHz 09 863,2 MHz
02 864,1 MHz 10 864,2 MHz
03 863,6 MHz 11 863,7 MHz
04 864,6 MHz 12 864,7 MHz
05 863,3 MHz 13 863,4 MHz
06 864,3 MHz 14 864,4 MHz
07 863,8 MHz 15 863,9 MHz
08 864,8 MHz 16 864,9 MHz
Mezzi di memoria: . . . . . . . memoria USB,
Formati file audio: . . . . . . .MP3, WAV
Profilo Bluetooth:
Uscite
Line Link: . . . . . . . . . . . .RCA, 300 mV
Speaker esterno: . . . . . . .compatibile Speakon®,
Alimentazione: . . . . . . . . .batteria ricaricabi-
Temperatura d’esercizio: . .0 – 40 °C
Altezza totale: . . . . . . . . . . 120 cm
Peso: . . . . . . . . . . . . . . . . . 7,7 kg
. . . . . .30 m approx.
scheda SD / SDHC / MMC
. . . . . . .A2DP
min. 4
Ω
le12 V/ 7,2 Ah
Italiano
Con riserva di modifiche tecniche.
La MONACOR ® INTERNATIONAL GmbH & Co. KG si riserva ogni diritto di elaborazione in qualsiasi forma
delle presenti istruzioni per l’uso. La riproduzione – anche parziale – per propri scopi commerciali è vietata.
35
Page 36

Draagbare versterkerinstallatie
Deze handleiding is bedoeld voor de gebruiker
zonder bijzondere vakkennis. Lees de handleiding grondig door, alvorens het apparaat in gebruik te nemen, en bewaar ze voor latere raad-
Nederlands
pleging. Op pagina 2 vindt u een overzicht van
alle bedieningselementen en de aansluitingen.
Inhoud
1 Overzicht . . . . . . . . . . . . . . . . . . 36
2 Veiligheidsvoorschriften . . . . . . . . . 37
3 Toepassingen en toebehoren. . . . . . . 38
3.1 Draadloze microfoons en zender . . . . . . . 38
3.2 Conformiteit en goedkeuring . . . . . . . . . 38
4 Ingebruikname . . . . . . . . . . . . . . 38
4.1 De accu laden . . . . . . . . . . . . . . . . 38
4.2 Audio-aansluitingen totstandbrengen . . . . 38
4.2.1 Microfoon . . . . . . . . . . . . . . . . . 38
4.2.2 Geluidsbron met lijnniveau . . . . . . . . 38
4.2.3 Versterker of opnameapparaat. . . . . . . 39
4.2.4 Luidsprekers. . . . . . . . . . . . . . . . 39
4.3 Afstandsbediening . . . . . . . . . . . . . . 39
4.4 Extra accu aansluiten. . . . . . . . . . . . . 39
5 Bediening . . . . . . . . . . . . . . . . . 39
5.1 Bediening met draadloze microfoons . . . . . 40
5.1.1 Overdrachtskanalen instellen . . . . . . . 40
5.1.2 Geluidsvolume instellen . . . . . . . . . . 41
5.1.3 Ruisonderdrukking instellen . . . . . . . . 41
5.2 Audiospeler . . . . . . . . . . . . . . . . . 41
5.3 Bluetooth-ontvanger . . . . . . . . . . . . . 42
5.4 Bedieningsoverzicht voor de
audiospeler/ Bluetooth-ontvanger. . . . . . . 43
6 Technische gegevens . . . . . . . . . . . 43
36
1 Overzicht
1
USB-bus (type A) voor het aansluiten van een
USB-geheugenstick voor het afspelen van
audiobestanden
2 Sleuf voor een SD-geheugenkaart voor het
afspelen van audiobestanden
3
Display voor de weergave van de Bluetooth-functie of van het geselecteerde opslagmedium en de huidige titeltrack of de
verstreken speeltijd van de track
4
Bedieningstoetsen voor de audiospeler/ Bluetooth-ontvanger (☞hoofdstuk 5.4)
5
Gecombineerde XLR- / 6,3 mm-stekkerbus
1 MIC / LINE IN voor het aansluiten van een
microfoon of een andere monogeluidsbron
(bijv. mengpaneel)
6 Volumeregelaar LEVEL voor een op (5) aan-
gesloten microfoon of audioapparaat
7
Volumeregelaar 2 WIRELESS voor radiomicrofoons
8
Gemeenschappelijke klankregelaar TONE
voor een op (5) aangesloten microfoon of
audioapparaat en radiomicrofoons
9
Cinch-bussen 3 LINE IN voor het aansluiten
op een geluidsbron (bijv. cd-speler); bij het
aansluiten van een stereogeluidsbron wordt
in de versterker een monosignaal gevormd
10
Cinch-uitgangen LINE LINK voor het opnemen van het mengsignaal of het doorsturen
naar een andere versterkerinstallatie; voor
stereo-opnameapparaten zijn er twee bussen
beschikbaar.
11
Volumeregelaar PLAYER voor de ingang
3 LINE IN (9) evenals de audiospeler/ Bluetooth-ontvanger
12
Klankregelaar TONE voor de ingang 3 LINE
IN(9) evenals de audiospeler/ Bluetooth-ontvanger
13
Functie VOICE OVER voor het uitmengen van
het geluid van een op ingang 3 LINE IN aangesloten geluidsbron en van de audiospeler/
Bluetooth-ontvanger, terwijl in een microfoon wordt gesproken.
LED MUSIC brandt, als het geluid wordt
uitgemengd
Regelaar DEPTH om de gevoeligheid in te
stellen voor het uitmengen
van de muziek
Page 37
14 Statusleds voor de accu
CHARGE Rood: tijdens het laden
Groen: na afloop van het laad-
proces
FULL laadtoestand: vol
OK laadtoestand: goed
LOW laadtoestand: gering
15
LED LIMITER brandt, als de niveaubegrenzing
actief is
16 Bedrijfsled PWR ON
17 Aan- / Uit-schakelaar
18
Connector voor het opladen van de accu;
alleen de meegeleverde lader gebruiken
19
Schakelaar INTERNAL SPEAKER voor het
in- en uitschakelen (ON /OFF) van de eigen
luidsprekerkast
20
Bus EXT. SPEAKER voor het aansluiten van
een (extra) luidspreker
Opmerking: Om overbelasting van de versterker bij
hoge geluidsvolumes te vermijden, wordt aanbevolen
om de luidsprekerbox van PAS-254D bij aansluiting
van een externe luidspreker uit te schakelen met behulp van de schakelaar INTERNAL SPEAKER (19).
21 Deksel voor de accuvakken
2 Veiligheidsvoorschriften
De apparaten (versterkerinstallatie en lader) zijn
in overeenstemming met alle relevante EU-richtlijnen en dragen daarom het -kenmerk.
WAARSCHUWING
Probeer de versterkerinstallatie niet bij sterke
•
regen te gebruiken en let er steeds op dat
er geen vocht in het apparaat terechtkomt.
De meegeleverde kap beschermt de luidsprekerkast tegen vocht. De lader is uitsluitend
geschikt voor gebruik binnenshuis. Vermijd
druip- en spatwater evenals plaatsen met
een hoge vochtigheid. Het toegestane omgevingstemperatuurbereik voor de apparaten
bedraagt 0 – 40 °C.
De netspanning van de
lader is levensgevaarlijk.
Open het apparaat niet,
want door onzorgvuldige
ingrepen loopt u het risico
van elektrische schokken.
Plaats geen bekers met vloeistof zoals drink-
•
glazen etc. op de lader.
Schakel de apparatuur niet in resp. trek on-
•
middellijk de stekker van de lader uit het
stopcontact,
1.
wanneer de apparaten of het netsnoer
zichtbaar beschadigd zijn,
2. wanneer u een defect vermoedt nadat het
apparaat bijvoorbeeld gevallen is.
3. wanneer het apparaat slecht functioneert.
De apparaten moeten in elk geval hersteld
worden door een gekwalificeerd vakman.
Trek de stekker van de netadapter nooit met
•
het snoer uit het stopcontact, maar met de
stekker zelf.
Een beschadigd netsnoer mag alleen in een
•
werkplaats worden vervangen.
Gebruik voor de reiniging alleen een droge of
•
licht bevochtigde doek. Gebruik in geen geval
chemicaliën of agressieve reinigingsmiddelen.
In geval van ongeoorloofd of verkeerd ge-
•
bruik, verkeerde aansluiting, foutieve bediening of van herstelling door een niet-gekwalificeerd persoon vervalt de garantie en de
aansprakelijkheid voor hieruit resulterende
materiële of lichamelijke schade. Zo kunnen
wij ook niet aansprakelijkheid worden gesteld
voor gegevensverliezen als gevolg van foutieve bediening of een defect, noch voor de
schade die hieruit volgt.
Wanneer de apparaten definitief uit
bedrijf worden genomen, bezorg ze
dan voor verwerking aan een plaatselijk
recyclagebedrijf.
Nederlands
37
Page 38

3 Toepassingen en toebehoren
De PAS-254D is een versterkerinstallatie met
accuvoeding die (bijv. bij optochten) als rugzak
gedragen kan worden. Boven de versterker bevindt zich een frame met een luidsprekerbox
Nederlands
met vier bandbreedluidsprekers die het geluid
naar voor en achter afstralen. De versterker is
uitgerust met mengbare ingangen voor een microfoon en een (stereo-)geluidsbron, bijv. een
cd-speler, evenals met een ontvangstmodule
voor twee radiomicrofoons. Bovendien kunnen
de audiobestanden van een USB-geheugenstick,
van een SD/ MMC-geheugenkaart of via de ingebouwde Bluetooth-ontvanger (bijv. van een
smartphone) worden afgespeeld. Daarbij kunt
u, terwijl er in de microfoon wordt gesproken,
automatisch bijv. muziek uitmengen. De versterkerinstallatie kan met volledig geladen accu tot
7 uur autonoom worden gebruikt.
Met een tweede, onafhankelijk verkrijgbare
accu (NPA-12 / 7) kunt u de bedrijfsduur verlengen. In de zijvakken van de rugzak kunt u bijv.
microfoons en aansluitkabels opbergen.
3.1 Draadloze microfoons en zender
Uit het assortiment van MONACOR zijn volgende apparaten beschikbaar:
Type Model
Draadloze handmicrofoon TXA-800HT
Zakzender met dasspeldmicrofoon
en hoofdmicrofoon
Zender met lijnniveau-ingang
voor audiosignalen
Om het geluid in grotere ruimten te verzorgen
kunnen de radiosignalen van de zenders ook
tegelijk door meerdere PAS-254D-apparaten
ontvangen worden.
3.2 Conformiteit en goedkeuring
Hiermee verklaart MONACOR INTERNATIONAL,
dat de radio-ontvanger van de PAS-254D in overeenstemming is met de richtlijn 2014 / 53 / EU. De
EU-conformiteitsverklaring is beschikbaar op het
internet: www.monacor.com
Het gebruik van het radiosysteem (zender en
ontvanger) is algemeen toegelaten in de Lidstaten van de EU en de EFTA, en is vrij van registratie en van taksen.
38
TXA-800HSE
TXA-800ST
4 Ingebruikname
4.1 De accu laden
Om de ingebouwde accu en een extra aangesloten accu te laden, sluit u de meegeleverde
lader aan op de laagspanningsjack (18) en een
stopcontact (230 V/ 50 Hz). Via de statusleds (14)
wordt de laadtoestand weergegeven: FULL (vol),
OK (goed) of LOW (laag). Terwijl de accu wordt
geladen, brandt de LED CHARGE rood. De versterker kan hierbij uitgeschakeld zijn.
Als de accu geladen is (de led CHARGE
brandt groen), koppelt u de lader van de versterker en van het net.
4.2 Audio-aansluitingen
totstandbrengen
4.2.1 Microfoon
Sluit een microfoon met een XLR-stekker aan
op de jack 1 MIC / LINE IN (5).
Voor microfoons die met een fantoomvoeding werken (bijv. elektreetmicrofoons) is
aan de XLR-contacten van de bus een fantoomvoeding van 12 V beschikbaar.
Opmerking: Microfoons of andere geluidsbronnen met
asymmetrische uitgang mogen niet op de XLR-bus worden aangesloten, omdat deze door de fantoomvoeding
zouden kunnen worden beschadigd.
Microfoons met een 6,3 mm-stekker kunnen
ook op de bus 1 MIC / LINE IN worden aange
sloten. Deze ingang is evenwel iets minder gevoelig.
4.2.2 Geluidsbron met lijnniveau
Een monogeluidsbron met lijnsignaalniveau (bijv.
mengpaneel, extra ontvanger voor radiomicrofoons) kan via een 6,3 mm-stekker op de jack
1 MIC / LINE IN (5) aangesloten worden. Alternatief kunt u deze geluidsbron ook op een van de
Cinch-jacks 3 LINE IN (9) aansluiten.
Sluit een stereogeluidsbron (bv. cd- / mp3speler, radio, mengpaneel) aan via de bussen
3 LINE IN (9). Omdat de versterker monofoon
werkt, wordt een monosignaal intern steeds
op basis van het stereosignaal gevormd. Het
signaal van een op deze bussen aangesloten
geluidsbron kan tijdens een aankondiging via
een microfoon worden gedempt (functie VOICE
OVER ☞hoofdstuk 5).
-
Page 39
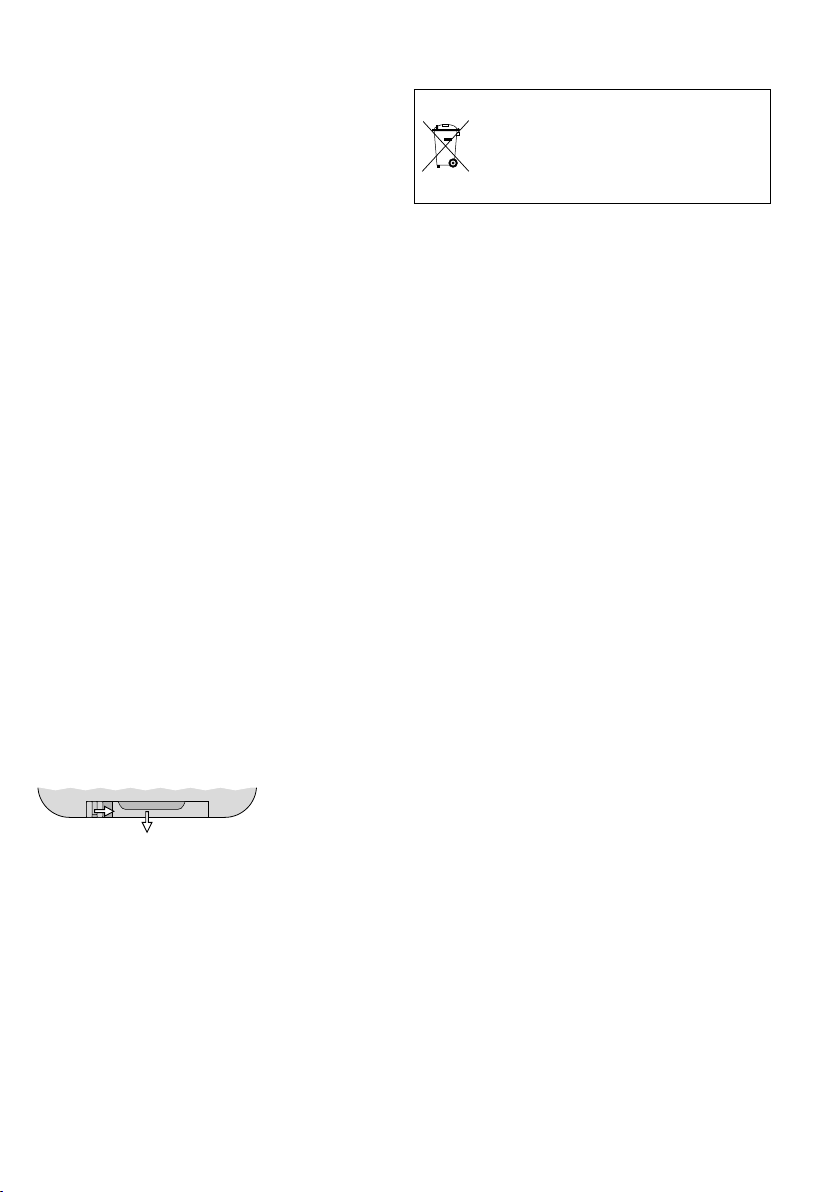
4.2.3 Versterker of opnameapparaat
Op de bussen LINE LINK (10) kunt u een bijkomende versterkerinstallatie of een opnameapparaat aansluiten. Voor stereo-opnameapparaten
zijn twee bussen beschikbaar. Omdat de versterker monofoon werkt, zijn de signalen op beide
bussen identiek.
4.2.4 Luidsprekers
Via de Speakon®-compatibele bus EXT. SPEAKER
(20) kunt u een extra luidspreker aansluiten.
Deze kan aanvullend op de beschikbare luidsprekerkast of als alternatief worden gebruikt.
Draai de luidsprekerstekker na inpluggen
in de aansluiting naar rechts tot hij vast klikt.
Om hem er later weer uit te trekken, trekt u de
vergrendeling van de stekker naar achteren en
draait u de stekker naar links.
Met de schakelaar INTERNAL SPEAKER (19)
schakelt u de luidsprekerkast van de PAS-254D
uit (stand “OFF”) indien nodig.
Opmerking: Om overbelasting van de versterker bij hoge
geluidsvolumes te vermijden, wordt aanbevolen om de
luidsprekerbox van PAS-254D bij aansluiting van een externe luidspreker uit te schakelen.
4.3 Afstandsbediening
De afstandsbediening voor de bediening van
de audiospeler/ Bluetooth-ontvanger wordt met
afzonderlijke batterij geleverd. Breng de batterij
voor het eerst gebruik aan. Duw hiervoor aan de
achterzijde van de afstandsbediening de kleine
grendel met de groef naar rechts en trek de
batterijhouder er tegelijk uit.
1. 2.
Batterijhouder uittrekken
➋
Plaats de batterij zoals op de afstandsbediening
aangegeven in de batterijhouder (Let op de
polariteit “+”!) en schuif de houder opnieuw in
de afstandsbediening.
Als de reikwijdte van de afstandsbediening
afneemt, vervangt u de batterij door een exemplaar van hetzelfde type.
Als de afstandsbediening langere tijd niet
wordt gebruikt, neemt u de batterij eruit, zodat
de afstandsbediening niet wordt beschadigd bij
eventueel uitlopen van de batterij.
Lege batterijen horen niet in het huisvuil. Verwijder ze voor een milieuvriendelijke verwerking uitsluitend als KGA
(bijv. de inzamelbox in uw gespecialiseerde elektrozaak).
4.4 Extra accu aansluiten
Om de bedrijfsduur te verlengen, kunt u een bijkomende afzonderlijk verkrijgbare accu van het
type NPA-12 / 7 aansluiten. Wegens de gevaren
bij verkeerde hantering mag de accu uitsluitend
door vakmensen worden ingebouwd.
1) Zorg dat de PAS-254D uitgeschakeld en van
de lader is gekoppeld.
2) Open het deksel (21) voor de accuvakken na
het uitdraaien van de centrale schroef.
3) Sluit de accu aan op de beide kabels in het
vrije vak, en let daarbij zeker op de correcte
polariteit (rood = +).
Opmerking: Mocht de accu niet in het vrije vak passen, wissel dan eventueel de positie en de aansluitingen van de beide accu‘s om.
4) Brengt het deksel opnieuw aan.
5 Bediening
1)
Alvorens een eerste keer in te schakelen
draait u alle volumeregelaar (6, 7, 11) in de
stand “0”. Zo vermijdt u een onverwacht
hoog geluidsvolume bij het inschakelen.
2) Schakel de aangesloten geluidsbronnen en /
of radiozenders in.
3) Schakel de versterker in met de schakelaar
(17). De led PWR ON (16) licht op. Bovendien wordt met een led (14) de laadtoestand van de accu‘s aangegeven. Als de led
LOW brandt, moet de accu geladen worden
(☞hoofdstuk 4.1)
4)
Speel bijvoorbeeld muziek af van een aangesloten geluidsbron of spreek in een via
kabel aangesloten of draadloze microfoon (bediening van de audiospeler/ Bluetooth-ontvanger ☞hoofdstuk 5.2 tot 5.4).
Nederlands
39
Page 40
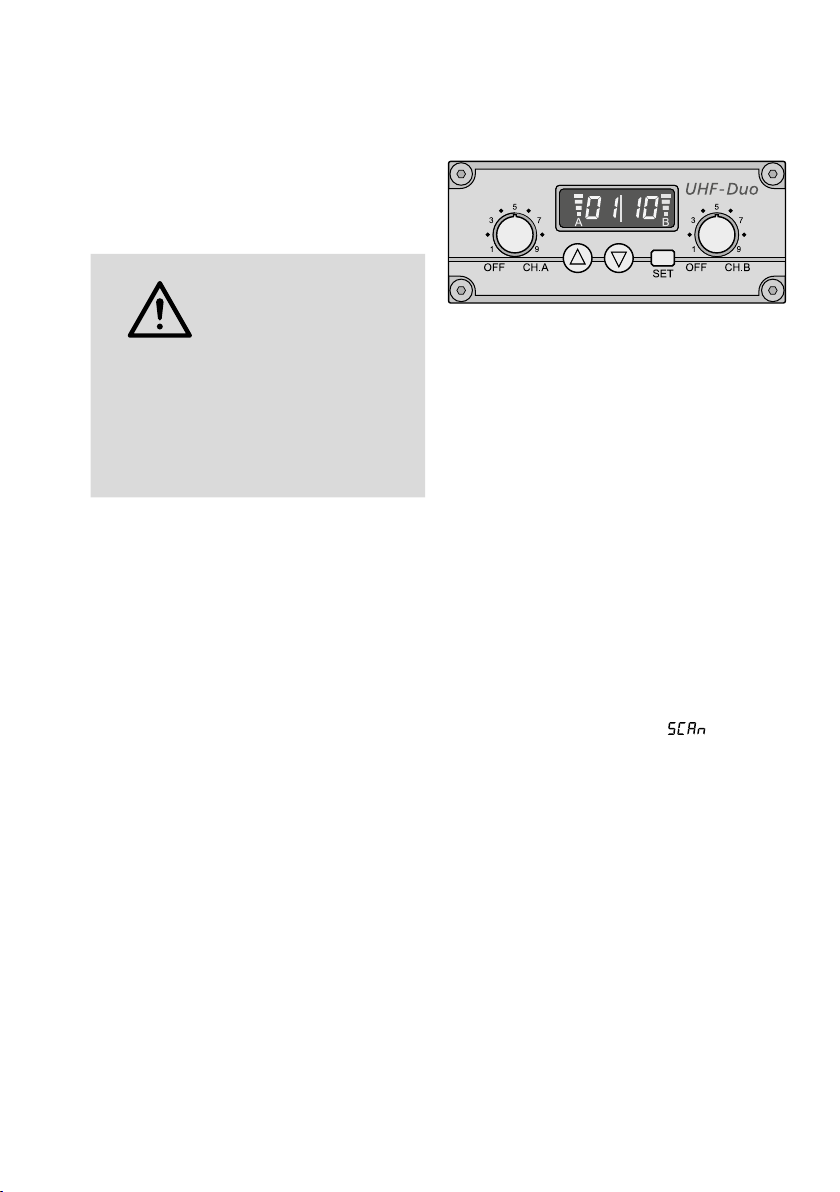
5) Stel het geluidsvolume voor de geluidsbronnen in met de respectieve regelaar.
LEVEL (6): geluidsbron op de ingang
1 MIC / LINE IN
2 WIRELESS (7): radiomicrofoons, zie ook
Nederlands
hoofdstuk 5.1.2
PLAYER (11): geluidsbron op de ingang
3 LINE IN en audiospeler/
Bluetooth-ontvanger
WAARSCHUWING
Gebruik het apparaat
nooit, als de luidsprekers
zich nabij de oren van een
persoon bevinden! Door
het hoge geluidsvolume
kan het gehoor bescha-
digd worden.
Vermijd akoestische terugkoppeling (luide
fluittoon), door de luidsprekers niet op de
microfoon te richten en voor voldoende
afstand tot de microfoon te zorgen.
Een schakeling voor niveaubegrenzing voorkomt automatisch vervormingen bij hoge geluidsvolumes. Uw activiteit wordt door de led
LIMITER (15) aangegeven.
6) Stel met de regelaar TONE (8) de gewenste
klank voor de microfoons of voor een op de
bus (5) aangesloten geluidsbron in. Stel met
de regelaar TONE (12) de klank in voor een op
de bussen 3 LINE IN aangesloten geluidsbron
evenals de audiospeler/ Bluetooth-ontvanger
in. Voor de audiospeler/ Bluetooth-ontvanger zijn er op de afstandsbediening andere klankinstelmogelijkheden beschikbaar
(☞hoofdstuk 5.4, toets “EQ”).
7)
Als het geluid van een op de bussen 3 LINE IN
(9) aangesloten geluidsbron of de audiospeler/Bluetooth-ontvanger tijdens het spreken
in een microfoon automatisch gedempt moet
worden [VOICE OVER (13)], stelt u de regelaar DEPTH zo in, dat de led MUSIC tijdens
de aankondiging gaat branden.
8) Om de accu niet onnodig te ontladen, schakelt u de versterker na gebruik en bij langere
pauzes met de schakelaar (17) opnieuw uit.
Als u de versterkerinstallatie langere tijd niet
gebruikt, laadt u de accu voor opslag volledig op
en laadt u ze om de 6 maanden bij, om het normale proces van zelfontlading te compenseren.
40
5.1 Bediening met draadloze microfoons
De versterkerinstallatie is uitgerust met een
ontvangermodule voor twee draadloze microfoons / zenders. De module bevindt zich onder
de luidsprekerbox.
Draadloze ontvangermodule
➌
De ontvangers A en B hebben elk een regelaar
om het geluidsvolume in te stellen en in en uit
te schakelen (afb. 3). Het display is ingedeeld in
een linker helft voor ontvanger A en een rechter
helft voor ontvanger B. Na inschakelen van een
ontvanger wordt op het display het transmissiekanaal weergegeven. Om de radiofrequentie
kort aan te geven, drukt u op de toets (voor
eenheid A) of (voor eenheid B).
5.1.1 Overdrachtskanalen instellen
Schakel de ontvangers in met de regelaars. Laat
de bijbehorende draadloze microfoons/zenders
daarbij eerst nog uitgeschakeld.
5.1.1.1 Kanaalzoekopdracht
Houd de toetsen en
ingedrukt tot op het display wordt weergegeven. De zoekfunctie start: De ontvangers
worden op vrije kanalen ingesteld die elkaar niet
storen. Als u geen vrije kanalen vindt, worden
de ingestelde kanalen behouden.
Opmerking: De zoekopdracht kan ook slechts voor een
eenheid worden gestart (toets voor eenheid A of toets
voor eenheid B).
5.1.1.2 Handmatige kanaalkeuze
Als beide ontvangers A en B zijn ingeschakeld:
1) Houd de toets SET ingedrukt tot op het display voor ontvanger A de kanaalaanduiding
knippert.
2)
Selecteer het kanaal voor ontvanger A met de
toets of en bevestig met de toets SET.
3) Op het display knippert voor ontvanger B de
kanaalaanduiding. Selecteer het kanaal voor
gelijktijdig ca. 1 sec.
Page 41

ontvanger B met de toets of en bevestig
met de toets SET.
Als slechts één ontvanger A of B is ingeschakeld:
Houd de toets SET ingedrukt tot op het display
de kanaalaanduiding knippert. Selecteer het
kanaal met de toets of en bevestig met
de toets SET.
Aanwijzingen:
1.
U kunt de ontvangers niet op hetzelfde kanaal instellen.
2.
Als u een kanaal niet binnen 10 seconden met de toets
SET bevestigt, dan wordt de instelmodus verlaten en
het vroeger ingestelde kanaal behouden.
3. Als de respectieve segmentweergave A of B op het
display ontvangst aangeeft bij uitgeschakelde zender, dan worden er storingssignalen of signalen van
andere zenders ontvangen. Selecteer in dit geval een
ander kanaal.
5.1.2 Geluidsvolume instellen
Schakel de draadloze microfoons/zenders in en
stel er een in op het kanaal van ontvanger A en
de andere op het kanaal van ontvanger B. Op
het display geeft de respectieve segmentweergave dan de sterkte van de radio-ontvangst aan.
Stel met de regelaars voor elke ontvanger het
volume in.
Stel het totale geluidsvolume van de ontvangen audiosignalen in met de regelaar
2 WIRELESS (7).
Opmerking: Als er geen signaal van de draadloze microfoon wordt ontvangen, controleer dan of de microfoon op
de juiste frequentie (kanaal) zendt evenals de laadtoestand
van de batterij van de microfoon. Indien nodig vermindert
u de afstand tussen versterkerinstallatie en microfoon.
5.1.3 Ruisonderdrukking instellen
De ruisonderdrukking (Squelch) zorgt voor een
volledige demping van de ontvanger, als het
niveau van het radiosignaal onder de ingestelde
drempelwaarde zakt. Zo voorkomt u dat storingssignalen de ruis versterken, als de zender
uitgeschakeld is of het radiosignaal ervan te
zwak is: als de niveaus van de stoorsignalen
onder de drempelwaarde liggen, wordt de ontvanger volledig gedempt. Een hogere drempelwaarde biedt een grotere ruisongevoeligheid,
maar vermindert ook het transmissiebereik.
1) Schakel eerst beide ontvangers A en B uit.
Schakel dan bij ingedrukte toets SET een
ontvanger in. Op het display verschijnt de
melding of , het nummer knippert.
2)
Om de instelmodus voor Squelch te openen,
drukt u op de toets SET. Op het display verschijnt (voor “Squelch”) en de huidige
waarde (knippert).
3) Stel met de toets of de waarde in (niveau 7 = hoogste drempelwaarde). Om de
instelmodus voor Squelch te verlaten, drukt
u op de toets SET.
Opmerking: De instelmodi worden na 5 seconden zonder
bediening van een toets ook automatisch verlaten. Doorgevoerde instellingen worden ook in dit geval opgeslagen.
5.2 Audiospeler
De ingebouwde audiospeler kan audiobestanden in mp3- of wav-formaat afspelen. Als
opslagmedia kunt u USB-geheugensticks of
SD[HC]-geheugenkaarten (ook MMC-kaarten)
gebruiken.
Opmerking: Door de verscheidenheid aan fabrikanten
van opslaggeheugens en aan besturingsprogramma‘s kan
niet gegarandeerd worden, dat alle opslagmedia compatibel zijn met de audiospeler.
Plaats een USB-geheugenstick in de USB-bus (1)
en/of schuif een geheugenkaart (met de contacten naar boven gericht) in de sleuf (2).
Met het inschakelen van het apparaat wordt het
laatst afgespeelde audiobestand geselecteerd en
de audiospeler staat in de pauzestand (display:
). Daarbij heeft het USB-geheugen voorrang ten opzichte van de geheugenkaart. Als u
tijdens het gebruik een opslagmedium insteekt,
wordt dit automatisch geselecteerd.
De bediening van de audiospeler kan gebeuren
via de toetsen (4) of de meegeleverde afstandsbediening (afb. 4) (☞hoofdstuk 5.4). Richt de
afstandsbediening op de infraroodsensor rechts
in het display (3).
Het display geeft de verstreken afspeeltijd
van de huidige track weer. Het geluidsvolume
van het afspelen hangt af van de instellingen op
de audiospeler en op de regelaar PLAYER (11).
Nederlands
41
Page 42
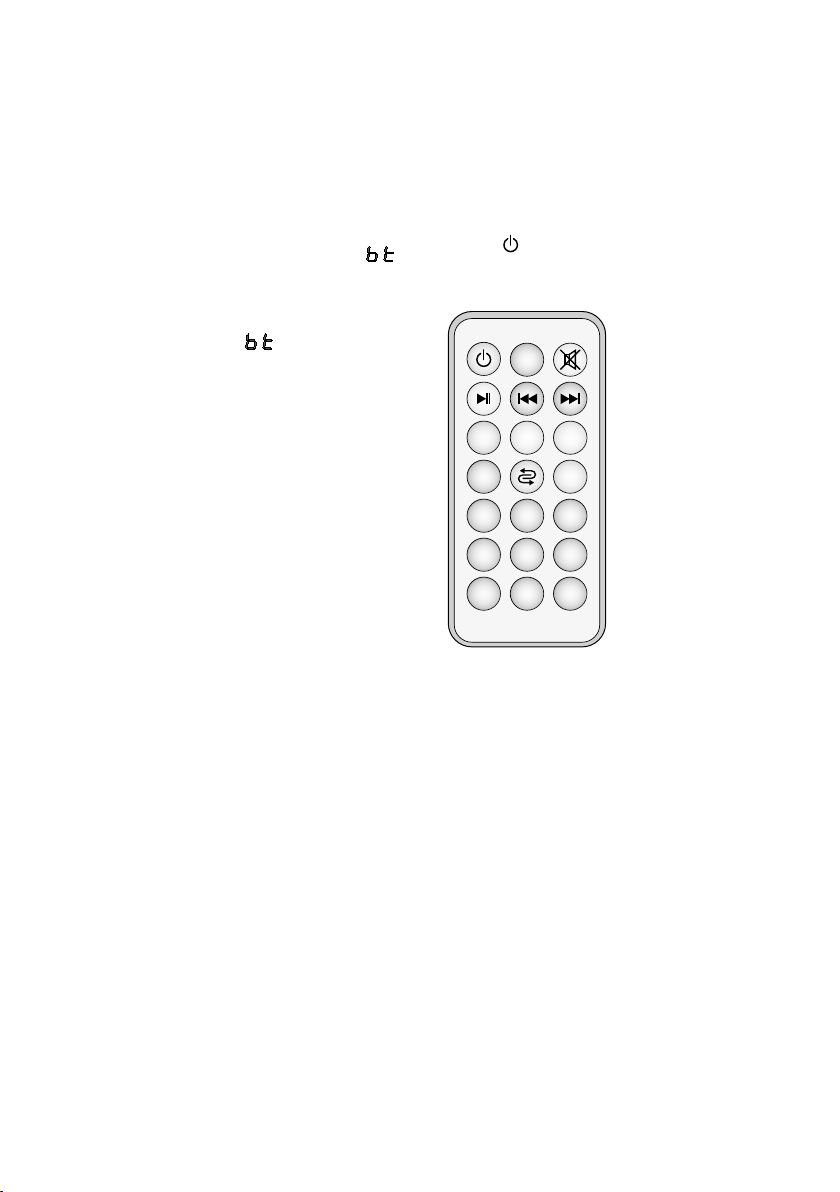
5.3 Bluetooth-ontvanger
8 97
5
64
2 31
0
EQ
+−
U/SD
SCAN
Mode
Alternatief voor het afspelen vanaf een USB-geheugen of een geheugenkaart kan de ingebouwde Bluetooth-ontvanger draadloos worden
verbonden met een Bluetooth-geluidsbron (bijv.
Nederlands
smartphone of tablet-pc).
1) Als er geen USB-geheugen en geen geheugenkaart is aangesloten, bevindt de PAS254D zich automatisch in de Bluetoothmodus: op het display (3) verschijnt .
Bij een aangesloten opslagmedium drukt
u enkele keren op de toets M tot links op
het display TF noch USB branden. Na enkele
seconden verschijnt op het display.
2)
Schakel op de Bluetooth-bron de Bluetooth-functie in. In de lijst met beschikbare
apparaten wordt de PAS-254D als “BTSPEAKER” weergegeven.
3)
Verbind de “BT-SPEAKER” (raadpleeg hiervoor evt. de handleiding van de Bluetoothbron). Daarna worden beide apparaten
automatisch verbonden.
Bij geslaagde verbinding zijn na elkaar
twee signalen hoorbaar.
De bediening van het afspelen via Bluetooth kan
gebeuren op de Bluetooth-bron of via de toetsen (4) of de meegeleverde afstandsbediening
(afb.4) (☞hoofdstuk 5.4). Richt de afstands-
bediening op de infraroodsensor rechts in het
display (3).
Het geluidsvolume van het afspelen via
Bluetooth hangt af van de instellingen op
de Bluetooth-bron, op de audiospeler / Bluetooth-ontvanger en op de regelaar PLAYER (11).
Als de audiospeler noch de Bluetoothontvanger worden gebruikt, kunnen ze met
de afstandsbediening worden uitgeschakeld
(toets ). Hierdoor kan de levensduur van
de accu verhoogd en een ongewenste Bluetooth-ontvangst verhinderd worden.
Afstandsbediening
➍
42
Page 43
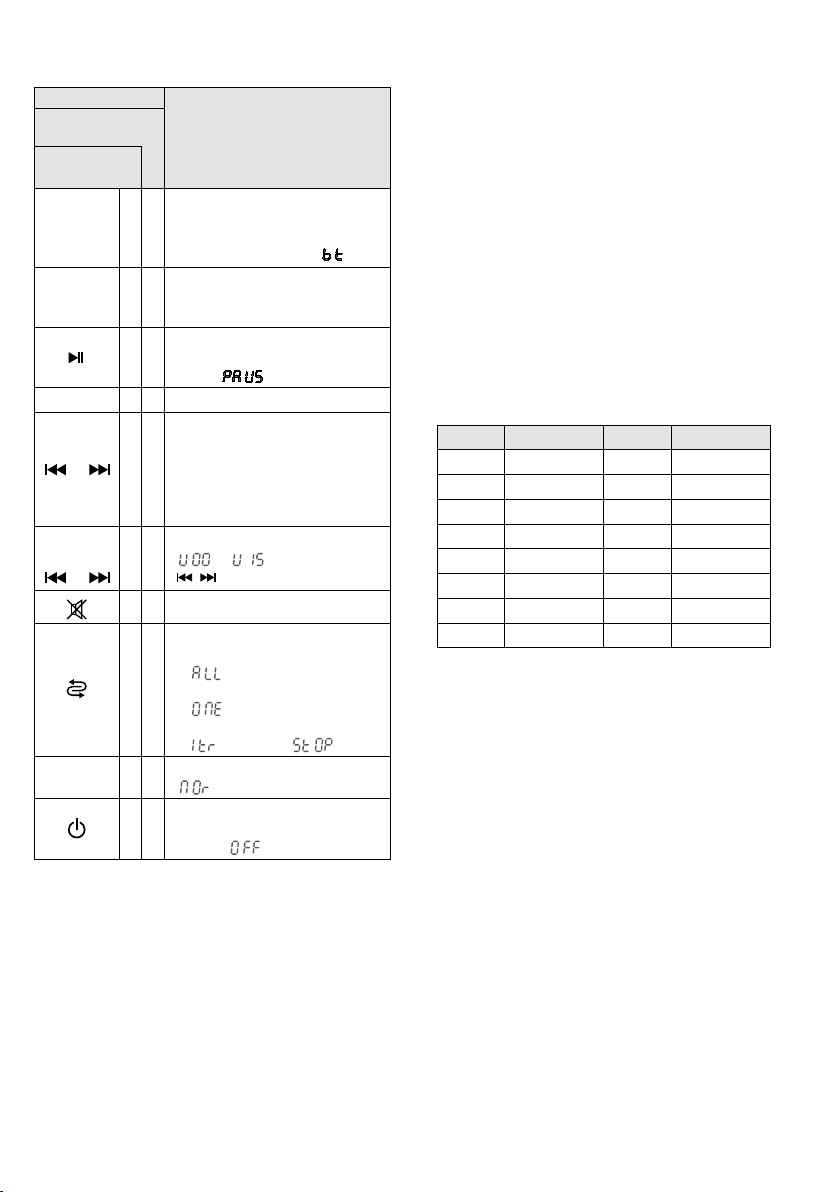
5.4 Bedieningsoverzicht voor de audiospeler/ Bluetooth-ontvanger
Toets
afstands-
bediening
op het
apparaat
Mode
M
U/SD
SCAN
1… 9, 0
/
− / +
/
EQ
*ook bij afspelen via Bluetooth
Bron omschakelen*
✅
USB-geheugen “
Geheugenkaart “
✅
Bluetooth-ontvanger “
Omschakelen tussen
✅
USB-geheugen “
Geheugenkaart “
Afspelen starten en
✅ ✅
omschakelen tussen afspelen en
pauze “
✅
Een track rechtstreeks selecteren
Vorige / volgende track*:
Kort op de toets drukken
snel vooruit / achteruit zoeken
✅ ✅
(alleen met afstandsbediening):
Toets ingedrukt houden (geluid
daarbij gedempt)
Volume wijzigen*
✅
“
(
✅
✅
Geluid uit- en inschakelen*
Afspeelmodus
– herhaling van alle tracks
“
✅
– herhaling van een track
“
– afspelen van een enkele track
“
6 klankvoorinstellingen*
✅
“
Audiospeler/ Bluetooth-
✅
ontvanger
aan /uit “ ”*
Functie
…
/ ingedrukt houden)
”
”
”, daarna “ ”
” = neutraal
USB”
TF”
USB”
TF”
”*
”
6 Technische gegevens
Versterker
Versterkerklasse . . . . . . .D
Sinusvermogen op 2 Ω: . . 70 W
Piekvermogen: . . . . . . . . 80 W
Frequentiebereik: . . . . . . . . 80 – 20 000 Hz
Ingangen (aansluiting, type, gevoeligheid)
Microfoon: . . . . . . . . . . .XLR, gebalanceerd, 2 mV
”
Line: . . . . . . . . . . . . . . . . 6,3 mm, gebalanceerd,
met fantoomvoeding 12 V
14 mV
Cinch, ongebalanceerd,
80 mV
Draadloze ontvangers: . . . .2
Ontvangstbereik:
. . . . . . . .ca. 30 m
Ontvangstfrequenties
Kanaal Frequentie Kanaal Frequentie
01 863,1 MHz 09 863,2 MHz
02 864,1 MHz 10 864,2 MHz
03 863,6 MHz 11 863,7 MHz
04 864,6 MHz 12 864,7 MHz
05 863,3 MHz 13 863,4 MHz
06 864,3 MHz 14 864,4 MHz
07 863,8 MHz 15 863,9 MHz
08 864,8 MHz 16 864,9 MHz
Opslagmedia: . . . . . . . . . .USB-geheugen,
SD / SDHC / MMC-kaart
Audiobestandsformaten: . .mp3, wav
Bluetooth-profiel:
. . . . . . .A2DP
Uitgangen
Line Link: . . . . . . . . . . . .Cinch, 300 mV
Ext. speaker: . . . . . . . . . . Speakon®-compatibel,
min. 4
Ω
Voedingsspanning: . . . . . .Accu 12 V/ 7,2 Ah
Omgevings-
temperatuurbereik: . . . . . . 0 – 40 °C
Totale hoogte: . . . . . . . . . .120 cm
Gewicht: . . . . . . . . . . . . . .7,7 kg
Nederlands
Wijzigingen voorbehouden.
Deze gebruiksaanwijzing is door de auteurswet be schermd eigendom van MONACOR ® INTERNATIONAL
GmbH& Co. KG. Een reproductie – ook gedeeltelijk – voor eigen commerciële doeleinden is verboden.
43
Page 44

Sistema Amplificador Portátil
Estas instrucciones van dirigidas a usuarios sin
ningún conocimiento técnico especial. Lea aten-
Español
tamente estas instrucciones antes de utilizar el
aparato y guárdelas para usos posteriores. Todos
los elementos de funcionamiento y las conexiones que se describen pueden encontrarse en la
página 2.
Contenidos
1 Vista General . . . . . . . . . . . . . . . 44
2 Notas de Seguridad . . . . . . . . . . . . 45
3 Aplicaciones y Accesorios . . . . . . . . 46
3.1 Micrófonos inalámbricos y emisores . . . . . 46
3.2 Conformidad y aprobación . . . . . . . . . . 46
4 Puesta en Marcha . . . . . . . . . . . . . 46
4.1 Recargar la batería . . . . . . . . . . . . . . 46
4.2 Establecer las conexiones de audio . . . . . . 46
4.2.1 Micrófono . . . . . . . . . . . . . . . . . 46
4.2.2 Fuente de audio con nivel de línea. . . . . 46
4.2.3 Amplificador o grabador. . . . . . . . . . 47
4.2.4 Altavoces . . . . . . . . . . . . . . . . . 47
4.3 Control remoto. . . . . . . . . . . . . . . . 47
4.4 Conectar una batería adicional . . . . . . . . 47
5 Funcionamiento . . . . . . . . . . . . . . 47
5.1 Funcionamiento con micrófonos inalámbricos 48
5.1.1 Ajuste de los canales de transmisión. . . . 48
5.1.2 Ajuste del volumen . . . . . . . . . . . . 49
5.1.3 Ajuste del squelch . . . . . . . . . . . . . 49
5.2 Lector de audio . . . . . . . . . . . . . . . 49
5.3 Receptor Bluetooth. . . . . . . . . . . . . . 50
5.4 Resumen del funcionamiento del lector de audio/
receptor Bluetooth . . . . . . . . . . . . . . 51
6 Especificaciones . . . . . . . . . . . . . . 51
1 Vista General
1
Puerto USB (tipo A) para conectar una unidad
flash USB que reproduzca archivos de audio
2 Ranura para una tarjeta de memoria SD que
reproduzca archivos de audio
3
Visualizador para indicar la función Bluetooth
o el medio de almacenamiento seleccionado
y el número de pista actual o el tiempo
reproducido de la pista
4 Botones de control para el lector de audio/
receptor Bluetooth (☞apartado 5.4)
5
Toma combinada XLR / 6,3 mm 1 MIC / LINE IN
para conectar un micrófono u otra fuente de
audio mono (p. ej. mezclador)
6
Control de volumen LEVEL para un micrófono
o aparato de audio conectado a (5)
7 Control de volumen 2 WIRELESS para micró-
fonos inalámbricos
8 Control de sonido común TONE para un mi-
crófono o aparato de audio conectado a(5)
y para micrófonos inalámbricos
9
Tomas RCA 3 LINE IN para conectar una fuente de audio (p. ej. lector CD); cuando se haya
conectado una fuente de audio estéreo, se
creará una señal mono en el amplificador
10 Salidas RCA LINE LINK para grabar la señal
mezclada o para enviarla a otro sistema amplificador; hay dos tomas disponibles para los
grabadores estéreo.
11 Control de volumen PLAYER para la entrada
3 LINE IN (9) y para el lector de audio/ receptor Bluetooth
12
Control de sonido TONE para la entrada
3 LINE IN (9) y para el lector de audio/ receptor Bluetooth
13 Función VOICE OVER para silenciar el soni-
do de una fuente de audio conectada a la
entrada 3 LINE IN y para el lector de audio/
receptor Bluetooth mientras se hable por el
micrófono.
LED MUSIC Se iluminará cuando se
silencie el sonido
Control DEPTH Para ajustar la sensibilidad
cuando se silencia el sonido
44
Page 45
14
Indicadores de estado LED para la batería
recargable
CHARGE Rojo: durante el proceso de
carga
Verde: cuando ha terminado el
proceso de carga
FULL Estado de la carga: completado
OK Estado de la carga: bueno
LOW Estado de la carga: bajo
15 Indicador LED LIMITER; se iluminará cuando
el limitador de nivel esté activo
16 Indicador Power PWR ON
17 Interruptor Power
18
Toma de conexión para cargar la batería;
utilice sólo el cargador entregado
19 Interruptor INTERNAL SPEAKER para conec-
tar/ desconectar el recinto del amplificador
20
Toma EXT.SPEAKER para conectar un altavoz
(adicional)
Nota: Para garantizar que el amplificador no se sobrecargue cuando el volumen sea elevado y se conecte un
altavoz externo, se recomienda desconectar el recinto
del amplificador PAS-254D mediante el interruptor
INTERNAL SPEAKER (19).
21 Tapa de los compartimentos de las baterías
2 Notas de Seguridad
Los aparatos (sistema amplificador y cargador)
cumplen con todas las directivas relevantes de
la UE y por lo tanto están marcados con el símbolo .
ADVERTENCIA
No utilice nunca el sistema amplificador bajo
•
lluvias intensas y asegúrese de que no entra
humedad en el aparato. La cubierta entregada
protege el recinto de humedad.
El cargador está adecuado sólo para utilizarlo
en interiores. Protéjalo contra goteos, salpicaduras y humedad elevada.
El cargador utiliza un voltaje
peligroso. Deje el mantenimiento en manos del personal
cualificado. El manejo inexperto
puede provocar una descarga.
Rango de temperatura ambiente admisible
para los aparatos: 0 – 40 ºC.
No coloque ningún recipiente lleno de líquido
•
encima del cargador, como por ejemplo un
vaso.
No utilice los aparatos y desconecte inmedia-
•
tamente el cable de corriente del cargador
del enchufe si:
1.
Un aparato o el cable de corriente están
visiblemente dañados.
2.
El aparato ha sufrido daños después de una
caída o accidente similar.
3. No funciona correctamente.
Sólo el personal técnico puede reparar los
aparatos bajo cualquier circunstancia.
No tire nunca del cable de corriente del carga-
•
dor para desconectar el enchufe de la toma,
tire siempre del enchufe.
Un cable de corriente dañado sólo puede re-
•
pararse por el personal cualificado.
Utilice sólo un paño suave y seco, o levemente
•
húmedo, para la limpieza; no utilice nunca ni
productos químicos ni detergentes agresivos.
No podrá reclamarse garantía o responsabi-
•
lidad alguna por cualquier daño personal o
material resultante si los aparatos se utilizan
para otros fines diferentes a los originalmente
concebidos, si no se conectan correctamente,
no se utilizan adecuadamente o no se reparan
por expertos. Del mismo modo, no se aceptará ninguna responsabilidad por la pérdida de
datos provocada por un defecto o por errores
de funcionamiento ni por los daños a consecuencia de esta pérdida de datos.
Si va a poner los aparatos fuera de
servicio definitivamente, llévelos a la
planta de reciclaje más cercana para
que su eliminación no sea perjudicial
para el medioambiente.
Español
45
Page 46

3 Aplicaciones y Accesorios
El amplificador PAS-254D se alimenta mediante
una batería recargable y se puede transportar
Español
como una mochila durante manifestaciones,
por ejemplo. Encima del amplificador hay un
marco con un recinto y cuatro altavoces full
range que proyectan el sonido hacia delante y
hacia atrás. El amplificador está equipado con
entradas mezclables para un micrófono, una
fuente de audio (estéreo) (p. ej. lector CD) y una
sección receptora para dos micrófonos inalámbricos. Además, los archivos de audio se pueden
reproducir desde una unidad flash USB, desde
una tarjeta de memoria SD / MMC o mediante
el receptor Bluetooth integrado (p. ej. desde un
smartphone). Se puede silenciar la música automáticamente, por ejemplo mientras se habla por
el micrófono. Con una batería completamente
cargada, el amplificador puede funcionar hasta
7horas.
Se pueden utilizar una segunda batería
recargable (NPA-12 / 7), disponible opcionalmente como accesorio, para aumentar el tiempo de
funcionamiento. Hay otros compartimentos a
ambos lados de la mochila para objetos como
micrófonos y cables de conexión.
3.1 Micrófonos inalámbricos y emisores
Los aparatos siguientes de la gama de MONACOR están disponibles:
Tipo Modelo
Micrófono a mano inalámbrico TXA-800HT
Emisor de petaca con microfóno de diadema y
Para proporcionar sonido en zonas más grandes, las señales inalámbricas de los emisores
se pueden recibir simultáneamente por varios
PAS-254D.
3.2 Conformidad y aprobación
Por la presente, MONACOR INTERNATIONAL declara que el receptor inalámbrico del
PAS-254D cumple con la directiva 2014 / 53 / EU.
La declaración de conformidad de la UE está
disponible en Internet:
www.monacor.com
46
micrófono de solapa
Emisor con entrada de nivel de línea para
señales de audio
TXA-800HSE
TXA-800ST
El sistema inalámbrico (emsior y receptor) está
aprobado para el funcionamiento en la UE y
en los países de la AELC; no requiere ninguna
licencia ni registro.
4 Puesta en Marcha
4.1 Recargar la batería
Para recargar la batería integrada y una batería
conectada adicional, conecte el cargador entregado a la toma de bajo voltaje (18) y luego
a un enchufe (230 V/ 50 Hz). Los indicadores de
estado LED (14) indicarán el estado de carga:
FULL (completo), OK (bueno) y LOW (bajo). El
indicador LED CHARGE se iluminará en rojo
cuando la batería se esté recargando. El amplificador puede desconectarse durante la recarga.
Cuando la batería se haya recargado
(indicador LED CHARGE iluminado en verde),
desconecte el cargador del amplificador y de
la corriente.
4.2 Establecer las conexiones de audio
4.2.1 Micrófono
Conecte un micrófono con un conector XLR a
la toma 1 MIC / LINE IN (5).
Para los micrófonos que necesiten alimentación phantom (p. ej. micrófonos electret) existe
una alimentación phantom de 12 V en los contactos XLR de la toma.
Nota: No conecte nunca micrófonos u otras fuentes de
audio con una salida asimétrica a la toma XLR; la alimentación phantom podría dañarlos.
También se pueden conectar micrófonos con un
conector jack 6,3 mm a la toma 1 MIC / LINE IN;
esta entrada, sin embargo, es menos sensible
en cierta medida.
4.2.2 Fuente de audio con nivel de línea
Mediante un conector jack 6,3 mm, se puede
conectar una fuente de audio mono con nivel
de señal de línea (p. ej. mezclador, receptor adicional para micrófonos inalámbricos) a la toma
1 MIC / LINE IN (5). Como alternativa, esta fuente
de audio se puede conectar a una de las tomas
RCA 3 LINE IN(9).
Conecte una fuente de audio estéreo (p. ej.
lector CD / MP3, radio, mezclador) a las tomas
3 LINE IN(9). El amplificador es monofónico;
Page 47
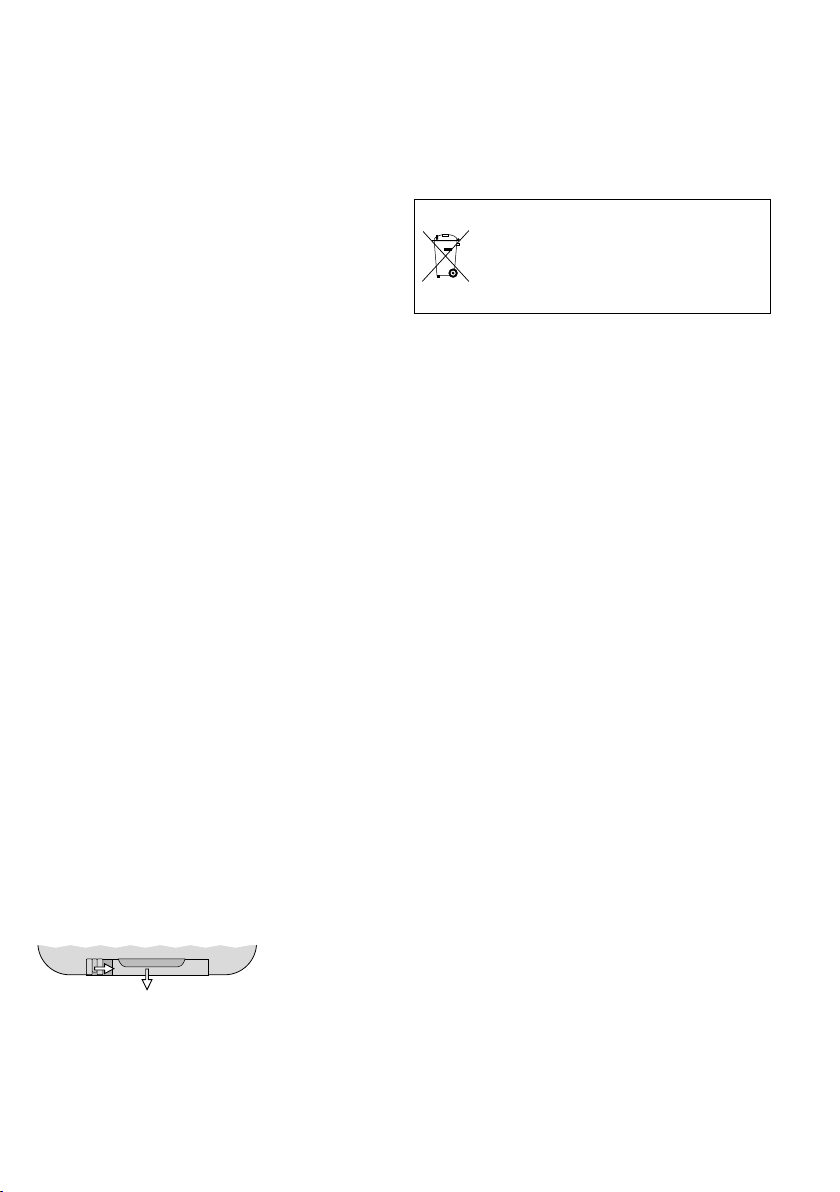
por lo tanto, las señales estéreo se transforman
internamente en una señal mono. Se puede
silenciar la señal de una fuente de audio conectada a una de las tomas 3 LINE IN mientras se
habla por el micrófono (función VOICE OVER
apartado 5).
☞
4.2.3 Amplificador o grabador
Se puede conectar un sistema amplificador adicional o un grabador a las tomas LINE LINK (10).
Para grabadores estéreo, hay dos tomas disponibles. El amplificador es monofónico; por lo
tanto, las señales de las dos tomas son idénticas.
4.2.4 Altavoces
Se puede conectar un altavoz adicional a la toma
compatible con Speakon® EXT.SPEAKER (20).
Este altavoz se puede utilizar como añadido o
como alternativa al recinto existente.
Conecte el conector de altavoz en la toma y
luego gire el conector en sentido horario hasta
que encaje. Para extraer el conector, tire de
la pestaña de seguridad del conector y gire el
conector en sentido horario inverso.
Si es necesario, utilice el interruptor INTERNAL SPEAKER (19) para desconectar el recinto
del PAS-254D (posición “OFF”).
Nota: Para garantizar que el amplificador no se sobrecargue cuando el volumen sea elevado y se conecte un
altavoz externo, se recomienda desconectar el recinto del
amplificador PAS-254D.
4.3 Control remoto
El control remoto para el funcionamiento del
lector de audio/ receptor Bluetooth está alimentado con una batería distinta. Antes del
primer funcionamiento, inserte la batería: En la
parte posterior del control remoto, presione la
pequeña pestaña con la ranura hacia la derecha
y extraiga el soporte de la batería.
1. 2.
Extraer el soporte de la batería
➋
Inserte la batería en el soporte de la batería
como se indica en el control remoto (asegúrese de prestar atención a la polaridad “+”) y
luego coloque de nuevo el soporte en el control
remoto.
Cuando el rango de funcionamiento del
control remoto disminuye, significa que hay
que cambiar la batería por otra del mismo tipo.
Si el control remoto no se va a utilizar durante un largo periodo de tiempo, quite la batería
como precaución para que el control remoto no
se dañe si se derraman las baterías.
No deposite nunca las baterías gastadas
en el contenedor normal. Para proteger
el medioambiente, llévelas siempre a
un contenedor especializado, p. ej. el
contenedor selectivo de su tienda.
4.4 Conectar una batería adicional
Se puede conectar una batería recargable adicional del tipo NPA-12 / 7 (disponible por separado
como accesorio) para aumentar el tiempo de
funcionamiento. El manejo incorrecto es peligroso; por lo tanto, sólo un técnico especializado
debe conectar la batería.
1)
Asegúrese de que el PAS-254D está apagado
y desconectado del cargador.
2)
Extraiga el tornillo central de la tapa (21) para
los compartimentos de la batería y luego abra
la tapa.
3)
Conecte la batería a los dos cables en el
compartimento vacío; asegúrese de prestar
atención a la polaridad correcta (rojo = +).
Nota: Si la batería no encaja en el compartimento
vacío, puede cambiar la posición y las conexiones de
las dos baterías.
4) Cierre la tapa.
5 Funcionamiento
1) Antes de la conexión inicial, ajuste todos los
controles de volumen (6, 7, 11) en “0” para
evitar volúmenes elevados inesperados cuando se conecte el amplificador.
2)
Conecte las fuentes de audio conectadas y/o
los emisores inalámbricos.
3)
Utilice el interruptor Power (17) para conectar
el amplificador. Se iluminará el indicador LED
Power PWR ON (16). Además, el indicador
LED apropiado (14) indicará el estado de
carga actual de la batería. Cuando se ilumina el indicador LED LOW, hay que recargar
la batería (☞apartado 4.1).
Español
47
Page 48
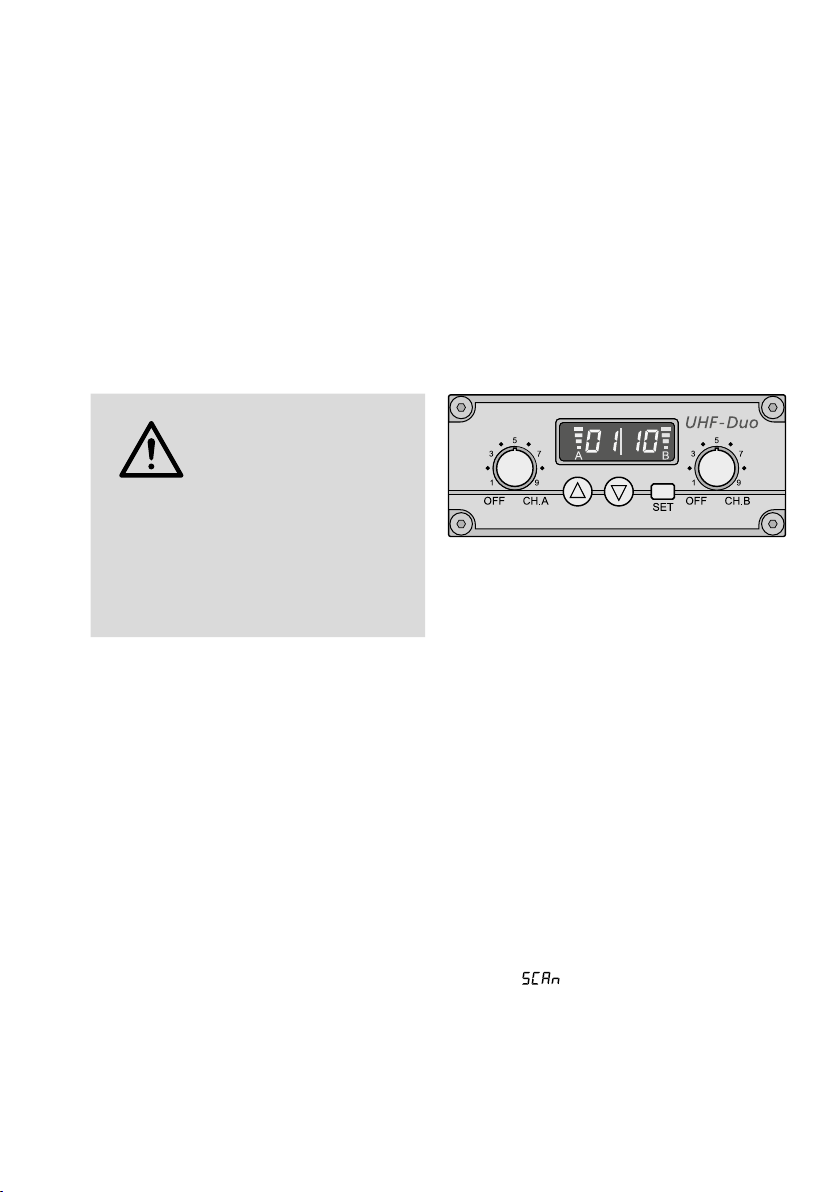
4)
Reproducza música, por ejemplo, desde
una fuente de audio conectada o hable por
un micrófono inalámbrico o un micrófono
conectado por cable (funcionamiento del lec-
Español
tor de audio/ receptor Bluetooth ☞apartados 5.2 a 5.4).
5)
Ajuste el volumen de las fuentes de audio
con el control correspondiente.
LEVEL (6): Fuente de audio en la entra-
da 1 MIC / LINE IN
2 WIRELESS (7): Micrófonos inalámbricos,
ver también apartado 5.1.2
PLAYER (11): Fuente de audio en la en-
trada 3 LINE IN y lector de
audio/ receptor Bluetooth
ADVERTENCIA ¡No utilice nunca el ampli-
ficador cuando los altavoces estén cerca de algún
oyente! El volumen elevado puede provocar daños
auditivos.
Para evitar el feedback acústico (pitido
estridente), no coloque nunca el altavoz
hacia el micrófono y asegúrese siempre de
que hay suficiente distancia entre el altavoz
y el micrófono.
Un limitador de nivel prevendrá automáticamente las distorsiones con volúmenes
elevados. El indicador LED LIMITER (15) se
iluminará cuando el limitador esté activo.
6)
Utilice el control TONE (8) para ajustar el
sonido deseado para los micrófonos o para
una fuente de audio conectada a la toma (5).
Utilice el control TONE (12) para ajustar el
sonido de una fuente conectada a las tomas
3 LINE IN y para el lector de audio/ receptor
Bluetooth. El control remoto ofrece opciones
de ajuste de sonido adicionales para el lector
de audio/ receptor Bluetooth (☞apartado5.4, botón “EQ”).
7) Para silenciar automáticamente el sonido de
una fuente de audio conectada a las tomas
3 LINE IN (9) o del lector de audio / receptor
Bluetooth durante los anuncios realizados
mediante el micrófono [VOICE OVER (13)],
ajuste el control DEPTH de modo que el indicador LED MUSIC se ilumine mientras se
hable por el micrófono.
48
8)
Para evitar descargas innecesarias de la
batería, desconecte el amplificador con el
interruptor Power (17) después del funcionamiento o durante pausas largas.
Si no se va a utilizar el amplificador durante un
largo periodo de tiempo, cargue completamente
la batería antes de guardarla y recárguela cada
seis meses para compensar la autodescarga
normal.
5.1 Funcionamiento con micrófonos inalámbricos
El sistema amplificador está equipado con un
módulo receptor para dos micrófonos / emisores
inalámbricos. El módulo receptor está debajo
del recinto.
Módulo receptor inalámbrico
➌
Cada sección receptora (A y B) está equipada
con un control para ajustar el volumen y para conectarlo y desconectarlo (fig. 3). El visualizador
está dividido en dos partes: parte izquierda para
la sección receptora A, parte derecha para la
sección receptora B. Cuando se haya conectado
una sección receptora, el visualizador indicará el
canal de transmisión. Para indicar brevemente
la frecuencia de radio, pulse el botón (para
la sección A) o
5.1.1 Ajuste de los canales de transmisión
Utilice los controles para conectar las secciones
receptoras. No conecte los micrófonos / emisores
inalámbricos correspondientes por el momento.
5.1.1.1 Escaneo de canales
Mantenga pulsados simultáneamente los botones y durante 1 segundo aprox. hasta que
aparezca en el visualizador. Empezará el
escaneo: Las secciones receptoras se ajustarán
en canales libres sin interferencias mutuas. Si
no se encuentran canales libres, se mantendrá
el ajuste de los canales.
Nota: El escaneo de canales también puede iniciarse sólo
para una sección (botón para la sección A o botón
para la sección B).
(para la sección B).
Page 49

5.1.1.2 Selección manual de canal
Si ambas secciones receptoras A y B están conectadas:
1)
Mantenga pulsado el botón SET hasta que la
indicación de canal de la sección receptoraA
empiece a parpadear en el visualizador.
2)
Seleccione el canal para la sección receptoraA con el botón o y luego confirme
con el botón SET.
3) La indicación de canal de la sección receptoraB empezará a parpadear en el visualizador. Seleccione el canal para la sección
receptoraB con el botón o y luego
confirme con el botón SET.
Cuando sólo se haya conectado una sección
receptora A o B:
Mantenga pulsado el botón SET hasta que la
indicación de canal empiece a parpadear en el
visualizador. Seleccione el canal con el botón
o y luego confirme con el botón SET.
Notas:
1. Las secciones receptoras no se pueden ajustar en el
mismo canal.
2.
Si un canal no se confirma en 10 segundos con el
botón SET, saldrá del modo de ajuste y no se mantendrá el canal previamente ajustado.
3.
Si, con el emisor apagado, la barra de segmentos
correspondiente A o B del visualizador indica recepción, significa que hay interferencias o que se reciben
señales de otros emisores. En este caso, utilice un
canal diferente.
5.1.2 Ajuste del volumen
Conecte los micrófonos / emisores inalámbricos y
ajuste uno en el canal de la sección receptoraA
y el otro en el canal de la sección receptoraB. La
barra de segmentos respectiva del visualizador
indicará la fuerza de las señales de radio recibidas. Utilice los controles para ajustar el volumen
deseado para cada sección receptora.
Utilice el control 2 WIRELESS (7) para ajustar
el volumen de las señales de audio recibidas.
Nota: Si no recibe ninguna señal desde el micrófono
inalámbrico, asegúrese de que el micrófono emite en la
frecuencia correcta (canal) y compruebe su batería. Si es
necesario, reduzca la distancia entre el sistema amplificador y el micrófono.
5.1.3 Ajuste del squelch
La función squelch silenciará la sección receptora
correspondiente cuando el nivel de la señal de
radio caiga por debajo del valor de umbral ajustado. Por lo tanto, las señales de interferencia no
provocarán ruidos cuando el emisor se desconecte o cuando la señal de radio sea insuficiente:
Si los niveles de las señales de interferencia están
por debajo del valor de umbral, la sección receptora se silenciará. Un valor de umbral superior
ofrece mayor resistencia a las interferencias pero
reducirá el rango de transmisión.
1)
Desconecte las secciones receptoras A y
B. Luego mantenga pulsado el botón SET
mientras conecta una sección receptora. El
visualizador indicará o , con el número
parpadeando.
2) Pulse el botón SET para activar el modo de
ajuste squelch: (para “Squelch”) y el valor
actual (parpadeando) aparecerán en el visualizador.
3) Utilice el botón o para ajustar el valor
(nivel 7 = valor de umbral más alto). Pulse
el botón SET para salir del modo de ajuste
squelch.
Nota: Se sale de los modos de ajuste automáticamente
después de 5 segundos si no se pulsa ningún botón. Se
guardará cualquier ajuste realizado.
5.2 Lector de audio
El lector de audio integrado puede reproducir
archivos de audio en el formato MP3 o WAV. Se
pueden utilizar unidades flash USB o tarjetas de
memoria SD[HC] (también tarjetas MMC) como
medio de almacenamiento.
Nota: Debido a la gran cantidad de fabricantes de medios
de almacenamiento y de drivers, no podemos garantizar
que todos los medios de almacenamiento sean compatibles con el lector de audio.
Inserte una unidad flash USB en el puerto USB(1)
y/o inserte una tarjeta de memoria (contactos
mirando hacia arriba) en la ranura (2).
Cuando el aparato esté conectado, se seleccionará el último archivo de audio reproducido y
el lector de audio se pondrá en el modo pausa
(indicación: ). La unidad flash USB tendrá
prioridad sobre la tarjeta de memoria. Cuando
se inserte un medio durante el funcionamiento,
se seleccionará automáticamente.
Español
49
Page 50
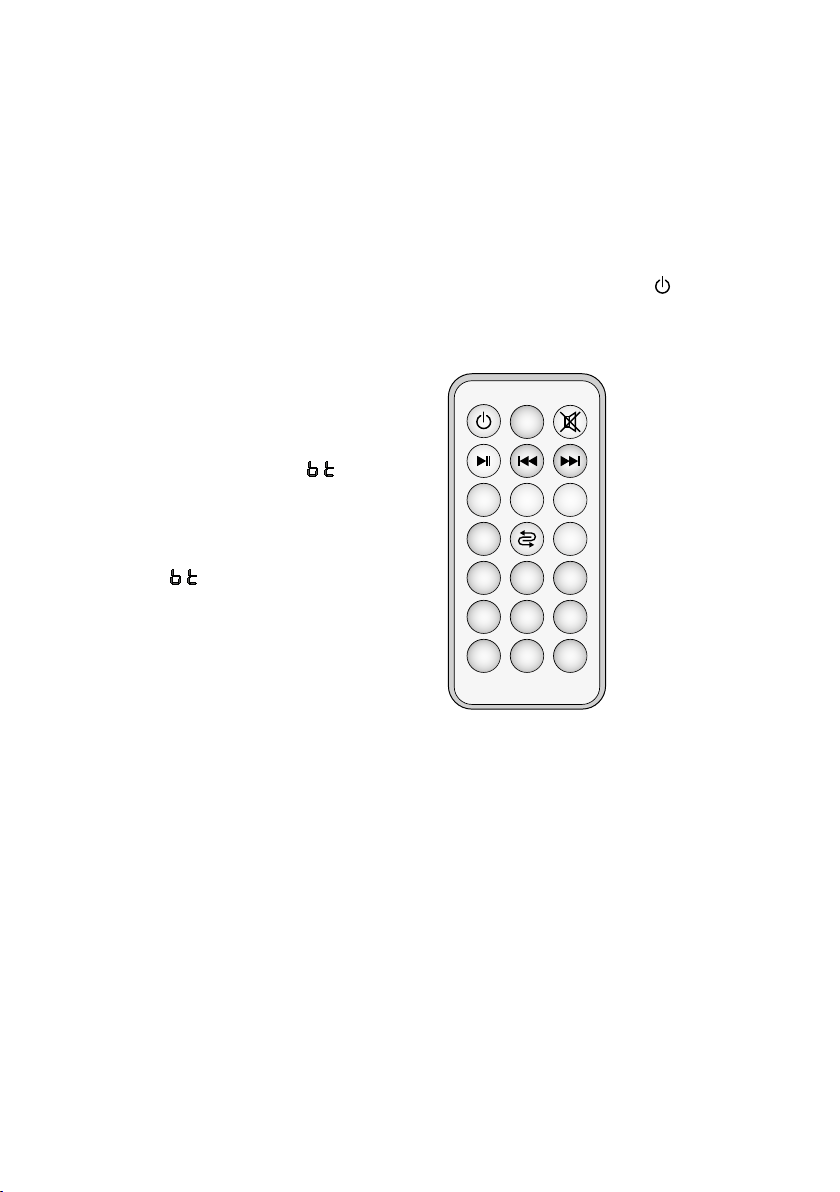
El lector de audio puede funcionar mediante
8 97
5
64
2 31
0
EQ
+−
U/SD
SCAN
Mode
los botones (4) o el control remoto entregado (fig.4) (☞apartado 5.4). Dirija el control
remoto hacia el sensor IR a la derecha del vi-
Español
sualizador (3).
El visualizador indica el tiempo reproducido
de la pista actual. El volumen de la reproducción
depende de los ajustes del lector de audio y del
control PLAYER (11).
5.3 Receptor Bluetooth
Como alternativa a la reproducción desde una
unidad flash USB o tarjeta de memoria, el receptor Bluetooth integrado puede utilizarse para
la conexión inalámbrica a una fuente de audio
Bluetooth (p. ej. smartphone o tablet).
1) Cuando no se conecte ninguna unidad flash
USB o tarjeta de memoria, el PAS-254D pasará automáticamente al modo Bluetooth: En
el visualizador (3) aparecerá .
Cuando se conecte un medio de almacenamiento, pulse el botón M repetidamente
hasta que no se ilumine ni TF ni
izquierda del visualizador. En el visualizador
aparecerá al cabo de unos segundos.
2)
Active la función Bluetooth en la fuente
Bluetooth. Aparecerá PAS-254D (designado
como “BT-SPEAKER”) en la lista de aparatos
disponibles.
3) Empareje la fuente con “BT-SPEAKER” (ver
manual de instrucciones de la fuente Bluetooth, si es necesario). Los dos aparatos se
conectarán automáticamente.
Cuando se haya establecido la conexión,
sonará una secuencia de 2 tonos.
USB
en la parte
La reproducción mediante el receptor Bluetooth
se puede controlar mediante los botones(4)
o con el control remoto entregado (fig.4)
(☞apartado5.4). Dirija el control remoto hacia
el sensor IR a la derecha del visualizador (3).
El volumen de la reproducción Bluetooth
depende de los ajustes de la fuente Bluetooth,
del lector de audio/ receptor Bluetooth y del
control PLAYER (11).
Cuando no se utilice ni el lector de audio ni
el receptor Bluetooth, desconéctelos mediante
el control remoto (botón ). Esto aumentará el tiempo de funcionamiento de la batería
y prevendrá cualquier recepción Bluetooth no
deseada.
Control remoto
➍
50
Page 51
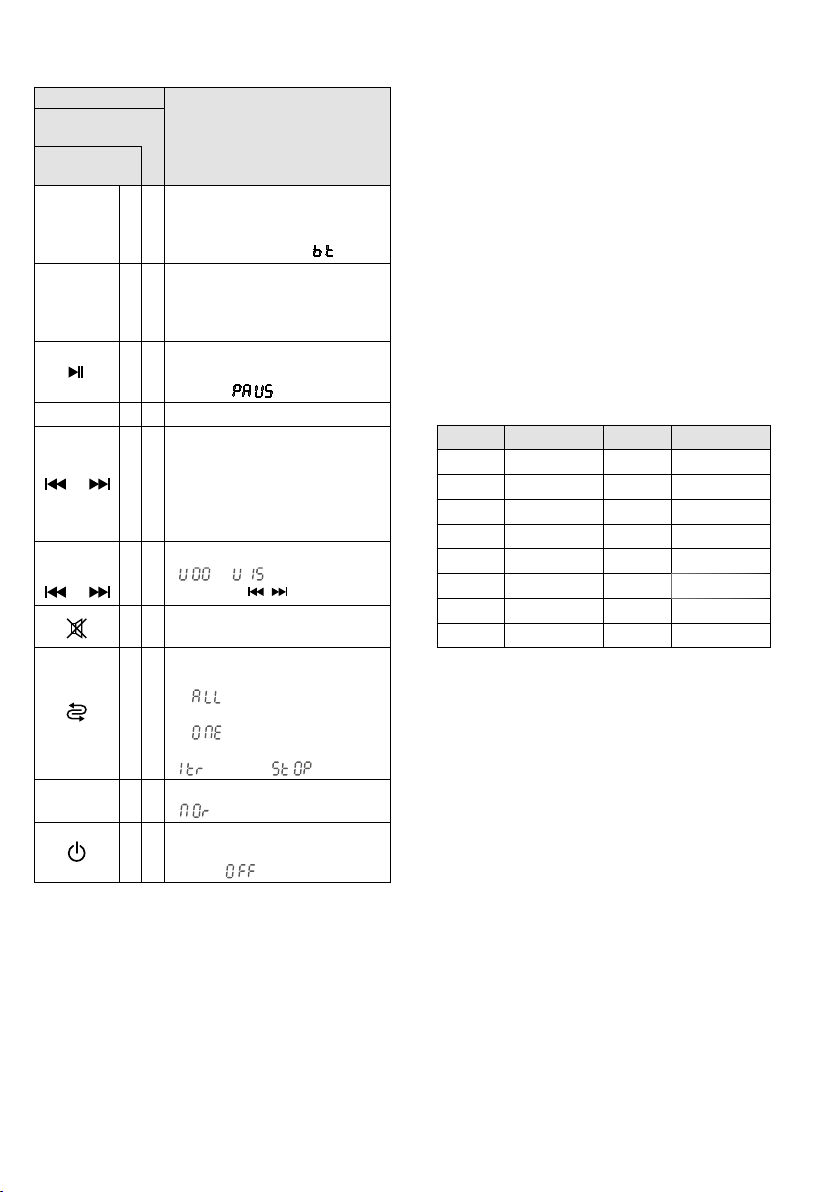
5.4 Resumen del funcionamiento del lector de audio/receptor Bluetooth
Botón
En el
control remoto
En el
aparato
Mode
M
U/SD
SCAN
1… 9, 0
/
− / +
/
EQ
*también para reproducción Bluetooth
Para cambiar la fuente*
✅
Medio de almacenamiento
Tarjeta de memoria “
✅
Receptor Bluetooth “
Para cambiar entre
Medio de almacenamiento USB
✅
“
USB”
Tarjeta de memoria “
Para iniciar la reproducción y
✅ ✅
para cambiar entre reproducción
y pausa
✅
Selección directa de pista
Pista anterior / siguiente*:
Pulse brevemente el botón
Avance / retroceso rápido
✅ ✅
(sólo con el control remoto):
mantenga el botón pulsado
(sonido silenciado)
Para cambiar el volumen*
✅
“
(mantenga
✅
Para silenciar y
✅
devolver el sonido*
Modo repetición
– repetición de todas las pistas
“
✅
– repetición de una pista
“
– reproducción de una pista
“
6 preajustes de sonido*
✅
“
Lector de audio / receptor
✅
Bluetooth
on / off “ ”*
Función
“ ”*
”
…
/ pulsado)
”
”
”, luego “ ”
” = neutral
“USB”
TF”
”
TF”
6 Especificaciones
Amplificador
Clase de amplificador: . . . D
Potencia RMS a 2 Ω: . . . .70 W
Potencia de pico: . . . . . .80 W
Rango de frecuencias: . . . .80 – 20 000 Hz
Entradas (conexiones, tipo, sensibilidad)
Micrófono: . . . . . . . . . . .XLR, sim., 2 mV
con alimentación
phantom 12 V
Línea: . . . . . . . . . . . . . . . 6,3 mm, sim., 14 mV
RCA, asim., 80 mV
Secciones receptoras
inalámbricas: . . . . . . . . . . .2
Rango de recepción:
Frecuencias recibidas
Canal Frecuencia Canal Frecuencia
01 863,1 MHz 09 863,2 MHz
02 864,1 MHz 10 864,2 MHz
03 863,6 MHz 11 863,7 MHz
04 864,6 MHz 12 864,7 MHz
05 863,3 MHz 13 863,4 MHz
06 864,3 MHz 14 864,4 MHz
07 863,8 MHz 15 863,9 MHz
08 864,8 MHz 16 864,9 MHz
Medio de
almacenamiento: . . . . . . . .Unidad flash USB,
Formatos de archivo
de audio: . . . . . . . . . . . . . . MP3, WAV
Perfil Bluetooth:
Salidas
Line Link: . . . . . . . . . . . .RCA, 300 mV
Ext. Speaker: . . . . . . . . . .Compatible con Speakon®,
Alimentación: . . . . . . . . . . Batería rec., 12 V/ 7,2 Ah
Temperatura ambiente: . . . 0 – 40 °C
Altura total: . . . . . . . . . . .120 cm
Peso: . . . . . . . . . . . . . . . . . 7,7 kg
. . . . .30 m aprox.
tarjeta SD / SDHC / MMC
. . . . . . . . . A2DP
4 Ω mín.
Español
Sujeto a modificaciones técnicas.
Manual de instrucciones protegido por el copyright de MONACOR ® INTERNATIONAL GmbH & Co. KG. Toda
reproducción mismo parcial para fines comerciales está prohibida.
51
Page 52

Przenośny system wzmacniający
Niniejsza instrukcja przeznaczona jest dla użyt-
Polski
kowników, którzy nie posiadają wiedzy i doświadczenia technicznego. Przed rozpoczęciem
użytkowania proszę zapoznać się z instrukcją,
a następnie zachować ją do wglądu. Na stronie
2 pokazano elementy operacyjne oraz złącza.
Spis treści
1 Elementy operacyjne i złącza. . . . . . . 52
2 Środki bezpieczeństwa . . . . . . . . . . 53
3 Zastosowanie i akcesoria. . . . . . . . . 54
3.1 Mikrofony i nadajnikibezprzewodowe . . . . 54
3.2 Normy i zezwolenia . . . . . . . . . . . . 54
4 Przygotowanie do pracy . . . . . . . . . 54
4.1 Ładowanie akumulatora . . . . . . . . . . . 54
4.2 Podłączanie . . . . . . . . . . . . . . . . . 54
4.2.1 Mikrofon . . . . . . . . . . . . . . . . . 54
4.2.2 Źródło audio z wyjściem liniowym . . . . . 54
4.2.3 Dodatkowy wzmacniacz lubrejestrator . . 55
4.2.4 Głośniki . . . . . . . . . . . . . . . . . . 55
4.3 Zdalne sterowanie . . . . . . . . . . . . . . 55
4.4 Dodatkowy akumulator . . . . . . . . . . . 55
5 Obsługa . . . . . . . . . . . . . . . . . . 55
5.1 Mikrofony bezprzewodowe. . . . . . . . . . 56
5.1.1 Wybór kanału transmisji . . . . . . . . . . 56
5.1.2 Regulacja głośności . . . . . . . . . . . . 57
5.1.3 Regulacja progu squelch. . . . . . . . . . 57
5.2 Odtwarzacz audio . . . . . . . . . . . . . . 57
5.3 Odbiornik Bluetooth . . . . . . . . . . . . . 57
5.4 Przegląd funkcji odtwarzacza audio / odbiornika
Bluetooth . . . . . . . . . . . . . . . . . . 58
6 Specyfikacja . . . . . . . . . . . . . . . . 59
1 Elementy operacyjne i złącza
1
Port USB (typu A) do podłączania pamięci
USB w celu odtwarzania plików audio
2
Czytnik kart SD do odtwarzania plików audio
3
Wyświetlacz pokazujący informacje o włączeniu funkcji Bluetooth, wyborze nośnika oraz
numerze bieżącego utworu lub minionym
czasie jego odtwarzania
4
Przyciski sterujące odtwarzaczem audio /
odbiornikiem Bluetooth (☞rozdz. 5.4)
5
Gniazdo wejściowe 1 MIC / LINE IN (combo
XLR / 6,3 mm) do podłączania mikrofonu lub
źródła audio z wyjściem liniowym mono
(np.miksera)
6
Regulator głośności LEVEL dla mikrofonu lub
źródła audio podłączonego do gniazda (5)
7 Regulator głośności 2 WIRELESS dla mikro-
fonów bezprzewodowych
8 Wspólny regulator barwy dźwięku TONE dla
mikrofonu lub źródła audio podłączonego
do gniazda (5) oraz dla mikrofonów bezprzewodowych
9 Gniazda wejściowe RCA 3 LINE IN dla źródła
audio z wyjściem liniowym (np. odtwarzacza
CD); w przypadku sygnałów stereo, sygnał
zostaje wewnętrznie zmiksowany do postaci
mono
10
Gniazda wyjściowe LINE LINK do nagrywania
zmiksowanego sygnału lub do podłączania
kolejnego systemu wzmacniającego; dostępne są dwa gniazda dla rejestratorów stereo
11
Regulator głośności PLAYER dla wejścia
3 LINE IN (9) oraz wbudowanego odtwarzacza audio/ odbiornika Bluetooth
12 Regulator barwy TONE dla sygnału z wejścia
3 LINE IN (9) oraz odtwarzacza audio/ odbiornika Bluetooth
13
Funkcja VOICE OVER do wyciszania muzyki z
wejścia 3 LINE IN oraz wbudowanego odtwarzacza audio/ odbiornika Bluetooth podczas
nadawania komunikatów przez mikrofon
Dioda MUSIC zapala się gdy muzyka zo-
staje wyciszona
Regulator DEPTH do regulacji stopnia wyci-
szenia
52
Page 53
14 Diodowy wskaźnik ładowania akumulatora
CHARGE Czerwony: podczas ładowania
Zielony: po zakończeniu łado-
wania
FULL stan naładowania: pełny
OK stan naładowania: dobry
LOW stan naładowania: niski
15 Dioda LIMITER; zapala się przy aktywacji li-
mitera
16 Wskaźnik zasilania PWR ON
17 Włącznik zasilania
18 Gniazdo do podłączania zasilacza w celu ła-
dowania akumulatora
19
Przełącznik INTERNAL SPEAKER do włączania /
wyłączania wbudowanego głośnika
20
Gniazdo EXT.SPEAKER do podłączania dodatkowego głośnika
Uwaga: Dla ochrony wzmacniacza przed przeciążeniem, w przypadku podłączania zewnętrznego głośnika, zaleca się wyłączenie wbudowanego zestawu
głośnikowego, za pomocą przełącznika INTERNAL
SPEAKER (19).
21 Pokrywa akumulatora
2 Środki bezpieczeństwa
Urządzenia (system wzmacniający oraz zasilacz)
spełniają wszystkie wymagania norm UE i dlatego zostały oznaczone symbolem .
UWAGA
Nie używać urządzenia podczas silnego desz-
•
czu oraz zawsze zapobiegać dostaniu się
wody do wnętrza urządzenia. Dostarczony
wraz z urządzeniem pokrowiec chroni jedynie
przed wilgocią.
Ładowarka przeznaczona jest wyłącznie do
użytku w pomieszczeniach. Należy chronić
ją przed wodą oraz wysoką wilgotnością
Zasilacz urządzenia pracuje na
niebezpiecznym napięciu. Wszelkie naprawy należy zlecić osobie
przeszkolonej. Nieprawidłowa
obsługa może spowodować
porażenie prądem elektrycznym.
powietrza. Należy chronić urządzenie przed
działaniem ekstremalnych temperatur (dopuszczalny zakres 0 – 40 °C).
Na zasilaczu nie należy stawiać żadnych po-
•
jemników z cieczą np. szklanek.
Nie wolno używać urządzenia lub natychmiast
•
odłączyć zasilacz od gniazdka sieciowego
1.
jeżeli stwierdzono istnienie widocznego
uszkodzenia urządzenia lub kabla zasilającego,
2.
jeżeli uszkodzenie urządzenia mogło nastąpić w wyniku upadku lub innego podobne
go zdarzenia,
3. jeżeli urządzenie działa nieprawidłowo
W każdym przypadku, naprawę należy zlecić
specjaliście.
Nie wolno odłączać zasilacza urządzenia z
•
gniazdka sieciowego ciągnąc za kabel zasilania, należy zawsze chwytać za wtyczkę.
Wymianę uszkodzonego kabla zasilającego
•
należy zlecić specjaliście.
Do czyszczenia używać suchej lub zwilżonej,
•
miękkiej ściereczki; nie używać silnych środków chemicznych.
Producent ani dostawca nie ponoszą odpo-
•
wiedzialności za wynikłe szkody: uszkodzenie
sprzętu lub obrażenia użytkownika, a także
utratę danych z podłączonych nośników, jeśli
urządzenie było używane niezgodnie z ich
przeznaczeniem, nieprawidłowo podłączone
lub obsługiwane bądź poddane nieautoryzowanej naprawie.
Po całkowitym zakończeniu eksploatacji, urządzenie należy oddać do punktu
recyklingu, aby nie zaśmiecać środowiska.
Polski
-
53
Page 54

3 Zastosowanie i akcesoria
System wzmacniający PAS-254D zasilany jest z
Polski
wbudowanego akumulatora i może być przenoszony jak plecak np. podczas procesji lub
pielgrzymek. Nad sekcją wzmacniacza miksującego znajduje się rama z zestawem głośnikowym, wyposażonym w cztery pełnopasmowe
przetworniki, emitujące dźwięk jednocześnie
do przodu oraz do tyłu. Wzmacniacz miksujący
posiada wejścia do podłączania mikrofonu oraz
stereofonicznego źródła audio (np. odtwarzacza
CD), a także odbiornik dla dwóch mikrofonów
bezprzewodowych. Dodatkowo, urządzenie
wyposażone jest w odtwarzacz plików audio z
portem USB, czytnikiem kart SD oraz odbiornikiem Bluetooth do odtwarzania muzyki np. ze
smartfona. Przydatną funkcją jest możliwość
wyciszania tła muzycznego podczas nadawania
komunikatów przez mikrofon. W pełni naładowany akumulator pozwala na pracę do 7 godzin.
W celu wydłużenia czasu pracy na zasilaniu
akumulatorowym, możliwe jest podłączenie zewnętrznego akumulatora (np. NPA-12 / 7). Może
być on przechowywany w osobnej kieszeni plecaka. W plecaku przewidziano również kieszenie
na akcesoria: mikrofony oraz kable.
3.1 Mikrofony i
nadajnikibezprzewodowe
System wzmacniający współpracuje z następującymi urządzeniami marki MONACOR:
Typ Model
Mikrofon doręczny z nadajnikiem TXA-800HT
Nadajnik kieszonkowy z mikrofonem
nagłownym i krawatowym
Nadajnik stacjonarny dla
sygnałów audio
Dla nagłośnienia większego obszaru, sygnał
radiowy z powyższych nadajników może być
odbierany równocześnie przez kilka urządzeń
PAS-254D.
3.2 Normy i zezwolenia
Niniejszym firma MONACOR INTERNATIONAL
oświadcza, że odbiornik urządzenia PAS-254D
spełnia wymogi dyrektywy 2014 / 53 / EU. Dekla-
TXA-800HSE
TXA-800ST
racja zgodności dostępna jest na stronie.
www.monacor.com
System bezprzewodowy (nadajnik i odbiornik)
nie wymaga zezwolenia i został dopuszczony
do użytkowania w krajach należących do UE
oraz EFTA.
4 Przygotowanie do pracy
4.1 Ładowanie akumulatora
W celu naładowania wbudowanego akumulatora i/lub podłączonego akumulatora zewnętrznego, podłączyć dołączony zasilacz do gniazda
niskonapięciowego (18) a następnie do gniazdka sieciowego (230 V/ 50 Hz). Proces ładowania
sygnalizowany jest świeceniem diody CHARGE
(14), natomiast stopień naładowania pokazywany jest za pomocą diod: FULL (pełny), OK
(dobry) oraz LOW (niski). Podczas ładowania,
wzmacniacz może być wyłączony.
Po naładowaniu akumulatora (dioda
CHARGE zmieni kolor na zielony) odłączyć
ładowarkę od gniazdka sieciowego, a następnie
od urządzenia.
4.2 Podłączanie
4.2.1 Mikrofon
Mikrofon należy podłączać do złącza XLR w
gnieździe 1 MIC/LINE IN (5).
W przypadku mikrofonów (elektretowych)
wymagających zasilania phantom, na gnieździe
XLR dostępne jest napięcie 12 V.
Uwaga: Do gniazda XLR nie wolno podłączać mikrofonów lub źródeł audio z wyjściem niesymetrycznym;
napięcie zasilania phantom może spowodować ich uszkodzenie.
Mikrofony z wtykiem 6,3 mm można również
podłączać do gniazda 1 MIC / LINE IN; ale wejście
to ma niższą czułość.
4.2.2 Źródło audio z wyjściem liniowym
Złącze 6,3 mm w gnieździe 1 MIC / LINE IN (5)
pozwala na podłączanie źródła sygnału mono o
poziomie liniowym (np. miksera lub odbiornika
mikrofonu bezprzewodowego). Jako alternatywę, takie źródło można podłączyć do jednego
z gniazd RCA 3 LINE IN (9).
54
Page 55

Do podłączania źródeł sygnału stereo (np. odtwarzacza CD / MP3, radia, miksera) służą gniazda 3 LINE IN (9). Ze względu na to, że urządzenie jest monofoniczne, sygnał z obu kanałów
jest wewnętrznie miksowany do postaci mono.
Możliwe jest wyciszanie sygnału z wejścia 3 LINE
IN podczas nadawania komunikatów przez
mikrofon (funkcja VOICE OVER ☞rozdz. 5).
4.2.3 Dodatkowy wzmacniacz
lubrejestrator
Dodatkowy system wzmacniający lub rejestrator należy podłączać do wyjścia LINE LINK (10).
Wyjście pozwala na podłączanie rejestratorów
stereo, jednak ze względu na to, że urządzenie
jest monofoniczne, na obu gniazdach dostępny
jest ten sam sygnał.
4.2.4 Głośniki
Urządzenie pozwala na podłączenie dodatkowego głośnika do gniazda typu Speakon® EXT.
SPEAKER (20). Głośnik ten będzie wówczas jako
dodatkowy lub alternatywny do zamontowanych na górze.
Wsunąć wtyk typu speakon do gniazda i
przekręcić go w prawo aż zaskoczy. Aby odłączyć wtyk, należy najpierw odciągnąć blokadę
na wtyku i przekręcić go w lewo.
Jeżeli trzeba, można odłączyć zestaw głośnikowy znajdujący się na górze PAS-254D za
pomocą przełącznika INTERNAL SPEAKER (19)
(pozycja “OFF”).
Uwaga: Dla ochrony wzmacniacza przed przeciążeniem,
w przypadku podłączania zewnętrznego głośnika, zaleca
się wyłączenie wbudowanego zestawu głośnikowego.
4.3 Zdalne sterowanie
Pilot sterujący do odtwarzacza audio/ odbiornika Bluetooth zasilany jest bateryjnie. Przed
rozpoczęciem pracy należy włożyć baterię do
pilota: Wcisnąć mały pasek na tylnej stronie
pilota (pierwsza strzałka) i wysunąć uchwyt na
baterię (druga strzałka).
1. 2.
Wyjmowanie uchwyt na baterię
➋
Umieścić baterię w uchwycie zgodnie z oznaczeniem polaryzacji i wsunąć uchwyt na baterię do
komory bateryjnej.
Jeżeli zasięg działania pilota się zmniejszy,
wymienić baterię na nową tego samego typu.
Jeżeli pilot nie będzie przez dłuższy czas używany, należy wyjąć z niego baterie, aby zapobiec
jego uszkodzeniu na skutek wylania baterii.
Zużyte baterie należy wyrzucać do specjalnie oznaczonych pojemników, nie
do zwykłych koszy na śmieci.
4.4 Dodatkowy akumulator
W celu wydłużenia czasu pracy na zasilaniu
akumulatorowym, możliwe jest podłączenie
zewnętrznego akumulatora, np. NPA-12 / 7
(dostępny jako wyposażenie dodatkowe). Podłączenie to należy zlecić specjaliście ze względu
na ryzyko porażenia prądem.
1)
Upewnić się że urządzenie PAS-254D jest
wyłączone i odłączone od zasilacza.
2) Odkręcić środkową śrubę z pokrywy komory
na akumulator (21) i otworzyć pokrywę.
3)
Podłączyć dodatkowy akumulator do dwóch
kabli w pustej komorze uważając na odpowiednią polaryzację (czerwony = +).
Uwaga: Jeżeli akumulator nie chce łatwo wejść do pustej komory, można spróbować zamienić go miejscami
ze znajdującym się w drugiej komorze.
4) Zamknąć i przykręcić pokrywę.
5 Obsługa
1) Przed pierwszym włączeniem wzmacniacza,
ustawić wszystkie regulatory głośności (6,
7, 11) na “0” aby uniknąć zbyt wysokiego
poziomu głośności.
2) Włączyć podłączone źródła sygnału audio i /
lub nadajniki bezprzewodowe.
3)
Włączyć urządzenie przełącznikiem (17).
Zapali się dioda PWR ON (16). Dodatkowo,
odpowiednie diody (14) pokażą stan naładowania akumulatora. Jeżeli świeci się dioda
LOW, konieczne jest naładowanie akumulatora (
4)
Włączyć odtwarzanie muzyki z podłączonego
źródła audio, mikrofonu lub wbudowanego
odtwarzacza audio/ odbiornika Bluetooth
(☞rozdz. 5.2 do 5.4).
rozdz. 4.1).
☞
Polski
55
Page 56
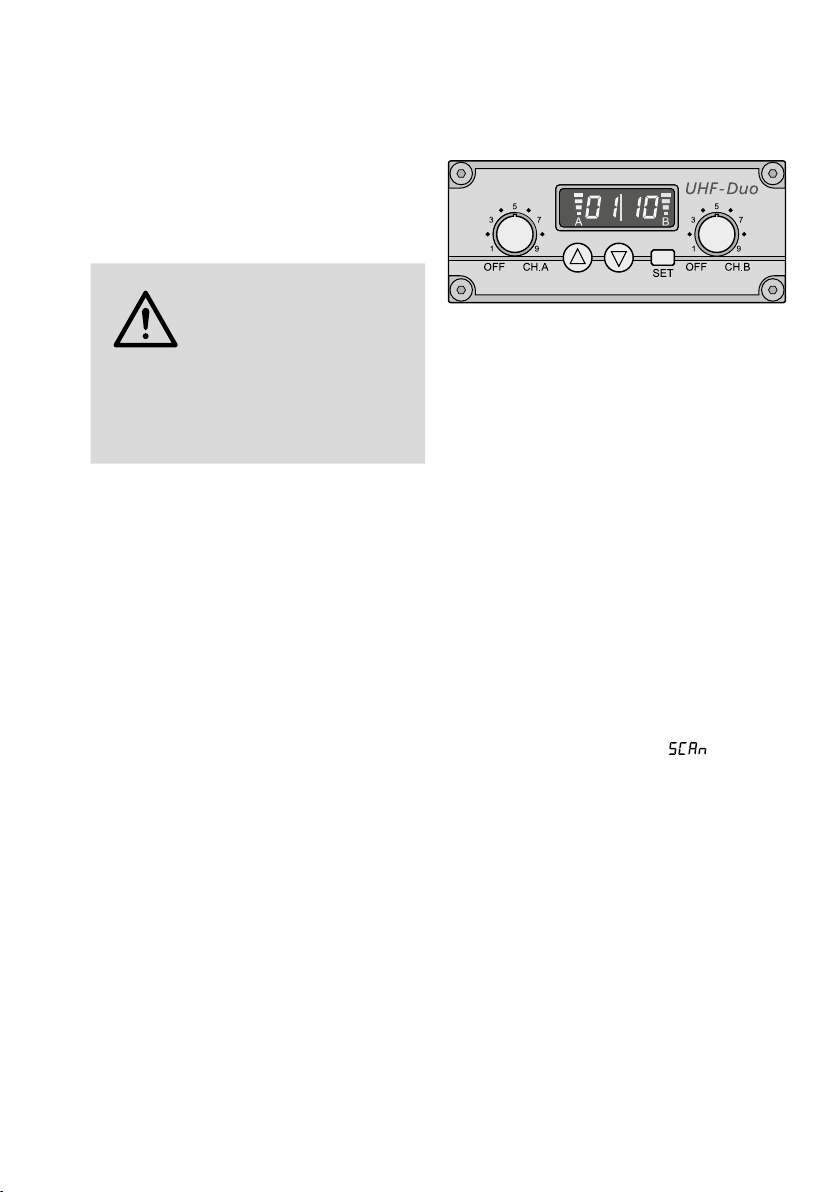
5)
Ustawić głośność sygnałów w poszczegól
nych źródeł odpowiednimi regulatorami.
Polski
LEVEL (6): Sygnał z wejścia
1 MIC / LINE IN
2 WIRELESS (7): Mikrofony bezprzewodowe,
patrz także rozdz. 5.1.2
PLAYER (11): Sygnał z wejścia 3 LINE IN i
odtwarzacza audio/ odbiornika Bluetooth
UWAGA
Aby uniknąć powstawania sprzężenia (głośne piszczenie) nigdy nie kierować mikrofonu w stronę głośników i zachowywać
odpowiedni dystans między głośnikami i
mikrofonem.
Wbudowany limiter zabezpiecza urządzenie przez zbyt wysokim poziomem sygnału.
Dioda LIMITER (15) zapala się w przypadku
aktywacji limitera.
6)
Za pomocą regulatora TONE (8) ustawić
barwę dźwięku dla mikrofonu lub źródła
podłączonego do wejścia (5); Za pomocą
regulatora TONE (12) ustawić barwę dźwięku
dla źródła podłączonego do wejścia 3 LINE
IN oraz odtwarzacza audio/ odbiornika Bluetooth. Z poziomu pilota sterującego można
dokonać dodatkowych ustawień dźwięku dla
odtwarzacza audio/ odbiornika Bluetooth
(☞rozdz. 5.4, przycisk “EQ”).
7) W celu automatycznego wyciszania sygnału
muzycznego z wejścia 3 LINE IN (9) podczas
nadawania komunikatów przez mikrofon
[VOICE OVER (13)], ustawić regulator DEPTH
na taką pozycję, aby dioda MUSIC zapalała
się podczas mówienia do mikrofonu.
8)
Aby uniknąć niekontrolowanego rozładowywania się akumulatora, po zakończeniu
pracy oraz w czasie dłuższych przerw wyłączyć urządzenie przełącznikiem (17).
Aby zapobiec uszkodzeniu akumulatora na
skutek głębokiego rozładowania, w przypadku dłuższych przerw w użytkowaniu, należy go
całkowicie naładować co najmniej raz na sześć
miesięcy.
56
Nigdy nie ustawiać urządzenia
blisko uszu słuchaczy! Wysoki
poziom dźwięku może uszkodzić narząd słuchu.
-
5.1 Mikrofony bezprzewodowe
System wzmacniający wyposażony jest w podwójny odbiornik bezprzewodowy współpracujący z odpowiednimi mikrofonami oraz nadajnikami kieszonkowymi.
Moduł odbiornika bezprzewodowego
➌
Każda sekcja odbiornika (A i B) wyposażona jest
w regulator głośności z włącznikiem (rys.3).
Wyświetlacz podzielony jest na dwie części:
lewa dla sekcji A, prawa dla sekcji B. Po włą
czeniu danej sekcji odbiornika, na wyświetlaczu
pokazywany jest wybrany kanał transmisji. Aby
sprawdzić częstotliwość tego kanału, wcisnąć
przycisk (dla sekcji A) lub (dla sekcji B).
5.1.1 Wybór kanału transmisji
Włączyć daną sekcję odbiornika za pomocą odpowiedniego regulatora. Nie włączać jeszcze
mikrofonów bezprzewodowych i nadajników.
5.1.1.1 Skanowanie kanałów
Aby rozpocząć wyszukiwanie wolnych kanałów
dla obu sekcji odbiornika, przytrzymać wciśnięte
oba przyciski oraz przez około 1 sekundę,
aż na wyświetlaczu pojawi się . Skanowanie
rozpocznie się: wyszukany zostanie kanał wolny
od zakłóceń. Jeżeli nie zostanie znaleziony wolny
kanał, odbiornik powróci do poprzedniego ustawienia.
Uwaga: Możliwe jest wyszukiwanie tylko dla jednej sekcji
(przycisk dla sekcji A lub przycisk dla sekcji B).
5.1.1.2 Ręczny wybór kanałów
Jeżeli obie sekcje odbiornika A i B są włączone:
1)
Przytrzymać wciśnięty przycisk SET aż numer
kanału sekcji A zacznie migać.
2)
Wybrać kanał dla sekcji A przyciskami oraz
i zatwierdzić przyciskiem SET.
3)
Numer kanału sekcji B zacznie migać. Wybrać
kanał dla sekcji B przyciskami oraz i
zatwierdzić przyciskiem SET.
-
Page 57

Jeżeli włączona jest tylko jedna sekcja odbiornika A lub B:
Przytrzymać wciśnięty przycisk SET, aż wskazanie
kanału zacznie migać. Wybrać kanał transmisji
dla włączonej sekcji, przyciskami oraz i
zatwierdzić przyciskiem SET
Uwagi:
1.
Poszczególne sekcje nie mogą zostać ustawione na
ten sam kanał.
2.
Jeżeli wybór nie zostanie potwierdzony w ciągu 10
sekund przyciskiem SET, odbiornik powróci do poprzedniego ustawienia.
3.
Jeżeli mimo wyłączonego nadajnika, po wybraniu
kanału pasek graficzny A lub B sygnalizuje odbiór
sygnału, oznacza to, że w danym kanale występują
zakłócenia lub sygnały z innych nadajników. Należy
wówczas wybrać inny kanał.
5.1.2 Regulacja głośności
Włączyć nadajniki i ustawić je na analogiczne
kanały transmisji: jeden na kanał z sekcji A
odbiornika, drugi – na kanał z sekcji B. Paski
graficzne sygnalizują siłę odbieranego sygnału
radiowego. Za pomocą regulatorów ustawić
odpowiednią głośność dla sygnału z każdej sekcji
odbiornika.
Za pomocą regulatora 2 WIRELESS (7) usta-
wić głośność odbieranego sygnału audio.
Uwaga: Jeżeli odbiór sygnału nie jest sygnalizowany lub
odbiór jest słaby, sprawdzić czy nadajniki są ustawione na
ten sam kanał (częstotliwość) oraz czy baterie nadajnika
nie są wyczerpane. Jeżeli trzeba, zmniejszyć odległość
między nadajnikami a odbiornikiem
5.1.3 Regulacja progu squelch
Tłumik wycisza wszystkie sygnały o poziomie
poniżej ustawionej wartości progowej np. przerwy pomiędzy wypowiedziami lub piosenkami.
Pozwala to na wycięcie zakłóceń i szumów powstających przy wyłączonym nadajniku lub zbyt
słabym poziomie sygnału. Wysoki próg tłumienia
pozwala na uniknięcie zakłóceń, ale zmniejsza
dynamikę systemu mikrofonowego. Ze względu
na to, zaleca się ustawianie wysokiego progu
jeżeli odbiór sygnału jest dobry, oraz niskiej
wartości jeżeli odległość między nadajnikiem a
odbiornikiem jest duża.
1) Wyłączyć obie sekcji A i B. Następnie, trzymając wciśnięty przycisk SET włączyć odbiornik. Wyświetlacz pokaże bieżące ustawienie
grupy lub , z migającym numerem.
2)
Wcisnąć przycisk SET, aby wyjść z trybu
ustawiania grupy i aktywować tryb regulacji
progu działania tłumika zakłóceń: na wyświetlaczu pokazane zostanie (Squelch) oraz
migająca wartość.
3)
Za pomocą przycisków oraz ustawić
wartość (poziom 7 = najwyższy próg). Wcisnąć przycisk SET aby wyjść z trybu ustawiania.
Uwaga: Wyjście z trybu ustawiania następuje automatycznie w ciągu 5 sekund po ostatnim wciśnięciu przycisku. Wszystkie dokonane ustawienia zostają zapisane.
5.2 Odtwarzacz audio
Wbudowany odtwarzacz obsługuje pliki audio
w formacie MP3 oraz WAV. Współpracuje z
nośnikami USB oraz kartami pamięci SD[HC]
(również MMC).
Uwaga: Ze względu na szeroką gamę nośników dostępnych na rynku, producent urządzenia nie gwarantuje
kompatybilności z nośnikami wszystkich producentów
Podłączyć nośnik USB do portu USB (1) i / lub
włożyć kartę pamięci do czytnika (2) (stykami
do przodu).
Po włączeniu urządzenia, odtwarzacz ustawia
się w tryb pauzy na ostatnio wybranym utworze (wskazanie: ). Nośnik USB ma wyższy
priorytet niż karta pamięci. Podłączenie nośnika
USB zawsze spowoduje przełączenia na niego.
Do obsługi odtwarzacza służą przyciski (4) lub
pilot (rys. 4) (☞rozdz. 5.4). Podczas pracy należy kierować pilota w stronę czujnika IR obok
wyświetlacza (3) na odtwarzaczu.
Na wyświetlaczu pokazywany jest miniony
czas odtwarzania utworu. Głośność zależy od
ustawień odtwarzacza oraz regulatora PLAYER
(11).
5.3 Odbiornik Bluetooth
Alternatywnie do odtwarzania z nośników USB
oraz kart pamięci, możliwe jest połączenie z
zewnętrznymi urządzeniami (np. smartfonem
lub tabletem) poprzez funkcję Bluetooth.
1)
Jeżeli do urządzenia nie podłączono ani
nośnika USB ani karty pamięci, PAS-254D
przełączy się automatycznie w tryb Bluetooth: Na wyświetlaczu (3) pojawi się .
Aby włączyć funkcję Bluetooth przy pod-
łączonych nośnikach, wcisnąć kilka razy przy-
Polski
57
Page 58
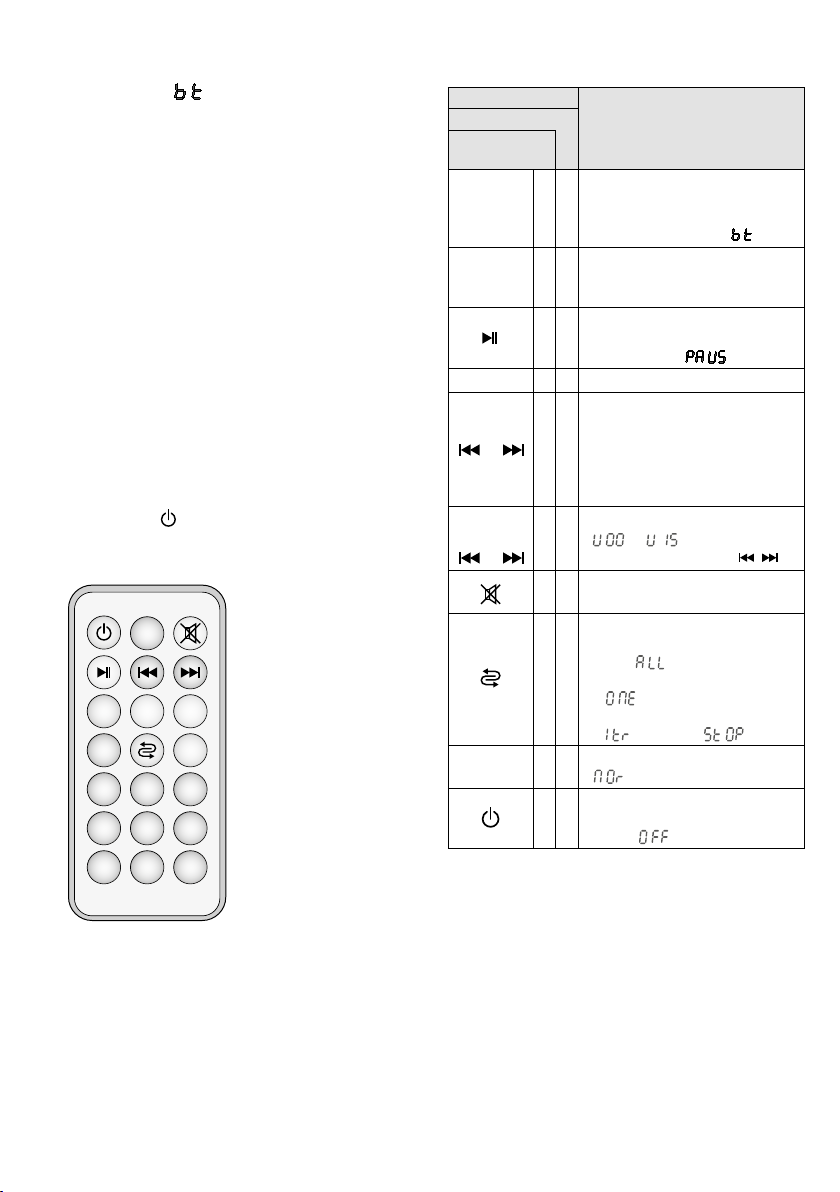
cisk M aż z wyświetlacza znikną wskazania TF
8 97
5
64
2 31
0
EQ
+−
U/SD
SCAN
Mode
oraz
USB
. Na wyświetlaczu pojawi się po chwili
wskazanie .
Polski
2)
Aktywować funkcję Bluetooth na źródle
Bluetooth. Na wyświetlaczu źródła Bluetooth, PAS-254D oznaczony będzie jako “BTSPEAKER”.
3) Sparować źródło z “BT-SPEAKER” (patrz instrukcja obsługi źródła Bluetooth). Połączenie
zostanie nawiązane automatycznie.
Po zakończeniu parowania wyemitowa-
ny zostanie dwutonowy dźwięk.
Odtwarzanie ze źródła Bluetooth może być
sterowane przyciskami (4) lub pilotem (rys. 4)
(☞rozdz. 5.4). Pilota należy kierować w stronę
czujnika IR obok wyświetlacza (3).
Głośność sygnału ze źródła Bluetooth zależy
od ustawień na źródle, odtwarzaczu audio oraz
regulatora PLAYER (11).
Jeżeli wbudowany odtwarzacz ani odbiornik
Bluetooth nie są wykorzystywane, wyłączyć je
przyciskiem na pilocie. Wydłuży to czas pracy
na zasilaniu akumulatorowym i zabezpieczy
przed niepożądanym połączeniem Bluetooth.
5.4 Przegląd funkcji odtwarzacza audio / odbiornika Bluetooth
Przycisk
na
Mode
M
U/SD
SCAN
1… 9, 0
/
− / +
/
EQ
zmiana źródła*
✅
nośnik USB “
kata pamięci “
✅
odbiornik Bluetooth “
zmiana między
✅
nośnikiem USB “
a kartą pamięci “
start odtwarzania oraz
✅ ✅
przełączanie między odtwarzaniem a pauzą “
✅
wybór numeru utworu
poprzedni / kolejny utwór*:
wcisnąć przycisk na krótko
szybkie przewijanie w przód /
✅ ✅
w tył (tylko na pilocie):
przytrzymać wciśnięty przycisk
(dźwięk wyciszony)
regulacja głośności*
✅
„
(przytrzymać wciśnięty
✅
włączanie / wyłączanie wycisze-
✅
nia dźwięku*
tryby odtwarzania
– powtarzanie wszystkich utwo-
rów “
✅
– powtarzanie jednego utworu
“ ”
– odtworzenie jednego utworu
“ ”, potem “ ”
6 ustawień korektora*
✅
“
odtwarzacz audio / odbiornik
✅
Bluetooth
on /off “ ”*
Funkcja
…
”
” = neutralny
USB”
TF”
USB”
TF”
”*
“
na pilocie
urządzeniu
*także dla Bluetooth
”
/ )
58
Pilot sterujący
➍
Page 59

6 Specyfikacja
Wzmacniacz
Klasa: . . . . . . . . . . . . . . . D
Moc RMS przy 2 Ω: . . . . .70 W
Moc szczytowa: . . . . . . .80 W
Pasmo przenoszenia: . . . . .80 – 20 000 Hz
Wejścia (złącze, typ, czułość)
Mikrofon: . . . . . . . . . . . .XLR, sym., 2 mV
z 12 V zasilaniem phantom
Linia: . . . . . . . . . . . . . . .6,3 mm, sym., 14 mV
RCA, niesym., 80 mV
Sekcje odbiornika: . . . . . . .2
. . . . . . . . . . . . . . .około 30 m
Zasięg:
Częstotliwości radiowe
Kanał Częstotliwość Kanał Częstotliwość
01 863,1 MHz 09 863,2 MHz
02 864,1 MHz 10 864,2 MHz
03 863,6 MHz 11 863,7 MHz
04 864,6 MHz 12 864,7 MHz
05 863,3 MHz 13 863,4 MHz
06 864,3 MHz 14 864,4 MHz
07 863,8 MHz 15 863,9 MHz
08 864,8 MHz 16 864,9 MHz
Nośniki: . . . . . . . . . . . . . .pamięć USB,
karta SD / SDHC / MMC
Formaty audio: . . . . . . . . .MP3, WAV
Bluetooth:
Wyjścia
Line Link: . . . . . . . . . . . .RCA, 300 mV
Ext. Speaker: . . . . . . . . . .Typu speakon®, 4 Ω min.
Zasilanie: . . . . . . . . . . . . .akumulator, 12 V/ 7,2 Ah
Zakres temperatur: . . . . . .0 – 40 °C
Całkowita wysokość: . . . .120 cm
Waga: . . . . . . . . . . . . . . . .7,7 kg
. . . . . . . . . . . . .A2DP
Polski
Z zastrzeżeniem możliwości zmian.
Instrukcje obsługi są chronione prawem copyright for MONACOR ® INTERNATIONAL GmbH & Co. KG.
Przetwarzanie całości lub części instrukcji dla osobistych korzyści finansowych jest zabronione.
59
Page 60
Læs nedenstående sikkerhedsoplysninger opmærksomt igennem før ibrugtagning af enheden. Bortset fra sikkerhedsoplysningerne hen-
Dansk
vises til den engelske tekst.
Vigtige sikkerhedsoplysninger
Denne enhed overholder alle relevante EU-direktiver og er som følge deraf mærket .
ADVARSEL
ADVARSEL Brug ikke højttalersystemet, hvis
akustisk feedback, må højttalerne ikke spille I
retning af mikrofonen. Sørg for at holde god
afstand mellem mikrofon og højttaler.
Benyt ikke forstærkersystemer i kraftig regn
•
og sørg for at fugt ikke kommer ind i enheden.
Opladeren er kun beregnet til indendørs brug.
Beskyt den mod vanddråber og -stænk, høj
luftfugtighed og varme (tilladt omgivelsestemperatur 0 – 40 °C).
Placer aldrig nogen former for væsker på
•
opladeren.
Benyt aldrig enheden og afbryd øjeblikkeligt
•
strømmen,
1. hvis der er synlige skader,
2. hvis en fejl opstår efter enheden har været
tabt,
3. hvis enheden ikke fungerer korrekt.
I alle tilfælde skal enheden undersøges og
repareres af uddannet personale.
Enhedens strømforsyning benytter livsfarlig netspænding. Udfør
aldrig nogen form for modifikationer på produktet og indfør
aldrig genstande i ventilationshullerne, da du dermed risikere
at få elektrisk stød.
det er meget tæt på folks øre,
da det kraftige lydtryk kan forårsag høreskader. For at undgå
Tag aldrig netstikket ud af stikkontakten ved
•
at trække i kablet, tag fat i selve stikket.
Et beskadiget netkabel ma kun repareres af
•
autoriseret personel.
Rengør kabinettet med en tør, blød klud; der
•
må under ingen omstændigheder benyttes
kemikalier eller vand.
Hvis enheden benyttes til andre formål, end
•
den oprindeligt er beregnet til, hvis den monteres eller betjenes forkert, eller hvis den ikke
repareres af autoriseret personel, omfattes
eventuelle skader ikke af garantien.
Hvis enheden skal tages ud af drift for
bestandigt skal den bringes til en lokal
genbrugsstation for bortskaffelse.
Smid aldrig brugte batterier i affaldscontainere. Aflever dem i stedet på den lokale genbrugsstation.
Alle rettigheder til denne brugsvejledning tilhører MONACOR ® INTERNATIONAL GmbH & Co. KG. Ingen dele
af denne vejledning må reproduceres under ingen omstændigheder til kommerciel anvendelse.
60
Page 61
Ge akt på säkerhetsinformationen innan enheten tas i bruk. Skulle ytterliggare information
behövas kan den återfinnas i Manualen för
andra språk.
Säkerhetsföreskrifter
Enheterna (förstärkarsystem och laddare) motsvarar alla relevanta EU-direktiv och är därför
märkta med .
VARNING
VARNING
rundgång (högt tjut), placera aldrig mikrofonen mot högtalaren och alltid se till att det
finns ett tillräckligt avstånd mellan högtalaren
och mikrofonen.
Använd aldrig förstärkarsystemet i hårt regn
•
och se alltid till att ingen fukt kommer in i
systemet.
Laddaren är endast lämplig för inomhusbruk.
Skydda det mot droppande vatten, stänkvatten och hög luftfuktighet. Det tillåtna temperaturområdet för enheterna är 0 – 40 °C.
Placera inga kärl fyllda med vätska, e. g. drick-
•
glas, på laddaren.
Använd inte enheterna och dra aldrig ur lad-
•
darens nätsladd ur vägguttaget
1.
Om en enhet eller nätsladden är synligt
skadad,
2. Om en defekt kan ha inträffat efter att en
enhet har tappats eller drabbats av en liknande olycka,
3. om funktionsfel uppstår.
I alla fall måste enheterna repareras av kompetent personal.
Laddaren använder farlig nätspänning. Lämna service till
kompetent personal. Ovan hantering kan leda till elektrisk stöt.
Använd aldrig förstärkaren när
högtalarna är nära någons öron!
Den höga volymen kan orsaka
hörselskador. För att undvika
Dra aldrig i laddarens nätsladd för att dra ur
•
stickkontakten från uttaget, använd alltid
kontakten.
En skadad nätsladd får endast bytas ut av
•
kunnig personal.
Vid rengöring använd endast en mjuk trasa,
•
torr eller lite våt; Använd aldrig kemikalier eller
aggressiva tvättmedel.
Inga garantianspråk för enheterna och inget
•
ansvar för någon följd av personskador eller
materiella skador kommer att godtas om enheterna används för andra ändamål än vad
de ursprungligen var avsedda för, om de inte
är korrekt anslutna eller drivna eller om de
inte repareras på ett proffessionellt sätt. På
samma sätt kommer inget ansvar att accepteras för förlust av data som orsakats av fel
eller driftsfel och för eventuella följdskador på
denna dataförlust.
Om enheterna ska tas i drift slutligt, ta
dem till en lokal återvinningsanläggning för bortskaffande som inte skadar
miljön.
Placera aldrig defekta batterier i hushållssoporna. För att skydda miljön, ta alltid dem till en
behållare för specialavfall, t. ex. uppsamlingsbehållaren hos din återförsäljare.
Svenska
Alla rättigheter är reserverade av MONACOR ® INTERNATIONAL GmbH & Co. KG. Ingen del av denna instruktionsmanual får eftertryckas i någon form eller på något sätt användas i kommersiellt syfte.
61
Page 62
Ole hyvä ja huomioi joka tapauksessa seuraavat turvallisuuteen liittyvät seikat ennen laitteen
käyttöä. Laitteen toiminnasta saa lisätietoa tar-
Suomi
vittaessa tämän laitteen muunkielisistä käyttöohjeista.
Turvallisuudesta
Yksiköt (vahvistinjärjestelmä ja laturi) vastaavat
kaikkia EU: n asiaa koskevia direktiivejä, ja ne
on siten merkitty -merkinnällä.
VAROITUS
HUOMIO Älä koskaan käytä laitetta lähellä
älä aseta kaiuttimia ja mikrofonia vastakkain
ja varmista aina, että niiden välillä on riittävä
välimatka.
Älä koskaan käytä vahvistinjärjestelmää rank-
•
kasateessa ja varmista aina, että kosteutta ei
pääse järjestelmään.
Laturi soveltuu vain sisäkäyttöön. Suojaa se
tippuvedeltä, roiskeelta ja korkealta ilmankosteudelta. Laitteiden sallittu ympäristön
lämpötila-alue on 0 – 40 °C.
Älä laita mitään nestettä sisältäviä astioita,
•
esim. juomalasia, laturin päälle.
Älä käytä laitetta ja irrota laturin verkkovirta
•
välittömästi pistorasiasta
1.
jos yksikkö tai verkkojohto on näkyvästi
vaurioitunut,
2.
jos laite on voinut vioittua esim. putoamisen
seurauksena tai muulla tavoin,
3. jos ilmenee toimintahäiriö.
Kaikissa tapauksissa tuote on korjattava ammattitaitoisella henkilöllä.
Laturi käyttää vaarallista verkkojännitettä. Jätä huolto ammattitaitoiselle henkilölle. Epäasiallinen käsittely voi aiheuttaa
sähköiskun.
kenenkään korvia. Kova äänenvoimakkuus voi vahingoittaa kuuloa. Jotta ääni ei alkaisi kiertää,
Älä koskaan vedä laturista tai laturin virtajoh-
•
dosta irroittakksesi sitä verkkovirrasta, vaan
irroita se vetämällä pistokkeesta.
Vahingoittunut verkkokaapeli on vaihdettava
•
vain ammattilaisen toimesta.
Puhdista vain pehmeällä liinalla, kuivalla tai
•
hieman kostealla. Älä koskaan käytä kemikaaleja tai voimakkaita pesuaineita.
Laitteen takuu raukeaa, eikä valmistaja, maa-
•
hantuoja tai myyjä ota vastuuta mahdollisista
välittömistä tai välillisistä vahingoista, jos laitetta on käytetty muuhun kuin alkuperäiseen
käyttötarkoitukseen, laitetta on taitamattomasti käytetty tai kytketty tai jos laitetta on
huollettu muussa kuin valtuutetussa huollossa.
Kun laitteet poistetaan käytöstä lopullisesti, ne on toimitettava kierrätykseen
asianmukaisesti.
Käytöstä poistettavat patterit on vietävä niille
tarkoitettuihin keräyspisteisiin, eikä niitä saa
hävittää muun sekäjätteen mukana.
Kaikki oikeudet pidätetään MONACOR ® INTERNATIONAL GmbH & Co. KG. Mitään tämän käyttöohjeen osaa
ei saa jäljentää miltään osin käytettäväksi mihinkään kaupallisiin tarkoituksiin.
62
Page 63

MONACOR INTERNATIONAL GmbH & Co. KG • Zum Falsch 36 • 28307 Bremen • Germany
Copyright © by MONACOR INTERNATIONAL. All rights reserved. A-2000.99.01.06.2019
 Loading...