

Page 1

CD-/MP3-SPIELER-EINSCHUB MIT RDS-TUNER
CD/MP3 PLAYER INSERTION WITH RDS TUNER
BEDIENUNGSANLEITUNG
INSTRUCTION MANUAL
MODE D’EMPLOI
ISTRUZIONI PER L’USO
MANUAL DE INSTRUCCIONES
INSTRUKCJA OBSŁUGI
VEILIGHEIDSVOORSCHRIFTEN
SIKKERHEDSOPLYSNINGER
SÄKERHETSFÖRESKRIFTER
TURVALLISUUDESTA
PA-1140RCD
Bestellnummer 17.3530
Page 2

2
Voor u inschakelt …
Wij wensen u veel plezier met uw nieuwe apparaat van MONACOR. Lees de veiligheidsvoorschriften grondig door, alvorens het apparaat in
gebruik te nemen. Zo behoedt u zichzelf en het
apparaat voor eventuele schade door ondeskundig gebruik. Bewaar de handleiding voor
latere raadpleging.
De veiligheidsvoorschriften vindt u op pagina 34.
NL
B
Avant toute installation …
Nous vous souhaitons beaucoup de plaisir à utiliser cet appareil MONACOR. Lisez ce mode
dʼemploi entièrement avant toute utilisation. Uniquement ainsi, vous pourrez apprendre lʼensemble des possibilités de fonctionnement de
lʼappareil, éviter toute manipulation erronée et
vous protéger, ainsi que lʼappareil, de dommages
éventuels engendrés par une utilisation inadaptée. Conservez la notice pour pouvoir vous y
reporter ultérieurement.
La version française se trouve page 14.
F
B
CH
Prima di accendere …
Vi auguriamo buon divertimento con il vostro
nuovo apparecchio di MONACOR. Leggete
attentamente le istruzioni prima di mettere in
funzione l'apparecchio. Solo così potete cono scere tutte le funzionalità, evitare comandi sbagliati e proteggere voi stessi e l'apparecchio da
eventuali danni in seguito ad un uso improprio.
Conservate le istruzioni per poterle consultare
anche in futuro.
Il testo italiano inizia a pagina 19.
I
Bevor Sie einschalten …
Wir wünschen Ihnen viel Spaß mit Ihrem neuen
Gerät von MONACOR. Bitte lesen Sie diese
Bedienungsanleitung vor dem Betrieb gründlich
durch. Nur so lernen Sie alle Funktionsmög lichkeiten kennen, vermeiden Fehlbedienungen
und schützen sich und Ihr Gerät vor eventuellen
Schäden durch unsachge mäßen Ge brauch.
Heben Sie die Anleitung für ein späteres Nachlesen auf.
Der deutsche Text beginnt auf der Seite 4.
D
A
CH
Before switching on …
We wish you much pleasure with your new
MONACOR unit. Please read these operating
instructions carefully prior to operating the unit.
Thus, you will get to know all functions of the
unit, operating errors will be prevented, and
yourself and the unit will be protected against
any damage caused by improper use. Please
keep the oper ating in structions for later use.
The English text starts on page 9.
GB
Antes de la utilización …
Le deseamos una buena utilización para su
nuevo aparato MONACOR. Por favor, lea estas
instrucciones de uso atentamente antes de hacer
funcionar el aparato. De esta manera conocerá
todas las funciones de la unidad, se prevendrán
errores de operación, usted y el aparato estarán
protegidos en contra de todo daño causado por
un uso inadecuado. Por favor, guarde las instrucciones para una futura utilización.
El texto en español empieza en la página 24.
E
Innan du slår på enheten …
Vi önskar dig mycket glädje med din nya
MONACOR produkt. Läs igenom säkerhetsföreskrifterna noga innan enheten tas i bruk.
Detta kan förhindra att problem eller fara för
dig eller enheten uppstår vid användning.
Spara instruktionerna för framtida användning.
Säkerhetsföreskrifterna återfinns på sidan 35.
S
Før du tænder …
God fornøjelse med dit nye MONACOR produkt. Læs venligst sikkerhedsanvisningen nøje,
før du tager produktet i brug. Dette hjælper dig
med at beskytte produktet mod ukorrekt ibrug tagning. Gem venligst denne betjeningsvejledning til senere brug.
Du finder sikkerhedsanvisningen på side 34.
DK
Ennen kytkemistä …
Toivomme Sinulle paljon miellyttäviä hetkiä
uuden MONACOR laitteen kanssa. Ennen
laitteen käyttöä pyydämme Sinua huolel lisesti tutustumaan turval lisuusohjeisiin. Näin
vältyt vahingoilta, joita virheellinen laitteen
käyttö saattaa aiheuttaa. Ole hyvä ja säilytä
käyttöohjeet myöhempää tarvetta varten.
Turvallisuusohjeet löytyvät sivulta 35.
FIN
Przed uruchomieniem …
Życzymy zadowolenia z nowego produktu
MONACOR. Dzięki tej instrukcji obsługi będą
państwo w stanie poznać wszystkie funkcje
tego urządzenia. Stosując się do instrukcji
unikną państwo błędów i ewentualnego uszkodzenia urządzenia na skutek nieprawidłowego
użytkowania. Prosimy zachować instruk cję.
Tekst polski zaczyna się na stronie 29.
PL
Page 3
3
ON OFF
IN
TUNE
POWER MODE BAND
TRACK
DISP
INT RPT
RDM F
LEVEL
010
1 2 3
4 5 6
F
ch
CD-R/RW ANTI-SHOCK SYSTEMRDS FM/AM TUNER
EJECT AF/REG
PTY
PA-1140RCD TUNER/CD PLAYER INSERTION
USB
MP3
1234 5 6789
b
a
c
d
10 11 12 13 14 15 16 17
AM GND 300Ω
FM 75Ω
e
ANT. Terminal
(option)
AM GND 300Ω
FM 75Ω
Page 4
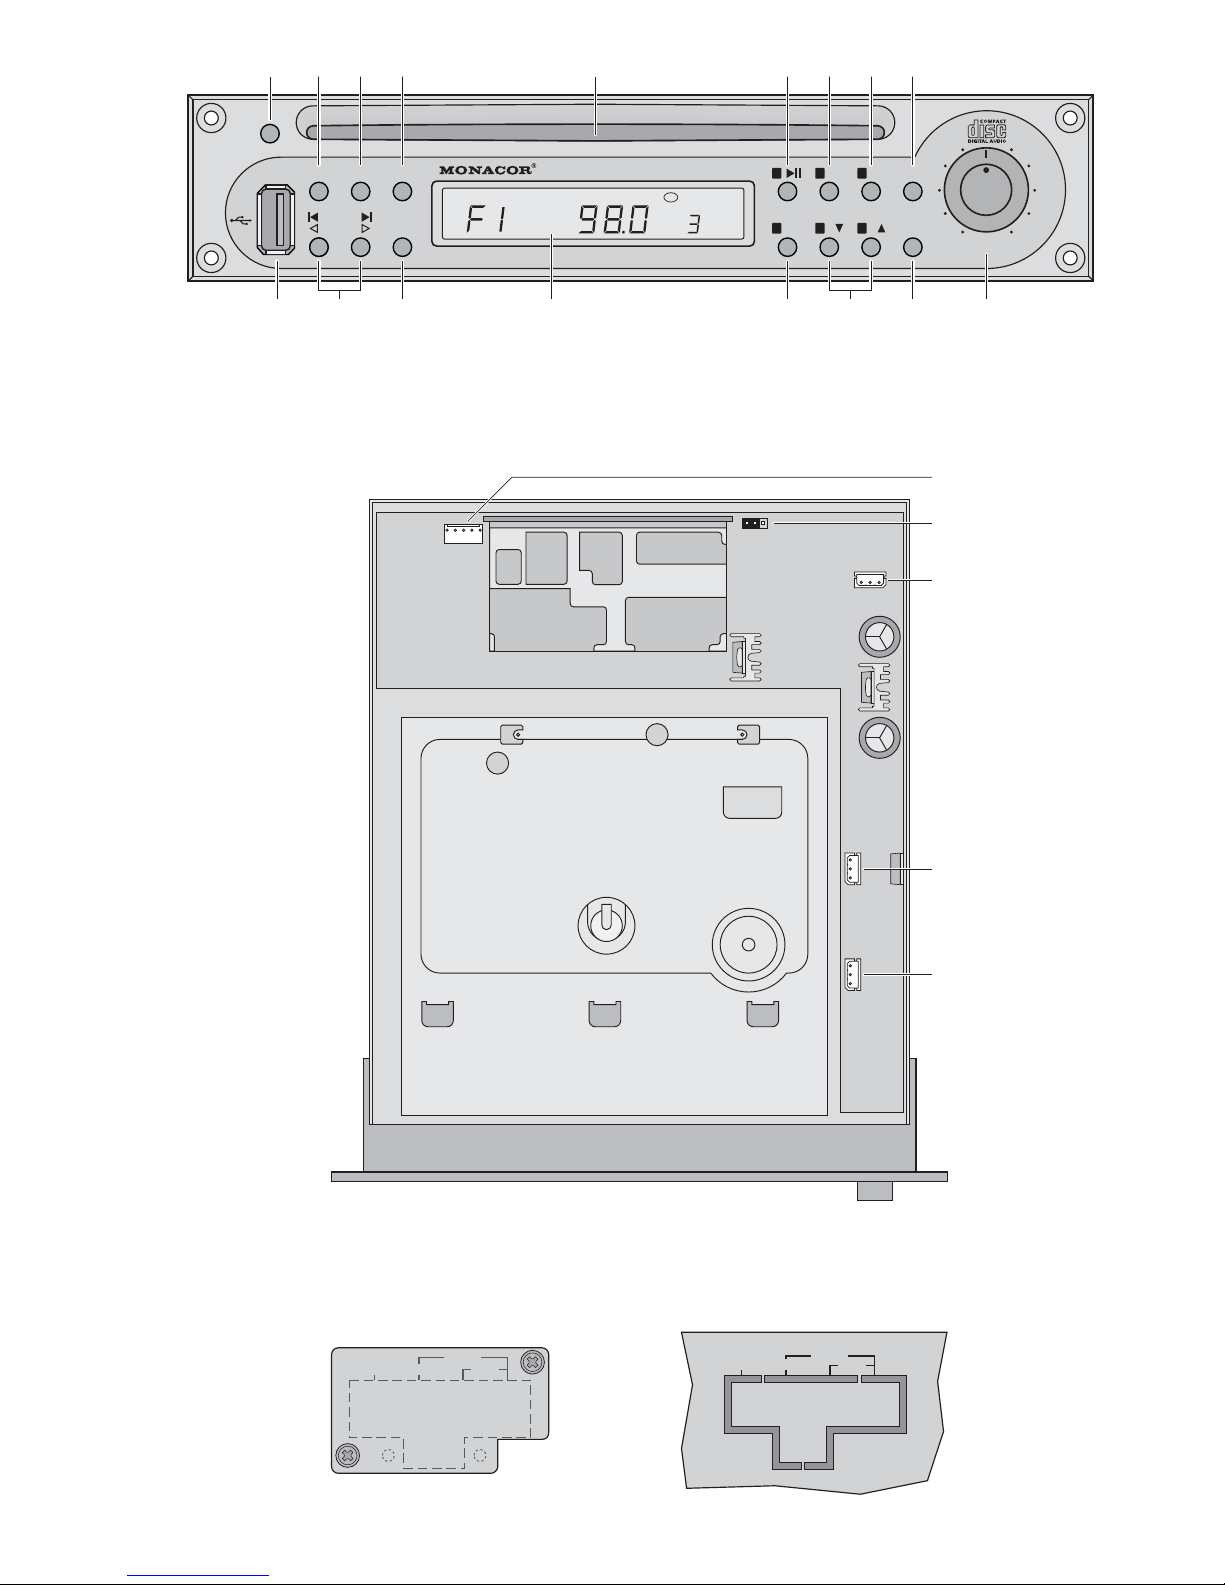
Auf der ausklappbaren Seite 3 finden Sie alle be schriebenen Bedienelemente und Anschlüsse.
1 Übersicht der Bedienelemente
1 Taste EJECT zum Auswerfen der CD
2 Taste POWER zum Ein- und Ausschalten des
Gerätes
3 Taste MODE zum Umschalten zwischen CD-Wie-
dergabe, MP3-Wiedergabe über den USB-An schluss (10) und Radioempfang
4 Taste BAND zum Umschalten der Empfangsberei-
che bei Radiobetrieb
5 CD-Einsteckschlitz
6 Stationstaste 1 oder
bei CD / MP3-Betrieb Pause / Start
7 Stationstaste 2 oder
bei CD / MP3-Betrieb Anspielen aller Titel
8 Stationstaste 3 oder
bei CD / MP3-Betrieb Wiederholung des laufenden
Titels
9 Taste AF / REG für die Funktion Alternativfrequenz
bei RDS-Empfang
10 USB-Anschluss zum Einstecken eines USB-Sticks
11 Tasten TRACK/TUNE
CD / MP3: Zum Weiterspringen auf den nächsten
Titel bzw. zum Zurückspringen auf den
vorherigen Titel; bei gedrückt gehaltener
Taste schneller Vor- bzw. Rücklauf
Radio: Zum Einstellen eines Senders
Um den Sendersuchlauf zu starten, die
entsprechende Taste kurz drücken.
Zur manuellen Sendereinstellung die
Taste oder gedrückt halten, bis das
Display kurz MANUAL signalisiert. Dann
den Sender mit der Taste oder einstellen.
12 Taste DISP zum Umschalten des Displays auf ver-
schiedene Informationen (z. B. Uhrzeit, Programmtyp, ID3-Tags)
13 Display
14 Stationstaste 4 oder bei CD / MP3-Betrieb Zufalls-
wiedergabe
15 Stationstasten 5 und 6 oder bei CD / MP3-Betrieb
Ordneranwahl
16 Taste PTY zur Auswahl des Programmtyps bei
RDS-Empfang
17 Lautstärkeregler LEVEL
2 Hinweise für den sicheren Gebrauch
Das Einschubmodul entspricht allen relevanten Richt linien der EU und ist deshalb mit gekennzeichnet.
G
Der Einschub darf nur von einer qualifizierten Fachkraft eingebaut werden.
G
Verwenden Sie den Einschub nur im Innenbereich.
Schützen Sie ihn vor Tropf- und Spritzwasser, hoher
Luftfeuchtigkeit und Hitze (zulässiger Einsatztemperaturbereich 0 – 40 °C).
G
Nehmen Sie das Gerät mit dem eingebauten Einschub nicht in Betrieb und ziehen Sie den Netzstecker sofort aus der Steckdose, wenn:
1. sichtbare Schäden am Einschub, am Gerät oder
an der Netzanschlussleitung vorhanden sind,
2. nach einem Sturz oder Ähnlichem der Verdacht
auf einen Defekt besteht,
3. Funktionsstörungen auftreten.
Geben Sie den Einschub oder das komplette Gerät
in jedem Fall zur Reparatur in eine Fachwerkstatt.
G
Verwenden Sie für die Reinigung nur ein weiches,
trockenes Tuch, auf keinen Fall Chemikalien oder
Wasser.
G
Wird der Einschub zweckentfremdet, nicht fachgerecht eingebaut, falsch bedient oder nicht fachgerecht re pa riert, kann keine Garantie für das Gerät
und keine Haftung für daraus resultierende Sachoder Personenschäden übernommen werden.
3 Einsatzmöglichkeiten
Das Einschubmodul ist zum Einbau in MONACORELA-Verstärker mit einem Einschubschacht und in
MONACOR-Grundgeräte für Einschübe geeignet,
zum Beispiel:
PA-1120 ELA-Verstärker für 5 Zonen
PA-1200 ELA-Verstärker für 4 Zonen
PA-1200EX Grundgerät für 2 Einschübe
PA-1204EX Grundgerät für 4 Einschübe
PA-1240 ELA-Verstärker für 5 Zonen
PA-5240 ELA-Verstärker für 5 Zonen
PA-5480 ELA-Verstärker für 5 Zonen
PA-6240 ELA-Verstärker für 6 Zonen
PA-6480 ELA-Verstärker für 6 Zonen
PA-6600 ELA-Verstärker für 6 Zonen
Soll der Einschub endgültig aus dem Betrieb
genommen werden, übergeben Sie ihn zur
umweltgerechten Entsorgung einem örtlichen Recyclingbetrieb.
D
A
CH
4
Page 5
4 Einbau des Einschubmoduls
1) Den Gehäusedeckel des Verstärkers bzw. des
Grundgerätes abnehmen.
2) Auf der Frontseite des Verstärkers bzw. des Grundgerätes die Abdeckblende für den Einschubschacht
abschrauben. Den Einschub einsetzen und festschrauben.
3) Die freiliegende dreipolige Leitung des Verstärkers
bzw. des Grundgerätes in das Stiftgehäuse der
Position c stecken (siehe Abb. 2). Hierüber wird der
Einschub mit 17 V versorgt und das Audiosignal
zum Verstärker geleitet.
4) Bei Bedarf stehen zwei weitere Audioausgänge zur
Verfügung:
symmetrischer Monoausgang am Anschluss d
asymmetrischem Stereoausgang am Anschluss e
5) Zur Montage der beiliegende Antennenanschlüsse
auf der Rückseite des Verstärkers / des Grundge rätes die Abdeckblende (Abb. 3) abschrauben oder
das Abdeckblech (Abb. 4) heraustrennen. Die An tennenanschlussplatine in die Öffnung einsetzen
und festschrauben.
6) Die Leitung der eingesetzten Antennenanschlussplatine in das fünfpolige Stiftgehäuse der Position a
stecken.
7) Der Einschub PA-1140RCD besitzt eine Speicherbatterie, damit die Sender auch bei ausgeschaltetem Gerät gespeichert bleiben. Die Speicherbatterie ist im Auslieferungszustand deaktiviert, um eine
allmähliche Entladung bis zum Einbau zu verhindern. Zum Aktivieren der Batterie die Brücke b in
die Position ON setzen.
Soll die Batterie wieder deaktiviert werden (z. B.
bei einer längeren Lagerung), die Brücke b in die
Position OFF setzen.
8) Den Verstärker bzw. das Grundgerät mit dem
Gehäusedeckel wieder verschließen und die Emp fangsantennen an die Antennen-Schraub anschlüs se anschließen. Dabei die Beschriftung am Verstärker bzw. am Grundgerät beachten:
AM+GND für Mittelwellenantenne
FM 75 Ω für UKW-Antenne mit 75-Ω-Anschluss -
kabel
300 Ω für UKW-Antenne mit 300-Ω-Anschluss -
kabel
5 Bedienung
1) Den Verstärker bzw. das Grundgerät mit dem Netzschalter einschalten und das Einschubmodul mit
der Taste POWER (2).
2) Mit dem Lautstärkeregler LEVEL (17) die ge wünschte Lautstärke einstellen.
3) Zum Ausschalten die Taste POWER erneut betätigen.
5.1 Bedienung des CD / MP3-Spielers
Mit dem Gerät können Audio-CDs, selbst gebrannte
Audio-CDs (CD-R) sowie CDs mit Titeln im MP3-Format abgespielt werden. Bei wiederbeschreibbaren
CDs (CD-RW) kann es jedoch je nach CD-Typ, verwendetem CD-Brenner und Brennprogramm beim
Abspielen zu Problemen kommen.
Über den USB-Anschluss lassen sich auch MP3-
Dateien von einem USB-Stick abspielen.
5.1.1 Musiktitel abspielen
1) Eine CD mit der Beschriftung nach oben so weit in
den Einsteckschlitz (5) schieben, bis sie automatisch eingezogen wird. Falls sich bereits eine CD im
Gerät befindet, zeigt das Display das Symbol .
Zum Wechseln einer CD die Taste EJECT (1)
drücken. Die CD fährt heraus. Wird die CD nicht
entnommen, zieht das Gerät die CD nach einigen
Sekunden wieder hinein.
2) Alternativ oder zusätzlich kann ein USB-Stick in
den Anschluss USB (10) gesteckt werden.
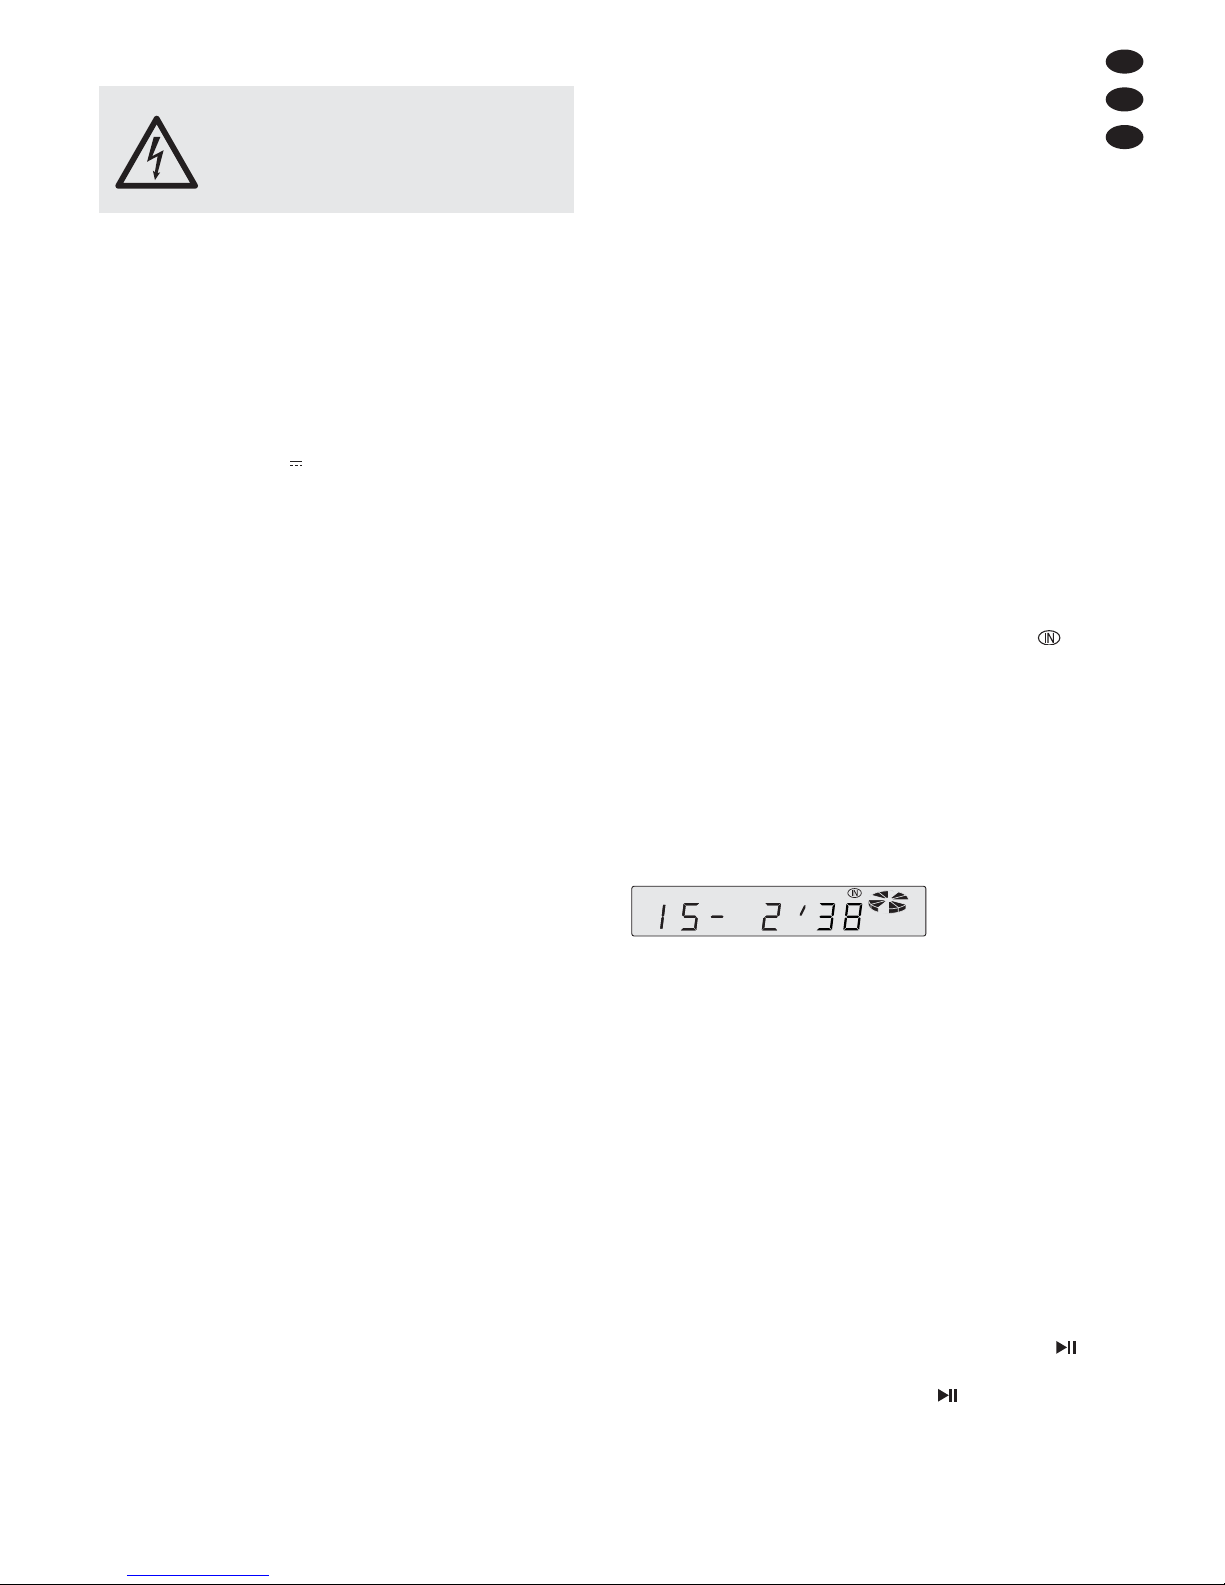
3) Nach dem Ladevorgang startet der erste Titel. Bei
Standard-Audio-CDs zeigt das Display die Titelnummer und die bereits gespielte Zeit (Min. : Sek.) an.
Bei Titeln im MP3-Format wird der Dateiname
durchlaufend angezeigt und nach einem Durchlauf
hinter dem Buchstaben „T“ die Titelnummer. Durch
mehrfaches Drücken der Taste DISP (12) können
Informationen über den Titel des Musikstücks, des
Albums, über den Interpreten etc. (ID3-Tags) im
Display angezeigt werden. Sind keine ID3-Tags
vorhanden, signalisiert das Display NO ID3.
Hinweis: Bei der Wiedergabe von einer CD oder einem
USB-Stick werden durch Drücken der Taste DISP auch
Informationen zum eingestellten Sender angezeigt, siehe
Kapitel 5.2.3, Absatz Informationen. Darum die Taste
DISP so oft betätigen, bis die gewünschte Information im
Display erscheint.
4) Nach dem Abspielen des letzten Titels startet das
Gerät wieder den ersten Titel (Endloswiedergabe).
5) Zum Unterbrechen der Wiedergabe die Taste
(6) drücken. Das Display signalisiert S-PAUSE.
Durch erneutes Drücken der Taste wird die Wiedergabe fortgesetzt.
6) Zum Umschalten zwischen der Wiedergabe von
der CD, vom USB-Stick und dem Radioempfang
die Taste MODE (3) drücken.
WARNUNG Vor dem Einbau des Einschubs den
Netzstecker des Verstärkers oder des
Einschubgrundgerätes aus der Steckdose ziehen. Anderenfalls besteht die
Gefahr eines elektrischen Schlages.
D
A
CH
5
Page 6

5.1.2 Titel und Ordner anwählen
1) Mit den Tasten TRACK (11) den gewünschten Titel
anwählen.
Taste : bei jedem Antippen springt das Gerät
einen Titel weiter.
Taste : kurz gedrückt – das Gerät springt auf den
Titelanfang;
mit jedem weiteren Antippen der Taste wird immer
ein Titel weiter zurückgesprungen.
2) Sind die Titel in verschiedene Ordner (Dateienverzeichnisse) einsortiert, lassen sich die Ordner mit
den Tasten F
und F (15) anwählen. Der Name
des angewählten Ordners erscheint einmal durchlaufend im Display.
Nach der Anwahl des Ordners startet immer der
erste Titel des Ordners. Zum Anwählen eines anderen Titels die Tasten TRACK (11) verwenden. Mit
der Taste kann auch vom letzten Titel eines Ordners auf den ersten Titel des nächsten Ordners
gesprungen werden und mit der Taste vom
ersten Titel eines Ordners auf den letzten Titel des
vorherigen Ordners.
Hinweis: Die Titel werden in folgender Reihenfolge ab gespielt, wenn sie in verschiedene Order einsortiert sind:
1. alle Titel ohne Ordner
2. alle Titel in Ordnern auf der Hauptebene
3. alle Titel in Unterordnern usw.
Das Anwählen von Ordnern und die Nummerierung der
Titel erfolgt ebenfalls in dieser Reihenfolge.
5.1.3 Schneller Vor- und Rücklauf
Bei gedrückt gehaltener Taste (11) läuft der CDSpieler vor und bei gedrückt gehaltener Taste zu rück. Bei Titeln im MP3-Format kann mit dem Vor- und
Rücklauf nicht über mehrere Titel gefahren werden.
Am Ende oder Anfang eines Titels schaltet das Gerät
trotz gedrückt gehaltener Taste (11) auf normale Wiedergabe zurück.
5.1.4 Kurzes Anspielen der Titel
Alle Titel können für jeweils 10 Sekunden angespielt
werden.
1) Die Taste INT (7) drücken. Im Display erscheint
S-INT und die Titelnummer. Bei Titeln im MP3-Format wird dazu im Wechsel der Dateiname durchlaufend angezeigt. Wenn der momentane Titel
schon länger als 10 Sekunden läuft, springt das
Gerät auf den nächsten Titel.
2) Sollen nur die Titel im angewählten Ordner angespielt werden, beim Einschalten der Anspielfunktion die Taste INT länger als 3 Sek. drücken,
sodass im Display kurz D-INT (directory intro)
angezeigt wird.
3) Zum Ausschalten der Funktion die Taste INT erneut
drücken. Die Anzeige S-INT bzw. D-INT erlischt
und der gerade angespielte Titel wird weiter abgespielt. Die Funktion wird auch durch Betätigen der
Taste RPT (8) oder RDM (14) ausgeschaltet.
5.1.5 Wiederholtes Abspielen von Titeln
1) Den zu wiederholenden Titel mit der Taste oder
(11) anwählen und anschließend die Taste RPT
(8) drücken. Im Display erscheint die Anzeige
S-RPT und die Titelnummer. Bei Titeln im MP3-Format wird dazu im Wechsel der Dateiname durchlaufend angezeigt. Der Titel wird endlos wiederholt.
2) Sollen alle Titel im angewählten Ordner wiederholt
werden, beim Einschalten der Wiederholfunktion
die Taste RPT länger als 3 Sek. drücken, sodass im
Display kurz D-RPT (directory repeat) angezeigt
wird.
3) Zum Ausschalten der Funktion die Taste RPT er -
neut drücken. Die Anzeige S-RPT bzw. D-RPT
erlischt. Die Funktion wird auch durch Betätigen
der Taste INT (7) oder RDM (14) ausgeschaltet.
5.1.6 Zufallswiedergabe
Bei der Zufallswiedergabe werden die Titel nicht in
aufsteigender Titelfolge abgespielt, sondern in einer
durch das Gerät zufällig ausgewählten Reihenfolge.
1) Die Taste RDM (14) drücken. Das Gerät wählt
zufallsbedingt den nächsten Titel aus. Im Display
erscheint die Anzeige S-RDM und die Titelnummer.
Bei Titeln im MP3-Format wird dazu im Wechsel
der Dateiname durchlaufend angezeigt.
2) Sollen nur die Titel im angewählten Ordner in zufäl-
liger Reihenfolge gespielt werden, beim Einschalten der Zufallswiedergabe die Taste RDM länger
als 3 Sek. drücken, sodass im Display kurz D-RDM
(directory random) angezeigt wird.
3) Zum Ausschalten der Zufallswiedergabe die Taste
RDM erneut drücken. Die Anzeige S-RDM bzw.
D-RDM erlischt. Die Funktion wird auch durch
Betätigen der Taste INT (7) oder RPT (8) ausgeschaltet.
5.1.7 Hinweis zu Tonaussetzern und Lesefehlern
Zigarettenrauch und Staub dringen leicht durch alle
Öffnungen des Gerätes und setzen sich auch auf der
Optik des Laser-Abtastsystems ab. Sollte dieser Belag
zu Lesefehlern und Tonaussetzern führen, muss das
Gerät in einer Fachwerkstatt gereinigt werden. Diese
Reinigung ist kostenpflichtig, auch während der
Garantiezeit!
D
A
CH
6
Page 7

5.2 Bedienung des Tuners
Sobald eine CD eingeschoben oder ein USB-Stick eingesteckt wird, schaltet das Gerät automatisch auf die
Wiedergabe von der CD bzw. von dem USB-Stick um.
Mit der Taste MODE (3) lässt sich dann zwischen
Radioempfang und Wiedergabe von der CD bzw. von
dem USB-Stick umschalten.
5.2.1 Sender einstellen und speichern
Mit dem Tuner können UKW- und Mittelwellensender
empfangen werden. Damit sich mit den sechs Stationstasten (6, 7, 8, 14, 15) mehr als sechs Sender speichern lassen, ist der UKW-Bereich in drei identische
Unterbereiche aufgeteilt. In den drei Unterbereichen
(F 1, F2, F 3) und im Mittelwellenbereich (MW) können
jeweils sechs Sender gespeichert werden, somit insgesamt 18 UKW- und 6 Mittelwellensender.
1) Mit der Taste BAND (4) auf den gewünschten Be reich schalten. Am übersichtlichsten ist es, zuerst
im Bereich F 1 sechs Sender zu speichern und
dann auf den Bereich F 2 umzuschalten und da nach auf F 3.
2) Ein Sender lässt sich mit dem Sendersuchlauf finden oder manuell einstellen:
Zum Starten des Sendersuchlaufs die Taste (11)
(vorwärts) oder (rückwärts) kurz drücken. Der
Sendersuchlauf läuft bis zum nächsten Sender.
Während des Suchlaufs zeigt das Display SEARCH
an. Den Suchlauf so oft erneut starten, bis der ge wünschte Sender empfangen wird.
Zur manuellen Sendereinstellung die Taste
oder gedrückt halten, bis im Display kurz
MANUAL angezeigt wird. Danach lässt sich die
Empfangsfrequenz mit jedem Tastendruck schrittweise erhöhen oder verringern (im UKW-Bereich
um 50 kHz, im Mittelwellenbereich um 9 kHz). Um
manuell schnell einen großen Bereich zu durchlaufen, die Taste oder gedrückt halten. Nach dem
manuellen Einstellen schaltet das Gerät nach einigen Sekunden wieder auf automatischen Suchlauf
um, wenn nicht zuvor die Taste oder erneut
ge drückt wird. Das Display signalisiert kurz AUTO.
3) Ist der Sender eingestellt, die gewünschte Ziffern taste (6, 7, 8, 14, 15) so lange gedrückt halten, bis
rechts im Display die Stationsnummer und die
Anzeige „ch“ erscheinen (siehe Abb. 1). Der Sender ist dann unter dieser Nummer im jeweiligen
Unterbereich abgespeichert.
5.2.2 Gespeicherte Sender aufrufen
1) Mit der Taste BAND (4) den Bereich wählen, in dem
der gewünschte Sender gespeichert wurde.
2) Die Stationsnummer des Senders mit der entsprechenden Zifferntaste (6, 7, 8, 14, 15) wählen.
3) Mit dem Lautstärkeregler LEVEL (17) die ge wünschte Lautstärke einstellen.
4) Bei einer Stereosendung erscheint oben links im
Display ST.
5.2.3 RDS-Funktionen
Strahlt der gewählte Sender RDS-Informationen (radio
data system) aus, wird im Display der Sendername
anstelle der Frequenz angezeigt. Einige Sender
geben im Wechsel mit dem Sender namen zusätzliche
Informationen an, z. B. Musiktitel, Interpret.
Bietet ein Sender Verkehrsfunk an, erscheint im
Display die Anzeige TP (traffic program). Wird EON
(enhanced other networks) angezeigt und ein Programm empfangen, das zurzeit keinen Verkehrsfunk
bietet, schaltet der Tuner automatisch auf ein anderes
Programm der gleichen Sendeanstalt um, wenn dort
Verkehrsmeldungen durchgegeben werden. Nach der
Verkehrsdurchsage schaltet das Gerät wieder auf das
vorherige Programm zurück.
Informationen
Mit der Taste DISP (12) lassen sich folgende Informationen anzeigen:
1. Tastendruck → Anzeige der Uhrzeit
Wird keine Uhrzeit gesendet, zeigt das Display NO
CLOCK. Weil die Uhrzeit nicht kontinuierlich gesen-
det wird, kann es nach dem Einschalten des
Radios einige Minuten dauern, bis die Uhrzeit ver-
fügbar ist.
2. Tastendruck → Anzeige des Bereichs (F1, F2, F3,
MW) und der Senderfrequenz
3. Tastendruck → Anzeige des Programmtyps
Wird vom Sender kein Programmtyp angegeben,
zeigt das Display PTY NONE.
4. Tastendruck → Sendername (Grundeinstellung)
Das Display schaltet auch 5 Sek. nach dem letzten
Tastendruck auf die Grundeinstellung zurück.
Diese Informationen lassen sich auch während der
Wiedergabe von einer CD bzw. von einem USB-Stick
mit der Taste DISP anzeigen.
Alternativfrequenzen
Erscheint im Display kontinuierlich AF (nicht blinkend),
wird das Programm auch auf Alternativfrequenzen
umliegender Sender ausgestrahlt. Das Gerät wechselt
dann automatisch auf den am besten empfangbaren
Sender. Mit der Taste AF / REG (9) lässt sich diese
Funktion ausschalten (AF erlischt) und wieder einschalten.
Einige Sender strahlen regional zeitweise ein
unterschiedliches Programm aus, z. B. Regionalnachrichten. Damit beim automatischen Wechsel auf einen
besser empfangbaren Sender auch auf das gleiche
Regionalprogramm umgeschaltet wird, lässt sich der
Regionalprogrammmodus einschalten: Die Taste AF /
REG 3 Sek. gedrückt halten, bis das Display kurz REG
ON signalisiert. Bei eingeschaltem Modus erscheint
die Anzeige REG im Display. Zum Ausschalten des
Modus die Taste AF / REG erneut 3 Sek. gedrückt halten, bis das Display kurz REG OFF signalisiert.
D
A
CH
7
Page 8

Programmtyp
Mit der Taste PTY (16) lässt sich von den gespeicherten Sendern einer auswählen, der gerade Musik oder
Informationen einer bestimmten Rubrik sendet. Folgende Rubriken können gewählt werden:
1) Mit der Taste PTY (16) die Funktion Programmtyp
einschalten. Damit ist eine genauere Auswahl aus
der Gruppe Musik möglich. Im Display wird eine
Rubrik aus dieser Gruppe angezeigt. Zum Um schalten auf die Gruppe Wort die Taste PTY erneut
drücken. Das Display zeigt eine Rubrik aus dieser
Gruppe an. (Beim dritten Tastendruck ist die Funktion Programmtyp wieder ausgeschaltet.)
2) Durch (mehrfaches) Drücken der zugehörigen Zifferntaste die gewünschte Rubrik aus der zuvor ge wählten Gruppe selektieren. Das Gerät sucht unter
den gespeicherten Sendern den heraus, der zurzeit
ein Programm in der gewählten Rubrik ausstrahlt.
Während des Suchvorgangs ist der Ton ausgeschaltet.
Kann das Gerät keinen Sender mit der ge wünschten Rubrik finden, blinkt nach einiger Zeit im
Display die Meldung PTY NONE und das Gerät
springt auf den zuletzt eingestellten Sender zurück.
3) Um die Funktion Programmtyp auszuschalten und
die gespeicherten Sender wieder mit den zugehörigen Stationstasten aufrufen zu können, die Taste
PTY ein- oder zweimal drücken, sodass im Display
die Senderfrequenz oder der Sendername angezeigt wird.
6 Technische Daten
Blockschaltbild siehe Seite 37
CD/ MP3-Spieler
Klirrfaktor: . . . . . . . . . . . . < 0,03 %
Störabstand: . . . . . . . . . . > 85 dB
Frequenzgang: . . . . . . . . 10 –20 000 Hz, ±1dB
Gleichlauf-
schwankungen: . . . . . . . . nicht messbar
(quarzgenau)
Tuner
Empfangsfrequenz
FM: . . . . . . . . . . . . . . . 87,5 –108 MHz
MW: . . . . . . . . . . . . . . . 522 – 1620 kHz
HF-Empfindlichkeit
FM: . . . . . . . . . . . . . . . 6 dBµV
MW: . . . . . . . . . . . . . . . 25 dBµV
Störabstand
FM: . . . . . . . . . . . . . . . > 60 dB
MW: . . . . . . . . . . . . . . . > 50 dB
Klirrfaktor: . . . . . . . . . . . . < 0,5 %
Allgemeine Daten
Stromversorgung: . . . . . . 17 V über den ELA-Ver-
stärker oder über das
Grundgerät
Abmessungen
(B × H × T): . . . . . . . . . . . 195 × 40 × 215 mm
Gewicht: . . . . . . . . . . . . . . 1,1 kg
Änderungen vorbehalten.
Gruppe Musik Gruppe Wort
mit der Zifferntaste 1 (6) selektierbar
POP M Pop-Musik
ROCK M Rock-Musik
NEWS Nachrichten
AFFAIRS aktuelle Infos
INFO Service-Programm
mit der Zifferntaste 2 (7) selektierbar
EASY M Unterhaltungsmusik
LIGHT M leichte Klassik
SPORT Sport
EDUCATE Bildung
DRAMA Hörspiel, Literatur
mit der Zifferntaste 3 (8) selektierbar
CLASSICS ernste Klassik
OTHER M spezielle Musik
CULTURE Kultur, Gesellschaft
SCIENCE Wissenschaft
VARIED Unterhaltung
mit der Zifferntaste 4 (14) selektierbar
JAZZ Jazz
COUNTRY Country-Musik
WEATHER Wetter
FINANCE Wirtschaft
CHILDREN Kinderprogramm
mit der Zifferntaste 5 (15) selektierbar
NATION M Landesmusik
OLDIES Oldies
SOCIAL Soziales
RELIGION Religion
PHONE IN Anrufsendung
mit der Zifferntaste 6 (15) selektierbar
FOLK M Folklore
TRAVEL Reiseinformationen
LEISURE Freizeit
DOCUMENT
Dokumentation
D
A
CH
8
Diese Bedienungsanleitung ist urheberrechtlich für MONACOR®INTERNATIONAL GmbH & Co. KG geschützt.
Eine Reproduktion für eigene kommerzielle Zwecke – auch auszugsweise – ist untersagt.
Page 9
All operating elements and connections de scribed
can be found on the fold-out page 3.
1 Operating Elements
1 Button EJECT to eject the CD
2 Button POWER for switching the unit on and off
3 Button MODE to switch between CD replay, MP3
replay via the USB port (10) and radio reception
4 Button BAND to select the reception bands for the
radio
5 CD slot
6 Station button 1 or
for CD/MP3 operation: Pause / Start
7 Station button 2 or
short playing of all title beginnings for CD / MP3
operation
8 Station button 3 or
repeat of the current title for CD/ MP3 operation
9 Button AF/REG for the function: alternative fre-
quency for RDS reception
10 USB port for inserting a USB flash drive
11 Buttons TRACK/ TUNE
CD / MP3: To go to the next title or to go back to the
previous title; fast forward/reverse run
with the button kept pressed
Radio: station tuning
To start the automatic station finding,
shortly press the corresponding button.
For manual station finding, keep the button or pressed until MANUAL is
shortly displayed. Then adjust the station with the button or .
12 Button DISP for switching the display to various
information (e. g. time, programme type, ID3 tags)
13 Display
14 Station button 4 or random replay for CD / MP3
oper ation
15 Station buttons 5 and 6 or folder selection for CD /
MP3 operation
16 Button PTY to select the programme type for RDS
reception
17 Volume control LEVEL
2 Safety Notes
The insertion module corresponds to all relevant directives of the EU and is therefore marked with .
G
The insertion must only be installed by qualified,
specialized personnel.
G
The insertion is suitable for indoor use only. Protect
it against dripping water and splash water, high air
humidity, and heat (admissible ambient temperature
range 0 – 40 °C).
G
Do not set the unit with the installed insertion into
operation, and immediately disconnect the mains
plug from the mains socket if
1. there is visible damage to the insertion, the unit,
or to the mains cable,
2. a defect might have occurred after a drop or similar accident,
3. malfunctions occur.
The insertion or the complete unit must in any case
be repaired by skilled personnel.
G
For cleaning only use a dry, soft cloth, never use
chemicals or water.
G
No guarantee claims for the unit and no liability for
any resulting personal damage or material damage
will be accepted if the insertion is used for other purposes than originally intended, if it is not correctly
installed or operated or not repaired in an expert
way.
3 Applications
The insertion module is suitable for installation into PA
amplifiers from MONACOR with an insertion compartment and into basic units for insertions from MONACOR, e. g.:
PA-1120 PA amplifier for 5 zones
PA-1200 PA amplifier for 4 zones
PA-1200EX basic unit for 2 insertions
PA-1204EX basic unit for 4 insertions
PA-1240 PA amplifier for 5 zones
PA-5240 PA amplifier for 5 zones
PA-5480 PA amplifier for 5 zones
PA-6240 PA amplifier for 6 zones
PA-6480 PA amplifier for 6 zones
PA-6600 PA amplifier for 6 zones
If the insertion is to be put out of operation
definitively, take it to a local recycling plant for
a disposal which is not harmful to the environment.
GB
9
Page 10
GB
10
4 Installation of the Insertion Module
1) Remove the housing cover of the amplifier or of the
basic unit.
2) Screw off the cover for the insertion compartment
on the front side of the amplifier or of the basic unit.
Install the insertion and tighten it with screws.
3) Connect the bare three-pole line of the amplifier or
of the basic unit to the pin housing of position c (see
fig. 2). This allows to supply the insertion with 17 V
and to feed the audio signal to the amplifier.
4) If required, two further audio outputs are available:
balanced mono output at the connection d
unbalanced stereo output at the connection e
5) For mounting the supplied antenna connections on
the rear side of the amplifier/basic unit, unscrew the
cover panel (fig. 3) or remove the cover plate
(fig. 4). Insert the antenna connecting PCB into the
opening and tighten it with screws.
6) Connect the line of the inserted antenna PCB to the
five-pole pin housing of position a.
7) The insertion PA-1140RCD has a storage battery
so that the stations also remain stored with the unit
switched off. The storage battery is deactivated in
the factory to prevent successive discharge before
installation. To activate the battery, set the jumper b
to position ON.
To deactivate the battery again (e. g. if stored for
a longer time), set the jumper b to position OFF
again.
8) Close the amplifier or the basic unit with the hous ing cover and connect the reception antennas to the
screw connections of the antennas. Pay attention to
the lettering on the amplifier or on the basic unit:
AM+GND for medium wave antenna
FM 75 Ω for FM antenna with 75 Ω connection
cable
300 Ω for FM antenna with 300 Ω connection
cable
5 Operation
1) Switch on the amplifier or the basic unit with the
mains switch and the insertion module with the
POWER button (2).
2) Adjust the desired volume with the volume control
LEVEL (17).
3) To switch off, press the POWER button again.
5.1 Operation of the CD /MP3 player
It is possible to replay audio CDs including those you
have burnt yourself (CD-R) and CDs with titles in the
MP3 format. In case of rewritable CDs (CD-RW), however, problems may occur while replaying depending
on the CD type, the CD burner and the burning programme used.
Via the USB port also MP3 files can be replayed
from a USB flash drive.
5.1.1 Replaying music titles
1) Insert a CD with the lettering facing upwards so far
into the slot (5) until it is automatically retracted. If
there is already a CD in the unit, the display shows
the symbol .
To change a CD, press the button EJECT (1).
The CD is ejected. If the CD is not removed, the
unit retracts the CD after a few seconds.
2) Alternatively or additionally, a USB flash drive can
be inserted into the USB port (10).
3) After loading, the first title starts. For standard
audio CDs the display shows the title number and
the time already played (min. : sec.).
For titles in the MP3 format the file name passes
through the display, then the title number is shown
behind the letter “T”. When the button DISP (12) is
pressed repeatedly, information about the title of
the music piece, the album, the artist etc. (ID3 tags)
can be displayed. If no ID3 tags are available, the
display shows NO ID3.
Note: When replaying from a CD or a USB flash drive
and the button DISP is pressed, also information about
the station adjusted are displayed, see chapter 5.2.3,
paragraph “Information”. Therefore, actuate the button
DISP repeatedly until the desired information is displayed.
4) After replaying the last title, the unit restarts with the
first title (continuous replay).
5) To interrupt the replay, press the button (6). The
display indicates S-PAUSE. When pressing the
button again, the replay is continued.
6) To switch between the replay from the CD, the USB
flash drive and the radio reception, press the button
MODE (3).
WARNING Prior to the installation of the insertion
disconnect the mains plug of the amplifier or of the basic insertion unit from the
mains socket. Otherwise there is an
electric shock hazard.
Page 11

5.1.2 Selecting title and folder
1) Select the desired title with the buttons TRACK (11).
Button : each time the button is shortly pressed,
the unit advances one title.
Button : shortly pressed – the unit goes to the title
beginning;
each time the button is shortly pressed, the unit
reverses one title.
2) If the titles are filed into different folders (file directories), the folders can be selected with the buttons
F
and F (15). The name of the selected folder
passes through the display once.
After the selection of the folder always the first
title of the folder starts. To select another title, use
the buttons TRACK (11). With the button it is also
possible to go from the last title of a folder to the
first title of the next folder, and with the button
from the first title of a folder to the last title of the
previous folder.
Note: The titles are replayed in the following order when
they are filed in different folders:
1. All titles without folder
2. All titles in folders in the root directory
3. All titles in subfolders etc.
The folders are selected and the titles are num bered
according to this order as well.
5.1.3 Fast forward and reverse run
With the button (11) pressed the CD player advanc es and with the button pressed it reverses. For titles
in the MP3 format it is not possible to go beyond several titles with the fast forward and reverse. At the end
or beginning of a title the unit switches back to normal
replay even if the button (11) is kept pressed.
5.1.4 Short replaying of the title beginnings
The beginnings of all titles can be replayed for 10 seconds respectively.
1) Press the button INT (7). S-INT is displayed and the
title number. For titles in the MP3 format also the
file name passes through the display alternately.
When the current title is already replayed for more
than 10 seconds, the unit goes to the next title.
2) For replaying only the beginnings of the titles in the
selected folder, press the button INT for more than
3 seconds when switching on the function short
replaying of the title beginnings so that D-INT
(directory intro) is shortly displayed.
3) To switch off the function, press the button INT
again. S-INT or D-INT will be extinguished and the
title whose beginning is currently replayed is con tinued. The function is also deactivated by actuating
the button RPT (8) or RDM (14).
5.1.5 Repeated replaying of titles
1) Select the title to be repeated with the button or
(11) and then press the button RPT (8). S-RPT is
displayed and the title number. For titles in the MP3
format also the file name passes through the display alternately. The title is continuously repeated.
2) To repeat all titles in the selected folder, press the
button RPT for more than 3 seconds when switching on the repeat function so that D-RPT (directory
repeat) is shortly displayed.
3) To switch off the function, press the button RPT
again. S-RPT or D-RPT will be extinguished. The
function is also deactivated when actuating the button INT (7) or RDM (14).
5.1.6 Random replay
With the random replay the titles are not replayed in an
ascending title sequence but in a sequence selected
by the unit at random.
1) Press the button RDM (14). The unit selects the
next title at random. S-RDM is displayed and the
title number. For titles in the MP3 format also the
file name passes through the display alternately.
2) To replay at random only the titles in the selected
folder, press the button RDM for more than 3 seconds when switching on the random replay so that
D-RDM (directory random) is shortly displayed.
3) To switch off the random replay, press the button
RDM again. S-RDM or D-RDM will be extinguished.
The function is also deactivated by actuating the
button INT (7) or RPT (8).
5.1.7 Note concerning sound interruptions
and reading errors
Cigarette smoke and dust will easily penetrate through
all openings of the unit and also settle on the optics of
the laser sampling system. If this deposit causes reading errors and sound interruptions, the unit must be
cleaned by skilled personnel. Please note that there
will be a charge on cleaning, even during the warranty
period!
GB
11
Page 12

GB
12
5.2 Operation of the tuner
Once a CD or a USB flash drive has been inserted, the
unit will automatically be switched to replay from the
CD or USB flash drive. Press the button MODE (3) to
switch between radio reception and replay from the
CD or USB flash drive.
5.2.1 Station tuning and storing
The tuner is able to receive FM and medium wave stations. To allow storing of more than six stations with
the six station buttons (6, 7, 8, 14, 15), the FM band
has been divided into three identical subbands. In the
three subbands (F 1, F 2, F 3) and in the medium wave
band (MW) six stations can be stored respectively,
thus a total of 18 FM and 6 medium wave stations.
1) Select the desired band with the button BAND (4).
It is recommended to store six stations in the band
F 1 first and then to switch over to the band F 2 and
then to F 3.
2) For station tuning, use either the automatic or manual station finding:
To start the automatic station finding, shortly
press the button (11) (forward) or (backward).
The automatic station finding stops at the next station. During the station finding SEARCH is displayed. Restart the station finding so many times
until the desired station is received.
For manual station finding keep the button or
pressed until MANUAL is shortly displayed. Then
the received frequency can be increased or re duced step by step with each pressing of the button
(in the FM band by 50 kHz, in the medium wave
band by 9 kHz). To run quickly through a great area
for manual station finding, keep the button or
pressed. After manual station finding the unit
switches to automatic station finding again after a
few seconds unless the button or has been
pressed again before. AUTO is shortly displayed.
3) If the station has been tuned, keep the desired
numerical key (6, 7, 8, 14, 15) pressed until the station number and “ch” appear on the right in the display (see fig. 1). Then the station is stored under
this number in the respective subband.
5.2.2 Calling stored stations
1) Select the band with the button BAND (4) in which
the desired station has been stored.
2) Select the number of the station with the corresponding numerical key (6, 7, 8, 14, 15).
3) Adjust the desired volume with the volume control
LEVEL (17).
4) With a stereo programme, ST appears on the top
left of the display.
5.2.3 RDS functions
If the selected station transmits RDS information
(radio data system), the name of the station is displayed instead of the frequency. Some stations show
additional information alternately with the station
name, e. g. music title, artist.
If a station offers traffic programme, TP is displayed. If EON (enhanced other networks) is shown
and a programme is received which at present does
not offer a traffic programme, the tuner automatically
switches to another programme of the same broad casting station when traffic messages are transmitted
there. After the traffic announcement the unit switches
back to the previous programme.
Information
With the button DISP (12) the following information
can be displayed:
1
st
pressing of button → time indication
If no time is transmitted, NO CLOCK is displayed.
As the time is not transmitted continuously, it can
take a few minutes after switching on the radio
until the time is available.
2
nd
pressing of button → indication of the band (F1,
F2, F3, MW) and of the station frequency
3
rd
pressing of button → indication of the programme
type
If no programme type is indicated by the station,
PTY NONE is displayed.
4
th
pressing of button → station name (basic setting)
The display also switches to the basic setting
5 seconds after pressing the button the last time.
This information can also be displayed with the button
DISP while replaying from a CD or USB flash drive.
Alternative frequencies
If AF is continuously displayed (not flashing), the programme is also broadcasted on alternative frequencies of neighbouring stations. Then the unit automatically changes to the station which can be received
best. With the button AF/REG (9) this function can be
switched off (AF will be extinguished) and switched on
again.
Some stations temporarily broadcast a different
programme depending on the region, e. g. regional
news. For automatical switching to a station with a better reception and at the same time for switching over to
the same regional programme, the regional programme mode can be switched on. Keep the button
AF/REG pressed for 3 seconds until REG ON is
shortly displayed. With the mode switched on, REG is
displayed. To switch off the mode, keep the button
AF/REG pressed again for 3 seconds until REG OFF
is shortly displayed.
Page 13

Programme type
With the button PTY (16) one of the stored stations
can be selected which currently broadcasts music or
information of a special category. The following categories can be selected:
1) Switch on the function programme type with the
button PTY (16). Thus, a more detailed selection of
the music group is possible. One category of this
group is displayed. To switch to the word group,
press the button PTY again. The display shows a
category of this group. (With the third pressing of
the button, the function programme type is switched
off again.)
2) By (repeated) pressing of the corresponding nu merical key, select the desired category of the
group chosen before. Among the stored stations,
the unit searches for the station which currently
broadcasts a programme in the selected category.
During search ing, the sound is switched off.
If the unit cannot find a station with the desired
category, the message PTY NONE flashes in the
display after some time, and the unit goes to the
station last tuned.
3) To switch off the function programme type and to be
able to call the stored stations again with the corresponding station buttons, press the button PTY
once or twice so that the station frequency or the
station name is displayed.
6 Specifications
Block diagram see page 37
CD/ MP3 player
THD: . . . . . . . . . . . . . . . . < 0.03 %
S / N ratio: . . . . . . . . . . . . . > 85 dB
Frequency response: . . . . 10 – 20 000 Hz, ±1 dB
Wow and flutter: . . . . . . . . not measurable
(quartz precision)
Tuner
Received frequency
FM: . . . . . . . . . . . . . . . 87.5 –108 MHz
MW: . . . . . . . . . . . . . . . 522 – 1620 kHz
RF sensitivity
FM: . . . . . . . . . . . . . . . 6 dBµV
MW: . . . . . . . . . . . . . . . 25 dBµV
S/N ratio
FM: . . . . . . . . . . . . . . . > 60 dB
MW: . . . . . . . . . . . . . . . > 50 dB
THD: . . . . . . . . . . . . . . . . < 0.5 %
General information
Power supply: . . . . . . . . . 17 V via the PA amplifier
or via the basic unit
Dimensions (W × H × D): . 195 × 40 × 215 mm
Weight: . . . . . . . . . . . . . . . 1.1 kg
Subject to technical modification.
Music Group Word Group
to be selected with the numerical key 1 (6)
POP M Pop-Music
ROCK M Rock-Music
NEWS News
AFFAIRS Current affairs
INFO Information
to be selected with the numerical key 2 (7)
EASY M Easy Listening Music
LIGHT M Light Classical Music
SPORT Sport
EDUCATE Education
DRAMA Drama
to be selected with the numerical key 3 (8)
CLASSICS Serious Classical
Music
OTHER M Other Music
CULTURE Culture
SCIENCE Science
VARIED Varied
to be selected with the numerical key 4 (14)
JAZZ Jazz Music
COUNTRY Country Music
WEATHER Weather
FINANCE Finance
CHILDREN
Children’s Programmes
to be selected with the numerical key 5 (15)
NATION M National Music
OLDIES Oldies Music
SOCIAL Social Affairs
RELIGION Religion
PHONE IN Phone In
to be selected with the numerical key 6 (15)
FOLK M Folk Music
TRAVEL Travel
LEISURE Leisure
DOCUMENT
Documentary
GB
13
All rights reserved by MONACOR®INTERNATIONAL GmbH & Co. KG. No part of this instruction manual may
be reproduced in any form or by any means for any commercial use.
Page 14

Vous trouverez sur la page 3, dépliable, les éléments et branchements décrits.
1 Eléments et branchements
1 Touche EJECT : éjection du CD
2 Touche POWER pour allumer et éteindre lʼappareil
3 Touche MODE pour commuter entre lecture de
CD, lecture MP3 via le port USB (10) et réception
radio
4 Touche BAND pour commuter les plages de récep-
tion en mode radio
5 Fente dʼinsertion du CD
6 Touche de station 1 ou
touche pause/start en mode CD / MP3
7 Touche station 2 ou
lecture des débuts des titres en mode CD / MP3
8 Touche station 3 ou
répétition du titre en cours en mode CD / MP3
9 Touche AF/REG pour la fonction de fréquence
alternative en réception RDS
10 Port USB pour insérer une clé USB
11 Touches TRACK/TUNE
CD / MP3 : pour aller au titre suivant ou pour revenir
au titre précédent ; si la touche est maintenue enfoncée, avance et retour
rapides
Radio : réglage dʼune station
Pour démarrer la recherche de stations,
appuyez brièvement sur la touche cor respondante.
Pour un réglage manuel de stations,
maintenez la touche ou enfoncée
jusquʼà ce que lʼaffichage indique brièvement MANUAL. Réglez ensuite la station avec la touche ou .
12 Touche DISP pour commuter lʼaffichage sur des
informations distinctes (par exemple heure, type
de programmation, ID3 Tags)
13 Affichage
14 Touche station 4 ou lecture aléatoire en mode CD /
MP3
15 Touches station 5 et 6 ou sélection de dossiers en
mode CD / MP3
16 Touche PTY pour sélectionner le type de pro-
gramme en réception RDS
17 Potentiomètre de réglage de volume
2 Conseils dʼutilisation
Le module insert répond à toutes les directives nécessaires de lʼUnion Européenne et porte donc le symbole .
G
Seul un personnel habilité peut effectuer lʼinstallation du module.
G
Le module nʼest conçu que pour une utilisation en
intérieur. Protégez-le de tout type de projections
dʼeau, des éclaboussures, dʼune humidité de lʼair
élevée et de la chaleur (plage de température de
fonctionnement autorisée : 0 – 40 °C).
G
Ne faites pas fonctionner lʼappareil avec le module
installé et débranchez immédiatement la fiche secteur dans les cas suivants :
1. le module, lʼappareil ou le cordon secteur présente des dommages.
2. après une chute, lʼappareil présente un défaut.
3. des dysfonctionnements apparaissent.
Dans tous les cas, les dommages sur le module ou
lʼappareil complet doivent être réparés par un technicien spécialisé.
G
Pour nettoyer, utilisez un chiffon sec, en aucun cas
de produits chimiques ou dʼeau.
G
Nous déclinons toute responsabilité en cas de dommages matériels ou corporels consécutifs si le
module est utilisé dans un but autre que celui pour
lequel il a été conçu, sʼil nʼest pas correctement installé, utilisé ou nʼest pas réparé par une personne
habilitée ; de même, la garantie deviendrait caduque.
3 Possibilités dʼutilisation
Le module peut être inséré dans des amplificateurs
Public Adress MONACOR avec compartiment pour
module et dans des appareils MONACOR de base
adaptés pour des modules insert, par exemple :
PA-1120 ampli PA 5 zones
PA-1200 ampli PA 4 zones
PA-1200EX appareil de base pour 2 modules
PA-1204EX appareil de base pour 4 modules
PA-1240 ampli PA 5 zones
PA-5240 ampli PA 5 zones
PA-5480 ampli PA 5 zones
PA-6240 ampli PA 6 zones
PA-6480 ampli PA 6 zones
PA-6600 ampli PA 6 zones
Lorsque le module est définitivement retiré
du service, vous devez le déposer dans une
usine de recyclage adaptée pour contribuer à
son élimination non polluante.
F
B
CH
14
Page 15

4 Montage du module
1) Retirez le couvercle du boîtier de lʼamplificateur/ de
lʼappareil de base.
2) Sur la face avant de lʼamplificateur/ de lʼappareil de
base, dévissez le cache du compartiment du
module. Placez ce dernier et vissez-le.
3) Mettez le câble lâche 3 pôles de lʼamplificateur/ de
lʼappareil de base dans le boîtier de connexion de
la position c (schéma 2). Le module est ici alimenté
avec une tension 17 V et le signal audio est dirigé
vers lʼamplificateur.
4) Si besoin, deux autres sorties audio sont disponibles :
sortie mono symétrique à la connexion d
sortie stéréo asymétrique à la connexion e
5) Pour monter les branchements dʼantenne livrés sur
la face arrière de lʼamplificateur / de lʼappareil de
base, dévissez la plaque de protection (schéma 3)
ou retirez la plaque métallique (schéma 4). Insérez
la platine de branchement dʼantenne dans lʼouverture et vissez-la.
6) Mettez le câble de la platine antenne installée dans
le boîtier de connexion 5 pôles de la position a.
7) Le module PA-1140RCD possède une batterie de
mémoire pour que les positions des stations restent
enregistrées même si lʼappareil est débranché.
Cette batterie est désactivée à la sortie dʼusine
pour éviter quʼelle ne se décharge lentement jusquʼà ce quʼelle soit placée. Pour activer la batterie,
mettez le cavalier b sur ON.
Si la batterie doit être désactivée à nouveau (par
exemple en cas de stockage prolongé), mettez le
cavalier b sur la position OFF.
8) Refermez le couvercle de lʼamplificateur/ lʼappareil
de base avec le couvercle puis connectez les
antennes de réception aux connexions de vis
antenne. Respectez les repères figurant sur lʼamplificateur/lʼappareil de base :
AM+GND pour antenne AM
FM 75 Ω pour antenne FM avec cordon branche-
ment 75 Ω
300 Ω pour antenne FM avec cordon branche-
ment 300 Ω
5 Utilisation
1) Allumez lʼamplificateur / lʼappareil de base avec lʼinterrupteur secteur puis le module avec la touche
POWER (2).
2) Réglez le volume souhaité avec le potentiomètre
LEVEL (17).
3) Pour éteindre, appuyez une nouvelle fois sur la
touche POWER.
5.1 Utilisation du lecteur CD /MP3
Avec cet appareil, on peut lire des CDs audio, des
CDs audio gravés (CD-R) et des CDs avec des titres
au format MP3. Lors de la lecture de CD réinscriptibles
(CD-RW), selon le type de CD, de graveur de CD utilisé et de programme de gravure, on peut rencontrer
des problèmes lors de la lecture.
Via le port USB, on peut également lire des fichiers
MP3 depuis une clé USB.
5.1.1 Lecture de titres de musique
1) Insérez un CD, inscription vers le haut dans la fente
(5) jusquʼà ce quʼil soit automatiquement entré. Sʼil
y a déjà un CD dans lʼappareil, lʼaffichage indique le
symbole .
Pour changer un CD, appuyez sur la touche
EJECT (1). Le CD est éjecté. Si vous ne le retirez
pas, lʼappareil le fait rentrer automatiquement
après quelques secondes.
2) A la place ou en plus, on peut brancher une clé
USB dans le port USB (10).
3) Une fois le processus de chargement terminé, le
premier titre démarre. Pour des CDs audio standards, lʼaffichage indique le numéro du titre et la
durée déjà lue (minutes, secondes).
Pour des titres au format MP3, le nom du fichier est
affiché en continu, puis derrière la lettre “T”, le
numéro du titre. En appuyant plusieurs fois sur la
touche DISP (12), on peut afficher des informations
sur le titre du morceau de musique, de lʼalbum, lʼinterprète ... (ID-3Tags). Sʼil nʼy a pas de ID3-Tags,
lʼaffichage indique NO ID3.
Note : lors de la lecture dʼun CD ou dʼune clé USB, des
informations sur la station réglée sont également affichées en appuyant sur la touche DISP, voir chapitre
5.2.3, point Informations. Appuyez sur la touche DISP
jusquʼà ce que lʼinformation souhaitée soit visible sur lʼaffichage.
4) Une fois le dernier titre lu, lʼappareil redémarre le
premier (lecture continue).
5) Pour interrompre la lecture, appuyez sur la touche
(6). Lʼaffichage indique S-PAUSE. Par une nouvelle pression sur la touche , la lecture est poursuivie.
6) Pour commuter entre lecture du CD, de la clé USB et
la réception radio, appuyez sur la touche MODE (3).
AVERTISSEMENT Avant de monter le module, veiller à
retirer le cordon dʼalimentation de la
prise secteur de lʼamplificateur ou
de lʼappareil de base. Sinon il y a
risque de dé charge électrique.
F
B
CH
15
Page 16

5.1.2 Sélection des titres et dossiers
1) Avec les touches TRACK (11), sélectionnez le titre
souhaité :
touche : à chaque pression, lʼappareil saute au
titre suivant
touche : brièvement enfoncée : lʼappareil revient
au début du titre ; à chaque nouvelle pression, le
lecteur recule toujours dʼun titre.
2) Si les titres sont classés dans différents dossiers
(répertoires de données), on peut sélectionner les
dossiers avec les touches F
et F (15). Le nom
du dossier sélectionné défile une fois sur lʼaffichage.
Une fois le dossier sélectionné, le premier titre
du dossier démarre toujours. Pour sélectionner un
autre titre, utilisez les touches TRACK (12). Avec la
touche , on peut sauter du dernier titre dʼun dossier au premier titre du dossier suivant et avec la
touche , du premier titre dʼun dossier au dernier
titre du dossier précédent.
Note : les titres sont lus dans lʼordre suivant lorsquʼils
sont listés dans différents dossiers:
1. tous les titres sans dossier
2. tous les titres dans les dossiers du répertoire principal
3. tous les titres dans les sous-répertoires etc.
Les répertoires sélectionnés et les titres sont également
numérotés selon cet ordre.
5.1.3 Avance et retour rapides
Si vous maintenez la touche (11) enfoncée, le lecteur CD avance, si vous maintenez la touche enfoncée, il recule. Pour des titres au format MP3, on ne
peut pas aller sur plusieurs titres, avec lʼavance et
retour rapide. A la fin ou au début du titre, lʼappareil
revient à la lecture normale même si la touche (11) est
maintenue enfoncée.
5.1.4 Lecture des intros des titres
Il est possible dʼécouter les intros de tous les titre pendant 10 secondes respectivement.
1) Enfoncez la touche INT (7), lʼaffichage indique
S-INT et le numéro du titre. Pour des titres au format MP3, le nom du fichier est affiché en continu à
la place. Si le titre actuellement en cours a été lu
plus de 10 secondes, lʼappareil passe au titre suivant.
2) Si seuls les débuts des titres dans le dossier sélectionné doivent être lus, appuyez sur la touche INT
plus de trois secondes lorsque vous activez la fonction de la lecture des intros des titres, de telle sorte
que sur lʼaffichage D-INT (directory intro) sʼaffiche
brièvement.
3) Pour déconnecter la fonction, enfoncez une nouvelle fois la touche INT ; S-INT ou D-INT nʼest plus
visible, la lecture du titre en cours se poursuit. La
fonction est déconnectée lorsque les touches RPT
(8) ou RDM (14) sont activées.
5.1.5 Répétition dʼun titre
1) Sélectionnez le titre à répéter avec la touche ou
(11) et appuyez sur la touche RPT (8). Sur lʼaffi-
chage, S-RPT et le numéro du titre sont visibles.
Pour des titres au format MP3, le nom du fichier est
affiché en continu à la place. Le titre est répété en
boucle.
2) Si tous les titres dans le dossier sélectionné doivent
être répétés, appuyez sur la touche RPT plus de
trois secondes lorsque vous activez la fonction de
répétition, de telle sorte que sur lʼaffichage D-RPT
(directory repeat) sʼaffiche brièvement.
3) Pour déconnecter cette fonction, enfoncez une
nouvelle fois la touche RPT, S-RPT ou D-RPT nʼest
plus visible sur lʼaffichage ; la fonction est également déconnectée en activant les touches INT (7)
ou RDM (14).
5.1.6 Lecture aléatoire
Lors de la lecture aléatoire, les titres ne sont pas lus
dans lʼordre dʼenregistrement mais dans un ordre arbitraire sélectionné par lʼappareil.
1) Enfoncez la touche RDM (14). Lʼappareil sélec-
tionne de manière arbitraire le titre suivant. Sur lʼaffichage, S-RDM et le numéro du titre sont visibles.
Pour des titres au format MP3, le nom du fichier est
affiché en continu à la place.
2) Si seuls les ti tres dans le dossier sélectionné doi-
vent être lus dans un ordre aléatoire, appuyez sur
la touche RDM plus de trois secondes lorsque vous
activez la fonction de reproduction aléatoire, de
telle sorte que sur lʼaffichage D-RDM (directory random) sʼaffiche brièvement.
3) Pour déconnecter cette fonction, enfoncez une
nouvelle fois la touche RDM, S-RDM ou D-RDM
nʼest plus visible sur lʼaffichage ; la fonction est
également déconnectée en activant les touches
INT (7) ou RPT (8).
5.1.7 Remarques sur les coupures du son et
les erreurs de lecture
La fumée de cigarettes et la poussière sʼintroduisent
facilement dans les ouvertures du lecteur et se déposent sur lʼoptique du système laser. Cela peut générer
des erreurs de lecture et des coupures de son, donc,
le nettoyage du lecteur doit être confié à un technicien
spécialisé. Cette opération est à la charge de lʼutilisateur, même lorsque lʼappareil est sous garantie !
F
B
CH
16
Page 17

5.2 Utilisation du tuner
Dès quʼun CD est inséré ou une clé USB placée, lʼappareil commute automatiquement sur la lecture du CD
ou de la clé USB. Avec la touche MODE (3), vous pouvez commuter entre réception radio et lecture de CD
ou de la clé USB.
5.2.1 Réglage et mémorisation de la station
Avec le tuner, vous pouvez recevoir des stations FM et
AM. Pour pouvoir mémoriser plus de six stations avec
les 6 touches (6, 7, 8, 14, 15), la plage FM est divisée
en trois sous-plages identiques. Dans les trois sousplages (F 1, F 2, F 3), et la plage AM (MW), six stations
peuvent respectivement être mémorisées, soit un total
de 18 stations FM et 6 stations AM.
1) Avec la touche BAND (4), sélectionnez la plage
souhaitée ; il est recommander de mémoriser les
6 stations dans la plage FM 1, puis passez dans la
plage FM 2 puis FM 3.
2) Vous avez le choix entre une recherche automatique ou manuelle des stations pour trouver une
station:
Démarrez la recherche de stations par une brève
pression sur la touche (11) (avant) ou (arrière).
La recherche automatique sʼarrête dès que la station suivante est trouvée. Pendant la recherche, lʼaffichage indique SEARCH. Refaites la recherche
jusquʼà ce que la station souhaitée soit reçue.
Pour une recherche manuelle des stations, maintenez la touche ou enfoncée jusquʼà ce que
MANUAL soit visible brièvement sur lʼaffichage. La
fréquence de réception peut être augmentée ou
diminuée par palier à chaque pression sur la
touche (dans la plage FM de 50 kHz, dans la plage
AM de 9 kHz). Pour faire défiler rapidement
manuellement une plage plus grande, maintenez la
touche ou enfoncée. Après le réglage manuel,
lʼappareil commute après quelques secondes, à
nouveau sur la recherche automatique si la touche
ou nʼa auparavant pas été enfoncée. Lʼaffi-
chage indique brièvement AUTO.
3) Lorsque la station est trouvée, maintenez la touche
numérique souhaitée (6, 7, 8, 14, 15) enfoncée jusquʼà ce que sur lʼaffichage à droite, le numéro de la
station et “ch” soient visibles (schéma 1). La station
est alors mémorisée sous ce numéro dans la sousplage correspondante.
5.2.2 Appel des stations mémorisées
1) Avec la touche BAND (4), sélectionnez la plage
dans laquelle se trouve la station souhaitée.
2) Sélectionnez le numéro de la station avec la touche
numérique correspondante (6, 7, 8, 14, 15).
3) Réglez ensuite le volume avec le potentiomètre
LEVEL (17).
4) Pour une émission stéréo, ST sʼaffiche en haut à
gauche sur lʼaffichage.
5.2.3 Fonctions RDS
Si la station sélectionnée émet des informations RDS
(radio data system), sur lʼaffichage le nom de la station
sʼaffiche à la place de la fréquence. Certaines stations
donnent des informations supplémentaires, par
exemple titre, interprète, en alternance avec le nom de
la station.
Si une station propose des informations trafic, TP
(trafic program) sʼaffiche. Si EON (enhanced other
networks) sʼaffiche et si un programme qui ne propose
pas dʼinformation trafic à cet instant, est reçu, le tuner
commute automatiquement sur un autre programme
de la même station où des informations trafic sont
données. Après lʼannonce de trafic, lʼappareil revient
au programme précédent.
Informations
Avec la touche DISP (12), on peut afficher les informations suivantes :
1. pression → affichage de lʼheure
si aucune heure nʼest émise, lʼaffichage indique NO
CLOCK. Parce que lʼheure nʼest pas émise en
continu, cela peut prendre plusieurs minutes après
lʼallumage de la radio jusquʼà ce que lʼheure soit
disponible.
2. pression → affichage de la plage (F 1, F2, F 3, MW)
et la fréquence dʼémission
3. pression → affichage du type de programme
Si aucun type de programme nʼest donné par la
station, lʼaffichage indique PTY NONE.
4. pression → nom de la station (réglage de base)
Lʼaffichage revient également sur le réglage de
base 5 secondes après la dernière pression sur la
touche.
Ces informations peuvent également être affichés
pendant la lecture dʼun CD ou dʼune clé USB avec la
touche DISP.
Fréquences alternatives
Si sur lʼaffichage, AF est visible en continu (non cli gnotant), le programme est diffusé sur des fréquences
alternatives de stations voisines. Lʼappareil change
automatiquement sur la station à la meilleure réception. Avec la touche AF/REG (9), cette fonction peut
être déconnectée (AF sʼéteint) et rallumée.
Certaines stations émettent, selon les régions, des
programmes différents, par exemple des informations
régionales. Pour une commutation automatique sur
une station avec une meilleure réception et à la fois
pour commuter sur le même programme régional, le
mode Programme régional peut être activé : maintenez la touche AF/REG enfoncée 3 secondes jusquʼà
ce que REG ON soit visible brièvement sur lʼaffichage.
Lorsque le mode est activé, REG est visible sur lʼaffichage. Pour désactiver le mode, maintenez à nouveau
la touche AF/REG enfoncée pendant 3 secondes jusquʼà ce que lʼaffichage indique brièvement REG OFF.
F
B
CH
17
Page 18

Type de programme
Avec la touche PTY (16), on peut sélectionner une des
stations mémorisées qui envoie de la musique ou des
informations sur une rubrique donnée. On peut sélectionner les rubriques suivantes :
1) Avec la touche PRY (16), allumez la fonction de
type de programme. Une sélection plus précise du
groupe musique est ainsi possible. Sur lʼaffichage,
une rubrique de ce groupe est affichée. Pour commuter sur le groupe mot, enfoncez une nouvelle
fois la touche PTY. Lʼaffichage indique une rubrique
de ce groupe. (Par une troisième pression, la fonction est désactivée).
2) Par une pression (plusieurs pressions) sur la
touche numérique correspondante, sélectionnez la
rubrique du groupe précédemment sélectionné.
Lʼappareil recherche parmi les stations mémorisées celle qui diffuse un programme dans la caté-
gorie choisie. Pendant la recherche, le son est
coupé.
Si lʼappareil ne peut trouver aucune station avec
la rubrique souhaitée, le message PTY NONE cli gnote sur lʼaffichage après quelque temps et lʼappareil revient à la dernière station réglée.
3) Pour désactiver la fonction de type de programme,
et pouvoir appeler les stations mémorisées avec
les touches de stations correspondantes, appuyez
une ou deux fois sur la touche PTY de telle sorte
que sur lʼaffichage, la fréquence de la station ou le
nom de la station soit affiché.
6 Caractéristiques techniques
schéma technique voir page 37
Lecteur CD/ MP3
Taux de distorsion : . . . . . < 0,03 %
Rapport signal/bruit : . . . . > 85 dB
Bande passante : . . . . . . . 10 –20 000 Hz, ±1 dB
Pleurage et scintillement : non mesurable
(précision quartz)
Tuner
Fréquence de réception
FM : . . . . . . . . . . . . . . . 87,5 –108 MHz
MW : . . . . . . . . . . . . . . 522 – 1620 kHz
Sensibilité HF
FM : . . . . . . . . . . . . . . . 6 dBμV
MW : . . . . . . . . . . . . . . 25 dBμV
Rapport signal/bruit
FM : . . . . . . . . . . . . . . . > 60 dB
MW : . . . . . . . . . . . . . . > 50 dB
Taux de distorsion : . . . . . < 0,5 %
Généralités
Alimentation : . . . . . . . . . . 17 V via lʼamplificateur
Public Adress ou lʼappa-
reil de base
Dimensions (L × H × P) : . 195 × 40 × 215 mm
Poids: . . . . . . . . . . . . . . . . 1,1 kg
Tout droit de modification réservé.
F
B
CH
18
groupe musique groupe mot
sélectionnable avec la touche numérique 1 (6)
sélectionnable avec la touche numérique 2 (7)
POP M pop
ROCK M rock
NEWS informations
AFFAIRS magazine
INFO info-service
EASY M chansons
LIGHT M classique léger
SPORT sport
EDUCATE éducation
DRAMA dramatique
sélectionnable avec la touche numérique 3 (8)
sélectionnable avec la touche numérique 4 (14)
CLASSICS musique classique
OTHER M autre musique
CULTURE culture
SCIENCE sciences
VARIED divertissement
sélectionnable avec la touche numérique 5 (15)
JAZZ musique de jazz
COUNTRY musique de country
WEATHER météo
FINANCE économie et finances
CHILDREN programmes
pour enfants
sélectionnable avec la touche numérique 6 (15)
NATION M chansons du pays
OLDIES musique rétro
SOCIAL société
RELIGION religion
PHONE IN ligne ouverte et
interactivité
FOLK M musique folklorique
TRAVEL voyages
LEISURE loisirs
DOCUMENT
documentaire
Notice dʼutilisation protégée par le copyright de MONACOR®INTERNATIONAL GmbH & Co. KG. Toute reproduction même partielle à des fins commerciales est interdite.
Page 19

A pagina 3, se aperta completamente, vedrete
sempre gli elementi di comando e i collegamenti
descritti.
Elementi di comando
1 Tasto EJECT per espellere il CD
2 Tasto POWER per accendere e spegnere lʼappa-
recchio
3 Tasto MODE per cambiare fra riproduzione CD,
riproduzione MP3 tramite la porta USB (10) e ricezione radio
4 Tasto BAND per cambiare il campo di ricezione
con funzionamento radio
5 Fessura per lʼintroduzione del CD
6 Tasto stazione 1 oppure
con funzionamento CD / MP3 Pausa /Start
7 Tasto stazione 2 oppure
con funzionamento CD / MP3 riproduzione dellʼinizio di tutti i titoli
8 Tasto stazione 3 oppure
con funzionamento CD / MP3 riproduzione del titolo
attuale
9 Tasto AF/REG per la funzione frequenza alterna-
tiva in caso di ricezione RDS
10 Porta USB per inserire una chiavetta USB
11 Tasti TRACK/TUNE
CD / MP3: Per saltare al titolo successivo oppure
per ritornare al titolo precedente; con il
tasto premuto, avanzamento o ritorno
veloce
Radio: per impostare una stazione radio
Per avviare la ricerca automatica, premere brevemente il relativo tasto.
Per lʼimpostazione manuale delle stazioni radio, tener premuto il tasto o
finché il display non segnali brevemente
MANUAL. Quindi impostare la stazione
radio con il tasto o .
12 Tasto DISP per visualizzare sul display varie infor-
mazioni (p. es. ora, tipo di programma, tag ID3)
13 Display
14 Tasto stazione 4 oppure, con funzionamento CD /
MP3 riproduzione in ordine casuale
15 Tasti stazione 5 e 6 oppure, con funzionamento CD /
MP3 scelta di una cartella
16 Tasto PTY per scegliere il tipo di programma in
caso di ricezione RDS
17 Regolatore volume LEVEL
2 Avvertenze di sicurezza
Il modulo inserto è conforme a tutte le direttive richieste dellʼUE e pertanto porta la sigla .
G
Lʼinserto devʼessere montato solo da una persona
qualificata.
G
Usare lʼinserto solo allʼinterno di locali. Proteggerlo
dallʼacqua gocciolante e dagli spruzzi dʼacqua, da
alta umidità dellʼaria e dal calore (temperatura dʼimpiego ammessa fra 0 e 40 °C).
G
Non mettere in funzione lʼapparecchio con lʼinserto
montato e staccare subito la spina rete se:
1. lʼapparecchio, lʼinserto o il cavo rete presentano
dei danni visibili;
2. dopo una caduta o dopo eventi simili sussiste il
sospetto di un difetto;
3. lʼapparecchio non funziona correttamente.
Per la riparazione consegnare lʼinserto o lʼintero
apparecchio in ogni caso ad una officina competente.
G
Per la pulizia usare solo un panno morbido, asciutto;
non impiegare in nessun caso prodotti chimici o
acqua.
G
Nel caso dʼuso improprio, di montaggio sbagliato,
dʼimpiego scorretto o di riparazione non a regola
dʼarte dellʼinserto, non si assume nessuna respon sabilità per eventuali danni consequenziali a persone o a cose e non si assume nessuna garanzia
per lʼapparecchio.
3 Possibilità dʼimpiego
Lʼinserto è adatto per il montaggio in amplificatori PA
della MONACOR con relativo vano e in apparecchi
base della MONACOR per inserti, per esempio:
PA-1120 amplificatore PA per 5 zone
PA-1200 amplificatore PA per 4 zone
PA-1200EX apparecchio base per 2 inserti
PA-1204EX apparecchio base per 4 inserti
PA-1240 amplificatore PA per 5 zone
PA-5240 amplificatore PA per 5 zone
PA-5480 amplificatore PA per 5 zone
PA-6240 amplificatore PA per 6 zone
PA-6480 amplificatore PA per 6 zone
PA-6600 amplificatore PA per 6 zone
Se si desidera eliminare lʼinserto definitivamente, consegnarlo per lo smaltimento ad
unʼistituzione locale per il riciclaggio.
I
19
Page 20

4 Montaggio del modulo inserto
1) Togliere il coperchio dellʼamplificatore o dellʼapparecchio base.
2) Dal lato frontale dellʼamplificatore o dellʼapparecchio base svitare la mascherina che copre il vano
per lʼinserto. Inserire lʼinserto e avvitarlo.
3) Inserire il cavetto libero a 3 poli dellʼamplificatore o
dellʼapparecchio base nel connettore di posizione c
(vedi fig. 2). Così, lʼinserto viene alimentato con
17 V , e il segnale audio viene inoltrato allʼamplificatore.
4) Se necessario, sono disponibili altre due uscite
audio:
uscita mono simmetrica al contatto d
uscita stereo asimmetrica al contatto e
5) Per il montaggio dei contatti in dotazione per
antenne, sul retro dellʼamplificatore / unità base svitare la mascherina (fig. 3) o togliere la parte staccabile (fig. 4). Inserire la scheda di connessione
delle antenne nellʼapertura e avvitarla.
6) Inserire il cavetto della scheda di collegamento dellʼantenna nel connettore a 5 poli di posizione a.
7) Lʼinserto PA-1140RCD è equipaggiato con una batteria di memoria per poter tener in memoria le stazioni radio anche con lʼapparecchio spento. Tale
batteria è disattivata alla consegna dellʼapparecchio per evitare che lentamente si scarichi prima
del montaggio. Per attivare la batteria, mettere il
ponticello b in posizione ON.
Per disattivare nuovamente la batteria (p. es. in
caso di un magazzinaggio prolungato), mettere il
ponticello b in posizione OFF.
8) Richiudere lʼamplificatore o lʼapparecchio base con
il coperchio e collegare le antenne di ricezione con
i morsetti a vite per antenne rispettando le scritte
applicate sullʼamplificatore o sullʼapparecchio base:
AM+GND per antenna di onde medie
FM 75 Ω per antenna FM con cavo di collega-
mento di 75 Ω
300 Ω per antenna FM con cavo di collega-
mento di 300 Ω
5 Funzionamento
1) Accendere lʼamplificatore o lʼapparecchio base con
lʼinterruttore di rete e il modulo inserto con il tasto
POWER (2).
2) Con il regolatore volume LEVEL (17) impostare il
volume desiderato.
3) Per spegnere azionare nuovamente il tasto
POWER.
5.1 Funzionamento del lettore CD / MP3
Con questo apparecchio si possono riprodurre dei CD
audio, dei CD audio masterizzati in proprio (CD-R)
nonché CD con titoli nel formato MP3. Nel caso di CD
riscrivibili (CD-RW) si possono manifestare dei problemi nella riproduzione a seconda del tipo di CD utilizzato, del masterizzatore usato e del programma di
masterizzazione.
Tramite la porta USB si possono riprodurre anche i
file MP3 di una chiavetta USB.
5.1.1 Riprodurre titoli di musica
1) Inserire un CD con la scritta rivolta in alto nella relativa fessura (5) finché non viene ritirato automaticamente. Se nellʼapparecchio si trova già un CD, il
display visualizza il simbolo .
Per cambiare un CD, premere il tasto EJECT
(1). Il CD esce. Se non viene prelevato, dopo alcuni
secondi lʼapparecchio lo ritira nuovamente.
2) In alternativa o in aggiunta, nella porta USB (10) si
può inserire una chiavetta USB.
3) Dopo la carica, si avvia il primo titolo. Con i CD
audio standard, il display visualizza il numero del
titolo e il tempo già trascorso (min. : sec.).
Nei titoli nel formato MP3, il nome del file scorre
attraverso il display, seguito dalla lettera “T” e il
numero del titolo. Premendo più volte il tasto DISP
(12), sul display si possono visualizzare delle informazioni sul titolo del brano, dellʼalbo, sullʼinterprete
ecc. (tag ID3). Se non sono presenti dei tag ID3, il
display segnala NO ID3.
Nota: Durante la riproduzione di un CD o di una chiavetta
USB, premendo il tasto DISP saranno visualizzate anche
delle informazioni sulla stazione impostata, vedi 5.2.3,
paragrafo Informazioni. Azionare il tasto DISP tante volte
finché sul display non appare lʼinformazione desiderata.
4) Dopo la riproduzione dellʼultimo titolo, lʼapparecchio riparte con il primo titolo (riproduzione senza
fine).
5) Per interrompere la riproduzione premere il tasto
(6). Il display segnala S-PAUSE. Premendo
nuovamente il tasto , la riproduzione continua.
6) Per cambiare fra riproduzione da CD, da chiavetta
USB e ricezione radio, premere il tasto MODE (3).
AVVERTIMENTO Prima del montaggio dellʼinserto
staccare la spina rete dellʼamplificatore o dellʼapparecchio base. Altrimenti sussiste il pericolo di una scarica elettrica.
I
20
Page 21

5.1.2 Selezionare titoli e cartelle
1) Con i tasti TRACK (11) selezionare il titolo desiderato.
Tasto : con ogni tocco, lʼapparecchio salta un
titolo in avanti.
Tasto : premuto brevemente – lʼapparecchio
salta allʼinizio del titolo;
con ogni ulteriore tocco, si salta indietro di un titolo.
2) Se i titoli sono ordinati in varie cartelle (elenchi di
file), le cartelle possono essere selezionate con i
tasti F
e F (15). Il nome della cartella selezio-
nata scorre una volta attraverso il display.
Dopo la selezione della cartella si avvia sempre
il primo titolo della cartella. Per scegliere un altro
titolo usare i tasti TRACK (11). Con il tasto è possibile anche saltare dallʼultimo titolo di una cartella
al primo titolo della cartella successiva, e con il
tasto dal primo titolo di una cartella allʼultimo
titolo della cartella precedente.
Nota: I titoli saranno riprodotti nel seguente ordine se
sono disposte in varie cartelle:
1. tutti i titoli senza cartella
2. tutti i titoli nelle cartelle del livello principale
3. tutti i titoli in sottocartelle ecc.
La selezione delle cartelle e la numerazione dei titoli
avviene pure nello stesso ordine.
5.1.3 Avanzamento e ritorno veloce
Con il tasto (11) tenuto premuto, il lettore CD scorre
in avanti e con il tasto tenuto premuto scorre allʼindietro. Nel caso di titoli nel formato MP3, con lʼavanzamento e ritorno veloce non si può passare sopra più
titoli. Alla fine o allʼinizio di un titolo, lʼapparecchio
passa alla riproduzione normale anche se il tasto (11)
viene tenuto premuto.
5.1.4 Riproduzione breve degli inizi dei titoli
Di tutti i titoli si possono riprodurre gli inizi per 10
secondi.
1) Premere il tasto INT (7). Sul display si vede S-INT e
il numero del titolo. Nel caso di titoli nel formato
MP3, scorre in aggiunta e alternativamente il nome
del file. Se il titolo attuale viene riprodotto per oltre
10 secondi, lʼapparecchio salta al titolo successivo.
2) Se si deve riprodurre lʼinizio solo dei titoli della cartella selezionata, premere, mentre si attiva la funzione di riproduzione degli inizi, il tasto INT per più
di 3 secondi, in modo che sul display si vede brevemente D-INT (directory intro).
3) Per disattivare la funzione, premere di nuovo il
tasto INT. Lʼindicazione S-INT o D-INT si spegne e
prosegue la riproduzione del titolo iniziato. La funzione viene disattivata anche azionando il tasto
RPT (8) o RDM (14).
5.1.5 Riproduzione ripetuta di titoli
1) Selezionare con il tasto o (11) il titolo da ripetere e quindi premere il tasto RPT (8). Sul display si
legge lʼindicazione S-RPT e il numero del titolo. Nel
caso di titoli nel formato MP3, scorre in aggiunta e
alternativamente il nome del file. Il titolo viene ripetuto senza fine.
2) Se si vogliono ripetere tutti i titoli nella cartella selezionata, premere, mentre si attiva la funzione di
riproduzione ripetuta, il tasto RPT per più di 3
secondi, in modo che sul display si vede brevemente D-RPT (directory repeat).
3) Per disattivare la funzione, premere di nuovo il
tasto RPT. Lʼindicazione S-RPT o D-RPT si spegne. La funzione viene disattivata anche azionando
il tasto INT (7) o RDM (14).
5.1.6 Riproduzione in ordine casuale
Durante la riproduzione in ordine casuale, i titoli non
vengono riprodotti in ordine crescente dei titoli, bensì
in un ordine scelto a caso da parte dellʼapparecchio.
1) Premere il tasto RDM (14). Lʼapparecchio sceglie a
caso il titolo successivo. Sul display si vede lʼindicazione S-RDM e il numero del titolo. Nel caso di
titoli nel formato MP3, scorre in aggiunta e alternativamente il nome del file.
2) Se si vogliono riprodurre solo i titoli della cartella
selezionata, premere, mentre si attiva la funzione di
riproduzione casuale, il tasto RDM per più di 3
secondi, in modo che sul display si vede brevemente D-RDM (directory random).
3) Per disattivare la funzione di riproduzione casuale,
premere di nuovo il tasto RDM. Lʼindicazione
S-RDM o D-RDM si spegne. La funzione viene
disattivata anche azionando il tasto INT (7) o RPT
(8).
5.1.7 Note su possibili buchi nella riproduzione e
su errori di lettura
Il fumo di sigarette e la polvere penetrano facilmente
fra tutte le aperture dellʼapparecchio e si depositano
sul sistema ottico della scansione ai raggi laser. Se
questo deposito di sporco dovesse provocare errori di
lettura e buchi nella riproduzione, lʼapparecchio deve
essere pulito in un laboratorio specializzato. Una tale
pulizia è a pagamento, anche durante il periodo di
garanzia!
I
21
Page 22

5.2 Funzionamento del tuner
Non appena si inserisce un CD o una chiavetta USB,
lʼapparecchio passa automaticamente alla riproduzione del CD o della chiavetta USB. Con il tasto
MODE (3) si può allora cambiare fra ricezione radio e
riproduzione del CD o della chiavetta USB.
5.2.1 Impostare e memorizzare le stazioni radio
Con il tuner si possono ricevere stazioni di modulazione di frequenza e di onde medie. Per poter memorizzare più di sei stazioni con i sei tasti disponibili (6, 7,
8, 14, 15), il settore FM è suddiviso in tre gruppi identici (F 1, F 2, F 3), e nel settore delle onde medie (MW)
si possono memorizzare fino a 6 stazioni per un totale
di 18 stazioni FM e 6 stazioni di onde medie.
1) Con il tasto BAND (4) selezionare il campo desiderato. È conveniente memorizzare dapprima sei stazioni del gruppo F 1, quindi passare al gruppo F 2 e
dopo a F 3.
2) La stazione può essere trovata con la ricerca stazione automatica oppure manualmente:
Per attivare la ricerca stazione premere brevemente i tasti (11) (avanti) o (indietro). Il tuner
si sposta sulla stazione più vicina. Durante la
ricerca, il display indica SEARCH. Se necessario
riavviare la ricerca automatica finché si riceve la
stazione desiderata.
Per la sintonizzazione manuale tenere premuto il
tasto o finché non si vede la scritta MANUAL.
Dopodichè, la frequenza di ricezione può essere
aumentata o abbassata a passi con ogni pressione
del tasto (in FM di 50 kHz, nelle onde medie di
9 kHz). Per scorrere velocemente un grande settore nella sintonizzazione manuale, tener premuto
il tasto o Dopo la sintonizzazione manuale,
lʼapparecchio passa, dopo alcuni secondi, nuovamente alla ricerca automatica se prima non si
preme nuovamente il tasto o . Il display se gnala brevemente AUTO.
3) Dopo aver sintonizzato la stazione premere il tasto
numerico (6, 7, 8, 14, 15) prescelto finché il display
indica a destra il numero della stazione e lʼindicazione “ch” (vedi fig. 1). A questo punto la stazione è
memorizzata con tale numero nel rispettivo gruppo.
5.2.2 Chiamare una stazione memorizzata
1) Selezionare con il tasto BAND (4) la banda di frequenza in cui si trova la stazione memorizzata.
2) Scegliere il numero della stazione con il relativo
tasto numerico (6, 7, 8, 14, 15).
3) Impostare il volume desiderato con il regolatore
LEVEL (17).
4) Nel caso di una trasmissione stereo, in alto a sini stro sul display si vede ST.
5.2.3 Funzioni RDS
Se la stazione prescelta trasmette delle informazioni
RDS (radio data system), sul display viene visualiz zato il nome della stazione al posto della frequenza.
Alcune stazioni, alternando con il nome della stazione,
offrono altre informazioni, p. es. titolo del brano musicale, interprete.
Se una stazione offre anche informazioni sul traffico stradale, sul display si vede lʼindicazione TP
(traffic program). Se si vede EON (enhanced other
networks) e se si sta ricevendo un programma che
attualmente non offre informazioni sulla situazione
stradale, il tuner passa automaticamente ad un altro
programma della stessa stazione se tale programma
offre delle informazioni sul traffico. Dopo lʼinformazione sul traffico, lʼapparecchio ritorna al programma
precedente.
Informazioni
Con il tasto DISP (12) si possono visualizzare le
seguenti informazioni:
1. pressione del tasto → indicazione dellʼora
Se non viene trasmessa lʼora, il display indica NO
CLOCK. Dato che lʼora non viene trasmessa conti-
nuamente, è possibile che dopo lʼaccensione della
radio passino alcuni minuti prima che sia disponi-
bile lʼindicazione dellʼora.
2. pressione del tasto → indicazione del campo (F1,
F2, F3, MW) e della frequenza
3. pressione del tasto → indicazione del tipo di pro-
gramma
Se la stazione non indica il tipo di programma, il
display indica PTY NONE.
4. pressione del tasto → nome della stazione (im pos-
tazione base)
Il display, passati 5 secondi dallʼultima pressione di
un tasto, ritorna allʼimpostazione base.
Queste informazioni si possono visualizzare anche
durante la riproduzione di un CD o di una chiavetta
USB premendo il tasto DISP.
Frequenze alternative
Se sul display si vede continuamente AF (non lampeggiando), il programma viene trasmesso anche su frequenze di stazioni vicine. Allora, lʼapparecchio passa
automaticamente alla stazione che si riceve meglio.
Con il tasto AF/REG (9) è possibile disattivare la funzione (AF si spegne) e riattivarla.
Alcune stazioni trasmettono delle volte dei programmi differenti secondo la regione, p. es. delle informazioni regionali. Per far sì che con il cambio automatico su una stazione che si riceve meglio sia mantenuto
lo stesso programma regionale, si può attivare la
modalità di programma regionale: tener premuto il
tasto AF/REG per 3 sec. finché il display segnala brevemente REG ON. Se la modalità è attivata, sul display
si vede lʼindicazione REG. Per disattivare la modalità,
tener premuto unʼaltra volta il tasto AF/REG per 3 sec.
finché il display segnala brevemente REG OFF.
I
22
Page 23

Tipo di programma
Con il tasto PTY (16), fra le stazioni memorizzate si
può scegliere una che sta trasmettendo musica o
informazioni di una determinata rubrica. Si possono
scegliere le seguenti rubriche:
1) Con il tasto PTY (16) attivare la funzione tipo di programma. In questo modo è possibile una selezione
più precisa nel gruppo musica. Il display indica una
rubrica di questo gruppo. Per passare al gruppo
parola, premere di nuovo il tasto PTY. Il display
indica una rubrica di quel gruppo (con la terza pressione del tasto, la funzione tipo di programma è
nuovamente disattivata.)
2) Premendo (più volte) il relativo tasto numerico, si
seleziona la rubrica richiesta dal gruppo scelto precedentemente. Lʼapparecchio sceglie fra le stazioni
memorizzate quella che sta trasmettendo un programma nella rubrica scelta. Durante la ricerca,
lʼaudio è disattivato.
Se lʼapparecchio non riesce a trovare nessuna
stazione con la rubrica desiderata, dopo un poʼ di
tempo sul display lampeggia il messaggio PTY
NONE e lʼapparecchio torna alla stazione impo stata per ultima.
3) Per disattivare la funzione tipo di programma e per
poter chiamare le stazioni memorizzate con i relativi tasti stazione, premere il tasto PTY una o due
volte, in modo che sul display si veda la frequenza
o il nome della stazione.
6 Dati tecnici
Schema a blocchi vedi pagina 37
Lettore CD/ MP3
Fattore di distorsione: . . . < 0,03 %
Rapporto S/R: . . . . . . . . . > 85 dB
Gamma di frequenze: . . . 10 –20 000Hz, ±1 dB
Wow and flutter: . . . . . . . . non misurabile
(precisione del quarzo)
Tuner
Frequenza di ricezione
FM: . . . . . . . . . . . . . . . 87,5 –108 MHz
OM: . . . . . . . . . . . . . . . 522 –1620 kHz
Sensibilità HF
FM: . . . . . . . . . . . . . . . 6 dBμV
OM: . . . . . . . . . . . . . . . 25 dBμV
Rapporto S/R
FM: . . . . . . . . . . . . . . . > 60 dB
OM: . . . . . . . . . . . . . . . > 50 dB
Fattore di distorsione: . . . < 0,5 %
Dati generici
Alimentazione: . . . . . . . . . 17 V tramite
amplificatore PA o
apparecchio base
Dimensioni (l × h × p): . . . 195 × 40 × 215 mm
Peso: . . . . . . . . . . . . . . . . 1,1 kg
Con riserva di modifiche tecniche.
I
23
Gruppo musica Gruppo parola
da selezionare con il tasto numerico 1 (6)
da selezionare con il tasto numerico 2 (7)
POP M Musica pop
ROCK M Musica rock
NEWS Ultime notizie
AFFAIRS Attualità, magazine
INFO Informazioni
EASY M Musica leggera
LIGHT M Musica classica
leggera
SPORT Notizie sportive
EDUCATE Programmi educativi
DRAMA Commedia e teatro
da selezionare con il tasto numerico 3 (8)
da selezionare con il tasto numerico 4 (14)
CLASSICS Musica classica
OTHER M Altri generi di musica
CULTURE Programmi culturali
SCIENCE Programmi scientifici
VARIED Generi vari
da selezionare con il tasto numerico 5 (15)
JAZZ Musica jazz
COUNTRY Musica country
WEATHER Previsioni del tempo
FINANCE Economia e finanza
CHILDREN
Programma per ragazzi
da selezionare con il tasto numerico 6 (15)
NATION M Musica italiana
OLDIES Vecchi successi
SOCIAL Programmi sociali
RELIGION Programmi religiosi
PHONE IN Forum, opinioni
FOLK M Musica popolare
TRAVEL Viaggi
LEISURE Svago
DOCUMENT
Documentari
La MONACOR®INTERNATIONAL GmbH & Co. KG si riserva ogni diritto di elaborazione in qualsiasi forma delle
presenti istruzioni per lʼuso. La riproduzione – anche parziale – per propri scopi commerciali è vietata.
Page 24

Puede encontrar todos los elementos de funcionamiento y las conexiones que se describen en la
página 3 desplegable.
1 Elementos operativos
1 Botón EJECT para expulsar el CD
2 Botón POWER para encender y apagar la unidad
3 Botón MODE para conmutar entre reproducción
CD, reproducción MP3 mediante puerto USB (10)
y recepción radio
4 Botón BAND para seleccionar las bandas de
recepción para la radio
5 Ranura CD
6 Botón de emisora 1 o
para funcionamiento CD/MP3: Pausa /Inicio
7 Botón de emisora 2 o
reproducción breve de todos los principios de título
para funcionamiento CD/ MP3
8 Botón de emisora 3 o
repetición del título actual para funcionamiento
CD/ MP3
9 Botón AF/ REG para la función: frecuencia alterna-
tiva para recepción RDS
10 Puerto USB para insertar una unidad flash USB
11 Botones TRACK/ TUNE
CD / MP3: Para ir al título siguiente o para ir hacia
atrás hacia el título previo; ejecución
hacia delante/hacia atrás manteniendo
el botón presionado
Radio: sintonización de estación
Para iniciar la búsqueda de emisora
automática, presione brevemente el
botón correspondiente.
Para la búsqueda de emisora manual,
mantenga el botón o presionado
hasta que aparezca brevemente
MANUAL. A continuación ajuste la emisora con el botón o .
12 Botón DISP para conmutar la pantalla a informa-
ciones varias (p. ej. hora, tipo de programa, etiquetas ID3)
13 Pantalla
14 Botón de emisora 4 o reproducción random (alea-
toria) para funcionamiento CD / MP3
15 Botones de emisora 5 y 6 o selección de directorio
para funcionamiento CD / MP3
16 Botón PTY para seleccionar el tipo de programa
para recepción RDS
17 Control de volumen LEVEL
2 Notas de seguridad
El módulo de inserción corresponde a todas las Directivas requeridas por la UE y por ello está marcada
con .
G
La inserción sólo debe ser instalada por personal
cualificado especializado.
G
La inserción sólo está indicada para el uso en interior. Protéjala contra goteos y salpicaduras de agua,
humedad elevada del aire, y del calor (gama de
temperatura ambiente admisible 0 – 40 °C).
G
No ajuste la unidad con la inserción instalada, y desconecte inmediatamente el enchufe de la toma de
red si:
1. existen daños visibles en la inserción, la unidad,
o el cable de red,
2. puede haber ocurrido un defecto tras una caída o
un accidente similar,
3. se producen fallos.
La inserción o la unidad completa deben ser reparadas en cualquier caso por personal autorizado.
G
Para la limpieza utilice sólo un paño seco y suave,
no use nunca productos químicos o agua.
G
No se aceptará ninguna reclamación de garantía
para la unidad ni se asumirá ninguna responsabilidad en caso de daños personales o patrimoniales
resultantes si la inserción se usa para fines distintos
a los originalmente concebidos, si no se instala o se
utiliza correctamente, o si no se repara de manera
experta.
3 Aplicaciones
El módulo de inserción está indicado para la instalación en amplificadores de megafonía de MONACOR
con un compartimiento de inserción y dentro de unidades básicas para inserciones de MONACOR, p. ej.:
PA-1120 amplificador de megafonía para 5 zonas
PA-1200 amplificador de megafonía para 4 zonas
PA-1200EX unidad básica para 2 inserciones
PA-1204EX unidad básica para 4 inserciones
PA-1240 amplificador de megafonía para 5 zonas
PA-5240 amplificador de megafonía para 5 zonas
PA-5480 amplificador de megafonía para 5 zonas
PA-6240 amplificador de megafonía para 6 zonas
PA-6480 amplificador de megafonía para 6 zonas
PA-6600 amplificador de megafonía para 6 zonas
Si la inserción debe retirarse definitivamente
del funcionamiento, llévela a un centro de
reciclaje local para su disposición no perjudicial para el medio ambiente.
E
24
Page 25

4 Instalación del módulo de inserción
1) Saque la tapa de la carcasa del amplificador o de la
unidad básica.
2) Desatornille la tapa para el compartimiento de
inserción en la parte frontal del amplificador o de la
unidad básica. Instale la inserción y apriétela con
tornillos.
3) Conecte la línea de tres polos sin protección del
amplificador o de la unidad básica a la carcasa pin
de posición c (vea la imagen 2). Esto permite alimentar la inserción con 17 V y suministrar la
señal audio al amplificador.
4) Si es necesario, hay dos salidas audio más disponibles:
salida mono simétrica en la conexión d
salida estéreo asimétrica en la conexión e
5) Para el montaje de las conexiones de antena entregadas en la parte posterior del amplificador/unidad
básica, desenrosque la tapa del panel (fig. 3) o
extraiga la placa (fig. 4). Inserte la PCB de conexión de antena en la apertura y fíjela con tornillos.
6) Conecte la línea de la antena PCB insertada a la
carcasa pin de 5 polos de posición a.
7) La inserción PA-1140RCD tiene una batería de
almacenamiento, de manera que las emisoras también permanecen guardadas con la unidad apagada. La batería de almacenamiento se desactiva
en la fábrica para prevenir la descarga sucesiva
antes de la instalación. Para activar la batería,
ajus te el jumper b en la posición ON.
Para desactivar la batería de nuevo (p. ej. si
está almacenada durante un largo periodo de
tiempo), ajuste de nuevo el jumper b en la posición
OFF.
8) Cierre el amplificador o la unidad básica con la tapa
de la carcasa y conecte las antenas de recepción a
las conexiones de tornillo de las antenas. Preste
atención a la inscripción sobre el amplificador o
sobre la unidad básica:
AM+GND para antena de onda media
FM 75Ω para antena FM con cable de conexión
75 Ω
300 Ω para antena FM con cable de conexión
300 Ω
5 Funcionamiento
1) Encienda el amplificador o la unidad básica con el
interruptor de red y el módulo de inserción con el
botón POWER (2).
2) Ajuste el volumen deseado con el control de volumen LEVEL (17).
3) Para apagar, presione el botón POWER de nuevo.
5.1 Funcionamiento del lector CD /MP3
Puede reproducir CDs de audio, incluyendo los creados por usted (CD-R) y CDs con pistas en formato
MP3. Sin embargo, pueden aparecer problemas
cuando se reproduce un CD reescribible (CD-RW),
dependiendo del tipo de CD, del grabador de CDs y
del programa de grabación utilizado.
Mediante el puerto USB, también se pueden repro-
ducir archivos MP3 desde una unidad flash USB.
5.1.1 Reproducción de pistas musicales
1) Inserte un CD con la inscripción hacia arriba en la
ranura (5) hasta que se introduzca automáticamente. Si ya hay un CD en el aparato, se mostrará
el símbolo en el visualizador.
Para cambiar un CD, pulse el botón EJECT (1).
Se expulsará el CD. Si no quita el CD, el aparato
volverá a introducir el CD unos segundos después.
2) Adicionalmente o como alternativa, puede insertarse una unidad flash USB en el puerto USB (10).
3) Después de la carga, se iniciará la primera pista.
Para CDs de audio estándar, en el visualizador se
muestra el número de pista y el tiempo transcurrido
(min. : seg.).
En las pistas con formato MP3, el nombre de
archivo circula por el visualizador, luego se muestra el número de pista tras la letra “T”. Cuando se
pulsa el botón DISP (12) repetidamente, puede
visualizarse información sobre la pista de la pieza
musical, el álbum, el artista, etc. (etiquetas ID3). Si
no hay etiquetas ID3 disponibles, en el visualizador
se mostrará NO ID3.
Nota: Cuando se reproduce un CD o una unidad flash
USB y se pulsa el botón DISP, también se visualiza información sobre la emisora, ver apartado 5.2.3, parágrafo
“Información”. Por lo tanto, pulse el botón DISP repetidamente hasta que se visualice la información deseada.
4) Después de reproducir la última pista, el aparato
empieza de nuevo con la primera pista (reproducción continua).
5) Para interrumpir la reproducción, pulse el botón
(6). En el visualizador aparece S-PAUSE. Al pulsar
de nuevo el botón , continúa la reproducción.
6) Pulse el botón MODE (3) para conmutar entre reproducción CD, unidad flash USB y recepción radio.
ADVERTENCIA Antes de la instalación de la inserción
desconecte el enchufe del amplificador o de la unidad de inserción básica
de la toma de red. De otro modo existe
un riesgo de descarga eléctrica.
E
25
Page 26

5.1.2 Seleccionar título y directorio
1) Seleccione el título deseado con los botones
TRACK (11).
Botón : cada vez que se presiona brevemente el
botón, la unidad avanza un título.
Botón : brevemente presionado – la unidad va al
principio del título;
cada vez que se presiona brevemente el botón, la
unidad retrocede un título.
2) Si los archivos están en carpetas diferentes (directorios de archivos), pueden seleccionarse las carpetas con los botones F
y F (15). El nombre del
directorio seleccionado pasa por la pantalla una vez.
Tras la selección del directorio siempre se inicia
el primer título del directorio. Para seleccionar otro
título, use los botones TRACK (11). Con el botón
también es posible ir del último título de un directorio al primer título del directorio siguiente, y con el
botón del primer título de un directorio al último
título del directorio previo.
Nota: Las pistas se reproducen en el siguiente orden
cuando están en carpetas diferentes:
1. Todos los títulos sin directorio
2. Todos los títulos en directorios en el directorio de raíz
3. Todos los títulos en subdirectorios etc.
Los directorios también se seleccionan y los títulos se
numeran de acuerdo a este orden.
5.1.3 Ejecución rápida hacia delante/hacia atrás
Con el botón (11) presionado el reproductor CD
avanza, y con el botón presionado retrocede. Con
pistas en formato MP3 no se pueden pasar varias pistas con el avance o retroceso rápido. Al final o al principio de un título la unidad vuelve a la reproducción
normal incluso si se mantiene presionado el botón
(11).
5.1.4 Reproducción breve de principio de título
Los principios de todos los títulos se pueden reproducir durante 10 segundos respectivamente.
1) Presione el botón INT (7). Aparece S-INT y el
número de título. Con pistas en formato MP3 también se muestra alternativamente en el visualizador
el nombre de archivo. Cuando el título actual ya se
ha reproducido durante más de 10 segundos, la
unidad va al título siguiente.
2) Para reproducir sólo los principios de los títulos en
el directorio seleccionado, presione el botón INT
durante más de 3 segundos cuando encienda la
función de reproducción breve de los principios de
título de manera que D-INT (directory intro = introducción de directorio) aparece brevemente.
3) Para apagar la función, presione el botón INT de
nuevo. S-INT o D-INT se apagará y el título cuyo
principio se está reproduciendo actualmente continúa. La función se desactiva actuando sobre el
botón RPT (8) o RDM (14).
5.1.5 Reproducción repetida de títulos
1) Seleccione el título a repetir con el botón o
(11) y luego presione el botón RPT (8). Aparece
S-RPT y el número de título. Con pistas en formato
MP3 también se muestra alternativamente en el
visualizador el nombre de archivo. El título se repite
continuamente.
2) Para repetir todos los títulos en el directorio seleccionado, presione el botón RPT durante más de 3
segundos cuando encienda la función de repetición
de manera que aparezca brevemente D-RPT
(directory repeat = repetición de directorio).
3) Para apagar la función, presione el botón RPT de
nuevo. S-RPT o D-RPT se apagará. La función
también se desactivará cuando actúe sobre el
botón INT (7) o RDM (14).
5.1.6 Reproducción random
Con la reproducción random los títulos no se reproducen en una secuencia de título ascendente sino en
una secuencia seleccionada por la unidad en modo
random (aleatoriamente).
1) Presione el botón RDM (14). La unidad selecciona
el título siguiente en random. Aparece S-RDM y el
número de título. Con pistas en formato MP3 también se muestra alternativamente en el visualizador
el nombre de archivo.
2) Para reproducir en random sólo los títulos en el
directorio seleccionado, presione el botón RDM
durante más de 3 segundos cuando encienda la
reproducción random de manera que aparezca
brevemente D-RDM (directory random = directorio
random).
3) Para apagar la reproducción random, presione el
botón RDM de nuevo. S-RDM o D-RDM se apagarán. La función también se desactiva actuando
sobre el botón INT (7) o RPT (8).
5.1.7 Nota respecto a las interrupciones
de sonido y errores de lectura
El humo del tabaco o el polvo pueden penetrar fácilmente a través de todas las ranuras del aparato y
posarse en las ópticas del sistema de muestreo láser.
Si estos restos provocan errores de lectura e interrupciones de sonido, el personal cualificado tiene que limpiar el aparato. Tenga en cuanta que habrá un cargo
en la limpieza, incluso durante el periodo de garantía.
E
26
Page 27

5.2 Funcionamiento del sintonizador
Cuando se ha insertado un CD o una unidad flash
USB, el aparato cambia automáticamente a reproducción desde el CD o desde la unidad flash USB. Pulse el
botón MODE (3) para conmutar entre recepción radio y
reproducción desde CD o desde unidad flash USB.
5.2.1 Sintonización y almacenamiento de emisoras
El sintonizador puede recibir emisoras de onda media
y FM. Para poder guardar más de seis emisoras con
los seis botones de emisora (6, 7, 8, 14, 15), la banda
FM se ha dividido en tres sub-bandas idénticas. En las
tres sub-bandas (F 1, F 2, F 3) y en la banda de onda
media (MW) se pueden guardar seis emisoras respectivamente, esto hace un total de 18 emisoras FM y
6 emisoras de onda media.
1) Seleccione la banda deseada con el botón BAND
(4). Se recomienda guardar primero seis emisoras
en la banda F 1 y luego cambiar a la banda F 2 y
luego a la F 3.
2) Para la sintonización de emisora, use o bien la búsqueda automática o bien la búsqueda manual:
Para iniciar la búsqueda de emisora automática,
presione brevemente el botón (11) (hacia adelante) o (hacia atrás). La búsqueda de emisora
automática se detiene en la emisora siguiente.
Durante la búsqueda de emisora aparece SEARCH.
Reinicie la búsqueda de emisora las veces necesarias hasta que se reciba la estación deseada.
Para la búsqueda de emisora manual mantenga
el botón o presionado hasta que aparezca
MANUAL brevemente. A continuación se puede
aumentar o reducir paso a paso la frecuencia recibida con cada presión del botón (50 kHz en la
banda FM, 9 kHz en la banda de onda media). Para
echar un vistazo a un área grande rápidamente
para búsqueda de emisora manual, mantenga el
botón o presione. Tras la búsqueda de emisora manual la unidad conmutará de nuevo a búsqueda de emisora automática cuando hayan
pasado unos segundos sin que se haya presionado
antes el botón o de nuevo. AUTO aparece
brevemente.
3) Si se ha sintonizado la emisora, mantenga la tecla
numérica deseada (6, 7, 8, 14, 15) presionada
hasta que aparezca el número de emisora y “ch” a
la derecha de la pantalla (vea la imagen 1). A continuación se guarda la emisora con este número en
la sub-banda respectiva.
5.2.2 Seleccionar emisoras almacenadas
1) Seleccione la banda con el botón BAND (4) en el
cual ha sido guardada la emisora deseada.
2) Seleccione el número de la emisora con la tecla
numérica correspondiente (6, 7, 8, 14, 15).
3) Ajuste el volumen deseado con el control de volumen LEVEL (17).
4) Con un programa estéreo, aparece ST en la parte
superior izquierda de la pantalla.
5.2.3 Funciones RDS
Si la emisora seleccionada transmite información RDS
(radio data system = sistema de datos de radio), aparece el nombre de la emisora en vez de la frecuencia.
Algunas emisoras muestran información adicional
alternativamente con el nombre de la emisora, p. ej. el
título de la música o el artista.
Si una emisora ofrece programa de tráfico, aparece
TP (traffic program). Si aparece EON (enhanced other
networks = otras redes aumentadas) y se recibe un
programa que actualmente no ofrece un programa de
tráfico, el sintonizador conmuta automáticamente a
otro programa de la misma emisora cuando aquí se
transmiten mensajes de tráfico. Tras el anuncio de tráfico la unidad vuelve al programa previo.
Información
Con el botón DISP (12) se puede mostrar la información siguiente:
1ª presión del botón → indicación de hora
Si no se transmite ninguna hora, aparece NO
CLOCK. Como la hora no se transmite continua-
mente, pueden pasar algunos minutos tras el
encendido de la radio hasta que esté disponible la
hora.
2ª presión del botón → indicación de la banda (F1, F2,
F3, MW) y de la frecuencia de la emisora
3ª presión del botón → indicación del tipo de pro-
grama
Si la emisora no indica el tipo de programa aparece
PTY NONE.
4ª presión del botón → nombre de la emisora (ajuste
básico)
La pantalla también conmuta al ajuste básico 5 se -
gundos después de presionar el botón la última vez.
Esta información también puede visualizarse con el
botón DISP mientras la reproducción se haga desde
un CD o una unidad flash USB.
Frecuencias alternativas
Si aparece AF continuamente (no parpadea), el programa también se emite en frecuencias alternativas
de emisoras vecinas. A continuación la unidad cambia
automáticamente a la estación que pueda recibir
mejor. Con el botón AF/REG (9) se puede apagar la
función (AF estará apagado) y encenderla de nuevo.
Algunas emisoras emiten temporalmente un programa diferente dependiendo de la región, p. ej. noticias regionales. Para conmutar automáticamente a
una emisora con una mejor recepción y al mismo
tiempo para cambiar al mismo programa regional, se
puede encender el modo de programa regional. Mantenga el botón AF/REG presionado durante 3 segundos hasta que aparezca brevemente REG ON. Con el
modo encendido, aparece REG. Para apagar el modo,
mantenga el botón AF/REG presionado de nuevo
durante 3 segundos hasta que aparezca brevemente
REG OFF.
E
27
Page 28

Tipo de programa
Con el botón PTY (16) se puede seleccionar una de
las emisoras almacenadas que actualmente emite
música o información de una categoría especial. Se
pueden seleccionar las categorías siguientes:
1) Encienda el tipo de programa de función con el
botón PTY (16). De este modo, es posible una se lección más detallada del grupo de música. Se
muestra una categoría de este grupo. Para conmutar al grupo de palabra, presione el botón PTY de
nuevo. La pantalla muestra una categoría de este
grupo. (Con la tercera presión sobre el botón, el
tipo de programa de función se apaga de nuevo.)
2) Presionando (repetidamente) la tecla numérica
correspondiente, seleccione la sección deseada
del grupo elegido antes. Entre las emisoras almacenadas, la unidad busca la emisora que actual-
mente emite un programa en la categoría seleccionada. Durante la búsqueda, el sonido se apaga.
Si la unidad no puede encontrar una emisora
con la categoría deseada, después de algún
tiempo parpadea el mensaje PTY NONE en la pantalla, y la unidad va a la última emisora sintonizada.
3) Para apagar el tipo de programa de función y para
poder seleccionar de nuevo las emisoras almacenadas con los botones de emisora correspondientes, presione el botón PTY una o dos veces de
manera que se muestre la frecuencia de la emisora
o el nombre de la emisora.
6 Características técnicas
Diagrama de bloques, vea la página 37
Reproductor CD/ MP3
Distorsión harmónica total: < 0,03 %
Relación señal/ruido: . . . > 85 dB
Respuesta de frecuencia: 10 –20 000Hz, ±1 dB
Fluctuación y trémolo: . . . no mesurable
(precisión cuarzo)
Sintonizador
Frecuencia recibida
FM: . . . . . . . . . . . . . . . 87,5 –108 MHz
OM: . . . . . . . . . . . . . . . 522 –1620 kHz
Sensibilidad RF
FM: . . . . . . . . . . . . . . . 6 dBμV
OM: . . . . . . . . . . . . . . . 25 dBμV
Relación S/N
FM: . . . . . . . . . . . . . . . > 60 dB
OM: . . . . . . . . . . . . . . . > 50 dB
Distorsión harmónica total: < 0,5 %
Información general
Alimentación: . . . . . . . . . . 17 V mediante el amplifi-
cador de megafonía o
mediante la unidad básica
Dimensiones
(B × H × P): . . . . . . . . . . . 195 × 40 × 215 mm
Peso: . . . . . . . . . . . . . . . . 1,1 kg
Sujeto a modificaciones técnicas.
E
28
Grupo de Música Grupo de palabra
a seleccionar con la tecla numérica 1 (6)
a seleccionar con la tecla numérica 2 (7)
POP M Música Pop
ROCK M Música Rock
NEWS Noticias
AFFAIRS Magazin
INFO Información
EASY M Grandes éxitos
LIGHT M Música ligera
SPORT Deportes
EDUCATE Educación
DRAMA Drama
a seleccionar con la tecla numérica 3 (8)
a seleccionar con la tecla numérica 4 (14)
CLASSICS Música clásica
OTHER M Otra Música
CULTURE Cultura
SCIENCE Ciencia
VARIED Varios
a seleccionar con la tecla numérica 5 (15)
JAZZ Música Jazz
COUNTRY Country-Musik
WEATHER Información
meteorológica
FINANCE Economía
CHILDREN Infancia
a seleccionar con la tecla numérica 6 (15)
NATION M Música Nacional
OLDIES Música de ayer
SOCIAL Sociedad
RELIGION Religión
PHONE IN Opinión
FOLK M Música Folk
TRAVEL Viajes
LEISURE Ocio
DOCUMENT
Documental
Manual de instrucciones protegido por el copyright de MONACOR®INTERNATIONAL GmbH & Co. KG. Toda
reproducción mismo parcial para fines comerciales está prohibida.
Page 29

Proszę otworzyć niniejszą instrukcję na stronie 3.
Pokazano tam rozkład elementów operacyjnych i
złączy.
1 Elementy sterujące
1 Klawisz EJECT: wysuwanie płyty CD
2 Włącznik zasilania POWER
3 Klawisz MODE do przełączania między odtwarza-
niem płyty CD, plików MP3 poprzez port USB (10)
a radiem
4 Klawisz BAND: wybór pasma odbioru dla odbior-
nika radiowego
5 Kieszeń na płyty CD
6 Klawisz wyboru stacji 1 lub
funkcja pauzy/startu dla odtwarzacza CD/ MP3
7 Klawisz wyboru stacji 2 lub
funkcja odtwarzania próbek początków utworów
dla odtwarzacza CD/ MP3
8 Klawisz wyboru stacji 3 lub
funkcja powtarzania utworu dla odtwarzacza CD/
MP3
9 Klawisz AF/REG dla alternatywnych częstotliwości
przy odbiorze danych RDS
10 Port USB do podłączania nośników USB
11 Klawisze TRACK/TUNE
Odtwarzacz
CD / MP3: przejście do kolejnego/powrót do
poprzedniego utworu; szybkie
przewijanie do przodu/do tyłu po
przyciśnięciu klawisza
Radio: wybór stacji
Automatyczne wyszukiwanie stacji rozpocznie się po krótkim naciśnięciu klawisza.
Aby wybrać stację ręcznie,
należy przytrzymać klawisz lub
, aż na wyświetlaczu po jawi się
komunikat MANUAL. Następnie
należy nastawić stację przy
pomocy klawisza lub .
12 Klawisz DISP: prezentowanie informacji na wyświe-
tlaczu (pn. godzina, rodzaj programu, znaczniki ID3)
13 Wyświetlacz
14 Klawisz wyboru stacji 4 lub odtwarzanie w kolejno-
ści losowej dla odtwarzacza CD / MP3
15 Klawisze wyboru stacji 5 i 6 lub wybór folderu dla
odtwarzacza CD / MP3
16 Klawisz PTY: wybór rodzaju programu dla odbioru
danych RDS
17 Regulator głośności LEVEL
2 Bezpieczeństwo użytkowania
Moduł spełnia wymogi dyrektyw obowiązujących w
Unii Europejskiej, posiada więc oznaczenie .
G
Instalację modułu należy zlecić specjaliście.
G
Moduł przeznaczony jest do użytku jedynie
wewnątrz pomieszczeń. Urządzenie należy chronić
przed bezpośrednim kontaktem z wodą, dzia łaniem
wilgoci oraz wysokiej temperatury (dopu szczalna
temperatura otoczenia pracy: 0 – 40 °C).
G
Należy przerwać użytkowanie urządzenia z zainstalowanym modułem oraz niezwłocznie wyjąć wtyczkę
sieciową z gniazda, jeśli:
1. istnieje widoczne uszkodzenie urządzenia lub
kabla zasilającego,
2. mogło nastąpić uszkodzenie urządzenia w
wyniku jego upuszczenia itp.,
3. urządzenie działa nieprawidłowo
Moduł lub całe urządzenie należy przekazać do
autoryzowanego punktu serwisowego.
G
Do czyszczenia modułu należy używać suchej,
miękkiej tkaniny. Nie wolno stosować wody ani chemicznych środków czyszczących.
G
Producent ani dostawca nie ponoszą odpowie dzialności za wynikłe szkody (uszkodzenie sprzętu
lub obrażenia użytkownika), jeśli moduł używano
niezgodnie z przeznaczeniem, nieprawidłowo zainstalowano, obsługiwano bądź poddano nieautoryzowanej naprawie.
3 Zastosowanie
Urządzenie jest przystosowane do montażu we
wzmacniaczach PA firmy MONACOR wyposażonych
w odpowiednią komorę do instalacji urządzenia oraz w
modułach rozszerzających firmy MONACOR, np.:
PA-1120 5-strefowy wzmacniacz PA
PA-1200 4-strefowy wzmacniacz PA
PA-1200EX podwójny moduł rozszerzający
PA-1204EX poczwórny moduł rozszerzający
PA-1240 5-strefowy wzmacniacz PA
PA-5240 5-strefowy wzmacniacz PA
PA-5480 5-strefowy wzmacniacz PA
PA-6240 6-strefowy wzmacniacz PA
PA-6480 6-strefowy wzmacniacz PA
PA-6600 6-strefowy wzmacniacz PA
Po całkowitym zakończeniu eksploatacji
urządzenia należy przekazać je do punktu
utylizacji odpadów, aby uniknąć zanieczyszczenia środowiska.
PL
29
Page 30

4 Montaż modułu odtwarzacza CD/ tunera
1) Należy zdjąć obudowę wzmacniacza lub modułu
rozszerzającego.
2) Należy odkręcić śruby mocujące pokrywę ko mory,
znajdującej się na panelu frontowym wzmacniacza
lub modułu rozszerzającego. Następnie należy
zainstalować moduł odtwarza cza CD/tunera i przykręcić śruby mocujące.
3) Należy podłączyć goły przewód wzmacniacza lub
modułu rozszerzającego do obudowy wtyku “c”
(zob. schemat nr 2). Umożliwia to zasilanie modułu
prądem 17 V oraz podawanie sygnału dźwiękowego do wzmacniacza mocy.
4) Dostępne są też kolejne dwa wyjścia audio:
wyjście mono, symetryczne na złączu “d”
wyjście stereo, niesymetryczne na złączu “e”
5) W celu montażu złączy antenowych znajdujących
się module, należy na tylnej stronie wzmacniacza /
obudowy, odkręcić płytkę (rys. 3) lub usunąć
zaślepkę (rys. 4). Wsunąć płytkę PCB w otwór i
przykręcić ją.
6) Podłączyć przewód płytki PCB anteny do obudowy
wtyku “a”.
7) Moduł PA-1140RCD posiada baterię akumulatorową, dzięki czemu stacje pozostają zapisane w
pamięci również przy wyłączonym urządzeniu.
Bateria akumulatorowa pozostaje wyłączona do
momentu instalacji, aby uniknąć jej stopniowego
rozładowania. Aby włączyć baterię, należy ustawić
łącznik “b” w pozycji ON.
Aby ponownie wyłączyć baterię (np. przy dłuższym przechowywaniu), należy ponownie ustawić
łącznik “b” w pozycji OFF.
8) Należy założyć obudowę wzmacniacza lub modułu
rozszerzającego i podłączyć anteny odbiorcze to
złącz śrubowych anten. Należy zwrócić uwagę na
oznaczenia na wzmacniaczu lub module rozszerzającym:
AM+GND antena dla fal średnich
FM 75 Ω antena FM z kablem 75 Ω
300 Ω antena FM z kablem 300 Ω
5 Obsługa
1) Należy włączyć wzmacniacz lub moduł rozszerzający za pomocą włącznika zasilania oraz moduł
odtwarzacza CD/tunera przy pomocy klawisza
POWER (2).
2) Należy ustawić głośność regulatorem LEVEL (17).
3) Aby wyłączyć urządzenie, należy ponownie nacisnąć klawisz POWER.
5.1 Obsługa odtwarzacza CD /MP3
Odtwarzacz jest przystosowany do odczytu standardowych płyt CD, płyt CD-R oraz płyt CD z plikami
audio w formacie MP3. Mogą pojawić się problemy
przy odtwarzaniu płyt wielokrotnego zapisu (CD-RW),
zależy to jednak od rodzaju płyty CD, nagrywarki oraz
programu do nagrywania.
Poprzez port USB możliwe jest odtwarzanie plików
MP3 z nośników USB.
5.1.1 Odtwarzanie utworów muzycznych
1) Do kieszeni (5) odtwarzacza należy włożyć płytę
CD (nadrukiem do góry) tak głęboko, aż zostanie
automatycznie wciągnięta do środka. Jeśli w kieszeni znajduje się już płyta, na wyświetlaczu pojawi
się symbol .
Aby zmienić płytę, należy nacisnąć klawisz
EJECT (1) – płyta zostanie wysunięta z kieszeni.
Jeśli w ciągu kilku sekund płyta nie zostanie wyjęta
z kieszeni, odtwarzacz wciągnie płytę do środka.
2) Alternatywnie lub dodatkowo, podłączyć nośnik
USB deportu USB (10).
3) Po wczytaniu, rozpocznie się odtwarzanie pierwszego utworu. W przypadku standardowych płyt
audio CD na wyświetlaczu pojawi się numer utworu
oraz czas jego odtwarzania (min. : sek.).
W przypadku plików MP3 najpierw na wyświetlaczu
pojawi się nazwa pliku, a następnie numer utworu
poprzedzony literą “T”. Po kilkakrotnym naciśnięciu
klawisza DISP (12) na wyświetlaczu pojawią się
informacje o nazwie utworu, albumu, wykonawcy,
itd. (znaczniki ID3). Jeśli znaczniki ID3 nie są
dostępne, na wyświetlaczu będzie widoczny komunikat NO ID3.
Uwaga: Podczas odtwarzania płyty CD lub nośnika USB,
po wciśnięciu klawisza DISP, na wyświetlaczu pojawi się
informacja o wybranej stacji, także podczas odtwarzania
płyty CD, zob. rozdział 5.2.3, akapit “Informacje”. Należy
kilkakrotnie nacisnąć klawisz DISP, aż na wyświetlaczu
pojawi się szukana informacja.
4) Po odtworzeniu ostatniego utworu urządzenie
rozpoczyna ponowne odtwarzanie od pierwszego
utworu (odtwarzanie ciągłe).
5) Aby przerwać odtwarzanie należy nacisnąć klawisz
(6). Na wyświetlaczu pojawi się komunikat
S-PAUSE. Aby kontynuować odtwarzanie wcisnąć
klawisz ponownie.
UWAGA Przed montażem modułu odtwarzacza
CD/tunera należy odłączyć wtyk sieciowy wzmacniacza lub modułu rozsze rzającego z gniazda zasilania, ponieważ
istnieje zagrożenie porażeniem prądem
elektrycznym.
PL
30
Page 31

6) Do przełączania między odtwarzaniem z płyty CD,
nośnika USB oraz radiem służy klawisz MODE (3).
5.1.2 Wybór utworu i folderu
1) Należy wybrać utwór za pomocą klawiszy TRACK
(11).
Klawisz : każdorazowe krótkie naciśnięcie klawisza powoduje przejście o jeden utwór do przodu.
Klawisz : krótkie naciśnięcie klawisza powoduje
przejście do początku utworu;
każdorazowe krótkie naciśnięcie klawisza powoduje przejście o jeden utwór do tyłu.
2) Jeżeli utwory na nośniku pogrupowane są w folderach, do przechodzenia między folderami służą klawisze F
oraz F (15). Na wyświetlaczu pojawi
się numer wybranego folderu.
Po wyborze folderu odtwarzanie rozpoczyna się
od pierwszego utworu w folderze. Aby wybrać inny
utwór, należy nacisnąć odpowiedni klawisz TRACK
(11). Za pomocą klawisza można przejść z
ostatniego utworu w folderze do pierw szego utworu
w kolejnym folderze, a za pomocą klawisza z
pierwszego utworu w folderze do ostatniego utworu
w poprzednim folderze.
Uwaga: Kolejność odtwarzania utworów pogrupowanych
w różnych folderach:
1. Wszystkie utwory nie zapisane w folderach
2. Wszystkie utwory z folderów lub z folderu głównego
3. Wszystkie utwory z podfolderów itd.
Wybór folderów oraz numeracja utworów jest również
zgodna z powyższym porządkiem.
5.1.3 Przewijanie do przodu i do tyłu
Po wciśnięciu klawisza (11) następuje przewijanie
do przodu, po wciśnięciu klawisza przewijanie do
tyłu. W przypadku plików MP3 nie ma możliwości
przechodzenia między utworami podczas szybkiego
przewijania. Na końcu lub na początku utworu urządzenie automatycznie przełącza się na tryb odtwarzania, nawet przy wciśniętym klawiszu (11).
5.1.4 Odtwarzanie próbek początków utworów
Można odtwarzać próbki początków wszystkich utworów z płyty; odtwarzanie każdego fragmentu trwa
10 sekund:
1) Należy nacisnąć klawisz INT (7). Na wyświetlaczu
pojawi się komunikat S-INT oraz numer utworu. W
przypadku plików MP3 na wyświetlaczu pojawia się
również nazwa pliku. Po odtworzeniu 10 sekund
utworu następuje przejście do kolejnego.
2) Aby odtwarzać początki utworów z wybranego folderu, należy przytrzymać klawisz INT przez ponad
3 sekundy przy włączaniu funkcji “Odtwarzanie
próbek początków utworów”, aż na wyświetlaczu
pojawi się na chwilę komunikat D-INT (skrót od
“directory intro”).
3) Aby wyłączyć tę funkcję należy ponownie nacisnąć
klawisz INT. Z wyświetlacza zniknie komunikat SINT lub D-INT i utwór, którego początek został
odtworzony, zostanie odtworzony w całości. Wyłączenie funkcji nastąpi również po naciśnięciu klawisza RPT (8) lub RDM (14).
5.1.5 Powtarzanie wszystkich utworów
1) Za pomocą klawisza lub (11) należy wybrać
utwór, który będzie powtarzany, następnie nacisnąć klawisz RPT (8). Na wyświetlaczu pojawi się
komunikat S-RPT oraz numer utworu. W przypadku plików MP3 na wyświetlaczu pojawia się
również nazwa pliku. Wybrany utwór będzie ciągle
powtarzany.
2) Aby włączyć funkcję powtarzania wszystkich utworów z wybranego folderu należy przytrzymać klawisz RPT przez ponad 3 sekundy przy włączaniu
funkcji powtarzania, aż na wyświetlaczu pojawi się
na chwilę komunikat D-RPT (skrót od “directory
repeat”).
3) Aby wyłączyć tę funkcję należy ponownie nacisnąć
klawisz RPT. Z wyświetlacza zniknie komunikat SRPT lub D-RPT. Wyłączenie funkcji nastąpi również
po naciśnięciu klawisza INT (7) lub RDM (14).
5.1.6 Odtwarzanie utworów w kolejności losowej
W przypadku odtwarzania utworów w kolejności losowej utwory nie są odtwarzane po kolei, lecz w przypadkowej kolejności.
1) Należy nacisnąć klawisz RDM (14). Kolejny utwór
zostanie wybrany losowo. Na wyświetlaczu pojawi
się komunikat S-RDM oraz numer utworu. W przypadku plików MP3 na wyświetlaczu pojawia się
również nazwa pliku.
2) Aby odtwarzać w przypadkowej kolejności utwory z
wybranego folderu, należy przytrzymać klawisz
RDM przez ponad 3 sekundy przy włączaniu funkcji “Odtwarzanie w kolejności losowej”, aż na
wyświetlaczu pojawi się na chwilę komunikat
D-RDM (skrót od “directory random”).
3) Aby wyłączyć tę funkcję należy ponownie nacisnąć
klawisz RDM. Z wyświetlacza zniknie komunikat SRDM lub D-RDM. Wyłączenie funkcji nastąpi również po naciśnięciu klawisza INT (7) lub RPT (8).
5.1.7 Uwagi dotyczące zakłóceń i błędów w odczycie
Wpływ dymu papierosowego oraz kurzu może spowodować błędy przy odczycie płyt CD. Niestety uniknięcie szkodliwych warunków nie zawsze jest możliwe
(np. w dyskotekach). W takim przypadku należy zlecić
okresowe czyszczenie urządzenia przez autoryzowany serwis.
PL
31
Page 32

5.2 Obsługa tunera
Po umieszczeniu płyty CD w kieszeni odtwarzacza lub
podłączeniu nośnika USB, urządzenie automatycznie
przełącza się na tryb odtwarzacza CD lub USB. Aby
przełączyć na tryb odbiornika radiowego, należy nacisnąć klawisz MODE (3). Aby ponownie włączyć tryb
odtwarzacza, należy nacisnąć ten sam klawisz po raz
kolejny.
5.2.1 Wybór i zapisywanie stacji
Tuner odbiera fale FM oraz fale średnie. Pasmo FM
zostało podzielone na trzy identyczne podpasma,
dzięki czemu możliwe jest zapisywanie ponad sześciu
stacji za pomocą odpowiednich klawiszy (6, 7, 8, 14,
15). W trzech podpasmach (F 1, F 2, F 3) oraz w
paśmie fal średnich (MW) można zapisać po sześć
stacji, co daje w sumie 18 stacji FM i 6 stacji na falach
średnich.
1) Należy wybrać pasmo za pomocą klawisza BAND
(4). Należy najpierw zapisać sześć stacji w paśmie
F 1, dopiero później przejść do pasma F 2 i F 3.
2) Można użyć automatycznego lub ręcznego trybu
wyszukiwania stacji:
Aby włączyć automatyczne wyszukiwanie stacji,
należy krótko nacisnąć klawisz (11) (do przodu)
lub (do tyłu). Wyszukiwanie stacji zostanie
zatrzymane przy kolejnej stacji. Podczas wyszukiwania na wyświetlaczu pojawi się komunikat
SEARCH. Należy ponownie włączyć wyszukiwanie, aż szukana stacja zostanie znaleziona.
Aby włączyć ręczne wyszukiwanie stacji należy
przytrzymać klawisz lub , aż na wyświetlaczu
pojawi się na chwilę komunikat MANUAL. Można
stopniowo zwiększyć lub zmniejszyć częstotliwość
odbiorczą naciskając klawisz (w paśmie FM o
50 kHz, w paśmie średnim o 9 kHz). Aby przy śpieszyć wyszukiwanie stacji, należy przytrzymać klawisz lub . Po ręcznym wyszukaniu stacji urządzenie ponownie przełączy się na tryb automatycznego wyszukiwania po kilku sekundach, chyba że
wcześniej zostanie naciśnięty klawisz lub . Na
wyświetlaczu pojawi się na chwilę komunikat
AUTO.
3) Po wyborze danej stacji należy przytrzymać odpowiedni klawisz (6, 7, 8, 14, 15), aż po prawej stronie
wyświetlacza pojawi się numer stacji oraz “ch”
(zob. schemat nr 1). Stacja zostanie zapisana pod
tym numerem w odpowiednim podpaśmie.
5.2.2 Przywoływanie zapisanych stacji
1) Za pomocą klawisza BAND (4) należy wybrać
pasmo, na którym została zapisana dana stacja.
2) Należy wybrać numer stacji przy pomocy odpowiedniego klawisza numerycznego (6, 7, 8, 14, 15).
3) Następnie należy ustawić odpowiedni poziom głośności za pomocą regulatora LEVEL (17).
4) W przypadku programu stereofonicznego w górnym lewym rogu wyświetlacza pojawi się komunikat “ST”.
5.2.3 Funkcje RDS
Jeśli dana stacja wysyła dane RDS (skrót z ang. “radio
data system”), na wyświetlaczu będzie widoczna
nazwa stacji zamiast częstotliwości. Niektóre stacje
oprócz nazwy wysyłają też dodatkowe informacje, np.
tytuł utworu, wykonawcę.
Jeśli dana stacja nadaje informacje dla kierowców,
na wyświetlaczu widoczny jest komunikat “TP”. Jeśli
widoczny jest komunikat “EON” (skrót z ang.: ”enhanced other networks”) i odbierany jest program, który w
danej chwili nie nadaje informacji dla kierowców, tuner
automatycznie przełączy się na inny program tej
samej rozgłośni, w którym podawane są informacje
dotyczące warunków na drogach. Po zakończeniu
informacji dla kierowców urządzenie automatycznie
przełączy się na poprzedni program.
Informacje
Przy użyciu klawisza DISP (12) można wyświetlić
następujące informacje:
1. naciśnięcie klawisza po raz pierwszy → wskazanie
czasu
Jeśli wskazanie czasu nie jest wysyłane, na
wyświetlaczu pojawi się komunikat NO CLOCK.
Wskazanie czasu jest wysyłane co pewien czas, po
włączeniu radia należy więc chwilę odczekać.
2. naciśnięcie klawisza po raz drugi → wskazanie
pasma (F1, F2, F3, MW) i częstotliwości danej stacji
3. naciśnięcie klawisza po raz trzeci → wskazanie
rodzaju programu
Jeśli stacja nie określiła rodzaju programu, na
wyświetlaczu widoczny jest komunikat PTY NONE.
4. naciśnięcie klawisza po raz czwarty → nazwa stacji
(ustawienie podstawowe)
Wyświetlacz także przejdzie do ustawienia podsta-
wowego 5 sekund po naciśnięciu klawisza po raz
ostatni.
Informacja ta pojawia się także po wciśnięciu klawisza
DISP podczas odtwarzania płyty CD lub nośnika USB.
Częstotliwości alteratywne
Jeśli na wyświetlaczu stale widoczny jest komunikat AF
(komunikat nie miga), oznacza to, że program jest
nadawany również na częstotliwościach alternatywnych
sąsiednich stacji. Urządzenie automatycznie przełączy
się na tę stację, która jest najlepiej odbierana. Za
pomocą klawisza AF/REG (9) funkcję tę można wyłączyć (zniknie komunikat AF) i ponownie włączyć.
Niektóre stacje nadają różne programy w zależności
od regionu, np. wiadomości regionalne. Tryb regionalny
umożliwia automatyczne przełączenie na stację z lepszą jakością odbioru tego samego programu regionalnego. Należy przytrzymać klawisz AF/REG przez 3
sekundy, aż na wyświetlaczu pojawi się na chwilę komunikat REG ON. Przy włączonym trybie regionalnym na
wyświetlaczu widoczny jest komunikat REG. Aby wyłączyć ten tryb należy ponownie przytrzymać klawisz
AF/REG przez 3 sekundy, aż na wyświetlaczu pojawi
się na chwilę komunikat REG OFF.
PL
32
Page 33

Rodzaj programu
Za pomocą klawisza PTY (16) spośród zapisanych
stacji można wybrać tę, która w danej chwili nadaje
muzykę lub informacje z wybranej kategorii. Do
wyboru są następujące kategorie:
1) Należy włączyć funkcję “Rodzaj programu” za
pomocą klawisza PTY (16). Można wtedy w sposób
bardziej szczegółowy wybrać grupę muzyczną.
Wyświetli się jedna kategoria z tej grupy. Aby
przejść do grupy “Informacje”, należy ponownie
nacisnąć klawisz PTY. Na wyświetlaczu pojawi się
kategoria z tej grupy. (Po naciśnięciu klawisza po
raz trzeci funkcja “Rodzaj programu” zostanie wyłączona.)
2) Naciskając (wielokrotnie) odpowiedni klawisz
numeryczny, należy wybrać odpowiedni dział z
wybranej grupy. Spośród zapisanych stacji zostanie wyszukana ta, która w danej chwili nadaje pro-
gram z wybranej kategorii. Podczas wyszukiwania
dźwięk jest wyłączony.
Jeśli stacja z żądanej kategorii nie zostanie znaleziona, na wyświetlaczu po chwili pojawi się komunikat PTY NONE. Urządzenie przejdzie do
poprzednio wybranej stacji.
3) Aby wyłączyć funkcję “Rodzaj programu” i przywołać zapisane stacje za pomocą odpowiednich klawiszy, należy jednokrotnie lub dwukrotnie nacisnąć
PTY, aż na wyświetlaczu pojawi się częstotliwość
stacji lub jej nazwa.
6 Dane techniczne
Zob. diagram blokowy na str. 37
Odtwarzacz CD/ MP3
THD: . . . . . . . . . . . . . . . . < 0,03 %
Stosunek S/N: . . . . . . . . . > 85 dB
Charakterystyka
częstotliwości: . . . . . . . . . 10 –20 000 Hz, ±1 dB
Drżenie i kołysanie
dźwięku: . . . . . . . . . . . . . . niemierzalne
(kwarcowa precyzja)
Tuner
Częstotliwość odbiorcza
FM: . . . . . . . . . . . . . . . 87,5 –108 MHz
MW: . . . . . . . . . . . . . . . 522 – 1620 kHz
Czułość RF
FM: . . . . . . . . . . . . . . . 6 dBμV
MW: . . . . . . . . . . . . . . . 25 dBμV
Stosunek S/N
FM: . . . . . . . . . . . . . . . > 60 dB
MW: . . . . . . . . . . . . . . . > 50 dB
THD: . . . . . . . . . . . . . . . . < 0,5 %
Informacje ogólne
Zasilanie: . . . . . . . . . . . . . 17 V ze wzmacniacza
mocy lub z modułu rozszerzającego
Wymiary
(szer. × wys. × głęb.): . . . 195 × 40 × 215 mm
Waga: . . . . . . . . . . . . . . . 1,1 kg
Z zastrzeżeniem możliwości zmian.
PL
33
Instrukcje obsługi są chronione prawem copyright for MONACOR®INTERNATIONAL GmbH & Co. KG.
Przetwarzanie całości lub części instrukcji dla osobistych korzyści finansowych jest zabronione.
Grupa: Muzyka Grupa: Informacje
wybór za pomocą klawisza numer 1 (6)
wybór za pomocą klawisza numer 2 (7)
POP M Pop
ROCK M Rock
NEWS Wiadomości
AFFAIRS Bieżące wydarzanias
INFO Informacje
EASY M Lekka muzyka
LIGHT M Muzyka klasyczna
(dla każdego)
SPORT Sport
EDUCATE Edukacja
DRAMA Teatr
wybór za pomocą klawisza numer 3 (8)
wybór za pomocą klawisza numer 4 (14)
CLASSICS Muzyka klasyczna
(dla koneserów)
OTHER M Inne rodzaje muzyki
CULTURE Kultura
SCIENCE Nauka
VARIED Różne
wybór za pomocą klawisza numer 5 (15)
JAZZ Jazz
COUNTRY Country
WEATHER Pogoda
FINANCE Gospodarka
CHILDREN Audycje dla dzieci
wybór za pomocą klawisza numer 6 (15)
NATION M Muzyka danego kraju
OLDIES Dawne przeboje
SOCIAL
Program publicystyczny
RELIGION Program religijny
PHONE IN Program
z telefonicznym
udziałem słuchaczy
FOLK M Folk
TRAVEL Program podróżniczy
LEISURE Program rozrywkowy
DOCUMENT
Program dokumentalny
Page 34

34
Insats med CD-spelare plus radiodel
Ge akt på säkerhetsinformationen innan enheten tas i
bruk. Skulle ytterliggare information behövas kan den
återfinnas i Manualen för andra språk.
Säkerhetsföreskrifter
Insaten uppfyller samtliga Eu-direktiv och har därför
försett med symbolen .
G
Insatsen skall monteras av tekniskt kunnig personal
och är endast avsedd för följande enheter ur
MONACOR-serien
PA-1120 PA-förstärkare 5 zoner
PA-1200 PA-förstärkare 3 zoner
PA-1200EX basenhet för 2 insatser
PA-1204EX basenhet för 4 insatser
PA-1240 PA-förstärkare 5 zoner
PA-5240 PA-förstärkare 5 zoner
PA-5480 PA-förstärkare 5 zoner
PA-6240 PA-förstärkare 6 zoner
PA-6480 PA-förstärkare 6 zoner
PA-6600 PA-förstärkare 6 zoner
G
Insatserna är endast avsedda för inomhusbruk.
Skydda insatserna mot vätskor, hög luftfuktighet och
hög värme (tillåten omgivningstemperatur 0 –40 °C).
G
Tag omedelbart ut elkontakten ur eluttaget om något
av följande fel uppstår.
1. Om enheten har synliga skador på chassi eller
elsladd.
2. Om enheten är skadad av fall eller dylikt.
3. Om enheten har andra felfunktioner.
Enheten skall alltid lagas på auktoriserad verkstad.
G
Rengör endast med en ren och torr trasa, använd
aldrig vätskor i någon form då dessa kan rinna in
och orsaka kortslutning.
G
Om enheten används på annat sätt än som avses,
om den inte kopplas in ordentligt, om den används
på fel sätt eller inte repareras av auktoriserad per sonal upphör alla garantier att gäll. I dessa fall tas
inget ansvar för uppkommen skada på person eller
materiel.
Notering ang ljud avbrott och läs problem
Cigar ett rök och damm kommer lätt in genom enhetens intag och kan då givetvis sätta sig på det optiska
läshuvudet. Om detta sker och förorsakar ljudstörningar och avbrott så måste enheten rengöras av kvalificerad personal. Var vänlig att notera att detta kommer att fakturears även om artikeln befinner sig inom
garantiperioden.
Om enheten skall kasseras bör den lämnas
till återvinning.
DK
CD-speler-plug-inmodule med tuner
Lees aandachtig de onderstaande veiligheidsvoorschriften, alvorens het toestel in gebruik te nemen.
Mocht u bijkomende informatie over de bediening van
het toestel nodig hebben, lees dan de Engelse tekst
van deze handleiding.
Veiligheidsvoorschriften
De plug-inmodule is in overeenstemming met alle vereiste EU-Richtlijnen en is daarom gekenmerkt met .
G
De plug-inmodule mag uitsluitend door een gekwalificeerd persoon worden ingebouwd en is geschikt
voor montage in een MONACOR-geluidsversterker
met een moduleopening en in MONACOR-basisapparatuur voor modules, bijvoorbeeld:
PA-1120 geluidsversterker voor 5 zones
PA-1200 geluidsversterker voor 4 zones
PA-1200EX kast voor 2 modules
PA-1204EX kast voor 4 modules
PA-1240 geluidsversterker voor 5 zones
PA-5240 geluidsversterker voor 5 zones
PA-5480 geluidsversterker voor 5 zones
PA-6240 geluidsversterker voor 6 zones
PA-6480 geluidsversterker voor 6 zones
PA-6600 geluidsversterker voor 6 zones
G
De module is alleen geschikt voor gebruik binnenshuis. Vermijd druip- en spatwater, uitzonderlijk warme
plaatsen en plaatsen met een hoge vochtigheid (toegestaan omgevingstemperatuurbereik: 0 –40 °C).
G
Schakel het apparaat met de ingebouwde module
niet in en trek onmiddellijk de stekker uit het stopcontact wanneer:
1. de module, het apparaat of het netsnoer zichtbaar beschadigd zijn,
2. er een defect zou kunnen optreden nadat een
apparaat bijvoorbeeld gevallen is,
3. een apparaat slecht functioneert.
De module of het volledige apparaat moet in elk geval
hersteld worden door een gekwalificeerd vakman.
G
Gebruik voor de reiniging uitsluitend een droge, zachte
doek. Gebruik in geen geval chemicaliën of water.
G
In geval van ongeoorloofd of verkeerd gebruik,
ondeskundige montage, foutieve bediening of van
herstelling door een niet-gekwalificeerd persoon vervalt de garantie en de verantwoordelijkheid voor hieruit resulterende materiële of lichamelijke schade.
Opmerking in verband met klankstoringen en leesfouten
Sigarettenrook en stof dringen makkelijk in alle openingen van de cd-speler en zet zich ook af op de optische onderdelen van het laser-aftastsysteem. Mocht
deze afzetting tot leesfouten en klankstoringen leiden,
dan moet het apparaat door een gekwalificeerd vakman worden gereinigd. De kosten voor deze reiniging
draagt de koper, ook tijdens de garantietermijn!
Wanneer de module definitief uit bedrijf genomen wordt, bezorg ze dan voor milieuvriendelijke verwerking aan een plaatselijk recyclagebedrijf.
NL
B
Page 35

35
CD-Soitin sekä radioviritin lisäyksikkö
Ole hyvä ja huomioi joka tapauksessa seuraavat turvallisuuteen liittyvät seikat ennen laitteen käyttöä. Laitteen toiminnasta saa lisätietoa tarvittaessa tämän laitteen muunkielisistä käyttöohjeista.
Turvallisuudesta
Tämä laite täyttää kaikki siihen kohdistuvat EU-direk tiivit ja sille on myönnetty hyväksyntä.
G
Lisäyksiköiden asennus tulee suorittaa valtuutetun
henkilön toimesta, ja yhteensopivuus on ainoastaan
seuraaviin MONACOR -laitteisiin:
PA-1120 5 alueen PA vahvistin
PA-1200 3 alueen PA vahvistin
PA-1200EX Asennuskotelo kahdelle lisäyksikölle
PA-1204EX Asennuskotelo neljälle lisäyksikölle
PA-1240 5 alueen PA vahvistin
PA-5240 5 alueen PA vahvistin
PA-5480 5 alueen PA vahvistin
PA-6240 6 alueen PA vahvistin
PA-6480 6 alueen PA vahvistin
PA-6600 6 alueen PA vahvistin
G
Tämä laite soveltuu vain sisätilakäyttöön. Suojele
lai tetta kosteudelta, vedeltä ja kuumuudelta (sallittu
ympä röivä lämpötila 0 –40 °C).
G
Irrota virtajohto pistorasiasta, äläkä käynnistä laitetta, jos:
1. laitteessa tai sen virtajohdossa on havaittava
vaurio,
2. putoaminen tai muu vastaava vahinko on saattanut aiheuttaa vaurion,
3. laitteessa esiintyy toimintahäiriöitä.
Kaikissa näissä tapauksissa laitteet tulee toimittaa
valtuutettuun huoltoliikkeeseen.
G
Käytä puhdistamiseen pelkästään kuivaa, pehmeää
kangasta. Älä käytä kemikaaleja tai vettä.
G
Maahantuoja ja valmistaja eivät vastaa mahdollisesta vahingosta, jos laitetta käytetään muuhun tarkoitukseen kuin se alun perin on suunniteltu, se on
väärin asennettu, sitä on väärin käytetty tai huollatettu muualla kuin valtuutetussa huoltoliikkeessä.
Tiedote koskien levyn lukuhäiriöitä
sekä katkoksia äänessä
Laitteeseen kertyvä pöly, tupakansavu yms aiheuttaa
laitteeseen lukuvirheitä. Laitteen saa avata ja huoltaa
vain av-huoltoliike tai sähköalan ammattilainen. Huomioi että kyseessä on normaalisti veloitettava huoltotyö myös takuuaikana.
Kun laite joskus poistetaan lopullisesti käytöstä, huolehdi, että laite hävitetään asianmukaisesti jätteenkäsittelylaitoksessa.
FIN
Insats med CD-spelare plus radiodel
Ge akt på säkerhetsinformationen innan enheten tas i
bruk. Skulle ytterliggare information behövas kan den
återfinnas i Manualen för andra språk.
Säkerhetsföreskrifter
Insaten uppfyller samtliga Eu-direktiv och har därför
försett med symbolen .
G
Insatsen skall monteras av tekniskt kunnig personal
och är endast avsedd för följande enheter ur
MONACOR-serien
PA-1120 PA-förstärkare 5 zoner
PA-1200 PA-förstärkare 3 zoner
PA-1200EX basenhet för 2 insatser
PA-1204EX basenhet för 4 insatser
PA-1240 PA-förstärkare 5 zoner
PA-5240 PA-förstärkare 5 zoner
PA-5480 PA-förstärkare 5 zoner
PA-6240 PA-förstärkare 6 zoner
PA-6480 PA-förstärkare 6 zoner
PA-6600 PA-förstärkare 6 zoner
G
Insatserna är endast avsedda för inomhusbruk.
Skydda insatserna mot vätskor, hög luftfuktighet och
hög värme (tillåten omgivningstemperatur 0 –40 °C).
G
Tag omedelbart ut elkontakten ur eluttaget om något
av följande fel uppstår.
1. Om enheten har synliga skador på chassi eller
elsladd.
2. Om enheten är skadad av fall eller dylikt.
3. Om enheten har andra felfunktioner.
Enheten skall alltid lagas på auktoriserad verkstad.
G
Rengör endast med en ren och torr trasa, använd
aldrig vätskor i någon form då dessa kan rinna in
och orsaka kortslutning.
G
Om enheten används på annat sätt än som avses,
om den inte kopplas in ordentligt, om den används
på fel sätt eller inte repareras av auktoriserad per sonal upphör alla garantier att gäll. I dessa fall tas
inget ansvar för uppkommen skada på person eller
materiel.
Notering ang ljud avbrott och läs problem
Cigarett rök och damm kommer lätt in genom enhetens intag och kan då givetvis sätta sig på det optiska
läshuvudet. Om detta sker och förorsakar ljudstörningar och avbrott så måste enheten rengöras av kvalificerad personal. Var vänlig att notera att detta kommer att fakturears även om artikeln befinner sig inom
garantiperioden.
Om enheten skall kasseras bör den lämnas
till återvinning.
S
Page 36

36
Page 37

37
Blockschaltbild • Block diagram
BAT
ON OFF
Page 38

MONACOR INTERNATIONAL GmbH & Co. KG •Zum Falsch 36 •28307 Bremen •Germany
Copyright
©
by MONACOR INTERNATIONAL. All rights reserved. A-1294.99.01.01.2012
®
 Loading...