

Page 1
BEDIENUNGSANLEITUNG
INSTRUCTION MANUAL
MODE D’EMPLOI
ISTRUZIONI PER L’USO
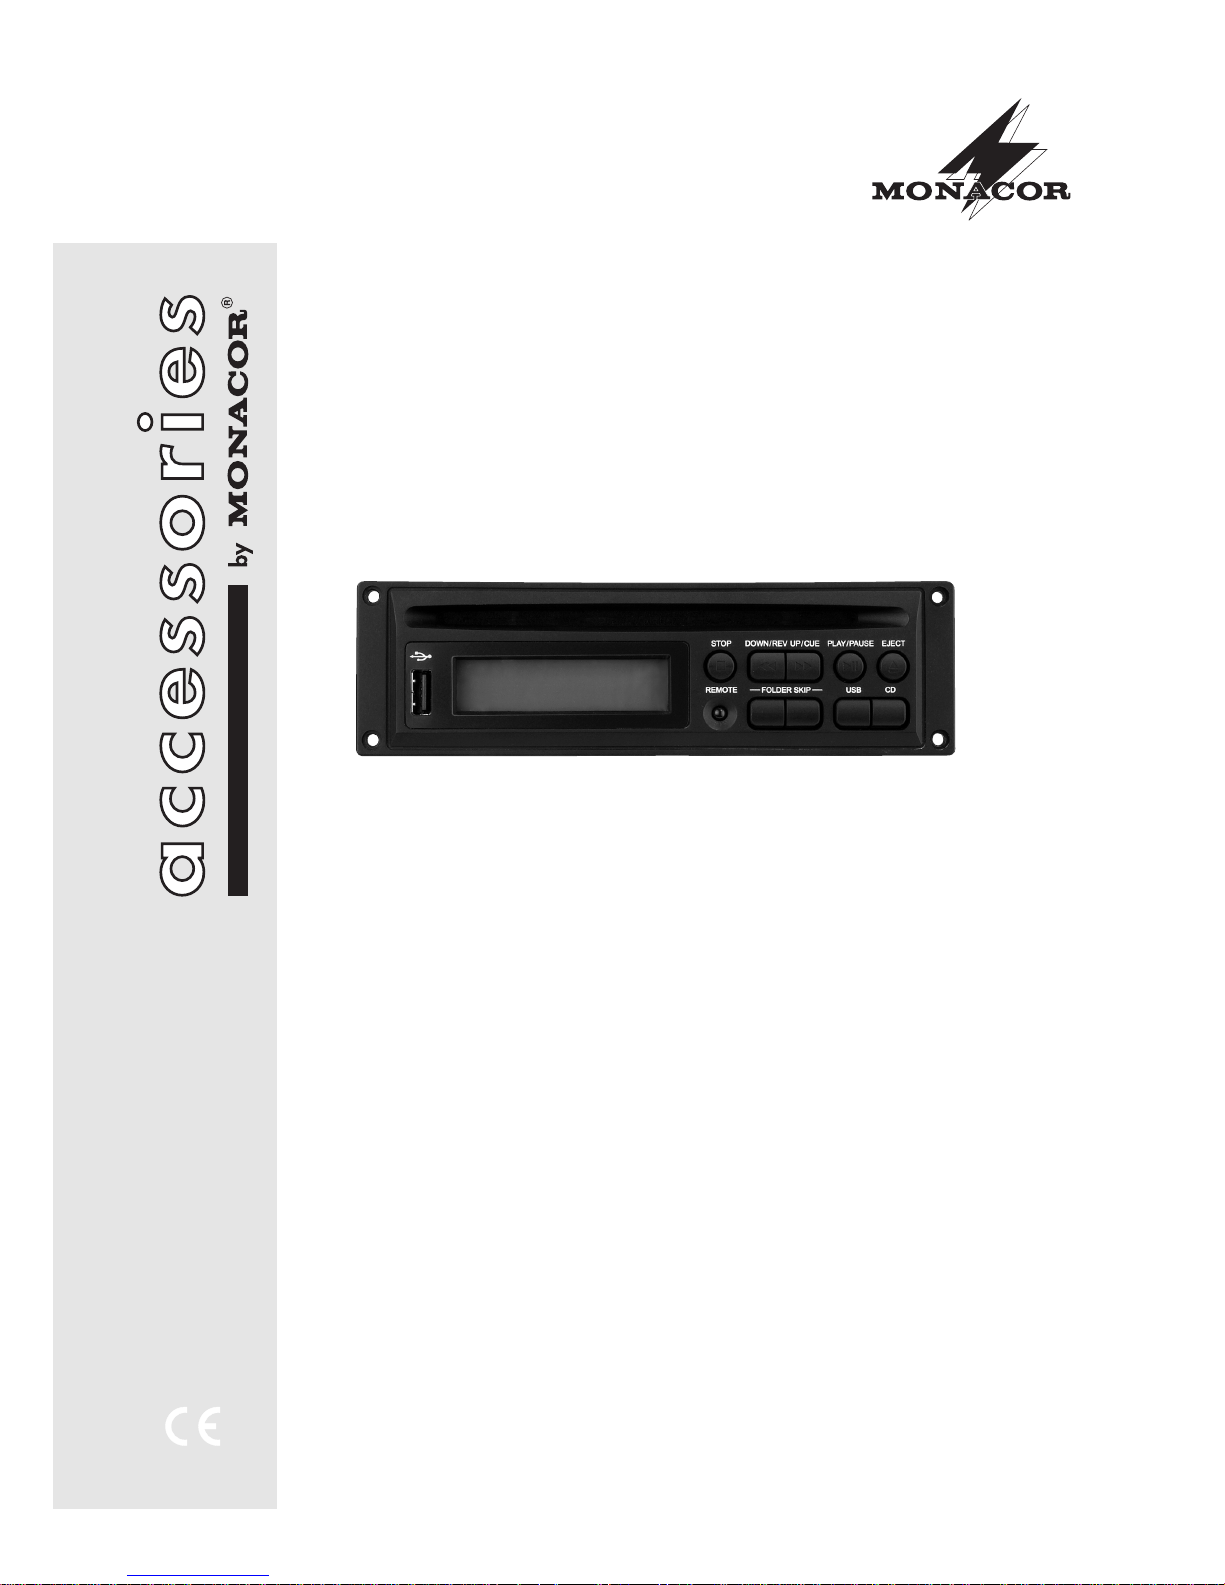
CD-SPIELER-MODUL
CD PLAYER MODULE
®
M-30CD
Best.-Nr. 17.2490
Page 2

2
Avant toute installation …
Nous vous souhaitons beaucoup de plaisir à
utiliser cet appareil MONACOR. Lisez ce
mode d’emploi entièrement avant toute utilisation. Uniquement ainsi, vous pourrez apprendre l’ensemble des possibilités de fonctionnement de l’appareil, éviter toute manipulation
erronée et vous protéger, ainsi que l’appareil,
de dommages éventuels engendrés par une
utilisation inadaptée. Conservez la notice pour
pouvoir vous y reporter ultérieurement.
La version française se trouve page 12.
F
B
CH
Prima di accendere …
Vi auguriamo buon divertimento con il vostro
nuovo apparecchio di MONACOR. Leggete
attentamente le istruzioni prima di mettere in
funzione l'apparecchio. Solo così potete conoscere tutte le funzionalità, evitare comandi
sbagliati e proteggere voi stessi e l'apparecchio da eventuali danni in seguito ad un
uso improprio. Conservate le istruzioni per
poterle consultare anche in futuro.
Il testo italiano inizia a pagina 16.
I
Bevor Sie einschalten …
Wir wünschen Ihnen viel Spaß mit Ihrem
neuen Gerät von MONACOR. Bitte lesen Sie
diese Bedienungsanleitung vor dem Betrieb
gründlich durch. Nur so lernen Sie alle Funktionsmöglichkeiten kennen, vermeiden Fehlbedienungen und schützen sich und Ihr Gerät
vor eventuellen Schäden durch unsachgemäßen Gebrauch. Heben Sie die Anleitung für
ein späteres Nachlesen auf.
Der deutsche Text beginnt auf der Seite 4.
D
A
CH
Before switching on …
We wish you much pleasure with your new
MONACOR unit. Please read these operating
instructions carefully prior to operating the
unit. Thus, you will get to know all functions of
the unit, operating errors will be prevented,
and yourself and the unit will be protected
against any damage caused by improper use.
Please keep the operating instructions for later
use.
The English text starts on page 8.
GB
Page 3
3
FOLDER SKIP
DOWN/REV UP/CUESTOP
REMOTE
USB CD
PLAY/PAUSE EJECT
67 891011
12345
0
8
5
2
7
4
1
9
6
3
FIND
PROG
STOP
ESP
P
L
A
Y
/
P
A
U
S
E
MUTEEJECT
FOLDER SKIP DOWN/REV UP/CUE
DISPLAYPLAYMODE CD USB
➁
➀
5
12
9
13
14
15
4
11
10
3
2
16
17
18
Page 4

Bitte klappen Sie die Seite 3 heraus. Sie sehen dann
immer die beschriebenen Bedienelemente.
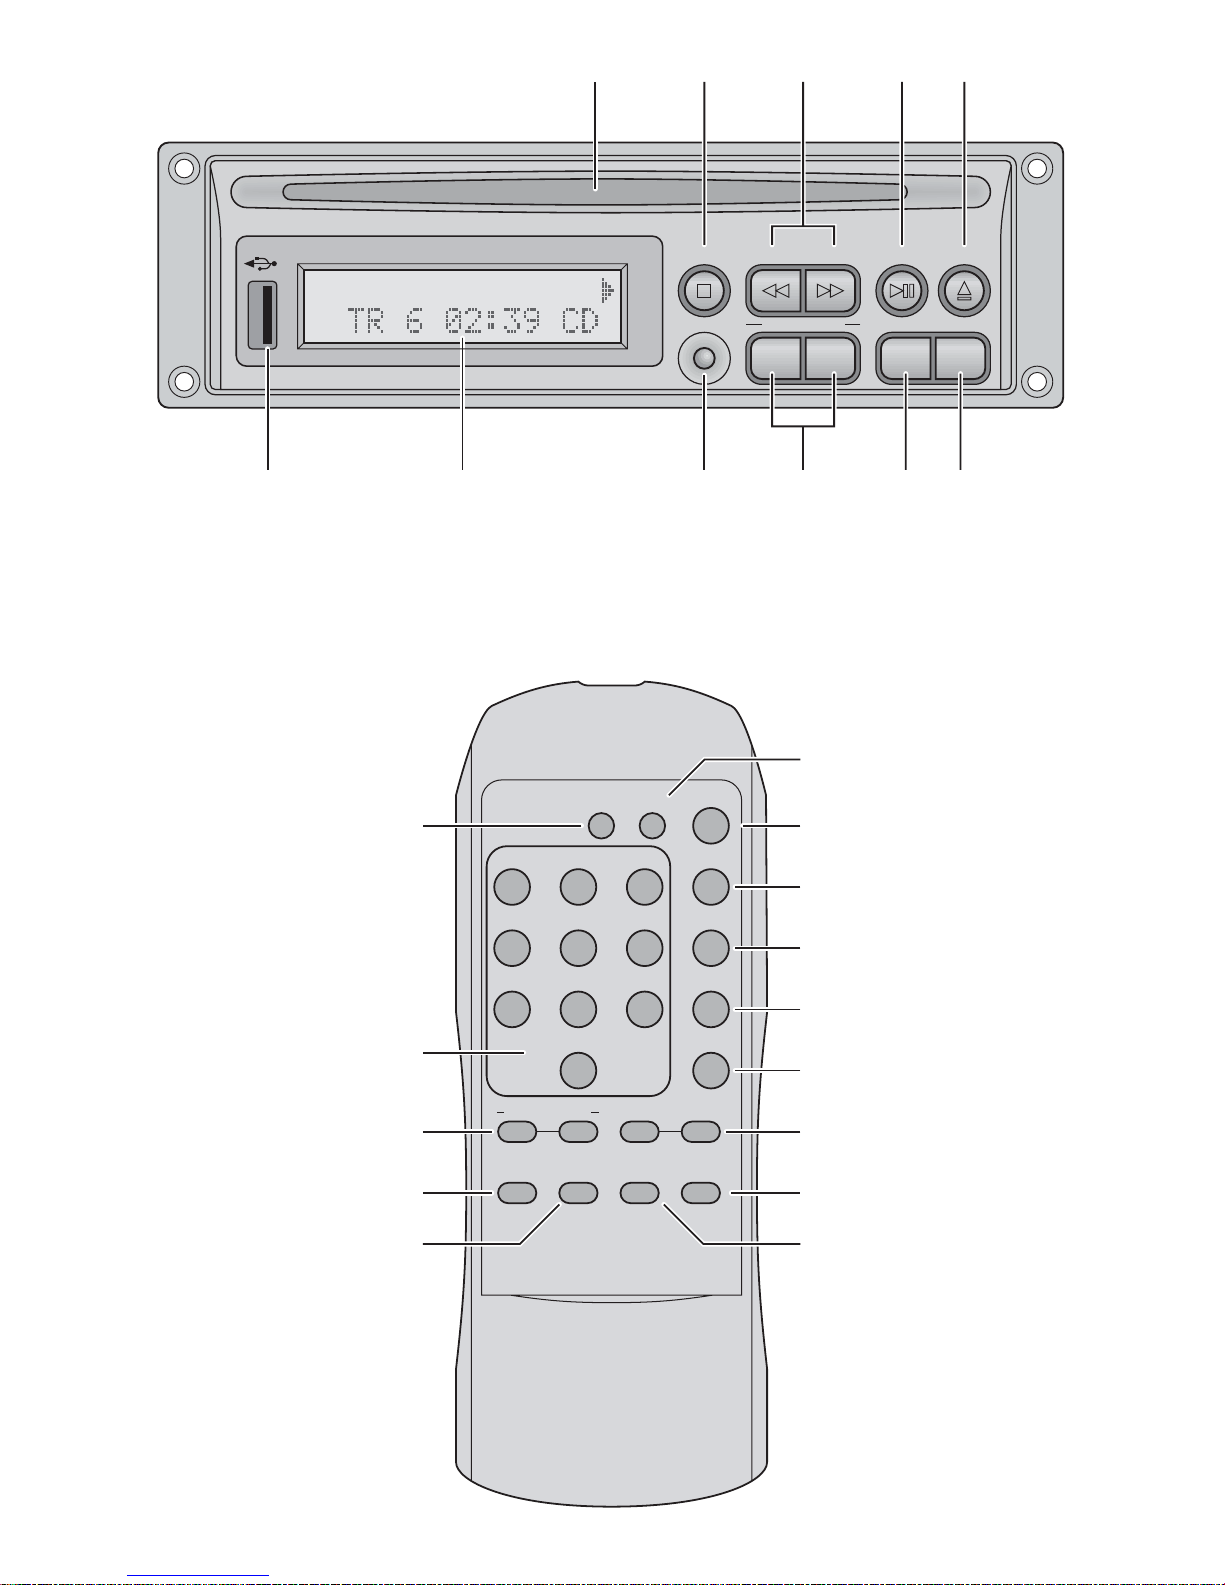
1 Übersicht der Bedienelemente
1.1 CD-Spieler
1 CD-Einzugsschlitz; die CD so weit in den Schlitz
schieben, bis sie automatisch eingezogen wird
2 Taste STOP zum Beenden des Abspielens
3 Tasten DOWN/REV und UP/CUE für die Titelanwahl
sowie den schnellen Vor- und Rücklauf
Titelanwahl
Mit jedem Drücken der Taste UP/CUE wird ein
Titel vorgesprungen; durch Drücken der Taste
DOWN/REV wird an den Titelanfang gesprungen
und mit jedem weiteren Drücken ein Titel zurück.
schneller Vor-/Rücklauf
Für den Vorlauf die Taste UP/CUE gedrückt halten, für den Rücklauf die Taste DOWN/ REV.
4 Taste PLAY/ PAUSE zum Umschalten zwischen Wie-
dergabe und Pause
5 Taste EJECT zum Auswerfen der CD
6 USB-Schnittstelle zum Einstecken eines USB-Sticks
oder zum Anschluss einer Festplatte
7 alphanumerisches Display
8 Infrarotsensor für die Fernbedienungssignale
9 Tasten –FOLDER SKIP– zur Anwahl des ersten
Titels in einem anderen Ordner (Dateiverzeichnis)
bei MP3-Dateien und zur weiteren Titelauswahl:
Mit der linken Taste wird auf den ersten Titel des vorherigen Ordners gesprungen und mit der rechten
Taste auf den ersten Titel des nächsten Ordners.
Während der Wiedergabe kann durch Gedrückthalten einer Taste auf die folgenden oder auf die davor
liegenden Titel gesprungen werden.
10 Taste USB zum Anwählen der USB-Schnittstelle (6)
11 Taste CD zum Anwählen der eingelegten CD
1.2 Fernbedienung
2–5und 9–11
Diese Tasten haben die gleichen Funktionen wie die
Tasten am CD-Spieler
12 Zifferntasten zur Direktanwahl eines Titels, z. B.:
Titelnr. Tasten
4 4, PLAY/PAUSE
27 2, 7, PLAY/PAUSE
135 1, 3, 5, PLAY/PAUSE
13 Taste PLAY MODE zum Anwählen der Wiederhol-
funktionen und der Zufallswiedergabe
Grundeinstellung (PLAY ALL)
alle Titel des Datenträgers oder einer programmierten Titelfolge werden einmal abgespielt
erster Tastendruck (PLAYALL RANDOM)
Wiedergabe der Titel in zufälliger Reihenfolge
nächster Tastendruck (REPEAT TRACK)
ständige Wiederholung des angewählten Titels
nächster Tastendruck (REPEAT FOLDER)
ständige Wiederholung aller Titel im angewählten
Ordner (Funktion nur bei MP3-Dateien vorhanden)
nächster Tastendruck (REPEATALL)
ständige Wiederholung aller Titel
nächster Tastendruck (RANDOM REPEAT)
ständiges Abspielen der Titel in zufälliger Reihenfolge
nächster Tastendruck (PLAYALL)
Zurückschalten auf die Grundeinstellung
14 Taste DISPLAY zum Umschalten der Informationen
in der unteren Displayzeile bei MP3-Dateien; die
obere Displayzeile zeigt immer durchlaufend den
Namen des Albums, des Titels und des Interpreten
oder der Gruppe (Artist) an
Grundeinstellung
In der unteren Zeile wird die Titelnummer (TR) und
die gespielte Zeit des Titels angezeigt
1. Tastendruck
Der Ordnername wird angezeigt
2. Tastendruck
Der Titelname wird angezeigt
3. Tastendruck
Die Anzahl der Ordner und der Titel werden angezeigt
4. Tastendruck
Zurückschalten auf die Grundeinstellung
15 Taste MUTE zum Stummschalten des CD-Spielers
16 Taste PROG, um zum Zusammenstellen einer eige-
nen Titelfolge in den Programmiermodus zu schalten
(siehe Kap. 5.7)
17 Taste FIND zur alphabetischen Suche eines Titels
auf MP3-CDs (siehe Kap. 5.3.3)
18 Taste ESP zum Aus- und Wiedereinschalten des
Anti-Schock-Speichers
(nicht bei MP3-Betrieb möglich)
2 Hinweise für den sicheren Gebrauch
Das CD-Spieler-Modul entspricht allen erforderlichen
Richtlinien der EU und ist deshalb mit gekennzeichnet.
●
Das Modul ist nur zur Verwendung im Innenbereich
geeignet. Schützen Sie es vor Tropf- und Spritzwasser, hoher Luftfeuchtigkeit und Hitze (zulässiger
Einsatztemperaturbereich 0 – 40°C).
●
Wird das Modul zweckentfremdet, falsch bedient oder
nicht fachgerecht installiert oder repariert, kann keine
Haftung für daraus resultierende Sach- oder Personenschäden und keine Garantie für das Modul übernommen werden.
Soll das Modul endgültig aus dem Betrieb
genommen werden, übergeben Sie es zur
umweltgerechten Entsorgung einem örtlichen
Recyclingbetrieb.
D
A
CH
4
Page 5
3 Einsatzmöglichkeiten
Das CD-Spieler-Modul M-30CD ist für den Einbau in ein
Basisgerät (z. B. Aktivbox, Verstärker) vorgesehen und
bietet umfangreiche Funktionen, wie z. B. Endloswiederholung, Zufallswiedergabe, Programmierung einer eigenen Titelfolge, gezielte Anwahl von Ordnern (Dateienverzeichnissen) auf MP3-CDs. Es können AudioCDs, selbst gebrannte Audio-CDs (Audio CD-R) sowie
CDs mit Titeln im MP3-Format abgespielt werden. Bei
wiederbeschreibbaren CDs (CD-RW) kann es jedoch je
nach CD-Typ, verwendetem CD-Brenner und Brennprogramm beim Abspielen zu Problemen kommen. Über
die USB-Schnittstelle lassen sich auch MP3-Dateien von
einer Festplatte oder von einem USB-Stick abspielen.
Der CD-Spieler ist mit einem Anti-Schock-Speicher
ausgestattet, der Störungen beim Abtasten einer CD
durch Stöße und Vibrationen bis 40 Sekunden ausgleichen kann. Jedoch können damit keine lang anhaltenden Störungen ausgeglichen werden. Zum Testen
lässt sich der Anti-Schock-Speicher mit der Taste ESP
(18) auf der Fernbedienung ausschalten (nicht bei MP3Betrieb). Das Display (7) signalisiert kurz „ESP OFF“.
Zum Wiedereinschalten die Taste ESP erneut drücken.
Das Display zeigt kurz „40 SEC CD“.
4Einbau und Anschluss
●
Das CD-Spieler-Modul darf nur von einer qualifizierten
Fachkraft eingebaut werden!
●
Das Modul muss waagerecht in das Basisgerät eingebaut werden.
1) Vor dem Einbau des Moduls das Basisgerät unbe-
dingt vom 230-V-Stromnetz trennen.
2) Für die Aufnahme des Moduls ist am Basisgerät ein
Ausschnitt von 155 mm x 49,5 mm erforderlich.
3) Auf der oberen Seite des Moduls die beiden Trans-
portsicherungsschrauben entfernen. Die Schrauben-
löcher mit den beiliegenden Klebeplättchen abdichten.
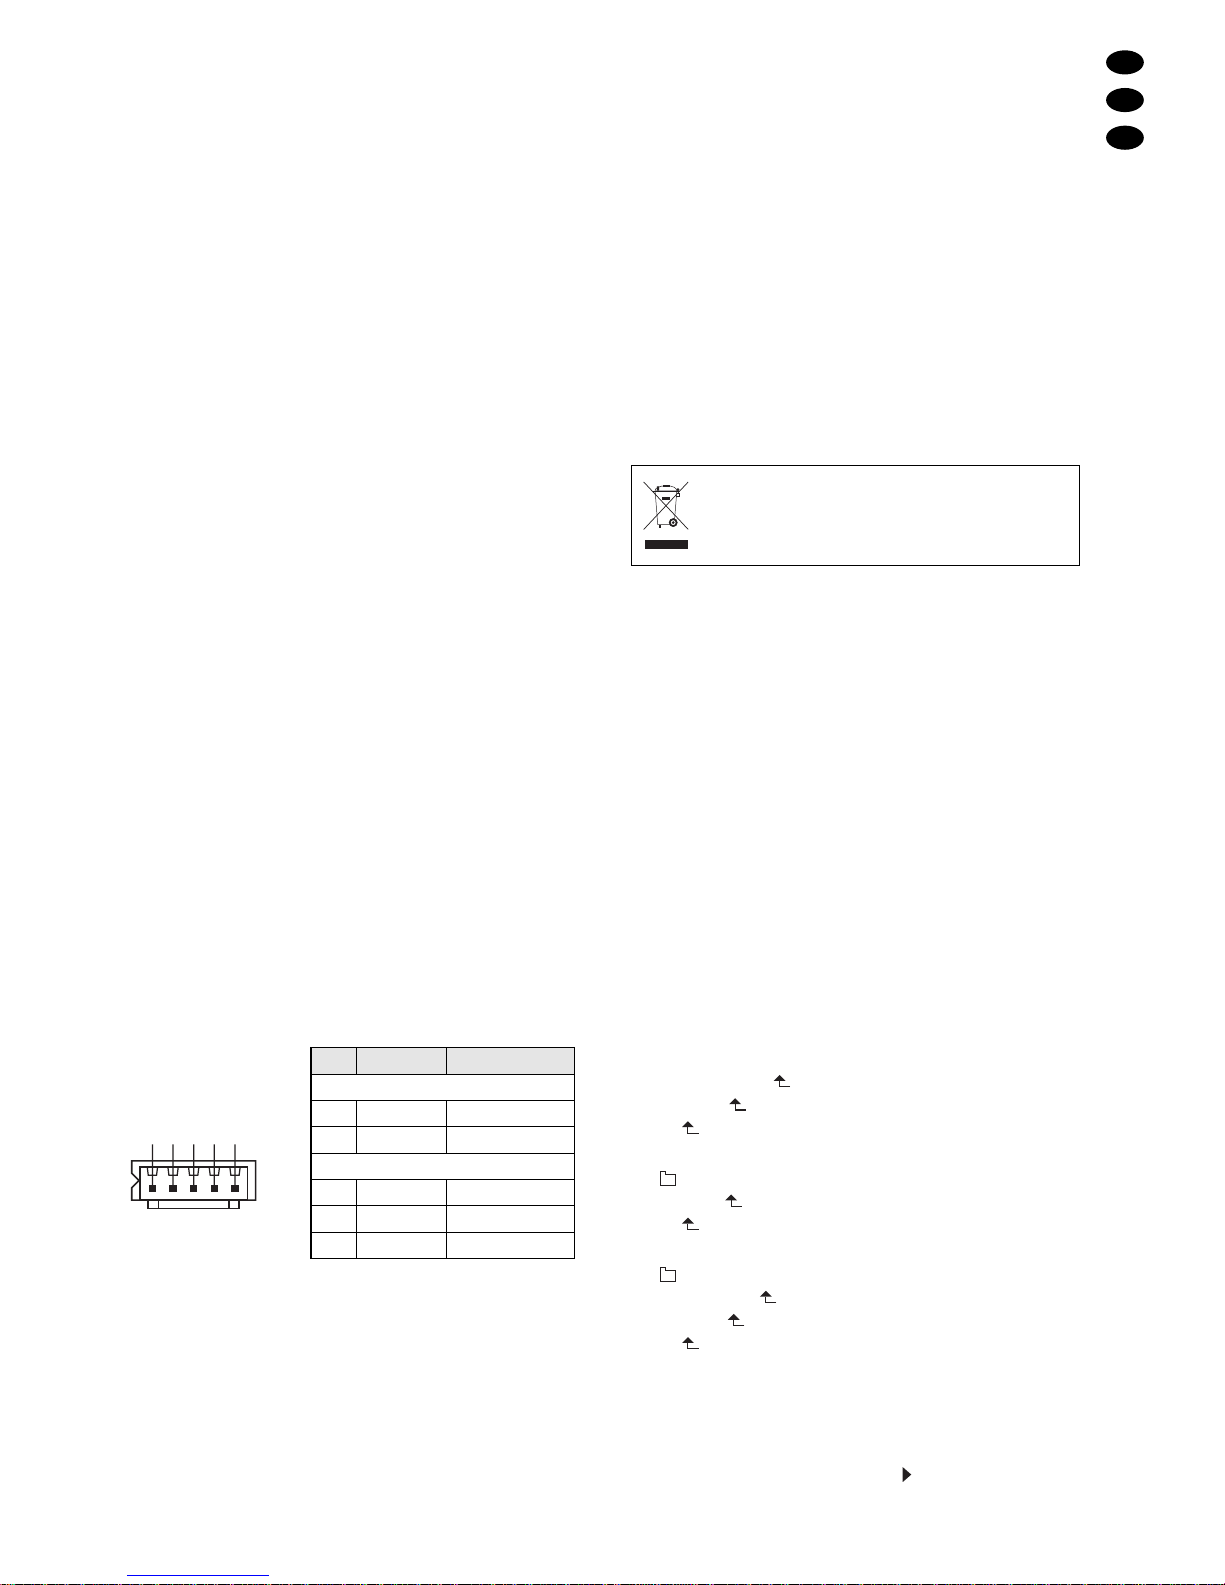
4) Den elektrischen Anschluss zum Basisgerät herstel-
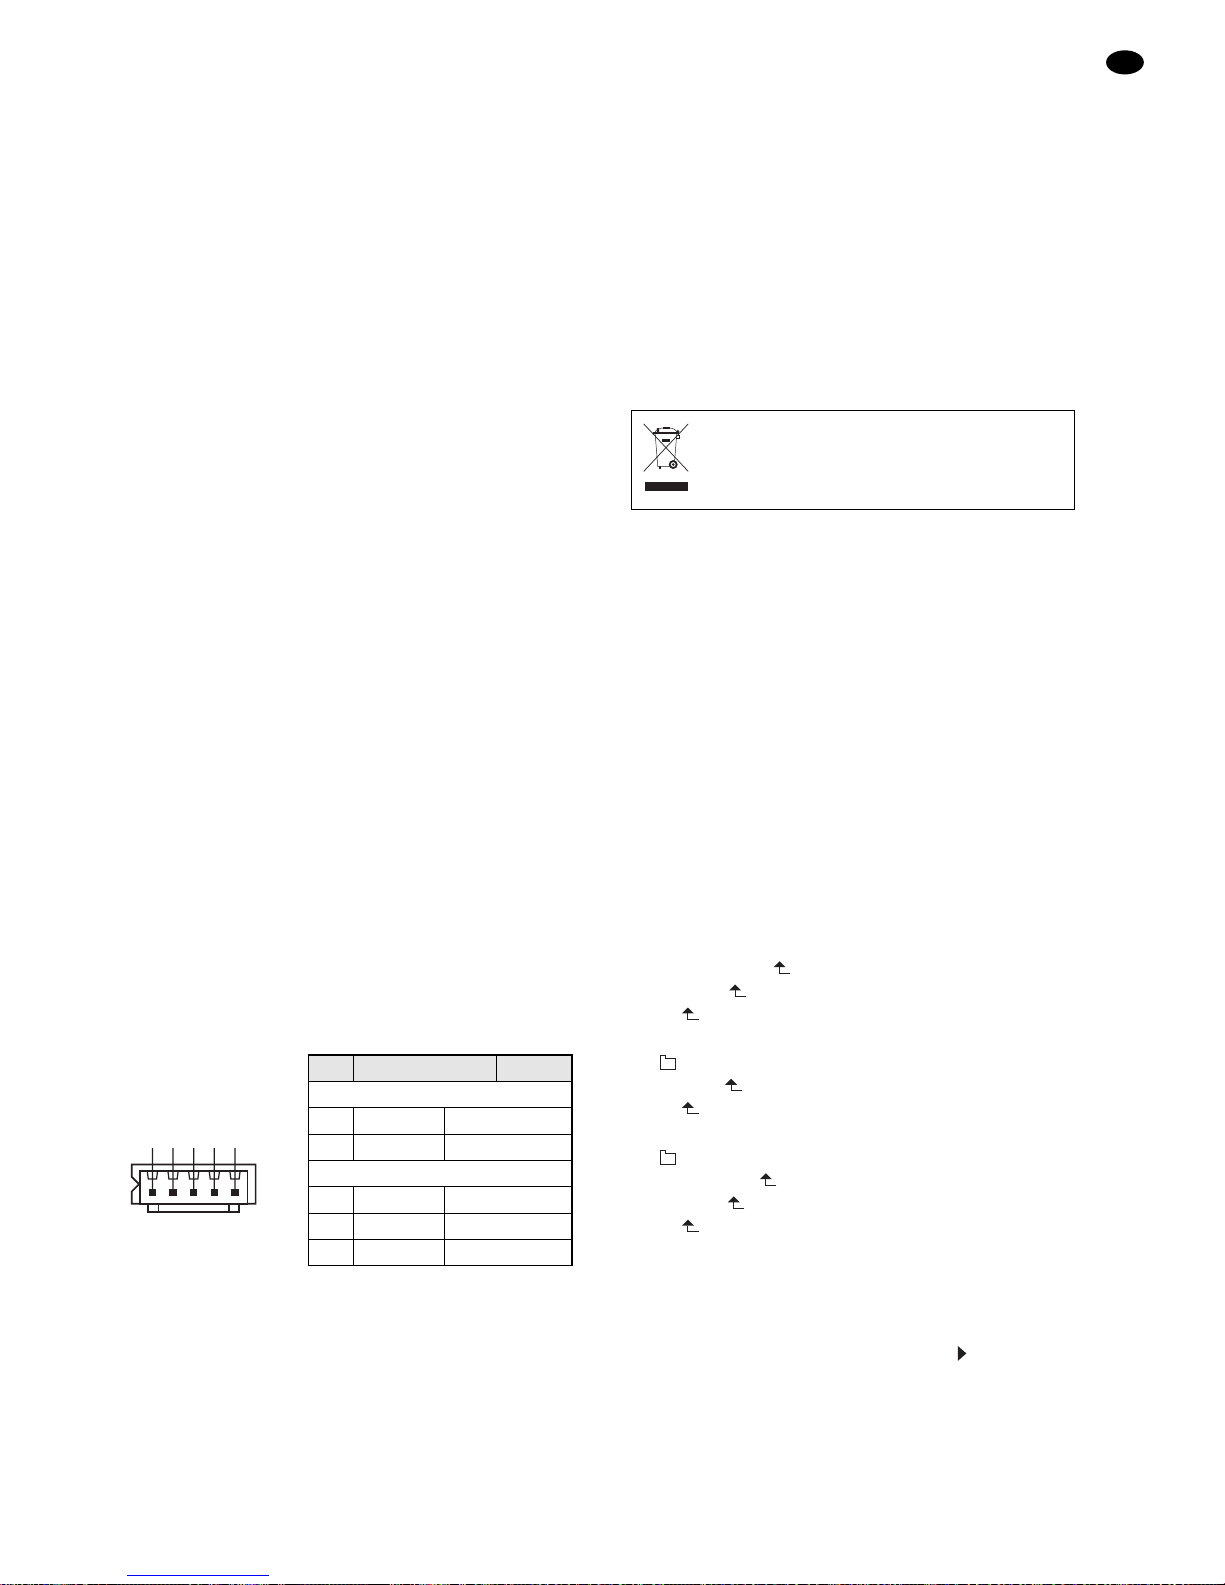
len. Die Anschlussbelegung des 5-poligen Steckver-
binders ist in der folgenden Abbildung dargestellt.
5) Das Modul durch die Einbauöffnung am Basisgerät
schieben und über seine Frontplatte mit vier Schrau-
ben befestigen.
5 Bedienung
5.1 Fernbedienung
1) Zum Einsetzen der Batterien (2 x 1,5 V, Größe AAA=
Mikro) auf der Rückseite der Fernbedienung auf den
Pfeil des Deckels drücken und den Deckel nach
unten schieben. Die Batterien, wie im Batteriefach
angegeben, einsetzen. Das Fach mit dem Deckel
wieder schließen.
2) Die Fernbedienung beim Betätigen einer Taste immer
in Richtung des Sensors REMOTE (8) halten. Dabei
muss Sichtverbindung zwischen der Fernbedienung
und dem Sensor bestehen.
3) Lässt die Reichweite der Fernbedienung nach, sind
wahrscheinlich die Batterien verbraucht und müssen
ausgewechselt werden.
5.2 Datenträger abspielen
Nach dem Anlegen der 12-V-Betriebsspannung ist der
CD-Spieler eingeschaltet. Auf dem Display (7) erscheint
die Anzeige „READING DISC“ oder „NO DISC“, wenn
keine CD eingelegt ist.
1) Eine CD mit der Beschriftung nach oben so weit in
den Einzugsschlitz (1) schieben, bis sie automatisch
eingezogen wird.
2) Zusätzlich oder alternativ kann ein USB-Stick oder
eine Festplatte in den USB-Anschluss (6) gesteckt
bzw. mit dem USB-Anschluss verbunden werden.
Zum Umschalten auf den USB-Anschluss die Taste
USB (10) drücken, zum Wechseln zur CD die Taste
CD (11).
3) Nach dem Einlesen des Datenträgers (CD, USBStick oder Festplatte) zeigt das Display folgende
Informationen an:
– bei einer CD ohne MP3-Dateien z. B.:
TR21 60:22 CD
Datenträger
Gesamtlaufzeit (Min. : Sek.)
Anzahl der Titel
– bei einer CD mit MP3-Dateien z. B.:
5 149
Anzahl der Titel
Anzahl der Ordner
– bei einer Festplatte oder einem USB-Stick z. B.:
8 218Flash
USB-Anschluss
Anzahl der Titel
Anzahl der Ordner
4) Mit der Taste PLAY/PAUSE (4) die Wiedergabe des
ersten Titels starten. Zum Anwählen eines anderen
Titels siehe Kapitel 5.3.
5) Während des Abspielens ist in der oberen Displayzeile das Wiedergabesymbol eingeblendet. Die
untere Zeile zeigt die Nummer (TR …) des laufen-
Werfen Sie verbrauchte Batterien nicht in
den Hausmüll, sondern geben Sie sie nur in
den Sondermüll (z. B. Sammelbehälter bei
Ihrem Elektrofachhändler).
12 V AUDIO
+ – L G R
D
A
CH
5
AderPin
Betriebsspannung
rot+ +12 V (0,8 A)
schwarz-Masse
Audioausgang
weißL links
rotR rechts
schwarzG Masse
Page 6

den Titels und die bereits verstrichene Abspielzeit
(Min. : Sek.) des Titels an.
Bei MP3-Dateien erscheint zusätzlich durchlaufend in der oberen Zeile der Name des Titels
(Title: …), des Interpreten oder der Gruppe (Artist: …)
und des Albums (Album: …). Der Dateiname
(File-…) wird nur einmal nach dem Starten der Wiedergabe angezeigt. Fehlt eine Angabe, zeigt das Display z. B. „Title : Unknown“ oder „Artist :None“. Durch
Drücken der Taste DISPLAY (14) auf der Fernbedienung können bei MP3-Dateien in der unteren Displayzeile verschiedene Informationen angezeigt werden:
Grundeinstellung
In der unteren Zeile wird die Titelnummer und die
gespielte Zeit des Titels angezeigt
1. Tastendruck
Der Ordnername wird angezeigt
2. Tastendruck
Der Titelname wird angezeigt
3. Tastendruck
Die Anzahl der Ordner und der Titel werden ange-
zeigt
4. Tastendruck
Zurückschalten auf die Grundeinstellung
6) Mit der Taste PLAY/PAUSE kann zwischen Wiedergabe und Pause gewechselt werden. Im Pausenmodus ist das Pausensymbol eingeblendet und die
Zeitangabe blinkt.
7) Zum Auswerfen der CD die Taste EJECT (5) drücken.
Das Display zeigt „EJECT“, die CD wird herausgefahren und kann entnommen werden. Wird die CD
nicht aus dem Einzugsschlitz genommen, zieht der
CD-Spieler sie nach ca. 10 s wieder automatisch ein.
5.3 Titelanwahl
5.3.1 Direktwahl der Titelnummer
Mit den Zifferntasten (12) der Fernbedienung lässt sich
ein Titel durch Eingabe seiner Nummer direkt anwählen.
Zum Starten des Titels anschließend die Taste PLAY/
PAUSE (4) drücken. Beispiele:
Titelnr. Tasten
4 4, PLAY/PAUSE
27 2, 7, PLAY/PAUSE
135 1, 3, 5, PLAY/PAUSE
5.3.2 Titel vor- oder zurückspringen
Um einen oder mehrere Titel vor- oder zurückzuspringen, die Taste UP/CUE bzw. DOWN/REV (3) kurz
drücken.
Taste UP/CUE: zum nächsten Titel springen
Taste DOWN/REV: an den Anfang des gerade laufen-
den Titels springen. Durch weiteres Drücken der Taste
DOWN/REV wird immer ein Titel weiter zurückgesprungen.
Hinweis: Die Tasten DOWN/ REV und UP/CUE nur kurz
drücken, sonst erfolgt ein schneller Rück- bzw. Vorlauf.
5.3.3 Alphabetische Suche auf MP3-CDs
1) Auf der Fernbedienung die Taste FIND (17) drücken.
Die untere Displayzeile zeigt „A–……“ und den ersten
Titel, der mit dem Buchstaben A beginnt.
2) Mit der Taste UP/ CUE (3) [vorwärts laufend] oder
DOWN/REV (3) [rückwärts laufend] den Buchstaben
wählen, mit dem der gesuchte Titel beginnt. Hierbei
können auch die Ziffern 0 – 9 gewählt werden. Buchstaben und Ziffern, mit denen kein Titel beginnt, sind
durch „None“ gekennzeichnet.
3) Die Taste PLAY/PAUSE (4) drücken. Wenn mehrere
Titel mit dem gleichen Buchstaben vorkommen, nach
dem Drücken der Taste PLAY/PAUSE mit der Taste
UP/CUE auf den gewünschten Titel springen.
Hinweis: Beim Abspielen von MP3-Dateien über die
USB-Schnittstelle (6) kann die alphabetische Suche
nicht genutzt werden.
5.3.4 Ordneranwahl bei MP3-Dateien
Bei Datenträgern mit MP3-Dateien und mehreren Ordnern (Dateiverzeichnisse) werden die Titel in folgender
Reihenfolge abgespielt:
1. alle Titel auf der Hauptebene (ohne Ordner), angezeigt als Ordner „ROOT“
2. alle Titel in Ordnern auf der Hauptebene
3. alle Titel in Unterordnern
4. alle Titel in Unterunterordnern usw.
Mit den Tasten –FOLDER SKIP– (9) können in dieser
oder in umgekehrter Reihenfolge die Ordner angewählt
werden. Dabei wird immer auf den ersten Titel in einem
Ordner gesprungen. Mit der Taste UP/CUE oder
DOWN/REV (3) lassen sich andere Titel im Ordner
anwählen.
Im Stoppmodus zeigt die obere Displayzeile nach
dem Drücken einer der Tasten –FOLDER SKIP– den
Ordnernamen an. Um während der Wiedergabe oder im
Pausenmodus den Ordnernamen anzuzeigen, mit der
Taste DISPLAY (14) die untere Displayzeile entsprechend umschalten ( ……).
5.4 Schneller Vor- /Rücklauf
Während des Abspielens kann mit den Tasten UP/CUE
und DOWN/REV (3) schnell vor- oder zurückgefahren
werden: Für den schnellen Vorlauf die Taste UP/CUE
gedrückt halten, für den schnellen Rücklauf die Taste
DOWN/REV. Bei MP3-Dateien kann ein Vor- oder Rücklauf nur innerhalb eines Titels erfolgen und nicht akustisch verfolgt werden.
5.5 Wiederholfunktionen und Zufallswiedergabe
Mit der Taste PLAY MODE (13) auf der Fernbedienung
lässt sich eine der Wiederholfunktionen und die Wiedergabe der Titel in zufälliger Reihenfolge einschalten:
Grundeinstellung (PLAY ALL)
Alle Titel des Datenträgers oder einer programmierten Titelfolge werden einmal abgespielt, dann schaltet das Gerät in den Stoppmodus.
erster Tastendruck (PLAYALL RANDOM)
Wiedergabe der Titel in zufälliger Reihenfolge
D
A
CH
6
Page 7

nächster Tastendruck (REPEAT TRACK)
ständige Wiederholung des angewählten Titels
nächster Tastendruck (REPEAT FOLDER)
ständige Wiederholung aller Titel im angewählten
Ordner (Funktion nur bei MP3-Dateien vorhanden)
nächster Tastendruck (REPEATALL)
ständige Wiederholung aller Titel
nächster Tastendruck (RANDOM REPEAT)
ständiges Abspielen der Titel in zufälliger Reihenfolge
nächster Tastendruck (PLAYALL)
Zurückschalten auf die Grundeinstellung
5.6 Ton stumm schalten
Um den Ton stumm zu schalten, die Taste MUTE (15)
auf der Fernbedienung drücken. Zum Wiedereinschalten des Tons die Taste MUTE erneut drücken.
5.7 Eigene Titelfolge zusammenstellen
Sollen von einem Datenträger nur einige Titel in einer
bestimmten Reihenfolge abgespielt werden, kann eine
Folge von max. 10 Titeln programmiert werden.
1) Der CD-Spieler muss sich im Stoppmodus befinden,
ggf. die Taste STOP (2) drücken.
2) Mit der Taste PROG (16) den Programmiermodus einschalten. Alle weiteren Tasten müssen jeweils innerhalb von 10 Sekunden gedrückt werden, sonst wird
der Programmiermodus verlassen. In diesem Fall die
Taste PROG erneut drücken. Das Display zeigt:
– bei einer CD ohne MP3-Dateien
MEM
TR00 P-01 CD
– bei einer CD mit MP3-Dateien
MEM P-01
000 000
3) Bei CDs ohne MP3-Dateien diesen Bedienschritt
überspringen und direkt mit dem Schritt 4 fortfahren.
Bei MP3-Dateien muss zuerst die Nummer des
Ordners gewählt werden, in dem sich der erste
gewünschte Titel für die Titelfolge befindet. Dieses ist
auch erforderlich, wenn alle Dateien auf der Hauptebene ROOT ohne Ordner auf dem Datenträger
gespeichert sind. Die Hauptebene wird dann als Ordner 1 bezeichnet.
Sind Dateien auf der Hauptebene vorhanden,
werden die Ordner auf der Hauptebene ab Ordnernummer 2 in alphabetischer Reihenfolge aufsteigend
nummeriert. Wenn nicht, beginnt die Nummerierung
für die Ordner mit der Nummer 1. Anschließend folgen alle Unterordner und dann eventuelle Unterunterordner usw.
Die Ordnernummer mit den Tasten DOWN/ REV
und UP/CUE (3) wählen oder mit den Zifferntasten
(12) eingeben. Zum Speichern dann die Taste PROG
drücken. Die drei Nullen unter der Anzeige „P-01“ blinken als Aufforderung, die Titelnummer einzugeben.
4) Die Nummer des ersten Titels für die Titelfolge mit
den Tasten DOWN/ REV und UP/CUE (3) wählen
oder mit den Zifferntasten (12) eingeben. Bei MP3Dateien in Ordnern beachten, dass jetzt nicht alle
Dateien durchnummeriert sind, sondern dass jeweils
die erste Datei in einem Ordner mit Nummer 1 bezeichnet wird.
5) Zum Speichern die Taste PROG drücken. Das Display zeigt die nächste Speicherplatznummer, z. B.
„P-02“.
6) Die Bedienschritte (3), 4 und 5 für alle weiteren gewünschten Titel wiederholen, bis die gesamte Titelfolge programmiert ist.
7) Zum Starten der Titelfolge die Taste PLAY/PAUSE (4)
drücken. Die oberen Displayzeile zeigt „MEM“ für
Memory an und die Titelfolge wird abgespielt.
8) Mit den Tasten DOWN/REV und UP/CUE kann jeder
Titel der Titelfolge angewählt oder durch Gedrückthalten der jeweiligen Taste der schnelle Vor-/Rücklauf innerhalb eines Titels aktiviert werden.
9) Nach dem Abspielen der Titelfolge oder beim Drücken der Taste STOP schaltet der CD-Spieler in den
Stoppmodus. Soll die Titelfolge erneut gestartet werden, zuerst die Taste PROG und dann die Taste
PLAY/PAUSE drücken.
Hinweis: Eine programmierte Titelfolge wird beim Wechseln des Datenträger, beim Drücken der Taste STOP im
Programmiermodus und beim Ausschalten des CDSpielers gelöscht.
6Pflege
Das CD-Spieler-Modul vor Staub, Vibrationen, direktem
Sonnenlicht, Feuchtigkeit und Hitze schützen (zulässiger Einsatztemperaturbereich 0 –40 °C). Für die Reinigung nur ein weiches, trockenes Tuch verwenden, auf
keinen Fall Wasser oder Chemikalien
Hinweis zu Tonaussetzern und Lesefehlern
Zigarettenrauch dringt leicht durch alle Geräteöffnungen
und setzt sich auch auf der Optik des Laser-Abtastsystems ab. Dieser Belag kann zu Lesefehlern und Tonaussetzern führen. Da sich Zigarettenrauch nicht immer vermeiden lässt (z. B. in der Discothek), muss das Gerät
dann in einer Fachwerkstatt gereinigt werden. Diese Reinigung ist kostenpflichtig, auch während der Garantiezeit!
7Technische Daten
Stromversorgung: . . . . . . . . . 12 V , 800 mA
Audioausgang: . . . . . . . . . . . 1 V
Abmessungen (B × H × T): . . 174
× 51,5 × 166 mm
Einbauöffnung (B × H × T): . . 155 × 49,5
× 156 mm
Gewicht: . . . . . . . . . . . . . . . . 1,3 kg
Änderungen vorbehalten.
D
A
CH
7
Diese Bedienungsanleitung ist urheberrechtlich für MONACOR®INTERNATIONAL GmbH & Co. KG geschützt. Eine
Reproduktion für eigene kommerzielle Zwecke – auch auszugsweise – ist untersagt.
Page 8

GB
8
Please unfold page 3. Then you can always see the
operating elements described.
1Operating Elements
1.1 CD player
1 CD slot; slide the CD so far into the slot until it is
retracted automatically
2 Button STOP for stopping the replay
3 Buttons DOWN/ REV and UP/CUE for the title selec-
tion and for fast forward/reverse
Title selection
Each time the button UP/CUE is pressed, the unit
will advance one title; when the button DOWN/
REV is pressed, the unit will go to the beginning of
the title and with each further actuation, the unit
will go back one title at a time.
Fast forward/reverse
For fast forward, keep the button UP/CUE pressed;
for fast reverse, keep the button DOWN/REV
pressed.
4 Button PLAY/PAUSE for switching between replay
and pause
5 Button EJECT for ejecting the CD
6 USB interface for inserting a USB memory stick or for
connecting a hard disk
7 Alphanumeric display
8 Infrared sensor for the remote control signals
9 Buttons –FOLDER SKIP– for selecting the first title in
another folder (file directory) with MP3 files and for
further title selection:
Use the left button to go to the first title of the
previous folder and the right button to go to the first
title of the following folder. To go to the following titles
or previous titles while replaying, keep a button
pressed.
10 Button USB for selecting the USB interface (6)
11 Button CD for selecting the CD inserted
1.2 Remote control
2–5and 9–11
These buttons have the same functions as the buttons on the CD player.
12 Numerical keys for direct selection of a title, e. g.:
Title No. Keys
4 4, PLAY/PAUSE
27 2, 7, PLAY/PAUSE
135 1, 3, 5, PLAY/PAUSE
13 Button PLAY MODE for selecting the repeat func-
tions and the random replay
Basic setting (PLAY ALL)
All titles of the data carrier or a programmed title
sequence will be replayed once.
First actuation of button (PLAY ALL RANDOM)
Random replay of the titles
Next actuation of button (REPEAT TRACK)
Continuous repeat of the title selected
Next actuation of button (REPEAT FOLDER)
Continuous repeat of all titles in the folder selected
(function available for MP3 files only)
Next actuation of button (REPEAT ALL)
Continuous repeat of all titles
Next actuation of button (RANDOM REPEAT)
Continuous replay of the titles in random order
Next actuation of button (PLAY ALL)
Return to the basic setting
14 Button DISPLAY for switching over the information in
the lower display line with MP3 files; in the upper display line, the names of the album, of the title, and of
the artist will scroll continuously
Basic setting
Indication of the title number (TR) and the time
already played of the title in the lower line.
1
st
actuation of button
Indication of the folder name.
2
nd
actuation of button
Indication of the title name.
3
rd
actuation of button
Indication of the number of folders and titles.
4
th
actuation of button
Return to the basic setting.
15 Button MUTE for muting the CD player
16 Button PROG for switching to the programming
mode for compiling an individual title sequence (see
chapter 5.7)
17 Button FIND for alphabetic search for a title on MP3
CDs (see chapter 5.3.3)
18 Button ESP for switching off/switching on the anti-
shock memory
(not possible during MP3 operation)
2 Safety Notes
The CD player module corresponds to all required directives of the EU and is therefore marked with .
●
The module is suitable for indoor use only. Protect
it against dripping water and splash water, high air
humidity, and heat (admissible ambient temperature
range 0 – 40°C).
●
No guarantee claims for the module and no liability for
any resulting personal damage or material damage
will be accepted if the module is used for other purposes than originally intended, if it is not correctly operated, or not installed or repaired in an expert way.
If the module is to be put out of operation definitively, take it to a local recycling plant for disposal which is not harmful to the environment.
Page 9
3 Applications
The CD player module M-30CD is provided for the installation into a basic unit (e. g. active system, amplifier) and
offers extensive functions, like continuous repeat, random replay, programming of an individual title sequence,
purposeful selection of folders (file directories) on MP3CDs. It is possible to play audio CDs, audio CDs you
have burnt yourself (audio CD-R), and CDs with titles in
the MP3 format. However, problems may occur when
replaying rewriteable CDs (CD-RW), depending on the
type of CD, the CD burner used, and the burning programme. The USB interface allows to replay MP3 files
from a hard disk or a USB memory stick.
The CD player is equipped with an anti-shock
memory which is able to compensate interruptions up to
40 seconds caused by shocks or vibrations when sampling a CD. However, the anti-shock memory will not be
able to compensate continuous interruptions. For
testing, switch off the anti-shock memory with the button
ESP (18) on the remote control (not during MP3 operation). The display (7) will shortly indicate “ESP OFF”. To
switch it on again, press the button ESP once again. The
display will shortly indicate “40 SEC CD”.
4Installation and Connection
●
The CD player module must only be installed by qualified personnel!
●
The module must be installed into the basic unit in a
horizontal way.
1) Prior to the installation of the module, it is indispen-
sable to disconnect the basic unit from the 230 V
mains.
2) For accommodating the module, at the basic unit a
cutout of 155 mm x 49.5 mm is required.
3) Remove the two securing screws for transport on the
upper side of the module. Seal the screw holes with
the small adhesive plates supplied.
4) Make the electrical connection to the basic unit. The
pin configuration of the 5-pole plug-in connector is
shown in the following figure.
4) Slide the module through the mounting opening at the
basic unit and fix it via its front panel with four screws.
5 Operation
5.1 Remote control
1) To insert the batteries (2 x 1.5V, size AAA), press the
arrow of the cover on the rear side of the remote control and slide the cover downwards. Insert the batteries as indicated in the battery compartment. Close
the compartment again with the cover.
2) When actuating a button, always direct the remote
control towards the sensor REMOTE (8). There must
be no obstacles between the remote control and the
sensor.
3) If the range of the remote control decreases, the batteries are probably exhausted and must be replaced.
5.2 Replaying a data carrier
After applying the 12 V operating voltage, the CD player
is switched on. The display (7) will show “READING
DISC” or “NO DISC” if no CD has been inserted.
1) Slide a CD with the lettering facing upwards so far
into the slot (1) until it is retracted automatically.
2) Additionally or alternatively, the USB port (6) allows to
insert a USB memory stick or to connect a hard disk.
To switch to the USB connection, press the button USB
(10); to change to the CD, press the button CD (11).
3) After reading in the data carrier (CD, USB memory
stick, or hard disk), the display will show the following
information:
– for a CD without MP3 files, e. g.:
TR21 60:22 CD
data carrier
total replay time (min. : sec.)
number of titles
– for a CD with MP3 files, e. g.:
5 149
number of titles
number of folders
– for a hard disk or USB memory stick, e. g.:
8 218Flash
USB connection
number of titles
number of folders
4) Start the replay of the first title with the button PLAY/
PAUSE (4). To select another title see chapter 5.3.
5) While replaying, the replay symbol is shown in the
upper display line. The lower line shows the number
(TR …) of the title currently playing and the time
already played of the title (min. : sec.).
Dead batteries do not belong in the household rubbish; always take them to a special
waste disposal (e. g. collecting container at
your retailer).
12 V AUDIO
+ – L G R
GB
9
Core
black
Pin
-
Operating Voltage
ground
red
red
+ +12 V (0,8 A)
whiteL left
Audio Output
R right
blackG ground
Page 10

GB
10
For MP3 files, the names of the title (Title: …), of
the artist (Artist: …), and of the album (Album: …) will
additionally scroll continuously in the upper line. The
file name (File-…) will only be shown once after starting the replay. If an information is missing, the display
will show e. g. “Title: Unknown” or “Artist: None”. By
pressing the button DISPLAY (14) on the remote control, various information for MP3 files can be given in
the lower display line:
Basic setting
Indication of the title number and the time already
played of the title in the lower line.
1
st
actuation of button
Indication of the folder name.
2ndactuation of button
Indication of the title name.
3
rd
actuation of button
Indication of the number of folders and titles.
4thactuation of button
Return to the basic setting.
6) Use the button PLAY/ PAUSE to change between
replay and pause. In the pause mode, the pause
symbol will be shown and the time display will flash.
7) To eject the CD, press the button EJECT (5). The display will show “EJECT”, the CD will be ejected and
can be removed. However, if it is not removed from
the slot, the CD player will retract it automatically after
approx. 10 s.
5.3 Title selection
5.3.1 Direct selection of the title number
For direct selection of a title with the numerical keys (12)
on the remote control, enter its number. To start the title,
then press the button PLAY/PAUSE (4). Examples:
Title No. Keys
4 4, PLAY/PAUSE
27 2, 7, PLAY/PAUSE
135 1, 3, 5, PLAY/PAUSE
5.3.2 Skipping titles in forward/backward direction
To skip one title/several titles in forward or backward
direction, shortly press the button UP/CUE or DOWN/
REV (3).
Button UP/CUE: Advance to the next title
Button DOWN/REV: Return to the beginning of the title
currently playing. With each further actuation of the button DOWN/REV, the unit will go back one title at a time.
Note: Only press the buttons DOWN/REV and UP/ CUE
shortly, otherwise this will result in fast forward or reverse.
5.3.3 Alphabetic search on MP3 CDs
1) Press the button FIND (17) on the remote control.
The lower display line will show “A-……” and the first
title beginning with the letter A.
2) With the button UP/CUE (3) [forward] or DOWN /REV
(3) [backward], select the first letter of the title
searched. The numbers 0 – 9 are also available. If
there are no titles beginning with certain letters or numbers, these letters or numbers are marked by “None”.
3) Press the button PLAY/PAUSE (4). If there are several titles beginning with the same letter, press the button PLAY/PAUSE, then go to desired title with the
button UP/CUE.
Note: When replaying MP3 files via the USB interface
(6), the alphabetic search is not available.
5.3.4 Folder selection with MP3 files
In case of data carriers with MP3 files and several folders (file directories), the titles will be replayed in the following order:
1. all titles in the root directory (without folders), indicated as folder “ROOT”
2. all titles in folders in the root directory
3. all titles in subfolders
4. all titles in subsubfolders etc.
With the buttons –FOLDER SKIP– (9), the folders can be
selected in this order or in reverse order. The unit will
always go to the first title in a folder. With the button
UP/CUE or DOWN/REV (3), other titles in the folder can
be selected.
In the stop mode, the upper display line will show the
folder name after one of the buttons –FOLDER SKIP–
has been pressed. To show the folder name during the
replay or in the pause mode, switch over the lower display line ( ……) with the button DISPLAY (14) accordingly.
5.4 Fast forward/reverse
While replaying, fast forward or reverse is possible with
the buttons UP/CUE and DOWN/REV (3): For fast forward, keep the button UP/CUE pressed; for fast reverse,
keep the button DOWN/REV pressed. With MP3 files,
the fast forward or reverse function is only possible within a title and cannot be traced acoustically.
5.5 Repeat functions and random replay
With the button PLAY MODE (13) on the remote control,
one of the repeat functions and the replay of the titles in
random order can be activated:
Basic setting (PLAY ALL)
All titles of the data carrier or a programmed title
sequence will be replayed once, then the unit will go
to the stop mode.
First actuation of button (PLAY ALL RANDOM)
Random replay of the titles
Next actuation of button (REPEAT TRACK)
Continuous repeat of the title selected
Next actuation of button (REPEAT FOLDER)
Continuous repeat of all titles in the folder selected
(function available for MP3 files only)
Next actuation of button (REPEAT ALL)
Continuous repeat of all titles
Next actuation of button (RANDOM REPEAT)
Continuous replay of the titles in random order
Next actuation of button (PLAY ALL)
Return to the basic setting
Page 11
5.6 Muting the sound
For muting the sound, press the button MUTE (15) on
the remote control. To switch on the sound again, press
the button MUTE once again.
5.7 Compiling an individual title sequence
For replaying only a few titles from a data carrier in a
certain order, a sequence of 10 titles max. can be programmed.
1) The CD player must be in the stop mode, press the
button STOP (2), if required.
2) Switch on the programming mode with the button
PROG (16). All other buttons must be pressed within
10 seconds respectively, otherwise the programming
mode will be exited. In this case, press the button
PROG once again. The display will show:
–
for a CD without MP3 files
MEM
TR00 P-01 CD
– for a CD with MP3 files
MEM P-01
000 000
3) In case of CDs without MP3 files, skip this operating
step and directly proceed with step 4.
In case of MP3 files, first select the number of the
folder containing the first title desired for the title
sequence. This is also required if all files have been
memorized on the data carrier in the root directory
ROOT without folder. The root directory will then be
named Folder 1.
If there are files in the root directory, the folders in
the root directory starting from Folder No. 2 will be
numbered in ascending alphabetic order. If not, the
numbering for the folders will start with the number 1,
followed by all subfolders and then by any subsubfolders etc.
Select the folder number with the buttons DOWN/
REV and UP/CUE (3) or enter it with the numerical
keys (12). To memorize, press the button PROG. The
three zeroes below the indication “P-01” will flash as
a request to enter the title number.
4) Select the number of the first title for the title sequence with the buttons DOWN/REV and UP/CUE
(3) or enter it with the numerical keys (12). If there are
MP3 files in folders, please note that these files are
not numbered consecutively but that the first file in
each folder is always named No. 1.
5) To memorize press the button PROG. The display will
show the next memory location number, e.g. “P-02”.
6) Repeat the operating steps (3), 4 and 5 for all further
titles desired until the entire title sequence has been
programmed.
7) To start the title sequence, press the button PLAY/
PAUSE (4). The upper display line will show “MEM”
(memory) and the title sequence will be replayed.
8) With the buttons DOWN /REV and UP/CUE, select
any title of the title sequence or activate the fast forward/reverse function within a title by keeping the
corresponding button pressed.
9) After replaying the title sequence or when pressing the
button STOP, the CD player will go to the stop mode.
To restart the title sequence once again, first press the
button PROG, then the button PLAY/ PAUSE.
Note: A programmed title sequence will be deleted if
the data carrier is changed, if the button STOP is
pressed in the programming mode, and if the CD player
is switched off.
6 Maintenance
Protect the CD player module against dust, vibrations,
direct sunlight, humidity, and heat (admissible ambient
temperature range 0 – 40°C). For cleaning only use a
soft, dry cloth, by no means water or chemicals.
Note on sound interruptions and reading errors
Cigarette smoke easily penetrates through all openings
of the unit and settles on the optics of the laser system.
This deposit may cause reading errors and sound interruptions. As cigarette smoke cannot always be avoided
(e. g. in a discothèque), the unit must in this case be
cleaned by authorized personnel. There is a charge on
this cleaning, even during the warranty time!
7 Specifications
Power supply: . . . . . . . . . . . . 12 V , 800 mA
Audio output: . . . . . . . . . . . . . 1 V
Dimensions (W
× H × D): . . . 174 × 51.5 × 166 mm
Mounting cutout (W
× H × D):. 155 × 49.5 × 156 mm
Weight: . . . . . . . . . . . . . . . . . 1.3 kg
Subject to technical modification.
GB
11
All rights reserved by MONACOR®INTERNATIONAL GmbH & Co. KG. No part of this instruction manual may be
reproduced in any form or by any means for any commercial use.
Page 12

Ouvrez le présent livret page 3 de manière à visualiser les éléments.
1 Eléments et branchements
1.1 Lecteur CD
1 Fente d’insertion du CD : poussez le CD dans la
fente jusqu’à ce qu’il entre automatiquement.
2 Touche STOP pour arrêter la lecture
3 Touches DOWN/REV et UP/CUE pour la sélection
de titres et l’avance et retour rapides
Sélection de titre :
à chaque pression sur la touche UP/CUE, on
avance d’un titre ; en appuyant sur la touche
DOWN/REV, on revient au début du titre et à chaque nouvelle pression, on recule d’un titre.
Avance et retour rapides :
pour l’avance rapide, maintenez la touche UP/
CUE enfoncée, pour le retour rapide, la touche
DOWN/ REV.
4 Touche PLAY/ PAUSE pour commuter entre la lectu-
re et la pause
5 Touche EJECT pour éjecter le CD
6 Interface USB pour placer une clé USB ou pour bran-
cher un disque dur
7 Affichage alphanumérique
8 Capteur infrarouge pour les signaux de la télécom-
mande
9 Touches –FOLDER SKIP– pour sélectionner le pre-
mier titre dans un autre dossier (répertoire de
fichiers) avec des fichiers MP3 et pour sélectionner
un autre titre :
avec la touche gauche, allez au premier titre du dossier précédent et avec la touche droite au premier
titre du dossier suivant. Pour aller aux titres suivants
ou aux titres précédents pendant la lecture, maintenez une touche enfoncée.
10 Touche USB pour sélectionner l’interface USB (6)
11 Touche CD pour sélectionner le CD inséré
1.2 Télécommande
2–5et 9–11
Ces touches ont les mêmes fonctions que les touches sur le lecteur CD
12 Touches numériques pour une sélection directe d’un
titre, p. ex. :
Numéro de titre Touches
4 4, PLAY/PAUSE
27 2, 7 PLAY/PAUSE
135 1, 3, 5 PLAY/PAUSE
13 Touche PLAY MODE pour sélectionner les fonctions
de répétition et de lecture aléatoire
Réglage de base (PLAY ALL)
Tous les titres du support de données ou d’une
suite programmée sont lus une fois.
Première pression (PLAY ALL RANDOM)
lecture de tous les titres dans un ordre aléatoire
Pression suivante (REPEAT TRACK)
répétition continue du titre sélectionné
Pression suivante (REPEAT FOLDER)
répétition continue de tous les titres dans le dossier sélectionné (fonction uniquement pour des
fichiers MP3)
Pression suivante (REPEAT ALL)
répétition continue de tous les titres
Pression suivante (RANDOM REPEAT)
lecture continue des titres dans un ordre aléatoire
Pression suivante (PLAY ALL)
retour au réglage de base
14 Touche DISPLAY pour commuter les informations
dans la ligne inférieure de l’affichage pour des
fichiers MP3 ; la ligne supérieure indique toujours en
continu le nom de l’album, du titre ou de l’interprète
ou du groupe (Artist)
Réglage de base
dans la ligne inférieure, le numéro du titre (TR) et
la durée déjà lue du titre sont affichés
Première pression
le nom du dossier est affiché
Deuxième pression
le nom du titre est affiché
Troisième pression
le nombre de dossiers et titres est affiché
Quatrième pression
retour au réglage de base
15 Touche MUTE pour couper le son du lecteur CD
16 Touche PROG pour passer en mode programmation
pour composer sa propre séquence de titres (chapitre 5.7)
17 Touche FIND pour une recherche alphabétique d’un
titre sur des CDs MP3 (chapitre 5.3.3)
18 Touche ESP pour éteindre et allumer la mémoire
anti-chocs (pas possible en mode MP3)
2 Conseils de sécurité et d’utilisation
Le module répond à toutes les directives nécessaires de
l’Union Européenne et porte donc le symbole .
●
Le module n’est conçu que pour une utilisation en intérieur. Protégez-le des éclaboussures, de tout type de
projections d’eau, d’une humidité d’air élevée et de la
chaleur (température ambiante admissible 0 – 40 °C).
●
Nous déclinons toute responsabilité en cas de dommages corporels ou matériels résultants si le module
est utilisé dans un but autre que celui pour lequel il a
été conçu, s’il n’est pas correctement utilisé, installé
ou réparé par une personne habilitée ; de même, la
garantie deviendrait caduque.
Lorsque le module est définitivement retiré du
service, vous devez le déposer dans une usine
de recyclage de proximité pour contribuer à
son élimination non polluante.
F
B
CH
12
Page 13

3 Possibilités d’utilisation
Le module lecteur CD M-30CD est conçu pour une
installation dans un élément de base (p. ex. enceinte
active, amplificateur) et propose les fonctions variées
comme la répétition sans fin, la lecture aléatoire, la programmation d’une suite individuelle de titres, la sélection
ciblée de dossiers (répertoires de fichiers) sur CDs MP3.
Il est possible de lire des CDs audio et des CD-R audio
gravés et des CDs avec titres au format MP3. Cependant, lors de la lecture de CDs réinscriptibles (CD-RW),
on peut noter, selon le type de CD, selon le graveur utilisé ou le logiciel de gravure, des problèmes. Via l’interface USB, des fichiers MP3 d’un disque dur ou d’une clé
USB peuvent être lus.
Le lecteur CD est doté d’une mémoire anti-chocs qui
peut compenser les coupures causées par les vibrations
et chocs lors de la lecture d’un CD jusqu’à 40 secondes.
Cependant, des interruptions continues ne peuvent être
compensées. Pour tester, on peut déconnecter la
mémoire anti-chocs avec la touche ESP (18) sur la télécommande (pas en mode MP3). L’affichage (7) indique
brièvement “ESP OFF”. Pour la réactiver, enfoncez une
nouvelle fois la touche ESP. L’affichage indique brièvement “40 SEC CD”.
4Installation et branchement
●
Le module lecteur CD ne doit être installé que par un
technicien qualifié!
●
Le module doit être placé à l’horizontale dans l’appareil de base.
1) Avant l’installation du module, débranchez impérati-
vement l’appareil de base du secteur 230 V~.
2) Une découpe de 155 mm x 49,5 mm est nécessaire
dans l’appareil de base pour recevoir le module.
3) Enlevez les deux vis de blocage pour le transport sur
la face supérieure du module. Fermez les trous des
vis avec les petites plaques adhésives livrées.
4) Faites le branchement électrique vers l’appareil de
base. La configuration de branchement du connec-
teur à 5 pôles est montrée dans la figure suivante.
5) Poussez le module dans l’ouverture de montage et
fixez-le via sa façade avec quatre vis.
5 Utilisation
5.1 Télécommande
1) Pour insérer les batteries (2 x 1,5 V de type R03),
appuyez sur la flèche du couvercle sur la face arrière
de la télécommande et poussez le couvercle vers le
bas. Insérez les batteries comme indiqué dans le
compartiment et refermez avec le couvercle.
2) Maintenez la télécommande toujours dans la direction du capteur REMOTE (8) lorsque vous activez
une touche. Aucun obstacle ne doit être présent entre
la télécommande et le capteur.
3) Si la portée de la télécommande diminue, les batteries sont vraisemblablement mortes et doivent être
remplacées.
5.2 Lecture d’un support de données
Une fois la tension de fonctionnement de 12 V est appliquée, le lecteur CD est allumé. Sur l’affichage (7), l’indication “READING DISC” apparaît ou “NO DISC” si
aucun CD n’est inséré.
1) Insérez un CD avec le repère vers le haut dans la
fente (1) jusqu’à ce qu’il entre automatiquement.
2) En plus ou à la place, on peut brancher, via la prise
USB (6), une clé USB ou relier un disque dur. Pour
commuter sur la connexion USB, enfoncez la touche
USB (10), pour revenir au CD, enfoncez la touche
CD (11).
3) Après la lecture du support de données (CD, clé USB
ou disque dur), l’affichage indique les informations
suivantes :
– Pour un CD sans fichiers MP3, p. ex. :
TR21 60:22 CD
support de données
durée totale (mn : s)
nombre de titres
– Pour un CD avec fichiers MP3, p. ex. :
5 149
nombre de titres
nombre de dossiers
– Pour un disque dur ou une clé USB, p. ex. :
8 218Flash
connexion USB
nombre de titres
nombre de dossiers
4) Avec la touche PLAY/PAUSE (4), démarrez la lecture du premier titre. Pour sélectionner un autre titre,
voir chapitre 5.3.
5) Pendant la lecture, le symbole lecture s’affiche dans
la ligne supérieure de l’affichage. La ligne inférieure
indique le numéro (TR…) du titre en cours et la durée
déjà écoulée (mn : s) du titre.
Ne jetez pas les batteries usagées dans la
poubelle domestique mais déposez-les
dans le container spécifique ou ramenezles à votre revendeur.
12 V AUDIO
+ – L G R
F
B
CH
13
ConducteurPin
Tension fonctionnement
rouge+ +12 V (0,8 A)
noir
-
masse
Sortie audio
blancL gauche
rougeR droit
noirG masse
Page 14

Pour des fichiers MP3, le nom du titre (Title :…),
de l’interprète (Artist :…) et de l’album (Album :…)
s’affichent en plus en continu dans la ligne supérieure. Le nom du fichier (File-…) n’est affiché qu’une
seule fois, après le début de la lecture. S’il manque
une donnée, l’affichage indique par exemple “Title :
Unknown” ou “Artist : None”. En appuyant sur la touche DISPLAY (14) de la télécommande, différentes
informations peuvent être précisées pour des fichiers
MP3 dans la ligne inférieure de l’affichage :
Réglage de base
indication du numéro du titre et de la durée déjà
lue du titre dans la ligne inférieure de l’affichage
Première pression
Le nom du dossier est affiché
Deuxième pression
Le nom du titre est affiché
Troisième pression
Le nombre de dossiers et titres est affiché
Quatrième pression
Retour au réglage de base
6) Avec la touche PLAY/PAUSE, on peut commuter
entre lecture et pause. En mode pause, le symbole
pause s’affiche et la donnée de temps clignote.
7) Pour éjecter le CD, enfoncez la touche EJECT (5).
L’affichage indique “EJECT”, le CD sort et peut être
récupéré. Si le CD n’est pas retiré de la fente, le lecteur l’insère à nouveau automatiquement au bout de
10 secondes environ.
5.3 Sélection de titres
5.3.1 Sélection directe du numéro du titre
Avec les touches numériques (12) de la télécommande,
on peut sélectionner directement un titre en tapant son
numéro. Pour démarrer le titre, enfoncez ensuite la touche PLAY/PAUSE (4). Exemples :
Numéro de titre Touches
4 4, PLAY/PAUSE
27 2, 7 PLAY/PAUSE
135 1, 3, 5 PLAY/PAUSE
5.3.2 Saut de titres en avant et arrière
Pour avancer ou reculer d’un ou plusieurs titres, enfoncez brièvement la touche UP/CUE ou DOWN/REV (3).
touche UP/CUE : aller au titre suivant
touche DOWN/REV : aller au début du titre en cours.
Par une nouvelle pression sur la touche DOWN/REV, on
recule toujours d’un titre.
Conseil : N’enfoncez que brièvement les touches
DOWN/REV et UP/CUE sinon il y a une avance ou un
recul rapide.
5.3.3 Recherche alphabétique sur des CDs MP3
1) Sur la télécommande, enfoncez la touche FIND (17).
La ligne inférieure de l’affichage indique “A-…...” et le
premier titre commençant par la lettre A.
2) Avec la touche UP/CUE (3) [vers l’avant en continu]
ou DOWN/REV (3) [vers l’arrière en continu], sélectionnez la première lettre du titre recherché. Les chif-
fres 0 – 9 peuvent être sélectionnés. Si aucun titre ne
commence avec certaines lettres ou chiffres, ces lettres et chiffres sont répérés par “None”.
3) Enfoncez la touche PLAY/PAUSE (4). S’il y a plusieurs titres avec la même première lettre, appuyez
sur la touche PLAY/PAUSE puis allez au titre souhaité avec la touche UP/CUE.
Conseil : lors de la lecture de fichiers MP3 via l’interface
USB (6), la recherche alphabétique ne peut être utilisée.
5.3.4 Sélection de dossiers avec des fichiers MP3
Pour des supports de données avec fichiers MP3 et plusieurs dossiers (répertoires de fichiers), les titres sont
lus dans l’ordre suivant :
1. Tous les titres du répertoire principal (sans dossiers)
affichés sous “ROOT”
2. Tous les titres dans les dossiers sur le répertoire principal
3. Tous les titres dans les sous-dossiers
4. Tous les titres dans les sous-sous dossiers etc.
Avec les touches –FOLDER SKIP– (9), les dossiers peuvent être sélectionnés dans cet ordre ou l’ordre inverse.
L’appareil va toujours au premier titre dans un dossier.
Avec la touche UP/CUE ou DOWN/REV (3), on peut
sélectionner d’autres titres dans le dossier.
En mode stop, la ligne supérieure de l’affichage indi-
que le nom du dossier après une pression sur une des
touches –FOLDER SKIP–. Pour afficher le nom du dossier en mode pause ou pendant la lecture, changez la
ligne inférieure en conséquence avec la touche DIS-
PLAY (14) [ .....].
5.4 Avance et retour rapides
Pendant la lecture, on peut avec les touches UP/CUE et
DOWN/REV (3) faire une avance ou retour rapides.
Pour l’avance rapide, maintenez la touche UP/CUE
enfoncée, pour le retour rapide, la touche DOWN/REV.
Pour des fichiers MP3, une avance et retour rapides ne
peuvent s’effectuer qu’au sein d’un titre et ne peut être
repéré acoustiquement.
5.5 Fonctions répétition et lecture aléatoire
Avec la touche PLAY MODE (13) sur la télécommande,
on peut activer une des fonctions répétition et la lecture
de tous les titres en mode aléatoire :
réglage de base (PLAY ALL)
Tous les titres du support de données ou d’une
séquence programmée sont lus une fois puis l’affichage revient en mode Stop.
première pression (PLAY ALL RANDOM)
lecture de tous les titres dans un ordre aléatoire
pression suivante (REPEAT TRACK)
répétition continue du titre sélectionné
pression suivante (REPEAT FOLDER)
répétition continue de tous les titres dans un dossier
sélectionné (fonction uniquement sur des fichiers
MP3)
pression suivante (REPEAT ALL)
répétition continue de tous les titres
F
B
CH
14
Page 15

pression suivante (RANDOM REPEAT)
lecture continue des titres dans un ordre aléatoire
pression suivante (PLAY ALL)
retour au réglage de base
5.6 Coupure du son
Pour couper le son, appuyez sur la touche MUTE (15) de
la télécommande. Pour réactiver le son, appuyez une
nouvelle fois sur la touche MUTE.
5.7 Création d’une séquence de titres personnelle
Si seuls quelques titres doivent être lus à partir d’un support de données dans un ordre défini, on peut programmer une suite de 10 titres au plus.
1) Le lecteur CD doit être en mode Stop, si besoin,
enfoncez la touche STOP (2).
2) Avec la touche PROG (16), allumez le mode de pro-
grammation. Toutes les autres touches doivent être
enfoncées en l’espace de 10 secondes sinon vous
quittez le mode programmation. Dans ce cas, enfoncez une nouvelle fois la touche PROG. L’affichage
indique :
– pour un CD sans fichiers MP3
MEM
TR00 P-01 CD
– pour un CD avec fichiers MP3
MEM P-01
000 000
3) Pour des CDs sans fichiers MP3, sautez cette étape
et allez directement au point 4.
Pour des fichiers MP3, sélectionnez tout d’abord
le numéro du dossier dans lequel se trouve le premier
titre souhaité pour la séquence. Ceci est également
nécessaire si tous les fichiers sont mémorisés sur le
support dans le répertoire principal ROOT sans dossier. Le répertoire principal est alors désigné comme
dossier 1.
S’il y a des fichiers dans le répertoire principal, les
dossiers dans ce répertoire sont numérotés à partir
du numéro 2 en ordre alphabétique croissant. Si ce
n’est pas le cas, la numérotation commence pour les
dossiers avec le chiffre 1. Ensuite, suivent tous les
sous-dossiers et éventuellement les sous-sous-dossiers etc.
Sélectionnez avec les touches DOWN/REV et
UP/CUE (3) le numéro de dossier ou tapez le numéro
avec les touches numériques (12). Pour mémoriser,
enfoncez la touche PROG. Les trois zéros au-dessous l’affichage “P-01” clignotent pour inciter à saisir
le numéro de titre.
4) Sélectionnez le numéro du premier titre pour la
séquence avec les touches DOWN/REV et UP/CUE
(3) ou tapez-le avec les touches numériques (12). S’il
y a des fichiers MP3 dans les dossiers, notez que ces
fichiers ne sont pas numérotés de manière consécu-
tive mais que le premier fichier dans chaque dossier
porte toujours le numéro 1.
5) Pour mémoriser, enfoncez la touche PROG. L’affichage indique le numéro suivant de mémoire par
exemple “P-02”.
6) Répétez les points (3), 4, 5 pour les autres titres souhaités jusqu’à ce que la séquence complète soit programmée.
7) Pour démarrer la séquence, enfoncez la touche
PLAY/PAUSE (4). La ligne supérieure de l’affichage
indique “MEM” pour Memory (mémoire) et la séquence est lue.
8) Avec les touches DOWN/ REV et UP/CUE, chaque
titre de la séquence peut être sélectionné ou en maintenant la touche correspondante enfoncée, l’avance
ou retour rapide au sein d’un titre peut être activé.
9) Une fois la séquence lue ou en appuyant sur la touche STOP, le lecteur CD commute sur le mode Stop.
Si la séquence doit être à nouveau démarrée, enfoncez tout d’abord la touche PROG puis la touche
PLAY/PAUSE.
Conseil : si on change de support de donnée, si on
enfonce la touche STOP en mode programmation et si
on éteint le lecteur CD, la séquence programmée est
effacée.
6 Entretien de l’appareil
Protégez l’appareil de la poussière, des vibrations, de la
lumière directe du soleil, de l’humidité et de la chaleur
(plage de fonctionnement autorisée 0 – 40°C). Pour le
nettoyer, utilisez uniquement un chiffon sec et doux, en
aucun cas, de produits chimiques ou d’eau.
Remarques sur les coupures du son et les erreurs
de lecture
La fumée de cigarettes s’introduit dans toutes les ouvertures du lecteur et se dépose sur l’optique du système
laser. Cela peut générer des erreurs de lecture et des
coupures de son. On ne peut pas toujours éviter la
fumée de cigarettes (par exemple en discothèque), confiez impérativement le nettoyage du lecteur à un technicien spécialisé. Cette opération est à la charge de l’utilisateur, même lorsque l’appareil est sous garantie.
7 Caractéristiques techniques
Alimentation :. . . . . . . . . . . . . 12 V , 800 mA
Sortie audio : . . . . . . . . . . . . . 1 V
Dimensions (L × H × P) : . . . . 174 × 51,5 × 166 mm
Ouverture de montage
(L × H × P) : . . . . . . . . . . . . . . 155 × 49,5
× 156 mm
Poids : . . . . . . . . . . . . . . . . . . 1,3 kg
Tout droit de modification réservé.
F
B
CH
15
Notice d’utilisation protégée par le copyright de MONACOR®INTERNATIONAL GmbH & Co. KG. Toute reproduction même partielle à des fins commerciales est interdite.
Page 16
Vi preghiamo di aprire completamente la pagina 3.
Così vedrete sempre gli elementi di comando descritti.
1 Elementi di comando e collegamenti
1.1 Lettore CD
1 Fessura d’introduzione del CD; inserire il CD finché
non viene ritirato automaticamente
2 Tasto STOP per terminare la riproduzione
3 Tasti DOWN/REV e UP/CUE per la scelta di un tito-
lo nonché per l’avanzamento e ritorno veloce
Scelta di un titolo
Con ogni pressione del tasto UP/CUE si salta
avanti di un titolo; premendo il tasto DOWN/REV
si salta all’inizio del titolo e con ogni ulteriore pressione si torna indietro di un titolo.
Avanzamento/ritorno veloce
Per l’avanzamento tener premuto il tasto UP/CUE,
per il ritorno il tasto DOWN/REV.
4 Tasto PLAY/ PAUSE per cambiare fra riproduzione e
pausa
5 Tasto EJECT per espellere il CD
6 Porta USB per inserire una chiavetta USB o per il col-
legamento di un disco rigido
7 Display alfanumerico
8 Sensore a infrarossi per i segnali del telecomando
9 Tasti –FOLDER SKIP– per scegliere il primo titolo in
un’altra cartella di file MP3 e per la successiva scelta dei titoli:
Con il tasto di sinistro si salta sul primo titolo della
cartella precedente e con il tasto di destra sul primo
titolo della cartella successiva. Durante la riproduzione, tenendo premuto un tasto, si può saltare ai titoli
precedenti o successivi.
10 Tasto USB per scegliere la porta USB (6)
11 Tasto CD per scegliere il CD inserito
1.2 Telecomando
2–5e 9–11
Questi tasti hanno funzioni identiche ai tasti sul lettore CD
12 Tasti numerici per la scelta diretta di un titolo, p.es.:
N. titolo. Tasti
4 4, PLAY/PAUSE
27 2, 7, PLAY/PAUSE
135 1, 3, 5, PLAY/PAUSE
13 Tasto PLAY MODE per scegliere le funzioni di ripeti-
zione e della riproduzione casuale
Impostazione base (PLAY ALL)
Si riproducono una volta tutti i titoli del supporto
dati o di una sequenza programmata di titoli
Prima pressione del tasto (PLAY ALL RANDOM)
Riproduzione dei titoli in ordine casuale
Altra pressione del tasto (REPEAT TRACK)
Ripetizione continua del titolo scelto
Altra pressione del tasto (REPEAT FOLDER)
Ripetizione continua di tutti i titoli nella cartella
scelta (solo con file MP3)
Altra pressione del tasto (REPEAT ALL)
Ripetizione continua di tutti i titoli
Altra pressione del tasto (RANDOM REPEAT)
Riproduzione continua dei titoli in ordine casuale
Altra pressione del tasto (PLAY ALL)
Ritorno all’impostazione base
14 Tasto DISPLAY per cambiare le informazioni nella
riga inferiore del display con i file MP3; la riga superiore del display indica sempre il nome dell’albo, del
titolo e dell’interprete o del gruppo (Artist)
Impostazione base
Nella riga inferiore è indicato il numero del titolo
(TR) con il tempo trascorso del titolo
1. pressione del tasto
È indicato il nome della cartella
2. pressione del tasto
È indicato il nome del titolo
3. pressione del tasto
È indicato il numero delle cartelle e dei titoli
4. pressione del tasto
Ritorno all’impostazione base
15 Tasto MUTE per ammutolire il lettore CD
16 Tasto PROG, per entrare nella modalità di program-
mazione per compilare una sequenza personale di
titoli (vedi cap. 5.7)
17 Tasto FIND per la ricerca alfabetica di un titolo sui CD
con MP3 (vedi cap. 5.3.3)
18 Tasto ESP per spegnere e accendere la memoria
anti-shock
(non con funzionamento MP3)
2Avvertenze di sicurezza
L’apparecchio è conforme a tutte le direttive richieste
dell’UE e pertanto porta la sigla .
●
Il modulo è adatto solo per l’uso all’interno di locali.
Proteggerlo dall’acqua gocciolante e dagli spruzzi
d’acqua, da alta umidità dell’aria e dal calore (temperatura d’impiego ammessa fra 0 °C e 40 °C).
●
Nel caso d’uso improprio, d’impiego scorretto, di installazione sbagliata o di riparazione non a regola d’arte
del modulo, non si assume nessuna responsabilità per
eventuali danni consequenziali a persone o a cose e
non si assume nessuna garanzia per il modulo.
Se si desidera eliminare il modulo definitivamente, consegnarlo per lo smaltimento ad
un’istituzione locale per il riciclaggio.
I
16
Page 17
3 Possibilità d’impiego
Il modulo lettore CD M-30CD è previsto per il montaggio
in un apparecchio di base (p. es. cassa acustica attiva,
amplificatore) ed offre molte funzioni, come p. es. la ripetizione senza fine, la riproduzione in ordine casuale, la
programmazione di una propria sequenza di titoli, la
scelta mirata di cartelle (elenchi dei file) sui CD nel formato MP3. Si possono riprodurre CD audio, CD masterizzati in proprio (CD-R audio) e CD nel formato MP3.
Con CD riscrivibili (CD-RW) è possibile che ci siano dei
problemi a seconda del tipo di CD, del masterizzatore e
del programma di masterizzazione. Per mezzo della
porta USB si possono riprodurre anche file MP3 provenienti da un disco rigido o da una chiavetta USB.
Il lettore CD è equipaggiato con una memoria antishock che è in grado di compensare disturbi dovuti a urti
o vibrazioni della durata fino a 40 secondi. Tuttavia non è
possibile compensare disturbi perduranti. Per eseguire
dei test, la memoria anti-shock può essere disattivata con
il tasto ESP (18) sul telecomando (non con il funzionamento MP3). Il display (7) segnala brevemente “ESP
OFF”. Per riattivare la funzione, premere di nuovo il tasto
ESP. Il display indica brevemente “40 SEC CD”.
4 Montaggio e collegamento
●
Il modulo lettore CD deve essere montato solo da un
esperto qualificato!
●
Il modulo deve essere montato nell’apparecchio base
in senso orizzontale.
1) Prima di montare il modulo, separare assolutamente
l’apparecchio base dalla rete 230 V.
2) Per il montaggio del modulo, nell’apparecchio base
deve essere applicata un’apertura di 155 mm x
49,5 mm.
3) Togliere dalla parte superiore del modulo le due viti di
protezione durante il trasporto. Chiudere i fori con le
piastrine adesive allegate.
4) Effettuare il collegamento elettrico con l’apparecchio
base. I contatti del connettore a 5 poli sono illustrati
nella figura seguente.
5) Inserire il modulo nell’apparecchio base attraverso
l’apertura di montaggio e fissare il pannello frontale
con l’aiuto di quattro viti.
5 Funzionamento
5.1 Telecomando
1) Per inserire le batterie (2 x 1,5 V, AAAministilo) esercitare una pressione sulla freccia del coperchio sul retro
del telecomando e spingere il coperchio verso il
basso. Inserire le batterie come segnato nel vano batterie. Richiudere il vano batterie con il suo coperchio.
2) Se si aziona un tasto, tenere il telecomando sempre
in direzione del sensore REMOTE (8). Non ci devono
essere degli ostacoli fra il telecomando e il sensore.
3) Se la portata del telecomando diminuisce vuol dire
che le batterie sono probabilmente scariche e che
devono essere sostituite.
5.2 Riproduzione da supporti dati
Dopo aver applicato la tensione d’esercizio 12 V, il lettore CD è acceso. Sul display (7) si legge “READING
DISC” oppure “NO DISC”, se non è inserito nessun CD.
1) Inserire un CD con la scritta rivolta in alto nella fessura d’inserimento (1) finché non viene introdotta
automaticamente.
2) In più o in alternativa è possibile inserire una chiavetta USB nella porta USB (6) o collegare un disco rigido con quella porta. Per attivare il collegamento USB
premere il tasto USB (10), per passare al CD premere il tasto CD (11).
3) Dopo aver riconosciuto il supporto dati (CD, chiavetta USB o disco rigido), il display indica le seguenti
informazioni:
– con un CD senza file MP3 p. es.:
TR21 60:22 CD
Supporto dati
Durata complessiva (min. : sec.)
Numero titoli
– con un CD con file MP3 p. es.:
5 149
Numero titoli
Numero cartelle
– con un disco rigido o con una chiavetta USB p. es.:
8 218Flash
Porta USB
Numero titoli
Numero cartelle
4) Con il tasto PLAY/PAUSE (4) avviare la riproduzione
del primo titolo. Per scegliere un altro titolo vedi capitolo 5.3.
5) Durante la riproduzione, nella riga superiore del display si vede il simbolo di riproduzione . La riga inferiore indica il numero (TR …) del titolo attuale e il
tempo già trascorso (min. : sec.) del titolo.
Non gettare le batterie scariche nelle immondizie di casa, bensì negli appositi contenitori (p. es. presso il vostro rivenditore).
12 V AUDIO
+ – L G R
I
17
ConduttorePin
Tensione d’esercizio
rosso+ +12V (0,8 A)
nero
-
massa
Uscita audio
weißL sinistra
rossoR destra
neroG massa
Page 18

Nel caso di file MP3, nella riga superiore si vede
anche il nome del titolo (Title: …), dell’interprete o del
gruppo (Artist: …) o dell’albo (Album: …). Il nome del
file (File-…) viene indicato solo una volta dopo l’avvio
della riproduzione. Se manca un’informazione, il display segnala p. es. “Title : Unknown” o “Artist : None”.
Premendo il tasto DISPLAY (14) sul telecomando,
per i file MP3 si possono visualizzare varie informazioni nella riga inferiore del display:
Impostazione base
Nella riga inferiore è indicato il numero del titolo
con il tempo trascorso del titolo
1. pressione del tasto
È indicato il nome della cartella
2. pressione del tasto
È indicato il nome del titolo
3. pressione del tasto
È indicato il numero delle cartelle e dei titoli
4. pressione del tasto
Ritorno all’impostazione base
6) Con il tasto PLAY/PAUSE si può cambiare fra riproduzione e pausa. Nella modalità di pausa si vede il
simbolo di pausa , e l’indicazione del tempo sta lampeggiando.
7) Per espellere il CD premere il tasto EJECT (5). Il display indica “EJECT”, il CD esce e può essere
prelevato. Se il CD non viene tolto dalla fessura di
inserimento, dopo 10 s circa il lettore CD lo ritira automaticamente.
5.3 Scelta del titolo
5.3.1 Scelta diretta del numero del titolo
Con i tasti numerici (12) del telecomando si può scegliere un titolo direttamente digitando il suo numero. Per
avviare poi il titolo, premere il tasto PLAY/PAUSE (4).
Esempi:
N. titolo Tasti
4 4, PLAY/PAUSE
27 2, 7, PLAY/PAUSE
135 1, 3, 5, PLAY/PAUSE
5.3.2 Saltare dei titoli in avanti o indietro
Per saltare in avanti o indietro uno o più titoli, premere
brevemente rispettivamente il tasto UP/CUE o DOWN/
REV (3).
Tasto UP/CUE: per saltare al titolo successivo
Tasto DOWN/REV: per saltare all’inizio del titolo attuale.
Premendo ancora il tasto DOWN/REV si salta indietro
ogni volta di un altro titolo.
N. B.: I tasti DOWN/REV e UP/CUE devono essere premuti solo brevemente, altrimenti si attiva l’avanzamento
o il ritorno veloce.
5.3.3 Ricerca alfabetica su CD con MP3
1) Sul telecomando, premere il tasto FIND (17). La riga
inferiore del display indica “A–……” e il primo titolo
che inizia con la lettera A.
2) Con il tasto UP/ CUE (3) [in avanti] o DOWN/REV (3)
[indietro] scegliere la lettera con la quale inizia il tito-
lo cercato. Si possono scegliere anche le cifre 0 – 9.
Lettere e cifre con le quali non inizia nessun titolo
sono contrassegnate con “None”.
3) Premere il tasto PLAY/PAUSE (4). Se sono presenti
più titoli che iniziano con la medesima lettera, dopo la
pressione del tasto PLAY/PAUSE, con il tasto UP/
CUE si può saltare sul titolo desiderato.
N.B.: Riproducendo dei file MP3 attraverso la porta USB
(6), la ricerca alfabetica non è possibile.
5.3.4 Scelta della cartella con file MP3
Nei supporti dati con file MP3 e con più cartelle, i titoli
sono riprodotti nel seguente ordine:
1. tutti i titoli sul livello principale (senza cartelle), indicato come “ROOT”
2. tutti i titoli in cartelle sul livello principale
3. tutti i titoli in sottocartelle
4. tutti i titoli in sottocartelle subordinate ecc.
Con i tasti –FOLDER SKIP– (9) è possibile scegliere le
cartelle in questo ordine o in ordine inverso. Si salterà
sempre sul primo titolo della cartella. Con il tasto UP/
CUE o DOWN/REV (3) si possono scegliere altri titoli
nella cartella.
Nella modalità di Stop, la riga superiore del display,
dopo la pressione di uno dei tasti –FOLDER SKIP– indica il nome della cartella. Per visualizzare il nome della
cartella durante la riproduzione o in pausa, cambiare l’indicazione della riga inferiore del display con il tasto DIS-
PLAY (14) [ .....].
5.4 Avanzamento/ritorno veloce
Durante la riproduzione, con i tasti UP/CUE e DOWN/
REV (3) si attiva l’avanzamento e il ritorno veloce: per
l’avanzamento veloce tener premuto il tasto UP/CUE,
per il ritorno veloce il tasto DOWN/REV. Con i file MP3,
l’avanzamento o il ritorno è possibile solo all’interno dello
stesso titolo e non può essere seguito acusticamente.
5.5
Funzioni di ripetizione e riproduzione casuale
Con il tasto PLAY MODE (13) sul telecomando si può
attivare una delle funzioni di ripetizione e la riproduzione
dei titoli in ordine casuale:
Impostazione base (PLAY ALL)
Si riproducono una volta tutti i titoli del supporto dati
o di una sequenza programmata di titoli; quindi l’apparecchio va nella modalità di Stop.
Prima pressione del tasto (PLAY ALL RANDOM)
Riproduzione dei titoli in ordine casuale
Altra pressione del tasto (REPEAT TRACK)
Ripetizione continua del titolo scelto
Altra pressione del tasto (REPEAT FOLDER)
Ripetizione continua di tutti i titoli nella cartella scelta
(solo con file MP3)
Altra pressione del tasto (REPEAT ALL)
Ripetizione continua di tutti i titoli
Altra pressione del tasto (RANDOM REPEAT)
Riproduzione continua dei titoli in ordine casuale
Altra pressione del tasto (PLAY ALL)
Ritorno all’impostazione base
I
18
Page 19

5.6 Rendere muto l’audio
Per rendere muto l’audio, premere il tasto MUTE (15) sul
telecomando. Per riattivare l’audio, premere nuovamente il tasto MUTE.
5.7 Creare una compilation personale
Se di un supporto dati si vogliono riprodurre solo alcuni
titoli in un determinato ordine, è possibile programmare
una sequenza di un massimo di 10 titoli.
1) Il lettore CD deve trovarsi nella modalità di Stop;
eventualmente premere il tasto STOP (2).
2) Con il tasto PROG (16) attivare la modalità di programmazione. Tutti gli altri tasti devono essere premuti sempre entro 10 secondi, altrimenti si esce dalla
modalità di programmazione. In questo caso premere di nuovo il tasto PROG. Il display indica:
– con un CD senza file MP3
MEM
TR00 P-01 CD
– con un CD con file MP3
MEM P-01
000 000
3) Nei CD senza file MP3 saltare questo passo e continuare direttamente con il passo n. 4.
Nei file MP3 di deve dapprima scegliere il numero
della cartella nella quale si trova il primo titolo desiderato per la sequenza. Ciò è importante anche se
tutti i file sono memorizzati senza cartella nella root
del supporto dati. Il livello principale sarà contrassegnato con cartella 1.
Se sul livello principale si trovano dei file, le cartelle sul livello principale, a partire dal numero cartella 2, vengono numerate in ordine alfabetico crescente. Altrimenti, la numerazione per le cartelle inizia con
il numero 1. Seguono tutte le sottocartelle e eventuali cartelle subordinate ecc.
Scegliere il numero cartella con i tasti DOWN/
REV e UP/CUE (3) oppure digitarlo con i tasti numerici (12). Per memorizzare premere quindi il tasto
PROG. I tre zeri sotto l’indicazione ”P-01” lampeggiano come invito a impostare il numero del titolo.
4) Scegliere il numero del primo titolo per la sequenza
con i tasti DOWN/REV e UP/CUE (3) oppure digitarlo con i tasti numerici (12). Nel caso di file MP3 nelle
cartelle, tener presente che ora non sono numerati
tutti i file, ma che il primo file in una cartella è sempre
segnato con il numero 1.
5) Per memorizzare premere il tasto PROG. Il display
indica il numero successivo per la memorizzazione,
p. es. “P-02”.
6) Ripetere i passi (3), 4 e 5 per tutti gli altri titoli desiderati finché l’intera sequenza è programmata.
7) Per avviare la sequenza, premere il tasto PLAY/
PAUSE (4). La riga superiore del display segnala
“MEM” per Memory, e la sequenza viene riprodotta.
8) Con i tasti DOWN /REV e UP/CUE si possono scegliere tutti i titoli della sequenza, oppure, tenendo premuto il relativo tasto, si può attivare l’avanzamento/
ritorno veloce all’interno di un titolo.
9) Dopo la riproduzione della sequenza, oppure premendo il tasto STOP, il lettore CD si mette nella
modalità di Stop. Per avviare nuovamente la sequenza di titoli, premere dapprima il tasto PROG e quindi
il tasto PLAY/ PAUSE.
N. B.: Una sequenza programmata di titoli viene cancellata con il cambio del supporto dati, con la pressione del
tasto STOP nella modalità di programmazione e con lo
spegnimento del lettore CD.
6 Manutenzione
Proteggere il modulo lettore CD dalla polvere, da vibrazioni, dalla luce diretta del sole, dall’umidità e dal calore
(temperatura d’impiego ammessa fra 0 e 40 °C). Per la
pulizia usare solo un panno asciutto e morbido; non
impiegare in nessun caso prodotti chimici o acqua.
Note su possibili errori di lettura
Il fumo di sigarette penetra facilmente fra tutte le aperture dell’apparecchio e si deposita sul sistema ottico della
scansione ai raggi laser. Ciò può provocare errori di lettura e buchi nella riproduzione. Poiché non si può escludere sempre il fumo di sigarette (p. es. in una discoteca),
l’apparecchio deve eventualmente essere pulito in un
laboratorio specializzato. Una tale pulizia è a pagamento, anche durante il periodo di garanzia!
7 Dati tecnici
Alimentazione:. . . . . . . . . . . . 12 V , 800 mA
Uscita audio: . . . . . . . . . . . . . 1 V
Dimensioni (l × h × p): . . . . . . 174 × 51,5 × 166 mm
Apertura di montaggio
(l × h × p): . . . . . . . . . . . . . . . 155 × 49,5
× 156 mm
Peso: . . . . . . . . . . . . . . . . . . . 1,3 kg
Con riserva di modifiche tecniche.
I
19
La MONACOR®INTERNATIONAL GmbH & Co. KG si riserva ogni diritto di elaborazione in qualsiasi forma delle presenti istruzioni per l’uso. La riproduzione – anche parziale– per propri scopi commerciali è vietata.
Page 20

Copyright©by MONACOR INTERNATIONAL GmbH & Co. KG, Bremen, Germany. All rights reserved. A-0747.99.01.06.2007
®
 Loading...