

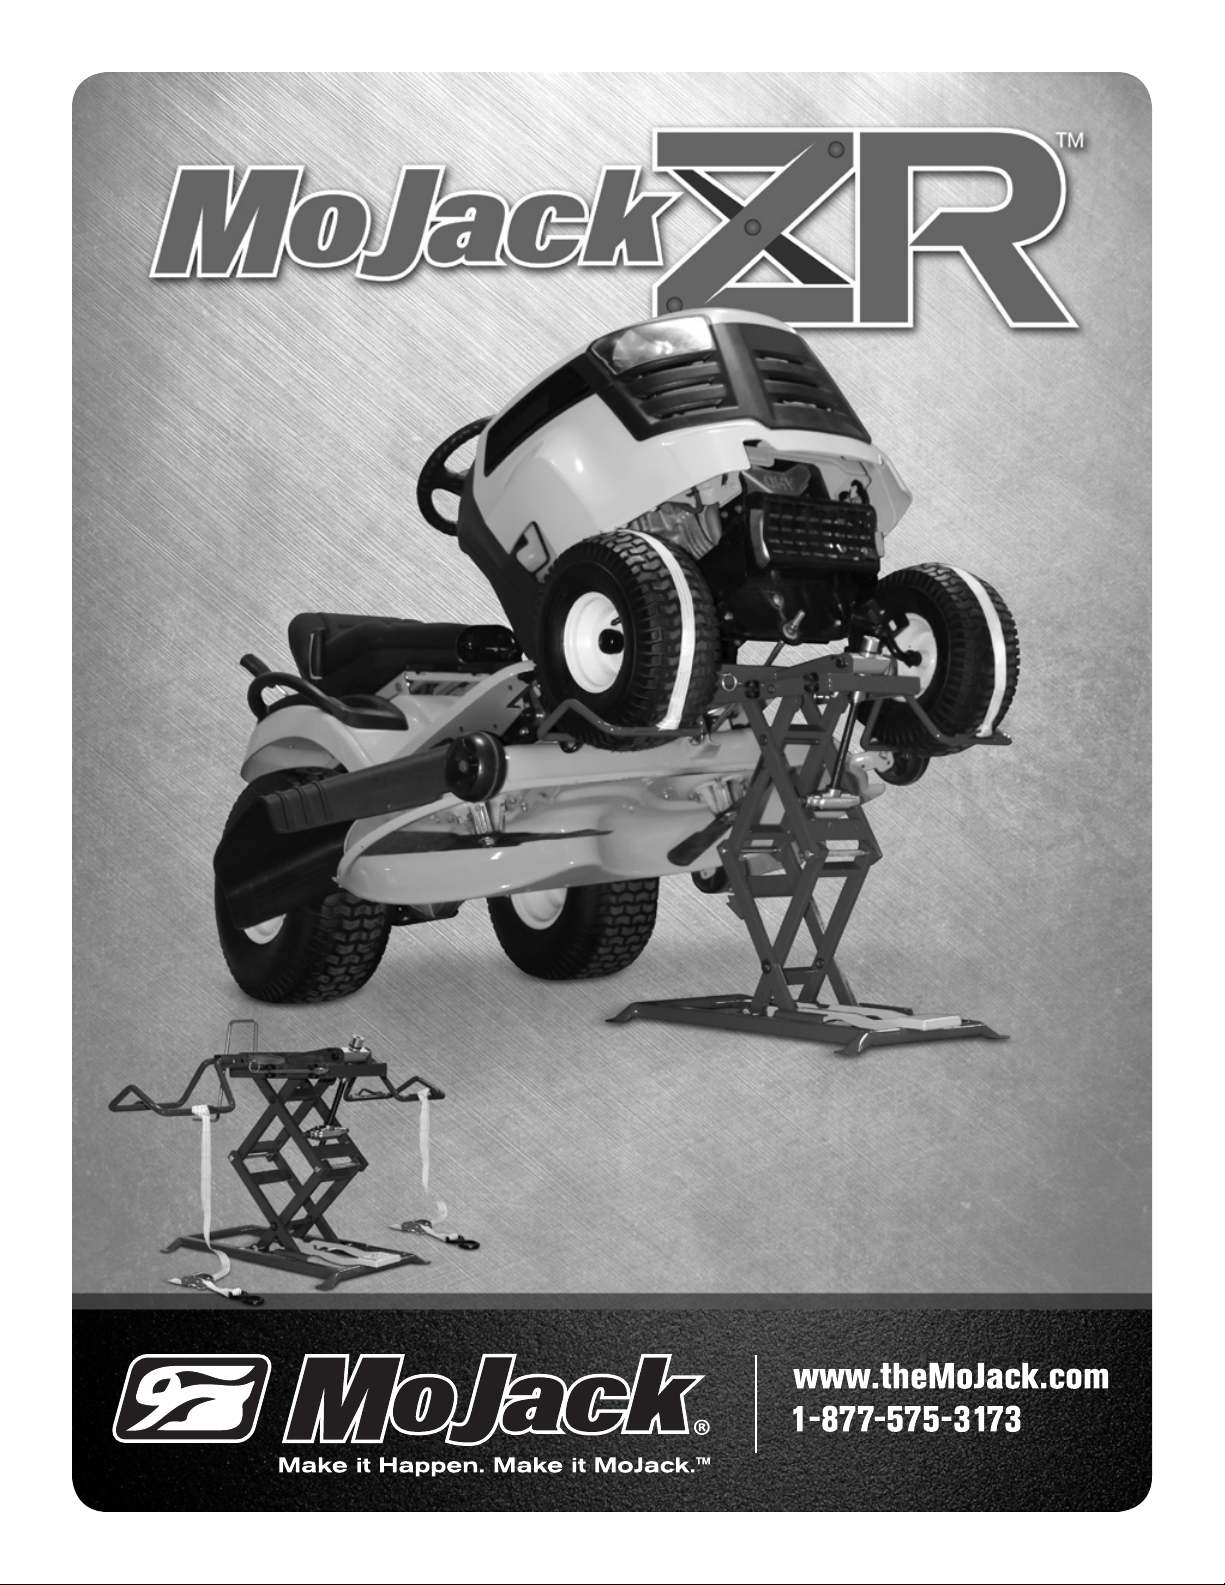
Page 1
Instructions for Assembly and Operation
Consignes d’assemblage et d’utilisation
Instrucciones Para El Montaje Y La Operación
Ver. 091412
Page 2
MoJack ZR Lift MoJack ZR Lift
Introduction
This manual contains assembly, parts, operating,
maintenance, adjustment and safety instructions
for your MoJack ZR lift.
BEFORE USING YOUR MOJACK ZR, CAREFULLY
READ THIS MANUAL IN ITS ENTIRETY.
By following these operating, maintenance and safety
instructions, you will prolong the life of your MoJack
lift and promote safe operation.
If additional information is needed, or should you
require a trained service mechanic, contact your
authorized MoJack equipment dealer or distributor.
All MoJack parts are thoroughly tested and inspected
before leaving the factory to ensure that they comply
with all relevant safety standards.
Warnings and Safety Instructions
Read and understand all safety and operating instructions before using the MoJack ZR.
Never allow anyone unfamiliar with the safety or operating instructions to use the MoJack ZR.
Follow all safety and servicing instructions provided by the lawn mower’s manufacturer before using the MoJack ZR.
Do not modify the MoJack ZR in any way. Any modifications will void any and all warranties and could compromise
your personal safety.
When using the MoJack ZR, keep ALL bystanders at a safe distance away from the MoJack ZR.
The MoJack ZR must be used on a solid level surface.
Do not lift the front end and the back end of the mower at the same time.
Only use the MoJack ZR for mowers that are less than 250lbs front end weight and properly fits in the provided wheel
pads. (ie. 10” to 17” diameter and within outside wheel measurements of 34” to 43.5”).
Always stop engine and remove key before beginning any work on the mower.
Always place mower in neutral or disengage the hydraulic drive by following the mower owner’s manual.
Never operate the engine while using the MoJack ZR.
Do not exceed the lifting capacity of 250 lbs. front end weight.
NOTE: Please save this manual for future reference.
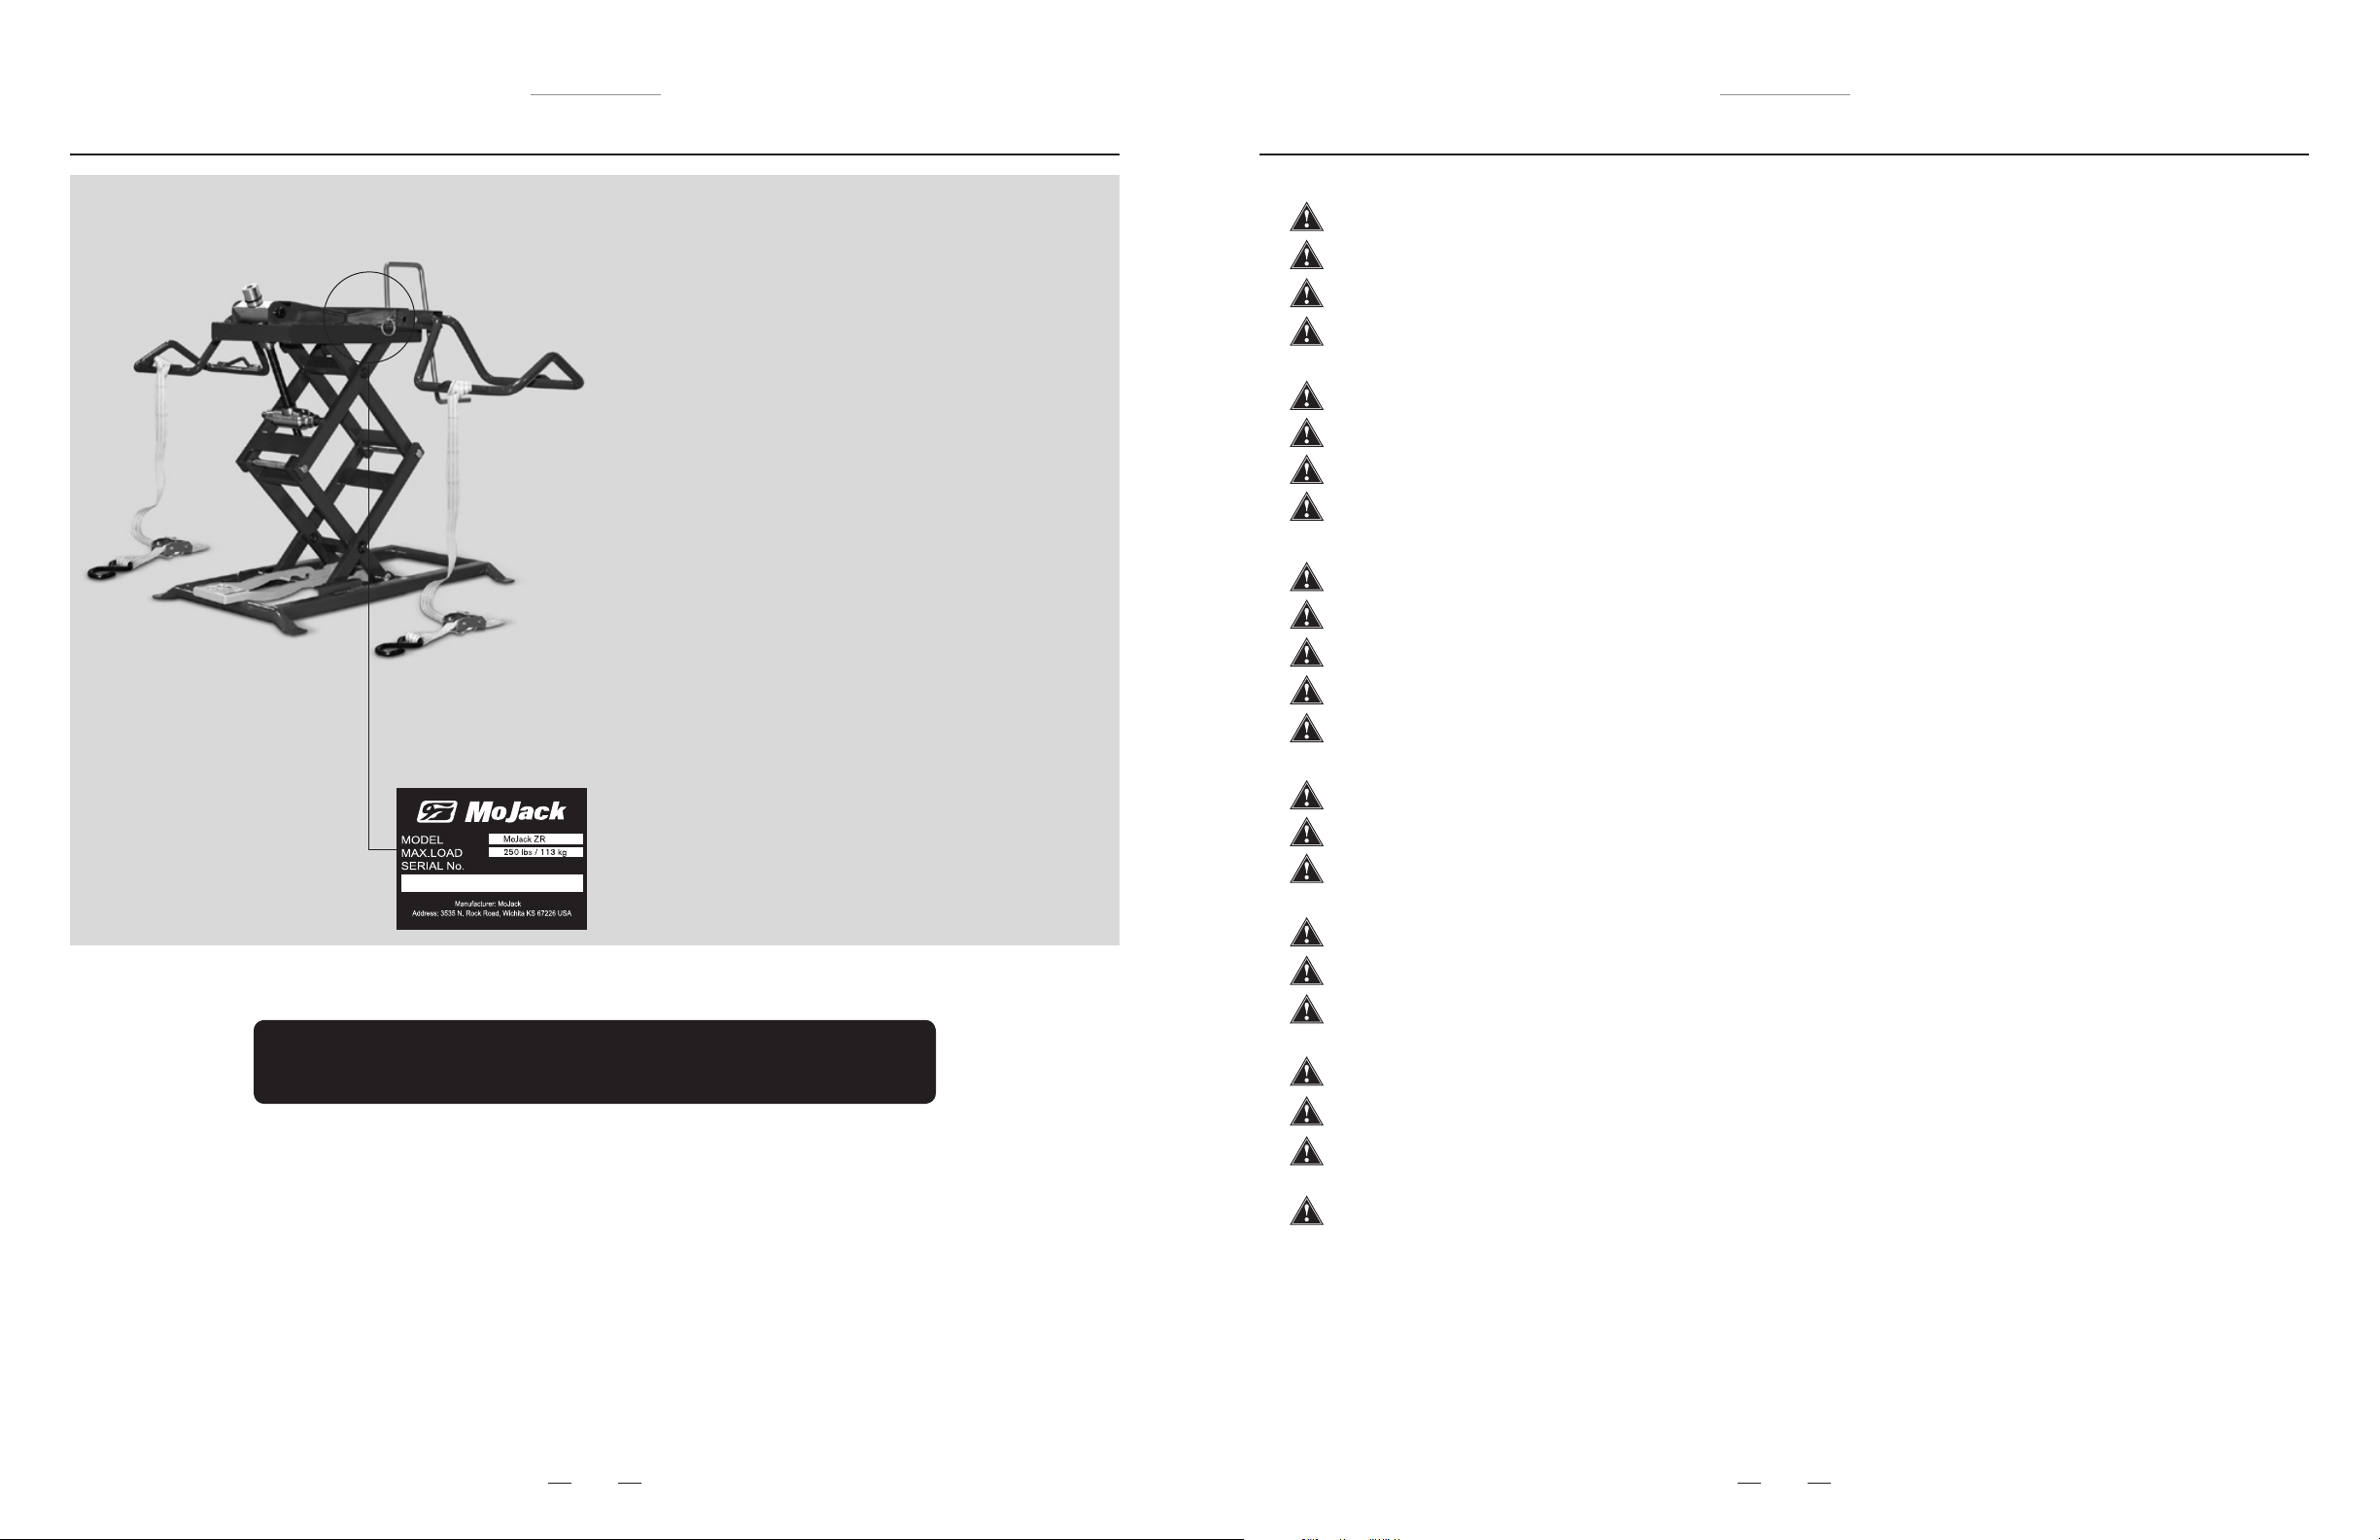
NOTE: Location of unit Serial Number.
Need Assistance?
Please DO NOT return this product to the store.
Our Customer Service Department is ready to help!
1-877-575-3173
Submit your questions online at:
www.theMoJack.com
If the MoJack ZR shear pin breaks allowing the crank handle to spin freely while lifting the mower, this indicates an
overload condition. Remove the riding equipment immediately.
Scissor Lock must be engaged before starting any service on mower.
Do not remove safety warnings or decals from MoJack ZR.
Before each use, always check for any worn, loose or damaged parts on the MoJack ZR. If any damaged parts are
present, do not use the MoJack ZR and contact MoJack at 1-877-575-3173.
Do not climb on mower while it is lifted, being lifted or being lowered.
No one should be on the mower while it is lifted, being lifted or being lowered.
After the mower is raised to a working height, always place wheel chocks (not included) behind the back tires of
the mower.
Wheel Pads must be set at an equal distance to maintain proper balance.
Remove all mower attachments before using the MoJack ZR.
Some mowers which are equipped with a fuel tank vent may spill fuel when lifted. If this happens, run fuel level down
in the tank to prevent spilling.
Failure to follow these warnings may result in property damage and serious bodily injury or death.
IMPORTANT: The MoJack ZR is intended for use with mowers only. Do not exceed 250 lbs. front end weight.
It should never be used to service mowers with a front end weight over 250 lbs.
MoJack and the MoJack logo are registered trademarks of MoJack Distributors, LLC.
© 2012 (MoJack Distributors, LLC.)
MoJack ZR is a trademark of MoJack Distributors, LLC. All rights reserved.
Patent pending.
2 3
Page 3
MoJack ZR Lift MoJack ZR Lift
Warranty and Returns Parts List
LIMITED WARRANTY
For two years for residential use only, MoJack warrants the product against failure due to defect in material or
workmanship when product is used properly. MoJack will replace any defective part at no cost. This warranty does
not cover any product that has been altered or adjusted, or any product that has been misused or abused. THIS
IS THE CUSTOMER’S SOLE AND EXCLUSIVE REMEDY. MOJACK DISCLAIMS ALL IMPLIED WARRANTIES,
INCLUDING THE WARRANTY OF MERCHANTABILITY AND FITNESS FOR A PARTICULAR PURPOSE.
MOJACK SHALL NOT BE LIABLE FOR ANY INCIDENTIAL OR CONSEQUENTIAL DAMAGES. SOME STATES
OR PROVINCES DO NOT ALLOW THE EXCLUSION OR LIMITATION OF THE IMPLIED WARRANTIES OR
THE REMEDIES FOR BREACH OF THE IMPLIED WARRANTIES, SO THESE EXCLUSIONS MAY NOT APPLY TO YOU. THIS LIMITED WARRANTY GIVES YOU SPECIFIC LEGAL RIGHTS, AND YOU MAY ALSO HAVE
OTHER RIGHTS WHICH VARY FROM STATE TO STATE OR PROVINCE TO PROVINCE.
What does this warranty cover?
This warranty covers against a failure due to a defect in material or workmanship within two years of purchase for
residential use only.
What does this warranty NOT cover?
This warranty does not cover any MoJack which has been altered or adjusted in any way from its original model.
It will not cover any MoJack which has been damaged due to misuse, abuse, accident or negligence. This warranty
does not cover incidental or consequential damages.
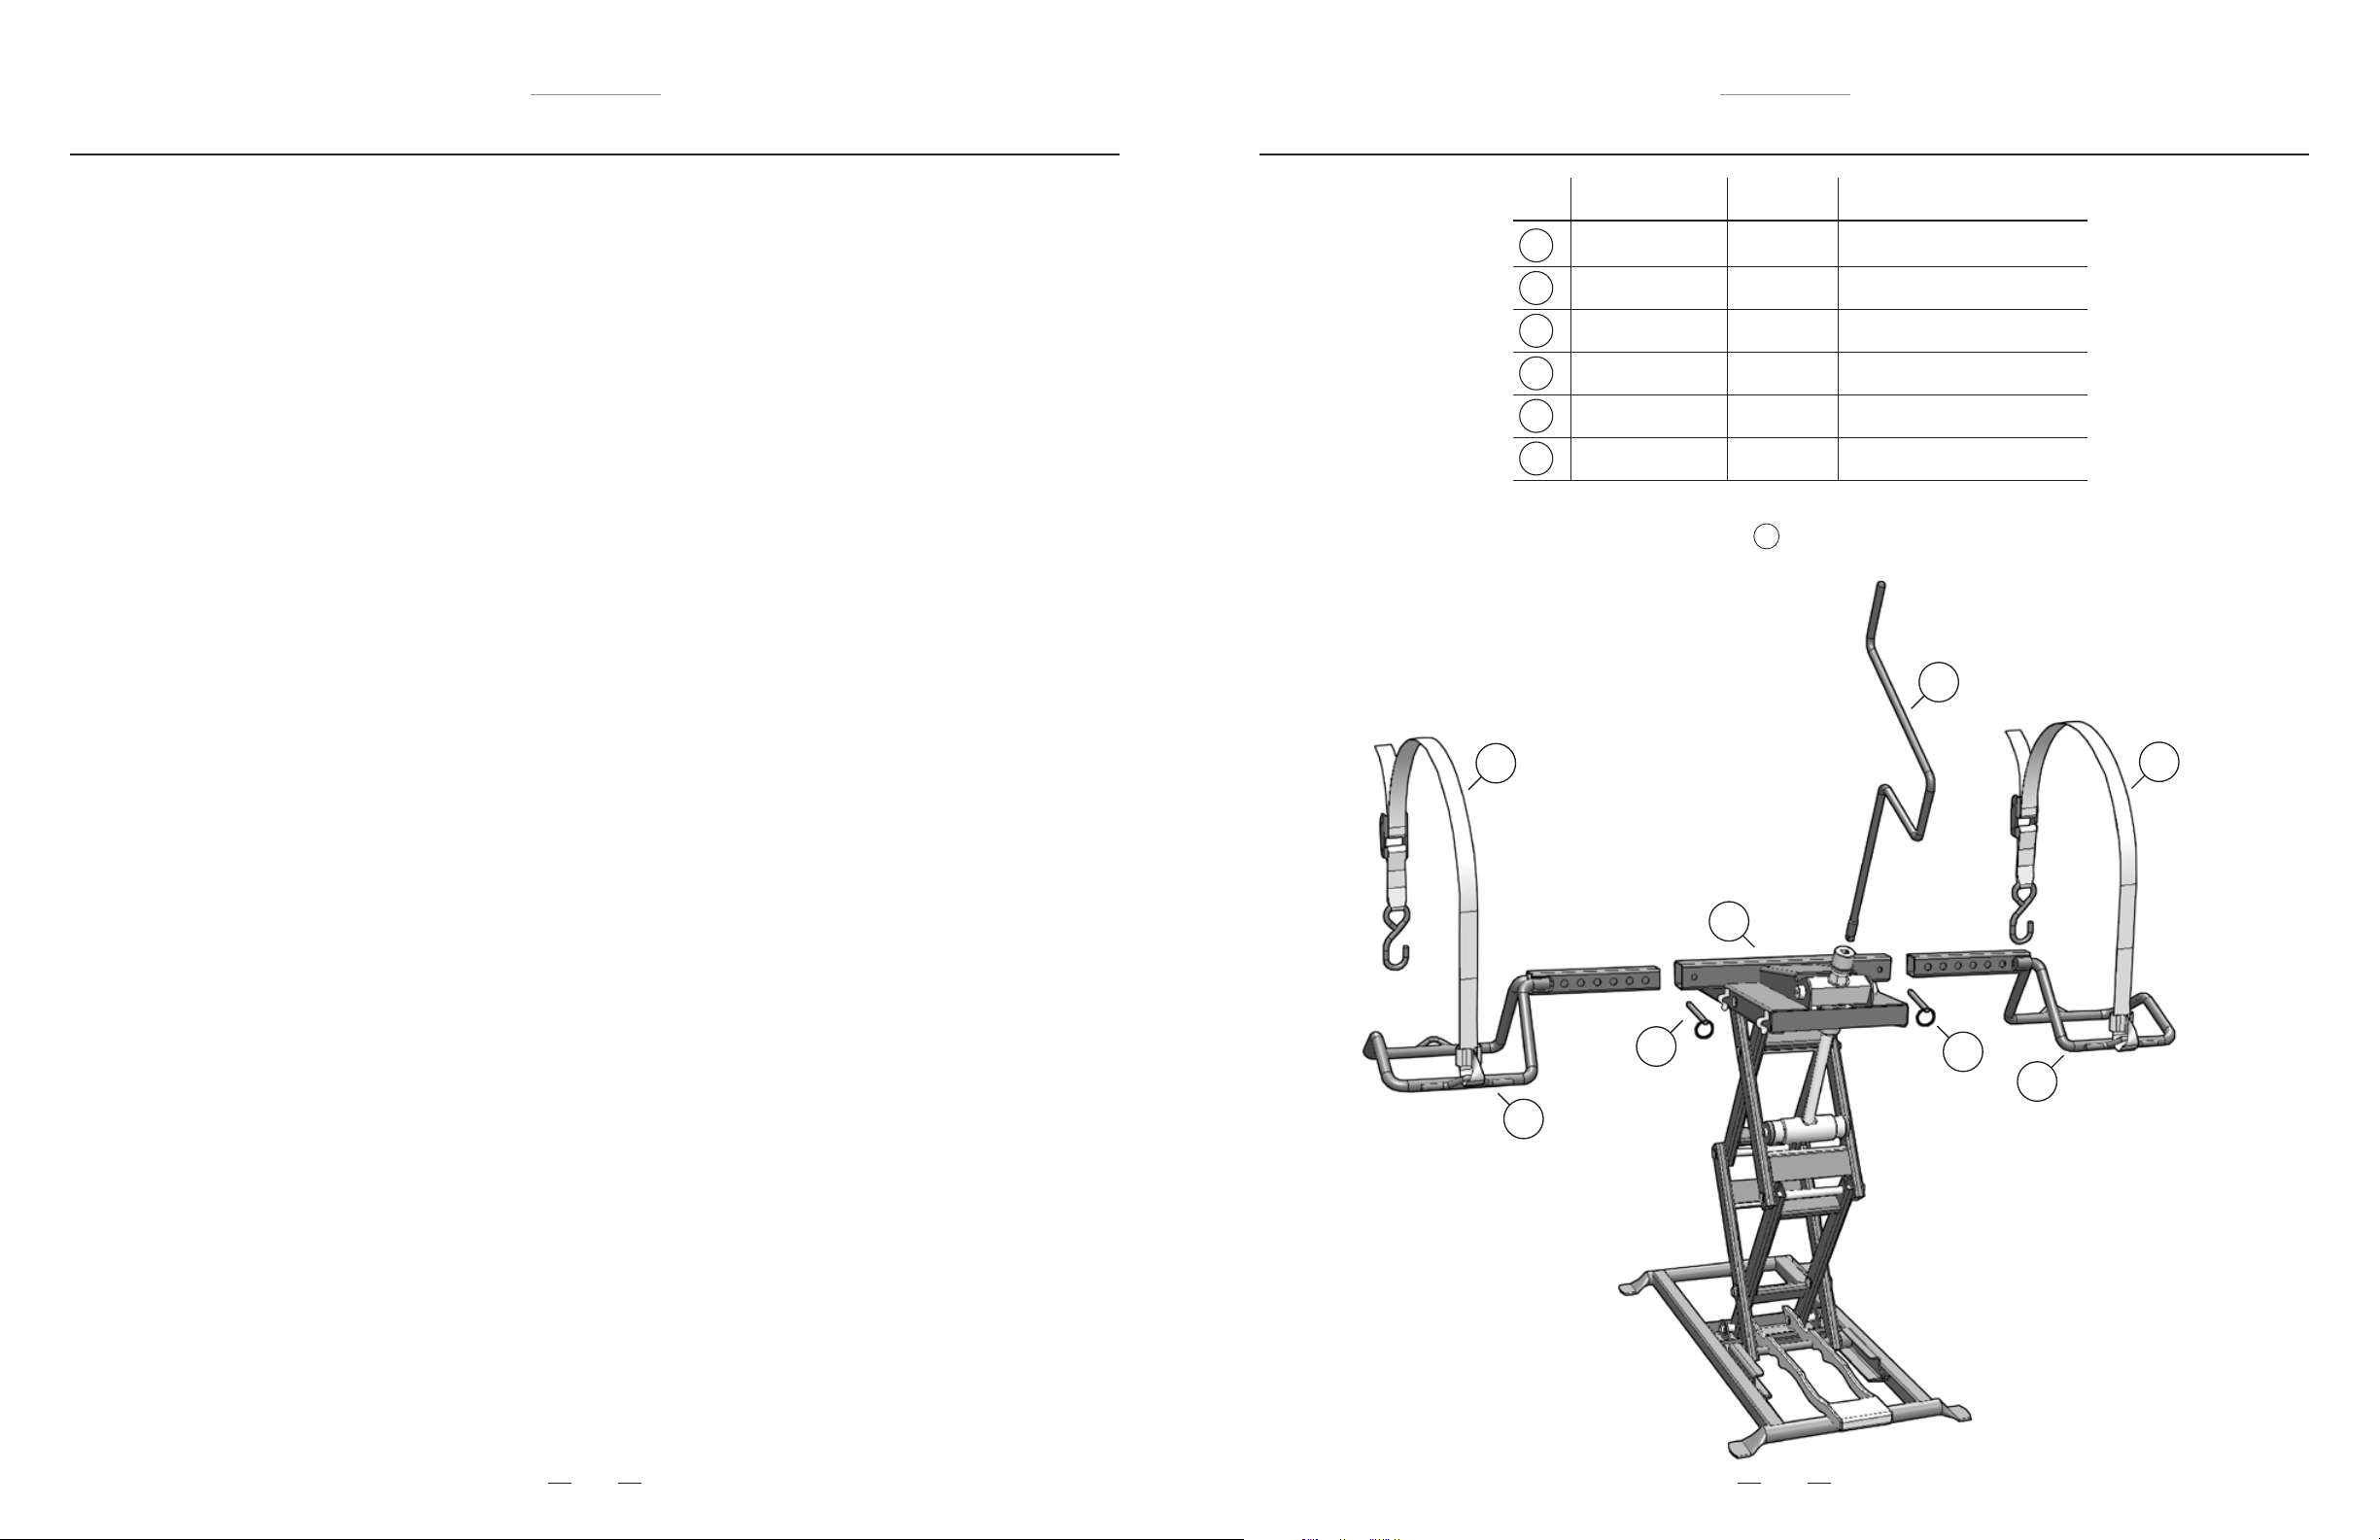
Item
No.
1
2
3
4
5
6
Part
No.
508-0000
508-0044
508-0035
009-0007
001-0013
001-0015
Qty.
1
2
1
2
2
2 Spares
Description
Scissor Jack Assembly
Wheel Pad
Crank Handle
Safety Strap
Push Pin
Brass Shear Pin
NOTE: No tools or fasteners are required for assembly.
NOTE: Brass Shear Pin is attached to the user manual.
6
3
What is the period of coverage?
Two-year warranty for residential use only from date of purchase for the original owner.
What will MoJack do to correct problems?
We will replace any defective part (within the coverage period) at no charge.
How can I get service?
In order to be eligible for service under this warranty you MUST register your MoJack within thirty (30) days of
purchasing. After the thirty (30) day period, you must provide proof of purchase (receipt) to register the product.
Please register your new MoJack lift on our website at www.themojack.com or by calling our toll-free
number 1-877-4MO-JACK.
How do I contact MoJack about a warranty issue?
You can contact us from our website at www.themojack.com or by calling our toll-free number 1-877-575-3173.
Do I have other rights under State Law?
This warranty gives you specific legal rights, and you may also have other rights which vary from state to state.
What is the return policy?
Please do not return to store. Contact MoJack for return policies and procedures at our toll-free
number 1-877-575-3173 or by email at info@themojack.com.
How do I contact MoJack?
You can call our toll-free number 1-877-575-3173 or by email at info@themojack.com.
4
4
1
5
5
2
2
4 5
Page 4
MoJack ZR Lift MoJack ZR Lift
Assembly Instructions
STEP 1
Remove MoJack ZR from package.
Inventory items to be certain all parts and hardware
are present. If any parts or hardware are missing,
please contact MoJack at 1-877-575-3173 or
email us at parts@themojack.com.
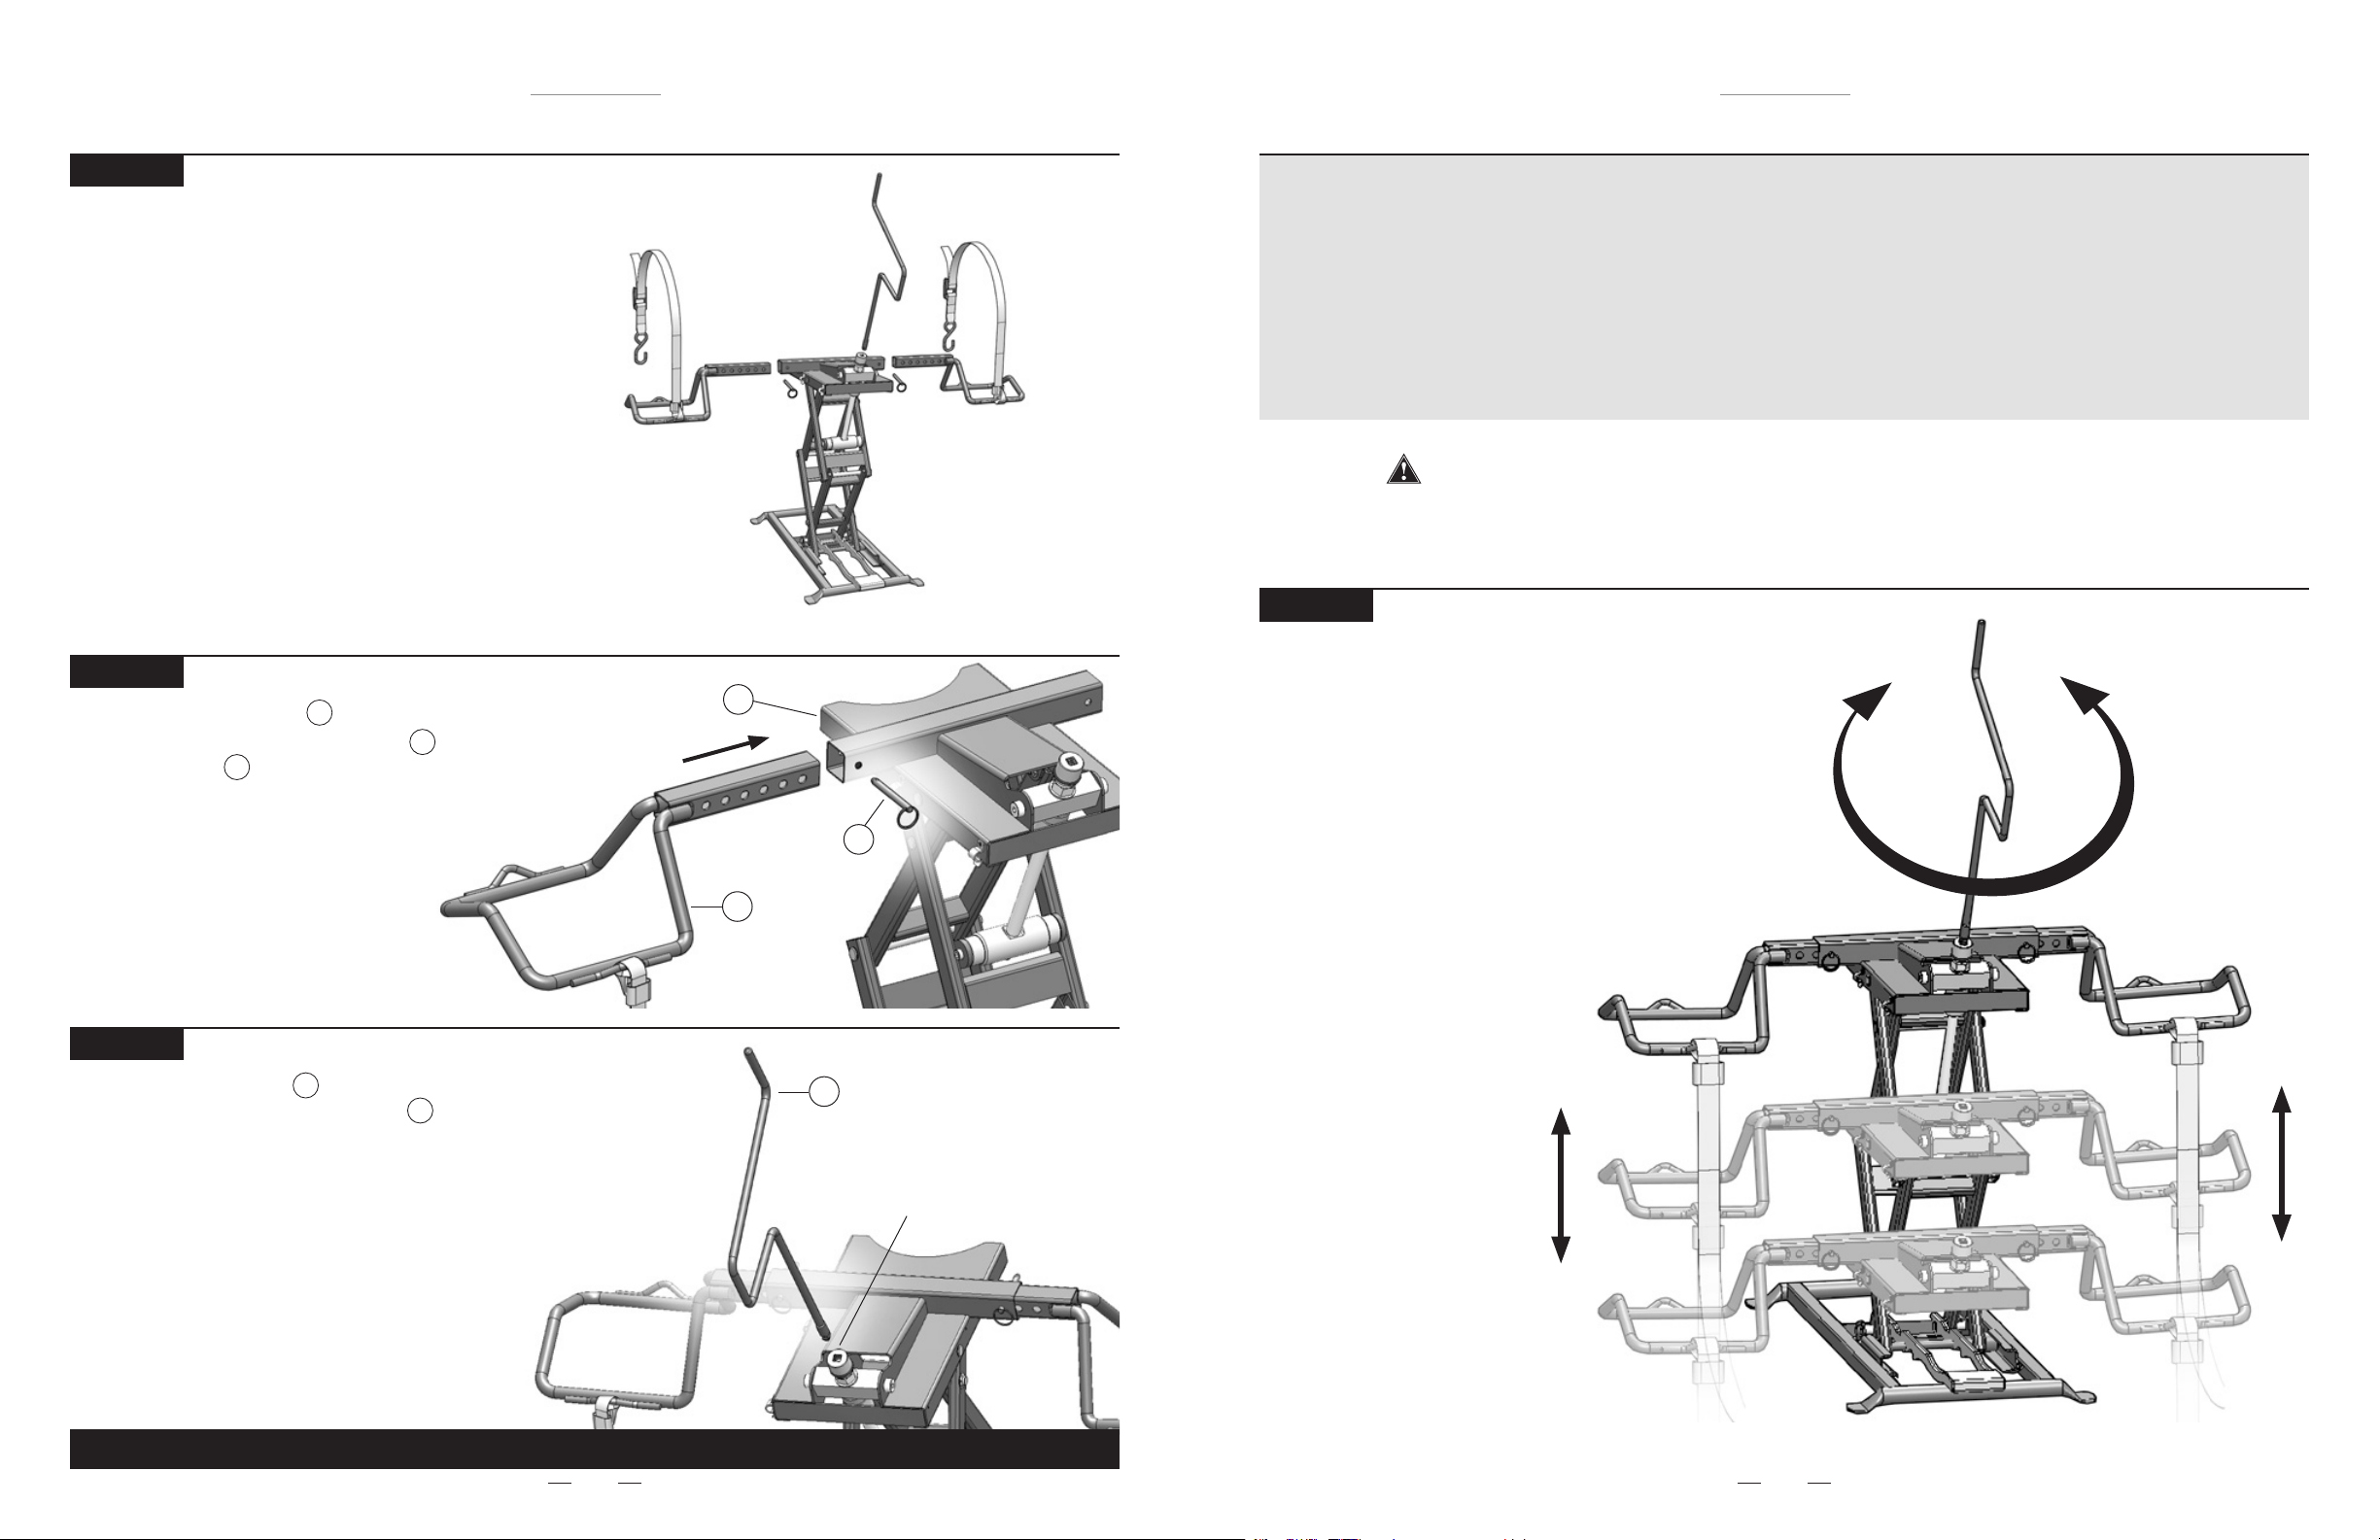
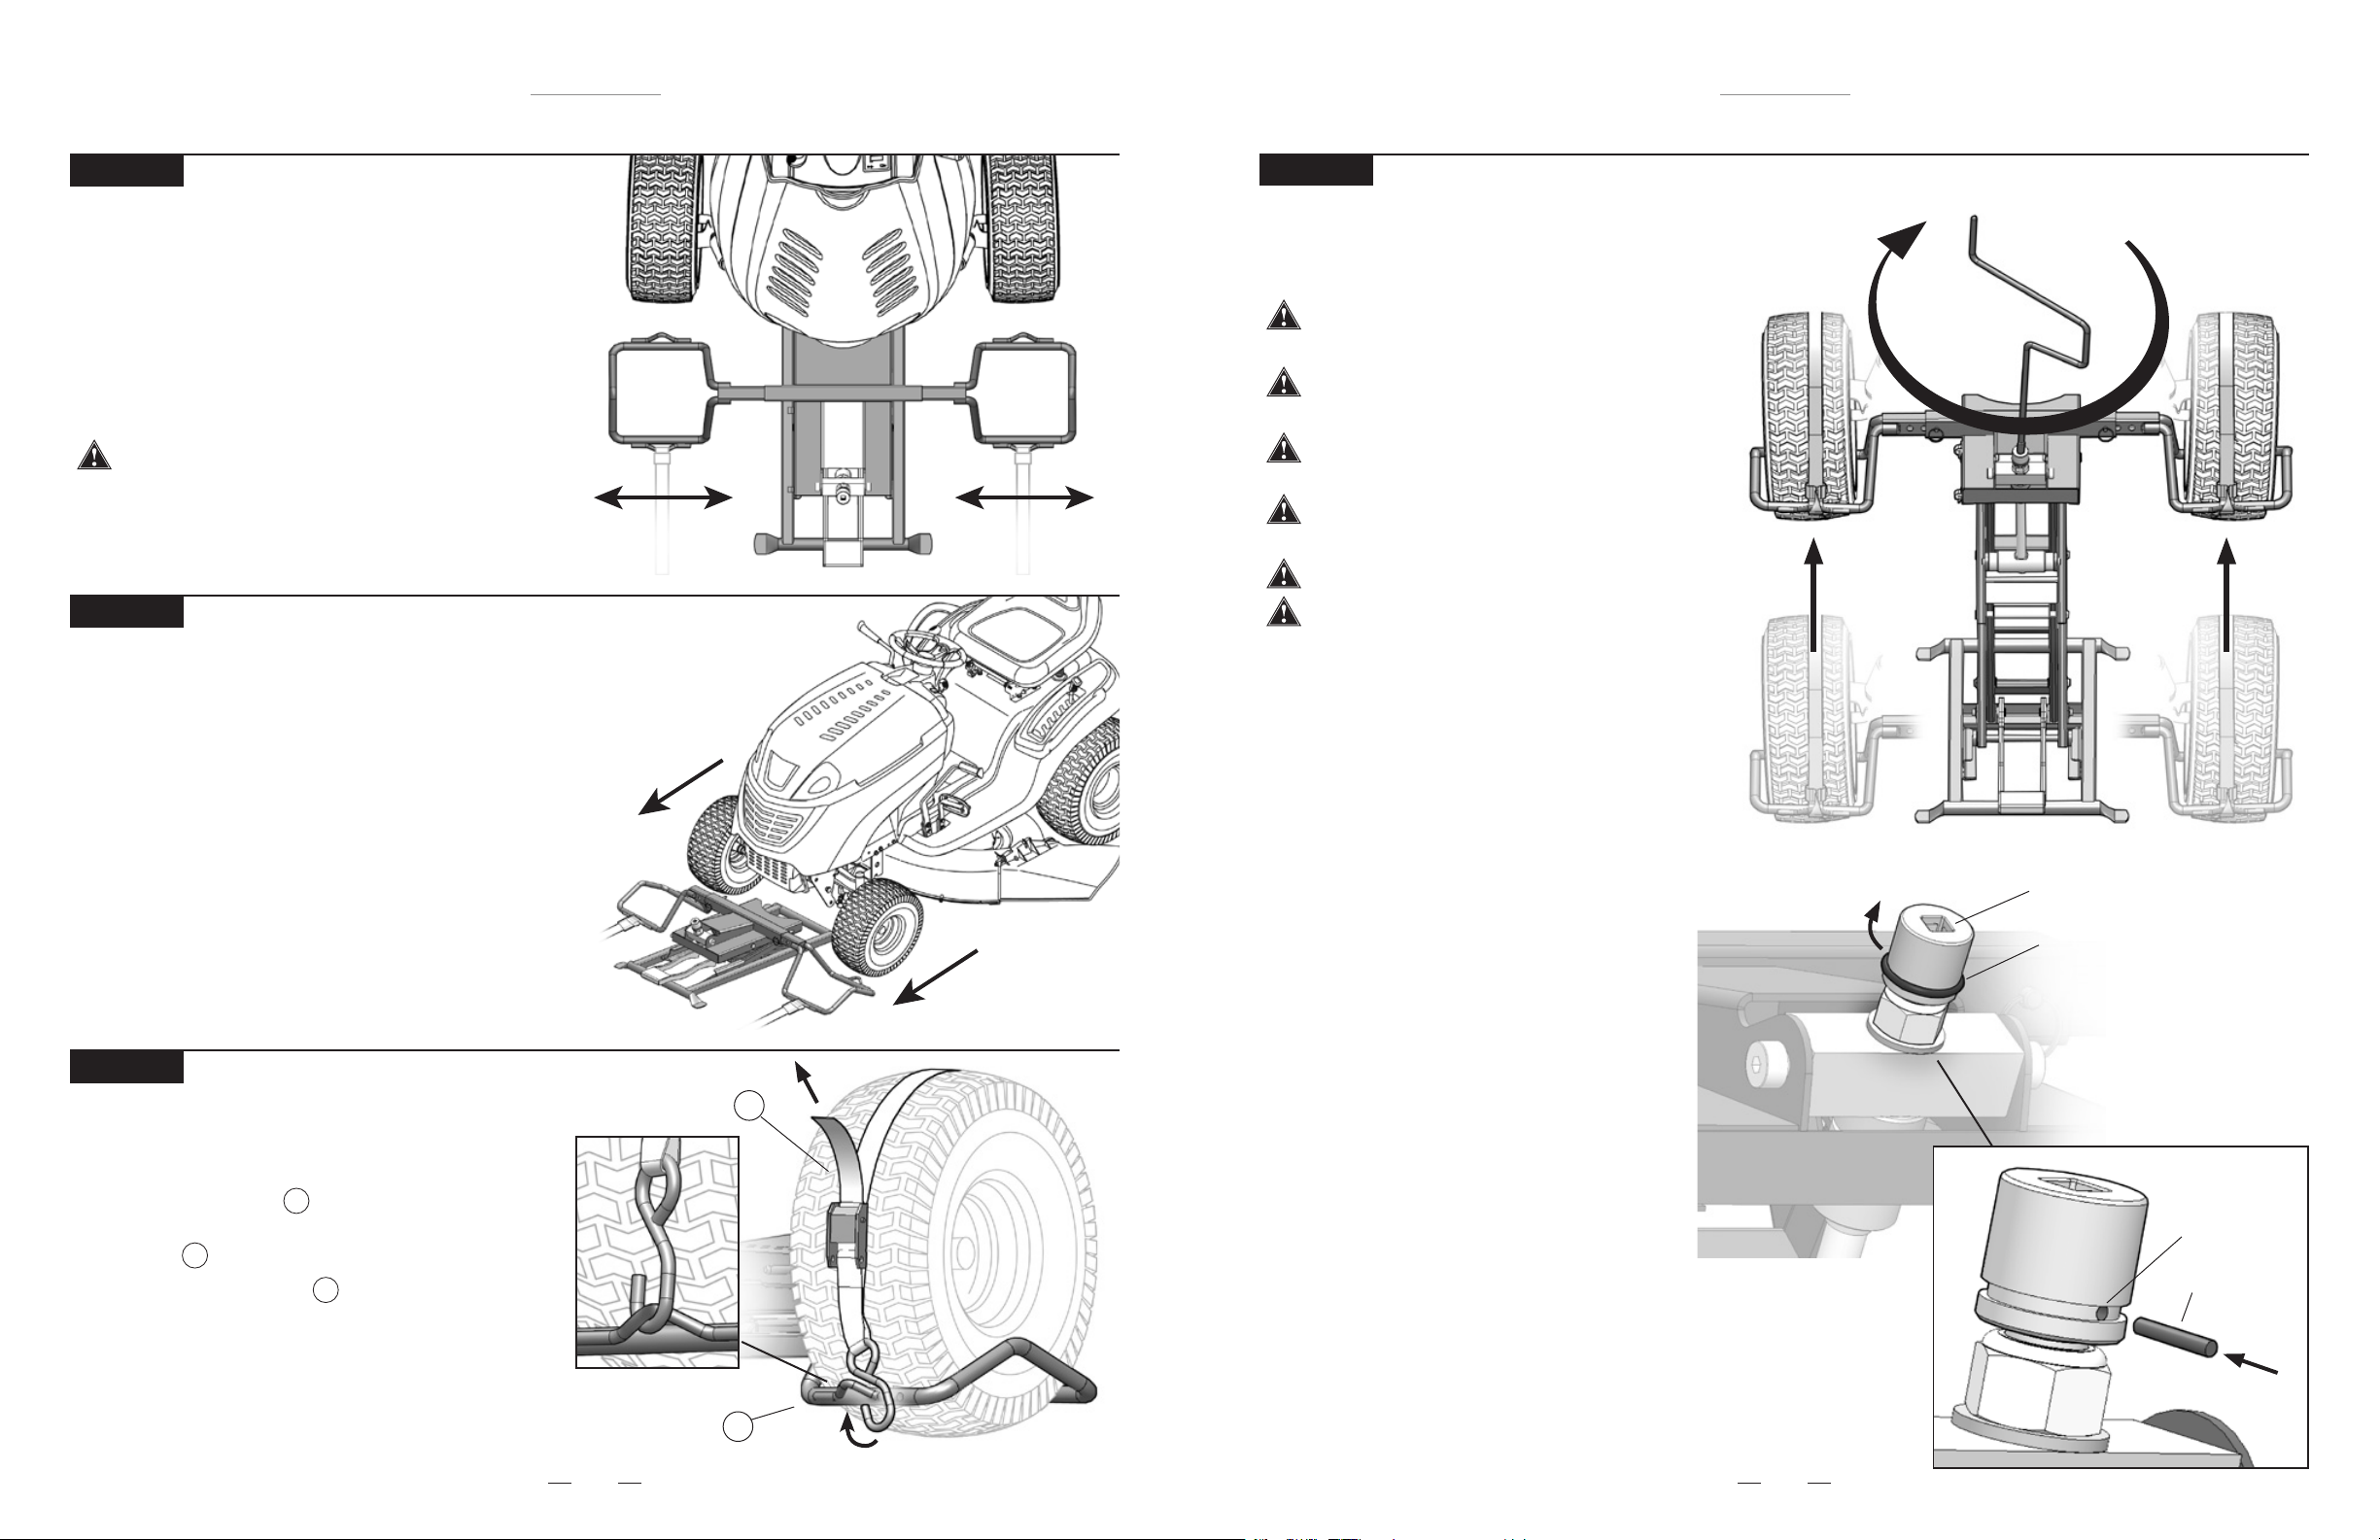
STEP 2
Assemble the Wheel Pad into the square
tube on the top of the Scissor Frame and
install Push Pins . Repeat with second
Wheel Pad.
5
2
1
Scissor Frame
Operating Instructions
The Operating Instructions will show how
to operate the MoJack ZR and show how to
prepare the MoJack ZR for storage.
Before using the MoJack ZR, carefully read this manual in its entirety.
STEP 1
Familiarize Yourself with the MoJack ZR
1
• Practice raising and lowering the MoJack ZR
before attempting to lift a mower (see Steps 5-8
on how to raise and lower a mower).
• Practice Step 10 if you intend to raise or lower
the mower with a drill attachment.
STEP 3
Insert the Crank Handle into the drive socket.
The square end of the Crank Handle is
tapered to make cranking more comfortable.
If the Crank Handle wobbles a little during use,
this is normal.
3
3
Push Pin
Wheel Pad
2
5
Crank Handle
3
Drive Socket
NOTE: Locking bar must be raised before lowering.
THIS COMPLETES ASSEMBLY.
6 7
Page 5
MoJack ZR Lift MoJack ZR Lift
Operating Instructions
STEP 2
Aligning Wheel Pads to Fit Mower
• Place the MoJack ZR wheel pads 6” in front of the
mower’s front tires.
• Remove Push Pins and align the Wheel Pads so that
the front tires will be centered on the Wheel Pads.
• Replace the Push Pins to lock the Wheel Pads to
the Scissor Frame.
Wheel Pads must be equal distance from the
Scissor Frame to maintain proper balance.
STEP 3
Move mower onto MoJack ZR
The MoJack ZR must be used on a solid level surface.
• Carefully roll or drive mower onto Wheel Pads.
• Place the mower in neutral or disengage hydraulic drive.
• Stop engine and remove the key.
Operating Instructions
STEP 5
Raising the Mower
• Raise the mower by rotating the Crank Handle clockwise.
• See Step 10 for raising the mower with drill attachment.
Do not attempt to lift more than 250 lbs.
front end weight.
The MoJack ZR must be used on
a solid level surface.
The engine must be turned off and
key removed.
The mower must be in neutral or
hydraulic drive disengaged.
The parking brake must be off during this step.
The Safety Straps must be firmly tightened
holding wheels to wheel pads.
NOTE: The MoJack ZR is equipped with a
Shear Pin to protect itself from accidental
overload. If the MoJack ZR is overloaded
with too much weight, the Shear Pin will
break and release the Crank Handle from
the screw and allow the Crank handle to
rotate freely. If this happens, a new
Shear Pin will need to be installed.
Drive Socket
O-Ring Retainer
STEP 4
Strapping Front Mower Tires to Wheel Pads
Secure the front mower tires to the Wheel Pads
using the Safety Straps.
• Wrap the safety strap over the mower tire
and secure the hook into the loop on the
wheel pad .
• Tighten the safety straps by pressing down
on the metal clip.
2
4
4
Replacement of Brass Shear Pin
• Remove the rubber O-ring retainer.
• Slide out the broken Shear Pin and replace
Safety Strap
Wheel Pad
8 9
4
2
with new Shear Pin provided with the
MoJack ZR. You may need to use a small
punch or nail to push out the broken
Shear Pin. DO NOT USE A DRILL TO
REMOVE SHEAR PIN.
• Replace the rubber O-ring retainer making
sure it is seated in the groove.
Shear Pin Hole
Shear Pin
Page 6
MoJack ZR Lift MoJack ZR Lift
Operating Instructions
STEP 6
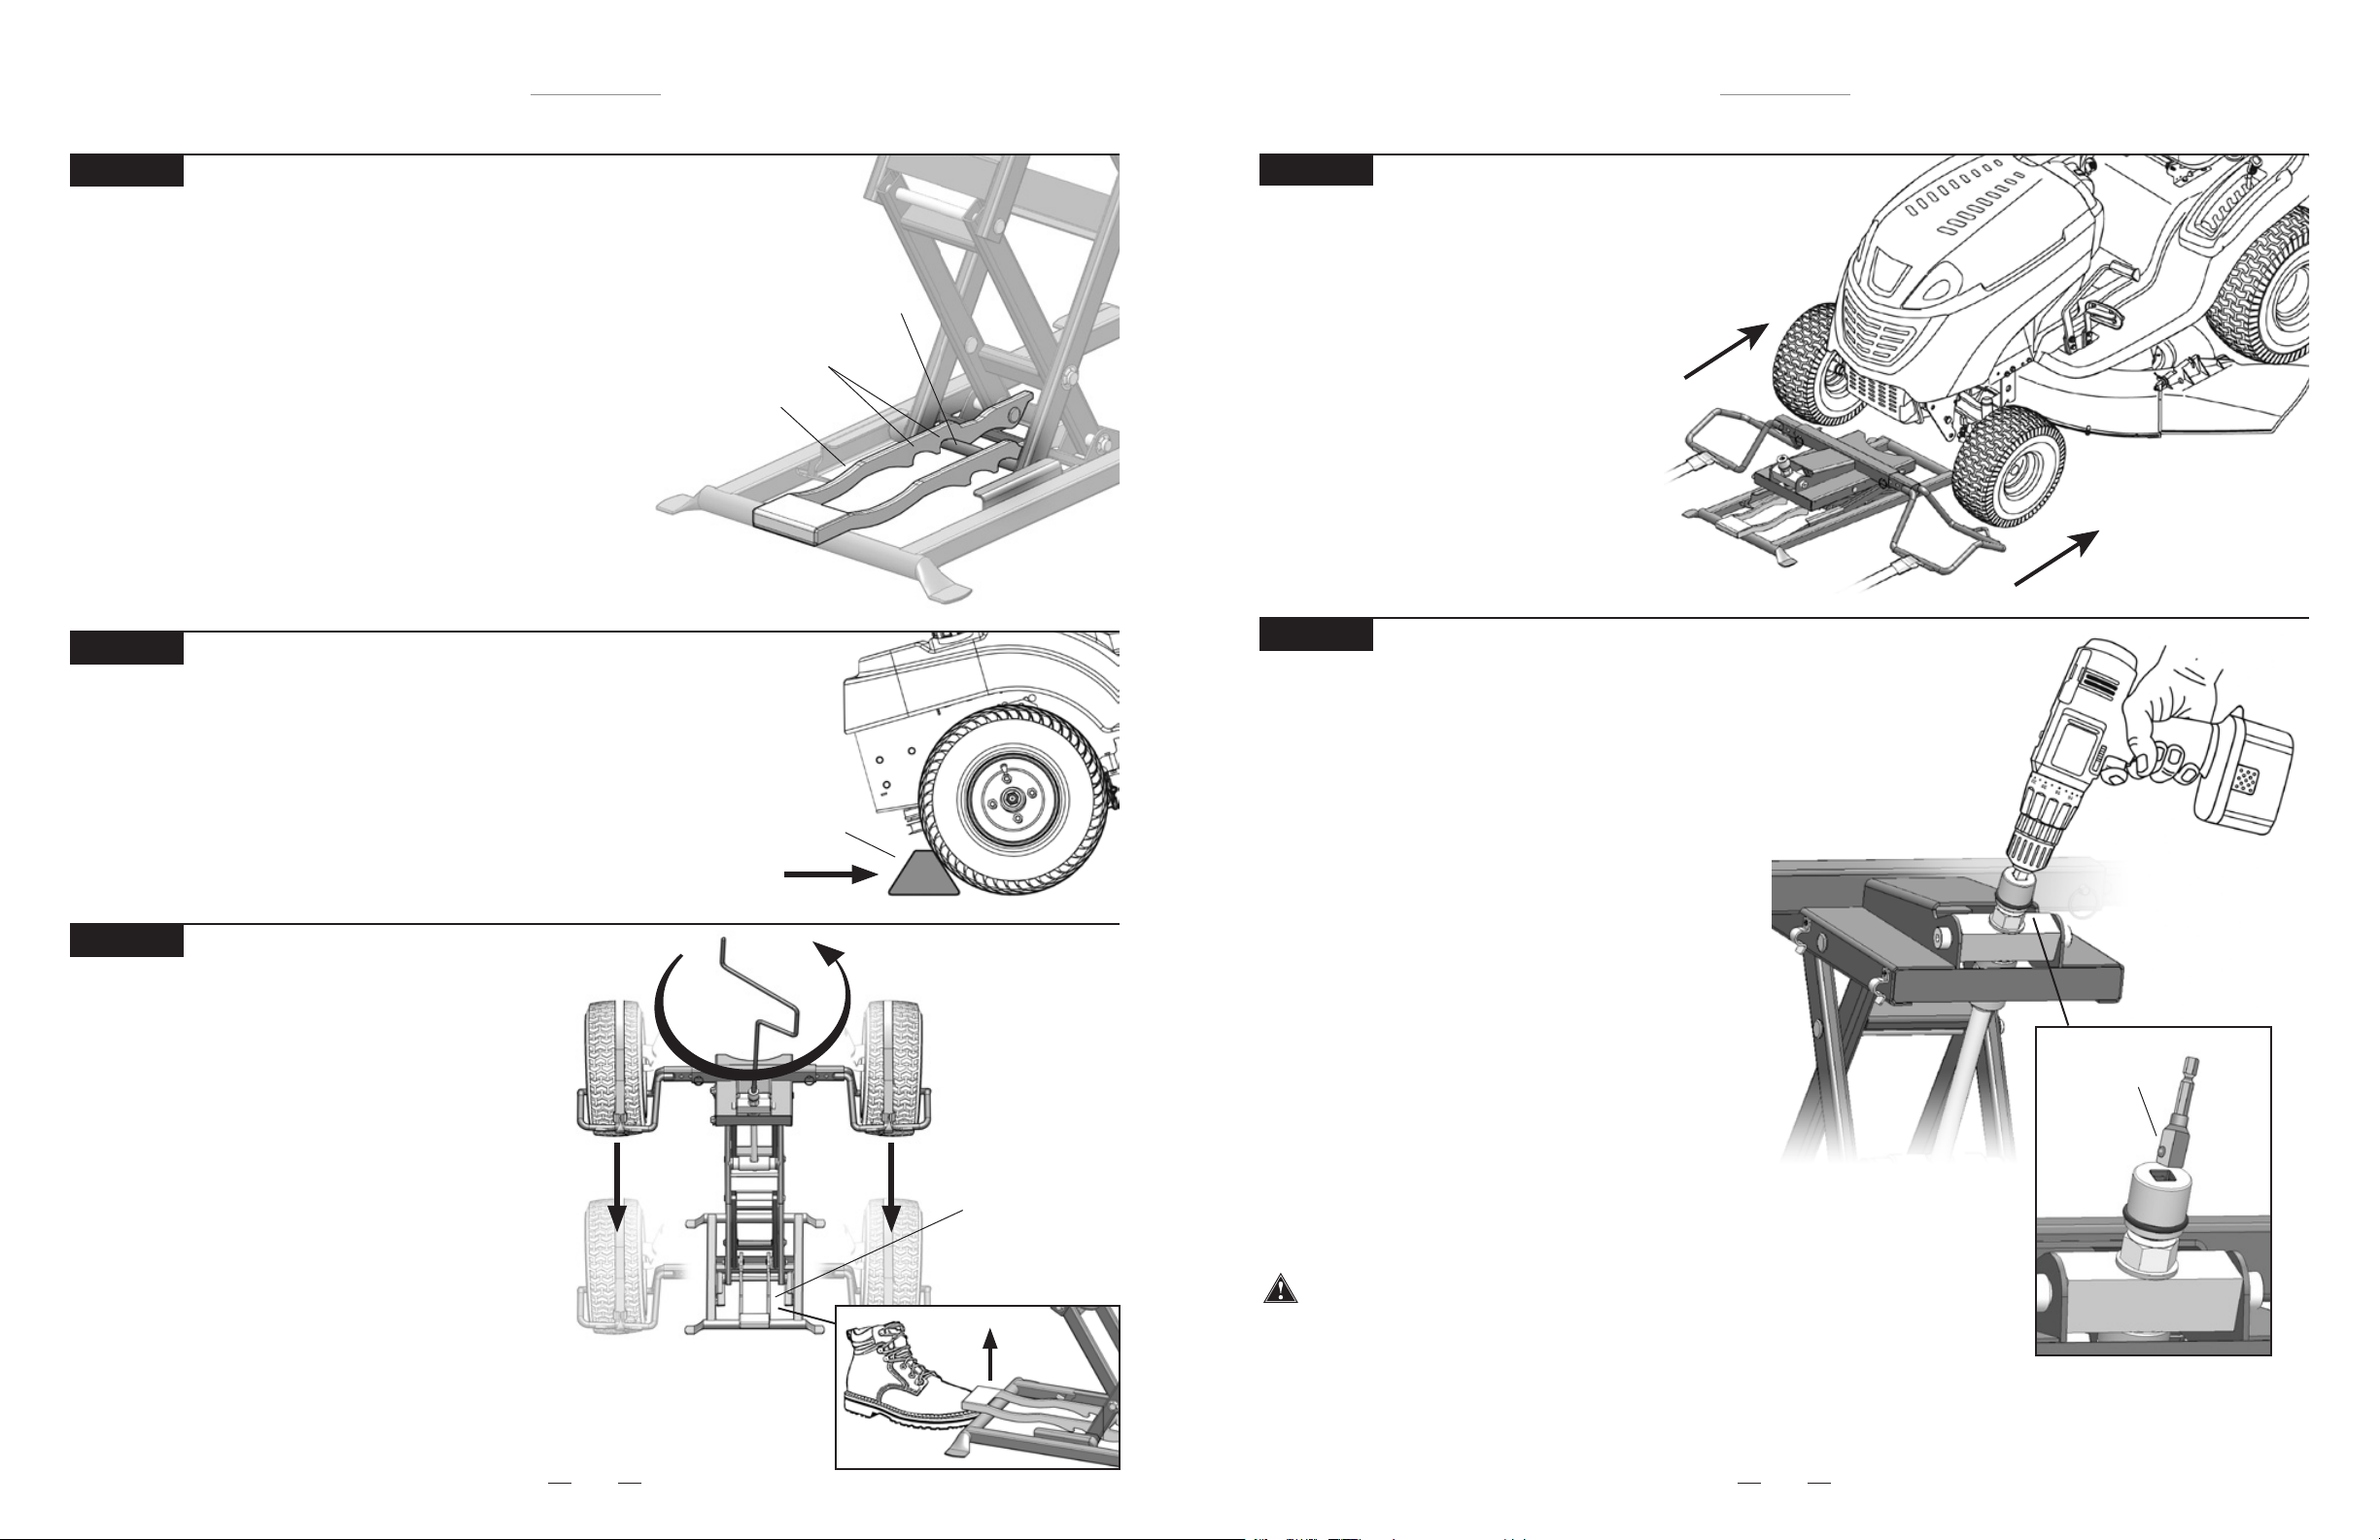
Raising MoJack ZR to Locking Position
• Raise the lift until the lower axle drops into one of the
two notches in the Locking Bar. The locking heights are
approximately 16” and 20” (full height).
• The Locking Bar automatically drops to engage the lower
axle when raising the MoJack ZR.
• When lowering the MoJack ZR, the Locking Bar must be
held up until the lower axle clears the last notch.
NOTE: The MoJack ZR is equipped with a clutch to protect
itself from accidental damage. If the Locking Bar is not
disengaged when lowering, the clutch will release the
Crank Handle from the screw and rotate freely. To re-engage
the Crank Handle, turn clockwise for a few turns.
STEP 7
Preparing the Mower for Service
• Place wheel chocks (not included) behind the back tires of the mower.
• Apply the parking brake on the mower.
• The lower axle must be engaged in one of the notches of the
Locking Bar.
Locking Bar
Lower Axle
Notches
Wheel Chock
Operating Instructions
STEP 9
Removing the Mower from the MoJack ZR
• Remove the Safety Straps from front mower tires.
• Drive or roll the mower off of the Wheel Pads.
STEP 10
Raising the MoJack ZR with a power drill (optional)
The MoJack ZR can be raised or lowered by using a
variable speed corded drill (7 amp minimum) or variable
speed cordless drill (18V minimum).
• The drill will require a 3/8” square driver (not included
but can be purchased at a hardware or home
improvement store).
STEP 8
Lowering the Mower
• Remove wheel chocks.
• Release the parking brake.
• Mower must be in neutral or hydraulic
drive disengaged.
• Lift up and hold the Locking Bar and turn the Crank
Handle counterclockwise until the wheel pads are
firmly on the ground. The Locking Bar must be lifted
up until it clears the last notch. It may be necessary
to raise the lift slightly to allow the Locking Bar to be
lifted up.
NOTE: The MoJack ZR is equipped with a clutch to
protect itself from accidental damage. If the Locking
Bar is not disengaged when lowering, the clutch will
release the Crank Handle from the screw and rotate
freely. To re-engage the Crank Handle, turn clockwise
for a few turns.
• Remove Crank Handle.
• Firmly insert the 3/8” square driver in the Square
Receiver. Rotate the drill forward (clockwise) to raise
the Lift Arm and rotate the drill in reverse (counterclockwise) to lower the Lift Arm.
• Locking Bar must be lifted and held up until it clears
the last notch.
NOTE: The MoJack ZR is equipped with a clutch to
protect itself from accidental damage. If the Locking
Bar is not disengaged when lowering, the clutch will
release the drill drive from the screw and rotate freely.
Lift Locking Bar
when lowering
To re-engage the drill drive, turn clockwise for a
few turns.
Operator must have a firm grip on the drill before raising or
lowering the Lift Arm.
• Follow all other operating instructions while using the drill attachment.
• Replace the Crank Handle as necessary for future use.
10 11
3/8” Square
Driver
Page 7

MoJack ZR Lift
Élévateur MoJack ZR
Operating Instructions
STEP 11
Preparing the MoJack ZR for Storage
• Remove the Push Pins , slide the
Wheel Pads to the narrowest position
and reinsert the Push Pins.
• Lower the MoJack ZR until the Wheel Pads
are firmly on the ground.
• Place the Crank Handle in the
storage clips.
2
5
THE MOJACK ZR IS NOW READY FOR STORAGE OR TRANSPORT.
Maintenance Schedule
Push Pin
Wheel Pad
2
5
Storage Clips
Introduction
Le présent manuel traite de l’assemblage et
des pièces ainsi que des directives d’utilisation,
d’entretien, de réglage et de sécurité pour votre
élévateur MoJack ZR.
AVANT D’UTILISER VOTRE MOJACK ZR, LISEZ
ATTENTIVEMENT CE MANUEL DANS SON
INTÉGRALITÉ.
En respectant ces directives d’utilisation, de maintenance et de sécurité, vous prolongerez la durée de
vie de votre élévateur MoJack et garantirez sa bonne
utilisation.
Si vous avez besoin de renseignements supplémentaires ou des services d’un mécanicien spécialisé,
veuillez contacter votre concessionnaire ou votre
distributeur d’équipement MoJack agréé.
Toutes les pièces du MoJack sont testées et
inspectées en profondeur avant de quitter l’usine afin
d’assurer qu’elles sont conformes à toutes les normes
de sécurité pertinentes.
• Before each use, always check for any worn,
loose or damaged parts on the MoJack ZR.
If any damaged parts are present, do not use
the MoJack ZR and contact MoJack at
1-877-575-3173.
• Clean and oil the screw thread after every
50 uses or at least once a year using light
machine oil.
• Place lithium grease between all the pivot
points after every 50 uses or once a year.
• Add a few drops of light machine oil to the
thrust bearing after every 50 uses or once
a year.
Oil Thrust
Bearing
Clean and oil
Screw Thread
Grease all
pivot points
REMARQUE : Veuillez conserver une copie de ce
manuel pour usage ultérieur.
REMARQUE : Emplacement du numéro de série de
la pièce.
Besoin D’assistance?
NE retournez PAS ce produit au magasin.
Notre Service client est disposé à vous aider!
1-877-575-3173
Veuillez soumettre vos questions en ligne sur:
www.theMoJack.com
12
Brevet d’invention en instance.
© 2012 (MoJack Distributors, LLC.)
MoJack et le logo MoJack sont des marques déposées de MoJack Distributors, LLC.
MoJack ZR est une marque déposée de MoJack Distributors, LLC.
13
Page 8

Élévateur MoJack ZR Élévateur MoJack ZR
Mises en garde et consignes de sécurité
Lisez et comprenez toutes les consignes de sécurité et d’utilisation avant d’utiliser le MoJack ZR.
N’autorisez jamais une personne peu familière avec les directives de sécurité ou d’utilisation à se servir du MoJack ZR.
Suivez toutes les directives de sécurité et d’entretien fournies par le fabricant de la tondeuse à gazon avant d’utiliser le MoJack ZR.
Ne modifiez le MoJack ZR d’aucune façon. Toute modification annulera toute garantie et risque de compromettre votre sécurité
personnelle.
Lors de l’utilisation du MoJack ZR, gardez toutes les personnes spectatrices à une distance sécuritaire.
Le MoJack ZR doit être utilisé sur une surface solide et plane.
Ne soulevez pas la partie avant et arrière de la tondeuse à gazon au même moment.
Utilisez uniquement le MoJack ZR pour les tondeuses dont le poids de la partie avant est inférieur à 113 kg et qui s’insèrent
convenablement dans les appuis de roue fournis (c.-à-d. de 25 à 43 cm de diamètre et avec des dimensions extérieures de roue
comprises entre 86 et 110 cm).
Arrêtez toujours le moteur et enlevez la clé avant de commencer à travailler sur la tondeuse.
Positionnez toujours la tondeuse au point mort ou désengagez la transmission hydraulique conformément au guide d’utilisation
de la tondeuse.
Ne mettez jamais le moteur en marche pendant l’utilisation du MoJack ZR.
Ne dépassez pas la charge de levage de 113 kg.
On observe une condition de surcharge lorsque la goupille de sécurité du MoJack ZR lâche, laissant la poignée de la manivelle
tourner librement lors du soulèvement de la tondeuse. Retirez l’équipement de conduite immédiatement.
Garantie et Retours
GARANTIE LIMITÉE
Pendant deux ans pour une utilisation résidentielle uniquement, MoJack garantit le produit contre tout défaut de pièce
ou de fabrication lorsque le produit est utilisé de façon appropriée. MoJack remplacera sans frais toute pièce. La présente garantie ne couvre pas les produits qui ont été modifiés ou ajustés ou tout produit ayant été mal utilisé ou ayant fait l’objet d’une
utilisation abusive. IL S’AGIT DU RECOURS UNIQUE ET EXCLUSIF DU CLIENT. MOJACK DÉCLINE TOUTE GARANTIE,
INCLUANT LA GARANTIE DE QUALITÉ MARCHANDE ET D’ADAPTATION À UN BUT PARTICULIER. MOJACK NE SERA
PAS TENUE RESPONSABLE DE TOUT DOMMAGE INDIRECT OU ACCESSOIRE. CERTAINS ÉTATS OU PROVINCES
NE PERMETTENT PAS L’EXCLUSION OU LA LIMITATION DE GARANTIE IMPLICITE OU LE RECOURS POUR LA VIOLATION DE GARANTIE IMPLICITE, LES PRÉSENTES EXCLUSIONS PEUVENT AINSI NE PAS S’APPLIQUER À VOUS.
CETTE GARANTIE LIMITÉE VOUS DONNE DES DROITS JURIDIQUES SPÉCIFIQUES, ET VOUS POUVEZ ÉGALEMENT
AVOIR D’AUTRES DROITS QUI VARIENT D’UN ÉTAT À L’AUTRE OU D’UNE PROVINCE À L’AUTRE.
Quels sont les éléments couverts par cette garantie?
Cette garantie couvre un défaut de matériel ou de fabrication à l’intérieur de deux ans de l’achat pour une utilisation
résidentielle uniquement.
Quels sont les éléments NON couverts par cette garantie?
Cette garantie ne s’applique à aucun appareil MoJack dont la forme originale a été modifiée ou ajustée de quelque façon que
ce soit. De plus, elle ne s’applique à aucun appareil MoJack endommagé à la suite d’une mauvaise utilisation, une utilisation
abusive, un accident ou une négligence. La présente garantie n’assure aucune protection contre les dommages indirects ou
accessoires.
Le verrou des ciseaux doit être activé avant de commencer à travailler sur la tondeuse.
Ne retirez pas les avertissements ou les décalques de sécurité du MoJack ZR.
Avant chaque utilisation, cherchez toujours toute pièce usée, desserrée ou endommagée sur le MoJack ZR. Dans le cas où une
pièce est endommagée, n’utilisez pas le MoJack ZR et contactez MoJack au numéro 1-877-575-3173.
Ne grimpez pas sur la tondeuse lorsqu’elle est en position soulevée, ou lors de son levage ou abaissement.
Personne ne doit se trouver sur la tondeuse lorsqu’elle est en position soulevée, ou lors de son levage ou abaissement.
Après avoir soulevé la tondeuse à la hauteur de travail, placez toujours les cales de roues (non comprises) derrière les roues arrières de la tondeuse.
Les appuis de roue doivent être à une distance égale afin de garantir un bon équilibre.
Enlevez tous les accessoires attachés à la tondeuse avant d’utiliser le MoJack ZR.
Certaines tondeuses équipées d’un évent de réservoir à carburant peuvent déverser le carburant en position soulevée.
Si ce phénomène se produit, abaissez le niveau du carburant dans le réservoir pour éviter le déversement.
Le non-respect de ces mises en gardes pourrait entraîner des dommages matériels et de graves préjudices corporels ou la mort.
IMPORTANT: le MoJack ZR est conçu pour être utilisé uniquement avec les tondeuses. N’excédez pas la capacité
de charge de 113,40 kg sur la partie avant. Il ne doit jamais être utilisé dans l’entretien des tondeuses avec une
capacité de charge avant supérieure à 181,43 kg.
Quelle est la période de couverture de la garantie?
Garantie de deux ans pour l’utilisation résidentielle à compter de la date d’achat par le propriétaire original.
Comment MoJack résoudra-t-il les problèmes?
Nous remplacerons, sans frais, toute pièce défectueuse (au cours de la période de couverture).
Comment puis-je obtenir du service?
Afin d’avoir droit au service en vertu de la présente garantie, vous DEVEZ enregistrer votre MoJack dans les trente (30) jours
suivant l’achat. Après une période de trente (30) jours, vous devez fournir une preuve d’achat (reçu) pour enregistrer le produit.
Veuillez enregistrer votre nouvel élévateur MoJack sur notre site Internet www.themojack.com ou appeler notre
numéro sans frais au 1-877-4MO-JACK.
Coordonnées de MoJack pour la résolution de problèmes liés à la garantie?
Vous pouvez nous contacter à partir de notre site Internet au www.themojack.com ou appeler notre numéro sans frais
au 1-877-575-3173.
Ai-je d’autres droits en vertu des lois provinciales?
La présente garantie vous confère des droits spécifiques. Vous pouvez également jouir d’autres droits qui varient d’un état à
l’autre et d’une province à l’autre.
Quelle est la politique de retour?
Veuillez ne pas retourner ce produit au magasin. Veuillez contacter MoJack au sujet des politiques et procédures de
retour à notre numéro sans frais 1-877-575-3173 ou par courriel à info@themojack.com.
Comment dois-je contacter MoJack?
Vous pouvez appeler notre numéro sans frais au 1-877-575-3173 ou par courriel à info@themojack.com.
14 15
Page 9

Élévateur MoJack ZR Élévateur MoJack ZR
Liste des Pièces
N° de
l’article
1
2
3
4
5
6
REMARQUE : Aucun outil ou attache n’est requis pour l’assemblage.
REMARQUE : La goupille de sécurité en cuivre est jointe à ce manuel d’utilisateur.
4
N° de la pièce
508-0000
508-0044
508-0035
009-0007
001-0013
001-0015
Qté Description
1
2
1
2
2
2 Spares
Assemblage de ciseaux de levage
Appui de roue
Poignée de la manivelle
Sangle de sécurité
Goupille-poussoir
Goupille de sécurité en cuivre
6
3
Directives d’assemblage
ÉTAPE 1
Retirez le MoJack ZR de l’emballage.
Vérifiez les articles pour vous assurer que toutes les pièces
et la quincaillerie sont présentes. Si des pièces ou de la
quincaillerie sont manquantes, veuillez contacter MoJack
au 1-877-575-3173 ou nous envoyer un courriel à l’adresse
suivante: parts@themojack.com.
ÉTAPE 2
Assemblez l’appui de roue dans le tube
carré au-dessus du cadre des ciseaux et
4
installez les goupilles-poussoirs . Procédez de la
même façon avec le deuxième appui de roue.
2
1
5
Cadre de ciseaux
1
Goupille-poussoir
Appui de
1
5
5
2
2
ÉTAPE 3
Insérez la poignée de la manivelle dans la prise
d’entraînement. L’extrémité carrée de la poignée de la
manivelle est fuselée pour rendre le démarrage
plus confortable. Un léger chancellement de la
poignée de la manivelle pendant l’utilisation est un
phénomène normal.
3
3
2
roue
5
Poignée de la manivelle
3
Prise d’entraînement
CECI COMPLÈTE L’ASSEMBLAGE.
16 17
Page 10

Élévateur MoJack ZR Élévateur MoJack ZR
Directives d’utilisation
Les directives d’utilisation indiqueront comment
il convient d’utiliser le MoJack ZR et de préparer
le MoJack ZR au rangement.
Avant d’utiliser le MoJack ZR, lisez attentivement le présent manuel dans son intégralité.
ÉTAPE 1
Familiarisez-vous avec le MoJack ZR
• Exercez-vous à soulever et abaisser le MoJack ZR
avant d’essayer de soulever une tondeuse (voir les étapes
5-8 sur le levage et l’abaissement d’une tondeuse).
• Pratiquez l’étape 10 si vous souhaitez soulever ou abaisser
la tondeuse à l’aide d’une perceuse.
REMARQUE : la barre de verrouillage doit être soulevée
avant d’être abaissée.
Directives d’utilisation
ÉTAPE 2
Alignez les appuis de roues à la tondeuse
• Placez les appuis de roue MoJack à 15,24 cm devant les
pneus avant de la tondeuse.
• Retirez les goupilles-poussoirs et alignez les appuis de
roue pour que les pneus avant soient centrés par rapport
à ces derniers.
• Remplacez les goupilles-poussoirs pour verrouiller les appuis de roue au cadre de ciseaux.
Les appuis de roue doivent être à une distance
égale du cadre des ciseaux afin de garantir un
bon équilibre.
ÉTAPE 3
Déplacez la tondeuse sur le MoJack ZR
Le MoJack ZR doit être utilisé sur une surface solide et plane.
• Poussez minutieusement la tondeuse dans les appuis de roue.
• Positionnez toujours la tondeuse au point mort ou relâchez la
transmission hydraulique.
• Arrêtez le moteur et enlevez la clé.
ÉTAPE 4
Fixez les pneus avant de la tondeuse sur les appuis
de roue
Fixez solidement les pneus de la tondeuse sur les appuis
de roue à l’aide des sangles de sécurité.
• Entourez la sangle de sécurité autour du pneu de
la tondeuse et fixer l’anneau dans le trou sur appui
de roue .
• Serrez les sangles de sécurité en appuyant sur la
pince métallique.
18 19
2
4
4
Sangle de sécurité
Appui de roue
4
2
Page 11

Élévateur MoJack ZR Élévateur MoJack ZR
Directives d’utilisation
ÉTAPE 5
Soulèvement de la tondeuse
• Soulevez la tondeuse en faisant tourner la poignée de la
manivelle dans le sens des aiguilles d’une montre.
• Voir l’étape 10 sur le soulèvement de la tondeuse
à l’aide d’une perceuse.
N’essayez pas de soulever plus de 113,40 kg
de poids avant.
Le MoJack ZR doit être utilisé sur une surface
solide et plane.
Le moteur doit être éteint et la clé enlevée.
La tondeuse doit être au point mort ou la
transmission hydraulique doit être désactivée.
Le frein de stationnement ne doit pas être
actionné pendant cette étape.
Les sangles de sécurité doivent être solidement
serrées en tenant les roues sur les appuis
de roue.
REMARQUE : Le MoJack ZR est équipé d’une
goupille de sécurité qui la protège de la surcharge
accidentelle. Si le MoJack ZR est surchargé, la
goupille de sécurité lâchera et libérera la poignée
de la manivelle de la vis et permettra à la poignée
de la manivelle de tourner librement. Si ce phénomène se produit, une nouvelle goupille de
sécurité devra être installée.
Prise d’entraînement
Bague d’arrêt annulaire
Directives d’utilisation
ÉTAPE 6
Soulèvement du MoJack ZR à la position verrouillée
• Soulevez l’élévateur jusqu’à ce que l’axe inférieur tombe dans
l’une des encoches de la barre de verrouillage. Les hauteurs de
verrouillage sont environ de 40 et 50 cm (hauteur totale).
• La barre de verrouillage s’affaisse automatiquement pour
actionner l’axe inférieur lors du soulèvement du MoJack ZR.
• Lors de l’abaissement du MoJack ZR, la barre de verrouillage
doit être élevée jusqu’à ce que l’axe inférieur dépasse la
dernière encoche.
REMARQUE: Le MoJack ZR est équipé d’un embrayage qui le
protège contre les dommages matériels. Si la barre de verrouillage
n’est pas relâchée lors de l’abaissement, l’embrayage relâchera la
poignée de la manivelle de la vis et tournera librement. Pour réactiver
la poignée de la manivelle, faites lui faire quelques tours dans le sens
des aiguilles d’une montre.
ÉTAPE 7
Préparation de la tondeuse pour l’entretien
• Placez les cales de roue (non incluses) derrière les pneus arrière
de la tondeuse.
• Appuyez sur le frein de stationnement de la tondeuse.
• L’axe inférieur doit être actionné dans l’une des encoches de
la barre de verrouillage.
ÉTAPE 8
Lower Axle
Notches
Locking Bar
Cale de roue
Remplacement de la goupille de sécurité
en cuivre
• Retirez la bague d’arrêt annulaire.
• Faites glisser la goupille de sécurité et
remplacez-la par une nouvelle goupille fournie
avec le MoJack ZR. Vous pourriez avoir besoin
d’utiliser un petit poinçon ou un clou pour retirer
la goupille de sécurité cassée. N’UTILISEZ
PAS UNE PERÇEUSE POUR ENLEVER UNE
GOUPILLE DE SÉCURITÉ.
• Retirez la bague d’arrêt annulaire en caoutchouc,
en vous assurant qu’elle est assise sur la rainure.
Abaissement de la tondeuse
• Retirez les cales de roue.
• Relâchez le frein à main.
• La tondeuse doit être au point mort ou la transmission
hydraulique doit être désactivée.
• Soulevez et maintenez la barre de verrouillage et tournez
la poignée de la manivelle dans le sens contraire des
Trou de la goupille
de sécurité
Goupille de
sécurité
20 21
aiguilles d’une montre jusqu’à ce que les appuis de roue
soient solidement fixés sur le sol. La barre de verrouillage
doit être soulevée jusqu’à ce qu’elle dépasse la dernière
encoche. Il pourrait être nécessaire de soulever l’élévateur
légèrement pour permettre à la barre de verrouillage d’être
soulevée.
REMARQUE: Le MoJack ZR est équipé d’un embrayage qui le
protège contre les dommages matériels. Si la barre de verrouillage
n’est pas désactivée lors de l’abaissement, l’embrayage relâchera
la poignée de la manivelle de la vis et tournera librement. Pour
réactiver la poignée de la manivelle, faites lui faire quelques tours
dans le sens des aiguilles d’une montre.
Soulevez la barre
de verrouillage lors
de l’abaissement
Page 12

Élévateur MoJack ZR Élévateur MoJack ZR
Directives d’utilisation
ÉTAPE 9
Retrait de la tondeuse du MoJack ZR
• Retirez les sangles de sécurité des pneus avant de la
tondeuse.
• Retirez la tondeuse des appuis de roue.
ÉTAPE 10
Soulèvement du MoJack ZR à l’aide d’une perceuse
mécanique (facultatif)
Le MoJack peut être soulevé à l’aide d’une perceuse avec fil à
vitesse variable (7 amp minimum) ou d’une perceuse sans fil à
vitesse variable (18V minimum).
Directives d’utilisation
ÉTAPE 11
Préparation du MoJack ZR au rangement
• Retirez les goupilles-poussoirs , faites
glisser les appuis de roue vers la position
plus étroite et réinsérez les goupilles-poussoirs.
• Abaissez le MoJack ZR jusqu’à ce que
les appuis de roue soient solidement
fixés sur le sol.
• Placez la poignée de la manivelle dans
les pinces de rangement.
5
2
LE MOJACK ZR EST MAINTENANT PRÊT AU RANGEMENT OU AU TRANSPORT.
Programme de maintenance
Goupille-poussoir
Appui de
2
roue
5
Pinces de
rangement
• La perceuse exigera un tournevis carré de 9,5 mm (non
compris, mais qui peut être acheté dans une quincaillerie ou
un magasin de rénovation).
• Retirez la poignée de la manivelle.
• Insérez fermement le tournevis carré de 9,5 mm dans le
récepteur carré. Imprimez une rotation de la perceuse vers
l’avant (dans le sens des aiguilles d’une montre) pour
soulever le bras de levage et tournez-la dans le sens
contraire (des aiguilles d’une montre) pour abaisser le
bras de levage.
• La barre de verrouillage doit être soulevée jusqu’à ce qu’elle
dépasse la dernière encoche.
REMARQUE: Le MoJack ZR est équipé d’un embrayage
qui le protège contre les dommages matériels. Si la barre de
verrouillage n’est pas désactivée lors de l’abaissement,
l’embrayage relâchera la poignée de la manivelle de la vis et
tournera librement. Pour réactiver la poignée de la manivelle,
faites la tourner dans le sens des aiguilles d’une montre
pendant quelques minutes.
Le conducteur doit saisir fermement la tondeuse avant de soulever ou d’abaisser
le bras de levage.
• Suivez toutes les directives d’utilisation pendant l’utilisation de la perceuse.
Tournevis carré
de 9,25 mm
• Avant chaque utilisation, cherchez toujours toute
pièce usée, desserrée ou endommagée sur le
MoJack ZR. Dans le cas où il y aurait des pièces
endommagées, n’utilisez pas le MoJack ZR et
contactez MoJack au 1-877-575-3173.
• Nettoyez et huilez tout le filet de vis après toutes
les cinquante (50) utilisations ou au moins une
fois l’an à l’aide d’une huile mouvement légère.
• Placez la graisse au lithium entre tous les points
pivots toutes les cinquante (50) utilisations ou au
moins une fois l’an.
• Ajoutez quelques gouttes d’huile mouvement
légère au palier de butée toutes les 50 fois qu’il
est utilisé ou une fois par an.
Huilez la palier
de butée
Nettoyez et
huilez le filet
de vis
Graissez tous
les points pivots
• Replacez au besoin la poignée de la manivelle pour usage ultérieur.
22 23
Page 13

Elevador MoJack ZR Elevador MoJack ZR
Introducción
Este manual contiene las instrucciones de montaje,
las piezas, el funcionamiento, mantenimiento, ajuste y
seguridad de su elevador MoJack ZR.
ANTES DE USAR SU EQUIPO MOJACK ZR, LEA
COMPLETAMENTE ESTE MANUAL.
Al seguir estas instrucciones de funcionamiento,
mantenimiento y seguridad, usted aumentará la
vida útil de su elevador MoJack y promoverá un
funcionamiento seguro.
Si necesita información adicional o requiere un
servicio mecánico certificado, póngase en contacto
con su distribuidor o concesionario de equipo
MoJack autorizado.
Todas las partes MoJack se prueban y revisan por
completo antes de salir de la fábrica, para garantizar
que cumple con todos los estándares de seguridad
aplicables.
Advertencias e instrucciones de seguridad
Lea y comprenda todas las instrucciones de seguridad y funcionamiento antes de usar el MoJack ZR.
Nunca permita que las personas no familiarizadas con las instrucciones de operación o seguridad, usen el MoJack ZR.
Siga todas las instrucciones de seguridad y servicio ofrecidas por el fabricante de la podadora, antes de usar el equipo MoJack ZR.
No modifique de ningún modo el equipo MoJack ZR. Cualquier modificación anulará todas y cada una de las garantías y podría
comprometer su seguridad personal.
Cuando use el equipo MoJack ZR, mantenga TODOS los espectadores a una distancia segura, lejos del MoJack ZR.
El equipo MoJack ZR debe usarse en una plataforma de servicio sólida y nivelada.
Nunca eleve al mismo tiempo el frente y la parte posterior de la podadora.
Use el equipo MoJack ZR únicamente para podadoras con un peso frontal menor de 113 kilos y que se ajuste adecuadamente en
las plataformas incluidas para las ruedas. (Es decir, con diámetros de 10 a 17 pulgadas y con la rueda exterior con dimensiones
de 86 a 110 cm.
Detenga siempre el motor y quite la llave antes de iniciar cualquier trabajo con la podadora.
Coloque siempre la podadora en neutral o desenganche la transmisión hidráulica conforme al manual del propietario de la podadora.
Nunca opere el motor mientras usa el equipo MoJack ZR.
No exceda la capacidad de carga de 113 kilos de peso delantero.
NOTA: Guarde este manual para usarlo en el futuro.
NOTA: Ubicación del Número de serie de la unidad.
¿Necesita ayuda?
NO devuelva este producto a la tienda.
¡Nuestro departamento de servicio para el cliente está listo para ayudarle!
1-877-575-3173
Haga sus preguntas en línea en:
Si se rompe el pasador de seguridad del equipo MoJack ZR, permitiendo que la palanca de manivela gire libremente mientras se carga
la podadora, esto indica que existe una condición de sobrecarga. Retire de inmediato el equipo de montaje.
Se debe enganchar la tijera de bloqueo antes de iniciar cualquier tarea de servicio en la podadora.
No deben retirarse las calcomanías, ni las advertencias de seguridad, en el equipo MoJack ZR.
Antes de cada uso, revise siempre que no haya piezas desgastadas, sueltas o dañadas en el equipo MoJack ZR. No use el equipo
MoJack ZR si tiene partes dañadas, póngase en contacto con MoJack llamando al 1-877-575-3173.
No suba a la podadora mientras se encuentre elevada, al ascender, o al descender.
Nadie debe subir a la podadora mientras se encuentre elevada, al ascender, o al descender.
Después de que la podadora se eleve hasta alcanzar la altura de trabajo, coloque siempre las calzas (no incluidas) detrás de las
ruedas posteriores de la podadora.
Las plataformas de las ruedas deben colocarse a una distancia igual, para mantener un equilibrio adecuado.
Retire todos los accesorios de la podadora, antes de usar el equipo MoJack ZR.
Algunas podadoras que se encuentran equipadas con un escape en el tanque de combustible, pueden derramar combustible
mientras se levantan. Si esto sucediera, ejecute el procedimiento de reducción del nivel de combustible dentro del tanque,
para prevenir derrames.
El no seguir estas instrucciones puede dar como resultado daños materiales y lesiones corporales serias o incluso la muerte.
www.theMoJack.com
Patente en trámite.
© 2012 (MoJack Distributors, LLC.)
MoJack y el logotipo de MoJack son marcas registradas de MoJack Distributors, LLC.
MoJack ZR es una marca registrada de MoJack Distributors, LLC. Todos los derechos reservados.
24 25
IMPORTANTE: El equipo MoJack ZR está diseñado para usarse únicamente con podadoras. El peso frontal no
debe ser mayor que 113 kilos. Este equipo nunca deberá usarse para darle servicio a podadoras con un peso frontal
mayor que 113 kilos.
Page 14

Elevador MoJack ZR Elevador MoJack ZR
Garantía y devoluciones Lista de partes
GARANTÍA LIMITADA
Por dos años, únicamente para uso residencial, MoJack garantiza el producto contra fallas debidas a defectos en los materiales o la mano
de obra, cuando el producto se usa adecuadamente. MoJack reemplazará cualquier parte defectuosa sin ningún costo. Esta garantía no
cubre a ningún producto que se haya alterado o ajustado, ni a productos que se hayan usado inadecuadamente o excesivamente. ESTA ES
LA SOLUCIÓN ÚNICA Y EXCLUSIVA PARA EL CLIENTE. MOJACK NO SE RESPONSABILIZA POR NINGUNA GARANTÍA IMPLÍCITA,
INCLUIDAS LAS GARANTÍAS DE COMERCIALIZACIÓN O ADECUACIÓN PARA UN USO EN PARTICULAR. MOJACK NO SERÁ
RESPONSABLE DE NINGÚN DAÑO INCIDENTAL O CONSECUENTE. EN ALGUNOS ESTADOS O PROVINCIAS NO SE PERMITE LA
EXCLUSIÓN O LIMITACIÓN DE LAS GARANTÍAS IMPLÍCITAS O LAS SOLUCIONES POR DESVIACIÓN DE LAS GARANTÍAS
IMPLÍCITAS, DE MODO QUE ESTAS EXCLUSIONES PODRÍAN NO SER APLICABLES A USTED. ESTA GARANTÍA LIMITADA LE
OTORGA DERECHOS LEGALES ESPECÍFICOS, ASIMISMO USTED PUEDE GOZAR DE OTROS DERECHOS, LOS CUALES
VARÍAN DE UNA PROVINCIA A OTRA O DE UN ESTADO A OTRO.
¿Qué cubre esta garantía?
Esta garantía cubre las averías derivadas de defectos en materiales o mano de obra, por dos años, contados a
partir de la fecha de compra y solamente para el caso de uso doméstico.
¿Qué NO cubre esta garantía?
Esta garantía no cubre ningún equipo MoJack que se haya alterado o ajustado en cualquier forma, respecto del
modelo original. No cubrirá ningún equipo MoJack que se haya averiado debido al mal uso, abuso, por accidentes
o negligencia. Esta garantía no cubre los daños incidentales o consecuentes.
¿Cuál es el periodo de cobertura?
Garantía de dos años, únicamente para uso doméstico, contados a partir de la fecha de compra por parte del
propietario original.
Número de
artículo
1
2
3
4
5
6
NOTA: No se requieren herramientas o sujetadores para el montaje.
NOTA: El pasador de seguridad de latón está adjunto al manual del usuario.
Número de parte
508-0000
508-0044
508-0035
009-0007
001-0013
001-0015
Cantidad Descripción
1
2
1
2
2
2 Spares
Conjunto del gato de tijera
Plataforma para las ruedas
Palanca de manivela
Tirante de seguridad
Pasador de empuje
Pasador de seguridad de latón
6
3
4
4
¿Qué hará MoJack para corregir los problemas?
Cambiaremos cualquier parte defectuosa (dentro del periodo de cobertura), sin ningún costo.
¿Cómo se puede obtener el servicio?
Con el objetivo de tener derecho a recibir el servicio cubierto por esta garantía, usted DEBE registrar su equipo
MoJack en los treinta (30) días posteriores a su compra. Después del periodo de treinta (30) días, usted deberá
presentar comprobante de compra (nota) para registrar el producto. Por favor, registre su elevador MoJack
nuevo en nuestro sitio en Internet: www.themojack.com o llamando a nuestra línea telefónica gratuita
1-877-4MO-JACK.
¿Cómo puedo ponerme en contacto con MoJack para hacer válida la garantía?
Usted puede ponerse en contacto con nosotros a través de nuestro sitio en Internet www.themojack.com o
llamando a nuestro número telefónico gratuito 1-877-575-3173.
¿Gozo de otros derechos conforme a la legislación estatal?
Esta garantía le otorga derechos legales específicos, asimismo usted podrá gozar de otros derechos, los cuales
varían de un estado a otro.
¿Cuál es la política de devolución?
No devuelva el producto a la tienda. Póngase en contacto con MoJack para obtener información
sobre las políticas y los procedimientos de devolución llamando a nuestro número telefónico
gratuito 1-877-575-3173 o por el correo electrónico info@themojack.com.
1
5
5
2
2
¿Cómo puedo comunicarme con MoJack?
Puede comunicarse a través de nuestra línea telefónica directa 1-877-575-3173 o por el correo electrónico
info@themojack.com.
26 27
Page 15

Elevador MoJack ZR Elevador MoJack ZR
Instrucciones de Ensamblado
PASO 1
Saque el equipo MoJack ZR del empaque.
Revise la lista de partes para asegurarse de que
se encuentren todos los herrajes y piezas. Si faltan
piezas o herrajes, póngase en contacto con
MoJack llamando al 1-877-575-3173 o escríbanos
al correo electrónico parts@themojack.com.
PASO 2
Ensamble la plataforma para las ruedas
dentro del tubo cuadrado en la parte superior de
la estructura de tijera e instale los pasadores
de empuje . Repita el procedimiento con la
segunda plataforma para las ruedas.
5
1
2
Estructura de
tijera
1
Pasador
de empuje
Plataforma
2
para la
rueda
Instrucciones de operación
Las instrucciones de operación mostrarán
cómo operar el equipo MoJack ZR y cómo
prepararlo para guardarlo.
Antes de usar el equipo MoJack ZR, lea con cuidado este manual por completo.
PASO 1
Familiarícese con el equipo MoJack ZR
• Practique haciendo ascender y descender el equipo
MoJack ZR antes de intentar levantar una podadora
(véase los pasos 5 al 8, acerca de cómo hacer
ascender y descender una podadora).
• Practique el Paso 10 si intenta hacer ascender o
descender la podadora con el accesorio de taladro.
5
NOTA: La barra de bloqueo debe estar levantada
antes de poder descender.
PASO 3
Inserte la palanca de manivela dentro del
casquillo. El extremo cuadrado de la palanca de
manivela tiene una forma cónica para hacer
más cómodo el accionamiento de la manivela.
Es normal que la palanca de manivela fluctúe un
poco durante su uso.
3
3
ESTO COMPLETA EL MONTAJE.
Palanca de manivela
3
Casquillo
28 29
Page 16

Elevador MoJack ZR Elevador MoJack ZR
Instrucciones de operación
PASO 2
Alineación de las plataformas para la rueda de modo que se
ajusten a la podadora
• Coloque las plataformas para las ruedas MoJack ZR de 6
pulgadas, frente a las llantas delanteras de la podadora.
• Retire los pasadores de empuje y alinee las plataformas para
las ruedas, de modo que las llantas delanteras se encuentren
centradas sobre las plataformas para las ruedas.
• Vuelva a colocar los pasadores de empuje para bloquear las
plataformas para las ruedas en el armazón de tijera.
Las plataformas para las ruedas deben estar a la misma
distancia respecto del armazón de tijeras, para mantener un
equilibrio adecuado.
PASO 3
Mover la podadora sobre el MoJack ZR
El equipo MoJack ZR debe usarse en una superficie de
servicio sólida y nivelada.
• Con cuidado ruede o maneje la podadora para colocarla sobre
las plataformas para las ruedas.
• Coloque la podadora en neutral o desenganche la transmisión
hidráulica.
• Detenga el motor y quite la llave.
Instrucciones de operación
PASO 5
Elevación de la podadora
• Eleve la podadora haciendo girar la palanca de manivela
hacia la derecha.
• Véase el paso 10 para hacer ascender la podadora con el
accesorio de taladro.
No intente cargar más de 113 kilos en el
extremo delantero.
El equipo MoJack ZR debe usarse en una
superficie de servicio sólida y nivelada.
Debe apagarse el motor y quitar la llave.
La podadora debe colocarse en neutral o
desenganchar la transmisión hidráulica.
Durante este paso debe liberarse el freno de
estacionamiento.
Los tirantes de seguridad deben apretarse con
firmeza para sostener las llantas en las plataformas
correspondientes.
NOTA: El equipo MoJack ZR cuenta con un pasador de
seguridad que protege al equipo contra una sobrecarga
accidental. Si se sobrecarga el equipo MoJack con un
peso excesivo, se rompe el pasador de seguridad
y se liberará la palanca de manivela del tornillo, lo cual
permite que la palanca de manivela gire libremente.
Si sucede esto, necesitará volver a instalar un pasador
de seguridad nuevo.
PASO 4
Atar los tirantes de las llantas delanteras de la
podadora en las plataformas para las ruedas
Asegure las llantas delanteras de la podadora a las
plataformas para las ruedas usando los tirantes de
seguridad.
• Enrolle el tirante de seguridad sobre la llanta de la
4
podadora y asegure el gancho dentro del bucle en la
plataforma para las ruedas .
• Apriete los tirantes de seguridad presionando las
2
4
abrazaderas metálicas.
Tirante de
seguridad
Plataforma para
la rueda
Casquillo
Retén de collarín “O”
Reemplazo del pasador de seguridad de latón
• Quite el retén del collarín “O” de hule.
• Deslice el pasador de seguridad roto y cámbielo
por el pasador de seguridad nuevo incluido con
4
el equipo MoJack ZR. Podrá necesitar el uso de
un punzón pequeño o cuña para empujar hacia
fuera el pasador de seguridad roto. NO USE UN
TALADRO PARA RETIRAR EL PASADOR DE
SEGURIDAD.
• Cambie el retén del collarín “O”, asegurándose de
Orificio del
pasador de
seguridad
que se asiente en la ranura.
Pasador de
seguridad
2
30 31
Page 17

Elevador MoJack ZR Elevador MoJack ZR
Instrucciones de operación
PASO 6
Eleve el equipo MoJack ZR hasta la posición de bloqueo
• Haga ascender el elevador hasta que el eje inferior caiga dentro de una
de las dos ranuras en la barra de bloqueo. Las alturas de bloqueo son
de aproximadamente 16 y 20 pulgadas (altura total).
• La barra de bloqueo cae automáticamente para enganchar el eje
inferior cuando se hace ascender el equipo MoJack ZR.
• Cuando se hace descender el equipo MoJack ZR, la barra de bloqueo
debe soportarse hasta que el eje inferior despeje la última muesca.
NOTA: El equipo MoJack ZR tiene un embrague que protege al equipo
contra cualquier daño accidental. Si la barra de bloqueo no está
desenganchada cuando se hace descender, el embrague liberará la
palanca de manivela del tornillo, para que gire libremente. Para volver
a enganchar la palanca de manivela, haga girar unas cuantas vueltas
hacia la derecha.
PASO 7
Preparación de la podadora para darle servicio
• Coloque las calzas de las llantas (no incluidas) detrás de las llantas
posteriores de la podadora.
• Accione el freno de estacionamiento en la podadora.
• El eje inferior debe engancharse en una de las muescas de la
barra de bloqueo.
PASO 8
Bajar la podadora
• Retire las calzas de las llantas.
• Libere el freno de estacionamiento.
• La podadora debe colocarse en neutral o desenganchar
la transmisión hidráulica.
• Levante y sostenga la barra de bloqueo, haga girar la palanca de
manivela hacia la izquierda, hasta que las plataformas para las
ruedas queden soportadas con firmeza sobre el piso. La barra
de bloqueo debe levantarse hasta que libere la última muesca.
Puede ser necesario levantar ligeramente el elevador, para
poder subir la barra de bloqueo.
NOTA: El equipo MoJack ZR tiene un embrague que protege al
equipo contra cualquier daño accidental. Si la barra de bloqueo
no está desenganchada cuando se hace descender, el embrague
liberará la palanca de manivela del tornillo, para que gire libremente.
Para volver a enganchar la palanca de manivela, hágala girar unas
cuantas vueltas hacia la derecha.
Ranuras
Barra de bloqueo
Calza de la llanta
Eje inferior
Levante la barra
de bloqueo
cuando se haga
descender el
equipo.
Instrucciones de operación
PASO 9
Retirar la podadora del equipo MoJack ZR
• Quite los tirantes de seguridad de las llantas
delanteras de la podadora.
• Conduzca o ruede la podadora fuera de las
plataformas para las llantas.
PASO 10
Elevación del equipo MoJack ZR con un tornillo eléctrico (opcional)
El equipo MoJack ZR puede hacerse ascender o descender por medio de
un taladro eléctrico de velocidad variable (con un mínimo de 7 amperios) o
un taladro inalámbrico de velocidad variable (con un mínimo de 18 voltios).
• El taladro requerirá un dado cuadrado de 3/8 de pulgada (no se incluye,
pero puede comprarse en una ferretería o tienda de construcción).
• Retire la palanca de manivela.
• Inserte con firmeza el dado cuadrado de 3/8 de pulgada
en el receptor cuadrado. Accione el taladro hacia adelante
(a la derecha) para elevar el brazo de carga y acciónelo en
reversa (a la izquierda) para hacer descender el brazo de carga.
• La barra de bloqueo debe elevarse y sostenerse, hasta que se
libere la última muesca.
NOTA: El equipo MoJack ZR está equipado con un embrague que
protege al equipo contra cualquier daño accidental. Si la barra de
bloqueo no está desenganchada cuando se hace descender, el
embrague liberará el dado de conducción del taladro, para que gire
libremente. Para volver a enganchar el dado del taladro, hágala
girar unas cuantas vueltas hacia la derecha.
El operador debe tener sujetado el dado con firmeza,
antes de hacer ascender o descender el brazo de
carga.
• Siga el resto de las instrucciones de operación cuando use el
accesorio de taladro.
• Vuelva a colocar la palanca de manivela como sea necesario para usarlo en el futuro.
Dado cuadrado de
3/8 de pulgada
32 33
Page 18

Instrucciones de operación
PASO 11
Preparación del equipo MoJack ZR para su
almacenamiento
• Quite los dos pasadores de empuje , deslice
las plataformas para las llantas hasta la
posición más estrecha y vuelva a insertar los
pasadores de empuje.
• Haga descender el equipo MoJack ZR
hasta que las plataformas para las
llantas se encuentren soportadas con
firmeza sobre el piso.
• Coloque la palanca de manivela en las
abrazaderas de almacenamiento.
5
2
Elevador MoJack ZR
Pasador
de empuje
Plataforma
2
para la
rueda
5
Abrazaderas de
almacenamiento
EL EQUIPO MOJACK ZR ESTÁ LISTO AHORA PARA TRANSPORTARSE O ALMACENARSE.
Programa de mantenimiento
• Antes de cada uso, revise siempre que no haya
piezas desgastadas, sueltas o dañadas en el
equipo MoJack ZR. No use el equipo MoJack ZR
si tiene partes dañadas, póngase en contacto con
MoJack llamando al 1-877-575-3173.
• Limpie y lubrique el roscado del tornillo después
de cada 50 usos, o por lo menos una vez al año,
usando aceite ligero para máquinas.
• Coloque grasa de litio entre todos los puntos de
giro, después de cada 50 usos o una vez al año.
• Agregue unas gotas de aceite ligero para máquina
en el rodamiento de empuje, después de cada 50
usos o una vez al año.
Lubrique el
rodamiento de
empuje
Limpie y
lubrique el
roscado del
tornillo
34
Engrase todos
los puntos de
giro
35
Page 19

Find all these hard working MoJack products at www.theMoJack.com
Retrouvez tous ces produits MoJack à l’adresse suivante : www.theMoJack.com
Encuentre todos los productos de uso rudo MoJack en www.theMoJack.com
MoJack PRO™
750 lb Capacity / Capacité de 340 kg
340 kg Capacidad
MoJack EZ™
300 lb Capacity / Capacité de 136 kg
136 kg Capacidad
MoJack XT™
500 lb Capacity / Capacité de 226 kg
226 kg Capacidad
MoJack ZR™
250 lb Capacity / Capacité de 113 kg
113 kg Capacidad
MoJack EZ MAX™
400 lb Capacity / Capacité de 181 kg
181 kg Capacidad
WorkBench Attachment™
200 lb Capacity / Capacité de 90 kg
90 kg Capacidad
Push Mower Lift
Élévateur de tondeuse
Elevador de podadora manual
Hand Trucks
Diables
Carretillas
MoJack LoadKicker™
 Loading...