

Page 1
Instructions for Use
Tumble Dryer
Page 2

162969
Thank you for your trust and for buying our tumble
dryer. We congratulate you on your wise decision.
This appliance is designed for drying clothes for
home use only.
The dryer enables quick drying of your laundry,
leaving it soft and tender without affecting its shape.
Our appliances are environmentally friendly:
some of the materials are recyclable while
others are disposed of and destroyed. To protect
the environment, dispose of your appliance by
delivering it to the authorized location.
Appliance description ......................................3
Warnings ............................................................4
Notes on disposal..............................................6
Important safety instructions ..........................7
Installation and connection ..............................9
Operation..........................................................12
Tips for drying and for the economic
use of the dryer................................................17
Cleaning and maintenance .............................18
Troubleshooting ..............................................19
Tables ...............................................................20
Warranty ...........................................................22
Ownership Registration ..................................23
Consumer Support ..........................................25
2
Page 3
162969
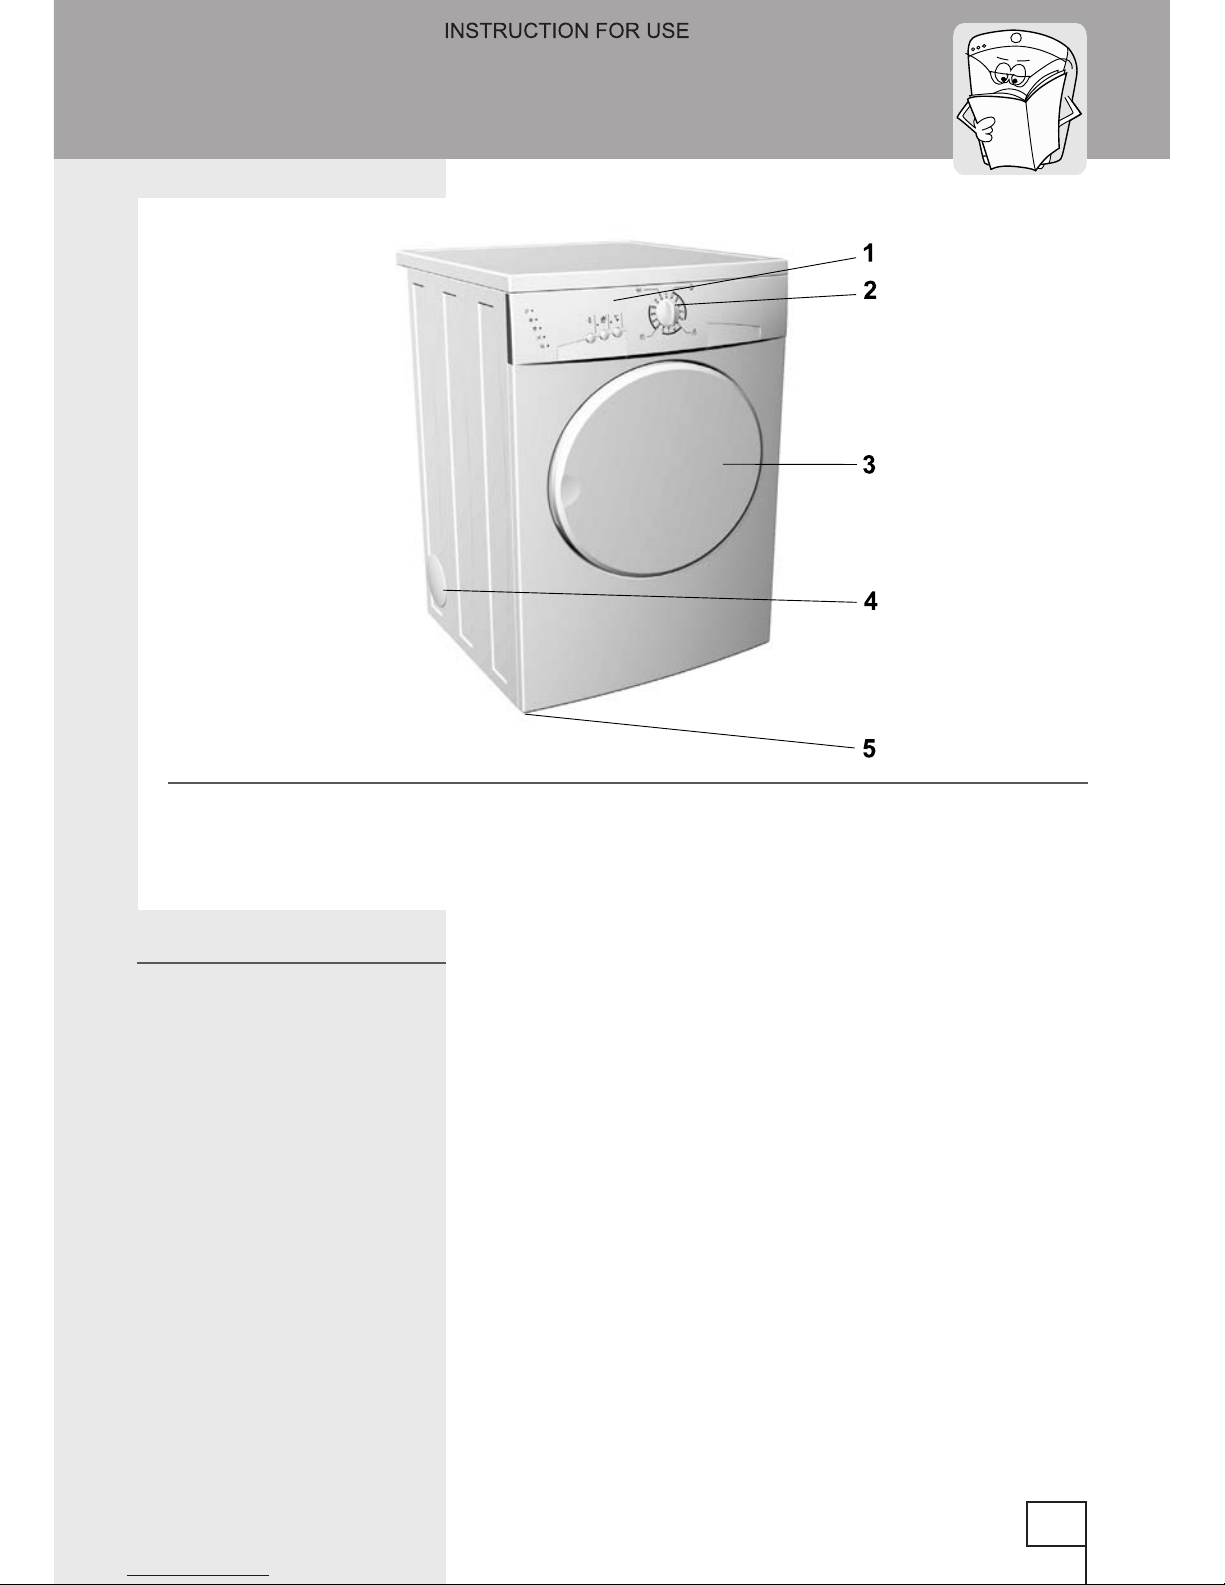
1. Front panel
2. Drying program button
3. Door
4. Vent (also in rear)
5. Legs
Name plate with technical information for the appliance is located
under the door frame.
Dimensions of the appliance (w x d x h):
600 mm x 600 mm x 850 mm
Weight (net): evacuation dryer 34 kg
Nominal voltage: 240 V, 60 Hz
Connecting power: 2400 W
Max. load: 15 lbs (7 kg)
Connection: power cord (240 V, 30 A)
Fuse: 10 A
Heater: 2100 W
3
Appliance description
Technical data
Page 4

162969
•
Use the dryer to dry only laundry washed
with water. Do not attempt to dry laundry
which has been washed or cleaned with
ammable detergents or solutions (gasoline,
trichloroethylene etc.), as it may cause explosion.
•
Do not let children play with the appliance.
Prevent your children or pets from entering the
dryer drum.
•
When discarding the old appliance remove
the power cord and break the lock, so that the
door can not be locked (safety precautions for
children).
•
Clean lint lter after each drying. If you pulled the
lter out, always reinsert it before the next drying
operation.
•
After use always turn the appliance off (the
program selection knob should be in position “0”)
and unplug the power cord.
•
Leave all repairs to a qualied technician.
Tampering with the appliance or repairs by an
unqualied person may cause accidents or
failures. Call the authorized service department
(see list of authorized service departments).
•
Rating plate with technical information about the
appliance is located under the door frame.
•
The room must be well ventilated, surrounding air
must not contain dusty particles.
•
Room where the appliance is located must be well
ventilated to prevent back ow of gases, released
by open re gas appliances (replace).
4
Warnings
Page 5
162969
To reduce the risk of re, always consider the
following:
•
Never dry soiled clothes in the tumble dryer.
•
Laundry soiled with substances like cooking oil,
acetone, alcohol, petrol, petroleum, stain remover,
turpentine, wax and waxes must be washed in hot
water and detergent prior drying in tumble dryer.
•
Do not dry objects made of foam (latex), water
resistant fabrics, rubber lined fabrics, and clothes
lled with rubber foam in the dryer.
•
For wash cycles use laundry softeners as
instructed by their manufacturers.
•
Last stage of drying is carried out without heating,
to allow laundry to cool down before extracting it
from the drum. If you take the laundry out before it
cools down, spread it to allow cooling.
Before connecting the appliance read
these instructions carefully. Repairing
any failure arising from inappropriate
connections or misuse of the appliance is
not covered by the guarantee.
Never stop a tumble dryer before the end
of the drying cycle unless all items are
quickly removed and spread out so that
the heat is dissipated.
5
Page 6
162969
Risk of suffocation
There is a risk of suffocation from the cardboard box
and plastic lm.
Do not allow children to play with the packaging.
All our packaging materials are environmentally
friendly and recyclable. Please dispose of the
packaging in an environmentally-responsible
manner.
Any retailer or your local authority will be able
to advise you on the disposal methods currently
available.
Danger of death
Danger of death from electrocution or suffocation.
Your old dryer:
•
Disconnect it from the main power supply.
•
Cut through the main cable and discard along with
the plug.
•
Break the door lock. This prevents children from
locking themselves in the dryer.
Environmentally-friendly disposal conserves
valuable raw materials.
Any retailer or your local authority will be able
to advise you on the disposal methods currently
available.
6
Disposing of packaging
Notes on disposal
Disposing of old dryers
Page 7

162969
To reduce the risk of re, electric shock,
or injury to persons when using your
appliance follow basic precautions,
including the following:
1. Read all instructions before using the appliance.
2. Do not wash articles that have been previously
cleaned in, washed in, soaked in or spotted
with gasoline, dry-cleaning solvents, and other
ammable or explosive substances as they give
off vapors that could ignite or explode.
3. Do not add gasoline, dry-cleaning solvents, or
other ammable or explosive substances to the
wash water. These substances give off vapors
that could ignite or explode.
4. Under certain conditions, hydrogen gas may
be produced in a hot water system that has not
been used for 2 weeks or more. HYDROGEN
GAS IS EXPLOSIVE, if the hot water system
has not been used for such a period, before
using a washing machine, turn on all hot
water faucets and let the water ow from
each for several minutes. This will release
any accumulated hydrogen gas. As the gas is
ammable do not smoke or use an open ame
during this time.
5. Do not allow children to play on or in the
appliance. Close supervision of children is
necessary when the appliance is used near
children.
6. Before the appliance is removed from service or
discarded, remove the door.
7. Do not reach into the appliance if the tub or
agitator is moving.
8. Do not install or store this appliance where it will
be exposed to the weather.
9. Do not tamper with controls.
10. Do not repair or replace any part of the
appliance or attempt any servicing unless
specically recommended in the user-
7
Important safety instructions
Page 8
162969
maintenance instructions, or in published userrepair instructions that you understand and have
the skills to carry out.
11. To reduce the risk of electric shock, disconnect
the appliance from the power supply before
attempting any user maintenance. Turning
the controls to the »OFF« position does not
disconnect the appliance from the power supply.
Grounding instructions
This appliance must be grounded. In the event of
malfunction or breakdown, grounding will reduce
the risk of electric shock by providing a path of
least resistance for electric current. This appliance
is equipped with a cord having an equipmentgrounding conductor and a grounding plug. The
plug must be plugged into an appropriate outlet that
is properly installed and grounded in accordance
with all local codes and ordinances.
Improper connection of the equipment-
grounding conductor can result in a risk
of electric shock. Check with a qualied
electrician or serviceman if you are in
doubt as to whether the appliance is
properly grounded.
Do not modify the plug provided with the appliance-
if it will not t the outlet; have a proper outlet
installed by a qualied electrician.
8
Save these instructions
Page 9
162969
•
Packaging materials are environmentally friendly:
they can either be recycled, safely disposed of or
destroyed, without any threat to the environment.
•
To be able to do this effectively all materials are
marked accordingly.
Be careful not to damage the cabinet of
the appliance with a sharp object when
removing the packaging.
Before connecting the appliance, let it warm
up to room temperature (wait for two hours).
Ventilation slots and openings on the appliance
front and rear wall should not be obstructed.
•
Connect a rigid or exible metal duct to the
prepared opening.
•
Ventilation must not be connected to an air
duct used as a chimney for exhaust gasses of
appliances using other combustion material.
Only rigid or exible metal duct should be
use for ventilation.
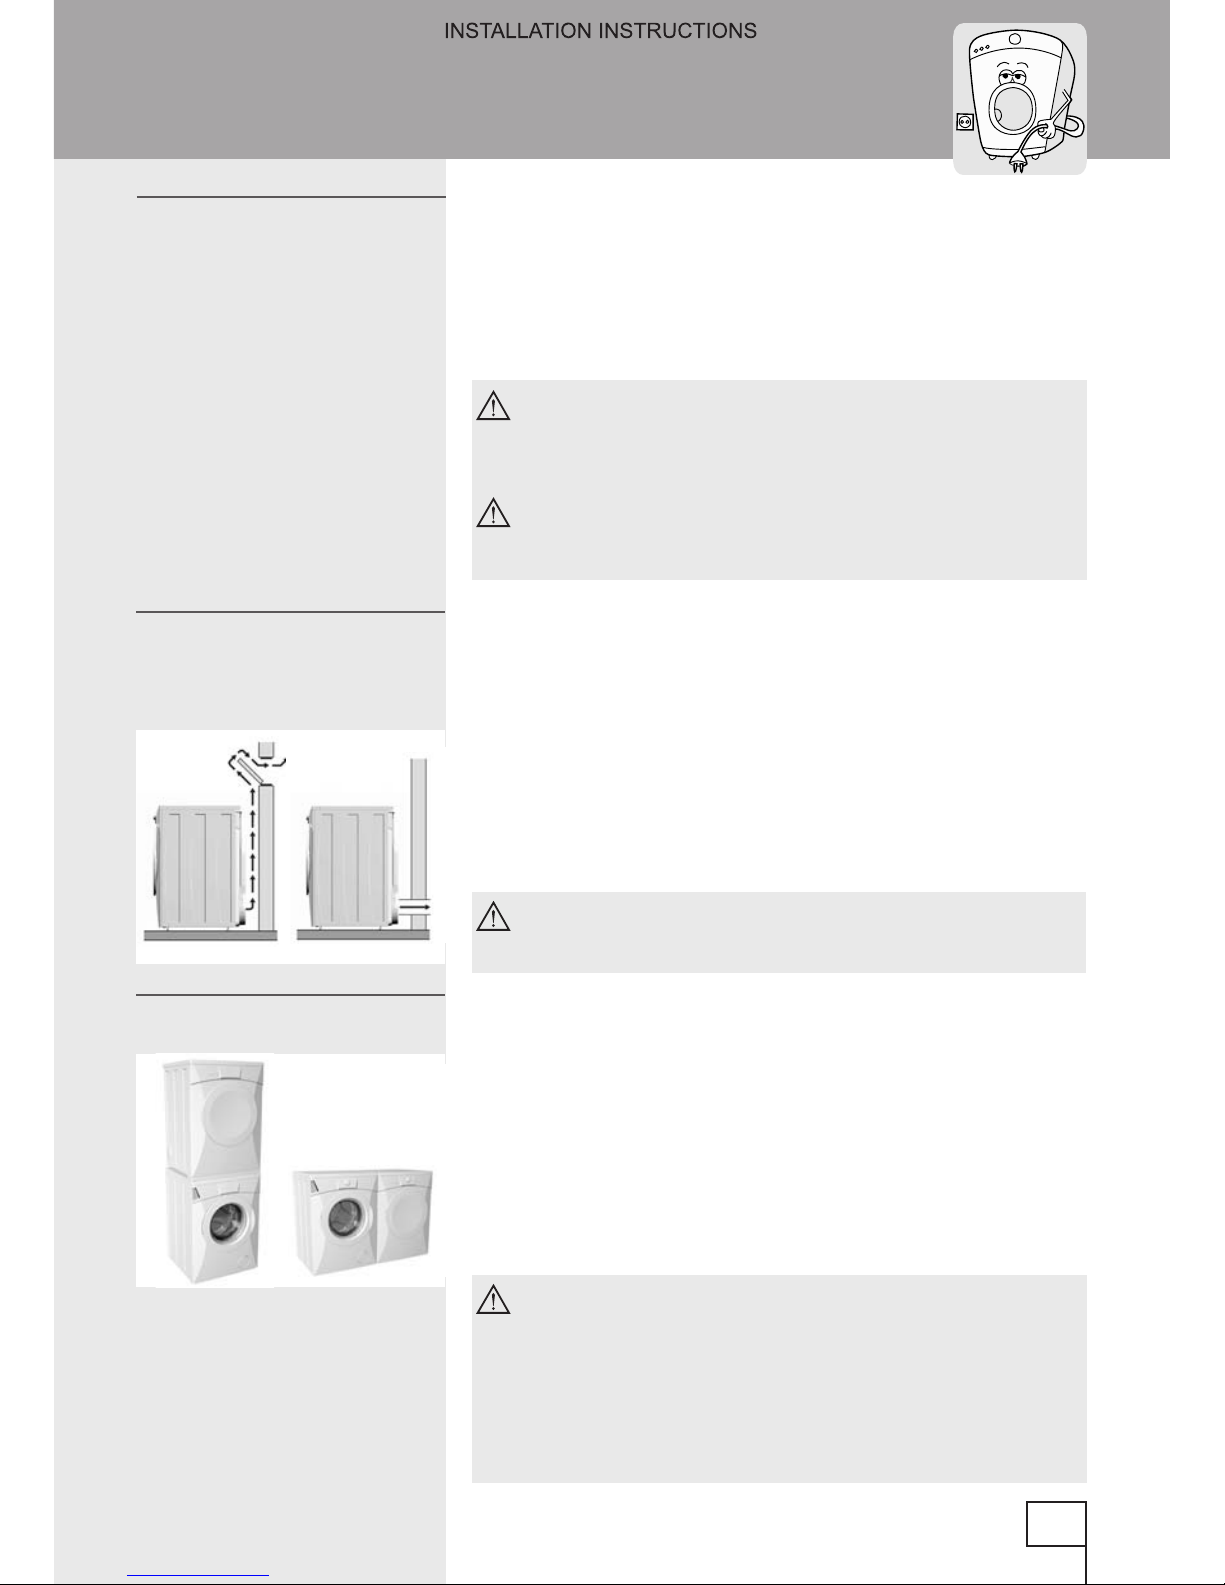
•
Appliance can either stand on its own or can be
placed on top of a washing machine of the same
dimensions - minimum width 517 mm (21 inch),
depth 476 mm (19 inch). The surface for placing
the dryer must be clean and at. Use supplied
vacuum feet to prevent sliding of the appliance.
Washing machine hardtop must be wooden or
metallic.
Do not place the appliance behind lockable
door, sliding door, and door with hinges on
the opposite side of the appliance.
Place the appliance in the room in such
a way to ensure free opening of the dryer
door.
9
Installation and connection
Removing wrapping
Selecting the
appropriate location of
the appliance
Installation
Page 10
162969
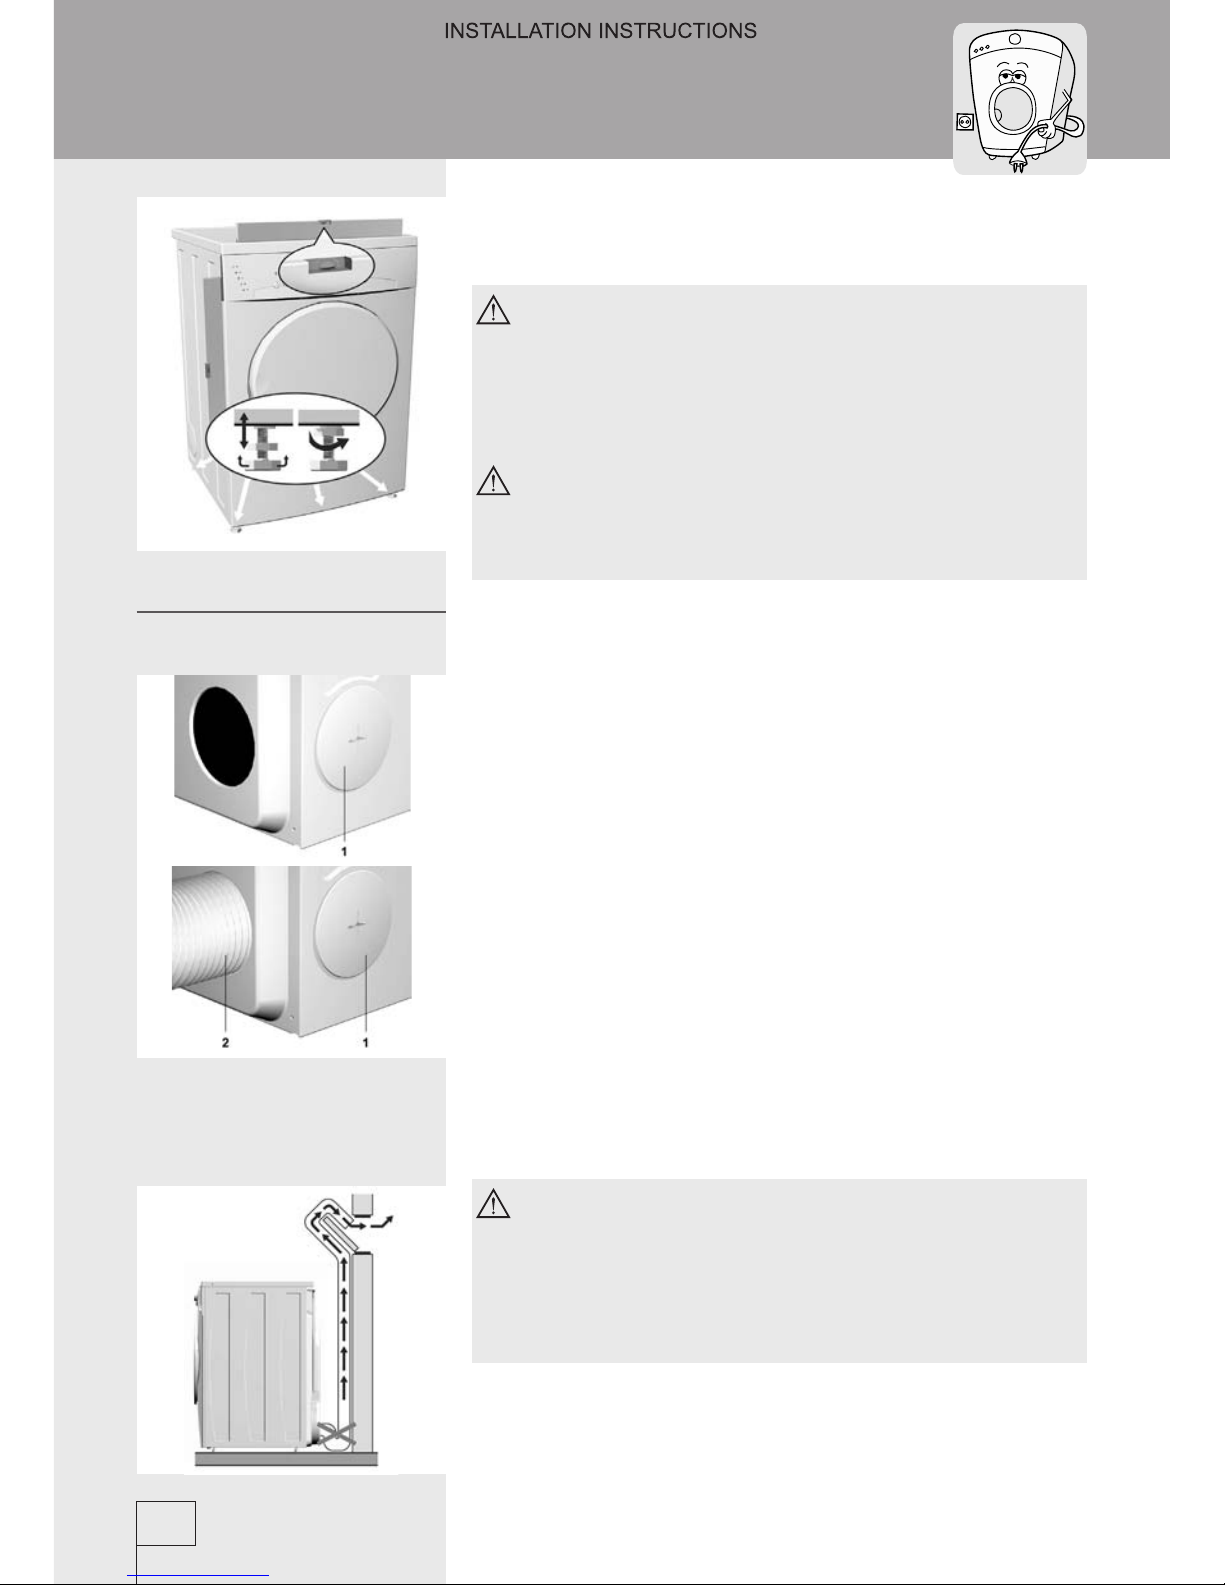
•
Level the machine by rotating the adjustable feet,
(maximum adjustability +/- 0,39 inch (1 cm)).
The appliance should be placed on a
surface with concrete base; the surface
should be dry and clean in order to prevent
slipping. The adjustable feet should also
be cleaned before installation.
Do not place the dryer on a thick
carpet since this could obstruct the air
circulation.
•
There are two openings for venting out humid air.
One of them should be closed with the supplied
cover, while the other should be connected to the
ventilation duct.
The distance between the dryer and the
moist air outlet (ventilation shaft, window)
should not exceed 80 inches (2 metres),
otherwise water can accumulate in the
duct.
1 Lid
2 Evacuation solid or exible
metal tube
10
Moist air outlet
Page 11
162969
•
Use the power cord to connect the dryer to the
power supply via wall socket.
•
Rated voltage and other characteristics are
indicated on the rating plate, located below the
door of the appliance.
The wall socket should always be within
reach. It has to be grounded according to
local regulations.
If the power cord is damaged it should
only be replaced by a qualied technician.
Electric connection and grounding should
be carried out in accordance with current
standards and regulations.
Connect to individual branch circuit.
11
Power connection
Page 12
162969
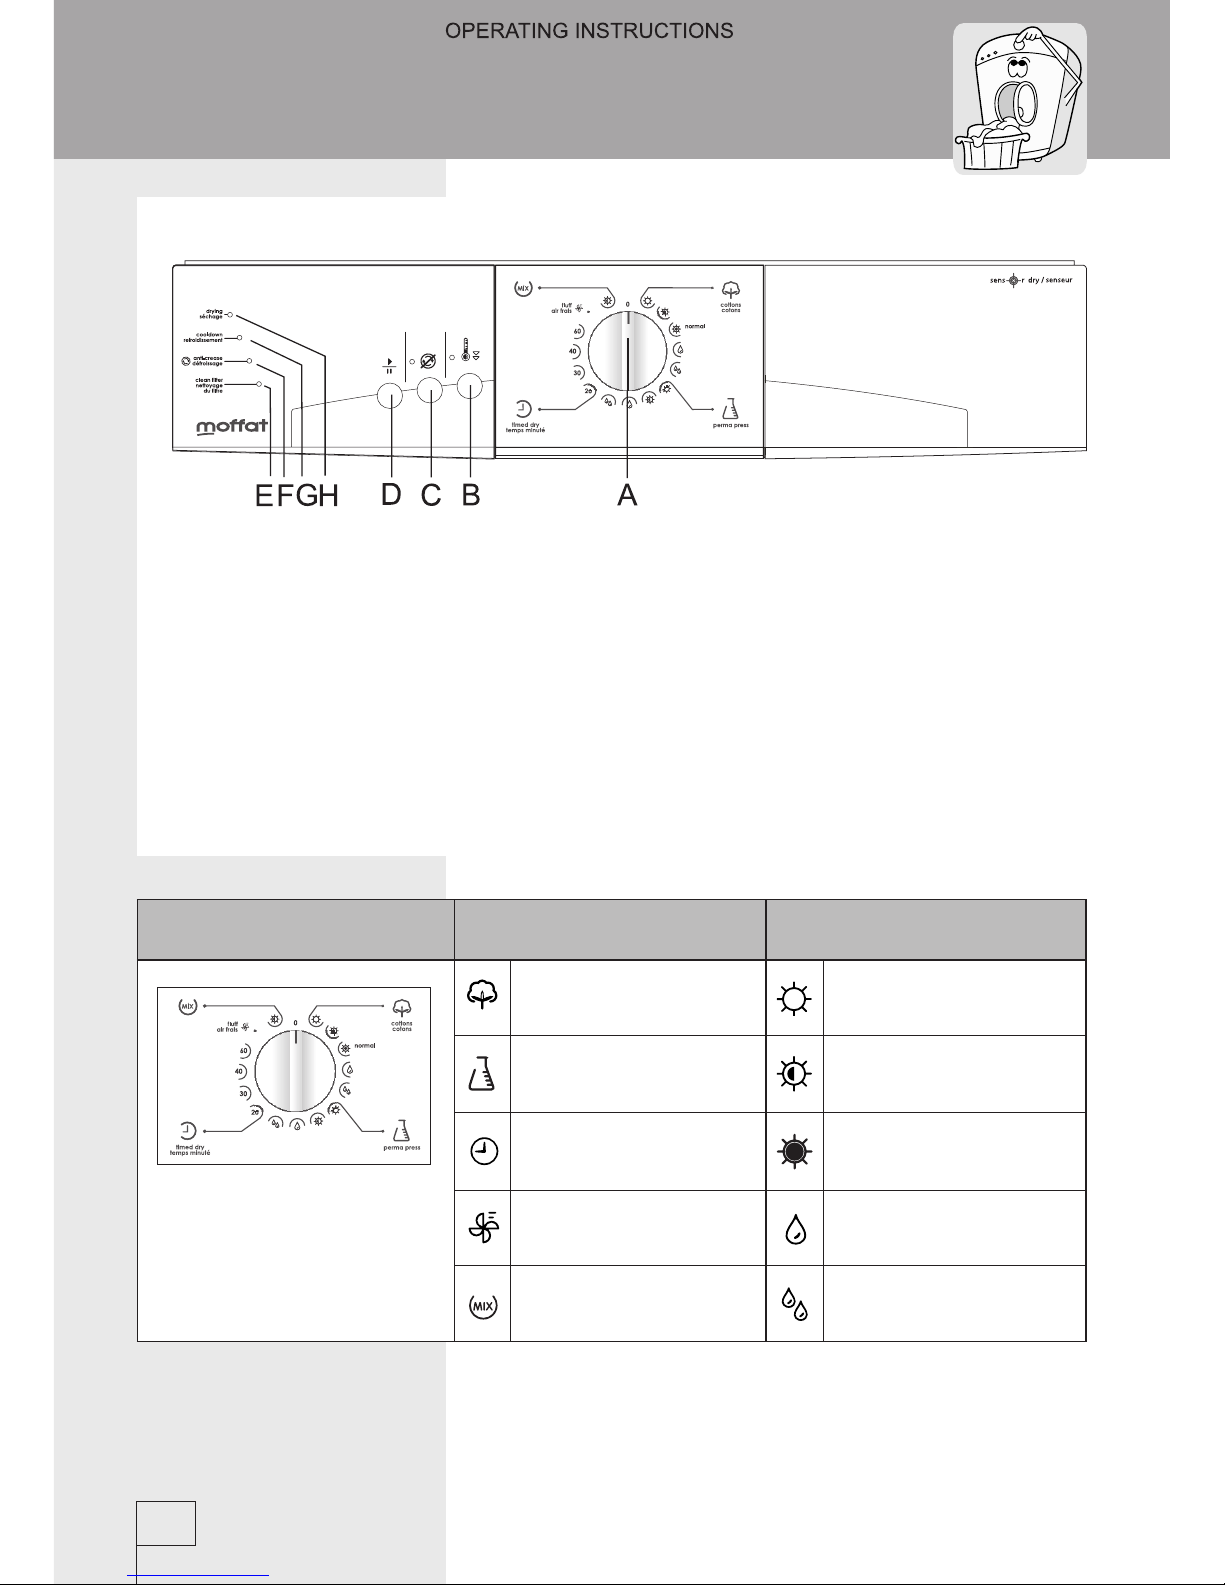
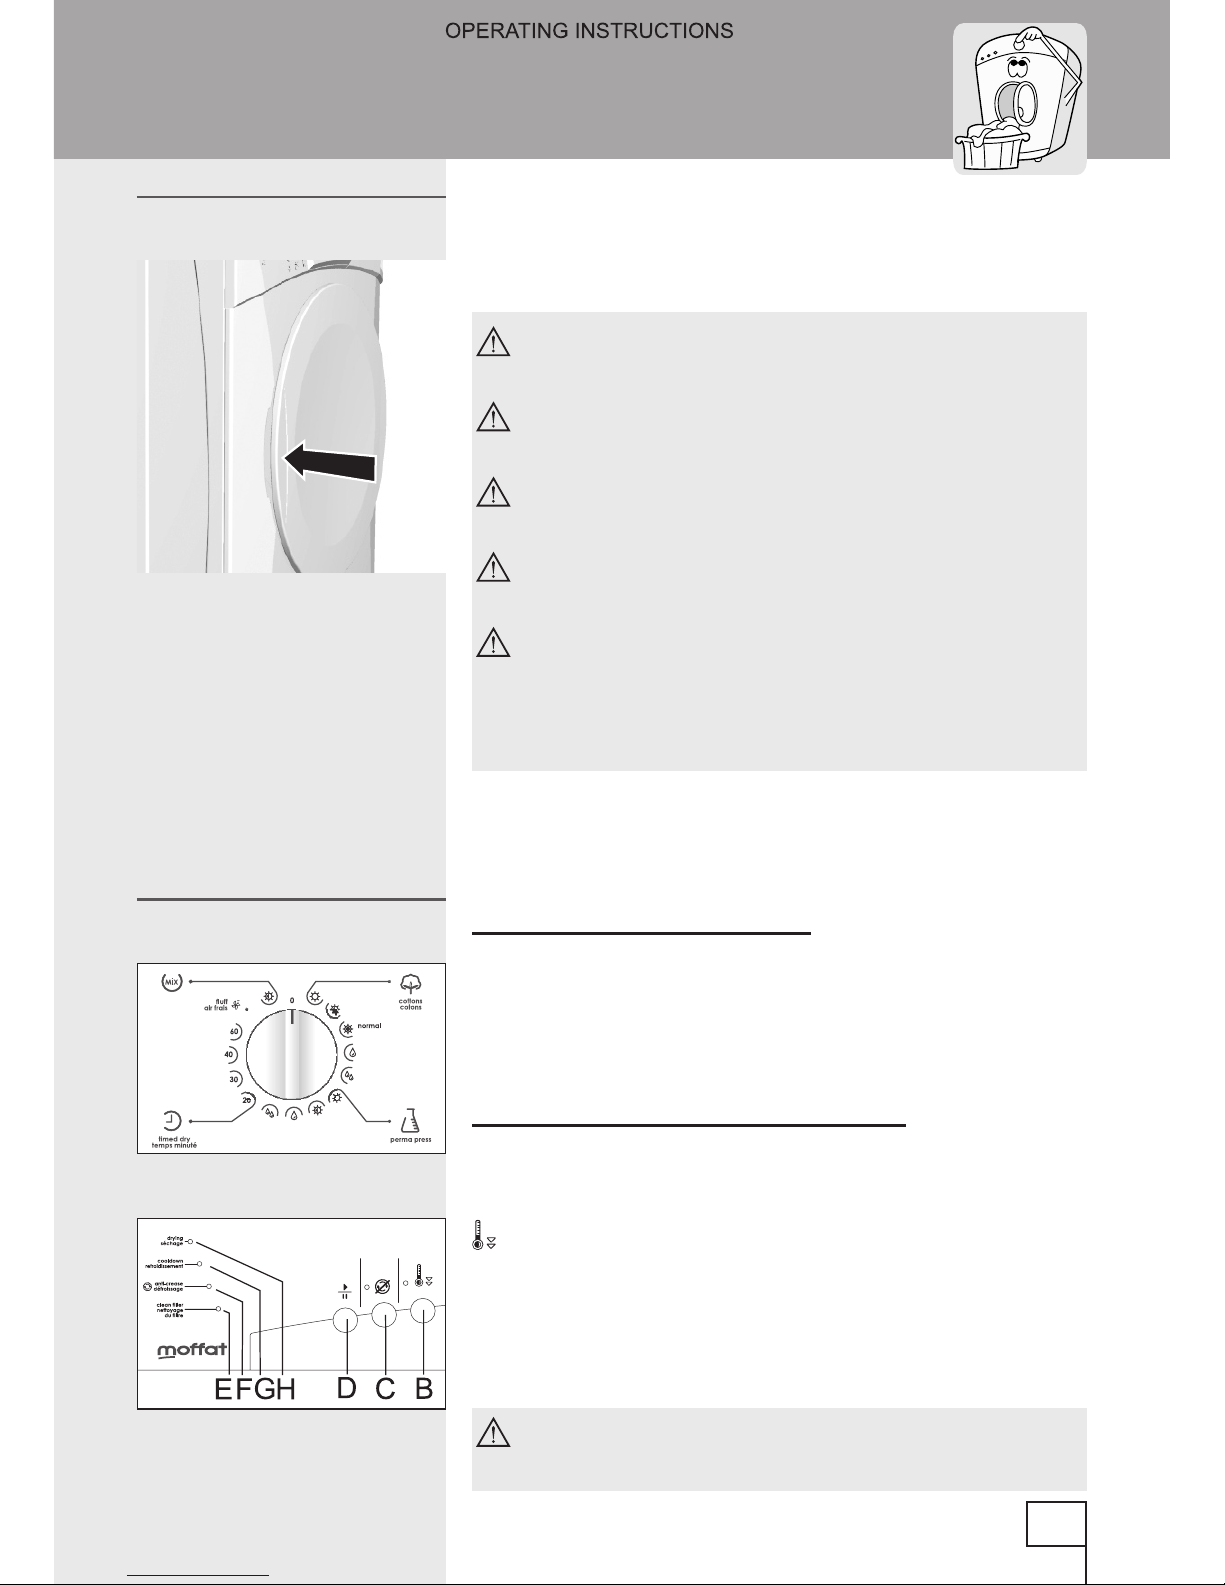
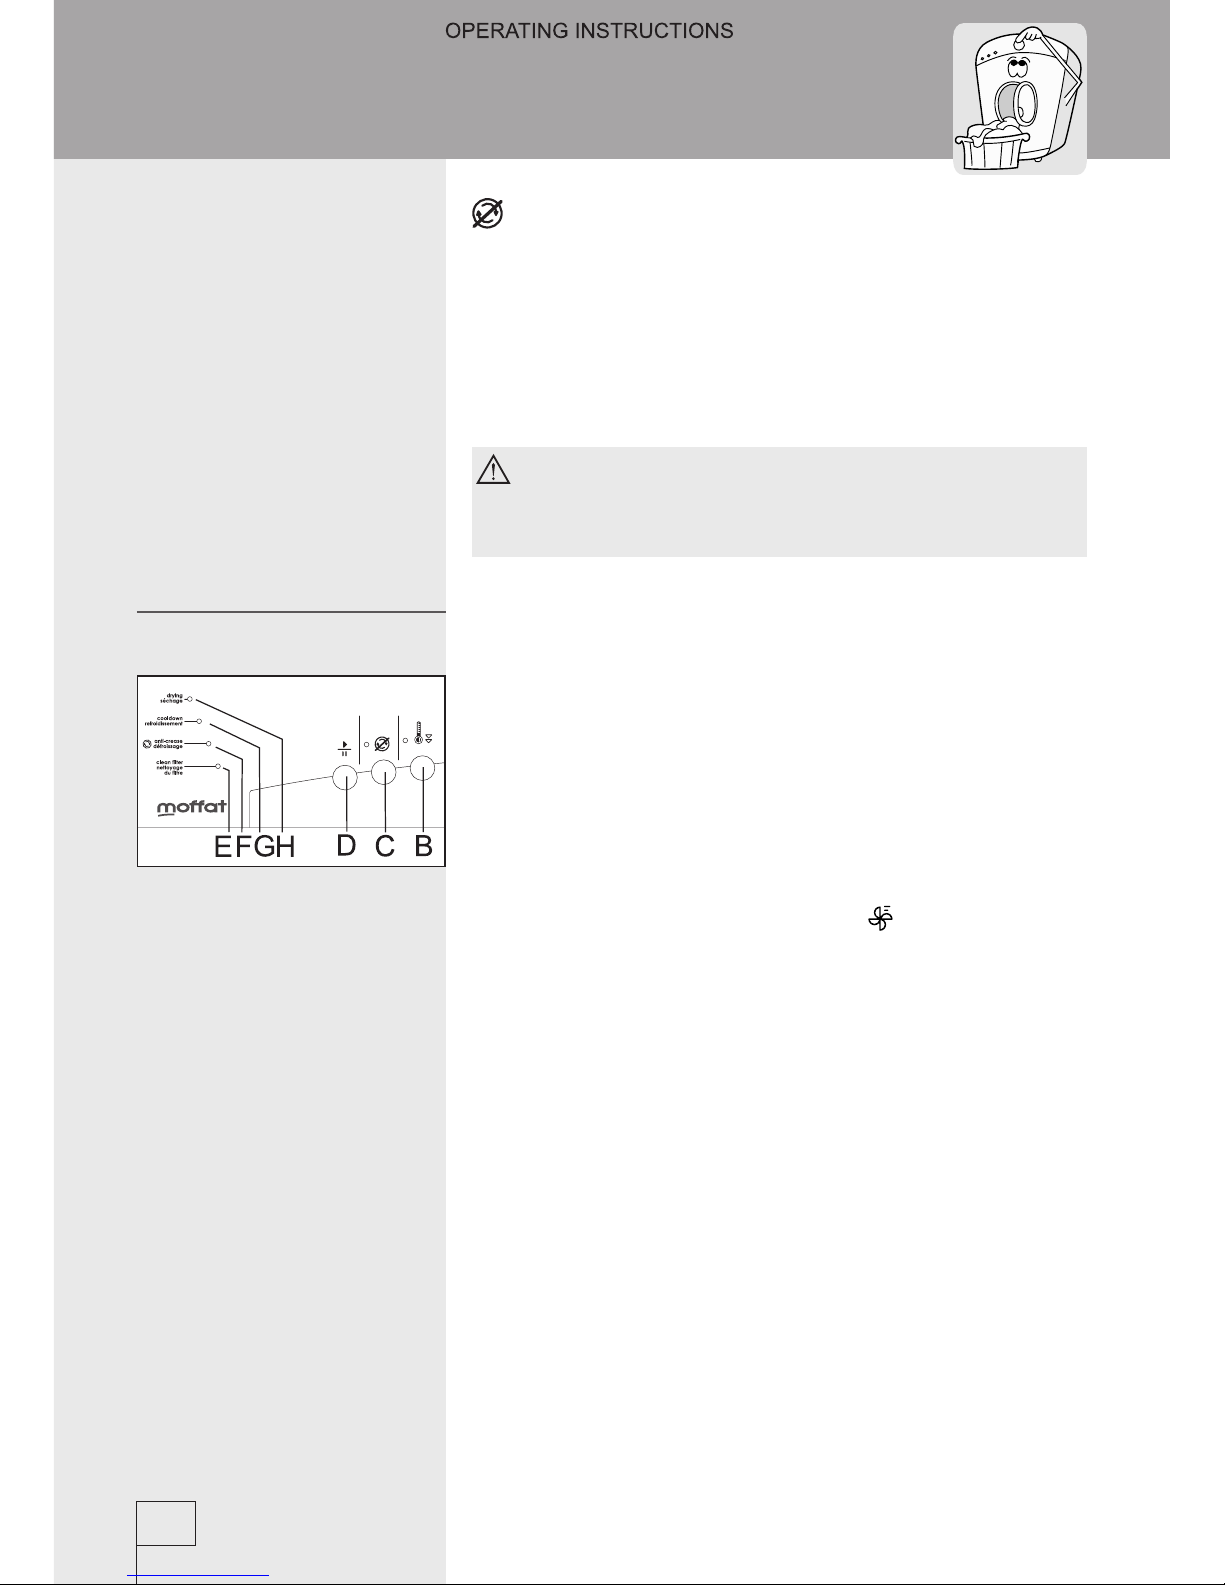
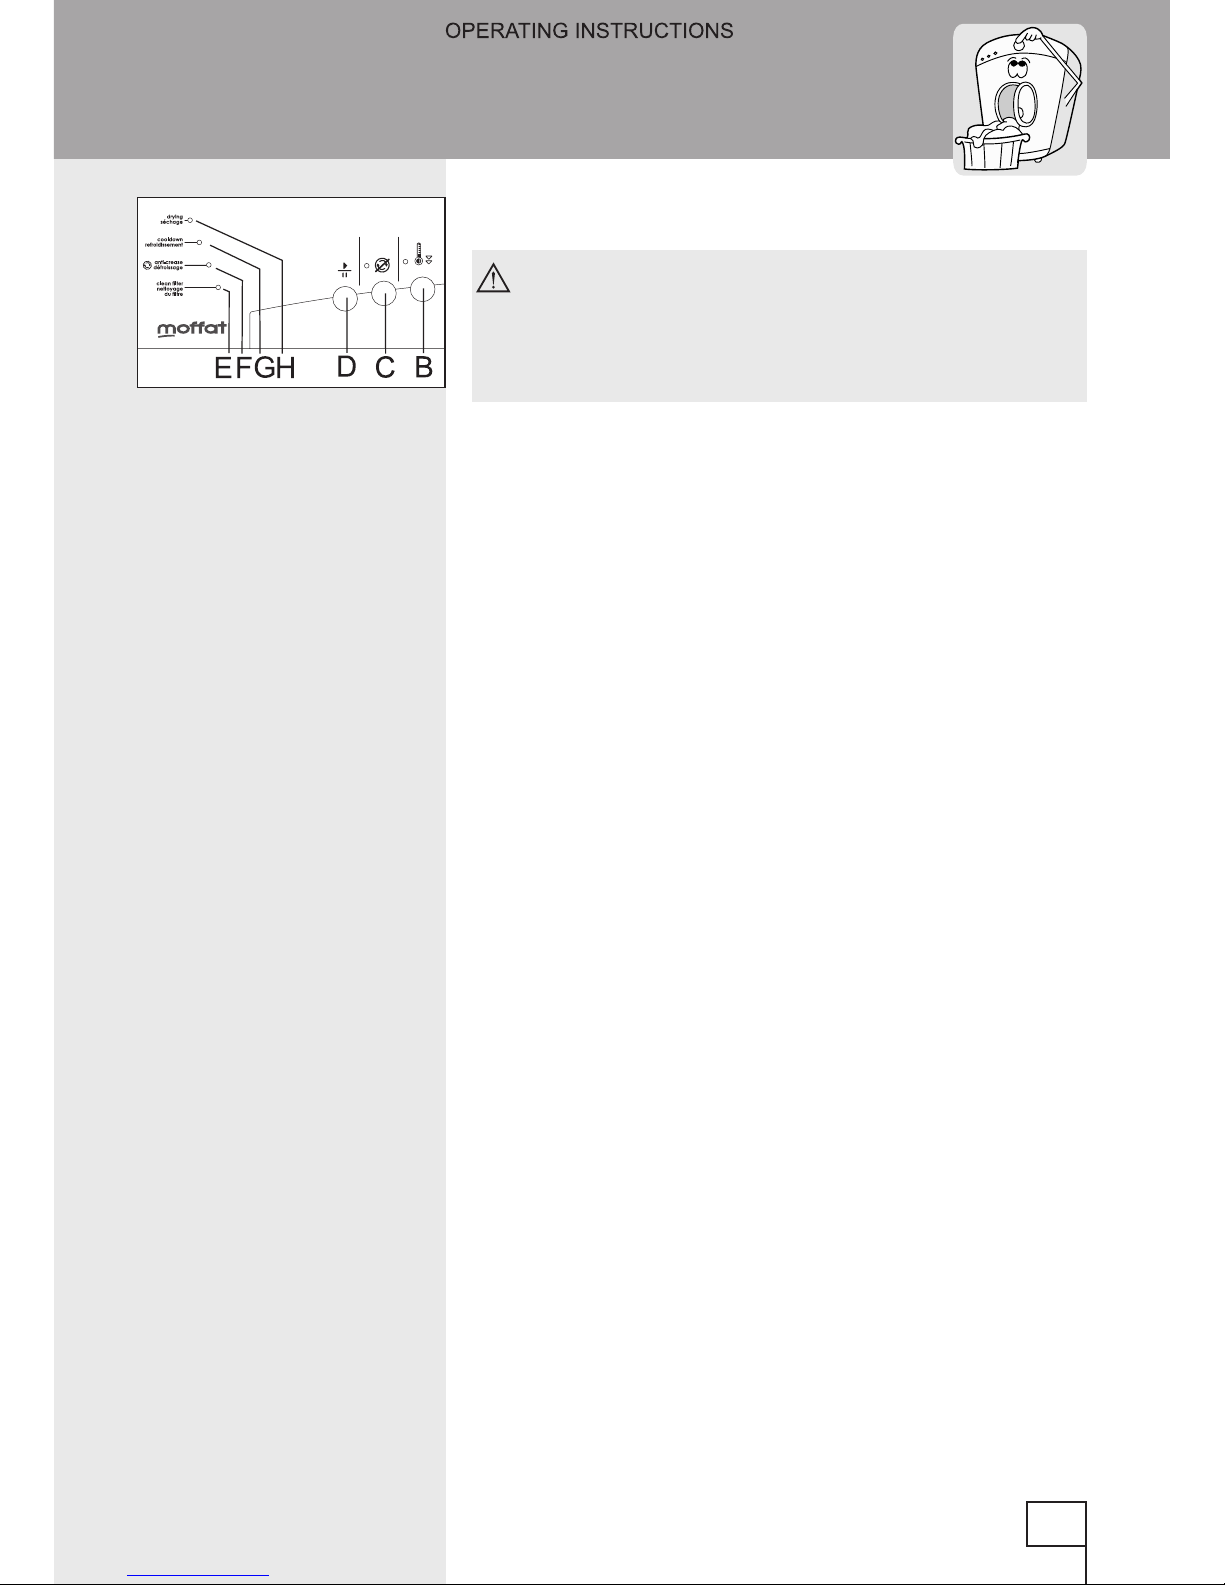
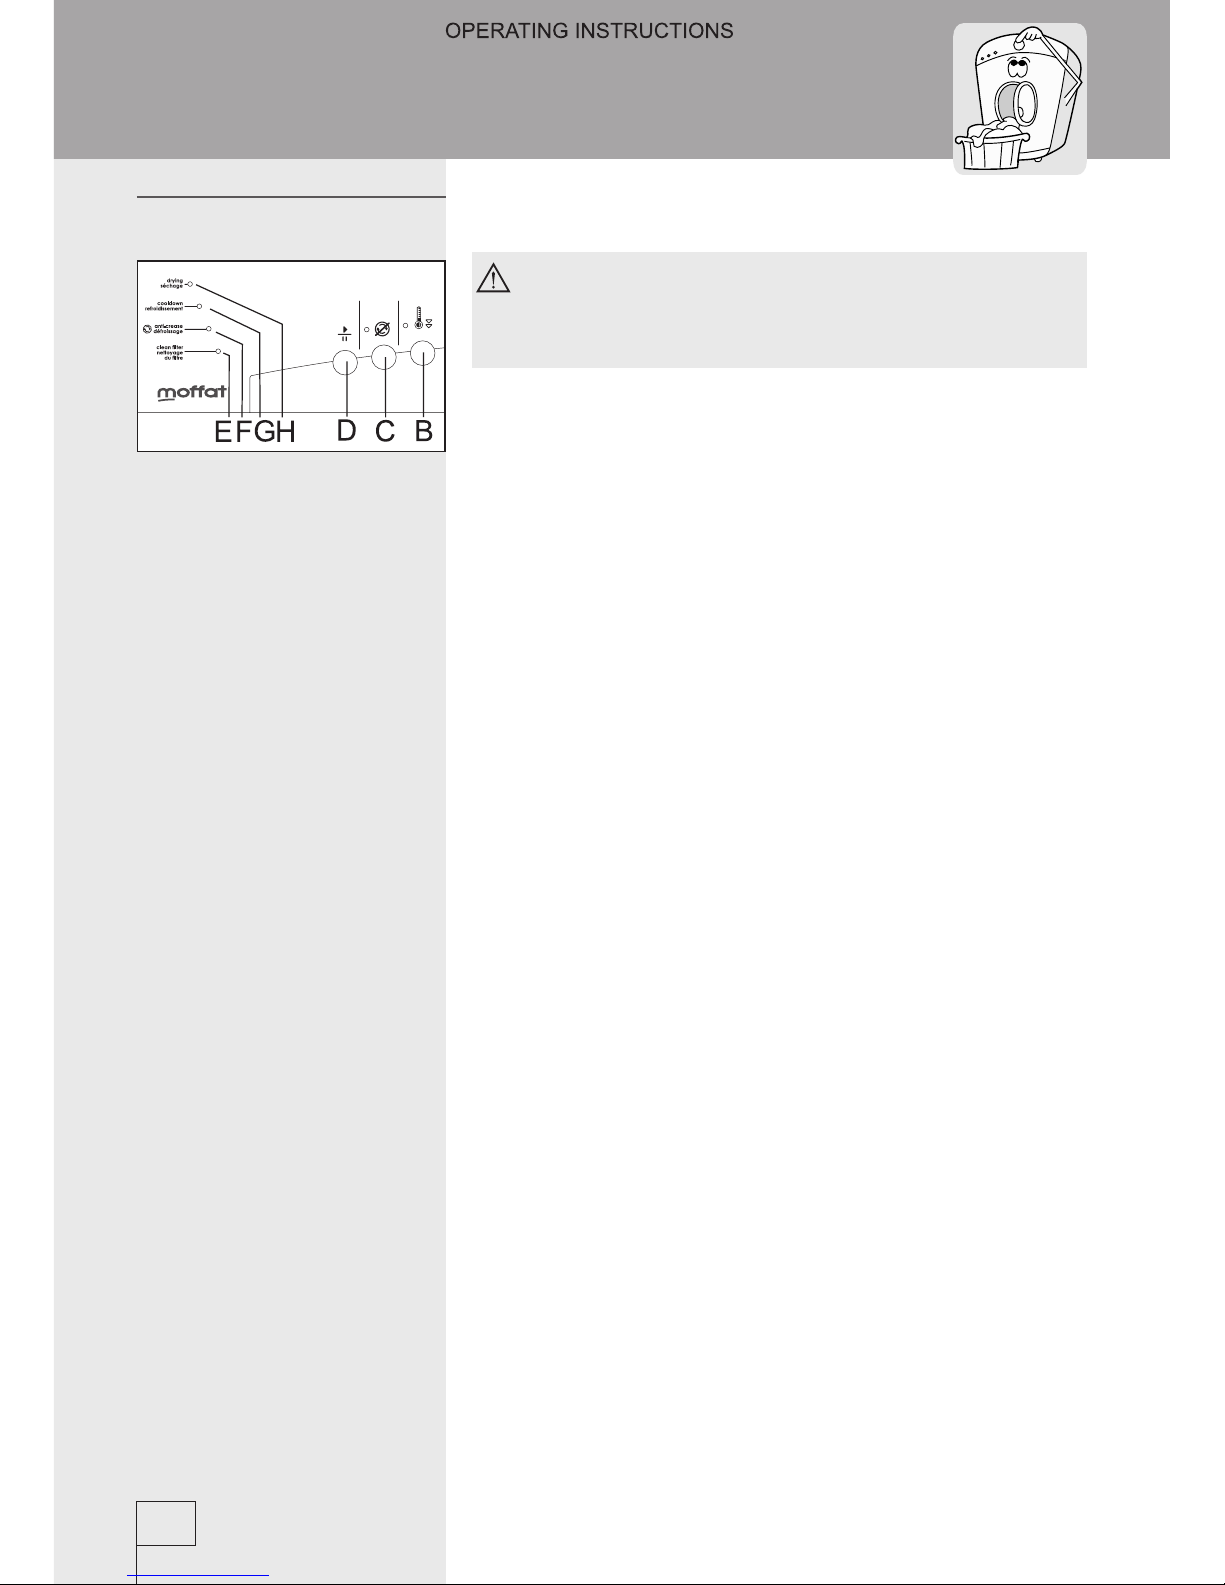
A - program selection knob
B - lower temperature button
C - anti crease program off key
D - START / PAUSE button
E - lint lter alarm LED
F - drying cycle end / anti crease program button
G - cooling LED / ventilation
H - drying in progress LED
12
Operation
Program selection jog
Program symbols
Moisture level
cottons
5 moisture levels
very dry
perma press
4 moisture levels
dry
timed dry
4 time settings
normal dry
uff slightly damp
mixed laundry iron dry
Page 13
162969
- Open the dryer door by pushing the left-hand
side of the door towards the appliance.
- Sort the laundry according to the type of fabric.
Fasten buttons and zippers, tie any strings
and pull out the pockets.
Very delicate laundry should be put in a
special protective sack.
It is recommended to load the drum with
items of different sizes.
Do not load drip-wet laundry into the dryer
(min. 800 rpm).
Pay attention to the labels on the clothes,
indicating the recommended drying mode
(see table of textile treatment symbols on
the last page).
- Load the laundry into the drum.
- Close the dryer door.
- Drying program selection
By turning selector knob (A) select the preferred
drying program according to the type of laundry and
required nal moisture. The selector knob may be
turned in both directions.
- Selection of additional functions
Additional functions are selected prior to pressing
the START button (D).
Decreasing the temperature
This function is selected if you wish to dry laundry
at a temperature lower than determined by the
program (see drying programs chart on page 20).
This function makes the drying cycle last longer.
After drying is completed, this function
returns to the initial higher temperature.
13
Drying procedure
Operating the dryer
Page 14
162969
Turning the anti-crease program off
The anti crease program is active at the end of
each program and will remain active for one hour
(occasionally turning the drum) to prevent clothes
from creasing.
Press the (C) button to turn off the anti crease
program; the LED above the button will illuminate.
When the dryer is turned off, this function
is reset; the anti crease program defaults
to “ON”.
•
The drying process is turned on by pressing the
START/PAUSE button (D); the (H) LED illuminates.
•
If you turn the program selector knob during
the drying process, settings do not change. The
program can be reset only by turning the selector
knob to the “0”, position rst.
•
When the set moisture level is reached, the cooling
process starts; the (H) LED goes off and the (G)
LED is on.
•
If the “Fluff” program is selected (see drying
programs table) the (H) LED is on throughout the
entire program.
•
Cooling off period lasts 10 minutes; LED (G) is on.
•
Program is suspended if the drum sensor fails to
detect laundry in the drum.
•
The anti-crease program is active at the end of
program and remains active for 1 hour (drum
occasionally spins around).
•
If you open the drum door after the drying cycle is
completed, the anti-crease program is ended.
14
Drying procedure
Page 15
162969
- End of drying procedure
At the end of the drying procedure the (F)
LED ashes, indicating that the drying
program has ended. The “clean lter” LED
will illuminate.
•
Open the dryer door by pushing the left-hand side
of the door towards the appliance.
•
Remove the laundry from the dryer.
•
Turn the appliance off by turning the knob selector
(A) to the position “0”.
•
Clean the lint lter (see chapter on Cleaning and
Maintenance).
•
Close the dryer door.
•
Pull the power cord from the socket and cut the
power supply.
15
Page 16
162969
•
By the user
After drying be careful when extracting
laundry from the appliance, as it may be
hot!
Suspending the operation by pressing the
START/PAUSE button.
In case you press the START/PAUSE button (D)
during the drying procedure, the drying program is
suspended, and with the next press of the same
button the program is resumed where it had been
interrupted.
Changing the program or the functions
If you wish to change the drying program or the
additional functions during the drying procedure,
move button (A) to the position “0”, select new
drying program or additional functions and conrm
the new selection by pressing the START/PAUSE
button.
Door opened
If the door is opened during the drying process this
will pause the operation. The (H) LEDs will ash,
depending on the drying process stage. When the
door is closed, the drying process resumes only
after the START/PAUSE button (D) is pressed. The
(H) LED stops ashing.
•
Power failure
If a power failure occurs during the operation
of the dryer (H) LED ashes, depending of the
drying process stage), press the START (D)
button to resume the program from where it was
interrupted (the LED stops ashing).
16
Interruptions
Page 17

162969
•
Drying is economically most effective if you dry
the recommended quantity of laundry per load
(see Program Chart on page 20).
•
Do not dry laundry made of especially sensitive
bers (wool, silk), which may shrink or lose shape.
•
It is not necessary to use a fabric conditioner
when washing the laundry, since drying makes it
soft and tender.
•
Drying time is much shorter and consequently the
energy consumption lower if laundry is well spun
prior to drying.
•
By selecting the most suitable drying program,
you will avoid over-drying and difcult ironing.
•
By cleaning the lter on regular basis drying time
is shorter and consumes less energy.
17
Tips for drying and for the economic
use of the dryer
Page 18

162969
•
After every drying clean the lint lter, located in
the inner part of the door.
•
Lift the lter lid (Fig.).
•
Use your ngers to remove lint. Replace the lter
cover.
•
If necessary, also clean the lter housing and door
edges.
Cleaning of the lter on the lower side of the
door opening (only with some models)
Before removing clothes from the drum, clean the
lter on the lower side of the door opening with a
damp cloth or wet hand.
If the lter is clogged in such way that it needs
washing, pull it out as shown (Fig.), wash it under
hot water and dry. Be sure that the replaced lter
snaps safely to its position, and only then close the
lter lid.
If the lter is not regularly cleaned, the
airow is obstructed, which causes longer
drying time and danger of overheating.
Turn the appliance off prior to cleaning
(unplug the power cord from the wall
socket).
•
Clean the cabinet and drum interior with soft cloth
and mild detergent.
•
Periodically clean (vacuum) the interior of the
ventilation exit and duct.
18
Cleaning and maintenance
Cleaning the lter
Page 19

162969
Environmental interference (for example electrical
wiring) could induce signalization of different faults.
In such cases:
- switch the appliance off, and wait for a few
seconds;
- switch the appliance back on and repeat the
drying program.
If the fault repeats, call authorized service shop.
19
Troubleshooting
Trouble Check
Appliance does
not work:
• If there is current in the socket and if the fuse is
functioning.
• If the plug is correctly inserted into the socket.
There is current
in the socket, but
the drum is not
rolling:
• If the door is closed tightly (press it towards the
appliance).
• If the program runs according to instructions.
• If appropriate drying time is selected.
Laundry is not
dry:
• If the lter is clean.
• If the room is adequately ventilated.
• If the amount of laundry to be dried is not too big.
• If the ventilation duct is too long (only with evacuation
dryer - max 2 m (80 inch)).
• If the laundry loaded in the drum has not been spun
enough or if appropriate drying time has been set.
Unevenly dried
laundry:
• If the amount of laundry to be dried is not too big.
• If there are only large pieces of laundry (large and small
pieces should be dried together).
• If different fabrics are dried together (group the laundry
according to the type of fabrics).
The machine signals errors or failures in operation by ashing signal LED's.
Record number of ashes representing the failure, shut the machine off and
call nearest authorized service.
If a failure occurs due to incorrect installation or inappropriate use of the
appliance, the guarantee is void, and the repair bill shall be settled by the user.
Page 20

162969
20
Tables
Program chart
Program
Type of laundry
Example of laundry
COTTONS max. load: 7 kg (15 lbs)
Very dry
Thick or multiple layer laundry.
Terry cloth, bathrobe
Dry
Unevenly thick laundry, requiring little or
no ironing.
Terry cloth laundry, knitting,
household laundry ...
Normal dry
Uniformly thick laundry, requiring little or
no ironing.
Terry cloth, tricot laundry
Slightly damp
Fine laundry requiring ironing.
Tricot, ne cotton undershirts
Iron dry
Normally thick cotton or ax laundry.
Bed linen, table cloth,
trousers, shirts, undershirts ..
PERMA PRESS max. load: 3,5 kg (8 lbs)
Very dry
Thick or multiple layer synthetic or mixed
fabrics laundry.
Pullovers, dresses, blankets
Dry
Uniformly thick laundry not requiring
ironing.
Shirts, blouses, bed linen,
socks, children clothes
Slightly damp
Fine laundry, requiring little or no ironing.
Tricot laundry, undershirts,
table cloth, shirts, dresses,
sports attires
Iron dry
Laundry for ironing.
Shirts, blouses, bed linen,
table cloth, ...
DELICATE (on reduced temperature
synthetics program) max. load: 2,5 kg (5,5 lbs)
Dry
Delicate laundry, to be dried at reduced
temperature and requires no ironing.
Blouses, delicate underwear
Slightly damp
Delicate laundry, to be dried at reduced
temperature and requires ironing.
Blouses, delicate underwear
Page 21

162969
Select the desired program depending on
the type of laundry, drum load and drying
level.
compulsory possible
21
Program chart/
additional functions
Program Additional functions
Lower temperature Anti-crease program off
Cottons
Perma press
Delicate
Timed dry
Fluff
Mix
Program
Type of laundry
Example of laundry
TIMED DRY max. load: 3,5 kg (8 lbs)
20 to 60 minutes
Single pieces of thick laundry that has to
be completely dried, or small amount of
laundry (up to 1 kg), ...
Basket drying (certain models only).
Straightening of laundry - following prior
wringing.
Bathrobe, bathing towels,
pullovers, ...
Sports footwear, ...
FLUFF
20 minutes
Laundry to be aired quickly (without
heating up).
Worn clothing
MIX max. load: 3,5 kg (8 lbs)
Dry
Mixed cotton and combined fabrics
laundry.
Bed linen, table cloth,
clothes
Page 22

162969
22
Warranty
Page 23

Page 24

Page 25

162969
25
Consumer Support
Page 26

162969
26
Page 27

Page 28

SP PG2 OEM MOFFAT
350A4502P547
162969/en (07-07)
Page 29

Mode d’emploi
Sécheuse
Page 30

162970
Nous vous remercions de la conance que vous
nous avez témoignée en achetant un sèche-
linge de notre marque et vous félicitons de votre
excellente décision.
Cet appareil destiné au séchage du linge est conçu
pour une utilisation domestique.
Il permet de sécher rapidement le linge, tout
en douceur pour le respect des textiles les plus
délicats.
Nos appareils respectent l’environnement: certains
matériaux sont recyclables tandis que d’autres
peuvent être remis au service de la propreté ou
détruits. Pour protéger l’environnement, remettez
l’appareil usagé au service habilité pour le
ramassage des appareils ménagers.
Description de la sécheuse ..............................3
Avertissements ..................................................4
Consignes pour la mise au rebut .....................6
Consignes de sécurité importantes ................7
Installation et raccordement.............................9
Fonctionnement...............................................12
Conseils de séchage et d’utilisation
économique de la sécheuse ...........................18
Nettoyage et entretien .....................................19
Dépannage .......................................................20
Tableaux ...........................................................21
Fische d’inscription du propriétaire ..............23
Garantie du client ............................................25
Soutien au consommateur .............................26
2
Page 31

162970
La plaque signalétique indiquant les caractéristiques principales
de la sécheuse est apposée au-dessous de l’encadrement de la
porte.
1. Penneau de commande
2. Sélecteur de programme
3. Porte
4. Ouvertures d'évacuation de
l’air humide
5. Pieds
Dimensions de l’appareil (l x p x h):
600 mm x 600 mm x 600 mm
Poids de l’appareil (net): Séchoir à évacuation 34 kg
Tension nominale: 240 V, 60 Hz
Puissance électrique: 2400 W
Chargement maximal: 15 lbs (7 kg)
Raccordement secteur (240 V, 30 A)
Fusible: 10 A
Résistance: 2100 W
3
Description de la sécheuse
Caractéristiques
techniques
Page 32

162970
•
Utilisez la sécheuse pour sécher uniquement le
linge lavé à l'eau. Ne mettez jamais dans votre
séchoir des vêtements nettoyés avec des produits
inammables (essence, trichloréthylène, etc.),
cela peut provoquer une explosion.
•
Ne laissez pas les enfants jouer avec l’appareil.
Empêchez vos enfants ou vos animaux de
compagnie de pénétrer dans le tambour de la
sécheuse.
•
Lors de la mise au rebut de l’appareil usagé,
veillez à enlever (ou sectionnez) le cordon
d’alimentation et rendez inutilisable le système
de verrouillage de la porte an d’empêcher les
enfants de s’y enfermer.
•
Nettoyez le ltre après chaque séchage.
•
Après chaque utilisation, éteignez toujours
l'appareil (sélecteur de programme sur la position
“0”) et débranchez le cordon d'alimentation.
•
Conez toutes les interventions à un
professionnel. Les réparations qui ne sont pas
effectuées par du personnel qualié peuvent être
la cause d’accidents ou de pannes. Faites appel
au service après-vente agréé (voir la liste des
S.A.V.).
•
La plaque signalétique indiquant les
caractéristiques principales de la sécheuse est
apposée au-dessous de l’encadrement de la
porte.
•
La pièce doit être bien aérée et exempte de
poussière.
•
Si la sécheuse se trouve dans un local où des
appareils à gaz sont reliés à un conduit de
cheminée, une ventilation appropriée doit être
assurée pour empêcher le retour éventuel des
gaz émanant de ces appareils.
4
Avertissements
Page 33

162970
Pour réduire le risque d'incendie, faites
attention aux points suivants:
•
Ne faites pas sécher de linge sale dans le sèche-
linge, lavez-le au préalable.
•
Le linge sale comportant des taches d’huile
alimentaire, acétone, alcool, essence, pétrole,
détachant, térébenthine, cire et détachants
de cires doit être lavé à l'eau chaude avec un
détergent spécial avant d'être séché dans la
sécheuse.
•
Ne mettez pas dans le sèche linge: objets en
mousse (latex), textiles imperméables, textiles
caoutchoutés et vêtements molletonnés.
•
Utilisez les assouplissants suivant les conseils de
leurs fabricants.
•
Le dernier cycle du séchage est effectué à froid
(cycle de refroidissement) ce qui permet au linge
de rester dans le séchoir à une température qui
ne l’abîme pas. N’arrêtez jamais la sécheuse
avant la n du cycle de refroidissement, sauf si
vous retirez le linge immédiatement et le laissez
refroidir étendu.
Avant de mettre votre combiné en service,
prenez le temps de lire attentivement
cette notice. Les pannes ou réclamations
résultant d’un branchement ou d’une
utilisation incorrect ne sont pas couvertes
par la garantie.
N’arrêtez jamais le sèche-linge avant la n
du cycle de refroidissement,, sauf si vous
retirez le linge immédiatement et le laissez
refroidir étendu.
5
Page 34

162970
Risque d’étouffement !
Risque d’étouffement dû aux emballages et aux
lms.
Gardez les emballages hors de portée des enfants.
Les emballages sont réalisés dans des matériaux
écologiques et recyclables. Respectez la législation
en matière d’élimination des emballages ménagers.
Consultez votre revendeur ou votre mairie pour
connaître les possibilités d’élimination existantes.
Danger de mort !
Danger de mort par électrocution ou par
étouffement.
Sécheuse en n de vie :
•
Débrancher le cordon d’alimentation.
•
Coupez le cordon d’alimentation pour rendre la
sécheuse inutilisable.
•
Détruisez la serrure de la porte pour empêcher
que des enfants ne s’enferment dans l’appareil.
L’élimination dans le respect de l’environnement
permet de recycler des matières premières
précieuses.
Consultez votre revendeur ou votre mairie pour
connaître les possibilités d’élimination existantes.
6
Rebutage de
l’emballage
Consignes pour la mise au rebut
Elimination de
l’appareil en n de vie
Page 35

162970
An de réduire les risques d’incendie,
d’électrocution et d’accidents corporels
lors de l’utilisation de votre appareil,
veuillez prendre les précautions
élémentaires de sécurité et respecter les
consignes suivantes:
1. Lisez entièrement le mode d’emploi avant
d’utiliser votre appareil.
2. Ne lavez pas les articles qui ont été
préalablement nettoyés, lavés, trempés
ou aspergés d’essence, de solvants pour
nettoyage à sec ou de toute autre substance
inammable ou explosive; ces substances
produisent des émanations qui peuvent
s’enammer ou exploser.
3. Lors du lavage, n’ajoutez à l’eau ni essence,
ni solvants pour nettoyage à sec, ni aucune
autre substance inammable ou explosive; ces
substances produisent des émanations qui
peuvent s’enammer ou exploser
4. Sous certaines conditions, de l’hydrogène
peut s’accumuler dans un circuit d’eau chaude
resté inactif pendant deux semaines ou plus.
L’HYDROGÈNE EST UN GAZ EXPLOSIF. Si
le circuit d’eau chaude est resté inactif pendant
un certain temps, ouvrez tous les robinets
d’eau chaude avant d’utiliser votre machine à
laver, et laissez l’eau couler pendant quelques
minutes. Cela permettra d’évacuer l’hydrogène
accumulé. L’hydrogène étant inammable, ne
fumez pas et éteignez toute amme pendant
cette opération.
5. Ne laissez pas les enfants jouer à proximité
ou à l’intérieur de l’appareil. Il est toujours
nécessaire de les surveiller attentivement
lorsque l’appareil fonctionne en leur présence
6. IMPORTANT: Démontez la porte avant de
déplacer ou de vous débarrassez de l’appareil.
Cela évitera aux enfants de se retrouver
7
Consignes de sécurité importantes
Page 36

162970
accidentellement enfermés à l’intérieur.
7. Ne mettez pas vos mains à l’intérieur de
l’appareil quand le tambour est en mouvement
8. N’installez pas cet appareil à l’extérieur et ne
l’exposez pas aux intempéries.
9. Ne modiez pas les boutons de réglage.
10. Ne réparez pas l’appareil vous-même et ne
remplacez aucune pièce; ne tentez aucune
révision de l’appareil, à moins que celle-ci ne
soit recommandée par le manuel d’entretien
ou par tout autre manuel de réparation, et que
vous soyez en mesure d’en comprendre les
instructions et de les exécuter.
Consignes pour la mise a la terre
Cet appareil doit être branché à une prise de terre.
En cas de panne ou de fonctionnement défectueux,
le branchement à une prise de terre réduira les
risques d’électrocution en fournissant un chemin
de moindre résistance au courant électrique. Cet
appareil est muni d’un câble de raccordement à la
terre et d’une prise de terre mâle. Cette prise doit
être branchée sur une prise femelle appropriée,
correctement installée et reliée à la terre,
conformément à la réglementation en vigueur.
Il y a risques d’électrocution en cas de
raccordement inadéquat du câble à la
terre. Veuillez faire contrôler la mise à la
terre de votre installation électrique par
un électricien qualié ou un prestataire de
service agréé.
Ne modiez pas la prise fournie avec l’appareil
si elle ne s’adapte pas à votre installation. Faites
installer une prise femelle adéquate par un
électricien qualié.
8
Conservez ces
consignes
Page 37

162970
•
Pour emballer nos produits, nous utilisons
des matériaux d’emballage qui respectent
l’environnement: ils peuvent être réutilisés
(recyclés), remis au service de la propreté ou
détruits sans risque pour l’environnement.
•
Dans ce but, tous les matériaux sont pourvus du
marquage approprié.
Veillez à ne pas endommager la carrosserie
de l’appareil avec un objet pointu en
enlevant l’emballage.
Avant de raccorder l’appareil, laissez-le
s’adapter à la chaleur de la pièce (patientez
deux heures).
Les ouvertures d’évacuation et la grille d’aération en
façade ou à l’arrière de la sécheuse doivent rester
dégagées.
•
Raccordez le tuyau d’évacuation en métal rigide ou
exible à l’ouverture prévue à cet effet.
•
Le tuyau d’évacuation ne doit pas être relié à
un conduit de cheminée servant à l’évacuation
des gaz des appareils qui utilisent des matières
inammables.
Seul ce tuyau métallique rigide ou exible
doit servir à l’évacuation.
•
La sécheuse est prévu pour la pose libre, mais il
peut aussi être placé au-dessus d’une machine à
laver de dimensions identiques ou supérieures largeur 517 mm (21 inch), profondeur 476 mm (19
inch) (les pieds à ventouses fournis l’empêcheront
de glisser de l’appareil). La surface sur laquelle
vous le placez doit être propre et plane; la machine
à laver doit avoir un couvercle en bois ou en métal.
Vous pouvez acheter une plaque décorative pour
dissimuler l’espace entre les deux appareils.
9
Installation et raccordement
Déballage
Choix de
l’emplacement
approprié
Installation
Page 38

162970
N’installez pas l’appareil derrière une
porte battante ou coulissante ou dont les
charnières sont situées du côté opposé à
l’appareil. Positionnez la sécheuse dans la
pièce de façon à pouvoir ouvrir librement la
porte.
•
Mettez l’appareil à niveau dans le sens longitudinal
et transversal en faisant tourner les pieds réglables
qui permettent un ajustement en hauteur de +/0,39 inch (1 cm).
L’appareil devra être placé sur un sol
résistant dont la surface sera sèche et
propre an d’éviter que l’appareil ne glisse.
Les pieds réglables devront être nettoyés
avant l’installation.
Ne le mettez pas sur un tapis épais an de
ne pas gêner la circulation de l’air.
A - Sécheuse à évacuation
•
L’appareil a deux ouvertures pour l’évacuation de
l’air humide. Fermez l’une avec le cache fourni et
vissez le tuyau d’évacuation sur l’autre.
1 Cache de l’ouverture
d’évacuation
2 Tuyau d’évacuation en métal
rigide ou exible
10
Evacuation de l’air
humide
Page 39

162970
La distance entre le sèche-linge et la
fenêtre ou le ventilateur ne doit pas
excéder 2 mètres, sinon l’eau peut
s’accumuler dans le tuyau.
•
Raccordez la sécheuse au réseau électrique en
branchant le cordon d’alimentation à une prise
secteur.
•
La tension nominale et autres caractéristiques
gurent sur la plaque signalétique apposée au-
dessous de l’encadrement de la porte.
La prise secteur doit rester accessible
et le système de mise à la terre doit être
conforme aux normes en vigueur.
Si le cordon d’alimentation est endommagé,
il doit être remplacé uniquement par un
technicien qualié.
Le branchement électrique et la mise à
terre doit se faire selon les normes locales
établies.
Connecter à un circuit individuel.
11
Raccordement au
réseau électrique
Page 40

162970
UTILISATION
A - sélecteur de programme
B - touche RÉDUCTION DE LA TEMPÉRATURE
C - touche DÉFROISSAGE DÉSACTIVÉ
D - touche START / PAUSE
E - voyant NETTOYER LE FILTRE
F - voyant TOUCHE FIN DU SÉCHAGE / CYCLE DÉFROISSAGE
G - voyant REFROIDISSEMENT
H - voyant SÉCHAGE EN COURS
12
Fonctionnement
Sélecteur de
programme
Programmes Degré de séchage /
d’humidité résiduelle
cotons séchage prolongé
perma press sec
temps minuté normale
air frais repassage vapeur
mixte
humide pour le
repassage au fer
Page 41

162970
UTILISATION
- Ouvrez la porte en appuyant sur le côté gauche
de la porte.
- Triez le linge selon la nature des bres.
Fermez les boutons et les fermetures à
glissières, nouez les rubans et retournez
les poches à l’envers.
Mettez le linge très délicat dans une
housse de protection spéciale.
Nous vous conseillons de faire sécher en
même temps les petites et grandes pièces
de linge.
Ne mettez jamais de linge non essoré dans
le séchoir.
Prêtez attention aux étiquettes sur les
vêtements, indiquant le mode de séchage
recommandé (voir le tableau des symboles
des traitements textiles en dernière page).
- Chargez le linge dans le tambour (assurez-vous
auparavant que le tambour est vide).
- Fermez la porte.
- Sélection des programmes de séchage
Pour choisir le programme de séchage désiré
(selon le type de linge ou le degré d’humidité
souhaité), tournez le sélecteur (A); le voyant I
clignote. Vous pouvez tourner le sélecteur dans les
deux sens.
- Sélection de fonctions complémentaires
Vous devez les choisir avant d’appuyer sur la
touche START (D).
13
Procédure de séchage
Fonctionnement de la
sécheuse
Page 42

162970
UTILISATION
Réduction de la température
Activez cette fonction si vous désirez sécher votre
linge à une température inférieure à celle utilisée
par le programme; dans ce cas, le séchage sera
plus long. Pour réduire la température, appuyez sur
la touche (B); le voyant au-dessus de la touche (B)
s’allume (voir le tableau des programmes).
Quand le séchage est terminé, le réglage de
la température revient à sa valeur par défaut.
Désactivation du cycle antifroissage
Le cycle antifroissage est activé à la n du
programme de séchage et dure 1 heure (le tambour
tourne de temps en temps).
Pour le désactiver, appuyez sur la touche (C); le
voyant au-dessus de la touche s’allume.
Si vous avez désactivé cette fonction, le voyant au-
dessus de la touche(C) s’éteint après le séchage,
sinon il clignote ainsi que le voyant (F).
Lorsque vous éteignez l’appareil, elle
revient à son réglage par défaut, c’est à
dire activée.
•
Pour lancer le séchage appuyez sur la touche
START/PAUSE (D); le voyant (H) s’allume.
•
Si vous tournez le sélecteur (A) pendant le
séchage, cela n’a aucune inuence sur les
réglages que vous avez effectués auparavant
sauf si vous le tournez sur la position “0” où le
programme est interrompu.
•
Quand le degré de séchage programmé est
atteint, le refroidissement commence et dure 10
minutes; le voyant (H) s’éteint et le voyant (G)
s’allume.
•
Si vous choisissez le programme d’aération
(voir le tableau des programmes), le voyant G
reste allumé.
•
Le programme s’interrompt si le détecteur ne
14
Séchage
Page 43

162970
UTILISATION
décèle pas de linge dans le tambour.
•
Le cycle antifroissage est activé à la n du
programme de séchage et dure 1 heure (le
tambour tourne de temps en temps).
•
Si vous ouvrez la porte une fois le programme
de séchage terminé, le cycle antifroissage
s’interrompt.
- Après le séchage
Lorsque le séchage est terminé, le voyant
(F) clignote. Le voyant (E) (nettoyer le
ltre) s’allume (E).
•
Ouvrez la porte en appuyant sur le côté gauche
de l’encadrement.
•
Enlevez le linge du tambour.
•
Mettez l’appareil à l’arrêt en tournant le sélecteur
(A) sur la position “0”.
•
Nettoyez le ltre (voir le chapitre Nettoyage et
entretien).
•
Fermez la porte.
•
Débranchez le cordon secteur pour déconnecter
l’appareil du réseau.
15
Page 44

162970
UTILISATION
•
Par l’utilisateur
Si vous avez interrompu le cycle de
séchage, faites attention en sortant le
linge, car il peut être brûlant.
•
Interruption en appuyant sur la touche START/
PAUSE
Si vous appuyez sur la touche START/PAUSE
(D) pendant le fonctionnement, vous interrompez
le séchage. Si vous appuyez de nouveau sur
cette touche, le programme reprend là où il a été
interrompu.
Changement de programme ou de fonctions
Si vous voulez modier le programme de séchage
ou les fonctions complémentaires pendant que
l’appareil est en marche, appuyez sur la touche
START/PAUSE (D), tournez le bouton (A) sur la
position “0”, choisissez le nouveau programme
ou les nouvelles fonctions complémentaires et
conrmez votre nouveau choix en appuyant sur la
touche START/PAUSE (D).
Ouverture de la porte
Si vous ouvrez la porte pendant le séchage, vous
interrompez le programme. Le voyant (H) clignote
selon la phase dans laquelle se trouve le sèche-
linge. Lorsque vous fermez la porte, le séchage
reprend seulement si vous appuyez sur la touche
START/PAUSE (D). Le voyant H ne clignote plus.
•
Coupure d’électricité
Si le séchage est interrompu par une coupure
d’électricité, après le rétablissement du courant
le voyant (I) ou (H) clignote selon la phase dans
laquelle se trouvait la sécheuse; appuyez sur la
touche START/PAUSE (D) et l’appareil reprend le
séchage là où il a été interrompu (le voyant cesse
de clignoter).
16
Interruptions
Page 45

162970
UTILISATION
•
Eclairage du tambour
L’éclairage du tambour est allumé quand la porte
est ouvert. Si la porte reste ouverte pendant plus
de 5 minutes et qu’aucun réglage n’est effectué,
l’éclairage s’éteint.
17
Fonctions spéciales
Page 46

162970
UTILISATION
•
Le séchage est plus économique si vous séchez
la quantité conseillée pour chaque type de linge
(voir le tableau des programmes).
•
Ne séchez pas trop de linge en même temps, car
il serait froissé et séché inégalement (max. 6 kg
de linge sec, résistant).
•
Ne faites pas sécher dans l’appareil les textiles
extrêmement délicats (laine, soie) qui peuvent
rétrécir ou se déformer.
•
Il n’est pas nécessaire d’utiliser un assouplissant
lors du lavage puisque le séchage rend le linge
doux et souple.
•
Si le linge est bien essoré avant le séchage
(minimum 1000 tours/min), la durée de séchage
est plus courte et la consommation d’électricité
moins importante.
•
En choisissant une durée de séchage appropriée,
vous éviterez de trop sécher votre linge et le
repassage sera plus facile.
•
Si vous nettoyez le ltre régulièrement, vous
raccourcirez la durée de séchage et réduirez la
consommation électrique.
18
Conseils de séchage et d’utilisation
économique de la sécheuse
Page 47

162970
ENTRETIEN EFFECTUÉ PAR L´UTILISATEUR
•
Après chaque séchage nettoyez le ltre qui se
trouve sur la face interne de la porte.
•
Soulevez la grille du ltre (schéma)
•
Retirez du ltre les bres et eflochures.
Refermez la grille.
•
Si nécessaire, nettoyez aussi le logement du ltre
et le joint de la porte.
Nettoyage du ltre dans l’encadrement de la
porte (seulement sur certains modèles)
Avant de retirer le linge du tambour, il est
recommandé de nettoyer le ltre à eflochures se
trouvant dans l’encadrement interne de la porte, en
bas. Servez-vous pour cela d’un chiffon humide ou
passez dessus votre main mouillée.
Si le ltre est si sale qu’il doit être lavé, enlevez-le
de son logement (schéma), passez-le sous l’eau
courante et faites-le sécher. Veillez à ce qu’il soit
bien en place dans son logement, puis refermez la
grille.
Si le ltre n’est pas régulièrement nettoyé,
le débit d’air n’est pas sufsant, ce qui
rallonge la durée de séchage et présente
un risque de surchauffe.
Avant le nettoyage, l'appareil doit
obligatoirement être déconnecté
(débranchez le cordon d'alimentation ou
tournez la minuterie (A) sur la position
“0”).
•
Nettoyez la carrosserie et la face intérieure de la
porte avec un chiffon doux et un détergent léger.
•
De temps en temps, il est nécessaire de nettoyer
(avec un aspirateur) l’intérieur de l’ouverture
d’évacuation d’air et la conduite de vidange.
19
Nettoyage et entretien
Nettoyage du ltre
Page 48

162970
ENTRETIEN EFFECTUÉ PAR L´UTILISATEUR
Des interférences provenant de l’environnement
(par exemple de l’installation électrique) peuvent
provoquer la signalisation de différentes anomalies.
Dans ce cas:
- mettez l’appareil à l’arrêt et attendez quelques
secondes,
- mettez l’appareil sous tension et relancez le
programme de séchage.
Si l’anomalie réapparaît, contactez votre service
après-vente.
20
Dépannage
Anomalie Vériez
L'appareil ne
se met pas en
marche
• si la prise secteur est sous tension et si le fusible est en
bon état,
• si la che du cordon d'alimentation est correctement
insérée dans la prise secteur.
La prise est
sous tension
mais le tambour
ne tourne pas
• si la porte est bien fermé (poussez-le vers l'appareil),
• si vous avez lancé le programme selon les instructions,
• si vous avez sélectionné le programme de séchage
convenable.
Le linge n'est
pas sec
• si le ltre est propre,
• si le local est sufsamment aéré,
• si vous n'avez pas mis trop de linge dans le séchoir,
• si le tuyau d'évacuation n'est pas trop long, (sécheuse à
èvacuation),
• si le linge a été sufsamment essoré et/ou si vous avez
sélectionné le programme de séchage approprié,
Le linge est
inégalement sec
• si vous n’avez pas mis trop de linge à sécher,
• s'il n’y a pas seulement de grandes pièces (les grandes et
petites pièces devraient être séchées en même temps),
• si vous n’avez pas mis à sécher ensemble des textiles
de différentes compositions (regroupez le linge dont la
composition des bres est identique).
Les voyants clignotants vous avertissent d’un problème ou d’une anomalie de
fonctionnement.
Notez le nombre de clignotements qui illustre l’anomalie, désactivez l’appareil
et contactez le service après-vente agréé le plus proche.
Les pannes ou réclamations résultant d'un raccordement ou d'une utilisation
non conforme ne sont pas couvertes par la garantie. Dans ce cas, les frais de
réparation seront à la charge de l'utilisateur.
Page 49

162970
ENTRETIEN EFFECTUÉ PAR L´UTILISATEUR
21
Tableaux
Tableau des
programmes
Programme
Type de linge
Exemples de linge
COTONS chargement maximal: 7 kg (15 lbs)
Séchage
prolongé
Linge épais ou doublé
Linge en tissu éponge,
peignoirs de bain
Sec
Linge moyennement épais, repassage
inutile ou très léger
Linge en tissu éponge, en
mailles, linge de maison…
Normale
Linge où le repassage est inutile ou très
léger
Linge en tissu éponge,
mailles
Repassage
vapeur
Linge n à repasser
Linge en mailles, T-shirts ns
en coton
Humide pour le
repassage au fer
Linge en coton ou lin, épaisseur normale
Draps, nappes, pantalons,
chemises, T-shirts…
Humide pour le
repassage au fer
Linge en coton ou lin à repasser à la
machine.
Défroissage du linge après essorage
préalable.
Draps, nappes,…
Linge nissant de sécher à
l’air libre.
SYNTHETIQUES chargement maximal: 3,5 kg (8 lbs)
Séchage
prolongé
Linge épais ou doublé en synthétique ou
mélange de bres
Pulls, robes, couettes…
Sec
Linge où le repassage est inutile ou très
léger
Chemises, chemisiers, draps,
chaussettes, vêtements
d’enfants,…
Repassage
vapeur
Linge n, repassage inutile ou très léger
T-shirts, nappes, chemises,
robes, vêtements de sport…
Humide pour le
repassage
Linge à repasser
Chemises, chemisiers, draps,
nappes…
DELICAT (avec réduction de la température sur les
programmes destinés aux synthétiques)
chargement maximal: 2,5 kg (5,5 lbs)
Sec
Linge délicat à sécher à faible température,
repassage inutile
Chemisiers, lingerie
délicate,…
Repassage
vapeur
Linge délicat à sécher à faible température,
à repasser
Chemisiers, lingerie
délicate,…
Page 50

162970
ENTRETIEN EFFECTUÉ PAR L´UTILISATEUR
Choisissez le programme en fonction du
type de linge, du chargement et du degré
de séchage souhaité.
obligatoire possible
22
Tableau des
programmes - fonctions
complementaires
Programme Fonctions complementaires
Reduction de la temperature Cycle anti-froissage desactivé
Cotons
Perma press
Delicat
Temps minuté
Air frais
Mixte
Programme
Type de linge
Exemples de linge
TEMPS MINUTÉ chargement maximal: 3,5 kg (8 lbs)
Entre 20 et 60
minutes
Pièces de linge épaisses à nir de sécher
ou petites quantités de linge (jusqu’à
1kg)…
Séchage dans le panier (certains modèles)
Défroissage du linge après essorage
préalable.
Peignoirs de bain, serviettes
de bain, pulls,
Espradilles…
Linge nissant de sécher à
l’air libre
AIR FRAIS
20 minutes
Vêtements à aérer
(fonctionnement à froid)
Vêtements portés
MIXTE chargement maximal: 3,5 kg (8 lbs)
Sec
Linge divers en coton et coton mélangé
Draps, nappes, vêtements…
Page 51

Page 52

Page 53

162970
25
Garantie du client
Page 54

162970
26
Soutien au consommateur
Page 55

Page 56

SP PG2 OEM MOFFAT
350A4502P549
162970/fr (07-07)
 Loading...