

Page 1
Modal Argon8
8 voice polyphonic wavetable synthesiser
User Manual
OS Version - 1.0
1
Page 2
Important Safety Information
WARNING – AS WITH ALL ELECTRICAL PRODUCTS, care and general precautions must
be observed in order to operate this equipment safely. If you are unsure how to operate this
apparatus in a safe manner, please seek appropriate advice on its safe use.
ENSURE CORRECT PSU POLARITY - FAILURE TO DO SO MAY CAUSE PERMANENT
DAMAGE - RECOMMENDED USE WITH PROVIDED POWER SUPPLY
This apparatus MUST NOT BE OPERATED NEAR WATER or where there is risk of the
apparatus coming into contact with sources of water such as sinks, taps, showers or outdoor
water units, or wet environments such as in the rain. Take care to ensure that no liquids are
spilt onto or come into contact with the apparatus. In the event this should happen remove
power from the unit immediately and seek expert assistance.
This apparatus produces sound that could cause permanent damage to hearing. Always
operate the apparatus at safe listening volumes and ensure you take regular breaks from
being exposed to sound levels
THERE ARE NO USER SERVICEABLE PARTS INSIDE THIS APPARATUS. It should only be
serviced by qualified service personnel, specifically when:
• The apparatus has been dropped or damaged in any way or anything has fallen on the
apparatus
• The apparatus has been exposed to liquid whether this has entered the apparatus or not
• The power supply cables to the apparatus have been damaged in anyway whatsoever
• The apparatus functions in an abnormal manner or appears to operate differently in any
way whatsoever.
2 3
Page 3
Index
00. Introduction
Specification
01. Getting Started
Basic Functions
UI Combinations
02. Connections
03. Synthesis Engine
Oscillators
Oscillator Modifiers
Wavetable Modifiers
Filter
Envelopes
LFOs
Arpeggiator
Sequencer
FX
Modulation
Keyboard/Voice
Settings
04. MIDI
MIDI Implementation Chart
05. Update
6
8
10
10
14
16
18
20
22
24
26
27
28
29
30
32
34
38
40
44
48
50
06. ModalApp
Getting Started
Main Editor
Preset Manager Tab
Modulation Tab
FX Tab
Sequencer Tab
Keyboard Tab
Settings Tab
52
54
55
56
57
58
59
60
61
4 5
Page 4
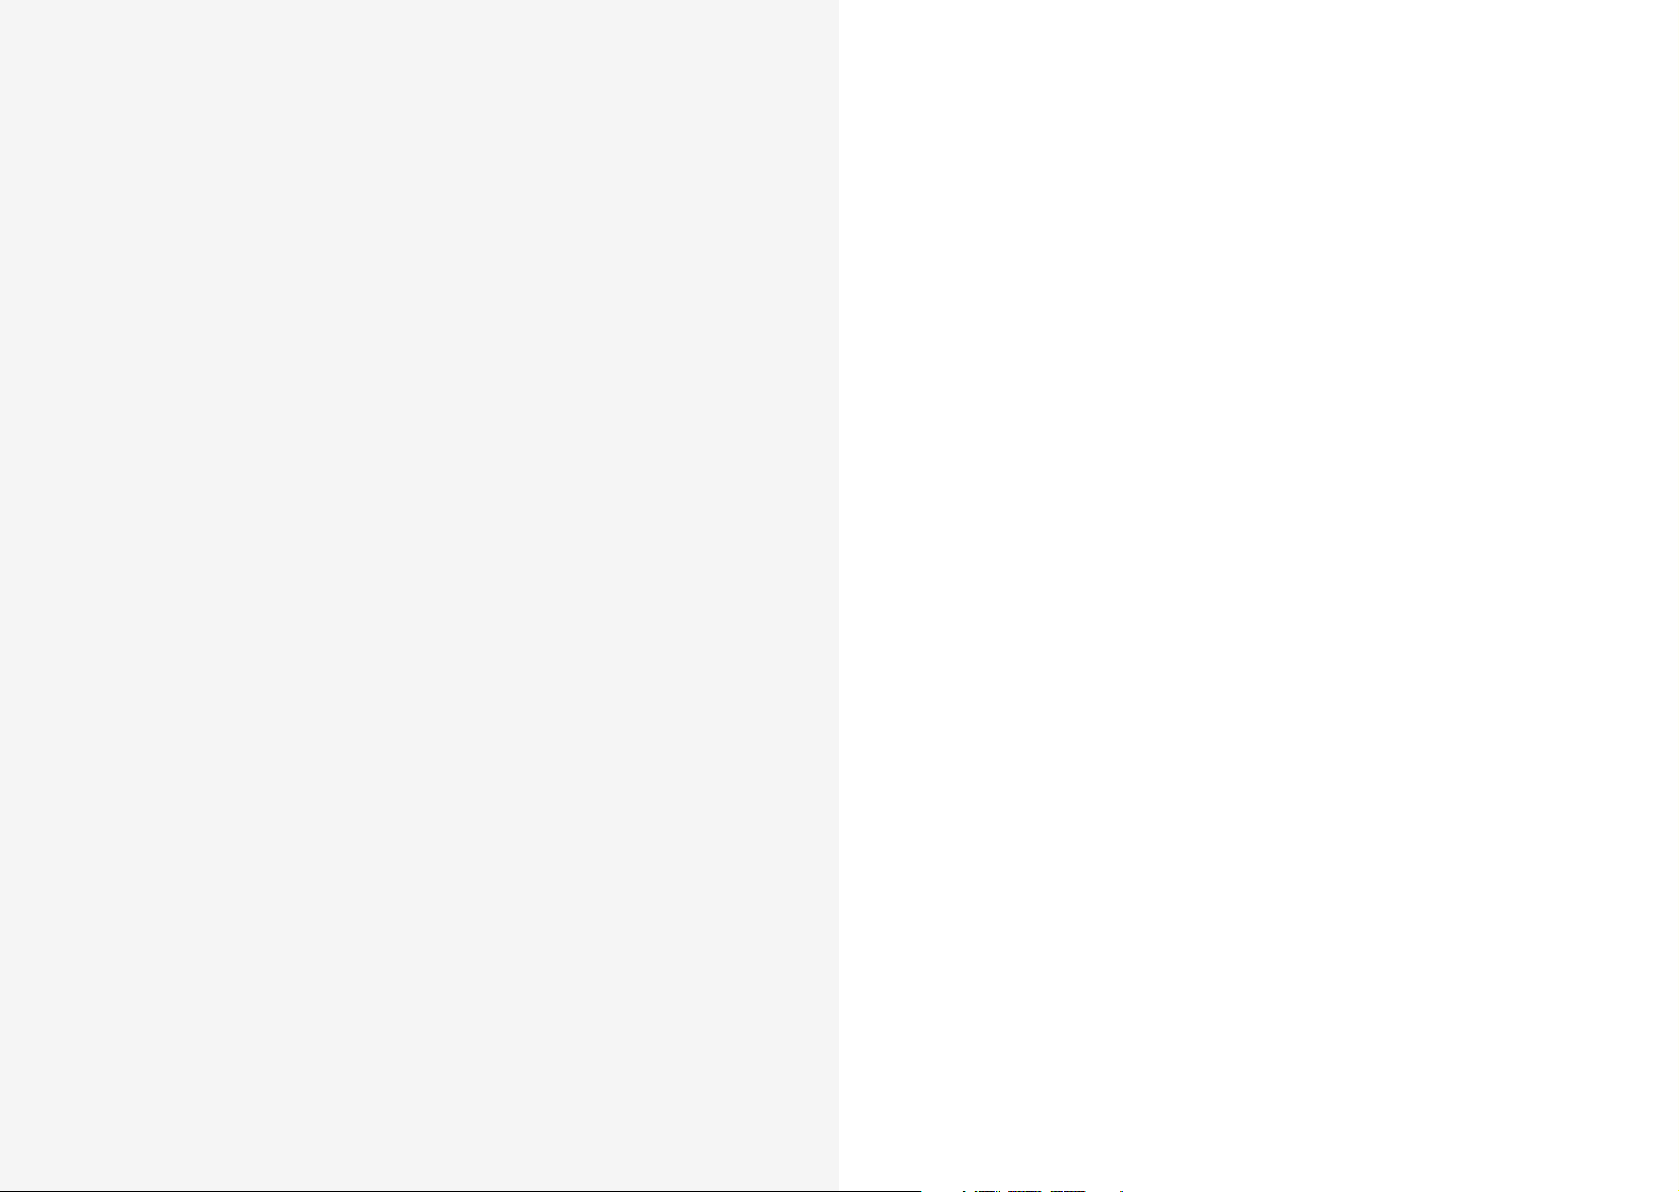
Modal Argon8 is an 8-voice polyphonic wavetable synthesiser.
00
Introduction
It features four digital oscillators per voice split into two controllable wavetables with one
innovative offline wave modifier available per wavetable with 32 different options to redraw
each wavetables and one modulatable oscillator modifier available per patch with 8 modifier
types to choose from.
There are 4 flexible multi-mode filters and 3 dedicated flexible envelope generators for AMP,
MOD and FILTER that can be accessed independently or all three simultaneously on board.
Argon8 also boasts a hugely powerful “Mod Matrix” with eight assignable slots and four
additional fixed routes, 11 mod sources and 52 destinations.
The 4-axis joystick can be assigned to a huge range of modulation destinations and can be
‘locked’ in place when desired.
There are two Audio rate LFO’s with tempo sync (one poly, one global). Polyphonic LFO can
sync to frequency divisions.
Argon8 has 12 on board FX; a waveshaping distortion that is followed by three incredibly
powerful, independent and user configurable stereo FX engines that can create sophisticated
Delays, lush Reverbs, Flanging, Phasing, and Rich Choruses to name a few.
The hardware has been manufactured with high-quality components: a powder coated black
steel case, anodised aluminium top panel, endless encoders and a super bright white on black
OLED screen.
Among the many connections, Modal Argon8 features a USB port to connect your synth to
the MODALapp user interface on a computer tablet or phone. This can be used for preset
design and management as well as updating the firmware on your Argon8 (please see
‘Updates’ section).
6 7
Page 5

Specification
Specification
• True 8 voice polyphonic
• 120 carefully crafted wavetables split into 24 banks of 5 morphable waveform sets,
covering virtual analogue classics through to cutting edge EDM and many from the
original Modal 002 as well as a whole range of mathematically generated tables.
Additional PWM bank and 3 noise/modulation banks accessible on Oscillator 2
• 32 static wavetable modifiers including, de-rez, wave folders, wave shapers, phase
shapers and rectify that can be applied to the 120 wavetables to give a mind boggling
array of permutations and new waveshapes.
• 32 high resolution wavetable oscillators, 4 per voice
• 8 types of oscillator modifier including: Phase Mod (FM), Ring Mod, Amp Mod, Hard Sync
and Windowed Sync
• Voice Drift and Width controls that help to create massive stereo soundscapes
• Multiple keyboard modes, Mono, Poly, Unison 2, unison 4, unison 8, Stack 2 and Stack 4
• Inbuilt sophisticated programmable arpeggiator of 32 steps with rest capability with up to
2048 steps before repeating
• Glide/Portamento with both legato and staccato modes
• 4 Filter types. All filters types are 2 pole state-variable filters, the ‘Standard’ filters
are based on the resonant filter found in other Modal products (SKULPTsynth,
CRAFTsynth2.0). The ‘Classic’ types have a more rounded character and a softer
resonance response.
• 8 assignable modulation slots
• 4 additional fixed modulation routings for common assignments
• 11 modulation sources
• 52 modulation destinations
• 4-axis joystick that can be assigned to a huge range of modulation destinations and
virtually ‘locked’ when desired
• 3 dedicated envelope generators for AMP, MOD and FILTER that can be accessed
independently or all three simultaneously including negative (reverse) versions
• 2 Audio rate LFO’s with tempo sync (one poly, one global). Polyphonic LFO can sync to
frequency divisions
• Waveshaping distortion
• 3 incredibly powerful independent and user configurable stereo FX engines for Chorus,
Phaser, Flanger (Pos), Flanger (Neg), Tremolo, LoFi, Rotary, Stereo Delay, Ping-Pong Delay,
X-Over Delay and Reverb that can be arranged in any order
• 32-step programmable arpeggiator
• Real time sequencer with 512 notes with input quantise and four recordable / editable
parameter animations (Delay FX, LFO’s, sequencer and arpeggiator can be either clocked
internally or externally)
• 500 patch memories, all fully editable and ships with 300 factory programs
• 200 user patch spaces. Patch upload and download through the free MODALapp
• 100 sequencer presets that can be linked to any patch for quickly loading arrangements
• 100 FX presets
• 8 Quick Recall slots accessible from the panel for quickly loading your favourite patches
• Analogue clock sync in and out (configured to the KORG / Teenage Engineering
specification)
• MIDI DIN in and out
• Full size quarter inch jacks for stereo audio outs, headphones and external control such as
sustain and expression
• 3.5 mm stereo input with ability to route incoming audio through the FX
• FATAR TP9/S Full size 37 key keybed with both velocity and aftertouch
• 1.54 inch large OLED display – that provides instant visual feedback to the user at all
times of playing/editing
• Class compliant MIDI provided over USB connection to host computer or tablet
• Optional MODALapp software editor available for macOS, Windows, iOS and Android
• MODALapp can also be run within your Digital Audio Workstation (DAW), with VST3
and AU versions available
• Power: DC-9.0V - 1.5A center-positive
• Road ready Steel and Aluminium chassis
Dimensions
• Width: 555mm – 22 inches
• Depth: 300mm – 11-3/4 inches
• Height: 100mm – 4 inches
8 9
Page 6
01
Basic Functions
Getting Started
Powering on
Connect the power lead to your Argon8 then connect the outputs of the Argon8 to your
mixer, or if you prefer, connect your headphones. Optionally connect a USB cable from your
computer or tablet device to the Argon8 for MODALapp communication.
Before powering up ensure the volume control to any speakers is at minimum, power on can
create a ‘pop’ and this may cause damage to your speakers and the sound guy’s ear drums.
Then power on.
You will see a loading animation on the screen. When the synth has loaded it will change to
show the main patch page.
Press down a key and slowly turn up the volume to a comfortable level.
Screen Control
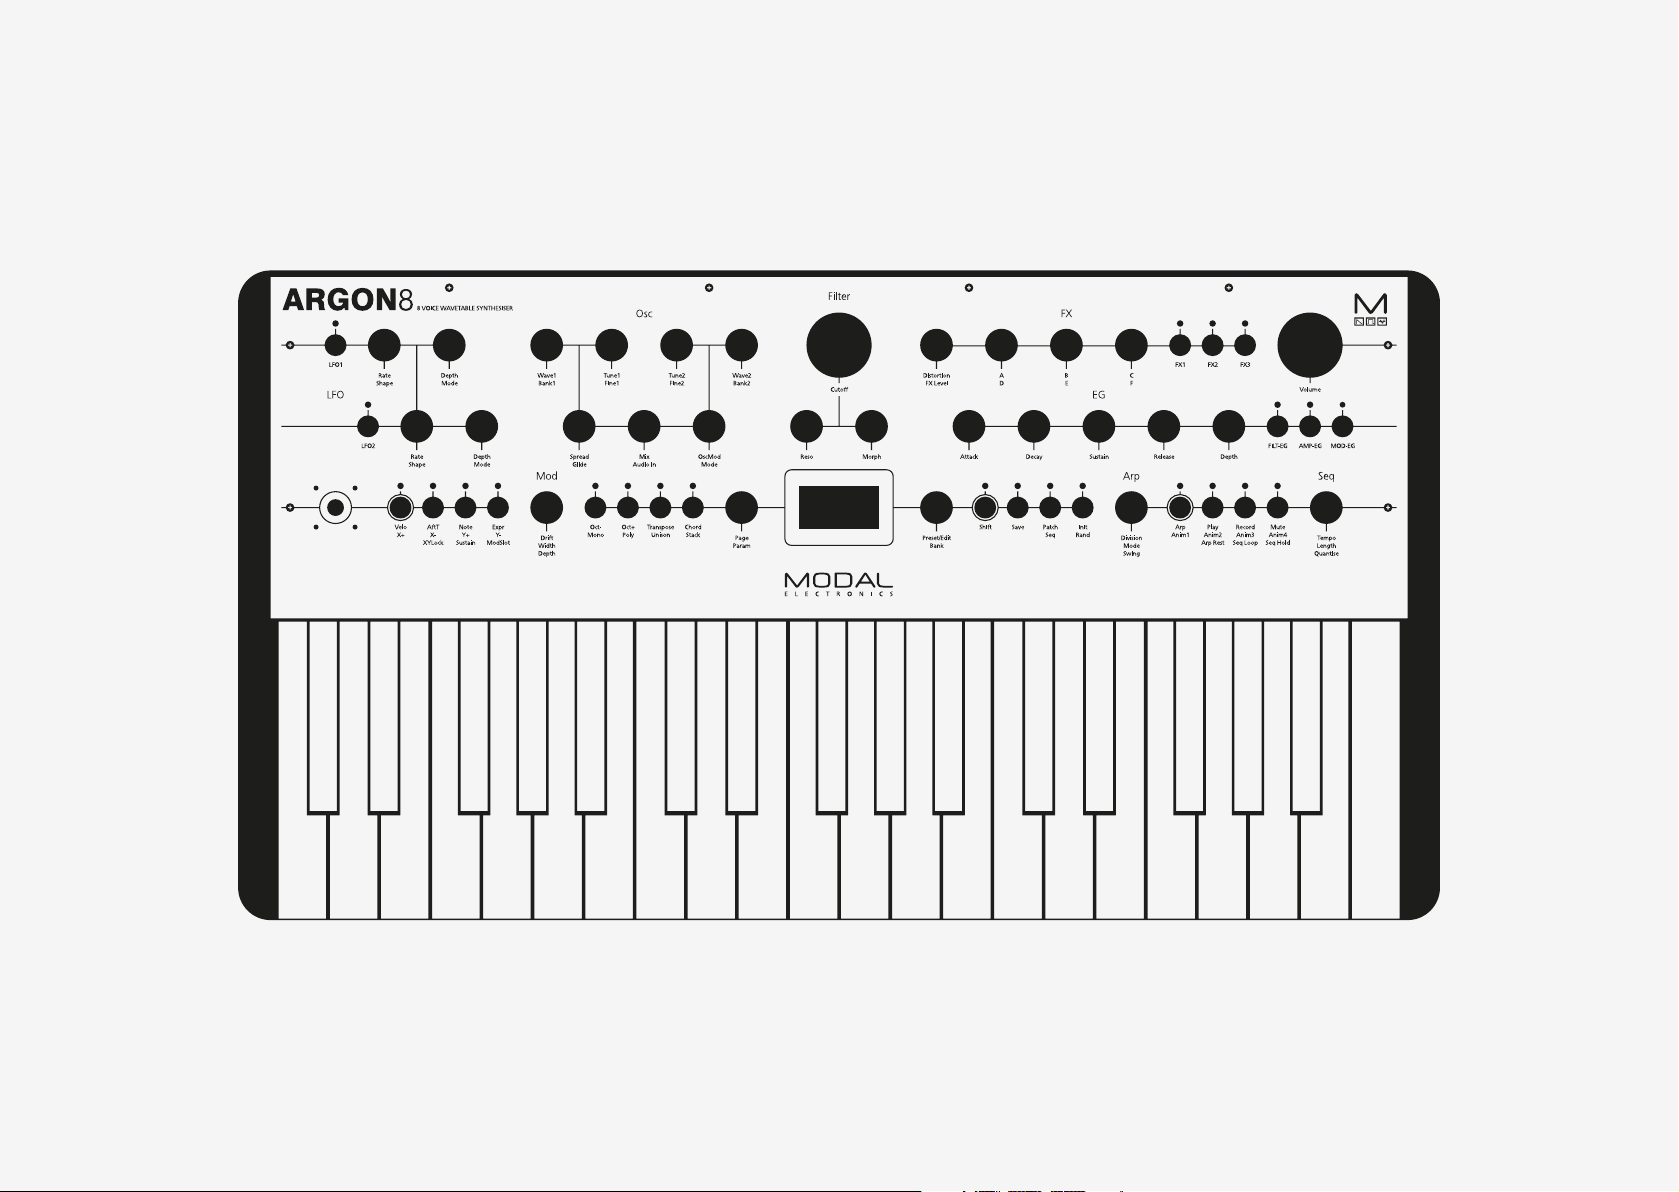
The Modal Argon8 interface is designed to be extremely intuitive and easy to use, so that
all the most important parameters are easily accessible and tweakable directly from the top
panel, however, all functions are also accessible and tweakable on-screen using the two
indented encoders.
These two switched-encoders are located either side of the screen are used for screen
navigation and control and can be clicked to either switch mode or trigger / modify the
selected function:
• Page/Param - When this encoder is in ‘Page’ mode (top row of on-screen text) it cycles
through the parameter pages / groups (e.g. Osc1, Osc2, Filter); when it’s in ‘Param’ mode
(bottom row of on-screen text) it cycles through the parameters on that page / group.
Use the switch by clicking the encoder to toggle between the two modes, where the
mode is displayed on the screen with a line at top for ‘Page’ mode and at the bottom for
‘Param’ mode.
• Preset/Edit (/Bank) - This encoder/switch is used to adjust the currently selected value
or ‘trigger’ the currently displayed parameter. When the panel is in ‘Shift’ mode the
‘Load Patch’ encoder is used to select the patch bank number, jumping up or down in
increments of 100.
10 11
Page 7

Basic Functions
Basic Functions
Secondary functions
Argon8 is a comprehensive and fully featured synthesiser despite its small size. Therefore there
are a number of user interface combinations that are required to access some of the deeper
functions of the synth. The top panel UI has 4 buttons that can access secondary functions.
These are the SHIFT, PATCH, VELO & ARP buttons.
To access the functions labelled in light blue text you may either press ‘Shift’ to latch shift
mode or use it momentarily by holding ‘Shift’ and turning an encoder or pressing a button.
Once let go the panel will return automatically to it’s regular non-Shift state.
To access the functions on the panel labelled in light grey text (3 buttons bottom left, 3
buttons and 2 encoders bottom right), hold the button in that section that has a light grey
ring (‘Velo’ button or ‘Arp’ button) and press the relevant button. NOTE: These combinations
are momentary, not latch-able.
The ‘Patch/Seq’ button is primarily used to switch the screen to either the ‘Load Patch’ or
‘Load Seq’ param for loading patches or sequences, entering the panel into either ‘Patch’
mode or ‘Seq’ mode. When in ‘Patch’ mode the ‘Save’ and ‘Init’ buttons are used for patch
preset management, however when in ‘Seq’ mode the ‘Save’ and ‘Init’ buttons are used for
sequence preset management. When the white LED above this button is lit, it signifies that the
panel is in ‘Seq’ mode.
When held the ‘Patch/Seq’ button can also be used to select ‘WavMod’s for each wavetable
by turning either of the ‘Wave1’ or ‘Wave2’ encoders, to select the Filter Type by turning the
‘Cutoff’ encoder, to select the ‘Arp Gate’ length by turning the ‘Arp’ encoder or, to dial in
the amount of dynamics processing being applied by the ‘Patch Gain’ function by turning the
‘Volume’ encoder.
The ‘Init / Rand’ button/functions respond to a button hold.
Navigating and Loading Preset
Randomise Preset
Either when in ’Shift’ mode or while momentarily holding ‘Shift’ press and hold the ‘Rand’
button, a confirmation message will appear on-screen however the preset will not be
overwritten until saved. Randomise is only available for patches.
Save Preset
First press the ’Save’ button to enter the ‘full’ save procedure (setting preset slot and/or name
- see below), or hold the ‘Save’ button to perform a ‘quick’ save (saving preset directly into
current slot with current name).
Once you are in the ‘full’ save procedure, presets are saved in the following way:
Slot Selection
Use the ‘Preset/Edit’ encoder to select the preset bank/number to save into, and press the
‘Edit’ switch to select it.
Naming
Use the ‘Page/Param’ encoder to select the character position, and use the ‘Edit’ encoder
to select the character. Press the ‘Preset/Edit’ switch to finish editing the name. There are a
number of panel shortcuts here:
• Press ‘Oct-‘ to jump to lowercase characters
• Press ‘Oct+’ to jump to uppercase characters
• Press ‘Transpose’ to jump to numbers
• Press ‘Chord’ to jump to symbols
• Press the ‘Page/Param’ switch to add a space (increment all above characters)
• Press ‘Init’ to delete the current character (decrement all above characters)
• Hold ‘Init’ to delete the entire name
To navigate through and load patches first press the ‘Patch/Seq’ button to return to the Patch
page and use the ‘Preset/Edit’ encoder to scroll through presets. Click this encoder in on the
desired preset to load it. An asterisk will appear on next to the current preset name to indicate
unsaved edits.
Init Preset
Press and hold the ‘Init’ button, a confirmation message will appear on-screen however the
preset will not be overwritten until saved.
Confirming
Press the ‘Preset/Edit’ switch to confirm the settings and save the preset.
At any point during the save procedure hold the ‘Page/Param’ switch to move back a step.
To exit/quit the procedure without saving the preset, press the ‘Patch/Seq’ button.
12 13
Page 8

UI Combinations
UI Combinations
Quick Recalls
Argon8 has 8 Quick Recall slots for quickly loading presets. Quick Recalls are controlled using
the following button combos:
• Hold ‘Patch’ + hold one of the eight buttons on bottom left of the panel to assign the
currently loaded patch to a QR slot
• Hold ‘Patch’ + press one of the eight buttons on bottom left of the panel to load the
patch in the QR slot
LFO
• Turn the ‘Rate’ encoders into the negative range to access synced rates
Oscillators
• Hold the ‘Patch’ button and turn the ‘Wave1’ or ’Wave2’ encoder to control the WavMod
parameters
Filter
• Hold the ‘Patch’ button and turn the ‘Cutoff’ encoder to control the Filter Type parameter
Envelopes
• Hold any of the EG buttons for one second and then turn the ADSR encoders to adjust all
envelopes simultaneously
• Press the MEG button when MEG is already selected to latch MEG assign
Sequencer
• Hold the ‘Mute’ button to clear the sequencer notes
• Hold the Anim1 / Anim2 / Anim3 / Anim4 buttons to clear an animation lane
• When the screen is displaying the ‘Linked Sequence’ parameter, hold the ‘Edit’ switch to
set the value to be the currently loaded sequence.
Arp
Keyboard/Voice
• Press ‘Unison’ repeatedly to cycle through the different unison modes; press ‘Stack’
repeatedly to cycle through the different stack modes
• Press ‘Chord’ whilst holding a chord on the internal or an external keyboard to set the
chord mode chord.
• Hold ‘Transpose’ and press a key on the internal keyboard to transpose all notes, where
the central C key is the root note. Press ’Transpose’ with no keyboard interaction to reset
the transpose value back to 0.
Modulation
• To assign a Mod Slot either hold (momentary) or latch the desired Mod source button then set a depth by turning desired modulation destination parameter encoder
• When latched in a Mod Source assign mode pressing the flashing Mod Source button
again will exit assign mode
• Mod source button + ‘Depth’ encoder - set global depth for that mod source
• Press ModSlot repeatedly to cycle through and view all mod slot settings on the screen
• When the screen is displaying a mod slot ‘Depth’ parameter (most easily accessed via
assigning modulation using the panel or via the ModSlot button), hold the ‘Edit’ switch to
clear the mod slot assignment.
• To assign a mod source to an osc’s global frequency destination, use either of the fine
tune controls. ‘Tune1’ will assign to Osc1 tune, ‘Tune2’ will assign to Osc2 tune.
FX
• Press FX1 / FX2 / FX3 button repeatedly to change the FX type of the slot
• Hold FX1 / FX2 / FX3 button to reset the FX type of the slot to ‘None’
• Turn the ‘B’ encoder into the negative range for the slot with a Delay FX assigned to
access synced delay times
• Press FX1 + FX2 + FX3 to jump to the ‘FX Preset Load’ parameter
Global Settings
• When the screen is displaying the ‘Reset’ option, hold the ‘Edit’ switch to trigger the
‘Reset’ function.
• Hold the ‘Arp’ button and press keys on the internal or an external keyboard to add
pattern notes or press the ‘Rest’ button to add a rest to the pattern
• Hold the ‘Patch’ button and turn the ‘Division’ encoder to control Arp Gate
14 15
Page 9
02
Connections
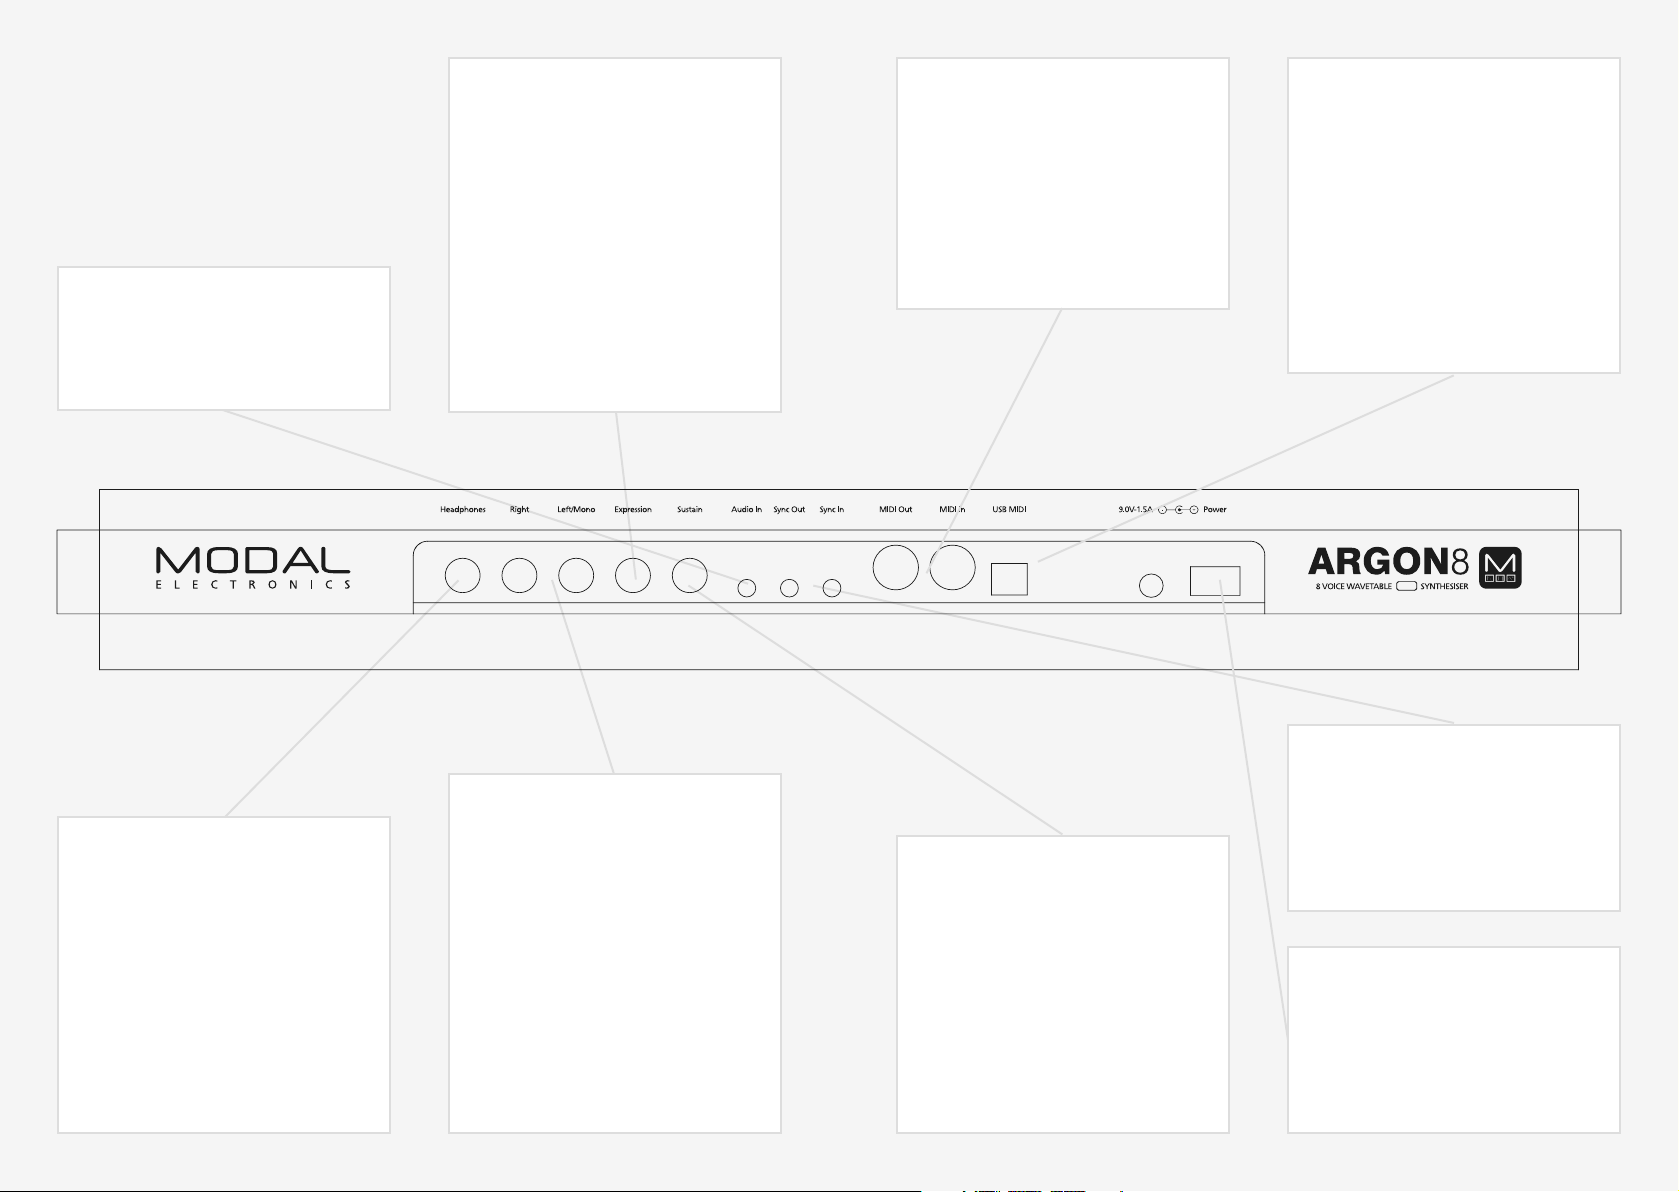
Audio In
Audio Input on 3.5mm stereo/TRS jack.
Expression Pedal over standard 1/4”
stereo/TRS jack from an external
expression source.
Argon8 works best with expression pedals that use the TRS
polarity and have a resistance of 10k or above. However
ARGON8 has a software configuration option for providing
basic compatibility with RTS polarity pedals as well as for
improving the compatibility with different resistances. If
your expression pedal has a polarity switch we recommend
setting it to the ‘TRS’ polarity (the default setting on most
pedals). For setting maximum compatibility with your
expression pedal’s polarity and resistance value, please see
the ‘Settings - Pedal Type’ section. If you are unable to
configure Argon8 to work adequately with your expression
pedal, you may need to use a TRS Polarity Adapter. Please
note that expression pedals with the TS polarity will not
work with Argon8.
MIDI (In, Out)
MIDI In / Out on MIDI 5-pin DIN
cable. These outputs can be used
to communicate with any other
MIDI devices. The MIDI Out can be
set to Thru using MODALapp or
MODALplugin (See the MIDI section)
USB MIDI
Argon8 is a class compliant USB MIDI
device and connects to a USB host
via USB B Connection for MODALapp
communication, MIDI input and MIDI
output. Simply connect Argon8 to a
USB socket, such as on your computer
or tablet with a standard USB cable and
find ‘Argon8’ listed as a MIDI port on
your computer or tablet.
Clock Sync (In, Out)
Line Out
Headphones
Headphone output on 3.5mm Stereo
jack. The volume can be adjusted using
the VOLUME knob, the MODALApp, or
through MDI CC. (See the MIDI section)
The headphone output will match the
audio output so it can be either stereo
or mono depending on the current
audio out configuration.
16 17
Line level stereo outputs on 1/4” mono/
TS and stereo/TRS jacks. The left jack
only will break the stereo circuit and
collapse the signal to mono. These
outputs can be connected to any
line level input for monitoring and
recording. The line output is higher
quality than the headphone output,
so always use it when recording or
performing. The Line out level can be
adjusted using the ‘Volume’ knob.
Sustain Pedal over standard 1/4” mono/
TS or stereo/TRS jack from an external
sustain pedal.
Note: Argon8 supports both types of sustain pedal
polarities. “Positive / Normally Open” pedals can be
connected / disconnected whilst Argon8 is powered on,
however “Negative / Normally Closed” pedals must be
connected before powering on the device and disconnected
after powering off the device in order to work correctly.
If your sustain pedal has a polarity switch we recommend
setting it to the “Positive” polarity. If you are unsure of your
pedal’s polarity type, it is recommended to only connect /
disconnected the pedal whilst the device is powered off.
Clock Sync In / Out on 1/4” mono/TS
jack. Simply plug into your clockable
gear as desired. (See the Sync section)
Power
Power switch for Argon8. Power via
DC-9.0V - 1.5A center-positive PSU
(supplied)
Page 10
03
Synthesis engine
18 19
Page 11

Oscillators
Oscillators
Argon8 features 28 banks of unique morphable waveform sets located on either Wave 1 (first
24) or Wave 2 (first 24 plus an additional 4). It has a total of 32 oscillators inside.
• Wave1: This encoder allows you to sweep continuously through the selected wavetable.
Holding Patch and turning this encoder will select the WavMod type for this wavetable
set.
• Wave2: This encoder allows you to sweep continuously through the selected wavetable.
Holding Patch and turning this encoder will select the WavMod type for this wavetable
set where available (PWM and noise banks are not modulatable in this way)
• Tune1: Turning this encoder allows us to control the coarse tuning of Wave1 (Tune) at
desirable intervals +/- 4 octaves.
• Tune2: Turning this encoder allows us to control the coarse tuning of Wave2 (Tune) at
desirable intervals +/- 4 octaves.
• Fine1: Holding the Shift button and (or when latched in shift mode) turning this encoder
allows us to control the fine tuning of Wave1 (Fine) +/- 100 cents
• Fine2: Holding the Shift button and (or when latched in shift mode) turning this encoder
allows us to control the fine tuning of Wave 2 (Fine) +/- 100 cents
• Bank1: Holding the Shift button and (or when latched in shift mode) turning this encoder
allows you to select which bank of waveforms you want on Wave 1.
• Bank2: Holding the Shift button and (or when latched in shift mode) turning this encoder
allows you to select which bank of waveforms you want on Wave 2 (there are 4 extra
banks for PWM and noise on Wave 2).
• WavMod1: Holding the Patch/Seq button and turning the Wave1 encoder selects which
of the 32 wavetable modifiers you want to apply to the wavetable on oscillator 1.
• WavMod2: Holding the Patch/Seq button and turning the Wave2 encoder selects which
of the 32 wavetable modifiers you want to apply to the wavetable on oscillator 2 (cannot
be applied to the PWM or noise banks).
• Spread: This introduces additional oscillators to achieve unison or stacked octaves and
intervals. In the first half of the dial, Wave 1 and Wave 2 are split into individual oscillators
and spread out over the frequency spectrum to create a fat unison sound. This effect is
increased up to the center position. Past half way, the oscillators arrange themselves into
intervals. A huge variation of chords can be created with this control in conjunction with
Wave1&2 detune.
Note: The average level of the sound will be lower when using the SPREAD control. This is
because the combining oscillators are phasing in and out and not constantly re-enforcing
each other as they would if the spread is set to zero.
• Glide: Holding the Shift button and (or when latched in shift mode) turning this encoder
controls the speed with which the oscillators change their pitch, ‘sliding’ from one note
to the next one pressed. Positive values will achieve normal always active glide and
negative amounts will achieve fingered glide and will only glide if another note is already
held. Envelopes will be retriggered with every note when the glide control is centred.
Moving the control in either direction will enable legato mode, where envelopes are
triggered only for the first note in a note stack.
• Mix: This encoder allows you to balance the volume between each wave. All the way to
the left you will hear only Wave 1, All the way to the right you will hear Wave 2. In the
centre you will hear a balanced blend of both waves.
• Audio In: Holding the Shift button and (or when latched in shift mode) turning this
encoder allows you to select the volume of the Audio Input. This will default to 0 on
boot.
• OscMod: Turning this encoder controls the oscillator modifier amount where either Wave
1 is the carrier and Wave 2 is the modulator or the modifier is applied directly to Wave 1.
• Mode: Holding the Shift button and (or when latched in shift mode) turning this encoder
selects which of the 8 oscillator modifiers you want to use.
20 21
Page 12

Oscillators Modifiers
Oscillator Modifiers
Argon8 features 8 oscillator modifiers to change how the oscillators cross modulate each
other. In all of the modifiers Wave 1 is the carrier and Wave 2 is the modulator.
• Phase Modulation
Effect: The phase of Wave 1’s oscillators are modulated by Wave 2’s, distorting the shape
of the waveform and producing complex frequencies. Phase Modulation is an expanded
version of “FM” found on our CRAFTsynth range
Control: Controls the Phase Modulation depth (how much Wave 2 affects the phase of
Wave 1).
Tip: For more harmonic results it is recommended to set Wave 2’s detune value to either
Octaves or Fifths. For complex waveforms the sound can get extreme fairly quickly, in
these cases a lesser PM depth is recommended.
• Ring Modulation
Effect: Wave 1’s oscillators are multiplied with Wave 2’s causing new frequencies (known
as sidebands) to be produced that are the sum and difference of those in the original
signals.
Control: Crossfades between the Dry and Ring Modulated signal on Wave 1.
Tip: For more harmonic results it is recommended to set Wave 2’s detune value to either
Octaves or Fifths. For sounds more akin to Amplitude Modulation set the crossfade value
at halfway.
• Amp Modulation:
Effect: Applies amplitude modulation to Wave 1 and Wave 2’s oscillators producing
new frequencies known as sidebands whilst retaining the original frequencies of the
wavetables
Control: Crossfades between the dry and amplitude modulated signals
Tip: Use ratios such as fifths and octaves for the most harmonic results
• Hard Sync:
Effect: Oscillator sync is performed on Wave 1, with a sharp jump occurring at the phase
reset. Wave 1 is synced to an internal master counter tracking the current playing note,
with the slave frequency being controlled via the “Osc Mod” control. This allows sync
effects to be created without having to use Wave 2’s tuning
Control: Controls the sync slave playback rate (how much faster Wave 1’s audible
oscillators are playing back in relation to the master counter).
Tip: This style of Sync is the version found on many synthesisers and works best on
harmonically rich waves, for classic kinds of synced sounds try using this effect on the
Square and Sawtooth waves (Wave Bank = 1, Wave 1 CC = 94 or 127).
• Wind Sync:
Effect: Oscillator sync is performed on Wave 1, with an amplitude window applied
over the waveform to smooth the jump at the phase reset. Wave 1 is synced to an
internal master counter tracking the current playing note, with the slave frequency being
controlled via the “Osc Mod” control. This allows sync effects to be created without
having to use Wave 2’s tuning.
(Note: As the window is always applied to the waveform, this modifier will have an
impact on the sound regardless of whether the control is set to zero, this can act like
filtering with waveforms that have a lot of variation towards their edges).
Control: Controls the sync playback rate (how much faster wave 1’s audible oscillators
are playing in relation to the master counter).
Tip: Window Sync is particularly useful for smooth sync effects on simple waveforms.
• Shaper:
Effect: Crossfades between several subtle waveshaping distortion curves which are
applied to wave 1, producing varying harmonics and altering the shape of the base
wavetable
Control: Controls which shaping curve is being applied.
• Inverter:
Effect: Inverts the phase of the the wavetable (i.e inverts a positive value to a negative
and vice versa), which can create sharp discontinuities in the waveform
Control:: Controls where in the wavetable to apply the phase inversion
Tip: The effect tends to be strongest when the wavetable value to invert is furthest away
from the zero crossing of the wavetables
• Sync RM:
Effect: Applies classic two oscillator Hard Sync, where Wave 1’s oscillators are slaved to
Wave 2’s oscillators frequency, with blend-able ring modulation of the master and slave
also possible.
Control: Crossfades between the dry and amplitude modulated signals
Tip: As the Oscillators are Synced, inharmonic tuning ratios between Wave 1 and Wave 2
can be set but the output will remain harmonically linked
22 23
Page 13

Wavetable Modifiers
Wavetable Modifiers
Argon8 has 32 static wavetable modifiers that can be applied to both Wavetables
independently. These are applied offline and effectively redraw the waveforms by applying a
process to them. Available modifications are:
• Derez 1: Applies a sample rate reduction effect to the wavetable
• Derez 2: Applies slightly more sample rate reduction
• Derez 3: Applies the most sample rate reduction out of the 3 different types
• Crush 1: Reduces the bit depth of the wavetables
• Crush 2: Further reduces the bit-depth of the wavetables
• Resample 1: Applies a naïve down-sampling algorithm, reducing the amount of detail in
the waveforms
• Resample 2: Applies slightly more down-sampling
• Resample 3: Applies the highest amount of down-sampling
• Simplify 1: Reduces the amount of high frequency partials in the wavetables
• Simplify 2: Reduces more high frequency partials than Simplify 1
• Dual Rectified 1: Alternates between a fully rectified version of the signal played back
at a faster rate and a zero value for the first half of the waveform and then mirrors the
response for the second half
• Dual Rectified 2: Alternates between a fully rectified version of the signal played back at
a faster rate and a zero value for the first half of the waveform and inverts the phase of
the first half for the second half of the wave.
• Triangle Fold: Boosts the amplitude of the waveform and wraps back around whenever
the signal would clip with a triangular curve
• Sine Fold Hybrid: Boosts the amplitude of the waveform and wraps around whenever
the signal would clip with a sinusoidal curve, with some additional wave-shaping applied
• Shaper 1: Applies an amplitude wave-shaping algorithm to the wavetables
• Shaper 2: Applies a different variation of wave-shaping effect-Shaper 3: Applies another
different wave-shaping effect
• Shaper 3: Applies another different wave-shaping effect
• Cubic Phaseshaper: cubes the read curve of the wavetable creating a different variation
of its shape
• Scrunch Phaseshaper: reads through different portions of the wavetable at varying rates
• Half Sine Phaseshaper: reads through the wavetableusing a half of a sine wave
• Rise Over Run Phaseshaper: reads through half of the wavetable at a slower rate then
originally stored and then reads through the other half faster
• Rubber: Plays through the wavetable shape several times at varying rates and stores
them into a single wavetable
• Window Amp Sync: modulates the amplitude of the wavetable with a half sine window
that is played 4.5 * faster than the fundamental
• Resonance Sync: Uses a half wave rectified version of the wavetable (that only keeps the
positive values of the signal) to modulate the amplitude of a sine wave playing back at
8.5 * the fundamental
• Half Rectified: Applies half wave rectification to the wavetable, keeping only the positive
values of the signal
• Half Rectified Inverted: Applies half wave rectification to the wavetable, keeping only
the negative values of the signal
• Shaped RM: Applies a wave shaped variation of ring modulation to the wavetable, using
a sine wave playing back at 2.5 * the fundamental as the modulator signal
• Symmetrical Signs: all values in the first half of the waveform are set to positive, whilst
all values in the second half are set to be negative.
• Mirror: Plays through the waveform twice but mirrors the result for the second half of
the wave
• Half Reverse: Alters the playing direction of various parts of the wavetable at different
positions
• Digital Wrap: Boosts the amplitude of the wavetable and whenever it passes the
maximum range the value jumps to a different polarity.
• Sign Subtract: Subtracts the current wavetable valuefrom its sign value, where sign is +1
if the wavetable value is positive and -1 if the wavetable value is negative
24 25
Page 14

Filter
Envelopes
Argon8 has 4 state variable 2-pole resonant filters to choose from: Standard, Standard Notch,
Classic and Classic Notch (all capable of morphing from low pass, through band pass / notch,
to high pass).
• Cutoff: This parameter controls the low-pass filter cutoff frequency. This affects the
cutoff frequency of the filter, from 0Hz up to 22kHz.
• Reso: This parameter controls the amount of resonance of the filter.
• Morph: This encoder allows control of the shape of the filter: note that the filter is low-
pass by default.
- At it’s minimum value you have a low pass filter;
- We move through a sort of low-shelving;
- At It’s midpoint we have a band-pass filter or notch filter;
- At it’s maximum value a high-pass filter.
TIP: With this feature at lower settings you can dampen the low frequencies while
maintaining a rich high-end texture.
• Type: This parameter selects the current mode of the filter. The filter types available are:
- Standard
- Standard Notch
- Classic
- Classic Notch
Argon8 provides 3 separate 4-stage Envelope Generators (i.e. envelopes), one for the filter
(FILT-EG), one for the amplifier (AMP-EG) and one for modulations (MOD-EG). With negative
amounts only the attack, decay and sustain levels are inverted, the release phase will still tend
to 0.
The envelope generator represented on the encoders can be selected using the 3 dedicated
buttons to the right of the envelope depth encoder.
• Attack: This parameter controls the time passing from the moment you press a key (i.e.
‘MIDI Note On’ message) until the sound reaches its maximum value.
• Decay: This parameter controls the time passing for the envelope to drop from its
maximum value to a sustain level (see below).
• Sustain: This parameter controls the level of the sustain phase (i.e. the volume of the
sound while keeping the key pressed for AMP-EG). If there are no modulations active, this
volume keeps constant until you release the key. (The envelope then enters the ‘release’
phase)
• Release: This parameter controls the time passing from the moment you leave a key (i.e.
‘MIDI Note Off’ message) until the sound reaches silence.
• Depth: This controls the envelope depth amount of the selected envelope generator (i.e.
FILT-EG, AMP-EG or MOD-EG.) This gives bi-polar control of the amount of modulation
the envelope has over it’s destination/s.
• FILT-EG, AMP-EG, MOD-EG: These buttons selects which envelope generator the above
controls are representing.
Pressing the MOD-EG button again latches the assign mode - you will notice the LED
blinking to indicate you are in assign mode. Press again to exit assign mode.
TIP: Holding down any of the EG select button and changing the ADSR parameters will
alter all three envelopes simultaneously and is a useful shortcut to quickly change all
envelopes at once.
26 27
Page 15

LFOs
Arpeggiator
Argon8 features two individual low frequency oscillators. LFO1 is global and LFO2 is
polyphonic.
Both LFO1 and LFO2 can be set to Retrigger, Single and Free mode and have these
parameters:
• LFO1: This button enters and exits assign mode for LFO1
• LFO2: This button enters and exits assign mode for LFO2
This is how we route the LFO’s to parameters in the matrix. Once in this mode, simply
turning the knob for the parameter that you would like the LFO to modulate, you will see
the LED above the button begin to flash to indicate you are currently in an assign mode.
• Rate: This parameter controls the speed of the LFO.
LFO1 in a positive amount is free rate meaning the LFO will never retrigger. In negative
amounts it is synced to the project tempo at various subdivisions.
LFO2 in a positive direction is free rate for the first half then snaps to divisions of the main
frequency of the note being played. This allows the LFO frequency to run into the audible
range and maintain harmonious modulations. A massive array of effects can be achieved
in this way, including AM and FM. In negative amounts the first half of the dial is synced
to the tempo and the second half is synced to divisions of the main frequency of the note
being played
• Shape: Holding the Shift button and (or when latched in shift mode) turning this encoder
controls the given LFO Shape. This allows you to continuously sweep through the four
available LFO waveforms (i.e. sine, sawtooth, square and sample & hold).
• Depth: This parameter controls the depth of the given LFOs modulation.
• Mode: Holding the Shift button and (or when latched in shift mode) turning this encoder
selects the Retrigger Mode. The modes are:
Retrigger - in this mode, each new keypress restarts the LFO and it the continues to run particularly useful for Unison/Stack sounds.
Free - in this mode LFO 2 is never reset, so it could be at any phase when a note is
pressed.
Single - In this mode, the LFO will start when a new key is pressed, complete cycle and
stop, but will not retrigger when a new note is triggered and one is already held.
Argon8 features an intuitive programmable arpeggiator. The speed of the arpeggiator is
controlled by the current clock which can either be received from the sync in port, external
MIDI or from the internal clock in Argon8.
• Arp: The Arp can be enabled / disabled by pressing this button. Holding this and entering
notes using the keys or over USB or MIDI connection will input notes to the Arp. Rests
can be input by pressing the Arp Rest button while entering notes.
• Division: Turning this encoder allows you to select the clock division of the Arp
• Mode: Holding the Shift button and (or when latched in shift mode) turning this encoder
allows you to select the octave range and direction of the Arp.
• Swing: Holding the Arp button and turning this encoder allows you to dial in swing
to the Arp. This setting is bi-polar allowing us to nudge every other note backward or
forward in time.
• Arp Gate: Holding the Patch button and turning the Arp encoder allows you to set Arp
Gate length.
Note. Programmed patterns in the arpeggiator are temporary and are not saved per patch.
They will remain until reprogrammed or until the unit is power cycled.
28 29
Page 16
Sequencer
Argon8 has an extremely powerful real-time sequencer on board boasting 512 notes
with input quantise and four recordable / editable parameter animations (Delay FX, LFO’s,
sequencer and arpeggiator can be either clocked internally or externally)
• Play: This button starts and stops the sequencer.
• Record: This button allows you to record enable and disable. If the sequence is not
playing when you press record it will begin.
Tip: You can enable or disable the metronome in the MODALapp or on-screen on the
‘Settings - Seq’ page.
• Mute: This button mutes all notes in the sequence. Hold the ‘Mute’ button to clear all
the sequencer notes in the currently selected sequence.
• Tempo: Turning this encoder selects the tempo of the internal clock.
• Length: Holding the Shift button and (or when latched in shift mode) turning this
encoder allows you to select the length of the selected sequence.
• Quantise: Holding the Arp button and turning this encoder allows you to select an input
quantise value for the sequencer.
• Seq Loop: Allows you to loop certain parts of the sequencer. When the button is first
pressed is the loop start point and when it is released becomes the loop end point. When
a loop is active pressing the button again will disable the loop.
• Seq Hold: Holds the current sequencer step and repeats it, like a beat repeater. When
the button is released the sequencer carries on from the location it should have been
before the step was repeated so it will still be in time.
• Linked Sequences: This is a screen only parameter that allows you to link a sequence
to a specific patch. This loads this sequence every time its linked patch is loaded. You
can access this easily by pressing the Patch button and using the Page/Param encoder to
scroll all the way to the right. Simply input the desired sequence number for that patch
or select ‘Off’ for no linked sequence. Like any other patch parameter, the patch must be
saved in order to retain the linked sequence number.
Tip: When selecting a Linked Sequence, hold the Preset/Edit switch to select the current
sequence.
Holding the Shift button and (or when latched in shift mode) holding the Anim1 / Anim2 /
Anim3 / Anim4 buttons clear their respective animation lanes.
The Sequence position LED will always cycle 1 - 16 over the current sequence length. Eg. if
sequencer is set to 4 bars, it will take 4 bars for the sequencer LED to scroll from 1 to 16 (i.e.
not steps) If sequencer is running, any sequencer length changes will only take affect at the
beginning of a bar.
30 31
Page 17
FX
FX
Argon8 features 3 incredibly powerful independent and user configurable stereo FX engines
and a separate per-voice waveshaping distortion pre-FX engine. The FX types are:
Chorus, Phaser, Flanger (Pos), Flanger (Neg), Tremolo, LoFi, Rotary, Stereo Delay, Ping-Pong
Delay, X-Over Delay and Reverb and can be rearranged in any order in series. 1>2>3. Any
effect can go in any slot but you may only use 1 type of each effect per preset.
• Distortion: When holding the Shift button this encoder allows us to control the
Distortion amount. The distortion is a waveshaping overdrive and as such is incapable of
bit- crushing effects.
• FX Level: Holding the Shift button and (or when latched in shift mode) this encoder
allows us to control the FX level amount within this patch.This parameter affects the
Dry/Wet mix of the of the FX engine’s audio output with the pre-FX signal. When set to
minimum, only the dry signal will be heard. When set to maximum, only the FX engine’s
signal will be heard.
• A: This encoder allows us to control the first parameter of the selected effect.
• B: This encoder allows us to control the second parameter of the selected effect.
Tip: Turn the ‘FX1,2 and 3 B’ encoder into the negative range to access synced delay
times with delay type FX.
• C: This encoder allows us to control the third parameter of the selected effect.
• D: Holding the Shift button and (or when latched in shift mode) this encoder allows us to
control the fourth parameter of the selected effect.
• E: Holding the Shift button and (or when latched in shift mode) this encoder allows us to
control the fifth parameter of the selected effect.
• F: Holding the Shift button and (or when latched in shift mode) this encoder allows us to
control the sixth parameter of the selected effect.
• FX1: This button allows to select 1st FX slot for control with encoders A-F with a single
click. With multiple clicks it will cycle through the effect type used in that slot.
• FX2: This button allows to select 2nd FX slot for control with encoders A-F with a single
click. With multiple clicks it will cycle through the effect type used in that slot.
• FX3: This button allows to select 3rd FX slot for control with encoders A-F with a single
click. With multiple clicks it will cycle through the effect type used in that slot.
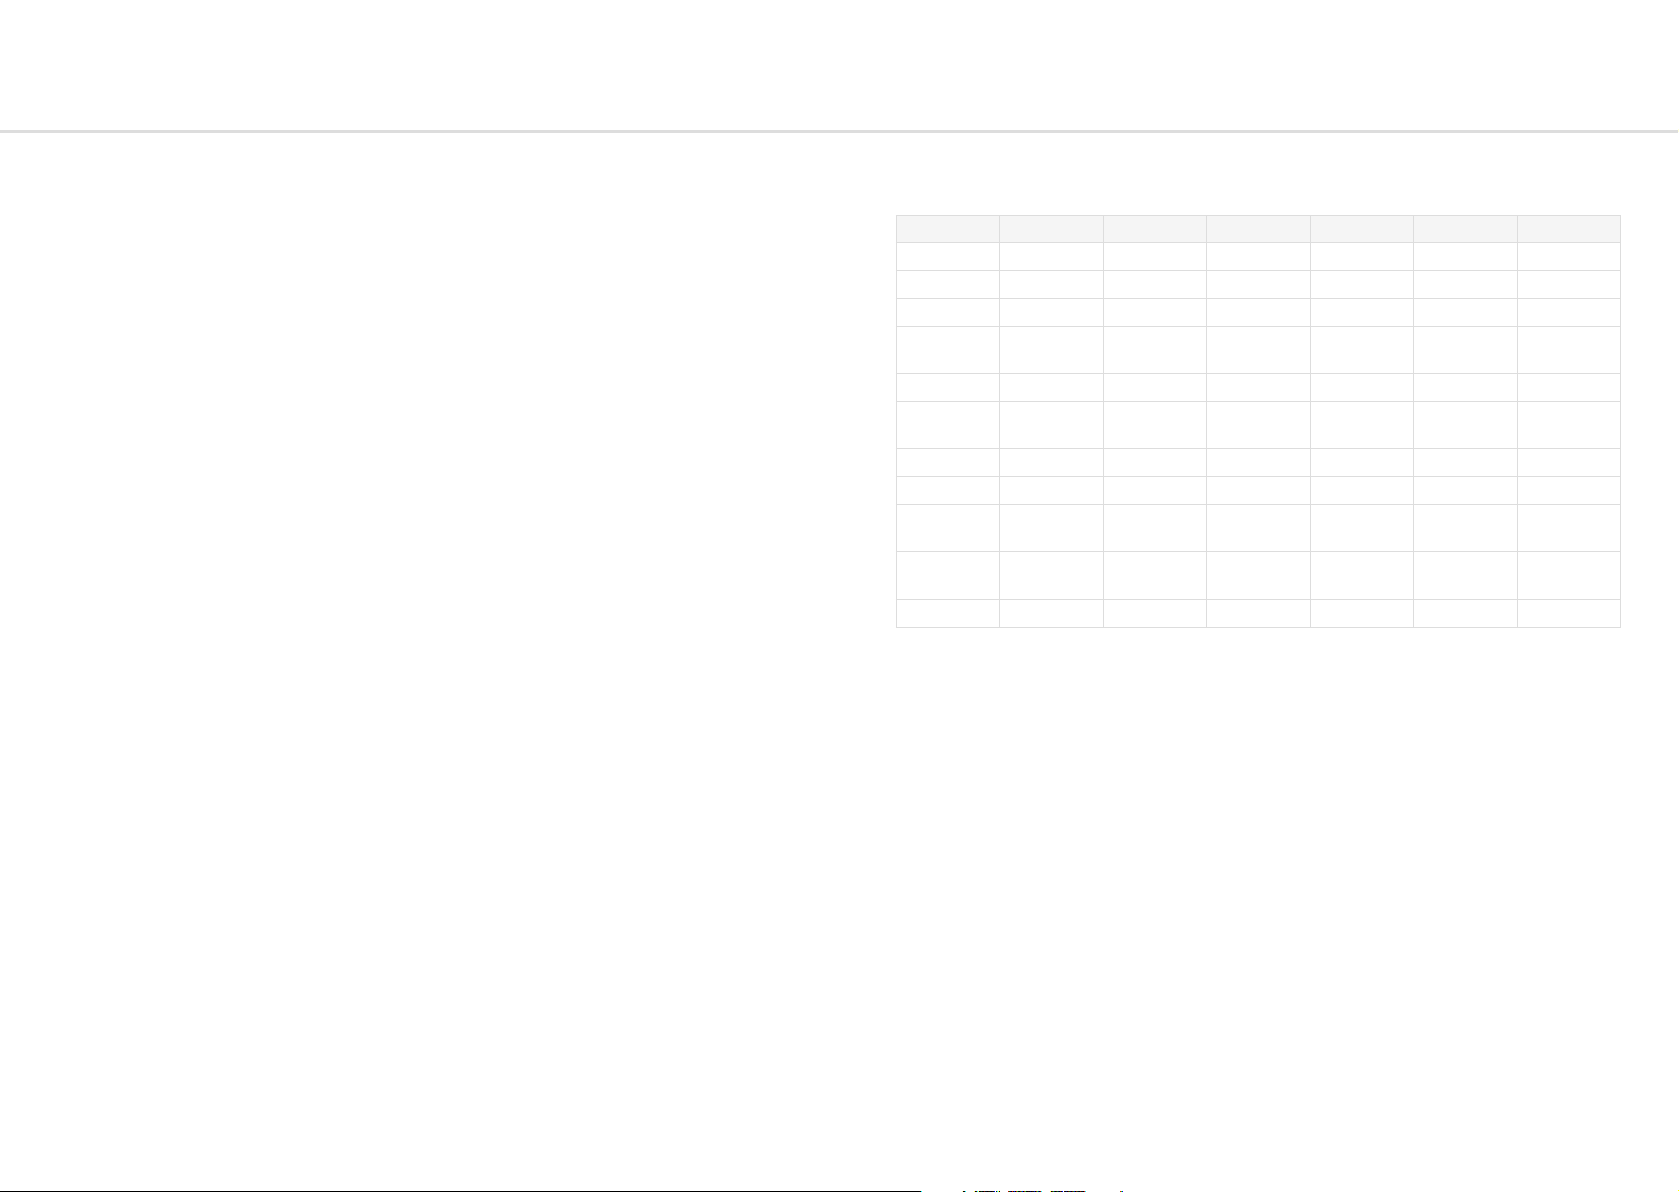
FX parameters are as follows:
FX A B C D E F
Chorus Dry:Wet Mix Mod Depth Mod Rate Time Feedback Phase
Phaser Dry:Wet Mix Mod Depth Mod Rate Frequency Feedback Phase
Flanger (Pos) Dry:Wet Mix Mod Depth Mod Rate Frequency Feedback Phase
Flanger
(Neg)
Tremolo Dry:Wet Mix Phase Rate Shape - -
LoFi
Rotary Dry:Wet Mix LFO Rate Vibrato Balance Width -
Stereo Delay Dry:Wet Mix Time Feedback HPF LPF -
Ping-Pong
Delay
X-Over
Delay
Reverb Dry:Wet Mix Time Size Dampening Pre-Delay Modulation
Dry:Wet Mix Mod Depth Mod Rate Frequency Feedback Phase
Redux
Amount
Dry:Wet Mix Time Feedback HPF LPF Mod Depth
Dry:Wet Mix Time Feedback HPF LPF -
SR Redux Bitcrush BC Amount Noise -
FX Presets
Argon8 can store up to 100 FX presets on board and comes loaded with 60 factory FX presets
for you to instantly switch up your sound. FX presets range from simple single-FX presets to
complex multi-FX presets.
To easily navigate to the FX preset page simply press all thee FX slot buttons (FX1, FX2, FX3)
at the same time. Loading an FX preset will apply preset FX settings to the currently loaded
patch, but you need to save the patch to save the new FX settings to the patch.
FX Preset saving can be done on-screen once you have navigated to the FX preset pages.
Saving here will save the FX settings from the currently loaded patch into the selected FX
preset slot.
Note: You can hold FX1, 2 or 3 when cycling through FX types to clear that slot.
You can press FX1 + FX2 + FX3 to jump to the ‘FX Preset Load’ page to save or load FX
presets.
32 33
Page 18

Modulation
Modulation
Argon8 has a comprehensive Modulation Matrix with 11 Modulation Sources and 52
Modulation destinations.
These Mod slots can be used to assign a combination of modulation sources to destinations, 8
modulation sources can be assigned to a single destination, or any other combination thereof.
There are also 4 pre assigned slots for common modulation routings.
The Mod Matrix is additive - Modulation values are added or subtracted from the modulated
parameter value and limited to the parameter range. If a parameter is at 0, negative
modulation values will not be audible until the parameter value is increased. The opposite is
true for parameters at max value.
All of the modulation depths are bipolar, meaning sources can be inverted using negative
depths.
When multiple mod slots are assigned to the same destination, the modulation from all
assigned slots is summed and limited before being applied.
LFO1, LFO2, MOD-EG, Velo, AftT, Note, Expr, X+, X-, Y+, Y- can all be assigned to destinations
from the front panel by holding their buttons on the front panel and turning the desired
modulation destination encoder in a positive or negative direction.
Note. An LED flashing is used to indicate that the panel is in assign mode for the relative
function to that LED.
ModSlots can be viewed on-screen by using the Velo + ModSlot combination which also gives
access to screen only ModSlot Status control which allows you to activate or deactivate that
slot.
• Velo: Pressing this button enters and exits the assign mode for velocity. Turn an encoder
to assign velocity to modulate that parameter. Holding this button while turning
an encoder / series of encoders allows momentary assignment of velocity to those
destinations. Upon letting go the assign mode will be exited.
• AftT: Pressing this button enters and exits the assign mode for after touch. Turn an
encoder to assign aftertouch to modulate that parameter. Holding this button while
turning an encoder / series of encoders allows momentary assignment of after touch to
those destinations. Upon letting go the assign mode will be exited.
• Note: Pressing this button enters and exits the assign mode for Note. Turn an encoder to
assign Note to modulate that parameter. Holding this button while turning an encoder
/ series of encoders allows momentary assignment of Note to those destinations. Upon
letting go the assign mode will be exited.
• Expr: Pressing this button enters and exits the assign mode for expression. Turn an
encoder to assign expression to modulate that parameter. Holding this button while
turning an encoder / series of encoders allows momentary assignment of expression to
those destinations. Upon letting go the assign mode will be exited.
• X+: Holding the Shift button and (or when latched in shift mode) pressing this button
enters and exits the assign mode for Joystick X+. Turn an encoder to assign Joystick X+
to modulate that parameter. Holding this button while turning an encoder / series of
encoders allows momentary assignment of Joystick X+ to those destinations. Upon letting
go the assign mode will be exited.
• X-: Holding the Shift button and (or when latched in shift mode) pressing this button
enters and exits the assign mode for Joystick X-. Turn an encoder to assign Joystick Xto modulate that parameter. Holding this button while turning an encoder / series of
encoders allows momentary assignment of Joystick X- to those destinations. Upon letting
go the assign mode will be exited.
• Y+: Holding the Shift button and (or when latched in shift mode) pressing this button
enters and exits the assign mode for Joystick Y+. Turn an encoder to assign Joystick Y+
to modulate that parameter. Holding this button while turning an encoder / series of
encoders allows momentary assignment of Joystick Y+ to those destinations. Upon letting
go the assign mode will be exited.
• Y-: Holding the Shift button and (or when latched in shift mode) pressing this button
enters and exits the assign mode for Joystick Y-. Turn an encoder to assign Joystick Yto modulate that parameter. Holding this button while turning an encoder / series of
encoders allows momentary assignment of Joystick Y- to those destinations. Upon letting
go the assign mode will be exited.
• XYLock: Holding Velo and pressing this button locks the Joystick in the position it is held
allowing you to let go and continue playing. Pressing this button again will unlock the
Joystick.
• Sustain: Holding Velo and pressing this button enables MIDI sustain. Pressing this button
again disables MIDI sustain.
• ModSlot: Pressing this button navigates to the ModSlot page on-screen. Repeatedly
pressing this button cycles through all mod slot settings pages on the screen.
Holding any mod source button and turning the ‘Depth’ encoder allows you to set the
global depth for that mod source (pre-assigned mod routings are not affected by the source’s
global depth value). When the screen is displaying a mod slot ‘Depth’ parameter (most easily
accessed via assigning modulation using the panel or via the ModSlot button), hold the ‘Edit’
switch to clear the mod slot assignment.
To assign a mod source to an osc’s global frequency destination, use either of the fine tune
controls. ‘Tune1’ will assign to Osc1 tune, ‘Tune2’ will assign to Osc2 tune.
34 35
Page 19
Modulation
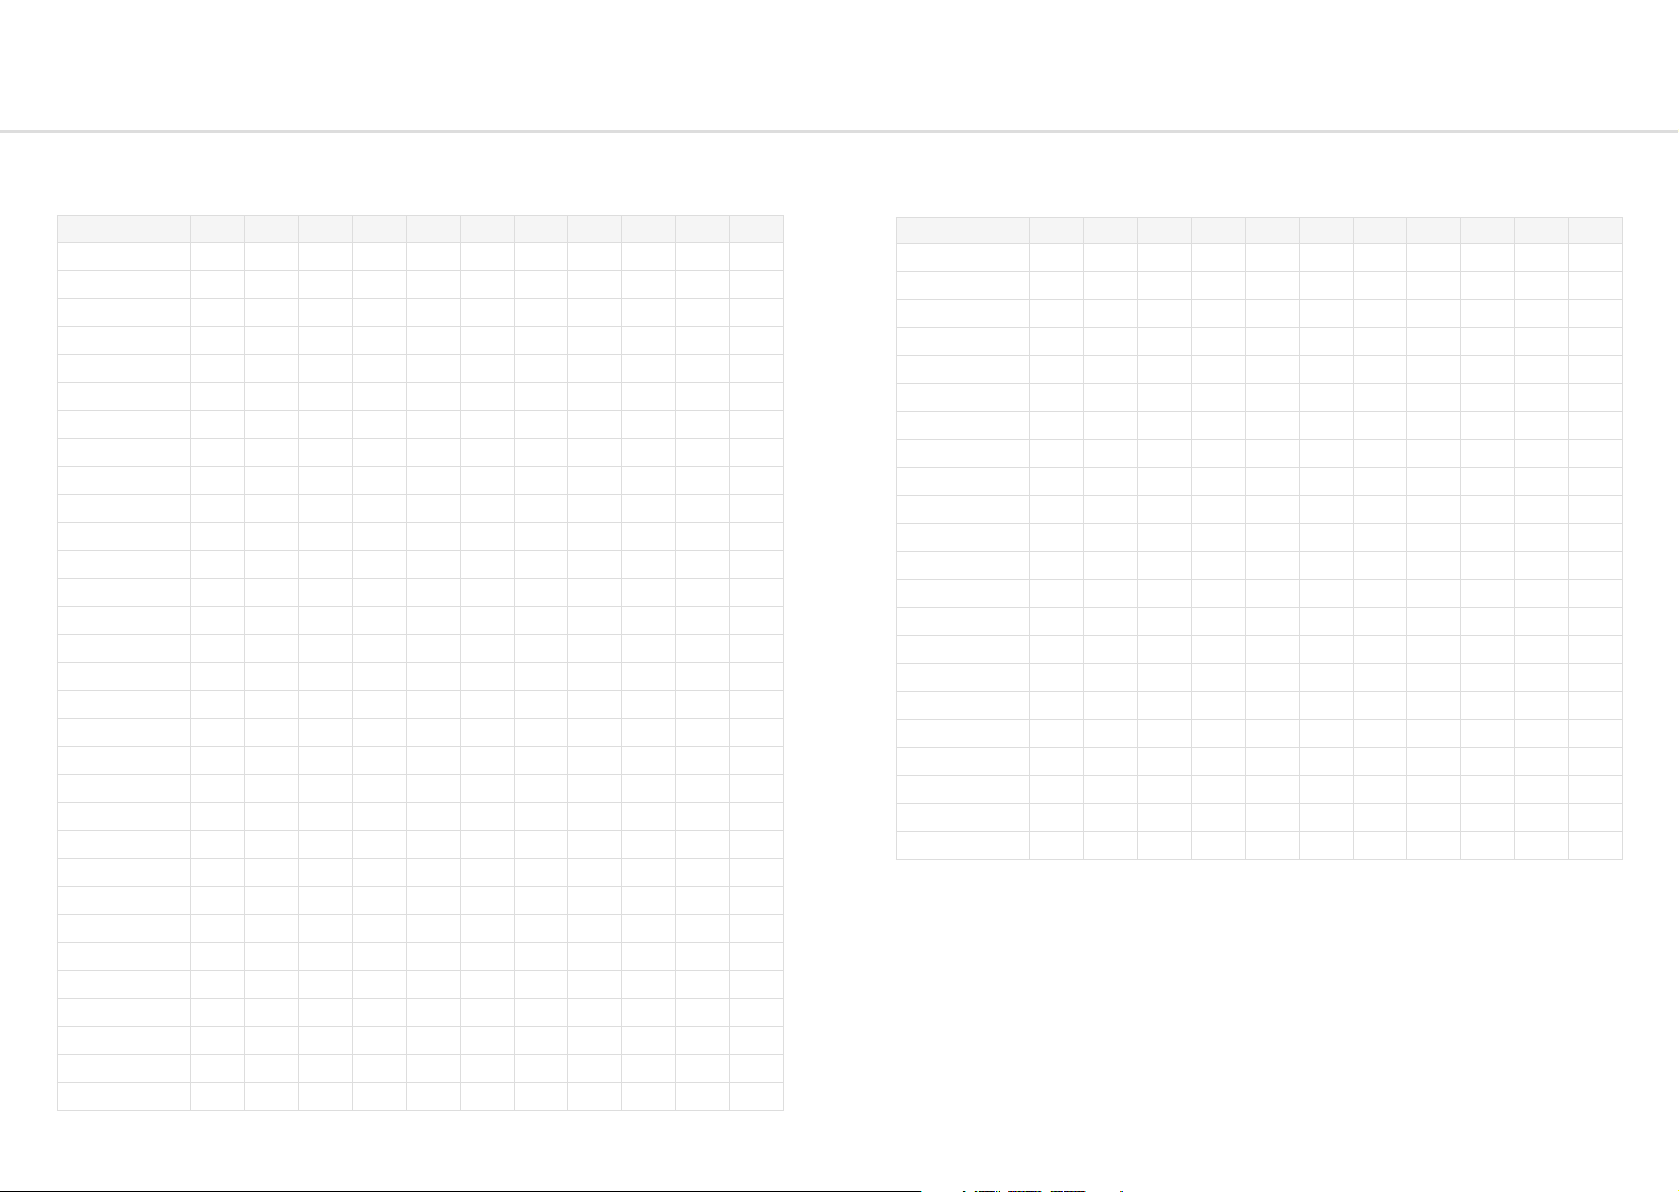
Valid combinations are listed here:
Modulation
Parameter LFO1 LFO2 EG NOTE VELO EXPR AFTT X+ X- Y+ Y-
Wave 1
Wave 2
Mix
Global Pitch
Osc2 Pitch
Osc-Mod
LFO1 Rate X X X X
LFO2 Rate
LFO1 Shape X X X X X
LFO2 Shape X
LFO1 Depth X X X X X
LFO2 Depth X
Cutoff X
Reso
Morph
FEG Attack X
FEG Decay X
FEG Sustain X
FEG Release X
FEG Amount
AEG Attack X
AEG Decay X
AEG Sustain X
AEG Release X
AEG Amount X
MEG Attack X
MEG Decay X
MEG Sustain X
MEG Release X
MEG Amount X
Distortion
Parameter LFO1 LFO2 EG NOTE VELO EXPR AFTT X+ X- Y+ Y-
Spread
Glide X
Osc2 Pitch
FX Amount X X X X
FX-1 A X X X X
FX-1 B X X X X
FX-1 C X X X X
FX-1 D X X X X
FX-1 E X X X X
FX-1 F X X X X
FX-2 A X X X X
FX-2 B X X X X
FX-2 C X X X X
FX-2 D X X X X
FX-2 E X X X X
FX-2 F X X X X
FX-3 A X X X X
FX-3 B X X X X
FX-3 C X X X X
FX-3 D X X X X
FX-3 E X X X X
FX-3 F X X X X
Scaling
LFO1 and LFO2 are scaled such that if they are assigned with maximum depth and the
modulated parameter is at it’s centre value, the full parameter range will be modulated. All
other modulation sources are scaled such that if they are assigned with maximum positive
depth and the modulated parameter is at 0, the full parameter range will be modulated.
36 37
Page 20

Keyboard/Voice
Keyboard/Voice
• Oct -/+: These buttons control the key range available along the keyboard.
Tip: You can use this while holding notes to access unavailable notes. Particularly handy
when used in conjunction with Sustain and Chord mode.
• Transpose: Holding this button enters Transpose mode. Here you can directly transpose
the pitch of both oscillators using the keyboard. C2 (directly beneath the Transpose
button) is the default position. Keys below this transpose down 1 semitone per key and
keys above transpose up 1 semitone per key.
Note: Using transpose will not trigger a new note. If you are using low EG settings you
may not notice the change. This can be used to great effect while sequencing the synth
from its Arp or Seq or from external sources.
Note. Pressing Transpose without entering any key values will reset transposition to 0.
Transpose is a performance feature and as such is not saved per patch. It will remain until
it is either reset, turned off or the unit is power cycled.
• Chord: Pressing this button while holding a chord (input directly from the keys or via
incoming MIDI) stores this chord and enables chord mode. This chord can then be
played from a single note trigger until the chord is changed, or chord mode is disabled.
To change a chord, simply turn Chord mode off and repeat the process holding your
new chord shape. To exit simply press the Chord button again. The Chord function is a
performance feature and as such is not saved per patch. It will remain until it is either
reset or the unit is power cycled.
• Mono: This button selects Mono voice mode for the current patch. 4 oscillators will be
stacked into a single voice
• Poly: This button selects polyphonic voice mode for the current patch. 8 voice stereo true
polyphonic path all the way to the stereo FX engine input.
• Unison: This button selects Unison voice mode. Cycle through to choose between
Unison-2, Unison-4 or Unison-8. These are monophonic voice modes where multiple
voices are stacked and detuned, the number reflects the number of voices per note.
• Stack: This button selects Stack voice mode. Cycle through to choose between Stack-2
or Stack-4. These are polyphonic voice modes where multiple voices are stacked. Stack-2
offer 4-note polyphony and Stack-4 offers 2-note polyphony.
• Drift: This encoder controls the voice drift amount. This is the amount of slop or random
detuning of each oscillators phase and tune per note.
• Width: Holding the Shift button and (or when latched in shift mode) turning this
encoder controls the voice width of the current patch. This sets how far left and right the
alternating pan of the voices is from mono at 0 to hard panned & wide at 127.
Joystick
The joystick can be assigned to up to 11 destinations at once. You can assign things to any of
the X or Y directions. The Joystick position can be locked or unlocked using the Velo + XYLock
button combination. This locks the joystick at whatever value it was held at while the buttons
were depressed.
The X axis controls pitch bend as standard but this can also be turned off (on-screen: Joystick:
Pitchbend status or on MODALapp) it also sends MIDI pitch bend messages which can also be
toggled on or off in the global settings.
Y+ sends MIDI mod wheel data (CC1) which can also be toggled on or off in the global
settings.
Y- Sends MIDI CC118 which can also be toggled on or off in the global settings.
Audio In
The audio inputs route audio directly in to the 3-slot stereo FX engine although this can also
be bypassed if you want to use the Audio In to only mix in the audio input with the synths
output. The Audio In settings (Audio-In Volume, FX Bypass) are temporary and will not be
saved so will need to be reset when using upon each boot.
38 39
Page 21

Settings
Settings
General
• Clock Source: Sets the clock source for the Argon8 with the following available options:
Internal, MIDI, Sync-In, Auto. If ‘Auto’ is selected then the Argon8 will automatically use
any detected clock source (prioritising Sync-In over MIDI) else it will use the internal clock.
Please note that if ‘MIDI’ or ‘Sync-In’ is selected whilst there is no MIDI or Sync-In clock
present then clocked-synced functions (sequencer, arpeggiator, delay FX, LFOs) may not
work correctly or at all.
• Global Tune: Sets the global tuning of the Argon8 with a range of +/- 1 semitone. You
may need to adjust this if using the Argon8 with other synthesisers that are not tuned to
the standard tuning (e.g. old analogue synthesisers).
• Reset: Hold the ‘Edit’ switch to reset all global settings to the factory default settings.
Please note that this will also reset the Main Volume and Tempo parameter values.
MIDI
• Channel: Sets the MIDI channel that the Argon8 uses for both MIDI input (the MIDI-in
messages channel that the device will respond to) and MIDI output (the channel for the
transmitted MIDI messages).
• Omni: Enables the Argon8 to be configured to ‘Omni Mode’, where it will respond to
MIDI-in message on any MIDI channel.
• Pitch Bend Range: Sets the Argon8 pitch bend range - in semitones - for both MIDI-in
Pitch Bend messages and the joystick X axes.
• DIN In: A set of MIDI filter settings for enabling / disabling the Argon8 from responding
to certain types of MIDI-in messages from the MIDI DIN-in port.
• DIN Out: A set of MIDI filter settings for enabling / disabling the Argon8 from
transmitting certain types of MIDI-in messages from the MIDI DIN-out port.
• DIN Thru: Enables a ‘Soft MIDI Thru’ mode for the DIN ports, where messages received
by the DIN-in port are forwarded to the DIN-out port.
• USB Thru: Enables a ‘Soft MIDI Thru’ mode for all MIDI sources, where messages
received by the DIN-in port are forwarded to USB-out and messages received by USB-in
are forwarded to DIN-out.
• Arp/Seq Out: Enables the Argon8 arpeggiator and / or sequencer to transmit notes
to the MIDI-out ports. When arp out is enabled the internal keyboard notes will not be
transmitted to MIDI-out. Please note that MIDI-in notes that are being arpeggiated will
also be transmitted to MIDI-out if arp out is enabled, which may cause MIDI loop / echo
issues in complex MIDI setups.
Keyboard
• Local: Enables / disables the internal keyboard’s connection with the internal sound
engine. If you are using Argon8 with an external sequencer you may need to set the Local
setting to ‘Off’ to eliminate the double-triggering of notes caused by MIDI loops / echoes.
• Velocity Curve: Sets the velocity curve / sensitivity for notes from the internal keyboard.
There are six curve options - Very Light, Light, Normal, Heavy, Very Heavy, Fixed. Select
‘Light’ or ‘Very Light’ if you play keys lightly but would like the device to respond as
though they were played harder; select ‘Heavy’ or ‘Very Heavy’ if you play keys heavily
but would like the device to respond as though they were played lighter; or select ‘Fixed’
to have a constant velocity value of 127 (maximum velocity).
• Aftertouch Curve: Sets the aftertouch curve / sensitivity for the internal keyboard. There
are five curve options - Very Light, Light, Normal, Heavy, Very Heavy. Select ‘Light’ or
‘Very Light’ if you want more control over the upper range of values of the aftertouch
response; or select ‘Heavy’ or ‘Very Heavy’ if you want more control over the lower range
of values of the aftertouch response.
Sequencer
• Metronome: Enables / disables the metronome click track for sequence recording. Please
note that the sequencer pre-roll (if enabled) will always contain the metronome.
• Pre-Roll: Sets the sequence recording pre-roll length to determine how many bars of the
metronome click track you hear before the recording starts.
• Quantise: Sets the sequencer note recording input quantise value to ensure that played
notes can be kept in time. Please note that this is an input quantise setting and therefore
cannot be used to adjust previously recorded notes.
• Transport: Enables / disables the sequencer transport to be controlled by MIDI Clock
Start / Continue / Stop messages from USB-MIDI. You may want to disable this behaviour
if using Argon8 with an external MIDI sequencer.
40 41
Page 22

Settings
Settings
Joystick
• Mod Wheel Out: Enables / disables the joystick Y+ axis from transmitting MIDI
Modulation Wheel messages (MIDI CC 1) to MIDI-out. You may want to disable this
behaviour if the Argon8 is connected to other synthesisers that responds to MIDI
Modulation Wheel messages.
• Pitch Bend Out: Enables / disables the joystick X axes from transmitting MIDI Pitch Bend
messages to MIDI-out. You may want to disable this behaviour if the Argon8 is connected
to other synthesisers that responds to MIDI Pitch Bend messages. Please note that if
this is disabled the joystick X axes will instead transmit CC messages for MODALapp
communication.
Screen
• Brightness: Sets the brightness / contrast of the Argon8 screen.
• Switch: Sets the screen ‘Page Switch’ / ‘Context Sensitivity’ mode to determine how the
screen responds to certain panel control interactions and MIDI-in messages.
There are three main Page Switch modes - Regular, Smart, Off; and the first two modes
contain three sub modes - All, Panel, MIDI.
The ‘Regular’ mode causes the screen to switch to the page of the adjusted parameter
and stay on the page until another parameter is adjusted; the ‘Smart’ mode causes the
screen to switch to the page of the adjusted parameter but then switch back to the
previous page after two seconds, where the ‘previous’ page will be the page accessed via
either the screen ‘Page / Param’ control, the Patch / Seq button, or the FX1 + FX2 + FX3
button combination.
The sub-mode of each mode sets the parameter source - the panel, MIDI-in, or both.
• Saver: Sets the idle time for the screen’s screensaver. A smaller time will increase the
lifetime of the screen.
Expression Pedal
• Pedal Type: Allows you to configure the Argon8 to work with various types of expression
pedals.
There are two main modes here (TRS and RTS) where each mode has three sub modes
(1-3).
Select a ‘TRS’ polarity mode if you are using a TRS expression pedal (or an expression
pedal with a polarity switch, set to the TRS polarity) - this is the most common polarity of
expression pedals. Select an ‘RTS’ polarity mode if you are using an RTS expression pedal
which contains no polarity switch. If your pedal does not contain a polarity switch and
you are unsure of it’s polarity, if the Argon8 isn’t responding to your pedal correctly (e.g.
full modulation range can’t be obtained, modulation curve is skewed), it is likely that you
need to switch the Argon8 polarity mode. Please note that expression pedals with the TS
polarity will not work with Argon8.
Select the ‘1’ sub-mode for expression pedals with a resistance of 10k; select the ‘2’ submode for expression pedals with a resistance of 20k or 25k, or select the ‘3’ sub-mode
for expression pedals with a resistance of 50k or above. If you are unsure of the resistance
of your expression pedal then select the ‘1’ sub-mode - this will work with the majority
of expression pedals but you may find that the maximum modulation happens before the
pedal completes it movement (but selecting ‘2’ or ‘3’ instead may improve on this).
If you are unable to configure Argon8 to work adequately with your expression pedal
using this setting, you may need to use a TRS Polarity Adapter.
LEDs:
• Brightness: Sets the brightness of the panel LEDs.
42 43
Page 23
04
MIDI
MIDI
Argon8 is a fully class-compliant USB-MIDI device, meaning you can plug it into your
computer, no drivers required, and gain access to a huge array of extra features. Simply plug
in Argon8 synthesiser to a USB port and it will show up as a MIDI input and output device in
any software that supports external MIDI devices.
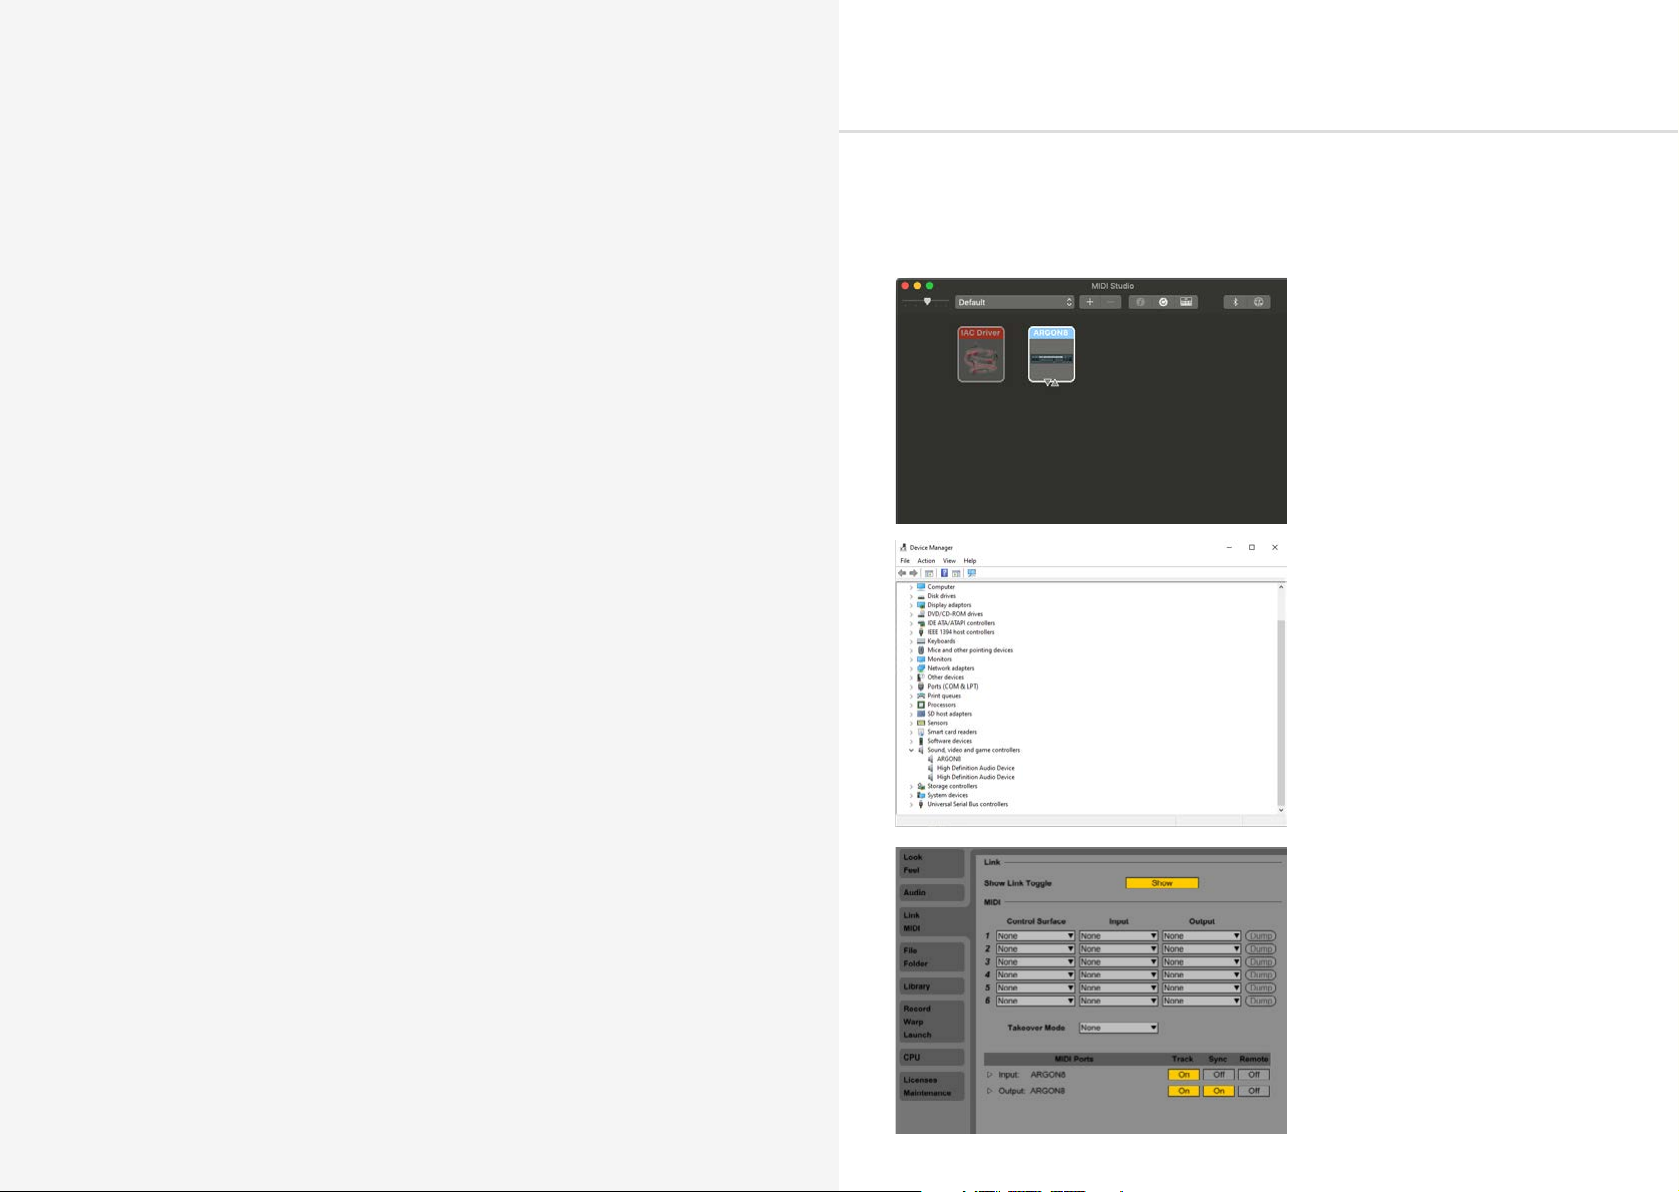
On Mac OSX, Argon8 will show up in
‘Midi Studio’, found in Applications
> Utilities > Audio MIDI Setup. (Once
open, select Window > Show MIDI
Studio)
On Windows, Argon8 will show up as
a sound device in the Device manager.
Remember to enable the device
input and output in your DAW’s
preferences.
44 45
Page 24

MIDI
MIDI
MIDI Channel
On Argon8 the MIDI channel can be set in the on-screen settings, or with the MODALapp.
You can also change additional MIDI settings in the on-screen settings pages or in the settings
tab of MODALapp.
MIDI Output
Argon8 can sequence your DAW or any device that can send MIDI notes over USB, MIDI or CV
clock using the keyboard, sequencer or the arpeggiator.
The keyboard sends MIDI Channel Aftertouch messages and the Joystick can send MIDI Pitch
Bend messages.
All of the encoders on Argon8 output MIDI messages (The appropriate CC message
depending on the SHIFT or panel state) This allows Argon8 to be used as a fully functional
plug and play MIDI controller!
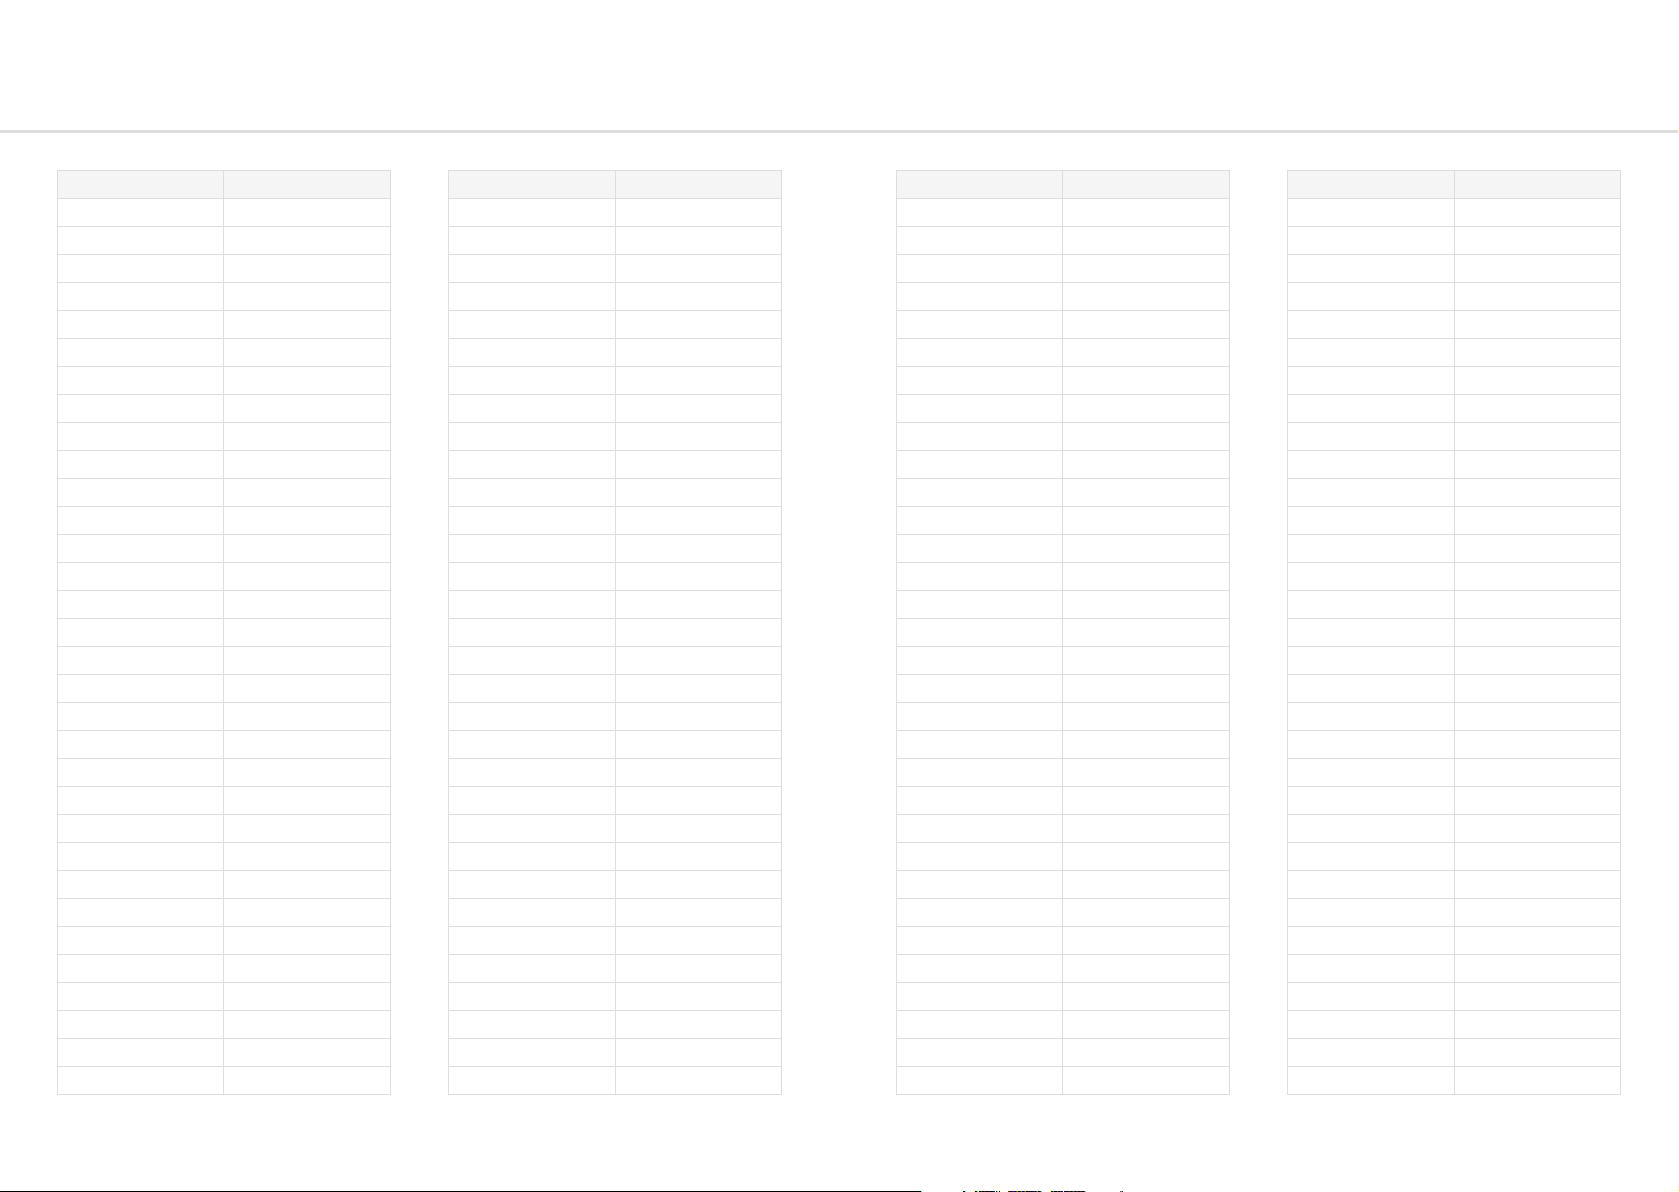
When a change is detected on any of the parameters, a CC message is sent out. See the MIDI
implementation chart to find which parameters send which CC numbers. The keys also send
the appropriate MIDI notes for the Octave range and scale that they are programmed to.
MIDI Input
Argon8 can be played by sending it MIDI notes. This means you can use your DAW or any
device that can send MIDI notes over USB, MIDI to sequence Argon8 or control any of the
parameters featured in the CC Implementation List
MIDI Clock
Configure your DAW and MIDI devices to send or receive MIDI clock (Sync) to or from Argon8
and, when Auto is selected it will automatically configure itself to work in time with your
track tempo. When no clock is detected, the Argon8 will continue to use whatever tempo it is
internally configured to.
Program Change
Sending a bank change (0-4) followed by a program change (0-99) to Argon8 will load the
relevant preset.
Sync
The analogue sync connections on Argon8 are configured to use a 3.3v, rising edge, 1 pulse
per 16th note signal. This is used to syncopate any other gear that is CV clock enabled with
your device. PLEASE DO NOT EXCEED 5V INPUT AND OUTPUT.
Any signal received by the SYNC IN connection is automatically forwarded to the SYNC OUT.
When running off internal clock or external clock SYNC OUT sends out the received clock.
Sync auto detects incoming clock / sync signals and will select these in priority order:
1) Sync, 2) Ext MIDI and 3) Internal.
Sync will fall back to the next available sync source in reverse priority order after a timeout of
3 seconds.
Din MIDI Filters
Argon8 has app-configurable midi filters on the Din input and output:
Notes, CC, Program Change, Aftertouch, Pitchbend, Transport, Clock and Sysex.
By default Din IN allows all message types, and Din OUT allows all message types except clock.
MIDI In Omni
MIDI can be made omni within the Settings pages or in the Settings tab of MODALapp. Omni
mode makes Argon8 listen to all midi channels, for all received midi (din or usb). Transmitted
midi is still sent out on Argon8’s current midi channel.
MIDI Soft Thru
Argon8 has two soft thru settings configurable from the app:
• DIN Thru: Forwards Midi received on din in to din out
• USB Thru: Soft interface mode which forwards midi received on din in to USB out, and
USB in to din out
46 47
Page 25
MIDI CC Implemention Chart
CC Function
0 Bank Change
1 Mod Wheel
2 -
3 WavMod 1
4 -
5 Glide
6 -
7 Main Volume
8
9 Voice Mode
10 -
11 Expression Pedal
12 Distortion
13 WavMod 2
14 Osc1 Tune
15 Osc1 Fine
16 Osc1 Shape
17 Osc2 Shape
18 Osc Mix
19 OscMod
20 Spread
21 OscMod Mode
22 FEG Attack
23 FEG Decay
24 FEG Sustain
25 FEG Release
26 AEG Attack
27 AEG Decay
28 AEG Sustain
29 AEG Release
30 Osc2 Tune
31 Osc2 Fine
CC Function
32 FEG Amount
33 Morph
34 Cutoff
35 Resonance
36 LFO1 Rate
37 LFO1 Depth
38 -
39 LFO1 Shape
40 Octave
41 -
42 Filter Type
43 MEG Attack
44 MEG Decay
45 MEG Sustain
46 MEG Release
47 LFO2 Rate
48 LFO2 Depth
49 MEG Depth
50 LFO2 Shape
51 AEG Depth
52 LFO1 MIDI Sync
53 Arp Gate
54 LFO2 MIDI Sync
55 Delay MIDI Sync
56 LFO1 Mode
57 LFO2 Mode
58 Arp Status
59 Arp Octave
60 Arp Direction
61 Arp Division
62 Osc1 Bank
63 Osc2 Bank
CC Function
64 Sustain Pedal
65 -
66 -
67 Seq Length
68 Seq Mute
69 Seq Clear
70 Seq Hold
71 Seq Loop
72 Seq Record
73 FX Amount
74 -
75 Transpose
76 -
77 -
78 Swing
79 Seq Quantise
80 -
81 -
82 -
83 Audio In
84 All EG Attack
85 All EG Decay
86 All EG Sustain
87 All EG Release
88 ModSlot 1 Depth
89 ModSlot 2 Depth
90 ModSlot 3 Depth
91 ModSlot 4 Depth
92 ModSlot 5 Depth
93 ModSlot 6 Depth
94 ModSlot 7 Depth
95 ModSlot 8 Depth
CC Function
96 Chord Mode
97 -
98 -
99 -
100 ModSlot 1 Source
101 ModSlot 2 Source
102 ModSlot 3 Source
103 ModSlot 4 Source
104 ModSlot 5 Source
105 ModSlot 6 Source
106 ModSlot 7 Source
107 ModSlot 8 Source
108 ModSlot 1 Dest
109 ModSlot 2 Dest
110 ModSlot 3 Dest
111 ModSlot 4 Dest
112 ModSlot 5 Dest
113 ModSlot 6 Dest
114 ModSlot 7 Dest
115 ModSlot 8 Dest
116 Joystick X+
117 Joystick X-
118 Joystick Y-
119 Patch Gain
120 All Sound Off
121 Randomise Patch
122 -
123 All Notes Off
124 Omni Off
125 Omni On
126 -
127 -
48 49
Page 26
05
Update
Update
The firmware on Argon8 can be updated remotely. This means that you will be able to update
your Argon8 to the latest version each time an update is released.
MODALapp will provide the most user-friendly way to update firmware, however it is also
possible to update the firmware using MIDI sysex messages, meaning you won’t need the app.
DO NOT run any other MIDI software that could be sending messages to Argon8 during the
update process.
50 51
Page 27
06
MODALapp
MODALapp
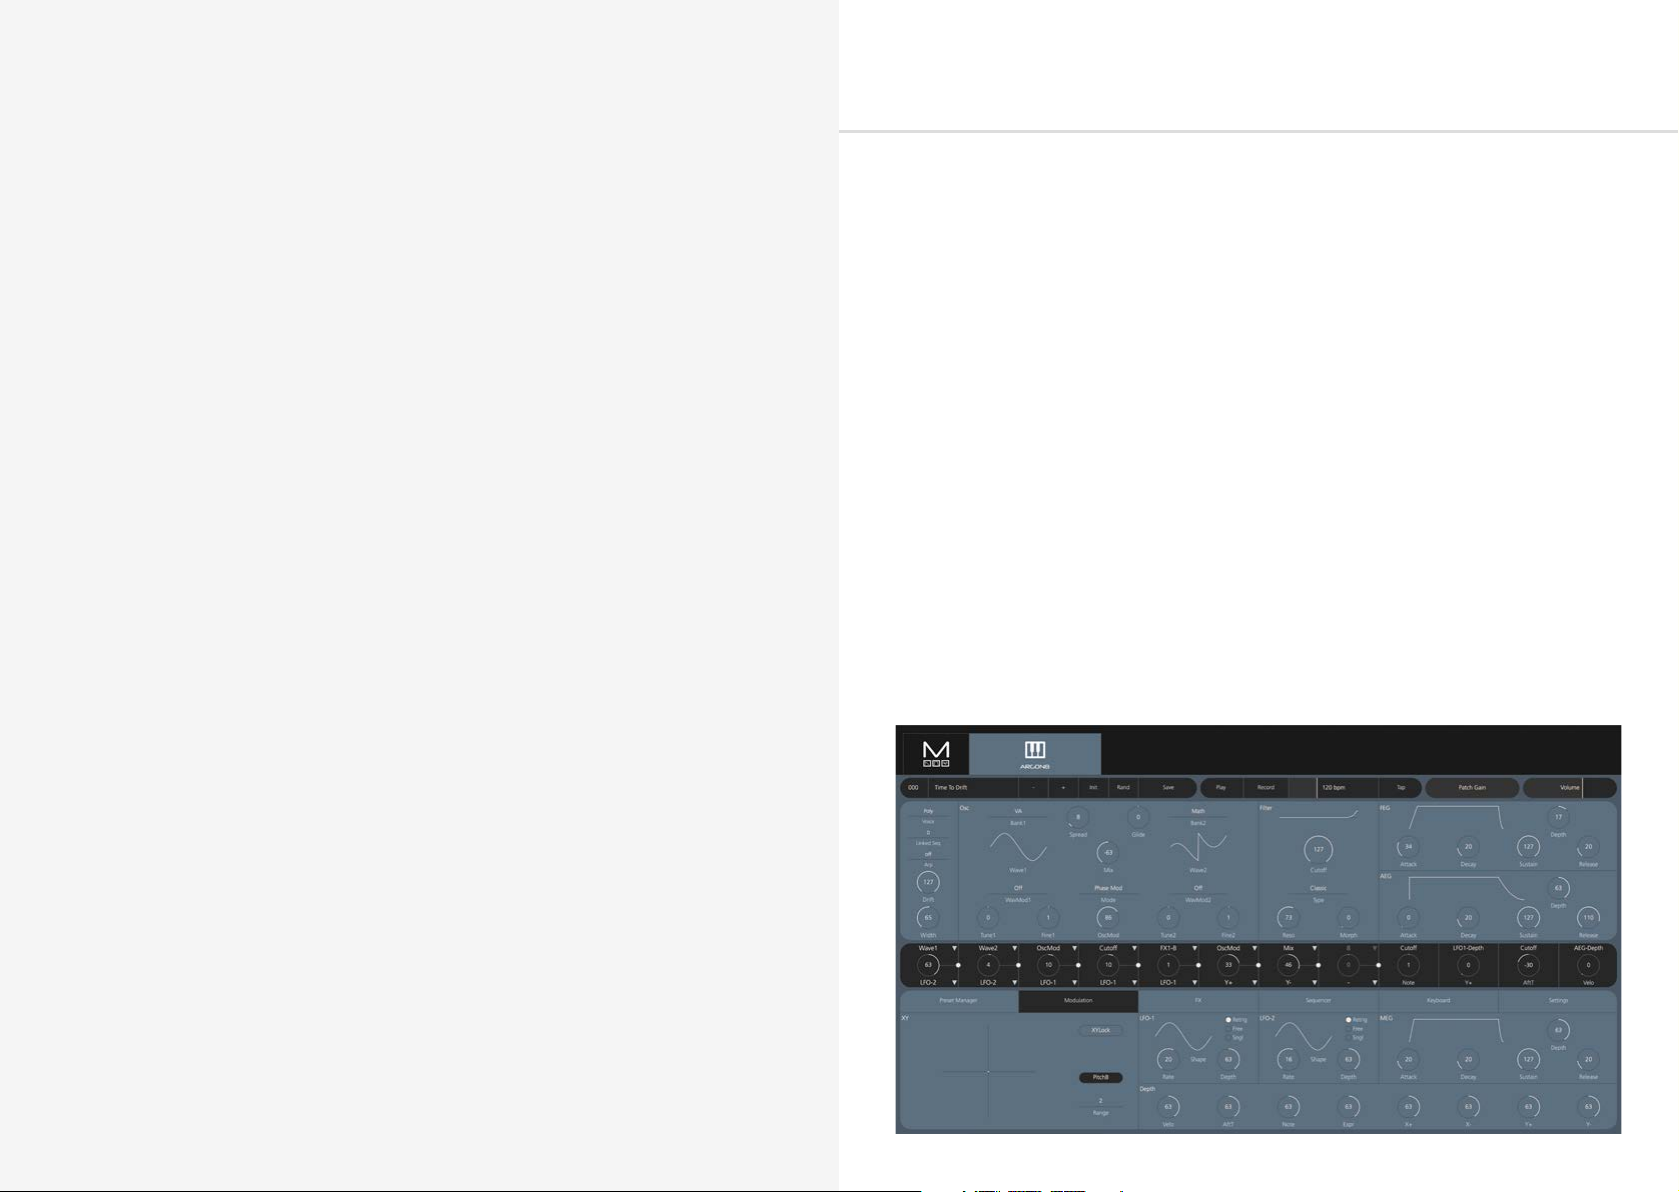
MODALapp adds visual feedback for Argon8 (and other Modal devices) and access to a
handful of extra settings outlined above. All parameters are accessible from a single interface
split into 3 tabs.
• All UI parameters accessible from a single interface
• Preset Manager page for preset management, backup and import
• Modulation page to quickly view and edit the current patch modulation settings
• FX page for selecting and editing the 3 stereo FX engines on Argon8
• Sequence page for live sequence controls and editing the 4 parameter animation rows
• Keyboard page for playing Argon8 directly from your device as well as access to other
keyboard settings
• Settings page to configure MIDI settings and update the firmware
MODALapp is available for OSX, iOS, Windows, and Android.
To find the app on your platform, visit www.modalelectronics.com/modalapp
52 53
Page 28
Getting Started
Main Editor
Connecting devices
MODALapp can be attached to an iPad using a Camera Connection kit, or an Android device
using a USB OTG (On-the-go) adapter.
MODALapp can only be connected via USB MIDI and not by MIDI DIN.
Install and open MODALapp. You will see a splash screen until a Argon8 has been detected,
at which point you will see the Editor page appear.
Playing Argon8
At this point you can play your Argon8 with any MIDI controller! MODALapp forwards all
incoming MIDI to Argon8 automatically. Just make sure that your MIDI controller is sending to
the same MIDI channel you’re Argon8 is assigned to.
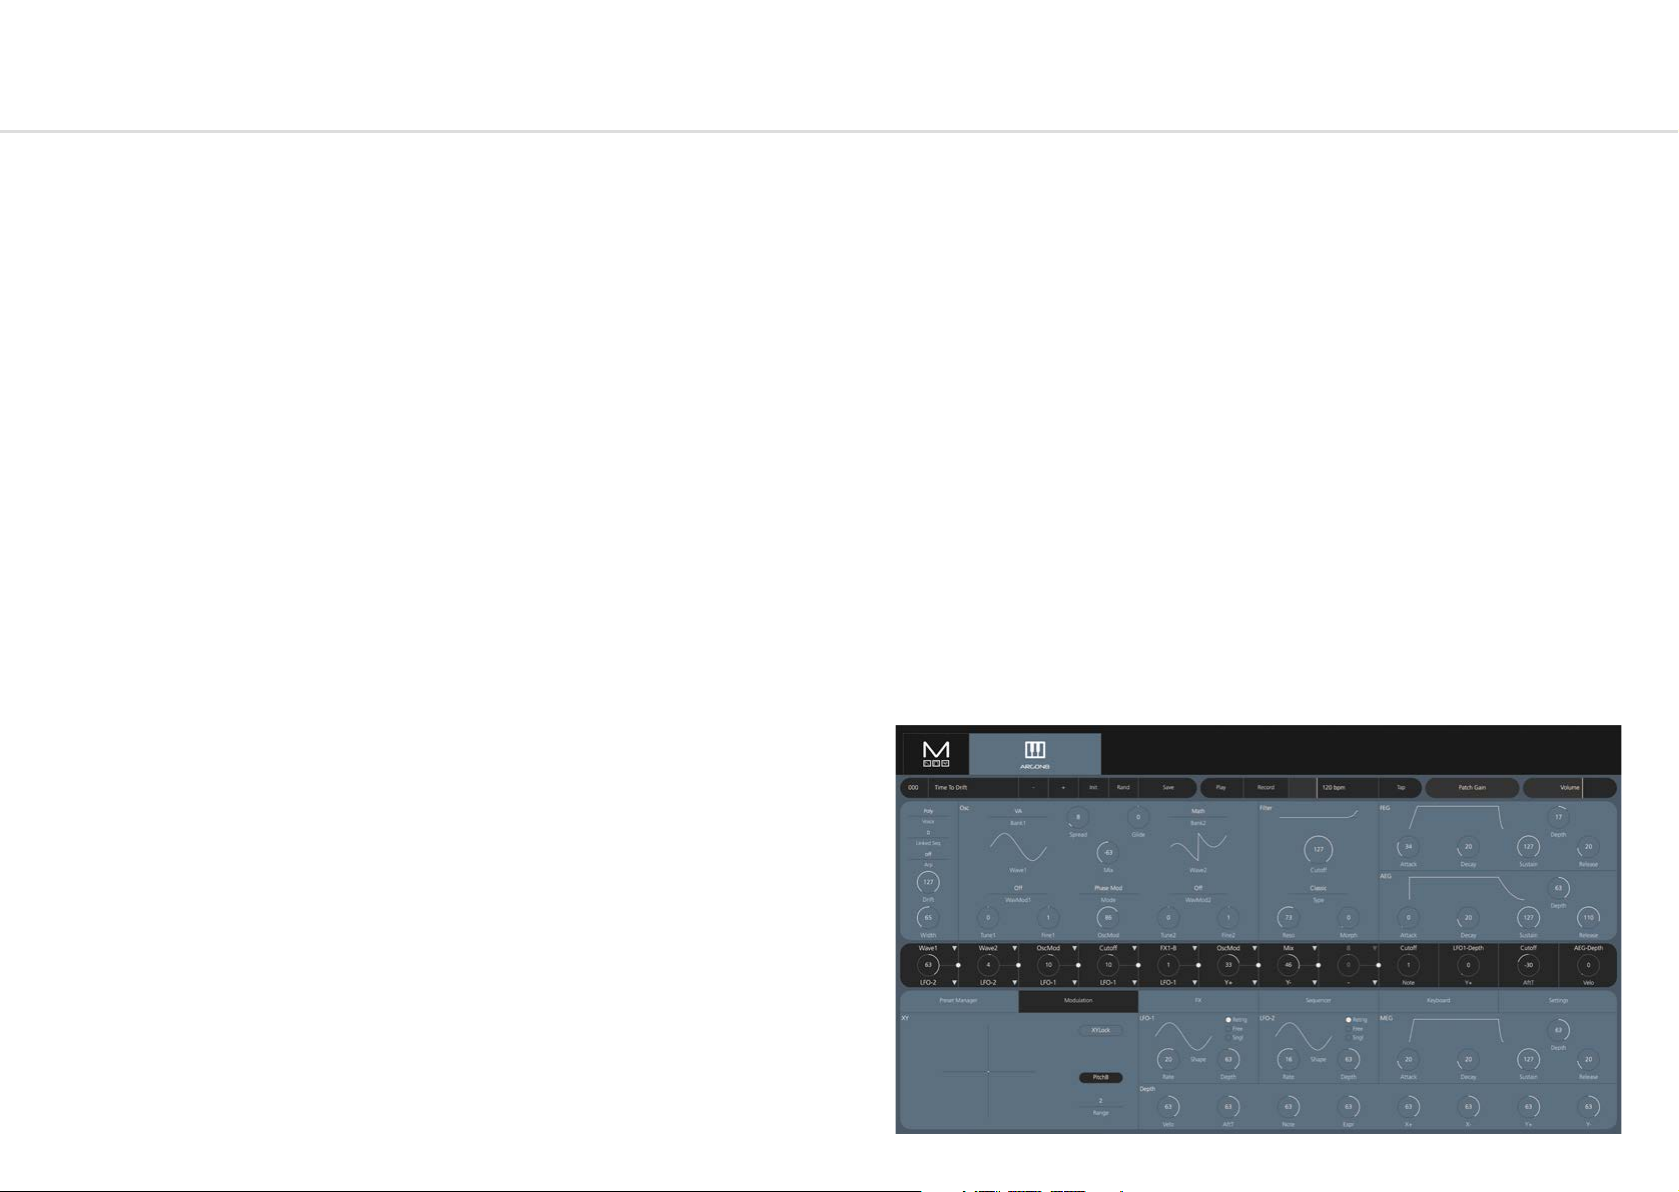
This is the main section for patch design / editing. You will find keyboard/voice, oscillator, filter,
and envelopes here.
The currently selected preset is shown at the top. There are also options for previous or next
preset, init preset and randomise.
To save a preset first click the save button. You can then select the slot you would like to save
the new preset with the - / + buttons. You can change the name of the preset by clicking on
the preset name. Finally click either SAVE again to confirm or EXIT to discard any name / slot
changes.
There is also access to play, record, tempo options as well as sliders for patch gain and volume.
Across the middle there are the 12 modulation slots with 8 user configurable and 4 pre
defined. Only valid modulation destinations for the respective source will be shown in the
drop down menu.
54 55
Page 29
Preset Manager Tab
Modulation Tab
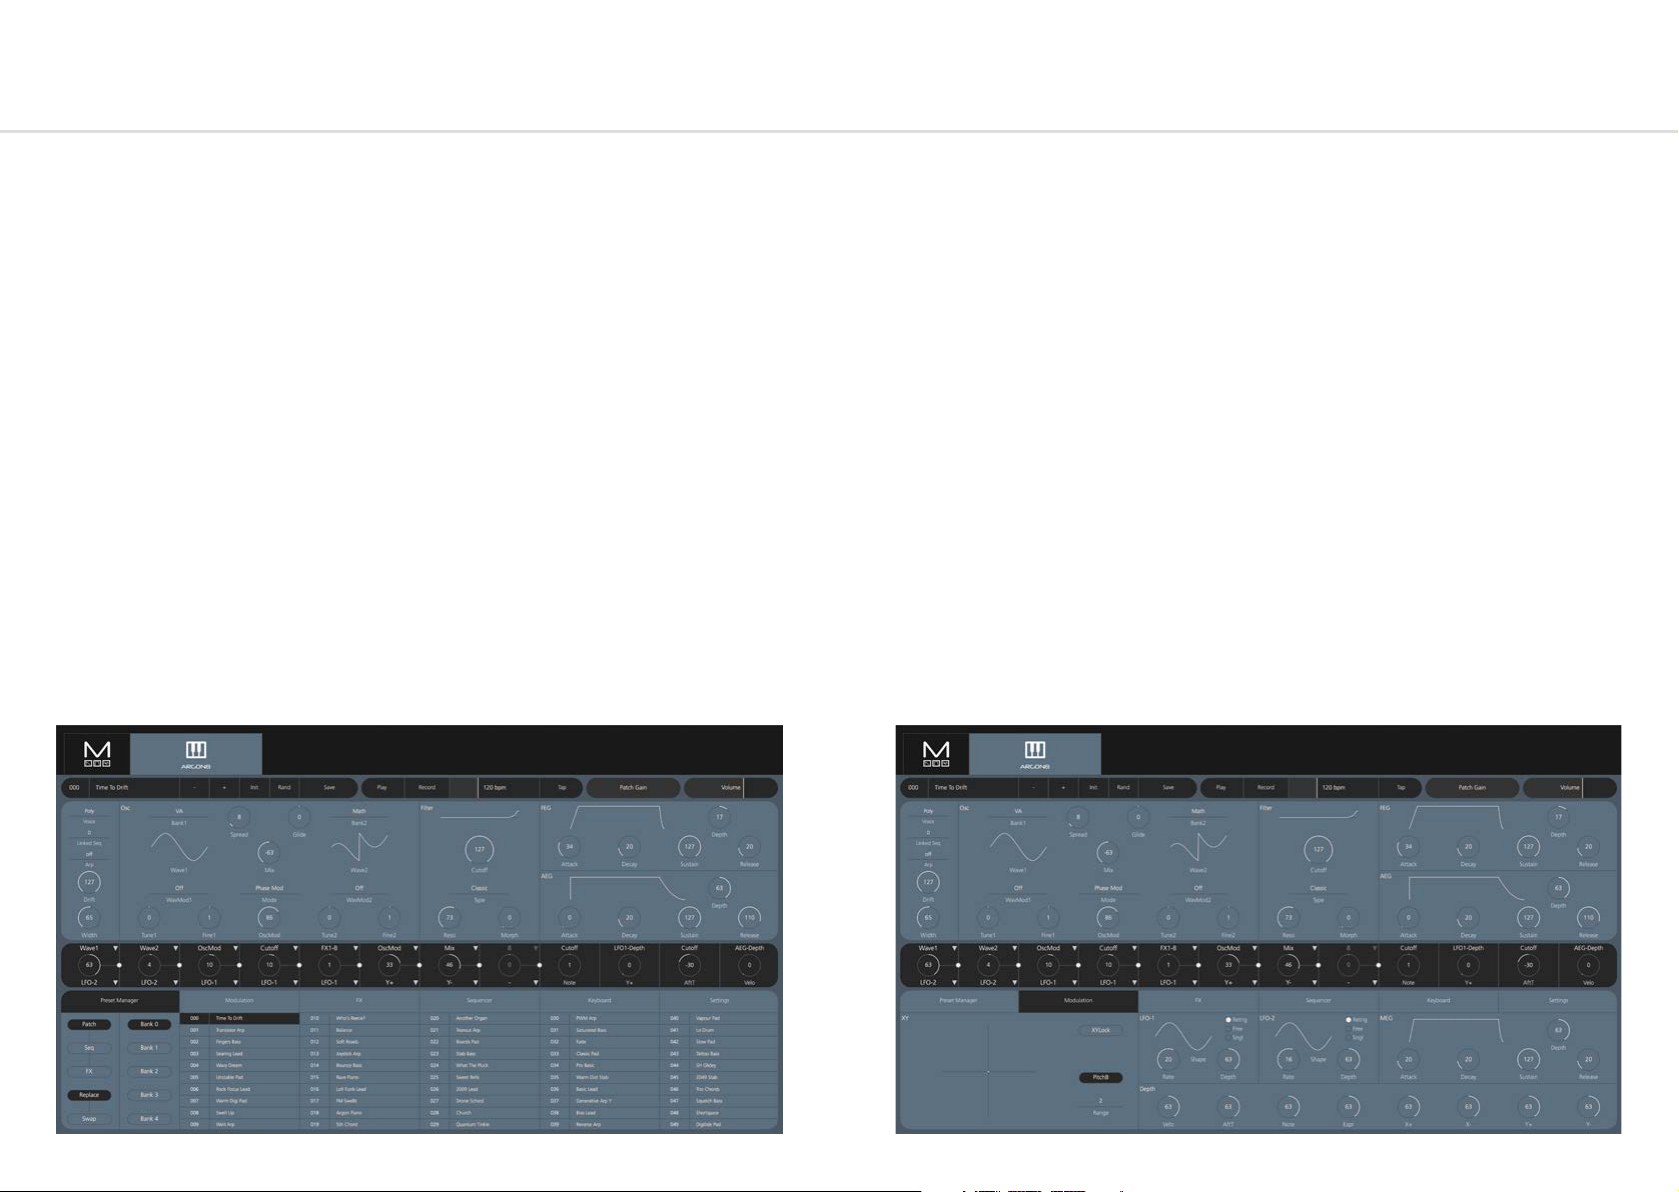
In the Preset Manager Tab there are options to curate, move, backup or import presets.
Presets can loaded with a double click and they can be renamed with two slow clicks. To move
a preset simply click and drag it into a the desired location. Dragging the preset to either edge
of the preset manager window will start it scrolling in that direction. Different banks can be
accessed by dragging the selected preset over the bank button.
Multiple presets can be selected by holding shift, ctrl or cmd and clicking. Shift clicking will
select a block of presets and cmd or ctrl clicking will select individual presets. Once multiple
are selected you can start moving them by clicking on a selected preset and dragging.
Right clicking brings up a menu allowing exporting or importing patches. Exporting will copy
and send all of the selected presets to the selected folder. Importing will overwrite all of the
selected presets in the preset manager with the presets selected from your computer.
All actions will display a confirmation window unless the yes to all button has been clicked. In
which case no confirmation window will appear for the rest of the session.
On touchscreens a single tap will be the equivalent of a cmd or ctrl click. Holding a selected
preset will start a move action
In the Modulation Tab there is access to the parameters for LFO-1, LFO-2 and MOD-EG.
There is also an XY pad that will emulate the movements of the Joystick on Argon8 as well as
options for pitch bend and XYLock so that the XY pad will not return to zero on release.
Finally there is also access to the global depths of the 8 modulation sources Velo. Aftertouch,
Note, Epression Pedal and the 4 Joystick axis.
56 57
Page 30
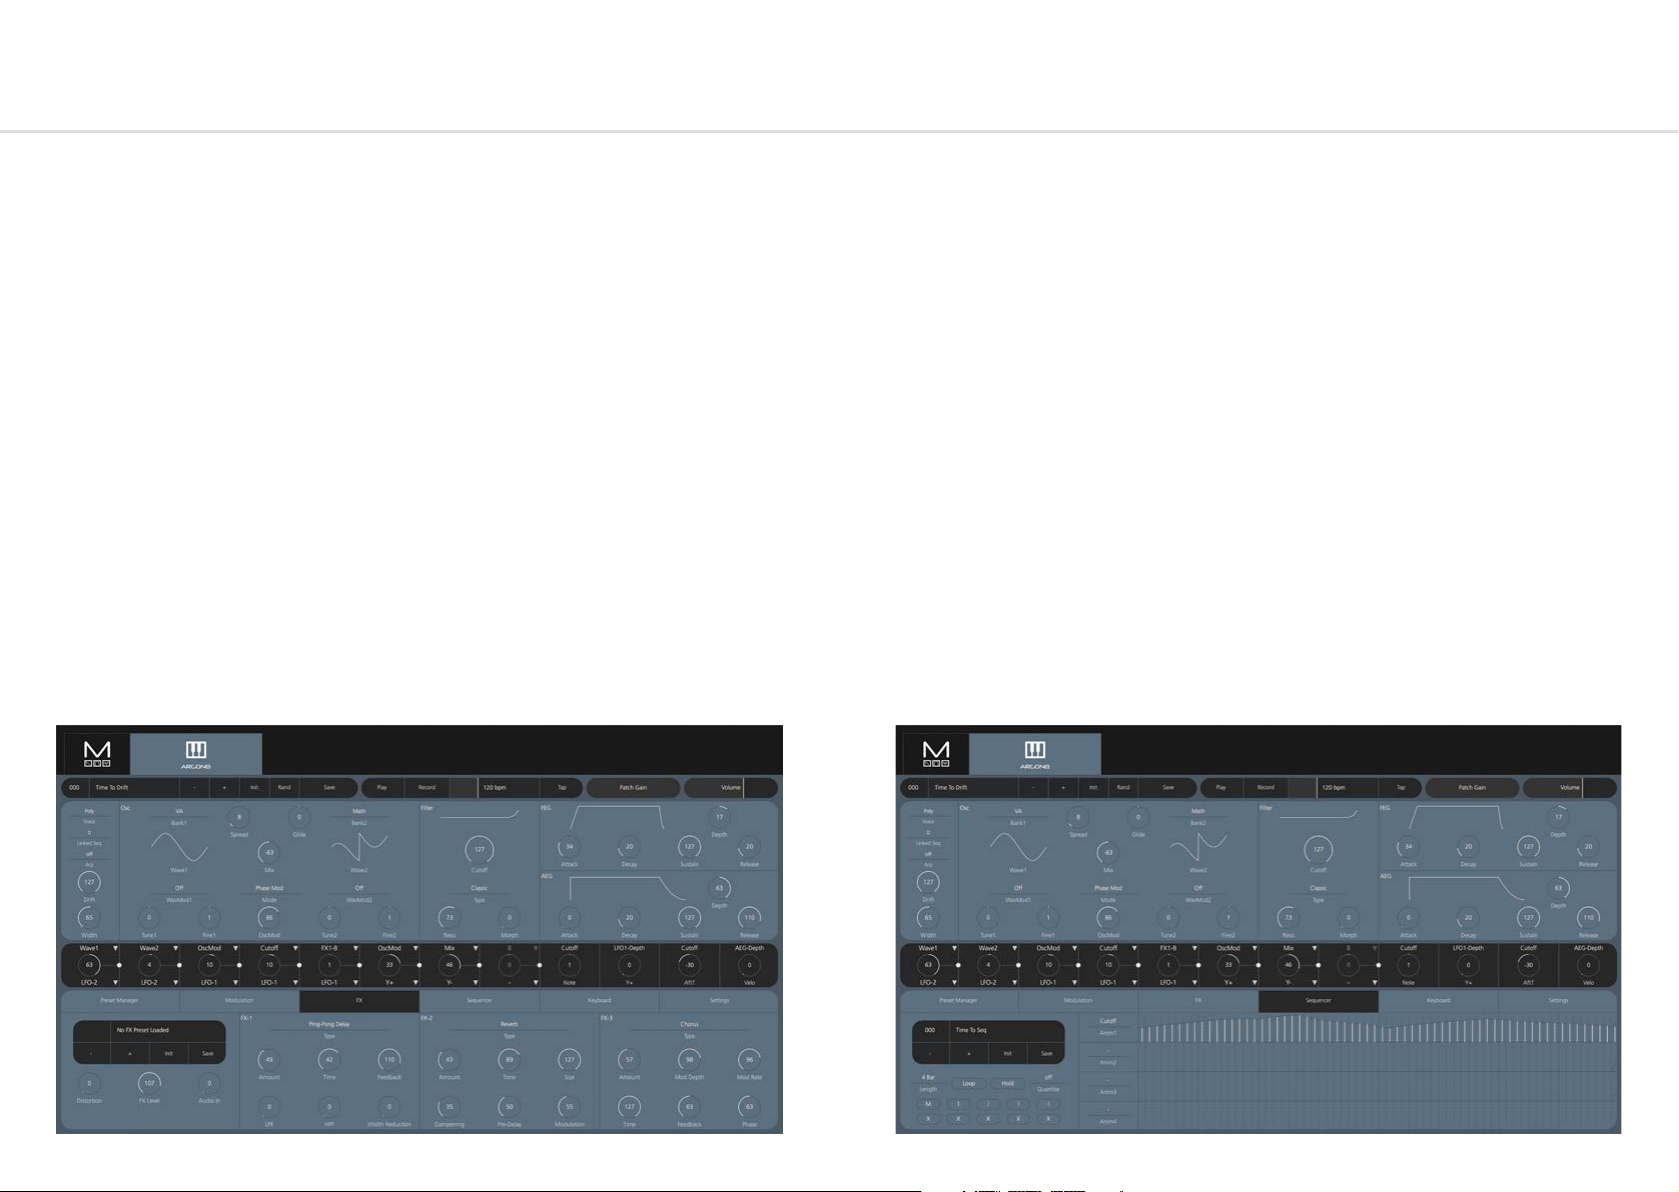
FX Tab
Sequencer Tab
In the FX Tab you can load, initialise and save any of the FX presets as well edit any of the
global FX parameters such as Level and Distortion.
The FX preset selection box on the left will display that no preset is loaded if an fx parameter is
altered in any way, e.g. changing an fx parameter on Argon8 or loading a patch.
Also on this page you will find the external Audio In parameter that controls the amount of
Audio In signal sent through the 3 stereo FX engines.
Finally there is access to the 3 stereo FX engines that show the currently selected FX in each
slot and their respective controls.
In the FX Tab you can load, initialise and save any of the Seq presets as well access the live
sequence controls such as Length, Hold, Loop and Quantise.
The top row of buttons in the bottom left will mute either the note row or any of the 4
parameter animation lanes.
The bottom row of buttons in the bottom left will clear the note row or animation lanes.
On the right you can draw in and edit the 4 animation lanes as well as change what
parameter that name is effecting.
Animation lanes cannot be altered while the Argon8 is recording. It is also not possible to alter
a lane without a parameter selected.
58 59
Page 31
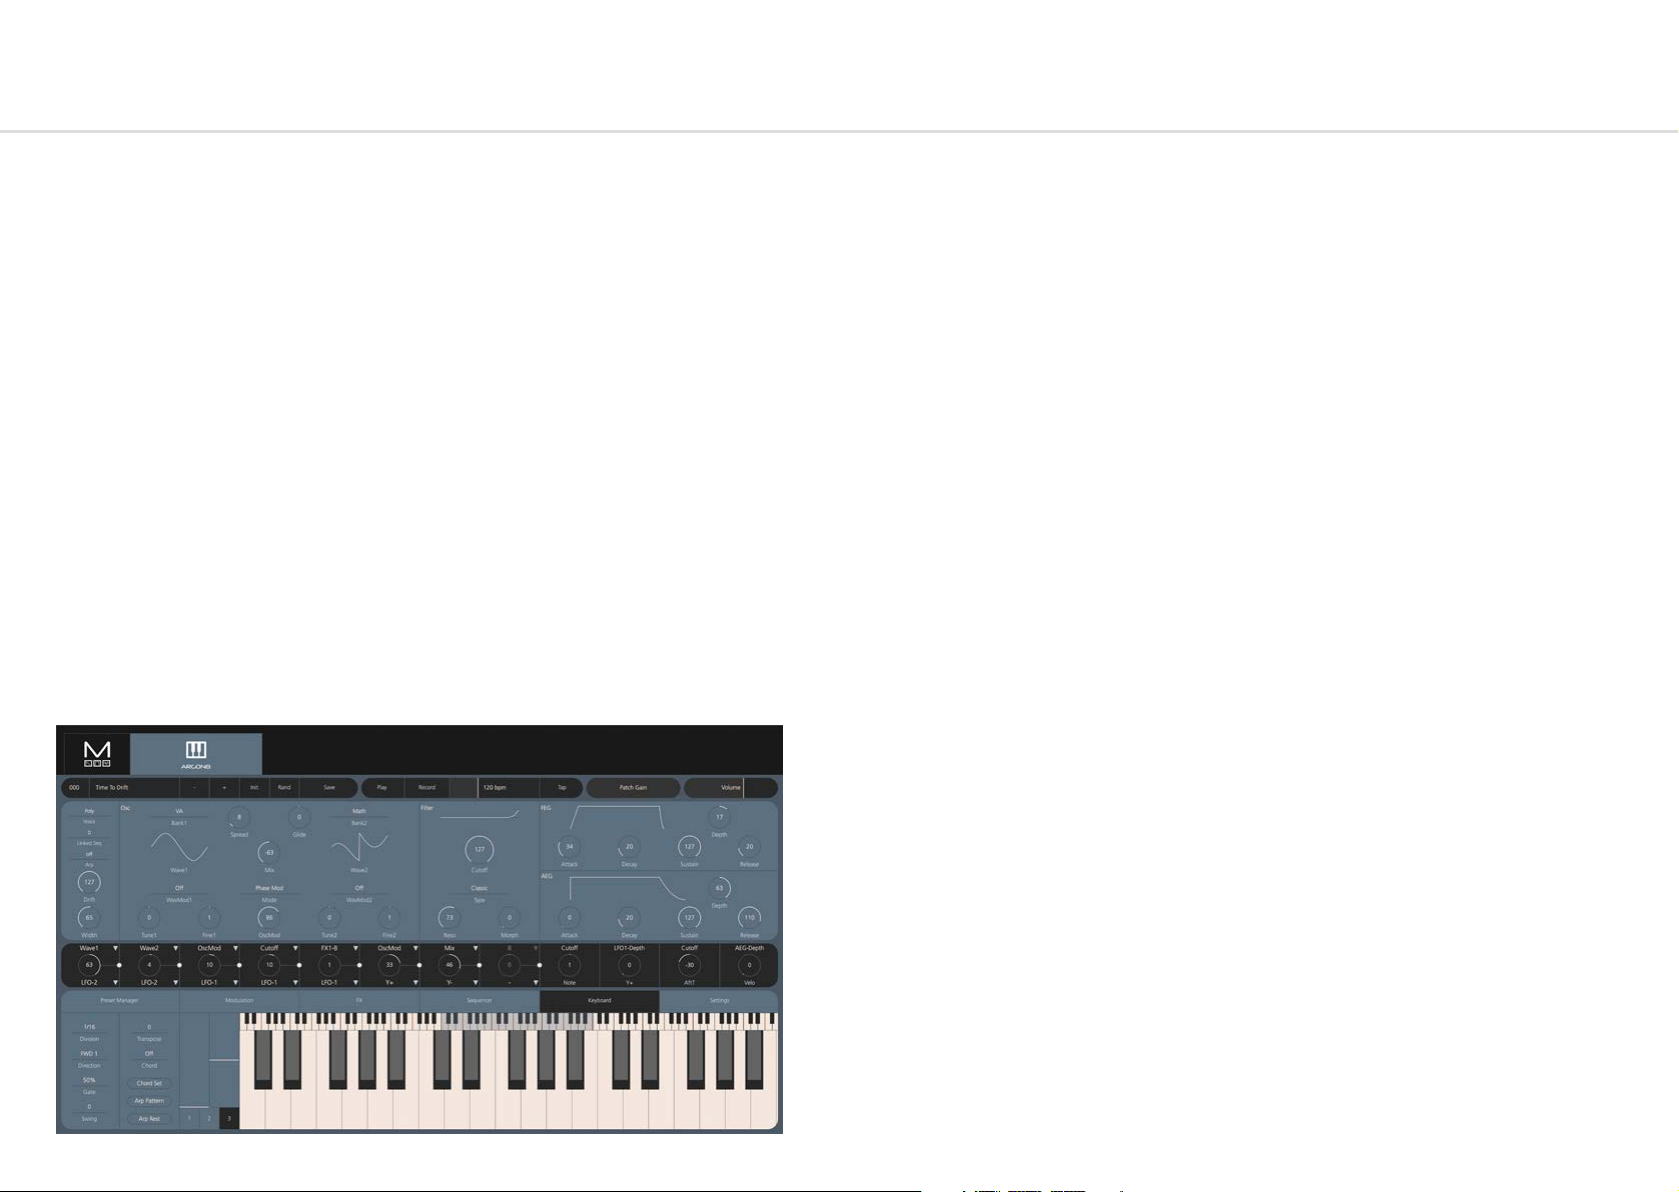
Keyboard Tab
Settings Tab
In the Keyboard Tab there is a MIDI controller that can be used to play notes on Argon8 from
your device. There are pitchbend and modwheels as well as 3 buttons to determine how many
octaves are shown on the screen at one time. The piano keyboard can be scrolled using the
top scroll bar.
There is also access to the Arpeggiator controls and transpose/chord options.
In the Settings Tab there are options for updating your Argon8 to the latest versions.
ModalApp will notify you when a new update is available.
To have the app update the screen in realtime, the page switch mode needs to be set to one
of the (All) or (MIDI) options.
Finally there is access to the other settings available on Argon8. For a list of all settings
available please read the Settings section in Synthesis Engine section of this manual.
60 61
 Loading...