

Page 1
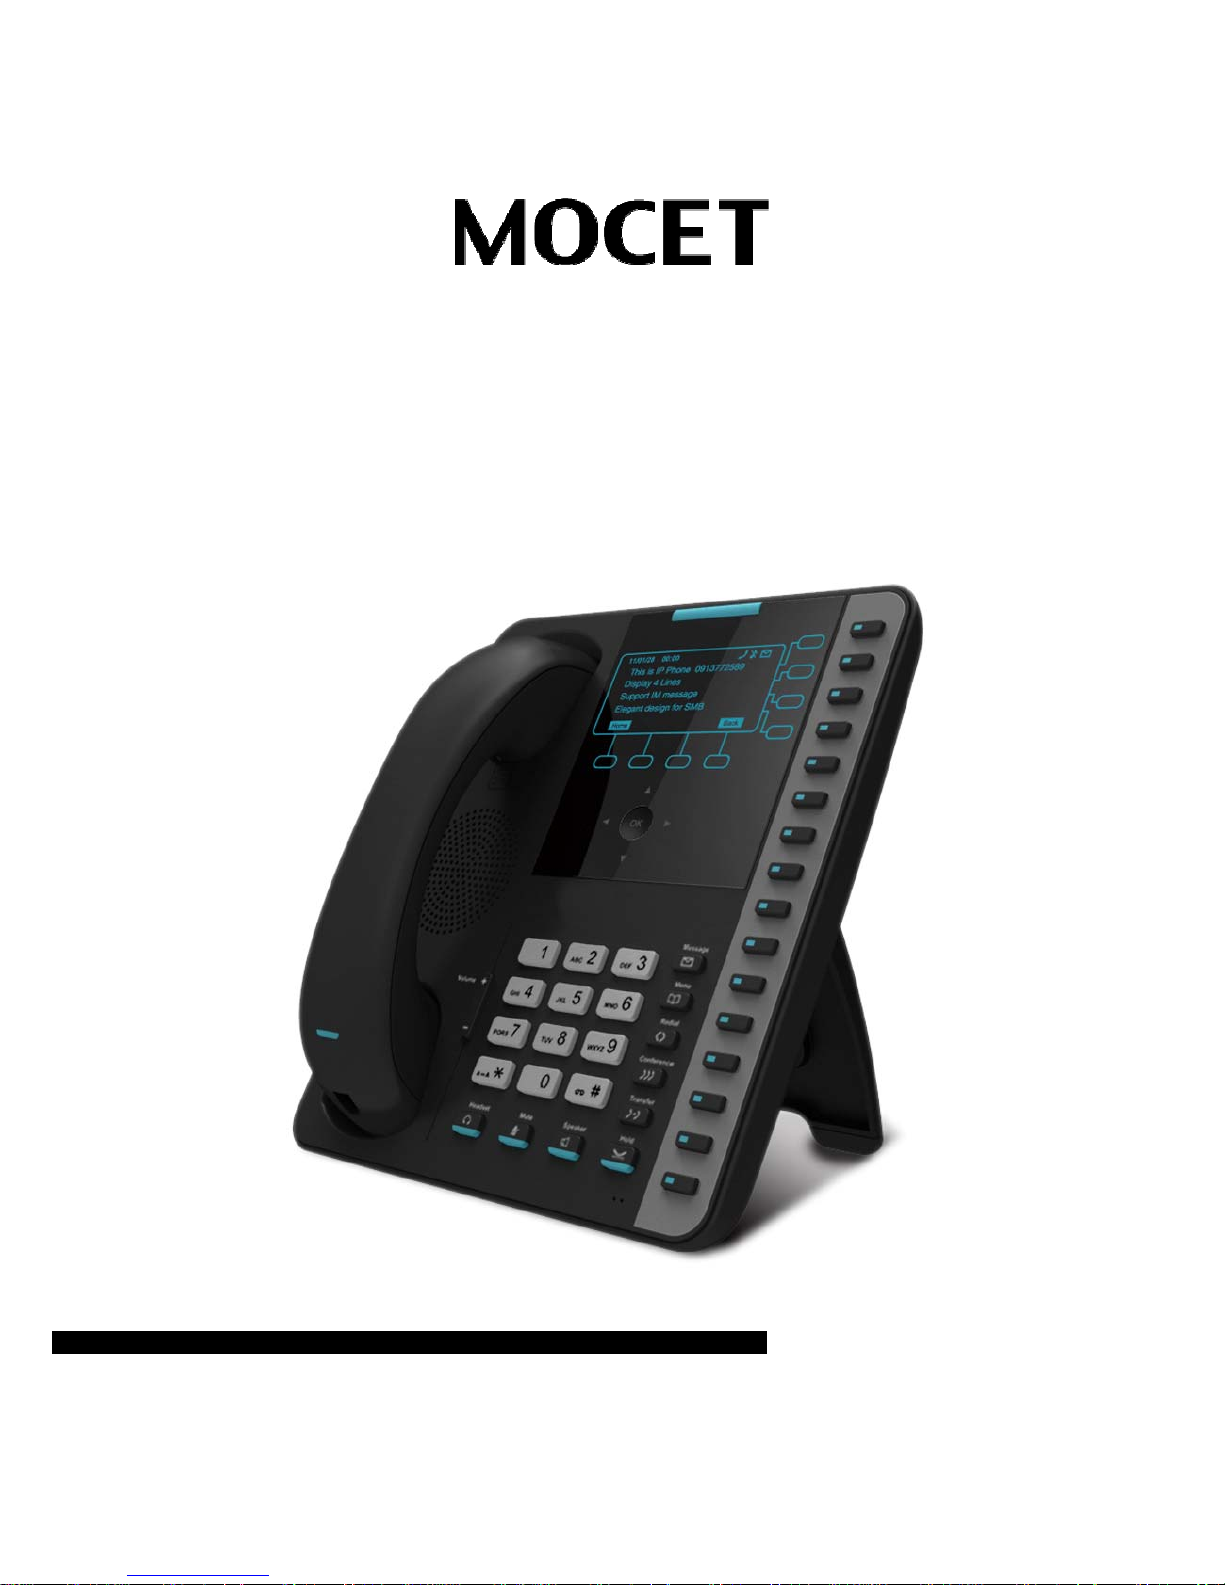
IP3062D Professional IP Phone with
DECT Base Station
User Guide
Copy r i ght © 2012, All Rights Reserved.
Ver: R01 D/C: 101-0831
Page 2

Page 2
MOCET IP3062D Professional IP Phone with DECT Base Station User Guide
FCC Statement
This equipment generates, uses and can radiate radio f requency energy and, if not installed and
used in accordance with the instructions in this guide, may cause interference to radio
communications. This equipment as been tested and f ound to comply with the limits for a Class B
computing device pursuant to Subpart J of Part 15 of FCC rules, which are designed to provide
reasonable protection against radio interference when operated in a commercial environment.
Operation of this equipment in a residential area is likely to cause interference, in which case the
user, at is own expense, will be required to take whatever measures are necessary to correct the
interface.
CE Declaration of Conformity
This equipment complies with the requ irements relating to electromagnetic compatibility, EN55022
class B for ITE an d E N 5008 2 -1. Thi s mee ts the ess en t ial pro tec t ion requ ir em en ts of t he Eu ro pean
Council Directive 89/336/EEC on the approximation of the laws of the Member States relating to
electromagnetic compatibility.
Environment
The phone you have purchased, as well as any used batteries must not be disposed of with
household waste. You should return these to your distributor if they are to replaced or dispose of
them in an approved recycling center.
T rademarks
Windows 98/2000/XT/NT™ and Internet Explorer™ are registered trademarks of Microsoft
Corporation. All other company, brand and product names, like
Metaswitch™, Broadsoft™,
Freeswitch™ and Aster isk™ are registered trademarks of their respective owners.
WARNING! ▼
1. Read these installation instructions carefully before connecting the IP phone to its power.
2. To reduce the risk of electric shock, do not remove the cover from the IP phone or attempt
to dismantle it. Opening or removing covers may expose you to dangerous voltage levels.
Equally, incorrect reassembly could cause electric shock on re-use of the appliance.
3. Do not expose the IP Phone to Fire, direct sunlight or excessive heat.
4. Do not expose the IP Phone to rain or moisture and do not allow it to come into contact with
water.
5. Do not install the IP phone in an environment likely to present a THREAT OF IMPACT.
6. You may clean the IP phone using a fine damp cloth. Never use solvents (such as
trichloroethylene or acetone), which may damage the phone’s plastic surface and LCD
screen. Never spray the phone with any cleaning product whatsoever.
7. Take care not to scratch the LCD screen.
8. The IP phone is designed to work in temperatures from 5
o
C to 40oC.
9. The IP phone must be installed at least 1 meter from radio f requency equipment, such as
TVs, radios, hi-fi or video equipment (which radiate electromagnetic fields).
10. Do not connect the LAN/PC port to any network other than an Ethernet network.
11. Do not attempt to upgrade your IP phone in an unstable power environment. This could
cause unexpected issues.
12. Do not work on the system or conn ect or disconnect cables during lightn ing storms.
13. Children don't recognize the risks of electrical appliances. Therefore use or keep the phone
only under supervision of adults or out of the reach from children.
14. No repair can be performed by the end user, if you experience trouble with this equipment,
for repair or warranty information, please contact your supplier.
!
Page 3

Page 3
MOCET IP3062D Professional IP Phone with DECT Base Station User Guide
About this Guide .............................................................................................6
Overview...........................................................................................................7
1 Introduction ...............................................................................................8
1.1 Phone Features and Specifications............................................................9
1.2 Requirements ...............................................................................................9
1.3 Installation and Setup..................................................................................9
1.3.1
Attaching the Stand to the Phone
........................................................9
1.3.2
Detaching the Stand from the Phone
................................................10
1.3.3
Installation Combination Table
..........................................................11
1.3.4
Connect the Handset and Power Adapter to the Phone
..................12
1.3.5
Connect the Ethernet Cables
.............................................................12
1.4 Appearance and Function Description.....................................................13
1.5 IP3062D Port Functions .............................................................................16
1.6 IP3062D LED Functions .............................................................................17
1.7 LCD Screen Indicators...............................................................................18
2 Getting Started ........................................................................................20
2.1 Customizing Your IP Phone from Menu...................................................20
2.2 Configuring Basic Setting s .......................................................................21
2.2.1 Volume Setting....................................................................................21
2.2.2
LCD Brightness
...................................................................................22
2.2.3
LCD Contrast
.......................................................................................22
2.2.4
Call Setting
..........................................................................................22
2.2.5
Lock Your Phone
.................................................................................22
2.2.6
Speed Dialing Setti ng
.........................................................................23
2.2.7
Reboot Your phone
.............................................................................23
2.3 Managing Contact s ....................................................................................24
2.3.1
Adding Contacts
..................................................................................24
2.3.2
Editing Contacts
..................................................................................24
2.3.3
Deleting Contacts
................................................................................25
2.3.4
Searching for a Contact
......................................................................25
2.3.5
Placing a Call to a Contact
.................................................................25
2.4 Managing Call Logs....................................................................................25
2.5 Viewing Your Phone’s Information ...........................................................26
2.6 Configuring Programmable Keys .............................................................26
Table of Content
Page 4

Page 4
MOCET IP3062D Professional IP Phone with DECT Base Station User Guide
2.7 Configuring An Extended Dial Module (EDM) Setting.............................26
2.8 Managing Voice Mail ..................................................................................27
2.9 Managing Instant Message........................................................................27
2.10 Viewing Notifications.................................................................................28
3 Using Basic Features................................................................................29
3.1 Common Terms..........................................................................................29
3.1.1
Lines
.....................................................................................................29
3.1.2
Calls
......................................................................................................29
3.1.3
Registration
.........................................................................................30
3.1.4
Caller ID
................................................................................................30
3.2 Installing Your IP Phone............................................................................30
3.3 Configuring Your IP Phone for Service....................................................30
3.4 Line Selection.............................................................................................30
3.5 Placing a Call..............................................................................................31
3.6 Placing an Urgent Call...............................................................................32
3.7 Adjusting Call Volume ...............................................................................32
5.8 Canceling a Call..........................................................................................32
3.9 Answering a Call ........................................................................................33
3.10 Answering an Urgent Call..........................................................................33
3.11 Rejecting a Call...........................................................................................33
3.12 Ending and Holding and Resuming a Call ...............................................34
3.13 Muting and Un-mut ing a Call.....................................................................35
3.14 Redialing a Number....................................................................................35
3.15 Setting up a Conference Call.....................................................................35
3.16 Transferring a Call......................................................................................36
3.16.1
Blind Transfer
......................................................................................36
3.16.2
Semi-A ttended Transfer
......................................................................36
3.16.3
Attended Transfer
...............................................................................36
3.17 Forwarding a Call.......................................................................................36
3.18 Using Voice Mail.........................................................................................37
3.19 Placing a Speed Dial Call...........................................................................37
3.20 Using Multiple Lines...................................................................................37
3.21 Using Multiple Calls...................................................................................39
4 Using DECT Handsets............................................................................41
4.1 Registering a DECT Handset to IP3062D..................................................41
4.2 Deregistering a DECT Handset from IP3062D..........................................42
Page 5

Page 5
MOCET IP3062D Professional IP Phone with DECT Base Station User Guide
4.3 Making an Intercom Call............................................................................42
4.4 Making a Paging......................................................................................... 42
4.5 Ending a Paging .........................................................................................42
5 Using Advan ce d Features......................................................................44
5.1 Login Web UI ..............................................................................................44
5.2 Changing the User’s Password.................................................................44
5.3 Viewing Phone Information on Web User Interface.................................45
5.4 Configuring Pho ne Settings......................................................................45
5.5 Managing Programmable Keys.................................................................47
5.6 Configuring SIP Line Set tings...................................................................48
5.7 Configuring Syst em Settings ....................................................................49
5.8 Managi ng EDM............................................................................................49
5.9 Managing Phonebook................................................................................49
5.9.1
Private Phonebook
..............................................................................50
5.9.2
Public Phonebook
...............................................................................50
5.9.3
LDAP Directory
....................................................................................50
5.10 Placing a Call from the Private Phonebook.............................................50
5.11 Sending an Instant Message (IM)..............................................................51
6 Using Advan ce d C all Fe at ur es ..............................................................52
6.1 Centralized Conferencing (for Broadsoft PBX)........................................52
6.2 Call Waiting.................................................................................................52
6.3 Intercom Call...............................................................................................52
6.3.1
Answering an Intercom Call
...............................................................52
6.3.2
Placing an Intercom Call
.....................................................................52
7 Phone Firmware Upgra d e ......................................................................54
8 Using USB Devices with Your Phone ...................................................55
8.1 USB Keyboard ............................................................................................55
8.2 USB Memory Dongle..................................................................................55
5.8 USB WLAN Dongle.....................................................................................56
9 Troubleshooting......................................................................................57
10 Glossary...................................................................................................58
10.1 Acronyms....................................................................................................58
10.2 Terminology................................................................................................59
Page 6

Page 6
MOCET IP3062D Professional IP Phone with DECT Base Station User Guide
About this Guide
This guide explains how to use the basic features of your new IP3062D phone. Not all
features listed are available by default. Contact your system or net work administrator to
find out which features and services are available to you on your system.
Your System Ad ministrator has the ability to customize some features on thi s phone. For
information on more advanced settings and configurations, administrators should refer to
the IP3062D Professional IP Phone with DECT Base Station Administrators’ Guide.
Page 7
Page 7
MOCET IP3062D Professional IP Phone with DECT Base Station User Guide
Overview
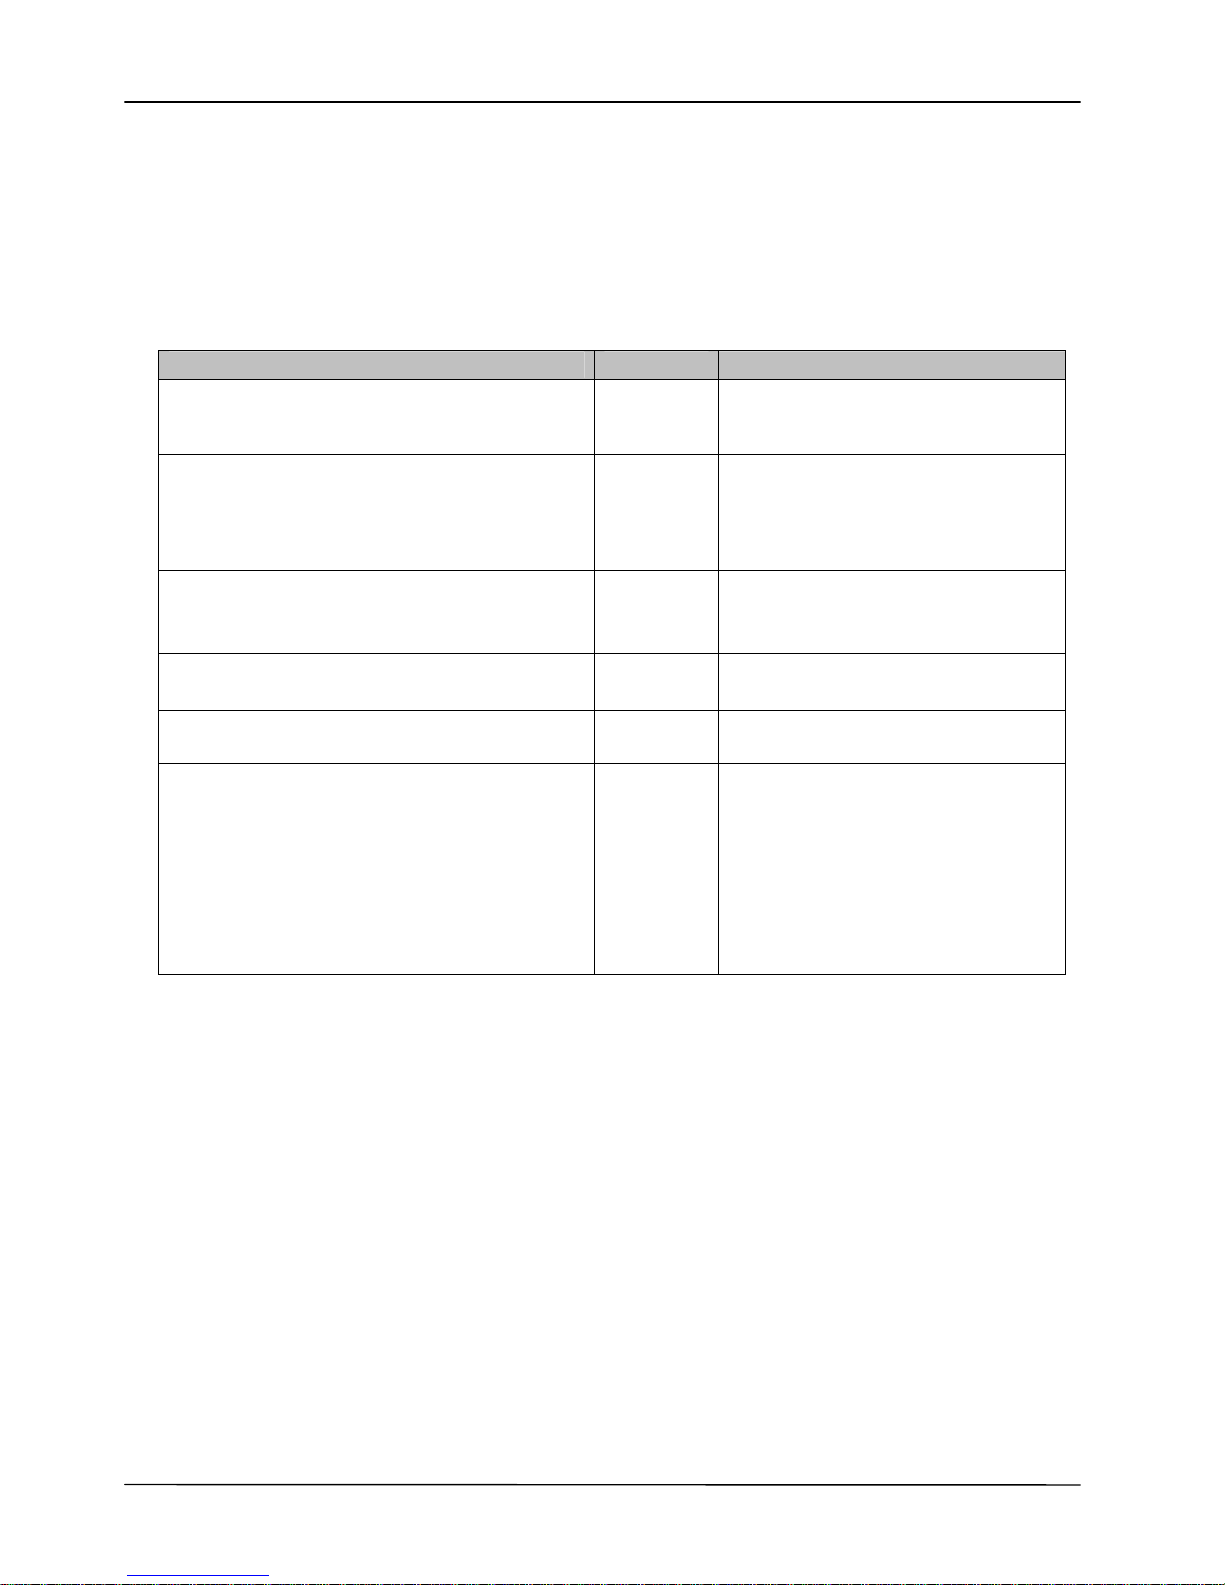
The MOCET IP3062D Professi onal IP Deskphone with an integrated DECT base station
has availablity to support up to five DECT6.0 CAT-iq2.0 compliant handsets compared to
the lower cost IP3062 Professional IP Deskphone. The following table highlights the
differences between the two phones:
Features IP3062 IP3062D
DECT Base Station
No Yes
DECT RF Paramet ers
(Only configurable by administrator)
N/A
FCC US DECT Classic ( Defaul t)
European DECT
FCC US DECT
Registered CAT-iq2.0 DECT Hand set
Quantity
N/A Up to 5 handsets
Intercom with DECT Handset
N/A Yes
Paging with DECT Handset
N/A Yes
PBX-like Call Features
(Only configurable by administrator)
N/A
Direct Inwards Dialing
Ringing Group
Hunting Group
Multiple Line Selection
Auto-Attendant
Voice Mailbox
Page 8
Page 8
MOCET IP3062D Professional IP Phone with DECT Base Station User Guide
1 Introduction
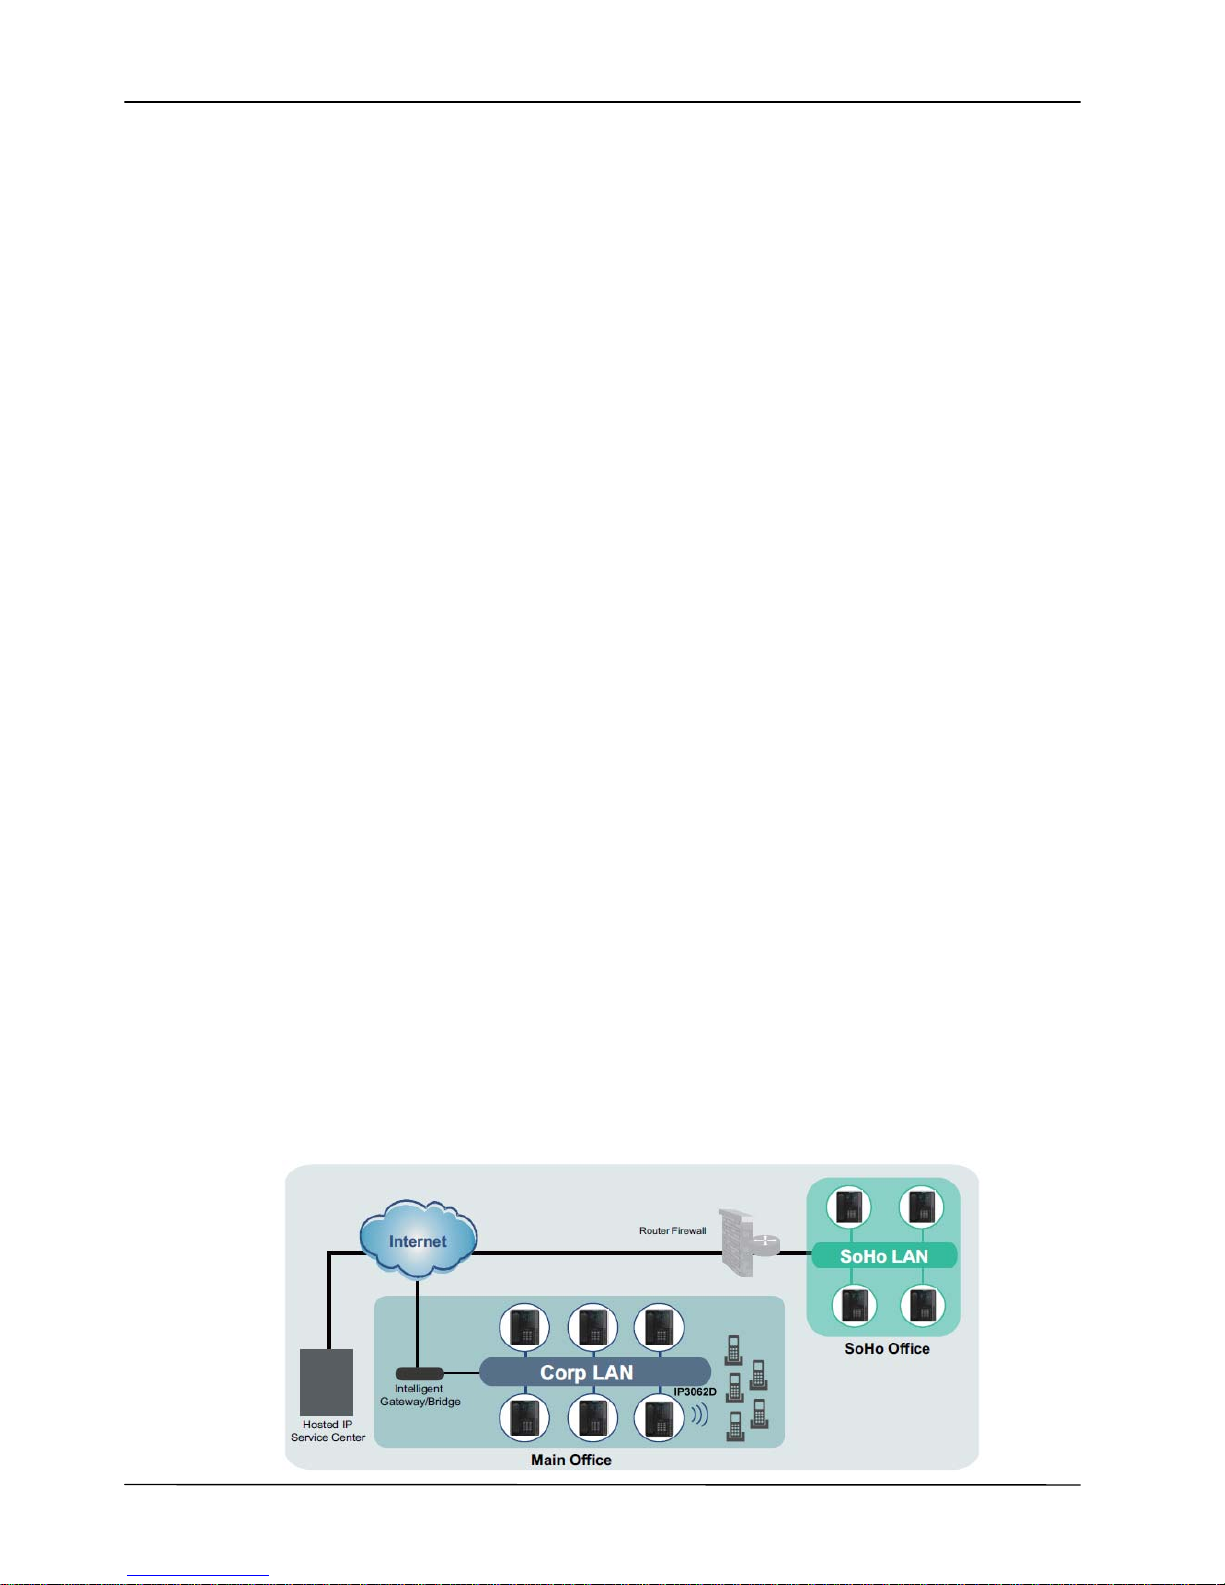
The MOCET IP3062D is a Professional IP phone with an integrated DECT base stati on
supporting up to five DECT6.0 CAT -iq2.0 compliant handsets. The IP3062D is an easy-touse high quality desk phone with many advanced features including support for secure
calling with trusted layer security (T LS) and Secure Real-time T ransfer Protocol (SRTP), a
built-in IP Security (IPSEC) virtual private network (VPN) client, instant messaging, and
Digital Enhanced Cordless Telecommunications (DECT) base station capabilities. The
built-in DECT base station can be configured to serve as a mini IP-PBX with an autoattendant, voicemail and ringing group or each paired handset can be independently
registered to a SIP server.
Utilizing a next generation capacitive touch sensi tivity panel desi gn, the IP3062D supports
up to four simultaneous lines and can be positioned in multiple tilt angles and has a wall
mount option. The IP3062D has a built-in two port 10/100 Ethernet switch with automatic
support for power over Ethernet (PoE). It has 16 programable buttons and can be
configured through the simple built in menus displayed on the high quality blue backlit LCD
or from the phone’s web user interface. The IP3062D can be automatically provisioned
from a local or Internet based server usi ng the built-in MOCET auto-provisioning system
and management protocol s.
The IP3062D IP Phone supports many advanced features including 5-way on-phone
conferencing, can transfer and receive calls using industry-standard SIP protocols, and
can provide built-in music-on-hold (MoH) over an IP network. The IP3062D is
interoperable with a wide range of SIP services and servers including those based on
Metaswitch™, Broadsoft™, Freeswitch™ and Asterisk™. Therefore, the IP3062 can be
deployed and used anywhere there is a suitable local area network (LAN) with Internet
access and a local or remotely hosted SIP server. Since it is a stand-alone and “alwayson” device, it does not require connection to a computer for it to work.
In addition, the IP3062D has a large LCD di splay to show all calls in progress at once and
supports HD audio through the use of the G.722 wideband codec, has a dedicated
external headset port, USB 2.0 host type A and Mini type B ports, and an Extended Dial
Module port. These functions make the IP3062D a more powerful and flexible IP phone to
meet the demands of a busy professional user.
Page 9
Page 9
MOCET IP3062D Professional IP Phone with DECT Base Station User Guide
1.1 Phone Features and Specifications
Complete VoIP and networking protocol support
Rich supplementary call services and phone features
HD acoustic hardware design for handset and speakerphone
G.722 wideband audio codec support
4 SIP Lines with 16 call appearances
Built-in two port 10/100 Ethernet switch
5-way on-phone conferencing
16 programmable keys with LEDs
Interoperable with Asterisk, Freeswitch, Metaswitch and Broadsoft
Auto-provisioning, remote management and security enhancements
Registered up to five DECT6.0 CAT-iq2.0 compliant handsets
PBX-like call features
802.11n Wi-Fi connection through an external Wi-Fi adapter
External extended dial module to extend programmable keys
1.2 Requirements
The IP3062D IP Phone requires the following environments:
Compatible SIP-based IP PBX system or Inte rnet-bas ed h osted SIP service a ccoun t
Ethernet/Fast Ethernet LAN (10/100 Base-T)
DECT6.0 CAT-iq2.0 compliant handset (if you would like to use DECT handset)
1.3 Installation and Setup
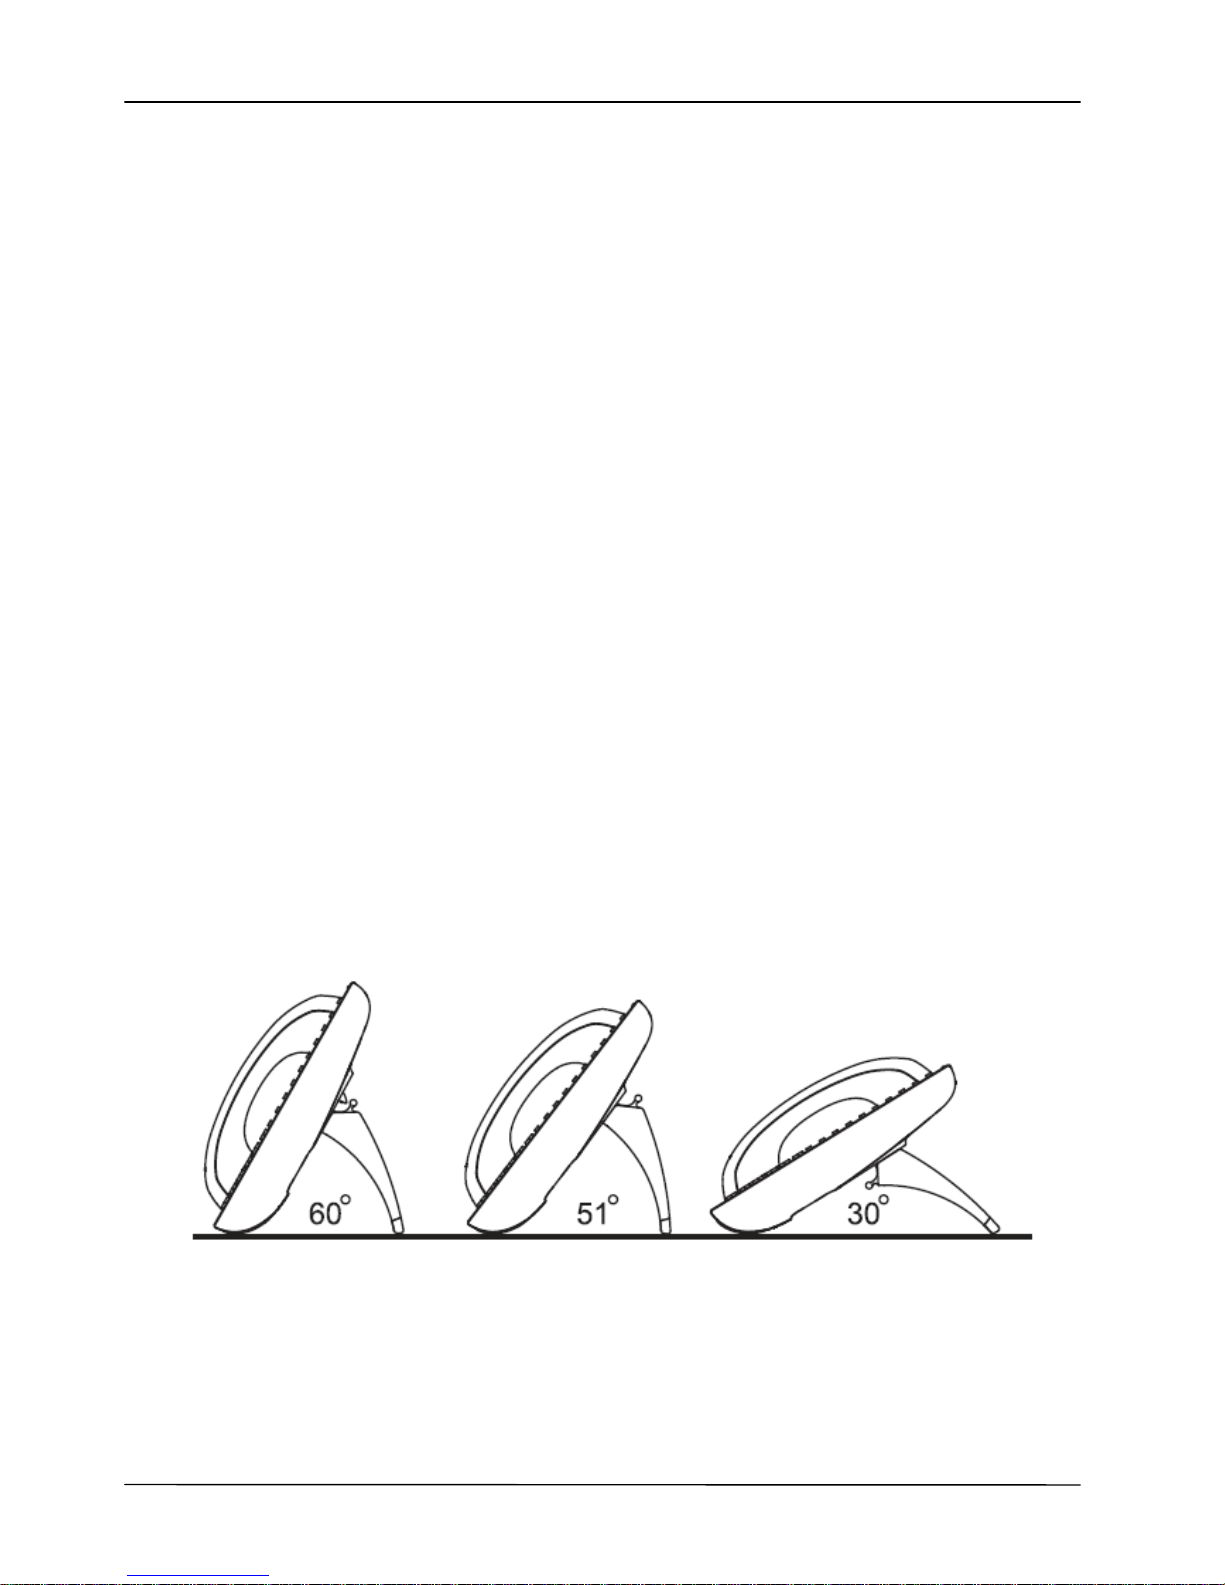
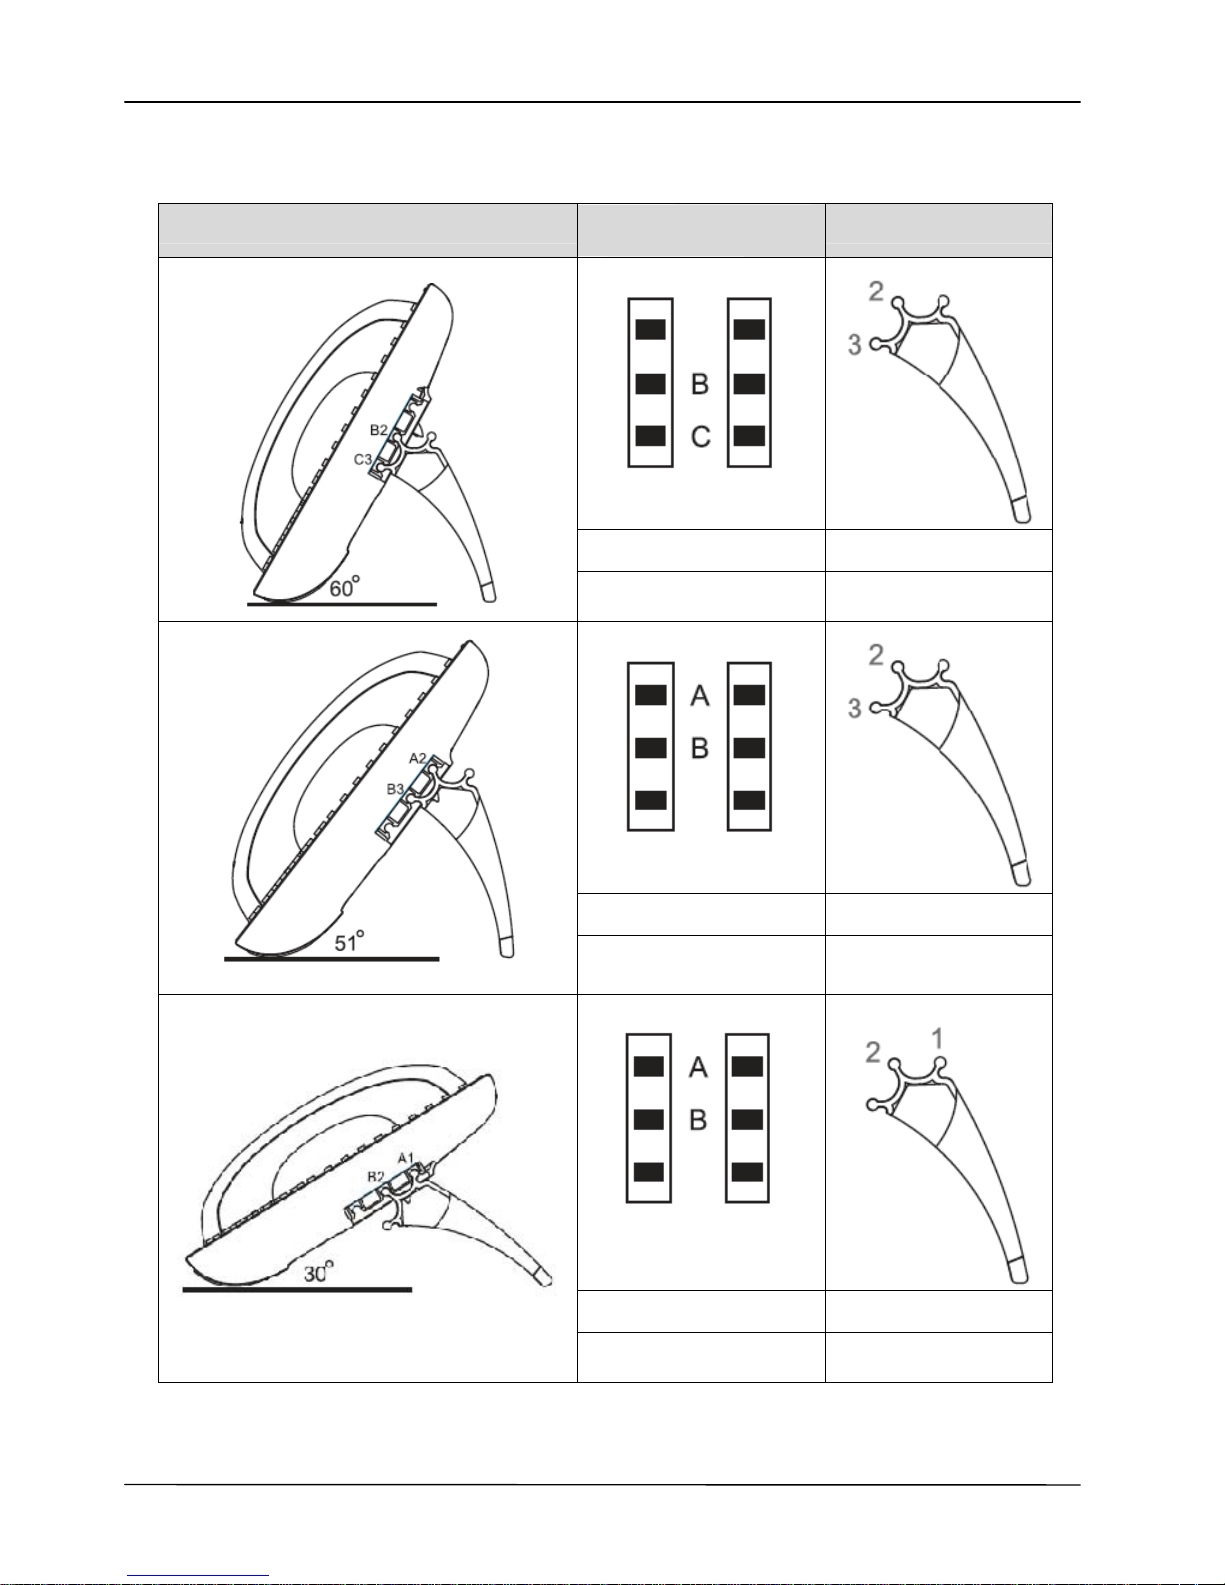
The IP3062D can support three different tilt angles of 60°, 51°, and 30° (see below).
1.3.1 Attaching the Stand to the Phone
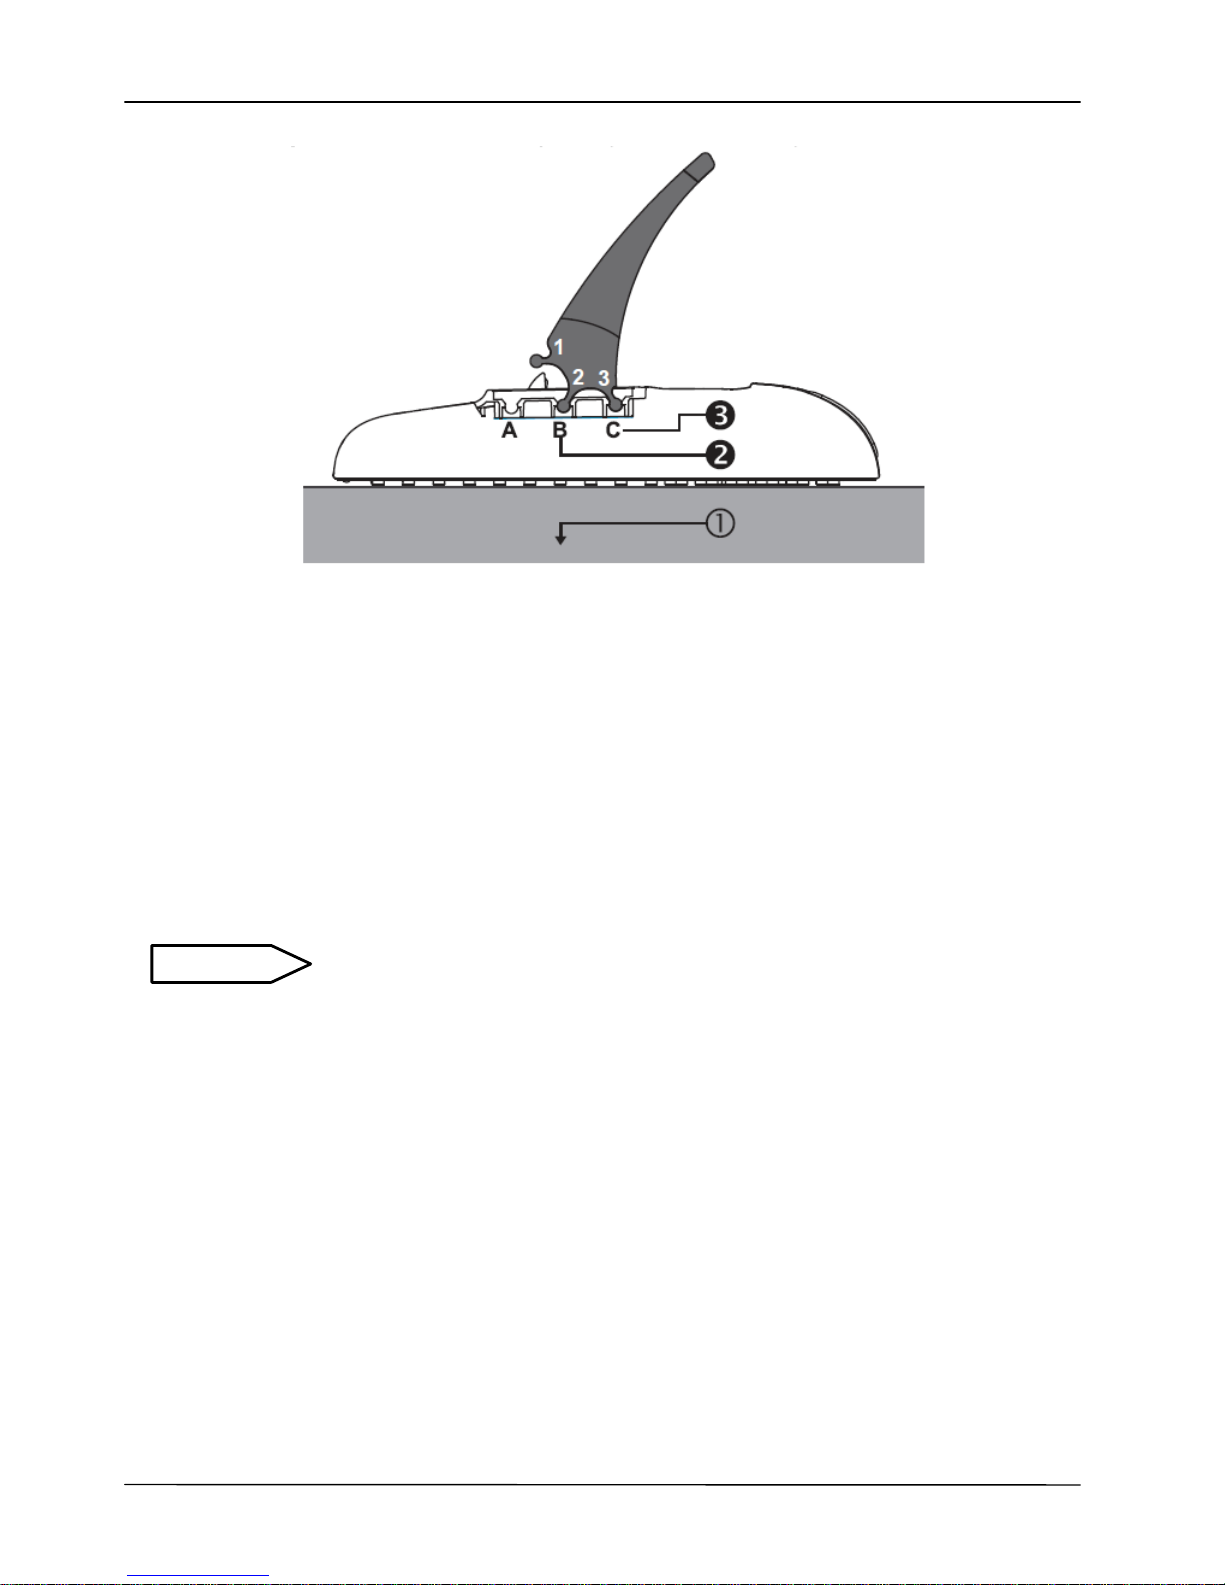
After unpacking the box, attach the stand to the IP3062 phone first. Below this paragraph
we illustrate an example below of 60° angle installation with the stand. There are three
sets of “antlers” on the top of the stand (named 1, 2 and 3) and there are three sets of
mounting slots on the back of the phone (named A, B and C). See the illustration below.
Page 10
Page 10
MOCET IP3062D Professional IP Phone with DECT Base Station User Guide
The procedures for attaching the stand to the phone are as follows :
Step : Place the main body of the IP3062 face down on your lap or a firm sofa;
Step : First snap the “2nd” antler into the slot “B” hole;
Step : Then snap the “3rd” antler into the slot “C” hole (it may take a bit of pressure,
but when it locks in place, you will hear a click and the stand will not wiggle
on the phone.)
For other stand angle, such as 51° and 30°, pl ease refer to the Installation Combination
Table below to find correct slots and correct antlers to use.
CAUTION Snapping the slot “B” hol e with the antler of stand first i s the most
important step for a smooth installation. The product sticker on stand
should be facing inward towards the phone. When a stand i s installed at 60° or 30°, you
can rotate the stand between 30° and 60° quickly without pulling the antler in the slot B out.
1.3.2 Detaching the Stand from the Phone
To remove the stand from the IP3062D phone, follow the procedures below (we are using
a 60° stand as an example):
Step : Place the main body of the IP phone face down in your lap or a firm sofa;
Step : Press with one hand on the back of the IP phone and fi rml y pull the the
“3rd” antler straight out of the slot “C” hole;
Step : Press with one hand on the back of the IP phone and fi rml y pull the the
“2nd” antler straight out of the slot “B” hole.
Page 11
Page 11
MOCET IP3062D Professional IP Phone with DECT Base Station User Guide
1.3.3 Installation Combination Table
Different Tilt Angle Installation
Slot Holes
on the Back Shell
Antlers of Stand
B 2
C 3
B 3
A 2
B 2
A 1
Page 12
Page 12
MOCET IP3062D Professional IP Phone with DECT Base Station User Guide
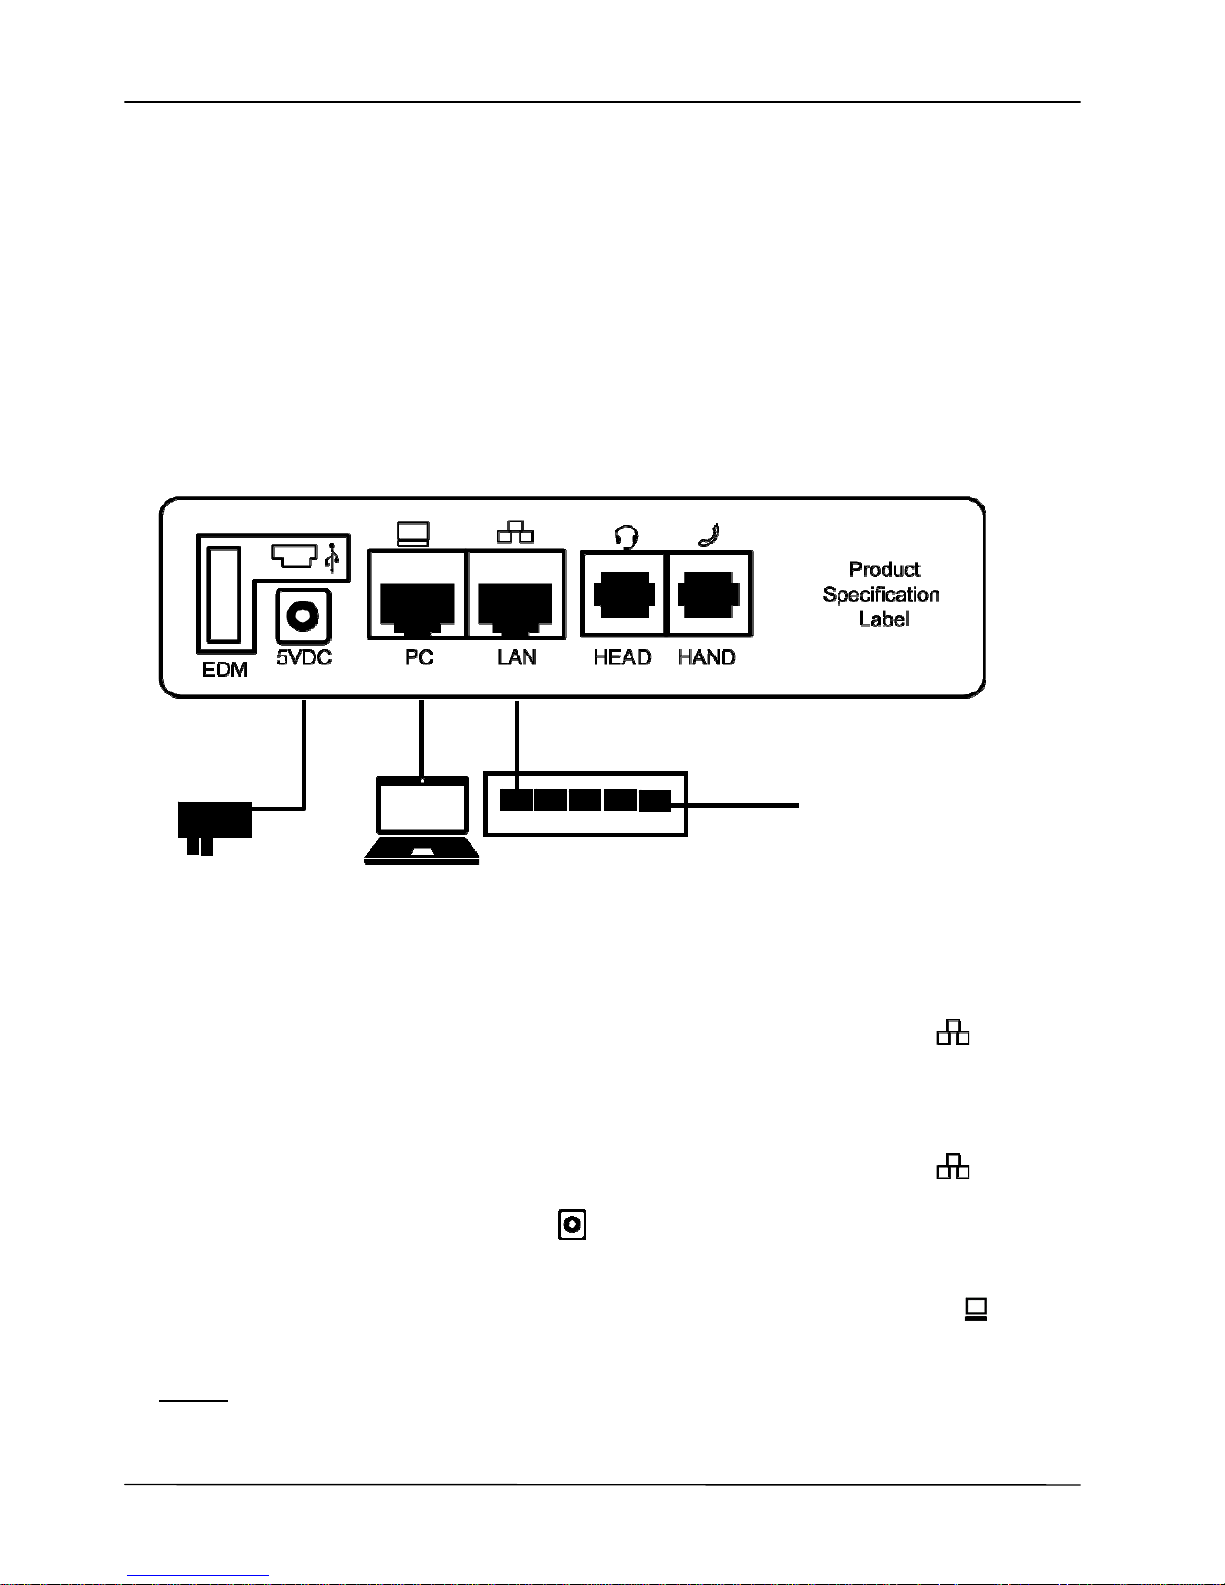
1.3.4 Connect the Handset and Power Adapter to the Phone
After unpacking the box, connect the handset to the curl y handset cord and then connect
the other end of the curly handset cord to the port marked HAND with the handset icon
on the bottom of the IP3062D. Then connect the included power adapter to the port on
the bottom of the phone marked 5VDC. Please make sure you use the right power
adapter. It will have a label showing 5V and 2A. In some cases, power will be provi ded
from your network’s Ethernet switches and you will not need to use the included power
adapter. Please check with your network or site administrator for more details on whether
your network supports PoE. And the PoE power specificati on is compliant IEEE802.3af
with Class 2 level. Please review the following diagram for more assistance.
1.3.5 Connect the Ethernet Cables
Using a general CAT-5 Ethernet cable, follow the installation steps below:
If your Ethernet Switch supports PoE:
- Please connect an Ethernet cabl e to the Switch port from the LAN port of the
IP3062D. Then you will see the phone LEDs and buttons light up momentarily and
the phone will boot.
If your Ethernet Switch doesn’t support PoE:
- Please connect an Ethernet cable to the Switch port from the LAN port of the
IP3062D. Plug in the included power adaptor to the wall power outlet then plug
the barrel plug to the power port on the back of the phone. You should see the
phone LEDs and buttons light up momentarily and the phone will boot.
To eliminate the requirement for multiple Ethernet cables to a user’s location, the user’s
computer can be connected to the network through the second Ethernet port on the
IP3062D.
Notice : The IP3062D takes just under two minutes to start up and become operational.
There are a series of LEDs and buttons that will light up periodically to provide
boot progress information. Please be patient.
Ethernet Switch to
Office LAN or Internet
Power
Adaptor
Page 13
Page 13
MOCET IP3062D Professional IP Phone with DECT Base Station User Guide
1.4 Appearance and Function Description
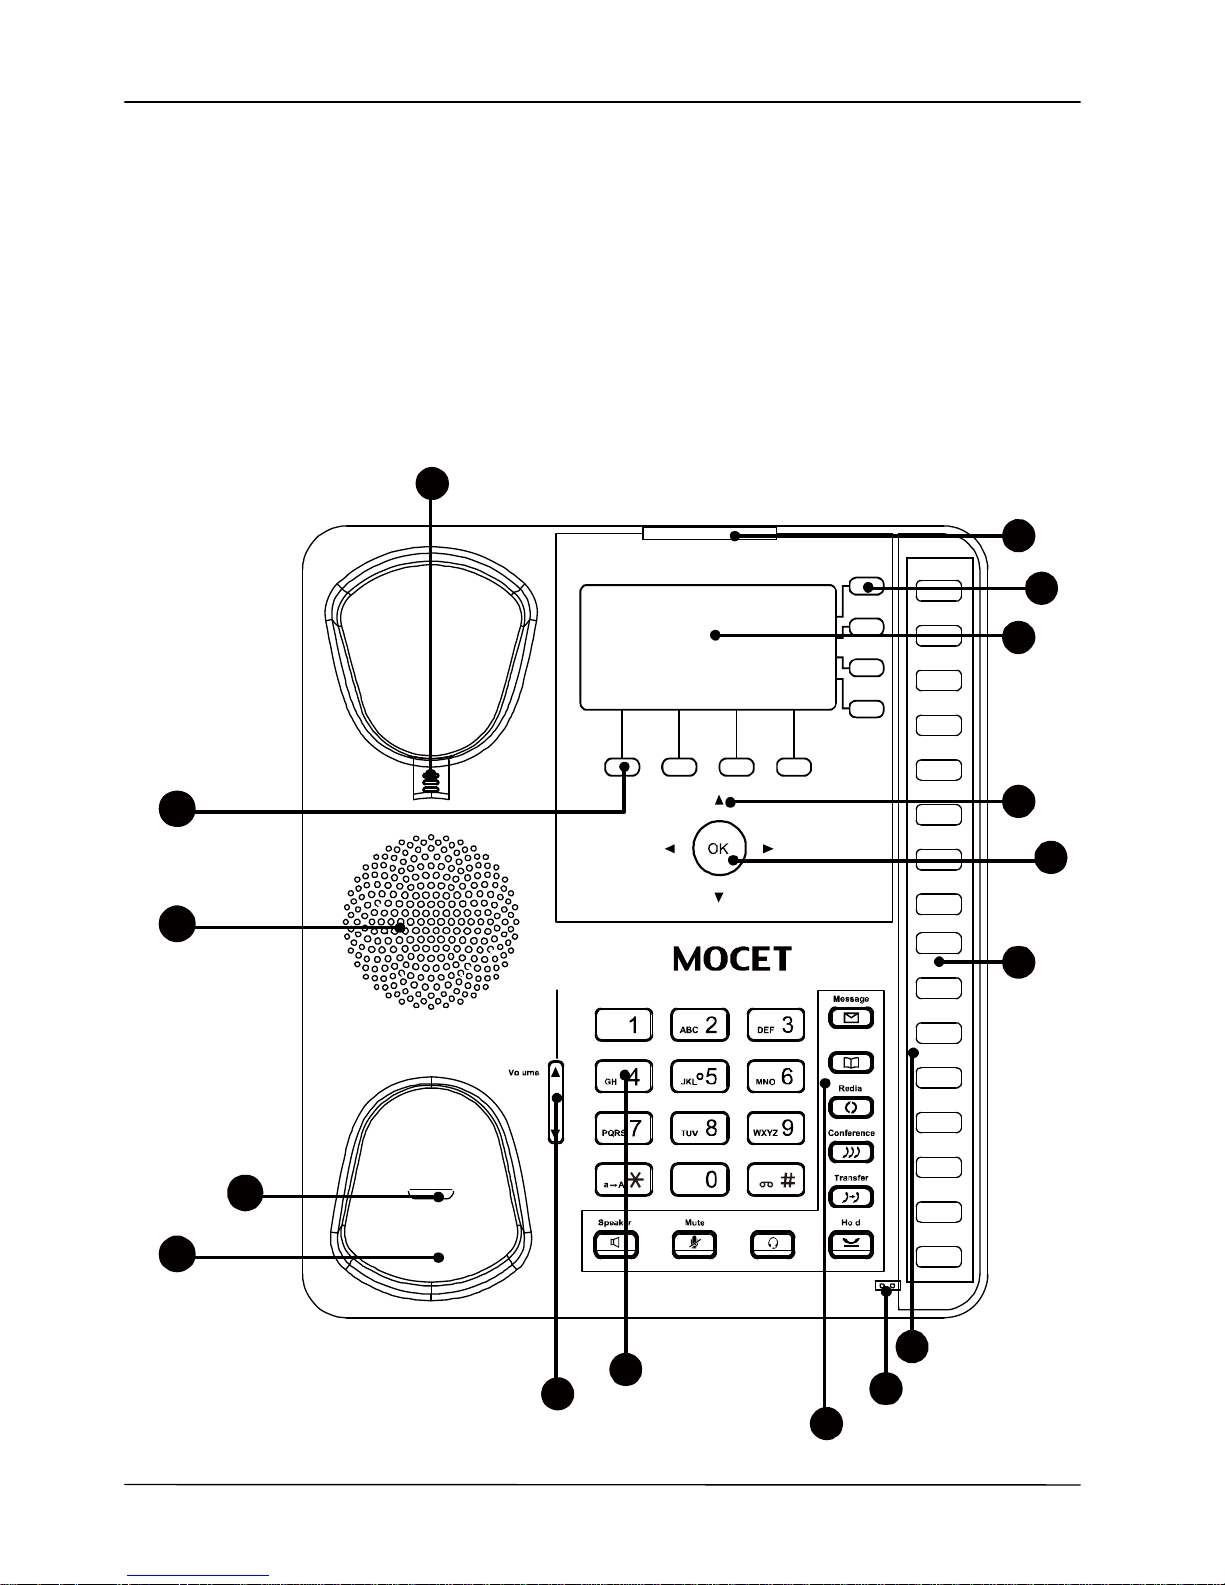
The IP3062D Professional IP Phone with DECT Base Station comes wi th a blue text and
graphic LCD display, capacitive touch keys, including 4 soft keys, 4 line keys, and 5
navigator keys, as well as a traditional keypad, 16 programmable keys and 9 function keys.
In the box, a handset, curly handset cord and a power adaptor supplied. It can be installed
and placed on the desktop or mounted on the wall. The wall mount accessory is available
separately. The figure below illustrates the front view of the IP3062D IP Phone. With the
point numbers, you can find its name and a simple description of specified part in the
following table.
o
P
1
P
o
t
e
1
6
2
1 3
10
9
11
1
2
16
15
14
5
7
4
8
3
Phon e b o o k
Headset
Page 14
Page 14
MOCET IP3062D Professional IP Phone with DECT Base Station User Guide
No Part Name Description
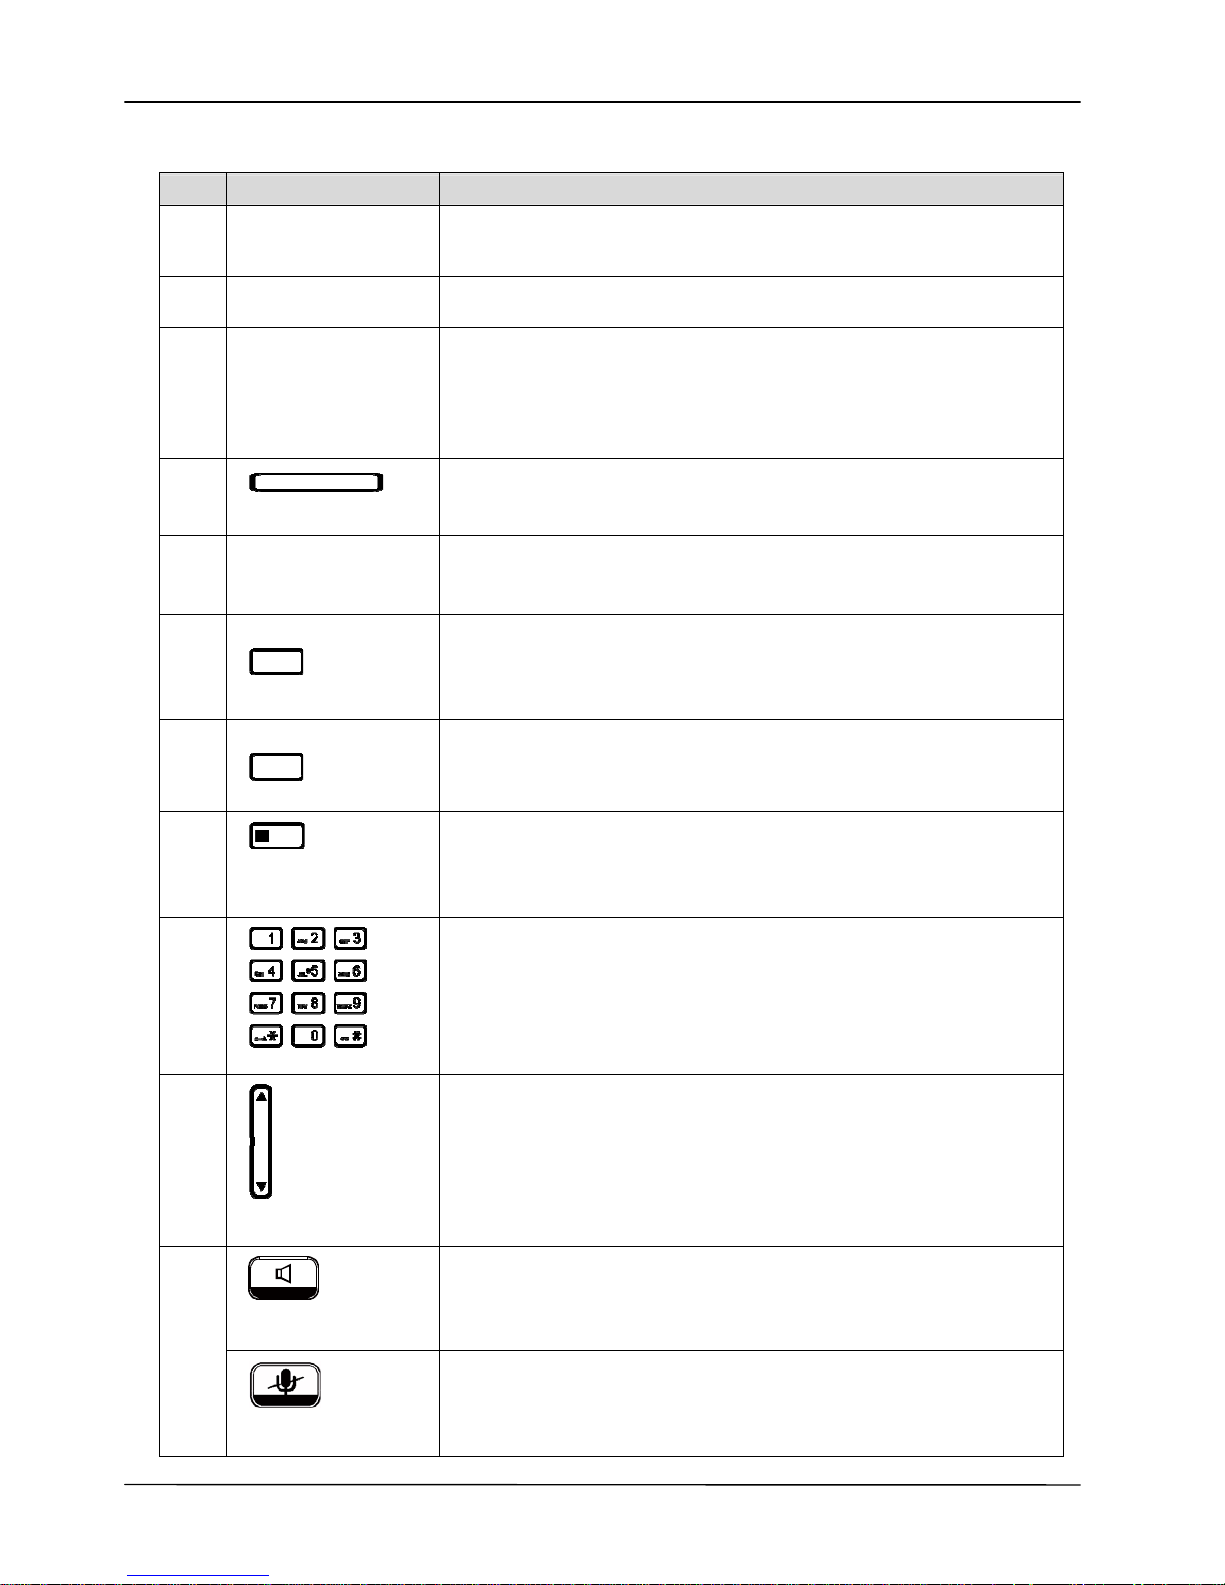
1
Hanger
The hanger can be pulled; it is reversed for wall-mount
installation.
2
Speaker
For ring and ha nds -free talking.
3
Hook switch &
Handset
bottom cradle
Under the cra dl e, a hook switch is used for handset hang-on and
hang-off detection.
The handset bottom cradle is for the placement of handset;
placing the handset o n the bottom cradle while on a call will e nd
the call.
4
Message LED
The message LED. Steady Blue means the phone is booting or
upgrading.
5
LCD Display
The LCD sc reen is used for d isplaying phon e’s settings , phone
number, call status and so forth.
6
Soft keys
Soft keys displayed on the LCD are used for item selection or
control. The various soft key functions depend on the current
activity on the ph on e as t hey ar e context-sensitiv e .
7
Line keys
Line keys are used for line selection. A blue LED is associated
with each key to indicate its line or call status.
8
Programmable
keys
Programmable keys can be used for indicating busy lamp field
(BLF) status of other phones, speed dial phone numbers, or for
activating features of a service or IP-PBX. A blue LED is
associated with each key to indicate its status.
9
Numeric keypad
[1], [2], …, [9], [*], [0], [#]: The numeric keypad for dialing
numbers.
10
Volume
Control key
The Volume Control key is used to set the loudness of the ringer,
handset and speakerphone functions. While the phone is in idle
state, the Ringer is adjustable. While in a call, the Handset or
Speaker volume is adjustable.
Speaker Phone
key
The SPKR key is used to activate or deactivate the hands-f ree
speaker. A blue LED is used to indicate whether the
speakerphone is active or not.
11
MUTE key
The MUTE key is used to activate or deactivate the
microphones on the IP3062D. A blue LED is used to indicate
whether the phone is muted or not.
Page 15
Page 15
MOCET IP3062D Professional IP Phone with DECT Base Station User Guide
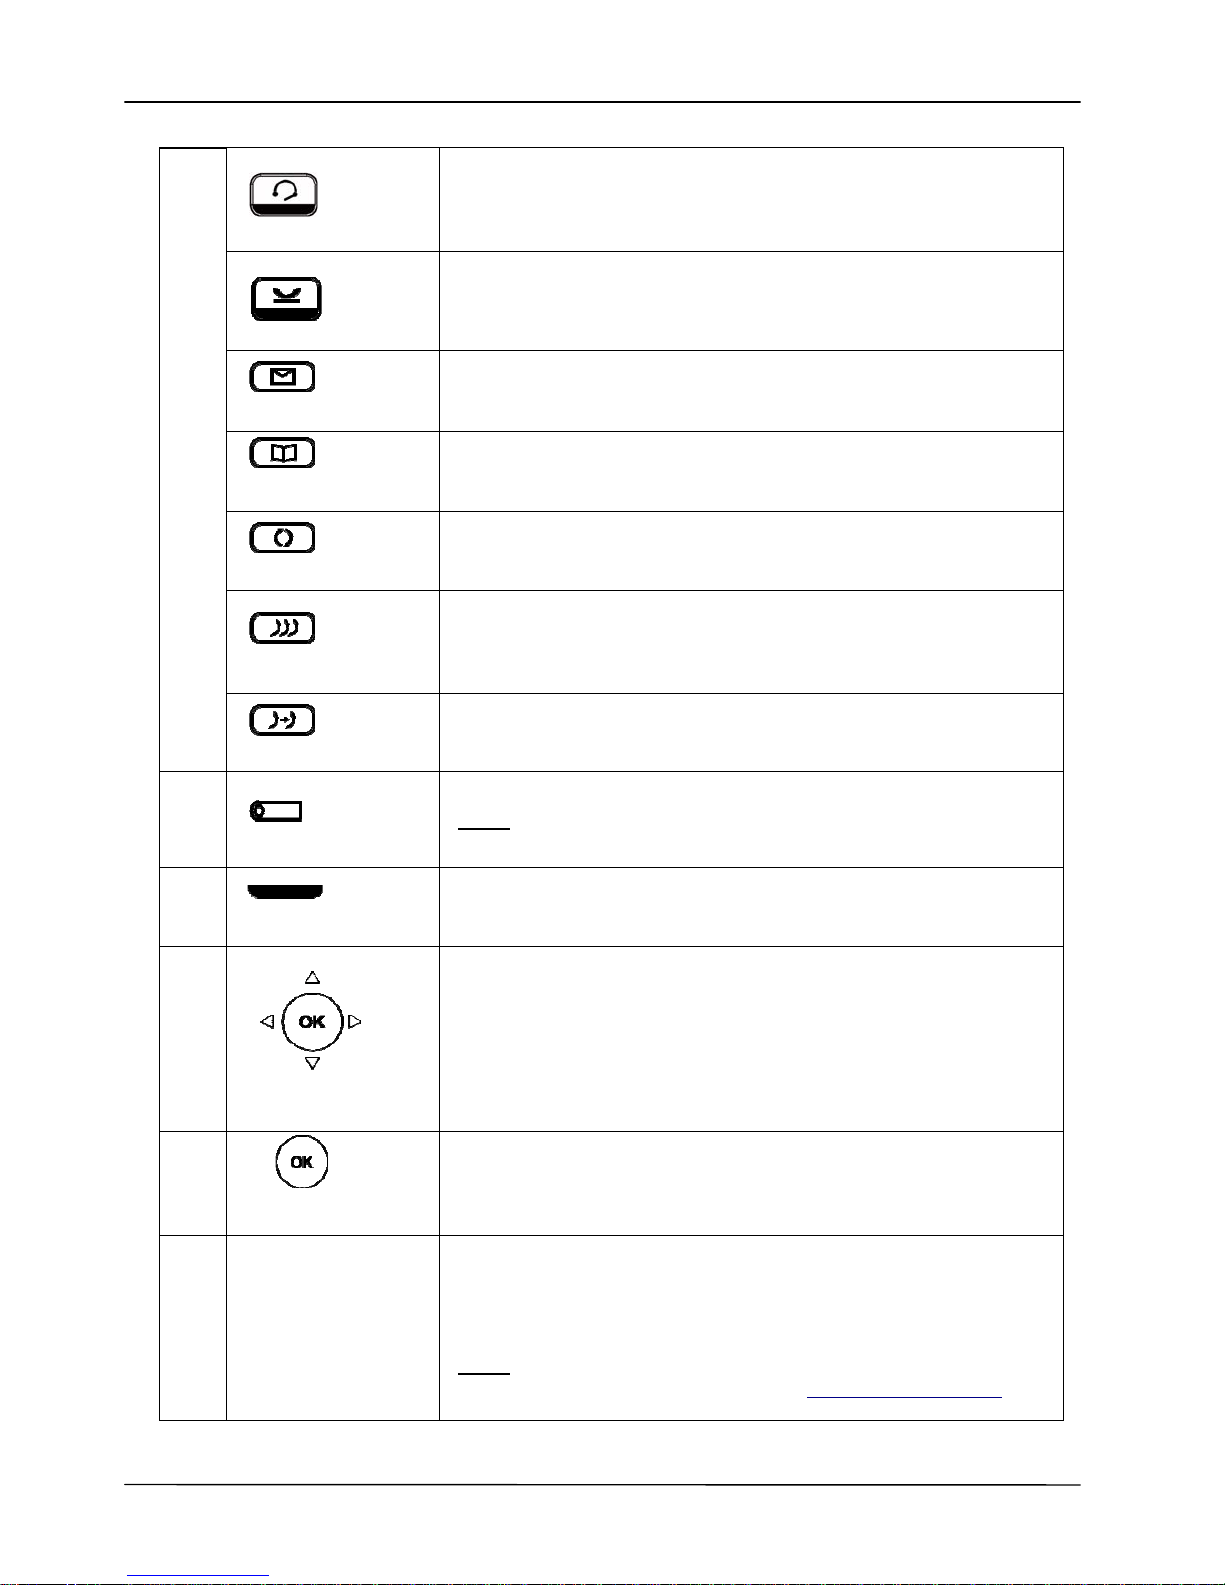
Headset key
The headset key is used to activate or deactivate the external
headset. A blue LED is lit to indicate active status.
Hold key
The Hold key is used to place the active call on hold. A blue
LED is used to indicate whether the call is on hold or not.
Message key
The Message key is used to enter into VM Messages list to
access the Voice Mail System for message retrieval.
Phonebook key
The Phonebook key is used to enter into the Phonebook menu
to cal l , add, edit or delete a contact in a selec ted phonebook.
Redial key
The Redial key is used to enter into the Dialed Record list to
dial the sele c te d num b er.
Conferen c e key
The Conference key is used to place multiple calls on the
phone into a conference on the phone. Up to 5 callers can be
join ed in a co nferen ce on the IP3062D.
Tran s f er key
The Transfer key is used to transfer a call to another IP phone.
12
Hands-free MIC
The Hands-free MIC.
Note: You can use a paperclip to pick up the programmable key
plate label (overlay) right here.
13
Handset LED
The Ha ndset LED is used to show the phone’s statu s.
14
Navigator Control
Keys
The Na vigatio n Contro l Keys are used for naviga ting the m enus
on the phone; me nu items are di splayed on the LCD scree n.
15
Navigator OK Key
The OK button is used to confirm and save a setting on the
phone or to dial a phone number.
16
Programmable
key plate label
The programmable key plate label is plastic. For best results,
we recommend using a fine permanent marker (such as Sharpie
brand) to write on it. It can be cleaned with industrial alcohol.
Note:
Custom templates and programming software for MOCET
phones are available from DESI (see, http://labels.desi.com
)
Page 16
Page 16
MOCET IP3062D Professional IP Phone with DECT Base Station User Guide
1.5 IP3062D Port Functions
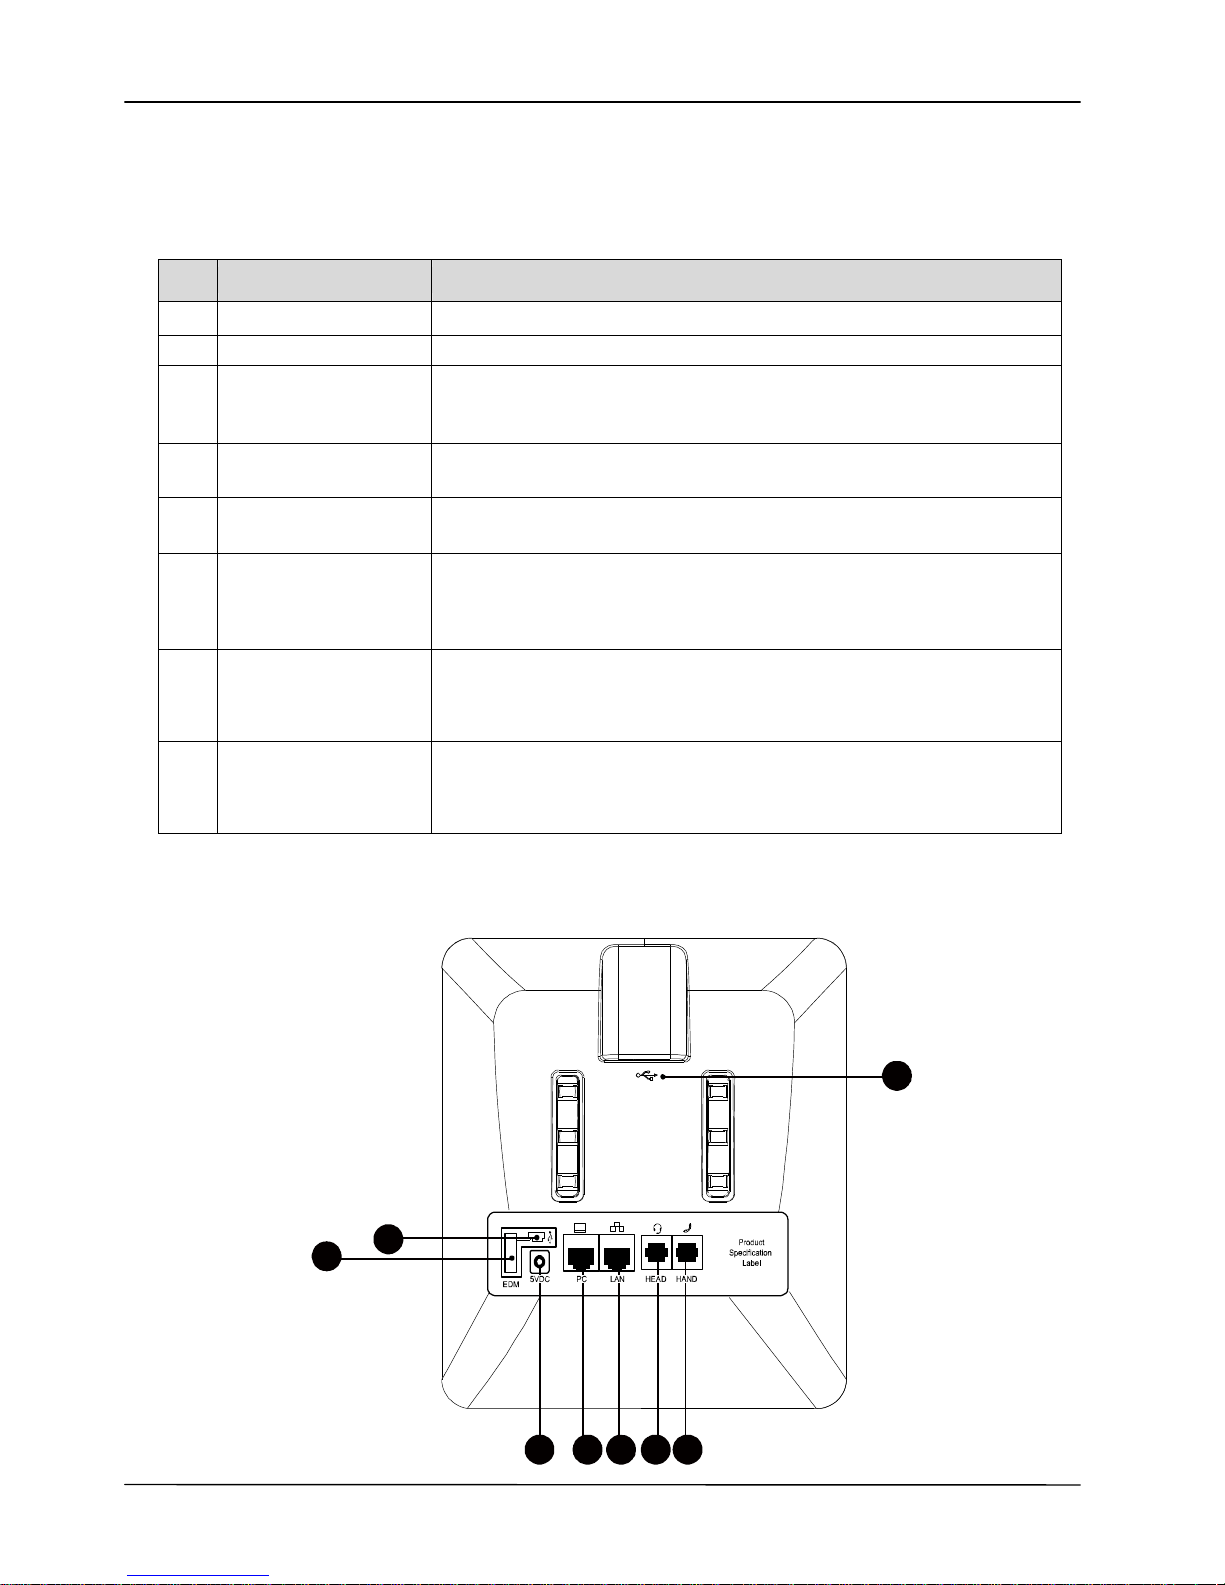
The back side view and the connectors of the IP3062D are as follows:
No Part Name Description
1 Handset Connector
RJ-9 jack for connecting handset cord.
2 Headset Connector
RJ-9 jack for connecting headset cord.
3 LAN Port
RJ-45 jack for the 100/10Mbps Ethernet port to connect the
phone to an IP network; this port can support power over
Ethernet (PoE) if the LAN switch provides it.
4 PC Port
RJ-45 jack for the 10 0/1 0Mbps Ethernet port to conn ec t a
computer.
5 Power Jack
If a power source from adaptor is required, please use the
standard power adapter supplied in the package.
6 EDM Port
SATA interface for attaching the Extended Dial Module (EDM)
accessory. Up to two EDM units can be supported on the
IP3062D. Please refer to IP-EDMX Quick User Guide for more
information.
7 USB Type A Port
USB 2.0 port with 5V/500mA power limitation; it can be used to
connect supported accessories including Wi-Fi adapters,
keyboards and memory devices.
8 USB Mini b Port
USB 2.0 port with 5V/200mA power limitation; it can be used to
connect supported accessories including Wi-Fi adapters,
keyboards and memory devices.
Their locations are shown in the figure below:
7
8
6
2 1345
Page 17
Page 17
MOCET IP3062D Professional IP Phone with DECT Base Station User Guide
1.6 IP3062D LED Functions
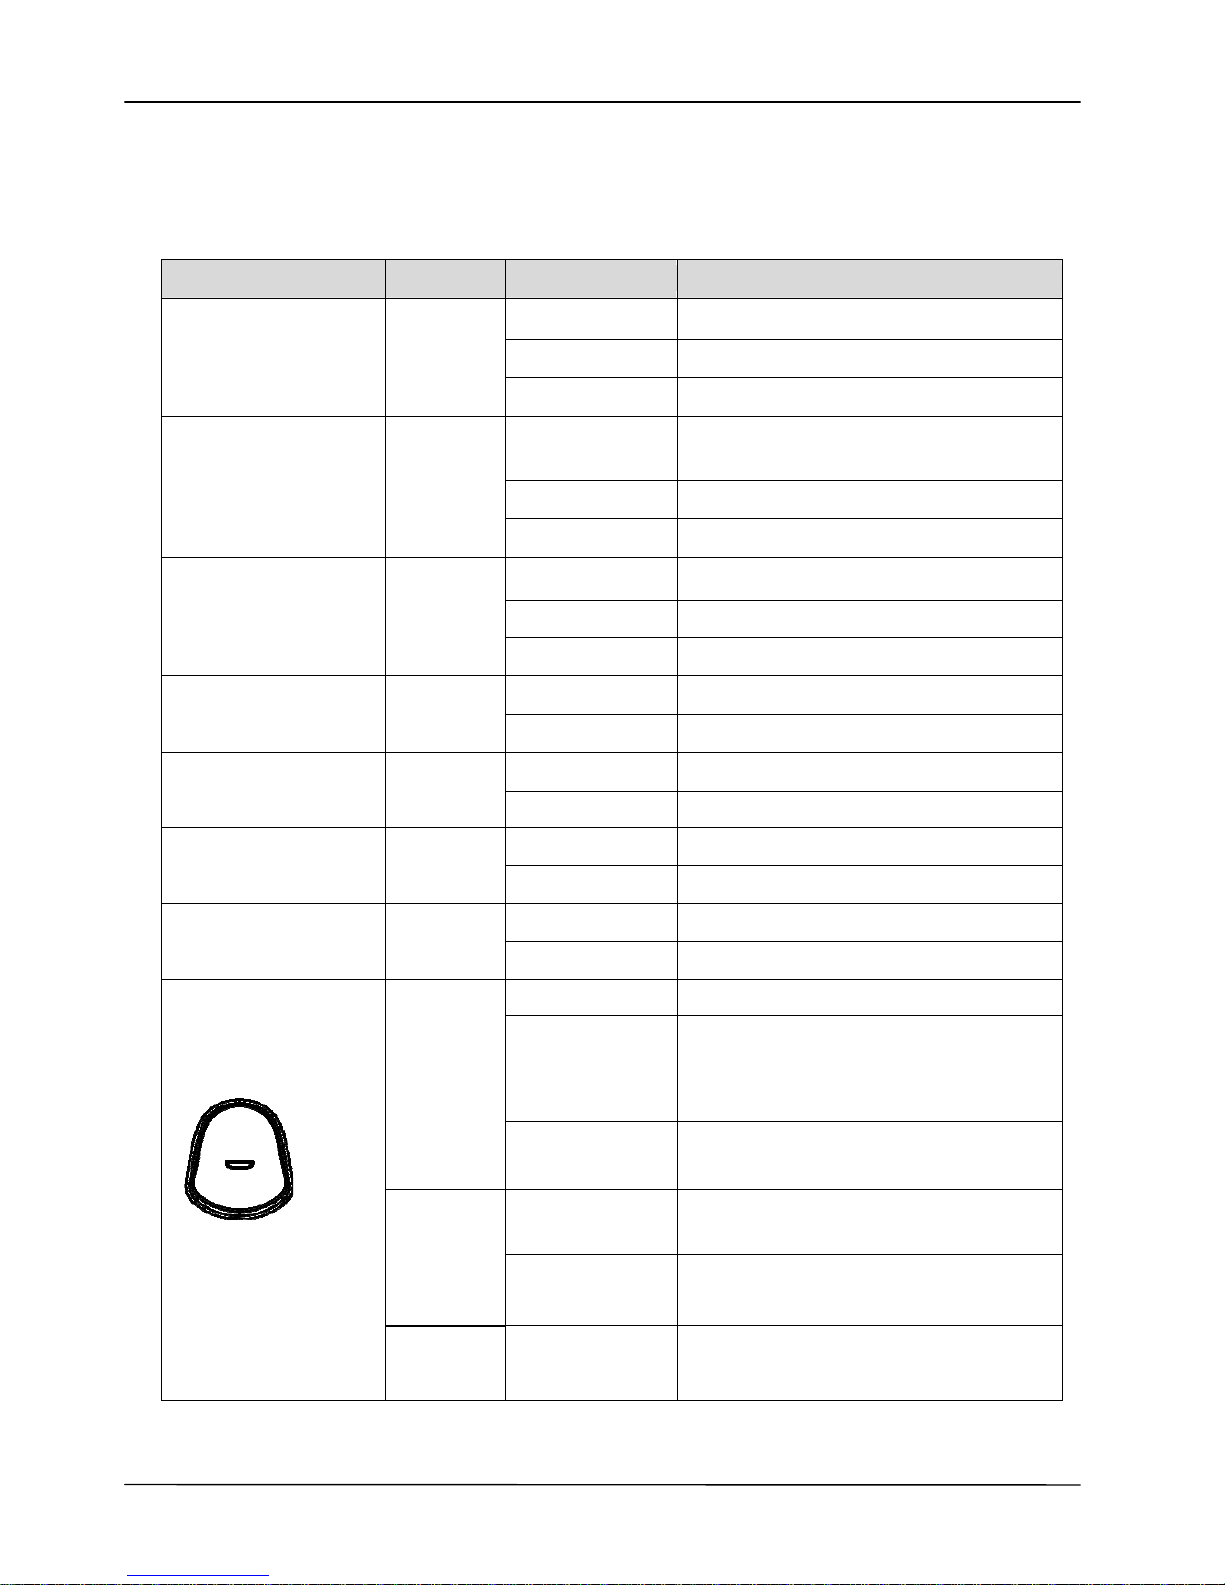
The following tabl e describes all functions of the LED indicators:
LED Color Status Description
Off No new me ssage(s).
Steady Phone is booting or upgrading.
Message LED
Blue
Blinking slow New message(s) indication.
Steady
Feature is set to “ON – Active”.
Or Phone is busy.
Blinking slow Incoming call notification.
Programmable LED
Blue
Off Feature is set “Off -inactive”.
Steady Line is active, dialing or in a call.
Blinking slow Call is on hold.
Line LED Blue
Flashin g faster Incoming c al l.
Off No call is on hold.
Hold LED Blue
Blinking slow Call is placed on hold.
Off Speakerphone is not in use.
Speakerphone LED Blue
Steady On-hook dialing or hands-free mode.
Off Microphone is active.
MUTE LED Blue
Steady Microphone is inactive.
Off Headset is not in use.
Headset LED Blue
Steady Headset is in use.
Steady The phone is bo oti n g.
Flashin g faster
The phone is up gr a di ng or ur g ent
call ringing; urgent call feature not
available on all phone systems.
Red
Blinking slow
Link failure, SIP account expiration, or
SIP Server not responding.
Steady
The phone is in a normal idle state,
or is during a call with G.722 codec.
Blue
Blinking slow
A normal incoming call with wideband
G.722 codec notification.
Handset LED
Purple
Flashing faster
The phone is during DECT handset
registration or deregistration.
Page 18
Page 18
MOCET IP3062D Professional IP Phone with DECT Base Station User Guide
1.7 LCD Screen Indicators
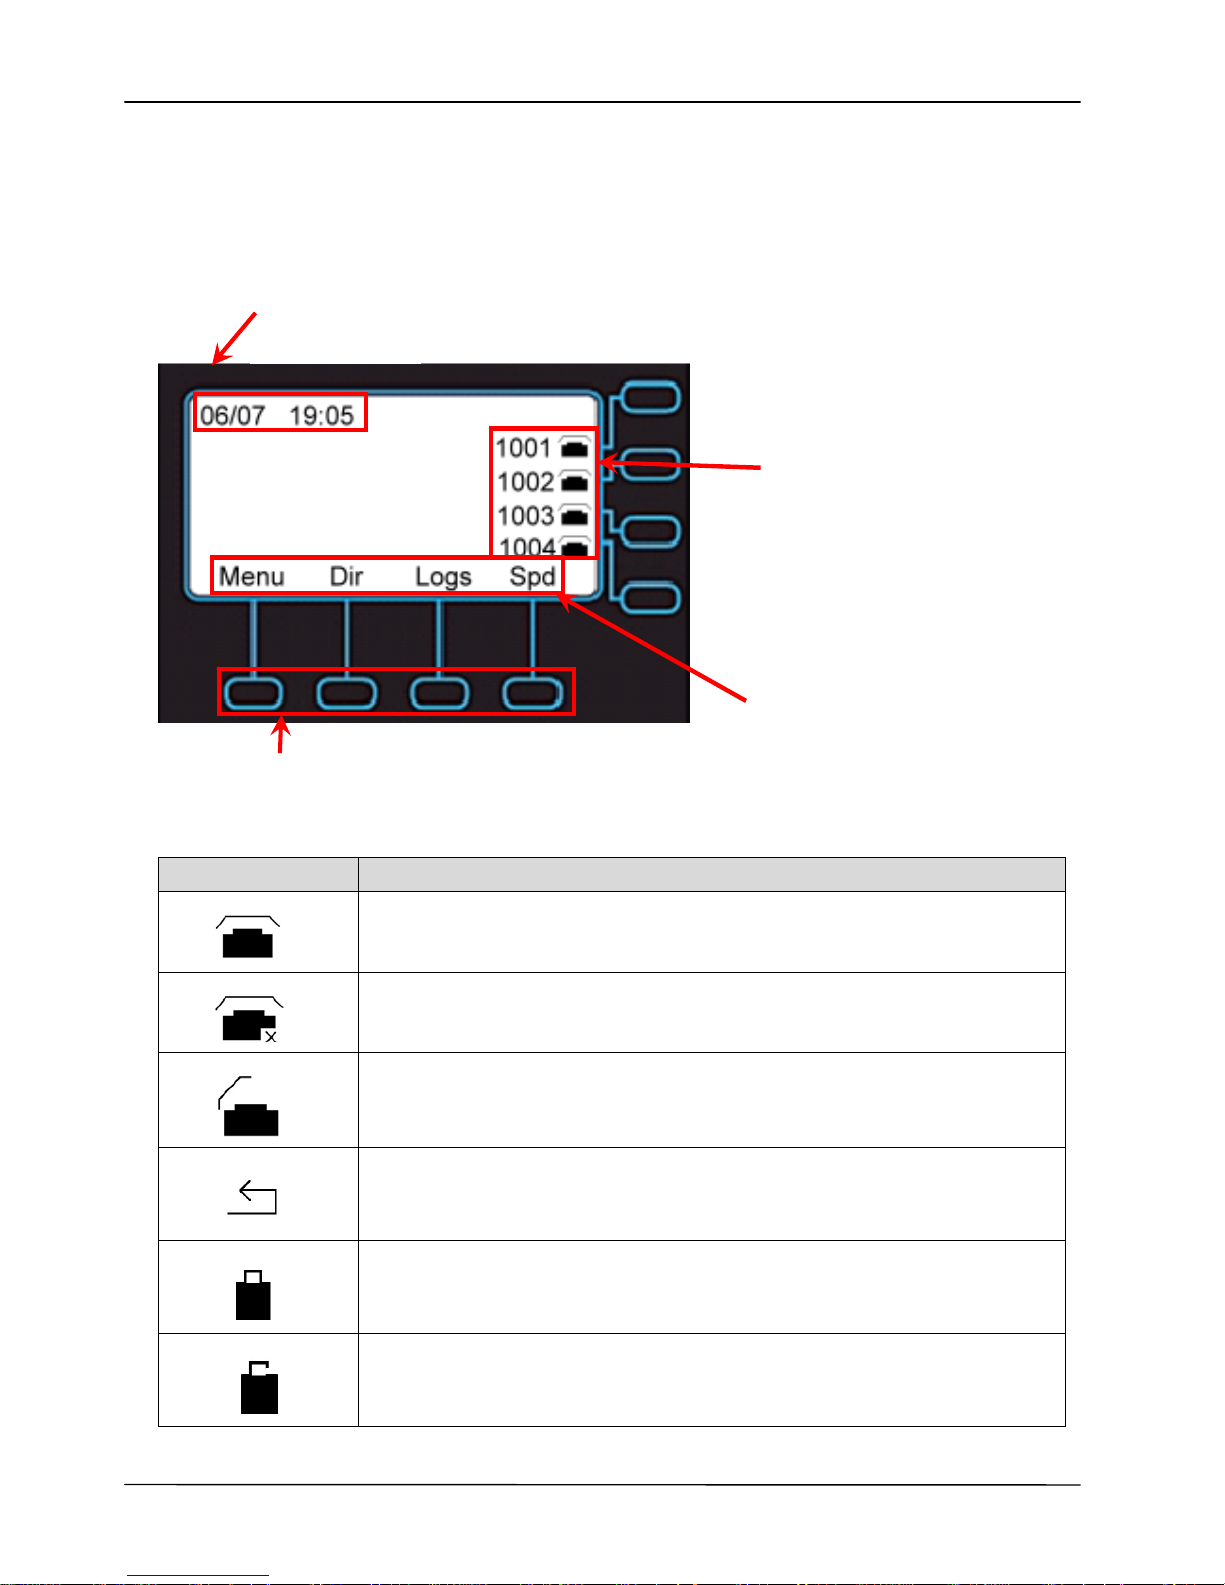
The following figure shows the standard display of the LCD. There are four soft keys
associated with the operation of LCD display. For different menu or status items, the
display items will change accordingly.
Soft-key menu
Line Status Icon Description
The line is registered to the SIP server or service.
The line is not registered to the SIP server or service.
The line is registered to the SIP server or service and is in use.
The line is set for “Call Forwarding” to the configured number.
The line is enabled both of “SIPs” and “S RTP”.
The line is enabled “SIPs” or “SRTP”.
Line status &
Phone numbers indicator
Soft-key buttons
Date & Time
Page 19
Page 19
MOCET IP3062D Professional IP Phone with DECT Base Station User Guide
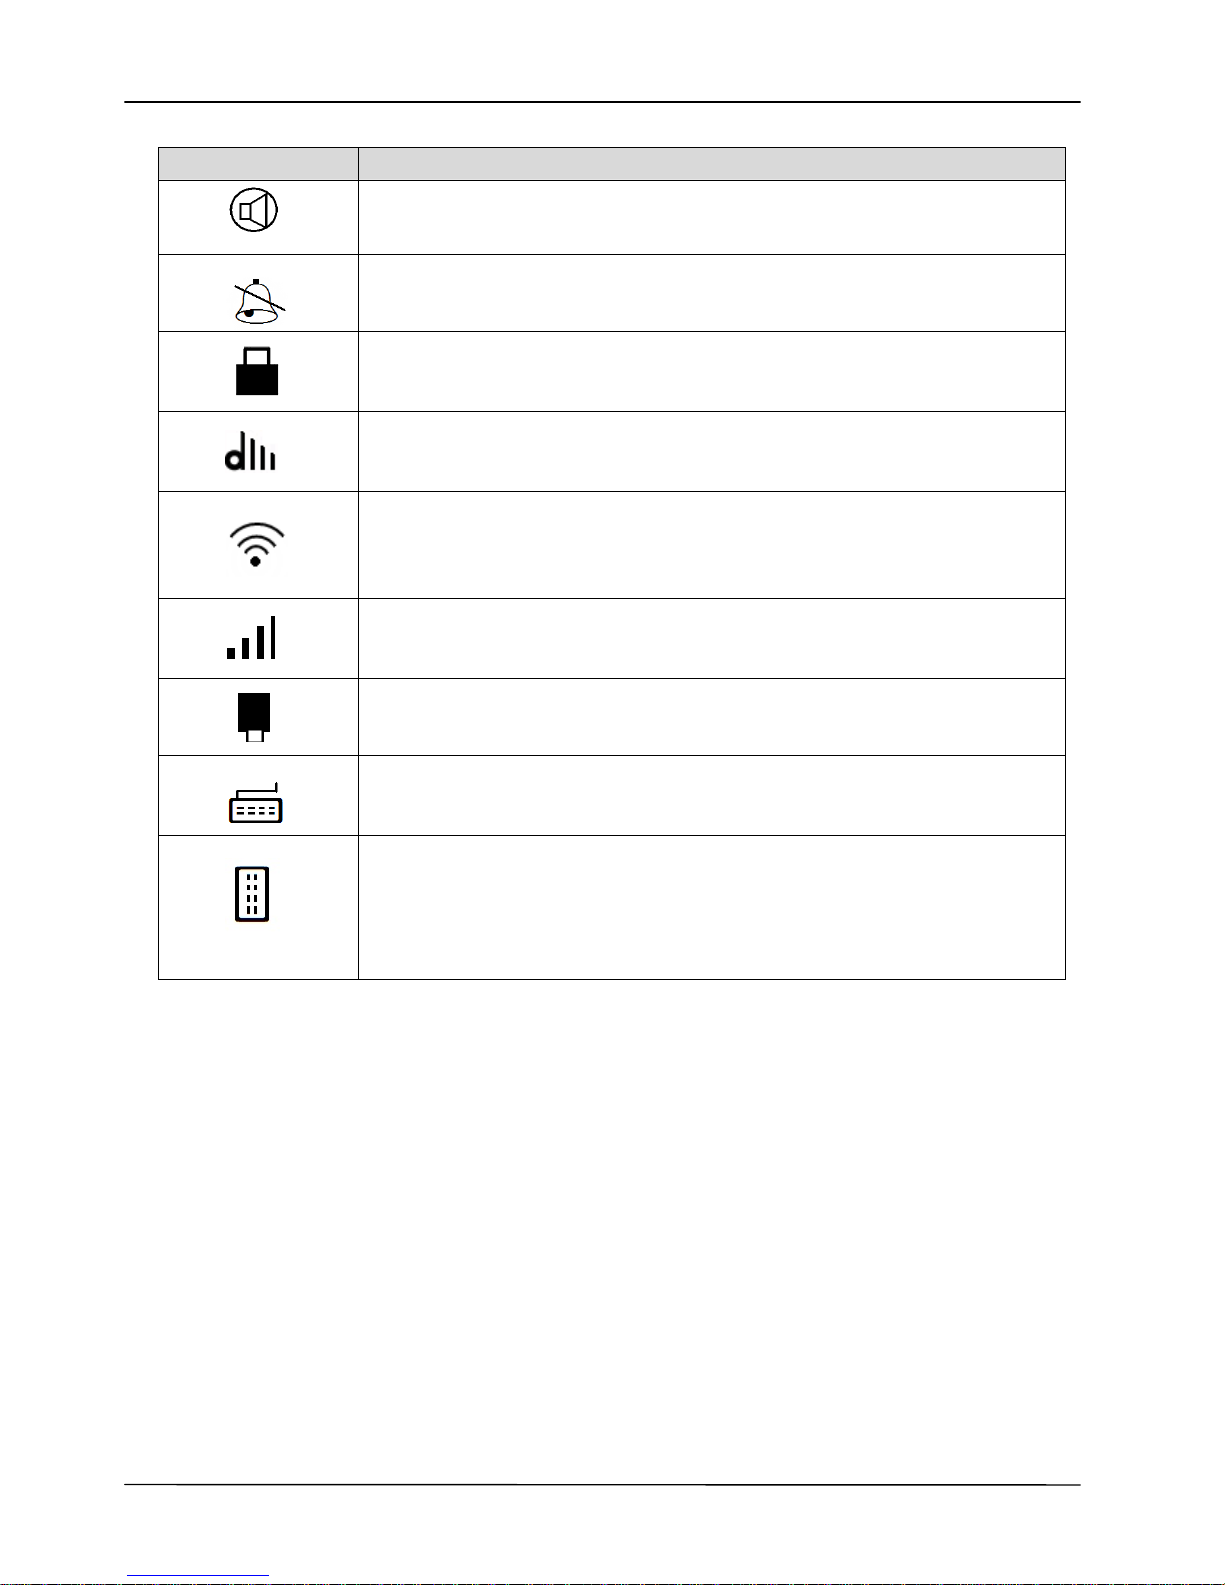
Screen Icon Description
IP3062D is on “Auto Answer” mode.
IP3062D is on “Do Not Disturb” mode.
IP3062D is enabled “Phone Locked”.
IP3062D is during DECT handset registration or is registered ready by
DECT handset(s).
IP3062D is co nnecting with an USB Wi-Fi dongle.
To use Wi-Fi network connection, you need to use a specified USB
Wi-Fi dongle. Please contact your distr ibutor for purchasi ng .
The Wi-Fi signal strength of IP3062D which is connecting to Wi-Fi network.
IP3062 D is connecting w ith an USB memory dongle.
IP3062D is connecting with an USB keyboard.
IP3062D is connecting with IP-EDMX.
Each IP-EDMX can provide 24 programmable keys. To use over 16
programmable keys that IP3062D supports, you will need to have an
IP-EDMX to expand. Please contact your distributor for purchasing.
Page 20
Page 20
MOCET IP3062D Professional IP Phone with DECT Base Station User Guide
2 Getting Started
2.1 Customizing Your IP Phone from Menu
You can customize your IP phone by adjusting the settings incl uding display contrast, ri ng
type, device volume adjustment, call settings, and add, edit or delete contacts in the
phonebooks of the IP3062D using the on-screen menus, buttons and navigation keys.
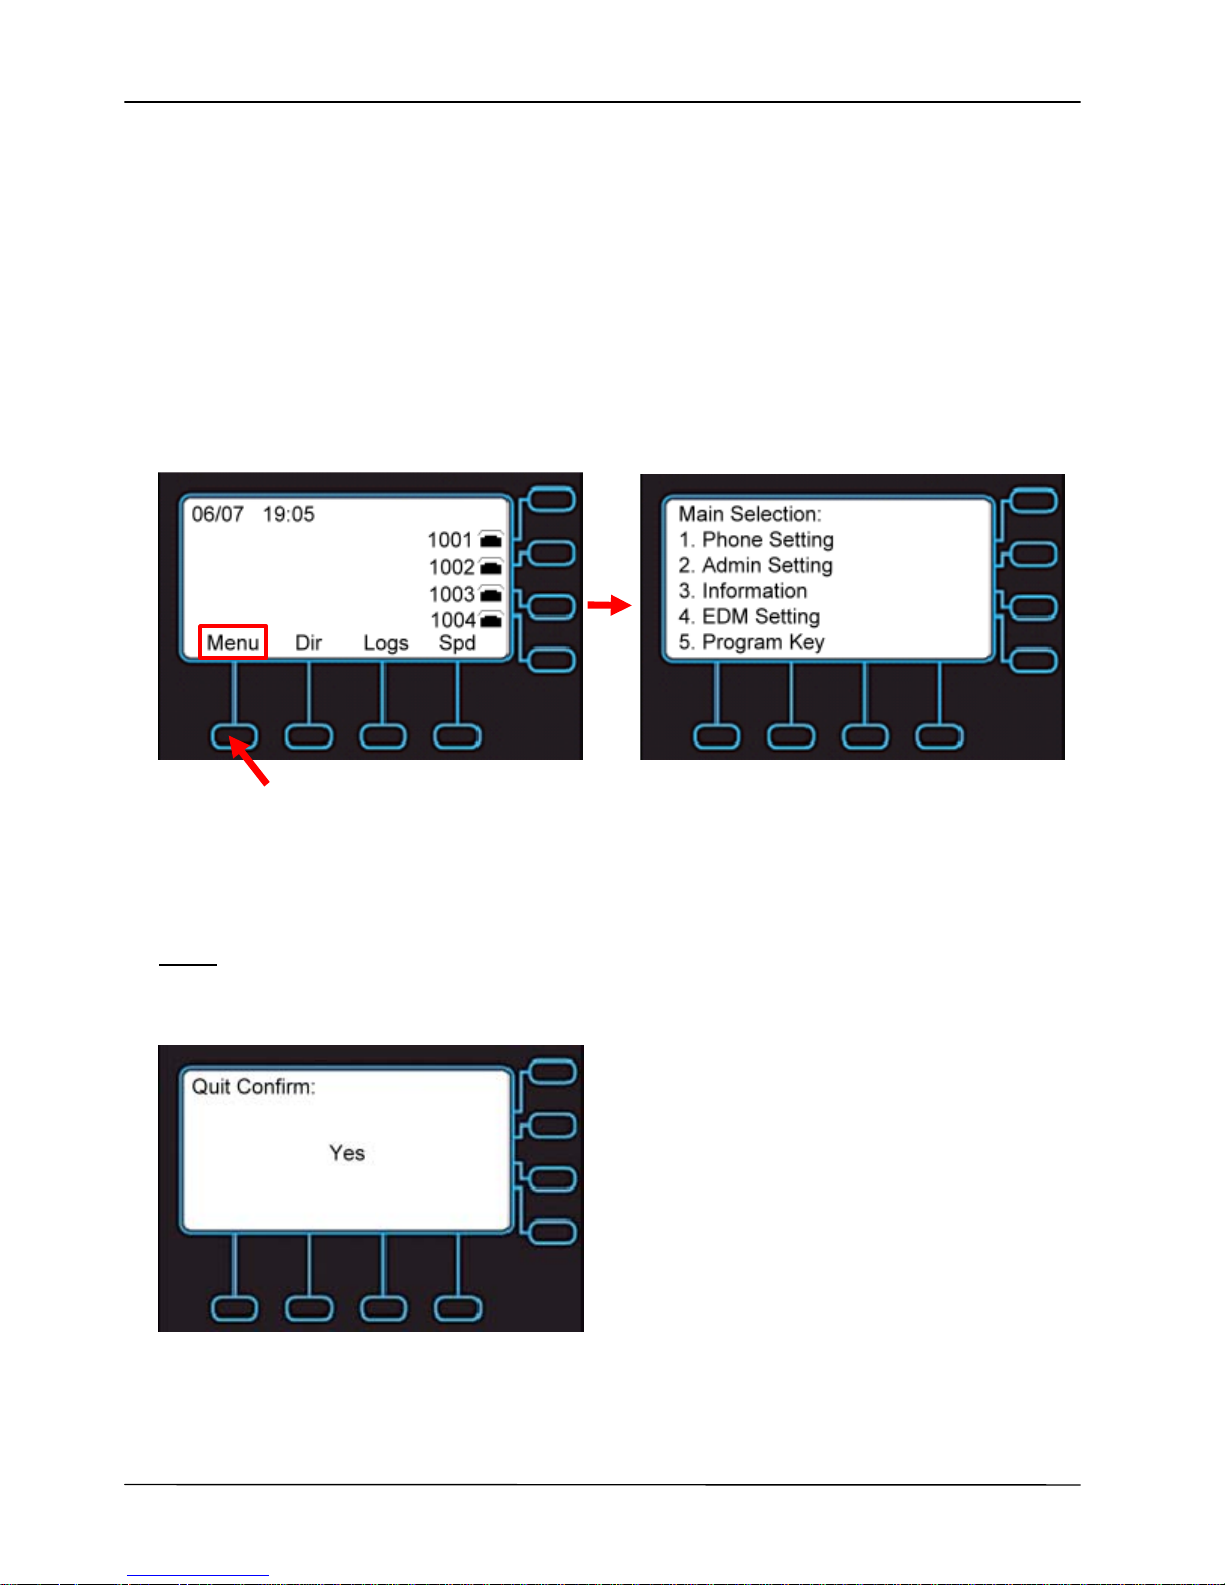
To configure your IP Phone from the menu, you can press Menu soft-key under the LCD
screen.
Press this key
You can navigate through the menu with the navigation keys. The followi ng sections will
describe how you can setup your IP Phone through this menu. If you require additional
information or assistance with your new phone, contact your system administrator.
Note:
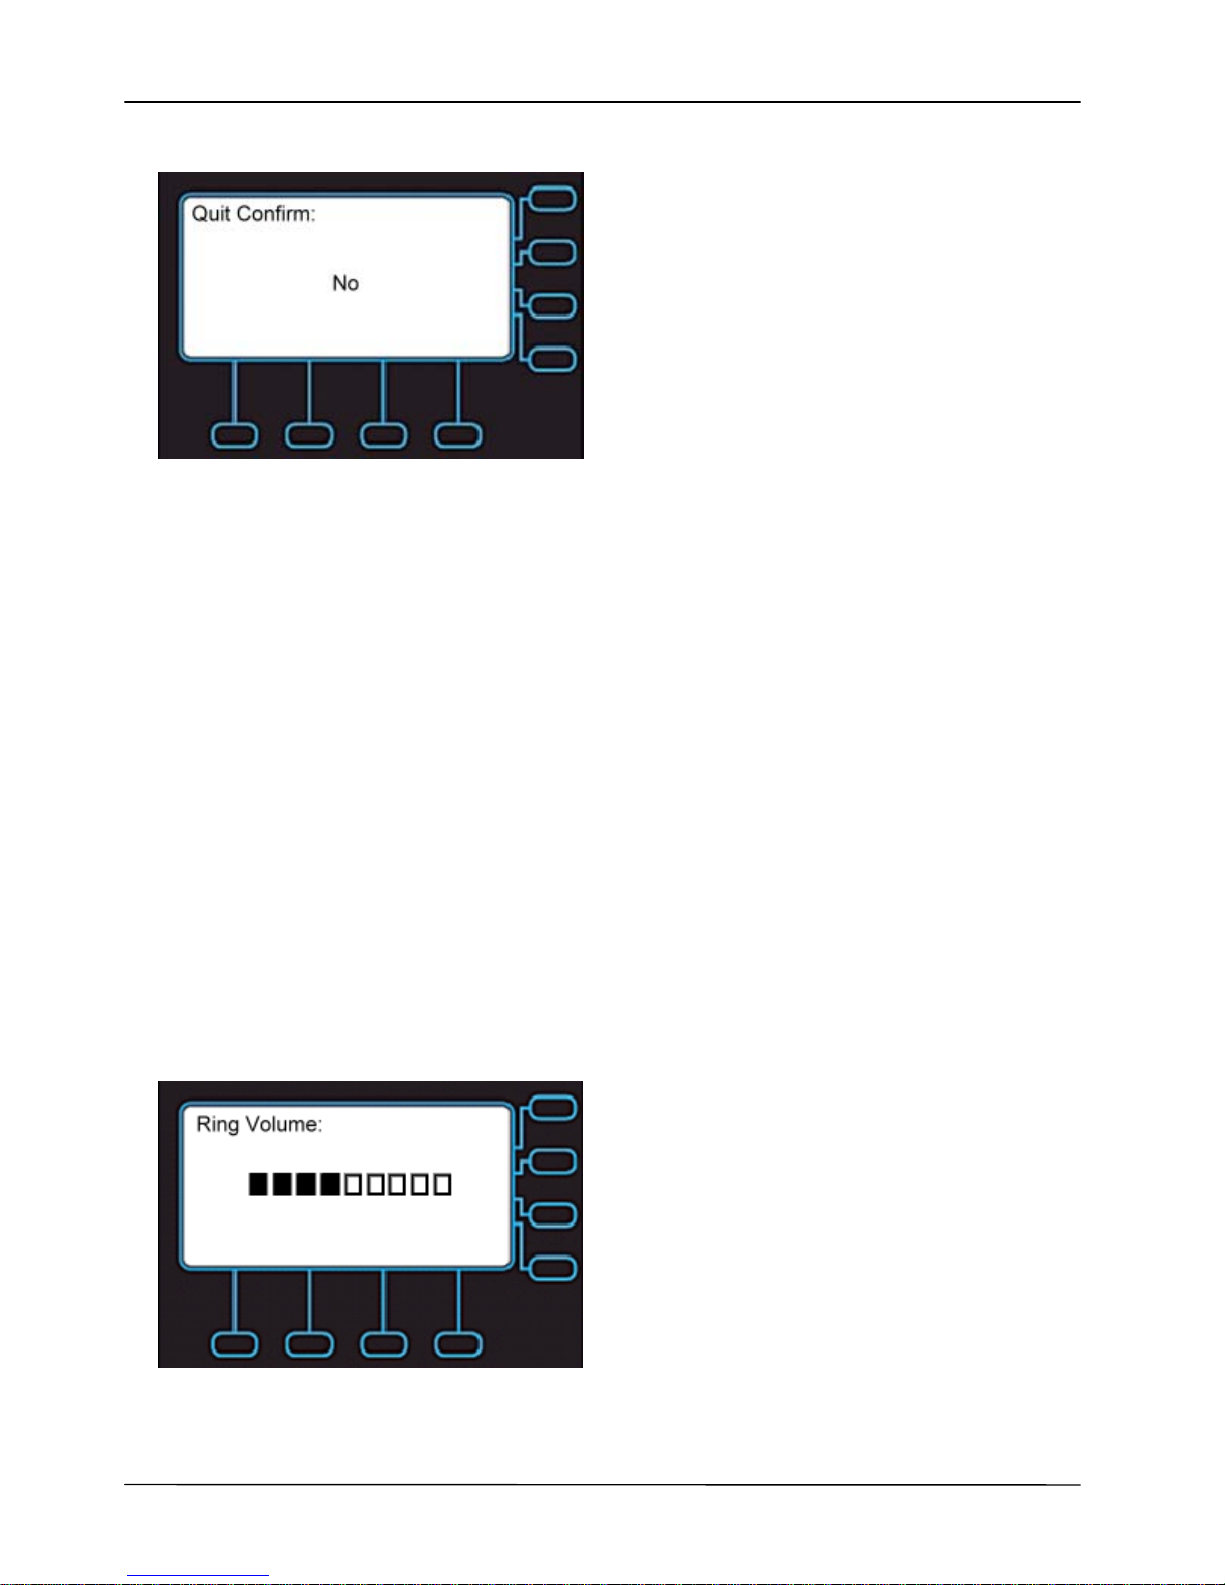
changes to the phone setti ngs will only become active after you exi t from the menu
and confirm the changes. The LCD will show the following screen to let you confirm your
changes and exit the menu.
If you press Navigation OK, phone will save the settings.
If you press Navigation Up and Down, phone will change the screen to the following
screen:
Page 21
Page 21
MOCET IP3062D Professional IP Phone with DECT Base Station User Guide
You will exit the screen and can continue to configure your phone.
2.2 Configuring Basic Settings
2.2.1 Volume Setting
You can configure following volume settings:
Ring Volume
Handset Speaker
Hands-free Speaker
Headset Speaker
Handset MIC
Hands-free MIC
Headset MIC
To configure volume:
1. Press “Menu”.
2. Select Phone Sett ing > Volume Setting. And select which device volume you want
to set.
3. Select from Ring Volume, Handset Speaker, Hands-free Speaker, Headset Speaker,
Handset MIC, Hands-free MIC, Headset MIC.
4. Use the Navigation Up and Down or Volume Up and Down keys to change the
volume levels.
5. Press the Navigation OK key to confirm the change and exit volume change screen.
Page 22
Page 22
MOCET IP3062D Professional IP Phone with DECT Base Station User Guide
2.2.2 LCD Brightness
To configure the brightness of the LCD to a comfortable level:
1. Press “Menu”.
2. Select Phone Setting > Backlight > Brightness.
3. Press Navigation Up and Down keys to increase or decrease the display brightness.
4. Press the Navigation OK key to confirm the changes and exit the menu.
2.2.3 LCD Contrast
To configure the contrast of the LCD to a comfortable level:
1. Press “Menu”.
2. Select Phone Setting > Contrast.
3. Press Navigation UP and Navigation Down keys to increase or decrease the display
contrast.
4. Press Navigation OK key to confirm the changes and exit the menu.
2.2.4 Call Setting
You can configure following call features:
Do Not Disturb (DND)
Auto Answer
Call Waiting
To configure those features:
1. Press “Menu”.
2. Select the Phone Setting > Call Setting: then select which feature you want to
change.
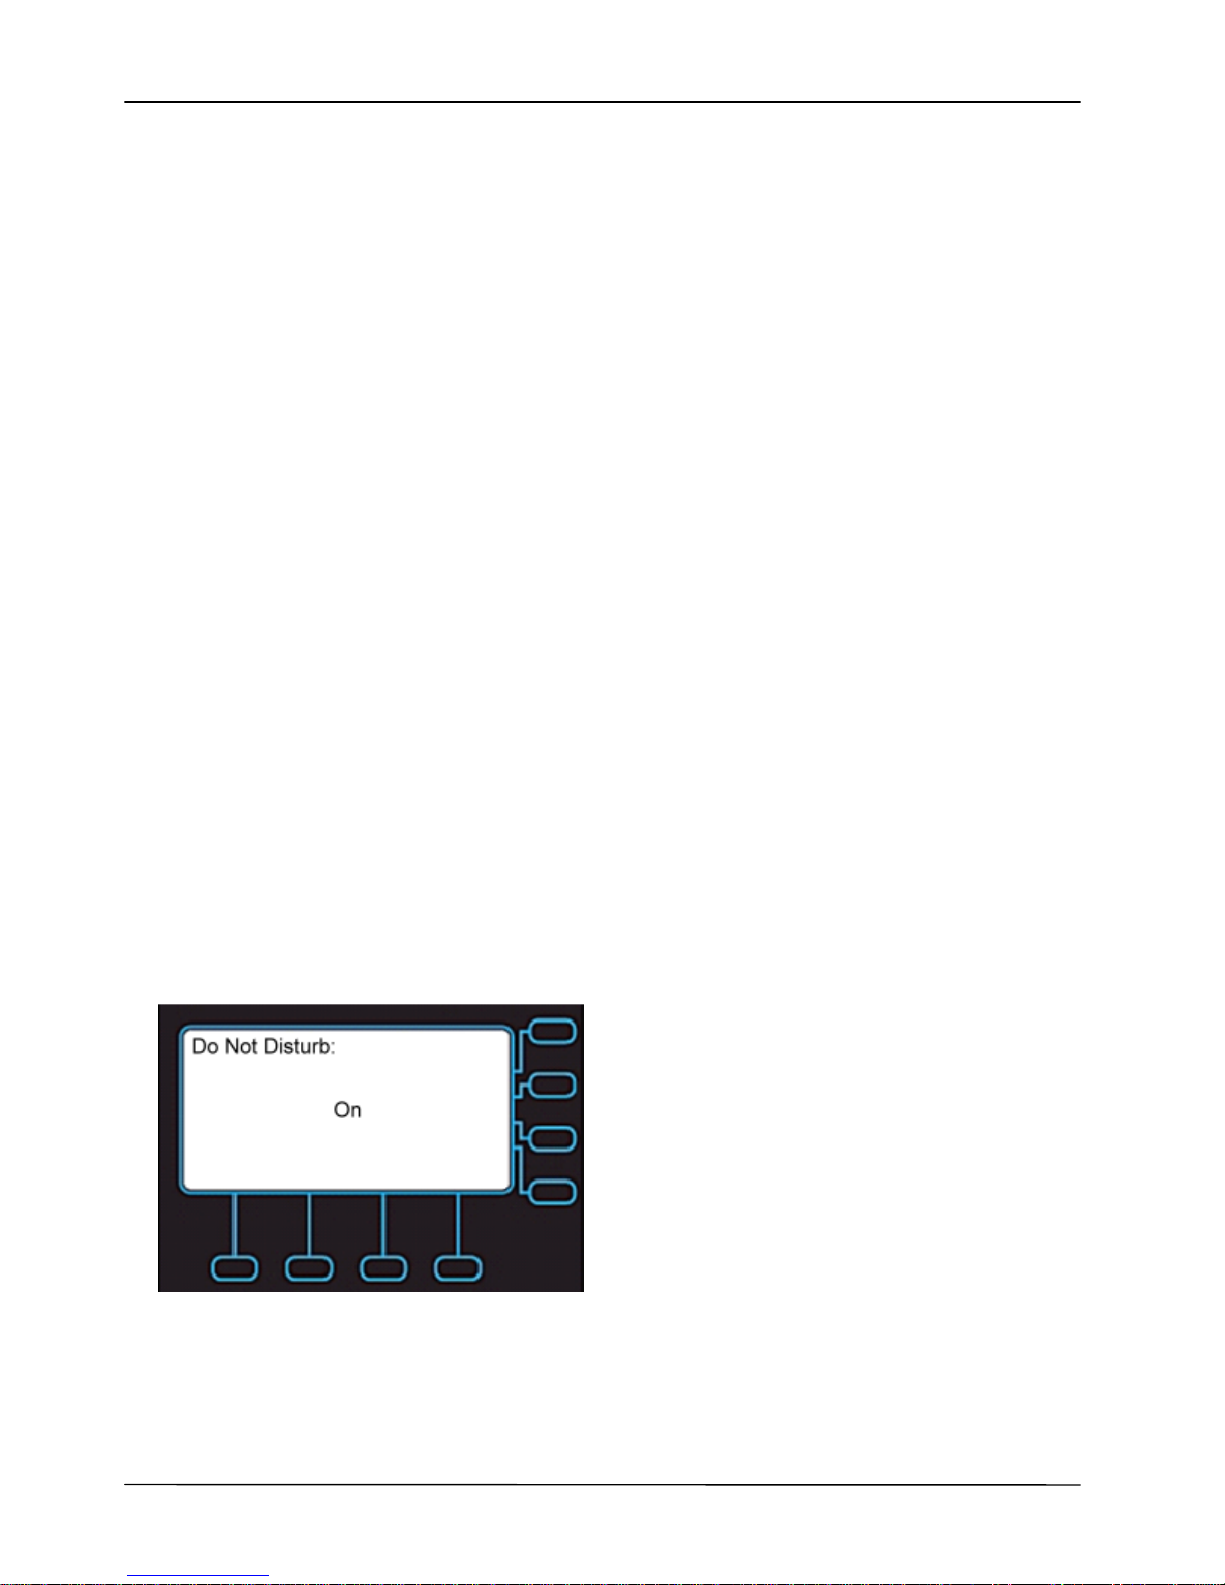
3. Select from DND, Auto Answer, or Call Waiting. Following screen is DND setting
screen.
4. Use the Navigation Up and Down keys to select On or Off.
5. Press the Navigation OK key to confirm the changes and exit the menu.
2.2.5 Lock Your Phone
Page 23
Page 23
MOCET IP3062D Professional IP Phone with DECT Base Station User Guide
Sometimes you don’t want other people to use your IP Phone. You can l ock your phone
and configure a personal identification key (PIN) to unlock the phone.
To lock your phone:
1. Press “Menu”.
2. Select Phone Setting > Phone Lock .
3. Press the Navigation Up and Down keys to select On or Off.
4. Press Navigation OK key to confirm the change and exit the menu.
5. You will see your phone is locked.
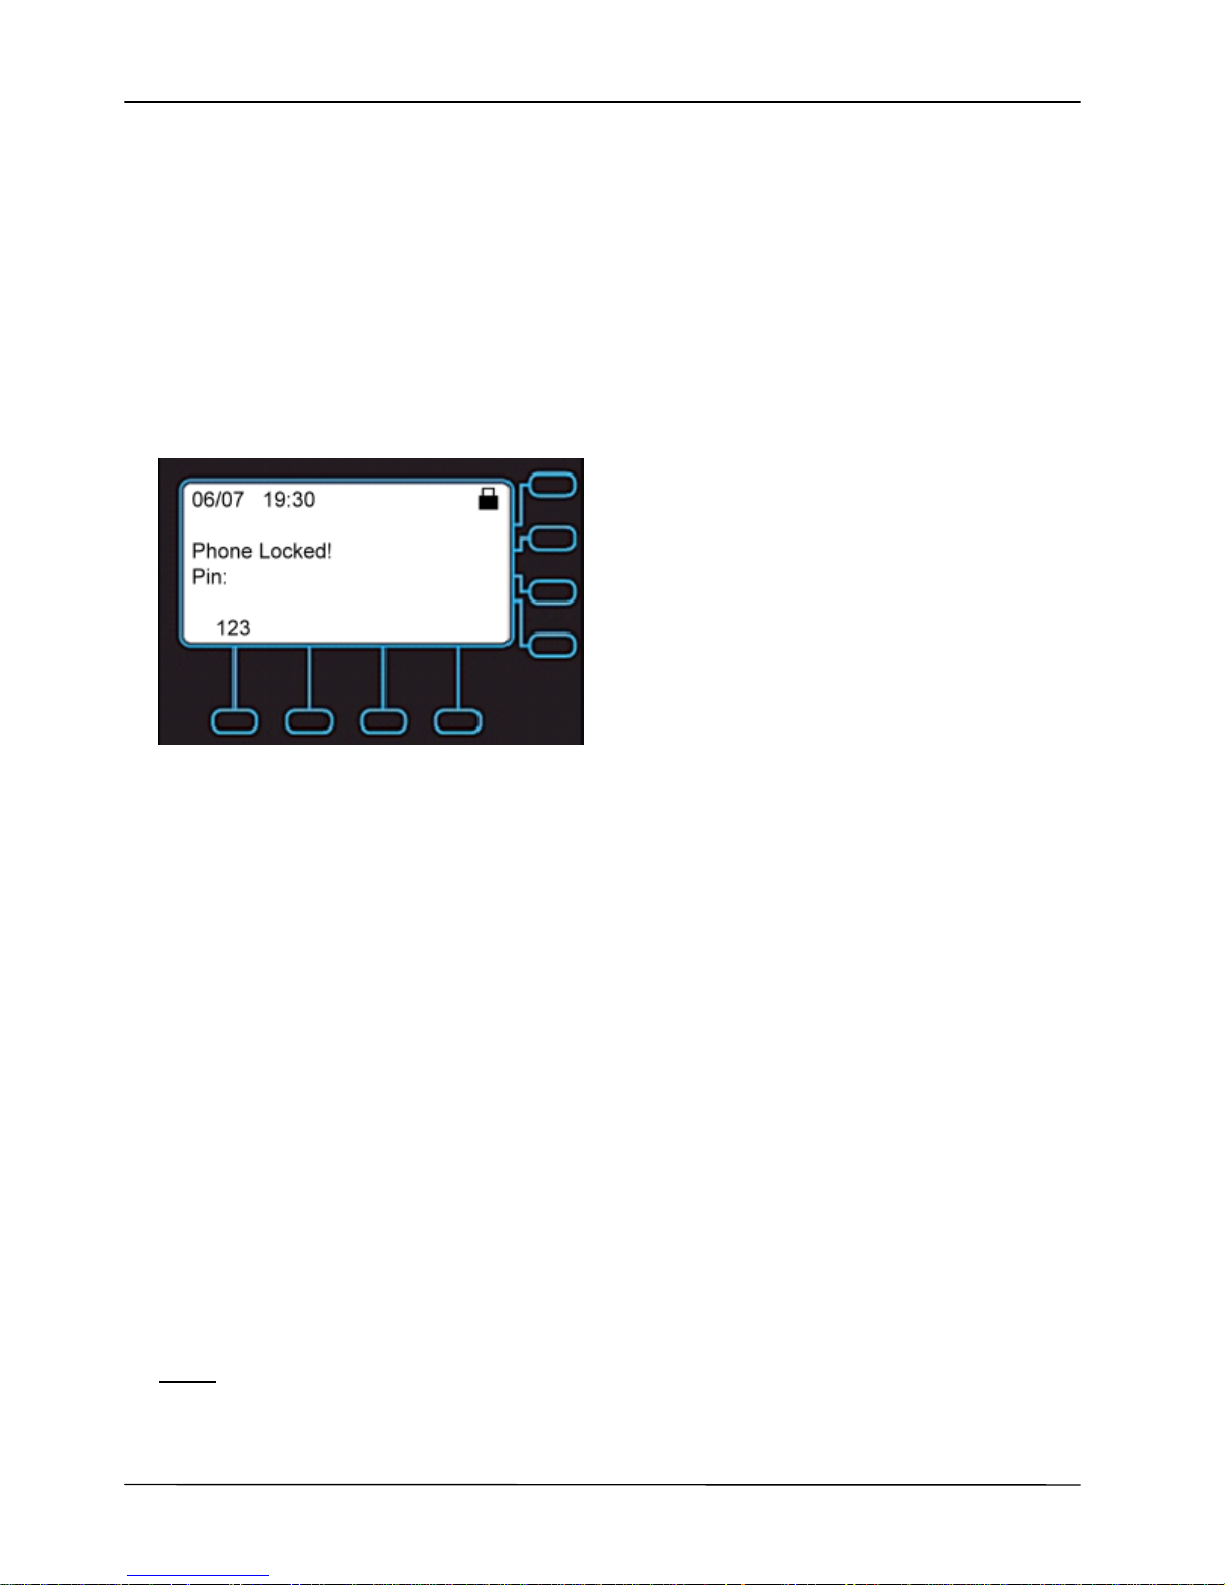
Following is a locked phone screen.
2.2.6 Speed Dialing Setting
The Speed Dialing feature let you store up to 10 phone numbers that you can access
easily using a single di git Speed Dial number from 0 to 9.
To configure a speed dial number:
1. Press the “Spd” sofk-key below the LCD screen, or Press Menu > Phone Setting
> Speed Dialing.
2. Select the speed dial number to configure (from 0 to 9). And press the Navigation
OK or “Edit” soft-key to edit the setting, and enter the phone number.
3. Press the Navigation OK key to confirm the changes and exit the menu.
2.2.7 Reboot Your phone
Sometimes you will need to reboot your phone to apply new settings.
To reboot your phone:
1. Press “Menu”.
2. Use the Navigation Up and Down keys to select Reboot.
3. Press Navigation OK to reboot your phone. Phone will show a “Reboot” message
and the phone will re start.
Note: the IP3062D takes about 2 minutes to startup after rebooting; there will be a series
of diagnostic lights on the phone during the process. If your phone does not become
operational within 2 minutes, contact your administrator or Service Provider support line.
Page 24
Page 24
MOCET IP3062D Professional IP Phone with DECT Base Station User Guide
2.3 Managing Contacts
The IP3062D supports four different contact lists:
All Contacts
LDAP Directory
Public Contacts
Private Contacts
You can store up to 100 Private Contacts in your phone’s directory, and you can add, edit,
delete, dial, or search for a contact in this directory.
Public Contacts are provided for you by the ad ministrator or Service Provider. They can
be viewed, and used, but not changed or del eted. For more information, please contact
your administrator or Service Provider.
The IP3062D can also access a local or remote LDAP Directory. Please contact your
administrator or Service Provider for more information on how to enable, configure or
access this feature.
The All Contacts lets you search and dial a contact from all the configured contacts
databases.
There are three ways to enter your phone’s directory:
Press the “Phonebook” hot key.
Press “Dir” soft-key.
Navigate to Menu > Phone Se tting > Phonebook.
2.3.1 Adding Contacts
To add a new contact:
1. Go to the Phonebook > Private.
2. Press the “Add” soft-key.
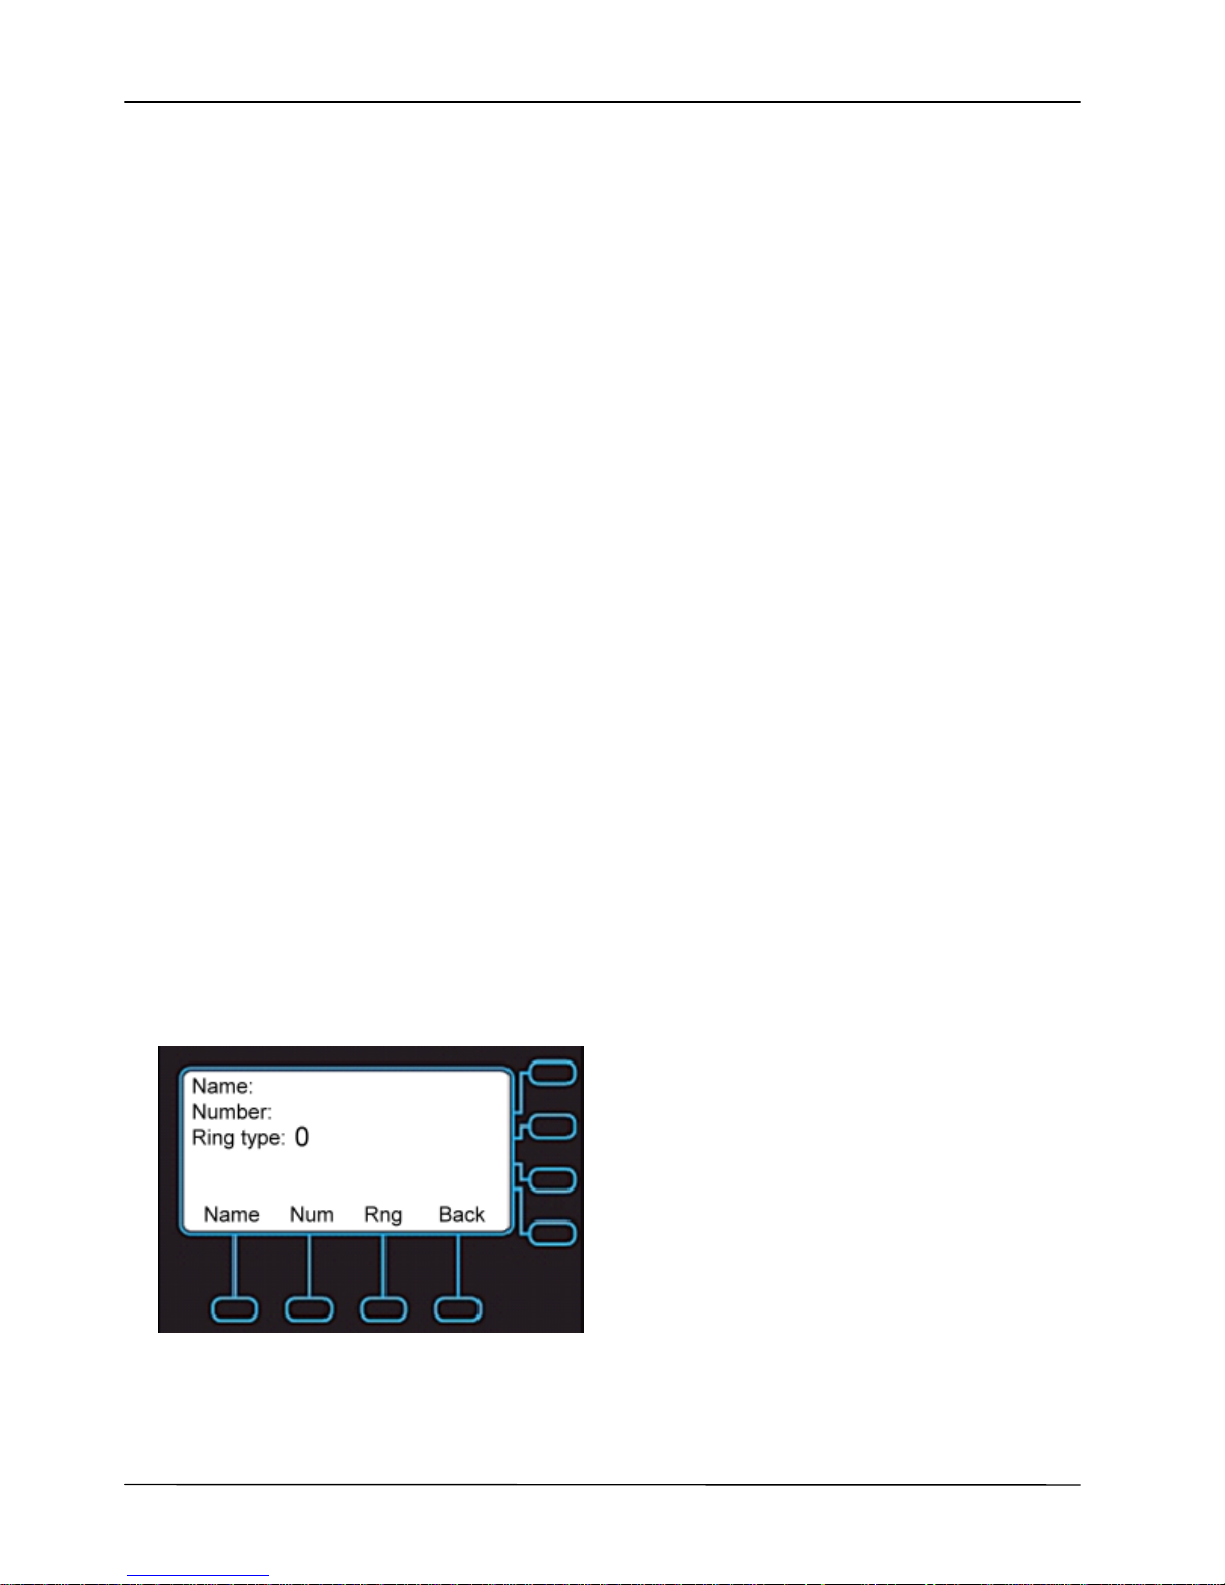
3. Enter “Name”, ”Number”, and ”Ring type”, from the key pad.
4. Press the “Save” soft-key when you are finished.
2.3.2 Editing Contacts
Page 25
Page 25
MOCET IP3062D Professional IP Phone with DECT Base Station User Guide
To edit your contact:
1. Use the Navigation Up and Down keys to select the contact your want to edit.
2. Press the “Edit” soft-key.
3. Use the Navigation Up and Down keys to select the fields you want to change.
4. When finished making changes, press the “Save” soft-key to save the changes.
2.3.3 Deleting Contacts
To delete your contact:
1. Use the Navigation Up and Down keys to select the contact your want to delete.
2. Press “Del” soft-key.
3. The contact is deleted from the directory.
2.3.4 Searching for a Contact
To search for a particular contact:
1. Go to Phonebook > Private.
2. Press the “Search” soft-key.
3. Input the first character of the contact’s name and the IP3062D will move to the first
contact matching the character.
4. Using the Navigation Up and Down keys, choose the desired contact.
2.3.5 Placing a Call to a Contact
To dial from a directory:
1. Navigate to a contact (private, public or LDAP).
2. Press the “Dial” soft-key.
3. The phone will dial the number selected.
2.4 Managing Call Logs
In the IP3062D, there are three call log types:
Dialed Calls
Missed Calls
Answered Calls
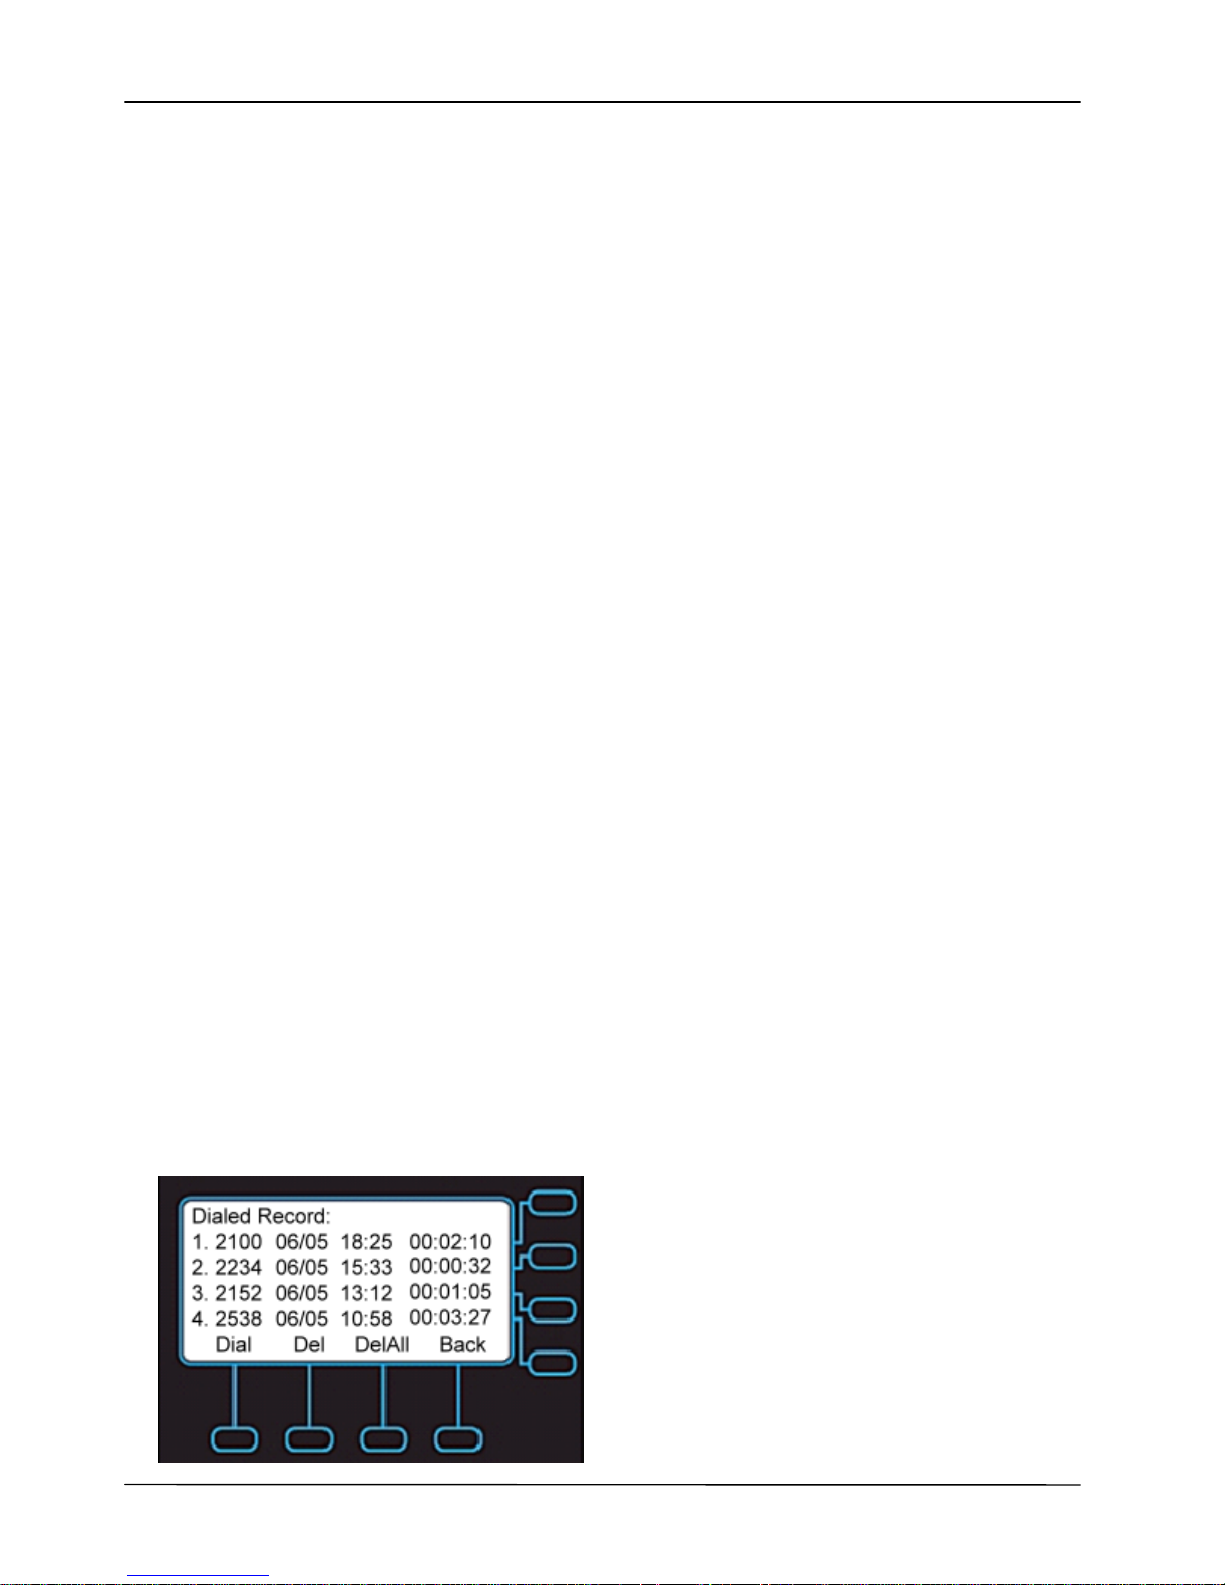
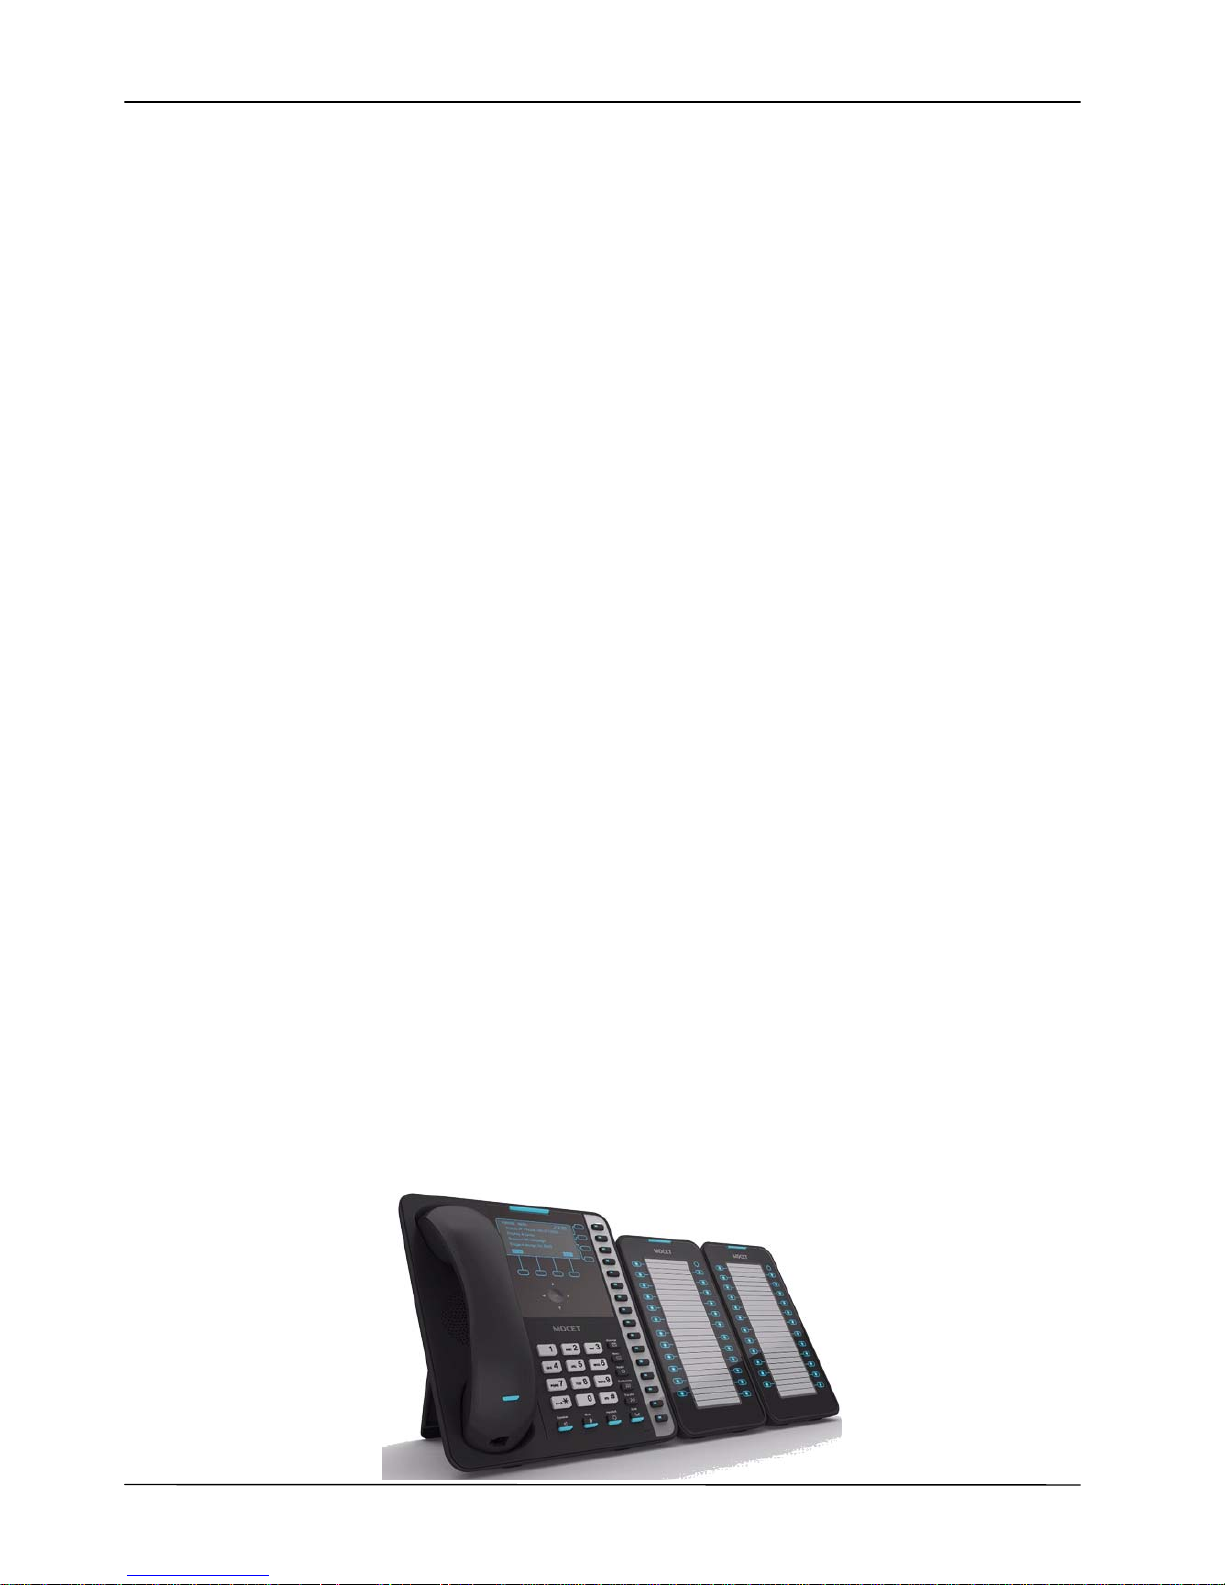
The call logs save the last 30 numbers dialed, missed or answered. For example, the
following is the Dialed Calls list screen.
Page 26
Page 26
MOCET IP3062D Professional IP Phone with DECT Base Station User Guide
From the call log lists, you can view, delete, and dial.
To manage the selected call log:
Use the Dial soft-key to redial the call.
Use the Del soft-key to delete the selected item.
Use the DelAll soft-key to delete all items in the list.
Use the Back soft-key to exit the call list screen.
2.5 Viewing Your Phone’s Information
Using the menu of the IP306D, you can check the IP3062D hardware version, firmware
version, and network status.
To view this information:
1. Press the “Menu”.
2. Select “Information”.
3. Use the Navigation Up and Down keys to view the information.
2.6 Configuring Programmable Keys
The IP3062D has 16 programmable keys, which can be confi gured for speed dial numbers,
phone system features like park, pickup and paging, or to monitor other extensions using
busy lamp field (BLF) notifications. From the Menu, you can view the settings for each key.
To see the setting status:
1. Press “Menu”.
2. Select the “Program Key”.
3. Select the FUNC#1-FUNC#16 to see their settings.
2.7 Configuring An Extended Dial Module (EDM) Setting
The IP3062D supports the connection of up to two 24 button extended di al modules (EDM)
for a total of 64 programabl e buttons on a phone. The buttons can be used for monitoring
other phone extensi ons with busy lamp field (BLF) notifi cation, speed dials numbers and
system features such as overhead paging, park and pickup. The EDM is connected to the
IP3062D with a smal l cable, making it very convient to add and program extra buttons as
needed.
Page 27

Page 27
MOCET IP3062D Professional IP Phone with DECT Base Station User Guide
There are 24 buttons on an EDM. Each button can be programed for speed dial numbers,
phone system features like park, pickup and paging, or to monitor other extensions using
busy lamp field (BLF) notifications.
To configure an EDM key:
1. Press “Menu”.
2. Select “EDM Setting”.
3. Select an EDM (from 1 to 2) to set.
And then select a key (from Key 1 to Key 24), for each key, you can set Function type,
Function Number and Line Supported.
2.8 Managing Voice Ma il
Some hosted SIP services and IP PBXs provide a message waiting indicator (MWI) to
alert you to any new voi cemail on your phone. Your phone can receive MWI information
from supported services and servers.
To view your voice mail status:
1. Press “Menu”.
2. Select “Voice Mail”.
3. You can see the voice mail count for your accounts.
To get more information on MWI status:
1. Press Menu > Voice Mail.
2. Select the account you want to check and press the Navigation OK key.
2.9 Managing Instant Message
The IP3062D supports SIP SIMPLE Instant Messaging (IM). With a supported servi ce or
server, such as Ondo, Partysip, Asterisk (in-session mode), and any SIP proxy or PBX that
can forward SIP MESSAGE requests, you can send and receive messages ri ght from your
phone using the on-screen dialpad; there is also a way to configure some useful Message
Templates, which are pre-made messages for common requests or responses, to simpli fy
use of IM on the IP3062D. In addition, you can attach a supported USB keyboard to the
IP3062D to use the IM features
There is a message icon and a popup mess age on the LCD screen when there is a new
message received.
To view the me ssages, you can:
1. Press the Navigation OK key.
2. The messages are listed for you to view.
Or
1. Press “Menu”.
2. Select Message > Instant Messaging > Simple > Inbox.
3. The messages are listed for you to view.
Page 28
Page 28
MOCET IP3062D Professional IP Phone with DECT Base Station User Guide
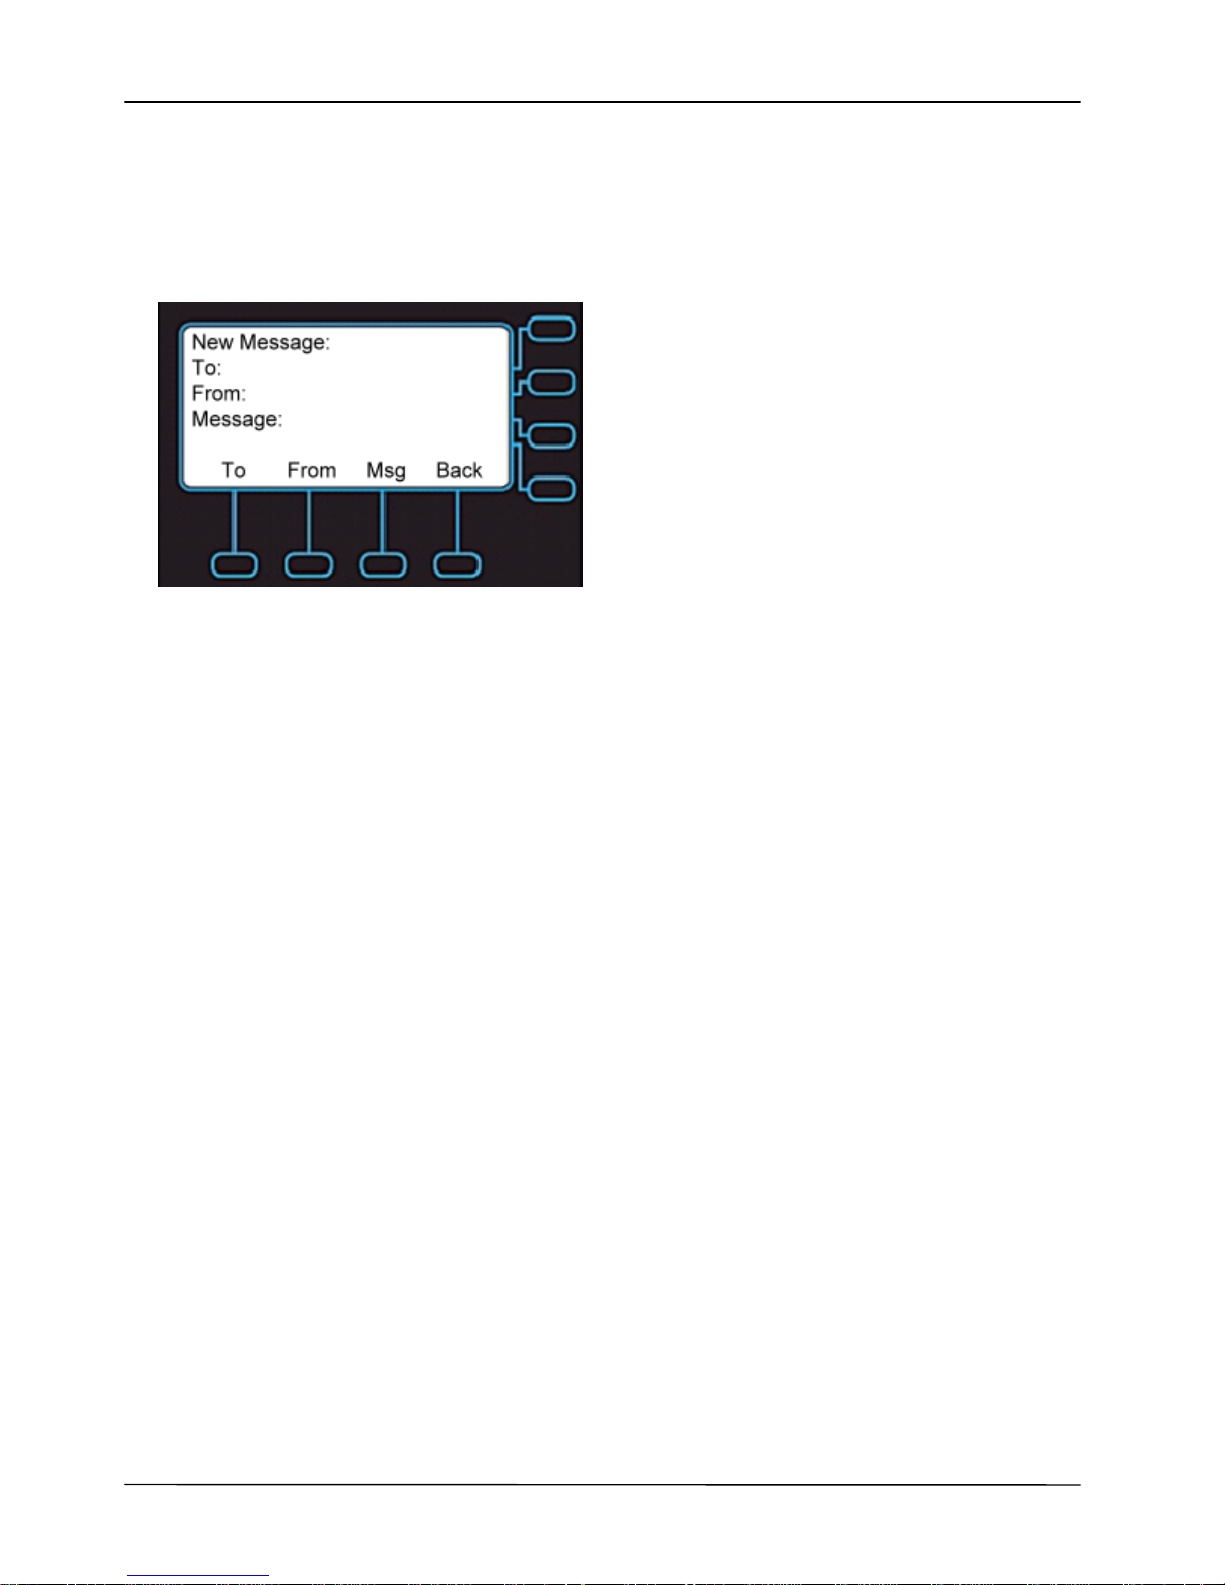
To create a new message:
1. Press “Menu”.
2. Select Message > Instant Messaging > Simple > New Message.
3. Enter “To”, ”From”, and ”Msg”, from the key pad.
To delete a message:
1. Press “Menu”.
2. Select Message > Instant Message > Simple > Delete Messages.
3. Select what data you want to delete, you can select Delete Inbo x Messages,Delete
Outbox Messages or Delete All Messages.
To edit a Message Template:
1. Press “Menu”.
2. Select Message > Instant Message > Simple > Templates.
The IP3062D can save and use up to 30 Message Templates.
2.10 Viewing Notifications
The IP3062D supports Broadsoft Server Notifications. With this feature, administrators or
service providers can send messages to users connected to a Broadsoft server. For more
information, please contact your administrator or Service Provider.
Page 29

Page 29
MOCET IP3062D Professional IP Phone with DECT Base Station User Guide
3 Using Basic Features
The IP3062D Professi onal IP Phone wi th an integrated DECT base station is designed to
be used like a regular phone on a public switched telephone network (PSTN). You can
place calls, transfer a call to someone else, or conduct a conference call.
The IP3062D supports up to four simultaneous calls. However, only one of these calls can
be active at a time.The active call is the one you are using to speak or listen to. The
inactive calls can be:
On hold
Joined in a conference (with up to five callers)
“Incoming call” or “Ringing”
This chapter provides basic operating instructions for the phone including:
Placing a Call
Placing an Urgent Call
Answering a Call
Answering an Urgent Call
Ending a Call
Redialing a Number
Putti ng a Call on Hold
Setting Up a Conference
Transferring a Call
Forwarding Calls
Enabling or Disabling Do Not Disturb
3.1 Common Terms
To use the IP3062D, you need to follow some conventions that we will mention in this
guide. In the following descriptions, we will introduce some common terms for your
understanding.
3.1.1 Lines
A “Line” in thi s guide represents how many phone numbers supported in one phone. For
example, the IP3062D can support up to four lines configured for the same or different
service providers or servers and even make up to four concurrent calls. Therefore, the
IP3062D is said to support multiple line appearances.
3.1.2 Calls
A “Call” in thi s guide represents how many simultaneous connections can be made to a
single phone number. Each line of service in the IP3062D can support up to four calls
simultaneously. This allows the user to place one caller on hold and talk to the other
person in another call on the same Li ne. Therefore, the IP3062D phone is said to support
multiple call appearances.
Page 30

Page 30
MOCET IP3062D Professional IP Phone with DECT Base Station User Guide
3.1.3 Registration
The IP3062D must be configured before it can perform some basic functions. Although the
phone can make a peer-to-peer SIP call by dialing the other user’s IP address (i.e.,
192.168.0.12) directly on the keypad, this is inconvenient and it is hard to remember all the
IP addresses of phones on the system. This i s why a hosted SIP server or local IP PBX
implements a Registrar service, which allows the connected phones to find and dial each
other more easily by extension numbers or names instead of IP addresses.
In additi on , the hosted SIP server or IP PBX helps keep tra ck of active phones, their IP
addresses for routing calls, as well as keeping track of which phones are busy or idle.
Most hosted SIP services and IP PBXs support direct system service (DSS) as well as
showing the busy lamp fi eld (BLF) status of system phones. These allow you to directly
dial another extension and can show you whether the other phone is on a call or not.
Usually, the hosted SIP service or IP PBX will also use the Registrar service to send
messages to your phone to alert you that you have voicemail. This is called message
waiting indication (M WI).
3.1.4 Caller ID
When you receive a cal l, the caller's phone number is shown on the screen, if the caller
has not chosen to hide his number and i f the network supports the Call er ID feature. The
IP Phone can display both the Caller ID (CLID) and the Caller Name (CNAM) of the caller
if it is available. Not all services and servers support CLID and CNAM. For more
information about this topic, please contact your service provider or system administrator.
3.2 Installing Your IP Phone
Before placing the phone into operation, either you or your administrator or Service
Provider has to install the phone on your network. Please contact your administrator or
Service Provider for more details.
3.3 Configuring Your IP Phone for Service
The IP3062D must be configured for the hosted SIP service or IP PBX befor e operation.
The phone is usually pre-configured by the administrator or hosted SIP service provider.
For an advanced or experienced user, you may refer to the IP3062D Administrators’ Guide
for full information on how to configure all the settings of the IP3062D.
3.4 Line Selection
The IP3062D can support up to 4 lines.
To select a line you can:
Use the preferred line setting. That means when you pick up handset, or press the
speakerphone key, or press headset key when not on a call, the phone will automatically
use the preferred li ne for the call. If the preferred line is not the line you want to use, you
Page 31
Page 31
MOCET IP3062D Professional IP Phone with DECT Base Station User Guide
can press Line Key buttons ( ) on the right hand side of the LCD to switch to the
desired line. Press the Line Key buttons ( ), which will connect to the chosen line.
3.5 Placing a Call
You can place a call in many ways from the IP3062D:
Using the handset
Using the speakerphone
Using the headset
Pressing a line key
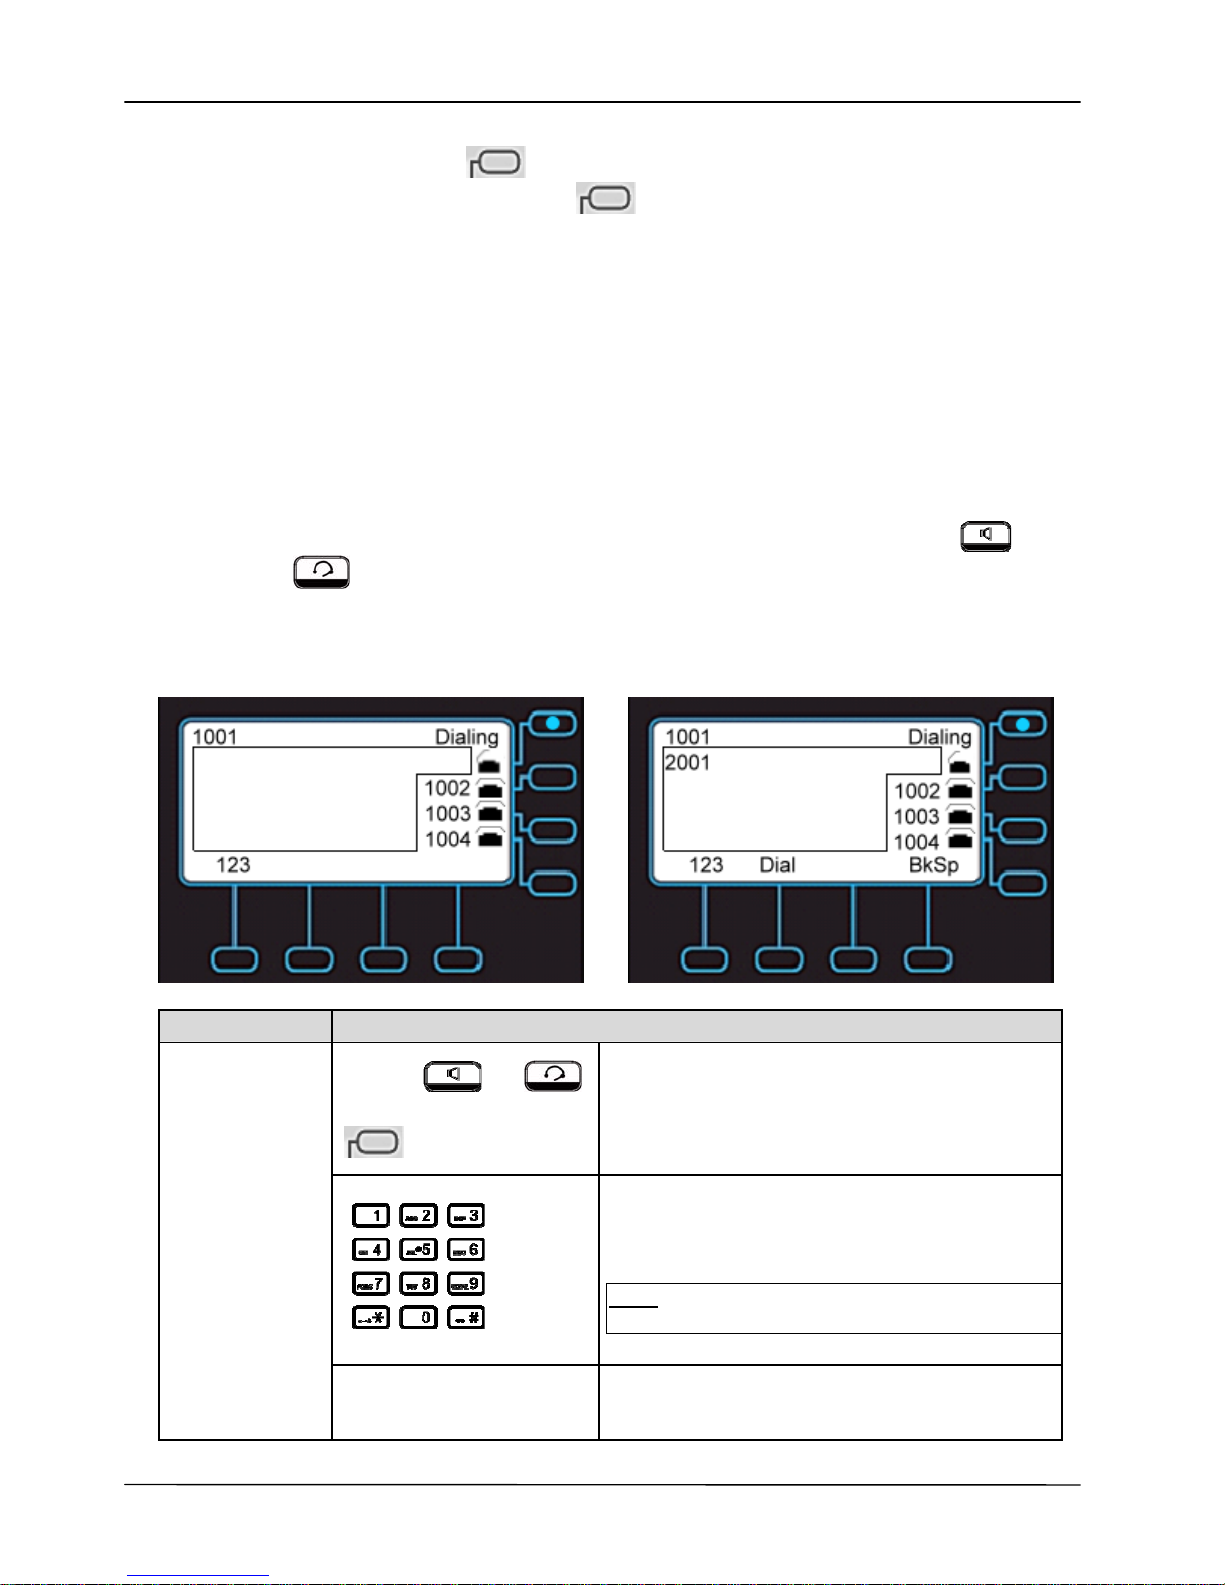
You can also dial the number first and then choose the method you will use to dial the
other party. This is called pre-dialing. During a call, you can alternate between using the
handset, headset or speakerphone modes by pressing the speakerphone key( ), the
headset key( ) or picking up the handset while on a speakerphone call. The call
duration on an active call is shown on the LCD during the call.
To place a new call:
Operation Description
or or
Line Key
1. Pick-up the handset or press a line key or
press the speakerphone key or press the
headset key.
You will hear a dial tone.
2. Use the keypad to di al the phone number.
The LCD window displays the number you
enter.
Note: You ma y use the “BkSp” soft-key to delete
the last digit.
Making a call
3. On-hook the handset when your
conversation is over.
Page 32
Page 32
MOCET IP3062D Professional IP Phone with DECT Base Station User Guide
3.6 Placing an Urgent Call
The IP3062D supports Broadsoft’s Urgent Call feature. Please refer to the Section 5.4
Configuring Pho ne Settings for more information on configuration of this feature.
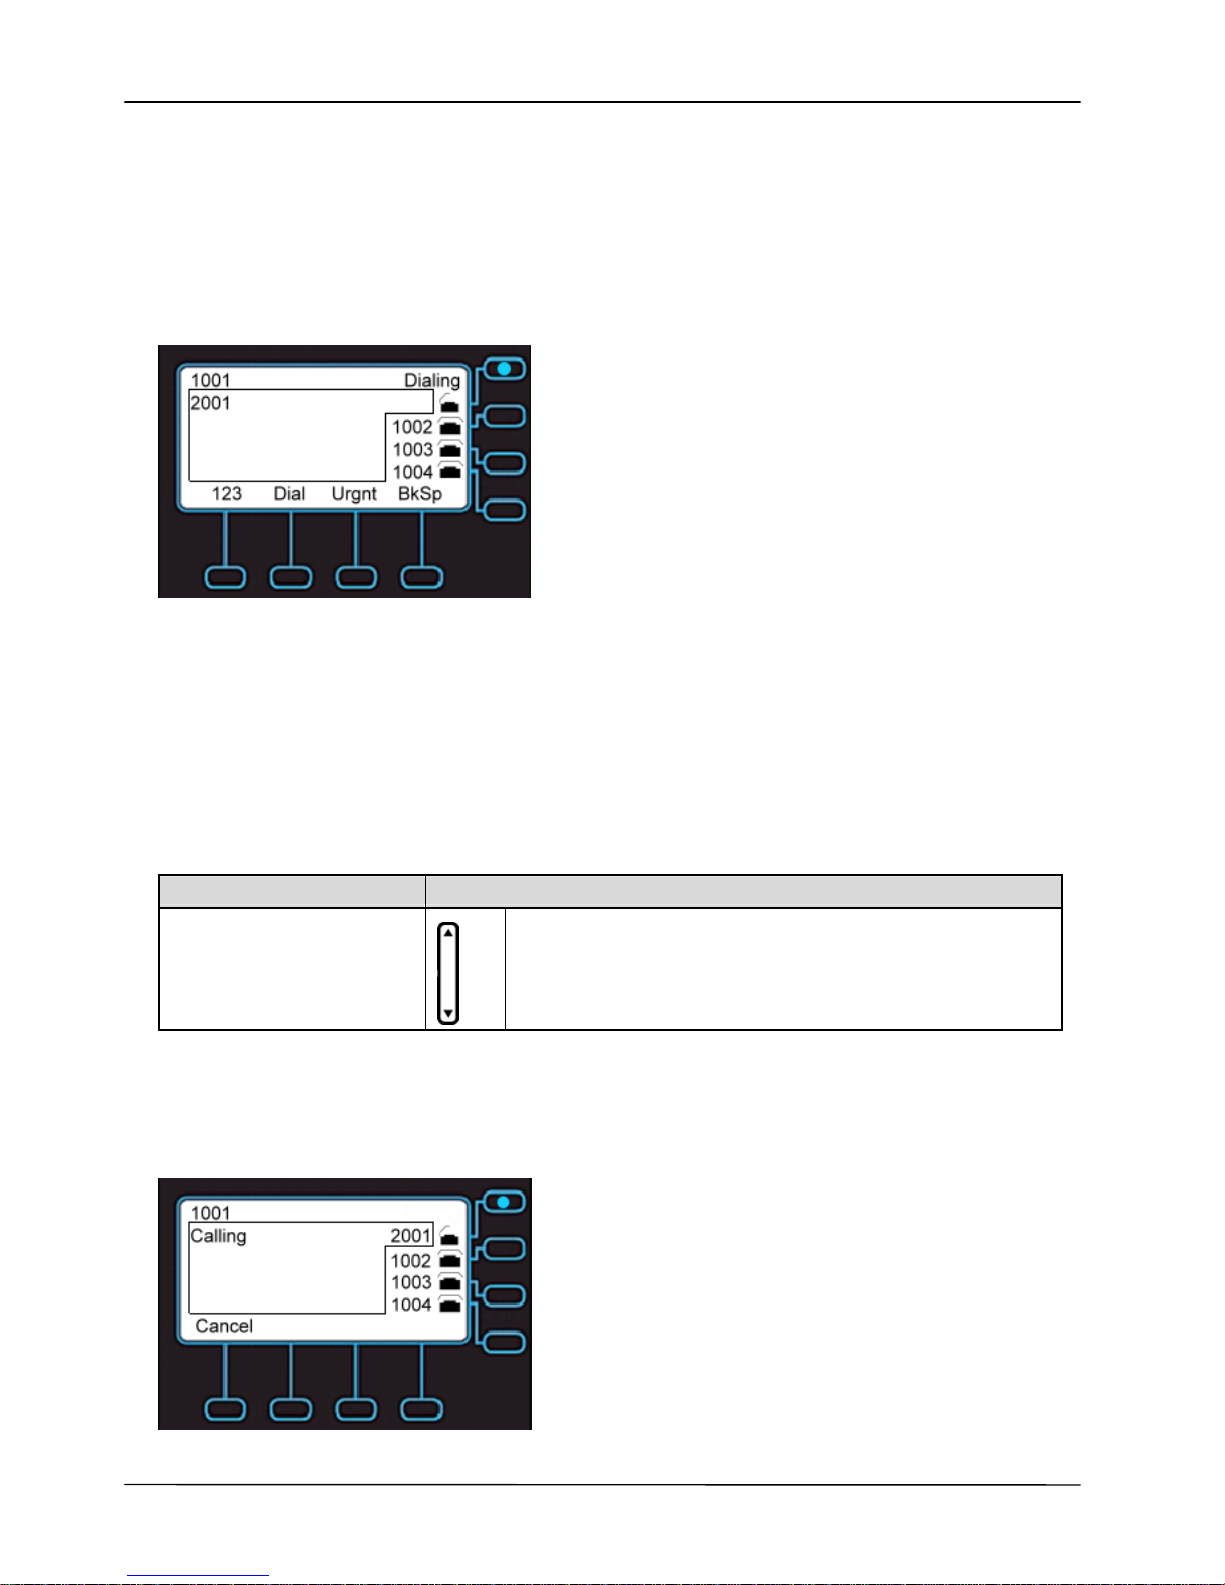
If your IP phone is enabled for “Urgent Call”, when you dial a number, there is an “Urgnt”
softkey displayed on the LCD screen.
If you press the “Urgnt” softkey to dial the number out, the call will be marked as an urgent
call. The called party can neither deny nor block the call even the called party’s phone is
on DND.
3.7 Adjusting Call Volume
During a conversation, if the voice volume is too low or too high, you may adjust it.
To adjust volume while on a call:
Operation Description
Adjusting Call Volume
Press the Volume control key to adjust the volume.
5.8 Canceling a Call
After you dial a call, but the called party has not answered, you can Cancel the call.
Page 33
Page 33
MOCET IP3062D Professional IP Phone with DECT Base Station User Guide
Operation Description
Canceling a call
Cancel
Press “Cancel” soft-key to reject the call.
If only the calling call on the phone, you can just press
speakerphone or put down handset to cancel the call.
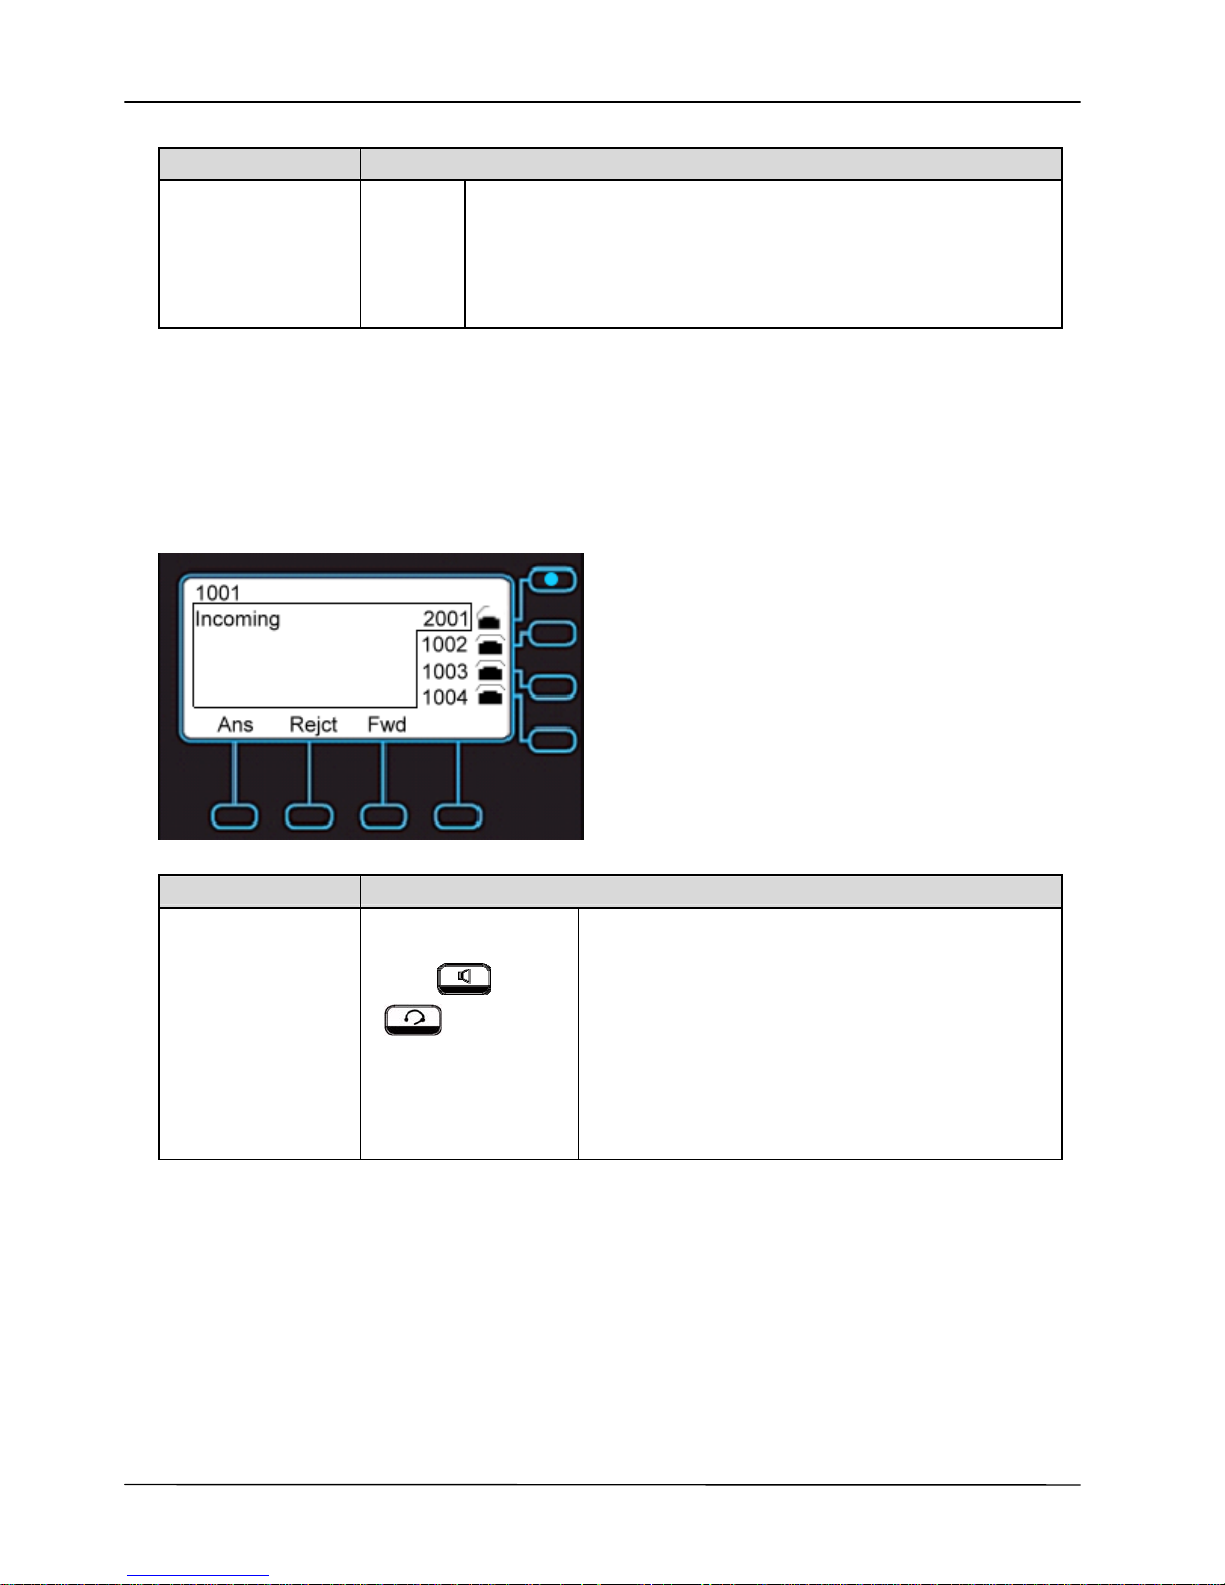
3.9 Answering a Call
When there is a new incoming call on the phone, you can answer a call by:
Using the handset
Using the speakerphone
Using a headset
Pressing “Ans” soft-key
Operation Description
Answering a call
or or
or Answer
If there is no other call , just pick-up the
handset or press the speakerphone key or the
headset key or press the “Answer” soft-key
upon hearing the phone ringing.
If there is another call, press “Answer” softkey to accept the call, the previous call will be
placed on hold automatically.
3.10 Answering an Urgent Call
When there is an incoming urgent call on the phone, you can answer a call as you would
normally; however, some features will be ignored automatically including DND and call
blocking.
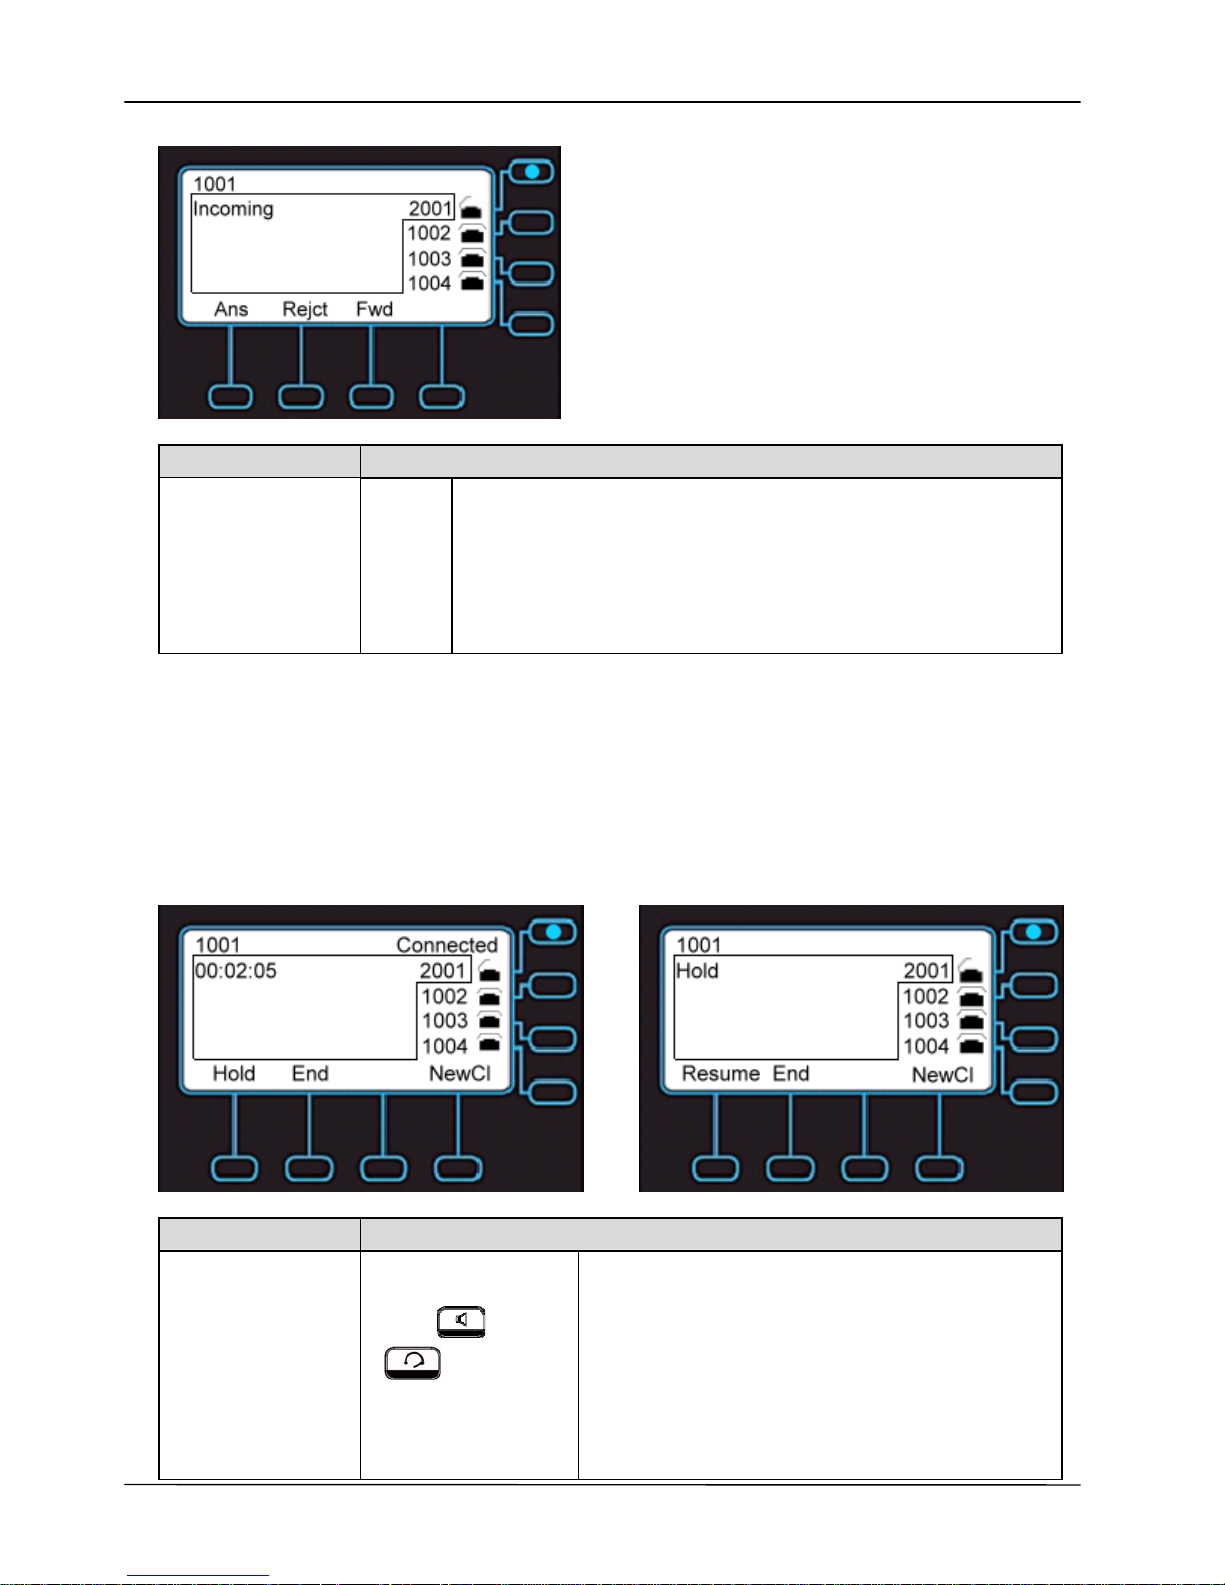
3.11 Rejecting a Call
When there is an incoming call on the phone, you can reject the call.
Page 34
Page 34
MOCET IP3062D Professional IP Phone with DECT Base Station User Guide
Operation Description
Rejecting a call
Reject
Press “Reject” soft-key to reject the call.
After pressing the “Reject” soft-key, the call will be dropped
directly. The record will be logged in answered call list.
Other call features are not affected by this operation.
3.12 Ending and Holding and Resuming a Call
When a call is in connected state, you can end a call by:
Using the handset
Using the speakerphone
Using a headset
Pressing “EndCall” soft-key
Operation Description
Ending a call
or or
or End
If there is only one call, just place the handset
back into the cradle, press the speakerphone
key or the headset key or press “End” soft-key
to end the call.
If there is another call, press the “End” softkey to end the call.
Page 35
Page 35
MOCET IP3062D Professional IP Phone with DECT Base Station User Guide
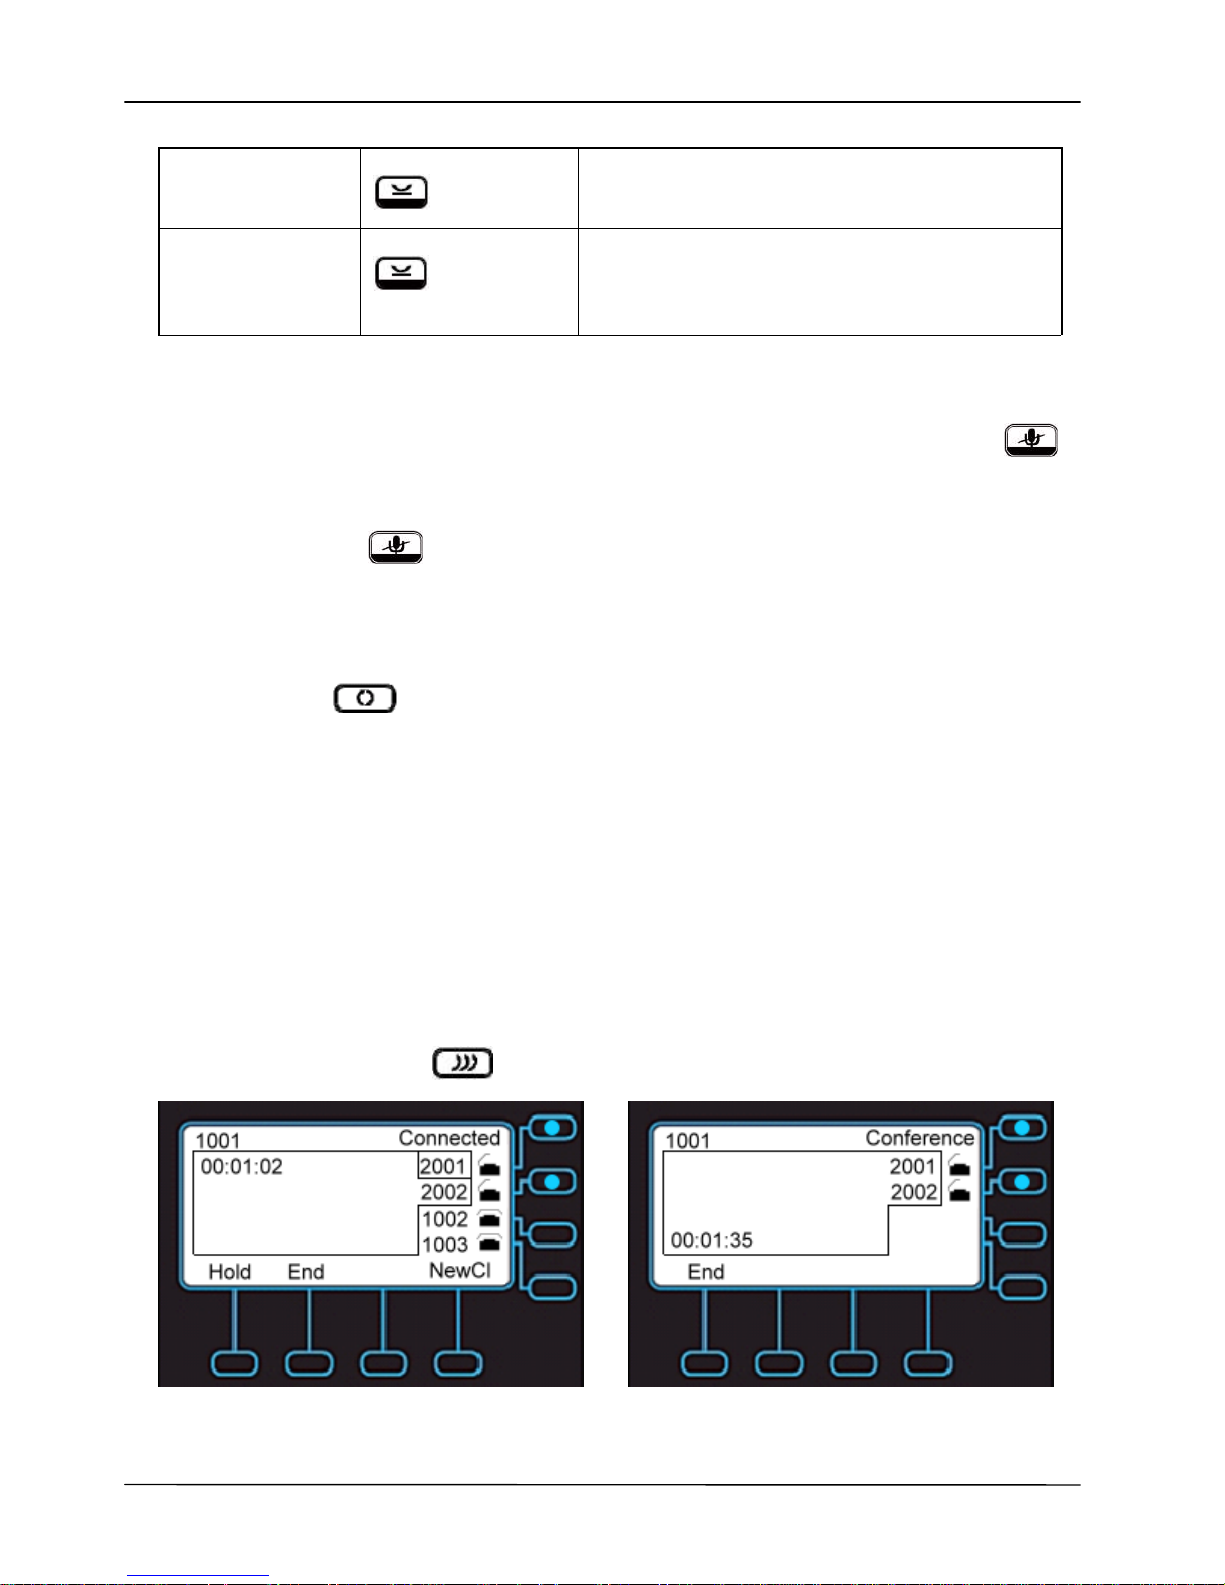
Holding a call
or Hold
Press the “Hold” soft-key or Hold key on the
phone to place an active call on hold.
Resuming a call
or Resume
Press the “Resume” soft-key or Hold key on
the phone again to place an active call on
hold.
3.13 Muting and Un-muting a Call
While in a conversation, you may mute the microphone by pressing the MUTE ()
button. The LED of the button will become blue. When muted, the other caller will not hear
anything from your phone.
Pressing the MUTE ( ) key again will Un-mute the phone.
3.14 Redialing a Number
To redial the last numbers you dialed:
1. Press Redial( ) hot key.
2. Phone will enter “Dialed Record” list.
3. Select the number you want to redial.
4. Press “Dial” soft-key to di al out.
For more information, please see 2.4 Managing Call Logs.
3.15 Setting up a Conference Call
The IP3062D can support a 5-party conference call .
To set up a conference:
1. Call the first party and Hold the call.
2. Press “NewCl” soft-key to call another party
3. Press the Conference ( ) hot key to set up a 3-party conference call.
Note, here is a 3-party conference call, if you want to set up a 4-party or a 5-party
conference call, repeat Step2 to dial third or fourth call, and then do Step3.
Page 36

Page 36
MOCET IP3062D Professional IP Phone with DECT Base Station User Guide
3.16 Transferring a Call
A call can be transferred in one of three ways:
Blind Transfer: The call is automatically transferred after you dial the number of the party
to whom you want to transfer the call.
Semi-Attended transfer: The party to whom you want to transfer the call does not answer
their phone before you transfer the call (when you hear ring-back tone).
Attended transfer: The party to whom you want to transfer the call answers their phone
before you transfer the call. You can consult with them before completing the transfer.
3.16.1 Blind Transfer
To complete a blind transfer:
1. During an active call, press the Transfer ( ) hot key.
2. The active call is placed on hold, and an entry screen is displayed for the number
you want to transfer to.
3. Press Navigation OK or “Dial” soft-key to complete the transfer. If you want to
4. cancel transfer operation, just press the “Back” soft-key.
3.16.2 Semi-Atten ded Transfer
To do Semi-Attended transfer:
1. During an active call, press “NewCl” soft-key to call another party.
2. When you hear the ring-back tone, press the Transfer ( ) hot key.
3.16.3 Attended Transfer
To do Attendant transfer:
1. During an active call, press “NewCl” soft-key to call another party.
2. Wait for the other party to answer the call.
3. Press the Transfer ( ) hot key.
Note:
sometimes, you may place more than 2 calls on your phone, when you press
Transfer ( ) hot key, phone will show a call list to let you select a call to finish the
transfer operation.
3.17 Forwarding a Call
You can configure your phone to forward your incoming call to another party, which is
sometimes called as static forwarding. You can also dynamically forward cal ls while your
phone is ringing.
There are three types of static forwarding:
Unconditional
No answer
Page 37

Page 37
MOCET IP3062D Professional IP Phone with DECT Base Station User Guide
Busy
For more information on how to setup static call forwarding, please contact your
administrator or Service Provider support center.
To use dynamic forwarding:
1. When the phone rings with an incoming call, press the “Fwd” soft-key.
2. Enter a number to forward the incoming call to.
3. Press OK soft-key to forward the call.
3.18 Using Voice Mail
Your voi cemail i s saved on either your host ed SIP servi ce or o n the IP PBX, but you can
access it from the IP3062D using the Message key.
The presence of new voice mail messages is indicated by a flashing message waiting
indicator (MWI) LED on the front of the phone and an icon is shown on LCD.
Note: Voice mail is a n optional f eature co nfigured o n a hosted SIP servi ce or IP PBX an d
may not be supported on your particular system. To use voicemail on the IP3062D, some
settings need to be configured first. For more information please contact your administrator
or Service Provider support center.
To listen your voice me ssages:
1. Press the Message ( ) hot key to display the mailbox list.
2. Select which SIP line’s mailbox you want to listen to and press “OK”.
3. A call will be placed to your voice mail server.
4. Follow the interactive voice response (IVR) instructions to retrieve and listen, forward
or delete your messages.
3.19 Placing a Speed Dial Call
To configure a speed dial number, please see 2.2.6 Speed Dialing Setting.
To make a speed dial call:
1. Pickup the handset, or press a line key, or press the speaker key or press the headset
key.
2. When you hear dial tone, dial the one digit (0-9) speed dial key you previously
configured.
3. Press “OK” or the “Dial” soft-key and the phone will look up the key in the speed dial
table, find the matching item and dial the number assigned to the speed dial key.
3.20 Using Multiple Lines
IP3062D can support up to four lines configured for the same or different service providers
or servers. It allows you to make up to four concurrent calls.
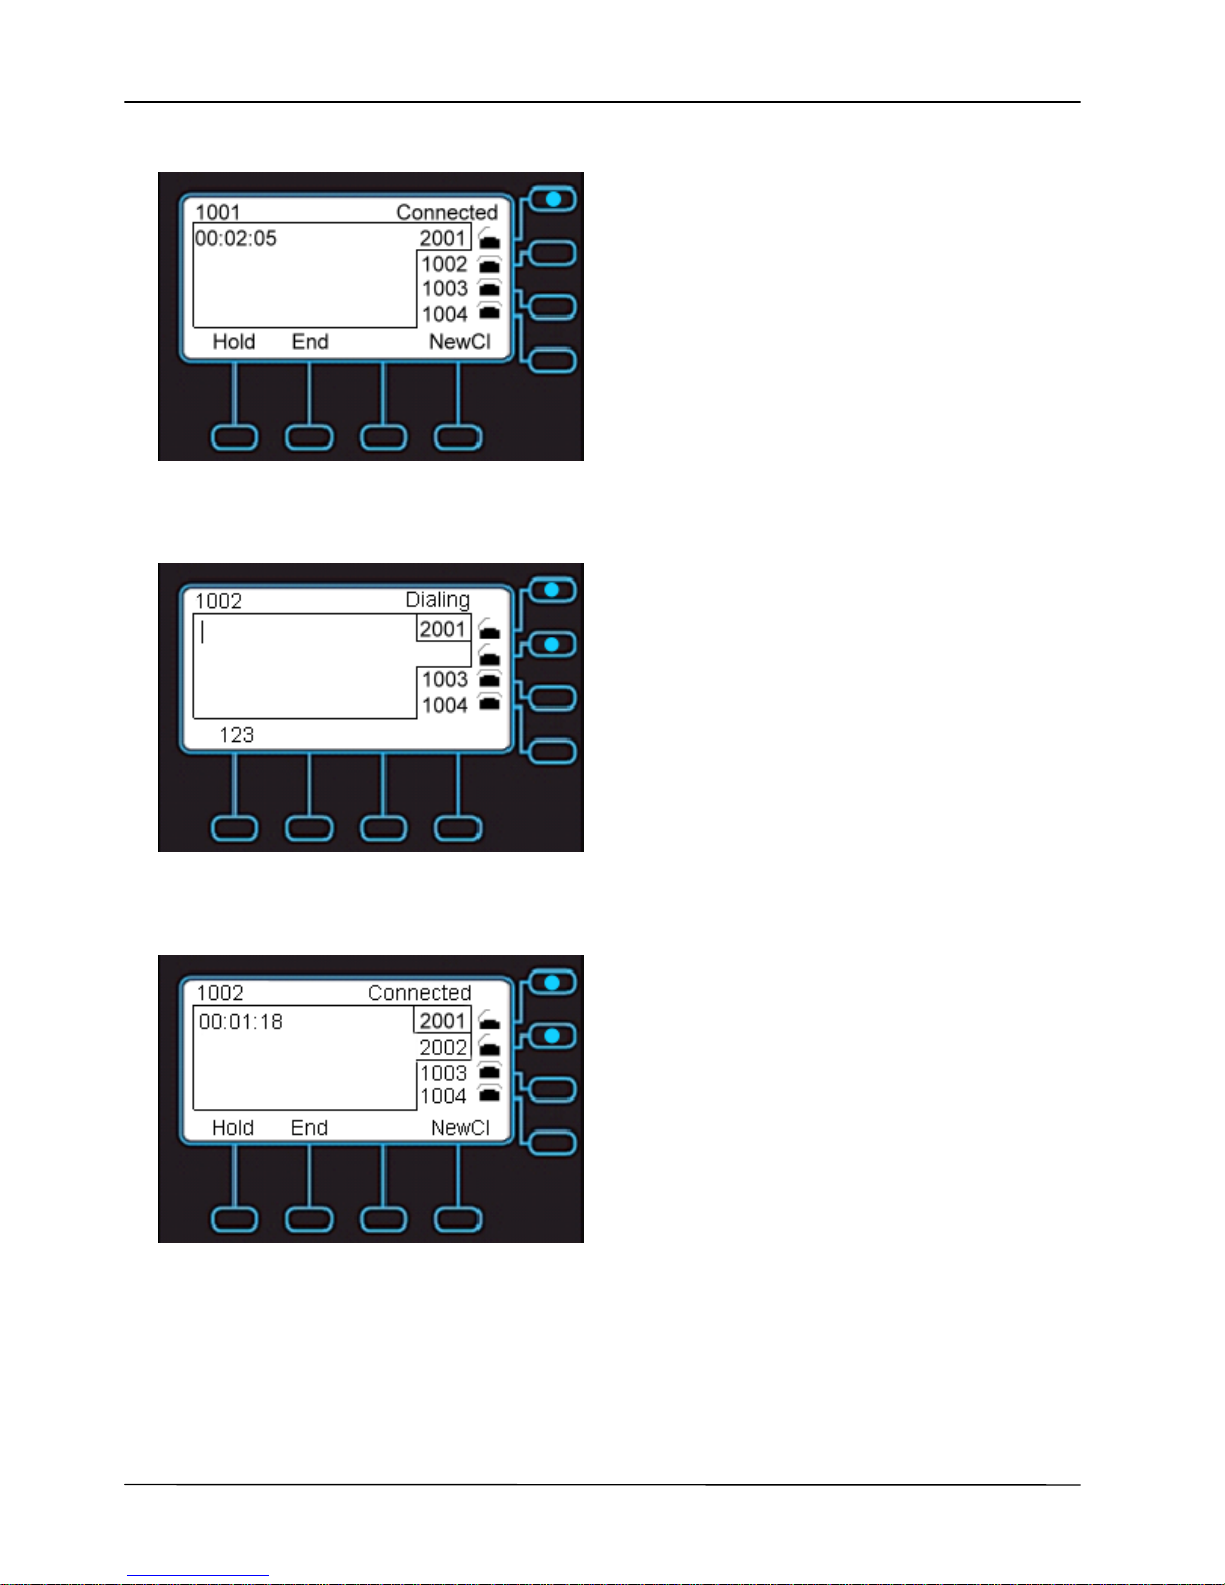
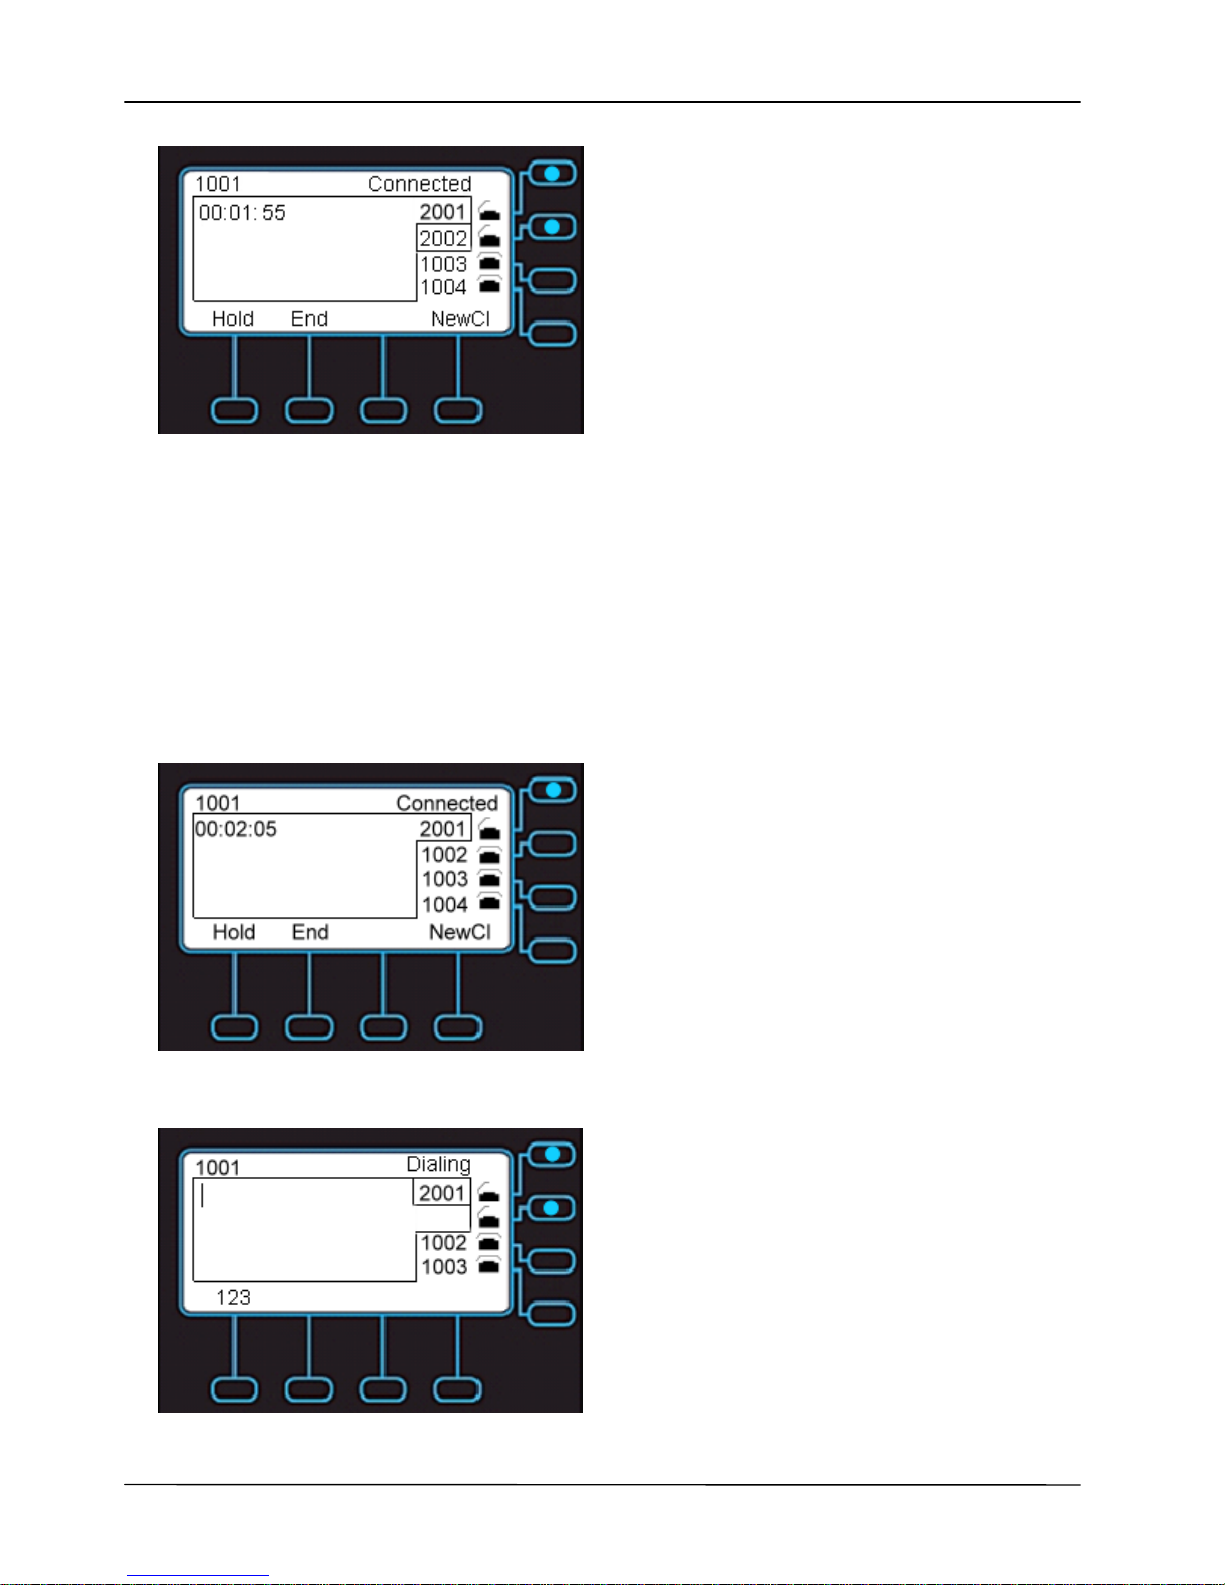
For example, the following screen shows you line1001 has one active call with
number2001.
Page 38
Page 38
MOCET IP3062D Professional IP Phone with DECT Base Station User Guide
You can make a new call by using another line, 1002. Press the Line Key button, 1002,
on the right hand side of the LCD, and then make a call to number 2002.
After the called party answers the call , the following screen shows you line1001 has one
held call with number2001, and line1002 has one active call with number2002.
To switch between the two calls, press Hold soft-key to hold the line1002 which calls to
number2002 first. Then press the Line Key button, 1001, on the right hand side of the
LCD, which calls to number2001 to unhold the call.
Page 39
Page 39
MOCET IP3062D Professional IP Phone with DECT Base Station User Guide
By the steps as above, you can make up to four concurrent calls.
3.21 Using Multiple Calls
Each line of service in the IP3062D can support up to four calls simultaneously. It allows
you to place one caller on hold and talk to the other person i n another call on the same
line.
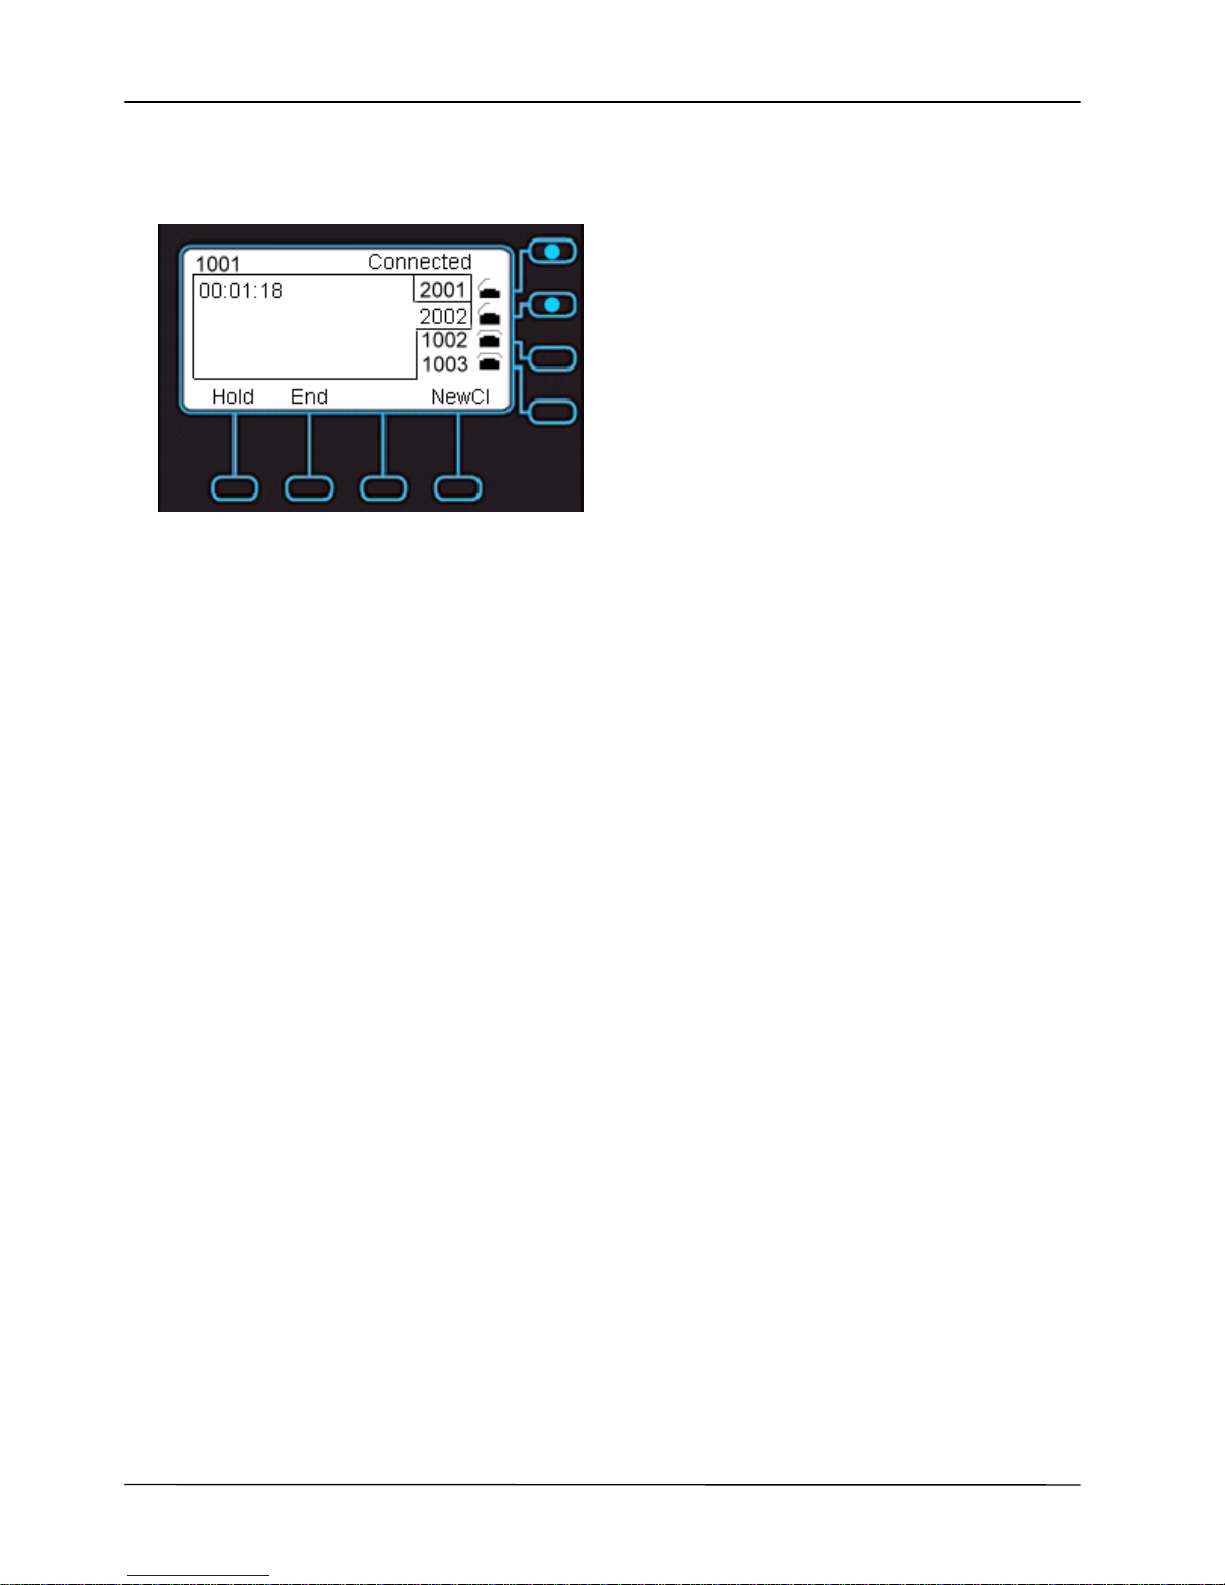
For example, the following screen shows you line1001 has one active call with
number2001.
You can make a new call on the same line, just press NewCl soft-key to call another party.
Page 40
Page 40
MOCET IP3062D Professional IP Phone with DECT Base Station User Guide
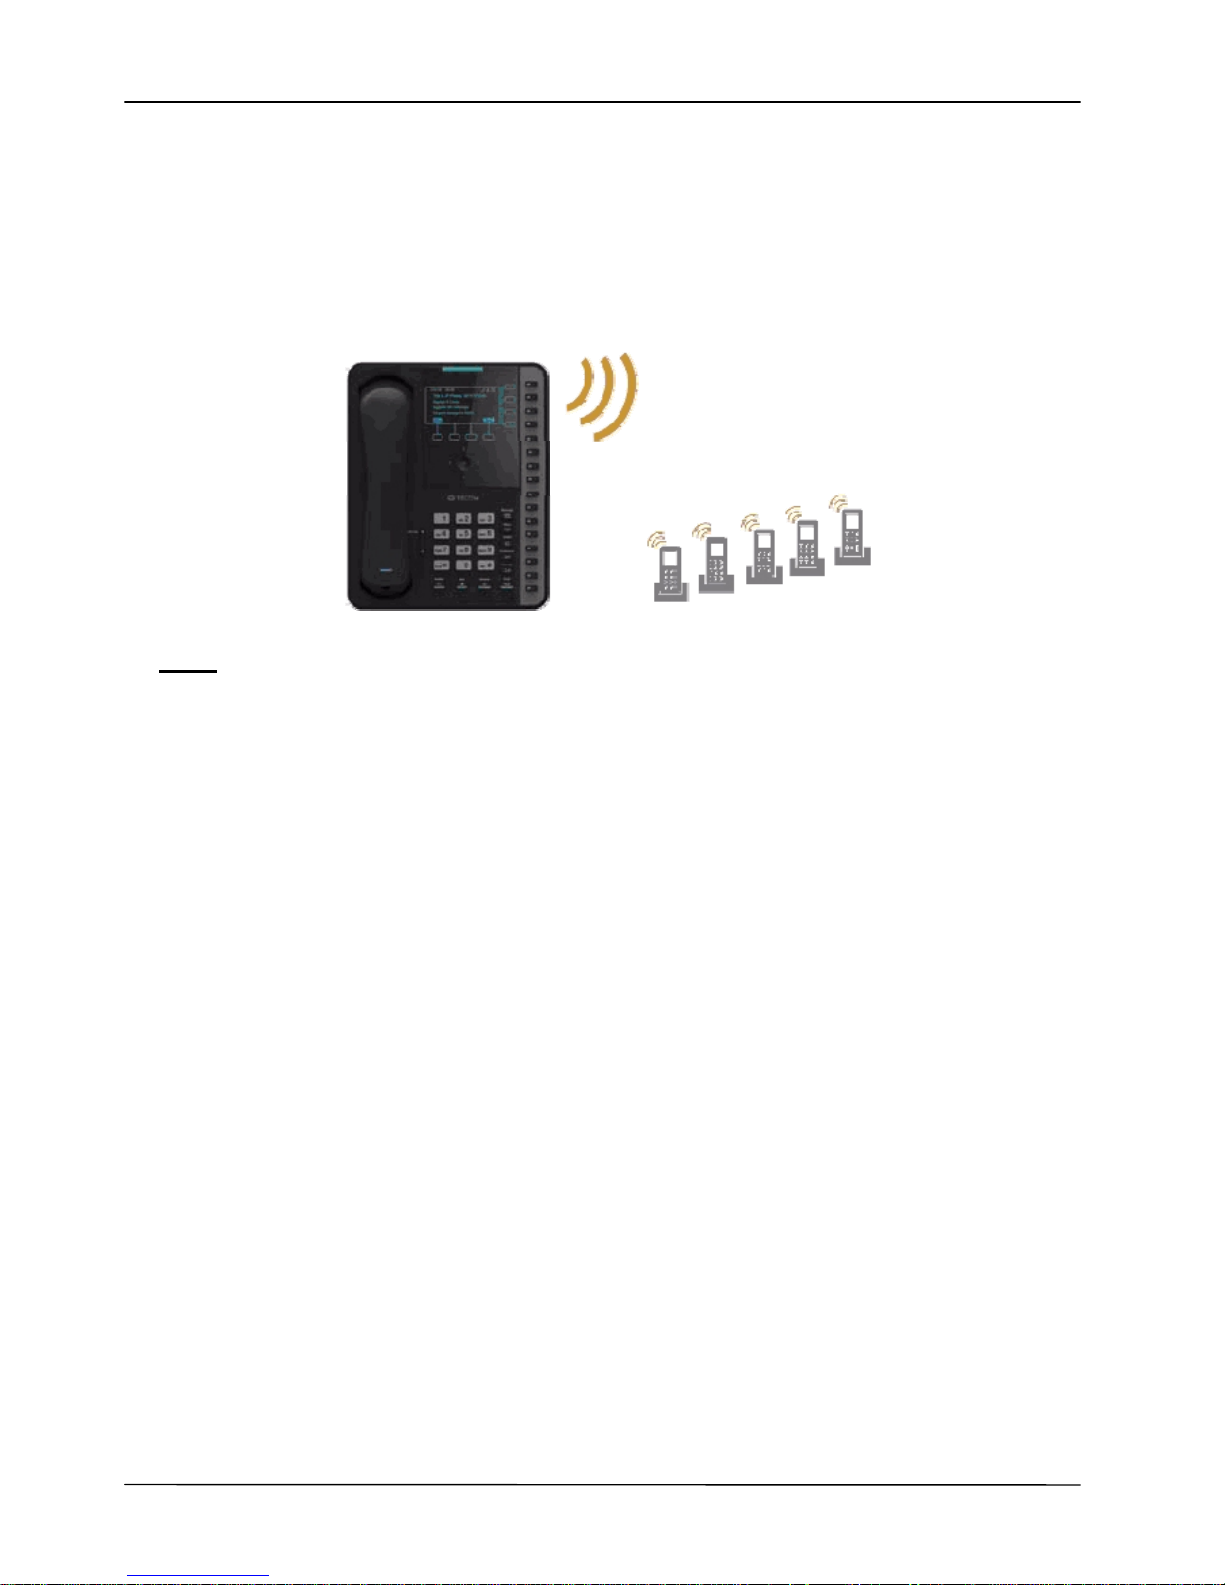
After the called party answers the call, the followi ng screen shows you line1001 has two
calls, the call to number2001 is on hold, and the call to number 2002 is active.
By the steps as above, you can use one line to make 4 calls simultaneously.
Page 41
Page 41
MOCET IP3062D Professional IP Phone with DECT Base Station User Guide
4 Using DECT Handsets
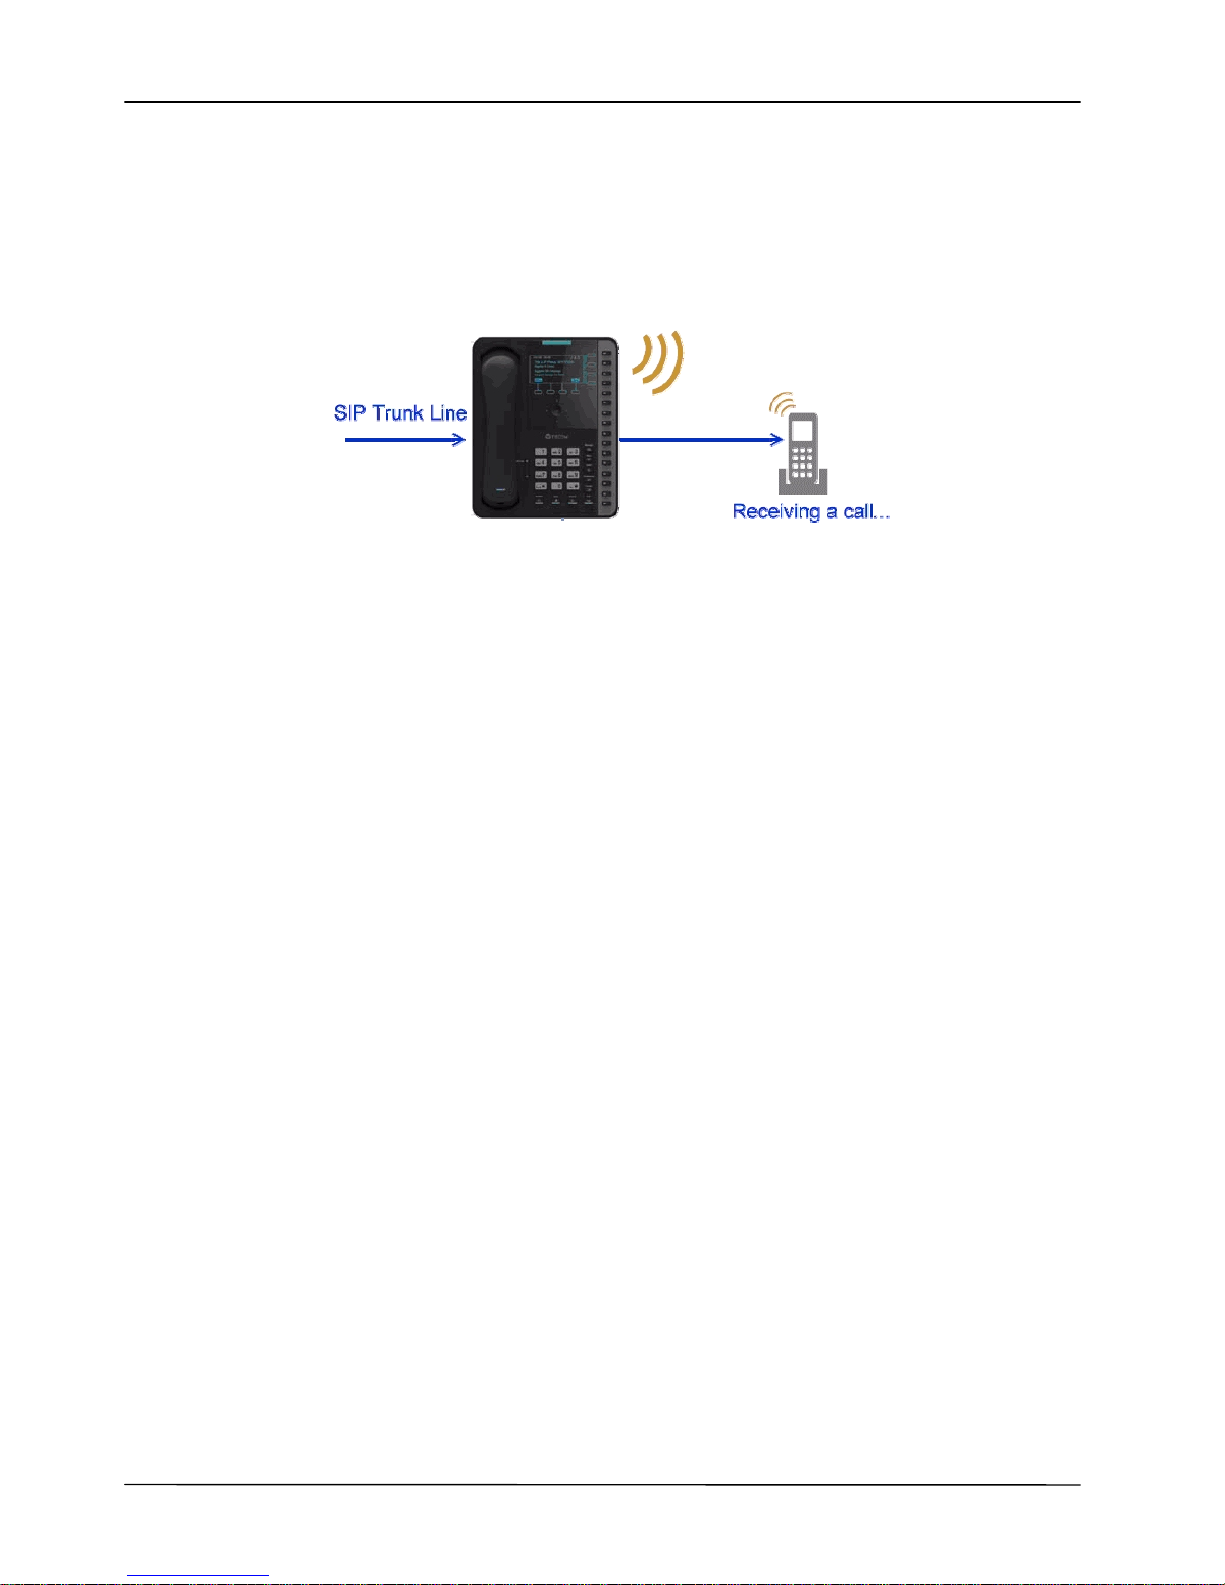
With an integrated DECT base station, IP3062D can be registered up to five DECT6.0
CAT-iq2.0 compliant handsets. Before using IP3062D with DECT6.0 CAT-iq2.0 compliant
handset, you need to make the DECT handset register to IP3062D. To learn how to use
DECT handset with IP3062D, please refer to the following sections.
Note:
1. The defualt DECT RF parameters of IP3062D is FCC US DECT Classic. Sometimes,
even your handset is DECT 6.0 compatible; it still can not register successfully with
IP3062D. It is because DECT6.0 does not emphasize any compatibility with other
vendors. DECT6.0 is only related to FCC regulations from RF aspects. So, there are
some restrictions on supporting all kinds of DECT handsets. For example, some
popular DECT handsets would make a check during the registration to make sure the
DECT base station is its own phone and only its DECT handset can be registered to
its DECT base station.
2. With respect to European DECT support, IP3062D is well compatible of GAP/ CAT-iq
standards. However, the default setting of IP3062D for DECT RF parameters is FCC
US DECT Classic. If you would like to use European DECT handset with IP3062D,
please ask for assistances from your administrator.
4.1 Registering a DECT Handset to IP 3062D
About DECT Handset registration with IP3062D DECT base station, there are two
alternative ways to enter the DECT Registration Mode in IP3062D, from LCD menu or
from Web User Interface. Here we use entering the DECT registration mode from IP3062D
LCD menu as an example.
On IP3062D:
1. Press “Menu”.
2. Select ”Phone Setting”.
3. Select “DECT Se tting”.
4. Select “Register Mode” to make IP3062D enter DECT registration mode.
After IP3062D is on the DECT registration mode, you should be able to configure the
DECT handset to register with IP3062D. Please check the registration procedure of your
DECT handset user guide.
Page 42

Page 42
MOCET IP3062D Professional IP Phone with DECT Base Station User Guide
Note: when the phone is during DECT handset registration or deregistration, the IP3062D
handset LED will be flashing fast in purple color and the IP3062D’s screen will display
icon.
4.2 Deregistering a DECT Handset fr om IP3062D
On IP3062D:
1. Press “Menu”.
2. Select ”Phone Setting”.
3. Select “DECT Se tting”.
4. Select “Deregister” to enter the registered handsets list screen.
5. Use the Navigation Up and Down keys to select the handset that you want to
remove.
6. Press “OK” to make deregistration progress take effect.
4.3 Making an Intercom Call
On IP3062D:
1. Press “Menu”.
2. Select ”Phone Setting”.
3. Select “DECT Se tting”.
4. Select “Intercom” to enter the Intercom screen.
5. Use the Navigation Up and Down keys to view handset list and then press “OK” to
make an intercom call to the selected handset.
4.4 Making a Paging
On IP3062D:
1. Press “Menu”.
2. Select ”Phone Setting”.
3. Select “DECT Se tting”.
4. Select “Paging” to enter the Paging screen.
5. Use the Navigation Up and Down keys to view handset list and then press “OK” to
make a paging to the selected handset.
4.5 Ending a Paging
On IP3062D:
1. Press “Menu”.
2. Select ”Phone Setting”.
3. Select “DECT Se tting”.
4. Select “End Paging” to enter the End Paging screen.
5. Press “OK” to make the phone stop paging.
As for placing a call, answering a call, or ending a call from DECT handset operation,
please check your DECT handset user guide.
Moreover, when IP3062D is configured advanced Handset Setting ready, it can perform
many PBX-like call features, such as DID call (Direct Inward Dial call), Hunting Group,
Page 43
Page 43
MOCET IP3062D Professional IP Phone with DECT Base Station User Guide
Ringing Group, Au to Ans wer Mac hine and Voice Mail Box, in addition to basic calling
features. Refer to the scenarios below for applications. For advanced Handset Setting
configuration, please ask your Administrator or Service Provider to help.
DID calling: Receive a call from SIP trunk line directly to a specific registered
handset configured with a direct inward di al (DID) number.
Hunting Group: up to five registered handsets can be configured as a a single
hunt group. When the first registered handset in the group is busy, the other
handsets in the group will receive it. If no handsets in the group are available, the
calling party will hear a busy signal.
Ringing Group: up to five registered handsets can be configured as a si ngle ring
group. An incomi ng call to the phone will cause all the handsets to ring. When one
registered handset picks up the incoming call, the other s will be released.
Auto-Attendant: incoming callers will be automatically transferred to a specific
registered handset by pressing a directory number after listening to a message like
"Welcome to ACME Corporation. If you know your party’s extension, you may dial
it now. For sales, press one; for support, press two; to reach the operator, press
0.". Users can record their own auto-attendant greeting and configure calling
destinations for the IP3062D and up to five handsets.
Voice Mailbox: when regi stered handsets are unreachable or not answered, the
caller will be prompted to leave a voicemail.
Page 44
Page 44
MOCET IP3062D Professional IP Phone with DECT Base Station User Guide
5 Using Advanced Feat ures
The Getting Started chapter describes the steps used to customize the IP3062D from the
LCD menu of the phone. However, there are many advanced features that need to be
configured using the phone’s web user interface. This chapter provides instructions on
how to use these features.
5.1 Login Web UI
To use your web browser to configure the IP3062D, you need to know the IP address of
the phone on your l ocal area network (LAN). Using the LCD menu, find the IP address of
the phone by one of the following methods:
Menu > Information > IP Address.
Pressing “OK” when the phone is on the main screen.
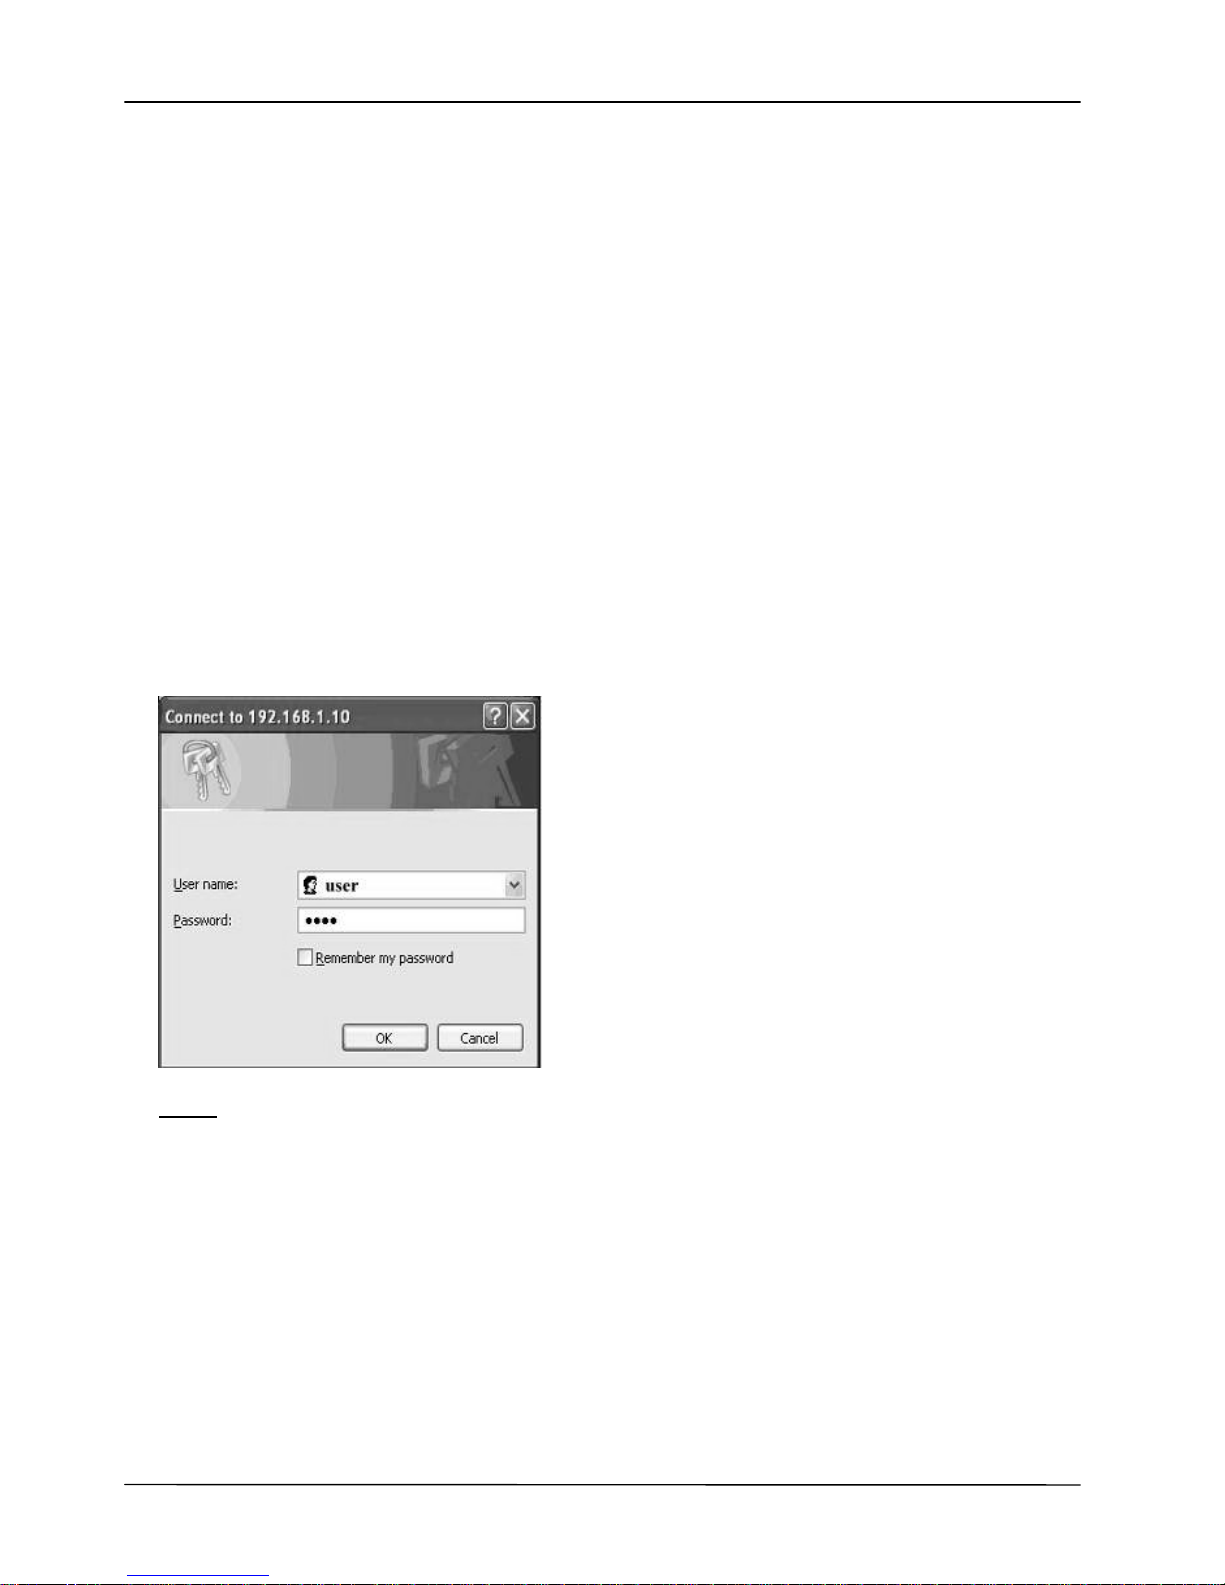
1. Point your web browser to the IP address of the IP3062D.
2. Enter the correct Username and Password information into the di alog box and press
OK.
Note: The default Username is “user” and the default Password is “1111” and the default
network settings are:
Default IP address: 192.168.1.10
Default Subnet mask: 255.255.255.0
Default Gateway: 192.168.1.1
Default DNS: 8.8.8.8
5.2 Changing the User’s P asswo rd
Some features of the IP3062D require you to enter a personal identification number (PIN)
for security. The default PIN of the IP3062D User account is “1111”.
To change the User password:
Page 45
Page 45
MOCET IP3062D Professional IP Phone with DECT Base Station User Guide
1. Navigate to the System tab.
2. Locate User Settings > User Password:.
3. Change the password to use a new PIN.
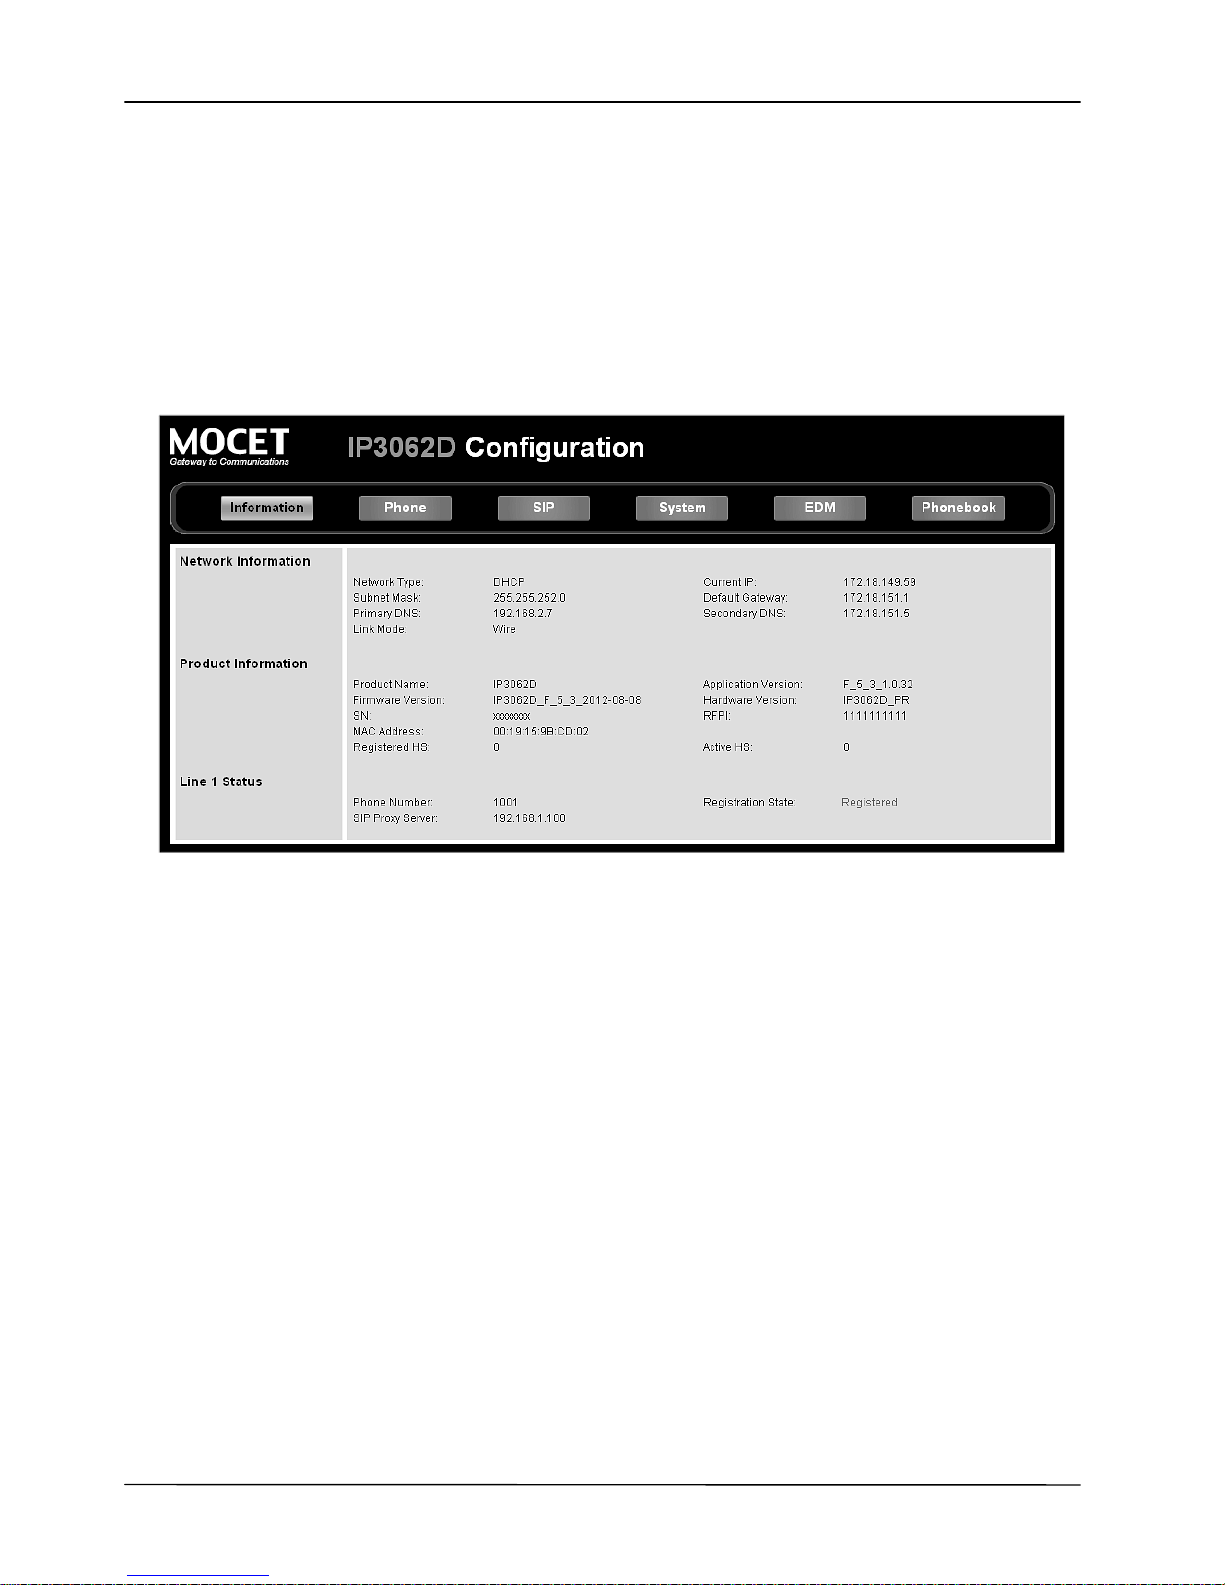
5.3 Viewing Phone Information on Web User Interface
Information is the first page you will see when you login to the phone’s web user interface.
This page lets you check the status of the IP Phone including network and product related
information as well as account status information.
For SIP Line status:
When this line is disabled, the line status will not be displayed.
“Registration State” will be marked “Registered” with green text.
“Unregistered” will be marked with red text.
5.4 Configuring Phone Settings
Phone Settings enables you to configure pri vate settings for phone. Select the Phone tab
of the web user interface to begin configuration.
From this page you can change following settings:
Device Volume
Tone and Ring types
Advanced phone features (DND, Auto-answer, Call Waiting, etc)
Speed dial settings
Voicemail settings
Programmable key settings
DECT handset registration
Here is the description of each field.
Page 46

Page 46
MOCET IP3062D Professional IP Phone with DECT Base Station User Guide
Field Name Function
Handset Mic
Set the input level of handset microphone.
Handset Speaker
Set the output level of handset speaker.
Handfree Mic
Set the input level of hand-free microphone.
Handfree Sp eaker
Set the output level of hand-free speaker.
Headset Mic
Set the input level of headset microphone.
Headset Speaker
Set the output level of headset speaker.
Ring Volume
Set the output level of ring.
Tone Type
Select the tone type.
There are 11 types of standard Tone for selection.
Ring Type
Select the ring type.
There are 11 types of standard Ring for selection.
Sidetone
Set the output level of side tone.
Preferred Line
Select the SIP line automatically to dial out if not press SIP
line manually when dialing.
Enable Music on Hold
Plays hold music on phone when held by remote.
Enable Auto A nswer
Turn on auto answer function.
Enable DND
Turn on DND function, block any incoming all
Enable Call Waiting
Turn on call waiting function.
Enable Call Waiting Tone
Play call waiting tone when there’s another incoming call.
Enable Hold Reminder
Turn on the Hold Reminder function.
Hold Reminder Time (sec)
Set the time (10~60 sec) that phone will remind user with a
tone when the call hold remote every this time period.
Hotline Number
Set the hotline number
Hotline Timeout(sec)
Set the time (1~60 sec) when phone off hook but not dial,
phone will dial out the hotline number automatically after
this time period.
Dial Timeout (sec)
Set the time (1~30 sec) that phone will dial out
automatically after this time period.
Enable Phone Lock
Lock the phone.
Enable Urgent Call
Enable Urgent Call to add urgent call option in dialing
screen.
Phone Number Display
style
Set the display style for calling name and number.
RTP Port Base
Set phone local RTP Base Port.
Speed Dialing Entry 0~9
There are 10 speed di al entries for user to store. Each entry
map to the numeri c keypad on the IP Phone.
Enable MWI LED Flash
Turn on MWI LED flash indication function.
Page 47

Page 47
MOCET IP3062D Professional IP Phone with DECT Base Station User Guide
Enable MWI Popup
Message
Turn on MWI pop up message function.
Programmable Key Setting
1~16
Please refer to the secti on 4.5. Managing programmable
keys.
Enter Register Mode
Press the button to enter DECT handset registration mode.
Deregister HS
Press the button to deregister the DECT handset.
5.5 Managing Programmable Keys
Your IP3062D Phone has 16 programmable keys which can be configured for different
features.
To use the programmable keys, just press the key, then the configured feature will be
executed, some features will blink the LEDs or turn on the related features.
To configure programmable keys, go to Phone tab of the web user interface, and find the
“Programmable Key Settings” section:
Option Name Function
Do Not Disturb
Enable/disable DND feature.
Lock IP-Phone
Lock your phone.
Speed Dial
Speed dial configured numbers.
Abbreviated Codes
Speed dial the codes.
Busy Forward
Set static forwarding number when busy.
Always Forward
Set static forwarding number unconditional.
No answer forward
Set static forwarding number when no answer.
DND Forward
Set forwarding number when DND feature is enabled.
Auto Answer
Enable/disable auto-answer feature.
Caller Blocking
Set a caller blocking i tem.
BLF
Set number for Busy lamp field feature.
Contact administrator for help.
Call Park
Set call park number, PBX related feature.
Contact administrator for help.
SLA
Set SLA number. PBX related fe ature.
Contact administrator for help.
Page 48

Page 48
MOCET IP3062D Professional IP Phone with DECT Base Station User Guide
Asterisk Parking N umber
Set Aster isk Park n umber, PBX related feature.
Contact administrator for help.
Asterisk Parking Slot
Set Aster isk Park Slot number, PBX related feature.
Contact administrator for help.
Intercom
Set Inte rcom number, PBX related feature.
Contact administrator for help.
Feature Code
Set speed dial for feature codes.
DTMF
Set DTMFs for call.
Save Settings
Save changes in this page to the phone.
Cancel
Discard all changes in this page.
5.6 Configuring SIP Line Settings
On the SIP tab of the web user interface, you can change various SIP settings for each
Line.
A user can block specific calls by Caller ID (CLID). For each SIP Line, you can confi gure
up to 10 blocking entries.
Field Name Function
Line Shared
Enable/disable line shared.
Always Call Forwarding
Enable/disable always call forwarding.
Busy Call Forwarding
Enable/disable busy call forwarding.
No-Answer Call Forwarding
Enable/disable no-answer call forwarding.
DND Call Forwarding
Enable/disable DND call forwarding.
No Answer Timeout
Set no answer timeout time (seconds).
Always Forward Destinatio n
Set always forward number.
Busy Forward Destination
Set busy forward number.
No-Answer Forward Destination
Set no answer forward number.
DND Forward Destination
Set DND forward number.
Enable Block Anonymous Call
Enable/disable block anonymous call feature.
Caller Blocking Entry 0~9
Set caller blocking numbers.
Save Settings
Save changes in this page to the phone.
Cancel
Discard all changes in this page.
Page 49

Page 49
MOCET IP3062D Professional IP Phone with DECT Base Station User Guide
5.7 Configuring System Settings
On the System tab, the user can access or change:
Password
Time settings
Debug logs
Reboot the phone
Configure key sequences
Field Name Function
User Name
The user username. It is fixed, and can’t be changed.
User Password
The user password; the default password is 1111.
Auto DST
Enable Automatic daylight saving time flag.
Time Format
Set LCD date/time display modes.
Time Zone
Set Phone Time Zone.
System Log Download
Click to download System Log.
SIP Log Download
Click to download SIP Log.
Reboot
Click to reboot IP Phone.
Reboot Sequence
Set key sequence for reboot; the default sequence is
***732668.
Reset Sequence
Set key sequence for reset; the default sequence is
***73738.
Update by TFTP Sequence
Set key sequence for update by TFTP; the default
sequence is ***8732831.
Debug Mode Sequence
Set key sequence for debug mode; the default
sequence is ***33284.
Update by USB Sequence
Set key sequence for update by USB; the defaul
t
sequence is ***8732832.
Save Settings
Save changes in this page to the phone.
Cancel
Discard all changes in this page.
5.8 Managing EDM
On the EDM tab, the user can configure 24 programable keys of each EDM. For the
details of setting options, please refer to the section 5.5. Managing Programmable Keys.
5.9 Managing Phonebook
On the Phonebook tab, the user can manage his phone directories.
Page 50

Page 50
MOCET IP3062D Professional IP Phone with DECT Base Station User Guide
5.9.1 Private Phonebook
For the Private Phonebook, the user can add, edit, delete or dial an entry directly from the
web page. The user can also upload his contacts from a file using a web browser. The
Private Phonebook can have up to 100 contacts.
5.9.2 Public Phonebook
For the Public Phonebook, a user or administrator can upload a file using a web browser.
5.9.3 LDAP Directory
The LDAP Directory can be configured using a web browser; please contact your
administrator or Service Provider support desk for more information.
Field Name Function
Number Guessing Option
Set number guessing feature data source.
LDAP Security
Set LDAP sec urity type, SSL2, SSL3 or TLSv1.
LDAP Server Address
Set LDAP server address.
LDAP Server Port
Set LDAP Ser ver port.
LDAP Login Name
Set LDAP user name.
LDAP Login Password
Set LDAP user password.
LDAP Base
Set LDAP Search Base.
LDAP Max. Hits
Set retrieve record counts from Server one time.
LDAP Name F ilter
Set Name guessing filed in LDAP server.
LDAP Number Filter
Set Number guessing field in LDAP server.
Test Configuration
Click to test if the LDAP server available. Show “Error” i n
red when unavailable, “Available” in green when available,
“Not Configured” in black when hasn’t set select LDAP.
5.10 Placing a Call from the Private Phonebook
There is a “Dial” button for each contact entry under Pricvate Phonebook tab, you can
press it and place a call to the contact.
A new window will show up when you click the “Dial” button,
Page 51
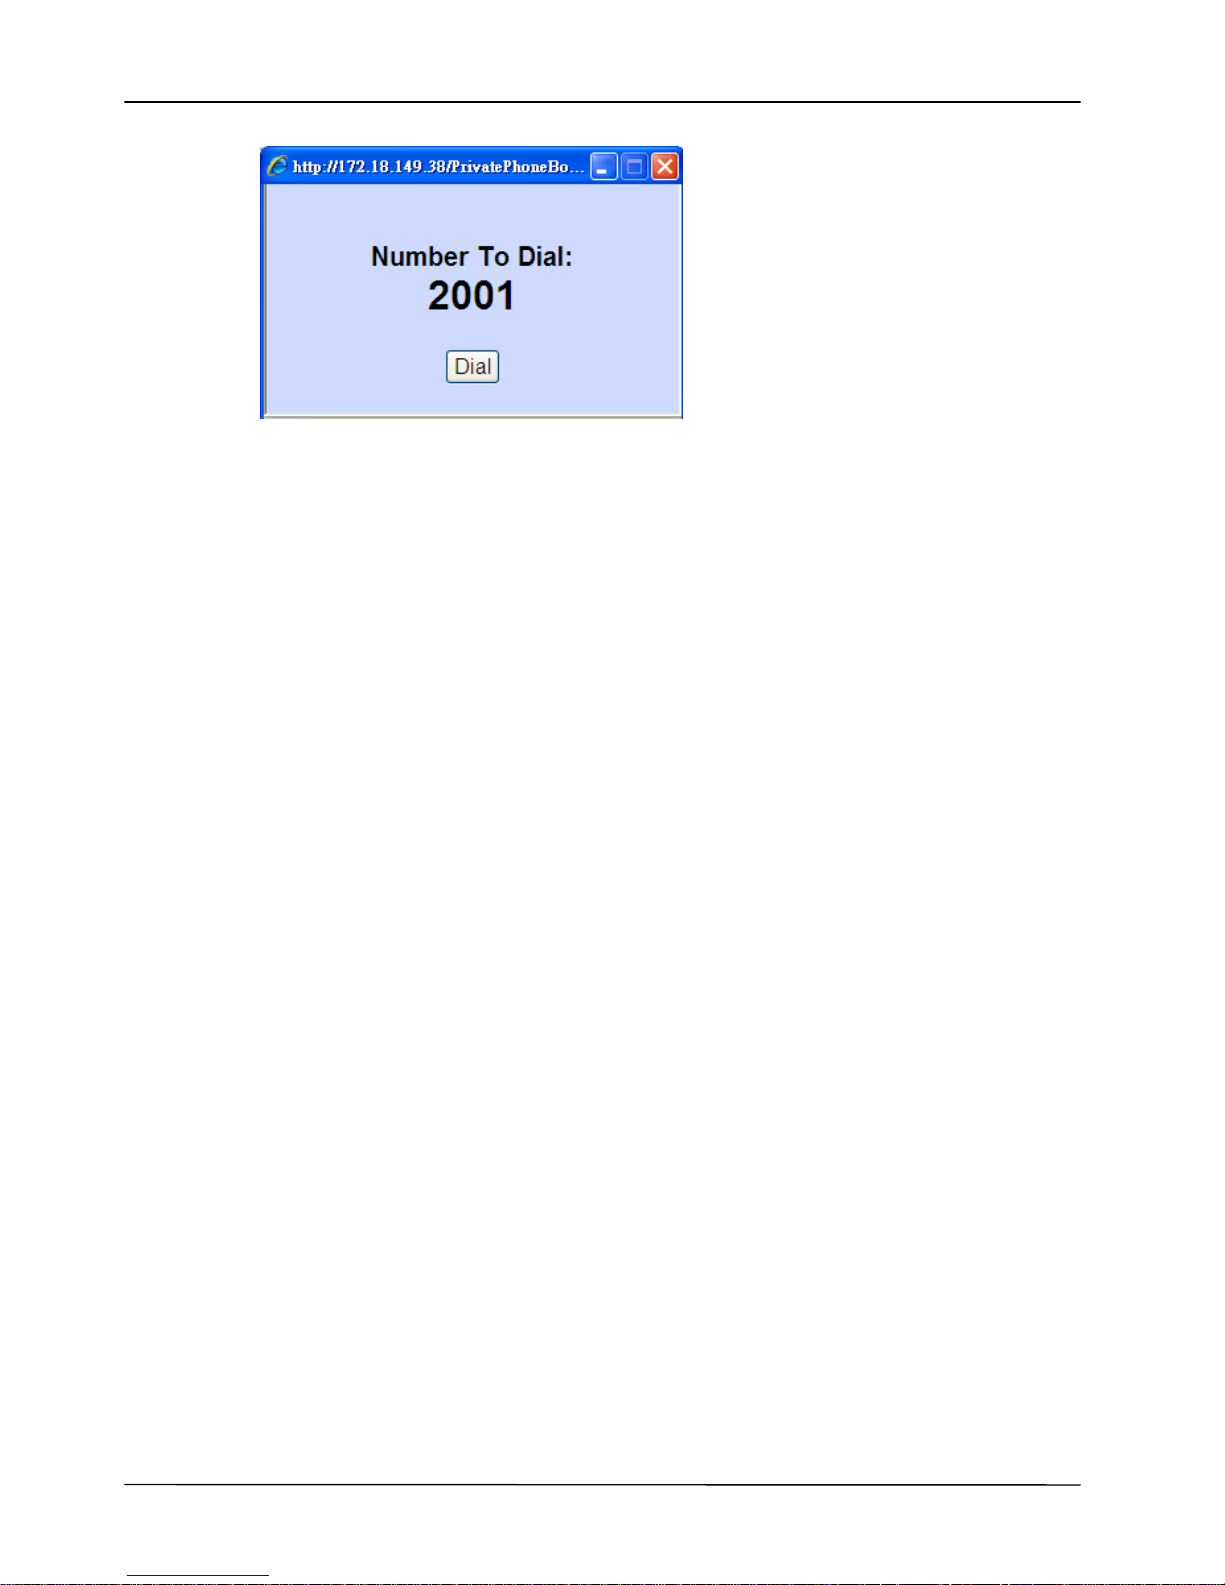
Page 51
MOCET IP3062D Professional IP Phone with DECT Base Station User Guide
If you click “Dial” to place the call, when the number dials out, the window will close.
5.11 Sending an Instant Message (IM)
On the Phonebook tab, the user can send instant messages.
To send an instant message:
1. Select a registered line that you want to use to send the IM.
2. Enter a text message.
3. Enter a contact’s number.
4. Press “Send” button to send the instant message out.
Page 52

Page 52
MOCET IP3062D Professional IP Phone with DECT Base Station User Guide
6 Using Advanced Call Features
6.1 Centralized Conferencing (for Broadsoft PBX)
The IP3062D allows you to create multiple conferences with unlimited participants
(depending on servi ce or IP PBX limitations) when your Administrator enables Centralized
Conferencing.
The steps to make centralized conferencing available are different for each supported IP
PBX or hosted SIP service. On a Broadsoft softswitch, you can initiate a Server-based
conference by pressing “Conf” soft key on LCD.
Note: the “Conf ” soft-key will show only you have set the “Conference Numb er” on SIP
Web page.
To create a Conference:
1. Place some calls with the participants.
2. Press “NewCal” to enter dial screen, and a “Conf” soft-key will show up.
3. Press “Conf” soft-key and a conference will be created.
4. All participants are added to the conference automatically.
To add new participant to the conference:
1. Press “NewCal”, and dial the participant you want to add.
2. There will be a “Conf” soft-key when the call is answered by the other participant.
3. Press the “Conf” soft-key and the new participant will be added to the conference.
6.2 Call Waiting
The call waiting feature notifies the user on an active call of a new incoming call. You can
disable the call wai ting feature, so that the new incoming call is automati cally rejected by
the phone with a busy message.
If you disable call waiting on the phone, and the user is on a call, any further incoming
calls receive busy unless “Call Forward Busy” is configured on the phone, where it then
forwards the call acco rding to the configured destination.
6.3 Intercom Call
6.3.1 Answering an Intercom Call
By default, the IP phone allows i ncoming intercom calls to be automatically answered on
your phone. If the intercom call comes into the phone while an active call is already
present, the phone puts the active call on hold and answers the intercom call.
6.3.2 Placing an Intercom Call
The Intercom call feature depends on PBX/SIP Serve r as there are differen t intercom call
codes for each servers; for example, the Asterisk default intercom code is “*80”.
Page 53

Page 53
MOCET IP3062D Professional IP Phone with DECT Base Station User Guide
To place intercom call on an Asterisk server, just make a call to “*80”+ [destination number]
(“*801001” for example). For other phone systems or hosted SIP services, please contact
your administrator or Service Provider for more information.
Page 54

Page 54
MOCET IP3062D Professional IP Phone with DECT Base Station User Guide
7 Phone Firmware Upgrade
The IP3062D supports several different ways to update its firmware (please refer to the
table below). This is for system administrators or service providers. End users normally do
not have to upgrade firmware by themselves. Please contact your Administrator or service
provider for assistance.
No. Method Description User Admin. Dist.
1
Auto-Provision
upgrade with MOCET
APS
Firmware upgrade via TFTP/ FTP/
HTTP/ HTTPS mass provisioning by
using T ecom APS protocol with
encrypted XML configurati on file.
2
Upgrade from US B
memory do ngle*
Press the special keys combination
on phone LCM to update firmware
from USB memory dongle.
3
Upgrade using web
browser on a specified
computer
Download SW Update Pack fr om PC
that Dual Kernel Image and
Upgradable Applications are
supported.
4
Upgrade using
TFTP/FTP/HTTP/HTTPS
server
Firmware upgrade via
TFTP/FTP/HTTP/HTTPS server with
XML configuration file.
5
Engineering key
sequences on root
menu
Download SW Update Pack fr om
TFTP server.
6
Emergency Upgrade
on Boot
When the system partition on flash is
damaged, press the special keys
combination in booting to download
complete flash image from TFTP
server at fixed IP address.
7
Updating images
through Console by
U-boot
This method is required to have a
dedicated console cable and take
apart housings.
It downloads image from TFTP
server by issuing download
commands through a dedi cated
console cable.
Note: Upgrade firmware from USB memory dongle needs to contact your distributor (or
service provide) to acquire the USB memory dongle with the authorized firmware.
Page 55
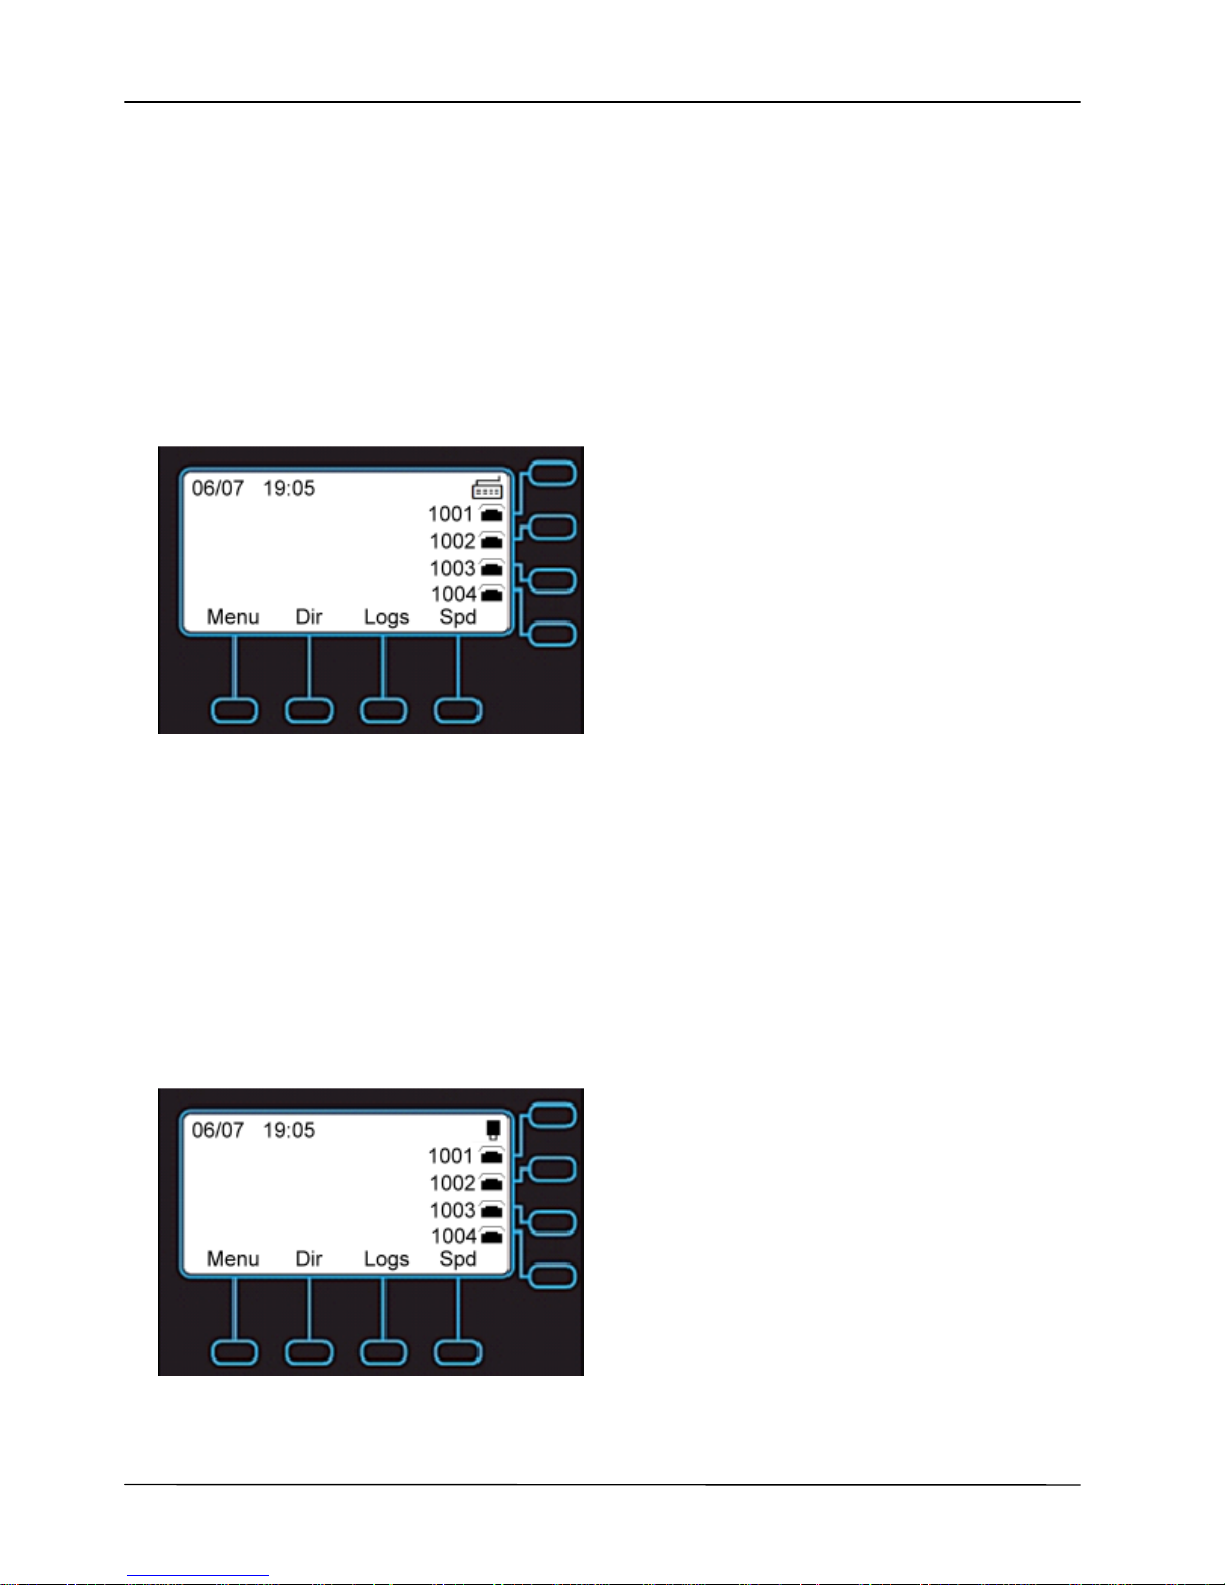
Page 55
MOCET IP3062D Professional IP Phone with DECT Base Station User Guide
8 Using USB Devices with Your Phone
IP3062D can support different USB devices including USB keyboard, USB memory
dongle* and USB Wi-Fi dongle.
8.1 USB Keyboard
When attaching an USB keyboard on your phone, there will be an USB keyboard icon on
the LCD screen.
With USB keyboard, you can:
Dial phone number
Edit Phonebook
Edit Speed Dial
Edit Instant Message
Edit Programmable Keys fields and EDM fields
8.2 USB Memory Dongle
When attaching an USB memory dongle on your phone, there will be a USB memory
dongle icon on the LCD screen.
With USB memory dongle inserted in the IP3062D, you can:
Backup your phone’s configuration file.
Backup your private phonebook.
Page 56
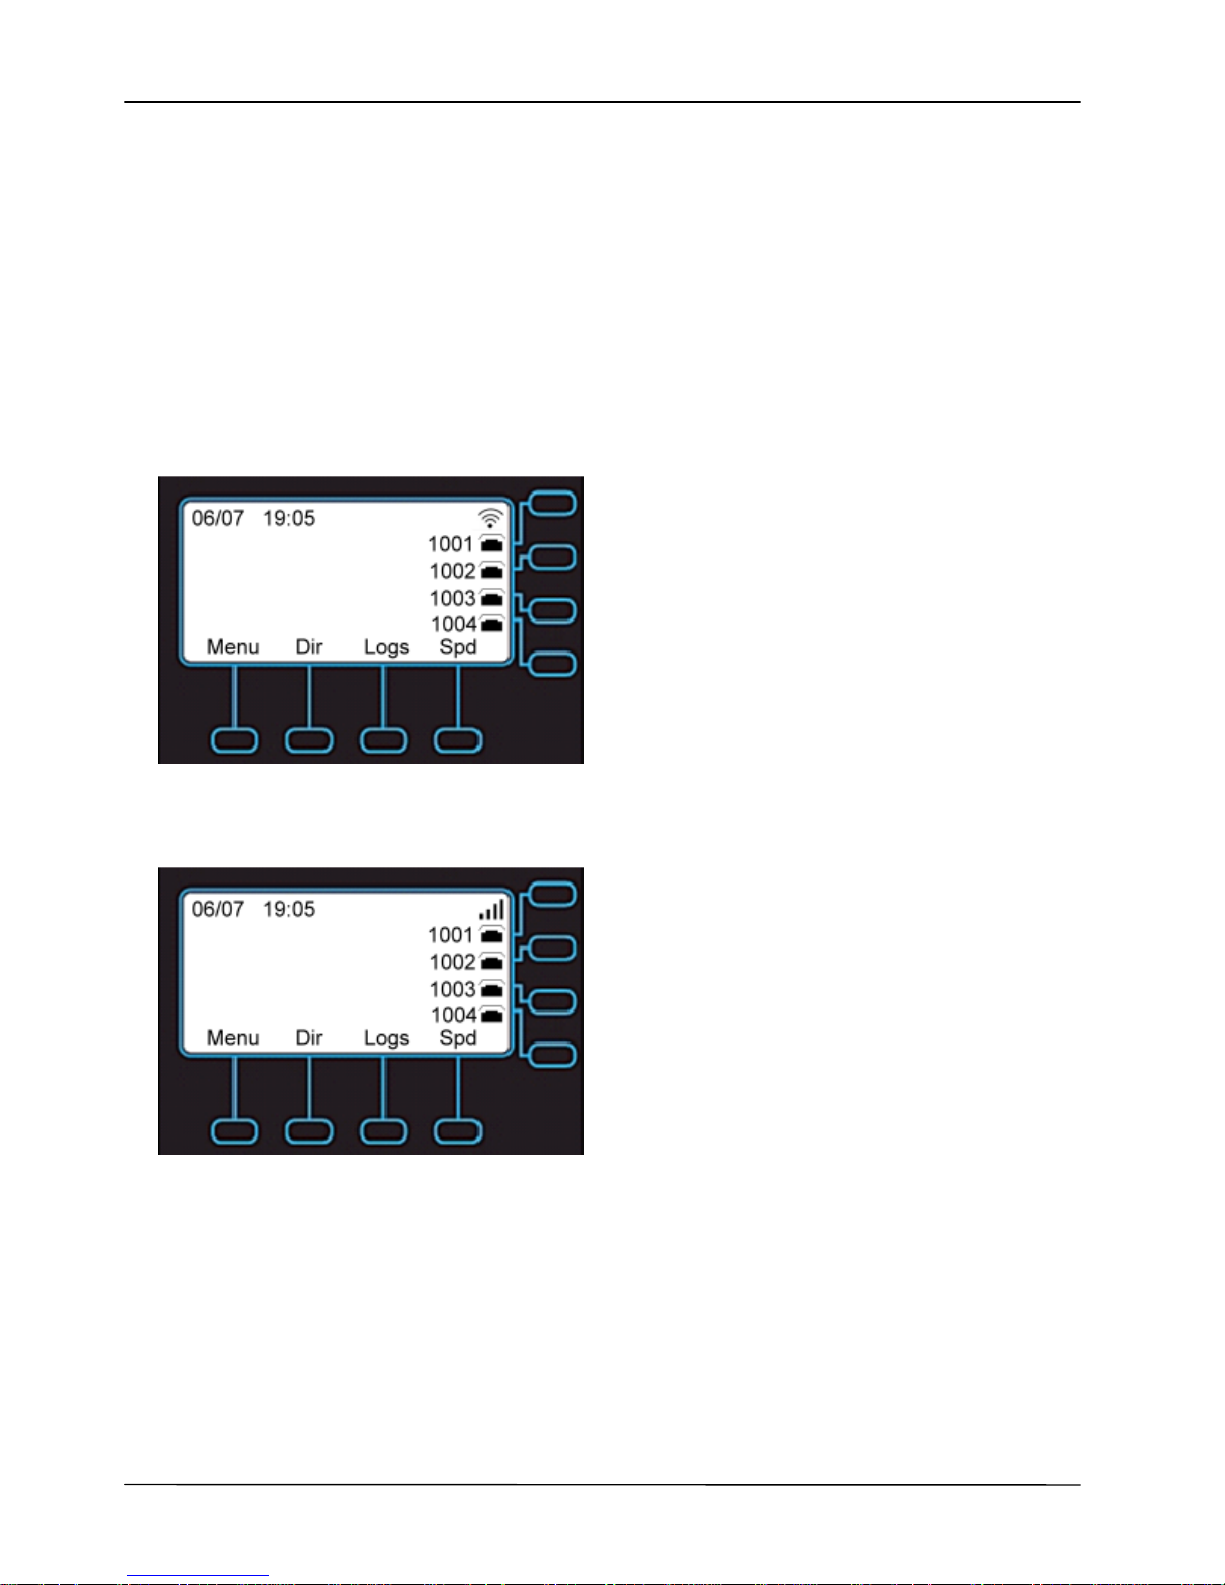
Page 56
MOCET IP3062D Professional IP Phone with DECT Base Station User Guide
Use .wav files for your Music-on-Hold (MoH), ringtones, and play recorded voi ce
messages.
Upgrade IP3062D phone firmware.
5.8 USB WLAN Dongle
To use an USB WLAN dongle with IP3062D, you must use the supported model sold by
MOCET.
When attaching an USB WLAN dongle on your phone, your phone will display an icon on
the LCD screen.
After connecting to a W LAN, your phone will display a WLAN signal strength icon on the
screen.
To configure the USB WLAN dongle, please contact your admini strator or service provider
for more information or assistance.
Page 57

Page 57
MOCET IP3062D Professional IP Phone with DECT Base Station User Guide
9 Troubleshooting
Symptom Check & Remedy
No operation
Check if the power adapter is properly connected.
Check if the Ethernet cable is properly connected.
No dial tone
Check if the handset cord is properly connected.
Check if the power adapter is properly connected.
LAN connection lost
status message
Check if the Ethernet cable is properly connected.
Cannot make call
Check the status of your SIP registration status or
contact your administrator, supplier or ITSP for more
information or assistance.
Cannot receive a call
Check if the Ethernet cable is properly connected.
Check the status of your SIP registration status, or
contact your administrator, Distributor (dealer) or ITSP
for more information or assistance.
One way voice
Usually this is related to NAT tranversal issue. Please
contact your network vendor or service provider.
Cannot connect to the
IP3062 configuration
pages with a browser
Check if the Ethernet cable is properly connected.
Check the IP address of the IP Phone.
Check if your firewall/NAT settings is correct.
Page 58

Page 58
MOCET IP3062D Professional IP Phone with DECT Base Station User Guide
10 Glossary
10.1 Acronyms
ANC
APS
B2BUA
CA
CID
CODEC
CNG
CPC
CPE
CWCID
CWI
CWT
DHCP
DNS
DTMF
ETSI
FQDN
FSK
HTML
HTTP
ICMP
IETF
IP
ISP
ITSP
IVR
LAN
LBR
LBRC
MWI
PoE
PPPoE
PSTN
NAT
NTP
RTP
RTCP
SDP
SIP
TFTP
TCP
UDP
URL
VLAN
WAN
XDSL
XML
Anonymous Call
Auto-Provisioning Server
Back to Back User Agent
Certificate Authority
Caller ID
Coder and Decoder of Voice
Comfort Noise Generation
Calling Party Control
Customer Premises Equipment
Call Waiting Caller ID
Call Waiting Indication
Call Waiting Tone
Dynamic Host Configuration Protocol
Domain Name Server
Dual Tone Multiple Frequency
European Telecomm unication Standard
Fully Qualified Domain Name
Frequency Shift Keying
Hypertext Markup Language
Hypertext Transfer Pr otocol
Internet Control Message Protocol
Internet Engineering Task Force
Internet Protocol
Internet Service Provider
IP Telephony Service Provider
Interactive Voice Response
Local Area Network
Low Bit Rate
Low Bit Rate Codec
Message Waiting Indication
Power over Ethernet (IEEE802.3af standard)
Point-to-point protocol over Ethernet (mainly for xDSL modem connection)
Public Switched Telephone Network
Network Address Translation
Network Time Protocol
Real Time Protocol
Real Time Control Protocol
Session Description Protocol
Session Initiation Protocol
Trivial File Transfer Protocol
Transmission Control Protocol
User Datagram Protocol
Uniform Resource Locator
Virtual Local Area Network
Wide Area Network
Digital Subscriber Loop, such as ADSL, VDSL, HDSL, etc.,….
Extensible Markup Language
Page 59
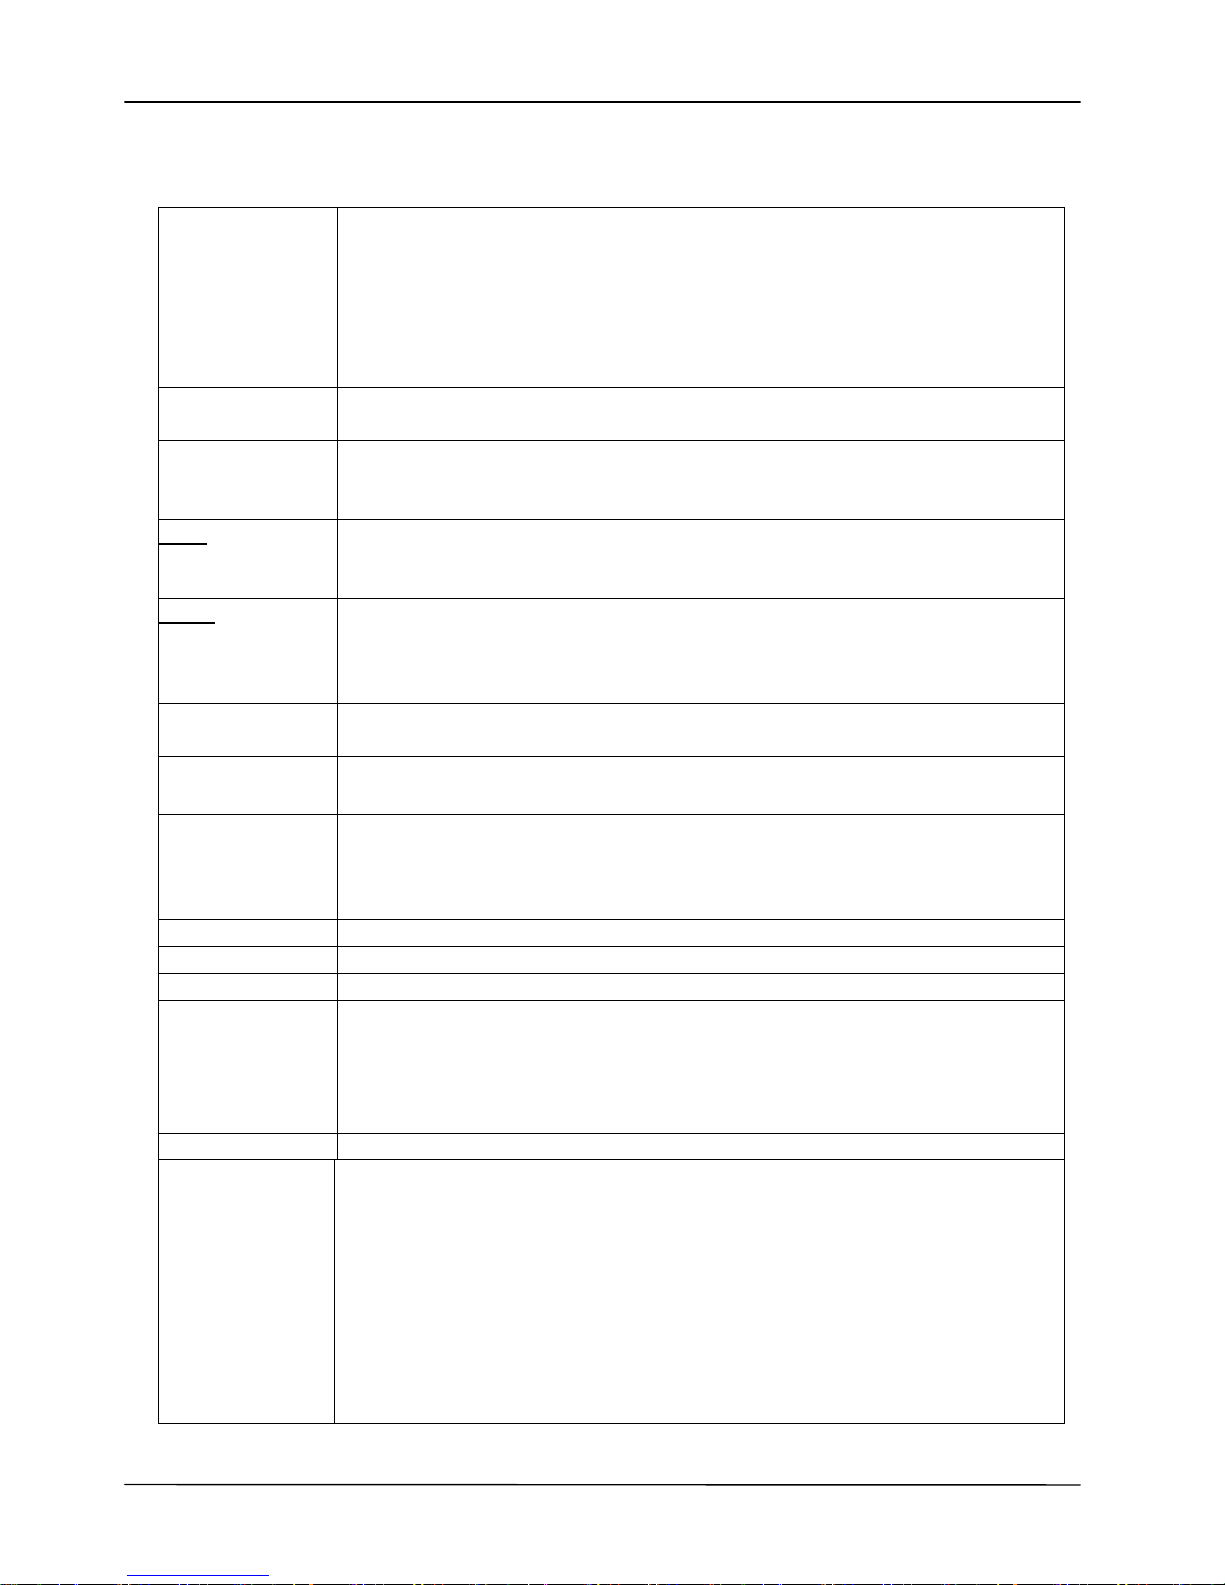
Page 59
MOCET IP3062D Professional IP Phone with DECT Base Station User Guide
10.2 Terminology
10/100BASE-T
It is a LAN transmission line specification stipulated b y IEEE.
Transmission speed is 10 or 100 Mbps and the modulation technique
is base-band modulation. The cable uses unshielded twisted pair,
similar to a telephone wire. 10BaseT is an IEEE standard (802.3) for
operating 10 Mbps Ethernet networks (LANs) with twisted pair cabling
and a wiring hub.
802.1p An IEEE standard for providing QoS using three bits (defined in
802.1q) to allow switches to reorder packets based on priority level.
802.1q An IEEE standard for providing virtual LAN (VLAN) identification and
QoS levels. Three bits are used to allow eight priority levels, and 12
bits are used to identify up to 4,096 VLANs.
AGC
A
utomatic Gain Control is a feature of IP solutions units that all ows the
units to automatically adjust the incoming voice signal to a user
defined level in dBm.
A-law The PCM coding and compression standard used in Europe and in
areas outside of North America influence. A Law Encoding is the
method of encoding sampled audio waveforms used in 2.048Mbps, 30
channel PCM primary system known as E-carrier.
Auto answer In telephone call control : The capability of a machine to answer a
ringing telephone without human intervention.
Autodial In telephone call control: An auxiliary device for a telephone that
automatically dials any of a group of prerecorded telephone numbers.
Blocked Calls Caused by an insufficient network facility that does not have enough
lines to allow calls to reach a given destination. May also pertain to a
call from an originati ng number that is blocked by the receiving
telephone number.
Call Completion The point at which a dialed number is answered.
Call Termination The point at which a call is disconnected.
CDR In telephone call control: Call Detail Record for billing
IP Centrex
This service is offered by the LEC to the end user. The feature-rich
Centrex line offers the same features and benefits as a PBX to a
customer without the capital investment or main tenance charges. The
LEC charges a monthly fee to the customer, who must agree to sign a
term agreement. And the abive service is thru VoIP called IP centrex.
CO Switching center for the local exchange carrier.
CODEC The CODEC (CODER/DECODER) is a standard through which voice
information can be encoded into data or decoded back to voice
information. Both a Coder and Decoder are necessary on both sides
of the telephone call since telephone calls occur simultaneously in
both directions. Bandwidth is an extremely important factor in QOS
(Quality of Service). MOS (Mean Opinion Score) is an attempt to
make a quantifiable benchmark of voice quality. Below are examples
of the CODEC, bit rate and mean opinion score: G.711 (toll quality)
64K MOS=4.1, G.726 16K (32K) MOS =3.8, G.729AB (cell phone
quality) 8K MOS=3.7.
Page 60

Page 60
MOCET IP3062D Professional IP Phone with DECT Base Station User Guide
Customer
Premise
Equipment
The only part of the telecommunications system that the customer
comes into direct contact with. Example of such pieces of equipment
are: telephones, key systems, PBXs, voicemail systems and call
accounting systems as well as wiring telephone jacks. T he standard
for this equipment is set by the FCC, and the equipment is supplied by
an interconnect company.
DHCP
A
utility that enables a server to dynamically assign IP addresses from
a predefined list and limit their time of use so that they can be
reassigned. Without DHCP, an IT Manager would have to manually
enter in all the IP addresses of all the computers on the network.
When DHCP is used, whenever a computer logs onto the network, it
automatically gets an IP address assigned to it.
DID Direct Inward Dialing: The ability to make a telephone call directly into
an internal extension without having to go through the operator.
Diff-Serv Differentiated Services : The Diff-Serv model divides traffic into a
small number of classes to provide quality of service (QoS). One of
QoS in internet
Direct inward
dialing
A Centrex feature that allo ws an outside caller to dial a central
business number, as well as an extension number.
Diversity antenna A type of antenna system that uses two antennas to maximize
reception and transmission quality and reduce in terference.
DNS Domain Name Service : A server/program that translates URLs to IP
addresses by accessing a database maintained on a collection of
Internet servers. The program works behind the scenes to facilitate
surfing the Web with alpha versus numeric addresses. A DNS server
converts a name like mywebsite.com to a series of numbers like
107.22.55.26. Every website has its own specific IP address on the
Internet. Typically one or more DNS servers is located in an IP
network.
DSL Various technology protocols for high-speed data, voice and video
transmission over ordinary twisted-pair copper POTS (Pl ain Old
Telephone Service) telephone wires.
DSP Digital Signal Processors (DSP) standardize the different states of a
digital signal into an organized and understandable si gnal. DSP
circuits can differentiate between digital signals and digital noise.
Signal-to-Noise ratio is one of the most important factors in telephony
voice communication because if there is too much noise in a signal,
the DSP will be unable to find a signal standard and lose it. DSP
circuits always adjust digital signal levels so the can mai n tain a
standard without noise.
DTMF Dual Tone Multi-Frequency: The type of audio signals generated
when you press the buttons on a touch-tone telephone. Can be used
in inbound(after voice channel connected) and outbound(before
voice channel connected) application.
Ethernet International standard networking technology for wired
implementations. Basic 10BaseT networks offer a bandwidth of
about 10 Mbps. Fast Ethernet (100 Mbps) and Gigabit Ethernet
(1000 Mbps) are becoming popular.
G.711 64 kbps PCM half-duplex codec (high quality, high bandwidth,
minimum processor load)
Page 61

Page 61
MOCET IP3062D Professional IP Phone with DECT Base Station User Guide
G.723.1 6.4/5.3 kbps MP-MLQ codec (low quality, low bandwidth, high
processor load due to the compression)
G.726 40/32/24/16 ADPCM codec (good quality, medium bandwidth, low
processor load)
G.729 8 kbps ACELP codec (medium quality, low bandwidth, high
processor load)
IEEE Institute of Electrical and Electronics Engineers, New York,
www.ieee.org. A membership organization that includes engineers,
scientists and students in electronics and allied fields. It has more
than 300,000 members. The IEEE is an international organiza tion
that develops standards for hundreds of electronic and electri cal
technologies for computers and communications. The organization
uses a series of numbers, like the Dewey Decimal system in
libraries, to differentiate between the various technology families.
IP (Internet
Protocol)
Internet Protocol is located at 3rd layer of ISO network model. A set
of rules used to send and receive messages at the Internet address
level. IP protocol is widely used in Internet and LAN networks. The
purpose is to deliver data between computing equipment over the
network. The protocol is generally effective but does not guarantee
complete and accurate data communications.
IP address A 32-bit number that identifies each sender or receiver of
information that is sent across the Internet. An IP address has two
parts: an identifier of a particular network on the Internet and an
identifier of the particular device (which can be a server or a
workstation) within that network. A number used to identify the
location of a host device. It is expressed in numeric dot notation
(e.g. 202.203.27.31).
IP Centrex
This service is offered by the LEC to the end user. The feature-rich
Centrex line offers the same features and benefits as a PBX to a
customer without the capital investment or mai n tenance charges.
The LEC charges a monthly fee to the customer, who must agree to
sign a term agreement. And the above service is thru VoIP called IP
centrex.
Jitter Jitter refers to fluctuations in transmission delay time. In the case of
voice data, conversations are packaged into packets (IP
packetization) and transmitted. Individual packets can take different
routes through the varied networks that comprise the Internet. When
the time interval for the arrival of the packets is not constant the
timing fluctuations that may occur are referred to as "jitter".
MAC Medium Access Cont roller (MAC) : The IEEE 802.11 Standard
encompasses the physical layer (PHY) and the lower portion of the
data link layer. The lower portion of the data link layer is often
referred to as the Medium Access Controller (MAC) sublayer. Every
wireless 802.11 device has its own specific MAC address hardcoded into it. This uni que identifier can be used to provide security
for wireless networks. When a network uses a MAC table, only the
802.11 radios that have had their MAC addresses added to that
network's MAC table will be able to get onto the network.
Page 62

Page 62
MOCET IP3062D Professional IP Phone with DECT Base Station User Guide
NAT Network Address Translation: A network capability that enables a
houseful of computers to dynamically share a single incoming IP
address from a dial-up, cable or xDSL connection. NAT takes the
single incoming IP address and creates new IP address for each
client computer on the network.
Numbering plan In a communications network, a numbering plan allocates specific
numeric codes to identify each subscriber line, special lines, trunk
lines, etc. Numbering plans can be divided into the numbering
system and number assignments. The numbering system indicates
the number of digits to be assigned and the basi c scheme of number
assignment. The assignment of specific codes is performed
according to the numbering system.
PBX Private Branch Exchange: An in-house telephone switching system
that interconnects telephone extensions to each other as well as to
the outside telephone network.
Peer-to-peer
network
A wireless or wired computer network that has no server or central
hub or router. All the networked PCs are equally able to act as a
network server or client, and each client computer can talk to all the
other wireless computers without having to go through an acce ss
point or hub. However, since there is no central base station to
monitor traffic or provide Internet access, the various signals can
collide with each other, reducing overall performance.
POTS Plain Old Telephone Service (POTS), or Pretty Old Telephone
System is the standard analog traditional telephone service that
most homes use. In contrast, telephone services based on high-
speed, digital communications, such as ISDN and DSL, are not
POTS. The main distinctions between POTS and non-POTS
services are speed and bandwidth.
Proxy server Used in larger companies and organizations to improve network
operations and security, a proxy server is able to prevent direct
communication between two or more networks. The proxy server
forwards allowable data requests to remote servers and/or responds
to data requests directly from stored remote server data.
PSTN Public Switched Telephone Network: The worldwide voice telephone
network.
QoS Quality of service (QoS)
RJ-45 Standard connectors used in Ethernet networks. Even though they
look very similar to standard RJ-11 telephone connectors, RJ-45
connectors can have up to eight wires, whereas telephone
connectors have only four.
Router A device that forwards data packets from one local area network
(LAN) or wide area network (WAN) to another. Based on routing
tables and routing protocols, routers can read the network address
in each transmitted frame and make a decision on how to send it via
the most efficient route based on traffic load, line costs, speed, bad
connections, etc.
Page 63

Page 63
MOCET IP3062D Professional IP Phone with DECT Base Station User Guide
RTP/RTCP Real-Time Pr otocol/Real-Time Control Protocol(RTP / RTCP) : IETF
specifications for audio and video signal management. Allows
applications to synchronize and spool audio and video information.
RTP (Real Time Protocol) is specifically concerned with the
dependable transmission of latency-sensitive traffic across the
network and is involved in using time stamping to determine network
jitter tolerance and makes sure that voice packets are arriving in
order.
SIP Session Initiation Protocol: A protocol that provides telephony
services similar to H.323, but is less complex and uses less
resources. SIP (Session Initiation Protocol) is a signaling protocol for
Internet conferencing, telephony, presence, events notification and
instant messaging. SIP is a text-based protocol, similar to HTTP and
SMTP, for initiating interactive communi cation sessions between
users.
Subnetwork or
Subnet
Found in larger networks, these smaller networks are used to
simplify addressing between numerous computers. Subnets connect
to the central network through a router, hub or gateway. Each
individual wireless LAN will probably use the same subnet for all the
local computers it talks to.
TCP/IP Internet Standard Protocol: The underlying technology behind the
Internet and communi cations between computers in a network. The
first part, TCP, is the transport part, which matches the size of the
messages on either end and guarantees that the correct message
has been received. The IP part is the user's computer address on a
network. Every computer in a TCP/IP network has its own IP
address that is either dynamically assigned at startup or
permanently assigned. All TCP/IP messages contain the address of
the destination network as well as the address of the destination
station. This enables TCP/IP messages to be transmitted to multiple
networks (subnets) within an organization or worldwide.
TOS Type of Service: A method of setting precedence for a particular
type of traffic for QoS.
UDP User Datagram Protocol. An unreliable networking layer that sits at
the same level of the networking stack at TCP. UDP is a
connectionless transport protocol that is part of a suite of protocols
(the others being RTP and IP) that allow for the timely and efficient
transfer of voice data across and IP network. UDP is the better
transport protocol for VoIP data than TCP.
VAD Voice Activity Detection (VAD) helps save bandwidth during calls.
Examples: When you are making a VoIP call and you are not
speaking and you are listening, that silence is still taking up
bandwidth during the call . When silence is detected by VAD
software over a predetermined length of time, is sends silent
packets that inform other VAD enabled systems to stop holding the
bandwidth for these empty packets.
Page 64

Page 64
MOCET IP3062D Professional IP Phone with DECT Base Station User Guide
VoIP Voice Over Internet Protocol : VoIP is based on the principal of
transmitting digitized voi ce packets over networks. Basically, VoIP
consists of converting voice signals into streams of digital packets
and sending those packets of data through an IP-constructed
network environment. VoIP can work in both LAN (local area
network) and WAN (wide area network) environments for
intranetwork or internetwork communication between VoIP channel
users. Routers and switches and other special compression
protocols direct the packetized voice data to their destination IP
address. VoIP can be less expensive than voice transmission using
standard analog packets over POTS (Plain Old Telephone Service).
It allows telephone calls, faxes, or overhead paging to be
transported over an existing IP data network topology.
VPN Virtual Private Network(VPN) is a virtual created sub-network based
on a public real network. A type of technology designed to increase
the security of information transferred over the Internet. VPN can
work with either wired or wireles s netwo rks, as well as with dial-up
connections over POTS. VPN creates a private encrypted tunnel
from the end user's computer, through the local wireless network,
through the Internet, all the way to the corporate servers and
database.
WAN Wide Area Network: For global or long distance networking access
thru the support of telecommunication devices. A communication
system of connecting PCs and other computing devices across a
large local, regional, national or international geographic area. Also
used to distinguish between phone-based data networks and Wi-Fi.
Phone networks are considered WANs and Wi-Fi networks are
considered Wireless Local Area Networks (WLANs).
WLAN Also referred to as LAN. A type of local-area network that uses hi gh-
frequency radio waves rather than wires to communicate between
nodes.
============= Th e End of Document =========== ====
 Loading...