

Page 1
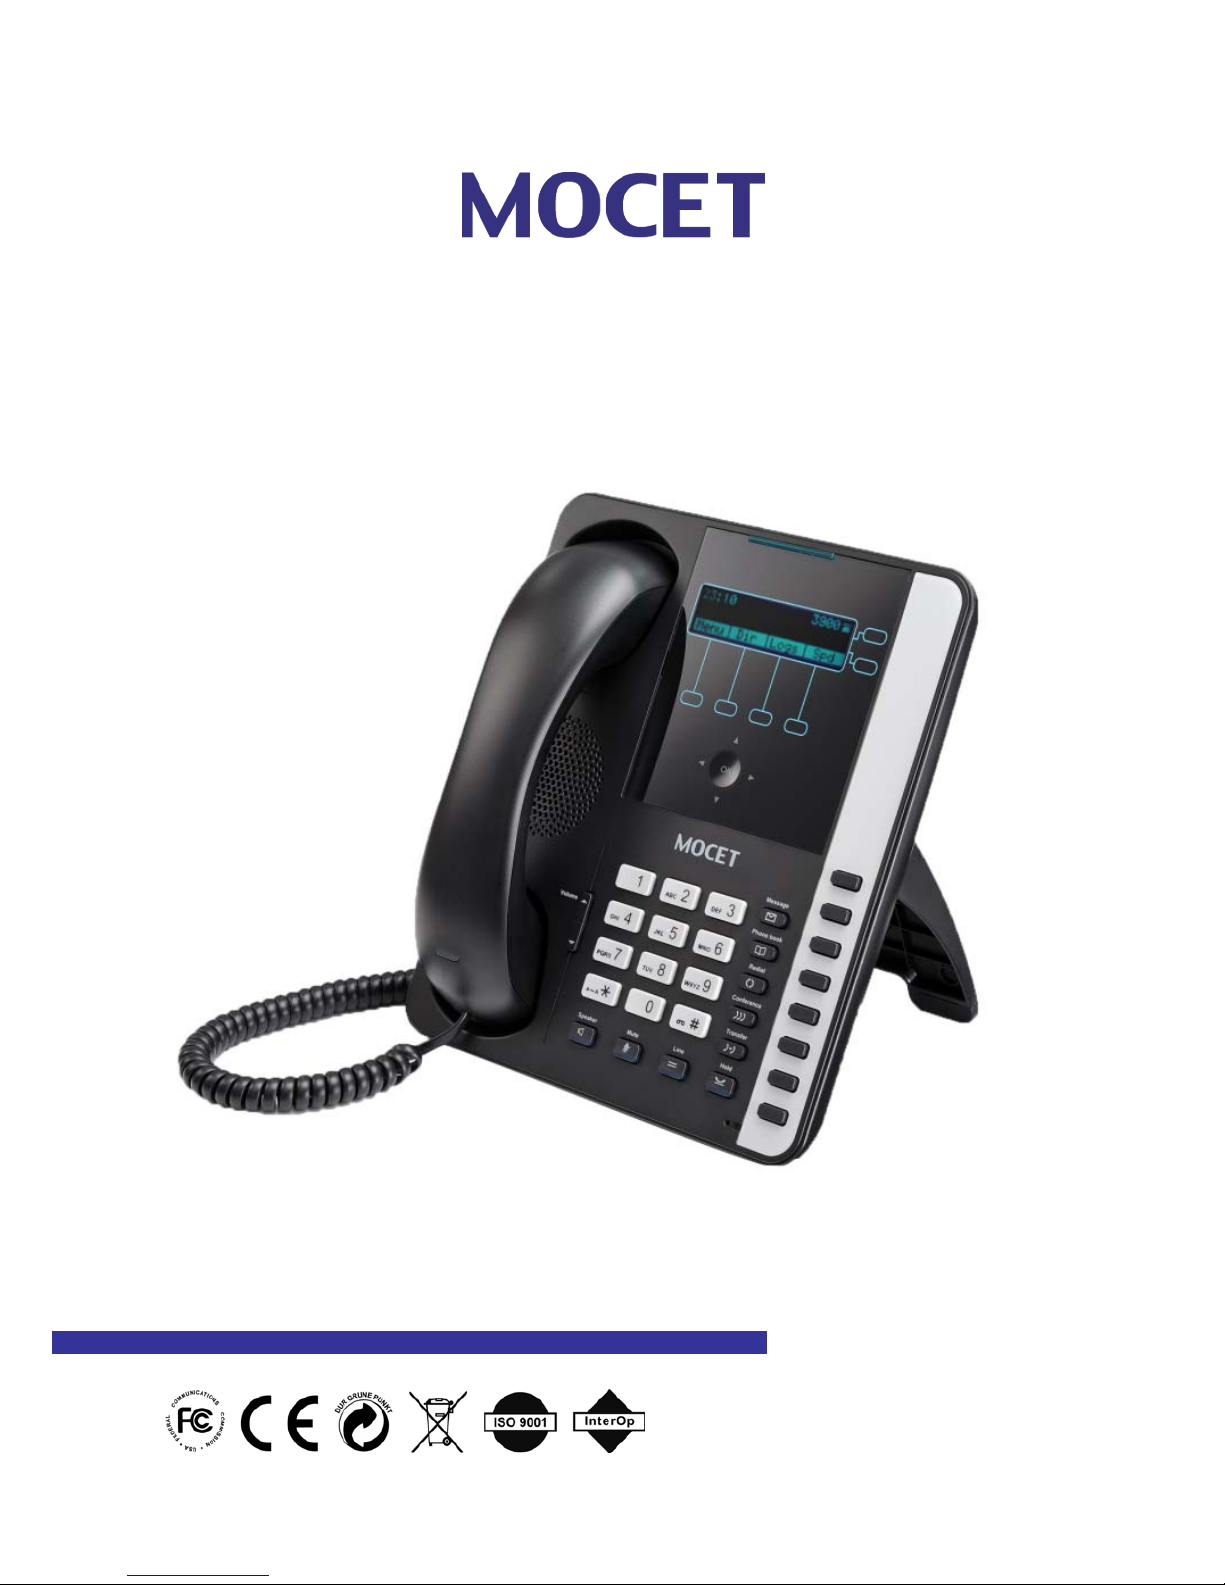
IP3032 Standard IP Deskphone
Quick User Guide
Copy r i ght © 2012, All Rights Reserved.
Ver: B D/C: 101-1204
Page 2

Page 2
MOCET IP3032 Standard IP Deskphone Quick User Guide
FCC Statement
This equipment generates, uses and can radiate radio frequency energy and, if not installed and
used in accordance with the instructions in this manual, may cause interference to radio
commu nicat ions. Th is equipmen t as been tested and found to comply wit h the limits for a Cla ss B
computing device pursuant to Subpart J of Pa rt 15 of FCC rules, which are des igned to provide
reasonable protection against radio interference when operated in a commercial environment.
Operation of this equipment in a residential area is likely to cause interference, in which case the
user, at is own expense, will be required to take whatever measures are necessary to correct the
interface.
CE Declaration of Conformity
This equipment complies with the require ments relating to electromagnetic compatibility, EN55022
class B for ITE and EN 50082-1. This meets the essential protection requirements of the European
Council Directive 89/336/EEC on the approximation of the laws of the Member States relating to
electromagnetic compatibility.
Environment
The phone you have purchased, as well as any used batteries must not be disposed of with
household waste. You should return these to your distributor if they are to replaced or dispose of
them in an approved recycling center.
T rademarks
All company, brand and product names, like Metaswitch™, Broadsoft™, Freeswitch™ and
Asterisk™ are registered trademarks of their respective owners.
WARNING! ▼
1. Read these installation instructions carefully before connecting the IP phone to its power.
2. To reduce the risk of electric shock, do not remove the cover from the IP phone or attempt to
dismantle it. Opening or removing covers may expose you to dangerous voltage levels.
Equally, incorrect reassembly could cause electric shock on re-use of the appliance.
3. Do not expose the IP Phone to Fire, direct sunlight or excessive heat.
4. Do not expose the IP Phone to rain or moisture and do not allow it to come into contact with
water.
5. Do not install the IP phone in an environment likely to present a THREAT OF IMPACT.
6. You may clean the IP phone using a fine damp cloth. Never use solvents (such as
trichloroethylene or acetone), which may damage the phone’s plastic surface and LCD
screen. Never spray the phone with any cleaning product whatsoever.
7. Take care not to scratch the LCD screen.
8. The IP phone is designed to work in temperatures from 5
o
C to 40oC.
9. The IP phone must be installed at least 1 meter from radio frequency equipment, such as
TVs, radios, hi-fi or video equipment (which radiate electromagnetic fields).
10. Do not connect the LAN por t to any network ot her than an Ethernet ne tw or k.
11. Do not attempt to upgrade your IP phone in an unstable power environment. This could
cause unexpected issues.
12. Do not work on the system or connect or disconnect cables during lightning storms.
13. Children don't recognize the risks of electrical appliances. Therefore use or keep the phone
only under supervision of adults or out of the reach from children.
14. No repair can be performed by the end user, if you experience trouble with this equipment,
for repair or warranty information, please contact your supplier.
!
Page 3
Page 3
MOCET IP3032 Standard IP Deskphone Quick User Guide
Introduction
The MOCET IP3032 Standard IP Deskphone is an easy-to-use high quality deskphone
with many advanced features including support for secure calling with trusted layer
security (TLS) and Secure Real-time Transfer Protocol (SRTP), a built-in IP Security
(IPSEC) vir tual priv ate network ( VPN) clien t, and instant messaging capabilities. Utilizing
a next generation capacitive touch sensitivity panel design, the IP3032 supports up to
four simultaneous lines and can, multiple tilt angles and wall mount options as well as
automatic support for power over Ethernet (PoE). The IP3032 can be configured through
the simple built in menus displayed on the blue backlit LCD or from the phone’s web user
interface. The IP3032 can be automatically provisioned from a local or Internet based
server using the built-in MOCET auto-provisioning and management protocols.
The IP3032 IP Phone supports many advanced features including 3-way on-phone
conferencing, can transfer and receive calls using industry-standard SIP protocols, and
can provide built-in music-on-hold (MoH) over IP network. The IP3032 is interoperable
with a wide range of SIP services and servers including those based on Metaswitch™,
Broadsoft™, Freeswitch™ and Asterisk™. Therefore, the IP3032 can be deployed and
used anywhere there is a suitable local area network (LAN) with Internet access and a
local or remotely hosted SIP server. Since it is a stand-alone and “always-on” device, it
does not require connection to a computer for it to work.
Hardware Installation
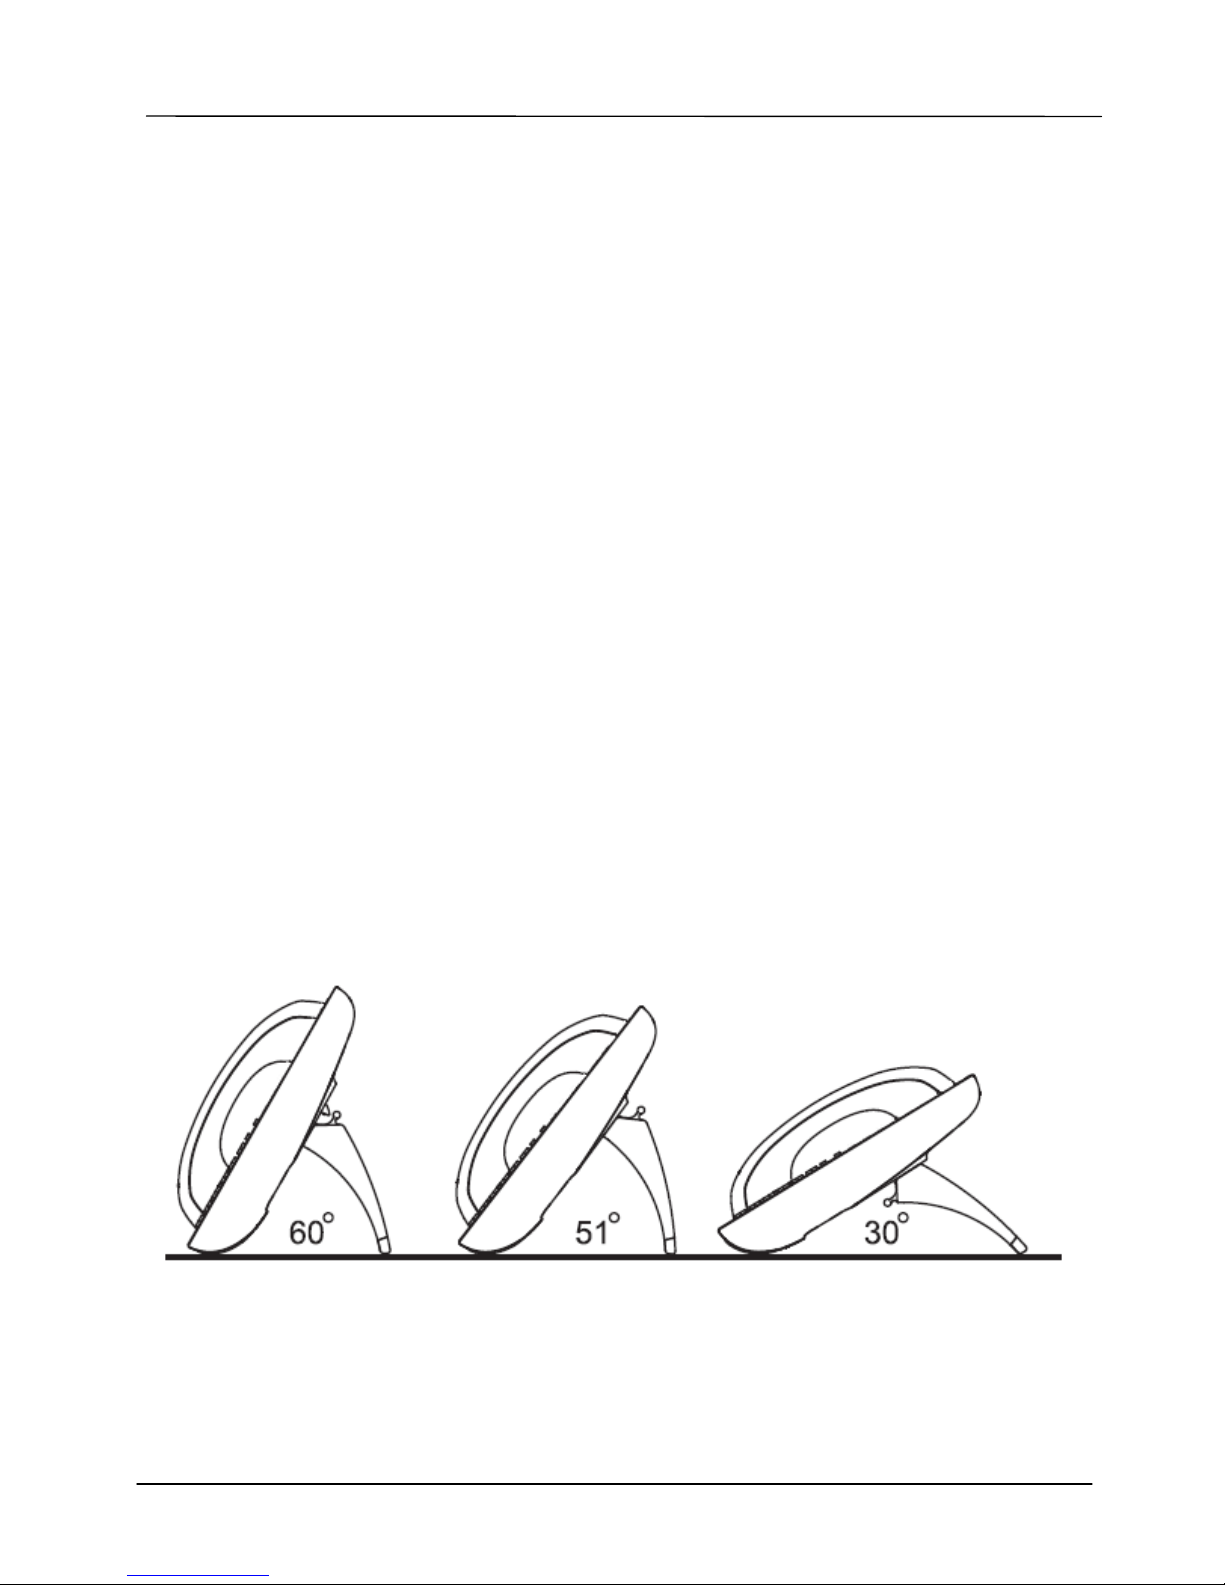
The IP3032 can support three different tilt angles (please refer to the illustrations below).
Attaching the Stand to the Phone
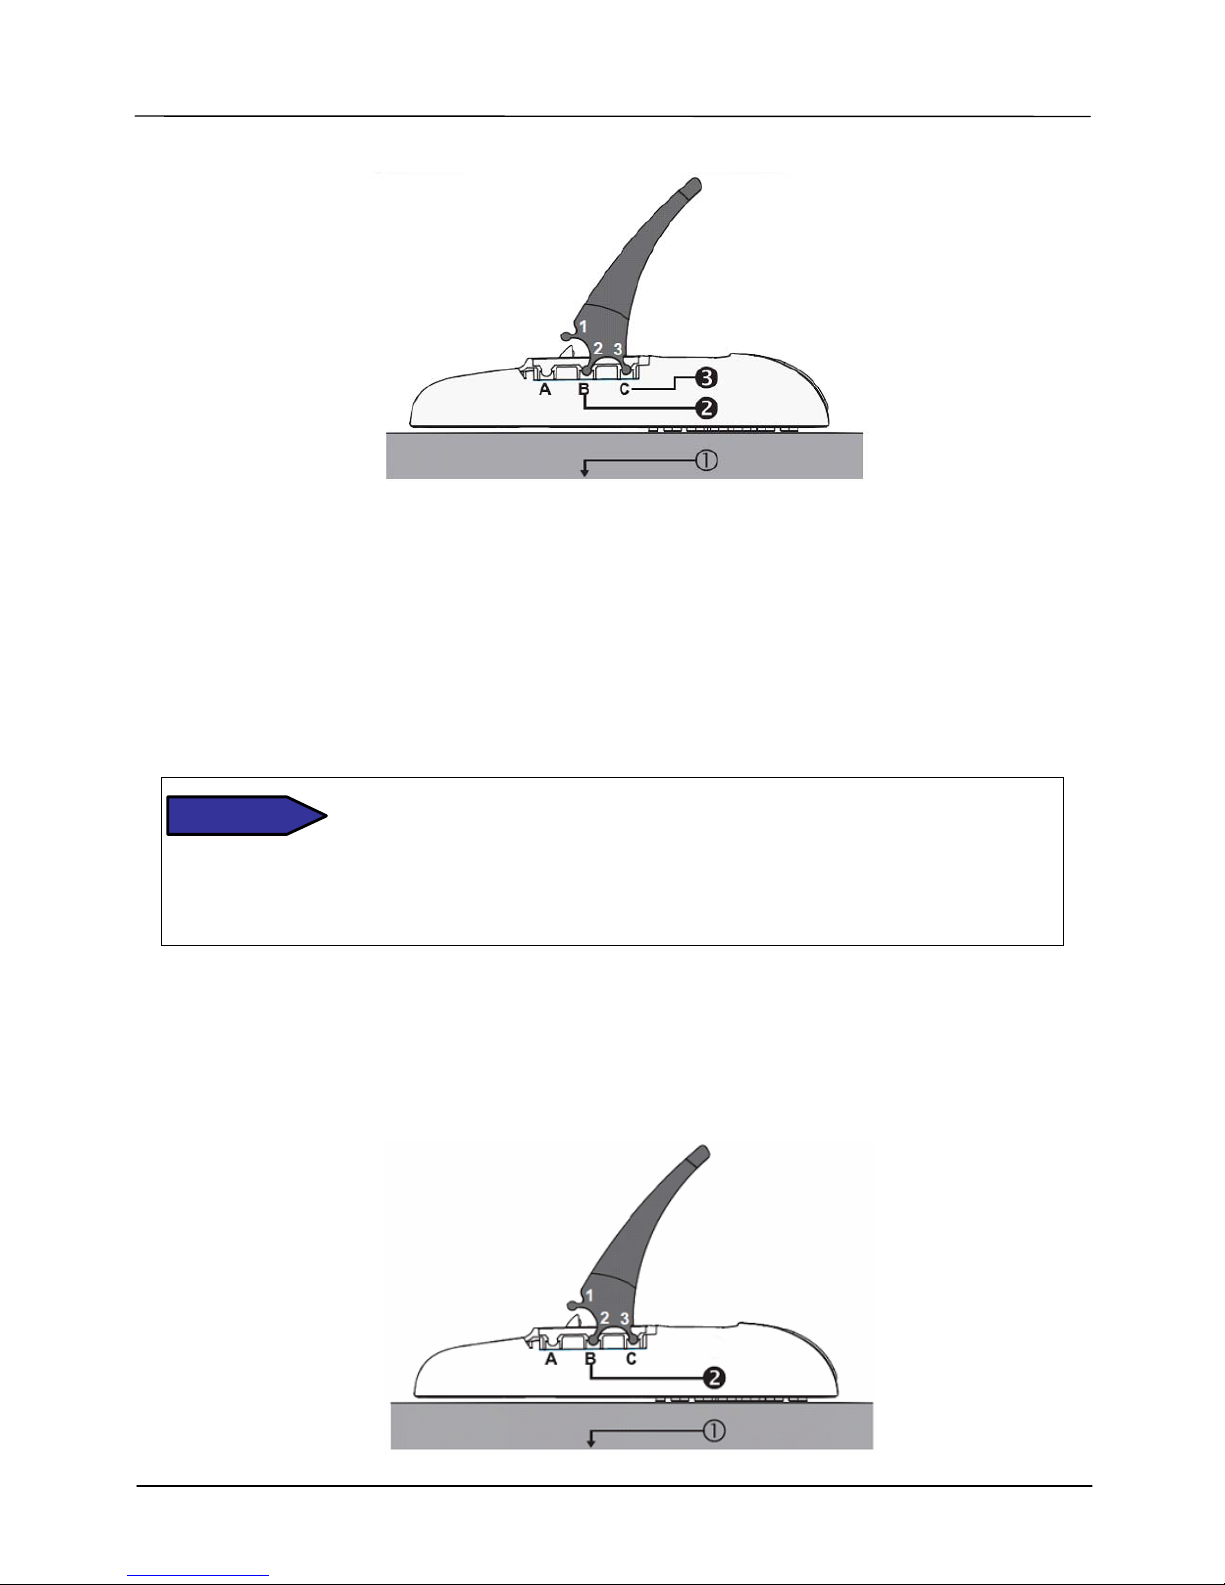
After unpacking the box, install the stand on the IP3032 phone first. Here we illustrate an
example below of 60° angle installation with the stand. There are three sets of “antlers” on
the top of the stand (named 1, 2 and 3) and there are three sets of mounting slots on the
back of the phone (named A, B and C). See the illustration below.
Page 4
Page 4
MOCET IP3032 Standard IP Deskphone Quick User Guide
The procedures for installation are as follows :
Step : Place the main body of the IP phone face down on your lap or a firm sofa;
Step : First snap the “2nd” antler into the slot “B” hole;
Step : Then snap the “3rd” antler into the slot “C” hole (it may take a bit of pressure,
but when it locks in place, you will hear a click and the stand will not wiggle
on the phone.)
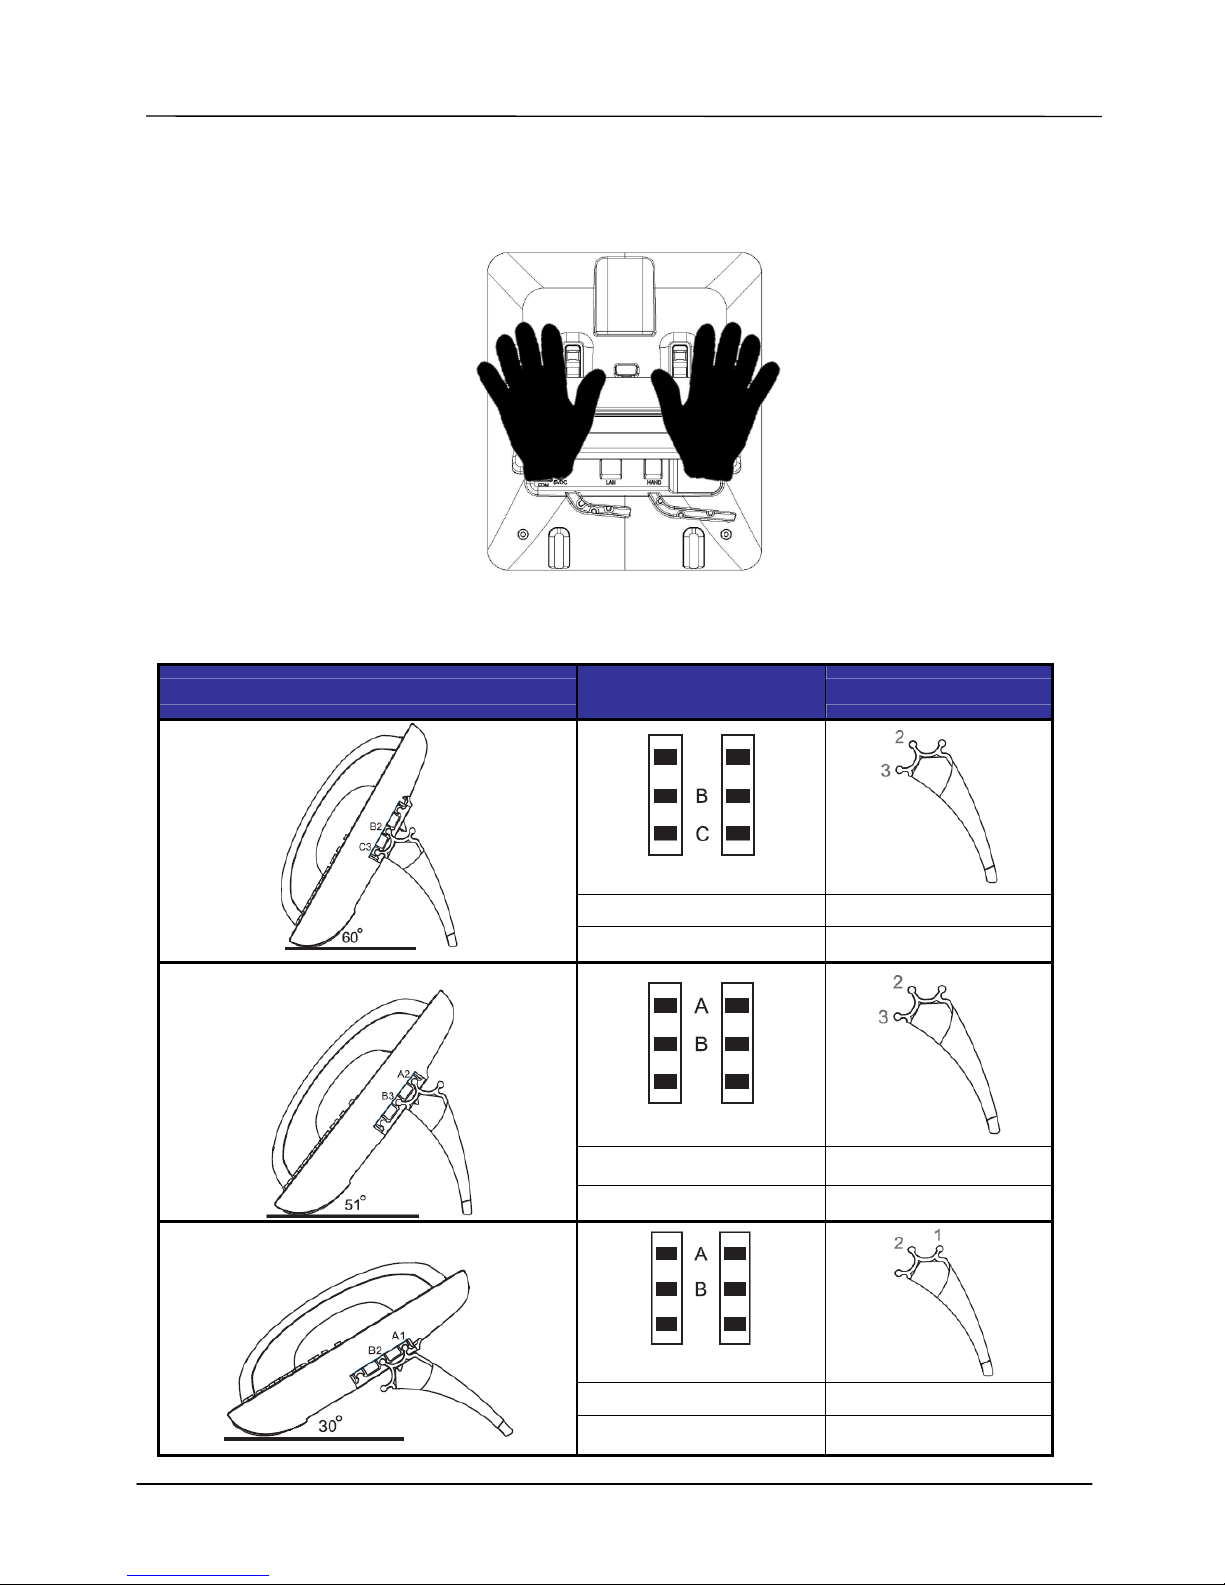
For other angle installation, such as 51° and 30°, please refer to the Installation
Combination Table below to find correct slots and correct antlers.
Snapping the slot “B” hole with the antler of stand first is the most
important step for a smooth installation. The product sticker on stand
should be facing inward towards the phone. When a stand is installed
at 60° or 30°, you can rotate the stand between 30° and 60° quickly
without pulling the antler in the slot B out.
Detaching the Stand from the Phone
To remove the stand from the IP3032 phone, follow the procedures below (we are using a
60° stand as an example):
Step
: Place the main body of the IP3032 face down in your lap or a firm sofa;
CAUTION
Page 5
Page 5
MOCET IP3032 Standard IP Deskphone Quick User Guide
Step : Place with two hands on the stand of the IP3032 and firmly press down the
stand, the “2nd” antler will be pulled straight out of the slot “B” hole; Keep pressing down
the stand, the “3rd” antler will be pulled straight out of the slot “C” hole.
Installation Combination Table
Different Tilt Angle Installation
Slot Holes
on the Back Shell
Antlers of Stand
B 2
C 3
B 3
A 2
B 2
A 1
Page 6
Page 6
MOCET IP3032 Standard IP Deskphone Quick User Guide
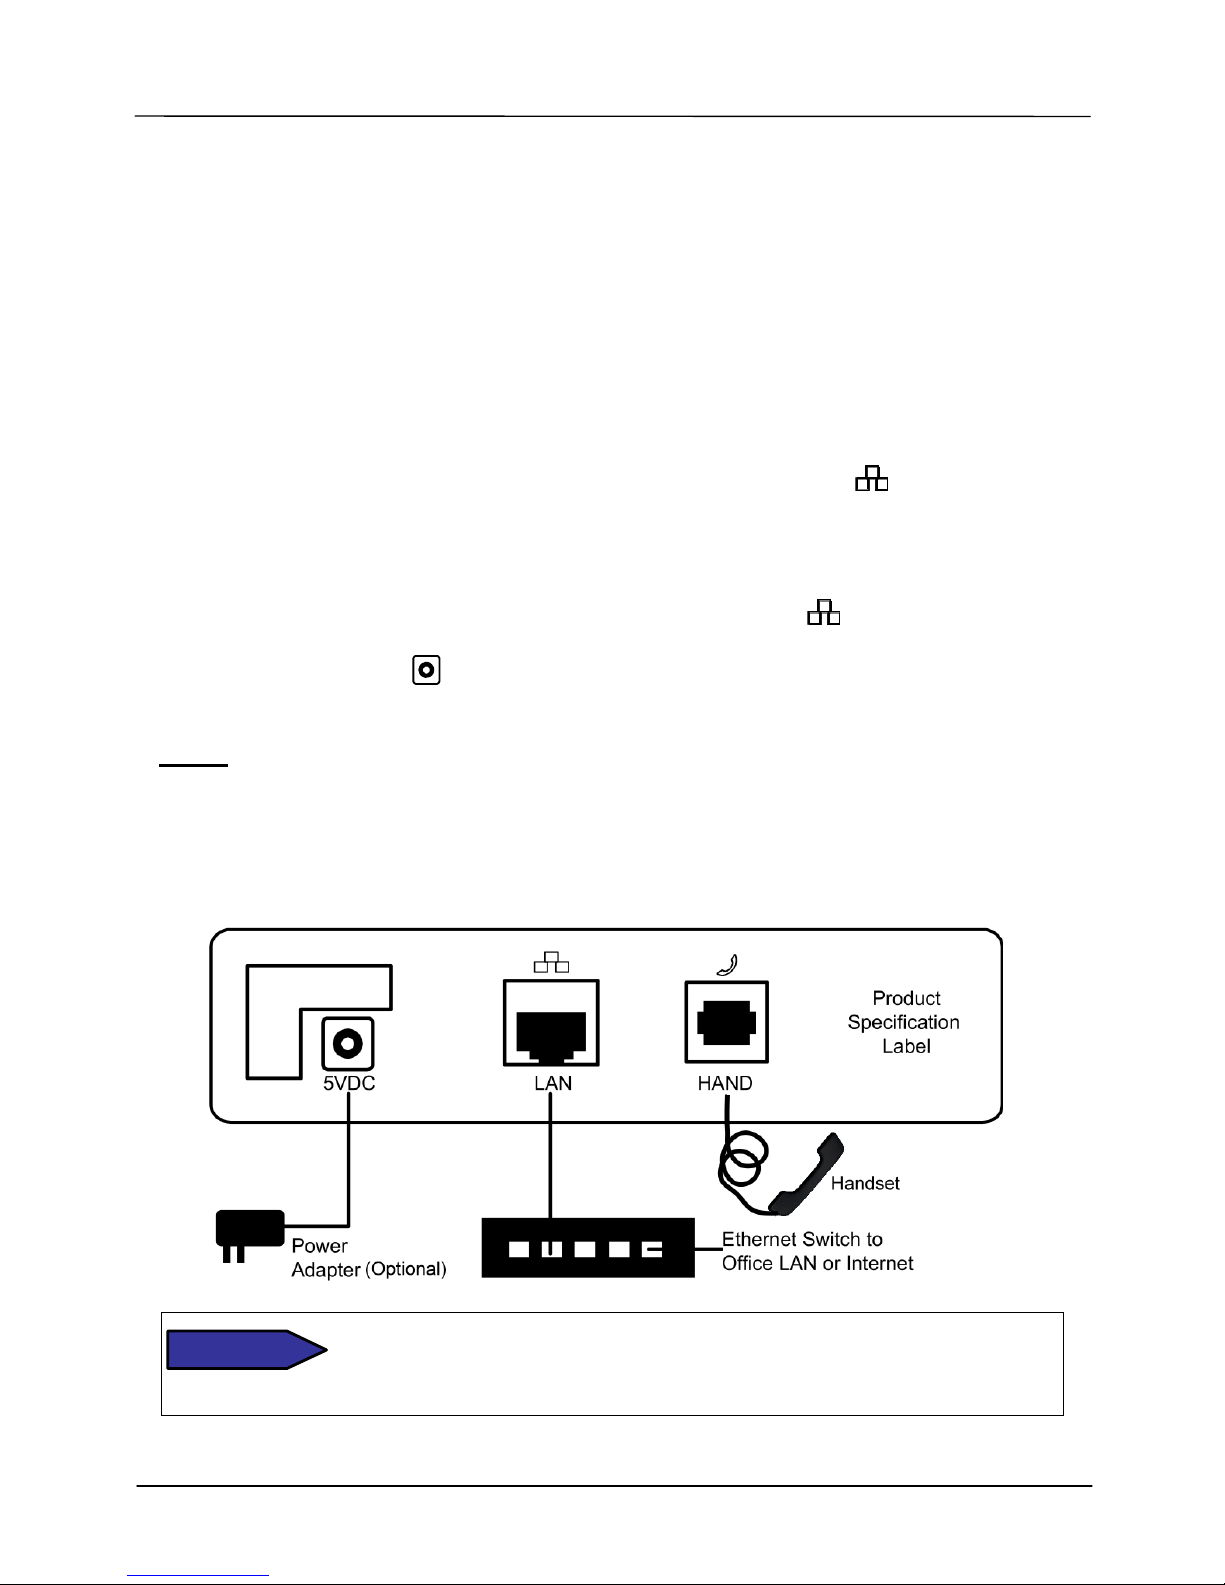
Connecting the Handset to the Phone
After installing the stand, connect the handset to the curly handset cord and then connect
the other end of the curly handset cord to the port marked HAND with the handset icon
on the bottom of the IP3032.
Connecting the Ethernet Cable
Using a general CAT-5 Ethernet cable, follow the installation steps below:
(1) If your Ethernet Switch supports PoE:
- Please connect an Ethernet cable to the Switch port from the LAN port of the
IP3032. Then you will see the phone LEDs and buttons light up momentarily and
the phone will boot.
(2) If your Ethernet Switch doesn’t support PoE:
- Please connect an Ethernet cable to the Switch port from LAN port.
- Plug in the IP3032 power adaptor to the wall power outlet then plug the barrel plug
to the power port on the back of the phone. You should see the phone LEDs
and buttons light up momentarily and the phone will boot.
Notice :
1. The IP3032 takes just under two minutes to start up and becomes operational. There
are a series of LED and buttons that will light up periodically to provide boot progress
information. Please be patient.
2. The IP3032 does not ship with a power adapter. If you are not using Power over
Ethernet (PoE), you must order the power adapter separately from MOCET.
Do not use other power adapters. Use only the MOCET IP3032 Power
Adapter with your IP3032 IP Phone. Adapters for other devices may
damage IP3032 IP Phone.
CAUTION
Page 7
Page 7
MOCET IP3032 Standard IP Deskphone Quick User Guide
Appearance & Function Description
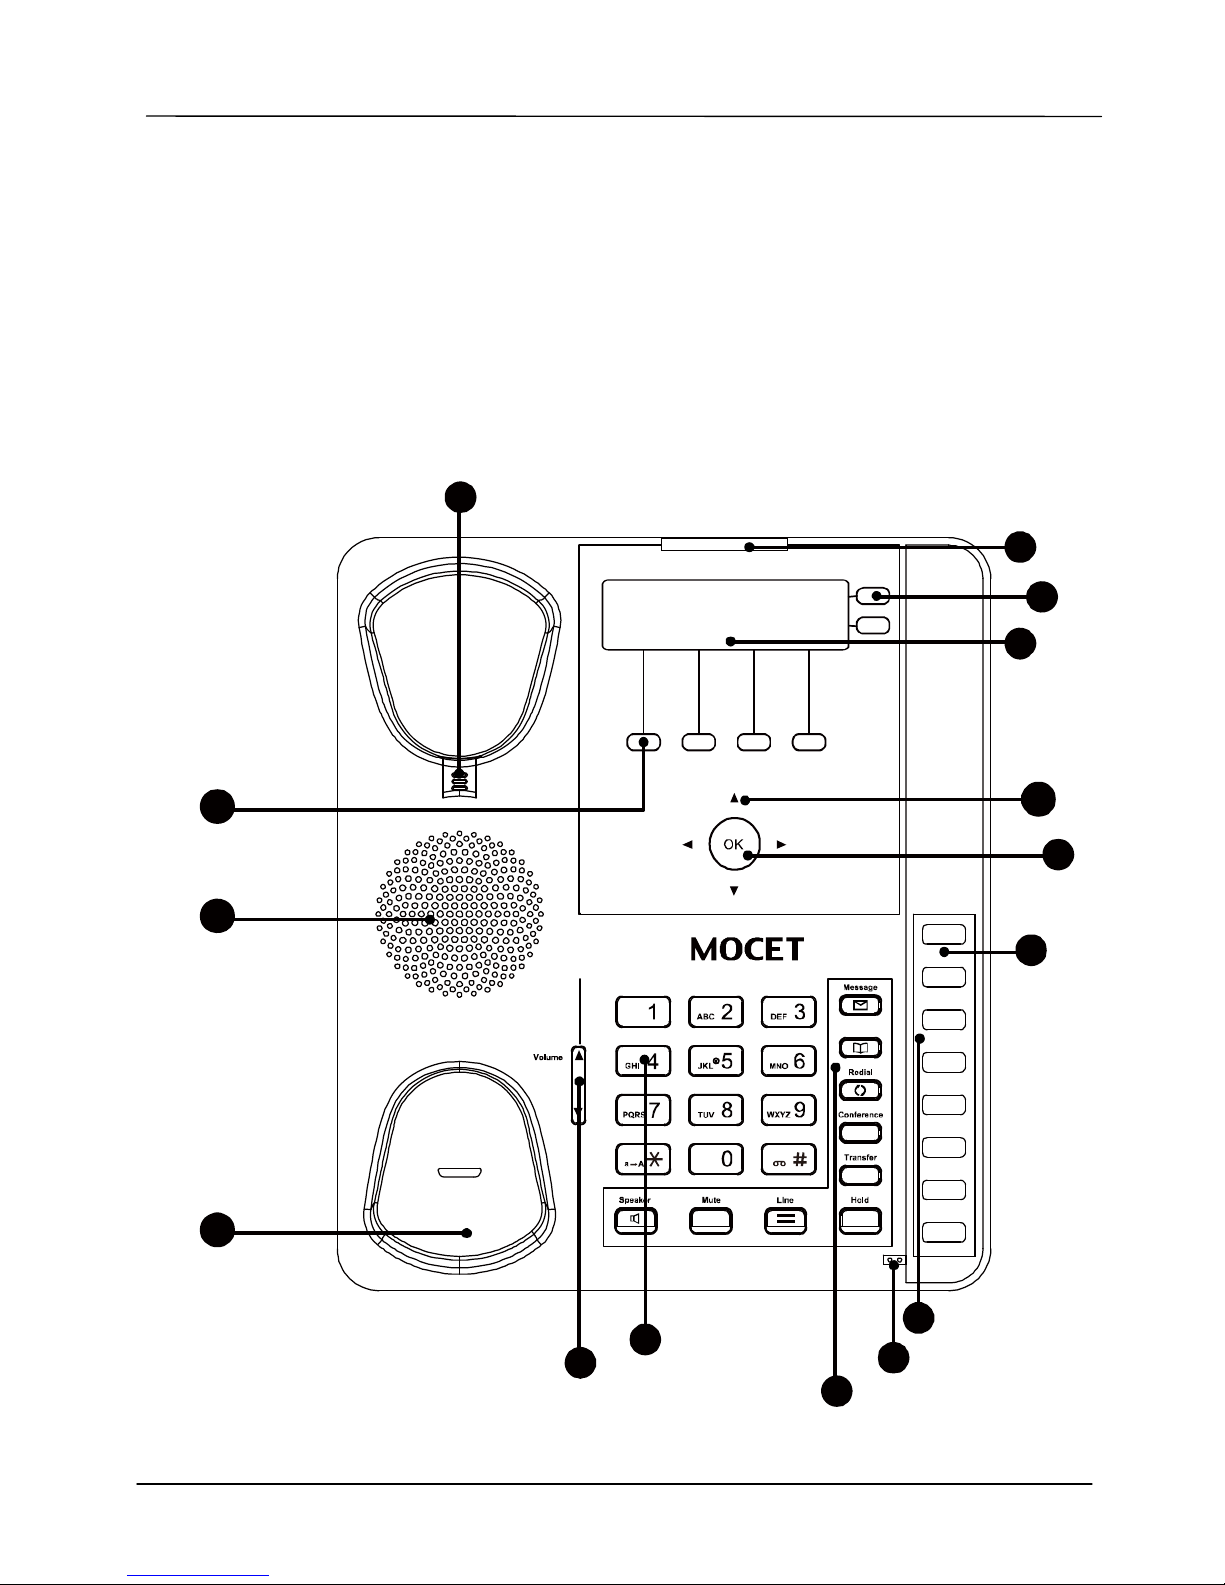
The IP3032 Standard IP Deskphone comes with a blue-green graphic LCD display,
capacitive touch keys, including 4 soft keys, 2 line keys, and 5 navigator keys, as well as
a traditional keypad, 8 programmable keys and 9 functi on keys. In the box, a handset,
curly handset cord and an Ethernet cable supplied. It can be installed and placed on the
desktop or mounted on the wall . The wall mount accessory is available separately. The
figure below illustrates the front view of the IP3032 IP Phone. With the point numbers,
you can find its name and a simple description of specified part in the following table.
1
6
2
13
10
9
11
12
15
14
5
7
4
8
3
Ph o n e b o o k
Page 8
Page 8
MOCET IP3032 Standard IP Deskphone Quick User Guide
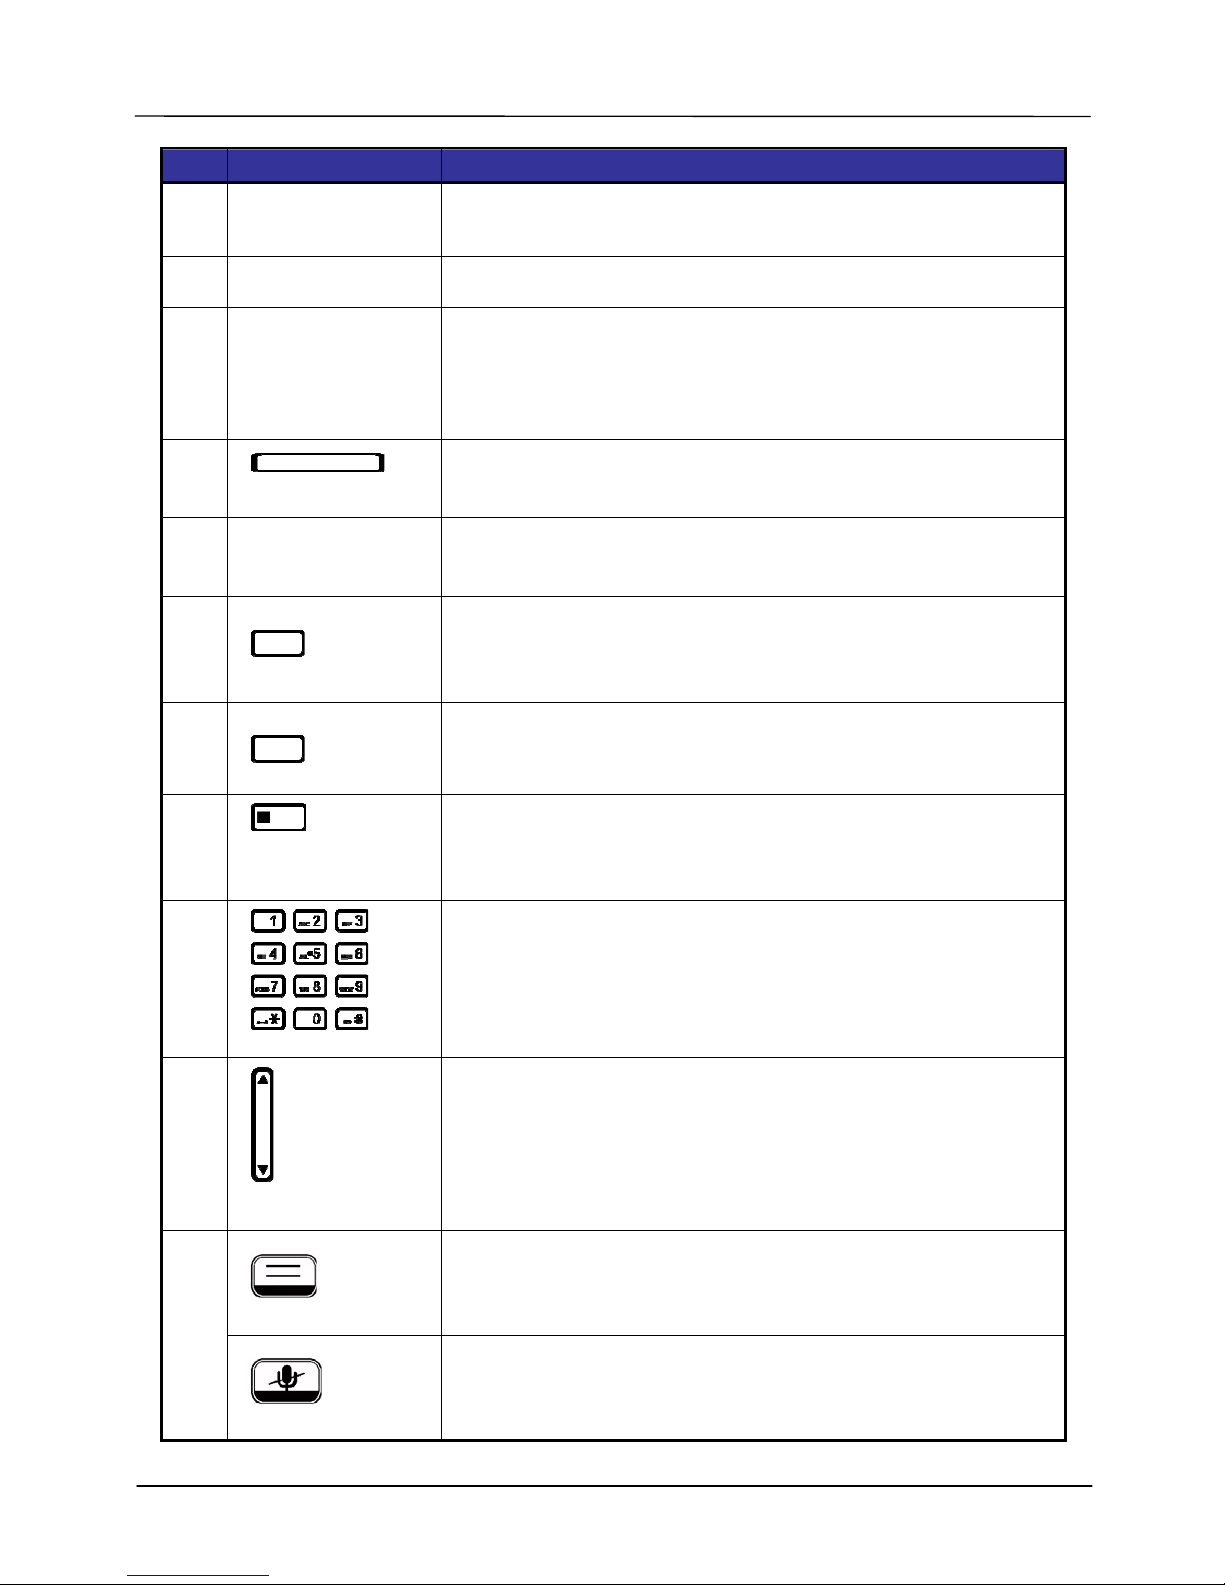
No Part Name Description
1
Hanger
The hanger can be pulled; it is reversed for wall-mount
installation.
2
Speaker
For ring and ha nds -free t al ki ng.
3
Hook switch &
Handset
bottom cradle
Under the cradle, a hook switch is used for handset hang-on
and hang-off detection .
The handset bottom cradle is for the placement of handset;
placing the hand set on the botto m cradle while on a call will end
the call.
4
Message LED
The message LED. Steady Blue means the phone is booting or
upgrading.
5
LCD Display
The LCD screen is used for displaying phone’s se ttings, phone
number, call status and so forth.
6
Soft keys
Soft keys displayed on the LCD are used for item selection or
control. The various soft key functions depend on the current
activity on the ph on e as t hey ar e context-sensitive .
7
Line keys
These keys are used for line selection. A blue LED is associated
with each key to indicate its line/call status.
8
Programmable
keys
Programmable keys can be used for indicating busy lamp field
(BLF) status of other phones, speed dial phone numbers, or for
activating features of a service or IP-PBX. A blue LED is
associated with each key to indicate its status.
9
Numeric keypad
[1], [2], …, [9], [*], [0], [#]: The numeric keypad is for dialing
numbers.
10
Volume
Control key
The Volume Control key is used to set the loudness of the
ringer, handset and speakerphone functions. While the phone is
in idle state, the ringer is adjustable. While in a call, the handset
or speaker volume is adjustable.
Line Group key
The Line Group key is used to toggle between line group 1,2 to
line group 3,4. Or switc h back from lin e group 3,4 to line group
1,2.
11
MUTE key
The MUTE key is used to activate or deactivate the microphone
on the IP3032. A blue LED is used to indicate whether the
phone is muted or not.
Page 9
Page 9
MOCET IP3032 Standard IP Deskphone Quick User Guide
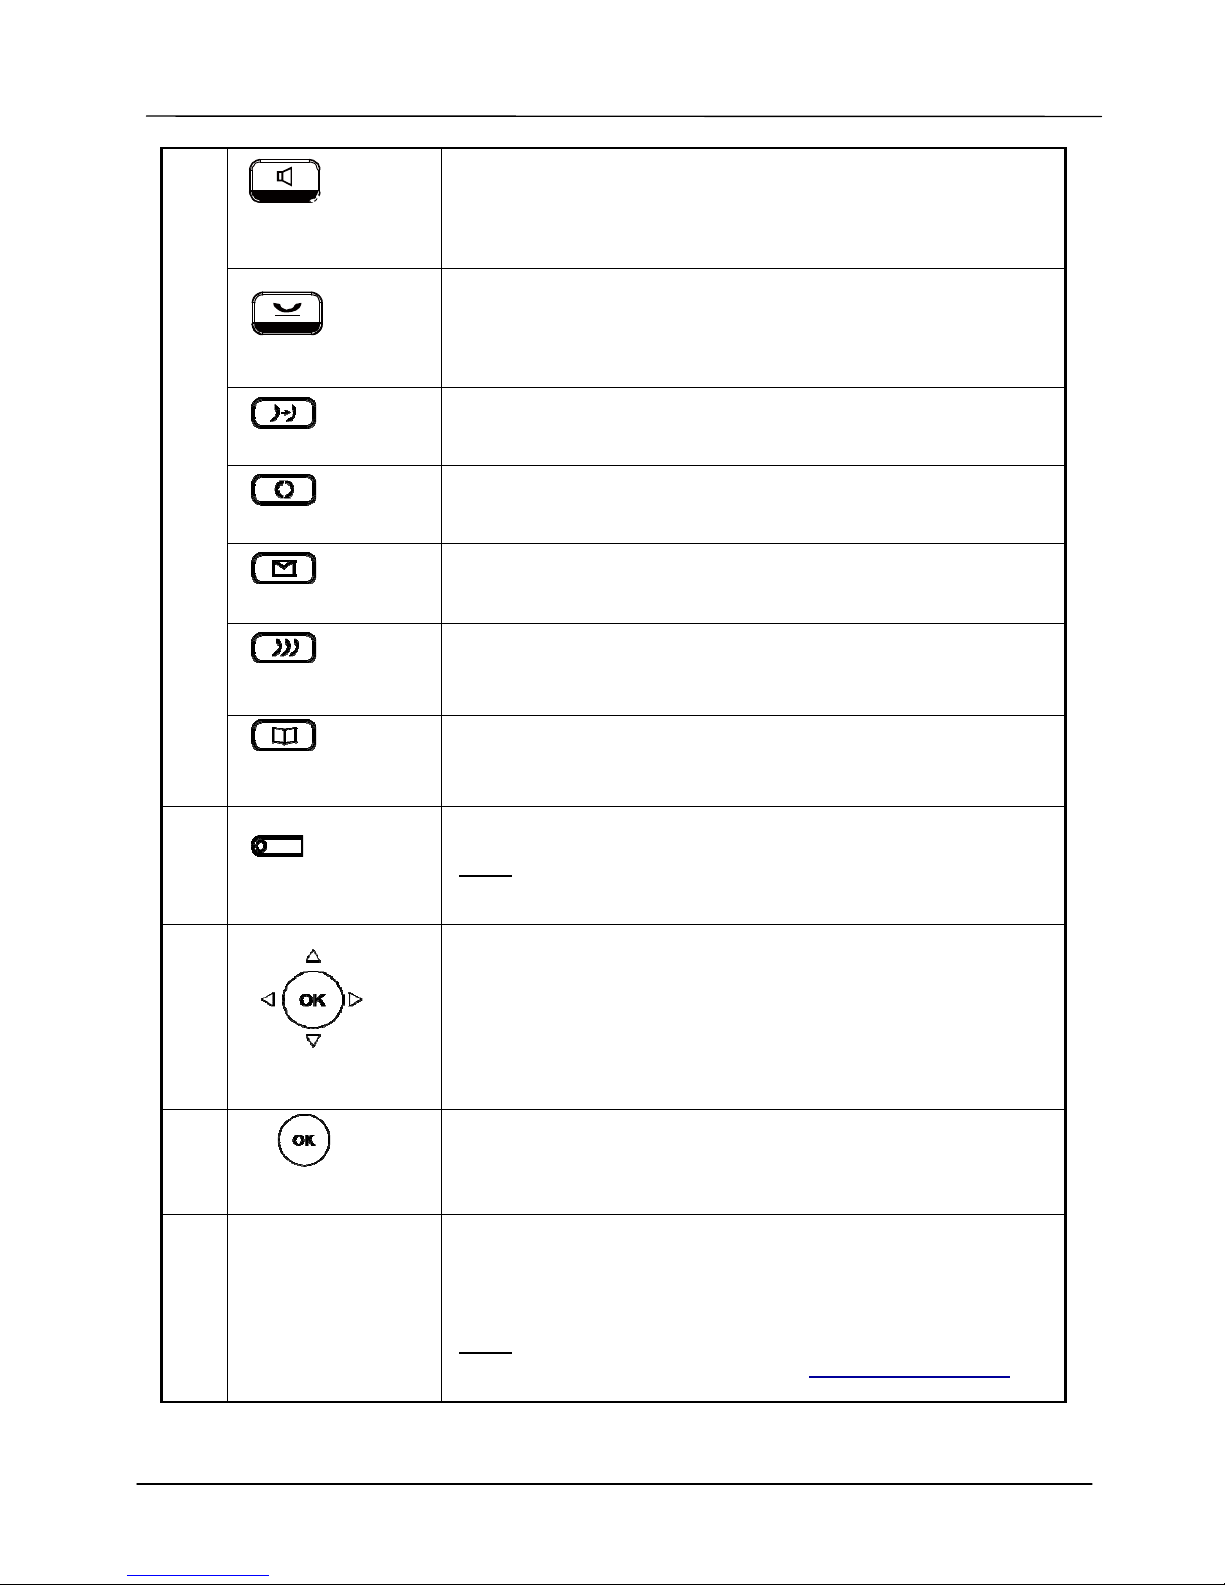
Speaker Phone
key
The SPKR key is used to activate or deactivate the Hands-free
feature. A blue LED is used to indicate whether the
speakerphone i s active o r not.
Hold key
The Hold key is used to place the active call on hold. A blue LED
is used to indicate whether the call is on hold or not.
Tran s f er key
The Transfer key is used to transfer a call to another IP phone.
Redial key
The Redial key dials the last dialed number automatically.
Message key
The Message key is used to access the Voice Mail System for
message retrieval.
Conferen c e key
The Conference key is used to place multiple calls on the phone
into a conference on the phone.
Phonebook key
The Phonebook key is used to enter into the Phone Book menu
to cal l , add, edit or dele te a contact i n a selected phonebook.
12
Hands-free MIC
Hands-free MIC hole.
Note:
You can use a papercli p to pi ck up the pr ogrammable key
plate label (overlay) right here.
13
Navigator Control
Keys
The Navigation Control Keys are used for navigating the menus
on the phone; me nu items are di splayed on the LCD screen.
14
Navigator OK Key
The OK button is us ed to c on fi r m and save a setting on the
phone or to dial a phone number .
15
Programmable
key plate label
The programmable key plate label is plastic. For best results,
we recommend using a fine permanent marker (such as Sharpie
brand) to write on it. It can be cleaned with industrial alcohol.
Note:
Custom templates and programming software for MOCET
phones are available from DESI (see, http://labels.desi.com)
e
P
Page 10
Page 10
MOCET IP3032 Standard IP Deskphone Quick User Guide
IP3032 Port Functions
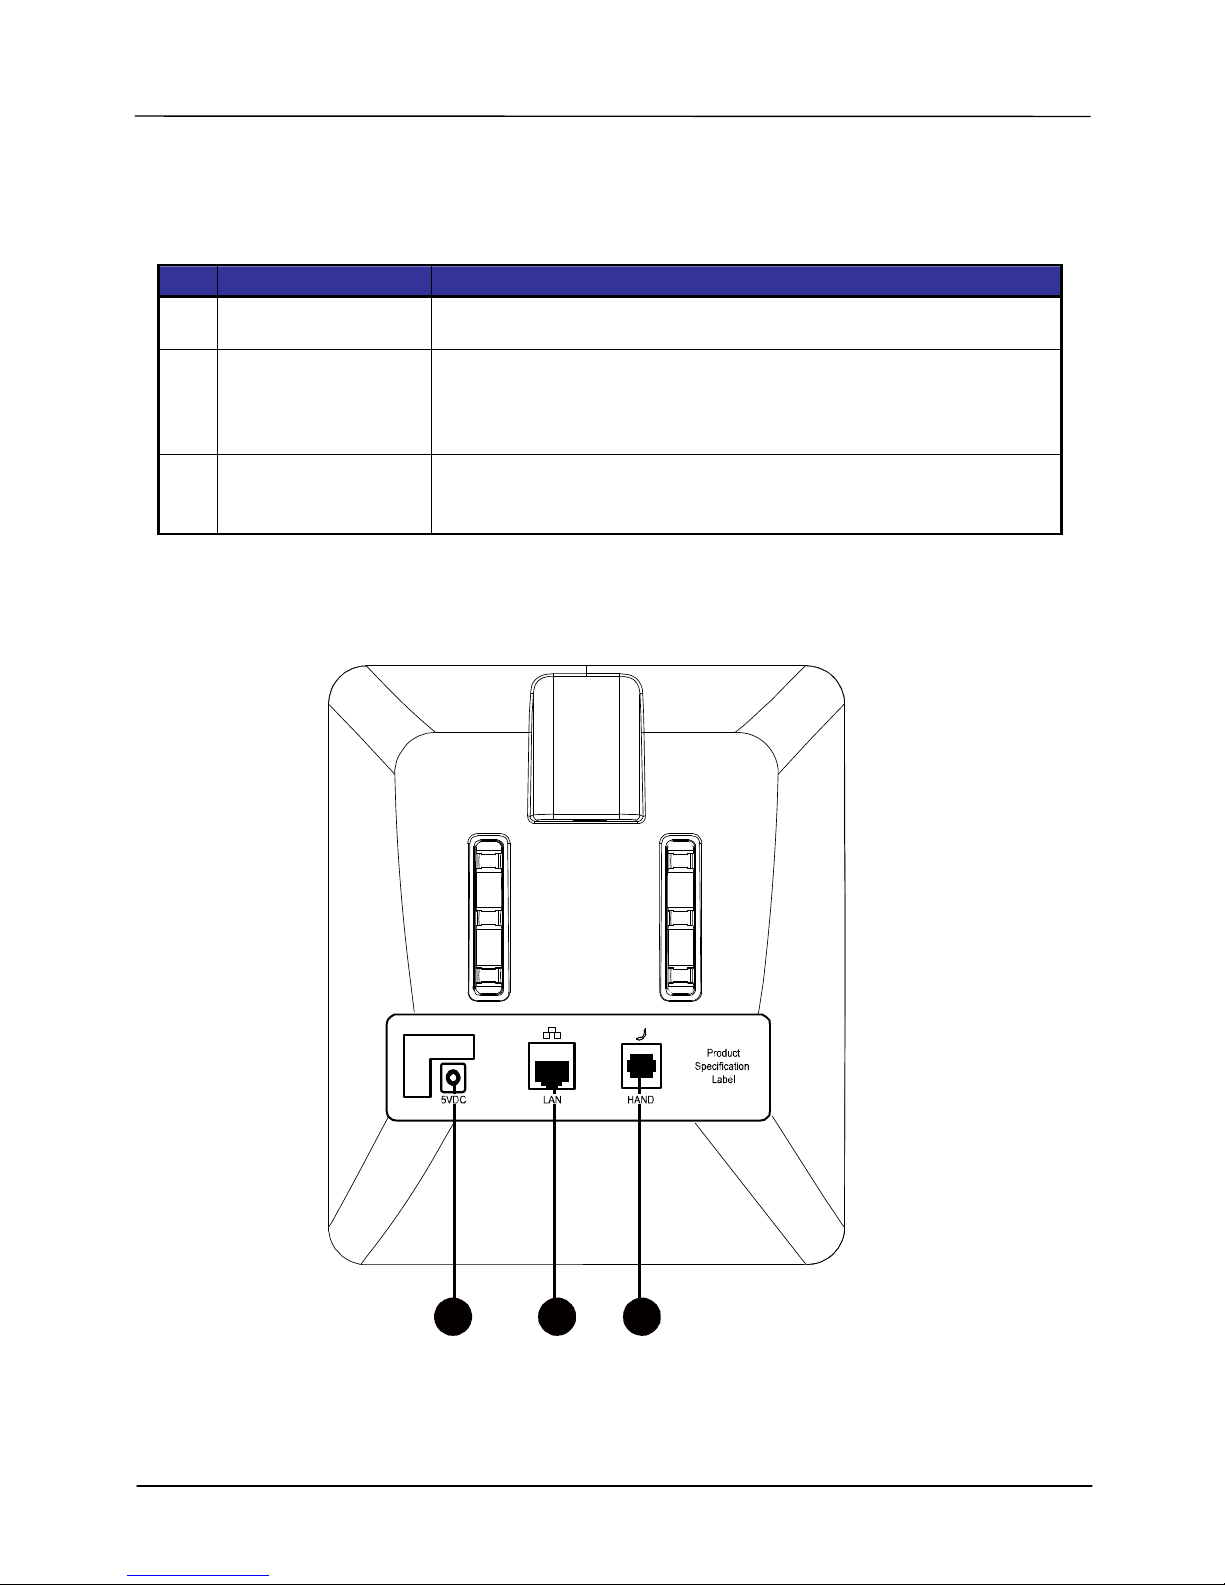
The back side view and the connectors of the IP3032 are as follows:
No Part Name Description
1 Handset Connector
RJ-9 Jack for connecting handset co r d.
2 LAN Port
RJ-45 Jack 10 0/1 0Mbps Ethernet port for con necting to the local
area network (LAN). This port can support power over Ethernet
(PoE) if the LAN swi tch provid es it .
3 Power Jack
If a power source from adaptor is required, please order the
IP3032 power adapter separately fr om M O CET .
Their locations are shown in the figure below:
123
Page 11
Page 11
MOCET IP3032 Standard IP Deskphone Quick User Guide
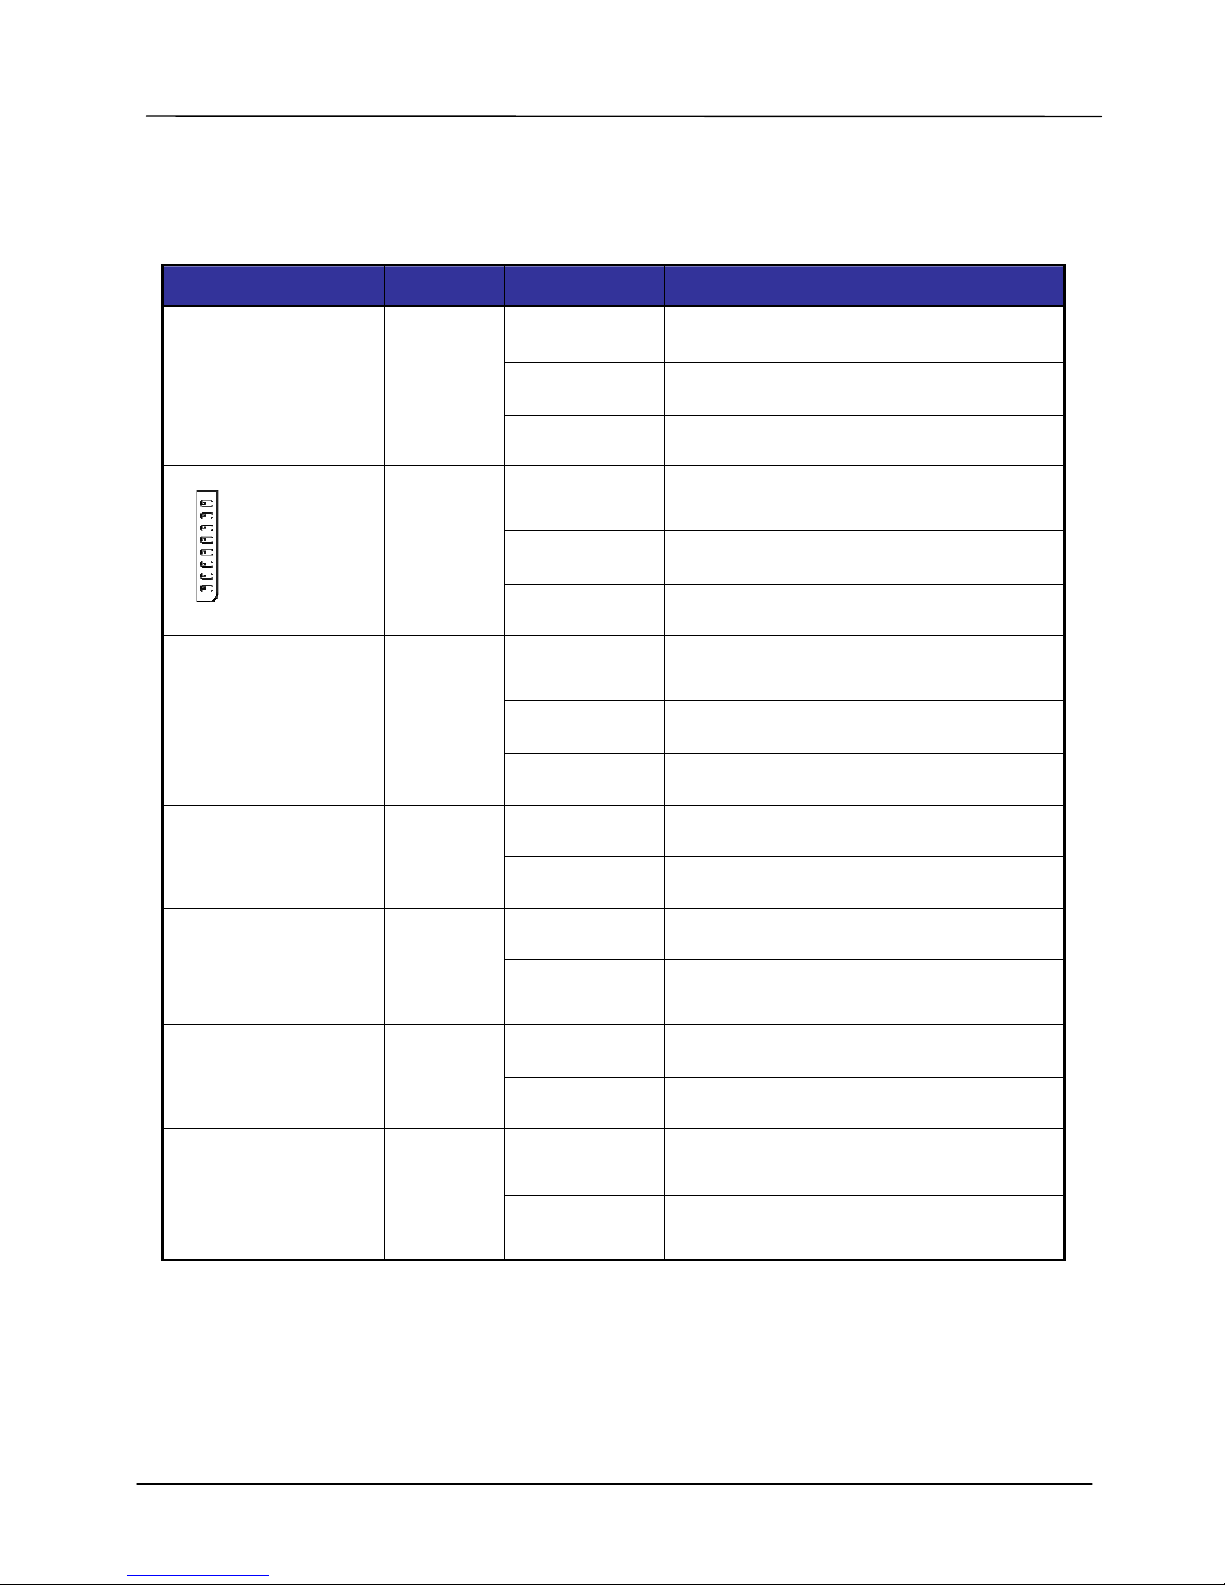
IP3032 LED Functions
The following table describes all functions of LED indicators:
LED Color Status Description
Off No new message(s).
Steady Phone is booting or upgrading.
Message LED
Blue
Blinking slow New message(s) indication.
Steady
Feature is set to “ON – Active”.
Or Phone is busy.
Blinking slow Incoming call notification.
Programmable LED
Blue
Off Feature is set “Off-inactive”.
Steady Line is active, dialing or in a call.
Blinking slow Call is on hold.
Line LED Blue
Flashin g faster Incoming c all .
Off No call is on hold.
Hold LED Blue
Blinking slow Call is placed on hold.
Off Speakerphone is not in use.
Speakerphone LED Blue
Steady On-hook dialing or hands-free mode.
Off Microphone is active.
MUTE LED Blue
Steady Microphone is inactive.
Off
The line 1, 2 status is displayed on
LCD.
Line Group LED
Blue
Steady
The line 3, 4 status is displayed on
LCD.
Page 12
Page 12
MOCET IP3032 Standard IP Deskphone Quick User Guide
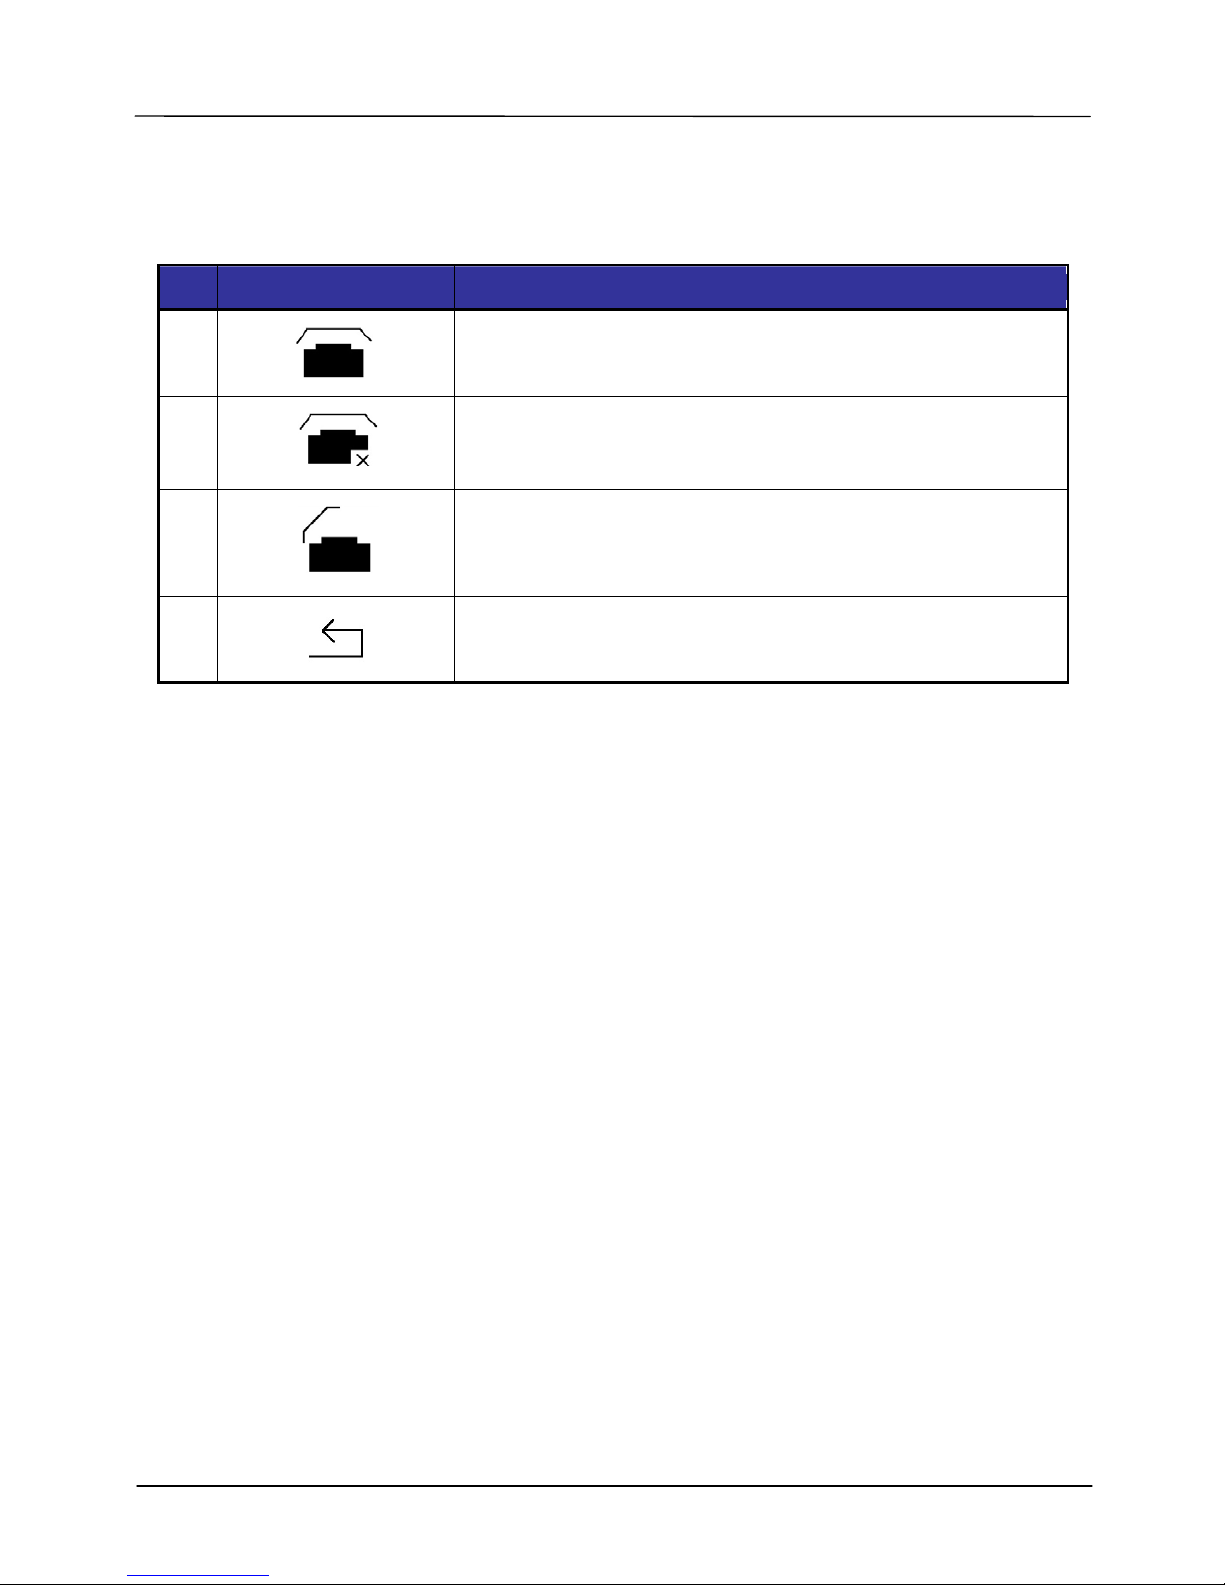
IP3032 Line Status Icons
The following table describes line status icons on the main screen:
No Line Status Icon Description
1
The line is registered to the SIP server or service.
2
The line is not registered to the SIP server or service.
3
The line is registered to the SIP server or service and is in
use.
4
The line is set for “Call Forwarding” to the configured
number.
Page 13
Page 13
MOCET IP3032 Standard IP Deskphone Quick User Guide
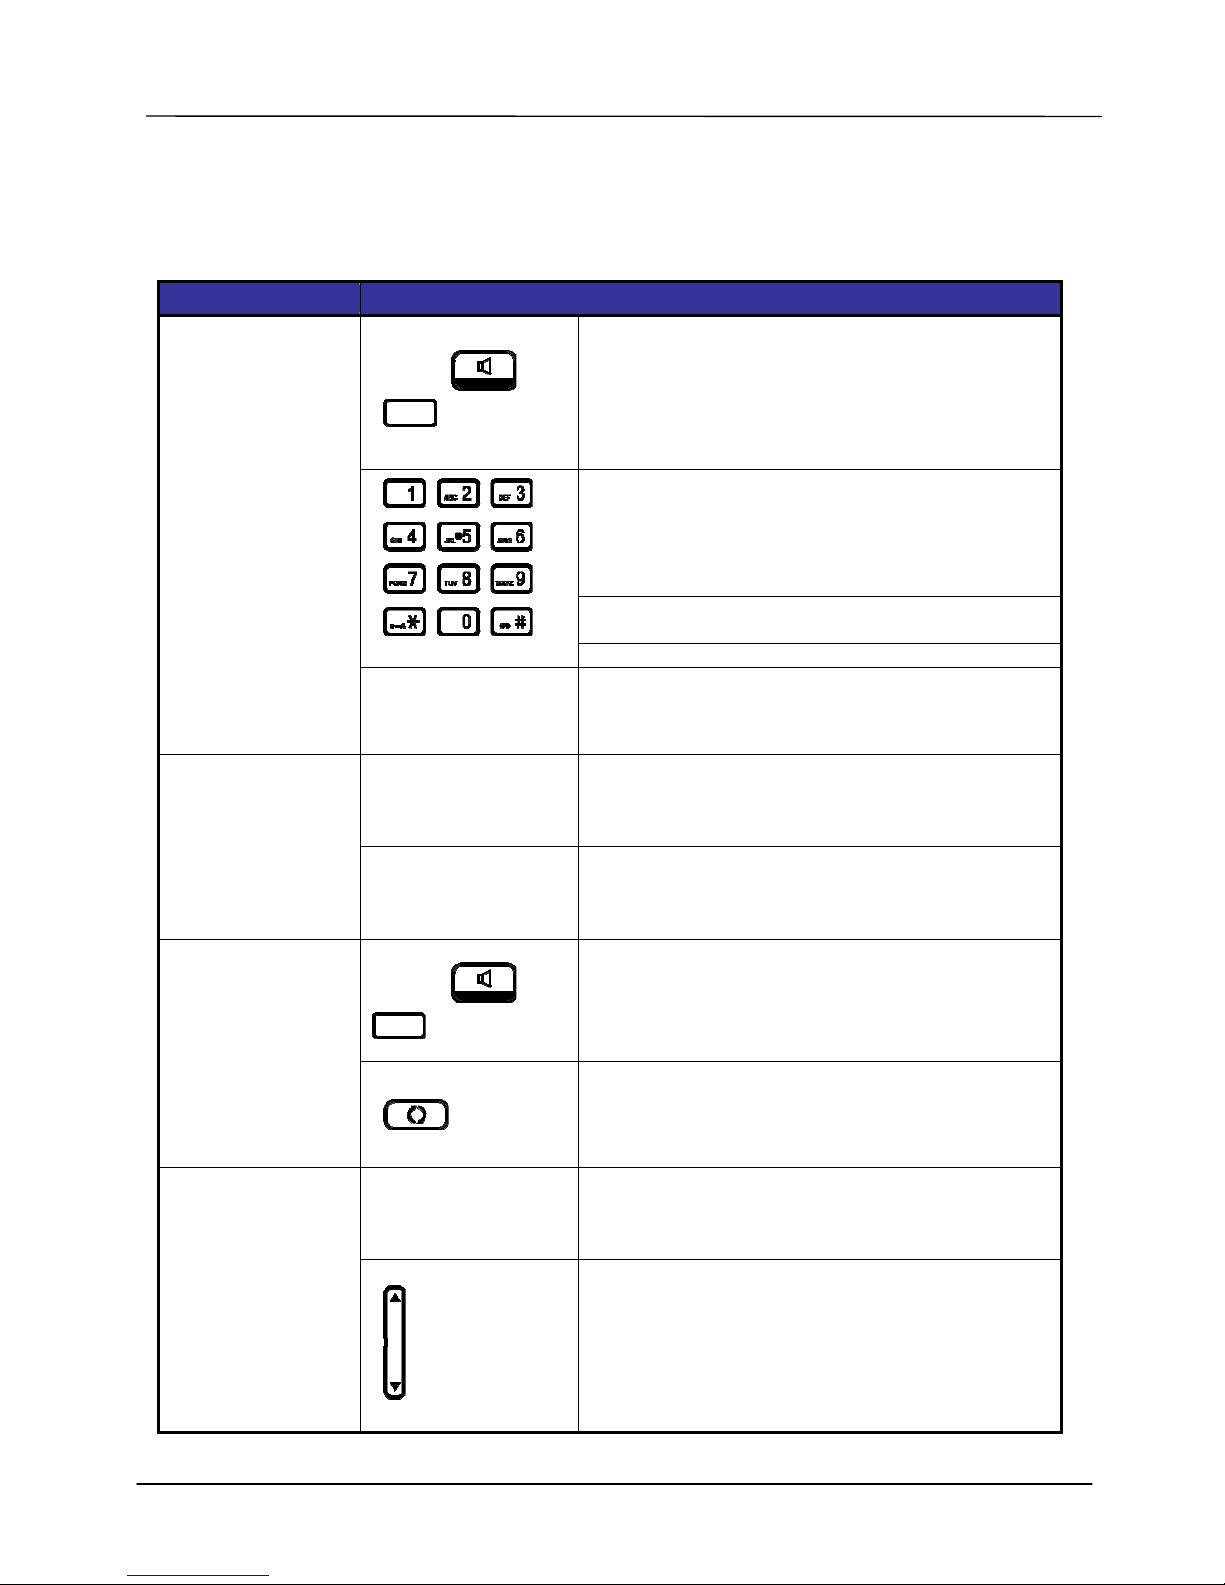
Basic Operation Guide
This section will introduce some basic features of the IP3032 Standard IP Deskphone.
Operation Description
or
Line Key
1. Pick-up the handset or press a line key or
press the speaker key.
You will hear a dial tone.
2. Use the keypad to dial the phone number.
The LCD window displays the number you
enter.
Note:You may use the “BkSp” soft- key to
delete the last digit .
Making a call
3. On-hook the handset when your
conversation is over.
1. Pick-up the handset upon hearing the phone
ringing.
Receiving a call
2. On-hook the handset when your
conversation is over.
or
Line Key
1. Pick up the handset or press a line key or
press the speaker key.
Last number
redial
2. Press the REDIAL key. The last dialed
number will be automatically redialed.
1. During a conversation, if the voice volume is
too low or too high, you may adjust it.
To adjust volume
while on a call
2. Press the Volume control key Up or Down
to adjust the volume of Speaker, or
Handset.
Page 14
Page 14
MOCET IP3032 Standard IP Deskphone Quick User Guide
Call Logs
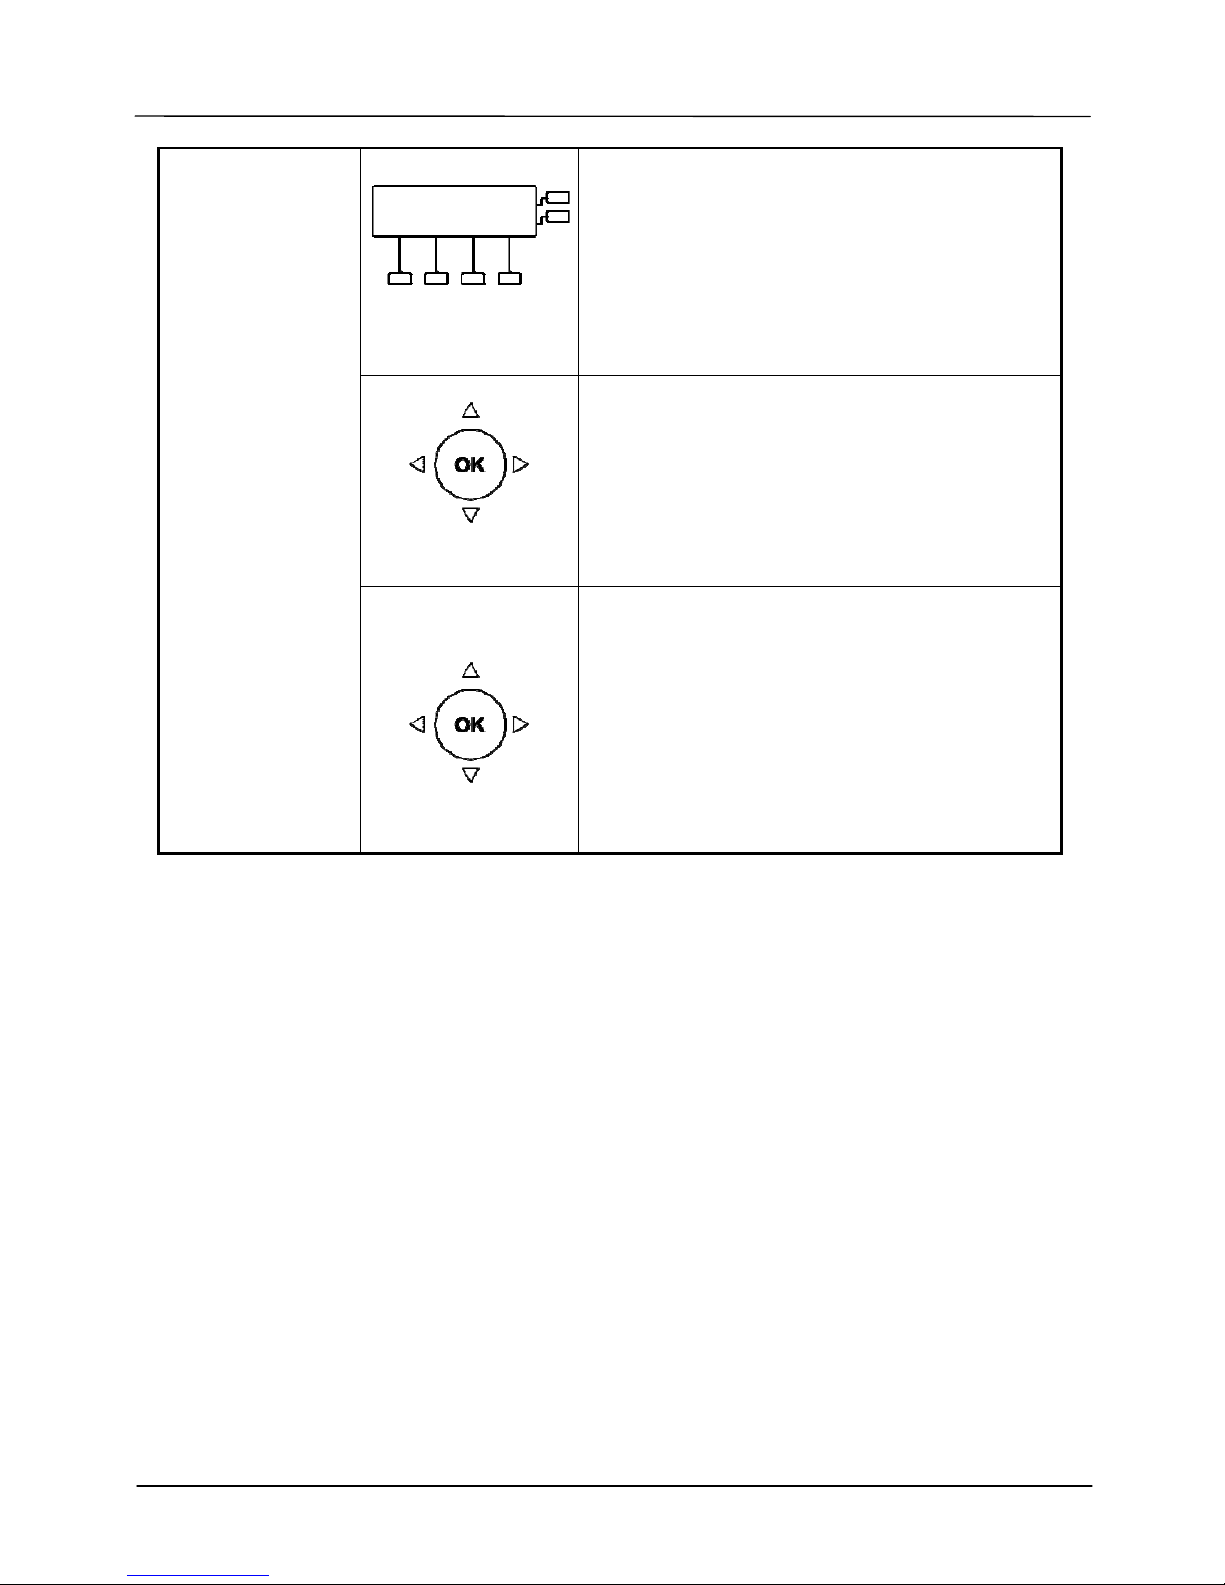
1. Press the “Logs” softkey to enter and
view Call log record.
Missed Calls
2. Select the item Missed Calls and validate
with the validate key “OK”.
Review missed
phone calls
3. Use the navigation key to review the
different missed calls. You may choose to
redial the number if the Caller ID is known
(using the “Dial” soft key).
4. Press the Navigation LEFT button to exit
the menu.
Page 15
Page 15
MOCET IP3032 Standard IP Deskphone Quick User Guide
IP3032 Configuration with a Web Browser
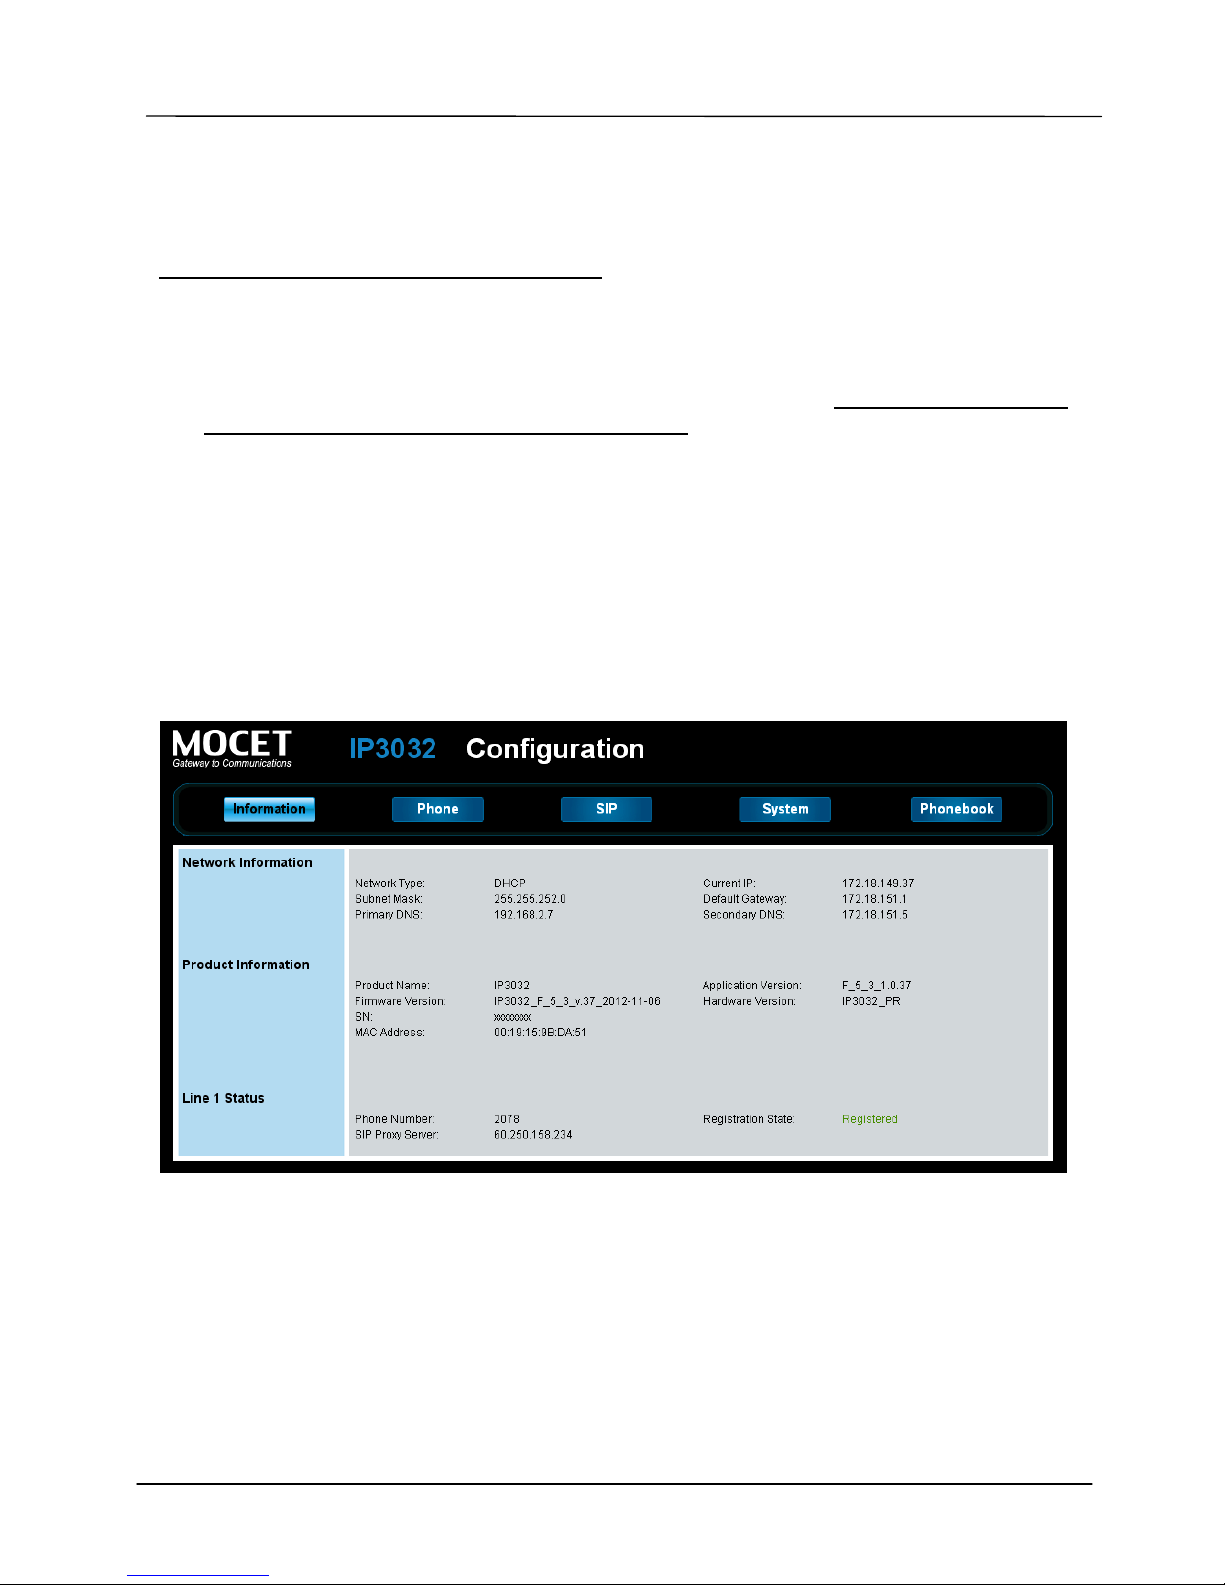
The IP3032 can be configured using a web browser. Point your web browser to the
factory default IP address of 192.168.1.10 (assuming the subnet mask is 255.255.255.0)
and the login dialog will appear.
To access the web interface, please follow the following steps:
1. Start a web browser then enter the URL http://192.168.1.10 and click ENTER key.
2. You will be prompted for to enter a username and a password. The default username
is “user” and the default password is “1111”.
This Web interface (see the example page figure below) allows you check the status and
configure all the settings of IP Phone:
(1) Information
(2) Phone settings
(3) SIP settings
(4) System settings
(5) Phonebook settings
Resetting the IP Phone
There is a “Reboot” soft key in LCD Menu, which can execute the warm reboot of the
phone. In general, when you finish a configuration, you will be asked by IP phone to
confirm the save of configuration and reboot function. To clear the current configuration
and reset the IP3032 to factory defaults, please ask your Administrator for help.
Page 16

Page 16
MOCET IP3032 Standard IP Deskphone Quick User Guide
Upgrading the IP Phone
Normally, general user is unable to upgarde IP phone by themselves. To upgrade IP
phone, please ask your Administrator for help. Administrator can upgrade the IP phone
through the Web user interface of the IP phone. There is also an Emergency Upgrade
process available for administrators or vendors to recover a phone with corrupt or defective
firmware that cannot be fixed using the web user interface of the phone.
More Information
Please refer to related User Manuals of the Phone for more detailed descriptions or
contact your administrator or supplier for advanced configuration support.
Thank you for your choice of product. Remember to record your IP phone information
below for further support service, if needed.
Page 17

Page 17
MOCET IP3032 Standard IP Deskphone Quick User Guide
Notes
This device has Model number, MAC Address and Serial Number which are located
on the back of Base Unit. Please record down them for service check.
Model Number: IP3032
MAC : Serial Number:
And every time you change the PASSWORD and/or User ID, please record down and
retain them for use.
USER ID:
PASSWORD:
USER ID:
PASSWORD:
USER ID:
PASSWORD:
 Loading...