

Page 1
70168
Page 2

Table of Contents
Package Contents 1
Hardware & System Requirements 1
Equipment Needed to Connect 1
Primary Features 1
Installation 2
Quick Features Setup 7
Motion Detection 7
Standard Recording 9
User Name & Password Settings 10
Troubleshooting 11
Warranty 13
Page 3

Package Contents…
• MobiCam® Anywhere Software Disc
• AV to USB Adaptor Cord
• Registration Serial Number and Key (on CD sleeve)
• Instruction Manual
Hardware & System Requirements…
• Intel Pentium 2 GHz or higher
• Microsoft Windows 200, XP, 2003, Vista 32 bit
• 512MB RAM (1GB recommended)
• Color Monitor
• Mouse or other pointing device
• Broadband Internet Service
Before you begin installation please verify that you meet all of the
above hardware and software requirements.
Equipment Needed to Connect…
• MobiCam®AV or MobiCam® Digital Monitoring System or…
• other video source with A/V output
• PC running Windows 2000, XP, or Vista
Currently this software does not support Apple operating systems.
Primary Features…
• Motion detection with e-mail or text-message alerts
• Scheduled motion detection and recording
• Record and playback up to 4 cameras to your PC
• Date and time stamp recordings
• Advanced hard drive space management for continuous recording
• Broadcast live video and sound
• Password protected Internet account
Note: To stream video using the MobiCam
browser or Windows Media cell phone, you will need to set up your personal
account with mobicam.com during the MobiCam® Software account signup.
The streaming account comes with 2 free hours per month. You can also
choose a plan with unlimited hours for $9.95 per month.
®
Internet Kit Software to a web-
1
Page 4
Installation
Note: Do not connect the USB Connector to your computer until you have
completed Step 2.
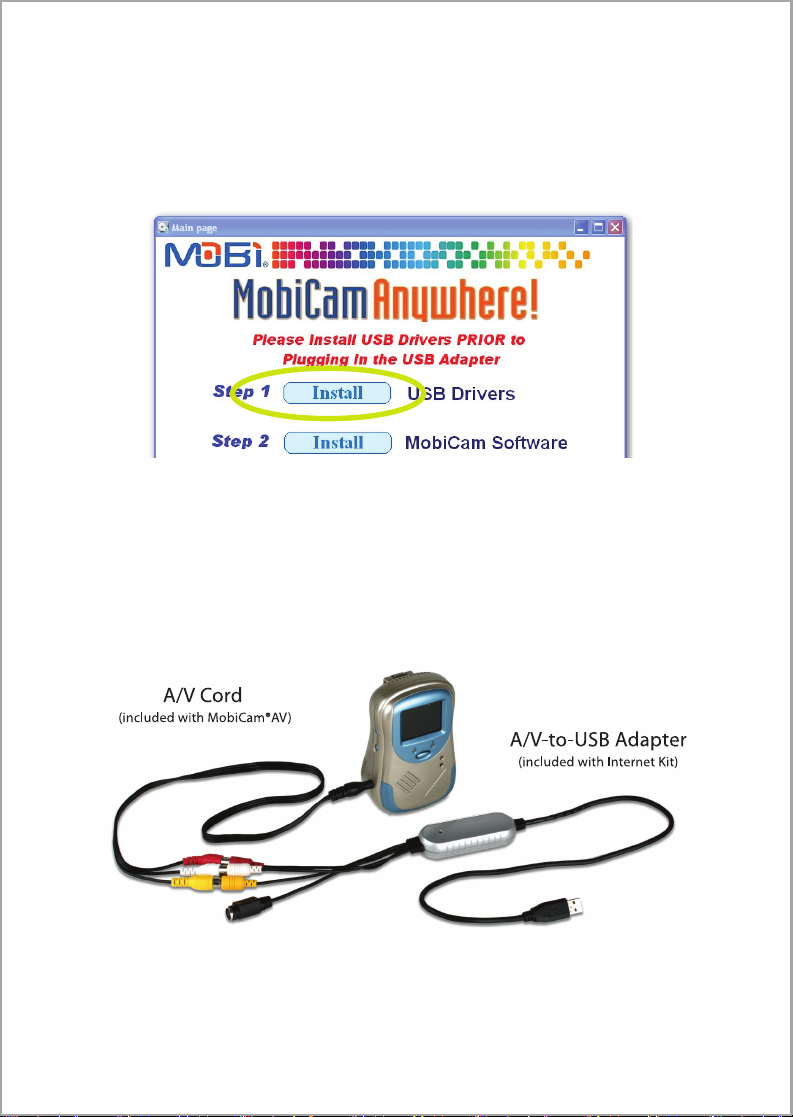
1. Insert the MobiCam® Software CD into the CD drive of your computer.
2. At the menu shown above, select “Install USB Drivers.” Once the installation
is completed you will need to reboot your computer before continuing.
Note: This step could take several minutes, depending on your connection
speed, to download the latest version.
3. Plug the AC adaptors into your MobiCam®AV camera and monitor and turn
them on.
4. Connect the AV-to-USB adapter (included in with the Internet Kit) to the AV
cord (included with the MobiCam®AV monitor) as shown here.
Connect the Yellow to Yellow plug, Red to Red plug, and White to White
plug. The S-Video (Black) plug is not used with the MobiCam®AVsystem.
2
Page 5
If you are using another video source, connect the three AV connections from
that source the same as above, or use the S-Video plug instead (if S-Video is
available from your source).
5. Once your computer restarts close any programs on your PC and plug the
USB adaptor into an available USB port directly on the computer. We recom mend you DO NOT connect the USB capture cable to the computer through a
USB hub. Windows automatically recognizes, and installs, the USB adapter
drivers for video and audio. Depending on your operating system you may be
directed to the Install New Hardware Wizard. From there, select “Automatic
Installation” and allow sufcient time for your PC to nd your new adapter
and install the needed drivers. (Only after your hardware is installed success fully will you be able to get picture and sound to your PC). After installa-
tion is complete you may be asked to restart your computer depending on
your operating system.
Note: If you disconnect your USB adapter you must reconnect to the same
USB port each time. Otherwise the USB driver will need to be reinstalled.
(This is a Window function for video devices.)
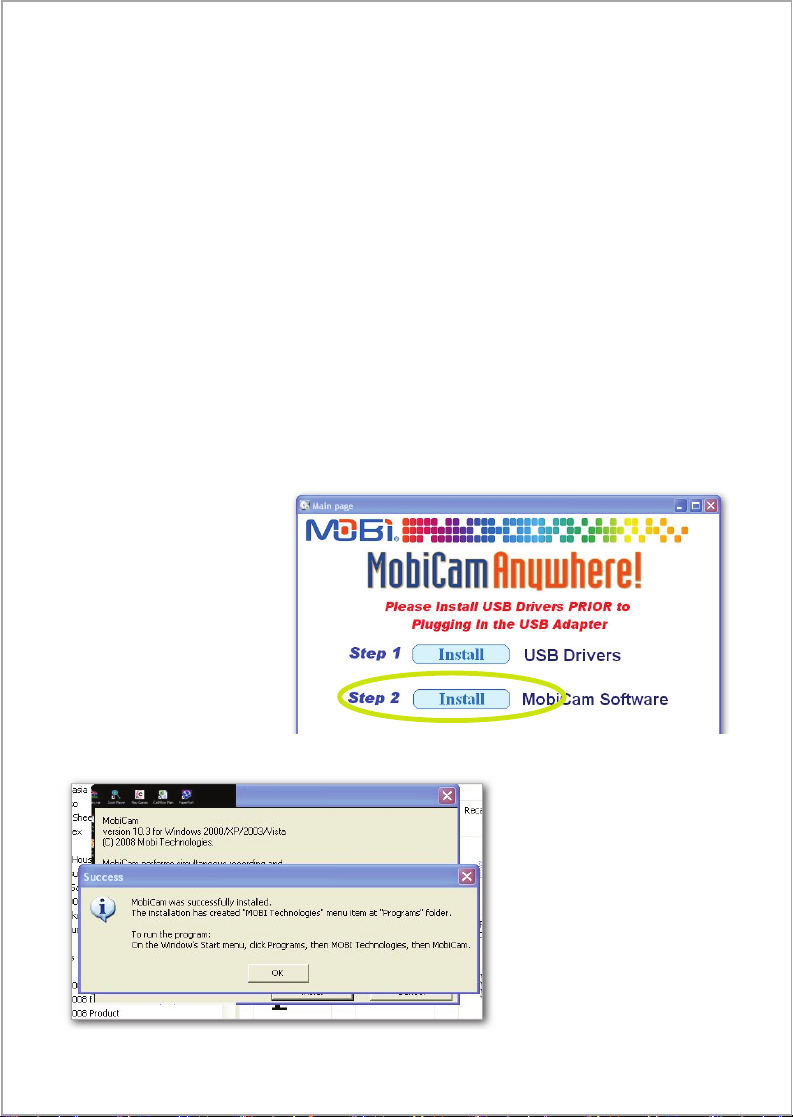
6. Make sure the USB
adapter is plugged into
your PC then reinsert
(restart) the MobiCam
®
Software CD.
At this menu select
“Install” MobiCam
Software.
®
Upon successful installa-
tion you will see this.
3
Page 6
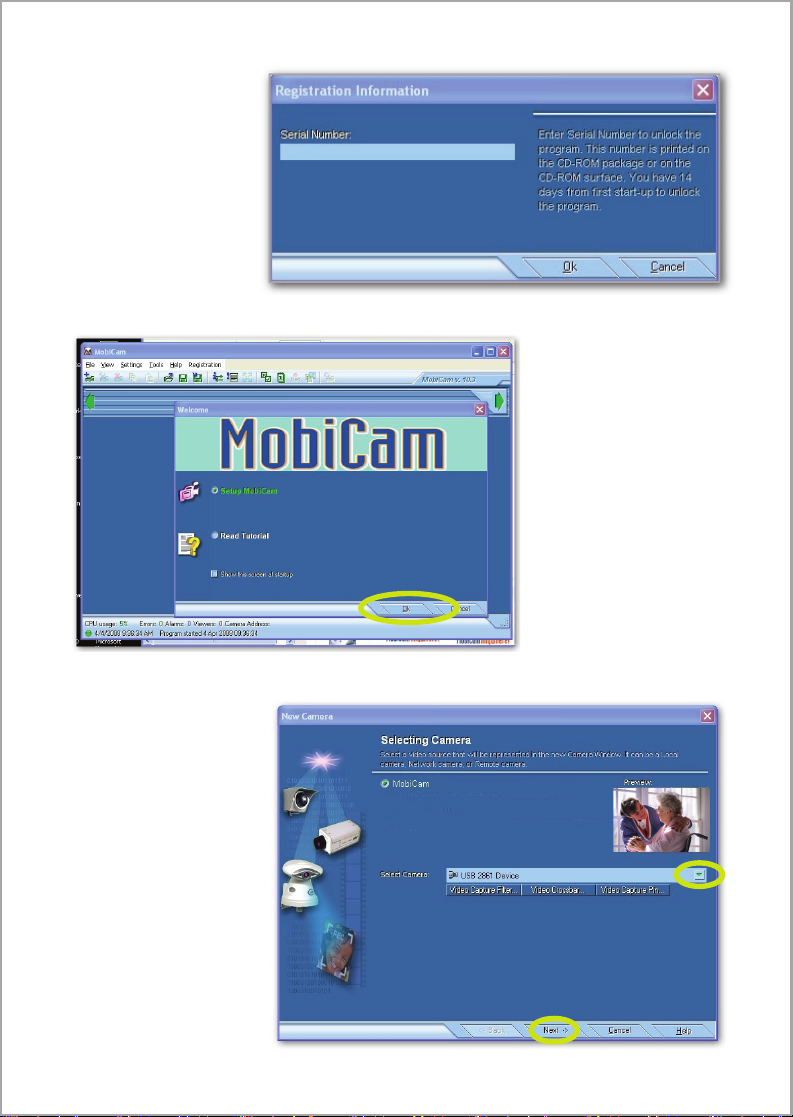
7. Enter your Serial
Number (found
on the program CD
sleeve) into the Se rial Number eld...
8. Once the Camera
Setup Screen appears
select “Ok” to begin
setup...
9. On the following
screen click on the
drop down menu and
select “USB 2861
Device.” Once you
have selected the
camera the picture
should appear on the
screen as shown...
Then select “Next”
at the bottom of the
window to create
your MobiCam
®
Internet Account...
4
Page 7
10. You will now be directed to mobicam.com where you will select your view ing plan and create your own secure MobiCam® account that you can access
via the Internet with a PC browser or a cell phone. Upon completing the
registration you will be returned to the MobiCam® program. Be sure to keep
your user name and password.
Note: If you missed the registration process you can simply go to the main
screen, select “Tools,” then “Account to Stream to Web Server,” then “Sign
Up for Account,” and register. You can also view your user name, password,
and personal webpage address.
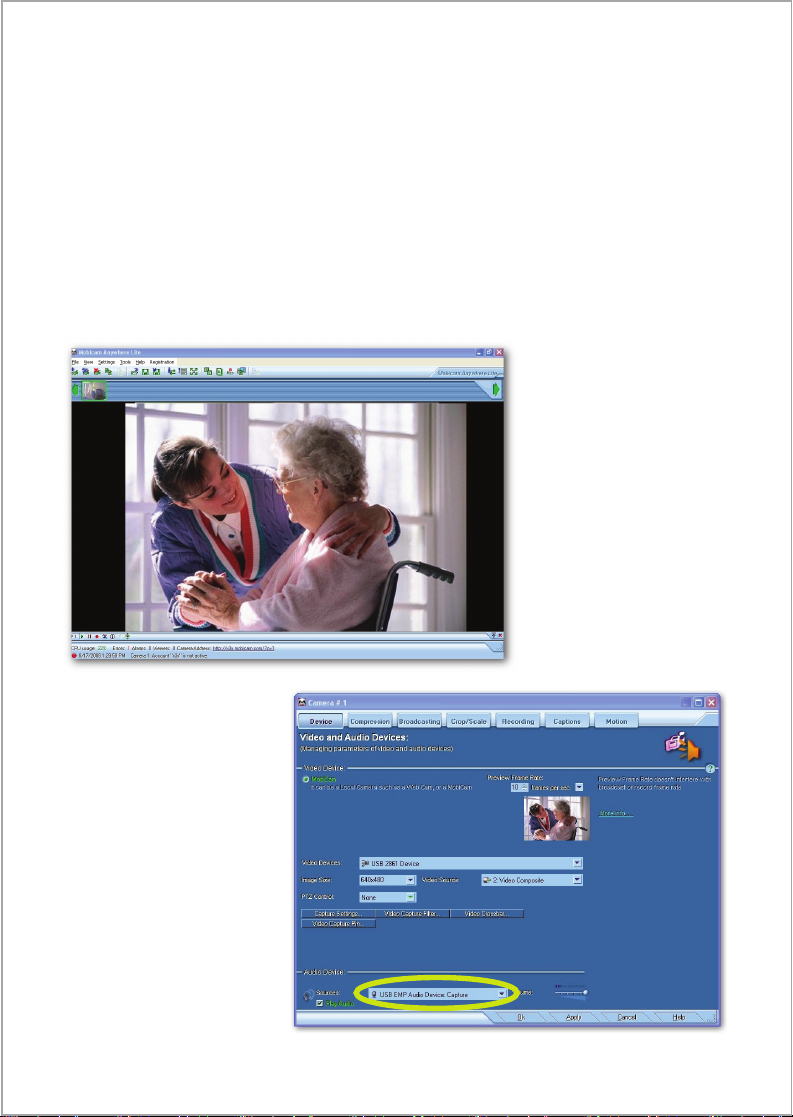
MAIN SCREEN
11. Double click on the
video image to go to
the Camera Setup
page.
12. To enable the Audio
features, double click
on the camera’s im age to go to the Cam-
era setup screen.
Under Audio Device,
select the drop down
list, then select “USB
EMP Audio Device
Capture,” then select
“Apply”...
5
Page 8
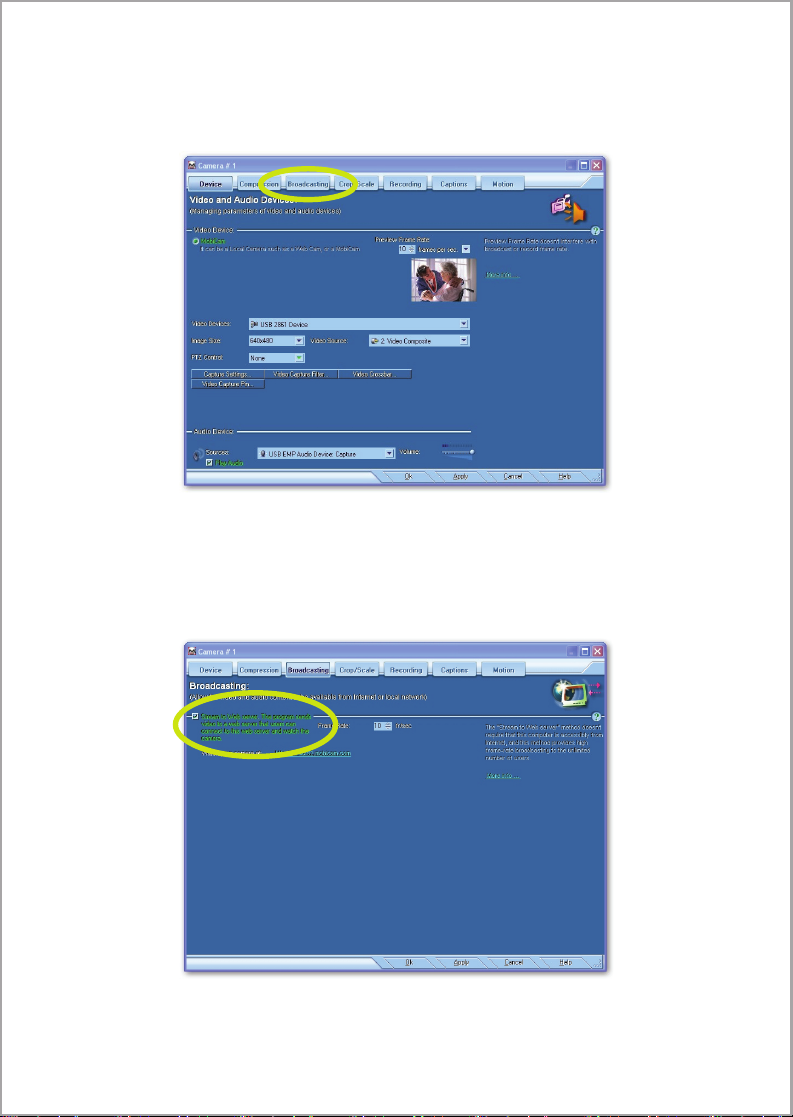
13. To begin broadcasting and remote access to your account page for viewing,
select the “Broadcasting” tab at the top of the camera setup screen, then
check the “Stream to Web Server” box and select “Ok”...
If you signed up correctly in Step 10 the link to your camera should appear
on the broadcasting page.
Otherwise, go to “Tools” on the Main MobiCam® Anywhere page, then
select “Stream to Web Server” and sign up...
You must sign up for your streaming account to broadcast.
6
Page 9
14. Once you have completed the setup process it is important to save your
settings. To save the settings simply go to the main screen click on “File”
then select “Save Session” and name the File. This step ensures that when
you open the program the next time all settings remain the same. It is re commended that you follow this step whenever you make changes to any of
your settings.
Congratulations! Your MobiCam® software installation is complete.
For more advanced features and functions, please refer to the MobiCam
Help area within the program. You can now see and hear the signal from
your camera via the internet at: http://YourUserID.mobicam.com
Note: Your User ID and Password were created during the registration pro cess covered earlier. Additional information regarding your account, and
available options, will be sent to the e-mail address you entered during
registration.
®
Quick Features Setup
Please refer to the Help les within the software for a complete list of fea tures and expanded explanations for advanced setup.
Motion Detection
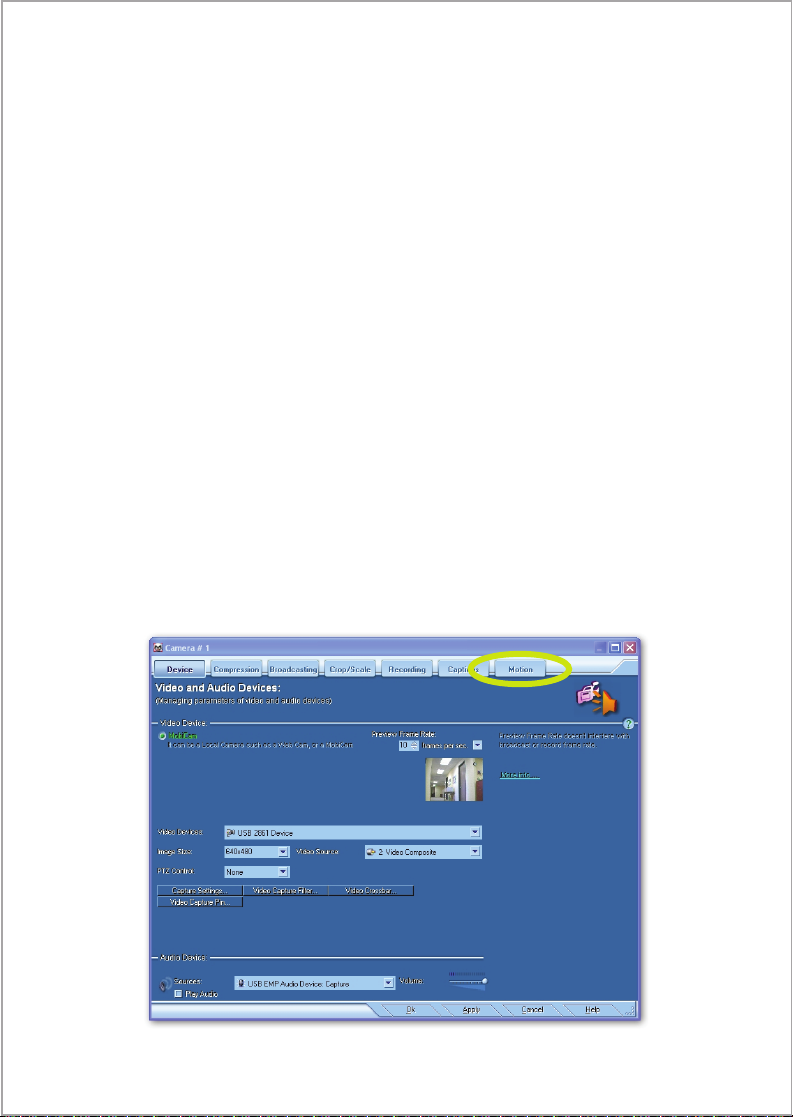
a) To activate motion detection, double-click on the camera image to open
the main setup page for the camera. Then select the “Motion” tab...
7
Page 10
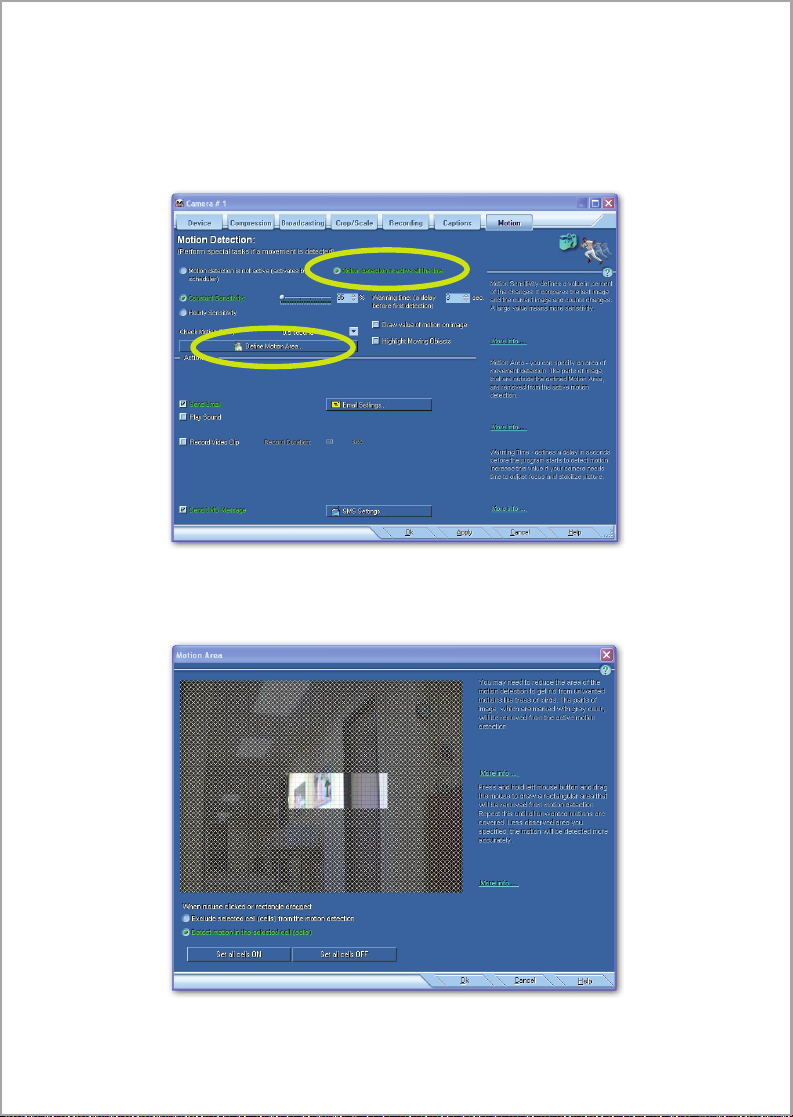
b) Select one of two detection modes: “By Scheduler” or “All the Time.”
Then select “Dene Motion Area.”
If you chose the “By Scheduler” mode be sure to enable and setup a schedule
for the camera under “Tools” then “Scheduler” on the main menu.
c) You may then dene the whole frame or specic areas of the camera view to
be sensitive to motion detection by clicking and dragging your mouse over
the desired area...
You may also select multiple zones if you want.
8
Page 11
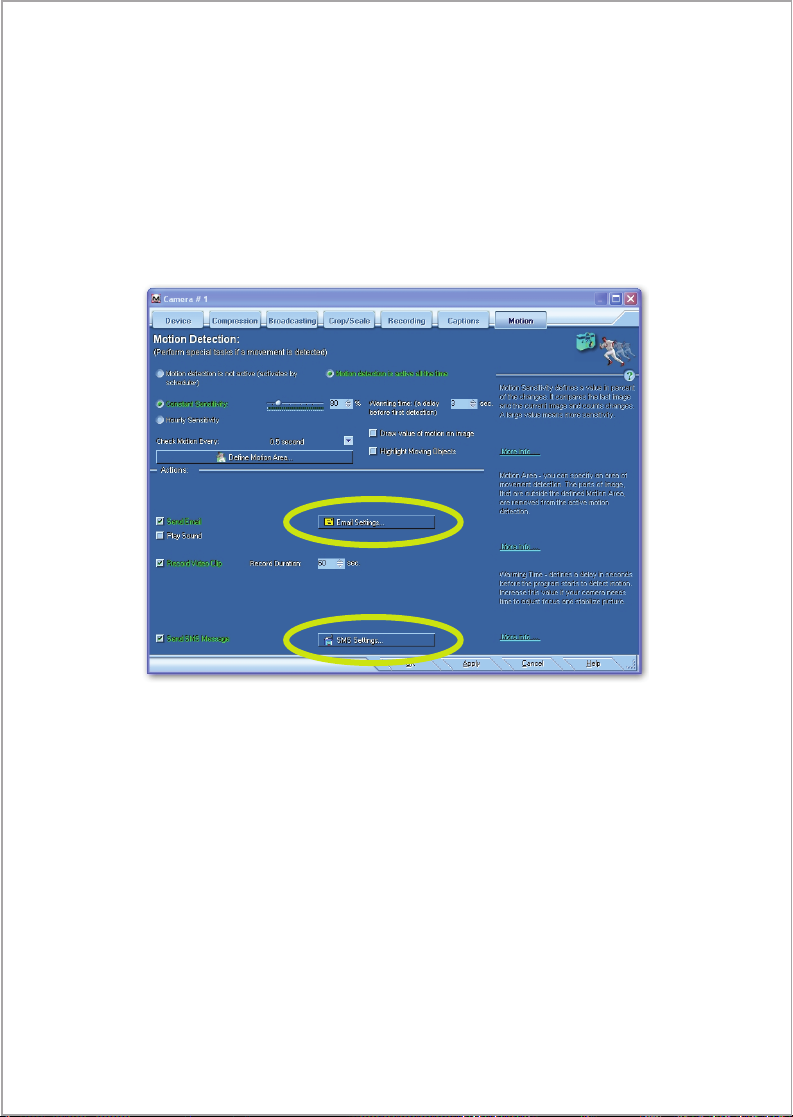
Note that areas you select will respond to the sensitivity setting on the prev ious page and you can adjust the sensitivity or the selected area for your
desired result in triggering automatic notications and recordings.
Select “Ok” to accept.
d) By checking their appropriate boxes, you can activate features that will be
triggered automatically based on motion detection, such as e-mail and text
message Notication or Recording of short video clips...
To set up either e-mail or text message alerts you must enter your account
settings in the appropriate elds. Once you have set up the information you
can send a test email or text message to ensure the settings are correct.
To change the settings at any time simply double click on the main camera
image go to the “Motion” tab and select the setting you wish to change.
Standard Recording
You can set your camera to record constantly (instead of on a schedule or
triggered by motion) directly to your computer’s hard drive for playback
later.
9
Page 12
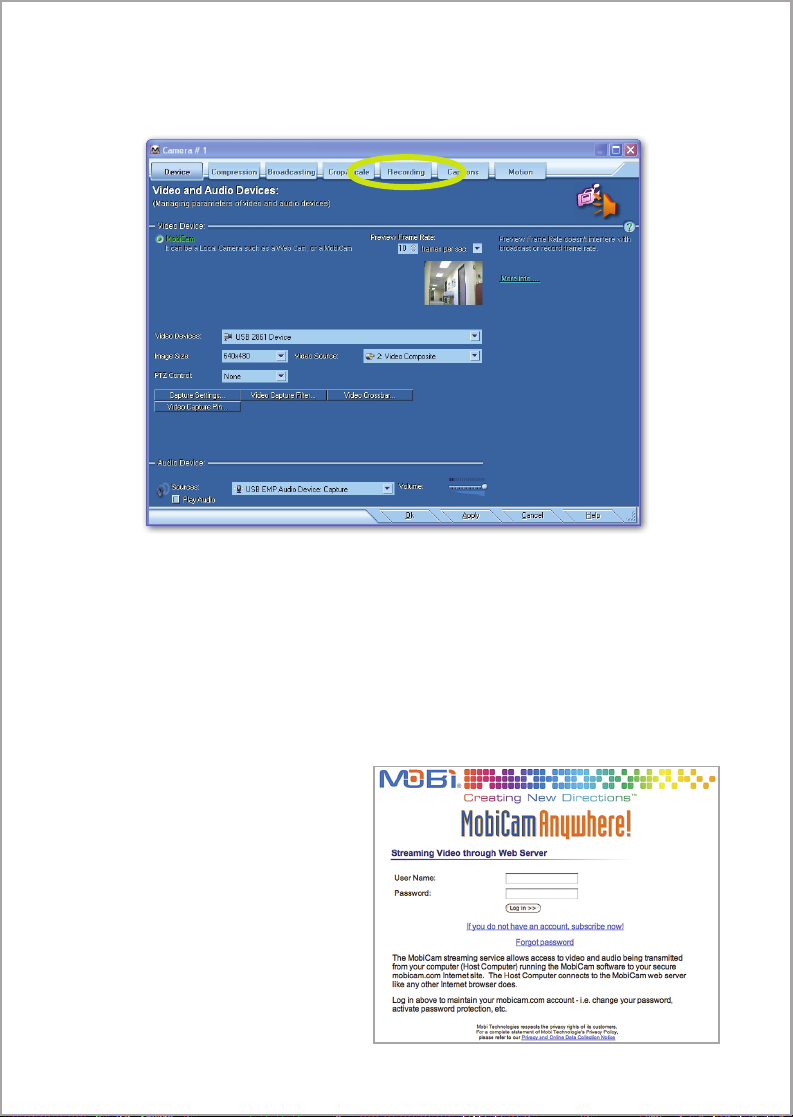
a) To activate constant recording, double-click on the camera image to enter the
camera setup page then select the “Recording” tab.
b) Then select “Record All the Time.” Next select “Browse” on the “Folder for
Archives” to chose where you want the les saved on your hard drive. (You
can change the le name.) Then select “Apply” to save the settings.
c) To view your recorded Files choose “View” and “Gallery” from the Menu.
d) To customize the captions on your camera, select the “Captions” tab, then
single-click on the caption that you want to change. You can change the
name, date or both.
User Name and Password
Settings
You can change your user name
and password at anytime. Sim-
ply open your web browser and
go to login.mobicam.com.
You will be prompted to enter
your current user name and
password before continuing.
10
Page 13
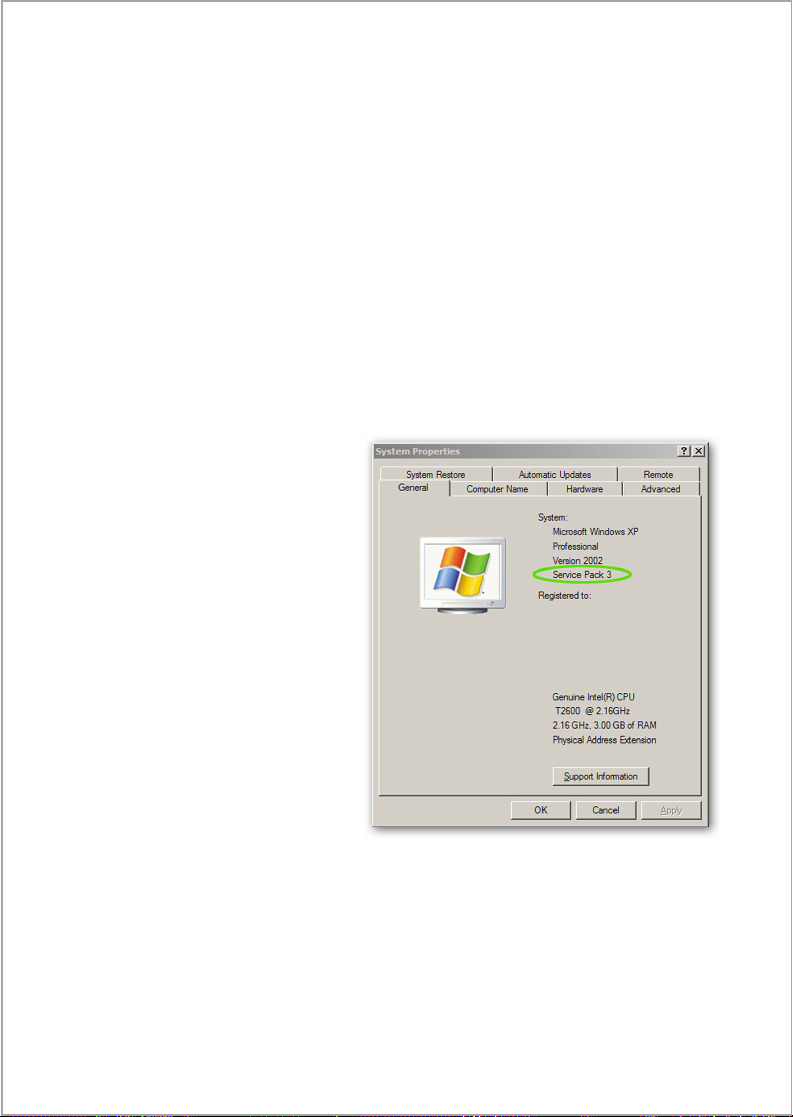
Once you have entered the required information you will be able to change
your password. The main screen will display your account information and
account Status. To change your password simply click on “Change Pass word” and follow the prompts. You can also upgrade your subscription and
cancel your subscription on this page.
To add password protection for remote access, click on “Password Protec tion” and select “Restrict access to camera.” Once you have changed this set ting your camera will become accessible only if a valid password is entered.
Troubleshooting
To ensure the USB driver is installed correctly, please check the following
information:
1. Check the latest version of Windows Service Pack. Go to Start, Control
Panel, and System.
Please make sure your Win-
dows system has the minimum
required Service Pack in-
stalled.
• Windows XP must have at
least Service Pack 1 installed.
Note: If you have Windows
XP and have Service Pack 2,
no further action is required.
Windows XP Service Pack
1 download site: http://www
microsoft.com/windowsxp
pro/downloads/servicepacks
sp1/network.asp
• Windows 2000 must be
upgraded to Service Pack 4.
Windows 2000 Service Pack 4
download site: http://www.microsoft.com/Windows2000/downloads/service
packs/sp4/download.asp
• Windows Vista can block the driver setup if the latest updates are not in stalled. Go to your “Start Menu” type in Windows Updates and select
“Windows Updates.” After you have installed the latest updates you will need
to remove the MobiCam Anywhere Software program completely and rein-
stall the program.
11
Page 14
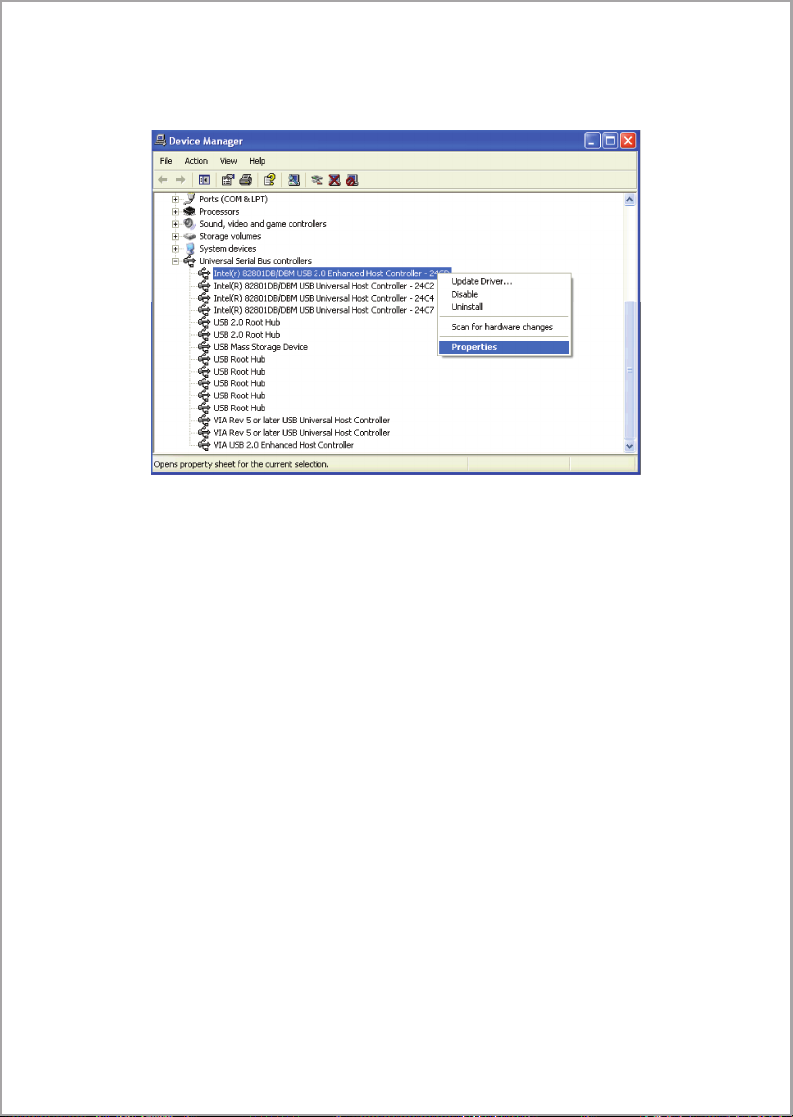
2. Next check the USB Enhanced Host Controller. Go to Control Panel, then
select Device Manager
The USB Enhanced Host Controller must be listed in the Universal Serial
Bus Controller section in order for the USB driver to function properly.
Check the version of the device driver for USB Enhanced Host Controller by
right-clicking on the Enhanced Host Controller and selecting Properties.
Click on the “Driver” Tab and check to make sure the driver is provided by
Microsoft.
If it is not, you will need to update the device driver. If you are not familiar
with the process we recommend you contact a PC technician or Microsoft.
3. Determine if your anti-virus blocked the setup process. Certain anti-virus
programs can block the upload of the USB driver. Please disable you anti virus program, remove the MobiCam® Software completely and re-install
the program. Once you have completed the setup you can enable your anti virus program.
• To remove the MobiCam Anywhere Lite Software from Windows XP, go
to Control Panel, Add/Remove Programs, and Select MobiCam® Anywhere
Lite once the programs populate and click on Change/Remove. Repeat the
same step to remove the USB Video/Audio Device Driver. You will also need
to remove the folder that was created during the initial setup. Go to my Com puter, Select your Local C Drive, go to Program Files, Select the MobiCam
®
File, right-click and select delete.
12
Page 15

• To remove the MobiCam® Anywhere software from Vista, go to Control
Panel, Programs and Features, select MobiCam® Anywhere, right-click and
press delete. To delete the folder created during set up go to Computer, select
your Local C Drive, and delete the appropriate folder.
Limited Warranty
Mobi Technologies, Inc. warrants this product to be free from defects in
material and workmanship for a period of ninety (90) days from the date of
purchase. Should this product prove to be defective at any time during the
warranty period, Mobi Technologies, Inc. will, at its option, either replace
or repair it without charge. After the warranty period, a service charge will be
applied for replacement of parts or labor for repair. To obtain warranty ser vice, please return the product to Mobi® along with a dated sales receipt
from the place of purchase. Purchaser is responsible for shipping the product
to Mobi Technologies, Inc. at the address indicated below and for all associ ated freight and insurance cost. This warranty does not cover damage caused
by accident, misuse, abuse, improper maintenance, or unauthorized modica tion. A charge will be made for repair of such damage. This warranty ex-
cludes all incidental or consequential damages and any liability other than
what is stated above.
Mobi Technologies, Inc.
5913 Blackwelder St
Culver City CA 90232
www.getmobi.com
© 2009 Mobi Technologies, Inc. All Rights Reserved.
Mobi Technologies, Inc.
Please register your product at: www.getmobi.com/registerproduct.php
13
Page 16

Notes
 Loading...