

Page 1
Camera Monitoring and Notification Software
Owner’s Manual
&
Quick Start Guide
Page 2

- 2 -
Contents
Getting Started
Welcome to ReCam Software
o About Recam
o About the Registration Key
o Registration and Customer Support
Installation & Quick Start
o Installation Notes
o Installing ReCam Software
o Quick Camera Setup
o ReCam Folder Structure
o About the ReCam Window
o Program Options
User Guide
Part 1. Setting Up a Session
Part 2. Camera Settings
o Camera Setting dialog box
o Local Video and Audio devices
o Network Cameras
o Remote Cameras
o Cycle through cameras
Part 3. Quality of Recording and Broadcasting
o Image Quality
o Sound Quality
Part 4. Scale and Crop Image
Part 5. Caption on Image
o Time formatting macros
Part 6. Broadcasting
o Remote Access
o FTP Upload
o Configure FTP Connection
o HTTP Server
o Configure WebCam HTTP Server
o Save Frames to Local Folder
Part 7. Watching Broadcast
o Web Page Creation Wizard
o How to add WebCam to your own HTML text
o Java Applet Parameters
o How to create WebCam page with Actual Drawing
o Displaying Still Images on Web Page
o Testing Camera Accessibility from the Internet
Part 8. Motion Detection
o Customize Motion Detection
o Motion Actions
o Start FTP Uploading when motion detected
o Send Email
o Play Sound
o Launch a Program
o Record Video Clip
o Pop-Up the Program Window
o Create Motion Snapshots
Page 3

- 3 -
o Change Settings
Part 9. Schedule Events
Part 10. Recording Video
o Recording Video Clips
o Customizing Recording
o Live Recording
o Archive Recording
o Archive of Snapshots
Part 11. Managing Program from Command-line
Part 12. Tools
o Creating a Web Page
o Dynamic IP Service
o Using a Dial-Up Connection
o Your Computer’s IP Address
o Testing Camera Accessibility from the Internet
o Editing Video Clips
Part 13. Troubleshooting
Page 4

- 4 -
Welcome to ReCam Software
Welcome to the ReCam® Camera Monitoring & Notification software by MOBI Technologies, Inc. ReCam is
designed to help you easily monitor your home or business from anywhere in the world.
You can maximize its use and benefit by reviewing the included Help files and ReCam’s web page at
www.getmobi.com/recam.php to familiarize yourself with many of its features.
About ReCam
ReCam captures images up to 30 frames per second from any video device, including USB cameras, analog
cameras connected to a capture card, TV-boards, camcorders with FireWire (IEEE 1394) interface, and Network
cameras. The program broadcasts captured live audio and video content in real time to client computers from
either your computer or through any FTP server.
Viewers can watch real video and audio using an Internet browser or another copy of the ReCam program.
When the program detects motion in the monitored area, it can sound an alarm, e-mail you the captured images,
start broadcasting, or record a video.
The program has features to add text-captions and image-logos to the images, place a date/time stamp on each
video frame, and to adjust the frame rate, picture size, and quality.
About the registration key
The registration key is a twenty-five-digit alpha-numeric code located on the ReCam CD jacket. Do not lose this
code.
Important You must enter the registration key after the installation, or the software will run in trial mode.
The installation code ensures adherence to the single user license agreement, which allows for use of one (1)
copy of the software on a single computer at a time.
Registration and customer support
Please take time to register your product during installation through the MOBI Technologies, Inc. web site at
www.getmobi.com/recam.php
For information about technical support and customer service, please visit www.getmobi.com/recam.php or
choose the Help menu from the ReCam software. The help menu will have options available, such as a user
manual, answers to Frequently Asked Questions, and trouble shooting information. Unlimited support for
installation will be provided via e-mail or telephone with your registration key. For sales or installation support we
can be reached at 310-551-1120 Mon.-Fri. 9am-5pm PST.
Page 5

- 5 -
Installation & Quick Start
Before you begin the installation process, exit other open programs, and save your work. For updated information
about ReCam, visit www.getmobi.com/recam.php
Installation notes
Before you install ReCam, review the following notes:
To install ReCam in Windows NT, XP, or 2000 Professional, you must log on with Administrator or Power User
privileges.
If an old version of ReCam software is already installed on your computer, you can install the newer version
without uninstalling the old one.
If your computer is running virus protection software, disable it before installing ReCam software, and turn it back
on after installation.
By default, ReCam software will be installed in the C:\Program Files\ReCam folder. During installation, you can
choose another drive or folder for the install.
Installing ReCam software
You must use the installation program to install ReCam software—you can’t install ReCam software by dragging
files to your hard disk.
To install ReCam on your hard disk:
1. Insert ReCam CD into your CD or DVD drive
2. Follow the on-screen instruction to complete installation
Quick Start (IP Camera setup)
1. Select File on the Menu Bar
2. Select New Camera
3. Select Network IP Camera from the video device list
4. Choose your IP camera from the Camera Model drop down list (In most cases even if your specific camera
brand or model is not listed you can access the camera via ReCam by just entering its IP address)
5. Enter the IP address and Port for your camera
6. Enter the User Id and Password if applicable
7. Click Connect to Camera
8. Click Ok
Notes: By default cameras added will have the “Enable Live Recording” feature in the “Recording” tab activated
for continuous recording.
All camera settings or profiles can be saved as sessions that can be reloaded automatically.
Certain models may not be compatible with ReCam software. Please check www.getmobi.com/recam.php for a
list of incompatible IP cameras.
Quick Start (USB Camera setup)
Note: Before you create a new local camera, make sure its driver is installed on your computer. Consult your
Camera’s user manual for proper installation.
1. Select File on the Menu Bar
2. Select New Camera
3. Select Local Camera the video device list
Page 6

- 6 -
4. Select your camera from the Video Devices list. (If the camera isn’t installed properly, it will not show up
here)
5. Click OK
USB Video Capture Device (Optional)
If you purchased ReCam with the optional USB Video Capture adaptor, you must install the adaptor and its driver.
Please follow the USB adaptor’s installation instructions for proper installation & configuration. After installation,
you can access the device from ReCam by selecting Local Camera and choosing the Capture device under the
Video Devices drop down list in the Camera Settings area.
Page 7

- 7 -
ReCam Folder Structure
The ReCam folder contains all the files you need to use ReCam.
Do not move or rename the ReCam folder or any folders within it. If you need to relocate the ReCam folder, you
must uninstall and reinstall the program.
ReCam performs best when the application and its parts remain in the folder recommended during installation.
This is especially true with the \Gallery folder.
If you change folder names and/or locations using Windows Explorer or File Manager, ReCam might not be able
to track files and links properly.
The sub folders organize files according to their use:
\Gallery contains captured pictures, which you create with the "Take a Picture" command.
\Help contains help files.
\Images is used in the "Web Cam HTTP server" publishing method.
\NetCams Models contains configuration files for various types of Network cameras.
\Page Templates contains templates for Web Page Creation Wizard.
Page 8
- 8 -
About the ReCam window
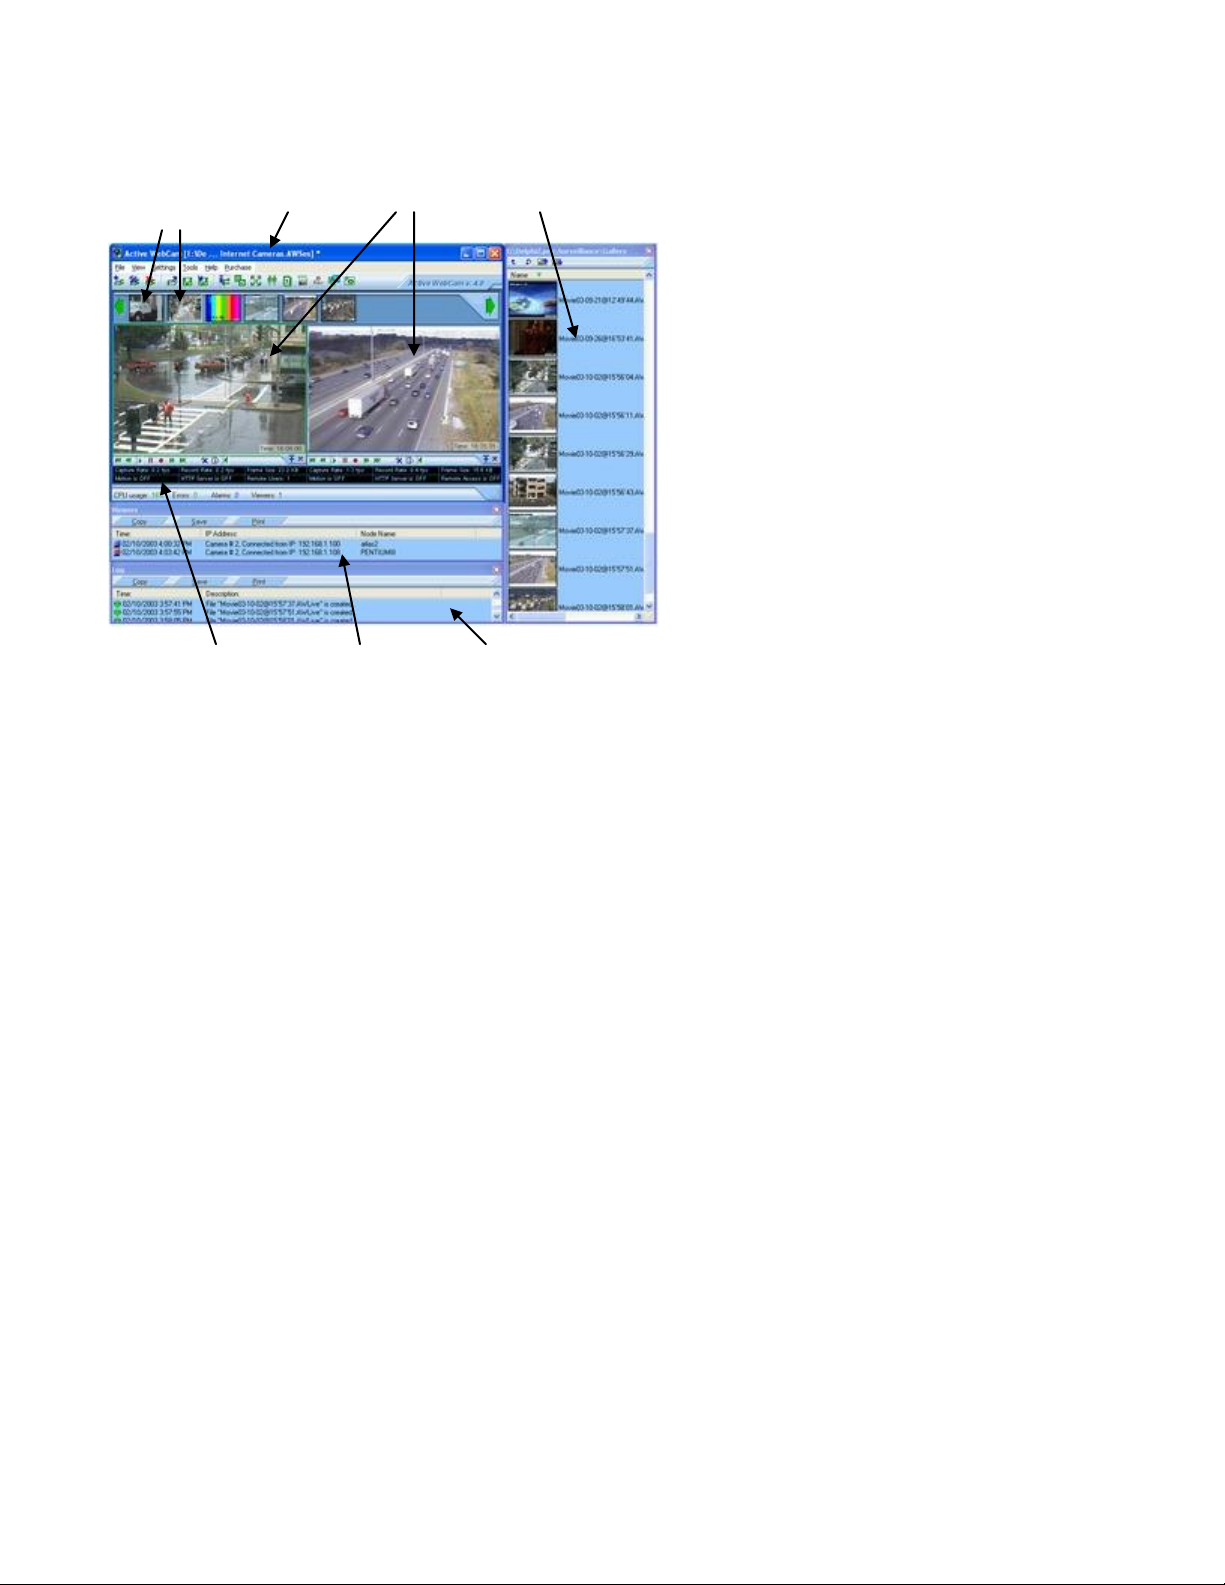
The ReCam work area contains some panels that you can show or hide to get a more comfortable working place.
Here are some of the most used components:
Camera Main Window Camera Windows Gallery Panel
Thumbnail
Information Viewers Log
Panel Panel Panel
The Camera Window is used to control and preview camera. It has button bar to operate with Live
Recording.
Camera Thumbnails are used to select a camera and show or hide it.
The Information Panel displays useful information about the camera state.
The Log Panel collects a history about events and errors. It helps to troubleshoot a broadcasting process.
This information can be printed or saved to a file.
The Viewers Panel collects a history about viewers IP addresses and node names. This information can be
printed or saved to a file.
The Gallery Panel shows small images of recorded files and snapshots in the Gallery folder. Click with right
mouse button to an image to get a context menu for the appropriated file.
To open a panel, use the View menu. A check mark next to an item indicates that the named item is currently
open. To display an item that isn't currently open, choose the item name from the menu.
Page 9
- 9 -
Program Options
ReCam has options that control the general appearance of the user interface as well as options related to specific
features.
To change ReCam options
Select Program Settings from the Settings menu.
The Program Options dialog box appears.
Set desired options.
Press Ok.
The Program Options dialog box fields:
Click to select Open Session at Startup if you want the program to open a previously saved session at startup.
If you select Session File Name, the program will allways open the specified session.
If you select Last Saved Session, the program will open a recently saved session.
Click to select Start on Windows Startup if you want ReCam to run at Start up.
Click to select Run Minimized if you want the program to run minimized after start.
Click to select Minimize to Task Tray if you want the program not to be presented in task bar when you click the
minimize button.
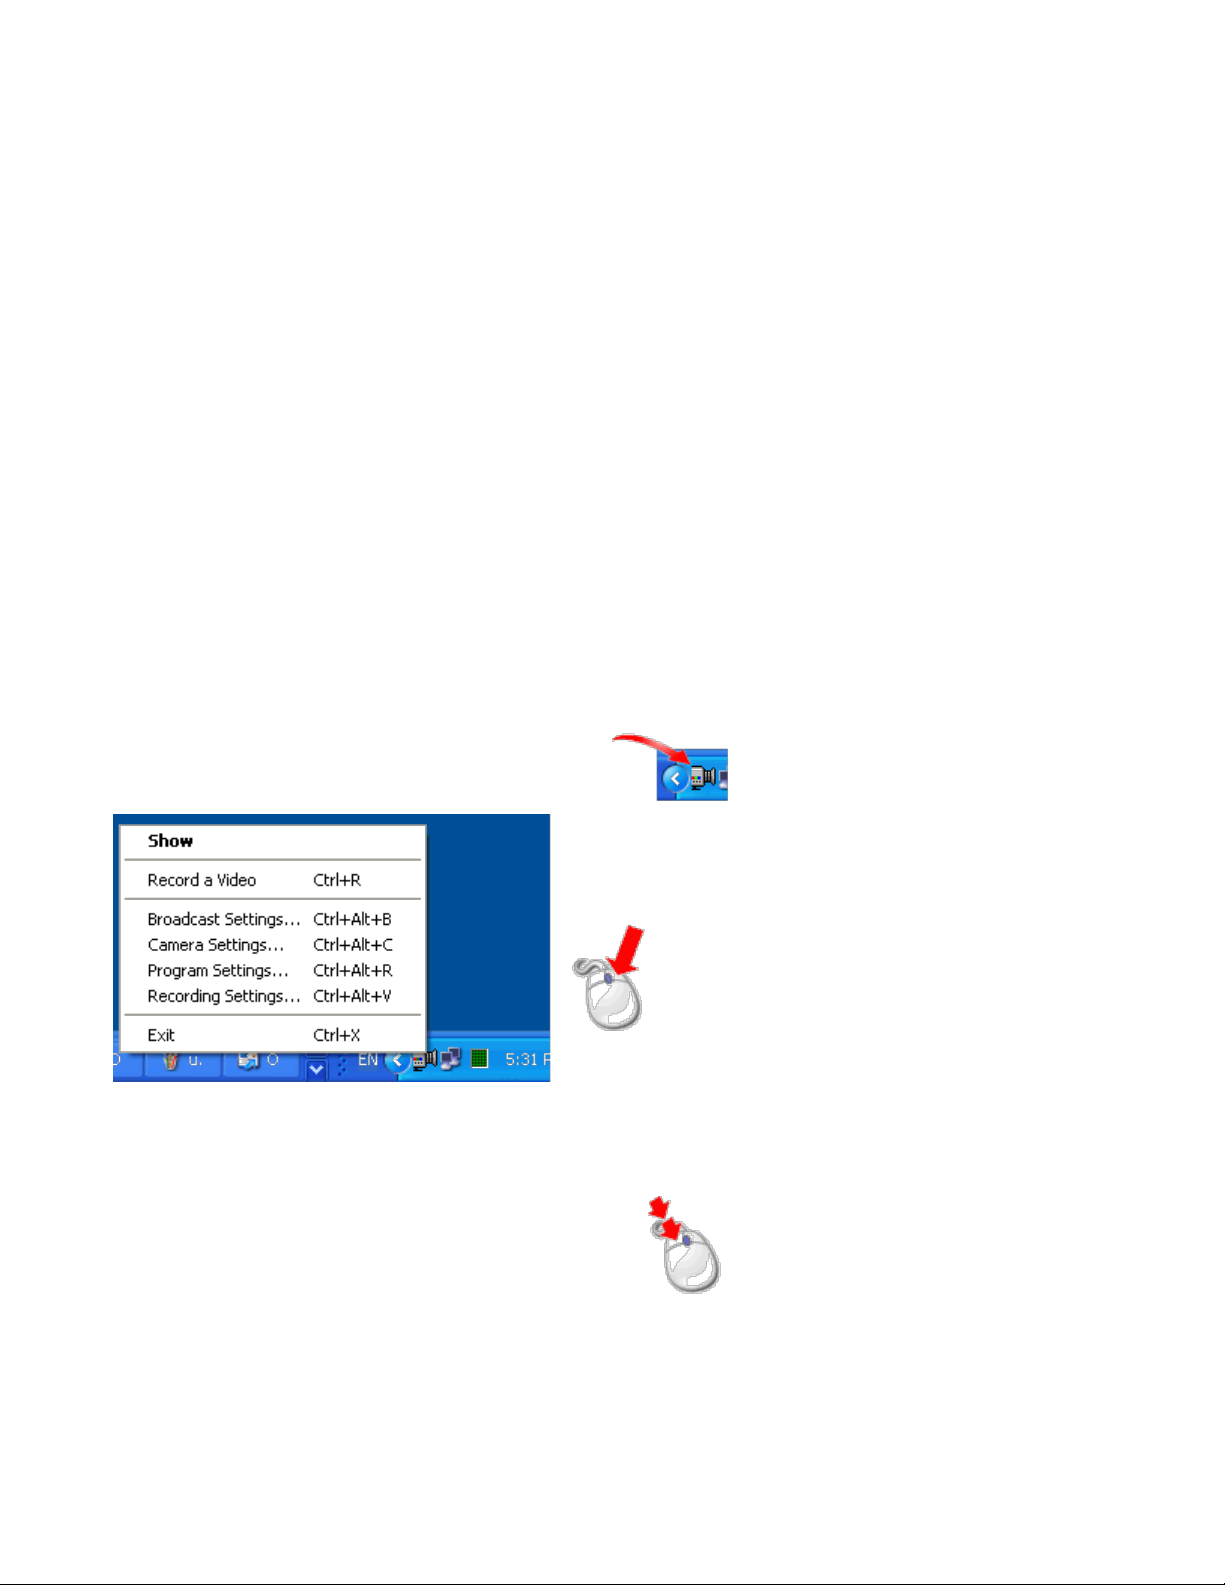
The program displays an icon in the system tool tray at the bottom right of your screen. This icon
helps you operate with minimized program:
Click right mouse button on the icon to display a popup menu.
To show the Main window again, double click the icon with the left mouse button.
To have the program completely invisible when it is
when minimized. In this mode the program doesn't display
presented in the task bar tray. To show the program you need to press a defined key combination (the
"Shortcut").
Click to select Hide the "Stealth Mode" Warning Box to force the program not to show a notification window
when it's going to "Stealth Mode".
Click to select Protect from Opening From Task Tray or from "Stealth" mode with Password if you want the
program to ask for a password when a user clicks the icon in the system tool tray.
minimized, click to select "Stealth" mode
any icon in the sys tool tray and it is not
Page 10

- 10 -
Click to select Log HTTP viewers to the "HTTP_Log.txt" file to cause the program to write the viewers' IP
addresses to the log file.
Click to select Log motion events to the "Motion_Log.txt" file to cause the program to save motion information
to the log file.
Page 11

- 11 -
Part 1
Setting Up a Session
Information about cameras you have created can be stored to a file with an .AWSes extension so you can open
and reuse the session at a later date.
A session file contains information about video and audio devices, compression, broadcasting, and recording
parameters of every camera.
To save a session
Click Save Session As from the File menu.
In File name, enter a name and location for the file, and then click Save.
To open an existing session
Click Open a Session from the File menu.
In File name, enter the name and location of the session file you want to open. Session files have
.AWSes extension.
Click Open.
Page 12
- 12 -
Part 2
Camera Settings
The ReCam software works with many video sources simultaneously. Every video source is represented by a
Camera Window. A Camera Window can be connected to a local camera (frame grabber or USB camera),
network camera (Axis®, D-Link®, etc.), or a remote camera (another ReCam program launched on a remote
computer with a video capture device).
To create a new camera
Click New Camera from the File menu.
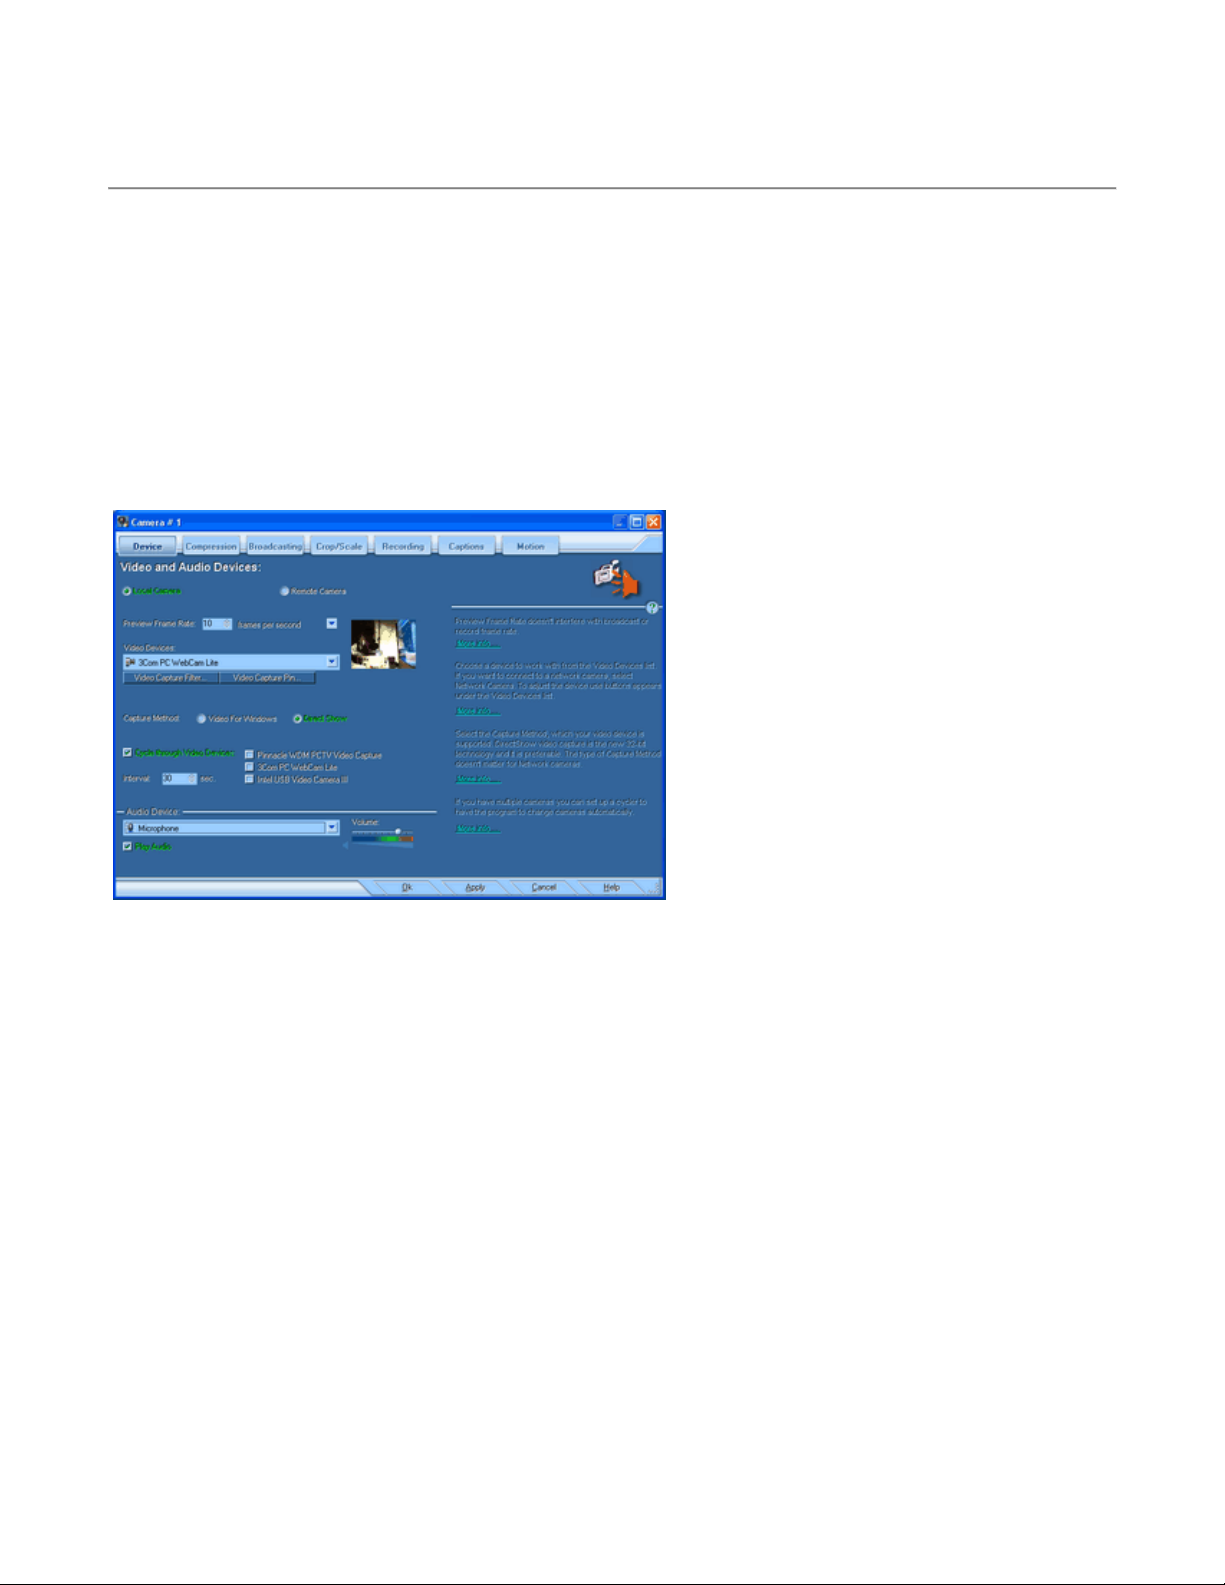
Camera Setting dialog box appears.
Camera Setting dialog box
The Camera Setting dialog box helps you control the selected video source. To open the Camera Settings dialog
box for an existing camera, select Camera Settings from the File menu.
Set a preview rate in the Preview Frame Rate box. This indicates the number of frames per second in the
camera window. The default value is 10 frames per second. This value doesn't interfere with broadcast or record
frame rate.
Local Video and Audio devices
Click to select Local Camera if you want to work with a video device connected to the computer or with a
Network camera.
Capture Method
The Capture Method radio buttons allow you to select a method of video capture.
The type of Capture Method doesn't matter for Network cameras.
Video for Windows (VfW) was released for the Windows 3.1 operating system and was optimized for capturing
movies to disk. Since then, video capture rates have risen dramatically because of the use of the PCI bus, bus
mastering controllers, and direct transfer of captured video from adapter memory to disk without data copies.
DirectShow video capture was designed to resolve the problems inherent in the VfW architecture. It provides 32-
Page 13

- 13 -
bit drivers for devices with a 32-bit architecture, such as USB and IEEE 1394 conferencing cameras and supports
multiple streams.
Video Device
Choose a camera to work with from the Video Devices drop-down list. If you want to connect to a network
camera, select Network Camera.
The camera control buttons set depends on the type of camera. For USB cameras it is mostly the Source and
Format buttons. The Source button helps change image characteristics, like brightness, contrast, sharpness, etc.
The Format button allows you to set image size and color mode.
Network Cameras
Network cameras are devices on local networks or on the Internet that answer with JPEG images by HTTP
request.
Select Network Camera from the Video Devices drop-down list. The Camera Interface dialog box appears.
Select the network camera type from the Camera Model drop-down list. If your camera is not presented in this
list, select Unknown.
In the IP Address box, type the network address of your network camera. Don't place the protocol prefix (like
http://) in the IP address box. Only enter the four numbers of the IP address delimited by dots, like:
192.168.1.101. If your network camera has dynamic IP address, you can find the camera address in the DHCP
table of your network router.
How to Find the IP Address
In the String to request JPEG image box type command to read image from camera. For example:
http://{CAMERA_IP}/__live.jpg?&&&
The program uses the following abbreviation to replace parameters in the interface strings: {CAMERA_IP},
{USER_ID}, {PASSWORD}.
For Network cameras there are two control buttons - Camera Interface and Control Camera. The Camera
Interface button allows you to select the camera model and set up command strings, which are used for image
requests. The Control Camera button shows dialog box with controls that are enabled for the particular model of
network camera, such as:
Remote Cameras
Remote camera is another ReCam program with enabled Remote Access launched on a remote computer. Both
programs use UDP protocol to communicate with each other. If the connection with the Remote camera goes
through a firewall, make sure that the IP address of your computer, local and remote ports are opened on the
firewall, and the UDP protocol is enabled.
To connect to Remote Camera
In the Device tab, click to select Remote Camera.
Specify the computer address in the IP address box. Don't place the protocol prefix (like http://) in the address.
Only enter the four numbers of the IP address delimited by dots, like: 192.168.1.101. You can find out the remote
computer IP address by clicking Get Computer IP Address from the Tools menu on the remote computer.
Type port, which is open on the remote computer for remote access, in the Remote Port box. This value is
specified in the Port box in the Broadcasting | Remote Access properties on the remote computer.
Specify port, which will be used to receive data from the remote camera, in the Local Port box. If your network
uses a firewall, make sure that the Local Port and computer's IP address are opened in the firewall. Use the
Check the Port Availability button to make sure that this port is not used by another program.
If the remote computer requires authorization, enter user name and password in the appropriate boxes. The
authorization could be set in the Broadcasting tab in the Camera Settings window in the Remote Access
Additional Settings window on the remote computer.
Page 14

- 14 -
If the Remember Password check box is checked, the user name and password will be saved among the
session parameters.
Cycle through cameras
If you have multiple cameras you can set up a cycler to have the program change cameras automatically.
To configure the Camera Cycler (available only for local cameras):
Click Camera Settings from the File menu.
Select Cycle through cameras to activate cycler.
Type cycler interval in seconds.
Select cameras to cycle.
Page 15
- 15 -
Part 3
Quality of Recording and Broadcasting
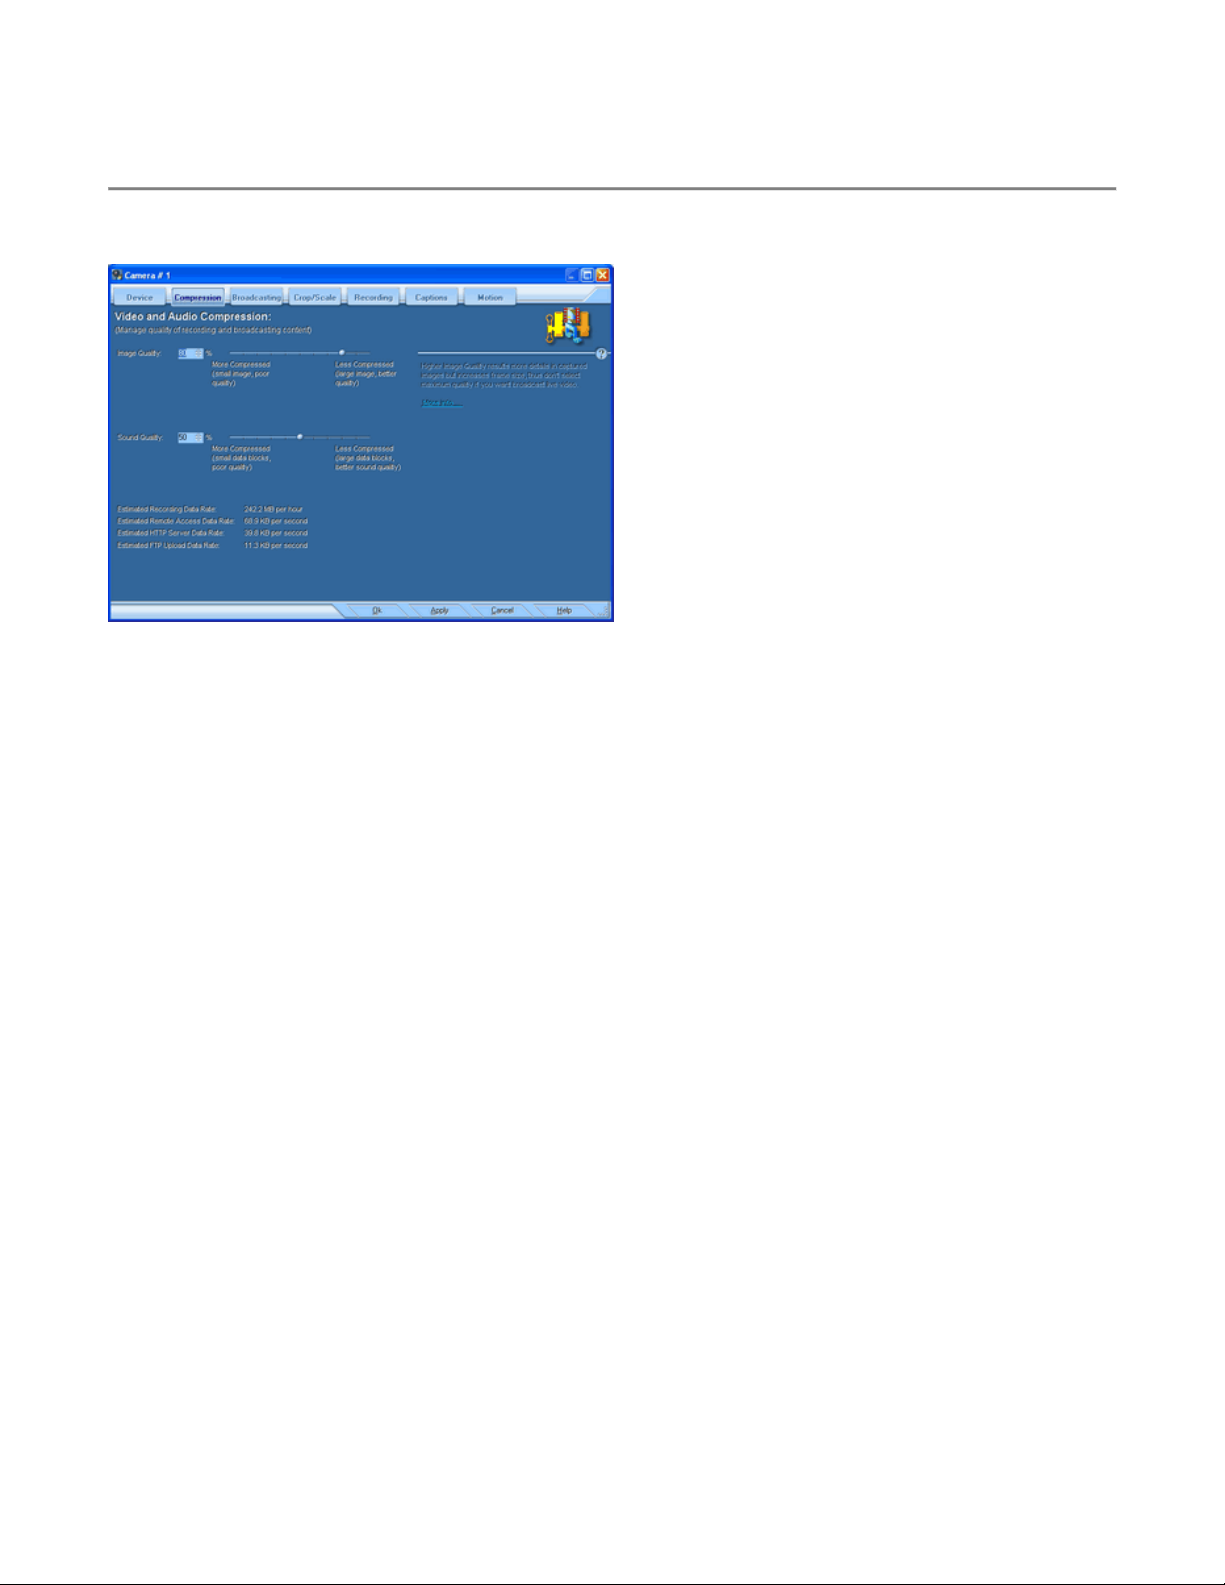
The Compression tab of the Camera Setting dialog box allows you to set up image and sound quality by
changing their compression levels. These settings are used to prepare content for broadcasting and recording.
Image Quality
Higher Image Quality provides more details in captured images but increases frame size. Thus, don't select
maximum quality if you want broadcast live video.
To change image quality
Click Camera Settings from the File menu.
Select the Compression tab.
Change value in the Image Quality box where 100% is highest quality.
Sound Quality
More compressed sound has less bit rate and sampling frequency and results in low quality.
To change sound quality
Click Camera Settings from the File menu.
Select the Compression tab.
Change value in the Sound Quality box where 100% is highest quality.
Page 16
- 16 -
Part 4
Scale and Crop Image
Scale Image shrinks or grows captured image. Set desired image size as a percentage of original image.
Crop Image allows you to select part of a captured image and ignore the rest.
To define cropping area, click to select the Crop Image check box. A resizable selection box appears over the
image. Resize the selection as needed and then move it over the part of the image you want to keep. You can
use Arrow keys to move the rectangle or Shift + Arrows to resize.
The Crop Image parameter is used in broadcasting and in the video recording.
Some cameras and frame grabbers allow you to produce cropped and scaled image. If this process is performed
"on board" it doesn't use computer CPU. Check the presenting of such features by clicking the Format button at
Camera Settings dialog box.
Page 17
- 17 -
Part 5
Caption on Image
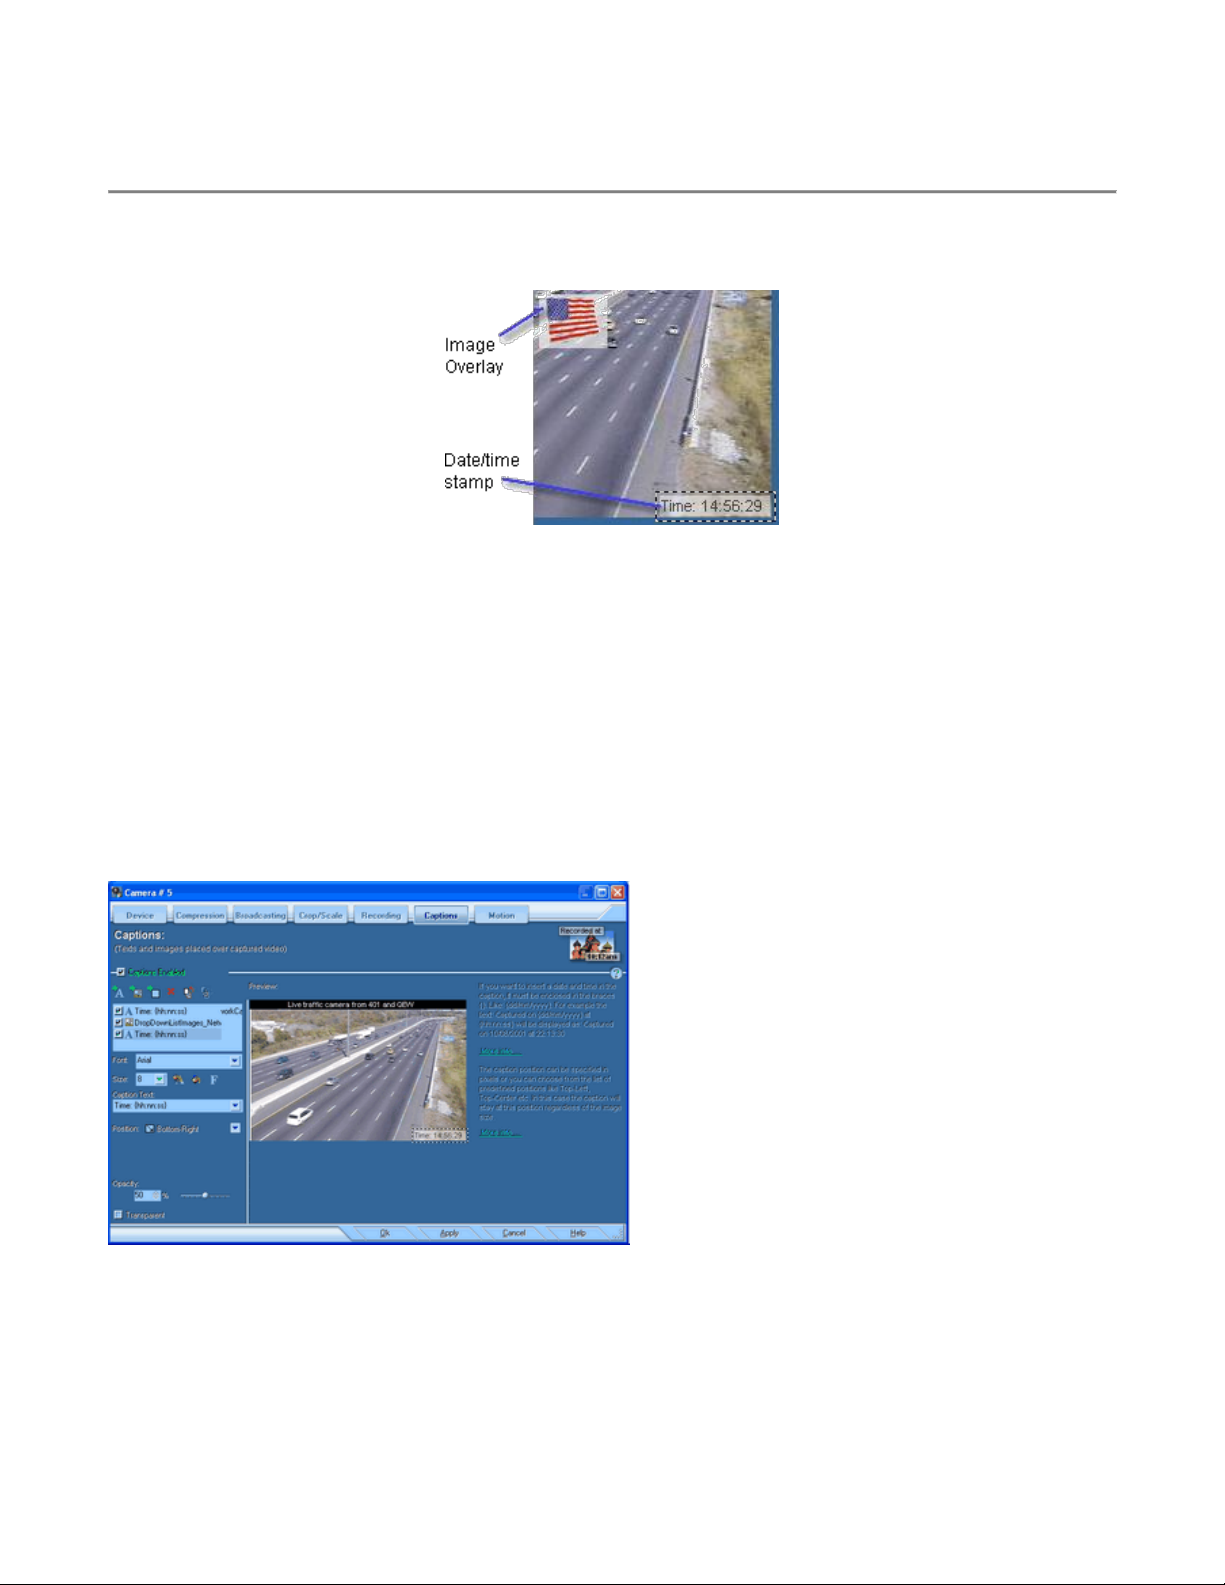
The program can place an unlimited number of text, image, and rectangular captions onto captured images. Text
captions provide information on captured image, and/or a dynamic date/time stamp. The image and rectangular
captions allow you to decorate the captured image.
The caption position can be specified in pixels or you can choose from the list of predefined positions like TopLeft, Top-Center, etc. In this case the caption will stay at this position regardless of the image size.
To create new caption
Select Caption from the Settings menu.
Click the Captions tab in the Camera Setting dialog box.
Click to select the Caption Enabled check box to cause ReCam draw caption on every captured image.
Click appropriate button to add text, image, or rectangle caption.
Text Captions
In the Caption Text box, type a text caption.
If you want to insert a date and time in the caption, it must be enclosed in the braces {}. Like: {dd/mm/yyyy}.
For example the text:
Captured on {dd/mm/yyyy} at {hh:nn:ss}
will be displayed as:
Captured on 10/08/2001 at 22:13:30
Page 18

- 18 -
Placeholder:
Displays:
d
Displays the day as a number without a
leading zero (1-31).
dd
Displays the day as a number with a leading
zero (01-31).
ddd
Displays the day as an abbreviation (SunSat).
dddd
Displays the day as a full name (SundaySaturday).
m
Displays the month as a number without a
leading zero (1-12).
mm
Displays the month as a number with a
leading zero (01-12).
mmm
Displays the month as an abbreviation (JanDec).
mmmm
Displays the month as a full name (JanuaryDecember).
yy
Displays the year as a two-digit number (00-
99).
yyyy
Displays the year as a four-digit number
(0000-9999).
h
Displays the hour without a leading zero (0-
23).
hh
Displays the hour with a leading zero (00-23).
n
Displays the minute without a leading zero (0-
59).
nn
Displays the minute with a leading zero (00-
59).
s
Displays the second without a leading zero (0-
59).
ss
Displays the second with a leading zero (00-
59).
am/pm
Uses the 12-hour clock and displays 'am' for
any hour before noon, and 'pm' for any hour
after noon.
Time formatting macros
You can use the following data/time placeholders to display current date and time in the Text Captions:
Special wildcards:
{CAMERA} - displays camera number.
{MOTION} - shows current value of motion.
Image Captions
Set the image file by clicking the Browse button. Use appropriate controls to change the image position, opacity,
and transparency.
Rectangles
The program allows you place rectangular areas onto image. You can set up the rectangle color and outline, as
well as width, height, position, opacity, and transparency.
Part 6
Page 19
- 19 -
Broadcasting
Broadcasting allows you to share captured video and audio among Internet users or within local area network.
You can broadcast in several ways:
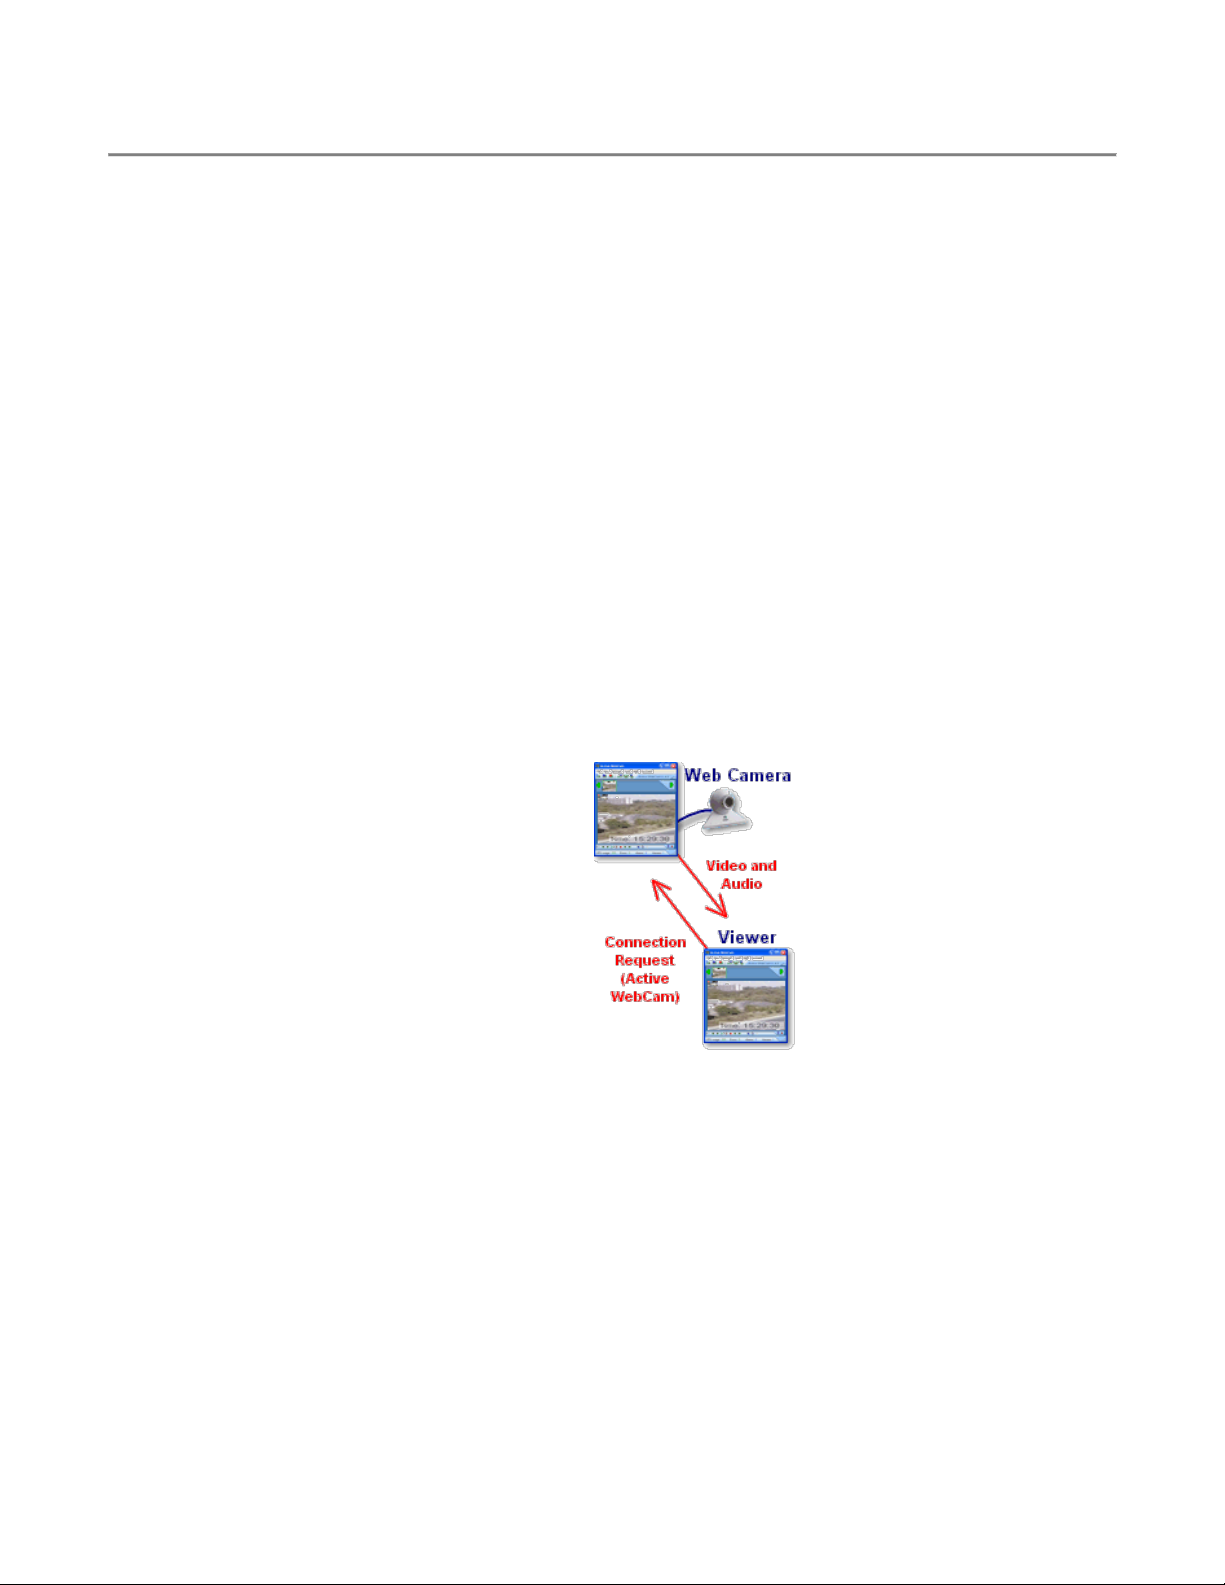
1. Remote Access - allows other computers to access the camera using the ReCam program. The program uses
UDP protocol to push captured images and sound to viewers' computers.
2. HTTP Server - the program runs HTTP server allowing users to view captured images through an Internet
Browser.
3. FTP Upload - the program uploads captured images to a web server using FTP protocol. Viewers point
Internet browsers to your web site and watch the captured images.
4. Copy Captured Images - the program copies captured images into a folder on your computer in order to use
them with other software.
To select the Broadcasting type
Click Broadcast Settings from the Settings menu.
Select the Broadcasting tab.
Click to select the appropriate check box.
Remote Access
receive video and audio on remote computers with very high quality and frame rate.
Viewers must use the ReCam program to access the camera and the camera computer
must be visible from the Internet (unlike the FTP Upload method).
check box in the Broadcasting tab to enable access
computers. Another copy of ReCam should be installed on the remote computer in
order to have Remote Access.
Set up the remote access Frame Rate and the UDP Port value. ReCam uses the Port
value to receive requests from remote computers. The Port must be available, meaning it's
not used by other programs and it's not used by other cameras in ReCam.
Availability button to make sure the port is not used
If you want to have Remote Access
to the camera from outside your local network (from Internet), make sure that the port and IP address of your
computer are opened in the firewall.
Click the Additional Settings button to configure Remote Access.
The content of remote access is managed by the Enable Video Stream and Enable Audio Stream buttons.
If you want to control the number of remote clients, click to select the Limit Viewers check box and enter the
maximum number of viewers that can be connected to the camera. When the maximum is reached, viewers will
receive message: "Administrator has limited the number of camera viewers. Please try again later."
Transferred video and audio data can be encrypted for security reason. Select the encryption type from the Use
Encryption to Transfer Data list.
You can restrict access to the camera by user name and password. Click to select the Use Authorization check
box, and click the Add button to grant access to this camera to a user or group. Only selected users and users
belonging to selected groups will have access to the camera. Viewers must enter a valid name and password in
order to connect to the camera.
Remote Access allows you to
Click to select the Remote Access
to this camera from other
Click the Check the Port
by other programs.
Page 20
- 20 -
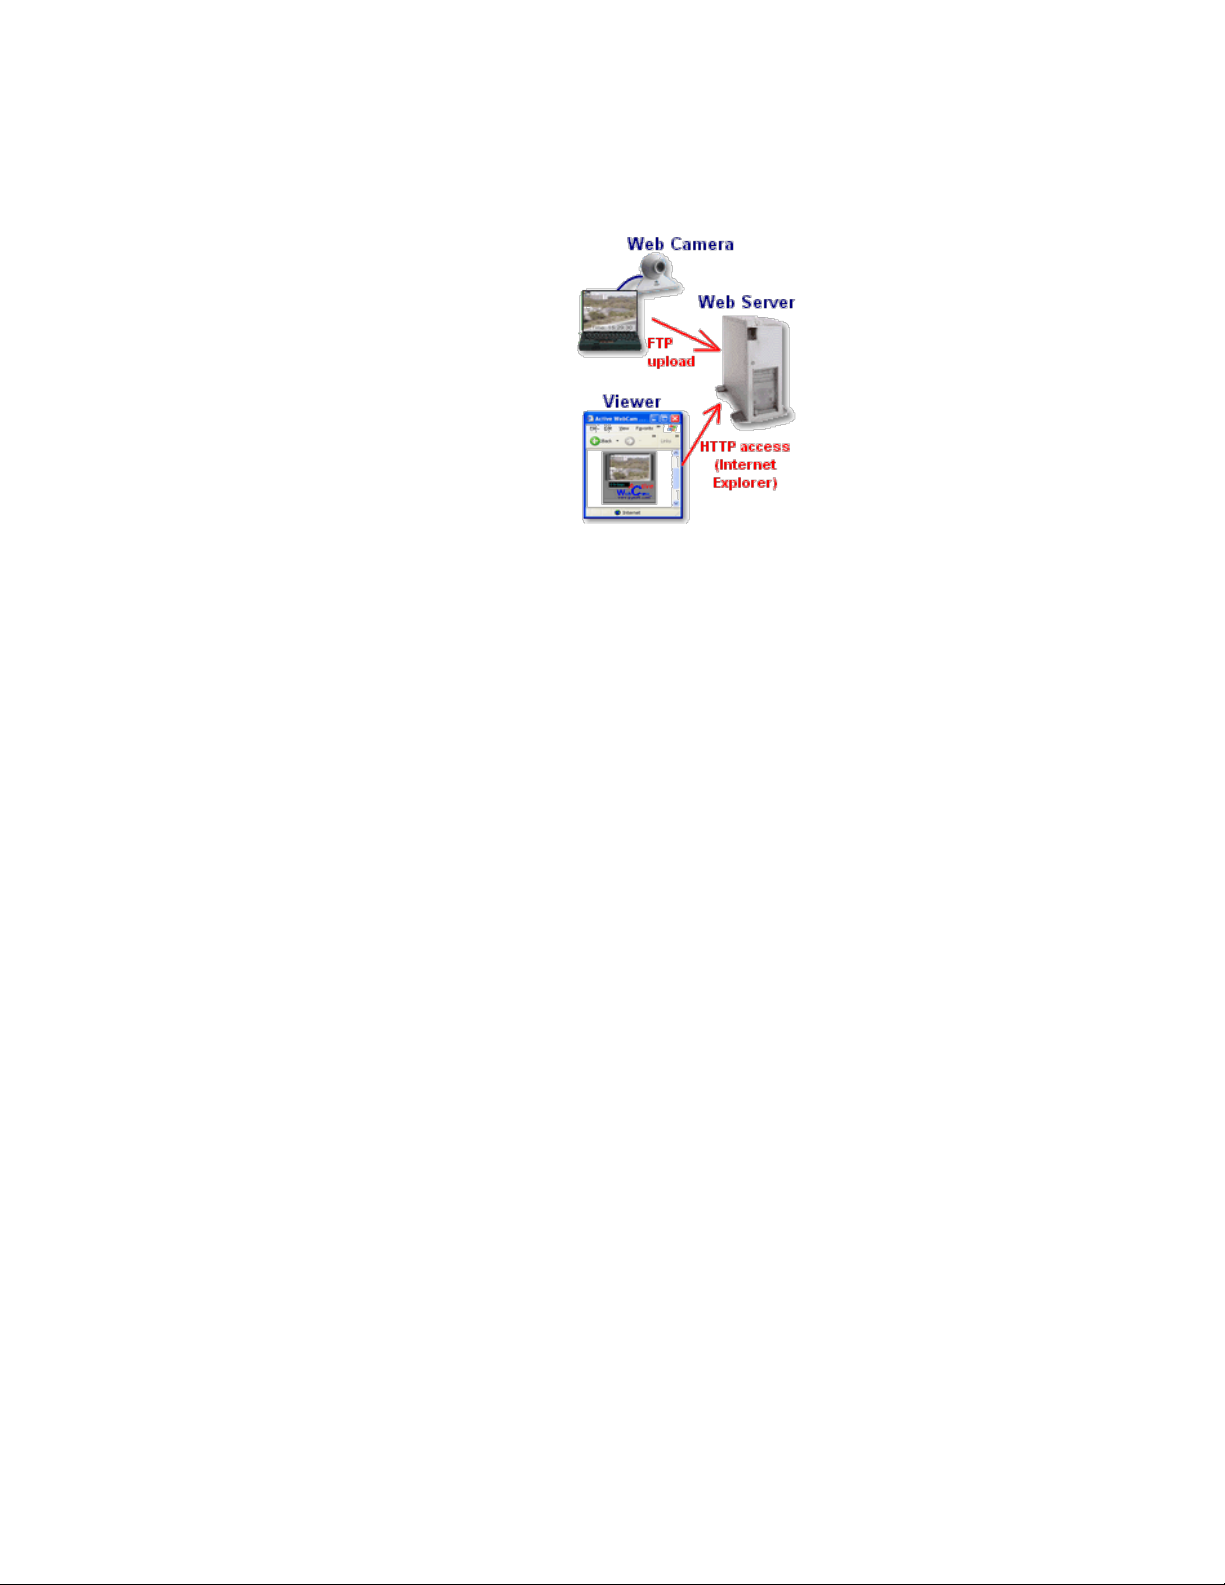
FTP Upload
Select the FTP Upload method if you want the
to your Web site using FTP protocol. To watch the captured images, you just need to
point your Internet browser to your site.
The benefits of FTP use are: you don't need to have a permanent and fast internet
connection (such as, Cable Modem, DSL, ISDN, etc.), and it's not necessary to
make your computer accessible from the Internet (security problems). A downside of
FTP use is the lower frame-rate.
What is FTP?
As the name implies, FTP is used to transfer files between computers on a network, such as the Internet. In an FTP
transfer, your computer acts as a "client," sending a files to a remote host, or "server". Even computers from different
manufacturers and running incompatible software can use this FTP process to exchange files over the Internet. To
establish a connection to an FTP server, you generally need to provide a user name and a password in
addition to the Internet address of the server (for example, hostname.berkeley.edu); someone would need
to set up a user account and assign a password for you before you would be able to access the server.
Click Broadcast Settings from the Settings menu.
Click to select the FTP Upload check box.
program to upload captured images
FTP is an acronym for File Transfer Protocol.
To run FTP Upload
In the Frame Rate box, enter how often you want to capture images. An image will be captured and
broadcasted from your computer each time a specified time has passed. To avoid a CPU overload
problem, set the Frame Rate equal to your network bandwidth.
Configure FTP Connection
Click the FTP Settings button to set up FTP parameters.
Address of FTP server
Type name of FTP host of your Internet Service Provider (ISP), e.g. ftp.microsoft.com or members.aol.com.
User Name
Type user (login) name for this FTP server.
Password
Type your password for this FTP server. The password field replaces all typed characters with asterisks to hide it.
Folder to Upload
Type path to a folder where captured image and web page files will be placed.
FTP Port
Specify port number, which is used for FTP service on your web site (if it's not 21 on your server). It may be
different if you are going through a firewall, or if the site administrator has assigned the FTP service to a nonstandard port.
Passive FTP
This option causes the program to use passive mode on FTP uploads. Some proxy servers require the use of this
option.
Use Proxy
Specify if the program needs to use a proxy server to connect to FTP server. To list a proxy for a specific protocol,
the string must follow the format:
<protocol>=<protocol>://<proxy_name>
Page 21
- 21 -
The valid protocols are http, https, ftp, and gopher. For example, to list an ftp proxy, a valid string would be:
ftp=ftp://ftp_proxy_name:21
where ftp_proxy_name is the name of the ftp proxy and 21 is the port number that must be used to access the
proxy. If the proxy uses the default port number for that protocol, the port number can be omitted.
Click the Additional Settings button to change extra FTP parameters.
Image Name
The program uploads captured images to FTP server under this name. If you change the Image Name, be sure
you've changed appropriate parameter in the webcam's web page. For Java applet it is the IMAGE parameter. If
your Web Page doesn't use Java applet, change the SRC parameter in the <IMG> tag.
See Creating Web Page for more info about Java applet parameters.
Wait for response
The program waits for this time for an answer from FTP server. If there is no answer, it interrupts the FTP session
and reconnects.
Disconnect after
If there was no activity during this time, the program disconnects from FTP server.
Image when WebCam is Offline
By default ReCam deletes the last captured image from FTP server when broadcasting are going to be stopped. If
you want the program to replace last captured image with your own image (for example, image with text: "I'll be
back"), click to select the Upload Another Image to FTP Server check box and specify the image file name in
the text box.
HTTP Server
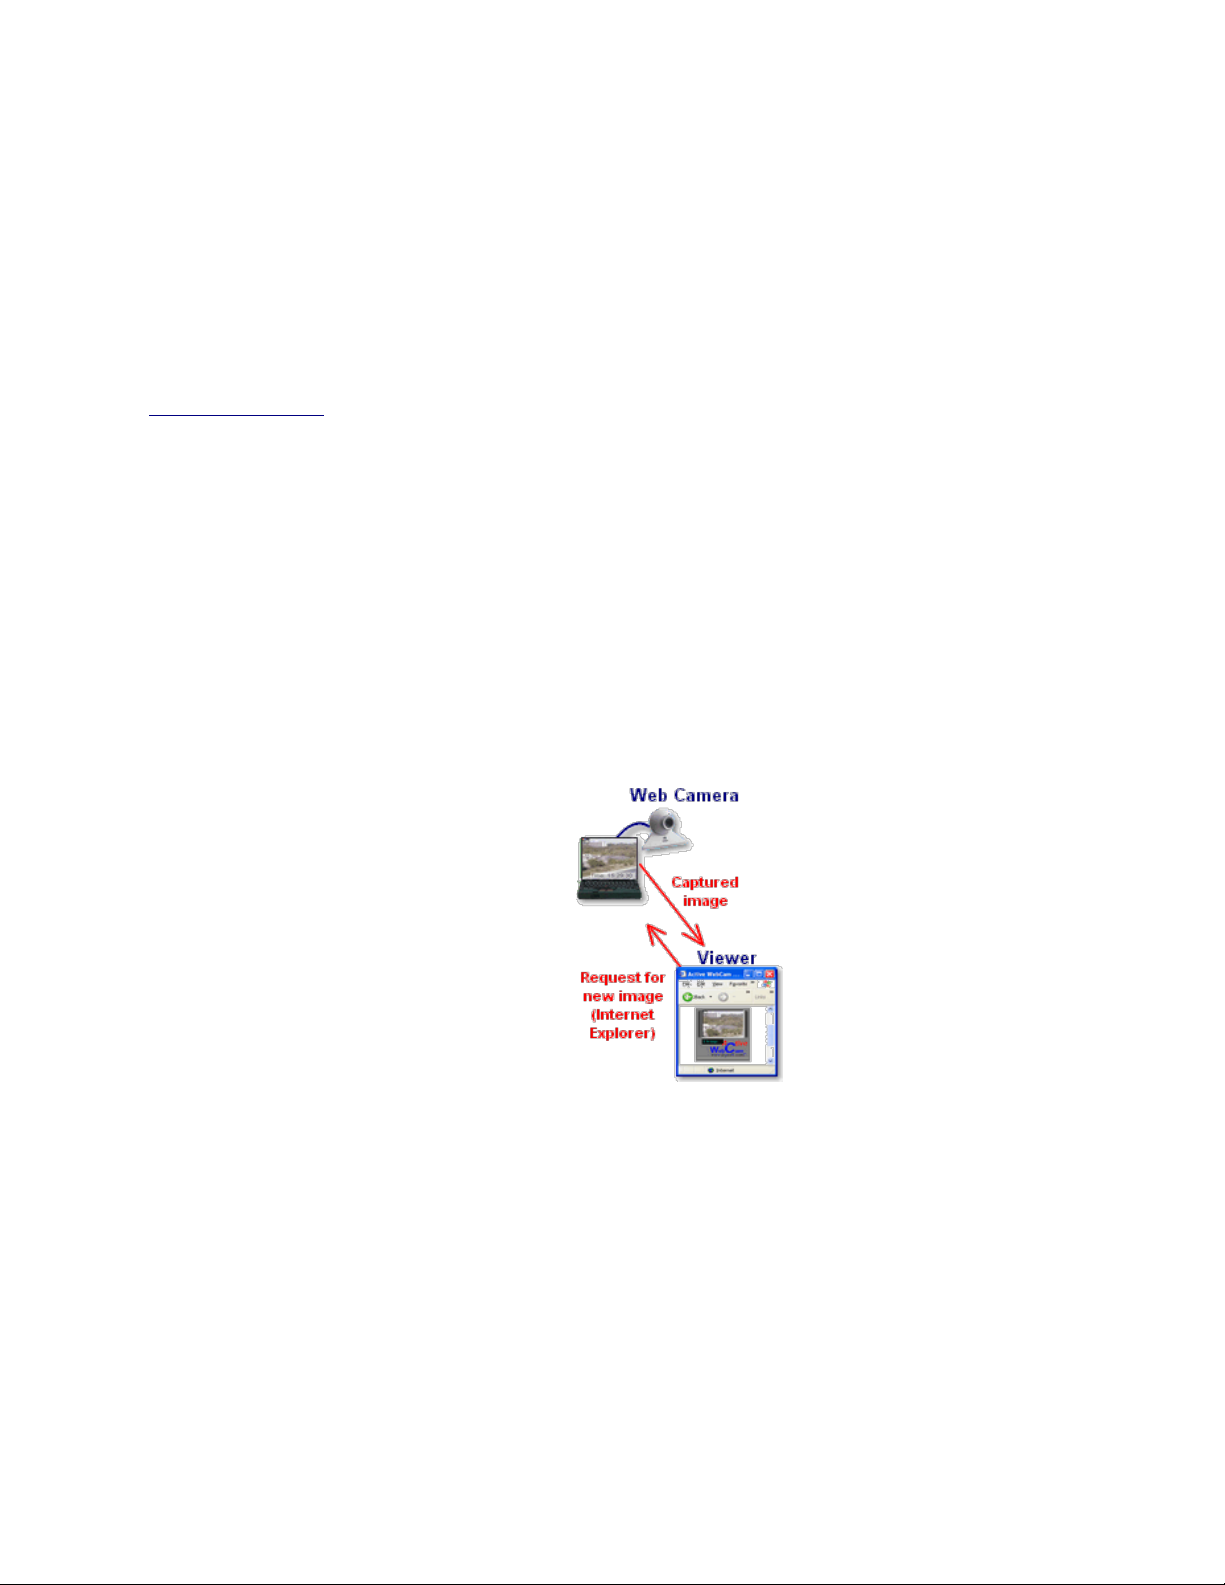
Select the HTTP Server method if you want to
computer. ReCam will run in your own HTTP Server on the port you have specified.
To watch the captured images, your viewers need to type the address of your computer
and HTTP port in the Internet browser, for example:
http://www.mycomputer.com:8080
Unlike Remote Access, viewers don't need to have ReCam to connect to HTTP server.
They can use any Internet browser to watch captured images, but this method
broadcasts at a lower frame rate than using Remote Access.
broadcast captured images from your
http://63.236.73.147:8080 or
To run WebCam HTTP server
Click Broadcast Settings from the Settings
Click to select the HTTP Server check box.
How does WebCam HTTP Server work?
When a viewer types the address of your computer and HTTP port in the Internet browser, the Internet browser
sends a request to your computer to obtain default web page. This page contains the link to the java applet, which
will be downloaded from your computer too. Once the Internet browser has downloaded the applet, the applet will
execute and start sending requests to your computer for captured images. The applet sends requests according
the frame-rate interval.
What do you need to run WebCam HTTP Server
Your computer must be visible from the Internet. If your computer is behind a firewall or proxie, you need to
configure that device so that the IP address and port you specified are not blocked.
If you plan to broadcast among computers in a Local Area Network (LAN), your computer and computers of all
viewers must have IP protocol.
menu.
Configure WebCam HTTP Server
In the Frame Rate box, enter how often you want the picture to refresh on the viewers' computers. To avoid the
"Off Line" color bars appearing on the client's computer, set the Frame Rate equal to the clients' network
Page 22

- 22 -
bandwidth.
Port
Type the HTTP port number on which ReCam will listen for viewer requests. To connect to the HTTP Server,
viewers enter the IP address of your computer and HTTP Port in the Internet browser. For example:
http://192.168.1.1:8080. Use the Get Computer IP Address command from the Tools menu to define the IP
address of your computer.
Click the Additional Settings button to change extra parameters of HTTP server.
Image Name
Image Name is used on the viewer's side to show captured images. If you change Image Name, be sure you've
changed the appropriate parameters in the webcam's web page. For Java applet, it is the IMAGE parameter. If
your Web Page doesn't use Java applet, change the SRC parameter in the <IMG> tag.
See Creating Web Page in the Tools section for more info about Java applet parameters.
Server Folder
Type folder name where you want to place WebCam web page and java applet. ReCam will copy captured
images to this folder.
Default Web Page
Specify file name of WebCam web page. This file must exist and must be placed into the Server Folder. If
viewers do not specify a file name in the URL, the HTTP server displays the contents of the default Web Page.
Use the Web Page Creation Wizard to create this web page.
Restrict Access to HTTP server
Access to your WebCam can be restricted by user name and password. To restrict the access click to select the
Use Authorization check box and type User Name and Password. Now, when viewers point the Internet
browser to your webcam page, they are asked to enter a valid user name and password.
Limit Number of Viewers
The number of WebCam viewers can be limited. It can be useful, for example, in order to reduce Internet traffic.
To limit the number of viewers, click to select the Limit Viewers check box and enter the maximum number of
viewers in the Max. Number of Viewers box.
Save Frames to Local Folder
Select the Copy Captured Images method if you want ReCam to save captured images to a folder on your
computer. You can broadcast the images using default web server (for example Microsoft WWW Server) or for
other purposes.
Type the folder name, where ReCam saves captured images, in the Folder box.
Don't forget to copy a web page with the link to ReCam java script, and the java script file into this folder.
Click the Additional Settings button to change extra parameters.
Image Name
Image Name is used on viewer's side to show captured images. If you change Image Name, be sure you've
changed the appropriate parameter in the webcam's web page. For Java applet, it is the IMAGE parameter. If
your Web Page doesn't use Java applet, change the SRC parameter in the <IMG> tag. See Creating Web Page
in the Tools section for more info about Java applet parameters.
Image when WebCam is Offline
By default, ReCam deletes the last captured image from the folder when broadcasting is going to be stopped. If
you want the program to replace last captured image with your own image (for example, image with text: "I'll be
back"), click the Replace with Another Image check box and specify the image file name in the text box.
Page 23
- 23 -
Part 7
Parameter:
Description:
COLOR
Defines the applet's background color. The
color value is a six digit hexadecimal RGB
specification preceded by the pound (#) sign.
The first two digits indicate the red value, the
second two digits indicate the green value, and
the last two digits indicate the blue value. The
range for each color value is 00 to FF inclusive.
Modify the COLOR parameter according to the
color of your web page.
Watching Broadcast
If the Remote Access broadcasting method is used, the ReCam program must be installed on the viewer's
computer in order to watch the camera. See more info about how to set up Remote Access in the Camera
Settings section.
If the HTTP Server or FTP Upload broadcasting method is used, viewers open a web page in the Internet
browser and watch the camera. This web page contains special code that is constantly refresh images from the
camera and simulates a live picture.
You can prepare the WebCam web page using any HTML editor you like.
Fortunately, ReCam has its own tool to prepare simple Web Camera web pages.
Web Page Creation Wizard
To open the Web Page Creation Wizard, select Create Web Page from the Tools menu.
Web Page Creation Wizard helps you specify a title for your web page and change other attributes, such as
background, text color, and upper and lower captions.
Web Page Creation Wizard creates the web page HTML file, and uploads the page's files to a folder or to an FTP
server where your web page must be.
Your web page folder must contain the WebCam_Viewer.class file. This file uploads captured images from the
Web Camera and shows them in your Internet browser.
How to add WebCam to your own HTML text
Just add the following code to your HTML text:
<APPLET CODE="WebCam_Viewer.class"
WIDTH=640 HEIGHT=480>
<PARAM NAME="COLOR" VALUE="#00FF00">
<PARAM NAME="IMAGE" VALUE="capture0.jpg">
<PARAM NAME="BORDER" VALUE="ON">
</APPLET>
Modify the COLOR parameter according to the color of your web page.
Change the IMAGE parameter according to value in the Image Name box in the Internet Setting dialog
box.
Java Applet Parameters
Java Applet displays captured images up to 20 frames per second. Unfortunately not all Web Browsers support
Java Applets. Also, most Pocket PCs don't have a Java Engine.
Page 24
- 24 -
Example:
<!-- red background -->
<PARAM NAME="COLOR"
VALUE="#FF0000">
IMAGE
Defines file name of captured image, which is
defined in the Image Name box. See Image
Name in the Broadcasting section for more
info.
Example:
<PARAM NAME="IMAGE" VALUE="Cam.jpg">
BORDER
If value is "ON," applet draws frame around
image. If value is "OFF," applet just displayes
the captured image.
Example:
<PARAM NAME="BORDER" VALUE="OFF">
How to create WebCam page with Actual Drawing
In the Actual Drawing program:
Click Container with HTML text from the Insert menu.
Add the following text in the HTML script window.
<APPLET CODE="WebCam_Viewer.class"
WIDTH=640 HEIGHT=480>
<PARAM NAME="COLOR" VALUE="#00FF00">
<PARAM NAME="IMAGE" VALUE="capture0.jpg">
<PARAM NAME="BORDER" VALUE="ON">
</APPLET>
Modify the COLOR parameter according to color of your web page.
Change the IMAGE parameter according to value in the Image Name box in the Internet Setting dialog
box.
Displaying Still Images on Web Page
If you don't want to use the Java applet on your web page to display the webcam, it is easy to configure your web
page to display captured image.
This method doesn't need any special technologies like a Java Engine, and it works with any Web browser, but
frame rate cannot be higher than 1 frame per second.
Use a tag like this to display the image:
<IMG WIDTH=240 HEIGHT=180 SRC="capture0.jpg">
Change the SRC parameter according to value in the Image Name box in the Internet Setting dialog box.
To refresh the image, add a tag like this to the <Head> section of your web page:
<META HTTP-EQUIV="REFRESH" CONTENT="10">
This will cause the Internet browser to refresh page every 10 seconds. Specify this value to the same as your
Page 25
- 25 -
broadcasting frame rate and your viewers will see an updated image right away when it has been captured.
Testing Camera Accessibility from the Internet
This procedure helps you to determine the reason your camera is not visible to your viewers from the Internet.
The testing procedure performs the following tasks:
Testing that the computer is connected to a network and that an Internet connection is enabled.
The program checks that the HTTP server for the selected camera is launched.
Next, the program checks that the Default Web Page is presented in the Server Folder. You can use the
Web Page Creation Wizard to create this web page.
After this step, the program tests that the Dynamic IP Service is enabled. Dynamic IP Service allows your
web camera to have a permanent address on the Internet.
Final step: the program sends requests to the www.getmobi.com server. The server pings back to the
computer with a test HTTP packet. If the server receives a valid answer from your computer, the test is
done successfully.
To perform the camera accessibility testing
Click Testing Accessibility from Internet from the Tools menu.
Select a camera to test and then press the Next button.
Part 8
Motion Detection
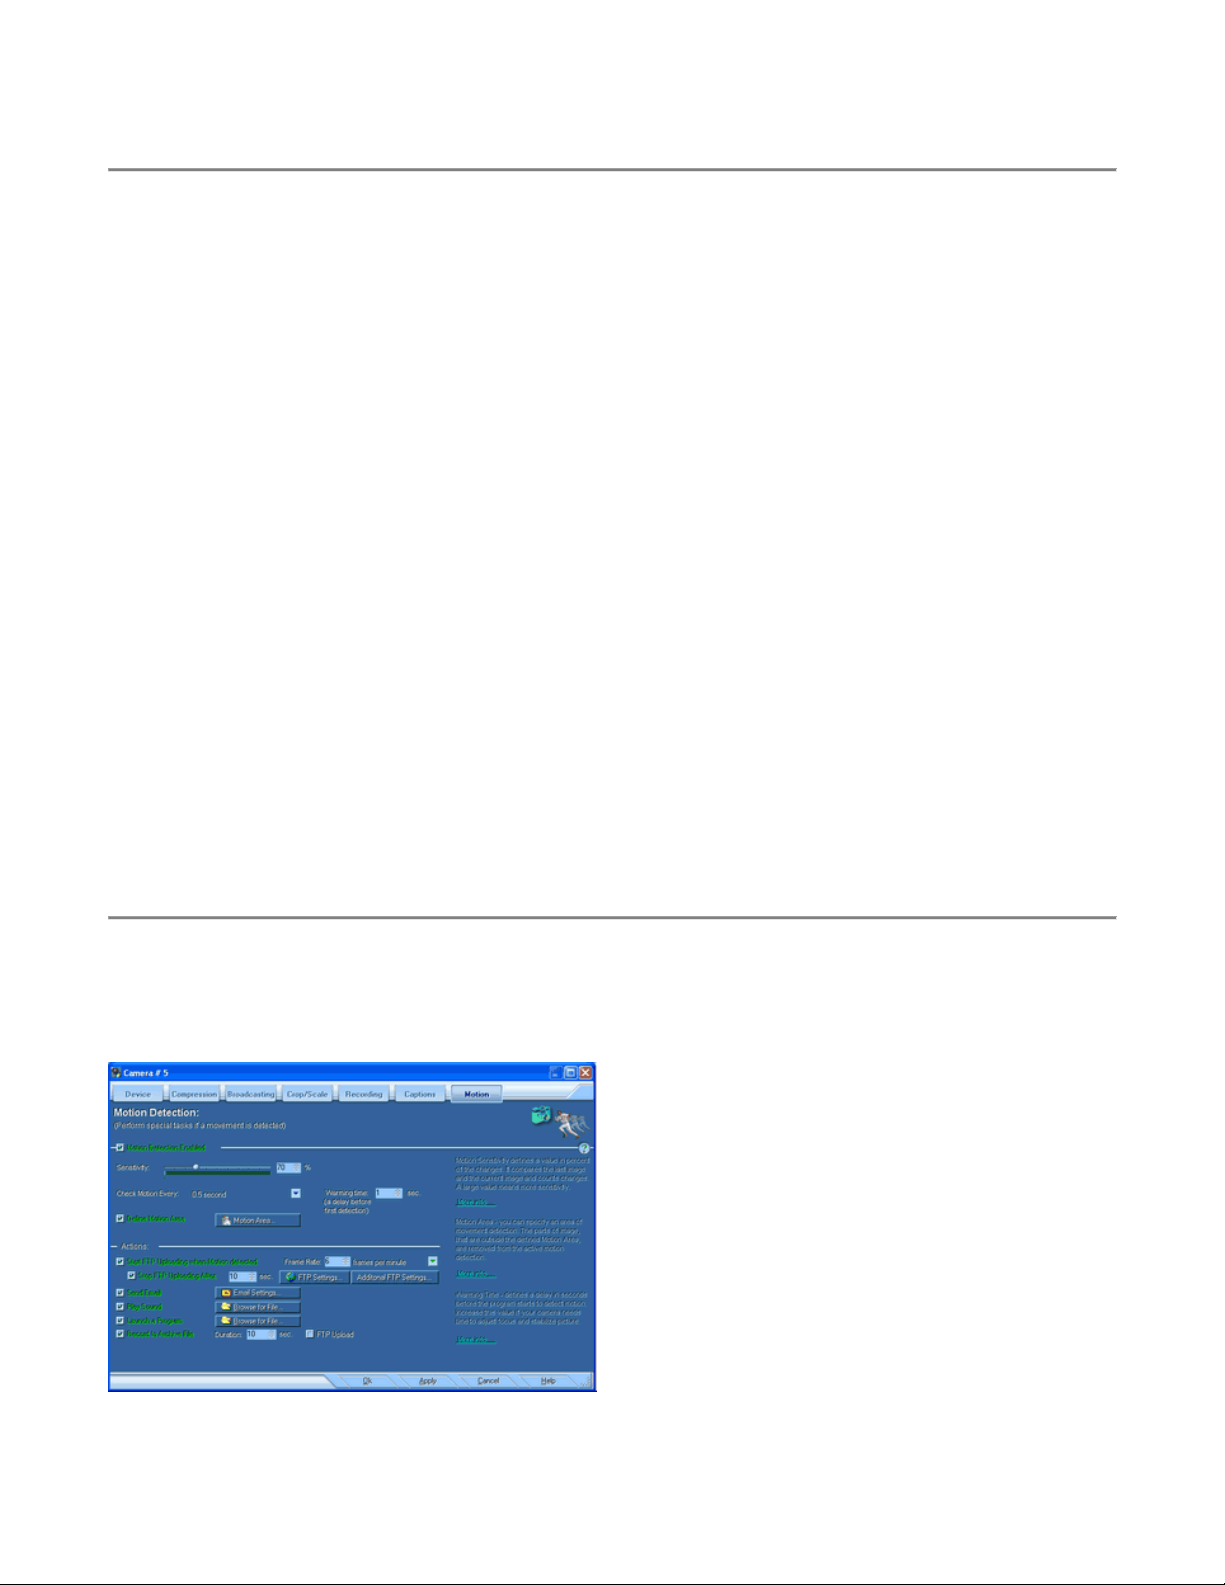
The Motion Detecting feature compares captured images and performs special tasks if a movement is detected.
With the Motion Detecting feature you can use ReCam to watch your home, office, children, pets or anything else.
It alerts you if something moves or changes in the monitored area.
To enable Motion Detection and set its properties, click Motion Detection from the Settings menu.
Click to select the Motion Detection Enabled check box to have ReCam to detect motion.
Page 26

- 26 -
Customize Motion Detection
Motion Sensitivity
Motion Sensitivity defines a value in percent of the changes. It compares the last image and the current image
and counts changes.
A large value means more sensitivity. You can check your settings with the colored bar below the sensitivity track
bar: green - no motion event, red - there is motion.
Check Motion each
Select the frequency of motion detection from the drop-down list.
Motion Area
You can specify an area of movement detection. The parts of image, which are outside the defined Motion Area,
are removed from the active motion detection.
For example, you can use this option if you want to remove cars moving outside the window.
To define Motion Area:
Click to select the Define Motion Area check box.
Click the Motion Area button.
Drag and resize the rectangle, which defines the area where monitored motion appears. The less area
you specify, the motion will be detected more accurately. You can use Arrow keys to move rectangle or
Shift + Arrows to resize.
Warming Time
Defines a delay in seconds before the program starts to detect motion. Increase this value if your camera needs
time to adjust focus and stabilize picture.
Motion Actions
When a motion is detected, ReCam can perform the following actions:
Start FTP Uploading when motion detected
If a motion is detected, ReCam starts FTP uploading.
If the Stop FTP Uploading After check box is checked, the uploading will be stopped in specified number of
seconds.
Send Email
Click to select the Send Email check box if you want to receive a email when motion is detected.
Click the Email Settings button to customize the email parameters.
Outgoing Mail Server
This is the mail server that your e-mail is sent through. If you are unsure of this setting, have a look at the
settings of your E-Mail client and see what you have set for your SMTP server.
Sender
Enter your e-mail address.
Recipient
Enter the e-mail address of who will receive the e-mail message. If there are a few recipients, type the e-mail
address of each recipient, separating addresses with a comma or semicolon ( ; ).
Subject
Enter the subject of e-mail message.
Message
Enter contents of the message.
Page 27

- 27 -
Do not send more than one email during
Enter number of seconds, which specifies highest frequency of message sending.
Attach Images to Email
Click to select the Attach Images to Email check box if you want the e-mail message to contain images of the
event.
Message Priority
Select the priority of e-mail message.
Play Sound
Click to select the Play Sound check box to make an alert sound when motion is detected.
Launch a Program
Click to select the Launch a Program check box to start a program when motion is detected.
Record Video Clip
Click to select the Record to Archive File check box to have ReCam record a video file when motion is detected.
Specify the video clip length in the Record Duration box. If there was a motion during the recording time, the
program continues recording. The recording stops if there was no motion during the Record Duration period.
Recorded video clips can be uploaded on FTP server right after their creation. Click to select the FTP Upload box
if you want the recorded file to be uploaded to web server.
Click the FTP Settings button to set up FTP parameters.
Pop-Up the Program Window
Click to select the Pop-Up Program's Window check box if you want the program to be on the top of other
programs when a motion has been detected. This feature can be useful in conjunction with a sound playing in that
you have a video reminder, which makes sound and pops up on the computer screen when somebody walks in
front of your camera.
Create Motion Snapshots
Click to select the Create Snapshots check box to have ReCam record video file when motion is detected.
Specify time period of snapshots produced in the Stop After box. If there was a motion during the generation
time, the program continues the snapshots creation. The creation stops if there was no motion during this period
of time.
Click the Additional Settings button to change the following parameters:
File Name - the program saves incrementally named JPEG images under the file name specified in this box. Use
the {COUNTER} tag in the file name as a place-holder for the counter value.
If you specify full path in the File Name box, snapshots are saved under this file name, otherwise they are saved
in the Gallery folder.
Frame Rate - use this box to set the how many snapshots created per second, per minute, or per hour.
Click to select the Reset counter to the Start Index when the snapshots creation starts box if you want the
counter to be set to the start value every time when new snapshots sequence begins.
The Upload Snapshots check box causes the program to upload snapshots to the FTP server. Click the FTP
Settings button to set up FTP parameters.
Click to select the When the snapshots creation starts, make new sub-folder box if you want the program to
create new sub-folder on the FTP server every time when new snapshots sequence begins. The folder name may
include parameters like time: {hh:nn}, camera number: {CAMERA}, or current motion value: {MOTION} enclosed
in the braces {}. See more info about parameters in the time formatting macros topic in the Captions section.
Page 28

- 28 -
Archived images can change size of snapshots in order to use them as thumbnails. Click to select the Resize
Snapshots check box and enter the thumbnail width and height in appropriate boxes.
Change Settings
This feature helps to save disk space by recording good quality video only when there is motion and, as result,
less disk space when there is no motion. Set the appropriate settings for video and sound quality when motion is
detected. These settings take place only when motion is detected. When the time period that is defined in the Set
Settings back after box passes, the program goes back to the settings defined in the Compression and in the
Recording tabs.
Page 29

- 29 -
Part 9
Schedule Events
ReCam has a scheduler, which performs tasks on specified day of week and time period.
For example, this feature can be useful if you need to start broadcasting in the morning and stop it in the evening.
To schedule a task, click Scheduler from the Tools menu.
Click to select the Enable Scheduler check box to have ReCam to perform scheduled tasks.
Click the Add button to add new schedule line.
Click the Edit button to customize current schedule line.
Click the Delete button to delete current schedule line.
In the Schedule dialog box set the properties of schedule:
Select camera from the Camera list.
Select a day in the Day of Week drop-down list.
Specify the start and end time in the From and To boxes.
Choose an action. Depends on what you have selected, ReCam will start broadcasting, recording video, or detect
motion.
Recording - the selected camera or all cameras start recording at scheduled time.
Detecting Motion - the selected camera or all cameras start motion detection at scheduled time.
FTP Uploading - the selected camera or all cameras start uploading images to FTP server at scheduled time.
The FTP settings must be specified in the Broadcasting tab in the Camera Settings window.
Enabling Remote Access - the selected camera or all cameras start to be enabled from remote computers at
scheduled time.
Running HTTP Server - the selected camera or all cameras start HTTP server at scheduled time.
Copying Captured Images to a folder - the selected camera or all cameras start copying captured images into
specified folder at scheduled time.
Creating Snapshots - the selected camera or all cameras start creating snapshots of captured images at
scheduled time.
Make sure that the system date and time for your computer are accurate. ReCam uses this information to start a
scheduling. You can use the Date/Time option in Control Panel to update your computer's date and time.
Page 30
- 30 -
Part 10
Recording Video
You can use ReCam to record a stream of full-motion video and audio from your video and audio sources. The
program has the following recording features: Live Recording, Archive Recording, and ability to create Archive of
Snapshots.
With Live Recording, the program records video and audio constantly in a temporary file that allows you pause,
fast-forward, and rewind live video from the camera at any time.
The Archive Recording is performed when user clicks the Record button. The video and audio content is
streamed into a file on your hard disk.
Archive of Snapshots is a sequence of still images captured with a predefined time interval.
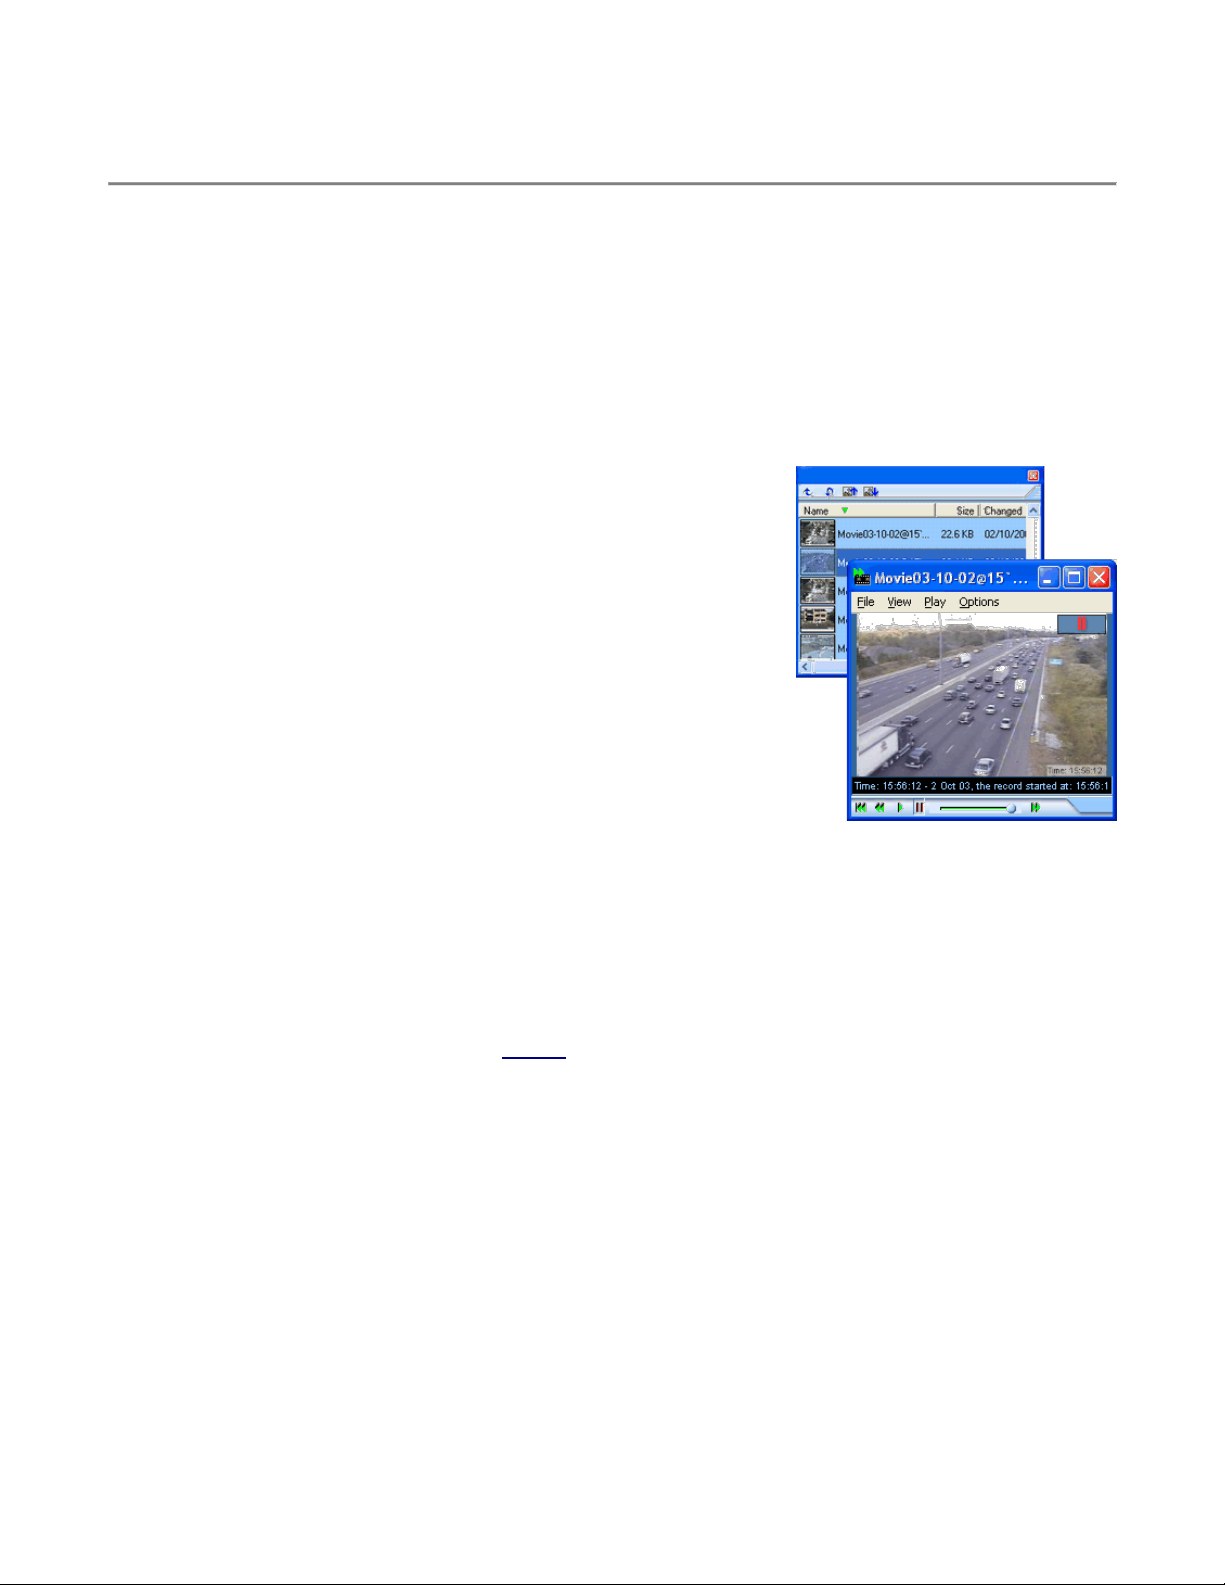
Recording Video Clips
To record a video clip, click Record a Video from the Tools menu.
To stop recording, click Record a Video again.
To see the list of recorded files, click Gallery from the View menu.
To play recorded file double click on it in the Gallery panel.
Customizing Recording
To customize video recording, click Recording Settings from the Settings menu.
Recording Frame-Rate
Use the Frame-Rate box to set the number of frames per second to be recorded. The Frame-Rate value can be
set from 1 to 30. How much you adjust this value should depend on the speed of your computer’s processor and
the type of video (high movement versus low movement) the computer is encoding. More frames used per second
means that there are smaller changes between frames, which equates to smoother-looking video. The lower the
number of frames per second means that there are fewer frames per second to display action, which equates to
less smooth or even jerky video. The more frames per second that your computer has to encode, the harder the
processor has to work.
Maximum file size
Set maximum size of single video clip.
Minimum disk space
Specify minimum disk space when ReCam starts to delete the oldest video clips before recording new ones.
Page 31

- 31 -
Live Recording
The Live Recording means that the program records video and audio constantly in a temporary file. This process
takes some CPU usage, but at any moment you can rewind and playback recorded content. The maximum
duration of live content is controlled by the Max. File Size value.
Click to select the Enable Live Recording check box to switch on the live recording.
Specify temporary file name in the Live File box.
The file with live recording can be encrypted to prevent its misusing. Select the encryption type from the Encrypt
Live File list.
Archive Recording
The Archive Recording is performed when user clicks the Record button, or if a motion has been detected, or if
the recording was scheduled at certain time. The video and audio content is streamed into a file on the computer's
hard disk.
ReCam saves the recorded clips in a predefined folder. You can change this folder in the Folder for Archives
box.
Also, you can define how to name the video files in the File Name box. File name may include parameters like
time: {hh:nn}, camera number: {CAMERA}, or index: {COUNTER} enclosed in the braces {}. See more info
about parameters in the time formatting macros topic in the Captions section.
Format of Archive files
Select a video format which will be used to record and playback video files.
AWLive (ReCam Video Format) is used in the ReCam program only. These video files can be played only on
computers where ReCam is installed. Instead of using standard video formats like AVI and MPEG, this video
format provides encryption and password protection that all video and audio information in a password protected
file is scrambled and the file can be played with a valid password only. Click the Additional Settings button to
change these options.
AVI stands for Audio Video Interleave and it is defined by Microsoft®. The most common AVI problem: if viewer's
computer doesn't have a codec to decode AVI file, it pops up an error message and doesn't show video. You can
use the AVI format if you are sure that the viewer's computer has the appropriate codec to decode the AVI file.
Click the Additional Settings button to change the AVI codec and its options. During playback, the video quality
depends on the selected video codec and its quality setting. Experiment with each video codec and quality
setting to obtain a satisfactory recording. The trade off of having better quality is a larger video file size.
MPEG is an ISO/IEC standard being developed by MPEG (Moving Picture Experts Group) is for compressing
sound and movie files for downloading across the Internet. All modern Internet browsers support the MPEG
format.
Recording Sound with Video
If the Record Sound check-box is selected, the recorded video file will contain audio as well as recorded video.
This greatly increases the file size.
Continue recording when maximum file size or minimum disk space exceeds.
When the Record button is pressed and the maximum file size or minimum disk space is exceeded the program
closes the video file and stops the recording. If you want the program to continue recording, click to select the
Create new file and continue recording when max. file size or min. disk space exceeds check box. In this
case, the program closes the video file but creates a new one and doesn't stop the recording.
Uploading Recorded Video to FTP server
Click to select the FTP Upload Archives check box to cause the program to upload recorded video files to FTP
server right after its creation.
Click to select the Rename uploaded file to box and specify a file name if you want the program to rename the
Page 32

- 32 -
uploaded file on FTP server. This option can be useful if you want to place a link to the last recorded video file on
your web page.
How to add Recorded Video to Web Page
Open your page in Notepad add the following code to HTML text:
<OBJECT ID="MMPlayer1" WIDTH=pixels HEIGHT=pixels
classid="CLSID:22d6f312-b0f6-11d0-94ab-0080c74c7e95"
CODEBASE="http://activex.microsoft.com/activex/controls/mplayer/en/nsmp2inf.cab#Version=5,1,52,701"
standby="Loading Microsoft Windows Media Player components..." type="application/x-oleobject">
<PARAM NAME="FileName" VALUE="http://www.mysite.com/WebCamVideo.mpeg">
<PARAM NAME="ShowControls" VALUE="1">
<PARAM NAME="ShowStatusBar" VALUE="1">
<PARAM NAME="ShowDisplay" VALUE="0">
<PARAM NAME="DefaultFrame" VALUE="Slide">
<PARAM NAME="Autostart" VALUE="1">
<embed type="application/x-mplayer2"
pluginspage="http://www.microsoft.com/Windows/MediaPlayer/download/default.asp"
src="http://www.mysite.com/WebCamVideo.mpeg"
Name=MMPlayer1 Autostart=1 ShowControls=1
ShowDisplay=0 ShowStatusBar=1 DefaultFrame="Slide"
width=pixels height=pixels>
</embed>
</OBJECT>
Modify the FileName and src parameters with full URL to video file.
Change the Width and Height parameters according to image size.
How to add recorded video to the Web page using the Actual Drawing program
In the Actual Drawing program:
Click Advanced from the Insert menu and then click Multimedia File.
Type URL to the video file in the File Name or URL box.
Specify the image width and height in the appropriate boxes.
Click Ok.
To record a video clip
Click Record Video Clip from the Tools menu
To stop the video clip recording
Click Record Video Clip from the Tools menu again.
Archive of Snapshots
If you want the program to create archive of captured images, click to select the Create Archive of Snapshots
check box.
Click the Archive of Snapshots Settings button to change the following parameters:
File Name - the program saves incrementally named JPEG images under the file name specified in this box. Use
the {COUNTER} tag in the file name as a place-holder for the counter value.
If you specify a full path in the File Name box, snapshots are saved under this file name; otherwise, they are
saved in the Gallery folder.
Page 33

- 33 -
Frame Rate - use this box to set the how many snapshots are created per second, per minute, or per hour.
Click to select the Reset counter to the Start Index when the snapshots creation starts box if you want the
counter to be set to the start value every time a new snapshots sequence begins.
The Upload Snapshots check box causes the program to upload snapshots to the FTP server. Click the FTP
Settings button to set up FTP parameters. For more info on FTP parameters see Broadcasting section.
Click to select the When the snapshots creation starts, make new sub-folder if you want the program to
create a new sub-folder on the FTP server every time a new snapshots sequence begins. The folder name may
include parameters like time: {hh:nn}, camera number: {CAMERA}, or current motion value: {MOTION} enclosed
in the braces {}. See more info about parameters in the time formatting macros topic in the Captions section.
Archived images can change the size of snapshots in order to use them as thumbnails. Click to select the Resize
Snapshots check box and enter the thumbnail width and height in appropriate boxes.
Page 34
- 34 -
Part 11
Command-line
Parameter:
Description:
/Q
Terminates an already launched
ReCam.
Example: WebCam.exe /Q
/REMOTE_ON
Enables Remote Access.
Example: WebCam.exe
/REMOTE_ON
/REMOTE_OFF
Disables Remote Access.
Example: WebCam.exe
/REMOTE_OFF
/HTTP_ON
Starts HTTP Server.
Example: WebCam.exe
/HTTP_ON
/HTTP_OFF
Stops HTTP Server.
Example: WebCam.exe
/HTTP_OFF
/FTP_ON
Starts FTP Uploading.
Example: WebCam.exe /FTP_ON
/FTP_OFF
Stops FTP Uploading.
Example: WebCam.exe /FTP_OFF
/R_ON
Starts Recording.
Example: WebCam.exe /R_ON
/R_OFF
Stops Recording.
Example: WebCam.exe /R_OFF
/SNAPSHOTS_ON
Starts Snapshots Creation.
Example: WebCam.exe
/SNAPSHOTS_ON
/SNAPSHOTS_OFF
Stops Snapshots Creation.
Example: WebCam.exe
/SNAPSHOTS_OFF
/M_ON
Starts Motion Detection.
Example: WebCam.exe /M_ON
/M_OFF
Stops Motion Detection.
Example: WebCam.exe /M_OFF
/DEVICE
Causes program to select video
device, which index is defined in
the next parameter. First device
has index 1.
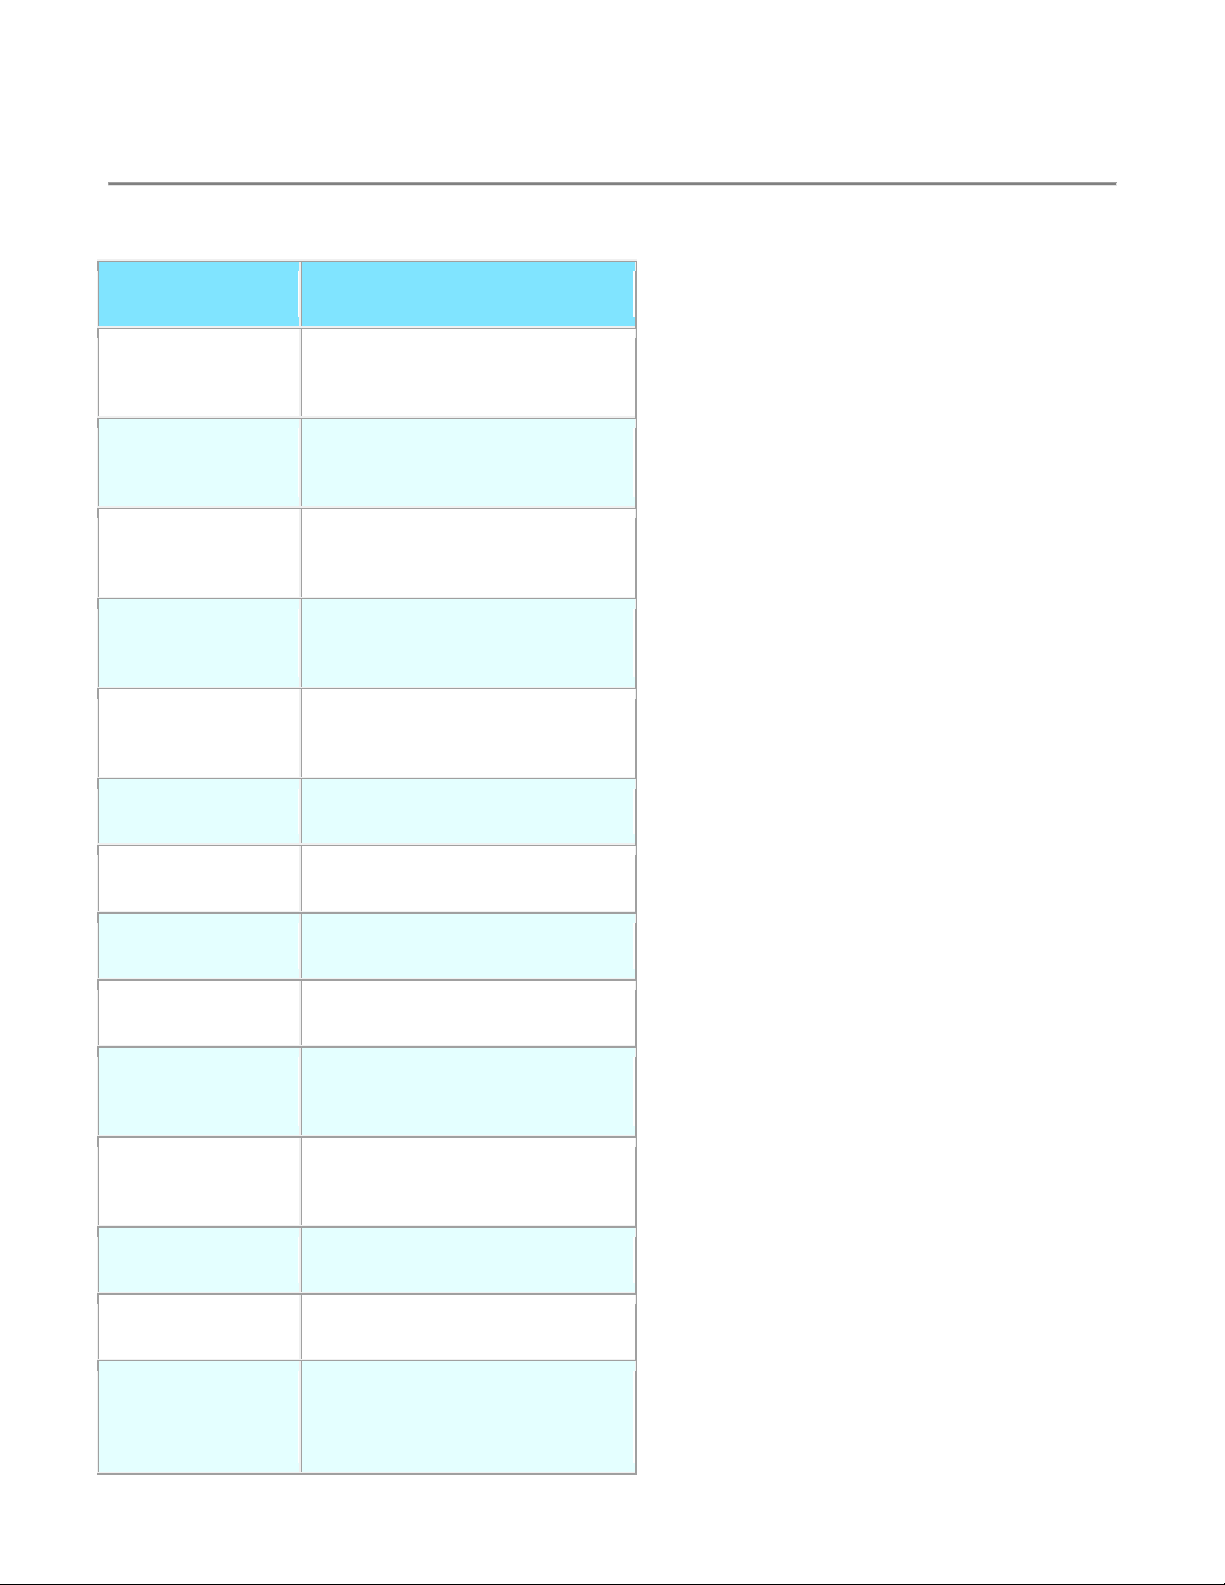
Managing Program from Command-line
ReCam accepts commands from command-line. You can run the program with command-line parameters or send
commands to the already launched program.
Page 35

- 35 -
For example if there is the following
list of video devices on your
computer:
Logitech USB video camera
3Com PC Web Camera
ATI TV Wonder
To select "3Com PC Web Camera"
the command line must be:
WebCam.exe /DEVICE 2
/USE_VFW
Causes program to use Video for
Windows.
Example: WebCam.exe
/USE_VFW
/USE_DS
Causes program to use
DirectShow.
Example: WebCam.exe /USE_DS
/CAM_NO
Causes program to make active
camera window, which index is
defined in the next parameter. First
camera window has index 1.
For example to select 2-nd camera
the command line must be:
WebCam.exe /CAM_NO 2
You can place any number of parameters to command line in any sequence.
Page 36
- 36 -
Part 12
Parameter:
Description:
COLOR
Defines the applet's background color. The
color value is a six digit hexadecimal RGB
specification preceded by the pound (#) sign.
The first two digits indicate the red value, the
second two digits indicate the green value, and
the last two digits indicate the blue value. The
Tools
Creating a Web Page
If the Remote Access broadcasting method is used, the ReCam program must be installed on the viewer's
computer in order to watch the camera. See more info about how to set up Remote Access in the Camera
Settings section.
If the HTTP Server or FTP Upload broadcasting method is used, viewers open a web page in the Internet
browser and watch the camera. This web page contains special code that is constantly refresh images from the
camera and simulates a live picture.
You can prepare the WebCam web page using any HTML editor you like.
Fortunately, ReCam has its own tool to prepare simple Web Camera web pages.
Web Page Creation Wizard
To open the Web Page Creation Wizard, select Create Web Page from the Tools menu.
Web Page Creation Wizard helps you specify a title for your web page and change other attributes, such as
background, text color, and upper and lower captions.
Web Page Creation Wizard creates the web page HTML file, and uploads the page's files to a folder or to an FTP
server where your web page must be.
Your web page folder must contain the WebCam_Viewer.class file. This file uploads captured images from the
Web Camera and shows them in your Internet browser.
How to add WebCam to your own HTML text
Just add the following code to your HTML text:
<APPLET CODE="WebCam_Viewer.class"
WIDTH=640 HEIGHT=480>
<PARAM NAME="COLOR" VALUE="#00FF00">
<PARAM NAME="IMAGE" VALUE="capture0.jpg">
<PARAM NAME="BORDER" VALUE="ON">
</APPLET>
Modify the COLOR parameter according to the color of your web page.
Change the IMAGE parameter according to value in the Image Name box in the Internet Setting dialog
box.
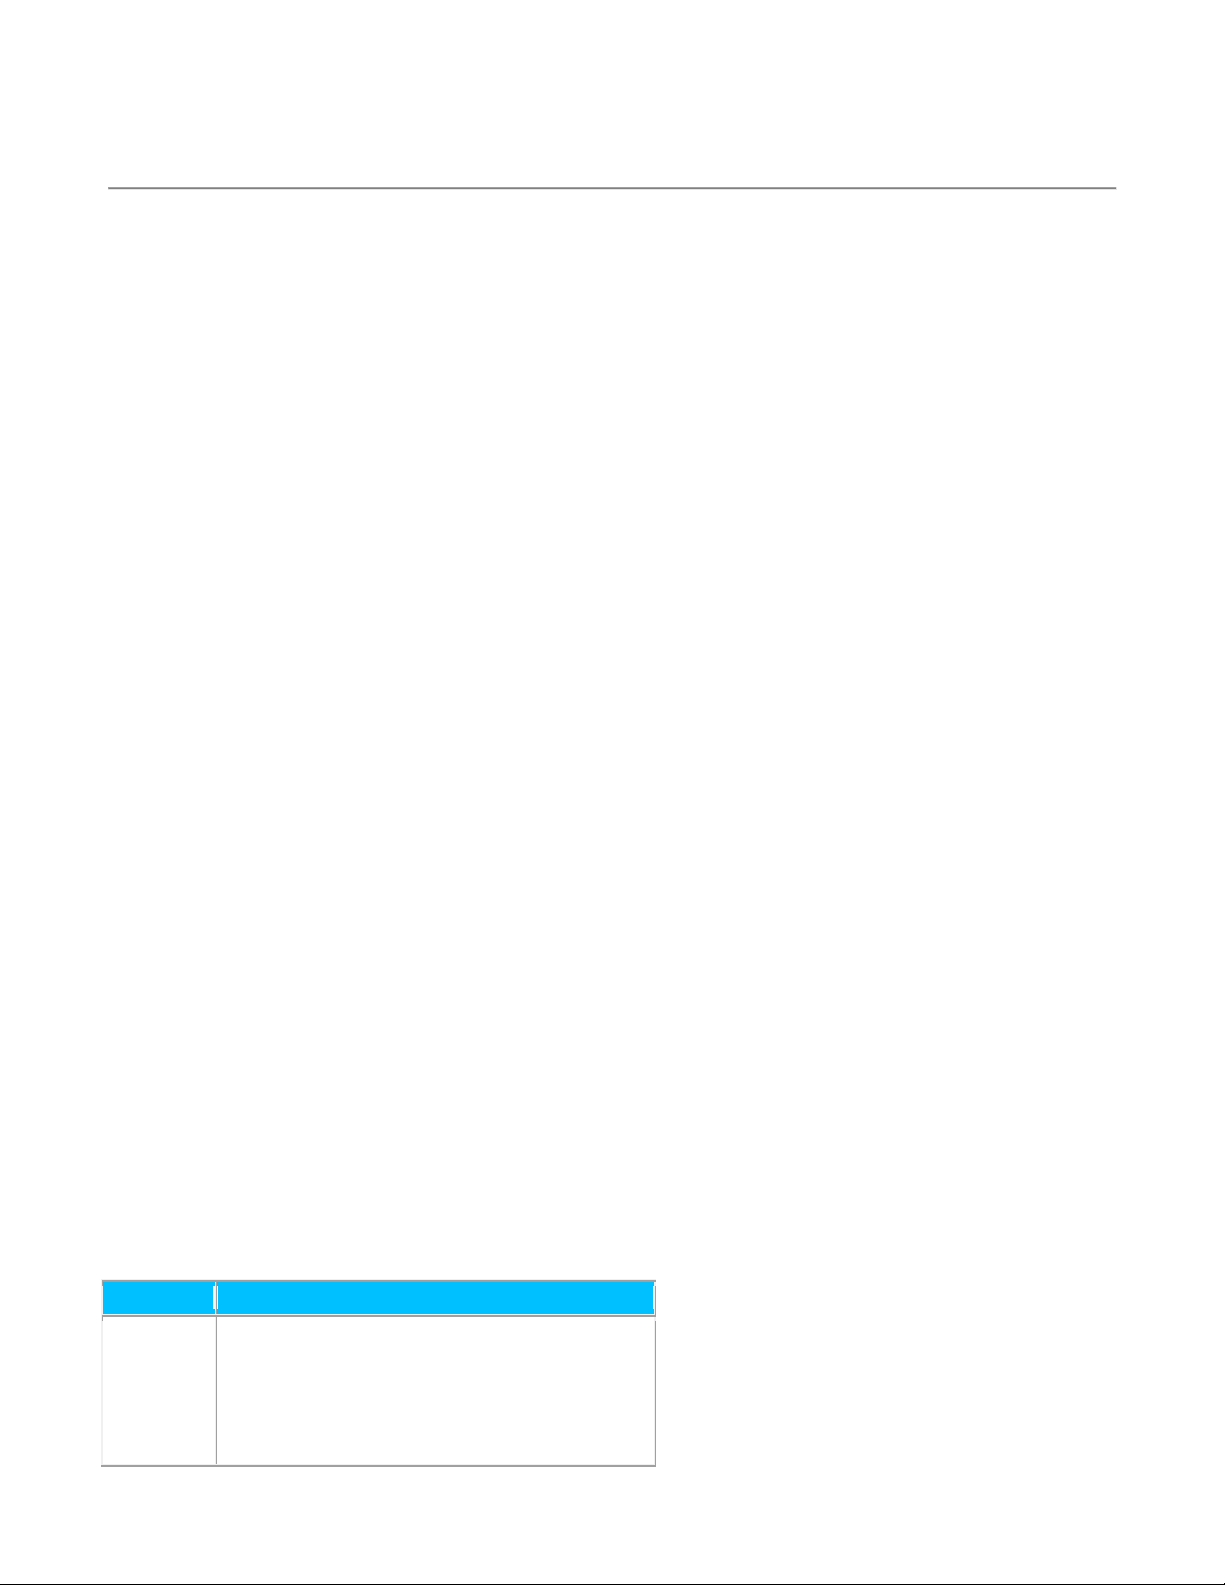
Java Applet Parameters
Java Applet displays captured images up to 20 frames per second. Unfortunately not all Web Browsers support
Java Applets. Also, most Pocket PCs don't have a Java Engine.
Page 37
- 37 -
range for each color value is 00 to FF inclusive.
Modify the COLOR parameter according to the
color of your web page.
Example:
<!-- red background -->
<PARAM NAME="COLOR"
VALUE="#FF0000">
IMAGE
Defines file name of captured image, which is
defined in the Image Name box. See Image
Name in the Broadcasting section for more
info.
Example:
<PARAM NAME="IMAGE" VALUE="Cam.jpg">
BORDER
If value is "ON," applet draws frame around
image. If value is "OFF," applet just displayes
the captured image.
Example:
<PARAM NAME="BORDER" VALUE="OFF">
How to create WebCam page with Actual Drawing
In the Actual Drawing program:
Click Container with HTML text from the Insert menu.
Add the following text in the HTML script window.
<APPLET CODE="WebCam_Viewer.class"
WIDTH=640 HEIGHT=480>
<PARAM NAME="COLOR" VALUE="#00FF00">
<PARAM NAME="IMAGE" VALUE="capture0.jpg">
<PARAM NAME="BORDER" VALUE="ON">
</APPLET>
Modify the COLOR parameter according to color of your web page.
Change the IMAGE parameter according to value in the Image Name box in the Internet Setting dialog
box.
Displaying Still Images on Web Page
If you don't want to use the Java applet on your web page to display the webcam, it is easy to configure your web
page to display captured image.
This method doesn't need any special technologies like a Java Engine, and it works with any Web browser, but
frame rate cannot be higher than 1 frame per second.
Use a tag like this to display the image:
<IMG WIDTH=240 HEIGHT=180 SRC="capture0.jpg">
Change the SRC parameter according to value in the Image Name box in the Internet Setting dialog box.
To refresh the image, add a tag like this to the <Head> section of your web page:
Page 38

- 38 -
<META HTTP-EQUIV="REFRESH" CONTENT="10">
This will cause the Internet browser to refresh page every 10 seconds. Specify this value to the same as your
broadcasting frame rate and your viewers will see an updated image right away when it has been captured.
Dynamic IP Service
If you broadcast from your computer, you should provide your viewers with IP address of your computer. However
if you have a dial-up connection, DSL line, or cable modem, then the IP address of your computer changes every
time you connect. To solve this problem, you can use the MOBI Technologies, Inc web server, which allows your
web camera to have a permanent address on the internet.
A special web address is reserved for you once you sign up for the MOBI Technologies, Inc. Dynamic IP service.
This web address is based on a User ID, which you receive after you sign up.
For example, if your User ID is "billsmith", the Internet address of your WebCam is
http://www.mobionline.com/cgi-bin/ip.cgi?billsmith. Therefore, users can access your ReCam easily.
How does the Dynamic IP Service work?
ReCam:
defines IP address of your computer or detects if the IP address has been changed.
sends the IP address of your computer to the MOBI Technologies, Inc. web server.
MOBI Technologies, Inc. web server updates the data base.
A viewer to watch your WebCam:
points Web browser to the MOBI Technologies, Inc. web server (for example:
"http://www.mobionline.com/cgi-bin/ip.cgi?Bill_Smith").
MOBI Technologies, Inc. web server redirects Web browser to the IP address of your computer.
Web browser connects to your computer and shows images captured from camera.
To sign up for the Dynamic IP Service:
Click Dynamic IP Service from the Options menu.
Click the Sign Up for Free Trial Account button to try this service for free during 30 days.
Click the Sign Up for Permanent Account button to sign up for this service.
Using a Dial-Up Connection
You don't need to use dial-up connection if your computer is connected to Internet always, e.g. it has a permanent
internet connection (such as, Cable Modem, DSL, ISDN, etc.).
If the Dial-Up service is enabled, ReCam establishes a dial-up connection every time when it needs to upload
captured image.
To install dial-up networking (if it is not installed), open Control Panel, select Add/Remove Programs, choose Windows Setup, double-click
Communications, and select Dial-Up Networking.
Page 39

- 39 -
To use Dial Up service
Click Dial Up Connection from the Tools menu.
Click to select the Use Dial Up Connection check box.
Connection
Select a dial-up connection from drop-down list. Click the Create New Dial-Up Connection button if you want to
make a new dial-up connection.
Disconnect after upload
After having uploaded an image, ReCam is able to hang up the dial-up connection. This can be useful, if you have
configured a large interval to upload images and don't want to stay connected all this time.
Click to select the Disconnect After Upload check box, if you want ReCam to hang up after an image has been
uploaded.
Authentication
If the Use Default check box is checked, ReCam uses saved by Windows user name, password, domain, and
phone number.
If the Use Default check box is unchecked, you can specify the user name, password, domain, and phone
number yourself.
Your Computer’s IP Address
ReCam has a tool to determine your computer's internal and external IP addresses. Internal IP address can be
used to connect to the computer inside a local area network. External IP address is used to connect to the
computer from the Internet. Usually, a computer has different external and internal IP addresses, because the
external IP addresses is established by your Internet service provider.
Click Get Computer IP Address from the Tools menu to see the value of internal and external IP addresses.
Testing Camera Accessibility from the Internet
This procedure helps you to determine the reason your camera is not visible to your viewers from the Internet.
The testing procedure performs the following tasks:
Testing that the computer is connected to a network and that an Internet connection is enabled.
The program checks that the HTTP server for the selected camera is launched.
Next, the program checks that the Default Web Page is presented in the Server Folder. You can use the
Web Page Creation Wizard to create this web page.
After this step, the program tests that the Dynamic IP Service is enabled. Dynamic IP Service allows your
web camera to have a permanent address on the Internet.
Final step: the program sends requests to the www.getmobi.com server. The server pings back to the
computer with a test HTTP packet. If the server receives a valid answer from your computer, the test is
done successfully.
To perform the camera accessibility testing
Click Testing Accessibility from Internet from the Tools menu.
Select a camera to test and then press the Next button.
Page 40
- 40 -
Editing Video Clips
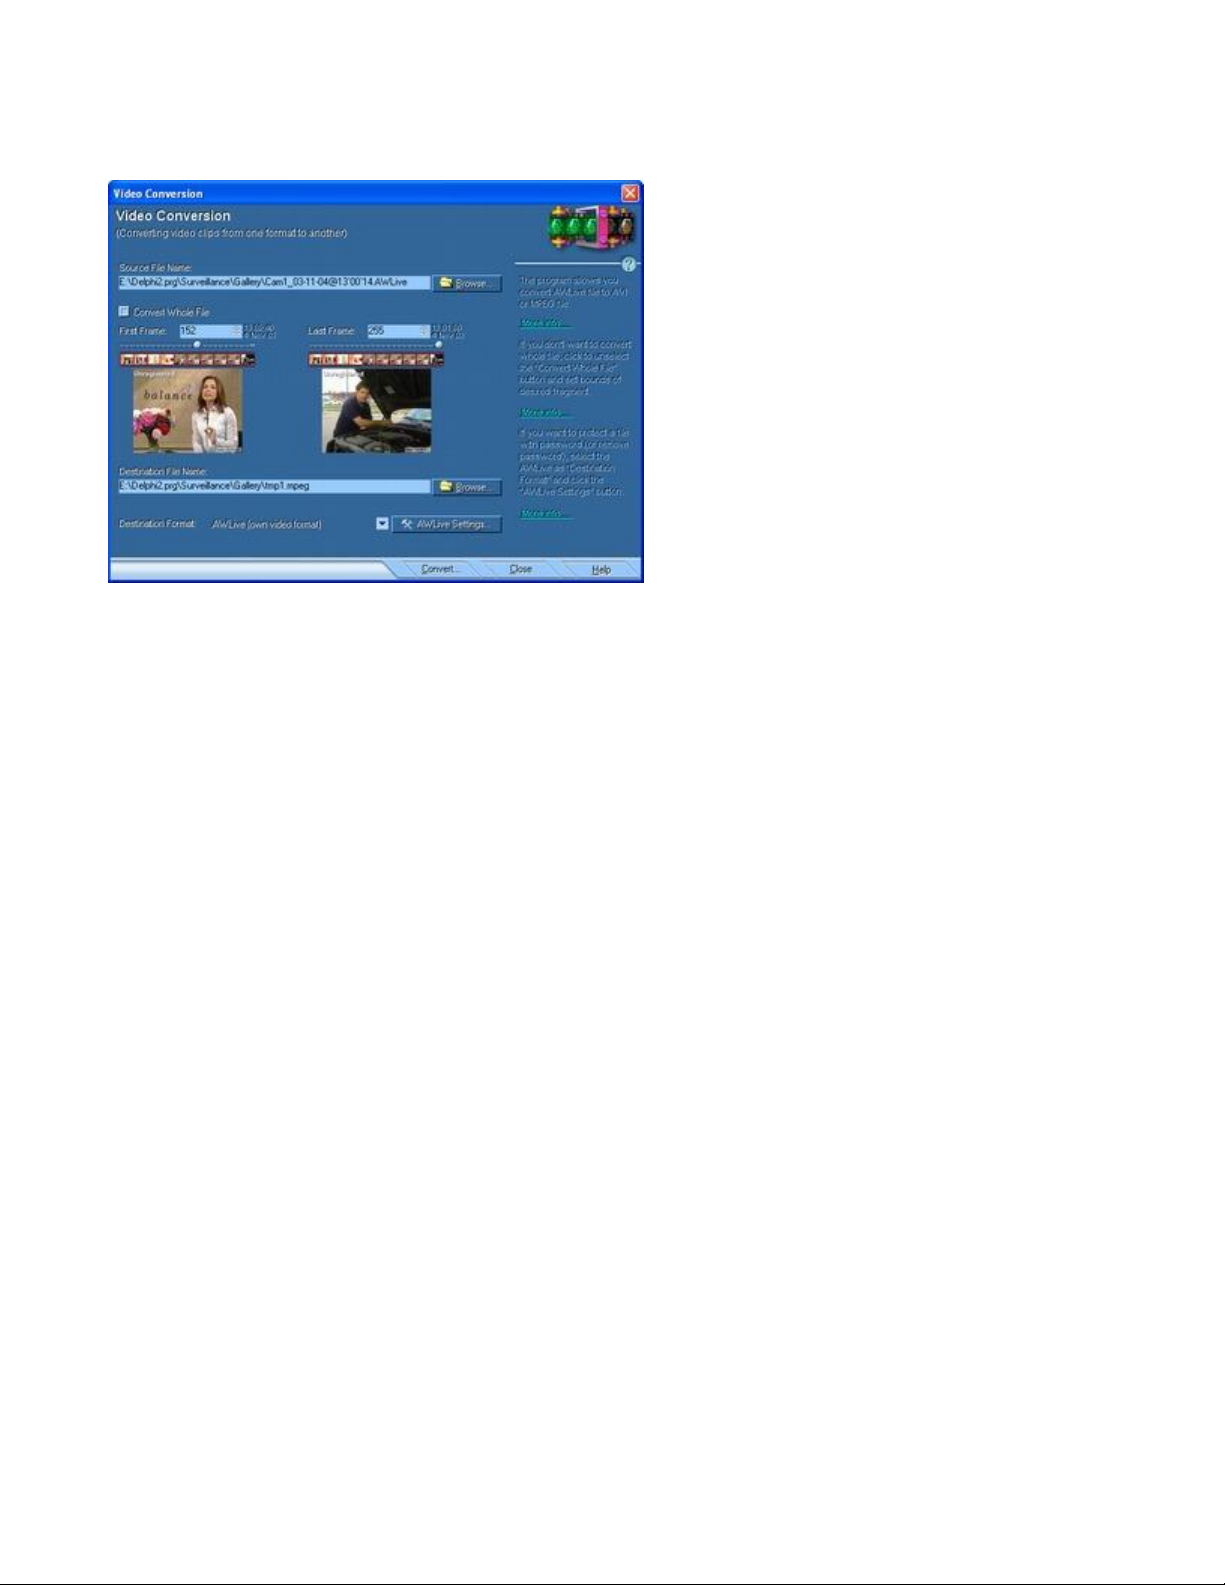
Video Conversion tool helps you edit video clips and convert them from AWLive format to AVI and MPEG files.
To edit video clip with Video Conversion tool:
Click Edit Video Clips from the Tools menu.
Specify the Source File Name in the appropriate box. It can be an AWLive file only. Other file formats
are not acceptable.
If you don't want to convert whole file, click to unselect the Convert Whole File button and set the first
and last frames of the part to be converted.
In the Destination File Name box type the file where conversion will be performed to.
Select format of result file from the Destination Format list. If you want to protect a file with password (or
remove password), select the AWLive as destination format and click the AWLive Settings button to
enter the password. AVI and MPEG files cannot be password protected because these formats don't
support such protection.
Click the Format Settings button to customize parameters of selected video format. See more info in the
Format of Archive files topic in the Recording Video Section.
Click the Convert button to start conversion.
Page 41

- 41 -
Part 13
Troubleshooting
Camera freezes, times out, or stops showing live images
Click Reconnect to Camera in the Device Settings window
If problem persists:
Reset camera by turning it off and back on
Check compatibility of camera with ReCam software
Number of allowed users trying to access the same camera at the same time may have been exceeded.
Please refer to your camera’s manual or specifications.
Problem may be with camera. Test ReCam software with another camera
Check CPU usage. Computer may not have enough resources available to view live camera. Lowering
the frame rate, increasing compression, and disabling functions, such as motion detection and live
recording, may free up the needed resources.
ReCam does not work or cannot connect with IP camera
Confirm you have assigned and entered the correct IP address and port for the camera.
Confirm your camera’s internal settings. Please refer to your camera’s manual or specifications.
ReCam is compatible with IP cameras using JPEG picture compression. Please refer to your camera’s
manual or specifications.
Email Notification is not sent upon motion detection
Check your E-mail settings by clicking E-mail Settings in the Motion Settings window
Contact your ISP if you are unsure of your Outgoing Mail Server settings
Make sure Server Requires Authentication check box is checked and Account Name and Password
are correct if authentication is required by your server
Page 42

- 42 -
Notes:
Page 43

- 43 -
Notes:
Page 44

- 44 -
©2004 MOBI Technologies Inc.
 Loading...