

Page 1
WayPoint Map Loader
Users Manual
Page 2

You can find additional product and support information for your
WayPoint at the following website:
http://www.mobilecrossing.com
or contact:
Mobile Crossing
1230 Oakmead Parkway, Suite 304
Sunnyvale, CA 94085
(408) 850-8156
Fax (408) 738-8806
E-mail: [email protected]
© 2005 Mobile Crossing Inc. - All rights reserved
June 2005
ii
Page 3

Table of Contents
Introduction . . . . . . . . . . . . . . . . . . . . . . . . . . . . . . . . . . . . 1
Map Loader Overview . . . . . . . . . . . . . . . . . . . . . . . . . . . . 3
Starting the WayPoint Map Loader. . . . . . . . . . . . . . . . 3
The Main Menu . . . . . . . . . . . . . . . . . . . . . . . . . . . . . 6
Purchase Map Activation key . . . . . . . . . . . . . . . . . . . . . . 8
Order Using the Map Loader program . . . . . . . . . . . . . 8
Order Using the Web Interface . . . . . . . . . . . . . . . . . . 11
Order Using a Phone. . . . . . . . . . . . . . . . . . . . . . . . . . 13
Region Coverage . . . . . . . . . . . . . . . . . . . . . . . . . . . . . . . 15
Region Descriptions . . . . . . . . . . . . . . . . . . . . . . . . . . 15
Special Regions. . . . . . . . . . . . . . . . . . . . . . . . . . . . . . 17
Map Loading . . . . . . . . . . . . . . . . . . . . . . . . . . . . . . . . . . 18
Using the Internet . . . . . . . . . . . . . . . . . . . . . . . . . . . . 18
Using a card. . . . . . . . . . . . . . . . . . . . . . . . . . . . . . . . . 18
Making your own Map Loader card . . . . . . . . . . . . . 18
Map Loading Steps . . . . . . . . . . . . . . . . . . . . . . . . . . . 19
Using “Choose Map” in WayPoint . . . . . . . . . . . . . . . 22
Problem Resolution . . . . . . . . . . . . . . . . . . . . . . . . . . . . . 24
Internet Connection Problems. . . . . . . . . . . . . . . . . . . 24
Map Activation Problems . . . . . . . . . . . . . . . . . . . . . . 24
Flash Disk repair . . . . . . . . . . . . . . . . . . . . . . . . . . . . . 25
Recovering Missing Maps. . . . . . . . . . . . . . . . . . . . . . 25
File List lost. . . . . . . . . . . . . . . . . . . . . . . . . . . . . . . . . 26
Other Errors. . . . . . . . . . . . . . . . . . . . . . . . . . . . . . . . . 27
Index. . . . . . . . . . . . . . . . . . . . . . . . . . . . . . . . . . . . . . . . . 28
iii
Page 4
Introduction
A WayPoint unit comes with 128 Megabytes of Flash Disk space
for maps. While this will not hold the entire United States, it will
hold one region plus the long haul maps. The long haul maps
contain major road maps of the entire country.
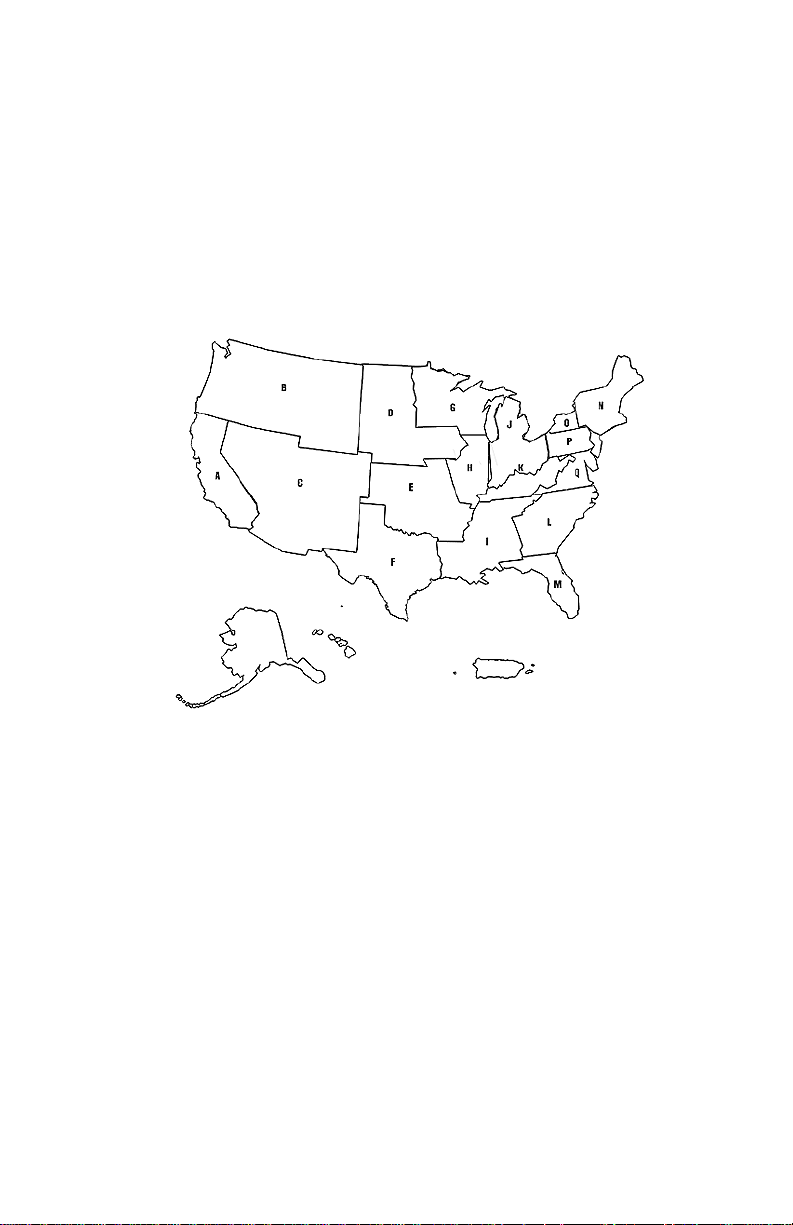
approximate boundaries of the regions. For detailed data see
"Region Coverage" on page 15.
Figure 1 shows the
Figure 1. Region Map
The WayPoint Map Loader is a program that comes with the
WayPoint PDA. It manages the map regions that are used by the
navigation software and facilitates map purchases. The WayPoint
Map Loader provides the following functions:
• Manage maps on either the built-in Flash Disk or a user
supplied SD card.
• Identify which regions are owned by the user and available to
be loaded on the unit.
Page 5

• Show which regions are already loaded on the unit.
• Unload or reload any region as needed by the user. The
source maps can be on a card or they can be retrieved from
the Internet.
• Purchase maps.
Using the map loader permits the user to keep maps they are using
separate from maps that they own. This impr ov es pe rformance of
the mapping software while providing flexibility for the user. Maps
that are not needed can be on a CompactFlash card, an SD card,
or readily retrieved from the Internet at any time. They are
compressed to save storage space and to reduce download time if
they are downloaded from the Internet. Loading a region to your
Flash Disk area can be done in less that 15 minutes from a Map
Loader equipped CompactFlash card.
WayPoint source maps are freely available as a download fr om the
Mobile Crossing web site and from other media formats for about
the cost of the media. However, to use the maps you will need a
Map Activation key. This key provides the license to use the maps.
It is the key that is actually purchased.
2
Page 6
Map Loader Overview
The intent of the Map Loader program is to provide an easy to use
method to purchase new maps and manage those that you alr eady
own. Managing maps is a two step process.
1. Purchasing the Map Activation key.
2. Loading the maps onto your PDA.
The purchasing step can be done entirely via the Map Loader
program if your PDA has an Internet connection. If you do not have
an Internet connection on your PDA you can use th e Map Loader in
combination with our web site,
purchase maps. If you don’t have web access you can use the Map
Loader in combination with a phone call to purchase maps.
Starting the WayPoint Map Loader
To start the WayPoint Map Loader follow these steps:
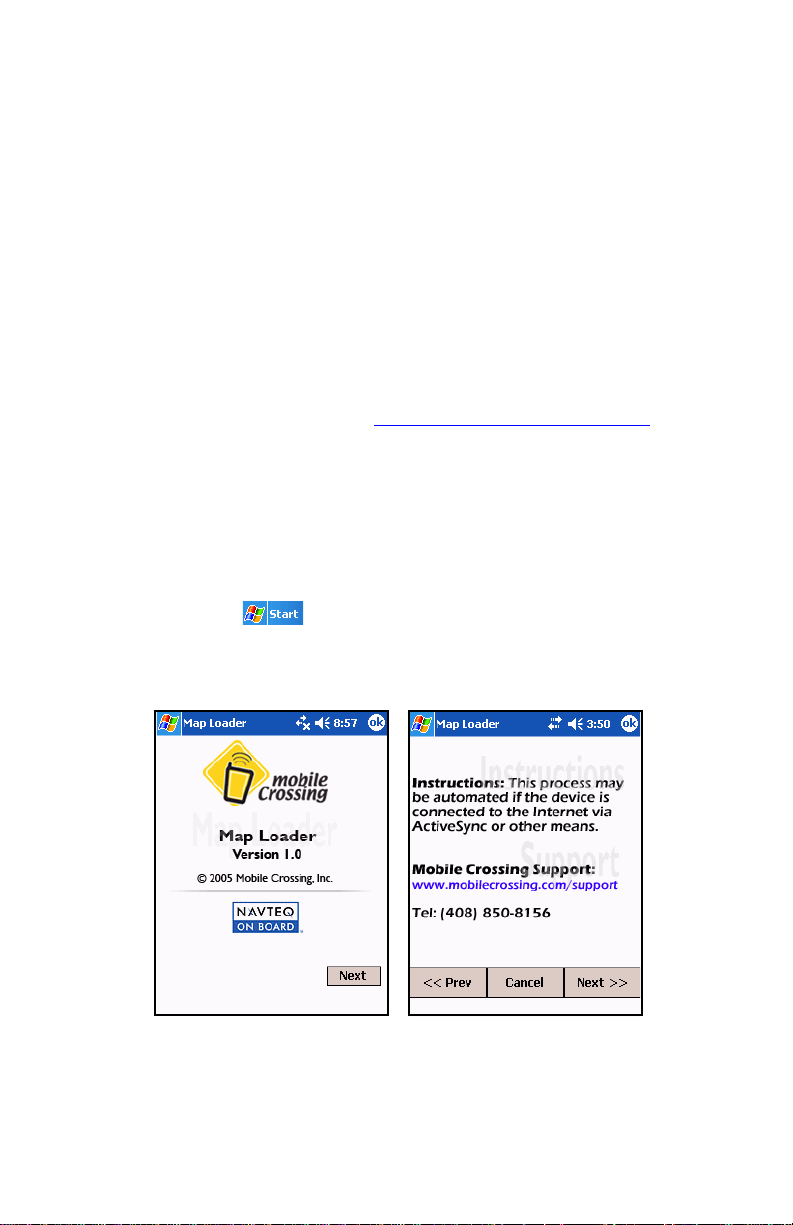
1. From the Start menu select Programs > Map
Loader. Alternatively, inserting a Mobile Crossing Map
Loader card will start this tool automatically.
http://www.mobilecrossing.com, to
Figure 2. Opening Screens
3
Page 7
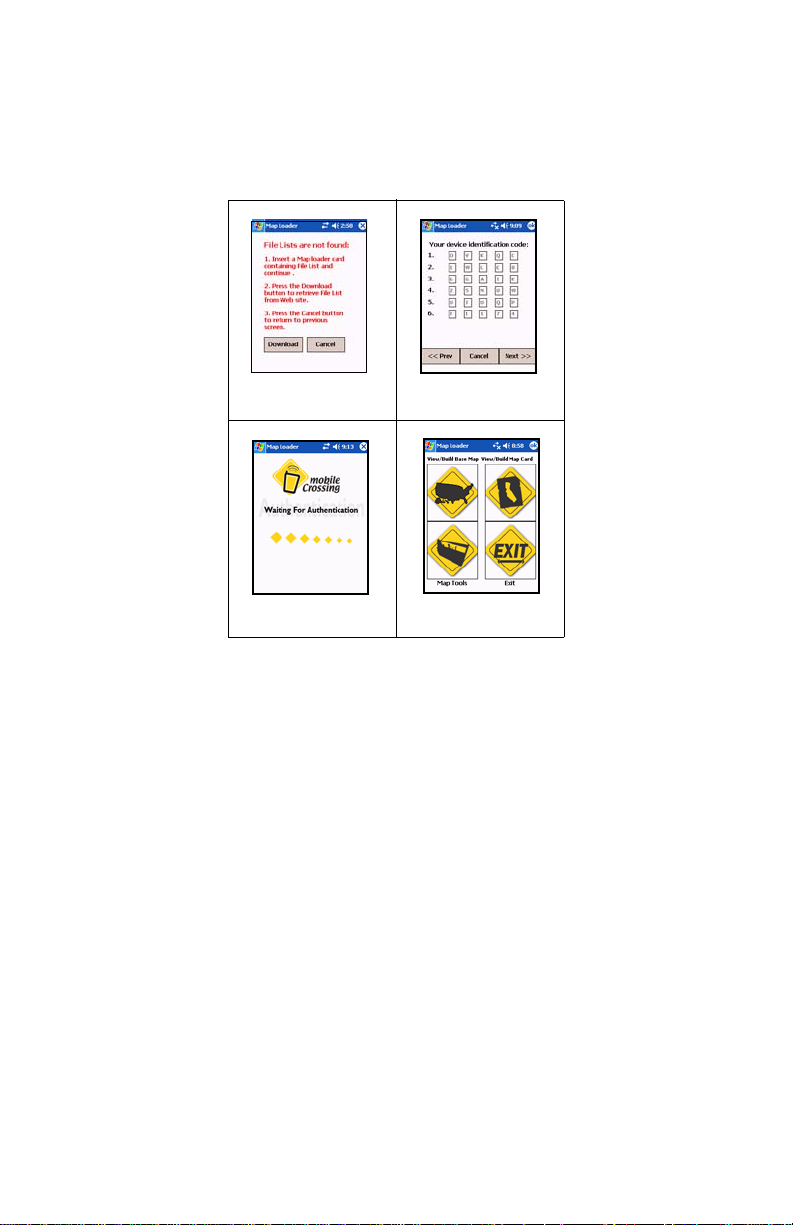
2. Tapping Next will bring up one of four screens. Compare the
screen you see with the images below to determine which
step to follow.
Go to Step 3 Go to Step 4
Go to Step 5
Figure 3. Screen Choices
3. You will see this screen if you forgot to install your Map
Loader card and have never downloaded maps from the
Internet. Follow the screen instructions to get a file list. Once
you have obtained the file list you will go back to step 2. For
more information see
4. You will reach this step if you do not have an Internet
connection and you have never activated a map before or
your activation key is corrupt. If you have never activated a
map please go to
Otherwise go to "Map Activation Problems" on page 24
"Purchase Map Activation key" on page 8.
Go to Step 6
"File List lost" on page 26.
4
Page 8
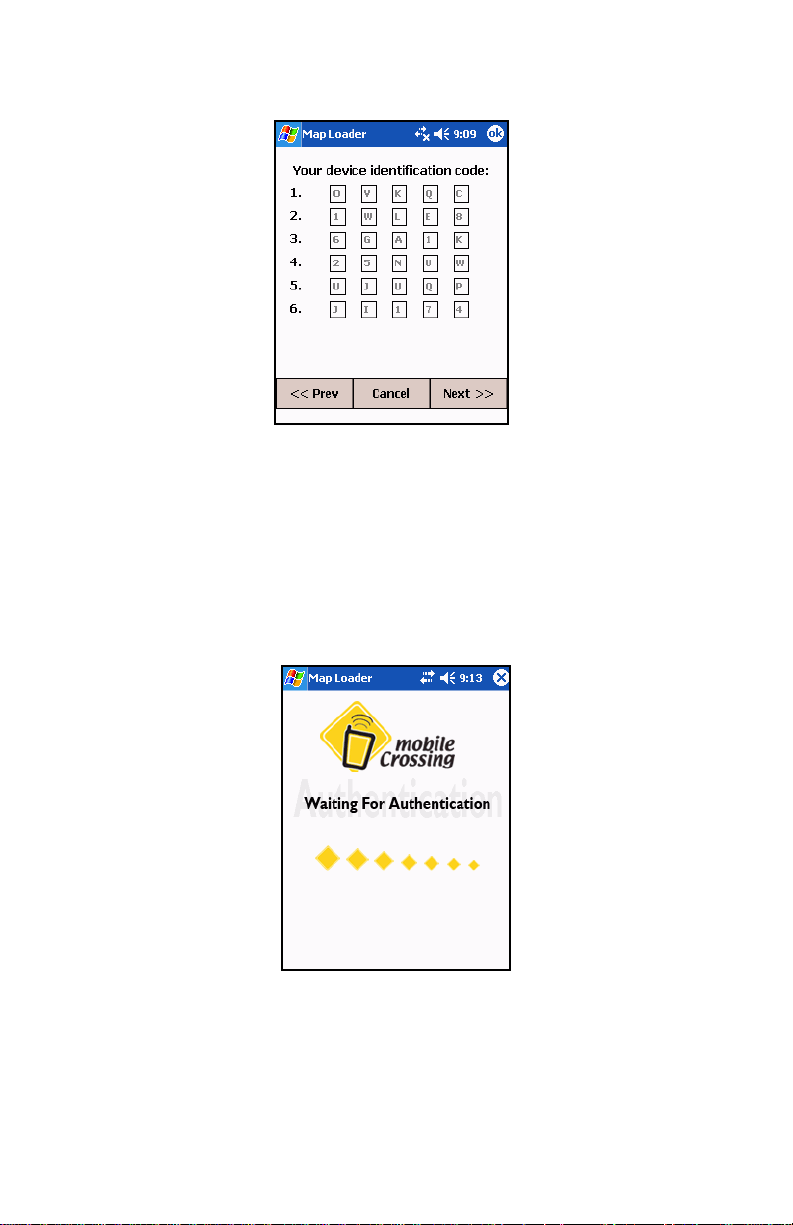
Figure 4. Device Identification
If you think this screen should not have appeared please
check the chapter
"Problem Resolution" on page 24.
5. If you have an Internet connection the authentication screen
will appear briefly and then switch automatically to the main
menu screen (step 6).
Figure 5. Internet Authentication
5
Page 9
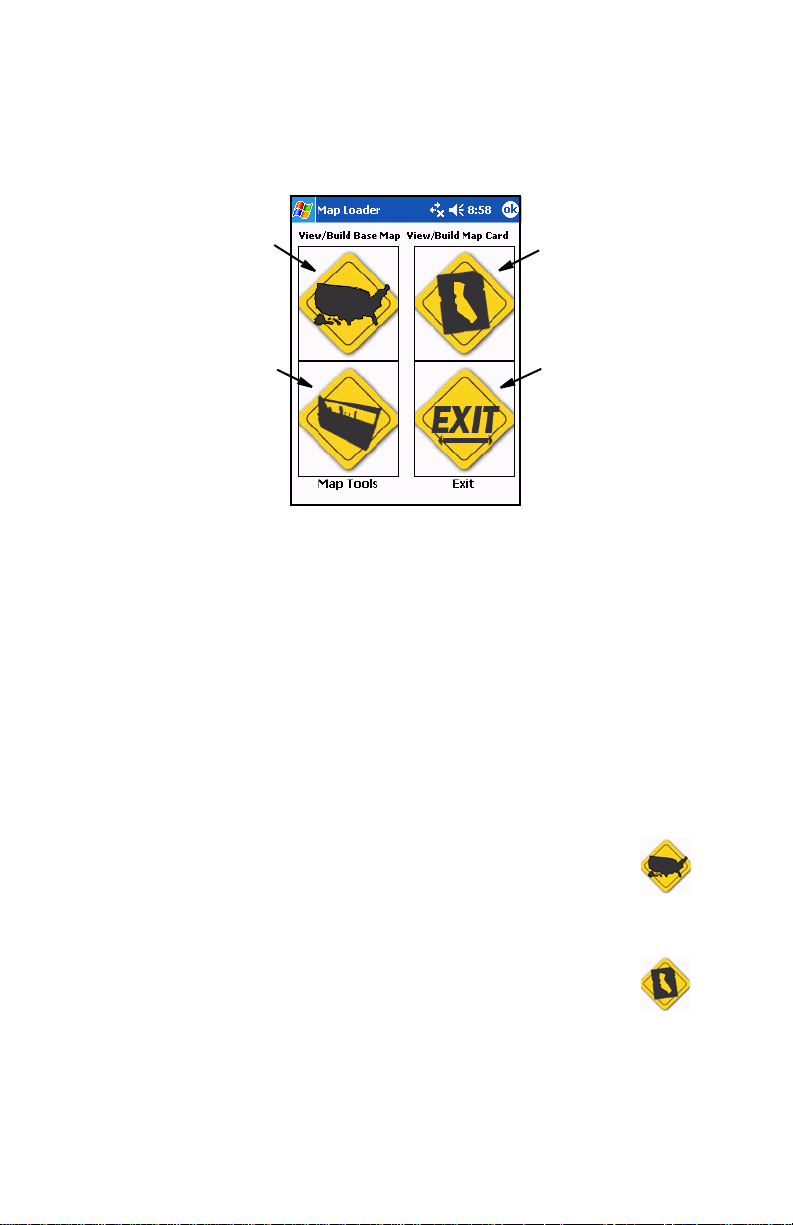
6. The Map Loader main menu is shown in Figure 6. This is
where you will decide what you want to do.
1
3
2
4
Figure 6. Main Menu
If you thought you were on the Internet and do not see the
authentication screen of the previous step you should tap
EXIT and see
"Problem Resolution" on page 24 before
restarting the Map Loader.
The program is fully functional without an Internet connection but
some tasks can be automated if you have a connection.
The Main Menu
The task available from the main menu include (refer to Figure 6):
• (1) View/Build Base Map - This command loads maps
into the Flash Disk area on the WayPoint. It also shows
which region is currently loaded and manages the map
area permitting you to swap loaded regions.
• (2) View/Build Map Card - This command permits
loading maps into the card plugged in the SD slot on the
WayPoint. It also manages the maps that are loaded on
the SD.
6
Page 10

• (3) Map Tools - This command is where you can go to
purchase maps and perform maintenance tasks such
as repairing map related data on the unit. More
information on using Map Tools can be found in the chapter on
"Problem Resolution" on page 24.
• (4) Exit - This command will shut down the map loader.
The user can also use the Cancel command available
at the bottom of most screens to shut down the map
loader.
7
Page 11

Purchase Map Activation key
You need a Map Activation key before you can load maps into your
unit. The source maps themselves are not useful without the
activation key.
Purchasing the Map Activation key can be done three different
ways. These include using the Map Loader directly, using the
Mobile Crossing web site, and by phone.
If you have never activated a region before the first region will be
free. You will still use the appropriate process in this section to
receive access to your free region.
There is only one Map Activation key needed for the unit. If you
own multiple maps this information is contained in the one key. If
you purchase a new region you will get a new key that replaces all
previous keys. The key you receive will only work on one unit.
Order Using the Map Loader program
If you have an internet connection the process will be simplified
since the device identification code and the map activation key will
be transferred automatically as needed. You will be able to do
everything from within the Map Loader program. Use the process
shown in
the program.
"Starting the WayPoint Map Loader" on page 3 to start
The following steps in the Map Loader can be used to Purchase
one or more regions:
8
Page 12
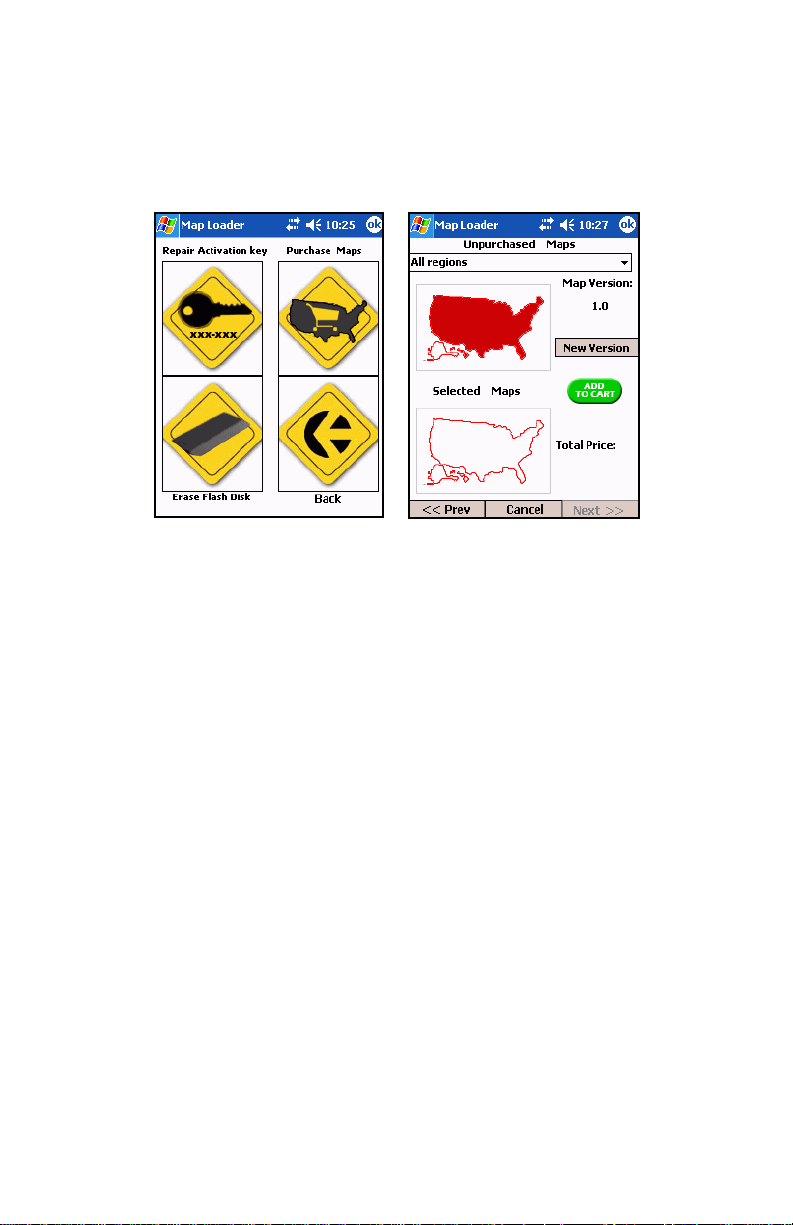
1. Tap the Map Tools entry on the main menu to bring up the
Tools menu and select Purchase Maps. The screen shown
in
Figure 7 will appear.
Figure 7. Purchase Maps screen
2. Select one or more map regions by selecting them from the
pull-down menu at the top of the screen. Tap the Add to
Cart button to place the ones you want in the shopping cart.
The name of this button will change to Remove from Cart.
The region you selected will be added to the Select Maps.
The total price of the purchase will be shown. The
descriptions for each region is shown in the Region
description chapter.
Tip: If you tap the map regions pull-down menu twice it will
remain selected. You can use the thumb wheel or cursor
keys to scroll through the list. This is often easier to control
that try to scroll the list with the stylus.
The New Version button will appear if there is another
version of the maps available. You do not need to upgrade
when a new version is available but all loaded maps must be
of the same version.
9
Page 13
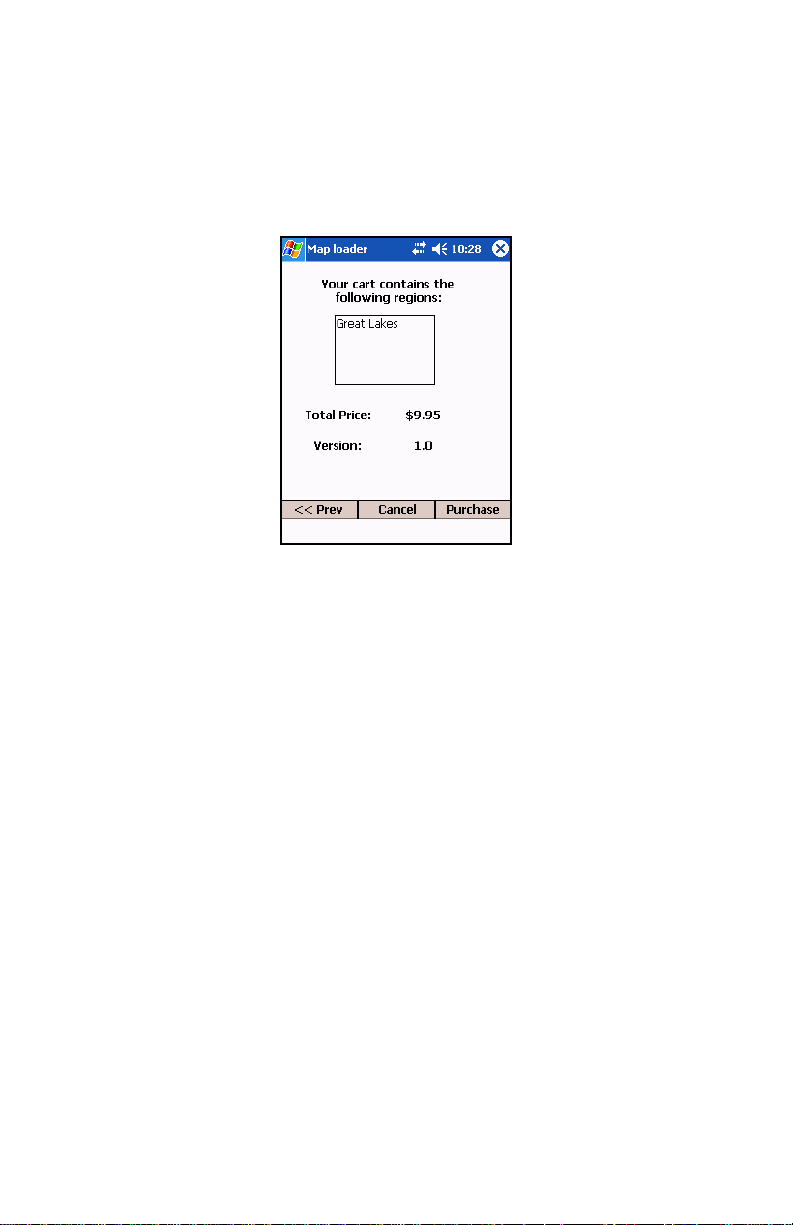
3. When you have selected the maps that you wish to purchase
tap the Next entry at the bottom of the screen. This will bring
up the review purchase screen shown in
Figure 8. It lists all
of the regions you have selected and the total price.
Figure 8. Review purchase screen
4. When you are ready to complete your order tap the
Purchase entry at the bottom of the screen. This will bring
up the secure data entry screen shown in
Figure 9.
5. Fill in all of the data on the form. Some of the data will be prefilled from your WayPoint owner information. For credit card
purchases please ensure that the Cardholder’s name
matches the name on the card. Also ensure that the address
is the billing address for the card. The E-mail address will be
used to send you confirmation of the order and verification of
your map activation key for your records.
6. If you are not purchasing your “free” region you will need to
enter your credit card information. At the time of this writing
we accept Visa, Master Card, American Express, and
Discover. The Card Security Code is on the back of the card.
10
Page 14
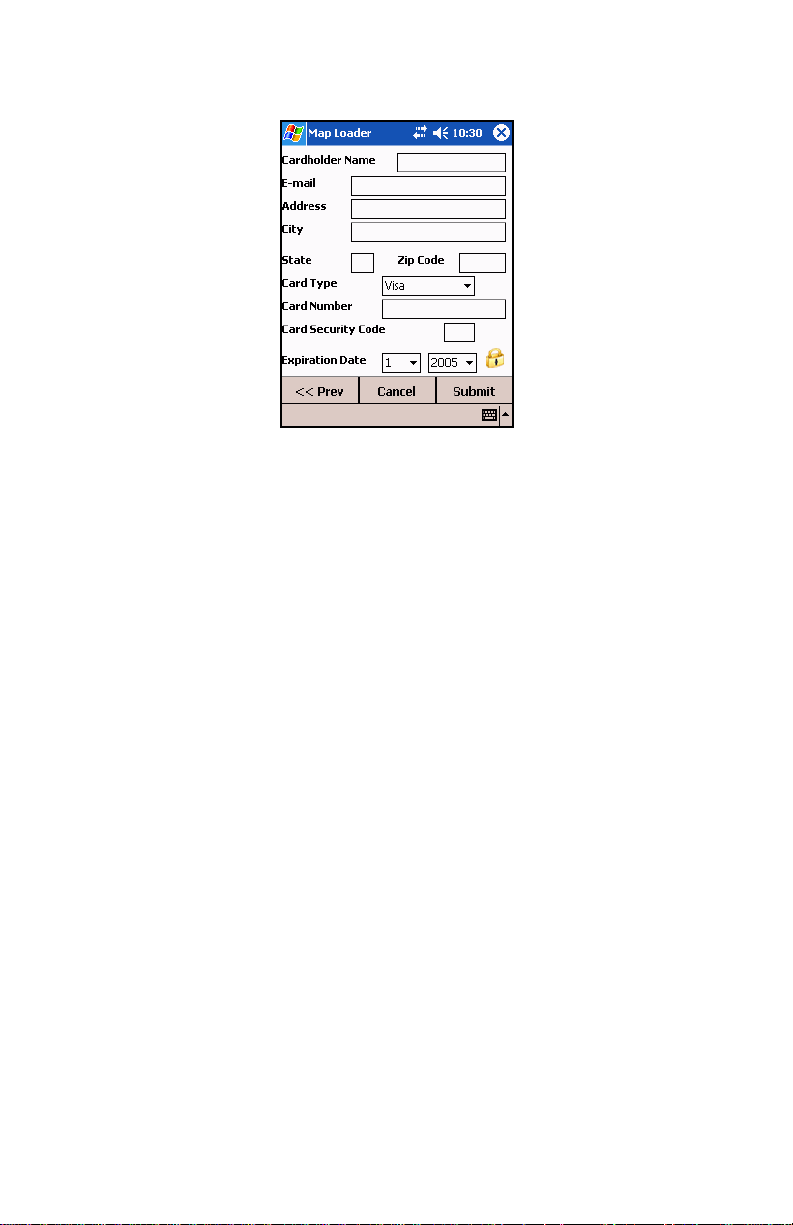
Figure 9. Secure credit card screen
Note that PayPal is not supported here but can be used for
Web purchases. See
page 11.
7. Tap Submit to complete the purchase. The data will be sent
via a secure connection and validated. If there are any erro rs
you will be given an error message so that you can correct
the data and try again. Your map activation key will be
downloaded and installed in the unit automatically once the
information has been accepted. A confirmation E-mail will be
sent which contains the map activation key for your records.
You can return to the main menu to install your new maps or you
can exit and install them any time later.
"Order Using the Web Interface" on
Order Using the Web Interface
The Web interface permits you to enter the data yourself. If you
have cookies enabled on your web browser some information can
be saved on your local machine so you won’t have to reente r it
after the first time. The steps are as follows:
11
Page 15
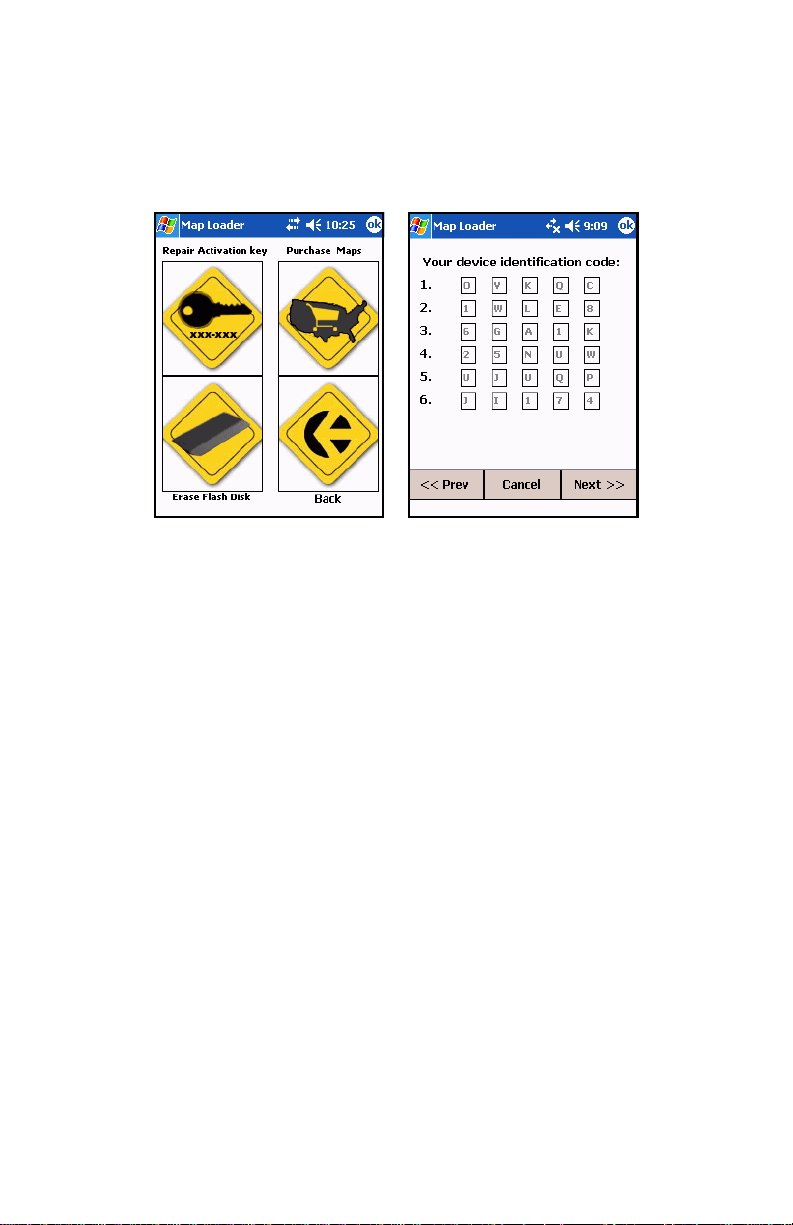
1. Tap the Map Tools selection and tap Repair Activation
key. This will bring up the device identification code. This is
shown in
Figure 10.
Figure 10. Displaying the Device Code
2. Use your web browser to view the Mobile Crossing web site
and select Purchase Map Activation Key from the Map Store
menu.
3. Enter the data from your PDA screen into the screen on the
web site. Click Submit and follow the on screen instructions
to purchase the maps you want.
The web site accepts payments from PayPal, Visa, Master
Card, American Express, and Discover.
12
Page 16
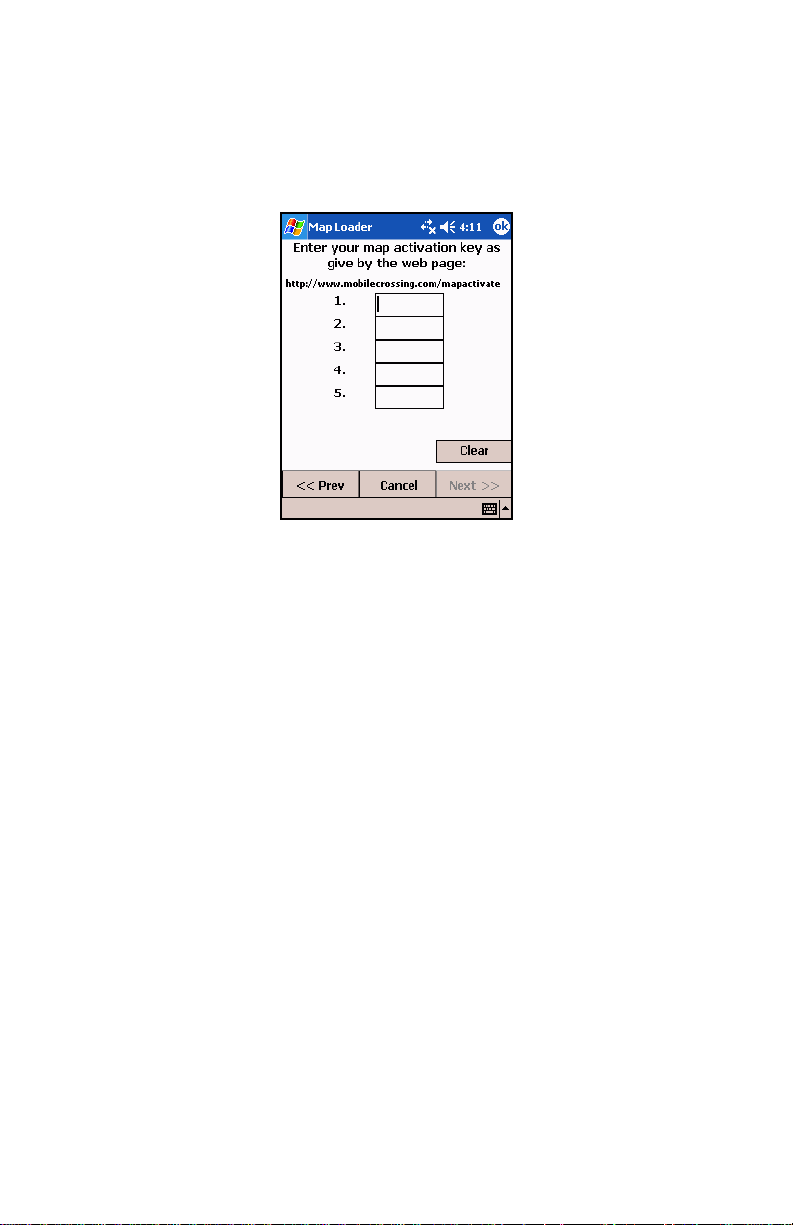
4. Once you have purchased your map activation key you will
need to enter it into the PDA. Tap Next to bring up the
activation screen. See
Figure 11. Map Activation key
5. Enter the 25 characters from the Web display to the PDA and
tap Next to check for errors. The maps you purchased are
now activated. You can proceed to
18.
Figure 11.
"Map Loading" on page
Tip: If you can get an Internet connection with your WayPoint
but chose to buy your maps on the web for some reason,
such as PayPal support, you can still use the Map Loader to
enter the activation key and avoid having to enter this data
manually. Start the Map Loader while online and use the
Repair Activation key command to automatically enter the
data.
Order Using a Phone
This is the least automated method. To use this method you need
to start the map loader and go to the main menu page. Then follow
these steps.
1. If you don’t have the Device Identification code screen
showing on your PDA tap the Map Tools selection from the
13
Page 17

main menu and tap Repair Activation key. This will bring up
the device identification code. This is shown in
Figure 10.
2. Now, with your credit card or PayPal number ready, call the
number and order your region. The operator will ask you
exactly the same information that would be required by using
the Web site method. This includes, the desired region(s),
your name, address, and credit card number (unless you a re
ordering a free region).
3. Once you have ordered your region or regions you will need
to enter the activation key into your unit. Tap Next on the
Map Loader to show the activation screen as shown in
Figure 11.
4. Enter the 25 characters and tap Next to check for erro rs. The
maps you purchased are now activated. You can proceed to
"Map Loading" on page 18.
14
Page 18
Region Coverage
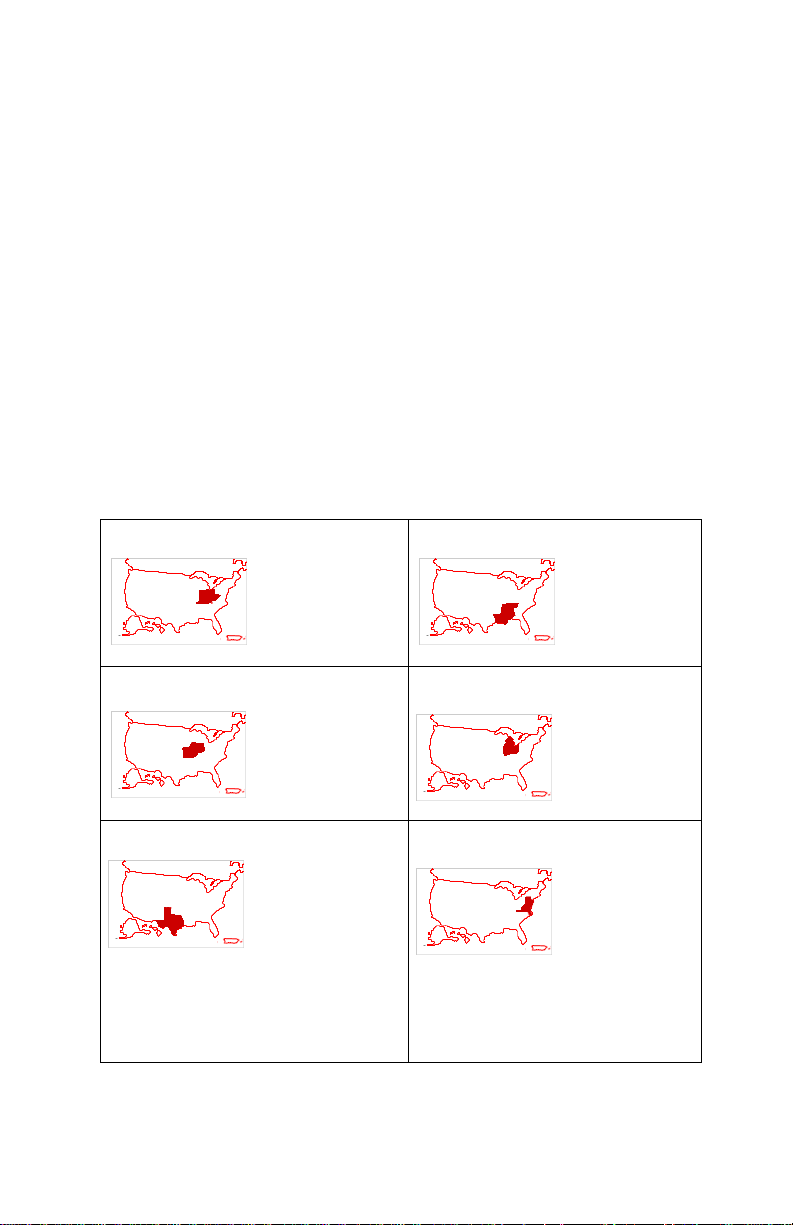
The regions shown on the next few pages are available from
Mobile Crossing. The WayPoint can ho ld one region p lus long haul
maps without the need for additional storage. The long haul map
permits long distance routing between two regions that are
otherwise not connected. It is possible to install a region on the
WayPoint and another region on an SD memory expansion card.
The long haul maps are recommended for routing between sets of
otherwise unconnected regions. Regions generally include one or
more adjacent states but may also include partial states (adjacent
counties) to improve usability.
Region Descriptions
The standard regions include:
Figure 12. Regions
Blue Grass
Indiana
Ohio
Kentucky
West Virginia
Central Midwest
Indiana
Illinois
East Missouri
Lone Star
Texas
Cajun South
Tennessee
Alabama
Louisiana
Mississippi
Great Lakes
Michigan Lower
Ohio
Indiana
Mid Atlantic
Pennsylvania Eastern
Delaware
MaryLand
Washington
DC
New Jersey Western
15
Page 19
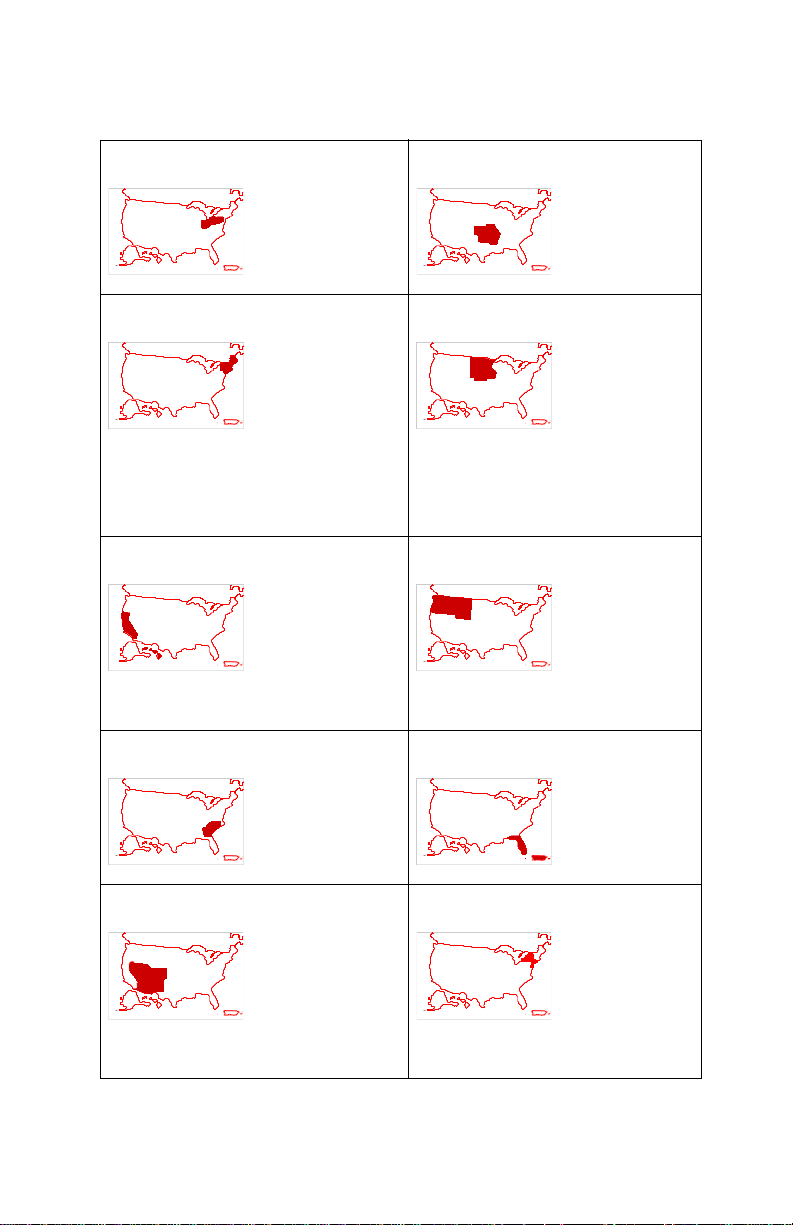
Figure 12. Regions
Mideast
Ohio
Pennsylvania
New England
Maine
New Hampshire
Vermont
Massachusetts
Rhode Island
Connecticut
New York Eastern
Pacific
California
Hawaii
Midwest
Kansas
Missouri
Oklahoma
Arkansas
North Central
North Dakota
South Dakota
Nebraska
Minnesota
Iowa
Pacific Northwest
Washington
Oregon
Idaho
Montana
Wyoming
Utah-North
South Atlantic
Southwest
North Carolina
South Carolina
Georgia
Utah
Colorado
New Mexico
Arizona
Nevada
Wyoming-S
Southeast
Georgia Southern
Florida
Puerto Rico
Tristate
New York
Connecticut
New Jersey
16
Page 20
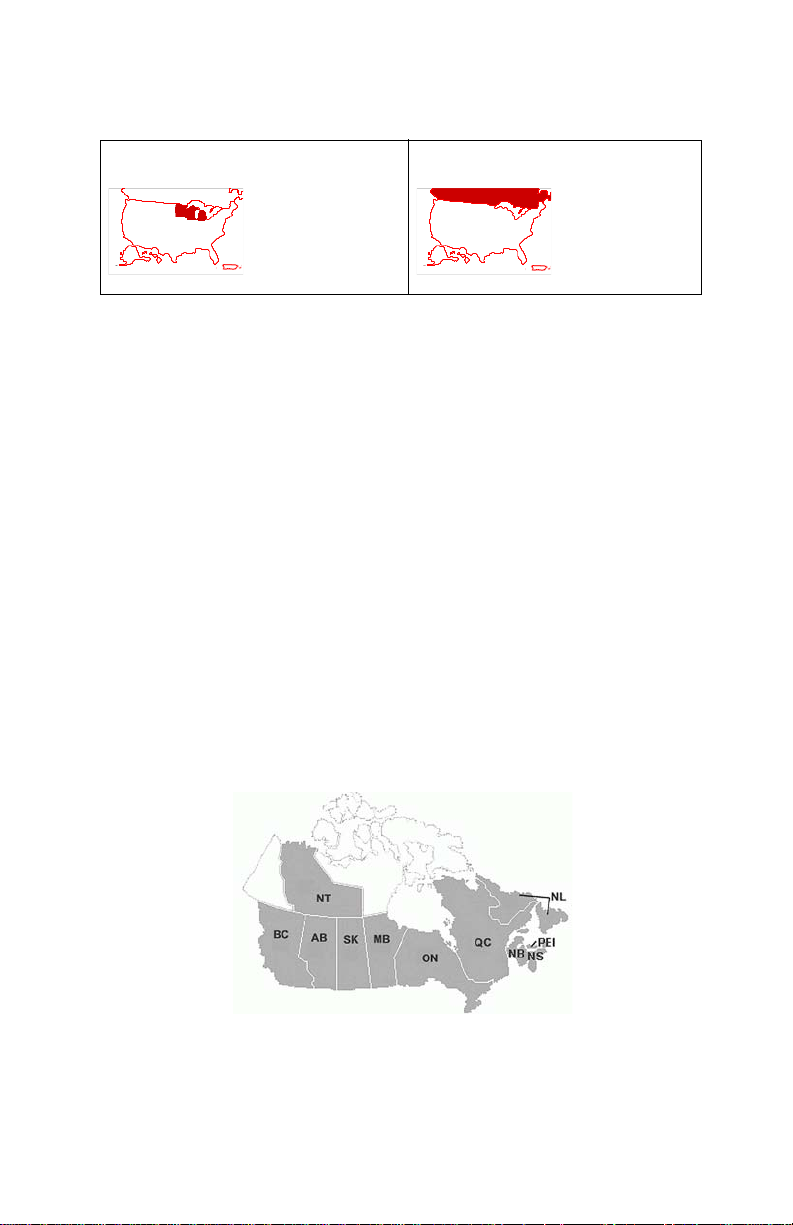
Figure 12. Regions
Upper Great Lakes
Minnesota
Michigan
Wisconsin
Canada
(see
Figure 13)
Special Regions
There is a Long Haul region that contains major road maps for the
entire United States except Alaska. Puerto Rico and Washington
DC major road maps are also included.
National maps include detailed maps of all the areas covered by
the Long Haul region.
Great Lakes region is a duplicate in that all of the states in that
region are in other regions. It is provided as a convenience for the
folks in that area. All other regions have at least one state that is
unique to that region.
There is also a region for Canada. It includes the following
provinces and territories: New Brunswick, Newfoundland, Nova
Scotia, Ontario, Prince Edward Island, Quebec, Alberta, British
Columbia, Manitoba, Northwest Territories, and Saskatchewan. It
also includes all of the Long Haul maps for Canada.
Figure 13. Canada
17
Page 21

Map Loading
You can install any map set that you have previously purchased.
The maps can be obtained from a CF card, an SD card or directly
from the Internet. Mobile Crossing has a 1 Gigabyte CF card
available with all of the US and Canada maps preloaded. You can
also build your own card if you prefer.
Using the Internet
If you have an Internet connection on your WayPoint unit you can
use this connection to download maps. Generally a broadband
connection is needed to minimize the download time. You will be
downloading more than 70 Megabytes of data in multiple files. No
single file will be larger than 4 Megabytes. Should you lose your
connection during the download this will be detected and you can
recover and continue with the download.
Using a card
If you have a CF or SD card available containing the source map
files you can use this card to install the maps you have purchased.
Mobile Crossing offers a 1 Gigabyte CF card containing all of the
maps. If you build your own card and accidently miss some of the
files the program will detect this and offer to download them from
the Internet. It is possible to mix source map files and loaded map
files on the same SD card.
Making your own Map Loader card
This section is only for advanced users who know how to work
directly with the file system on a pc. To minimize the time to build a
Map Loader card you may wish to utilize a card reader. You may
also need an unzipper depending on how your get your source
maps.
1. The first step is to obtain a card and place a directory called
WpMaps on the root of the card. All of the source maps will
go in this directory. The card can be either a CF card or an
SD card.
2. The second step is to obtain a set of source maps. These
can be regions downloaded from the web site or obtained
18
Page 22

from a CD-ROM. You may also be able to get these from a
friend. If they are zipped you will need to unzip them and
copy the contents into the directory created in step 1.
3. You will also need two files in this same directory. These are
the FileIndex.xml and the FileIndex_short.xml. These files
are in a separate zip file that should be downloaded and
unzipped into the same place. These files are also located
on the Flash Disk if you have ever downloaded any files from
the web site and may be copied to the card.
4. Once the files are located on the card you can use it for map
loading just like the one purchased from Mobile Crossing.
(The one from Mobile Crossing may contain extra fe atu r es
such as autorun.)
Note that there may be duplicate files in the various regions. They
are identical and can be overwritten if you wish when making the
copies.
Map Loading Steps
The steps to load a map are described in this section. The program
itself will sense the Map Card and use it if it is available. Otherwise
the program will attempt to retrieve the maps from the internet. If
you have a Map Loader equipped card please insert it before
beginning the process. If you will need an Internet connection, it
should be established before starting Map Loader.
1. Use the process shown in "Starting the WayPoint Map
Loader" on page 3 to start the program and use the Next
commands to move to the Main Menu.
2. From the Main Menu select the destination for the maps. Tap
Build Base Map to place the maps on your Flash Disk. Tap
Build Map Card to place the maps on your SD card. Once
you have selected the destination a screen will appear to
19
Page 23
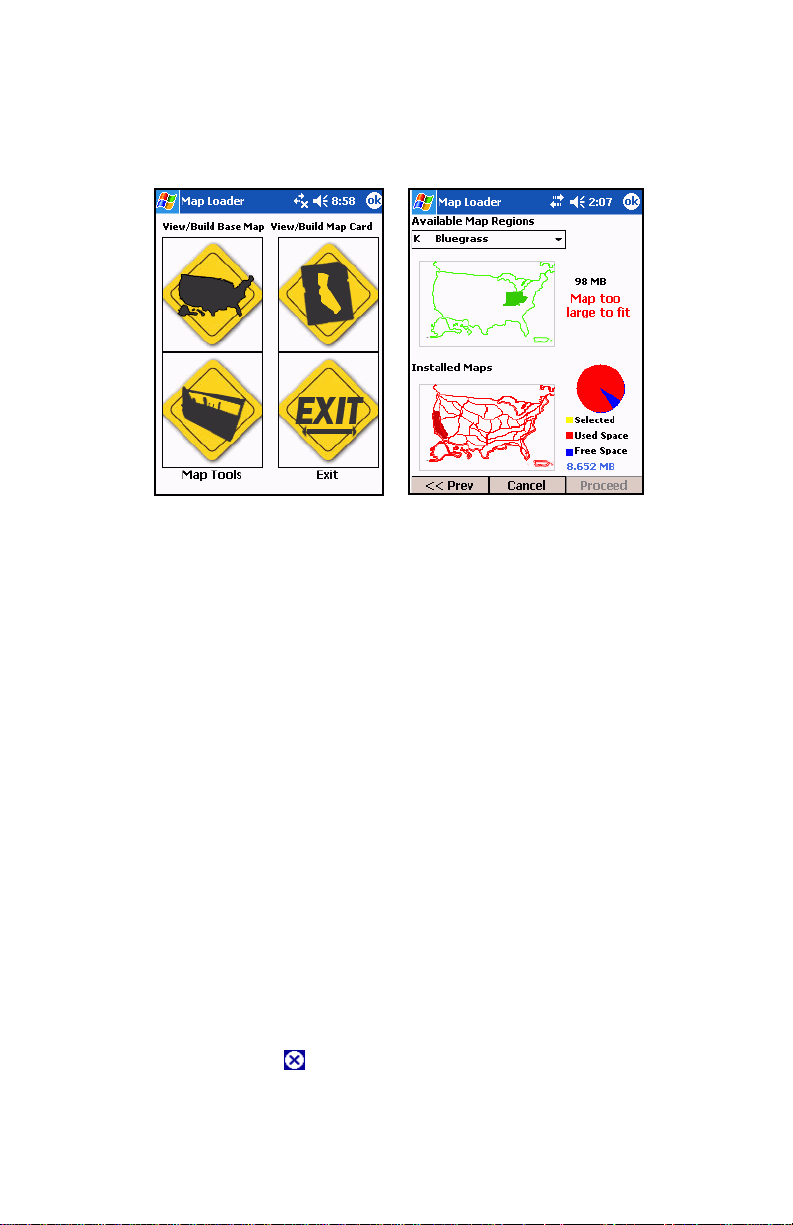
allow you to select the map region you wish to load. This is
shown in
Figure 14
.
Figure 14. Build Map screen
3. Use the pull down menu to select one of your available
regions. All of your purchased regions will be shown, even
those you may have already loaded. The loaded regions will
be shown on the bottom map. In
Figure 14 the screen is
showing that Pacific region and the Long Haul maps are
already installed while the Bluegrass region is selected.
Clearly this is too large to fit in the Flash Disk area.
4. If the region you want to install is too large then you will need
to remove the existing maps. Use the pull down menu to
choose one of the installed regions and the button name will
change to uninstall map. Tap proceed to uninstall the map.
Tip: If you tap the map regions pull-down menu twice it will
remain selected. You can use the thumb wheel or cursor
keys to scroll through the list. When you reach the installed
map the Uninstall Map button will appear.
If removing maps does not solve the problem with space you
will need to use the File Explorer program to remove files.
When you tap
to leave the File Explorer and return to this
20
Page 24
page you can tap OK to reload the screen so that the free
space will read correctly.
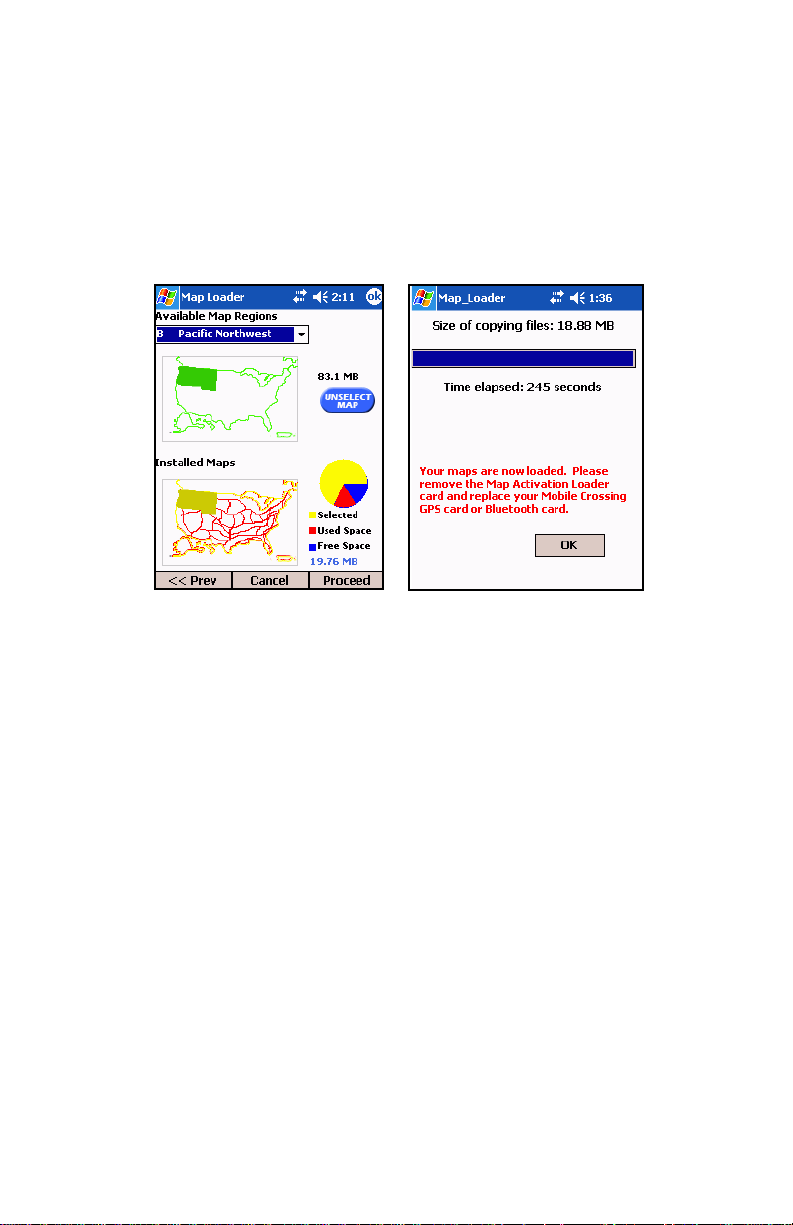
5. If the region fits you can tap Proceed to copy the maps to
your Flash Disk or SD card. An example is shown in
Figure 15
.
Figure 15. Selecting Maps to Load
6. A progress bar will appear while the region is being erased or
copied. A button will appear when the task is done. Pressing
this button will return to the Main Menu screen. The progress
bar will be slightly different if you are downloading the maps
from the Internet. There will be two bars, one for each file
download progress and one for overall progress.
7. If you get an error during the download or copy process or
cancel the operation you will get a message saying “Some
source files are missing.” If you get this error please check
the error recovery section
"Recovering Missing Maps" on
page 25 for more information.
8. After a successful load you can exit out of the program and
re-install your GPS or Bluetooth card and begin using your
new maps. Or, you can load more maps.
21
Page 25
Tip: Since removing one region to make room for another is a
common task you can do both in one step. Simply select the one
you wish to remove, select the one you wish to add and then tap
Proceed. The Map Loader will do both the erase and reload in a
single step. This trick will also work to load multiple regions in a
singe step by selecting them all if there is room to do so.
If you are removing a region that had missing files the amount of
free space shown on the pie chart may be wrong since it is based
on the known region size, not the actual files loaded size. It is
always correct when you first enter one of the Build Map screens.
Using “Choose Map” in WayPoint
While the maps are now loaded on your WayPoint unit they may or
may not be loaded in the WayPoint navigation program. If you
removed your existing maps and loaded a full set of new maps the
WayPoint application may start by showing you the Choose Map
page since you will have no maps loaded that it knows about.
Otherwise it will simply load the old maps it used the last time it ran
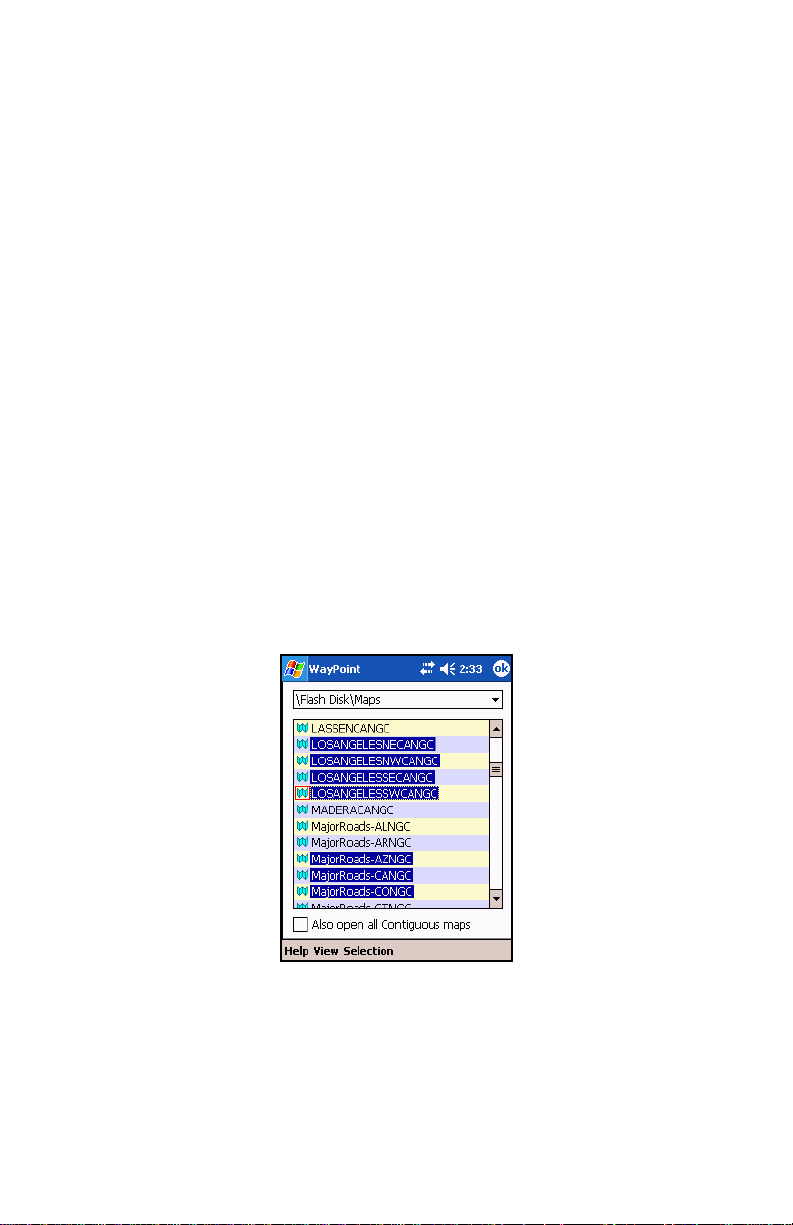
and the new ones will not be seen. To select the new maps use the
Choose Map command from the Tools menu. See
Figure 16.
Figure 16. Choose Map
It may take a little time for this screen to appear as it will need to
search for the files. The top entry is a pull down list. It can be set to
22
Page 26

use maps only from a particular directory or from all directories on
the WayPoint that contain maps. The Selection choice on the
command bar will let you unselect all maps and controls the ability
to select multiple maps. You will usually want more than one map
displayed. You can tap as many maps as you wish and then tap ok.
If you have one or two regions loaded you may just want to display
all of the maps. Use the Choose Map command and th en highlight
one or more maps. Tap the box beside “Also open all Contiguous
maps” and tap ok. This will cause WayPoint to select every map
that is adjacent to another map. This can select quite a few maps.
If major road maps are selected in this process it will try and load
every map in the entire United States that you have on your unit.
You can restrict this behavior by not using the check box or by
limiting the search to one directory u sing the pull down at the top of
the screen to select the directory you wish to use. There is a limit
as to how many maps can be opened at once because of limits in
the OS and performance issues. Generally do not load more than
two or three regions.
If you are not familiar with the county names you may wish to just
load the major highway maps and then select the areas
graphically. For more information see the Advanced Topics chapter
in the WayPoint Navigator’s Handbook.
23
Page 27

Problem Resolution
This section provides information on solving problems you may
encounter while using the Map Loader program.
Internet Connection Problems
Internet Explorer on the Pocket PC can be used to verify that an
Internet connection is present on the device. This connection can
be established via a network card, a connection to a cell phone, a
connection to a modem, or via ActiveSync.
The easiest connection to establish is with ActiveSync. The
ActiveSync connection presumes you have an Internet connection
on the PC itself and then passes this connection to the PDA. It
must be already connected before the PDA can use it. To connect
via ActiveSync follow these steps:
1. On the Pocket PC check Settings > Connections >
Connections > Advanced > Network Card.
2. In the top menu, ensure that the setting is 'Work'.
3. On the PC be sure that the WayPoint shows connected on
the ActiveSync display.
4. In ActiveSync under Tools > Options > Rules ensure the
Pass through setting is also set to 'Work'. The setting in
active sync and the PDA must agree.
Map Activation Problems
If the unit does not permit you to install a map set that you own you
have a map activation problem. To fix this problem you need to ta p
Map Tools and then Repair Activation key.
If you have an Internet connection this will automatically fix the
activation key based on the Mobile Crossing database information.
Otherwise you will see the Device ID page as shown in
You can use the data on this page via phone or the Mobile
Crossing web site to retrieve your Map Activation key. Tap Next to
enter the activation key.
Figure 17.
24
Page 28
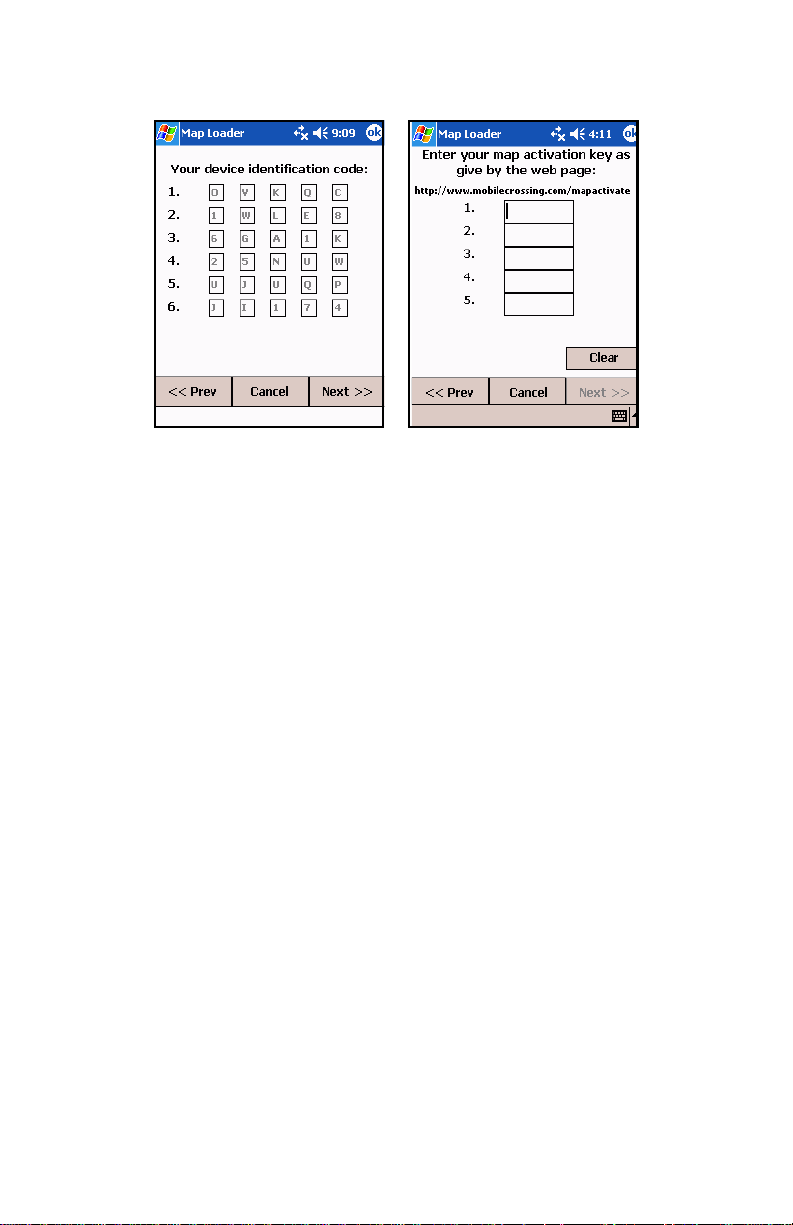
Figure 17. Repairing map activation key
Flash Disk repair
If you are attempting to load a region on your Flash Disk area and
there isn’t room you may need to erase the current maps that are
on the card. Generally this can be done simply by removing the
current region from the area but if there are still maps remaining
you can use the Map Tools > Erase Flash Disk command to
clean up the map directory on your Flash Disk. This will remove the
entire contents of your map directory.
Map Loader will not be able to remove map s if you have them ope n
in WayPoint. Be sure that you exit WayPoint.
If a region still won’t fit it means you have placed too much
additional data on the Flash Disk. You will need to use the File
Explorer to remove enough data so that your maps will fit.
Recovering Missing Maps
If the download failed to load all of the maps needed for a region
you can revisit the Build Map screen to recover the missing files.
The missing map files can only be recovered by downloading them
from the web site.
25
Page 29
If you need to recover files that are on your Map Loader prepared
card you should remove the effected region and reload it. When
you are offered the option to repair the region selec t ign or e erro rs
and then use the manual recovery method of removing the region
and then reloading it.
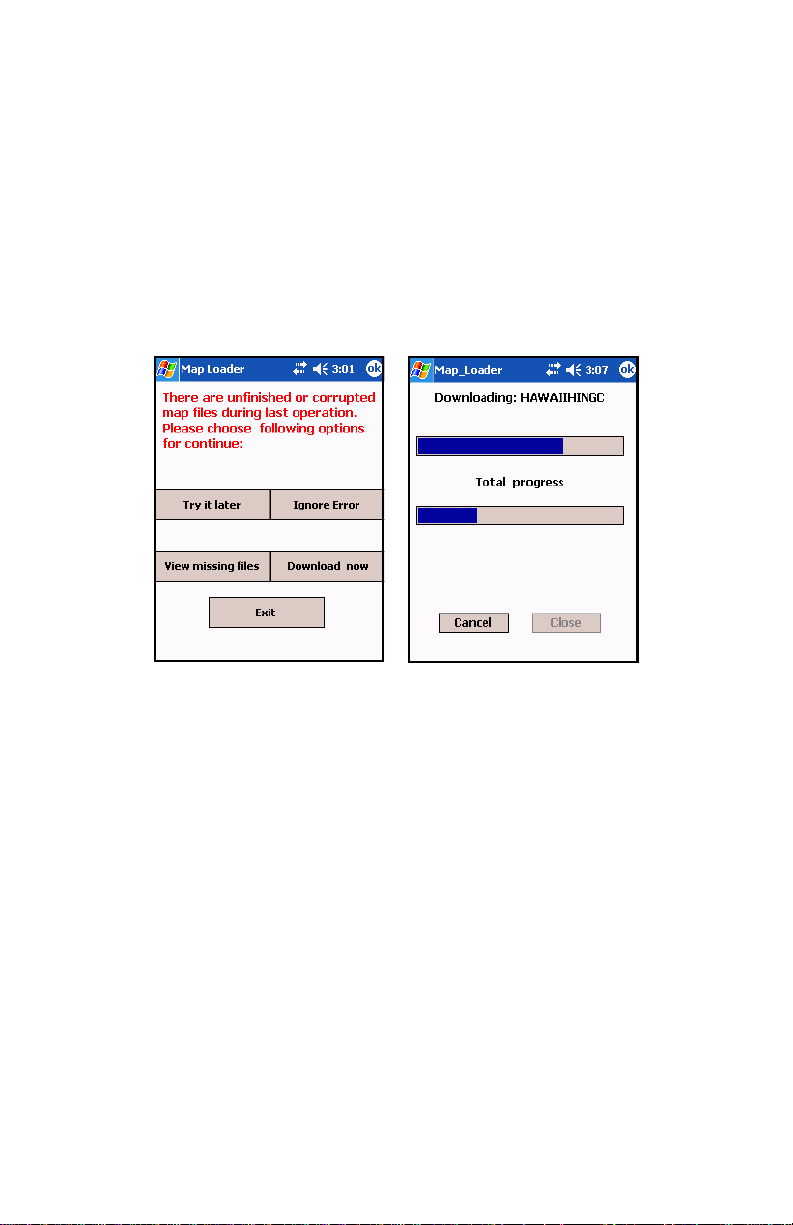
To recover the missing maps using the you will need to select the
destination for the maps from the main menu. You will see the
screen shown in
Figure 18.
Figure 18. Repairing missing files
At this point you have several choices as shown in the figure. You
can view missing files to see if they are ones you still need. If they
are and you have an Internet connection you can tap the
Download now button to retrieve them. You may also choose to
postpone your decision to just ignore the error.
If you choose to ignore the error and decide you need the files later
you will need to re-install the full region.
File List lost
If you receive a message that your file list has been lost or
corrupted you must fix t his condition before procee ding. If you have
an online connection you can download a new one from our web
26
Page 30

site by tapping the Download to repair button. Otherwise you will
need to install the files manually.
If you have a Map Loader Card containing the source map files you
can insert this card to fix this problem. Please refer to
own Map Loader card" on page 18 for information on building this
card if you don’t want to purchase a card.
"Making your
Other Errors
The screen error message will provide instructions on recovering
from the error.
If you use Settings > System > Memory > Running Programs to
stop the Map Loader you may find more than one entry in the list.
Be sure and stop all copies. Do not attempt to activate Map Loader
from this menu.
Do not run other programs while Map Loader is running. If you
have to be sure and quit out of them to return to Map Loader.
Switching directly to Map Loader may causes sequencing errors
between screens.
Be sure that WayPoint is not running when working with maps. If
WayPoint has the maps open you will not be able to erase them.
27
Page 31

Index
A
American Express 10, 12
authentication 5, 6
B
Blue Grass 15
Build Base Map 6, 19
Build Map Card 6, 19
C
Cajun South 15
Canada 17
Central Midwest 15
Choose Map 22
credit card 10
cursor keys 9, 20
D
device identification code 12
Discover 10, 12
Download now 26
Download to repair 27
E
Exit 7
F
File List lost 26
Flash Disk 1
Flash Disk repair 25
G
Great Lakes 15, 17
I
ignore error 26
Internet Connection Prob-
lems 24
L
Lone Star 15
Long Haul 17
long haul maps 1
M
main menu 6
Making a Map Loader card
18
Map Activation key 2, 8
Map Activation Problems 24
map limit 23
Map Loader 1, 3, 8
Map Loading 18
Map Loading Steps 19
Map Tools 7, 9
Master Card 10, 12
Mid Atlantic 15
Mideast 16
Midwest 16
N
National Maps 17
New England 16
North Central 16
O
Order Using a Phone 13
Order Using the Map Loader
8
28
Page 32

Order Using the Web Inter-
face 11
Other Errors 27
P
Pacific 16
Pacific Northwest 16
PayPal 12
Problem Resolution 24
Purchase Map Activation
Key 12
Purchase Maps 9
Purchase Using the Map
Loader 8
R
Recovering Missing Maps
21, 25
Region Coverage 1
Repair Activation key 12, 24
S
secure data entry 10
South Atlantic 16
Southeast 16
Southwest 16
Special Regions 17
Upper Great Lakes 17
V
view missing files 26
Visa 10, 12
T
Tip 9, 13, 20, 22
Tristate 16
Try it later 26
U
Uninstall Map 20
29
 Loading...