

Page 1
Introduction
Getting Started
Basic Operation
Getting Started
w/ Navigation
WayPoint
Operation
WayPoint
Navigation
Step by Step
Bluetooth
Operation
Advanced
Topics
Troubleshooting
WAYPOINT 100/200 SERIES
NAVIGATOR’S HANDBOOK
Page 2

ii
Page 3

WayPoint 100/200 series
Navigator’s Handbook
You can find additional product and support information at the following website:
http://www.mobilecrossing.com or contact:
Mobile Crossing
1230 Oakmead Parkway, Suite 304
Sunnyvale, CA 94085
(408) 738-8816
(800) 605-8198
Fax (408)738-8806
email: [email protected]
i
Page 4

Copyright
© 2004,2005 Mobile Crossing - All rights reserved.
Disclaimer: Mobile Crossing shall not be liable for any technical or editorial errors or
omissions contained herein; or for incidental or consequential damages resulting from
furnishing this material, or the performance or use of this product.
reserves the right to change product specifications without notice. Information in this
document may change without notice. No part of this document may be copied,
reproduced, or transmitted by any means, for any purpose without prior written
permission from
Mobile Crossing.
Mobile Crossing
Second Edition: April 2005
Trademarks
Pocket PC, Outlook, ActiveSync, are trademarks of Microsoft Corporation.
Windows 98, Windows 2000, Windows XP are trademarks of Microsoft Corporation.
XScale is a trademark of Intel Corporation.
MediaQ is a trademark of Nvidia, Inc.
iPAQ is a trademark of Hewlett Packard.
CompactFlash is a trademark on SanDisk Corporation.
SD and Secure Digital are trademarks.
MMC is a trademark of Infineon Technologies.
Bluetooth is a trademark of Bluetooth SIG, Inc.
Graffiti is a trademark name used by PalmSource, Inc.
FIC is a trademark of First International Computer, Inc.
Velcro is a trademark of Velcro Industries B. V.
All other trademarks are the property of their respective owners. Company / product
names may be trademarks or registered trademarks of their respective holders and are
used here for identification purposes only.
Partnerships
Mobile Crossing has an engineering and manufacturing partnership with “First International Computer” (FIC).
ii
Page 5

Table of Contents
Copyright . . . . . . . . . . . . . . . . . . . . . . . . . . . . . . . . . . . . . . . . . . .ii
Trademarks . . . . . . . . . . . . . . . . . . . . . . . . . . . . . . . . . . . . . . . . . .ii
Partnerships . . . . . . . . . . . . . . . . . . . . . . . . . . . . . . . . . . . . . . . . .ii
Introduction 1
Welcome . . . . . . . . . . . . . . . . . . . . . . . . . . . . . . . . . . . . . . . . . . . . . .1
Caring For Your WayPoint PDA . . . . . . . . . . . . . . . . . . . . . . . . . . .2
Routine Care . . . . . . . . . . . . . . . . . . . . . . . . . . . . . . . . . . . . . . . . .2
AC Adapter Care . . . . . . . . . . . . . . . . . . . . . . . . . . . . . . . . . . . . .3
Display Care . . . . . . . . . . . . . . . . . . . . . . . . . . . . . . . . . . . . . . . . .3
Care While Traveling . . . . . . . . . . . . . . . . . . . . . . . . . . . . . . . . . .4
Shipping the unit . . . . . . . . . . . . . . . . . . . . . . . . . . . . . . . . . . . . .4
Using this Manual . . . . . . . . . . . . . . . . . . . . . . . . . . . . . . . . . . . . . . .4
Getting Started 7
Unpacking the Boxes . . . . . . . . . . . . . . . . . . . . . . . . . . . . . . . . . . . .7
Cable Identification . . . . . . . . . . . . . . . . . . . . . . . . . . . . . . . . . . .9
Product Registration . . . . . . . . . . . . . . . . . . . . . . . . . . . . . . . . . . . . .9
WayPoint PDA Overview . . . . . . . . . . . . . . . . . . . . . . . . . . . . . . . . 9
The First Time You Use Your WayPoint PDA . . . . . . . . . . . . .14
Power . . . . . . . . . . . . . . . . . . . . . . . . . . . . . . . . . . . . . . . . . . . . . . .16
Using Battery Power . . . . . . . . . . . . . . . . . . . . . . . . . . . . . . . . .16
Using AC Power . . . . . . . . . . . . . . . . . . . . . . . . . . . . . . . . . . . . .17
Using Vehicle DC Power . . . . . . . . . . . . . . . . . . . . . . . . . . . . . .20
USB Charging . . . . . . . . . . . . . . . . . . . . . . . . . . . . . . . . . . . . . .21
Maintaining the Batteries . . . . . . . . . . . . . . . . . . . . . . . . . . . . . .22
Turning Your WayPoint PDA On and Off . . . . . . . . . . . . . . . . . . .23
Turning Your WayPoint PDA On . . . . . . . . . . . . . . . . . . . . . . .23
Turning Your WayPoint PDA Off . . . . . . . . . . . . . . . . . . . . . . .24
Turning on your Bluetooth GPS . . . . . . . . . . . . . . . . . . . . . . . . .24
Vehicle Installation . . . . . . . . . . . . . . . . . . . . . . . . . . . . . . . . . . . . .24
Installing the Bluetooth GPS . . . . . . . . . . . . . . . . . . . . . . . . . . .26
Tips . . . . . . . . . . . . . . . . . . . . . . . . . . . . . . . . . . . . . . . . . . . . . . .26
iii
Page 6

Basic Operation of the WayPoint PDA 29
Using the Stylus . . . . . . . . . . . . . . . . . . . . . . . . . . . . . . . . . . . . . . .29
The Screen Elements . . . . . . . . . . . . . . . . . . . . . . . . . . . . . . . . . . . .30
The Title Bar . . . . . . . . . . . . . . . . . . . . . . . . . . . . . . . . . . . . . . .30
Using the Menus . . . . . . . . . . . . . . . . . . . . . . . . . . . . . . . . . . . . .31
The Command Bar . . . . . . . . . . . . . . . . . . . . . . . . . . . . . . . . . . .31
Entering Text . . . . . . . . . . . . . . . . . . . . . . . . . . . . . . . . . . . . . . .31
Using the Input Panel to Enter Typed Text . . . . . . . . . . . . . . . .31
Other Methods to Work with the Screen . . . . . . . . . . . . . . . . . . . .32
Using the Cursor Button . . . . . . . . . . . . . . . . . . . . . . . . . . . . . . .32
Using the Thumb wheel . . . . . . . . . . . . . . . . . . . . . . . . . . . . . . .33
Using the Programmable Application Buttons . . . . . . . . . . . . . .33
Entering a contact . . . . . . . . . . . . . . . . . . . . . . . . . . . . . . . . . . . . . .33
Advanced features . . . . . . . . . . . . . . . . . . . . . . . . . . . . . . . . . . .34
Setting the Clock . . . . . . . . . . . . . . . . . . . . . . . . . . . . . . . . . . . . . . .34
Alarms . . . . . . . . . . . . . . . . . . . . . . . . . . . . . . . . . . . . . . . . . . . .35
Owner Information . . . . . . . . . . . . . . . . . . . . . . . . . . . . . . . . . . . . .36
Backup . . . . . . . . . . . . . . . . . . . . . . . . . . . . . . . . . . . . . . . . . . . . . .37
Restore . . . . . . . . . . . . . . . . . . . . . . . . . . . . . . . . . . . . . . . . . . . .38
Choices . . . . . . . . . . . . . . . . . . . . . . . . . . . . . . . . . . . . . . . . . . . .39
Advanced Features . . . . . . . . . . . . . . . . . . . . . . . . . . . . . . . . . . .39
About Backups . . . . . . . . . . . . . . . . . . . . . . . . . . . . . . . . . . . . . .41
Using Help . . . . . . . . . . . . . . . . . . . . . . . . . . . . . . . . . . . . . . . . . . .41
ActiveSync . . . . . . . . . . . . . . . . . . . . . . . . . . . . . . . . . . . . . . . . . . .41
Getting Started with Navigation 43
Road Safety . . . . . . . . . . . . . . . . . . . . . . . . . . . . . . . . . . . . . . . . . . .44
Starting WayPoint . . . . . . . . . . . . . . . . . . . . . . . . . . . . . . . . . . . . . .44
Subscreen Button use . . . . . . . . . . . . . . . . . . . . . . . . . . . . . . . . .45
Starting the GPS . . . . . . . . . . . . . . . . . . . . . . . . . . . . . . . . . . . . . . .45
The GPS Data Screen . . . . . . . . . . . . . . . . . . . . . . . . . . . . . . . . .46
Satellite Status . . . . . . . . . . . . . . . . . . . . . . . . . . . . . . . . . . . . . .47
GPS Settings . . . . . . . . . . . . . . . . . . . . . . . . . . . . . . . . . . . . . . . .48
Using the Cursor Keys . . . . . . . . . . . . . . . . . . . . . . . . . . . . . . . .49
Starting the GPS for the first time . . . . . . . . . . . . . . . . . . . . . . .49
Saving your home location . . . . . . . . . . . . . . . . . . . . . . . . . . . . . . .51
iv
Page 7

Add Locations to Favorites . . . . . . . . . . . . . . . . . . . . . . . . . . . .52
Where to from here . . . . . . . . . . . . . . . . . . . . . . . . . . . . . . . . . . . . .53
WayPoint Operation 54
The Map Screen . . . . . . . . . . . . . . . . . . . . . . . . . . . . . . . . . . . . . . .54
WayPoint Command Bar . . . . . . . . . . . . . . . . . . . . . . . . . . . . . .55
The Navigation Pane . . . . . . . . . . . . . . . . . . . . . . . . . . . . . . . . .55
The Tools Menu . . . . . . . . . . . . . . . . . . . . . . . . . . . . . . . . . . . . .56
Display and Control Options . . . . . . . . . . . . . . . . . . . . . . . . . . .57
Using Hardware Buttons . . . . . . . . . . . . . . . . . . . . . . . . . . . . . .57
Customizations . . . . . . . . . . . . . . . . . . . . . . . . . . . . . . . . . . . . . . . .58
Map Features . . . . . . . . . . . . . . . . . . . . . . . . . . . . . . . . . . . . . . .58
Program Options . . . . . . . . . . . . . . . . . . . . . . . . . . . . . . . . . . . .58
Color Customizations . . . . . . . . . . . . . . . . . . . . . . . . . . . . . . . . .59
Landmarks . . . . . . . . . . . . . . . . . . . . . . . . . . . . . . . . . . . . . . . . . . .60
WayPoint Navigation 61
Road Navigation . . . . . . . . . . . . . . . . . . . . . . . . . . . . . . . . . . . . . . .61
Navigation Pane . . . . . . . . . . . . . . . . . . . . . . . . . . . . . . . . . . . . .62
ETA . . . . . . . . . . . . . . . . . . . . . . . . . . . . . . . . . . . . . . . . . . . . . .62
Building a route . . . . . . . . . . . . . . . . . . . . . . . . . . . . . . . . . . . . . . . .63
Direct Navigation . . . . . . . . . . . . . . . . . . . . . . . . . . . . . . . . . . . .63
The Quick Approach . . . . . . . . . . . . . . . . . . . . . . . . . . . . . . . . .65
The Find Approach . . . . . . . . . . . . . . . . . . . . . . . . . . . . . . . . . . .67
The Route . . . . . . . . . . . . . . . . . . . . . . . . . . . . . . . . . . . . . . . . . .68
The Directions Screen . . . . . . . . . . . . . . . . . . . . . . . . . . . . . . . . . . .69
Navigating the Route . . . . . . . . . . . . . . . . . . . . . . . . . . . . . . . . . . .70
Detours . . . . . . . . . . . . . . . . . . . . . . . . . . . . . . . . . . . . . . . . . . .70
Other Navigation features . . . . . . . . . . . . . . . . . . . . . . . . . . . . .71
Customizations . . . . . . . . . . . . . . . . . . . . . . . . . . . . . . . . . . . . . .71
Step-by-Step 73
Quick Routes . . . . . . . . . . . . . . . . . . . . . . . . . . . . . . . . . . . . . . . . . .73
Route to a Favorite Location . . . . . . . . . . . . . . . . . . . . . . . . . . .73
v
Page 8

Quick Route . . . . . . . . . . . . . . . . . . . . . . . . . . . . . . . . . . . . . . . . . . . . . . 74
Other Routes . . . . . . . . . . . . . . . . . . . . . . . . . . . . . . . . . . . . . . . . . .75
Route to an Address . . . . . . . . . . . . . . . . . . . . . . . . . . . . . . . . . .76
Route to a Landmark . . . . . . . . . . . . . . . . . . . . . . . . . . . . . . . . .77
Route to a Contact . . . . . . . . . . . . . . . . . . . . . . . . . . . . . . . . . . .79
Finding Locations . . . . . . . . . . . . . . . . . . . . . . . . . . . . . . . . . . . . . .80
Finding a Location Graphically . . . . . . . . . . . . . . . . . . . . . . . . .80
Using the SignPost . . . . . . . . . . . . . . . . . . . . . . . . . . . . . . . . . . .81
Bluetooth Operation 83
Bluetooth Hardware . . . . . . . . . . . . . . . . . . . . . . . . . . . . . . . . . . . .83
Automatic Operation . . . . . . . . . . . . . . . . . . . . . . . . . . . . . . . . . . . .84
Bluetooth Manager . . . . . . . . . . . . . . . . . . . . . . . . . . . . . . . . . . . . .84
Enabling the Bluetooth Driver . . . . . . . . . . . . . . . . . . . . . . . . . . . .86
Other Uses . . . . . . . . . . . . . . . . . . . . . . . . . . . . . . . . . . . . . . . . . . . .86
Screen Descriptions . . . . . . . . . . . . . . . . . . . . . . . . . . . . . . . . . . . . .88
Bluetooth GPS Receiver . . . . . . . . . . . . . . . . . . . . . . . . . . . . . . . . .90
Advanced Topics 92
GPS hardware topics . . . . . . . . . . . . . . . . . . . . . . . . . . . . . . . . . . . .93
How a GPS works . . . . . . . . . . . . . . . . . . . . . . . . . . . . . . . . . . .93
External Antennas . . . . . . . . . . . . . . . . . . . . . . . . . . . . . . . . . . .94
PDA Hardware Topics . . . . . . . . . . . . . . . . . . . . . . . . . . . . . . . . . .95
Resetting Your WayPoint PDA . . . . . . . . . . . . . . . . . . . . . . . . .95
Restoring the Factory Defaults . . . . . . . . . . . . . . . . . . . . . . . . . .95
Adding Hardware to your WayPoint PDA . . . . . . . . . . . . . . . . .96
Advanced WayPoint Software features . . . . . . . . . . . . . . . . . . . . .97
Geocaching . . . . . . . . . . . . . . . . . . . . . . . . . . . . . . . . . . . . . . . . .97
Choosing Maps to Display . . . . . . . . . . . . . . . . . . . . . . . . . . . . .97
Using the Log file . . . . . . . . . . . . . . . . . . . . . . . . . . . . . . . . . . . .98
Extra Software . . . . . . . . . . . . . . . . . . . . . . . . . . . . . . . . . . . . . . . . .99
Installing Programs . . . . . . . . . . . . . . . . . . . . . . . . . . . . . . . . . .99
Wisbar . . . . . . . . . . . . . . . . . . . . . . . . . . . . . . . . . . . . . . . . . . .101
GPSInfo . . . . . . . . . . . . . . . . . . . . . . . . . . . . . . . . . . . . . . . . . .102
TrafficWatch and Weather Underground . . . . . . . . . . . . . . . . .104
vi
Page 9

More Information . . . . . . . . . . . . . . . . . . . . . . . . . . . . . . . . . . . . .105
Troubleshooting 106
PDA Problems . . . . . . . . . . . . . . . . . . . . . . . . . . . . . . . . . . . . . . . .106
PC Connection Problems . . . . . . . . . . . . . . . . . . . . . . . . . . . . . . .108
Bluetooth Problems . . . . . . . . . . . . . . . . . . . . . . . . . . . . . . . . . . . .108
Vehicle Mount and power . . . . . . . . . . . . . . . . . . . . . . . . . . . . . . .109
WayPoint navigation . . . . . . . . . . . . . . . . . . . . . . . . . . . . . . . . . . .109
Tips and Techniques . . . . . . . . . . . . . . . . . . . . . . . . . . . . . . . . . . .110
Appendix A - Technical Specifications 112
WayPoint PDA Specifications . . . . . . . . . . . . . . . . . . . . . . . . . . .112
Operating Conditions . . . . . . . . . . . . . . . . . . . . . . . . . . . . . . . . . .113
Com port usage . . . . . . . . . . . . . . . . . . . . . . . . . . . . . . . . . . . . . . .114
GPS Technical Specifications . . . . . . . . . . . . . . . . . . . . . . . . . . . .114
Vehicle mount . . . . . . . . . . . . . . . . . . . . . . . . . . . . . . . . . . . . . . . .115
Appendix B - Regulatory Notices 116
FCC Notice . . . . . . . . . . . . . . . . . . . . . . . . . . . . . . . . . . . . . . . . . .116
Modifications . . . . . . . . . . . . . . . . . . . . . . . . . . . . . . . . . . . . . .116
Cables . . . . . . . . . . . . . . . . . . . . . . . . . . . . . . . . . . . . . . . . . . . .116
European Union Notice . . . . . . . . . . . . . . . . . . . . . . . . . . . . . . . . .117
Safety Instructions . . . . . . . . . . . . . . . . . . . . . . . . . . . . . . . . . . . . .117
Power Cord Requirements . . . . . . . . . . . . . . . . . . . . . . . . . . . .117
Interference . . . . . . . . . . . . . . . . . . . . . . . . . . . . . . . . . . . . . . . .118
Battery Safety . . . . . . . . . . . . . . . . . . . . . . . . . . . . . . . . . . . . . .118
Appendix C - Command Line Interface 119
Introduction . . . . . . . . . . . . . . . . . . . . . . . . . . . . . . . . . . . . . . . . . . . . . . . . . 119
Command Line For Navigation software . . . . . . . . . . . . . . . . . . .119
Command line syntax . . . . . . . . . . . . . . . . . . . . . . . . . . . . . . . .119
Command line parameters . . . . . . . . . . . . . . . . . . . . . . . . . . . .120
Calling WayPoint from Another Application . . . . . . . . . . . . .121
vii
Page 10

Function Usage . . . . . . . . . . . . . . . . . . . . . . . . . . . . . . . . . . . . .121
GPS/Routing Updates Saved in Registry . . . . . . . . . . . . . . . . .125
Bluetooth Command Line interface . . . . . . . . . . . . . . . . . . . . . . .125
Registry entry . . . . . . . . . . . . . . . . . . . . . . . . . . . . . . . . . . . . . .126
Scripting programs . . . . . . . . . . . . . . . . . . . . . . . . . . . . . . . . . . . .126
The DOS Command Line . . . . . . . . . . . . . . . . . . . . . . . . . . . . .126
Other Scripting Tools . . . . . . . . . . . . . . . . . . . . . . . . . . . . . . . .127
ShortCuts . . . . . . . . . . . . . . . . . . . . . . . . . . . . . . . . . . . . . . . . . . . .127
QuickLaunch . . . . . . . . . . . . . . . . . . . . . . . . . . . . . . . . . . . . . . . . .128
Appendix D - Firmware and Map Updates 130
Firmware Upgrades . . . . . . . . . . . . . . . . . . . . . . . . . . . . . . . . . . . .130
Backup . . . . . . . . . . . . . . . . . . . . . . . . . . . . . . . . . . . . . . . . . . .130
Performing the Upgrade . . . . . . . . . . . . . . . . . . . . . . . . . . . . . .131
Map Updates and Installs . . . . . . . . . . . . . . . . . . . . . . . . . . . . . . .132
Glossary 133
Index 137
WayPoint Quick Reference 143
Shortcuts . . . . . . . . . . . . . . . . . . . . . . . . . . . . . . . . . . . . . . . . . . . .143
Handy Commands . . . . . . . . . . . . . . . . . . . . . . . . . . . . . . . . . . . . .143
Things to Try . . . . . . . . . . . . . . . . . . . . . . . . . . . . . . . . . . . . . . . . .143
viii
Page 11

Introduction
Welcome
Chapter
1
Introduction
Congratulations on purchasing your new WayPoint PDA (Personal
Digital Assistant
Portable Navigation tool and full-featured personal digital assistant,
enabling you to automatically route to places of interest, addresses or
locations in your contact list. In addition, you can use PIM (Personal
Information Manager) functions to keep track of information wherever
you go. Powered by Microsoft
WayPoint PDA offers a host of functions designed to make your life
easier.
The WayPoint navigation PDA is a full-featured GPS auto-routing
mapping solution that offers door-to-door routing with turn-by-turn
instructions. (To read about how your GPS works check
Topics” on page 92.) The WayPoint PDA uses GPS position
information and maps to help the user decide on the best route to tr avel.
The WayPoint navigation software in cludes the full maps for one region.
For example, the California edition contains maps covering all of
California. Unlike most other products the maps of your region are
preloaded. Extra regions may be purchased to supplement or replace the
built in maps.
The WayPoint PDA is available in two models which can be distinguished by color. The model
100 is Space Silver and the model 200 is Midnight Blue. They differ primarily in the GPS
hardware capability as described below. The model 200 also includes a subscription to
TrafficWatch and Weather Underground for one year. (TrafficWatch and Weather Underground
are described in separate manuals.)
). You now have the convenience and flexibility of a
®
Pocket PC 2003 Premium Edition, your
“Advanced
L
A PDA is a small
computer that fits in
the palm of your
hand.
L
PIM functions are
programs that keep
track of things such
as an address book or
your calendar.
L
A GPS is a radio receiver that can compute your position
anywhere on the
planet.
1
Page 12

• The model 100 has an included CompactFlash
GPS receiver. It can be inserted in the CF slot of the WayPoint
100 whenever GPS navigation is needed. To save battery
power, the GPS can be removed or turned off when it is not
needed.
• The WayPoint 200 model uses Bluetooth
conjunction with a Bluetooth GPS. The Blueto oth CF card
onboard will communicate with the included Bluetooth GPS
receiver which is in a separate package. The Bluetooth CF
module can also be used for other communication tasks such as
connecting to the Internet via a cell phone . The Bluetoot h
module should be shut off when not needed to save battery
power.
The WayPoint PDA can be installed in a car using the provided portable vehicle mount. The user
should choose a convenient spot on the windshield, left or right of the steering wheel to attach
the suction cup. Be sure the unit is not blocking any of the view of the road.
When driving, always use the vehicle mount so that you can maximize the performance settings
without worrying about running the battery down. The po wer cable can be routed t o the unit
from the 12 Volt “cigarette lighter” power outlet and plugged into the base of the WayPoint
vehicle mount. A small adapter cable connects the vehicle mount to the PDA unit.
®
(CF
®
technology in
) based
L
CompactFlash (CF)
refers to the larger of
the two slots in the
top of your WayPoint. It can hold
memory or devices.
L
Bluetooth refers to a
wireless system that
permits information
exchange between
other nearby Bluetooth devices.
No part of the hardware should be installed in front of either fro nt airbag. Detailed installation is
given in
be left in an unattended car.
“Getting Started” on page 7 or the Quick Start Guide. For security, the PDA should not
Caring For Your WayP oint PD A
Routine Care
To keep your WayPoint working properly, please follow these guidelines.
• Do not attempt to disassemble or modify the product.
• Never place anything on top of the product.
• Avoid using or storing the product in places where static electricity or electrical noise is
likely to
• Avoid using or storing the product in direct sunlight, or in places that are subject to
extreme temperatures or sudden changes in temperature. Do not leave the unit in the
vehicle mount where it might be exposed to the direct sunligh t in a closed up car. The
temperature under these conditions can exceed the ratings on the WayPoint products.
be present.
2
Page 13

• Keep the product away from liquids. Do not expose it to condensation, precipitation or
excessive moisture.
• To clean the product, first unplug it from the wall socket. Wipe the screen and the
exterior with a soft, damp cloth
other cleaning products.
. Only use water to moisten the clot h; do not use soap or
• Your WayPoint PDA features a replaceable lithium-ion battery and a backup ba ttery.
To reduce the risk of fire or burns, do not disassemble, crush, puncture, short the
external contacts, or dispose of the batteries in fire or water. Replacement of the internal
backup battery should be performed by a Mobile Crossing authorized service provider.
• The unit can be placed in the cradle charger at any time. Th e battery works best when it
is topped off.
• The vehicle mount window suction cup will attach solidly to the windshield, but it is still
not a good idea to leave the WayPoint unit in the vehicle mount un-attended for long
periods of time. This is particularly true if the vehicle undergoes wide temperature
changes.
AC Adapter Care
• Always use the AC adapter provided, or use an optional adapter supplied or approved
by
Mobile Crossing.
Introduction
• Grasp the plug, not the cord, when unplugging the adapter from a wall socket.
• If the power cord becomes damaged, replace it immediately.
• Use the power button to turn the device off. Disconnect the WayPoint PDA from
the AC adapter before unplugging it from a wall socket.
Display Care
• Clean the screen by wiping with a soft, damp cloth. Moisten the cloth with water only;
d
o not use soap or other cleaning products.
• Do not spray liquid directly onto the screen. Prevent excess liquid from leaking into the
device
at the edge of the screen.
• Never place anything on the screen.
• Avoid scratching the screen with hard objects.
3
Page 14

• Do not expose the product to direct sunlight for a prolonged period of time.
• A screen protector with anti-glare characteristics is recommended for use in a vehicle or
outdoors.
Care While Traveling
• Safeguard your data by making a backup copy.
• Turn the power off and disconnect all external devices.
• Take the included AC adapter or car charger along with you.
• Pack the product in a protective case and carry it in your hand luggage.
• Avoid exposing the product to magnetic security devices.
• To avoid interference, do not use the produc t on an airplane without permissio n. This
unit meets FCC class B requirements and is generally safe for use above 10,000 feet. The
FCc logo on the back signifies that the unit meets these requirements.
• The CE logo on the back of the unit indicates that your WayPoint also meets the
requirements of European countries and is similar to the FCC class B requirements.
Shipping the unit
When shipping, pack the product and all external devices in the original packing boxes or in
similar packaging with sufficient protective padding material. Nothing should be permitted to
rattle.
If, for some reason, you need to ship the unit to Mobile Crossing, be sure and get an MRA
(Material Return Authorization) number first and include this number on t he outside of the
packaging.
Using this Manual
Many of you do read manuals and this one is organized to be read from front to back. It also
contains an index for ready reference later. There is a glossary near the b ack for terms you might
not be familiar with. Many of these terms are also described in a sidebar.
However, it is recognized that some may only wish to skim the manual or are very familiar with
some aspects and may choose to skip over those sections at first. This can be a very useful way to
get going quickly but at some point it would be a good idea to return to those sections as they
cover some unique features in the product.
4
Page 15

If you want to skip around you will find the following descriptions helpful in determining your
choices. The tabs on the cover provide and easy way to get to the various chapters.
• Chapter 2 “Getting Started” supplements the Quick Start Guide. It provides a text
check list to complement the picture check list in the Quick Start Guide. It also provides
a tour of the buttons and hardware features of the WayPoint PDA. Finally it includes
information on charging and powering the unit as well as more installation information
to complement the Quick Start Guide.
• Chapter 3 “Basic Operations” provides information for new PDA users on how to
get started with a Pocket PC. It also provides some information on unique features of
this particular PDA. If you are familiar with Microsoft Pocket PC PDA’s you may be
able to just skim this chapter.
• Chapter 4 “Getting Started with Navigation” contains the introduction and getting
started information for the GPS navigation features of this product. This is where you
will learn to use the GPS itself. If you are familiar with GPS operation using other GPS
devices you may be able to just skim this chapter. It will be a handy reference if you have
any problems with the GPS.
• Chapter 5 “WayPoint Operation” contains the introduction to the WayPoint
navigation software itself. It explains the basic operation of this navigation tool. It can
be used as a reference for learning how the various commands in the tool work and how
the screen display is laid out.
Introduction
• Chapter 6 “WayPoint Navigation” explains the automatic routing and navigation
features of the product.
• Chapter 7 “Step by Step” is for folks that like to learn by example. It provides several
step by step examples of performing navigation tasks.
• Chapter 8 “Bluetooth Operation” is for WayPoint 200 users who will want to learn
how to set up their Bluetooth GPS unit. It also introduces some basic Bluetooth
features.
• Chapter 9 “Advanced Topics” is intended to go beyond the basic operation of the unit
and to provide some more information for the curious. It also provides information on
the optional tools that are included on the CD-ROM.
• Chapter 10 “Troubleshooting” provides help for users that are having specific
problems with their unit. This is the first place to check if something doesn’t work right.
If you are not sure how something is supposed to work you can use the index to find
information about the topic.
5
Page 16

• Appendix A “Technical Specifications” provides all of the detailed information about
the specifications in a table form.
• Appendix B “Regulatory Notices” provides information on the FCC, EC compliance
and some important Safety information on using the unit and carrying for the battery.
• Appendix C “Command Line Interface” provides information for programmers
wishing to add unique features or capabilities to their WayPoint.
• Appendix D “Firmware and Map Upgrades” provides information on how to
upgrade the firmware and maps in the unit or to add additional maps.
• Appendix G “Glossary” provides definitions of some of the terms used in the manual.
• Appendix I “Index” is where to look when you need to learn about a particular topic.
• The Back Cover provides a quick reference to some key features of the Way Point.
We recommend that you keep the manual in your glove box so it is handy. The Wa yPoint
manual is your key resource but not the only one. If you would like to search the document
electronically or want a copy on the PDA itself you will find a PDF version of this manual on the
CD-ROM that accompanies the WayPoint PDA. The PDF version is pre-tagged so that it will
read well on the small screen. There are links in all the critical places so you can just tap a link to
move around in the document. You will need to download a copy of Adobe Acrobat Reader for
the Pocket PC to use this feature on the WayPoint.
The CD-ROM also contains additional information in the form of PDF manuals on Pocket PC
operation, Bluetooth operation, and for the built in TrafficWatch & Weather Underground
software. The Mobile Crossing web site may contain updates to any or all of these manuals.
6
Page 17

Getting Started
Unpacking the Bo xes
Chapter
2
Start by preparing a suitable workspace to unpack the boxes and set up your WayPoint. Select a
place that is located close to an electrical outlet , making sure that the surface is stable, level and
clean. There are two boxes. One contains th e WayPoint PDA (Personal Digital Assistant) and is
described first. A second box contains the GPS receiver, the car mount, and DC power cord.
Open the WayPoint box carefully, ensuring that you do not damage the box or any of the other
packing materials. The box will be useful to save in case you ever have to store or ship your
WayPoint Pocket PC.
The package contains the following items:
Inside the Outer Box
WayPoint Users Manual
Additional Software instructions
Warranty Card
Product Registration Card with Warranty sheet
Quick Start Guide
Support Sheet
EULA booklet – End Users License Agreement
Getting Started
Box 1
WayPoint Pocket PC
Travel Adapter (USB & Charging)
7
Page 18

Main Battery
Stylus
USB Desktop Cradle / Charging Stand
USB Cable
AC Adapter
Companion / Documentation CD
Getting Started DVD
Plastic dust cover installed in the SD slot
Box 2 For WayPoint 100 and WayPoint 200
Powered Vehicle Mount
Vehicle Mount T-Slot Docking Plate
Windshield Suction Cup with Gooseneck
12 Volt “Cigarette Lighter” Plug cable
PDA Vehicle Charging Adapter
Audio Cord (3.5 mm to 3.5 mm)
WayPoint 100 only
CompactFlash GPS Receiver (Box 2)
Plastic dust cover installed in the CF slot in PDA (Box 1)
WayPoint 200 only
CompactFlash Bluetooth card pre-installed in PDA (Box 1)
Bluetooth GPS charging cable / Adapter (Box 2)
Bluetooth GPS Receiver (Box 2)
Split Charger cable (Box 2) Bluetooth GPS / WayPoint PDA
Please contact your dealer if any of the items are damaged or missing.
8
Page 19
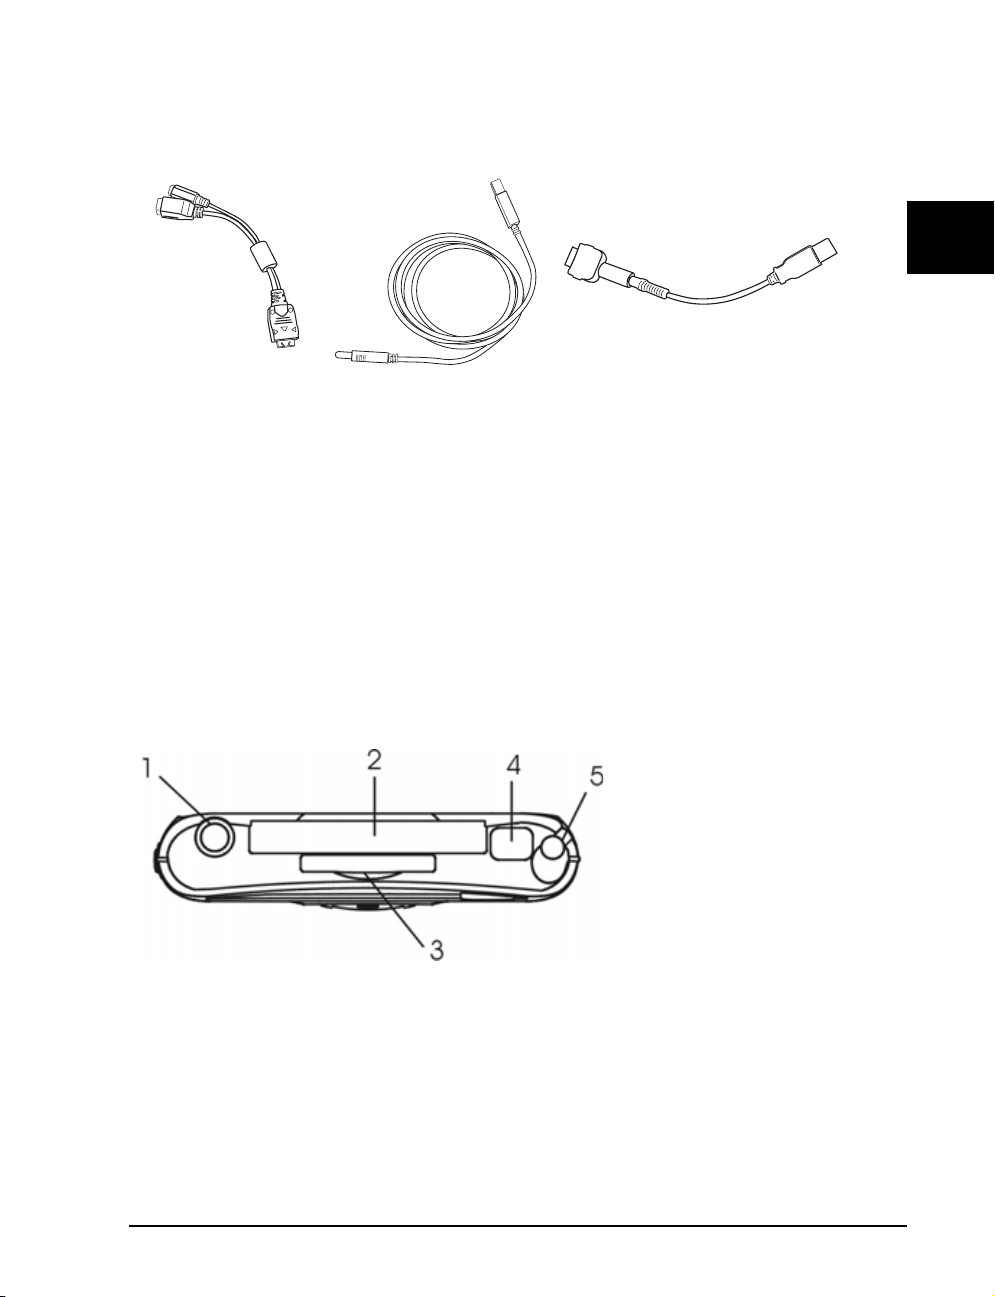
Cable Identification
The following pictures should help in identifying the correct cables.
Travel Adapter USB Cable PDA Vehicle Charging Adapter
Product Registration
You can register your product by filling in and mailing the registration card or by visiting the
Mobile Crossing web site at http://www.mobilecrossing.com/registration. Product registration
ensures warranty coverage and provides you with the opportunity to receive update notices of
any improvements that may become available for the prod uct. The actual warranty coverage is
specified on the Warranty Card that came the product.
WayPoint PD A Ov erview
Getting Started
Take a few moments to study your new WayPoint. Learn the locations of the buttons,
connectors and other hardware features.
1. Stereo Headphone Jack
2. CompactFlash Expansion
Slot
3. Secure Digital card slot
4. IR port for Infrared
communications
Top view of the WayPoint
9
5. Stylus – spring loaded. Press
Down to remove.
Page 20
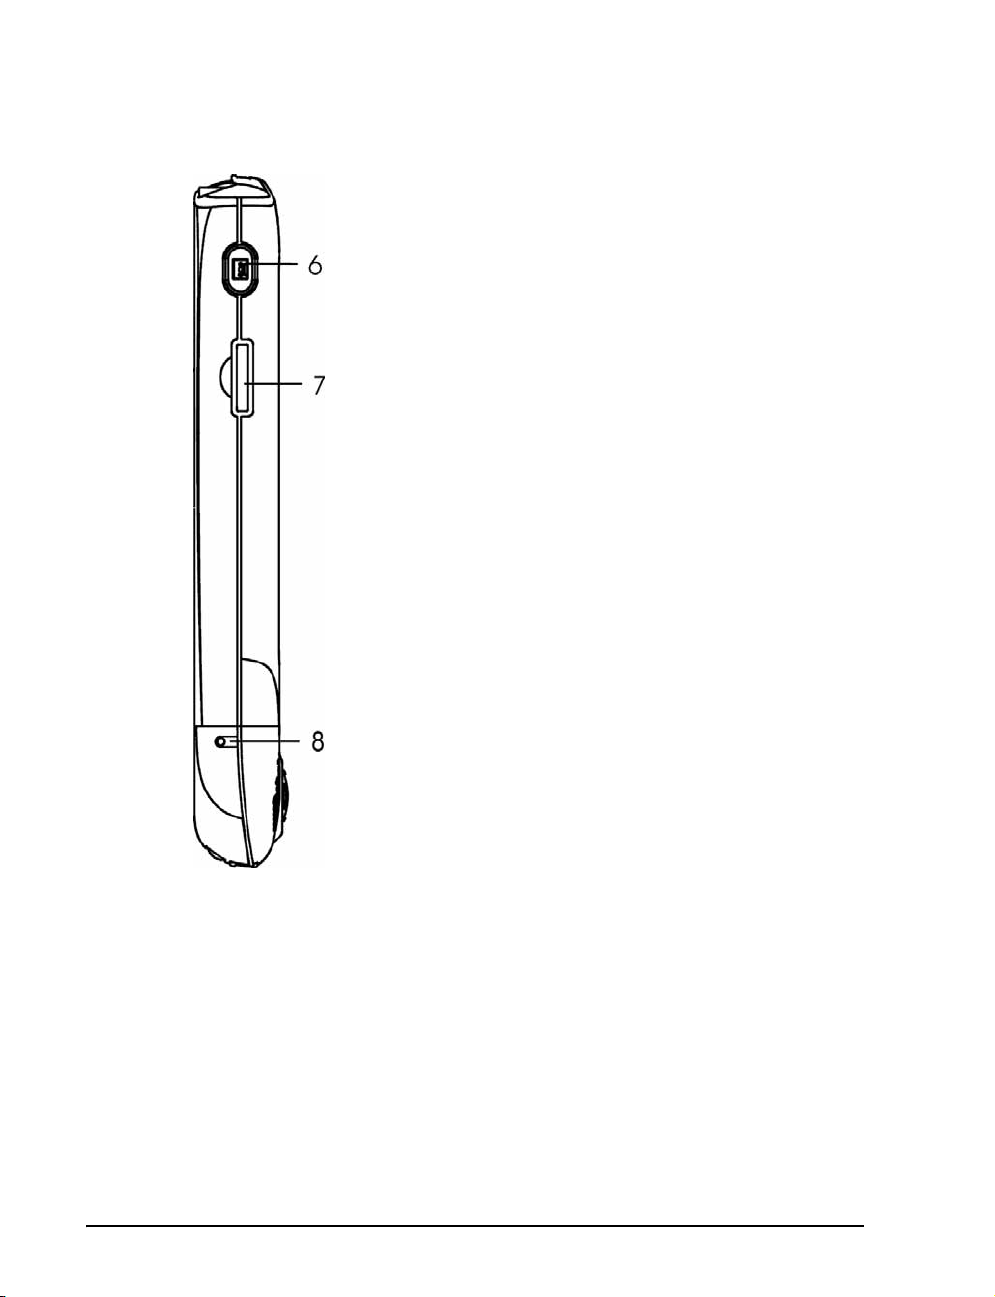
6. Voice Recorder – press and
hold to start recording sound
via the microphone. Release to
stop.
7. Thumb wheel – press to
operate: move up / move
down / depress to enter
8. Software Reset Button –
Unscrew the top end of the
stylus and use it to press the
software reset button or angle
the stylus tip.
Left Side View of WayPoint Front view of the
WayPoint
10
Page 21
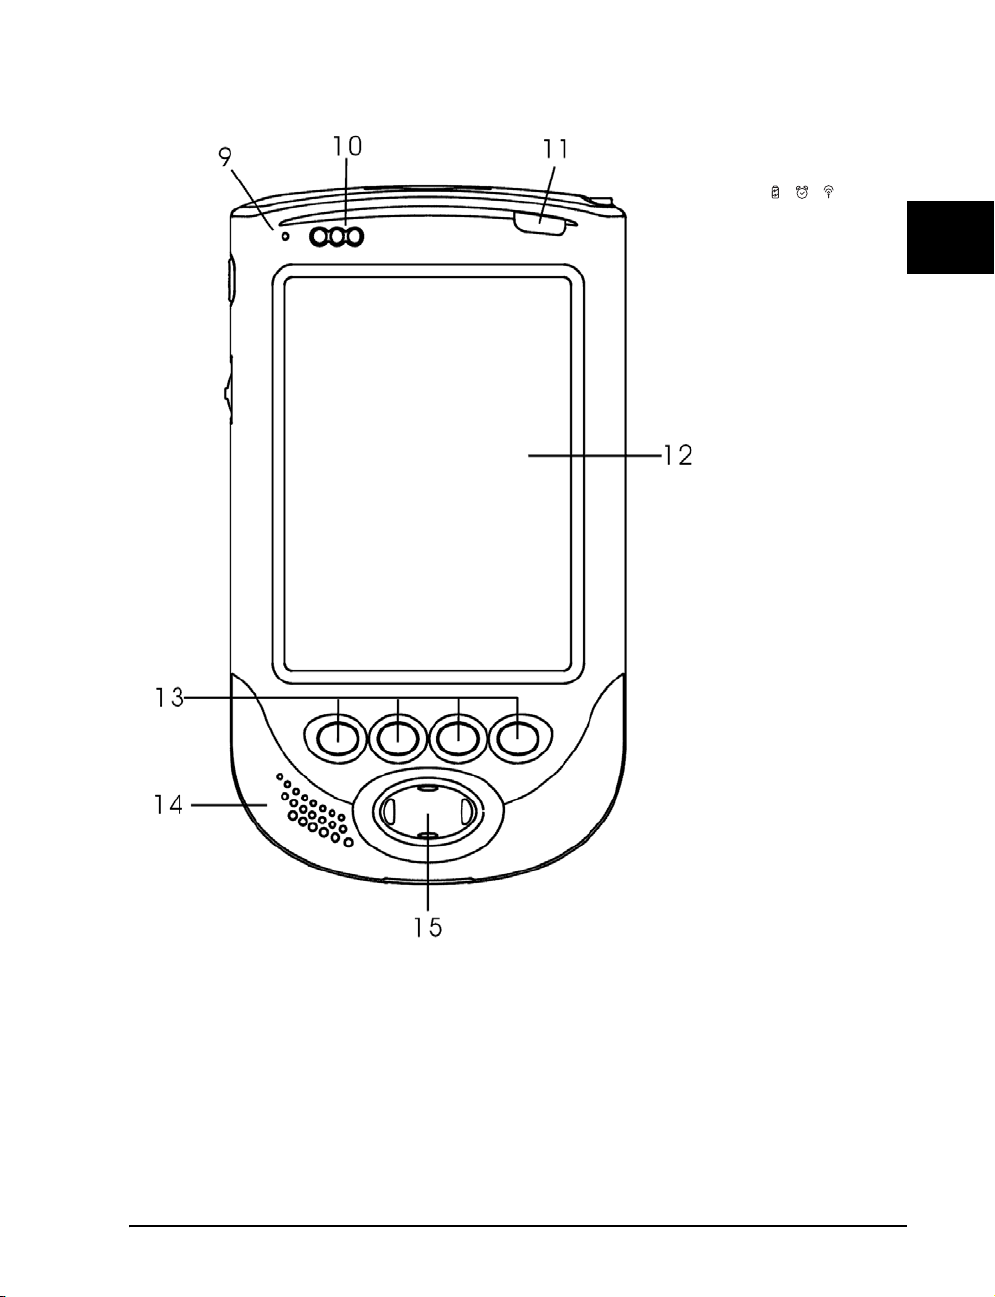
9. Microphone
10. LED –
Left: battery
charging
indicator
(flashing red –
battery fast
charging /
continuous green
– battery 80%
full and trickle
charging) Middle:
Alarm / Turn
Assist (red light)
Right: future use
Front view of the WayPoint
11. Power Button
Getting Started
12. Touch Screen
13. 4 Programmable
Application
Buttons – can be
set to launch
applications
quickly. PDA
Default settings
(left to right):
1. Calendar
2. Contacts
3. Tasks
4. WayPoint
navigation
14. Speaker
15. Cursor Button –
press to operate:
move up/move
down/move left/
move right
11
Page 22
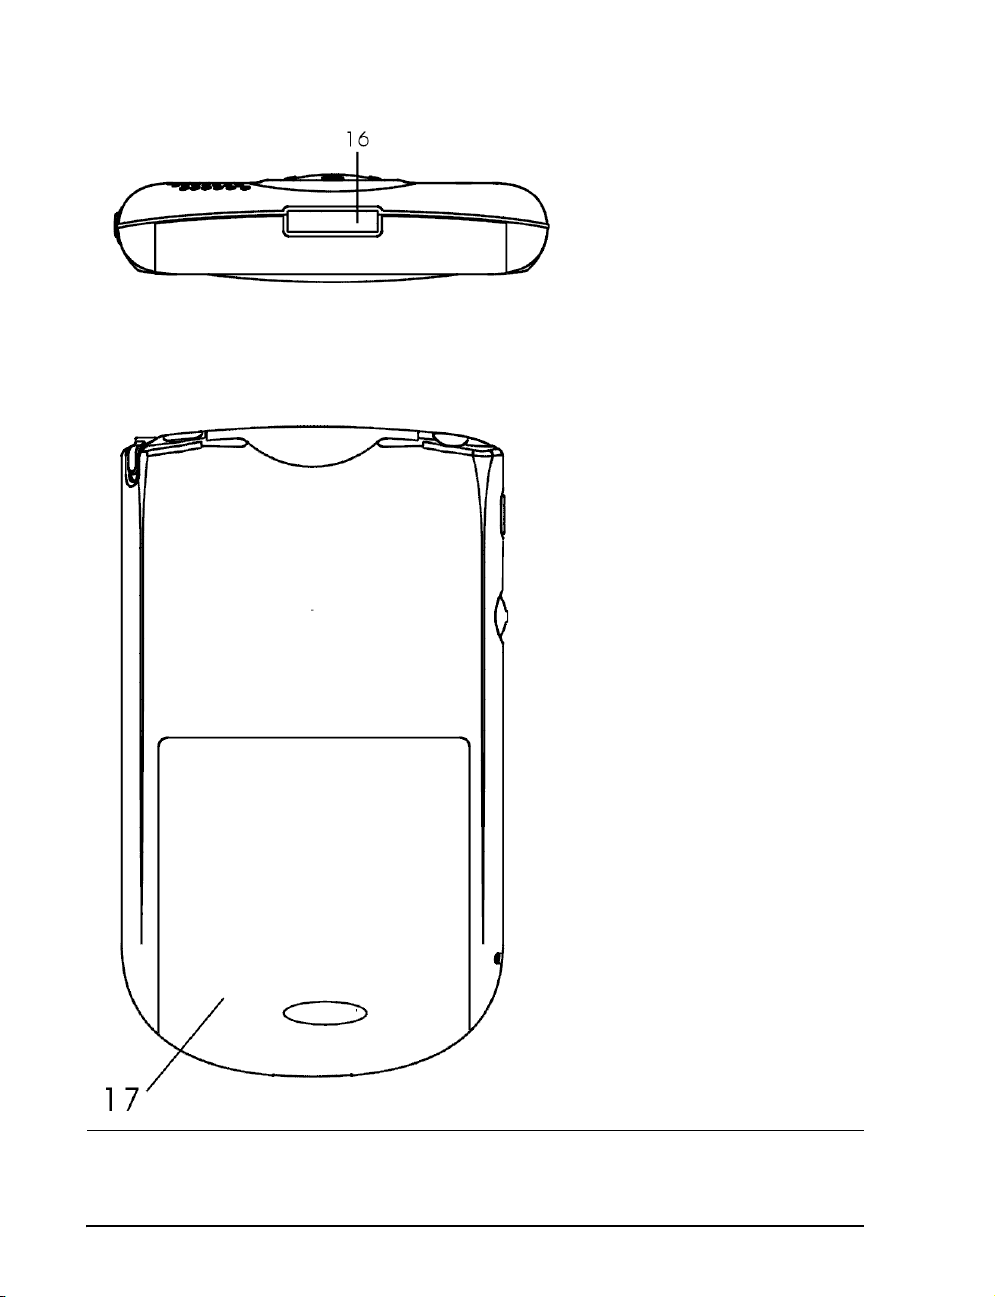
Bottom view of the WayPoint
16. Charging /
Communications Port –
connects to the USB
cradle or to a PC via the
USB cable. Also used to
connect to external
power or serial devices.
17. Main battery - To remove
the battery cover:
Press the button on the
battery cover and slide it
downwards. The battery
cover can then be lifted off.
Please note that when the
button on the battery cover
is pressed, the device goes
into sleep mode.
To replace the battery cover
the cover should be pushed
firmly over the battery
compartment, making sure
that the tabs on the cover
engage with the guides in the
battery compartment. The
cover can then be slid up
into place.
The cover should fit snugly
into place with no gaps.
Rear view of the WayPoint PDA
12
Page 23
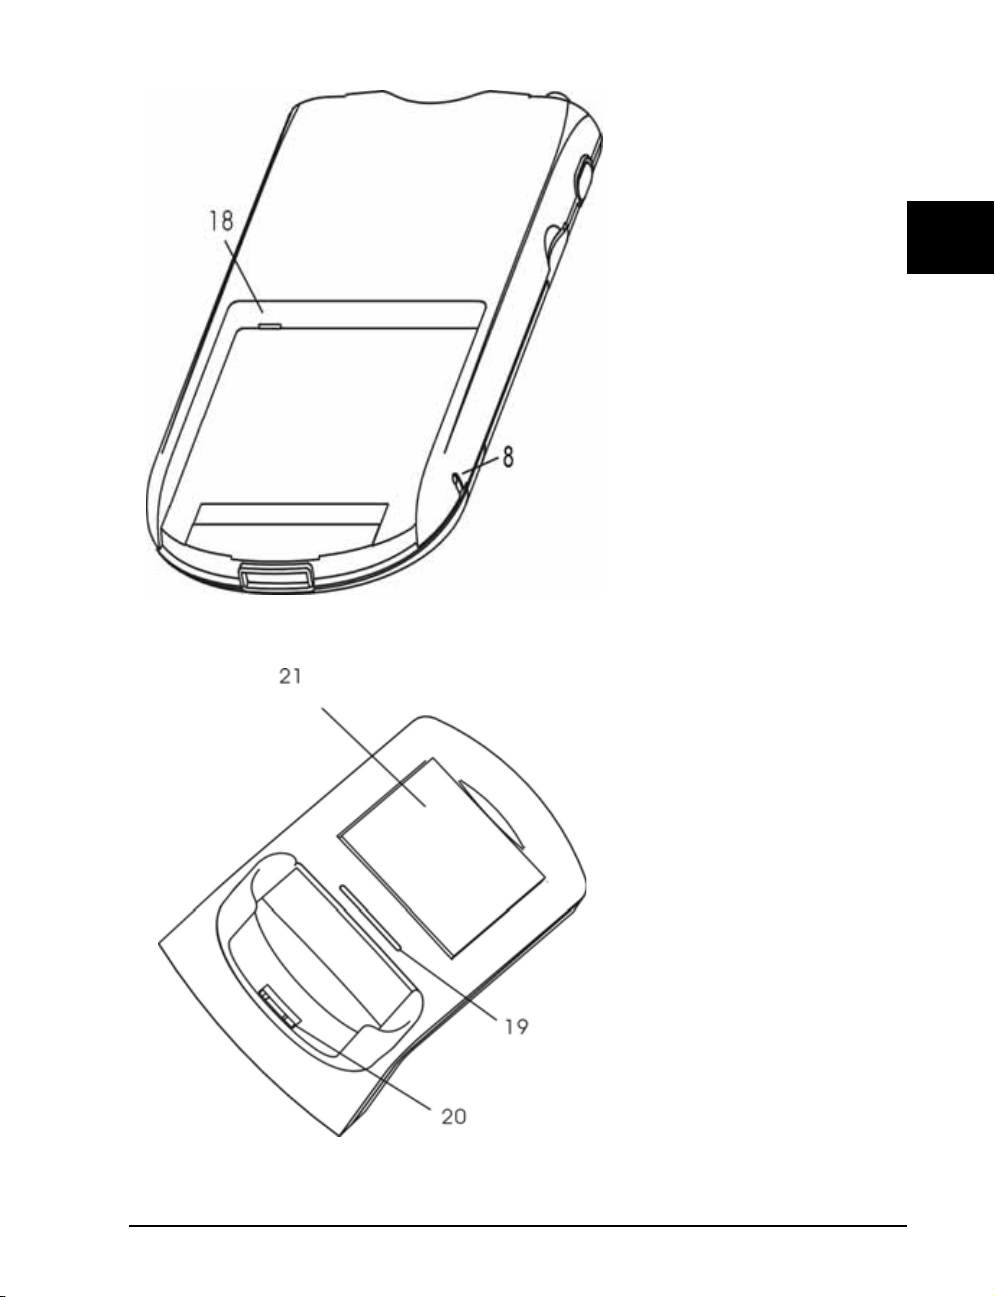
18. Master Power Switch Unscrew the top end of the
stylus and use to operate the
switch (Only visible after
battery is removed). This
switch is used to perform a
Hardware reset.
WARNING: Be sure data is
backed up before operating this
switch. All data will be lost
Software reset button
shown for reference
(item 8)
19. LED Charge Indicator. This
lamp will be lit to indicate
connection to AC power
and will brighten to indicate
that the spare battery is
being charged.
20. The WayPoint PDA
Charging / Communications
Connector – connects to the
Charging / Communications
Port on the base of the PDA
.
Getting Started
USB cradle Top View
21. Charging Bay for spare
battery
13
Page 24
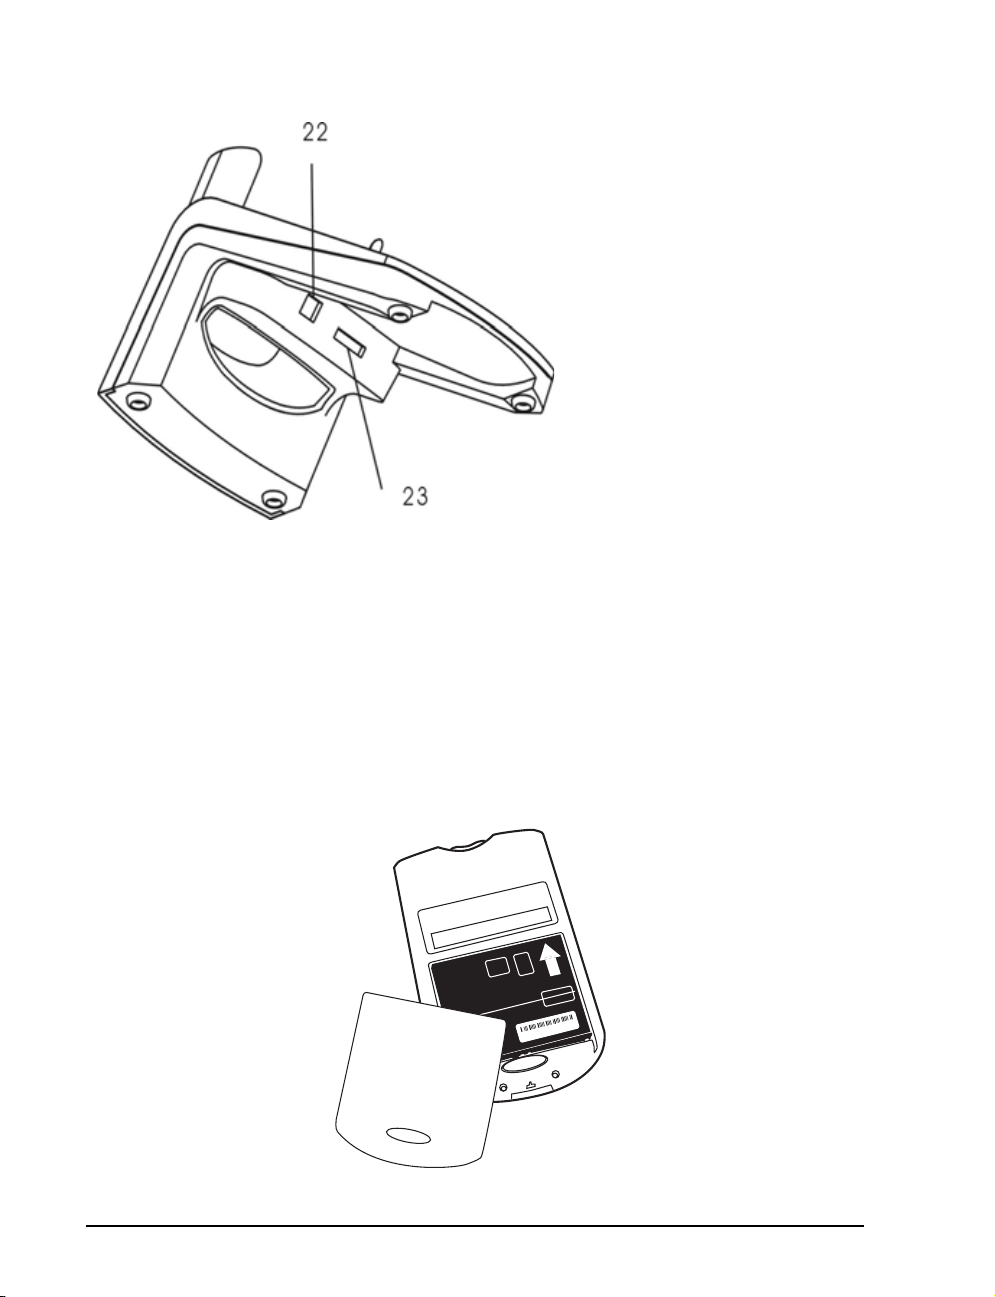
USB Cradle Bottom View
The First Time You Use Your WayPoint PDA
1. Insert the main battery into the PDA.
a. Remove the back cover by pressing the button sliding the cover down
22. 22. DC in jack
23. 23. USB Cable Port
b. Insert the battery
c. Place the cover on and press down to slide the cover in plac e. See figure belo w.
ABCD12345678
14
Page 25
2. Before using your WayPoint PDA for the first time, you will
need to use AC
to do this:
a. Connect your WayPoint PDA to a wall outlet using the
b. Plug the USB cradle into a wall outlet and dock the
Please read the discussion on “Power” on page 16 for
information on setting up the cradle or travel adapter for
charging.
3. Allow a total of 8 hours to fully charge your main battery and backup battery. You must
fully charge the battery before disconnecting the device from AC power. the first time.
4. To prepare your WayPoint PDA for use, follow th is simple proced ure the first time you
turn the device on.
a. First, remove the back cover and battery.
b. Locate the master power switch beneath the main battery.
c. Unscrew the top of the stylus and use it to slide the switch from off to on. See
power to charge the battery. There are two ways
travel adapter.
device in the cradle.
the drawing on the next page.
L
USB (Universal Serial
Bus) refers to an connector on the front
or back of your computer or peripheral
device. It serves as a
method for the data
or power to get from
the computer to the
peripheral device.
Getting Started
d. Put in the main battery.
e. Wait 1 minute for the Welcome Wizard to be displayed.
f. Follow the on-screen instructions to calibrate th e screen and set up the operating
system.
g. Do not remove the unit from the charger during these steps unless it has been
charged the full 8 hours.
5. There is a backup battery in the unit. It will be recharged from the main battery and is
used to permit swapping the main battery for a spare without losing any informa tion.
You are likely to see a message about a low backup battery when you first turn the unit
on.
15
Page 26
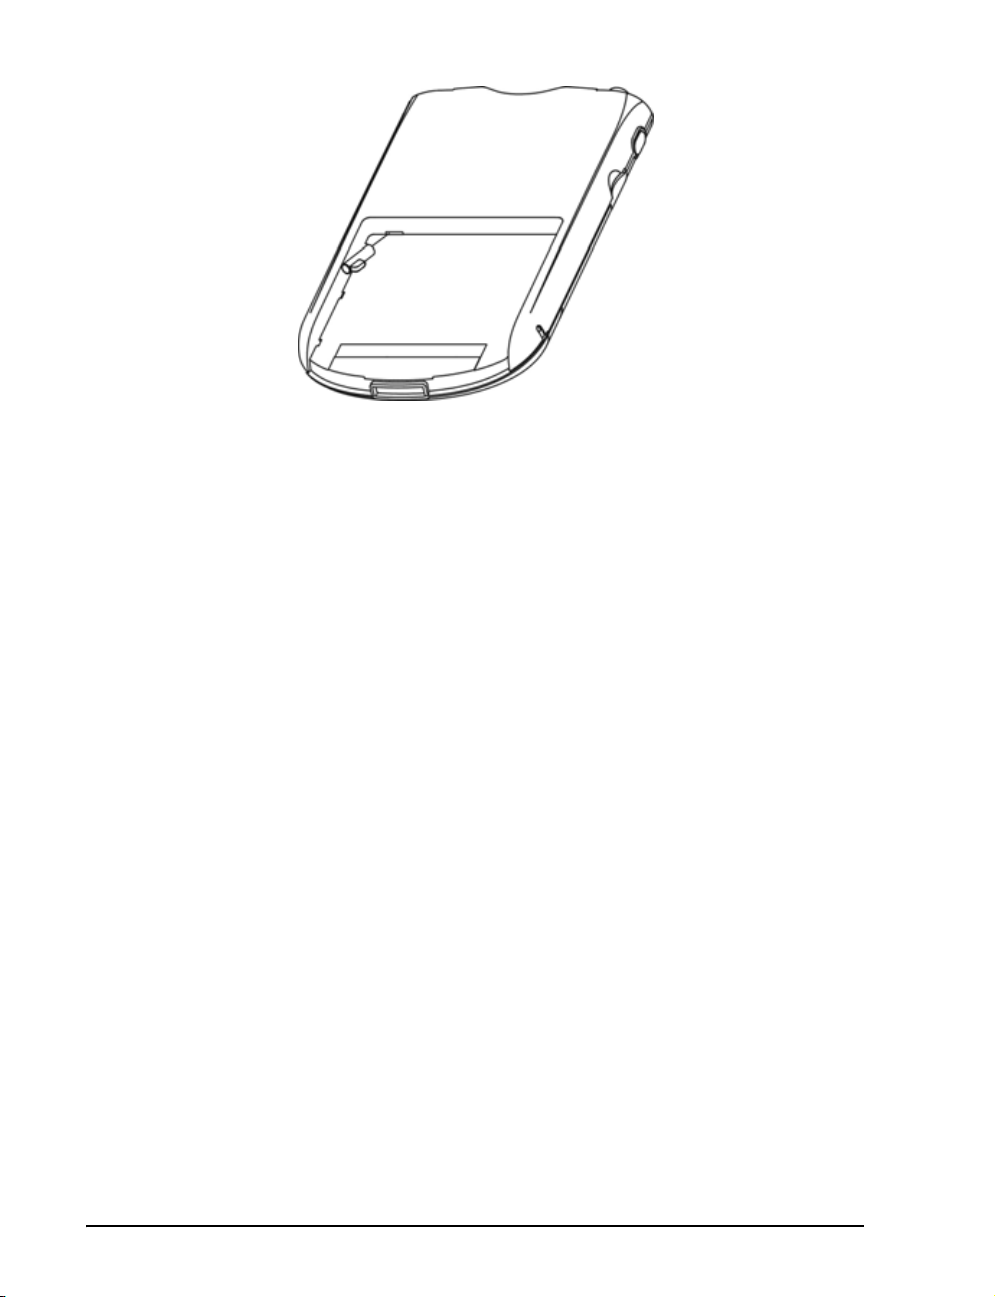
Slide the Master Power switch from off to on the first time you use your WayPoint PDA. Note the use of
the top of the stylus as shown in the picture. Please note that the power switch must remain switched on
when the WayPoint PDA is in use.
Power
Using Battery Power
Your WayPoint PDA features a main battery and a backup battery.
MAIN BATTERY
When fully charged, the main battery will provide enough power for more than 6 hours use
under normal operating conditions, if utilized for standard PDA functions with minimum
backlight use. However, the actual battery life is dependent on the type of use as some functions,
such as the backlight, raise power consumption considerably.
The main battery is charged whenever AC power is connect ed, even if you decide to contin ue to
operate the WayPoint PDA. However, connecting to AC power with the WayPoint PDA turned
off results in a much faster charge time.
BACKUP BATTERY
The backup battery will ensure that no data or settings are lost when the main battery is removed
or runs out of charge.
The backup battery is charged from the main battery or from the AC supply when the unit is
connected to the power outlet. When the main battery is removed, the backup battery mainta ins
power to the memory of your WayPoint PDA so that no data or settings are lost.
16
Page 27

When the main battery is removed the backup battery maintains power to memory for at least 5
minutes to permit swapping the battery. If the main battery goes flat but is not removed, data and
settings are maintained for 72 hours.
Your WayPoint PDA will automatically go into sleep mode when the main battery is removed
and cannot be awakened until the main battery has been replaced.
BLUETOOTH GPS BATTERY
The WayPoint 200 includes a Bluetooth GPS receiver that can run from its built-in rechargeable
battery. When fully charged, it can provide more than 8 hours of continuous use. It has a
charging indicator lamp that will remain off unless charging is need. When the charging light
lights, discontinue use of the GPS receiver until it can be charged as reception and accuracy
cannot be assured.
Using AC Power
Connecting your WayPoint PDA to the AC power supply offers an alternative to using battery
power. As well as allowing unlimited use of the WayPoint PDA while you sta y connected, AC
power also charges the battery, ensuring that the WayPoint PDA is ready for future mobile use.
The included AC adapter accepts 90V to 260V, enabling worldwide use with the appropriate
local connector.
To charge the device using the AC adapter:
Getting Started
1. Connect the travel adapter to the charging/communications port on the base of your
WayPoint PDA as shown in the picture below.
2. Connect the adapter cord to the adapter cord connector of the travel cable.
3. Plug the adapter into an AC outlet.
17
Page 28
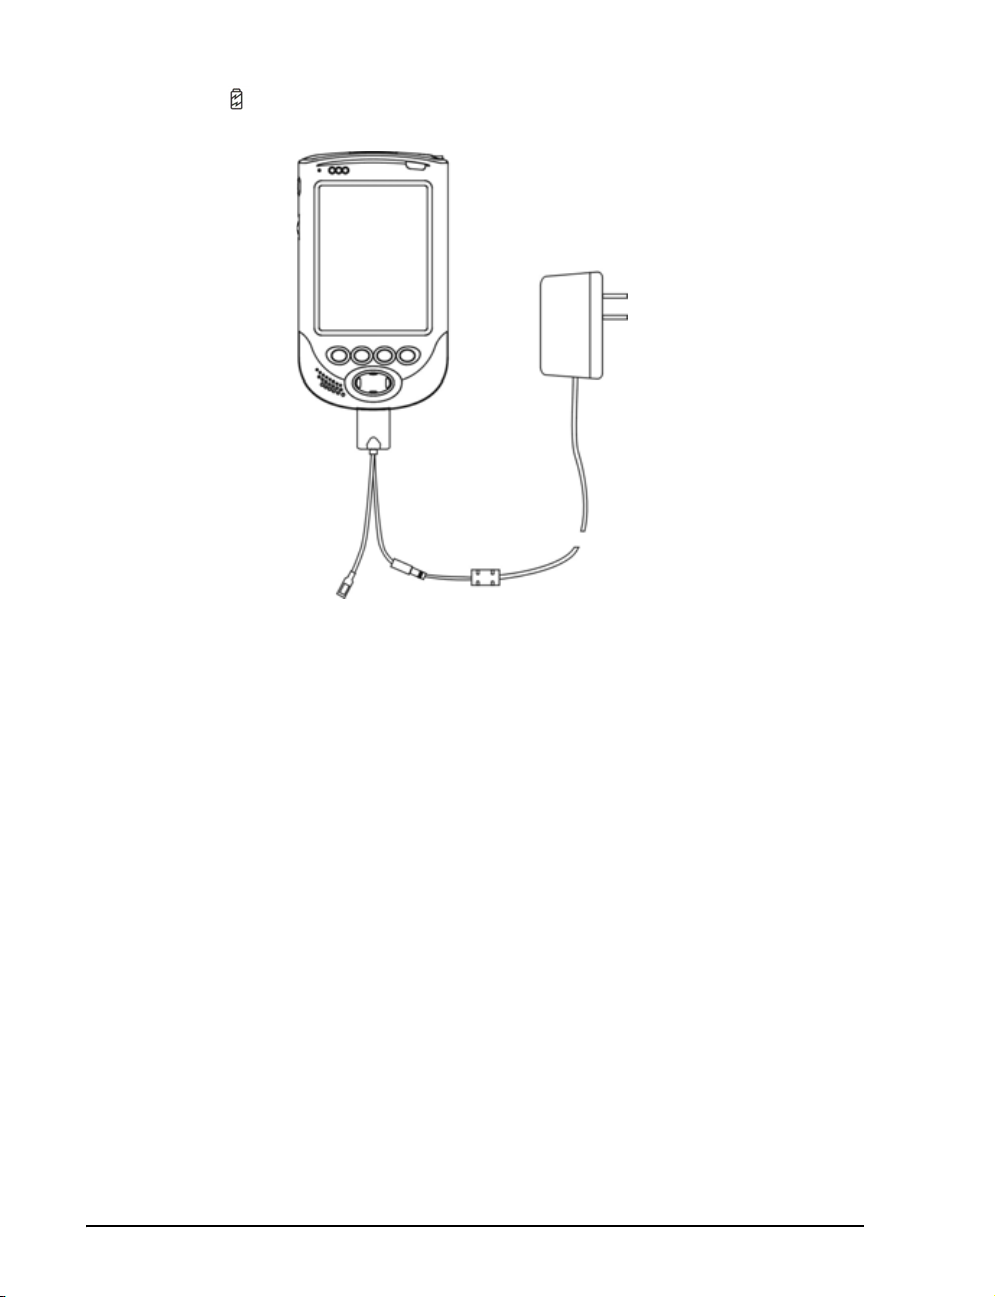
The power LED shows flashing red while the battery is fast charging and continuous green
light when the battery is in trickle charging at least 80% charged.
Direct Connection to the AC Power Supply via the travel adapter
! Important! You must fully charge the battery the first time you operate your WayPoint PDA.
A full charge of both main battery and backup battery will take approximately 8
hours.
BLUETOOTH GPS CHARGING
The WayPoint 200 GPS receiver can also be charged using the same AC charger or via the
included dual-charge cable. The dual-charge cable permits simult aneous charging of the GPS and
the PDA. The Charging lamp will light on the GPS when it is being charged. This lamp will dim
and finally shut off when the GPS is fully charged.
18
Page 29
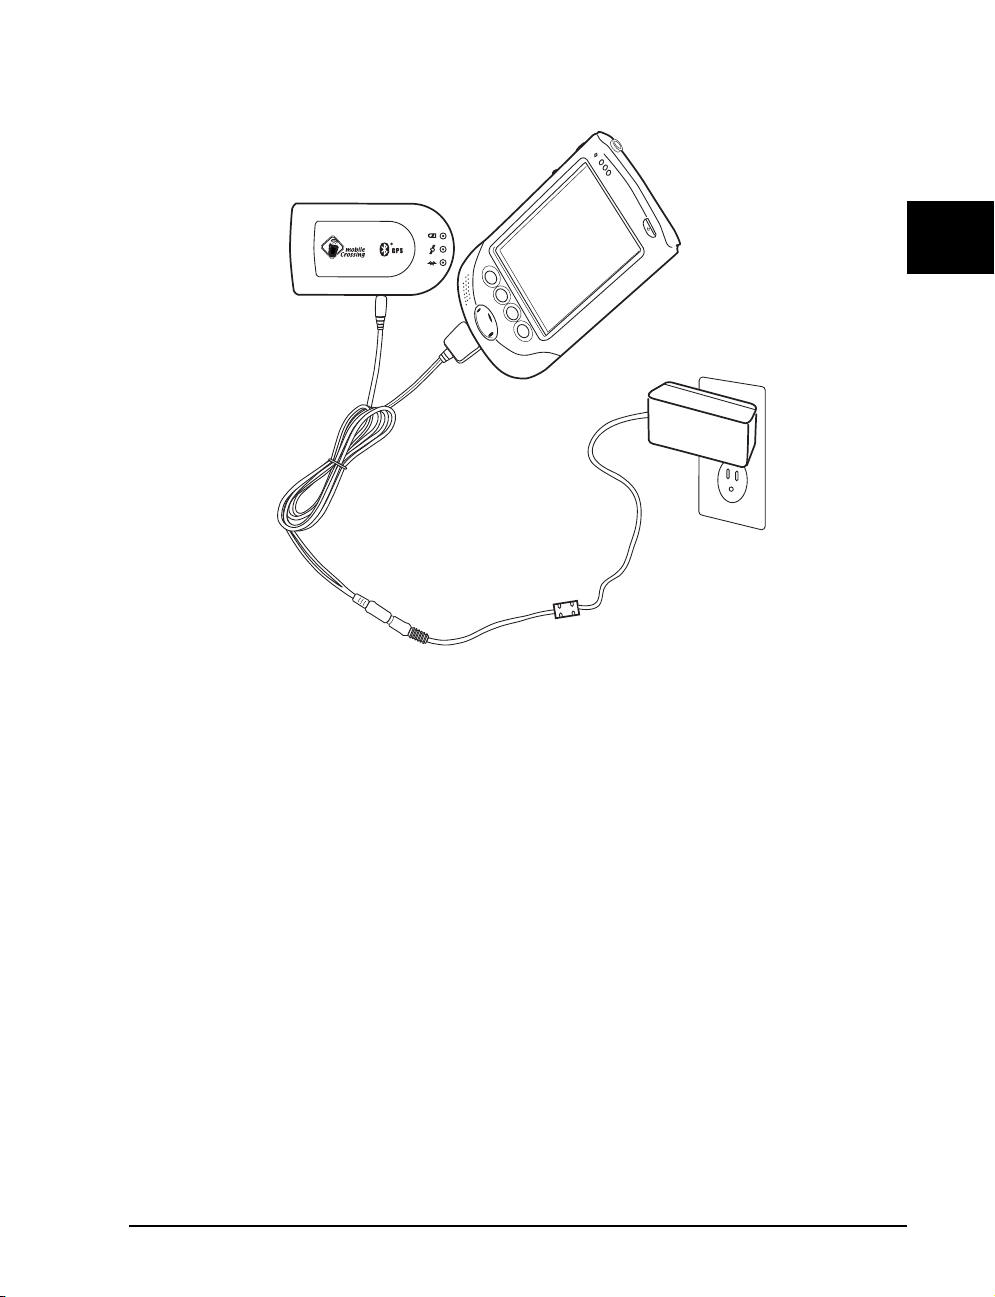
The dual charge cable is shown in the figure below.
Getting Started
USING THE USB CRADLE
By keeping the USB cradle connected to the AC power supply, your WayPoint PDA can be
charged whenever it is docked. Spare batteries may also be charged by inserting them in the
cradle.
To connect the USB cradle to the AC power supp ly:
1. Insert the power cord jack into the DC-IN jack socket on the USB cradle.
2. Plug the adapter into an AC outlet.
19
Page 30
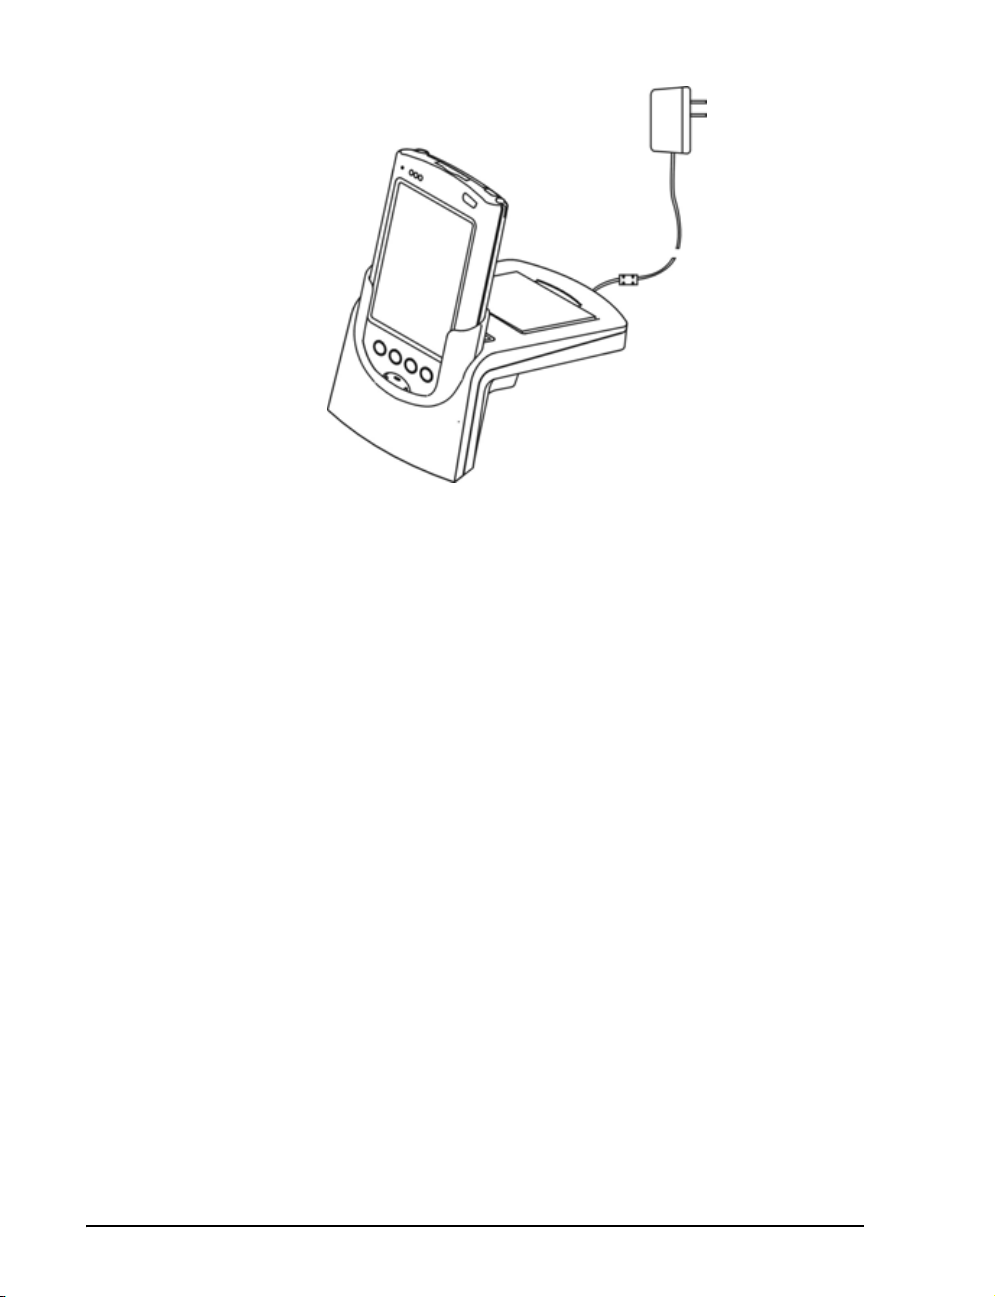
USB cradle
The cradle may also be used to charge a spare battery that is not installed in your WayPoint PDA.
To charge a spare battery, place the battery in the battery ba y after the US B cradle has been
connected to AC power.
Using Vehicle DC Power
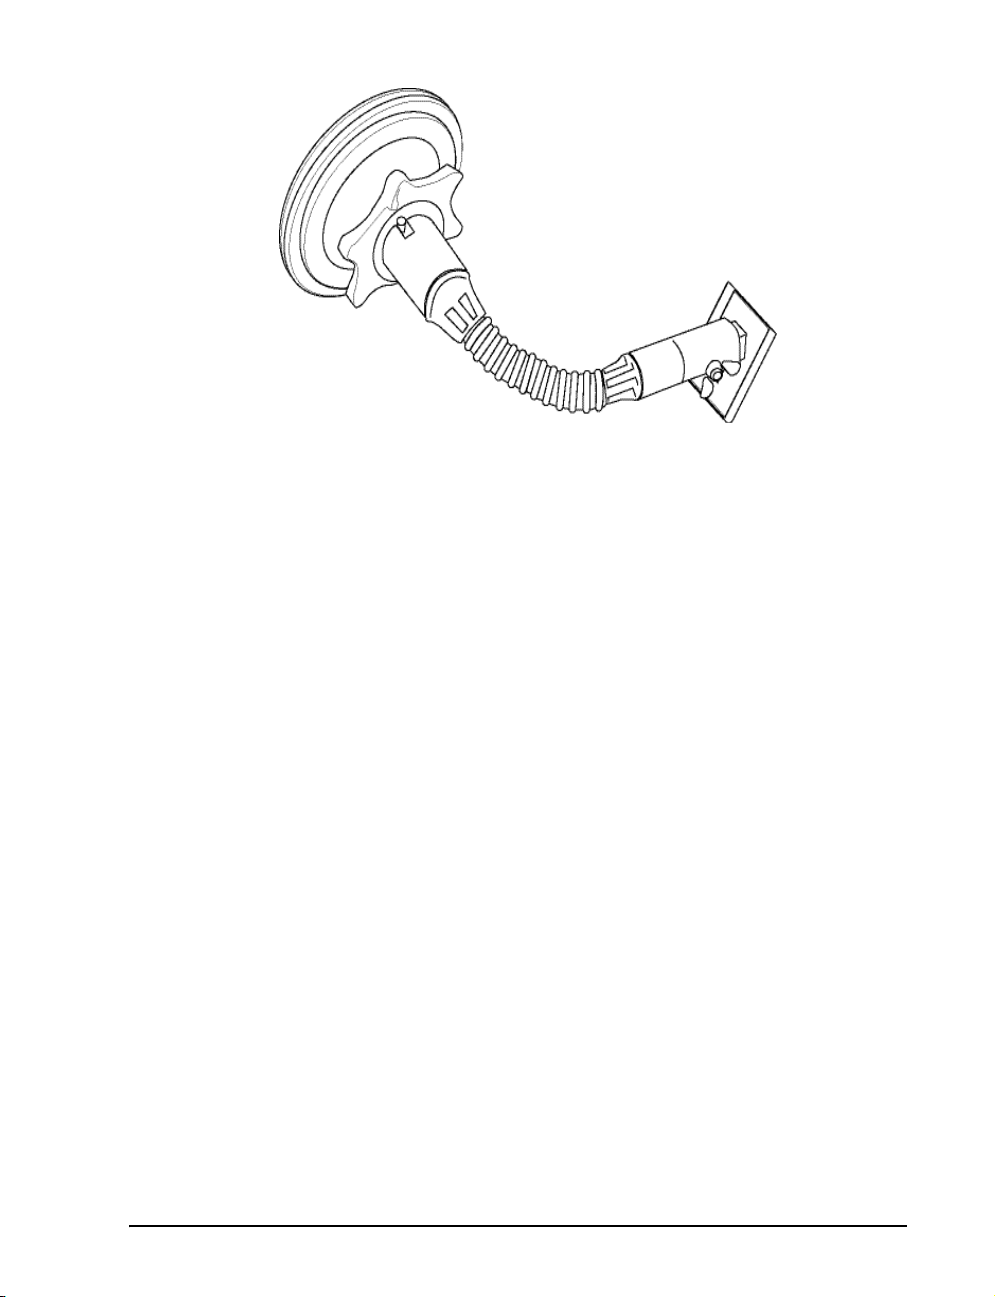
The vehicle mount consists of a powered cradle that houses the external speaker and h olds the
PDA as well as a gooseneck connector attached to a windshield suction cup. External power is
brought to the mount with the supplied power cable. In the WayPoint 100 and 200 the mount
supplies power to the WayPoint PDA though a short cable that plugs into the power/
communication port on the bottom of the unit.
Use DC external power when the WayPoint PDA is in your vehicle. This can be supplied from a
power (cigarette lighter) outlet via the vehicle PDA mount. Plugging the unit into th e mount and
hooking up the connector will pick up the power connection from the mount. The vehicle
mount will keep the unit fully charged.
WAYPOINT 100 GPS POWER
The GPS derives its power from the PDA itself so as long as power is applied to the PDA the
GPS will run. If the power is unplugged the PDA will continue to power the GPS from its
battery.
WAYPOINT 200 BLUETOOTH GPS POWER
The WayPoint 200 Bluetooth GPS receiver can also be plugged into the vehicle PDA mount at
the side of the mount to obtain external power. This allows unlimited use of the GPS receiver,
but does require a wire between the two units. Some users may prefer fully wireless GPS
20
Page 31
operation with the DC power cable serving as a backup when the GPS battery is low. The power
cable will permit GPS operation while simultaneously charging the unit.
USB Charging
The batteries in your WayPoint PDA can be charged using a USB co nnection to a PC, e ven
though the device itself is not connected to th e AC power supply. However, charging the unit in
this way is only effective when the unit itself is powered off and will take much more time. There
are two ways of making a USB connection to a PC:
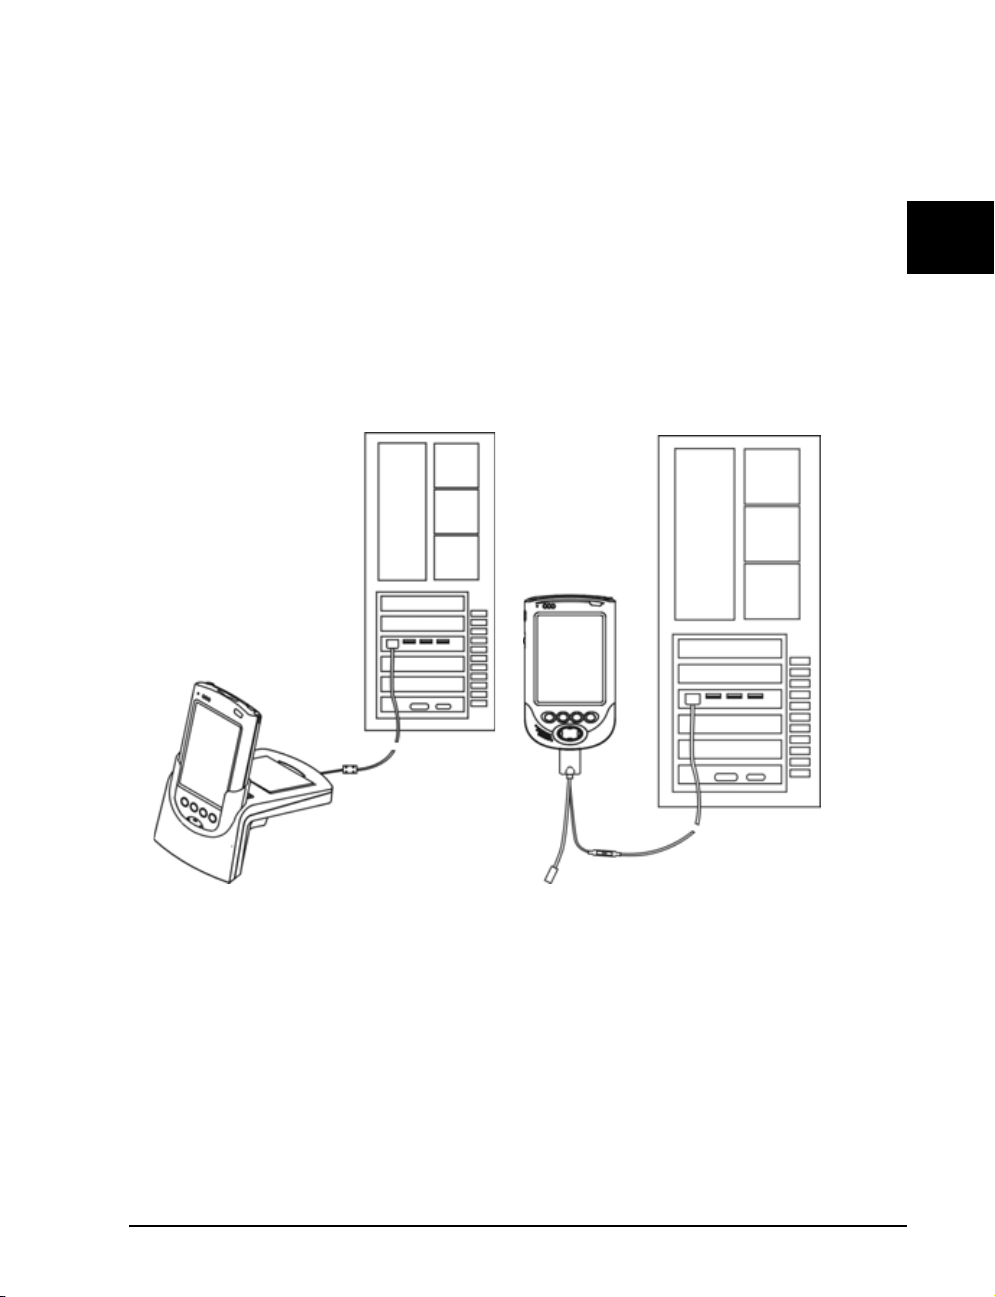
1. You can make a direct cable connection from the WayPoint PDA, using the supplied
travel adapter
2. You can use the USB cradle.
Getting Started
WayPoint PDA Connected to the back of a PC via the USB Cable on the left and the travel adapter on the right.
There are two types of USB hardware configurations used in PC’s.
1. One type supplies a separate 5V power source for the USB power.
2. The second type derives the power from an internal bus.
There is only a limited amount of power available from a USB connection and sometimes this is
divided among all the connections. Extension USB hubs are also available in two types; one has
its own 5 Volt power while the second gets its source of power from the USB connection on the
PC.
21
Page 32

The WayPoint PDA cannot be charged effectively via a bus-powered USB hub. USB charging is
only effective via a self-powered USB hub, or when the WayPoint PDA has exclusive use of a
USB port. The PC itself must be powered up and the WayPoint PDA must be powered off.
If the WayPoint PDA is powered on the charging indicator will flash and the unit will receive
some power from the USB hub but the unit will use more power than the hub can supply so the
unit will still need some battery power and will not be charged. You can verify whether the unit is
receiving a charge via the AC adapter or the USB connection by looking at the back of the stand.
There is a lamp showing power is available for battery charging and it is only lit when the AC
adapter is used.
Maintaining the Batteries
All programs, files, data and custom settings that you save are stored in RAM. This is a volatile
storage medium requiring electrical power to remain operational. It is there fore essential that th e
WayPoint PDA receives a continuous supply of power, either from its internal battery or an
external source, as any interruption will result in the RAM contents being lost. Although the
operating system and pre-installed programs, stored in Flash ROM, will be unaffected, you will
have to re-enter all other information.
SAFEGUARDING DATA
To safeguard your data, you should periodically back up your files. This
can be done on a pc
using a Microsoft program called ActiveSync.
ActiveSync is included on the CD-ROM that accompanies your
WayPoint PDA. This is described in the Pocket PC reference manual
that is also located on the CD-ROM.
There is a backup program supplied with your PDA that can use a CF
card, an SD storage card, or the Flash Disk area to back up data or personal settings in
storage
PIM applications. See Chapter 3,
CHECKING THE BATTERY
“Backup” on page 37 for more details.
L
ActiveSync - The
Microsoft software
that interfaces between the PDA and a
host computer.
You will receive a notification when the main battery level or the backup battery level is low
when running on battery power. While running on batteries, you can check the remaining char ge
in either battery at any time by tapping Settings on the start menu, and then select ing the
System tab and tapping Power.
If your battery is being charged you will not be able to see the state of the main battery without
temporarily disabling the charging. If the battery is fully char ged this will be shown even wh en
power is applied.
22
Page 33
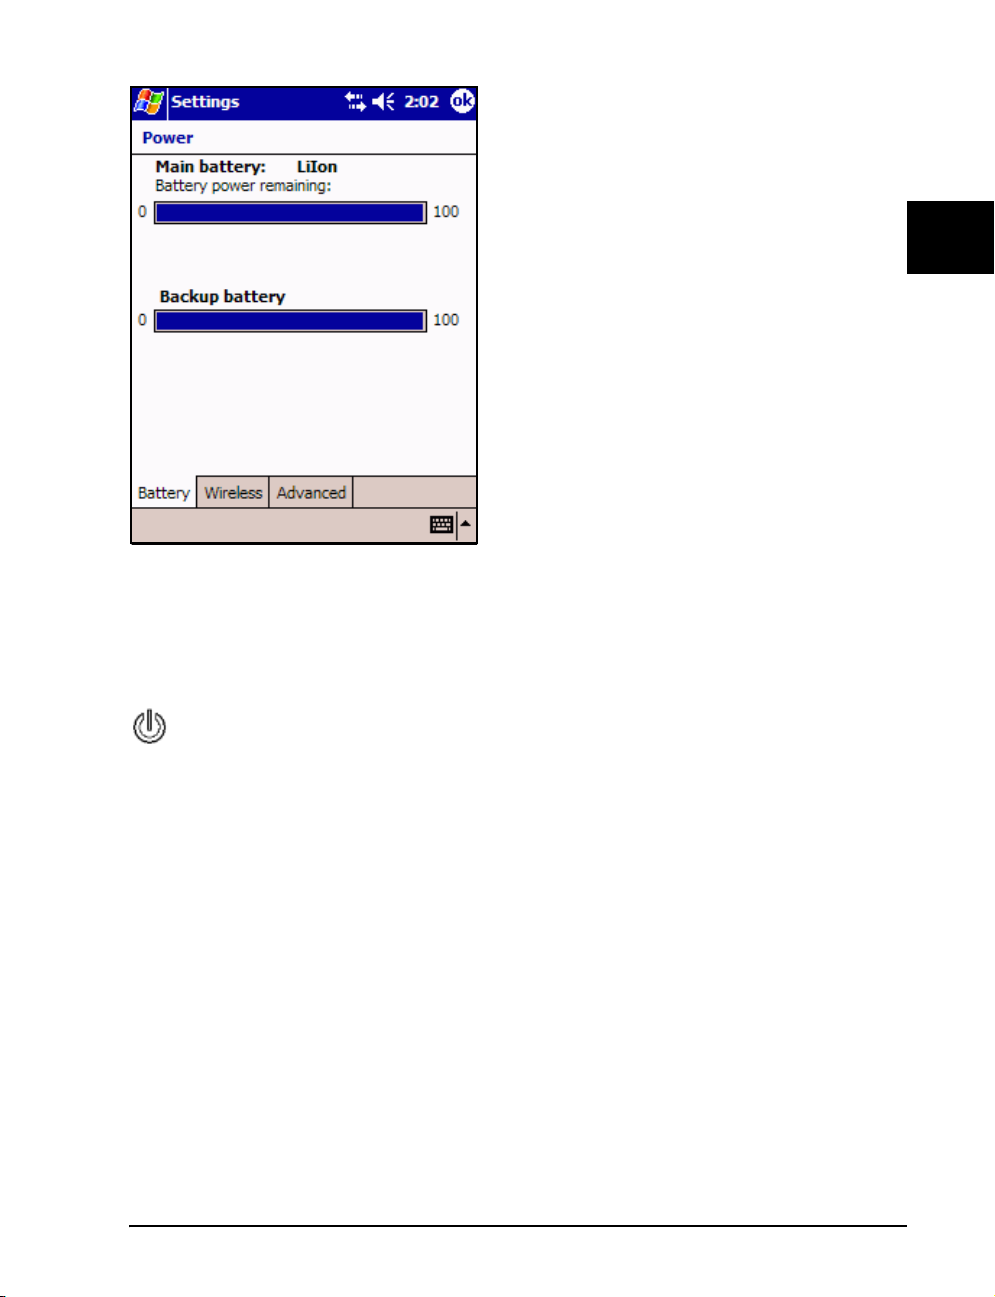
The battery settings screen is shown on the left. It
shows both the Main and Backup batteries are fully
charged.
When the backup battery is fully charged it will
maintain power to volatile memory for at least 5
minutes if the main battery is removed. This
provides ample time to swap a spare battery in
place.
If the main battery runs out of charge, power to
volatile memory is maintained for
as the main battery is not removed.
To remove the main battery, it is necessary to move
the battery release switch on your WayPoint PDA
to the release position and remove the battery
cover. When the battery release switch is in the
release position, the unit will automatically go into
sleep mode and cannot be awakened until the main
battery has been replaced and the release switch is returned to the original p osition.
72 hours as along
Turning Y our W ayPoint PDA On and Off
Getting Started
Turning Your WayPoint PDA On
Your WayPoint PDA offers the convenience of instant on, enabling you to start work
immediately without waiting for lengthy initiation procedures to be completed. To turn on your
WayPoint PDA, press the power button, the recorder button or one of the 4 programmable
application buttons.
It is possible to disable the feature of turning on the unit from the four (4) application button s
and the recorder button. For details see the Pocket PC reference guide included on the CDROM.
23
Page 34
Turning Your WayPoint PDA Off
When you turn your WayPoint PDA off, the device
will not shut down completely, but instead enters
standby mode. Although power consumption is
extremely low, the system clock continues to run
and the RAM contents are maintained (see
“Maintaining the Batteries” o n page 22 for more
information).
Furthermore, if you turn your WayPoint PDA on
again within 4 hours, operation will resume where
you left off the last time you used the device . After 4
hours the unit starts with the Today screen.
To turn your WayPoint PDA off, press the power
button located on the front of the device
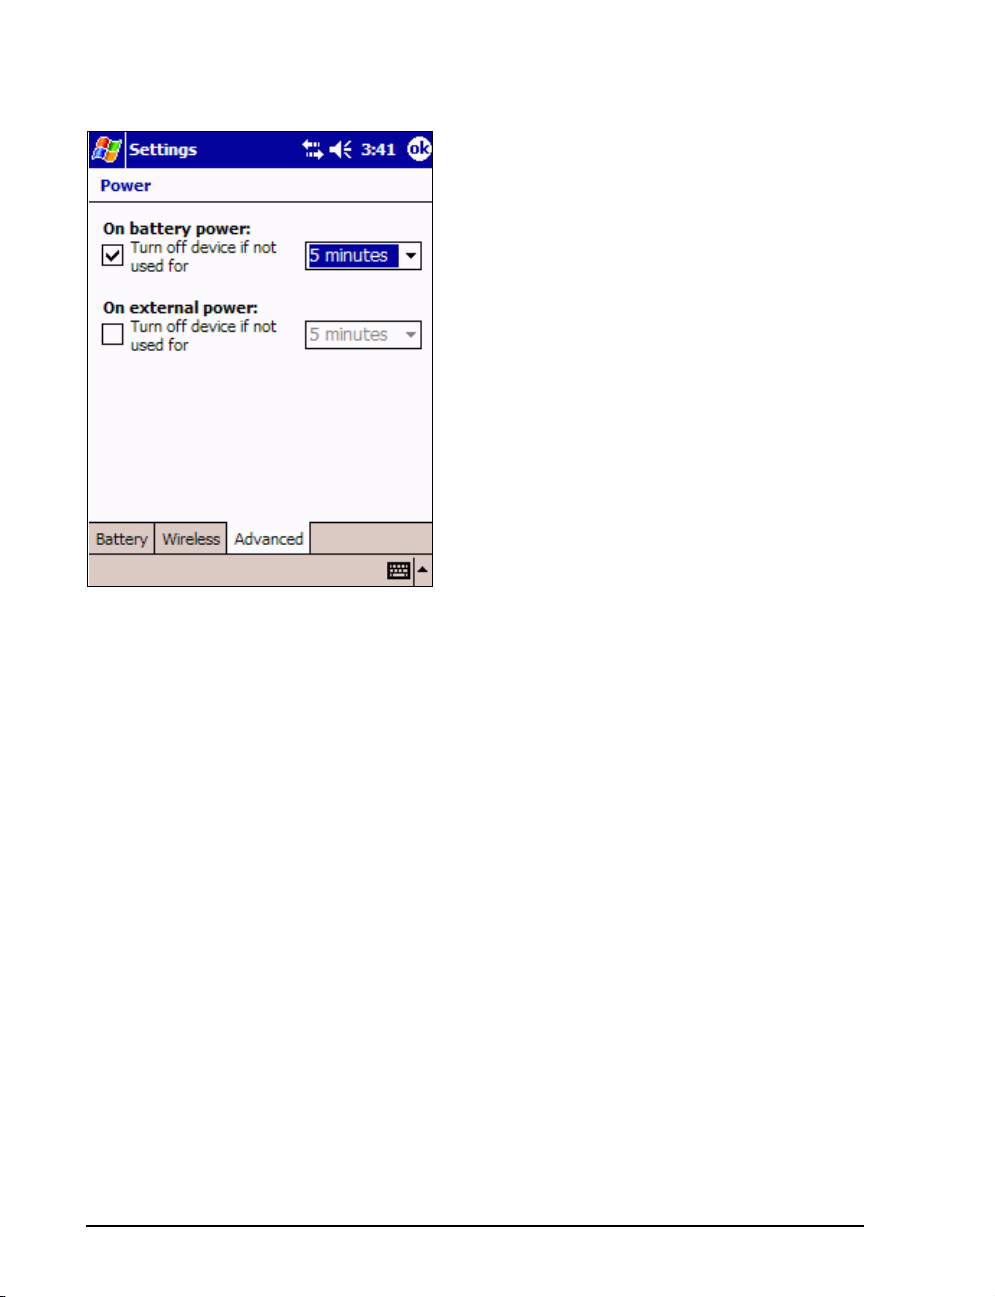
Your WayPoint PDA is set to turn itself off after
three minutes of inactivity when operating on
battery power. You can change these settings by
tapping Setting on the start menu, and then
selecting the System tab and tapping Power. The Advanced tab is shown above.
This setting can be overridden by the WayPoint navigation software. When a GPS is in use it is
usually desirable to leave power on all the time, even when using batteries. See
“Starting the
GPS” on page 45 for more information.
Turning on your Bluetooth GPS
The Bluetooth GPS needs to be charged for at least an hour prior to its first use. It should be
fully charged before removing power. A full charge will require up to 8 hours or even more if the
unit is on.
Plug the GPS into the AC adapter. The charging light will turn off when the unit is fully charged.
When used in a vehicle, the unit can be plugged into the DC powe r cable attached to the vehicle
mount to prevent the GPS battery from running down. The unit may be used without th e cable
for full wireless operation. The battery life of the Bluetooth GPS is about 8 hours between full
charges.
V ehicl e Installation
The primary vehicle installation concern is user safety. Do not mount or install any of the
brackets, devices, or cables in front of any air bag. Do not mount any object where it obstructs
the driver vision. Do not route any cable where it interferes with the operation of the vehicle.
Follow these steps to install the unit. (The illustration on the next page shows a WayPoint 100.
Other models are similar.)
24
Page 35
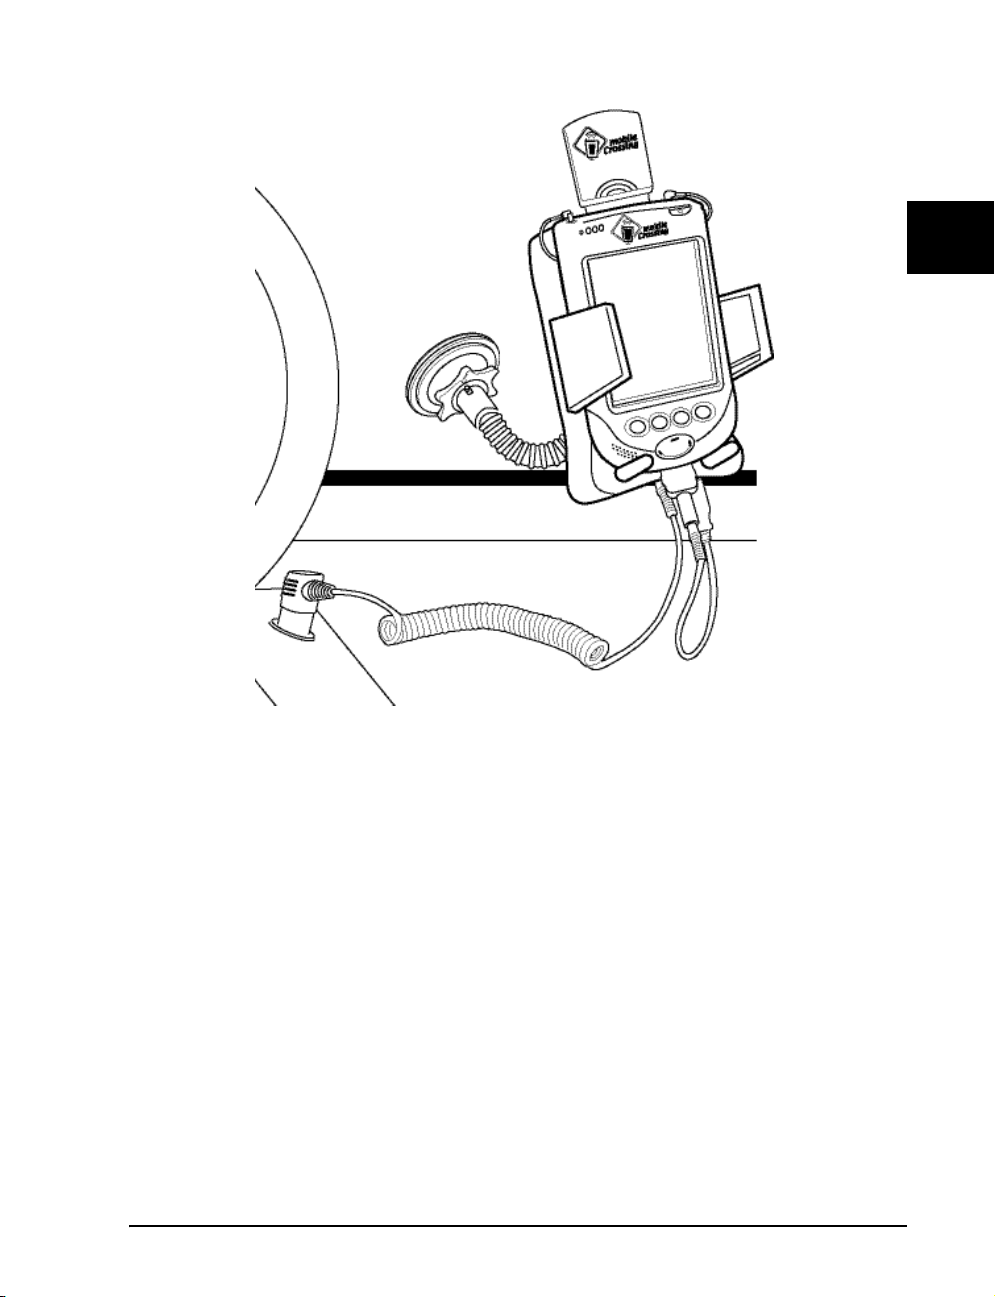
1. If you have a WayPoint 100 place the GPS in the CF slot.
2. Install the WayPoint PDA in the vehicle mount.
3. Plug the audio cord into the headphone jack
4. If you have a WayPoint 100 or 200 attach the power connector to the bottom of the
PDA.
5. Find a suitable place in the car to mount the assembly. The figure above shows a
WayPoint 100 with the full vehicle mount which includes the PDA cradle with external
speaker, the goose neck, suction cup, and power cable.
6. The audio cord is shown attached at the top. This should be inserted into the headphone
jack on the PDA to use the external speaker for clear voice instructions while navigating.
A volume control is located on the left side of the vehicle mount.
Getting Started
The unit can be mounted to the left or to the right of the driver where it can be easily seen.
The WayPoint 100 needs to be mounte d where the GPS will ha ve a cl ear sky vie w unless an
external antenna is used. Consideration should be given to possible passenger use.
25
Page 36

7. Once the location is chosen, the area should be cleaned so that the suction cup will stick.
8. Attach the suction cup to the windshield and twist the lock on the back to seal t he
connection. A tighter seal can sometimes be made with a damp suction cup.
9. Route the power cable down to the power (cigarette lighter) outlet and th e installation is
complete.
Installing the Bluetooth GPS
WayPoint 200 customers will also have to determine a location for their Bluetooth GPS unit.
Placing the unit near the base of the windshield will ensure that the unit will have a good sky view
for satellite reception. A Velcro strip is supplied that can be used to secure the location while
providing the ability to easily remove the unit. Depending on your mounting location this may or
may not be needed.
1. To attach the Velcro, clean both mating surfaces and attach the pad side to the bottom of
the unit by removing the tape and attaching the sticky side of the pad to the unit.
2. Ensure proper operation before making the final location choice.
a. Place the GPS in the proposed location and turn on both the GPS and PDA.
b. Setup up the GPS connection to the PDA using the instructions in “Getting
Started with Navigation ” on page 43.
3. After ensuring the location has good reception, attach the hook side to the dashboard.
4. A power cable can be run from the cradle connector to the GPS to provide unlimited
service. Full wireless operation can be used up to 8 hours on batteries.
Tips
Be sure and remove the WayPoint PDA when you leav e the car. This unit is a tempting target for
thieves. If your unit does get stolen, be sure to report this to the police and to Mobile Crossing.
Mobile Crossing maintains a database of all registered units which may be useful in identifying
your missing unit.
Inspect the suction cup from time to time by looking at it from the outside to ensure that it is still
fully sealed against the windshield. It can be removed for use in another vehicle when you need
to by twisting the knurled knob to release the suction and then prying the cup from the
windshield. Always clean both surfaces before attaching to the windshield.
26
Page 37
The WayPoint 100 GPS antenna is on the top of the GPS. It will work better if the whole unit is
tilted back a little bit so it can get are view of the sky through the windshield. If it has trouble
getting a lock you might want to find a better place to mount it. You can also just lay the unit on
the dashboard until it gets its first lock. It will usually maintain the lock when you move it to the
vehicle mount. If you continue to have problems you might want to consider an external
antenna.
27
Page 38

28
Page 39

Chapter
3
Basic Operation of the WayP oint PDA
This chapter is devoted to getting you started with the WayPo int PDA. The WayPoint PDA runs
Microsoft Pocket PC 2003 Premium Edition. The full instructions for the use of this operating
system and all of the applications that are provided with Pocket PC are in the Pocket PC
reference manual which can be found on the Documentation CD-ROM. This chapter will
provide a brief summary of the operation of the Pocket PC opera ting system.
Using the Stylus
The stylus is the primary method of data manipulation and da ta entry for Pocket PC use. For
safety reasons, the driver should never use a stylus in a moving car. During car navigation other
techniques can be used to minimize the need for the stylus. For example the large on-screen
buttons allows the user’s finger to be used. Hardware buttons have been pre-programmed to
perform common functions.
The stylus is often the best tool for everyday PDA use a nd can be essential for text en try. Use the
stylus to operate on and select items on-screen. The bullets on the next page describe the various
ways to use the stylus.
Basic Operation
29
Page 40
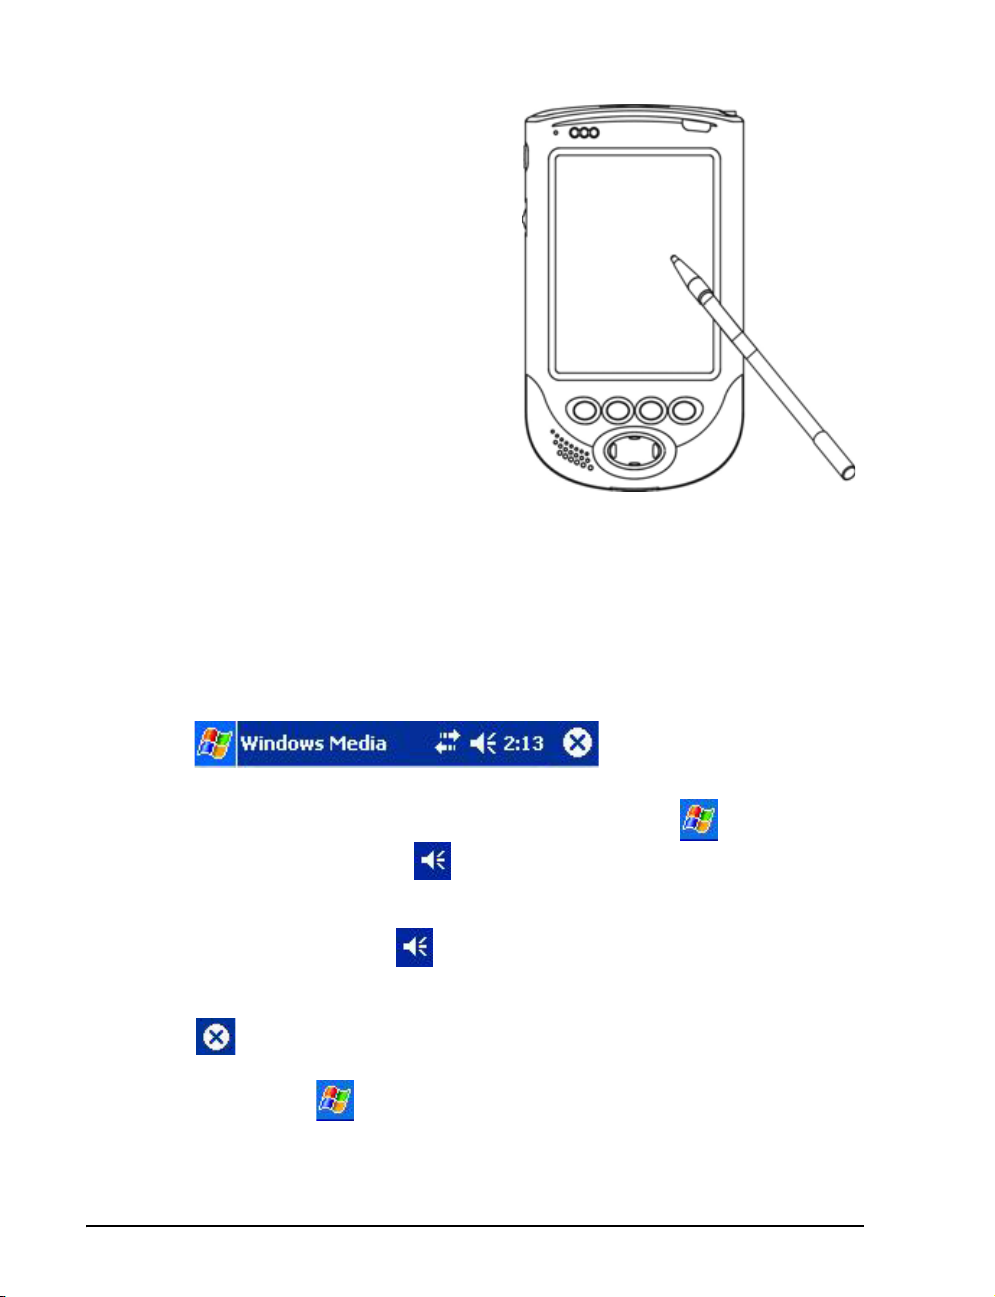
• Tap the screen once to select an item.
• Drag the stylus to select text and images. In
a list, drag to select multiple items.
• If the screen is not large enough to show
the full data, try dragging the stylus off the
edge of the viewing area to cause the data to
pan.
• Tap and hold an item to display a pop-up
menu listing available actions. (This is the
equivalent of the right mouse button on a
pc.) Tap your selection to perform the
action.
The Screen Elements
The screen is usually divided into three sections. At the top is the Title bar, at the bottom is the
Command bar, and the center of the screen contains the program data . Occasionally a program
may remove the title bar and/or the command bar from the screen to get more display area.
The Title Bar
The Title bar is found at the top of the screen. It displays the start button , the name of the
active program, the speaker volume icon and the time. The title bar also displays notification
icons from time to time such as a low battery warning.
• Tap the speaker volume icon to change the volume level or to mute the WayPoint
PDA.
• The can be used to leave the application.
• Tap the start menu to display the list of programs, and then select a program from
the list.
30
Page 41
Using the Menus
To open or switch between running programs using the start menu, tap on the start button
in the title bar, and then select the program you want from the list. For example tap the contacts
menu item to bring up the contacts list. In addition to the programs that can be started from the
menu, there are icons representing the most recently started programs across the top of the
menu. These icons can be tapped to restart a program or may be used to switch between running
programs.
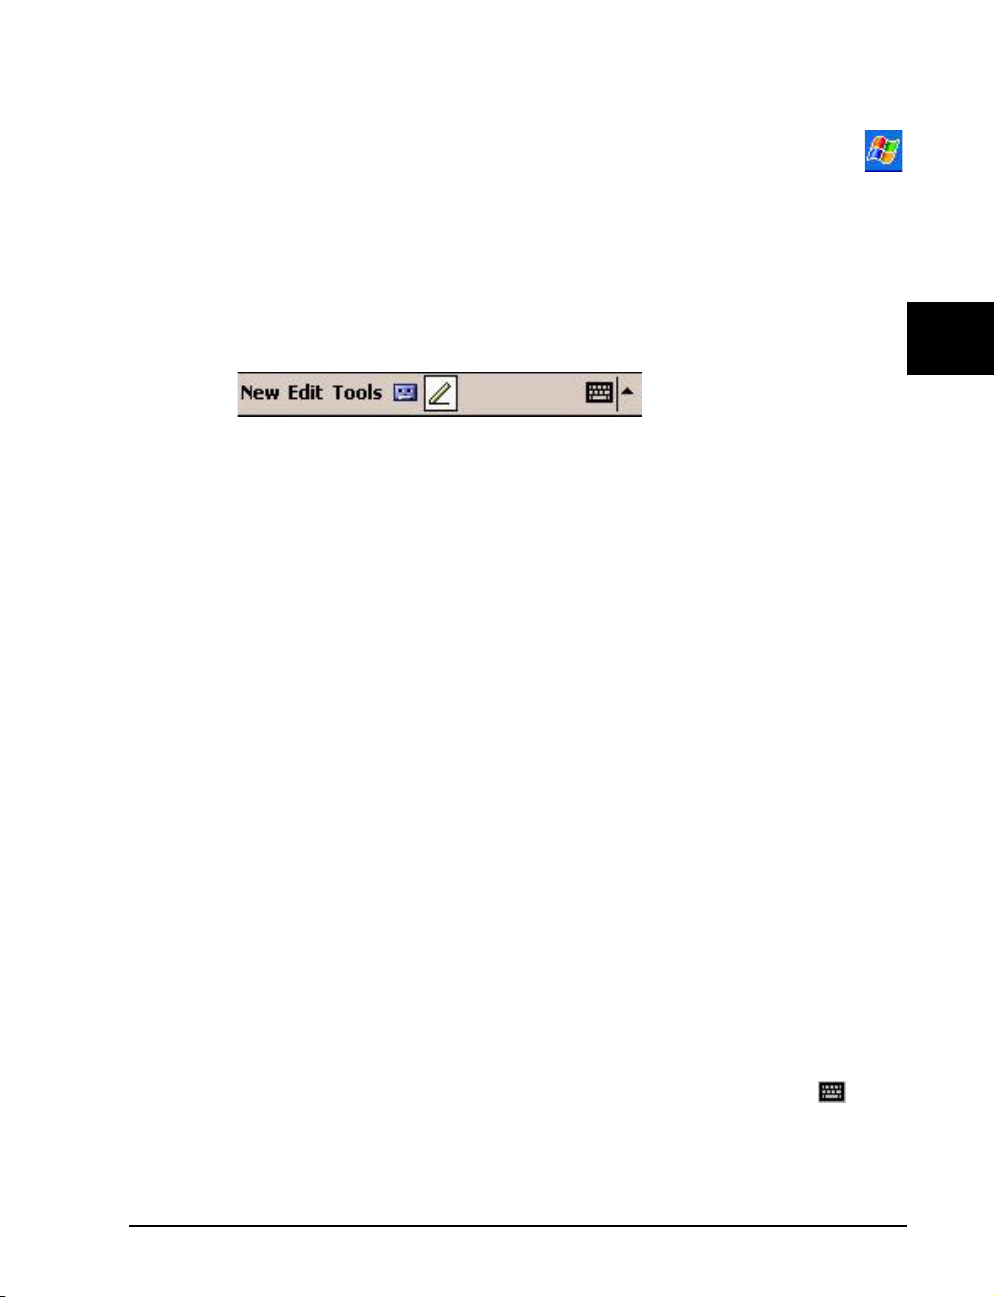
The Command Bar
The command bar is always found at the bottom of the screen. It displays menu names and
available buttons, as well as the input panel button. These controls allow you to perform tasks in
programs.
• Tap a menu name to see its pop-up list, and then select an action on the list.
• Tap a button to perform an action. Tap and hold the stylus on a button to see the name
of a button, and then drag the stylus off the button to p revent the action from b eing
performed.
Basic Operation
Entering Text
There are several ways to enter text with your stylus into your WayPoint PDA:
• Use the on-screen Keyboard
• Use the Block Recognizer which is similar to Palm Graffiti
• Use the Letter Recognizer which allows you to enter the letters similar t o how you
would print them yourself.
• Use the Transcriber where the stylus is used to write directly on the screen. Your
handwriting will be recognized and converted to text.
Using the Input Panel to Enter Typed Text
The input panel can be used to enter text in any program. Tap the input panel button on the
command bar to display the input panel. Tap the arrow next to the button to see the list of input
options.
31
Page 42
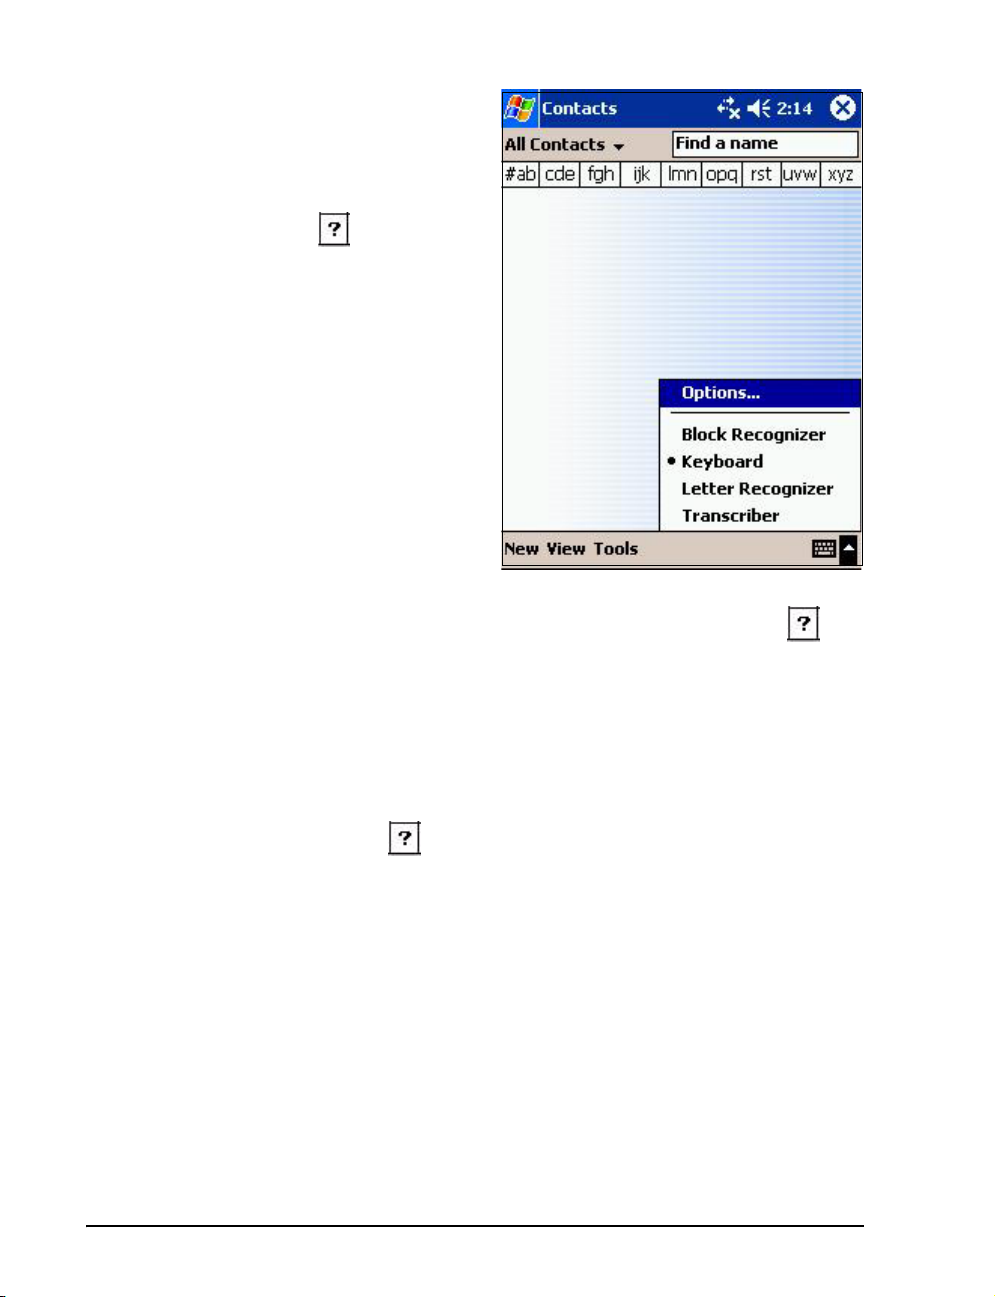
The following input options are listed:
• Block Recognizer - To select the Block
Recognizer, tap the input panel arrow.
For help with using Block Recognizer,
tap the help button
.
• Keyboard - The keyboard can be setup
to permit a full 5 row typewriter
keyboard or a keyboard with larger keys
but requiring extra steps for some key
functions.
• Letter Recognizer - Letter Recognizer
allows you to use the stylus to write on
screen, just as you would write with a
pen on paper. After you write each letter
it is converted to a text character.
Tap the input panel arrow and select
Letter Recognizer. For help with using Letter Recognizer, tap the help button
.
• Transcriber - Transcriber also allows you to write onscreen with the stylus. However,
this method allows you to write blocks of information before pausing for the characters
to be recognized. The transcriber does word recognition to aid in translating the onscreen writing.
Tap the input panel arrow and select Transcriber. A Transcriber Intro screen will be
shown. Tap the help button
for information on using the transcriber.
The input method will be shown as an icon next to the input method arrow. This icon can be
tapped to bring the input area up or down. Generally wh en input is needed, th e input area will
appear automatically using the default or previous input method.
Other Methods to Work with the Screen
Using the Cursor Button
Use the four-way Cursor Button to move up and down, and side to side, when moving between
on-screen buttons and controls. You can use this feature to scroll through lists of files and
documents.
32
Page 43
Using the Thumb wheel
Use the thumb wheel to move up and down when navigating on-screen buttons and contro ls.
Press to make your selection. The thumb wheel can also be used to traverse an y menu and to
select items from it once the menu has been opened. In the navigation program the thumb wheel
performs zoom-in and zoom-out functions on the map screen.
Using the Programmable Application Buttons
The Programmable Application Buttons provide a fast and convenient way to open your favorite
programs. Press one of the Programmable Application Buttons to instantly open the application
assigned to that key. By default the contact list is on the second button from th e left and is
represented by the icon above the button.
Entering a contact
You can use Contacts to keep important contact information on all your friends, colleagues and
business associates. This information can be quickly shared with other mobile device users by
making an infrared connection. The contacts address can be used with the WayPoint navigation
program as a starting point or as a destination. The first entry you are likely to enter is yourself.
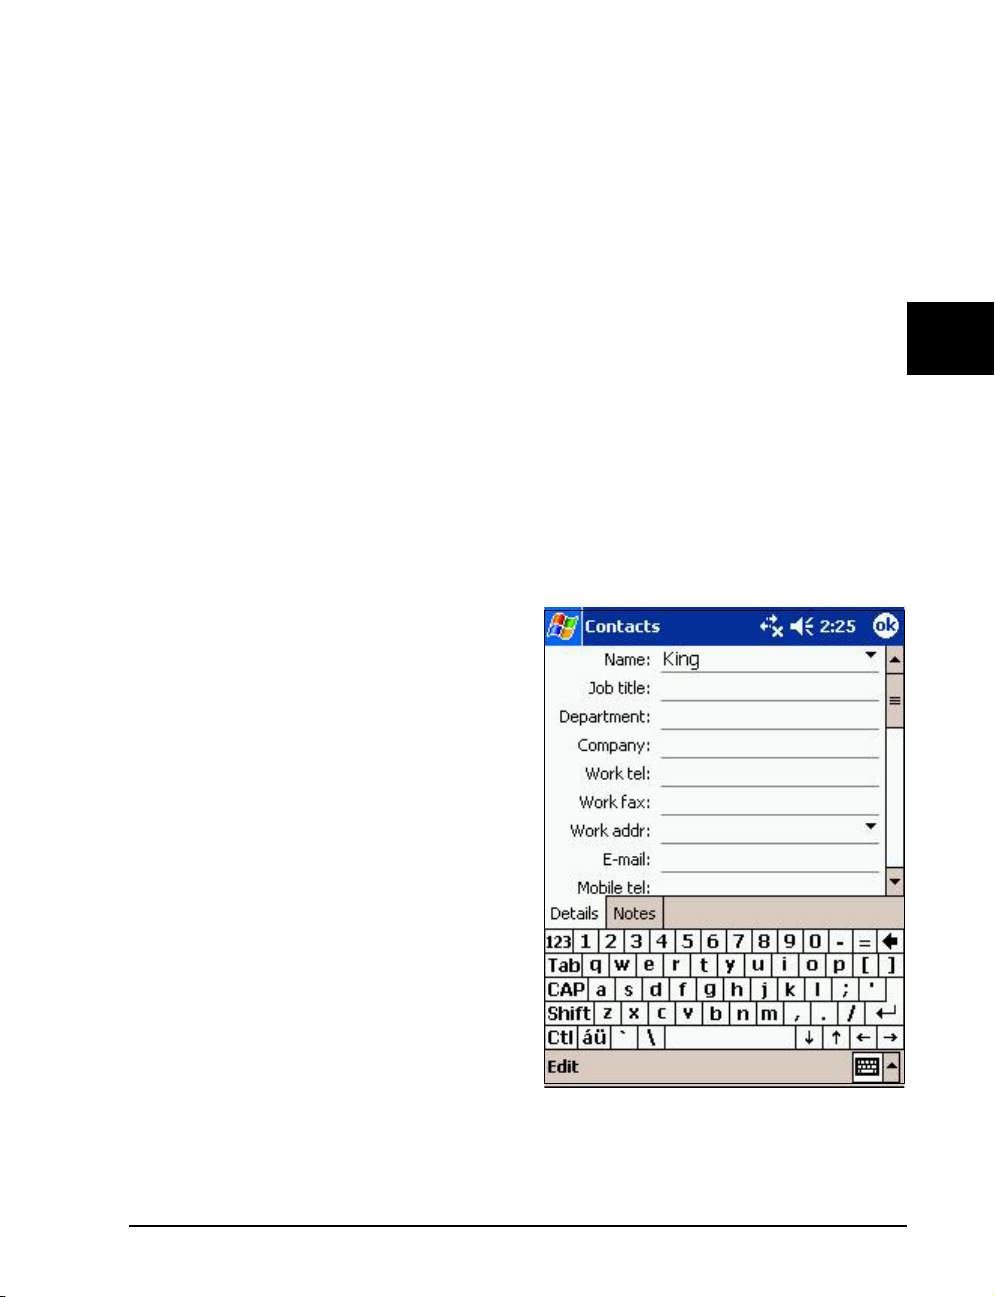
With the contact application open, tap the New entry on th e command bar.
• To enter the data for the new contact,
tap each field.
Basic Operation
• The down arrows next to the name field
and address fields can be used to
provide more structure to these entries if
needed.
• There are three address areas. These are
work, home, and other.
• There are several phone number fields.
These include home, business, cell
phones, fax machines, etc.
• To reach more entry areas, use the scroll
bar or the cursor pad.
• Assign the new contact to a category by
scrolling down to Categories and
selecting one from the list.
33
Page 44
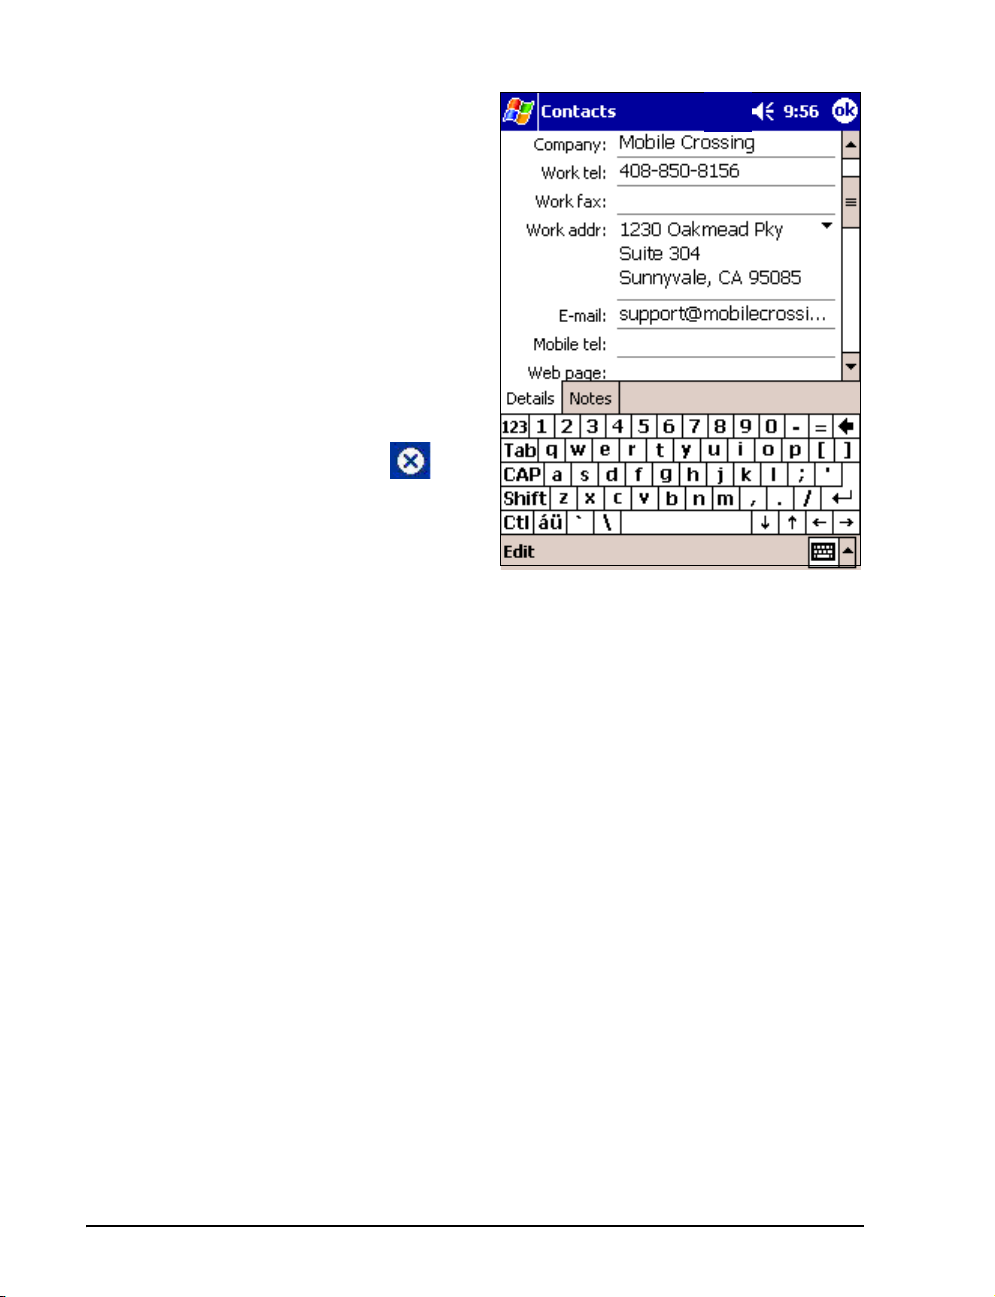
• When you are finished, tap the OK
button on the Title bar.
• You can find contacts or groups of
contacts by tapping Find on the start
menu, and selecting Contacts.
• To display a contact summary screen,
tap a contact in the contacts list.
• To change the information with a
contact summary screen displayed, tap
Edit on the command bar.
• To leave the application, tap on
title bar from the summary screen or just
start another application.
Advanced features
There are some interesting features available for Contacts from the tools menu.
• You can make a copy of a contact as a starting point for further editing.
• You can beam the contact information to another person.
• The WayPoint 200 has an additional feature. You can send the contact via Bluetooth.
The Bluetooth option is only available from the summary list so tap and hold the en try
to see the selection or use the Tools menu item. It is called: send by Bluesoleil.
Setting the Clock
A new PDA will need to have the clock set to the correct time and time zone. The time may need
to be adjusted occasionally and the time zone will need to be changed if you travel outside your
area. Use the following steps to set the clock:
1. Tap the Start menu and select Settings.
2. Select the System tab, and then tap on the Clock icon.
3. Tap the Time tab if necessary.
4. Set the time zone and adjust the time and date.
34
Page 45
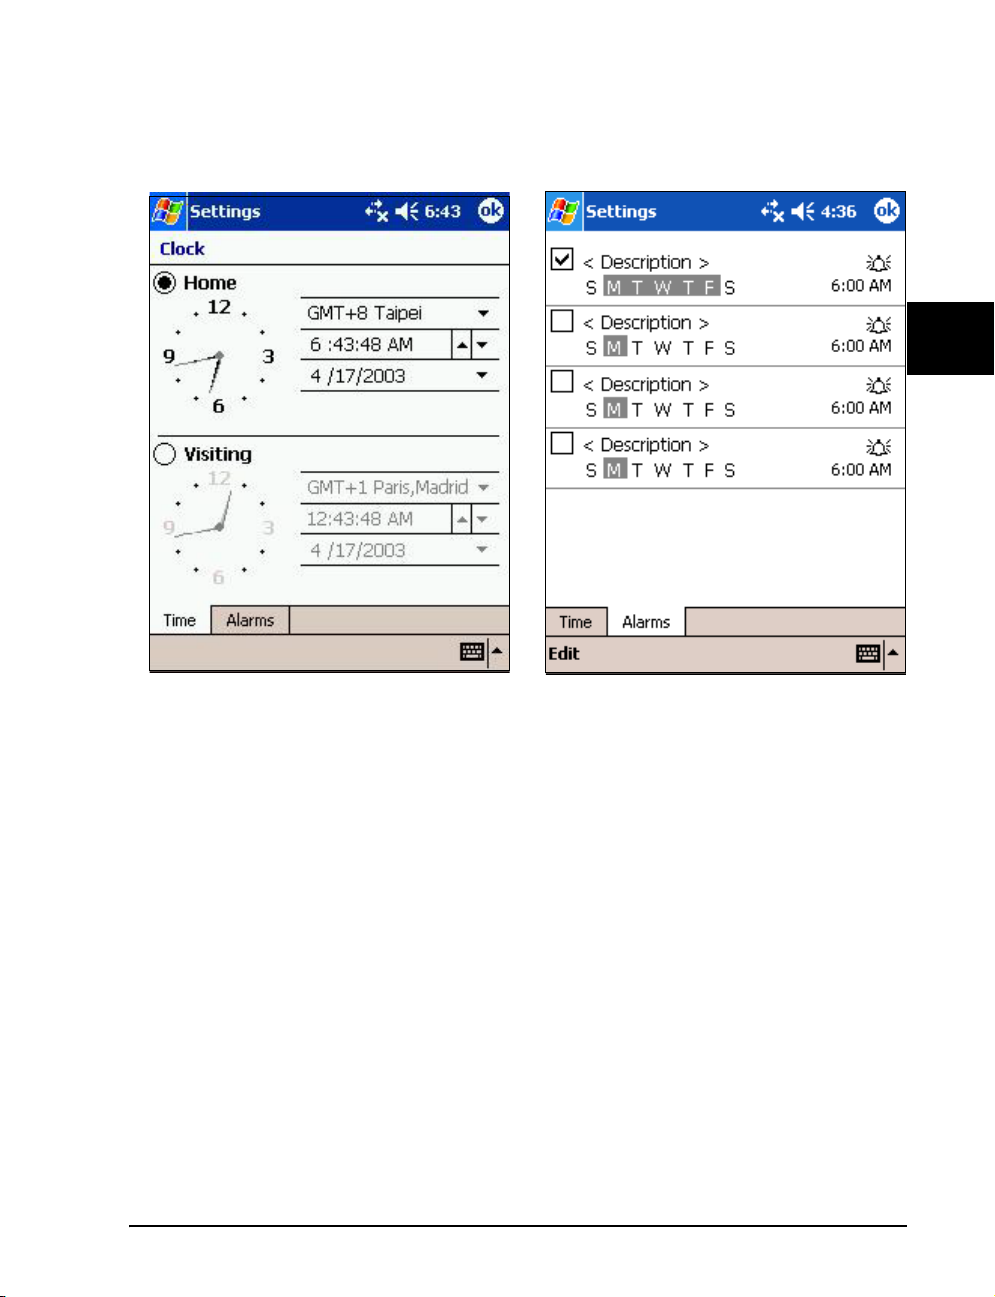
5. You can set up two locations, home and visiting, enabling you to work on local time
when you make a trip without losing your home settings. Tap the Home or Visiting
button to change the setting you want to use.
Basic Operation
The clock will be maintained at the correct time from your PC when you activesync the unit or
by your GPS when you have a fix.
Alarms
The clock also supports alarms. Clicking the Alarms tab brings up the display showing four alarm
settings. As shown the top setting has an alarm set for weekdays at 6 AM. The checked box
indicates that this is an active alarm. The days have been tapped to highlight the full week and the
time is set. The time itself or the bell icon can be tapped to bring up the two screens on the next
page.
35
Page 46
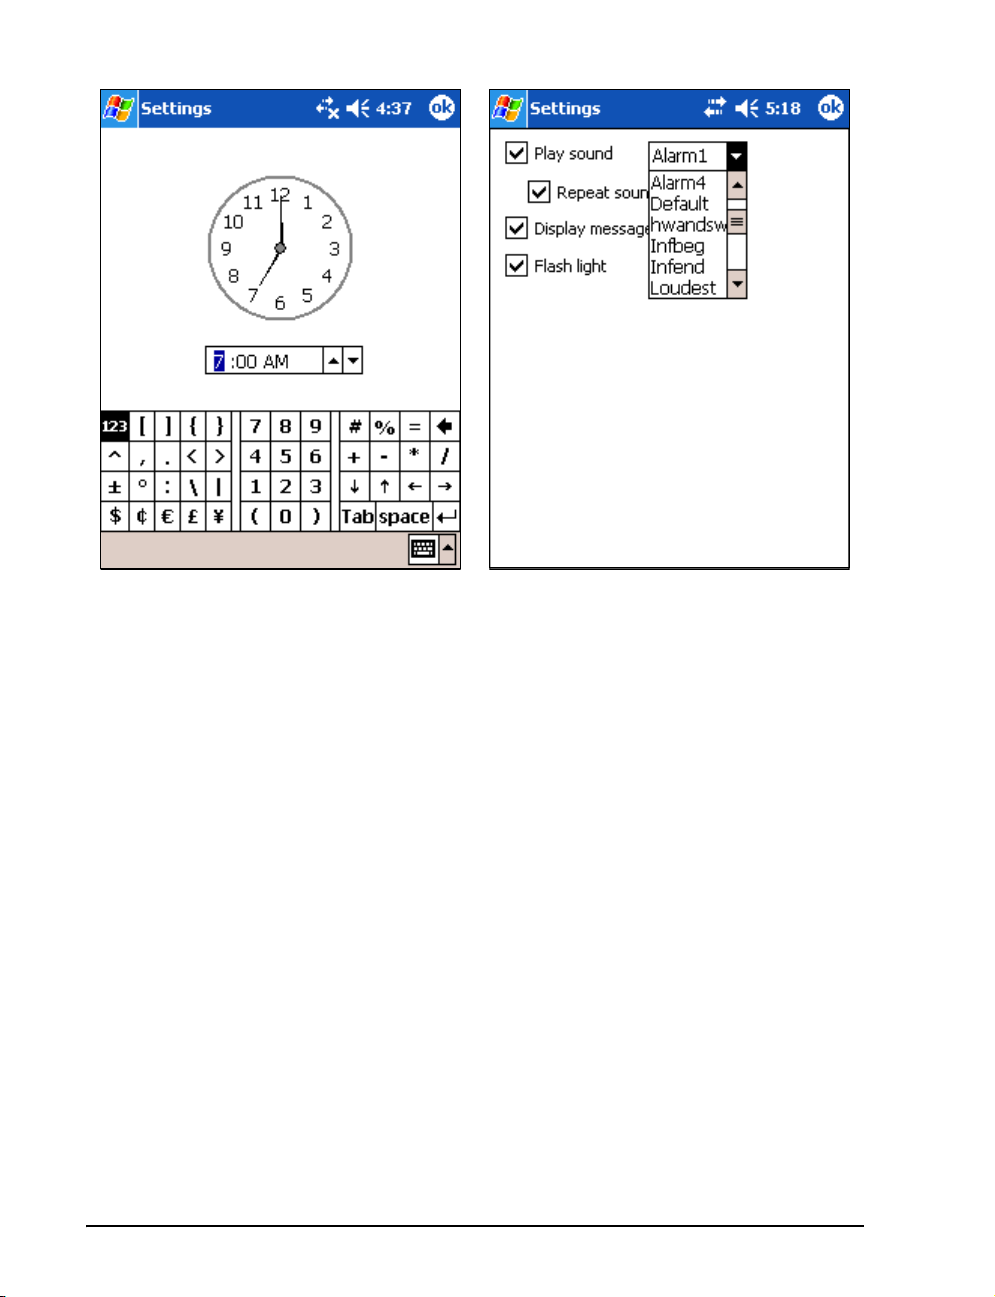
The clock itself can be changed by tapping the number and either tapping the arrows to modify it
or using the input field to enter the exact value. Tap OK to return to the alarm screen.
The bell icon tap reveals the various alarm choices. The sound itself can be changed or turned
off. Selecting an alarm entry causes it to sound momentarily. A visual alarm can be initiated with
a displayed message and/or flashing the center light above the screen on the WayPoint PDA.
An alarm can also be set in the calendar application when a reminder for a special appointment is
needed.
Owner Information
Use the start menu and system setting to reach the Owner Information icon. Tap on the Owner
Information icon to enter your personal details. You can display a summary of the information
when you turn your WayPoint PDA by selecting the box at the botto m of the screen. Tap on the
Notes tab to enter additional information.
36
Page 47
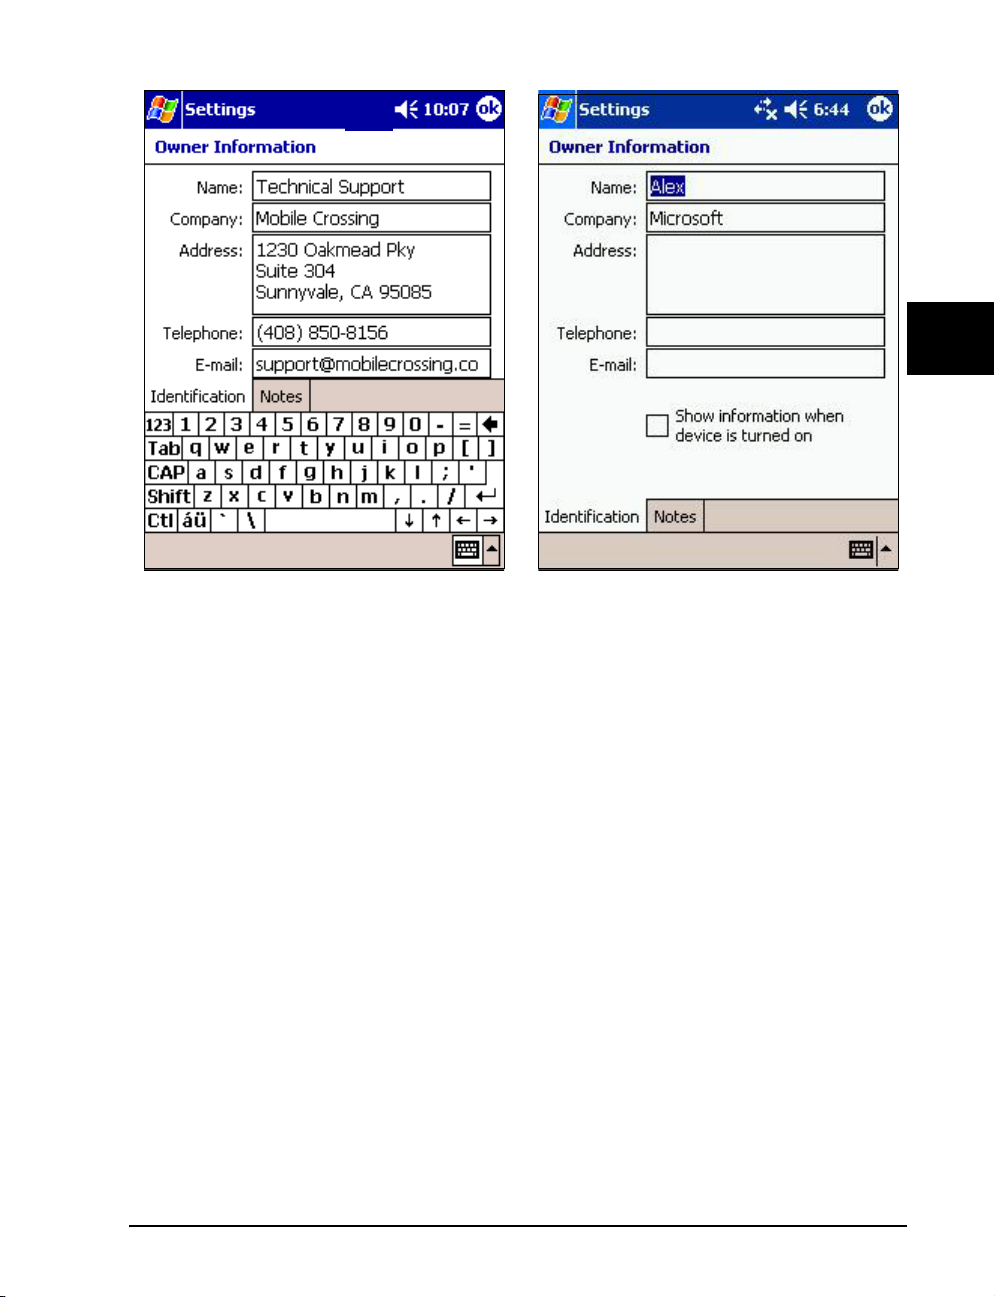
The Owner Information Screen should match the Registration information that was returned to
Mobile Crossing. The name and E-mail address will be checked by the Traffic Watch program, if
used. Being a subscriber of Traffic Watch will provide some security if the WayPoint PDA is ever
stolen, since its location can be determined if the program is run by the thief. Please report thefts
or transfers of ownership of your registered product. Also report a change of E-mail address to
Mobile Crossing or update you online registration.
Backup
It is important to always have a backup of critical information in your PDA. There are two ways
to back up the data on the unit. They a re:
1. ActiveSync on the PC. (See the Pocket PC reference manual on the CD-ROM for more
information on this solution.)
2. Gismo Backup on the WayPoint unit itself
Both have there place but for users that are away from home, or do not use a pc, an on b oard
backup tool is critical. The WayPoint PDA uses volatile memory, meaning that if the battery runs
down the memory is erased. Therefore it is doubly important to keep ba ckups of the data
contained in RAM (volatile) memory just in case. You may also want backups just in case you
accidently erase something or make a change that you later decide needs to be un-done.
Basic Operation
Note: If Gismo is not installed use the File Explorer and tap the Gismo cab file in \Windows to
install it. The cab file is called GisMo_PPC.ARM.
37
Page 48
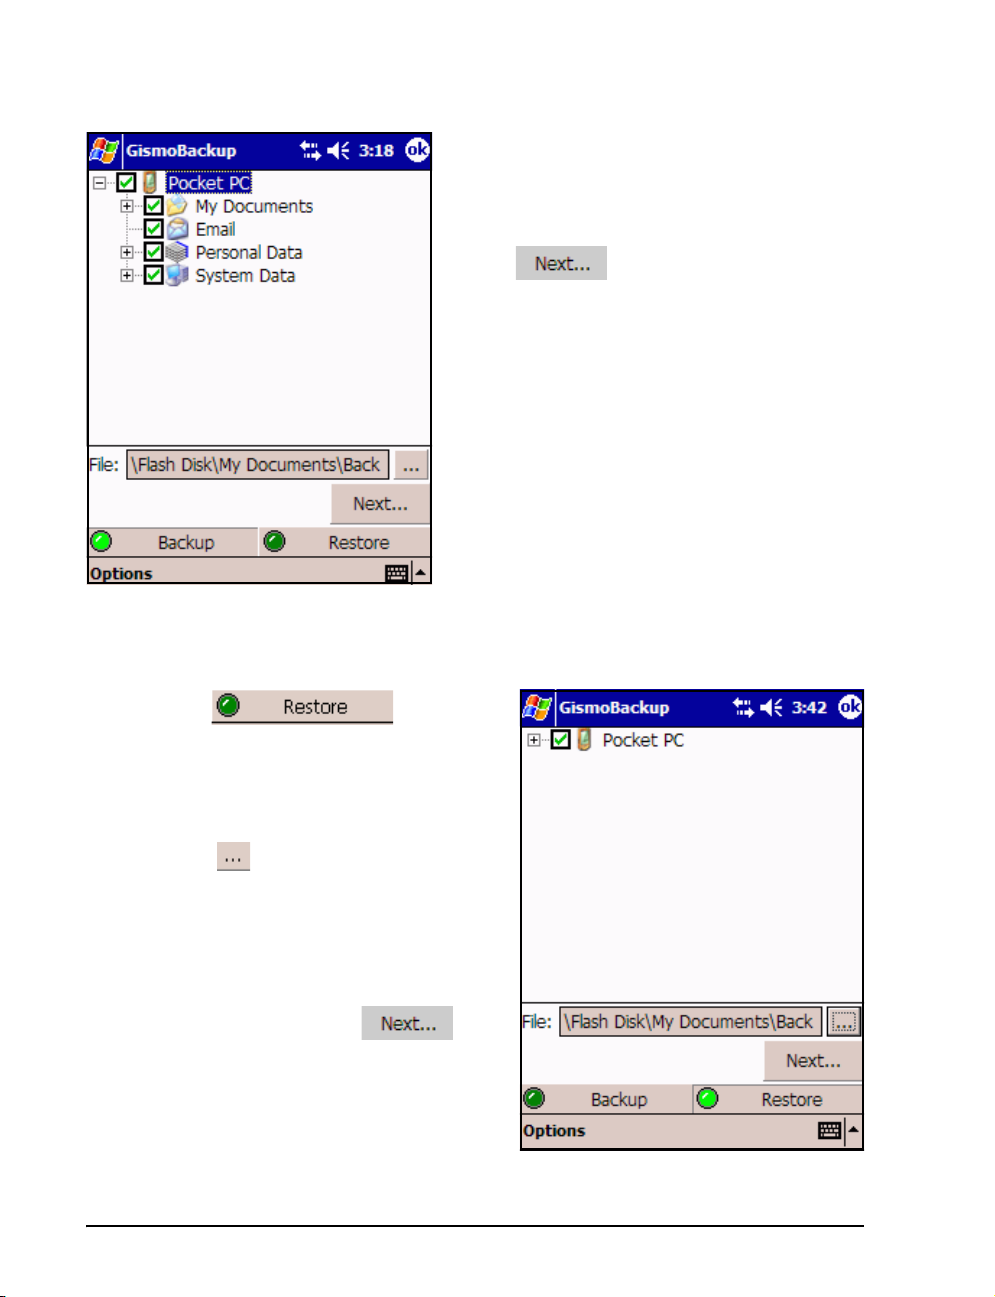
To back up the full data perform the following steps.
1. Start the backup program
2. The screen displayed at the left appears with all
things selected.
3. Tap to initiate the backup.
4. A confirming screen will appear. Tap Start to
begin. The screen will display the progress.
You have just backed up all your data. All processes
on your machine were also stopped and you took a
lot longer to back up data you probably didn’t care
about. Making the backup more efficient is covered
in the Backup Advanced topics below.
Once the backup is completed you can restore it at
any time. Of course anything you restore won’t have
any of the changes you made since the backup.
Restore
To restore the data that you backed up you start Gismo again.
1. tap the entry.
2. A screen with no data on it will appear. The
lamp icon on the Restore button will show
you are in restore mode by turning yellow.
3. Tap the button to bring up a list of
choices from your previous backups.
4. Tap the one you want. The screen at the
right will appear. The essential data is now
filled in.
5. To restore everything tap .
6. Confirm the selection by tapping Start to
begin the restore operation.
38
Page 49
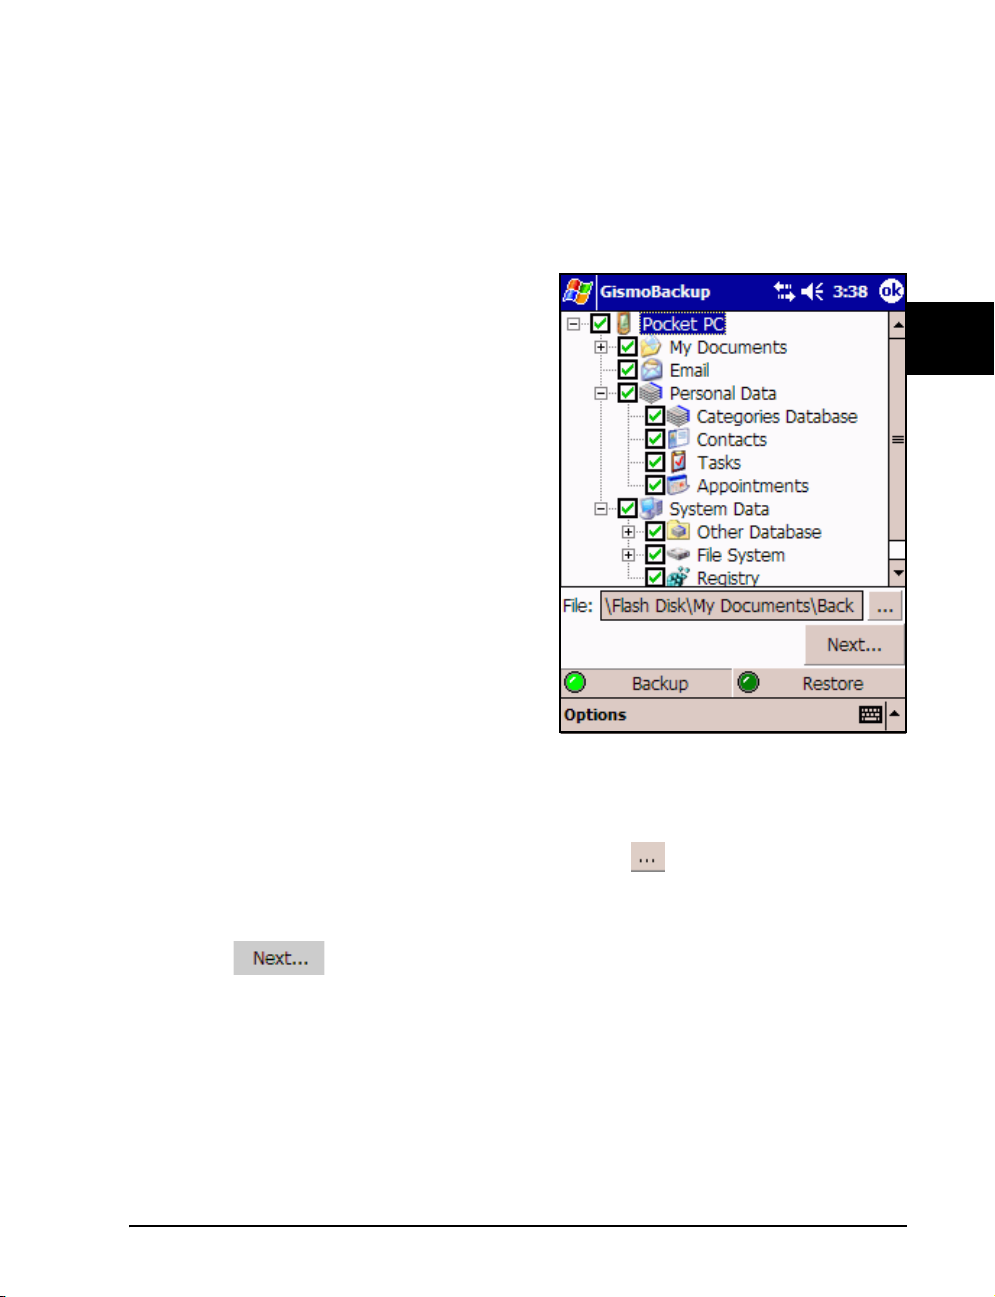
Choices
Generally you won’t want to back up everything in RAM every time and you will usually only
want to restore part of what you backed up unless the backup is caused by a complete battery
loss. The screen below is similar to the first screen shown above except that the Personal Data
entries and Option entries have been expanded by tapping the plus sign to show the contents.
This listing is similar for either a backup or a restore.
The list includes everything that is stored in RAM
on the WayPoint Pocket PC and by default all items
are checked to be backed up as shown on the
screen by the checkmarks.
For a restore the list shows everything that is in the
backup file that was selected.
Smaller backups of less data can be useful to keep
track of personal data that changes frequently or
files that you are planning to edit but would like to
be able to restore if the change doesn’t work. Your
personal data can be the most important item on
the list and you may want to consider special
backups of this data.
CUSTOM BACKUP
Basic Operation
To backup just the data you want:
1. Uncheck the items you do not wish to back
up. Use the + entry to show more detail about yo ur choices. Check or uncheck the boxes
until the exact choices are made.
2. If you wish to change the filename or location, tap the icon. Generally you will want
to select somewhere other than RAM for your backup file. The filename should be
descriptive. See more below under Advanced Features.
3. Tap to initiate the backup.
4. A confirming screen will appear. Tap Start to begin. The screen will display the progress.
Advanced Features
In the System Data category is a check mark for the file system. Much of th e file system files are
actually in ROM but this setting will get all of the rest of them. The Registry is a special place used
by the Pocket PC OS to store settings for programs. In particular this is a good thing to backup if
you install beta software or other software that you don’t trust so that if you have to remove it
39
Page 50
you can restore the Registry as well. The standard remove program often leaves entries in the
Registry.
The backup file selection Button permits defining the file name and file location. It brings up
a form with 4 entries to fill in. These are:
1. Name: This is the name of the file. It should be descriptive of the contents and date.
2. Folder: This is the file folder that you wish the backup to be stored in. Tapping this will
bring up a selection list.
3. Type: Gismo can store files in two formats. A .gbk file is the standard form, but you can
also select a self extracting .exe file. This kind of file will automatically bring up the
program to extract the contents if it is executed.
4. Location: This is the name of the media which defines the place that you wish to store or
retrieve the backup. In file explorer this is the same as the top level directory name for
extended storage locations. Tapping this will bring up a selection list. You must have the
memory card installed to see it on this list.
The backup program works by building a compressed file in the Location and directory you
specify. The file contains only the items that you selected. It can build a regular backup file or a
little larger self-restore file. Self-The backup command ca n save your backup to any locat ion that
you may wish. It is a good idea to reserve an SD card especially for this purpose. While the
program supports backups even to RAM (main memory), this should only be used for temporary
saves.
Note that you cannot backup SD or CF card
contents with this program. The files on these cards
will not get lost if the battery runs down, but the
recommendation is to keep critical data backed up
by temporarily placing a copy in RAM and using the
backup utility. It is also possible to use file explorer
to copy your SD card to a CF card to be used as
backup. Similarly, the WayPoint navigation maps
and programs are supplied on a Flash Disk. This is
a non-volatile 128 MByte storage area in your unit.
It is also a good idea to back this up by making a
copy using file explorer to an SD or CF card.
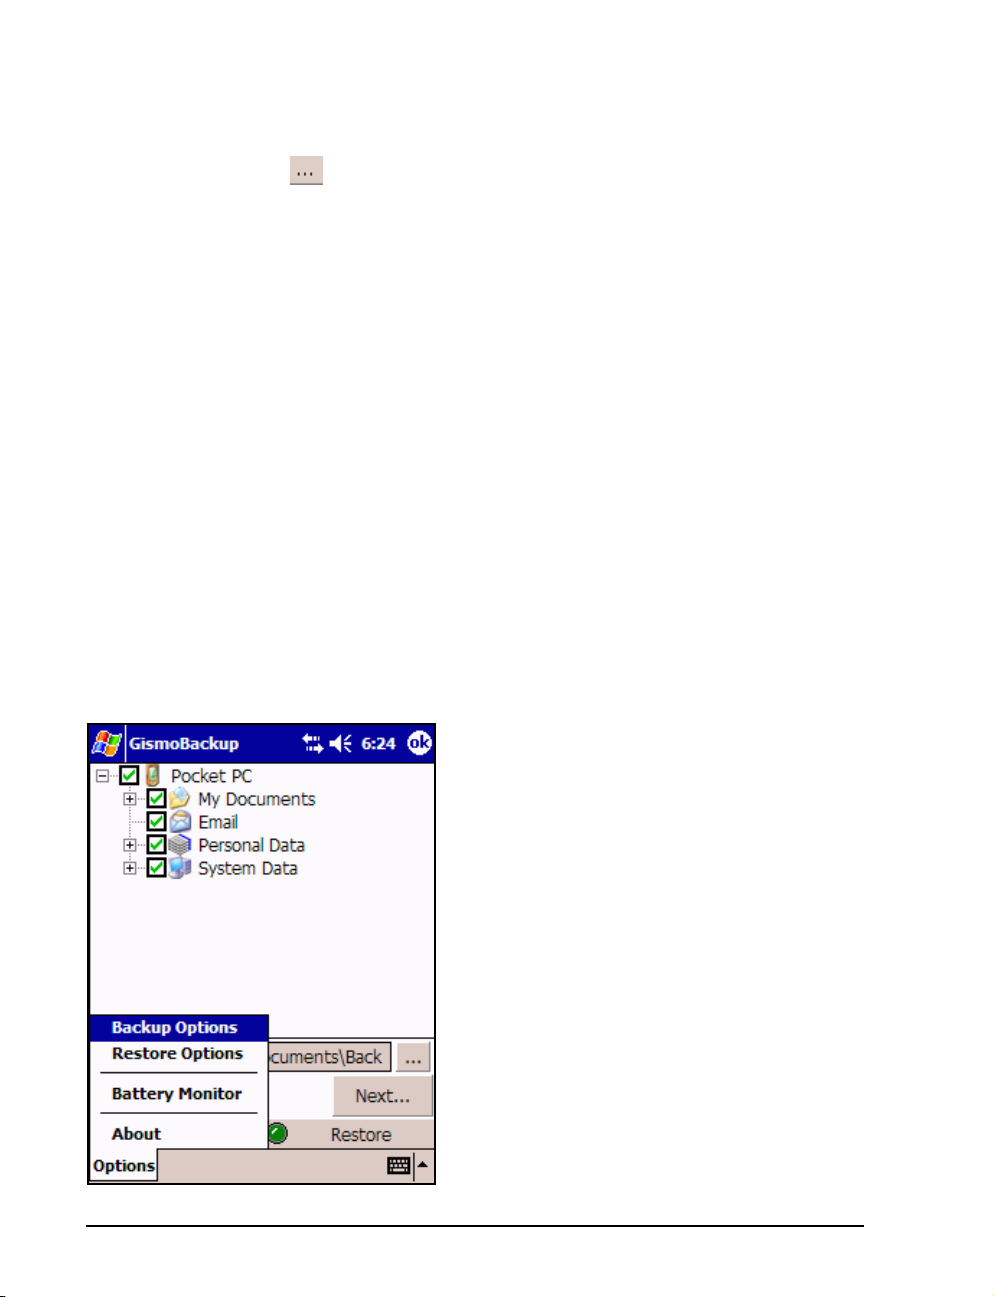
The figure at the left shows the Options menu.
• The Backup Options include the ability to
stop all running processes. This is important for a
full backup since running processes cannot be
safely backed up under some conditions. There is
40
Page 51

also an option to exclude certain files from the backup (such as previous backup files or
temp files).
• The Restore Options include the ability to stop processes and the ability to handle the
start menu based on what is restored.
• The Battery Monito r feature can auto matically back up data based on a battery level
threshold. Thus if the battery starts to get low the unit can stop what its doing and save
the state of your RAM contents. It can also be used to simply warn you about the
battery status and can be set to whatever percentage yo u might like.
About Backups
It is easy to build backups that can eventually fill up your storage so it is a good idea to purge
them occasionally. The file explorer command can be used to erase files. You should load your
backup to ensure that it is readable by the backup program prior to deleting earlier ones. It is not
necessary to actually execute the restore to verify that the file can be read.
Using Help
This was only an introduction to the many programs and feat ures available within the WayPoint
Pocket PC PDA. And, of course, you can customize it by adding more programs of your own
choosing. The unit has an extensive help system built-in that can be used to explore the loaded
programs and to review their operation when a manual is not present.
Basic Operation
• From the TODAY screen you can tap Start and then select Help to view the full list of
available help files.
• From within most applications you can get context sensitive help by tapping Start and
selecting Help with the application running.
Once inside of help you can use the View command to reach the full installed help database or
jump to the table of contents. There is a Find command to search the help file you are using.
However, most of the time ‘help’ is designed with a table of contents and logical links so that a
search is not necessary. The arrows on the command bar can be used to return back to the
previous entry in the help tree.
The “WayPoint Pocket PC Reference Manual” and this ma nual are included a s a tagged PDF
files on the CD-ROM. Supplying pre-tagged PDF files permits users without ActiveSync to read
the file in reflow mode on their PDA using an acrobat reader that supports reflow such as the
one from Adobe. These files can be downloaded to the PDA for more extensive help.
ActiveSync
The installation quick start guide includes the optional installation of ActiveSync for PC users.
The use of ActiveSync is covered in the WayPoint Pocket PC Reference manual but a few tips
41
Page 52

on its installation are covered here. ActiveSync is optional and is not needed by your WayPoint
PDA.
Users wishing to sync their WayPoint PDA with information on a PC will need to install
ActiveSync from the included CD-ROM. They will need a copy of Outlook to pe rform syncs of
their contact list and other PIM data. A copy of Outlook is also on the CD-ROM.
Users that already have Outlook 2002 or later or ActiveSync 3.7 or later already installed will not
need to reinstall these products, however the WayPoint PDA will probably not be recognized by
the previously installed copy of ActiveSync since it is a new product.
If your PDA is not recognized by ActiveSync when you plug it in then place the WayPoint CDROM in your CD drive and have it search the CD-ROM for the correct driver. Using the driver
from the CD will permit your existing ActiveSync installation to work with the new WayPoint
unit.
42
Page 53

Chapter
4
Getting Started with Navigation
WayPoint navigation requires a combination of resources which consists of the mapping
application, a set of maps, and a GPS receiver. The first step is to set up the GPS receiver
correctly.
WayPoint 100 users should plug in the CF GPS receiver. The lamp on the receiver will light,
indicating that the unit is on, when the GPS is selected in WayPoint. The CF GPS receiver is on
Com 3. The baud rate must be set to 4800. The lamp will blink when a GPS fix has been
obtained. If the GPS is shut off via WayPoint or another GPS program the lamp will turn off.
WayPoint 200 users should find a place for the Bluetooth GPS within approximat ely 10 to 15
feet or so (no more than 30) of the PDA and with a clear view of the sky through th e car
windows. The following conditions will be noted:
• Turn the GPS unit on with the power switch and let it acquire a GPS signal.
• The blue light should flash indicating a Bluetooth network can be established between
the unit and the PDA. The blue light flashes quicker after a link is established. A
connection to the GPS can be established from the Bluetoot h start menu. See
“Bluetooth Operation” on page 83 for more information on setting up the Bluetooth
network.
• The center lamp shows the GPS status. It will light when powered on and will flash
when a GPS fix has been achieved.
• The third light shows the power status. It will flash when a battery recharge is needed. It
will light steady when external power is applied and the unit is charging.
If you are hiking with this unit, the GPS should be placed as high on your body as possible, or
hold the unit away from your body. The water in the human body effectively blocks the satellite
signals in the direction of your body. If you place it in your pocket the GPS antenna must be
facing out.
43
Getting Started w/ Navigation
Page 54

The WayPoint PDA should be installed in the vehicle mount for car use. WayPoint 200 users
should start the Bluetooth radio and ensure a connection to the GPS receiver. This can be
accomplished easily by selecting the “Start GPS” entry from the Bluetooth menu. Then follow
the on screen instructions to establish the default connection. Se e the chapter on
Operation” on page 83 for more details.
“Bluetooth
Road Safety
Before launching WayPoint, road safety should be considered. A GPS navigation device is an
important tool when used properly but it can be a distraction to the driver if used improperly.
• A stylus should never be used by the driver while a vehicle is in motion.
• The route should be set up ahead of time before the car ever moves from its parking
place. It is possible to set up the route in your home with the GPS off if desired.
• Make sure the WayPoint GPS has your current location before starting.
• The driver should depend on voice prompts whenever possible and only occasionally
glance at the screen.
• Automatic recalculations should help prevent any need to int eract with the screen .
• If you have to deal with the program use your finger for a stylus.
• Use the buttons and the thumb wheel to the maximum extent possible. Depressing the
Thumb wheel on the map screen selects the tools menu and the thumb wheel can be
used to move up and down the menu itself and depressing the switch selects the item.
• The thumb wheel provides zoom in and zoom out capability.
• Pull off the road if you need to do anything complicated.
Mobile Crossing is not responsible for your actions. Use care when operating this unit.
Note that, in the discussions that follow the term locations, landmarks, and POI (Points Of
Interest) will be used interchangeably. They all indicate some object or location that you are
interested in.
Starting WayPoint
The Mobile Crossing WayPoint navigation software can be started by pressing the right
hand button on the face of the PDA just below the screen. It can also be started like any other
program by tapping the icon on the start menu, if you prefer. You should install a map memory
card if needed for your trip before starting the program. The program will open with a splash
screen and then load the map display. While working inside the WayPoint navigation software, all
44
Page 55
four of the hardware buttons below the screen are defined to do useful tasks. From left to right
these are called Favorites, Detour, Status, and WayPoint. From the map screen the buttons work
as follows:
Press the Button
Navigate to one of your
favorite locations. (See
Favorites
Detour
Status
WayPoint
The WayPoint button is the method of starting WayPoint navigatio n software and leaving
WayPoint navigation software. The effect of the button is to toggle between navigation a nd
another task.
“Route to Favorites” on
page 65.)
If no route then bring up
the route form else
Route with Detour. (See
“Building a route” on
page 63 or “Detours ” on
page 70.)
Check GPS status by
displaying the GPS
screen. (See
GPS” on page 45.)
Go to previous
application (Leave
WayPoint navigation).
“Starting the
Press and hold the Button
Save an entry in locations at your
current position. (See
home location” on page 51.)
Navigate to nearby Gas Station,
Restaurant, or other Location. (See
“Take A Quick Detour” on
page 65.)
Provide voice prompt with
distance to and direction of next
turn. Use this to repeat a message
that you missed.
Start TrafficWatch & Weather
Underground programs. Other
quick start programs can also be
configured.
“Saving your
Subscreen Button use
When viewing a subscreen such as the GPS information, pressing the same button again (or any
of the left three buttons) will be the same as OK. Pressing the WayPoint
no subscreen) performs a cancel.
button (which has
Starting the GPS
After starting the software a connection should be established between the WayPoint program
and the GPS installed above.
Press the GPS status button to reach the screen wh ere the GPS data is displayed. One of
the two GPS views shown below will be visible. The left and right cursor keys can be used to
switch screens.
45
Getting Started w/ Navigation
Page 56
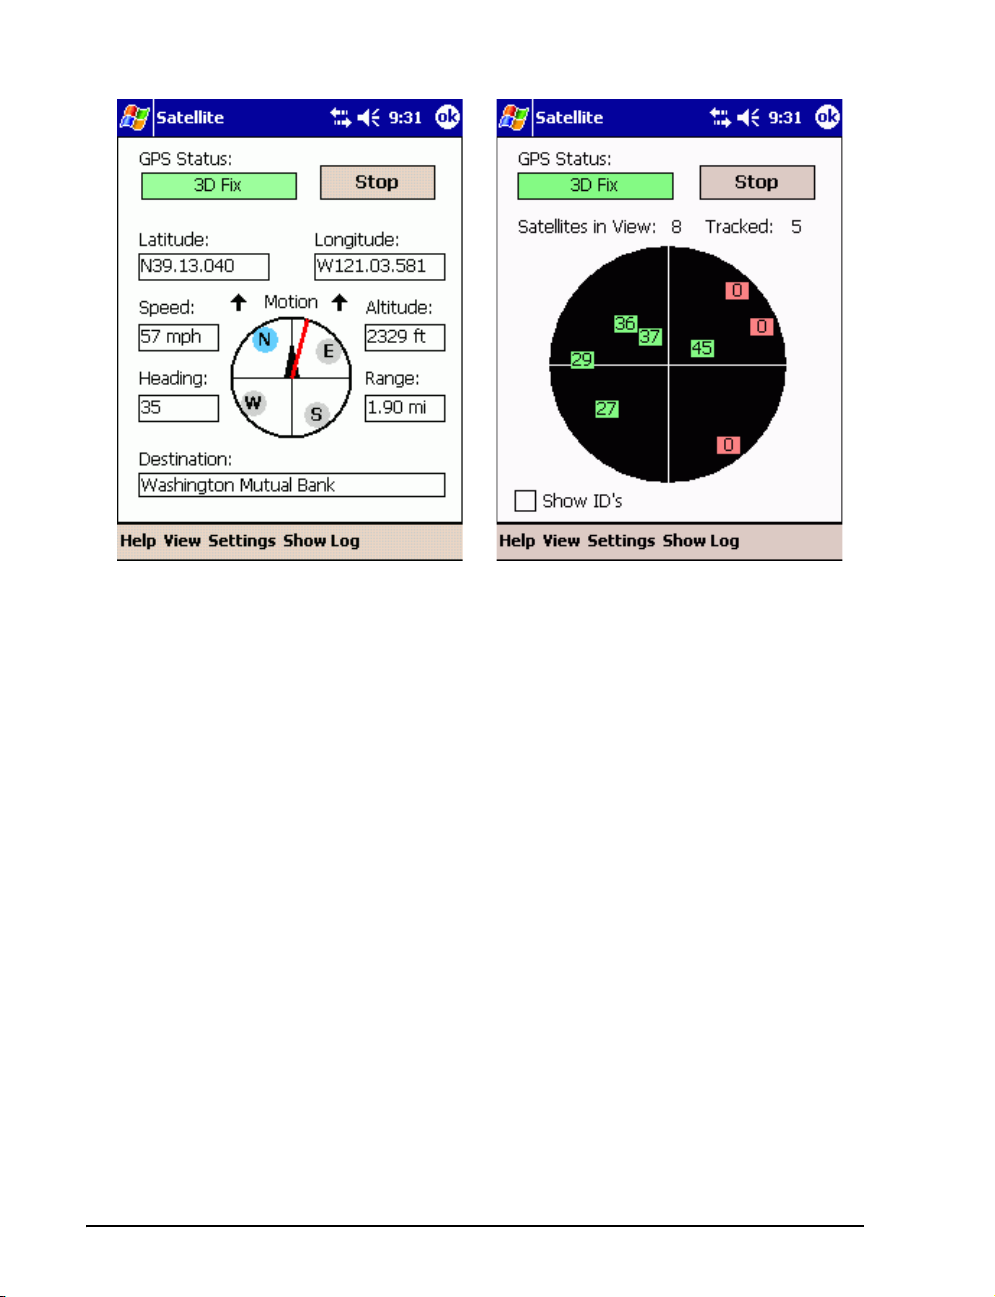
The GPS Data Screen
The GPS Data screen is shown above on the left. This data screen shows the GPS running and a
destination selected. However, this is not likely to be the case the first time you run the program.
The Satellite Map screen is shown above on the right. When you enter the GPS command either
of these screens may be shown.
• Other things on the GPS Data screen include the current latitude & longitude, the
altitude, the current speed, and heading. If a destination is selected then its na me and the
range will be shown. The center shows a compass like display with an arrow showing
the direction of travel. In addition, if a destination is selected a red line will appear to
show the direction to the destination.
• This screen is where the GPS is started or stopped. It can be restarted each time the
program is started or you can set it up to automatically start in the WayPoint general
program settings.
• The GPS status is shown here. This will indicate if a GPS is connected, if it is currently
acquiring satellites, and if it has a fix. A 2D fix means that the altitude is not being
computed while a 3D fix shows indicates more satellites are being used as part of the
solution and the overall solution is likely to be more accurate.
46
Page 57

Satellite Status
The Satellite Map screen can be chosen from the view menu or by the left/right cursor keys. It is
shown above on the right. It has the same start/stop boxes as the data screen but the rest of the
screen shows the satellite display.
• This is a nice screen to view if you are having trouble getting a GPS fix. You can use it to
check for satellite reception. The display shows the various satellites in their
approximate location in the sky with the top of the screen pointing north. The screen
can display satellite signal to noise ratio (strength) or the satellite ID's. Most of the time
the strength is what you want to view.
In the figure, there are 8 satellites in view and 5 are being tracked. This does not mean
that 5 are being used as part of the solution however. A tracked satellite may or may not
be part of the solution.
For example, the ephemeris data may not be downloaded yet or the satellite signal
strength may not be high enough to use although it is being tracked. Generally, a value
of at least 28 is needed for reliable reception on the WayPoint GPS receivers supplied
with the product. One of the satellites shown in the figure has a value below 28.
A minimum of 4 satellites is required to produce a 3D fix. More will often produce a
slightly more accurate position.
• The first time you use your GPS you should find a place with a clear view of the sky,
start the GPS and give it some time to find your current location. This initialization will
allow it to get a GPS fix m uch faster the next time. It is better if you are not in the car
for this step since the car itself may block some of the signals. See “Using the Cursor
Keys” on page 49
47
Getting Started w/ Navigation
Page 58
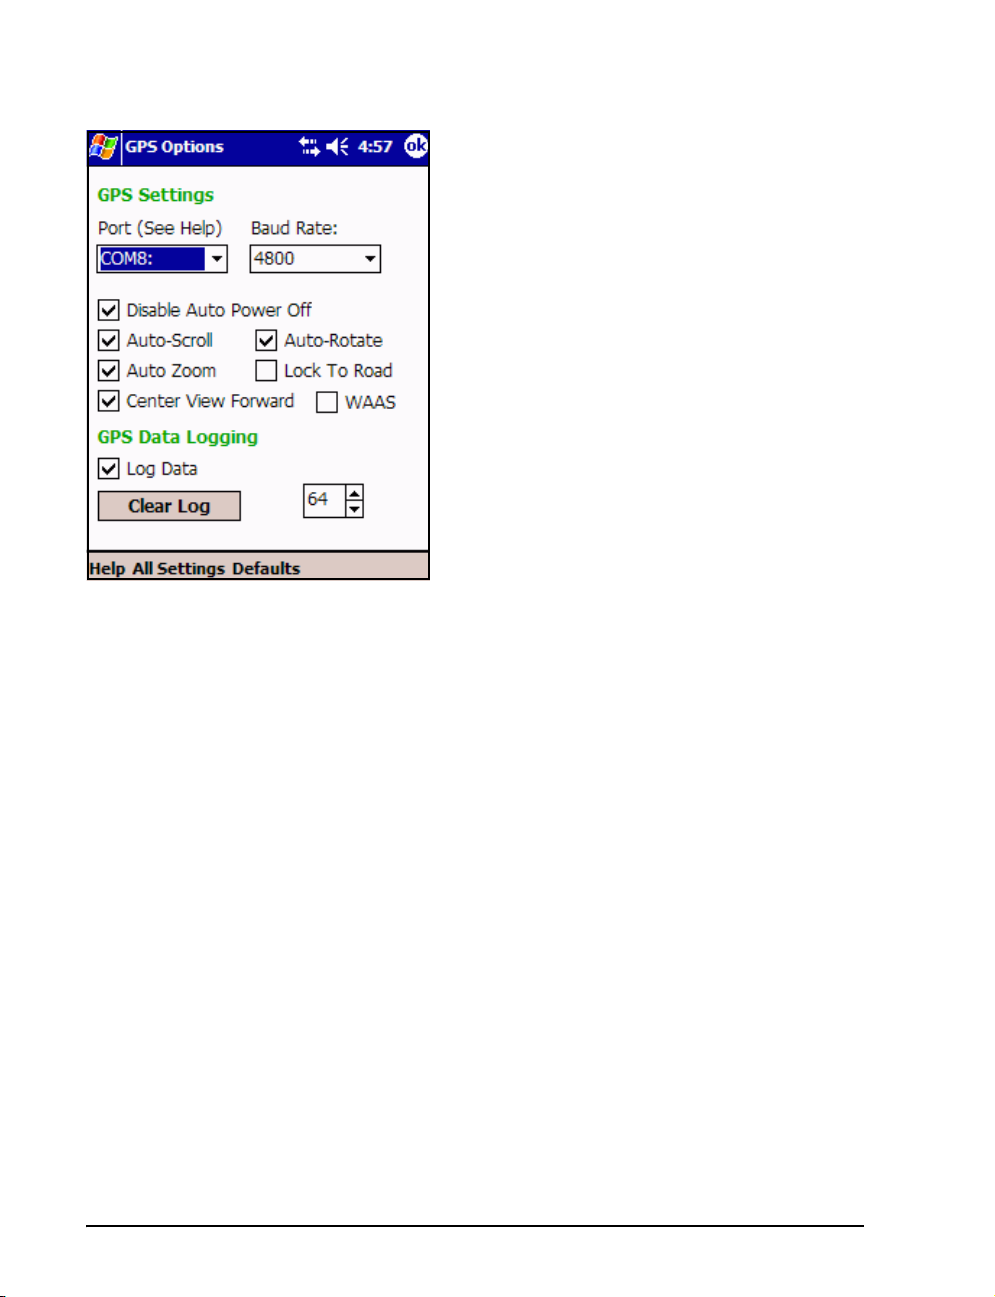
GPS Settings
The settings menu item shown at the bottom of the
screen should be tapped to show the COM port you
need to select and the baud rate which must be set
to 4800. Once the correct settings are made you can
return to the status page to start the GPS
• A WayPoint 100 should be set to COM 3
• A WayPoint 200 should be set to COM 8
(Perhaps 7 or 9 depending on the configuration, let
the Bluetooth software pick the port.).
The settings menu choice is the place to choose the
particular GPS settings and GPS options. Options
include the ability disable power off and to
automatically handle the screen so that you don’t
have to operate the controls while traveling down
the road. Using the automatic settings are
recommended.
• Auto-scroll will keep the GPS display on the map screen with the map itself moving
underneath the GPS position.
.
• Auto-rotate will keep the map always point such that the current movement is toward
the top of the screen. This will make the turns a head match the idea of left/right instead
of dealing with compass headings.
• Auto-zoom will change the zoom setting as you get closer to a turn so that the turn will
be shown with more detail.
• Lock To Road will cause the GPS position to be shown directly on the road even if
there are errors in the map.
• The Center View Forward check mark relocates the GPS position so that there is
more screen area devoted to the map ahead of you than behind you.
48
Page 59
• The WAAS check mark enables WAAS reception for increased
accuracy in areas where
the WAAS satellites can be received.
• There is support for a GPS log that will keep track of your
travels by saving GPS position data in a file periodically. It will
wrap around if the file size is exceeded. It is a good idea to clear
the log prior to starting a trip. The file can be reviewed later.
Check
“Using the Log file” on page 98 for more information.
L
WAAS stands for
Wide Area Augmentation System. This is
a system maintained
by the FAA to provide more accuracy
and integrity for GPS
signals used by aircraft.
• Press the GPS status button a couple of times to return
to the map page.
Using the Cursor Keys
The cursor keys can be used while looking at the GPS status screens.
The left and right keys will rotate through the satellite status screen, the
GPS data screen, the trip summary screen, and the GPS setup screen.
Note that the trip summary screen is only useful if trip logging is turned
on in the GPS setup screen. It provides data about the trip such as
average speed, distance, number of stops, and maximum speed. A new trip is generated
automatically if the stop time exceeds about 10 minutes.
Starting the GPS for the first time
The very first time you use the GPS or if you move the GPS more than 200 miles from the last
location where it was used the unit will have to search the sky to find it s location. This process
can take up to 10 minutes to locate your position, or even longer if the unit does not have a clear
sky view. The unit should remain stationary until it has a fix.
Your WayPoint can
make use of this system for more accuracy on the ground as
well. It is generally
not needed for vehicle navigation.
If you leave the GPS running in places where it cannot get a fix it may revert to the search the sky
view even though it has not been moved. This is caused by the unit assuming it was moved a
long distance since it couldn’t get a fix where it is. For this reason the GPS should not be turned
on and left to run in the house. It will recover from this condition the next time it is out of doors
but expect it to take another 10 minutes or so. This condition can also occur if the unit loses track
of time caused by leaving it off for a long period.
The following screen shots shows the “search the sky” sequence.
49
Getting Started w/ Navigation
Page 60
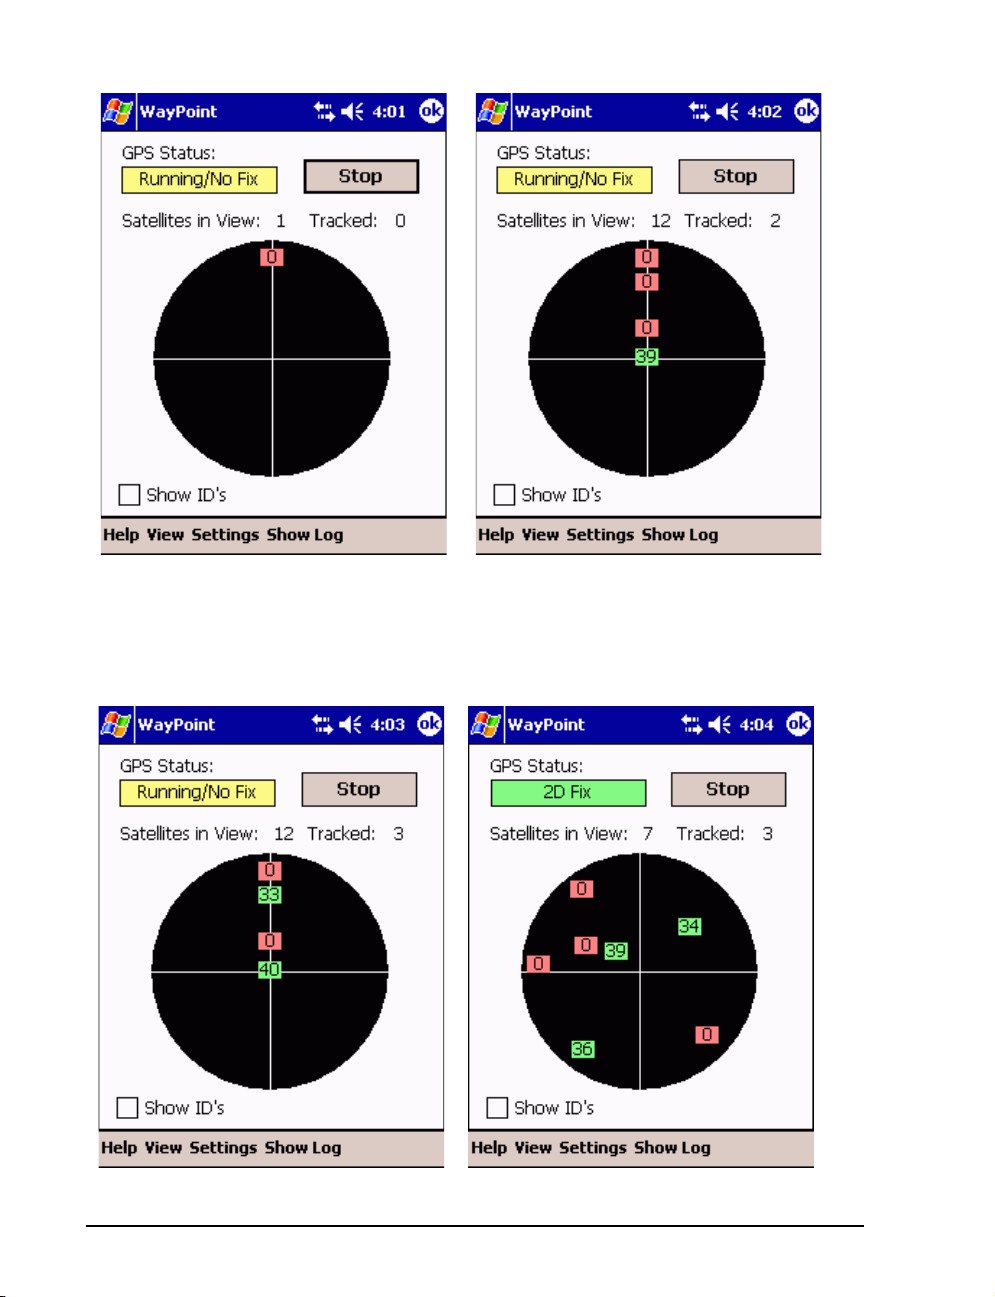
The first picture shows that the GPS is sending information to the PDA but no satellites have
been found. The second picture shows that it has found some satellites but has no idea where
they are in the sky.
50
Page 61
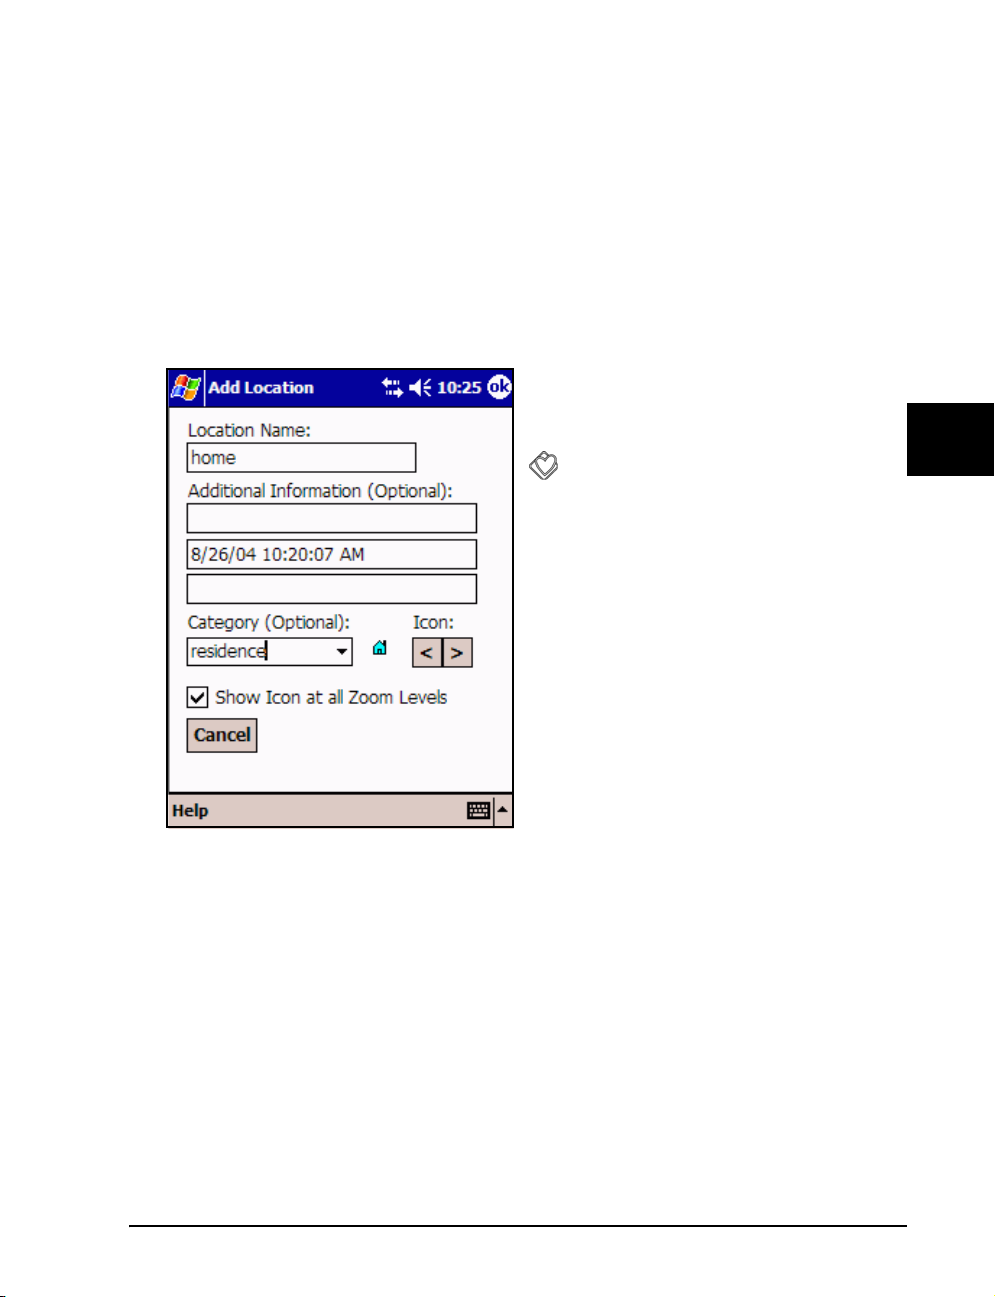
These pictures show that the GPS has acquired data from the GPS wit h information about their
locations. Once the unit is able to compute a fix it will place the satellite locations in the correct
place on the screen display. You can begin to navigate at this point but it would be better to wait
for one more satellite to have a 3D fix.
Saving your home loca tion
Once you have a satellite fix the GPS location will be displayed on the map as a small doughnut
shape. The first things most users want to do is to save their home location. Having your home
location stored away makes a lot of sense since it will likely be the starting point or destination for
many of your trips.
• If you are still parked in your driveway or
standing in your yard you can save the locat ion
by pressing and holding the favorites button
.
By the way, why is it that people park in a
driveway and drive on a parkway? Anyway, as
soon as you release the button a screen will
appear that can be used to record the loca tion
you just set.
• The only data you need to supply is the
name which in this case is likely to be ‘Home’.
A default name that shows the date is
automatically provided but you are likely to
want to change it. In the figure on the left the
date was cut and pasted into the additional
information field and a new name entered.
• Other things can be entered such as a category and picking an icon but these things can
be done later if you prefer.
• You can name your own categories, so a category like ‘family’ or ‘residence’ would be
good choices. You can also just leave it blank or pick an existing category.
• If the data entry field (keyboard) is removed as shown above you will find some more of
the form.
• You can select the zoom level used by the icon.
• Tap OK to save the point. You have just created your first Landmark.
51
Getting Started w/ Navigation
Page 62
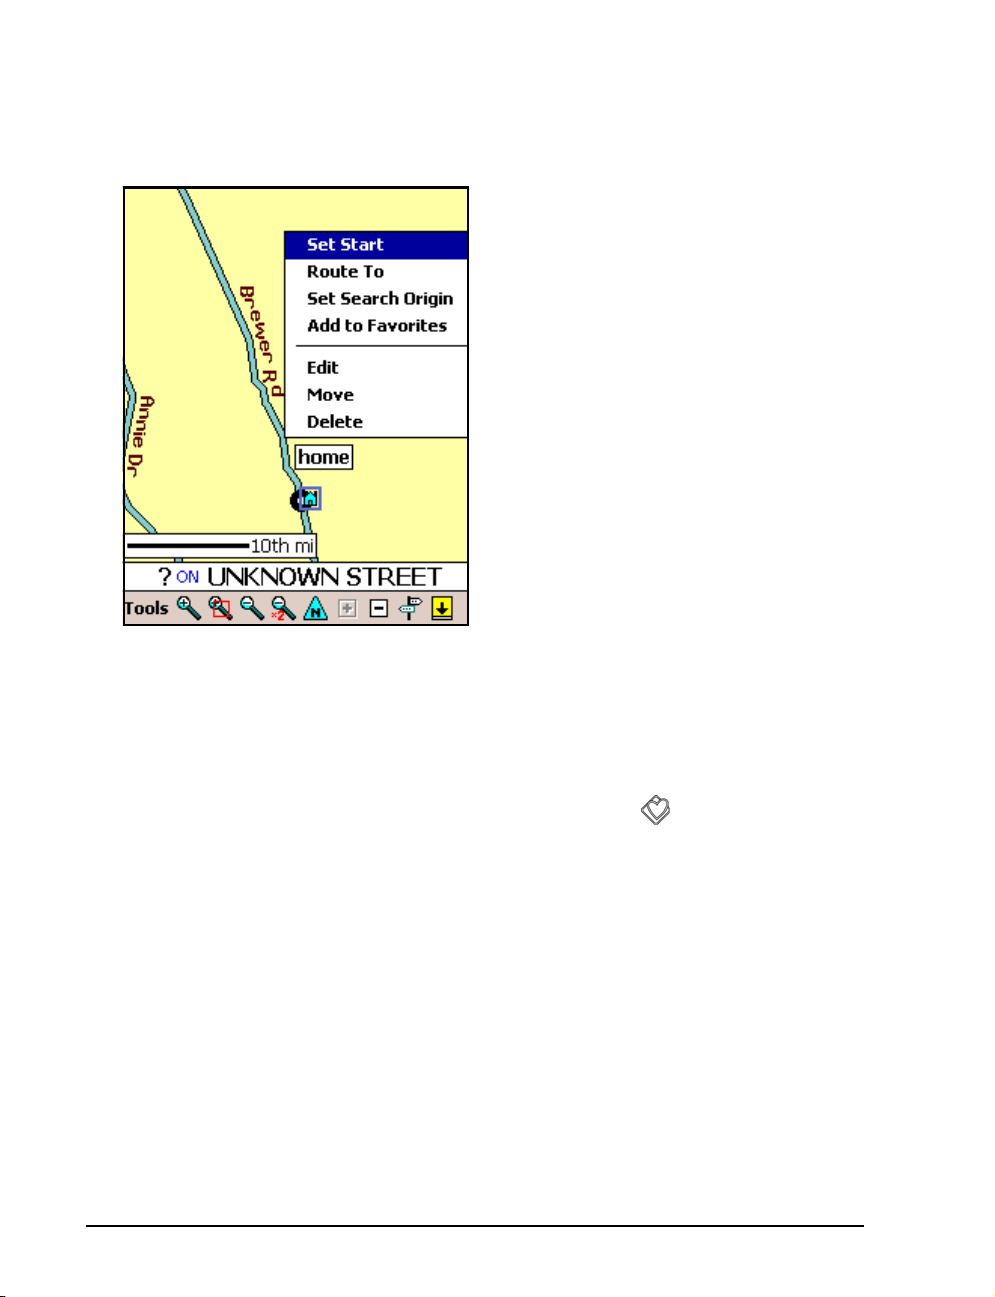
You can create as many landmarks as you wish to mark GPS locations. They can also be
created from the map without needing the GPS position. (See
page 60.)
“Landmarks ” on
• Tap the locatio n you just created (which
may be under the doughnut) and a box will
appear describing the object.
• Tap and hold on the box anywhere a nd a
menu will appear.
• Select Add to Favorites.
Surely your home location will be one of your
favorites!
You might notice that you can edit, move, or
delete this point with this menu or set the
Landmark as the starting point for the next big
adventure. You can tap any object on the
screen with similar results.
• Press the left button again (but don’t hold it this time) and a menu will appear of your
favorite landmarks will appear.
Notice that home is in this very short list. Actually the list can grow to eight entries. After eight,
the bottom entry will be dropped off if you add any more. Use the organize function from the
menu to keep your best favorites near the top of the list. The list can be used to select the target
destination for navigation, if it is displayed, by pushing the favorites
Add Locations to Favorites
There is an option to favorites that hasn’t been mentioned so far. On the Tools > Settings >
program options is a setting to automatically add Locations to Favorites. It changes the entire
idea of favorites to be recent instead. The 8 most recent locations will be maintained in the favorites
list, which can be handy if you don’t care much about keepin g favorite locations. It is also a good
way to collect locations initially without having to make them manually.
If you want both you might consider making a favorites category in your locations d atabase.
Remember that only the last 8 locations are saved in the recent list so you will want to make a
copy of them in the Locations database if you want to keep them permanently.
52
button.
Page 63

1. Tap on the sign post icon to bring up the list of favorites.
2. Tap the one you want to save in your locations file. The screen will display this location in
the center.
3. Tap the location to bring up the text display.
4. Tap and hold on the display to bring up a menu that includes Add Landmark to add this
location to your landmark file. You will not be given this option if the location you chose
was already in your landmarks file.
Where to from here
At this point in the discussion users are likely to want to go in several different directions.
• Some will want to jump in the car and drive around after getting familiar with the map
screen and how to use it. For them the next chapter to read is Chapter 5
Operation” on page 54 (t he next page).
• Others may be much more interested in creating some routes and finding out how the
route engine and navigation works. They should jump to Chapter 6
Navigation” on page 61 and read about their new favorite topic.
• If you would rather just see examples with step by step instructions with minimal text
then try Chapter 7
“Step-by-Step” on page 73.
“WayPoint
“WayPoint
Of course, you will want to read all of the chapters eventually.
53
Getting Started w/ Navigation
Page 64
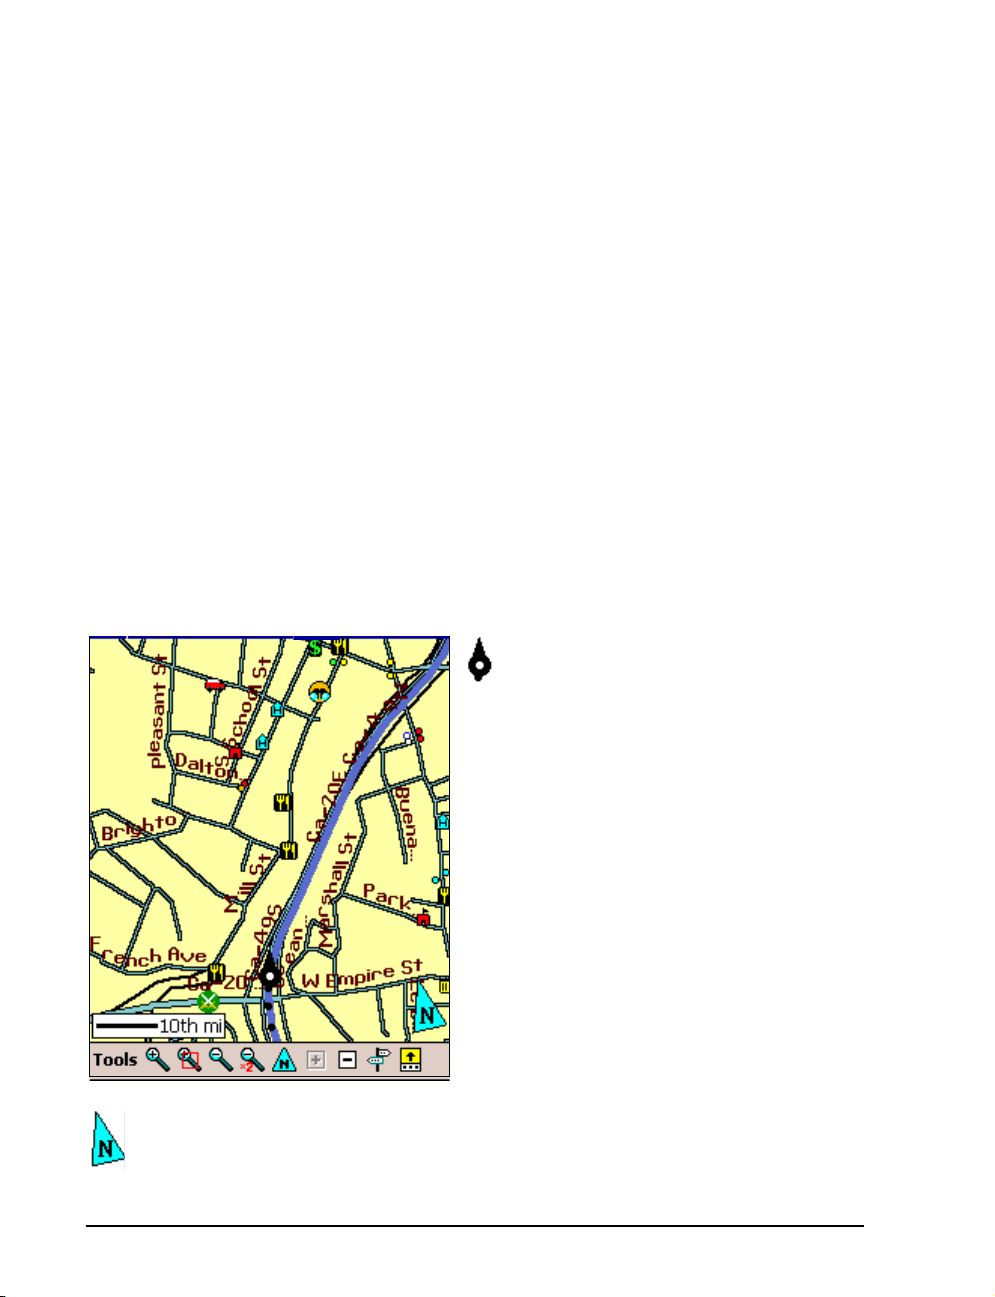
Chapter
5
WayP oint Operation
Once the WayPoint Navigation program has been started and the GPS connection has been
establish you are ready to view the maps and operate the program. You can view the help file if
you need to review the operation of any command. When the map screen has a local map loaded
and you are zoomed in quite a way, it will look something like this:
The Map Screen
The screen display to the left shows your
current location, if a GPS is in use, as a circle with
an arrowhead on it indicating the directio n of
travel. The color can be customized by the user.
The banner has been removed to show more
map area. This is a configurable option. If you
remove this title area you will need to leave
WayPoint or bring up a a subscreen to use the
system menus.
Other items that can be seen are an optional scale
(lower left corner), and points of interest (POI's),
such as hotels and restaurants, which are also
called landmarks. Note that some of the POI's
do not have icons so they are shown as small
circles on the map. As you zoom out all of the
POI's will be shown as small circles.
An arrow near the right bottom corner of the screen shows the direction of North.
54
Page 65
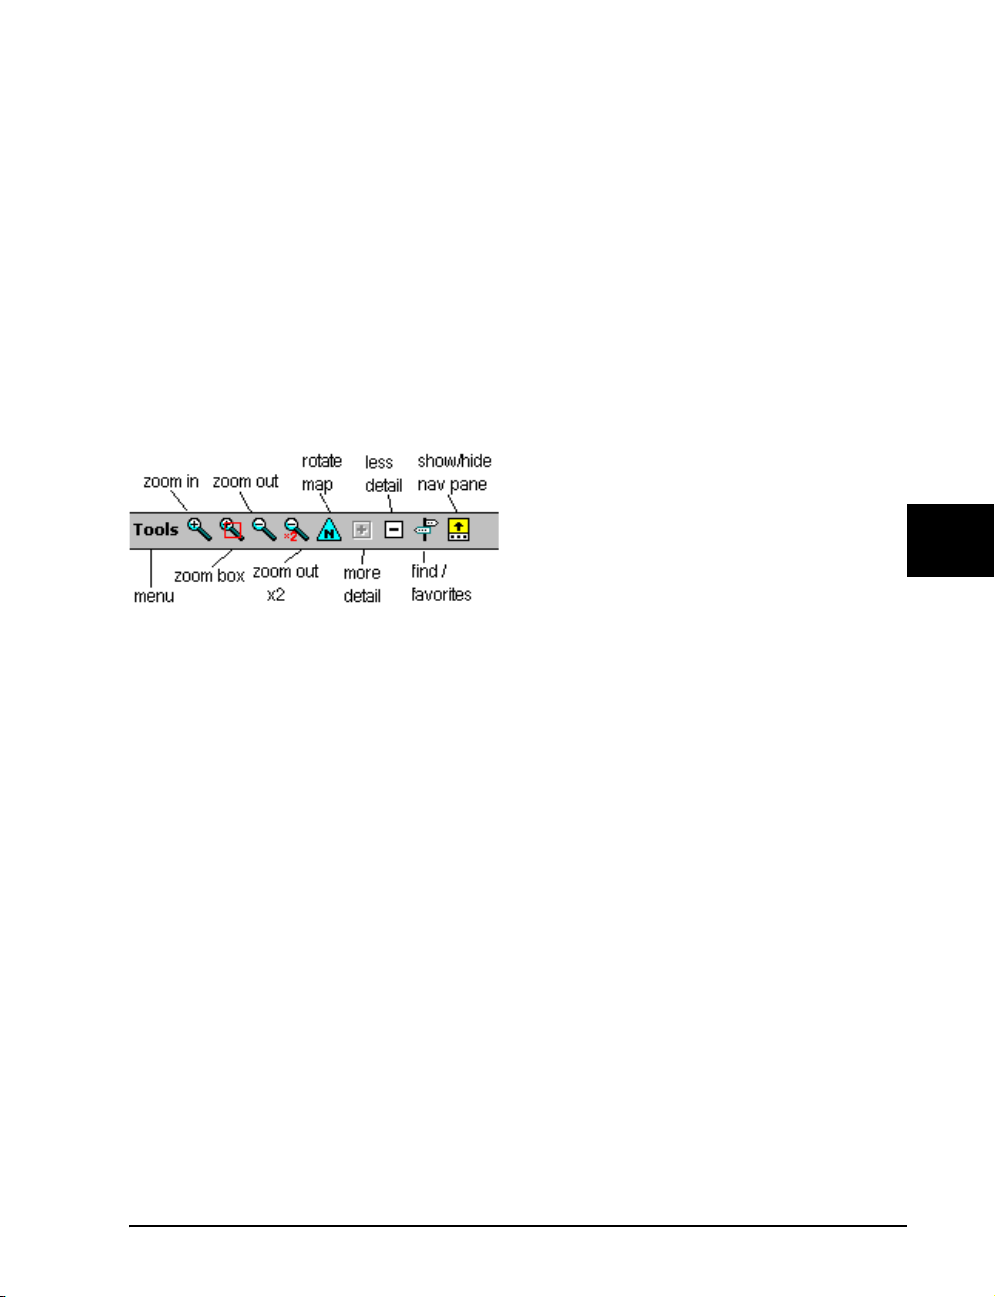
The map can be panned in any direction just by touching the sc reen and dra gging it in the
direction you want to go, or you can use the cursor keypad to do the panning.
As you travel the GPS position will remain almost stationary and the map will travel under it. The
location of the GPS icon is an option. As shown it keeps most of the screen ahead of you. You
can set it to be in the center of the screen if you wish. The two black dots just visible behind the
GPS icon are the end of an optional track log.
Another option is to have the screen oriented with the direction of travel toward the top as
shown here. That way all of the turn directions can be left and righ t. You could elect to always
have north or the direction you choose at the to p. This can be useful if you are trying to match
the map display with a paper map.
WayPoint Command Bar
Across the bottom are the Tools menu selection
and several icons.
• The two at the left are for zooming in (one
fixed amount and one variable)
• The next two are for zooming out (fixed
amount and twice the fixed amount).
• It is better to use the thumb wheel when traveling in a car to do the zooming.
WayPoint Operation
• A map rotation button is next. Tapping it brings up a compass rose which can be used
to rotate the map just by tapping the location you wa nt to be at t he top.
• The next two icons are the plus and minus and are used to control the amount of detail
present in the map. They can be tapped at any time to reduce clutter (-) or show more
detail (+).
• A signpost is next for finding locations and quick selection of your favorite places.
• The last icon permits full screen maps or maps with a pane at the bottom with
additional data on it.
The Navigation Pane
The Navigation pane can be turned on or off with the nav pane icon. It contains important data
for the user.
55
Page 66
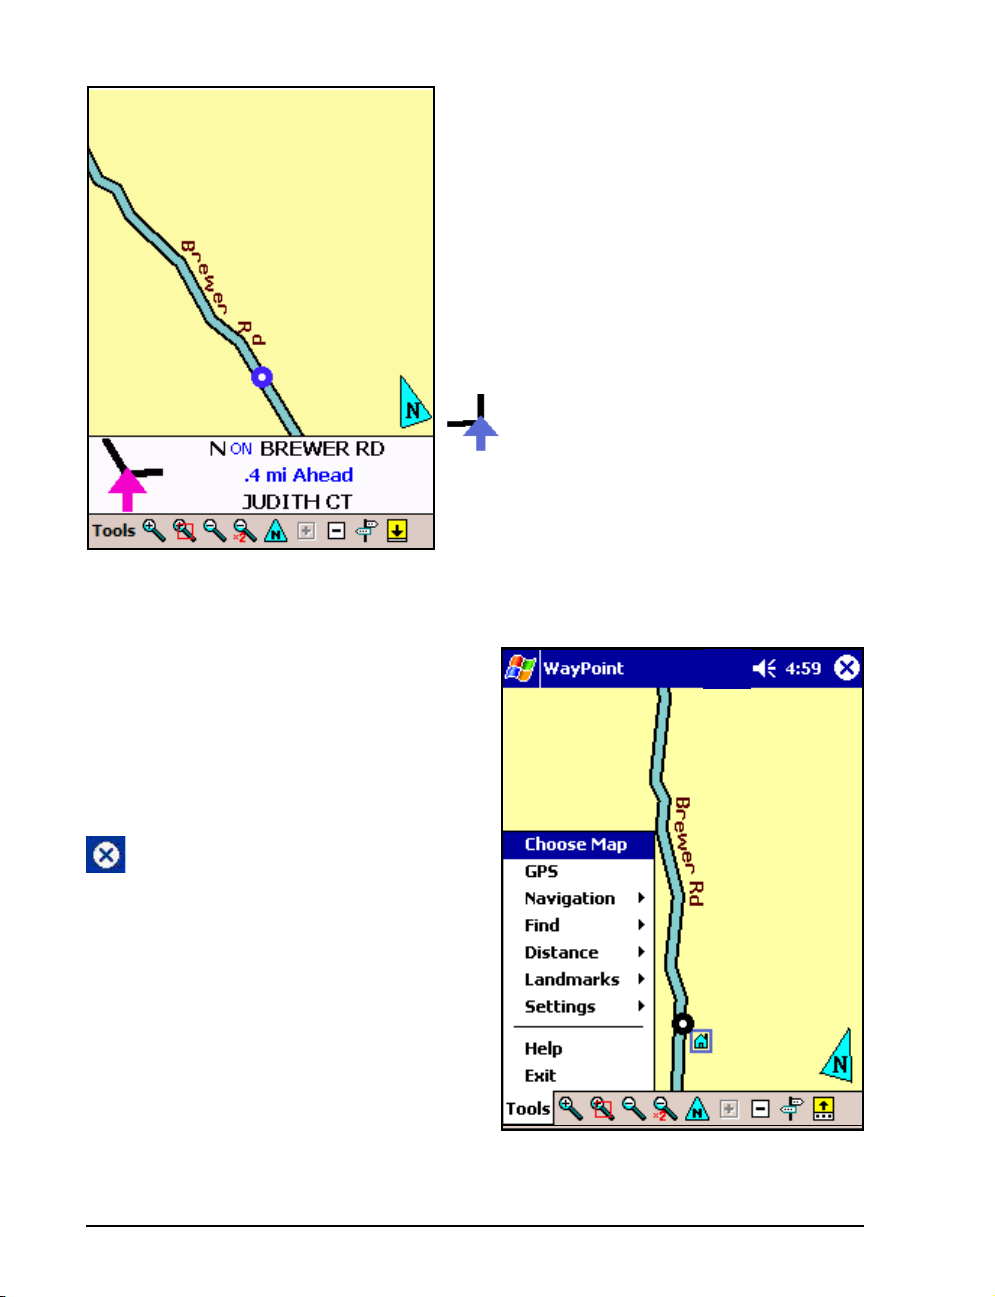
The navigation pane is where all the navigation
messages are shown or, when not navigating, it will
show the street name you are traveling on along
with the direction you are traveling and upcoming
cross-street names or exits.
Tapping on this pane will return the map to the
GPS position if you happen to scroll it away. The
screen on the left shows a map with the information
pane enabled. The name of the street you are
traveling on is shown along with the name of the
next street ahead and its distance ahead is shown.
street if it is a T or will show it as a cross street.
Even the angle of the street is shown. These values
are updated as you travel down the road. This small
drawing will show the relative direction even if the
main map is set to north up.
The Tools Menu
All of the menu selections are on the Tools menu
and are listed below. The Tools menu could be
tapped, however, the best way to reach the To ols
menu is to press the thumb wheel. The thumb
wheel can then be used to select the entries as
well. The commands on this menu include
:
A small drawing shows the direction of the
Exit – A command that stops the program. (The
in the top bar leaves the program running).
In particular the Exit command stops the GPS.
Help – A command to bring up the online help
screen. This is an online reference manual for the
program. All of the commands and options are
covered.
Settings – This menu brings up the
customization settings (covered below)
Landmarks – A menu that provides the ability to
define your own Landmarks (POI's) or view the
ones you have already defined. (covered below)
56
Page 67

Distance– The distance calculator will show the distance between two locations on the map.
You can even trace the route on the road and it will show the distan ce covered.
Find – This is the main find menu, a subset of which is repeated on the sign post icon. (covered
in the Navigation chapter
Navigation – This is the main menu to set up and manage routes. (covered in the Naviga tion
chapter
GPS – The GPS command: provides GPS status and control. (covered in the “Getting Started
with Navigation ” on page 43.)
Choose Map – A command that is used to manage maps. (covered in “Advanced Topics” on
page 92.)
Display and Control Options
As discussed in the GPS section, the GPS position icon can be set to lock to the road position.
However, if it you don’t select that option most of the features acts as if it was on anyway.
Tapping on the map:
“WayPoint Navigation” on page 61)
“The Find Approach” on page 67)
• Always snaps to the nearest road or object.
• Draws a little house to show the snapped location on a road.
WayPoint Operation
• Displays the address in a box.
• Optionally it can display the name of the city, the latitude/ longitude location, and speed
zone for roads.
Tapping the box removes it or it will disappear automatically if you scroll or do anything else with
the screen. You can tap and hold on the box to bring up a menu that can b e used to work with
that object such as setting it as a destination or add it to your favorites.
Tapping a POI object shows information about the object that includes the data about its
location, its name, and perhaps a phone number. If it is one of the Landmarks you defined, it will
display your comment data.
You can also touch and drag the screen to pan it in any direction.
Using Hardware Buttons
Most of the important commands have already been programmed to a hardware button.
• The cursor pad can be used to pan the map (when not navigating).
57
Page 68

• The thumb wheel can be used to zoom in and out. Pressing down on the Thumb wheel
will select the tools menu and the thumb wheel can be used to select entries from the
menu.
• The 4 hardware buttons under the screen are all pre-programmed to do useful things.
It is important to take advantage of these features, as it can be dangerous to use a stylus while
driving down the road.
Customizations
Customizations are reached from the Settings command. Once you select any customization
you can move between settings using the cursor left and right keys. Customizations include:
• Map Features
• Program Options
• GPS Options - see “GPS Settings” on page 48
• Routing Options - see “Routing Options” on page 69
• Navigation Options - see “Customizations” on page 71
• Map Colors - see “Color Customizations” on page 59
• Sounds - see “Sound Settings” on page 72
Map Features
Map Features covers the display of information on the map scre en. You can choose to show a
Scale Bar, Street names, city/town names, city boundaries, landmarks, and a GPS trail (track log
must be on). In addition you can choose additional data to be displayed when tapping an object.
This data includes coordinates, city name, and speed data for roads.
Program Options
Program options include the ability to:
• Show Splash Menu at Start
• Activate GPS at Program Start
• Auto Add Locations to Favorites
• Use Metric Units
58
Page 69
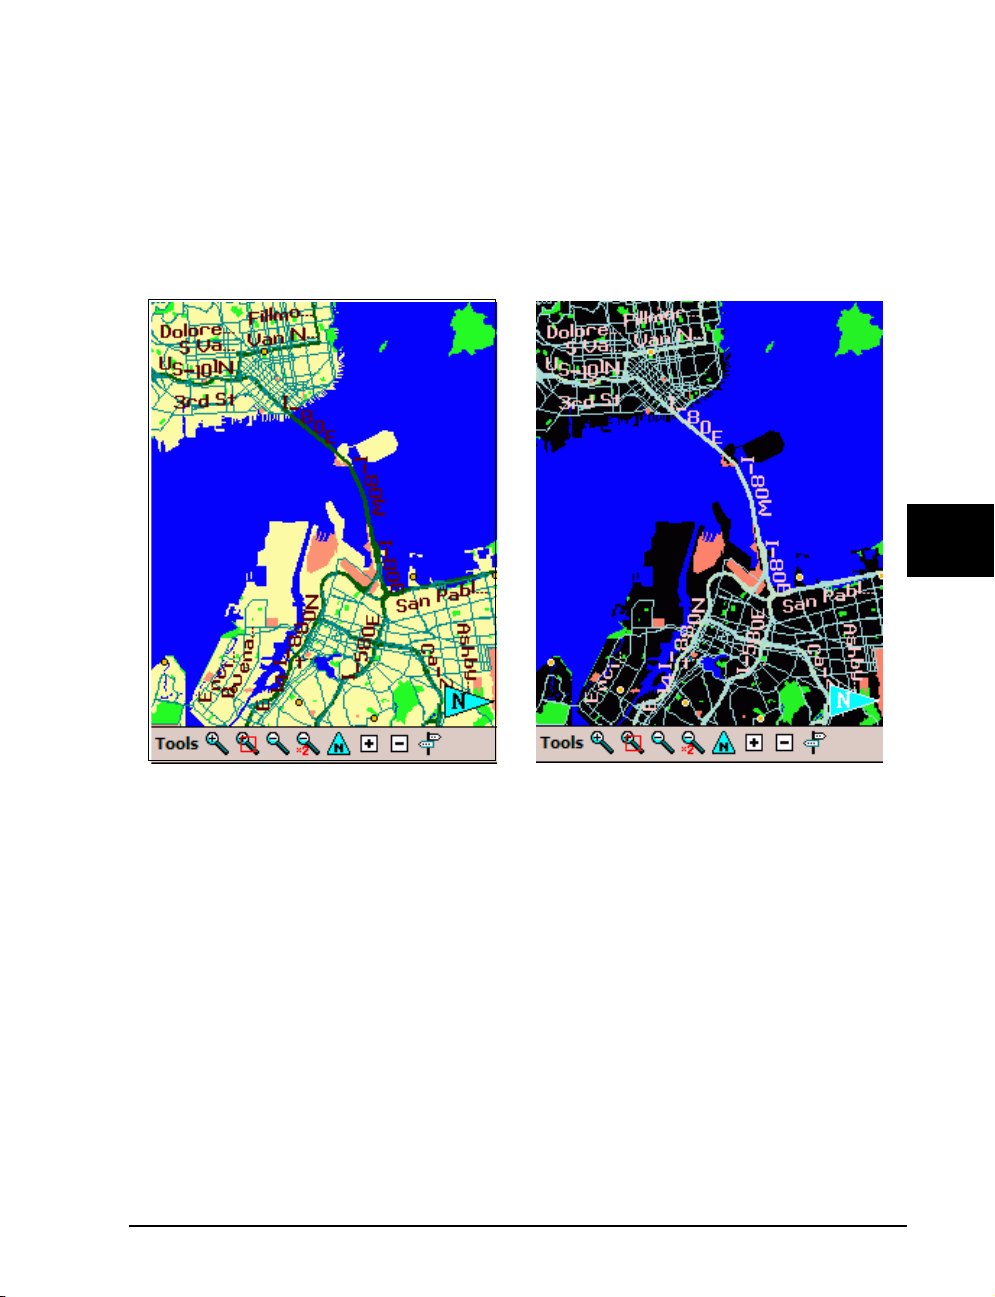
• Hide Pocket PC Title Bar
Color Customizations
Customizations include the ability to show certain optional data on the screen, change the
displayed units, and the screen colors. There are two sets of screen colors, one for day and one
for night. The marketing department thinks you might not realize why there are two choices. It is
dark at night and the day colors could be too bright. The day sc reen is on the left .
WayPoint Operation
Each of these settings is fully customizable to contain just the color scheme you pref er. The GPS
icon is set to red if a GPS signal is lost. Making this red all of the time would mask this feature.
The color option can be set to automatically switch between the day screen and the night screen
at dawn and nightfall.
59
Page 70
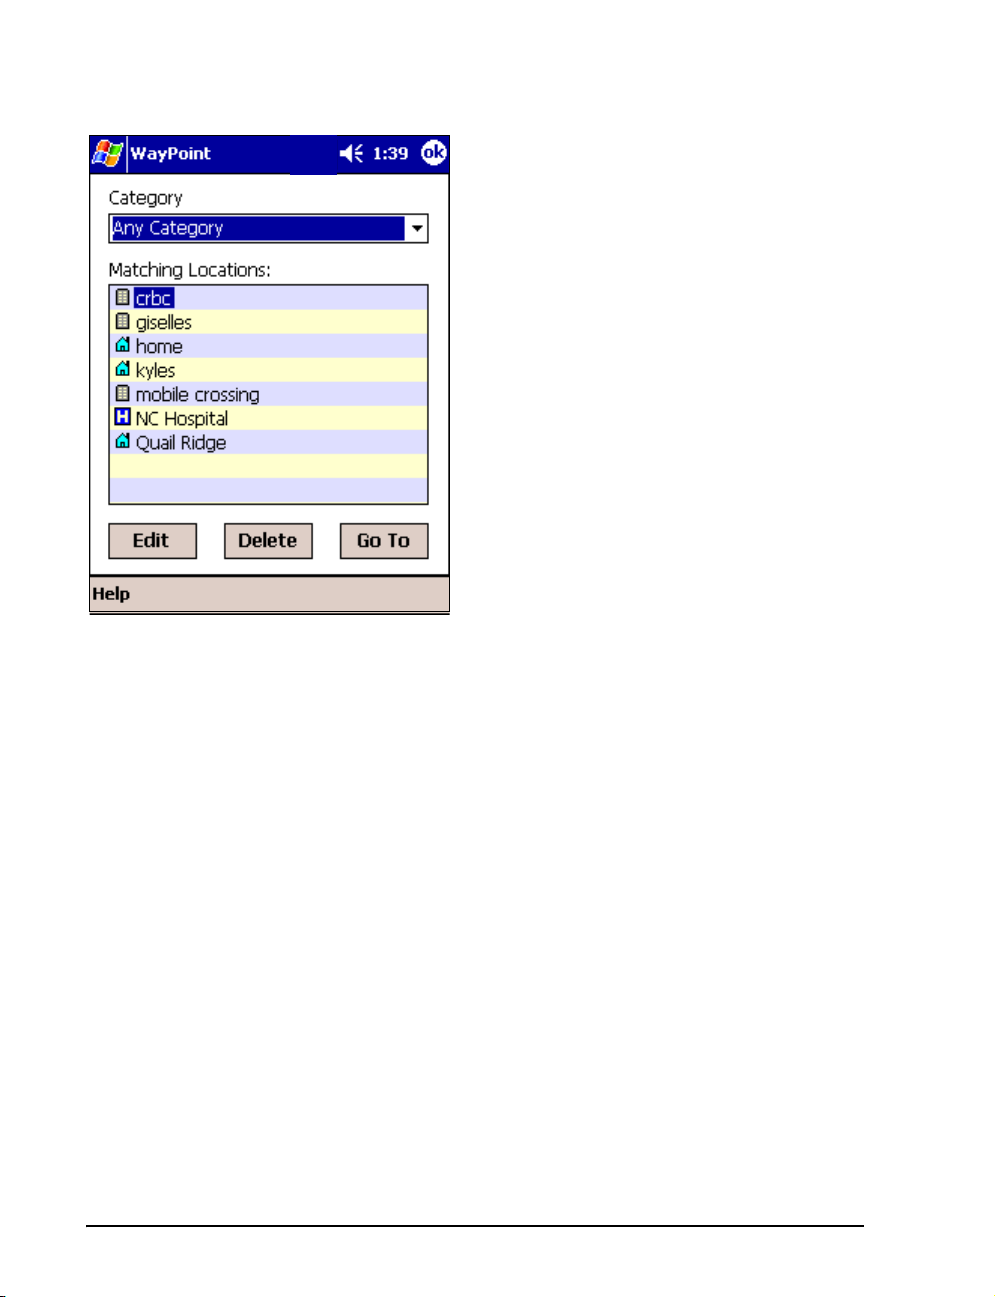
Landmarks
Landmarks1 is the name for a personal database
that contains Landmarks created by the user.
• These can be used for personal places like the
homes of your family.
• They can also be used to supply the locations
and names of businesses that are missing from
the map database.
As mentioned in the last chapter, this is where the
information is stored when you press and hold
the left button. However, these locations can also
be entered directly from the map using the
command Tools > Landmarks > Add
Location.
If you select an address on the map by tapping on
it and then create a landmark, that address will be
shown in the comments.
The command Tools > Landmarks > Show Locations will display the screen shown at the
left. Any of the entries can be edited or deleted from this screen. Tap Go To to view the location
on the map.
Categories can be the same as the ones in the POI database supplied with the WayPoint or they
can be new ones that you make up. If they are the same as POI categories then the entries will be
mixed in with other items of that category when you are searching.
You can send the database to your friends or upload it to the Mobile Crossing forum with a
descriptive name and others can use it for viewing with their maps. However only the one default
file can be used for adding information to the database.
60
Page 71
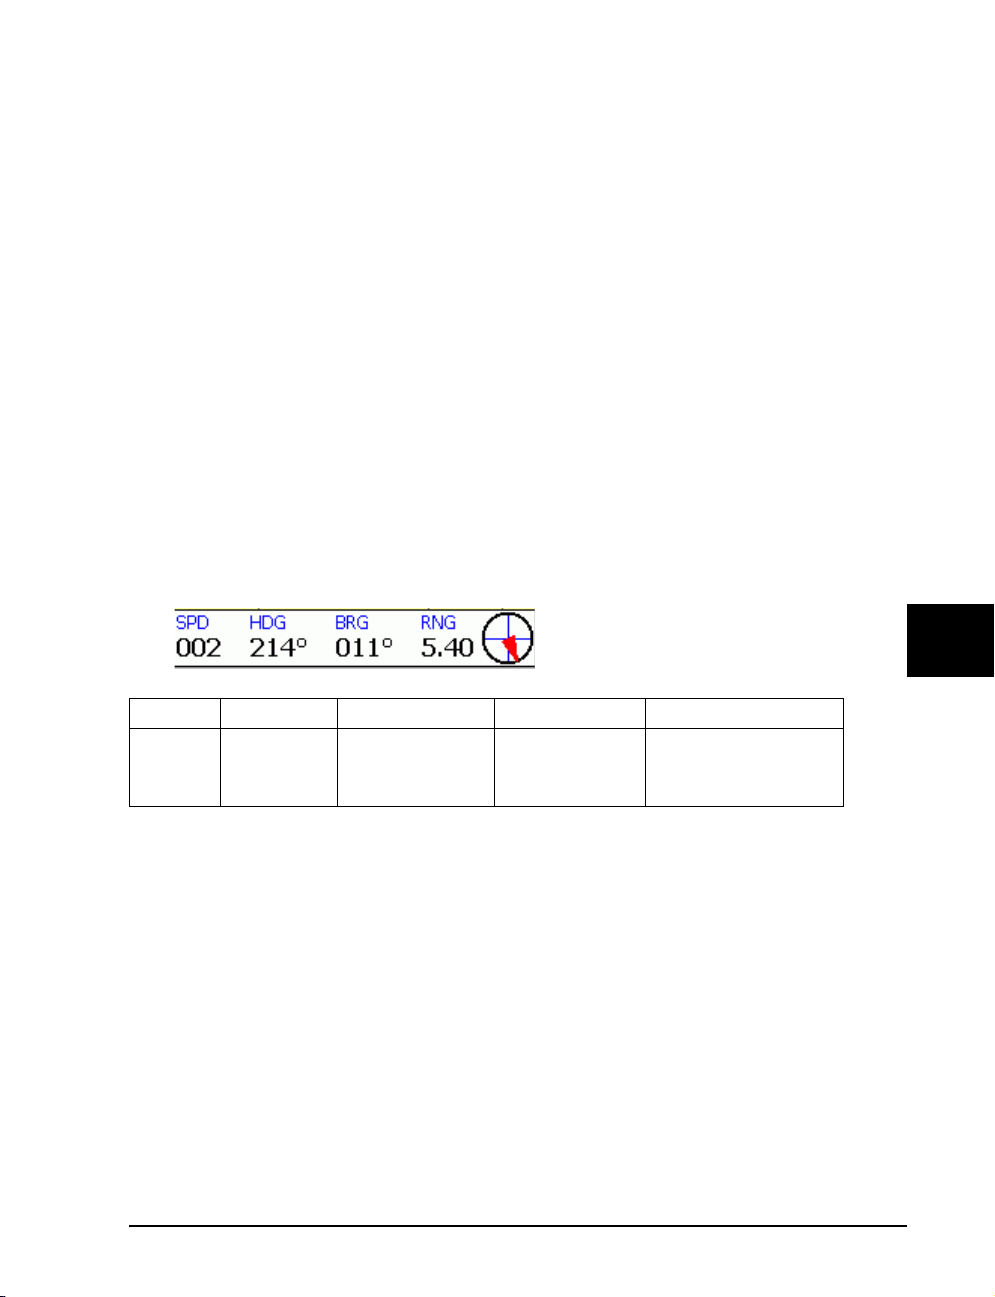
Chapter
6
WayP oint Navigation
Navigation is the ability of the program to guide you to a destination. In its simplest form, it is
just an arrow pointing the way toward the destination. This was shown in the GPS display
“Getting Started with Navigation ” on page 43 where a direction was shown ‘as the crow flies’. A
slightly better version of this air line navigation is represented by the pilot data pane which can
be found on the Tools > Navigation menu. It looks like this:
WayPoint Navigation
Speed Heading Bearing Range Compass
Current
speed
This is called the pilot data pane since it is perfect for a pilot. It is also useful when you are on a
commercial airline that permits you to use your GPS. On the ground, you may wish to use it for
Geocaching. For more see
Direction
of travel
Direction to the
destination
“Geocaching” on page 97.
Distance to the
destination
Shows the direction
needed to get to the
destination
Road Naviga tion
Most users a likely to want something a little more capable for road navigation an d this section
covers these features.
The display below shows WayPoint providing turn-by-turn instructions on the screen. In this
case, there are two turns coming up that are very close together. The program senses this and
displays both turns to alert the user. Normally there will only be one turn indicated in the
navigation pane.
Note that when the user selects turn by turn navigation by calculating a route this navigation
pane will replace any other selected pane as soon as the system needs to display a message.
61
Page 72
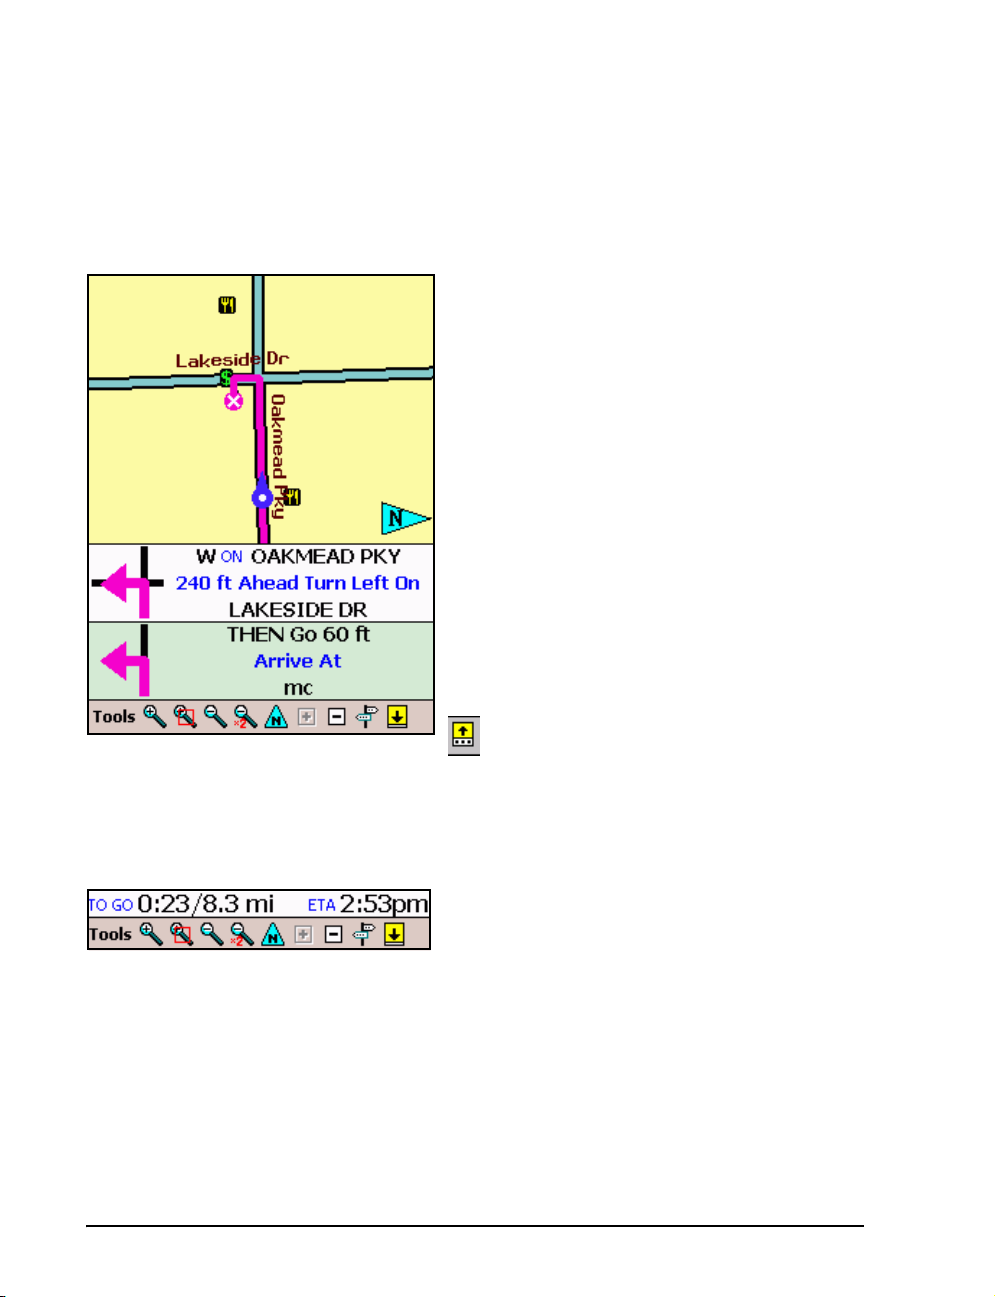
There is a user option to control the size of this information pane. The smaller of the two sizes is
shown in the picture.
Voice prompts accompany the visual data and allo w you to keep yo ur eyes on the ro ad. The
voice prompt repetition rate near a turn is adjustable. There is also a Turn Assist provided by the
Alarm lamp on the front of the unit. When the turn message appears the lamp will sta rt flashing.
As you near the turn the flash rate will increase to indicate that the turn is closer.
Navigation Pane
Some of the power of this banner display may not
be obvious at first. For example, suppose you are
stopped at a light and wanted to study a difficult
turn that is still quite a bit ahead of you. When the
navigation pane is active the cursors keys can be
used to walk you through the various turns in the
route providing the turn instructions and the map
for the turn.
Use cursor right to travel forward through the list
and cursor left to back up. After several seconds of
inactivity, the display will revert to the GPS location
or you can tap on the pane to return to the GPS
location. Note that the route instructions will also
be shown if you lose the GPS lock, your GPS is
turned off, or you are not using a GPS.
If you tap the full screen icon in the lower right
corner to remove the navigation pane, you can use the cursor pad to scroll the map. This will
work even if you are selecting a different place on the route. Tapping th e icon again will turn the
pane back on.
ETA
The bottom of the pane can show an optional line
that contains the time to go and the distance to go as
well as the estimated time of arrival, ETA.
ETA is computed based on the distance to go and the speed classifications of the roads on the
route. It generally does a good job of providing the answer to the question: “When are we going
to get there?” It is updated as the trip progresses. It is also useful in showing the cost of a traffic
jam in time lost by comparing the new ETA with the earlier prediction.
ETA is displayed based on your local time setting. If the destination is in another time zone you
can use the Visiting entry on the clock settings (Start > Settings > System > Clock) to set the
destination time zone. This will cause both the ETA and the internal PDA clock display to use
the Visiting time zone value.
62
Page 73
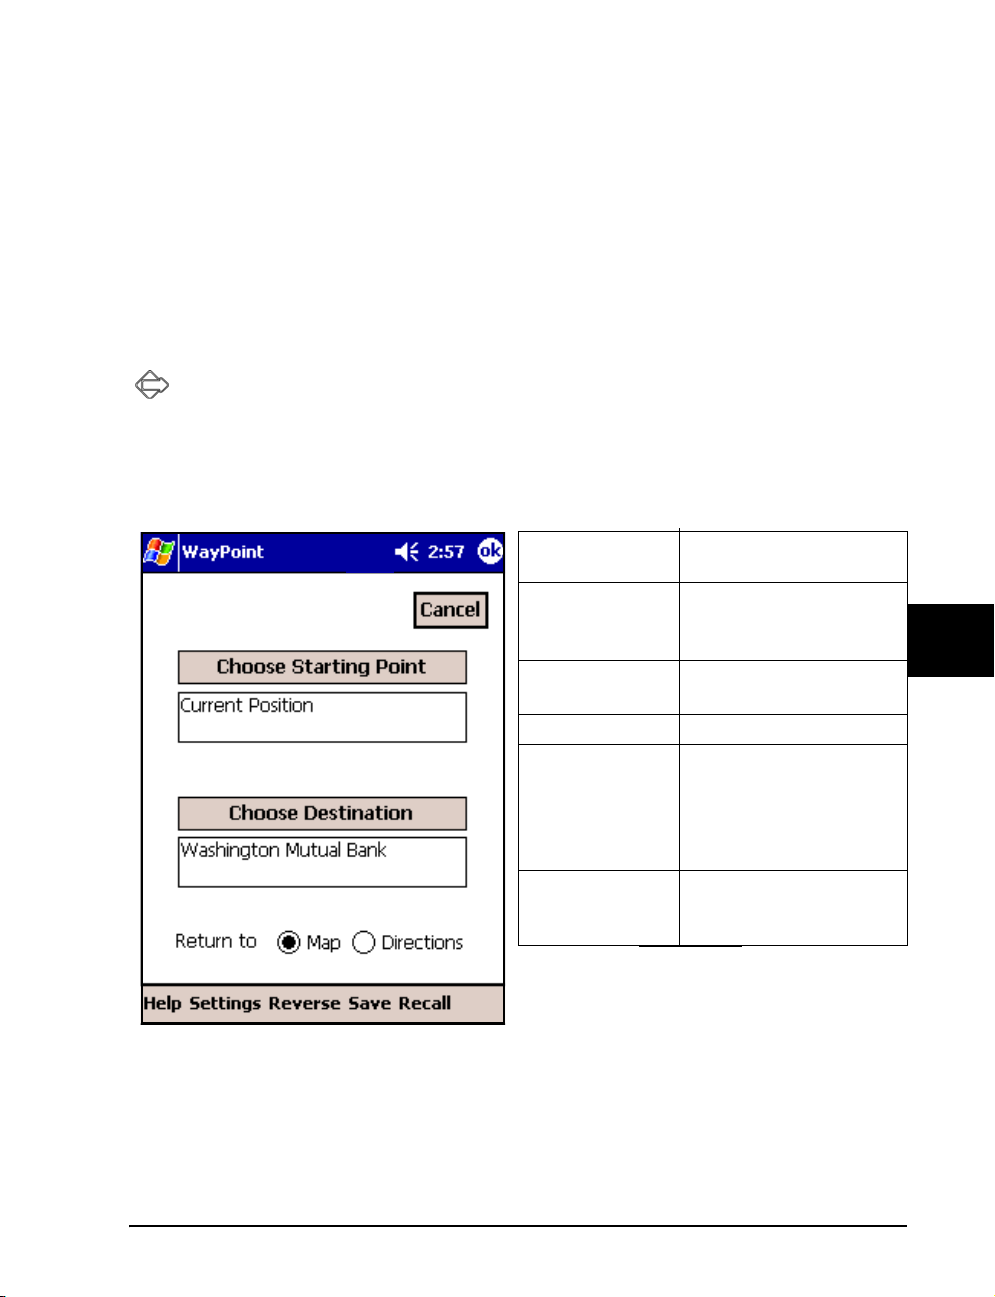
Building a route
To build a route using the loaded maps, you only need to supply a starting location and a
destination. Often the starting location is the current position as determined by the GPS so you
only need a destination. The automatic router will find the path from the starting point to the
destination.
There are two approaches to route creation. From the To ols menu they are called Navigation
and Find.
Direct Navigation
Tools > Navigation > Find Route is the more direct approach. It takes you straight to
the Find Route screen where you can choose the S tarting point, choose the Destination, an d kick
off the route by tapping ok. If there is no existing route the n the same command c an reached
more easily from the Detour button.
Choose Either Starting Point or Destination to bring up a menu that contains:
Select Address Full and partial address
will work here
Select
Landmark
Select
Intersection
Select Contact From your address book
Find on Map The graphical approach –
Use GPS
Position
This includes all points of
interest and user defined
landmarks
Two cross streets
The map should be
displaying the correct
place before the Find
Route is given.
current location
WayPoint Navigation
63
Page 74
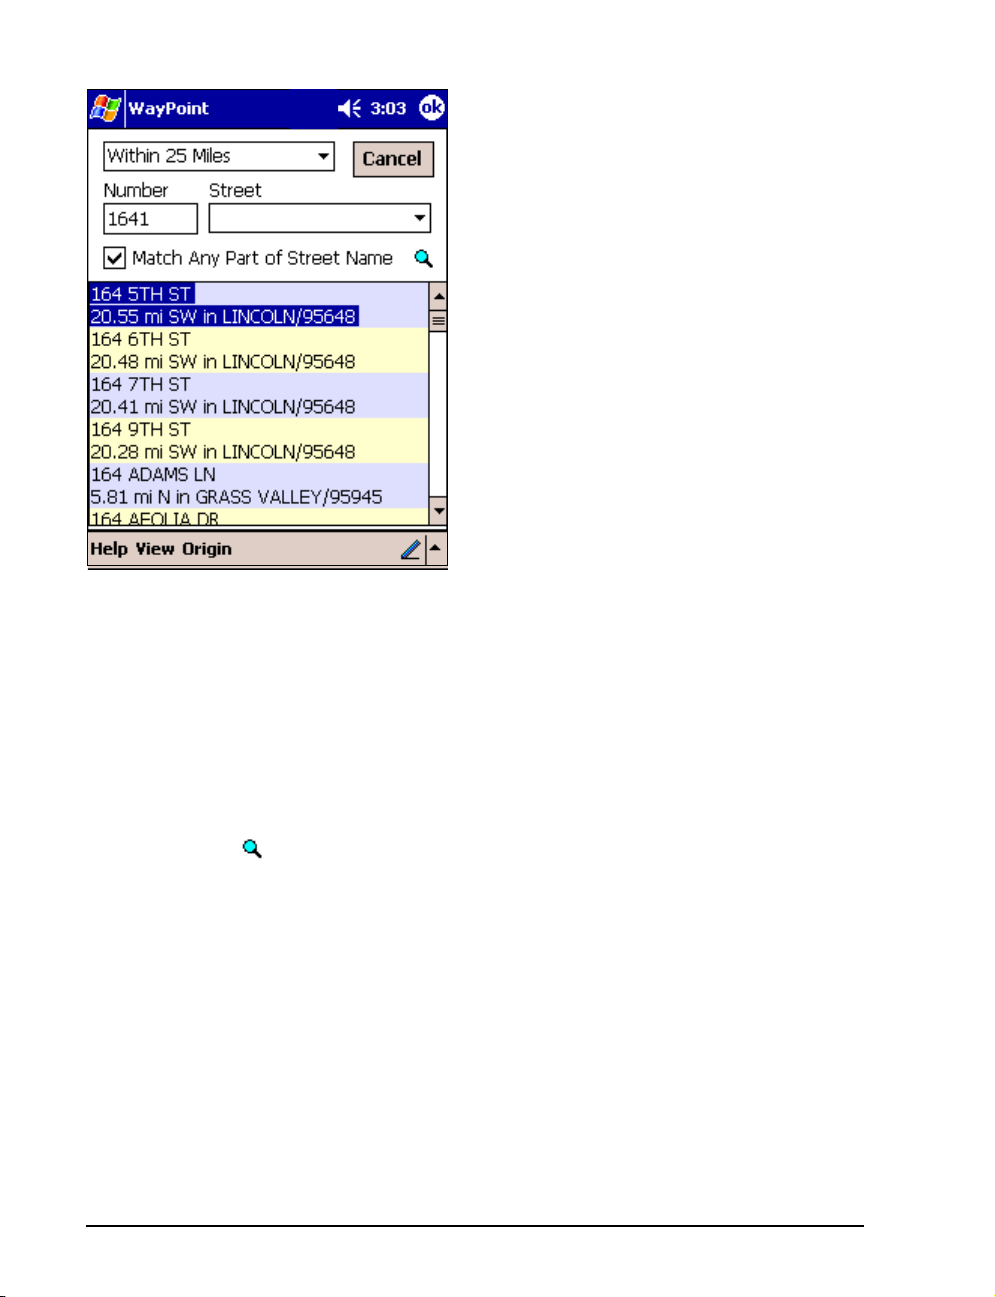
The first three choices bring up similar screens to
enter the required data. Of course the individual
data on the screens is different but approach is
the same. The address screen is shown at the left
as an example.
You can search the entire database or you can
restrict the data geographically or by category or
both. You can restrict the search:
• To a distance within 25 miles of your location
• To an area that is displayed on the screen
• To a zip code
• To a city
Other specific Step by Step flows can be seen in
Chapter 7,
An important feature that is easy to overlook is on the View men u item shown on the command
bar.
“Step-by-Step” on page 73
• You can sort the results alphabetically or by distance.
• You can also choose to show the distances and address in the search results.
Being able to sort the results by distance means it is easy to find the next filling station or
restaurant depending on whether the car or you are hungry.
THE SEARCH
Selecting a category or specific street data will cause the program to start searching as indicated by
the appearance of the spy glass icon. This icon will blink while the search is in progress.
• You can further limit the search with data in the third field. It is ok to add data while the
search icon is blinking.
• As soon as you see the data you want tap ok. When the search is complete the spy glass
icon will disappear.
Select the Origin menu on the command bar to tell the program where it is to search. You ca n
restrict the area based on the map view, the GPS location, or any of your favorite locations.
64
Page 75

Searching for intersections is a two step process. First search for on e street and the unit will offer
a list of choices for the second street that intersect the first. If you don’t see what you want, try
reversing the entries.
CONTACTS SEARCH
Selecting Contacts lets you search through your address book. WayPoint will copy a list of the
address book entries to a form within the program. Specific Step by Step flows can be seen in
Chapter 7,
“Step-by-Step” on page 73.
• There must be an address listed for you contact for the address search to work.
• If there are two addresses it will present the choice of wo rk or home.
• Select the address you want and tap ok to begin the search.
Occasionally the form of the address in the address book will not match the form needed by
WayPoint. If this happens the location will be identified but the search will fail. You can try
editing the address entry being shown on the search screen to give it a clearer address.
Generally the search works best with less data. One wrong character will cause the search to fail
but leaving out letters or even whole words will not be a problem for the search algorithm. Once
it presents a list of possible choices you can simply select the correct one.
If you are able to find the address this way you might consider using the displayed form in your
contact list so that future searches will be successful.
The Quick Approach
There are two hotkeys preprogrammed to facilitate quick routing.
ROUTE TO FAVORITES
Tap the Favorites Button to navigate to one of your favorites. Selecting one from the list
will kick off the router and route to that location from your current location. You must have a
GPS fix for this to work. Specific Step by Step flows can be seen in
“Step-by-Step” on page 73.
TAKE A QUICK DETOUR
If you are driving and need some Gas or Food the Quick Detour function can be handy. It is also
a good way to find close by locations.
Press and hold the detour button for a couple of seconds and the category screen will
appear as shown on the next page.
WayPoint Navigation
65
Page 76
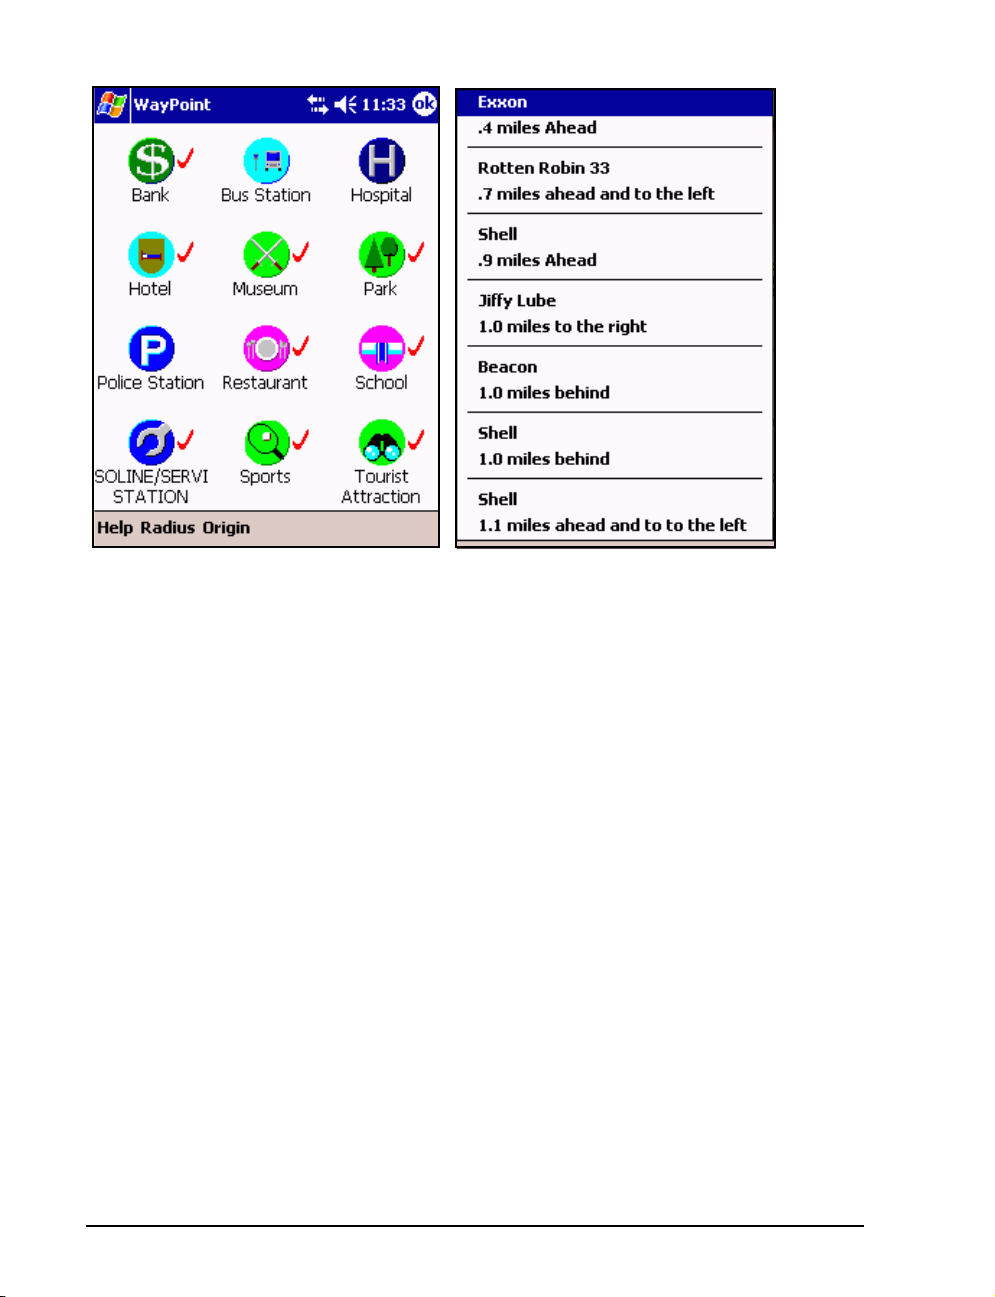
Tapping one of the icons will bring up a short list of locations matching the category along with
their distance and direction. In the example shown above on the right the nearest gasoline
stations are shown.
• The name of the business as well as the direction will be shown as you might want to
skip those that are behind you.
• Note that if you are stopped the GPS may not be reporting the correct direction so it is
best to do this command while you are moving.
• If you don’t have a fix the unit will tell you cardinal directions to the location rather than
relative direction.
• Tapping an entry will route you to that location.
• If there is not a check mark by your choice you may want to increa se the radius.
This is a quick way to choose from among your favorite categories and will only offer choices
that are within a prescribed radius of your location (or an origin that you choose).
As shown the check marks indicate that there is an entry for that category available.
The search radius can be defined from ¼ mile to 20 miles in approximately 2X increments using
the Radius menu on the command bar. The value is remembered once it is set.
66
Page 77
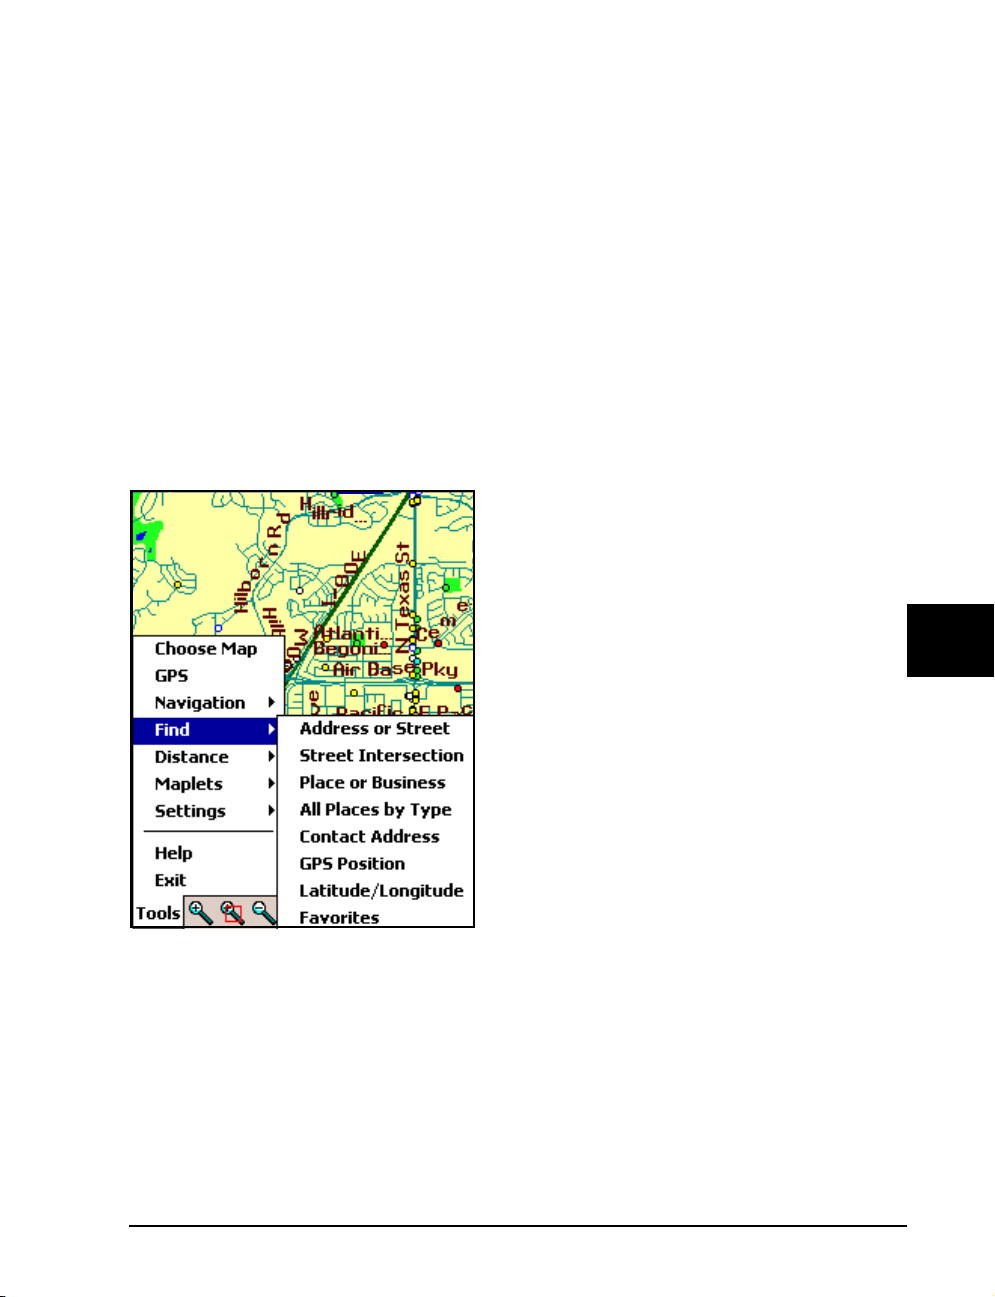
Specific Step by Step flows can be seen in Chapter 7, “Step-by-Step” on page 73.
It is not possible to show all of the categories in the database but this screen can be customized to
show the ones you wish. If you tap and hold on the category you will be able to change the
category to any of those available in the database. You may want to keep important and useful
categories on this screen.
• Getting to a Gasoline station in a hurry could be a high priority.
• Finding a Restaurant is usually one that you would want to keep.
• Route to nearest can be really useful for getting to a hospital or the clo sest police station.
• The category list even includes those from your own Landmark database.
The Find Approach
The Find approach is used when you wish to find
and display the object on the screen and then call
the router. This method is a little more flexible if you
aren’t sure which of the many locations in a chain of
stores you really want.
Many of the most used find commands plus a list of
your favorite locations are available from the
signpost icon on the command bar. All of the
choices are available from the menu.
WayPoint Navigation
Click Tools > Find to bring up the menu of the full
find options.
Once you have found the object you are interested
in it will be shown on the map. You can tap it and
then tap the description to set it to the starting poi nt
or the destination.
Find > Latitude/Longitude is useful for looking at a location that matches a paper map.
Find > Favorites is one of the choices on this menu. The favorites list can be managed with this
command. Items can be moved around or deleted. The Favorites list is also available by pressing
the favorites button. The favorites button choice will kick off a route to the favo rite location.
The Find > all places by Type choice brings up the same screen and holding the Detour
button down for a second. However, in this case it will bring up a map showing nearby locations
that match the category chosen. This is a great way to just scan through the “yellow pages”
67
Page 78

graphically for something you might like. Just set up a radius and then select the type you want.
The map will appear with all the points of interest for that category highlighted with their icons.
See “Step-by-Step” on page 73 for examples showing the use of most of these search choices.
Your personal locations can be searched as well althou gh they are not on the find men u. Use
Tools > Landmarks > Show locations to bring them up. You can select categories similar to
the ones for points of interest or you can make up your own. Items can be edited or click to
‘goto’ to center the location on the screen. It is then a simple matter to make it the destination
using tap and hold.
Once you have used find to pick your spot you can tap the detour button to bring up the
Find Route form. It will have the destination you selected already filled in. Alternately you can
use the Navigation > Find route command to automatically route to it by t apping ok.
The Route
Once you have generated a route you can look it over or just start following it. You can also
revisit the Tools > Navigation > Find Route command to:
• save the route for future use. to
• reverse the route to get back home.
• Recall a route you saved earlier.
Recall and reverse route do not try to use the whole route you set up earlier. Instead they simply
use the start and finish points plus any ‘route through’ points (described below) to generate a new
route.
GUIDING THE ROUTER
If you don’t like the route that the program chose you can request a modification. When a route
is active you can click on a place on the map and tell the router you want to route through that
location. Press and hold on the description to reach this choice.
This is a powerful tool that will guide the router to go in the way you wish. These intermediate
points are saved when you save the route so they are completely reusable. You only have to tell it
once.
Multiple route through locations can be a dded to the rou te. Multiple loca tions would allo w a
complete route to be set up with multiple stops.
When a route through location is determined a small circle is added to the road at that point. Th is
circle can be tapped to remove the route through point if desired.
68
Page 79
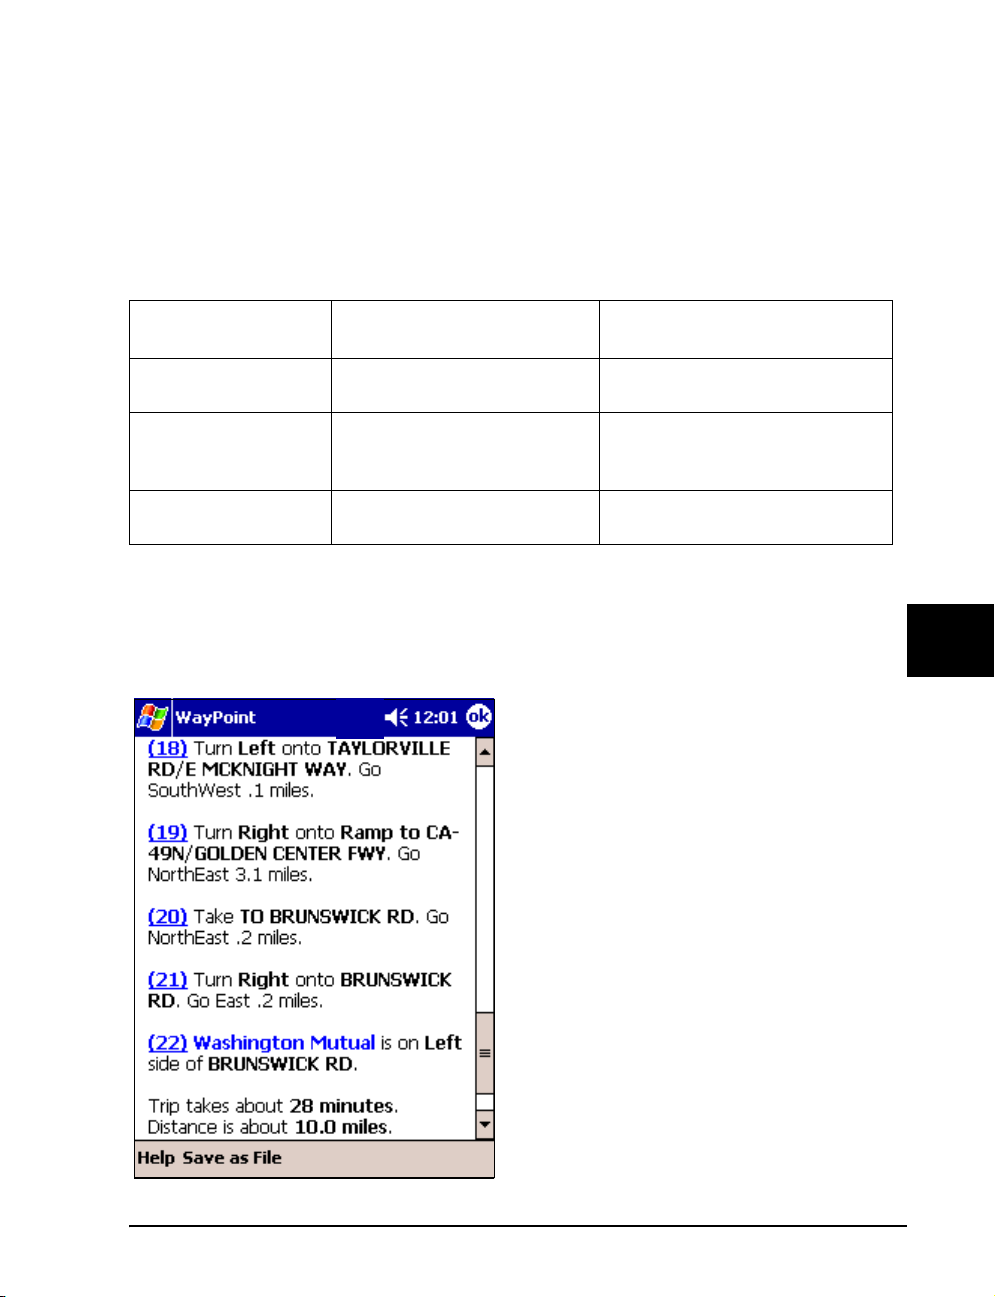
ROUTING OPTIONS
Another way to guide the router is through the Tools > Settings > Routing options. You have
control over the router in that you can tell it how quick to produce results. Thus, you can trade
off calculation speed that may not find the optimum route for a more exhaustive approach.
You can tell the router to avoid toll roads to save money when other routes are just as good. The
other choices are shown in the table below:
Freeway Use
Neutral to Freeway
use
Prefer Freeway Good for travel through a bad
Avoid Freeway Good for taking the scenic
Routing with fastest selected causes the Router to use the speed of the road in determining the
best route. When routing using the shortest route the router assigns all roads to the same speed.
Fastest Route Shortest Route
Normally the best choice Provides an alternate route.
Good choice in outlying areas
neighborhood. Likely to
compute results more quickly.
route. Use for motorbikes.
where the road classification may
not be correct.
Best for walking or bicycling
The Directions Screen
When a route is active the cursor buttons can b e
used to scroll though the various turn
instructions. There is also a route screen that can
be used to see the full instructions. This screen
can be reach from Tools > Navigation >
Show Directions menu.
The directions screen shows each of the turns
with distance and turn details. A trip summary
appears at the end of the list showing the
distance and estimated driving time. The
directions can be saved as a file and beamed to
your friends in a caravan.
WayPoint Navigation
The route can be scrolled using the cursor key to
show each and every turn. The numbers show
exactly how many turns are required. They are
live in that if you tap on them they will display
the map showing the turn.
69
Page 80

If you are navigating and bring up the directions screen the current leg of the route will be shown
at the top of the screen.
Tapping ok will return to the active map screen.
Navigating the R oute
Once you are satisfied with the route, you can just start following it. Even if you are not
completely happy you could just start driving anyway. WayPoint will detect when you are off
route and will generate a new one from your current location so eventually it will route the way
you want to go whether you went off route intentionally or by accident.
The main features of the route guidance features were covered in “Road Navigation” on page 61
Detours
The detour button can be used to generate a detour if you get into a traffic jam or find the
road impassable. Tapping Detour will bring up a table of choices for the distance to avoid. These
include ¼, ½, 1, 2, 5, and 15 mile increments. Tapping one choice will cause the router to
regenerate a route that tries to avoid the specified distance or so of the current route. (Remember
that the thumb wheel can be used to perform the selection.)
• On a normal surface street this may cause the router to request an immediate U-turn.
• On a freeway it will initiate a route that takes the next exit.
• It is possible that the route that takes the exit may just route the u nit right back on the
freeway, particularly if you were quite a ways from the exit when yo u tapped it. Selecting
a longer distance will help prevent this.
• But if you see that the freeway is still clo gged just press the detour b utton again wh en
you get to the crossroads of the interchange. This will cause the router to avoid the
entrance ramp just ahead.
• The detour button is designed to be interactive. It can be pressed as many times as you
wish to try out the alternatives. Each time you press the detour button it starts over
from your current position and does not remember items from the previous time you
pushed the button. It is likely that it may find the original route again under some
conditions.
The detour button can also be used to silence an annoying re-routing message. If you decide to
change the route just be driving off the current route the voice prompt can sometimes take a long
time to determine that you really wanted to change the route. Tapping the detour button will tell
the program of your real intentions.
70
Page 81

Other Navigation features
You can also suspend the route if you wish and return to it later by tapping the command
Tools > Navigation > Active Route Guidance. Pressing the detour button will turn it on
again.
When Navigation is on the WayPoint unit will warn you about upcoming turns by voice and a
flashing light. If you have the navigation pane on you can see the turn instructions. The amount
and frequency of the announcements are customizable on the Navigation Settings form. The
voice instructions and the flashing light will occur even if you suspend the program to look at
something else or even run a different program.
You can press and hold the status button for a second at any time to hear a message about
the next turn. It will tell you the distance to the turn and direction of the turn.
If, for some reason, the GPS reception is lost the Navigation pane reverts to showing the route
turn instructions so you can continue to use the map and route instructions. A Red panel appears
to alert you to the fact that GPS reception was lost and the doughnut icon showing your last
position will turn red. When GPS reception is regained the navigation begins again from
wherever it finds itself. You might have to tap the banner to get the GPS position back on the
screen.
Customizations
There are many customizations to permit the guidance to be tuned to the user’s preferences.
These include the already mentioned Voice prompt settings as well as changing the size of the
navigation pane, making it automatically appear, showing the ETA (Estimated Time of Arrival),
as well as some GPS options. ETA is a really useful banner for predicting arrival times. It uses the
speed data from the road classes to predict an arrival based on the remaining distance. To ensure
that the GPS and PDA agree as to what time it is the PDA will automatically be set to GPS time.
WayPoint Navigation
The GPS options of particular use while navigating include
• auto-scroll
• auto zoom
• auto-rotate
• lock to road - This changes the behavior of the GPS position indicator.
• center the view forward
This last setting offsets the GPS position from the center of the screen to make more
information available about the route ahead.
71
Page 82

SOUND SETTINGS
Sound settings include customizing the beeps and sounds associated with various navigation
notifications. First turn, Turn Coming, Turn Complete, Re-route sounds can be customized.
There is also a setting for Special Notices.
In addition notifications are available for GPS change in status. Fix acquired and Fix lost can b e
set independently.
The various sounds can also be turned off if desired. Sound choices include standard Pocket PC
alarms and unique WayPoint navigation sounds.
Speed alert can be set to sound at a specific speed.
Voice volume can also be changed here or by using the system volume settings.
72
Page 83
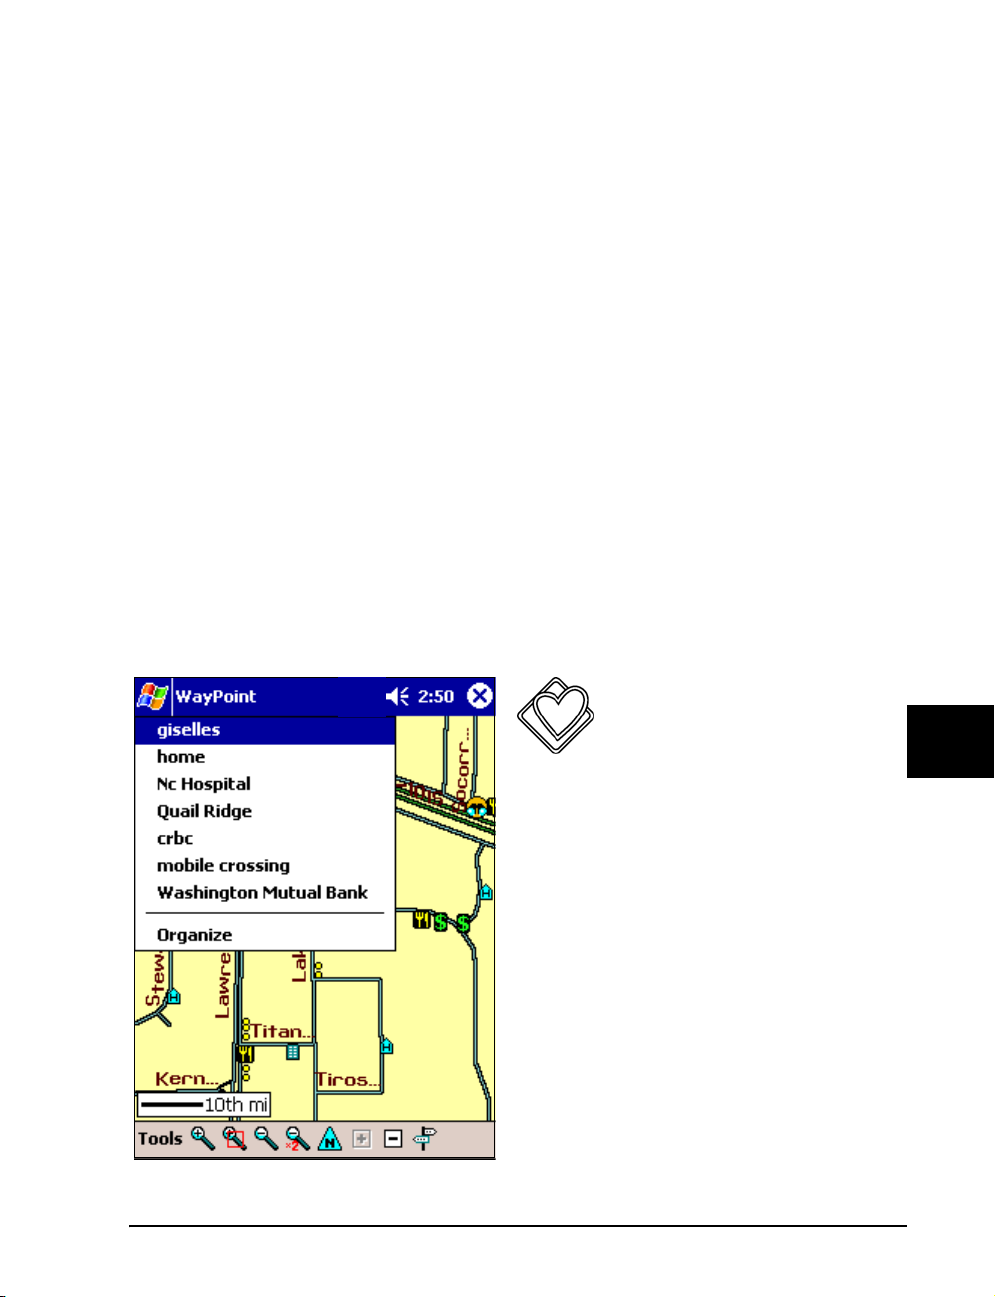
Chapter
7
Step-by-Step
This Chapter contains step by step samples to do specific tasks in the WayPoint navigation
software.
Quick Route s
Quick Routes always route from your current location.
Route to a Favorite Location
Step by Step
You can generate a route to any of your favorite
locations.
1. Press the Favorites Button
2. Select a location from the menu that appears.
You must have a fix for this to work.
73
Page 84
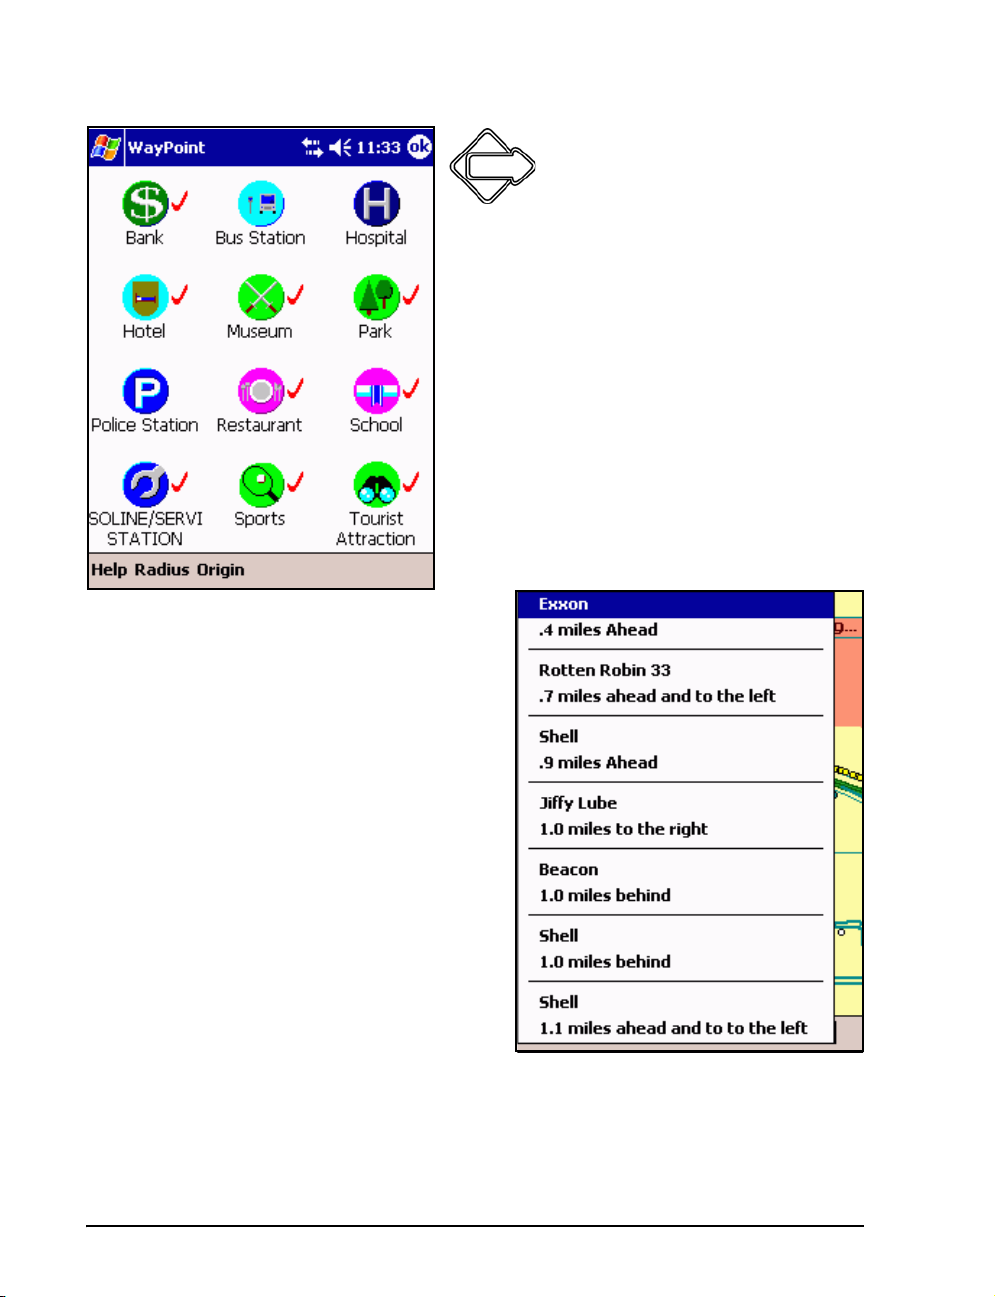
Quick Route
You can generate a route to the nearest Gas Station
or the Nearest Restaurant. or other specific
category.
1. Press and Hold the Detour button for a second.
2. Tap the category you wish.
3. A menu will appear for you to select from a list of
close by locations. The direction will be indicated as
shown below. The check marks indicate that there
is a nearby entry for that category.
4. Tap the one you wish to generate a route to that
location. Tapping outside the box will cancel the
command.
The categories shown on this screen can be
customized to be any available category in the
database.
74
Page 85
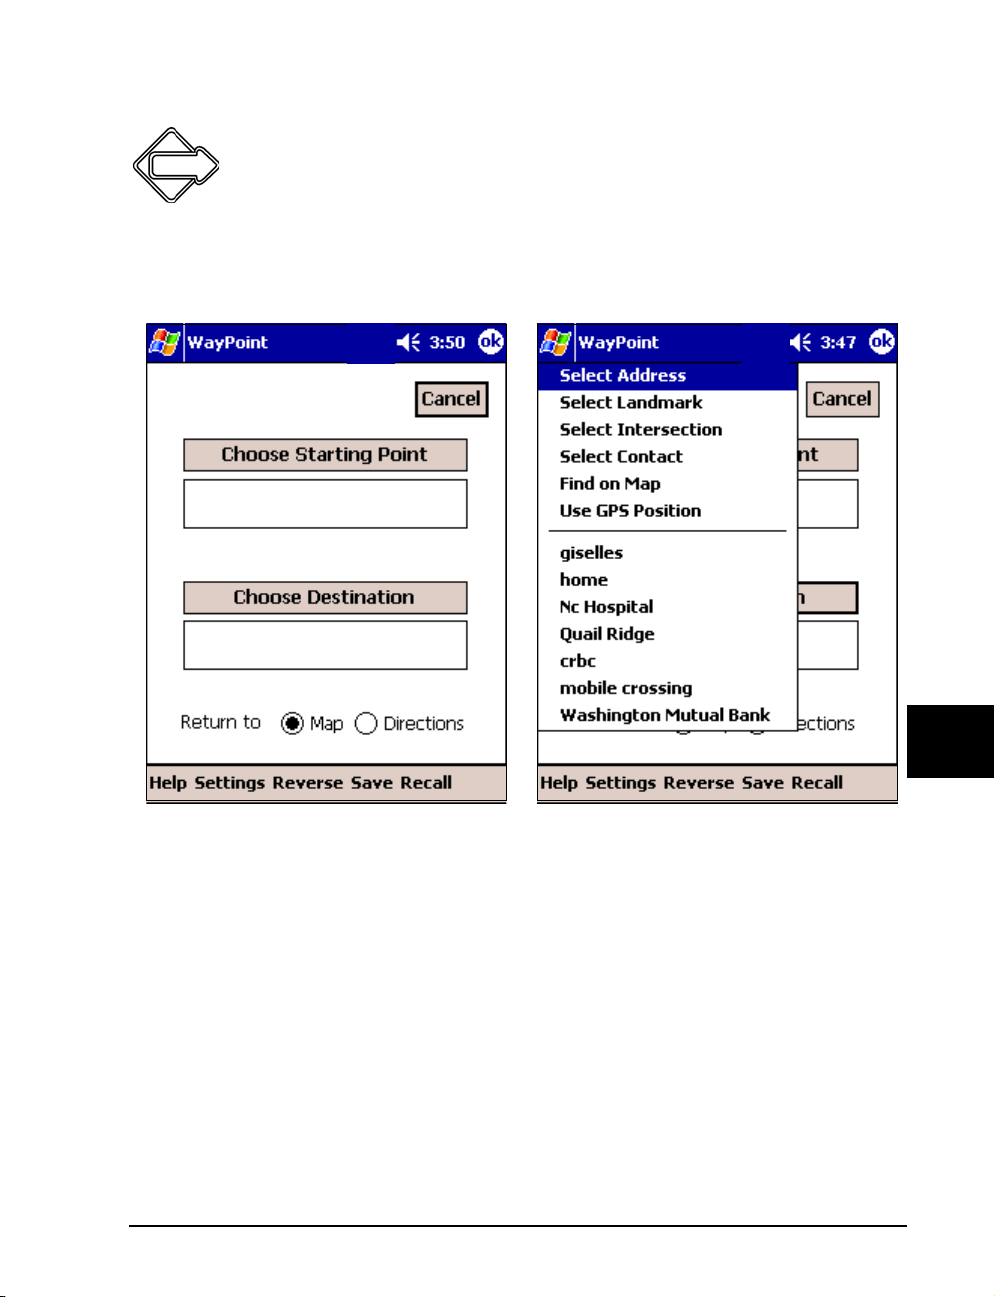
Other Routes
For other routes you need to start with the Tools > Navigation > Find Route
command. If there is no route active it can be found on the detour button which normally does
the detour command when you are navigating a route.
The first steps are always the same.
Step by Step
1. Tap the Choose Destination
2. Select a Choice from the menu.
Notice that your favorites are listed among the choice s. If the Find Route form already has data
on it from a previous route then you will also need to tap the Choose Starting Point to change
it. Choose Use GPS Position for the starting point.
75
Page 86
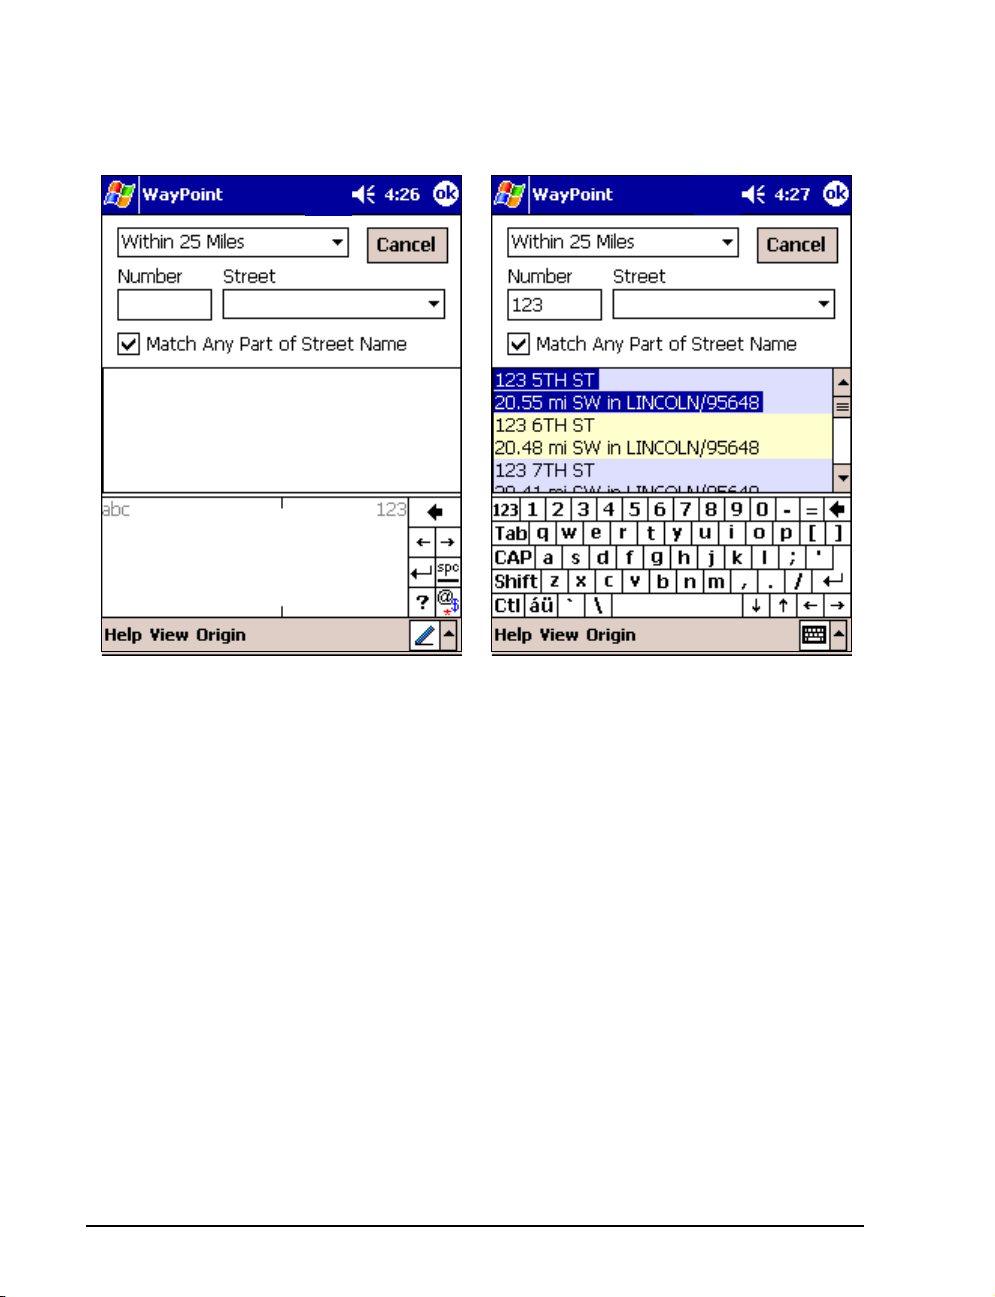
Route to an Address
Perform the first two steps above and tap Select Address.
3. The top left corner box contains a selection. Choices include Within 25 Miles, Anywhere,
Current View Area, A list of all loaded towns, and a list of all loaded zi p codes. Pic k what
you want. You can enter the first letter to aid in searching the dropdown list .
4. Enter the search data using any of the available entry methods. You can start with the
number or the street name. The Search spy glass will appear to show that a search is in
progress.
5. When addresses begin to appear you can scroll to select one or just enter more data to
trim the list. Scrolling can be done with the scroll bar, the cursor key, or the thumb wheel
but you will need to tap the field to scroll since the top field can also be scrolled.
6. Tap OK with the one you want highlighted. The list can be sorted by nearest or in
alphabetical order.
7. Tap OK on the route form to kick off the route.
76
Page 87
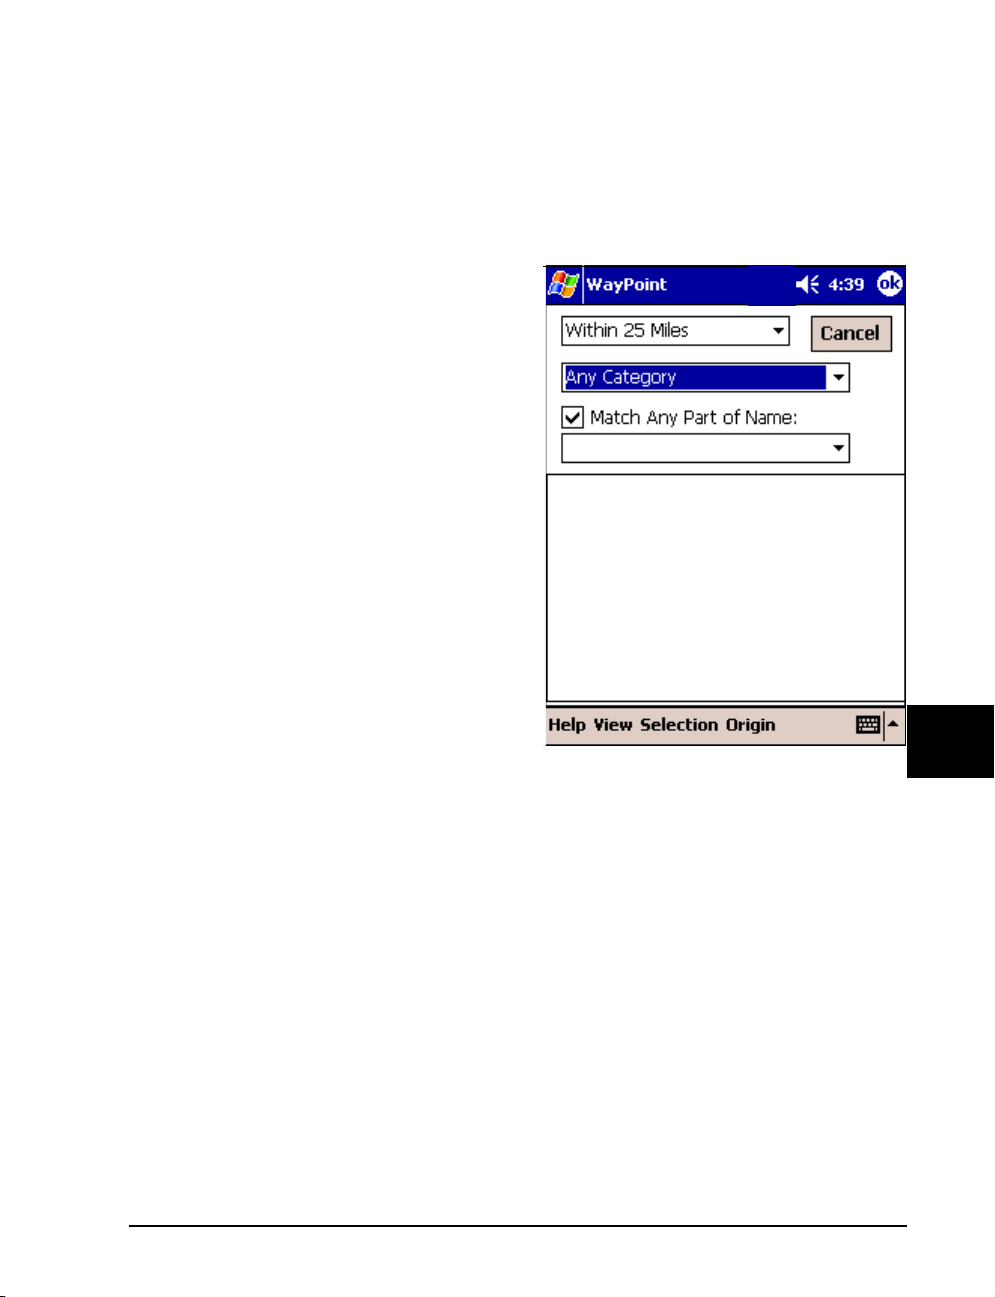
Route to a Landmark
Perform the same two starting steps and tap Select Landmark. A landmark can be a point of
interest, Business, Rest Area, Government facility, Tourist Attraction, or some place you saved in
your own locations database.
3. The top left corner box contains a selection. Choices include:
• Within 25 Miles.
• Anywhere.
• Current View Area.
• A list of all loaded towns.
• A list of all loaded zip codes.
Pick what you want. Entering the first
character can help to move rapidly through
the list.
4. Tap the category or name field to limit the
choices.
Step by Step
77
Page 88
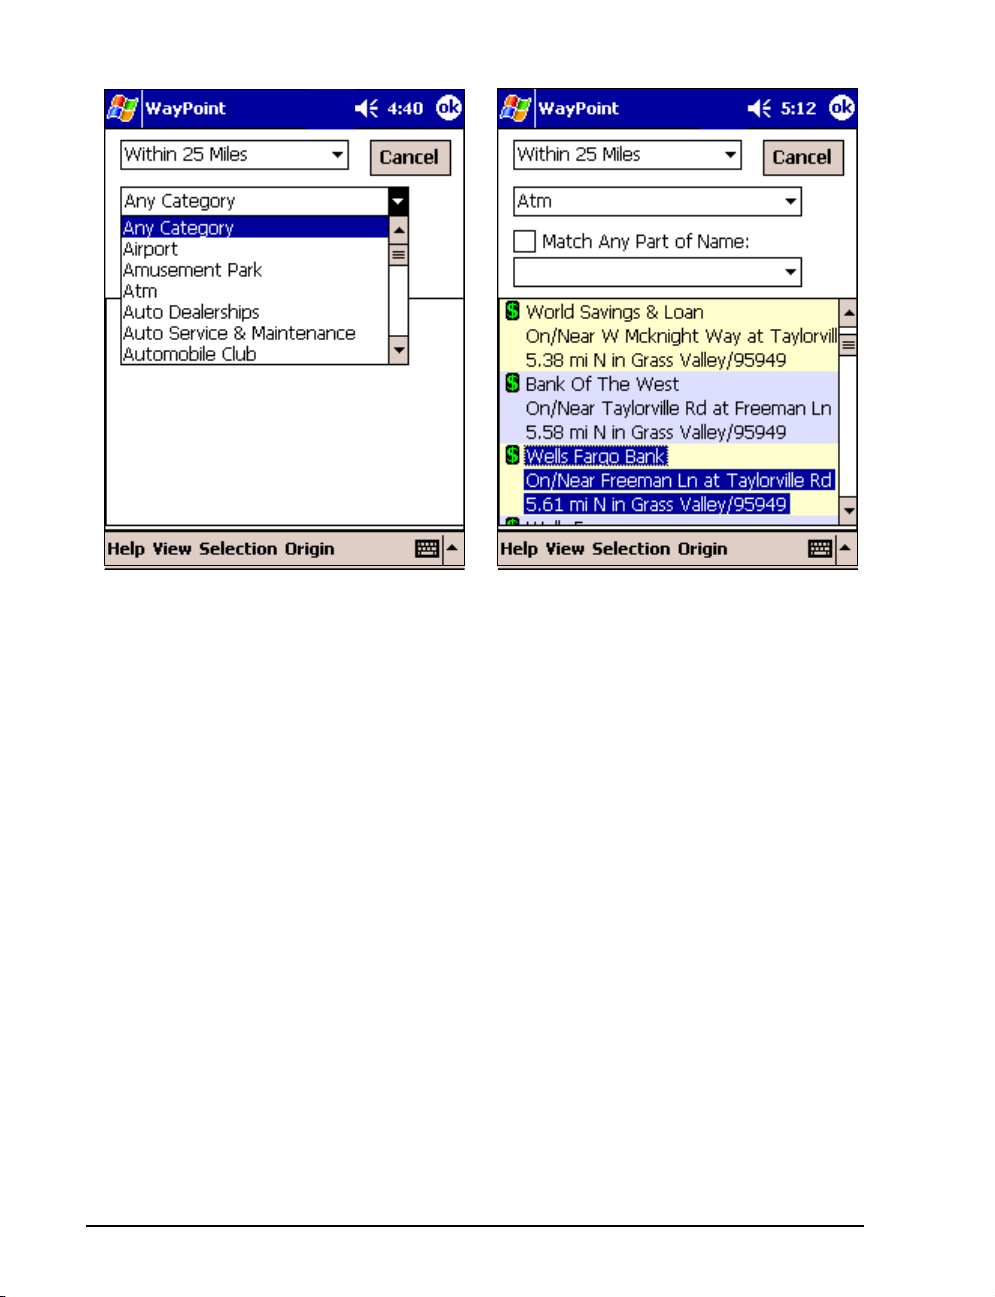
5. Select the Category you wish. You can move more rapidly through the list with the
keyboard by entering a few starting letters. You can also tap this entry field and use
the cursor key or thumb wheel to move through the list.
6. Find the one you want, either scroll for it or enter a few characters in the name field.
The name field also has a pull down list of recent places you picked.
7. Tap OK with the one you want highlighted. The list can be sorted by nearest or in
alphabetical order
8. Tap OK on the route form to kick off the route.
78
Page 89
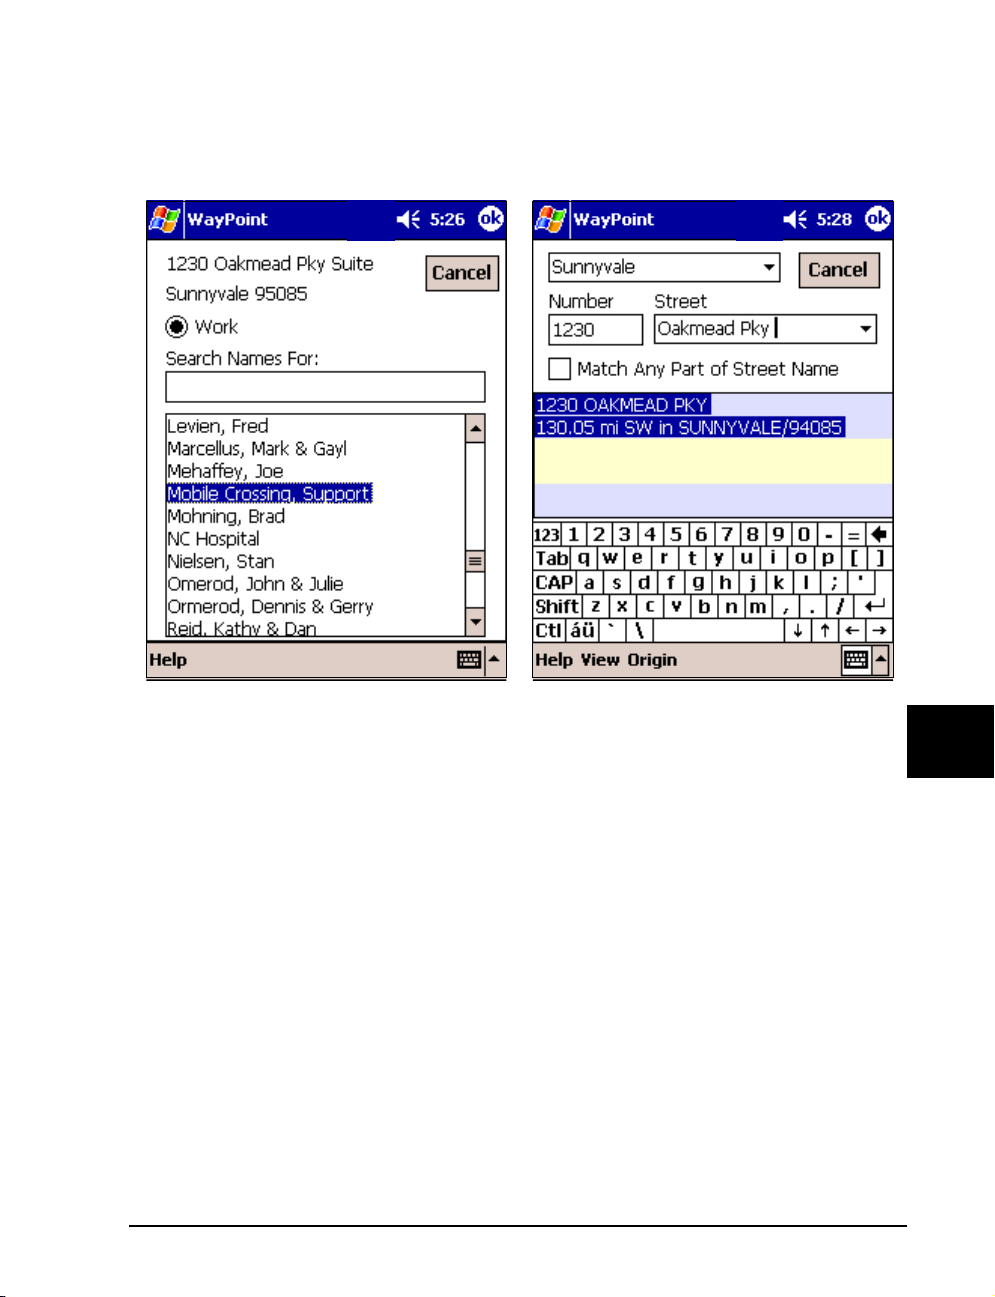
Route to a Contact
You can route to an address in your contact list. Perform the same first two steps above and t ap
Select Contact.
3. Select the correct entry from your contact list. You can scroll or search the list. If
the entry has two addresses a second button will appear to permit you to choose
which one you want.
4. Tap ok to allow the program to search for your address. If successful a list of choices
will appear on the next screen. If you get a no match error you can try to modify the
address a bit. For example, you might pick a different town or edit the street name.
Remove any suffixes on the address and apartment numbers.
5. Once you have the correct address selected, tap OK to return to the route screen.
6. Tap OK on the route screen to generate the route.
Step by Step
79
Page 90
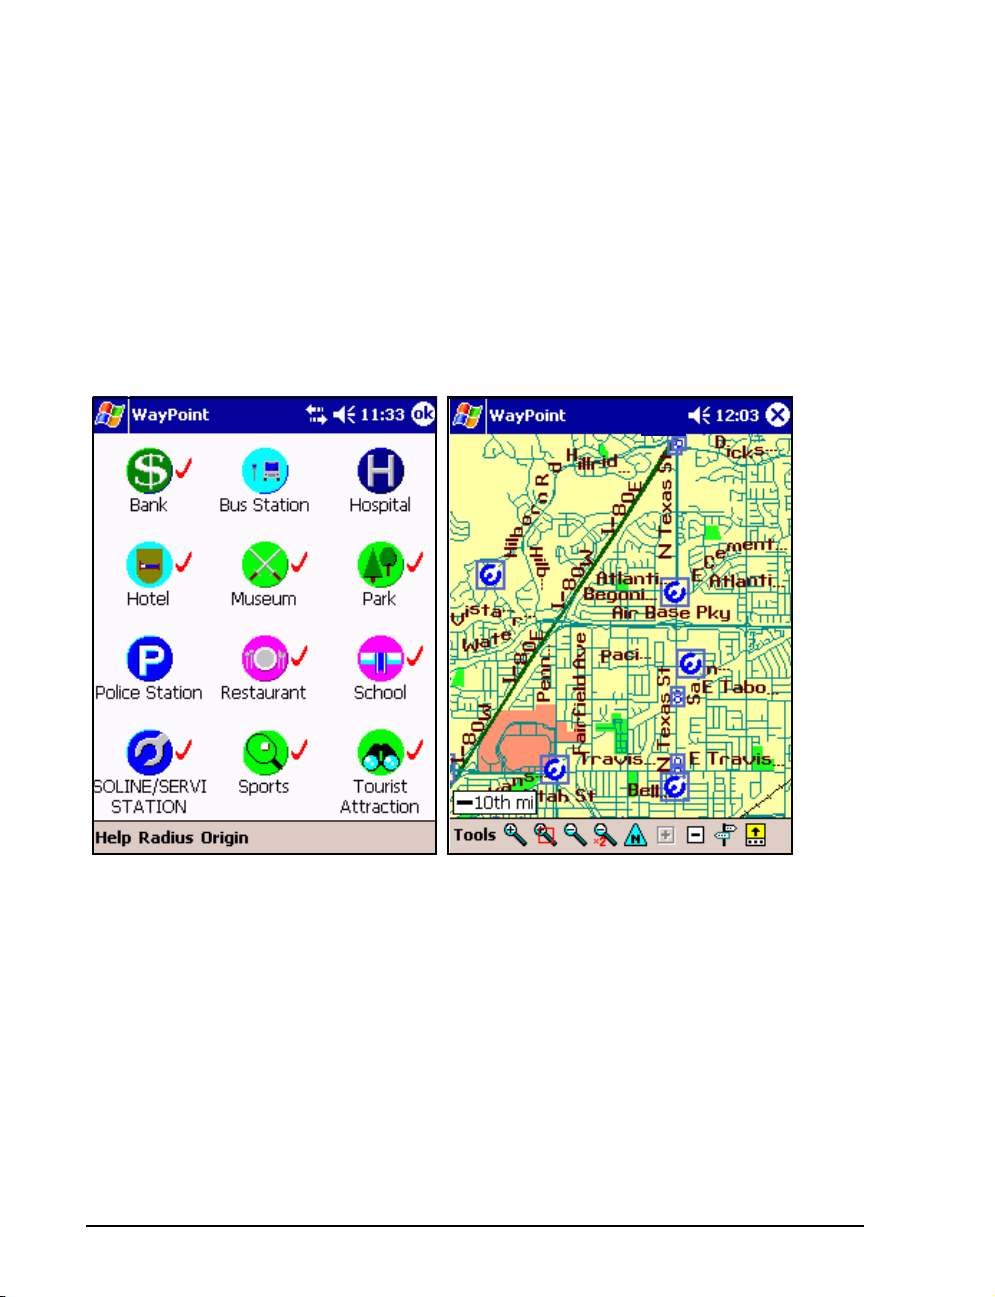
Finding Locations
Another approach to routing is to find the location first. This is especially useful when you aren’t
sure of the location name or haven’t quite made up your mind yet.
Finding a Location Graphically
You can find a location graphically and then route to it. Let’s supp ose you are driving east on I-80
somewhere near Fairfield and decide you need gas. Here is o ne way to proceed.
1. Select Tools > Find > All Places by Type. This will bring up the screen shown
below on the left. (Note that this screen also appears in the
page 74 command description but the subsequent behavior is different.)
“Quick Route” on
2. Select the radius you want to search or take the previous one you used. The check
marks indicate that there are entries for that category within the radius chosen.
3. Tap the Gas/Service Station icon.
4. A screen showing all the gas stations in the radius you chose will be shown. You
can tap any of them to find out what kind of station they are and their locations are
clearly shown on the map. Don’t forget to look at the small dots as well. These are
stations that are too close together to show the big icon. You can zoom or pan until
you find the one you like.
80
Page 91
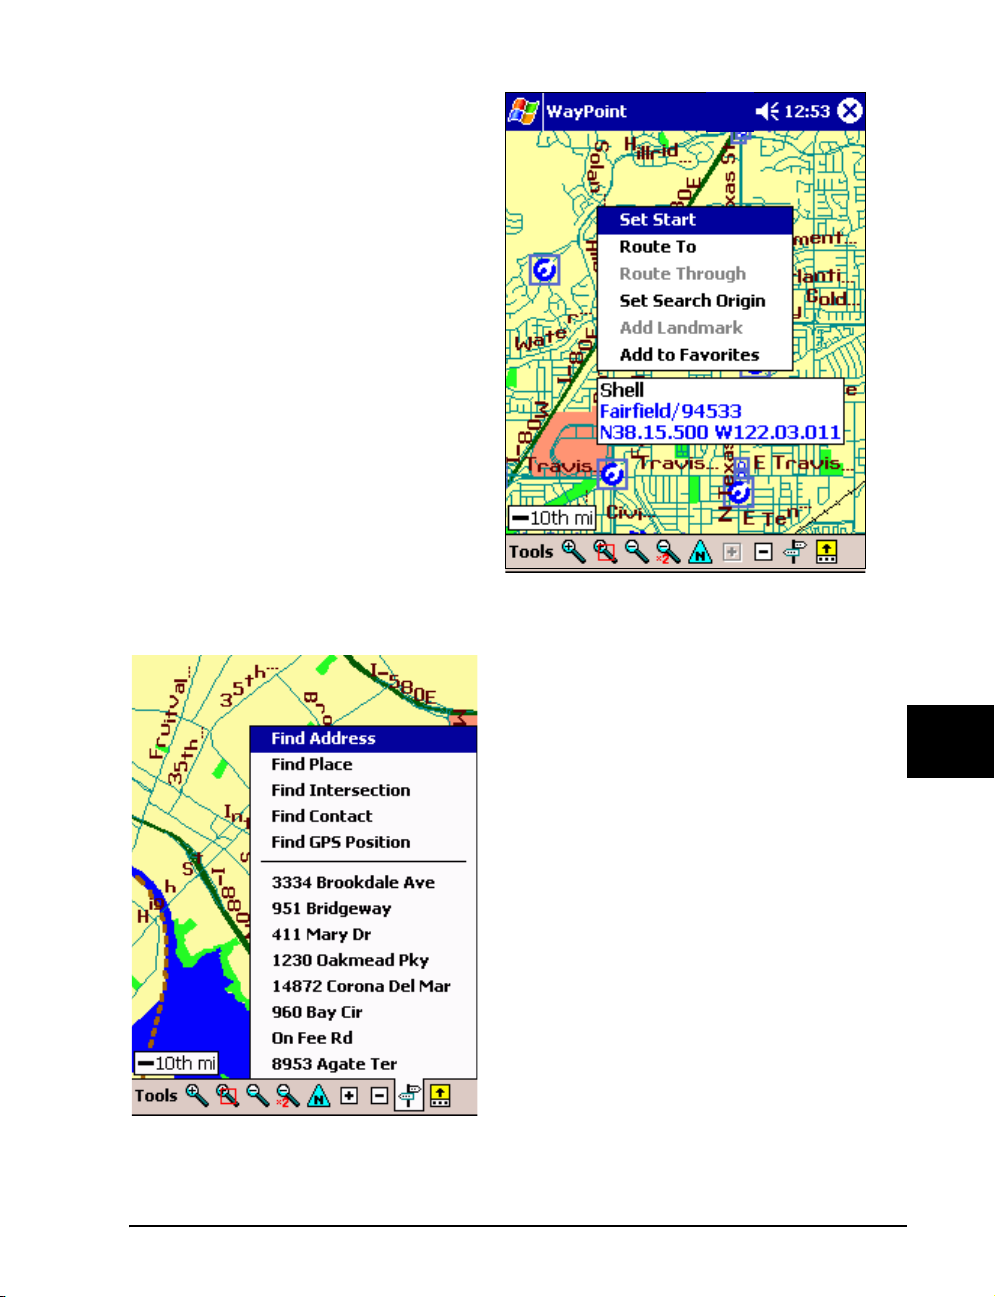
5. Once you have one in mind tap and
hold on the description to bring up
the menu.
6. Selecting Route To will generate a
route to that location. Or, if you’re
already running a route, consider
Route Through to add the gas stop
to the existing route. This will route
to the station and then back to the
route you were already on.
Using the SignPost
The SignPost quick find icon is near the right end
on the command bar. Tapping this will bring up the
quick find menu shown at the left
contains some frequently used find commands and
a list of your favorite locations.
1. Tap the sign post icon.
2. Select the entry you are interested in.
3. Once the location appears on the screen, use the
tap and hold technique to bring up a menu.
4. Select Route To to kick off the router to route
to that location.
. This menu
Step by Step
81
Page 92

82
Page 93
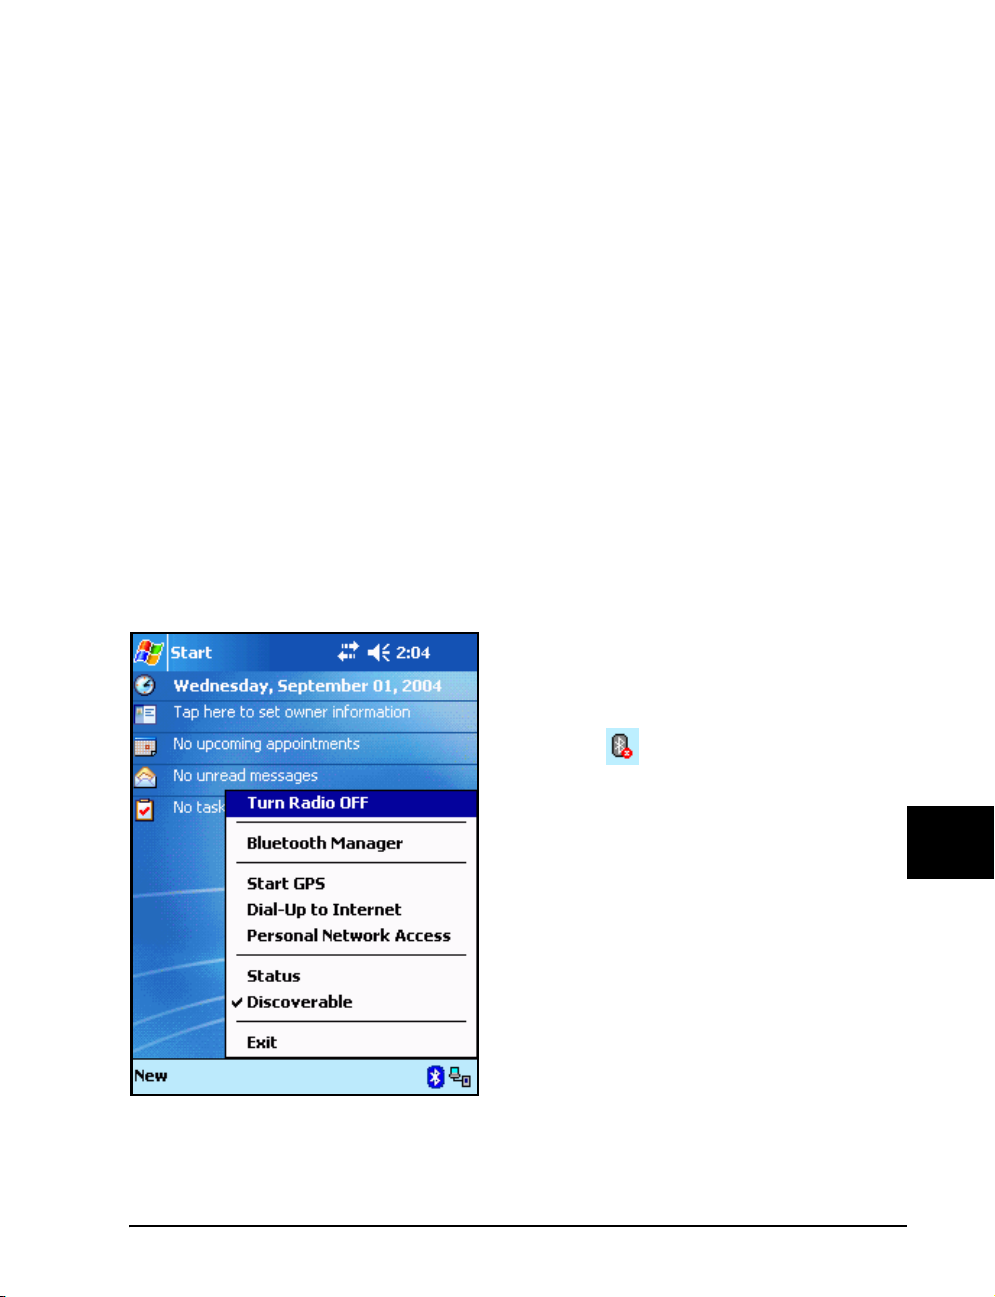
Chapter
8
Bluetooth Operation
Bluetooth GPS is a feature of the WayPoint 200 product. Bluetooth wireless technology consists
of a CF hardware card and Bluetooth management software with a Bluetooth Driver. The intent
of the Bluetooth module is to permit the use of the Bluetooth GPS receiver but it can also be
used for many other tasks.
Bluetooth Hardware
The Bluetooth hardware is a CompactFlash card
that is inserted in the slot at the top of the unit. It
may automatically turn on when it is insert ed. It can
be turned on or off from the Bluetooth menu.
the Bluetooth icon on the command bar at the
bottom of the Today screen to manage the
Bluetooth connections. Expect some loss of battery
life when the Bluetooth module is in use.
Use
Bluetooth Operation
There will be small x in the lower corner of the
Bluetooth icon if the card is not present.
A lamp on the module blinks to remind you that it
is in use and is working. When it is receiving data is
may turn solid on. The Bluetooth antenna extends
slightly above the PDA case and contains this lamp.
If the Bluetooth module does not turn on
automatically use the Bluetooth menu to Turn the
Radio on (or off).
83
Page 94

The settings in the Menu can be used to reach Bluetooth connections if
they have been
it can configure itself automatically (see “Enabling the Bluetooth Driver”
on page 86.) This is also the place where the Bluetooth radio is turned on
or off and where the unit can be changed from hidd en to discove rable.
Be sure that it is on before proceeding. To configure the devices and
connections use the Bluetooth Manager.
For the serial port connection needed for GPS use many of these
settings do not make any difference, but may be changed for increased
security or to restrict what can be done with the connection. Once a
GPS device is set up as the default for Bluetooth serial connections the
Bluetooth software will automatically connect to that device when the
mapping application requests it.
previously configured. In the case of the GPS connection
L
This is a class II
Bluetooth radio with
a maximum range of
up to 32 feet (10
meters) and a data
rate up to 721 Kbps.
It supports up to 7
devices. It is compliant with the Bluetooth V1.1 standard.
The typical power
consumption is
40mA but can reach
90mA peak.
Automatic Operation
There is a special feature that provides automatic operation of the Bluetooth for GPS operation.
The Bluetooth GPS receiver must be turned on for these features to work This capability
includes:
• Automatic configuration and connection to a WayPoint Bluetooth GPS. Tap the Start
GPS to automatically search and pair with the GPS device. Once the connection is
made the WayPoint application will automatically be started.
• Automatic reconnection of the GPS if you power off the unit. This is specific to the
default GPS device which will cause the Bluetooth to reconnect to this unit when
powered on.
• It will also cause the GPS to be found and connected automatically if a Bluetooth GPS
is requested from WayPoint or any other GPS enabled software.
Bluetooth Manager
The Bluetooth manager establishes the connection s with supported d evices. When you sta rt the
Bluetooth Manager you will see the ShortCuts Window. In the figure below left a serial port
Bluetooth device (In this case a GPS) is shown. The first time yo u enter the Manager this screen
will be empty. To make a connection to the GPS as shown perform the following steps.
84
Page 95
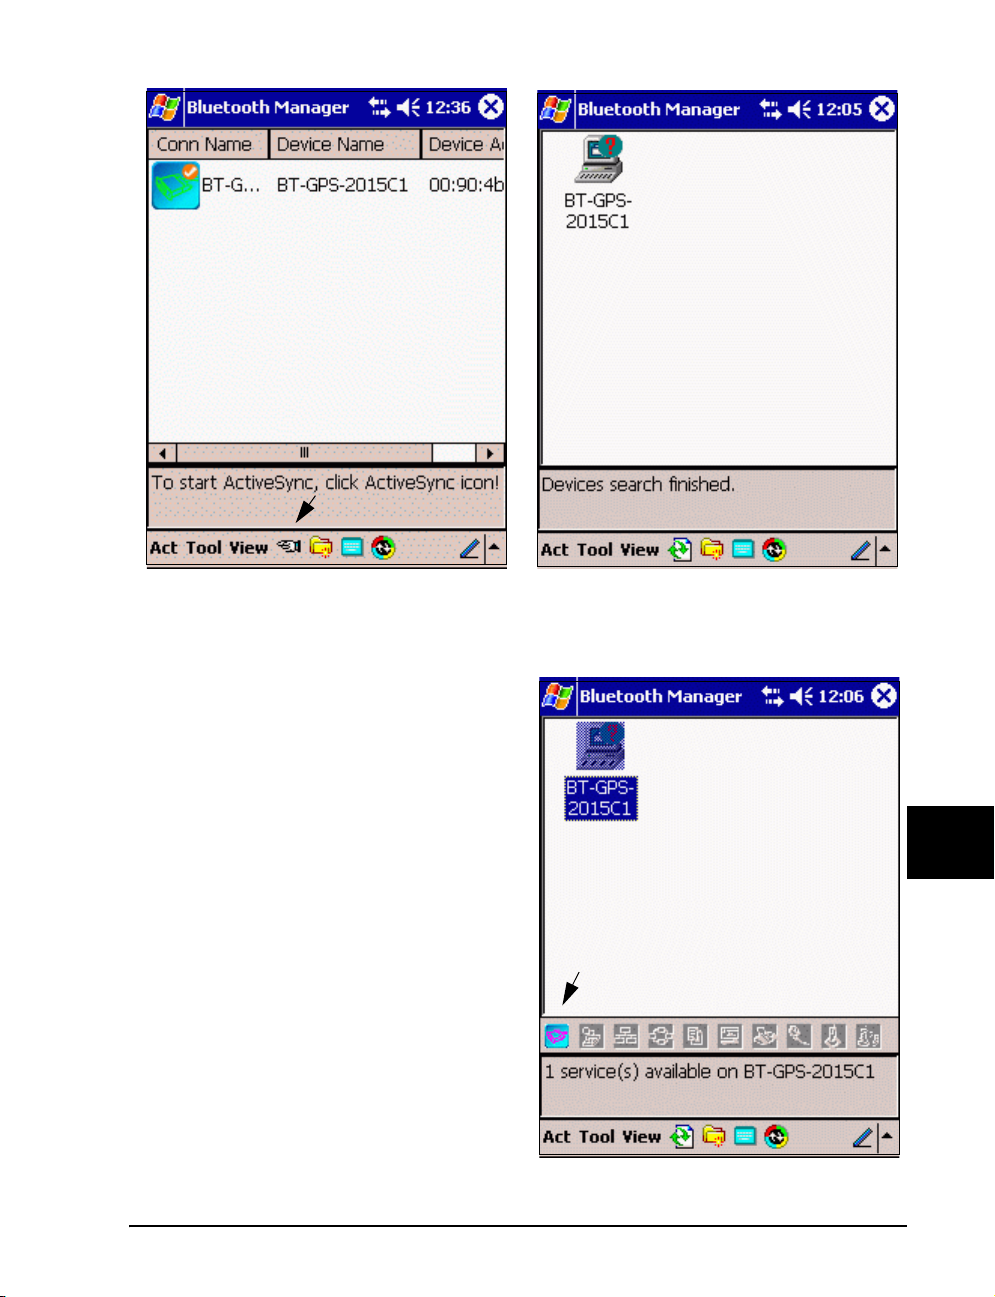
1. Tap the hand shown on the command bar to bring up the Devices Nearby window
shown above on the right.
2. Generally this will kick off the search
automatically. You ca
refresh icon to look for devices nearby.
The screen shows that a GPS has been
found.
3. Tap twice quickly on the icon to disc over
the services it provides.
4. Depending on the security settings it may
ask you for a passkey. It is 2003 for this
device. (Security level is controlled on
Tool > Configuration)
5. The window shown to the right will
appear.
6. Only the Serial Port service will appear
for this a GPS device (on the left near the
bottom as shown by the arrow). Tap it to
connect and create a short cut.
n also tap the
Bluetooth Operation
85
Page 96
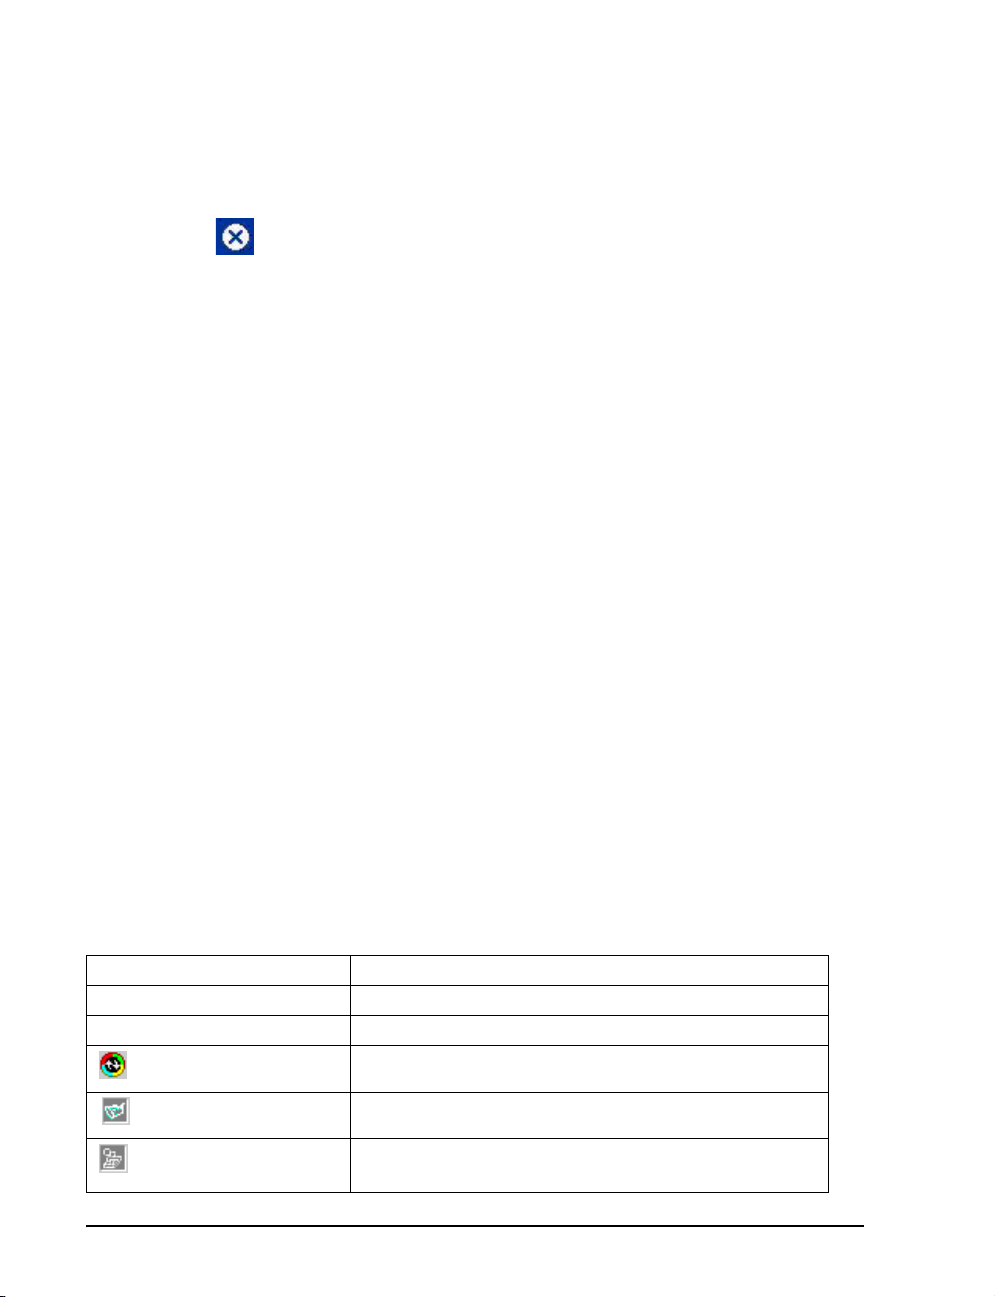
7. You are now back to the screen you started with. A co nnection has bee n made to the
Bluetooth GPS unit.
8. If this is the first serial device it will also be set as the default device. If you have multiple
serial devices you can choose the default one from a menu.
9. Tap the icon to leave the Manager or just press the WayPoint button to bring up the
WayPoint application. It can use the Bluetooth GPS connec tion that was just creat ed.
This is the minimum needed to set up the Bluetooth GPS but will only need to be done the first
time. For more security you can set a bond between the devices by setting the security to “high
security” on the Tool > Configuration > Options menu. A high security will require you to
enter the security code. It is 2003 to make the connection. The devices will then be paired. It will
remain paired unless you delete the pairing. Only one device at a time can use the serial
connection. Once it is established, the GPS will be locked to your unit as if there was a wire
running between them.
The WayPoint navigation tool will be able to access the Bluetooth GPS on COM 8. While the
Bluetooth CF card does not use as much current as a direct connection of a GPS would, it still
uses some power. It should be turned off when not needed.
Enabling the Bluetooth Driver
Normally the Bluetooth driver will always be running even if the Bluetooth hardware card is
removed. If the Bluetooth icon is missing from the bottom of the Today screen it means the
driver are not running. Use the start menu > programs and start the driver by tapping the
Bluetooth icon named BlueSoleil. If the driver is already running tapping this icon will do
nothing. A copy of this icon should be in the startup folder (\Windows\Startup) to aut omatically
start the Bluetooth driver after a software reset.
Other Uses
While the main intent of the Bluetooth module is to su pport the B luetooth GPS unit, it can also
support other activities and tasks. For example it can work with the contact list to send a contact
via Bluetooth to another device or it can use the contact entry to dial a Bluetooth phone. It
supports:
Service Definition
General Access (GAP)
Service Discovery (SDAP) Manages device discovery process
ActiveSync
Serial Port (SPP)
Dial-Up network (DUN)
Provide wireless ActiveSync capability.
Used by GPS - General Serial Port support
Used by a wireless modem. GPRS cell phones are
supported.
86
Page 97
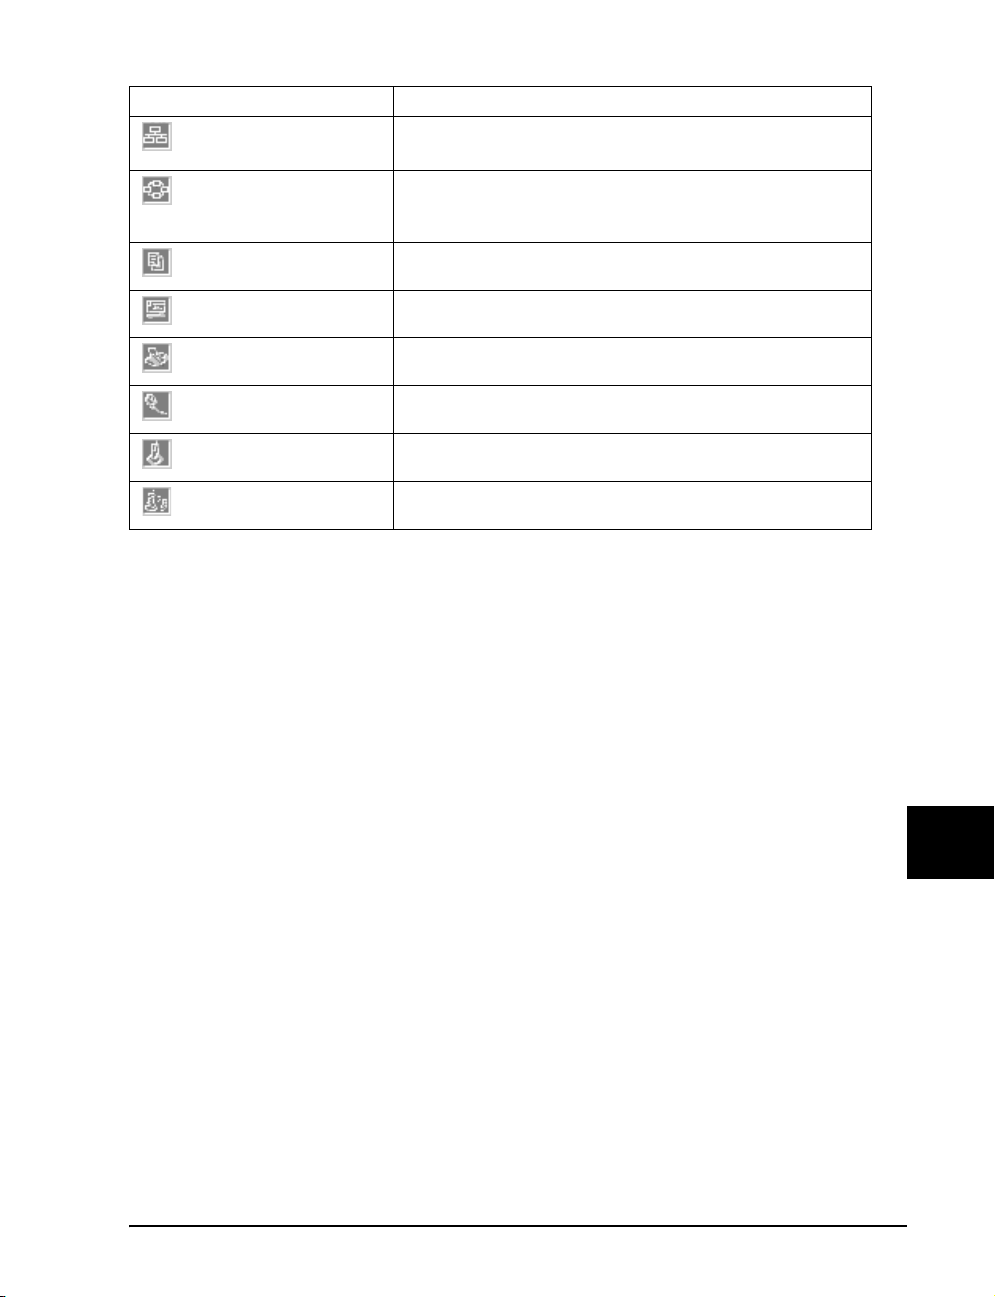
Service Definition
LAN Access (LAP)
Personal Area Network
(PAN)
File Transfer (FTP)
Object Push (OPP)
Fax (FAX)
headset
Audio Gateway
Cordless Phone Gateway
Check the Official Bluetooth website http://www.bluetooth.org for more information on th ese
features or read the vendor documentation on Bluetooth that is available on t he CD-ROM as a
pdf file.
The PAN service can support a local network of up to 7 units. If one of the units on this local
network is a Internet Access Point the full Internet can be browsed directly from the WayPoint
PDA. Thus a WayPoint unit could use the PAN network and a GPS serial connection to provide
simultaneous access to the GPS device and an internet connection. This would permit Traffic
Watch, for example, to be collecting live data while WayPoint is tracking your current location.
Used by wireless access points to provide network
connection
Provides a local network of up to 7 devices
Provides ability to transfer files between wireless devices
Sends business cards
Used to support a wireless fax machine
Used to support a wireless head set for cell phones
Similar to headset but no ring support
Used to support a cordless phone
The DUN service can be used with GPRS phones to support internet connections as well. This
would also permit live Traffic Watch or Weather Underground capability.
87
Bluetooth Operation
Page 98
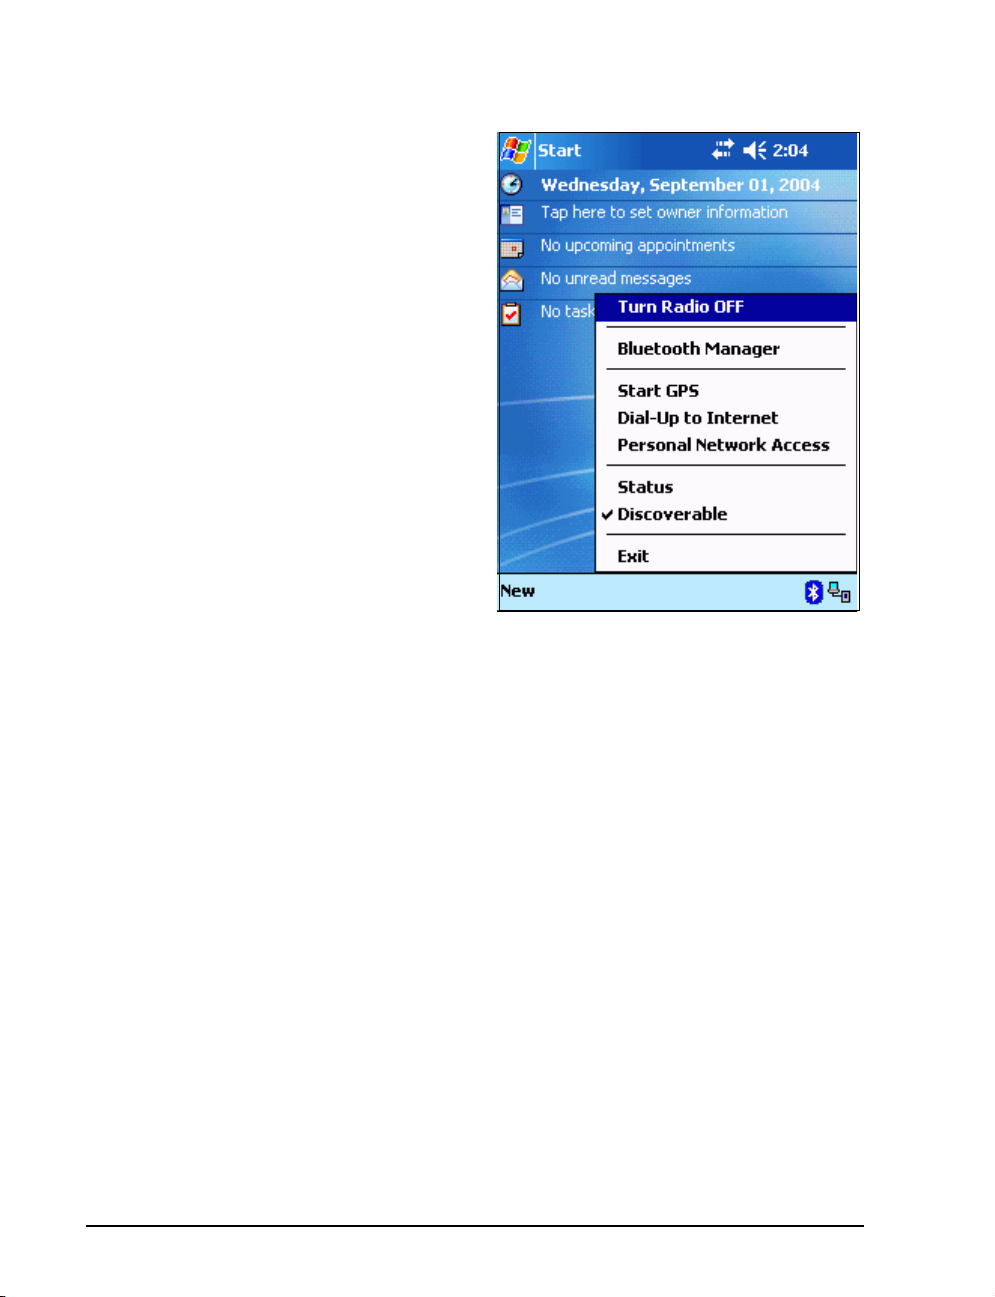
Screen Descriptions
The screens available for Bluetooth operation are
generally available in the Bluetooth manager. The
ACT menu on the command bar duplicates the
screen access from the icons. In addition the
status screen can be accessed from the today
Bluetooth menu. The Radio on/off toggle and
the Bluetooth Manager have already been
described. The additional features are available on
this menu include:
• 3 shorts cuts that permit direct access
for previously setup features in the
Manager. These are:
o Start GPS - This starts the
default GPS device. It is
intended to start the WayPoint
GPS for use in the WayPoint
application.
o Dial-up Internet - starts the
default DUN connection
o Personal Network Access - starts the
default PAN connection.
88
Page 99
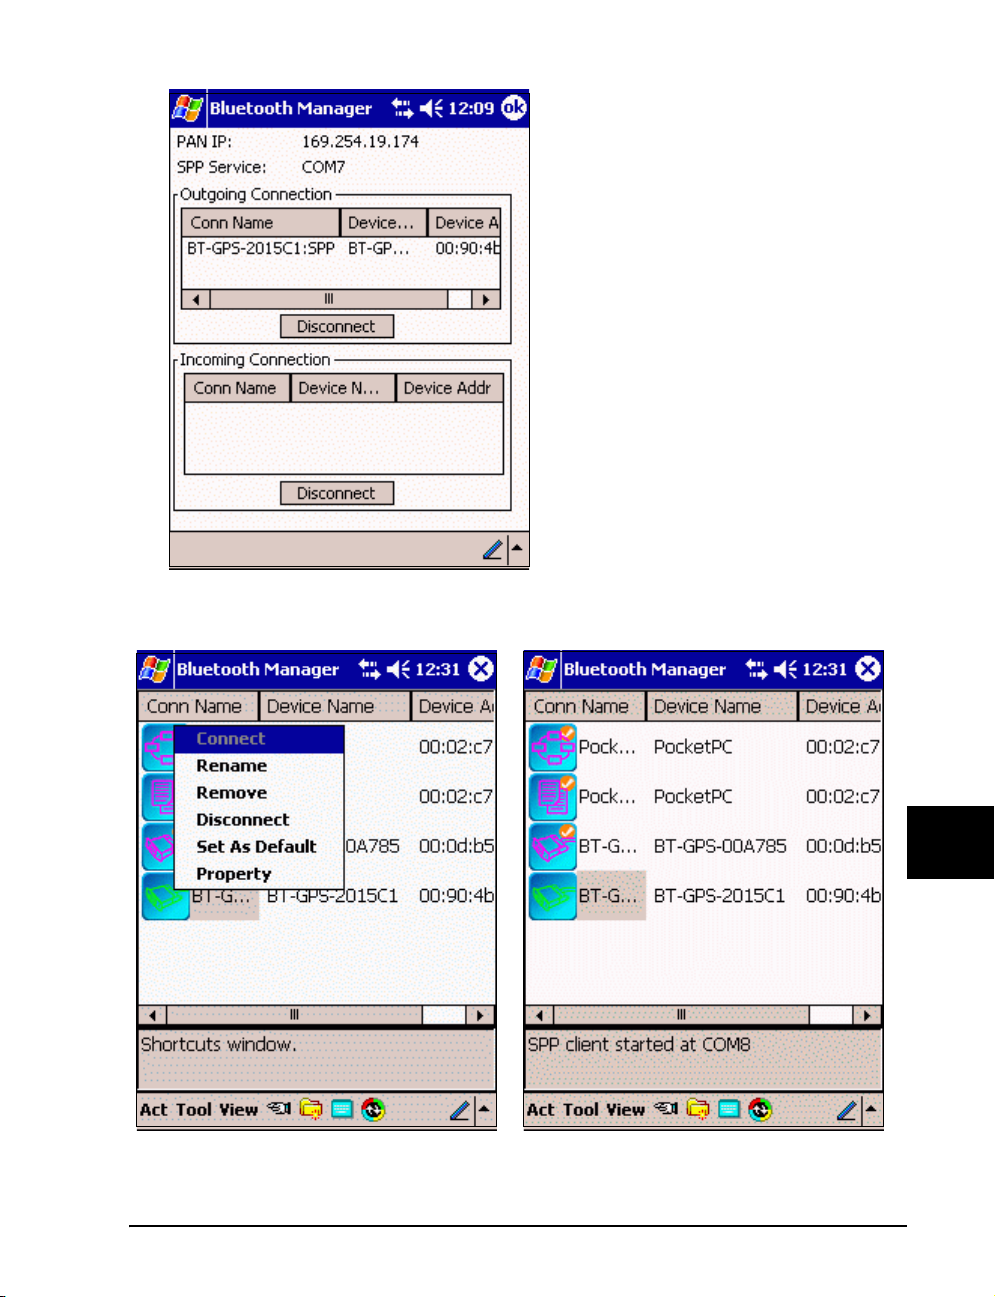
• The Status screen shows the active
connections. It is shown on the left. A
disconnect can be performed from this
screen.
• Discoverable is a toggle that permits the
unit to be found by other Bluetooth devices.
• Exit - quits the Bluetooth application.
The SPP service shown on the Status screen
is the address for incoming Serial
Connections. The Bluetooth GPS is an
outgoing connection as shown in the figure.
The SPP service COM port is generally one
higher than the Incoming Port however the
hardware may choose whatever it wishes.
To know which COM post address the GPS
is really connected to the Shortcut properties
can be used to verify the address.
The Screens in the Bluetooth Manager are shown below:
After tapping Property text in the right screen shows the SPP connection is on COM 8.
89
Bluetooth Operation
Page 100
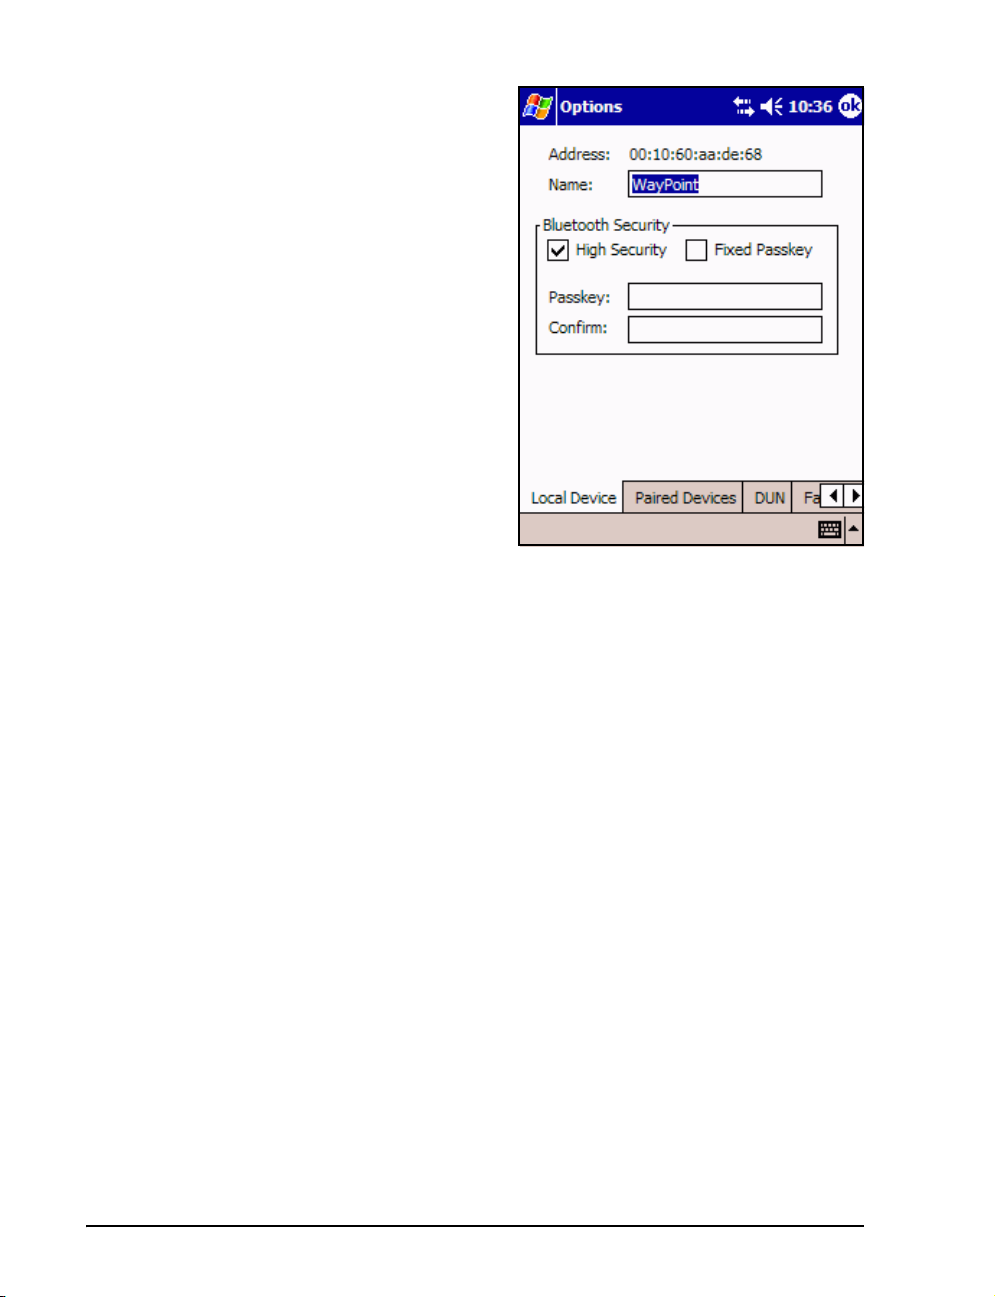
The Options screen is reached Tool >
Configuration in the Bluetooth Manager. It is
shown on the right.
• The Address is the internet address for a
pan connection.
• The name is the one used to identify the
the WayPoint PDA in Bluetooth
connections.
• The security can be set to high security to
require paired devices. If not checked then
no pairing will be required.
• A fixed password for this unit can be
assigned if desired. Otherwise you may be
prompted for a Passkey.
• The tabs show the connection options settings for various Protocols supported by this
unit including the business card transfer (OPP).
Bluetooth GPS Receiv er
The Bluetooth GPS receiver is the prime use for the Bluetooth module in the WayPoint PDA.
The unit runs 8 hours on its own internal battery is fully charged when the lamp goes out. A few
tips include:
• Do not exceed 5 V input.
• If left unused, a fully charged battery will discharge itself over time.
• Do not cover the antenna area shown in the figure on the next page. It is used for GPS
reception and for Bluetooth operation.
• If you decide to pair the GPS and the Bluetooth module the passkey is 2003.
• The Bluetooth lamp will flash at a one second rate when you are connected and much
slower while awaiting a connection.
• If the car power is removed when the ignition key is turned off, the unit will revert t o
battery power. Be sure and turn it off if you intend to leave the car for a long period.
90
 Loading...