

Page 1

®
MODEL 5803 ADVANCE CONTROL BASE
FOR THE
MODULAR TABLE SYSTEM
MAINTENANCE and REPAIR MANUAL
30031 Ahern Avenue
Union City, CA 94587-1234
Bus: 510-429-1500 Toll Free: 800-777-4674 Fax: 510-429-8500
OSI 2005 NW 0422 Rev.E
Page 2

1
IMPORTANT NOTICES
CAUTION: To ensure safe operation of the equipment, please READ THESE
INSTRUCTIONS COMPLETELY and keep this manual readily available for future reference.
Carefully observe and comply with all warnings, cautions and instructions placed on the
equipment or described in this manual.
In this manual, the WARNING symbol is intended to alert the user to the presence of
important operation, maintenance, or safety instructions.
Dans ce manuel, le symbole AVERTISSANT est projeté d'alerter l'utilisateur à la
présence d'opération importante, l'entretien, ou les instructions de sûreté.
Classification and Table Rating
The 5803 table is considered Class I Exempt and has a rating of IPX-4.
PROTECTION AGAINST ELECTRICAL SHOCK HAZARD:
This symbol indicates this equipment is an applied part TYPE B and is generally
suitable for applications involving external or internal contact with the patient, excluding
the heart. The patient circuit is connected to protective earth and this equipment should be
connected only to outlets with a protective earth ground.
LA PROTECTION CONTRE LE DANGER DE CHOC ELECTRIQUE:
Ce symbole indique cet équipement est un appliqué partie TYPE B et est pour
applications impliquant externe ou interne contact avec le malade, exclure le coeur. Le est
connecté à protectif terre et ce devrait être seulement connecté à sorties avec un protectif
terre. Cet équipement a un IPX -4 évaluant.
This symbol indicates the external stud that is at the same potential as the
equipment. If the AC power cable is not connected to an outlet with a protective
earth ground, this external stud should be connected to a protective earth
ground.
This device is to be used by trained personnel only.
5803 Maintenance and Repair Manual NW0422 Rev E
Page 3

2
TABLE OF CONTENTS
1.0 INTRODUCTION..................................................................................................................................................................4
1.1 General Description .............................................................................................................................................................. 4
1.2 Specifications........................................................................................................................................................................4
1.3 Shipping..................................................................................................................................................................................4
1.4 Storage....................................................................................................................................................................................4
2.0 CONTROLS IDENTIFICATION......................................................................................................................................5
2.1 Major Component Identification........................................................................................................................................5
2.2 Base Orientation....................................................................................................................................................................5
2.3 Model Number and Serial Number....................................................................................................................................6
3.0 INSPECTION..........................................................................................................................................................................7
3.1 Acceptance & Transfer........................................................................................................................................................7
3.2 Preoperative...........................................................................................................................................................................7
3.3 Postoperative.........................................................................................................................................................................7
3.4 Annually .................................................................................................................................................................................7
4.0 PRE -OPERATIONAL FUNCTION CHECK................................................................................................................8
5.0 BASIC OPERATION............................................................................................................................................................9
5.1 Casters.....................................................................................................................................................................................9
5.2 Control Operation...............................................................................................................................................................10
5.3 Rotation Safety Lock..........................................................................................................................................................10
5.4 180° - Rotation Lock Indicator..........................................................................................................................................11
5.5 Tilt Drive Status Indicator.................................................................................................................................................11
5.6 Hand Control Module ........................................................................................................................................................12
5.7 Synchronizing The Lateral Tilt Function........................................................................................................................13
5.8 Tabletop Coupling Procedure...........................................................................................................................................14
5.9 Tabletop Coupling Procedure With Top In Place.........................................................................................................16
5.10 Rotation Procedures.........................................................................................................................................................16
5.11 Rotation Lock System......................................................................................................................................................16
5.12 Rotation Procedure For The 5803 Base........................................................................................................................16
5.13 Retracting The Base For Storage...................................................................................................................................17
6.0 CLEANING and MAINTENANCE.................................................................................................................................18
6.1 Cleaning and Disinfecting.................................................................................................................................................18
6.2 Lubrication ...........................................................................................................................................................................18
6.3 Preventative Maintenance ................................................................................................................................................. 18
7.0 THE ELECTRICAL SYSTEM.........................................................................................................................................19
7.1 Description ...........................................................................................................................................................................19
7.2 Power Cord ..........................................................................................................................................................................19
7.3 ON/OFF Power/Circuit -Breaker Switch......................................................................................................................... 19
7.4 Power ON / Fault / Battery Status Lights.......................................................................................................................19
7.5 Battery Recharging .............................................................................................................................................................19
8.0 TROUBLESHOOTING......................................................................................................................................................20
8.1 Electrical System................................................................................................................................................................20
9.0 REMOVAL and REPLACEMENT of COMPONENTS ...........................................................................................23
9.1 Head-end Cover..................................................................................................................................................................23
9.2 Foot-end Cover....................................................................................................................................................................24
9.3 Hand Control Module ........................................................................................................................................................24
9.4 Batteries................................................................................................................................................................................25
9.5 Power Supply ....................................................................................................................................................................... 27
9.6 Controller Circuit Board ....................................................................................................................................................27
9.7 On -Off Power Switch / Circuit Breaker..........................................................................................................................27
9.8 Head-end Assembly ...........................................................................................................................................................27
9.9 Head-end Tilt Motor ...........................................................................................................................................................28
9.10 Foot-end Rotation Safety Lock Motor..........................................................................................................................28
9.11 Head or Foot-end Column ...............................................................................................................................................28
9.12 Retractable Center Beam.................................................................................................................................................28
9.13 Casters................................................................................................................................................................................28
10.0 ADJUSTMENT of COMPONENTS .............................................................................................................................29
5803 Maintenance and Repair Manual NW0422 Rev E
Page 4

3
HEAD END................................................................................................................................................................................29
10.1 Tilt Actuator Rod End Length........................................................................................................................................29
10.2 180° Rotation Lock Sensor.............................................................................................................................................29
10.3 Home & Tilt Left/Right Sensors....................................................................................................................................30
10.4 Head-End Slider Adjustment Procedure.......................................................................................................................31
FOOT END................................................................................................................................................................................32
10.5 Rotation Safety Lock.......................................................................................................................................................32
10.6 Rotation Safety Lock (Brake) “ON” Sensor Setting..................................................................................................33
11.0 TECHNICAL DRAWINGS and PARTS LISTS .......................................................................................................34
11.1 Table-base Interconnect Diagram..................................................................................................................................34
11.2 Table-base Assembly Bill of Materials.........................................................................................................................34
11.3 Replacement / Spare Parts List.......................................................................................................................................34
12.0 GLOSSARY of TERMS ....................................................................................................................................................35
13.0 OSI TECHNICAL SERVICE.........................................................................................................................................36
13.1 Contact for Parts and Service .........................................................................................................................................36
13.2 To order Replacement Parts (RP) ..................................................................................................................................36
13.3 To return damaged parts (RGA)....................................................................................................................................36
13.4 To send a par t or item here for us to repair (RA)........................................................................................................36
5803 Maintenance and Repair Manual NW0422 Rev E
Page 5

4
1.0 INTRODUCTION
1.1 General Description
This manual describes the use, maintenance, and repair of the Modular Table System (MTS)
5803 Advance Control I-Base, DC (5803 Base). It is the primary component of the system
designed to support patients for a variety of surgical procedures. There are five procedurespecific Table Tops: Jackson Spinal, Imaging, Trauma, Endourology and Maximum Access
Lateral Top available for use on the MTS Base.
1.2 Specifications
• Maximum patient weight: Table Top specific but not to exceed 500 lbs
• Height Range 34 - 48 inches for Orthopedic Top
• Trendelenburg Range 10° ±3°
• Powered Tilt Range 25° ±3°
• Power Input 120 VAC at 60 Hz or 230 VAC at 50 Hz and internal
battery power
• Compatible Tabletops All MTS tops equipped with gimbals.
• Overall Length 120 inches
• Retracted Length 73.5 inches
• Width 30 inches
• Maximum tilt torque 55 ft-lb
• Maximum brake torque 95 ft-lb
• Duty Cycle 4% or 2.5 minutes continuously per hour
1.3 Shipping
The 5803 Base must be shipped in a manner that prevents damage to its structural elements,
caster wheels, electronics, and operating controls. Contact with solid objects in the environment
must be prevented during shipment and storage, except at the four Casters. Banding for lateral
constraint is to be limited to the base structure. Additionally, banding of the Head End Assembly
to prevent movement of the trolley is necessary. It is not necessary to fully crate the 5803 Base if
it is assured that no impact with foreign solid objects will be made during transit. The 5803 Base
is to be shipped in an environment within the following limits:
• Ambient temperature -20° C to +50° C (32°F & 120°F)
• Relative humidity from 10% to 100%, including condensation
• Atmospheric pressure from 50 to 110 kPa.
1.4 Storage
When not in use, store in a clean, dry environment with temperature between 32°F and 120°F.
If the Battery Status Light is red, it is recomme nded that the 5803 Base be stored with the power
cord plugged into a proper AC receptacle with the ON/OFF Power-switch “ON” for a minimum
of three (3) hours to ensure that the batteries are fully charged. If the red Battery Status lamp
remains illuminated after this time, do not operate the table under battery power and call for
service. Prior to use it is also recommended that the 5803 Base be plugged into a proper AC
receptacle with the ON/OFF switch in the “ON” position for a minimum of three (3) hours to
ensure that the batteries are fully charged.
5803 Maintenance and Repair Manual NW0422 Rev E
Page 6
5
2.0 CONTROLS IDENTIFICATION
H-Frame
Lock Knob
Power Cord
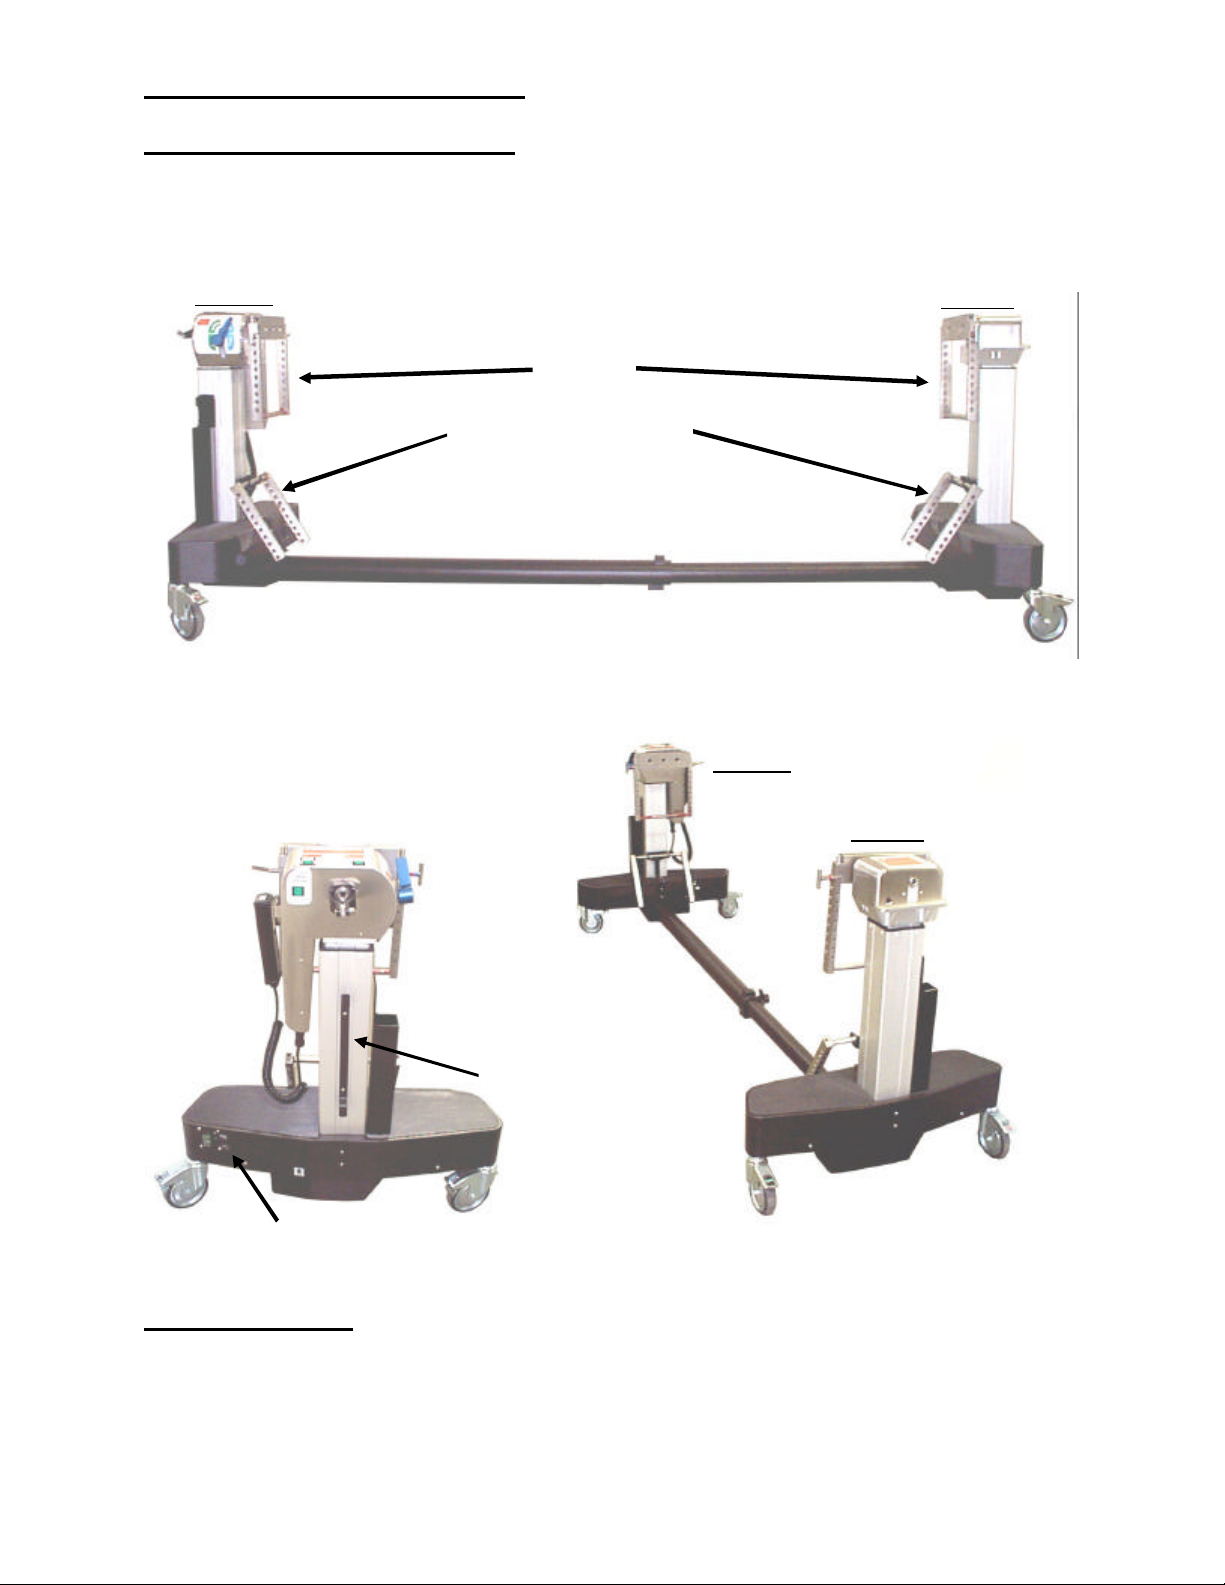
2.1 Major Component Identification
The 5803 Base is designed to hold a Table Top that will provide a patient support that is free of
any obstructions that might compete for space with the C-Arm. The major components of the
5803 Advanced Control Base are identified in the following figures.
Head-end
H-Frame in Storage Bracket
Center Beam
Foot-end
Hand Control
Caster
Figure 1- 5803 Base - Side View
Head-end
T-Pin Storage
Brake Caster
Brake Caster
Retracting
Storage
Caster
Foot-end
T-Pin Storage
Brake Caster
Figure 2 - 5803 Base – Head-end View Figure 3 - 5803 Base – View from Foot-end
On/Off Switch – I.D. Label
Steer Caster
2.2 Base Orientation
The control end of the Base is considered the Head End, and the opposite end is the Foot End.
The right side of the Base is the side to the operator’s right when standing at the Head End
looking toward the Foot End Base. The general nomenclature and orientation of the Table is
shown in Figure 1. Refer to the appropriate User Guide supplied with each Table Top for Table
Top Component Identification and more detailed information about the use of each Table Top.
5803 Maintenance and Repair Manual NW0422 Rev E
Page 7

6
2.3 Model Number and Serial Number
The Model Number and Serial Number are printed on the Identification Label located at the
Head End Base. This label is located to the right of the ON/OFF switch as shown below.
ON/OFF Power
Switch
Battery Status / Fault / Power lights
Figure 4. Head End; ON/OFF Switch – Serial Number Label
5803 Maintenance and Repair Manual NW0422 Rev E
Page 8

7
3.0 INSPECTION
3.1 Acceptance & Transfer
Upon receipt of your 5803 Base, remove any protective wrapping or packaging. Visually inspect
all surfaces for freight damage. Check each caster for proper rolling operation.
NOTE: Any freight damage must be reported to the freight carrier immediately upon delivery.
It is the responsibility of the recipient to make freight damage claims.
1. Verify receipt of the Completeness and Test Report provided with each 5803 Base.
2. Read the Model/Serial Number Identification Label found at the Pedestal End of the base
(See Figure 2.) to confirm the serial number and the input power require ments.
3. Place the 5803 Base in an area with at least 4 feet of clearance on all sides.
4. Perform Pre-Operational function check; see Section 4.0.
3.2 Preoperative
1. Perform Pre-Operational function check; see Section 4.0.
3.3 Postoperative
1. Perform Pre-Operational function check; see Section 4.0.
3.4 Annually
1. Perform Pre-Operational function check; see Section 4.0. Thoroughly clean the table as
described in CLEANING, Section 7.0. Pay special attention to the cleanliness of the controls
as excessive soil could affect function.
2. Inspect the power cord for cuts in the insulation or damage to the connector.
3. Check to see that all fasteners are tight.
4. Check the operation and security of the Brake Casters with and without a load in place.
5. Perform complete Preventative Maintenance Checklist.
Contact OSI Technical Service for a complete Preventative Maintenance Checklist.
5803 Maintenance and Repair Manual NW0422 Rev E
Page 9

8
4.0 PRE-OPERATIONAL FUNCTION CHECK
After reading the Basic Operation Section, perform all the steps in this procedure. For a complete
definition of reference terms used, please refer to the GLOSSARY OF TERMS Section.
1. Plug in the Hand Control cable-connector into the receptacle located under the head-end.
2. Plug the power cord into a “hospital grade” power outlet and flip the main “ON/OFF” Power
Switch to "ON". Verify the switch illuminates; this indicates power is applied to the table.
3. In succession, press and hold each of the six buttons on Hand Control and confirm the
operation of the following functions:
3.1. “TABLE UP”
3.2. “TABLE DOWN”
3.3. “TRENDELENBURG”
3.4. “REVERSE TRENDELENBURG”
3.5. “TILT LEFT”
3.6. “TILT RIGHT”
3.7. Engage the Rotation Safety Lock (switch to on) and the 180°- Rotation Locks (blue
handle clockwise, indicator light illuminates).
3.8. Release the Rotation Safety and 180° Rotation locks.
3.9. Confirm Head-end and Foot-end Crossbars are “unlocked” by rotating each one
complete revolution.
3.10. Re-engage both the Rotation Safety and 180° Rotation locks.
3.11. Confirm Head-end and Foot-end Crossbars are “locked”; Both Crossbars firmly resist
rotation.
3.12. Using Hand Control, press and hold “Tilt Left” button to end of travel. Confirm the
Foot-end Crossbar rotates freely.
3.13. Repeat the same when “Tilt Right” is operated.
Report any malfunction to your OSI representative immediately.
5803 Maintenance and Repair Manual NW0422 Rev E
Page 10

9
5.0 BASIC OPERATION
Push to Unlock
The 5803 Base can be operated on AC or DC power. For AC power plug the AC Power Cord
into the proper AC receptacle depending on the voltage requirements of the 5803 Base. Refer to
the label at the Head End Base for input voltage requirements. The 5803 Base can also be
operated on internal battery power with the Power Cord removed or not plugged into an AC
receptacle. Turn the ON/OFF Power Switch to “ON”. A green, "Power On" light, next to the
switch indicates that the power is ON. The ON/OFF Power Switch is a combination power
switch, circuit breaker. To reset this circuit breaker, turn the ON/OFF Power Switch OFF and
back ON.
NOTE: When the power cord is removed and/or not plugged into an AC outlet, the protective
earthing ground stud near the power entry module must be connected to a proper earth ground
during use.
5.1 Casters
Each Base is equipped with three (3) Locking Casters and one (1) Steer Caster. The Steer Caster
functions to allow the Tab le to roll along a straight path when pushed from the Head End. The
Steer Caster is located on the right side of the Foot End. The Steer Caster has a green label
marked “Steer”. To lock the Table Base securely in place, it is necessary to engage the Lock on
each of the four (4) Casters.
To lock a Caster Lock, step on the Lock Tab until you hear an audible click and the Tab remains
in the down or locked position. To unlock the Caster, push the Unlock Button. When the Unlock
Button is pressed, the Tab will click back to the original unlocked position.
Push Down to Lock
Figure 5 - Unlocked Caster Figure 6 - Locked Caster
5803 Maintenance and Repair Manual NW0422 Rev E
Page 11

10
5.2 Control Operation
180°° Rotation
1) 180° Rotation Lock
3) Rotation Safety Lock
2) Tilt Drive Status
The 5803 Base is controlled by means of a Hand Control that operates the Up/Down, Lateral Tilt
and Trendelenburg / Reverse-Trendelenburg movements of the table. See Hand Control Section.
The Head End of the 5803 Advanced Control Base is equipped with three Indicator Lights.
These lights are: 1) 180° Rotation Lock Indicator Light, 2) Tilt Drive Status Light and 3)
Rotation Safety Lock Indicator Light. Verify that the Rotation Safety Lock switch is in the ON
position and the 180° Rotation Lock Lever is in the locked position. These indicator lights are
shown in Figure 7. Under normal operation, the ON/OFF power switch light and battery status
light should be lit green and the Fault light should be dark.
NOTE: If the Fault Light is lit, the 5803 Base has detected a fault. Determine fault before use.
Lighted Switch
Indicator Light
Crossbar
Indicator Light
Traction Pulley
Lock Lever
Figure 7- Head-end Pivot Assembly, Indicator Lights and Controls
5.3 Rotation Safety Lock
The Rotation Safety Lock Lighted Switch locks out the 180° Rotation function. This feature is
designed to prevent unintended rotation of the Table Top. When the Rotation Safety Lock
Lighted Switch is illuminated, the Table Top can still be Laterally Tilted by pressing the Left or
Right Lateral Tilt button on the Hand Control. The Rotation Safety Lock Switch should be
turned off only when a 180° rotation is to be performed. If the Rotation Safety Lock Switch is
not illuminated, press the rocker switch to the ON position.
5803 Maintenance and Repair Manual NW0422 Rev E
Page 12

11
5.4 180°- Rotation Lock Indicator
When illuminated, the 180° Rotation Lock Indicator Light indicates the 180° Rotation Lock is
engaged and the table cannot be rotated 180°. If the 180° Rotation Lock Indicator is not
illuminated, rotate the Rotation Lock Lever clockwise until the light is illuminated.
NOTE: If a 180° rotation is to be performed, the Rotation Lock Lever should be rotated
counterclockwise approximately one half rotation past the point that the Rotation Lock Indicator
Light goes out. Rotating the Lock Lever to this point lessens the drag of the friction control,
thereby allowing the Table Tops to rotate more freely during the rotation. If even less friction is
desired, the Lock Lever may be rotated further counterclockwise, as necessary.
After the rotation is complete, rotate the Rotation Lock Le ver clockwise until the Rotation Lock
Indicator Light is illuminated.
NOTE: When the Rotation Lock Indicator Light is not illuminated, the Table Top is unlocked
regardless of how much the Lock Lever has been rotated clockwise or counterclockwise. After a
180° Rotation, always rotate the Lock Lever until the Rotation Lock Indicator Light is
illuminated.
5.5 Tilt Drive Status Indicator
The Tilt Drive Status Indicator Light is illuminated when the powered lateral Tilt Drive
mechanism is in the center position of the +/- 25- lateral tilt range. If the Tilt Drive Status
Indicator is not illuminated, operate the lateral tilt function using the Hand Control in the
appropriate direction until the indicator is illuminated. The Head-end Crossbar should be
horizontal when the Tilt Drive Status Indicator is illuminated. If the Head-end Crossbar is not
horizontal, the internal power tilt mechanism is out of synchronization with the Crossbar. Refer
to Synchronizing the Lateral Tilt Function to reset this function.
5803 Maintenance and Repair Manual NW0422 Rev E
Page 13
12
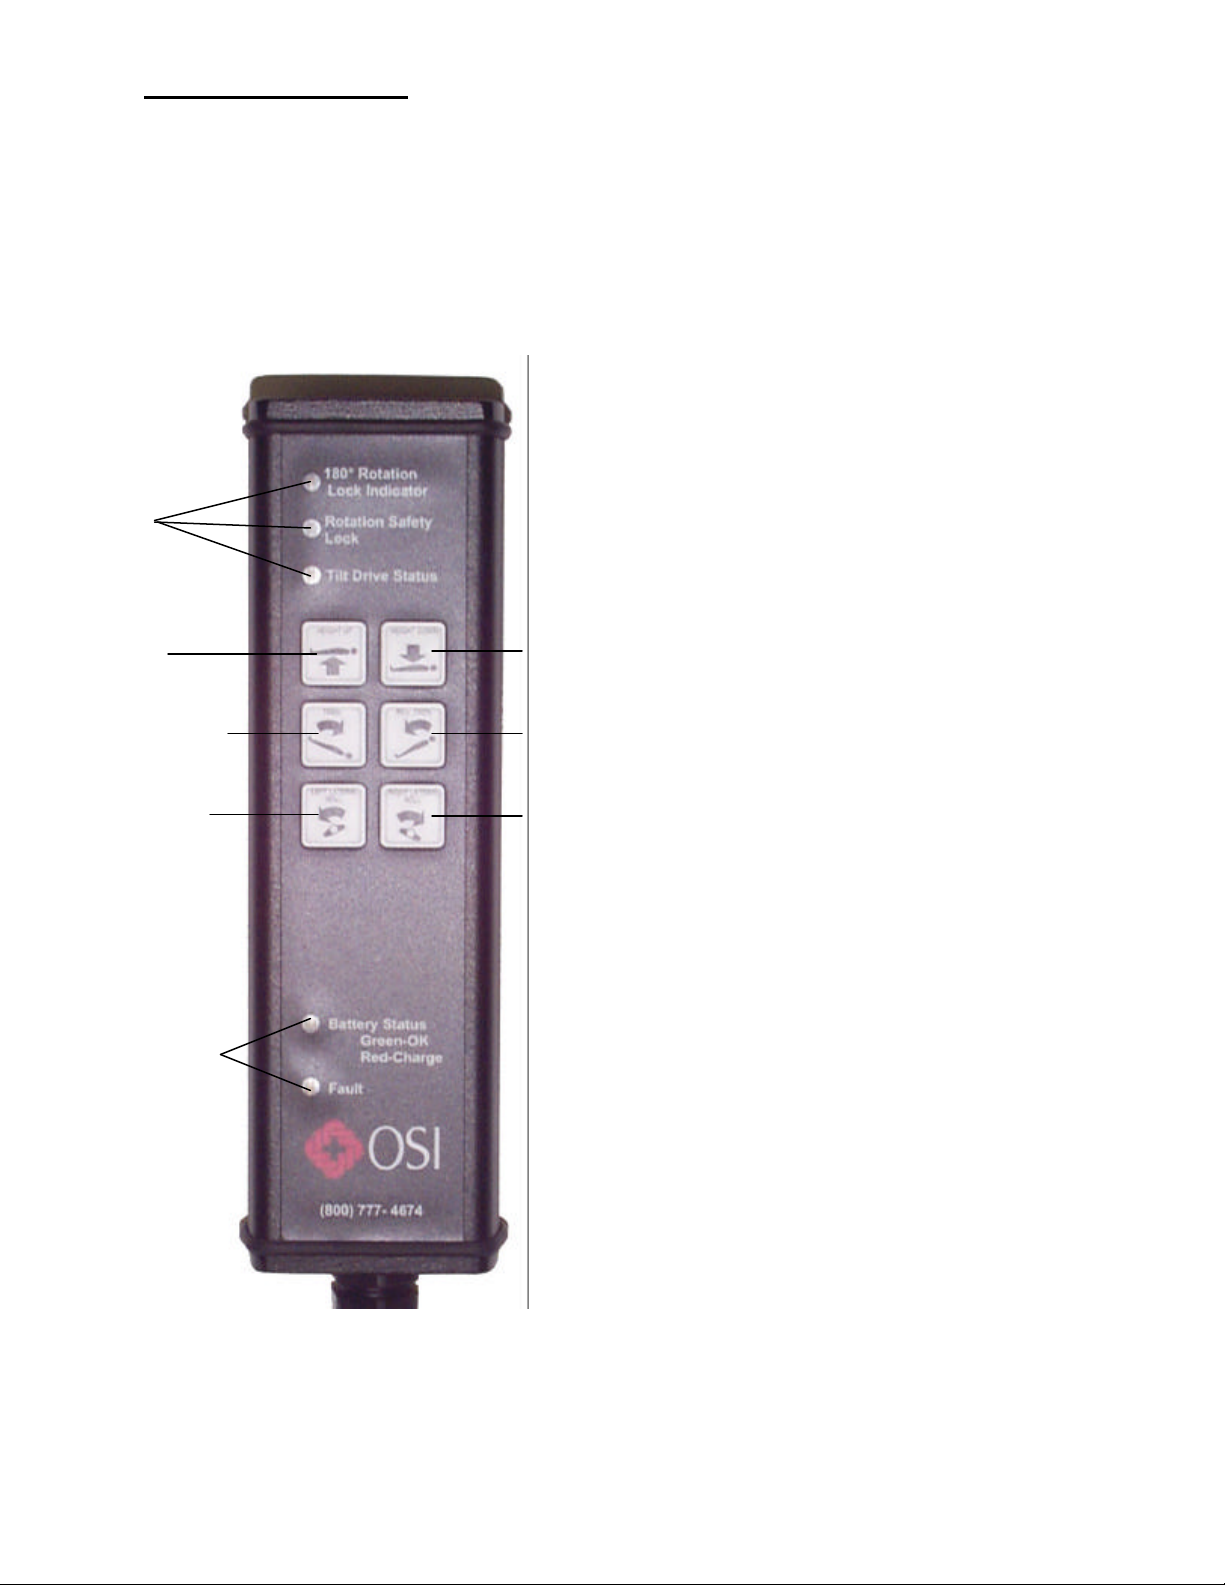
5.6 Hand Control Module
Each 5803 Base is equipped with a push-button hand-held pendant control module (Hand
Control), which is stored on a bracket at the Head-end. The Hand Control allows the operator to
raise, lower, Trendelenburg, reverse-Trendelenburg, and laterally tilt any attached table top. The
selected function will continue to operate until the button on the Hand Control is released.
NOTE: It is recommended that a Table Top always be connected between the Head-end and
Foot-ends of the base when operating the powered controls.
To Raise the Table, depress the Height
Up Button (a) on the left side of the
control with the arrow that points in the
“up” direction.
Indicator
Lights
(a) Height
Up
(c) Trendelenburg
(e) Left Lateral
Tilt
Indicator
Lights
NOTE: In the event a large Traction Arc 5855-13 is placed on the Base, the Tilt function has
been made inoperable. However in the event a small Traction Arc 5848-191 is placed on the
base, the Tilt Function is still operable.
5803 Maintenance and Repair Manual NW0422 Rev E
(b) Height
Down
(d) Reverse
Trendelenburg
(f) Right
Lateral Tilt
To Lower the Table, depress the Height
Down Button (b) on the right side of the
control with the arrow that points in the
“down” direction.
To Trendelenburg the Table, depress
the button on the left with the arrow that
indicates Foot Up (c) until the desired
Trendelenburg angle is achieved. This
lowers the Head End Column and raises
the Foot End Column simultaneously. If
the Table is in a fully lowered position,
only the Foot End will rise to achieve the
desired Trendelenburg angle.
To Reverse Trendelenburg the Table,
depress the button on the right with the
arrow that indicates Foot Down (d) until
the desired Reverse Trendelenburg angle
is achieved. This raises the Head End
Column and lowers the Foot End
Column simultaneously. If the Table is
in a fully raised position, only the Foot
End will lower to achieve the proper
Reverse Trendelenburg angle.
To Laterally Tilt To The Left, depress
the Left Tilt Button (e) on the left side of
the control.
To Laterally Tilt To The Right,
depress the Right Tilt Button (f) on the
right side of the control.
Page 14

13
Battery Status Light:
• Green = OK
• Red = Needs Recharge.
Fault Indicator Light:
• Electrical Fault = turn Power Switch OFF; disconnect Power Cord.
To unplug and re-attach the Hand Control:
At the end of the Hand Control coiled-cord is a black connector-plug. Unscrew the connector
locking-nut and pull the connector straight out of the socket. To re-attach, insert the connector
into the socket with the notches on connector lining up with the slots on the socket. The
connector locking-nut must be tightened around the socket to insure proper connection.
5.7 Synchronizing The Lateral Tilt Function
Normally, the Head-end Crossbar and left-or-right lateral Tilt Drive-mechanism are
synchronized so that the Tilt Drive is in the middle of its travel range when the Crossbar is level.
It is possible for the Crossbar and Tilt Drive to become unsynchronized if the Crossbar is rotated
manually. Also, the Head-end Crossbar and Foot-end Crossbar can become unsynchronized (not
at the same tilt angle) if a Crossbar is rotated manually or the 5803 Base is operated without a
Table Top in place. The Crossbars must be synchronized to each other, as well as to the Tilt
Drive-mechanism.
NOTE: Never attempt to attach a Table Top to the 5803 Base if the Head-end and Foot-end
Crossbars are not horizontal in all planes. Doing so may cause damage to the Table Top or the
Tilt Drive System.
To verify synchronize of the Tilt Drive and Head-end Crossbar:
1. Confirm that the 180° Rotation Lock is engaged.
2. Confirm that the Rotation Safety Lock is engaged.
3. Use the Hand Control “Lateral Roll” buttons to rotate the Head-end Crossbar until it is level.
4. Confirm the Tilt Drive Status Indicator Light illuminates (on Hand Control or Head-end
Pivot Assembly) indicating proper synchronization.
• If the Light will not illuminate, the Head-end Crossbar and Tilt Drive are not
synchronized.
• If the Head End Crossbar will not level using the Hand Control “Lateral Roll” buttons,
then the Head-end Crossbar and Tilt Drive are not synchronized.
To re-synchronize the Tilt Drive and Head End Crossbar:
1. Turn Power Switch “ON”, the switch illuminates green.
2. Turn the Rotation Safety Lock “OFF”. The illuminated switch goes dark.
Caution – this allows the Foot-end Crossbar to rotate (swing) freely if no Table Top is
attached.
3. Rotate the 180° Rotation Lock-handle counter-clockwise until it is disengaged; the
illuminated indicator light goes dark.
Caution – this allows the Table Top, if attached, or Head-end Crossbar to rotate (swing)
freely.
4. The Tilt Drive mechanism will automatically return to the middle of its range. While this
occurs, you will hear the Tilt Motor (at head-end) running and the Table Top, if attached,
may rotate slightly (if at all). When the Tilt Motor stops running, verify the Tilt Drive Status
light illuminates, confirming the Tilt Drive is in the middle of its travel range. Verify that the
Head and Foot Crossbars are level.
5803 Maintenance and Repair Manual NW0422 Rev E
Page 15

14
5. If no Table Top is attached:
Jackson
Gimbal Coupling
H-
Frame
See detai
l
Drop Lock
5.1. Manually level the Head End Crossbar.
5.2. Manually level the Foot End Crossbar
6. Turn the Rotation Safety Lock Switch “ON”; the switch should illuminate.
7. Rotate the 180° Rotation Lock Handle clockwise until it is engaged; the Indicator Light
should illuminate.
8. The Tilt Drive is now synchronized to the Crossbars, and the Crossbars are synchronized to
each other.
5.8 Tabletop Coupling Procedure
The Modular Table Tops may be interchanged and coupled to the 5803 Base as needed to
provide flexibility and specific procedural capability. Position the 5803 Base and engage all four
Caster Locks. Only Table Tops with Gimbals may be used with the 5803 Base.
Spinal Top
Imaging Top
Figure 9- Jackson Spinal Top & Imaging Top with Gimbal Mounting Assemblies.
Device
NOTE: Verify that the Jackson Spinal Top or the Imaging Top being used has Gimbals. Never
attach a Jackson Spinal Top or Imaging Top to the 5803 Base that does not have Gimbals.
Crossbar
Figure 10- T-Pin Assembly
Foot End
Mounting Stud
ON
Drop Lock
H-Frame
T-Pin
T-Pin
at left
H-Frame
Detail
Figure 11- H-Frame Installed - Foot End Column
Storage Bracket
5803 Maintenance and Repair Manual NW0422 Rev E
Page 16

15
The following procedure assumes the Foot End and Head End Columns do not have Table Tops
coupled in place. The coupling procedure is as follows:
1. Remove the H-Frame from the H-Frame Storage Bracket located on the Head End Column.
Install the H-Frame to Head End Crossbar and secure with a T-Pin. The T-Pins are stored in
the T-Pin Quiver located adjacent to each column. The T-Pin must extend completely
through both sides of the H-Frame and the Drop Lock should be in sight and pivot freely
(See Figure 12). The Head End Crossbar is attached to a Sliding Assembly that adjusts
superiorly and inferiorly to accommodate Trendelenburg and Reverse Trendelenburg. Fully
retract the Head End H-Frame against the Head End Column.
NOTE: If the H-Frame is not aligned with the mounting studs, it may bind. Do not force it. Lift
the H-Frame off and repeat until it mounts easily.
Head End Sliding Assembly
T-Pin
ON
T-Pin Quiver
H-Frame
H-Frame Storage
Figure 12- Head-end Pivot Assembly, H-Frame Installed
NOTE: Two people are required to complete the following sequence.
2. Select the appropriate mounting-hole position on the H-Frame to support the tabletop. Hole
selection will differ depending on the top selected and the procedure that would be
performed. Align the mounting tube with the hole in the H-frame and push the T-pin
completely through the H-frame and mounting tube on the foot end.
NOTE: Verify that the T-pin is inserted through the H-frame, passes completely through the
table mounting tube, and through the opposite side of the H-frame and the T-pin drop lock is in
sight and pivots freely. Failure may result in the tabletop being dropped.
3. To couple the Head End of the Table Top, slide the H-Frame and Crossbar away from the
Foot End as necessary to accommodate the length of the Table Top. Align the holes in the
Head End H-Frame and the Table Coupling Device. Push the T-Pin completely through both
sides of the H-Frame and the Coupling Device making certain that the Drop Lock is in sight
and pivots freely. The Head End and the Foot End of the Table Top are normally coupled at
the same hole in the H-Frame. The only exception is when extreme Trendelenburg is needed.
5803 Maintenance and Repair Manual NW0422 Rev E
Page 17

16
NOTE: Prior to Rotation, verify that all Table Coupling Devices and H-Frames are properly
installed and the T-Pins pass completely through the H-Frames and Crossbars with the Drop
Lock in sight and pivots freely. Two (2) T-pins and Drop Locks should be visible and checked at
each end of the Table. Please read more about this process in the appropriate top-specific User
Guide.
5.9 Tabletop Coupling Procedure With Top In Place
When one Table Top is already coupled to the Base and you are coupling a second Top in order
to change Tops or facilitate a 180° tabletop rotation, the slide mechanism of the Head End
Sliding Assembly will be held in a fixed position due to the fixed length of the first Top. This
requires a different procedure to couple the second Top.
With two people holding the second Top,
1. Attach the Head End H-frame as described above to the Table Top at the desired Mounting
Hole.
2. Position the second Table Top and attach the Head End H-Frame to the Head End Crossbar.
3. Attach the Foot End H-Frame to the Foot End Crossbar surrounding the Table Top Coupling
Device.
4. Connect the Table Top Coupling Device to the Foot End H-Frame at the desired mounting
hole. Verify that the Table Top is coupled at the desired height at the Head End.
5.10 Rotation Procedures
The 5803 Base provides the capability of rotating a tabletop 180°. This is a manually activated
function.
NOTE: At least two people are required to hold and control the rotating motion of the Table
Tops. Prior to rotation, verify that all tabletop coupling devices and H-frames are properly
installed; the T-pins pass completely through the H-frames and crossbars with the drop locks in
sight and able to pivot freely. Four (4) T-pins and drop locks should be visible and checked at
each end of the Table.
5.11 Rotation Lock System
The 5803 Base is designed to engage the Rotation Safety Lock automatically whenever the
ON/OFF Power switch is turned “OFF”. Automatic Rotation Safety Lock engagement ensures
that the Table Top cannot unintentionally rotate laterally without power.
5.12 Rotation Procedure For The 5803 Base
With an attendant at the Head End of the Table:
1. Release the 180° Rotation Lock by rotating the lever counterclockwise until the 180°
Rotation Lock Indicator Light goes out.
2. Advise the attendants holding the tabletops that the Rotation Safety Lock is about to be
released.
3. Release the Rotation Safety Lock by pressing the rocker switch to the OFF position.
Observe that the Indicator Light goes out.
4. Rotate the tabletops.
5803 Maintenance and Repair Manual NW0422 Rev E
Page 18

17
NOTE: The attendant performing the Rotation must rotate the tabletops 180° toward himself or
Retract
herself without stopping until the complete 180° rotation is achieved.
After the Rotation:
1. Immediately engage the Rotation Safety Lock by pressing the rocker switch to the ON
position and observe that the Indicator Light is illuminated.
2. Lock the 180° Rotation Lock by rotating the Lever clockwise until the 180° Rotation Lock
Indicator Light is illuminated.
NOTE: The attendant performing the Rotation may now release the Table Tops.
5.13 Retracting The Base For Storage
The 5803 Base retracts from 120 inches to 73-1/2 inches for storage.
To retract the Base:
1. Lock the Head End Casters and unlock the Foot End Casters.
2. Loosen the Retracting Locking Knob found on the Base.
NOTE: This knob will become completely separated from the Base if turned too far counter
clockwise.
3. Push the Foot End of the Base toward the Head End of the Base until the Foot End is
retracted to its minimum length.
4. Tighten the Locking Knob.
5. Unplug the Power Cord and store it on the Cord Wrap for transfer of the Base. The Base and
Table Top are now ready for storage.
Head End Foot End
Retracting
Lock Knob
Figure 13- Retracting the MTS Base
5803 Maintenance and Repair Manual NW0422 Rev E
Page 19

18
6.0 CLEANING and MAINTENANCE
6.1 Cleaning and Disinfecting
NOTE: The Head and Foot Columns of all the Table Bases are not sealed, therefore:
• Never pour any liquid directly onto the table.
• Never allow any liquid to enter the extensile joint of the columns.
• Never subject the 5803 Table-base to an equipment washing machine.
Failure to thoroughly dry any surface after cleaning and disinfecting may result in rust.
It is important to dry the Base to prevent rusting. Rust formation can prematurely shorten the
useful life expectancy of the 5803 Base.
USE OF IODOPHORS WILL CAUSE STAINING.
Table Exterior:
• Exterior surface should be regularly wiped clean with a mild detergent solution and wiped
dry with a soft lint-free cloth.
• Care should be taken to avoid expos ing the table to excessive moisture. Flooding, fogging or
steam cleaning is not recommended and will void any warranty.
• Blood or other fluids, etc., if allowed to remain on the table for a long period of time, will
require special cleaning to remove. A 5% acetic acid solution or white vinegar and water
solution is especially good for this purpose.
• Cleaning with a good commercial cleaning compound, such as Stainless Steel Magic or
Acme White Finish, and then buffing the surface by hand can correct staining and
discoloration of plated or stainless steel surfaces.
• To disinfect exterior surface use a quaternary ammonium or similar type disinfectant
compound according to manufacturer's directions for use. Wipe dry with a soft lint-free cloth.
• Casters should be cleaned and disinfected in the same manner as table exterior.
6.2 Lubrication
Table Exterior:
Following a thorough cleaning and decontamination of the table, silicone lubricant spray may be
used on most of the exposed inner head and foot columns and inner retractable beam. No other
lubrication is necessary.
Table Interior:
All of the internal moving parts of the 5803 Base receive factory lubrication which, under normal
use, provides lubrication for the life of the equipment.
6.3 Preventative Maintenance
Contact OSI Technical Service for a complete Preventative Maintenance Checklist.
5803 Maintenance and Repair Manual NW0422 Rev E
Page 20

19
7.0 THE ELECTRICAL SYSTEM
7.1 Description
The 5803 Base uses an external AC power source or internal, rechargeable, battery power for
operation. It uses AC power when plugged into a proper AC receptacle and the ON/OFF Powerswitch is in the “ON” position. When not plugged in, or AC power is lost, the 5803 Base will
automatically switch over to internal battery power. The batteries are automatically recharged
whenever the 5803 Base is plugged into an AC power source and the ON/OFF power-switch is
in the “ON” position. Located next to the ON/OFF power-switch on the Head End base (see
Figure 4) is the Power On, Fault, and Battery Status lights.
7.2 Power Cord
The table is equipped with a standard EIC power cord with the appropriate 120 VAC hospital
grade connector (230 VAC versions do not include the power connector).
7.3 ON/OFF Power/Circuit -Breaker Switch
An ON/OFF Main Power-switch is mounted at the head end of the base. This switch also serves
as a circuit breaker and in the event of an overload condition this switch will trip off. To reset,
push to the “OFF” position and then the “ON” position. Next to it a green "Power On" light
illuminates indicating that the table power is on.
NOTE: Determine the source of the overload prior to resetting this switch.
7.4 Power ON / Fault / Battery Status Lights
Next to the ON/OFF Power-switch is a small panel of three lights:
• Green = Power ON (AC power or battery power).
• Red = Fault Light (Electrical fault, d etermine source of fault prior to using table).
• White = Battery Status.
o When illuminated Green = installed properly and charged
o When illuminated Red = recharging required
7.5 Battery Recharging
The batteries in the 5803 Base are automatically charged whenever the table is in an operational
condition (plugged into AC power source and ON/OFF Power-switch in the “ON” position). No
additional procedures are needed to assure maintenance of the batteries. The “Battery Status”
lamp, next to the ON/OFF Power-switch on the head end base casting, indicates battery charge
condition. If lit, the red “Battery Status” lamp indicates that the batteries require recharging and
the table must be plugged into an AC outlet. If the “Battery Status” lamp remains illuminated red
after about three (3) hours, do not attempt to operate the base under battery power and call for
service (the 5803 Base should remain functional under AC power). It is recommended that, prior
to use, the 5803 Base be plugged into a proper AC receptacle with the ON/OFF switch in the
“ON” position for a minimum of three (3) hours to ensure that the batteries are fully charged.
5803 Maintenance and Repair Manual NW0422 Rev E
Page 21

20
8.0 TROUBLESHOOTING
8.1 Electrical System
In the advent of a table malfunction, the first item to investigate is the input power. Be certain
that the Power Cord is plugged into a live electrical outlet and the Power Switch is switched ON.
A green "Power On" light illuminates indicates this.
WARNING
Before removing any sheet metal covers the table must be turned off and unplugged.
Dangerous high voltage may be present in the circuitry under the covers. Only trained
technicians should perform this task.
AVERTISSANT
Enlever de Befor n'importe quel métal de drap couvre la table doit être tournée de et
débranché. Dangereux à haute tension peut être actuel dans le circutry sous les
couvertures. Technitions seulement entraîné doit exécuter cette tâche.
SYMPTOM INSPECT ACTION
No column func tion
either end.
No column function
Head End
No column function
Foot End
Rotation friction control
won’t stop Rotation -Head
Or Foot End.
Caster won’t lock/unlock Check Caster for damage. Replace Caster.
Check power.
Check that circuit breaker (light is
green).
Check Hand Control Module and
cord.
Check electrical connector at
base of Head or Foot End
Column.
Check Hand Control.
Check electrical connector at
base of Head End Column.
Check Hand Control Module and
cord. Check electrical connector
at the base of Foot End Column.
Tighten lever to Max. Check
brake band.
Plug in.
Reset breaker, turn on.
Plug in connector.
Plug in connector.
Plug in connector.
Adjust brake tension.
Adjust handle to proper range.
Replace if necessary.
5803 Maintenance and Repair Manual NW0422 Rev E
Page 22

21
FUNCTION GUIDE
Command: Result: If not, determine if
(Hand Controller) Table Up. Both columns up. Table power is off.
Power to PC board is not
connected.
Hand controller is non-operative,
or not plugged in.
Cable from PC board to column
is not connected, or is faulty.
If none of these are the problem
then the column or the PC board
is faulty.
Table Down. Both columns down. Same as for Table Up.
Trendelenburg. Head column down and foot
column up.
Reverse Trendelenburg. Foot column down and head
column up.
Tilt left or right w/Rotation Safety
Lock switch off.
Rotation Safety Lock switch off. Brake releases. Table power is off. Power to PC
Rotation Safety Lock switch on. Brake engages. See rocker switch off.
Tilt L or R w/ Rotation Safety
Lock switch on.
Release Tilt button. Tilt motor ceases; brake
Release button. (all functions
except Tilt when rocker switch is
on).
Tilt motor drives Table power is off, power supply
Brake releases; tilt motor drives. Same as tilt with rocker switch
engages.
Immediate cessation of above.
No addition al function.
Same as for Table Up.
Same as for Table Up.
is not operating correctly, power
to PC board is not connected,
hand controller is non-operative,
hand controller is not plugged in,
PC board is non-operative,
cabling is not connected or is
faulty, tilt motor is faulty, brake
on sensor is closed, brake on
sense wire is shorted, either limit
switch is faulty, either limit switch
is open, limit switch wiring is
disconnected.
board is not connected.
Power supply is not operating.
Cable from PC board to column
is not connected.
Cable to column is faulty.
Brake off switch is faulty.
Wire connection to switch is
faulty.
Traction arc switch closed.
Traction arc switch wiring
shorted.
Limit switch faulty.
Limit switch operating
mechanical error, limit.
Also verify switch, wiring, and
mounting of brake on sensor if
brake is weak, brake force
adjustment is incorrect.
off.
Additionally: brake motor faulty,
wiring not connected.
Hand controller faulty, PC board
faulty.
Same as for tilt w/rocker on.
Hand controller faulty, PC board
faulty.
5803 Maintenance and Repair Manual NW0422 Rev E
Page 23

22
Command:
Traction arc switch closed. Tilt
left or right.
Rotation Safety Lock switch off. Brake motor disabled. Same.
Handle Loose. Tilt motor drives until tilt home
Result: If not, determine if:
Tilt motor disabled, brake motor
disabled.
LED lights.
Faulty switch, broken wiring
connection, switch adjustment
incorrect, PC board faulty.
Power off, power to PC board not
connected, power supply non-op,
PC board non -op, cable from PC
board to tilt motor not connected,
tilt motor non -op, home sensor
faulty, home sensor wiring
shorted, sensor misadjusted, 1/r
sensor faulty, 1/r sensor wiring
shorted or disconnected, sensor
misadjusted, lock sensor faulty,
lock sensor wiring disconnected,
traction arc switch closed,
traction arc switch wiring shorted.
Rotation Safety Lock switch on.
Foot crossbar tilted left or right.
Rotation Safety Lock off.
Power down.
Tilt left or right
DISABLED.
Brake engages. LED turns on for
15-25 seconds later, LED off.
Tilt left or right limit switch faulty,
wiring disconnected.
PC board faulty, motor faulty,
wring to motor disconnected,
LED faulty; wiring disconnected.
PC board faulty. No battery
power.
5803 Maintenance and Repair Manual NW0422 Rev E
Page 24

23
9.0 REMOVAL and REPLACEMENT of COMPONENTS
9.1 Head-end Cover
1. Switch off the table at the circuit breaker and disconnect the power cord from the source.
2. Remove the foot-end base covers.
3. Disconnect the negative wires at the battery terminals.
4. Remove 1” external retaining ring. Remove Traction Pulley Assembly.
5. Remove 180° Rotation Lock handle by rotating it counterclockwise until it is free.
6. Remove the cover screws on both sides of the cover except the lower screws.
7. Remove lower screws on both sides of the cover, and remove head end cover inside panel.
8. Carefully slide the cover away from the base, along the tilt axis.
Caution:
Wires still connect the switches and lights on the cover to the base. Lifting out the 180°
Rotation Lock Indicator light will help prevent damage.
Figure 14: Head Cover Removal
5803 Maintenance and Repair Manual NW0422 Rev E
Page 25

24
9.2 Foot-end Cover
1. Switch off the table at the circuit breaker and disconnect the power cord from the source.
2. Remove the foot-end base covers.
3. Disconnect the negative wires at the battery terminals.
4. Remove the foot-end cover screws.
5. Carefully lift foot-end cover up and off.
Figure 15: Foot Cover Removal
9.3 Hand Control Module
1. Switch off the table at the circuit breaker and disconnect the power cord from the source.
2. Unscrew Hand Control cord-connector from base receptacle.
3. Unplug Hand Control cord connector from the base.
5803 Maintenance and Repair Manual NW0422 Rev E
Page 26

25
9.4 Batteries
WARNING
Improperly installed batteries can leak, causing equipment damage or injury. See
photo below to assure correct installation of replacement batteries.
AVERTISSANT
Les piles incorrectement installées peuvent fuir, les dommages d'équipement
causant ou la blessure. Voir que la photo assure l'installation exacte de piles de
remplacement.
• Rechargeable lead-acid batteries contain toxic materials. Batteries should be fully
discharged prior to handling, or the terminals should be isolated to prevent accidental
discharge.
• Batteries contain sulfuric acid. In the event of a leak in the battery or fire, dilute spilled
fluid with water. In case of skin contact, wash areas with water. In the event of eye
contact, flush eyes with water for 15 minutes and consult a physician immediately.
• Batteries should only be replaced with OSI approved parts. Contact OSI to obtain
correct replacement batteries.
• Incorrectly connected batteries can cause damage to equipment or injury. Bridging
(shorting) of battery terminals can ca use explosion of the battery or fire.
• Do not attempt to connect AC power to the 5803 Base until correct battery connection
is confirmed.
• Always dispose of batteries properly. Do not incinerate batteries. Do not place
rechargeable 12V batteries into a metal trashcan, toolbox, drawer or parts bin.
• Always take the following precautions when removing the battery compartment
covers:
1. Remove metal jewelry and wristwatches when in proximity to batteries.
2. Always cover at least one terminal of each battery with insulating material if connectors
are removed.
3. Use caution when employing metal tools in proximity to batteries. Metal tools create
circuit bridges (electrical shorts) upon contact. When possible, use tools with insulated
handles and ends.
4. Never place anything on top of batteries, whether batteries are mounted or removed from
product.
Charging and Inspection:
Charge for minimum three (3) hours (Power Cord plugged into power source and ON/OFF
Power-switch “ON”). If battery fails to hold a charge it should be replaced. Replace only with
identical type and size battery. Replace both batteries at the same time. Batteries should be
replaced once every five (5) years. Whenever the battery cover is opened, check battery for signs
of corrosion. Battery terminals should be clean and free from corrosion, oil, grease, dirt, or other
contaminants.
Battery Type: Gel-cell LED acid batteries, 12 Volt, 12 Amp-hour rating.
Battery Size: 150mm long, 98mm wide, 100mm deep.
Battery OSI ordering number: NV0801
5803 Maintenance and Repair Manual NW0422 Rev E
Page 27

26
Terminal
Wire
Connection wires to columns
Battery “A”
Battery “B”
Positive
Terminal
Jumper
Negative
Figure 16 – Battery Placement
Battery Removal:
1. Switch ON/OFF Power-switch to “OFF”, disconnect the power cord from power source (AC
outlet).
2. Remove the foot-end base covers.
3. Disconnect the wires at the battery terminals. Cover at least one terminal of each battery with
insulating material.
4. Carefully lift batteries out of base.
Battery Replacement:
1. Place replacement batteries in base as shown.
2. Install adhesive-backed loop closure (Velcro).
3. Attach battery wires as shown:
• Red wire to positive ter minal of battery “A”.
• Jumper wire from battery “A” to battery “B”.
• Black wire to negative terminal of battery “B”.
Battery Function Check:
1. Verify Power Cord is disconnected from power source (AC outlet).
2. Turn ON/OFF Power-switch to “ON” (utilizing batter y power).
3. Verify all Hand Control lights illuminate on and off sequentially.
4. Verify Hand Control and Base Panel Battery Status Lights:
• Green = batteries installed correctly and charged.
• Red = batteries need charging.
5. Fault Light on and Battery Status Light red = batteries not connected properly, or completely
discharged. Turn ON/OFF Power-switch “OFF” immediately and check:
• Batteries connected properly.
• Batteries have been charged.
• Repeat test that all lights on Hand Control illuminate on and off sequentially and Battery
Fault Light is dark. If not, contact OSI Technical Service.
5803 Maintenance and Repair Manual NW0422 Rev E
Page 28

27
9.5 Power Supply
1. Switch off the table at the circuit breaker and disconnect the power cord from the source.
2. Remove the 10-32 screws holding the input plate and circuit breaker plates to the cover.
3. Remove the head end base covers.
4. Disconnect the negative battery wire.
5. Disconnect all cables from power supply and line filter. Remove transformer wires from
power entry module.
6. Remove the three power supply tray assembly mounting screws and remove tray assembly.
7. Install replacement in the reverse order.
9.6 Controller Circuit Board
1. Switch off the table at the circuit breaker and disconnect the power cord from the source.
2. Remove the 10-32 screws holding the input plate and circuit breaker plates to the head end
base covers.
3. Remove the head end base covers.
4. Disconnect the negative battery wire.
5. Disconnect all cables from controller circuit board
6. Remove the three 10-32 screws mounting the controller circuit board tray and remove tray
assembly.
7. Install replacement in the reverse order.
9.7 On-Off Power Switch / Circuit Breaker
1. Switch off the table at the circuit breaker and disconnect the power cord from the source.
2. Remove the 10-32 screws holding the input plate and circuit breaker plat es to the head end
base covers.
3. Remove the head end base covers.
4. Disconnect the negative battery wire.
5. Disconnect the wires from Circuit Beaker / On-Off Switch terminals.
6. Remove the Circuit Beaker / On-Off Switch.
7. Install replacement in the reverse order.
9.8 Head-end Assembly
1. Switch off the table at the circuit breaker and disconnect the power cord from the source.
2. Remove the foot-end base covers and disconnect the negative wire at a battery terminal.
3. Remove the 180° Rotation Lock Handle.
4. Remove grip ring from Crossbar Shaft and slide the Traction Pulley Bracket, from the shaft.
5. Remove the 8-32 screws from rear of cover.
6. Remove the 2 screws from the front cover and slide inside cover down and away.
Disconnect the electrical cable attached to the cover.
7. Remove the remaining screw at the front cover, and take the cover off by rotating it to the
right.
8. Remove the ground wire screw.
9. Disconnect the electrical cable at the top of the column.
10. Remove the 10-32 screw underneath of the trolley in the groove at front.
11. Slide the Head End Assembly away from you and remove it from base.
12. Install replacement in the reverse order.
5803 Maintenance and Repair Manual NW0422 Rev E
Page 29

28
9.9 Head-end Tilt Motor
1. Disconnect the motor wire from the wire harness.
2. Remove the E-ring from the pivot axle at the Actuator rod joint end.
3. Slide the pivot axle out of the assembly.
4. Loosen and remove the shoulder screw (or E-rings on newer tables) at the base of the
actuators and remove the actuator.
9.10 Foot-end Rotation Safety Lock Motor
1. Remove the shoulder screws holding t he Actuator to the brake pivot arm, and foot pivot base.
2. Install in reverse order.
3. Adjust Rotation Safety Lock. (Refer to Rotation Safety Lock Adjustment).
9.11 Head or Foot-end Column
1. Remove any tabletop and H-Frame(s).
2. Switch off the table at the circuit breaker and disconnect the power cord from the source.
3. Remove the foot-end base covers and disconnect the negative wires at the battery terminals.
4. Remove the foot-end base cover by removing the mounting screws.
5. Remove the Head-end Assembly or Foot End.
6. Remove Head-end Base Cover: Remove the 10-32 screws holding the input plate and circuit
breaker plates to the head end base covers. Remove cover.
7. Remove Foot-end Base Cover: Remove the 10-32 screws holding the cover. Remove cover.
8. Unplug the connectors at the base of each head-end and foot-end column.
9. Remove four socket-head screws attaching the column to the retractable beam.
10. Lift out of the base the column.
11. Install replacement in the reverse order.
12. Adjust Rotation Safety Lock per Rotation Safety Lock Adj ustment.
NOTE: Before tightening the mounting screws upon installation stand the base upright and
attach a tabletop between the Head and Foot End Crossbar. With the screws loose, rotate the
top slowly several times to align the Head and Foot Ends. Reach under the Head and Foot End
Base and tighten the mounting screws before removing the tabletop.
9.12 Retractable Center Beam
1. Remove any tabletop and H-Frame.
2. Switch off the table at the circuit breaker and disconnect the power cord from the source.
3. Remove the foot-end base covers and disconnect the negative wire at a battery terminal.
4. Remove head-end covers.
5. Unplug beam cables.
6. Remove the Head and Foot columns.
7. Remove the ¼-20 inch screws attaching the beam to head-end and foot-end bases.
8. Remove the center beam.
9. Install replacement in the reverse order.
9.13 Casters
1. Remove the ½-inch bolt from the outside of the base plate.
5803 Maintenance and Repair Manual NW0422 Rev E
Page 30

29
10.0 ADJUSTMENT of COMPONENTS
HEAD END
10.1 Tilt Actuator Rod End Length
1. Loosen lock nut on actuator rod end.
2. Rotate Actuator rod until six threads are showing on the rod end.
3. Tighten lock nut.
4. Disconnect the Actuator from the Base wiring and connect an external power controller to
the Actuator.
5. Drive the tilt mechanism all the way right (Actuator extended). Watch for clearance between
the Actuator rod and the Pillow Block at the end of Actuator travel.
6. If the actuator rod touches the Pillow Block, re-loosen the locknut and turn the Actuator rod
as many turns as necessary to ensure clearance. Retighten the rod end.
7. Once complete, disconnect the tilt actuator from the external controller and connect to the
base wiring.
10.2 180° Rotation Lock Sensor
1. Remove the blue 180° rotation lock handle.
2. Remove head-end cover per procedure; do not unplug electrical connector, hang cover o n
table base power cord storage bracket.
3. Loosen 8-32 button-head screw securing the 180° rotation-sensor (micro switch)
mounting bracket. This is mounted just to the left of the blue 180° rotation lock handle.
See Figure 8.
4. Tighten the blue 180° rotation lock handle until rotating crossbar resists 95 ft/lbs of
rotational force in both directions using torque wrench and Rotational Test Bar (p/n
T5890-21/23).
5. Adjust the 180° rotation-sensor (micro switch) mounting bracket until the micro switch
clicks on. The "180° Rotation Lock Indicator" light should be illuminated blue. Tighten
8-32 button-head screw.
6. Test by unscrewing 180° Rotation Lock handle until "180° Rotation Lock Indicator" goes
out. Retighten 180° Rotation Lock handle until "180° Rotation Lock Indicator" lights.
7. Retest that Rotating Crossbar resists 95 ft/lbs of rotational force in both directions using
torque wrench and Rotation Test Bar.
8. If test fails, repeat adjustment procedure.
9. If test passes continue.
10. Install covers per procedure.
11. Install "180° Rotation Lock" handle and tighten until "180° Rotation Lock Indicator"
light illuminates blue.
12. Retest that Rotating Crossbar resists 95 ft/lbs of rotational force in both directions using
torque wrench and Rotation Test Bar P/N T5890-21-23
13. If test fails, repeat adjustment procedure.
14. If test passes adjustment is complete.
5803 Maintenance and Repair Manual NW0422 Rev E
Page 31

30
10.3 Home & Tilt Left/Right Sensors
1. Turn the Base power on.
2. Tighten the 180° Rotation Lock handle, and make sure that the indicator light is lit.
3. Using the Hand Control, drive the tilt mechanism to the right.
4. Loosen the 6-32 cap head screw beneath the sensor bracket and move the bracket closer to
the pillow block until the left/right sensor switch clicks.
5. Using the Hand Control, drive the tilt mechanism to the left. Stop when the home sensor
clicks. The indicator light should light up to confirm that the tilt drive is at home.
6. Tighten the 6-32 cap head screw.
7. Using the Hand Control, drive the tilt mechanism to the right for about three seconds.
8. Loosen the 180° Rotation Lock handle . The tilt mechanism should drive to the center and
stop.
9. If it drives towards the center but stops before true level, the sensor switch is too close to the
pillow block. Tighten the 180° Rotation Lock handle. Loosen the 6-32 cap head screw
beneath the sensor bracket and move the bracket away from the pillow block slightly. Re tighten the 6-32. Check this readjustment by repeating steps.
10. If it drives to the center but does not stop, either rocking back and forth or continuing past
lever, the sensor switch is too far from the pillow block slightly. Re -tighten the 6-32 screw.
Check this readjustment by repeating steps.
11. If it does not drive at all when the 180° Rotation Lock handle is loosened, there is an
electronic fault in the Base. Check the wiring to the head end, and if this does not alter the
condition of the base, replace the controller PC Board.
Figure 17: 180°- Rotation Lock Indicator Light limit switch and Lock Handle.
5803 Maintenance and Repair Manual NW0422 Rev E
Page 32

31
10.4 Head-End Slider Adjustment Procedure
Overview:
With one of the OSI modular (interchangeable) table-tops attached to the Advanced Control
Base, in-line movement of the Head-end Slider (or trolley assembly) is required to accommodate
Trendelenburg and Reverse-Trendelenburg positioning. Periodic adjustment may be needed to
maintain proper friction of movement.
Tools Required:
Hex (Allen) Key, 5/64-inch
Force Gauge, to 25-pounds pushing force.
Procedure:
1. Turn “ON/OFF” Power Switch to “OFF”, disconnect power cord from power source (AC
wall outlet), allow 30 seconds for discharge.
2. Remove head-end pivot assembly cover per procedure.
3. Some models may have a set screw installed in front of the spring plunger. This screw
must be removed prior to adjustment. Using 5/64-inch hex key, adjust Slider spring
plunger (shown below) as needed.
4. Using force gauge pushing on rotating crossbar, verify Head-end Slider Assembly
(without any top attached) moves in-line to its stops, in both directions, uniformly, with
20 to 25 pounds of force applied.
Head-end Pivot Assembly, Left Side (cover removed).
5803 Maintenance and Repair Manual NW0422 Rev E
Page 33

32
FOOT END
10.5 Rotation Safety Lock
As the Safety Lock wears, adjustment may be required to achieve complete locking. The
adjustment for this is as follows:
1. The 5803 Base should be upright.
2. Supply power to the base and turn the circuit breaker on.
3. Remove the foot end cover.
4. If the sensor is not indicating that the Rotation Safety Lock is on when crossbar is secure,
loosen the lock nut by one turn, then turn the adjustment setscrew counter clockwise, while
maintaining the setscrew position, and tighten the lock nut. Verify operation of the Rotation
Safety Lock by turning it off and then on again.
5. If the crossbar is not adequately secure when the sensor indicates that the Rotation Safety
Lock is on, loosen the lock nut and turn the adjustment setscrew clockwise. Then, while
maintaining the setscrew orientation, tighten the lock nut. Verify operation of the Rotation
Safety Lock by turning it off and back on again.
6. The crossbar is secure when it resists 93 foot-pounds of torque without slippage, using torque
wrench and rotation text bar P/N 5890-21-23.
7. Replace the cover.
Figure 18: Foot End Assembly
5803 Maintenance and Repair Manual NW0422 Rev E
Page 34

33
10.6 Rotation Safety Lock (Brake) “ON” Sensor Setting
1. Remove the foot-end base covers.
2. Disconnect the battery wire.
3. Turn off the Rotation Safety Lock switch on the head cover.
4. Supply power to the Base and turn the circuit breaker on. Verify brake “off” sensor is
closed. If it is not, the system may have an electronic fault.
5. Back out the setscrew that locates the brake clamp all the way (see Figure.4, Adjustment
Setscrew).
6. Turn off the power to the Base (either unplug or turn off the circuit breaker). Wait until all
the system lights go out.
7. Locate the “Brake On” sensor. Loosen the screw that holds the mount plate for the sensor to
the Brake Lever.
8. Set the sensor all the way away from the motor housing. Snug the screw.
9. Restore power to the Base (plug back in and turn on the circuit breaker).
10. Turn the Rotation Safety Lock switch on; the brake motor will drive upward until locked. If
it does not drive up, the system has an electronic fault. The Fault Light will be lit due to
improper switch adjustment. Ignore.
11. Loosen the sensor bracket. Push the sensor body closer to the motor housing until a click can
be heard. Re-snug the mount screw.
12. Turn the system power on again.
13. Turn the Rotation Safety Lock switch off; the brake motor will drive down until the brake
“off” sensor switch closes.
14. Turn the Rotation Safety Lock switch on.
15. Verify that the switch is closed when the motor stops.
16. Reconnect the battery wire.
17. Replace the cover underneath the foot end base casting.
5803 Maintenance and Repair Manual NW0422 Rev E
Page 35

34
11.0 TECHNICAL DRAWINGS and PARTS LISTS
11.1 Table-base Interconnect Diagram
See attached drawing at end of manual.
11.2 Table-base Assembly Bill of Materials
See attached drawing at end of manual.
11.3 Replacement / Spare Parts List
1. Power Supply…………….…………….…………………..….(part number) 5803-48
2. 10 Amp Motor Control PCB………………………………………………….5803-21
3. Telescopic I-Beam Assembly…………………………………………………5803-49
4. Hand Control…………………………………………………………...……….6807-1
5. Circuit Breaker……………………………………………………….………. NV0387
6. Power Cord……………………………………………………………..…….. NV0584
7. Battery………………………………………………………………………… NV0801
8. Rotation Test Bar………………………………………………………….T5890-21-23
5803 Maintenance and Repair Manual NW0422 Rev E
Page 36

35
12.0 GLOSSARY of TERMS
Basic assumptions of Patient Orientation on the tabletop:
Our glossary of terms and technical procedures assume the patient is oriented with their head at
the “front or head-end of table” and their feet at the “rear or foot-end of table”. The hand control
functions are oriented for this position only.
“Front of table” indicates the end of the table where the power cord, "On-Off" switch, and
Control Panel are located; otherwise referred to as the “head end”.
“Rear of table ” indicates the opposite end of the table also referred to the “foot end".
“Pedestal” refers to one of two main column structures that support the tabletop.
“Left side of the table” refers to the table as you stand at the front of table.
“Right side of the table refers to the table as you stand at the front of table.
“Raise the table” refers to raising the height of the table.
“Lower the table” refers to lowering t he height of the table.
“Level the Table” refers to leveling the tabletop regardless of height.
“Hospital Grade" outlet refers to a 120VAC outlet properly wired with earth ground: Neutral to
Common = 120VAC; Neutral to Ground = 120VAC; Common to Ground less than zero point
five (0.5) VAC.
5803 Maintenance and Repair Manual NW0422 Rev E
Page 37

36
13.0 OSI TECHNICAL SERVICE
13.1 Contact for Parts and Service
For detailed repair information or to order replacement parts, call the OSI Technical Services
Department:
1-800-777-4674
A Technical Services line is available from 7AM-5PM PST, Monday through Friday. Please
leave a message after business hours.
Please state slowly your name, phone number, your facility name and city, and affected
equipment model number.
An e-mail message may be left anytime at techsvcs@osisosi.com or through the Technical Service
icon in our web site: www.osiosi.com.
13.2 To order Replacement Parts (RP)
1. If unable to identify part - telephone, fax or E-mail to Technical Service.
2. If part is known - telephone, fax or E-mail part number and description to Customer Service
for price and availability.
3. To place Replacement Parts (RP) order - telephone, fax or E-mail part number, description,
price, customer number and method of shipment to Customer Service with purchase order.
Indicate that order is for Replacement Parts (RP).
13.3 To return damaged parts (RGA)
1. Identify parts to be returned.
2. Telephone, fax or E-mail part number and description of parts for return to Customer Service
for Return Goods Authorization (RGA) number.
3. Return ship parts with RGA number clearly marked on outside of package.
4. Complete Certificate of Disinfected Parts Document #40204-17.
13.4 To send a part or item here for us to repair (RA)
1. If unable to identify part - call, fax or E-mail to Technical Service.
2. If part is known - telephone, fax or E-mail part number and description to Technical Service
for Repair Authorization (RA) number.
3. Clean (disinfect) parts prior to shipping; complete Certificate of Disinfected Parts Document
#40204-17.
4. Ship part with RA number clearly marked on outside of package.
5. Part will be evaluated and customer will be contacted with the cost of repair.
6. After customer approval of repair cost, part wil l be repaired and return shipped to customer.
5803 Maintenance and Repair Manual NW0422 Rev E
Page 38

Page 39

Page 40

73 ADAXA 1/4-28 UNC HEX NUT 2
72 ADATA #10-32 UNF HEX NUT 5
71 AAM6030CAA M6-1.00 X 30MM SKT HD CAP SCR GRADE 12.9 16
70 AABF125CA 1/2-13 UNC X 1.25 SOCKET HD CAP SCREW 4
69 AAAW100CAC 1/4-20 UNC X 1.00 CAP HD SOCKET SCR SS 2
68 AAAW100CA 1/4-20 UNC X 1.00 CAP HD SKT SCREW BLACK 14
67 AAAW075CA 1/4-20 UNC X .75 CAP HD SKT SCREW 8
66 AAAW075AAC 1/4-20 UNC X .75 BUTT HD SKT SCREW S.S. 12
65 AAAW018HAC 1/4-20 UNC X .18 SOCKET SET SCREW S.S. 1
64 AAAT150AAC #10-32 UNF X 1.50 BUTT HD SKT SCREW S.S. 1
63 AAAT100AAC #10-32 UNF X 1.00 BUTTON HD SKT SCR S.S. 1
62 AAAT062CA #10-32 UNF X .62 CAP HD SOCKET SCREW 4
61 AAAT037CAC #10-32 UNF X .37 SKT HD CAP SCREW S.S. 1
60 AAAT037AAC #10-32 UNF X .37 SST BT HD SKT SCR 19
59 AAAP037AAC #8-32 UNC X .37 BUTT HD SKT SCREW S.S. 18
58 AAAM050BAC #6-32 UNC X .50 FLT HD SKT SCREW S.S. 1
57 AAAM025BAC #6-32 UNC X .25 FLAT HD SKT SCREW S.S. 5
56 AAAH037AAC #4-40 UNC X .37 BUTT HD SKT SCREW S.S. 4
55 AAAH025AAC #4-40 UNC X .25 SST BT HD SKT SCR 4
54 9650-231 1/2 IN RUBBER CUSHIONED STEEL LOOP CLAMP 2
53 6807-10 HAND PENDANT COMMON 1
52 5892-79 PULLEY ASSEMBLY 1
51 5892-67 FOOT END COVER 1
50 5892-42 INSIDE PANEL, HEAD END COVER 1
49 5892-35 RETAINER BLOCK, HEAD END TROLLY 1
48 5892-26 BASEPLATE, TROLLEY 1
47 5892-133 GUARD, ROCKER SWITCH 2
46 5892-130 CABLE, GROUND, HEAD END 1
45 5892-110 WASHER, BAFFLE SUPPORT 2
44 5892-108 BAFFLE, HANDLE STUD 1
43 5892-107 STUD, BAFFLE GUIDE 1
42 5892-1 HEAD END PIVOT ASSEMBLY 1
41 5848-231 2" X 7" P/S HOOK, BLACK 2
40 5848-229 2"X7" P/S HOOK, BLACK 1
39 5840-689 PUCK BACKING PLATE 1
38 5840-682 BRAKE PUCK 1
37 5840-659 QUIVER PAD 2
36 5840-656 QUIVER ASSY, WELDMENT 2
35 5840-293 CORD BRACKET 1
34 5803-99 FAULT INDICATOR ASSEMBLY 1
33 5803-98 BATTERY STATUS INDICATOR ASSEMBLY 1
32 5803-97 CABLE, HEAD END BASE GROUND 1
31 5803-96 CABLE, POWER 1
30 5803-95 CABLE, BATTERY, FOOT END 1
29 5803-94 CABLE, HEAD END WIRE HARNESS 1
28 5803-92 CABLE ASSY, ROTATION SAFETY LOCK 1
27 5803-91 CABLE, HEAD END COVER WIRE HARNESS 1
26 5803-90 INDICATOR, MODIFIED 2
25 5803-88 CABLE, CONTROL BOARD WIRE HARNESS 1
24 5803-86 CABLE POWER SUPPLY TO CONTROL BOARD PWR 1
23 5803-85 CABLE POWER SW ITCH MODE 1
22 5803-84 CABLE, HAND PENDANT CONNECTOR 1
21 5803-67 BASE COVER, HEAD LEFT 1
20 5803-66 BASE COVER, FOOT LEFT 1
19 5803-65 BASE COVER, COMMON RT 2
18 5803-49 TELESCOPIC BEAM ASSEMBLY 1
17 5803-48 POWER SUPPLY ASSEMBLY 1
16 5803-43 BASE REAR PLATE 2
15 5803-42 BASE FRONT PLATE 2
14 5803-41 TABLE BASE 2
13 5803-4 CAM FOLLOWER BEARING, MODIFIED 2
12 5803-36 FOOT END MOUNT PLATE 1
11 5803-35 HEAD END COVER 1
10 5803-27 FOOT PAD, BASE COVER, HEAD LEFT 1
9 5803-26 FOOT PAD, BASE COVER, LEFT 1
8 5803-25 FOOT PAD, BASE COVER, RIGHT 2
7 5803-24 INPUT PLATE 1
6 5803-23 CIRCUIT BREAKER MOUNT PLATE 1
5 5803-22 MAIN COL. WITH CONNECTORS 2
4 5803-21 10 AMP MOTOR CONTROL BOARD ASSY FOR 5803 1
3 5803-2 FOOT END ASSEMBLY 1
2 5803-19 TABLE TOP BRACKET 2
1 5803-101 CABLE, BATTERY, HEAD END 1
ITEM PART No. DESCRIPTION QTY
105 SB200BLZP 2" BLACK P/S LOOP 2.50
104 SA0137 1/2"x1.0" NEOPRENE ADHESIVE BACK STRIP 48 in
103 NV0884 LED, PANEL MOUNT, GRN, NEWARK 16F776 1
102 NV0802 AC POWER ENTRY/ TYCO P/N 95F8112 1
101 NV0801 BATTERY 12V, 12 A H SONNENSCHEIN ES12-12 2
100 NV0603 CIRCUIT BREAKER, 10 A 1
99 NV0531 CABLE TIE MOUNT 5
98 NV0529 SPIRAL CUT TUBING, 1/4, NATURAL 0.5 ft
97 NV0528 FLEX GUARD WIRE LOOM, 1/4, BLACK 0.5 ft
96 NP1852 5803 HAND PENDANT ID LABEL 1
95 NP1821 FAULT INDICATOR LABEL 1
94 NP1820 BATTERY STATUS LABEL 1
93 NP1611 TILT DRIVE STATUS LABEL 1
92 NP1551 LABEL, MEDICAL, TYPE BF 1
91 NP1549 ELECTRICAL GROUND LABEL 6
90 NP1455 PATENT NUMBER LABEL NO. 5,088,706 & 5,131,106 1
89 NG0719 1/4-20 POSI HEX PLUNGER VLIER PN SSPH54N 1
88 ND0437 5" X 1-1/4" SWIVEL CASTER W/TO TAL LOCK 3
87 ND0436 5" X 1-1/4" SWIVEL CASTER W/STEER LOCK 1
86 NC0362 5/8" SQ 4-WAY CABLE TIE MOUNTING BASE 9
85 NC0312 CABLE TIES 5 7/8" LONG 3M PN-06201 OR EQ 37
84 NB0342 1" DIA SOLID RUBBER PLUG 2
83 NA0100 1/2 DIA ROLLER BEARING 4
82 MZNV0791 GROUNDING STUD 1
81 MZNP1811 LABEL, EQUIPOTENTIAL 1
80 MZA30106010 M6 HEX NUT, ZINC PLATED 2
79 KA0120100 1/8X1.0 ADH BACKED POLYURETHANE 60A 22 in
78 AJ0114 RETAINING RING EXTERNAL 1" DIA, SST 2
77 AEO21050A #10 FLAT WASHER (.50 OD X .21 ID X .04) 4
76 AE025051ED 1/4 EXTERNAL TOOTH WASHR,ZP PN 91114A029 2
75 AE018037EC STAR LOCK WASHER, EXTERNAL, .18 X.37 5
74 AE011021B #4 SPLIT LOCK WASHER(.209X.112X.03) 4
ITEM PART No. DESCRIPTION QTY
in
BILL OF MATERIALS FOR 5803
Page 41

1 APPLY BLUE LOCTITE #242 OR EQ TO THREADS PRIOR TO ASSEMBLY
ADJUST HEAD END TROLLEY RESISTANCE
2
TO 20-25 POUNDS BY ADJUSTING ITEM 89
IN AND OUT. LOCK ITEM 89 IN PLACE
WITH ITEM 65.
3
STRIP PAINT OFF OF ITEM 18 (APPROX .5
DIA 2 PLACES) FOR GOOD GROUND
CONTACT WITH SCREW S ITEM 67
2X GASKET SEAM SHOULD BE LOCATED ON THIS FACE.
THERE SHOULD BE NO GAP.
93
262X
10ADHERED TO OUTSIDE OF BASE COVER AS SHOWN
21TO BE INSTALLED AT NEXT LEVEL
74NOT SHOWN 4X
55NOT SHOWN 4X
22
22PART OF
564X
472X
782X
52
4X 60
28
11
2
65
1
692X
48
834X
13PRESS FIT 2X
35
59DRILL AND TAP APPROX. AS SHOWN 2X
60
5912X
91
42
44
45 2X INSTALLED BEHIND BAFFLE
86
50
89
61
49
73 2X
39
38
41
792X 5 INCHES
104 2X APPROX 19 INCHES
594X
60
75
101 2X
51
12
41
66 4X
1
52X
40
3
71 8X
1
2X16
63
72 2X
75 2X
79 4X 3 INCHES
87
60
9 ADHERED TO OUTSIDE OF BASE COVER AS SHOW N
6
DETAIL B
94
22X
604X
95
842X
92
A
B
603X
17
762X
91
33
103
34
100
802X
82
142X
664X
686X
1
1052X 1.25 INCHES
104 2X APPROX. 3 INCHES
66 4X
15 2X
64
72 3X
75 2X
4
60 3X
37 2X
36 2X
688X
1
91
3
18
3
EXPLODED VIEW FOR 5803
19 2X
20
102
DETAIL A
88 3X
70 4X
1
624X
774X
1
8 2X ADHERED TO OUTSIDE OF BASE COVER AS SHOWN
7
678X
1
3
71 8X
1
54 2X
60 2X
Page 42

ORANGE FROM BEAM CONNECTED
91
91
99 5X
57 5X
58
96
53
TO RED FROM COLUMN
RED FROM BEAM
30
854X
GREY FROM BEAM CONNECTED
TO BLACK FROM COLUMN
BLACK FROM BEAM
85 2X
86 85
GROUND STUD PART SEQUENCE
FROM BASE IS STAR WASHER, NUT,
GROUND WIRES, STAR W ASHER, NUT.
"H"
11REF
"ROT"
"180"
27
863X
854X
97.5 FT
852X
22
STAMP SERIAL NUMBER
WITH 3/16 TO 1/4
HIGH NUMBERS
90
91
25NUMBERS ON CONNECTORS COORESPOND TO NUMBERS ON BOARD
43
86 2X
81
856X
862X
852X
32
24GREEN/YELLOW PART OF
18GREEN/YELLOS PART OF
5GREEN/YELLOW PART OF
75REF
75REF
24 REF
72 3X REF
TO GROUND TERMINAL ON
POWER ENTRY
1
80 2X REF
76 REF
31GREEN/YELLOW PART OF
24GREEN/YELLOW PART OF
31GREEN/YELLOW PART OF
76 REF
24TO P16 ON POWER SUPPLY
102 REF, POW ER ENTRY
32 REF
RED FROM BEAM TO "E16"
BLK FROM BEAM TO "E17"
ON POWER SUPPLY
17 REF, POWER SUPPLY
43 REF
23 BLK TO "34", RED TO "31"
85 8X
CONNECT LEADS FROM CB3
TO CIRCUIT BREAKER
31
CONNECT "L" AND "N" TO "L" AND "N"
OF POWER ENTRY.
CONNECT "11" AND "21" TO "11" AND
"21" OF POWER SW ITCH, NEXT
ASSEMBLY.
CONNECT REMAINING WIRES TO
COORESPONDING LOCATIONS ON
SWITCH AND LINE FILTER
46REF
98.5 FT
29
85 86
NO, VIO
COMMON, BRN
NO, PINK
COMMON, BRN
NO, RED/BLUE
COMMON, BRN
14 REF
60REF
54REF
18 REF
85 5X
862X REF
852X
24ROUTE AS SHOWN REF
46
29GREEN/YELLOW PART OF
EXPLODED VIEW FOR 5803
Page 43

 Loading...