

Page 1

EN-1
ENGLISH
ESPAÑOL
DEUTSCH
FRANÇAIS
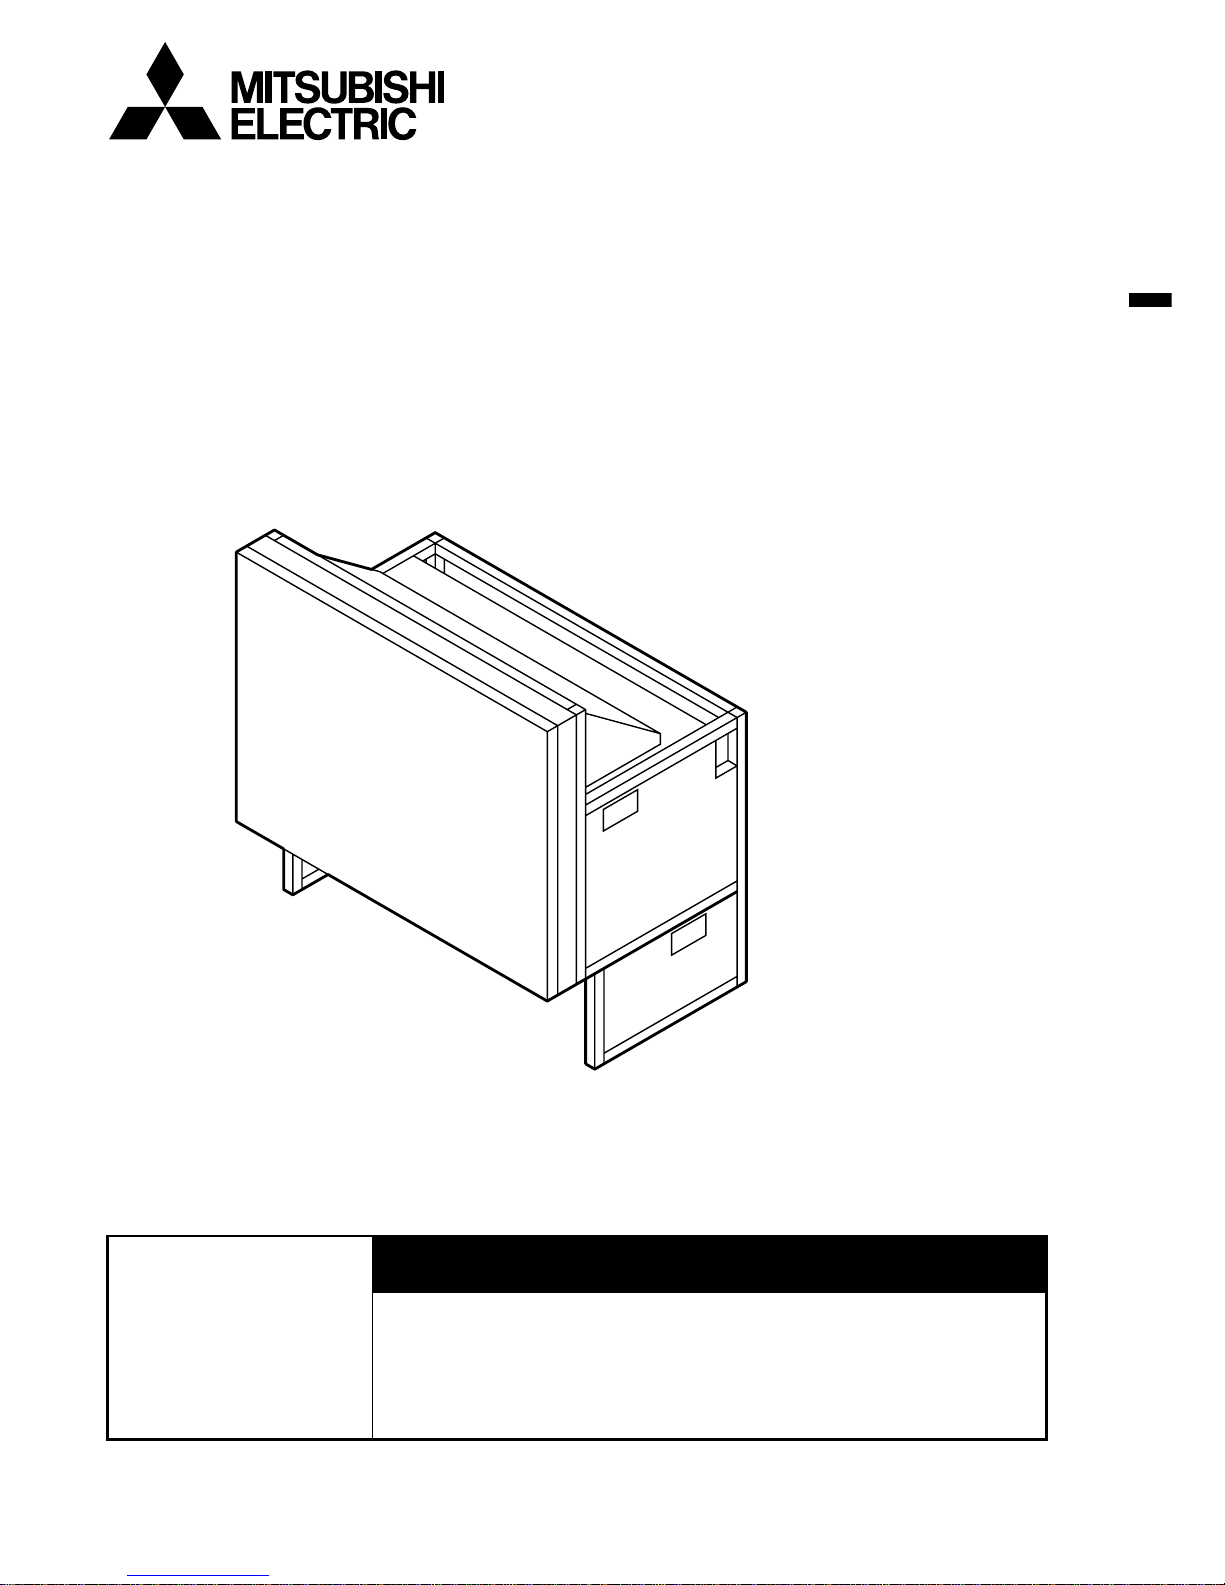
DLPTM PROJECTOR
MODEL
VS-50VL10U
User’s Manual
This user’s manual is important to you.
Please read it before using your DLPTM projector.
Be sure to follow the directions below.
This projector requires special installation to prevent
toppling.
Please ask installation specialists for installation.
Don’t attempt to install the projector by yourself.
Warning:
Page 2

EN-2
Page 3
EN-3
ENGLISH
RISK OF ELECTRIC SHOCK
DO NOT OPEN
CAUTION
CAUTION: TO REDUCE THE RISK OF ELECTRIC SHOCK,
DO NOT REMOVE COVER (OR BACK)
NO USER-SERVICEABLE PARTS INSIDE
REFER SERVICING TO QUALIFIED
SERVICE PERSONNEL.
The lightning flash with arrowhead symbol, within an equilateral triangle, is intended
to alert the user to the presence of uninsulated “dangerous voltage” within the
product’s enclosure that may be of sufficient magnitude to constitute a risk of electric
shock.
The exclamation point within an equilateral triangle is intended to alert the user to the
presence of important operating and maintenance (servicing) instructions in the literature accompanying the appliance.
WARNING:
TO PREVENT FIRE OR SHOCK HAZARD, DO NOT EXPOSE THIS APPLIANCE TO RAIN OR MOISTURE.
CAUTION:
TO PREVENT ELECTRIC SHOCK, DO NOT USE THIS (POLARIZED) PLUG WITH AN EXTENSION
CORD, RECEPTACLE OR OTHER OUTLET UNLESS THE BLADES CAN BE FULLY INSERTED TO
PREVENT BLADE EXPOSURE.
NOTE:
SINCE THIS PROJECTOR IS PLUGGABLE EQUIPMENT, THE SOCKET-OUTLET MUST BE INSTALLED
NEAR THE EQUIPMENT AND SHOULD BE EASILY ACCESSIBLE.
Page 4

EN-4
Main features
•High brightness
The new optical system employing the 0.7-inch DMDTM chip realizes displaying clear images of a high level
visibility and high brightness of 440 cd/m2.
•Digital Color Space Control (CSC) for Optimal Blending between Screens
CSC is utilized to correct color rendering between projectors, which is often a problem with multi-screen
configurations. This circuitry ensures good color blending between each screen and excellent color render-
ing control.
•High reliability with no burn-in
Projection by the DLPTM system generates no burn-in on the screen. Therefore, this projector is suitable for
displaying still images and text information for a long time.
•Optional Input Board: VC-B10KA
The optional board gives you the ability to display data, graphics and video seamlessly across up to 5 X 5
array of the DLPTM XGA display without using any external zooming multi vision processor.
The board has Matrix Switch (3 X 2) and Scaling Chip which can accept 3 inputs: RGB Analog & Digital
port (TMDS) and Composite video or Y/C.
Trademarks
All the names shown in this manual are trademarks or registered trademarks of their respective companies.
• DLP
TM
(Digital Light Processing) and DMDTM (Digital Micromirror Device) are trademarks or registered trademarks
of Texas Instruments Incorporated in the U.S.
Page 5

EN-5
ENGLISH
Contents
Main features ......................................................................................... 4
Important safeguards ............................................................................ 6
Product overview .................................................................................... 8
Specifications / Items sold separately ................................................... 9
Outline drawings .................................................................................... 10
How to replace the lamp cartridge ........................................................ 11
Maintenance ........................................................................................... 13
Troubleshooting ...................................................................................... 14
Page 6

EN-6
Important safeguards
Please read all these instructions regarding your DLP
TM
projector and retain them for future reference. Follow
all warnings and instructions marked on the DLP
TM
projector.
1. Read instructions
All the safety and operating instructions should
be read before the appliance is operated.
2. Retain instructions
The safety and operating instructions should be
retained for future reference.
3. Warnings
All warnings on the appliance and in the operating instructions should be adhered to.
4. Instructions
All operating instructions must be followed.
5. Cleaning
Unplug this projector from the wall outlet before cleaning it. Do not use liquid aerosol cleaners. Use a damp soft cloth for cleaning.
6. Attachments and equipment
Never add any attachments and/or equipment
without the approval of the manufacturer as
such additions may result in the risk of fire, electric shock or other personal injury.
7. Water and moisture
Do not use this projector near water or in contact with water.
8. Accessories
Do not place this projector on an unstable cart,
stand, tripod, bracket or table. Use only with a
cart, stand, tripod bracket, or table recommended
by the manufacturer or sold with the projector.
Any mounting of the appliance should follow the
manufacturer's instructions and should use a
mounting accessory recommended by the manufacturer.
10. Power sources
This projector should be operated only from the
type of power source indicated on the marking
label. If you are not sure of the type of power,
please consult your appliance dealer or local
power company.
11. Power-cord protection
Power-supply cords should be routed so that they
are not likely to be walked on or pinched by items
placed upon or against them. Pay particular attention to cords at plugs, convenience receptacles,
and points where they exit from the appliance.
12. Overloading
Do not overload wall outlets and extension cords
as this can result in a fire or electric shock.
13. Objects and liquids
Never push objects of any kind through openings of this projector as they may touch dangerous voltage points or short-out parts that could
result in a fire or electric shock. Never spill liquid of any kind on the projector.
14. Servicing
Do not attempt to service this projector yourself.
Refer all servicing to qualified service personnel.
15. Damage requiring service
Unplug this projector from the wall outlet and
refer servicing to qualified service personnel under the following conditions:
(a) If the power-supply cord or plug is dam-
aged.
(b) If liquid has been spilled, or objects have
fallen into the projector.
(c) If the projector does not operate normally
after you follow the operating instructions.
Adjust only those controls that are covered
by the operating instructions. An improper
adjustment of other controls may result
in damage and may often require extensive work by a qualified technician to restore the projector to its normal operation.
(d) If the projector has been exposed to rain
or water.
(e) If the projector has been dropped or the
cabinet has been damaged.
(f) If the projector exhibits a distinct change
in performance - this indicates a need for
service.
16. Replacement parts
When replacement parts are required, be sure
that the service technician has used replacement
parts specified by the manufacturer or parts
having the same characteristics as the original
part. Unauthorized substitutions may result in
fire, electric shock or other hazards.
17. Safety check
Upon completion of any service or repair to this
projector, ask the service technician to perform
safety checks determining that the projector is
in a safe operating condition.
An appliance and cart combination should be
moved with care. Quick stops, excessive force and
uneven surfaces may cause the appliance and
cart combination to overturn.
9. Ventilation
Slots and openings in the cabinet are provided
for ventilation, ensuring reliable operation of the
projector and to protect it from overheating. Do
not block these openings or allow them to be
blocked by placing the projector on a bed, sofa,
rug, or bookcase. Ensure that there is adequate
ventilation and that the manufacturer's instructions have been adhered to.
Page 7

EN-7
ENGLISH
WARNING:
Unplug immediately if there is something
wrong with your projector.
Do not operate if smoke, strange noise or odor comes
out of your projector. It might cause fire or electric
shock. In this case, unplug immediately and contact
your dealer.
Never remove the cabinet.
This projector contains high voltage circuitry. An
inadvertent contact may result in an electric shock.
Except as specifically explained in the Owner's
Guide, do not attempt to service this product
yourself. Please contact your dealer when you want
to fix, adjust or inspect the projector.
Do not modify this equipment.
It can lead to fire or electric shock.
Use the attached specified power supply
cord.
If you use another power-supply cord, it may cause
interference with radio and television reception.
This apparatus must be grounded.
Do not turn off the main power abruptly or
unplug the projector during operation.
It can lead to lamp breakage, fire, electric shock or
other trouble. It is best to wait for the fan to turn off
before turning main power off.
COMPLIANCE NOTICE OF FCC
This equipment has been tested and found to comply with the limits for a Class A digital device, pursuant to Part 15
of the FCC Rules. These limits are designed to provide reasonable protection against harmful interference when the
equipment is operated in a commercial environment. This equipment generates, uses, and can radiate radio frequency energy and, if not installed and used in accordance with the instruction manual, may cause harmful interference to radio communications. Operation of this equipment in a residential area is likely to cause harmful interference in which case the user will be required to correct the interference at his own expense.
This digital apparatus does not exceed the Class A limits for radio noise emissions from digital apparatus as set out
in the interference-causing equipment standard entitled “Digital Apparatus”, ICES-003 of the Department of Communications.
Changes or modifications not expressly approved by Mitsubishi could void the user's authority to operate this equipment.
COMPLIANCE NOTICE OF INDUSTRY CANADA
This Class A digital apparatus complies with Canadian ICES-003.
Place the projector more than 2in. from the
wall to prevent blocking the intake, exhaust
slots and ventilation of this projector because
hot air comes out of it.
Do not use the projector under the following
circumstances, which may cause fire or electric shock.
•in a dusty or humid place
•near a heater
•in a oily, smoky or damp Place
•in direct sunlight
•with high temperature, such as the closed car
•where the temperature is lower than 50˚F or higher
than 95˚F
•When you replace the lamp, press the power button to
power off, then wait for 30 seconds in stand-by mode
to allow the lamp and DLPTM panels to cool. Turn off
the main switch, unplug the power cord from the out-
let, and wait one hour so that the lamp is cooled to the
touch.
CAUTION:
Battery replacement of the optional remote
control R-FD10TX
•Improper use may result in fire, injury, or spread dirt
due to leakage, heat generation, or explosion.
•Replace all the batteries with new ones. Use four AA
batteries (R6P).
COMPLIANCE NOTICE OF EC DIRECTIVE
This Projector complies with requirements of 89/336/EEC, 73/23/EEC and 93/68/EEC. The requirements of susceptibility have chosen at a level, that makes interference free operation possible in living areas, office areas and light
industry, related to indoor and outdoor operation. All places of operation are related to the public low voltage power
supply.
This is a equipment of Class A. This device could cause interferences in residential areas; in the case of interferences
it can be demand from the user to provide appropriate solutions and pay for it.
Page 8

EN-8
Product overview
STANDBY
STATUS
IN
OUT
POWER
CONTROL
SW1
ON
1
2
3
4
5
6
7
8
1
2
3
4
5
6
7
8
OFF
SW2
R
G
B
HD
VD
1kΩ
75Ω
Sync
R
G
B
HD
VD
1kΩ
75Ω
Sync
SET UP
IN
COMP
Y/C
OUT
REMOTE
DIGITAL IN
ANALOG IN
DIGITAL IN
DIGITAL OUT
VIDEO IN
ANALOG IN
RS-232C
Standby switch
Terminal panel
RS-232C interface
Projector control input
Projector control output
Main power switch
Status LED
Screen unit
Cabinet
Handles
Covered Lamp
cartridge storage
Composite video input
Input board VC-B10KA
(option)
Y/C video input
Digital output
Digital input
Analog RGB input
Analog input sync termination impedance switch
Power socket
SVGA digital input
SVGA analog RGB input
Analog input sync termination
impedance switch
Setup switches
Wired remote control input
Wired remote control output
Page 9
EN-9
ENGLISH
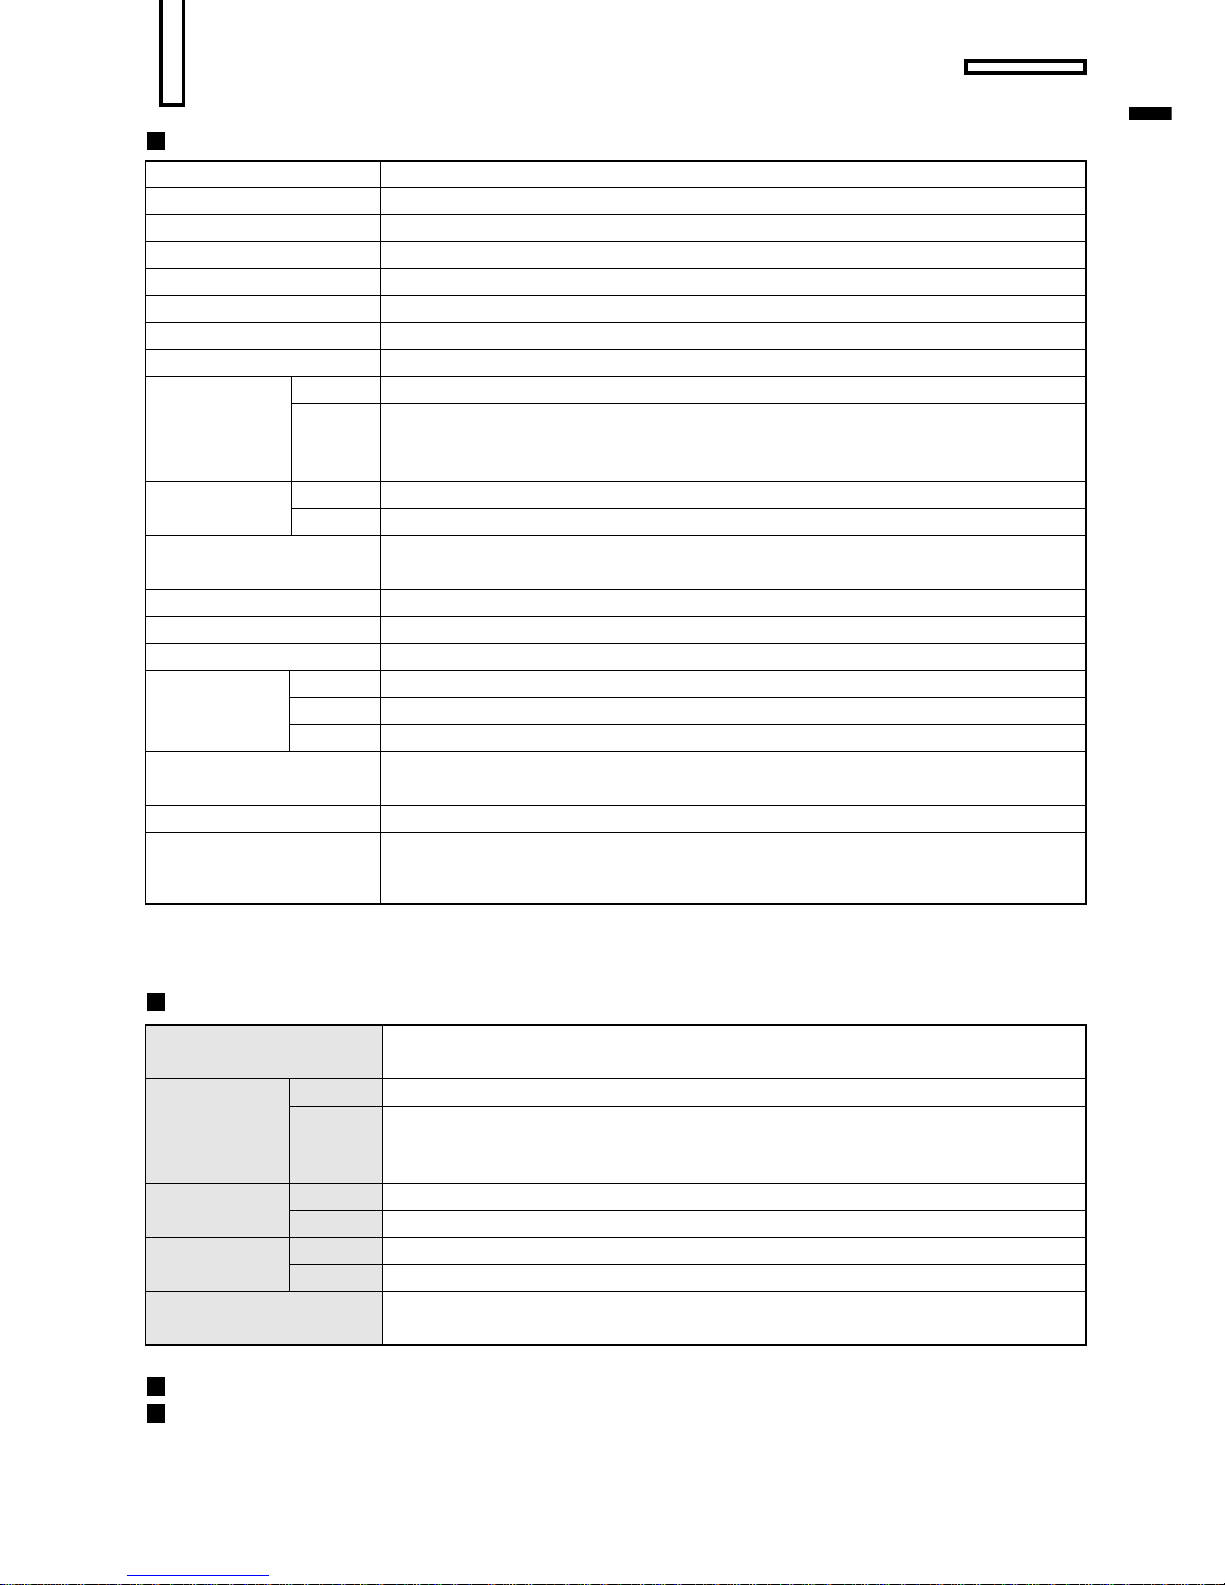
Specifications / Items sold separately
Model VS-50VL10U
Display system DLP
TM
system (0.7-inch 1-Chip DMDTM)
Resolution 800 ✕ 600 pixels
Screen size 50 inches (1016 ✕ 762 mm)
Screen brightness 440 cd/m
2
(TYPICAL)
Contrast ratio 300 : 1 (TYPICAL)
View angle Horizontal : 118°, Vertical : 50°
Input scanning freq. Horizontal : 31 to 40 kHz, Vertical : 49 to 61 Hz, Pixel clock rate : 33 to 43 MHz
SVGA analog RGB
Terminal BNC ✕ 5 (RGBHV)
video input
Signal
Video : 0.7 Vp-p/75Ω, Sync : TTL level (positive/negative)
[in Sync On Green] Video : 0.7 Vp-p positive, Sync : 0.3 Vp-p negative
(when terminated with 75 Ω)
SVGA digital RGB
Terminal MDR 20pin
video input
Signal TMDS (Pin array : according to DFP)
Control signal
RS-232C : D-Sub 9pin
RS-422 : D-Sub 9pin ✕ 2 (input and output)
Light source Ultra-high-pressure mercury lamp (4000 hours of average life)
Power consumption 200 W
Power supply AC 100 V to 240 V 50/60 Hz 3A
Width 1016 mm
Height 1032 mm
Depth 650 mm
Weight 55 kg
Attachment
VS-50VL10U
RGB input signal Resolution : VGA - SXGA, Horizontal : 31.5 to 80 kHz,
(analog/digital)
Vertical : 49 to 85 Hz, Pexel clock rate : 25 to 110 MHz
Analog RGB
Terminal BNC ✕ 5 (RGBHV)
video input
Signal
Video : 0.7 Vp-p/75 Ω, Sync : TTL level (positive/negative)
[in Sync On Green] Video:0.7 Vp-p positive, Sync:0.3 Vp-p negative
(when terminated with 75 Ω)
Digital RGB
Terminal MDR 20pin
video input
Signal TMDS (Pin array : according to DFP)
video input Terminal Composite : BNC ✕ 1, Y/C : S-video terminal ✕ 1
(NTSC/PAL)
Signal Composite : 1.0 Vp-p/75 Ω, Y : 1.0 Vp-p/75 Ω, C : 0.286 Vp-p/75 Ω
Function
Scaling : shrink and zoom
Frame rate conversion
Input board : VC-B10KA
Remote hand unit for wireless and wired use : R-FD10TX
Spare ultra-high-pressure mercury lamp : S-VD10LA
Option
External
dimensions
Operating temperature
and humidity
10 °C to 35 °C 20 % to 80 %
User's Manual, 2 Pow er cords (North America, Europe), Parts for connecting cubes (8 pcs.
each of hexagon socket head cap screws for M6, nut plates, flat washers, and spring
washers), Cube connection control cable
Page 10
EN-10
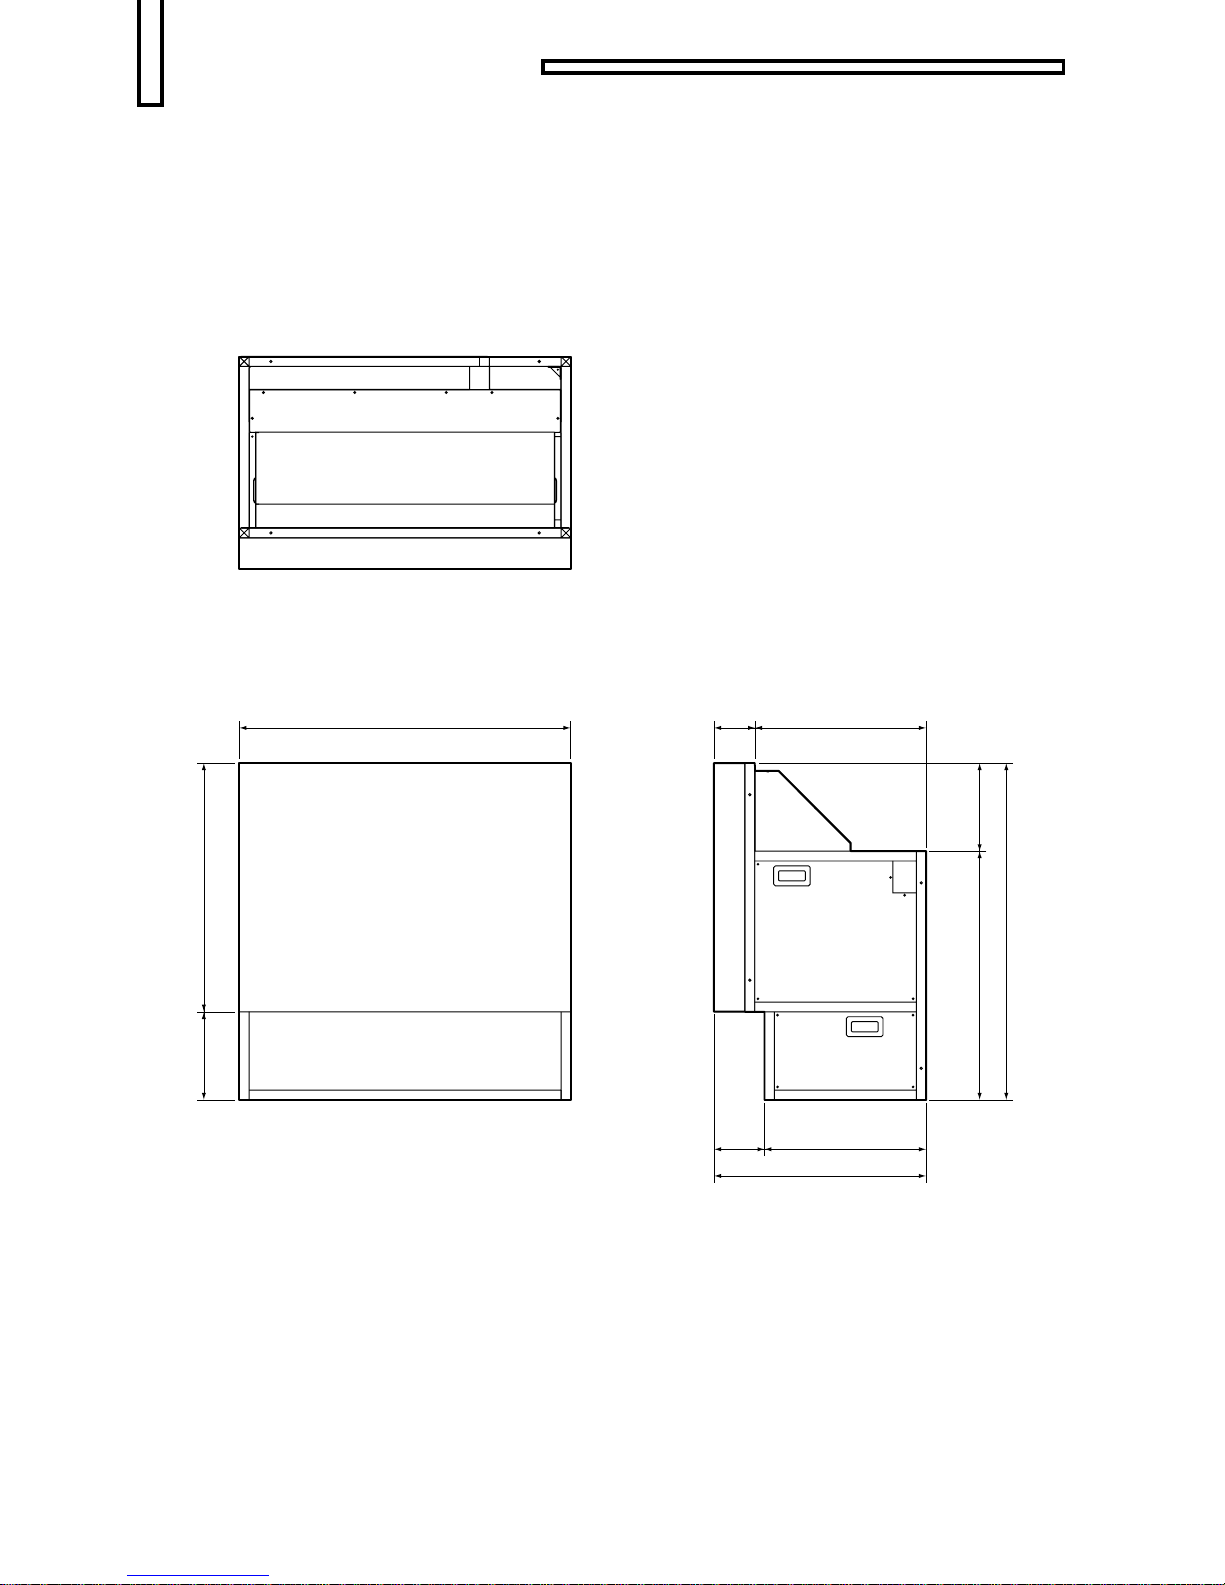
Outline drawings
1016 525125
762270
1032
762 270
495155
650
Top view
Front view Side view
Unit : mm
Page 11
EN-11
ENGLISH
How to replace the lamp cartridge
You can project images after replacing the lamp cartridge. However, the following adjustments are
required to enjoy the equivalent image quality to that offered before the replacement of the lamp
cartridge. Please contact your Mitsubishi dealer for the following adjustments.
•
6 axes adjustment
•
CSC adjustment
•
Reset of the lamp timer
Note
• Turn off the power and leave the projector for 1 hour or longer before replacing the lamp
cartridge. Be sure to put gloves on when replacing the lamp cartridge.
• Never touch the lamp while the lamp is on or right after the lamp is turned off because the
temperature of the lamp gets very high.
• Never touch the metal part of the lamp connector while the lamp is on because the temperature
of the metal part gets very high.
• Never touch the metal part of the lamp connector when the lamp is turned on because a high
pressure arises there.
• Never look into the lamp while it is on.
• Never touch the glass envelop of the lamp with your fingers. The oil on your fingers may cause
damage or explosion of the lamp.
• Replace the lamp with as little pressure as possible on the lamp cartridge.
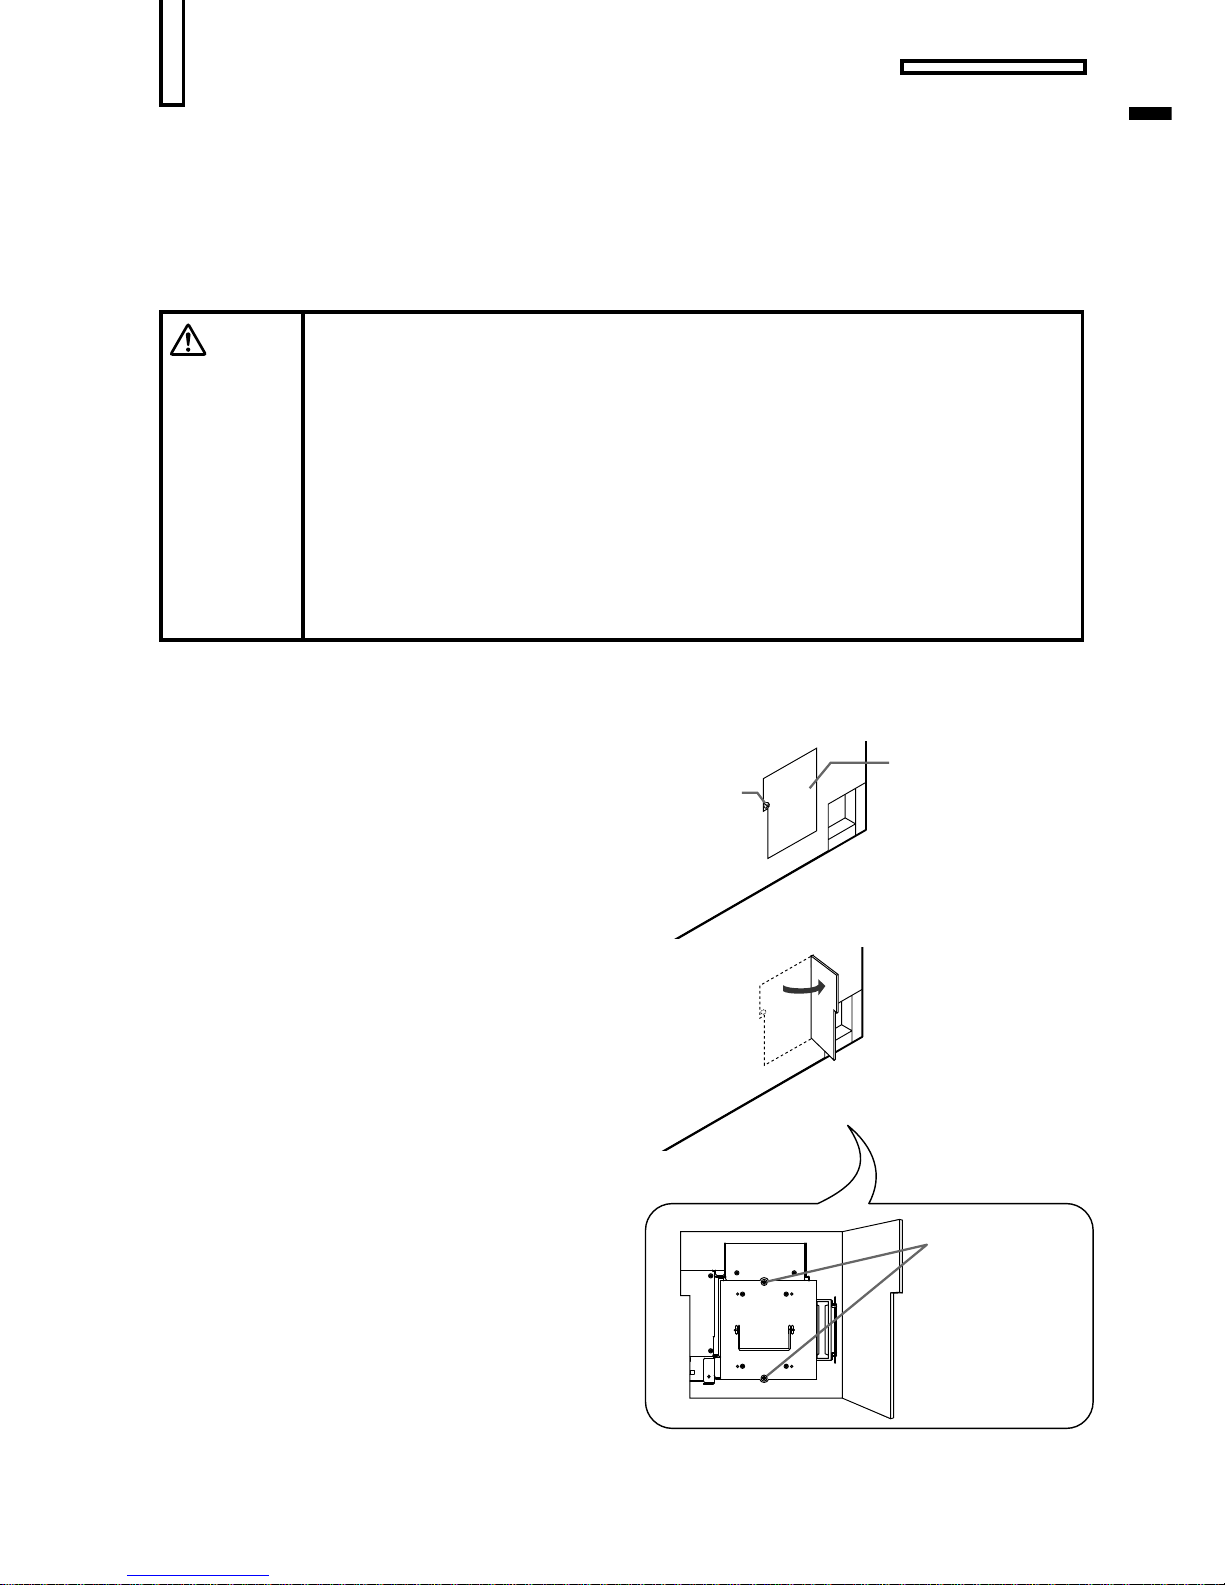
1.
Turn off the main power switch on the
terminal panel.
2.
Loosen the screw on the door of the
lamp cartridge storage.
3.
Open the door of the lamp cartridge
storage.
4.
Loosen the lamp cartridge fixing
screws.
Lamp cartridge
storage
Screw
Lamp cartridge
fixing screws
Page 12
EN-12
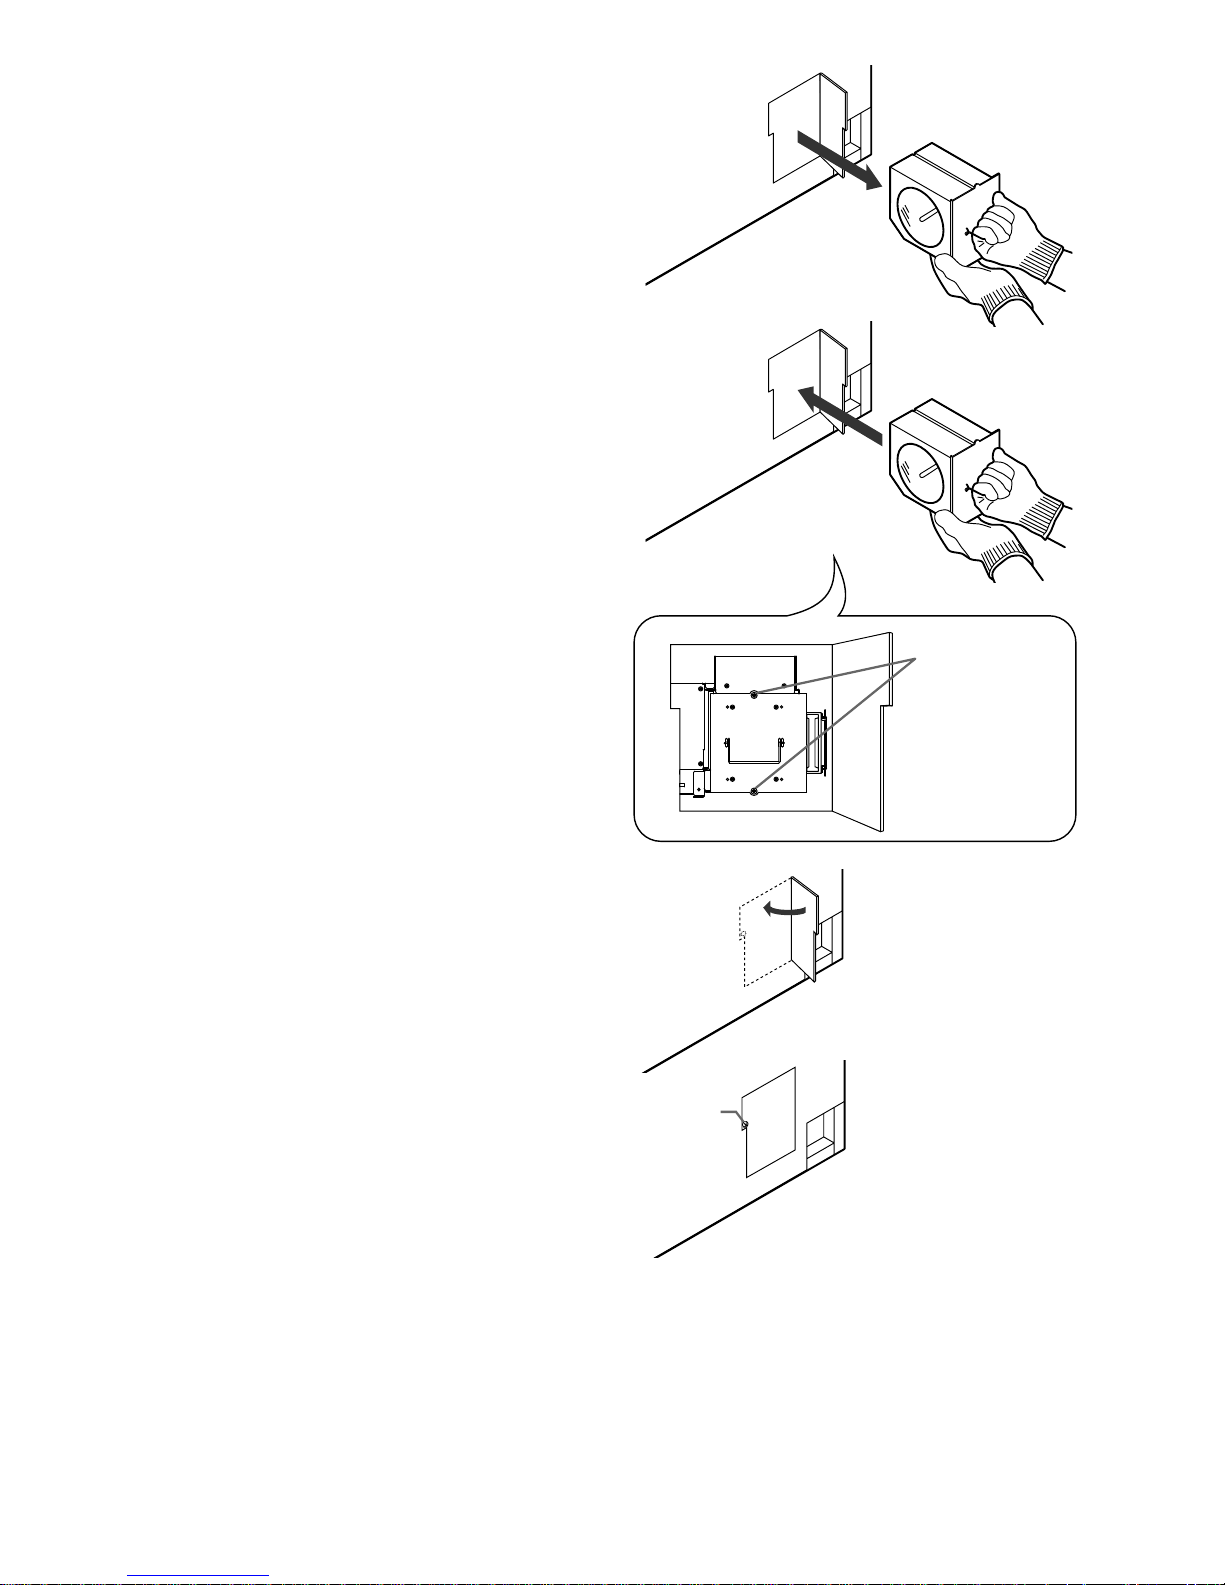
5.
Hold the handle and pull out the lamp
cartridge
•Be sure to grip the handle with one hand and
hold the lamp cartridge with the other hand to
pull it out safely.
•Do not touch the glass envelop of the lamp. It
may cause burns.
6.
Insert a new lamp cartridge into the
lamp storage to the end.
•Do not touch the glass envelop of the lamp with
your fingers. The oil on your fingers may
cause damage or explosion of the lamp.
•Be sure to grip the handle with one hand and
hold the lamp cartridge with the other hand to
insert it safely. Be careful not to pinch your
hand in the lamp cartridge storage.
7.
Tighten up the lamp cartridge fixing
screws.
8.
Close the door of the lamp cartridge
storage.
9.
Tighten up the screw on the door of the
lamp cartridge storage.
10.
Carry out the adjustments after replacement of the lamp cartridge.
You can project images after replacing the lamp cartridge. However, the following adjustments are
required to enjoy the equivalent image quality to that offered before the replacement of the lamp
cartridge. Please contact your Mitsubishi dealer for the following adjustments. Do not attempt to
carry out the adjustments by yourself.
• 6 axes adjustment
• CSC adjustment
• Reset of the lamp timer
Screw
Lamp cartridge
fixing screws
Page 13

EN-13
ENGLISH
Maintenance
Cleaning the projector
• Use a soft lint-free cloth to clean the projector. To remove sticking dirt, wipe the dirt off the projector
using a cloth dampened with a diluted mild detergent and then wipe the projector with a dry cloth.
• Do not use benzine or thinner to clean the projector. It may cause deterioration of the projector or the
coating may peel off.
Cleaning the ventilation slots
When the ventilation slots become clogged with dirt or dust, air circulation inside the projector may be
blocked and the inside temperature may rise causing troubles. Clean the ventilation slots every 100 hours
of use.
• Turn off the projector and unplug the power cord from the wall outlet.
• Vacuum the dirt or dust from the outside of the slots using a cleaner with a brush adapter. Do not use a
cleaner without a brush nozzle or do not use a nozzle adapter to clean the slots.
Cleaning the inside of the projector
If you keep using the projector with dirt or dust inside without cleaning, a fire or troubles may occur. Be
sure to contact your Mitsubishi dealer for cleaning the inside of the projector. Do not attempt to clean the
inside by yourself.
• Be sure to unplug the power cord from the wall outlet before maintenance of the product.
• Keep any volatile compounds such as an insecticide from attaching to the body or the screen of the
projector. Do not leave any rubber or plastic materials touching the projector or the screen for a long
time. It may cause deterioration of the projector or the coating may peel off.
Page 14
EN-14
No images appears on the screen
•Check the power cord is connected firmly.
•Check the correct input signals are selected for the terminals of the
external devices.
•Check the external devices are connected to the terminals firmly.
•Check the external devices are turned on.
•Check the appropriate signal is input from the external device to the
projector.
RemediesProblems
Hue of the image is not
appropriate.
•Check the signal connection between the external device and the projector.
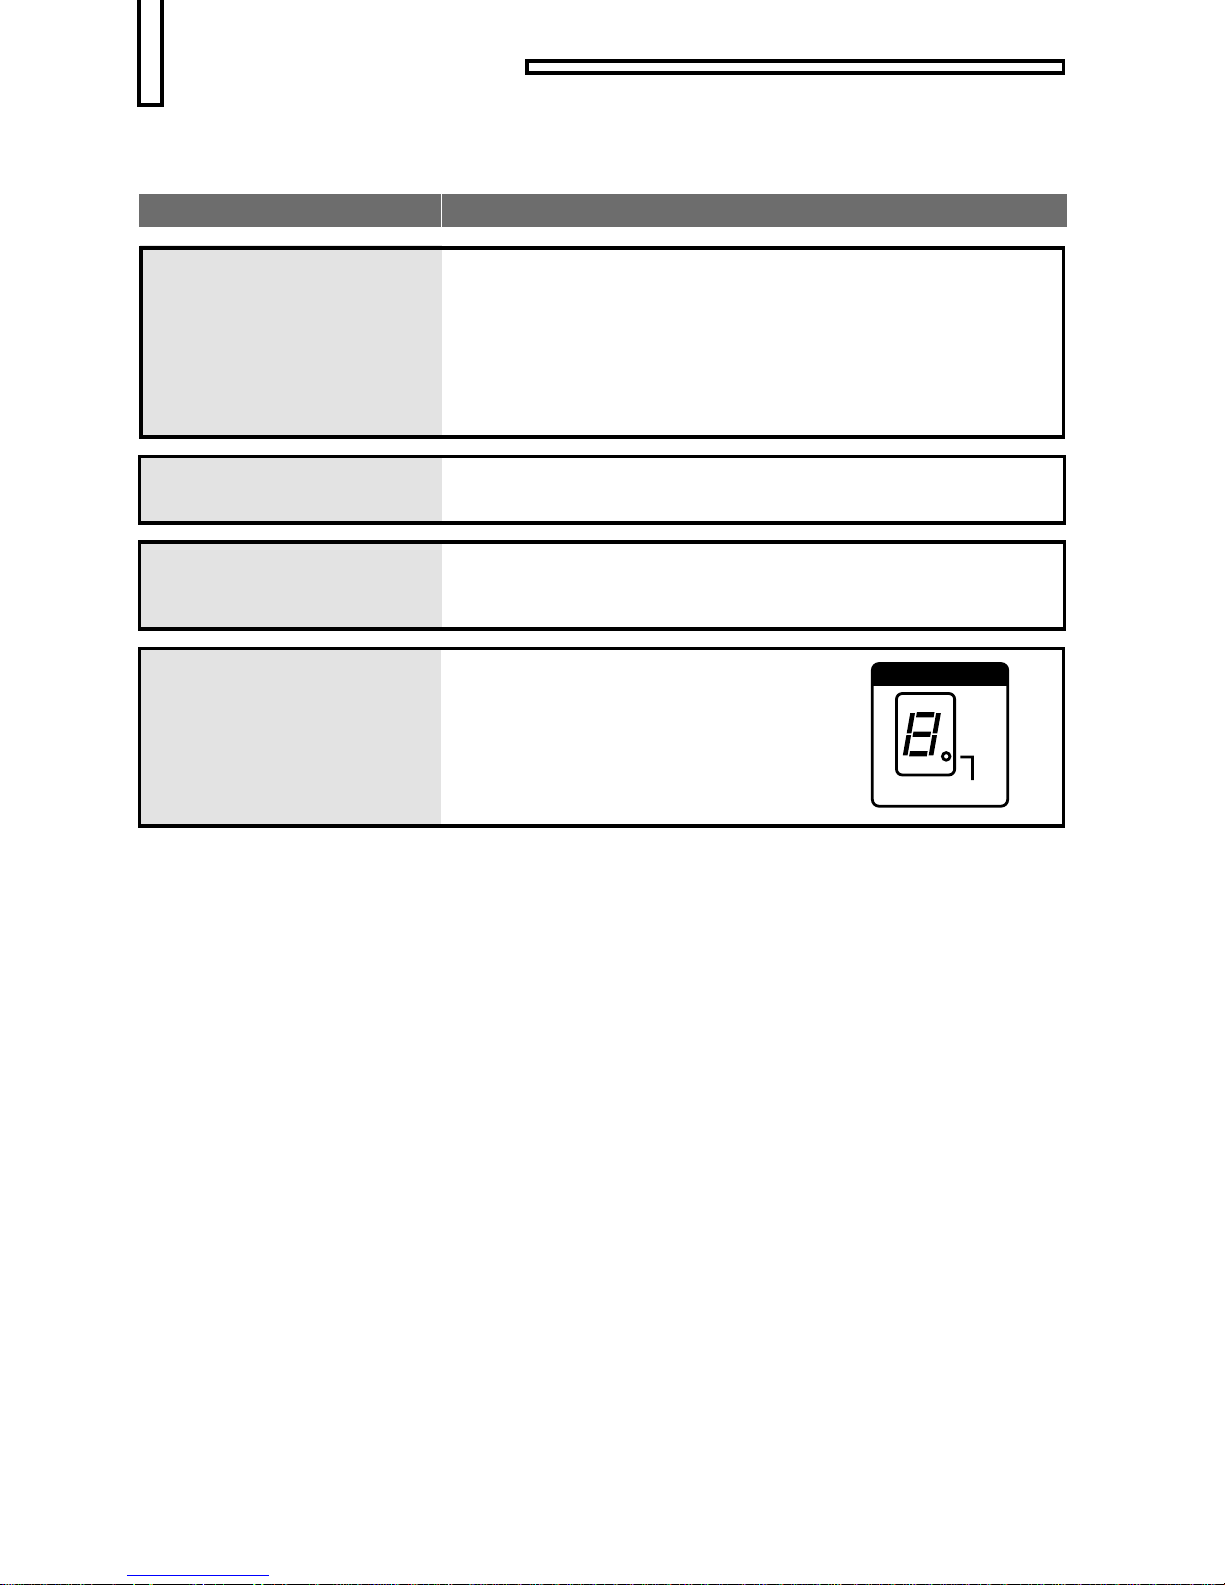
The status LED lights.
•When a failure occurs in the projector, the
status LED on the terminal panel shows any
figure of 0 to 7 in red and the projector turns
off automatically. Please contact your
Mitsubishi dealer immediately in such a
case.
Please check the following before contacting your dealer for service. Errors in signals are
apt to be taken for problems in the projector.
Troubleshooting
The cabinet makes a creak
•It sounds when the cabinet expands or shrinks because of change in the
ambient temperature, which doesn't affect projector's performance.
STANDBY
STATUS
Page 15
ES-1
ESPAÑOL
DLPTM PROYECTOR
MODELO
VS-50VL10U
Manual del Usario
Este manual del usuario es muy importante para usted.
Por favor léalo antes de utilizar su proyector DLP™.
Siga sin falta las indicaciones siguientes.
Este proyector requiere una instalación especial para evitar
la caída o el vuelco.
Solicite la instalación a un especialista.
No intente instalar el proyector por su cuenta.
Advertencia:
Page 16

ES-2
Page 17
ES-3
ESPAÑOL
RIESGO DE DESCARGA
ELÉCTRICA NO ABRIR
PRECAUCIÓN
PRECAUCIÓN: PARA REDUCIR EL RIESGO DE
DESCARGA ELÉCTRICA, NO QUITE LA CUBIERTA (O
PARTE POSTERIOR). LA UNIDAD NO TIENE EN SU INTE-
RIOR PIEZAS QUE PUEDAN SER REPARADAS POR EL
USUARIO. SOLICITE TODO SERVICIO A PERSONAL
CUALIFICADO.
El símbolo del rayo dentro de un triángulo equilátero tiene por finalidad alertar al
usuario de la presencia de “tensión peligrosa” sin aislación en el interior del producto
que puede tener la intensidad suficiente para constituir un riesgo de descarga eléctrica.
El signo de exclamación dentro de un triángulo equilátero tiene por finalidad alertar al
usuario de la presencia de importantes instrucciones de uso y mantenimiento (servicio)
en la literatura incluida con el aparato.
ADVERTENCIA:
PARA EVITAR INCENDIOS Y DESCARGAS ELÉCTRICAS, NO EXPONGA ESTE APARATO A LA LLUVIA NI
A LA HUMEDAD.
PRECAUCIÓN:
PARA EVITAR DESCARGAS ELÉCTRICAS, NO USE ESTA CLAVIJA (POLARIZADA) CON UN CABLE DE
EXTENSIÓN, RECEPTÁCULO U OTRA TOMA DE CORRIENTE A MENOS QUE LAS ESPIGAS PUEDAN
SER INSERTADAS COMPLETAMENTE, SIN QUEDAR EXPUESTAS.
NOTA:
DEBIDO A QUE ESTE PROYECTOR ES UN EQUIPO ENCHUFABLE, EL TOMACORRIENTE DEBERÁ
ESTAR INSTALADO CERCA DEL EQUIPO Y SER DE FÁCIL ACCESO.
Page 18

ES-4
Funciones Principales
•Brillo Alto
El nuevo sistema óptico empleando el chip DMDTM de 0,7 pulgadas hace posible la visualización de
imágenes claras de visibilidad de alto nivel y brillo alto de 440 cd/m2.
•Digital Color Space Control (CSC) (Control de espacio de color) para óptima mezcla entre las
pantallas
El CSC es utilizado para corregir la reproducción del color entre los proyectores, lo cual es frecuentemente
un problema con las configuraciones de pantalla múltiples. Esos circuitos aseguran una buena reproducción
del color entre cada pantalla y un excelente control de reproducción del color.
•Alta confiabilidad sin remanencia de la imagen
Las proyecciones con el sistema DLP™ no generan remanencia de imagen en la pantalla. Por lo tanto, este
proyector es adecuado para mostrar imágenes fijas e información de texto durante un tiempo prolongado.
•Tarjeta de entrada opcional: VC-B10KA
La tarjeta opcional le da la habilidad de visualizar datos, gráficos y vídeo sin cortes hasta el orden de 5X5
del monitor DLPTM XGA sin la utilización de ningún procesador de visión múltiple para tamaño.
La tarjeta tiene un interruptor Matriz (3X2) y un Chip de escala el cual puede aceptar 3 entradas: puerto
RGB Analógico y Digital (TMDS) y vídeo compuesto o Y/C.
Marcas de fábrica
Todos los nombres mostrados en este manual son marcas registradas o marcas comerciales registradas de sus
respectivas compañías.
• DLP
TM
(Digital Light Processing) y DMDTM (Digital Micromirror Device) son marcas de fábrica o marcas comerciales
registradas de la Texas Instruments Incorporated en los E.E.U.U.
Page 19

ES-5
ESPAÑOL
Contenido
Funciones Principales ............................................................................ 4
Importantes medidas de seguridad ....................................................... 6
Vista Panoramica ................................................................................... 8
Especificationes/ítems vendidos por separado...................................... 9
Dibujos Acotados .................................................................................... 10
Como reemplazar el cartucho de la lámpara ........................................ 11
Mantenimiento ....................................................................................... 13
Solución de problemas ........................................................................... 14
Page 20

ES-6
Importantes medidas de seguridad
LEA TODAS LAS INSTRUCCIONES REFERENTES
AL PROYECTOR DLPTM, Y CONSÉRVELAS PARA
FUTURAS CONSULTAS. OBSERVE TODAS LAS
ADVERTENCIAS E INSTRUCCIONES MARCADAS
EN EL PROYECTOR DLPTM.
1. Lea las instrucciones
Lea detenidamente todas las instrucciones de
seguridad y operación antes de usar el aparato.
2. Conserve las instrucciones
Conserve las instrucciones de seguridad y
operación para futuras consultas.
3. Respete las advertencias
Respete todas las advertencias presentes en el
aparato y en el manual de instrucciones.
4. Siga las instrucciones
Siga todas las instrucciones de operación y uso.
5. Limpieza
Desconecte el proyector LCD del tomacorriente
mural antes de limpiarlo. No use limpiadores
líquidos o aerosoles. Use un paño húmedo para
limpiar el aparato.
6. Accesorios y equipos
Nunca añada ningún accesorio y/o equipo sin la
aprobación del fabricante, ya que esto podría
resultar en incendios, descargas eléctricas o
lesiones personales.
7. Agua y humedad
No use este proyector en lugares donde haya
posibilidad de contacto o inmersión en el agua.
No use cerca de: bañeras, lavamanos, fregadero
de la cocina o lavandería, piscinas, etc.
8. Accesorios
No instale este proyector en un carro, soporte,
trípode o mesa inestables. El proyector podría
caerse, causando serias lesiones a un niño o
adulto, y resultando también severamente
dañado. Úselo sólo en un carro, soporte, trípode
o mesa recomendados por el fabricante o
vendidos junto con el proyector. Cualquier
instalación del aparato debe hacerse de acuerdo
con las instrucciones del fabricante y usando los
accesorios de montaje recomendados por el
mismo.
Una combinación de
aparato y carro deberá
ser movida con
cuidado. Las
detenciones bruscas, la
fuerza excesiva y las
superficies disparejas
pueden hacer que el
aparato y el carro se
vuelquen.
9. Ventilación
El gabinete tiene ranuras y aberturas de
ventilación para garantizar la operación fiable
del proyector y para evitar que se recaliente. No
bloquee estas aberturas y asegúrese de no
obstruirlas situando el proyector encima de una
cama, sofá, alfombra o estante para libros.
Asegúrese de que haya una ventilación adecuada
y de seguir las instrucciones del fabricante.
10. Fuentes de alimentación
Este proyector sólo debe ser usado con el tipo de
fuente de alimentación especificado en la etiqueta
indicadora. Si no está seguro del tipo de fuente de
alimentación que tiene en su casa, consulte al
distribuidor del proyector o a la compañía de
electricidad local.
11. Protección del cable de alimentación
Los cables de alimentación deben ser tendidos de
manera tal que la probabilidad de que sean pisados
o aplastados por objetos sea mínima. Preste especial
atención a las clavijas de los cables, a los receptáculos
y a los puntos donde salen del aparato. No coloque el
cable de alimentación debajo de una alfombra.
12. Sobrecarga
No sobrecargue los tomacorrientes murales y cables
de extensión, ya que esto podría causar incendios o
descargas eléctricas.
13. Entrada de objetos y líquido
Nunca introduzca objetos de ningún tipo por las
aberturas del proyector, ya que podría tocar peligrosos
puntos de alta tensión o causar cortocircuitos, lo que
a su vez podría resultar en incendios o descargas
eléctricas.
No derrame ningún tipo de líquido sobre el proyector.
14. Servicio
No intente reparar el proyector usted mismo; al abrir
o retirar las cubiertas usted se expondrá a alta
tensión y a otros peligros. Solicite todo servicio a personal cualificado.
15. Daños que requieren servicio
En los siguientes casos, desconecte el proyector del
tomacorriente mural y llame a un técnico de servicio
cualificado:
(a) Cuando el cable o la clavija de alimentación
estén dañados.
(b) Si se ha derramado líquido sobre el proyector,
o si algún objeto ha caído dentro del aparato.
(c) Cuando a pesar de haber seguido las
instrucciones de operación, el proyector no
funcione normalmente.
Ajuste solamente los controles indicados en el
manual de instrucciones; el ajuste incorrecto
de otros controles podrá causar daños al
proyector, el que por lo general requerirá de
un prolongado trabajo de reparación (por un
técnico cualificado) para que sus condiciones
normales de operació n puedan ser
restablecidas.
(d) Si el proyector ha sido expuesto a la lluvia o al
agua.
(e) Si el proyector se ha caído o si el gabinete se
ha dañado.
(f) Cuando el proyector muestre un cambio notorio
en su rendimiento — esto indica necesidad de
servicio.
16. Reemplazo de piezas
Cuando sea necesario reemplazar piezas, asegúrese
de que el técnico de servicio use las piezas de repuesto
especificadas por el fabricante, o piezas que tengan
las mismas características que la pieza original. Los
cambios no autorizados pueden resultar en incendios,
descargas eléctricas y otros daños.
Page 21

ES-7
ESPAÑOL
WARNING:
Desenchufe inmediatamente si algo va mal
con el Proyector.
No utilice el proyector cuando salga humo, olores o
se oigan ruidos extraños. Se puede producir fuego o
descargas eléctricas. Si se da este caso, desenchufe
inmediatamente el proyector y póngase en contacto
con su distribuidor.
Nunca extraiga el aparato de la caja
Este Proyector contiene circuitos de alto voltaje.
Entrar en contacto con los mismos inadvertidamente
puede producir descargas eléctricas. Exceptuando los
casos en que en la Guía del Propietario se diga algo
en contrario, no intente arreglar el aparato por sí
mismo. Póngase en contacto con su distribuidor
cuando tenga la necesidad de arreglar, ajustar o
inspeccionar el Proyector.
No modifique este equipo en modo alguno
Hacerlo puede producir fuego o descargas eléctricas.
Use el cable de alimentación incluido.
El uso de otro cable puede causar interferencias en
la recepción de radio o televisión.
Este aparato debe estar puesto a tierra.
No desconecte la corriente bruscamente ni
desenchufe el proyector mientras está
funcionando.
Puede provocar una rotura de la bombilla, fuego,
descarga eléctrica u otros problemas.
AVISO DE CONFORMIDAD CON LA FCC
Este equipo ha sido probado y se ha comprobado que está en acuerdo con los límites para un mecanismo digital
de Clase A, conforme a la parte 15 del reglamento FCC. Estos límites están diseñados para proteger, en la
medida de lo posible, al equipo contra una interferencia dañina cuando es empleado en un medio comercial.
Este equipo produce, usos, y puede irradiar energía de frecuencia de radio y, si no se utiliza correctamente como
se indica en el manual de instrucciones, puede causar interferencias que dañen a las comunicaciones de radio.
El uso este equipo en areas residenciales puede causar interferencias dañinas a otros, en tales casos el dueño
deberá reparar aquellos daños a su propio costo.
Este aparato digital no excede los límites de Clase A para emisiones de radio desde aparatos digitales como se
ajusta en el equipo estándar de interferencia-causa titulado “Aparatos Digitales”, ICES-003 del Departamento
de Comunicaciones.
El uso de este equipo en un área residencial puede causar interferencias perjudiciales, en cuyo caso el usuario
deberá corregir el problema por sus propios medios.
Los cambios o modificaciones no expresamente aprobados por Mitsubishi pueden anular la autoridad del
usuario para operar este equipo.
AVISO DE CONFORMIDAD CON LA INDUSTRIA CANADIENSE
Este aparato digital Clase A cumplen con ICES-003 de Canadá.
Instale el proyector a más de 5 cm de la
pared para no bloquear la entrada, ranuras
de escape y la ventilación de este proyector,
ya que sale aire caliente de éste.
No utilice el proyector bajo estas
circunstancias, que podrían causar
incendio o una descarga eléctrica.
•en lugares húmedos o con polvo.
•colocándolo de lado, boca abajo.
•cerca de un calefactor.
•colocándolo en una cocina, o en lugares aceitosos, con
humo o húmedos.
•a la luz directa del sol.
•con alta temperatura, tales como dentro de un coche
cerrado.
•donde la temperatura sea inferior a 5˚ C o superior a
40 ˚C.
•Al reemplazar la lámpara de fuente de luz, pulse el
botón POWER para desactivar el aparato y espere 30
segundos en modo reserva para enfriar la lámpara y
los paneles DLPTM y apague el interruptor principal,
después desenchufe de la toma de corriente y espere
otros 60 minutos para que la lámpara esté fría al
tocarla.
PRECAUCIÓN:
Sustitución de las baterías del mando a
distancia opcional R-FD10TX
•Un uso indebido puede ocasionar incendios, heridas,
suciedad por goteo, calor o explosiones.
•Sustituya todas las baterías por otras nuevas.
Utilice cuatro baterías de tipo AA (R6P).
NOTIFICACIÓN DE CONFORMIDAD DE LAS DIRECTIVAS DE EC
Este proyector cumple con los requeriminetos del 89/336/CEE, 73/23/CEE y 93/68CEE. Los requerimientos de
suceptibilidad se han escogido a un nivel, que hace posibles operaciones libres de interferencia en áreas de vivienda,
áreas de oficina e industrial ligera, relacionadas con operaciones en recinto cerrado o al aire libre. Todos los sitios de
operación se relacionan con la fuente de alimentación de bajo voltaje.
Este es un equipo de clase A. Este dispositivo puede causar interferencias en áreas residenciales; en el caso de
interferencias puede ser solicitado por el usuario el suministro de soluciones apropiados y el pago por ellas.
17. Comprobación de seguridad
Al finalizar cualquier trabajo de mantenimiento
o reparación del proyector, solicítele al técnico
de servicio que efectúe una comprobación de
seguridad para determinar si el proyector se
encuentra o no en condiciones óptimas de
operación.
Page 22

ES-8
Vista Panoramica
STANDBY
STATUS
IN
OUT
POWER
CONTROL
SW1
ON
1
2
3
4
5
6
7
8
1
2
3
4
5
6
7
8
OFF
SW2
R
G
B
HD
VD
1kΩ
75Ω
Sync
R
G
B
HD
VD
1kΩ
75Ω
Sync
SET UP
IN
COMP
Y/C
OUT
REMOTE
DIGITAL IN
ANALOG IN
DIGITAL IN
DIGITAL OUT
VIDEO IN
ANALOG IN
RS-232C
Interruptor de espera
Panel del terminal
Interfaz RS-232C
Entrada del control del proyector
Salida del control del proyector
Interruptor de alimentación principal
LED de estado
Unidad de la pantalla
Gabinete
Manijas
Depósito cubierto del
cartucho de la lámpara
Entrada de vídeo compuesta
Tarjeta de entrada VC-B10KA
(opcional)
Entrada de vídeo Y / C
Salida digital
Entrada digital
Entrada RGB analógica
Interruptor conmutador de impedancia
sincrónico de entrada analógica
Tomacorriente de alimentación
Entrada digital SVGA
Entrada analógica RGB SVGA
Interruptor conmutador de impedancia
sincrónico de entrada analógica
Interruptores de configuración
Entrada del mando a distancia alámbrico
Salida del mando a distancia inalámbrico
Page 23

ES-9
ESPAÑOL
ESPECIFICACIONES / ÍTEMS VENDIDOS POR SEPARADO
Modelo VS-50VL10U
Sistema de monitor Sistema DLP
TM
(0.7 pulg. 1 Chip DMDTM)
Resolución
800 x 600 píxeles
Tamaño de la pantalla 50 pulgadas (1016 x 762 mm)
Brillo de la pantalla 440 cd/m
2
(TÍPICO)
Relación de contraste 300 : 1 (TÍPICO)
Ángulo de visión Horizontal : 118°, Vertical : 50°
Frecuencia de exploración de entrada
Horizontal : 31 a 40 kHz, Vertical : 49 a 61 Hz, Velocidad del reloj de píxel : 33 a 43 MHz
Terminal BNC
x 5 (RGBHV)
Señal Vídeo : 0.7 Vp-p / 75 Ω, Sincron. : Nivel TTL (positivo/negativo)
[Sincronismo en verde] Video : 0.7 Vp-p (sinc. positivo), 0.3 Vp-p (sinc. negativo)
[cuando termina con 75 Ω]
Terminal MDR 20 Contactos
Señal TMDS (Sistema de contactos : de acuerdo al DFP)
Señal de control
RS-232C : D-Sub 9 contactos
RS-422 : D-Sub 9 contactos
x 2 (entrada y salida)
Fuente de luz Lámpara de mercurio de Ultra alta presión (promedio de vida útil 4000 horas)
Consumo de energía 200 W
Suministro de energía AC 100 V a 240 V 50/60 Hz 3 A
Anchura 1016 mm
Altura 1032 mm
Profundidad
650 mm
10 °C a 35 °C 20 % a 80 %
Peso 55 kg
Accesorios
VS-50VL10U
Resolución : VGA – SXGA, Horizontal : 31.5 a 80 kHz,
Vertical : 49 a 85 Hz, Velocidad del reloj de píxel : 25 a 110 MHz
Terminal BNC
x 5 (RGBHV)
Señal Vídeo : 0.7 Vp-p / 75 Ω Sincron. : nivel TTL (positivo/negativo)
[En sincron. en verde] Vídeo : 0.7 Vp-p positivo, Sincron. : 0.3 Vp-p negativo
(cuando se termina con 75 Ω )
Terminal 20 contactos MDR
Señal TMDS (Sistema de contactos: de acuerdo a DFP)
Terminal Compuesto : BNC
x 1, Y / C : Terminal de vídeo S x 1
Señal Compuesto : 1.0 Vp-p/75 Ω, Y : 1.0 Vp-p/75 Ω, C : 0.286 Vp-p/75 Ω
Función
Escalado: reducción y zoom
Conversión de velocidad de imagen
Tarjeta de entrada : VC-B10KA
Unidad manual a distancia para uso inalámbrico y alámbrico : R-FD10TX
Lámpara de mercurio de ultraalta presión de repuesto : S-VD10LA
Opcional
Dimensiones
externas
Entrada de vídeo
RGB analógica
SVGA
Entrada de vídeo
RGB digital SVGA
Entrada de vídeo
RGB analógica
Temperatura de
funcionamiento y humedad
Señal de entrada RGB
(analógica / digital )
Entrada de vídeo
RGB digital
Entrada de vídeo
(NTSC/PAL)
Manual del usuario, dos cables de alimentación (Norteamérica, Europa), Partes para
conexión de los cubos ( 8 piezas cada uno de los Tornillo de tuerca de cabeza hueca
hexagonal para M6, arandelas freno, arandelas planas, y arandelas elásticas), cable de
control de conexión de cubo
Page 24

ES-10
Dibujos Acotados
1016 525125
762270
1032
762 270
495155
650
Vista superior
Vista delantera Vista lateral
Unidad : mm
Page 25

ES-11
ESPAÑOL
Como reemplazar el cartucho de la lámpara
Usted puede proyectar imágenes después de reemplazar el cartucho de la lámpara. Sin embargo, se
requiere de los siguientes ajustes para disfrutar de una calidad de imagen equivalente a aquella
ofrecida antes del reemplazo del cartucho de la lámpara. Por favor contacte su distribuidor Mitsubishi
para los siguientes ajustes.
•
Ajuste de los 6 ejes
•
Ajuste CSC
•
Reajuste del temporizador de la lámpara
Nota
• Desactive la alimentación y deje el proyector en espera durante una hora o mas antes de
reemplazar el cartucho de la lámpara. Asegúrese de usar guantes cuando reemplace el cartucho
de la lámpara.
• Nunca toque la lámpara mientras esté encendida o inmediatamente después de apagarla
porque la temperatura tendrá una temperatura muy alta.
• Nunca toque la parte metálica del conector de la lámpara mientras que esta está encendida
porque la temperatura del metal es muy alta.
• Nunca toque la parte metálica del conector de la lámpara mientras que esta está encendida
porque una presión alta surge en este lugar.
• Nunca mire dentro de la lámpara mientras está encendida.
• Nunca toque la cubierta de vidrio de la lámpara con sus dedos. El aceite en sus dedos puede
causar daños o la explosión de la lámpara.
• Reemplace la lámpara procurando aplicar una presión mínima sobre el cartucho de la lámpara.
1.
Desactive el interruptor de
alimentación principal en el panel del
terminal.
2.
Afloje el tornillo en la puerta del
deposito del cartucho de la lámpara.
3.
Abra la puerta del depósito del
cartucho de la lámpara.
4.
Afloje los tornillos de fijación del
cartucho de la lámpara
Depósito del cartucho
de la lámpara
Tornillo
Tornillos de
fijación del
cartucho de
la lámpara
Page 26

ES-12
5.
Sostenga la manija y tire hacia afuera
del cartucho de la lámpara
• Asegúrese de agarrar la manija con una mano
y sostenga el cartucho de la lámpara con la
otra mano para sacarlo en forma segura.
• No toque la cubierta de vidrio de la lámpara.
Esta puede ocasionarle quemaduras.
6.
Inserte hasta el fondo un nuevo
cartucho de la lámpara dentro del
depósito.
• No toque la cubierta de vidrio de la lámpara
con sus dedos. El aceite en sus dedos puede
causar daños o la explosión de la lámpara.
• Asegúrese de agarrar la manija con una mano
y sosiegan el cartucho de la lámpara con la
otra para insertarlo en forma segura. Tenga
cuidado de no apretar su mano en el depósito
de cartuchos de la lámpara.
7.
Apriete los tornillos de fijación del
cartucho de la lámpara.
8.
Cierre la puerta del depósito del
cartucho de la lámpara.
9.
Apriete los tornillos en la puerta del
depósito de cartuchos de la lámpara.
10.
Realice los ajustes después del reemplazo del cartucho de la lámpara.
Usted puede proyectar imágenes después de reemplazar el cartucho de la lámpara. Sin embargo, se
requiere de los siguientes ajustes para disfrutar de una calidad de imagen equivalente a la ofrecida
antes del reemplazo del cartucho de la lámpara. Por favor contacte su distribuidor Mitsubishi para
los ajustes siguientes. No intente realizar los ajustes usted mismo.
• Ajuste de 6 ejes
• Ajuste CSC
• Reajuste del temporizador de la lámpara
Tornillo
Tornillos de
fijación del
cartucho de la
lámpara
Page 27

ES-13
ESPAÑOL
Mantenimiento
Limpieza del proyector
• Utilice un trapo suave libre de pelusas para limpiar el proyector. Para remover la suciedad pegada, limpie
esta suciedad utilizando un trapo húmedo con un detergente suave diluido y luego limpie el proyector con
un trapo seco.
• No utilice bencina o disolvente para limpiar el proyector. Esto puede causar el deterioro del proyector o el
desprendimiento del recubrimiento.
Limpieza de las ranuras de ventilación
Cuando las ranuras de ventilación se comiencen a obstruir con suciedad y polvo, la circulación del aire
dentro del proyector puede bloquearse y la temperatura interior puede incrementarse causando problemas.
Limpie las ranuras de ventilación cada 100 horas de uso.
• Apague el proyector y desconecte el cable de alimentación del tomacorriente de pared.
• Aspire la suciedad o polvo desde el exterior de las ranuras utilizando una aspiradora con un adaptador de
cepillo. No utilice una aspiradora sin una boquilla de cepillo o no utilice un adaptador de boquilla para
limpiara las ranuras.
Limpieza de la parte interna del proyector
Si usted continua usando el proyector con suciedad o polvo en su interior sin limpiarlo, un incendio u otros
problemas pueden ocurrir. Asegúrese de contactar a su distribuidor Mitsubishi para la limpieza interna del
proyector. No intente limpiar la parte interna por su cuenta.
• Asegúrese de desconectar el cable de alimentación del tomacorriente de pared antes de realizar el
mantenimiento del producto.
• Mantenga cualquier componente volátil tal como un insecticida lejos del contacto con el cuerpo o la
pantalla del proyector. No deje ningún caucho o materiales plásticos en contacto con el proyector o la
pantalla por largos periodos de tiempo. Esto puede causar deterioro del proyector o el recubrimiento
se puede desprender.
Page 28

ES-14
No aparecen imágenes en la
pantalla
•Verifique que el cable de alimentación está conectado firmemente.
•Verifique que las señales de entrada correctas se han seleccionado para los
terminales de los dispositivos externos.
•Verifique que los dispositivos externos están conectados firmemente a los
terminales.
•Verifique que los dispositivos externos están activados.
•Compruebe que se esté introduciendo la señal apropiada desde el
dispositivo externo al proyector.
RemedioProblemas
El color de la imagen no es el
apropiado.
•Verifique la conexión de señal entre el dispositivo externo y el proyector.
El LED de estado se enciende.
•En caso de que el proyector sufra algún fallo,
el LED de estado del panel del terminal
mostrará en rojo un número entre 0 y 7, y el
proyector se apagará automáticamente. Si
esto sucede, por favor pó ngase
inmediatamente en contacto con su
distribuidor Mitsubishi.
Por favor verifique lo siguientes puntos antes de contactar a su distribuidor para servicio
técnico. Errores en señales son aptas para ser tomadas en cuenta como problemas en el
proyector.
Solución de problemas
El gabinete realiza un crujido
•Este suena cuando el gabinete se expande o se contrae debido al cambio en la
temperatura ambiente, lo cual no afecta el funcionamiento del proyector.
STANDBY
STATUS
Page 29

DE-1
DEUTSCH
DLPTM PROJEKTOR
MODELL
VS-50VL10U
Bedienungs-Anleitung
Diese Bedienungsanleitung ist wichtig für Sie.
Bitte lesen Sie sie, bevor Sie Ihren DLPTM-Projektor verwenden.
Stellen Sie sicher, dass die untenstehenden Anweisungen befolgt werden.
Dieser Projektor erfordert eine spezielle Installation, um
Herunterfallen oder Umkippen zu verhüten.
Lassen Sie die Installation von einem Fachmann
durchführen.
Versuchen Sie nicht, den Projektor selbst zu installieren.
Warnung:
Page 30

DE-2
Page 31

DE-3
DEUTSCH
RISIKO EINES ELEKTRO-
SCHOCKSNICHT ÖFFNEN
VORSICHT
VORSICHT: UM DAS RISIKO EINES ELEKTROSCHOCKS
ZU VERMEIDEN, ENTFERNEN SIE NICHT DIE
ABDECKUNG (ODER RÜCKSEITE) SOWIE KEINE
BENUTZER-WARTUNGSFÄHIGEN TEILE IM INNEREN;
ÜBERLASSEN SIE DIE WARTUNG QUALIFIZIERTEM
SERVICE-PERSONAL.
Das Aufleuchten des Blitzes mit dem Pfeilsymbol im gleichseitigen Dreiecks ist dazu
da, den Benutzer zu warnen, wenn unisolierte “gefährliche Spannung” innerhalb des
Produktgehäuses herrscht, die groß genug ist, um das Risiko eines Elektroschocks
herbeizuführen.
Das Ausrufezeichen im gleichseitigen Dreieck ist dazu da, den Benutzer auf wichtige
Betriebs- und Wartungs- (Service) Anweisungen in der dem Gerät beigefügten
Literatur hinzuweisen.
WARNUNG:
UM EIN FEUER ODER DIE GEFAHR EINES SCHOCKS ZU VERMEIDEN, SETZEN SIE DIESES GERÄT
KEINEM REGEN ODER SONSTIGER FEUCHTIGKEIT AUS.
VORSICHT:
UM EINEN ELEKTROSCHOCK ZU VERMEIDEN, VERWENDEN SIE DIESEN (POLARISIERTEN)
STECKER NICHT MIT EINEM VERLÄNGERUNGSKABEL, EINER STECKDOSE ODER EINEM
ANDEREN AUSGANG, BEI DEM DER STECKER NICHT VOLLSTÄNDIG EINGESTECKT WERDEN
KANN, UM SO DAS HERVORSTEHEN DES STECKERS ZU VERMEIDEN.
HINWEIS:
DA ES SICH BEI DIESEM PROJEKTOR UM EINE STECKBARE EINRICHTUNG HANDELT, SOLLTE
DER STECKER-AUSGANG NAHE AN DER EINRICHTUNG INSTALLIERT WERDEN UND LEICHT
ZUGÄNGLICH SEIN.
Page 32

DE-4
Hauptfunktionen
•Äußerste Helligkeit
Das neue optische System, das mit dem 0,7-Zoll DMDTM-Chip ausgestattet ist, ermöglicht die Anzeige eines
klaren Bildes mit einem hohem Maß an Sichtbarkeit und einer äußersten Helligkeit von 440 cd/m2.
•Digital Color Space Control (CSC) für ein optimales Abblenden zwischen den Bildschirmen
CSC wird zur Korrektur der Farbwiedergabe zwischen den Projektoren verwendet, was bei MehrfachBildschirm-Konfigurationen ein häufiges Problem darstellt. Diese Schaltung sichert einen guten
Farbübergang zwischen den Bildschirmen und eine exzellente Steuerung der Farbwiedergabe.
•Hohe Verlässlichkeit ohne jegliche Nachwirkungsbilder
Die Projektion mit dem DLPTM-System hinterlässt keine Nachwirkungsbilder auf dem Bildschirm. Dieser
Projektor eignet sich deshalb für die Anzeige von Standbildern und Textinformationen über längere Zeit.
•Optionelle Eingangsplatine: VC-B10KA
Die optionelle Platine ermöglicht es Ihnen, Daten, Grafiken und Videos nahtlos auf einer bis zu 5 x 5
umfassenden Anordnung des DLPTM‘XGA-Displays anzuzeigen, ohne dass externe Multivision-Prozessoren
zum Zoomen verwendet werden müssen.
Die Platine verfügt über eine Matrix-Umschaltung (3 x 2) und einen Skalierungs-Chip, der 3 Eingänge
akzeptiert: RGB Analog- & Digital-Schnittstelle (TMDS) und Bildaustast-Synchronisierung oder Y/C.
Warenzeichen
Alle Namen und Bezeichnungen in diesem Handbuch sind Warenzeichen oder eingetragene Warenzeichen ihrer
jeweiligen Unternehmen.
• DLP
TM
(Digital Light Processing) und DMDTM (Digital Micromirror Device) sind Warenzeichen oder eingetragene
Warenzeichen von Texas Instruments Incorporated in den USA.
Page 33

DE-5
DEUTSCH
Inhalt
Hauptfunktionen .................................................................................... 4
Wichtige Sicherheitshinweise ............................................................... 6
Produktübersicht.................................................................................... 8
Technische Daten/Separat erhältliche teile.......................................... 9
Umrisszeichnung.................................................................................... 10
Verfahrensweise zum Austauschen des Lampen-Einsatzes ................ 11
Wartung .................................................................................................. 13
Fehlersuche ............................................................................................ 14
Page 34

DE-6
Wichtige Sicherheitshinweise
Bittle lesen sie diese instruktionen zu ihrem DLPTMprojektor aufmerksam durch und bewahren sie sie auf.
Beachten sie alle warnhinweise und instruktionen, die
auf dem DLPTM-projektor vermerkt sind.
1. Lesen Sie die Instruktionen durch.
Alle Sicherheits- und Betriebsinstruktionen
sollten gelesen werden, bevor das Gerät in
Betrieb genommen wird.
2. Bewahren Sie die Instruktionen auf.
Die Sicherheits- und Betriebsinstruktionen
sollten aufbewahrt werden, damit sie im
Bedarfsfall eingesehen werden können.
3. Warnhinweise:
Sämtliche Warnhinweise auf dem Gerät und in
der Bedienungsanleitung sollten beachtet
werden.
4. Instruktionen:
Alle Betriebsinstruktionen müssen befolgt
werden.
5. Reinigung:
Stecken Sie den Projektor vor dem Reinigen aus.
Verwenden Sie keine flüssigen Sprayreiniger.
Verwenden Sie zum Reinigen ein feuchtes Tuch.
6. Zusatzgeräte:
Verwenden Sie ohne Genehmigung des
Herstellers keine Zusatzgeräte, da derartige
Geräte eine Brand-, Stromschlag oder andere
Verletzungsgefahr darstellen können.
7. Wasser und Feuchtigkeit.
Verwenden Sie den Projektor nicht in der Nähe
von Wasser oder in Kontakt mit Wasser.
8. Aufstellen:
Stellen Sie den Projektor nicht auf wackelige
Wagen, Ständer, Stative, Regale oder Tische.
Stellen Sie ihn ausschließlich auf Wagen,
Ständer, Stative, Regale oder Tische, die vom
Hersteller empfohlen oder mit dem Projektor
verkauft werden. Beim Aufstellen des Geräts
sollten die Instruktionen des Herstellers befolgt
und nur vom Hersteller empfohlenes Montagezubehör verwendet werden.
Wenn das Gerät auf
einem Wagen steht,
sollte der Wagen
vorsichtig bewegt
werden. Durch
abruptes Anhalten,
ü bermäßigen
Kraftaufwand und
unebene Oberflächen
kann das Gerät mit
dem Wagen
umfallen.
9. Belüftung:
Die Schlitze und Öffnungen im Gehäuse sollen
für ausreichende Belüftung sorgen, den
zuverlässigen Betrieb des Projektors
sicherstellen und ihn vor Uberhitzung schützen.
Diese Offnungen dürfen nicht versperrt werden.
Dehalb sollte der Projektor nicht auf ein Bett, ein
Sofa, einen Teppich oder ein Bücherregal gestellt
werden. Vergewissern Sie sich, daß die Belüftung
ausreichend ist und daß die Instruktionen des
Herstellers befolgt werden.
10. Stromquellen:
Dieser Projektor sollte nur von einer Stromquelle aus
betrieben werden, die mit den Angaben auf dem
entsprechenden Etikett und den Technischen
Angaben übereinstimmt.
11. Kabelschutz:
Alle zum Betrieb gehörenden Kabelverbindungen
sollten so verlegt werden, daßkeine Stolperfallen oder
sogar Kabelabrisse erfolgen können. Verlegen Sie das
Kabel nicht unter einem Teppich.
12. Überlastung:
Verwenden Sie nur Anschlußkabel die dem Gerät
beigepackt sind oder für die Benutzung des Gerätes
ausgelegt sind. Verwenden Sie auf gar keinen Fall
unsachgemäße Verlängerungen. Überlasten Sie
Steckdosen und Verlängerungskabel nicht, da dies
zu Brand oder Stromschlag führen kann.
13. Lassen Sie keine fremden Gegenständen auf den
Projektor fallen, da dies zu Schäden am Gehäuse oder
dem Projektor selbst führen kann. Achten Sie darauf,
daß keine Flüssigkeiten in den Projektor eindringen
können, da dies zur Zerstörung des Gerätes, Brand
oder Stromschlag führen kann.
14. Wartung:
Versuchen Sie nicht, den Projektor selbst zu warten,
da Sie sich beim Öffnen oder Abnehmen der
Abdeckungen gefährlichen Spannung oder anderen
Gefahren aussetzen können. Überlassen Sie die
Wartung einem qualifizierten Techniker.
15. Fehlererscheinungen die eine Service erforderlich
machen:
Trennen Sie sofort den Projektor von der
Netzspannung.
a) Wenn das Stromkabel oder der Stecker /
Steckdose beschädigt ist.
b) Wenn Flüssigkeit in den Projektor gelaufen ist
oder Fremdgegenstände hinein gefallen sind.
c) Wenn der Projektor nicht funktioniert, obwohl
Sie die Betriebsinstruktionen befolgt haben.
Stellen Sie nur diejenigen Betriebs Merkmale
selbst ein, die in den Instruktionen genannt
sind, da falsche Einstellung anderer
Betriebsmerkmale Schäden verursachen
k ö nnen und oft langwierigen
Serviceaufenthalt erfordert, um den Projektor
wieder betriebsbereit zu machen.
d) Falls der Projektor Regen oder Wasser
ausgesetzt wurde.
e) Falls der Projektor heruntergefallen ist oder
das Gehäuse beschädigt wurde.
f) Falls der Projektor eine eindeutige
Leistungsschwäche aufweist, die auf einen
Wartungsbedarf hinweist.
16. Ersatzteile:
Wenn Ersatzteile erforderlich sind, vergewissern Sie
sich, daß Ihr Wartungsdienst Ersatzteile verwendet,
die vom Hersteller vorgegeben wurden oder die
gleichen techn. Merkmale wie das Originalteil haben.
Page 35

DE-7
DEUTSCH
WARNHINWEISE:
Stecken Sie den Projektor sofort aus, wenn
irgend etwas nicht stimmt.
Nehmen Sie ihn nicht in Betrieb, wenn Rauch,
eigenartige Geräusche oder Gerüche aus dem
Projektor kommen. Dies könnte Brand oder
Stromschlag verursachen. Das Gerät sofort von der
Spannungsversorgung trennen und an den
Fachhändler wenden.
Nie das Gehäuse entfernen.
Dieser Projektor enthält HochspannungsSchaltkreise. Unbeabsichtigter Kontakt kann zu
einem Stromschlag führen. Sofern nichts spezifisch
in der Bedienungsanleitung vermerkt ist, sollten Sie
auf keinen Fall versuchen, den Projektor selbst zu
warten. Bitte setzen Sie sich mit Ihrem Fachhändler
in Verbindung, wenn der Projektor repariert,
eingestellt oder inspiziert werden soll.
Nehmen Sie keinerlei Veränderungen an
diesem Gerät vor.
Dies kann zu Brand oder Stromschlag führen.
Benutzen Sie die beigefügte Netzleitung.
Die Verwendung einer anderen
Netzleitung kann zu Störungen des
Fernseh- und Rundfunkempfanges führen.
ÜBEREINSTIMMUNGSHINWEIS FÜR FCC
Diese Einrichtung wurde getestet und als für die Toleranz eines A-Klasse-Digital-Gerätes geeignet befunden,
womit Teil 15 der FCC-Regeln befolgt wird. Diese Toleranz wurde entwickelt, um einen vernünftigen Schutz
gegen schädliche Interferenzen zu gewährleisten, wenn die Einrichtung in einer kommerziellen Umgebung
genutzt wird. Diese Einrichtung verursacht, verwendet und verstrahlt Hochfrequenz-Energie und kann - falls
sie nicht entsprechend dem Bedienungshandbuch installiert und verwendet wird - schädliche Interferenzen mit
Radio-Kommunikationen verursachen. Der Betrieb dieser Einrichtung in einem häuslichen Bereich kann
ebenfalls schädliche Interferenzen verursachen; in diesem Fall ist der Benutzer angehalten, die Interferenzen
auf eigene Kosten zu korrigieren. Dieses digitale Gerät überschreitet nicht die A-Klasse-Begrenzungen für
Radiostörungs-Emissionen von digitalen Geräten, wie sie im Standardwerk zu Interferenz verursachenden
Einrichtungen “Digitale Geräte”, ICES-003 der Behörde für Kommunikation festgelegt werden.
Mit Veränderungen oder Modifikationen, denen Mitsubishi nicht ausdrücklich zugestimmt hat, kann der
Benutzer sein Recht am Betrieb dieser Einrichtung verwirken.
ÜBEREINSTIMMUNGSHINWEIS FÜR DIE INDUSTRIE KANADAS
Dieses digitale A-Klasse-Gerät entspricht dem kanadischen ICES-003.
Dieses Gerät muß an den Schutzleiter
angeschlossen
werden.
Schalten Sie den Strom nie abrupt ab und
stecken Sie den Projektor nicht während
des Betriebs aus.
Dadurch kann die Lampe beschädigt werden.
Außerdem können dadurch Brand, Stromschlag oder
andere Störungen verursacht werden.
Stellen Sie den Projektor mehr als 5cm von
einer Wand Entfernt auf, damit die
Luftzufuhr nicht beeinträchtigt wird.
Verwenden Sie den Projektor nie unter
folgenden Bedingungen, da sie zu Brand oder
Stromschlag führen können.
•Staubiger oder feuchter Umgebung
•Auf der Seite oder senkrecht stehend
•In der Nähe von Heizung oder Heizkörpern
•In der Küche an öligen, feuchten oder rauchigen Orten.
•Bei direktem Sonnenlicht
•Bei Temperaturen unter 5°C (41°F) oder über +40°C
(104°F)
•Zum Auswechseln der Lampe betätigen Sie die Ein-/
Aus-Taste, um das Gerät auszuschalten, und warten
30 Sekunden im Standby-Modus, damit sich die
Lampe und das DLPTM-Kontrolldisplay abkühlen,
dann schalten Sie den Hauptschalter aus, ziehen den
Netzstecker heraus und warten noch dreißig Minuten,
bis sich die Lampe kühl anfühlt.
VORSICHT:
Auswechseln der Batterie für die optionale
Fernbedienung R-FD10TX
•Unangemessene Verwendung kann zu Feuer,
Verletzungen, Verschmutzung durch Lecken,
Wärmeerzeugung oder Explosion führen.
•Ersetzen Sie alle Batterien durch neue. Verwenden
Sie vier Batterien der Größe AA (R6P).
ÜBEREINSTIMMUNGS-ERKLÄRUNG HINSICHTLICH EU-DIREKTIVEN
Dieser Projektor entspricht den Anforderungen der Direktiven 89/336/EEC, 73/23/EEC und 93/68/EEC. Die
Anforderungen an die Empfindlichkeit wurden so gewählt, dass sie einen störungsfreien Betrieb in Wohnbereichen,
Geschäftsräumen und Bereichen mit Kleinhandwerk sowohl hinsichtlich des Betriebes in geschlossenen Räumen
als auch draußen gewährleisten. Alle Orte des Betriebes beziehen sich auf öffentliche NiedrigspannungsStromversorgung.
Die ist ein A-Klasse-Gerät. Das Gerät könnte Störungen in Wohngegenden hervorrufen; im Falle von Störungen
kann der Benutzer dazu angehalten werden, für geeignete Lösungen auf eigene Kosten zu sorgen.
Ein nicht fachgerechter Austausch kann zu
Brand, Stromschlag oder anderen Gefahren
führen.
17. Sicherheitstest:
Nach Abschluß von Wartungs- oder
Reparaturarbeiten an dem Projektor sollten Sie
den Fachbetrieb bitten, einen Sicherheitstest
durchzuführen, um festzustellen, ob ein sichere
Betrieb des Projektors gewährleistet ist.
Page 36

DE-8
Produktübersicht
STANDBY
STATUS
IN
OUT
POWER
CONTROL
SW1
ON
1
2
3
4
5
6
7
8
1
2
3
4
5
6
7
8
OFF
SW2
R
G
B
HD
VD
1kΩ
75Ω
Sync
R
G
B
HD
VD
1kΩ
75Ω
Sync
SET UP
IN
COMP
Y/C
OUT
REMOTE
DIGITAL IN
ANALOG IN
DIGITAL IN
DIGITAL OUT
VIDEO IN
ANALOG IN
RS-232C
Standby-Schalter
Anschlusstafel
RS-232C-Schnittstelle
Projektor-Steuerungseingang
Projektor-Steuerungsausgang
Haupt-Netzschalter
Status-LED
Gehäuse
Bildschirmeinheit
Griffe
Verdeckte LampeneinsatzAufbewahrung
Bildaustast-Synchronisierungseingang
Eingangsplatine VC-B10KA
(optional)
Y/C-Bildeingang
Digital-Ausgang
Digital-Eingang
Analoger RGB-Eingang
Analoger Eingangssynch-AbschlussImpedanzschalter
Strombuchse
SVGA-Digitaleingang
SVGA-Analog-RGB-Eingang
Analoger Eingangssynch-Abschluss-
Impedanzschalter
Setup-Schalter
Verdrahteter Fernbedienungs-Eingang
Verdrahteter Fernbedienungs-Ausgang
Page 37

DE-9
DEUTSCH
Technische Daten / Separat erhältliche Teile
Modell VS-50VL10U
Display-System DLP
TM
System (0,7 Zoll 1-Chip DMDTM)
Auflösung 800 x 600 Pixel
Bildschirm-Größe 50 Zoll (1016 x 762 mm)
Bildschirm-Helligkeit 440 cd/m
2
(TYPISCH)
Kontrastverhältnis 300:1 (TYPISCH)
Ansichtswinkel Horizontal: 118˚, Vertikal: 50˚
Eingang-Abtastfrequenz Horizontal: 31 bis 40 kHz, Vertikal: 49 bis 61 Hz, Pixeltaktrate: 33 bis 43 MHz
Anschluss BNC x 5 (RGBHV)
Signal Video: 0,7 Vp-p / 75 Ω, Synch.: TTL-Pegel (positiv/negativ)
[in Synch. auf Grün] Video: 0,7 Vp-p positiv, Synch.: 0,3 Vp-p negativ
(bei Anschluss mit 75 Ω)
Anschluss MDR 20-polig
Signal TMDS (Pol-Anordnung: entsprechend DFP)
Steuerungssignal
RS-232C: D-Sub 9-polig
RS-422: D-Sub 9-polig x 2 (Eingang und Ausgang)
Lichtquelle Ultra-Hochdruck-Quecksilberlampe (4000 Stunden durchschnittliche Betriebsdauer)
Leistungsaufnahme 200 W
Netzanschluss Wechselstrom 100 V bis 240 V 50/60 Hz 3 A
Breite 1016 mm
Höhe 1032 mm
Tiefe 650 mm
10°C bis 35°C 20% bis 80%
Gewicht 55 kg
Zubehör
VS-50VL10U
Auflösung: V GA – SXGA, Horizontal: 31,5 bis 80 kHz
Vertikal: 49 bis 85 Hz, Pixeltaktrate: 25 bis 110 MHz
Anschluss BNC x 5 (RGBHV)
Signal
Video: 0,7 Vp-p / 75 Ω, Synch.: TTL-Pegel (positiv/negativ)
[in Synch. auf Grün] Video: 0,7 Vp-p positiv, Synch.: 0,3 Vp-p negativ
(bei Anschluss mit 75 Ω)
Anschluss MDR 20-polig
Signal TMDS (Pol-Anordnung: entsprechend DFP)
Anschluss Verbund: BNC x 1, Y/C: S-Video-Anschluss x 1
Signal Verbund: 1,0 Vp-p / 75 Ω, Y: 1,0 Vp-p / 75 Ω, C: 0, 286 Vp-p / 75 Ω
Funktion
Skalieren: Schrumpfen und Zoomen
Umwandlung der Bildwiederholrate
Eingangsplatine : VC-B10KA
Hand-Fernbedienungseinheit für verdrahtete und drahtlose Verwendung: R-FD10TX
Reserve-Ultrahochdruck-Quecksilberlampe : S-VD10LA
Sonderzubehör
Äußere
Abmessung
SVGA-AnalogRGB-Bildeingang
SVGA-DigitalRGB-Bildeingang
Analoger
RGB-Bildeingang
Betriebstemperatur und
Feuchtigkeit
RGB-Eingangssignal
(analog/digital)
Digitaler
RGB-Bildeingang
Bildeingang
(NTSC/PAL)
Benutzer-Handbuch, 2 Netzkabel (Nordamerika, Europa), Teile für den Anschluss der
Würfel (jeweils 8 Stck. Sechskantschrauben für M6, Mutternscheiben, flache
Unterlegscheiben und Feder-Unterlegscheiben), Würfelanschluss-Steuerungskabel
Page 38

DE-10
Umrisszeichnung
1016 525125
762270
1032
762 270
495155
650
Obere Ansicht
Vorderansicht Seitenansicht
Einheit: mm
Page 39

DE-11
DEUTSCH
Verfahrensweise zum Austauschen des Lampen-Einsatzes
Auch nach dem Ersetzen des Lampeneinsatzes können Sie Bilder projizieren. Trotzdem sind die
folgenden Einstellungen notwendig, um auch nach dem Ersetzen des Lampeneinsatzes eine
Bildqualität genießen zu können, die dem Zustand vor dem Ersetzen entspricht. Lassen Sie bitte
Ihren Mitsubishi-Händler die folgenden Einstellungen durchführen.
•
6-Achsen-Einstellung
•
CSC-Einstellung
•
Rücksetzen des Lampen-Zeitschalters
Hinweis
• Schalten Sie den Strom aus und lassen Sie den Projektor für mindestens eine Stunde abkühlen,
bevor Sie den Austausch des Lampeneinsatzes durchführen. Stellen Sie sicher, dass Sie
Handschuhe tragen, wenn Sie den Lampeneinsatz austauschen.
• Berühren Sie niemals die Lampe, während sie noch eingeschaltet ist, oder kurz nachdem sie
ausgeschaltet wurde, da die Temperatur der Lampe in diesem Zustand extrem hoch ist.
• Berühren Sie niemals das Metallteil des Lampenanschlusses, während die Lampe eingeschaltet
ist, da die Temperatur des Metallteils in diesem Zustand extrem hoch ist.
• Berühren Sie niemals das Metallteil des Lampenanschlusses, während die Lampe eingeschaltet
ist, da das Teil in diesem Zustand unter Hochdruck steht.
• Sehen Sie niemals direkt in die Lampe, während die Lampe eingeschaltet ist.
• Berühren Sie niemals die Glashülle der Lampe mit Ihren Fingern. Das Fett an Ihren Fingern
könnte einen Schaden verursachen oder zur Explosion der Lampe führen.
• Üben Sie beim Auswechseln der Lampe so wenig Druck wie möglich auf die Lampenpatrone
aus.
1.
Schalten Sie den Haupt-Netzschalter
an der Anschlusstafel aus.
2.
Lösen Sie die Schraube an der Tür der
Aufbewahrung des Lampeneinsatzes.
3.
Öffnen Sie die Tür der LampeneinsatzAufbewahrung.
4.
Lösen Sie die Befestigungsschrauben
des Lampeneinsatzes.
LampeneinsatzAufbewahrung
Schraube
LampeneinsatzBefestigungsschrauben
Page 40

DE-12
5.
Halten Sie den Griff fest und ziehen
Sie den Lampeneinsatz heraus.
• Stellen Sie sicher, dass Sie den Griff mit einer
Hand festhalten und mit der anderen Hand
den Lampeneinsatz vorsichtig herausziehen.
• Berühren Sie nicht die Glashülle der Lampe.
Dies könnte zu Verbrennungen führen.
6.
Setzen Sie einen neuen Lampeneinsatz
bis zum Ende der LampeneinsatzAufbewahrung ein.
• Berühren Sie nicht die Glashülle der Lampe
mit Ihren Fingern. Das Fett an Ihren Fingern
könnte einen Schaden verursachen oder zur
Explosion der Lampe führen.
• Stellen Sie sicher, dass Sie den Griff mit einer
Hand festhalten und mit der anderen Hand
den Lampeneinsatz vorsichtig wieder
einsetzen. Achten Sie darauf, dass Sie nicht
Ihre Hand in der LampeneinsatzAufbewahrung einklemmen.
7.
Ziehen Sie die Befestigungsschrauben
des Lampeneinsatzes wieder an.
8.
Schließ en Sie die Tü r der
Lampeneinsatz-Aufbewahrung.
9.
Ziehen Sie die Schraube an der Tür der
Lampeneinsatz-Aufbewahrung wieder
an.
10.
Führen Sie die Einstellungen nach dem Austauschen des Lampeneinsatzes durch.
Auch nach dem Ersetzen des Lampeneinsatzes können Sie Bilder projizieren. Trotzdem sind die
folgenden Einstellungen notwendig, um auch nach dem Ersetzen des Lampeneinsatzes eine
Bildqualität genießen zu können, die dem Zustand vor dem Ersetzen entspricht. Lassen Sie bitte
Ihren Mitsubishi-Händler die folgenden Einstellungen durchführen. Versuchen Sie nicht, die
Einstellungen selbst durchzuführen.
• 6-Achsen-Einstellung
• CSC-Einstellung
• Rücksetzen des Lampen-Zeitschalters
Schraube
LampeneinsatzBefestigungsschrauben
Page 41

DE-13
DEUTSCH
Wartung
Reinigung des Projektors
• Verwenden Sie ein fusselfreies Tuch zur Reinigung des Projektors. Um klebende Verschmutzungen zu
beseitigen, wischen Sie den Projektor mit einem mit mildem, verdünnten Reinigungsmittel befeuchteten
Tuch ab und wischen Sie den Projektor anschließend mit einem trockenen Tuch ab.
• Verwenden Sie keinerlei Benzin oder Lösungsmittel für die Reinigung des Projektors. Dies könnte eine
Beeinträchtigung des Projektors zur Folge Haben oder dazu führen, dass sich der Überzug ablöst.
Reinigung der Belüftungsschlitze
Wenn die Belüftungsschlitze durch Schmutz oder Staub verstopft werden, wird unter Umständen die
Luftzirkulation im Inneren des Projektors blockiert und die Innentemperatur könnte ansteigen und
Störungen verursachen. Reinigen Sie deshalb die Belüftungsschlitze jeweils nach 100 Betriebsstunden.
• Schalten Sie den Projektor aus und ziehen Sie den Netzstecker aus der Wandsteckdose.
• Saugen Sie den Schmutz oder Staub außen an den Schlitzen mit Hilfe eines Staubsaugers mit
Bürstenaufsatz ab. Verwenden Sie keinen Staubsauger ohne Bürstendüse oder mit einem
herkömmlichen Düsenaufsatz, um die Schlitze zu reinigen.
Reinigung des Inneren des Projektors
Wenn Sie damit fortfahren, den Projektor trotz Schmutz oder Staub im Inneren zu betreiben, ohne ihn zu
reinigen, kann dies eine Brandgefahr verursachen oder Störungen zur Folge haben. Stellen Sie sicher, dass
Sie sich mit Ihrem Mitsubishi-Händler in Verbindung setzen, damit er eine Reinigung des Inneren des
Projektors durchführt. Versuchen Sie nicht, die Reinigung selbst durchzuführen.
• Stellen Sie sicher, dass Sie den Netzstecker aus der Wandsteckdose ziehen, bevor Sie eine Wartung
des Produktes durchführen.
• Schützen Sie sowohl den Körper als auch den Bildschirm des Projektors vor flüchtigen Stoffen wie
beispielsweise Insektensprays. Vermeiden Sie, dass irgendwelche Gummi- oder Plastikmaterialien
mit dem Projektor oder dem Bildschirm über einen längeren Zeitraum in Berührung kommen. Dies
könnte eine Beeinträchtigung des Projektors zur Folge haben oder dazu führen, dass sich der
Überzug ablöst.
Page 42

DE-14
Auf dem Bildschirm erscheint
kein Bild.
•Stellen Sie sicher, dass das Netzkabel ordnungsgemäß angeschlossen ist.
•Stellen Sie sicher, dass die korrekten Eingangssignale von den
Anschlüssen der externen Geräte ausgewählt werden.
•Stellen Sie sicher, dass die externen Geräte ordnungsgemäß
angeschlossen sind.
•Stellen Sie sicher, dass die externen Geräte eingeschaltet sind.
•Stellen Sie sicher, dass ein angemessenes Signal vom externen Gerät zum
Projektor eingegeben wird.
AbhilfeProblem
Der Farbton des Bildes ist nicht
korrekt.
•Überprüfen Sie die Signalverbindung zwischen dem externen Gerät und
dem Projektor.
Die Status-LED leuchtet.
•Bei einem Defekt des Projektors zeigt die
Status-LED auf der Tafel eine Zahl von 0 bis
7 in roter Farbe und der Projektor schaltet
sich automatisch aus. Bitte nehmen Sie in
einem solchen Fall sofort Kontakt zu Ihrem
MITSUBISHI-Händler auf.
Bitte überprüfen Sie die folgenden Punkte, bevor Sie den Kundendienst Ihres Händlers in
Anspruch nehmen. Fehler bei den Signalen weisen auf Probleme im Projektor hin.
Fehlersuche
Das Gehäuse gibt knirschende
Geräusche von sich.
•Es verursacht Geräusche wenn sich das Gehäuse aufgrund von
Veränderungen in der Umgebungstemperatur ausdehnt oder
zusammenzieht; dies hat jedoch keinerlei Auswirkungen auf die Leistung des
Projektors.
STANDBY
STATUS
Page 43

FR-1
FRANÇAIS
DLPTM PROJECTEUR
MODELE
VS-50VL10U
Manuel d’utilisation
Ce manuel de l’utilisateur est essentiel pour l’usage de l’appareil.
Prière de le lire avant d’utiliser le projecteur DLP™.
Bien suivre les directives ci-dessous.
Ce projecteur requiert une installation spéciale pour éviter
qu’il ne se renverse.
Prière de recourir à des monteurs spécialistes pour
l’installation.
N’essayez jamais d’installer le projecteur vous-même.
Mise en
garde:
Page 44

FR-2
Page 45

FR-3
FRANÇAIS
DANGER D’ELECTROCUTION
NE PAS OUVRIR
AVERTISSEMENT
AVERTISSEMENT: POUR ELIMINER TOUT RISQUE
D’ELECTROCUTION NE PAS OUVRIR LE COUVERCLE(OU
LA PARTIE ARRIERE).
AUCUNE PIECE PEPARABLE PAR L’UTILISATEUR NE SE
TROUVE A L’INTERIEUR.
POUR TOUTE INTERVENTION D’ENTRETIEN OU DE REPA-
RATION SE CONFIER AUX TECHNICIENS QUALIFIES.
La flèche symbolisant le tonnerre à l’intérieur d’un triangle équilatéral a pour but de
prévenir l’utilisateur de la présence d’une “tension dangereuse” non isolée se trouvant à
l’intérieur du dispositif; elle est d’une magnitude suffisante pour constituer un risque
de décharge électrique.
Le point d’exclamation à l’intérieur d’un triangle équilatéral a pour but de prévenir
l’utilisateur de la présence d’importantes instructions concernant l’entretien et le un
fonctionnement indiquées dans les textes accompagnant le dispositif.
MISE EN GARDE:
AFIN DE REDUIRE LES RISQUES D’INCENDIE OU DE DECHARGE ELECTRIQUE, NE PAS EXPOSER
CET APPAREIL A LA PLUIE OU A L’HUMIDITE.
ATTENTION:
AFIN DE REDUIRE LES RISQUES DE DECHARGE ELECTRIQUE, NE PAS UTILISER LA FICHE
(POLARISEE) DE CET APPAREIL AVEC UN PROLONGATEUR, UNE PRISE OU UNE AUTRE PRISE DE
COURANT SAUF SI CES LAMES PEUVENT ETRE INSEREES A FOND.
REMARQUE:
ETANT DONNE QUE CE PROJECTEUR EST UN APPAREIL QUI DOIT ETRE BRANCHE, LA PRISE
MURALE DOIT ETRE INSTALLEE PRES DU PROJECTEUR ET DOIT ETRE FACILEMENT ACCESSIBLE.
Page 46

FR-4
Fonctions principales
•Luminosité importante
Le nouveau système optique utilisant la puce DMD de 0.7 pouces permet l’affichage d’images nettes à
haut niveau de visibilité et de luminosité importante à 440 cd/m2.
•Contrôle numérique d’espacement des couleurs (CSC) pour un couplage de couleurs optimal
entre écrans
Le CSC est utilisé afin de corriger le rendu de couleurs entre les projecteurs, ce qui représente souvent un
problème dans les configurations multi-écrans. Ce dispositif assure un bon couplage de couleurs entre
chaque écran et un excellent contrôle sur le rendu des couleurs.
•Haute fiabilité sans persistance d’image
La projection réalisée par le système DLPTM permet d’éviter l’effet de convergence sur l’écran. Par
conséquent, ce projecteur convient pour l’affichage d’images fixes et d’informations type texte pour une
longue durée.
•Carte d’entrée en option : VC-B10KA
La carte en option vous permet d’afficher des données, des images et de la vidéo sans effets nuisibles
jusqu’à une matrice de 5 x 5 d’écrans DLPTM XGA sans avoir la nécessité d’utiliser un processeur de
multivision et d’agrandissement externe.
La carte dispose d’un Commutateur Matriciel (3 x 2) et une puce de cadrage pouvant accepter trois types
d’entrée : RVB Analogique & Port Numérique (TMDS) et vidéo composée ou Y/C.
Marques déposées
Tous les noms de marques apparaissant dans ce mode d’emploi sont des marques déposées de leurs propriétaires
respectifs
• DLP
TM
(Digital Light Processing ) et DMD
TM
(Digital Micromirror Device) sont des marques de commerce ou des
marques déposées de Texas Instruments Incorporated aux Etats-Unis d’Amérique.
Page 47

FR-5
FRANÇAIS
Table des matières
Fonctions principales ............................................................................. 4
Consignes de sécurité importantes ....................................................... 6
Schéma Synoptique ................................................................................ 8
Caractéristiques techniques/Eléments vendus séparément ................ 9
Diagramme schématique ....................................................................... 10
Méthode de remplacement de la cartouche de lampe .......................... 11
Entretien................................................................................................. 13
Dépannage .............................................................................................. 14
Page 48

FR-6
Consignes de sécurité importantes
Lire toutes ces instructions concernant votre projecteur
DLPTM et conserver ce manuel en lieu sur afin de
pouvoir le consulter ulterieurement. Respecter toutes
les mises en garde et instructions marquees sur le
projecteur DLPTM.
1. Lire les instructions
Toutes les instructions de sécurité et d’utilisation
doivent être lues avant l’utilisation de l’appareil.
2. Conserver le manuel
Les instructions de sécurité et d’utilisation
doivent être conservées afin de pouvoir les consulter ultérieurement.
3. Respecter les mises en garde
Toutes les mises en garde sur l’appareil et dans
le mode d’emploi doivent être respectées.
4. Suivre les instructions
Toutes les instructions sur le fonctionnement et
l’utilisation doivent être suivies.
5. Nettoyage
Débrancher ce projecteur de la prise murale
avant d’effectuer le nettoyage. Ne pas utiliser
un produit de nettoyage en aérosol. Utiliser un
chiffon humide pour le nettoyage
6. Fixations et équipements
Ne pas utiliser des fixations et/ou des
équipements non recommandés par le fabricant
du projecteur, car ils risquent de provoquer un
incendie ou une décharge électrique ou des
blessures corporelles.
7. Eau et humidité
Ne pas utiliser ce projecteur près d’une source
d’eau - par exemple, près d’une baignoire, d’un
lavabo, d’un évier de cuisine ou d’un bac de lavage, ou près d’une piscine.
8. Accessoires
Ne pas placer ce projecteur sur un chariot, un
support, un trépied, une console ou une table
instable. Le projecteur risque de tomber et de
provoquer de graves blessures à un enfant ou
un adulte, et d’être endommagé sérieusement.
L’utiliser uniquement avec un chariot, support,
trépied, console ou une table recommandée par
le fabricant, ou vendue avec le projecteur. Tout
montage de l’appareil doit être effectué en
respectant les instructions données par le
fabricant, et en utilisant un accessoire de montage recommandé par le fabricant.
Un ensemble composé
de l’appareil et d’un
chariot doit être
d é placé avec
précaution. Des arrêts
rapides, une force excessive et des surfaces
inégales risquent de
provoquer le
renversement du
projecteur et du
chariot.
9. Ventilation
Les fentes et les ouvertures dans le coffret
servent à la ventilation et à assurer un
fonctionnement fiable du projecteur et le protéger
contre la surchauffe. Ne pas obstruer ces ouvertures
en plaçant le projecteur sur un lit, un fauteuil, un
tapis ou une étagère par exemple. S’assurer qu’une
ventilation correcte est assurée et que les instructions du fabricant ont été respectées.
10. Sources d’alimentation
Ce projecteur doit être utilisé uniquement à partir
du type de source d’alimentation indiqué sur
l’étiquette des caractéristiques. En cas de doute sur
le type d’alimentation à votre domicile, consulter le
revendeur de votre appareil ou la compagnie locale
d’électricité.
11. Protection du cordon d’alimentation
Les cordons d’alimentation doivent être acheminés
de sorte qu’ils ne soient pas piétinés ou coincés par
des objets placés sur ou contre ces cordons, en faisant
particulièrement attention aux cordons sur les fiches,
les prises de courant et le point d’où ils sortent de
l’appareil. Ne placez pas le cordon d’alimentation sous
un tapis.
12. Surcharge
Ne pas surcharger les prises murales et les cordons
de rallonge, car il y a risque d’incendie et de décharge
électrique.
13. Pénétration d’objets et de liquides
Ne jamais enfoncer d’objets de quelque nature qu’ils
soient dans les ouvertures de ce projecteur, car ils
risquent de toucher des points sous tension
dangereux ou des pièces court-circuitées qui
pourraient provoquer un incendie ou une décharge
électrique. Ne jamais renverser du liquide de quelque
nature qu’il soit sur ce projecteur.
14. Réparation
Ne pas essayer de réparer ce projecteur vous-même,
car l’ouverture ou la dépose des couvercles risque de
vous exposer à une tension dangereuse ou à d’autres
dangers. Ne confier les travaux d’entretien qu’à un
dépanneur qualifié.
15. Dommages nécessitant une réparation
Débrancher ce projecteur de la prise secteur et confier
la réparation à un dépanneur qualifié dans les cas
suivants:
(a) Lorsque le cordon ou la fiche d’alimentation est
endommagé.
(b) Si du liquide a été renversé, ou si des objets
sont tombés dans le projecteur.
(c) Si le projecteur ne fonctionne pas normalement
tout en respectant le mode d’emploi.
N’ajuster que les commandes qui sont décrites
dans le mode d’emploi, car un réglage inadéquat
d’autres commandes risque de provoquer des
dommages et nécessitera d’autres travaux
supplémentaires à effectuer par un technicien
qualifié pour remettre le projecteur en état de
fonctionnement normal.
(d) Si le projecteur a été exposé à la pluie ou à l’eau.
(e) Si le projecteur est tombé ou si le coffret a été
endommagé.
(f) Lorsque la performance du projecteur a changé
— cela signifie qu’ une ré paration est
nécessaire.
16. Pièces de remplacement Lorsque des pièces de
remplacement sont nécessaires, veiller à ce que le
dépanneur ait utilisé des pièces de remplacement
Page 49

FR-7
FRANÇAIS
WARNING:
Débranchez l’appareil immédiatement s’il
se produisait quelque chose d’anormal.
N’utilisez pas l’appareil s’il fume, si des bruits ou des
odeurs étranges proviennent du projecteur. Ce
pourrait causer un incendie ou un choc électrique.
Dans ce cas, débranchez immédiatement et
contactez votre revendeur.
Ne démontez jamais le coffret.
Ce projecteur contient des circuits haute tension. Un
contact accidentel peut provoquer un choc électrique.
En dehors de ce qui est expliqué dans le mode
d’emploi, n’essayez pas de réparer ce produit vousmême. Veuillez contacter votre revendeur quand
vous souhaitez réparer, ajuster ou inspecter le
projecteur.
Ne transformez pas cet appareil.
Cela peut causer un incendie ou un choc électrique.
Utiliser le cordon d’alimentation spécifié
fourni.
L’utilisation d’un autre cordon est susceptible de
provoquer des interférences avec la réception radio
ou télévision.
Cet appareil doit etre mis a la terre.
CONFORMITE A LA NOTICE FCC
Ce matériel a été testé et s’est avéré conforme aux limites pour les appareils numériques de Classe A, conformément
à la partie 15 du règlement FCC. Ces limites sont conçues pour fournir une protection raisonnable contre les
interférences nuisibles lorsque le matériel est utilisé dans un environnement commercial. Cet équipement génère,
utilise, et peut émettre de l’énergie de fréquence radio et, s’il n’est pas installé et utilisé conformément au manuel
d’instruction, il peut causer des interférences nuisibles aux communications radio. L’utilisation de ce matériel
dans une zone résidentielle risque de provoquer des interférences nuisibles, dans quel cas l’utilisateur devra
remédier aux interférences à ses frais.
Cet appareil numérique ne dépasse pas les limites de Classe A pour les émissions de bruits radio des appareils
numériques comme établi dans la norme des appareils créant des interférences intitulée “Appareils numériques”,
ICES-003 du Département des Communications.
Les changements ou modifications apportés à cet appareil et non expressément approuvés par Mitsubishi annulent
la garantie et violent l’accord FCC.
NOTICE DE CONFORMITE AU CANADA
Cet appareil numérique de la classe A est comforme à la norme NMB-003 du Canada.
Ne regardez pas dans I’objectif.
Cela peut conduire à une panne, un incendie, une
décharge électrique ou d’autres problèmes encore. Il est
préferable d’attendre I’arrêt complet du ventilateur
avant d’éteindre I’alimentation principale.
Placer le projecteur à une distance de plus
de 5 cm du mur afin de ne pas bloquer les
fentes d’admission et de sortie d’air et la
ventilation de ce projecteur, parce que l’air
chaud sort de ces fentes.
Ne pas utiliser le projecteur dans les situations suivantes, car cela pourrait provoquer
un incendie ou une décharge électrique.
•endroits poussiéreux ou humides
•position couchée sur le côté ou à l’envers
•près d’un radiateur
•dans une cuisine ou un endroit gras, chargé de fumées
ou humide
•aux rayons directs du soleil
•où il fait très chaud, comme dans une voiture fermée
par exemple
•endroits où la température est inférieure à 5˚C (41˚F)
ou supérieure à 40˚C (104˚F)
•Lorsque la lampe doit être remplacée, appuyer sur la
touche d’alimentation pour mettre le projecteur hors
circuit et attendre 30 secondes en mode d’attente pour
refroidir la lampe et les panneaux DLPTM et couper
l’interrupteur principal, puis débrancher la prise et
attendre 60 minutes afin de refroidir la lampe.
ATTENTION:
Remplacement de la pile de la
télécommande en option R-FD10TX
•L’emploi non conforme peut causer des incendies,
provoquer des blessures ou salir le local d’installation
à cause de fuites, génération de chaleur ou explosions.
•Remplacez les piles usées par de nouvelles piles.
Utilisez quatre piles AA (R6P).
Déclaration de conformité aux directives CE
Ce projecteur est conforme aux exigences des normes 89/336/EEC, 73/23/EEC, et 93/68/EEC. Les exigences de
susceptibilité électromagnétique ont été choisies à un niveau qui rend possible un fonctionnement sans création
d’interférences nuisibles en zones de peuplement dense, dans les zones de bureaux et d’industrie légère, et ce, pour
des conditions de fonctionnement en intérieur et en extérieurs. Ceci est valable pour des zones de fonctionnement
étant sous une tension générale publique basse.
Ceci est un équipement de classe A. Cet appareil peut causer des interférences dans des zones résidentielles ; dans ce
cas, l’utilisateur peut être forcé à fournir et à payer des solutions de réparation.
spécifiées par le fabricant ou qu’elles aient les
mêmes caractéristiques que la pièce d’origine.
Des pièces de remplacement non agréées,
risquent de provoquer un incendie, une décharge
électrique ou d’autres dangers.
17. Contrôle de sécurité Après chaque entretien ou
ré paration de ce projecteur, demander au
dépanneur d’effectuer des contrôles de sécurité
afin de déterminer que le projecteur est dans des
conditions de fonctionnement sûr.
Page 50

FR-8
Schéma Synoptique
STANDBY
STATUS
IN
OUT
POWER
CONTROL
SW1
ON
1
2
3
4
5
6
7
8
1
2
3
4
5
6
7
8
OFF
SW2
R
G
B
HD
VD
1kΩ
75Ω
Sync
R
G
B
HD
VD
1kΩ
75Ω
Sync
SET UP
IN
COMP
Y/C
OUT
REMOTE
DIGITAL IN
ANALOG IN
DIGITAL IN
DIGITAL OUT
VIDEO IN
ANALOG IN
RS-232C
Commutateur de veille
Panneau de Bornes
Interface RS-232C
Entrée de contrôle du projecteur
Sortie de contrôle du projecteur
Interrupteur principal de courant
LED d’état
Boîtier
Unité d’affichage
Poignées
Compartiment de la
cartouche de Lampe
couvert
Entrée vidéo composée
Carte d’entrée VC-B10KA
(en option)
Entrée vidéo Y/C
Sortie numérique
Entrée numérique
Entrées analogiques RVB
Commutateur d’impédance finale
de synchronisation d’entrée analogique
Prise de courant
Entrée numérique SVGA
Entrée RVB analogique SVGA
Commutateur d’impédance finale de
synchronisation d’entrée analogique
Commutateurs de réglage
Entrée de la télécommande à fil
Sortie de la télécommande à fil
Page 51

FR-9
FRANÇAIS
Caractéristiques techniques / Eléments vendus séparément
Modèle VS-50VL10U
Système d’affichage Système DLP
TM
(0.7 pouces,1 puce DMDTM)
Résolution 800 x 600 pixels
Taille de l’écran 50 pouces (1016 x 762 mm)
Luminosité de l’écran 440 cd/m
2
(VALEUR TYPIQUE)
Rapport de contraste 300 : 1 (VALEUR TYPIQUE)
Angle de vision Horizontalement : 118˚, Verticalement : 50˚
Fréq. de balayage en entrée Horizontale : 31 à 40 kHz, Verticale : 49 à 61 Hz, Fréquence montre pixel : 33 à 43 MHz
Borne BNC x 5 (RGBHV)
Vidéo : 0.7 Vp-p /75Ω, Sync : niveau TTL(positif / négatif)
[en synchronization sur vert] vidéo : 0.7 Vp-p positif, Sync : 0.3 Vp-p négatif
(en cas de terminaison par 75 Ω)
Borne MDR 20 broches
Signal TMDS (matrice de broches : selon DFP)
Signal de contrôle
RS-232C : D-Sub 9 broches
RS-422 : D-Sub 9 broches x 2 (entrée et sortie)
Source de lumière Lampe au mercure sous très haute pression (durée de vie moyenne de 4000 heures)
Consommation en puissance
200 W
Alimentation AC 100V à 240 V 50 / 60 Hz 3A
Largeur 1016 mm
Hauteur 1032 mm
Profondeur
650 mm
10 °C à 35 °C 20 % à 80 %
Poids 55 kg
Accessoires
Manuel d’utilisation, 2 cordons d’alimentation (Amérique du nord, Europe), pièces pour la
connexion des cubes (8 pièces de chaque élément : vis à tête hexagonale, plaquettes
d’écrous,rondelles plates, et rondelles à ressort), câble de contrôle de connexion des cubes.
VS-50VL10U
Résolution : VGA-SXGA, Horizontale : 31.5 à 80kHz
Verticale : 49 à 85 Hz, Fréquence montre pixel : 25 à110 MHz
Borne BNC x 5 (RGBHV)
Signal
Vidéo : 0.7 Vp-p /75Ω, Sync : niveau TTL(positif / négatif)
[en synchronisation sur vert] vidéo : 0.7 Vp-p positif, Sync : 0.3 Vp-p négatif
(en cas de terminaison par 75 Ω)
Borne MDR 20 broches
Signal TMDS (matrice de broches : selon DFP)
Borne Composé : BNC x 1, Y/C : Borne S-vidéo x 1
Signal 1.0 Vp-p/ 75 Ω, Y : 1.0 Vp-p/ 75 Ω, C : 0.286 Vp-p/ 75 Ω
Fonction
Echelle: rétrécissement et zoom
Conversion du taux de vitesse des plans
Carte d’entrée : VC-B10KA
Unité de télécommande pour utilisation avec et sans fil : R-FD10TX
Lampe au mercure sous ultra-haute pression de rechange : S-VD10LA
En option
Dimensions
externes
Entrée vidéo RVB
Analogique SVGA
Entrée vidéo RVB
Numérique SVGA
Entrée vidéo RVB
Analogique
Entrée vidéo RVB
Numérique
Température et humidité
de fonctionnement
Signal d’entrée RVB
Bildeingang
(NTSC/PAL)
Signal
Page 52

FR-10
Diagramme schématique
1016 525125
762270
1032
762 270
495155
650
Vue de dessus
Vue de face Vue de côté
Unité: mm
Page 53

FR-11
FRANÇAIS
Méthode de remplacement de la cartouche de lampe
Vous pouvez projeter des images après avoir remplacé la cartouche de lampe. Il est cependant
convenable d’effectuer les réglages suivants afin de disposer de la même qualité d’image offerte
avant le remplacement de la cartouche de lampe. Veuillez consulter votre revendeur Mitsubishi pour
les réglages suivants.
•
Réglage 6 Axes
•
Réglage CSC
•
Réinitialisation de la minuterie de la lampe
Remarque
• Mettez le projecteur hors tension et laissez-le durant 1 heure ou plus avant de remplacer la
cartouche de lampe.
• Ne touchez jamais la lampe lorsque la lampe est allumée ou juste après qu’elle ait été éteinte car
la température de la lampe est très élevée.
• Ne touchez jamais la pièce en métal du connecteur de lampe lorsque la lampe est allumée car la
température de la pièce en métal est très élevée.
• Ne touchez jamais la pièce en métal du connecteur de lampe lorsque la lampe est allumée car cet
endroit est sous haute pression.
• Ne regardez jamais l’intérieur de la lampe lorsqu’elle est allumée.
• Ne touchez jamais directement avec vos doigts la partie en verre de l’ampoule. La graisse de vos
doigts pourrait endommager ou faire exploser la lampe.
• Remplacez la lampe en appuyant le moins possible sur la cartouche de lampe.
1.
Mettez l’interrupteur de courant
principal sur le panneau de bornes
2.
Dé serrez les vis de la porte du
compartiment de la cartouche de
lampe.
3.
Ouvrez la porte du compartiment de la
cartouche de lampe.
4.
Dé vissez les vis de fixation du
compartiment de la cartouche de
lampe.
Compartiment de la
cartouche de Lampe
Vis
Vis de fixation du
compartiment de
la cartouche de
lampe
Page 54

FR-12
5.
Tirez doucement la cartouche de
lampe par la poignée
•Veuillez vous assurer de bien attraper la
poignée avec une main tout en maintenant la
cartouche avec l’autre main pour la retirer
sans dommages.
•Ne touchez pas la partie en verre de la lampe.
Ceci pourrait vous causer des blessures.
6.
Introduisez une nouvelle cartouche de
lampe dans le compartiment de la
cartouche de lampe jusqu’au fond.
•Ne touchez jamais directement avec vos doigts
la partie en verre de l’ampoule. La graisse de
vos doigts pourrait endommager ou faire
exploser la lampe.
•Veuillez vous assurer de bien attraper la
poignée avec une main tout en maintenant la
cartouche avec l’autre main pour la placer
sans dommages. Faites attention à ne pas
pincer vos doigts dans le compartiment de la
cartouche de lampe.
7.
Resserez les vis de fixation de la
cartouche de lampe.
8.
Fermez la porte du compartiment de la
cartouche de lampe.
9.
Resserrez les vis de la porte du
compartiment de la cartouche de
lampe.
10.
Effectuez les réglages après le remplacement de la cartouche de lampe.
Vous pouvez projeter des images après avoir remplacé la cartouche de lampe. Il est cependant
convenable d’effectuer les réglages suivants afin de disposer de la même qualité d’image offerte avant
le remplacement de la cartouche de lampe. Veuillez consulter votre revendeur Mitsubishi pour les
réglages suivants. N’essayez pas d’effectuer les réglages suivants vous-même.
• Réglage 6 Axes
• Réglage CSC
• Réinitialisation de la minuterie de la lampe
Vis
Vis de fixation du
compartiment de
la cartouche de
lampe
Page 55

FR-13
FRANÇAIS
Entretien
Nettoyage du projecteur
• Utilisez un linge propre non pelucheux pour nettoyer le projecteur. Pour nettoyer les saletés tenaces,
humectez le linge dans un détergent doux et passez-le sur le projecteur , puis essuyez-le à l’aide d’un linge
sec.
• N’utilisez pas d’essence de pétrole pour nettoyer le projecteur. Ceci pourrait endommager le projecteur ou
abîmer le fini.
Nettoyage des ouvertures d’aération
Si les ouvertures d’aération sont bloquées par de la poussière ou de la saleté, la circulation de l’air à
l’intérieur du projecteur peut être bloquée, ce qui pourrait causer des risques dus à l’augmentation de la
température. Nettoyez les ouvertures d’aération toutes les 100 heures d’utilisation.
• Eteignez le projecteur et débranchez le cordon d’alimentation de la prise de courant.
• Passez à l’aspirateur l’extérieur des ouvertures à l’aide d’un aspirateur équipé d’un adaptateur à brosses.
N’utilisez pas d’aspirateur sans brosse et n’utilisez pas d’adaptateur seul pour nettoyer les ouvertures.
Nettoyage de l’intérieur du projecteur
Si vous continuez à utiliser le projecteur lorsque de la poussière ou de la saleté se trouve à l’intérieur, il peut
y avoir un risque d’incendie ou d’autres problèmes peuvent survenir. Veuillez contacter votre revendeur
Mitsubishi pour nettoyer l’intérieur du projecteur. N’essayez pas de nettoyer l’intérieur vous-même.
• Veuillez vous assurer de bien débrancher le cordon d’alimentation de la prise de courant avant
d’effectuer des opérations de maintenance sur le produit.
• Maintenez tout produit volatil comme par exemple les insecticides hors d’atteinte de la carrosserie
ou de l’écran du projecteur. Ne laissez aucun objet en caoutchouc ou en plastique entrer en contact
avec le projecteur ou l’écran pendant longtemps. Ceci pourrait endommager le projecteur ou abîmer
le fini.
Page 56

FR-14
Aucune image n’apparaît à l’écran
•Vérifiez la connexion du cordon d’alimentation
•Vérifiez que les signaux d’entrée ont été choisis correctement pour les
bornes des dispositifs périphériques.
•Vérifiez que les dispositifs périphériques sont correctement connectés aux
bornes.
•Vérifiez que les dispositifs périphériques sont allumés.
•Vérifiez que le signal envoyé par l’appareil externe au projecteur est le bon
signal.
SolutionsProblèmes
La teinte des couleurs de
l’image est incorrecte
•Vérifiez la connexion du signal entre le dispositif périphérique et le
projecteur.
La LED d’état s’allume.
•Si le projecteur est en panne, la LED d’état
sur le panneau de l’unité montre un chiffre
compris entre 0 et 7 en rouge, et le
projecteur s’éteint automatiquement. Dans
ce cas, veuillez immédiatement contacter
votre revendeur Mitsubishi.
Veuillez vérifier les points suivants avant de contacter votre revendeur pour réparation.
Les erreurs concernant les signaux sont probablement dus à des problèmes de projecteur.
Dépannage
Le boîtier émet des bruits de
craquement
•Ceci est dû aux changements de la température ambiante, et n’affecte en
rien le fonctionnement du projecteur.
STANDBY
STATUS
Page 57

Manufactured by Mitsubishi Electric Corporation
1 Zusho Baba, Nagaokakyo-City, Kyoto Japan
871D310A90Printed in Japan
 Loading...