

Page 1
USER’S MANUAL
SRK20ZM-S
SRK25ZM-S
SRK35ZM-S
SRK50ZM-S
AIR-CONDITIONER
MANUEL DE L’UTILISATEUR
ANWENDERHANDBUCH
ISTRUZIONI PER L’USO
CONDIZIONATORE D’ARIA
MANUAL DEL PROPIETARIO
ACONDICIONADOR DE AIRE
GEBRUIKERSHANDLEIDING
MANUAL DO UTILIZADOR
APARELHO DE AR CONDICIONADO
ENGLISH
FRANÇAIS
CLIMATISEUR
DEUTSCH
KLIMAGERA¨T
ITALIANO
ESPAN˜OL
NEDERLANDS
AIRCONDITIONING
PORTUGUÊS
РУКОВОДСТВО ПО ЭКСПЛУАТАЦИИ
This air conditioner complies with EMC Directive 2004/108/EC,
LV Directive 2006/95/EC.
Ce climatiseur est conforme à la Directive EMC: 2004/108/EC, LV
Directive 2006/95/EC.
Dieses Kimagerät erfüllt die EMC Direktiven 2004/108/EC, LV
Direktiven 2006/95/EC.
Questo condizionatore d’aria è conforme alla Direttiva EMC: 2004/
108/EC, LV Direttiva 2006/95/EC.
ΟΔΗΓΙΕΣ ΧΡΗΣΗΣ
ΚΛΙΜΑΤΙΣΤΙΚΟ
КОНДИЦИОНЕР ВОЗДУХА
KULLANIM KILAVUZU
Este acondicionador de aire cumple con la directiva EMC: 2004/
108/EC, LV Directiva 2006/95/EC.
Deze airconditioner voldoet aan EMC Directive 2004/108/EC, LV
Directive 2006/95/EC.
Este aparelho de ar condicionado está em conformidade com a
Directiva EMC 2004/108/EC e a Directiva LV 2006/95/EC.
∞˘Щfi ЩФ ОПИМ·ЩИЫЩИОfi В›У·И Ы‡МКˆУФ МВ ЩИ˜ ЪФ‰И·БЪ·К¤˜ ЩЛ˜
√‰ЛБ›·˜ EMC 2004/108/EK Î·È Ù˘ √‰ËÁ›·˜ LV 2006/95/EK.
ΕΛΛΗΝΙΚΑ
РУССКИЙ
TÜRKÇE
RLA012A021B
Page 2

Page 3
Thank you for purchasing a MITSUBISHI HEAVY INDUSTRIES, LTD. Air-Conditioner. To
get the best long-lasting performance, please read and follow this User’s Manual carefully
before using your air-conditioner. After reading, please store the Manual in a safe place
and refer to it for operational questions or in the event of any irregularities.
This air-conditioner is intended for domestic use.
Do not vent R410A into the atmosphere: R410A is a fluorinated greenhouse gas,
covered by the Kyoto Protocol with a Global Warming Potential (GWP) = 1975.
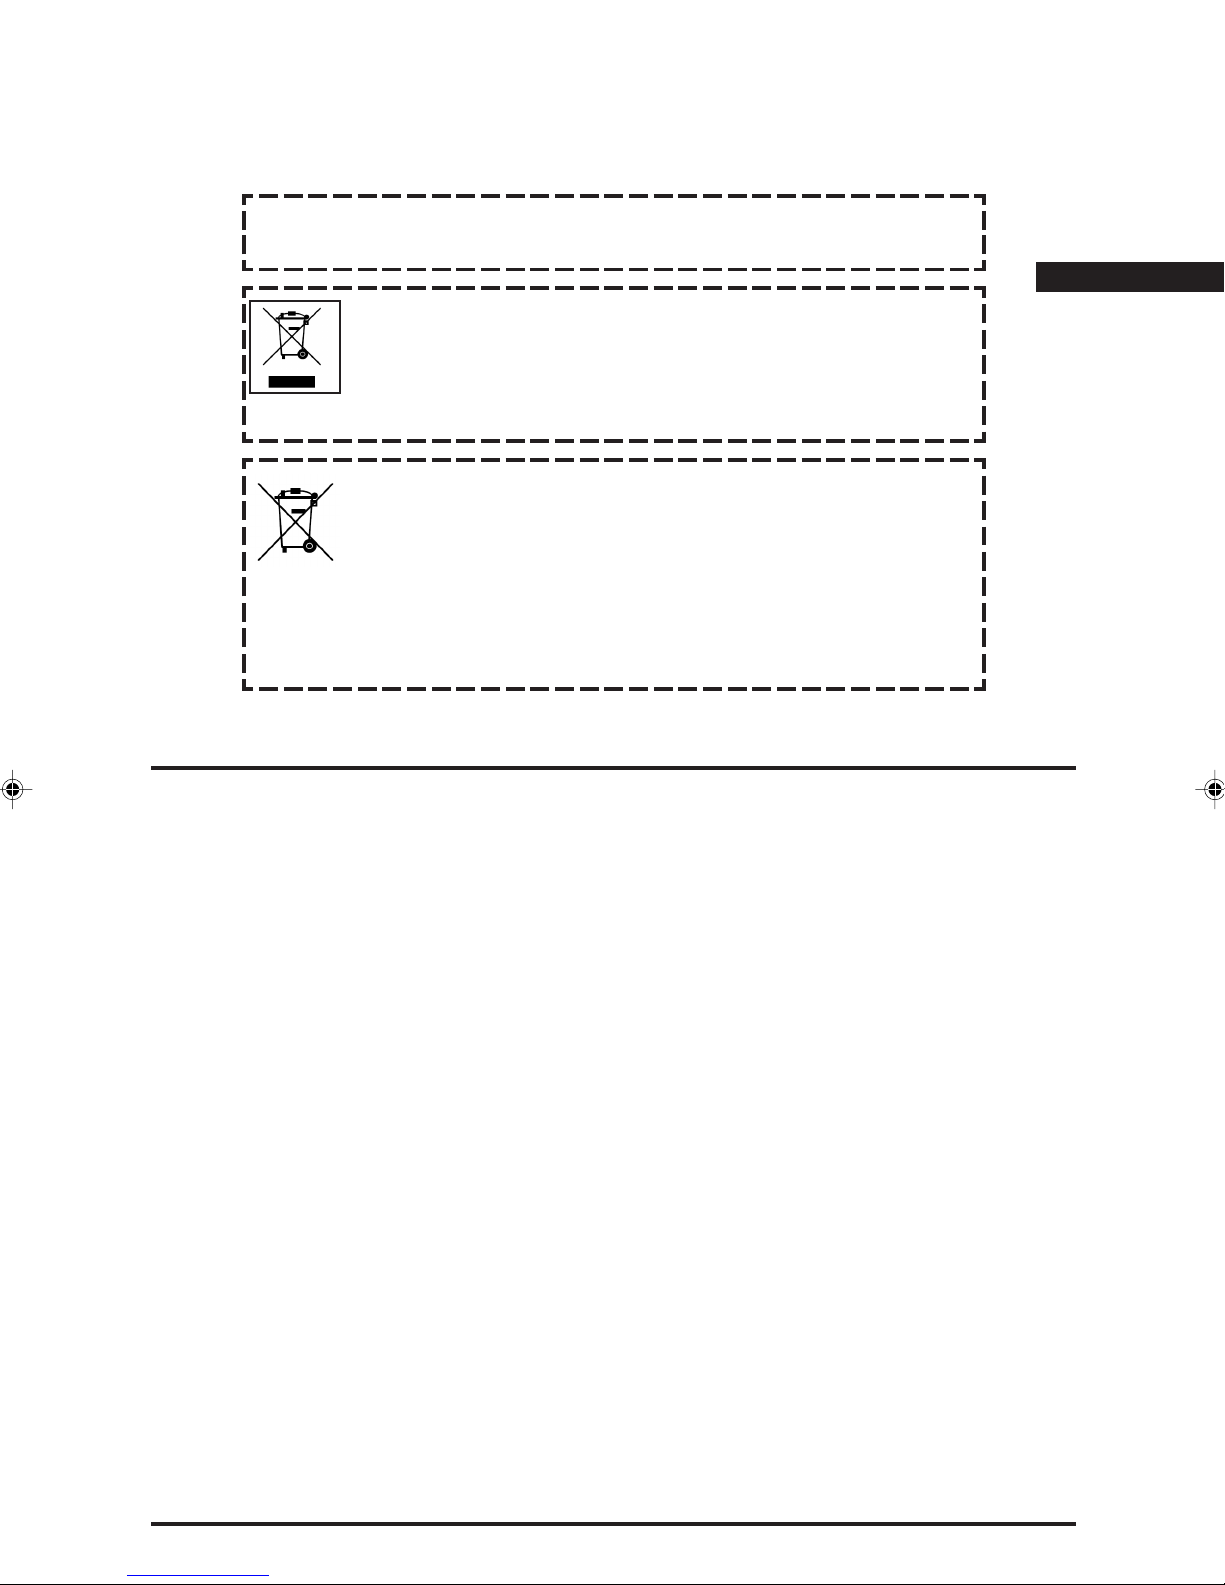
Your Air Conditioning product may be marked with this symbol. It means
that waste electrical and electronic equipment (WEEE as in directive 2002/
96/EC) should not be mixed with general household waste. Air conditioners
should be treated at an authorized treatment facility for re-use, recycling
and recovery and not be disposed of in the municipal waste stream. Please
contact the installer or local authority for more information.
This symbol printed in the batteries attached to your Air Conditioning
product is information for end-users according to the EU directive 2006/66/
EC article 20 annex II.
Batteries, at their end-of-life, should be disposed of separately from general
household waste. If a chemical symbol is printed beneath the symbol
shown above, this chemical symbol means that the batteries contain a
heavy metal at a certain concentration. This will be indicated as follows:
Hg:mercury(0.0005%) , Cd:cadmium(0.002%) , Pb:lead(0.004%)
Please, dispose of batteries correctly at your local community waste
collection or the recycling center.
ENGLISH
The emission sound pressure level from each Indoor and Outdoor unit is under 70 dB(A).
contents
Safety precautions ........................................ 2
Name of each part and its function ............... 4
Remote control handling ............................... 6
Operation failure with the remote control ...... 6
Temporary run operation .............................. 6
Installing two air conditioners in the same
room .............................................................. 7
Child Lock ..................................................... 7
Operation and display section for
remote control ............................................... 8
Current time setting....................................... 9
AUTO mode operation .................................. 9
Temperature adjustment during AUTO....... 10
FAN SPEED ................................................ 10
COOL/HEAT/DRY/FAN mode operation .... 11
Air-conditioner operable
temperature setting ..................................... 11
Characteristics of HEAT mode operation ... 11
Airflow direction adjustment ........................ 12
3D AUTO operation .................................... 12
SLEEP TIMER operation ............................ 13
OFF-TIMER operation ................................ 13
ON-TIMER operation .................................. 14
SLEEP TIMER + ON-TIMER operation ...... 14
ON-TIMER + OFF-TIMER operation .......... 15
ALLERGEN CLEAR operation .................... 15
WEEKLY TIMER operation ......................... 16
HIGH POWER/ECONOMY operation ......... 20
NIGHT SETBACK operation ....................... 21
SILENT operation ....................................... 21
SELF CLEAN operation .............................. 22
Auto restart function .................................... 22
Tips for effective operation ......................... 22
Installation location setting .......................... 23
Maintenance ............................................... 24
Proper installation ....................................... 26
Troubleshooting .......................................... 26
Notice .......................................................... 27
Contact your dealer..................................... 28
About the Multiple Air-conditioner ............... 28
Self diagnosis function ................................ 29
–1–
Page 4
Safety precautions
• Before starting to use the system, please read these “Safety precautions” carefully to ensure proper operation of the
system.
• When you have read this instruction manual, please keep it without missing. If someone else takes over as operator,
make certain that the manual is also passed on to the new operator.
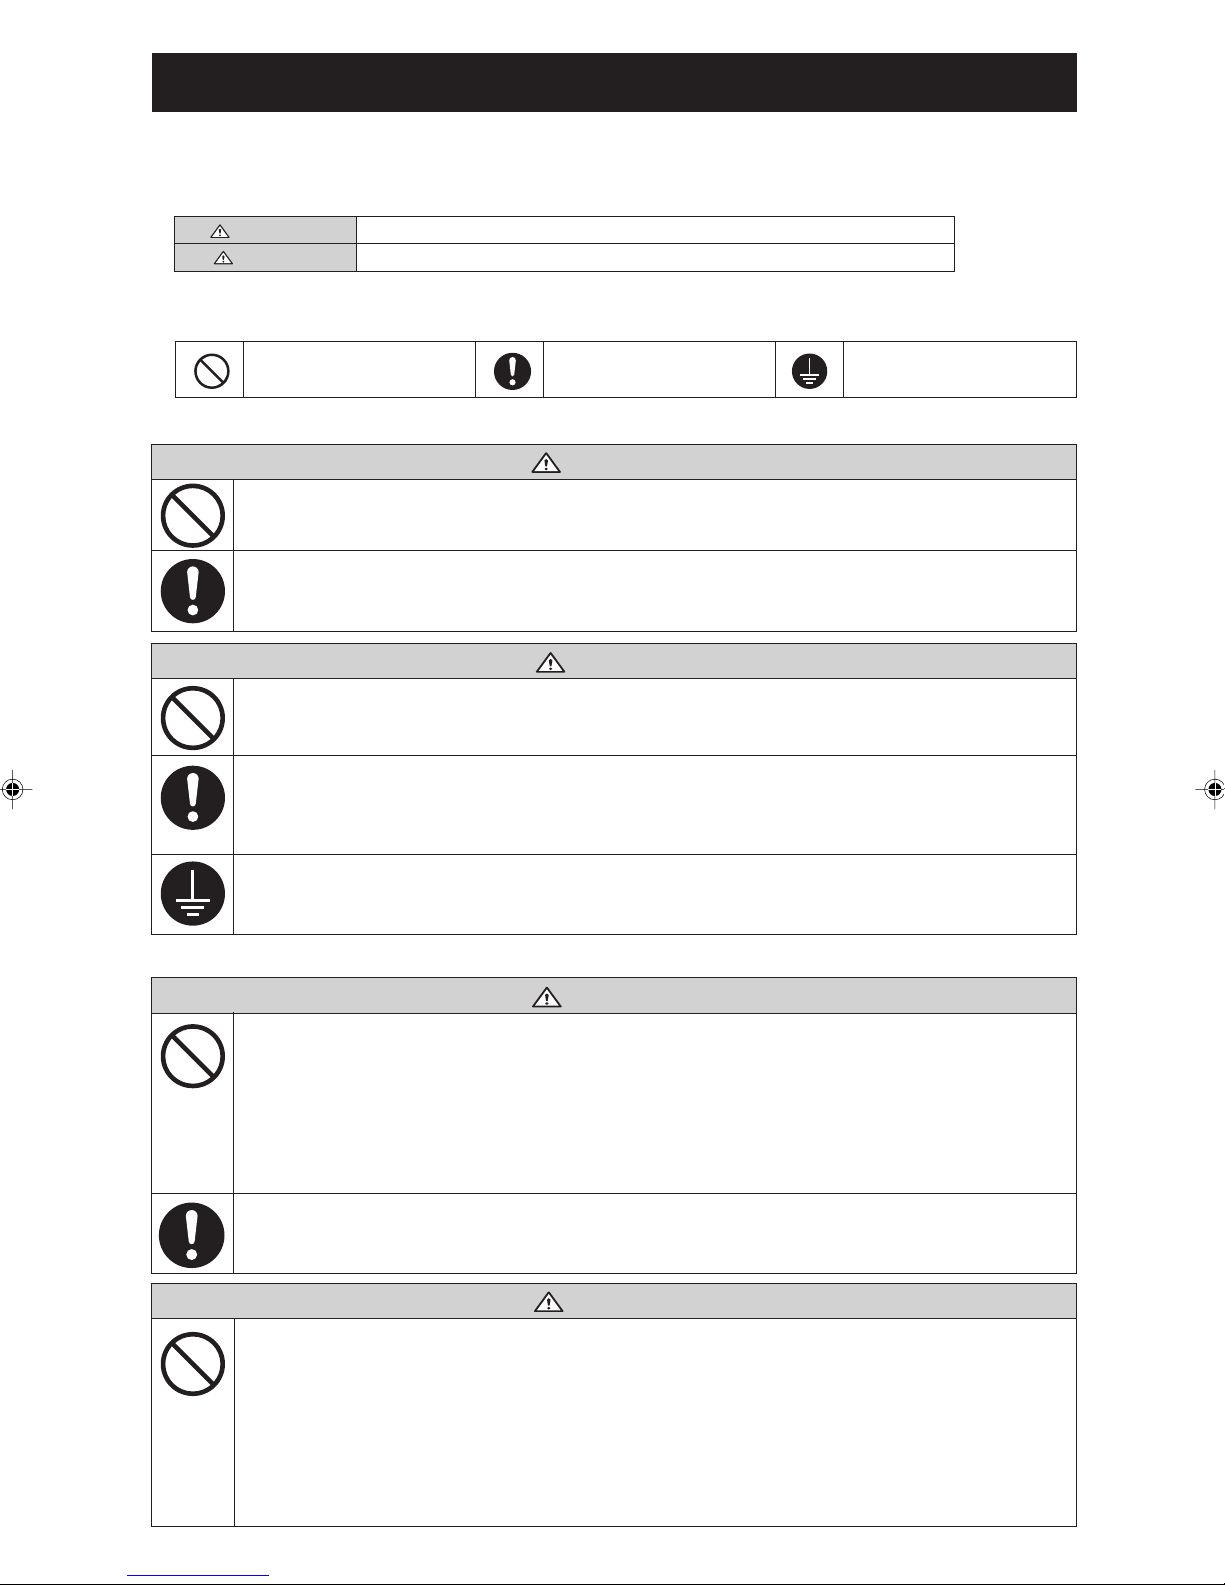
WARNING
CAUTION
Please observe these precautions with great care, since they are essential to your safety.
• Symbols which appear frequently in the text have the following meaning:
Strictly prohibited Provide proper earthing
Improper handling could lead to drastic result like death, serious injury, etc.
Might pose a serious problem, depending on the circumstances.
Observe instructions with
great care
❚ INSTALLATION PRECAUTIONS
WARNING
• The system is for domestic, residential etc. use.
If used in severer environments, such as an engineering workplace, the equipment may function poorly.
• The system must be installed by your dealer or a qualified professional.
It is not advisable to install the system by yourself, as faulty handling may cause leakage of water, electric
shock or fire.
CAUTION
• Do not install it where flammable gas may leak.
Gas leaks may cause fire.
• Depending on the place of installation, an
earth leakage breaker may be necessary.
If you do not install an earth leakage breaker,
you may get an electric shock.
• Make sure to install the drain hose properly
so that all the water is drained out.
Improper installation may lead to water drop in
the room resulting in wet furniture.
• Make sure that the system has been properly earthed.
Earth cables should never be connected to a gas pipe, water pipe, lightning conductor or telephone earth
cable. Incorrect installation of the earth cable may produce an electric shock.
❚ OPERATION PRECAUTIONS
• Do not expose yourself to the cooling air for a
long period.
This could affect your physical condition and
cause health problems.
• Do not insert anything into the air inlet.
This may cause injury, as the internal fan rotates
at high speed.
• Store the remote control out of reach of infants.
Failure to observe this may result in the batteries being swallowed or other accidents.
• Only use approved fuses.
Use of steel or copper wire instead of an approved
fuse is strictly prohibited, as it may cause a breakdown or fire.
• Do not handle the switches with wet hands.
This may cause an electric shock.
• Do not swing from the indoor unit.
If the indoor unit falls down,you may get injured.
WARNING
•
CAUTION
• Do not place a flammable insecticide or paint
• You should not expose any combustion
The appliance is not intended for use by persons
(including children) with reduced physical,sensory
or mental capabilities, or lack of experience and
knowledge, unless they have been given supervision or instruction concerning use of the appliance
by a person responsible for their safety.
Children should be supervised to ensure that they
do not play with the appliance.
spray near the blower, nor spray it directly on
the system.
This may result in a fire.
appliance directly to the air stream of the airconditioner.
The appliance may then work inadequately.
–2–
Page 5

❚ Safety precautions
• Do not wash the air-conditioner with water.
This could cause an electric shock.
• The system should only be used for its original
purpose and not for anything else like, for instance, preservation of food, plants or animals,
precision devices or works of art.
The system is only intended for use in ordinary
domestic rooms. Any other use of the system
may damage the quality of food, etc.
• Do not place anything containing water, like
vases, on top of the unit.
Water entering the unit could damage the
insulation and therefore cause an electric shock.
• Do not install the system where the airflow direction is aimed directly at plants or animals.
This will damage their health.
• Do not sit on the outdoor unit nor put anything
on it.
If the unit falls down or things drop off it, people
could get hurt.
• After a long period of use, check the unit's
support structure from time to time.
If you do not repair any damage right away, the
unit may fall down and cause personal injury.
CAUTION
• Do not touch the aluminum fins on the air heat
exchanger.
It may result in injury.
• Do not place household electrical appliances
or household items under neath the indoor or
outdoor units.
Condensation falling from the unit may stain
objects and cause accidents or electrical shock.
• Do not operate the system without the air
filter.
It can cause malfunction of the system due to
clogging of the heat exchanger.
• Do not shut off the power supply immediately
after stopping the operation.
Wait at least 5 minutes, otherwise there is a risk of
water leakage or breakdown.
• Do not control the system with main power
switch.
It can cause fire or water leakage. In addition,
the fan can start unexpectedly, which can cause
personal injury.
• If you operate the system together with a
combustion appliance, you must regularly
ventilate the indoor air.
Insufficient ventilation may cause accidents due
to oxygen deficiency.
• Stand firmly on a stepladder or other stable
object when removing the inlet panel and
filters.
Failure to observe this may result in injury
through insecure objects toppling over.
• When you clean the system, stop the unit
and turn off the power supply.
Never open the panel while the internal fan is
rotating.
❚ PRECAUTIONS FOR RELOCATION OR REPAIRS
• Do not perform any repairs or modifications by yourself. Consult the dealer if the unit requires
repair.
If you repair or modify the unit, it can cause water leaks, electric shocks or fire.
• Consult your dealer for repairs.
Wrong repairs could cause an electric shock,
fire, etc.
• In case the air-conditioner is relocated
elsewhere, contact your dealer or a professional fitter.
Faulty installation may cause water leakage,
electric shock, fire, etc.
•
If you notice anything abnormal (smell of
burning, etc.), stop the system, turn off the
power supply and consult your dealer.
Continued use of the system in abnormal
circumstances may result in malfunctioning,
electric shock, fire, etc.
• Do not place objects near the outdoor unit or
allow leaves to gather around the unit.
If there are objects or leaves around the outdoor
unit, small animals may enter unit and contact
electrical parts and may cause a break-down,
smoke or fire.
• Contact your dealer to clean inside the
indoor unit, do not attempt to do by yourself.
The use of a non-approved detergent or improper washing method may damage the unit’s
plastic components and cause leaks. Damage,
smoke, or fire may also happen if the detergent
comes in contact with electrical parts or the
unit’s motor.
• Stop the unit and turn off the power if you
hear thunder or there is a danger of lightning.
It may damage the unit.
WARNING
• If the air-conditioner fails to cool or warm the
room, it may have a refrigerant leakage.
Contact your dealer.
If refrigerant needs to be added, check with
your dealer for proper instructions.
If the refrigerant comes in contact with the bare
skin, it may cause cold injury.
If the refrigerant gas is inhaled excessively, it may
cause deterioration of nerve function like dizziness and headache, or deterioration of heart function like irregular heartbeat and heart palpitation
temporarily. If refrigerant unexpectedly leaks
from the unit onto a fan heater, stove, hotplate or
other heat source, harmful gases could be generated.
–3–
Page 6
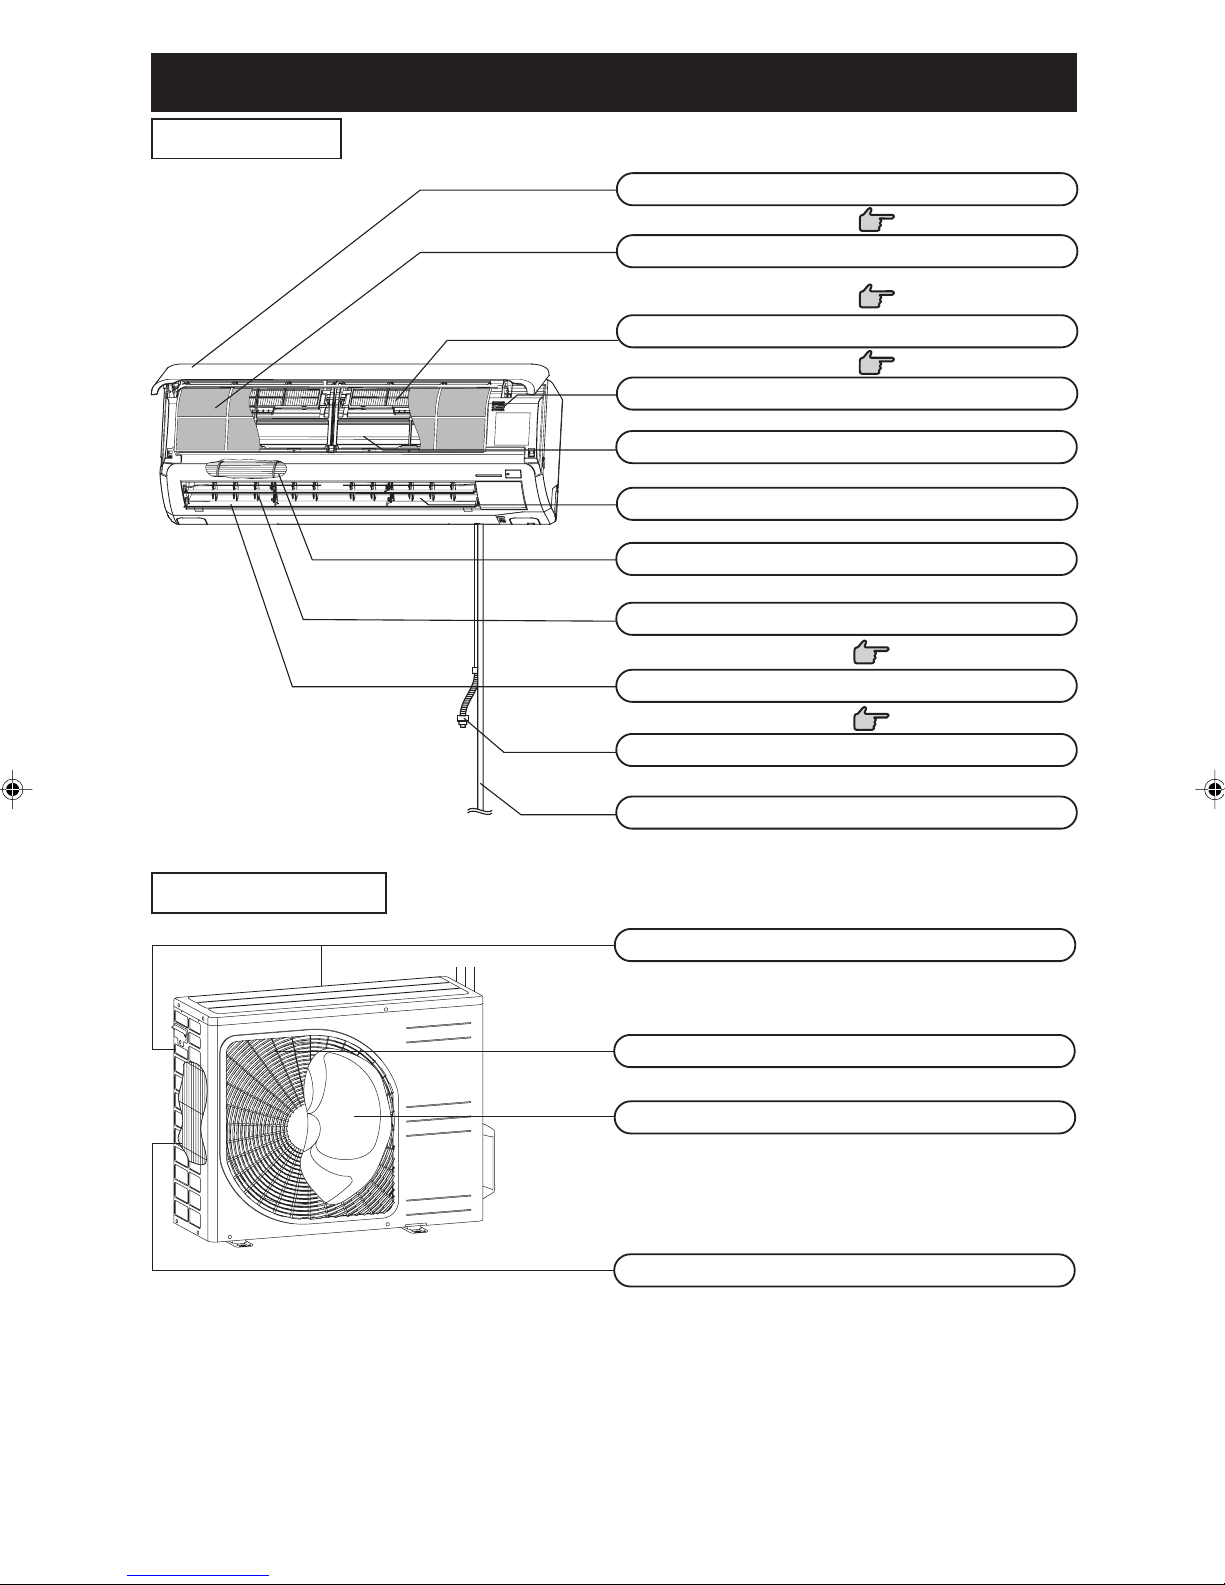
Name of each part and its function
INDOOR UNIT
Air Inlet panel
Draws the indoor air.
Air filter
Removes dust or dirt from the inlet air.
Air-cleaning filter
Room temperature sensor
Heat exchanger
Air outlet
Air blows out of here.
Indoor unit fan
Left/right airflow direction adjustment louver
Page 12
Page 24
Page 24
Page 25
OUTDOOR UNIT
Up/down airflow direction adjustment flap
Page 12
Drain hose
Drains water from the indoor unit.
Refrigerant piping connection and electric wire
Air inlet
(On side & rear surface)
Air outlet
Outdoor unit fan
Heat exchanger
–4–
Page 7
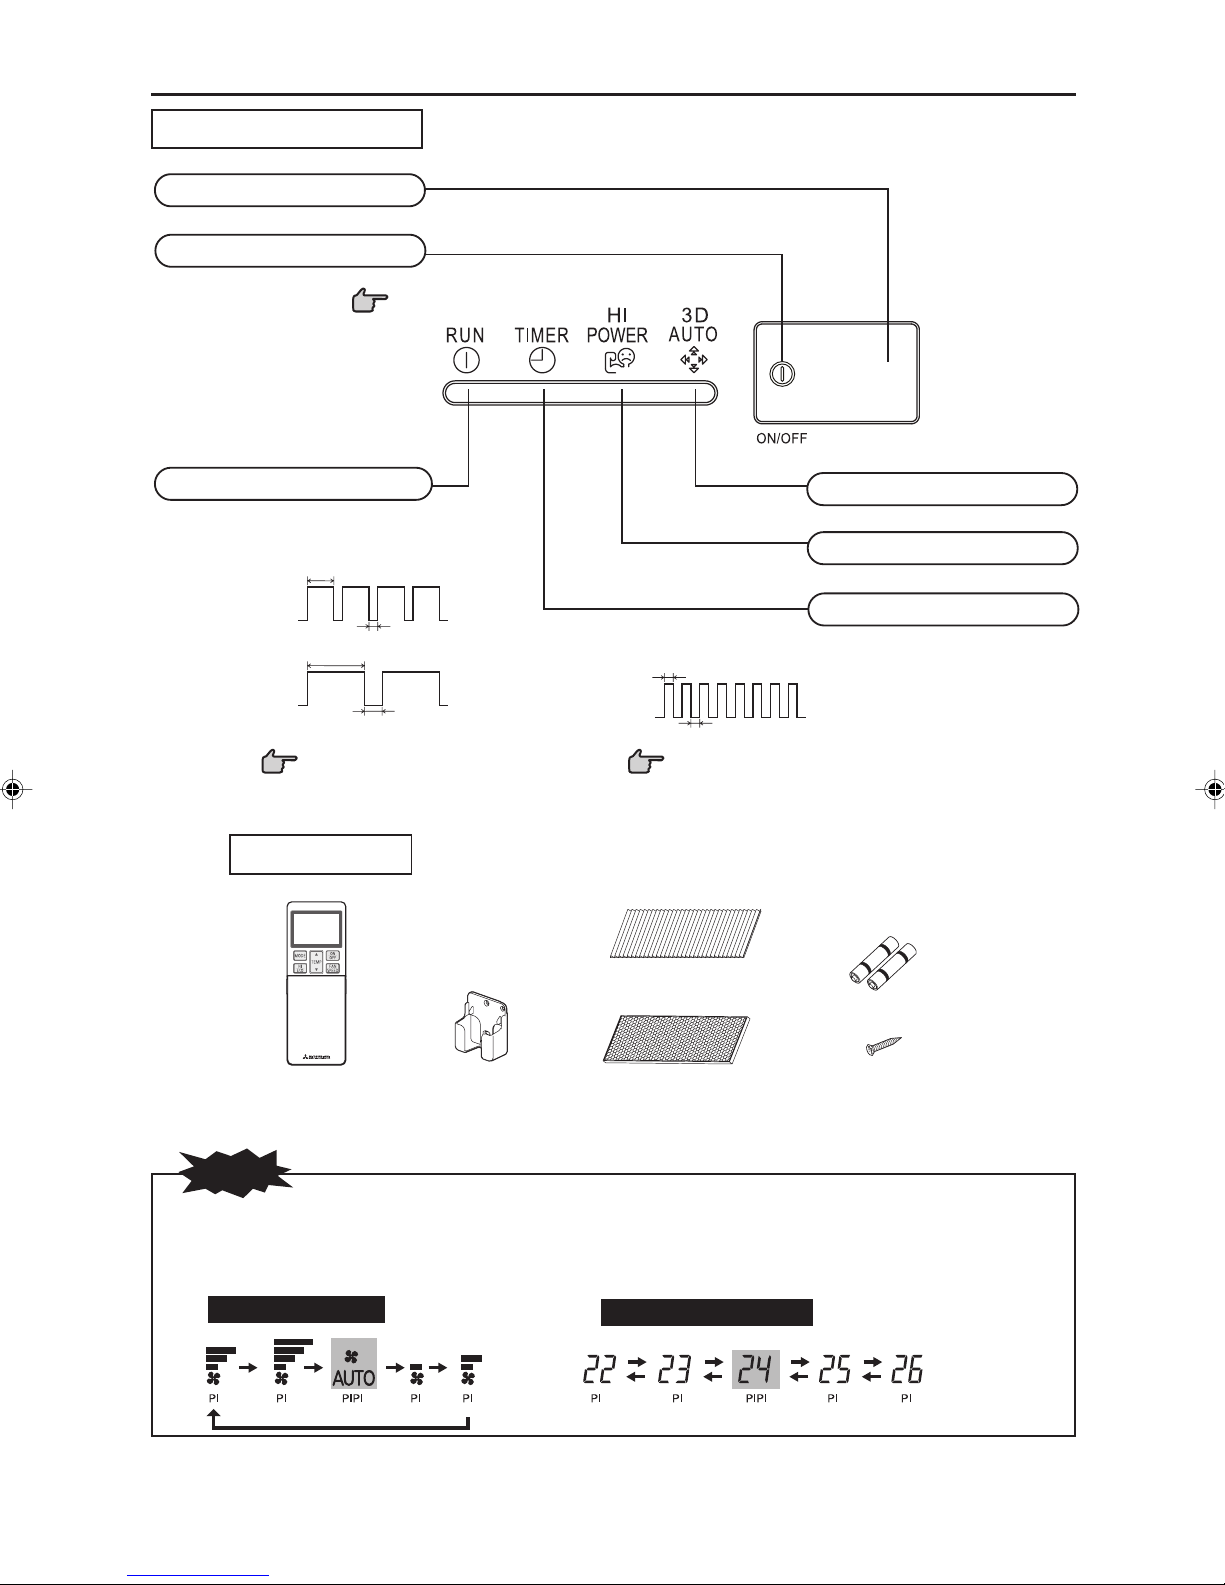
Name of each part and its function
Unit display section
Remote control signal receiver
Unit ON/OFF button
This button can be used for turning on/off the unit when
remote control is not available.
Page 6
RUN (HOT KEEP) light (green)
• Illuminates during operation.
Blinks when airflow stops due to the ‘HOT
•
KEEP’
, ‘CLEAN operation
mode invalid
HOT KEEP
CLEAN
operation
’.
ON
OFF
ON
OFF
1.5 sec.
3 sec.
Page 22
’and ‘
0.5 sec.
1 sec.
operation
Accessories
Operation mode
invalid
0.5 sec.
ON
OFF
0.5 sec.
Page 28
Allergen clear filter
(Light orange)
3D AUTO light (green)
Illuminates during 3D AUTO operation.
HI POWER light (green)
Illuminates during HIGH POWER operation.
TIMER light (yellow)
Illuminates during TIMER operation.
Battery
(R03 (AAA, Micro) ×2)
Wireless remote control
NOTE
• Buzzer sound for remote control
When preset temperature 24°C, automatic operation and automatic airflow are selected, the buzzer sound (PiPi) is produced.
When turning off the air conditioner by pressing ON/OFF button (except CLEAN mode), the buzzer sound (Pi) is produced.
This function is useful for operating the air conditioner in the darkness.
Air flow setting
Wireless remote
control holder
Photocatalytic washable
deodorizing filter (Orange)
Preset temperature
–5–
Wood screw (Quantity:2)
(for remote control holder mounting)
Page 8

Remote control handling
Replacing the batteries
The following cases signify exhausted batteries. Replace old batteries with new ones.
• Receiving beep is not emitted when a signal is transmitted.
• Display fades away.
NOTE
Pull out the cover and take
1
out old batteries.
Insert new batteries. R03
(AAA, Micro) x2
2
Pay attention to
the ª and ·
marks
• Do not use old and new batteries together.
• Remove the batteries when the remote control is not used for a long
period.
• The recommended effective period of a battery conforming to JIS or IEC
should be 6 to 12 months with normal use. If used longer, or when an
unspecified battery is used, liquid may leak from the battery, causing the
remote control to malfunction.
• The recommendable effective period is printed on the battery. This may be
shorter due to manufacturering time to the unit. However, the battery may
still be in working order after expiry of its nominal life.
■ When the display shows any abnormal condition, Press the ACL switch with
the tip of a ballpoint pen.
Using the remote control holder
Close the cover.
3
Press the ACL switch with
4
the tip of a ballpoint pen.
Page 9
The remote control can be attached to a wall or pillar
by using a remote control holder. Before installing the
remote control, check that the air-conditioner receives
the signals properly.
For installing or removing the remote control, move it
up or down in the holder.
Warning note for remote control handling
Strictly prohibited
• Do not go near high temperature
places, such as an electric carpet
or stove.
• Do not put any obstructing obstacles between the remote control
and the unit.
• Do not leave the remote control exposed to direct sunlight or other
strong lighting.
• Do not spill any liquid on the
remote control.
• Do not drop the remote control.
Handle with care.
• Do not place heavy objects on the
remote control, or step on it.
Operation failure with the remote control
• Are the batteries running down?
“Replacing the batteries” above.
Replace the batteries with new ones and retry
the operation.
• If the operation fails, operate the unit
with temporary operation function.
Contact your dealer to have the remote control checked.
Below
Temporary run operation
• The unit ON/OFF button on the unit operates ON/OFF temporarily when the remote control is not used.
Operation program
• OPERATION MODE : AUTO
• FAN SPEED : AUTO
• AIR FLOW : AUTO
• Operation starts by pressing the unit ON/OFF button; it stops if you press
the button again.
NOTE
• Do not hold the Unit ON/OFF button down for more than 5 seconds.
(Holding it down longer than 5 seconds sets the automatic cooling used during servicing or when relocating the air-conditioner.)
Unit ON/OFF button
–6–
Page 9

Installing two air conditioners in the same room
■ When two air conditioners are installed in the same room, use this setting when the two air conditioners are not operated with one
remote control. Set the remote control and indoor unit.
Setting the remote control
Pull out the cover and take out batter-
1
ies.
Disconnect the switching line next to
the battery with wire cutters.
2
Disconnect
Insert batteries.
3
Close the cover.
Setting an indoor unit
Turn off the power supply, and turn it on after 1 minute.
1
Point the remote control that was set according to the
procedure described on the left side at the indoor unit
2
and send a signal by pressing the ACL switch on the
remote control.
Since the signal is sent in
about 6 seconds after the
ACL switch is pressed,
point the remote control
at the indoor unit for
some time.
Check that the reception buzzer sound "pip" is emitted
3
from the indoor unit.
At completion of the setting, the indoor unit emits a buzzer sound
"pip". (If no reception tone is emitted, start the setting from the beginning again.)
Reception
pip
Child Lock
■ This function locks the remote control operation to prevent an operation error.
Point the remote control toward the air-conditioner, and
Press the SET button for 3 seconds or longer.
1
is displayed. While Child Lock is set, only the ON/OFF button can be
operated.
Releasing procedure
Turn off the light by pressing the SET button for 3 seconds or longer.
NOTE
• While Child Lock is set, the settings of temperature, fan speed and airflow
direction cannot be changed. To change the settings, reset Child Lock.
• Child lock will not function during ALLERGEN CLEAR operation.
–7–
Page 10
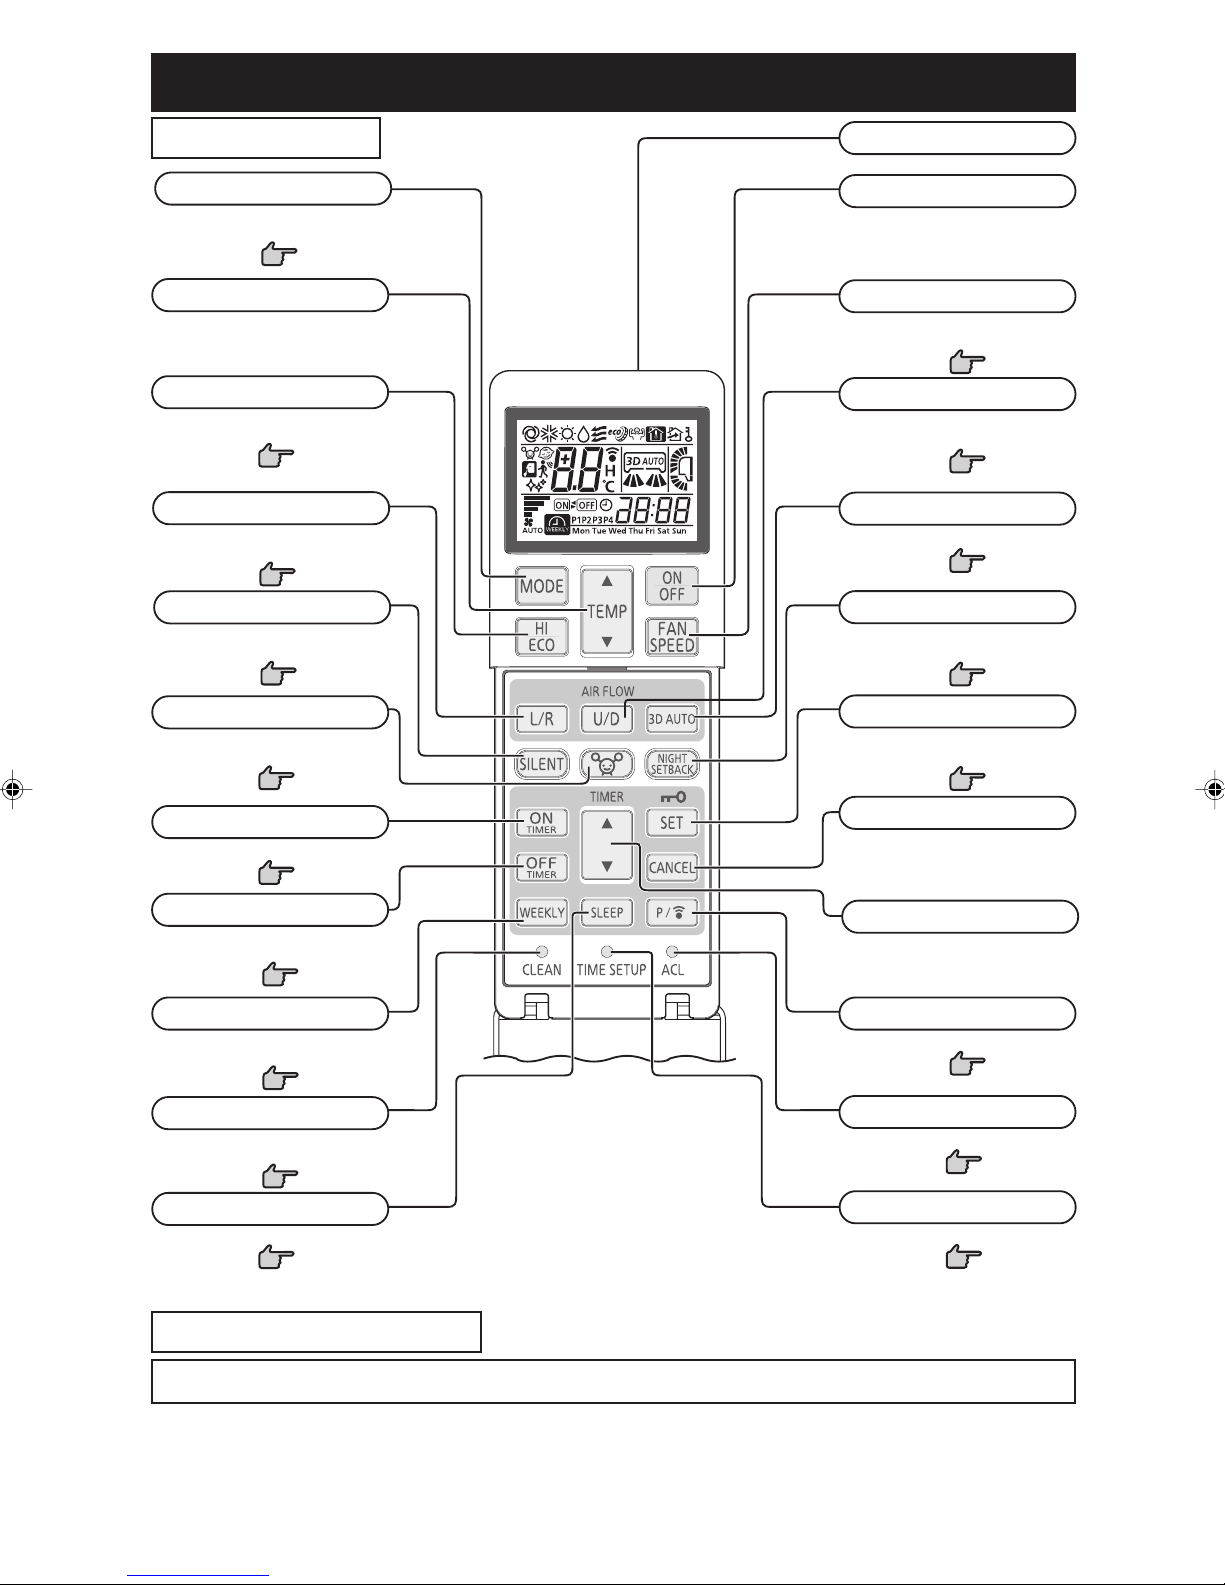
Operation and display section for remote control
Operation section
OPERATION MODE select button
Each time the button is pressed, the
mode changes.
Page 9,11
TEMPERATURE button
This button sets the room temperature.
HI/ECO button
This button changes the HIGH POWER/
ECONOMY operation.
Page 20
AIR FLOW (LEFT/RIGHT) button
This button changes the air flow (left/
right) direction.
Page 12
SILENT button
This buttion changes the SILENT
operation.
Page 21
ALLERGEN CLEAR button
This button selects ALLERGEN CLEAR
operation.
Page 15
Transmission section
ON/OFF (luminous) button
Press to start operation, press again to
stop.
FAN SPEED button
Each time the button is pressed, the fan
speed changes.
Page 10
AIR FLOW (UP/DOWN) button
This button changes the air flow (up/
down) direction.
Page 12
3D AUTO button
This button sets 3D AUTO operation.
Page 12
NIGHT SETBACK button
This button sets NIGHT SETBACK
operation.
Page 21
SET/Child Lock button
Use this button to set the timer and
Child Lock.
Page 7
ON TIMER button
This button selects ON TIMER operation.
Page 14
OFF TIMER button
This button selects OFF TIMER
operation.
Page 13
WEEKLY button
This button switches the WEEKLY
TIMER to ON/OFF.
Page 16
CLEAN switch
This switch selects the CLEAN
operation.
Page 22
SLEEP button
This button selects SLEEP operation.
Page 13
• The above illustration shows all controls, but in
practice only the relevant parts are shown.
CANCEL button
This button cancels the ON timer, OFF
timer, and SLEEP operation.
TIMER button
This buttions is used for setting the current time and timer function.
PROGRAM button
This button sets WEEKLY TIMER.
ACL switch
Switch for resetting microcomputer.
TIME SET UP switch
This switch is for setting the time.
Transmission procedure
When each button on the remote control is pressed – with the remote control pointing towards the air-conditioner unit, a signal is transmitted.
When the air-conditioner receives the signal correctly, it will beep.
Page 16
Page 6
Page 9
–8–
Page 11

Current time setting
■ When inserting the batteries, the current time is automatically set to time setting mode. Mon and 13:00 are displayed as the current
time. Set a correct day of the week and a time.
Example: Set to Sat 10:30.
Press the TIME SET UP switch.
1
2
3
4
5
Press with the tip of a ballpoint pen, etc.
The day of the week display blinks, enabling the setting of a day of the
week.
Press the “ or (TIMER)” button.
(Set to Sat)
Press the SET button.
The day of the week display changes from blinking to steady lighting,
completing the setting of a day of the week, and the time display blinks.
Make sure to press the button within 60 seconds from the last operation in
step 2, otherwise the day of the week is not set.
Press the “ or (TIMER)” button.
(Set to 10:30)
Press the SET button.
The time display changes from blinking to steady lighting and the setting
is complete.
Make sure to press the button within 60 seconds from the last operation in
step 4, otherwise the time is not set.
NOTE
• The timer operation works based on the time clock, so please
set it correctly.
• The remote control data is reset when the present time is set.
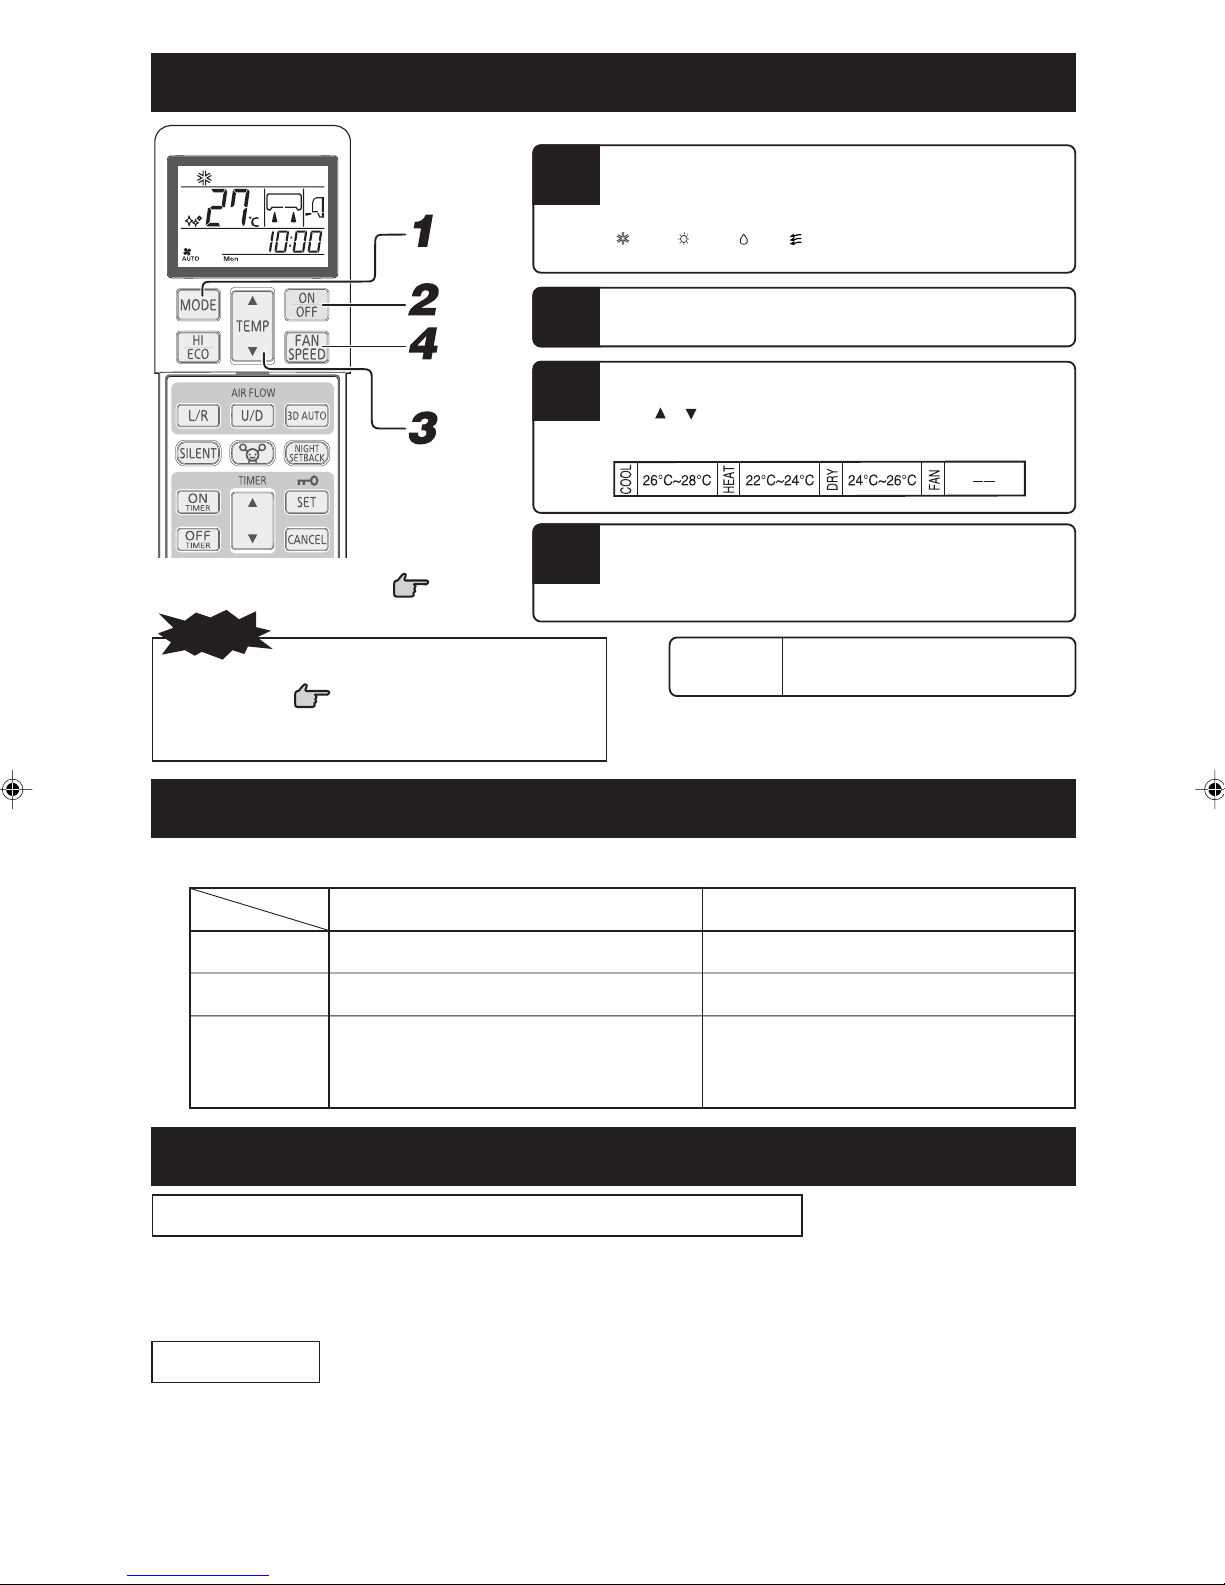
AUTO mode operation
■
Automatically selects the operation mode (COOL, HEAT, DRY) depending on the room temperature when switched on.
• In case air is not blowing out
• When the included clean filter is
Display in OFF status
• The current time, day of the week,
and present OPERATING MODE
are displayed while the air conditioner is turned off.
When the unit is not in AUTO mode:
1
Point the remote control toward the air-conditioner, and
2
NOTE
during the operation.
Page 27
installed the air conditioner will
clean the air during automatic
operation.
–9–
• When the battery of the remote control is replaced or the ACL
switch is pressed, the remote control is set to the initial state.
Since the WEEKLY TIMER program is not set in the initial
state, set the program according to the setting procedure.
Press MODE button.
The mode changes whenever the button is pressed.
Set to
.
Press the ON/OFF button.
To stop: Press the ON/OFF button.
AUTO mode can be
operated by simply
pressing the ON/
OFF button.
• If you do not want the AUTO mode program, change
to COOL, HEAT, DRY or FAN instead of AUTO.
Page 11
• Airflow direction adjustment procedure.
Page 12
Page 12

Temperature adjustment during AUTO
■ Air temperature adjustment is possible even during automatic operation. There are 6 levels of adjustment possible with the button or
button.During automatic operation, 24°C is preset both for heating and cooling.
the
When a change in temperature is required.
1
Press the“ or (TEMP)” button.
When it is a little cold
Press the
■ Each time the button is pressed, the switch over occurs in the following order
–6 → –5 → ............ –1 → ±0 → +1 ............ +6.
When +6 is indicated, even if the button is pressed, the indicator does not
change.
When it is a little hot
Press the
■ Each time the button is pressed, the switch over occurs in the following order
+6 → +5 → ............ +1 → ±0 → –1 ............ –6.
When –6 is indicated, even if the button is pressed, the indicator does not change.
Setting
temp.(°
FAN SPEED
■ You can choose the capacity of your air-conditioner when heating mode, cooling mode or fan mode.
button.
button.
-6 -5 -4 -3 -2 -1+0+1 +2+3 +4+5+6
C
)
18 19 20 21 22 23 24 25 26 27 28 29 30
Point the remote control toward the air-conditioner, and
Remote Control display
1
Press the FAN SPEED button.
Each time the button is pressed, the fan speed changes.
AUTO HIMEDLOULO
Operation capacity by your choice FAN SPEED
Set automatically by microcomputer AUTO
Silent operation ULO
Energy-saving operation LO
Standard operation MED
Powerful operation with high capacity HI
NOTE
• When FANSPEED is changed from HI to LO or ULO, the sound of refrigerant flowing may be heard.
–10–
Page 13
COOL/HEAT/DRY/FAN mode operation
Point the remote control toward the air-conditioner, and
Airflow direction adjustment procedure. Page 12
NOTE
• In case air is not blown out, when starting the heating operation.
• The operation mode can also be set or changed when the
air-conditioner is not in operation.
Page 27
1
2
3
4
Press the MODE select button.
Set to a required mode.
(Cool), (Heat), (Dry), (Fan)
Press the ON/OFF button.
Press the TEMP button.
Press or button for the preferred temperature.
Recommendation
Press the FAN SPEED button
Set the fan speed as preferred.
A fan speed cannot be set under Dry operation.
To stop: Press the ON/OFF button.
Air-conditioner operable temperature setting
■ Use within the following operational range. Operating outside of this range may result in the protection devices being activated,
preventing the unit from working.
Outside temperature
Inside temperature
Inside humidity
Approximately -15 to 46 °C Approximately -15 to 24 °C
Approximately 18 to 32 °C Approximately 15 to 30 °C
Below approximately 80%
The long-term use of the unit with a humidity level
exceeding 80% may result in condensation forming
on the surface of the indoor unit, leading to
water drips.
Characteristics of HEAT mode operation
Mechanism and capacity of HEAT mode operation
■ Mechanism
• The unit draws heat from the cold outside air, transfers it to indoors and heats the room. As a characteristic of heat pump system, the
heating capacity reduces when the outside air temperature gets colder.
• It may take some time to supply hot air after turning on the air-conditioner.
• If the outside temperature becomes extremely low, it would be better to use an additional source of heating.
Defrosting
If the outside temperature becomes low and humidity is high, the heat exchanger in the outdoor unit may frost over, which prevents
efficient heating.
If this happens, the automatic defrost function is activated and during defrosting the heating operation stops for 5 to 15 minutes
during defrosting.
• Both indoor and outdoor fans stop and the RUN light blinks slowly (1.5 sec. ON, 0.5 sec. OFF) during defrosting.
• The outdoor unit may give off some steam during defrosting. This is to help the defrosting process and is not a defect.
• The HEAT operation resumes as soon as defrosting has been completed.
Cooling operation Heating operation
–11–
Page 14
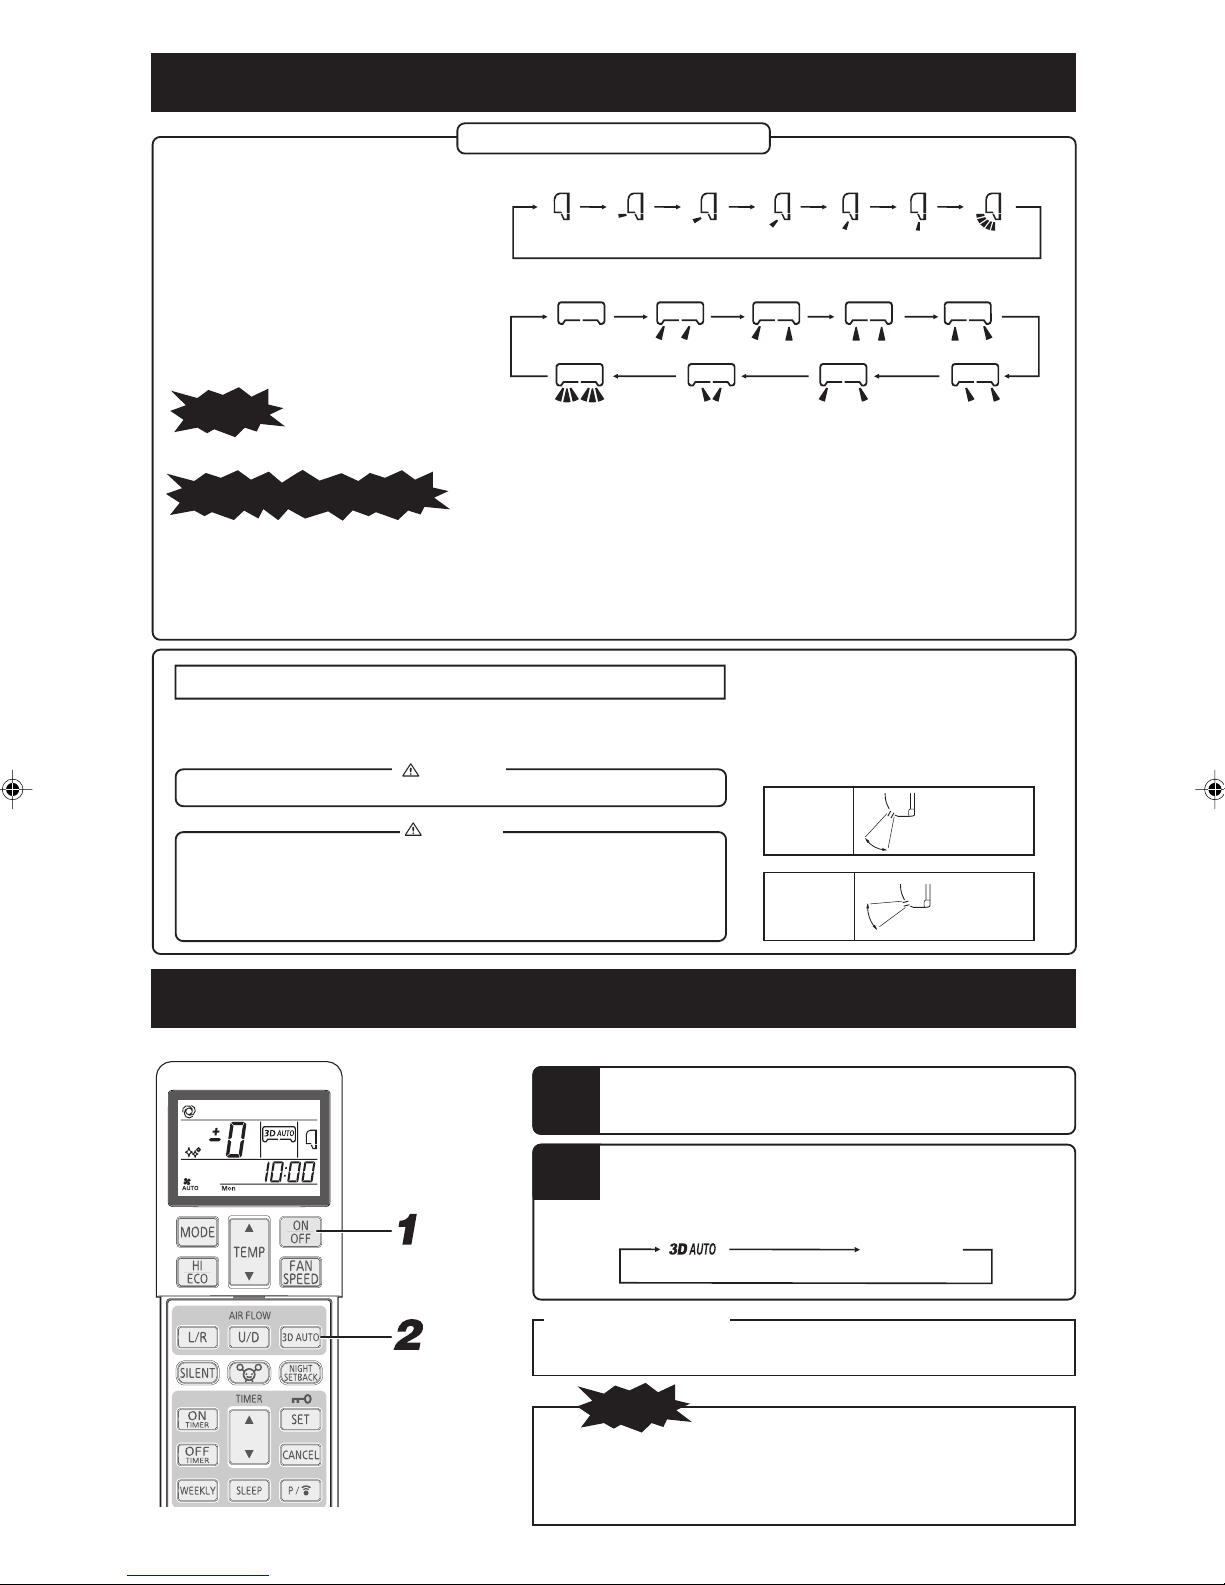
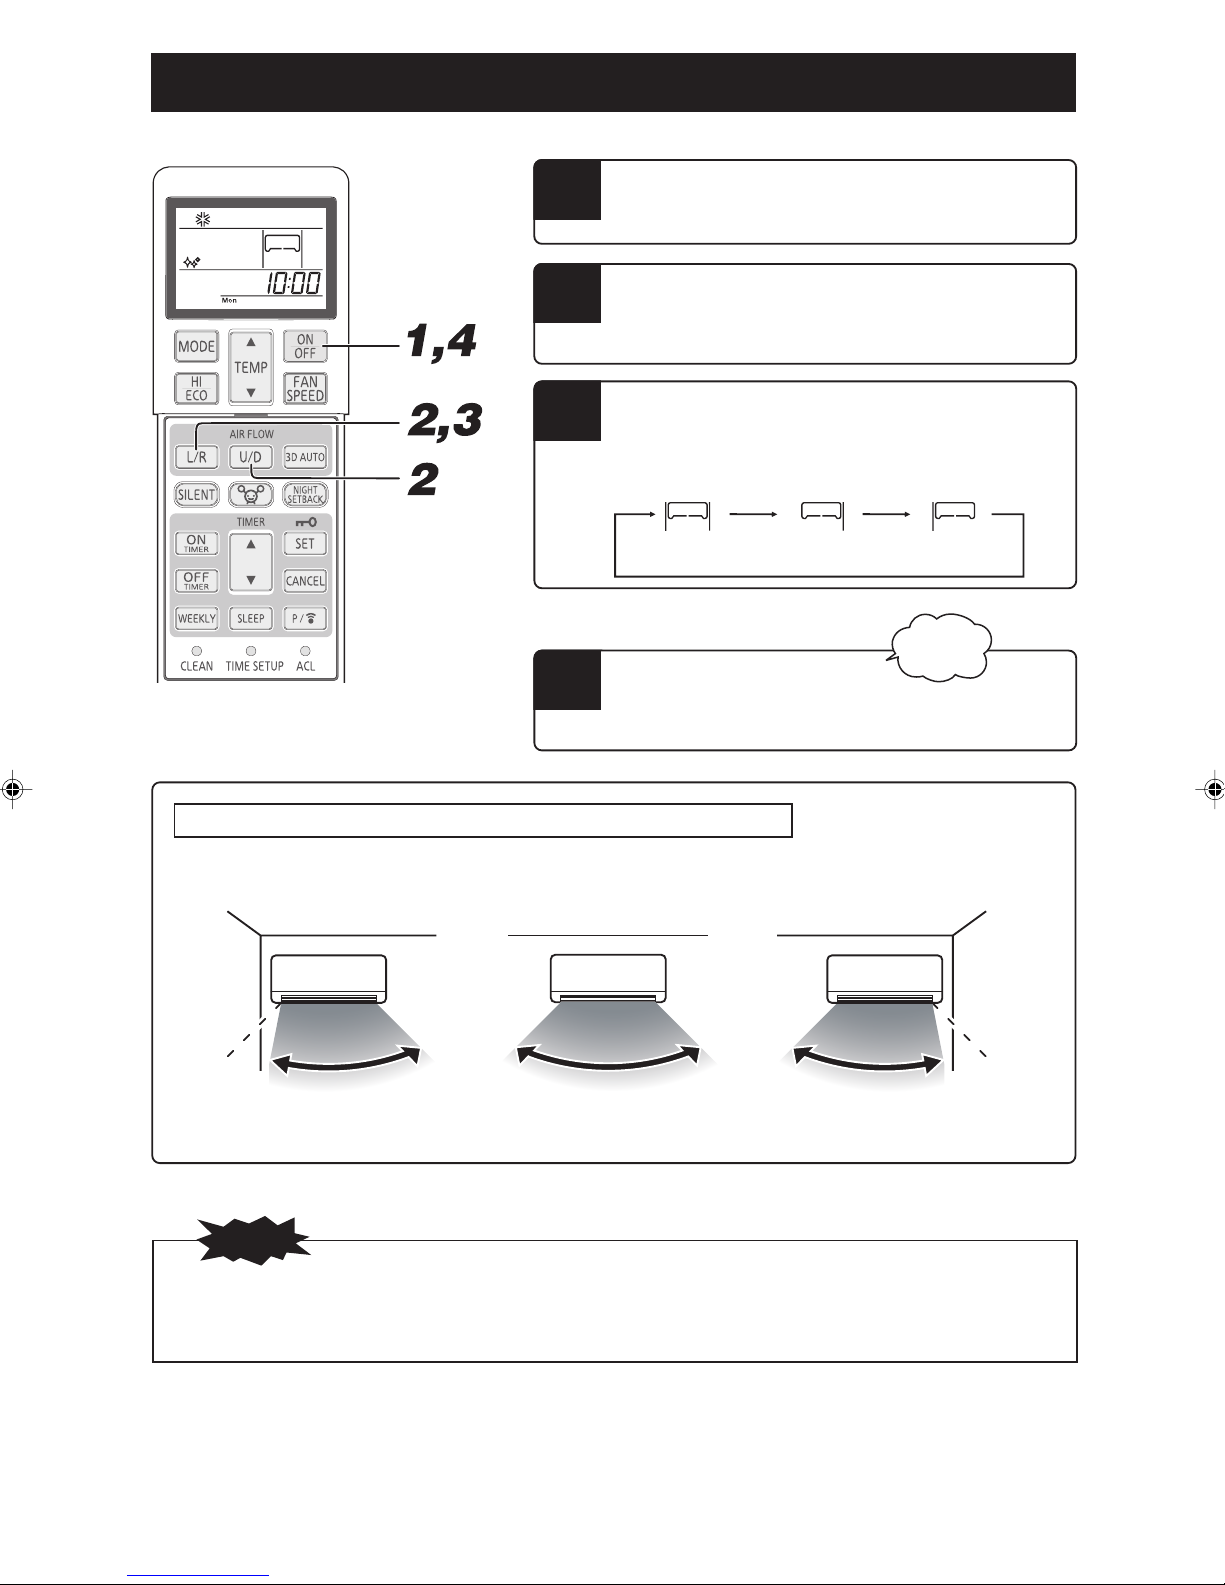
Airflow direction adjustment
Adjusting airflow direction
■ Up/down direction can be adjusted with the AIRFLOW U/D (UP/DOWN) button on the remote control. Every time you press this
button the mode changes as follows:
Change on AIRFLOW (UP/DOWN) mode.
(Flap stopped)
■ Left/right direction can be adjusted with the AIRFLOW L/R (LEFT/RIGHT) button on the remote control. Every time you press this
button the mode changes as follows:
Change on AIRFLOW (LEFT/RIGHT) mode.
(Louver stopped)
(Swing)
NOTE
• The actual position of the flap and louver may differ from the display shown.
NOTE FOR HEATING OPERATION
• When operation starts, the flap and louver direction is fixed at the horizontal / center position in order to avoid cold draft, and return
to the set the position that was set after the warm air supply is starting.
• The flap and louver direction will be controlled to the horizontal/center position when the room temperature reaches the set tem-
perature and compressor stops or when defrosting is in operation.
• The airflow direction cannot be set during the period mentioned above. Change the airflow direction settings after the warm air is
supplied and the flap/louver goes to the set position.
(Swing)
MEMORY FLAP (FLAP OR LOUVER STOPPED)
When you press the AIRFLOW (U/D or L/R) button once while the flap or louver is operating, it stops swinging at the position. Since this angle is
memorized in the microcomputer, the flap or louver will automatically be set at this angle when the next operation is started.
WARNING
• Do not expose directory to airflow from the air-conditioner for a long time.
CAUTION
• When in COOL or DRY operation, do not operate for a long period with the
airflow blowing straight down. Otherwise, condensation may appear on
the outlet grill and drip down.
• Do not try to adjust the flaps and louvers by hand, as the control angle may
change or the flap or louver may not be closed completely.
• Recommended angle of the flap when
stopping
HEAT
COOL, DRY
(Slant forward
blowing)
(Horizontal
blowing)
3D AUTO operation
■
Fan speed and air flow direction are automatically controlled, allowing the entire room to be efficiently conditioned.
1
2
Releasing procedure
Press the 3D AUTO button to turn off the 3D AUTO display.
• 3D AUTO operation is cancelled when you switch the operation mode.
• If 3D AUTO operation is cancelled then the air flow direction changes to
• 3D AUTO operation can be set in AUTO, COOL, or HEAT operation
Press the ON/OFF button.
Press the 3D AUTO button.
Each time the 3D AUTO button is pressed, the display is switched in the
order of:
(3D AUTO)
NOTE
that used before 3D AUTO was set.
mode only.
No display
(Normal operation)
–12–
Page 15
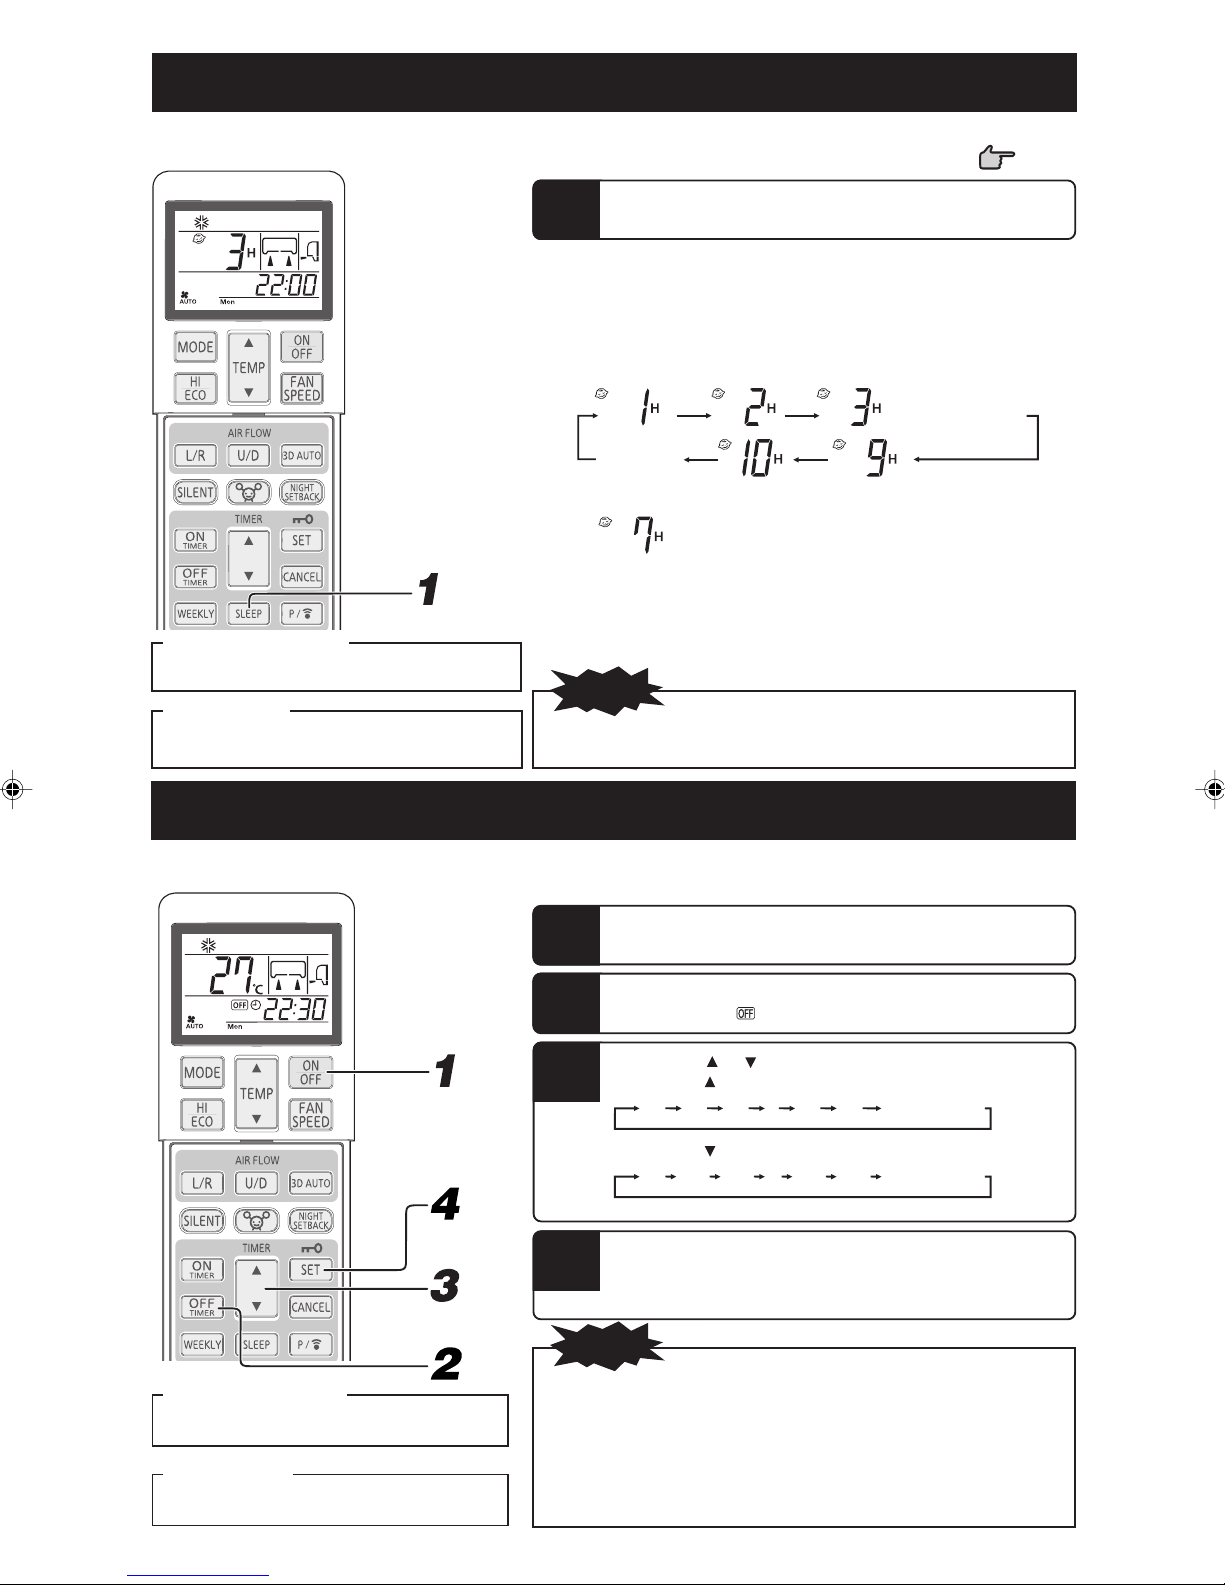
SLEEP TIMER operation
■ The unit stops automatically after the set time lapses.
The set temperature is automatically adjusted according to the elapsed time in order to avoid too much cooling or heating.
Page 15
Changing of set time
Set a new time by pressing SLEEP button.
How to cancel
Press the CANCEL button to turn off the SLEEP
display.
1
Press the SLEEP button.
■ If it is pressed while the unit is off
SLEEP TIMER operation starts with the previous operation settings, and the air
conditioning is turned off after the set time elapses.
■ If it is pressed while the unit is running
The air conditioner is turned off after the set time elapses.
Every time the button is pressed, the display changes as follows:
... (Units of one hour)
No display
(cancelled)
Example: You prefer it to stop after 7 hours.
Set to
The timer light (yellow) is on.
• The unit stops after the set time lapses.
• SLEEP operation will not function during ALLERGEN CLEAR operation.
• Cannot be set at the same time with OFF-TIMER.
h
NOTE
OFF-TIMER operation
■ The unit stops automatically when the set time comes.
With the air conditioner turned off, start the operation from Step 1. With the air conditioner running, start from Step 2.
Changing of set time
Set a new time by using the OFF-TIMER button.
How to cancel
Press the CANCEL button to turn off the timer
display.
Example: You prefer it to stop 22:30.
1
2
3
4
Press the ON/OFF button.
Press the OFF-TIMER button.
OFF TIMER display is blinking.
Press the “ or (TIMER)” button.
Every time the button is pressed, the display is switched in the order of:
0:00 0:10 0:20
Every time the button is pressed, the display is switched in the order of:
0:00 23:50 23:40
Set at 22:30.
Press the SET button.
The display changes from blinking to steady lighting and the setting is
complete.
The timer light (yellow) is on.
NOTE
• The unit stops at the end of the set period of time.
• Make sure to press the button within 60 seconds from the last operation
in step 3, otherwise the setting is not completed.
• The current time is not displayed during OFF-TIMER operation.
• OFF-TIMER operation will not function during ALLERGEN CLEAR op-
eration.
• Different from SLEEP TIMER operation, automatic set temperature adjustment is not done during OFF-TIMER operation.
–13–
...
...
23:00 22:50
1:00 1:10
(Units of ten minutes)
(Units of ten minutes)
Page 16
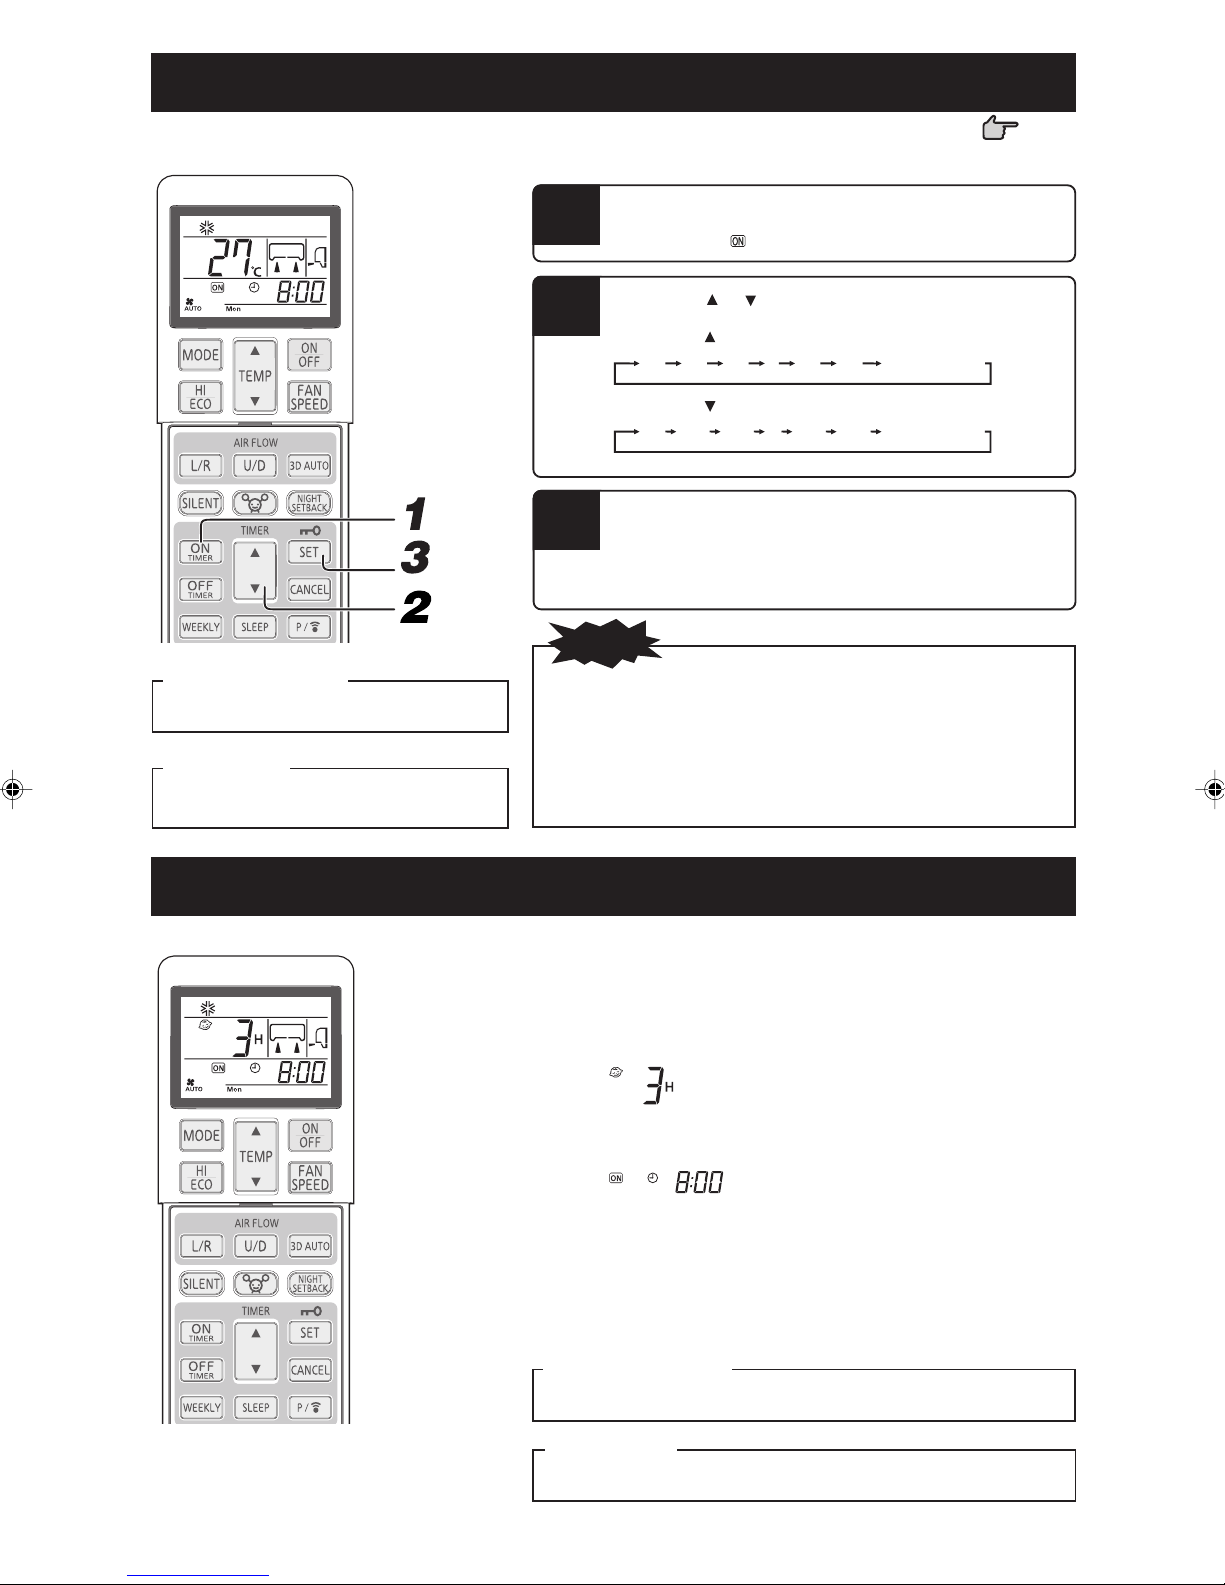
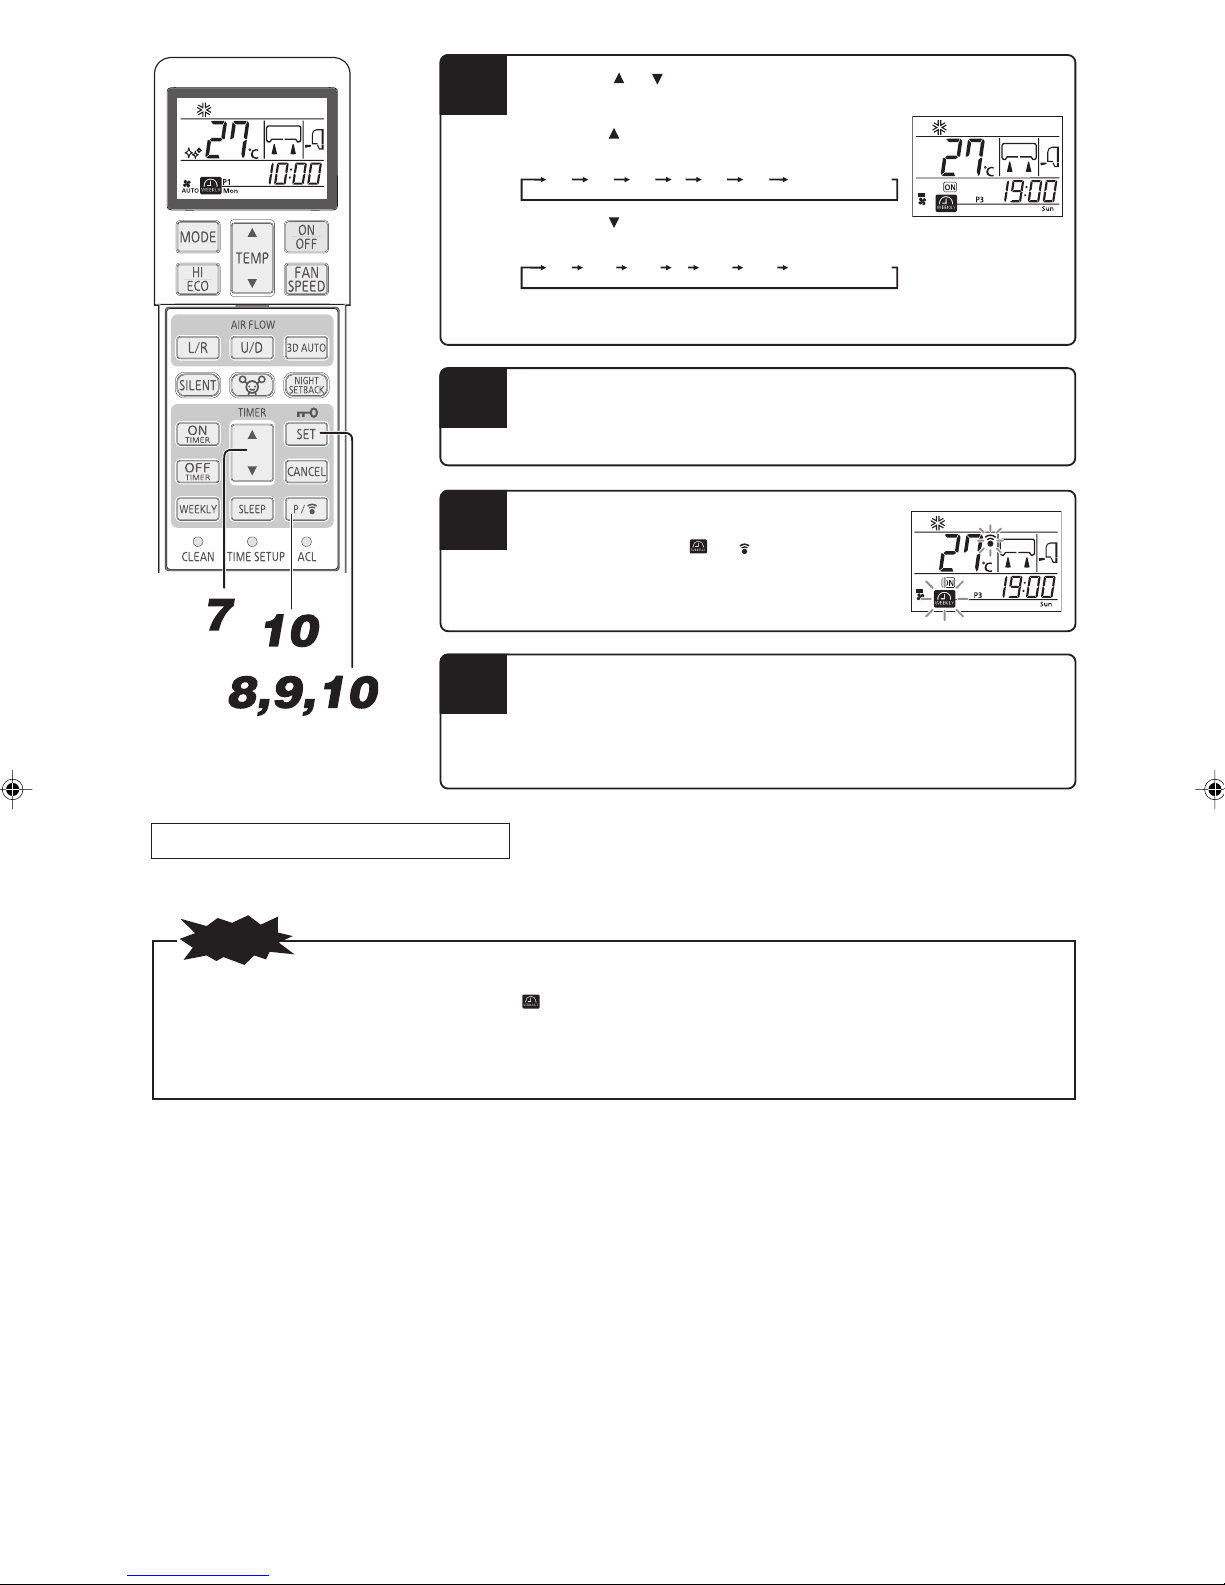
ON-TIMER operation
■
Operation starts 5 to 60 minutes before the set time so that the room temperature reaches the optimum temperature at the set time.
ON-TIMER operation can be set regardless of whether the air-conditioner is running or not.
Example: In the case the preferred room temperature is required at 8:00.
Press the ON-TIMER button.
1
2
3
ON-TIMER display is blinking.
Press the “ or (TIMER)” button.
Every time the button is pressed, the display is switched in the order of:
0:00 0:10 0:20
Every time the button is pressed, the display is switched in the order of:
0:00 23:50 23:40
Set at 8:00.
Press the SET button.
The display changes from blinking to steady lighting and the setting is
complete.
The timer light (yellow) is on.
The operation stops if it is set during operation.
NOTE
...
...
23:00 22:50
1:00 1:10
(Units of ten minutes)
(Units of ten minutes)
Page 15
Changing of set time
Set a new time by using the ON-TIMER button.
How to cancel
Press the CANCEL button to turn off the timer
display.
• Operation starts 5 to 60 minutes before the set time.
• The timer light (yellow) goes out at the set time.
• Make sure to press the button within 60 seconds from the last opera-
tion in step 2, otherwise the setting is not completed.
• The current time is not displayed during ON-TIMER operation.
• ON-TIMER operation will not function during ALLERGEN CLEAR
operation.
SLEEP TIMER + ON-TIMER operation
■ Combined timer operation of SLEEP TIMER and ON-TIMER.
Example: When it is required to stop after 3 hours and then start operation at 8:00, near the
set temperature.
■ SLEEP TIMER setting
Set by the procedures on page 13.
Set to
■ ON-TIMER operation setting
Set by the above procedure mentioned in ON-TIMER.
Set to
The setting of the lighting of the timer light (yellow) of this unit is complete.
h
• After the SLEEP TIMER set time has elapsed, the operation stops, and it starts
from 5 to 60 minutes before the ON-TIMER’s set time.
• The timer light is turned off when ON-TIMER set time comes.
Changing of set time
Set a new time by using the SLEEP or ON-TIMER button.
How to cancel
Press the CANCEL button to turn off the timer display.
–14–
Page 17
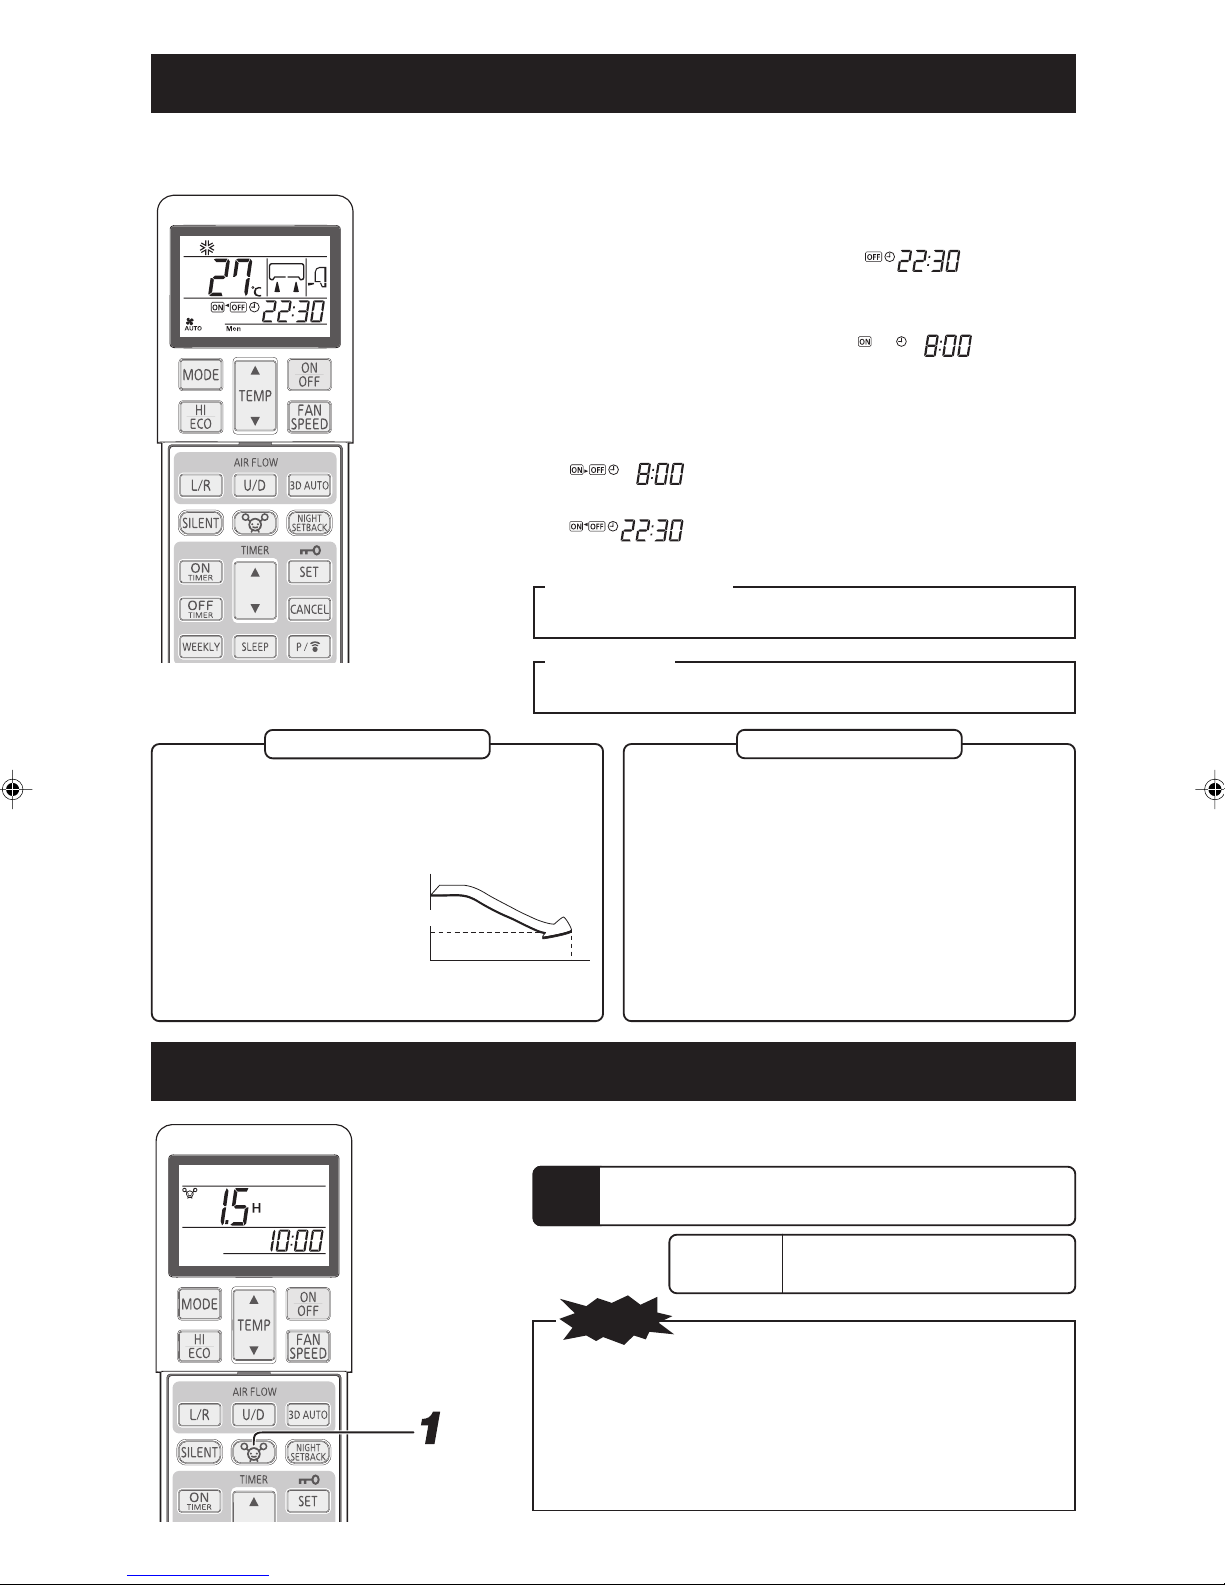
ON-TIMER + OFF-TIMER operation
■ The timer operations of the combination of ON and OFF-TIMER.
Example: When it is prefered to stop at 22:30, and then start operation at 8:00, near the set
temperature.
■ OFF-TIMER operation setting
Set by the procedures on page 13. Set to
■ ON-TIMER operation setting
Set by the procedures on page 14. Set to
Timer light (yellow) on the unit will light when the setting is completed.
The set time will be displayed on the remote control. The display will change depending on the operational status.
With ON-TIMER, the air conditioner starts running. Then,
with OFF-TIMER, the air conditioner stops running.
(Example Present time : 5:00 The air conditioner stopping.)
With OFF-TIMER, the air conditioner stops running. Then,
with ON-TIMER, the air conditioner starts running.
(Example Present time : 20:00 The air conditioner running.)
Changing of set time
Set a new time by using the OFF-TIMER or ON-TIMER button.
How to cancel
Press the CANCEL button to turn off the timer display.
Comfort Start-up
In ON-TIMER operation, the unit starts the operation a little earlier, so
that the room can approach optimum temperature at ON time. This is
so called “Comfort start-up”.
• Mechanism
The room temperature is
checked 60 minutes before
the ON time. Depending on
the temperature at that time,
the operation starts 5 to 60
minutes before the timer is at
ON.
• The function is available for
both COOL and HEAT operation mode (including AUTO).
It does not work for DRY
mode.
In COOL operation
▼
(Stop) Operation starts
Set temperature
Check the room
temp. 60 mins.
before.
▼
(Operation)
Set time
When SLEEP TIMER is selected, the set temperature is automatically
adjusted after a while, ensuring that the room is not too cold during
cooling or too warm during heating.
• During cooling : the preset temperature is lowered by 1°C at the start
of SLEEP operation (when the timer is set). After that, the temperature goes up by 1°C every an hour to become 1°C higher than the
present temperature.
• During heating: Preset temperature is lowered by 1°C at the start of
SLEEP operation (when the timer is set). After that the temperature
to becomes 3°C lower in an hour and 6°C lower in two hours than the
present temperature.
ALLERGEN CLEAR operation
■ The power of enzymes is used to eliminate allergy-causing allergens that accumulate on the allergen clear filter.
Aim the remote control at the air-conditioner.
1
Press the ALLERGEN CLEAR button.
To stop:
NOTE
SLEEP TIMER
Press the ON/OFF or
ALLERGEN CLEAR button.
• Since the room temperature may change quite a bit, it is recommended
that this be used when no one is in the room. (It completes automatically in approximately 90 min.)
• During ALLERGEN CLEAR operation temperature, fan speed, airflow
direction and timer operations settings cannot be made.
• In case of SCM multi system, ALLERGEN CLEAR control function is
invalid.
• In case of SCM multi system, if ALLERGEN button is pressed by mistake,
the indoor unit which received such command stops.
–15–
Page 18
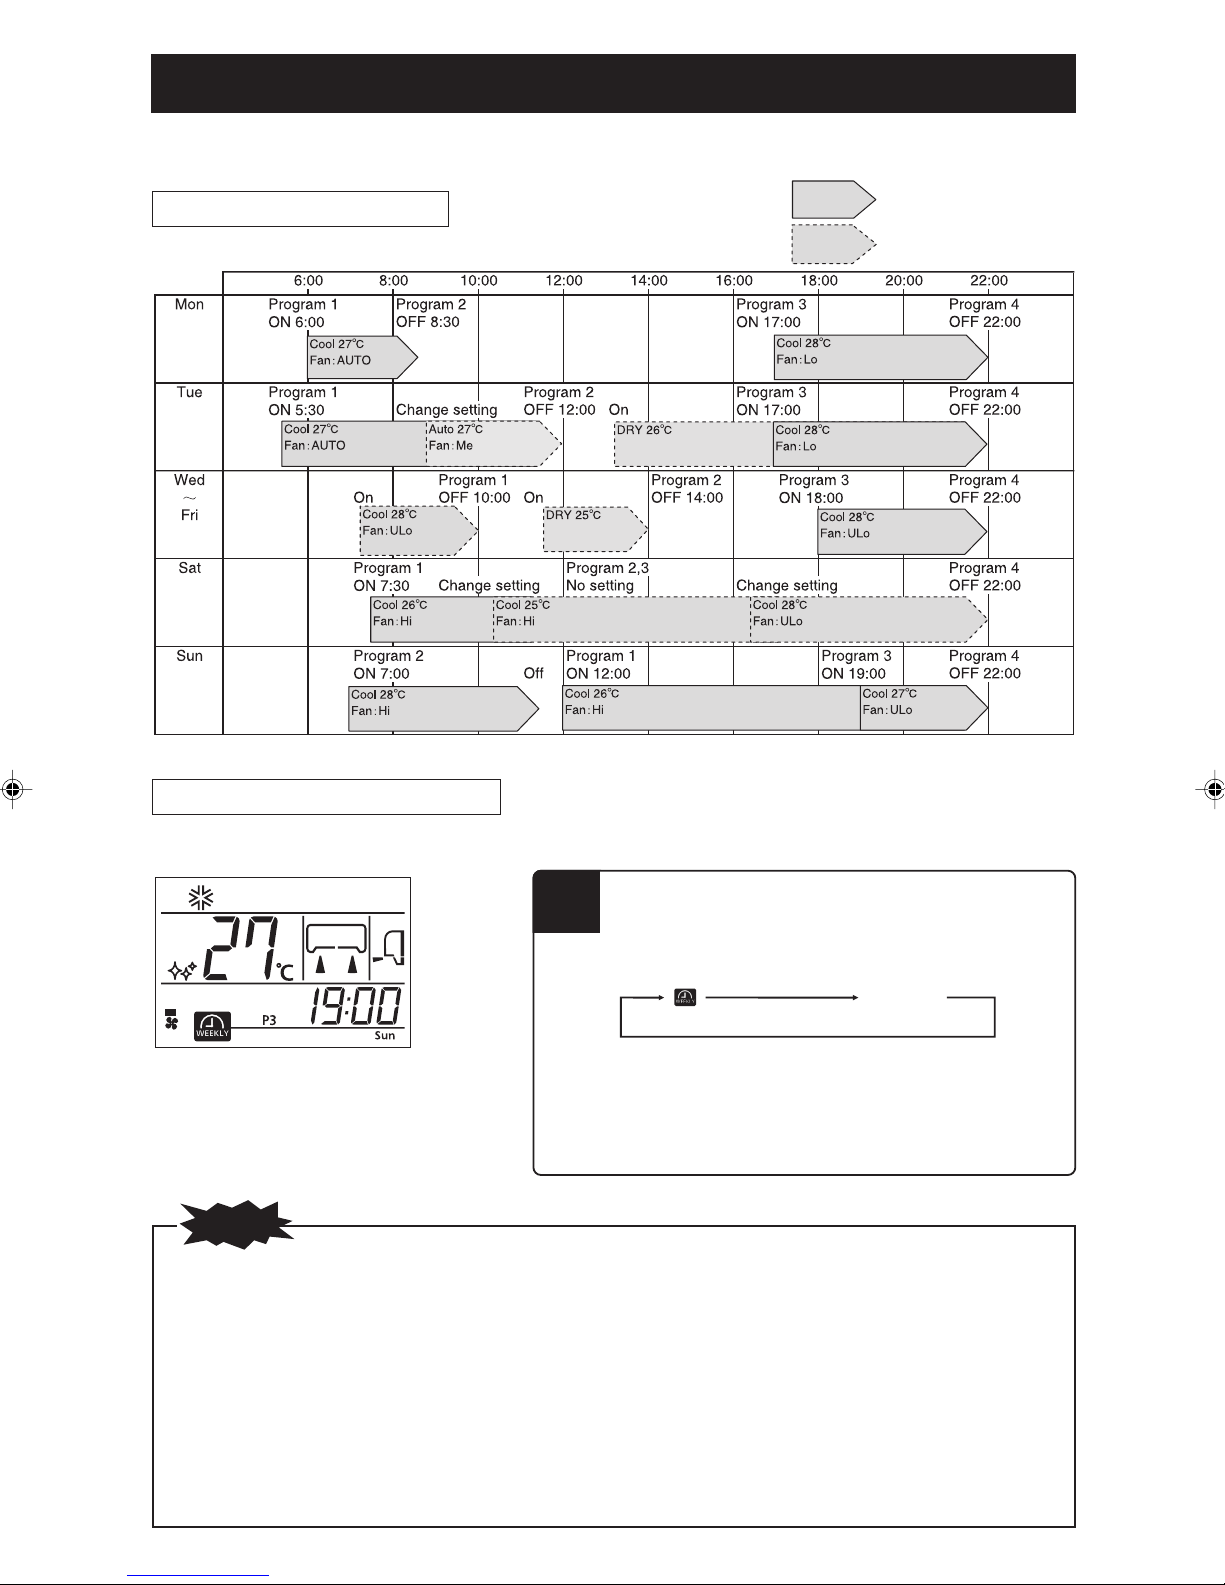
WEEKLY TIMER operation
■ Up to 4 programs with timer operation (ON-TIMER / OFF-TIMER) are available for each day of the week. Max 28 programs per week
are available. Once this has been set, the timer operation will be repeated at the same programs every week unless the WEEKLY
TIMER is canceled.
Sample (At cooling season)
: WEEKLY TIMER setting
: MANUAL setting
WEEKLY TIMER ON/OFF setting
■ Switch the WEEKLY TIMER to ON/OFF by using the WEEKLY button.
Press the WEEKLY button.
1
NOTE
• The WEEKLY TIMER is switched to ON/OFF regardless of
whether the air conditioner is running or not.
• The ON-TIMER operation of the WEEKLY TIMER is effective
regardless of whether the air conditioner is running or not.
When the ON-TIMER setting time is reached, the remote
control operates according to the contents that are set. The
remote control display is also switched to the operation contents that are set. The setting can be changed from the remote control after ON-TIMER operation of the WEEKLY
TIMER.
The following contents can be set by the ON-TIMER.
Operation mode, fan speed, temperature, airflow direction,
ECONOMY, 3D AUTO, NIGHT SETBACK, SILENT.
Comfort start-up is not performed for WEEKLY TIMER ONTIMER operation.
The WEEKLY TIMER becomes effective.
Every time the WEEKLY button is pressed, the display is switched in the
order of:
When the WEEKLY TIMER is set to ON, the timer light (yellow) of the air
conditioner is on.
When the battery of the remote control is replaced or the ACL switch is
pressed, the remote control is set to the initial state. Since the WEEKLY
TIMER program is not set in the initial state, set the program according to
the setting procedure.
• OFF-TIMER operation of the WEEKLY TIMER is effective
• When multiple program numbers are set for the current day
• When various timers (ON-TIMER, OFF-TIMER, and SLEEP
• The ON-TIMER or OFF-TIMER of the same time in the same
No display
(WEEKLY TIMER on) (WEEKLY TIMER off)
only when the air conditioner is running. When the time set
by the OFF-TIMER is reached, the air conditioner stops.
(day of the week), the operation is performed from the earliest time that is set.
TIMER) are operating, the WEEKLY TIMER does not operate even if the time set in the ON-TIMER or OFF-TIMER is
reached. The WEEKLY TIMER becomes effective after various timers are terminated.
day of the week cannot be set.
–16–
Page 19

Setting mode <Individual setting>
Set after setting the current day of the week and the time.
1
2
3
Press the PROGRAM button.
and current day of the week blink.
Press the “ or (TIMER)” button.
Select a day of the week to be reserved.
Every time the
the order of:
Mon Tue Wed
Every time the button is pressed, the display is switched in
the order of:
Mon Sun
Press the SET button.
The day of the week is determined and the program number
blinks.
button is pressed, the display is switched in
...
Display of all of the days of
the week
Display of all of the days of
Sun
the week
Sat
...
Tue
4
5
6
Press the “ or (TIMER)” button.
Select a program number.
Every time the
order of:
P1 P2 P3 P4
Every time the
order of:
P1 P4 P3 P2
Press the SET button.
When no set contents (ON-TIMER or OFF-TIMER) are
available, both the
When set contents (ON-TIMER or OFF-TIMER) are
available, either one of
Press the ON-TIMER or OFF-TIMER button.
ON-TIMER or OFF-TIMER is determined and time display blinks.
button is pressed, the display is switched in the
button is pressed, the display is switched in the
and timers blink.
or is lit.
ON-TIMER is selected OFF-TIMER is selected
–17–
Page 20
7
8
9
Press the “ or (TIMER)” button.
Set a time.
Every time the
order of:
0:00 0:10 0:20
Every time the button is pressed, the display is switched in the
order of:
0:00 23:50 23:40
When ON-TIMER is selected, go to Step 8.
When OFF-TIMER is selected, go to Step 9.
Set required operation contents.
When ON-TIMER is selected, operation mode, fan speed, and air flow direction can be
changed and the ECONO, SILENT or NIGHT SETBACK operation can be set.
Press the SET button.
The time is determined and and blink.
button is pressed, the display is switched in the
...
...
23:00 22:50
1:00 1:10
(Units of ten minutes)
(Units of ten minutes)
Press the PROGRAM button or SET button.
10
When the PROGRAM button is pressed, the setting is sent to the air conditioner.
Since it takes 3 seconds for transmission, point the remote control at the remote control
signal receiver of the indoor unit during the period.
When the setting is received, a buzzer sound (pip, pip, pip) is emitted.
When the SET button is pressed, the setting continues from Step 2.
Setting mode <Collective setting>
■ Set the same operation contents to the same program number of all the days of the week. In Step 2 above, select “all of the days of the
week”. When the contents that were individually set exist in the same program number, the contents are overwritten.
NOTE
• If no operation is performed for 60 seconds in setting mode, the setting changes that have been made until then become invalid
and the setting mode terminates. Subsequently,
• At the end of the setting mode, point the remote control at the air conditioner and press the PROGRAM button. In this case, check
that the air conditioner emits a reception buzzer sound three times (pip, pip, pip). If the buzzer sound is not emitted, set the mode
to the setting mode again by pressing the PROGRAM button and check that the buzzer sound is emitted.
and all the program numbers (P1, P2, P3 and P4) blink for 10 seconds.
–18–
Page 21

How to cancel the setting <Individual setting>
1
2
3
4
5
6
Press the PROGRAM button.
and current day of the week blink.
Press the “ or (TIMER)” button.
Select a day of the week to be cancelled.
Press the SET button.
The day of the week is determined and the program number blinks.
Press the “ or (TIMER)” button.
Select a program number to be cancelled.
At cancelation operation, do not press the SET button. If the SET button is
pressed, the mode is shifted to the Set mode.
Press the CANCEL button.
The setting contents of the ON or OFF-TIMER are cancelled and
is displayed on the time display section.
Press the PROGRAM button.
When the PROGRAM button is pressed, the setting is sent to the air
conditioner.
When the setting is received, a buzzer sound (pip, pip, pip) is emitted.
The setting contents of each program are cancelled. Perform the
operation indicated above for each program to be cancelled.
How to cancel the setting <Collective setting>
■ When the same operation contents exist in the same program number of all the days of the week, collective erase is allowed. In Step
2 above, select “all of the days of the week”. The procedure from Step 3 is the same as that indicated above.
If the operation contents have been changed or erased by individual setting after the collective setting described in page 18, causing
setting content discrepancies among the days of the week, collective erase is not allowed.
Confirm mode
The WEEKLY TIMER setting contents can be confirmed.
Press the PROGRAM button for 3 seconds or more.
1
2
Releasing procedure
The Confirm mode can be terminated by pressing the ON/OFF, CANCEL or
SET button.
blinks and the setting content lights.
Press the “ or (TIMER)” button.
Select a day of the week and a program number to be confirmed.
Display starts from the current day of the week. For the program without
setting,
Confirm mode, a setting mode is set.
Mon P1 P2 P3 P4
Sun P1 P2 P3 P4
Display of all of the
days of the week
is displayed. When the PROGRAM button is pressed in
P1 P2 P3 P4Tue
P1 P2 P3 P4
NOTE
• If no operation is performed for 60 seconds in Confirm mode, the
Confirm mode is terminated.
–19–
Page 22

HIGH POWER/ECONOMY operation
If the air-conditioner is not operating, point the remote control toward the air conditioner, and
1
Press the ON/OFF button.
Press the HI/ECO button.
2
• When the operating mode is AUTO, COOL or HEAT
Every time the HI/ECO button is pressed, the display is switched in the
order of:
No display
(
HIGH POWER
• When the operating mode is DRY or ON-TIMER + OFF-TIMER
Every time the HI/ECO button is pressed, the display is switched in the
order of:
ECONOMY
(
Concerning HIGH POWER operation
Pressing the HI/ECO button intensifies the operating power and initiates powerful cooling or heating operation for 15 minutes continu-
ously. The remote control
NOTE
• During the HIGH POWER operation, the room temperature
is not controlled. When it causes an excessive cooling or
heating,press the HI/ECO button again to cancel the HIGH
POWER operation.
• HIGH POWER operation is not available during the DRY
and ON-TIMER + OFF-TIMER operations.
• When HIGH POWER operation is set after setting ONTIMER operation, HIGH POWER operation will start from
the set time.
• Not operable while the air conditioner is OFF.
• After HIGH POWER operation, the sound of refrigerant
flowing may be heard.
displays and the FAN SPEED display disappears.
• When the following operations are set, HIGH POWER
operation will be canceled.
1 When the HI/ECO button is pressed again.
2 When the operation mode is changed.
3 When it has been 15 min. since HIGH POWER
operation has started.
4 When the 3D AUTO button is pressed.
5 When the SILENT button is pressed.
6 When the NIGHT SETBACK button is pressed.
)(
ECONOMY
) (Normal operation)
) (Normal operation)
No display
Concerning ECONOMY operation
Pressing the HI/ECO button initiates a soft operation with the power suppressed in order to avoid an excessive cooling or heating.
The unit operates 1.5°C higher than the setting temperature during cooling or 2.5°C lower than that during heating. The remote
control
• It will go into ECONOMY operation at the next time the air-
displays and the FAN SPEED display disappears.
NOTE
conditioner runs in the following case.
When the air-conditioner is stopped by ON/OFF button
1
during ECONOMY operation.
2
When the air-conditioner is stopped in SLEEP or OFF
TIMER operation during ECONOMY operation.
3 When the operation is retrieved from CLEAN or AL-
LERGEN CLEAR operation.
• When the following operations are set, ECONOMY operation
will be canceled.
1 When the HI/ECO button is pressed again.
2 When the operation mode is changed DRY to FAN.
3 When the NIGHT SETBACK button is pressed.
• Not operable while the air conditioner is OFF.
–20–
Page 23
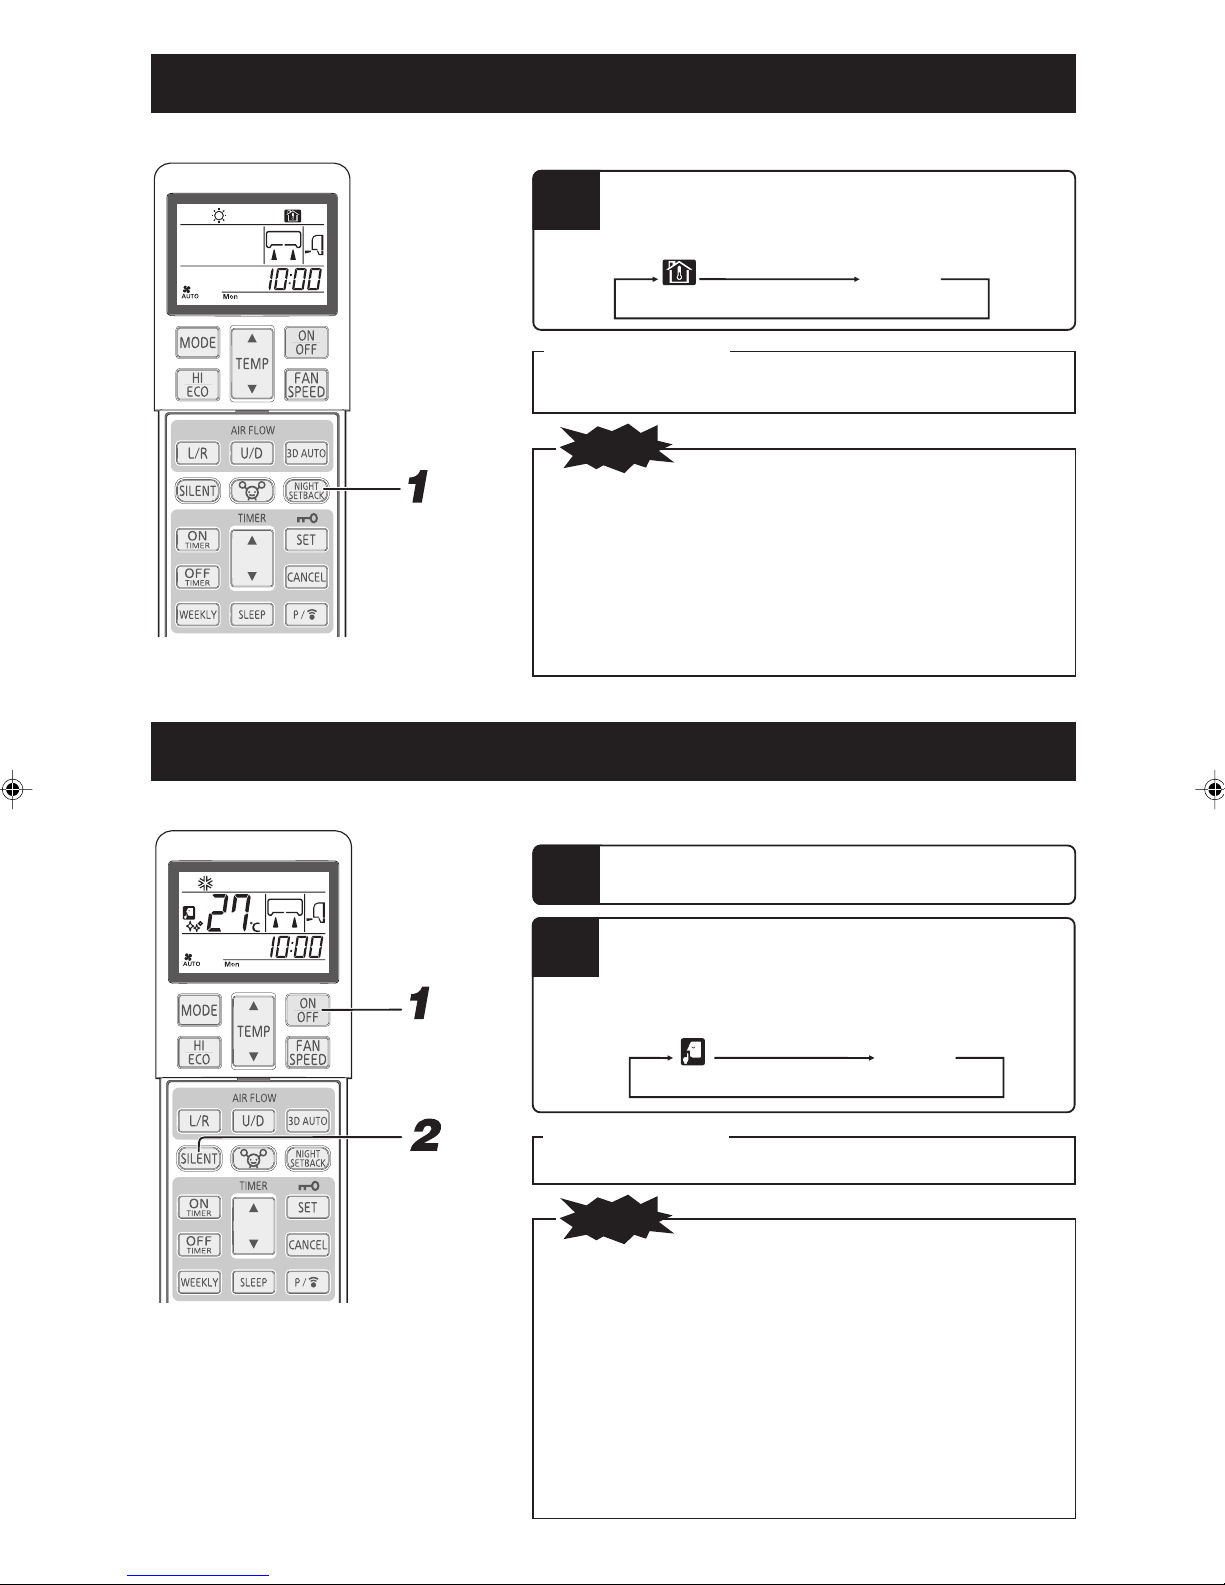
NIGHT SETBACK operation
■ During the cold season, the room temperature can be maintained at a comfortable level during the absence, at night, and while the
room is unattended. The air conditioner maintains the constant temperature at about 10°C.
Press the NIGHT SETBACK button.
1
Releasing procedure
Press the NIGHT SETBACK button or MODE button to turn off the NIGHT
SETBACK display.
• During NIGHT SETBACK operation, the air conditioner maintains the
• During NIGHT SETBACK operation, temperature settings cannot be
• Since the room temperature may change quite a bit, it is recommended
• During NIGHT SETBACK operation, none of HIGH POWER and
• When NIGHT SETBACK operation is cancelled by pressing the NIGHT
Every time the NIGHT SETBACK button is pressed, the display is switched
in the order of:
No display
(NIGHT SETBACK on) (NIGHT SETBACK off)
NOTE
set temperature at about 10°C.
made.
that this be used when no one is in the room.
ECONOMY operations can be set.
SETBACK button, the operation mode is reset to the mode immediately
prior to the NIGHT SETBACK operation.
SILENT operation
■ When the SILENT operation is set, the unit operates more silently reducing noise from the outdoor unit.
If the air-conditioner is not operating, point the remote control toward the air conditioner, and
1
2
Releasing procedure
Press the SILENT button to turn off the SILENT display.
• During SILENT operation, the maximum cooling and heating capacities
• SILENT operation will not function during DRY and FAN operation.
• It will go into SILENT operation at the next time the air-conditioner runs in
• Not operable while the air conditioner is OFF.
• The noise level of the outdoor unit may not decrease depending on the
• In case of SCM multi system, SILENT control function is invalid.
Press the ON/OFF button.
Press the SILENT button.
• When the operating mode is AUTO, COOL, HEAT or NIGHT SETBACK
Every time the SILENT button is pressed, the display is switched in the
order of:
(SILENT on) (SILENT off)
NOTE
deteriorate.
the following case.
When the air-conditioner is stopped by ON/OFF button during SILENT
1
operation.
2
When the air-conditioner is stopped in SLEEP or OFF-TIMER op-
eration during
3 When the operation is retrieved from CLEAN or ALLERGEN
CLEAR operation.
condition.
SILENT
operation.
No display
–21–
Page 24

SELF CLEAN operation
■ CLEAN operation should be run after AUTO, COOL and DRY operation to remove the moisture from inside the indoor unit and control
the growth of mold and bacteria.
In order to active CLEAN operation, press the CLEAN
1
• Two hours later, the air conditioner stops running automatically. To stop
• CLEAN operation is not operated after HEAT and FAN, OFF-TIMER,
• The indoor unit fan runs for about two hours in CLEAN operation.
• The RUN light illuminates during CLEAN operation.
• Pressing the SLEEP button, ALLERGEN CLEAR button or NIGHT
• This is not a function for removing mold, germs or grime that have
switch with the tip of a ballpoint pen.
Every time the CLEAN switch is pressed, the display is
switched in the order of:
(CLEAN on) (CLEAN off)
NOTE
the air conditioner immediately, press the ON/OFF button.
SLEEP and ALLERGEN CLEAR operations have finished.
ON
OFF
SETBACK button during CLEAN operation cancels the CLEAN
operation and then the unit is set to SLEEP, ALLERGEN CLEAR or
NIGHT SETBACK operation.
already adhered to the unit.
No display
3 sec.
1 sec.
Auto restart function
■ What is auto restart function?
• Auto restart function records the operational status of the air-conditioner immediately prior to be switched off by a power cut, and then
automatically resumes operations after the power has been restored.
• The following settings will be cancelled:
1 Timer settings
2 HIGH POWER operations
NOTE
• Auto restart function is set at on when the air-conditioner is shipped from the factory. Consult with your dealer if this function needs
to be switched off.
• When power failure occurs, the timer setting is cancelled. Once power is resumed, set the timer again.
Tips for effective operation
■ Please observe the following for the most economic and comfortable use of your unit.
Set a suitable room temperature.
Excessively high or low temperatures
are not good for your health and waste of
electricity.
Adjust the airflow direction properly.
Adjust the up/down and left/right airflow
to ensure a steady room temperature.
Clean the filters frequently.
Clogged filters may block the airflow and
cause less efficient operation.
Operate the unit only when needed.
Use the timer properly to operate the unit
only when needed.
Avoid direct sunlight and draught.
Cut out direct sunlight by drawing the
curtains or blinds when cooling. Keep
windows and doors shut, except when
ventilating.
Keep heat source away when cooling.
Keep heat sources out of the room as
much as possible.
–22–
Page 25
Installation location setting
■ Take the air conditioning unit’s location into account and adjust the left/right airflow range to maximize air-conditioning.
If the air conditioning unit is running, press the ON/
1
2
3
OFF button to stop.
The installation location setting cannot be made while the unit is running.
Press the AIR FLOW U/D (UP/DOWN) button and the
AIRFLOW L/R (LEFT/RIGHT) button together for 5
seconds or more.
The installation location display illuminates.
Setting the air-conditioning installation location.
Press the AIR FLOW L/R (LEFT/RIGHT) button and adjust to the desired
location.
Each time the AIR FLOW L/R (LEFT/RIGHT) button is pressed, the display
is switched in the order of:
4
(Center Installation)
Press the ON/OFF button.
The air-conditioner's installation location is set.
Press within 60 seconds of setting the installation location (while the installation location setting display illuminates).
(Right End Installation) (Left End Installation)
Press within
60 sec.!
Air conditioner installation location and airflow range
The diagram below indicates the airflow ranges corresponding to the air-conditioner's installation location. Consider your room's
layout and set the airflow range to maximize conditioning effectiveness.
Airflow range Airflow range Airflow range
(Left End Installation) (Center Installation) (Right End Installation)
NOTE
• Once the installation location setting is configured, the installation location setting is stored in the air conditioner even if the power
supply is turned off. To change the installation location setting, set a location again with the remote control.
• During the operation, an installation location cannot be set.
• When the air conditioner is installed at the location within 50 cm from the wall, it is recommended to change the location to “Right
End Installation” or “Left End Installation”.
–23–
Page 26
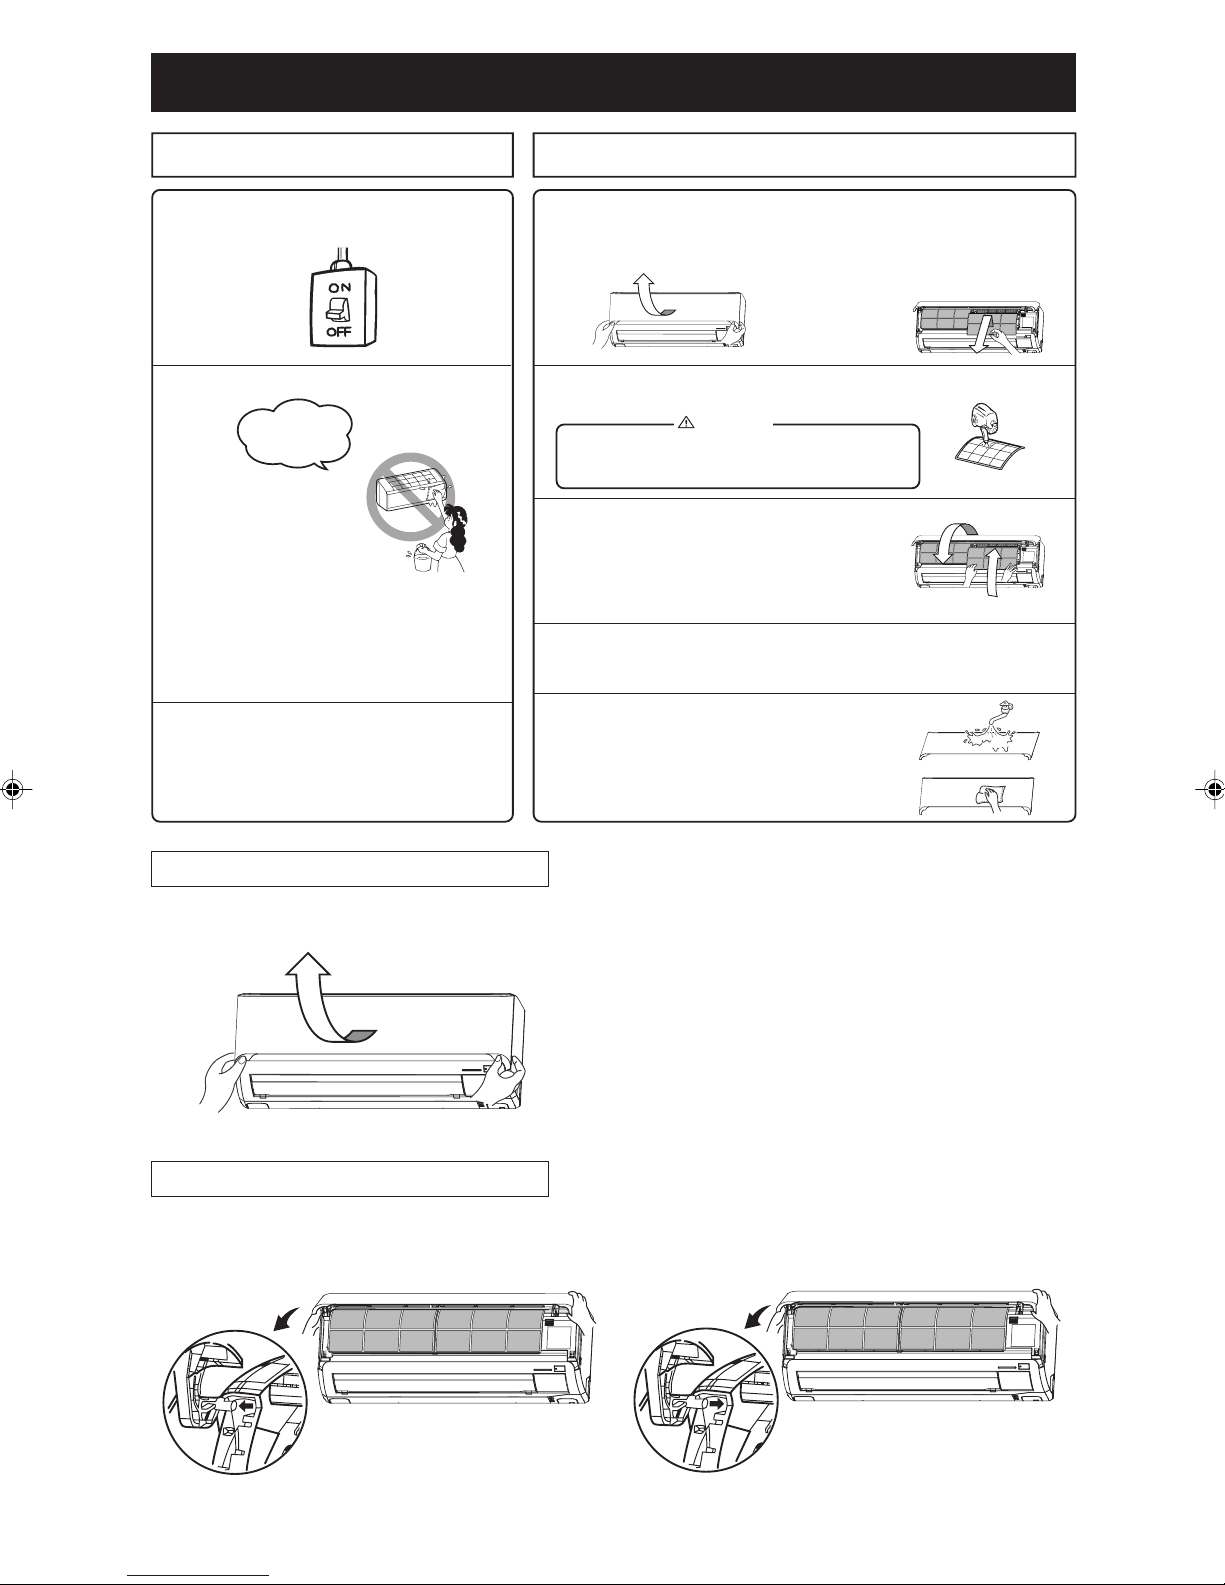
Maintenance
Before maintenance
Turn off the power supply.
• Do not spill any liquid.
There's a danger of electric
shock.
Wipe the unit with a
soft, dry cloth.
• Do not touch the aluminum fins on
the heat exchanger.
• Stand firmly on a stepladder or other
stable object when removing the inlet
panel and filter.
Do not use the following articles:
• Hot water (40°C or more)
It may deform or discolour the unit.
• Petrol, paint thinner, benzine or cleanser, etc.
They may deform or scratch the unit.
During the operational season
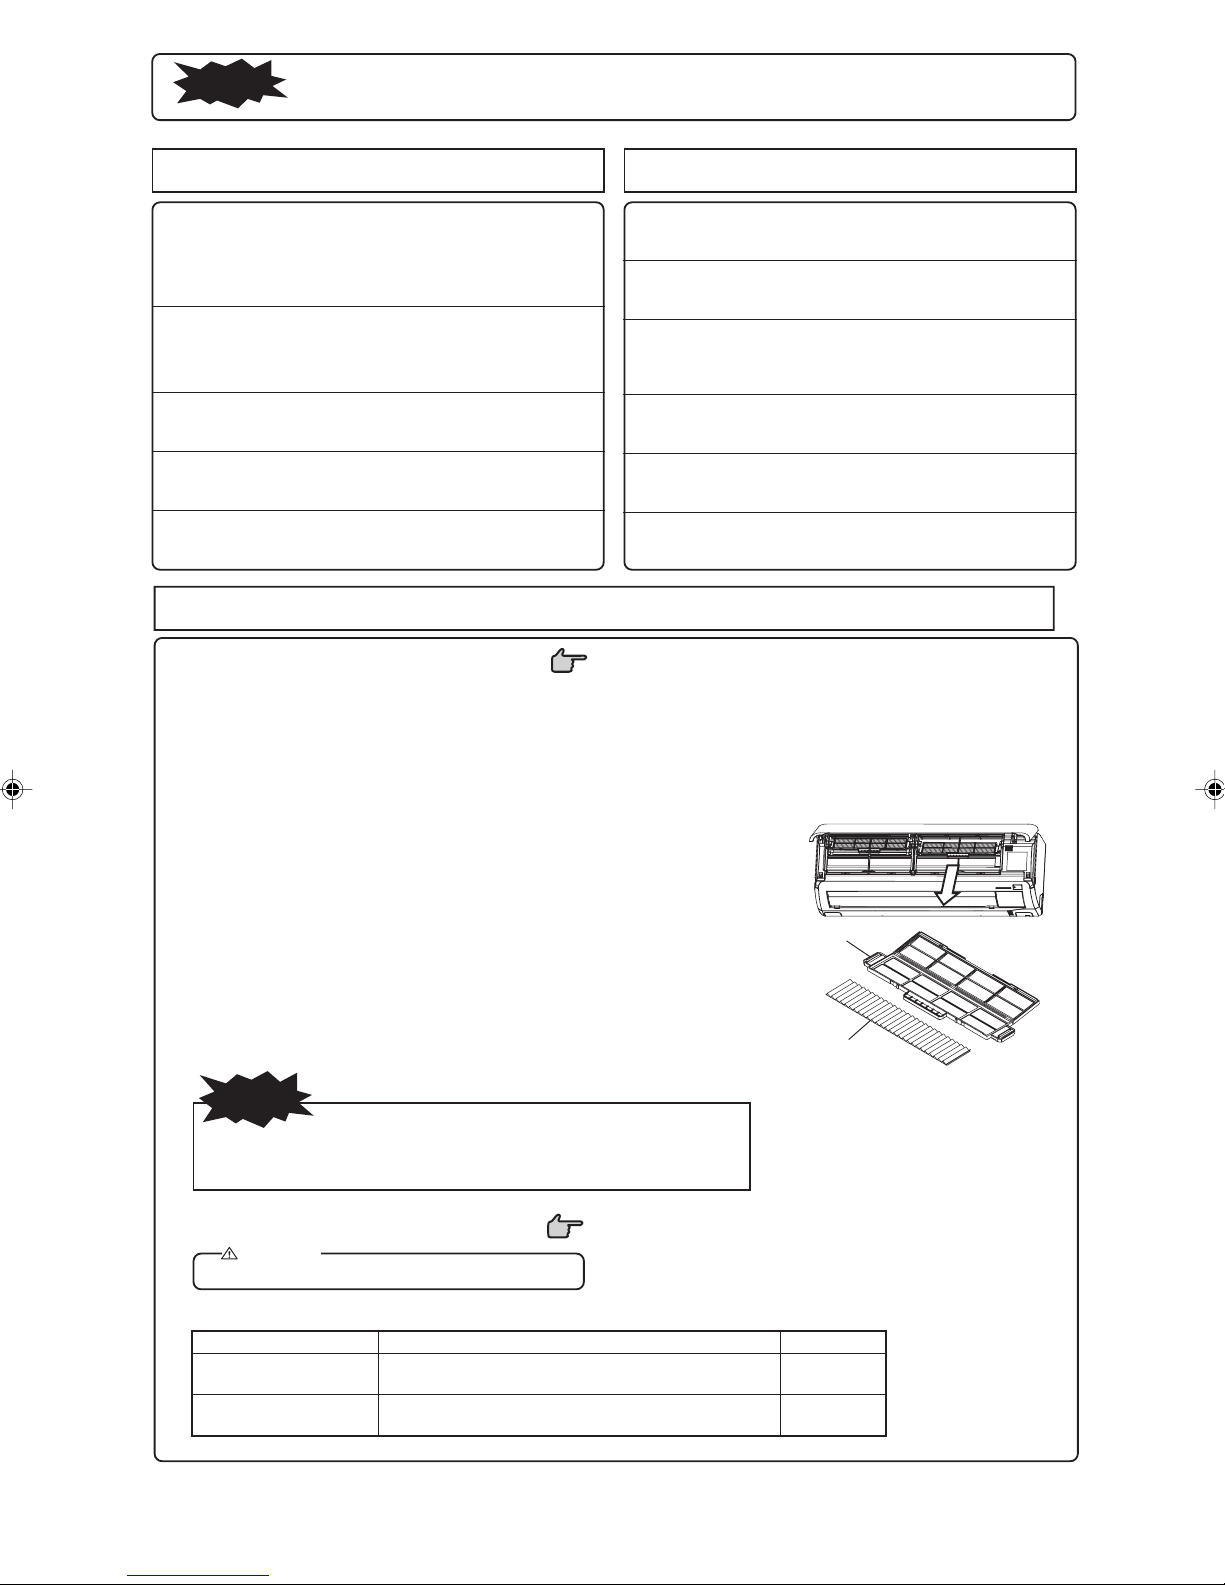
Cleaning the air filter
Remove the air filter
1
Cleaning
2
• Do not clean the filters with boiling water.
• Do not dry them over an open flame.
• Pull them out gently.
Reinstall the air filter
3
• Hold firmly the filter at both sides as shown at
right and insert securely.
• Operating without putting back the air filters will
make the unit dusty, and may cause damage.
Cleaning the unit
• Wipe the unit with a soft, dry cloth, or use a vacuum cleaner.
• If the unit is very dirty, wipe it with a cloth soaked in warm water.
Cleaning the air inlet panel
• Removal, installation of air inlet panel.
• The panel can be washed with water. After
washing with water, wipe any moisture off the
panel and dry out of direct sunlight.
If the filter is very dirty, clean it with warm water
(approx. 30°C), and dry it thoroughly.
CAUTION
Standard interval is once
every two week
• Pull up the air inlet panel forward.
Lightly hold the knobs both sides and lift
•
a little to remove the panel forward.
How to open, close the air inlet panel
Open
Place fingers at the recesses on both sides of the panel and pull
up the panel forward so that it will be open by about 60 degrees.
Removal, installation of air inlet panel
Removal
When removing the air inlet panel for internal cleaning or others,
open the panel by 80 degrees and then pull it forward.
Close
Push both ends evenly and press further lightly at the center.
Installation
Secure the upper edge of the air inlet panel by lightly pushing it
in, and then close the panel.
–24–
Page 27
NOTE
Cooling/heating is affected by an air filter clogged up with dust etc., and the operation noise becomes louder. It
may also use extra electricity. Please clean the air filter at appropriate intervals.
At the end of the season
Perform the fan operation for 2 to 3 hours.
1
Dry the inside of the unit.
Stop the unit and turn off the power supply.
2
The unit consumes approx. 4W even when the unit is not operating. Turning off the power supply will help saving energy consumption and cost.
Clean and reinstall the air filters.
3
Clean both the indoor and outdoor units.
4
Remove batteries from the remote control.
5
Installing, inspecting, and replacing the air-cleaning filter
1. Open the air inlet panel and remove the air filters. Page 24
2. Remove the filter holders, with the air-cleaning filter installed in the folders, from the
air-conditioner.
3. Remove the allergen clear filter (Light orange) from filter holder and inspect the
filter. Use a vacuum cleaner to remove any dust or dirt from the allergen clear filter.
Replace the allergen clear filter if it cannot be cleaned or if it has been for about 1
year.
(The allergen clear filter should be replaced after about 1 year of use. However, the
actual replacement period may vary depending on the conditions in which the filter
is used.)
Remove the photocatalytic washable deodorizing filter (orange) from the filter
holder and inspect the filter. Periodically, remove any dust or dirt from the photocatalytic washable deodorizing filter. If the photocatalytic washable deodorizing filter is particularly dirt, it may be washed with water. However, the filter is fragile so
be sure to wash it installed in the filter holder to avoid damaging it. After washing
the filter, place it in sunlight to dry. Placing the filter in sunlight revitalizes the deodorizing effect.
At the beginning of the season
Ensure that the earth wiring is not snapped
1
nor disconnected.
Check if there is no corrosion or rust on the
2
base frame of the outdoor unit.
Make sure that there are no obstacles block-
3
ing the airflow around the air intake and outlet
openings of the indoor and outdoor units.
Ensure that the air filters are clean.
4
Turn on the power supply.
5
Insert batteries in the remote control.
6
Filter holder
(Do not dispose of the filter holders. They are reusable. )
4. Install the air-cleaning filter in the filter holders, and then install the filter
holders in the air-conditioner.
NOTE
• The allergen clear filter and the photocatalytic washable deodorizing filter
may be installed on either the right or left side of the air-conditioner.
• Install the allergen clear filter with the light orange side front.
5. Install the air filters and closed the air inlet panel.
CAUTION
• The heat exchanger may injure your fingers.
For replacement the air-cleaning filter, contact your dealer.
Item Feature Color
Allergen clear filter
Photocatalytic washable
deodorizing filter
The power of enzyme is used to eliminate allergy-causing allergens that accumulate on the filter.
Sources of odors on the filter are broken up, resulting in
a deodorizing effect.
Filter
Page 24
Light orange
Orange
–25–
Page 28

Proper installation
Suitable installation position
• Do not put any obstruction in front of the indoor unit, preventing proper ventilation and functioning.
• Do not install the unit in any of the following places:
• Where there is a danger of leaking flammable gases.
• Where there is substantial splashing of oil.
• Malfunctioning due to corrosion may occur if the unit is installed in a spa where sulfide gases are generated, or in a seaside resort
exposed to sea breezes. Contact your dealer.
• The air-conditioner and remote control must be at least 1 metre away from a TV set or radio.
• Drain the dehumidified liquid from the indoor unit into a spot that drains well.
Pay attention to operating noises!
• When you install the unit, take care to choose a place that can comfortably stand the weight of the unit and does not increase the
operating noise or vibration. If vibration is transmitted through the house, fix the unit with the aid of vibration-proof pads between
the unit and the fittings.
• Select a place where cold or hot air, operation noises from the indoor and outdoor units do not cause any inconvenience to your
neighbours.
• Do not leave any obstacles near the outlet and inlet of the outdoor unit. This may cause malfunctioning and increased operating
noise.
• If you hear an irregular noise during operation, contact your dealer.
Inspection and maintenance
Depending on operating environment, the inside of the air-conditioner may become dirty after a few year operations. This will reduce
performance. In addition to normal cleaning, we would recommend inspection and maintenance. (This may lead the air-conditioner to
having a longer life without any trouble.)
• Contact your dealer, or any distributor, for inspection and maintenance. (There will be a charge for this service).
• We would recommend inspection and maintenance to be carried out during the off-season.
• If the supply cord of this appliance is damaged, it must only be replaced by a repair shop appointed by the manufacturer, because
special purpose tools are required.
Troubleshooting
Please carry out the following checks before making a service call.
The air-conditioner does not work at all.
Has the power switch been
turned off?
Have you set the thermostat
at a suitable temperature?
suitable
tempera-
ture
Is there any direct sunlight
entering the room?
Has the timer been set in the
“ON” position?
Poor cooling or heating
Is the air filter clean? (Not
clogged?)
Poor cooling
Is there a heat source in the
room?
Is there a power failure or a
blown fuse?
Did you leave any doors or
windows open?
Are there too many people
in the room?
If the air-conditioner does not operate properly after you have
checked the left points, or if any
doubt still exists after you have
consulted page 27, or if things
happen as shown on page 28,
switch off the power and contact
your dealer.
An alternative refrigerant (R410A) is used in this air-conditioner. When asking your
dealer for service or inspection and maintenance, explain the dealer about it.
–26–
Page 29
Notice
The unit does not restart immediately after you have
stopped it.
(RUN light is on)
Not
operating?
Airflow is not blown out when starting the HEATING operation.
RUN light blinks slowly
(1.5 sec ON, 0.5 sec OFF)
Airflow is not blown out for 5 to 15 min. or blown out not
warm wind for a moment at HEATING operation.
RUN light blinks slowly
(1.5 sec ON, 0.5 sec OFF)
Airflow is not blown out when starting the DRY operation.
(RUN light is on)
Some steam escapes during COOL operation.
There is a slight smell.
Restart is blocked for 3 minutes after you have stopped the operation to protect the unit.
Please wait for
three minutes.
The three-minute protection timer in the microcomputer automatically starts it up again.
Airflow has stopped to prevent blowing out of cold air until the
indoor heat exchanger has warmed up. (2 to 5 min.) (HOT
KEEP program)
When outdoor temperature is low and humidity is high, the unit
sometimes performs defrosting automatically. Please wait. During defrosting, water or steam may escape from the outdoor
unit.
The indoor fan may stop to prevent re-evaporation of
dehumified moisture and to save energy.
This may occur if the room's temperature and humidity are very
high. It disappears as soon as the temperature and humidity
decrease.
Air blown out during operation may smell. This is caused by
tobacco or cosmetics adhering to the unit.
You hear a slight gurgling sound.
You hear a slight cracking sound.
You hear a hissing or clicking sound.
After a power cut, the unit does not restart even if power
has been restored.
Remote control signals are not received.
Moisture may form on the air outlet grills.
Whistling noise is heard from the outdoor unit.
Fan will not stop immediately after unit operation was
stopped.
RUN light stays on even though operation was stopped.
This is caused by refrigerating liquid moving within the unit.
This is caused by heat expansion or contraction.
This is caused by the operation of the refrigerant control valves
or electric components.
If the auto restart function is not set, the unit will not restart
automatically. Use the remote control to start the operation
again.
Remote control signals may not be received if the signal
receiver on the air-conditioner is exposed to direct sunlight or
other bright light.
If so, cut out the sunlight or reduce the other light.
If the unit is operated for a long time in high humidity, moisture
may form on the air outlet grills and start dripping.
The noise means that the revolution speed of the compressor is
increasing or decreasing.
Indoor fan : Fan will not stop after 2 hours if set to CLEAN
operation.
Outdoor fan : Fan will not stop about a 1 minute period in
order to protect the unit.
The RUN light illuminates during CLEAN operation.
Run light turns off when CLEAN operation ends.
Sometimes a “Shooooo” sound might come for a short time
from the unit that is turned off.
This is the sound when operation of another indoor unit is
stopped.
–27–
Page 30

Contact your dealer
■ Turn off the power switch immediately and inform your dealer in any of the following situations:
The fuse or switch blows continuously.
The cable becomes extremely hot.
The covering of the cable is cracked.
CAUTION
Fuse often blows.
The TV, radio or other equipment
starts to malfunction.
When abnormalities occur, turn off the power supply
immediately and turn it on after 3 minutes. Restart the
operation with ON/OFF button of the remote control and the
abnormalities still continue.
If the power cord becomes damaged, ask your dealer or a qualified engineer to
install the replacement to avoid accidents.
A switch does not activate properly. You hear a strange noise during
operation.
The RUN and TIMER lights on the unit display section blink
quickly (0.5 sec. ON; 0.5 sec. OFF) and do not work.
About the Multiple Air-conditioner
Simultaneous Operation
• The air-conditioners cannot be in different operating modes at the same time, such as one unit being in the “Cool” mode and one
unit being in the “Heat” mode.
• When conducting different operations, the air-conditioner that was operated first will be given priority, so the air-conditioner that is
operated after that will conduct air blowing operation.
• When you want to give priority to the air-conditioner that was started later, either stop the air-conditioner that has priority or cause
the operation type of the unit operated first to match that of the unit operated second.
• When other indoor units are operating in different modes, the RUN light illuminates.
0.5 sec.
ON
OFF
0.5 sec.
Automatic Operation
• When the remote control operation switch is in the “Auto” mode the air-conditioner automatically selects either “Cool,” “Dry,” or
“Heat” when operation is started depending on the room temperature.
• During simultaneous operation of air-conditioner units, operation modes may be automatically changed in response to the temperatures of the individual rooms; this will result in the operation of the outdoor unit being stopped. In such a case, COOL or HEAT
mode should be used instead of AUTO. (This is only relevant when more than one air-conditioner unit is being used.)
Refrigerant (oil) recovery operation
• If the all of the indoor units are not operated at the same time for an extended period, the cooling or heating performance may
temporarily decrease. This is in order to control the recovery of the refrigerant (oil) in the stopped indoor unit(s). At this time, the
sound of refrigerant flowing may be heard from the stopped indoor unit(s).
–28–
Page 31

Self diagnosis function
■ We are constantly trying to do better service to our customers by installing such judges that show abnormality of each function as follows:
TIMER light ON
RUN light keeps flashing
RUN light
1-time flash
2-time flash
3-time flash
5-time flash
6-time flash
7-time flash
TIMER light
1-time flash
2-time flash
4-time flash
5-time flash
Description of trouble
Heat exchanger sensor 1 error
Room temperature sensor error
Heat exchanger sensor 3 error
Active filter voltage error
Indoor fan motor error
Refrigerant is insufficient
Closed service valve
Heat exchanger sensor 1 error
Outdoor temperature sensor error • Broken outdoor sensor wire, poor connector connection
Outdoor heat exchanger fluid pipe
sensor error
Discharge pipe sensor error
Suction pipe sensor error • Broken suction pipe sensor wire, poor connector connection
• Broken heat exchanger sensor 1 wire, poor connector
connection
Broken room temperature sensor wire, poor connector
•
connection
• Broken heat exchanger sensor 3 wire, poor connector
connection
• Defective power supply
• Defective fan motor, poor connector connection
Refrigerant is insufficient, leaking
•
Closed serice valve
•
Broken heat exchanger sensor 1 wire, poor connector
•
connection
•
Broken heat exchanger fluid pipe sensor wire, poor
connector connection
• Broken discharge pipe sensor wire, poor connector connection.
Cause
RUN light ON
RUN light 2-time flash
RUN light 7-time flash
1-time flash
2-time flash
3-time flash
4-time flash
5-time flash
6-time flash
7-time flash
Keep flashing
2-time flash
1-time flash
•
Current cut
Trouble of outdoor unit
Over current
Power transistor error
Over heat of compressor
Error of signal transmission
Outdoor fan motor error • Defective fan motor, poor connector connection
Cooling high pressure protection • Gas over charge, short circuit of outdoor unit
Rotor lock
Closed service valve
Compressor locking, open phase on compressor
output, shortcircuit on power transistor, closed service
valve
• Broken power transistor, broken compressor wire
• Broken discharge pipe sensor wire, poor connector connection
• Compressor blockage
• Overload operation, overcharge
• Broken power transistor
•
Gas shortage, defective discharge pipe sensor,
closed service valve
Defective power supply, Broken signal wire, defective
•
in/outdoor unit boards
• Defective compressor
• Open phase on compressor
• Defective outdoor unit boards
• Closed serice valve
–29–
Page 32

–30–
Page 33

Nous vous remercions d’avoir choisi un climatiseur MITSUBISHI HEAVY INDUSTRIES,
LTD. Pour obtenir des performances optimales et durables, veuillez lire attentivement et
respecter les instructions du présent manuel d’utilisateur avant d'utiliser votre climatiseur.
Reportez-vous au manuel si vous avez des questions ou en cas de dysfonctionnement.
Ce climatiseur est à usage domestique.
Ne laissez pas sortir du R410A dans l’atmosphère: Le R410A est un gaz à effet de
serre fl uoré, à Potentiel de Réchauffement Global (PRG, GWP Global Warming Potential) = 1975 selon le Protocole de Kyoto.
Votre unité de climatisation peut comporter ce symbole, qui signifi e que les
déchets d’équipements électriques et électroniques (DEEE selon la directive 2002/96/CE) ne doivent pas être jetés aux ordures ménagères générales.Les climatiseurs doivent être réusinés dans un établissement autorisé,
en vue de leurs réutilisation, recyclage et récupération, et non pas être
éliminés dans une décharge municipale. Pour de plus amples renseignements à ce sujet, veuillez communiquer avec l’installateur ou l’autorité municipale.
Ce symbole, imprimé sur les piles insérées dans votre appareil de climatisation, est une information destinée à l’utilisateur fi nal, selon la Directive
2006/66/CE Article 20 Annexe II de l’UE.
Les piles usées ne doivent pas être jetées avec les déchets domestiques.
Si un symbole chimique est imprimé à côté du symbole indiqué ci-dessus,
cela signifi e que les piles contiennent une certaine concentration de métal
lourd. Ceci est indiqué de la façon suivante:
Hg: mercure (0,0005%), Cd: cadmium (0,002%), Pb: plomb (0,004%)
Veuillez déposer les piles à l’endroit préconisé dans votre déchetterie locale ou dans un centre de recyclage.
FRANÇAIS
Le niveau d’émission sonore dû à la pression des appareils extérieur et intérieur est inférieur à 70 dB(A).
table des matières
Consignes de sécurité ...........................32
Description des éléments et
leurs fonctions .......................................34
Mode d’emploi de la télécommande ......36
Panne de la télécommande ...................36
Fonction de secours ..............................36
Installation de deux climatiseurs
dans la même pièce ..............................37
Sécurité enfants .....................................37
Fonctionnement et affi chage
de la télécommande ..............................38
Réglage de l’heure actuelle ...................39
Mode de fonctionnement AUTO ............39
Réglage de la température en mode
AUTO .....................................................40
FAN SPEED
(VITESSE DE VENTILATION) ...............40
Mode de fonctionnement
COOL/HEAT/DRY/FAN ..........................41
Réglage de la température de
fonctionnement du climatiseur ...............41
Particularités du mode de
fonctionnement HEAT ............................41
Réglage de l’orientation du fl ux d’air .....42
Fonctionnement en mode 3D AUTO ......42
Fonction SLEEP TIMER ........................43
Fonction OFF-TIMER ............................43
Fonction ON-TIMER ..............................44
Fonctions SLEEP TIMER +
ON-TIMER .............................................44
Fonction ON-TIMER + OFF-TIMER ......45
Fonction ALLERGEN CLEAR ................45
Fonction de la minuterie
hebdomadaire ........................................46
Fonction HIGH POWER/ECONOMY .....50
Fonction NIGHT SETBACK ...................51
Fonction SILENT ...................................51
Fonction SELF CLEAN ..........................52
Fonction de redémarrage
automatique ...........................................52
Conseils d’utilisation ..............................52
Confi guration en fonction du lieu
d’installation ...........................................53
Entretien et maintenance .......................54
Procédure d’installation .........................56
Que faire avant d’appeler
l’installateur/le service après-vente ......56
À savoir ..................................................57
Contactez votre revendeur ....................58
Climatiseurs multiples ............................58
Fonction auto-diagnostic .......................59
– 31 –
Page 34

Consignes de sécurité
Avant de mettre en route le système, veuillez lire attentivement les « Consignes de sécurité » pour le bon fonctionne-
•
ment de l’appareil.
Après avoir lu ce manuel d’instructions, conservez-le afi n de pouvoir vous y référer ultérieurement. Si l’opérateur est
•
remplacé, assurez-vous de remettre ce manuel au nouvel opérateur.
AVERTISSEMENT
PRUDENCE
Assurez-vous d’observer strictement ces consignes de sécurité, parce qu’elles constituent des informations très importantes en matière de sécurité.
Les symboles que l’on rencontre souvent dans le texte ont les signifi cations suivantes :
•
Interdiction totale
CONSIGNES DE SÉCURITÉ POUR L’INSTALLATION
❚
Ce système est destiné à un usage domestique.
•
S’il est utilisé dans des environnements diffi ciles, tels que des milieux techniques, les performances du
système peuvent en être fortement altérées.
L’appareillage doit être installé par votre concessionnaire ou par un installateur professionnel.
•
Il n’est pas recommandé d’installer le système par vous-même dans la mesure où une mauvaise manipulation peut provoquer une fuite d’eau, un choc électrique ou un incendie.
Une mauvaise manipulation pourrait avoir de sérieuses conséquences telles que
des blessures fatales, graves, etc.
Pourraient également entraîner de graves problèmes selon les circonstances.
Respectez les instructions
consciencieusement
Assurer une mise à la terre
adéquate
AVERTISSEMENT
PRUDENCE
Ne pas l’installer dans un endroit présentant un risque de fuite de gaz infl ammable.
•
Des fuites de gaz se propagent: risque d’incendie.
Selon l’emplacement choisi de l’installa-
•
tion, un disjoncteur de mise à la terre peut
s’avérer nécessaire.
Si vous n’installez pas de disjoncteur de mise à
la terre, vous vous exposez à un risque de choc
électrique.
Assurez une bonne mise à la terre.
•
Le câble de terre ne doit jamais être branché à un tuyau de gaz, à une conduite d’eau, à un paratonnerre
ou un à câble téléphonique. Risque de décharges électriques en cas de mauvaise installation.
CONSIGNES DE SÉCURITÉ POUR L’UTILISATION
❚
Veiller à installer correctement le tuyau
•
d’écoulement de sorte que toute l’eau
puisse être purgée.
Une mauvaise installation peut entraîner la chute
de gouttes d’eau dans la pièce et endommager
ainsi les meubles par cette humidifi cation.
AVERTISSEMENT
Évitez de vous exposer au courant d’air
•
froid pendant une durée prolongée.
Cela pourrait avoir une infl uence sur votre condition physique, ou causer des problèmes de santé.
N’insérez rien dans la grille d’arrivée d’air.
•
Vu que le ventilateur interne tourne à grande
vitesse, vous pourriez vous blesser.
Rangez la télécommande hors de la portée des jeunes enfants.
•
Vous éviterez ainsi qu’ils n’avalent les piles et tout autre accident.
Cet appareil n'est pas conçu pour être utilisé par des per-
•
sonnes (y compris des enfants) dont les facultés physiques, sensorielles ou mentales sont réduites, ou qui manquent d'expérience et de connaissances, à moins qu'une
personne responsable de leur sécurité ne les surveille ou
leur donne des instructions sur la manière de l'utiliser.
Les enfants doivent être surveillés pour s'assurer qu'ils ne jouent pas avec l'appareil.
N’utilisez que des fusibles approuvés.
•
Il est strictement interdit d’utiliser un fi l de fer ou
de cuivre à la place d’un fusible approuvé, afi n d’
éviter tout risque d’incident de fonctionnement
ou d’incendie.
Ne manipulez pas les interrupteurs avec les
•
mains mouillées.
Risque de décharges électriques.
Ne vous suspendez pas à l’appareil.
•
Si l’unité d’intérieur tombe, vous pouvez vous faire mal.
PRUDENCE
Ne placez pas d’insecticide infl ammable ni de
•
pulvérisateur de peinture près du souffl eur et
ne les vaporisez pas directement sur le système.
Risque d’incendie.
Les appareils à combustion ne doivent pas
•
être placés à proximité d’une sortie du climatiseur.
Risque de combustion insuffi sante de l’appareil.
– 32 –
Page 35

Consignes de sécurité
❚
Ne lavez pas le climatiseur avec de l’eau.
•
Risque de décharges électriques.
Il ne faut jamais utiliser l’appareil à d’autres
•
fi ns que celles prévues, par exemple pour la
conservation d’aliments, pour des plantes ou
des animaux, des dispositifs de précision ou
oeuvres d’art.
L’appareil ne doit être utilisé que pour des pièces ordinaires. D’autres applications peuvent
endommager la qualité des aliments, etc.
Ne mettez pas de vase ou autre objet conte-
•
nant de l’eau sur le dispositif.
Si l’eau pénètre dans l’appareil, l’isolation
électrique risque d’être détériorée. Risque de
décharges électriques.
Installez le système de sorte que le fl ux d’air
•
ne soit pas directement orienté vers des plantes ou des animaux.
Ce n’est pas bon pour leur santé.
Ne vous asseyez pas ou ne posez rien sur le
•
dispositif extérieur.
Si le dispositif ou les objets entreposés tombent, des personnes pourraient se blesser.
Vérifi ez de temps en temps l’état du support
•
du dispositif lorsque l’installation est ancienne.
Lorsque l’appareil marche en même temps
•
qu’un appareil à combustion, l’air de la
pièce doit être ventilé fréquemment.
Une ventilation insuffi sante peut provoquer un
accident par manque d’oxygène.
Utilisez un escabeau ou autre objet stable
•
pour atteindre et retirer le panneau d’arrivée d’
air ou les fi ltres.
Un objet instable pourrait s’écrouler et par
conséquent vous risqueriez de vous blesser.
Lorsque vous procédez au nettoyage du
•
système, arrêtez l’appareil et mettez-le hors
tension.
N’ouvrez jamais le panneau lorsque le ventilateur intérieur tourne.
Ne posez rien près du dispositif extérieur et
•
veillez à ce qu’il n’y ait pas d’amoncellement
de feuilles tout autour.
PRUDENCE
Si vous ne réparez pas immédiatement une
panne, l’appareil peut tomber et provoquer des
blessures.
Ne touchez pas les volets en aluminium de l’
•
échangeur de chaleur.
Risque de blessure
Ne placez aucun appareil ménager électrique
•
ni d’autre équipement ménager sous le dispositif intérieur ou extérieur.
La condensation tombant de l’appareil peut tacher des objets et provoquer des accidents ou
un choc électrique.
N'utilisez pas l'appareil sans le fi ltre à air.
•
Ceci peut causer un dysfonctionnements du
système à cause de l'encrassement de l'échangeur de chaleur.
Ne coupez pas l'alimentation immédiatement
•
après l'arrêt du fonctionnement.
Attendez au moins 5 minutes, sinon il y a a un
risque de fuite d'eau ou de panne.
Ne contrôlez pas le système avec l'interrup-
•
teur principal allumé.
Cela peut entraîner un incendie ou une fuite
d'eau. De plus, le ventilateur peut se mettre en
marche de façon imprévisible, ce qui peut causer des blessures.
Si des objets ou des feuilles se trouvent près du
dispositif extérieur, de petits animaux risquent
de pénétrer dans l’appareil et de toucher des
pièces électriques pouvant générer une panne,
de la fumée ou un incendie.
Contactez votre revendeur pour nettoyer l’
•
intérieur du dispositif interne. N’essayez pas
de le faire par vous-même.
L’utilisation d’un détergent non approuvé ou d’
une méthode de nettoyage inappropriée peut
endommager les composants plastiques de l’
appareil et entraîner des fuites. Tout contact du
détergent avec des composants électriques ou
le moteur de l'appareil peut générer une panne,
de la fumée ou un incendie.
Arrêtez l’appareil et mettez-le hors tension si
•
vous entendez le tonnerre ou en cas de risque
de foudre.
Risque d’endommager l’appareil.
PRÉCAUTIONS POUR LE DÉPLACEMENT OU LES RÉPARATIONS DE L’APPAREIL
❚
Ne réparez ou ne modifi ez jamais l'appareil par vous-même. Consultez votre distributeur si
•
l'appareil a besoin d'être réparé.
Si vous réparez ou modifi ez l'appareil, ceci peut causer des fuites d'eau, électrocutions ou incendies.
Contactez votre revendeur pour toute répara-
•
tion de l’appareil.
Des réparations inadéquates peuvent provoquer des décharges électriques, incendies, etc.
Si le climatiseur doit être déplacé, contactez vo-
•
tre revendeur ou un installateur professionnel.
Une installation inadéquate peut entraîner des
fuites d’eau, des décharges électriques, des
incendies, etc.
Si vous remarquez la moindre anomalie (odeur
•
de brûlé, etc.), arrêtez l’appareil, mettez-le
hors tension et contactez votre revendeur.
Le fonctionnement continu en cas de conditions
anormales peut provoquer le dysfonctionnement, des décharges électriques, des incendies, etc.
AVERTISSEMENT
Le fait que le climatiseur ne refroidisse/ré-
•
chauffe plus la pièce peut indiquer une fuite de
réfrigérant. Contactez votre revendeur.
S’il faut ajouter du réfrigérant, vérifi ez avec votre revendeur la procédure correcte à suivre.
Si le réfrigérant entre en contact avec la peau
nue, il peut provoquer une blessure due au froid.
Si le gaz réfrigérant est inhalé avec excès, il
peut provoquer une détérioration de la fonction nerveuse se traduisant par des vertiges et
des maux de tête, ou une détérioration de la
fonction cardiaque se traduisant par des battements de cœur irréguliers et des palpitations
cardiaques, d'une durée temporaire. Une fuite
accidentelle de réfrigérant sur un appareil de
chauffage, un réchaud, une plaque chauffante
ou toute autre source de chaleur, peut générer
des substances nocives.
– 33 –
Page 36

Description des éléments et leurs fonctions
DISPOSITIF INTÉRIEUR
Panneau d’arrivée d’air
Réceptionne l’air intérieur.
Filtre à air
Filtre les poussières ou salissures de l’air aspiré.
Filtre de nettoyage d’air
Capteur de température ambiante
Échangeur de chaleur
Sortie de l’air
Souffl age par volet motorisé.
Ventilateur du dispositif intérieur
Louvre de réglage du sens gauche/droit du fl ux d’air
Volet motorisé
Page 54
Page 54
Page 55
Page 42
DISPOSITIF EXTÉRIEUR
Page 42
Tuyau d’écoulement
Purge l’eau du dispositif intérieur.
Tuyaux de réfrigérant et câble électrique
Arrivée d’air
(Surface arrière & latérale)
Sortie d’air
Ventilateur du dispositif extérieur
Échangeur de chaleur
– 34 –
Page 37

Description des éléments et leurs fonctions
Panneau de contrôle
Récepteur signal télécommande
Interrupteur ON/OFF de l’unité
Ce bouton vous permet d’allumer/arrêter l’appareil lorsque vous ne pouvez pas le faire à l’aide de la télécommande.
Page 36
Voyant RUN (HOT KEEP) (vert)
S’allume en fonctionnement.
•
Clignote lorsque le fl ux d’air s’arrête suite aux
•
opérations « HOT KEEP », « CLEAN » et
« Mode d’opération invalide ».
1.5 sec.
HOT KEEP
Mode CLEAN
Page 52
ON
OFF
ON
OFF
0.5 sec.
3 sec.
1 sec.
Accessories
Mode d’opération
invalide
0.5 sec.
ON
OFF
0.5 sec.
Page 58
Filtre hypoallergénique
(Orange pâle)
Voyant 3D AUTO (vert)
Éclairé en mode 3D AUTO.
Voyant HI POWER (vert)
Éclairé en mode HIGH POWER.
Voyant TIMER (jaune)
S’allume en mode TIMER.
Pile
(R03(AAA, Micro)×2)
Télécommande sans fi l Porte télécommande
NOTA
Signal sonore pour la télécommande
•
Avec une température préréglée de 24°C, le mode automatique et le fl ux d’air automatique sont sélectionnés, un signal sonore (bip
bip) est émis.
Lors de l’arrêt du climatiseur par une pression sur le bouton MARCHE/ARRÊT (sauf en mode CLEAN), un signal sonore (bip)
est émis.
Cette fonction est utile pour utiliser le climatiseur dans l’obscurité.
Réglage du fl ux d’air
sans fi l
Filtre photocatalytique désodorisant
lavable (Orange)
Température préréglée
– 35 –
Vis à bois (Quantité : 2)
(pour le montage du porte télé-
commande)
Page 38

Mode d’emploi de la télécommande
Remplacement des piles
Dans les cas suivants vos piles sont usagées. Remplacez les piles usées par des piles neuves.
Aucun « bip » n’est émis lorsque le signal est transmis par la télécommande au dispositif intérieur.
•
Le contraste de l’affi chage est faible.
•
NOTA
Ouvrir le couvercle et retirer
1
les piles usagées.
Insérez les piles neuves.
2
R03 (AAA, Micro) x2
Veillez à respecter
la polarité
( et )
Ne mélangez pas les piles usagées et les piles neuves.
•
Enlevez les piles quand vous n’utilisez pas la télécom mande pendant une longue
•
période.
La durée de vie d’une pile conforme aux normes JIS ou IEC est de 6 à 12 mois en
•
utilisation normale. Si on l’utilise plus longtemps ou si on utilise une pile non spécifi ée, une substance liquide pourrait couler de la pile entraînant le non fonctionnement de la télécommande.
La durée de vie moyenne est indiquée sur la pile. Elle peut être moins longue
•
en raison de la date de fabrication de l’appareil. Toutefois la pile peut durer plus
longtemps que prévu.
Si l’affichage indique un dysfonctionnement, appuyez sur l’interrupteur
■
ACL avec la pointe d’un stylo à bille.
L’utilisation du support de boitier de télécommande
Refermez le couvercle.
3
Appuyez sur l’interrupteur
4
ACL avec la pointe d’un stylo
bille.
Page 39
La télécommande peut être utilisée en la fixant sur
un mur ou un poteau à l’aide d’un support (un portetélécom-mande). Dans ce cas, il faudra mettre la télécommande en place en s’assurant que les signaux de
contrôle émis de celle-ci vers le dispositif intérieur sont
bien transmis.
Pour sortir et remettre la télécommande, il suffi t de la
glisser le long du porte-télécommande.
Remarques concernant l’usage de la télécommande
Interdiction totale
Ne la mettez pas à proximité d’appa-
•
reils électriques, un poêle ou d’autres
appareils dégageant une temp. élevée.
Ne mettez pas d’obstacles entre la
•
télécommande et le dispositif.
Evitez de la mettre à un endroit
•
non protégé contre la lumière solaire directe / l’éclairage puissant.
Protégez la télécommande de tout
•
type d’éclaboussures.
Attention, ne la laissez pas tomber.
•
Ne placez pas d’objets lourds sur la
•
Panne de la télécommande
Est-ce que les piles ne sont pas trop faibles?
•
Voir « Remplacer les piles » ci-dessus.
Remplacez les piles usagées par des piles neuves puis répé-
tez la procédure.
Si l’appareil ne fonctionne toujours pas,
•
actionnez la fonction de secours.
Contactez votre revendeur pour que votre télécommande soit véri-
fi é e .
Elle risque d’être endommagée.
télécommande et ne marchez pas
dessus.
Ci-dessous.
Fonction de secours
La touche ON/OFF de l’unité permet d’actionner ON/OFF de l’appareil temporairement quand on n’utilise pas la télécommande.
•
Types de fonctionnement
OPERATION MODE : AUTO
•
FAN SPEED : AUTO
•
AIR FLOW : AUTO
•
L’appareil se met en route en appuyant sur la touche ON/OFF de l’unité,
•
en réappuyant il s’arrête.
NOTA
Ne maintenez pas le bouton ON/OFF de l’appareil enfoncé pendant plus de 5 secondes.
•
(Maintenir ce bouton enfoncé pendant plus de 5 secondes déclenche la climatisation automatique utilisée pour l’entretien ou le
déplacement du climatiseur.)
Interrupteur ON/OFF de l’unité
– 36 –
Page 39

Installation de deux climatiseurs dans la même pièce
Lorsque deux climatiseurs sont installés dans la même pièce, utilisez ces réglages alors que les deux climatiseurs ont été éteints avec
■
une télécommande. Réglez la télécommande et le dispositif interne.
Réglage de la télécommande
Ouvrez le couvercle et retirez
1
les piles.
Coupez le commutateur à proximité
2
de la pile à l’aide d’un coupe-fi l.
Coupez
Insérez les piles.
3
Refermez le couvercle.
Réglages d’un dispositif interne
Coupez l’alimentation et remettez-la au bout d’une
1
minute.
Dirigez la télécommande qui a été réglée selon la
2
procédure décrite à la gauche de cette page en direction du dispositif interne et envoyez un signal en appuyant sur l’interrupteur ACL de la télécommande.
Étant donné que le signal
est envoyé environ 6 secondes après avoir appuyé
sur l’interrupteur ACL,
dirigez la télécommande
en direction du dispositif
interne pendant quelques
instants.
Assurez-vous que le dispositif interne émet le signal
3
sonore de réception « bip »
À la fin du réglage, le dispositif interne émet un « bip » comme
signal sonore. (Si aucune tonalité de réception n’est émise, recommencez le réglage depuis le début.)
.
Réception
bip
Sécurité enfants
Cette fonction verrouille le fonctionnement de la télécommande afi n d’empêcher toute erreur de fonctionnement.
■
Dirigez la télécommande en direction du climatiseur, et
1
Procédure de désactivation
Éteignez le témoin en appuyant sur le bouton SET pendant 3 secondes ou plus.
•
•
Appuyez sur le bouton SET pendant 3 secondes ou
plus.
est affi ché. Lorsque la Sécurité enfants est activée, seul le bouton ON/OFF
peut être actionné.
NOTA
Lorsque la Sécurité enfants est activée, les réglages de la température, de
la vitesse du ventilateur et de la direction du souffl e ne peuvent pas être
changés. Pour changer les réglages, réinitialisez la Sécurité enfants.
La Sécurité enfants n’est pas disponible pendant le fonctionnement en
mode ALLERGEN CLEAR.
– 37 –
Page 40

Fonctionnement et affi chage de la télécommande
Boutons
Bouton de sélection OPERATION MODE
À chaque fois que vous appuyez sur
cette touche, le mode change.
Bouton TEMP (=réglage température)
Ce bouton règle la température de la
pièce.
Bouton HI/ECO
Ce bouton change la fonction HIGH
POWER/ECONOMY.
Bouton AIR FLOW (LEFT/RIGHT)
Ce bouton permet de changer la direction du
fl ux d’air (gauche/droite).
Bouton SILENT
Ce bouton change la fonction SILENT.
Bouton ALLERGEN CLEAR
Ce bouton sélectionne le fonctionnement
ALLERGEN CLEAR (hypoallergénique).
Page 39,41
Page 50
Page 42
Page 51
Page 45
Section de transmission
Bouton ON/OFF (lumineux)
Appuyez sur ce bouton pour mettre l’
appareil en marche, et appuyez de nouveau sur ce bouton pour l’arrêter.
Bouton FAN SPEED
Chaque fois que vous appuyez sur ce
bouton, la vitesse du ventilateur change.
Page 40
Bouton AIR FLOW (UP/DOWN)
Ce bouton permet de changer la direction du fl ux d’air (haut/bas)
Page 42
Bouton 3D AUTO
Ce bouton permet de sélectionner le mode
3D AUTO.
Page 42
Bouton NIGHT SETBACK
Ce bouton active le mode NIGHT SETBACK.
Page 51
Bouton SET/Sécurité enfants
Utilisez ce bouton pour régler la minuterie et la Sécurité enfants.
Page 37
Bouton ON TIMER
Ce bouton sert à régler la fonction ON TIMER.
Page 44
Bouton OFF TIMER
Ce bouton sert à régler la fonction OFF
TIMER.
Page 43
WEEKLY button
Ce bouton fait passer le mode de la
minuterie hebdomadaire en ON/OFF.
Page 46
Sélecteur CLEAN
Ce bouton sélectionne le mode CLEAN.
Page 52
Bouton SLEEP
Ce bouton permet de sélectionner le mode
.
SLEEP
Page 43
La figure ci-dessus montre toutes les indications
•
dans le but d’expliquer; dans la pratique seuls les
éléments pertinents ont été indiqués.
Bouton CANCEL
Ce bouton annule les minuteurs ON et
OFF et le mode SLEEP.
Bouton TIMER
Ce bouton permet de régler l’heure actuelle et de confi gurer la fonction de la
minuterie.
Bouton PROGRAM
Ce bouton active le mode de la minuterie
hebdomadaire.
Page 46
Interrupteur ACL
Interrupteur de réinitialisation du microordinateur.
Page 36
Sélecteur TIME SET UP
Ce bouton sert à régler l’heure.
Page 39
Transmission des signaux
Lorsqu’on appuie sur une touche de sélection ou de réglage alors que la télécommande est pointée vers l’unité intérieure, un signal d’actualisation est
envoyé vers le climatiseur.
Lorsqu’il est correctement reçu, l’appareil émet un « BIP » de réception.
– 38 –
Page 41

Réglage de l’heure actuelle
Lorsque vous insérez les piles, l’appareil passe automatiquement en mode de réglage de l’heure. Mon (lundi) 13:00 est affi chée comme
■
heure actuelle. Réglez l’horloge pour affi cher le jour de la semaine et l’heure exacts.
Exemple: Réglé sur Sat (samedi) 10:30.
Appuyez sur l’interrupteur TIME SET UP.
1
2
3
4
5
NOTA
Utilisez le bout d’un stylo à pointe bille, etc.
Le jour de la semaine clignote, ce qui indique qu’il peut être réglé
Appuyez sur le bouton “ ou (TIMER)”.
(Réglé sur Sat (samedi))
Appuyez sur le bouton SET.
Le jour de la semaine affi ché arrête de clignoter, ce qui permet de terminer
la procédure du réglage du jour de la semaine. Dès lors, l’heure affi chée se
met à clignoter.
Veillez à appuyer sur ce bouton dans un délai de 60 secondes après avoir effectué l’étape 2 afi n que le réglage du jour de la semaine soit pris en compte.
Appuyez sur le bouton “ ou (TIMER)”.
(Réglé sur 10:30)
Appuyez sur le bouton SET.
L’heure affi chée arrête de clignoter une fois la procédure de réglage terminée.
Veillez à appuyer sur ce bouton dans un délai de 60 secondes après avoir
effectué l’étape 4 afi n que le réglage de l’heure soit pris en compte.
La minuterie est programmée à partir de l’horloge, veuillez
•
donc régler celle-ci correctement.
Les données de la télécommande sont réinitialisées quand l’
•
heure est réglée.
Mode de fonctionnement AUTO
Sélectionne automatiquement le type de fonction (COOL,HEAT, DRY) , en fonction de la température ambiante au départ.
■
Il peut se produire une tempori-
•
Lorsque le fi ltre d’épuration livré
•
Affi chage à l’ARRÊT
L’heure, le jour de la semaine, et le mode de
•
fonctionnement actuels sont affi chés lorsque
le climatiseur est éteint.
Quand le dispositif n’est pas branché sur AUTO:
1
Appuyez sur la touche MODE.
À chaque fois que vous appuyez sur ce bouton, le mode change.
Réglez sur
Dirigez la télécommande en direction du climatiseur, et
Appuyez sur la touche ON/OFF.
2
NOTA
sation du fl ux d’air dans certains
cas.
est installé, le climatiseur purifi e
l’air pendant le fonctionnement
automatique.
Page 57
– 39 –
Lorsque les piles de la télécommande sont changées ou
•
après avoir appuyé sur l’interrupteur ACL, la télécommande
est réinitialisée. Le programme de la minuterie hebdomadaire n’étant pas réglé à l’état de réinitialisation, réglez le
programme selon la procédure de réglage.
.
Pour arrêter: Appuyez sur la touche ON/OFF.
La fois d’après il est
possible d’actionner
le mode AUTO en
appuyant simple-ment
sur la touche ON/OFF.
Si vous ne souhaitez pas utiliser le mode AUTO, pas-
•
sez en mode COOL, HEAT, DRY ou FAN.
Page 41
Réglage de la direction du souffl e.
•
Page 42
Page 42

Réglage de la température en mode AUTO
Le réglage de la température de l’air est possible même pendant le fonctionnement en mode automatique. Il y a 6 niveaux de réglage
■
possibles à l’aide du bouton
ou du bouton . En mode automatique, 24°C est préréglé pour le chauffage et le refroidissement.
Pour changer la température :
1
Quand il fait un petit peu froid
Appuyez sur le bouton
À chaque fois que vous appuyez sur le bouton
■
Quand il fait un petit peu chaud
Appuyez sur le bouton
À chaque fois que vous appuyez sur le bouton
■
Quand vous voyez -6, même si vous appuyez sur le bouton , le témoin ne change pas.
Réglage de la
température (°C)
Appuyez sur le bouton “ ou (TIMER)”.
, vous passez à la fonction
suivante, dans l’ordre
–6 → –5 → ............ –1 → ±0 → +1 ............ +6.
Quand vous voyez +6, même si vous appuyez sur le bouton , le témoin ne change pas.
, vous passez à la fonction
suivante, dans l’ordre
+6 → +5 → ............ +1 → ±0 → –1 ............ –6.
Affi chage de la télécommande
-6 -5 -4 -3 -2 -1 +0 +1 +2 +3 +4 +5 +6
18 19 20 21 22 23 24 25 26 27 28 29 30
FAN SPEED (VITESSE DE VENTILATION)
Vous pouvez choisir la capacité de votre climatiseur en mode chauffage, refroidissement ou ventilation.
■
Dirigez la télécommande en direction du climatiseur, et
1
Force de fonctionnement à votre choix
Réglé automatiquement par micro-ordinateur AUTO
Fonctionnement silencieux ULO
Fonctionnement avec économie d’énergie LO
Fonctionnement standard MED
Fonctionnement très puissant en position de force élevée
•
Appuyez sur le bouton FAN SPEED.
Chaque fois que vous appuyez sur ce bouton, la vitesse du ventilateur
change.
AUTO HIMEDLOULO
NOTE
Lorsque FANSPEED passe de HI à LO ou ULO, il se peut que vous en-
tendiez le réfrigérant couler.
FAN SPEED (VITESSE DU VENTILATEUR)
HI
– 40 –
Page 43
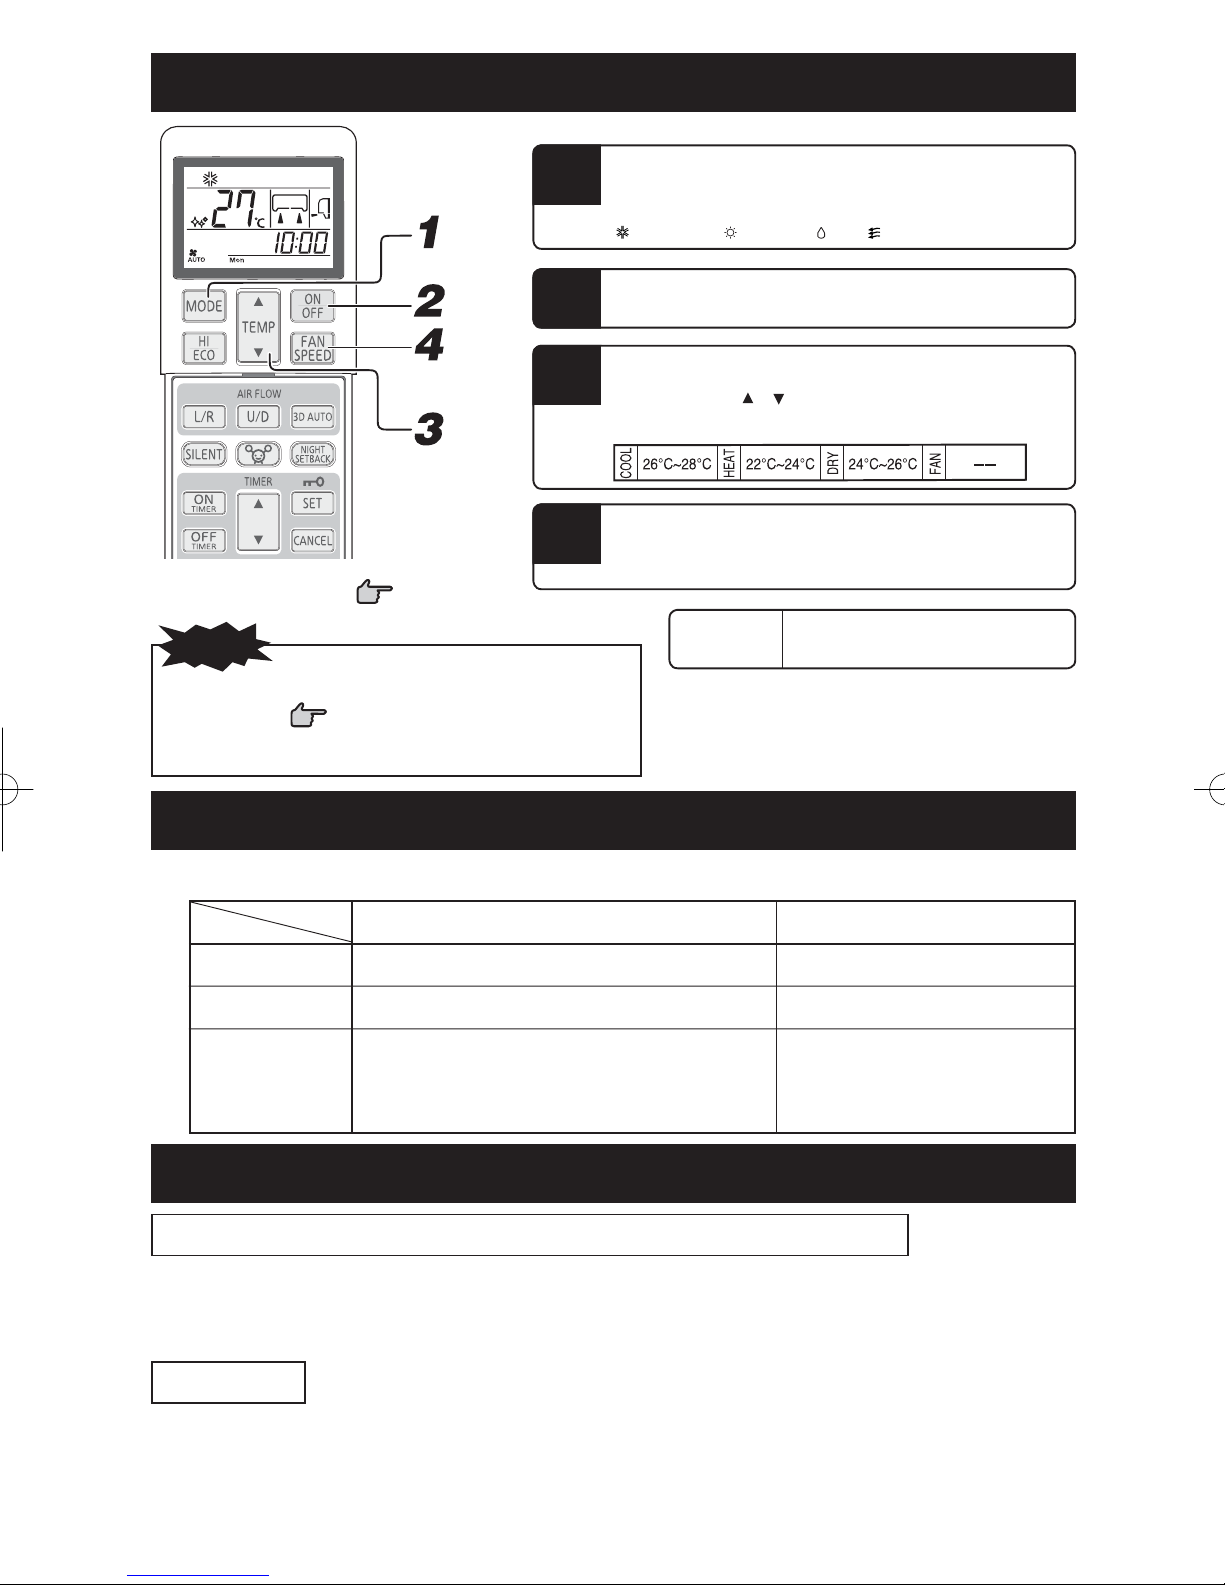
Mode de fonctionnement COOL/HEAT/DRY/FAN
Dirigez la télécommande en direction du climatiseur, et
1
2
3
4
Réglage de la direction du souffl e. Page 42
NOTA
Il peut se produire une temporisation du fl ux d’air au démarrage
•
du chauffage.
• Même si le climatiseur est hors service, vous pouvez réglez ou
modifi ez le mode de fonctionnement.
Page 57
Appuyez sur la touche de sélection MODE.
Réglez sur le mode souhaité.
(Réfrigération), (Chauffage), (Sec), (Ventilation)
Appuyez sur la touche ON/OFF.
Appuyez sur la touche TEMP.
Appuyez sur le bouton ou pour régler l’appareil à la température souhaitée.
Recommandation
Appuyez sur la touche FAN SPEED.
Réglez le ventilateur à la vitesse souhaitée.
La vitesse du ventilateur ne peut pas être réglée lorsque le ventilateur est
en mode Dry.
Pour arrêter: Appuyez sur la touche ON/OFF.
Réglage de la température de fonctionnement du climatiseur
Utilisez-le uniquement selon la fourchette de fonctionnement suivante. Autrement les dispositifs de protection s’activeront et empê-
■
cheront l’appareil de fonctionner.
Refroidissement Chauffage
Température extérieure
Température intérieure
Inférieure à environ 80%
De la condensation se formera sur la surface de l’appareil
Humidité intérieure intérieur et des gouttelettes tomberont lors de l’utilisation
prolongée de l’appareil alors que l’humidité est supérieure
à 80%.
Entre environ -15 et 46°C Entre environ -15 et 24°C
Entre environ 18 et 32°C Entre environ 15 et 30°C
—
Particularités du mode de fonctionnement HEAT
Mécanisme et capacité du mode de fonctionnement HEAT
Mécanisme
■
L’appareil aspire la chaleur de l’air froid extérieur, la transvase à l’intérieur et chauffe la pièce. Comme tout système de pompe à cha-
•
leur, la capacité de chauffage diminue à mesure que la température extérieure baisse.
L’arrivée d’air chaud peut prendre quelques minutes après la mise en marche du climatiseur.
•
Utilisez en même temps un autre type de chauffage si la température extérieure est extrêmement basse.
•
Dégivrage
Quand la température extérieure est peu élevée et l’humidité forte, l’échangeur de chaleur risque de geler, empêchant le bon fonctionnement de chauffage.
Dans ce cas, la fonction de dégivrage automatique se met en marche et arrête le chauffage pendant 5 à 15 minutes pour dégivrer.
Les ventilateurs intérieur et extérieur s’arrêtent et le voyant RUN clignote lentement (1.5 sec ON, 0.5 sec OFF) pendant le dégivrage.
•
Le dispositif extérieur peut dégager de la vapeur. Cela a lieu dans le but de dégivrer plus rapidement, ce n’est pas un défaut.
•
La fonction HEAT reprend après le dégivrage complet.
•
– 41 –
Page 44
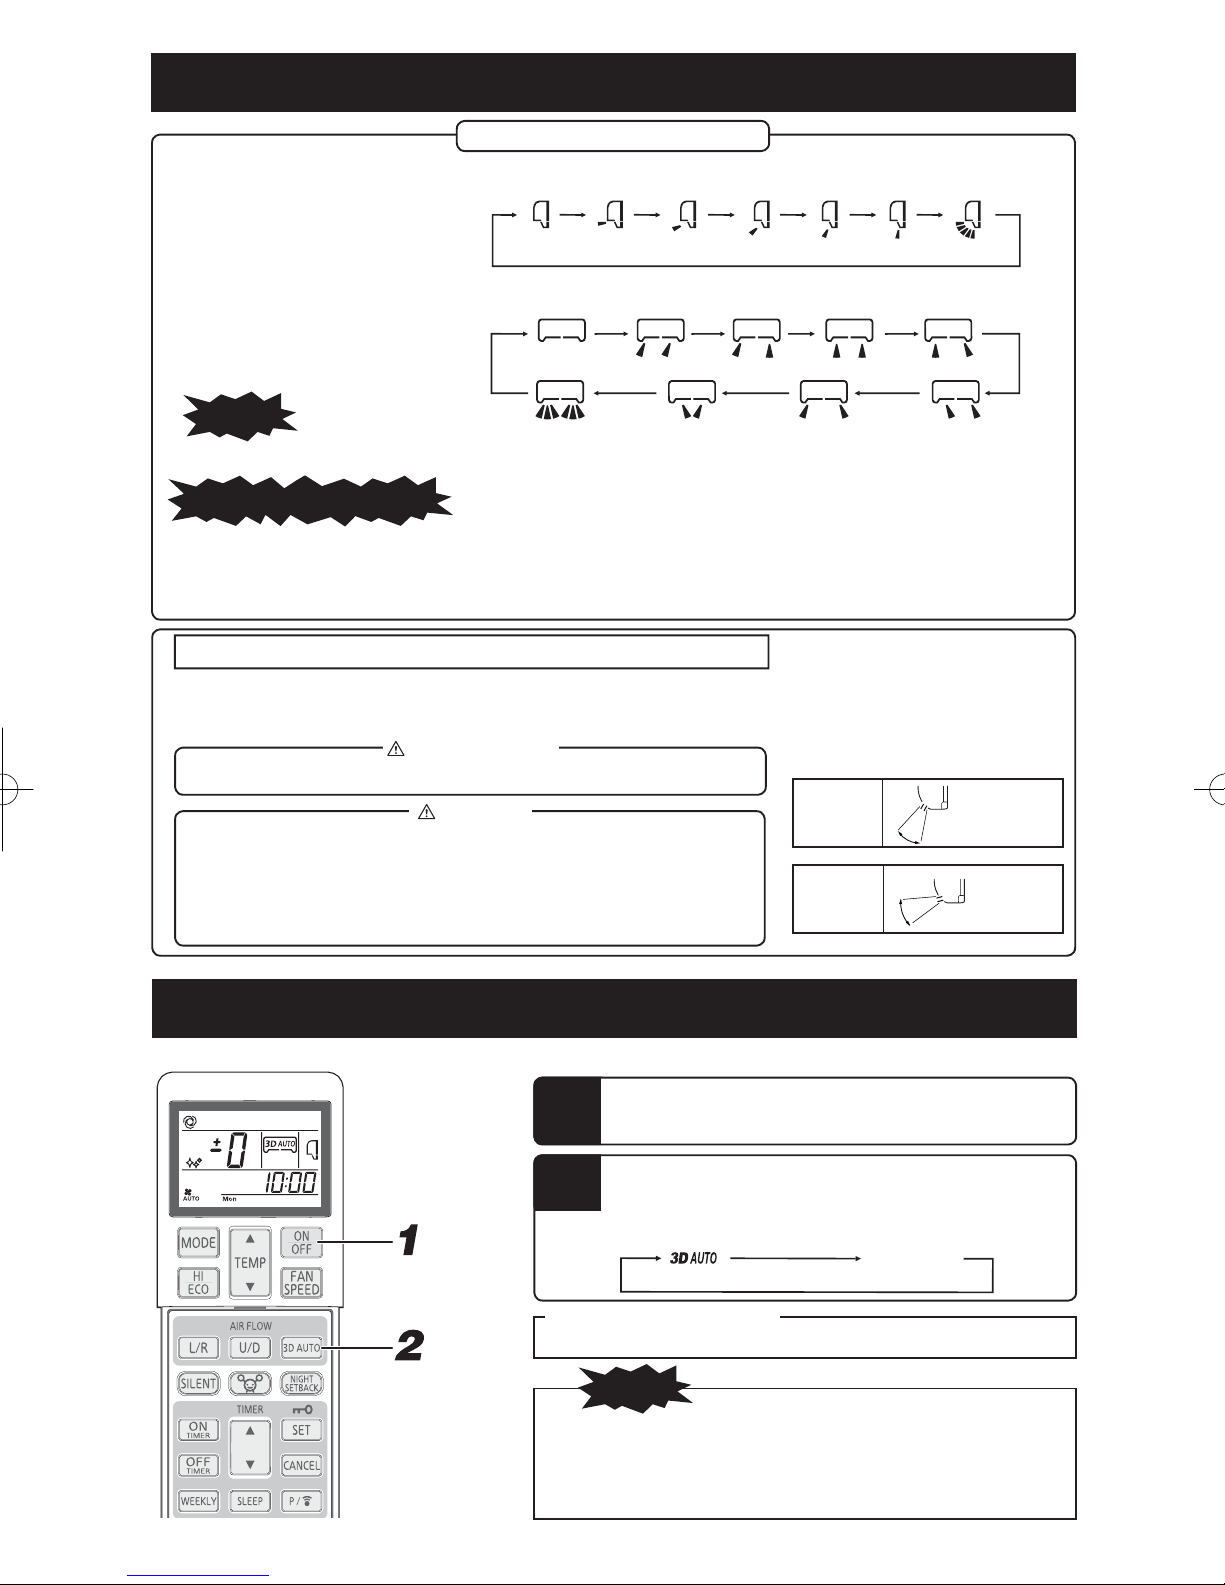
Réglage de l’orientation du fl ux d’air
Ajuster la direction du souffl e
Vous pouvez ajuster le souffl e vers le haut ou le bas grâce au bouton AIRFLOW U/D (UP/DOWN) de la télécommande. Chaque
■
fois que vous appuyez sur ce bouton, le mode change comme suit :
Mode AIRFLOW (UP/DOWN).
(Stoppé)
Vous pouvez ajuster le souffl e droite/gauche grâce au bouton AIRFLOW L/R (LEFT/RIGHT) de la télécommande. Chaque fois que
■
vous appuyez sur ce bouton, le mode change comme suit :
Mode AIRFLOW (LEFT/RIGHT).
(Stoppé)
NOTA
La position réelle du volet et de la grille de transfert peut être différente de celle indiquée.
•
NOTA POUR LE FONCTIONNEMENT DU CHAUFFAGE
Lorsque le chauffage est mis en route, le volet et le louvre se mettent en position horizontale/centrale afi n d’éviter de souffl er de l’air froid, et revien-
•
nent leur position initialement réglée une fois que l’air chaud commence à sortir.
Le volet et le louvre se mettent en position horizontale/centrale lorsque la température de la pièce atteint la température réglée et que le compresseur s’
•
arrête, ou lorsque l’appareil est en mode Dégivrage.
L’orientation du fl ux d’air ne peut pas être réglée dans les cas précédemment mentionnés. Modifi ez les réglages d’orientation du fl ux d’air après l’arri-
•
vée de l’air chaud et une fois que le volet/louvre revient dans sa position initialement réglée.
(Bascule)
Bascule
(
)
MEMORY FLAP (FLAP OR LOUVER STOPPED)
Lorsque vous appuyez sur le bouton AIRFLOW (U/D ou L/R) une fois que le volet ou le louvre fonctionne, il arrête de basculer d’angle en angle. Dans
la mesure où cet angle est mémorisé dans le micro-ordinateur, le volet ou le louvre se règlera automatiquement sur cet angle au prochain démarrage.
Comme cet angle est mémorisé dans le micro ordinateur, le volet ou le louver se règlera automatiquement sur cet angle quand commencera l’opération suivante.
N’exposez aucun objet directement au fl ux d’air du climatiseur pendant une
AVERTISSEMENT
•
durée prolongée.
PRUDENCE
En mode COOL ou DRY, ne faites pas fonctionner l’appareil avec le fl ux d’air
•
orienté vers le bas pendant une période prolongée afi n de ne pas produire de
condensation sur la grille de sortie qui goutterait alors sur le sol.
condensation risque de se former sur la grille de sortie et de goutter sur le sol.
N’essayez pas de régler les volets et les louvres à la main car l’angle de contrôle
•
pourrait être modifi é, ou le volet/louvre pourrait ne pas se refermer complètement.
Sinon, de la
L’angle d’arrêt du volet conseillé
•
HEAT
COOL, DRY
(Incliné)
(Horizontal)
Fonctionnement en mode 3D AUTO
La force de ventilation et la direction du souffl e sont automatiquement contrôlées, permettant ainsi à la pièce toute entière d’être effi cacement climatisée.
■
1
Appuyez sur le bouton ON/OFF.
2
Procédure de désactivation
Appuyez sur le bouton 3D AUTO pour désactiver l’affi chage 3D AUTO.
Le mode 3D AUTO se désactive lorsque vous changez de mode de fonc-
•
Si le fonctionnement en mode 3D AUTO est annulé, la direction du souf-
•
Le mode 3D AUTO ne peut être réglé qu’en mode AUTO, COOL, ou HEAT.
•
Appuyez sur le bouton 3D AUTO.
À chaque fois que vous appuyez sur le bouton 3D AUTO, l’affi chage change
comme suit :
Pas d’affi chage
(Fonctionnement normal)(3D AUTO)
NOTA
tionnement.
fl e changera pour revenir à celle sélectionnée avant l’activation du mode
3D AUTO.
– 42 –
Page 45

Fonction SLEEP TIMER
L’appareil s’arrête automatiquement une fois que la minuterie a atteint le temps préréglé.
■
La température se règle automatiquement par rapport au temps passé afi n d’éviter que la pièce ne soit trop froide/chaude.
Page 45
Modifi cation du réglage
Appuyez sur le bouton SLEEP pour prérégler
une nouvelle durée de fonctionnement.
Comment annuler votre réglage
Appuyez sur le bouton CANCEL pour désactiver
l’affi chage SLEEP.
1
Appuyez sur le bouton SLEEP.
■
Si vous appuyez sur ce bouton lorsque l’appareil est éteint,
le mode SLEEP TIMER démarre selon les réglages précédemment effectués,
et la climatisation s’arrête une fois que la minuterie a atteint le temps préréglé.
■
Si vous appuyez sur ce bouton lorsque l’appareil est en marche,
le climatiseur s’éteint une fois que la minuterie a atteint le temps préréglé.
Chaque fois que vous appuyez sur ce bouton, l’indication change comme suit :
... (Unités d’une heure)
Pas d’affichage
(annulé)
Exemple : Vous souhaitez qu’il s’arrête au bout de 7 heures.
Réglé sur
Le témoin minuteur (jaune) est allumé.
L’appareil s’arrête une fois que la minuterie a atteint le temps préréglé.
•
NOTA
Le mode SLEEP n’est pas disponible pendant le fonctionnement en
•
mode ALLERGEN CLEAR.
Vous ne pouvez pas régler le mode SLEEP lorsque l’appareil est en
•
mode OFF-TIMER.
Fonction OFF-TIMER
L’appareil s’arrête automatiquement une fois que la minuterie a atteint l’heure préréglée.
■
Le climatiseur étant arrêté, démarrez l’opération à l’étape 1. Si le climatiseur est en marche, commencez à l’étape 2.
Modifi cation du réglage
Réglez sur une nouvelle heure avec le bouton
OFF- TIMER.
Comment annuler votre réglage
Appuyez sur le bouton CANCEL pour faire disparaître l’affi chage de la minuterie.
Exemple : Vous souhaitez qu’il s’arrête à 22:30.
1
2
3
4
•
•
•
•
•
Appuyez sur le bouton ON/OFF.
Appuyez sur le bouton OFF-TIMER.
L’indicateur OFF TIMER clignote.
Appuyez sur le bouton “ ou (TIMER)”.
Chaque fois que vous appuyez sur ce bouton , l’affi chage change comme suit :
0:00 0:10 0:20
Chaque fois que vous appuyez sur ce bouton , l’affi chage change comme suit :
0:00 23:50 23:40
Réglage à 22h30.
Appuyez sur le bouton SET.
L’heure affi chée arrête de clignoter une fois la procédure de réglage de l’
heure terminée.
Le voyant de la minuterie (jaune) s’allume.
NOTA
L’appareil s’arrête lorsque le temps défi ni s’est écoulé.
Veillez à appuyer sur ce bouton dans un délai de 60 secondes après
avoir effectué l’étape 3 afi n que le réglage de l’heure soit pris en compte.
L’heure actuelle ne s’affi che pas en mode OFF-TIMER.
Le mode OFF-TIMER n’est pas disponible pendant le fonctionnement en
mode ALLERGEN CLEAR.
Contrairement au mode SLEEP TIMER, le réglage automatique de la
température ne peut pas être effectué en mode OFF-TIMER.
...
...
1:00 1:10
23:00 22:50
(unités de dix
minutes)
(unités de dix
minutes)
– 43 –
Page 46
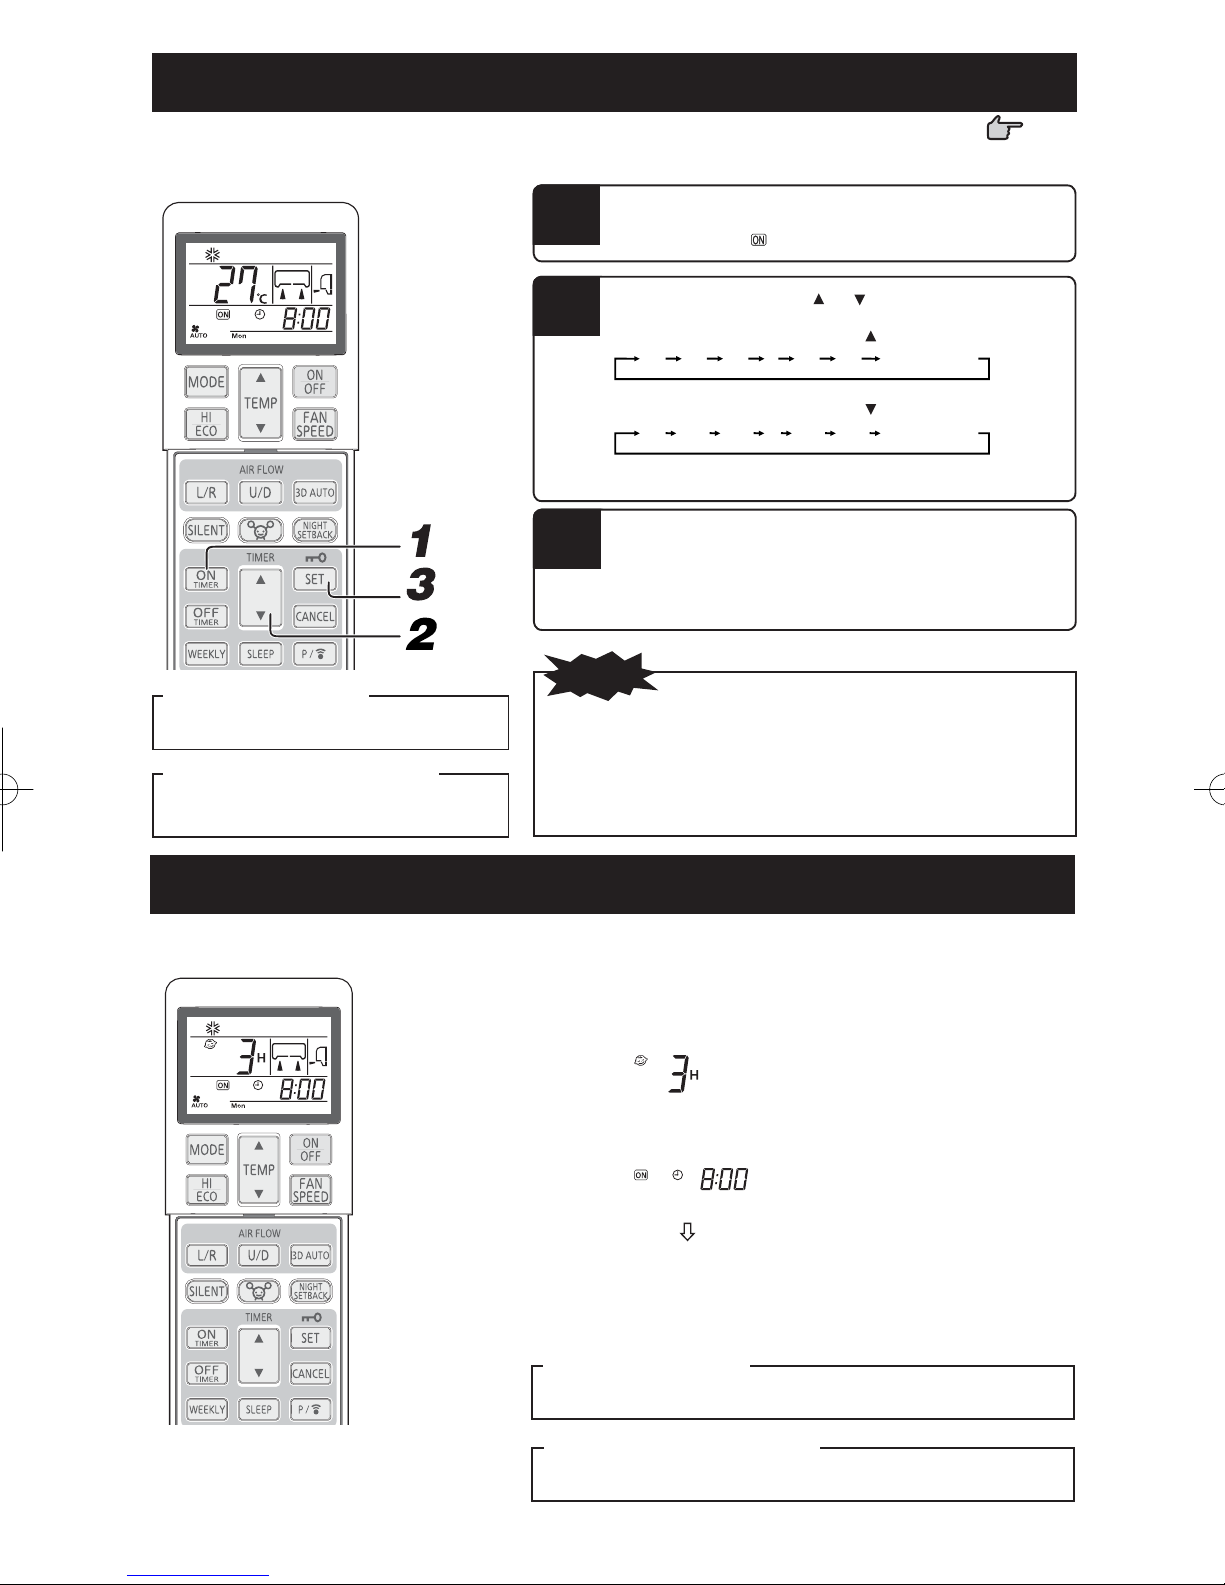
Fonction ON-TIMER
La mise en marche de l’appareil débute 5 à 60 minutes avant l’heure préréglée afi n que la température de la pièce atteigne la température optimale à cette heure préréglée. Page 45
■
Le fonctionnement ON-TIMER peut être réglé que le climatiseur soit ou non en fonctionnement.
Exemple : Si vous souhaitez que la pièce soit à la température souhaitée à 8:00.
Appuyez sur le bouton ON-TIMER.
1
L’indicateur ON TIMER clignote.
Appuyez sur le bouton “ ou (TIMER)”.
2
Chaque fois que vous appuyez sur ce bouton , l’affi chage change comme suit :
0:00 0:10 0:20
...
1:00 1:10
(unités de dix
minutes)
Chaque fois que vous appuyez sur ce bouton , l’affi chage change comme suit :
0:00 23:50 23:40
Réglage à 8:00.
...
23:00 22:50
Appuyez sur le bouton SET.
Modifi cation du réglage
Réglez sur une nouvelle heure avec le bouton
ON-TIMER.
Comment annuler votre réglage
Appuyez sur le bouton CANCEL pour faire disparaître l’affi chage de la minuterie.
3
L’appareil se met en marche 5 à 60 minutes avant l’heure programmée.
•
Le voyant de minuterie (jaune) s’éteint à l’heure réglée.
•
Veillez à appuyer sur ce bouton dans un délai de 60 secondes après
•
L’heure actuelle ne s’affi che pas en mode ON-TIMER
•
Le mode ON-TIMER n’est pas disponible pendant le fonctionnement en
•
L’heure affichée arrête de clignoter une fois la procédure de réglage de
l'heure terminée.
Le voyant de la minuterie (jaune) s’allume.
L’appareil s’arrête si vous effectuez un réglage en fonctionnement.
NOTA
avoir effectué l’étape 2 afi n que le réglage de l’heure soit pris en compte.
mode ALLERGEN CLEAR.
Fonctions SLEEP TIMER + ON-TIMER
Fonctions combinées SLEEP TIMER et ON-TIMER.
■
Exemple : Si vous souhaitez que l’appareil s’arrête au bout de 3 heures et qu’il se remette en
marche et atteigne à peu près la même température à 8:00.
(unités de dix
minutes)
.
Réglage du mode SLEEP TIMER
■
Réglage selon les procédures de la page 43.
Régler sur
Réglage de la fonction ON-TIMER
■
Effectuez le réglage selon la procédure précédemment mentionnée pour le mode
ON-TIMER.
Régler sur
le réglage de l’allumage du témoin du minuteur (jaune) de cet appareil est terminé.
Une fois que la minuterie a atteint le temps préréglé en mode SLEEP TIMER, l’
•
appareil s’arrête, et il se remet en marche entre 5 et 60 minutes avant l’heure préréglée en mode ON-TIMER.
Le témoin de la minuterie s’éteint à l’heure préréglée en mode ON-TIMER.
•
Modifi cation du réglage
Réglez sur une nouvelle heure avec le bouton SLEEP ou ON-TIMER.
Comment annuler votre réglage
Appuyez sur le bouton CANCEL pour faire disparaître l’affi chage de la minuterie.
– 44 –
Page 47

Fonction ON-TIMER + OFF-TIMER
Réglage des fonctions combinées ON et OFF-TIMER.
■
Exemple: Si vous souhaitez que l’appareil s’arrête à 22:30 et qu’il se remette en marche et
Réglage de OFF-TIMER
■
Réglez-le selon les instructions page 43. Réglez sur
Réglage de ON-TIMER
■
Réglez-le selon les instructions page 44. Réglez sur
Le voyant de la minuterie de l’appareil (jaune) s’allumera à l’issue de la procédure
de réglage.
L’heure préréglée s’affi chera sur la télécommande. L’affi chage changera en fonction
du mode opérationnel.
Modifi cation de l’heure réglée
Réglez sur une nouvelle heure avec les boutons OFF-TIMER ou ON-TIMER.
Comment annuler votre réglage
Appuyez sur le bouton CANCEL pour faire disparaître l’affi chage de la
minuterie.
Fonction Confort
En mode ON TIMER, l’appareil se met en marche quelques minutes
avant l’heure préréglée afi n que la pièce atteigne à peu près la même
température à l’heure préréglée. Il s’agit de la fonction Confort.
• Mise en oeuvre
La température de la pièce est
contrôlée 60 minutes avant l’heure
préréglée en mode ON-TIMER.
En fonction de la température à
ce moment-là, l’appareil démarre
5 à 60 min. avant l’heure prévue
du TIMER (ON-TIME).
• Cette fonction n’est disponible qu’
en mode COOL et HEAT (notamment AUTO). Elle ne peut être
utilisée en mode DRY.
Fonctionnement COOL
▼
(Stop) Démarrage
Réglage température
Contrôle de la
température
ambiante 60 min.
avant.
(Fonctionnement)
▼
l’heure prévue
atteigne à peu près la même température à 8:00.
Le climatiseur démarre avec ON-TIMER.
Puis il s’arrête avec OFF-TIMER.
(Exemple d’heure actuelle : 5:00, le climatiseur s’arrête.)
Le climatiseur s’arrête avec OFF-TIMER. Le climatiseur
démarre ensuite avec ON-TIMER.
(Exemple d’heure actuelle : 20:00, le climatiseur démarre.)
Fonction SLEEP TIMER
Lorsque vous sélectionnez la fonction SLEEP TIMER, la température
de la pièce est contrôlée automatiquement après quelques minutes afi n
de s’assurer que la pièce n’est pas trop froide/chaude.
Lors du refroidissement : La température choisie est baissée de
•
1°C au commencement de l’opération SLEEP (quand le minuteur est
réglé). Après cela, la température monte de 1°C par heure et donne
une température à 1°C supérieure par heure à la température actuelle.
Lors du chauffage : La température choisie est baissée de 1°C au
•
commencement du mode SLEEP (quand le minuteur est réglé).
Après cela, la température baisse de 3°C par heure et de 6°C en
deux heures par rapport à la température actuelle.
Fonction ALLERGEN CLEAR
La puissance des enzymes permet d’éliminer les allergènes qui s’accumulent sur
■
le fi ltre hypoallergénique.
Pointez la télécommande sur le climatiseur.
1
•
•
•
•
Appuyez sur le bouton ALLERGEN CLEAR.
Pour arrêter:
NOTA
La température pouvant changer notablement dans la pièce, il est recom-
mandé de faire cela quand personne ne s’y trouve. (Cela se termine automatiquement en 90 min. environ).
Lors d’une opération de ALLERGEN CLEAR, la température, la vitesse du
ventilateur, la direction du souffl e et les réglages des minuteurs ne peuvent
être modifi és.
Dans le cas des modèles SCM système multi, la fonction de contrôle ALLER-
GEN CLEAR n’est pas valide.
NOTA
Dans le cas des modèles SCM système multi, si le bouton ALLERGEN
CLEAR est enfoncé par erreur, l’unité intérieure qui a reçu cette commande s’
arrête.
Appuyez sur le bouton ON/OFF
ou ALLERGEN CLEAR.
– 45 –
Page 48

Fonction de la minuterie hebdomadaire
Cette fonction permet de régler jusqu’à 4 programmes du mode de la minuterie (ON timer/OFF timer) pour chaque jour de la semaine.
■
28 programmes max. sont disponibles par semaine. Une fois ces réglages effectués, la fonction de la minuterie sera activée sur les
mêmes programmes chaque semaine tant que l’on n’annule pas le mode de la minuterie hebdomadaire.
Exemple (pendant la saison de refroidissement)
: Réglage du mode de la
minuterie hebdomadaire
: Réglage du mode
MANUEL
Réglage du mode de la minuterie hebdomadaire en ON/OFF
Faites passer le mode de la minuterie hebdomadaire en ON/OFF avec le bouton WEEKLY.
■
NOTA
Le mode de la minuterie hebdomadaire se met en ON/OFF
•
que le climatiseur soit en marche ou pas.
La fonction ON-TIMER du mode de la minuterie heb-
•
domadaire est effective, que le climatiseur soit en marche ou
pas.
Une fois la durée programmée pour la fonction ON-TIMER
écoulée, la télécommande fonctionne selon les réglages préétablis. La zone d’affi chage de la télécommande fonctionne
aussi selon les réglages pré-établis. Les réglages peuvent
être modifiés par le biais de la télécommande après avoir
activé la fonction ON-TIMER du mode de la minuterie heb-
domadaire.
Les éléments suivants peuvent être réglés par ON-TIMER.
Le mode de fonctionnement, la vitesse du ventilateur, la tem-
pérature, la direction du souffl e, les fonctions ECONOMY, 3D
AUTO, NIGHT SETBACK, SILENT.
Confort ne fonctionnent pas en mode ON-TIMER de la minu-
terie hebdomadaire.
1
Appuyez sur le bouton WEEKLY.
Le mode de la minuterie hebdomadaire prend effet.
À chaque fois que vous appuyez sur le bouton WEEKLY, l’affi chage change
comme suit :
No display
Pas d’affi chage
(minuterie hebdomadaire activée) (minuterie hebdomadaire désactivée)
Lorsque la minuterie hebdomadaire est réglée sur ON, le voyant de la minuterie du climatiseur (jaune) s’allume.
Lorsque les piles de la télécommande sont changées ou après avoir appuyé
sur l’interrupteur ACL, la télécommande est réinitialisée. Le programme de
la minuterie hebdomadaire n’étant pas réglé à l’état de réinitialisation, réglez
le programme selon la procédure de réglage.
La fonction OFF-TIMER du mode de la minuterie heb-
•
domadaire n’est effective que lorsque le climatiseur est en
marche. Lorsque la durée pré-réglée pour la fonction OFFTIMER est atteinte, le climatiseur s’arrête.
Lorsque plusieurs programmes sont pré-réglés pour le jour
•
(de la semaine) actuel, l’opération démarre à l’heure préréglée correspondant au moment le plus tôt.
Lorsque plusieurs minuteries (ON-TIMER, OFF-TIMER, and
•
SLEEP TIMER) fonctionnent en même temps, la minuterie
hebdomadaire ne fonctionne pas même si l’heure réglée
avec ON-TIMER ou OFF-TIMER est atteinte. Le mode de la
minuterie hebdomadaire devient alors effectif après que plusieurs minuteries soient terminées.
La fonction ON-TIMER ou OFF-TIMER ne peut pas être
•
réglée pour la même heure du même jour de la semaine.
– 46 –
Page 49

Mode de réglage <Réglage individuel>
Réglez après avoir défi ni le jour de la semaine actuel et l’heure actuelle.
1
2
3
Appuyez sur le bouton PROGRAM.
et le jour de la semaine actuel clignoteront.
Appuyez sur le bouton “ ou (TIMER)”.
Sélectionnez un jour de la semaine à réserver.
Chaque fois que vous appuyez sur ce bouton , l’affi chage change
comme suit:
Mon Tue Wed
Chaque fois que vous appuyez sur ce bouton , l’affi chage change
comme suit:
Mon Sun
Tous les jours de la semaine
s’affichent
Appuyez sur le bouton SET.
Le jour de la semaine est déterminé et le numéro du programme
clignote.
...
Tous les jours de la semaine
Sun
s’affichent
Sat
...
Tue
4
5
6
Appuyez sur le bouton “ ou (TIMER)”.
Sélectionnez un numéro de programme.
Chaque fois que vous appuyez sur ce bouton
comme suit:
P1 P2 P3 P4
Chaque fois que vous appuyez sur ce bouton
comme suit:
P1 P4 P3 P2
Appuyez sur le bouton SET.
Lorsqu’aucun réglage pré-établi (ON-TIMER or OFF-TIMER) n’
est disponible, les deux minuteries
Lorsque des réglages pré-établis (ON-TIMER or OFF-TIMER)
sont disponibles, une des deux minuteries
Appuyez sur le bouton ON-TIMER ou OFF-TIMER.
ON-TIMER ou OFF-TIMER est choisi et l’heure affi chée clignote.
ON-TIMER est sélectionné OFF-TIMER est sélectionné
, l’affi chage change
, l’affi chage change
et clignotent.
ou s’allume.
– 47 –
Page 50

7
8
9
Appuyez sur le bouton “ ou (TIMER)”.
Choisissez une heure.
Chaque fois que vous appuyez sur ce bouton , l’affi chage change
comme suit:
0:00 0:10 0:20
Chaque fois que vous appuyez sur ce bouton , l’affi chage change
comme suit:
0:00 23:50 23:40
Lorsque ON-TIMER est sélectionné, passez à l’étape 8.
Lorsque OFF-TIMER est sélectionné, passez à l’étape 9.
Régler les éléments de fonctionnement nécessaires.
Lorsque ON-TIMER est sélectionné, le mode de fonctionnement, la vitesse du ventilateur,
et la direction du souffl e peuvent être modifi és et la fonction ECONOMY, SILENT ou NIGHT
SETBACK peut être réglée.
Appuyez sur le bouton SET.
La durée est déterminée et les voyants et clignotent.
...
...
23:00 22:50
1:00 1:10
(unités de dix
minutes)
(unités de dix
minutes)
Appuyez sur le bouton PROGRAM ou le bouton SET.
10
Lorsque vous appuyez sur le bouton PROGRAM, le climatiseur se règle selon vos réglages.
La transmission se faisant en 3 secondes, dirigez la télécommande en direction du récepteur de signaux de l’unité interne durant cet instant.
Lorsque les réglages sont reçus, un signal sonore (bip, bip, bip) se fait entendre.
Lorsque vous appuyez sur le bouton SET, les réglages continuent à partir de l’étape 2.
Mode de réglage <Réglage collectif>
Réglez les mêmes éléments de fonctionnement au même numéro de programme pour tous les jours de la semaine. Dans l’étape 2
■
ci-dessus, sélectionnez « tous les jours de la semaine ». Lorsque les éléments qui sont réglés individuellement existent déjà dans le
même numéro de programme, ces éléments sont écrasés.
NOTA
Si aucune opération n’a été effectuée durant 60 secondes dans le mode de réglage, les modifi cations apportées au réglage jusqu’
•
à la fi n des 60 secondes deviennent invalides et le mode de réglage prend fi n. Par la suite,
(P1, P2, P3 et P4) clignotent pendant 10 secondes.
À la fi n du mode de réglage, dirigez la télécommande en direction du climatiseur et appuyez sur le bouton PROGRAM. Ce faisant,
•
vérifi ez que le climatiseur émet un signal sonore de réception triple (bip, bip, bip). Si aucun signal sonore n’est émis, retournez
dans le mode de réglage en appuyant sur le bouton PROGRAM et vérifi ez que le signal sonore est émis.
et tous les numéros de programme
– 48 –
Page 51

Comment annuler le réglage <Réglage individuel>
1
2
3
4
5
6
Appuyez sur le bouton
et le jour de la semaine actuel clignoteront.
Appuyez sur le bouton “ ou (TIMER)”.
Sélectionnez un jour de la semaine à annuler.
Appuyez sur le bouton
Le jour de la semaine est déterminé et le numéro du programme clignote.
Appuyez sur le bouton “ ou (TIMER)”.
Sélectionnez un numéro de programme à annuler.
Au moment de l’annulation, n’appuyez pas sur le bouton SET. Si vous appuyez sur le bouton SET, le mode actuel passera au mode de réglage.
Appuyez sur le bouton CANCEL.
Les réglages de ON ou OFF-TIMER sont annulés et est affi ché sur
la zone d’affi chage de l’heure.
Appuyez sur le bouton PROGRAM.
Lorsque vous appuyez sur le bouton PROGRAM, le climatiseur se règle
selon vos réglages.
Lorsque les réglages sont reçus, un signal sonore (bip, bip, bip) se fait
entendre.
Les réglages de chaque programme sont annulés. Exécutez la procédure
indiquée ci-dessus pour chaque programme à annuler.
PROGRAM
SET
.
.
Comment annuler le réglage <Réglage collectif>
Lorsque les mêmes éléments de fonctionnement existent dans le même numéro de programme pour tous les jours de la semaine, la
■
suppression collective peut se faire. Dans l’étape 2 ci-dessus, sélectionnez « tous les jours de la semaine ». La procédure à partir de l’
étape 3 est la même que celle décrite ci-dessus.
Dans le cas où les éléments de fonctionnement ont été modifi és ou effacés par un réglage individuel après réglage collectif comme
décrit à la page 48, causant des incohérences dans les réglages des jours de la semaine, la suppression collective est impossible.
Mode de Confi rmation
Les réglages du mode de la minuterie hebdomadaire peuvent être confi rmés.
Appuyez sur le bouton PROGRAM pendant 3 secondes ou plus.
1
2
Procédure de désactivation
Le mode de Confi rmation peut se terminer en appuyant sur le bouton ON/OFF,
CANCEL ou SET.
clignote et l’indication du réglage s’allume.
Appuyez sur le bouton “ ou (TIMER)”.
Sélectionnez un jour de la semaine et un numéro de programme à confi rmer.
L’affi chage commence à partir du jour actuel de la semaine. Pour le programme sans réglage,
bouton PROGRAM dans le mode de Confi rmation, un mode de réglage s’
initialise.
Mon P1 P2 P3 P4
Sun P1 P2 P3 P4
Tous les jours de la
semaine s’affichent
est affiché. Lorsque vous appuyez sur le
P1 P2 P3 P4Tue
P1 P2 P3 P4
NOTA
Si aucune opération n’a été effectuée durant 60 secondes dans le mode
•
de Confi rmation, le mode se ferme.
– 49 –
Page 52

Fonction HIGH POWER/ECONOMY
Si le climatiseur n’est pas en fonctionnement, dirigez la télécommande en direction du climatiseur, puis
1
Appuyez sur le bouton ON/OFF.
2
Pour le fonctionnement HIGH POWER
Appuyer sur le bouton HI/ECO intensifi e la puissance de fonctionnement et lance un programme de chauffage ou de refroidissement
intensif de 15 minutes. La télécommande affi che et l’indicateur de la FAN SPEED (vitesse de ventilation) disparaît
NOTA
Lors du mode HIGH POWER, la température de la pièce n’
•
est plus contrôlée. Lorsque le niveau de refroidissement ou
de chauffage est trop élevé, appuyez de nouveau sur le bouton HI/ECO pour annuler le mode HIGH POWER.
La fonction HIGH POWER n’est pas disponible pendant que
•
les fonctions DRY et ON-TIMER + OFF-TIMER sont en cours
d’utilisation.
Lorsque la fonction HIGH POWER est réglée après le ré-
•
glage de la fonction ON-TIMER, la fonction HIGH POWER
commencera à l’heure préréglée.
Impossible lorsque le climatiseur est éteint.
•
Après le fonctionnement en mode HIGH POWER, il se peut
•
que vous entendiez le réfrigérant couler.
Appuyez sur le bouton HI/ECO.
Quand vous êtes en mode AUTO, COOL ou HEAT
•
Chaque fois que vous appuyez sur le bouton HI/ECO, l’affi chage change
comme suit :
Aucun affichage
(
HIGH POWER
Quand vous êtes en mode DRY ou ON-TIMER + OFF-TIMER
•
Chaque fois que vous appuyez sur le bouton HI/ECO, l’affi chage change
comme suit :
(
ECONOMY
Les opérations suivantes entraînent l’annulation du mode
•
HIGH POWER :
1
2
3
Quand le bouton 3D AUTO est enfoncé.
4
Lorsque vous appuyez sur le bouton SILENT.
5
Lorsque vous appuyez sur le bouton NIGHT SETBACK.
6
)(
ECONOMY
)
Quand vous appuyez à nouveau sur le bouton HI /ECO
Quand le mode de fonctionnement est modifi é.
Au bout de 15 minutes de fonctionnement du mode
HIGH POWER.
)(
Fonctionnement normal
Aucun affichage
Fonctionnement normal
(
)
)
.
À propos du mode ECONOMY
Une pression sur le bouton HI/ECO démarre le mode doux sans puissance afi n d’éviter un refroidissement ou un chauffage excessif.
L’appareil fonctionne à 1,5°C au-dessus de la température de climatisation préréglée ou à 2,5°C en dessous de la température de
chauffage préréglée. La télécommande affi che et l’indicateur de la vitesse de ventilation disparaît.
NOTA
Le climatiseur se mettra en mode ECONOMY dans les
•
conditions suivantes :
Lorsque le climatiseur est arrêté à l’aide du bouton
1
ON/OFF.
Lorsque le climatiseur est arrêté en mode SLEEP ou
2
OFF TIMER.
Lorsque l’appareil sort du mode CLEAN ou ALLER-
3
GEN CLEAR.
Les opérations suivantes entraînent l’annulation du mode
•
ECONOMY :
Quand vous appuyez à nouveau sur le bouton HI /ECO.
1
Quand le mode de fonctionnement passe de DRY
2
(déshumidiication) à FAN (ventilation).
Lorsque vous appuyez sur le bouton NIGHT SETBACK.
3
Impossible lorsque le climatiseur est éteint.
•
– 50 –
Page 53

Fonction NIGHT SETBACK
Au cours de la saison froide, la température de la pièce peut être maintenue à un niveau confortable durant votre absence, la nuit et
■
lorsque la pièce est laissée sans surveillance. Le climatiseur garde une température constante d’environ 10 °C.
Fonction SILENT
Appuyez sur le bouton
1
Procédure de désactivation
Appuyez sur le bouton NIGHT SETBACK ou sur le bouton MODE pour désactiver l’affi chage NIGHT SETBACK.
•
•
•
•
•
Chaque fois que vous appuyez sur le bouton NIGHT SETBACK, l’affi chage
change comme suit:
(NIGHT SETBACK activé) (NIGHT SETBACK désactivé)
NOTA
Pendant que vous utilisez la fonction NIGHT SETBACK, le climatiseur
maintient la température réglée à environ 10 °C.
Au cours de la fonction NIGHT SETBACK, il est impossible de modifi er
les réglages de la température.
La température de la pièce pouvant légèrement changer, il est recom-
mandé d’utiliser cette fonction lorsque la pièce est vide.
Lorsque la fonction NIGHT SETBACK est en cours, aucune des deux
fonctions HIGH POWER et ECONOMY ne peuvent être réglées.
Lorsque vous annulez la fonction NIGHT SETBACK en appuyant sur le
bouton NIGHT SETBACK, le mode de fonctionnement est réinitialisé immédiatement avant la fonction NIGHT SETBACK.
NIGHT SETBACK
Aucun affichage
.
Lorsque la fonction SILENT est activé, l’appareil fonctionne plus silencieusement, réduisant ainsi le bruit de l’unité externe.
■
Si le climatiseur n’est pas en fonctionnement, dirigez la télécommande en direction du
climatiseur, puis
1
2
Procédure de désactivation
Appuyez sur le bouton SILENT pour désactiver l’affi chage SILENT.
•
•
•
•
•
•
Appuyez sur le bouton ON/OFF.
Appuyez sur le bouton SILENT.
Lorsque vous êtes en mode AUTO, COOL, HEAT ou NIGHT SETBACK
•
Chaque fois que vous appuyez sur le bouton SILENT, l’affi chage change
comme suit:
Aucun affichage
(SILENT activé) (SILENT désactivé)
NOTA
Au cours de la fonction SILENT, les capacités maximum de refroidisse-
ment et de chauffage se détériorent.
La fonction SILENT ne peut pas fonctionner en même temps que les
fonctions DRY et FAN.
La fonction SILENT s’activera la prochaine fois que le climatiseur entrera
dans un des cas suivants.
Lorsque le climatiseur est arrêté par le biais du bouton ON/OFF au
1
cours du fonctionnement du mode SILENT.
Lorsque le climatiseur est arrêté dans la fonction SLEEP ou OFF-
2
TIMER au cours du fonctionnement du mode SILENT.
Lorsque l’appareil sort du mode CLEAN ou ALLERGEN CLEAR.
3
Impossible lorsque le climatiseur est éteint.
Il se peut que le niveau sonore du dispositif externe ne diminue pas en
fonction des conditions.
Dans le cas des modèles SCM système multi, la fonction de contrôle
LENT
n’est pas valide.
– 51 –
SI-
Page 54

Fonction SELF CLEAN
On doit effectuer une opération de CLEAN après un AUTO, COOL et DRY pour déshumidifi er l’appareil intérieur et limiter la croissance
■
des moisissures et des bactéries.
Pour activer le mode CLEAN, appuyez sur la touche
1
•
•
•
•
•
•
CLEAN à l’aide de la pointe d’un stylo à bille.
Chaque fois que vous appuyez sur la touche CLEAN, l’affi chage change comme suit :
(CLEAN activé) (CLEAN désactivé)
NOTA
Deux heures plus tard, le climatiseur s’arrête automatiquement. Pour
arrêter le climatiseur immédiatement, appuyez sur le bouton ON/OFF.
Le mode CLEAN n’est pas disponible lorsque l’appareil sort du HEAT,
FAN, OFF-TIMER, SLEEP et ALLERGEN CLEAR.
Le ventilateur de l’unité intérieure fonctionne environ deux heures pour
un CLEAN.
Le voyant RUN s’allume pendant le fonctionnement en mode CLEAN.
Si vous appuyez sur le bouton SLEEP, ALLERGEN CLEAR ou NIGHT
SETBACK au cours du mode CLEAN, vous sortirez du mode CLEAN
et l’appareil se réglera en mode SLEEP, ALLERGEN CLEAR ou NIGHT
SETBACK.
Cette fonction ne permet pas l’élimination des moisissures, des germes
ou de la saleté adhérant déjà à l’appareil.
3 sec.
ON
OFF
1 sec.
Fonction de redémarrage automatique
Qu’est-ce que la fonction de redémarrage automatique ?
■
La fonction de redémarrage automatique enregistre le mode opérationnel dans lequel est le climatiseur juste avant une coupure de
•
courant, puis remet automatiquement l’appareil dans ce mode une fois le climatiseur remis en marche.
Les réglages suivants seront annulés:
•
Réglages de la minuterie
1
Le fonctionnement en mode HIGH POWER (haute puissance)
2
NOTA
La fonction de redémarrage automatique est activée à la sortie d’usine du climatiseur. Veuillez contacter votre concessionnaire si
•
vous souhaitez désactiver cette fonction.
Le réglage de minuterie est annulé en cas de panne de courant. Réglez à nouveau la minuterie une fois le courant rétabli.
•
Conseils d’utilisation
Pour un usage économique et agréable, observez les points suivants.
■
Réglez une température ambiante
convenable.
Des températures excessivement élevées ou basses sont néfastes pour votre
santé et gaspillent de l’électricité.
Ajustez la direction de l’arrivée d’air
comme il faut.
Ajustez l’arrivée d’air haut/bas et droite/
gauche pour obtenir une température
ambiante égale.
Nettoyez les fi ltres fréquemment.
Les fi ltres encrassés peuvent empêcher
l’air de passer et diminuent l’effi cacité du
fonctionnement.
N’utilisez l’appareil qu’en cas de nécessité.
Faites un bon usage du timer pour n’
enclencher l’appareil que lorsqu’il faut.
Evitez la lumière solaire directe et les
courants d’air.
Fermez les rideaux ou les stores pendant
le refroidissement pour éviter que la
lumière entre directement. Tenez les
fenêtres et les portes fermées pendant la
ventilation.
Tenez toute source de chaleur éloignée
lorsque la climatisation fonctionne.
N’utilisez pas d’appareils qui chauffent
dans la pièce (autant que possible).
– 52 –
Page 55

Confi guration en fonction du lieu d’installation
Prenez en considération le lieu d’installation du climatiseur et réglez le balayage gauche/droite pour maximiser la climatisation.
■
Si le climatiseur fonctionne, appuyez sur le bouton ON/OFF
1
2
3
pour l’arrêter.
La confi guration ne peut pasêtre effectuée pendant le fonctionnement de l’appareil,
Appuyez simultanément sur le bouton AIR FLOW U/D (UP/
DOWN) et le bouton AIRFLOW L/R (LEFT/RIGHT) pendant 5
secondes ou plus.
L’affi cheur de confi guration s’allume.
Confi guration du climatiseur en fonction du lieu d’installation.
Appuyez sur le bouton AIR FLOW L/R (LEFT/RIGHT) pour régler le balayage gauche/droite comme souhaité.
À chaque fois que vous appuyez sur le bouton AIR FLOW L/R (LEFT/
RIGHT), l’affi chage change comme suit :
4
(Confi guration centrale)
Appuyez sur le bouton ON/OFF.
La confi guration du climatiseur est terminée.
Appuyez dans les 60 secondes qui suivent la confi guration (pendant que l’
affi cheur de confi guration est allumé).
(Confi guration droite) (Confi guration gauche)
Appuyez dans
les 60 sec.!
Confi guration du climatiseur et réglage du balayage de l’air
Le schéma ci-dessous indique le réglage de balayage de l’air correspondant à la confi guration du climatiseur. Prenez en considération la forme de la
pièce et réglez le balayage de l’air de manière à maximiser les effets de la climatisation.
Balayage de l’air
Balayage de l’air
Balayage de l’air
(Confi guration gauche)
NOTA
Une fois le réglage de l’emplacement d’installation confi guré, le réglage de l’emplacement d’installation est stocké dans le clima-
•
tiseur même si l’alimentation électrique est coupée. Pour modifi er le réglage de l’emplacement d’installation, re-défi nissez un emplacement avec la télécommande.
Au cours de cette opération, il est impossible de défi nir un emplacement d’installation.
•
Lorsque le climatiseur est installé à moins de 50 cm du mur, il est recommandé de modifi er l’emplacement selon « Confi guration
•
droite » ou « Confi guration gauche ».
(Confi guration centrale)
– 53 –
(Confi guration droite)
Page 56

Entretien et maintenance
Avant la maintenance Entretien en saison
Coupez l’alimentation.
N’aspergez aucun liquide.
Danger de décharges électriques.
Essuyez le dispositif à l’
aide d’un chiffon doux et
sec.
Ne touchez pas aux lattes d’alumi-
•
nium de l’échangeur de chaleur.
Assurez-vous d’être bien installé
•
sur votre échelle ou tout autre
objet stable quand vous ôtez le
panneau d’entrée et le fi ltre.
N’utilisez pas les produits suivants :
De l’eau chaude (40°C et plus)
•
Risque de déformation ou décoloration du
dispositif.
Essence, diluant, benzine ou détergent, etc.
•
Risque de déformation ou de rayures.
Nettoyage du fi ltre à air.
Enlevez le fi ltre
1
2
232
3
3
Nettoyage
Ne le lavez pas avec de l’eau bouillante.
•
Ne le séchez pas au dessus d’une fl amme.
•
Manipulez-le soigneusement.
•
Remise en place du fi ltre
Tenez fermement le fi ltre de chaque côté comme
•
indiqué dans l’illustration, et insérez-le correctement.
Le fonctionnement sans le filtre rend l’appareil
•
poussiéreux, et risque de l’endommager.
Nettoyage du dispositif
Essuyez l’appareil avec un chiffon doux et sec, ou nettoyez-le à l’aide de l’aspi-
•
rateur.
Si l’appareil est extrêmement sale. essuyez-le avec un chiffon imbibé d’eau
•
chaude.
Nettoyer le panneau d’entrée d’air
Démontage, installation du panneau d’entrée d’air.
•
Vous pouvez laver le panneau à l’eau. Après un
•
lavage à l’eau, essuyez toute humidité du panneau
et séchez-le à l’abri du soleil.
PRUDENCE
Fréquence standard : une fois
tous les 15 jours
Tirez le panneau d’arrivée d’air vers l’
•
avant.
Maintenez légèrement les boutons de
•
chaque côté et soulevez légèrement
pour tirer le panneau vers l’avant.
Si le fi ltre est très sale, lavez-le à l’eau
chaude (ennv. 30°C), puis séchez-le
soigneusement.
Comment ouvrir et fermer le panneau d’arrivée d’air
Pour l’ouvrir
Placez vos doigts en retrait de chaque côté du panneau et
tirez le panneau vers l’avant de façon à l’ouvrir à environ 60
degrés.
Pour le fermer
Pousser de façon uniforme les deux extrémités puis appuyez légèrement au centre.
Démontage, installation du panneau d’arrivée d’air
Démontage
Pour démonter le panneau d’arrivée d’air afi n d’en nettoyer l’
intérieur ou d’effectuer d’autres opérations, ouvrez le panneau à 80 degrés et tirez-le vers l’avant.
Installation
Fixez le bord supérieur du panneau d’arrivée d’air en le poussant
légèrement, puis refermez le panneau.
– 54 –
Page 57

NOTA
Quand le fi ltre à air est encrassé de poussières, etc., la capacité COOL/HEAT diminue, le bruit de fonctionnement augmente, tandis qu’on gaspille davantage d’électricité. Nettoyez donc régulièrement le fi ltre à air.
A la fi n de la saison
Lancez une ventilation durant 2 à 3 heures.
1
Séchez l’intérieur de l’appareil.
Arrêtez l’appareil et coupez l’alimentation.
2
L’appareil consomme environ 4 W même lorsqu’il n’est pas en
fonctionnement.
Mettre l’appareil hors tension permet faire des économies d’
énergie et de coûts.
Nettoyez et remettez les fi ltres à air.
3
Nettoyez les dispositifs intérieur et extérieur.
4
Enlevez les piles de la télécommande.
5
1
2
3
4
5
6
Au début de la saison
Assurez-vous que le câble de terre est toujours connecté.
Vérifiez l’absence de corrosion ou de rouille
sur la structure du dispositif extérieur.
Assurez-vous qu’aucun obstacle n’empêche l’
air d’entrer et de sortir des dispositifs intérieur et extérieur.
Assurez-vous que les fi ltres à air sont propres.
Mettez l’appareil sous tension.
Insérez les piles dans la télécommande.
Installation, inspection et remplacement du fi ltre de nettoyage d’air.
1. Ouvrez le panneau d’entrée d’air et ôtez les fi ltres à air.
2. Retirez du climatiseur les porte-fi ltres, avec le fi ltre de nettoyage d’air en place.
3. Ôtez le filtre hypoallergénique (orange pale) du porte-filtre et inspectez le filtre.
Enlevez la poussière ou la saleté du fi ltre hypoallergénique à l’aide d’un aspirateur.
Remplacez le fi ltre hypoallergénique si vous ne pouvez pas le nettoyer, ou s’il sert
depuis déjà un an environ.
(Le fi ltre hypoallergénique doit être remplacé au bout d’un an d’utilisation environ.
Toutefois, la période de remplacement peut changer en fonction des conditions d’
utilisation du fi ltre.)
Ôtez le fi ltre photocatalytique désodorisant lavable (orange) du porte-fi ltre et inspectez le fi ltre. Ôtez périodiquement la poussière et la saleté de ce fi ltre. Si le fi ltre photocatalytique désodorisant lavable est particulièrement sale, vous pouvez le nettoyer
à l’eau. Toutefois, ce fi ltre est fragile, aussi lavez-le dans son porte-fi ltre pour éviter
de l’endommager. Après avoir lavé le fi ltre, placez-le au soleil pour qu’il y sèche.
Placer le fi ltre au soleil en ravive les effets déodorants.
(Ne jetez pas les porte-fi ltres. Ils sont réutilisables. )
4. Installez le fi ltre de nettoyage d’air dans les porte-fi ltres, puis installez les porte-fi ltres dans le climatiseur.
Page 54
Porte-fi ltre
Filtrer
NOTA
Le fi ltre hypoallergénique et le fi ltre photocatalytique désodorisant
•
lavable peuvent être installés à la droite ou à la gauche du climatiseur.
Montez le fi ltre hypoallergénique avec la face orange clair à l’avant.
•
5. Installez les fi ltres à air et refermez le panneau d’entrée d’air.
PRUDENCE
L’échangeur de chaleur peut blesser vos doigts.
•
Pour remplacer le fi ltre de nettoyage d’air, contactez votre revendeur.
Objet Fonction Couleur
Filtre hypoallergénique
Filtre photocatalytique désodorisant lavable
La puissance des enzymes permet d’éliminer les allergènes qui s’accumulent sur le fi ltre.
Les sources d’odeurs sont dissociées sur ce fi ltre, ce qui a
un effet désodorisant.
Page 54
Orange pâle
Orange
– 55 –
Page 58

Procédure d’installation
L’installation convenable
Ne placez aucun obstacle devant le dispositif intérieur risquant d’obstruer la ventilation et de gêner le fonctionnement.
•
N’installez pas l’appareil dans des emplacements présentant :
•
Un risque de fuites de gaz infl ammables.
•
Des éclaboussures d’huile.
•
Quand l’appareil est utilisé dans une station thermale p.e. où se produisent des gaz sulfurés, la corrosion peut entraîner le dys-
•
fonctionnement. Consultez votre distributeur.
Le climatiseur et la télécommande doivent se trouver à 1 m ou plus d’un poste de télévision ou de radio.
•
Evacuez l’eau obtenue par déshumidifi cation du dispositif intérieur dans l’endroit le plus commode.
•
Faites également attention aux bruits
• Quand vous installez l’appareil, choisissez un endroit supportant le poids et qui n’augmente pas le bruit de fonctionnement ou de
vibration. Si le bâtiment subit des vibrations, installez des matériaux anti-vibrations entre l’appareil et les accessoires.
• Choisissez un endroit où l’air froid ou chaud et le bruit de fonctionnement des dispositifs intérieur et extérieur ne gênent pas le voisinage.
• Ne laissez pas (traîner) d’objets près de l’entrée et de la sortie du dispositif extérieur; cela provoque le dysfonctionnement ou des
bruits.
• Consultez votre concessionnaire/distributeur quand vous entendez des bruits suspects.
Inspection et maintenance
Selon l’environnement d’utilisation de l’appareil, l’intérieur du climatiseur peut s’encrasser après plusieurs années de fonctionnement,
réduisant ainsi ses performances Nous vous recommandons de procéder à l’inspection ainsi qu’à la maintenance de l’appareil, en
plus de son nettoyage normal. (Cela peut permettre de prolonger la durée de vie du climatiseur.)
• Quant à l’inspection et la maintenance, consultez votre concessionnaire ou toute autre société habilitée. (Des frais de service sont
demandés dans ce cas-là.)
• Nous recommandons de faire effectuer l’inspection et la maintenance hors-saison.
Si le cordon de cet appareil est endommage’, il ne doit être remplace’ que par un agent agrée par le constructeur, un outillage spécialise’ étant
•
nécessaire.
Que faire avant d’appeler l’installateur/le service après-vente
Veuillez vérifi er les points suivants avant de faire appel au service après-vente de votre concessionnaire.
Le climatiseur ne marche pas du tout.
La fiche électrique est-elle
bien dans une prise de courant?
La capacité de refroidissement ou de chauffage est réduite.
La température ambiante de
consigne affichée est-elle
adéquate?
température
convenable
La capacité de refroidissement est réduite.
La lumière solaire entre-t-elle
directement dans la pièce?
Le TIMER est branché sur
ON?
Les fi ltres à air sont-ils propres (non encrassés)?
Y a-t-il une source de chaleur inhabituelle dans la
pièce?
Est-ce que le courant est
coupé, ou un fusible a sauté
?
Les fenêtres et les portes
sont-elles ouvertes ou fermées?
Y a-t-il trop de personnes
dans la pièce?
Si le climatiseur ne fonctionne
pas normalement, même après
avoir vérifié les points décrits à
gauche, ou si les doutes/problèmes persistent même après avoir
consulté la page 57, ou au cas
où des phénomènes apparaissent comme ceux montrés à la
page 58, débranchez l’appareil
et contactez votre distributeur/
installateur.
Ce climatiseur utilise un réfrigérant alternatif (R410A).
deur une tâche de service, d’inspection ou de maintenance, fournissez-lui toutes les
informations nécessaires.
Si vous demandez à votre reven-
– 56 –
Page 59
À savoir
L’appareil ne redémarre pas immédiatement après qu’il a
été éteint.
(voyant RUN s’allume)
ça ne
marche pas
L’air ne sort pas en mode HEATING.
Voyant RUN clignote lentement
(1.5 sec. ON, 0.5 sec OFF)
L’air ne sort pas pendant 5 à 15 minutes où l’air souffl é n’
est pas chaud alors que l’appareil est en mode HEATING.
Voyant RUN clignote lentement
(1.5 sec. ON, 0.5 sec OFF)
L’air ne sort pas en mode DRY.
(voyant RUN s’allume)
De la vapeur épaisse sort pendant le fonctionnement COOL.
Cela dégage une odeur.
On entend du bruit comme de
l’eau qui coule.
Pour protéger l’appareil, il est impossible de le redémarrer pendant les 3 minutes qui suivent son arrêt.
Veuillez
attendre pendant
3 minutes.
Ce délai de protection de trois minutes intégré dans le microordinateur s’enclenche automatiquement.
Le souffl e d’air est arrêté pour éviter la sortie d’air froid jusqu’à
ce que l’échangeur de chaleur intérieur soit chaud. (2 à 5 min)
(fonction HOT KEEP)
Lorsque la température extérieure est basse et l’humidité élevée, le dispositif se met parfois automatiquement en mode dégivrage. Veuillez attendre. Pendant le dégivrage, de l’eau ou de la
vapeur pourrait sortir du dispositif extérieur.
Le ventilateur intérieur s’arrête parfois pour éviter la revaporisation et pour économiser de l’énergie.
Ce phénomène se produit parfois quand la température et l’humidité de la
pièce sont très élevées; cela disparaît quand la température et l’humidité
baissent.
L’air sortant pendant le fonctionnement de l’appareil peut dégager une certaine odeur. C’est l’odeur de tabac ou de produits
cosmétiques déposée sur l’appareil.
C’est provoqué par un réfrigérant circulant à l’intérieur de l’appareil.
On entend un craquement.
Vous entendez un siffl ement ou un bruit de cliquetis.
Après une coupure de courant, l’appareil ne redémarre
pas même si le courant est rétabli.
Pas de réception des signaux de la télécommande.
De la condensation se forme sur les grilles de sortie d’air.
L’appareil pour l’extérieur émet un siffl ement.
Le ventilateur ne s’arrête pas immédiatement après l’
arrêt du fonctionnement de l’appareil.
Le voyant RUN reste allumé après l’arrêt du climatiseur.
Parfois, un chuintement de courte durée peut se faire entendre lorsque l’appareil est mis hors tension.
C’est provoqué par l’expansion due à la chaleur ou par la contraction des plastiques.
Ceci est dû au fonctionnement des soupapes de commande du
frigorigène ou des composants électriques.
Si la fonction de redémarrage automatique n’est pas sélectionnée, l’appareil ne redémarrera pas automatiquement. Utilisez la
télécommande pour redémarrer.
Il se pourrait que les signaux ne soient pas reçus quand le récepteur de signaux sur le climatiseur est exposé à la lumière
solaire directe ou à un éclairage très fort.
Dans ce cas, atténuez la source lumineuse.
Si le dispositif est en service depuis une longue période dans une
humidité élevée, de la condensation se forme sur les grilles de sortie d’air et des gouttes d’eau tombent.
Ce bruit indique que la vitesse de rotation du compresseur augmente ou diminue.
Ventilateur intérieur : Le ventilateur continue à tourner pendant
2 heures en mode CLEAN.
Ventilateur extérieur : Le ventilateur continue à tourner pendant
environ 1 minute afi n de protéger l’appareil.
Le voyant RUN s’allume pendant le fonctionnement en mode
CLEAN.
Le voyant RUN s’éteint quand le fonctionnement en mode CLEAN est
terminé.
Voici le bruit que l’on entend lorsqu’un autre appareil d’intérieur
est arrêté.
– 57 –
Page 60

Contactez votre revendeur
Débranchez l’appareil immédiatement et appelez votre distributeur dans les cas suivants:
■
Le fusible ou le disjoncteur sautent
souvent.
Le fusible
saute souvent.
On remarque un dysfonctionnement de
la Télé, de la radio ou autres appareils.
En cas d’anomalie, coupez immédiatement l’alimentation
et remettez l’appareil en marche après 3 minutes. Répétez la procédure en appuyant sur le bouton ON/OFF de la
télécommande, l’anomalie ne disparaît pas.
Le fi l électrique est extrêmement chaud.
L’enveloppe du fi l électrique est détériorée.
PRUDENCE
Si le cordon d’alimentation est endommagé, demandez à votre concessionnaire ou
à un ingénieur qualifi é d’installer un nouveau cordon pour éviter tout accident.
Les touches ne fonctionnent pas comme il faut.
Les voyants RUN et TIMER de l’appareil clignotent rapidement (0,5 s. en marche ; 0,5 s. à l’arrêt) et ne fonctionnent pas.
On entend un bruit anormal pendant le
service.
Climatiseurs multiples
Fonctionnement simultané
• Les climatiseurs ne peuvent pas être dans des modes de fonctionnement différents en même temps, comme par exemple un appareil en mode « cool » et un autre en mode « heat ».
• Lorsque des modes différents sont sélectionnés, le climatiseur qui a été mis en marche le premier a priorité de sorte que le climatiseur démarré en second s’occupe de la ventilation.
• Si vous souhaitez que le climatiseur lancé plus tard ait la priorité, il vous faut soit arrêter le climatiseur qui a actuellement la priorité
ou faire en sorte que le mode de fonctionnement de l’appareil utilisé en premier soit identique à celui de l’appareil utilisé en second.
• Lorsque les unités intérieures fonctionnent en modes différents, le voyant RUN s’allume.
0.5 sec.
ON
OFF
0.5 sec.
Fonctionnement automatique
• Lorsque le commutateur de mode fonctionnement de la télécommande est sur « Auto », le climatiseur sélectionne automatiquement « Cool », « Dry » ou « Heat » au démarrage en fonction de la température de la pièce.
• Lors du fonctionnement simultané de plusieurs appareils, les modes de fonctionnement peuvent changer automatiquement en
fonction de la température de chaque pièce ; cela entraîne l’arrêt du fonctionnement de l’appareil extérieur. Dans un tel cas, le
mode COOL ou HEAT doit être utilisé à la place du mode AUTO (cela ne s’applique que lorsque plusieurs appareils sont utilisés).
Opération de récupération du liquide frigorigène (huile)
Ceci afi n de contrôler la récupération du liquide frigorigène (huile) de l’unité/des unités qui n’est/ne sont pas en marche. Lors de
•
sa récupération, vous entendrez peut-être le son du liquide frigorigène qui s’écoule de l’unité/des unités qui n’est/ne sont pas en
marche.
– 58 –
Page 61

Fonction auto-diagnostic
Nous essayons sans cesse d’améliorer nos services de sorte que les anomalies se détectent facilement:
■
Voyant RUN
Clignote-1 fois
Description du problème
Erreur pour le capteur de l’échangeur de chaleur 1
Cause
Fil cassé pour le capteur de l’échangeur de chaleur 1, faux
•
contact au niveau de la connexion
Voyant TIMER allumé
Le voyant RUN clignote en
continu
Clignote-2 fois
Clignote-3 fois
Clignote-5 fois
Clignote-6 fois
Clignote-7 fois
Voyant TIMER
Clignote-1 fois
Clignote-2 fois
Clignote-4 fois
Clignote-5 fois
Clignote-1 fois
Clignote-2 fois
Erreur du capteur de température
ambiante
Erreur pour le capteur de l’échangeur de chaleur 3
Erreur de tension du fi ltre actif
Erreur du moteur de ventilateur d’
intérieur
Manque de réfrigérant
Vanne de service fermée
Erreur du capteur 1 d’échangeur de
chaleur
Erreur du capteur de température
extérieure
Erreur du capteur du conduit de
liquide de l’échangeur de chaleur
extérieur
Erreur du capteur de tuyau de refoulement
Erreur de capteur de tube d’aspiration
Coupure de courant
Problème de l’appareil d’extérieur
Fil du capteur de température ambiante cassé, branchement
•
incorrect du connecteur
Fil cassé pour le capteur de l’échangeur de chaleur 3, faux
•
contact au niveau de la connexion
Alimentation défectueuse
•
Moteur de ventilateur défectueux, branchement incorrect du
•
connecteur
Manque ou fuite de réfrigérant
•
Vanne de service fermée
•
Fil 1 de capteur d’échangeur de chaleur cassé, mauvais
•
branchement du connecteur
Fil du capteur de température extérieure cassé, branche-
•
ment incorrect du connecteur
Fil du capteur du conduit de liquide de l’échangeur de cha-
•
leur cassé, branchement incorrect du connecteur
Fil du capteur du tuyau de refoulement brisé, branchement
•
incorrect du connecteur
Fil de capteur de tube d’aspiration cassé, mauvais branche-
•
ment du connecteur.
Blocage du compresseur, coupure de phase à la sortie du
•
compresseur, court-circuit du transistor de puissance, robinet de service fermé
Transistor de puissance cassé, fi l de compresseur coupé.
•
Fil du capteur du conduit d’évacuation cassé, branchement
•
incorrect du connecteur
Blocage du compresseur
•
Voyant RUN allumé
Le témoin de fonctionnement
RUN clignote 2 fois
Le témoin de fonctionnement
RUN clignote 7 fois
Clignote-3 fois
Clignote-4 fois
Clignote-5 fois
Clignote-6 fois
Clignote-7 fois
Clignotement permanent
Clignote-2 fois
Clignote-1 fois
Surintensité
Erreur du transistor de puissance
Surchauffe du compresseur
Erreur de transmission du signal
Erreur du moteur de ventilateur
extérieur
Protection pour la surpression de
refroidissement
Verrouillage du rotor
Vanne de service fermée
Surcharge en fonctionnement, excès de liquide
•
Transistor de puissance endommagé
•
Manque de fluide, capteur du conduit d’évacuation défec-
•
tueux, robinet de service fermé
Alimentation défectueuse, fil de signal cassé, cartes de l’
•
appareil d’intérieur ou d’extérieur défectueuses
Moteur de ventilateur défectueux, mauvais raccordement du
•
connecteur
Surcharge de gaz, cour t-circuit pour l’unité extérieure
•
Compresseur défectueux
•
Phase en l’air du compresseur
•
Car tes de l’appareil extérieur défectueuses
•
Vanne de service fermée
•
– 59 –
Page 62

– 60 –
Page 63

Wir danken Ihnen für Ihr Vertrauen in den MITSUBISHI HEAVY INDUSTRIES, LTD.
Klimagerät. Damit Sie lange Freude daran haben und das Gerät für eine lange Zeit
zuverlässig arbeitet, sollten Sie das Anwenderbuch sorgfältig lesen, bevor Sie das Klimagerät verwenden.
Betriebsfragen oder eventuellen Unregelmäßigkeiten zu Rate.
Dieses Klimagerät ist für den Hausgebrauch bestimmt.
Nicht R410A in die Atmosphäre ablassen: R410A ist ein fl uorhaltiges Treibhausgas,
das im Kyoto-Protokoll mit dem relativen Treibhauspotential (Global Warming Potential, GWP) = 1975 ausgewiesen ist.
Ihre Klimaanlage ist möglicherweise mit diesem Symbol gekennzeichnet.
Es bedeutet, dass Elektro- und Elektronik-Altgeräte (EEAG wie nach der
Richtlinie 2002/96/EG) nicht mit allgemeinen Haushaltsabfällen gemischt
werden dürfen. Klimaanlagen sollten in einer genehmigten Behandlungsanlage für die erneute Verwendung, das Recycling oder die Wiederherstellung aufbereitet werden und nicht mit dem normalen Abfall entsorgt werden. Bitte wenden Sie sich an den Installationsbetrieb oder an die lokalen
Behörden, wenn Sie weitere Informationen dazu erhalten möchten.
Das auf die Ihrem Klimaanlagenprodukt beigefügten Batterien aufgedruckte Symbol ist eine Information für Endverbraucher entsprechend der
EURichtlinie 2006/66/EG Artikel 20 Anhang II.
Batterien müssen, wenn sie das Ende ihrer Lebensdauer erreicht haben,
getrennt von algemeinem Haushaltsmüll entsorgt werden. Wenn ein
Chemikaliensymbol unter dem oben gezeigten Symbol aufgedruckt ist,
weist dieses darauf hin, dass die Batterien Schwermetalle in bestimmter
Konzentration enthalten. Diese werden wie folgt angegeben:
Hg: Quecksilber (0,0005%) , Cd: Kadmium (0,002%) , Pb: Blei (0,004%)
Bitte ensorgen Sie die Batterien sachgemäß bei einer Batteriesammelstelle oder im entsprechend markierten Sondermüll.
Anschließend gut aufbewahren. Ziehen Sie das Handbuch bei allen
DEUTSCH
Der jeweilige Schallemissionsdruckpegel von Innen- und Außeneinheit liegt unter 70 dB(A).
Sicherheitshinweise ...............................62
Namen der Teile und ihre Funktionen ....64
Verwenden der Fernbedienung .............66
Wenn die Fernbedienung nicht
funktioniert ............................................. 66
Vorübergehender Betrieb ......................66
Installation von zwei Klimaanlagen im
selben Raum .........................................67
Kindersicherung ....................................67
Bedienungs- und Anzeigenteil für die
Fernbedienung ......................................68
Einstellung der aktuellen Zeit ................69
Automatischer Betrieb (AUTO) ..............69
Temperatureinstellung bei AUTO ...........70
FAN SPEED
(LÜFTERGESCHWINDIGKEIT) ...........70
COOL/HEAT/DRY/FAN-Betrieb .............71
Temperatureinstellungen für das
Klimagerät .............................................71
Kennzeichen beim HEAT Betrieb...........71
Einstellung der Luftströmungsrichtung ..72
3D AUTO-Betrieb ...................................72
SLEEP TIMER-Betrieb ..........................73
Inhalt
OFF TIMER-Betrieb ...............................73
ON TIMER-Betrieb ................................74
SLEEP TIMER & ON-TIMER-Betrieb ....74
ON-TIMER- + OFF-TIMER-Betrieb .......75
ALLERGEN CLEAR-Betrieb ..................75
WOCHEN-TIMER-Betrieb ....................76
HIGH POWER/ECONOMY-Betrieb .......80
NIGHT SETBACK-Betrieb .....................81
SILENT-Betrieb ...................................... 81
SELF CLEAN-Betrieb ............................82
Automatischer
Autowiederaufnahmenfunktion ..............82
Tipps für den effektiven Betrieb .............82
Installationsort-Einstellung ....................83
Wartung .................................................84
Richtige Installation ...............................86
Fehlersuche ..........................................86
Hinweis ..................................................87
Wenden Sie sich an Ihren
Fachhändler ...........................................88
Zur Mehrfachklimaanlage ......................88
Selbstdiagnosefunktion .........................89
– 61 –
Page 64

Sicherheitshinweise
Vor Benutzung des Systems, diese Sicherheitshinweise sorgfältig durchlesen, damit alles einwandfrei funktioniert.
•
Nach dem Lesen dieses Handbuchs sollten Sie es zum Nachschlagen bereithalten. Wenn eine andere Person Ihre
•
Aufgabe übernimmt, dafür sorgen,dass auch diese das Handbuch erhält.
WARNUNG
ACHTUNG
Beachten Sie diese Sicherheitsanweisungen sehr sorgfältig, da Ihre persönliche Sicherheit davon abhängt.
Häufi g im Text enthaltene Symbole bedeuten folgendes:
•
Streng verboten
VORSICHTSMASSNAHMEN BEI DER INSTALLATION
❚
Eine unsachgemäße Handhabung kann gravierende Folgen wie Tod, schwere Verletzungen,
etc., nach sich ziehen.
Es können, je nach Umständen, ernsthafte Probleme verursacht werden.
Anweisungen genau
beachten
Sorgen Sie für geeignete
Erdung
WARNUNG
Dieses System ist für Wohnraumbedarf und dergleichen ausgelegt.
•
Wird es in anderen Umgebungen verwendet, wie beispielsweise in einem Fertigungsbetrieb, kann es zu
Fehlfunktion kommen.
Das System muß von Ihrem Lieferanten oder qualifi zierten Fachkräften installiert werden.
•
Es wird nicht empfohlen, die Zentralsteuerung selbst zu installieren, da unsachgemäße Handhabung
Stromschlag oder Feuer zur Folge haben könnte.
ACHTUNG
Nicht in der Nähe von eventuellen Leckstellen brennbarer Gase installieren.
•
Gasleckagen können Feuer verursachen.
Abhängig vom Ort der Installation kann ein geerde-
•
ter Stromunterbrechungsschalter notwendig sein.
Installieren Sie keinen geerdeten Stromunterbrechungsschalter, kann das zu Stromschlägen führen.
Sorgen Sie dafür, daß das Gerät einwandfrei geerdet ist.
•
Erdungskabel sollten nie an Gas- oder Wasserleitungen, Lichtschalter oder Erdungskabel von Telefonen angeschlossen werden. Falscher Anschluß des Erdkabels kann elektrischen Schlag verursachen.
Achten Sie darauf, dass Sie den Ablauf-
•
schlauch richtig anbringen, damit das Wasser
ablaufen kann.
Unsachgemäße Installation kann dazu führen,
dass Wasser austritt und Möbel beschädigen kann.
VORSORGE IM BETRIEB
❚
Setzen Sie sich nicht für längere Zeit direkt
•
der kalten Luft aus.
Hierdurch können sich Körperschäden oder
Gesundheitsprobleme ergeben.
Stecken Sie nichts in den Lufteinlass.
•
Hierdurch kann Beschädigung verursacht werden,
da sich der Innenventilator sehr schnell dreht.
Die Fernbedienung außerhalb der Reichweite von Kindern aufbewahren.
•
Nichtbeachtung kann das Verschlucken von Batterien oder sonstige Unfälle zur Folge haben.
Verwenden Sie nur einwandfreie Sicherungen.
•
Die Verwendung von Kupferdraht anstelle von
geeigneten Sicherungen ist streng verboten, da
es einen Ausfall oder Feuer verursachen kann.
Bedienen Sie die Schalter nicht mit feuchten Händen.
•
Hierdurch kann ein elektrischer Schlag verursacht werden.
Schaukeln Sie nicht auf der Inneneinheit oder
•
hängen Sie sich nicht an diese.
Wenn die Inneneinheit herunterfällt, kann das
zu Verletzungen führen.
WARNUNG
•
ACHTUNG
Lagern Sie keine brennbaren Insektenvertil-
•
gungsmittel oder Farbspraydosen in der Nähe
des Gebläses und sprühen Sie damit auch
nicht direkt in das System.
Hierdurch kann Feuer verursacht werden.
Keine Heizkörper dem direkten Luftstrom des
•
Klimager
Hierdurch kann unrichtige Verbrennung verursacht werden.
– 62 –
Dieses Gerät ist nicht für Personen (einschließlich Kinder)
mit physischen, sensoriellen oder geistigen Behinderungen oder für Personen mit unzureichender Erfahrung und
Kenntnissen gedacht, es sei denn, diese wurden von einer
für deren Sicherheit verantwortlichen Person bei der Verwendung des Geräts beaufsichtigt bzw. dazu eingewiesen.
Kinder sind zu beaufsichtigen, damit sie nicht
mit dem Gerät spielen.
ä
tes aussetzen.
Page 65

Sicherheitsvorschriften
❚
Klimagerätes
Den
•
Hierdurch kann ein elektrischer Schlag verursacht werden.
Das System ist ausschließlich für seine ei-
•
gentlichen Zwecke zu verwenden und nicht
anderweitig, beispielsweise zum Schutz von
Lebensmittel, Pflanzen oder Tieren, Präzisionsgeräten oder Kunstwerken.
Das System ist ausschließlich für normale
Wohnraumzwecke bestimmt, und jede anderweitige Verwendung kann Schädigung der Qualität der Nahrungsmittel usw. verursachen.
Stellen Sie kein Gefäß mit Wasser, beispiels-
•
weise Vasen, auf das Gerät.
In das Gerät eindringendes Wasser kann die
Isolierung beschädigen und daher elektrischen
Schlag verursachen.
Installieren Sie das System nicht an Stellen,
•
bei denen der Luftstrom direkt auf Pflanzen
oder Tiere gerichtet ist.
Dies kann gesundheitsschädigend sein.
Setzen Sie sich nicht auf das Außengerät, und
•
stellen Sie nichts darauf ab.
Wenn das Gerät herabfällt oder Teile fallen runter, können Menschen verletzt werden.
Nach lange andauernder Benutzung von Zeit zu
•
Zeit die Tragekonstruktion der Einheit kontrollieren.
Wenn Sie das System zusammen mit einem
•
Heizgerät verwenden, ist der Raum regelmäßig
zu lüften.
Ungenügende Lüftung kann Unfälle durch Sauerstoffmangel verursachen.
Beim Abnehmen der Lufteinlassklappe und
•
der Filter darauf achten, daß man fest auf einer
Trittleiter oder anderen stabilen Fläche steht.
Nichtbeachtung kann Verletzungen durch Umkippen oder Herunterfallen zur Folge haben.
Wenn Sie das System reinigen, schalten Sie
•
es ab und trennen Sie es von der Stromversorgung.
Öffnen Sie die Abdeckung niemals, während
das interne Gebläse sich noch dreht.
Stellen Sie keine Gegenstände neben das Au-
•
ßengerät, und lassen Sie Laub darum ansammeln.
Falls sich Objekte oder Blätter um die Außen-
ACHTUNG
nicht mit Wasser reinigen.
Falls Sie Schäden nicht umgehend reparieren,
kann die Einheit herunterfallen und Personenschäden verursachen.
Die Aluminiumrippen am Wärmetauscher nicht
•
berühren.
Das kann zu Verletzungen führen
Platzieren Sie keine elektrischen Haushaltsge-
•
räte oder –gegenstände unter den Innen- oder
Außeneinheiten.
Von der Einheit tropfendes Kondensationswasser kann Objekte verschmutzen und Unfälle
oder Stromschläge verursachen.
Das System darf nicht ohne Luftfi lter betrieben
•
werden.
Das kann aufgrund einer Verstopfung des
Wärmeaustauschers zu Fehlfunktionen des Systems führen.
Schalten Sie die Stromversorgung nicht sofort
•
ab, nachdem Sie den Betrieb beenden haben.
Warten Sie mindestens 5 Minuten, es kann
sonst zu Wasserlecks oder Ausfällen kommen.
Steuern Sie das Gerät nicht über den Haupt-
•
stromschalter.
Das kann zu Bränden oder Wasserlecks führen.
Darüber hinaus kann das Gebläse unerwartet
starten, wodurch Menschen verletzt werden
können.
einheit herum befi nden, können kleine Tiere in
das Gerät eindringen und mit elektrischen Teilen in Berührung kommen, das kann zu Ausfall,
Rauch oder Feuer führen.
Für eine Reinigung des Inneren der Innenein-
•
heit nehmen Sie bitte Kontakt zu Ihrem Fachhändler auf. Führen Sie diese Reinigung nicht
selbst durch.
Bei Verwendung von nicht zugelassenen Lösungsmitteln oder falschen Waschverfahren,
können Kunststoffteile des Geräts beschädigt
und Lecks hervorgerufen werden. Schäden,
Rauch oder Brände können ebenfalls verursacht werden, wenn Lösungsmittel mit elektrischen Motorenteilen des Geräts in Berührung
kommt.
Bei Gewitter oder Gefahr von Blitzeinschlag
•
schalten Sie das Gerät ab und trennen Sie es
von der Stromversorgung.
Es können sonst Schäden am Gerät entstehen
HINWEISE FÜR DEN TRANSPORT UND REPARATUREN
❚
Führen Sie keine Reparaturen oder Änderungen selbst durch. Bitten Sie einen Händler um Rat,
•
falls das Gerät eine Reparatur benötigt.
Wenn Sie das Gerät reparieren oder ändern, kann das zu Wasserlecks, Stromschlägen oder Brand führen.
Weitere Informationen zu den Reparaturen
•
erhalten Sie von Ihrem Fachhändler.
Fehlerhafte Reparaturen können elektrischen
Schlag, Feuer usw. verursachen.
Setzen Sie sich mit Ihrem Fachhändler oder ei-
•
nem professionellen Installateur in Verbindung,
wenn das Gerät woanders hin versetzt werden
soll.
Fehlerhafte Installation kann Wasserleckage,
Stromschläge, Feuer usw. verursachen.
Sobald Sie etwas Außergewöhnliches fest-
•
stellen (Brandgeruch, usw.), halten Sie das
System an, trennen Sie es von der Stromversorgung und informieren Sie Ihren Fachhändler.
Fortsetzung des Betriebes unter abnormalen
Umständen kann fehlerhaftes Funktionieren,
elektrischen Schlag, Feuer usw. verursachen.
WARNUNG
Falls das Klimagerät nicht kühlt oder wärmt,
•
– 63 –
kann ein Kältemittelleck vorliegen. Wenden Sie
sich an Ihren Fachhändler.
Wenn Kältemittel nachgefüllt werden muß,
lassen Sie sich vom Händler bezüglich des
richtigen Verfahrens beraten.
Kommt das Kühlmittel in Kontakt mit der Haut,
kann es zu Verletzungen durch Kälte kommen.
Wird das Kühlmittelgas übermäßig eingeatmet,
kann es zu Verschlechterungen der Nervenfunktionen, wie Schwindel oder Kopfschmerzen,
oder zu Verschlechterungen der Herzfunktionen
wie vorübergehendem unregelmäßigen Herzschlag und Herzklopfen kommen. Falls Kühlmittel unerwartet aus dem Gerät auf ein Heizgebläse, einen Ofen oder eine Heizplatte tropft,
könnten schädliche Gase entstehen.
Page 66

Namen der Teile und ihre Funktionen
INNENGERÄT
Lufteinlassklappe
Ansaugung der Raumluft.
Luftfi lter
Hält Staub und Schmutz vom Innengerät zurück.
Luftreinigungsfi lter
Raumtemperaturfühler
Wärmetauscher
Luftaustritt
Luftaustritt hier.
Gebläse der Inneneinheit
Luftklappe für Einstellung der Ausblasrichtung Links/Rechts
Regelklappe Luftstrom auf/ab
Seite 84
Seite 84
Seite 85
Seite 72
Seite 72
AUSSENEINHEIT
Ablaufschlauch
Abführung des Wassers von der Inneneinheit.
Kältemittel-Rohrverbindung und Stromkabel
Lufteinlass
(Seitlich und hintere Oberfl äche)
Luftauslass
Gebläse der Außeneinheit
Wärmetauscher
– 64 –
Page 67

Namen der einzelnen Teile und ihre Funktion
Anzeigenteil
Signal-empfänger Fernbedienung
ON/OFF-Taste am Gerät
Mit diesem Schalter kann das Gerät ein- oder ausgeschaltet werden, wenn die Fernbedienung nicht
zur Verfügung steht.
Seite 66
RUN (HOT KEEP)-Licht (grün)
Leuchtet während des Betriebs.
•
Blinkt bei Luftstromstopp aufgrund von ‘HOT
•
KEEP’, ‘CLEAN-Betrieb’ und 'Betriebsmodus ungültig'.
1.5 sec.
ON
HOT KEEP
CLEAN-Betrieb
OFF
ON
OFF
0.5 sec.
3 sec.
1 sec.
Seite 82
Zubehör
Betriebsmodus
ungültig
0.5 sec.
ON
OFF
0.5 sec.
Seite 88
Allergenfi lter (Hellorange)
3D AUTO-Licht (grün)
Leuchtet bei 3D AUTO-Betrieb auf.
HI POWER-Licht (grün)
Leuchtet während HIGH POWER (Hochleistungsbetrieb).
TIMER-Licht (gelb)
Leuchtet während des TIMER-Betriebs.
Batterie
(R03 (AAA, Micro) ×2)
Drahtlose Fernbedienung
Halterung für die
drahtlose Fernbedienung
ANMERKUNG
•
Summerton für Fernbedienung
Beträgt die voreingestellte Temperatur 24°C und sind automatischer Betrieb und Luftstrom eingestellt, ertönt ein Summerton
(PiPi).
Wird die Klimaanlage über die Taste ON/OFF ausgeschaltet (außer im Modus CLEAN), ertönt das Summgeräusch (Pi).
Diese Funktion ist nützlich für den Betrieb der Klimaanlage bei Dunkelheit.
Einstellung der Luftströmung
Fotokatalytischer, waschbarer Geruchs-
neutralisationsfi lter (orange)
Voreingestellte Temperatur
– 65 –
Holzschraube (Menge: 2)
(für die Befestigung der
Fernbedienungshalterung)
Page 68

Verwenden der Fernbedienung
Batterien auswechseln
In folgenden Fällen erkennen Sie leere Batterien. Die leeren Batterien sind auszutauschen.
Kein Empfangston nach der Signalübermittlung.
•
Verschwommene Anzeige.
•
ANMERKUNG
Entfernen Sie die Abdek-
1
kung und entnehmen Sie
die alten Batterien.
Neue Batterien einsetzen.
2
R03 (AAA, Micro) x2
Achten Sie auf
die und
Markierungen
Bringen Sie die Abdeckung
3
wieder an.
Drücken Sie den ACL-
4
Schalter mit der Spitze eines
Kugelschreibers.
Seite 69
Niemals alte und neue Batterien zusammen verwenden.
•
Batterien herausnehmen, wenn die Fernbedienung längere Zeit nicht benutzt
•
wird.
Die Lebensdauer der Batterien ist laut JIS oder IEC 6-12 Monate bei norma-
•
lem Gebrauch. Bei längerem Gebrauch oder Benutzung einer unspezifi zierten
Batterie kann Feuchtigkeit heraustreten und die Fernbedienung gebrauchsunfähig machen.
Die Lebensdauer ist auf der Batterie angegeben. Abhängig vom Zeitpunkt der
•
Herstellung der Batterie kann ihre Lebensdauer auch kürzer ausfallen. Die
Batterie kann jedoch auch nach normaler Betriebsdauer länger brauchbar
sein.
Wird auf der Anzeige etwas Ungewöhnliches angezeigt, drücken Sie mit der Spitze
■
eines Kugelschreibers den ACL-Schalter.
Benutzung des Fernbedienungshalters
Bei Benutzung des Halters kann die Fernbedienung an
der Wand oder einem Pfeiler befestigt werden. In diesem
Fall vor der Anbringung kontrollieren, ob das Klimagerät
von dieser Stelle aus die Signale einwandfrei empfängt.
Zum Einsetzen oder Herausnehmen bewegt man die
Fernbedienung im Halter nach oben bzw. unten.
Beim Umgang mit der Fernbedienung folgendes beachten
Streng verboten
Vermeiden Sie Stellen mit hoher
•
Temperatur, wie etwa elektrische
Heizdecken oder einen Ofen.
Vermeiden Sie Hindernisse zwi-
•
schen der Fernbedienung und dem
Klimagerät.
Die Fernbedienung nicht direktem
•
Sonnenschein oder starken Lichtquellen aussetzen.
Die Fernbedienung nicht mit Wasser
•
oder Flüssigkeiten bespritzen.
Fernbedienung nicht fallen lassen.
•
Sorgsam behandeln.
Keine schweren Gegenstände auf
•
die Fernbedienung legen und auch
nicht darauf treten.
Wenn die Fernbedienung nicht funktioniert
Sind die Batterien leer?
•
Siehe
„Batterien auswechseln
Ersetzen Sie die Batterien und versuchen Sie es erneut.
“ weiter oben.
Falls der Vorgang fehlschlägt, bedienen Sie
•
das Gerät mittels der temporären Bedienungsfunktionen.
Kontaktieren Sie Ihren Fachhändler, um die
Fernbedienung überprüfen zu lassen.
Siehe unten
Vorübergehender Betrieb
Die ON/OFF-Taste am Gerät kann zeitweilig benutzt werden, wenn die Fernbedienung nicht zur Verfügung steht.
•
Betriebsart
OPERATION MODE : AUTO (Autom. Auswahl)
•
FAN SPEED : AUTO
•
AIR FLOW : AUTO
•
Der Betrieb beginnt durch Druck auf die ON/OFF- Taste am Gerät und
•
stoppt bei erneutem Tastendruck.
ANMERKUNG
Halten Sie die ON/OFF-Taste am Gerät länger ald 5 Sekunden gedrückt.
•
(Durch Drücken länger als 5 Sekunden wird der bei der Wartung oder während dem Transport des Klimageräts verwendete auto-
matische Kühlbetrieb eingestellt.)
ON/OFF-Taste am Gerät
– 66 –
Page 69

Installation von zwei Klimaanlagen im selben Raum
Wenn zwei Klimaanlagen im selben Raum installiert werden, verwenden Sie diese Einstellung falls die beiden Klimaanlagen nicht mit
■
einer einzigen Fernbedienung bedient werden. Stellen Sie die Fernbedienung und die Inneneinheit ein.
Einstellung der Fernbedienungseinheit
Ziehen Sie die Abdeckung heraus
1
und nehmen Sie die Batterien heraus.
Sie die Schaltleitung neben der Bat-
2
terie mit Drahtschneidern.
Trennen
Batterien einsetzen.
3
Die Abdeckung schließen.
Einstellen einer Inneneinheit
Schalten Sie den Netzstrom aus und schalten Sie ihn
1
nach 1 Minute wieder ein.
Richten Sie die Fernbedienung, die Sie mit dem auf der
2
linken Seite beschriebenen Verfahren eingestellt haben,
auf die Inneneinheit und senden Sie ein Signal, indem
Sie den ACL-Schalter auf der Fernbedienung drücken.
Da das Signal ca. 6
Sekunden nach dem
Drücken des ACLSchalters gesendet
wird, richten Sie die
Fernbedienung einige
Zeit lang auf die Inneneinheit.
Kontrollieren Sie, dass die Inneneinheit den Emp-
3
fangssummerton „pip“ abgibt.
Nach Abschluss der Einstellung gibt die Inneneinheit einen Summerton „pip“ ab. (Wenn kein Empfangston abgegeben wird, starten
Sie die Einstellung noch einmal von Anfang an.)
Empfang
pip
Kindersicherung
Diese Funktion sperrt die Fernbedienung, um Bedienungsfehler zu verhindern.
■
Richten Sie die Fernbedienung in Richtung Klimagerät und
Drücken Sie die SET-Taste 3 Sekunden oder länger.
1
wird angezeigt. Bei eingestellter Kindersicherung kann nur die ON/OFF-
Taste bedient werden.
Freigabeverfahren
Schalten Sie das Licht aus, indem Sie die SET-Taste 3 Sekunden oder
länger drücken.
ANMERKUNG
Bei eingestellter Kindersicherung können die Einstellungen der Temper-
•
atur, Lüftergeschwindigkeit und Luftströmungsrichtung nicht geändert
werden. Um die Einstellungen zu ändern, setzen Sie die Kindersicherung
zurück.
Die Kindersicherung arbeitet nicht beim ALLERGEN CLEAR-Betrieb.
•
– 67 –
Page 70

Bedienungs- und Anzeigenteil für die Fernbedienung
Bedienungsteil
Betriebsarttaste (MODE)
Jedes Mal, wenn die Taste gedrückt
wird, ändert sich die Betriebsart.
TEMPERATURE Taste
Diese Taste stellt die Raumtemperatur ein.
Taste HI/ECO
Diese Taste wechselt den HIGH POWER/ECONOMY-Betrieb.
Taste AIR FLOW (LEFT/RIGHT)
Dieser Schalter ändert die Richtung des
Luftfl uss (links/rechts).
SILENT-Taste
Diese Taste wählt den SILENT-Betrieb
aus.
Taste ALLERGEN CLEAR
Diese Taste wählt den ALLERGEN
CLEAR-Betrieb aus.
Seite 69,71
Seite 80
Seite 72
Seite 81
Seite 75
Übermittlungsteil
(Leucht)-Taste ON/OFF
Drücken Sie, um den Betrieb zu starten,
und drücken Sie erneut, um anzuhalten.
Gebläsestufentaste (FAN SPEED)
Jedes Mal, wenn die Taste gedrückt
wird, ändert sich die Lüftergeschwindigkeit.
Seite 70
Taste AIR FLOW (UP/DOWN)
Dieser Schalter ändert die Richtung
des Luftfl uss (auf/ab).
Seite 72
3D AUTO-Taste
Diese Taste wählt den 3D AUTO-Betrieb.
Seite 72
Taste NIGHT SETBACK
Diese Taste stellt den NIGHT SETBACKBetrieb ein.
Seite 81
SET-/Kindersicherungstaste
Verwenden Sie diese Taste, um den
Timer und die Kindersicherung einzustellen.
Seite 67
Taste EINSCHALTTIMER
Die Taste dient zum Wählen des Einschalttimerbetriebs.
Seite 74
Taste AUSSCHALTTIMER
Die Taste dient zum Wählen des Ausschalttimerbetriebs.
Seite 73
WEEKLY-Taste
Diese Taste schaltet den WOCHENTIMER auf ON/OFF.
Seite 76
CLEAN-Schalter
Mit diesem Schalter wechseln Sie in den
CLEAN-Betrieb.
Seite 82
Taste SLEEP
Dieser Schalter wählt den SLEEPBetrieb.
Seite 73
Obige Illustration zeigt alle Angaben, doch in der
•
Praxis werden nur die relevanten Teile angezeigt.
Taste ANNULLIEREN
Diese Taste storniert den Einschalttimer,
Ausschalttimer und den SLEEP-Betrieb.
Taste TIMER
Diese Taste wird verwendet, um die aktuelle Zeit und den Timer einzustellen.
PROGRAM-Taste
Diese Taste stellt den WOCHEN-TIMER
ein.
ACL-Schalter
Schalter zum Rückstellen des Mikrocomputers.
Schalter TIME SET UP
Dieser Schalter dient der Zeiteinstellung
Übermittlung
Nachdem eine Taste der Fernbedienung betätigt worden ist - mit Ausrichtung der Fernbedienung auf das Klimagerät - wird ein Signal übermittelt.
Sobald das Signal einwandfrei empfangen ist, wird vom Klimagerät ein Empfangston gesendet.
Seite 76
Seite 66
Seite 69
– 68 –
Page 71

Einstellung der aktuellen Zeit
Beim Einsetzen der Batterien wird die aktuelle Zeit automatisch auf Zeiteinstellmodus gestellt. Mon (Montag) und 13:00 werden als ak-
■
tuelle Zeit angezeigt. Stellen Sie den korrekten Wochentag und die Uhrzeit ein.
Beispiel: Eingestellt auf Sat (Samstag) 10:30.
Drücken Sie den TIME SETP UP.
1
2
3
Drücken Sie ihn mit einem Kugelschreiber oder ähnlichem.
Die Wochentaganzeige blinkt, so dass ein Wochentag eingestellt werden
kann.
Drücken Sie die „ oder (TIMER)“-Taste.
(Eingestellt auf Sat (Samstag))
Drücken Sie die SET-Taste.
Die Anzeige wechselt von Blinken auf stetiges Leuchten, was die Einstellung
des Wochentags abschließt und die Zeitanzeige blinkt.
Stellen Sie sicher, dass Sie die Taste innerhalb von 60 Sekunden nach dem
letzten Vorgang in Schritt 2 drücken, ansonsten wird der Wochentag nicht
eingestellt.
4
5
ANMERKUNG
Der Timerbetrieb arbeitetet basierend auf der eingestellten Zeit
•
– stellen Sie diese daher korrekt ein.
Die Fernbedienungsdaten werden rückgesetzt, wenn die aktu-
•
elle Zeit eingestellt wird.
Drücken Sie die „ oder (TIMER)“-Taste.
(Eingestellt auf 10:30)
Drücken Sie die SET-Taste.
Die Anzeige wechselt von Blinken auf stetiges Leuchten und die Einstellung
ist abgeschlossen.
Stellen Sie sicher, dass Sie die Taste innerhalb von 60 Sekunden nach dem
letzten Vorgang in Schritt 4 drücken, ansonsten wird die Zeit nicht eingestellt.
Wenn die Batterie der Fernbedienung ausgetauscht wird oder
•
der ACL-Schalter gedrückt wird, wird die Fernbedienung auf
ihre Grundeinstellung zurückgesetzt. Da das WOCHEN-TIMERProgramm in den Grundeinstellungen nicht eingestellt ist, stellen Sie das Programm dem Einstellungsvorgang folgend ein.
Automatischer Betrieb (AUTO)
Automatische Wahl der Betriebsart (COOL, HEAT, DRY) , je nach Raumtemperatur bei Einschaltung.
■
Wenn das Gerät nicht in AUTO Betrieb ist:
1
Drücken Sie das MODE-Taste.
Der Modus ändert sich jedes Mal, wenn die Taste gedrückt wird.
Eingestellt auf
Richten Sie die Fernbedienung in Richtung Klimagerät und
.
ANMERKUNG
•
Wenn der vorhandene Reini-
•
Anzeige im Status OFF
Während die Klimaanlage ausgeschaltet
•
ist, werden aktuelle Zeit, Wochentag und
voreingestellter OPERATING MODE angezeigt.
2
Im Falle, dass während des Be-
triebs kein Luftaustritt stattfi ndet.
Seite 87
gungsfi lter installiert ist, reinigt die
Klimaanlage die Luft während des
Automatik-Betriebs.
Drücken Sie das ON/OFF-Taste.
– 69 –
Stoppen: Drücken Sie das ON/OFF-Taste.
AUTO wird durch
einfachen Druck auf
die Taste ON/OFF
beim nächsten Mal
eingestellt.
Falls Sie einen anderen Programmmodus als AUTO
•
verwenden möchten, wechseln Sie stattdessen zu
COOL, HEAT, DRY oder FAN.
Einstellung der Luftströmungs-richtung.
•
Seite 71
Seite 72
Page 72

Temperatureinstellung bei AUTO
Die Einstellung der Lufttemperatur ist auch bei automatischem Betrieb möglich. Mit den Tasten
■
len. Während des automatischen Betriebs wird für Heiz- und Kühlbetrieb 24 °C voreingestellt.
Wenn eine Änderung der Temperatur erforderlich ist.
1
Wenn es etwas zu kalt ist
Taste betätigen.
Jedes Mal, wenn die Taste gedrückt wird, wird in folgender Reihenfolge weiterge-
■
schaltet
–6 → –5 → ............ –1 → ±0 → +1 ............ +6.
Wenn +6 angezeigt wird, ändert sich die Anzeige nicht, auch wenn die Taste gedrückt wird.
Wenn es etwas zu heiß ist
Taste betätigen.
Jedes Mal, wenn die Taste gedrückt wird, wird in folgender Reihenfolge weiterge-
■
schaltet
+6 → +5 → ............ +1 → ±0 → –1 ............ –6.
Wenn -6 angezeigt wird, ändert sich die Anzeige nicht, auch wenn die Taste gedrückt wird.
Drücken Sie das „ oder (TIMER)“
Temperature
instellung (°C)
-6 -5 -4 -3 -2 -1 +0 +1 +2 +3 +4 +5 +6
18 19 20 21 22 23 24 25 26 27 28 29 30
und assen sich 6 Positionen einstel-
Fernbedienungsanzeige
FAN SPEED (LÜFTERGESCHWINDIGKEIT)
Sie können im Heiz-, Kühl oder Lüftermodus die Kapazität Ihres Klimageräts wählen.
■
Richten Sie die Fernbedienung in Richtung Klimagerät und
1
Gewünschte Stärke des Luftstroms Gebläsestufe (FAN SPEED)
Vom Mikrocomputer automatisch festgelegt AUTO
Ruhiger Betrieb ULO
Stromsparbetrieb LO
Normalbetrieb MED
Starker Luftstrom mit hohem Volumen HI
Wenn die Lüftergeschwindigkeit (FANSPEED) von HI nach LO oder ULO
•
Drücken Sie die FAN SPEED-Taste.
Jedes Mal, wenn die Taste gedrückt wird, ändert sich die Lüftergeschwindigkeit.
AUTO HIMEDLOULO
ANMERKUNG
geändert wird, können vom Kühlmittel herrührende Strömungsgeräusche zu
hören sein.
– 70 –
Page 73

COOL/HEAT/DRY/FAN-Betrieb
Richten Sie die Fernbedienung in Richtung Klimagerät und
1
2
3
4
Regelung der Luftströmungsrichtung.
ANMERKUNG
Im Falle, dass während des Heizbetriebs kein Luftaustritt stattfi n-
•
det.
Die Betriebsart kann auch eingestellt oder geändert werden,
•
wenn die Klimaanlage nicht in Betrieb ist.
Seite 87
Seite 72
Drücken Sie das MODE SELECT-Taste.
Auf einen erforderlichen Modus einstellen.
(Cool), (Heat), (Dry), (Fan)
Drücken Sie das ON/OFF-Taste.
Drücken Sie das TEMP-Taste.
Drücken Sie die oder Taste für die bevorzugte Temperatur.
Empfehlung
Drücken Sie das FAN SPEED-Taste.
Stellen Sie die Lüftergeschwindigkeit ein, wie gewünscht.
Während des Dry-Betriebs kann keine Gebläsestufe eingestellt werden.
Stoppen: Drücken Sie das ON/OFF-Taste.
Temperatureinstellungen für das Klimagerät
Innerhalb des nachstehenden Betriebsbereichs verwenden. Bei Betrieb außerhalb dieses Bereichs können die Schutzvorrichtun-
■
gen aktiviert werden, wodurch das Gerät nicht arbeiten kann.
Kühlbetrieb Heizbetrieb
Außentemperatur Etwa -15 bis 46°C. Etwa -15 bis 24°C
Innentemperatur Etwa 18 bis 32°C Etwa 15 bis 30°C
Unter etwa 80%
Wird das Gerät langfristig bei einer Raumluftfeuchtigkeit
Raumluftfeuchtigkeit von über 80% betrieben, kann dies die
Kondenswasserbildung auf der Oberfl äche des
Innengerätes zur Folge haben, so daß Wasser heruntertropft.
Kennzeichen beim HEAT Betrieb
Mechanismen und Leistung des HEAT Betriebes
Mechanismen
■
Das Gerät saugt die kalte Außenluft an, befördert sie in den Innenraum und wärmt den Raum. Eine Charakteristik von Wärmepumpen
•
ist, dass die Heizleistung sich reduziert, sobald die Temperatur der Außenluft absinkt.
Es kann nach dem Einschalten des Klimageräts ein wenig dauern, bis es warme Luft bereitstellt.
•
Bei außerordentlicher niedriger Außentemperatur ein zusätzliches Heizgerät verwenden.
•
Entfrostung
Bei niedriger Außentemperatur und hoher Luftfeuchtigkeit kann der Wärmeaustauscher der Außenanlage Frost verursachen, wodurch eine
effi ziente Heizung behindert wird.
Falls dies passiert, wird die automatische Entfrostungsfunktion aktiviert und während diesem Vorgang wird der Heizbetrieb für 5
bis 15 Minuten unterbrochen.
Innen- und Außenventilatoren stoppen, und die RUN Lampe blinkt träge (1,5 Sek. an, 0,5 Sek. aus) während des Entfrostens.
•
Bei der Außenanlage kann während des Entfrostens Dampf auftreten. Der entsteht durch rasches Entfrosten und ist keine Störung.
•
Nach vollendetem Entfrosten beginnt wieder der HEAT Betrieb.
•
—
– 71 –
Page 74

Einstellung der Luftströmungsrichtung
Einstellen der Luftströmungsrichtung
Die Richtung nach oben/nach unten kann mit der Taste AIRFLOW U/D (UP/DOWN) auf der Fernbedienung eingestellt werden. Je-
■
des Mal, wenn Sie diesen Schalter drücken, ändert sich der Modus folgendermaßen:
Wechseln zu AIRFLOW (AUF/AB) Modus.
(Klappe gestoppt)
Die Richtung nach links/nach rechts kann mit der Taste AIRFLOW L/R (LEFT/RIGHT) auf der Fernbedienung eingestellt werden.
■
Jedes Mal, wenn Sie diesen Schalter drücken, ändert sich der Modus folgendermaßen:
Wechseln zu AIRFLOW (LINKS/RECHTS) Modus.
(
Luftklappe gestoppt
)
(Schwingen)
ANMERKUNG
Die tatsächliche Stellung der Klappe und des Lüftungsschlitzes kann von der im Display angezeigten abweichen.
•
HINWEISE FÜR DEN HEIZBETRIEB
Wenn der Heizbetrieb beginnt, wird der kalte Luftauslass blockiert, damit Klappe und Luftklappe sich nicht in die horizontale/mittlere Position bewegen
•
und die Position wieder aufnehmen, die nach Beginn des warmen Luftauslasses eingestellt war.
Die Stellung von Klappe und Luftklappe wird auf die horizontale/mittlere Position gesteuert, sobald die Raumtemperatur den festgelegten Wert erreicht
•
hat und der Kompressor anhält oder wenn das Entfrosten läuft.
Die Richtung des Luftstroms kann während dieses oben genannten Zeitraums eingestellt werden. Ändern Sie die Luftstromrichtung, nachdem die
•
warme Luft beginnt zu strömen und die Klappe/Luftklappe bewegt sich in die festgelegte Position.
(Schwingen)
MEMORY FLAP (KLAPPE ODER LUFTKLAPPE GESTOPPT)
Wenn Sie den AIRFLOW (
bestimmten Winkel. Da dieser Winkel im Mikrocomputer gespeichert wird, werden die Klappe oder Luftklappe automatisch auf diesen Winkel eingestellt,
wenn der nächste Betrieb beginnt. Da dieser Winkel im Mikrocomputer gespeichert wird, ist die Klappe oder die Luftklappe automatisch auf diesen Winkel eingestellt, wenn der nächste Betrieb startet.
Vermeiden Sie andauernden Luftstrom aus dem Klimagerät auf ein Objekt.
•
In den Betriebsarten COOL oder DRY betreiben Sie das Gerät nicht über
•
einen längeren Zeitraum bei gerade nach unten gerichtetem Luftstrom.
Ansonsten kann es zu Kondensation auf dem Auslassgrill kommen und
dieser kann herabtropfen. da sich sonst am Ausgangsgitter Kondenswasser bilden und herabtropfen kann.
Versuchen Sie nicht, die Klappen und Luftklappen von Hand einzustellen,
•
da der Steuerungswinkel sich ändern kann oder die Klappe oder Luftklappe sich eventuell nicht mehr richtig schließen.
U/D
oder
) Schalter einmal drücken, während Klappe oder Luftklappe in Betrieb sind, stoppt das Schwingen an einem
L/R
WARNUNG
ACHTUNG
Empfohlener Klappenwinkel beim Stopp
•
HEAT
(Heizen)
COOL, DRY
(Kühlen,
Entfeuchten)
(schräg voraus
blasend)
(Horizontal
blasend)
3D AUTO-Betrieb
Gebläsegeschwindigkeit und Luftstromrichtung werden automatisch gesteuert und erlauben effi ziente Klimatisierung des gesamten Raums.
■
1
Drücken Sie die ON/OFF-Taste.
2
Freigabeverfahren
Drücken Sie die 3D AUTO-Taste, um die 3D AUTO-Anzeige auszuschalten.
Der 3D AUTO-Betrieb wird abgebrochen, wenn Sie die Betriebsart umschalten.
•
Wenn der 3D AUTO-Betrieb aufgehoben wird, wechselt die Luftstromrichtung
•
Der 3D AUTO-Betrieb kann nur in der Betriebsart AUTO, COOL oder
•
Drücken Sie die 3D AUTO-Taste.
Jedes Mal, wenn die 3D AUTO-Taste gedrückt wird, wird die Anzeige in folgender Reihenfolge weitergeschaltet:
Keine Anzeige
(3D AUTO)
ANMERKUNG
auf die vor der Einstellung von 3D AUTO eingestellte Richtung um.
HEAT eingestellt werden.
(Normalbetrieb)
– 72 –
Page 75
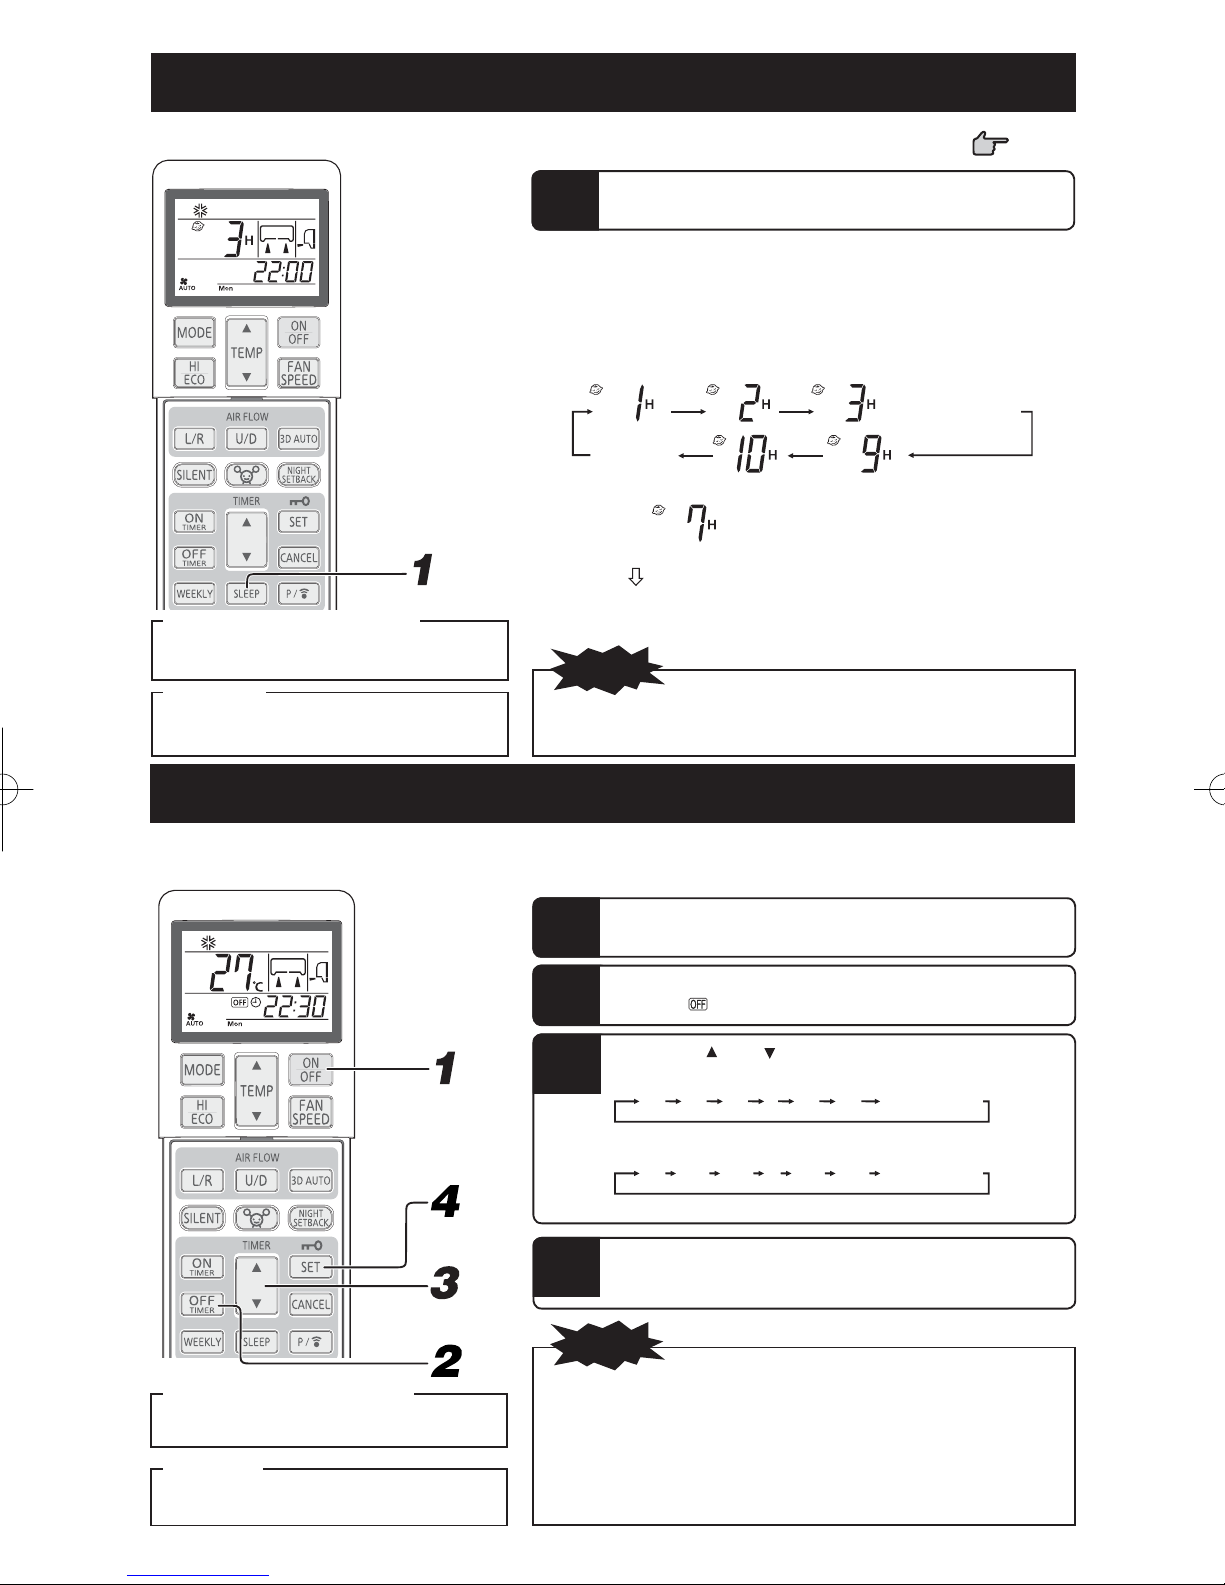
SLEEP TIMER-Betrieb
Das Gerät stoppt automatisch am Ende des eingestellten Zeitraums.
■
Die Raumtemperatur wird entsprechend der vergangenen Zeit kontrolliert, damit der Raum nicht zu heiß oder kalt wird.
Seite 75
Ändern der eingestellten Zeit
Stellen Sie eine neue Zeit mithilfe der Taste
SLEEP ein.
Abbrechen
Drücken Sie die CANCEL-Taste, um die SLEEPAnzeige auszuschalten.
1
Drücken Sie die-Taste SLEEP.
■
Drücken bei ausgeschaltetem Gerät,
Der SLEEP TIMER startet mit den vorherigen Betriebseinstellungen und das
Klimagerät wird ausgeschaltet, wenn die eingestellte Zeit abgelaufen ist.
■
Drücken bei eingeschaltetem Gerät,
nach Ablauf der eingestellten Zeit schaltet sich die Anzeige ab.
Jedes Mal, wenn Sie diesen Schalter drücken, ändert sich die Anzeige folgen-
dermaßen:
... (Einheiten von einer
Stunde)
Keine Anzeige
(storniert)
Beispiel: Das Gerät soll nach 7 Stunden angehalten werden.
Eingestellt auf
Die Timer-Licht (gelb) ist ein.
Das Gerät stoppt am Ende des eingestellten Zeitraums.
•
ANMERKUNG
SLEEP-Betrieb arbeitet nicht beim ALLERGEN CLEAR-Betrieb.
•
Im Gegensatz zum SLEEP-Betrieb ist die automatische Temperaturein-
•
stellung beim OFF-TIMER-Betrieb nicht möglich.
OFF TIMER-Betrieb
Das Gerät stoppt automatisch wenn die eingestellte Zeit erreicht ist.
■
Starten Sie den Vorgang bei ausgeschalteter Klimaanlage ab Schritt 1. Bei laufender Klimaanlage starten Sie ab Schritt 2.
Ändern der eingestellten Zeit
Mit der Taste OFF TIMER eine neue Zeit einstellen.
Abbrechen
Drücken Sie den CANCEL-Taste, um den Zeitmesseranzeiger auszumachen.
Beispiel: Das Gerät soll um 22:30 Uhr den Betrieb einstellen.
1
2
3
4
•
•
•
•
•
Drücken Sie das ON/OFF-Taste.
Drücken Sie das OFF TIMER-Taste.
Die Anzeige des AUSSCHALTTIMERS blinkt.
Die Taste „ oder (TIMER)“ drücken.
Jedes Mal, wenn der Schalter gedrückt wird, wird die Anzeige in folgender
Reihenfolge weitergeschaltet.
0:00 0:10 0:20
Jedes Mal, wenn der Schalter gedrückt wird, wird die Anzeige in folgender
Reihenfolge weitergeschaltet.
0:00 23:50 23:40
Eingestellt auf 22:30.
Drücken Sie die SET-Taste.
Die Anzeige wechselt von Blinken auf stetiges Leuchten und die Einstellung
ist abgeschlossen.
Das Timerlicht (gelb) ist an.
ANMERKUNG
Das Gerät schaltet sich am Ende des eingestellten Zeitraums aus.
Stellen Sie sicher, dass Sie die Taste innerhalb von 60 Sekunden nach
dem letzten Vorgang in Schritt 3 drücken, ansonsten wird die Einstellung nicht übernommen.
Die aktuelle Zeit wird während des OFF-TIMER-Betrieb nicht angezeigt.
OFF-TIMER-Betrieb arbeitet nicht beim ALLERGEN CLEAR-Betrieb.
Anders als beim SLEEP-TIMER-Betrieb, wird während des OFF-TIMER
Betriebs keine automatische Temperaturangleichung vorgenommen.
...
1:00 1:10
...
23:00 22:50
(Einheiten von
zehn Minuten)
(Einheiten von
zehn Minuten)
– 73 –
Page 76

ON TIMER-Betrieb
Der Betrieb startet 5 bis 60 Minuten vor der Zeit, die eingestellt ist, damit die Raumtemperatur zur eingestellten Zeit den optimalen Wert erreicht.
■
ON-TIMER-Betrieb kann unabhängig davon eingestellt werden, ob die Klimaanlage läuft oder nicht.
Beispiel: In diesem Fall möchten Sie die gewünschte Raumtemperatur um 8:00 Uhr.
Drücken Sie das ON TIMER-Taste.
1
Die Anzeige des EINSCHALTTIMERS blinkt.
Drücken Sie das „ oder (TIMER)“-Taste.
2
Jedes Mal, wenn der Schalter gedrückt wird, wird die Anzeige in folgender
Reihenfolge weitergeschaltet.
0:00 0:10 0:20
Jedes Mal, wenn der Schalter gedrückt wird, wird die Anzeige in folgender
Reihenfolge weitergeschaltet.
0:00 23:50 23:40
Eingestellt auf 8:00.
...
1:00 1:10
...
23:00 22:50
(Einheiten von
zehn Minuten)
(Einheiten von
zehn Minuten)
Drücken Sie die SET-Taste.
Ändern der eingestellten Zeit
Mit der Taste ON TIMER eine neue Zeit einstellen.
Abbrechen
Drücken Sie die CANCEL-Taste, um die TimerAnzeige auszuschalten.
3
•
•
•
•
•
Die Anzeige wechselt von Blinken auf stetiges Leuchten und die Einstellung
ist abgeschlossen.
Das Timerlicht (gelb) ist an.
Der Betrieb wird gestoppt, falls dies während des Betriebs festgelegt wird.
ANMERKUNG
Der Betrieb beginnt 5 bis 60 Minuten vor der eingestellten Zeit.
Die Timer-Anzeige (gelb) erlischt gleichzeitig.
Stellen Sie sicher, dass Sie die Taste innerhalb von 60 Sekunden nach
dem letzten Vorgang in Schritt 2 drücken, ansonsten wird die Einstellung
nicht übernommen.
Die aktuelle Zeit wird während des ON-TIMER-Betrieb nicht angezeigt.
OFF TIMER-Betrieb arbeitet nicht beim ALLERGEN CLEAR-Betrieb.
Seite 75
SLEEP TIMER & ON-TIMER-Betrieb
Kombinierter Timerbetrieb von SLEEP TIMER und ON TIMER.
■
Beispiel: In diesem Fall soll nach 3 Stunden angehalten und dann wieder gestartet werden,
wenn die Temperatur um 8:00 Uhr erreicht werden soll.
Einstllung für den SLEEP-TIMER-Betrieb
■
Wird eingestellt durch die Verfahren auf Seite 73.
Eingestellt auf
Einstellung für den ON TIMER-Betrieb
■
Wird eingestellt durch das Verfahren erwähnt bei ON TIMER.
Eingestellt auf
Die Einstellung der Beleuchtung des Timer-Lichts (gelb) dieses Geräts ist abgeschlossen.
Nachdem die für den SLEEP TIMER eingestellte Zeit abgelaufen ist, stoppt der Be-
•
trieb, und beginnt 5 bis 60 Minuten vor der Zeit des ON-TIMER.
Die Timer-Lampe leuchtet zur festgelegten Zeit des ON-TIMERS nicht.
•
Ändern der eingestellten Zeit
Stellen Sie eine neue Zeit ein, indem Sie die Taste SLEEP oder EINSCHALTTIMER verwenden.
Abbrechen
Drücken Sie den CANCEL-Taste, um den Zeitmesseranzeiger auszumachen.
– 74 –
Page 77

ON-TIMER- + OFF-TIMER-Betrieb
Die Timer-Betriebsarten aus einer Kombination von ON- und OFF-TIMER.
■
Beispiel: Wenn um 22:30 Uhr angehalten und dann wieder gestartet werden soll,
damit die eingestellte Temperatur um 8:00 Uhr erreicht wird.
Einstllung für den OFF-TIMER-Betriebs.
■
Einstellung gemäß des Verfahrens auf Seite 73
vornehmen.
Einstllung für den ON-TIMER-Betriebs.
■
Einstellung gemäß des Verfahrens auf Seite 74
vornehmen.
Das Timerlicht (gelb) auf dem Gerät wird leuchten, sobald die Einstellungen übernommen sind.
Die eingestellte Zeit wird auf der Fernbedienung angezeigt. Die Anzeige
wechselt je nach Betriebszustand.
Bei ON TIMER beginnt die Klimaanlage zu arbeiten.
Mit OFF TIMER beendet die Klimaanlage ihren Betrieb.
(Beispiel aktuelle Zeit: 5:00 Die Klimaanlage beendet den Betrieb.)
Bei OFF TIMER beendet die Klimaanlage ihren Betrieb. Bei ON
TIMER nimmt die Klimaanlage den Betrieb wieder auf.
(Beispiel aktuelle Zeit: 20:00 Die Klimaanlage läuft.)
Ändern der eingestellten Zeit
Mit der Taste ON TIMER oder OFF TIMER eine neue Zeit einstellen.
Abbrechen
Drücken Sie den CANCEL-Taste, um den Zeitmesseranzeiger auszumachen.
Eingestellt auf
Eingestellt auf
Komfort Start
Beim ON TIMER-Betrieb beginnt das Gerät ein wenig früher zu arbeiten,
damit der Raum die bei der Einschaltzeit optimale Temperatur aufweist.
Das nennt man „Komfort Start“.
Mechanismus
•
Die Raumtemperatur wird 60
Minuten vor der Einschaltzeit
überprüft. Je nach der dann
herrschenden Temperatur
beginnt der Betrieb 5-60
Minuten vor der ONZeiteinstellung.
Die Funktion ist für beides
•
verfügbar, COOL und HEAT
Betriebsmodus (einschließlich
AUTO). und nicht bei DRY Betrieb.
In COOL Betrieb
▼
(Stopp) Betriebsbeginn
(Betrieb)
Temperatureinstellung
Kontrolle der
Raumtemperatur
60 Min. vorher. vorher.
▼
Zeiteinstellung
SLEEP TIMER (Ruhezustands-Timer)
Wenn der SLEEP TIMER ausgewählt ist, wird die Raumtemperatur
nach einer Weile automatisch kontrolliert und es wird sichergestellt,
dass der Raum während dem Kühlen nicht zu kalt und während dem
Heizen nicht zu warm ist.
Während des Kühlens: Die eingestellte Temperatur wird um 1°C beim
•
Start des SLEEP-Betriebs verringert (wenn der Timer eingestellt ist).
Danach steigt die Temperatur um 1°C jede Stunde, um 1°C höher zu
werden, als die aktuelle Temperatur.
Während dem Heizen: Die eingestellte Temperatur wird um 1°C beim
•
Start des SLEEP-Betriebs verringert (wenn der Timer eingestellt ist).
Danach wird die Temperatur jede Stunde um 3°C gesenkt und wird in
zwei Stunden 6°C niedriger als die aktuelle Temperatur.
ALLERGEN CLEAR-Betrieb
Die Leistung der Enzyme wird verwendet, um allergieauslösende Allergene zu
■
beseitigen, die sich am Allergenfi lter ansammeln.
Richten Sie die Fernbedienung auf die Klimaanlage.
1
Drücken Sie das ALLERGEN CLEAR-Taste.
Stoppen:
Drücken Sie das ON/OFF oder
ALLERGEN CLEAR-Taste.
ANMERKUNG
Da die Raumtemperatur sich ziemlich ändern kann, sollte dies verwendet
•
werden, wenn sich niemand im Raum befi ndet. (Wird automatisch in ungefähr 90 Min. durchgeführt.)
Während des ALLERGEN CLEAR-Betriebs können keine Einstellungen
•
der Temperatur, Lüftergeschwindigkeit, Luftströmungsrichtung und des
Timers vorgenommen werden.
Bei einem SCM-Multisystem ist die ALLERGEN CLEAR-Kontrollfunktion
•
ungültig.
Falls bei einem SCM-Multisystem die ALLERGEN CLEAR-Taste verse-
•
hentlich gedrückt wird, stoppt die Innenheit, die einen solchen Befehl
erhalten hat.
– 75 –
Page 78

WOCHEN-TIMER-Betrieb
Für jeden Wochentag sind bis zu 4 Programme mit Timer-Betrieb (ON-TIMER / OFF-TIMER) verfügbar. Pro Woche sind maximal 28
■
Programme verfügbar. Nachdem dies eingestellt ist, wird der Timer-Betrieb jede Woche dasselbe Programm wiederholen, solange der
WOCHEN-TIMER nicht aufgehoben wird.
Beispiel (während der Kühlsaison)
: WOCHEN-TIMER-Einstellung
: MANUELLE Einstellung
WOCHEN-TIMER ON/OFF-Einstellung
Schalten Sie den WOCHEN-TIMER auf ON/OFF, indem Sie die WEEKLY-Taste verwenden.
■
Drücken Sie die WEEKLY-Taste.
1
ANMERKUNG
Der WOCHEN-TIMER ist unabhängig davon, ob die Klimaan-
•
lage läuft oder nicht, auf ON/OFF geschaltet.
Der ON-TIMER-Betrieb des WOCHEN-Timers ist unabhän-
•
gig davon, ob die Klimaanlage läuft oder nicht, aktiv.
Wenn die eingestellte ON-TIMER-Zeit erreicht ist, arbeitet
die Fernbedienung entsprechend den eingestellten Werten.
Die Fernbedienungsanzeige wird auch auf die eingestellten
Betriebswerte umgeschaltet. Die Einstellung kann von der
Fernbedienung aus nach dem ON-TIMER-Betrieb des WO-
CHEN-TIMER geändert werden.
Die folgenden Werte können vom ON-TIMER eingestellt werden.
Betriebsart, Lüftergeschwindigkeit, Temperatur, Luftströ-
mungsrichtung, ECONOMY, 3D AUTO, NIGHT SETBACK,
SILENT.
Komfort Start wird für den WOCHEN-TIMER ON-TIMER-
Betrieb nicht ausgeführt.
Der WOCHEN-TIMER wird aktiviert.
Jedes Mal, wenn die WEEKLY-Taste gedrückt wird, wird die Anzeige in
folgender Reihenfolge weitergeschaltet:
(WOCHEN-TIMER ein)
Wenn der WOCHEN-TIMER auf ON eingestellt ist, ist das Timer-Licht (gelb)
der Klimaanlage an.
Wenn die Batterie der Fernbedienung ausgetauscht wird oder der ACLSchalter gedrückt wird, wird die Fernbedienung auf ihre Grundeinstellung
zurückgesetzt. Da das WOCHEN-TIMER-Programm in den Grundeinstellungen nicht eingestellt ist, stellen Sie das Programm dem Einstellungsvorgang
folgend ein.
Der OFF-TIMER-Betrieb des WOCHEN-TIMER ist nur aktiv,
•
wenn die Klimaanlage läuft. Wenn die eingestellte Zeit des OFFTIMER erreicht ist, beendet die Klimaanlage ihren Betrieb.
Wenn mehrere Programmnummern für den aktuellen
•
Tag (Wochentag) eingestellt sind, wird der Betrieb ab der
frühesten eingestellten Zeit ausgeführt.
Wenn mehrere Timer (ON-TIMER, OFF-TIMER und SLEEP-
•
TIMER) arbeiten, arbeitet der WOCHEN-TIMER nicht. Er
arbeitet auch dann nicht, wenn die eingestellte Zeit des ONTIMER oder OFF-TIMER erreicht ist. Der WOCHEN-TIMER
wird aktiviert, nachdem mehrere Timer beendet sind.
Der ON-TIMER oder OFF-TIMER derselben Zeit desselben
•
Wochentags kann nicht eingestellt werden.
Keine Anzeige
No display
(WOCHEN-TIMER aus)
– 76 –
Page 79

Einstellmodus <Individuelle Einstellung>
Nach dem Einstellen des aktuellen Wochentags und der Zeit einstellen.
1
2
3
Drücken Sie die PROGRAM-Taste.
und aktueller Wochentag blinken.
Die Taste „ oder (TIMER)“ drücken.
Wählen Sie einen Wochentag aus, der reserviert werden soll.
Jedes Mal, wenn der Schalter gedrückt wird, wird die Anzeige
in folgender Reihenfolge weitergeschaltet.
Mon Tue Wed
Jedes Mal, wenn der Schalter gedrückt wird, wird die Anzeige
in folgender Reihenfolge weitergeschaltet.
Mon Sun
Anzeige aller Wochentage Tue
Drücken Sie die SET-Taste.
Der Wochentag ist festgelegt und die Programmnummer blinkt.
...
Anzeige aller Wochentage
Sun
Sat
...
4
5
6
Die Taste „ oder (TIMER)“ drücken.
Wählen Sie eine Programmnummer aus.
Jedes Mal, wenn der Schalter gedrückt wird, wird die Anzeige
in folgender Reihenfolge weitergeschaltet.
P1 P2 P3 P4
Jedes Mal, wenn der Schalter gedrückt wird, wird die Anzeige
in folgender Reihenfolge weitergeschaltet.
P1 P4 P3 P2
Drücken Sie die SET-Taste.
Wenn keine eingestellten Werte (ON-TIMER oder OFF-TIMER)
verfügbar sind, blinken sowohl der
Wenn eingestellte Werte (ON-TIMER oder OFF-TIMER) verfügbar sind, leuchtet entweder
Drücken Sie die ON-TIMER- oder OFF-TIMER-Taste.
Der ON-TIMER oder OFF-TIMER ist festgelegt und die Zeitanzeige blinkt.
als auch der Timer.
oder .
ON-TIMER ist ausgewählt OFF-TIMER ist ausgewählt
– 77 –
Page 80

7
8
9
Die Taste „ oder (TIMER)“ drücken.
Stellen Sie eine Zeit ein.
Jedes Mal, wenn der Schalter gedrückt wird, wird die Anzeige
in folgender Reihenfolge weitergeschaltet.
0:00 0:10 0:20
Jedes Mal, wenn der Schalter gedrückt wird, wird die Anzeige
in folgender Reihenfolge weitergeschaltet.
0:00 23:50 23:40
Wenn ON-TIMER ausgewählt ist, gehen Sie zu Schritt 8.
Wenn OFF-TIMER ausgewählt ist, gehen Sie zu Schritt 9.
Stellen Sie erforderliche Betriebswerte ein.
Wenn ON-TIMER ausgewählt ist, können Betriebsart, Lüftungsgeschwindigkeit und Luftströmungsrichtung geändert und der ECONOMY-, SILENT- oder NIGHT SETBACK-Betrieb
eingestellt werden.
Drücken Sie die SET-Taste.
Die Zeit ist festgelegt und und blinken.
...
...
23:00 22:50
1:00 1:10
(Einheiten von
zehn Minuten)
(Einheiten von
zehn Minuten)
Drücken Sie die PROGRAM-Taste oder die SET-Taste.
10
Wenn die PROGRAM-Taste gedrückt wird, wird die Einstellung an die Klimaanlage gesendet.
Da es die Übermittlung 3 Sekunden dauert, richten Sie die Fernbedienung während dieser
Zeit auf den Fernbedienungssignalempfänger der Inneneinheit.
Wenn die Einstellung empfangen wird, ertönt ein Summerton (pip, pip, pip).
Wenn die SET-Taste gedrückt wird, werden die Einstellungen ab Schritt 2 fortgesetzt.
Einstellmodus <Kollektive Einstellung>
Stellen Sie dieselben Betriebswerte auf dieselbe Programmnummer von allen Wochentagen. Wählen Sie im obigen Schritt 2 „alle Wo-
■
chentage“ aus. Wenn die individuell eingestellten Werte in derselben Programmnummer vorkommen, werden die Werte überschrieben.
ANMERKUNG
Wenn im Einstellmodus 60 Sekunden lang kein Vorgang ausgeführt wird, werden die bis dahin durchgeführten Einstellung-
•
sänderungen ungültig und der Einstellmodus wird geschlossen. Anschließend blinken
P3 und P4) 10 Sekunden lang.
Am Ende des Einstellmodus richten Sie die Fernbedienung auf die Klimaanlage und drücken Sie die PROGRAM-Taste. Kontrol-
•
lieren Sie in diesem Fall, dass die Klimaanlage drei Mal einen Empfangssummerton abgibt (pip, pip, pip). Wenn kein Summerton
ertönt, stellen Sie den Modus wieder auf Einstellmodus, indem Sie die PROGRAM-Taste drücken und kontrollieren Sie, ob ein
Summerton ertönt.
und alle Programmnummern (P1, P2,
– 78 –
Page 81

Wie Sie die Einstellung <Individuelle Einstellung> aufheben
1
2
3
4
5
6
Drücken Sie die PROGRAM-Taste.
und aktueller Wochentag blinken.
Die Taste
Wählen Sie einen Wochentag aus, der gelöscht werden soll.
Drücken Sie die SET-Taste.
Der Wochentag ist festgelegt und die Programmnummer blinkt.
Die Taste
Wählen Sie eine Programmnummer aus, die gelöscht werden soll.
Drücken Sie während des Löschvorgangs nicht die SET-Taste. Wie die SETTaste gedrückt wird, wird der Modus auf Einstellmodus umgestellt.
Drücken Sie die CANCEL-Taste.
Die Einstellungswerte des ON- oder OFF-TIMER werden gelöscht und
Drücken Sie die PROGRAM-Taste.
Wenn die PROGRAM-Taste gedrückt wird, wird die Einstellung an die Klimaanlage gesendet.
Wenn die Einstellung empfangen wird, ertönt ein Summerton (pip, pip, pip).
Die Einstellungswerte aller Programme werden gelöscht. Führen Sie den
oben beschriebenen Vorgang aus, um alle Programme zu löschen.
„ oder (TIMER)“
„ oder (TIMER)“
wird auf dem Zeitanzeigefeld angezeigt.
drücken.
drücken.
Wie Sie die Einstellung <Kollektive Einstellung> aufheben
Wenn dieselben Betriebswerte in derselben Programmnummer von allen Wochentagen vorkommen, ist kollektives Löschen möglich.
■
Wählen Sie im obigen Schritt 2 „alle Wochentage“ aus. Der Vorgang von Schritt 3 ist derselbe wie der oben beschriebene.
Falls die Betriebswerte nach der kollektiven Einstellung beschrieben auf Seite 78 durch individuelle Einstellung geändert oder gelöscht
wurden und so zu Abweichungen der Einstellungswerte unter den Wochentagen geführt haben, ist kollektives Löschen nicht möglich.
Die WOCHEN-TIMER-Einstellungen können bestätigt werden.
Bestätigungsmodus
Drücken Sie die PROGRAM-Taste 3 Sekunden oder länger.
1
2
blinkt und die Einstellungen leuchten.
Die Taste
Wählen Sie einen Wochentag und eine Programmnummer aus, die bestätigt werden sollen.
Die Anzeige beginnt ab dem aktuellen Wochentag. Für das Programm ohne
Einstellung wird
GRAM-Taste gedrückt wird, wird ein Einstellmodus eingestellt.
„ oder (TIMER)“
angezeigt. Wenn im Bestätigungsmodus die PRO-
Mon P1 P2 P3 P4
Sun P1 P2 P3 P4
Anzeige aller
Wochentage
drücken.
P1 P2 P3 P4Tue
P1 P2 P3 P4
Freigabeverfahren
Der Bestätigungsmodus kann durch das Drücken der ON/OFF-, CANCEL- oder
SET-Taste beendet werden.
ANMERKUNG
Wenn im Bestätigungsmodus 60 Sekunden lang kein Vorgang ausgeführt
•
wird, wird der Bestätigungsmodus beendet.
– 79 –
Page 82

HIGH POWER/ECONOMY-Betrieb
Falls die Klimaanlage nicht funktioniert, richten Sie die Fernbedienung auf die Klimaanlage und
Drücken Sie das ON/OFF-Taste.
1
Drücken Sie das HI /ECO -Taste.
2
HIGH POWER-Betrieb
Drücken der Taste HI /ECO intensiviert die Betriebsleistung und initiiert 15 Minuten lang einen starken Kühl- oder Heißbetrieb. Die
Fernbedienung zeigt an und die Gebläsegeschwindigkeit erlischt.
ANMERKUNG
Wenn die Betriebsart AUTO, COOL oder HEAT ist
•
Jedes Mal, wenn der HI /ECO-Schalter gedrückt wird, wird die Anzeige in
folgender Reihenfolge weitergeschaltet:
Keine Anzeige
Normalbetrieb
(
HIGH POWER
Bei DRY- oder ON-TIMER- + OFF-TIMER-Betrieb
•
Jedes Mal, wenn der HI /ECO-Schalter gedrückt wird, wird die Anzeige in
folgender Reihenfolge weitergeschaltet:
(
ECONOMY
)(
ECONOMY
)
)
(
Keine Anzeige
(
Normalbetrieb
)
)
Während dem HIGH POWER-Betrieb wird die Raumtempe-
•
ratur nicht kontrolliert. Wenn dadurch übermäßiges Kühlen
oder Heizen verursacht wird, drücken Sie die Taste HI /ECO
erneut, um den HIGH POWER-Betrieb abzubrechen.
Der HIGH POWER-Betrieb ist während des DRY- und ON-
•
TIMER- + OFF-TIMER-Betriebs nicht verfügbar.
Wenn der HIGH POWER-Betrieb nach der Einstellung des
•
ONTIMER-Betriebs eingestellt wird, wird der HIGH POWERBetrieb ab der eingestellten Zeit beginnen.
Funktioniert nicht bei ausgeschalteter Klimaanlage.
•
Nach dem HIGH POWER-Betrieb ist eventuell das Geräusch
•
von fl ießendem Kühlmittel zu hören.
Wenn die folgenden Betriebsarten eingestellt sind, wird der
•
HIGH POWER-Betrieb abgebrochen.
Wenn die HI /ECO-Taste erneut gedrückt wird.
1
Wenn die Betriebsart geändert wird.
2
Wenn seit Start des HIGH POWER-Betriebs 15 Mi-
3
nuten vergangen sind.
Wenn die 3D AUTO-Taste gedrückt wird.
4
Wenn die SILENT-Taste gedrückt wird.
5
Wenn die NIGHT SETBACK-Taste gedrückt wird.
6
ECONOMY-Betrieb
Das Drücken der Taste HI /ECO betreibt das Gerät im Sparbetrieb, um ein übermäßiges Kühlen oder Heizen zu vermeiden.
Das Gerät arbeitet um 1,5°C höher als die eingestellte Temperatur während des Kühlens und um 2,5°C niedriger während dem Heizen. Die Fernbedienung wird angezeigt und die Anzeige FAN SPEED erlischt.
ANMERKUNG
Das Gerät wechselt in den ECONOMY-Betrieb, wenn das
•
Klimagerät das nächste Mal in folgenden Fällen läuft:
Wenn das Klimagerät während des ECONOMY-
1
Betriebs durch die ON/OFF Taste angehalten wird.
Wenn das Klimagerät im SLEEP- oder AUSSCHALT-
2
TIMER-Betrieb gestoppt wird.
Wenn der CLEAN- oder ALLERGEN CLEAR-Betrieb
3
endet.
Wenn die folgenden Betriebsarten durchgeführt werden, wird
•
der ECONOMY-Betrieb abgebrochen.
1
Wenn die HI/ECO-Taste erneut gedrückt wird.
2
Wenn die Betriebsart von DRY-Betrieb (Trocknen) zu
FAN-Betrieb (Lüfter) geändert wird.
3
Wenn die NIGHT SETBACK-Taste gedrückt wird.
Funktioniert nicht bei ausgeschalteter Klimaanlage.
•
– 80 –
Page 83

NIGHT SETBACK-Betrieb
Bei Abwesenheit, in der Nacht und wenn der Raum unbeaufsichtigt ist, kann in der kalten Jahreszeit die Raumtemperatur auf einer an-
■
genehmen Höhe gehalten werden. Die Klimaanlage hält die Raumtemperatur konstant auf etwa 10 °C.
SILENT-Betrieb
Drücken Sie das
1
Freigabeverfahren
Drücken Sie die NIGHT SETBACK- oder MODE-Taste, um die NIGHT SETBACK-Anzeige auszuschalten.
•
•
•
•
•
Jedes Mal, wenn der NIGHT SETBACK-Schalter gedrückt wird, wird die Anzeige in folgender Reihenfolge weitergeschaltet:
(NIGHT SETBACK ein)
ANMERKUNG
Während des NIGHT SETBACK-Betriebs, hält die Klimaanlage die
eingestellte Temperatur auf etwa 10 °C.
Während des NIGHT SETBACK-Betriebs können keine Temperaturein-
stellungen vorgenommen werden.
Da die Raumtemperatur sich stark ändern kann, wird empfohlen dies zu
nutzen, wenn sich niemand in dem Raum befi ndet.
Während des NIGHT SETBACK-Betriebs kann keiner der HIGH POWER-
und ECONOMY-Betriebe eingestellt werden.
Wenn der NIGHT SETBACK-Betrieb aufgehoben wird, indem Sie die
NIGHT SETBACK-Taste drücken, wird die Betriebsart auf den Betrieb
unmittelbar vor dem NIGHT SETBACK-Betrieb zurückgesetzt.
NIGHT SETBACK
(NIGHT SETBACK aus)
-Taste.
Keine Anzeige
Wenn der SILENT-Betrieb eingestellt ist, wird die Klimaanlage auf geringerem Geräuschpegel betrieben, da Geräusche der Außenein-
■
heit reduziert werden.
Falls die Klimaanlage nicht funktioniert, richten Sie die Fernbedienung auf die Klimaanlage und
1
2
Freigabeverfahren
Drücken Sie die SILENT-Taste, um die SILENT-Anzeige auszuschalten.
•
•
•
•
•
•
Drücken Sie das ON/OFF-Taste.
Drücken Sie das SILENT-Taste.
Bei AUTO-, COOL-, HEAT- oder NIGHT SETBACK-Betrieb
•
Jedes Mal, wenn der SILENT-Schalter gedrückt wird, wird die Anzeige in
folgender Reihenfolge weitergeschaltet:
Keine Anzeige
(SILENT ein) (SILENT aus)
ANMERKUNG
Während des SILENT-Betriebs lassen die maximalen Kühl- und Hei-
zungsleistungen nach.
Der SILENT-Betrieb arbeitet nicht beim DRY- und FAN-Betrieb.
Das Gerät wechselt in den SILENT-Betrieb, wenn die Klimaanlage das
nächste Mal in folgenden Fällen läuft.
Wenn die Klimaanlage während des SILENT-Betriebs durch die
1
ON/OFF-Taste angehalten wird.
Wenn die Klimaanlage während des SILENT-Betriebs im SLEEP-
2
oder OFF-TIMER-Betrieb gestoppt wird.
Wenn der CLEAN- oder ALLERGEN CLEAR-Betrieb endet.
3
Funktioniert nicht bei ausgeschalteter Klimaanlage.
Der Geräuschpegel der Außeneinheit könnte abhängig von der Voraus-
setzung nicht reduziert werden.
Bei einem SCM-Multisystem ist die SILENT-Kontrollfunktion ungültig.
– 81 –
Page 84

SELF CLEAN-Betrieb
Der CLEAN-Betrieb sollte nach dem AUTO-, COOL- und DRY-Betrieb ausgeführt werden, um die Feuchtigkeit aus dem Inneren des
■
Innengeräts zu entfernen und das Wachstum von Schimmel und Bakterien zu kontrollieren.
Um den CLEAN-Betrieb zu aktivieren, drücken Sie das
1
•
•
•
•
•
•
CLEAN-Schalter mithilfe einer Kugelschreiberspitze.
Jedes Mal, wenn der CLEAN-Schalter gedrückt wird, wird die
Anzeige in folgender Reihenfolge weitergeschaltet:
Keine Anzeige
(CLEAN ein) (CLEAN aus)
ANMERKUNG
Nach zwei Stunden schaltet sich die Klimaanlage automatisch aus. Um
die Klimaanlage sofort auszuschalten, drücken Sie die Taste ON/OFF.
Der CLEAN-Betrieb wird nicht durchgeführt, nachdem HEAT und FAN,
OFF-TIMER, SLEEP und ALLERGEN CLEAR-Vorgänge beendet wur-
den.
Der Lüfter des Innengeräts läuft im CLEAN-Betrieb ungefähr zwei Stun-
den.
Das RUN-Licht leuchtet beim CLEAN-Betrieb auf.
Durch Drücken der SLEEP-, ALLERGEN CLEAR- oder NIGHT SET-
BACK-Taste beim CLEAN-Betrieb wird der CLEAN-Betrieb aufgehoben
und das Gerät schaltet dann selber auf SLEEP-, ALLERGEN CLEAR-
oder NIGHT SETBACK-Betrieb um.
Dies ist nicht eine Funktion zum Entfernen von Schimmel, Keimen oder
Schmutzresten, die am Gerät anhaften.
3 sec.
ON
OFF
1 sec.
Automatischer Autowiederaufnahmenfunktion
Was ist ein automatischer Neustart?
■
Die Neustartfunktion bei Stromausfall ist eine Funktion, die den Betriebszustand des Klimageräts unmittelbar vor dem Ausschalten
•
durch einen Stromausfall aufzeichnet, und dann nach der Wiederherstellung der Stromzufuhr den Betrieb automatisch genau an diesem Punkt wieder aufnimmt.
Die nachstehenden Einstellungen werden annulliert:
•
Timereinstellungen
1
HIGH POWER-Betrieb
2
ANMERKUNG
Diese Funktion ist von Werk aus aktiviert. Wenden Sie sich an Ihren Fachhandler, wenn diese Funktio ausgeschaltet serden muß.
•
Tritt ein Stromausfall auf, werden die Timer-Einstellungen gelöscht. Stellen Sie dann den Timer neu ein.
•
Tipps für den effektiven Betrieb
Beachten Sie das Folgende, damit Ihr Gerät möglichst wirtschaftlich und vorteilhaft funktioniert.
■
Einstellung der üblichen Raumtemperatur.
Außergewöhnlich hohe oder niedrige Temperaturen sind nicht gut für Ihre Gesundheit und
stellen eine Energieverschwendung dar.
Luftströmungsrichtung sorgfältig einstellen.
Luftströmung auf/ab sowie rechts/links
so einstellen, daß eine gleichmäßige
Raumtemperatur erzielt wird.
Filter regelmäßig reinigen.
Verstopfte Filter behindern die Luftströmung und bewirken einen ungünstigen
Betrieb.
Betrieb des Gerätes nur zu entsprechenden Zeiten.
Den TIMER auf angemessene Weise
einstellen.
Direkte Sonneneinstrahlung und Zugluft vermeiden.
Vorhänge oder Fensterläden gegen direkte
Sonneneinstrahlung während des Kühlbetriebs. Fenster und Türen geschlossen
halten, ausgenommen beim Lüften.
Entfernen Sie beim Kühlen vorhandene
Wärmequellen.
Andere Wärmequellen nach Möglichkeit
aus dem Raum entfernen.
– 82 –
Page 85

Installationsort-Einstellung
Stellen Sie unter Beachtung des Installationsorts des Geräts den linken/rechten Luftstrombereich zur Maximierung der Klimatisierung ein.
■
Wenn das Klimagerät läuft, drücken Sie die ON/OFF-Taste zum
1
2
3
Stoppen.
Die Installationsort-Einstellung kann nicht bei laufendem Gerät vorgenommen werden.
Drücken Sie die Taste AIR FLOW U/D (UP/DOWN) und die Taste AIRFLOW L/R (LEFT/RIGHT) gleichzeitig 5 Sekunden lang
oder länger.
Die Installationsort-Anzeige leuchtet auf.
Einstellung des Installationsorts für die Klimaanlage.
Drücken Sie die Taste AIRFLOW L/R (LEFT/RIGHT) und stellen Sie den
gewünschten Ort ein.
Jedes Mal, wenn die AIR FLOW L/R (LEFT/RIGHT)-Taste gedrückt wird,
wird die Anzeige in folgender Reihenfolge weitergeschaltet:
(Installation an
linker Seite)
Drücken Sie sie
innerhalb von
60 Sek.!
4
(Mitteninstallation)
Drücken Sie die ON/OFF-Taste.
Der Installationsort des Klimageräts ist eingestellt.
Innerhalb von 60 Sekunden nach der Installationsort-Einstellung drücken
(während die Installationsort-Einstellanzeige leuchtet).
(Installation an
rechter Seite)
Klimagerät-Installationsort und Luftstrombereich
Die untenstehende Zeichnung zeigt die Luftstrombereiche entsprechend dem Installationsort des Klimageräts an. Beachten Sie das Layout des
Raums und stellen Sie den Luftstrombereich zur Maximierung der Klimatisierungswirkung ein.
Luftstrombereich
(Installation an linker Seite)
Luftstrombereich
(Mitteninstallation)
Luftstrombereich
(Installation an rechter Seite)
ANMERKUNG
Sobald die Einstellung des Installationsorts konfi guriert ist, ist die Einstellung des Installationsorts in der Klimaanlage gespeichert,
•
selbst wenn die Stromzufuhr getrennt ist. Um die Einstellung des Installationsorts zu ändern, stellen Sie den Ort erneut mit der
Fernbedienung ein.
Während des Betriebs kann kein Installationsort eingestellt werden.
•
Wenn die Klimaanlage an einem Ort innerhalb 50 cm von der Wand installiert ist, wird empfohlen, den Ort auf „Installation an rech-
•
ten Seite“ oder „Installation an linken Seite“ zu ändern.
– 83 –
Page 86

Wartung
Vor der Wartung Während der Betriebssaison
Trennen Sie die Stromzufuhr.
Verspritzen Sie keine Flüssigkeiten.
•
Gefahr von elektrischem Schlag.
Gerät mit einem weichen,
trockenen Tuch reinigen.
Berühren Sie die Aluminiumlamellen
•
am Wärmetauscher nicht.
Sie sollten fest auf einer Stufenleiter
•
oder auf einem stabilen Gegenstand
stehen, wenn Sie die Einlaßklappe
und den Filter entfernen.
Folgendes nicht verwenden:
Heißes Wasser (40°C oder mehr). Hierdurch
•
kann das Gerät deformiert oder gebleicht
werden.
Petroleum, Farbverdünner, Benzin oder Rei-
•
nigungsmittel, usw. Hierdurch kann das Gerät
deformiert oder zerkratzt werden.
Luftfi lter reinigen
Luftfilter heraus-
1
nehmen
2
3
Reinigung
Filter nicht in kochendem Wasser reinigen.
•
Nicht über offener Flamme trocknen.
•
Behutsam herausnehmen.
•
Wiedereinsetzen des Luftfi lters
Den Filter auf beiden Seiten leicht festhalten und
•
fest einsetzen.
Bei Betrieb mit entferntem Luftfi lter verstaubt das
•
Innere des Gerätes und kann Beschädigungen ver-
ursachen.
Standardzwischenraum einmal in zwei Wochen
Heben Sie die Lufteinlassabdeckung
•
nach vorne ab.
Halten Sie Knöpfe an beiden Seiten
•
leicht fest und etwas anheben, um die
Abdeckung nach vorne hochzuheben.
Bei stark verschmutztem Filter Reinigung mit
etwa 30°C warmem Wasser , danach gut abtrocknen.
ACHTUNG
Reinigung des Gerätes
Das Gerät mit einem weichen, trockenen Tuch oder einem Staubsauger
•
reinigen.
Bei stark verschmutztem Gerät kann man auch eine warme Reinigungs-
•
lösung verwenden.
Reinigen der Lufteinlaßklappe
Entfernen, Installation der Lufteinlaßklappe.
•
Die Klappe kann mit Wasser abgewaschen werden.
•
Nach dem Abwaschen die Feuchtigkeit von der
Klappe wischen und es an einem vor direkten Son-
nenlicht geschützten Ort trocknen lassen.
Bringen Sie die Abdeckung in umgekehrter Reihenfolge wieder an
Öffnen
Die Finger an den seitlichen Einbuchtungen einhaken und die
Abdeckung um etwa 60 Grad nach vorne aufklappen.
Schließen
Beide Seiten gleichmäßig andrücken und dann leicht gegen
die Klappenmitte drücken.
Abnehmen und Einsetzen der Lufteinlassklappe
Herausnehmen
Zur Reinigung oder für andere Zwecke wird die Lufteinlassklappe
um 80 Grad aufgeklappt und dann nach vorne herausgezogen.
Installation
Sichern Sie die Oberkante der Lufteinlaßplatte durch leichtes Eindrücken, und schließen Sie die Platte.
– 84 –
Page 87

ANMERKUNG
Bei Betrieb mit einem stark verschmutzten Luftfi lter verstärkt sich das Betriebsgeräusch und wird mehr Strom
verbraucht. Luftfi lter daher regelmäßig reinigen.
Bei Ende der Saison
Führen Sie den Lüfterbetrieb 2 bis 3 Stunden
1
lang durch.
Das Innere des Gerätes trocknen.
Schalten Sie das Gerät ab und trennen Sie es
2
von der Stromversorgung.
Das Gerät verbraucht im Ruhezustand etwa 4 Watt.
Die Stromzufuhr zu unterbrechen spart Energie und Kosten.
Filter reinigen und erneut einsetzen.
3
Innen- und Außengerät reinigen.
4
Batterien aus der Fernbedienung entfernen.
5
Installieren, Kontrollieren und Ersetzen des Luftreinigungsfi lters
1. Öffnen Sie die Lufteinlaßklappe und nehmen Sie die Luftfi lter heraus.
2. Entfernen Sie die Filterhalter mit in den Haltern eingesetztem Luftreinigungsfi lter
aus dem Klimagerät.
3. Nehmen Sie den Allergenfi lter (hell orange) aus der Filterhalterung und überprüfen
Sie den Filter. Verwenden Sie einen Staubsauger, um Staub oder Schmutz vom
Allergenfi lter zu entfernen. Tauschen Sie den Allergenfi lter aus, wenn er nicht gereinigt werden kann oder wenn er ungefähr 1 Jahr lang verwendet wurde.
(Der Allergenfi lter sollte ungefähr nach 1 Jahr Gebrauch ausgetauscht werden. Die
tatsächliche Zeit bis zum Austauschen kann jedoch je nach den Bedingungen variieren, in denen der Filter eingesetzt wird.)
Nehmen Sie den fotokatalytischer, waschbarer Geruchsneutralisationsfi lter (orange)
aus der Filterhalterung und überprüfen Sie den Filter. Entfernen Sie regelmäßig
Staub und Schmutz vom fotokatalytischer, waschbarer Geruchsneutralisationsfi lter.
Wenn der fotokatalytischer, waschbarer Geruchsneutralisationsfilter besonders
schmutzig ist, kann er mit Wasser ausgewaschen werden. Der Filter ist jedoch zerbrechlich, achten Sie deshalb darauf, ihn bei Auswaschen in der Filterhalterung zu
lassen, damit er nicht beschädigt wird. Nach dem Auswaschen des Filters, legen
Sie ihn in die Sonne zum Trocknen. Wenn Sie den Filter in die Sonne legen, wird
der deodorisierende Effekt erneuert.
(Werfen Sie die Filterhalterungen nicht weg. Diese sind wiederverwendbar. )
4. Setzen Sie den Luftreinigungsfi lter in die Filterhalter, und setzen Sie dann
die Filterhalter in das Klimagerät.
Stellen Sie sicher, dass die Verkabelung für
1
die Erdung nicht beschädigt oder durchtrennt
ist.
Prüfen Sie das Gestell der Außeneinheit auf
2
Korrosion oder Rost.
Stellen Sie sicher, dass keine Hindernisse den
3
Luftfl uss rund um den Lufteinlass und Auslassöffnungen der Innen- und Außeneinheiten
behindern.
Sauberkeit der Luftfi lter überprüfen.
4
Schalten Sie den Strom ein.
5
Batterien in die Fernbedienung einsetzen.
6
Bei Saisonbeginn
Seite 84
Filterhalterung
Filter
ANMERKUNG
Der Allergenfi lter und der fotokatalytischer, waschbarer Geruchsneutralisations-
•
fi lter können entweder links oder rechts in der Klimaanlage eingebaut werden.
Bringen Sie den Allergenfi lter mit der hellorangenen Seite nach vorne an.
•
5. Bauen Sie die Luftfi lter ein und schließen Sie die Lufteinlaßklappe.
ACHTUNG
Sie können sich am Wärmeaustauscher Ihre Finger verletzen.
•
Zum Ersetzen des Luftreinigungsfi lters wenden Sie sich an Ihren Händler.
Element Funktion Farbe
Allergenfi lter
Fotokatalytischer, waschbarer Geruchsneutralisationsfi l t e r
Die Leistung der Enzyme wird verwendet, um allergieauslösende Allergene zu beseitigen, die sich am Allergenfi lter
ansammeln.
Geruchsquellen auf dem Filter werden aufgebrochen, was
zu einem deodorisierendem Effekt führt.
Seite 84
Hellorange
Orange
– 85 –
Page 88

Richtige Installation
Angemessene Installation
Entfernen Sie alle Hindernisse vor der Inneneinheit, die eine einwandfreie Ventilation und Funktionalität beeinfl ussen könnten.
•
Installieren Sie das Gerät nicht an folgenden Plätzen:
•
Wo die Gefahr von austretendem und brennbarem Gas vorhanden ist.
•
Wo erhebliche Ölspritzer auftreten.
•
Eine Stelle, wo korrosives Gas gewonnen wird (Mineralquellen usw.) oder wo die Anlage salzhaltigen Seebrisen ausgesetzt ist (Küste
•
usw.) Wenden Sie sich an Ihren Lieferanten.
Das Klimagerät und die Fernbedienung muss mindestens einen Meter vom Fernsehgerät oder Radio entfernt sein.
•
Leiten Sie das Entfeuchtungswasser vom Innengerät zu einer gutem Abfl ußstelle.
•
Achten Sie auf das Betriebsgeräusch!
• Bei Installation des Gerätes darauf achten, daß die Stelle das Gewicht des Gerätes gut tragen kann und das Betriebsgeräusch
nicht durch Schwingung der Anlage verstärkt wird. Falls im Gebäude Vibrationen übertragen werden, befestigen Sie das Gerät mithilfe von Schwingungsdämpfern zwischen dem Gerät und den Halterungen.
•
Wählen Sie eine Stelle, an der die Kalt- und Warmluft und Betriebsgeräusche der Innen- und Außeneinheit, der Nachbarschaft keine Unannehmlichkeiten bereiten.
• Vermeiden Sie alle Behinderungen nahe dem Luftein- und -auslaß der Außenanlage. Hierdurch kann Fehlfunktion und Verstärkung
des Betriebsgeräusches verursacht werden.
• Bei irgendwelchen ungewöhnlichen Geräuschen während des Betriebes Ihren Lieferanten benachrichtigen.
Inspektion und Wartung
Je nach Betriebsumgebung kann das Innere des Klimageräts nach ein paar Jahren im Einsatz verschmutzt sein. Das reduziert die
Leistung. Zusätzlich zur normalen Reinigung empfehlen wir Inspektion und Wartung. (Das kann dazu führen, dass Ihr Klimagerät länger und zuverlässiger arbeiten wird.)
• Erkundigen Sie sich bei Ihrem Lieferanten nach einem Inspektions- und Wartungsvertrag.
• Wir empfehlen eine Inspektion und Wartung außerhalb der Saison.
• Wenn die Versorgungsleitung des Gerätes beschädigt ist, darf diese nur von einer vom Hersteller ausgestatteten Instandsetzungsfi rma ausgetauscht werden, da zu diesem Zweck spezielle Werkzeuge erforderlich sind.
Fehlersuche
Vor einem Service-Anruf folgende Kontrollen ausführen.
Das Klimagerät funktioniert überhaupt nicht.
Ist der Strom angeschaltet? Ist der Strom abgeschaltet
Ungenügende Kühl- oder Heizleistung
Haben Sie den Thermostat
auf die angemessene Temperatur gestellt?
angemessene
Temperatur
Bekommt der Raum direkte
Sonneneinstrahlung?
Steht der TIMER in „ON“ Position?
Ist das Luftfi lter sauber
(nicht verstopft)?
Ungenügende Kühlleistung
Ist eine andere Wärmequelle
im Raum?
oder eine Sicherung kaputt?
Haben Sie irgendwelche Türen oder Fenster geöffnet?
Sind zu viele Personen im
Raum?
Wenn das Klimagerät nach
Überprüfung der links genannten
Punkte nicht einwandfrei funktioniert, oder wenn Sie nach dem
Durchlesen von Seite 87 irgendwelche Zweifel haben, oder wenn
sich etwas von dem ereignet,
was auf Seite 88 beschrieben ist,
sollten Sie den Strom abschalten
und Ihren Lieferanten benachrichtigen.
Bei dieser Klimaanlage wird ein alternatives Kältemittel (R410A) verwendet. Wenn
Sie den Händler um Reparatur oder Inspektion und Wartung bitten, erklären Sie ihm
diesen Umstand.
– 86 –
Page 89

Hinweis
Das Gerät kann nach dem Anhalten nicht sofort wieder gestartet werden.
(RUN Licht ist an)
Kein
Betrieb?
Keine Luftausblasung beim Start des Heizbetriebs.
RUN Licht blinkt langsam
(1.5 sec. ON, 0.5 sec OFF)
5 bis 15 Minuten lang wird keine Luft ausgeblasen oder
während dem HEATING-Betrieb wird keine warme Luft ausgeblasen.
RUN Licht blinkt langsam
(1.5 sec. ON, 0.5 sec OFF)
Keine Luftausblasung im DRY-Betrieb.
(RUN Licht brennt)
Austritt von etwas Dampf beim COOL Betrieb. Dies kann auftreten, wenn die Raumtemperatur und die Feuch-
Auftreten von Geruch.
Gurgelnde Geräusche. Verursacht durch die Kältemittelfl üssigkeit im System.
Ein Neustart ist nach dem Anhalten des Betriebs für drei Minuten gesperrt, um das Gerät zu schützen.
Bitte 3 Minuten
warten
Nach dem dreiminütigen Schutz startet der Mikrocomputer wieder automatisch.
Der Luftstrom stoppt zur Vorbeugung gegen das Ausblasen von
kühler Luft, während der Raumwärmeaustauscher sich erwärmt.
(2-5 Min.) (HOT KEEP-Programn)
Bei niedriger Außentemperatur und hoher Luftfeuchtigkeit startet
mitunter die Entfrostung der Anlage automatisch. Etwas abwarten. Während des Entfrostens kann etwas Dampf oder Wasser
aus der Außenanlage kommen.
Der Innenventilator stoppt gelegentlich zum Schutz gegen Wiederverdunstung von entfeuchtetem Dunst und zur Energieeinsparung.
tigkeit sehr hoch sind und verschwindet wieder, sobald die Temperatur und die Luftfeuchtigkeit gesunken sind.
Die während des Betriebs ausgeblasene Luft kann eventuell
riechen. Dieser Geruch wird durch Rückstände von Rauch- und
Kosmetik in der Inneneinheit verursacht.
Knackende Geräusche.
Sie hören ein zischendes oder klickendes Geräusch.
Nach einem Stromausfall startet das Gerät nicht neu, auch
wenn wieder Strom vorhanden ist.
Signale der Fernbedienung werden nicht empfangen.
Feuchtigkeitsniederschlag auf dem Luftausblasgrill.
Die Außenanlage gibt ein pfeifendes Geräuch von sich.
Das Gebläse stoppt nicht sofort nach dem Stoppen des
Betriebs des Geräts.
Das RUN-Licht leuchtet auch nach gestopptem Betrieb weiter.
Manchmal ist aus einem abgestellten Gerät ein zischendes
Geräusch zu hören.
Verursacht durch Ausdehnung oder Zusammenziehung im System.
Dies wird durch die Funktion der Kältemittelsteuerventile oder
elektrischen Bauteile verursacht.
Falls der automatische Neustart nicht aktiviert ist, wird das Gerät nicht automatisch starten. Zur Betriebseinschaltung die Fernbedienung benutzen.
Ursache des Nichtempfangs der Signale kann sein, daß die
Fernbedienung direkter Sonnenstrahlung oder starkem Licht
ausgesetzt ist. In diesem Fall die Einwirkung der Sonne oder
des starken Lichtes verhindern.
Wenn das Gerät längere Zeit bei hoher Luftfeuchtigkeit arbeitet,
kann sich auf dem Ausblasgrill Feuchtigkeit bilden und herabtropfen.
Das Geräusch kommt vom Kompressor, dessen Drehzahl gerade ansteigt oder abnimmt.
Innengebläse: Das Gebläse stoppt nicht nach 2 Stunden,
wenn der CLEAN-Betrieb eingestellt ist.
Außengebläse: Das Gebläse stoppt nicht für etwa 1 Minute,
um das Gerät zu schützen.
Das RUN-Licht leuchtet beim CLEAN-Betrieb auf.
Das RUN-Licht erlischt beim Ende des CLEAN-Betriebs.
Dieses Geräusch ertönt, wenn sich ein anderes Einzelgerät der
Anlage ausschaltet.
– 87 –
Page 90

Wenden Sie sich an Ihren Fachhändler
In folgenden Situationen sofort den Strom abschalten und den Lieferanten benachrichtigen:
■
Ständige Betätigung des Schalters
oder der Sicherung.
Sicherung brennt
wiederholt durch.
Der Fernseher, das Radio oder anderes Gerät wird gestört.
Sollten Abweichungen auftreten, trennen Sie das Gerät umgehend von der Stromversorgung und schalten Sie es nach
drei Minuten wieder ein. Schalten Sie das Gerät mittels der
Fernbedienung (ON/OFF) ein und wieder aus und die Abweichung besteht weiterhin.
Das Kabel wird heiß.
Die Kabelisolierung ist gebrochen.
ACHTUNG
Wenn das Netzkabel beschädigt wird, lassen Sie zur Vermeidung von Unfällen die
Installation des neuen Kabels von einem Fachhändler oder Fachtechniker vornehmen.
Ein Schalter funktioniert nicht einwandfrei.
Die RUN und TIMER Lampen der Anzeigen auf dem Gerät
blinken schnell (0,5s ON; 0,5s OFF), aber leuchten nicht permanent.
Ungewöhnliche Geräusche während
des Betriebs.
Zur Mehrfachklimaanlage
Gleichzeitiger Betrieb
• Die Klimaanlagen können nicht gleichzeitig in verschiedenen Betriebsarten betrieben werden. Z.B. ist gleichzeitiger Betrieb von
COOL des einen Geräts und HEAT des anderen Geräts nicht möglich.
• Bei verschiedenen Bedienungsschritten erhält die zuerst eingeschaltete Klimaanlage den Vorrang, so daß die danach eingeschaltete Klimaanlage auf Gebläsebetrieb schaltet.
• Wenn Sie der später eingeschalteten Klimaanlage den Vorrang geben wollen, müssen Sie entweder die zuerst eingeschaltete Klimaanlage abschalten oder aber die Betriebsart der zuerst eingeschalteten Klimaanlage der Betriebsart der danach eingeschalteten Klimaanlage angleichen.
•
Wenn andere Innengeräte in anderen Modi betrieben werden, leuchtet das RUN-Licht auf.
0.5 sec.
ON
OFF
0.5 sec.
Automatischer Betrieb
• Falls der Schalter der Fernbedienung auf Betriebsart AUTO steht, wählt die Klimaanlage automatisch entweder COOL, DRY oder
HEAT, wenn der jeweilige Betrieb durch die Zimmertemperatur aktiviert wird.
• Während gleichzeitigen Betriebs der Klimaanlagengeräte wird eventuell die Betriebsart jedes Geräts je nach der jeweiligen Zimmertemperatur automatisch gewechselt, was dazu führen kann, daß sich die Außenanlage abschaltet. In solchem Fall sollten Sie
statt AUTO die Betriebsart COOL oder HEAT wählen. (Gilt nur für den Fall, wo mehrere Klimaanlagengeräte eingesetzt werden.)
Kältemittelaufbereitung (Öl)
Wenn die Innengeräte längere Zeit nicht betrieben werden, kann die Kühl- oder Heizleistung zeitweilig sinken. Das geschieht, um
•
die Aufbereitung des Kältemittels (Öl) in den angehaltenen Innengeräten zu regeln. Gleichzeitig ist möglicherweise das Fließen
des Kältemittels aus den angehaltenen Innengeräten zu hören.
– 88 –
Page 91

Selbstdiagnosefunktion
Wir sind ständig bemüht, unseren Kundendienst durch Einbau von Prüfmöglichkeiten zu verbessern, die die jeweilige Fehlerquelle aufzeigen:
■
RUN-Licht
Blinkt-1 mal
Wärmetauschersensor 1 Fehler
Störung
Ursache
Wärmetauschersensor 1 Kabel unterbrochen, schlechte
•
Anschlussverbindung
TIMER-Licht ON
RUN-Licht blinkt fortwährend
Blinkt-2 mal
Blinkt-3 mal
Blinkt-5 mal
Blinkt-6 mal
Blinkt-7 mal
TIMER-
Licht
Blinkt-1 mal
Blinkt-2 mal
Blinkt-4 mal
Blinkt-5 mal
Blinkt-1 mal
Blinkt-2 mal
Blinkt-3 mal
Defekt des Zimmertemperatursensors
Wärmetauschersensor 3 Fehler
Aktivfi lter Spannungsfehler
Defekt des Innenanlagenventilators• Ventilatormotor defekt, mangelhafter Steckerkontakt
Unzureichende Kühlmittelmenge
Geschlossenes Serviceventil
Wärmeaustauscher-Sensor 1
Fehler
Defekt des Außentemperatursensors
Defekt des Sensors der Außenwärmetauscher-Flüssigkeitsleitung
Ablaufl eitung-Sensorfehler
Fehler Ansaugrohr-Sensor
Stromversorgung abgebrochen
Defekt der Außenanlage
Überlaststrom
Draht des Zimmertemperatursensors gebrochen, mangelhaf-
•
ter Steckerkontakt
Wärmetauschersensor 3 Kabel unterbrochen, schlechte
•
Anschlussverbindung
Fehlerhafte Stromversorgung
•
Unzureichende Kühlmittelmenge, undicht
•
Geschlossenes Serviceventil
•
Kabel von Wärmeaustauscher-Sensor 1 unterbrochen,
•
schlechte Anschlussverbindung
Draht des Außentemperatursensors gebrochen, Steckerkon-
•
takt mangelhaft
Draht des Sensors der Außenwärmetauscher-Flüssigkeitslei-
•
tung gebrochen, Steckerkontakt mangelhaft
Fühlerdraht der Ablaufl eitung gebrochen; schlechte Stecker-
•
verbindung
Kabel von Ansaugrohr-Sensor unterbrochen, schlechte
•
Anschlussverbindung
Kompressor gesperrt, offene Phase am Kompressoraus-
•
gang, Kurzschluß am Stromtransistor, Hauptabsperrarmatur
geschlossen
Kaputter Stromtransistor, kaputtes Kompressorkabel
•
Kaputter Draht des Ablaufrohrsensors, Steckerkontakt mangelhaft
•
Kompressor blockiert
•
Überlastbetrieb, Überdruck
•
RUN-Licht EIN
Run-Licht blinkt 2-mal
Run-Licht blinkt 7-mal
Blinkt-4 mal
Blinkt-5 mal
Blinkt-6 mal
Blinkt-7 mal
Blinkt ständig
Blinkt-2 mal
Blinkt-1 mal
Stromtransistor-Fehler
Kompressor überhitzt
Signalübertragungsfehler
Außengebläsemotor-Fehler
Kühlung Überdruckschutz
Rotorsperre
Geschlossenes Serviceventil
Kaputter Stromtransistor
•
Zu wenig Kältemittel, Ablaufrohrsensor defekt, Hauptabsper-
•
rarmatur geschlossen.
Netzteil defekt, Signalleitung unterbrochen, Innen-/Außenan-
•
lagenplatine defekt
Defekter Gebläsemotor, schlechte Steckverbindung
•
Gasüberladung, Kurzschluss der Außeneinheit
•
Defekter Kompressor
•
Offene Phase am Kompressor
•
Defekte Schalttafeln der Außenanlage
•
Geschlossenes Serviceventil
•
– 89 –
Page 92

– 90 –
Page 93

Vi ringraziamo per aver scelto un condizionatore d’aria MITSUBISHI HEAVY INDUSTRIES,
LT D.
Al fi ne di ottenere le migliori e più durature prestazioni possibili, leggere e osservare
le indicazioni di questo Manuale dell’utente, prima di utilizzare il condizionatore d’aria.
Consultare il libretto in caso di incertezze sull’impiego o in caso di eventuali anomalie nel funzionamento.
Questo condizionatore d’aria è destinato ad un uso domestico.
Non diffondere l’R410A nell’atmosfera: esso è infatti un gas fl uorurato a effetto serra
classifi cato Global Warming Potential (GWP) = 1975 nel Protocollo di Kyoto.
Il condizionatore d'aria può essere contrassegnato da questo simbolo. Ciò
indica che i rifi uti di apparecchiature elettriche ed elettroniche (i RAEE di
cui alla direttiva 2002/96/CE) devono essere smaltiti separatamente dai
rifi uti provenienti dai nuclei domestici. I condizionatori devono essere smaltiti presso uno stabilimento o un'impresa di trattamento autorizzata per
eseguire il riutilizzo, riciclaggio e recupero e non devono essere smaltiti nel
fl usso di rifi uti municipali. Per ulteriori informazioni contattare l'installatore
o la autorità locali.
Questo simbolo, stampato sulle batterie fornite con il condizionatore d’aria,
è un’informazione destinata all’utilizzatore fi nale in accordo all’allegato II
dell’articolo 20 della direttiva europea 2006/66/CE.
Al termine della durata delle batterie le si deve eliminare separatamente
dai rifi uti solidi urbani. Se sotto il simbolo sopra riportato appare altresì il
simbolo di prodotto chimico signifi ca inoltre che le batterie contengono metallo pesante in una determinata concentrazione, ad esempio Hg:
mercurio (0,0005%), Cd: cadmio (0,002%) o Pb: piombo (0.004%).
Si raccomanda pertanto si eliminare le batterie nel modo corretto affi dandole
a un centro di raccolta differenziata locale oppure a un centro di riciclaggio.
ITALIANO
Il livello di pressione dell’emissione sonora proveniente da ciscuna unità interna ed esterna è inferiore a 70 dB(A).
Misure di sicurezza ......................................... 92
Nome e funzione dei componenti .................. 94
Funzionamento del telecomando ................... 96
Mancata operatività del telecomando ............ 96
Operazione di funzionamento
temporaneo ..................................................... 96
Installazione di due condizionatori nella stessa
stanza .............................................................. 97
Blocco per bambini ......................................... 97
Paragrafo del funzionamento e della
visualizzazione del telecomando ...................98
Regolazione dell’ora corrente ........................99
Funzionamento della modalità AUTO
(automatica) .................................................... 99
Regolazione della temperatura durante il funzio-
namento AUTO ............................................. 100
FAN SPEED
(VELOCITÀ DELLA VENTOLA) ................... 100
Funzionamento della modalità
FREDDO/CALDO/SECCO/VENTOLA ........ 101
Regolazione della temperatura operabile del
condizionatore d’aria ....................................101
Caratteristiche della funzione di HEAT
(RISCALDAMENTO) .................................... 101
Regolazione della direzione del fl usso d’aria 102
Funzionamento 3D AUTO ............................ 102
Indice
Funzionamento della SLEEP TIMER .......... 103
Funzionamento dello OFF-TIMER ............... 103
Funzionamento dell’ON-TIMER ................... 104
Funzionamento di
SLEEP TIMER/ON-TIMER .......................... 104
Funzionamento di
ON-TIMER + OFF-TIMER ...........................105
Funzionamento della
ALLERGEN CLEAR ..................................... 105
Funzionamento di
TIMER SETTIMANALE ............................... 106
Funzionamento nelle modalità
HIGH POWER/ECONOMY..........................110
Funzionamento di NIGHT SETBACK .......... 111
Funzionamento di SILENT ........................... 111
Funzionamento di SELF SCAN ................... 112
Funzione di avvio automatico ....................... 112
Suggerimenti per un’operatività corretta ...... 112
Impostazione del luogo di installazione ....... 113
Pulizia e manutenzione ................................ 114
Installazione appropriata .............................. 116
Assistenza .................................................... 116
Avviso ............................................................ 117
Mettersi in contatto con il proprio distributore ..
118
Condizionatore multiplo ................................ 118
Funzione di autodiagnosi .............................119
– 91 –
Page 94
Misure di sicurezza
Leggere attentamente le seguenti “Misure di sicurezza” prima di usare l’impianto, per assicurarne un corretto funzio-
•
namento.
Una volta letto questo Manuale d’istruzioni, conservarlo per poterlo consultare quando necessario. Se un’altra perso-
•
na dovesse subentrare in qualità di operatore, assicuratevi di fornire anche queste istruzioni per l’uso al nuovo utente.
AVVERTENZA
ATTENZIONE
Si prega di osservare attentamente queste avvertenze, in quanto essenziali per la vostra sicurezza.
I simboli che fi gurano frequentemente nel testo hanno il seguente signifi cato:
•
Una manipolazione non corretta può causare danni gravi all’incolumità personale,
quali morte, serie ferite, ecc.
Possono rappresentare un serio problema, a seconda delle circostanze.
Rigorosamente proibito
AVVERTENZE PER L’INSTALLAZIONE
❚
Osservare attentamente
le istruzioni
AVVERTENZA
Questo sistema è inteso per un utilizzo domestico.
•
Se impiegata in ambienti gravosi, quali un posto di lavoro tecnico, l’attrezzatura potrebbe funzionare ad
un livello mediocre.
L’impianto deve essere installato dal vostro rivenditore o da un installatore qualifi cato.
•
È sconsigliabile installare il sistema per contro proprio, poiché un suo maneggiamento errato potrebbe
causare perdite d’acqua, scosse elettriche o incendi.
ATTENZIONE
Non installare questo sistema laddove possano essere presenti perdite di gas infi ammabili.
•
Eventuali perdite di gas potrebbero causare incendio.
A seconda del luogo in cui viene installato,
•
potrebbe essere necessario un interruttore
automatico di scarico a terra.
Se non si installa un interruttore automatico di
scarico a terra, può insorgere un pericolo di scosse elettriche.
Assicurarsi che l’impianto sia correttamente collegato a terra.
•
I cavi di messa a terra non devono mai essere connessi alle tubazioni del gas o dell’acqua, ad un
conduttore elettrico o a un cavo di messa a terra dell’impianto telefonico. Un’installazione scorretta del
conduttore di terra potrebbe causare scossa elettrica.
AVVERTENZE PER IL FUNZIONAMENTO
❚
Predisporre una messa a
terra corretta
Assicurarsi di installare il tubo d’evacuazione
•
in maniera corretta, per cui tutta l’acqua possa essere drenata.
Un’installazione non corretta potrebbe portare
ad un gocciolio d’acqua nella stanza, con conseguenti danni per il mobilio.
Non esporre la propria persona all’aria refrige-
•
rata per un lungo periodo.
Ciò potrebbe infuenzare la vostra salute e causare problemi.
Non introdurre alcun oggetto nella bocchetta
•
dell’aria.
Ciò potrebbe causare lesioni, poiché il ventilatore interno gira ad alta velocità.
Tenere il telecomando lontano dalla portata dei bambini.
•
I bambini potrebbero inghiottire le pile o provocare altri incidenti.
Utilizzare soltanto fusibili approvati.
•
L’impiego di un fi lo d’acciaio o di rame al posto
di un fusibile approvato è severamente vietato,
dato che potrebbe provocare un guasto o un
incendio.
Non manipolare gli interruttori con le mani
•
bagnate.
Ciò potrebbe causare scossa elettrica.
Non far oscillare o inclinare l’unità esterna.
•
Se l’unità al coperto precipita in giù, può essere ferito.
AVVERTENZA
L'apparecchio non è destinato all'uso da parte di
•
persone (ivi inclusi i bambini) con ridotte capacità
fi siche, sensoriali o mentali o mancanza di esperienza
e conoscenza, a meno che non abbiano ricevuto supervisione o istruzioni circa l'uso dell'apparecchio da
una persona responsabile della loro sicurezza.
È necessario supervisionare i bambini al fi ne di
garantire che non giochino con l'apparecchio.
ATTENZIONE
Non sistemare un insetticida infiammabile o
•
nebulizzare vernice spray accanto alla bocchetta soffi ante, né spruzzare alcunché direttamente sul sistema.
Potrebbe esserci pericolo d’incendio.
Non esporre direttamente apparecchiature a
•
combustione al fl usso d’aria del condizionatore.
L’apparecchiatura potrebbe avere una combustione inadeguata.
– 92 –
Page 95

Misure di sicurezza
❚
Non pulire con acqua il condizionatore d’aria.
•
Ciò potrebbe causare scossa elettrica.
L’impianto deve essere utilizzato unicamente
•
per lo scopo a cui è destinato e ad esclusione
di qualsiasi altro come, ad esempio, la conservazione di alimenti, piante o animali, apparecchiatura di precisione od opere d’arte.
L’impianto è destinato unicamente all’uso in normali ambienti domestici. Qualsiasi altro utilizzo
dell’impianto potrebbe danneggiare la qualità
degli alimenti ecc.
Non collocare recipienti contenenti acqua,
•
come ad esempio vasi, sulla superfi cie superiore dell’apparecchio.
L’intrusione di acqua nell’apparecchio potrebbe
danneggiare l’isolazione e quindi causare scossa elettrica.
Non installare il sistema in una posizione tale
•
per cui la direzione del fl usso dell’aria è diretta verso piante o animali.
Ciò danneggerà la loro salute.
Non sedersi sull’unità esterna né collocare og-
•
getti di qualsiasi tipo su di essa.
L’eventuale crollo dell’unità o caduta di oggetti
potrebbe causare lesioni.
Dopo un utilizzo prolungato, controllare di
•
tanto in tanto la struttura di supporto dell’
Facendo funzionare l’impianto insieme ad ap-
•
parecchiatura a combustione, aerare regolarmente l’ambiente.
Una ventilazione insuffi ciente potrebbe causare
infortuni dovuti ad una mancanza di ossigeno.
Reggersi saldamente su una scala a pioli o un
•
altro oggetto stabile per rimuovere il pannello di
entrata dell’aria e i fi ltri.
Gli oggetti instabili potrebbero traballare o cadere.
Quando si procede alla pulizia del sistema,
•
arrestare l’unità e spegnere l’alimentazione
elettrica.
Non aprire mai il pannello quando la ventola
interna sta ruotando.
Non collocare oggetti nei pressi dell’unità
•
esterna, né permettere che vi si accumulino
foglie.
ATTENZIONE
unità.
Se non si provvede a riparare subito un qualche danno, l’unità potrebbe cadere e provocare
ferite alle persone.
Non toccare le alette di alluminio sullo scam-
•
biatore di calore.
Potrebbe provocare ferite alle persone.
Non sistemare apparecchi elettrodomestici
•
od oggetti vari sotto l’unità interna o quella
esterna.
La condensazione che gocciola dall’unità può
macchiare oggetti e causare incidenti o scosse
elettriche.
Non mettere in funzione il sistema senza il
•
fi ltro dell'aria.
Questo può causare malfunzionamenti del sistema dovuti all'ostruzione dello scambiatore di
calore.
Non spegnere immediatamente al termine del-
•
l'utilizzo.
Attendere almeno 5 minuti, per evitare rischi di
perdite d'acqua o rotture.
Non controllare il sistema tramite l'interruttore
•
principale.
Questo può causare incendi o perdite d'acqua.
Inoltre le ventole possono avviarsi improvvisamente, causando lesioni.
Se si lasciano oggetti o foglie secche attorno
all’unità esterna, dei piccoli animali potrebbero
accedere all’unità, entrare in contatto con le
parti elettriche, e provocare un guasto, fumo o
incendio.
Mettersi in contatto con il proprio distributore
•
per la pulizia all’interiore dell’unità interna.
Non tentare di far ciò da soli.
L’impiego di un detergente non approvato, o un
metodo di lavaggio non corretto può danneggiare gli elementi di plastica dell’unità e provocare perdite. Possono verifi carsi danni, fumo
o incendio se il detergente venisse in contatto
con parti elettriche, o con il motore dell’unità.
Arrestare il sistema e spegnere l’alimentazio-
•
ne se tuona o vi è il pericolo di un tempesta
con fulmini.
La tempesta potrebbe danneggiare l’unità.
PRECAUZIONI PER IL TRASFERIMENTO O LA RIPARAZIONE DELL’APPARECCHIO
❚
Non apportare modifi che né eseguire riparazioni per conto proprio. Consultare il rivenditore se
•
l'unità richiede riparazioni.
Riparando o modifi cando l'unità si possono causare perdite d'acqua, scosse elettriche o incendi.
Rivolgersi al proprio distributore per le riparazioni.
•
Riparazioni mal eseguite potrebbero causare
scossa elettrica, incendio ecc.
Se il condizionatore d’aria dovesse essere
•
riposizionato altrove, mettersi in contatto con
il proprio distributore o uno specialista del
settore.
Un’installazione scorretta potrebbe causare perdita d’acqua, scossa elettrica, incendio ecc.
Se si nota una qualche anomalia di funzio-
•
namento (odor di bruciato, etc.) arrestare il
sistema, spegnere l’alimentazione elettrica e
mettersi in contatto con il proprio distributore.
Un uso continuato dell’impianto in circostanze
anormali potrebbe causare un funzionamento
difettoso, scossa elettrica, incendio ecc.
AVVERTENZA
Se il condizionatore d’aria non dovesse più raffred-
•
dare o riscaldare la stanza, potrebbe sussistere
una perdita di refrigerante. Mettersi in contatto con
il proprio distributore.
Se è necessario aggiungere del refrigerante,
consultare il rivenditore per ottenere le istruzioni
adeguate.
Se il liquido refrigerante entra in contatto diretto
con la pelle, può causare lesioni da freddo.
L'inalazione di una quantità eccessiva di gas
refrigerante potrebbe causare il deterioramento
della funzione dei nervi, come vertigini e mal di
testa, o il deterioramento della funzione cardiaca, come battito cardiaco irregolare e palpitazioni
temporanee del cuore. La perdita inaspettata di
liquido refrigerante dall'unità su un riscaldatore a
ventola, una stufa, una piastra o un'altra fonte di
– 93 –
calore può provocare l'emissione di gas tossici.
Page 96

Nome e funzione dei componenti
UNITÀ INTERNA
Pannello di entrata dell’aria
Estrae l’aria interna.
Filtro dell’aria
Rimuove polvere e sporcizia dall’aria aspirata.
Filtro per la pulizia dell'aria
Sensore della temperatura ambientale
Scambiatore di calore
Bocca di uscita dell’aria
Da qui viene emessa l’aria.
Ventola dell’unità interna
Persiana di regolazione del fl usso d’aria sinistra/destra
Pagina 114
Pagina 114
Pagina 114
Pagina 115
Pagina 102
UNITÀ ESTERNA
Defl ettore per la regolazione della direzione del fl usso d’aria verso l’alto o verso il basso
Pagina 102
Tubo fl essibile di drenaggio della condensa
Estrae l’acqua dall’unità interna.
Connessione della tubazione del refrigerante e cavo elettrico
Bocchetta d’entrata
(Su lato e superfi cie posteriore)
Bocchetta d’uscita dell’aria
Ventola dell’unità esterna
Scambiatore di calore
– 94 –
Page 97

Nome e funzione dei componenti
Paragrafo della visualizzazione dell’unità
Ricevitore del segnale del telecomando
Pulsante ON/OFF dell’apparecchio
Questo pulsante può essere utilizzato per accendere/spegnere l’unità, se non fosse disponibile il telecomando.
Pagina 96
Spia RUN (HOT KEEP) (verde)
S’illumina durante il funzionamento.
•
Lampeggia all’arresto del flusso d’aria,
•
a causa di 'HOT KEEP', 'Operazione di
CLEAN' e 'modalità di funzionamento invalida'.
HOT KEEP
Operazione di
CLEAN
1.5 sec.
ON
OFF
0.5 sec.
3 sec.
ON
OFF
Pagina 112
1 sec.
Accessori
Modalità di
funzionamento invalida
Pagina 118
Filtro per l’eliminazione degli
allergeni (Arancione chiaro)
ON
OFF
0.5 sec.
0.5 sec.
Spia 3D AUTO (verde)
Si accende durante il funzionamento e la funzione 3D AUTO.
Spia HI POWER (alto regime) (verde)
Si illumina durante il funzionamento HIGH
POWER.
Spia luminosa del TIMER (gialla)
S’illumina durante il funzionamento del TIMER.
Pile
(R03(AAA, Micro)×2)
Telecomando Supporto per il teleco-
mando senza fi li
NOTA
Avvisatore acustico per telecomando
•
Quando si selezionano le funzioni di temperatura preselezionata a 24 °C, il funzionamento automatico e il fl usso d’
aria automatico, risuona l’avvisatore acustico (PiPi).
Se si spegne il condizionatore mediante il pulsante ON/OFF (ad eccezione della modalità di pulizia CLEAN), risuona l’
avvisatore acustico (Pi).
Questa funzione si rivela utile per far funzionare il condizionatore nell’oscurità.
Impostazione del fl usso d’aria.
Filtro deodorante fotocatalitico
lavabile (Arancione)
Temperatura preselezionata
– 95 –
Vite da legno (Quantità: 2)
(per il montaggio del supporto
per il telecomando)
Page 98

Funzionamento del telecomando
Sostituzione delle batterie
Nei seguenti casi le batterie sono scariche: sostituirle.
Il suono di ricezione non viene emesso dall’apparecchio quando viene trasmesso il segnale.
•
La visualizzazione sparisce.
•
NOTA
Estrarre il coperchietto e
1
rimuovere le batterie esaurite.
Inserire le batterie.
2
R03(AAA, Micro) x2
Prestare attenzio-
ne ai + ed alle
marche
-
Non usare una vecchia e una nuova batteria contemporaneamente.
•
Rimuovere le batterie se prevedete di non usare il telecomando per un lungo
•
periodo.
Il periodo consigliato di effi cienza di una batteria, conformemente alle norme
•
JIS o IEC, dovrebbe essere di 6 o 12 mesi di utilizzo normale. Se viene
usata più a lungo o se si usa una pila non indicata, l’eventuale fuoriuscita di
acido dalla batteria causerà guasti al telecomando.
Il periodo effettivo consigliato è riportato sulla batteria. La durata della bat-
•
teria potrebbe essere più breve di quella del condizionatore, a seconda del
tempo di fabbricazione dell’unità. La batteria potrebbe comunque non essere
esaurita anche dopo la data di scadenza.
Quando il visualizzatore mostra una qualche condizione anomala, premere l’
■
interruttore di azzeramento (“ACL”) mediante la punta di una penna a sfera.
Impiego del supporto per il telecomando
Richiudere il coperchietto.
3
Premere il commutatore di
4
azzeramento ACL con la
punta di una penna a sfera.
Pagina 99
Il telecomando si può impiegare fi ssato ad una parete
con un supporto per telecomando. In questo caso,
installare il supporto del telecomando dopo aver controllato che il condizionatore riceva correttamente i
segnali.
Per installare o rimuovere il telecomando, infilarlo e
sfi larlo dalla parte superiore del supporto.
Istruzioni per il telecomando
Rigorosamente proibito
Non collocarlo vicino a fonti di
•
calore come coperte elettriche o
stufe.
Non porre ostacoli tra il teleco-
•
mando e l’apparecchio.
Non esporlo all’azione diretta dei
•
raggi solari o a forte illuminazione.
Non versare alcun liquido sul tel-
•
ecomando.
Il telecomando si danneggerà se
•
verrà fatto cadere. Maneggiare con
cura.
Non collocare pesi sul telecomando
•
né calpestarlo.
Mancata operatività del telecomando
Se l’operazione non dovesse avere esito posi-
Le pile sono scariche?
•
“Sostituzione delle batterie” sopra.
Sostituire le batterie con altre nuove, e ritentare l’oper-
azione.
•
tivo, far funzionare l’unità mediante la funzione
operativa temporanea.
Mettersi in contatto con il proprio distributore per
una verifi ca del telecomando.
Sotto
Operazione di funzionamento temporaneo
Con il pulsante ON/OFF dell’apparecchio si può temporaneamente accendere e spegnere l’apparecchio quando il telecomando è fuori
•
uso.
Programma del funzionamento
OPERATION MODE : AUTO
•
FAN SPEED : AUTO
•
AIR FLOW : AUTO
•
Si attiva il funzionamento premendo il pulsante ON/OFF dell’apparecchio;
•
lo si interrompe ripremendo il tasto.
NOTA
Non tenere premuto il pulsante ON/OFF dell'unità per più di 5 secondi.
•
(Se si preme questo pulsante per più di 5 secondi, si imposta il raffreddamento automatico utilizzato durante l’intervento di as-
sistenza, o quando si riposiziona il condizionatore d’aria.)
Pulsante ON/OFF dell’apparecchio
– 96 –
Page 99

Installazione di due condizionatori nella stessa stanza
Quando si installano due condizionatori nella stessa stanza, utilizzare questa impostazione se i due condizionatori non vengono azi-
■
onati con un telecomando. Impostare il telecomando e l'unità interna.
Impostazione del telecomando
Togliere il coperchio ed estrarre le
1
batterie.
Scollegare la linea di commutazione
2
accanto alla batteria con delle pinze
tagliafi li.
Scollegare
Inserire le batterie.
3
Chiudere il coperchio.
Impostazione di una unità interna
Spegnere l'alimentazione e riaccenderla dopo 1 minuto.
1
Puntare il telecomando, impostato in base alla proce-
2
dura descritta sul lato sinistro, verso l'unità interna e
inviare un segnale premendo il commutatore di azzeramento ACL sul telecomando.
Poiché il segnale viene
inviato in circa 6 secondi
dopo aver premuto il commutatore di azzeramento
ACL, puntare a lungo il
telecomando verso l'unità
interna.
Controllare che l'unità interna emetta un segnale acustico
3
("bip") di ricezione.
Al termine dell'impostazione, l'unità interna emette un segnale
acustico ("bip"). (Se non viene emesso il segnale acustico di ricezione, eseguire di nuovo l'impostazione.)
di ricezione
Bip
Blocco per bambini
Questa funzione blocca il funzionamento del telecomando per evitare un errore nell'operazione.
■
Puntare il telecomando verso il condizionatore d’aria, e
1
Procedura di rilascio
Spegnere la spia premendo il pulsante SET per almeno 3 secondi.
•
•
Premere il pulsante SET per almeno 3 secondi.
Viene visualizzato . Quando si imposta Blocco per bambini, è possibile
utilizzare solo il pulsante ON/OFF.
NOTA
Quando si imposta Blocco per bambini, non è possibile modifi care le im-
postazioni relative a temperatura, velocità della ventola e direzione del
fl usso d'aria. Per modifi care le impostazioni, resettare Blocco per bambini.
Blocco per bambini non è operativo durante il funzionamento ALLERGEN
CLEAR.
– 97 –
Page 100

Paragrafo del funzionamento e della visualizzazione del telecomando
Tasti
Pulsante di selezione della mo-
dalità operativa
Ogni volta che si preme il pulsante, la
modalità cambia.
Tasto regolazione TEMPERATURA
Questo pulsante imposta la temperatura
ambientale.
Tasto regolazione
Questo pulsante cambia il funzionamento di HIGH POWER/ECONOMY.
Pulsante FLUSSO ARIA (sinistra/destra)
Questo pulsante cambia la direzione del
fl usso d’aria (verso sinistra/destra).
Pulsante SILENT
Questo pulsante cambia il funzionamento di SILENT.
Pulsante ALLERGEN CLEAR
Questo pulsante seleziona la funzione
ALLERGEN CLEAR (Eliminazione degli
allergeni).
Pulsante ON TIMER
Con questo pulsante si seleziona l’accensione programmata del timer.
Page 99,101
HI/ECO
Page 110
Page 102
Page 111
Page 105
Page 104
Sezione trasmissione
Pulsante (luminoso) ON/OFF
Premere par avviare l’operazione; premere di nuovo per arrestarla.
Pulsante FAN SPEED
Ogni volta che si preme il pulsante, la
velocità della ventola cambia.
Page 100
Pulsante FLUSSO ARIA (alto/basso)
Questo pulsante cambia la direzione del
fl usso d’aria (verso l’alto/il basso).
Page 102
Pulsante 3D AUTO
Questo pulsante imposta il funzionamento 3D AUTO.
Pulsante
Questo pulsante imposta il funzionamento di NIGHT SETBACK.
Page 102
NIGHT SETBACK
Page 111
Pulsante SET/Blocco per bambini
Utilizzare questo pulsante per impostare
il timer e Blocco per bambini.
Page 97
Pulsante CANCEL
Questo pulsante annulla l’accensione e
lo spegnimento programmato del timer
e la funzione SLEEP.
Pulsante OFF TIMER
Con questo pulsante si seleziona lo spegnimento programmato del timer.
Page 103
Pulsante WEEKLY
Questo pulsante commuta TIMER SETTIMANALE su ON/OFF.
Page 106
Interruttore CLEAN
Questo commutatore seleziona il funzionamento di CLEAN.
Page 112
SPulsante SLEEP
L’illustrazione in alto riporta tutte le indicazioni del
Questo pulsante seleziona l’operazione di
spegnimento dopo essersi addormentati
(funzione SLEEP).
Page 103
•
telecomando, ma di fatto vengono descritti solo i
componenti pertinenti all’uso.
Procedura di trasmissione
Premendo un tasto del telecomando con il telecomando diretto verso il condizionatore si trasmette un segnale.
Se il segnale viene ricevuto correttamente, l’apparecchio emette il suono di ricezione.
Pulsante TIMER
Questo pulsante viene utilizzato per impostare l'ora attuale e la funzione timer.
Pulsante PROGRAM
Con questo pulsante si imposta TIMER
SETTIMANALE.
Page 106
Commutatore di azzeramento ACL
Pulsante di azzeramento del computer.
Page 96
Interruttore TIME SET UP
Con questo pulsante si imposta l’ora.
Page 99
– 98 –
 Loading...