


Digital-Analog Converter Module
User's Manual
-Q62DAN
-Q62DA
-Q64DAN
-Q64DA
-Q68DAVN
-Q68DAV
-Q68DAIN
-Q68DAI
-GX Configurator-DA (SW2D5C-QDAU-E)

SAFETY PRECAUTIONS
(Always read these precautions before using this equipment.)
Before using this product, please read this manual and the relevant manuals introduced in this manual
carefully and pay full attention to safety to handle the product correctly.
The precautions given in this manual are concerned with this product only. For the safety precautions of
the programmable controller system, refer to the user's manual for the CPU module used.
In this manual, the safety precautions are classified into two levels: " WARNING" and " CAUTION".
WARNING !
!
CAUTION
Under some circumstances, failure to observe the precautions given under " CAUTION" may lead to
serious consequences.
Observe the precautions of both levels because they are important for personal and system safety.
Make sure that the end users read this manual and then keep the manual in a safe place for future
reference.
Indicates that incorrect handling may cause hazardous conditions,
resulting in death or severe injury.
Indicates that incorrect handling may cause hazardous conditions,
resulting in minor or moderate injury or property damage.
[Design Precautions]
! !
!
!
WARNING
Do not write data into the "System area" of the buffer memory of intelligent function modules.
Also, do not use any "Use prohibited" signals as an output signal to an intelligent function
module from the programmable controller CPU.
Writing data into the "System area" or outputting a signal for "Use prohibited" may cause a
malfunction of the programmable controller system.
!
CAUTION
Do not bunch the control wires or communication cables with the main circuit or power wires, or
install them close to each other.
They should be installed 100mm or more from each other.
Not doing so could result in noise that may cause malfunction.
At power on/off, voltage or current may instantaneously be output from the output terminal of this
module. In such case, wait until the analog output becomes stable to start controlling the
external device.
A - 1
A - 1
[Installation Precautions]
!
CAUTION
Use the programmable controller in an environment that meets the general specifications
contained in the user's manual of the CPU module to use.
Using this programmable controller in an environment outside the range of the general
specifications may cause electric shock, fire, malfunction, and damage to or deterioration of the
product.
While pressing the installation lever located at the bottom of module, insert the module fixing tab
into the fixing hole in the base unit until it stops. Then, securely mount the module with the fixing
hole as a supporting point.
Improper installation may result in malfunction, breakdown or the module coming loose and
dropping. Securely fix the module with screws if it is subject to vibration during use.
Tighten the screws within the range of specified torque.
If the screws are loose, it may cause the module to fallout, short circuits, or malfunction.
If the screws are tightened too much, it may cause damage to the screw and/or the module,
resulting in fallout, short circuits or malfunction.
Be sure to shut off all phases of the external power supply used by the system before mounting
or removing the module.
Not doing so may cause damage to the module.
In the system where a CPU module supporting Online module change is used and on the
MELSECNET/H remote I/O stations, modules can be replaced online (during energizing).
However, there are some restrictions on replaceable modules and the replacement procedures
are predetermined for each module.
For details, refer to the chapter of Online module change in this manual.
Do not directly touch the conductive area or electronic components of the module.
Doing so may cause malfunction or failure in the module.
[Wiring Precautions]
!
CAUTION
Always ground the FG terminal for the programmable controller.
There is a risk of electric shock or malfunction.
Use applicable solderless terminals and tighten with the specified torque. If any solderless spade
terminal is used, it may be disconnected when the terminal screw comes loose, resulting in
failure.
When turning on the power and operating the module after wiring is completed, always attach
the terminal cover that comes with the product.
There is a risk of electric shock if the terminal cover is not attached.
Tighten the terminal screws within the range of specified torque.
If the terminal screws are loose, it may result in short circuits or malfunction.
If the terminal screws are tightened too much, it may cause damage to the screw and/or the
module, resulting in short circuits or malfunction.
Be careful not to let foreign matter such as sawdust or wire chips get inside the module.
They may cause fires, failure or malfunction.
The top surface of the module is covered with protective film to prevent foreign objects such as
cable offcuts from entering the module when wiring.
Do not remove this film until the wiring is complete.
Before operating the system, be sure to remove the film to provide adequate ventilation.
A - 2
A - 2
[Startup and Maintenance Precautions]
!
CAUTION
Do not disassemble or modify the modules.
Doing so could cause failure, malfunction injury or fire.
Be sure to shut off all phases of the external power supply used by the system before mounting
or removing the module.
Not doing so may cause failure or malfunction of the module.
In the system where a CPU module supporting Online module change is used and on the
MELSECNET/H remote I/O stations, modules can be replaced online (during energizing).
However, there are some restrictions on replaceable modules and the replacement procedures
are predetermined for each module.
For details, refer to the chapter of Online module change in this manual.
Do not install/remove the module to/from the base unit, or the terminal block to/from the module
more than 50 times after the first use of the product. (IEC 61131-2 compliant)
Failure to do so may cause malfunction.
Do not touch the connector while the power is on.
Doing so may cause malfunction.
Switch off all phases of the externally supplied power used in the system when cleaning the
module or retightening the terminal or module fixing screws.
Not doing so may cause failure or malfunction of the module.
If the screws are loose, it may cause the module to fallout, short circuits, or malfunction.
If the screws are tightened too much, it may cause damages to the screws and/or the module,
resulting in the module falling out, short circuits or malfunction.
Always make sure to touch the grounded metal to discharge the electricity charged in the body,
etc., before touching the module.
Failure to do so may cause a failure or malfunctions of the module.
[Disposal Precautions]
!
CAUTION
When disposing of this product, treat it as industrial waste.
A - 3
A - 3

CONDITIONS OF USE FOR THE PRODUCT
(1) Mitsubishi programmable controller ("the PRODUCT") shall be used in conditions;
i) where any problem, fault or failure occurring in the PRODUCT, if any, shall not lead to any major or
serious accident; and
ii) where the backup and fail-safe function are systematically or automatically provided outside of the
PRODUCT for the case of any problem, fault or failure occurring in the PRODUCT.
(2) The PRODUCT has been designed and manufactured for the purpose of being used in general
industries.
MITSUBISHI SHALL HAVE NO RESPONSIBILITY OR LIABILITY (INCLUDING, BUT NOT LIMITED
TO ANY AND ALL RESPONSIBILITY OR LIABILITY BASED ON CONTRACT, WARRANTY, TORT,
PRODUCT LIABILITY) FOR ANY INJURY OR DEATH TO PERSONS OR LOSS OR DAMAGE TO
PROPERTY CAUSED BY the PRODUCT THAT ARE OPERATED OR USED IN APPLICATION NOT
INTENDED OR EXCLUDED BY INSTRUCTIONS, PRECAUTIONS, OR WARNING CONTAINED IN
MITSUBISHI'S USER, INSTRUCTION AND/OR SAFETY MANUALS, TECHNICAL BULLETINS AND
GUIDELINES FOR the PRODUCT.
("Prohibited Application")
Prohibited Applications include, but not limited to, the use of the PRODUCT in;
Nuclear Power Plants and any other power plants operated by Power companies, and/or any other
cases in which the public could be affected if any problem or fault occurs in the PRODUCT.
Railway companies or Public service purposes, and/or any other cases in which establishment of a
special quality assurance system is required by the Purchaser or End User.
Aircraft or Aerospace, Medical applications, Train equipment, transport equipment such as Elevator
and Escalator, Incineration and Fuel devices, Vehicles, Manned transportation, Equipment for
Recreation and Amusement, and Safety devices, handling of Nuclear or Hazardous Materials or
Chemicals, Mining and Drilling, and/or other applications where there is a significant risk of injury to
the public or property.
Notwithstanding the above, restrictions Mitsubishi may in its sole discretion, authorize use of the
PRODUCT in one or more of the Prohibited Applications, provided that the usage of the PRODUCT is
limited only for the specific applications agreed to by Mitsubishi and provided further that no special
quality assurance or fail-safe, redundant or other safety features which exceed the general
specifications of the PRODUCTs are required. For details, please contact the Mitsubishi
representative in your region.
A - 4
A - 4
REVISIONS
The manual number is given on the bottom left of the back cover.
Print Date Manual Number Revision
Dec., 1999 SH (NA)-080054-A
First printing
Oct., 2000 SH (NA)-080054-B Add the contents of the function version B.
Correction
About the Generic Terms and Abbreviations, Section 2.1, Section 3.1.3,
3.3.1, 3.4, Section 4.3, Section 5.2.1, 5.2.2, 5.3.3, 6.5.1
Partial addition
Section 1.1, Section 3.1.1, 3.1.2, 3.2.1, 3.2.2, 3.3.1, 3.3.2, 3.4.3,
Section 4.5, Section 5.6.1, Section 7.2.3, 7.2.4
Addition
Section 1.2, Section 2.2, Section 3.2.3, Appendix 1
Dec., 2000 SH (NA)-080054-C
Addition of Models
Q68DAV, Q68DAI
Correction
Section 3.2, 3.2.1, 3.2.2, 3.2.3, 3.3.1, 3.3.2, 3.4.1, 3.4.2, 3.4.3, 3.4.4,
3.4.6, 3.4.7, Section 4.5, Section 7.2.3, App-1.3
Partial addition
About the Generic Terms and Abbreviations, Product Structure,
Chapter 1, Section 1.1, Section 2.1, Section 3.1.1, 3.1.4, Section 4.1,
4.3, Section 7.1, Appendix 2
Jun., 2001 SH (NA)-080054-D Standardize the name from software package (GPP function) to Product
name (GX Developer).
Standardize the name from utility package (QDAU) to Product name
(GX Configurator-DA).
Correction
Conformation to the EMC Directive and Low Voltage Instruction, About
the Generic Terms and Abbreviations, Product Structure, Section 2.1,
2.2, Section 4.6, Section 5.2, 5.2.1, 5.2.2, 5.3.3, Appendix 1.2
Feb., 2002 SH (NA)-080054-E Add the contents of the function version B.
Correction
Product Structure, Section 1.2, Section 2.2, Section 3.2.2, 3.2.3, 3.4.1,
Section 4.2, 4.4.1, Section 5.3.3
Partial addition
SAFETY PRECAUTIONS, About the Generic Terms and Abbreviations,
Section 1.2, Section 2.1, Section 3.1.1, 3.2, 3.2.2, 3.2.3, Section 4.3,
4.6, Section 5.2.1, 5.2.2, Section 8.1, 8.2.1, Appendix 1
Addition
Section 3.4.2, 3.4.3, 3.4.4, 3.4.12, 3.4.13, 3.4.14, Chapter 7, App-2, 2.1,
2.2, 2.3
Renumbering
Section 3.4.2 to Section 3.4.8 Section 3.4.5 to Section 3.4.11,
Chapter 7 Chapter 8, Appendix 2 Appendix 3
A - 5
A - 5
The manual number is given on the bottom left of the back cover.
Print Date Manual Number Revision
May, 2002 SH(NA)-080054-F
Correction
Section 3.4.1, 3.4.2, 3.4.3, 3.4.4, 3.4.6, 3.4.13, 3.4.14, Section 4.5, 4.6,
Section 7.3.1, 7.3.2, 7.3.3, 7.3.4, 7.3.5, 7.3.6, 7.4, 7.5, Appendix 1.1,
2.2, 2.3
Partial addition
Section 3.3.2, Section 8.2.3
Feb., 2003 SH(NA)-080054-G
Correction
SAFETY PRECAUTIONS, Section 1.2, Section 3.2, 3.4.1 to 3.4.4,
3.4.14, Section 4.5, Section 5.1, 5.2.1, 5.2.2, 5.3.2, 5.6.1 to 5.6.3,
Section 7.3.3 to 7.3.6, 7.4, Appendix 1.1 to Appendix 1.3, Appendix 2.2,
Appendix 2.3
Addition
Section 5.6.4, 5.6.5
May, 2003 SH(NA)-080054-H
Correction
Section 2.2, Section 3.1.1, 3.4.1, 3.4.2, 3.4.3, 3.4.4, 3.4.13, 3.4.14,
Section 4.5, 4.6, Section 5.3.1
May, 2004 SH(NA)-080054-I Addition of program example for use on the remote I/O network
Correction
Section 2.2, Section 3.1.4, 3.2.1, 3.2.2, 3.4.7, Chapter 6, Section 7.1,
7.3.1 to 7.3.6
Aug., 2004 SH(NA)-080054-J
Correction
Section 1.1, Section 5.1, 5.2.1, 5.2.2, 5.3.1, 5.3.2, 5.3.3, 5.6.1, 5.6.2,
5.6.3, Appendix 2.3
Oct., 2004 SH(NA)-080054-K
Nov., 2005 SH (NA)-080054-L
Partial addition
Section 5.6.4, Section 5.7, 5.8
Correction
SAFETY PRECAUTIONS, Section 2.1, Section 3.1.1, Section 4.1,
Section 6.2, 6.2.1
Addition of Models
Q62DAN, Q64DAN, Q68DAVN, Q68DAIN
Correction
SAFETY PRECAUTIONS, Conformation to the EMC Directive and Low
Voltage Instruction, Product Structure, Section 2.1, Section 5.2.2,
Section 6.2.2
Addition
Appendix 1.4
A - 6
A - 6
The manual number is given on the bottom left of the back cover.
Print Date Manual Number Revision
Mar., 2006 SH (NA)-080054-M
Correction
SAFETY PRECAUTIONS, Conformation to the EMC Directive and Low
Voltage Instruction, Section 2.1, 4.6, Appendix 2
Jan., 2007 SH (NA)-080054-N
Correction
Section 3.2.1, Section 3.4.2, Section 4.6
Jun., 2007 SH (NA)-080054-O
Correction
Section 4.3, Appendix 3
Jan., 2008 SH (NA)-080054-P
Correction
SAFETY PRECAUTIONS, About the Generic Terms and Abbreviations
Section 1.1, Section 2.1, Section 2.3, Section 3.4.1 to Section 3.4.4,
Section 4.1, Section 4.6, Section 5.2.1, Section 5.2.2, Section 7.3.3,
Section 7.3.5, Section 8.1, Appendix 1.1, Appendix 2, Appendix 2.1,
Appendix 2.2, Appendix 2.3
May, 2008 SH (NA)-080054-Q
Dec., 2010 SH (NA)-080054-R
May, 2015 SH (NA)-080054-S
Addition
Section 2.2
Correction
SAFETY PRECAUTIONS, Compliance with the EMC and Low Voltage
Directives, About the Generic Terms and Abbreviations, Section 2.1,
Section 4.1, Section 5.2.1, Section 5.2.2, Section 5.3.1, Section 5.3.3,
Section 7.1
Correction
About the Generic Terms and Abbreviations, Product Structure,
Section 1.1, Sections 2.1 to 2.3, Section 3.1.1, Section 3.1.2,
Section 3.2.1, Section 3.2.2, Sections 3.4.1 to 3.4.4, Section 3.4.9,
Section 4.1, Section 4.3, Section 4.5, Section 5.2.1, Section 5.3.1,
Section 5.3.3, Section 5.4, Section 5.5, Section 5.6.1, Section 5.7,
Section 6.2, Section 6.2.2, Section 7.1, Sections 7.3.1 to 7.3.6,
Section 8.1, Section 8.2.3, Section 8.2.5, Appendix 2,
Appendices 2.1 to 2.3, Appendix 3
Addition
CONDITIONS OF USE FOR THE PRODUCT
Correction
SAFETY PRECAUTIONS, RELEVANT MANUALS, Compliance with the
EMC and Low Voltage Directives, About the Generic Terms and
Abbreviations, Section 2.1, Section 2.2, Section 3.2.3, Section 4.3,
Section 4.6, Section 5.2.1, Section 5.2.2, Section 5.6.2, Section 5.6.3,
Section 6.1.2, Section 7.1, Section 7.3.6, Section 7.5, Appendix 3
A - 7
A - 7
The manual number is given on the bottom left of the back cover.
Print Date Manual Number Revision
Jun., 2016 SH (NA)-080054-T
Correction
Sec
tions 4.3, Section 4.4.2, Section 4.5, Appendix 3
Addition
INUED MODELS
RODUCTION, COMPLIANCE WITH THE EMC AND LOW
Jun., 2017 SH (NA)-080054-U
DISCONT
Correction
INT
VOLTAGE DIRECTIVES, ABOUT THE GENERIC TERMS AND
ABBREVIATIONS, Section 3.1.1
Japanese Manual Version SH-080027-X
This manual confers no industrial property rights or any rights of any other kind, nor does it confer any patent
lice
nses. Mitsubishi Electric Corporation cannot be held responsible for any problems involving industrial property
rights which may occur as a result of using the contents noted in this manual.
1999 MITSUBISHI ELECTRIC CORPORATION
A -
8
A - 8

INTRODUCTION
Thank you for purchasing the Mitsubishi Electric MELSEC-Q series programmable controllers.
Before using the product, please read this manual carefully to develop full familiarity with the functions and
performance of the Q series programmable controllers to ensure correct use.
CONTENTS
SAFETY PRECAUTIONS ............................................................................................................................. A-
CONDITIONS OF USE FOR THE PRODUCT .......................................................................................... A-
REVISIONS ................................................................................................................................................... A-
INTRODUCTION ........................................................................................................................................... A-
CONTENTS ................................................................................................................................................... A-
ABOUT MANUALS ........................................................................................................................................ A-12
COMPLIANCE WITH THE EMC AND LOW VOLTAGE DIRECTIVES ....................................................... A-12
ABOUT THE GENERIC TERMS AND ABBREVIATIONS ........................................................................... A-13
PRODUCT STRUCTURE .............................................................................................................................. A-14
DISCONTINUED MODELS ........................................................................................................................... A-14
1 OVERVIEW 1-
1 to 1- 3
1
4
5
9
9
1.1 Features ................................................................................................................................................. 1- 1
1.2 Functions Added to Function Version B and Later............................................................................... 1-
2 SYSTEM CONFIGURATION 2-
2.1 Applicable Systems ............................................................................................................................... 2- 1
2.2 Precautions on System Configuration .................................................................................................. 2-
2.3 Checking Function Version, Serial Number, and Software Version .................................................... 2-
3 SPECIFICATIONS 3-
3.1 Performance Specifications .................................................................................................................. 3- 1
3.1.1 Performance specifications list ..................................................................................................... 3-
3.1.2 I/O conversion characteristics ...................................................................................................... 3-
3.1.3 Accuracy ........................................................................................................................................ 3-10
3.1.4 Conversion speed ......................................................................................................................... 3-10
3.2 D/A Converter Module Function............................................................................................................ 3-11
3.2.1 Synchronous output function ........................................................................................................ 3-11
3.2.2 Analog output HOLD/CLEAR function ......................................................................................... 3-12
3.2.3 Analog output test during programmable controller CPU STOP ................................................ 3-14
3.3 I/O Signals for the Programmable Controller CPU............................................................................... 3-15
3.3.1 List of I/O signals........................................................................................................................... 3-15
3.3.2 Details of I/O signals ..................................................................................................................... 3-16
3.4 Buffer Memory ....................................................................................................................................... 3-20
3.4.1 Buffer memory assignment (Q62DAN/Q62DA) ........................................................................... 3-20
3.4.2 Buffer memory assignment (Q64DAN/Q64DA) ........................................................................... 3-22
3.4.3 Buffer memory assignment (Q68DAVN/Q68DAV) ...................................................................... 3-24
3.4.4 Buffer memory assignment (Q68DAIN/Q68DAI) ......................................................................... 3-26
3.4.5 D/A conversion enable/disable (buffer memory address 0: Un\G0) ........................................... 3-28
3.4.6 Digital value (buffer memory address 1 to 8: Un\G1 to Un\G8) .................................................. 3-28
3.4.7 Set value check code (buffer memory address 11 to 18: Un\G11 to Un\G18) ........................... 3-29
3.4.8 Error code (buffer memory address 19: Un\G19) ........................................................................ 3-29
1 to 2- 7
1 to 3-33
3
4
5
1
3
A - 9
A - 9

3.4.9 Setting range (buffer memory address 20, 21: Un\G20, Un\G21) .............................................. 3-30
3.4.10 Offset/gain setting mode and Offset/gain specification
(buffer memory address 22, 23: Un\G22, Un\G23) ......................................................... 3-30
3.4.11 Offset/gain adjustment value specification (buffer memory address 24: Un\G24) ................... 3-31
3.4.12 Mode switching setting (buffer memory address 158, 159: Un\G158, Un\G159) .................... 3-31
3.4.13 Pass data classification setting (buffer memory address 200: Un\G200)
(Q62DAN, Q64DAN, Q62DA, and Q64DA only) ............................................................. 3-32
3.4.14 Industrial shipment settings and User range settings Offset/gain value
(buffer memory address 202 to 233: Un\G202 to Un\G233) .......................................... 3-33
4 SETUP AND PROCEDURES BEFORE OPERATION 4-
4.1 Handling Precautions ............................................................................................................................ 4- 1
4.2 Setup and Procedures before Operation .............................................................................................. 4-
4.3 Part Identification Nomenclature ........................................................................................................... 4-
4.4 Wiring ..................................................................................................................................................... 4-
4.4.1 Wiring precautions ........................................................................................................................ 4-
4.4.2 External wiring ............................................................................................................................... 4-
4.5 Switch Setting for Intelligent Function Module ..................................................................................... 4-
4.6 Offset/Gain Settings .............................................................................................................................. 4-13
5 UTILITY PACKAGE (GX Configurator-DA) 5-
5.1 Utility Package Functions ...................................................................................................................... 5- 1
5.2 Installing and Uninstalling the Utility Package ...................................................................................... 5-
5.2.1 Handling precautions .................................................................................................................... 5-
5.2.2 Operating environment ................................................................................................................. 5-
5.3 Utility Package Operation ...................................................................................................................... 5-
5.3.1 Common utility package operations ............................................................................................. 5-
5.3.2 Operation overview ....................................................................................................................... 5-10
5.3.3 Starting the intelligent function module utility ............................................................................... 5-12
5.4 Initial Setting .......................................................................................................................................... 5-15
5.5 Auto Refresh Setting ............................................................................................................................. 5-17
5.6 Monitor/Test ........................................................................................................................................... 5-19
5.6.1 Monitor/test screen ....................................................................................................................... 5-19
5.6.2 Offset/gain setting operation (Function version C or later) .......................................................... 5-23
5.6.3 Offset/gain setting operation (Function version B or earlier) ....................................................... 5-25
5.6.4 Confirmation of Conversion Characteristic .................................................................................. 5-27
5.6.5 Pass data (Q62DAN/Q64DAN/Q62DA/Q64DA).......................................................................... 5-29
5.6.6 Pass data (Q68DAVN/Q68DAIN/Q68DAV/Q68DAI) ................................................................... 5-31
5.7 FB Conversion of Initial Setting/Auto Refresh Setting ......................................................................... 5-32
5.8 Usage of FB ....................................................................................................................................... 5-33
5.8.1 Outline ........................................................................................................................................... 5-33
5.8.2 Paste an FB to a Sequence Program .......................................................................................... 5-35
5.8.3 Convert (Compile) a Sequence Program ..................................................................................... 5-36
1 to 4-17
1 to 5-36
2
3
6
6
7
9
2
2
5
7
7
6 PROGRAMMING 6-
6.1 For Use in Normal System Configuration ............................................................................................. 6- 1
6.1.1 Programming example using the utility package ......................................................................... 6-
6.1.2 Programming example without using the utility package ............................................................ 6-
A - 10
A - 10
1 to 6-11
2
4

6.2 For Use on Remote I/O Network .......................................................................................................... 6-
6.2.1 Programming example using the utility package ......................................................................... 6-
6.2.2 Programming example without using the utility package ............................................................ 6-10
6
7
7 ONLINE MODULE CHANGE 7-
7.1 Online Module Change Conditions ....................................................................................................... 7- 2
7.2 Online Module Change Operations ...................................................................................................... 7-
7.3 Online Module Change Procedure ....................................................................................................... 7-
7.3.1 When industrial shipment setting is used and initial setting was made with GX Configurator-DA
........................................................................................................................................... 7-
7.3.2 When industrial shipment setting is used and initial setting was made with sequence program
........................................................................................................................................... 7-
7.3.3 When user range setting is used and initial setting was made with GX Configurator-DA
(other system is available) ................................................................................................ 7-14
7.3.4 When user range setting is used and initial setting was made with GX Configurator-DA
(other system is unavailable) ........................................................................................... 7-19
7.3.5 When user range setting is used and initial setting was made with sequence program
(other system is available) ................................................................................................ 7-25
7.3.6 When user range setting is used and initial setting was made with sequence program
(other system is unavailable) ........................................................................................... 7-30
7.4 Range Reference Table ........................................................................................................................ 7-35
7.5 Precautions for Online Module Change................................................................................................ 7-36
8 TROUBLESHOOTING 8-
8.1 Error Code List ....................................................................................................................................... 8- 1
8.2 Troubleshooting ..................................................................................................................................... 8-
8.2.1 When the "RUN" LED is flashing or turned off ............................................................................. 8-
8.2.2 When the "ERROR" LED is on or flashing ................................................................................... 8-
8.2.3 When an analog output value is not output ................................................................................. 8-
8.2.4 When analog output value is not held .......................................................................................... 8-
8.2.5 Checking the D/A converter module status using GX Developer system monitor ..................... 8-
1 to 7-36
1 to 8- 5
3
4
4
9
2
2
2
3
4
4
APPENDICES App-
Appendix 1 Function upgrade for the D/A converter module ................................................................ App- 1
Appendix 1.1 A comparison of functions of the D/A converter module ........................................... App-
Appendix 1.2 Combinations of D/A converter module functions and
GX Configurator-DA software versions ....................................................................... Ap p-
Appendix 1.3 Precautions for replacing the module of function version A
with the one of function version B or lat er ................................................................... App-
Appendix 1.4 Precautions for replacing the Q62DA/Q64DA/Q68DAV/Q68DAI with
Q62DAN/Q64DAN/Q68DAVN/Q68DAIN.................................................................... App-
Appendix 2 Dedicated Instruction List and Available Devices .............................................................. App-
Appendix 2.1 G(P).OFFGAN ............................................................................................................ App-
Appendix 2.2 G(P).OGLOAD ............................................................................................................ App-
Appendix 2.3 G(P).OGSTOR ........................................................................................................... App-13
Appendix 3 External Dimensions ........................................................................................................... App-19
INDEX Index-
A - 11
A - 11
1 to App-21
1 to Index- 2
1
2
3
4
5
6
8

ABOUT MANUALS
The following manuals are also related to this product.
If necessary, order them by quoting the details in the tables below.
Related Manuals
Manual Name
GX Developer Version 8 Operating Manual
Describes the methods of using GX Developer to create a program and print out, monitor, and debug the
program. (Sold separately)
GX Developer Version 8 Operating Manual (Function Block)
Describes the methods of using GX Developer to create a function block and print out the function block.
(Sold separately)
GX Works2 Version 1 Operating Manual (Common)
Describes the system configuration, parameter settings, and online operations (common to Simple project
and Structured project) of GX Works2 (Sold separately)
GX Works2 Version 1 Operating Manual (Intelligent Function Module)
Describes how to operate the parameter settings, monitor, predefined protocol support function, and others
of the intelligent function modules on GX Works2 (Sold separately)
REMARK
Manual Number
(Model Code)
SH-080373E
(13JU41)
SH-080376E
(13JU44)
SH-080779E
(13JU63)
SH-080921E
(13JU69)
If you would like to obtain a manual individually, printed matters are available
separately. Order the manual by quoting the manual number on the table above
(model code).
COMPLIANCE WITH THE EMC AND LOW VOLTAGE DIRECTIVES
(1) For programmable controller system
To ensure that Mitsubishi Electric programmable controllers maintain EMC and
Low Voltage Directives when incorporated into other machinery or equipment,
certain measures may be necessary. Please refer to one of the following
manuals.
• QCPU User’s Manual (Hardware Design, Maintenance and Inspection)
• Safety Guidelines
(This manual is included with the CPU module or the base unit.)
The CE mark on the side of the programmable controller indicates compliance
with EMC and Low Voltage Directives.
(2) For the product
No additional measures are necessary for the compliance of this product with the
EMC and Low Voltage Directives.
A - 12
A - 12
ABOUT THE GENERIC TERMS AND ABBREVIATIONS
Unless otherwise specified, this manual uses the following generic terms and
abbreviations.
Abbreviation/general terms Description of the abbreviation/general terms
D/A converter module
DOS/V personal computer IBM PC/AT® or compatible computer with DOS/V.
GX Developer
GX Works2
GX Configurator-DA
QCPU (Q mode)
Basic model QCPU Generic term for Q00JCPU, Q00CPU, and Q01CPU.
High Performance model
QCPU
Process CPU Generic term for Q02PHCPU, Q06PHCPU, Q12PHCPU, and Q25PHCPU.
Redundant CPU Generic term for the Q12PRHCPU and Q25PRHCPU.
Universal model QCPU
Personal computer Generic term for DOS/V personal computer.
Industrial shipment setting
FB Abbreviation of function block.
Generic term for Q62DAN, Q64DAN, Q68DAVN, Q68DAIN, Q62DA, Q64DA, Q68DAV,
Q68DAI.
Product name of the software package for the MELSEC programmable controllers.
Generic term for digital-analog converter module setting and monitor tool GX
Configurator-DA (SW2D5C-QDAU-E).
Generic term for Basic model QCPU, High Performance model QCPU, Process CPU,
Redundant CPU, and Universal model QCPU.
Generic term for Q02CPU, Q02HCPU, Q06HCPU, Q12HCPU, and Q25HCPU.
Generic term for Q00UJCPU, Q00UCPU, Q01UCPU, Q02UCPU, Q03UDCPU,
Q03UDVCPU, Q03UDECPU, Q04UDHCPU, Q04UDVCPU, Q04UDEHCPU,
Q06UDHCPU, Q06UDVCPU, Q06UDEHCPU, Q10UDHCPU, Q10UDEHCPU,
Q13UDHCPU, Q13UDVCPU, Q13UDEHCPU, Q20UDHCPU, Q20UDEHCPU,
Q26UDHCPU, Q26UDVCPU, Q26UDEHCPU, Q50UDEHCPU, and Q100UDEHCPU.
Generic term for analog input ranges 1 to 5V, 0 to 5V, -10 to 10V, 4 to 20mA and 0 to
20mA.
A - 13
A - 13
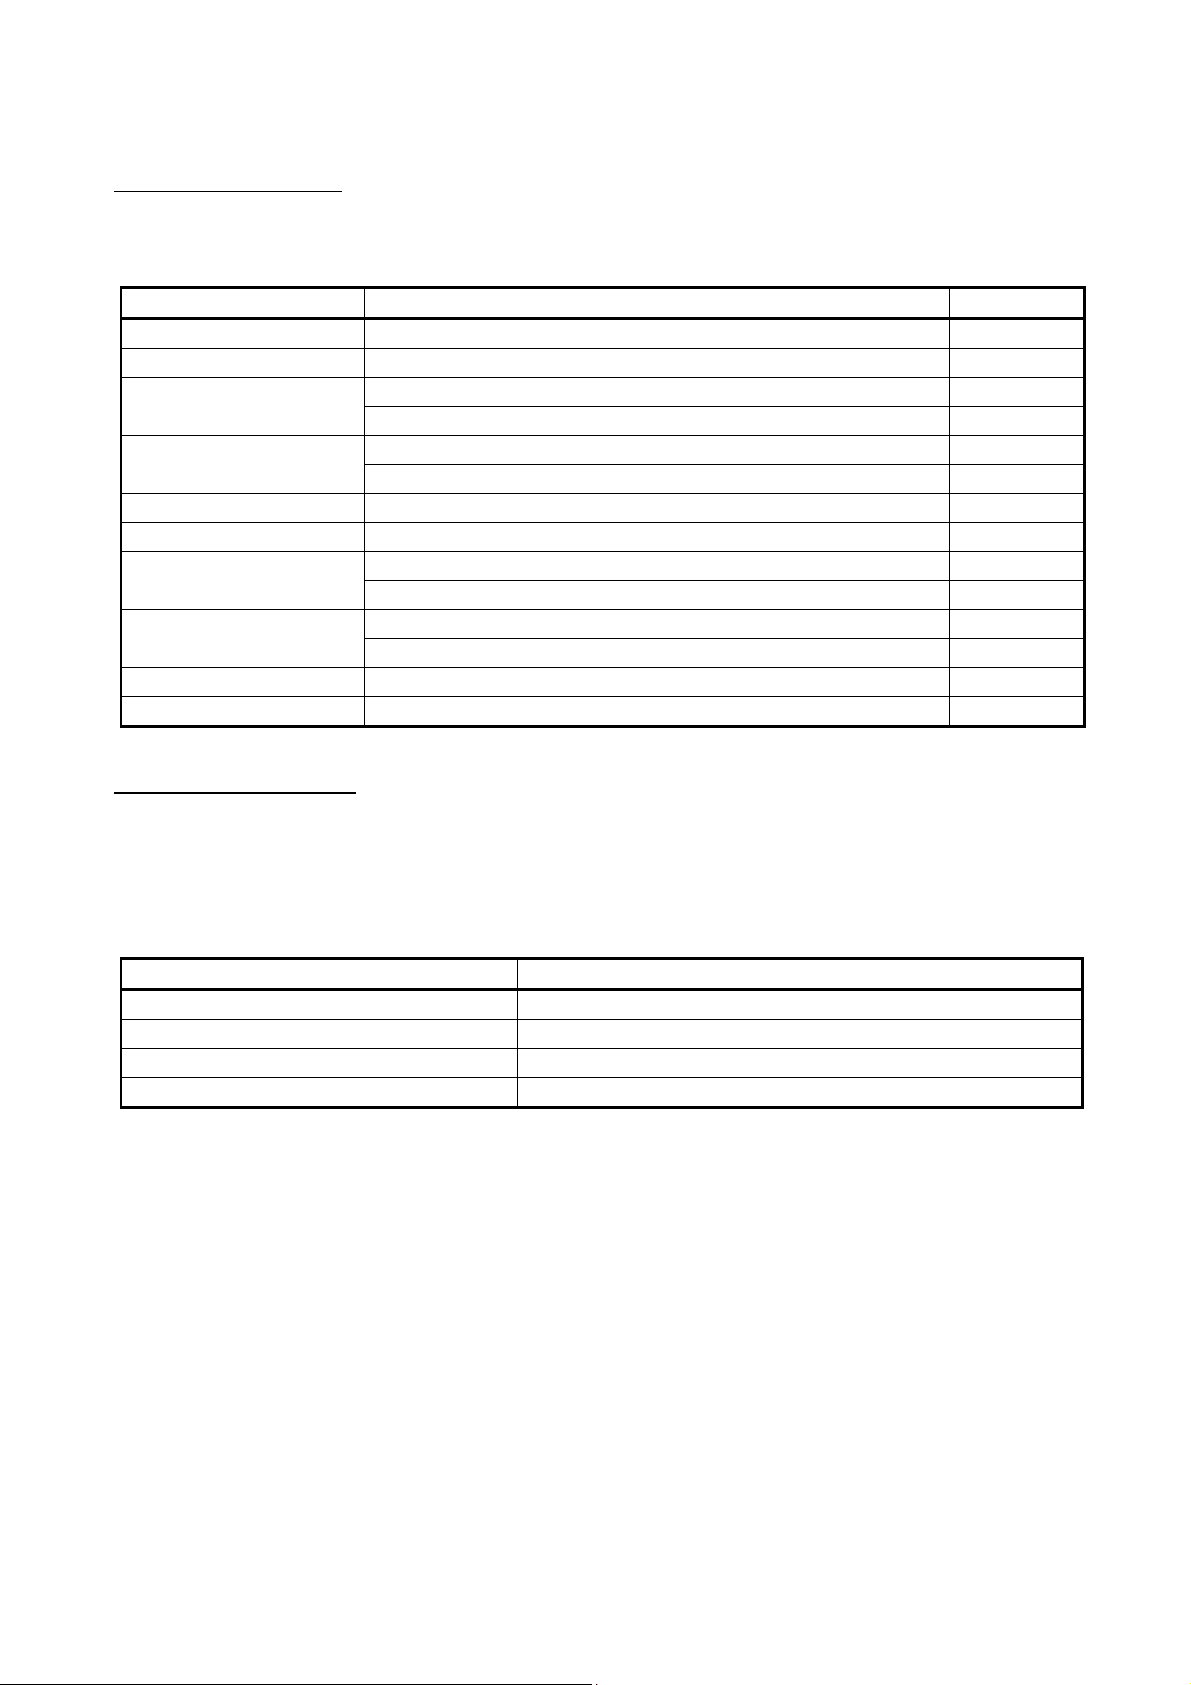
PRODUCT STRUCTURE
The product structure of this product is given in the table below.
Model code Product name Quantity
Q62DAN Q62DAN Model Digital-Analog Converter module 1
Q64DAN Q64DAN Model Digital-Analog Converter module 1
Q68DAVN
Q68DAIN
Q62DA Q62DA Model Digital-Analog Converter module 1
Q64DA Q64DA Model Digital-Analog Converter module 1
Q68DAV
Q68DAI
SW2D5C-QDAU-E GX Configurator-DA Version 2 (1-license product) (CD-ROM) 1
SW2D5C-QDAU-EA GX Configurator-DA Version 2 (Multiple-license product) (CD-ROM) 1
Q68DAVN Model Digital-Analog Converter module 1
FG terminal L-Shaped metal fitting 1
Q68DAIN Model Digital-Analog Converter module 1
FG terminal L-Shaped metal fitting 1
Q68DAV Model Digital-Analog Converter module 1
FG terminal L-Shaped metal fitting 1
Q68DAI Model Digital-Analog Converter module 1
FG terminal L-Shaped metal fitting 1
DISCONTINUED MODELS
The models in the table below are described in this manual, but are no longer
produced.
For the onerous repair term after discontinuation of production, refer to
"WARRANTY".
Model Production discontinuation
Q62DA December 2007
Q64DA December 2007
Q68DAV December 2007
Q68DAI December 2007
A - 14
A - 14

MEMO
A - 15
A - 15

1 OVERVIEW
1 OVERVIEW
MELSEC-Q
1
1.1 Features
This User's Manual provides the specifications, handling instructions and
programming methods for the following digital-analog converter modules that are
used in combination with MELSEC-Q series CPU modules (hereinafter referred to as
programmable controller CPU).
• Q62DAN type digital-analog converter module (hereinafter referred to as the Q62DAN)
• Q64DAN type digital-analog converter module (hereinafter referred to as the Q64DAN)
• Q68DAVN type digital-analog converter module (hereinafter referred to as the Q68DAVN)
• Q68DAIN type digital-analog converter module (hereinafter referred to as the Q68DAIN)
• Q62DA type digital-analog converter module (hereinafter referred to as the Q62DA)
• Q64DA type digital-analog converter module (hereinafter referred to as the Q64DA)
• Q68DAV type digital-analog converter module (hereinafter referred to as the Q68DAV)
• Q68DAI type digital-analog converter module (hereinafter referred to as the Q68DAI)
In this manual, the Q62DAN, Q64DAN, Q68DAVN, Q68DAIN, Q62DA, Q64DA,
Q68DAV and Q68DAI are collectively referred to as the D/A (Digital-Analog) converter
modules.
(1) Available models
• Q62DAN, Q62DA
• Q64DAN, Q64DA ............. 4 channels: Voltage or current output can be selected for
• Q68DAVN, Q68DAV ........ 8 channels: All of which are voltage output.
• Q68DAIN, Q68DAI ........... 8 channels: All of which are current output.
.............
2 channels: Voltage or current output can be selected for
each channel.
each channel.
(2) Improved security and noise immunity (Q62DAN, Q64DAN,
Q68DAVN, Q68DAIN only)
Since isolation is provided between the external power supply and
analog output channels, the security and noise immunity have been
increased.
(3) High-speed conversion processing
Conversion processing is performed at a speed of 80 s/channel.
(4) High degree of accuracy
The conversion accuracy is ± 0.1% (When the ambient temperature is 25 ± 5 °C).
(5) Changing the resolution mode
The resolution mode can be changed according to the application, and digitalvalue resolution settings of 1/4000, 1/12000 or 1/16000 can be selected.
(6) Changing the output range
The output range1 can easily be changed using GX Developer.
1 The output range refers to the type of offset/gain settings. The most
frequently used range is set as the default but the user can also specify their
own offset/gain settings.
(7) Synchronous output function
This function sets a constant time (120 s) until the analog value is output after
the digital value is written from the programmable controller CPU. Highly
accurate analog control can be achieved by combining this function with a
constant cycle execution type program for the programmable controller CPU or
the constant scan function
1 The constant scan function executes the sequence program within a
fixed time interval.
1
.
1 - 1 1 - 1

1 OVERVIEW
MELSEC-Q
(8) Analog output HOLD/CLEAR function
This function is set to either retain or clear the analog output value when the CPU
module is in the STOP status or when a stop error occurs.
(9) Easy settings with GX Configurator-DA
The number of sequence programs can be reduced since GX Configurator-DA
(sold separately) allows the D/A converter module settings on the screen.
Also, GX Configurator-DA simplifies checking of the module settings and
operation status.
1
FB
can be automatically created from intelligent function module parameters
set in advance to use them in a sequence program.
1 FB is the function for making a circuit block used in a sequence program
repeatedly a part (FB) to use it in the sequence program.
This function can improve the efficiency of program development and
minimize program bugs to improve program qualities.
For the details of FB, refer to "GX Developer Version 8 Operating Manual
(Function Block)."
1
1 - 2 1 - 2
1 OVERVIEW
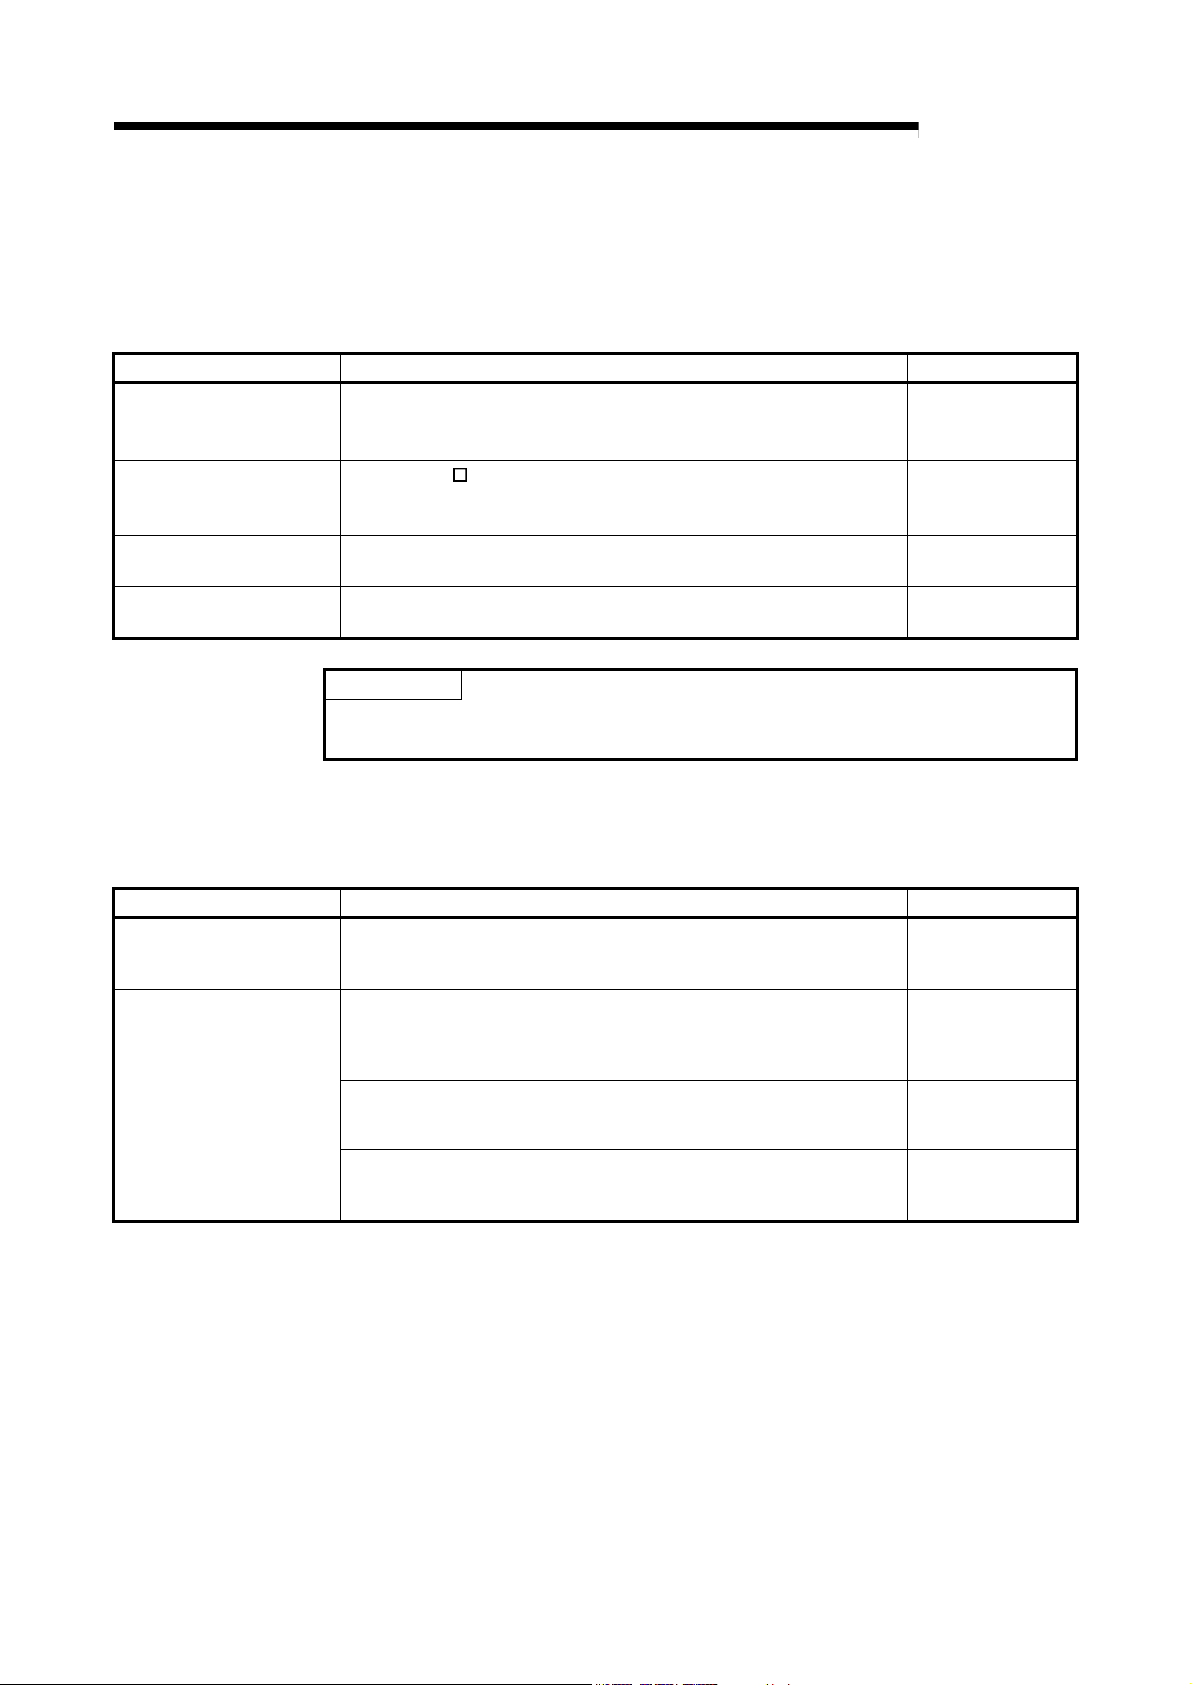
1.2 Functions Added to Function Version B and Later
(1) Functions added to function version B D/A converter module
The functions added by the function version B D/A converter module are listed
Item Function overview Reference section
Multiple CPU system
compatibility
Analog output test during
programmable controller
CPU STOP
Resolution mode
High resolution mode
status flag (X8)
below.
Compatible with a Multiple CPU system.
A programmable controller CPU of function version B or later are
required.
When the CH
programmable controller CPU STOP, the D/A converted value is
output.
The resolution mode can be changed according to the application, and
a resolution setting can be selected from 1/4000, 1/12000 and 1/16000.
This turns on when in high resolution mode. Section 3.3
output enable/disable flag is forced on during
POINT
(1) Refer to Appendix 1.1 for a comparison of functions of the function version.
(2) Refer to Section 2.3 on how to check the function version.
(2) Functions added to function version C D/A converter module
The functions added by the function version C D/A converter module are listed
Item Function overview Reference section
Online module change
Mode switching that does
not require programmable
controller CPU to be reset
below.
You can change the module without stopping the system.
A programmable controller CPU of function version C or later is
required.
Mode switching setting (buffer memory address 158, 159: Un\G158,
Un\G159) and Operating condition setting request (Y9), the module is
switched between the normal mode and offset/gain setting mode
without the programmable controller CPU being reset.
Using the dedicated instruction (G(P).OFFGAN), the module is
switched between the normal mode and offset/gain setting mode
without the programmable controller CPU being reset.
Using GX Configurator-DA, the module is switched between the normal
mode and offset/gain setting mode without the programmable controller
CPU being reset.
MELSEC-Q
Section 2.1
Section 3.2.3
Section 3.2
Chapter 7
Section 3.4.12
Appendix 3.1
Section 5.6.2
1 - 3 1 - 3

2 SYSTEM CONFIGURATION
MELSEC-Q
2 SYSTEM CONFIGURATION
This chapter explains the system configuration of the D/A converter module.
2.1 Applicable Systems
This section describes the applicable systems.
(1) Applicable modules and base units, and No. of modules
(a) When mounted with a CPU module
For the applicable modules, the number of modules, and base units
applicable to the D/A converter module, refer to the user’s manual for the
CPU module used.
Note the following when the D/A converter module is mounted with a CPU
module.
• Depending on the combination with other modules or the number of
mounted modules, power supply capacity may be insufficient. Pay
attention to the power supply capacity before mounting modules, and if
the power supply capacity is insufficient, change the combination of
modules.
• Mount a module within the number of I/O points for the CPU module. If
the number of slots is within the available range, the module can be
mounted on any slot.
2
REMARK
When the module is used with a C Controller module, refer to the user’s manual for
the C Controller module.
(b) Mounting to a MELSECNET/H remote I/O station
For the applicable MELSECNET/H remote I/O station, the number of
mountable modules, and the applicable base units, refer to the Q
Corresponding MELSECNET/H Network System Reference Manual
(Remote I/O Network).
(2) Support of the multiple CPU system
When using the D/A converter module in a multiple CPU system, refer to the
following manual first.
• QCPU User's Manual (Multiple CPU System)
(3) Compatibility with Online module change
To make an Online module change, use the module of function version C or
later.
2 - 1
2 - 1

2 SYSTEM CONFIGURATION
(4) Supported software packages
2
Single CPU system Version 7 or later
Q00J/Q00/Q01CPU
Multiple CPU system Version 8 or later
Q02/Q02H/Q06H/
Q12H/Q25HCPU
Q02PH/Q06PHCPU
Q12PH/Q25PHCPU
Q12PRH/
Q25PRHCPU
Q00UJ/Q00U
Q01UCPU
Q02U/Q03UD/
Q04UDH/
Q06UDHCPU
Q10UDH/
Q20UDHCPU
Q13UDH/
Q26UDHCPU
Q03UDE/Q04UDEH/
Q06UDEH/Q13UDEH/
Q26UDEHCPU
Q10UDH/
Q20UDHCPU
CPU modules other
than the above
If installed in a MELSECNET/H remote I/O
station
Single CPU system Version 4 or later
Multiple CPU system Version 6 or later
Single CPU system
Multiple CPU system
Single CPU system
Multiple CPU system
Redundant CPU
system
Single CPU system
Multiple CPU system
Single CPU system
Multiple CPU system
Single CPU system
Multiple CPU system
Single CPU system
Multiple CPU system
Single CPU system
Multiple CPU system
Single CPU system
Multiple CPU system
Single CPU system
Multiple CPU system
MELSEC-Q
The relationship between the system including the D/A converter module and the
software package is shown in the following table.
GX Developer or GX Works2 is necessary when using the D/A converter module.
Software Version
GX Developer
Version 8.68W or
later
Version 7.10L
or later
Version 8.45X or
later
Version 8.78G or
later
Version 8.48A or
later
Version 8.78G or
later
Version 8.62Q
or later
Version 8.68W
or later
Version 8.78G or
later
Not supported Not supported
Version 6 or later
GX Configurator-DA
Version 1.10L or later
(cannot be used with the
SW0D5C-QDAU-E 60G
or earlier versions).
SW0D5C-QDAU-E 00A
or later
SW0D5C-QDAU-E 20C
or later
Version 1.13P or later
(cannot be used with the
SW0D5C-QDAU-E 60G
or earlier versions).
Version 1.15R or later
Version 2.06G or later
SW0D5C-QDAU-E 50F
or later
1, 2
GX Works2
Refer to the GX Works2
Version 1 Operating
Manual (Common).
2 - 2
2 - 2

2 SYSTEM CONFIGURATION
1: Refer to Appendix 1.2 for the combinations of the D/A converter module functions and
GX Configurator-DA software versions.
When using the Q68DAVN, Q68DAIN, Q68DAV or Q68DAI, use SW0D5C-QDAU-E
60G or later.
2: The Q62DAN, Q64DAN, Q68DAVN and Q68DAIN can be selected for GX
Configurator-DA Version 2.03D or later.
To use the software package of an earlier version, select a model name from which
suffix "N" is removed.
POINT
(1) The products of function version C include the functions of the products of
function versions A and B.
(2) Depending on the version of GX Configurator-DA, CPU modules and functions
of the D/A converter module differ.
(3) When using GX Works2, refer to the following:
• GX Works2 Version 1 Operating Manual (Common)
• GX Works2 Version 1 Operating Manual (Intelligent Function Module)
MELSEC-Q
2 - 3
2 - 3
2 SYSTEM CONFIGURATION
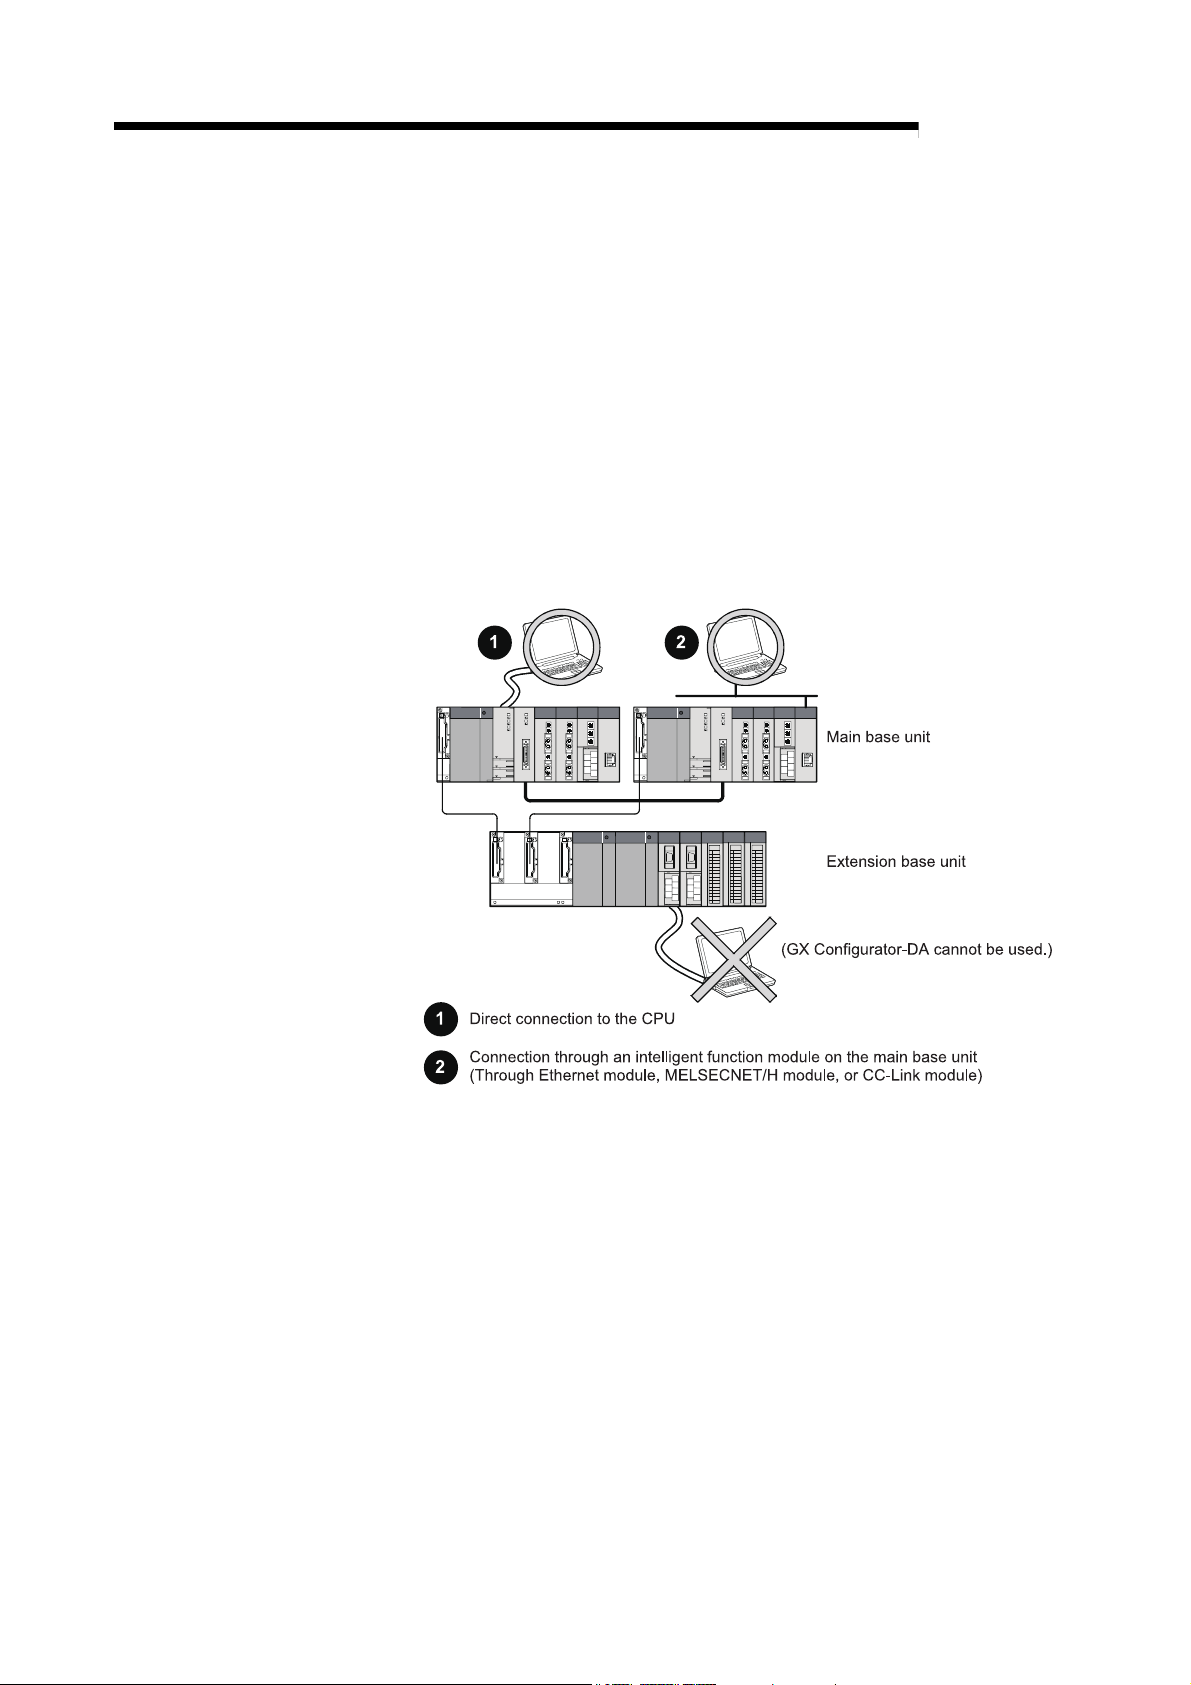
2.2 Precautions on System Configuration
(1) Using D/A converter module with Redundant CPU
(a) Dedicated instruction
The dedicated instruction cannot be used.
(b) GX Configurator-DA
GX Configurator-DA cannot be used when accessing the Redundant CPU
via an intelligent function module on an extension base unit from GX
Developer.
Connect a personal computer to the Redundant CPU with a communication
path indicated below.
MELSEC-Q
2 - 4
2 - 4
2 SYSTEM CONFIGURATION
2.3 Checking Function Version, Serial Number, and Software Version
This section describes how to check the function version of the D/A converter module
and the GX Configuration-DA software version.
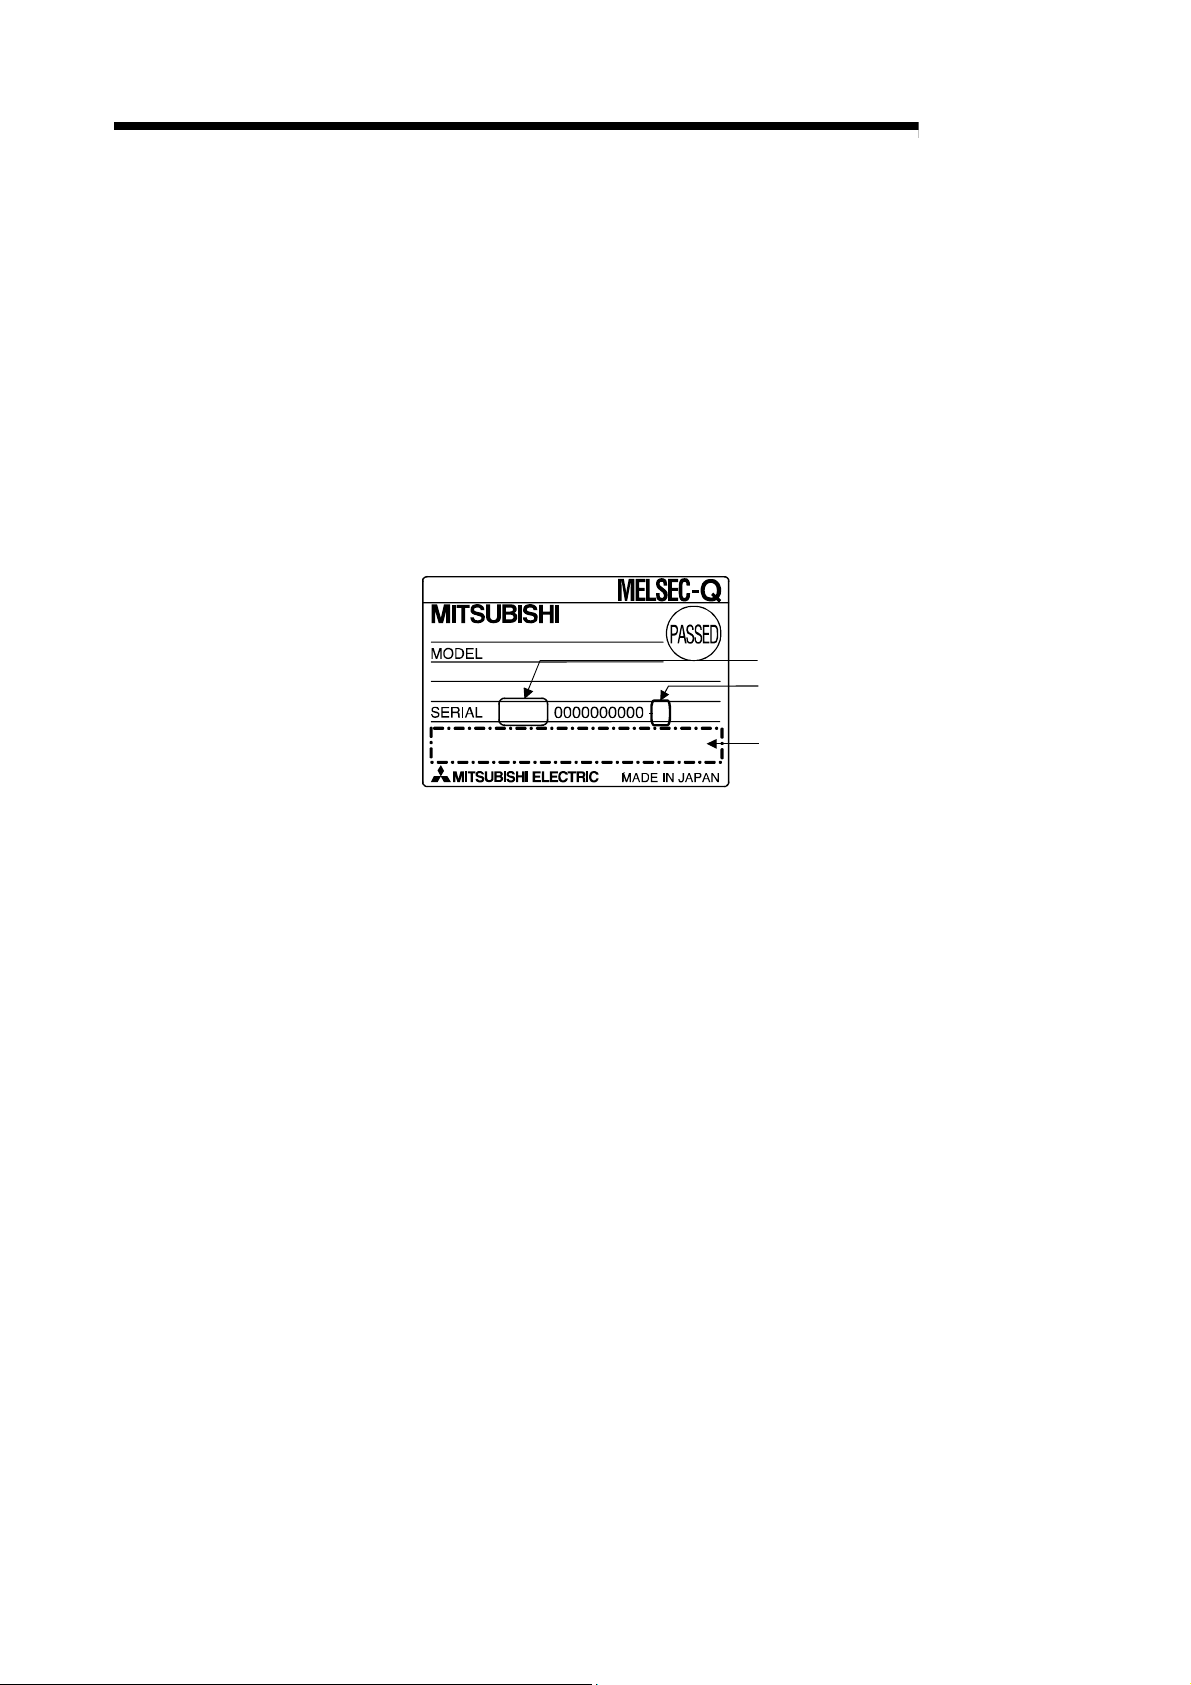
(1) Checking the function version and serial number of the D/A
converter module
The serial number and function version of the D/A converter module are
described in the rating plate, on the front part of the module, or displayed in the
System monitor dialog box developer.
(a) Checking on the rating plate on the side of the D/A converter module
MELSEC-Q
11011
Serial No. (first 5 digits)
Function version
C
Relevant regulation standards
2 - 5
2 - 5
2 SYSTEM CONFIGURATION
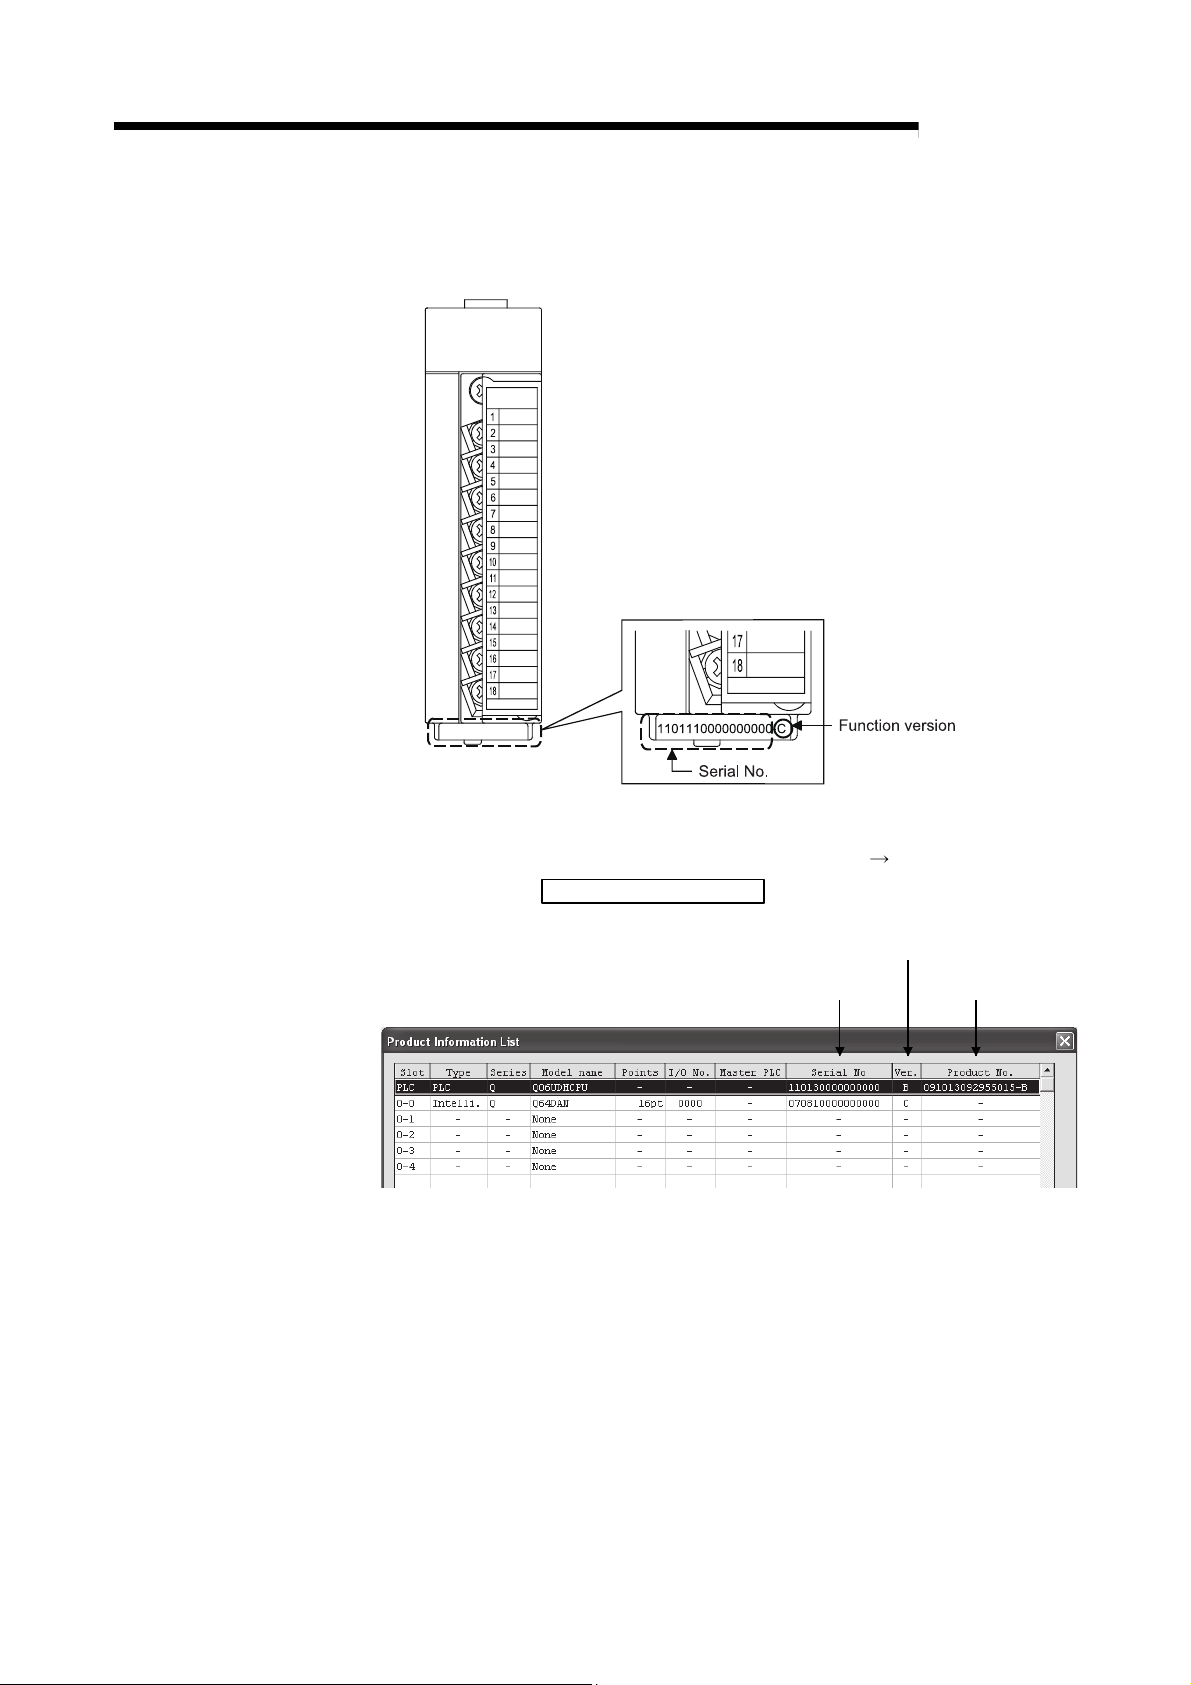
(b) Checking on the front of the module
The serial number and function version on the rating plate is shown on the
front (at the bottom) of the module.
MELSEC-Q
(c) Checking on the System monitor dialog box (Product Information List)
To display the system monitor, select [Diagnostics]
and click the Product Information List
1) Displaying the product No.
Since the D/A converter modules do not support the display function,
"-" is displayed in the "Product No." field.
button of GX Developer.
Serial No.
[System monitor]
Function version
Product No.
2 - 6
2 - 6
2 SYSTEM CONFIGURATION
POINT
The serial number displayed on the Product information list dialog box of GX
Developer may differ from that on the rating plate and on the front of the module.
• The serial number on the rating plate and front part of the module indicates the
management information of the product.
• The serial number displayed on the Product information list dialog box of GX
Developer indicates the function information of the product.
The function information of the product is updated when a new function is added.
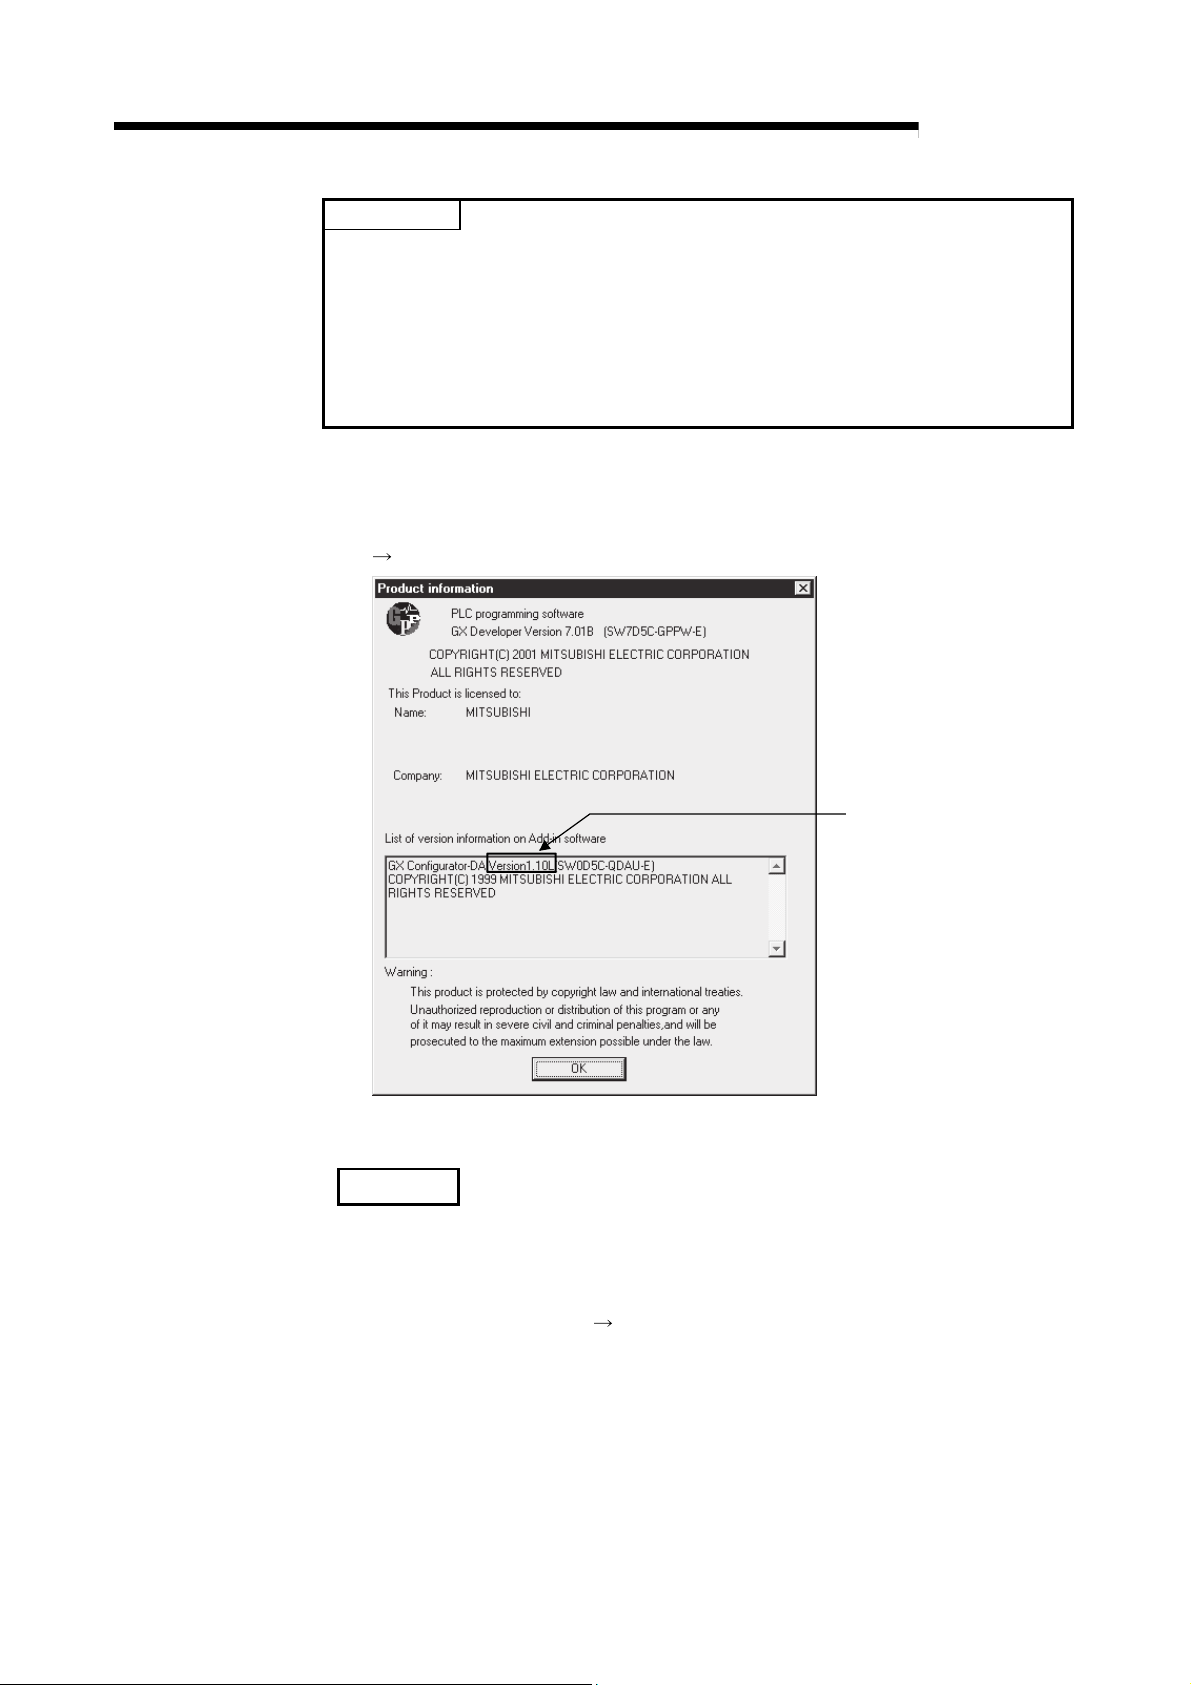
(2) Checking the software version of GX Configurator-DA
The software version of GX Configurator-DA can be checked by selecting [Help]
[Product information] of GX Developer.
MELSEC-Q
Software version
(In the case of GX Developer Version 7)
REMARK
The version indication for the GX Configurator-DA has been changed as shown
below from the SW0D5C-QDAU-E 60G upgrade product.
Previous product Upgrade and subsequent versions
SW0D5C-QDAU-E 60G
GX Configurator-DA Version 1.10L
2 - 7
2 - 7
3 SPECIFICATIONS
3 SPECIFICATIONS
3.1 Performance Specifications
3.1.1 Performance specifications list
MELSEC-Q
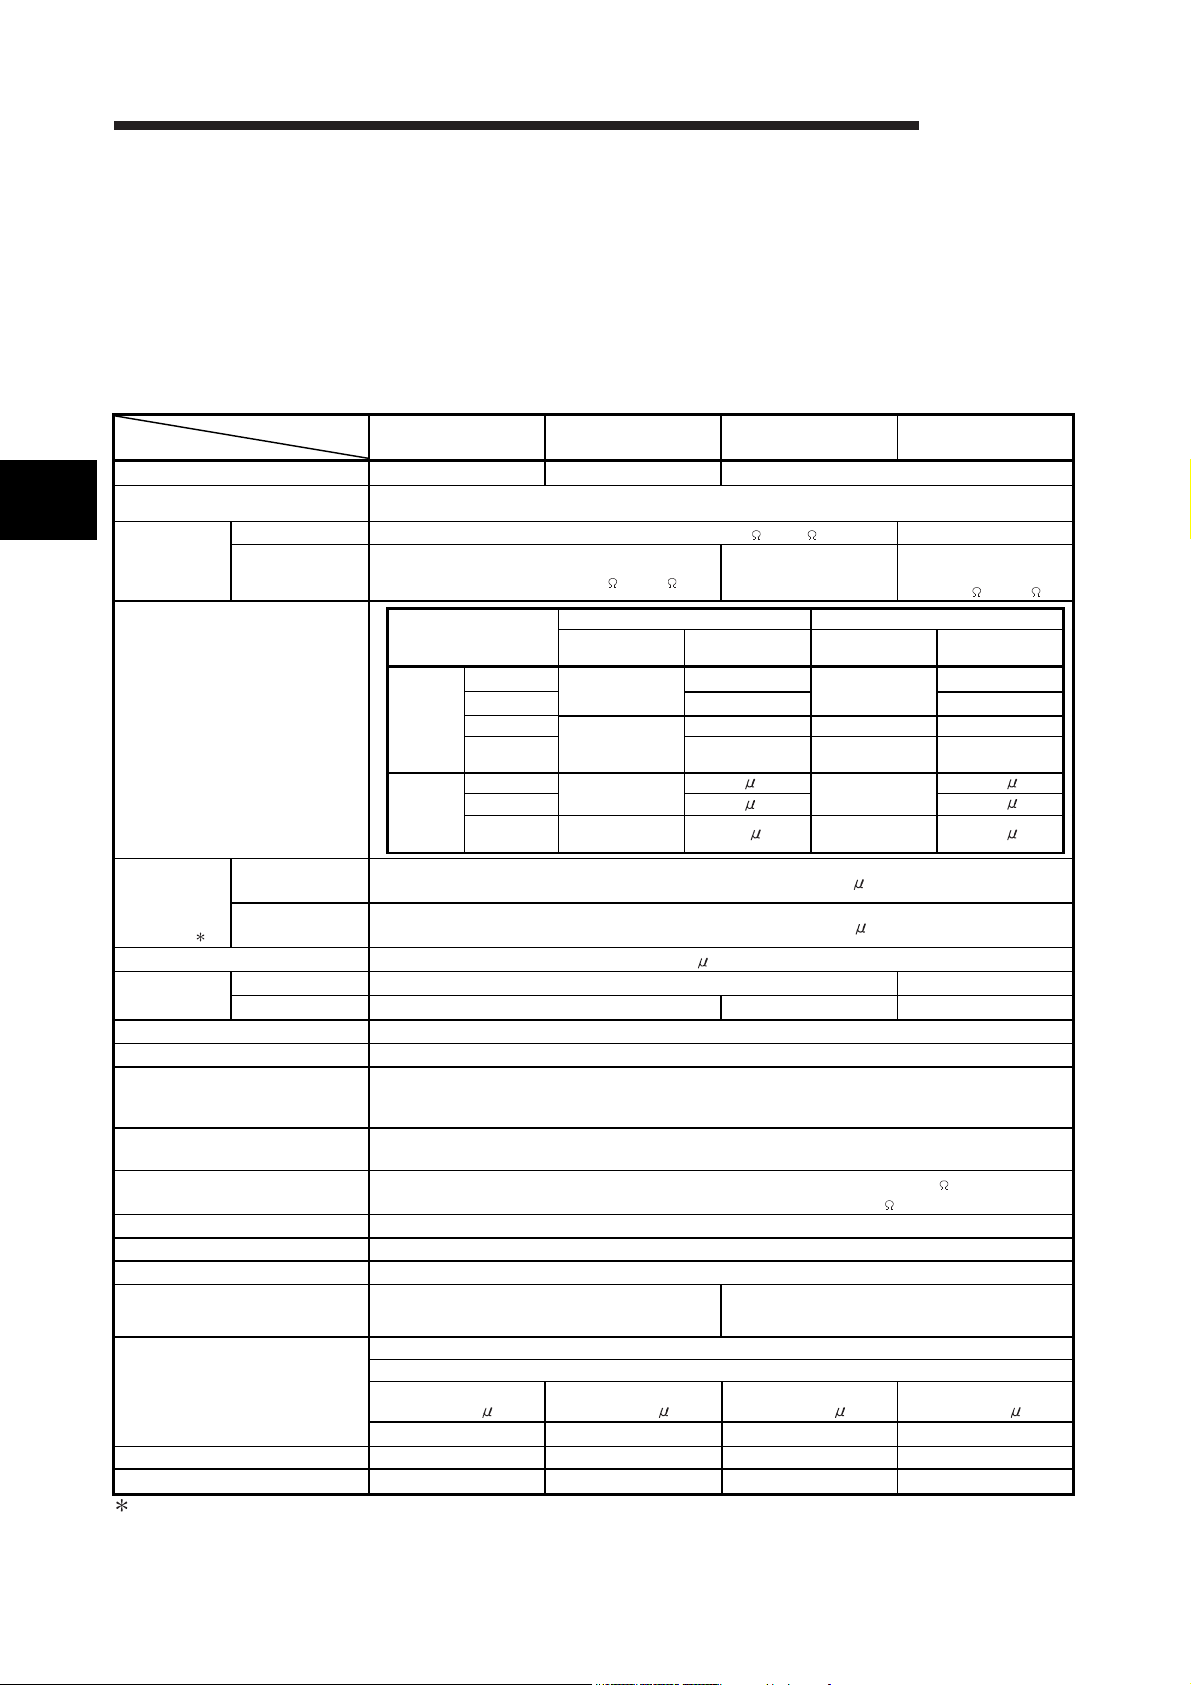
(1) Q62DAN, Q64DAN, Q68DAVN, Q68DAIN
Table 3.1 Performance specifications list
Item
Number of analog input channels
3
Digital input
Analog output
I/O characteristics,
Maximum resolution
Accuracy
(Accuracy in
respect to
maximum analog
output value)
Conversion speed
Absolute
maximum output
E2PROM write count Max. 100 thousand times
Output short circuit protection Available
Insulation method
Dielectric withstand voltage
Insulation resistance
I/O occupied points 16 points (I/O assignment: Intelligent 16 points)
External interface 18-points terminal block
Applicable wire size 0.3 to 0.75 mm2
Applicable solderless terminal
1
External supply power
Internal current consumption (5 V DC)
Weight
1: D/A converter modules need to be powered on 30 minutes prior to operation for compliance to the
specification (accuracy).
3 - 1 3 - 1
Model name
Voltage –10 to 10 V DC (External load resistance value: 1 k to 1M ) —
Current
Q62DAN Q64DAN Q68DAVN Q68DAIN
2 channels 4 channels 8 channels
16-bit signed binary (normal resolution mode: -4096 to 4095,
high resolution mode: -12288 to 12287, -16384 to 16383)
0 to 20 mA DC
(External load resistance value: 0 to 600 )
Analog output range
Voltage
Current
Ambient temperature
25 ± 5 °C
Ambient temperature
0 to 55 °C
Voltage ± 12 V —
Current 21 mA — 21 mA
Between the I/O terminal and programmable controller power supply :
(A solderless terminal with sleeve cannot be used)
Inrush current: 4.7 A,
within 280 s
0 to 5V
1 to 5V 1.0 mV 0.333 mV
-10 to 10V
User range
setting
0 to 20 mA
4 to 20 mA 4 A
User range
setting
Between external supply power and analog output :
Between the I/O terminal and programmable controller power supply: 500VAC for 1 minute
Between external supply power and analog output: 500VAC for 1 minute
Between the I/O terminal and programmable controller power supply: 500VDC 20M or more
Between external supply power and analog output: 500VDC 20M or more
R 1.25-3
0.15 A 0.24 A 0.20 A 0.27 A
0.33 A 0.34 A 0.38 A 0.38 A
0.19 kg 0.20 kg 0.20 kg 0.20 kg
Normal resolution mode High resolution mode
Digital input value
0 to 4000
-4000 to 4000
0 to 4000
-4000 to 4000 1.5 A -12000 to 12000 0.83 A
Within ± 0.1 % (Voltage: ±10 mV, Current: ± 20 A)
Within ± 0.3 % (Voltage: ± 30 mV, Current: ± 60 A)
Between output channels :
24 V DC + 20 %, – 15 %
Ripple, spike 500 mV P-P or less
Inrush current: 4.7 A,
within 280 s
Maximum
resolution
1.25 mV
2.5 mV -16000 to 16000 0.625 mV
0.75 mV -12000 to 12000 0.333 mV
5 A
80 s/channel
FG terminal: R1.25-3, 1.25-YS3, RAV1.25-3, V1.25-YS3A
Other terminals than FG: R1.25-3 (A solderless terminal
—
Digital input value
0 to 12000
0 to 12000
Photo coupler insulation
No insulation
Transformer insulation
Inrush current: 4.7 A,
within 280 s
0 to 20 mA DC
(External load resistance
value: 0 to 600 )
Maximum
resolution
0.416 mV
1.66 A
A
1.33
with sleeve cannot be used)
Inrush current: 4.7 A,
within 280 s
3 SPECIFICATIONS
MELSEC-Q
REMARK
Refer to the user's manual for the CPU module being used for the general
specifications for the D/A converter module.
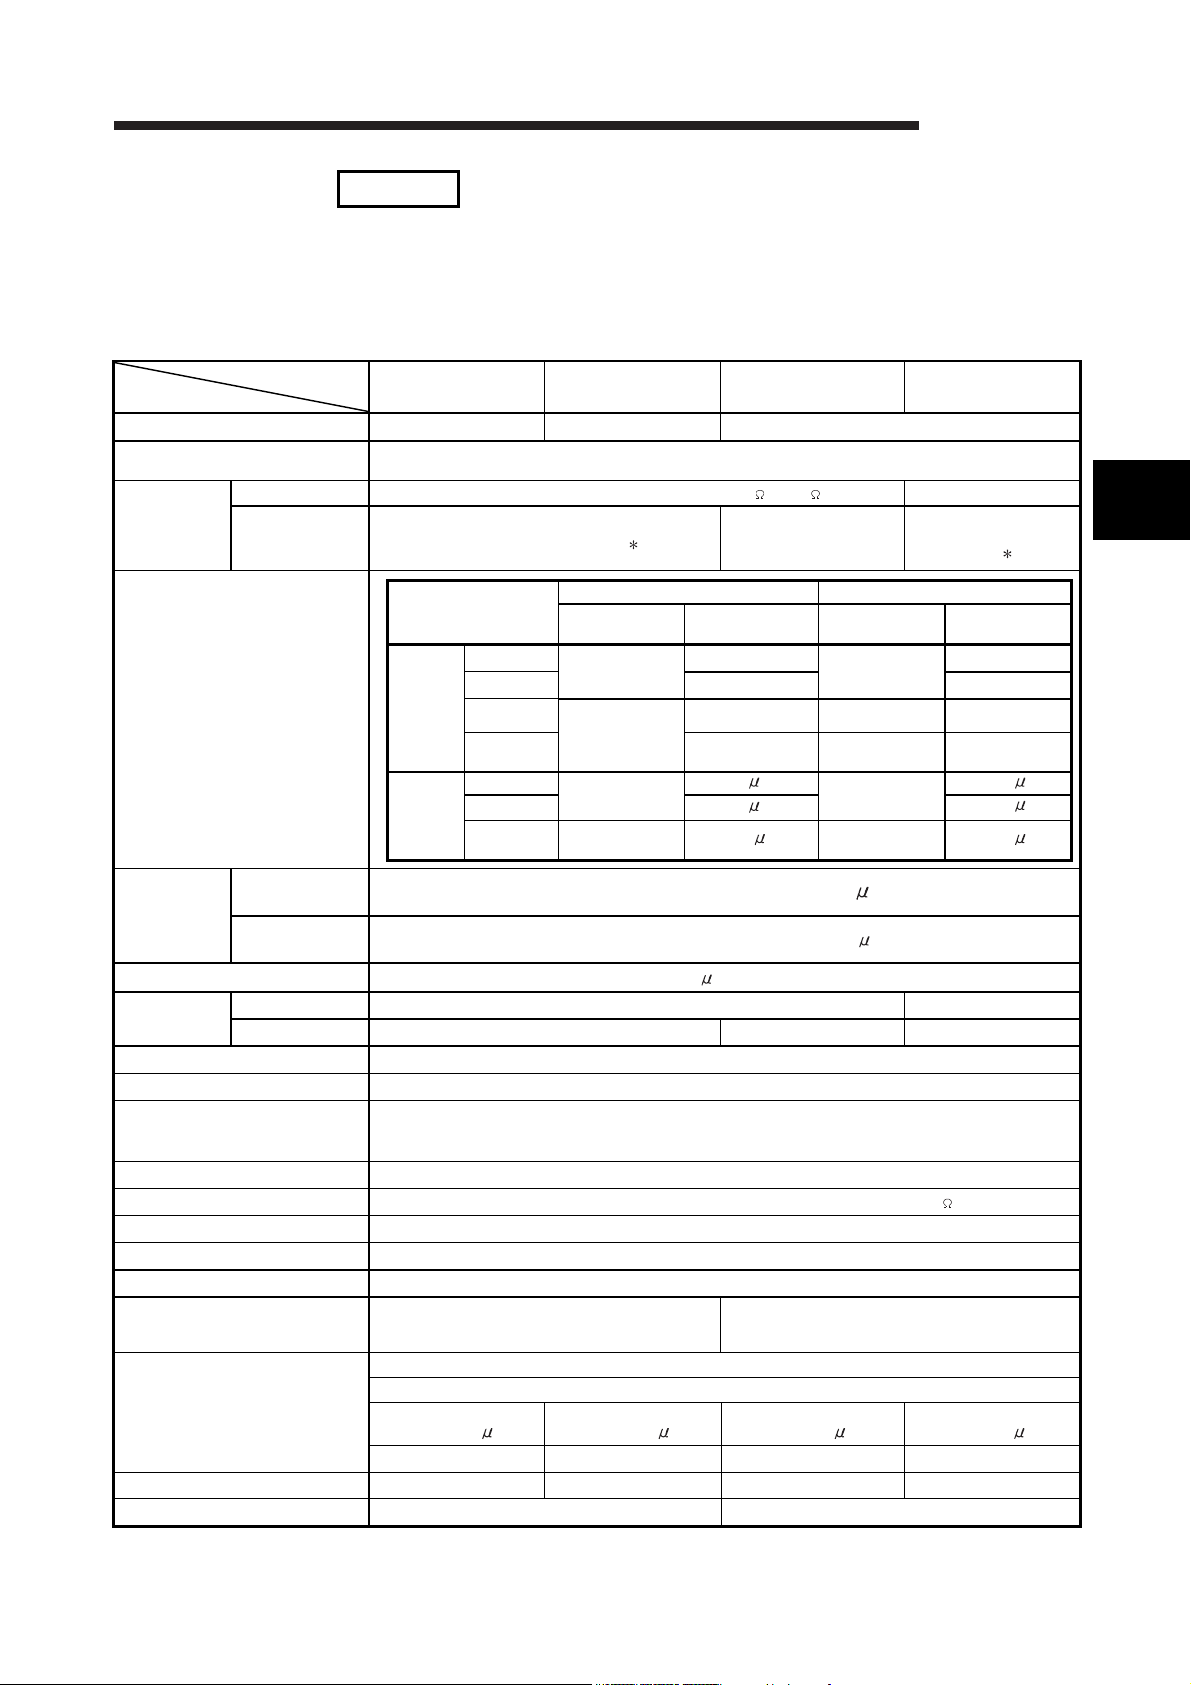
(2) Q62DA, Q64DA, Q68DAV, and Q68DAI
Table 3.2 Performance specifications list
Item
Number of analog input channels 2 channels 4 channels 8 channels
Digital input
Analog output
Model name
Voltage
Current
I/O characteristics,
Maximum resolution
Accuracy
(Accuracy in
respect to
maximum analog
output value)
Conversion speed
Absolute
maximum output
E2PROM write count Max. 100 thousand times
Output short circuit protection Available
Insulation method
Dielectric withstand voltage Between the I/O terminal and programmable controller power supply: 500VAC for 1 minute
Insulation resistance Between the I/O terminal and programmable controller power supply: 500VDC 20M or more
I/O occupied points 16 points (I/O assignment: Intelligent 16 points)
External interface 18-points terminal block
Applicable wire size 0.3 to 0.75 mm2
Applicable solderless terminal
External supply power
Internal current consumption (5 V DC)
Weight
Ambient temperature
25 ± 5 °C
Ambient temperature
0 to 55 °C
Voltage ± 12 V —
Current 21 mA — 21 mA
3 - 2 3 - 2
Q62DA Q64DA Q68DAV Q68DAI
16-bit signed binary (normal resolution mode: -4096 to 4095,
high resolution mode: -12288 to 12287, -16384 to 16383)
–10 to 10 V DC (External load resistance value: 1 k to 1M )
0 to 20 mA DC
(External load resistance value: 1)
Analog output range
Voltage
Current
Between the I/O terminal and programmable controller power supply :
(A solderless terminal with sleeve cannot be used)
Inrush current: 1.9 A,
within 300 s
0 to 5V
1 to 5V 1.0 mV 0.333 mV
-10 to 10V
User range
setting
0 to 20 mA
4 to 20 mA 4 A
User range
setting
Between external supply power and analog output :
R 1.25-3
0.12 A 0.18 A 0.19 A 0.28 A
0.33 A 0.34 A 0.39 A 0.38 A
0.19 kg 0.18 kg
Normal resolution mode High resolution mode
Digital input value Maximum resolution Digital input value
0 to 4000
-4000 to 4000
0 to 4000
-4000 to 4000 1.5 A -12000 to 12000 0.83 A
Within ± 0.1 % (Voltage: ±10 mV, Current: ± 20 A)
Within ± 0.3 % (Voltage: ± 30 mV, Current: ± 60 A)
Between output channels :
24 V DC + 20 %, – 15 %
Ripple, spike 500 mV P-P or less
Inrush current: 3.1 A,
within 300 s
1.25 mV
2.5 mV -16000 to 16000 0.625 mV
0.75 mV -12000 to 12000 0.333 mV
5 A
80 s/channel
FG terminal: R1.25-3, 1.25-YS3, RAV1.25-3, V1.25-YS3A
Other terminals than FG: R1.25-3 (A solderless terminal with
—
0 to 12000
0 to 12000
Photo coupler insulation
No insulation
No insulation
sleeve cannot be used)
Inrush current: 3.3 A,
within 70 s
(External load resistance
—
0 to 20 mA DC
value: 1)
Maximum
resolution
0.416 mV
1.66 A
1.33
Inrush current: 3.1 A,
within 75 s
3
A
y
3 SPECIFICATIONS
MELSEC-Q
1 When the voltage of the external power supply is less than 22.85V DC, the analog output current and the
external load resistance value are as follows.
20
Analog output current
18.5
17.3
16.5
(mA)
510480 550 600
External load resistance value( )
REMARK
Refer to the user's manual for the CPU module being used for the general
specifications for the D/A converter module.
3.1.2 I/O conversion characteristics
I/O conversion characteristics are used for converting the digital value written from the
programmable controller CPU to an analog output value (voltage or current output),
and represented by inclined straight lines when offset and gain values are included.
Offset value
The offset value is the analog output value (voltage or current) when the digital input
value set from the programmable controller CPU is 0.
Gain value
The gain value denotes the analog output value (voltage or current) when the digital
input value set from the programmable controller CPU is
4000 (in normal resolution mode),
12000 (when 1 to 5V, 0 to 5V, 4 to 20 mA, 0 to 20 mA or the user range setting is
selected in high resolution mode),
16000 (when -10 to 10V is selected in high resolution mode).
External power suppl
22.85V to 28.8V
22V
21V
20.4V
3 - 3 3 - 3

3 SPECIFICATIONS
(1) Voltage output characteristic
10
5
MELSEC-Q
(a) Voltage output characteristic in normal resolution mode
Figure 3.1 shows a graph of the voltage output characteristic in normal
resolution mode.
3)
1)
1
0
Analog output value (V)
-5
-10
0
Digital input value
2)
Practical analog output range
4095
40002000-2000-4000-4096
Number Output range setting Offset value Gain value Digital input value
1) 1 to 5 V 1 V 5 V
2) 0 to 5 V 0 V 5 V 1.25 mV
0 to 4000
Maximum
resolution
1.0 mV
3) –10 to 10 V 0 V 10 V –4000 to 4000 2.5 mV
—
User range setting
1
1
–4000 to 4000 0.75 mV
Figure 3.1 Voltage output characteristic in normal resolution mode
3 - 4 3 - 4

3 SPECIFICATIONS
10
5
(b) Voltage output characteristic in high resolution mode
Figure 3.2 shows a graph of the voltage output characteristic in high
resolution mode.
3)
1)
MELSEC-Q
1
0
Analog output value (V)
-5
-10
0
Digital input value
2)
12000
Practical analog output range
16383160008000-8000-16000-16384
12287
Number Output range setting Offset value Gain value Digital input value
1) 1 to 5 V 1 V 5 V
2) 0 to 5 V 0 V 5 V 0.416 mV
0 to 12000
Maximum
resolution
0.333 mV
3) –10 to 10 V 0 V 10 V –16000 to 16000 0.625 mV
—
User range setting
1
1
–12000 to 12000 0.333 mV
Figure 3.2 Voltage output characteristic in high resolution mode
3 - 5 3 - 5

3 SPECIFICATIONS
MELSEC-Q
POINT
(1) Set within the digital input range and analog output range for each output
range.
If these ranges are exceeded, the maximum resolution and accuracy may not
fall within the performance specifications. (Avoid using the dotted line area
shown in Figures 3.1 and 3.2.)
(2) Set the offset/gain values for the user setting range 1 within a range in
which the following conditions are satisfied.
(a) Setting range is from –10 to 10 V.
(b) Without using the utility package
(c) Using the utility package
Normal resolution mode setting: { (Gain value) - (Offset value) } > 3.0V
High resolution mode setting: { (Gain value) - (Offset value) } ≥ 4.0V
Normal resolution mode setting: { (Gain value) - (Offset value) } > 3.0V
High resolution mode setting: { (Gain value) - (Offset value) } > 4.0V
3 - 6 3 - 6

g
g
3 SPECIFICATIONS
(2) Current output characteristic
20
MELSEC-Q
(a) Current output characteristic in normal resolution mode
Figure 3.3 shows a graph of the current output characteristic in normal
resolution mode.
15
10
1)
Analog output value (mA)
5
4
0
0 2000 4095
Number Output range setting Offset value Gain value Digital input value
1) 4 to 20 mA 4 mA 20 mA
2) 0 to 20 mA 0 mA 20 mA
—
User range setting
2)
Digital input value
1
4000
0 to 4000
1
–4000 to 4000
e
output ran
Practical analo
Maximum
resolution
4 A
5 A
1.5 A
Figure 3.3 Current output characteristic in normal resolution mode
3 - 7 3 - 7

3 SPECIFICATIONS
(b) Current output characteristic in high resolution mode
Figure 3.4 shows a graph of the current output characteristic in high
resolution mode.
MELSEC-Q
Number Output range setting Offset value Gain value Digital input value
1) 4 to 20 mA 4 mA 20 mA
2) 0 to 20 mA 0 mA 20 mA
—
User range setting
1
1
0 to 12000
–12000 to 12000
Figure 3.4 Current output characteristic in high resolution mode
Maximum
resolution
1.66 A
1.33 A
0.83 A
3 - 8 3 - 8

3 SPECIFICATIONS
MELSEC-Q
POINT
(1) Set within the digital input range and analog output range for each output
range.
If these ranges are exceeded, the maximum resolution and accuracy may not
fall within the performance specifications. (Avoid using the dotted line area
shown in Figures 3.3 and 3.4.)
(2) Set the offset/gain values for the user setting range 1 within a range in
which the following conditions are satisfied.
(a) Setting range is from 0 to 20 mA
(b) Normal resolution mode setting:
{ (Gain value) - (Offset value) } > 6.0mA
High resolution mode setting:
{ (Gain value) - (Offset value) } > 10.0mA
3 - 9 3 - 9

3 SPECIFICATIONS
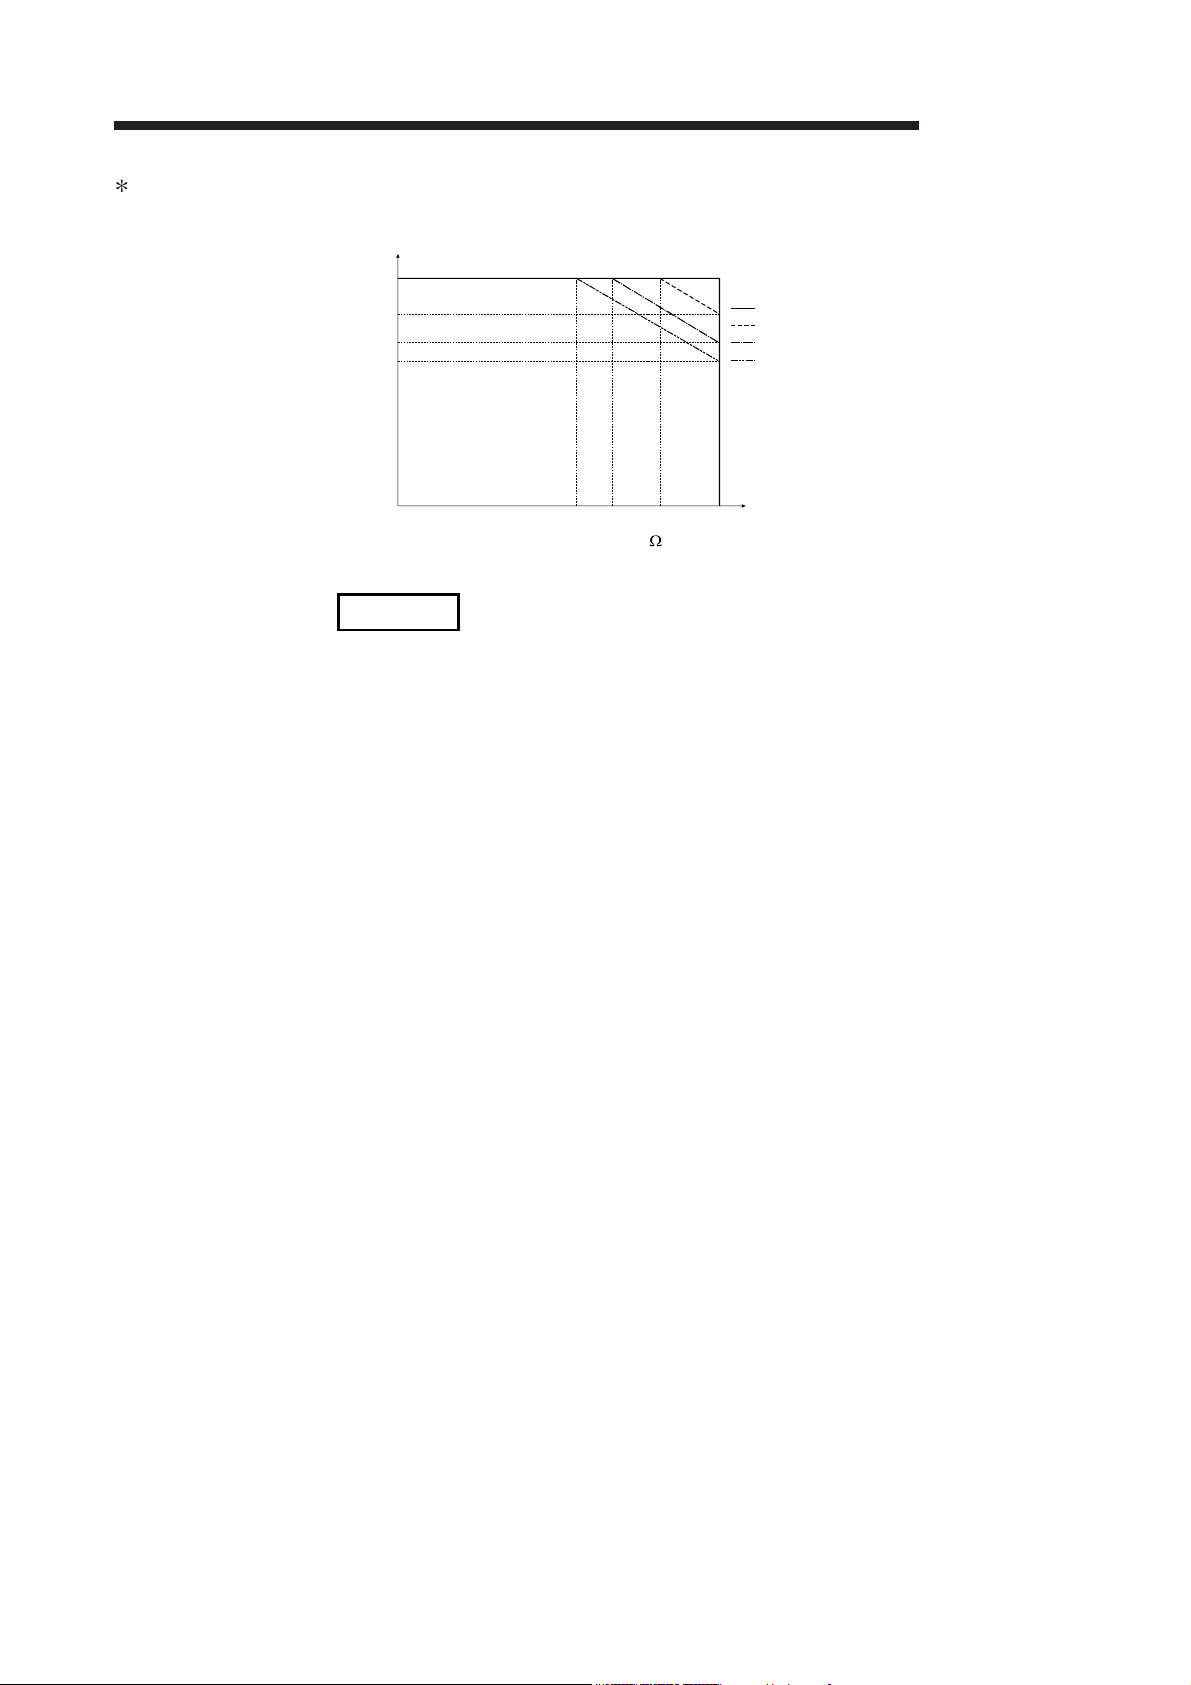
3.1.3 Accuracy
Accuracy is represented with respect to the maximum analog output value.
Accuracy does not change and remains within the range listed in the performance
specification even if the output characteristic is changed by changing offset/gain
settings, output range and resolution mode.
Figure 3.5 shows the range of fluctuation in accuracy when a -10 to 10V range is
selected and in normal resolution mode.
Accuracy for the analog output is within ± 0.1% (± 10 mV) when the ambient
temperature is 25 ± 5 °C and within ± 0.3% (± 30 mV) when the ambient temperature
is 0 to 55°C.
10
MELSEC-Q
Fluctuation range
0
Analog output value (V)
–10
–4000 0 +4000
Digital input value
Figure 3.5 Accuracy
3.1.4 Conversion speed
The conversion speed for the D/A converter module is "80 s the number of
conversion enabled channels".
By setting the unused channels to D/A conversion disabled in buffer memory address
0 (Un\G0), the conversion speed can be increased.
3 - 10 3 - 10
3 SPECIFICATIONS
MELSEC-Q
3.2 D/A Converter Module Function
Table 3.3 shows the function of the D/A converter modules.
Table 3.3 Function list
Item Function Reference section
(1) Specifies whether to enable or disable the D/A conversion for each channel.
D/A conversion enable/disable
D/A output enable/disable
function
Synchronous output function (1) An analog output synchronized with the programmable controller CPU can be obtained. Section 3.2.1
Analog output HOLD/CLEAR
function
Analog output test during
programmable controller CPU
STOP
Resolution mode
Online module change (1) A module change is made without the system being stopped. Chapter 7
(2) By disabling the D/A conversion for the channels that are not used, the conversion speed can
be shortened.
(1) Specifies whether to output the D/A converted value or output the offset value for each channel.
(2) The conversion speed stays constant regardless of whether D/A output is enabled or disabled.
(1) The output analog value can be retained when the programmable controller CPU module is
placed in the STOP status or when an error occurs.
(1) When CH Output enable/disable flag is forced on during programmable controller CPU STOP,
the D/A converted analog value is output.
(1) The resolution mode can be changed according to the application, and a resolution setting can
be selected from 1/4000, 1/12000 and 1/16000.
(2) The resolution mode setting is applicable to all channels in block.
(3) Refer to Section 3.1.1 for the digital input values and maximum resolution in normal resolution
mode and high resolution mode.
Section 3.4.4
Section 3.3.1
Section 3.2.2
Section 3.2.3
Section 3.1.1
Section 4.5
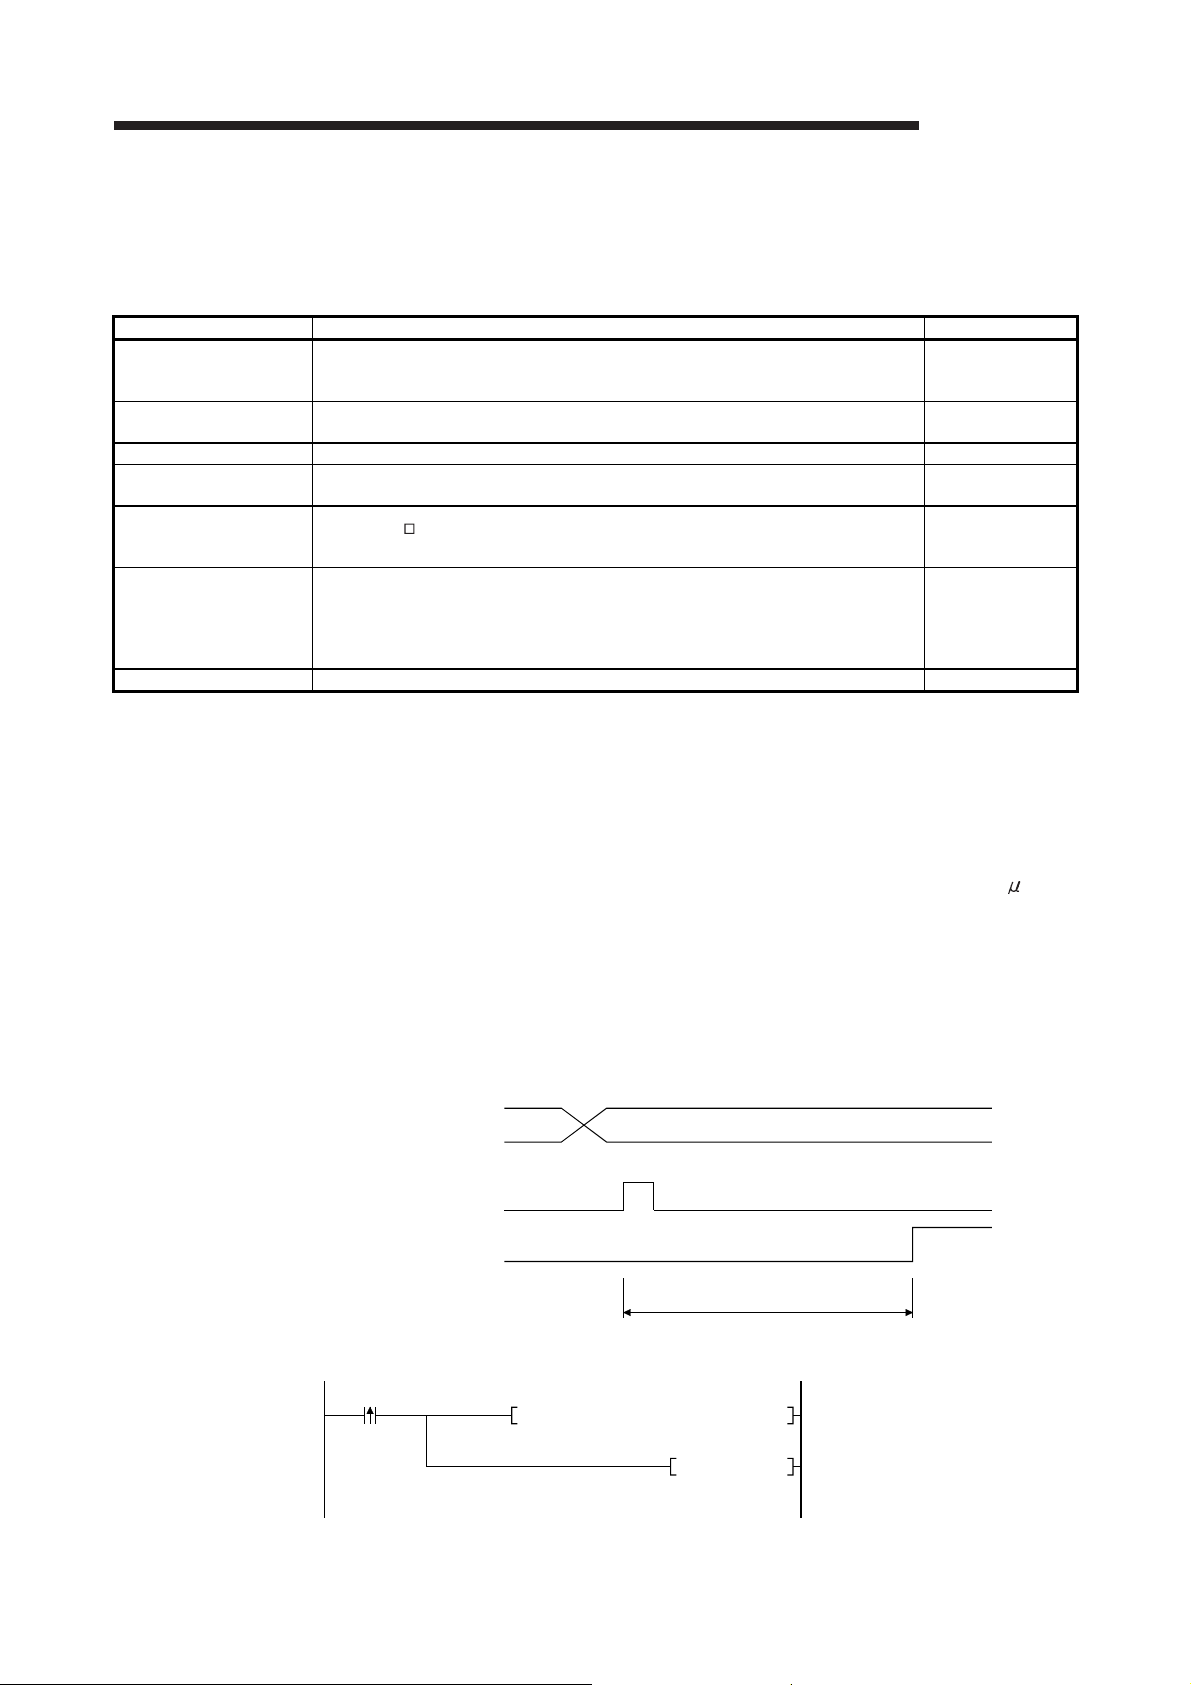
3.2.1 Synchronous output function
An analog output that is synchronized with the programmable controller CPU can be
obtained.
The analog output will be updated after Synchronous output request (YD) is set to on
and the time specified as "Programmable controller CPU processing time + 120 s"
has elapsed.
However, the analog output will be fixed to CH1, and other channels (CH2 to CH8)
cannot be used.
When the module is mounted on a remote I/O station, the analog output will not be
synchronized because of a link scan delay if the synchronous output function is
specified.
Digital write from the
programmable controller
CPU
Synchronous output
request (YD)
Analog output value
<Program example>
Write command
T0 K1 D0 K1H0
Always constant
Digital value write
DELTA
DYD
Outputs synchronous
output request as a pulse
3 - 11 3 - 11

3 SPECIFICATIONS
3.2.2 Analog output HOLD/CLEAR function
(1) For the case where the programmable controller CPU is placed in STOP or in a
stop error status, whether to hold (HOLD) or clear (CLEAR) the analog output
value can be set.
(2) Set the HOLD/CLEAR in "Switch 3" (HOLD/CLEAR function setting) cell of
Switch setting for I/O and intelligent function module dialog box. (Refer to Section
4.5 (1))
(3) Depending on combinations of the HOLD/CLEAR setting, D/A conversion
enable/disable setting, and CH Output enable/disable flag (Y1 to Y8), the
analog out-put status varies as shown in Table 3.4.
Table 3.4 Analog output status combination list
MELSEC-Q
D/A conversion enable/disable
Setting
combination
execution
status
Analog output status when programmable controller CPU is
RUN
Analog output status when programmable controller CPU is
STOP
Analog output status when a programmable controller CPU
stop error occurs
Analog output status when a watchdog timer error1 occurs
in D/A converter module
(buffer memory address 0: Un\G0)
CH Output enable/disable flags (Y1 to Y8) Enable Disable Enable or disable
HOLD/CLEAR setting HOLD CLEAR HOLD or CLEAR HOLD or CLEAR
Outputs the analog value of the
D/A converted digital value.
Hold Offset Offset 0 V/0 mA
Hold Offset Offset 0 V/0 mA
0 V/0 mA 0 V/0 mA 0 V/0 mA 0 V/0 mA
Enable Disable
Offset 0 V/0 mA
1 This occurs when program operations are not completed within the scheduled time due to a hardware
problem of the D/A converter module. When a watchdog timer error occurs, Module ready (X0) turns off
and the D/A converter module RUN LED turns off.
3 - 12 3 - 12

3 SPECIFICATIONS
MELSEC-Q
POINT
The following conditions should be satisfied when the analog output HOLD/CLEAR
function is used on a MELSECNET/H remote I/O station.
• The master module of function version D or later and the remote I/O module of
function version D or later are required.
• Validate the station unit block guarantee of the send side cyclic data.
• The setting for holding the D/A converter module output in the case of a link
error must be made in the "Error time output mode in the I/O assignment setting".
(Refer to Section 4.5 (2).) The HOLD/CLEAR setting by the intelligent function
module switch is invalid.
This setting is validated on a per-module basis, and is not made on a perchannel basis. Therefore, to make the output status at a stop error or STOP of
the programmable controller CPU matched with the output status at a link error,
set the same HOLD/CLEAR setting to all channels. (Refer to the table below.)
Hold analog output
Clear analog output
(Output offset value)
Error time output mode
Hold HOLD
Clear CLEAR
For the station unit block guarantee of the cyclic data, refer to the Q
Corresponding MELSECNET/H Network System Reference Manual (Remote I/O
Network).
HOLD/CLEAR setting
(Same setting to all channels)
3 - 13 3 - 13

3 SPECIFICATIONS
3.2.3 Analog output test during programmable controller CPU STOP
(1) During the programmable controller CPU STOP, an analog output test as shown
in Table 3.5 can be performed.
(2) The analog output test performs the following operations in GX Developer device
testing or GX configurator-DA selection testing described in Section 5.6.1.
(a) Set D/A conversion enable/disable (buffer memory address 0: Un\G0) of
the channel to be tested to enable.
(b) Turn Operating condition setting request (Y9) from off to on. (Refer to
Section 3.3.2)
(c) Check that Operating condition setting completed flag (X9) turns off, and
turn Operating condition setting request (Y9) from on to off.
(d) Enable (off on) Output enable/disable flag (Y1 to Y8) of the channel
where the test is to be conducted.
(e) Write a digital value corresponding to the desired analog output value in
CH Digital value (refer to Table 3.7 in Section 3.4.1) in the buffer memory.
This function is performed with the D/A converter module of function version B or
later.
Table 3.5 List of analog output test
MELSEC-Q
Setting
combination
D/A conversion enable/disable
(Un\G0)
CH Output enable/disable flag (Y1 to Y8) Enable Disable Enable disable
Analog output test Allowed Not allowed
1 Perform the analog output test after changing D/A conversion enable/disable (buffer
memory address 0: Un\G0) to enable.
POINT
When the digital value storage device has been set in the automatic refresh setting
of GX Configurator-DA, the buffer memory is overwritten since automatic refresh is
performed if the programmable controller CPU is during STOP.
In this case, write a digital value to the digital value storage device instead of the
buffer memory.
Enable Disable
1
Not allowed
3 - 14 3 - 14

3 SPECIFICATIONS
MELSEC-Q
3.3 I/O Signals for the Programmable Controller CPU
3.3.1 List of I/O signals
Table 3.6 shows a list of the I/O signals for the D/A converter modules.
The following explanation is mentioned based on the Q68DAVN, Q68DAIN, Q68DAV
and Q68DAI with 8-channel analog output (CH1 to CH8).
Note that I/O numbers (X/Y) shown in this chapter and thereafter are the values when
the start I/O number for the D/A converter module is set to 0.
Table 3.6 List of I/O signal
Signal direction D/A converter module CPU module Signal direction CPU module D/A converter module
Device No Signal name Device No. Signal name
X0 Module ready Y0
X1
X2 Y2 CH2 Output enable/disable flag
X3
X4
X5
X6
X7
X8 High resolution mode status flag
X9
XA Offset/gain setting mode flag YA User range writing request
XB Channel change completed flag YB Channel change request
XC Set value change completed flag YC Set value change request
XD Synchronous output mode flag YD Synchronous output request
XE
XF Error flag YF Error clear request
Use prohibited
Operating condition setting
completed flag
Use prohibited 1
1
Y1 CH1 Output enable/disable flag
Y3 2
Y4 2
Y5 2
Y6 2
Y7 2
Y8 2
Y9 Operating condition setting request
YE
POINT
1 The Use prohibited signal cannot be used by the user since they are used by
the system. If these are turned on/off by the sequence program, the functioning
of the D/A converter module cannot be guaranteed.
2 For the Q62DAN and Q62DA, Y3 to Y8 Use prohibited.
For the Q64DAN and Q64DA, Y5 to Y8 Use prohibited.
Use prohibited 1
CH3 Output enable/disable flag
CH4 Output enable/disable flag
CH5 Output enable/disable flag
CH6 Output enable/disable flag
CH7 Output enable/disable flag
CH8 Output enable/disable flag
Use prohibited 1
3 - 15 3 - 15

3 SPECIFICATIONS
3.3.2 Details of I/O signals
I/O signals for the D/A converter module are explained in detail below.
Device No. Signal name Description
X0 Module ready
X8
X9
High resolution
mode status flag
Operating
condition setting
completed flag
(1) Input signals
(1) When the programmable controller CPU is powered on or reset, this signal turns on
once the preparation for D/A conversion has been completed, and D/A conversion
processing is then performed.
(2) When Module ready (X0) signal is off, D/A conversion processing is not performed.
Module ready (X0) turns off in the following situations:
• During offset/gain setting mode
• When the D/A converter module has a watchdog timer error
(1) This turns on when in high resolution mode.
(1) This is used as an interlock condition for turning Operating condition setting request
(Y9) on/off when the setting for D/A conversion enable/disable (buffer memory
address 0: Un\G0) is changed.
(2) Under the following conditions, Operating condition setting completed flag (X9) turns
off.
• Module ready (X0) is off.
• Operating condition setting request (Y9) is on
Performed by the D/A converter module
Module ready (X0)
Performed by the sequence program
MELSEC-Q
Operating condition
setting completed flag (X9)
Operating condition
setting request (Y9)
3 - 16 3 - 16

3 SPECIFICATIONS
Device No. Signal name Description
[In offset/gain setting mode]
(1) This is used as an interlock condition for setting User range writing request (YA) to
on/off when registering the value after adjustment of the offset/gain settings have
been completed.
(2) Refer to Section 4.6 regarding the offset/gain settings.
Performed by the D/A converter module
Performed by the sequence program
Module ready (X0)
Offset/gain setting mode flag (XA)
OFF
MELSEC-Q
XA
XB
Offset/gain setting
mode flag
Channel change
completed flag
User range writing request (YA)
[In normal mode]
(1) This signal is used as an interlock condition to turn on/off User range writing request
(YA) when the user range is restored.
(2) Refer to Chapter 7 regarding the user range restoration.
Performed by the D/A converter module
Performed by the sequence program
Module ready (X0)
Offset/gain setting mode flag (XA)
User range writing request (YA)
ON
(1) This is used as an interlock condition for setting Channel change request (YB) to
on/off when changing the channel for which the offset/gain settings are to be
performed.
(2) Refer to Section 4.6 regarding the offset/gain settings.
Performed by the D/A converter module
Performed by the sequence program
Offset/gain setting mode
Offset/gain specifications
(buffer memory addresses 22 and 23:
Un\G22 and Un\G23)
Channel change completed
flag (XB)
Channel change request (YB)
3 - 17 3 - 17

3 SPECIFICATIONS
Device No. Signal name Description
(1) This is used as an interlock condition for setting Set value change request (YC) to
on/off when adjusting the offset/gain settings.
(2) Refer to Section 4.6 regarding the offset and gain settings.
Performed by the D/A converter module
XC
Set value change
completed flag
Set value change completed
flag (XC)
Performed by the sequence program
MELSEC-Q
Set value change request (YC)
XD
XF Error flag
Synchronous
output mode flag
This flag turns on when the system is set to the synchronous output mode.
(1) Error flag (XF) turns on when a write error occurs.
(2) To turn Error flag (XF) off, remove the cause of the error and set Error clear request
(YF) to on.
Error flag (XF)
Error clear request (YF)
Performed by the D/A converter module
Performed by the sequence program
Error code is read during this interval.
3 - 18 3 - 18

3 SPECIFICATIONS
MELSEC-Q
(2) Output signals
Device No. Signal name Description
(1) Specifies whether to output the D/A converted value or offset value for each
channel.
on: D/A converted value off: Offset value
(2) The D/A conversion speed is constant regardless of whether the output
Y1 to Y8
CH Output
enable/disable flag
enable/disable flag is on or off.
Y9
Operating
condition setting
request
(1) This turns on when the contents of D/A conversion enable/disable are validated.
(2) Refer to the X9 column for the on/off timing.
[In offset/gain setting mode]
(1) This turns on when the values for the adjusted offset/gain settings are registered in
the D/A converter module.
(2) Refer to the XA column for on/off timing.
Refer to Section 4.6 for offset/gain settings.
[In normal mode]
YA
User range writing
request
(1) Turn on this signal when restoring the user range.
(2) Refer to the XA column for the on/off timing.
Refer to Chapter 7 for the user range restoration.
(1) This turns on when changing the channel for which offset/gain settings are to be
performed.
(2) Refer to the XB column for the on/off timing.
YB
Channel change
request
(1) This turns on/off when increasing or decreasing the analog output value during
YC
Set value change
request
adjustment of the offset/gain settings.
(2) The analog output is either increased or decreased based on the value that was
set in buffer memory address 24 (Un\G24).
YD
Synchronous
output request
YF Error clear request
(1) While in the synchronous output mode, D/A conversion is performed and the
analog value is output at the timing when Synchronous output request (YD) is on.
(1) This turns on when a write error is cleared.
(2) Refer to the XF column for on/off timing.
POINT
When User range writing request (YA) is turned on with D/A conversion enabled in
the normal mode, the D/A converter module restores the user range.
Offset/gain setting mode
flag (XA)
User range writing request (YA)
Restoration processing
Conversion enable/disable
Operating condition setting
completed flag (X9)
Operating condition setting
request (Y9)
During restoration: D/A conversion disable
After restoration : D/A conversion processing can be executed in the restored user range
During conversion
enable
During
restoration
During conversion disable
Restoration completed
3 - 19 3 - 19

3 SPECIFICATIONS
3.4 Buffer Memory
The explanation in Section 3.4.5 and later is based on the
Q68DAVN/Q68DAIN/Q68DAV/Q68DAI in 8-channel analog output (CH1 to CH8).
3.4.1 Buffer memory assignment (Q62DAN/Q62DA)
This section describes the assignment of the Q62DAN/Q62DA buffer memory.
POINT
Do not write data from System area or sequence program to the buffer memory
area where writing is disabled. Doing so may cause malfunction.
Table 3.7 Buffer memory assignment (Q62DAN/Q62DA) (1/2)
MELSEC-Q
Address
Hexadecimal Decimal
0H 0 D/A conversion enable/disable 3H R/W Section 3.4.5
1H 1 CH1 Digital value 0 R/W
2H 2 CH2 Digital value 0 R/W
3H 3
to to
AH 10
BH 11 CH1 Set value check code 0 R
CH 12 CH2 Set value check code 0 R
DH 13
to to
12H 18
13H 19 Error code 0 R/W Section 3.4.8
14H 20 Setting range (CH1 and CH2) 0H R Section 3.4.9
15H 21 System area — — —
16H 22 Offset/gain setting mode Offset specification 0 R/W
17H 23 Offset/gain setting mode Gain specification 0 R/W
18H 24 Offset/gain adjustment value specification 0 R/W Section 3.4.11
19H 25
to to
9DH 157
9EH 158
9FH 159 0 R/W
A0H 160
to to
C7H 199
1 This is the initial value set after the power is turned on or the programmable controller CPU is reset.
2 Indicates whether reading from and writing to a sequence program are enabled.
R : Reading enabled W : Writing enabled
Description
System area — — —
System area — — —
System area — — —
Mode switching setting
System area — — —
Default
1
Read/write 2
0 R/W
Reference
section
Section 3.4.6
Section 3.4.7
Section 3.4.10
Section 3.4.12
3 - 20 3 - 20

3 SPECIFICATIONS
Table 3.7 Buffer memory assignment (Q62DAN/Q62DA) (2/2)
MELSEC-Q
Address
Hexadecimal Decimal
C8H 200
C9H 201 System area — — —
CAH 202
CBH 203
CCH 204
CDH 205
CEH 206
CFH 207
D0H 208
D1H 209
1 This is the initial value set after the power is turned on or the programmable controller CPU is reset.
2 Indicates whether reading from and writing to a sequence program are enabled.
R : Reading enabled W : Writing enabled
3 Areas used to restore the user range settings offset/gain values when online module change is made.
Refer to chapter 7 for details of Online module change.
Pass data classification setting
CH1 Industrial shipment settings offset value
CH1 Industrial shipment settings gain value
CH2 Industrial shipment settings offset value
CH2 Industrial shipment settings gain value
CH1 User range settings offset value
CH1 User range settings gain value
CH2 User range settings offset value
CH2 User range settings gain value
Description
3
3
3
3
3
Default
3
3
3
3
1
Read/write 2
0 R/W Section 3.4.13
0 R/W
0 R/W
0 R/W
0 R/W
0 R/W
0 R/W
0 R/W
0 R/W
Reference
section
Section 3.4.14
3 - 21 3 - 21

3 SPECIFICATIONS
MELSEC-Q
3.4.2 Buffer memory assignment (Q64DAN/Q64DA)
This section describes the assignment of the Q64DAN/Q64DA buffer memory.
POINT
Do not write data from System area or sequence program to the buffer memory
area where writing is disabled. Doing so may cause malfunction.
Table 3.8 Buffer memory assignment (Q64DAN/Q64DA) (1/2)
Address
Hexadecimal Decimal
0H 0 D/A conversion enable/disable FH R/W Section 3.4.5
1H 1 CH1 Digital value 0 R/W
2H 2 CH2 Digital value 0 R/W
3H 3 CH3 Digital value 0 R/W
4H 4 CH4 Digital value 0 R/W
5H 5
to to
AH 10
BH 11 CH1 Set value check code 0 R
CH 12 CH2 Set value check code 0 R
DH 13 CH3 Set value check code 0 R
EH 14 CH4 Set value check code 0 R
FH 15
to to
12H 18
13H 19 Error code 0 R/W Section 3.4.8
14H 20 Setting range (CH1 to CH4) 0H R Section 3.4.9
15H 21 System area — — —
16H 22 Offset/gain setting mode Offset specification 0 R/W
17H 23 Offset/gain setting mode Gain specification 0 R/W
18H 24 Offset/gain adjustment value specification 0 R/W Section 3.4.11
19H 25
to to System area
9DH 157
9EH 158
9FH 159 0 R/W
A0H 160
to to System area
C7H 199
1 This is the initial value set after the power is turned on or the programmable controller CPU is reset.
2 Indicates whether reading from and writing to a sequence program are enabled.
R : Reading enabled W : Writing enabled
Description Default
System area — — —
System area — — —
Mode switching setting
1
Read/write 2
— — —
0 R/W
— — —
Reference
section
Section 3.4.6
Section 3.4.7
Section 3.4.10
Section 3.4.12
3 - 22 3 - 22

3 SPECIFICATIONS
MELSEC-Q
Table 3.8 Buffer memory assignment (Q64DAN/Q64DA) (2/2)
Address
Hexadecimal Decimal
C8H 200 Pass data classification setting3 0 R/W Section 3.4.13
C9H 201 System area — — —
CAH 202 CH1 Industrial shipment settings offset value3 0 R/W
CBH 203 CH1 Industrial shipment settings gain value3 0 R/W
CCH 204 CH2 Industrial shipment settings offset value3 0 R/W
CDH 205 CH2 Industrial shipment settings gain value3 0 R/W
CEH 206 CH3 Industrial shipment settings offset value3 0 R/W
CFH 207 CH3 Industrial shipment settings gain value3 0 R/W
D0H 208 CH4 Industrial shipment settings offset value3 0 R/W
D1H 209 CH4 Industrial shipment settings gain value3 0 R/W
D2H 210 CH1 User range settings offset value3 0 R/W
D3H 211 CH1 User range settings gain value3 0 R/W
D4H 212 CH2 User range settings offset value3 0 R/W
D5H 213 CH2 User range settings gain value3 0 R/W
D6H 214 CH3 User range settings offset value3 0 R/W
D7H 215 CH3 User range settings gain value3 0 R/W
D8H 216 CH4 User range settings offset value3 0 R/W
D9H 217 CH4 User range settings gain value3 0 R/W
1 This is the initial value set after the power is turned on or the programmable controller CPU is reset.
2 Indicates whether reading from and writing to a sequence program are enabled.
R : Reading enabled W : Writing enabled
3 Areas used to restore the user range settings offset/gain values when Online module change is made.
Refer to chapter 7 for details of Online module change.
Description Default
1
Read/write 2
Reference
section
Section 3.4.14
3 - 23 3 - 23

3 SPECIFICATIONS
MELSEC-Q
3.4.3 Buffer memory assignment (Q68DAVN/Q68DAV)
This section describes the assignment of the Q68DAVN/Q68DAV buffer memory.
POINT
Do not write data from System area or sequence program to the buffer memory
area where writing is disabled. Doing so may cause malfunction.
Table 3.9 Buffer memory assignment (Q68DAVN/Q68DAV) (1/2)
Address
Hexadecimal Decimal
0H 0 D/A conversion enable/disable FFH R/W Section 3.4.5
1H 1 CH1 Digital value 0 R/W
2H 2 CH2 Digital value 0 R/W
3H 3 CH3 Digital value 0 R/W
4H 4 CH4 Digital value 0 R/W
5H 5 CH5 Digital value 0 R/W
6H 6 CH6 Digital value 0 R/W
7H 7 CH7 Digital value 0 R/W
8H 8 CH8 Digital value 0 R/W
9H 9
AH 10
BH 11 CH1 Set value check code 0 R
CH 12 CH2 Set value check code 0 R
DH 13 CH3 Set value check code 0 R
EH 14 CH4 Set value check code 0 R
FH 15 CH5 Set value check code 0 R
10H 16 CH6 Set value check code 0 R
11H 17 CH7 Set value check code 0 R
12H 18 CH8 Set value check code 0 R
13H 19 Error code 0 R/W Section 3.4.8
14H 20 Setting range (CH1 to CH4) 2222H R
15H 21 Setting range (CH5 to CH8) 2222H R
16H 22
17H 23
18H 24 Offset/gain adjustment value specification 0 R/W Section 3.4.11
Description Default
System area — — —
Offset/gain setting mode
Offset specification
Offset/gain setting mode
Gain specification
1
Read/write 2
0 R/W
0 R/W
1 This is the initial value set after the power is turned on or the programmable controller CPU is reset.
2 Indicates whether reading from and writing to a sequence program are enabled.
R : Reading enabled W : Writing enabled
Reference
Section 3.4.6
Section 3.4.7
Section 3.4.9
Section 3.4.10
section
3 - 24 3 - 24

3 SPECIFICATIONS
Table 3.9 Buffer memory assignment (Q68DAVN/Q68DAV) (2/2)
MELSEC-Q
Address
Hexadecimal Decimal
19H 25
to to
9DH 157
9EH 158
9FH 159 0 R/W
A0H 160
to to
C9H 201
CAH 202
CBH 203 CH1 Industrial shipment settings gain value3 0 R/W
CCH 204
CDH 205 CH2 Industrial shipment settings gain value3 0 R/W
CEH 206 CH3 Industrial shipment settings offset value3 0 R/W
CFH 207
D0H 208 CH4 Industrial shipment settings offset value3 0 R/W
D1H 209
D2H 210 CH5 Industrial shipment settings offset value3 0 R/W
D3H 211 CH5 Industrial shipment settings gain value3 0 R/W
D4H 212 CH6 Industrial shipment settings offset value3 0 R/W
D5H 213 CH6 Industrial shipment settings gain value3 0 R/W
D6H 214
D7H 215 CH7 Industrial shipment settings gain value3 0 R/W
D8H 216 CH8 Industrial shipment settings offset value3 0 R/W
D9H 217 CH8 Industrial shipment settings gain value3 0 R/W
DAH 218 CH1 User range settings offset value3 0 R/W
DBH 219
DCH 220 CH2 User range settings offset value3 0 R/W
DDH 221
DEH 222 CH3 User range settings offset value3 0 R/W
DFH 223 CH3 User range settings gain value3 0 R/W
E0H 224
E1H 225 CH4 User range settings gain value3 0 R/W
E2H 226
E3H 227 CH5 User range settings gain value3 0 R/W
E4H 228 CH6 User range settings offset value3 0 R/W
E5H 229
E6H 230 CH7 User range settings offset value3 0 R/W
E7H 231
E8H 232 CH8 User range settings offset value3 0 R/W
E9H 233 CH8 User range settings gain value3 0 R/W
CH1 Industrial shipment settings offset value
CH2 Industrial shipment settings offset value
CH3 Industrial shipment settings gain value
CH4 Industrial shipment settings gain value
CH7 Industrial shipment settings offset value
CH1 User range settings gain value
CH2 User range settings gain value
CH4 User range settings offset value
CH5 User range settings offset value
CH6 User range settings gain value
CH7 User range settings gain value
1 This is the initial value set after the power is turned on or the programmable controller CPU is reset.
2 Indicates whether reading from and writing to a sequence program are enabled.
R : Reading enabled W : Writing enabled
3 Areas used to restore the user range settings offset/gain values when Online module change is made.
Refer to chapter 7 for details of Online module change.
Description
System area — — —
Mode switching setting
System area — — —
3
3
3
3
3
3
Default
3
3
3
3
3
1
Read/write 2
0 R/W
0 R/W
0 R/W
0 R/W
0 R/W
0 R/W
0 R/W
0 R/W
0 R/W
0 R/W
0 R/W
0 R/W
Reference
section
Section 3.4.12
Section 3.4.14
3 - 25 3 - 25

3 SPECIFICATIONS
3.4.4 Buffer memory assignment (Q68DAIN/Q68DAI)
The following explains based on the Q68DAIN/Q68DAI with 8-channel analog output
(CH1 to CH8).
POINT
Do not write data from System area or sequence program to the buffer memory
area where writing is disabled. Doing so may cause malfunction.
Table 3.10 Buffer memory assignment (Q68DAIN/Q68DAI) (1/2)
Address
Hexadecimal Decimal
0H 0 D/A conversion enable/disable FFH R/W
1H 1 CH1 Digital value 0 R/W
2H 2 CH2 Digital value 0 R/W
3H 3 CH3 Digital value 0 R/W
4H 4 CH4 Digital value 0 R/W
5H 5 CH5 Digital value 0 R/W
6H 6 CH6 Digital value 0 R/W
7H 7 CH7 Digital value 0 R/W
8H 8 CH8 Digital value 0 R/W
9H 9
AH 10
BH 11 CH1 Set value check code 0 R
CH 12 CH2 Set value check code 0 R
DH 13 CH3 Set value check code 0 R
EH 14 CH4 Set value check code 0 R
FH 15 CH5 Set value check code 0 R
10H 16 CH6 Set value check code 0 R
11H 17 CH7 Set value check code 0 R
12H 18 CH8 Set value check code 0 R
13H 19 Error code 0 R/W
14H 20 Setting range (CH1 to CH4) 0000H R
15H 21 Setting range (CH5 to CH8) 0000H R
16H 22
17H 23
18H 24 Offset/gain adjustment value specification 0 R/W
Description Default
System area — — —
Offset/gain setting mode
Offset specification
Offset/gain setting mode
Gain specification
1 This is the initial value set after the power is turned on or the programmable controller CPU is reset.
2 Indicates whether reading from and writing to a sequence program are enabled.
R : Reading enabled W : Writing enabled
1
Read/write 2
0 R/W
0 R/W
MELSEC-Q
Reference
section
Section 3.4.5
Section 3.4.6
Section 3.4.7
Section 3.4.8
Section 3.4.9
Section 3.4.10
Section 3.4.11
3 - 26 3 - 26

3 SPECIFICATIONS
Table 3.10 Buffer memory assignment (Q68DAIN/Q68DAI) (2/2)
MELSEC-Q
Address
Hexadecimal Decimal
19H 25
to to
9DH 157
9EH 158
9FH 159 0 R/W
A0H 160
to to
C9H 201
CAH 202 CH1 Industrial shipment settings offset value 3 0 R/W
CBH 203 CH1 Industrial shipment settings gain value 3 0 R/W
CCH 204 CH2 Industrial shipment settings offset value 3 0 R/W
CDH 205 CH2 Industrial shipment settings gain value 3 0 R/W
CEH 206
CFH 207 CH3 Industrial shipment settings gain value 3 0 R/W
D0H 208 CH4 Industrial shipment settings offset value 3 0 R/W
D1H 209 CH4 Industrial shipment settings gain value 3 0 R/W
D2H 210 CH5 Industrial shipment settings offset value 3 0 R/W
D3H 211
D4H 212 CH6 Industrial shipment settings offset value 3 0 R/W
D5H 213
D6H 214 CH7 Industrial shipment settings offset value 3 0 R/W
D7H 215 CH7 Industrial shipment settings gain value 3 0 R/W
D8H 216
D9H 217 CH8 Industrial shipment settings gain value 3 0 R/W
DAH 218
DBH 219 CH1 User range settings gain value 3 0 R/W
DCH 220 CH2 User range settings offset value 3 0 R/W
DDH 221
DEH 222 CH3 User range settings offset value 3 0 R/W
DFH 223
E0H 224 CH4 User range settings offset value 3 0 R/W
E1H 225 CH4 User range settings gain value 3 0 R/W
E2H 226 CH5 User range settings offset value 3 0 R/W
E3H 227 CH5 User range settings gain value 3 0 R/W
E4H 228
E5H 229 CH6 User range settings gain value 3 0 R/W
E6H 230 CH7 User range settings offset value 3 0 R/W
E7H 231 CH7 User range settings gain value 3 0 R/W
E8H 232 CH8 User range settings offset value 3 0 R/W
E9H 233
CH3 Industrial shipment settings offset value
CH5 Industrial shipment settings gain value
CH6 Industrial shipment settings gain value
CH8 Industrial shipment settings offset value
CH1 User range settings offset value
CH2 User range settings gain value
CH3 User range settings gain value
CH6 User range settings offset value
CH8 User range settings gain value
1 This is the initial value set after the power is turned on or the programmable controller CPU is reset.
2 Indicates whether reading from and writing to a sequence program are enabled.
R : Reading enabled W : Writing enabled
3 Areas used to restore the user range settings offset/gain values when Online module change is made.
Refer to chapter 7 for details of Online module change.
Description Default
System area — — —
Mode switching setting
System area — — —
3
3
3
3
3
3
3
3
3
1
Read/write 2
0 R/W
0 R/W
0 R/W
0 R/W
0 R/W
0 R/W
0 R/W
0 R/W
0 R/W
0 R/W
Reference
section
Section 3.4.12
Section 3.4.14
3 - 27 3 - 27

3 SPECIFICATIONS
3.4.5 D/A conversion enable/disable (buffer memory address 0: Un\G0)
MELSEC-Q
(1) Set whether D/A conversion is enabled or disabled for each channel.
(2) It is necessary to set Operating condition setting request (Y9) to on/off to validate
D/A conversion enable/disable. (Refer to Section 3.3.2.)
(3) By default, all channels are set to D/A conversion disabled.
(4) When the Q62DAN and Q62DA are used, b2 to b7 (CH3 to CH8) become
invalid.
Un\G0
When the Q64DAN and Q64DA are used, b4 to b7 (CH5 to CH8) become invalid.
b15 b14 b13 b12 b11 b10 b9 b8 b7 b6 b5 b4 b3 b2 b1 b0
CH
CH
CH
00000000
For Q62DAN, Q62DA, information for b2 to b15 is fixed at 0.
For Q64DAN, Q64DA, information for b4 to b15 is fixed at 0.
CH
8
5
6
7
POINT
Design the system so that D/A conversion enable/disable (buffer memory address
0: Un\G0) changes to "Enable" after the external power (refer to Section 4.3) is
supplied.
Analog output may not properly be performed if the external power is not at the
specified voltage.
3.4.6 Digital value (buffer memory address 1 to 8: Un\G1 to Un\G8)
CH4CH3CH2CH
1
1: D/A conversion disabled
0: D/A conversion enabled
(1) This area is used to write digital values for performing D/A conversion from the
programmable controller CPU as 16-bit signed binary code.
(2) If a value outside the settable range is written, the upper or lower limit value of
the range is used for D/A conversion. (Refer to Table 3.11.) Also, if this happens,
a check code and an error code will be stored in CH
(buffer memory address 11 to 18 : Un\G11 to 18) and Error code (buffer memory
address 19 : Un\G19) respectively.
(3) For the Q62DAN and Q62DA, Un\G3 to Un\G8 (CH3 to CH8) become invalid.
For the Q64DAN and Q64DA, Un\G5 to Un\G8 (CH5 to CH8) become invalid.
Table 3.11 Output range settings and valid range
Normal resolution mode
Output range setting
0: 4 to 20 mA
1: 0 to 20 mA
2: 1 to 5 V
3: 0 to 5 V
4: –10 to 10 V
F: User range setting
Valid range
(practical range)
0 to 4095
(Practical range:
0 to 4000)
–4096 to 4095
(Practical range:
–4000 to 4000)
Digital value that is set
when a value outside the
valid range is written
4096 or larger: 4095
–1 or smaller: 0
4096 or larger: 4095
–4097 or smaller: –4096
High resolution mode
Valid range
(practical range)
0 to 12287
(Practical range:
0 to 12000)
–16384 to 16383
(Practical range:
–16000 to 16000)
–12288 to 12287
(Practical range:
–12000 to 12000)
Set value check code
Digital value that is set
when a value outside the
valid range is written
12288 or larger: 12287
–1 or smaller: 0
16384 or larger: 16383
–16385 or smaller: 16384
12288 or larger: 12287
–12289 or smaller: –12288
3 - 28 3 - 28

3 SPECIFICATIONS
MELSEC-Q
3.4.7 Set value check code (buffer memory address 11 to 18: Un\G11 to Un\G18)
(1) This area stores the result of checking whether a digital value that was set is
within or outside the valid range.
(2) When a digital value outside the valid range (refer to Table 3.11) is written, one
of the check codes listed in Table 3.12 is stored.
Table 3.12 Check code list
Check code Description
000FH A digital value exceeding the valid range was written.
00F0H A digital value that falls short of the valid range was written.
A digital value that either falls short or exceeds the valid range was
written.
00FFH
(3) Once a check code is stored, it will not be reset even if the digital value is within
the valid range.
(4) To reset CH Set value check code (buffer memory address 11 to 18 : Un\G11
to 18), set Error clear request (YF) to on after rewriting the digital value so that it is
within the valid range.
(5) For the Q62DAN and Q62DA, Un\G13 to Un\G18 (CH3 to CH8) become invalid.
For the Q64DAN and Q64DA, Un\G15 to Un\G18 (CH5 to CH8) become invalid.
For example, the 00FFH check code is stored if a digital value
exceeding the valid range is written, and then, without the check
code being reset, a digital value that falls short of the valid range is
written.
3.4.8 Error code (buffer memory address 19: Un\G19)
(1) Error code detected by the D/A converter module are stored.
(2) For details on Error code, refer to Section 8.1.
3 - 29 3 - 29

3 SPECIFICATIONS
3.4.9 Setting range (buffer memory address 20, 21: Un\G20, Un\G21)
(1) This area is used to confirm the setting range of the D/A converter module.
Settings for channels 1 to 4 are stored in Un\G20.
Settings for channels 5 to 8 are stored in Un\G21.
(2) For the Q62DAN and Q62DA, b8 to b15 (CH3 and 4 information) for Un\G20 and
Un\G21 (information of CH5 to CH8) are invalid.
Un\G20 (setting range CH1 to CH4)
Un\G21 (setting range CH5 to CH8)
For the Q64DAN and Q64DA, Un\G21 (CH5 to CH8 information) is invalid.
Output range Setting value
4 to 20 (mA) 0H
0 to 20 (mA) 1H
1 to 5 (V) 2H
0 to 5 (V) 3H
–10 to 10 (V) 4H
User range setting FH
(3) The default is 0
setting even when 0
b15 b12 b11 b8 b7 b4 b3 b0
H. The Q68DAVN and Q68DAV are operated in 2H (1 to 5 V)
to to to to
CH4 CH3 CH2 CH1
CH8 CH7 CH6 CH5
H (default) is set for the output range setting so that 2H will be
stored.
POINT
Setting ranges cannot be changed by using Setting range (buffer memory
addresses 20, 21: Un\G20, Un\G21).
Change the setting range in the Switch setting for I/O and intelligent function
module dialog box. (Refer to Section 4.5.)
MELSEC-Q
3.4.10 Offset/gain setting mode Offset/gain specification (buffer memory address 22, 23: Un\G22, Un\G23)
(1) Specifies the channel to be adjusted for the offset/gain settings.
(2) Specification can be made for 1 channel only.
An offset/gain setting mode error (Error code 500) will occur if more than one
channel is specified at the same time.
(3) For the Q62DAN and Q62DA, b2 to b7 (CH3 to CH8) are invalid.
For the Q64DAN and Q64DA, b4 to b7 (CH5 to CH8) are invalid.
Un\G22 (Offset specification)
Un\G23 (Gain specification)
(4) Refer to Section 4.6 for the details of the offset/gain settings.
b15b14b13b12b11b10b9b8b7b6b5b4b3b2b1b0
0 CH4 CH3 CH2 CH1
0000000
0 CH4 CH3 CH2 CH1
0000000
For Q62DAN, Q62DA, b2 to b15 information is fixed at 0.
For Q64DAN, Q64DA, b4 to b15 information is fixed at 0.
CH8 CH7 CH6 CH5
CH8 CH7 CH6 CH5
1: Channel to be set
0: Invalid
3 - 30 3 - 30

3 SPECIFICATIONS
MELSEC-Q
3.4.11 Offset/gain adjustment value specification (buffer memory address 24: Un\G24)
(1) This area is used to set the amount of adjustment for analog output values in the
offset/gain setting mode.
(2) The valid input range is from –3000 to 3000.
When the input value is 1000, the analog output values can be adjusted by about
0.33 V for voltage output and about 0.65 mA for current output.
(3) Refer to Section 4.6 for the details of the offset/gain settings.
3.4.12 Mode switching setting (buffer memory address 158, 159: Un\G158, Un\G159)
(1) Set the values of the mode to which you want to switch.
(2) After setting the values, turning Operating condition setting request (Y9) from off
to on switches to that mode.
(3) When mode switching is performed, this area is cleared to zero and Operating
condition setting completed flag (X9) turns off.
After confirming that Operating condition setting completed flag (X9) has turned
off, turn off Operating condition setting request (Y9).
Mode to be switched to
Normal mode 0964H 4144H
Offset/gain setting mode 4144H 0964H
POINT
If the values written are other than the above, mode switching is not performed and
only the operating condition is changed.
Buffer memory address 158 Buffer memory address 159
Set values
3 - 31 3 - 31

3 SPECIFICATIONS
3.4.13 Pass data classification setting (buffer memory address 200: Un\G200) (Q62DAN, Q64DAN, Q62DA, and Q64DA only)
(1) Areas used to restore the user range settings offset/gain values when online
module change is made.
Refer to Chapter 7 for details of online module change.
(2) Specify whether the offset/gain values to be saved/restored are voltages or
currents when saving/restoring the offset/gain values of the user range setting.
b15 b14 b13 b12 b11 b10 b9 b8
b7
b6
b4 b3 b2 b1 b0
b5
MELSEC-Q
00000000
Q62DAN, Q62DA: Data in b2 to b15 are fixed to 0.
Q64DAN, Q64DA: Data in b4 to b15 are fixed to 0.
POINT
Refer to Section 4.6 for the offset/gain value setting method.
0000
CH4 CH3 CH2 CH1
1: Current specified
0: Voltage specified
3 - 32 3 - 32

3 SPECIFICATIONS
MELSEC-Q
3.4.14 Industrial shipment settings and User range settings Offset/gain value (buffer memory address 202 to 233: Un\G202 to Un\G233)
(1) Areas used to restore the user range settings offset/gain values when online
module change is made.
Refer to chapter 7 for details of online module change.
(2) When the offset/gain values of the user range setting are restored, the used
data are stored.
The data are stored (saved) when:
• Initial setting write is performed by the utility;
• Operating condition setting request is set (Y9 turns from off to on 1); or
• The offset/gain values are written in the offset/gain setting mode (YA turns from
off to on).
1: The data are not saved when values have been written to Mode switching
setting area (buffer memory addresses 158, 159: Un\G158, Un\G159).
(3) When restoring the offset/gain values of the user range setting, set the data
saved here similarly into the corresponding area of the module where the data
will be restored.
(4) Buffer memory saving recording procedure for online module change
1) Set Pass data classification setting
2) Turn Operating condition setting request (Y9) from off to on.
3) Compare the offset/gain values of CH Industrial shipment settings and User
range settings offset/gain value (buffer memory addresses 202 to 233:
Un\G202 to Un\G233) with the range reference values. Refer to Section 7.4
for the range reference values.
4) If the values are proper, record Offset/gain values of the Pass data
classification setting
1: The Q68DAVN/Q68DAIN/Q68DAV/Q68DAI do not require the setting and
recording of the Pass data classification setting.
POINT
Refer to Section 4.6 for the offset/gain value setting method.
1
, Industrial shipment settings and User range settings.
1
(buffer memory address 200: Un\G200).
3 - 33 3 - 33

4 SETUP AND PROCEDURES BEFORE OPERATION
MELSEC-Q
4 SETUP AND PROCEDURES BEFORE OPERATION
4.1 Handling Precautions
(1) Do not drop the module case or subject it to heavy impact.
(2) Do not remove the PCB of the module from its case. Doing so may cause the
module to fail.
(3) Be careful not to let foreign particles such as swarf or wire chips enter the module.
They may cause a fire, mechanical failure or malfunction.
(4) The top surface of the module is covered with a protective film to prevent foreign
objects such as wire burrs from entering the module during wiring. Do not remove
this film until the wiring is complete. Before operating the system, be sure to
remove the film to provide adequate heat ventilation.
(5) Tighten the screws such as module fixing screws within the following ranges.
Loose screws may cause short circuits, failures, or malfunctions.
Screw location Tightening torque range
1
Module fixing screw (M3 screw)
Terminal block terminal screw (M3 screw) 0.42 to 0.58 N.m
Terminal block mounting screw (M3.5 screw) 0.66 to 0.89 N.m
FG terminals screw (M3 screw)
1: The module can be easily fixed onto the base unit using the hook at the top of
the module.
However, it is recommended to secure the module with the module fixing
screw if the module is subject to significant vibration.
2 Q68DAVN, Q68DAIN, Q68DAV, Q68DAI only.
(6) While pressing the installation lever located at the bottom of module, insert the
module fixing tab into the fixing hole in the base unit until it stops. Improper
installation may result in malfunction, breakdown or the module coming loose and
dropping.
2
0.36 to 0.48 N.m
0.42 to 0.58 N.m
4
4 - 1
4 - 1

4 SETUP AND PROCEDURES BEFORE OPERATION
4.2 Setup and Procedures before Operation
Module mounting
Mount the D/A converter module in the specified
slot.
Start
MELSEC-Q
4
Wiring
Wire external devices to the D/A converter module.
Intelligent functional module switch settings
Perform settings using GX Developer
(Refer to Section 4.5).
Use user range settings?
Use user range settings
Offset/gain setting
If user range settings are used, perform the
offset and gain settings (Refer to Section 4.6).
Use industrial shipment
settings.
Use the utility package?
YES
NO
Initial setting and automatic refresh setting
The program can be simplified if the utility
package is used for setting (Refer to Chapter 5).
Programming and debugging
Create and check the sequence program.
4 - 2
4 - 2

4 SETUP AND PROCEDURES BEFORE OPERATION
4.3 Part Identification Nomenclature
This section explains each part name of the D/A converter module, providing examples
of the Q62DAN, Q64DAN, Q68DAVN, and Q68DAIN.
The differences between the Q62DAN, Q64DAN, Q68DAVN, and Q68DAIN, also,
Q62DA, Q64DA, Q68DAV, and Q68DAI are model names, external dimensions, and
serial number plates.
For details, refer to Appendix 3 External Dimension Diagram.
MELSEC-Q
4 - 3
4 - 3

4 SETUP AND PROCEDURES BEFORE OPERATION
MELSEC-Q
Number Name and appearance
1) RUN LED Displays the operating status of the D/A converter module.
On : Normal operation
Flashing : During offset/gain setting mode
Off : 5V power switched off, watchdog timer error occurred, or
online module change enabled
2) ERROR LED Displays the error status of the D/A converter module.
On : Error
Off : Normal operation
Flashing : Error in switch settings
3) External power supply terminal This is the terminal for connecting the 24 V DC external power supply.
4) FG terminal Frame ground terminal
5) Serial number plate Indicates the serial No. of the D/A converter module.
1: Check Error code for details.
1
Switch No. 5 of the intelligent function module has been
set to a value other than "0".
Description
4 - 4
4 - 4

4 SETUP AND PROCEDURES BEFORE OPERATION
MELSEC-Q
Terminal
number
1
2 COM COM COM COM
3 I + I +
4 Vacant Vacant COM COM
5
6 COM COM COM COM
7 I + I +
8 Vacant Vacant COM COM
9 Vacant
10 Vacant COM COM COM
11 Vacant I +
12 Vacant Vacant COM COM
13 Vacant
14 Vacant COM COM COM
15 Vacant I +
16 24V COM COM
17 24G 24V
18 FG 24G
Q62DAN, Q62DA Q64DAN, Q64DA Q68DAVN, Q68DAV Q68DAIN, Q68DAI
V +
CH1
V +
CH2
CH1
CH2
CH3
CH4
Signal name
V +
V +
V +
V +
CH1
CH2
CH3
CH4
CH5
CH6
CH7
CH8
V +
V +
V +
V +
V +
V +
V +
V +
CH1
CH2
CH3
CH4
CH5
CH6
CH7
CH8
I +
I +
I +
I +
I +
I +
I +
I +
4 - 5
4 - 5

4 SETUP AND PROCEDURES BEFORE OPERATION
4.4 Wiring
The wiring precautions and examples of module connection are provided below.
4.4.1 Wiring precautions
In order to optimize the functions of the D/A converter module and ensure system
reliability, external wiring that is protected from noise is required.
Please observe the following precautions for external wiring:
(1) Use separate cables for the AC control circuit and the external input signals of the
D/A converter module to avoid the influence of the AC side surges and inductions.
(2) Do not mount the cables close to or bundle them with the main circuit line, a high-
voltage cable or a load cable from other than the programmable controller. This
may increase the effects of noise, surges and induction.
(3) Perform a one-point grounding for shielded lines and the shields of sealed cables.
(4) A solderless terminal with insulating sleeve cannot be used for the terminal block.
Covering the cable- connection portion of the solderless terminal with a marked
tube or an insulation tube is recommended.
POINT
For using the Q68DAVN, Q68DAIN, Q68DAV or Q68DAI, when it is difficult to wire
FG terminals due to the limited installation space, use FG terminal L-shaped metal
fitting.
MELSEC-Q
4 - 6
4 - 6

4 SETUP AND PROCEDURES BEFORE OPERATION
4.4.2 External wiring
MELSEC-Q
1 Use a twisted two core shielded wire for the power wire.
2 If there is noise or ripples in the external wiring, connect a 0.1 to 0.47 F
25V capacitor between the V+ terminal and COM.
(2) For current output of the Q62DAN, Q64DAN, or Q68DAIN
(1) For voltage output of the Q62DAN, Q64DAN, or Q68DAVN
1 Use a twisted two core shielded wire for the power wire.
2 If there is noise or ripples in the external wiring, connect a 0.1 to 0.47 F
25V capacitor between the I+ terminal and COM.
4 - 7
4 - 7

4 SETUP AND PROCEDURES BEFORE OPERATION
MELSEC-Q
1 Use a twisted two core shielded wire for the power wire.
2 If there is noise or ripples in the external wiring, connect a 0.1 to 0.47 F 25V
capacitor between the V+ terminal and COM.
(4) For current output of the Q62DAN, Q64DAN, or Q68DAIN
(3) For voltage output of the Q62DAN, Q64DAN, or Q68DAVN
1 Use a twisted two core shielded wire for the power wire.
2 If there is noise or ripples in the external wiring, connect a 0.1 to 0.47 F 25V
capacitor between the I+ terminal and COM.
4 - 8
4 - 8

4 SETUP AND PROCEDURES BEFORE OPERATION
4.5 Switch Setting for Intelligent Function Module
The settings for the intelligent function module are performed using the I/O assignment
settings of GX Developer.
(1) Setting item
The intelligent function module switches consist of switches 1 to 5 and are set
using 16 bit data. When the intelligent function module switches are not set, the
default value for switches 1 to 5 is 0.
Table 4.1 Switch setting item for intelligent function module
Setting item
Switch 1
Switch 2
Output range setting
(CH1 to CH4)
CH4CH3 CH2CH1
Output range setting
(CH5 to CH8)
CH8CH7CH6CH5
H
H
Analog output range Output range setting value
4 to 20 mA
0 to 20 mA 1H
1 to 5 V 2H
0 to 5 V 3
– 10 to 10 V 4H
User range setting FH
MELSEC-Q
0H1
H
For the Q62DAN, Q64DAN, Q62DA and Q64DA
H
Switch 3
CH4CH3 CH2CH1
For the Q68DAVN, Q68DAIN, Q68DAV and
Q68DAI
b15
0to
Switch 4
b7 b6 b5 b4 b3 b2 b1 b0b8
0
CH8CH7 CH6CH5CH4 CH3CH2CH1
H
00
H
01H to FFH (numeric
value other than 00
0
H
1H to FH (numeric
value other than 0
0
H
1H to FH (numeric
value other than 0
H)*
: Normal mode (D/A conversion processing)
2
)*
H
: Offset/gain setting mode
2
Switch 5 0H: Fixed
1 For details, refer to the POINT(1) in the following page.
2 Setting any value within the setting range will provide the same operation.
When the setting range is 1
H to FH, set 1H for example.
HOLD/CLEAR function setting
H : CLEAR
0
H to FH (numeric
1
value other than 0H) 2: HOLD
HOLD/CLEAR function setting
0 : CLEAR
1 : HOLD
: Normal mode (non-synchronized)
2
: Synchronized output mode
H)*
: Normal resolution mode
: High resolution mode
4 - 9
4 - 9

4 SETUP AND PROCEDURES BEFORE OPERATION
MELSEC-Q
POINT
(1) Depending on the type of module used, the settings for D/A module output
range are shown below.
• Q62DAN, Q64DAN, Q62DA, Q64DA ..... 0
• Q68DAVN, Q68DAV ................................ 0H, 2H to 4H, FH
1 When the setting is 0H, the output operating ranges will be 1 to 5 V.
• Q68DAIN, Q68DAI................................... 0
(2) For the Q62DAN, Q64DAN, Q62DA and Q64DA, leave the switch 2 vacant.
(3) For the Q68DAVN, Q68DAIN, Q68DAV and Q68DAI, the switch 3 will set in
binary.
Setting will be easy if the input format is changed to binary number.
Example) For setting CH3, CH5 and CH8 to HOLD.
Input format Binary Hexadecimal
Setting value 10010100 94H
(4) If the offset/gain setting mode is set using intelligent function module switch 4,
other settings by switch 4 (settings for resolution mode and synchronous
output mode) will be ignored.
(5) Setting of the offset/gain setting mode differs from function version A to
function version B.
Perform the offset/gain settings after checking the RUN LED flashes in
offset/gain setting mode. If the RUN LED does not flash, check to see if the
switch 4 setting is correct. (Refer to Appendix 1.3)
(6) Since the analog output value will differ considerably, depending on the
resolution mode setting, thoroughly check the settings for the intelligent
function module switches before performing the analog output processing.
Example) Analog output value when the setting range is -10 to 10V and the
digital input value is set to 4000.
High resolution mode Normal resolution mode
Analog output value About 2.5 V About 10.0 V
H to 4H, FH
H, 1H, FH
4 - 10
4 - 10

4 SETUP AND PROCEDURES BEFORE OPERATION
(2) Operating procedure
Start the settings with GX Developer I/O assignment setting dialog box.
(a) I/O assignment setting dialog box
Set the following for the slot in which the D/A converter module is mounted.
The type setting is required; set other items as needed.
Type : Select "intelli."
Model name : Enter the module model name.
Points : Select 16 points.
Start XY : Enter the start I/O signal for the D/A converter module.
Detailed setting :
1) When using in the standard system configuration (on the main or
extension base), specify the control CPU of the D/A converter module.
The analog output status of when an error has occurred in the D/A
converter module is determined according to the setting of
"HOLD/CLEAR function setting" of the switch setting for intelligent
function module. Therefore, the setting of "Error time output mode" is
invalid.
2) When using on a remote I/O station, if the analog output is to be held in
the case of a link error, "Error time output mode" must be set to "Hold".
MELSEC-Q
4 - 11
4 - 11

4 SETUP AND PROCEDURES BEFORE OPERATION
(b) Switch setting for intelligent function module screen
Click on [Switch setting] on the I/O assignment setting to display the dialog
box shown at the left, then set switches 1 to 5.
The switches can easily be set if values are entered in hexadecimal. Change
the entry format to hexadecimal and then enter the values.
MELSEC-Q
4 - 12
4 - 12

4 SETUP AND PROCEDURES BEFORE OPERATION
4.6 Offset/Gain Settings
When the user range setting is used, perform the offset and gain settings according to
the following procedure.
When the industrial shipment setting is used, offset/gain setting is not necessary.
If the utility package is installed, perform the offset/gain settings according to the
procedure described in Section 5.6.2.
(1) Offset/gain setting procedure
Start
3)
Switch to the offset/gain
setting mode *1
Adjust gain?
NO
MELSEC-Q
Verify that the mode is set to
offset/gain setting and the RUN
LED is flashing.
2)
Set the offset setting channel
in Un\G22.
Set the Un\G23 to 0
Turn the channel change
request(YB) to ON.
Verify that the channel
change completed flag (XB) is ON.
1)
Turn the channel change
request signal (YB) to OFF.
Channel change completed flag (XB)
turns OFF.
Write the adjustment amount for the
analog output value in buffer memory
address 24 (Un\G24).
Turn the set value change request
signal (YC) ON.
YES
Set the gain setting
channel in buffer memory
address 23 (Un\G23).
Set buffer memory address
22 (Un\G22) to 0.
Turn the channel change
request signal (YB) ON.
Verify that the channel change
completed flag (XB) turns ON.
1)
Adjust other
channels?
NO
Turn on the user range write request (YA) to
register the value of offset/gain settings with
the D/A converter module.
Check that the offset/gain setting
mode flag (XA) is off.
Turn off the user range write
request (YA).
Error occurred?
NO
Switch to the normal setting mode. *1
END
YES
YES
2)
*2
3)
Verify that set value change completed flag
(XC) turns ON after the analog output value
is changed, and then turn the set value
change request signal (YC) OFF.
Desired analog
output value?
YES
NO
*1 The mode switching (normal mode to offset/gain setting mode to normal mode) method
is given below.
Dedicated instruction (G(P).OFFGAN)............................Refer to Section 4.6 (2), (a)
Setting made to mode switching setting (Un\G158, Un\G159) and turning the operation
condition setting request (Y9) from OFF to ON .......Refer to Section 4.6 (2), (b)
Intelligent function module switch setting .................. Refer to Section 4.5,
Section 4.6 (2), (c)
(After intelligent function module switch setting, reset the programmable controller CPU
or switch power OFF, then ON.)
*2 Do not perform the following during operation of "*2". Doing so may cause a flash
memory data error, resulting in malfunction of the D/A converter module.
Power-off of the programmable controller CPU
Reset of the programmable controller CPU
4 - 13
4 - 13

4 SETUP AND PROCEDURES BEFORE OPERATION
1 The mode switching (normal mode to offset/gain setting mode to normal mode) method
is given below.
• Dedicated instruction (G(P).OFFGAN) ......... Refer to Section 4.6 (2), (a)
• Setting made to mode switching setting (buffer memory address 158, 159: Un\G158,
Un\G159) and turning Operating condition setting request (Y9) from off to on
........................................................................ Refer to Section 4.6 (2), (b)
• Intelligent function module switch setting ...... Refer to Section 4.5, Section 4.6 (2), (c)
(After intelligent function module switch setting, reset the programmable controller
CPU or switch power off, then on.)
POINT
(1) Perform the offset/gain settings in the range that satisfies the conditions
specified in Section 3.1.2, (1) and (2).
When the setting exceeds this range, the maximum resolution or total
accuracy may not be within the range indicated in the performance
specification.
(2) Perform the offset/gain settings separately for each channel. If channels are
set in Offset/gain setting mode Offset specification (buffer memory address 22:
Un\G22) and Offset/gain setting mode Gain specification (buffer memory
address 23: UN\G23), at the same time, an error will occur and the ERROR
LED will be lit.
(3) After the offset and gain settings are completed, verify that the offset and gain
values have been set correctly under actual usage conditions.
(4) The offset and gain values are stored into the E
power-off.
(5) At the time of offset/gain setting, turn on User range writing request (YA) to
write the values to the E
Data can be written to the E
To prevent accidental write to the E
2
PROM.
2
PROM up to 100 thousand times.
2
(buffer memory address 19: Un\G19) will be stored if write is performed 26
consecutive times.
(6) If an error (Error code: 40
1
) occurs during offset/gain setting, re-set the
correct offset/gain value.
The offset/gain value of the channel where the error has occurred is not written
to the D/A converter module. ( 1: indicates the corresponding channel
number.)
(7) Module ready (X0) turns from off to on when the offset/gain setting mode
switches to the normal mode by the dedicated instruction (G(P).OFFGAN) or
the setting of Mode switching setting (buffer memory addresses 158, 159:
Un\G158, Un\G159).
Note that initial setting processing will be executed if there is a sequence
program that makes initial setting when Module ready (X0) turns on.
(8) D/A conversion is discontinued if the mode is switched (from the normal mode
to the offset/gain setting mode or from the offset/gain setting mode to the
normal mode) by the dedicated instruction (G(P).OFFGAN) or the setting of
Mode switching setting (buffer memory addresses 158, 159: Un\G158,
Un\G159).
(9) Pass data classification setting (buffer memory address 200: Un\G200) 202 to
233 (Un\G202 to Un\G233) are the areas used to restore the user range
settings offset/gain values when online module change is made.
Refer to chapter 7 for details of online module change.
MELSEC-Q
2
PROM and are not erased at
PROM, an error will occur and Error code
4 - 14
4 - 14

4 SETUP AND PROCEDURES BEFORE OPERATION
(2) Program examples
The program in the dotted area of (a) is common to (a), (b) and (c).
In this example, the I/O signals for the D/A converter module are X/Y0 to X/YF.
• Channel selection
• Offset setting
• Gain setting
• Channel change command
• Writing the adjustment amount
• Analog output value adjust command
• Offset/gain setting value write command to the module
• Mode switching
• Normal mode checking signal
• Channel designation storage device
• Dedicated instruction (G(P).OFFGAN) setting storage device
• Offset/gain adjustment storage device
...................................................................................
...........................................................................................
.............................................................................................
.....................................................................
...............................................................
........................................................................................
..................................................................
MELSEC-Q
....................................................
........................
.......................................................
..............
....................................................
M0
M1
M2
M3
M4
M5
M6
M7
M50
D0
D2
D1
4 - 15
4 - 15

4 SETUP AND PROCEDURES BEFORE OPERATION
(a) When switching the mode using the dedicated instruction (G(P).OFFGAN)
The following sample program switches to the offset/gain setting mode with
the dedicated instruction (G(P).OFFGAN), changes the channel where
offset/gain setting will be made, adjusts the offset/gain values, and writes
Switches to offset/gain setting mode
the offset/gain values to the D/A converter module.
MELSEC-Q
Stores setting of dedicated
instruction (G.OFFGAN) into D2.
*1
Switch to the channel where offset/gain settings will be performed
Set the amount of each change within the range from 3000 to 3000 during adjustment
Adjust the analog output value
Register the result of offset/gain settings in the module
Switches to normal mode
1
Write the channel to select the offset.
Write the channel to select the gain.
\
\
\
\
\
Dedicated instruction
Stores channel where offset/
gain setting will be made into D0.
Specifies offset setting channel.
Sets 0 to buffer memory
address 23.
Sets 0 to buffer memory
address 22.
Specifies gain setting channel.
Turns on Channel change
request (YB).
Turns off Channel change
request (YB).
Set offset value adjustment to D1.
Set D1 to buffer memory
address 24.
Turn on Set value change
request (YC).
Turn off Set value change
request (YC).
Turns on User range change
request (YA).
Turns off User range change
request (YA).
Stores setting of dedicated
instruction (G.OFFGAN) into D2.
(G.OFFGAN)
*1: The program in the dotted area is a common program.
4 - 16
4 - 16
Dedicated instruction (G.OFFGAN)
Processing in normal mode

4 SETUP AND PROCEDURES BEFORE OPERATION
(b) When switching the mode to the setting of Mode switching setting (buffer
memory address 158, 159: Un\G158, Un\G159) and Operating condition
setting request (Y9).
MELSEC-Q
4 - 17
POINT
When running this program together with the normal-mode A/D conversion
program (shown in Section 6.4.2), use 1 of this program as the initial setting
program.
Note) When adding this program to the normal-mode D/A conversion program
(shown in Section 6.4.2), replace the existing initial setting items with the
program marked 1.
(c) When switching the mode by making intelligent function module switch
4 - 17
setting
Only the common program is necessary.

5 UTILITY PACKAGE (GX Configurator-DA)
5 UTILITY PACKAGE (GX Configurator-DA)
5.1 Utility Package Functions
MELSEC-Q
Initial Setting 1
Auto Refresh Setting 1
5
Monitor/test
FB conversion
Table 5.1 shows an overview of the utility package functions.
Table 5.1 Utility package (GX Configurator-DA) function list
Item Description Reference section
(1) Sets D/A conversion enable/disable.
(2) The data for which initial setting has been completed is registered in
the parameters for the programmable controller CPU, and
automatically written to the D/A converter module when the
programmable controller CPU changes to RUN status.
(1) Sets automatic refresh for the D/A converter module buffer memory.
(2) The buffer memory that was set for automatic refresh is
automatically read and written to the specified device when the
END command for the programmable controller CPU is executed.
(1) Monitor/test
The buffer memory and I/O signals for the D/A converter modules
are monitored and tested.
(2) Operating condition setting
Changes D/A conversion enable/disable during the operation.
(3) Offset/gain setting
When setting the offset/gain to a value selected by the user (when
the analog output range setting is user range setting), the offset and
gain can be easily set while viewing the dialog box.
(4) Pass data
The pass data (Pass data classification setting, industrial shipment
settings offset/gain values, user range settings offset/gain values)
can be monitored and set.
Generates FB automatically from the intelligent function module
parameter (initial setting/auto refresh setting).
POINT
1 If initial setting and auto refresh setting are performed, the intelligent function
module parameters require a maximum of 24 bytes per module.
Section 5.4
Section 5.5
Section 5.6
Section 5.7
5 - 1 5 - 1

5 UTILITY PACKAGE (GX Configurator-DA)
MELSEC-Q
5.2 Installing and Uninstalling the Utility Package
For how to install or uninstall the utility package, refer to "Method of installing the
MELSOFT Series" included in the utility package.
5.2.1 Handling precautions
The following explains the precautions on using the GX Configurator-DA.
(1) For safety
Since GX Configurator-DA is add-in software for GX Developer, read "Safety
Precautions" and the basic operating procedures in the GX Developer Operating
Manual.
(2) About installation
GX Configurator-DA is add-in software for GX Developer Version 4 or later.
Therefore, GX Configurator-DA must be installed on the personal computer that
has already GX Developer Version 4 or later installed.
(3) Error of Intelligent function module utility
Insufficient system resource may cause the dialog box to be displayed
inappropriately while using the Intelligent function module utility. If this occurs,
close the Intelligent function module utility, GX Developer (program, comments,
etc.), and other applications, and then start GX Developer and Intelligent function
module utility again.
(4) To start the Intelligent function module utility
(a) In GX Developer, select "QCPU (Q mode)" for PLC series and specify a
project.
If any PLC series other than "QCPU (Q mode)" is selected, or if no project is
specified, the Intelligent function module utility will not start.
(b) Multiple Intelligent function module utilities can be started.
However, [Open parameters] and [Save parameters] operations under
[Intelligent function module parameter] are allowed for one Intelligent
function module utility only. Only the [Monitor/test] operation is allowed for
the other utilities.
(5) Switching between two or more Intelligent function module utilities
When two or more Intelligent function module utility windows cannot be displayed
side by side, select the window to be displayed on the top of others using the
task bar.
5
5 - 2 5 - 2

5 UTILITY PACKAGE (GX Configurator-DA)
(6) Number of parameters that can be set in GX Configurator-DA
When multiple intelligent function modules are mounted, the number of
parameter setting must not exceed the following limit.
When intelligent function modules are installed to:
Q00J/Q00/Q01CPU 512 256
Q02/Q02H/Q06H/Q12H/Q25HCPU 512 256
Q02PH/Q06PH/Q12PH/Q25PHCPU 512 256
Q12PRH/Q25PRHCPU 512 256
Q00UJ/Q00U/Q01UCPU 512 256
Q02UCPU 2048 1024
Q03UD/Q04UDH/Q06UDH/Q10UDH/
Q13UDH/Q20UDH/Q26UDH/Q03UDE/
Q04UDEH/Q06UDEH/Q10UDEH/Q13UDEH/
Q20UDEH/Q26UDEH/Q50UDEH/Q100UDEHCPU
CPU modules other than the above Not supported Not supported
MELSECNET/H remote I/O station 512 256
For example, if multiple intelligent function modules are installed to the
MELSECNET/H remote I/O station, configure the settings in GX Configurator-DA
so that the number of parameter settings for all the intelligent function modules
does not exceed the limit of the MELSECNET/H remote I/O station.
Calculate the total number of parameter settings separately for the initial setting
and for the auto refresh setting.
The number of parameters that can be set for one module in GX Configurator-DA
is as shown below.
Target module Initial setting Auto refresh setting
Q62DAN/Q62DA 1 (Fixed) 5 (Max.)
Q64DAN/Q64DA 1 (Fixed) 9 (Max.)
Q68DAVN/Q68DAIN/Q68DAV/Q68DAI 1 (Fixed) 17 (Max.)
Example) Counting the number of parameter settings in Auto refresh setting
MELSEC-Q
Maximum number of parameter settings
Initial setting Auto refresh setting
4096 2048
5 - 3 5 - 3
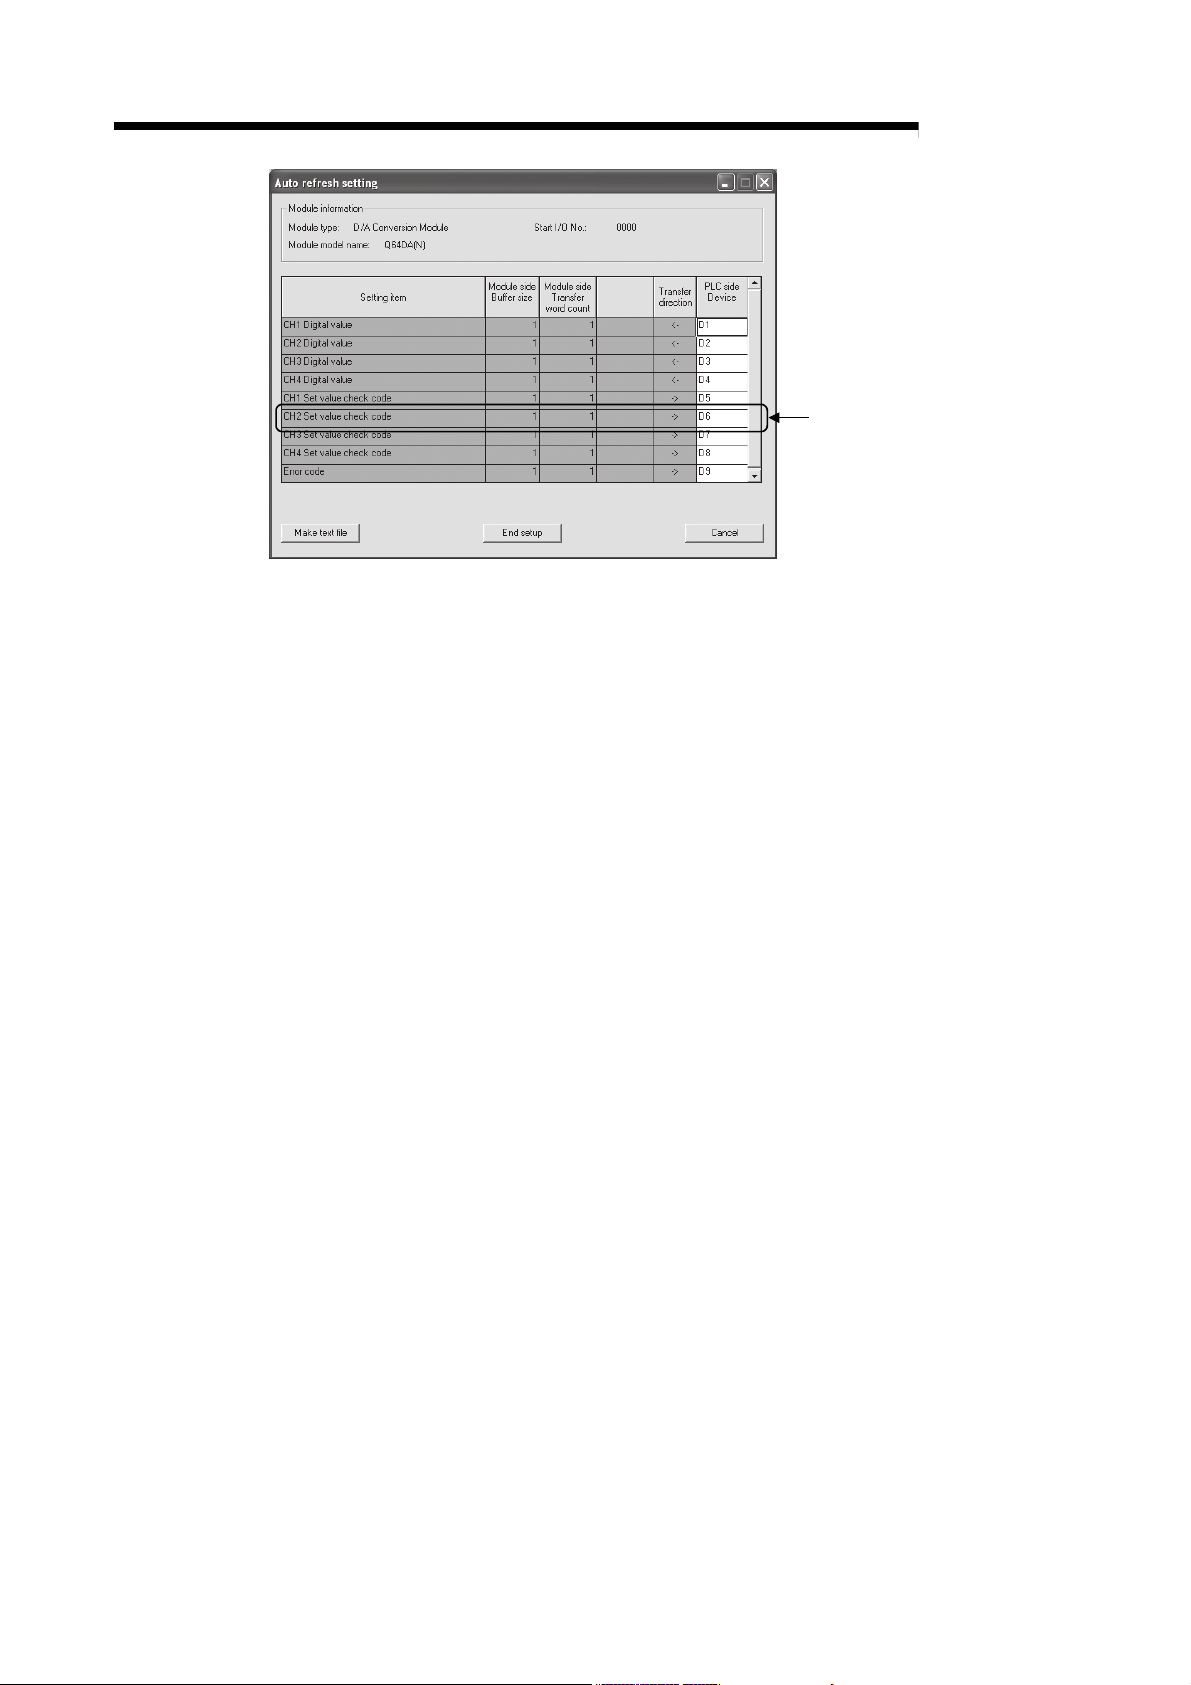
5 UTILITY PACKAGE (GX Configurator-DA)
MELSEC-Q
This one row is counted as one setting.
Blank rows are not counted.
Count up all the setting items on this
screen, and add the total to the
number of settings for other intelligent
function modules to get a grand total.
5 - 4 5 - 4

5 UTILITY PACKAGE (GX Configurator-DA)
MELSEC-Q
5.2.2 Operating environment
This section explains the operating environment of the personal computer that runs GX
Item Description
Installation (Add-in) target
Computer Personal computer running the operating systems listed below
CPU Refer to "Operating system and performance required for personal computer" in the
Required memory
Hard disk
space
Display
Operating system
For installation 65 MB or more
For operation 20 MB or more
Configurator-DA.
1
Add-in to GX Developer Version 4 (English version) or later2
next page.
3
600 dots or more resolution
800
Microsoft
Microsoft
Microsoft
Microsoft
Microsoft
Microsoft
Microsoft
R
WindowsR95 Operating System (English version)
R
WindowsR98 Operating System (English version)
R
WindowsRMillennium Edition Operating System (English version)
R
Windows NTRWorkstation Operating System Version 4.0 (English version)
R
WindowsR2000 Professional Operating System (English version)
R
WindowsRXP Professional Operating System (English version)
R
WindowsRXP Home Edition Operating System (English version)
MicrosoftRWindows VistaRHome Basic Operating System (English version)
MicrosoftRWindows VistaRHome Premium Operating System (English version)
Microsoft
R
Windows VistaRBusiness Operating System (English version)
MicrosoftRWindows VistaRUltimate Operating System (English version)
MicrosoftRWindows VistaREnterprise Operating System (English version)
Microsoft
R
WindowsR7 Starter Operating System (English version)4
MicrosoftRWindowsR7 Home Premium Operating System (English version)4
Microsoft
Microsoft
R
WindowsR7 Professional Operating System (English version)4
R
WindowsR7 Ultimate Operating System (English version)4
MicrosoftRWindowsR7 Enterprise Operating System (English version)4
1 Install GX Configurator-DA in GX Developer Version 4 or higher in the same language.
GX Developer (English version) and GX Configurator-DA (Japanese version) cannot be used in combination, and GX
Developer (Japanese version) and GX Configurator-DA (English version) cannot be used in combination.
2 GX Configurator-DA is not applicable to GX Developer Version 3 or earlier.
In addition, GX Developer Version 8 or later is necessary to use the FB conversion function.
3 Resolution of 1024 X 768 pixels or higher is recommended for Windows VistaRand WindowsR7.
4 For WindowsR7 (32-bit version), install GX Configurator-DA Version 2.11M or later as an add-in to GX Developer
Version 8.91V or later.
For WindowsR7 (64-bit version), install GX Configurator-DA Version 2.11M or later as an add-in to GX Developer
Version 8.98C or later.
5 - 5 5 - 5

5 UTILITY PACKAGE (GX Configurator-DA)
Operating system and performance required for personal computer
MELSEC-Q
Operating system
WindowsR95 PentiumR133MHz or more 32MB or more
WindowsR98 PentiumR133MHz or more 32MB or more
WindowsRMe PentiumR150MHz or more 32MB or more
Windows NTRWorkstation 4.0 PentiumR133MHz or more 32MB or more
WindowsR2000 Professional PentiumR133MHz or more 64MB or more
WindowsRXP PentiumR300MHz or more 128MB or more
Windows VistaR PentiumR1GHz or more 1GB or more
Windows 7R PentiumR1GHz or more
Performance required for personal computer
CPU Memory
1GB or more (for 32-bit version)
2GB or more (for 64-bit version)
POINT
(1) The functions shown below are not available for WindowsRXP, Windows
R
Vista
and WindowsR7.
If any of the following functions is attempted, this product may not operate
normally.
Start of application in Windows
R
compatible mode
Fast user switching
Remote desktop
Large fonts (Details setting of Display Properties)
DPI settings other than 100%
In addition, Windows
R
XP (64-bit version) and Windows VistaR (64-bit
version) are not supported.
R
(2) On Windows Vista
and WindowsR7, the user should have USER authority or
higher.
(3) The functions shown below are not available for Windows
R
7.
Windows XP Mode
Windows Touch
5 - 6 5 - 6

5 UTILITY PACKAGE (GX Configurator-DA)
5.3 Utility Package Operation
5.3.1 Common utility package operations
(1) Control keys
Special keys that can be used for operation of the utility package and their
applications are shown in the table below.
Key Application
Esc
Tab
Ctrl
Delete
Back
Space
MELSEC-Q
Cancels the current entry in a cell.
Closes the window.
Moves between controls in the window.
Used in combination with the mouse operation to select
multiple cells for test execution.
Deletes the character where the cursor is positioned.
When a cell is selected, clears all of the setting contents in the
cell.
Deletes the character where the cursor is positioned.
Page
Up
Page
Down
Enter
Moves the cursor.
Moves the cursor one page up.
Moves the cursor one page down.
Completes the entry in the cell.
5 - 7 5 - 7

r
5 UTILITY PACKAGE (GX Configurator-DA)
(2) Data created with the utility package
The following data or files that are created with the utility package can be also
handled in GX Developer. Figure 5.1 shows respective data or files are handled
in which operation.
(a) Intelligent function module parameter
This represents the data created in Auto refresh setting, and they are stored
in an intelligent function module parameter file in a project created by GX
Developer.
Project
Program
Parameter
PLC parameter
Network parameter
Intelligent function module paramete
MELSEC-Q
5 - 8 5 - 8

5 UTILITY PACKAGE (GX Configurator-DA)
(b) Text files
A text file can be created by clicking the Make text file
setting, Auto refresh setting, or Monitor/Test window.
GX Developer/
GX Configurator-DA
The text files can be utilized to create user documents.
Project Project
1)
Disk
MELSEC-Q
button on the Initial
AA
QCPU
Q25HCPU
USB
RS-232
MODE.
RUN.
ERR.
USER.
BAT.
BOOT.
A
3)
2)
Personal computer
B
A : Intelligent function module parameters
B : Data saved by "Make text file"
Figure 5.1 Correlation chart for data created with the utility package
Steps 1) to 3) shown in Figure 5.1 are performed as follows:
1) From GX Developer, select:
[Project] [Open project] / [Save]/ [Save as]
2) On the intelligent function module selection screen of the
utility, select:
[Intelligent function module parameter] [Open parameters] / [Save
parameters]
3) From GX Developer, select:
[Online] [Read from PLC] / [Write to PLC] "Intelligent function
module parameters"
Alternatively, from the intelligent function module selection screen of
the utility, select:
[Online]
5 - 9 5 - 9
[Read from PLC] / [Write to PLC]

5 UTILITY PACKAGE (GX Configurator-DA)
5.3.2 Operation overview
GX Developer screen
[Tools] [Intelligent function utility] [Start]
MELSEC-Q
Screen for selecting a target intelligent
Refer to Section 5.3.3.
function module
Enter "Start I/O No.", and select "Module type" and "Module model name".
Initial setting Auto refresh
Initial setting screen
1)
Auto refresh setting screen
Refer to Section 5.4.
Refer to Section 5.5.
5 - 10 5 - 10

5 UTILITY PACKAGE (GX Configurator-DA)
1)
[Online] [Monitor/Test]
MELSEC-Q
<<FB support parameter>> tab
FB conversion
Selecting monitor/test module screen
Select a module to be monitored/tested.
Monitor/Test
FB conversion screen
Refer to Section 5.7.
Refer to Section 5.6.
5 - 11 5 - 11

5 UTILITY PACKAGE (GX Configurator-DA)
5.3.3 Starting the Intelligent function module utility
[Operating procedure]
Intelligent function module utility is started from GX Developer.
[Tools]
[Intelligent function utility] [Start]
[Setting window]
Display when the <<FB support parameter>> tab is selected.
MELSEC-Q
[Explanation of items]
(1) Activation of other windows
Following windows can be displayed from the intelligent function module utility.
Common operations to the <<Intelligent function module parameter>> tab and
<<FB support parameter>> tab
(a) Initial setting
"Start I/O No.
Initial setting
(b) Auto refresh setting
"Start I/O No.
Auto refresh
(c) Select monitor/test module
[Online]
*1: Enter the start I/O No. in hexadecimal.
On the <<FB support parameter>> tab
(a) FB conversion
<<FB support parameter>> tab
For details, refer to section 5.7.
*1
" "Module type" "Module model name"
*1
" "Module type" "Module model name"
[Monitor/Test]
FB conversion
5 - 12 5 - 12

5 UTILITY PACKAGE (GX Configurator-DA)
POINT
The <<FB support parameter>> tab is displayed when the project which is being
edited is a label project.
MELSEC-Q
(2) Command buttons
Common operations to the <<Intelligent function module parameter>> tab and
<<FB support parameter>> tab
Delete
Exit
When the <<FB support parameter>> tab is selected
<<Parameter
When the <<Intelligent function module parameter>> tab is selected
FB parameter>>
Deletes the initial setting and auto refresh setting of the selected
module.
However, if initial setting and auto refresh setting have been
prepared and the cell of “Initial setting” or “Auto refresh” is
selected and executed, only the setting of the selected cell is
deleted.
Closes this window.
Moves the setting of the selected line to the <<Intelligent
function module parameter>> tab.
Moves the setting of the selected line to the <<FB support
parameter>> tab.
(3) Menu bar
(a) File menu
Intelligent function module parameters of the project opened by GX
Developer are handled.
[Open parameters]: Reads a parameter file.
[Close parameters]: Closes the parameter file. If any data are
modified, a dialog asking for file saving
[Save parameters]: Saves the parameter file.
[Delete parameters]: Deletes the parameter file.
[Open FB support parameters]: Opens the FB support parameter file.
[Save as FB support parameters]: Saves the FB support parameter file.
[Exit]: Closes this window.
(b) Online menu
[Monitor/Test]: Activates the Select monitor/test module window.
[Read from PLC]: Reads intelligent function module parameters from the
[Write to PLC]: Writes intelligent function module parameters to the
CPU module.
CPU module.
will appear.
5 - 13 5 - 13

5 UTILITY PACKAGE (GX Configurator-DA)
POINT
(1) Saving intelligent function module parameters in a file
Since intelligent function module parameters cannot be saved in a file by the
project saving operation of GX Developer, save them on the shown module
selection dialog box for intelligent function module parameter setting.
(2) Reading/writing intelligent function module parameters from/to a programmable
controller CPU using GX Developer
(a) Intelligent function module parameters can be read from and written into a
(b) Set a target programmable controller CPU in GX Developer:
(c) When the D/A converter module is installed to the remote I/O station, use
(3) Checking the required utility
While the start I/O is displayed on the Intelligent function module utility setting
dialog box, "
This means that the required utility has not been installed or the utility cannot
be started from GX Developer.
Check the required utility, selecting [Tools] - [Intelligent function utility] - [Utility
list...] in GX Developer.
programmable controller after having been saved in a file.
[Online]
"Read from PLC" and "Write to PLC".
[Transfer setup].
" may be displayed for the model name.
MELSEC-Q
5 - 14 5 - 14

5 UTILITY PACKAGE (GX Configurator-DA)
5.4 Initial Setting
[Purpose]
Set D/A conversion enable/disable with an initial setting parameter. Setting
parameters in the Initial setting window can omit parameter settings with
sequence program.
[Operating procedure]
"Start I/O No.1" "Module type" "Module model name" Initial setting
MELSEC-Q
1: Enter the start I/O No. in hexadecimal.
[Setting window]
[Explanation of items]
(1) Setting contents
Set whether D/A conversion is "Enable" or "Disable" for each channel.
(2) Command button
Make text file
Creates a file containing the data in text file format window.
End setup
Cancel
5 - 15 5 - 15
Saves the set data and ends the operation.
Cancels the setting and ends the operation.

5 UTILITY PACKAGE (GX Configurator-DA)
POINT
Initial settings are stored in an intelligent function module parameter file.
After being written to the CPU module, the initial setting is made effective by either
(1) or (2).
(1) Cycle the RUN/STOP switch of the CPU module: STOP
RUN.
(2) With the RUN/STOP switch set to RUN, turn off and then on the power or reset
the CPU module.
When using a sequencer program to write the initial settings, when the CPU is
switched from STOP to RUN the initial settings will be written, So ensures that
programming is carried out to re-execute the initial settings.
MELSEC-Q
RUN STOP
5 - 16 5 - 16

5 UTILITY PACKAGE (GX Configurator-DA)
5.5 Auto Refresh Setting
[Purpose]
Configure the D/A converter module's buffer memory for automatic refresh.
[Operating procedure]
"Start I/O No.1" "Module type" "Module model name" Auto refresh
1 Enter the start I/O No. in hexadecimal.
[Setting window]
MELSEC-Q
[Items]
(1) Contents of the window display
Module side Buffer size : Displays the buffer memory size of the setting
item. (fixed at one word).
Module side Transfer word
count
Transfer direction : "
PLC side Device : Enter a CPU module side device that is to be
: Displays the number of words to be transferred
to the CPU devices from the designated
address (fixed at one word).
" indicates that data are written from the
device to the buffer memory.
"
" indicates that data are loaded from the
buffer memory to the device.
automatically refreshed.
Applicable devices are X, Y, M, L, B, T, C, ST,
D, W, R and ZR.
When using bit devices X, Y, M, L or B, set a
number that can be divided by 16 points
(examples: X10, Y120, M16, etc.)
Also, buffer memory data are stored in a 16point area, starting from the specified device
number.
For example, if X10 is entered, data are stored
in X10 to X1F.
5 - 17 5 - 17

5 UTILITY PACKAGE (GX Configurator-DA)
(2) Command button
MELSEC-Q
Make text file
End setup
Cancel
POINT
The auto refresh settings are stored in an intelligent function module parameter file.
After being written to the CPU module, the auto refresh setting takes effect by
either (1) or (2).
(1) Cycle the RUN/STOP switch of the CPU module: STOP
RUN.
(2) With the RUN/STOP switch set to RUN, turn off and then on the power or reset
the CPU module.
The auto refresh settings cannot be changed from sequence programs.
However, processing equivalent to auto refresh can be added using the FROM/TO
instruction in the sequence program.
Creates a file containing the data in text file format window.
Saves the set data and ends the operation.
Cancels the setting and ends the operation.
RUN STOP
5 - 18 5 - 18

5 UTILITY PACKAGE (GX Configurator-DA)
5.6 Monitor/Test
5.6.1 Monitor/test screen
[Purpose]
Start buffer memory monitoring/testing and I/O signal monitoring/testing,
operating condition setting, offset/gain settings (refer to Section 5.6.2, 5.6.3),
pass data (refer to Section 5.6.5, 5.6.6) from this window.
[Operating procedure]
Select monitor/test module window "Start I/O No.1" "Module type"
"Module model name"
1 Enter the start I/O No. in hexadecimal.
The window can also be started from System monitor of GX Developer
Version 6 or later.
Refer to the GX Developer Operating Manual for details
[Setting screen]
Monitor/test
MELSEC-Q
1)
X/Y monitor/test
5 - 19 5 - 19

5 UTILITY PACKAGE (GX Configurator-DA)
1)
Operating setting
MELSEC-Q
Pass data
Offset/gain setting
Conversion characteristic
5 - 20 5 - 20

5 UTILITY PACKAGE (GX Configurator-DA)
[Explanation of items]
(1) Items
Setting item : Displays buffer memory names.
Current value : Monitors the present buffer memory values.
Setting value : Enter or select values to be written into the buffer memory for
(2) Command button
Current value
test operation.
Displays the current value of the item selected. (This is used
to check the text that cannot be displayed in the current value
field. However, in this utility package, all items can be
displayed in the display fields).
MELSEC-Q
Make text file
Start monitor
Stop monitor
Execute test
Close
POINT
(1) Turning the output enable/disable flag on/off or writing CH Digital value
during test operation changes the analog output, so perform these after taking
ample safety precautions.
Creates a file containing the data in text file format window.
Selects whether or not to monitor current values.
/
Performs a test on the selected items. To select more than one
item, select them while holding down the Ctrl
Closes the currently opened window and returns to the
previous window.
key.
5 - 21 5 - 21

5 UTILITY PACKAGE (GX Configurator-DA)
(3) Examples of "Selection test"
The following explains the case of forcing on CH1 Output enable/disable flag
(Y1).
(a) Click the Operating condition setting
(b) Change the setting value field for "Y01: CH1 Output enable/disable flag" to
"ON: enable".
At this point, the setting data have not been written to the D/A converter
module.
(c) Click on the field, of which setting value has been changed in step (b).
(When multiple items have been changed in operation (b), select the setting
value fields where setting values were changed, while holding down the
Ctrl
key. Multiple fields can be selected by dragging the mouse over
MELSEC-Q
button in the Monitor/Test window.
them.)
(d) Click the Execute test button to write the data.
After the writing is completed, the written values are displayed in the
"Current value" field.
5 - 22 5 - 22

5 UTILITY PACKAGE (GX Configurator-DA)
5.6.2 Offset/gain setting operation (Function version C or later)
Perform the offset/gain setting operation in the following sequence.
(1) Switch to the offset/gain setting dialog box
Perform the operation in Section 5.6.1 to display the offset/gain setting dialog
box.
At this point, a dialog box to confirm the transition of module's operation mode
(normal mode -> offset/gain setting mode) is displayed. Click the Yes
MELSEC-Q
button to
transit to the offset/gain setting mode.
(2) Specify a channel
Specify the target channel of offset setting or gain setting on the channel No.
combo box.
(3) Specify offset/gain setting
Specify either offset setting or gain setting on the channel specified on the
channel No. combo box using the radio button.
(4) Set up adjustment values
Set up an adjustment value of the offset value or gain value. Select "1", "10,"
"100", or "1000" on the combo box, however, you can also set up adjustment
values by entering a number (1 to 3000).
5 - 23 5 - 23
 Loading...