

Mitsubishi PDFY-P06NMU-E, PDFY-P12NMU-E, PDFY-P15NMU-E, PDFY-P08NMU-E, PDFY-P27NMU-E Operation Manual
...Page 1
GBF
Air-Conditioners For Building Application
INDOOR UNIT
PEFY-P-NMLU-E PDFY-P-NMU-E
PEFY-P-NMHU-E PFFY-P-NEMU-E
PEFY-P-NMHU-E-F PFFY-P-NRMU-E
PLFY-P-NLMU-E
OPERATION MANUAL
For safe and correct use, please read this operation manual thoroughly before operating the air-conditioner unit.
MANUEL D’UTILISATION
Pour une utilisation correcte sans risques, veuillez lire le manuel d’utilisation en entier avant de vous servir du climatiseur.
Page 2

2
˚C
˚C
ON/OFF
CENTRALLY CONTROLLED
ERROR CODE
CLOCK
ON OFF
CHECK
CHECK MODE
FILTER
TEST RUN
FUNCTION
1Hr.
NOT AVAILABLE
STAND BY
DEFROST
TEMP.
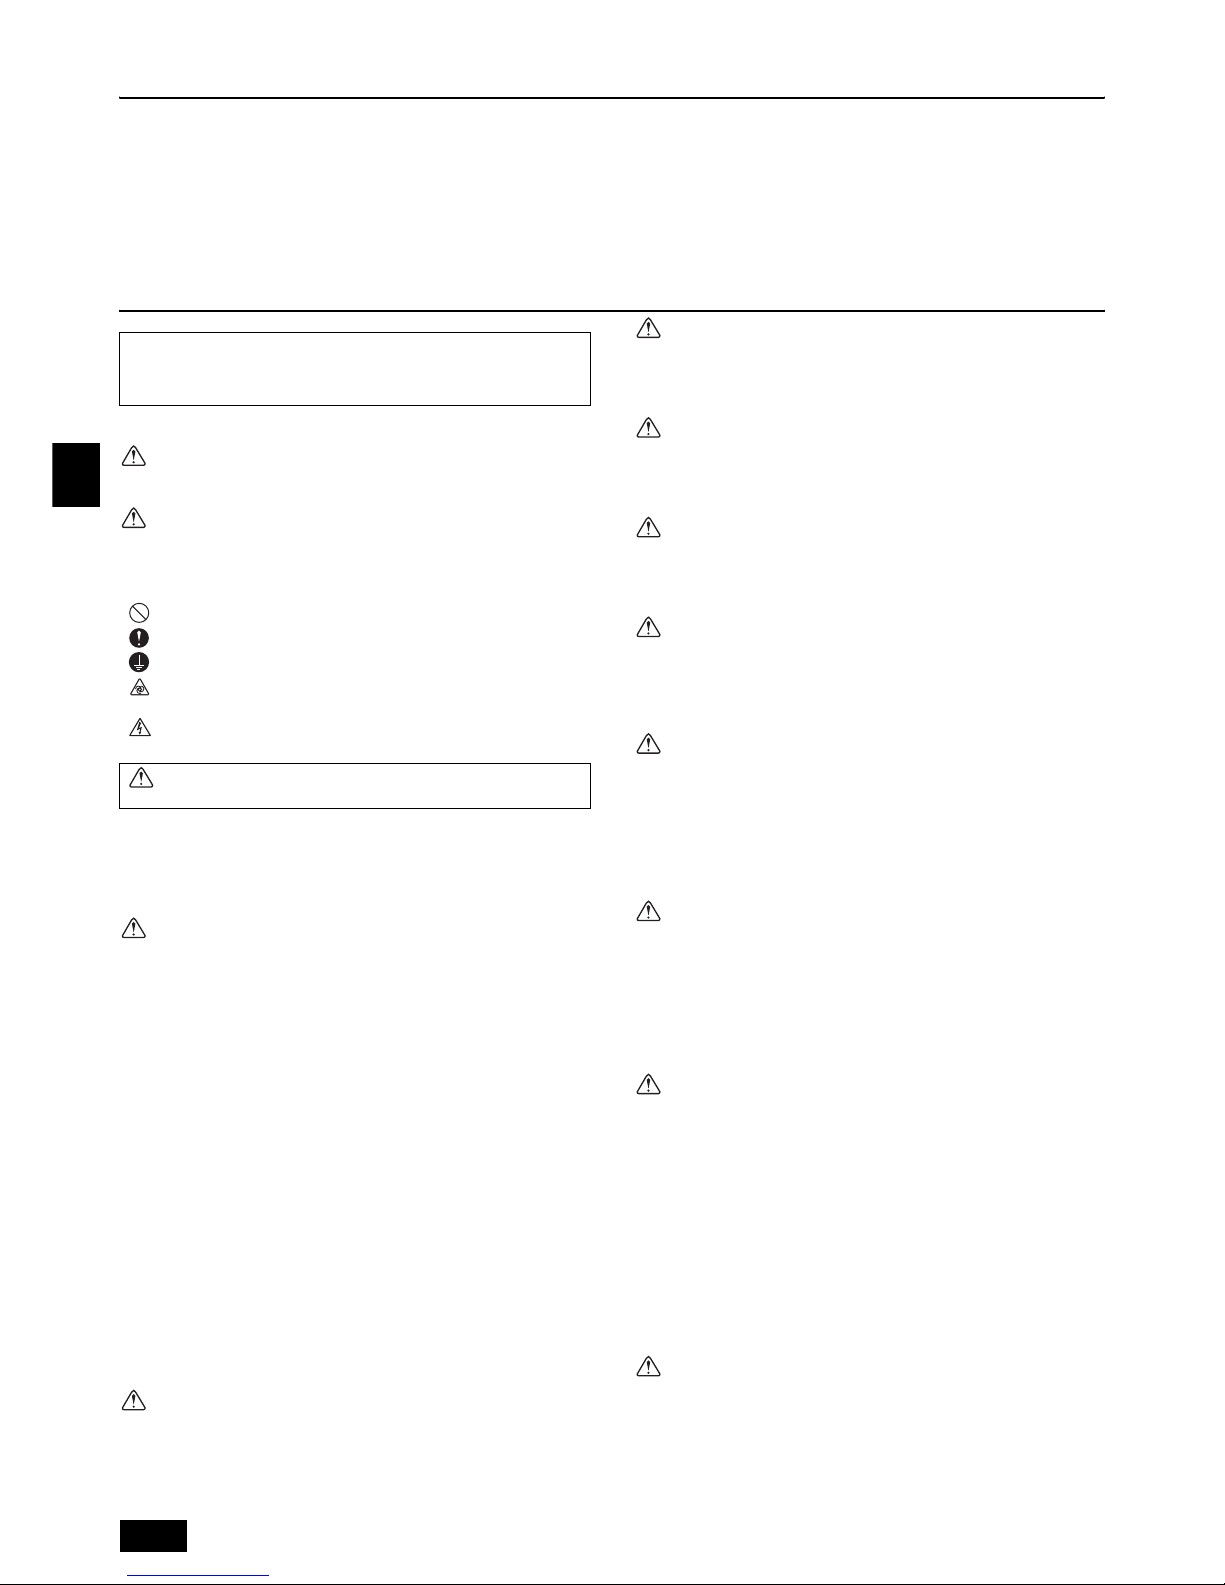
Image of PAR-21MAA
A Touche [Régler la température]
B Touche [Menu du programmateur]
Touche [Moniteur/Régler]
C Touche [Mode]
Touche [Retour]
D Touche [Programmateur ON/OFF]
Touche [Régler le jour]
E Touche [Lucarne]
Touche [Fonctionnement]
F Touche [Vitesse du ventilateur]
G Touche [Soufflerie haut/bas]
H Touche [Ventilation]
Touche [Fonctionnement]
I Touche [Vérification]
Touche [Libération]
J Touche [Essai de fonctionnement]
K Touche [Filtre]
Touche [ ↵ ]
L Touche [ON/OFF]
M Touche du capteur intégré de la température de la pièce
N Touche [Régler l'heure]
• Ne jamais laisser la commande à distance en plein soleil, sinon, les données
de température de la pièce risquent d’être erronées.
• Ne jamais placer d’obstacle devant la partie inférieure droite de la commande à distance, sinon, la lecture des températures de la pièce ne sera pas
correcte.
Current time/Timer
Centralized control
Timer OFF
Timer indicator
Operation mode: COOL, DRY, AUTO, FAN, HEAT
“Locked” indicator
Set temperature
Power ON
Louver
Ventilation
Filter sign
Set effective for 1 hr.
Sensor position
Room temperature
Airflow
Fan speed
Heure actuelle/Programmateur
Commande centralisée
Programmateur arrêté (OFF)
Indicateur du programmateur
Mode de fonctionnement: COOL (REFROIDISSEMENT), DRY (DÉSHUMIDIFICA-
TEUR), AUTO (AUTOMATIQUE), FAN (SOUFFLERIE), HEAT (CHAUFFAGE)
Indicateur “Verrouillé”
Régler la tempértature
Mise sous tension (ON)
Lucarne
Ventilation
Signe du filtre
Régler pour un fonctionnement pendant 1 heure
Emplacement du capteur
Température de la pièce
Flux d’air
Vitesse du ventilateur
A [Set Temperature] Button
B [Timer Menu] Button
[Monitor/Set] Button
C [Mode] Button
[Return] Button
D [Timer On/Off] Button
[Set Day] Button
E [Louver] Button
[Operation] Button
F [Fan Speed] Button
G [Airflow Up/Down] Button
H [Ventilation] Button
[Operation] Button
I [Check/Clear] Button
J [Test run] Button
K [Filter ] Button
[ ↵ ] Button
L [ON/OFF] Button
M Position of built-in room temperature
N [Set Time] Button
• Never expose the remote controller to direct sunlight. Doing so can result in
the erroneous measurement of room temperature.
• Never place any obstacle around the lower right-hand section of the remote
controller. Doing so can result in the erroneous measurement of room temperature.
Remote controller-Button
Touche Commande à distance
Remote controller-Display
Affichage Commande à distance
GB
F
GB
F
MI
A
B
C
DE
F
G
H
J
K
L
N
Page 3
3
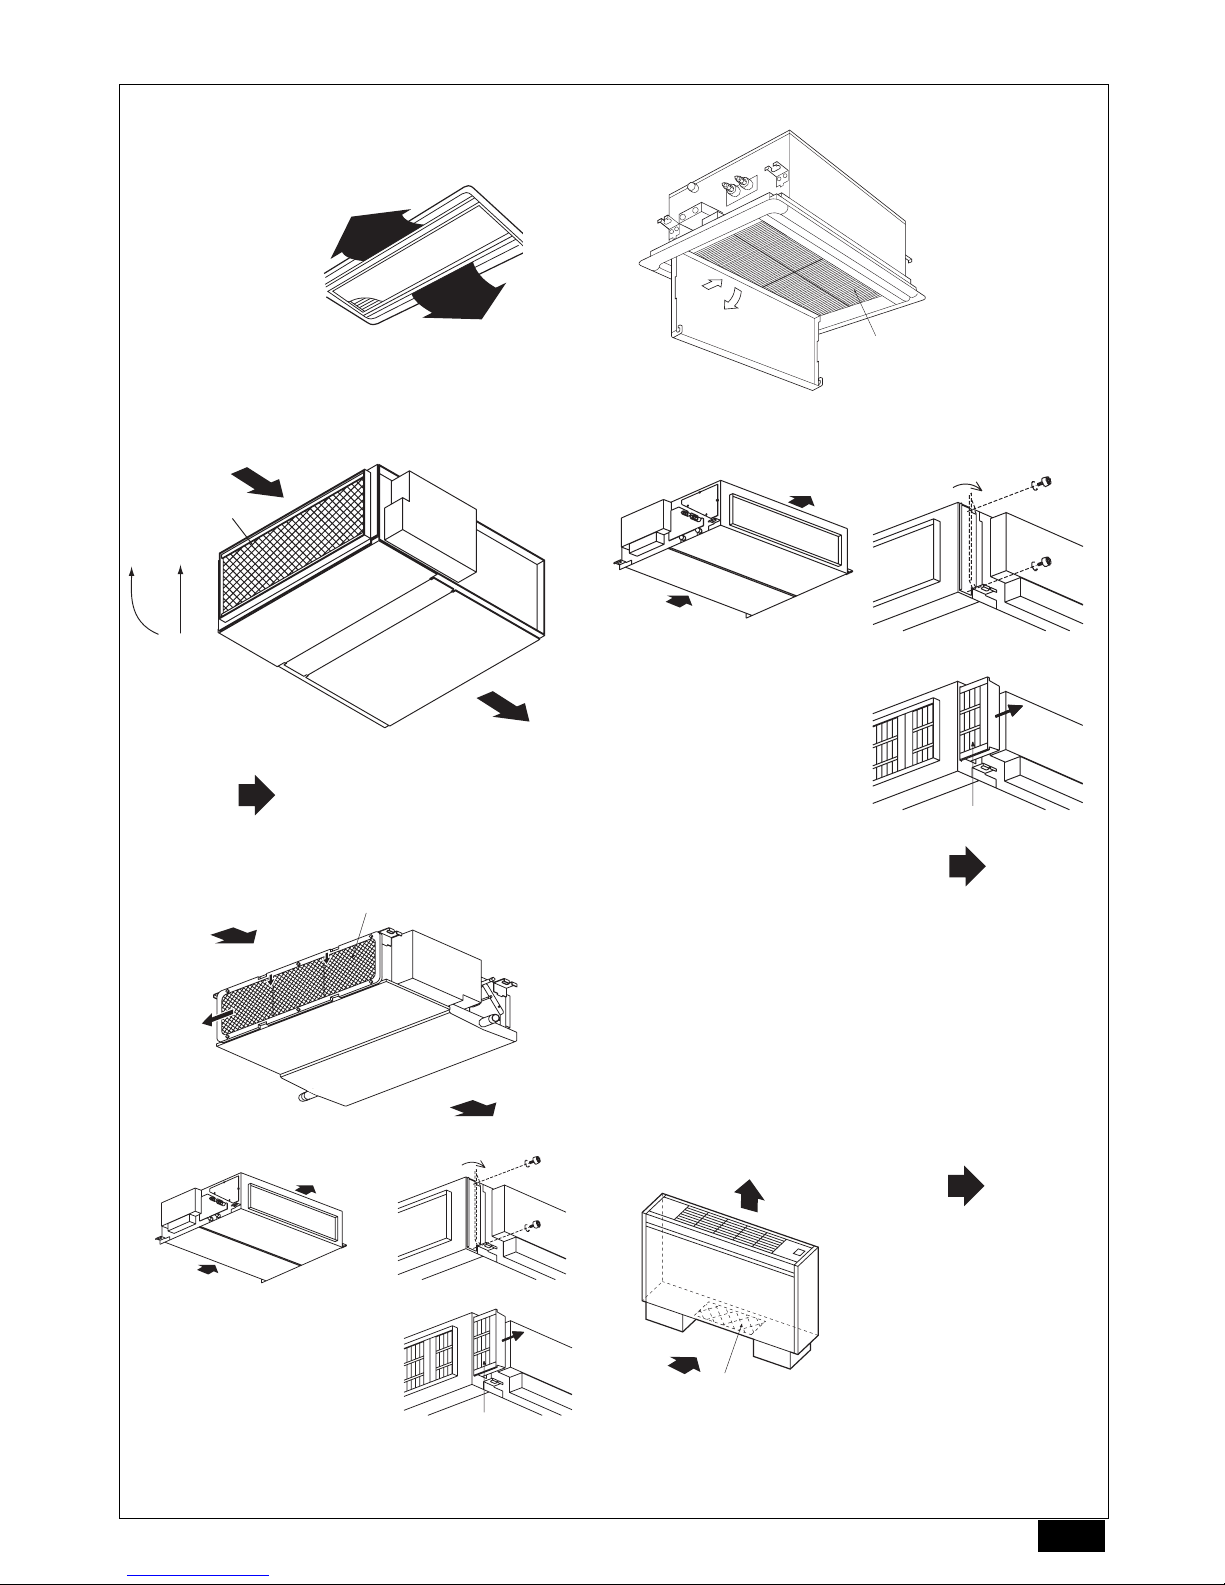
[Fig. A]
<PLFY-P-NLMU-E>
<PDFY-P-NMU-E> <PEFY-P-NMHU-E-F>
<PEFY-P-NMLU-E>
<PEFY-P-NMHU-E> <PFFY-P-NEMU-E, NRMU-E>
: Filter
Filtre
: Air Flow
Flux d’air
A B
In case of rear inlet
En cas d’aspiration
par l’arrière
: Filter : Air Flow
Filtre Flux d’air
:Filter : Air Flow
Filtre Flux d’air
Page 4
4
GB D F E I NL P GR RU TR TR
Contents
1. Safety precautions ........................................................................................ 4
1.1. Installation ................................................................................... 4
1.2. During operation .......................................................................... 4
1.3. Disposing of the unit .................................................................... 5
2. Names and functions of various parts........................................................... 5
3. How to operate.............................................................................................. 5
3.1. ON/OFF ....................................................................................... 5
3.2. Selecting operation ...................................................................... 5
3.3. Room temperature adjustment ....................................................6
3.4. Fan speed adjustment .................................................................6
3.5. Adjustment of up/down airflow direction ......................................6
3.6. Others .......................................................................................... 7
4. The smart way to use .................................................................................... 7
5. Caring for the machine .................................................................................. 7
6. Troubleshooting.............................................................................................8
7. Installation, transferring works, and checking................................................9
8. Specifications ................................................................................................9
1. Safety precautions
Symbols used in the text
Warning:
Describes precautions that should be observed to avoid the risk of injury or
death to the user.
Caution:
Describes precautions that should be observed to prevent damage to the
unit.
Symbols put on the unit
1.1. Installation
After you have read this manual, keep it and the Installation Manual in a
safe place for easy reference whenever a question arises. If the unit is
going to be operated by another person, make sure that this manual is
given to him or her.
Warning:
• The unit should not be installed by the user. Ask the dealer or an autho-
rized company to install the unit. If the unit is installed improperly, water
leakage, electric shock or fire may result.
• Use only accessories authorized by Mitsubishi Electric and ask your
dealer or an authorized company to install them. If accessories are
installed improperly, water leakage, electric shock or fire may result.
• The Installation Manual details the suggested installation method. Any
structural alteration necessary for installation must comply with local
building code requirements.
• Never repair the unit or transfer it to another site by yourself. If repair is
performed improperly, water leakage, electric shock or fire may result. If
you need to have the unit repaired or moved, consult your dealer.
• Keep the electric parts away from water (washing water) etc.
It might result in electric shock, catching fire or smoke.
Note1: When washing the Heat Exchanger and Drain Pan, ensure the
Control Box, Motor and LEV remain dry, using a water proof covering.
Note2: Never drain the washing water for the Drain Pan and the Heat
Exchanger using the Drain Pump. Drain separately.
• The appliance is not intended for use by young children or infirm per-
sons without supervision.
• Young children should be supervised to ensure that they do not play with
the appliance.
• Do not use a leak detection additive.
1) Outdoor unit
Warning:
• The outdoor unit must be installed on a stable, level surface, in a place
where there is no accumulation of snow, leaves or rubbish.
• Do not stand on, or place any items on the unit. You may fall down or the
item may fall, causing injury.
Caution:
The outdoor unit should be installed in a location where air and noise emitted by the unit will not disturb the neighbours.
2) Indoor unit
Warning:
The indoor unit should be securely installed. If the unit is loosely mounted,
it may fall, causing injury.
3) Remote controller
Warning:
The remote controller should be installed in such a way that children cannot play with it.
4) Drain hose
Caution:
Make sure that the drain hose is installed so that drainage can go ahead
smoothly. Incorrect installation may result in water leakage, causing damage to furniture.
5) Power line, fuse or circuit breaker
Warning:
• Make sure that the unit is powered by a dedicated supply. Other appliances connected to the same supply could cause an overload.
• Make sure that there is a main power switch.
• Be sure to adhere to the unit’s voltage and fuse or circuit breaker ratings.
Never use a piece of wire or a fuse with a higher rating than the one
specified.
6) Grounding
Caution:
• The unit must be properly grounded. Never connect the grounding wire
to a gas pipe, water pipe, lightning conductor or telephone grounding
wire. If the unit is not grounded properly, electric shock may result.
• Check frequently that the ground wire from the outdoor unit is properly
connected to both the unit’s ground terminal and the grounding electrode.
1.2. During operation
Caution:
• Do not use any sharp object to push the Buttons, as this may damage
the remote controller.
• Do not twist or tug on the remote controller cord as this may damage the
remote controller and cause malfunction.
• Never remove the upper case of the remote controller. It is dangerous to
remove the upper case of the remote controller and touch the printed circuit boards inside. Doing so can result in fire and failure.
• Never wipe the remote controller with benzene, thinner, chemical rags,
etc. Doing so can result in discoloration and failure. To remove heavy
stains, soak a cloth in neutral detergent mixed with water, wring it out
thoroughly, wipe the stains off, and wipe again with a dry cloth.
• Never block or cover the indoor or outdoor unit’s intakes or outlets. Tall
items of furniture underneath the indoor unit, or bulky items such as
large boxes placed close to the outdoor unit will reduce the unit’s efficiency.
Warning:
• Do not splash water over the unit and do not touch the unit with wet
hands. An electric shock may result.
• Do not spray combustible gas close to the unit. Fire may result.
• Do not place a gas heater or any other open-flame appliance where it will
be exposed to the air discharged from the unit. Incomplete combustion
may result.
Before operating the unit, make sure you read all the “Safety
precautions”.
“Safety precautions” lists important points about safety.
Please be sure to follow them.
: Indicates an action that must be avoided.
: Indicates that important instructions must be followed.
: Indicates a part which must be grounded.
: Indicates that caution should be taken with rotating parts. (This symbol
is displayed on the main unit label.) <Color: yellow>
: Beware of electric shock. (This symbol is displayed on the main unit
label.) <Color: yellow>
Warning:
Carefully read the labels affixed to the main unit.
Page 5
5
GBDFEINLPGRRUTRTR
Warning:
• Do not remove the front panel or the fan guard from the outdoor unit
when it is running. You could be injured if you touch rotating, hot or
high-voltage parts.
• Never insert fingers, sticks etc. into the intakes or outlets, otherwise
injury may result, since the fan inside the unit rotates at high speed.
Exercise particular care when children are present.
• If you detect odd smells, stop using the unit, turn off the power switch
and consult your dealer. Otherwise, a breakdown, electric shock or fire
may result.
• When you notice exceptionally abnormal noise or vibration, stop operation, turn off the power switch, and contact your dealer.
• Do not over-cool. The most suitable inside temperature is one that is
within 5 °C [9 °F] of the outside temperature.
• Do not leave handicapped people or infants sitting or standing in the
path of the airflow from the air-conditioner. This could cause health problems.
Caution:
• Do not direct the airflow at plants or caged pets.
• Ventilate the room frequently. If the unit is operated continuously in a
closed room for a long period of time, the air will become stale.
In case of failure
Warning:
• Never remodel the air-conditioner. Consult your dealer for any repair service. Improper repair work can result in water leakage, electric shock,
fire, etc.
• If the remote controller displays an error indication, the air-conditioner
does not run, or there is any abnormality, stop operation and contact
your dealer. Leaving the unit as it is under such conditions can result in
fire or failure.
• If the power breaker is frequently activated, get in touch with your dealer.
Leaving it as it is can result in fire or failure.
• If the refrigeration gas blows out or leaks, stop the operation of the airconditioner, thoroughly ventilate the room, and contact your dealer.
Leaving the unit as it is can result in accidents due to oxygen deficiency.
When the air-conditioner is not to be used for a long
time
• If the air-conditioner is not to be used for a long time due to a seasonal
change, etc., run it for 4 - 5 hours with the air blowing until the inside is
completely dry. Failing to do so can result in the growth of unhygienic,
unhealthy mold in scattered areas throughout the room.
• When it is not to be used for an extended time, keep the [power supply]
turned OFF.
If the power supply is kept on, several watts or several tens of watts will
be wasted. Also, the accumulation of dust, etc., can result in fire.
• Keep the power switched ON for more than 12 hours before starting
operation. Do not turn the power supply OFF during seasons of heavy
use. Doing so can result in failure.
1.3. Disposing of the unit
Warning:
When you need to dispose of the unit, consult your dealer. If pipes are
removed incorrectly, refrigerant (fluorocarbon gas) may blow out and come
into contact with your skin, causing injury. Releasing refrigerant into the
atmosphere also damages the environment.
2. Names and functions of various parts
Attachment and detachment of filter
[Fig. A] (P.3)
Caution:
• In removing the filter, precautions must be taken to protect your eyes
from dust. Also, if you have to climb up on a stool to do the job, be careful not to fall.
• Turn off the power supply when the filter is changed.
3. How to operate
Before starting operation
• Start running after the “PLEASE WAIT” display has disappeared. The
“PLEASE WAIT” display briefly appears on the room temperature display
(max. 3 minutes) when the power is turned on and after a power failure. This
does not indicate any failure of the air-conditioner.
• The operation modes of the indoor units’ cooling operation, dry operation,
and heating operation are different from those of the outdoor units.
When the operation is started with cooling/dry (heating) and other indoor
units connected to the counterpart outdoor units are already running in the
same operation mode, the remote control displays “ ” or “ ”
(“ ”) mode. However, the operation comes to stop, and you cannot get
a desired mode. When this occurs, you will be notified by the “ ” or
“ ” (“ ”) display that flashes in the liquid crystal display of the
remote controller. Set to the operation mode of other indoor unit by the operation switch Button.
The above does not apply to the models that simultaneously run both the
cooling operation and heating operation.
* DRY operation cannot be carried out by PEFY-P-NMHU-E-F.
• The outdoor units stop when all the indoor units connected to the counterpart
outdoor units stop.
• During heating operation, even if the indoor unit is set to operation while the
outdoor unit is in defrosting operation, operation starts after the defrosting
operation of the outdoor unit has ended.
3.1. ON/OFF
Start an operation
1. Press the L [ON/OFF] Button
Operation lamp ڹ lights up and operation starts.
Stop an operation
1. Press the L [ON/OFF] Button again
Operation lamp goes off and operation stops.
• Once the Buttons have been set, pressing of the [ON/OFF] Button only can
repeat the same operation thereafter.
• During operation, the operation lamp above the [ON/OFF] Button lights up.
Caution:
Even if the [ON/OFF] Button is pressed immediately after the operation is
once stopped, operation is not restarted for about 3 minutes. This function
protects the machine. It automatically starts operation after the lapse of
approximately 3 minutes.
3.2. Selecting operation
When selecting operation
1. Press the C [Mode (Return)] Button
Consecutive press of the selecting operation Button switches the operation
over to “ ”, “ ”, “ ”, (“ ”), and (“ ”). For
the contents of operation, check the display.
* DRY operation cannot be carried out by PEFY-P-NMHU-E-F.
For cooling
Press the C [Mode (Return)] Button and bring up the “ ” display.
MI
A
B
C
DE
F
G
H
J
K
L
N
ڹ
COOL
DRY
HEAT
COOL
DRY
HEAT
COOL
DRY
FAN
AUTO
HEAT
COOL
Page 6
6
GB D F E I NL P GR RU TR TR
For dry * Except PEFY-P-NMHU-E-F.
Press the
C
[Mode (Return)] Button and bring up the “ ” display.
• The indoor fan turns to the low-speed operation, disabling the change of fan
speed.
• Dry operation cannot be carried out at room temperature of less than 18 °C
[65 °F].
For fan
Press the C [Mode (Return)] Button and bring up the “ ” display.
• The fan operation functions to circulate the air in the room.
• The temperature of the room cannot be set by fan operation.
Caution:
Never expose your body directly to cool air for a long time. Excessive exposure to cool air is bad for your health, and should therefore be avoided.
Dry operation
The dry is a microcomputer-controlled dehumidifying operation which controls
excessive air-cooling according to the room temperature of your choice. (Not
usable for heating.)
1. Until reaching room temperature of your choice
The compressor and indoor fan function is linked motion according to the
change of the room temperature and automatically repeat ON/OFF.
2. When reaching room temperature of your choice
Both the compressor and indoor fan stop.
When stop continues for 10 minutes, the compressor and indoor fan are
operated for 3 minutes to keep the humidity low.
For heating
Press the C [Mode (Return)] Button to bring up the “ ” display.
Regarding displays during heating operation “DEFROST”
Displayed only during the defrosting operation.
“STAND BY”
Displayed from the start of heating operation until the moment warm air blows
out.
Caution:
• When the air-conditioner is used together with burners, thoroughly venti-
late the area. Insufficient ventilation can result in accidents due to oxygen deficiency.
• Never place a burner at a place where it is exposed to the airflow from
the air-conditioner.
Doing so can result in imperfect combustion of the burner.
• The microcomputer functions in the following cases: *
• Air does not blow out when heating starts. *
- To prevent any cool air from escaping, the indoor fan is gradually switched
in sequence from faint airflow/weak airflow/set airflow according to the temperature rise of the blown out air. Wait a moment until the airflow comes out
naturally.
• The fan is not moving at the set speed. *
- In some models, the system switches over to faint airflow when the temperature of the room reaches the set temperature. In other cases, it stops to
prevent any cool air from escaping during the defrosting operation.
• Air flows out even if operation is stopped. *
- Approximately 1 minute after the stop of operation, the indoor fan sometimes rotates to eliminate extra heat generated by the electric heater, etc.
The fan speed comes to low or high.
* Except PEFY-P-NMHU-E-F.
3.3. Room temperature adjustment
To change room temperature
Press the A [Set Temperature] Button and set the room temperature of
your choice.
Pressing or once changes the setting by 1 °C / 1 °F.
If the pressing is continued, the setting continues to change by 1 °C [2 °F].
• Indoor temperature can be set within the following range.
Cooling/dry :19 °C [67 °F] - 30 °C [87 °F]
Heating :17 °C [63 °F] - 28 °C [83 °F]
• It is impossible to set the room temperature by the air-blow operation.
* The range of room temperature display is 8 °C [46 °F] - 39 °C [102 °F]. Out-
side this range, the display flashes either 8 °C [46 °F] - 39 °C [102 °F] to
inform you if the room temperature is lower or higher than the displayed temperature.
3.4. Fan speed adjustment
* Except PEFY-P-NMHU-E-F.
To change fan speed
Every time you press the F [Fan Speed] Button once, it switches from the lowspeed to the high-speed settings successively.
In the electronic dry operation, the indoor fan automatically turns to low-speed
operation. Switching of fan speed is impossible. (Only the display on the remote
controller changes.)
* Every time the [Fan Speed] Button is once pressed, the fan speed is
changed.
PEFY-P72·96NMHU-E
Fan speed : 1 stage
PEFY-P15~54NMHU-E, PFFY-P-NEMU-E, PFFY-P-NRMU-E
PDFY-P36·48NMU-E series
Fan speed : 2 stages
PDFY-P06~30NMU-E series
Fan speed : 4 stages
PLFY-P06~18NLMU-E, PEFY-P-NMLU-E series
Fan speed : 3 stages
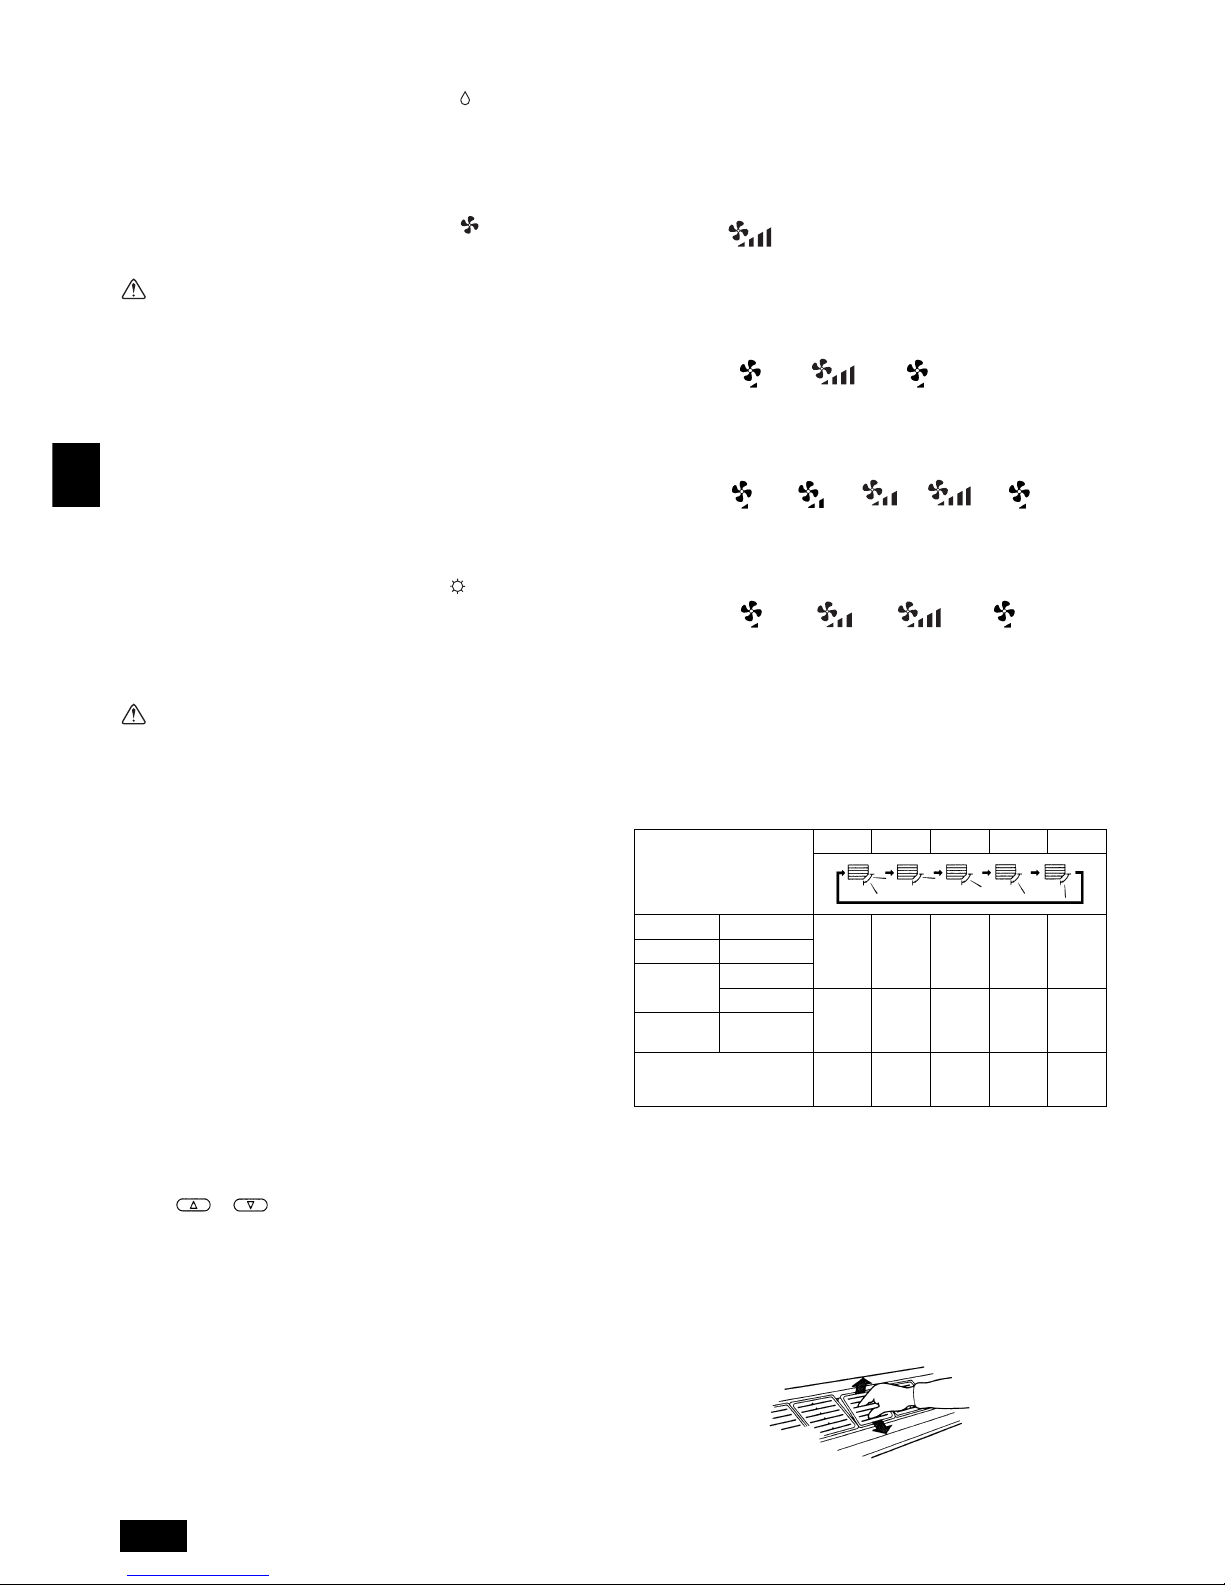
3.5. Adjustment of up/down airflow direction
* Except PEFY-P-NMHU-E-F.
To change the up/down airflow direction
Every time the G [Airflow Up/Down] Button is pressed, the direction of the
airflow changes.
PLFY-P-NLMU-E
*1 • It automatically returns to the “B 0 °” when one hour passes.
• The “ONLY 1 Hr.” is displayed on the remote controller (It is disappeared
when one hour passes.)
• This function is not available according to the models.
• In the following cases, it is different for the display and the unit.
1. “DEFROST” or “STAND BY” is displayed
2. Just starting in heating mode
3. Thermostat OFF in heating mode
PFFY-P-NEMU-E
While pulling the blowout grill out toward you, raise the rear, remove it, change
the direction, and set it in place.
DRY
FA
N
HEAT
Display:
(High)
Display: ÆÆ (repeat)
(Low) (High) (Low)
Display: ÆÆÆÆ (repeat)
(Low) (Mid2) (Mid1) (High) (Low)
Display: ÆÆÆ (repeat)
(Low) (Mid) (High) (Low)
Display
ASwing B 0° C 40° D 60° E 80°
Mode Fan speed
ABCDEHeating/Fan High/Mid/Low
Cooling
High
Mid/Low
ABCDE
Dry
Can not
Change
Initial setting —
Cooling
Dry
Fan
— — Heating
Page 7

7
GBDFEINLPGRRUTRTR
Caution:
Avoid putting your hand into the air outlet of the indoor unit any more than
necessary during operation. If you get your hands caught in the metal parts
when adjusting the airflow-direction-adjustment board and blowout grill, or
nip them in the autovane, there is a risk of injury and failure.
3.6. Others
4. The smart way to use
Even minimal steps to care for your air-conditioner can help make its use
far more effective in terms of air-conditioning effect, electricity charges,
etc.
Set the right room temperature
• In cooling operation, the temperature difference of about 5 °C [9 °F] between
indoors and outdoors is optimum.
• If the room temperature is raised by 1 °C [2 °F] during air-cooling operation,
about 10% electric power can be saved.
• Excessive cooling is bad for health. It also results in the waste of electric
power.
Clean the filter thoroughly
• If the screen of the air filter becomes clogged, the airflow and air-conditioning
effect can be significantly reduced.
Further, if the condition is left unattended, failure can result. It is particularly
important to clean the filter at the beginning of the cooling and heating seasons. (When profuse dust and dirt have accumulated, clean the filter thoroughly.)
Prevent intrusion of heat during air-cooling
• To prevent the intrusion of heat during cooling operation, provide a curtain or
a blind on the window to block out direct sunlight. Also, do not open the
entrance or exit except in cases of dire necessity.
Carry out ventilation sometimes
* Except PEFY-P-NMHU-E-F.
• Since the air periodically gets dirty in a room that is kept closed for a long
time, ventilation is sometimes necessary. When gas appliances are used
together with the air-conditioner, special precautions must be taken. If the
“LOSSNAY” ventilation unit developed by our company is used, you can perform ventilation with less waste. For details on this unit, consult with your
dealer.
5. Caring for the machine
Always have filter maintenance performed by a service person.
Before care-taking, turn the power supply OFF.
Refer to A and B in Fig.A on the page 3 for the way to remove the filter
*PDFY-P-NMU-E.
Caution:
• Before you start cleaning, stop operation and turn OFF the power supply.
Remember that the fan is rotating inside at high speed, posing a serious
risk of injury.
• Indoor units are equipped with filters to remove the dust of sucked-in air.
Clean the filters using the methods shown in the following sketches.
(The standard filter should normally be cleaned once a week, and the
long-life filter at the beginning of each season.)
• The life of the filter depends on where the unit is installed and how it is
operated.
How to clean
• Clear dust away lightly or clean it up with a vacuum cleaner. In the case of
severe staining, wash the filter in lukewarm water mixed with dissolved neutral detergent or water, and then rinse off the detergent completely. After
washing, dry it and fix it back into place.
Caution:
• Do not dry the filter by exposing it to direct sunlight or warming it using
fire, etc. Doing so can result in the deformation of the filter.
• Washing it in hot water (more than 50 °C [122 °F] ) can also result in
deformation.
Caution:
Never pour water or flammable sprays onto the air-conditioner. Cleaning
using these methods can result in the failure of the air-conditioner, electric
shock, or fire.
: Displayed when control is executed by a sepa-
rately sold centralized control unit, etc.
: Displayed from the start of heating operation
until the moment warm air blows out.
: This displays indication when some abnormal-
ity occurs in the unit.
: When a Button is pressed for any function
which the indoor unit cannot perform, this display flashes concurrently with the display of
that function.
: In the system in which the [Sensor] display is
indicated as the “remote controller”, room temperature measurement is performed by the
room temperature sensor built into the remote
controller. Therefore, pay attention to the following:
: Displayed when it is time to clean the filter.
Press the
K
[Filter (↵)] Button twice, then the
display is disappeared.
STAND BY
DEFROST
NOT AVAILABLE
FILTER
Page 8

8
GB D F E I NL P GR RU TR TR
6. Troubleshooting
Before you ask for repair service, check the following points:
• If operation stops due to a power failure, the [restart-preventing circuit at power failure] operates and disables unit operation even after power restoration. In this case,
press the [ON/OFF] Button again and start operation.
If malfunctions persist after you have checked the above, turn the power supply OFF and contact your dealer with information about the product name, the nature of the
malfunction, etc. If the display of “[check]” and (4 digit) check code flashes, tell the dealer contents of the display (check code). Never attempt to repair by yourself.
The following symptoms are not air-conditioner failures:
• The air blown out from the air-conditioner can sometimes give off odors. This is due to cigarette smoke contained in the air of the room, the smell of cosmetics, the
walls, furniture, etc., absorbed in the air-conditioner.
• A hissing noise can be heard immediately after the air-conditioner is started or stopped. This is the sound of the refrigeration flowing inside the air-conditioner. This is
normal.
• The air-conditioner sometimes snaps or clicks at the beginning or end of cooling/heating operation. This is the sound of friction on the front panel and other sections
due to expansion and contraction caused by temperature change. This is normal.
State of Machine Remote Controller Cause Troubleshooting
It does not run.
“ ” display is not lit up
No display appears
even when the [ON/
OFF] Button is pressed.
Power failure Press the [ON/OFF] Button after power restoration.
The power supply is turned OFF. Turn the power supply ON.
The fuse in the power supply is gone. Replace fuse.
The earth leakage breaker is gone. Put in the earth leakage breaker.
Air flows out but it
does not cool enough
or heat enough.
The liquid crystal display shows that it is in
the state of operation.
Improper temperature adjustment.
After checking the set temperature and inlet temperature
on the liquid crystal display, refer to [Room temperature
adjustment], and operate the adjustment Button.
The filter is filled with dust and dirt.
Clean up the filter.
(Refer to [Caring for the machine].)
There are some obstacles at the air inlet and outlet of
the indoor and outdoor units.
Remove.
Windows and doors are open. Close.
Cool air or warm air
does not come out.
The liquid crystal display shows that it is in
operation.
The restart-preventing circuit is in operation for 3 minutes.
Wait for a while.
(To protect the compressor, a 3-minute restart-prevent-
ing circuit is built into the indoor unit. Therefore, there
are occasions sometimes when the compressor does
not start running immediately. There are cases when it
does not run for as long as 3 minutes.)
Indoor unit operation was started anew during the
heating and defrosting operation.
Wait for a while.
(Heating operation starts after ending defrosting opera-
tion.)
It runs briefly, but soon
stops.
The “check” and check
code flashes on the liquid crystal display.
There are some obstacles at the air inlet and outlet of
the indoor and outdoor units.
Rerun after removal.
The filter is filled with dust and dirt.
Rerun after cleaning the filter. (Refer to [Caring for the
machine].)
The sound of the
exhaust and rotation
of the motor can still
be heard after stop of
running.
All lights are out except
the powered display of
“”.
When other indoor units are engaged in cooling operation, the machine stops after running a drain-up
mechanism for 3 minutes when air-cooling operation
is stopped.
Wait for 3 minutes.
The sound of the
exhaust and the rotation of the motor can
be heard intermittently
after stop of running.
All lights are out except
the powered display of
“”.
When other indoor units are engaged in cooling operation, drained water is brought in. If the drain water is
collected, the drain-up mechanism initiates a draining
operation.
It soon stops. (If the noise occurs more than 2-3 times in
an hour, ask for repair service.)
Warm air comes out
intermittently when
the thermostat is OFF
or during fan operation.
The liquid crystal display shows that it is in
the state of operation.
When other indoor units are engaged in heating operation, the control valves are opened and closed from
time to time to maintain the stability of the system.
It soon stops. (If the room temperature rises uncomfort-
ably high in a small room, stop operation.)
Page 9

9
GBDFEINLPGRRUTRTR
7. Installation, transferring works, and checking
Regarding place for installation
Consult with your dealer for details on installation and transferring the installation.
Caution:
Never install the air-conditioner where there is a risk of leakage of flammable gas.
If gas leaks and accumulates around the unit, fire can result.
Never install the air-conditioner at the following place:
• where there is a lot of machine oil
• near the ocean and beach areas where there is salt air.
• where humidity is high
• where there are hot springs nearby
• where there is sulphurous gas
• where there is a high-frequency processing machinery (a high-frequency
welder, etc.)
• where acid solution is frequently used
• where special sprays are frequently used
• Install the indoor unit horizontally. Otherwise, water leakage can result.
• Take sufficient measures against noise when installing the air-conditioners at
hospitals or communication-related businesses.
If the air-conditioner is used in any of the above-mentioned environments, frequent operational failure can be expected. It is advisable to avoid these types of
installation sites.
For further details, consult with your dealer.
Regarding electrical work
Caution:
• The electrical work must be undertaken by a person who is qualified as
an electrical engineer according to the [technical standard respecting
electrical installation], [internal wiring rules], and the installation instruction manual with the absolute use of exclusive circuits. The use of other
products with the power source can result in burnt-out beakers and
fuses.
• Never connect the grounding wire to a gas pipe, water pipe, arrester, or
telephone grounding wire. For details, consult with your dealer.
• In some types of installation sites, the installation of an earth leakage
breaker is mandatory. For details, consult with your dealer.
Regarding transfer of installation
• When removing and reinstalling the air-conditioner when you enlarge your
home, remodel, or move, consult with your dealer in advance to ascertain the
cost of the professional engineering work required for transferring the installation.
Caution:
When moving or reinstalling the air-conditioner, consult with your dealer.
Defective installation can result in electric shock, fire, etc.
Regarding noise
• In installing work, choose a place that can fully bear the weight of the air-conditioner, and where noise and vibration can be reduced.
• Choose a place where cool or warm air and noise from the outdoor air outlet
of the air-conditioner does not inconvenience the neighbors.
• If any alien object is placed near the outdoor air outlet of the air-conditioner,
decreased performance and increased noise can result. Avoid placing any
obstacles adjacent to the air outlet.
• If the air-conditioner produces any abnormal sound, consult with your dealer.
Maintenance and inspection
• If the air-conditioner is used throughout several seasons, the insides can get
dirty, reducing the performance.
Depending upon the conditions of usage, foul odors can be generated and
drainage can deteriorate due to dust and dirt, etc.
8. Specifications
PLFY-P-NLMU-E
Notes: *1 Cooling/Heating capacity indicates the maximum value at operation under the following condition.
Cooling: Indoor: 26.7 °C [80 °F] DB/19.4 °C [67 °F] WB Outdoor: 35 °C [95 °F] DB
Heating: Indoor: 21.1 °C [70 °F] DB Outdoor: 8.3 °C [47 °F] DB/6.1 °C [43 °F] WB
*2 The operating noise is the data that was obtained in an anechoic room.
*4 The figure in ( ) indicates Panel's.
Item Model PLFY-P06NLMU-E PLFY-P08NLMU-E PLFY-P12NLMU-E PLFY-P15NLMU-E PLFY-P18NLMU-E
Power sourse 208/230V, 60Hz
Capacity
*1
Cooling
kW 1.8 2.3 3.5 4.4 5.3
BTU/h 6000 8000 12000 15000 18000
Heating
kW 2.0 2.6 4.0 5.0 5.9
BTU/h 6700 9000 13500 17000 20000
Dimension
*4
Height
mm 290 (20)
in 11-7/16 (13/16)
Width
mm 776 (1080) 946 (1250)
in 30-9/16 (42-17/32) 37-1/4 (49-7/32)
Depth
mm 634 (710)
in
24-31/32 (27-31/32)
Net weight
kg 23 (6.5) 24 (6.5) 27 (7.5)
lb 51 (15) 53 (15) 60 (17)
FAN
Airflow rate
(Low-Middle-High)
m
3
/min 6.5-8.0-9.5 6.5-8.0-9.5 6.5-8.0-9.5 7.0-8.5-10.5 9.0-11.0-12.5
cfm 230-282-335 230-282-335 230-282-335 247-300-371 318-388-441
External static
pressure
Pa
208V-----
230V----Noise level
(Low-Middle-High) *2
dB(A)
208V 27-30-33 27-30-33 27-30-33 29-33-36 31-34-37
230V 28-31-34 28-31-34 28-31-34 30-34-37 32-35-38
Filter Standard filter
Page 10

10
GB D F E I NL P GR RU TR TR
PDFY-P-NMU-E
PDFY-P-NMU-E
PEFY-P-NMLU-E
Notes: *1 Cooling/Heating capacity indicates the maximum value at operation under the following condition.
Cooling: Indoor: 26.7 °C [80 °F] DB/19.4 °C [67 °F] WB Outdoor: 35 °C [95 °F] DB
Heating: Indoor: 21.1 °C [70 °F] DB Outdoor: 8.3 °C [47 °F] DB/6.1 °C [43 °F] WB
*2 The operating noise is the data that was obtained in an anechoic room.
*3 As for the factory setting is below.
PDFY-P-NMU-E series
Item Model PDFY-P06NMU-E PDFY-P08NMU-E PDFY-P12NMU-E PDFY-P15NMU-E PDFY-P18NMU-E
Power sourse 208/230V, 60Hz
Capacity
*1
Cooling
kW 1.8 2.3 3.5 4.4 5.3
BTU/h 6000 8000 12000 15000 18000
Heating
kW 2.0 2.6 4.0 5.0 5.9
BTU/h 6700 9000 13500 17000 20000
Dimension
Height
mm 295
in 11-5/8
Width
mm 710 960
in 27-31/32 37-13/16
Depth
mm 735
in 28-15/16
Net weight
kg 26 26 27 32 34
lb 57 57 60 71 75
FAN
Airflow rate
(Low-(Middle2-Middle1-) High)
m3/min 6.0-6.5-7.5-8.5 6.0-6.5-7.5-8.5 6.0-6.5-7.5-8.5
10.0-11.0-12.5-14.0 10.0-11.0-12.5-14.0
cfm 211-229-264-300 211-229-264-300 211-229-264-300 353-388-441-494 353-388-441-494
External static
pressure *3
Pa
208V 30-50-80 30-50-80 30-50-80 30-50-80 30-50-80
230V 40-60-100 40-60-100 40-60-100 40-60-100 40-60-100
Noise level
(Low-(Middle2-Middle1-) High) *2
dB(A)
208V 26-28-31-34 26-28-31-34 26-28-31-34 32-34-35-37 32-34-35-37
230V 28-30-33-36 28-30-33-36 28-30-33-36 34-36-37-39 34-36-37-39
Filter Standard filter
Item Model PDFY-P24NMU-E PDFY-P27NMU-E PDFY-P30NMU-E PDFY-P36NMU-E PDFY-P48NMU-E
Power sourse 208/230V, 60Hz
Capacity
*1
Cooling
kW 7.0 7.9 8.8 10.6 14.1
BTU/h 24000 27000 30000 36000 48000
Heating
kW 7.9 8.8 10.0 11.7 15.8
BTU/h 27000 30000 34000 40000 54000
Dimension
Height
mm 295 335
in 11-5/8 13-7/32
Width
mm 1160 1510
in 45-11/16 59-15/32
Depth
mm 735 775
in 28-15/16 30-17/32
Net weight
kg 39 39 39 52 52
lb 86 86 86 115 115
FAN
Airflow rate
(Low-(Middle2-Middle1-) High)
m3/min
12.5-14.0-16.0-18.0 13.5-15.5-17.5-19.5 14.0-16.5-18.5-21.0
19.5-28.0 24-34
cfm 441-494-565-635 477-547-618-689 494-582-653-741 688-988 847-1200
External static
pressure *3
Pa
208V 30-50-80 30-50-80 30-50-100 50-100-130 50-100-130
230V 40-60-100 40-60-100 40-60-115 60-115-150 60-115-150
Noise level
(Low-(Middle2-Middle1-) High) *2
dB(A)
208V 28-32-34-37 31-35-37-40 32-35-38-40 36-44 42-46
230V 30-34-36-39 32-36-38-40 34-37-40-42 38-45 43-47
Filter Standard filter
Item Model
PEFY-P06NMLU-E PEFY-P08NMLU-E PEFY-P12NMLU-E
Power sourse 208/230V, 60Hz
Capacity
*1
Cooling
kW 1.8 2.3 3.5
BTU/h 6000 8000 12000
Heating
kW 2.0 2.6 4.0
BTU/h 6700 9000 13500
Dimension
Height
mm 225
in 8-7/8
Width
mm 790
in 31-1/8
Depth
mm 550
in 21-21/32
Net weight
kg 18
lb 40
FAN
Airflow rate
(Low-Middle-High)
m
3
/min 4.8-5.8-7.9 4.8-5.8-7.9 4.8-5.8-9.5
cfm 169-205-279 169-205-279 169-205-335
External static
pressure
Pa
208V 5 5 5
230V 5 5 5
Noise level
(Low-Middle-High) *2
dB(A)
208V 25-29-36 25-29-36 25-29-40
230V 25-29-36 25-29-36 25-29-40
Filter Standard filter
PDFY-P06NMU-E PDFY-P08NMU-E PDFY-P12NMU-E PDFY-P15NMU-E PDFY-P18NMU-E
208V 230V 208V 230V 208V 230V 208V 230V 208V 230V
50 60 50 60 50 60 50 60 50 60
PDFY-P24NMU-E PDFY-P27NMU-E PDFY-P30NMU-E PDFY-P36NMU-E PDFY-P48NMU-E
208V 230V 208V 230V 208V 230V 208V 230V 208V 230V
50 60 50 60 50 60 50 60 50 60
Page 11

11
GBDFEINLPGRRUTRTR
PEFY-P-NMHU-E
PEFY-P-NMHU-E
Notes: *1 Cooling/Heating capacity indicates the maximum value at operation under the following condition.
Cooling: Indoor: 26.7 °C [80 °F] DB/19.4 °C [67 °F] WB Outdoor: 35 °C [95 °F] DB
Heating: Indoor: 21.1 °C [70 °F] DB Outdoor: 8.3 °C [47 °F] DB/6.1 °C [43 °F] WB
*2 The operating noise is the data that was obtained in an anechoic room.
*3 As for the factory setting is below.
PEFY-P-NMHU-E series
Item Model
PEFY-P15NMHU-E PEFY-P18NMHU-E PEFY-P24NMHU-E PEFY-P27NMHU-E PEFY-P30NMHU-E
Power sourse 208/230V, 60Hz
Capacity
*1
Cooling
kW 4.4 5.3 7.0 7.9 8.8
BTU/h 15000 18000 24000 27000 30000
Heating
kW 5.0 5.9 7.9 8.8 10.0
BTU/h 17000 20000 27000 30000 34000
Dimension
Height
mm 380
in 14-31/32
Width
mm 750 1000
in 29-17/32 39-3/8
Depth
mm 900
in 35-7/16
Net weight
kg 44 45 50
lb 98 100 111
FAN
Airflow rate
(Low-High)
m
3
/min 10.0-14.0 10.0-14.0 13.5-19.0 15.5-22.0 18.0-25.0
cfm 353-494 353-494 477-671 547-777 636-883
External static
pressure *3
Pa
208V ⎯ -50-160 ⎯ -50-160 ⎯ -50-160 ⎯ -50-160 ⎯ -50-160
230V 100-150-200 100-150-200 100-150-200 100-150-200 100-150-200
Noise level
(Low-High) *2
dB(A)
208V 25-32 25-32 29-36 30-38 33-40
230V 34-39 34-39 36-41 35-41 38-43
Filter Standard filter
Item Model
PEFY-P36NMHU-E PEFY-P48NMHU-E PEFY-P54NMHU-E PEFY-P72NMHU-E PEFY-P96NMHU-E
Power sourse 208/230V, 60Hz
Capacity
*1
Cooling
kW 10.6 14.1 15.8 21.1 28.1
BTU/h 36000 48000 54000 72000 96000
Heating
kW 11.7 15.8 17.6 23.4 31.7
BTU/h 40000 54000 60000 80000 108000
Dimension
Height
mm 380 470
in 14-31/32 18-17/32
Width
mm 1200 1250
in 47-1/4 49-7/32
Depth
mm 900 1120
in 35-7/16 44-1/8
Net weight
kg 70 100
lb 155 221
FAN
Airflow rate
(Low-High)
m
3
/min 26.5-38.0 26.5-38.0 28.0-40.0 58.0 72.0
cfm 936-1342 936-1342 989-1412 2048 2541
External static
pressure *3
Pa
208V ⎯ -50-160 ⎯ -50-160 ⎯ -50-160 70-160 70-160
230V 100-150-200 100-150-200 100-150-200 100-200 100-200
Noise level
(Low-High) *2
dB(A)
208V 31-41 31-41 31-41 45 52
230V 38-44 38-44 38-44 47 54
Filter Standard filter
PEFY-P15NMHU-E PEFY-P18NMHU-E PEFY-P24NMHU-E PEFY-P27NMHU-E PEFY-P30NMHU-E
208V 230V 208V 230V 208V 230V 208V 230V 208V 230V
50 150 50 150 50 150 50 150 50 150
PEFY-P36NMHU-E PEFY-P48NMHU-E PEFY-P54NMHU-E PEFY-P72NMHU-E PEFY-P96NMHU-E
208V 230V 208V 230V 208V 230V 208V 230V 208V 230V
50 150 50 150 50 150 160 200 160 200
Page 12

12
GB D F E I NL P GR RU TR TR
PEFY-P-NMHU-E-F
Notes: *1 Cooling/Heating capacity indicates the maximum value at operation under the following condition.
Cooling: Indoor: 33 °C [91 °F] DB/28 °C [82 °F] WB Outdoor: 33 °C [91 °F] DB
Heating: Indoor: 0 °C [32 °F] DB/–2.9 °C [27 °F] WB Outdoor: 0 °C [32 °F] DB/–2.9 °C [27 °F] WB
*2 The operating noise is the data that was obtained in an anechoic room.
*3 As for the factory setting is below.
PEFY-P-NMHU-E-F series
PFFY-P-NEMU-E
PFFY-P-NRMU-E
Notes: *1 Cooling/Heating capacity indicates the maximum value at operation under the following condition.
Cooling: Indoor: 26.7 °C [80 °F] DB/19.4 °C [67 °F] WB Outdoor: 35 °C [95 °F] DB
Heating: Indoor: 21.1 °C [70 °F] DB Outdoor: 8.3 °C [47 °F] DB/6.1 °C [43 °F] WB
*2 The operating noise is the data that was obtained in an anechoic room.
Item Model
PEFY-P30NMHU-E-F PEFY-P54NMHU-E-F PEFY-P72NMHU-E-F PEFY-P96NMHU-E-F
Power sourse 208/230V, 60Hz
Capacity
*1
Cooling
kW 8.8 15.8 21.1 28.1
BTU/h 30000 54000 72000 96000
Heating
kW 8.4 14.9 19.9 26.4
BTU/h 28500 51000 68000 90000
Dimension
Height
mm 380 470
in 14-31/32 18-17/32
Width
mm 1000 1200 1250
in 39-3/8 47-1/4 49-7/32
Depth
mm 900 1120
in 35-7/16 44-1/8
Net weight
kg 50 70 100
lb 111 155 221
FAN
Airflow rate
m
3
/min9 182835
cfm 318 636 989 1236
External static
pressure *3
Pa
208V 35-85-170 35-85-170 180 180
230V 50-130-210 60-130-220 260 260
Noise level *2 dB(A)
208V 38 38 43 44
230V 43 43 47 48
Filter Standard filter
PEFY-P30NMHU-E-F PEFY-P54NMHU-E-F PEFY-P72NMHU-E-F PEFY-P96NMHU-E-F
208V 230V 208V 230V 208V 230V 208V 230V
85 130 85 130 180 260 180 260
Model
Item
PFFY-
P06NEMU-E
PFFY-
P08NEMU-E
PFFY-
P12NEMU-E
PFFY-
P15NEMU-E
PFFY-
P18NEMU-E
PFFY-
P24NEMU-E
Power sourse 208/230V, 60Hz
Capacity
*1
Cooling
kW 1.8 2.3 3.5 4.4 5.3 7.0
BTU/h 6000 8000 12000 15000 18000 24000
Heating
kW 2.0 2.6 4.0 5.0 5.9 7.9
BTU/h 6700 9000 13500 17000 20000 27000
Dimension
Height
mm 630
in 24-13/16
Width
mm 1050 1170 1410
in 41-11/32 46-3/32 55-17/32
Depth
mm 220
in 8-11/16
Net weight
kg 23 23 25 26 30 32
lb 51 51 56 58 67 71
FAN
Airflow rate
(Low-High)
m
3
/min 5.5-6.5 5.5-6.5 7.0-9.0 8.5-11.0 10.0-13.0 10.0-14.0
cfm 194-229 194-229 247-317 300-388 353-459 353-494
External static
pressure
Pa
208V - - - - - -
230V - - - - - Noise level
(Low-High) *2
dB(A)
208V 36-41 36-41 37-41 38-43 38-43 40-46
230V 36-41 36-41 37-41 38-43 38-43 40-46
Filter Standard filter
Model
Item
PFFY-
P06NRMU-E
PFFY-
P08NRMU-E
PFFY-
P12NRMU-E
PFFY-
P15NRMU-E
PFFY-
P18NRMU-E
PFFY-
P24NRMU-E
Power sourse 208/230V, 60Hz
Capacity
*1
Cooling
kW 1.8 2.3 3.5 4.4 5.3 7.0
BTU/h 6000 8000 12000 15000 18000 24000
Heating
kW 2.0 2.6 4.0 5.0 5.9 7.9
BTU/h 6700 9000 13500 17000 20000 27000
Dimension
Height
mm 639
in 25-3/16
Width
mm 886 1006 1246
in 34-29/32 39-5/8 49-1/16
Depth
mm 220
in 8-11/16
Net weight
kg 19 19 20 21 25 27
lb 41 41 45 47 56 60
FAN
Airflow rate
(Low-High)
m
3
/min 5.5-6.5 5.5-6.5 7.0-9.0 8.5-11.0 10.0-13.0 10.0-14.0
cfm 194-229 194-229 247-317 300-388 353-459 353-494
External static
pressure
Pa
208V - - - - - -
230V - - - - - Noise level
(Low-High) *2
dB(A)
208V 36-41 36-41 37-41 38-43 38-43 40-46
230V 36-41 36-41 37-41 38-43 38-43 40-46
Filter Standard filter
Page 13

13
F
Table des matières
1. Consignes de sécurité ................................................................................ 13
1.1. Installation ................................................................................. 13
1.2. Pendant le fonctionnement........................................................13
1.3. Emplacement de l’appareil ........................................................ 14
2. Nom et fonction des différents éléments .....................................................14
3. Comment faire fonctionner le climatiseur ....................................................14
3.1. ON/OFF (Marche/Arrêt) ............................................................. 15
3.2. Sélection du mode de fonctionnement ......................................15
3.3. Réglage de la température de la pièce......................................15
3.4. Réglage de la vitesse du ventilateur .......................................... 15
3.5. Réglage du sens de la soufflerie vers le haut/vers le bas..........16
3.6. Autres ........................................................................................ 16
4. Comment utiliser le climatiseur intelligemment ...........................................16
5. Entretien de l’appareil .................................................................................16
6. Guide de dépannage...................................................................................17
7. Installation, travaux de déplacement et vérifications...................................18
8. Spécifications techniques............................................................................19
1. Consignes de sécurité
Symboles utilisés dans le texte
Avertissement:
Décrit les précautions à suivre pour éviter tout danger de blessures ou de
décès encourus par l’utilisateur.
Précaution:
Décrit les précautions devant être observées afin de prévenir tout endommagement de l’appareil.
Symboles utilisés sur l’appareil
1.1. Installation
Après avoir lu le présent manuel, le conserver avec le manuel d’installa-
tion dans un endroit sûr afin de pouvoir le consulter ultérieurement lorsqu’une question se pose. Si une autre personne va être chargée de faire
fonctionner l’appareil, veiller à bien lui remettre le présent manuel.
Avertissements:
• Cet appareil ne doit pas être installé par l’utilisateur. Demander au revendeur ou à une société agréée de l’installer. Si l’appareil n’est pas correctement installé, il peut y avoir un risque de fuite d’eau, d’électrocution ou
d’incendie.
• Utiliser uniquement les accessoires agréés pas Mitsubishi Electric et
demander au revendeur ou à une société agréée de les installer. Si les
accessoires ne sont pas correctement installés, il peut y avoir un risque
de fuite d’eau, d’électrocution ou d’incendie.
• Le manuel d’installation décrit en détails la méthode d’installation suggérée. Toute modification de structure nécessaire pour l’installation doit
être conforme aux normes locales de construction.
• Ne jamais réparer ou transférer soi-même l’appareil à un autre emplacement. Si les réparations effectuées ne sont pas correctes, il peut y avoir
un risque de fuite d’eau, d’électrocution ou d’incendie. En cas de panne
ou de déménagement de l’appareil, prière de contacter le revendeur.
• Garder les pièces électriques éloignées de l’eau (eau pour le lavage,
etc.). Il peut y avoir un risque d’électrocution, d’incendie ou de fumée.
Remarque1: Lors du lavage de l’échangeur de chaleur et de la vasque
d’écoulement, veiller à ce que le boîtier de commande, le
moteur et le LEV restent secs en utilisant une couverture
étanche.
Remarque2: Ne jamais vidanger l’eau de lavage de la vasque d’écoule-
ment et de l’échangeur de chaleur à l’aide de la pompe
d’écoulement. Les vidanger séparément.
• Ne pas permettre l’utilisation de cet appareil à des enfants en bas âge ou
à des personnes handicapées sans supervision.
• Toujours prendre toutes les précautions nécessaires pour éviter que des
enfants en bas âge jouent avec cet appareil.
• Ne pas utiliser de dispositif de détection des fuites.
1) Appareil extérieur
Avertissements:
• L’appareil extérieur doit être installé sur une surface plane et stable dans
un endroit non sujet à l’accumulation de neige, de feuilles ou de détritus.
• Ne pas se tenir sur l’appareil ni y déposer des objets. La personne ou les
objets risqueraient de tomber et de se blesser ou de blesser quelqu’un.
Précaution:
L’appareil extérieur doit être installé dans un endroit où l’air et le bruit
engendrés ne risquent pas de déranger les voisins.
2) Appareil intérieur
Avertissement:
L’appareil intérieur doit être correctement fixé, sinon, il pourrait tomber et
blesser quelqu’un.
3) Commande à distance
Avertissement:
La commande à distance doit être installée de telle sorte que les enfants ne
puissent pas y avoir accès.
4) Durit d’écoulement
Précaution:
S’assurer que la durit d’écoulement est installée de façon à ce que l’écoulement se déroule sans problème. Si l’installation n’est pas correctement
effectuée, cela peut entraîner une fuite d’eau risquant d’endommager le
mobilier.
5) Ligne d’alimentation électrique, fusible ou
coupe-circuit
Avertissements:
• S’assurer que l’appareil est alimenté par un circuit réservé. Le raccordement d’autres appareils au même circuit risque d’entraîner une surcharge.
• S’assurer de la présence d’un interrupteur secteur principal.
• Veiller à toujours respecter la tension indiquée sur l’appareil et le voltage
du fusible ou du coupe-circuit. Ne jamais utiliser un morceau de câble ou
un fusible d’un voltage supérieur à celui spécifié.
6) Mise à la terre
Précautions:
• L’appareil doit être correctement raccordé à la terre afin d’éviter tout risque d’électrocution. Ne jamais raccorder le câble de mise à la terre à un
tuyau de gaz ou d’eau. à un paratonnerre ou à un câble de terre téléphonique.
• Vérifier régulièrement que le câble de mise à la terre de l’appareil
extérieur est correctement raccordé à la borne de terre de l’appareil et à
l’électrode de mise à la terre.
1.2. Pendant le fonctionnement
Précautions:
• Ne pas utiliser d’objet pointu pour appuyer sur les touches, cela risque
d’endommager la commande à distance.
• Ne pas tordre ni tirer le câble de la commande à distance, cela risque de
l’endommager et d’entraîner un mauvais fonctionnement.
• Ne jamais retirer la partie supérieure de la commande à distance. On risque de toucher les cartes de circuits imprimés qui se trouvent à
l’intérieur, pouvant entraîner un incendie et une panne.
• Ne jamais essuyer la commande à distance avec du benzène, du diluant,
des chiffons chimiques, etc. Cela peut la décolorer et entraîner une
panne. Pour effacer les taches persistantes, tremper un chiffon dans un
détergent neutre dilué avec de l’eau, bien l’essorer, essuyer les taches,
puis essuyer de nouveau avec un chiffon sec.
Avant de faire fonctionner le climatiseur, lire attentivement
toutes les consignes de sécurité.
Les consignes de sécurité sont réparties en listes de points
importants concernant la sécurité. Veiller à bien les
respecter
: Indique une action devant être évitée.
: Indique des instructions importantes devant être suivies.
: Indique une pièce devant être mise à la terre.
: Indique la nécessité de faire attention aux pièces rotatives. (Ce sym-
bole est affiché sur l’étiquette de l’appareil principal.) <Couleur: Jaune>
: Attention, danger d’électrocution. (Ce symbole est affiché sur l’étiquette
de l’appareil principal.) <Couleur: Jaune>
Avertissement:
Lire soigneusement les étiquettes apposées sur l’appareil principal.
Page 14

14
F
• Ne jamais obstruer les entrées et les sorties des appareils extérieurs ou
intérieurs. Un meuble ou un objet haut placé au-dessous d’un appareil
intérieur ou des objets volumineux comme des grandes boîtes laissés à
proximité d’un appareil extérieur en réduiront l’efficacité.
Avertissements:
• Ne pas éclabousser l’appareil avec de l’eau et ne pas le toucher avec les
mains mouillées. Cela peut entraîner une électrocution.
• Ne pas vaporiser de gaz inflammable à proximité de l’appareil. cela peut
entraîner un incendie.
• Ne pas placer d’appareil de chauffage au gaz ou tout autre appareil fonctionnant avec une flamme nue à un endroit où il serait exposé à l’air
soufflé de l’appareil. Cela risque d’entraîner une combustion incomplète.
Avertissements:
• Ne pas retirer le panneau avant ou la garde du ventilateur de l’appareil
extérieur pendant son fonctionnement.Cela peut entraîner des blessures
si les pièces rotatives, chaudes ou sous haute tension sont touchées.
• Ne jamais insérer les doigts, de bâtons, etc. dans les entrées et les sorties d’air. Le ventilateur situé à l’intérieur tournant à haute vitesse, cela
peut entraîner des blessures. Faire particulièrement attention en
présence d’enfants.
• Si des odeurs inhabituelles se font sentir, arrêter l’appareil, le mettre
hors tension et contacter le revendeur. Sinon, cela peut entraîner une
panne, une électrocution ou un incendie.
• Si des bruits ou des vibrations anormaux se produisent, arrêter l’appareil, le mettre hors tension et contacter le revendeur.
• Ne pas refroidir exagérément. La température intérieure idéale se situe
dans une plage de 5 °C [9 °F] de différence par rapport à la température
extérieure.
• Ne pas laisser d’enfants ou de personnes handicapées assis ou debout
dans le passage du flux de l’air provenant du climatiseur. Cela peut
entraîner des problèmes de santé.
Précautions:
• Ne pas diriger le flux d’air vers des plantes ou des animaux domestiques
en cage.
• Aérer fréquemment la pièce. Si l’appareil fonctionne continuellement
dans une pièce fermée pendant une longue période, l’air devient vicié.
En cas de panne
Avertissements:
• Ne jamais modifier l’appareil. Consulter le revendeur pour toute réparation. De mauvaises réparations peuvent entraîner une fuite d’eau, une
électrocution,un incendie, etc.
• Si la commande à distance affiche un code d’erreur, si le climatiseur ne
fonctionne pas ou si une anomalie quelconque se produit, arrêter le
fonctionnement et contacter le revendeur. Si l’appareil est laissé dans de
telles conditions, cela peut entraîner un incendie ou une panne.
• Si le coupe-circuit est fréquemment activé, contacter le revendeur. Si
l’appareil est laissé dans de telles conditions, cela peut entraîner un
incendie ou une panne.
• Si le gaz réfrigérant s’échappe ou fuit, arrêter le fonctionnement du climatiseur, ventiler la pièce à fond et contacter le revendeur. Si l’appareil
est laissé dans de telles conditions, cela peut entraîner un accident dû
au manque d’oxygène.
Lorsque le climatiseur doit ne pas être utilisé pendant une longue période
• Lorsque le climatiseur doit ne pas être utilisé pendant une longue période à la suite d’un changement de saison, etc., le faire fonctionner pendant 4 à 5 heures avec la soufflerie d’air jusqu’à ce que l’intérieur soit
complètement sec.
• Sinon de la moisissure non hygiénique et insalubre risque de se développer à divers endroits de la pièce. Si l’alimentation est gardée sous tension, cela risque de gaspiller plusieurs watts, voire des dizaines de watts
et l’accumulation de poussière, etc., peut entraîner un incendie.
• Mettre l’alimentation sous tension au moins 12 heures avant de commencer le fonctionnement. Ne pas mettre l’alimentation hors tension
pendant les périodes de forte utilisation, cela risque d’entraîner une
panne.
1.3. Emplacement de l’appareil
Avertissement:
Lorsque l’appareil doit être mis au rebut, consulter le revendeur. Si les
tuyaux ne sont pas correctement retiré, du produit réfrigérant (gaz fluocarbonique) peut s’échapper et entrer en contact avec la peau, entraînant
des blessures. L’échappement du produit réfrigérant dans l’atmosphère
pollue également l’environnement.
2. Nom et fonction des différents éléments
Fixation et retrait du filtre
[Fig. A] (P. 3)
Précautions:
• Lors du retrait du filtre, se protéger les yeux de la poussière. De même,
si on doit monter sur un tabouret pour effectuer le travail, veiller à ne pas
tomber.
• Mettre l’alimentation hors tension avant de changer le filtre.
3. Comment faire fonctionner le climatiseur
Avant la mise en marche
• Démarrer la mise en marche lorsque l’affichage “PLEASE WAIT (VEUILLEZ
ATTENDRE)” a disparu. L’affichage “PLEASE WAIT (VEUILLEZ ATTEN-
DRE)” apparaît brièvement (max. 3 minutes) sur l’affichage de la température
de la pièce lorsque l’alimentation est mise sous tension et après une panne
de courant. Il n’indique nullement une panne du climatiseur.
• Le fonctionnement en mode refroidissement des appareils intérieurs dans les
modes de fonctionnement déshumidification et chauffage est différente de
celle des appareils extérieurs.
Lorsque le fonctionnement démarre avec le fonctionnement en mode
refroidissement/déshumidification (chauffage) et que les autres appareils
intérieurs raccordés à leurs appareils extérieurs correspondant fonctionnent
déjà dans le même mode de fonctionnement, la commande à distance
affiche le mode “ (REFROIDISSEMENT)” ou “ [ ]
(DÉSHUMIDIFICATION [CHAUFFAGE])”. Cependant, le fonctionnement
s’arrête et il n’est pas possible de programmer le mode de fonctionnement
désiré. Lorsque cela se produit, l’affichage “ (REFROIDISSEMENT)” ou “ [ ] (DÉSHUMIDIFICATION [CHAUFFAGE])” clignote sur l’écran à cristaux liquides de la commande à distance. Régler le
fonctionnement de l’autre appareil intérieur au moyen de la touche de
changement de mode.
Les indications ci-dessus ne s’appliquent pas aux modèles qui peuvent fonctionner simultanément comme climatiseur et comme appareil de chauffage.
* Le modèle PEFY-P-NMHU-E-F ne peut pas exécuter le mode de fonction-
nement DRY (DÉSHUMIDIFICATION).
• Les appareils extérieurs s’arrêtent lorsque tous les appareils intérieurs raccordés à leurs appareils extérieurs correspondant s’arrêtent.
• Pendant le fonctionnement en mode chauffage, même si l’appareil intérieur
est mis en fonctionnement alors que l’appareil extérieur fonctionne en mode
dégivrage, le fonctionnement ne démarre qu’après que le dégivrage de
l’appareil extérieur soit terminé.
MI
A
B
C
DE
F
G
H
J
K
L
N
ڹ
COOL
DRY
HEAT
COOL
DRY
HEAT
Page 15

15
F
3.1. ON/OFF (Marche/Arrêt)
Pour démarrer le fonctionnement
1. Appuyer sur la Touche L de [ON/OFF]
Le témoin de fonctionnement ڹ s’allume et le fonctionnement démarre.
Pour arrêter le fonctionnement
1. Appuyer de nouveau sur la Touche L de [ON/OFF]
Le témoin de fonctionnement s’éteint et le fonctionnement s’arrête.
• Lorsque les touches ont été programmées, le fait d’appuyer sur la Touche
[ON/OFF] ne fait que répéter continuellement la même opération.
• Pendant le fonctionnement, le témoin de fonctionnement situé au-dessus de
la Touche [ON/OFF] reste allumé.
Précaution:
Même si la Touche de [ON/OFF] est appuyée immédiatement après l’arrêt
du fonctionnement, l’appareil attend environ 3 minutes avant de se remettre
automatiquement en marche afin de protéger ses composants internes.
3.2. Sélection du mode de fonctionnement
Pour la sélection d’un mode de fonctionnement
1. Appuyer sur la Touche C de [Mode(Retour)]
Appuyer sur la touche de sélection du mode de fonctionnement de manière
consécutive pour faire passer le mode de fonctionnement de “
(REFROIDISSEMENT)” à “ (DÉSHUMIDIFICATION)”, à “
(SOUFFLERIE)”, à “ (AUTOMATIQUE)” et à “ (CHAUFFAGE)”. Pour plus de détails concernant chacune des opérations, se reporter
à l’affichage correspondant.
* Le fonctionnement en mode DRY (DÉSHUMIDIFICATEUR) ne peut pas
être exécuté par PEFY-P-NMHU-E-F.
Pour le refroidissement
Appuyer sur la Touche C de [Mode(Retour)] jusqu’à l’apparition de
l’affichage de “ (REFROIDISSEMENT)”.
Pour la déshumidification *Sauf le modèle PEFY-P-NMHU-E-F.
Appuyer sur la Touche C de [Mode(Retour)] jusqu’à l’apparition de
l’affichage de “ (DÉSHUMIDIFICATION)”.
• Le ventilateur intérieur se met en mode de fonctionnement à basse vitesse,
désactivant ainsi la fonction de modification de la vitesse du ventilateur.
• La déshumidification ne peut pas s’effectuer à une température de la pièce
inférieure à 18 °C [65 °F].
Pour le ventilateur
Appuyer sur la Touche C de [Mode(Retour)] jusqu’à l’apparition de
l’affichage de “ (SOUFFLERIE)”.
• Le mode de ventilation sert à faire circuler l’air dans la pièce.
• Il n’est pas possible de programmer la température de la pièce par le seul
fonctionnement du ventilateur.
Précaution:
Ne jamais s’exposer directement au souffle d’air froid pendant une période
prolongée. Une trop longue exposition à de l’air froid nuit à la santé et doit
donc être évitée.
Fonctionnement en mode déshumidification
La déshumidification consiste en une déshumidification de l’air commandée par
un micro-ordinateur qui commande un refroidissement excessif de l’air en fonction de la température de la pièce choisie. (Ne peut pas être utilisée en cas de
chauffage).
1. Jusqu’à la température de la pièce choisie
Le fonctionnement du compresseur et celui du ventilateur intérieur sont reliés
en fonction du changement de la température de la pièce et effectue la
répétition automatique Marche/Arrêt.
2. Lorsque la température choisie est atteinte
Le compresseur et le ventilateur intérieur s’arrêtent tous les deux.
Si l’arrêt se prolonge pendant 10 minutes, le compresseur et le ventilateur
fonctionnent pendant 3 minutes afin de maintenir un faible taux d’humidité.
Pour le chauffage
Appuyer sur la Touche C de [Mode(Retour)] jusqu’à l’apparition de
l’affichage de “ (CHAUFFAGE)”.
En ce qui concerne les affichages pendant le fonctionnement du mode
chauffage en “DEFROST (DÉGIVRAGE)”
S’affiche uniquement pendant le fonctionnement en mode dégivrage.
“STAND BY (ATTENTE)”
S’affiche entre le début du fonctionnement en mode chauffage et le moment où
de l’air chaud est soufflé dans la pièce.
Précautions:
• Lorsque le climatiseur est utilisé en même temps que des brûleurs, ventiler convenablement la pièce. Une ventilation insuffisante risque de provoquer des accidents à la suite d’un manque d’oxygène.
• Ne jamais placer un brûleur à un endroit où il est exposé à l’air soufflé
par le climatiseur, sinon sa combustion sera irrégulière.
• Le micro-ordinateur fonctionne dans les cas suivants:*
• L’air n’est pas soufflé lorsque le chauffage démarre.*
- Pour éviter le souffle d’air froid, le ventilateur interne passe progressivement dans l’ordre de très léger souffle/léger souffle/souffle en fonction de
l’augmentation de la température de l’air propulsé. Attendre un moment
jusqu’à ce que l’air souffle normalement.
• Le ventilateur ne tourne pas à la vitesse programmée.*
- Dans certains modèles, le système passe à un très léger souffle d’air lorsque la température de la pièce atteint la température programmée. Dans
d’autres cas, il s’arrête pour empêcher l’air froid de souffler pendant le fonctionnement en mode dégivrage.
• La soufflerie d’air fonctionne, même lorsque le fonctionnement est
arrêté.*
- Le ventilateur intérieur tourne parfois pendant environ 1 minute après l’arrêt
du fonctionnement pour éliminer le surcroît de chaleur généré par un
chauffage électrique, etc. La vitesse du ventilateur passe alors de faible à
élevée.
* Sauf le modèle PEFY-P-NMHU-E-F.
3.3. Réglage de la température de la pièce
Pour modifier la température de la pièce
Appuyer sur la Touche A de [Régler la température] pour programmer la
température de la pièce choisie.
Appuyer sur la touche ou pour modifier le réglage de 1 °C / 1 °F.
Si la touche est maintenue enfoncée, le changement du réglage continue par
incréments de 1 °C [2 °F].
• La température de la pièce peut être réglée dans les plages suivantes.
Refroidissement/déshumidification: 19 °C [67 °F] - 30 °C [87 °F]
Chauffage: 17 °C [63 °F] - 28 °C [83 °F]
• Il est impossible de régler la température de la pièce par le fonctionnement
en mode soufflerie.
* La plage d’affichage de la température de la pièce s’étend de 8 °C [46 °F] -
39 °C [102 °F]. À l’extérieur de cette plage, l’affichage clignote sur 8 °C [46
°F] ou sur 39 °C [102 °F] pour signaler que la température de la pièce est
inférieure ou supérieure à celle affichée.
3.4. Réglage de la vitesse du ventilateur
* Sauf le modèle PEFY-P-NMHU-E-F.
Pour modifier la vitesse du ventilateur
Chaque pression sur la Touche F de [Vitesse du ventilateur], le climatiseur commute successivement entre le réglage de la faible vitesse et le réglage de la
grande vitesse.
Pendant le fonctionnement en mode de déshumidification électronique, le ventilateur se met automatiquement sur faible vitesse et la modification de la vitesse du
ventilateur est impossible. (Seul l’affichage de la commande à distance change).
* Chaque pression sur la Touche de [Vitesse du ventilateur] fait changer la vit-
esse du ventilateur.
PEFY-P72·96NMHU-E
Vitesse du ventilateur: 1 étape
Séries PEFY-P15-54NMHU-E, PFFY-P-NEMU-E, PFFY-P-NRMU-E, PDFY-
P36·48NMU-E
Vitesse du ventilateur: 2 étapes
Séries PDFY-P06-30NMU-E
Vitesse du ventilateur: 4 étapes
Séries PLFY-P06-18NLMU-E, PEFY-P-NMLU-E
Vitesse du ventilateur: 3 étapes
COOL
DRY
FA
N
AUTO
HEAT
COOL
DRY
FA
N
HEAT
Affichage:
(Grande)
Affichage: ÆÆ (Répétition)
(Faible) (Grande) (Faible)
Affichage: ÆÆÆÆ(Répétition)
(Faible)
(Moyen2) (Moyen1)
(Grande) (Faible)
Affichage: ÆÆÆ (Répétition)
(Faible) (Moyen) (Grande) (Faible)
Page 16

16
F
3.5. Réglage du sens de la soufflerie vers
le haut/vers le bas
* Sauf le modèle PEFY-P-NMHU-E-F.
Pour modifier le sens de la soufflerie vers le haut/
vers le bas
Chaque pression sur la Touche G de [Soufflerie haut/bas] fait changer le
sens de la soufflerie.
PLFY-P-NLMU-E
*1 • Retourne automatiquement à “B 0 °” lorsqu’une heure s’est écoulée.
• Seulement “1 heure” s’affiche sur la commande à distance. (Disparaît lorsqu’une heure s’est écoulée).
• Cette fonction n’est pas disponible en fonction du modèle.
• Dans les cas suivants, elle est différente pour l’affichage et pour l’appareil.
1. “DEFROST (DÉGIVRAGE)” ou “STAND BY (ATTENTE)” s’affiche
2. Démarre juste en mode chauffage
3. Le thermostat est sur OFF (Arrêt) dans le mode chauffage
PFFY-P-NEMU-E
Tout en tirant la grille de la soufflerie vers soi, soulever la partie arrière, la retirer,
en modifier le sens et la remettre en place.
Précaution:
Éviter de mettre les mains dans la sortie d’air de l’appareil intérieur plus
longtemps que nécessaire pendant le fonctionnement. Si les mains sont
prises dans les parties métalliques lors du réglage du panneau d’ajustement du sens de la soufflerie et de la grille de la soufflerie ou si elles sont
coincées dans la pale automatique, cela risque d’entraîner des blessures et
une panne de l’appareil.
3.6. Autres
4. Comment utiliser le climatiseur intelligemment
Même de petites opérations effectuées pour prendre soin du climatiseur
peuvent le rendre plus efficace en termes d’effet de climatisation, de factures d’électricité, etc.
Régler une température adéquate pour la pièce
• En mode de fonctionnement refroidissement, une différence de température
d’environ 5 °C [9 °F] entre les appareils intérieurs et extérieurs est idéale.
• Si la température de la pièce est augmentée de 1 °C [2 °F] pendant le fonctionnement en mode refroidissement, cela peut représenter une économie
d’électricité d’environ 10%.
• Un refroidissement excessif est nuisible à la santé. Cela entraîne également
un gâchis d’énergie électrique.
Bien nettoyer le filtre à fond
• Si l’écran du filtre est obstrué, le débit de l’air et l’effet de climatisation peuvent être fortement diminués.
De plus, s’il n’est pas remédié à l’obstruction, l’appareil risque de tomber en
panne. Il est particulièrement important de bien nettoyer le filtre au début des
saisons de chauffage et de refroidissement. (En cas d’accumulation de
poussière et de crasse, bien nettoyer le filtre à fond).
Éviter toute intrusion de chaleur pendant le fonctionnement en mode refroidissement
• Pour éviter toute intrusion de chaleur pendant le fonctionnement en mode
refroidissement, munir la fenêtre de rideaux ou de stores vénitiens afin
d’empêcher tout rayon direct du soleil de pénétrer. De même, ne pas ouvrir
inutilement la porte d’entrée ou de sortie sauf en cas de nécessité absolue.
Aérer occasionnellement la pièce
* Sauf le modèle PEFY-P-NMHU-E-F.
• Étant donné que l’air est régulièrement vicié lorsqu’une pièce reste fermée
pendant une longue période, il est parfois nécessaire d’aérer la pièce. Prendre des précautions particulières lorsque des appareils à gaz sont utilisés en
même temps que le climatiseur. Si l’appareil de ventilation “LOSSNAY” développé par notre société est utilisé, l’aération de la pièce peut être effectuée en
perdant moins d’énergie. Pour plus de détails concernant cet appareil, consulter le revendeur.
5. Entretien de l’appareil
Toujours faire entretenir le filtre par un technicien qualifié.
Avant d’effectuer tout entretien, mettre l’alimentation hors tension.
Se reporter à A et à B dans la Fig. A de la page 3 pour la façon de retirer le
filtre *PDFY-P-NMU-E.
Précautions:
• Avant de commencer le nettoyage, arrêter le fonctionnement et mettre
l’alimentation hors tension.
Ne pas oublier que le ventilateur interne tourne à haute vitesse, pouvant
provoquer des blessures sérieuses.
• Les appareils intérieurs sont équipés de filtres destinés à retirer la
poussière de l’air aspiré.
Nettoyer les filtres en utilisant les méthodes indiquées dans les dessins
suivants. (Le filtre standard doit normalement être nettoyé chaque
semaine et le filtre longue durée au début de chaque saison).
• La durée de vie du filtre dépend de l’emplacement dans lequel l’appareil
est installé et de la façon dont il fonctionne.
Comment nettoyer les filtres
• Brosser doucement la poussière ou bien nettoyer à l’aide d’un aspirateur.
Dans le cas de taches persistantes, laver le filtre avec de l’eau tiède
mélangée à une solution de détergent neutre, puis bien rincer complètement
le détergent. Après le lavage, le faire sécher et le remettre en place.
Affichage
AOscil-
lation
B 0 ° C 40 ° D 60 ° E 80 °
Mode
Vitesse du
ventilateur
ABCDEChauffage/
Ventilateur
Grande/
Moyen/Faible
Refroidisse-
ment
Grand
Moyen/Faible
ABCDE
Déshumidifi-
cation
Impossible de
modifier
Arrangement initial —
Refroidisse-
ment
Déshumidi-
fication
Ventilateur
——
Chauff-
age
: S’affiche lorsque la commande est exécutée
par un appareil de commande centralisée
vendu séparément, etc.
: S’affiche à partir du départ du fonctionnement
en mode chauffage jusqu’au moment où de
l’air chaud est propulsé.
: Affiche l’indication d’une anomalie se produ-
isant dans l’appareil.
: Lorsqu’une touche est appuyée pour toute
fonction ne pouvant être exécutée par l’appareil
intérieur, cet affichage clignote en même
temps que l’affichage de cette fonction.
: Dans le système dans lequel l’affichage de
[Capteur] est indiqué comme la “commande à
distance”, la mesure de la température de la
pièce est exécutée par le capteur incorporé à
la commande à distance. Faire donc attention
à ce qui suit:
: Affiché lorsqu’il est temps de nettoyer le filtre.
Appuyer deux fois sur la Touche
K
de [Filtre
(↵)] pour faire disparaître l’affichage.
STAND BY
DEFROST
NOT AVAILABLE
FILTER
Page 17

17
F
Précautions:
• Ne pas faire sécher le filtre en l’exposant à la lumière directe du soleil ou
en le réchauffant à une flamme, etc. Cela peut entraîner la déformation
du filtre.
• Le laver dans de l’eau chaude (à plus de 50 °C [122 °F]) peut également
entraîner sa déformation.
Précaution:
Ne jamais verser d’eau ou vaporiser des produits inflammables sur le climatiseur. Le nettoyage à l’aide de ces méthodes peut entraîner une panne
du climatiseur, une électrocution ou un incendie.
6. Guide de dépannage
Avant de faire appel à un service après-vente, prière de vérifier les point suivants:
• Si le fonctionnement s’arrête à la suite d’une panne de courant, la fonction [empêchement du redémarrage des circuits après une panne de courant] s’active et
empêche le fonctionnement de l’appareil, même après le rétablissement du courant. Dans ce cas, appuyer de nouveau sur la touche [ON/OFF (Marche/Arrêt)] et
démarrer le fonctionnement.
Si le mauvais fonctionnement persiste après avoir vérifié les points ci-dessus, mettre l’alimentation hors tension et contacter le revendeur en lui fournissant les informations
concernant le nom du produit, la nature du mauvais fonctionnement, etc. Si [check] suivi d’un code de 4 chiffres clignotent sur l’affichage, indiquer au revendeur le contenu
de l’affichage (vérifier le code). Ne jamais essayer de réparer soi-même.
Les symptômes suivants ne constituent pas des pannes du climatiseur:
• L’air soufflé du climatiseur peut parfois dégager des odeurs. Cela est dû à la fumée de cigarettes contenue dans l’air de la pièce, à l’odeur de cosmétiques, des murs,
des meubles, etc. absorbées par le climatiseur.
• Un sifflement peut se faire entendre immédiatement après le démarrage du climatiseur ou son arrêt. Il s’agit du bruit du réfrigérant circulant à l’intérieur du climatiseur.
Cela est normal.
• Le climatiseur émet parfois des claquements ou des déclics au début ou à la fin du fonctionnement en mode refroidissement/chauffage. Il s’agit du bruit de la friction
du panneau avant avec d’autres parties à la suite de l’expansion et de la contraction provoquée par les changements de température. Cela est normal.
État de l’appareil Commande à distance Cause Dépannage
L’appareil ne fonctionne pas.
Le témoin “ ” ne
s’allume pas. Aucun
affichage n’apparaît,
même lorsque la touche
[ON/OFF (Marche/
Arrêt)] est appuyée.
Panne de courant
Appuyer sur la touche [ON/OFF(Marche/Arrêt)] après la
remise sous tension.
L’alimentation est hors tension. Brancher l’alimentation
Le fusible de la prise d’alimentation est grillé. Remplacer le fusible.
Le coupe-circuit de fuite de terre s’est déclenché. Remettre le coupe-circuit de fuite à la terre en circuit.
L’air souffle mais il ne
refroidit pas ou ne
réchauffe pas suffisamment.
L’affichage à cristaux
liquides indique que
l’appareil est en état de
fonctionnement.
Mauvais réglage de la température.
Après avoir réglé la température réglée et la température
d’entrée sur l’affichage à cristaux liquides,
se reporter à [Réglage de la température de la pièce] et
faire fonctionner la touche de réglage.
Le filtre est encombré de poussière et de crasse.
Nettoyer le filtre.
(Se reporter à [Entretien de l’appareil].)
Des obstacles bloquent l’arrivée et la sortie d’air des
appareils intérieurs et extérieurs.
Retirer les obstacles.
Des fenêtres et des portes sont ouvertes. Fermer les portes et les fenêtres.
Pas de sortie d’air
froid ou d’air chaud.
L’affichage à cristaux
liquides indique que
l’appareil est en cours
de fonctionnement.
Le circuit de prévention de la remise en marche fonctionne pendant 3 minutes.
Attendre un moment.
(pour assurer la protection du compresseur, un circuit
empêchant la remise en marche avant 3 minutes est
incorporé à l’appareil intérieur. C’est pourquoi, dans cer-
tains cas, le compresseur ne se remet pas en marche
immédiatement. Dans certains cas, il ne fonctionne pas
pendant 3 minutes.)
Le fonctionnement de l’appareil intérieur a été redémarré pendant le fonctionnement en modes
chauffage et dégivrage.
Attendre un moment.
(Le fonctionnement en mode chauffage démarre lorsque
le fonctionnement en mode dégivrage est terminé.)
Le climatiseur fonctionne pendant un bref
instant, puis s’arrête
aussitôt.
“Check” et le code de
vérifications clignotent
sur l’affichage à cristaux
liquides.
Des obstacles bloquent l’arrivée et la sortie d’air des
appareils intérieurs et extérieurs.
Remettre en marche après le retrait des obstacles.
Le filtre est encombré de poussière et de crasse.
Remettre en marche après avoir nettoyé le filtre. (Se
reporter à [Entretien de l’appareil].)
Le bruit de l’échappement et celui de la
rotation du moteur
sont encore audibles
après l’arrêt du
fonctionnement.
Tous les témoins sont
éteints sauf le témoin
d’alimentation “ ”.
Lorsque d’autres appareils intérieurs fonctionnent en
mode refroidissement, l’appareil s’arrête après avoir
fait fonctionner un mécanisme d’écoulement pendant
3 minutes pendant l’arrêt du fonctionnement en mode
refroidissement.
Attendre 3 minutes.
Le bruit de l’échappement et de la rotation
du moteur est toujours
audible par intermittence après
l’arrêt du climatiseur.
Tous les témoins sont
éteints sauf le témoin
d’alimentation“ ”.
Lorsque d’autres appareils intérieurs fonctionnent en
mode refroidissement, l’eau d’écoulement est
amenée à l’intérieur. Lorsque l’eau d’écoulement est
rassemblée, le mécanisme d’écoulement entame une
opération d’écoulement.
Le bruit s’arrête rapidement. (Lorsque le bruit se produit
plus de 2 ou 3 fois par heure, demander un
service de réparation.)
De l’air chaud sort par
intermittence lorsque
le thermostat est
coupé ou pendant le
fonctionnement
du ventilateur.
L’affichage à cristaux
liquides indique que
l’appareil est en état de
fonctionnement.
Lorsque d’autres appareils intérieurs fonctionnent en
mode chauffage, les vannes de commande s’ouvrent
et se referment de temps à autre afin de maintenir la
stabilité du système.
Le problème s’arrête rapidement. (Si la température de
la pièce augmente de façon inconfortable
dans une petite pièce, arrêter le fonctionnement.)
Page 18

18
F
7. Installation, travaux de déplacement et vérifications
En ce qui concerne l’emplacement d’installation
Consulter le revendeur pour les détails concernant l’installation et le déplacement
de l’installation.
Précaution:
Ne jamais installer le climatiseur dans un endroit sujet à des fuites de gaz
inflammable.
Si du gaz fuit et s’accumule autour de l’appareil, un incendie peut
s’ensuivre.
Ne jamais installer le climatiseur dans les endroits suivants:
• Endroits contenant beaucoup d’huile de machine.
• À proximité de la mer ou de plages où l’air contient du sel.
• Endroits où l’humidité est élevée.
• À proximité de sources thermales.
• Endroits contenant des gaz sulfuriques.
• Endroits où des machineries fonctionnent à haute fréquence (machines à
souder à haute fréquence, etc.).
• Endroits où des solutions acides sont fréquemment utilisées.
• Endroits où des produits spéciaux sont fréquemment vaporisés.
• Installer l’appareil intérieur horizontalement. Sinon une fuite d’eau peut se
produire.
• Prendre les mesures nécessaires contre le bruit lors de l’installation de climatiseurs dans des hôpitaux ou des entreprises ayant trait aux communications.
Si le climatiseur est utilisé dans l’un des environnements mentionnés ci-dessus, il
faut s’attendre à de fréquentes pannes de fonctionnement. Il est conseillé d’éviter
ces types de sites d’installation.
Pour plus de détails, consulter le revendeur.
En ce qui concerne les travaux d’installation électrique
Précautions:
• Les travaux d'installation électrique doivent être entrepris par une per-
sonne qualifiée, comme un ingénieur électrique, conformément à
[Normes techniques pour les installations électriques], à [Règlements
pour les câblages électriques intérieurs] et au manuel des instructions
d’installation et en utilisant impérativement des circuits exclusifs. L’utilisation d’autres appareils sur la même source d’alimentation peut faire
sauter les coupe-circuits et griller les fusibles.
• Ne jamais raccorder le câble de mise à la terre à une conduite de gaz,
une conduite d’eau, à un paratonnerre ou à un câble de mise à la terre de
ligne téléphonique. Pour plus de détails, consulter le revendeur.
• Dans certains types de sites d’installation, l’installation d’un coupe-circuit de fuites à la terre est obligatoire. Pour plus de détails, consulter le
revendeur.
En ce qui concerne le déménagement de l’installation
• Lors de l’enlèvement et de la réinstallation du climatiseur en cas d’agran-
dissement de la maison, de transformation ou de déménagement, consulter
le revendeur à l’avance pour une estimation des coûts des travaux du transfert de l’installation.
Précautions:
Lors du déplacement ou de la réinstallation du climatiseur, consulter le revendeur. Une installation défectueuse peut entraîner une électrocution, un
incendie, etc.
En ce qui concerne le bruit
• Pour les travaux d’installation, sélectionner un endroit pouvant supporter
complètement le poids du climatiseur et où le bruit et les vibrations peuvent
être réduits.
• Choisir un endroit où l’air froid ou chaud et le bruit de la sortie d’air extérieure
du climatiseur n’incommodent pas les voisins.
• Si un corps étranger est placé à proximité de la sortie d’air extérieure du cli-
matiseur, cela peut entraîner une diminution de la performance et une augmentation du bruit. Éviter de placer des obstacles à côté de la sortie d’air.
• Si le climatiseur émet un bruit anormal, consulter le revendeur.
Entretien et inspection
• Si le climatiseur est utilisé pendant plusieurs saisons, ses parties internes
peuvent s’encrasser, réduisant la performance.
En fonction des conditions d’utilisation, des mauvaises odeurs peuvent être
générées et l’écoulement peut se détériorer à cause de la poussière, de la
crasse, etc.
Page 19

19
F
8. Spécifications techniques
PLFY-P-NLMU-E
PDFY-P-NMU-E
PDFY-P-NMU-E
Remarques: *1 La capacité de refroidissement/chauffage indique la valeur maximum du fonctionnement dans les conditions suivantes.
Mode refroidissement: Température intérieure:26,7 °C [80 °F] DB/19,4 °C [67 °F] WB Température extérieure: 35 °C [95 °F] DB
Mode chauffage: Température intérieure: 21,1 °C [70 °F] DB Température extérieure: 8,3 °C [47 °F] DB/6,1 °C [43 °F] WB
*2 Les données du bruit de fonctionnement ont été obtenues dans une pièce sans écho.
*3 Se reporter ci-dessous pour les réglages d'usine.
Séries PDFY-P-NMU-E
*4 .La figure dans ( ) indique le panneau.
Élément Modèle PLFY-P06NLMU-E PLFY-P08NLMU-E PLFY-P12NLMU-E PLFY-P15NLMU-E PLFY-P18NLMU-E
Source d’alimentation 208/230V, 60Hz
Capacité
*1
Refroidissement
kW 1,8 2,3 3,5 4,4 5,3
BTU/h 6000 8000 12000 15000 18000
Chauffage
kW 2,0 2,6 4,0 5,0 5,9
BTU/h 6700 9000 13500 17000 20000
Dimensions
*4
Hauteur
mm 290 (20)
in 11-7/16 (13/16)
Largeur
mm 776 (1080) 946 (1250)
in 30-9/16 (42-17/32) 37-1/4 (49-7/32)
Profondeur
mm 634 (710)
in
24-31/32 (27-31/32)
Poids net
kg 23 (6,5) 24 (6,5) 27 (7,5)
lb 51 (15) 53 (15) 60 (17)
VENTILATEUR
Débit de l’air
(Faible Moyen-Haut)
m
3
/min 6,5-8,0-9,5 6,5-8,0-9,5 6,5-8,0-9,5 7,0-8,5-10,5 9,0-11,0-12,5
cfm 230-282-335 230-282-335 230-282-335 247-300-371 318-388-441
Pression statique
exter ne
Pa
208V-----
230V----Niveau de bruit
(Faible-Moyen-Haut)*2
dB(A)
208V 27-30-33 27-30-33 27-30-33 29-33-36 31-34-37
230V 28-31-34 28-31-34 28-31-34 30-34-37 32-35-38
Filtre Filtre standard
Élément Modèle PDFY-P06NMU-E PDFY-P08NMU-E PDFY-P12NMU-E PDFY-P15NMU-E PDFY-P18NMU-E
Source d’alimentation 208/230V, 60Hz
Capacité
*1
Refroidissement
kW 1,8 2,3 3,5 4,4 5,3
BTU/h 6000 8000 12000 15000 18000
Chauffage
kW 2,0 2,6 4,0 5,0 5,9
BTU/h 6700 9000 13500 17000 20000
Dimensions
Hauteur
mm 295
in 11-5/8
Largeur
mm 710 960
in 27-31/32 37-13/16
Profondeur
mm 735
in 28-15/16
Poids net
kg 26 26 27 32 34
lb 57 57 60 71 75
VENTILATEUR
Débit de l’air
(Faible-(Moyen2-Moyen1-)
Haut)
m3/min 6,0-6,5-7,5-8,5 6,0-6,5-7,5-8,5 6,0-6,5-7,5-8,5
10,0-11,0-12,5-14,0 10,0-11,0-12,5-14,0
cfm 211-229-264-300 211-229-264-300 211-229-264-300 353-388-441-494 353-388-441-494
Pression statique
exter ne *3
Pa
208V 30-50-80 30-50-80 30-50-80 30-50-80 30-50-80
230V 40-60-100 40-60-100 40-60-100 40-60-100 40-60-100
Niveau de bruit
(Faible-(Moyen2-Moyen1-) Haut)*2
dB(A)
208V 26-28-31-34 26-28-31-34 26-28-31-34 32-34-35-37 32-34-35-37
230V 28-30-33-36 28-30-33-36 28-30-33-36 34-36-37-39 34-36-37-39
Filtre Filtre standard
Élément Modèle PDFY-P24NMU-E PDFY-P27NMU-E PDFY-P30NMU-E PDFY-P36NMU-E PDFY-P48NMU-E
Source d’alimentation 208/230V, 60Hz
Capacité
*1
Refroidissement
kW 7,0 7,9 8,8 10,6 14,1
BTU/h 24000 27000 30000 36000 48000
Chauffage
kW 7,9 8,8 10,0 11,7 15,8
BTU/h 27000 30000 34000 40000 54000
Dimensions
Hauteur
mm 295 335
in 11-5/8 13-7/32
Largeur
mm 1160 1510
in 45-11/16 59-15/32
Profondeur
mm 735 775
in 28-15/16 30-17/32
Poids net
kg 39 39 39 52 52
lb 86 86 86 115 115
VENTILATEUR
Débit de l’air
(Faible-(Moyen2-Moyen1-)
Haut)
m3/min
12,5-14,0-16,0-18,0 13,5-15,5-17,5-19,5 14,0-16,5-18,5-21,0
19,5-28,0 24-34
cfm 441-494-565-635 477-547-618-689 494-582-653-741 688-988 847-1200
Pression statique
exter ne *3
Pa
208V 30-50-80 30-50-80 30-50-100 50-100-130 50-100-130
230V 40-60-100 40-60-100 40-60-115 60-115-150 60-115-150
Niveau de bruit
(Faible-(Moyen2-Moyen1-) Haut)*2
dB(A)
208V 28-32-34-37 31-35-37-40 32-35-38-40 36-44 42-46
230V 30-34-36-39 32-36-38-40 34-37-40-42 38-45 43-47
Filtre Filtre standard
PDFY-P06NMU-E PDFY-P08NMU-E PDFY-P12NMU-E PDFY-P15NMU-E PDFY-P18NMU-E
208V 230V 208V 230V 208V 230V 208V 230V 208V 230V
50 60 50 60 50 60 50 60 50 60
PDFY-P24NMU-E PDFY-P27NMU-E PDFY-P30NMU-E PDFY-P36NMU-E PDFY-P48NMU-E
208V 230V 208V 230V 208V 230V 208V 230V 208V 230V
50 60 50 60 50 60 50 60 50 60
Page 20

20
F
PEFY-P-NMLU-E
PEFY-P-NMHU-E
PEFY-P-NMHU-E
Remarques: *1 La capacité de refroidissement/chauffage indique la valeur maximum du fonctionnement dans les conditions suivantes.
Mode refroidissement: Température intérieure: 26,7 °C [80 °F] DB/19,4 °C [67 °F] WB
Température extérieure: 35 °C [95 °F] DB
Mode chauffage: Température intérieure: 21,1 °C [70 °F] DB
Température extérieure: 8,3 °C [47 °F] DB/6,1 °C [43 °F] WB
*2 Les données du bruit de fonctionnement ont été obtenues dans une pièce sans écho.
*3 Se reporter ci-dessous pour les réglages d'usine.
Séries PEFY-P-NMHU-E
Élément Modèle
PEFY-P06NMLU-E PEFY-P08NMLU-E PEFY-P12NMLU-E
Source d’alimentation 208/230V, 60Hz
Capacité
*1
Refroidissement
kW 1,8 2,3 3,5
BTU/h 6000 8000 12000
Chauffage
kW 2,0 2,6 4,0
BTU/h 6700 9000 13500
Dimensions
Hauteur
mm 225
in 8-7/8
Largeur
mm 790
in 31-1/8
Profondeur
mm 550
in 21-21/32
Poids net
kg 18
lb 40
VENTILATEUR
Débit de l’air
(Faible-Moyen-Haut)
m
3
/min 4,8-5,8-7,9 4,8-5,8-7,9 4,8-5,8-9,5
cfm 169-205-279 169-205-279 169-205-335
Pression statique
exter ne
Pa
208V 5 5 5
230V 5 5 5
Niveau de bruit
(Faible-Moyen-Haut)*2
dB(A)
208V 25-29-36 25-29-36 25-29-40
230V 25-29-36 25-29-36 25-29-40
Filtre Filtre standard
Élément Modèle
PEFY-P15NMHU-E PEFY-P18NMHU-E PEFY-P24NMHU-E PEFY-P27NMHU-E PEFY-P30NMHU-E
Source d’alimentation 208/230V, 60Hz
Capacité
*1
Refroidissement
kW 4,4 5,3 7,0 7,9 8,8
BTU/h 15000 18000 24000 27000 30000
Chauffage
kW 5,0 5,9 7,9 8,8 10,0
BTU/h 17000 20000 27000 30000 34000
Dimensions
Hauteur
mm 380
in 14-31/32
Largeur
mm 750 1000
in 29-17/32 39-3/8
Profondeur
mm 900
in 35-7/16
Poids net
kg 44 45 50
lb 98 100 111
VENTILATEUR
Débit de l’air
(Faible-Haut)
m
3
/min 10,0-14,0 10,0-14,0 13,5-19,0 15,5-22,0 18,0-25,0
cfm 353-494 353-494 477-671 547-777 636-883
Pression statique
exter ne *3
Pa
208V ⎯ -50-160 ⎯ -50-160 ⎯ -50-160 ⎯ -50-160 ⎯ -50-160
230V 100-150-200 100-150-200 100-150-200 100-150-200 100-150-200
Niveau de bruit
(Faible-Haut) *4
dB(A)
208V 25-32 25-32 29-36 30-38 33-40
230V 34-39 34-39 36-41 35-41 38-43
Filtre Filtre standard
Élément Modèle
PEFY-P36NMHU-E PEFY-P48NMHU-E PEFY-P54NMHU-E PEFY-P72NMHU-E PEFY-P96NMHU-E
Source d’alimentation 208/230V, 60Hz
Capacité
*1
Refroidissement
kW 10,6 14,1 15,8 21,1 28,1
BTU/h 36000 48000 54000 72000 96000
Chauffage
kW 11,7 15,8 17,6 23,4 31,7
BTU/h 40000 54000 60000 80000 108000
Dimensions
Hauteur
mm 380 470
in 14-31/32 18-17/32
Largeur
mm 1200 1250
in 47-1/4 49-7/32
Profondeur
mm 900 1120
in 35-7/16 44-1/8
Poids net
kg 70 100
lb 155 221
VENTILATEUR
Débit de l’air
(Faible-Haut)
m
3
/min 26,5-38,0 26,5-38,0 28,0-40,0 58,0 72,0
cfm 936-1342 936-1342 989-1412 2048 2541
Pression statique
exter ne *3
Pa
208V ⎯ -50-160 ⎯ -50-160 ⎯ -50-160 70-160 70-160
230V 100-150-200 100-150-200 100-150-200 100-200 100-200
Niveau de bruit
(Faible-Haut) *2
dB(A)
208V 31-41 31-41 31-41 45 52
230V 38-44 38-44 38-44 47 54
Filtre Filtre standard
PEFY-P15NMHU-E PEFY-P18NMHU-E PEFY-P24NMHU-E PEFY-P27NMHU-E PEFY-P30NMHU-E
208V 230V 208V 230V 208V 230V 208V 230V 208V 230V
50 150 50 150 50 150 50 150 50 150
PEFY-P36NMHU-E PEFY-P48NMHU-E PEFY-P54NMHU-E PEFY-P72NMHU-E PEFY-P96NMHU-E
208V 230V 208V 230V 208V 230V 208V 230V 208V 230V
50 150 50 150 50 150 160 200 160 200
Page 21

21
F
PEFY-P-NMHU-E-F
Remarques: *1 La capacité de refroidissement/chauffage indique la valeur maximum du fonctionnement dans les conditions suivantes.
Mode refroidissement: Température intérieure: 33 °C [91 °F] DB/28 °C [82 °F] WB
Température extérieure: 33 °C [91 °F] DB
Mode chauffage: Température intérieure:0 °C [32 °F] DB/–2,9 °C [27°F] WB
Température extérieure: 0°C [32 °F] DB/–2,9 °C [27°F] WB
*2 Les données du bruit de fonctionnement ont été obtenues dans une pièce sans écho.
*3 As for the factory setting is below.
Séries PEFY-P-NMHU-E-F
Élément Modèle
PEFY-P30NMHU-E-F PEFY-P54NMHU-E-F PEFY-P72NMHU-E-F PEFY-P96NMHU-E-F
Source d’alimentation 208/230V, 60Hz
Capacité
*1
Refroidissement
kW 8,8 15,8 21,1 28,1
BTU/h 30000 54000 72000 96000
Chauffage
kW 8,4 14,9 19,9 26,4
BTU/h 28500 51000 68000 90000
Dimensions
Hauteur
mm 380 470
in 14-31/32 18-17/32
Largeur
mm 1000 1200 1250
in 39-3/8 47-1/4 49-7/32
Profondeur
mm 900 1120
in 35-7/16 44-1/8
Poids net
kg 50 70 100
lb 111 155 221
VENTILATEUR
Débit de l’air
m
3
/min9 182835
cfm 318 636 989 1236
Pression statique
exter ne *3
Pa
208V 35-85-170 35-85-170 180 180
230V 50-130-210 60-130-220 260 260
Niveau de bruit *2 dB(A)
208V 38 38 43 44
230V 43 43 47 48
Filtre Filtre standard
PEFY-P30NMHU-E-F PEFY-P54NMHU-E-F PEFY-P72NMHU-E-F PEFY-P96NMHU-E-F
208V 230V 208V 230V 208V 230V 208V 230V
85 130 85 130 180 260 180 260
Page 22

22
F
PFFY-P-NEMU-E
PFFY-P-NRMU-E
Remarques: *1 La capacité de refroidissement/chauffage indique la valeur maximum du fonctionnement dans les conditions suivantes.
Mode refroidissement: Température intérieure: 26,7 °C [80 °F] DB/19,4 °C [67 °F] WB
Température extérieure: 35 °C [95 °F] DB
Mode chauffage: Température intérieure: 21,1 °C [70 °F] DB
Température extérieure: 8,3 °C [47 °F] DB/6,1 °C [43 °F] WB
*2 Les données du bruit de fonctionnement ont été obtenues dans une pièce sans écho.
Élément Modèle
PFFY-
P06NEMU-E
PFFY-
P08NEMU-E
PFFY-
P12NEMU-E
PFFY-
P15NEMU-E
PFFY-
P18NEMU-E
PFFY-
P24NEMU-E
Source d’alimentation 208/230V, 60Hz
Capacité
*1
Refroidissement
kW 1,8 2,3 3,5 4,4 5,3 7,0
BTU/h 6000 8000 12000 15000 18000 24000
Chauffage
kW 2,0 2,6 4,0 5,0 5,9 7,9
BTU/h 6700 9000 13500 17000 20000 27000
Dimension
Hauteur
mm 630
in 24-13/16
Largeur
mm 1050 1170 1410
in 41-11/32 46-3/32 55-17/32
Profondeur
mm 220
in 8-11/16
Poids net
kg 23 23 25 26 30 32
lb 51 51 56 58 67 71
VENTILATEUR
Débit de l’air
(Faible-Haut)
m
3
/min 5,5-6,5 5,5-6,5 7,0-9,0 8,5-11,0 10,0-13,0 10,0-14,0
cfm 194-229 194-229 247-317 300-388 353-459 353-494
Pression statique
exter ne
Pa
208V - - - - - -
230V - - - - - Niveau de bruit
(Faible-Haut) *2
dB(A)
208V 36-41 36-41 37-41 38-43 38-43 40-46
230V 36-41 36-41 37-41 38-43 38-43 40-46
Filtre Filtre standard
Élément Modèle
PFFY-
P06NRMU-E
PFFY-
P08NRMU-E
PFFY-
P12NRMU-E
PFFY-
P15NRMU-E
PFFY-
P18NRMU-E
PFFY-
P24NRMU-E
Source d’alimentation 208/230V, 60Hz
Capacité
*1
Refroidissement
kW 1,8 2,3 3,5 4,4 5,3 7,0
BTU/h 6000 8000 12000 15000 18000 24000
Chauffage
kW 2,0 2,6 4,0 5,0 5,9 7,9
BTU/h 6700 9000 13500 17000 20000 27000
Dimensions
Hauteur
mm 639
in 25-3/16
Largeur
mm 886 1006 1246
in 34-29/32 39-5/8 49-1/16
Profondeur
mm 220
in 8-11/16
Poids net
kg 19 19 20 21 25 27
lb 41 41 45 47 56 60
VENTILATEUR
Débit de l’air
(Faible-Haut)
m
3
/min 5,5-6,5 5,5-6,5 7,0-9,0 8,5-11,0 10,0-13,0 10,0-14.0
cfm 194-229 194-229 247-317 300-388 353-459 353-494
Pression statique
externe
Pa
208V------
230V-----Niveau de bruit
(Faible-Haut) *2
dB(A)
208V 36-41 36-41 37-41 38-43 38-43 40-46
230V 36-41 36-41 37-41 38-43 38-43 40-46
Filtre Filtre standard
Page 23

HEAD OFFICE: MITSUBISHI DENKI BLDG., 2-2-3, MARUNOUCHI, CHIYODA-KU, TOKYO 100-8310, JAPAN
This product is designed and intended for use in the residential, commer-
cial and light-industrial environment.
Please be sure to put the contact address/telephone number on
this manual before handing it to the customer.
Printed in JapanWT04561X01
 Loading...