

Page 1

Thank you for purchasing Mitsubishi Multi Entertainment System (MMES).
• Please read this owner’s manual thoroughly before operating MMES.
• After reading this manual, be sure to keep it handy for future reference.
Contents
Introduction ......................................................................................................................................... 5
Navigation ........................................................................................................................................... 9
1. WARNINGS AND SAFETY INFORMATION ......................................................................................................................................10
2. GETTING STARTED ..........................................................................................................................................................................10
Navigation menu .................................................................................................................................................................................11
Buttons and other controls on the screen ...........................................................................................................................................15
Map screen .........................................................................................................................................................................................19
Operation Regulations ........................................................................................................................................................................28
3. ON-ROAD NAVIGATION ....................................................................................................................................................................29
Selecting the destination of a route ....................................................................................................................................................29
Viewing the entire route on the map ...................................................................................................................................................51
Checking route parameters and accessing route related functions ....................................................................................................51
Modifying the route .............................................................................................................................................................................52
Saving a location as a Favorite destination .........................................................................................................................................56
Saving a map location as an alert point ..............................................................................................................................................57
Editing an alert point ...........................................................................................................................................................................57
Watching the simulation of the route ...................................................................................................................................................58
4. OFF-ROAD NAVIGATION ..................................................................................................................................................................59
Selecting the destination of the route .................................................................................................................................................59
Navigating in off-road mode ................................................................................................................................................................59
5. REFERENCE GUIDE .........................................................................................................................................................................60
Concepts .............................................................................................................................................................................................60
1
Page 2

Contents
‘More’ menu ........................................................................................................................................................................................63
Settings menu .....................................................................................................................................................................................64
Fuel Consumption ...............................................................................................................................................................................75
Trip Monitor .........................................................................................................................................................................................76
6. GLOSSARY ........................................................................................................................................................................................77
7. END USER LICENSE AGREEMENT .................................................................................................................................................79
8. COPYRIGHT NOTE ............................................................................................................................................................................85
Audio ................................................................................................................................................. 86
Playable Discs .....................................................................................................................................................................................87
DVD Video Features ...........................................................................................................................................................................87
9. PRECAUTIONS ..................................................................................................................................................................................89
Operation Panel/Generalities ..............................................................................................................................................................89
Cleaning ..............................................................................................................................................................................................90
About the Registered Marks, etc. ........................................................................................................................................................90
10. CONTROLS ........................................................................................................................................................................................91
Functions of Buttons ...........................................................................................................................................................................91
Outline of Button and Touchkey Operation .........................................................................................................................................92
11. BASIC OPERATIONS ........................................................................................................................................................................98
Turning the Power On/Off....................................................................................................................................................................98
Opening the Operation Panel and Adjusting the Angle ......................................................................................................................98
Adjusting the Display and Audio .........................................................................................................................................................99
Switching the Operation Mode ..........................................................................................................................................................100
Media and Device Operations ...........................................................................................................................................................101
Steering Wheel Audio Remote Control Operations ...........................................................................................................................103
Using a Rear View Camera ...............................................................................................................................................................104
2
Page 3

12. SOURCE OPERATIONS ..................................................................................................................................................................105
Radio Operations ..............................................................................................................................................................................105
DVD Video Operations ......................................................................................................................................................................106
Audio CD Operations ........................................................................................................................................................................111
MP3/WMA/AAC Disc Operations ......................................................................................................................................................112
SD Memory Card/USB Memory Operations .....................................................................................................................................115
iPod Operations ................................................................................................................................................................................117
Bluetooth Audio Operations ..............................................................................................................................................................120
13. TELEPHONE OPERATIONS ...........................................................................................................................................................122
Using your Bluetooth Mobile Phone with this Unit ............................................................................................................................122
14. SYSTEM SETTINGS ........................................................................................................................................................................125
Audio Settings ...................................................................................................................................................................................125
Display Adjustment ...........................................................................................................................................................................126
Volume and Beeps Settings ..............................................................................................................................................................126
Selecting a Language .......................................................................................................................................................................126
Phone Settings .................................................................................................................................................................................126
Bluetooth Settings .............................................................................................................................................................................129
Clock Settings ...................................................................................................................................................................................130
Other Settings ...................................................................................................................................................................................130
15. TROUBLESHOOTING......................................................................................................................................................................131
3
Page 4

4
Page 5

Introduction
The followings are what you need to know before using this product.
5
Page 6

Before Use
Disclaimers
• Mitsubishi Motors will in no way be held
responsible for losses resulting from fire,
earthquake, tsunami, flood, or other natural
disasters; from actions of third parties; from
other accidents; or from inappropriate or
abnormal usage conditions utilized by the
customer, be said conditions deliberate or
unintentional.
• There will be no indemnification for
alteration or loss of any information stored
upon this product (address book etc.) by
the customer or a third party resulting from
improper use of this product, the influence
of static electricity or electric noise, or at
the time of malfunction or repair or similar
circumstances. We recommend that you
create backups of important information as
a precautionary measure.
• Some personal information (addresses
in address book, telephone numbers
etc.) input into this product may remain in
memory even if this product is removed. The
customer is responsible for proper handling
and management (including deleting) of
personal information to protect privacy when
handing this product over to anyone else or
disposing of it. Mitsubishi Motors will in no
way be held responsible.
• Mitsubishi Motors will in no way be held
responsible for any collateral losses (loss
of business profits, alteration or loss of
recorded data) resulting from the usage or
inability to use this product.
6
• Please be aware that the map displayed
is from when the data was prepared, so
it may differ from current conditions. Also,
Mitsubishi Motors will in no way be held
responsible for any losses resulting from
map data inadequacies.
• This product contains data on traffic
regulations, but due to changes in traffic
rules, this data may differ from the actual
traffic rules. Always obey the actual traffic
regulations. Also, Mitsubishi Motors will in
no way be held responsible for any losses
resulting from traffic accidents or traffic
rule violations due to traffic regulation data
inadequacies.
• Returns, refunds, exchange, or conversion
for reasons of map data inadequacy or the
like are not possible. There may be times
when the map data does not match the
specific objective of the user. The contents
of the map data are subject to change
without notice. The map data may contain
wrong or missing characters, incorrect
locations etc.
• The rule guidance and audio guidance,
for example when to turn, may sometimes
differ from the actual traffic signs or traffic
regulations. Always obey the actual traffic
signs and actual traffic regulations.
• For the purpose of product improvement,
specifications and external appearance
may be subject to change without advance
notice. Accordingly, while the contents
of the User Manual may differ, please be
aware that returns, refunds, exchange, or
conversion are not possible.
• This User Manual explains details for
multiple vehicle models together. Depending
on the vehicle model, there may be
functions that may be described but not
available, or requirements for separately
purchased-products. Thank you for your
understanding.
• Images and illustrations used in the
User Manual are either those used in
development, or used for explanations.
Please be aware that these may differ from
the actual images and illustrations used in
the product.
• Please be aware that Mitsubishi Motors,
including after-sales service departments,
will in no way be held responsible for any
losses or detriment resulting from alteration
or loss of any information stored in this
product, including customer registration
information.
Page 7

Important Points on Usage
Common
• During operation, ensure that the vehicle is
not stationary in a garage or other confined
area with bad ventilation while the engine
is running. Doing so may result in gas
poisoning.
• For safety, the driver is not to operate this
product while the vehicle is moving. The
driver should also minimize as much as
possible the time spent viewing the screen.
Being distracted by the screen can result in
an accident.
• Do not turn the volume up to the extent that
you cannot hear sounds from outside the
vehicle while driving. Driving without being
able to hear sounds from outside the vehicle
can result in an accident.
• Do not disassemble or modify the product.
This may lead to malfunction, smoking, or
fire.
• Avoid relying on this product for guidance
to emergency facilities (hospitals, fire
departments, police, etc.). Contact such
emergency facilities directly.
• When operating, ensure that the vehicle is
stopped in a safe area in which stopping is
permitted.
• Continued usage of this product without
the engine running may deplete the vehicle
battery, meaning that the engine may not be
able to start.
Ensure this product is used while the engine
is running.
• The following phenomena are characteristic
of LCD screens. They do not indicate a
malfunction.
- Small black dots or bright dots (red, blue,
green) on the screen.
- Screen movement is slow during cold
weather.
- The screen is sometimes dark during hot
weather.
- The color tones and brightness vary with
the viewing angle.
• It is a characteristic of LCD screens that the
picture quality varies with the viewing angle.
When using this product for the first time,
adjust the picture quality.
• If you paste an commercially-available LCD
protective film or the like on the screen, it
may interfere with touch panel operation.
• If you operate the touch panel with a sharp
object (pen tip, finger nail, etc.), the screen
may be scratched and this unit may be
damaged, leading to faulty operation.
• Operating the touch panel with gloves on
may cause faulty operation.
• When cleaning the screen, wipe it with
a soft cloth. Do not use benzene, paint
thinners, anti-static agents, or other
chemical wipes. They could scratch the
screen.
7
Page 8
Important Points
on Safety for the
Customer
This product features a number of pictorial
indications as well as points concerning
handling so that you can use the product
correctly and in a safe manner, as well as
prevent injury or damage to yourself, other
users, or property.
WARNING
CAUTION
This indicates details
regarding handling of the
product that if ignored, could
be expected to result in death
or serious injury.
This indicates details
regarding handling of the
product that if ignored, could
be expected to result in
personal injury or property
loss.
WARNING
• The driver should not pay close
attention to the images on the
screen while driving.
This may prevent the driver looking
where they are going, and cause an
accident.
• The driver should not perform
complicated operations while
driving.
Performing complicated operations while
driving may prevent the driver looking
where they are going, and cause an
accident.
Therefore stop the vehicle in a safe
location before performing such
operations.
• Do not use during malfunctions,
such as when the screen does not
light up or no sound is audible.
This may lead to accident, fire, or electric
shock.
• Do not place anything on the
open display.
This may lead to accident, fire, electric
shock, or malfunction.
• Ensure water or other foreign
objects do not enter the product.
This may lead to smoking, fire, electric
shock, or malfunction.
WARNING
• Do not insert foreign objects into
the disc slot or card slot.
This may lead to fire, electric shock, or
malfunction.
• Always obey all actual traffic
regulations, even when following
route guidance from this
navigation system.
Due to changes in traffic rules, this
data may differ from the actual traffic
regulations.
Always obey the actual traffic regulations.
• In the event of abnormalities
occurring when foreign objects
or water enter the product,
resulting in smoke or a strange
smell, immediately stop using
the product, and consult with
your dealer.
Continuing to use the product may result
in accident, fire, or electric shock.
• Do not disassemble or modify
the product.
This may lead to malfunction, fire, or
electric shock.
During thunderstorms, do not
touch the antenna or the front
panel.
This may lead to electrical shock from
lightning.
8
Page 9

Navigation
9
Page 10
1. WARNINGS
AND SAFETY
2. GETTING
STARTED
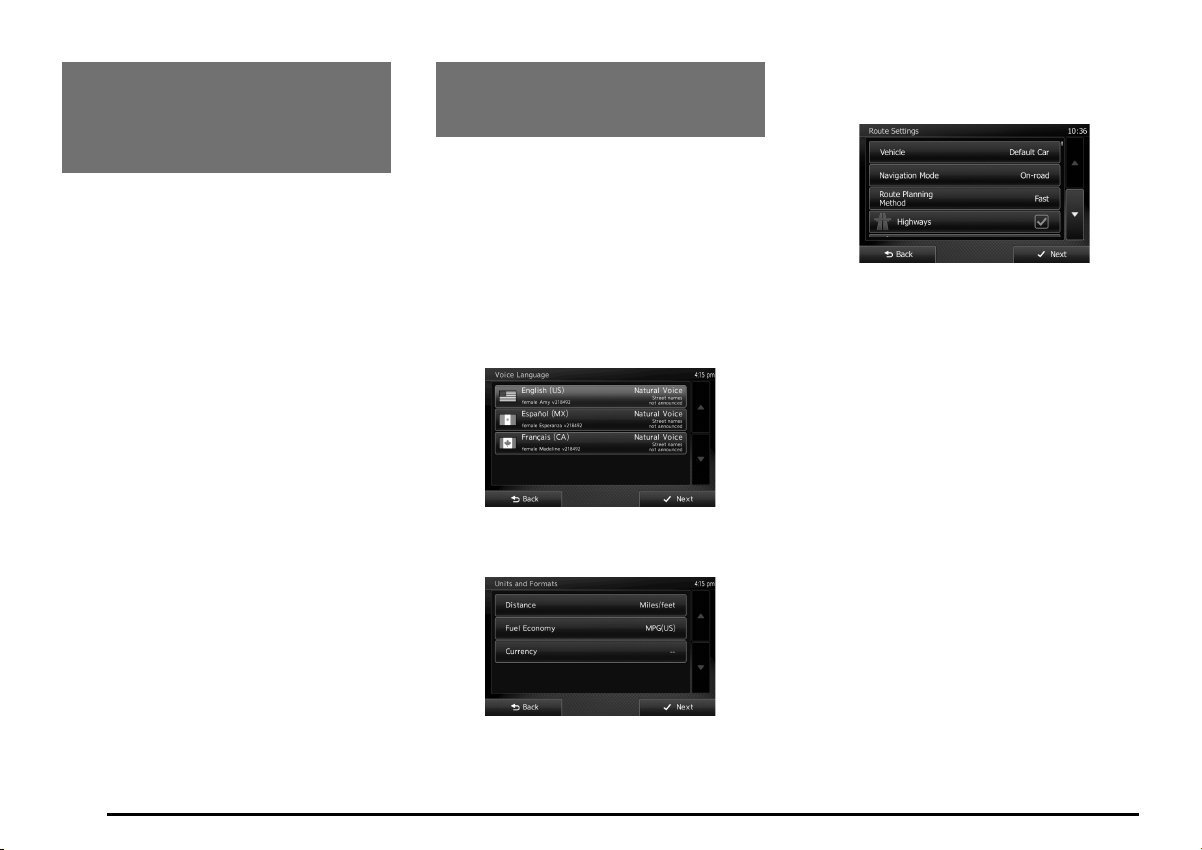
3. If needed, modify the default route
planning options. Later you can alter your
selection via the Route settings (page 68).
INFORMATION
The navigation system helps you find your
way to your destination with a connected
GPS receiver. MMES does not transmit your
position; others cannot track you.
If you accept it when first using the
application, MMES collects usage information
and GPS logs that may be used for improving
the application and the quality and coverage
of maps. The data is processed anonymously;
no one will be able to track any personal
information. If you change your mind later,
you can enable or disable the log collection in
Settings (page 74).
It is important that you look at the display only
when it is safe to do so. If you are the driver of
the vehicle, we recommend that you operate
MMES before you start your journey. Plan the
route before your departure and stop if you
need to change the route. Some operations
are restricted while driving for safety.
You must obey the traffic signs and follow
the road geometry. If you deviate from the
recommended route, MMES changes the
instructions accordingly.
MMES is optimized for in-car use. You can
use it easily by tapping the screen buttons and
the map with your fingertips.
When using the navigation software for
the first time, an initial setup process starts
automatically. Do as follows:
1. Select the language and voice used for
voice guidance messages. Later you can
alter your selection via the Sound and
Warnings settings (page 66).
2. If needed, modify the settings. Later you
can alter your selection via the Regional
settings (page 73).
4. The initial setup is now complete. The
Configuration wizard can be restarted
later from the Settings menu (page 64).
After the initial setup process, the Navigation
menu appears and you can start using MMES.
10
Page 11
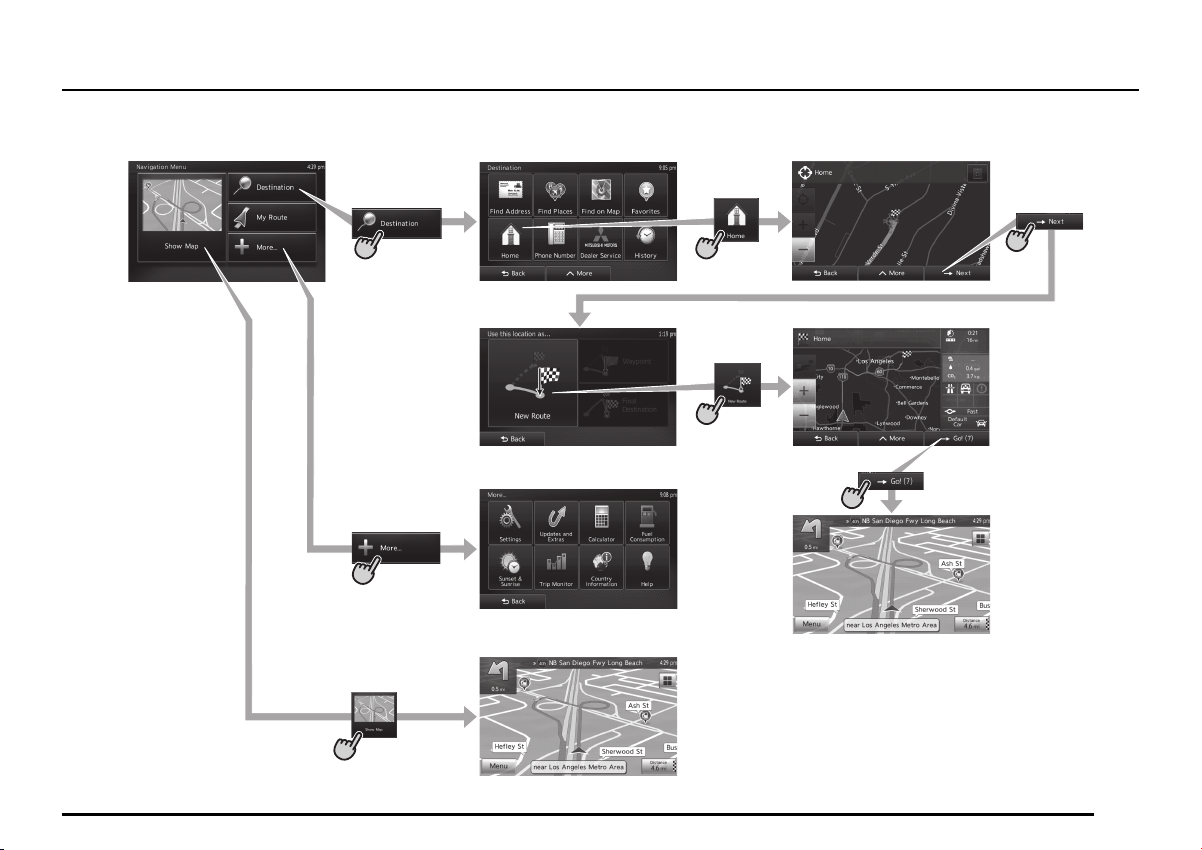
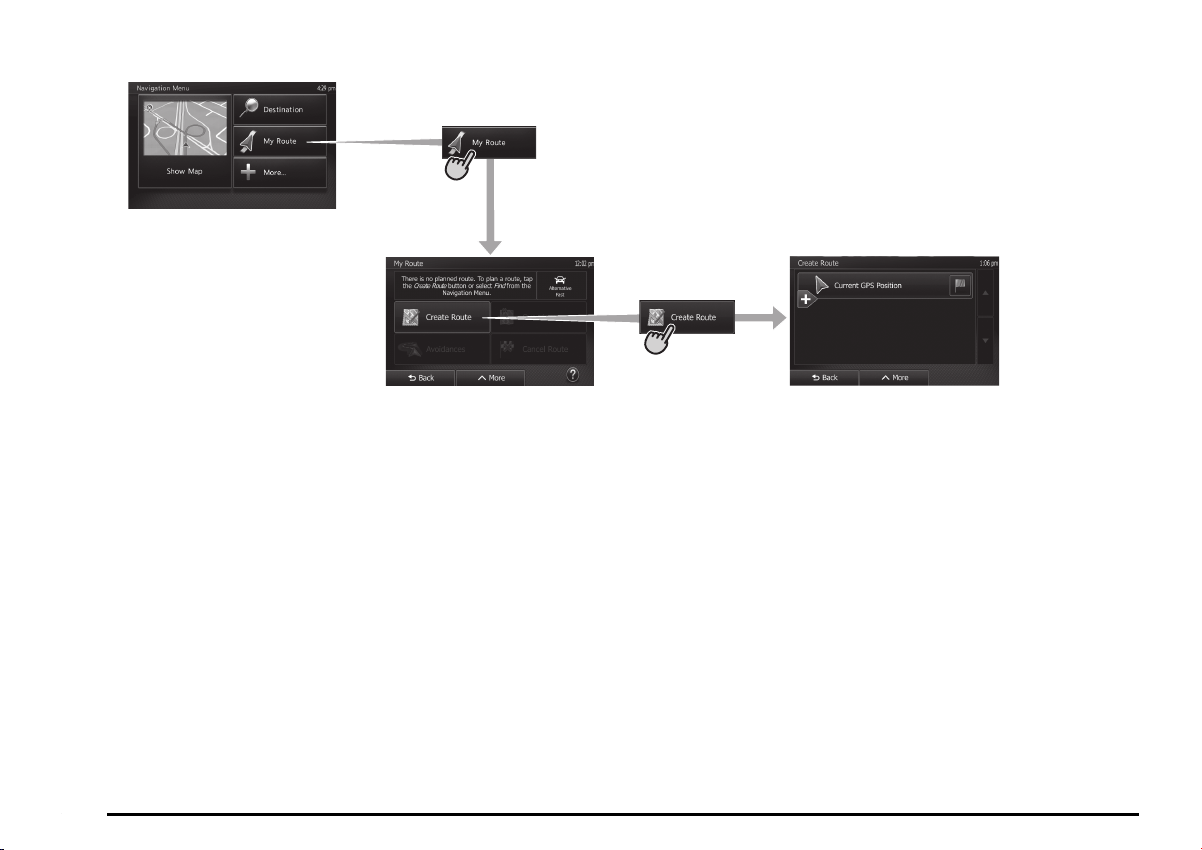
Navigation menu
You can reach all parts of MMES from the Navigation menu as follows.
(Navigation Menu screen) (Destination screen)
(More… screen)
(Map screen)
(Map screen)
11
Page 12
(Navigation Menu screen)
(Create Route screen)
(My Route screen without destination)
12
Page 13
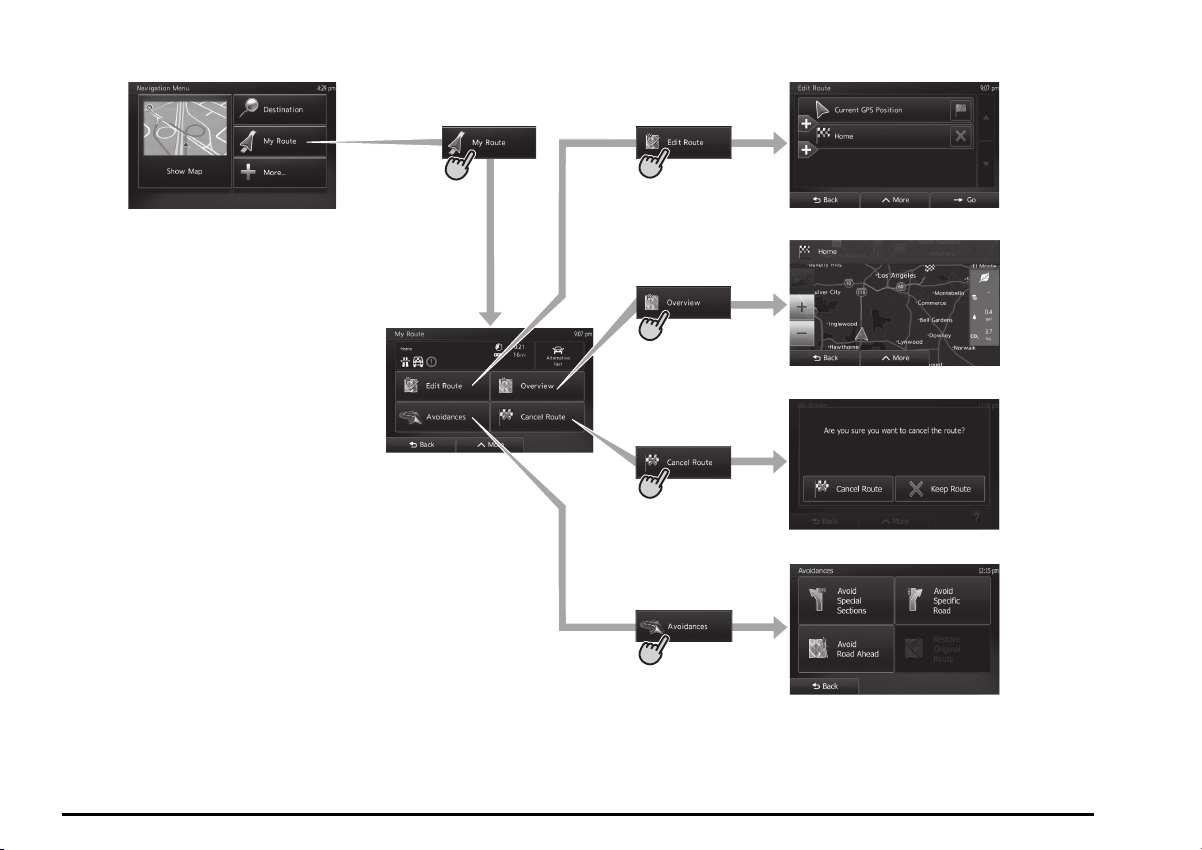
(Navigation Menu screen)
(Edit Route screen)
(Overview screen)
(My Route
screen with
destination)
(Cancel Route screen)
(Avoidances screen)
13
Page 14

You have the following options:
• Tap to select your
destination by entering an address or
selecting a place of interest, a location
on the map or one of your Favorite
destinations. You can also look up your
recent destinations from the Smart History
or enter a coordinate.
• Tap to display the
route parameters and the route in its full
length on the map. You can also perform
route-related actions such as editing or
canceling your route, setting a start point
for the route, picking route alternatives,
avoiding parts of the route, simulating
navigation or adding the destination to your
Favorites.
• Tap to customize the
way the navigation software works, to
simulate demo routes or to run some
additional applications.
• Tap to start navigating
on the map. The button itself is a
miniature live map that shows your current
position, the recommended route and the
surrounding map area. Tap the button to
enlarge the map to the full screen.
• Voice guidance is given when you press
and hold the MAP button to the right of the
screen for more than 1.5 seconds. You
can use this function whenever a route has
been set.
14
Page 15
Buttons and other controls on the screen
When you are using MMES, you usually tap buttons on the touch screen.
You only need to confirm selections or changes if the application needs to restart, it needs to perform a major reconfiguration, or you are about to
lose some of your data or settings. Otherwise, MMES saves your selections and applies the new settings without confirmation as soon as you use the
controls.
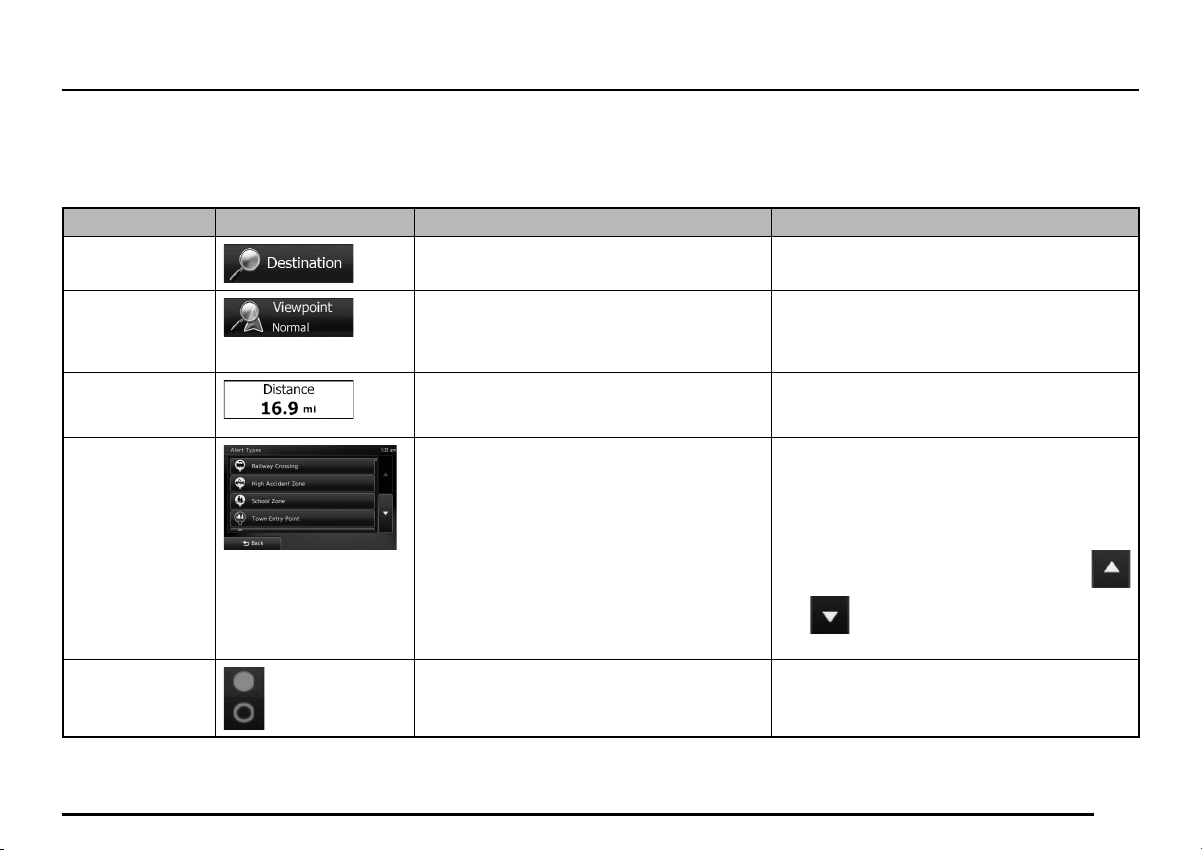
Type Example Description How to use it
Button Tap it to initiate a function, to open a new
screen, or to set a parameter.
Tap it once.
Button with value Some buttons display the current value of a
field or setting. Tap the button to change the
value. After the change, the new value is shown
on the button.
Icon Shows status information.
List When you need to select from several options,
they appear in a list.
Radio button When there are only a few choices, radio
buttons may be used instead of lists. Only one
value can be selected.
Tap it once.
Some icons also function as a button. Tap them
once.
Grab the list anywhere and slide your finger up or
down. Depending on the speed of the sliding, the
list will scroll fast or slow, only a bit or till the end.
This operation is available in navigation-related
screens only.
Alternatively, move between pages with the
and buttons and tap the value that you
want.
Tap one of the buttons to select a new value.
15
Page 16
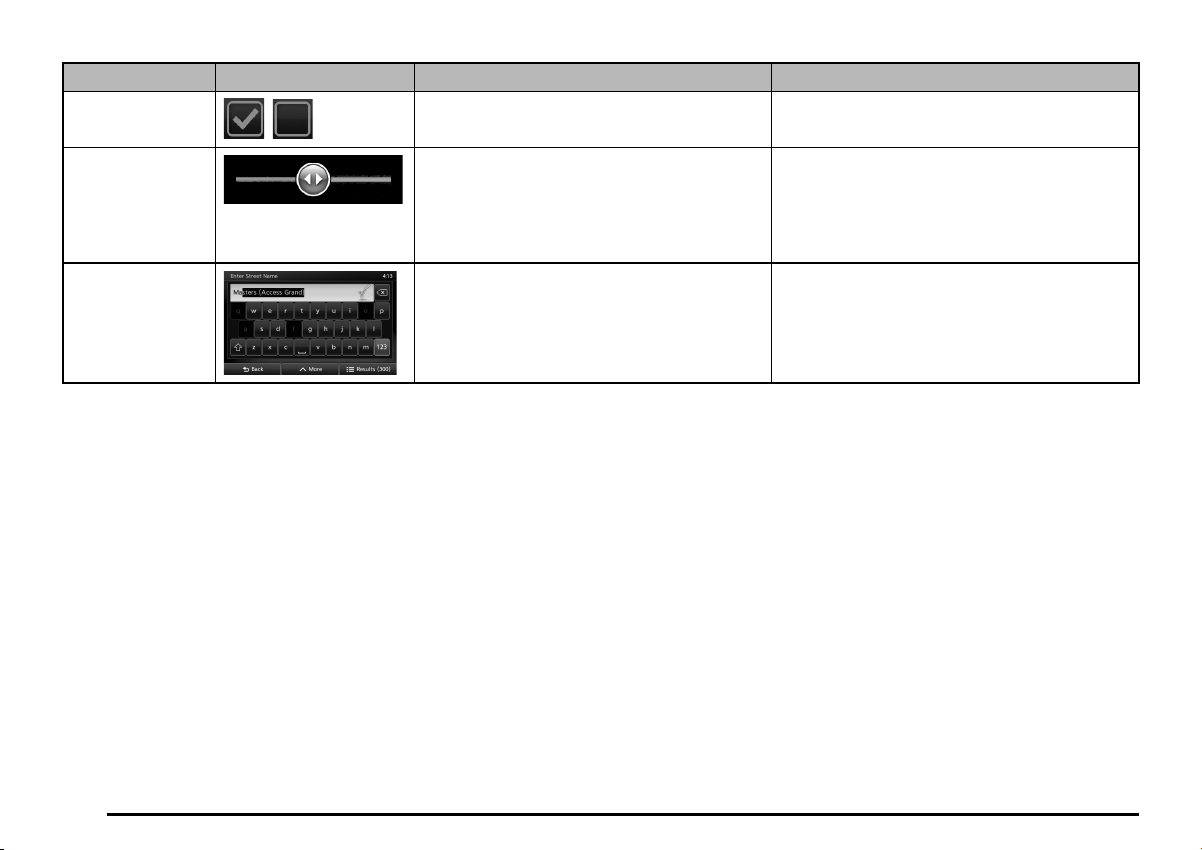
Type Example Description How to use it
Switch
Slider
Virtual keyboard
When there are only two choices, a checkmark
shows whether the feature is enabled.
When a feature can be set to different values in
a range, MMES shows an indicator on a gauge
that displays and sets the value.
Alphabetic and alphanumeric keyboards to
enter text and numbers.
Tap it to turn the switch on or off.
• Drag the handle to move the slider to its new
position.
• This operation is available in navigation-related
screens only.
• Tap the slider where you want the handle to
appear; the thumb jumps there.
Each key is a touch screen button.
q Using keyboards
You only need to enter letters or numbers when you cannot avoid it. You can type with your fingertips on the full-screen keyboards and you can switch
between various keyboard layouts, for example English, French or numerical. MMES supports address and POI name entry with a smart keyboard.
After typing the first letter on the virtual keyboard, the keys that do not correspond to any possible matching name become inactive. This makes typing
faster and helps in the spelling of complicated names. As soon as the number of matching names becomes small enough to fit on one screen, the
software displays a list to choose from, so the user does not have to type the full word in most cases.
The smart keyboard continuously offers the most likely match based on previous destination selections. As a result, it is usually enough to type the first
few letters of a city or street name.
16
Page 17
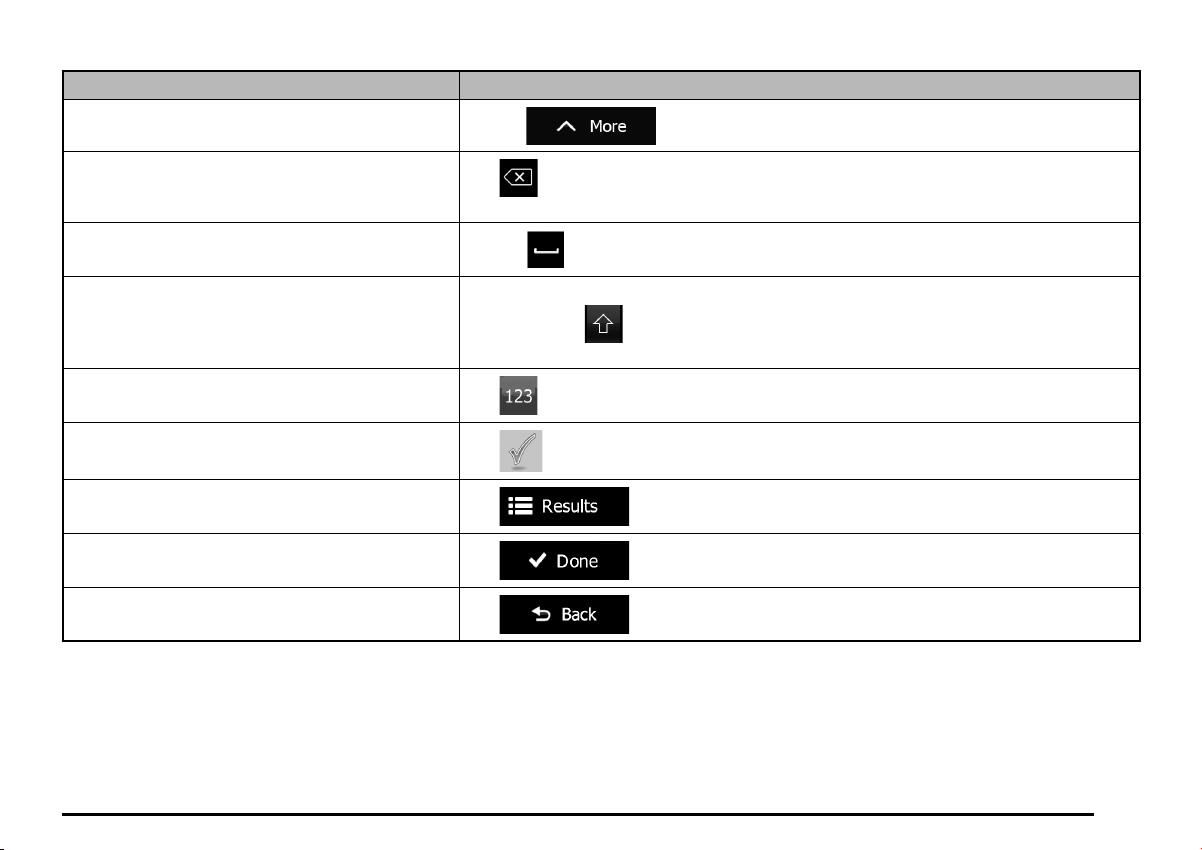
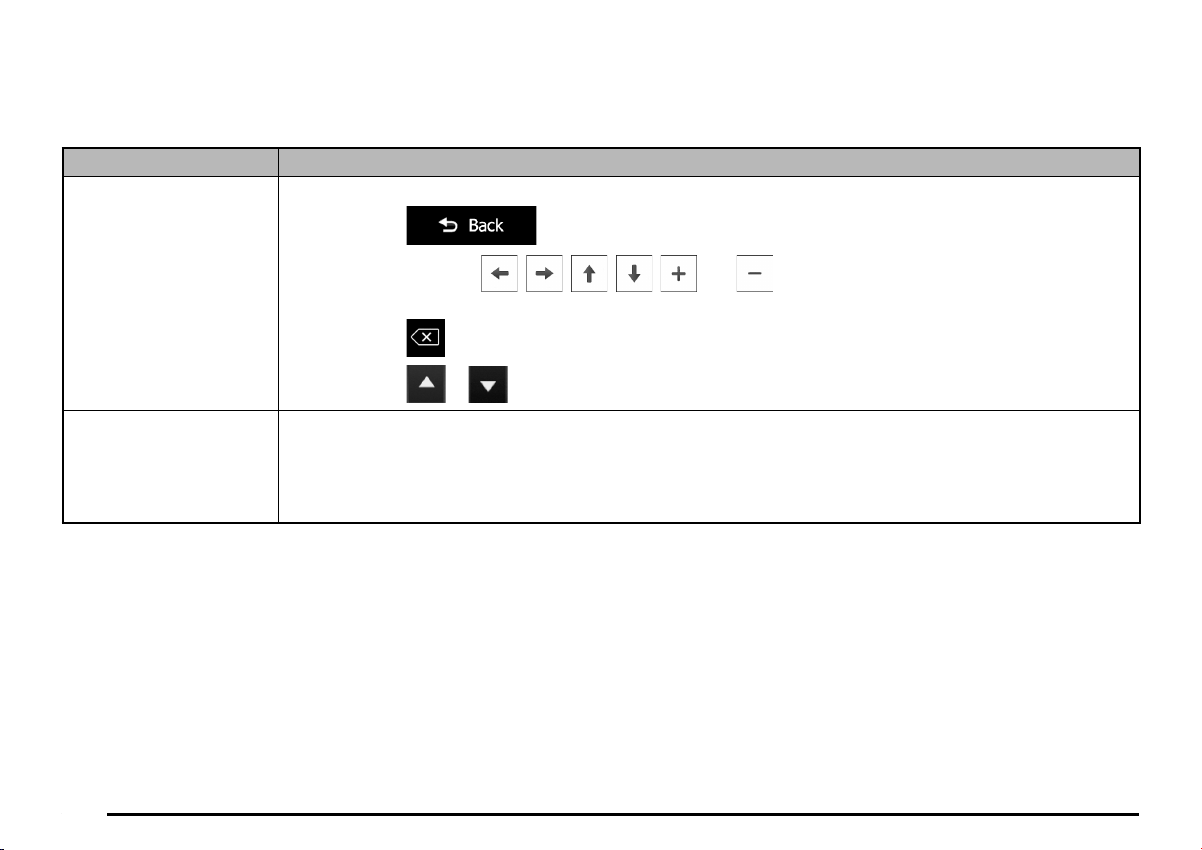
Task Instruction
Switching to another keyboard layout, for example
from an English keyboard to a French keyboard
Correcting your entry on the keyboard
Entering a space, for example between a first name
and a family name or in multi-word street names
Entering upper and lower case letters When entering a text, the first character appears in upper case while the rest of the text is in
Entering numbers and symbols
Finalizing the keyboard entry (accepting the
suggested search result)
Finalizing the keyboard entry (opening the list of
search results)
Finalizing the keyboard entry (saving your input)
Canceling the keyboard entry (returning to the
previous screen)
Tap the
Tap to remove the unneeded character(s).
Tap and hold the button to delete several characters or the entire input string.
Tap the
lower case. Tap to enter an upper case letter or tap twice to turn on Caps Lock. Tap
again and lower case letters return.
Tap to switch to a keyboard offering numeric and symbol characters.
Tap .
Tap .
Tap .
Tap .
button at the bottom center of the screen.
button and select the new keyboard layout from the list.
17
Page 18
q Beyond single screen tap
You usually need to tap the screen only once. However, some useful features can be accessed with combined touch screen tapping. Those are the
following:
Action Details
Tapping and holding the
screen
Gestures (drag&drop) You need to drag and drop the screen only in cases like:
Tap and keep pressing the following buttons to reach extra functions:
• Tap and hold
• Tap and hold any of the , , , , , and buttons on the Map screen: you can rotate, tilt or
scale the map continuously.
• Tap and hold on keyboard screens: you can delete several characters quickly.
• Tap and hold or in long lists: you can scroll pages continuously.
• Moving the handle on a slider.
• Scrolling the list: grab the list anywhere and slide your finger up or down. Depending on the speed of the sliding, the
list will scroll fast or slow, only a bit or till the end.
• Moving the map in map browsing mode: grab the map, and move it in the desired direction.
on list and menu screens: the Map screen appears.
18
Page 19
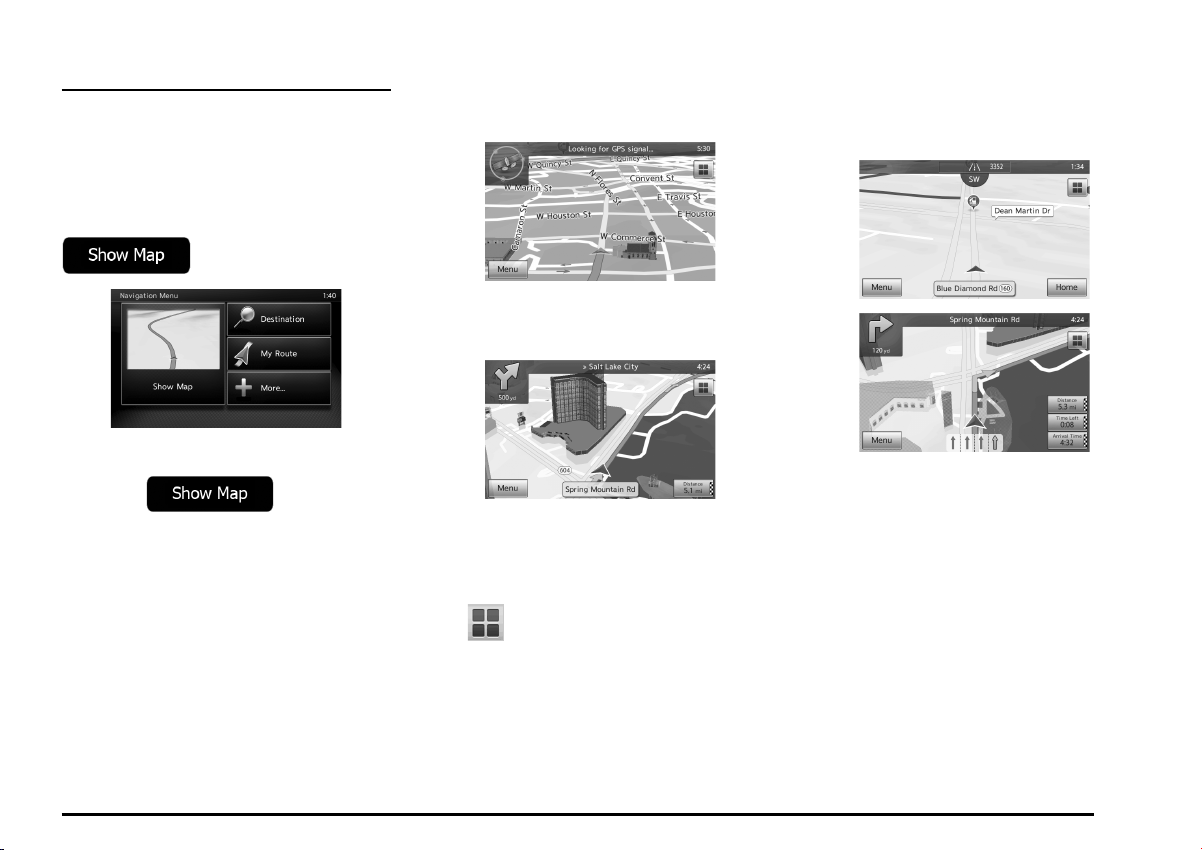
Map screen
q Navigating on the map
The Map screen is the most frequently used
screen of MMES.
A small live map is displayed on the
Navigation menu, as a part of the
button.
You see colored dots circling around a
satellite symbol in the top left corner. The
more green dots you see, the closer you are
to get the valid GPS position.
When GPS position is available, the
Vehimarker is displayed in full color, now
showing your current position.
By default, only one data field is displayed in
the bottom right corner. Tap this field to see all
route data fields. Tap any of the data fields to
suppress others and display only the selected
one.
To enlarge this small map and open the Map
screen, tap or press the
MAP button to the right of the screen.
This map shows the current position (the
Vehimarker, a red arrow), the recommended
route (an orange line), and the surrounding
map area.
When there is no GPS position, the
Vehimarker is transparent.
There are screen buttons and data fields
on the screen to help you navigate.
During navigation, the screen shows route
information.
The
frequently used functions. You can change
the available functions in Settings.
button gives quick access to
The data fields are different when you are
navigating an active route and when you have
no specified destination (the orange line is not
displayed).
19
Page 20
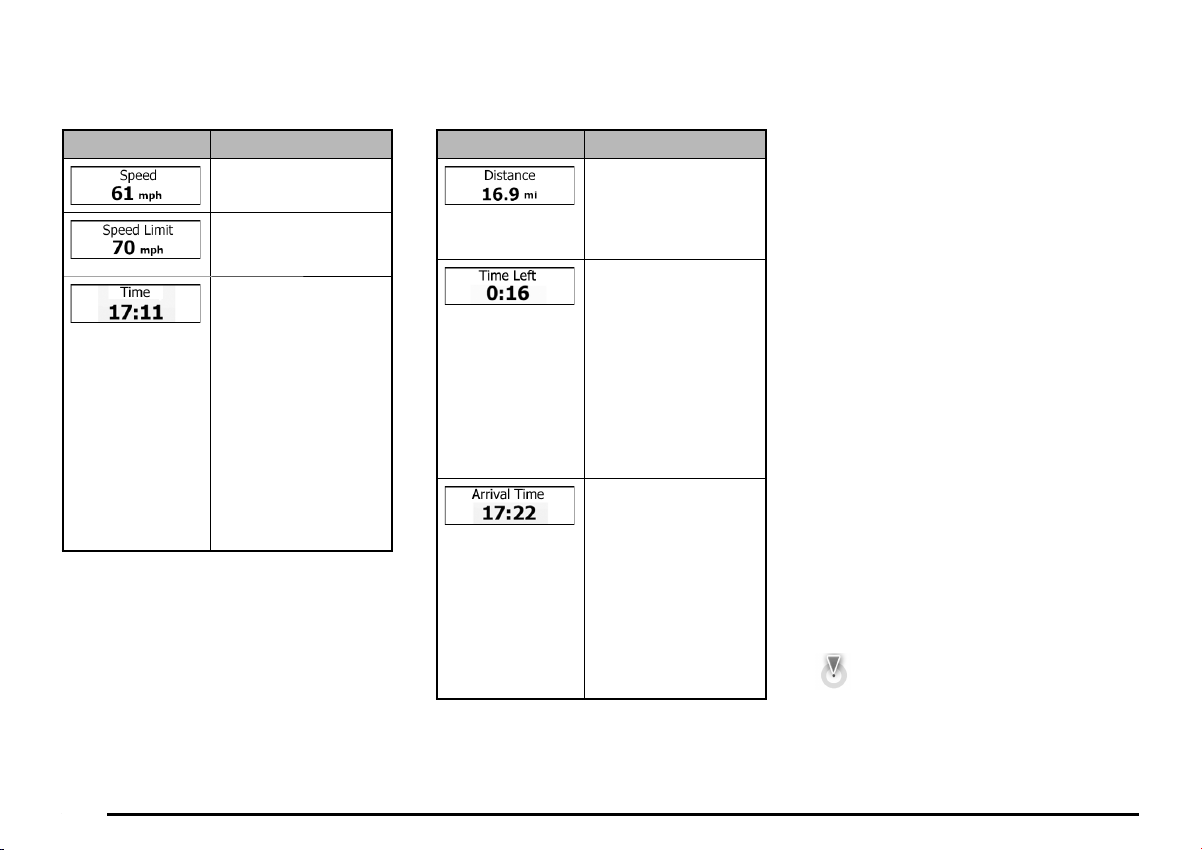
Default data fields when cruising without a
destination (tap and hold any of the fields to
change its value):
Field Description
Shows your current
speed.
Shows the speed limit
of the current road if
the map contains it.
Shows the current
time corrected with
time zone offset.
The accurate time
comes from the GPS
satellites, and the
time zone information
comes from the map or
it can be set manually
in Regional settings.
(The current time is
always displayed in
the top right corner of
menu screens.)
Note:
• The speed and speed limit display are auxiliary
functions. Check the speed in the vehicle’s
speedometer and observe the legal speed.
• Check the actual road signs because speed
limits are subject to change due to weather and
road conditions.
20
Default data fields when navigating a route
(tap and hold any of the fields to change its
value):
Field Description
Shows the distance
you need to travel
on the route before
reaching your final
destination.
Shows the time
needed to reach the
final destination of
the route based on
information available
for the remaining
segments of the route.
The calculation cannot
take into account
traffic jams and other
possible delays.
Shows the estimated
arrival time at the final
destination of the route
based on information
available for the
remaining segments of
the route.
The calculation cannot
take into account
traffic jams and other
possible delays.
q Position markers
Vehimarker and Lock-on-Road
MMES marks your current position with the
Vehimarker which is a red arrow.
When on-road navigation is selected, the
Vehimarker may not show your exact GPS
position and heading. If roads are near, it is
aligned to the nearest road to suppress GPS
position errors, and the direction of the icon is
aligned to the direction of the road.
If you select off-road navigation: The
Vehimarker is not aligned to the road. The
direction of the icon shows your current
heading.
Selected map location (Cursor)
and selected map object
You can mark a map location in the following
ways:
• Tap the map when navigating,
• Tap the map when you are asked to
confirm the destination at the end of a
search, or
• Tap the map in Find on Map (page 47)
When a map location is selected, the Cursor
appears at the selected point on the map. The
Cursor is displayed with a radiating red dot
( ) to make it visible at all zoom levels.
The location of the Cursor can be used as
the destination of the route, a new alert point,
you can search for Places around it, or you
can save this location as one of your Favorite
destinations.
Page 21
You can also select some of the objects
on the map. If you tap the map at the icon
of a Place of Interest or an alert point, the
object will be selected (you see a red circling
border around the object), and you can get
information about this object or use it as a
route point.
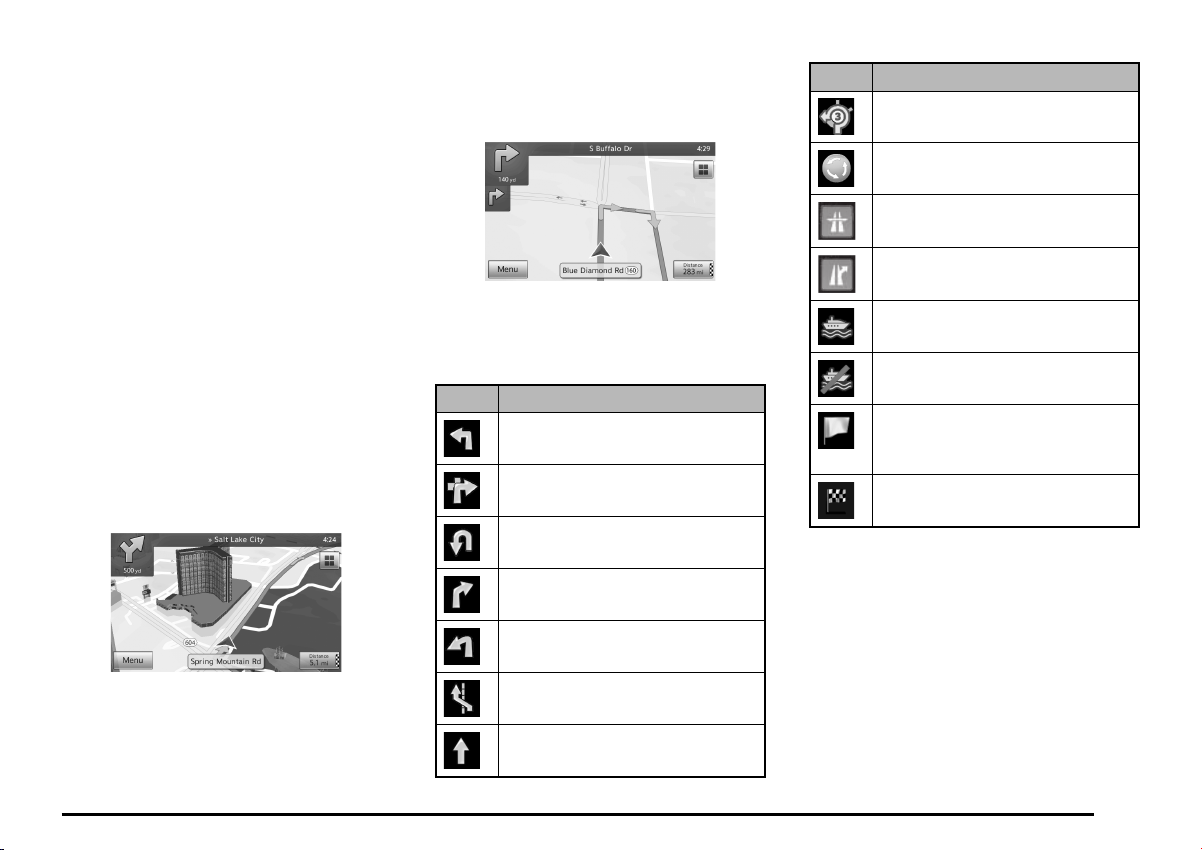
A smaller icon shows the type of the
second next maneuver if it is near the first
one. Otherwise, only the next maneuver is
displayed.
Icon Description
Go left on the traffic circle, 3rd exit
(next maneuver).
Enter traffic circle (second next
maneuver).
Enter freeway.
q Objects on the map
Streets and roads
MMES shows the streets in a way that is
similar to how the paper road maps show
them. Their width and colors correspond to
their importance: you can easily tell a freeway
from a small street.
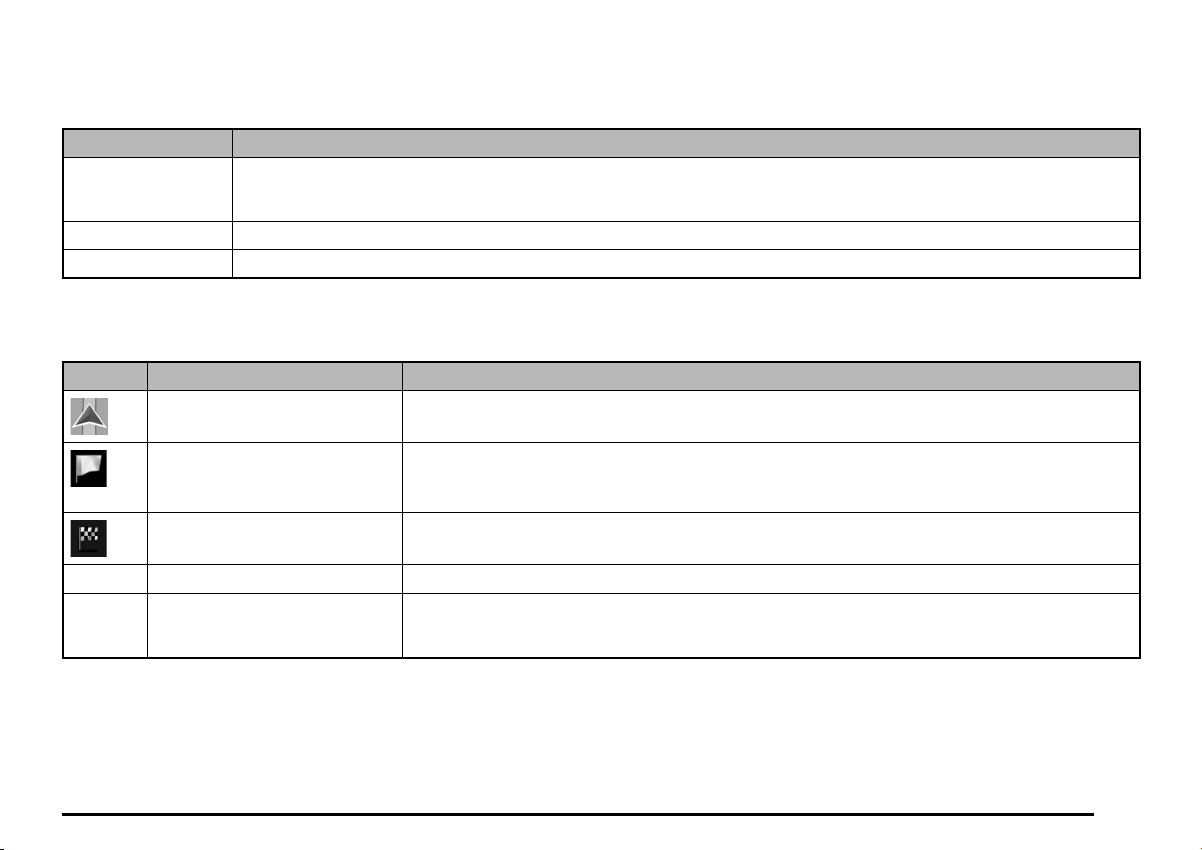
Turn preview and Next street
When navigating a route, the top section of
the Map screen shows information about the
next route event (maneuver) and the next
street or the next city/town.
There is a field in the top left corner that
displays the next maneuver. Both the type of
the event (turn, traffic circle, exiting freeway,
etc.) and its distance from the current position
are displayed.
Most of these icons are very intuitive. The
following table lists some of the frequently
shown route events. The same symbols are
used in both fields:
Icon Description
Turn left.
Turn right.
Turn back.
Bear right.
Turn sharp left.
Keep left.
Continue straight in the
intersection.
Exit freeway.
Board ferry.
Leave ferry.
Approaching a waypoint.
(yellow)
Approaching the destination.
Lane information and Signposts
When navigating on multilane roads, it is
important to take the appropriate lane in
order to follow the recommended route. If
lane information is available in the map data,
MMES displays the lanes and their directions
using small arrows at the bottom of the map.
Highlighted arrows represent the lanes you
need to take.
21
Page 22
Where additional information is available,
signposts substitute arrows. Signposts are
displayed at the top of the map. The color
and style of the signposts are similar to
the real ones you can see above road or
by the roadside. They show the available
destinations and the number of the road the
lane leads to.
All signposts look similar when cruising (when
there is no recommended route). When
navigating a route, only the signpost that
points to the lane(s) to be taken is displayed
in vivid colors; all others are darker.
If you want to hide the currently displayed
signposts, tap any of them and the normal
Map screen returns until new signpost
information is received.
Junction view
If you are approaching a freeway exit or
a complex intersection and the needed
information exists, the map is replaced with a
3D view of the junction. The lanes you need to
take are displayed with arrows. Signposts can
also be present if information is available.
If you want to hide the currently displayed
junction, tap the picture and the Map screen
returns.
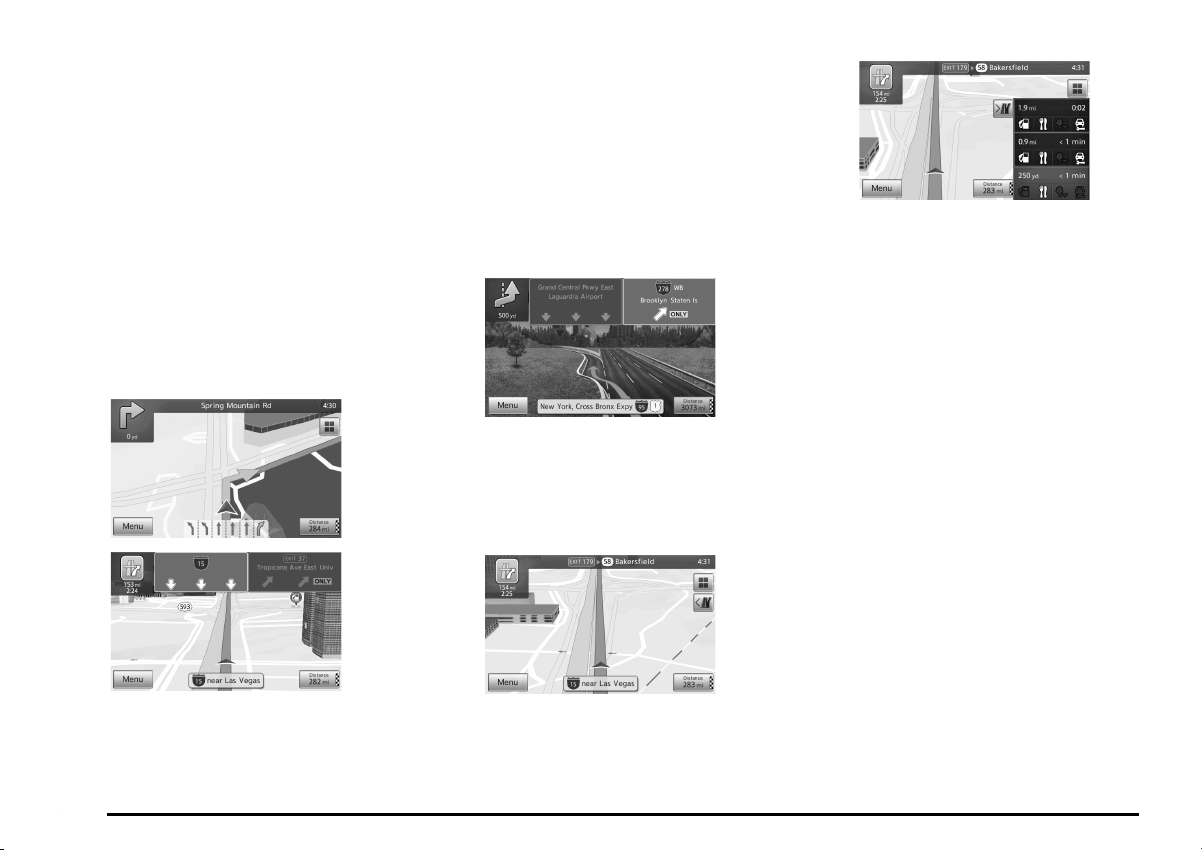
Freeway exit services
You may need a gas station or a restaurant
during your journey. This feature displays a
new button on the map when you are driving
on freeways.
Tap any of them to display the exit area on
the map. You can now easily add this exit as
a waypoint to your route if needed.
If you want to display other types of Places for
the exits, you can change the icons in Visual
Guidance settings (page 71).
22
Tap this button to open a panel with the
details of the next few exits or service
stations.
Page 23
3D object types
MMES supports the following 3D object types:
Type Description
3D terrain 3D terrain map data shows changes in terrain, elevations or depressions in the land when you view the map in 2D, and
Elevated roads Complex intersections and vertically isolated roads (such as overpasses or bridges) are displayed in 3D.
3D landmarks Landmarks are 3D artistic or block representations of prominent or well-known objects.
use it to plot the route map in 3D when you navigate. Hills and mountains are shown in the background of the 3D map, and
illustrated by color and shading on the 2D map.
Elements of the active route
MMES shows the route in the following way:
Symbol Name Description
Current position Your current position displayed on the map. If roads are near, it is aligned to the nearest road.
Waypoint (intermediate
destination)
(yellow)
Destination (end point) The final destination of the route.
– Route color The route always stands out with its color on the map, both in daytime and in night color mode.
– Streets and roads that are
excluded from the navigation
An intermediate destination of the route before reaching the final destination.
You can choose whether you want to use or avoid certain road types. However, when MMES cannot
avoid such roads, the route will include them and it will show them in a color that is different from the
route color.
23
Page 24

q Manipulating the map
Tap the map anywhere to browse it during navigation. The map stops following the current position (the Vehimarker, a red arrow, is not locked in a fix
position on the screen any more) and control buttons appear to help you modify the map view.
Action Button(s) Description
Moving the map with
drag&drop
Zooming in and out
Tilting up and down
Rotating left and right
2D or 3D view
Compass in 2D map view
mode
No buttons You can move the map in any direction: tap and hold the map, and move your finger towards the
,
,
,
,
,
direction you want to move the map.
Changes how much of the map is displayed on the screen.
MMES uses high-quality vector maps that let you examine the map at various zoom levels,
always with optimized content. It always displays street names and other text with the same font
size, never upside-down, and you only see the streets and objects that you need.
Map scaling has a limit in 3D map view mode. If you zoom out further, the map switches to 2D
view mode.
Tap the button once to modify the view in large steps, or tap and hold the button to modify it
continuously and smoothly.
Changes the vertical view angle of the map in 3D mode.
Tap the button once to modify the view in large steps, or tap and hold the button to modify it
continuously and smoothly.
Changes the horizontal view angle of the map.
Tap the button once to modify the view in large steps, or tap and hold the button to modify it
continuously and smoothly.
Tap this button to switch between the 3D perspective and 2D top-down map view modes.
The direction of the compass shows North. Tap the button to switch to North-up view, and then
tap again to rotate the map in the previous direction.
24
Page 25
Action Button(s) Description
Compass in 3D map view
mode
Location information
Return to normal
navigation
Additional options
Select destination Tap this button to select the Cursor as a new destination. The route is automatically calculated.
,
The direction of the compass shows North. Tap the button to switch to North-up view, and then
tap again to rotate the map in the previous direction.
Tap this button to open a new screen with information about the selected map point, the Cursor.
Tap this button to move the map back to follow the current position. Automatic map rotation is
also re-enabled.
The map manipulation buttons disappear and navigation continues.
Tap this button to open a list of additional features like saving the Cursor as a Favorite
destination, or searching for Places around the Cursor.
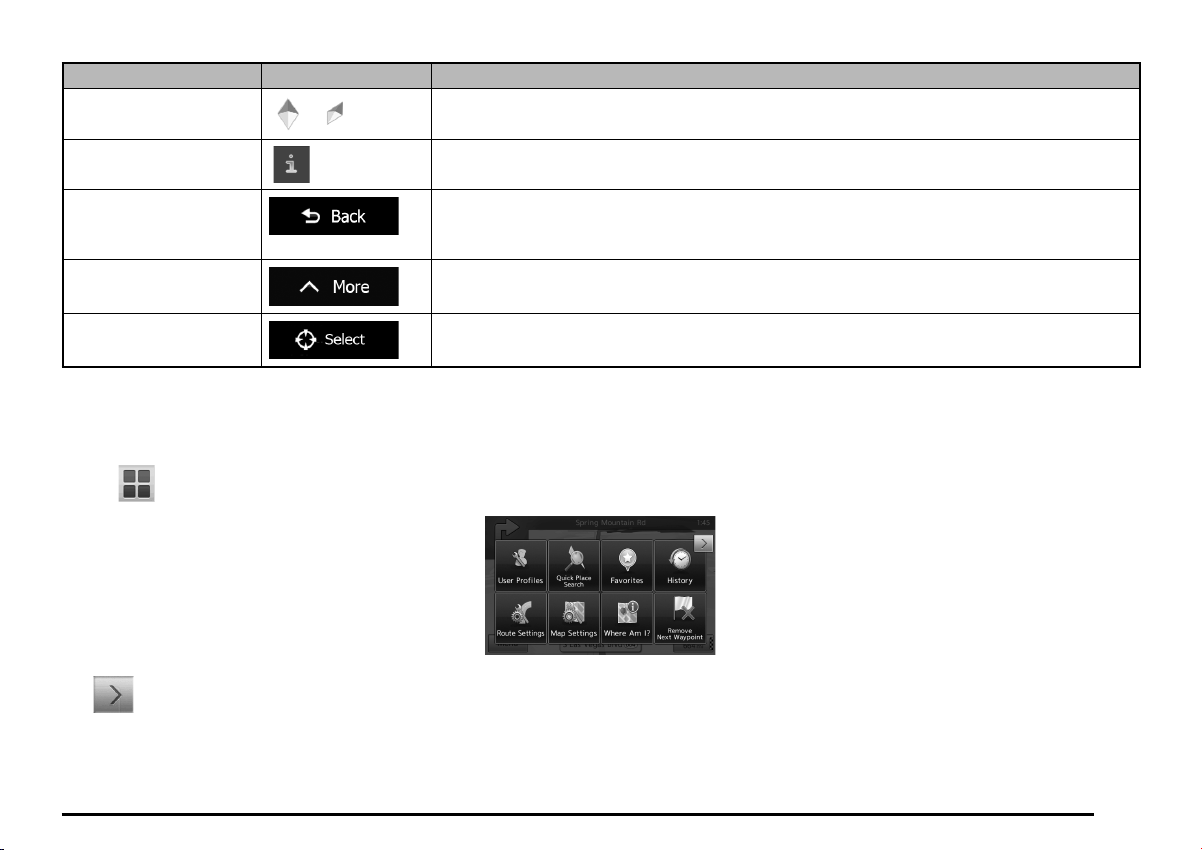
q Quick menu
The Quick menu is a selection of controls and functions that are frequently needed during navigation. It can be opened directly from the Map screen by
tapping .
Tap to close the menu.
Most of these functions are shortcuts. They are accessible from the menu system.
25
Page 26

There are more functions available than the number of buttons in the menu. The following options are available:
Button Description Shortcut for
This button opens the list of your Favorite destinations. Destination / Favorite (page 47)
This button opens a 2D map scaled and positioned to show the entire route. My Route / Overview (page 51)
26
This function lets you search for a Place by its name. The search is carried out either along your
route or around your current location if there is no route calculated.
This button opens the map related settings. More / Settings / Map Settings
This button opens the Visual Guidance settings screen. More / Settings / Visual Guidance
This button lets you bypass parts of the recommended route. My Route / Avoidances
This button cancels the route and stops navigation. The button is replaced with the next one if
waypoints are given.
This button skips the next waypoint from the route. The button is replaced with the previous one if
waypoints aren’t given.
This button opens the Trip Monitor screen where you can manage your previously saved trip logs
and track logs.
This button opens a special screen with information about the current position and a button to
search for nearby emergency or roadside assistance. For details, see the next chapter.
This button opens the route creating function. The button is replaced with the next one if the route is
given.
Destination / Find Places / Quick
Search (page 39)
(page 70)
(page 71)
My Route / Cancel Route (page 54)
n/a
More / Trip Monitor (page 63)
Tap the Current Street field on the
Map screen
My Route / Create Route
Page 27
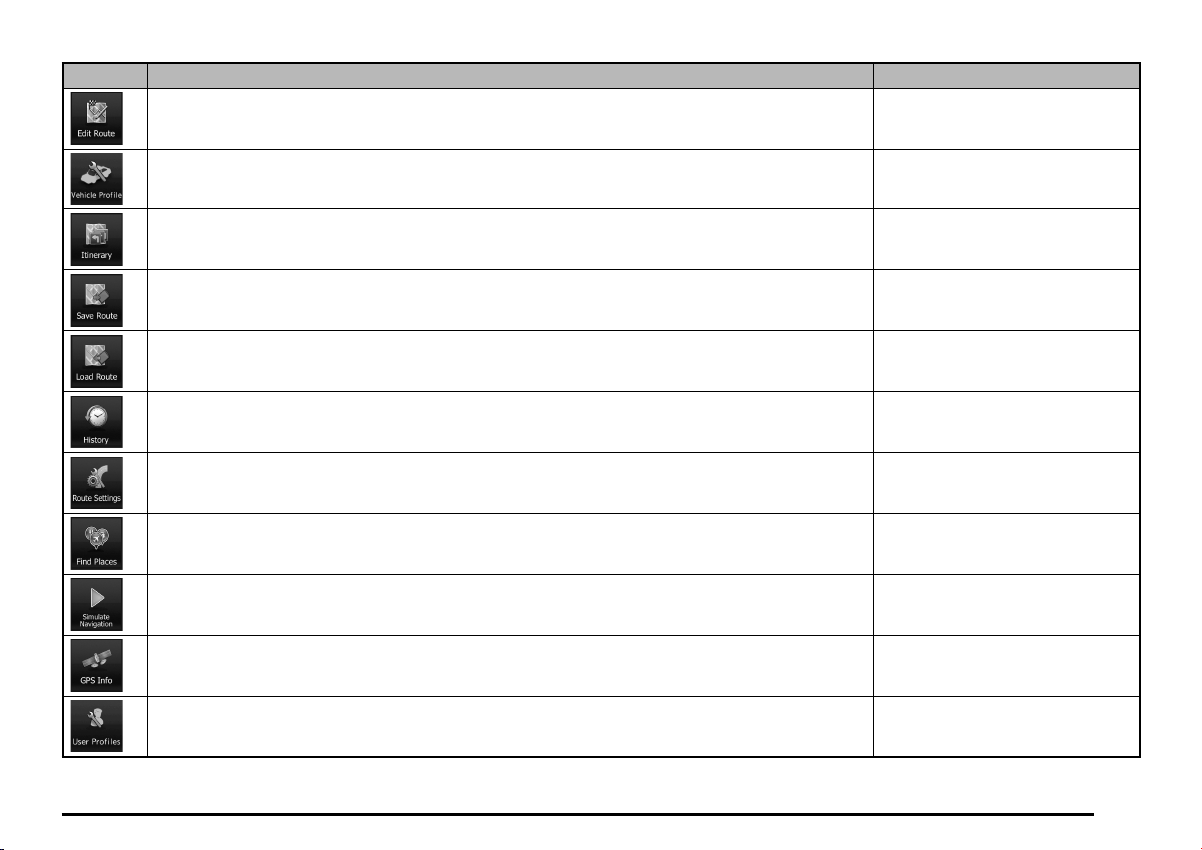
Button Description Shortcut for
This button opens the route editing function. The button is replaced with the previous one if the route
isn’t given.
My Route / Edit Route
This button opens the vehicle profile settings. More / Settings / Route Settings /
This button opens the list of maneuvers (the itinerary). Tap the top left of the Map screen
With this function you can save the active route for later use. My Route / More / Save Route
With this function you can replace the active route with a previously saved route. My Route / More / Load Route
This button opens the History list. You can select one of your previous destinations. Destination / History (page 49)
This button opens the route related settings. More / Settings / Route Settings
With this function you can search for Places of Interest in various different ways. Destination / Find Places (page 39)
This button opens the Map screen and starts simulating the active route. My Route / More / Simulate
This button opens the GPS Information screen with satellite position and signal strength information. Tap the top left of the Map screen
This button opens the user profile settings. More / Settings / User Profiles
Vehicle
during navigation.
Navigation (page 58)
when there is no GPS reception.
27
Page 28
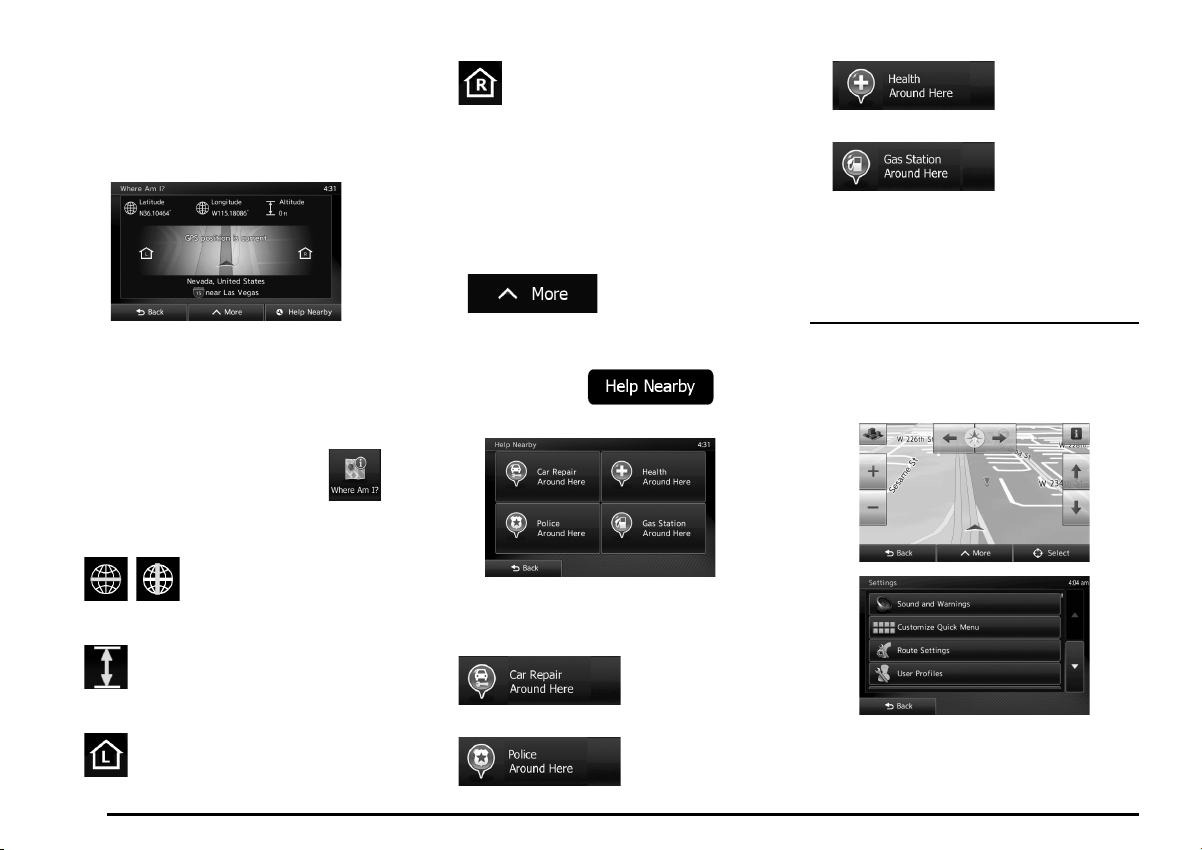
q Checking the details of the
current position (Where Am I?)
This screen contains information about the
current position and a button to search for
useful Places nearby.
•
• In the middle of the screen you can see
• Address details (when available) of the
You can also perform some actions on this
screen:
: House number on the right.
whether the position is current, or the time
left since it was last updated.
current position are displayed at the
bottom.
• : Medical and
emergency services
•
Tap any of the buttons, select a Place from
the list, and navigate to it.
: Gas stations
You can access this screen from the map in
one of the following ways:
• If the current street is displayed below
the Vehimarker (the current position on
the map), tap it to open the Where Am I?
screen.
• Open the Quick menu and tap the
button.
Information on this screen:
• , : Latitude and Longitude
(coordinate of the current position in
WGS84 format).
•
•
: Altitude (elevation information
coming from the GPS receiver - often
inaccurate).
: House number on the left.
28
Tap
position as a Favorite destination.
You can also search for assistance near your
current position. Tap
open a new screen for the Quick search:
The following services can be searched
around the current position or the last known
position:
•
roadside assistance services
•
to save the current
: Car repair and
: Police stations
to
Operation Regulations
Some features using the touch screen are
grayed out and disabled to help you keep
your attention on driving. When you stop, all
features are re-enabled.
Stop
Page 29

Driving
3. ON-ROAD
NAVIGATION
When first started, MMES calculates routes
using the road network of the high quality
vector maps provided with the product.
You can set up your route in different ways:
• If you need a route for immediate
navigation, you can select the destination
and start navigating to it right away (normal
navigation).
• You can also plan a route independently of
your current position.
You can plan routes with multiple destinations.
Select the first destination. Then select a
second destination and add it to your route
to create a multi-point route. You can add as
many destinations to your route as you like.
You can also use MMES for off-road
navigation. For details, see page 59.
Selecting the destination
of a route
MMES offers you several ways of choosing
your destination:
• Enter a full address or a part of an
address, for example a street name
without a house number or the names of
two intersecting streets (page 29).
• Enter an address with ZIP code (page 37).
This way you do not need to select the
name of the city/town and the search for
street names might be faster as well.
• Use a built-in Place of Interest as your
destination (page 39).
• Select a location on the map with the Find
on Map feature (page 47).
• Use a previously saved Favorite
destination (page 47).
• Select a location from the History of
previously used destinations (page 49).
• Enter the coordinate of the destination
(page 49).
q Entering an address or a
part of the address
If you know at least a part of the address, it is
the quickest way to select the destination of
the route.
Using the same screen, you can find an
address by entering:
• the exact address, including house number
• the center of a city/town
• an intersection
• the midpoint of a street
• any of the above, starting the search with
the ZIP code (page 37)
29
Page 30
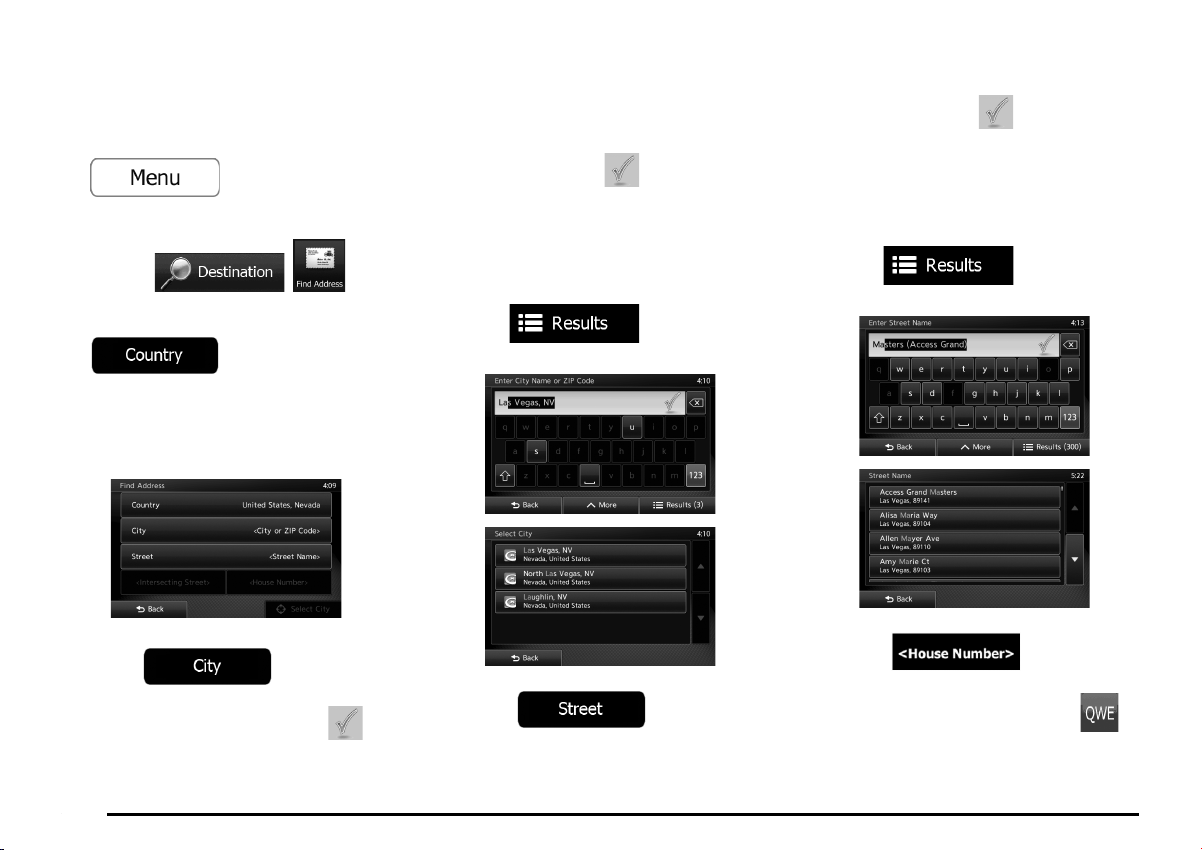
Entering an address (United States)
To enter an address as the destination, do as
follows:
1. If you are on the Map screen, tap
Navigation menu.
2. In the Navigation menu, tap the following
buttons:
3. By default, MMES proposes the country
and state where you are. If needed, tap
letters of the destination country or state
on the keyboard, and select one from the
list. If you select a country without a state,
you can search for a city/town in all its
states.
to return to the
, .
, enter the first few
b. Start entering the name of the city/
town on the keyboard.
c. Find the city/town you need:
• The most likely city/town name is
always shown in the input field. To
accept it, tap .
• If the desired name does not
show up, the names that match
the string appear in a list after
entering a couple of characters
(to open the list of results before
it appears automatically, tap
). Select the city/
town from the list.
• The most likely street name is
always shown in the input field. To
accept it, tap
• If the desired name does not
show up, the names that match
the string appear in a list after
entering a couple of characters
(to open the list of results before
it appears automatically, tap
street from the list.
.
). Select the
4. Select a new city/town:
a.
Tap . The city/town
of your current location is offered by
default. For a local search, tap
to accept it, otherwise continue with
entering the destination city/town name.
30
5. Enter the street name:
a. Tap .
b. Start entering the street name on the
keyboard.
c. Find the street you need:
6. Enter the house number:
a. Tap .
b. Enter the house number on the
keyboard. (To enter letters, tap ).
Page 31

c. Tap to finish
entering the address. (If the entered
house number cannot be found, the
midpoint of the street is selected as the
destination.)
Entering an address (Canada)
To enter an address as the destination, do as
follows:
1. If you are on the Map screen, tap
to return to the
Navigation menu.
2. In the Navigation menu, tap the following
7. A full screen map appears with the
selected point in the middle. If necessary,
tap the map somewhere else to modify the
destination. The Cursor ( ) appears at
the new location. Tap
to confirm the destination, or tap
to select a different
destination.
8. After a short summary of the route
parameters, the map appears showing
the entire route. The route is automatically
calculated. Tap
to modify route parameters, or tap
and start your journey.
buttons:
, .
3. By default, MMES proposes the country,
state and city/town where you are. If
Note:
• If you know that you will use this destination
needed, tap
first few letters of the destination country
or state on the keyboard, and select
, enter the
one from the list. If you select a country
frequently, before tapping
to confirm the destination, put it on the list of
your Favorites first: tap
then
new Favorite, and tap
save the location. The map with the destination
returns automatically. Now you can start your
journey.
, give a name for the
to
without a state, you can search for a city/
town in all its states.
4. If needed, select a new city/town:
a. Tap .
b. Start entering the name of the city/
town on the keyboard.
31
Page 32

c. Find the city/town you need:
• The most likely city/town name is
always shown in the input field. To
accept it, tap .
• If the desired name does not
show up, the names that match
the string appear in a list after
entering a couple of characters
(to open the list of results before
it appears automatically, tap
c. Find the street you need:
• The most likely street name is
always shown in the input field. To
accept it, tap
• If the desired name does not
show up, the names that match
the string appear in a list after
entering a couple of characters
(to open the list of results before
it appears automatically, tap
.
c. Tap
entering the address. (If the entered
house number cannot be found, the
midpoint of the street is selected as the
destination.)
to finish
town from the list.
). Select the city/
5. Enter the street name:
a. Tap .
b. Start entering the street name on the
keyboard.
32
street from the list.
). Select the
7. A full screen map appears with the
selected point in the middle. If necessary,
tap the map somewhere else to modify the
destination. The Cursor ( ) appears at
the new location. Tap
to confirm the destination, or tap
to select a different
destination.
6. Enter the house number:
a. Tap .
b. Enter the house number on the
keyboard. (To enter letters, tap ).
Page 33

8. After a short summary of the route
parameters, the map appears showing
the entire route. The route is automatically
calculated. Tap
to modify route parameters, or tap
and start your journey.
Entering an address starting with
the street name (in the United
States only)
You can leave the city/town name empty and
start the search with the street name. This
way you can search in all streets of a state.
Do as follows:
1. If you are on the Map screen, tap
Navigation menu.
2. In the Navigation menu, tap the following
buttons:
3. By default, MMES proposes the country
and state where you are. If needed, tap
the button with the name of the country,
enter the first few letters of the destination
country or state on the keyboard, and
select a country and state from the list. If
you select the country without a state, this
function cannot work.
4. Enter the street name:
a. Tap .
b. Start entering the street name on the
keyboard.
c. Find the street you need:
• The most likely street name is
always shown in the input field. To
accept it, tap .
to return to the
, .
• If the desired name does not
show up, the names that match
the string appear in a list after
entering a couple of characters
(to open the list of results before
it appears automatically, tap
). Select the
street from the list.
5. Enter the house number:
a. Tap .
b. Enter the house number on the
keyboard. (To enter letters, tap ).
c. Tap to finish
entering the address. (If the entered
house number cannot be found, the
midpoint of the street is selected as the
destination.)
33
Page 34

• If the desired name does not
show up, the names that match
the string appear in a list after
entering a couple of characters
(to open the list of results before
it appears automatically, tap
6. A full screen map appears with the
selected point in the middle. If necessary,
tap the map somewhere else to modify the
destination. The Cursor ( ) appears at
the new location. Tap
to confirm the destination, or tap
to select a different
destination.
7. After a short summary of the route
parameters, the map appears showing
the entire route. The route is automatically
calculated. Tap
to modify route parameters, or tap
and start your journey.
street from the list.
). Select the
Entering the midpoint of a street
as the destination
You can navigate to the midpoint of a street if
the house number is not available:
1. If you are on the Map screen, tap
Navigation menu.
2. In the Navigation menu, tap the following
buttons:
3. Select the country, state and city/town as
described earlier (page 30).
4. Enter the street name:
a. Tap .
b. Start entering the street name on the
keyboard.
c. Find the street you need:
• The most likely street name is
always shown in the input field. To
accept it, tap .
to return to the
, .
5. Instead of entering the house number, tap
. The midpoint of the
street is selected as the destination.
34
Page 35

6. A full screen map appears with the
selected point in the middle. If necessary,
tap the map somewhere else to modify the
destination. The Cursor ( ) appears at
the new location. Tap
to confirm the destination, or tap
to select a different
destination.
7. After a short summary of the route
parameters, the map appears showing
the entire route. The route is automatically
calculated. Tap
to modify route parameters, or tap
and start your journey.
Selecting an intersection as the
destination
To enter an address as the destination, do as
follows:
1. If you are on the Map screen, tap
Navigation menu.
2. In the Navigation menu, tap the following
buttons:
3. Select the country, state and city/town as
described earlier (page 30).
4. Enter the street name:
a. Tap
b. Start entering the street name on the
keyboard.
c. Find the street you need:
• The most likely street name is
always shown in the input field. To
accept it, tap
• If the desired name does not
show up, the names that match
the string appear in a list after
entering a couple of characters
(to open the list of results before
it appears automatically, tap
to return to the
, .
.
.
5. Enter the intersecting street name:
1. Tap
• If only a few intersecting streets
exist, their list appears immediately.
• In case of a longer street, the
keyboard screen appears.
Start entering the name of the
intersecting street on the keyboard.
As soon as the street names that
match the entered string can be
shown on one screen, their list
appears automatically. Select from
the list.
.
street from the list.
). Select the
35
Page 36

4. Select the destination city/town:
6. A full screen map appears with the
selected point in the middle. If necessary,
tap the map somewhere else to modify
the destination. The Cursor ( )
appears at the new location.
Tap to confirm the
destination, or tap to
select a different destination.
7. After a short summary of the route
parameters, the map appears showing
the entire route. The route is automatically
calculated. Tap
to modify route parameters, or tap
and start your journey.
a. Tap
b. Start entering the name of the city/
town on the keyboard.
c. Find the city/town you need:
• The most likely city/town name is
always shown in the input field. To
accept it, tap
• If the desired name does not
show up, the names that match
the string appear in a list after
entering a couple of characters
(to open the list of results before
it appears automatically, tap
Selecting a city/town center as the
destination
The city/town center is not the geometric
center of the city/town but an arbitrary point
the map creators have chosen. In towns
and villages, it is usually the most important
intersection; in larger cities, it is one of the
important intersections.
1. If you are on the Map screen, tap
Navigation menu.
2. In the Navigation menu, tap the following
buttons:
3. Select the country and state as described
earlier (page 30).
to return to the
, .
town from the list.
.
.
). Select the city/
36
Page 37

5. Instead of entering the street name, tap
. This way the center
of the displayed city/town becomes the
destination of the route.
b. Tap
c. Star t entering the ZIP code.
d. Find the city/town you need:
• The most likely ZIP code is always
to open the numeric keypad.
shown in the input field. To accept it,
6. A full screen map appears with the
selected point in the middle. If necessary,
tap the map somewhere else to modify
the destination. The Cursor ( )
appears at the new location.
Tap to confirm the
destination, or tap to
select a different destination.
7. After a short summary of the route
parameters, the map appears showing
the entire route. The route is automatically
calculated. Tap
to modify route parameters, or tap
and start your journey.
tap
• If the desired number does not
show up, open the list of results by
tapping . Select
the ZIP code from the list.
.
Entering an address with a ZIP
code
All of the above address searching
possibilities can be performed with entering
the ZIP code instead of the city/town name.
Find below an example with a full address:
1. If you are on the Map screen, tap
Navigation menu.
2. In the Navigation menu, tap the following
buttons:
3. Select the country and state as described
earlier (page 30).
4. Enter a new city/town using its ZIP code:
a. Tap .
to return to the
, .
5. Enter the street name:
a. Tap .
b. Start entering the street name on the
keyboard.
37
Page 38

c. Find the street you need:
• The most likely street name is
always shown in the input field. To
accept it, tap .
• If the desired name does not
show up, the names that match
the string appear in a list after
entering a couple of characters
(to open the list of results before
it appears automatically, tap
c. Tap
entering the address. (If the entered
house number cannot be found, the
midpoint of the street is selected as the
destination.)
to finish
street from the list.
). Select the
6. Enter the house number:
a. Tap .
b. Enter the house number on the
keyboard. (To enter letters, tap ).
38
7. A full screen map appears with the
selected point in the middle. If necessary,
tap the map somewhere else to modify the
destination. The Cursor ( ) appears at
the new location. Tap
to confirm the destination, or tap
to select a different
destination.
8. After a short summary of the route
parameters, the map appears showing
the entire route. The route is automatically
calculated. Tap
to modify route parameters, or tap
and start your journey.
Tips on entering addresses quickly
• When you are entering the name of a city/
town or a street:
• Only those letters are offered on the
keyboard that appear in possible
search results. All other characters are
grayed out.
• As you are typing, the most likely result
is always displayed in the input field. If
the guess is correct, tap
it.
• After entering a couple of letters, tap
to list the items that
contain the specified letters.
• You can speed up finding an intersection:
• Search first for the street with a less
common or less usual name; fewer
letters are enough to find it.
to select
Page 39

• If one of the streets is shorter, search
for that one first. You can then find the
second one faster.
• You can search for both the type and the
name of a road. If the same word appears
in several names, for example in the name
of streets, roads and avenues, you can
obtain the result faster if you enter the first
letter of the street type: For example, enter
‘PI A’ to obtain Pine Avenue and skip all
Pine Streets and Pickwick Roads.
• You can also search in ZIP codes. As ZIP
codes consist of only a few characters, this
is usually faster than entering the name of
the city/town.
q Selecting the destination
from the Places of Interest
You can select your destination from the
Places of Interest included with MMES.
Using the same screen, you can find a Place
in different ways:
• with the Quick search feature, you can
quickly find a nearby Place by its name
• with the Preset search feature, you can
find frequently searched types of Places
with only a few screen taps
• you can search for a Place by its category
• you can search for a Place by its name
In addition, you can search for special
services from the ‘Where Am I?’ screen.
You can also find MITSUBISHI dealer and
service locations directly from the Destination
screen with the
button.
Quick search for a Place of
Interest
The Quick search feature lets you quickly find
a Place by its name. The search is always
carried out
• along the recommended route if it exists or
• around your current location if there is no
destination given.
1. Start the Quick search function:
• If you are on the Map screen, tap
and then tap .
• If you are in the Navigation menu, tap
, and then
tap .
2. Using the keyboard, start entering the
name of the Place.
3. After entering a few letters, tap
to open the list of
Places with names containing the entered
character sequence.
4. (optional) The Places in the list are
ordered by the length of the necessary
detour (when navigating a route) or by
their distance from the current position
(when no destination is given). If you need
to reorder the list, tap .
5. Browse the list if necessary and tap one
of the list items. A full screen map appears
with the selected point in the middle.
The name and address of the Place is
displayed at the top of the screen.
6. (optional) Tap
the selected Place. Tap
to return to the map.
7. If necessary, tap the map somewhere
else to modify the destination. The Cursor
(
) appears at the new location.
Tap to confirm the
destination, or tap to
select a different destination.
to see the details of
39
Page 40

8. After a short summary of the route
parameters, the map appears showing
the entire route. The route is automatically
calculated. Tap
to modify route parameters, or tap
and start your journey.
2. In the Navigation menu, tap the following
buttons:
,
•
• If an active route exists, restaurants
are searched along the route.
• If there is no active route
(destination is not selected), they
are searched around the current
position.
:
Searching for a Place of Interest
using preset categories
The Preset search feature lets you quickly find
the most frequently selected types of Places.
1. If you are on the Map screen, tap
to return to the
Navigation menu.
40
3. The preset search categories appear:
•
• If an active route exists, gas
stations are searched along the
route.
• If there is no active route
(destination is not selected), they
are searched around the current
position.
•
• If an active route exists, parking
lots are searched around the
destination of the route.
• If there is no active route
(destination is not selected), they
are searched around the current
position.
:
:
•
• If an active route exists,
accommodation is searched around
the destination of the route.
• If there is no active route
(destination is not selected), they
are searched around the current
position.
4. Tap any of the quick search buttons to get
an instant list of Places.
5. (optional) The Places in the list are
ordered by their distance from the
current position, from the destination or
by the length of the necessary detour.
If you need to reorder the list, tap
:
.
Page 41

6. Browse the list if necessary and tap one
of the list items. A full screen map appears
with the selected point in the middle.
The name and address of the Place is
displayed at the top of the screen.
7. (optional) Tap
the selected Place. Tap
to return to the map.
8. If necessary, tap the map somewhere
else to modify the destination. The Cursor
(
) appears at the new location.
Tap to confirm the
destination, or tap to
select a different destination.
9. After a short summary of the route
parameters, the map appears showing the
entire route.
The route is automatically calculated.
Tap
parameters, or tap and
start your journey.
to see the details of
to modify route
Searching for a Place of Interest
by category
You can search for Places of Interest by their
categories and subcategories.
1. If you are on the Map screen, tap
Navigation menu.
2. In the Navigation menu, tap the following
buttons:
to return to the
. .
• Tap
around the current position. (The result
list will be ordered by the distance from
this position.)
• Tap
a place within a selected city/town.
(The result list will be ordered by
the distance from the center of the
selected city/town.)
• Tap
a place around the destination of
the active route. (The result list will
be ordered by the distance from the
destination.)
• Tap
the active route, and not around a
given point. This is useful when you
search for a later stopover that results
in a minimal detour only, such as
searching for upcoming gas stations
or restaurants. (The result list will be
ordered by the length of the necessary
detour.)
to search
to search for
to search for
to search along
3. Tap
4. Select the area around which the Place
should be searched for:
.
41
Page 42

5. (optional) If you have selected
, select the city/town to
search in.
6. Select one of the main Place
categories (e.g. Accommodation) or tap
8. Sometimes the list of brands in the
selected Place subcategory appears.
Select one brand or tap
to list all Places in the selected
subcategory around the selected location
or along the route.
10. (optional) The Places in the list are
ordered by their distance from the current
position, from the selected city/town, from
the destination or by the length of the
necessary detour. If you need to reorder
the list, tap .
11. Browse the list if necessary and tap one
of the list items. A full screen map appears
with the selected point in the middle.
The name and address of the Place is
displayed at the top of the screen.
12. (optional) Tap
to see the details of
the selected location or along the route.
to list all Places around
7. Select one of the Place subcategories
(e.g. Hotel or Motel) or tap
to list all Places in
the selected main category around the
selected location or along the route.
42
9. Finally, the results appear in a list.
the selected Place. Tap
to return to the map.
13. If necessary, tap the map somewhere
else to modify the destination. The Cursor
) appears
(
at the new location. Tap
to confirm the
destination, or tap to
select a different destination.
Page 43

14. After a short summary of the route
parameters, the map appears showing
the entire route. The route is automatically
calculated. Tap
to modify route parameters, or tap
and start your journey.
Searching for a Place of Interest
by name
You can search for Places of Interest by their
names. You can search around different
locations or along your route in the whole
Place database or in one Place category or
subcategory only.
1. If you are on the Map screen, tap
Navigation menu.
2. In the Navigation menu, tap the following
buttons:
to return to the
. .
• Tap
a place around the destination of
the active route. (The result list will
be ordered by the distance from the
destination.)
• Tap
the active route, and not around a
given point. This is useful when you
search for a later stopover that results
in a minimal detour only, such as
searching for upcoming gas stations
or restaurants. (The result list will be
ordered by the length of the necessary
detour.)
to search for
to search along
3. Tap
4. Select the area around which the Place
should be searched for:
• Tap to search
• Tap
.
around the current position. (The result
list will be ordered by the distance from
this position.)
to search for
a place within a selected city/town.
(The result list will be ordered by
the distance from the center of the
selected city/town.)
5. (optional) If you have selected
, select the city/town to
search in.
43
Page 44

6. Select one of the main Place categories
(e.g. Accommodation) to search in or tap
9. Using the keyboard, start entering the
name of the Place.
13. (optional) Tap
to see the details of
Places.
to search among all
7. Select one of the Place subcategories
(e.g. Hotel or Motel) to search in or tap
to search in the
selected Place category.
8. Tap if you have not
done it before.
10. After entering a few letters, tap
to open the list of
Places with names containing the entered
character sequence.
11. (optional) The Places in the list are
ordered by their distance from the current
position, from the selected city/town, from
the destination or by the length of the
necessary detour. If you need to reorder
the list, tap .
12. Browse the list if necessary and tap one
of the list items. A full screen map appears
with the selected point in the middle.
The name and address of the Place is
displayed at the top of the screen.
the selected Place. Tap
to return to the map.
14. If necessary, tap the map somewhere
else to modify the destination. The Cursor
(
) appears at the new location.
Tap to confirm the
destination, or tap to
select a different destination.
15. After a short summary of the route
parameters, the map appears showing the
entire route.
The route is automatically calculated.
Tap
parameters, or tap and
start your journey.
to modify route
44
Page 45

5. The list of Places with the entered
sequence in their phone number appears.
9. If necessary, tap the map somewhere
else to modify the destination. The Cursor
(
) appears at the new location.
Tap to confirm the
Searching for a Place of Interest
by its phone number
You can search for Places of Interest by their
phone number:
1. If you are on the Map screen, tap
Navigation menu.
2. In the Navigation menu, tap the following
buttons:
3. The numeric keyboard appears. Enter the
phone number you are looking for or a
part of it.
4. Tap .
to return to the
, .
6. (optional) The Places in the list are
ordered by their distance from the
current or last known position, from the
selected city/town, from the destination
or by the length of the necessary detour.
If you need to reorder the list, tap
7. Browse the list if necessary and tap one
of the list items. A full screen map appears
with the selected point in the middle.
The name and address of the Place is
displayed at the top of the screen.
8. (optional) Tap
the selected Place. Tap
to return to the map.
.
to see the details of
destination, or tap
select a different destination.
10. After a short summary of the route
parameters, the map appears showing
the entire route. The route is automatically
calculated. Tap
to modify route parameters, or tap
and start your journey.
to
45
Page 46

Selecting nearby assistance from
‘Where Am I?’
You can quickly search for nearby assistance
from the ‘Where Am I?’ screen.
1. On the Map screen, tap
Quick menu.
to open the
•
•
4. Tap any of the quick search buttons to get
an instant list of that type of Places.
: Police stations
: Gas stations
8. If necessary, tap the map somewhere
else to modify the destination. The Cursor
(
) appears at the new location.
Tap to confirm the
destination, or tap
select a different destination.
9. After a short summary of the route
parameters, the map appears showing
the entire route. The route is automatically
to
2. Tap , and then .
3. Preset search categories appear, all for
searching around the current position:
•
roadside assistance services
•
emergency services
: Car repair and
: Medical and
46
5. (optional) The Places in the list are
ordered by their distance from the current
position, from the selected city/town, from
the destination or by the length of the
necessary detour. If you need to reorder
the list, tap .
6. Browse the list if necessary and tap one
of the list items. A full screen map appears
with the selected point in the middle.
The name and address of the Place is
displayed at the top of the screen.
7. (optional) Tap
the selected Place. Tap
to return to the map.
to see the details of
calculated. Tap
to modify route parameters, or tap
and start your journey.
Page 47

q Selecting a map location as
the destination
1. If you are on the Map screen, tap
2. Tap
destinations is displayed.
. The list of Favorite
Navigation menu.
2. In the Navigation menu, tap the following
buttons:
3. Locate your destination on the map: move
and scale the map as needed.
4. Tap the location that you want to select
as your destination. The Cursor ( )
appears.
5. Tap
Cursor as the destination.
6. After a short summary of the route
parameters, the map appears showing
the entire route. The route is automatically
calculated. Tap
to modify route parameters, or tap
to return to the
, .
to select the
q Selecting the destination
from your Favorites
You can select a location that you have
already saved as a Favorite to be your
destination. Adding a location to the list of
Favorite destinations is described on page 56.
1. Access the list of Favorites:
• If you are on the Map screen, tap
to open the Quick menu.
• If you are in the Navigation menu, tap
.
3. Tap the Favorite that you want to set as
your destination. If necessary, browse
down to see more of the list or tap
from the name of the Favorite destination.
4. A full screen map appears with the
selected point in the middle. If necessary,
tap the map somewhere else to modify the
destination. The Cursor (
the new location. Tap
to confirm the destination, or tap
destination.
and enter a few letters
) appears at
to select a different
and start your journey.
47
Page 48

5. After a short summary of the route
parameters, the map appears showing
the entire route. The route is automatically
calculated. Tap
to modify route parameters, or tap
q Selecting your Home
location
To navigate to your Home location, first you
need to save it. Search for your address or
browse the map and when the Cursor is at the
3. After a short summary of the route
parameters, the map appears showing
the entire route. The route is automatically
calculated. Tap
to modify route parameters, or tap
and start your journey.
desired location, tap
select .
Now that the Home location is set, you can
quickly navigate to it:
1. To select the Home location, do one of the
following:
• Press and hold the DEST button to the
right of the screen for more than 1.5
seconds.
• If you are in the Navigation menu,
tap and then tap
.
2. A full screen map appears with the
selected point in the middle. If necessary,
tap the map somewhere else to modify the
destination. The Cursor (
the new location. Tap
to confirm the destination, or tap
to select a different
destination.
and
) appears at
and start your journey.
48
Page 49

q Selecting a recent
destination from the History
The destinations that you have set earlier
appear in the History. Two of those recent
destinations are shown in the Destination
menu for easy access. Smart History offers
these locations based on your navigation
habits, using parameters like the current
time of day, the day of week, and the current
location. The more you use the navigation
software, the better it can guess your desired
destination.
1. Access the History:
2. Smart History shows three destinations
most likely to be selected from the
previous destinations, regardless of
the search methods. The rest of the
destinations are listed in order of time
selected. If necessary, scroll the list to see
earlier destinations.
• If you are on the Map screen, tap
and then tap .
• If you are in the Navigation menu,
tap and then tap
.
3. Select a destination from the list.
4. A full screen map appears with the
selected point in the middle. If necessary,
tap the map somewhere else to modify the
destination. The Cursor (
the new location. Tap
to confirm the destination, or tap
destination.
5. After a short summary of the route
parameters, the map appears showing
the entire route. The route is automatically
calculated. Tap
to modify route parameters, or tap
to select a different
and start your journey.
) appears at
q Entering the coordinate of
the destination
You can also select a destination by entering
its coordinate. Do as follows:
1. If you are on the Map screen, tap
Navigation menu.
2. In the Navigation menu, tap
3. Open the
tap .
to return to the
.
menu and
49
Page 50

4. You can enter the latitude and longitude
values in any of the following formats:
decimal degrees; degrees and decimal
minutes; or degrees, minutes and decimal
seconds.
5. (optional) If necessary, tap
then
and enter the coordinate in UTM format.
6. When finished, tap .
7. A full screen map appears with the
selected point in the middle. If necessary,
tap the map somewhere else to modify the
destination. The Cursor (
the new location. Tap
to confirm the destination, or tap
to select a different
destination.
8. After a short summary of the route
parameters, the map appears showing
the entire route. The route is automatically
calculated. Tap
to modify route parameters, or tap
and start your journey.
) appears at
q Building a route from the
list of destinations (Create
Route)
You can also build your route destination by
destination from the My Route menu.
1. If you are on the Map screen, tap
Navigation menu.
2. In the Navigation menu, tap
3. Tap
4. There is only one line in the list of route
points, the start point of the route,
normally the current position.
to return to the
.
.
50
5. Tap
to select the destination.
Page 51

6. The Destination menu appears and you
can select the destination of the route the
same way as described in the previous
sections.
7. When the new destination is selected, the
list returns.
8. To add more destinations, tap where
you want to insert the new route point in
the list, and repeat the above procedure.
Viewing the entire route
on the map
It is easy to get a map overview of the active
route. Do as follows:
1. If you are on the Map screen, tap
Navigation menu.
2. In the Navigation menu, tap
3. Tap
is displayed in its full length on the map
together with additional information and
controls.
to return to the
.
. The active route
Checking route
parameters and accessing
route related functions
You can check different parameters of the
route recommended by MMES.
1. If you are on the Map screen, tap
to return to the
Navigation menu.
2. In the Navigation menu, tap
.
3. The following pieces of information are
displayed:
• The name and/or address of the
destination.
• Warning icons (if any). They provide
extra information about your route
(e.g. unpaved roads or toll roads to be
taken).
• The total time of the route.
• The total length of the route.
• The route planning method (e.g. Fast).
51
Page 52

4. You have the following options on this
screen (for detailed instructions on how to
use them, see the next chapter):
• Tap
route: to add or remove destinations or
change their sequence. You can also
set a route start point other than your
current location. This can be useful to
plan and save a future trip.
• Tap
entire route on the map.
• Tap
part of the route.
• Tap
active route.
• Tap
with more options like selecting from
route alternatives, changing route
parameters, simulating the route,
saving the active route or loading a
previously saved route.
• Tap
Navigation menu.
to edit the
to display the
to bypass a
to delete the
to open a list
to return to the
Modifying the route
When navigation is already started, there
are several ways to modify the active route.
The following sections show some of those
options.
q Selecting a new destination
when already having a route:
New Route, Waypoint or
Final Destination
If you already have a recommended route
and you select a new destination as described
in the above sections, the application will
ask you whether to start a new route, add
a new waypoint (intermediate destination)
to the route or append the newly selected
destination at the end of the current route.
• Tap to plan a new route to the
newly selected location. The previous
destination and waypoint(s) are deleted.
• Tap
location as an intermediate destination to
your route. The other destinations of the
route remain intact.
Note:
• The new waypoint is placed among destinations
to keep the route optimal. To decide where a
waypoint to appear, use the Edit Route feature.
• Tap to append the newly selected
destination at the end of the route. The
other destinations of the route remain
intact. The previous final destination is now
the last waypoint.
to add the newly selected
q Setting a new starting
position for the route
For normal navigation, all routes are planned
from the current position. In order to check
future routes, simulate them or see their
length in time and distance, you can turn
off the GPS receiver. Then you can set
the starting point of the route to a different
location than the current position.
1. If you are on the Map screen, tap
Navigation menu.
2. In the Navigation menu, tap
to return to the
52
.
Page 53

3. If you already have a route, tap
. If you are starting a
new route, tap .
5. The Destination menu appears and you
can select the start point of the route the
same way you select a destination.
q Editing the list of
destinations (Edit Route)
You can edit the route by modifying the list
of destinations. You can add or remove
destinations, modify the start position or
reorder the list.
1. If you are on the Map screen, tap
4. The first line is the start of the route,
normally the current position. Tap
(blue) and confirm your action at the
warning message.
6. When the new start point is set, tap
.
7. The map returns with a transparent
Vehimarker (showing that there is no
GPS reception). If an active route already
existed, it is now recalculated starting
from the selected location.
8. To return to normal navigation, tap
.
Navigation menu.
2. In the Navigation menu, tap
3. Tap
4. You have the following options:
• Tap
• Tap
• Tap
point of the route.
to return to the
.
.
to add a new destination.
to delete a destination.
(blue) to modify the start
53
Page 54

• Tap to reorder the
list. You can do it manually or you can
let the application optimize the route
for you.
q Pausing the active route
You do not need to pause the active route:
when you start driving again, MMES restarts
the voice instructions from your position.
q Checking route alternatives
when planning the route
You can select from different route
alternatives or change the route planning
method after you have selected a new
destination. Do as follows:
1. Select a destination as explained earlier,
and get to the route confirmation screen.
4. You see the basic details of three route
alternatives with the selected route
planning method. Tap any of them to see it
on the map.
5. Or if you cannot find a good alternative,
q Canceling the active route
To cancel the navigated route, do one of the
following:
• If you are on the Map screen, tap and
then tap . (If you have a route with
waypoints, you need to tap until all
waypoints are deleted.)
• In the Navigation menu, tap
and then tap
. The active route is
deleted with all its waypoints.
54
2. Tap .
3. Tap .
tap and scroll down for
routes with different routing methods.
6. Select one of the route alternatives and
tap to return to the
previous screen. MMES recalculates the
route. The orange line now shows the new
recommended route.
Page 55

q Checking route alternatives
for an existing route
To recalculate the active route with a different
route planning method, you can modify
the Route settings. There is another way
to do this and to compare different route
alternatives with the same route planning
method. Do as follows:
1. If you are on the Map screen, tap
4. Tap .
5. You see the basic details of three route
alternatives with the selected route
planning method.
Tap any of them to see it on the map.
q Changing the road types
used in route planning
To recalculate the active route with different
road type preferences, do as follows. These
changes can also be made in Settings (page
64).
1. On the Map screen, tap
and then
Navigation menu.
to return to the
2. In the Navigation menu, tap
.
3. Tap .
6. Or if you cannot find a good alternative,
tap and scroll down for
routes with different routing methods.
7. Select one of the route alternatives then
tap and hold for a few
seconds to return to the Map screen.
MMES recalculates the route. The orange
line now shows the new recommended
route.
tap .
2. Tap any of the listed road types to modify
the route. If needed, scroll the list for all
road types. You have the following options:
•
avoid freeways when you are driving
a slow car or you are towing another
vehicle.
•
pay roads where you can purchase
a pass or vignette to use the road for
a longer period of time. They can be
enabled or disabled separately from
toll roads.
- You might need to
- Charge roads are
55
Page 56

• - MMES includes
toll roads (pay roads where there is
a per-use charge) in the routes by
default. If you disable toll roads, MMES
plans the best toll-free route.
•
ferries in a planned route by default.
However, a map does not necessarily
contain information about the
accessibility of temporary ferries.
You might also need to pay a fare on
ferries.
•
unpaved roads by default: unpaved
roads can be in a bad condition and
usually you cannot reach the speed
limit on them.
3. The route has already been recalculated.
Tap
Map screen.
The orange line now shows the new
recommended route.
- MMES includes
- MMES excludes
to return to the
Saving a location as a
Favorite destination
You can add any location to Favorites, the
list of frequently used destinations. Planning
a route to one of the Favorite destinations is
described on page 47.
1. Select a destination as described before.
It can be an address, a Place, any location
on the map, a previously used destination
from History, etc.
2. When the full screen map appears with
the selected location in the middle, tap
.
3. Tap .
4. (optional) Using the keyboard, you can
change the name offered for the Favorite.
Tap
5. Tap to save the
location as a new Favorite destination.
to enter numbers or symbols.
q Editing the details of a
Favorite destination
You can select a location that you have
already saved as a Favorite and edit its
details. Adding a location to the list of Favorite
destinations is described on page 56.
1. Access the list of Favorites:
• If you are on the Map screen, tap
and then tap .
• If you are in the Navigation menu,
56
tap and then tap
.
Page 57

2. The list of Favorite destinations is
displayed.
Saving a map location as
an alert point
5. Tap to save the
location as a new alert point.
3. Tap the Favorite that you want to edit. If
necessary, browse down to see more of
the list or tap and enter
a few letters from the name of the Favorite
destination.
4. A full screen map appears with the
selected point in the middle.
5. Tap
Place.
6. Tap
content.
7. Tap and hold
to the map.
to see the details of the selected
and modify its
to return
You can save any map location as an alert
point (for example a railroad crossing). By
default, this is disabled. You can use it by
changing the setting (page 64).
1. Browse the map and select a location. The
red Cursor appears there.
2. Tap
3. Scroll down the list and tap
4. On the newly opened screen, select
the type of the alert point, the direction
from which you expect the alert, and (if
applicable) the speed limit for this alert
point.
.
.
Editing an alert point
You can edit a previously saved or uploaded
alert point (for example a railroad crossing).
1. Browse the map and select the alert point
to edit. The red circle appears around the
alert point.
2. Tap
3. Scroll down the list and tap
4. On the newly opened screen, modify the
type of the alert point, the direction from
which you expect the alert, or (if applicable)
the speed limit for this alert point.
.
.
57
Page 58

5. Tap to save the
changes to the alert point.
Watching the simulation
of the route
You can run a simulated navigation that
demonstrates the active route. Do as follows:
1. If you are on the Map screen, tap
4. Scroll down the list and tap
. The simulation starts
from the starting point of the route, and
using a realistic speed, it leads you
through the whole recommended route.
2. Tap
simulation.
to stop the
Navigation menu.
2. In the Navigation menu, tap
3. Tap
to return to the
.
.
58
1. (optional) You have the following
controls during the simulation (the
control buttons disappear after a few
seconds but you can open them again
if you tap the map):
•
•
•
•
: Jump to the next route event
(maneuver).
: Pause the simulation.
: Jump to the previous route
event (maneuver).
: Tap to increase the speed of
the simulation to 4, 8 or 16
times faster. Now tap again
to return to the normal
speed.
Page 59

4. OFF-ROAD
NAVIGATION
When first started, MMES calculates routes
using the road network of the high quality
vector maps provided with the product. You
can switch the application to off-road mode
in Navigation settings in one of the following
ways:
• From the Main menu, tap ,
Selecting the destination
of the route
Selecting the start point or a destination
(waypoint or final destination) is the same as
described at on-road navigation. The only
difference is that route points are linked to
form a route with straight lines regardless of
the road network and traffic regulations.
Navigating in off-road
mode
When you reach a waypoint, the orange line
will show the direction to the next destination.
(Future legs of the route are shown with
orange lines.)
When you reach the final destination,
navigation ends.
, and then
.
• From the Map screen, tap ,
and then
.
Most of the procedures described for on-road
navigation also apply to off-road navigation.
However, there are some that are not
available in this navigation mode (for example
you cannot open the itinerary as you have no
maneuvers just route points and straight lines
between them).
The real difference between the on-road and
off-road modes is the navigation itself. When
you are on the Map screen with an off-road
route:
• your position and heading is not aligned
with the nearest road and
• there is no turn by turn navigation just a
recommended direction.
You see a orange line drawn between your
current position and the next destination to
reach.
The Turn Preview field in the top left corner
shows a compass with your bearing and the
distance of the next destination.
59
Page 60

5. REFERENCE
GUIDE
On the following pages you will find the
description of the different concepts and menu
screens of MMES.
Concepts
q Smart Zoom
Smart Zoom provides much more than just a
usual automatic zoom feature:
• While following a route: when
approaching a turn, it will zoom in and
raise the view angle to let you easily
recognize your maneuver at the next
junction. If the next turn is at a distance, it
will zoom out and lower the view angle to
be flat so you can see the road in front of
you.
• While driving without an active route:
Smart Zoom will zoom in if you drive slowly
and zoom out when you drive at high
speed.
q Daytime and night color
themes
MMES uses different color themes during the
day and during the night for both the map and
the menu screens.
• Daytime colors are similar to paper road
maps, and the menus are bright.
• The night color themes use dark colors
for large objects to keep the average
brightness of the screen low.
MMES offers different daytime and night
color profiles. It can also switch automatically
between the daytime and the night schemes
based on the current time and position a few
minutes before sunrise, when the sky has
already turned bright, and a few minutes after
sunset, before it becomes dark.
q Tunnel view
When entering a tunnel, the map is replaced
with a generic tunnel image so that surface
roads and buildings cannot distract you.
The top-down overview of the tunnel helps
you orient yourself. The remaining distance in
the tunnel is also displayed.
After leaving the tunnel, the original map view
returns.
This feature can be turned off in Settings
(page 71).
q Route calculation and
recalculation
MMES calculates the route based on your
preferences:
• Route planning methods:
•
route if you can travel at or near the
speed limit on all roads. Usually the
best selection for fast and normal cars.
•
but fuel-efficient route based on the
fuel consumption data given in Route
settings. Travel cost and CO2 emission
calculations are estimations only. They
cannot take elevations, curves and
traffic conditions into account.
•
has the smallest total distance of all
possible routes. It can be practical for
slow vehicles.
•
route with fewer turns and no difficult
maneuvers. With this option, you can
make MMES to take, for example, the
freeway instead of a series of smaller
roads or streets.
• Vehicle types:
: Gives a quick
: Gives a quick
: Gives a route that
: Results in a
60
Page 61

• Road types used or avoided in route
calculation:
•
•
•
•
•
MMES automatically recalculates the route if
you deviate from the proposed itinerary.
q Green routing
Route calculation is not only about finding
the quickest or shortest route. You can also
check the fuel consumption and CO2 emission
when planning a route, and you can create
cost effective routes with less effect on the
environment.
In Route settings, you can edit the parameters
of the vehicle. Enter the fuel consumption
values and the price of the fuel. You can also
select whether you want to see the difference
between your route and the green route even
if the selected routing method is not Green.
After the above parameters are set, select
as route planning method
to get a fast but also fuel-efficient route. Note
that travel cost and CO2 emission calculations
are estimations only. They cannot take
elevations, turns, curves and traffic conditions
into account. Also, this routing is not meant
to give you the “greenest” route of all. It is still
important to travel quickly so the result is a
fast route with low fuel consumption and CO2
emission.
Whichever route planning method is selected,
the Green details are also shown when you
confirm the route:
If the selected route planning method is not
Green, and you have allowed the application
to show the green alternative, the price, fuel
consumption and CO2 emission differences
between your selected route and the Green
route are also shown on this screen:
Tap the field with these details to switch the
route to Green immediately.
q Proximity alert points
The application can warn you for the alert
points you added or edited in advance when
you approach them. You can set up the
different alert types individually in Sound and
Warning settings (page 66).
The following alert types are available:
• Audio warning: beeps can be played by
natural voice while you are approaching
one of these points, and an extra alert can
warn you if you exceed the given speed
limit while approaching.
• Visual warning: the type of the alert point,
its distance and the related speed limit
appear on the Map screen while you are
approaching one of these.
61
Page 62

For some of the alert points, the enforced or
expected speed limit is available. For these
points, the audio alert can be different if you
are below or above the given speed limit.
• Only when speeding: The audio alert is
only played when you exceed the given
speed limit.
• When approaching: The audio alert is
always played when approaching one of
these alert points. In order to draw your
attention, the alert is different when you
exceed the speed limit.
q Speed limit warning
Maps may contain information about the
speed limits of the road segments. MMES is
able to warn you if you exceed the current
limit. This information may not be available for
your region, or may not be fully correct for all
roads in the map.
Speed warning can be fine-tuned in Sound
and Warning settings (page 66).
You can set the relative speed above which
the application initiates the warning.
The following alert types are available:
• Audio warning: you receive a verbal
warning when you exceed the speed limit
with the given percentage.
• Visual warning: the current speed limit is
shown on the map when you exceed it
Note:
• The speed limit warning is an auxiliary function.
Check the speed in the vehicle’s speedometer
and observe the legal speed.
q Arrival notification
The inquiry screen appears when you stop
near the final destination.
MMES stops the route guidance and displays
the route summary if you select “Yes”.
MMES continues the route guidance if you
select “No”.
(for example:
You can also choose to see the speed limit
sign on the map all the time.
).
62
Page 63

‘More’ menu
The ‘More’ menu provides you with various options and additional applications. Tap the following buttons: , .
Button Description
You can configure the program settings, and modify the behavior of MMES. Fine-tune route planning options, change the look of the Map
screen, turn on or off warnings, or restart the Configuration wizard, etc.
See the next chapter for details.
Visit clarion.naviextras.com/ and download “Naviextras Toolbox” to get new maps. After downloading the installer file, simply doubleclick the file to start the installation and follow the instructions on the screen. If you check the “I would like to start Naviextras Toolbox
now.” option, Naviextras Toolbox will start automatically after installation. Then you can see “help” to download new maps in “Naviextras
Toolbox” application.
The scientific calculator helps you in all your calculation needs. Tap the Mode button for additional functions and use the memory to save
your results.
The Fuel consumption monitor helps you keep track of the consumption of your car even if you do not use navigation for all your journeys.
Set the initial odometer value and then record the distance taken and fuel filled in whenever you fill your car. You can also set reminders
for regular car maintenance.
Tap this button to see the sunlit and dark areas of the world. Your current location and route points are marked on the map. Tap the
Details button to see the exact sunrise and sunset times for all your route points (your current location, all waypoints and the final
destination).
If you save your trip logs when you arrive at some of your destinations or let the application automatically save the trip logs for you, those
logs are all listed here. Tap one of the trips to see the trip statistics, speed and altitude profile. If track log has also been saved, you can
display it on the map with the selected color.
63
Page 64

Button Description
Select a country from the list and see useful driving information about the selected country. Information may include speed limits on
different road types, the maximum blood alcohol level and any compulsory equipment you need to show when stopped by the police.
Run the Demo and watch sample route simulations to see how navigation works.
The About section provides you with product information. You can also access program usage statistics.
Settings menu
You can configure the program settings, and modify the behavior of MMES. Tap the following buttons: , , .
The Settings menu has several options. Tap
Button Description
Adjust the sound volume, mute your device or change the voice guidance language. In addition, you can enable and set up
different warnings and alerts.
The content of the Quick menu (page 25) is fully customizable. Tap the button you want to change, and select its new function
from the list.
or scroll with your finger to see the full list.
64
Page 65

Button Description
These settings determine how routes will be calculated. Select the type of vehicle you are driving, the road types used in route
planning, and the route planning method.
If more drivers use MMES for navigating, their settings can be remembered by using one of the user profiles.
You can fine-tune the appearance of the Map screen. Adjust the map view to your needs, choose suitable color themes from the
list for both daytime and night use, turn track logging on or off, and manage you Place visibility sets (which Places to show on
the map).
Adjust how the software helps you navigate with different kinds of route related information on the Map screen.
Display related settings.
These settings allow you to customize the application for your local language, measurement units, time and date settings and
formats, as well as to choose the time zone.
Trip logs and track logs contain useful information about your trips. Trip logs can be saved manually when you reach your
destination or you can turn on the automatic saving here.
The application collects usage information and GPS logs that may be used for improving the application and the quality and
coverage of maps. Here you can enable or disable collecting these logs.
Modify the basic software parameters set during the initial setup process.
For details, see page 10.
65
Page 66

q Sound and Warnings
Button Description
Tap this button to adjust the volume of the voice guidance.
This button shows the current voice guidance profile. By tapping the button, you can select a new profile from the list of available
languages.
Tap any of these to hear a sample voice prompt. Just tap when you have selected the new spoken
language.
Information for the next turn is given shortly before you make it. With this setting, you can also receive information for the next
turn shortly after you make the previous turn.
Tap this button to set the verbosity of the voice instructions:
• Verbose: Guide 3 times before the applicable intersection.
• Compact: Guide 2 times before the applicable intersection.
• Minimal: Guide 1 time just before the applicable intersection.
Note that the number of guidances may vary depending on the route.
Maps may contain information about the speed limits of the road segments. MMES is able to warn you if you exceed the current
limit. This information may not be available for your region, or may not be fully correct for all roads in the map.
This setting lets you decide whether you wish to receive visible and/or audible warnings.
Adjust the slider to set the relative speed above which the application initiates the warning.
The following alert types are available:
• Audio warning: you receive a verbal warning when you exceed the speed limit with the given percentage.
• Visual warning: the current speed limit is shown on the map when you exceed it.
If you prefer to see the speed limit sign on the map all the time (normally it is shown only if your speed exceeds it), you can set it
here.
66
Page 67

Button Description
This feature allows you to receive a warning when approaching alert points like school zones or railroad crossings. You must
ensure on your own liability that using this feature is legal in the country where you intend to use it.
You can set the alert for the different alert point categories individually. The following alert types are available:
• Audio warning: beeps can be played by natural voice while you are approaching one of these points, and an extra alert can
warn you if you exceed the given speed limit while approaching.
• Visual warning: the type of the alert point, its distance and the related speed limit appear on the Map screen while you are
approaching one of these.
For some of the alert points, the enforced or expected speed limit is available. For these points, the audio alert can be different if
you are below or above the given speed limit.
• Only when speeding: The audio alert is only played when you exceed the given speed limit.
• When approaching: The audio alert is always played when approaching one of these alert points. In order to draw your
attention, the alert is different when you exceed the speed limit.
Maps may contain driver alert information. Tap this button to turn on or off these warnings and to set the distance from the
hazard to receive the warning at. These can be set individually for the different warning types.
q Customize Quick menu
The content of the Quick menu (page 25) is fully customizable. Tap the button you want to change, and select its new function from the list.
The list of available functions and their descriptions are on page 26.
67
Page 68

q Route settings
These settings determine how routes will be calculated.
Button Description
Some parameters of your car can be set. These are taken into account in route calculation.
On-road navigation creates a turn by turn itinerary using the road network on the map. Switch to off-road navigation to navigate
between destinations in a straight line.
The route calculation can be optimized for different situations by changing the planning method. See below for details.
To let the route fit your needs, you can also set which road types are to be considered for or to be excluded from the route if possible.
Excluding a road type is a preference. It does not necessarily mean total prohibition. If your destination can only be accessed using some of the
excluded road types, they will be used but only as much as necessary. In this case a warning icon will be shown on the My Route screen, and the part
of the route not matching your preference will be displayed in a different color on the map.
In the list of road types you can see in how many segments and what total length of the road type is used in the current route.
Button Description
You might need to avoid freeways when you are driving a slow car or you are towing another vehicle.
Charge roads are pay roads where you can purchase a pass or vignette to use the road for a longer period of time. They can be
enabled or disabled separately from toll roads.
MMES includes toll roads (pay roads where there is a per-use charge) in the routes by default. If you disable toll roads, MMES
plans the best toll-free route.
MMES includes ferries in a planned route by default. However, a map does not necessarily contain information about the
accessibility of temporary ferries. You might also need to pay a fare on ferries.
MMES excludes unpaved roads by default: unpaved roads can be in a bad condition and usually you cannot reach the speed
limit on them.
If the selected routing method is not Green, you can have your route compared to the best green alternative on the screen when
confirming the route. If this alternative is much better than the selected method, you can quickly switch to Green mode.
68
Page 69

Route Planning Method types:
Button Description
Gives a quick route if you can travel at or near the speed limit on all roads. Usually the best selection for fast and normal cars.
Gives a quick but fuel-efficient route based on the fuel consumption data given in Route settings. Travel cost and CO2 emission
calculations are estimations only. They cannot take elevations, curves and traffic conditions into account.
Gives a short route to minimize the distance to travel. It can be practical for slow vehicles. Searching for a short route regardless
of the speed, this route type is rarely practical for normal vehicles.
Results in a route with fewer turns and no difficult maneuvers. With this option, you can make MMES to take, for example, the
freeway instead of a series of smaller roads or streets.
q User profiles
If more drivers use MMES for navigating, their settings can be remembered by using one of the user profiles. Rename the profiles after tapping the edit
button on the right so that all users know which profile to use and switch between profiles by tapping its name. If you select a new profile, the application
restarts so that the new settings can take effect.
69
Page 70

q Map settings
You can fine-tune the appearance of the Map screen. Adjust the map view to your needs, choose suitable color themes from the list for both daytime
and night use, show or hide 3D buildings, turn track logging on or off, and manage you Place visibility sets (which Places to show on the map).
The map is always shown on the screen so that you can see the effect when you change a setting.
Button Description
Switch the map view between a 3D perspective view and a 2D top-down view.
Adjust the basic zoom and tilt levels to your needs. Three levels are available.
When selected, the map zooms out to show an overview of the surrounding area if the next route event (maneuver) is far. When
you get close to the event, the normal map view returns.
Switch between daytime and night color modes or let the software switch between the two modes automatically a few minutes
before sunrise and a few minutes after sunset.
Select the color scheme used in daytime mode.
Select the color scheme used in night mode.
70
Show or suppress 3D landmarks, 3D artistic or block representations of prominent or well-known objects.
Show or suppress 3D city models, 3D artistic or block representation of full city building data containing actual building size and
position on the map. This is the optional content and you need to add to use.
Page 71

Button Description
Show or suppress the 3D elevation of the surrounding terrain.
Turn on or off track log saving, that is, saving the sequence of the locations your journeys go through.
Select which Places to show on the map while navigating. Too many Places make the map crowded so it is a good idea too
keep as few of them on the map as possible. For this, you have the possibility to save different Place visibility sets. You have the
following possibilities:
• Tap the checkbox to show or hide the Place category.
• Tap the name of the Place category to open the list of its subcategories.
• Tap
the default visibility settings.
to save the current Place visibility set or to load a previously saved one. Here you can also revert to
q Visual guidance settings
Adjust how the software helps you navigate with different kinds of route related information on the Map screen.
Button Description
The data fields in the corner of the Map screen can be customized. Tap this button and select the values you want to see. The
values can be different when you navigate a route from when you are just cruising without a given destination. The 3 data fields
on the left are displayed in the Map screen. For each field, you can select general trip data like your current speed or route data
related to your final destination from the list on the right.
71
Page 72

Button Description
You may need a gas station or a restaurant during your journey. This feature displays a new button on the map when you are
driving on freeways. Tap this button to open a panel with the details of the next few exits or service stations. Tap any of them to
display it on the map and add it as a waypoint to your route if needed.
Select the service types displayed for the freeway exists. Choose from the POI categories.
Whenever adequate information is available, lane information similar to the real ones on road signs above the road is displayed
at the top of the map. You can turn this feature on or off.
If you are approaching a freeway exit or a complex intersection and the needed information exists, the map is replaced with a
3D view of the junction. You can turn this feature on or let the map be displayed for the whole route.
When entering tunnels, the surface roads and buildings can be disturbing. This feature shows a generic picture of a tunnel
instead of the map. A top-down overview of the tunnel and remaining distance are also displayed.
Turn on the route progress bar to see your route as a straight line on the left side of the map. The red arrow represents your
current position and moves up as you travel. Waypoints are also displayed on the line.
When you slow down while driving on a freeway, there is a chance that you are in a traffic jam so MMES offers you a detour
using the next exit. The message shows you distance of the exit and the difference in distance and estimated time compared to
the original route. You can choose from one of the following options:
• Tap Dismiss or just ignore the message if you want to keep the original route.
• Tap Preview to see the overview of the original route and the detour to make the decision. You can accept the detour as
offered or increase the bypassed freeway segment before accepting.
• Turn to the suggested new direction and the route will be automatically recalculated.
Similar to the above possibility, alternative routes can be suggested when driving on normal roads. MMES will select a different
turn in the upcoming intersection and offers you a different route for the next section of the route.
Your options are the similar as above but you cannot modify the offered detour.
Parking at the destination may not be easy in city areas. As you approach the destination, MMES can offer parking category
Places near your destination. Tap the “P” button to open a top-down map with the destination and the offered parking Places.
Select one and modify the route accordingly.
If you leave the recommended route and suddenly exit the freeway, the application offers different alternatives near the exit like
gas stations or restaurants. Also, if there are avoidable parts of the original route ahead (like a tunnel, a toll road or a ferry), you
will find them in the list in case you want to bypass them with the help of MMES.
72
Page 73

q Display settings
This setting allows you to change the animation mode.
Button Description
When animation is turned on, buttons on menus and keyboard screens appear in an animated way. Screen transitions are also
animated.
q Regional settings
These settings allow you to customize the application for your local language, measurement units, time and date settings and formats, as well as to
choose the time zone.
Button Description
You can set the distance units to be used by the program. MMES may not support all the listed units in some voice guidance
languages.
Select between 12 and 24 hours time display and the various international date display formats.
You can also set other country specific units used to display different values in the application.
By default, time zone is taken from the map information and adjusted by your current location. Here you can set time zone and
daylight saving manually.
73
Page 74

q Trip monitor settings
Trip logs contain useful information about your trips. Trip logs can be saved manually when you reach your destination or you can turn on the automatic
saving here. You can access these logs in the Trip monitor. Trip monitor is available from the More menu.
Button Description
Trip monitor can record statistical data of your trips. If you need these logs later, you can let the application save them
automatically for you.
This is not a button. This line shows the current size of the trip database, the sum of all trip and track logs saved.
Track logs, the sequence of the positions given by the GPS receiver, can be saved together with trip logs. They can later be
displayed on the map. You can let the application save the track log whenever it saves a trip.
q Log collection settings
If you accept this when first using the application, it collects usage information and GPS logs that may be used for improving the application and the
quality and coverage of maps. The data is processed anonymously; no one will be able to track any personal information.
Here you can enable or disable collecting these logs.
Button Description
Anonymous statistical information on using the navigation software is collected for later development purposes. Understanding
how different people use the application can help us improve the user interface and the program workflow.
Anonymous track logs are collected for later development purposes. Your trips can help us improve the quality and coverage of
maps.
74
Page 75

Fuel Consumption
The Fuel consumption monitor helps you
keep track of the consumption of your car
even if you do not use navigation for all your
journeys.
1. Tap the following buttons:
, ,
4. Tap to return to the
main Fuel consumption screen.
2. Tap and input
maintenance information.
2. Tap
.
and set the initial odometer value.
3. Tap and record the
distance travelled and fuel filled whenever
you fill your car.
You can also set reminders for regular car
maintenance.
1. Tap the following buttons in the main Fuel
consumption screen:
3. The reminder screen appears when the
conditions you set are met.
.
75
Page 76

Trip Monitor
You can record a specific route’s trip data and
track log, and view them in the Trip Monitor.
1. Tap the following buttons:
, ,
.
4. You can see trip data details when you
select the log data from the list.
5. Tap to see your track
log data on the map.
7. Tap
Details screen to see the detailed
elevation or speed information.
and
or
in the Trip Data
2. Tap to start recording.
3. Tap to stop recording
after driving.
76
6. Check the “Display on Map” button in the
top right corner of the Trip Data Details
screen to see your track logs on the map
while driving. You need to enable Track
Logs in the Map settings in advance.
When ‘Enable Auto-Saving’ is selected
in Trip Monitor Settings, trip data is
automatically saved, but track logs are not.
When ‘Save Track Log’ is selected, track
logs are also automatically saved when
recording trip data.
Page 77

6. GLOSSARY
2D/3D GPS reception
The GPS receiver uses satellite signals to
calculate its (your) position and needs at
least four signals to give a three-dimensional
position, including elevation. Because the
satellites are moving and because objects
can block the signals, your GPS device might
not receive four signals. If three satellites
are available, the receiver can calculate the
horizontal GPS position but the accuracy is
lower and the GPS device does not give you
elevation data: only 2D reception is possible.
Active route
The currently navigated route. Whenever the
destination is set, the route is active until you
delete it, reach your destination or you quit
MMES. See also: Route.
City Center
The city/town center is not the geometric
center of the city/town but an arbitrary point
the map creators have chosen. In towns
and villages, it is usually the most important
intersection; in larger cities, it is one of the
important intersections.
Color theme
MMES comes with different color themes for
daytime or night use of the map and menu
screens. Themes are custom graphic settings
and they can have different colors for streets,
blocks or surface waters in 2D and 3D modes,
and they display shades or shadows in
different ways in 3D mode.
One daytime scheme and one night scheme
is always selected for the map and for the
menus. MMES uses them when it switches
from day to night and back.
GPS accuracy
Several factors have impact on the deviation
between your real position and the one given
by the GPS device. For example, signal delay
in the ionosphere or reflecting objects near
the GPS device have a different and varying
impact on how accurately the GPS device can
calculate your position.
Map
MMES works with digital maps which are not
simply the computerized versions of traditional
paper maps. Similarly to the paper road maps,
the 2D mode of digital maps show you streets,
roads, and elevation is also shown by colors.
In 3D mode, you can see the altitude
differences, for example valleys and
mountains, elevated roads, and in selected
cities 3D landmarks and 3D buildings are also
displayed.
You can use digital maps interactively: you
can zoom in and out (increase or decrease
the scale), you can tilt them up and down, and
rotate them left and right. In GPS-supported
navigation, digital maps facilitate route
planning.
North-up map orientation
In North-up mode the map is rotated so its top
always faces North. This is the orientation for
example in Find on Map.
Road Safety Camera
Special alert points for speed, red light or
bus lane cameras. Different data sources
are available. You can configure MMES to
warn you when you approach one of these
cameras.
Detecting the location of Road Safety Cameras
is prohibited in certain countries. It is the sole
responsibility of the driver to check whether
this feature can be used during the trip.
The software is capable of showing and
warning for more than just cameras. Various
other types of proximity alert points like
school zones and railroad crossings are also
available.
Route
A sequence of route events, i.e. maneuvers
(for example, turns and traffic circles) to reach
the destination. The route contains one start
point and one or more destinations. The start
point is the current position by default. If you
need to see a future route, the start point can
be replaced with any other given point.
77
Page 78

Track-up map orientation
In Track-up mode the map is rotated so its top
always points in the current driving direction.
This is the default orientation in 3D map view
mode.
Vehimarker
The current position is shown with a red arrow
on the map by default. The direction of the red
arrow shows the current heading.
78
Page 79

7. END USER LICENSE AGREEMENT
1 The contracting parties
1.1 This Agreement has been entered into by and between NNG Software Developing and Commercial Ltd. (registered seat: 23 Bérc utca, H-1016
Budapest, Hungary; company reg.no.: 01-09-891838) as Licensor (hereinafter: Licensor) and You as the end user (hereinafter: User; the User
and the Licensor jointly referred to as: Parties) in subject of the use of the products specified in this Agreement, including software products,
databases and content .
2 Conclusion of the Agreement
2.1 The Parties hereby acknowledge that this Agreement shall be concluded by implicit conduct of the Parties without signing the Agreement.
2.2 The User hereby acknowledges that following the lawful acquisition (online purchase from authorized vendor or preinstalled on purchased
Device) of the software product constituting the object of this Agreement (Section 4), any degree of use, installation into a computer or
other hardware equipment (cell phone, multi-function device, personal navigation device, in-car navigation or multi function head unit, etc.)
(hereinafter referred to as: “Device”), installation of such Device into a vehicle, pressing of the “Accept” button displayed by the software during
installation or use (hereinafter referred to as: “Use”) shall mean that the User has accepted the terms and conditions of this Agreement as
legally binding. The time of conclusion of the present Agreement is the time of executing the first action of use (commencement of use).
2.3 This Agreement shall by no means authorize Use of the software product by those persons having unlawfully acquired the software product or
having unlawfully installed it on a Device or in a vehicle.
2.4 U.S. Government Users. If you acquire the Software Product by or on behalf of the United States Government or any other entity seeking or
applying rights similar to those customarily claimed by the United States Government, you are on notice that the Software Product and the
Databases, content and services are commercial items as that term is defined at 48 C.F.R (“FAR”) 2.101 and that all use of the Software
Product is subject to this Agreement.
3 Applicable laws and regulations
3.1 Any action related to this Agreement will be governed by the laws of the Republic of Hungary, with specific reference to Act IV of 1959 on
the Civil Code and to Act LXXVI of 1999 on Copyrights (the “Copyright Act”) shall apply. The United Nations Convention on Contracts for the
International Sales of Goods is hereby excluded from application to this EULA.
3.2 The parties hereby agree that the courts of the Republic of Hungary will have exclusive jurisdiction to rule on any disputes arising in connection
with this Agreement.
3.3 The original language version of this Agreement is the Hungarian version. This Agreement has versions in other languages as well. In case of
dispute the Hungarian version shall prevail.
4 Object of the Agreement and Termination
4.1 The object of this Agreement shall be the navigation guidance software product of Licensor (hereinafter referred to as: the “Software Product”).
4.2 The Software Product shall include the operating computer program, its complete documentation, the map database pertaining thereto and any
third-party contents and services accessible through the Software Product (hereinafter together referred to as: the “Database”).
79
Page 80

4.3 Any form of display, storage, coding, including printed, electronic or graphic display, storage, source or object code, or any other as yet
undefined form of display, storage, or coding, or any medium thereof shall be deemed parts of the Software Product.
4.4 Error corrections, additions, updates or upgrades to the Software Product or the Databases used by the User following the conclusion of this
Agreement shall also be deemed parts of the Software Product and Used in accordance with this Agreement.
4.5. Your rights under this Agreement will terminate immediately without notice from Licensor if you materially breach it or take any action in
derogation of Licensor’s and/or its licensors’ rights to the Software Product. Licensor may terminate this Agreement if any Software Product
becomes, or in Licensor’s reasonable opinion likely to become, the subject of a claim of intellectual property infringement or trade secret
misappropriation. Upon termination, you will cease use of, and destroy Software Product and all parts of it and confirm compliance in writing to
Licensor, if requested.
5 Rights under copyright
5.1 Unless otherwise provided by law or contractual provisions, the Licensor is the sole and exclusive owner of all material copyrights vested in the
Software Product.
5.2 Copyrights extend to the whole Software Product and to its parts separately as well.
5.3 The owner(s) of the copyrights of the Database or certain works protected by intellectual property rights, that are forming part of the Software
Product is (are) the Licensor, or natural person(s) or corporate entity(ies) owners of certain Databases (hereinafter referred to as: “Database
Owner”). Some Database Owners are listed in the “About” or similar menu item of the Software Product. The Licensor hereby states that it has
obtained sufficient usage and representation rights from the Database Owners in order to utilize the Database, to offer it for utilization and to
transfer it for utilization as set forth in this Agreement.
5.4 Pursuant to this Agreement, all rights vested in the Software Product shall remain in the ownership of the Licensor, except for those to which
the User is entitled under law or by virtue of this Agreement.
6 Rights of the User
6.1 By default the User is entitled to install the Software Product on one Device having a single GPS sensor built in, and to run and use one copy of
the Software Product or a preinstalled copy of the Software Product thereon. The Software Product and Database is for the User’s personal or
internal business use only.
6.2 The User is entitled to make one backup copy of the Software Product. However, if the Software Product operates after installation without the
use of the original media copy, then the original media copy shall be deemed to be a backup copy. In all other cases, the User is only entitled
to use the backup copy if the original media copy of the Software Product has been ascertainably and unequivocally rendered unsuitable for its
lawful and intended use.
6.3 In the event that the Software Product comes preinstalled on- or otherwise licensed together with the Device or purchased online for and
installed by the User for a specific Device, the Software Product shall be tied to the Device and may not be separated-, transferred to-, or used
with another Device or sold to another User without selling the Device itself.
6.4 The Database, content or services provided to User may only be used together with User’s copy of the Software Product and may not be used
separately or with another copy of the Software Product.
80
Page 81

7 Limitations of use
7.1 The User is not entitled
7.1.1 to duplicate the Software Product (to make a copy thereof) except to the extent allowed by this Agreement or Applicable law;
7.1.2 to resell, sublicense or use it for commercial purposes, use to lease, rent or lend it, or to transfer it to a third person for any reason
without transferring the Device on which it was first legally installed on (see section 6.3);
7.1.3 to translate the Software Product (including translation (compilation) to other programming languages);
7.1.4 to decompile, disassemble, or reverse engineer the Software Product;
7.1.5 to evade the protection of the Software Product or to modify, circumvent or obviate such protection through technological or by any other
means;
7.1.6 to modify, extend, transform the Software Product (in whole or in part), to separate it into parts, combine it with other products, install it
in other products, utilize it in other products, not even for the purpose of achieving interoperability with other devices;
7.1.7 apart from using the computer program, to obtain information from the Database as a part of the Software Product, to decompile the
Database, to use, copy, modify, extend, transform the Database in whole or in part or the group of data stored therein, or to install it
in other products or otherwise, utilize it in other products or to transfer it, not even with the aim of achieving interoperability with other
products.
7.2 The User may only use the Databases, content and services available through the Software Product and provided by third parties and the data
received through the services provided by third parties for his/her own personal benefit and at his/her own risk. It is strictly prohibited to store,
to transfer or to distribute these data or contents or to disclose them in full or in part to the public in any format or to download them from the
product.
7.3 The User is not entitled to remove, modify or obscure of any copyright, trademark notice, or restrictive legend included in the Software Product,
the Database, content or services.
8 No warranty, limitation of liability
8.1
The Licensor hereby informs the User that although the greatest care was taken in producing the Software Product, given the nature of the
Software Product and its technical limitations, the Licensor does not provide a warranty for the Software Product being completely error-free, and
the Licensor is not bound by any contractual obligation whereby the Software Product obtained by the User should be completely error-free.
8.2 THE LICENSED SOFTWARE PRODUCTS, DATABASES, CONTENT AND SERVICES ARE PROVIDED ON AN “AS IS” AND “WITH ALL
FAULTS BASIS” (INCLUDING NO WARRANTY FOR THE CORRECTION OF FAULTS) AND LICENSOR, THE DATABASE OWNERS
AND THIRD PARTY SUPPLIERS EXPRESSLY DISCLAIM ALL WARRANTIES, EXPRESS OR IMPLIED, INCLUDING BUT NOT LIMITED
TO, THE IMPLIED WARRANTIES OF NON-INFRINGEMENT, MERCHANTABILITY, SATISFACTORY QUALITY, ACCURACY, TITLE AND
FITNESS FOR A PARTICULAR PURPOSE. NO ORAL OR WRITTEN ADVICE OR INFORMATION PROVIDED BY LICENSOR OR ANY OF
ITS AGENTS, DATABASE OWNERS, EMPLOYEES OR THIRD PARTY PROVIDERS SHALL CREATE A WARRANTY, AND USER IS NOT
ENTITLED TO RELY ON ANY SUCH ADVICE OR INFORMATION. THIS DISCLAIMER OF WARRANTIES IS AN ESSENTIAL CONDITION
OF THE AGREEMENT.
Licensor does not warrant that the Software Product, Database, content or service are capable of interoperating with any other system, Device
or product (e.g. software or hardware).
81
Page 82

8.3 The Licensor does not assume any responsibility for damages incurred due to an error in the Software Product (including errors of the
computer program, the documentation and the Database).
8.4 The Licensor does not assume any responsibility for damages incurred due to the Software Product not being applicable for any defined
purpose, or due to the error or incompatibility of the Software Product with any other system, device or product (e.g. software or hardware).
8.5 NEITHER LICENSOR NOR ITS SUPPLIERS SHALL BE LIABLE TO USER FOR ANY INCIDENTAL, CONSEQUENTIAL, SPECIAL,
INDIRECT OR EXEMPLARY DAMAGES ARISING OUT OF THIS AGREEMENT, INCLUDING LOST PROFITS OR COSTS OF COVER,
LOSS OF USE OR BUSINESS INTERRUPTION OR THE LIKE, REGARDLESS OF WHETHER THE PARTY WAS ADVISED OF THE
POSSIBILITY OF SUCH DAMAGES.
NOTWITHSTANDING ANYTHING TO THE CONTRARY CONTAINED HEREIN, THIRD PARTY SUPPLIERS (E.G. DATABASE
OWNERS, MAP PROVIDERS) OR AGENTS OF LICENSOR SHALL HAVE NO MONETARY LIABILITY TO THE USER FOR ANY CAUSE
(REGARDLESS OF THE FORM OF ACTION) UNDER OR RELATING TO THIS AGREEMENT.
8.6 The Licensor also draws the attention of the User to the fact that, when using the Software Product in any form of vehicle, observing the
traffic regulations and rules (e.g. use of obligatory and/or reasonable and suitable security measures, proper and generally expected care and
attention in the given situation, and special care and attention required due to the use of the Software Product) is the exclusive responsibility
of the User. The Licensor shall not assume any responsibility for any damages occurred in relation to use of the Software Product in a motor
vehicle.
8.7 By concluding the Agreement, the User shall, in particular, acknowledge the information stated in Section 8 above.
9 Sanctions
9.1 The Licensor hereby informs the User that, if the Licensor finds its rights under the Copyright Act to be breached, the Licensor may
9.1.1 seek judicial recognition of this breach;
9.1.2 demand that the breach cease and order the person in breach to refrain from continuing such actions;
9.1.3 demand that the person under breach give proper compensation (even by way of publicity at the expense of the person in breach);
9.1.4 claim the return of the increase of assets due to the breach;
9.1.5 demand the cease of the wrongful action and, demand restitution to its state before the breach was committed at the expense of the
person in breach, and may demand the destruction of instruments and materials used to commit the breach as well as of the products
created by the breach;
9.1.6 claim for damages.
9.2 The Licensor hereby also informs the User that the breach of copyrights and related rights is a crime under Act IV of 1978 on the Hungarian
Criminal Code, which may be sentenced of two years in prison in basic cases and up to eight years in prison in aggravated cases.
9.3 Content and services provided by third parties. The Licensor hereby excludes any liability of its own for the Database in the Software Product
and for any content or service provided by a third party by using the Database. The Licensor does not warrant the quality, suitability, accuracy,
fitness for a specific purpose or territorial coverage of the Database, content, product or service or the availability of the Database, content,
product or service, and it specifically excludes any liability for the suspension or cancellation of the service, and any damage arising in relation
to the service or for complete cancellation of the service. User acknowledges that the mapping data in Databases contains geographical data
and other data.
82
Page 83

The User hereby acknowledges that (i) inaccurate or incomplete information due to the passage of time, changing circumstances, sources
used and the nature of collecting comprehensive geographic data, may each lead to incorrect results; and (ii) that the Database, contents and
services provided by third parties may only be used at the risk of the User and for the personal or internal business benefit of the User. User
acknowledges that the Databases, content and services are the confidential information of Database Owners and disclosure of the Databases
to third parties is prohibited.
USE OF THE SOFTWARE PRODUCT’S REAL TIME ROUTE GUIDANCE FUNCTION IS AT USER’S SOLE RISK AS LOCATION DATA MAY
NOT BE ACCURATE.
9.4 Content and services provided by the Licensor or an agent of the Licensor. For certain Software Products the Licensor or a contractual partner
may offer various products and services to the User through clarion.naviextras.com. The User may only use these services when the User has
read and understood the relevant end user license agreement(s) at clarion.naviextras.com and the User is obliged to use the services in line
with the terms and conditions thereof.
9.5 Purchase and acquisition of activation license for the use of certain functions, Databases, content or services may require Internet connection
with no alternative way of acquisition offered by Licensor.
10 Anonymous data collection
10.1 The User hereby acknowledges that the Software Product may collect, transmit to Licensor or third parties, and in some cases store data
connected to the usage of the Software Product by the User (e.g. movement/route data, user interaction data). Such data collection functions
may be disabled or enabled by User any time from within the corresponding menu. The collected data is always anonymous, not associated in
any way with any personal information of the User or with the User itself.
10.2 The collected data may be uploaded to Licensor’s database or transmitted periodically or in real time to a third party partner and used
exclusively for the purpose of enhancing and improving the precision and reliability of features and services of the Software Product and the
Databases. Uploading is executed through Licensor’s special software or by the User navigation device, and the upload may be enabled or
disabled by User. After successful data upload, the collected data is deleted from the Software Product storage media.
10.3 Collected data is transmitted, stored and handled anonymously and no connection of the data with the User shall be established by Licensor or
any third party.
10.4 Licensor hereby informs the User, that if it accesses the Internet through mobile data service while abroad or otherwise roaming another mobile
network the transmission of such data may result in special roaming charges. To avoid such charges it is the responsibility of the User to
disable mobile data services while roaming or to turn off the data collection functions of the Software Product.
11 Online Content Service Auxiliary Terms
11.1 For online content services the following auxiliary terms shall also apply. Database content (e.g. weather-, location based info) may be supplied
by Licensor to the User’s Device through an Internet connection (hereinafter: “Online Content Services”). Such Content may be granted for a
fee or free of charge subject to Licensor’s decision. Ensuring access to the Internet is the responsibility of the User.
11.2 Online Content Services in general are not available in all countries, furthermore different conditions and Service characteristics may apply in
different countries. Use of certain Online Services may be prohibited in various countries. It is the User’s responsibility to comply with country
specific regulation. Licensor excludes its liability for the consequences of illegal use of such functions and User shall indemnify and hold
Licensor harmless from all claims against Licensor from authorities or third parties due to the illegal use.
83
Page 84

11.3 Online Content is downloaded by the Software Product from Service Provider’s Online content servers. The Licensor hereby excludes any
liability of its own for the Online content. The Licensor does not warrant the quality, suitability, accuracy, fitness for a specific purpose or
territorial coverage of the Online content, furthermore no warranty is offered regarding the availability (e.g. uptime) of Online content servers.
User acknowledges that in any territory or time, slow- or non-connectivity may be experienced due to capacity limitations of Licensor’s servers.
The Software Product may allow the User to access and communicate third party servers directly. In such cases use of such servers is for
User’s own risk entirely. Licensor shall not undertake any liability whatsoever for such servers and services accessed and received directly form
third parties.
11.4 User acknowledges that the data or information provided through Online Content Services is not updated in real-time and may not accurately
reflect the real life situation or events.
11.5 The User hereby acknowledges that the Online Content Services may only be used at the risk of the User and for the personal benefit of the
User. It is the sole responsibility of the User to provide and maintain a connection to the public Internet network. User accepts that the usage of
the Online Content Services generates data traffic (up- and downstream) and may result in increased data service fees payable by User.
11.6 Online Content Services may provide data, information or materials supplied and/or licensed by third parties to Licensor. For such materials
different terms and conditions imposed by such third parties may apply. Applicable third party terms shall be referred in the “About” section of
the Software Product or as part of this Agreement. When first using / enabling Online Content, User accepts compliance with those third party
terms and conditions.
11.7 Discontinuation. Licensor reserves the right to discontinue provision or access to any Online Content Service with or without prior notice to the
User. Such discontinuation shall not entail any consequences other than here stated. In case of discontinued Online Content Services that
were (i) provided for a pre-paid fee, AND (ii) such fee covers the use of the Online Content Service for a definite term (i.e. pre-paid subscription
service), User shall be entitled to a refund proportionate to the term remaining from such definite term from the time of the discontinuation.
11.8. Community Services. Some Online Content Services may be based on data and information uploaded by participating individuals (Users or
other persons) or a Database created and maintained by a group of such individuals. Such data may not come from a trusted source and may
also be intentionally false or misleading, as Licensor does not have any means to control or verify the credibility or accuracy of such data or the
individuals providing the data. Therefore User accepts that community type Online Content Services must be used with extreme care.
By participating in the community by providing data or any information via the Software Product or other means offered by Licensor (e.g.
through a website or other software), User shall accept the following:
(a) Licensor is granted a royalty free right to use the data uploaded, in particular, to modify, display, make available to the public, distribute,
(b) User warrants that not third party has any rights that would hinder or render impossible the use of the data as set out in (a) above, and that
(c) User indemnifies and holds harmless Licensor from any claim from a third party against Licensor due to violation of its rights regarding the
copy the data for any purpose;
no third party rights are infringed by uploading the data on those conditions;
uploaded data.
84
Page 85

8. COPYRIGHT NOTE
The product and the information contained herein are subject to change without prior notification.
This manual may not, in whole or in part, be reproduced or transmitted in any form either electronically or mechanically, including photocopying and
recording, without the express written consent of MMES.
© 2012 - MMES
© 2012 - NAVTEQ. All rights reserved.
All rights reserved.
85
Page 86

86
Audio
Page 87

Playable Discs
This DVD player can play the following discs:
Playable discs
DVD video discs Audio CDs CD TEXT
In addition, the DVD player can play CD-ROM/
R/RW, DVD-ROM/R/RW, and DVD+R/RW
discs on which the following media files have
been recorded:
Playable media files
MP3/WMA/AAC
For detailed information, see the sections
entitled “MP3/WMA/AAC Disc Operations”
(page 112).
About CD Extra discs
A CD Extra disc is a disc in which a total of
two sessions have been recorded. The first
session is Audio session and the second
session is Data session.
Your personally-created CDs with more than
second data sessions recorded cannot be
played on this DVD player.
Note:
• When you play a CD Extra disc, only the first
session will be recognised.
About playing a CD-ROM/R/RW
disc
This player can play CD-ROM/R/RW discs
previously recorded in Audio CD format or
format with MP3/WMA/AAC files.
About playing a DVD-ROM/R/RW
or DVD+R/RW disc
This player can play DVD-ROM/R/RW and
DVD+R/RW discs previously recorded in DVD
video format or format with MP3/WMA/AAC
files.
Discs that cannot be played
This player cannot play DVD Audio,
DVD-RAM, Video CDs, Blu-ray discs, etc.
Note:
• It may not be possible to play discs recorded
on some DVD/CD drive units. (Cause: disc
characteristics, cracks, dust/dirt, dust/dirt on
player’s lens, etc.)
• If a CD-R/RW, DVD-R/RW, or DVD+R/RW disc
that has not been finalized is played, it will take
a long time to start playing. Also, it may not
be possible to play depending on its recording
conditions.
• You cannot play the Super Audio CD layer of
hybrid Super Audio CDs. Playback of the CD
layer only is supported.
Note on region numbers of DVD
video discs
The DVD video system assigns a region
number to DVD players and DVD discs by
sales area.
The DVD video region number playable in this
system is marked on the disc jacket as shown
below.
ALL
1
DVD Video Features
This unit provides the following functions in
addition to the high image quality and sound
quality of DVD video.
Note:
• The functions described in this section differ
depending on the DVD video disc. Refer to the
instructions provided with the DVD video.
• Some disc functions may operate differently
from described in this manual.
87
Page 88

Multi-sound function
DVD video can store up to 8 languages
for one film; select the language of your
preference.
• The languages stored on the disc are
indicated by the icon shown below.
Multi-angle function
A DVD video that is filmed from multiple
angles allows you to select the angle of
choice.
• The number of recorded angles is indicated
by the icon shown below.
Subpicture (subtitles) function
A DVD video can record subtitles for up to 32
languages and you can select the language of
the subtitles you want to see.
• The number of recorded subtitle languages
is indicated by the icon shown below.
Multi-story function
When a DVD video contains more than one
story for a film, you can select the story you
want to enjoy. The operation procedures vary
with the disc; observe the instructions for
selecting a story provided during playback.
DVD menu
DVD Menus can be called up during DVD
video playback to perform menu setting.
• Example showing DVD menu
88
Page 89

9. PRECAUTIONS
WARNING
For your safety, the driver should not
watch the DVD video/movie data or
operate the controls while driving.
Please note that watching and operating
the DVD video/movie data while driving
are prohibited by law in some countries.
Also, while driving, keep the volume to
a level at which external sounds can be
heard.
1. When the inside of the vehicle is very cold
and the player is used soon after switching
on the heater, moisture may form on the
disc (DVD/CD) or the optical parts of the
player and proper playback may not be
possible. If moisture forms on the disc
(DVD/CD), wipe it off with a soft cloth. If
moisture forms on the optical parts of the
player, do not use the player for about one
hour. The condensation will disappear
naturally allowing normal operation.
2. Driving on extremely bumpy roads which
cause severe vibration may cause the
sound to skip.
3. This unit uses a precision mechanism.
Even in the event that trouble arises, never
open the case, disassemble the unit, or
lubricate the rotating parts.
INFORMATION FOR USERS:
CHANGES OR MODIFICATIONS TO
THIS PRODUCT NOT APPROVED BY
THE MANUFACTURER WILL VOID THE
WARRANTY.
CAUTION
This appliance contains a laser system
and is classified as a “CLASS 1 LASER
PRODUCT”. To use this model properly,
read this Owner’s Manual carefully and
keep this manual for your future reference.
In case of any trouble with this player,
please contact your nearest “Mitsubishi
Motors dealer”. To prevent direct exposure
to the laser beam, do not try to open the
enclosure.
Operation Panel/
Generalities
For a longer service life, be sure to read the
following cautions.
• The operation panel will operate properly in
a temperature range of 0 to 60°C.
• Do not allow any liquids on the set from
drinks, umbrellas, etc. Doing so may
damage the internal circuitry.
• Do not disassemble or modify the set in any
way. Doing so may result in damage.
• Do not draw the operation panel out and use
it as a tray. Also, subjecting the operation
panel to shocks may result in breakage,
deformation, or other damage.
• Do not let cigarettes burn the display. Doing
so may damage or deform the cabinet.
• If a problem should occur, have the set
inspected at your store of purchase.
• Do not insert objects or poke in the space
between the operation panel and the main
unit when the panel is tilted.
• Do not place anything on the display when
the panel is tilted.
• In extremely cold weather, the display
movement may slow down and the display
may darken, but this is not a malfunction.
The display will work normally when the
temperature increases.
• Small black and shiny spots inside the
operation panel are normal for LCD
products.
• The operation panel may stop temporarily
when it opens or closes, when the engine
stops or when it is cold.
• The touchkeys on the display operate when
slightly touched. Do not press the touchkey
screen with much force.
• Do not push the case surrounding the
touchkey panel with much force. This may
cause malfunctioning of the touchkeys.
89
Page 90

Cleaning
• Cleaning the cabinet
Use a soft and dry cloth and gently wipe off
the dirt. For tough dirt, apply some neutral
detergent diluted in water to a soft cloth,
wipe off the dirt gently, then wipe again with
a dry cloth.
Do not use benzene, thinner, car cleaner,
etc., as these substances may damage the
cabinet or cause the paint to peel. Also,
leaving rubber or plastic products in contact
with the cabinet for long periods of time may
cause stains.
CAUTION
Do not use benzene, thinner, car cleaner,
polishing spray, etc., as these substances
may cause a fire.
• Cleaning the operation panel
The operation panel tends to collect dust, so
wipe it off occasionally with a soft cloth. The
surface is easily scratched, so do not rub it
with hard objects.
About the Registered
Marks, etc.
• This product incorporates copy protection
technology that is protected by U.S. and
other intellectual property rights. The use
of Rovi Corporation’s copy protection
technology in the product must be
authorized by Rovi Corporation. Reverse
engineering or disassembly is prohibited.
Use of this product by the customer is
restricted to play program materials to which
the Rovi copyright protection process has
been applied.
• Manufactured under license from Dolby
Laboratories.
“Dolby” and the double-D symbol are
trademarks of Dolby Laboratories.
• The Bluetooth word mark and logos are
owned by the Bluetooth SIG, Inc. and any
use of such marks by Clarion Co., Ltd. is
under license. Other trademarks and trade
names are those of their respective owners.
• “Made for iPod,” and “Made for iPhone”
mean that an electronic accessory has been
designed to connect specifically to iPod, or
iPhone, respectively, and has been certified
by the developer to meet Apple performance
standards.
Apple is not responsible for the operation of
this device or its compliance with safety and
regulatory standards.
Please note that the use of this accessory
with iPod or iPhone may affect wireless
performance.
iPhone, iPod, iPod classic, iPod nano,
iPod touch, and iTunes are trademarks of
Apple Inc., registered in the U.S. and other
countries.
90
Page 91

10. CONTROLS
CAUTION
• When not updating the map data, do not
remove the map SD memory card. If you
remove the map SD memory card, the
unit will not start.
• When removing the SD memory card
to update the map data, make sure the
vehicle is set to ACC-OFF.
• Do not edit any data on the map SD
memory card or connect the map SD
memory card to a personal computer,
etc. This may cause errors.
l Operation panel
12 3 4
56
l With the operation panel open
!@0
789
Functions of Buttons
Note:
• Be sure to read this section while referring to
the front diagram.
• If your car has a rheostat feature, you can
adjust the button illumination level.
[AV] button
1
• Press this button to display/hide the
Source screen to switch the source
mode.
[{], [}] (Volume) buttons
2
• Use these buttons to increase/decrease
the volume.
[ ], [ ] (TUNE/TRACK) buttons
3
• In Tuner mode, press these buttons
to seek up/down by 1 step. Press and
hold these buttons to seek a station
automatically.
• In DVD, Audio CD, MP3/WMA/AAC,
SD memory card, USB memory, iPod
and Bluetooth Audio modes, use these
buttons to select a track to be played.
• In DVD, Audio CD, MP3/WMA/AAC,
SD memory card, USB memory, iPod,
and Bluetooth Audio modes, pressing
and holding a button during playback
performs the fast-forward/fast-backward
operation.
[MAP] button
4
• Press this button to display the Map
screen of the current location in any
mode.
• When the destination is set, keep
pressing this button for more than
about 1.5 seconds to check the current
guidance message.
[POWER] button
5
• Press this button to turn on/off the audio
features of this unit.
• Press and hold this button to turn off the
display.
Microphone
6
• The built-in microphone is for a Bluetooth
telephone.
Note:
• Do not put a pointed object into the hole
of the microphone. This may damage the
microphone.
[OPEN/TILT] button
7
• Use this button to open/close the
operation panel.
[DEST] button
8
• Press this button to display the
Destination Menu screen in any mode.
• Keep pressing this button for more than
about 1.5 seconds to display the Go
®
,
Home screen in any mode.
[MENU] button
9
• Press this button to display the Main
Menu screen in any mode.
Disc slot
0
• Insert a DVD Video, CD, or disc with MP3/
WMA/AAC files into the unit to play it.
SD memory card slot
!
• Insert an SD memory card with
WMA/AAC
Map SD memory card slot
@
• This card slot is used for an SD memory
card with map data.
files into the unit to play them.
MP3/
91
Page 92

Outline of Button and
Touchkey Operation
Turning the power on
Note:
• Start the engine before using this unit.
• Be careful about using this unit for a long time
without running the engine. If you drain the
vehicle’s battery too far, you may not be able to
start the engine and this can reduce the service
life of the battery.
Engine ON
position
--Please be sure to read this.--
--
Observe and obey all road signs,
traffic rules and drive safely.
Read owner's manual before using.
You are responsible for safety at all the times.
--
OK
OK
You can change the media sources.
*1 These images indicate the buttons to press
*1
or keys to touch.
92
Page 93

Tuner mode operation
Switches the radio band.
(Source screen)
Preset ch.
Select desired station after
selecting radio band.
Manual tuning
93
Page 94

DVD Video mode operation
(Source screen)
(DVD top menu)
(DVD Video mode screen)
(Settings screen)
(Default screen)
94
Page 95

Main menu operation
(Navigation screen)
(Bluetooth Phone)
Switching between
day and night modes.
Turning the
Monitor Display Off
and displaying the
Clock screen.
(General settings)
95
Page 96

Adjusting the General settings
(Main menu screen)
(Audio screen)
(Display Adj. screen)
(Volume and Beeps screen)
(Select Language screen)
96
Page 97

(Main menu screen)
(Phone screen)
(Bluetooth screen)
(Clock screen)
(Others screen)
97
Page 98

11. BASIC
OPERATIONS
Note:
• Be sure to read this chapter while referring to
“Controls” (page 91).
Turning the Power On/Off
Note:
• Start the engine before using this unit.
• Be careful about using this unit for a long time
without running the engine. If you drain the
vehicle’s battery too far, you may not be able to
start the engine and this can reduce the service
life of the battery.
q Turning the power on
1. Start the engine. The power is
automatically turned on and the startup
screen is displayed.
Note:
• The power is turned on even when the ignition
switch is set to the ACC ON position.
2. The startup screen automatically changes
to the caution screen. Touch the [OK] key.
The system resumes from its status when
the power was turned off.
The navigation system does not operate until
the [OK] key is touched.
• Some audio features are available even if
the [OK] key is not touched.
q Turning the power off
1. Turn the ignition switch to the OFF position.
Opening the Operation
Panel and Adjusting the
Angle
The operation panel can be opened/closed to
insert/eject a disc or memory card. The angle
of the operation panel can be adjusted to suit
the mounting angle of the unit or light coming
into the vehicle.
WARNING
• To prevent the battery from going
dead, operate this unit with the engine
running if possible.
• When the operation panel is operating,
be careful not to get your hand or
finger caught between the panel and
main unit or the instrument panel of
the vehicle.
• Do not move the operation panel by
hand.
q Opening/closing the
operation panel
1. Press the [OPEN/TILT] button to display
the OPEN/TILT screen.
2. Touch the [Panel Open/Close] key.
The operation panel opens.
3. Touch the [Panel Open/Close] key when
the operation panel is open.
The operation panel closes.
q Adjusting the angle of the
operation panel
The angle of the operation panel can be
adjusted in the range of 0 to 30°.
1. Press the [OPEN/TILT] button to display
the OPEN/TILT screen.
98
Page 99

2. Select the angle from [0] to [6] in Angle
Adjustment.
The selected angle is stored in memory.
Once you select the angle of the operation
panel, the operation panel returns to the
selected angle even after it is opened/
closed.
Returning the operation panel to
the original angle
1. Press the [OPEN/TILT] button to display
the OPEN/TILT screen.
2. Touch the [0] key in Angle Adjustment.
The operation panel moves and stops at
0°.
Adjusting the Display and
Audio
q Turning the Monitor Display
Off
You can turn off the monitor display, and
change it to a black screen.
1. Press the [MENU] button and touch the
[Display] key to display the Display screen.
2. Touch the [Screen Display OFF] key.
The monitor display turns off.
Turning the monitor display on
1. Touch the monitor display.
• You can also turn on the monitor display
by pressing the [AV], [MAP], [MENU],
[DEST], or [OPEN/TILT] button, or any
button on the Steering Wheel Audio
Remote Control (if so equipped).
q Switching between day and
night modes
You can switch the screen brightness setting
between day and night modes.
1. Press the [MENU] button and touch the
[Day/Night] key.
The display dims or brightens.
q Adjusting the Volume
1. Press the [{], [}] (Volume) buttons to
adjust the volume.
[{] button: Increases the volume.
[}] button: Decreases the volume.
• The volume level has a range of 0 (min.)
to 31 (max.).
q Turning the Audio Off
1. Press the [POWER] button.
Note:
• You can also turn off the audio features by
pressing the [AV] button once or twice until the
Source screen is displayed, and then touching
the [Audio OFF] key.
Turning the Audio features on
1. Press the [POWER] button.
Note:
• You can also turn on the audio features by
pressing the [AV] button once or twice until the
Source screen is displayed, and then touching
one of the source keys.
CAUTION
While driving, keep the volume at a level at
which external sounds can be heard.
99
Page 100

Switching the Operation
Mode
q Switching to the Source
screen, Navigation screen,
and Main Menu screen
To switch to the Source screen from the
Navigation screen, press the [AV] button once
or twice. To switch to the Navigation screen
from the Source screen, press the [MAP]
button.
Note:
• You can also access the Navigation screen from
the Main Menu screen.
É “Main Menu Operations” (page 100)
q Selecting a Media Source
You can change the media source to be
played from the Source screen.
1. Press the [AV] button once or twice to
display the Source screen.
2. Touch the corresponding key for the
desired Source.
The system switches to the corresponding
source mode.
When [Audio OFF] is not enabled,
pressing the [AV] button from the Source
screen displays the current mode screen.
Note:
• You can also change the source mode by using
the Steering Wheel Audio Remote Control (if so
equipped).
É “Steering Wheel Audio Remote Control
Operations” (page 103)
Available media sources
Key name Corresponding
FM/AM Tuner mode P. 105
DVD/CD*1Audio CD mode P. 111
SD Memory
CARD
USB/iPod*2USB memory
Bluetooth Bluetooth Audio
*1 The source mode differs depending on the
data format of the disc inserted into the CD
player.
When no disc is inserted into the CD
player, “No disc.” is displayed.
*2 The source mode differs depending on
the device connected. When no device
is connected, “No USB memory.” is
displayed.
source mode
MP3/WMA/AAC
mode
DVD Video mode P. 106
SD memory card
mode
mode
iPod mode P. 117
mode
Refer to
P. 112
P. 115
P. 115
P. 120
q Main Menu Operations
Selecting Navigation Mode
1. Press the [MENU] button and touch the
[Navigation] key to display the Navigation
screen.
Selecting Telephone mode
1. Press the [MENU] button and touch the
[Phone] key to display the Phone screen.
Note:
• Even in Telephone mode, the previous Source
mode continues operating.
É “Telephone Operations” (page 122)
Displaying the Clock Screen
You can change the screen to display only the
digital clock on a dark background.
1. Press the [MENU] button and touch the
[Display] key to display the Display screen.
2. Touch the [Clock Screen Display] key.
The Clock screen is displayed.
To return to the mode you were previously
using, touch the monitor screen.
• You can also exit the Clock screen by
pressing the [AV], [MAP], [MENU],
[DEST], or [OPEN/TILT] button.
100
 Loading...