

Page 1
SPLIT-TYPE AIR CONDITIONERS
OPERATING INSTRUCTIONS
INDOOR UNIT
MFZ-KA25VA
MFZ-KA35VA
MFZ-KA50VA
OPERATING INSTRUCTIONS For customers
To use this unit correctly and safely, be sure to read this operating instructions
•
before use.
Bedienungsanleitung Für Kunden
Um diese Einheit richtig und sicher zu verwenden, unbedingt diese Bedienungs-
•
anleitung vor der Inbetriebnahme durchlesen.
NOTICE D’UTILISATION A l’attention des clients
Pour avoir la certitude d’utiliser cet appareil correctement et en toute sécurité, veuillez
•
lire attentivement cette notice d’instructions avant de mettre l’appareil en fonction.
GEBRUIKSAANWIJZING Voor de klant
Om dit apparaat op de juiste manier en veilig te gebruiken, dient u eerst deze
•
gebruiksaanwijzing aandachtig door te lezen.
MANUAL DE INSTRUCCIONES Para los clientes
Para emplear correctamente este aparato y por razones de seguridad debe leer
•
este manual de instrucciones de manejo antes de su utilización.
LIBRETTO D’ISTRUZIONI Per gli utenti
Per utilizzare correttamente quest’unità, leggere questo libretto d’istruzioni atten-
•
tamente e per intero.
√¢∏°π∂™ §∂π∆√Àƒ°π∞™ °È· ÙÔÓ ÂÏ¿ÙË
°И· У· ¯ЪЛЫИМФФИ‹ЫВЩВ ·˘Щ‹ ЩЛУ МФУ¿‰· ЫˆЫЩ¿ О·И МВ ·ЫК¿ПВИ·, ‚В‚·ИˆıВ›ЩВ
•
fiЩИ ¤¯ВЩВ ‰И·‚¿ЫВИ ·˘Щfi ЩФ ВБ¯ВИЪ›‰ИФ Ф‰ЛБИТУ ЪИУ ·fi ЩЛУ ¯Ъ‹ЫЛ.
INSTRUÇÕES DE OPERAÇÃO Para os clientes
Para utilizar esta unidade correctamente, certifique-se de que lê estas instruções
•
de operação antes da utilização.
BRUGSANVISNING Til kunden
Læs denne brugsanvisning før brugen så korrekt og forsvarlig anvendelse af klima-
•
anlægget sikres.
BRUKSANVISNING För kunder
För att använda enheten på rätt och säkert sätt ska denna bruksanvisning läsas
•
innan enheten tas i bruk.
‹fiLETME TAL‹MATLARI Sat›n al›c›lar için
Bu birimi do¤ru ve güvenli olarak çal›flt›rmak için, kullanmadan önce bu iflletme
•
talimatlar›n› mutlaka okuyun.
РУКОВОДСТВО ПО ЭКСПЛУАТАЦИИ Для пользователей
Для обеспечения правильного и безопасного использования прибора следует
•
до начала его эксплуатации внимательно прочитать данное руководство.
English
Deutsch
Français
Nederlands
Español
Italiano
∂ППЛУИО¿
Português
Dansk
Svenska
Türkçe
Русский
Page 2
CONTENTS
SAFETY PRECAUTIONS ........................................................................................................................................................ 2
NAME OF EACH PART ............................................................................................................................................................ 3
PREPARATION BEFORE OPERATION .................................................................................................................................. 4
AUTO CHANGEOVER... AUTO MODE OPERATION .............................................................................................................. 6
MANUAL OPERATION (COOL, DRY, HEAT) ........................................................................................................................... 7
AIR FLOW VELOCITY AND DIRECTION ADJUSTMENT ...................................................................................................... 7
AIR OUTLET SELECTION ...................................................................................................................................................... 8
ECONO COOL OPERATION ................................................................................................................................................... 9
i-save OPERATION .................................................................................................................................................................. 9
TIMER OPERATION (ON/OFF TIMER) ................................................................................................................................. 10
WHEN THE AIR CONDITIONER IS NOT GOING TO BE USED FOR A LONG TIME .......................................................... 10
MAINTENANCE ..................................................................................................................................................................... 10
CLEANING THE FRONT GRILLE ......................................................................................................................................... 11
CLEANING THE CATECHIN AIR FILTER .............................................................................................................................. 11
CLEANING THE AIR CLEANING FILTER ............................................................................................................................. 12
REPLACEMENT OF THE AIR CLEANING FILTER ............................................................................................................... 12
BEFORE CONTACTING THE SERVICE REPRESENTATIVE, CHECK THE FOLLOWING AGAIN ...................................... 13
WHEN YOU THINK THAT TROUBLE HAS OCCURRED ...................................................................................................... 13
INSTALLATION, RELOCATION AND INSPECTION .............................................................................................................. 14
SPECIFICATIONS ................................................................................................................................................................. 14
SAFETY PRECAUTIONS
• Since rotating parts and parts which could cause an electric shock are used in this product, be sure to read
these “Safety Precautions” before use.
• Since the cautionary items shown here are important for safety, be sure to observe them.
Marks and their meanings
WARNING:
CAUTION: Incorrect handling could cause a serious hazard depending on the conditions.
Meanings of symbols used in this manual
• The colour of the sticker affixed to the unit is written in the parentheses.
(Black) : Never insert your finger or stick, etc.
(Black) : Never step onto the indoor/outdoor unit and do not put anything on them.
• After reading this manual, keep it together with the installation manual in a handy place for easy reference.
Warning positions
2
Incorrect handling could cause a serious hazard, such as death, serious injury, etc. with a high probability.
: Be sure not to do.
: Be sure to follow the instruction.
: Danger of electric shock. Be careful.
: Be sure to disconnect the power supply plug from the power outlet.
: Be sure to shut off the power.
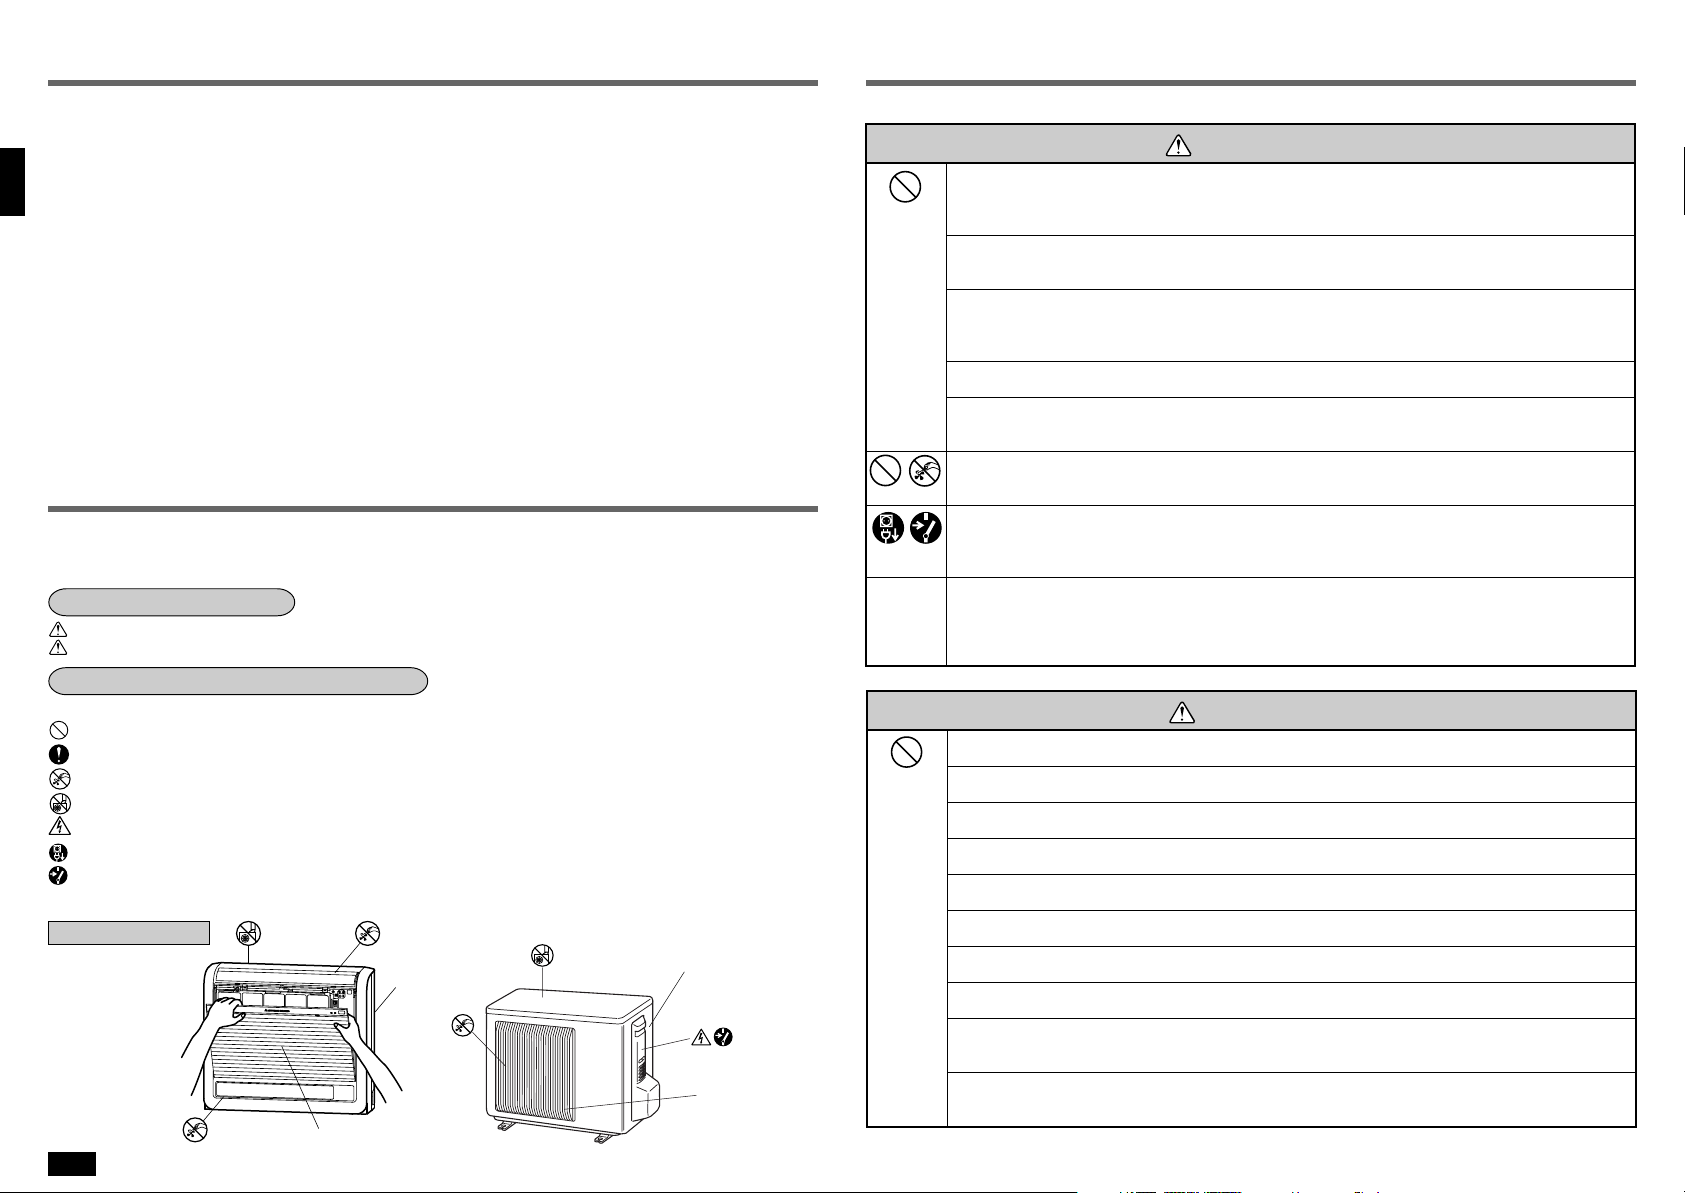
ENCLOSURE
FRONT GRILLE
ENCLOSURE
AIR OUTLET
This air conditioner is NOT intended for use by children or infirm persons without supervisions.
•
WARNING
Do not use intermediate connection of the power supply cord or the extension cord and do not
connect many devices to one AC outlet.
• A fire or an electric shock may result from poor contact, poor insulation, exceeding the permissible
current, etc.
Do not scratch or process the power supply cord, etc.
• Do not put heavy object on the power supply cord and do not scratch or process the cord. The cord may
be damaged and this may cause a fire or an electric shock.
Do not turn the breaker off/on or disconnect/connect the power supply plug during operation.
• This may cause a fire due to spark, etc.
• Be sure to turn off the breaker or disconnect the power supply plug absolutely after switching the indoor
unit off with the remote controller.
Do not expose your skin directly to cool air for a long time.
• This could damage your health.
The customer should not install this unit.
• If this is done incorrectly, it may cause a fire, an electric shock, or injury from the unit falling, water
leaking, etc. Consult your dealer.
Do not insert your finger or a stick, etc. into the air inlet/outlet.
• Since the fan rotates at high speed, this may cause an injury.
• Young children should be supervised to ensure that they do not play with the air conditioner.
When an abnormality (burning smell, etc.) occurs, stop the air conditioner and disconnect the power
supply plug or turn off the breaker.
• If the unit continues to be operated in an abnormal condition, it may cause a fire, trouble, etc. In this case,
consult your dealer.
Repairs or relocation should not be done by the customer.
• If this is done incorrectly, it may cause a fire, an electric shock, or injury from the unit falling, water
leaking, etc. Consult your dealer.
• If the power supply cord is damaged, it must be replaced by the manufacturer or its service agent in order
to avoid a hazard.
CAUTION
When the air filter is to be removed, do not touch the metal parts of the indoor unit.
• This may cause an injury.
Do not put a vase or glass on the indoor unit.
• Water dropping into the indoor unit may deteriorate the insulation, causing electric shock.
Do not use an insecticide or flammable spray.
• This may cause a fire or deformation of the cabinet.
Do not put a pet or houseplant where it will be exposed to direct airflow.
• This could injure the pet or plant.
Do not leave the unit on an installation stand which is damaged.
• The unit may fall and this may cause an injury.
Do not step onto an unstable bench when maintaining the unit, etc.
• This may cause an injury, etc. if you fall down.
Do not pull the power supply cord.
• The core wire of the power supply cord may be disconnected and this may cause a fire.
Do not charge or disassemble the batteries and do not throw them into a fire.
• This may result in leakage, fire or an explosion.
Do not operate the unit for a long time in high humidity, e.g. leaving a door or window open.
• In the cooling mode, if the unit is operated in a room with high humidity (80% RH or more) for a long time,
water condensed in the air conditioner may drop and wet or damage furniture, etc.
Do not operate the unit at low outside temperature (less than -10°C) in the cooling mode.
• In the cooling mode, if the unit is operated at low outside temperature (less than -10°C), water condensed in the air conditioner may drop and wet or damage furniture, etc.
Page 3
SAFETY PRECAUTIONS NAME OF EACH PART
CAUTION
Do not use the unit for special purposes.
• Do not use this air conditioner to preserve precision devices, food, animals, plants and art objects.
This may cause deterioration of quality, etc.
Do not put a stove, etc. where they are exposed to direct airflow.
• This may cause imperfect combustion.
When the unit is to be cleaned, switch it off and disconnect the power supply plug or turn off the
breaker.
• Since the fan rotates at high speed during operation, this may cause an injury.
When the unit is not going to be used for a long time, disconnect the power supply plug or turn off
the breaker.
• Otherwise, dirt may collect and this may cause a fire.
Replace the 2 batteries with new ones of same type.
• Using an old battery together with a new one may result in heat generation, leakage or an explosion.
If liquid from the batteries gets onto your skin or clothes, wash it well with clean water.
• If liquid from the batteries gets into your eyes, wash them well with clean water and consult a doctor at
once.
Ventilate well in using the unit with a stove, etc.
• An oxygen shortage may occur.
Do not operate switches with wet hands.
• This may cause an electric shock.
Do not clean the air conditioner with water.
• Water may enter the unit and degrade the insulation. This may cause an electric shock.
Do not step, sit or put anything on the indoor/outdoor unit.
• This may cause an injury, etc. if you or something falls down.
For installation
WARNING
• Consult your dealer for installation of the air conditioner.
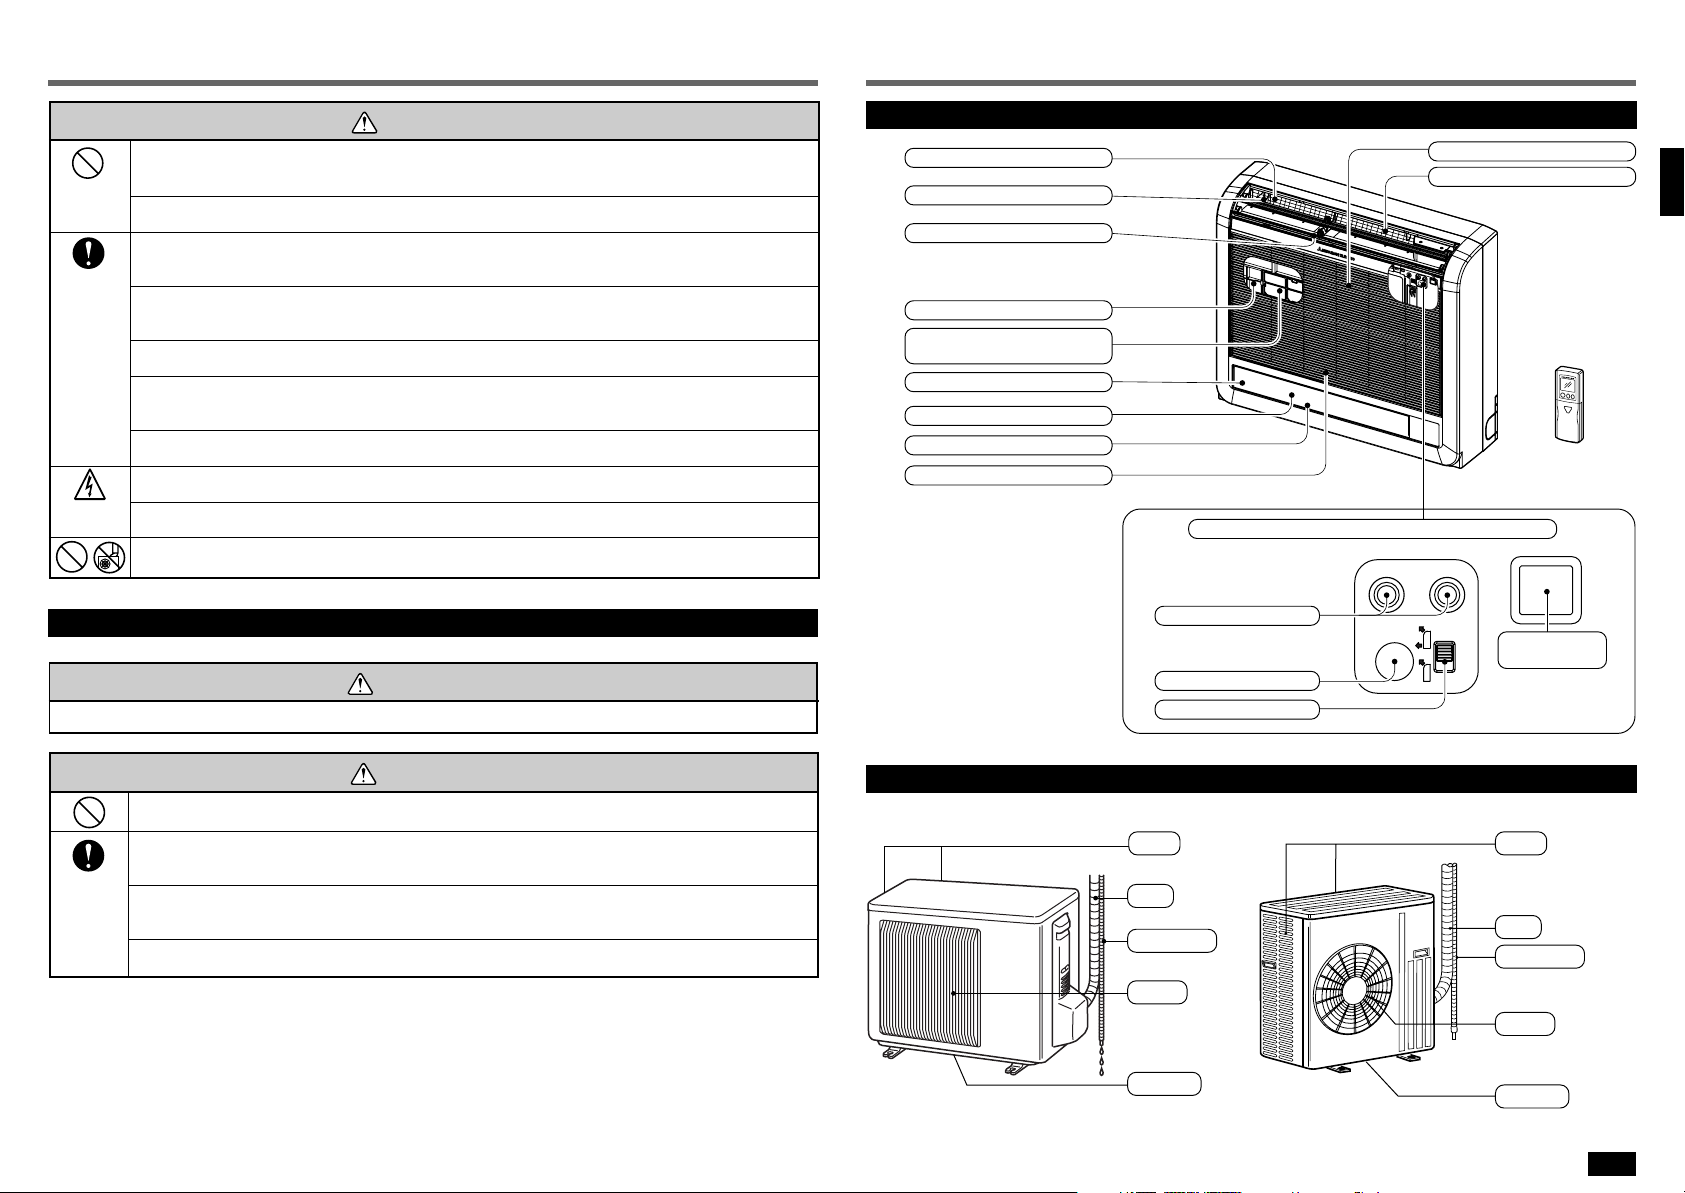
Indoor unit
Vertical vane
Air outlet
Horizontal vane
Catechin air filter
Air cleaning filter (Anti-Allergy
Enzyme Filter, blue bellows type)
Damper
Air outlet
Vertical vane
Air inlet
Front grille
Fan guard
Display and operation section (When the front grille is opened)
Operation indicator lamp
Emergency operation switch
Air outlet selection switch
Remote controller
Remote control
receiving section
CAUTION
Do not install the unit where flammable gas could leak.
• If gas leaks and collects around the unit, it may cause an explosion.
Earth the unit.
• Do not connect the earth to a gas pipe, water pipe, lightning rod or the earth of a telephone. If the
earthing is incorrect, it may cause an electric shock.
Install an earth leakage breaker depending on the place where the air conditioner is to be installed
(humid places, etc.).
• If the earth leakage breaker is not installed, it may cause an electric shock.
Drain should be fully drained.
• If the drainage route is incomplete, water may drop from the unit. This may wet and damage the furniture.
Outdoor unit
SUZ-KA25/35VA(H) SUZ-KA50VA
Air inlet (back and side)
Piping
Drainage hose
Air outlet
Drain outlet
Air inlet (back and side)
Piping
Drainage hose
Air outlet
Drain outlet
3
Page 4
NAME OF EACH PART
PREPARATION BEFORE OPERATION
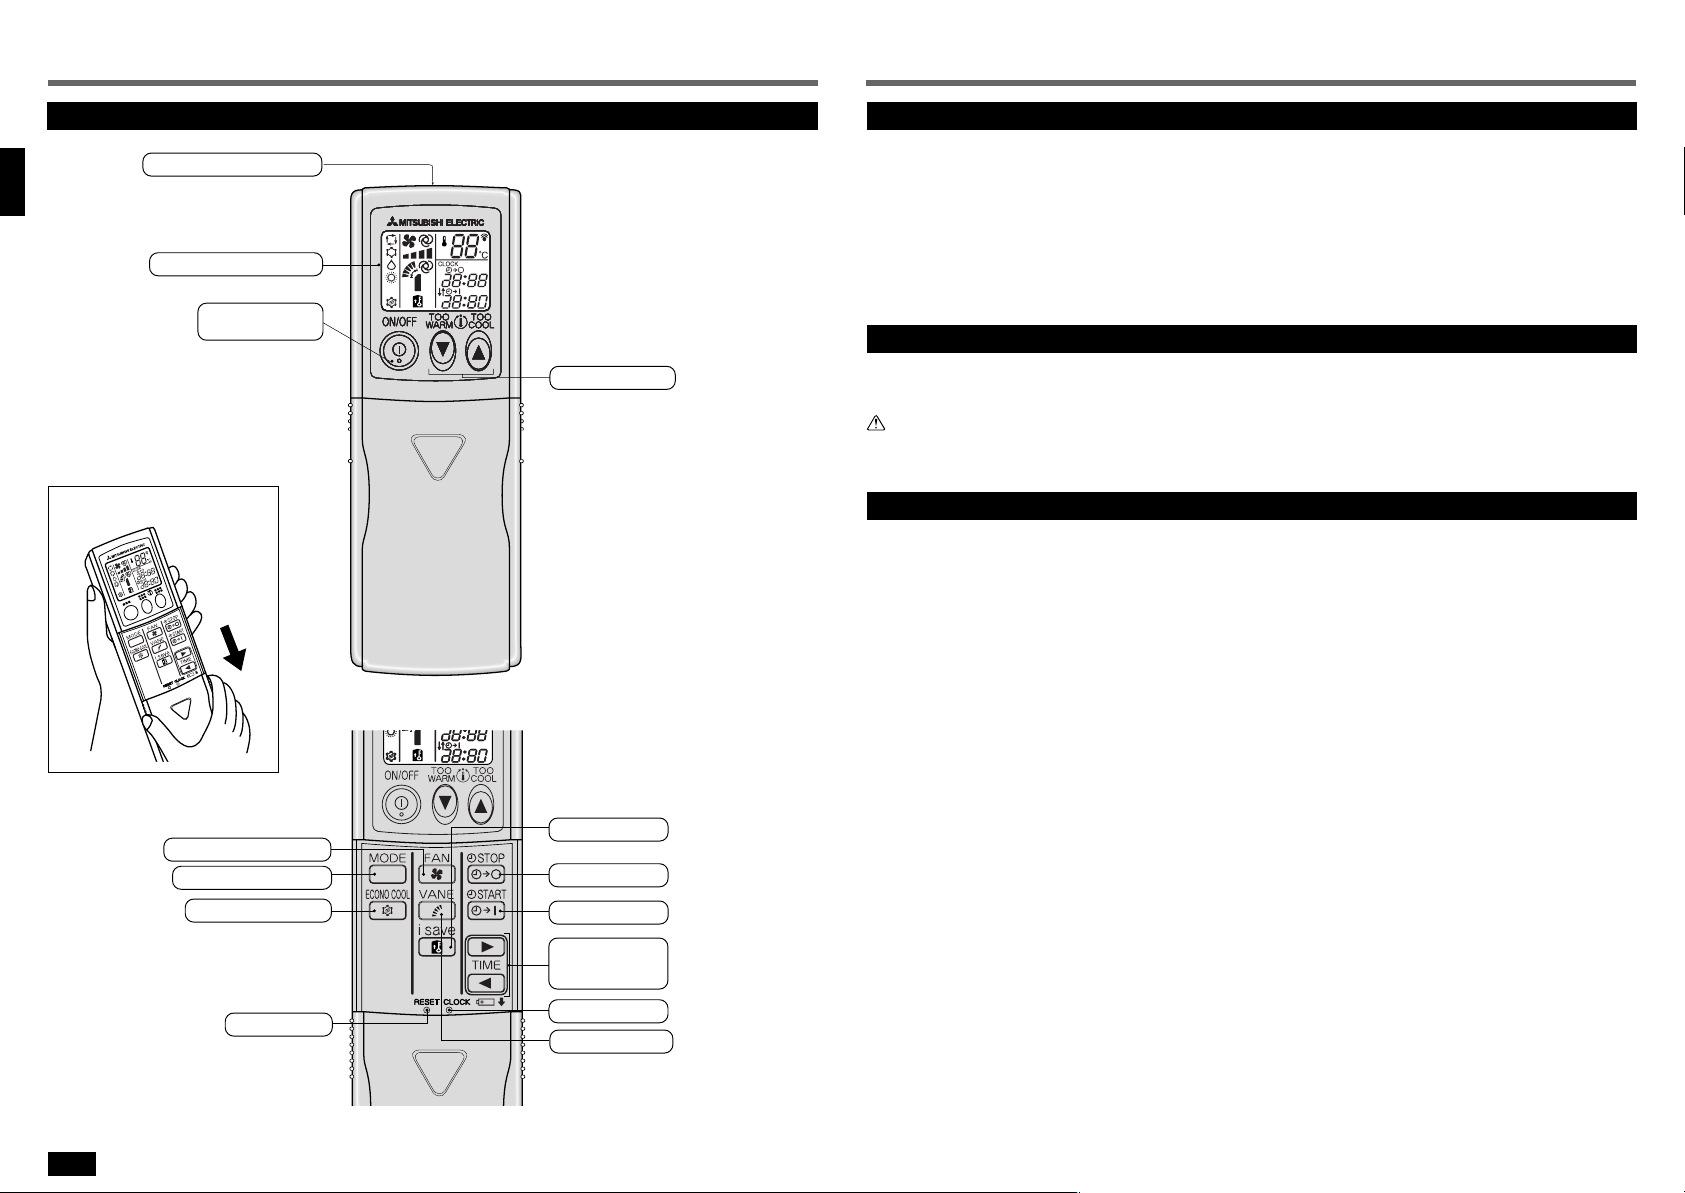
Remote controller
Signal transmitting section
Operation display section
ON/OFF (operate/
Open the front lid.
stop) button
(This diagram shows an overall view.)
(This diagram shows an overall view.)
(This diagram shows an overall view.)
Temperature buttons
Auto restart function
These models are equipped with an auto restart function. If you do not want to use this function,
■
please consult the service representative because the setting of the unit needs to be changed.
Auto restart function is ...
When the indoor unit is controlled with the remote controller, the operation mode, the set temperature and the fan speed are
stored in the memory. If a power failure occurs or the main power is turned off during operation, “Auto restart function” sets
automatically to start operating in the same mode as the one set with the remote controller just before the shut off of the main
power. (Refer to page 6 for details.)
Outdoor unit
Insert the power supply plug into the power outlet and/or turn the breaker on.
■
WARNING:
Remove dirt from the power supply plug and insert the plug securely.
If dirt adheres to the plug or insertion is incomplete, it may cause a fire or an electric shock.
Remote controller
Use the remote controller provided with the unit only. Do not use other remote controller.
■
Fan speed control button
Operation select button
ECONO COOL button
RESET button
i save button
Off-timer button
On-timer button
TIME set buttons
Forward button
Backward button
CLOCK set button
Vane control button
4
Page 5
PREPARATION BEFORE OPERATION
Remote controller
How to set the batteries and the current time
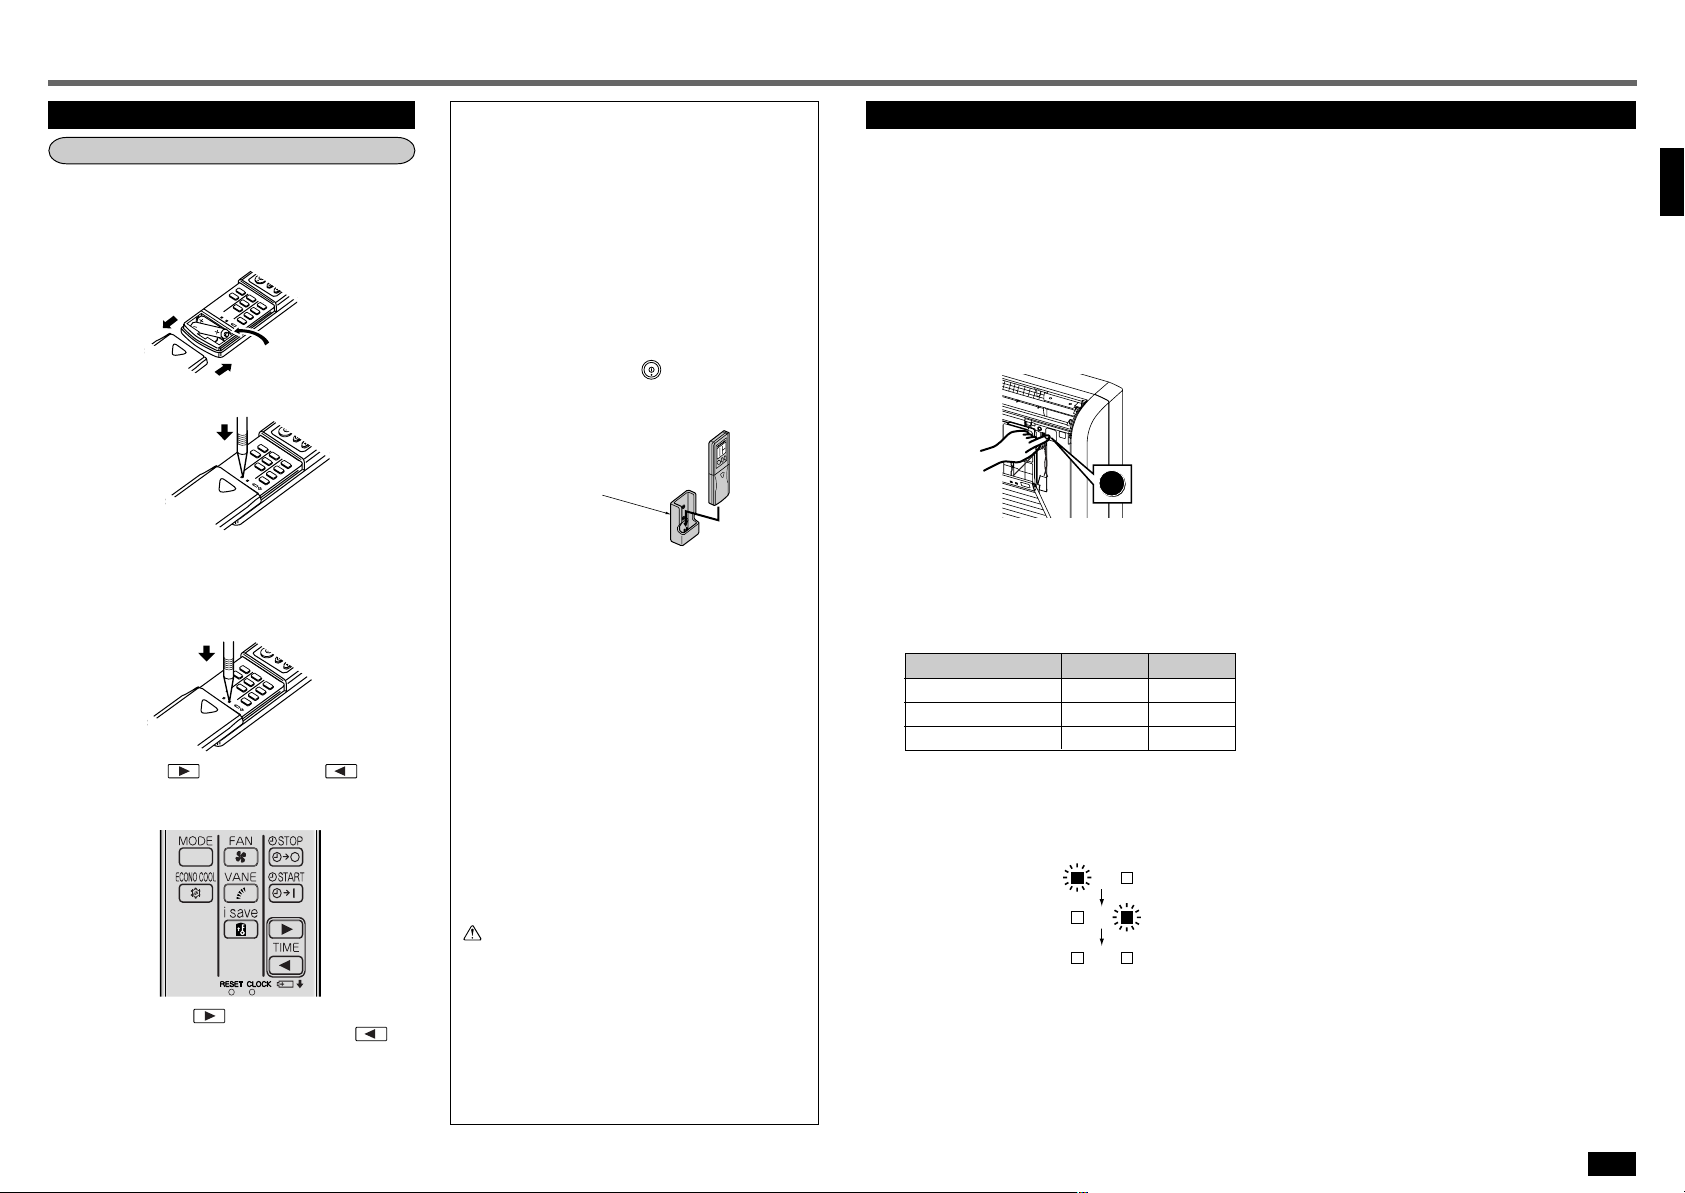
1 Remove the front lid and insert batteries.
Then reattach the front lid.
Insert the minus pole of the batteries first.
Check if the polarity of the batteries is correct.
Insert the minus pole
of the batteries first.
2 Press the RESET button.
Press using a
thin stick.
• If the RESET button is not pressed, the remote controller may not operate correctly.
• Be sure to press the RESET button not too strongly.
3 Press the CLOCK set button.
Press using a
thin stick.
4 Press the (Forward) and (Back-
ward) buttons (TIME SET buttons) to set the
current time.
• Each time the button is pressed, the set time
increases by 1 minute, and each time the
ton is pressed, the set time decreases by 1 minute.
• Pressing those buttons longer increases/decreases
the set time by 10 minutes.
but-
5 Press the CLOCK set button again and close
the front lid.
Handling of the remote controller
• The range that the signal can reach is about 6 m when
the remote controller is pointed at the front of the indoor unit.
• When a button is pressed, one or two beeps will be
heard from the indoor unit. If no sound is heard, operate again.
• Use the remote controller carefully.
If it is dropped, thrown or it gets wet, the remote controller may not operate.
When installing on a wall, etc.
• Install the remote controller holder in a position where
the signal reception sound (beep) can be heard from
the indoor unit when the
How to install/remove the remote controller
Installing :Insert the remote controller downward.
Removing :Pull it up.
Remote controller
holder
Dry-cell batteries
■ Reference for replacing batteries
Replace the batteries with new AAA alkaline batteries
in the following cases:
ON/OFF
button is pressed.
· When the indoor unit does not respond to the remote
control signal.
· When the display on the remote controller becomes
dim.
· When a button of the remote controller is pressed, all
displays appear on the screen, and then disappear
immediately.
Do not use manganese batteries. The remote controller
could malfunction.
• The service life of an alkaline battery is about 1 year.
However, a battery whose time limit is approaching
may be exhausted soon. The recommended usable
time limit is indicated (month/year) on the bottom of
the battery.
• To prevent liquid leakage, take out all batteries when
the remote controller is not going to be used for a
long time.
CAUTION:
If liquid from the batteries gets onto your skin or
clothes, wash it well with clean water.
If liquid from the batteries gets into your eyes, wash
them well with clean water and consult a doctor at
once.
• Do not use rechargeable batteries.
• Replace the 2 batteries with new ones of the same
type.
• Dispose of exhausted batteries in the correct manner.
When the remote controller cannot be used (emergency operation)
When the batteries of the remote controller run out or the remote controller malfunctions, the emergency operation
can be done using the EMERGENCY OPERATION switch.
1 Press the EMERGENCY OPERATION switch.
• Each time the EMERGENCY OPERATION switch is
pressed, the unit will operate in order of EMERGENCY COOL MODE, EMERGENCY HEAT MODE
and STOP MODE.
However, when the EMERGENCY OPERATION
switch is once pressed, the unit will operate in test
run for 30 minutes and then the operation mode
shifts to EMERGENCY MODE.
E.O.
SW
• Details of EMERGENCY MODE are as shown below. However, the temperature control does not
work for 30 minutes in test run and the unit is set
to continuous operation. The fan speed is set to
High in test run and shifts to Medium after 30 minutes.
Operation mode COOL HEAT
Set temperature 24°C24°C
Fan speed Medium Medium
Horizontal vane Auto Auto
• The operation mode is indicated by the Operation
Indicator lamp on the indoor unit as following figure.
Operation Indicator lamp
EMERGENCY COOL
EMERGENCY HEAT
STOP
2 To stop the emergency operation, press the
EMERGENCY OPERATION switch once (in
case of EMERGENCY HEAT MODE) or twice
(in case of EMERGENCY COOL MODE).
5
Page 6
AUTO CHANGEOVER... AUTO MODE OPERATION
An automatic cooling and heating changeover operation system ensures easy control and year-round
air conditioning.
Once the desired temperature is set, unit operation is switched automatically between cooling and
heating according to the room temperature. In addition, fan control of the outdoor unit enables cooling
operation at outside temperature as low as -10 °C.
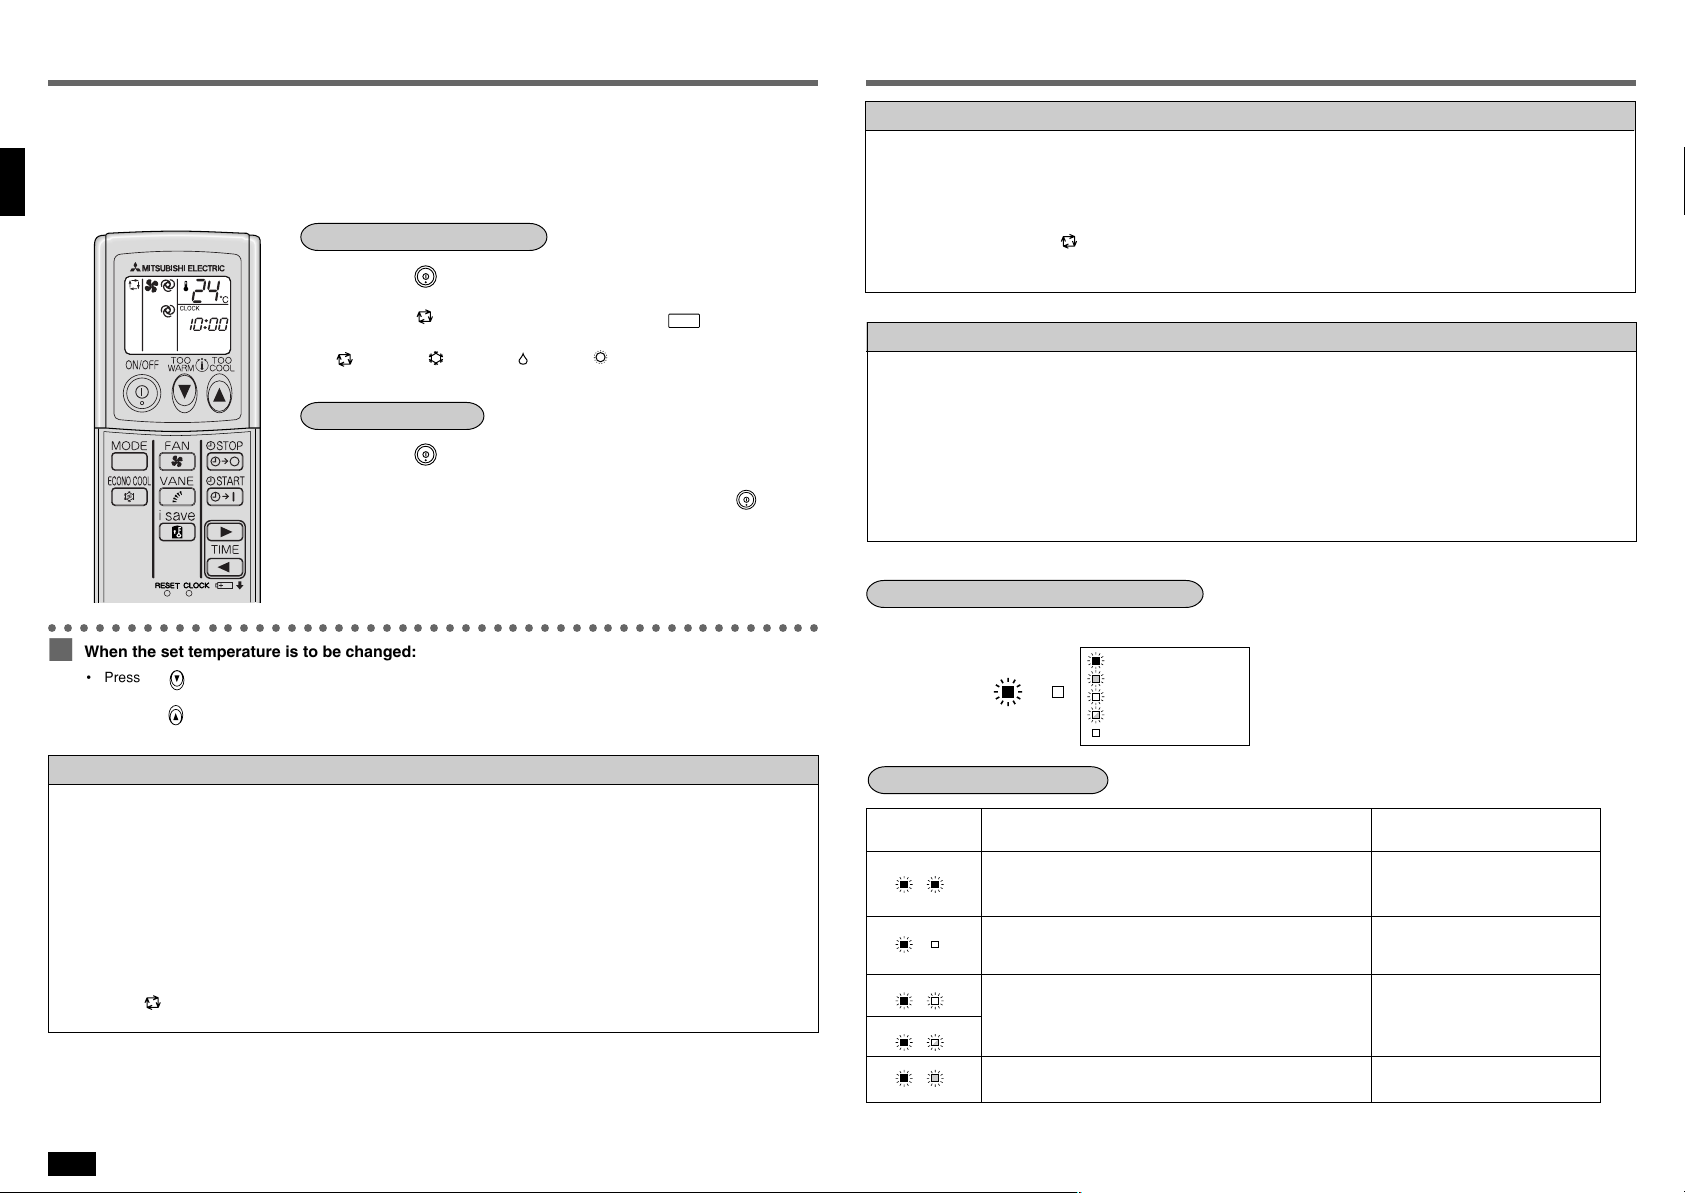
To select the AUTO mode:
1 Press the
2 Select the (AUTO) mode by pressing the
Each time this button is pressed, the operation mode is changed in sequence:
(AUTO) → (COOL) → (DRY) → (HEAT)
The set temperature is also displayed on the remote controller.
ON/OFF
button.
MODE
button.
To stop operation:
Press the
■
After the operation mode is set once, the operation starts in the same mode as
the one set previously from the next time by simply pressing the
○○○○○○○○○○○○○○○○○○○○○○○○○○○○○○○○○○○○○○○○○○○○○○○○○
When the set temperature is to be changed:
■
• Press the
• Press the
TOO
WARM
button to lower the temperature. One press lowers the temperature by about 1°C.
TOO
COOL
button to raise the temperature. One press raises the temperature by about 1°C.
ON/OFF
button.
ON/OFF
button.
Description of “AUTO RESTART FUNCTION”
• These units are equipped with an auto restart function. When the main power is turned on, the air conditioner will start
operation automatically in the same mode as the one set with the remote controller before the shutoff of the main
power.
• If the unit was set to off with the remote controller before the shutoff of the main power, it will remain stopped even after
the main power is turned on.
• If the unit is operated in “
stored in the memory. When the main power is turned on, the unit decides the operation mode by the initial room
temperature at restart and starts operation again.
AUTO” mode before power failure, the operation mode (COOL, DRY or HEAT) is not
Information for multi system air conditioner
Multi system air conditioner can connect two or more indoor units with one outdoor unit. According to the
capacity, two or more units can operate simultaneously.
• When you try to operate two or more indoor units with one outdoor unit simultaneously, one for the cooling and the other
for heating, the operation mode of the indoor unit that operates earlier is selected. The other indoor units that will start the
operation later cannot operate, indicating an operation state. (Refer to the table of Operation Indicator lamp below.)
In this case, please set all the indoor units to the same operation mode.
• When indoor unit starts the operation while the defrosting of outdoor unit is being done, it takes a few minutes (max.
10 minutes) to blow out the warm air.
• In the heating operation, the indoor unit that does not operate may get warm or the sound of refrigerant flowing may be
heard. This is not a malfunction since the refrigerant continuously flows into the indoor unit that does not operate.
Details of display on the indoor unit
The operation indicator at the right side of the indoor unit indicates the operation state.
(Green) : Lighted
Operation Indicator
(Orange) : Lighted
(Green) : Blinking
(Orange) : Blinking
: Not lighted
Description of “AUTO CHANGEOVER”
(1) Initial mode
1 When unit starts the operation with AUTO operation from off;
• If the room temperature is higher than the set temperature, operation starts in COOL mode.
• If the room temperature is equal to or lower than the set temperature, operation starts in HEAT mode.
(2) Mode change
1 COOL mode changes to HEAT mode when about 15 minutes have passed with the room temperature 2 degrees
below the set temperature.
2 HEAT mode changes to COOL mode when about 15 minutes have passed with the room temperature 2 degrees
above the set temperature.
NOTE:
If two or more indoor units are operating in multi system, there might be a case that the indoor unit, which is
operating in
standby. Refer to the detailed information for multi system air conditioner explained on the right.
(AUTO), cannot change over to the other operating mode (COOL↔HEAT) and becomes a state of
6
Operation indicator lamp
Indication
This shows that the air conditioner is operating to reach the
target temperature. Please wait until the target temperature
is obtained.
This shows that the room temperature is approaching the
target temperature.
[Normal operation]
[i-save operation]
This shows a state of standby for operation.
Please refer to Information for multi system air conditioner
above.
Refer to the description of i-save mode.
Operation state
Difference between target
temperature and room temperature
About 2°C or more
About 2°C or less
—
—
Page 7
MANUAL OPERATION (COOL, DRY, HEAT)
AIR FLOW VELOCITY AND DIRECTION ADJUSTMENT
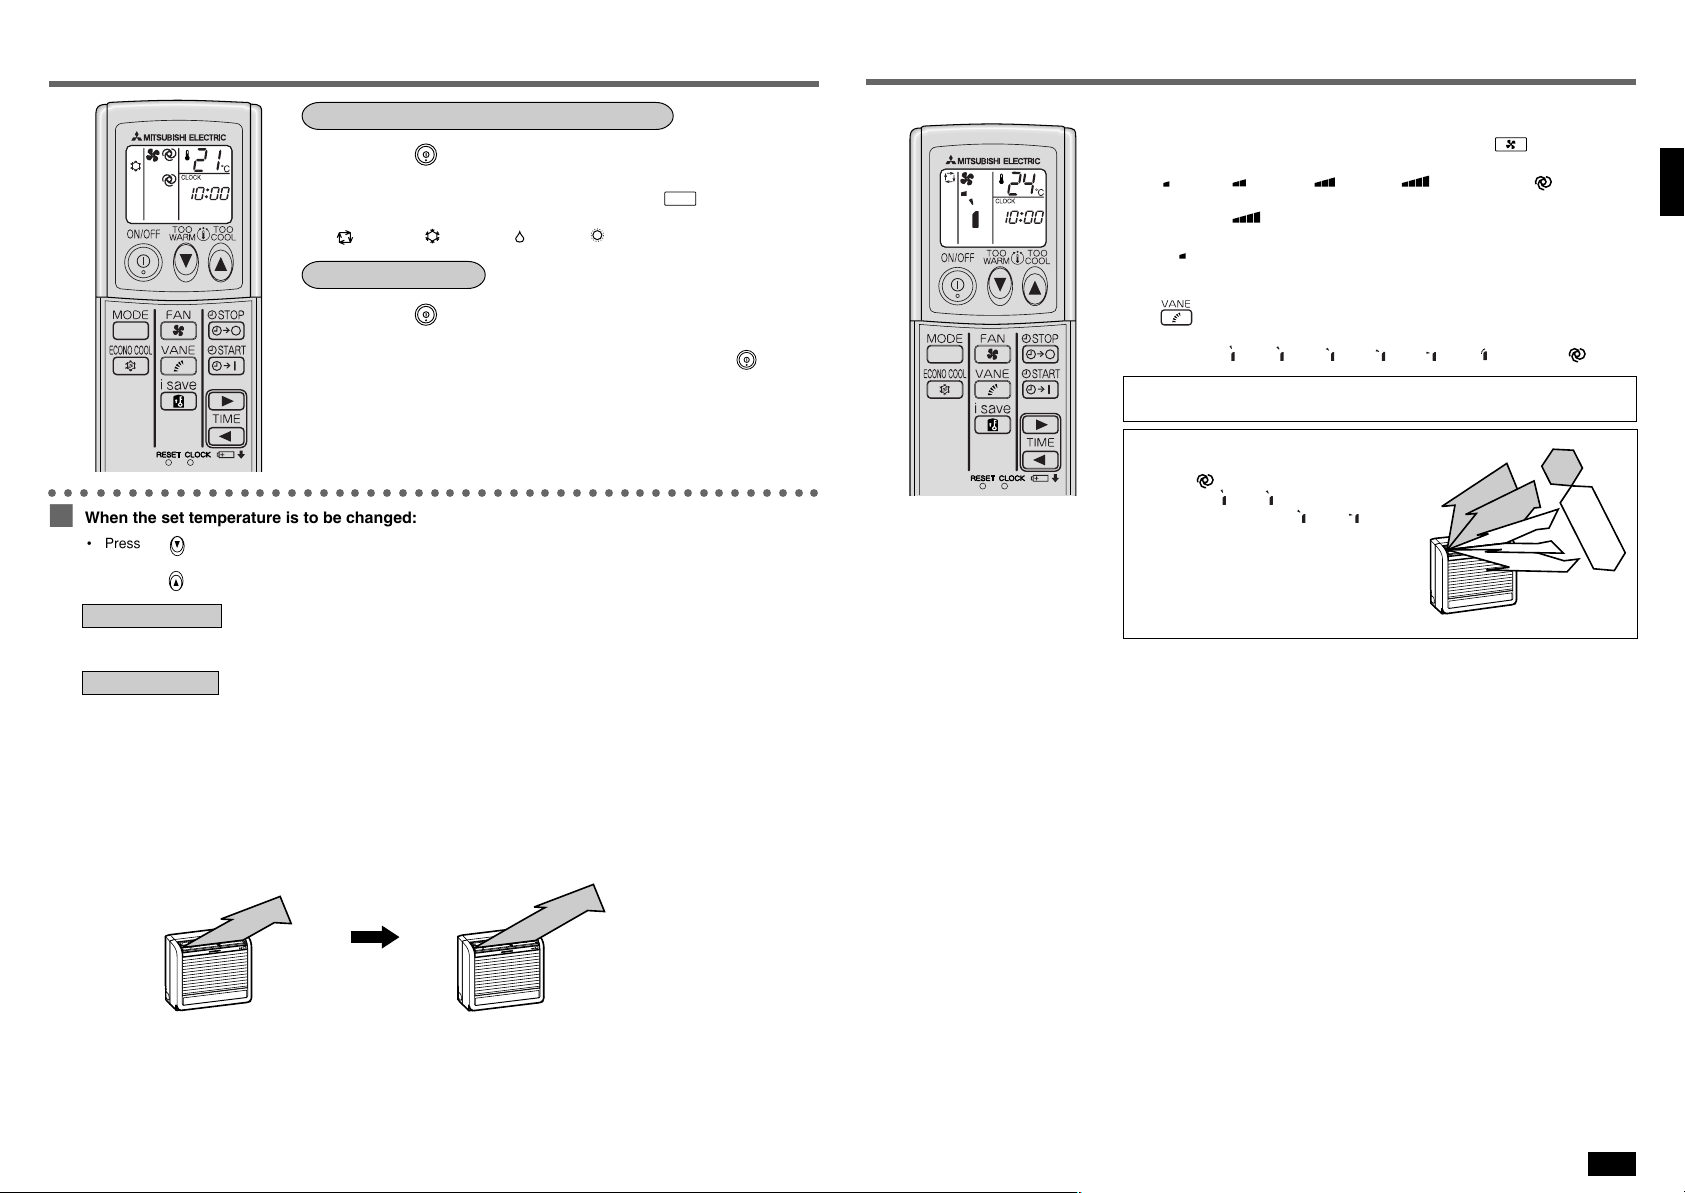
To select the COOL, DRY or HEAT mode:
1 Press the
2 Select the operation mode by pressing the
Each time this button is pressed, the operation mode is changed in sequence:
(AUTO) → (COOL) → (DRY) → (HEAT)
ON/OFF
button.
MODE
button.
To stop operation:
Press the
■
After the operation mode is set once, the operation starts in the same mode as
the one set previously from the next time by simply pressing the
○○○○○○○○○○○○○○○○○○○○○○○○○○○○○○○○○○○○○○○○○○○○○○○○○
When the set temperature is to be changed:
■
• Press the
• Press the
In COOL operation
• When the outside temperature is low, the fan of the outdoor unit turns on and off frequently or decreases the rotation
speed to maintain sufficient cooling capacity.
In DRY operation
• The temperature control (temperature setting) cannot be done.
• The room temperature is slightly lowered in this operation mode.
TOO
WARM
button to lower the temperature. One press lowers the temperature by about 1°C.
TOO
COOL
button to raise the temperature. One press raises the temperature by about 1°C.
ON/OFF
button.
ON/OFF
button.
AIR FLOW velocity and direction can be selected as required.
To change the AIR FLOW velocity, press the
■
Each time the button is pressed, the fan speed is changed in sequence:
(Low) → (Med.) → (High) → (Super High) → (AUTO)
• Use the
• If the operating sound of the air conditioner disturbs your sleep, use the
(Low) notch.
To change the AIR FLOW blowing direction vertically, press the
■
button.
Each time the button is pressed, the angle of the horizontal vane is changed in
sequence:
SWING OPERATION
Use the swing operation to deliver air evenly.
Recommended horizontal vane range for
more efficient air-conditioning
Use the
Use position
mode and use positions
HEAT mode when adjusting to your requirements.
(Super High) notch to cool/heat the room more efficiently.
(1) → (2) → (3) → (4) → (5) → (SWING) → (AUTO)
(AUTO) position usually.
(1) or (2) in the COOL or DRY
(3) to (5) in the
FAN
1
button.
COOL
DRY
2
3
4
5
HEAT
The details of the display on the indoor unit are explained on page 6.
■
If the air conditioner doesn’t cool or heat effectively…
If the fan speed is set to Low or AUTO, sometimes the air conditioner may not cool or heat the air effectively. In this case,
change the fan speed to Med. or upper.
Change the fan speed.
Fan speed: Low or AUTO Fan speed: Med. or upper
7
Page 8

AIR FLOW VELOCITY AND DIRECTION ADJUSTMENT
Movement of the horizontal vane
When to use ?
Select (AUTO) for most
situations.
■ Recommended air
flow direction is
automatically set.
■ Swing operation is
not used.
AUTO
Select the air flow
direction to suit your
personal preference.
■ The range displayed
on the remote
controller and the
(1)
actual operation
range of the
horizontal vane may
differ.
(2)
■ The vane does not
move to horizontal
position in COOL
(3)
and DRY modes.
(4)
COOL/DRY HEAT
Horizontal vane position (1) is set.
Vertical air flow (Does not blow directly
on individuals in room)
Water may condense and drip from
the horizontal vane if the air
conditioner is operated continuously
using the down horizontal vane
positions (2) – (5). To prevent this, the
horizontal vane automatically moves
to position (1) after 30 minutes to 1
hour of air conditioner operation. To
return to the previous setting, press
the
button on the remote
controller again to select the position.
After approximately 30
minutes to 1 hour
When air comes out from upper air outlet, down position (4) is set.
However, when air comes out from upper and lower air outlets, upper position
(2) is set.
The horizontal vane operates as described below to prevent air from blowing directly on individuals in the room.
When heating operation starts or during defrosting operation, the air flow is
reduced and the upper air flow direction
is set to prevent cold air from blowing
directly on individuals in the room.
Vertical air flow
(Does not blow
directly on
individuals in room)
The horizontal vane moves to the set
position once warm air blows from the
indoor unit.
To change the horizontal direction of the air flow, move the vertical vane manually.
■
• Change the direction of the vertical vane (upper), holding the tabs on the vane.
• Adjust the vane before operation starts.
Since the horizontal vane moves automatically, your fingers may be caught.
• Change the direction of the vertical vane (lower), holding
the vane.
Always adjust the vane when the damper is open. Opening the
damper forcibly with hands can cause damage or malfunction.
AIR OUTLET SELECTION
With this function, air comes out simultaneously from the upper and lower air outlets so that the room
can be cooled or heated effectively. This function is set using the switch behind the front grille of the
indoor unit. (This function is available in cooling and heating operation.)
How to set to blow out air from the upper
and lower air outlets:
Set the air outlet selection switch to .
■
How to set to blow out air from the upper
air outlet only:
Set the air outlet selection switch to .
■
(5)
When positions
(2)–(5) are
selected
Select (SWING) for
swing operation.
■ The horizontal vane
SWING
NOTE:
• Adjust the AIR FLOW direction using the remote controller. Moving the horizontal vane manually can cause trouble.
• When the operation mode changes in “
in each mode.
• The horizontal vane automatically moves in certain intervals to determine its position, and then it returns to the set
position.
moves intermittently
so that the air does
not blow directly on
an individual in the
room for too long.
The horizontal vane moves
intermittently between positions (1)
and (4).
The horizontal vane stops for a brief
period at positions (1) and (4).
(AUTO)” mode, the horizontal vane is automatically changed to the position
Position (1)
The horizontal vane moves intermittently between positions (2) and (4).
The horizontal vane stops for a brief
period at positions (2) and (4).
Set air flow direction
8
Air blows out automatically from the upper and lower air outlets as shown in the table below.
NOTE:
Set the air outlet selection switch to the end. Otherwise, air outlet cannot be selected as intended.
Description of operation
Operation
Air
flow
Upper and lower air flow
Room temperature
Conditions
and set temperature
are different.
• Be sure to keep the area around the damper of the lower air outlet free of any objects. If any objects block the normal
operation of the damper, the left operation indicator lamp may blink.
COOL DRY HEAT
Upper air flow
Room temperature is
close to set temperature, or the air
conditioner has
operated for 1 hour.
Upper air flow only
Upper and lower air flow
Air flow temperature
is high.
Upper air flow
Air flow temperature
is low.
(During defrosting
operation, start of
operation, etc.)
Page 9
ECONO COOL OPERATION
i-save OPERATION
Use this operation when you want to be comfortable in COOL mode even with energy saved.
Perform the following operations while the unit is operating in the MANUAL COOL mode.
Press the
■
When the (ECONO COOL) operation is selected in COOL mode, the air
conditioner performs swing operation vertically in various cycle according to
the temperature of air conditioner.
Also SET TEMPERATURE is automatically set 2°C higher than in COOL mode.
ECONO COOL
button.
To release the ECONO COOL operation:
Press the
■
○○○○○○○○○○○○○○○○○○○○○○○○○○○○○○○○
• When the button is pressed or the operation mode is changed during
• The
What is “ECONO COOL”?
Swing air flow (change of air flow) makes you feel cooler than constant air flow. So, even though the set temperature is
automatically set 2°C higher, it is possible to perform cooling operation with keeping comfort. As a result, energy can be saved.
ECONO COOL
button again.
the ECONO COOL operation, ECONO COOL operation is released.
FAN
button, the
are available.
TOO
TOO
COOL
WARM
or
button and ON/OFF timer (explained below)
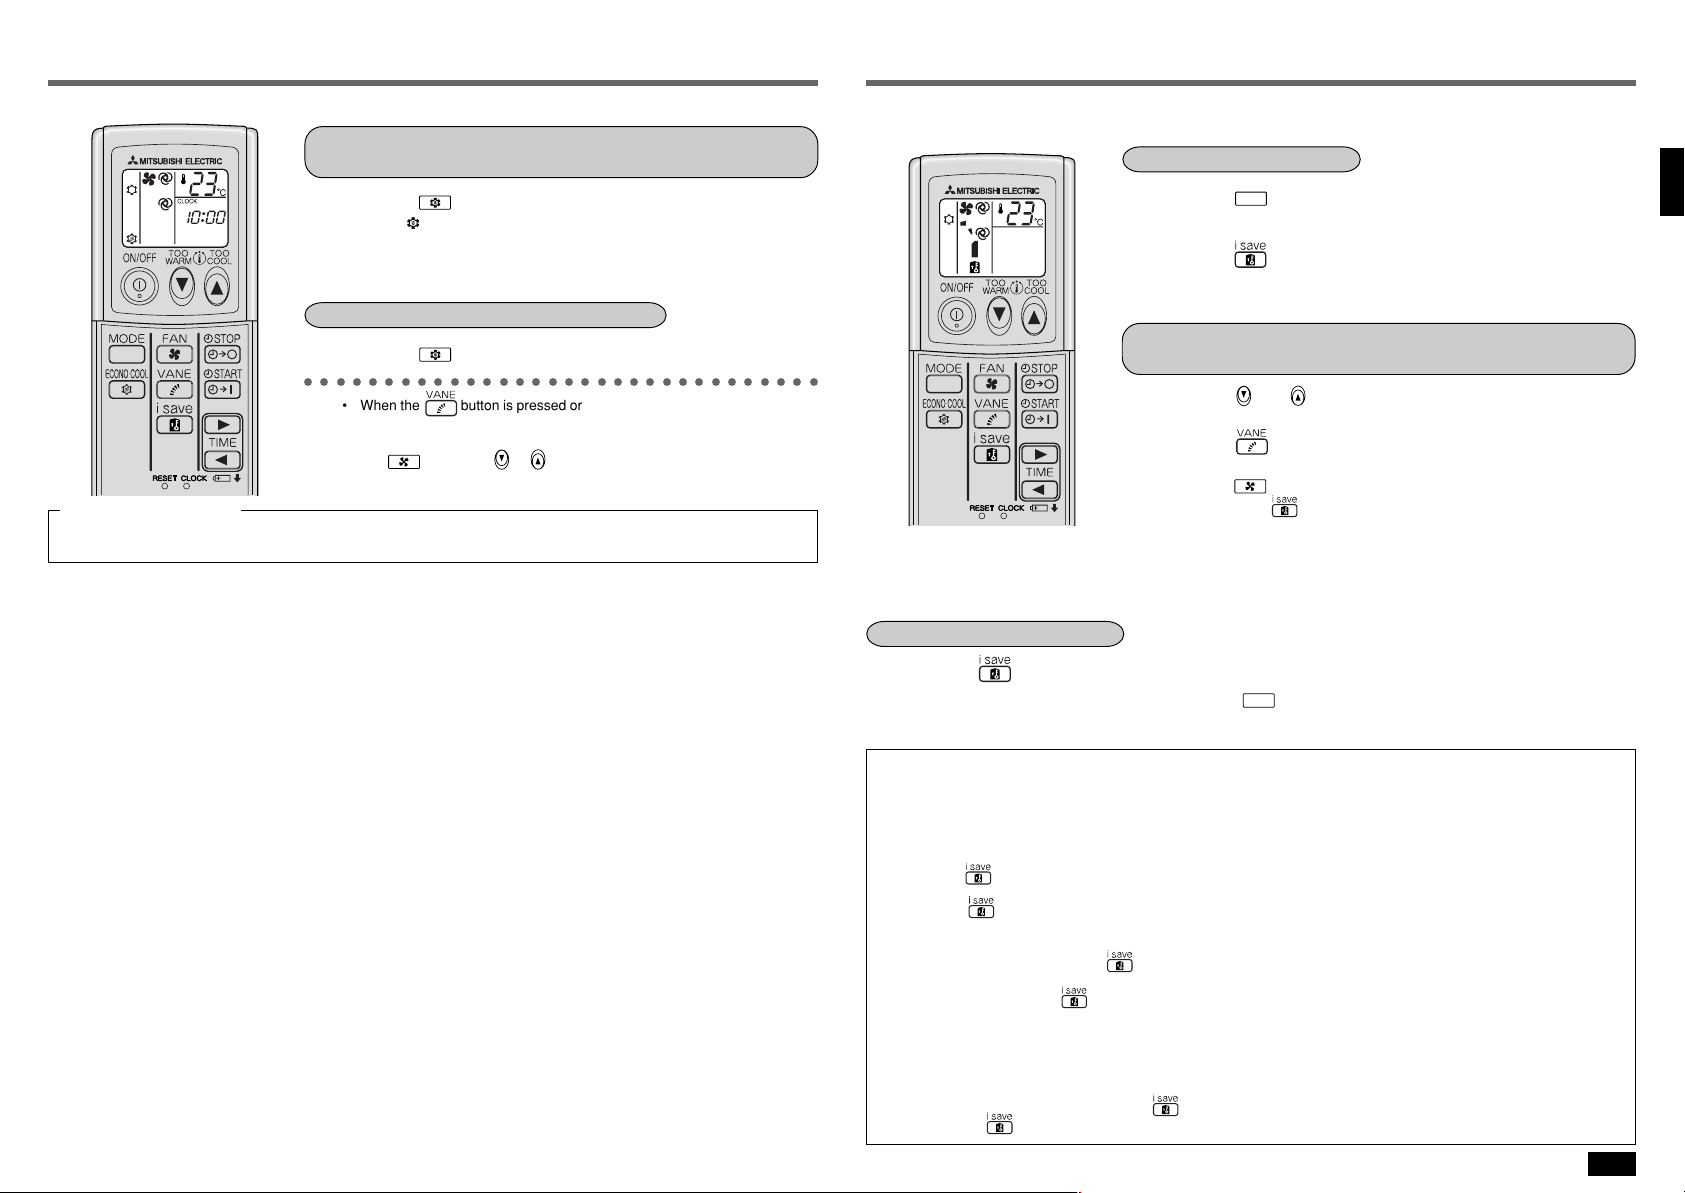
With this function, you can save the settings such as temperature, fan speed, and air flow direction for
both cooling and heating operation.
To start i-save operation:
1 Press the
i-save operation can only be set during cooling or heating operation.
MODE
button to select COOL or HEAT mode.
2 Press the button.
The operation indicator lamp on the right side of the indoor unit lights in orange.
To set the temperature, fan speed, and air flow direction
for i-save operation:
1 Press the
TOO
WARM
TOO
COOL
and
buttons to set the desired temperature.
2 Press the button to set the desired air flow direction.
3 Press the
The next time the button is pressed, the air conditioner starts operating
with the above settings for temperature, fan speed, and air flow direction. To
NOTE:
• ECONO COOL operation can be set together with COOL mode for i-save operation.
• Timer operation can be used even if i-save operation is set.
To cancel i-save operation:
Press the button again.
■
i-save operation can also be cancelled by pressing the
i-save operation has been successfully cancelled if the operation indicator lamp on the right side of the indoor unit turns
off or changes from orange to green.
change the settings, repeat steps 1 – 3.
FAN
button to set the desired fan speed.
MODE
button to change the operation mode.
Usage of i-save operation:
1 Using as a low-energy mode
i-save operation can be used as a low-energy mode by setting the temperature 2–3 °C warmer than the normal cooling
temperature or 2–3 °C cooler than the normal heating temperature. This is good to use if a room is unoccupied or while
you are sleeping.
■ Before leaving the room unoccupied:
· Press the
· When you return to the room, the temperature will not be too hot or too cold.
· Press the
and air flow direction for a comfortable, air-conditioned environment.
■ Before sleeping:
· Before going to sleep, press the
· While you are sleeping, the room will be air-conditioned using the low-energy mode until the following morning.
· In the morning, press the
ture, fan speed, and air flow direction. The set room temperature will be obtained quicker than if the air conditioner was
stopped while you were sleeping.
2 Using as a mode for frequent settings
If you often switch between two groups of settings for temperature, fan speed, and air flow direction in the same operation
mode, save one group of settings using the
by pressing the
button to switch to the low-energy mode before leaving the room.
button again and the air conditioner will operate with the normal settings for temperature, fan speed,
button, and then go to your bedroom.
button again, and the air conditioner will operate with the normal settings for tempera-
button. This will allow you to select the desired group of settings simply
button, avoiding the troublesome remote controller operations.
9
Page 10

TIMER OPERATION (ON/OFF TIMER)
WHEN THE AIR CONDITIONER IS NOT GOING TO BE
It is convenient to set the timer when you go to bed, when you get home, when you get up, etc.
How to set the ON timer
1 Press the
Each time the button is pressed, the ON timer mode
alternates between ON and OFF.
START
button during operation.
2 Set the time of the timer using the TIME but-
tons (Forward) and (Backward).
Each time the button is pressed, the set time
increases by 10 minutes; each time the
pressed, the set time decreases by 10 minutes.
To release the ON timer:
Press the
■
Programming timer operation
The ON timer and the OFF timer can be used in combination. The timer of the set time that is reached first will operate first.
(“ ” mark indicates the order of timer operations.)
• If the current time has not been set, the timer operation cannot be used.
NOTE:
If the main power is turned off or a power failure occurs while AUTO START/STOP timer is active, the timer setting is
cancelled. As these models are equipped with an auto restart function, the air conditioner starts operating with timer
cancelled at the same time that power is restored.
START
button.
button is
How to set the OFF timer
1 Press the
Each time the button is pressed, the OFF timer mode
alternates between ON and OFF.
STOP
button during operation.
2 Set the time of the timer using the TIME but-
tons (Forward) and (Backward).
Each time the button is pressed, the set time increases by 10 minutes; each time the
pressed, the set time decreases by 10 minutes.
To release the OFF timer:
■
Press the
STOP
button.
button is
USED FOR A LONG TIME
When it is not going to be used for a long
time:
1 Perform the FAN operation for 3 or 4 hours
to dry the inside of the air conditioner.
• To perform FAN operation, set the remote controller to the highest temperature in the MANUAL COOL
mode. (Refer to page 7.)
2 Turn off the breaker and/or disconnect the
power supply plug.
CAUTION:
Turn off the breaker or disconnect the power supply plug
when the air conditioner is not going to be used for a
long time.
Dirt may collect and this may cause a fire.
3 Remove the batteries from the remote con-
troller.
CAUTION:
To prevent liquid leakage, take out all batteries when the
remote controller is not going to be used for a long time.
MAINTENANCE
When the air conditioner is to be used
again:
1 Clean the air filter and install it in the indoor
unit.
(Refer to page 10 for cleaning instructions.)
2 Check that the air inlet and outlet of the in-
door/outdoor units are not blocked with any
obstacles.
3 Check that the earth is connected correctly.
CAUTION:
Earth the unit.
Do not connect the earth to a gas pipe, water pipe, lightning rod or the earth of a telephone. If the earthing is
incorrect, it may cause an electric shock.
10
Before starting maintenance
Turn off the breaker and/or disconnect the
■
power supply plug.
CAUTION:
When the unit is to be cleaned, switch it off and disconnect the power supply plug or turn off the breaker. Since
the fan rotates at high speed during operation, it may
cause an injury.
Cleaning the indoor unit
Clean the unit using a soft dry cloth.
■
• If the dirt is noticeable, wipe the unit with a cloth
soaked in a solution of mild detergent diluted in lukewarm water.
• Do not use gasoline, benzine, thinner, polishing powder, or insecticide. The unit may be damaged.
Page 11

CLEANING THE FRONT GRILLE
CLEANING THE CATECHIN AIR FILTER
Front grille
1 Push the 2 positions indicated by the arrows
until a click is heard and open the front grille.
2 Unhook the string which holds the grille.
3 Open the grille completely and then remove
it.
3 Wipe the front grille with a soft dry cloth or
wash it with water.
After washing the grille, wipe up the remaining water with a soft dry cloth and let it dry
out of direct sunlight.
• If the dirt is noticeable, wipe the front grille with a
cloth soaked in a solution of mild detergent diluted
in lukewarm water.
• Do not use gasoline, benzine, thinner, polishing
powder, or insecticide and do not wash the front
grille with a scrubbing brush or the hard surface of
a sponge.
• Do not soak the front grille in water/lukewarm water
longer than two hours and do not expose the grille
to direct sunlight, heat, or flames when drying it. The
grille may be deformed or discolored.
4 Close the grille following the removal
procedure in reverse.
Be sure to hook the string before closing the
grille.
Cleaning the catechin air filter (about once every 2 weeks)
1 Remove the catechin air filter.
Open the front grille
Catechin air filter
CAUTION:
When the catechin air filter is to be removed, do not touch
the metal parts of the indoor unit.
This may cause an injury.
3 After washing with water/lukewarm water, dry
the catechin air filter well in the shade.
• Do not expose the catechin air filter to direct sunlight or heat from a fire when drying it.
4 Install the catechin air filter.
Be sure to install its both ends into the tabs
as shown below.
2 Remove dirt from the catechin air filter us-
ing a vacuum cleaner or by washing the filter with water.
• Do not wash with scrubbing brush or hard surface
of sponge. Otherwise, the filter may deform.
• If the dirt is noticeable, wash the filter with a solution of mild detergent diluted in lukewarm water.
• If hot water (50 °C or more) is used, the filter may
be deformed.
Install.
5 Securely close the front grille.
CAUTION:
• Do not drop the front grille or pull it out forcibly.
The grille may be damaged.
○○○○○○○○○○○○○○○○○○○○○○○○○○○○○○○○○○○○○○○○○○○○○○○○○
What is “Catechin air filter”?
The air filter is dyed with a natural material, catechin, that is contained in tea. The catechin air filter deodorizes
odor and noxious gases such as formaldehyde, ammonia, and acetaldehyde. Moreover, it restraints the activity of
the viruses adhering to the filter.
11
Page 12

CLEANING THE
AIR CLEANING FILTER
REPLACEMENT OF THE AIR CLEANING FILTER
Cleaning the air cleaning filter (about once every 3 months)
1 Remove the catechin air filter.
Open the front grille
Catechin air filter
2 Remove the air cleaning filter.
Air cleaning filter
Catechin air filter
3 Soak the filter together with its frame in luke-
warm water and wash it.
■ If the dirt is noticeable, use a solution of mild detergent diluted in lukewarm water.
■ If hot water (50°C or more) is used, the filter may
be deformed.
■ Do not use a scrubbing brush or sponge. This may
damage the surface of the filter.
■ Do not use a chlorine detergent.
4 After rinsing with water/lukewarm water,
shake off the excess water and dry the filter
well in the shade.
■ Do not expose the filter to direct sunlight or heat
from a fire when drying it.
5 Attach the air cleaning filter. Fix the filter with
the tabs securely.
6 Install the catechin air filter. (Securely install
its tabs.)
Install.
7 Securely close the front grille.
When the capacity is lowered because of dirt, etc., it is necessary to replace the air cleaning filter.
Air cleaning filter replacement (about once every year)
1 Remove the catechin air filter.
Open the front grille
Catechin air filter
3 Attach a new air cleaning filter. Fix the filter
with the tabs securely.
4 Install the catechin air filter.
2 Remove the air cleaning filter.
Air cleaning filter
Catechin air filter
Be sure to install its both ends into the tabs
as shown below.
Install.
5 Securely close the front grille.
○○○○○○○○○○○○○○○○○○○○○○○○○○○○○○○○○○○○○○○○○○○○○○○○○
Air cleaning filter
• If the air cleaning filter is clogged, it may lower the unit’s capacity or cause condensation at the air outlet.
• The air cleaning filter is disposable. The standard usable term is about 1 year.
Optional parts Optional parts are available from your local dealer.
Name of parts
Parts number MAC-415FT-E
AIR CLEANING FILTER
(Anti-Allergy Enzyme Filter)
12
Page 13

BEFORE CONTACTING THE SERVICE REPRE-
WHEN YOU THINK THAT TROUBLE HAS OCCURRED
SENTATIVE, CHECK THE FOLLOWING AGAIN
Question
The air conditioner cannot
be operated.
The room cannot be cooled
or heated sufficiently.
The air from the indoor unit
smells strange.
The display on the remote
controller does not appear
or it is dim. The indoor unit
does not respond to the remote control signal.
When a power failure occurs.
Even if the above items are checked, when the air conditioner does not
recover from the trouble, stop using the air conditioner and consult your
dealer.
In the following cases, stop using the air conditioner and consult your dealer.
• When water leaks or drops from the indoor unit.
• When the left operation indicator lamp blinks.
• When the breaker trips frequently.
• The remote control signal may not be received in a room where an electronic
ON/OFF type fluorescent lamp (inverter-type fluorescent lamp, etc.) is used.
• Operation of the air conditioner may interfere with radio or TV reception in
areas where the reception is weak. An amplifier may be required for the affected device.
• When thunder is heard, stop operation and disconnect the power supply plug
or turn off the breaker. Otherwise, the electrical parts may be damaged.
• Is the breaker turned on?
• Is the fuse blown?
• Is the ON timer set? (Page 10)
• Is there anything that block the normal opera-
tion of the damper? (Page 8)
• Is the temperature setting correct? (Page 7)
• Is the filter clean? (Page 11)
• Are there any obstacles blocking the air inlet or
outlet of the indoor or outdoor unit?
• Is a window or door open?
• Is the filter clean? (Page 11, 12)
• Are the batteries exhausted? (Page 5)
• Is the polarity (+, -) of the batteries correct?
(Page 5)
• Are any buttons on the remote controller of other
electric appliances being pressed?
• Does the air conditioner start operating again?
If the air conditioner had operated before the
power failure, as these models are equipped with
an auto restart function, the air conditioner
should start operating again. (Refer to Description of “AUTO RESTART FUNCTION” on page
6.)
Check points
Question
The air conditioner cannot
be operated for about 3 minutes when restarted.
Cracking sound is heard.
The air from the indoor unit
smells strange.
The fan of the outdoor unit
does not rotate even though
the compressor is running.
Even if the fan starts to rotate, it stops soon.
The sound of water flowing
is heard.
The sound as burbling is
heard.
The room cannot be cooled
sufficiently.
Mist is discharged from the
air outlet of the indoor unit.
Mechanical sound is heard
from the indoor unit.
The swing operation of the
HORIZONTAL VANE is suspended for about 15 seconds, then restarted.
Answer (not a malfunction)
• This protects the air conditioner according to instructions from the microprocessor. Please wait.
• This sound is generated by the expansion/contraction of the front panel, etc. due to change in
temperature.
• The air conditioner may suck in an odor adhering to the wall, carpet, furniture, cloth, etc. and
blow it out with the air.
• When the outside temperature is low, the fan
may not operate to maintain sufficient cooling
capacity.
• This is the sound of refrigerant flowing inside
the air conditioner.
• This is the sound of condensed water flowing in
the heat exchanger.
• This is the sound of the heat exchanger defrosting.
• This sound is heard when the outside air is absorbed from the drain hose in turning on the
range hood or the ventilation fan and that makes
water flowing in the drain hose spout out.
This sound is also heard when the outside air
blows into the drain hose in case the outside
wind is strong.
• When a ventilation fan or a gas cooker is used
in a room, the cooling load increases, resulting
in an insufficient cooling effect.
• When the outside air temperature is high, the
cooling effect may not be sufficient.
• The cool air from the air conditioner rapidly cools
moisture in the air inside the room, and it turns
into mist.
• This is the switching sound in turning on/off the
fan or the compressor.
• This is for the swing operation of the HORIZONTAL VANE to be performed normally.
Question
The air flow direction
changes during operation.
The direction of the horizontal vane cannot be adjusted with the remote controller.
Water leaks from the outdoor unit.
White smoke is discharged
from the outdoor unit.
Air does not blow out soon
in the heating operation.
The operation is stopped
for about 10 minutes in the
heating operation.
Hissing sound is sometimes heard.
The room cannot be heated
sufficiently.
In a multi-unit system, the indoor unit which is not operating becomes warm and a
sound, similar to water flowing, is heard from the unit.
The air conditioner starts
the operation only with the
main power turned on,
though you do not operate
the unit with the remote
controller.
The damper opens and
closes automatically.
Answer (not a malfunction)
• When the air conditioner is operated in COOL
or DRY mode, if the operation continues with air
blowing down for 1 hour, the direction of the air
flow is automatically set to position (1) to prevent condensed water from dropping.
• In the heating operation, if the air flow temperature is too low or when defrosting is being done,
the horizontal vane position is automatically set
to horizontal.
• The horizontal vane automatically moves in certain intervals to determine its position, and then
it returns to the set position.
• During COOL and DRY operations, pipe or pipe
connecting sections are cooled and this causes
water to condense.
• In the heating operation, the defrosting operation makes water frozen on the outdoor unit melt
and drip down.
• In the heating operation, water condensed on
the heat exchanger drips down.
• In the heating operation, vapor generated by the
defrosting operation looks like white smoke.
• Please wait as the air conditioner is preparing
to blow out warm air.
• Defrosting of the outdoor unit is being done (Defrosting operation).
Since this is completed in 10 minutes, please
wait. (When the external temperature is too low
and humidity is too high, frost is formed.)
• This is the sound when the flow of refrigerant
inside the air conditioner is switched.
• When the outside air temperature is low, the
heating effect may not be sufficient.
• A small amount of refrigerant continues to flow
into the indoor unit even though it is not operating.
• These models are equipped with an auto restart
function. When the main power is turned off without stopping the air conditioner with the remote
controller and is turned on again, the air conditioner will start operation automatically in the
same mode as the one set with the remote controller just before the shutoff of the main power.
• The damper is automatically controlled by a microcomputer according to the air flow temperature and operation time of the air conditioner.
13
Page 14

INSTALLATION, RELOCATION AND INSPECTION
Installation place
Avoid installing the air conditioner in the following places.
• Where flammable gas could leak.
CAUTION:
Do not install the unit where flammable gas could leak.
If gas leaks and collects around the unit, it may cause
an explosion.
• Where there is much machine oil.
• Salty places such as the seaside.
• Where sulfide gas is generated such as a hot spring.
• Where oil is splashed or where the area is filled with
oily smoke.
• Where there is high-frequency or wireless equipment.
To prevent the effects
of a fluorescent lamp,
keep as far apart as
possible.
Cordless
phone or
Portable
phone
1 m
or more
1 m or more
The installation location of the outdoor unit should be
at least 3 m away from the antennas for TV sets,
radios, etc. In areas where the reception is weak, provide greater space between the outdoor unit and the
Inverter-type
antenna of the affected device if operation of the air
fluorescent lamp
conditioner interferes with radio or TV reception.
Keep a space
to prevent the
picture
distortion or
the noise.
Radio
100 mm or
more
TV
3 m
or more
Wellventilated
dry place
200 mm or
more
wall, etc.
WARNING:
If the air conditioner operates but does not cool or heat (depending on model) the room, consult your dealer since
there may be a refrigerant leak. Be sure to ask the service representative whether there is refrigerant leakage or not
when repairs are carried out.
The refrigerant charged in the air conditioner is safe. Refrigerant normally does not leak, however, if refrigerant gas
leaks indoors, and comes into contact with the fire of a fan heater, space heater, stove, etc., harmful substances will
be generated.
Electrical work
• Provide an exclusive circuit for the power supply of the air conditioner.
• Be sure to observe the breaker capacity.
WARNING:
• The customer should not install this unit.
If installation is done incorrectly, it may cause a fire, an electric shock, or injury from the unit falling, water leaking,
etc.
• Do not use intermediate connection of the power supply cord or the extension cord and do not connect many
devices to one AC outlet.
A fire or an electric shock may result from poor contact, poor insulation, exceeding the permissible current, etc.
Consult your dealer.
CAUTION:
• Earth the unit.
Do not connect the earth to a gas pipe, water pipe, lightning rod or the earth of a telephone. If the earthing is
incorrect, it may cause an electric shock.
• Install an earth leakage breaker depending on the place where the air conditioner is to be installed (humid places,
etc.).
If the earth leakage breaker is not installed, it may cause an electric shock.
Inspection and maintenance
• When the air conditioner is used for several seasons, the capacity may be lowered due to dirt inside the unit.
• Depending on the condition, an odor may be generated or dehumidified water may not drain out smoothly due to dirt,
dust, etc.
• It is recommended that the unit be inspected and maintained (charged) by specialist in addition to normal maintenance.
Consult your dealer.
Operating sound considerations
• Do not put an object around the air outlet of the outdoor unit. This may lower the capacity or increase the volume of the
operating sound.
• If an abnormal sound is heard during operation, consult your dealer.
Relocation
• When the air conditioner is to be removed or re-installed because of rebuilding, moving, etc., special techniques and
work are required.
WARNING:
Repairs or relocation should not be done by the customer.
If this is done incorrectly, it may cause a fire, an electric shock, or an injury from the unit falling, water leaking, etc.
Consult your dealer.
Disposal
To dispose of this product, consult your dealer.
If you have any questions, consult your dealer.
SPECIFICATIONS
Model Indoor
Function
Power supply
Capacity kW
Input kW
Weight Indoor kg
Refrigerant filling
capacity (R410A)
IP code
Permissible
excessive
operating
pressure
Noise level
14
Set name
Outdoor
Outdoor kg
kg
Indoor
Outdoor
LP ps MPa
HP ps MPa
Indoor (Super High/
High/Med./Low)
dB(A)
Outdoor dB(A)
MFZ-KA25VA(H) MFZ-KA35VA(H) MFZ-KA50VA
MFZ-KA25VA MFZ-KA35VA MFZ-KA50VA
SUZ-KA25VA(H) SUZ-KA35VA(H) SUZ-KA50VA
Cooling Heating Cooling Heating Cooling Heating
~ /N, 230V, 50Hz
2.5 3.4 3.5 4.0 4.8 6.0
0.58 0.835 1.09 1.10 1.55 1.86
14
33 37 53
0.90 1.05 1.60
IP 20
IP 24
1.64
4.15
37/32/27/22 37/32/27/22 38/33/28/23 38/33/28/25 43/39/35/32 44/39/35/32
46 47 48 53 55
NOTE:
1. Rating condition
Cooling — Indoor: 27°C DB, 19°C WB
Heating — Indoor: 20°C DB
Outdoor: 35°C DB
Outdoor: 7°C DB, 6°C WB
2. Guaranteed operating range
Indoor
Cooling
Upper limit
Lower limit
Upper limit
Heating
Lower limit
32°C DB 46°C DB 43°C DB 46°C DB
23°C WB ———
21°C DB -10°C DB -10°C DB -10°C DB
15°C WB ———
27°C DB 24°C DB 24°C DB 24°C DB
— 18°C WB 18°C WB 18°C WB
20°C DB -10°C DB -10°C DB -20°C DB
— -11°C WB -11°C WB -21°C WB
SUZ-KA25/35VA SUZ-KA50VA SUZ-KA25/35VAH
Outdoor
Page 15

СОДЕРЖАНИЕ
МЕРЫ ПРЕДОСТОРОЖНОСТИ ........................................................................................................................................ 145
НАЗВАНИЯ ОТДЕЛЬНЫХ ЧАСТЕЙ ПРИБОРА ................................................................................................................. 146
ПОДГОТОВКА ПРИБОРА К ЭКСПЛУАТАЦИИ ...................................................................................................................147
АВТОМАТИЧЕСКОЕ ПЕРЕКЛЮЧЕНИЕ РЕЖИМОВ ... РАБОТА В РЕЖИМЕ AUTO ...................................................... 149
РУЧНОЕ УПРАВЛЕНИЕ РЕЖИМАМИ (ОХЛАЖДЕНИЕ, СУШКА, ОБОГРЕВ) ................................................................ 150
РЕГУЛИРОВАНИЕ СКОРОСТИ И НАПРАВЛЕНИЯ ВОЗДУШНОГО ПОТОКА ............................................................... 150
ВЫБОР ВЫХОДНОГО ВОЗДУШНОГО ОТВЕРСТИЯ ....................................................................................................... 151
ФУНКЦИЯ ЭНЕРГОСБЕРЕЖЕНИЯ ПРИ ОХЛАЖДЕНИИ (ECONO COOL) ................................................................... 152
РАБОТА в режиме “i-save” .................................................................................................................................................. 152
РАБОТА С ИСПОЛЬЗОВАНИЕМ ТАЙМЕРА (ТАЙМЕР ВКЛЮЧЕНИЯ/ВЫКЛЮЧЕНИЯ) .................................................153
КОГДА ВЫ НЕ СОБИРАЕТЕСЬ ПОЛЬЗОВАТЬСЯ КОНДИЦИОНЕРОМ ДЛИТЕЛЬНОЕ ВРЕМЯ ..................................153
УХОД ЗА ПРИБОРОМ.........................................................................................................................................................153
ОЧИСТКА ПЕРЕДНЕЙ РЕШЕТКИ ..................................................................................................................................... 154
ОЧИСТКА КАТЕХИНОВОГО ВОЗДУШНОГО ФИЛЬТРА .................................................................................................. 154
ОЧИСТКА ФИЛЬТРА ОЧИСТКИ ВОЗДУХА ...................................................................................................................... 155
ЗАМЕНА ФИЛЬТРА ОЧИСТКИ ВОЗДУХА .........................................................................................................................155
ПЕРЕД ОБРАЩЕНИЕМ В СЕРВИСНУЮ СЛУЖБУ ЕЩЕ РАЗ ПРОВЕРЬТЕ СЛЕДУЮЩЕЕ ..........................................156
ЕСЛИ ВАМ КАЖЕТСЯ, ЧТО ПРИБОР НЕИСПРАВЕН ..................................................................................................... 156
УСТАНОВКА, ПЕРЕМЕЩЕНИЕ И ОСМОТР ПРИБОРА ................................................................................................... 157
ТЕХНИЧЕСКИЕ ХАРАКТЕРИСТИКИ .................................................................................................................................157
МЕРЫ ПРЕДОСТОРОЖНОСТИ
•
Ввиду того, что в конструкции данного изделия использованы вращающиеся детали, а также детали, способные привести к
поражению электротоком, обязательно прочитайте данный раздел “Меры предосторожности” перед использованием прибора.
• Ввиду того, что предостерегающая информация, содержащаяся в данном разделе, касается Вашей
безопасности, обязательно следуйте изложенным инструкциям
Символы и их значения
ПРЕДУПРЕЖДЕНИЕ:
ОСТОРОЖНО: Неправильное обращение с прибором представляет из себя серьезную угрозу для
Значение символики, используемой в тексте руководства
• Цвет этикетки, наклеенной на прибор, указан в скобках.
: Строго воспрещается.
: Тщательно следуйте инструкциям.
(
Черный
) : Запрещается вставлять пальцы или палки и т.д.
(
Черный
) : Запрещается вставать на внутренний/наружный прибор или ставить на них любые предметы.
: Опасность поражения электротоком. Будьте осторожны.
: Обязательно отсоедините вилку шнура питания от электророзетки.
: Обязательно отключите электропитание.
• После прочтения, храните данное руководство вместе с руководством по установке прибора в
легкодоступном месте и пользуйтесь ими для справок.
Расположение символики
безопасности на приборе
Неправильное обращение с прибором представляет из себя серьезную угрозу для здоровья и с большой
степенью вероятности может привести к смертельному исходу или получению тяжелой травмы и т.п.
здоровья в зависимости от конкретных обстоятельств.
КОРПУС
ПЕРЕДНЯЯ РЕШЕТКА
КОРПУС
ВЫХОДНЫЕ
ВОЗДУШНЫЕ
ОТВЕРСТИЯ
Данный кондиционер НЕ ПРЕДНАЗНАЧЕН для использования детьми, престарелыми или больными людьми без присмотра
•
ПРЕДУПРЕЖДЕНИЕ
Запрещается использование промежуточного соединения в шнуре питания или использование удлинителя.
Запрещается подсоединение нескольких электроприборов к одному источнику переменного тока.
• Слабые соединения, недостаточная изоляция, подключение к сети более высокого напряжения
и т.д. могут привести к пожару или поражению электротоком.
Запрещается резать или каким-либо образом модернизировать шнур питания.
•
Запрещается ставить тяжелые предметы на шнур питания, резать его или каким-либо образом
модернизировать. Это может повредить шнур питания и привести к пожару или поражению электротоком.
Запрещается включение/выключение прерывателя тока в сети электропитания или
отсоединение/подсоединение вилки шнура питания во время работы прибора.
• Это может привести к пожару вследствие образования искры и т.д.
• Обязательно выключайте прерыватель тока в сети или отсоединяйте вилку шнура питания от
розетки после выключения внутреннего прибора с помощью пульта дистанционного управления.
Защищайте кожу от длительного воздействия холодного воздуха.
• Это вредно для Вашего здоровья.
Установка данного прибора пользователем запрещается.
•
Неправильное выполнение ремонта и перемещения может привести к пожару, поражению электротоком,
получению травмы вследствие падения прибора, утечки жидкости и т.д. Обращайтесь к Вашему дилеру.
Запрещается вставлять пальцы, палки и т.д. в отверстия воздухозабора/выходные воздушные отверстия.
•
Ввиду того, что лопасти вентилятора вращаются с большой скоростью, это может привести к травме.
•
Необходимо внимательно присматривать за маленькими детьми и следить за тем, чтобы они не играли с кондиционером.
При появлении любых ненормальных признаков (запах гари и т.д.) немедленно остановите
кондиционер и отсоедините шнур питания от сети или выключите прерыватель тока в сети.
• Продолжение эксплуатации прибора в аномальных условиях может привести к пожару, поломке
и т.д. В данном случае Вам необходимо обратиться к Вашему дилеру.
Самостоятельное выполнение ремонта и перемещение кондиционера пользователем запрещаются.
•
Неправильное выполнение ремонта и перемещения может привести к пожару, поражению электротоком,
получению травмы вследствие падения прибора, утечки жидкости и т.д. Обращайтесь к Вашему дилеру.
•
Если шнур питания повреждён, во избежание риска производитель или его сервисный агент должны заменить его.
ОСТОРОЖНО
При замене воздушного фильтра не прикасайтесь к металлическим деталям внутреннего прибора.
• Это может привести к травме.
Не трогайте руками воздухозаборник или алюминиевые ребра наружной секции.
• Это может привести к травме.
Запрещается использовать инсектициды или воспламеняющиеся аэрозоли.
• Это может привести к пожару или деформации корпуса прибора.
Оберегайте домашних животных и растения от прямого воздействия воздушного потока.
• Это вредно для здоровья животных и растений.
Запрещается оставлять данный прибор на поврежденном установочном основании.
• Возможно падение прибора и нанесение травмы.
При проведении обслуживания кониционера запрещается вставать на неустойчивые конструкции, скамейки и т.д.
• В случае падения это может привести к травме и т.д.
Запрещается тянуть за шнур питания.
• Может произойти разрыв сердечника провода, и это может привести к пожару.
Запрещается заряжать и разбирать батарейки и бросать их в огонь.
• Это может вызвать утечку жидкости, пожар или взрыв батарейки.
Запрещается длительная эксплуатация прибора в условиях высокой влажности, например,
в помещении с открытым окном или дверью.
•
Если прибор длительное время работает в режиме охлаждения в помещении с высокой влажностью (80% отн. влажности
или выше), возможно капание влаги, сконденсировавшейся в кондиционере. Это может повредить мебель и т.д.
Запрещается эксплуатация прибора в режиме охлаждения в условиях низкой температуры наружного воздуха (менее -10°C).
•
В случае эксплуатации прибора в режиме охлаждения в условиях низкой температуры наружного воздуха (менее
-10°C) возможно капание влаги, сконденсировавшейся в кондиционере. Это может повредить мебель и т.д.
.
145
Page 16

МЕРЫ ПРЕДОСТОРОЖНОСТИ НАЗВАНИЯ ОТДЕЛЬНЫХ ЧАСТЕЙ ПРИБОРА
ОСТОРОЖНО
Запрещается использование прибора не по назначению.
• Запрещается использовать данный кондиционер в целях хранения точных приборов, продуктов
питания, животных, растений или предметов искусства.
Это может неблагоприятно сказаться на их качестве и т.д.
Запрещается ставить печки или подобное оборудование в зоне прямого воздействия воздушного потока.
• Это может привести к неполному сгоранию горючих веществ.
Перед чисткой прибора выключите его и отсоедините вилку шнура питания или выключите
прерыватель тока в электросети.
•
Ввиду того, что лопасти вентилятора вращаются с большой скоростью, это может привести к травме.
Если Вы не собираетесь пользоваться кондиционером длительное время, отсоедините вилку
шнура питания от розетки или выключите прерыватель тока в сети.
• В противном случае возможно скопление грязи, и это может привести к пожару.
При замене батареек заменяйте 2 старые батарейки на новые батарейки одного типа.
• Использование старой батарейки вместе с новой может вызвать генерирование тепла, утечку
жидкости или взрыв батарейки.
При попадании жидкости из батареек на кожу или одежду, тщательно промойте их в чистой воде.
•
При попадании жидкости из батареек в глаза, тщательно промойте их в чистой воде и немедленно обратитесь к врачу.
Проветривайте помещение, в котором прибор используется одновременно с печкой или
подобным оборудованием.
• Это может привести к нехватке кислорода.
Запрещается прикасаться к выключателям мокрыми руками.
• Это может привести к поражению электротоком.
Запрещается мыть кондиционер воздуха водой.
• Вода может попасть внутрь прибора и повредить изоляцию. Это может привести к поражению
электротоком.
Запрещается наступать, садиться или ставить какие-либо предметы на внутренний/наружный приборы.
•
В случае Вашего падения или падения постороннего предмета это может привести к травме и т.д.
При установке прибора
ПРЕДУПРЕЖДЕНИЕ
• Для установки кондиционера воздуха обратитесь к Вашему дилеру.
ОСТОРОЖНО
Запрещается установка прибора в местах, где возможна утечка воспламеняющегося газа.
• При утечке и скоплении воспламеняющегося газа рядом с прибором может произойти взрыв.
Заземлите прибор.
• Запрещается подсоединять провода заземления к газовым и водопроводным трубам,
громоотводам или к кабелю заземления телефонной сети. Неправильное заземление прибора
может привести к поражению электротоком.
В зависимости от места установки кондиционера установите прерыватель утечки тока на
землю (места с повышенной влажностью и т.д.).
• Если прерыватель утечки тока на землю не установлен, возможно поражение электротоком.
Обеспечьте надлежащее дренирование влаги из кондиционера.
• При неправильно выполненнной проводке дренажной системы возможно капание воды из
прибора. Это может повредить мебель.
Внутренний прибор
Вертикальная заслонка
Выходные воздушные отверстия
Горизонтальная заслонка
Катехиновый воздушный фильтр
Фильтр очистки воздуха (Противоаллергенный
Энзимный Фильтр, синий гофрированного типа)
Демпфер
Выходные воздушные отверстия
Вертикальная заслонка
Воздухозаборное отверстие
Секция дисплея и эксплуатации (При открытой передней решетке)
Индикаторная лампочка работы
Кнопка аварийного управления
кондиционером
Селекторный переключатель выходного
воздушного отверстия
Наружный прибор
SUZ-KA25/35VA(H) SUZ-KA50VA
Воздухозаборные отверстия
(сзади и сбоку)
Трубы
Дренажный шланг
Выходные
воздушные
отверстия
Выходное
дренажное
отверстие
Передняя решетка
Кожух вентилятора
Пульт
дистанционного
управления
Зона приема
сигналов с пульта
дистанционного
управления
Воздухозаборные отверстия
(сзади и сбоку)
Трубы
Дренажный шланг
Выходные
воздушные
отверстия
Drain outlet
146
Page 17

НАЗВАНИЯ ОТДЕЛЬНЫХ ЧАСТЕЙ ПРИБОРА
ПОДГОТОВКА ПРИБОРА К ЭКСПЛУАТАЦИИ
Пульт дистанционного управления
Излучатель сигналов
Сектор дисплея
Кнопка ON/OFF
(работа/останов)
Сдвиньте переднюю крышку.
(На данной диаграмме представлен общий вид пульта дистанционного управления.)
(This diagram shows an overall view.)
(This diagram shows an overall view.)
Кнопки регулирования
температуры
Функция автозапуска
Кондиционеры данных моделей оснащены функцией автозапуска. Если Вы не хотите
■
пользоваться этой функцией, обратитесь к представителю сервисной службы, так как
требуется изменить настройки данного прибора.
Что такое функция автозапуска ...
Когда управление внутренним прибором производится с пульта дистанционного управления, то рабочий режим,
заданная температура и скорость вентилятора вносятся в память прибора. Если произошел сбой питания или
электропитание прибора было выключено во время его работы, функция автозапуска автоматически настраивает
прибор на работу в том же режиме, который был задан с помощью пульта дистанционного управления до момента
отключения электропитания. (Более подробную информацию см. на стр. 149.)
Наружный прибор
Вставьте вилку шнура питания в розетку и/или включите прерыватель тока в электросети.
■
ПРЕДУПРЕЖДЕНИЕ:
Удалите грязь с вилки шнура питания и вставляйте вилку до упора.
Налипание грязи на вилку или неплотное введение вилки в розетку может вызвать пожар или поражение
электротоком.
Пульт дистанционного управления
Пользуйтесь только тем пультом дистанционного управления, который был поставлен с
■
прибором. Не используйте другие пульты дистанционного управления.
Кнопка регулирования
скорости вентилятора
Кнопка выбора рабочего режима
Кнопка ECONO COOL
Кнопка RESET (сброс)
Кнопка энергосбережения “i save”
Кнопка таймера выключения
Кнопка таймера включения
Кнопки TIME (установка времени)
Кнопка вперед
Кнопка назад
Кнопка CLOCK (настройка часов)
Кнопка регулирования
положения заслонок
147
Page 18

ПОДГОТОВКА ПРИБОРА К ЭКСПЛУАТАЦИИ
Пульт дистанционного управления
Как вставить батарейки и установить текущее время
1
Снимите переднюю крышку и вставьте
батарейки. Затем установите крышку на место.
Первым вставляйте конец батарейки с
отрицательной полярностью. Следите за
соблюдением полярности.
Первым вставляйте конец
батарейки с отрицательной
полярностью.
2 Нажмите кнопку RESET (сброс).
Нажмите
остроконечной
палочкой.
• Если не нажать кнопку RESET (сброс),
кондиционер может работать неправильно.
•
Не нажимайте кнопку RESET (сброс) слишком сильно.
3 Нажмите кнопку настройки часов CLOCK.
Нажмите
остроконечной
палочкой.
4
Нажатием кнопок TIME SET (установки
времени) (Вперед) (часы) и (Назад)
(минуты) установите текущее время.
•
При каждом нажатии кнопки установленное
время увеличивается на 1 минуту, а при каждом
нажатии кнопки
• Более продолжительное нажатие этих кнопок
приводит к увеличению/уменьшению
установленного времени на 10 минут.
уменьшается на 1 минуту.
5 Еще раз нажмите кнопку настройки часов
CLOCK и закройте переднюю крышку.
148
Правила обращения с пультом дистанционного управления
•
Дальность действия сигнала составляет приблизительно
6 метров, если пульт дистанционного управления
направлен на переднюю панель внутреннего прибора.
•
При нажатии кнопки на пульте дистанционного
управления внутренний прибор издает один или два
коротких тональных гудка. Если звукового сигнала не
слышно, еще раз нажмите кнопку.
•
Соблюдайте осторожность при обращении с пультом
дистанционного управления.
При падении пульта или при попадании внутрь воды, он
может выйти из строя.
При установке в настенном держателе и т.д.
• Установите держатель пульта дистанционного
управления в таком месте, где при нажатии
ON/OFF
кнопки
сигнала с пульта внутренним прибором.
Как устанавливать/снимать пульт дистанционного
управления из держателя
Установка : О пустите пульт дистанционного
Снятие : Поднимите его из держателя.
Держатель пульта
дистанционного управления
Батарейки сухого типа
■ Инструкции по замене батареек
В следующих случаях следует заменить батарейки
на новые щелочные батарейки (типа ААА):
· Когда внутренний прибор не реагирует на сигналы
с пульта дистанционного управления.
·
Когда потускнел дисплей на пульте дистанционного управления.
·
Когда, при нажатии кнопки на пульте дистанционного
управления, на экране сначала загораются и затем
немедленно исчезают все индикации дисплея.
Не пользуйтесь марганцевыми батарейками. Их
использование может вызвать неисправности в
работе пульта дистанционного управления.
• Срок действия щелочной батарейки составляет
приблизительно 1 год.
Однако батарейки с истекающим сроком годности
выходят из строя быстрее. Рекомендуемый
крайний срок использования батареек (год/месяц)
указывается на торце батарейки.
•
Для предотвращения утечки жидкости из батареек,
снимайте их из пульта дистанционного управления, если Вы
не собираетесь пользоваться пультом длительное время.
ОСТОРОЖНО:
При попадании жидкости из батареек на кожу или одежду,
тщательно промойте их в чистой воде.
При попадании жидкости из батареек в глаза, тщательно
промойте их в чистой воде и немедленно обратитесь к врачу.
• Не пользуйтесь перезаряжаемыми батарейками.
• Заменяйте 2 старые батарейки новыми
батарейками одного типа
• Утилизируйте старые батарейки в соответствии
с требованиями по охране окружающей среды.
слышен характерный звук приёма
управления в держатель.
.
Когда использование пульта дистанционного управления невозможно (аварийное управление кондиционером)
Когда на пульте дистанционного управления сели батарейки или в случае его неисправности, кнопка
EMERGENCY OPERATION (аварийное управление кондиционером) позволяет осуществлять аварийное
управление прибором.
1 Нажмите кнопку EMERGENCY OPERATION
(аварийное управление кондиционером).
• При последовательном нажатии кнопки
EMERGENCY OPERATION кондиционер
переключается в режим EMERGENCY COOL
MODE (аварийного охлаждения), затем в режим
EMERGENCY HEAT MODE (авaрийного обогрева)
и затем в режим STOP MODE (останов).
Однако, если кнопку EMERGENCY OPERATION
нажать один раз, кондиционер в течение 30
минут будет работать в режиме пробного
прогона, после чего работа перейдет в
EMERGENCY MODE (аварийный режим).
E.O.
SW
• Более подробная информация об аварийном
режиме EMERGENCY MODE приводится ниже.
Механизм управления температурой не
работает в течение 30 минут во время пробного
прогона, а прибор работает беспрерывно. Во
время пробного прогона скорость вентилятора
устанавливается на “High” (высокую), а через
30 минут переключается на “Medium”
(среднюю).
Рабочий режим
Заданная температура
Скорость вентилятора
Горизонтальная заслонка
• На приведенных ниже рисунках изображено,
как индикаторная лампочка работы,
расположенная на внутреннем приборе,
сигнализирует о рабочем режиме.
Индикаторная лампочка работы
АВАРИЙНОЕ
ОХЛАЖДЕНИЕ
АВАРИЙНЫЙ
ОБОГРЕВ
ОСТАНОВ
ОХЛАЖДЕНИЕ
24°C 24°C
Средняя Средняя
Авто Авто
ОБОГРЕВ
2 Для остановки режима аварийного
управления прибором нажмите кнопку
EMERGENCY OPERATION один раз (из
режима АВAРИЙНОГО ОБОГРЕВА) или
два раза (из режима АВАРИЙНОГО
ОХЛАЖДЕНИЯ).
Page 19

АВТОМАТИЧЕСКОЕ ПЕРЕКЛЮЧЕНИЕ РЕЖИМОВ ...
РАБОТА В РЕЖИМЕ AUTO
Система автоматического переключения между охлаждением и нагревом гарантирует простое
управление и круглогодичное кондиционирование воздуха.
После установки нужной температуры аппарат автоматически переключается между режимами
охлаждения и нагрева в зависимости от комнатной температуры. Кроме того, контроль скорости
вентилятора наружного блока обеспечивает охлаждение при температуре окружающей среды
ниже -10° C.
Чтобы выбрать режим AUTO:
1 Нажмите кнопкуe
2 Выберите режим (AUTO), нажав кнопку
При каждом нажатии данной кнопки рабочие режимы переключаются в
следующей последовательности:
→
(DRY - сушка) → (HEAT - обогрев)
Заданная температура также выводится на дисплее беспроводного пульта
дистанционного управления.
Для остановки работы прибора:
Нажмите кнопку
■
После того, как Вы один раз задали рабочий режим, при повторном
включении прибор будет включаться в ранее установленном режиме при
нажатии кнопки
○○○○○○○○○○○○○○○○○○○○○○○○○○○○○○○○○○○○○○○○○○○○○○○○○
Когда необходимо изменить заданную температуру:
■
• Нажмите кнопку
заданной температуры приблизительно на 1°С.
• Нажмите кнопку
заданной температуры приблизительно на 1°С.
Описание переключение режимов “AUTO CHANGEOVER”
(1) Начальный режим
1 При начале работы в режиме (AUTO) после отключения аппарата;
• Если комнатная температура выше установленной, то работа начинается в режиме COOL.
• Если комнатная температура равна или ниже установленной, то работа начинается в режиме HEAT.
(2) Изменение режима
1 Переключение режима COOL на режим HEAT происходит в том случае, если в течение 15 минут комнатная
температура будет на 2 градуса ниже установленной температуры.
2 Переключение режима HEAT на режим COOL происходит в том случае, если в течение 15 минут комнатная
температура на 2 градуса выше установленной температуры.
ПРИМЕЧАНИЯ:
Если два или более внутренних блоков объединены между собой, иногда может быть невозможно
переключить блок, работающий в автоматическом режиме
HEAT (Охлаждение ↔ Нагревание)), блок переходит в состояние ожидания. Подробные сведения о системах
из нескольких кондиционеров смотрите справа.
TOO
WARM
, чтобы снизить заданную температуру. Одно нажатие данной кнопки снижает значение
TOO
COOL
, чтобы повысить заданную температуру. Одно нажатие данной кнопки повышает значение
ON/OFF
.
MODE
(AUTO) → (COOL - охлаждение)
ON/OFF
.
ON/OFF
.
(AUTO), в другой режиме работы (COOL ↔
.
Описание функции автозапуска
• Эти приборы оборудованы функцией автозапуска. После включения питания кондиционер автоматически
начнет работать в режиме, который был установлен с помощью пульта дистанционного управления перед
отключением питания.
• Если прибор был выключен с помощью пульта дистанционного управления до отключения питания, он
останется выключенным даже после включения питания.
• Если аппарат находится в режиме “
не сохраняется в памяти. При отключении питания устройство определяет режим работы, исходя из начальной
комнатной температуры при перезапуске, и снова начинает работу.
AUTO” перед сбоем питания, то режим работы (COOL, DRY или HEAT)
Информация в отношении мультисистемных кондиционеров воздуха
Мультисистемный кондиционер воздуха позволяет подсоединять два или более внутренних прибора к одному
наружному прибору. В зависимости от мощности, два или более приборов могут работать одновременно.
• При попытке одновременной эксплуатации двух или более внутренних приборов (одного - в режиме охлаждения,
а второго - в режиме обогрева), подсоединенных к одному наружному прибору, выбирается рабочий режим,
начинающий работу раньше. Остальные внутренние приборы, начинающие работать позже, работать в заданных
режимах не смогут. Об их рабочем статусе просигнализирует соответствующая индикация. (См. приведенную
ниже таблицу индикатора режима работы.)
В данном случае пожалуйста установите все внутренние приборы на один и тот же рабочий режим.
• Когда внутренний прибор начинает работу во время операции размораживания наружного прибора, требуется
некоторое время (максимум 10 минут), прежде чем кондиционер начнет выдувать теплый воздух.
• При работе в режиме обогрева внутренний прибор, даже если он в данный момент и не работает, может
нагреваться. Также может быть слышен звук текущего в трубах хладагента. Это не является неисправностью.
Эти явления объясняются постоянным движением хладагента через внутренний прибор.
Индикация на внутреннем приборе
Индикатор работы, расположенный в правой части внутреннего прибора, сигнализирует о его рабочем статусе.
(Зеленый) :Горит
Operation Indicator
(Оранжевый) : Горит
(Зеленый) :Мигает
(Оранжевый) : Мигает
: Не горит
Индикаторная лампочка работы
Индикация
[Обычная работа]
[Работа в режиме “i-save”]
Рабочий статус
Данная индикация сигнализирует о том, что кондиционер
работает на достижение планируемой температуры. Пожалуйста
подождите, пока планируемая температура не будет достигнута.
Данная индикация сигнализирует о том, что температура
приближается к планируемой температуре.
Показывает состояние ожидания.
Сведения о многофункциональном кондиционере
приведены выше.
См. описание режима “i-save”.
Разница между планируемой температурой
и реальной температурой в помещении
Около 2°С или больше
Около 2°С или меньше
—
—
149
Page 20

РУЧНОЕ УПРАВЛЕНИЕ РЕЖИМАМИ
(ОХЛАЖДЕНИЕ, СУШКА, ОБОГРЕВ)
РЕГУЛИРОВАНИЕ СКОРОСТИ И НАПРАВЛЕНИЯ
ВОЗДУШНОГО ПОТОКА
Для выбора режимов COOL (охлаждение), DRY (сушка)
или HEAT (обогрев):
1 Нажмите кнопкуe
2 Выберите рабочий режим нажатием кнопки
При каждом нажатии данной кнопки рабочие режимы переключаются в
следующей последовательности:
→
(DRY - сушка) → (HEAT - обогрев)
ON/OFF
.
MODE
.
(AUTO) → (COOL - охлаждение)
Для остановки работы прибора:
ON/OFF
ON/OFF
.
.
Нажмите кнопку
■
После того, как Вы один раз задали рабочий режим, при повторном
включении прибор будет включаться в ранее установленном режиме при
нажатии кнопки
○○○○○○○○○○○○○○○○○○○○○○○○○○○○○○○○○○○○○○○○○○○○○○○○○
Когда необходимо изменить заданную температуру:
■
• Нажмите кнопку
заданной температуры приблизительно на 1°С.
• Нажмите кнопку
заданной температуры приблизительно на 1°С.
При работе в режиме COOL (охлаждение)
• При низкой температуре окружающей среды вентилятор наружного блока часто включается и выключается
или снижает скорость вращения для поддержания достаточной степени охлаждения.
При работе в режиме DRY (сушка)
• Регулирование температуры (заданной температуры) невозможно.
• При работе кондиционера в данном режиме температура помещения несколько понижается.
TOO
WARM
, чтобы снизить заданную температуру. Одно нажатие данной кнопки снижает значение
TOO
COOL
, чтобы повысить заданную температуру. Одно нажатие данной кнопки повышает значение
Вы можете по желанию выбрать скорость и направление ВОЗДУШНОГО ПОТОКА.
Для изменения скорости ВОЗДУШНОГО ПОТОКА нажмите кнопку
■
При каждом нажатии данной кнопки скорость вентилятора изменяется
в следующей последовательности:
→
(High - высокая) → (Oчень высокая) → (AUTO)
• Используйте установку
охлаждения/обогрева помещения.
• Если звук работающего кондиционера мешает Вам спать, используйте
установку
Для изменения направления ВОЗДУШНОГО ПОТОКА по
■
(Low - низкая).
(Low - низкая) → (Med. - средняя)
(Oчень высокая) для более быстрого
вертикали нажмите кнопку .
При каждом нажатии данной кнопки угол позиции горизонтальной
заслонки изменяется в следующей последовательности:
(3) → (4) → (5) → (SWING - КАЧАНИЕ) → (AUTO)
РАБОТА В РЕЖИМЕ SWING (качание)
Используйте работу в режиме качания для обеспечения равномерного
распределения подачи воздуха.
Рекомендуемый диапазон горизонтальной
заслонки для более эффективного
кондиционирования воздуха
Обычно рекомендуется использовать
положение
Используйте положение
режиме COOL (ОХЛАЖДЕНИЕ) или DRY
(СУШКА) и положения с
режиме HEAT (ОБОГРЕВ) при
осуществлении регулировки в
соответствии со своими требованиями.
(AUTO).
(1) или (2) в
(3) по (5) в
1
(1) → (2) →
COOL
DRY
2
3
4
5
HEAT
FAN
.
Подробная информация об индикации на внутреннем приборе приводится на странице 148.
■
Если кондиционер воздуха плохо охлаждает или обогревает…
В некоторых случаях когда скорость вентилятора установлена на Low (низкая) или AUTO (АВТО), кондиционер может
плохо охлаждать или обогревать воздух. В таком случае установите Med. (средняя) или высокую скорость вентилятора.
Измените скорость
вентилятора.
Скорость вентилятора:
Low или AUTO
Скорость вентилятора:
Med. (средняя) или Upper (повышенная)
150
Page 21

РЕГУЛИРОВАНИЕ СКОРОСТИ И НАПРАВЛЕНИЯ ВОЗДУШНОГО ПОТОКА
Движение горизонтальной заслонки
Когда использовать?
Выбирайте (АUТО) в
большинстве ситуаций.
■ Рекомендуемое
направление
потока воздуха
задается
автоматически.
■ Работа в режиме
AUTO (АВТО)
качания не
используется.
Выберите
направление потока
воздуха в
соответствии со
своими личными
предпочтениями.
(1)
■ Диапазон
отображаемый на
пульте
(2)
дистанционного
управления и
фактический
диапазон работы
(3)
горизонтальной
заслонки могут
отличаться.
■ Заслонка не
(4)
перемещается в
горизонтальное
положение в
(5)
режимах COOL
(ОХЛАЖДЕНИЕ) и
DRY (СУШКА).
Выберите (SWING)
для работы в режиме
качания.
■
Горизонтальная заслонка
непрерывно перемещается,
чтобы не обдувать
SWING (КАЧАНИЕ)
ПРИМЕЧАНИЕ:
• Отрегулируйте направление ВОЗДУШНОГО ПОТОКА с помощью пульта дистанционного управления.
Перемещение горизонтальной заслонки руками может привести к неисправности.
• При изменении режима работы в режиме “
переводится в нужное для каждого режима положение.
•Горизонтальная заслонка автоматически перемещается через определенные интервалы, чтобы определить свое
положение, затем возвращается в установленное положение.
находящихся в помещении
людей воздухом в течение
слишком продолжительного
времени.
COOL/DRY(охлаждение/сушка) HEAT (обогрев)
Установлено положение горизонтальной
заслонки (1).
Вертикальный поток воздуха (Не
подвергайте находящихся в помещении
людей прямому обдуву воздухом)
При непрерывной работе
кондиционера с использованием
нижних горизонтальных положений
заслонки (2)- (5), вода может
конденсироваться и капать с
горизонтальной заслонки. Для
предотвращения подобной ситуации,
горизонтальная заслонка
автоматически перемещается в
положение (1) по истечении от 30
минут до 1 часа работы кондиционера.
Для возврата к предыдущей
настройке, нажмите еще раз кнопку
на пульте дистанционного
управления для выбора положения.
Примерно по истечении
от 30 минут до 1 часа
При выборе
положений (2)-(5)
Горизонтальная заслонка
непрерывно перемещается между
положениями (1) и (4).
Горизонтальная заслонка
останавливается на короткое
время в положениях (1) и (4).
Положение (1)
(AUTO)” горизонтальная направляющая автоматически
Когда воздух выходит из верхнего
выходного воздушного отверстия,
устанавливается нижнее положение (4).
Однако при подаче воздуха из верхнего
и нижнего выходных отверстий
устанавливается верхнее положение (2).
Горизонтальная заслонка работает так,
как описано ниже, чтобы предотвратить
прямой обдув воздухом находящихся в
помещении людей.
При запуске работы в режиме
обогрева или в ходе размораживания,
поток воздуха уменьшается, и
устанавливается верхнее направление
потока воздуха, чтобы предотвратить
прямой обдув находящихся в
помещении людей холодным воздухом.
Вертикальный
поток воздуха
(Не подвергайте
находящихся в
помещении людей
прямому обдуву
воздухом)
Горизонтальная заслонка переместится
в положение установки, как только из
внутреннего прибора будет подаваться
теплый воздух.
Установленное
направление
потока воздуха
Горизонтальная заслонка
непрерывно перемещается между
положениями (2) и (4).
Горизонтальная заслонка
останавливается на короткое
время в положениях (2) и (4).
Для изменения направления воздушного потока в горизонтальной плоскости вручную сдвиньте вертикальную заслонку.
■
• Измените направление вертикальной заслонки
(верхней), удерживая фиксаторы заслонки.
• Отрегулируйте заслонку перед началом работы.
Так как горизонтальные заслонки перемещаются автоматически, следите за тем, чтобы не защемить пальцы.
• Измените направление вертикальной заслонки
(нижней), удерживая заслонку.
Всегда регулируйте заслонку при открытом демпфере.
Принудительное открытие демпфера руками может
привести к повреждению или неисправности.
ВЫБОР ВЫХОДНОГО ВОЗДУШНОГО ОТВЕРСТИЯ
При использовании данной функции воздух выходит одновременно из верхнего и нижнего выходных воздушных отверстий для
обеспечения эффективного охлаждения или обогрева помещения. Данная функция устанавливается с помощью переключателя,
находящегося за передней решеткой внутреннего прибора. (Данная функция доступна в режимах охлаждения и обогрева.)
Как задать подачу воздуха из верхнего и
нижнего выходных воздушных отверстий:
Установите переключатель выбора выходных
■
воздушных отверстий в положение .
Воздух подается автоматически из верхнего и нижнего
выходных воздушных отверстий, как показано в таблице ниже.
ПРИМЕЧАНИЕ:
Установите переключатель выбора выходных воздушных отверстий в крайнее положение. В противном случае,
необходимое выходное отверстие может быть не выбрано.
Описание работы
Работа
Поток
воздуха
Верхний и нижний
поток воздуха
Температура в
помещении и
Условия
заданная температура
отличаются.
•
Обязательно проследите, чтобы вокруг демпфера и нижнего выходного воздушного отверстия не было каких-либо предметов.
Если какие-либо предметы препятствуют нормальной работе демпфера, левая лампочка индикации работы может мигать.
охлаждение сушка обогрев
Верхний поток
воздуха
Температура в помещении
почти соответствует
заданной температуре,
или кондиционер работал
в течение 1 часа.
Как задать подачу воздуха только из
верхнего выходного воздушного отверстия:
Установите переключатель выбора выходных
■
воздушных отверстий в положение .
Только верхний
поток воздуха
Верхний и нижний
поток воздуха
Температура
потока воздуха
высокая.
Верхний поток
воздуха
Температура потока
воздуха низкая.
(В режиме
размораживания, в
начале работы и т.д.)
151
Page 22

ФУНКЦИЯ ЭНЕРГОСБЕРЕЖЕНИЯ ПРИ ОХЛАЖДЕНИИ (ECONO COOL)
РАБОТА в режиме “i-save”
Используйте данную функцию, если Вы хотите хотите почувствовать комфорт, когда кондиционер
работает в режиме COOL (охлаждение) - и при этом сэкономить электроэнергию.
Выполните следующие операции, когда кондиционер
работает в режиме MANUAL COOL (ручной - охлаждение).
Нажмите кнопку
■
При выборе функции (ECONO COOL) в режиме COOL кондиционер
работает в режиме качания в вертикальном направлении с переменным
циклом, который зависит от температуры кондиционера.
При этом ЗАДАННАЯ ТЕМПЕРАТУРА устанавливается на 2°C выше, чем
в режиме COOL (охлаждение).
ECONO COOL
.
Для выключения функции ECONO COOL
(энергосбережение при охлаждении):
Еще раз нажмите кнопку
■
○○○○○○○○○○○○○○○○○○○○○○○○○○○○○○○○
• Если во время действия функции ECONO COOL (энергосбережение
при охлаждении) нажать кнопку
(энергосбережение при охлаждении) выключается.
• Кнопки
(пояснения представлены ниже) продолжают действовать.
Что такое функция “ECONO COOL” (энергосбережение при охлаждении)?
Качающийся воздушный поток (изменение направления воздушного потока) приносит ощущение дополнительной
свежести в сравнении с воздушным потоком постоянного направления. Таким образом, несмотря на то, что установка
заданной температуры на 2°C выше, Вы испытываете чувство комфортности, когда прибор работает в режиме
охлаждения. В результате Вы можете сэкономить электроэнергию.
FAN
TOO
WARM
,
или
ECONO COOL
.
, функция ECONO COOL
TOO
COOL
, а также таймер ВКЛЮЧЕНИЯ/ВЫКЛЮЧЕНИЯ
С помощью данной функции можно сохранять заданные значения, такие, как температура, скорость вентилятора
и направление потока воздуха, и для работы в режиме охлаждения, и для работы в режиме обогрева.
Включение режима “i-save”:
1 Нажмите кнопку
(ОХЛАЖДЕНИЕ) или HEAT (ОБОГРЕВ).
Режим “i-save” можно включить только в режиме охлаждения или обогрева.
MODE
для выбора режима COOL
2 Нажмите кнопку .
Лампочка индикации работы на правой стороне внутреннего прибора
загорится оранжевым цветом.
Задание температуры, скорости вентилятора и
направления воздушного потока для режима “i-save”:
1
Нажмите кнопки
TOO
TOO
COOL
WARM
и
, чтобы задать необходимую температуру.
2 Нажмите кнопку , чтобы задать необходимое
направление воздушного потока.
3
Нажмите кнопку
При последующем нажатии кнопки кондиционер начнет работу с
вышеуказанными значениями температуры, скорости вентилятора и направления
воздушного потока. Чтобы изменить значения, повторите шаги с 1 по 3.
ПРИМЕЧАНИЕ:
•
Функцию энергосбережения при охлаждении (ECONO COOL) можно включить вместе с режимом COOL (ОХЛАЖДЕНИЕ) для режима “i-save”.
• Режим с использованием таймера можно включать даже при заданном режиме “i-save”.
Отмена режима “i-save”:
Нажмите кнопку еще раз.
■
Режим “i-save” также можно отменить нажатием кнопки
Режим “i-save” успешно отменен, если лампочка индикации работы с правой стороны внутреннего прибора
отключится или ее цвет изменится с оранжевого на зеленый.
Использование режима “i-save”:
1 Использование в качестве режима энергосбережения
Режим “i-save” можно использовать в качестве режима энергосбережения, задав температуру на 2 -3 °C выше
обычной температуры охлаждения, или на 2 -3 °C ниже обычной температуры обогрева. Такое использование
рекомендуется, если в помещении никого нет, или во время сна.
■ Перед тем, как выйти из помещения, в котором никого не останется:
· Перед тем, как выйти из помещения, нажмите кнопку
· Когда Вы возвратитесь в помещение, температура будет не слишком высокой и не слишком низкой.
·
Нажмите кнопку еще раз, кондиционер начнет работу с использованием обычных значений температуры,
скорости вентилятора и направления воздушного потока для обеспечения комфорта с кондиционированием воздуха.
■ Перед тем, как лечь спать:
· Перед тем, как лечь спать, нажмите кнопку
·
Пока вы спите, воздух в помещении будет кондиционироваться в режиме энергосбережения до следующего утра.
· Утром нажмите кнопку еще раз, и кондиционер начнет работу с обычными значениями температуры,
скорости вентилятора и направления воздушного потока. Заданная температура в помещении будет
достигнута быстрее, чем, если бы кондиционер был выключен на время сна.
2 Использование в качестве режима для часто используемых настроек
Если вы часто переключаетесь между двумя группами настроек температуры, скорости вентилятора и направления воздушного
потока в одном и том же режиме работы, сохраните одну группу настроек с помощью кнопки
необходимую группу настроек простым нажатием кнопки
FAN
, чтобы задать необходимую скорость вентилятора.
MODE
, чтобы изменить режим работы.
, чтобы переключиться в режим энергосбережения.
и идите в спальню.
, и избежать трудных действий с пультом дистанционного управления.
. Это позволит выбирать
152
Page 23

РАБОТА С ИСПОЛЬЗОВАНИЕМ ТАЙМЕРА (ТАЙМЕР
КОГДА ВЫ НЕ СОБИРАЕТЕСЬ ПОЛЬЗОВАТЬСЯ
ВКЛЮЧЕНИЯ/ВЫКЛЮЧЕНИЯ)
Таймер удобнее настраивать на время, когда Вы ложитесь спать, когда Вы возвращаетесь домой, встаете утром и т.д.
Как настроить таймер ВКЛЮЧЕНИЯ
1 Нажмите кнопку
в работе.
При каждом нажатии данной кнопки таймер
ВКЛЮЧЕНИЯ переключается между ON (ВКЛ.) и
OFF (ВЫКЛ.).
START
, когда кондиционер
2 Установите время таймера с помощью
кнопок TIME (Вперед) и (Назад).
При каждом нажатии кнопки установленное
время увеличивается на 10 минут, а при каждом
нажатии кнопки
Для выхода из режима таймера
ВКЛЮЧЕНИЯ:
Нажмите кнопку
■
Как запрограммировать работу таймера
Таймер ВКЛЮЧЕНИЯ и таймер ВЫКЛЮЧЕНИЯ можно использовать в комбинации. Таймер, заданное время которого
наступит раньше, сработает первым. (Значок “ ” показывает очередность работы таймера.)
• Если не установлено текущее время, использование таймера невозможно.
ПРИМЕЧАНИЯ:
Если в режиме работы таймера AUTO START/STOP происходит отключение или сбой питания, то настройки
таймера отключаются. Так как эти модели оборудованы функцией автоматического перезапуска, кондиционер
начинает работу с отключенным таймером сразу после восстановления питания.
уменьшается на 10 минут.
START
.
Как настроить таймер ВЫКЛЮЧЕНИЯ
1 Нажмите кнопку
в работе.
При каждом нажатии данной кнопки таймер
ВЫКЛЮЧЕНИЯ переключается между ON (ВКЛ.)
и OFF (ВЫКЛ.).
STOP
, когда кондиционер
2 Установите время таймера с помощью
кнопок TIME (Вперед) и (Назад).
При каждом нажатии кнопки установленное
время увеличивается на 10 минут, а при каждом
нажатии кнопки
Для выхода из режима таймера
ВЫКЛЮЧЕНИЯ:
Нажмите кнопку
■
уменьшается на 10 минут.
STOP
.
КОНДИЦИОНЕРОМ ДЛИТЕЛЬНОЕ ВРЕМЯ
Когда Вы собираетесь отключить
кондиционер на длительное время:
1 Включите кондиционер на 3 или 4 часа в
режиме FAN (вентилятор), чтобы
просушить внутренние детали прибора.
• Для включения режима FAN (вентилятор),
установите максимальную температуру на
пульте дистанционного управления в РУЧНОМ
режиме COOL (ОХЛАЖДЕНИЕ). (см. стр. 150.)
2 Выключите прерыватель тока в
электросети и/или отсоедините вилку
шнура питания от розетки.
ОСТОРОЖНО:
Если Вы не собираетесь пользоваться
кондиционером длительное время, выключите
прерыватель тока в электросети или отсоедините
вилку шнура питания от розетки.
В противном случае возможно скопление грязи, и
это может привести к пожару.
3 Снимите батарейки из пульта
дистанционного управления.
ОСТОРОЖНО:
Для предотвращения утечки жидкости из батареек,
снимайте их из пульта дистанционного управления,
если Вы не собираетесь пользоваться пультом
длительное время.
Когда Вы собираетесь включить
кондиционер после длительного перерыва:
1 Очистите воздушный фильтр и
установите его во внутренний прибор.
(Инструкции по чистке фильтра см. на стр. 153.)
2 Убедитесь в том, что воздухозаборные и
выходные воздушные отверстия
внутреннего/наружного приборов не
заблокированы посторонними
предметами.
3 Проверьте правильность соединений
заземления.
ОСТОРОЖНО:
Заземлите прибор.
Запрещается подсоединять провода заземления к
газовым и водопроводным трубам, громоотводам
или к кабелю заземления телефонной сети.
Неправильное заземление прибора может привести
к поражению электротоком.
УХОД ЗА ПРИБОРОМ
До начала чистки прибора
Выключите прерыватель тока в
■
электросети и/или отсоедините вилку
шнура питания от розетки.
ОСТОРОЖНО:
Перед чисткой прибора выключите его и
отсоедините вилку шнура питания или выключите
прерыватель тока в электросети. Ввиду того, что
лопасти вентилятора вращаются с большой
скоростью, это может привести к травме.
Чистка внутреннего прибора
Прибор следует чистить сухой мягкой
■
салфеткой.
• При сильном загрязнении протрите прибор
салфеткой, смоченной в растворе мягкого
моющего средства, разведенного в чуть теплой
воде.
• Запрещается использовать газолин, бензин,
растворитель, полировочный порошок или
инсектицид. Это может привести к
повреждению прибора.
153
Page 24

ОЧИСТКА ПЕРЕДНЕЙ РЕШЕТКИ
ОЧИСТКА КАТЕХИНОВОГО ВОЗДУШНОГО ФИЛЬТРА
Передняя решетка
1 Надавите в 2-х местах, указанных
стрелками, пока не услышите щелчок, и
откройте переднюю решетку.
2 Снимите с крючка веревку крепления
решетки.
3
Полностью откройте решетку и снимите ее.
3 Протрите переднюю решетку мягкой
сухой тканью или промойте ее водой.
После мытья решетки протрите ее насухо
мягкой сухой тканью и оставьте сушиться
вдали от прямых солнечных лучей.
• Если заметна грязь, протрите переднюю
решетку с помощью ткани, смоченной в слабом
растворе моющего средства, разведенного в
теплой воде.
• Не используйте газолин, бензин, растворитель,
чистящий порошок или инсектицид, а также не
мойте переднюю решетку с использованием
жесткой щетки или губки с твердой
поверхностью.
• Не замачивайте переднюю решетку в воде/
теплой воде более чем на два часа, а также не
подвергайте ее воздействию прямых солнечных
лучей, тепла или пламени при сушке. Это может
привести к деформации или обесцвечиванию
решетки.
4 Закройте решетку, выполнив процедуру
снятия в обратном порядке.
Обязательно наденьте веревку на крючок
перед закрытием решетки.
Очистка катехинового воздушного фильтра (каждые две недели)
1 Снимите катехиновый воздушный
фильтр.
Откройте переднюю решетку
Катехиновый
воздушный
фильтр
ОСТОРОЖНО:
При снятии катехинового воздушного фильтра не
прикасайтесь к металлическим деталям внутреннего
прибора.
Это может привести к травме.
2 Удалите грязь с катехинового
воздушного фильтра с помощью
пылесоса, или промыв фильтр в воде.
• Не проводите очистку жесткой щеткой или
губкой с жесткой поверхностью. Это может
привести к деформации фильтра.
• При сильном загрязнении промойте фильтр в
растворе мягкого моющего средства,
разведенного в чуть теплой воде.
• При использовании горячей воды (выше 50°C)
возможна деформация фильтра.
3 После промывки катехинового фильтра
в воде/теплой воде тщательно просушите
его в затененном месте.
• При просушивании не подвергайте катехиновый
фильтр воздействию прямых солнечных лучей
или жара открытого огня.
4 Установите катехиновый воздушный
фильтр на место.
Обязательно вставьте оба конца в
фиксаторы, как показано ниже.
Установите
на место.
5 Плотно закройте переднюю решетку.
ОСТОРОЖНО:
• Не роняйте переднюю решетку и не тяните за нее с
усилием.
Это может привести к повреждению решетки.
154
○○○○○○○○○○○○○○○○○○○○○○○○○○○○○○○○○○○○○○○○○○○○○○○○○
Что такое “катехиновый воздушный фильтр”?
Это воздушный фильтр, окрашенный при помощи природного материала, катехина, содержащегося в чае.
Катехиновый воздушный фильтр уничтожает запах и токсичные газы, такие как формальдегид, аммиак и
ацетальдегид. Более того, он блокирует действие вирусов, накапливающихся в фильтре.
Page 25

ОЧИСТКА ФИЛЬТРА ОЧИСТКИ ВОЗДУХА
ЗАМЕНА ФИЛЬТРА ОЧИСТКИ ВОЗДУХА
Очистка фильтра очистки воздуха (примерно один раз в 3 месяца)
1 Снимите катехиновый воздушный
фильтр.
Откройте переднюю решетку
Катехиновый
воздушный
фильтр
4 После промывки фильтра водой/теплой
водой стряхните с него остатки воды и
просушите, не допуская попадания на
него прямого солнечного света.
■ При сушке фильтра не допускайте попадания
на него прямого солнечного света или
воздействия источника тепла.
2 Выньте фильтр очистки воздуха.
Фильтр очистки воздуха
Катехиновый воздушный фильтр
5 Прикрепите фильтр очистки воздуха.
Плотно закрепите фильтр с помощью
фиксаторов.
3 Поместите фильтр вместе с рамой в
теплую воду и промойте его.
■ При сильном загрязнении используйте раствор
мягкого моющего средства, разведенного в чуть
теплой воде.
■ При использовании горячей воды (выше 50°C)
возможна деформация фильтра.
■ Запрещается использование проволочной
щетки или губки - они могут повредить
поверхность фильтра.
■ Запрещается использование хлоросодержащих
моющих средств.
6 Установите катехиновый воздушный
фильтр. (Надежно установите его
фиксаторы.)
Установите
на место.
7 Плотно закройте переднюю решетку.
При снижении эффективности работы вследствие загрязнения и т.п., необходимо произвести
замену фильтра очистки воздуха.
Замена фильтра очистки воздуха (примерно один раз в год)
1 Снимите катехиновый воздушный
фильтр.
Откройте переднюю решетку
Катехиновый
воздушный
фильтр
2 Выньте фильтр очистки воздуха.
Фильтр очистки воздуха
Катехиновый воздушный фильтр
3 Прикрепите новый фильтр очистки
воздуха. Плотно закрепите фильтр с
помощью фиксаторов.
4 Установите катехиновый воздушный
фильтр на место.
Обязательно вставьте оба конца в
фиксаторы, как показано ниже.
Установите
на место.
5 Плотно закройте переднюю решетку.
○○○○○○○○○○○○○○○○○○○○○○○○○○○○○○○○○○○○○○○○○○○○○○○○○
Фильтр очистки воздуха
• При засорении фильтра очистки воздуха возможно снижение эффективности работы кондиционера или
образование конденсации на выходных воздушных отверстиях.
• Фильтр очистки воздуха является одноразовым. Обычный период использования составляет 1 год.
Опциональные принадлежности Опциональные принадлежности можно приобрести у Вашего дилера.
Название детали
Номер детали MAC-415FT-E
ФИЛЬТР ОЧИСТКИ ВОЗДУХА
(Противоаллергенный Энзимный Фильтр)
155
Page 26

ПЕРЕД ОБРАЩЕНИЕМ В СЕРВИСНУЮ
ЕСЛИ ВАМ КАЖЕТСЯ, ЧТО ПРИБОР НЕИСПРАВЕН
СЛУЖБУ ЕЩЕ РАЗ ПРОВЕРЬТЕ СЛЕДУЮЩЕЕ
Вопрос
Кондиционер воздуха не
работает.
Недостаточное охлаждение
или обогрев помещения.
Воздух, выходящий из
внутреннего прибора, имеет
специфический запах.
На дисплее пульта
дистанционного
управления нет
изображения, или дисплей
потускнел. Внутренний
прибор не реагирует на
сигналы с пульта.
Если произошел сбой
питания.
Если после выполнения вышеназванных проверок кондиционер не
возобновит нормальную работу, прекратите его эксплуатацию и
обратитесь к Вашему дилеру.
В нижеописанных случаях необходимо остановить работу кондиционера
и обратиться к Вашему дилеру.
• Если с внутреннего прибора стекает вода.
• Если мигает левая индикаторная лампочка работы.
• Если часто срабатывает прерыватель тока в сети.
• Сигнал с пульта дистанционного управления может не приниматься в
помещении, где установлены люминесцентные лампы, ВКЛЮЧЕНИЕ/
ВЫКЛЮЧЕНИЕ которых производится с помощью электронного
устройства (люминесцентные лампы инверторного типа и т.д.).
•
В регионах со слабыми электроволнами при работе кондиционера воздуха
возникают помехи при приеме радио- или телевещания. Для нормального
приема радио- или телевещания может потребоваться усилитель.
• Во время грозы остановите кондиционер и отсоедините вилку шнура
питания от розетки или выключите прерыватель тока в электросети. В
противном случае возможно повреждение электродеталей.
156
Пункты, требующие проверки, или способ устранения неисправности
•
Возможно, выключен прерыватель тока в сети?
• Возможно, перегорел предохранитель?
• Возможно, запрограммирован таймер
включения? (Стр. 153)
• Не мешает ли что-нибудь нормальной работе
демпфера? (стр. 151)
•
Возможно, неправильно задана температура?
(Стр. 150)
• Возможно, засорился фильтр? (Стр. 154)
• Возможно, заблокировано воздухозаборное
или выходное воздушное отверстие
внутреннего или наружного прибора?
• Возможно, открыто окно или дверь?
•
Возможно, засорился фильтр? (Стр. 154, 155)
• Возможно, сели батарейки? (Стр. 148)
• Возможно, не соблюдена полярность (+,-)
при установке батареек? (Стр. 148)
• Возможно, нажаты какие-либо кнопки на
пульте дистанционного управления других
электроприборов?
•
Кондиционер возобновил работу?
Если перед перерывом в подаче
электроэнергии кондиционер работал, он
начнет работу снова, так как эти модели
оборудованы функцией автозапуска. (Смотрите
описание функции автозапуска на стр. 149.)
Вопрос
При повторном запуске прибор
не реагирует на команды
управления в течение
приблизительно 3 минут.
Слышно потрескивание.
Воздух, выходящий из
внутреннего прибора, имеет
специфический запах.
Вентилятор наружного
блока не вращается, даже
когда работает компрессор.
Даже если вентилятор
начинает вращаться, он
быстро останавливается.
Слышен звук текущей
воды.
Слышен булькающий
звук.
Помещение охлаждается
недостаточно.
Из выходного воздушного
отверстия внутреннего прибора
выходит легкий туман.
Из внутреннего прибора
прослушивается
механический звук.
Режим качания
ГОРИЗОНТАЛЬНОЙ
ЗАСЛОНКИ будет
приостановлен
приблизительно на 15
секунд, после чего он
возобновится.
• Это защитная функция кондиционера,
•
• Кондиционер всасывает запахи стен, ковра,
• При низкой температуре на улице
• Это звук хладагента, протекающего в трубах
• Это звук сконденсировавшейся влаги,
•
•
• При использовании в помещении
•
•
• Этот звук появляется при включении/
• Это необходимо для обеспечения
Ответ (это не неисправность)
активизируемая микропроцессором.
Пожалуйста подождите.
Потрескивание объясняется расширением/
сжатием передней панели и других деталей
прибора вследствие изменения температуры.
мебели, ткани и выдувает их вместе с
воздухом.
вентилятор может не работать, чтобы
поддерживать достаточную мощность
охлаждения.
кондиционера.
протекающей в трубах теплообменника.
Это звук теплообменника при размораживании.
Этот звук слышен, когда наружный воздух
всасывается из дренажного шланга при включении
вытяжного устройства или вентилятора, что и
вызывает выброс струи воды из дренажного шланга.
Этот звук также слышен при сильном ветре, когда
наружный воздух с силой проникает в дренажный шланг.
вентилятора или газовой плиты нагрузка на
кондиционер, работающий в режиме
охлаждения, возрастает, что в результате
снижает эффективность охлаждения.
При высокой температуре наружного воздуха
эффективность охлаждения может снизиться.
Прохладный воздух, поступающий из
кондиционера, быстро охлаждает влагу воздуха
внутри помещения, и образовывается дымка.
выключении вентилятора или компрессора.
нормальной работы ГОРИЗОНТАЛЬНОЙ
ЗАСЛОНКИ в режиме качания.
Вопрос
Во время работы
изменяется направление
движения воздушного
потока. Направление
горизонтальной
заслонки нельзя
отрегулировать с
помощью пульта
дистанционного
управления.
Из наружного прибора
вытекает вода.
Из наружного прибора
выходит белый дым.
При работе в режиме
обогрева не сразу
выдувается воздух.
При работе в режиме
обогрева прибор
останавливается
приблизительно на 10
минут.
Иногда слышен
шипящий звук.
Помещение
недостаточно
обогревается.
Если в системе из нескольких
блоков один из внутренних
блоков не используется, он
нагревается, и при этом
может быть слышен шум,
похожий на звук текущей
воды.
Кондиционер начнет
работу только при
включенном питании,
даже если вы не
управляете прибором с
помощью пульта
дистанционного
управления.
Демпфер открывается и
закрывается
автоматически.
Ответ (это не неисправность)
При работе кондиционера в режиме COOL или
•
DRY при направлении воздушного потока вниз
на протяжении 1 часа для предотвращения
капания конденсата направление потока
автоматически устанавливается в положение (1).
•
При работе в режиме обогрева, если
температура воздушного потока слишком низкая
или во время размораживания, позиция
горизонтальной заслонки автоматически
устанавливается на “горизонтальную”.
•
Горизонтальная заслонка автоматически
перемещается через определенные интервалы,
чтобы определить свое положение, затем
возвращается в установленное положение.
•
При работе в режимах COOL (охлаждение) и DRY
(сушка) происходит охлаждение труб и трубных
соединений, что вызывает конденсацию влаги.
• При работе в режиме обогрева во время
операции размораживания замерзшая вода
на наружном приборе тает и стекает вниз.
При работе в режиме обогрева влага,
•
сконденсировавшаяся в теплообменнике, стекает вниз.
•
В режиме обогрева пар, который появляется в
результате размораживания, имеет вид белого дыма.
• Пожалуйста подождите, кондиционер
готовится к выдуву теплого воздуха.
Производится размораживание наружного прибора
•
(Операция размораживания).
Эта операция длится 10 минут, пожалуйста
подождите. (При низкой температуре наружного
воздуха и высокой влажности образуется изморозь.)
• Этот звук слышен при изменениии потока
хладагента внутри кондиционера воздуха.
• При низкой температуре наружного воздуха
эффективность обогрева может снизиться.
Небольшое количество рефрижеранта
•
продолжает подаваться во внутренний блок,
даже если блок в этот момент не используется.
•
Эти модели оборудованы функцией автозапуска.
При выключении питания без остановки работы
кондиционера с помощью пульта дистанционного
управления и последующем включении питания
кондиционер автоматически начнет работу в
режиме, который был установлен с помощью
пульта дистанционного управления до
отключения питания.
•
Демпфер контролируется автоматически
микрокомпьютером в соответствии с температурой
потока воздуха и временем работы кондиционера.
Page 27

УСТАНОВКА, ПЕРЕМЕЩЕНИЕ И ОСМОТР ПРИБОРА
Место установки
Следует избегать установки кондиционера воздуха в следующих местах.
•
В местах, где возможна утечка воспламеняющегося газа.
ОСТОРОЖНО:
Запрещается установка прибора в местах, где
возможна утечка воспламеняющегося газа.
При утечке и скоплении воспламеняющегося газа
рядом с прибором может произойти взрыв.
• В местах, где много машинного масла.
В местах, где много соли, например, на морском побережье.
•
• В местах образования сероводородного газа,
например, рядом с горячим природным источником.
• В местах выброса нефтепродуктов или в местах с
обильными нефтяными испарениями.
• Если есть высокочастотное или принимающее
радиосигналы оборудование.
Люминисцентные лампы
инверторного типа
Устанавливайте как
можно дальше для
защиты от воздействия
люминисцентных ламп.
Беспроводный
телефон или
Портативный
телефонa
Не
менее
1 м
Не менее 1 м
Радиоприемник
Наружный прибор должен устанавливаться на расстоянии
не менее 3 м от антенн телевидения, радио и т. д. В
регионах со слабыми электроволнами требуется большее
расстояние между наружным прибором и антенной, в
случае, если при работе кондиционера воздуха возникают
помехи при приеме радио- или телевещания.
Хорошо
Не менее
100 мм
Не менее
3 м
проветриваемое
сухое место
Не менее
200 мм
Обеспечьте
достаточное
расстояние, чтобы
избежать искажения
картинки и звука.
Телевизор
стена и т.п.
ПРЕДУПРЕЖДЕНИЕ:
Если кондиционер работает, но при этом не охлаждает или не обогревает (в зависимости от модели) помещение,
обратитесь к Вашему дилеру, так как это может свидетельствовать об утечке хладагента. После выполнения ремонтных
работ обязательно спрашивайте представителя службы техобслуживания о наличии или отсутствии утечки хладагента.
Хладагент, заправленный в систему кондиционера, не представляет опасности для здоровья. Обычно утечки хладагента
не наблюдается, однако в случае утечки газа хладагента внутри помещения и его последующего контакта с огнем
тепловентилятора, отопителя помещений, печи и т. д. происходит образование вредных для здоровья веществ.
Электромонтажные работы
• Обеспечьте отдельный контур сети для питания кондиционера.
• Обязательно соблюдайте допустимую мощность прерывателя тока в электросети.
ПРЕДУПРЕЖДЕНИЕ:
• Запрещается самостоятельная установка кондиционера пользователем.
Неправильное выполнение установки может привести к пожару, поражению электротоком, получению
травмы вследствие падения прибора, утечки жидкости и т.д.
• Запрещается использование промежуточного соединения в шнуре питания или использование удлинителя.
Запрещается подсоединение нескольких электроприборов к одному источнику переменного тока.
Слабые соединения, недостаточная изоляция, подключение к сети более высокого напряжения и т.д. могут
привести к пожару или поражению электротоком.
Обратитесь к Вашему дилеру.
ОСТОРОЖНО:
• Заземлите прибор.
Запрещается подсоединять провода заземления к газовым и водопроводным трубам, громоотводам или к
кабелю заземления телефонной сети. Неправильное заземление прибора может привести к поражению
электротоком.
• В зависимости от конкретных условий установите прерыватель утечки тока на землю в месте, где
устанавливается кондиционер воздуха (места с повышенной влажностью и т.д.).
Если прерыватель утечки тока на землю не установлен, возможно поражение электротоком.
Осмотр и техническое обслуживание прибора
• После использования кондиционера в течение нескольких сезонов эффективность его работы может снизиться
вследствие скопления грязи на внутренних деталях прибора.
• В зависимости от конкретных условий эксплуатации возможно образование неприятных запахов или неполное
дренирование влаги вследствие скопления грязи, пыли т.д.
• Кроме обычных операций ухода за прибором рекомендуется проводить регулярный осмотр и техническое
обслуживание кондиционера спецалистом. Пожалуйста, обратитесь к Вашему дилеру.
Примите во внимание шум при работе прибора
• Не кладите посторонние предметы рядом с выходными воздушными отверстиями наружного прибора. Это может
снизить эффективность его работы, а также увеличить уровень шума при работе прибора.
• Если при работе слышен необычный шум, обратитесь к Вашему дилеру.
Перемещение прибора в другое место
• Для перемещения прибора, а также для его установки на новом месте вследствие проведения ремонта, переезда
и т.д., требуются специальные знания и специальные операции.
ПРЕДУПРЕЖДЕНИЕ:
Выполнение ремонта и перемещение кондиционера пользователем запрещаются.
Неправильное выполнение ремонта и перемещения может привести к пожару, поражению электротоком,
получению травмы вследствие падения прибора, утечки жидкости и т.д. Обращайтесь к Вашему дилеру.
Утилизация
По вопросам утилизации данного изделия обращайтесь к Вашему дилеру.
Если у Вас возникли какие-либо вопросы, обращайтесь к Вашему дилеру.
ТЕХНИЧЕСКИЕ ХАРАКТЕРИСТИКИ
Модель Внутренний
Комплект
Наружный
Режим
Требования к электропитанию
Мощность кВт
Мощность на входе кВт
Масса
Объем хладагента
(R410A)
Код IP
Допустимое Низк.
избыточное давл. (ps)
рабочее Выс.
давление давл. (ps)
шума
Внутренний кг
Наружный кг
Внутренний
Наружный
МПа
МПа
Внутренний (Oчень высокая/
Высокий/Средний/Низкий)
дБ(А)Уровень
Наружный дБ(А)
кг
MFZ-KA25VA(H) MFZ-KA35VA(H) MFZ-KA50VA
MFZ-KA25VA MFZ-KA35VA MFZ-KA50VA
SUZ-KA25VA(H) SUZ-KA35VA(H) SUZ-KA50VA
Охлаждение
Обогрев
Охлаждение
~ /N, 230V, 50Hz
2,5 3,4 3,5 4,0 4,8 6,0
0,58 0,835 1,09 1,10 1,55 1,86
14
33 37 53
0,90 1,05 1,60
IP 20
IP 24
1,64
4,15
37/32/27/22 37/32/27/22 38/33/28/23 38/33/28/25 43/39/35/32 44/39/35/32
46 47 48 53 55
Обогрев
Охлаждение
Обогрев
ПРИМЕЧАНИЯ:
1. Расчетные условия эксплуатации
Охлаждение — Температура в помещении: 27°C DB*, 19°C WB**
Обогрев — Температура в помещении: 20°C DB
*DB - Шарик сухого термометра
** WB - Шарик влажного термометра
Температура на улице: 35°C DB
Температура на улице: 7°C DB, 6°C WB
2. Гарантированный диапазон температур эксплуатации
Наружный
SUZ-KA50VA
Верхний 32°C DB 46°C DB 43°C DB 46°C DB
Охлаждение
предел 23°C WB — — —
Нижний 21°C DB -10°C DB -10°C DB -10°C DB
предел 15°C WB — — —
Верхний 27°C DB 24°C DB 24°C DB 24°C DB
Обогрев
предел — 18°C WB 18°C WB 18°C WB
Нижний 20°C DB -10°C DB -10°C DB -20°C DB
предел — -11°C WB -11°C WB -21°C WB
Внутренний
SUZ-KA25/35VA
SUZ-KA25/35VAH
157
Page 28

NOTE
Page 29

NOTE
Page 30

This product is designed and intended for use in the residential,
commercial and light-industrial environment.
The product at hand is based on
the following EU regulations:
• Low Voltage Directive 73/23/ EEC
• Electromagnetic Compatibility Directive
89/336/ EEC
HEAD OFFICE: MITSUBISHI DENKI BLDG., 2-2-3, MARUNOUCHI, CHIYODA-KU, TOKYO 100-8310, JAPAN
SG79Y505H01
 Loading...