

Page 1
2009 EclipsE / EclipsE spydEr QUicK rEFErENcE GUidE
Page 2

6
4
7
5 5
4
4
3
5
2
1
4
Climate Cont. &
1
Air Conditioning
Cruise
2
Control
Wiper/Window
3
Washer Control
Warning
4
Lights
Audio Control
5
Steering Wheel
5
Audio Control
Multi-center
6
Display
Exterior
7
Light Control
Page 3
A
E
C
F
D
1
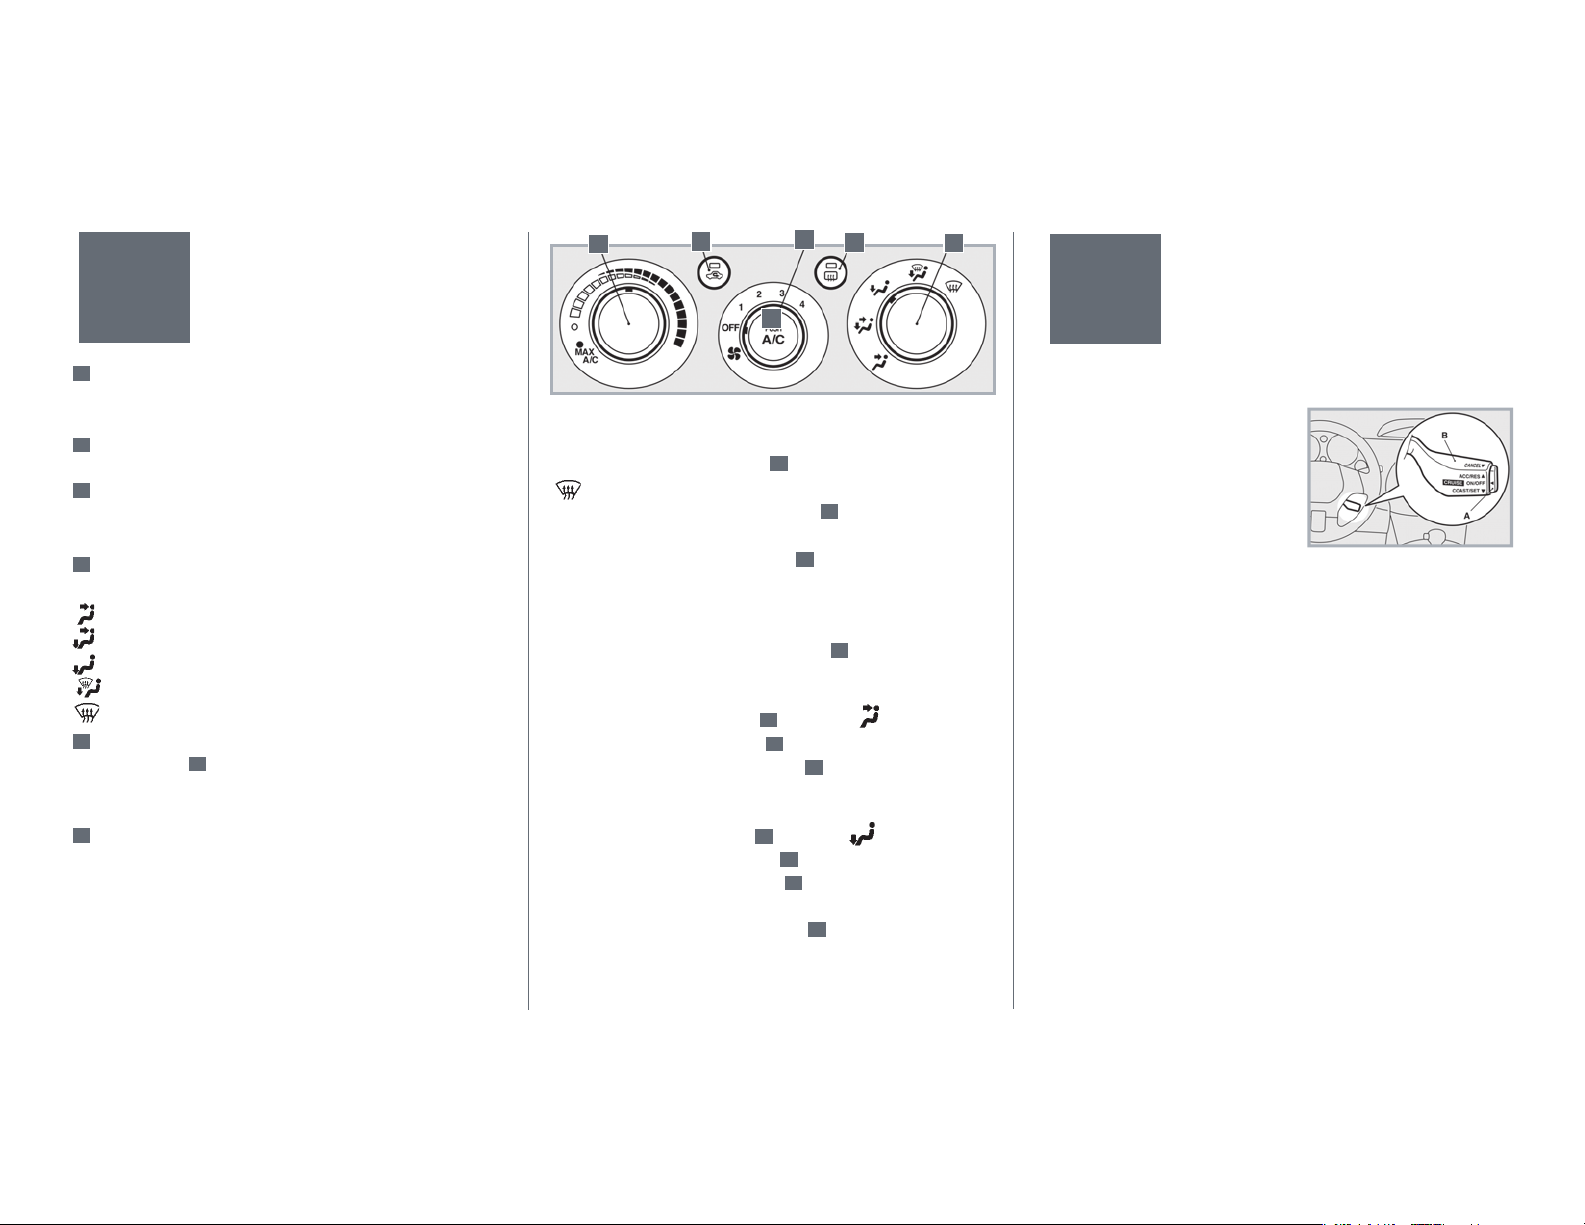
CLIMATE CONTROL
& AIR CONDITIONING
A
Temperature Control Dial
Turn the dial clockwise/counterclockwise to make the air warmer/
cooler.
B
Air Conditioning Switch
Press the button to turn on/off the A/C.
C
Blower Fan Speed Control Dial
Turn the dial clockwise/counterclockwise to increase/
decrease the fan speed.
D
Air Flow Selection Dial
Turn the dial to a comfortable air ow position.
Face
Face and Foot
Foot
Foot and Windshield (Defrost)
Defrost
E
Air Intake Selection Button
Press the button
culated” (indicator light on) to “outside” (indicator light off) and
vice versa.
F
Rear Window Defogger Switch
Press the button to turn on (indicator light on) or off
(indicator light off). The rear window defogger will
automatically turn off when the ignition is turned off,
or after 17 minutes of operation.
E
to change the air intake mode from “recir-
B
To quickly Remove FRosT oR Fog FRom
The Windshield
(1) Set the air ow selection dial
(
) position.
(2) Set the blower fan speed control dial
maximum speed.
(3) Turn the temperature control dial
highest temperature position.
To quickly Remove FRosT oR Fog FRom The
ReaR WindoW
(1) Press the rear window defogger button F
(indicator light on).
To quickly cool The inTeRioR
(1) Set the air flow selection dial
(2) Set the temperature control dial
(3) Set the blower fan speed control dial
maximum speed.
To quickly heaT The inTeRioR
(1) Set the air ow selection dial
(2) Set the air intake selection button
(3) Turn the temperature control dial
temperature position.
(4) Set the blower fan speed control dial
maximum speed.
D
to the defroster
C
to the
A
clockwise to the
D
to the face ( ) position.
A
to the “MAX A/C” position.
C
to the
D
to the foot ( ) position.
E
to the outside air mode.
A
clockwise to the highest
C
to the
2
CRUISE CONTROL
To seT The cRuising speed
(1) Momentarily press the main button
(A) at the end of the cruise control
lever. The “CRUISE” light comes on.
(2) Move the lever (B) down while
driving at the desired speed.
To cancel The
cRuising speed
• Press the main switch (A) at the end of the lever.
The indicator light “
OR
• Pull the cruise control lever (B) toward you.
OR
• Tap the brake pedal slightly or press down on it
to slow your vehicle speed.
To incRease The cRuising speed
• Push the cruise control lever up for less than one second. Speed
will be increased one mph each time
the lever is pushed up.
OR
• Push the cruise control lever up and hold it
until the desired speed is reached.
OR
• Press the accelerator pedal until the desired speed is reached.
Pull the cruise control lever down, and release it.
CRUISE” goes off.
Page 4

3
WIPER/WINDOW
WASHER CONTROL
The ignition switch must be in the “ON” or “ACC” position.
Windshield WipeRs
• To demist the windshield – Move the wiper lever to the “MIST”
position and release the lever. The wipers will wipe the windshield one time.
• To deactivate the wipers –
Move the wiper lever to the
OFF” position.
“
• To wipe slowly – Move
wiper lever to the “
• To wipe fast – Move the
lever to the “
• To wipe the windshield
intermittently – Move the wiper
lever to the “
wiping intervals are adjustable
with the “
Intervals vary in accordance with
vehicle speed. You can activate or
deactivate the speed-sensitive
operation by using the multi-center
display (if equipped).
• To activate – Pull the wiper
lever toward you.
WipeR and WasheR
• To activate the rear wiper –
Turn the rear wiper dial to the “
position. The wiper operates continuously for several seconds then
HI” position.
INT” position. The
INT” dial (A).
Windshield WasheR
ReaR WindoW
the
LO” position.
wiper
INT”
operates intermittently at intervals of about eight seconds. You
can adjust the intervals of the operation by using the
multi-center display (if equipped).
• To activate the rear washer – Turn the rear wiper dial fully to
either direction (
window glass and the wiper will automatically
operate two or three times.
• To deactivate the rear wiper – Turn the rear wiper dial to the
OFF” position.
“
). Washer uid will be sprayed onto the rear
4
WARNING LIGHTS
Service Engine Soon
A
: Service Engine Soon
If the light illuminates and stays on while driving, stop the
engine and check if the fuel ller cap has been properly
tightened. If the light still stays on, have the vehicle checked by
an authorized Mitsubishi Motors dealer as soon as possible.
A
Supplemental Restraint System
Tire Pressure Monitoring System
B
C
B
: Tire Pressure Monitoring System
If the warning light comes on, this indicates one or more of the
tires has low air pressure. Check the pressure of each tire, including the spare, and ll with air as soon as possible. If the warning
light still stays on, the system should be checked by an authorized
Mitsubishi Motors dealer.
C
: Supplemental Restraint System
Immediately have the vehicle checked by an authorized
Mitsubishi Motors dealer if the light comes on and stays on while driving, because this indicates a problem with the system.
Passenger Airbag Off
D
The indicator light will stay on while driving to show that the
passenger front air bag is not operational when:
• The passenger seat weight sensors sense a weight of less than
about 66 pounds on the front passenger seat.
• The front passenger seat is not occupied.
The indicator light will go off while driving to show that the
passenger front air bag is operational when the weight applied
to the front passenger seat is sensed at about 66 pounds or
greater. This includes a large dog sitting in the front passenger seat or heavy packages.
: Passenger Air Bag Off Indicator
D
Page 5

5
AUDIO TUNING/
CD CONTROL
To seT and play a cd
Single CD Player
Insert a CD into the CD slot
A
or press the CD button
B
with a CD in the player.
C
The CD indicator will turn
on, then the CD player will
begin playing.
6-Disc CD Changer
B
Press the CD button
the CD mode is selected.
and
I
CD playback will be started.
Press the disc select button
G
to listen to your desired disc. Each indicator light on each
disc select button
G
shows the condition of each disc slot.
Light off: No disc
Amber: Disc is set
Green: Disc is played (or selected)
To play mp3 cd
Single CD Player
A
Insert an MP3 CD into the CD slot
or press the CD button
with an MP3 CD in the player. If an MP3 CD is already in the
slot, playback will start. The folder number and the track
number will appear on the display.
6-Disc CD Changer
B
Press the CD button
if MP3 CDs are already in the CD
changer; playback will start. The folder number and the
track number will appear on the display. Turn the
H
TUNE/FOLDER dial
clockwise or counterclockwise
to select your desired folder.
To ejecT disc
Single CD Player
C
Press the EJECT button
; the CD will stop playing and the CD
will be ejected. The system then will switch to the radio mode.
6-Disc CD Changer
A
J
D
B
B
Press the LOAD/EJECT button C, then press one of the disc
select buttons
G
to select the slot where you wish to eject the
disc.
To selecT TRack
Use the SEEK/TRACK button
or to fast forward or fast reverse the disc: press the
D
to select a desired track
or
side of the SEEK/TRACK button until the desired track is
reached. The TRACK indicator will
display the number of the selected
track.
To FasT FoRWaRd
G
E
H
F
Hold down the side of the
SEEK/TRACK button
D
for more than one second.
To FasT ReveRse.
Hold down the side of the
SEEK/TRACK button
D
for more than one second.
To scan cd
Single CD Player
E
Press the SCAN button
. The SCAN indicator will come on,
and the rst ten seconds of each track of the CD will play.
6-Disc CD Changer
E
Press the SCAN button
. The SCAN indicator will come on, and
the rst ten seconds of each track of the selected disc will play.
To exit SCAN mode, press the SCAN button again.
To RepeaT a cd TRack
Press the RPT/RDM button
F
. The RPT indicator will turn on
when the system is in repeat mode.
To Randomly play cd TRacks
Press the RPT/RDM button
F
. The RDM indicator will
turn on when the system is in random mode. If it is an MP3 CD,
tracks selected randomly from all folders in the disc(s) will be
played back.
Radio
To lisTen To The Radio
1) Press the PWR dial
I
or AM-FM button
J
to turn the radio
on and off.
(2) Press the AM-FM button
J
to select the
desired band.
(3) Press the
or side of the SEEK/TRACK button
tune to a station or press one of the memory select buttons
D
to
G
to
recall a station memorized for that button.
To selecT Band (am-Fm)
Press the AM-FM button
J
to select the desired band (AM/FM1/
FM2).
Satellite Radio
(if equipped)
J
Press the AM-FM-SAT button
to select the desired band
(AM/FM1/FM2/SAT1/SAT2/SAT3/SAT4).
To Tune The Radio
Automatic Tuning
Press the
or side of the SEEK/TRACK button
D
,
and reception of the station selected will begin. You
can automatically receive available stations, and hear
their programs.
Manual Tuning
H
Turn the TUNE/FOLDER dial
clockwise or
counterclockwise. The radio station will be changed
consecutively by the operation.
To sToRe a Radio sTaTion in The memoRy
(1) Press the or side of the SEEK/TRACK button
H
turn the TUNE/FOLDER dial
to the station you wish to keep
D
or
in the memory.
G
(2) Press one of the memory select buttons
until you
hear a beep. The memory button number and the station
will appear on the display. Six stations can be stored in
each button for each band.
To Recall a pRe-selecTed Radio sTaTion
(1) Press the AM-FM button
(2) Press one of the memory select buttons
J
to select the desired band.
G
to recall a
station pre-selected for that button.
To scan availaBle Radio sTaTions
Press the SCAN button
E
. The SCAN indicator will come
on and the radio will tune consecutively to each available
station for about ve seconds per station. Press the SCAN
button again to stop scanning.
Page 6

6
MULTI-CENTER
DISPLAY
1
display FuncTions
(Main display)
1
Electronic compass
2
Digital clock
3
Outside temperature
4
Audio Mode
5
“H” / “M” Buttons
To adjusT The clock Time
Press the “H” and “M” buttons to set the clock as follows:
H (HOUR) — Press and hold the “H” button until the
correct hour appears.
M (MINUTE) — Press and hold the “M” button until the correct
minute appears.
To change The uniT oF
ouTside TempeRaTuRe
Press the “H” and “M” buttons simultaneously for more than
ten seconds when the ignition key is in the “ACC”
or “ON” position. The display will switch the outside
temperature unit between degree F and degree C.
2 3
4
2
4
5
5
7
EXTERIOR
LIGHT CONTROL
To TuRn on/oFF The
comBinaTion
Rotate the switch at the end of the turn signal lever.
OFF: All the lights will turn off.
: The parking, tail, front/rear side-marker, license plate and
instrument panel lights will turn
on respectively.
: Headlights and
other lights will turn
on respectively.
If the light switch is at
the or ,
the ignition key is turned
to “LOCK” or “ACC”
position or removed from the ignition switch, and the driver’s
door is opened, the lights will automatically turn off. If the light
switch is at the or position, the ignition key is turned
to “LOCK” or “ACC” or removed from the ignition switch, and
the driver’s door is closed, the lights will stay on for about three
minutes and turn
off automatically.
To change The headlighTs FRom
high Beam To loW Beam
Pull the turn signal lever fully toward you to change the
headlight beam height. The high beam indicator comes on
when the headlights are on high beam, and goes off when
the headlights are on low beam.
headlighT
SEAT ADJUSTMENT/CONTROL
poWeR seaT
• To adjust the seat position, press the bottom switch
the front (1) or rear (2) of
the vehicle.
• To adjust the seatback angle, pull the seatback lock lever
up gently, leaning
the seatback forward
slightly. Then lean
the seatback backward to a
comfortable position
and release the lever.
• To raise or lower the
front part of the seat
cushion,
raise or lower the front end of the bottom switch.
• To raise or lower the rear part of the seat cushion,
raise or lower the rearward end of the bottom switch.
• To raise or lower the entire seat cushion, raise or
lower the center of the bottom switch.
heaTed seaT
• To activate/deactivate heated seats:
Press the switch located in front of the oor console box
when the ignition key
is in the “ON” position. The indicator
A
light
will
illuminate while the
heater is on.
1 – Heater high
(to heat quickly)
2 – Heater off
3 – Heater low (to keep the seat warm)
(If equipped)
(If equipped)
A
toward
B
A
B
Page 7

LOCK/UNLOCK REMOTE
CONTROL TRANSMITTER
To lock dooRs and TailgaTe
Press the LOCK button
1
to lock all the doors and tailgate. The
dome light will blink once if the dome light switch is set at the
DOOR position. The turn
signal lights will also
blink once.
To unlock
dooRs and TailgaTe
Press the UNLOCK
2
button
to unlock only
the driver’s door. Press it
one more time, and all the doors and the tailgate will unlock.
The dome light will turn on for 15 seconds if the dome light
switch is set at the DOOR position. The turn signal lights will
also blink twice.
ALARM/ANTI-THEFT SYSTEM
To acTivaTe The panic alaRm
If you are near your vehicle and feel threatened and want to call
attention:
(1) Press the PANIC button
for one second or more.
(2) The headlights will blink and the horn will sound for about
three minutes.
3
on the remote control transmitter
(3) Press one of the
2
buttons ( 1,
or
3
)
on the remote control
transmitter to turn off
the alarm.
TheFT alaRm
sysTem
(If
equipped)
Arm the system by
locking the doors
with the transmitter or power door locks. The horn will sound
intermittently and the headlights will blink on and off for three
minutes. The system will then be rearmed until the system is
disarmed.
To disarm the system:
(1) All doors or the tailgate are unlocked by the remote control
transmitter or by using the key.
(2) The ignition key is turned to the “ACC” or “ON” position.
(3) If the UNLOCK button is pressed when all doors and the
tailgate are closed and no door is opened within
approximately 30 seconds, rearming will automatically occur.
elecTRonic immoBilizeR
(Anti-theft starting system)
You can start the vehicle with only the keys that have been
registered to the vehicle. If you lose the key, you can order
a key from your authorized Mitsubishi Motors dealer by referring
to the key number. Take your vehicle and all remaining keys to
your authorized Mitsubishi Motors dealer to have your ID code
changed to prevent vehicle theft.
SUNROOF
(If equipped)
To open sunRooF
Press the sunroof switch
1
once to open the sunroof a few
inches. Use this position for minimal wind noise. Press the
sunroof switch
sunroof movement, press the sunroof switch
1
again to fully open the sunroof. To stop the
1
a
third time.
To close sunRooF
Press the switch
3
, and the sunroof will close
while the switch is pressed.
To TilT up
Press the switch
2
, and the rear edge of the sunroof will be
raised for ventilation.
To TilT doWn
Press the switch
3
.
Page 8

This Quick Reference Guide is not intended to replace your vehicle Owner’s Manual which contains more detailed information concerning the features of your vehicle as well as important safety
warnings designed to help reduce the risk of injury to you and your passengers. Please read your entire Owner’s Manual carefully as you begin learning about your new Endeavor and refer to the
appropriate sections when questions arise.
All information contained in this Quick Reference Guide was accurate at the time of printing. We reserve the right to change features, operation and/or functionality of any vehicle specication at any
time. Your Mitsubishi Motors dealer is the best source for the most current information
9290C047
 Loading...