

Page 1

Air Conditioning Control System
Centralized Controller
AE-200A/AE-50A/EW-50A
AE-200E/AE-50E/EW-50E
–Web Browser for Initial Settings–
Contents
1. Introduction ...................................................................................2
1-1. Terms Used in This Manual ..............................................................2
1-2. PC Requirements .............................................................................2
1-3. Notes on using the integrated centralized control software
TG-2000A ........................................................................................2
2. Setting the Operating Environment ..............................................3
2-1. Setting the IP Address of the PC ......................................................3
2-2. Setting the Web Browser ..................................................................5
2-3. Java settings ....................................................................................8
3. Logging in to the Web Browser for Initial Settings ......................10
4. Initial Settings .............................................................................14
4-1. Date and Time ................................................................................15
4-2. Basic System..................................................................................16
4-3. Groups............................................................................................25
4-4. Interlocked LOSSNAY ....................................................................28
4-5. Blocks .............................................................................................29
5. Functions 1 .................................................................................30
5-1. E-Mail .............................................................................................30
5-2. Peak Cut (Energy-save control function) .......................................34
5-3. Measurement .................................................................................43
5-4. Energy Management Settings ........................................................47
6. Functions 2 .................................................................................49
6-1. Set Temperature Range Limit .........................................................49
6-2. Night Mode (quiet operation) Schedule ..........................................50
6-3. System-changeover .......................................................................51
7. Functions 3 .................................................................................52
7-1. External Temperature Interlock ......................................................52
7-2. Night Setback Control ....................................................................54
7-3. Interlock control ..............................................................................56
7-4. AHC Port Name Settings ................................................................65
8. User Settings ..............................................................................66
9. Utility ...........................................................................................68
9-1. Back up/import settings data ..........................................................68
10. License registration for optional functions ..................................70
1 1. Software update .........................................................................71
11-1. Preparation ...................................................................................71
11-2. Update procedures .......................................................................73
12. Notes on connecting to Web browser ........................................75
12-1. Clearing cache .............................................................................75
12-2. Resetting Internet Explorer ..........................................................77
Appendix: Added functions in Ver. 7.20 ...........................................78
Instruction Book
Before using the controller, please read this Instruction Book carefully to ensure proper operation.
Retain this manual for future reference.
Page 2
1. Introduction
This Instruction Book explains how to make initial settings for the AE-200A/AE-50A/EW-50A and
AE-200E/AE-50E/EW-50E using a Web browser.
Note: Initial settings for the connected AE-50A/EW-50A or AE-50E/EW-50E cannot be made on the AE-200A/AE-200E Web
1-1. Terms Used in This Manual
- “Centralized Controller AE-200A/AE-200E” is referred to as “AE-200.”
- “Centralized Controller AE-50A/AE-50E” is referred to as “AE-50.”
- “Centralized Controller EW-50A/EW-50E” is referred to as “EW-50.”
- “Booster unit” and “Water HEX unit” are referred to as “Air To Water (PWFY) unit.”
- “Advanced HVAC CONTROLLER” is referred to as “AHC.”
- “Hot Water Heat Pump unit” is referred to as “HWHP (CAHV, CRHV) unit.”
- A PI controller that is built-in on AE-200/AE-50/EW-50 is referred to as “Built-in PI controller.”
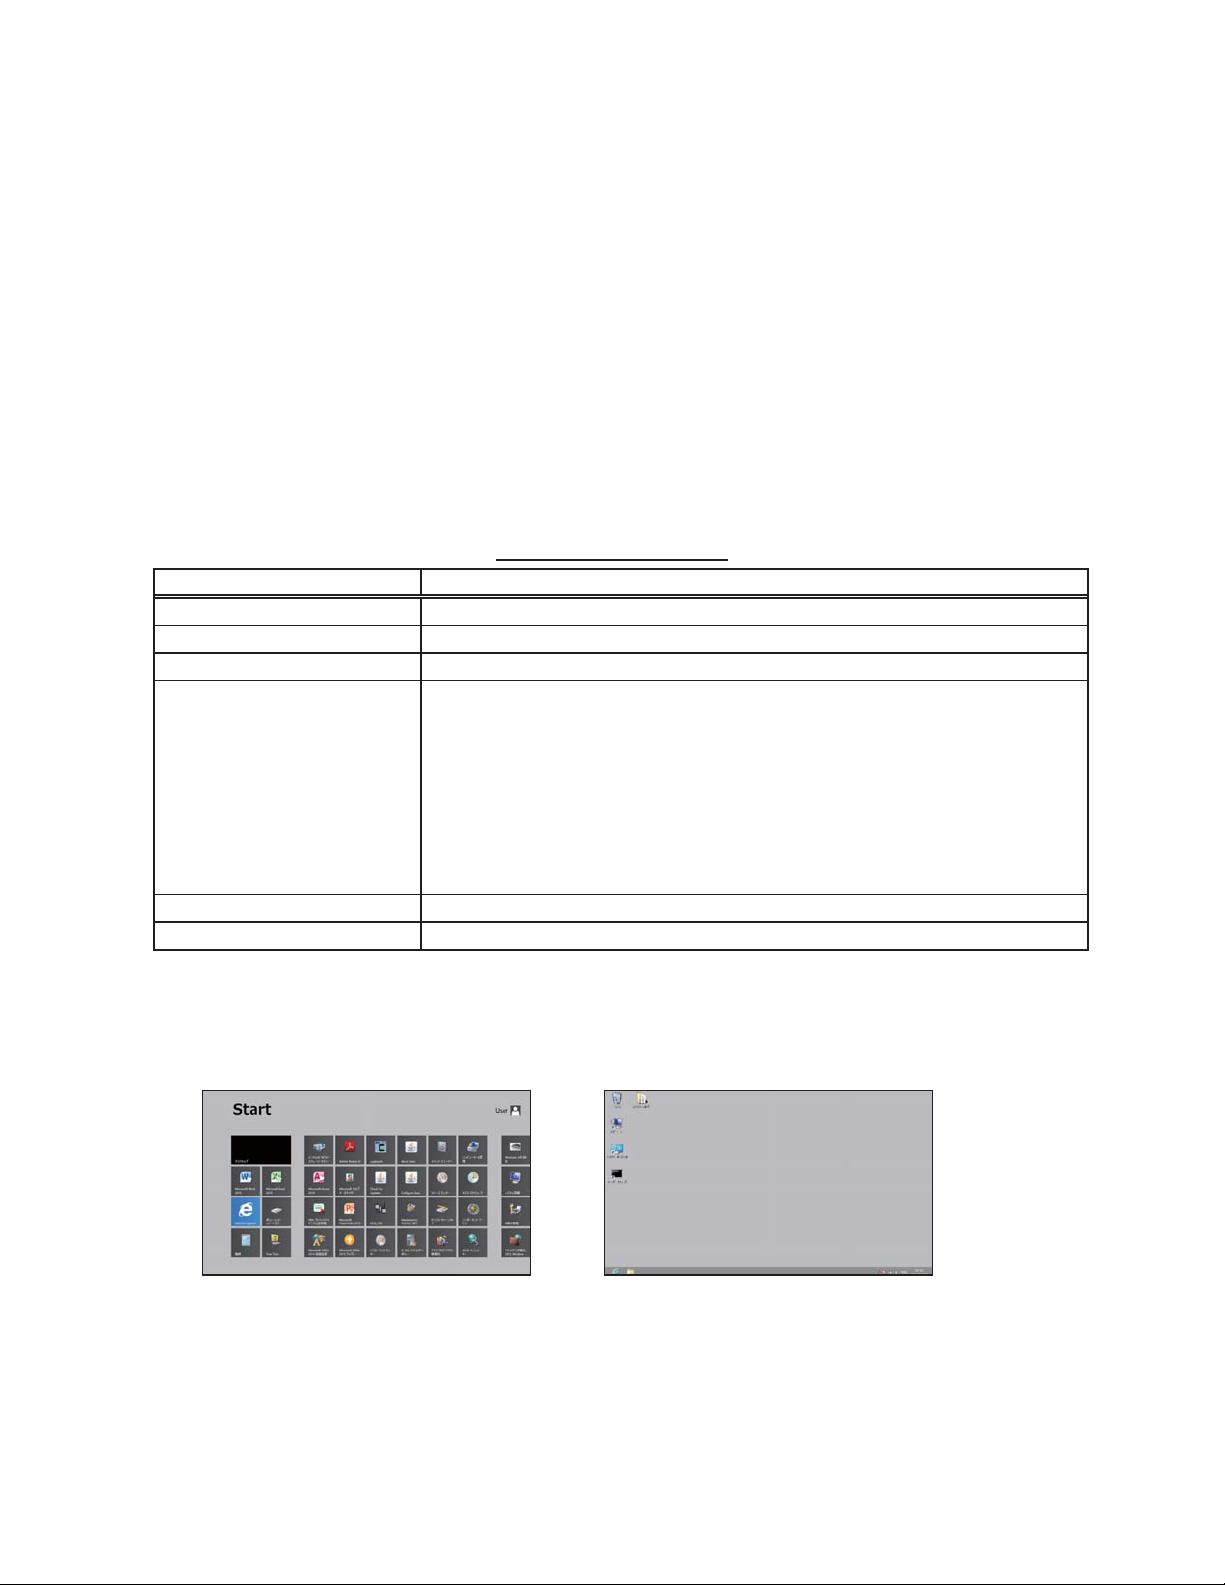
- Screen images used in this manual are from Windows 7
Note: Windows is a registered trademark or trademark of Microsoft Corporation in the United States and other countries.
1-2. PC Requirements
CPU 1 GHz or faster
Memory 512 MB or more
Screen resolution 1366 x 768 or higher recommended
Browser
On-board LAN port or LAN card 100 BASE-TX
Pointing device e.g., mouse
Note: Microsoft is a registered trademark or trademark of Microsoft Corporation in the United States and/or other countries.
Note: Although no particular OS is required, the Web browser will not properly operate when it is started up from the Internet
browser, and must be made on each AE-50A/EW-50A or AE-50E/EW-50E Web browser respectively.
®
and Internet Explorer 9.0.
Table 1-1 PC Requirements
Item Requirement
®
Microsoft
Microsoft
Microsoft
Microsoft
* Java execution environment is required.
(Verified to run on Oracle
* Install Oracle
using a 64-bit OS, install a 32-bit and a 64-bit Java Plug-in.
* The version of the Oracle
Control Panel.
Oracle and Java are trademarks or registered trademarks of Oracle Inc. in the United States and/or other countries.
Explorer on the Windows 8.1 start screen. If the Web browser was started up on the start screen, close the Web browser and
switch the screen to the desktop screen, and then start up the Web browser again. Refer to the help functions of Windows 8.1
for how to switch the screens.
Internet Explorer 8.0
®
Internet Explorer 9.0
®
Internet Explorer 10.0
®
Internet Explorer 11.0
®
®
Java Plug-in that is appropriate for your operating system. When
Java Plug-in Ver. 1.8.0_25)
®
Java Plug-in can be verified by clicking [Java] in the
Start screen Desktop screen
1-3. Notes on using the integrated centralized control software TG-2000A
If the system is connected to a TG-2000A, make or change all settings from the TG-2000A so that the data in the
TG-2000A and AE-200/AE-50/EW-50 will match.
Note: Use TG-2000A Ver. 6.60 or later.
WT07138X02
2
Page 3
2. Setting the Operating Environment
This chapter explains how to make PC settings and Web browser settings to monitor and operate the air
conditioning units.
2-1. Setting the IP Address of the PC
Follow the instructions below to set the PC’s IP address for the Web browser to recognize the
AE-200/AE-50/EW-50 unit.
The PC’s IP address must have the same network address as the AE-200/AE-50/EW-50’s IP address.
(i.e., AE-200’s IP address: [192.168.1.1], PC’s IP address: [192.168.1.101])
When connecting an AE-200/AE-50/EW-50 to an existing LAN, consult the system administrator to decide the IP
addresses.
Note: When using an AE-200/AE-50/EW-50-dedicated LAN, it is recommended that the AE-200 unit and the EW-50 unit (only
(1)
(2)
when used alone) be assigned an IP address between the range [192.168.1.1] and [192.168.1.40], the AE-50/EW-50 unit
be assigned an IP address between the range [192.168.1.211] and [192.168.1.249], and that the PC connected to the
AE-200/AE-50/EW-50 be assigned an IP address between the range [192.168.1.101] and [192.168.1.150].
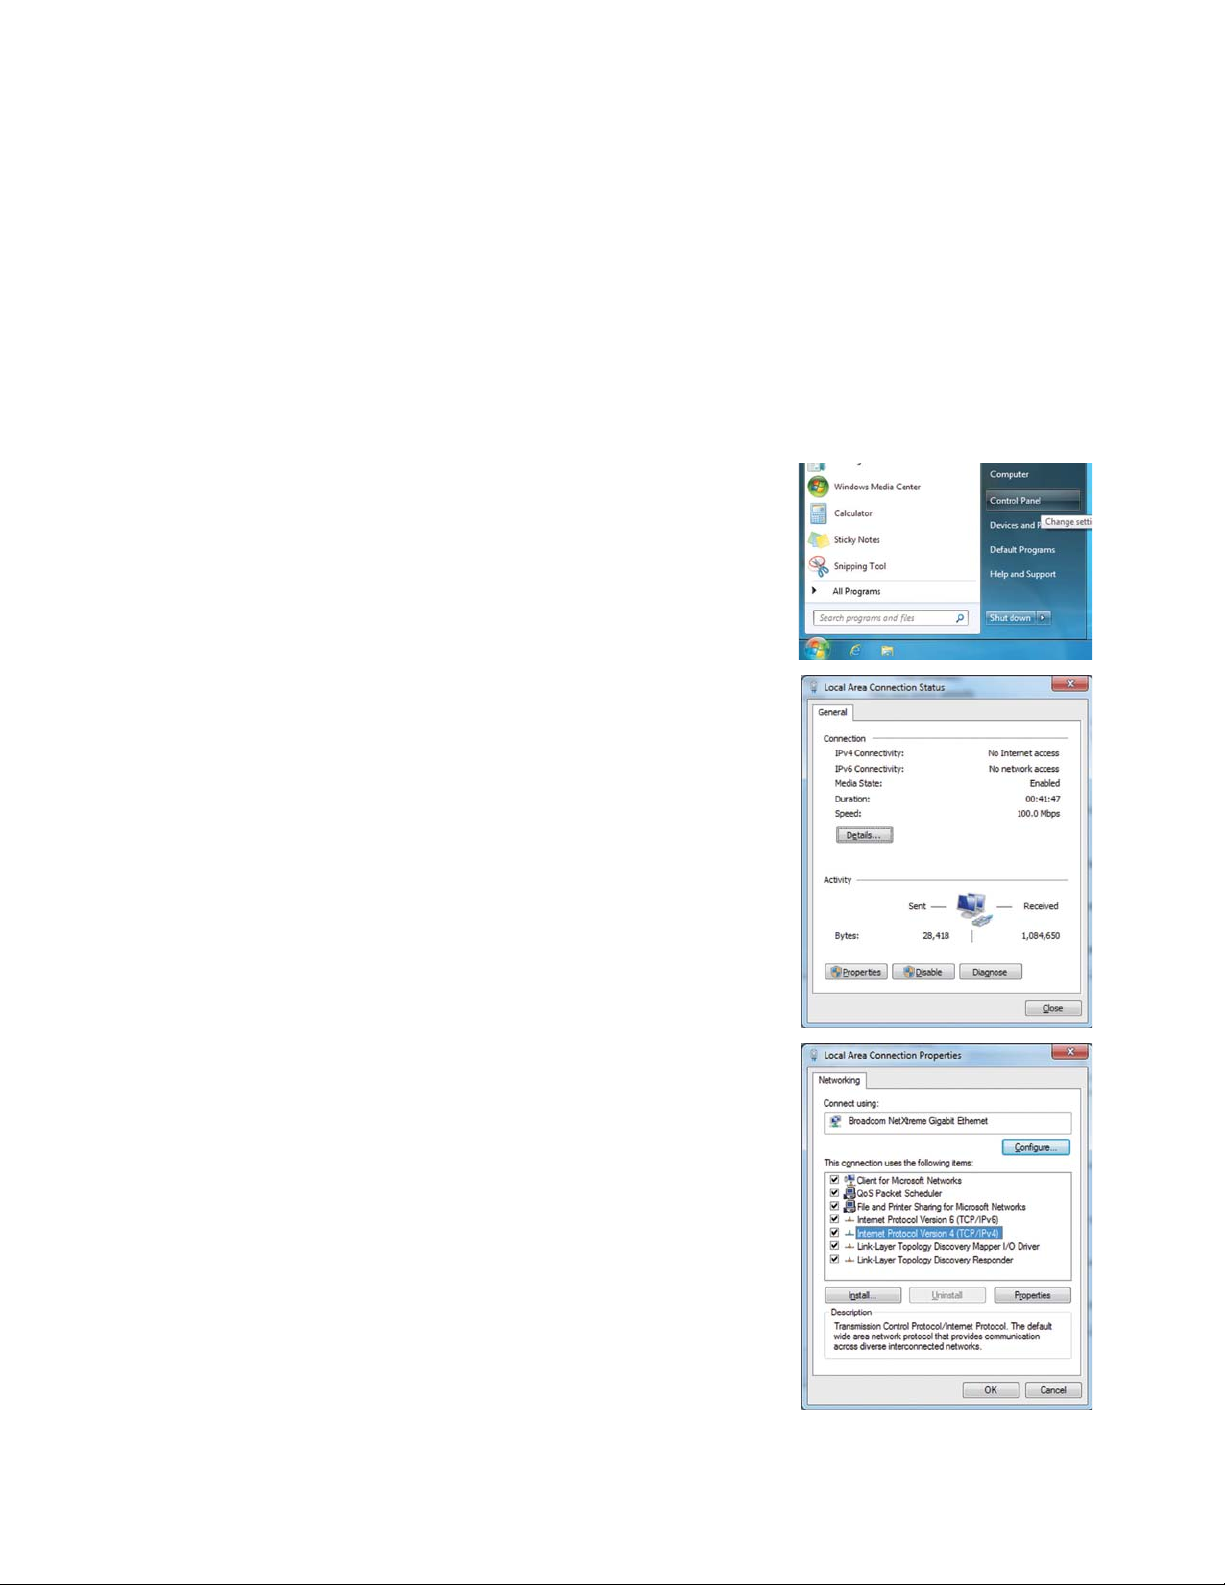
Click [Control Panel] in the Start menu.
Click [Network and Sharing Center]>[Local Area Setting].
In the [Local Area Connection Status] window, click [Properties].
(3)
Click [Internet Protocol Version 4 (TCP/IPv4)] to select it, and click
[Properties].
WT07138X02
3
Page 4
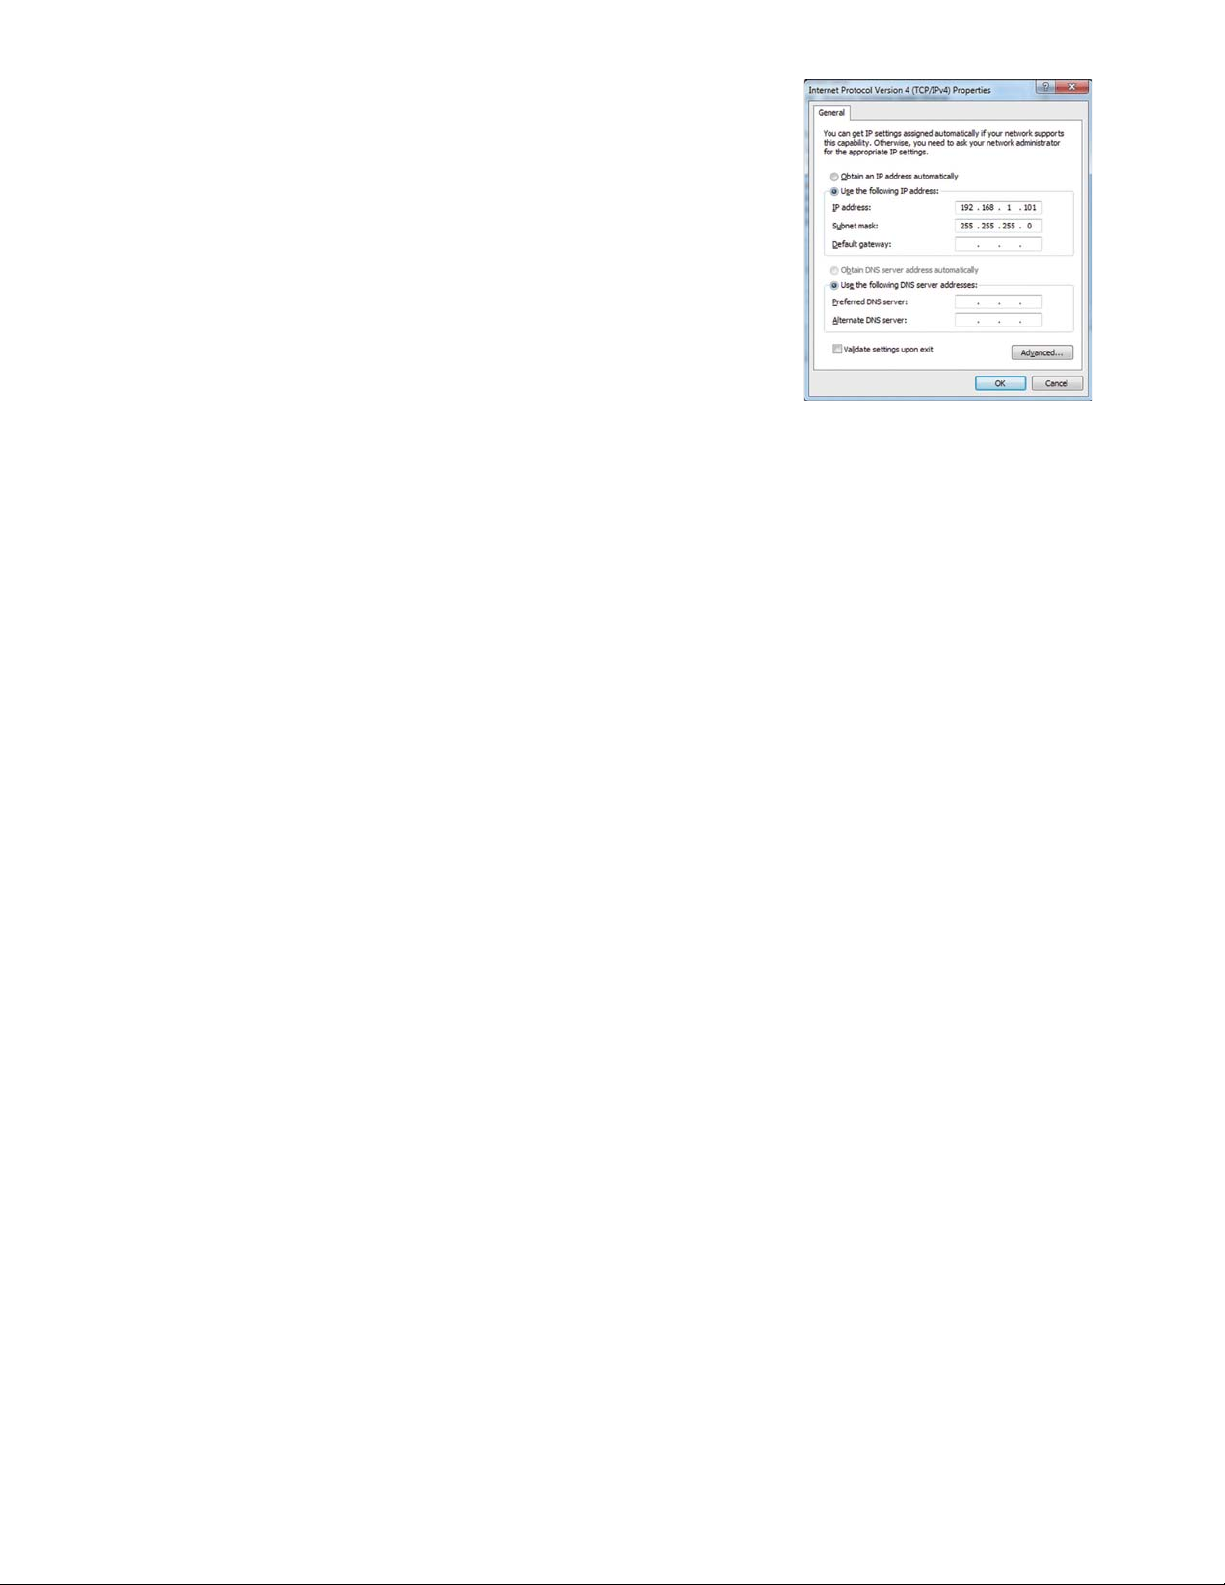
(4)
In the [Internet Protocol Version 4 (TCP/IPv4) Properties] window,
check the radio button next to [Use the following IP address].
Enter the PC’s IP address (e.g., [192.168.1.101]) in the [IP address]
field, and enter the subnet mask [255.255.255.0] (unless otherwise
specified) in the [Subnet mask] field.
In the [Default gateway] field, enter the gateway address as
necessary. (Refer to section 4-2-5 for details.)
Note: Consult the system administrator to decide the IP, subnet mask, and
(5)
Keep clicking [OK] or [Close] to close all windows.
gateway addresses.
WT07138X02
4
Page 5
2-2. Setting the Web Browser
Web browser setting varies with the Internet connection type. See the sections below for how to make Web
browser settings for different types of Internet connection.
To prevent unauthorized access, always use a security device such as a VPN router when
connecting the AE-200/AE-50/EW-50 to the Internet.
2-2-1. No Internet connection
To monitor and operate the air conditioning units from a PC with no Internet connection, follow the instructions
below to set the environment for the Web browser.
(1)
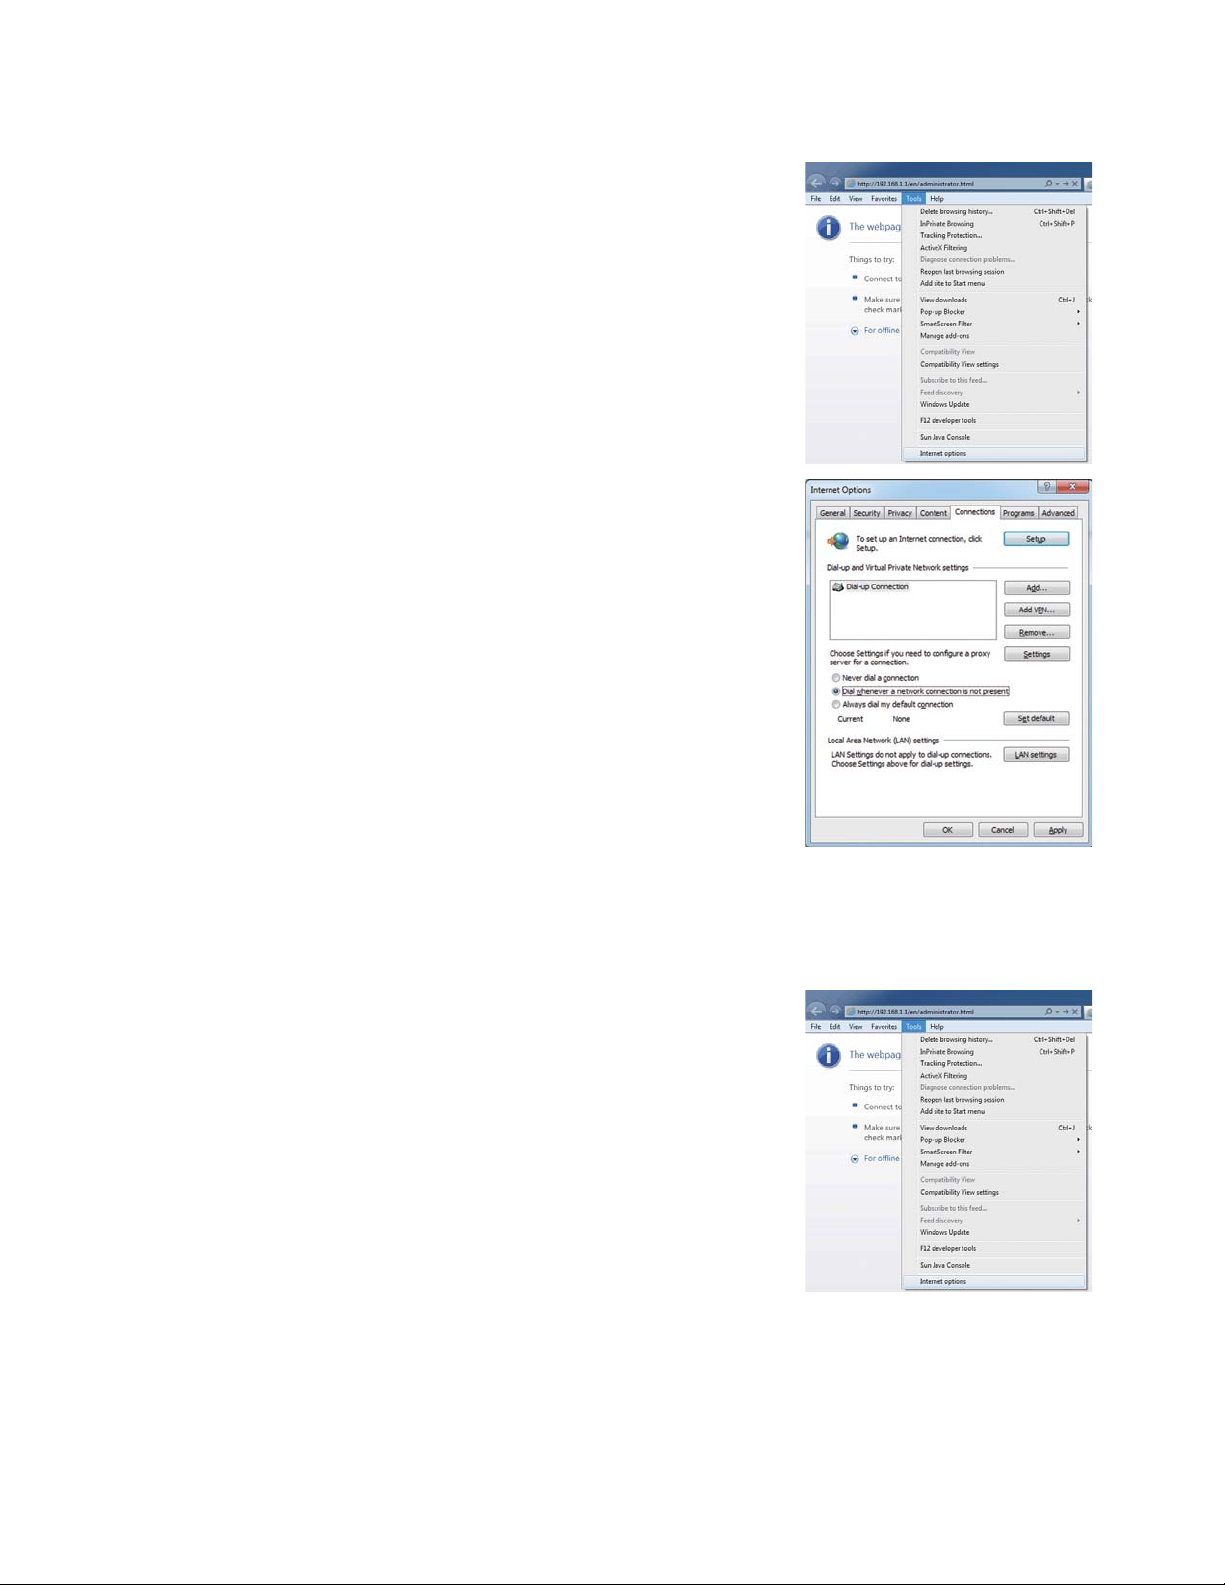
Click [Tools] in the menu bar, then click [Internet options].
(2)
In the [Internet Options] window, click the [Connections] tab.
(3)
Check the radio button next to [Never dial a connection] in the middle
of the window, and click [OK] to close the window.
WT07138X02
5
Page 6
2-2-2. Dial-up Internet connection
To monitor and operate the air conditioning units from a PC that connects to the Internet through a dial-up
connection, follow the instructions below to set the environment for the Web browser.
(1)
Click [Tools] in the menu bar, then click [Internet options].
(2)
In the [Internet Options] window, click the [Connections] tab.
(3)
Check the radio button next to [Dial whenever a network connection
is not present] in the middle of the window, and click [OK] to close the
window.
By making these settings, a message will appear asking whether
or not to use a dial-up connection when an Internet connection is
necessary. Follow the message to connect to the Internet.
2-2-3. Connecting to the Internet via proxy server using an existing LAN
To monitor and operate the air conditioning units from a PC that connects to the Internet through a proxy server
by connecting to an existing LAN, such as a LAN within your company, follow the instructions below to set the
environment for the Web browser.
(1)
Click [Tools] in the menu bar, then click [Internet options].
WT07138X02
6
Page 7

(2)
In the [Internet Options] window, click the [Connections] tab.
(3)
Check the radio button next to [Never dial a connection] in the middle
of the window.
(4)
Click [LAN settings] under [Local Area Network (LAN) settings].
(5)
In the [Local Area Network (LAN) Settings] window, check [Bypass
proxy server for local addresses], and click [Advanced].
(6)
In the [Proxy Settings] window, enter the AE-200/AE-50/EW-50’s
IP address (e.g., 192.168.1.1) in the [Exceptions] field. Then, keep
clicking [OK] or [Close] to close all windows.
If connecting multiple AE-200/AE-50/EW-50 units, enter their
addresses (e.g., [192.168.1.1; 192.168.1.2]). It is also possible to use
an asterisk as a wildcard (e.g., [192.168.1.*]).
WT07138X02
7
Page 8
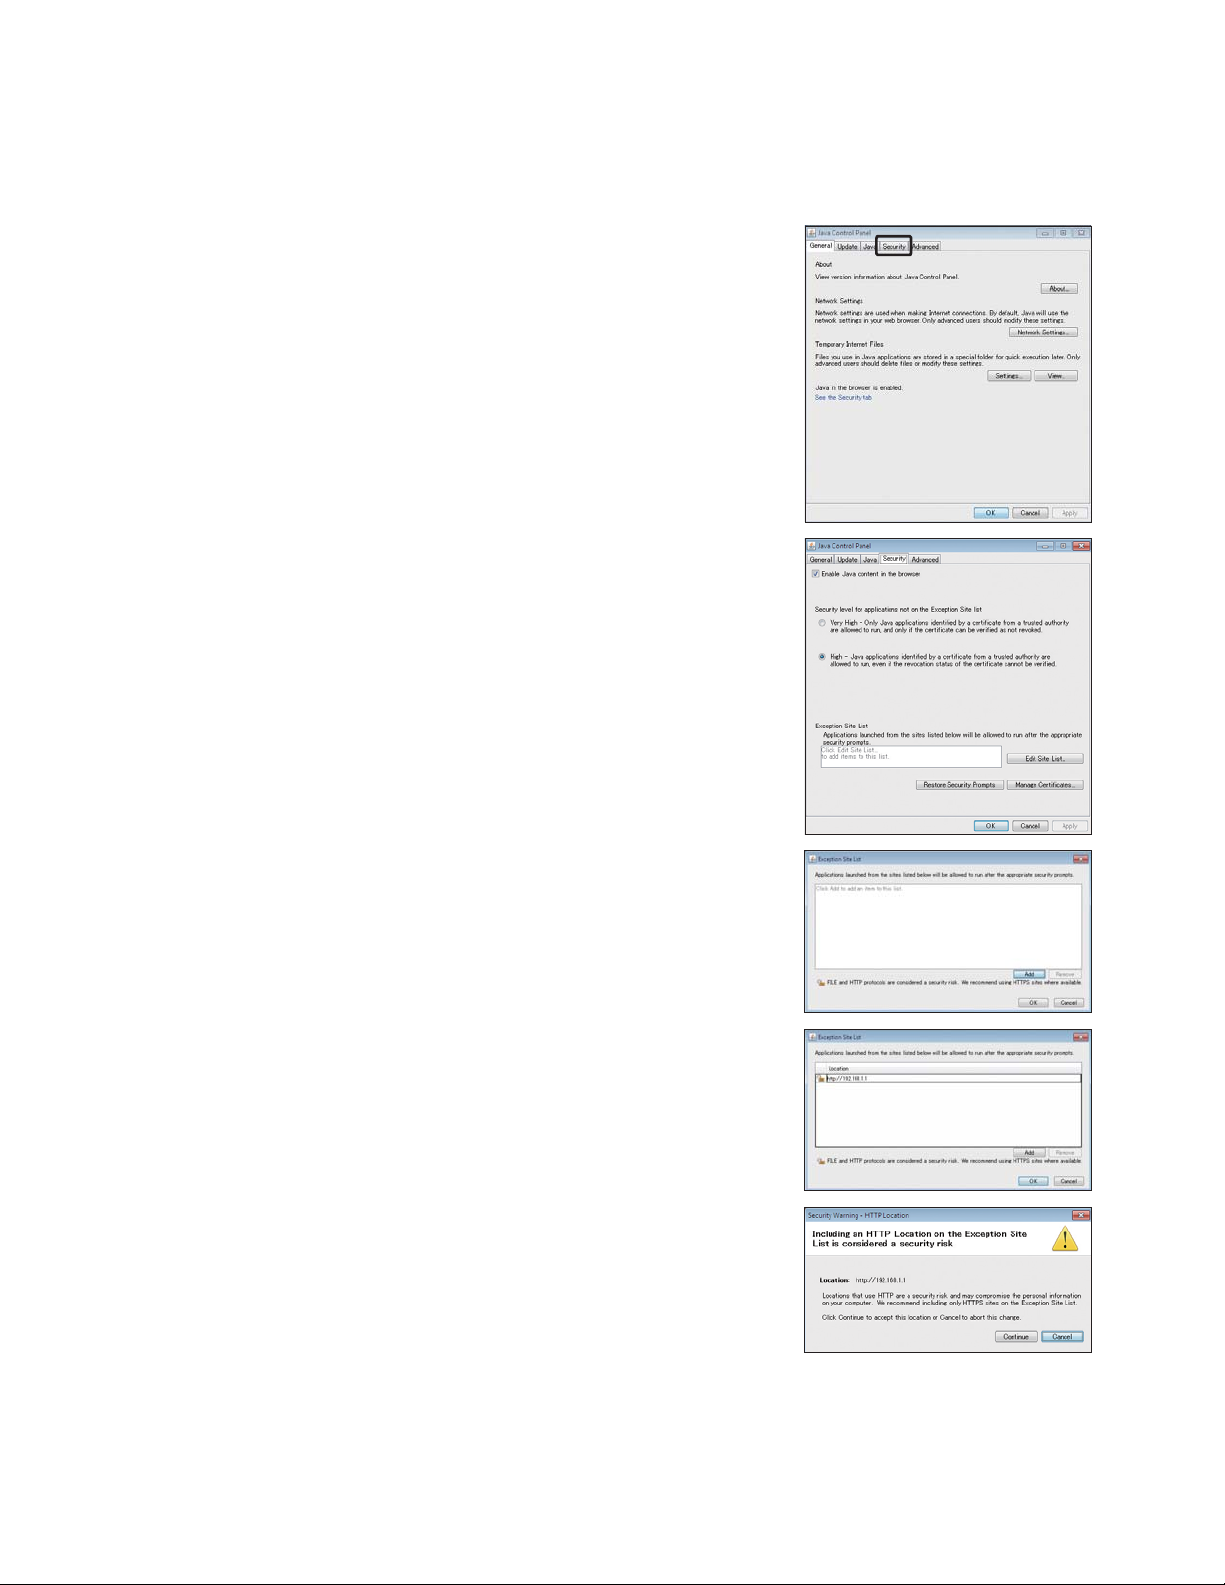
2-3. Java settings
2-3-1. How to register exception site list
(1)
Click [Control Panel]>[Java].
Note: If [Category] is selected in the top right corner, next to [View by:], change it to [Large icons] or [Small icons].
(2)
Java Control Panel will open.
Click the [Security] tab.
(3)
The security setting window will open.
Click the [Edit Site List...] button.
(4)
The [Exception Site List] dialog will appear.
Click [Add].
(5)
The [Exception Site List] dialog will appear.
In the white box, enter the following, and then click [OK].
http://[IP address of AE-200, AE-50, or EW-50]
Note: If the IP address of the AE-200 is [192.168.1.1], enter
Note: When using HTTPS (SSL) connection, prefix the web address with
(6)
The security warning screen will appear.
[http: //192.168.1.1].
[https]. (https: //[IP address of AE-200, AE-50, or EW-50])
Click [Continue].
Note: The security warning screen will not appear when HTTPS (SSL)
connection is used.
WT07138X02
8
Page 9
(7)
Add all AE-200/AE-50/EW-50 to the list in the same manner, and
click [OK].
(8)
If a PC with 32-bit OS is used, after completing the settings, close all Internet Explorer windows, and access
the Web page again to make sure the appropriate window will appear.
If a PC with 64-bit OS is used, go to step (9) below.
(9)
Click [My Computer]>[Local Disk (C:)]>[Program Files (x86)]
*1
>[Java]>[jre*] (The asterisk indicates a version
number. (i.e., jre1.8.0_31))>[bin] to open the [bin] folder.
*1 If a PC with 64-bit OS is used, both [Program Files] and [Program Files (x86)] folders will appear. Make sure to select [Program
Files (x86)].
(10)
Double click the “javacpl.exe” file in the [bin] folder.
(11)
Java Control Panel will open. Follow the steps (3) through (8) again.
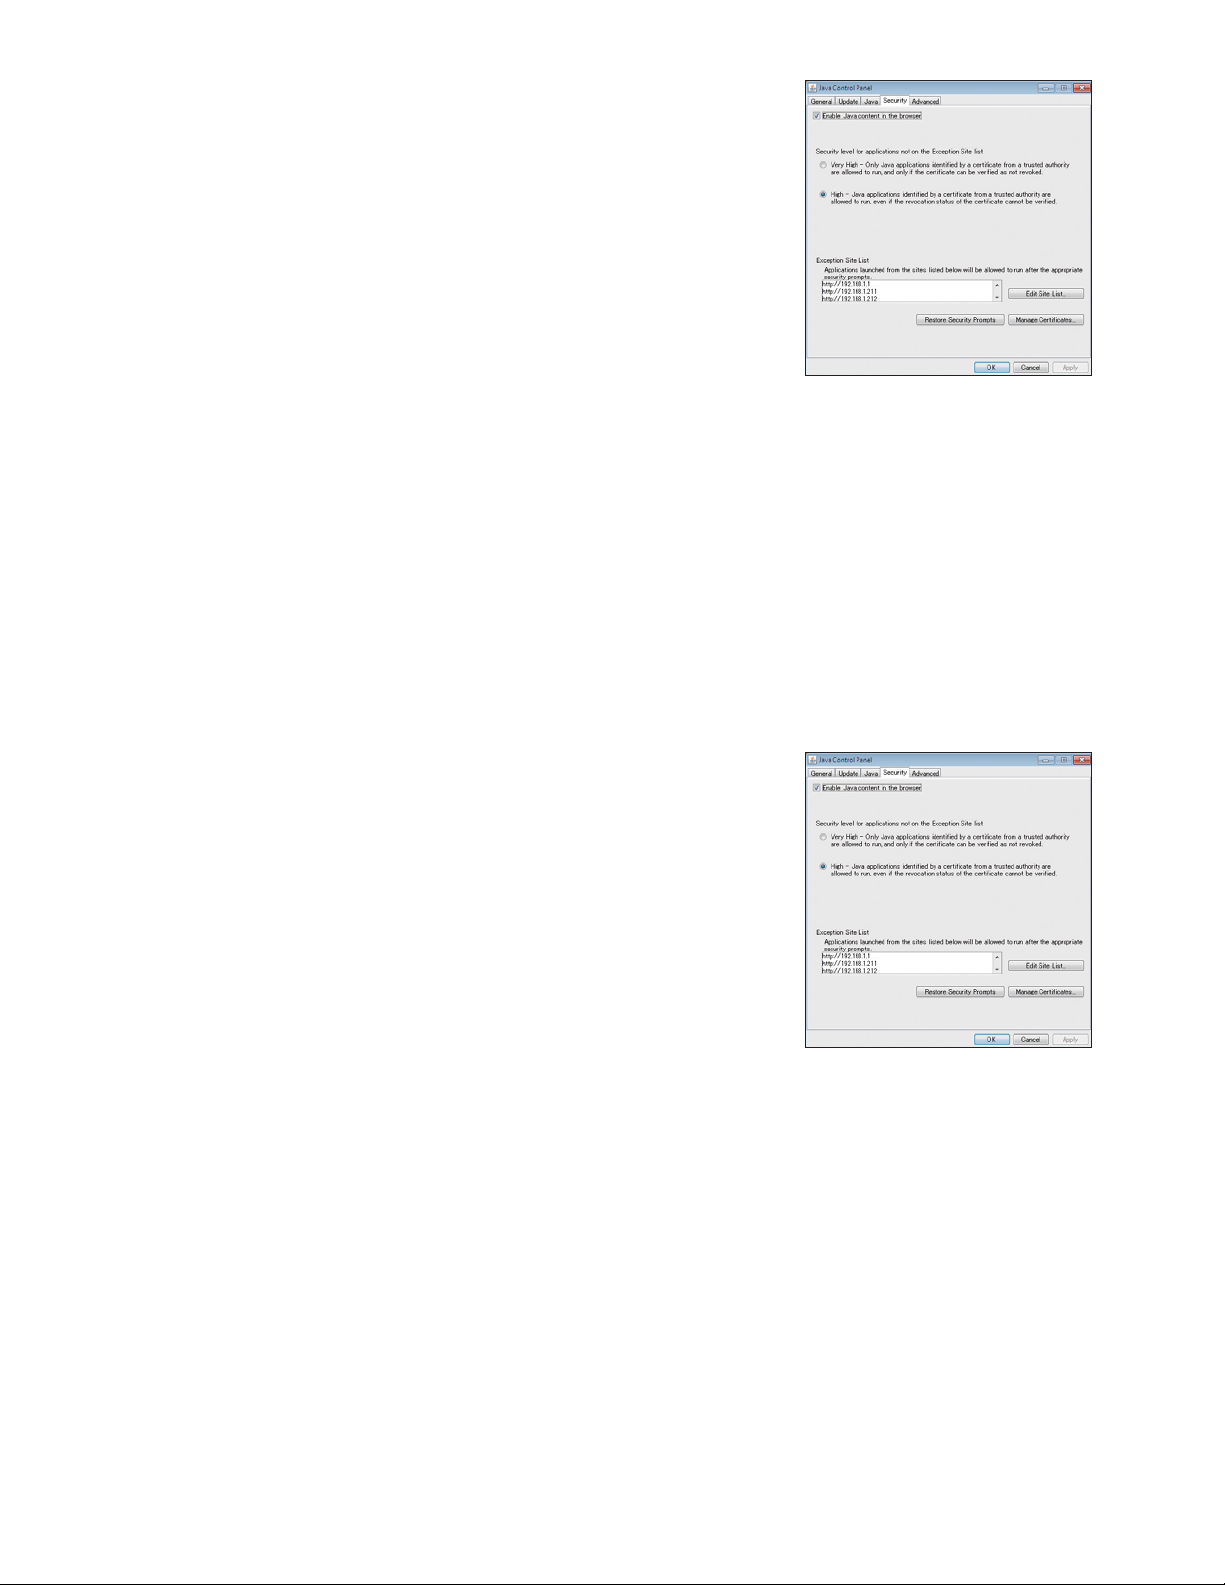
2-3-2. How to enable Java content
(1)
Open the security setting window. (See section 2-3-1 “How to register exception site list”.)
(2)
Click on the checkbox next to [Enable Java content in the browser]
unless it is already checked.
Click [Apply] at the right bottom corner of the screen, and then click
[OK].
(3)
After completing the settings, close all Internet Explorer windows, and access the Web page again to make
sure the appropriate window will appear.
WT07138X02
9
Page 10

3. Logging in to the Web Browser for Initial Settings
(1)
Enter the web page address in the address field of the Web browser as follows:
http://[IP address of each AE-200, AE-50, or EW-50]/init/administrator.html
Press the [Enter] key. A login screen will appear.
Note: If the IP address of the AE-200/AE-50/EW-50 is [192.168.1.1],
Note: Default IP address of AE-200, AE-50, and EW-50 is
Note: When one or more AE-50/EW-50 controllers are connected, log
Note: If the login screen does not appear then take the steps explained
Note: The web page will be displayed in the same language as the operating system on the PC.
the web page address is [http: //192.168.1.1/init/administrator.
html].
[192.168.1.1].
When one or more AE-50/EW-50 controllers are connected,
none of their IP addresses should overlap. The recommended IP
address ranges are as follows.
AE-200: Between [192.168.1.1] and [192.168.1.40]
AE-50/EW-50 (when used for system expansion):
Between [192.168.1.211] and [192.168.1.249]
EW-50 (when used alone):
Between [192.168.1.1] and [192.168.1.40]
Refer to section 4-2 “Basic System” for how to change the IP
addresses.
in to all AE-200, AE-50, and EW-50 Web browsers to make initial
settings for AE-200, AE-50 and EW-50 respectively. The Web
browser cannot be switched among the AE-200, AE-50, and
EW-50.
in chapter 12 to delete the temporary files.
The web page can be displayed in other languages by entering the web page address as follows:
Chinese http://[IP address of each AE-200, AE-50, or EW-50]/init/zh/administrator.html
English http://[IP address of each AE-200, AE-50, or EW-50]/init/en/administrator.html
French http://[IP address of each AE-200, AE-50, or EW-50]/init/fr/administrator.html
German http://[IP address of each AE-200, AE-50, or EW-50]/init/de/administrator.html
Italian http://[IP address of each AE-200, AE-50, or EW-50]/init/it/administrator.html
Japanese http://[IP address of each AE-200, AE-50, or EW-50]/init/ja/administrator.html
Portuguese http://[IP address of each AE-200, AE-50, or EW-50]/init/pt/administrator.html
Russian http://[IP address of each AE-200, AE-50, or EW-50]/init/ru/administrator.html
Spanish http://[IP address of each AE-200, AE-50, or EW-50]/init/es/administrator.html
Note: You can add the web page address to your Favorites on the login screen for easy access in the future.
WT07138X02
10
Page 11

(2)
Enter the user name and the password in the login screen, and click [Login]. A setting screen will appear.
The table below shows the default user names, passwords, and functions that are available for maintenance
users and building managers.
User
Maintenance
user
Default
user name
initial init
Default
password
Initial Settings
Functions 1
Functions 2
Available functions
Date and Time, Basic System, Groups,
Interlocked LOSSNAY, Blocks
E-Mail, Peak Cut, Measurement,
Energy Management Settings
Set Temperature Range Limit,
Night Mode Schedule, System-changeover
External Temperature Interlock,
Functions 3
Night Setback Control, Interlock control,
AHC Port Name Settings
User Settings User Settings
Utility Back up/import settings data
Building
manager
Note: A building manager will use the same user name and password for the Web Browser for System Maintenance Engineer.
Note: A maintenance user can specify the functions to be made available for building managers. Refer to chapter 8 “User
Settings” for details.
Note: It is recommended to change the default user name and password so that the users other than the maintenance users
and building managers will not be able to change the settings.
Note: When one or more AE-50/EW-50 controllers are connected, log in to all AE-200, AE-50, and EW-50 Web browsers
to make initial settings for AE-200, AE-50, and EW-50 respectively. The Web browser cannot be switched among the
AE-200, AE-50, and EW-50.
administrator admin
Out of the functions listed above, the items to which access rights
have been given on the User Settings screen are available.
WT07138X02
11
Page 12
Encrypting the communication data and logging in to the Web browser
(HTTPS connection)
AE-200/AE-50/EW-50 can encrypt communication data using HTTPS (SSL).
When connecting the AE-200/AE-50/EW-50 to the LAN that is accessible to the general public, it is
recommended that the following settings be made so that the units are monitored and controlled on the
encrypted web page.
Note: Depending on the operating system or the Java version, HTTPS encrypted communication may not be enabled properly.
(1)
(2)
If this happens, use an HTTP connection as explained in the previous page.
Prefix the web address with [https], enter the rest of the address, and
press the [Enter] key.
https://[IP address of each AE-200, AE-50, or EW-50]/init/
administrator.html
Note: If the IP address of the AE-200/AE-50/EW-50 is [192.168.1.1], the web page
address is [https: //192.168.1.1/init/administrator.html].
The encrypted data communication will begin, and the Login screen
will appear.
When the first time the Web browser is accessed, a security certificate
error page appears instead of the Login screen. Go to step (2) below.
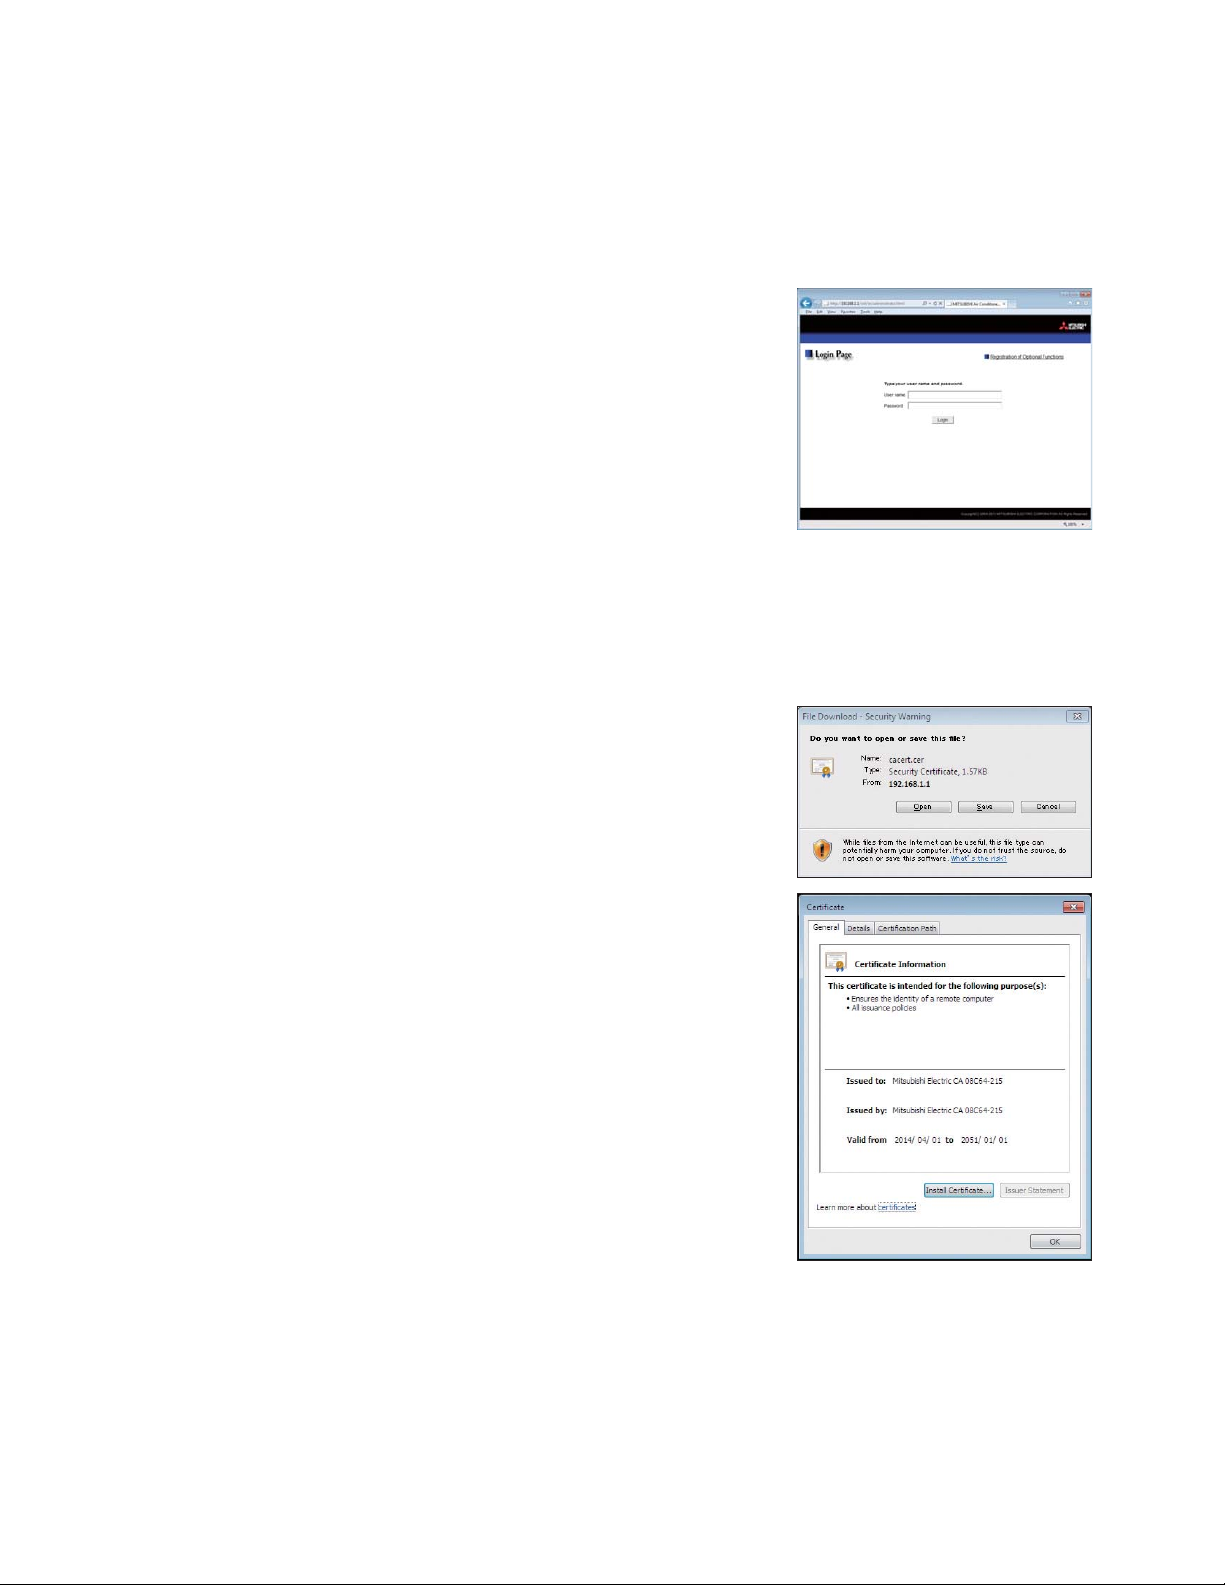
Enter the following web page address in the address field of the Web browser, and press the [Enter] key:
http://[IP address of each AE-200, AE-50, or EW-50]/cacert.cer
(3)
A notification bar or a window to confirm about file download will
appear.
Click [Open].
(4)
A certificate dialog will appear.
Click [Install Certificate...].
WT07138X02
12
Page 13

(5)
A Certificate Import Wizard window will appear.
Click [Next].
(6)
Choose [Place all certificates in the following store] and click the
[Browse...] button.
Select [Trusted Root Certification Authorities], click [OK], and then
click [Next].
(7)
Click [Finish] on completing the Certificate Import Wizard.
(8)
Click [Yes] on the security warning to install the certificate.
(9)
Certificate import process starts. A window will appear when the import
completes successfully.
Click [OK].
Note: The valid period of the certificate is from April 1st, 2014 to January 1st,
2051. The system date and time of the PC must be within the period.
WT07138X02
13
Page 14

4. Initial Settings
This chapter explains how to set the initial settings on the Web Browser for Initial Settings.
Note: When one or more AE-50/EW-50 controllers are connected, initial settings must be made on each AE-50/EW-50’s Web
Important
Ɣ If the system is connected to a TG-2000A, make or change all settings from the TG-2000A so that the data in the
TG-2000A and AE-200 will match.
Ɣ Any control (such as interlock control or Peak Cut control) between the outdoor and indoor units connected to the AE-200,
AE-50, and EW-50, as well as between the units connected to different AE-50/EW-50 controllers, cannot be performed.
browser. However, only Date and Time settings (section 4-1) and Basic System settings (section 4-2) must be made on
the AE-200 Web browser.
WT07138X02
14
Page 15
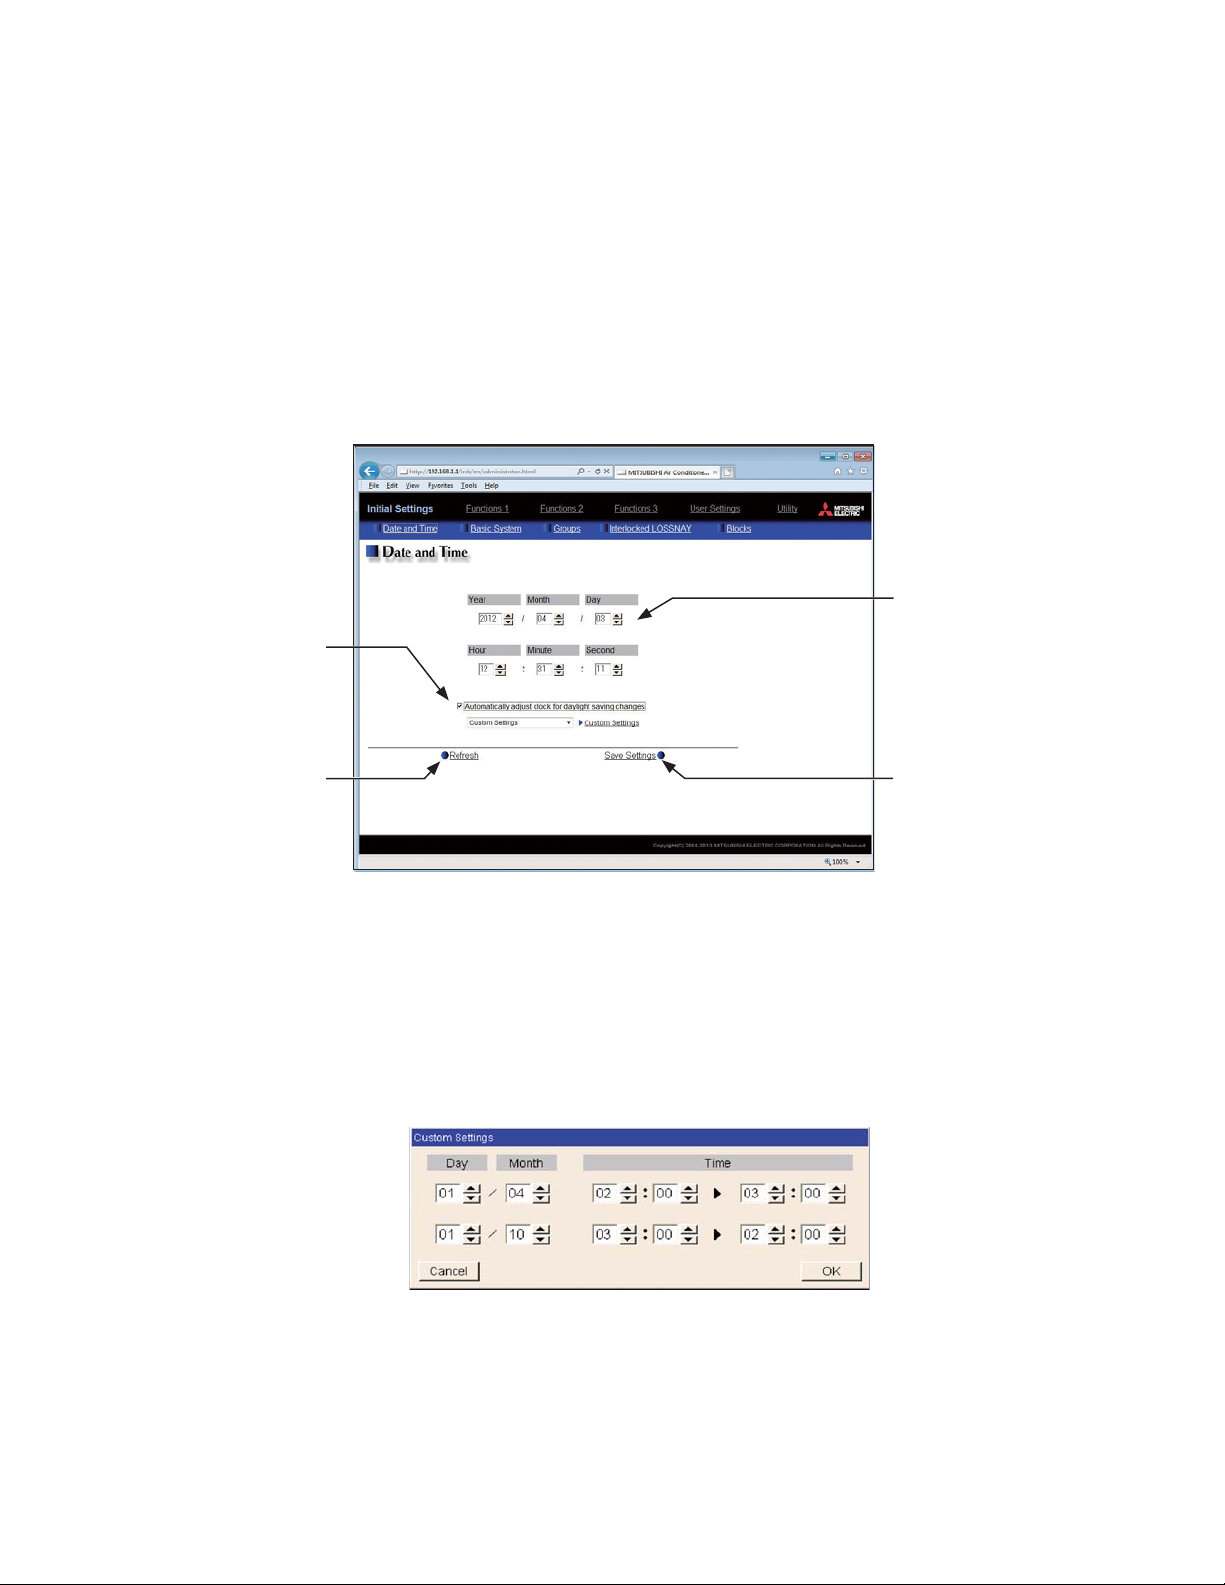
4-1. Date and Time
Click [Initial Settings] in the menu bar, and then click [Date and Time] to access the date and time settings
screen.
Set the current date and time, and then click [Save Settings].
Note: The date and time settings may not be accessible if logged in as a building manager.
Note: The date and time settings made on this screen will be reflected on all the units in the M-NET system, all connected
Note: The date and time cannot be set on this screen if the [Time Master] setting is set to [Sub].
Note: The daylight saving time setting is required only on the AE-200.
Note: Changing the date and/or time when the charging function is in use can affect the calculation of the charges.
Note: When AE-50/EW-50 controller, DIDO controller (PAC-YG66DCA), AI controller (PAC-YG63MCA), or PI controller (PAC-
Note: Although date and time settings can be made on each AE-50/EW-50, the date and time synchronization from AE-200 is
Click to enable the daylight
AE-50/EW-50 units, and the AE-200 units whose [Time Master] setting is set to [Sub].
YG60MCA) is added to the system, set the current date and time on this screen to synchronize the date and time on the
added controller.
performed once a day. Make the date and time settings on the AE-50/EW-50 only after the AE-50/EW-50 is replaced.
Current date and time
Enter the current date and
Daylight saving time
setting
saving time setting.
time.
Click to acquire the current
date and time from the
AE-200/AE-50/EW-50.
(1)
Enter the current date and time.
(2)
To adjust the daylight saving time automatically, check the [Automatically adjust clock for daylight saving
Refresh
Save Settings
Click to save the changes
made.
changes] checkbox, and select the applicable country in the pulldown menu.
If the applicable country is not in the pulldown menu, select [Custom Settings] instead. A [Custom Settings]
button will appear on the right of the pulldown menu.
Click the [Custom Settings] button to open the Custom Settings screen, and configure the daylight saving
time setting.
Custom Settings screen
WT07138X02
15
Page 16
4-2. Basic System
Click [Initial Settings] in the menu bar, and then click [Basic System] to access the Basic System settings screen.
Make necessary basic system settings such as AE-200/AE-50/EW-50 unit settings, network settings, and M-NET
settings, and then click [Save Settings] to send the settings to the AE-200/AE-50/EW-50. A message will appear
asking whether or not to restart the AE-200/AE-50/EW-50. Click [OK] to restart the AE-200/AE-50/EW-50 to
reflect the changes.
Note: The Basic System settings may not be accessible if logged in as a building manager.
M-NET Settings
Set the
AE-200/AE-50/EW-50
M-NET address and range
Unit Settings
Set the
AE-200/AE-50/EW-50 name
and unit ID.
Network Settings
Set the
AE-200/AE-50/EW-50 IP
address and subnet mask.
Display Format
Set the screen display items
for the AE-200/AE-50/EW-50
and the Web browser.
of prohibited controllers.
External Input Setting
Set the
AE-200/AE-50/EW-50
external signal input mode.
Advanced Setting
Click to display the screen
for making advanced
settings.
Click to import the settings
Refresh
from AE-200/AE-50/EW-50.
Save Settings
Click to save the changes
made.
4-2-1. Unit Settings
Follow the instructions below to set the AE-200/AE-50/EW-50 unit name and unit ID in the [Unit Settings] section.
The AE-200/AE-50/EW-50 serial number and software version will appear.
(1) Enter the unit name in the [Name] field in 40 alphanumeric or symbol characters or less. The name entered
here will be used on the screen of the software that controls multiple AE-200/AE-50/EW-50 units and will
also be used as a sender name in the error notification e-mail and e-mail alarm.
Note: The following characters cannot be used in the [Name] field: <, >, &, “, or ‘
(2) Enter the unit ID in the [Unit ID] field in 6 figures. Use this setting to manage the multiple unit IDs. The unit
ID entered here will be used on the screen of the software that controls multiple AE-200/AE-50/EW-50 units
and will also be used as a sender ID in the error notification e-mail and e-mail alarm.
WT07138X02
16
Page 17
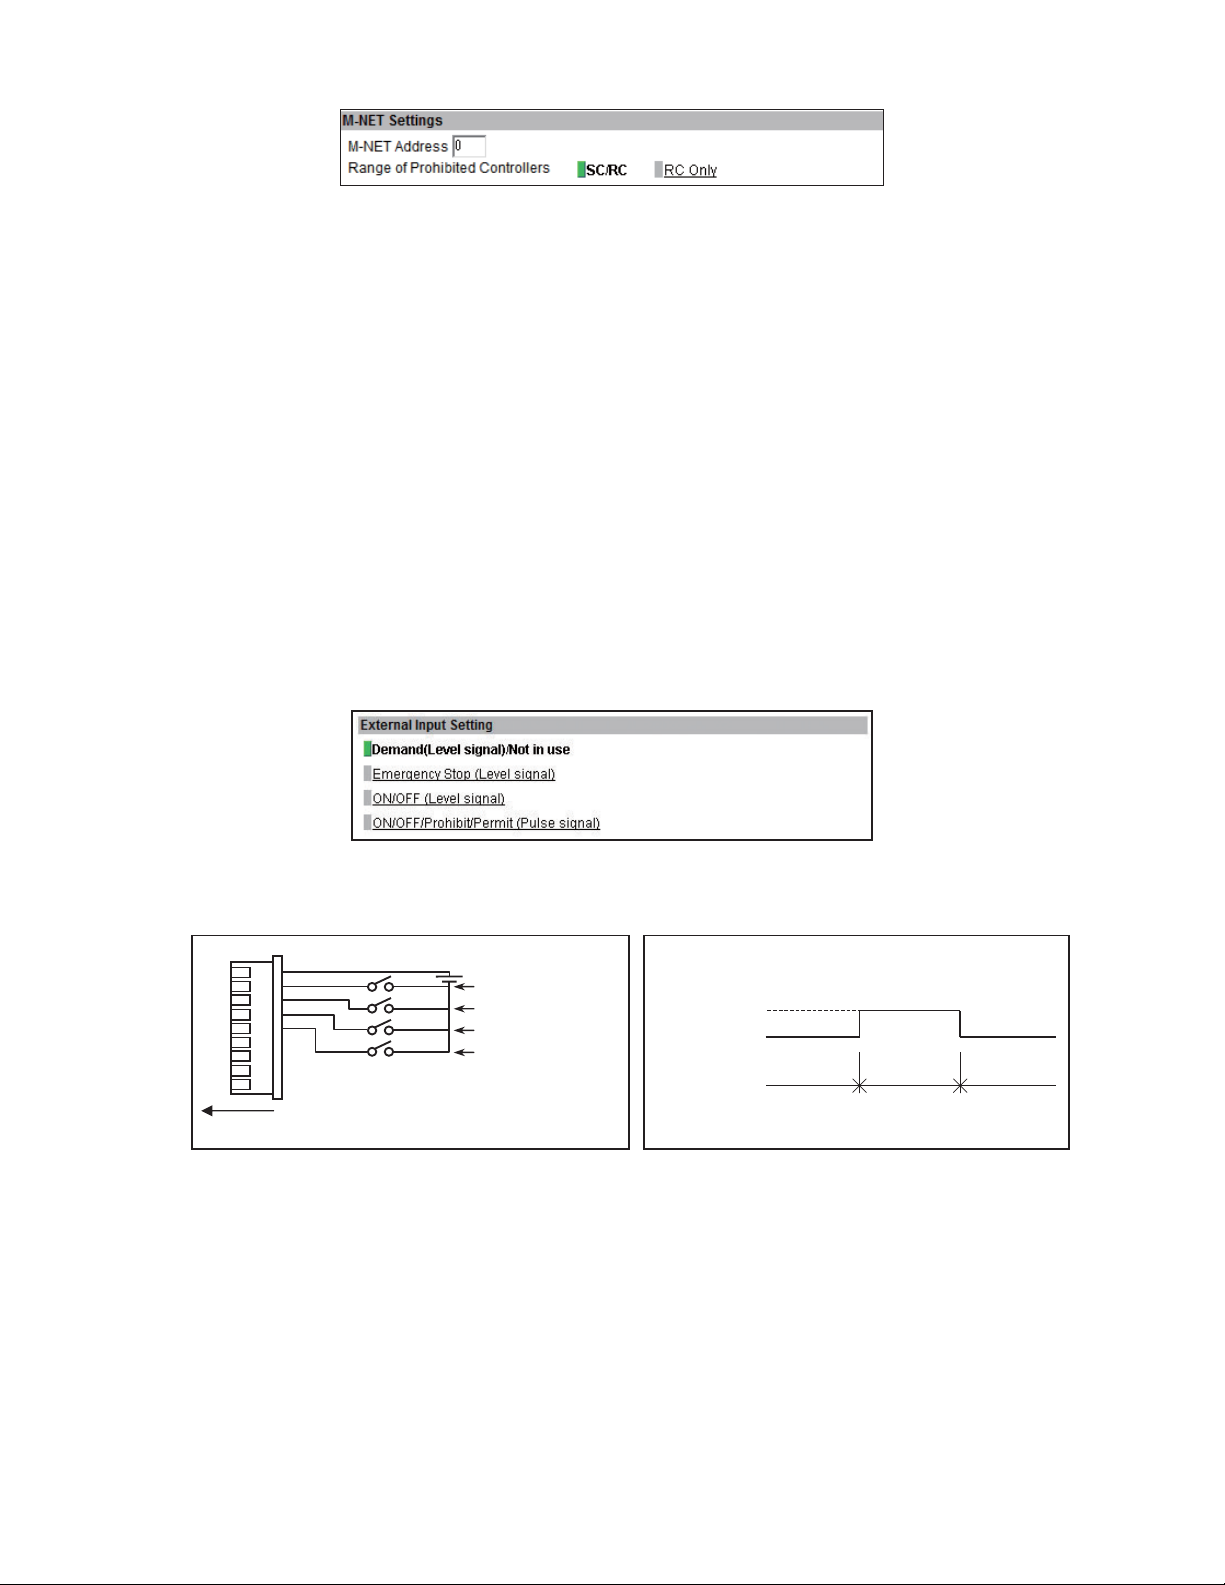
4-2-2. M-NET Settings
(1) Enter [0] in the [M-NET Address] field (unless otherwise specified).
(2) When the local remote controller operation is prohibited on the Web Browser for System Maintenance
Engineer, this setting determines the scope of its applicability. Select [SC/RC] to prohibit the operation from
both the sub system controllers and the remote controllers. Select [RC Only] to prohibit the operation only
from the remote controllers.
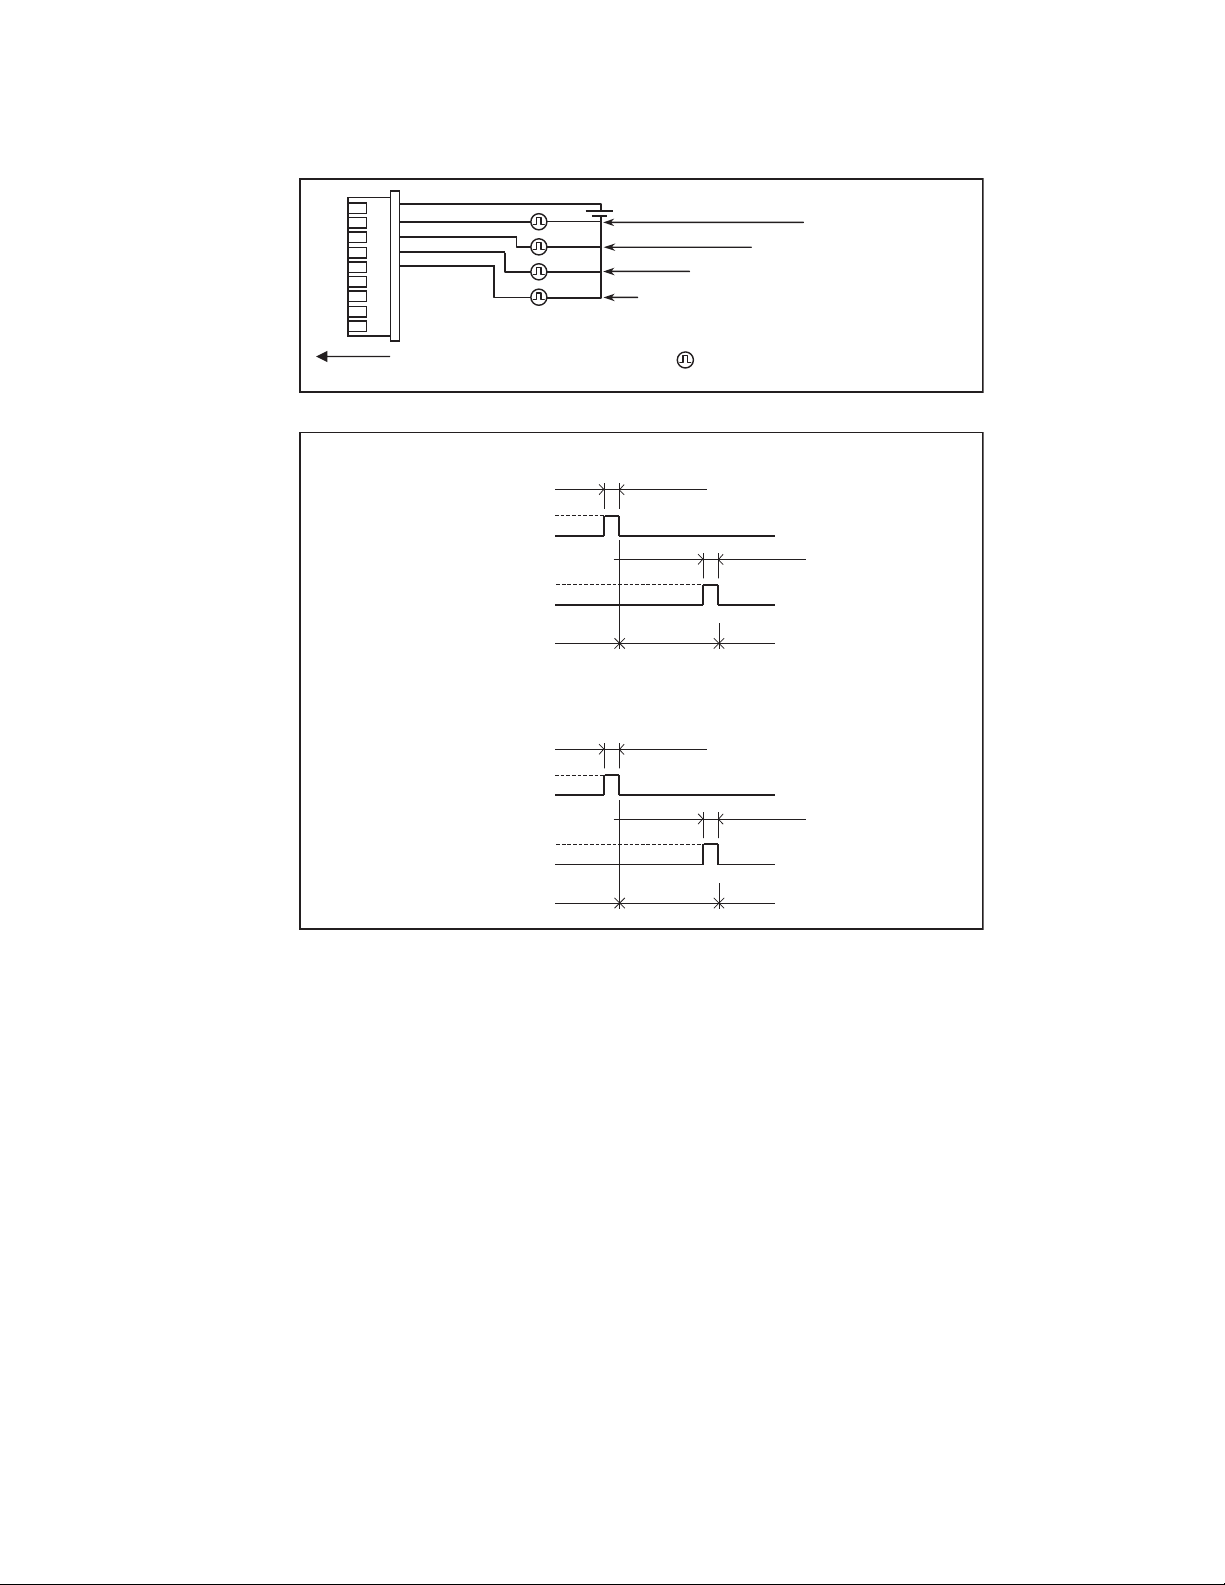
4-2-3. External Input Setting
Using the external signal input function, the following types of collective operations can be performed for all
connected air conditioning units: Emergency stop, ON/OFF operation, and Prohibit/Permit local remote controller
operation.
A separately-sold external input/output adapter (PAC-YG10HA-E) is required for each AE-200, AE-50 and EW-50.
Select the external signal input mode, referring to the explanations below.
Note: Peak Cut control is performed based on the demand level signal (level 1 to 4) input from the connected demand
Note: If an external signal is input to the AE-200 only, the collective operations will not be performed for the units connected to
Note: Refer to the AE-200 Installation Manual for details about the external signal input function.
Note: General equipment connected via DIDO controller (PAC-YG66DCA) cannot be collectively run or stopped by using the
controller. (A separate license is required to use the Peak Cut function.)
the AE-50/EW-50 controllers.
external signal input function unless [Emergency Stop (Level signal)] is selected and relevant switches on the DIDO
controller are set.
(1) Select [Demand(Level signal)/Not in use] when using a level signal to receive a demand level or when not
using the external signal input function.
Note: Refer to the AE-200 Installation Manual for details about the demand level.
9
8
7
6
5
4
3
2
1
Connection to AE-200/AE-50/EW-50 (CN5)
12 or 24 VDC
Demand level 4
Demand level 3
Demand level 2
Demand level 1
Contact ON
Contact OFF
Demand
OFF
Demand ONDemand
OFF
WT07138X02
17
Page 18
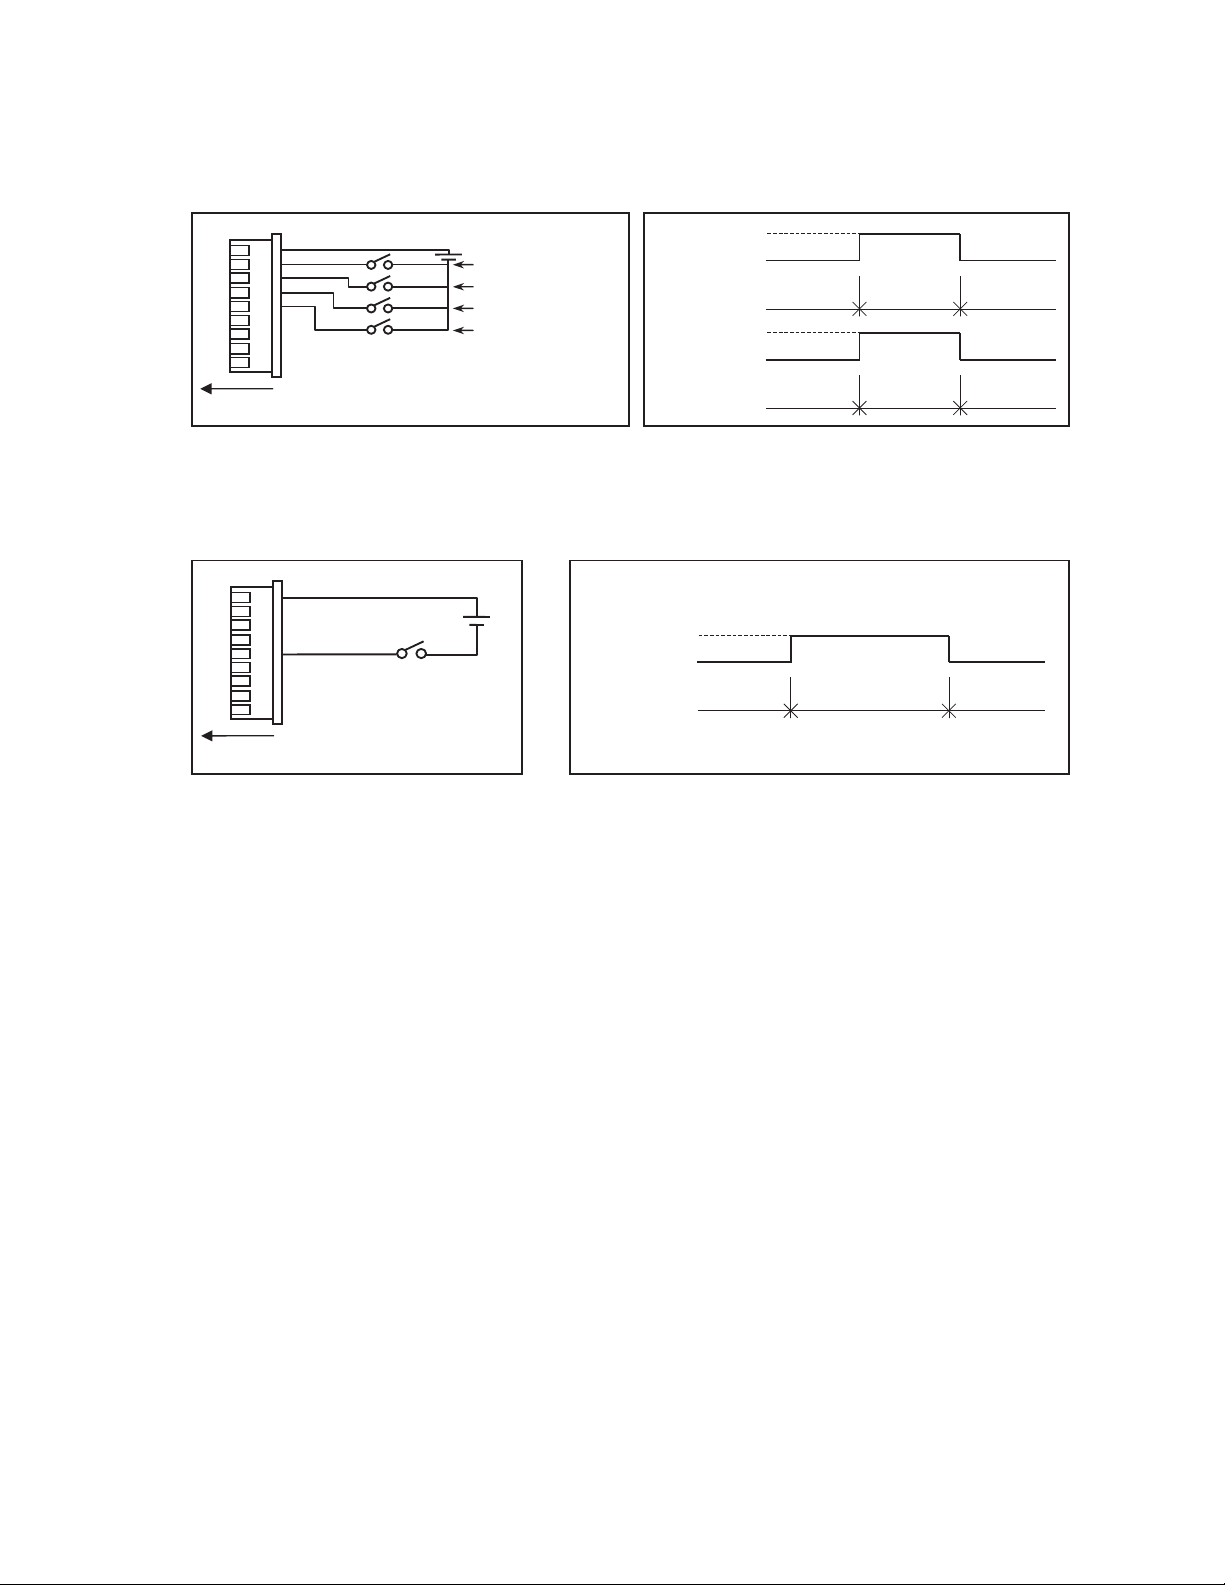
(2) Select [Emergency Stop (Level signal)] when using a level signal to collectively run or stop all the air
conditioning units connected to the AE-200, AE-50, or EW-50 in an emergency. During an emergency stop,
the ON/OFF operation from the local remote controllers will be prohibited, and the ON/OFF operation and
Prohibit/Permit settings on the AE-200, AE-50, or EW-50 will be prohibited.
Note: Refer to the AE-200 Installation Manual for details about the demand level.
12 or 24 VDC
9
8
7
6
5
4
3
2
1
Demand level 4
Demand level 3
Demand level 2
Emergency stop/
Normal operation
Connection to AE-200/AE-50/EW-50 (CN5)
Contact ON
Contact OFF
Contact ON
Contact OFF
Normal
Demand
OFF
Emergency
stop
Normal
Demand ONDemand
OFF
(3) Select [ON/OFF (Level signal)] when using a level signal to collectively run or stop all the air conditioning
units connected to the AE-200, AE-50, or EW-50. The ON/OFF operation from the local remote controllers
will be prohibited, and the ON/OFF operation and Prohibit/Permit settings on the AE-200, AE-50, or EW-50
will be prohibited.
9
8
7
6
5
4
3
2
1
Connection to AE-200/AE-50/EW-50 (CN5)
12 or 24 VDC
ON signal,
OFF signal
Contact ON
Contact OFF
Stop Run Stop
WT07138X02
18
Page 19
(4) Select [ON/OFF/Prohibit/Permit (Pulse signal)] when using a pulse signal to collectively run or stop all the
air conditioning units connected to the AE-200, AE-50, or EW-50, or to collectively prohibit or permit the
operation from the local remote controllers.
9
8
7
6
5
4
3
2
1
12 or 24 VDC
Connection to AE-200/AE-50/EW-50 (CN5)
(Example) ON/OFF
(ON)
(OFF)
Contact ON
Contact OFF
Contact ON
Contact OFF
Stop Run
(Example) Prohibit/Permit
(Prohibit)
Contact ON
Contact OFF
Permit signal
Prohibit signal
OFF signal
ON signal
: Pulse generator
0.5–1.0 second
0.5–1.0 second
Stop
0.5–1.0 second
0.5–1.0 second
(Permit)
Contact ON
Contact OFF
Permit
Prohibit Permit
WT07138X02
19
Page 20

4-2-4. Advanced Setting
4-2-4-1. Time Master/Sub
In the [Time Master] section, select [Master] or [Sub]. The default setting is [Master].
This setting is required to change only for a system with multiple AE-200 controllers. Set to [Master] on only
one of the AE-200 controllers in a system, and set to [Sub] on the rest of the AE-200 controllers. The date and
time synchronization is performed from the AE-200 whose [Time Master] setting is set to [Master] to the AE-200
whose [Time Master] setting is set to [Sub].
Note: When only one AE-200 controller is connected to the system, leave the default setting [Master] as it is.
Note: When multiple AE-50 controllers are connected to the system, leave the default setting [Master] as it is on all AE-50
4-2-4-2. Schedule: Season setting
In the [Schedule: Season setting] section, select [Available] to enable the seasonal settings of the weekly
schedules and [Not Available] to disable. Unless otherwise specified, leave the default setting [Available] as it is.
Note: The settings made on this screen on the AE-200 will be reflected on this screen on the AE-50/EW-50.
controllers.
4-2-4-3. Hold type
In the [Hold type] section, select [Normal] or [Forced].
The Hold function is a function to disable the operations that were scheduled for air conditioning unit groups.
If the setting for [Hold] is set to [ON] on the Condition List screen of the Web Browser for System Maintenance
Engineer and the [Hold type] on the screen above is set to [Forced], the [Hold] setting can be cancelled only
from the AE-200/AE-50/EW-50. If the [Hold type] is set to [Normal], the [Hold] setting can be cancelled from
AE-200/AE-50/EW-50, other system controllers, or remote controllers.
Note: The Hold function can be used on the AE-200A/AE-50A/EW-50A, but not on the AE-200E/AE-50E/EW-50E.
Note: The Hold function cannot be used on general equipments.
Note: The setting [Forced] will not be effective on Air To Water (PWFY) unit groups, LOSSNAY unit groups, and air conditioning
unit groups that do not support the Hold function (i.e., Mr. Slim M-Series/P-Series indoor units).
If the setting for [Hold] is set to [ON] on those unit groups on the Condition List screen and the [Hold type] on the screen
above is set to [Forced], the setting [Normal] will be effective.
4-2-4-4. Old model compatibility mode
In the [Old model compatibility mode] section, select [ON] or [OFF].
Select [ON] when not using the Dual set point function.
When [ON] is selected, the Prohibit Remote Controller function (Timer, Air Direction, Fan Speed) cannot be used.
Note: If the setting is changed, the controller will reboot.
WT07138X02
20
Page 21
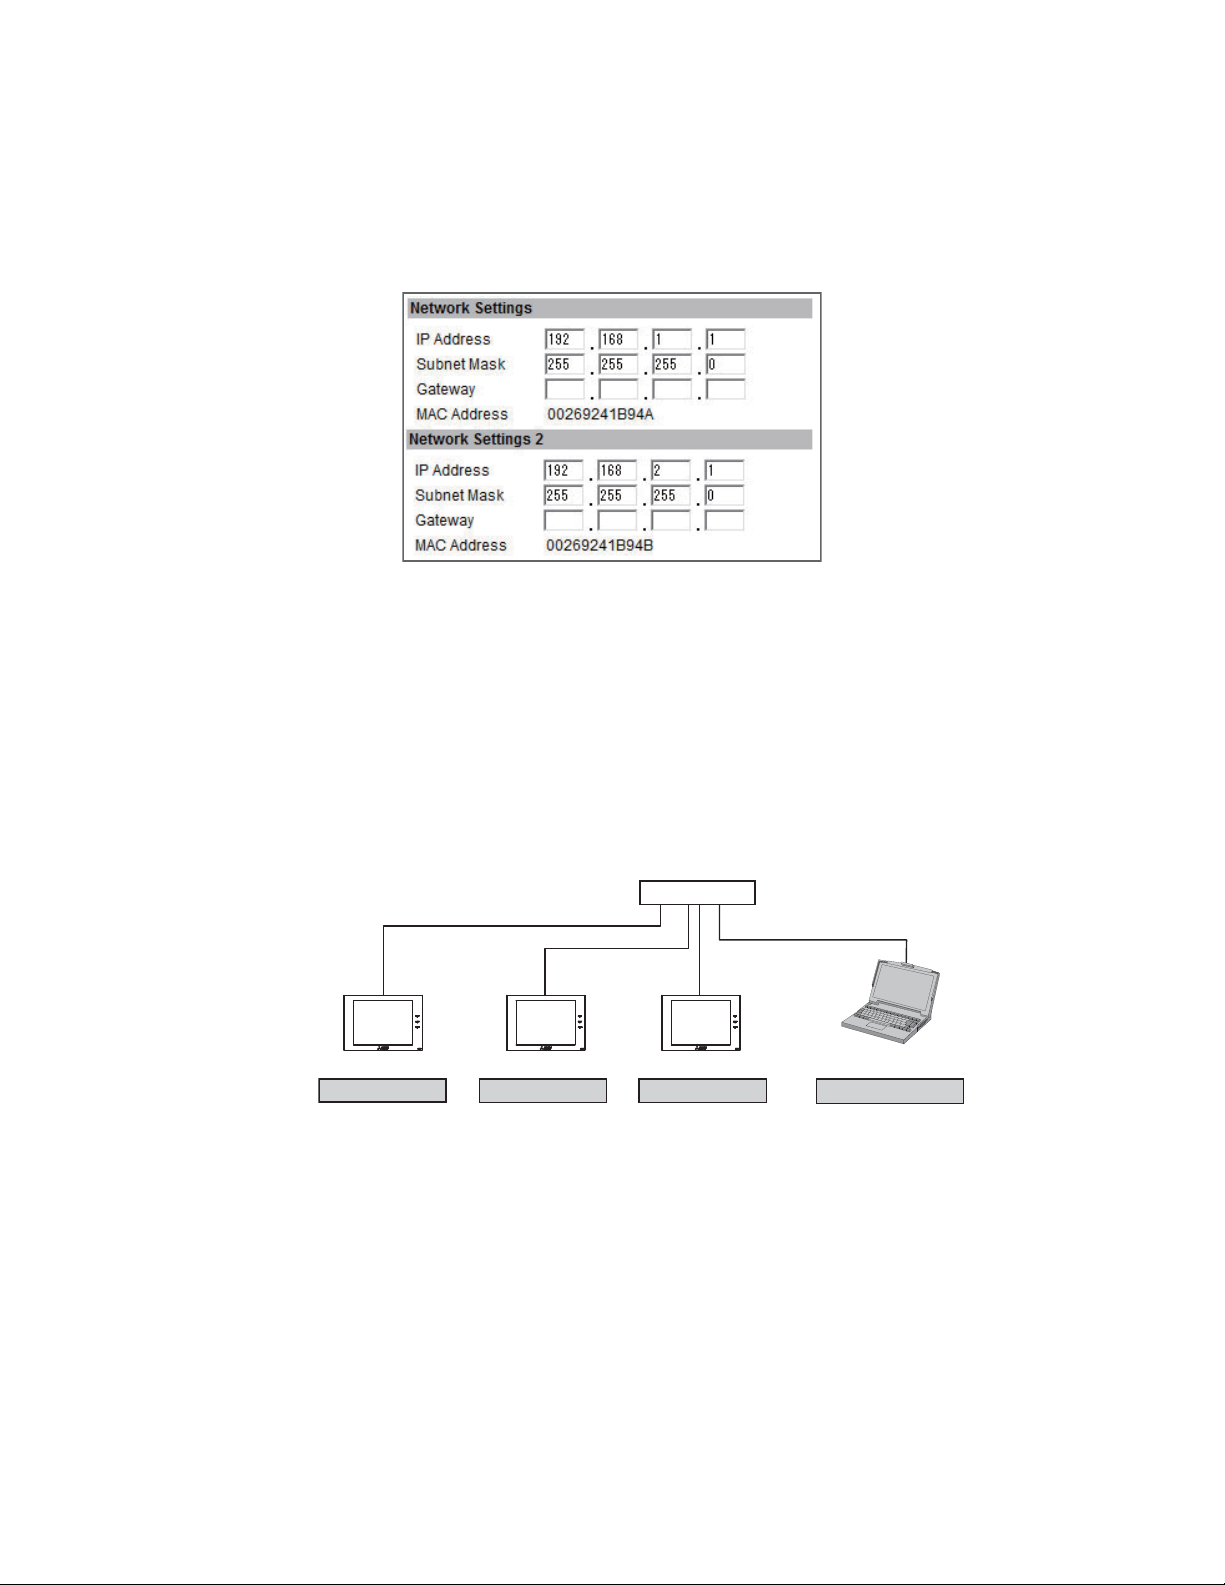
4-2-5. Network Settings
Network settings vary depending on whether the AE-200/AE-50/EW-50 is connected to a dedicated LAN or an
existing LAN. See the sections below for how to set the AE-200/AE-50/EW-50 IP, subnet mask, and gateway
addresses in the [Network Settings] section.
Note: Do not use the LAN2 port.
Note: Although the settings for LAN1 (Network Settings) and LAN2 (Network Settings 2) will appear on the screen, only the
Note: After the AE-200 IP address is changed, the AE-50/EW-50 power will be reset.
4-2-5-1. Settings for connecting the AE-200/AE-50/EW-50 to a dedicated LAN
(1) Enter the AE-200, AE-50, or EW-50’s IP address in the [IP Address] field. If the LAN has been newly set up,
settings for LAN1 is required. However, only when the LAN1 IP address is required to be set to [192.168.2.1], change the
default LAN2 IP address to avoid address overlap.
allocate IP addresses to the AE-200 units in a sequential order starting with [192.168.1.1]. For example, the
first AE-200 unit will have an IP address of [192.168.1.1], the second AE-200 unit will have an IP address of
[192.168.1.2] and so on.
Allocate IP addresses to the AE-50/EW-50 units in a sequential order starting with [192.168.1.211].
Note: The recommended IP address ranges are as follows.
AE-200: Between [192.168.1.1] and [192.168.1.40]
AE-50/EW-50: Between [192.168.1.211] and [192.168.1.249]
PC: Between [192.168.1.101] and [192.168.1.150]
[IP address setting example]
Hub
100 BASE-TX LAN straight cable
AE-200 AE-50 AE-50
Note: Some hubs have dedicated ports for connection with another hub.
Connect the AE-200/AE-50/EW-50 and PC to the normal ports.
(2) Enter [255.255.255.0] in the [Subnet Mask] field (unless otherwise specified).
PC
192.168.1.101 192.168.1.1 192.168.1.211 192.168.1.212
WT07138X02
21
Page 22
(3) When monitoring the system remotely or using e-mail function via a dial-up router, enter the router IP
address in the [Gateway] field.
Leave the [Gateway] field blank when not connecting a dial-up router.
[Remote Monitoring System example]
Telecommunication Network
Dial-up router
Dial-up router, cellular phone etc.
IP Address: 192.168.1.254
AE-200
PC
IP Address: 192.168.1.1
Subnet Mask: 255.255.255.0
Gateway: 192.168.1.254
Note: [192.168.1.254] is recommended for use as the IP address of the dial-up router. Refer to the dial-up router
instruction manual for details of how to set the IP address.
Note: The use of a dial-up router with no modem requires a modem (for analog or ISDN) to be connected between the
router and the public phone line.
IP Address: 192.168.1.101
Subnet Mask: 255.255.255.0
Gateway: Blank
PC
4-2-5-2. Settings for connecting the AE-200/AE-50/EW-50 to an existing LAN
(1) When connecting the AE-200/AE-50/EW-50 to an existing LAN, consult the system administrator to decide
the IP, subnet mask, and gateway addresses.
[Existing LAN System example]
Backbone LAN
AE-200
Obtain the addresses from
the system administrator.
IP Address: 10.1.1.1
Subnet Mask: 255.255.255.0
Gateway: 10.1.1.250
Gateway
Gateway
10.1.1.250 10.1.2.250
Obtain the addresses from
the system administrator.
PC
IP Address: 10.1.1.101
Subnet Mask: 255.255.255.0
Gateway: 10.1.1.250
IP Address: 10.1.2.51
Subnet Mask: 255.255.255.0
Gateway: 10.1.2.250
PC
WT07138X02
22
Page 23
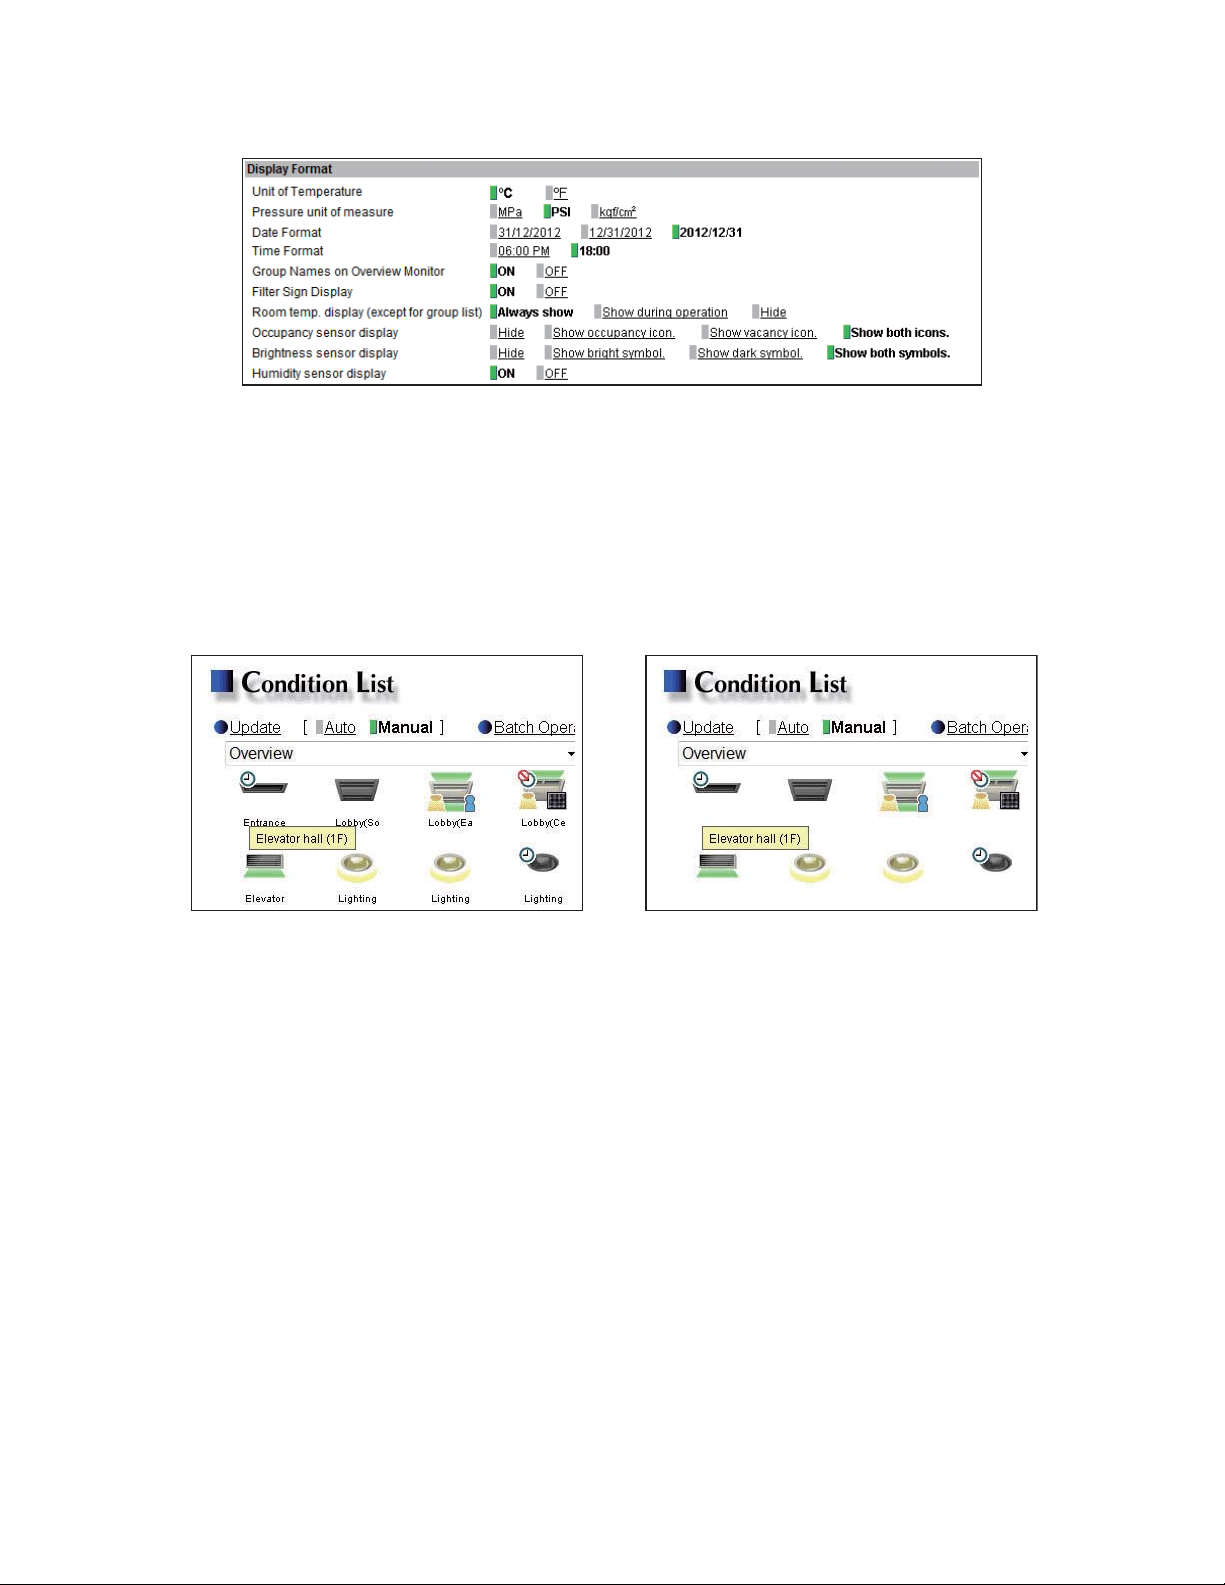
4-2-6. Display Format
Follow the instructions below to set the items in the [Display Format] section.
(1) In the [Unit of Temperature] section, select [ºC] or [ºF].
(2) In the [Pressure unit of measure] section, select [MPa], [PSI], or [kgf/cm
(3) In the [Date Format] section, select the desired display format for year, month, and date.
(4) In the [Time Format] section, select the desired display of time format.
(5) In the [Group Names on Overview Monitor] section, select [ON] to display the group names under the icons
on the Condition List screen. Select [OFF] not to display the group names.
Note: Only the first 8 characters will be visible under the icons. To display all characters, move the cursor to the icon.
2
].
Icons with group names
Icons without group names
(6) In the [Filter Sign Display] section, select [ON] to display the filter sign, and select [OFF] not to.
When the [Filter Sign Display] is set to [OFF], the filter sign will not appear on the Condition List screen even
when the indoor unit detects a filter cleaning signal.
If the filter is regularly cleaned and the sign display is unnecessary, set it to [OFF].
(7) In the [Room temp. display (except for group list)] section, select the desired temperature display option to
be used on the Block display of the Condition List screen.
Select [Always show] to display the temperature at all times, [Show during operation] to display the
temperature only during operation, and [Hide] not to display the temperature.
WT07138X02
23
Page 24
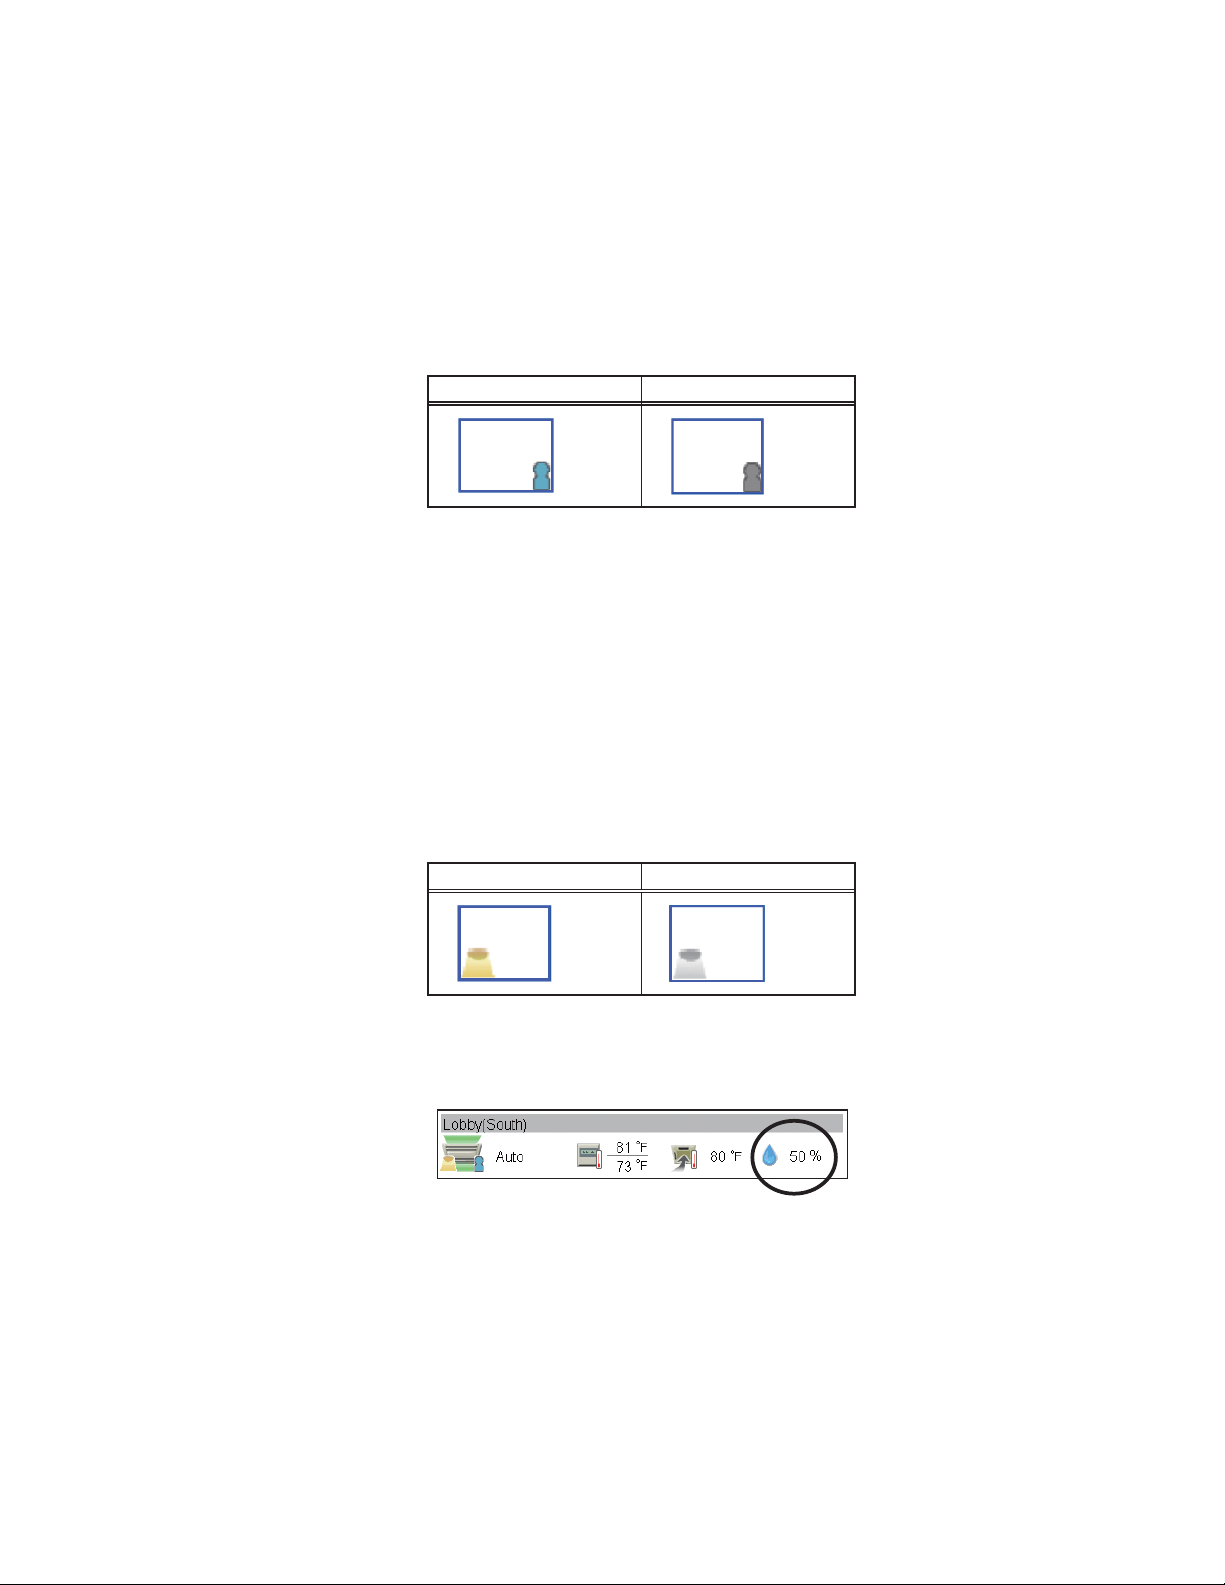
(8) In the [Occupancy sensor display] section, make the Show/Hide setting for the occupancy/vacancy status
that is detected by the built-in occupancy sensor on the ME remote controller (North America: PARU01MEDU, Europe: PAR-U02MEDA).
Select [Hide] not to display the occupancy/vacancy status on the Condition List screen.
Select [Show occupancy icon] to display the occupancy icon when the sensor on the remote controller
detects occupancy.
Select [Show vacancy icon] to display the vacancy icon when the sensor on the remote controller detects
vacancy.
Select [Show both icons] to display the occupancy or vacancy icon according to the occupancy status of the
room.
Note: If the ME remote controller has no built-in occupancy sensor, the occupancy/vacancy icons will not be displayed on
the Condition List screen.
Occupancy icon Vacancy icon
(Blue) (Gray)
(9) In the [Brightness sensor display] section, make the Show/Hide setting for the brightness/darkness status
that is detected by the built-in brightness sensor on the ME remote controller (North America: PARU01MEDU, Europe: PAR-U02MEDA).
Select [Hide] not to display the brightness/darkness icons on the Condition List screen.
Select [Show bright symbol] to display the brightness icon when the brightness level in the room reaches the
predetermined brightness level.
Select [Show dark symbol] to display the darkness icon when the darkness level in the room reaches the
predetermined darkness level.
Select [Show both symbols] to display the brightness or darkness icon according to the brightness/darkness
level of the room.
Note: If the ME remote controller has no built-in brightness sensor, the brightness/darkness icons will not be displayed on
Note: The brightness/darkness detection thresholds are set on the ME remote controller (North America: PAR-U01MEDU,
the Condition List screen.
Europe: PAR-U02MEDA).
Brightness icon Darkness icon
(Yellow)
(Gray)
(10) In the [Humidity sensor display] section, make the Show/Hide setting for the humidity reading of the built-in
humidity sensor on the ME remote controller (North America: PAR-U01MEDU, Europe: PAR-U02MEDA).
Select [ON] to display the humidity reading on the Block display of the Condition List screen.
WT07138X02
24
Page 25

4-3. Groups
Click [Initial Settings] in the menu bar, and then click [Groups] to access the group settings screen. Register
the groups of air conditioning units, LOSSNAY units (ventilators), Air To Water (PWFY) units, AHC, HWHP
(CAHV, CRHV) units, or general equipment to be connected to the AE-200/AE-50/EW-50, and then touch [Save
Settings].
Note: Some settings may not be accessible if logged in as a building manager.
Air conditioner, Air
To Water (PWFY) unit,
LOSSNAY unit, HWHP
(CAHV, CRHV) unit,
and general equipment
registration
Click to display the screen
for registering the air
conditioners, Air To Water
(PWFY) units, LOSSNAY
Group No.
Group name
AHC registration
Click to display the screen
for registering the AHC.
Refresh
Click to import the settings
from AE-200/AE-50/EW-50.
units, HWHP (CAHV,
CRHV) units, and general
equipment.
System controller
registration
Click to display the screen
for registering the system
controllers.
Remote controller
registration
Click to display the screen
for registering the remote
controllers.
Save Settings
Click to save the changes
made.
4-3-1. Setting group names
In the [Group Name] field, enter the group name to be displayed in 20 characters or less.
Note: The following characters cannot be used in the [Group Name] field: <, >, &, “, or ‘
4-3-2. Registering air conditioners, Air To Water (PWFY) units, LOSSNAY units, or HWHP
(CAHV, CRHV) units to a group
(1)
To register air conditioners, Air To Water (PWFY) units,
LOSSNAY units, or HWHP (CAHV, CRHV) units to each group,
click the [Air conditioner, Air To Water (PWFY) unit, LOSSNAY
unit, HWHP (CAHV, CRHV) unit, and general equipment
registration] field next to the target group name. The [Select Unit
Addresses] screen will appear.
Check the radio button next to [Air-conditioners / Air to water
/ HWHP], and select the address numbers of the units to be
registered.
The selected unit addresses will appear with a yellow-green
background.
Click again to deselect. The deselected unit addresses will
appear with a light-gray background.
Note: Each group can contain up to 16 air conditioners.
Note: Air conditioners, Air To Water (PWFY) units, LOSSNAY units,
and HWHP (CAHV, CRHV) units cannot be combined with
general equipment in one group. To change the registered units
to air conditioners, Air To Water (PWFY) units, LOSSNAY units,
or HWHP (CAHV, CRHV) units in the group in which general
equipment is registered, unregister the general equipment first.
Note: The addresses of the units that have been registered to other
groups will appear with a gray background and cannot be
selected.
WT07138X02
25
Page 26

(2)
To change the icon, click the right or left arrow.
The selected icon will be displayed on the Web browser.
4-3-3. Registering remote controllers to a group
(1)
To register remote controllers to a group, click the [Remote
controller registration] field next to the target group name. The
[Select Unit Addresses] screen will appear.
Select the address numbers of the remote controllers to be
registered. The selected unit addresses will appear with a yellowgreen background.
Click again to deselect. The deselected addresses will appear
with a light-gray background.
Note: Each group can contain up to two remote controllers.
Note: Each group can contain up to four remote and system controllers
Note: MA remote controllers do not need to be registered to a group.
combined.
4-3-4. Registering system controllers to a group
(1)
To register system controllers to a group, click the [System
controller registration] field next to the target group name. The
[Select Unit Addresses] screen will appear.
Select the address numbers of the system controllers to be
registered. The selected unit addresses will appear with a yellowgreen background.
Click again to deselect. The deselected addresses will appear
with a light-gray background.
Note: Each group can contain up to four remote and system controllers
combined (excluding AE-200/AE-50/EW-50).
4-3-5. Registering AHC to a group
(1)
To register an AHC to a group, click the [AHC registration] field
next to the target group name. The [Select Unit Addresses]
screen will appear.
Select the address number of the AHC to be registered. The
selected unit address will appear with a yellow-green background.
Click again to deselect. The deselected address will appear with
a light-gray background.
Note: Each group can contain one AHC.
Note: AHC must be registered to a group in which air conditioners are
registered. Do not register AHC to a group in which Air To Water
(PWFY) units, LOSSNAY units, HWHP (CAHV, CRHV) units, or
general equipment (via PAC-YG66DCA) are registered.
WT07138X02
26
Page 27

4-3-6. Registering general equipment to a group
(1)
To register general equipment to a group, click the [Air
conditioner, Air To Water (PWFY) unit, LOSSNAY unit,
HWHP (CAHV, CRHV) unit, and general equipment
registration] field next to the target group name. The
[Select Unit Addresses] screen will appear.
Check the radio button next to [General Equipment (via
PAC-YG66DCA)].
Select the device number of the DIDO controller (PACYG66DCA) that is connected to the general equipment
to be registered. The selected number will appear with
a red frame. Also, select contact points to which the
general equipments are connected.
Click again to deselect. The deselected numbers will
appear with a light-gray background.
Note: Each contact of DIDO controller counts as one unit.
Note: Each group can contain up to 16 general equipment.
Note: Up to six general equipment can be registered for each DIDO controller.
Note: Air conditioners, Air To Water (PWFY) units, LOSSNAY units, and HWHP (CAHV, CRHV) units cannot be combined
Note: General equipment groups cannot include remote controllers or system controllers.
with general equipment in one group. To change the registered units to general equipment in the group to which air
conditioners, Air To Water (PWFY) units, LOSSNAY units, or HWHP (CAHV, CRHV) units are registered, unregister
the air conditioners, Air To Water (PWFY) units, LOSSNAY units, or HWHP (CAHV, CRHV) units first.
(2)
To change the icon, click the right or left arrow.
The selected icon will be displayed on the Web browser.
(3)
In the [Allow Operations] section, make the setting to allow or disallow operation.
Select [In batch and on individual group] to allow the operator to turn on or off the general equipment
collectively or by the groups.
Select [On individual group] to allow the operator to turn on or off the general equipment by the groups.
Select [No operations (Monitor only)] to disallow the operator to turn on or off the general equipment.
(4)
In the [Monitor] section, select which status will be used to reflect the units' ON/OFF status to the unit icons
on the Condition List screen, accessible via the Web Browser for System Maintenance Engineer. Select
[Output status] to use the status that is sent to the general equipment, and [Input status] to use the status
that is sent from the general equipment.
WT07138X02
27
Page 28

4-4. Interlocked LOSSNAY
The ON/OFF status of the LOSSNAY unit can be interlocked with the operation of indoor units. Click [Initial
Settings] in the menu bar, and then click [Interlocked LOSSNAY] to access the Interlocked LOSSNAY settings
screen. Set the interlocking conditions, and then click [Save Settings].
Note: The Interlocked LOSSNAY settings may not be accessible if logged in as a building manager.
Note: The ON/OFF status of the indoor units are not interlocked with the ON/OFF status of the LOSSNAY unit.
Note: The interlock settings between the units connected to the AE-200, AE-50, and EW-50, as well as between the units
connected to different AE-50/EW-50 controllers, cannot be made.
Interlocked LOSSNAY unit
Click to display the screen
for registering the LOSSNAY
Click to import the settings
from AE-200/AE-50/EW-50.
(1)
registration
unit.
Refresh
Click the [Interlocked LOSSNAY unit registration] field. The [Select a
Unit Address] screen will appear.
Select the address number of the LOSSNAY unit to be registered.
The selected unit address will appear with a yellow-green
background.
Click again to deselect. The deselected address will appear with a
light-gray background.
(2)
Click the [Interlocked indoor unit registration] field. The [Select Unit
Addresses] screen will appear.
Select the address numbers of the indoor units to which the selected
LOSSNAY unit will be interlocked. The selected unit addresses will
appear with a yellow-green background.
Click again to deselect. The deselected addresses will appear with a
light-gray background.
Note: Each LOSSNAY unit can be interlocked with up to 16 indoor units.
Interlocked indoor unit
registration
Click to display the screen
for registering the indoor
units.
Save Settings
Click to save the changes
made.
WT07138X02
28
Page 29

4-5. Blocks
By making block settings, multiple groups in a given block can be collectively monitored or operated on the
Web browser. Click [Initial Settings] in the menu bar, and then click [Blocks] to access the block settings screen.
Register the groups to each block, and then click [Save Settings].
Note: Some settings may not be accessible if logged in as a building manager.
Note: The groups of units connected to the AE-200, AE-50, and EW-50, as well as the groups of units connected to different
AE-50/EW-50 controllers, cannot be registered to the same block.
Block Name
Group registration
Click to import the settings
from AE-200/AE-50/EW-50.
(1)
Enter the block name in the [Block Name] field to be displayed on the Web browser in 20 characters or less.
Note: The following characters cannot be used in the [Block Name] field: <, >, &, “, or ‘
(2)
Click the [Group registration] field next to the target block. The [Select
Refresh
Save Settings
Click to save the changes
made.
Groups] screen will appear.
Select the group numbers to be registered. (To show the group name,
move the cursor to the group number.)
The selected group numbers will appear with a yellow-green
background.
Click again to deselect. The deselected group numbers will appear
with a light-gray background.
Note: HWHP (CAHV, CRHV) unit groups cannot be registered to a block.
WT07138X02
29
Page 30

5. Functions 1
5-1. E-Mail
E-mail settings must be configured properly to use the error notification e-mail function or the e-mail
communication function. Error notification e-mail function is the function to send the error information to the
specified e-mail addresses. E-mail communication function is the function to send the units’ maintenance data to
the specified e-mail addresses of the PCs to which Maintenance Tool is installed.
Click [Functions 1] in the menu bar, and then click [E-Mail] to access the e-mail settings screen. Make the various
e-mail settings, and then click [Save Settings].
Note: The E-mail settings may not be accessible if logged in as a building manager.
Mail Server Information
Set the mail server/DNS
server information.
E-Mail Settings of
AE-200/AE-50/EW-50
Mail Communication
Setting
Set the e-mail addresses
of the PCs that will receive
maintenance data through
e-mail communication
function.
Refresh
Click to import the settings
from AE-200/AE-50/EW-50.
Error Mail Settings
Enter the e-mail information
for error notification e-mail
function.
Save Settings
Click to save the changes
made.
5-1-1. E-Mail Settings of AE-200/AE-50/EW-50
Enter the AE-200/AE-50/EW-50’s e-mail information provided by the Internet Service Provider (ISP) or the
system administrator. The items required to be set vary, depending on the functions to be used. Refer to the table
below to determine which items need to be set.
Note: A contract with the ISP is required to send e-mail via an ISP.
Table 5-1 Items required to be set (E-Mail Settings of AE-200/AE-50/EW-50)
Error notification e-mail function E-mail communication function
Item
E-Mail Address V V V V
User ID - V V V
Password - V V V
Interval of checking incoming mails - - V V
Without SMTP
authentication
With SMTP
authentication
Without SMTP
authentication
(V) Required to be set, (-) Not required to be set
With SMTP
authentication
WT07138X02
30
Page 31

5-1-2. Mail Server Information
Enter the e-mail server information provided by the ISP or the system administrator. The items required to be set
vary, depending on the functions to be used. Refer to the table below to determine which items need to be set.
Either the IP address or the host name (server name) can be entered in the [Outgoing Mail Server (SMTP)] and
[Incoming Mail Server (POP3)] fields.
Note: The port number of the Outgoing Mail Server (SMTP) can be changed. (Factory setting: 25)
Note: When “587” is entered in the [Port] field, make sure to check the checkbox next to [Use SMTP Authentication].
Table 5-2 Items required to be set (Mail Server Information)
Error notification e-mail function E-mail communication function
Item
Outgoing Mail Server (SMTP)
Use SMTP Authentication -V-V
Incoming Mail Server (POP3) - -
DNS Server (Primary) (V)
DNS Server (Secondary) (V)
*1 Not required if the IP address is entered in the [Outgoing Mail Server (SMTP)] or [Incoming Mail Server (POP3)] field.
Without SMTP
authentication
V
IP address or
host name
*1
*1
With SMTP
authentication
V
Host name
V (V)
V (V)
Without SMTP
authentication
V
IP address or
host name
V
IP address or
host name
*1
*1
(V) Required to be set, (-) Not required to be set
With SMTP
authentication
V
Host name
V
IP address or
host name
V
V
5-1-3. Error Mail Settings
(1)
In the [Mail Subject] field, enter the mail subject to be used for the error notification e-mail function in 40
characters or less.
Note: The following characters cannot be used in the [Mail Subject] field: <, >, &, “, or ‘
(2)
In the [Kind of Errors] field, select the error type out of the following: [Unit Error], [Preliminary Unit Error],
[Communication Error], [General Equipment], and [User Setting 1] through [User Setting 6]. Then, in the
[E-Mail Address] field, enter the e-mail addresses of the recipients of the error notification e-mail.
(3)
If [User Setting 1] through [User Setting 6] is selected in the [Kind
of Errors] field, a [User Settings] button will appear. To send error
notification e-mail only upon occurrences of certain errors, click
[User Settings] to display the User Settings screen.
Enter the error codes to be notified.
Up to 20 error codes can be set for each user setting. In addition
to specific error codes such as [1302] or [6607], codes that use
asterisks as wildcards such as [10**] or [12**] can also be used.
If [10**] is entered, for example, error notification e-mail will be
sent upon an occurrence of any type of errors between [1000] and
[1099]. If error codes are entered on this screen, confirm that the
e-mail addresses of the recipients are registered.
WT07138X02
31
Page 32

(4)
If [General Equipment] is selected in the [Kind of Errors] field, a
[PLC Connection] button will appear. To send error notification
e-mail upon occurrences of errors on the general equipment that
are connected to PLC Software for General Equipment, click [PLC
Connection] to display the [PLC Connection] screen. Enter the IP
addresses of PLC Software for General Equipment.
The row number that corresponds to each IP address will appear
in the error notification e-mail as a PLC number. (e.g., When an
error occurs on the general equipment #20 connected to the PLC
Software in the second row, “PLC2-20” will appear in the [Error
unit] section in the error notification e-mail.)
Note: A TG-2000A is required to monitor the status of the general
equipment that is connected to the PLC Software for General
Equipment.
5-1-4. Mail Communication Setting
To use an e-mail communication function, enter the addresses of the PCs that will receive the units’ maintenance
data in the [Mail Communication Setting] section. Up to 10 e-mail addresses can be set.
WT07138X02
32
Page 33

5-1-5. E-mail format
Error notification e-mail will be sent in the format shown below.
From:Mitsubishi Building(000001)
Date:01/06/2014 16:32:12
Error unit:065
Error code:1302
Status:Occurrence
Mail subject The mail subject entered in section 5-1-3 will appear.
From The AE-200/AE-50/EW-50 unit name and unit ID entered in section 4-2-1 will appear.
Date Error occurrence date and time will appear in the format entered in section 4-2-6.
- When an error occurs on air conditioning units or general equipment, the M-NET address of the unit
in error will appear.
- When an error occurs on general equipment connected to PLC Software for General Equipment, PLC
number* (1 to 20) and connection number of general equipment (1 to 32) will appear.
- When a communication error occurs on PLC Software for General Equipment, PLC number* (1 to 20)
Error unit
will appear.
* PLC number indicates the row number on the [PLC Connection] screen. (Refer to section 5-1-3 (4).)
Error code
Status
Note: When an error occurs on the general equipment connected via DIDO controller, M-NET address of
the DIDO controller will appear. (The recipients will know that an error has occurred on one of the
general equipment that is connected to the DIDO controller.)
Error code (4-digit) will appear.
- When an error occurs on air conditioning units, refer to the service manual of the unit for the error
codes.
- When an error occurs on general equipment, “0091” (General equipment error) will appear.
- When a communication error occurs on PLC Software for General Equipment, “0003” (LAN
communication error to PLC) or “0007” (PLC program stopped) will appear.
Error status “Occurrence” (The error is occurring) or “Recovery” (The error has been resolved) will
appear.
WT07138X02
33
Page 34

5-2. Peak Cut (Energy-save control function)
According to the selected Peak Cut method, the AE-200/AE-50/EW-50 obtains the demand level or the electric
energy values to determine the control level, and operates outdoor units and blocks of indoor units below the
specified maximum capacity that corresponds to the control level.
Click [Functions 1] in the menu bar, and then click [Peak Cut] to access the Peak Cut control settings screen.
Make necessary settings, and then click [Save Settings].
Important: The amount of electricity that is actually used may exceed the maximum power demand due to unexpected
problems such as controller malfunctions or broken transmission cables. Mitsubishi Electric will not be
responsible for exceeding the maximum power demand.
Note: After completing the settings, perform a test run and confirm proper connections of equipment before using the Peak Cut
function.
Note: A separate license is required to use the Peak Cut function. Make sure that the required license has properly been
registered on the Registration of Optional Functions screen. (Refer to chapter 10 for details.)
Note: Some settings may not be accessible if logged in as a building manager.
Note: Peak Cut control cannot be performed on DIDO controller (PAC-YG66DCA), AHC, or Air To Water (PWFY) unit.
Note: The Peak Cut control of indoor units is performed per block. Be sure to make block settings to use the Peak Cut function.
Note: The Peak Cut control settings between the outdoor and indoor units connected to the AE-200, AE-50, and EW-50, as
well as between the units connected to different AE-50/EW-50 controllers, cannot be made.
Peak Cut method
Control details for
outdoor units
Setting details for the
selected Peak Cut method
Control details for blocks
of indoor units
Click to import the settings
from AE-200/AE-50/EW-50
Refresh
and PLC.
5-2-1. Peak Cut method
[Demand-Input PLC]
Demand level
signal is sent.
AE-200
Demand-Input
AE-50
AE-50
AE-50
PLC
Maximum ten
AE-200/AE-50/EW-50 units
Demand level is
input.
Demand
controller
[Electric Amount Count PLC]
Reads electric
energy values.
AE-200
AE-50
AE-50
AE-50
Electric Amount
Count PLC
Maximum fourteen
AE-200/AE-50/EW-50 units
Save Settings
Click to send the settings to
AE-200/AE-50/EW-50 and
PLC.
Pulse
Pulse-watthour meter
WT07138X02
34
Page 35

[PI Controller]
<When a PI controller (PAC-YG60MCA) is used> <When a built-in PI controller is used>
Reads electric
energy values.
AE-200
PI controller
AE-50
Reads control
level.
AE-50
Maximum three
AE-50
AE-200/AE-50/EW-50 units
Peak Cut method [Remote AE]
[External Contact point input] (1)
External input/output
adapter (PAC-YG10HA-E)
LAN
AE-200
AE-50
Reads control
level.
AE-50
AE-50
Maximum three
AE-200/AE-50/EW-50 units
Demand level is
input.
Pulse
Pulse-watt-
hour meter
Demand
controller
AE-200
(Built-in PI controller)
AE-50
Reads control
level.
AE-50
Maximum three
AE-50
AE-200/AE-50/EW-50 units
Peak Cut method [Remote AE]
[External Contact point input] (2)
External input/output
adapter (PAC-YG10HA-E)
AE-200
AE-50
AE-50
AE-50
Demand level is
input.
Pulse
Pulse-watthour meter
Demand
controller
Maximum three
AE-200/AE-50
/EW-50 units
Peak Cut method [Remote AE]
[From external system]
Demand level
signal is sent.
AE-200
AE-50
AE-50
AE-50
PLC etc.
Maximum ten
AE-200/AE-50/EW-50 units
Pulse
Pulse-watthour meter
WT07138X02
35
Page 36

(A) When the Peak Cut method [Demand-Input PLC] is selected
(1)
In the [IP Address] field, enter the IP address of the Demand-Input PLC.
(2)
When using the Demand-Input PLC for the first time, click [Initialize] to initialize its internal memory.
Note: Do not initialize the Demand-Input PLC after the operation has begun, for it will clear all operation data.
(3)
In the [Controlled AE] field, enter the IP addresses of the AE-200/AE-50/EW-50 units to which the demand
level signal is sent. Up to 10 IP addresses can be registered.
(4)
In the [Temperature difference between set point and inlet] section, a temperature differential can be set to
between 3 and 9 as necessary. The Peak Cut control setting that corresponds to the control level 0 will be
disregarded for the indoor unit groups in which the temperature difference between the set temperature and
the room temperature is greater than the specified temperature differential.
Note: The Peak Cut control setting that corresponds to the control levels 1 to 4 will be effective regardless of the
temperature differential setting.
(B) When the Peak Cut method [Electric Amount Count PLC] is selected
(1)
In the [IP address] field, enter the IP address of the Electric Amount Count PLC.
(2)
When using the Electric Amount Count PLC for the first time, click [Initialize] to initialize the internal memory.
Note: Do not initialize the Electric Amount Count PLC after the operation has begun, for it will clear all operation data.
(3)
In the [DI Board] field, select the DI board number to which the watt-hour meter is connected, and the
terminal number. If the watt-hour meter is connected to terminal 2 on a DI board 1, select 1-2.
Note: Select a DI board number 1 or 2, and select a terminal number/code between 0 and F.
(4)
In the [Pulse Unit] field, enter the pulse value that the watt-hour meter outputs. Set the pulse value according
to the watt-hour meter to be used.
Important: Check the watt-hour meter readings several times on the hour and the half-hour. Then, be sure to check
(5)
In the [Control levels] section, the range of the electric power must be set for each control level. For control
that the increase in the watt-hour meter reading for each 30-minute period and the average electric power
consumption in the same period that the Peak Cut function is used are the same amount.
The average electric power for the period that the Peak Cut function is used can be checked on the Trend
Graph display or in the CSV file that can be downloaded from the Trend Graph display. The Trend Graph
display can be found on the Peakcut Control Status screen, accessible via the Web Browser for System
Maintenance Engineer. Refer to the Instruction Book (Web Browser for System Maintenance Engineer) for
details.
level 4, enter the value that is 10% to 15% below the maximum power demand (average electric energy that
cannot be exceeded in any 30-minute period). For control levels 3 to 0, enter the value that is decreased
by about 10% from the set value of the previous control level. (The screenshot above shows the setting
example of the maximum demand of 200 kW.)
Note: The optimum setting depends on the system configuration of the electric equipment and on the indoor environment in
each building. Determine the appropriate values accordingly.
WT07138X02
36
Page 37

(6)
In the [Temperature difference between set point and inlet] section, a temperature differential can be set to
between 3 and 9 as necessary. The Peak Cut control setting that corresponds to the control level 0 will be
disregarded for the indoor unit groups in which the temperature difference between the set temperature and
the room temperature is greater than the specified temperature differential.
Note: The Peak Cut control setting that corresponds to the control levels 1 to 4 will be effective regardless of the
temperature differential setting.
(C) When the Peak Cut method [PI Controller] is selected
(1) In the [Watthour meter] field, select the watt-hour meter used for the Peak Cut function or the PI controller to
which the watt-hour meter is connected.
Note: Only the watt-hour meters that have been registered on the Measurement screen are selectable. Refer to section 5-3
Note: When a built-in PI controller is used, [“Meter” + Channel No. + (space) + Metering device name] will appear. (For
for how to register metering devices.
example, if the watt-hour meter used for the Peak Cut function is connected to channel 3 of CN7 of AE-200 and the
metering device name is “For Peak Cut function,” [Meter3 For Peak Cut function] will appear.)
When a PI controller (PAC-YG60MCA) is used, [“Address” + PI controller address + “-” + Channel No. + (space) +
Metering device name] will appear. (For example, if the watt-hour meter used for the Peak Cut function is connected
to channel 2 of a PI controller (address 10) and the metering device name is not registered, [Address10-2] will
appear.)
(2) In the [Control levels] section, the range of the electric power must be set for each control level. For control
level 4, enter the value that is 10% to 15% below the maximum power demand (average electric energy that
cannot be exceeded in any 30-minute period). For control levels 3 to 0, enter the value that is decreased
by about 10% from the set value of the previous control level. (The screenshot above shows the setting
example of the maximum demand of 200 kW.)
Note: The optimum setting depends on the system configuration of the electric equipment and on the indoor environment in
each building. Determine the appropriate values accordingly.
(3) In the [Temperature difference between set point and inlet] section, a temperature differential can be set to
between 3 and 9 as necessary. The Peak Cut control setting that corresponds to the control level 0 will be
disregarded for the indoor unit groups in which the temperature difference between the set temperature and
the room temperature is greater than the specified temperature differential.
Note: The Peak Cut control setting that corresponds to the control levels 1 to 4 will be effective regardless of the
temperature differential setting.
WT07138X02
37
Page 38

(D) When the Peak Cut method [Remote AE] is selected
(1) In the [IP address] field, enter the IP address of the AE-200/AE-50/EW-50 that uses one of the following.
- Built-in PI controller
- PI controller (PAC-YG60MCA)
- External contact input (Refer to (E) “When the Peak Cut method [External Contact point input] is
selected” for details.)
Note: As the control level is obtained every minute from the AE-200/AE-50/EW-50 that uses a built-in PI controller or a
Note: Up to three AE-200/AE-50/EW-50 units can be connected to the AE-200/AE-50/EW-50 unit that uses a built-in PI
(2) In the [Temperature difference between set point and inlet] section, a temperature differential can be set to
between 3 and 9 as necessary. The Peak Cut control setting that corresponds to the control level 0 will be
disregarded for the indoor unit groups in which the temperature difference between the set temperature and
the room temperature is greater than the specified temperature differential.
Note: The Peak Cut control setting that corresponds to the control levels 1 to 4 will be effective regardless of the
PI controller (PAC-YG60MCA), the control will be late for up to one minute on the AE-200/AE-50 whose Peak Cut
method setting is [Remote AE].
controller or a PI controller (PAC-YG60MCA). When five or more AE-200/AE-50/EW-50 units are connected, add the
settings in (C) “When the Peak Cut method [PI Controller] is selected” or use the Peak Cut method [Electric Amount
Count PLC].
temperature differential setting.
(E) When the Peak Cut method [External Contact point input] is selected
Note: The external signal can be input to AE-200, AE-50, and EW-50, so that all outdoor units and blocks of indoor units can be
(1) In the [Temperature difference between set point and inlet] section, a temperature differential can be set to
selected.
between 3 and 9 as necessary. The Peak Cut control setting that corresponds to the control level 0 will be
disregarded for the indoor unit groups in which the temperature difference between the set temperature and
the room temperature is greater than the specified temperature differential.
Note: The Peak Cut control setting that corresponds to the control levels 1 to 4 will be effective regardless of the
temperature differential setting.
WT07138X02
38
Page 39

(F) When the Peak Cut method [From external system] is selected
(1) In the [Temperature difference between set point and inlet] section, a temperature differential can be set to
between 3 and 9 as necessary. The Peak Cut control setting that corresponds to the control level 0 will be
disregarded for the indoor unit groups in which the temperature difference between the set temperature and
the room temperature is greater than the specified temperature differential.
Note: The Peak Cut control setting that corresponds to the control levels 1 to 4 will be effective regardless of the
temperature differential setting.
WT07138X02
39
Page 40

5-2-2. Control details for outdoor units (All Peak Cut methods)
Follow the instructions below to make the Peak Cut control settings for each control level for given outdoor units.
Note: If the outdoor unit is a City Multi unit, the M-NET address will appear. If the outdoor unit is an A-control (Mr. Slim) unit, the
Note: As for A-control outdoor units, only the inverter models can perform Peak Cut control. The Peak Cut control settings for
Note: Do not make the Peak Cut control settings for heat pump models of outdoor units or City Multi S series (PUMY) outdoor
M-NET address and group name will appear.
constant-speed models can not be made.
units.
Copy
Paste
Control level
Batch Operations
Click to make settings for
all outdoor units at once.
(1)
To make settings for all outdoor units at once,
check the [Batch Operations] checkbox.
Then, set the maximum operating capacity for
each control level.
The smaller the maximum operating capacity,
the more energy will be saved.
Note: Energy-saving effects cannot be expected
Note: For heat pump outdoor units and City Multi
during low-load operation with the capacity
below the selected maximum capacity.
S series (PUMY) outdoor units, leave the
default setting [100%] as it is not to activate
the capacity-save control.
Capacity
80%
Maximum Capacity
Select the upper limit of outdoor unit
operating capacity.
e.g., Maximum capacity at 80%
Operating
Capacity
No energy-saving effects Energy-saving effects
Control Time
Energy saved
Time
(2)
For each control level, set the total time in which the Peak Cut control is performed during every 30 minutes.
Setting the time to [30] or [15] minutes is preferable, for shorter control time is not likely to bring much
benefit.
If any time other than [30] minutes is selected, the outdoor units will operate in rotation so that they will not
perform the Peak Cut control at the same time.
(3)
To copy the settings of an outdoor unit to the settings for other outdoor units, display the outdoor unit whose
settings are to be copied and click [Copy], then display the outdoor unit to which the copied settings are to
be pasted and click [Paste]. The rectangular icons next to the selected buttons will appear in yellow-green.
WT07138X02
40
Page 41

5-2-3. Control details for blocks of indoor units
Follow the instructions below to make the Peak Cut control settings for each control level for given blocks of
indoor units.
If the block settings have not been made, refer to section 4-5 for how to make the block settings.
Copy
Paste
Control level
Batch Operations
Click to make settings for
all blocks at once.
(1)
Scroll up or down to display the block whose settings are to be made. To make settings for all blocks at
Control method
Control Time
once, check the [Batch Operations] checkbox.
Then, select the control method for each control level, referring to the table below.
Note: Only the control method “OFF” is effective for Air To Water (PWFY) units. Other methods can be selected, but are not
effective.
Table 5-3 Indoor Unit Control Method
Control Method Control details
None Peak Cut control will not be performed.
During the Peak Cut control, the set temperature in the Cool or Dry mode will be offset by +2ºC (+4ºF),
and the set temperature in the Heat mode will be offset by -2ºC (-4ºF).
±2ºC (±4ºF)
Note:
Note: When the unit of temperature is Fahrenheit, the set temperature may not be offset by ±4ºF
Note: The set temperature will be adjusted within the set temperature restrictions settings.
Peak Cut
exactly because 2ºC is used for the calculation first, and then the temperature in Celsius is
converted into the temperature in Fahrenheit.
Refer to section 6-1 for details.
During the Peak Cut control, free-plan indoor units and A-control Mr. Slim indoor units (M-Series/
Fan
*1
P-Series indoor units) will go in to the Thermo-OFF state, and the units older than free-plan units will
operate in the Fan mode. (When the units are in the Thermo-OFF state, the operation mode on the
remote controller LCD will not change.)
During the Peak Cut control, the units will stop.
*1
OFF
*1 When the indoor unit Peak Cut control function is used during the heating operation, it takes a while to resume operation to prevent cold
air draft. This may negatively affect the performance of the unit for a certain period of time after the operation is resumed. To ensure
maximum performance, it is recommended to use an outdoor unit capacity-save control function (that will not stop the compressor
operation) during the heating operation. If the indoor unit Peak Cut control function is still used, selecting [3] minutes in the Control Time
section is recommended.
Note: If the control method is set to [OFF] and the Control Time is set to [30] minutes, the groups that
are operated in the Peak Cut control cannot be operated from any controller.
control will not be performed during the Fan or Auto mode.
WT07138X02
41
Page 42

(2)
For each control level, set the total time in which
the Peak Cut control is performed during every 30
When [6] minutes is selected
0 3 5 8 10 15 18 20 23 25 3013 28
Control time
minutes.
Each Peak Cut control is performed for three
Group 1
minutes. If [6] minutes is selected, three-minute
Peak Cut control will be performed twice during
Group 2
every 30 minutes.
If any time other than [30] minutes is selected, the
Group 3
indoor units will operate in rotation so that they will
not perform the Peak Cut control at the same time.
(3)
To copy the settings of a block to the settings for other blocks, display the block whose settings are to be
copied and click [Copy], then display the block to which the copied settings are to be pasted and click [Paste].
The rectangular icons next to the selected buttons will appear in yellow-green.
min
WT07138X02
42
Page 43

5-3. Measurement
Measurement settings must be made to use temperature sensors, humidity sensors, and metering devices.
Click [Functions 1] in the menu bar, and then click [Measurement] to access the measurement settings screen.
Set the measurement settings, and then click [Save Settings].
Note: The measurement settings may not be accessible if logged in as a building manager.
Selection of AI or PI
controller
M-NET address of
AI or PI controller
Selection of separator
character for energy
management data
Selection of decimal point
character for energy
management data
Refresh
Click to import the settings
from AE-200/AE-50/EW-50.
Setting details
Scroll bar
Slide to show the address to
which the AI or PI controller
will be connected.
E-mail Settings
Save Settings
Click to save the changes
made.
5-3-1. Registering AI controllers and temperature/humidity sensors
Follow the instructions below to make the system settings for measurement sensors. Up to two measurement
sensors can be connected to an AI controller (PAC-YG63MCA).
AI controller icon
Setting details of
sensor 1
Setting details of
sensor 2
Sensor name
Set offset
Selection of temperature
or humidity sensor icon
Measurable range
Upper/lower ON- and
OFF-threshold settings
for e-mail alarm function
Upper limit
(ON-threshold)
Upper limit
(OFF-threshold)
Lower limit
(OFF-threshold)
Lower limit
(ON-threshold)
(1) Using the scroll bar, select the address to which the AI controller (PAC-YG63MCA) will be connected.
(2)
Select the AI controller icon (
Note: Click again to deselect.
).
(3) In the [Sensor name] field, enter the name of the sensor.
(4)
Select the temperature sensor icon (
) or the humidity sensor icon ( ).
(5) Enter the measurable range of the sensor.
Note: When the Pt sensor is connected, the range must be between -30ºC (-22ºF) and +60ºC (+140ºF).
WT07138X02
When the sensors other than the Pt sensors are connected, enter the ranges that are described in the operation
manuals of the sensor.
43
Page 44

(6) To receive an e-mail alarm when the temperature or the humidity exceeds certain predetermined values, set
the ON- and OFF-thresholds for both the upper and lower limit temperatures.
Note: To avoid frequent ON/OFF cycling, the minimum differential between the ON- and OFF-threshold values should be
1ºC (2ºF).
5-3-2. Offsetting the measured temperature/humidity values
To set the offset value for the measured values, follow the instructions below.
Note: The actual measurement values or the adjusted measurement values are not displayed until the connection settings of
(1)
(2)
the AI controller are completed.
When the AI controller is registered for the first time, click [Save Settings] to send the settings data, and click [Functions
1]-[Measurement] to refresh the measurement settings screen.
Click [Set offset] in the [Setting details] section.
Select the offset value in the [Offset] pulldown menu, or
select the desired value in the [Modified value] pulldown
menu.
The settable offset value range for temperature sensor is
between -10.0ºC (-18.0ºF) and +10.0ºC (+18.0ºF), and
for the humidity sensor is between -10.0% and +10.0%.
5-3-3. Registering PI controllers and metering devices
Follow the instructions below to make the system settings of the metering devices. Up to four metering devices
can be connected to a PI controller (PAC-YG60MCA) or CN7 of AE-200/AE-50/EW-50.
Note: Although the maximum settable total number of built-in PI controllers and PI controllers (PAC-YG60MCA) for each
AE-200/AE-50/EW-50 is 15, the number of them in a system with connection to one or more AE-50/EW-50 controllers
must be 20 or less. (Each built-in PI controller counts as one unit.)
<When a built-in PI controller is used>
Metering device name
Setting details of
metering device 1
Setting details of
metering device 3
Pulse value
Measurement unit
Setting details of
metering device 2
Setting details of
metering device 4
<When a PI controller (PAC-YG60MCA) is used>
Metering device name
PI controller icon
Setting details of
metering device 1
Setting details of
metering device 3
Pulse value
Measurement unit
Setting details of
metering device 2
Setting details of
metering device 4
(1) Using the scroll bar, display the address to which the PI controller (PAC-YG60MCA) will be connected or to
display the settings area for a built-in PI controller at the top.
(2)
Select the PI controller icon (
).
When a built-in PI controller is used, the top row shows the setting area for the built-in PI controller and there
is no need to select an icon.
Note: Click again to deselect.
WT07138X02
44
Page 45

(3) In the [Metering device name] field, enter the name of the metering device.
(4) Enter the pulse value of the metering device, and select the measurement unit.
Note: The measurement unit can be selected from [kWh], [m3], [MJ], or [--(no unit)].
Note: Select the blank in the measurement unit pulldown menu when not using a metering device.
Note: If the pulse value field is left blank, the reading of the metering device cannot be properly obtained. Be sure to set the
pulse value.
Important: Set the pulse value according to the metering device to be used. To ensure proper settings, first check the value
measured by the metering device and the value counted by the PI controller. Then, after a certain time, check
that both values have increased by equal values. (The values that the PI controller counts can be checked on
the Web Browser for System Maintenance Engineer.)
5-3-4. E-mail alarm function settings
To receive an e-mail alarm when the temperature or the humidity exceeds certain predetermined values, set the
e-mail settings by following the instructions below.
(1)
In the [Type of E-Mail] field, select [Out-of-limit alarm].
Then, enter the mail subject and the e-mail addresses.
Note: The following characters cannot be used in the [Mail
An e-mail alarm will be sent in the format shown below.
From: Mitsubishi Building(000001)
Date/Time: 13/03/2014 09:38:39
Address: 50-1
Current value: 24.9 deg C
Status: Exceeded lower limit
Trend Data:
09:38 25.2 deg C
09:37 25.4 deg C
09:36 25.6 deg C
09:35 25.8 deg C
09:34 26.1 deg C
09:33 26.4 deg C
09:32 26.7 deg C
09:31 27.0 deg C
09:30 27.5 deg C
09:29 27.7 deg C
Subject] field: <, >, &, “, or ‘
AE-200/AE-50/EW-50 name + Unit ID
From
Date/Time
Address M-NET address of AI controller + sensor No.
Current value
Status
Trend Data
Note: The AE-200/AE-50/EW-50 unit name and unit
ID entered in section 4-2-1 will appear.
yyyy/mm/dd hh:mm:ss
Note: The date and time will appear in the format
selected in section 4-2-6.
Current temperature or humidity (one decimal place)
Note: [**.*] may appear until the value measured by
sensor becomes stable.
“Exceeded upper limit,” “Recovered from upper
limit,” “Exceeded lower limit,” or “Recovered from
lower limit”
Time + Temperature or humidity values (for the last
10 minutes)
(2)
Click [E-Mail Settings] to enter the mail server
information.
Note: The setting details are the same as those described in
WT07138X02
sections 5-1-1 and 5-1-2. Refer to those sections for
details.
45
Page 46

5-3-5. Energy management data format settings
Set the format of the energy management data that can be output in a CSV format from the screens under the
Energy Management menu, accessible via the Web Browser for System Maintenance Engineer.
Select the separator character.
Select the decimal point character.
WT07138X02
46
Page 47

5-4. Energy Management Settings
On the Energy Management Settings screen, make the settings for the energy-control-related items that appear
on the screens under the Energy Management menu (accessible via the Web browser for System Maintenance
Engineer), such as temperature sensor to measure the outdoor temperature with, electricity meters that are used
for acquiring the data to display the trend graph of indoor unit electricity consumption, and also the mode that are
used for apportioning indoor unit electricity consumption.
Click [Functions 1] in the menu bar, and then click [Energy Management Settings] to access the energy
management settings screen.
Note: The energy management settings may not be accessible if logged in as a building manager.
Note: Electricity consumption is apportioned based on the electricity consumed by outdoor units. The electricity consumed by
indoor units is not considered.
Important: The energy management settings must be made after all units have been started up.
Select a temperature sensor
to measure the outdoor
Click to import the settings
from AE-200/AE-50/EW-50.
The settings that have been saved while one or more units are starting up may be lost.
Temperature sensor
temperature with.
Refresh
Indoor unit operation
apportioning mode
Indoor unit electricity
meter
Indoor unit address
Group Name
Electricity meter
Save Settings
Click to save the changes
made.
(1) In the [Temperature sensor] section, select a temperature sensor to measure the outdoor temperature with.
In the pulldown menu, the name of the temperature sensor that is connected to the AI controller or the AHC
will appear.
Note: Connect the temperature sensor to either the Analog Input 1 or Analog Input 2 port on the AHC.
Note: This setting is interlocked with the temperature sensor setting on the External Temperature Interlock settings screen.
(2) In the [Indoor unit operation apportioning mode] section, select the way indoor units' operation time is
counted that is used to apportion the electricity consumption, which appears on the screens under the
Energy Management menu, accessible via the Web Browser for System Maintenance Engineer.
Select [Fan operation time] to apportion the electricity consumption based on the fan operation time, and
select [Thermo-ON time] to apportion the electricity consumption based on the Thermo-ON time of the
indoor units.
Select [Capacity save amount] to apportion the electricity consumption based on the indoor unit operation
time that was calculated based on the amount of energy saved on the indoor units.
The selected setting must meet the system requirements. Selecting [Capacity save amount] is
recommended.
Note: “FAN operation time” is the cumulative duration of time in which the indoor unit is powered on.
Note: “Thermo-ON time” is the cumulative duration of time in which the refrigerant is flowing into the indoor unit.
Note: “Capacity save amount” is the cumulative operation time of the outdoor unit based on its capacity.
Note: Electricity consumption is apportioned based on the electricity consumed by outdoor units. The electricity consumed
Note: When an AE-200 apportioned electricity billing function is used, this setting is not effective because the billing function
WT07138X02
by indoor units is not considered.
settings are used to apportion the electricity consumption.
47
Page 48

(3) In the [Indoor unit electricity meter] section, select the electricity meter to be used to measure the electricity
consumption of each group of indoor units.
In the pulldown menu, [“Address”+ PI controller address + “-” + Electricity meter number + Electricity
meter name] will appear when a PI controller (PAC-YG60MCA) is connected, or [“Meter” + Channel No. +
Electricity meter name] will appear when a metering device is directly connected to the controller.
Note: If the electricity meter name is long, only part of it may be displayed.
Note: The electricity meter name will be blank if it has not been registered.
Note: Only the electricity meters whose measurement unit setting is set to [kWh] on the Measurement screen are available
Note: When an AE-200 apportioned electricity billing function is used, this setting is not effective because the billing function
for selection.
settings are used to apportion the electricity consumption.
(4) Click [Save Settings] to save the settings.
WT07138X02
48
Page 49

6. Functions 2
6-1. Set Temperature Range Limit
The settable temperature range for the local remote controllers or the Web Browser for User can be limited.
By restricting the lower and upper limit of the set temperatures for cooling, heating, and auto modes, energy
consumption can be reduced.
Click [Functions 2] in the menu bar, and then click [Set Temperature Range Limit] to access the set temperature
range restrictions settings screen.
Note: The set temperature range restrictions settings may not be effective, depending on the unit model of the remote controller
Note: A-control (Mr. Slim) units, room air conditioners, and residential air conditioners do not support the set temperature range
Note: The set temperature range restrictions settings will be effective on the Web Browser for User, but not on the Web
Note: The set temperature range restrictions settings may not be accessible if logged in as a building manager.
Note: The set temperature limit range for the AUTO mode cannot be set for the groups that support the dual set point function
and the indoor unit.
restrictions settings.
Browser for System Maintenance Engineer. The temperature can be set to any temperature within the unit’s operable
temperature range on the Web Browser for System Maintenance Engineer regardless of the set temperature range
restrictions settings.
in the AUTO mode. The set temperature ranges for the normal cooling and heating modes will be used for the ones for
cooling and heating in the Auto (dual set point) mode.
Group No. and
group name
Click to import the settings
from AE-200/AE-50/EW-50.
(1)
Scroll up or down to display the group whose settings are
Refresh
to be made. To make settings for all groups at once, click
[Batch Operations].
Then, click the [Set temperature range] area to display
the setting screen.
Set the temperature ranges for cooling, heating, and auto
modes.
Click [OK] to return to the previous screen.
Note: When the temperature unit is Fahrenheit, temperatures
Note: The temperature range for Dry mode will be the same as
are displayed in 2ºF increments.
the one for cooling mode.
Set temperature range
Batch Operations
Click to make settings for all
groups collectively.
Copy
Paste
Save Settings
Click to save the changes
made.
(2)
To copy the settings of a group to the settings for other groups, click [Copy] in the row of the group whose
settings are to be copied, then click [Paste] in the row of the group to which the copied settings are to be
pasted. The rectangular icons next to the selected buttons will appear in yellow-green.
(3)
Click [Save Settings] to save the settings.
WT07138X02
49
Page 50

6-2. Night Mode (quiet operation) Schedule
Outdoor units can be operated in a quiet mode for the specified time period. Use the Night mode when low-noise
operation of the outdoor unit is preferable during the night.
Click [Functions 2] in the menu bar, and then click [Night Mode Schedule] to access the Night Mode Schedule
settings screen.
Note: Make the Night Mode Schedule settings only when all the units are in normal operation. When connection error occurs
Note: The degree of noise reduction depends on the outdoor unit model.
Note: The Night Mode Schedule settings may not be accessible if logged in as a building manager.
with the indoor or the outdoor units, the target outdoor units may not be displayed properly.
Start Time
Target Outdoor Units
Refresh
Click to import the settings
from AE-200/AE-50/EW-50.
End Time
Save Settings
Click to save the changes
made.
(1) In the [Start Time] and [End Time] sections, specify the start and end times for the Night mode.
Note: When the start time and the end time is the same, the units will operate in the Night mode at all times.
Note: The time period over the next day (such as 22: 00 - 6: 00) can be set.
(2) In the [Target Outdoor Units] section, select the M-NET addresses of the target outdoor units.
(3) Click [Save Settings] to save the settings.
WT07138X02
50
Page 51

6-3. System-changeover
The System-changeover function switches the operation modes of the indoor units connected to the same
outdoor unit between cooling and heating based on the room temperature and the set temperature. Click
[Functions 2] in the menu bar, and then click [System-changeover] to access the System-changeover settings
screen.
The System-changeover function is available only on the Y series of outdoor units, whose operation modes
do not include the Auto mode. Use this function to operate the air conditioning units in the heating mode in the
morning and in the cooling mode in the afternoon. The operation mode of all indoor units will automatically be
switched, eliminating the need to switch the operation mode manually from the remote controllers.
Note: Because the operation mode is selected based on the demands of the representative group or of the majority of the
Note: The System-changeover settings may not be accessible if logged in as a building manager.
Note: If the outdoor unit is an R2 series, whose operation modes include the Auto mode, use the Auto mode instead of the
groups, not all areas may be air conditioned to the optimum temperature.
System-changeover function to switch the operation mode automatically.
Target outdoor unit
The M-NET address of the
outdoor unit appears.
Change Mode
Refresh
Click to import the settings
from AE-200/AE-50/EW-50.
Groups
The names of the groups
that are connected to the
outdoor unit appear.
When the [Representative
Group] mode is selected,
select the representative
group from among these
groups.
Save Settings
Click to save the changes
made.
(1) Select the Change Mode [None], [Averaging], or [Representative Group], referring to the table below.
If [Representative Group] is selected, also select a representative group from among the groups on the right.
Table 6-1 Change Mode
Change Mode Content
None System-changeover function will not be used.
The operation mode (cooling or heating) will be determined and switched every 15
Averaging
Representative Group
minutes based on the demands of the majority of all groups connected to the outdoor
unit, taking into consideration the capacity of each indoor unit and the temperature
differences between the set temperatures and room temperatures.
The operation mode (cooling or heating) will be switched based on the temperature
difference between the set temperature and the room temperature of the
representative group.
(2) Click [Save Settings] to save the settings.
WT07138X02
51
Page 52

7. Functions 3
7-1. External Temperature Interlock
Based on the temperature difference between the set temperature and the outdoor temperature, the set
temperature can be adjusted automatically. Making this control setting on the air conditioning unit at an entrance
of a building prevents extreme temperature change from distressing our bodies and sending us into shock. Click
[Functions 3] in the menu bar, and then click [External Temperature Interlock] to access the External Temperature
Interlock settings screen.
Note: Either an AI controller (PAC-YG63MCA) or AHC, and an outdoor temperature sensor are required to measure the outdoor
Note: When connecting one or more AE-50/EW-50 controllers, connect an AI controller (PAC-YG63MCA) and outdoor
Note: The External Temperature Interlock settings between the units connected to the AE-200, AE-50, and EW-50, as well as
Note: The External Temperature Interlock settings may not be accessible if logged in as a building manager.
Select a temperature sensor
to measure the outdoor
temperature.
temperature sensor on each AE-50/EW-50.
between the units connected to different AE-50/EW-50 controllers, cannot be made.
Temperature Sensor
temperature with.
Group No. and
group name
Set Temperature Variation
Range
Select a maximum
temperature value to be
added to or subtracted from
the set temperature.
Click to import the settings
Refresh
from AE-200/AE-50/EW-50.
Save Settings
Click to save the changes
made.
(1) In the [Temperature Sensor] section, select a temperature sensor to measure the outdoor temperature with.
In the pulldown menu, the name of the temperature sensor that is connected to the AI controller or the AHC
will appear.
Note: Connect the temperature sensor to either the Analog Input 1 or Analog Input 2 port on the AHC.
(2) In the [Set Temperature Variation Range] section, select a maximum temperature value for each group to be
added to or subtracted from the set temperature.
For example, when [±4°C] (±8°F) is selected and the set temperature for the Cool or the Dry mode is set to
24°C (75°F), the set temperature will be adjusted to a maximum of 28°C (83°F) based on the temperature
difference between the set temperature and the outdoor temperature. When [±2°C] (±4°F) is selected, the
set temperature will be adjusted to maximum of 26°C (79°F).
Note: When the unit of temperature is Fahrenheit, the selected temperature value may not be added to the set temperature
accurately because 2ºC is used for the calculation first, and then the temperature in Celsius is converted into the
temperature in Fahrenheit.
(3) Click [Save Settings] to save the settings.
WT07138X02
52
Page 53

When the External Temperature Interlock function is active, the set temperature will be adjusted as shown
below.
“Cool” and “Dry” modes
■
36
Outdoor temperature
35
34
33
32
31
30
29
28
27
Temperature (°C)
26
25
24
23
Outdoor temperature conditions Set temperature after being adjusted
2XWGRRUWHPSHUDWXUH
Set temperature + 1.5°C (3°F)
2XWGRRUWHPSHUDWXUH
Set temperature + 4.5°C (9°F)
2XWGRRUWHPSHUDWXUH
Set temperature + 6.5°C (12°F)
2XWGRRUWHPSHUDWXUH
Set temperature + 7.5°C (14°F)
Set temperature after being adjusted
when [Set Temperature Variation
Range] is set to [±4°C] (±8°F)
Set temperature
Time
Set temperature + 1°C (2°F)
Set temperature + 2°C (4°F)
Set temperature + 3°C (6°F)
Set temperature + 4°C (8°F)
“Heat” mode
■
Set temperature
19
18
17
16
15
14
13
Set temperature after being adjusted
when [Set Temperature Variation
12
Range] is set to [±4°C] (±8°F)
11
10
Temperature (°C)
9
8
7
6
Time
Outdoor temperature
Outdoor temperature conditions Set temperature after being adjusted
2XWGRRUWHPSHUDWXUH
Set temperature - 4.0°C (8°F)
2XWGRRUWHPSHUDWXUH
Set temperature - 6.0°C (11°F)
2XWGRRUWHPSHUDWXUH
Set temperature - 8.0°C (15°F)
2XWGRRUWHPSHUDWXUH
Set temperature - 10.0°C (18°F)
Set temperature - 1°C (2°F)
Set temperature - 2°C (4°F)
Set temperature - 3°C (6°F)
Set temperature - 4°C (8°F)
WT07138X02
53
Page 54

7-2. Night Setback Control
The Night Setback Control function (hereafter abbreviated as Setback Control) prevents indoor condensation by
performing heating operation automatically when the room temperature goes outside of the specific range during
the night. Click [Functions 3] in the menu bar, and then click [Night Setback Control] to access the Night Setback
Control settings screen.
Heating operation starts when a given group is stopped and the room temperature drops below the specified
minimum temperature.
Note: The Setback Control function also prevents excessive temperature rise by performing cooling operation automatically
Note: If the room temperature is measured by the return air temperature sensor on the air conditioning unit, the measured
Note: The Night Setback Control may not be accessible if logged in as a building manager.
when the room temperature goes outside of the specific range. Cooling operation starts when a given group is stopped
and the room temperature rises above the specified maximum temperature.
value may not be an accurate representation of the temperature in the room, especially when the air conditioning unit
is stopped and the room air is stagnant. When this is the case, use an external temperature sensor (PAC-SE40TSA) or
remote controller sensor to measure the room temperature.
Setback Control Usability
Group No. and group
name
Refresh
Click to import the settings
from AE-200/AE-50/EW-50.
Setback Control Period
Temperature range
Copy
Paste
Save Settings
Click to save the changes
made.
(1) Select [Use] and set the time period in which Setback Control is performed.
Note: When [00: 00 - 00: 00] is selected, Setback Control is active for 24 hours.
(2) In the [Temperature range] section, set the maximum and minimum temperatures for each group.
For example, if [Setback Control Period] is set to [01:00 - 05:00] and [Temperature range] is set to
[12°C - --°C] ([53°F - --°F]), heating operation starts automatically when the room temperature drops below
the set temperature 12°C (53°F) between 1:00 and 5:00. When the Setback Control ends at 5:00, the set
temperature returns to the original setting, and the operation stops.
WT07138X02
54
Page 55

Note: The air conditioning units in the heating operation will stop and the set temperature will return to the original setting
when the Setback Control period is over or the room temperature rises to the minimum temperature plus 3°C (6°F).
Likewise, the air conditioning units in the cooling operation will stop and the set temperature will return to the original
setting when the Setback Control period is over or the room temperature drops to the maximum temperature minus
3°C (6°F).
Setback
operation
Room temp.
21°C (69°F)
Min. temp.
Setback
operation
starts.
ends.
3°C (6°F)
12°C (53°F)
Heat ON
21°C (69°F)
Heat OFF
Heat ON
12°C (53°F)
Heat OFF
21°C (69°F)
Setback Control period
When the temperature drops below the minimum temperature (heating operation)
Setback
operation
Max. temp.
28°C (83°F)
Room temp.
24°C (75°F)
24°C (75°F)
Cool ON
Cool OFF
Setback
operation
starts.
Cool ON
28°C (83°F)
ends.
Cool OFF
24°C (75°F)
3°C (6°F)
Setback Control period
When the temperature rises above the maximum temperature (cooling operation)
(3) To copy the settings of a group to the settings for other groups, click [Copy] in the row of the group whose
settings are to be copied, then click [Paste] in the row of the group to which the copied settings are to be
pasted. The rectangular icons next to the selected buttons will appear in yellow-green.
(4) Click [Save Settings] to save the settings.
WT07138X02
55
Page 56

7-3. Interlock control
Click [Functions 3] in the menu bar, and then click [Interlock control] to access the Interlock Control settings
screen. Set the interlocking conditions and actions, and then click [Save Settings] to save the settings.
Note: A separate license is required to use the Interlock Control function. Make sure that the required license has properly been
Note: The Interlock Control settings may not be accessible if logged in as a building manager.
Note: Interlock Control is not effective when [External Input Setting] is set to [ON/OFF (Level signal)]. (See section 4-2-3).
Note: If a group is deleted on the group settings screen, be sure to delete the Interlock Control settings in which the group is
Execute/Stop Execution
Click to enable/disable the
Click to enable/disable each
Interlock Control setting.
Click to display the screen to
registered on the Registration of Optional Functions screen. (Refer to chapter 10 for details.)
selected as the input units or the output units.
Interlock Control.
Enable/Disable
Input Category
Input state 1
Input state 2
Select Input Units
select input units.
Delete all steps
Click to delete all Interlock
Control settings.
Output Unit Type
Edit buttons
Status bar
Shows the settings status
of 150 settings (Green:
Settings have been made;
Red: Incomplete settings
exist.)
Scroll bar
Slide to show different
Interlock Control settings
between No.1 and No.150.
Click to import the settings
Refresh
from AE-200/AE-50/EW-50.
Save Settings
Click to save the changes
made.
Action
Click to set the interlocking
actions.
Select Output Units
Click to display the screen to
select output units.
Up to 150 Interlock Control settings from No.1 through No.150 can be set for each AE-200/AE-50/EW-50. (Up
to 600 Interlock Control settings can be made when one AE-200 and three or four AE-50/EW-50 controllers are
connected.) The Interlock Control verifies the state changes in an ascending order of No.1 to No.150 every three
to five seconds. When the interlocking conditions are met, the interlocking action commands will be issued to the
output units.
By making the interlocking condition settings (input category, input states, and input units) and interlocking action
settings (output unit type, actions, and output units) for each Interlock Control setting, the operation of the output
units can be interlocked with the operation of the input units.
Caution:
Before using the Interlock Control function, you must agree to the following.
1. This function must not be used for disaster prevention or security purposes unless a backup device is
provided in case of failure of this function. (This function should never be used in the way that would put
people's lives at risk.)
2. The interlocking action settings that are not supported by the interlocked output units must not be made on
the [Set up Actions] screen. Failure to observe this precaution may result in malfunctions.
3. After completing each Interlock Control setting, perform a test run and confirm proper settings and
operation.
4. Do not set the Interlock Control settings as the following examples show. Doing so will cause short-cycling,
resulting in unit damage.
Example 1: Group 1 is turned off when Group 1 is turned on.
Example 2: Group 1 is turned on when Group 1 is turned off.
WT07138X02
56
Page 57

Shown below are eight examples of Interlocked operations.
Example 1: Interlocked operation of indoor unit and card key via a DIDO controller
The card key status is input
Signal indicating the card
②
key has been removed
AE-200
Signal to stop the indoor
③
unit
DIDO controller
(PAC-YG66DCA)
①
through the contact.
Indoor unit
Example 2: Interlocked operation of operation mode between indoor units
Card key
Signal indicating the operation mode for the
②
indoor unit #1 has changed to fan mode
AE-200
Signal to change the
③
operation mode for the
indoor unit #2 to fan
mode
Indoor unit #1
(conference room No.1)
Indoor unit #2
(conference room No.2)
The operation mode has changed
①
from heating to fan mode.
Remote
controller
Example 3: Interlocked operation of indoor unit and window through the free contact on an indoor unit
Signal indicating the
②
window has been opened
AE-200
Signal to stop the indoor
③
unit
Indoor unit
The open/close status of the window is
①
input to the free contact (CN32).
Window
Example 4: Interlocked operation of indoor unit, lighting, and card key through the free contact on an indoor
unit
Signal indicating the card
②
key has been removed
The card key status is input
①
to the free contact (CN32).
Card key
WT07138X02
AE-200
Signal to stop the indoor
③
unit and turn off the
lighting
Indoor unit
57
Signal to turn off the lighting
④
via the free contact
Lighting
Page 58

Example 5: Interlocked operation of indoor unit and other company’s ventilation unit via a DIDO controller
Signal to operate the other company’s
②
ventilation unit
AE-200
Other company’s
ventilation unit
The indoor unit has
①
started operation
DIDO controller
(PAC-YG66DCA)
Indoor unit
Example 6: Interlocked operation of the indoor unit in error and the auxiliary unit
An error has occurred in the
①
indoor unit.
AE-200
Signal to operate the
②
auxiliary unit
Indoor unit
Indoor unit in error
Auxiliary unit
Example 7: Interlocked operation of the indoor units
The representative indoor unit
①
has stopped
AE-200
Representative
indoor unit
Signal to stop the other
②
indoor units
Indoor unit
Indoor unit Indoor unit
Example 8: Interlocked operation of the security system and the connected units
The security system alarm is input to
①
the free contact (CN32).
AE-200
Signal to stop the
②
indoor unit
Indoor unit
Signal to stop the
②
indoor unit
Representative
indoor unit
Security system
WT07138X02
Indoor unit LOSSNAY unit
58
Page 59

7-3-1. Making the interlocking condition settings
(1) Setting an Input Category and Input States
Select an Input Category and Input States 1 and 2, referring to the table below.
Table 7-1 Interlocking condition settings
Input Category
Input
unit icon
Input State 1 Input State 2
All Groups On
Group
(On/Off)
All Groups Off
One or more Groups On
–
One or more Groups Off
*1 *2 *3
Group
(Mode)
All groups in the mode
All groups out of the mode
One or more groups in the mode
One or more groups out of the mode
Air conditioning unit group:
Cool, Dry, Fan, Heat, Auto, Setback
LOSSNAY unit group:
Bypass, Heat Recovery, Auto
All units in error
Group
(Error/Normal)
All units in normal operation
One or more units in error
–
One or more units in normal operation
All Units On
Free Input Points
(On/Off)
All Units Off
One or more Units On
–
One or more Units Off
*1 The operation modes for Air To Water (PWFY) unit groups, HWHP (CAHV, CRHV) unit groups, or general equipment groups are
not available for selection.
*2 If the selected operation mode is not available on the input unit, interlocking conditions will not be fulfilled.
*3 The Setback mode can be selected on the AE-200A/AE-50A/EW-50A, but not on the AE-200E/AE-50E/EW-50E.
Note: If the Input Category is set to [Group (On/Off)] and the Input State 1 is set to [All Groups On], the interlocking action
Note: Free contact is available for use on R410A- and R407C-compatible indoor units with software Ver. 33 or later. The
Note: When [External Input Setting] is set to [Emergency Stop (Level signal)] (see section 4-2-3) or when the indoor unit is
commands will be issued to the output units when the state on the input units changes to [All Groups On] from another
state [All Groups Off], [One or more Groups On], or [One or more Groups Off].
software version can be confirmed with the Maintenance Tool.
stopped due to the Peak Cut control (see section 5-2), only the Interlock Control of free contact and DIDO controller
(PAC-YG66DCA) will be performed, but other Interlock Control will not be.
WT07138X02
59
Page 60

(2)
Selecting the input units
Click [Select Input Units] to display one of the following screens, depending on the selected Input Category.
(A) When [Group (On/Off)], [Group (Mode)], or [Group (Error/Normal)] is selected as the Input Category
The [Select Input Groups] screen will appear.
Select the group numbers of the input unit groups. The
selected group numbers will appear with a yellow-green
background.
Click again to deselect. The deselected group numbers will
appear with a light-gray background.
To deselect all selected groups, click [Reset selections].
To select a block of groups, click [Select a Block]. Select a
block name and press [OK]. The groups that are registered
to the block will appear with a yellow-green background.
Note: If the Input Category is set to [Group (On/Off)] or [Group (Error/Normal)], air conditioning unit groups, LOSSNAY
Note: Different types of groups (air conditioning unit groups, LOSSNAY unit groups, or general equipment (connected
unit groups, Air To Water (PWFY) unit groups, HWHP (CAHV, CRHV) unit groups, and general equipment
(connected via DIDO controller PAC-YG66DCA) groups can be selected.
If the input category is set to [Group (Mode)], air conditioning unit groups and LOSSNAY unit groups can be
selected.
via DIDO controller PAC-YG66DCA) groups) cannot be simultaneously selected.
(B) When [Free Input Points (On/Off)] is selected as the Input Category
The [Select Addresses of Input Units] screen will appear.
Select the addresses of the indoor units to which the
general equipment is connected, and select contact points
for each indoor unit.
The selected unit address will appear with a red frame. The
unit addresses whose contact points have been set will
appear with a yellow-green background.
WT07138X02
60
Page 61

7-3-2. Making the interlocking action settings
(1)
Setting an Output Unit Type and Actions
Select an Output Unit Type and set the Actions, referring to the table below.
Table 7-2 Interlocking action settings
Output Unit
Type
Output
unit icon
Setting item
*2
Actions
Setting options
ON/OFF ON, OFF
Air conditioning unit group:
Mode
*1
Cool, Dry, Fan, Heat, Auto, Setback
LOSSNAY unit group:
*3
Bypass, Heat Recovery, Auto
Set Temp.
Air direction
Group
Fan speed
Prohibit Remote Controller
Operation (ON/OFF)
Prohibit Remote Controller
Operation (Mode)
Prohibit Remote Controller
Operation (Set Temp.)
Free Output
Points
*1 The available setting options vary, depending on the connected indoor unit model.
Make the interlocking action settings that are available for the output units.
*2 Only the items “ON/OFF” and “Prohibit Remote Controller Operation (ON/OFF and Set Temp.)” can be selected for Air To Water
(PWFY) units. Only the item “ON/OFF” can be selected for HWHP (CAHV, CRHV) units.
*3 The Setback mode can be selected on the AE-200A/AE-50A/EW-50A, but not on the AE-200E/AE-50E/EW-50E.
ON/OFF ON, OFF
*1
*1
*1
Desired temperature
Mid3, Mid2, Mid1, Mid0, Horizontal, Swing, Auto
Low, Mid2, Mid1, High, Auto
Permit, Prohibit
Permit, Prohibit
Permit, Prohibit
WT07138X02
61
Page 62

The screen display under Action will vary, depending on the selected Output Unit Type.
(A) When [Group] is selected as the Output Unit Type
Click [Edit] under Action. The [Set up Actions]
screen will appear.
Set the interlocking actions to be taken when the
interlocking conditions are met.
Note: The current operation status will be maintained for the setting items that were not changed.
Note: The set temperature cannot be set unless the operation mode has been set.
Note: If the selected operation mode is not available on the interlocked output units, the Interlock Control will not be
Note: To prevent malfunctions of the air conditioning units, be sure to set the set temperature to a temperature within
Note: Signals for Swing and Auto of Air direction setting and Auto of Fan speed setting will not be output unless these
Note: When the interlocking conditions are met, it will take some time to issue the interlocking action commands to the
performed.
the normal operating temperature range, although there may be rare cases in which it is possible to set the set
temperature to a temperature outside the normal operating temperature range (depending on the model of the
air conditioning units that are connected to a system).
functions are available on the interlocked output units.
With respect to the air direction and fan speed, if the number of settable air directions and fan speeds vary
among the connected unit models, the signals that are rounded up to the settable range may be output.
output units. This may delay the state change verification, which is usually performed every three to five seconds.
(B) When [Free Output Points] is selected as the Output Unit Type
Select [ON] or [OFF] under Action to turn on or off
the output units.
WT07138X02
62
Page 63

(2)
Selecting the output units
Click [Select Output Units] to display one of the following screens, depending on the selected Output Unit
Type.
(A) When [Group] is selected as the Output Unit Type
The [Select Output Groups] screen will appear.
Select the group numbers of the output unit groups. The
selected group numbers will appear with a yellow-green
background.
Click again to deselect. The deselected group numbers will
appear with a light-gray background.
To deselect all selected groups, click [Reset selections].
To select a block of groups, click [Select a Block]. Select a
block name and press [OK]. The groups that are registered
to the block will appear with a yellow-green background.
Note: If the Output Unit Type is set to [Group], air conditioning unit groups, LOSSNAY unit groups, Air To Water (PWFY)
Note: Different types of groups (air conditioning unit groups, LOSSNAY unit groups, Air To Water (PWFY) unit groups,
unit groups, HWHP (CAHV, CRHV) unit groups, and general equipment (connected via DIDO controller PACYG66DCA) groups are available for selection.
HWHP (CAHV, CRHV) unit groups, or general equipment (connected via DIDO controller PAC-YG66DCA)
groups) cannot be simultaneously selected.
(B) When [Free Output Points] is selected as the Output Unit Type
The [Select Addresses of Output Units] screen will appear.
Select the addresses of the indoor units to which the
general equipment is connected, and select contact points
for each indoor unit.
The selected unit address will appear with a red frame.
The unit addresses whose contact points have been set
will appear with a yellow-green background.
WT07138X02
63
Page 64

7-3-3. Disabling/Enabling Interlock Control settings
Use the Enable/Disable button to enable or disable each Interlock Control setting.
No actions will be taken for the Interlock Control setting that is set to [Disable].
7-3-4. Temporarily disabling the Interlock Control
Click the [Stop Execution] button to temporarily disable the Interlock Control. Click [Execute] to resume the
Interlock Control.
Note: State change that occurs while [Stop Execution] is selected will be ignored.
7-3-5. Editing Interlock Control settings
Use the Edit buttons to edit each row of Interlock Control setting.
Button name Function
Delete all steps Deletes all Interlock Control settings.
Inserts a blank row of Interlock Control setting above the row that is displayed, and moves all
Insert a step
Delete a step
Clear the display Clears the row of Interlock Control setting that is displayed.
Copy
Paste
rows down by one.
If interlocking conditions are entered in the last row, no more rows can be inserted.
Deletes the row of Interlock Control setting that is displayed, and moves up the rows below by
one.
To copy the settings of a row to the settings for other rows, display the row whose settings are
to be copied and click [Copy], then display the row to which the copied settings are to be pasted
and click [Paste].
WT07138X02
64
Page 65

7-4. AHC Port Name Settings
On the AHC Port Name Settings screen, enter the names of the input and output ports of the Advanced HVAC
CONTROLLER (AHC).
The names that are entered on this screen will appear on the AHC List screen, accessible via the Web Browser
for System Maintenance Engineer.
Click [Functions 3] in the menu bar, and then click [AHC Port Name Settings] to access the AHC Port Name
Settings screen.
Note: The AHC port name settings may not be accessible if logged in as a building manager.
Important: The AHC port name settings must be made after all units have been started up.
Click to import the settings
from AE-200/AE-50/EW-50.
The settings that have been saved while one or more units are starting up may be lost.
Unit address
Digital Input
(1–15)
Input Port Name
Refresh
Extended Input
(1–4)
Output Port Name
Digital Output
(1–9)
Extended Output
(1–4)
Analog Output
(1–2)
Analog Input
(1–8)
Save Settings
Click to save the changes
made.
(1) In the [Input Port Name] field, enter the input port name in 20 characters or less.
Note: Digital Input (DI) 1–15, Extended Input (EI) 1–4, and Analog Input (AI) 1–8 will appear regardless of whether the ports
Note: The following characters cannot be used in the [Input Port Name] field: <, >, +, &, “, or ‘
are used or not.
(2) In the [Output Port Name] field, enter the output port name in 20 characters or less.
Note: Digital Output (DO) 1–9, Extended Output (EO) 1–4, and Analog Output (AO) 1–2 will appear regardless of whether
Note: The following characters cannot be used in the [Output Port Name] field: <, >, +, &, “, or ‘
the ports are used or not.
(3) Click [Save Settings] to save the settings.
WT07138X02
65
Page 66

8. User Settings
On the User Settings screen, the user names and passwords of maintenance users and building managers can
be changed, and the available functions for building managers can be limited.
For example, you can allow building managers to change the group name settings when the tenant is changed,
or disallow them to change the basic system settings such as unit settings or network settings.
Also, maintenance users can use this screen to change the user name and password of building managers in
case that they are forgotten.
Click [User Settings] in the menu bar to access the User Settings screen.
Maintenance user name
User name and password
Building manager’s user
User name and password
Click to import the settings
from AE-200/AE-50/EW-50.
and password
can be changed.
name and password
can be changed.
Refresh
Available functions
Select the available functions
for building managers.
Save Settings
Click to save the changes
made.
(1) To change the maintenance user name or password, type new information in the [User Name], [New
Password], and [Retype Password] fields.
Note: If the user logs in as a building manager, the maintenance user name and the password will not be displayed, and
Note: User name must contain only alphanumeric characters.
Note: The user name and password are case-sensitive.
Note: The user name must be in 20 characters or less, and the password in 3 to 10 characters.
cannot be changed.
(2) To change the building manager’s user name or password, type new information in the [User Name], [New
Password], and [Retype Password] fields.
WT07138X02
66
Page 67

(3) Click the functions to be made available for building managers. The rectangular icons next to the selected
functions will appear in yellow-green.
Click again to deselect. The rectangular icons next to the deselected functions will appear in gray.
For more information on each function, refer to Table 8-1.
Note: If the user logs in as a building manager, the currently available functions can be checked, but cannot be changed.
Note: The settings on this screen will not be reflected to the functions on the AE-200/AE-50’s LCD.
Table 8-1 Available Function List
Function Content
Date and Time Refer to section 4-1 for details.
Initial Settings
Functions 1
Basic System
Groups
*1
Group Name
Group Structure
Interlocked LOSSNAY
Blocks
*1
E-Mail
Peak Cut
Block Name
Block Structure
System Settings
Control Details
*1
*1
Refer to section 4-2 for details.
Refer to section 4-3 for details.
Refer to section 4-4 for details.
Refer to section 4-5 for details.
Refer to section 5-1 for details.
Refer to section 5-2 for details.
Measurement Refer to section 5-3 for details.
Energy Management Settings Refer to section 5-4 for details.
Set Temperature Range Limit Refer to section 6-1 for details.
Functions 2
Night Mode Schedule Refer to section 6-2 for details.
System-changeover Refer to section 6-3 for details.
External Temperature Interlock Refer to section 7-1 for details.
Functions 3
Night Setback Control Refer to section 7-2 for details.
Interlock control Refer to section 7-3 for details.
AHC Port Name Settings Refer to section 7-4 for details.
*1 At factory shipment, these settings by the building managers are prohibited.
(4) Click [Save Settings] to save the settings.
WT07138X02
67
Page 68

9. Utility
9-1. Back up/import settings data
The following data can be exported to an HDD or a USB memory as a backup: the settings data that have
been made from the Web Browser for Initial Settings, the schedule settings that have been made from the Web
Browser for System Maintenance Engineer, and the target value settings of the energy management data.
The exported data can be imported back to the AE-200/AE-50/EW-50 to restore the previous settings after
AE-200/AE-50/EW-50 replacement.
Click [Utility] in the menu bar, and then click [Back up/import settings data] to access the Back up/import settings
data screen.
Note: Back up/import settings data function is accessible only if logged in as a maintenance user.
Back up settings data
Click to back up the
AE-200/AE-50/EW-50
settings data.
Browse...
Click to browse for a file
Data import source
The path to the file to be
imported will appear.
that contains the data to be
imported.
Import settings data
Click to import the file
specified in the “Data
import source” field to the
AE-200/AE-50/EW-50.
9-1-1. Backing up settings data
(1) To back up the data, click [Back up settings data]. The settings data will be created and the Window’s
standard file download dialog will appear.
Note: It will take a few minutes to create the settings data.
Note: The name of the settings data will be “SettingData.dat”.
WT07138X02
68
Page 69

9-1-2. Importing settings data
(1) Click the [Browse...] button to launch the explorer and browse for a file that contains the data to be imported.
Select the desired file, and click [Open]. The path to the file to be imported on an external storage media will
appear in the [Data import source] field.
(2) Click [Import settings data] to import the data from the external storage media to the AE-200/AE-50/EW-50.
Note: It will take a few minutes to import the settings data.
(3) When the settings data has been successfully imported, the AE-200/AE-50/EW-50 will restart.
(4) Go back to the login screen and login again.
WT07138X02
69
Page 70

10. License registration for optional functions
This chapter explains how to register a license for optional functions.
Please ask your dealer for more details on the optional functions and how to purchase a license number.
Note: The current date and time settings are required for license registration. Refer to section 4-1 for date and time settings.
Note: The license registration is required for each AE-200/AE-50/EW-50.
(1) On the login screen, click [Registration of Optional Functions].
Registration of Optional Functions
The [Registration of Optional Functions] screen will appear.
Selecting Optional
Select the optional function
This indicates whether the
optional function is available
(2)
In the [Selecting Optional Function] section, select the optional
Function
to be registered.
Current Status
for use.
Software version
function to be registered. The current availability will appear in
the [Current Status] section.
(3)
In the [License number entry] field, enter the license number
and click [Register the license].
In the [Current Status] section, a word “Available” will appear.
If the registration is unsuccessful, verify that the selected
optional function and the license number are correct.
Note: Alphabet “O” and “I” are not used for license number.
Login Page
Click to return to the login
screen.
License number entry field
Register the license
Click to register the license.
WT07138X02
70
Page 71

11. Software update
The AE-200/AE-50/EW-50 software can be updated by either directly reading the update file in a USB memory
device or by using a Web browser.
Directly reading the update file in a USB
①
memory device
USB
Using a Web browser
②
USB
CD
PC for update
LAN
HUB
This manual explains how to update the software using a Web browser (②). For how to update the software by
directly reading the update file in a USB memory device(①), refer to the AE-200 Instruction Book or Installation
Manual.
11-1. Preparation
Follow the instructions below to change the IP address of the PC that is used for software update.
Note: When the system is connected to the existing LAN, ask the system administrator for permission before changing the IP
(1)
address settings and updating the software.
Click [Control Panel] in the Start menu, and click [Network and Sharing
Center]>[Local Area Setting].
In the [Local Area Connection Status] window, click [Properties].
(2)
Click [Internet Protocol Version 4 (TCP/IPv4)] to select it, and click
[Properties].
WT07138X02
71
Page 72

(3)
In the [Internet Protocol Version 4 (TCP/IPv4) Properties] window,
check the radio button next to [Use the following IP address].
Enter [192.168.1.*] in the [IP address] field. (The number indicated
with an asterisk must be different from the IP address of the
AE-200/AE-50/EW-50 to be updated.)
Leave [255.255.255.0] in the [Subnet mask] field as it is.
Note: If the IP address of the AE-200/AE-50/EW-50 is [192.168.1.1], set the
Note: Default IP address of AE-200, AE-50, and EW-50 is [192.168.1.1].
Note: When performing an update on a PC that is already connected to the
same 1st, 2nd, and 3rd numbers and different 4th number, such as
[192.168.1.2].
existing LAN, [255.255.255.0] may not appear in the [Subnet mask]
field. When [255.255.0.0] appears, enter the same 1st and 2nd numbers
(192.168) and different 3rd or 4th number of the IP address of the
AE-200/AE-50/EW-50 in the [IP address] field.
Caution:
Obtain an approval from the client for the following precautions as necessary.
1. The communication between AE-200/AE-50/EW-50 and the air conditioning units will stop while
the software is being updated. Although the unit in operation may detect a communication error
and an error sign may appear on the local remote controllers, the unit will continue its operation
and be operable from the local remote controllers.
* Note that Mr. Slim indoor units or systems with no local remote controllers may detect a communication
error and come to an abnormal stop.
2. Record the operation status of the air conditioning units immediately before updating the
software. After the software update completes, check the operation status of the units, and
manually operate the units as necessary.
3. Some operations and functions, such as scheduled operations, billing function, Peak Cut control,
energy management function, will be disabled while the software is being updated. Check the
setting details of these functions beforehand, and update the software when it does not affect
these functions.
4. If the functions in the table below are used on the TG-2000A, avoid updating the software during
the time period indicated in the right column.
TG-2000A function in use Time period in which the update is prohibited
Electricity charge apportioning function AM 4:05 – 4:35
Malfunction log backup AM 0:05 – 0:15
Peak Cut data backup AM 2:00 – 2:10
Measurement trend data backup AM 1:05 – 1:15
5. CSV output data (e.g., energy management data) will lose up to 60-minute worth of data.
6. When a built-in PI controller is used, pulse signals cannot be input while the software is being
updated.
WT07138X02
72
Page 73

11-2. Update procedures
(1)
Make sure that the PC that has been set in section 11-1 above and the AE-200/AE-50/EW-50 to be updated
are connected with a LAN cable.
(2)
Turn on the power to the AE-200/AE-50/EW-50, and insert a CD or USB memory device in which the update
file is stored to the PC.
(3)
Enter the web page address in the address field of the Web browser as follows:
https://[IP address of each AE-200, AE-50, or EW-50]/swupdate/Update.html
Press the [Enter] key.
Note: If the IP address of the AE-200/AE-50/EW-50 is [192.168.1.1], the web page address is [https: //192.168.1.1/
(4)
If the security certificate is invalid, a security certificate error page (as
shown at right) will appear.
Click [Continue to this website (not recommended)].
(5)
Enter the maintenance user name and the password in the login
screen, and click [OK]. (Default user name: initial, Default password:
init)
swupdate/Update.html].
(6)
A software update screen will appear.
(7)
Click the [Browse...] button and select the update file (AExx_FW####.
dat) stored in the CD or USB memory device, and click [Start Update].
Note: The software cannot be downgraded to an earlier version.
WT07138X02
73
Page 74

(8)
A software update process starts.
Note: It takes about ten minutes to complete the update.
Note: Do not disconnect the LAN cable or turn off the power to the
(9)
The AE-200/AE-50/EW-50 will reboot after the update is complete.
AE-200/AE-50/EW-50 while the software is being updated.
Check that the version that will appear on the screen is the same as
the version of the update file. Also check that the version displayed on
the login window of the AE-200/AE-50’s LCD is also the same.
If the software update did not properly complete, update the software again. If the problem persists,
the AE-200/AE-50/EW-50 may be damaged. Consult your dealer.
WT07138X02
74
Page 75

12. Notes on connecting to Web browser
Follow the instructions below to change settings if the message “If you see this you don’t have a Java-enabled
Web browser. Here’s a picture of what you are missing.” or “Error. Click for details.” appears, and no login
window appears when the AE-200’s Web page is accessed.
Note: To remedy the above-mentioned problem, go to section 12-1 “Clearing cache” first, and if the problem still persists, go to
12-1. Clearing cache
12-1-1. How to clear Java cache
(1)
(2)
(3)
section 12-2 “Resetting Internet Explorer”. Resetting Internet Explorer will reset Internet Explorer’s settings to their default
condition.
Click [Control Panel]>[Java].
Note: If [Category] is selected in the top right corner, next to [View by:], change it to [Large icons] or [Small icons].
Java Control Panel will open.
Click [Settings…] under [Temporary Internet Files].
(4)
The [Temporary Files Settings] dialog will appear. Click [Delete
Files…].
(5)
The [Delete Files and Applications] dialog will appear. Make sure
that the checkboxes next to [Trace and Log Files] and [Cached
Applications and Applets] are both checked, and then click [OK].
WT07138X02
75
Page 76

12-1-2. How to clear Internet Explorer cache
(1)
Open the Internet Explorer, click [Tools] in the menu bar, and then click [Internet options].
(2)
The [Internet Options] dialog will appear.
Click [Delete...] under [Browsing history].
(3)
Make sure that the checkbox next to [Temporary Internet files] is
checked, and then click [Delete].
WT07138X02
76
Page 77

12-2. Resetting Internet Explorer
If the problem persists after section 12-1 “Clearing cache”, reset Internet Explorer settings.
Note: Resetting Internet Explorer’s settings will impact the following. Before you make any changes, write down the current
(1)
(2)
settings if necessary.
- Disable toolbars and add-ons
- Advanced options
- Default web browser settings
- Tabbed browsing settings
- Privacy settings
- Pop-up settings
- Security settings
Open the Internet Explorer, click [Tools] in the menu bar, and then click [Internet options].
The [Internet Options] dialog will appear.
Click the [Advanced] tab, and then click [Reset...] under [Reset
Internet Explorer settings].
WT07138X02
77
Page 78

Appendix: Added functions in Ver. 7.20
The table below summarizes the newly added functions in Ver. 7.20.
Menu item Added function Reference
E-mail Port number of outgoing mail server is settable. Section 5-1
Functions 1
Peak Cut
“50%” is available for selection as outdoor unit maximum
operating capacity.
Section 5-2
WT07138X02
78
Page 79

WT07138X02
79
Page 80

This product is designed and intended for use in the residential,
commercial and light-industrial environment.
The product at hand is based on the following EU regulations:
Low Voltage Directive 2006/95/EC
Electromagnetic Compatibility Directive 2004/108/EC
Restriction of Hazardous Substances 2011/65/EU
Please be sure to put the contact address/telephone number
on this manual before handing it to the customer.
HEAD OFFICE: TOKYO BLDG., 2-7-3, MARUNOUCHI, CHIYODA-KU, TOKYO 100-8310, JAPAN
WT07138X02
 Loading...