

Page 1
Easyphoto v2.4.0 User‟s Manual
ENGLISH
OPERATOR USER´S MANUAL
DPS TERMINAL
Model MT1 series
Rev 1.9
For more information please visit www.mitsubishiphoto.com and www.easyphotosystem.com.
Page 2

Operator user‟s manual
TABLE OF CONTENTS
1 INTRODUCTION ......................................................................................... 5
1.1 The best choice ............................................................................................. 5
1.2 Description .................................................................................................... 5
1.2.1 Services ...................................................................................................... 5
1.2.2 Functions .................................................................................................... 6
1.3 Working Modes ............................................................................................. 6
1.3.1 Kiosk Mode ................................................................................................. 6
1.3.2 Operator Mode............................................................................................ 6
1.3.3 Order Terminal Mode (Optional) ................................................................ 6
1.4 System Users ................................................................................................ 6
1.4.1 End user ..................................................................................................... 6
1.4.2 Operator user .............................................................................................. 7
1.4.3 Supervisor user........................................................................................... 7
2 SYSTEM FUNCTIONS ................................................................................ 8
2.1 Input of images ............................................................................................. 8
2.1.1 Input images from a memory card .............................................................. 8
2.1.2 Input images from a USB device ................................................................ 8
2.1.3 Input images from CD/DVD ........................................................................ 8
2.1.4 Input images via Bluetooth ......................................................................... 8
2.2 Photography services .................................................................................... 9
2.2.1 Instant Prints ............................................................................................... 9
2.2.2 DVD/CD Burning......................................................................................... 9
2.2.3 Compositions .............................................................................................. 9
2.2.4 Photo ID (Optional) ..................................................................................... 9
2.2.5 Calendars (Optional) ................................................................................ 10
2.2.6 Collage (Optional) ..................................................................................... 10
2.2.7 Frames and greetings (Optional) .............................................................. 10
2.2.8 Mosaic Poster (Optional) .......................................................................... 10
2.2.9 ONLINE Kioskgifts (Optional) ................................................................... 11
2.3 Picture Retouch .......................................................................................... 11
3 SCREEN FLOW ........................................................................................ 12
3.1 Services: What do you want to do? ............................................................. 13
3.2 Input of images: Where do you have your pictures? .................................... 14
3.2.1 Memory Card ............................................................................................ 14
3.2.2 USB pendrive ............................................................................................ 15
3.2.3 DVD/CD .................................................................................................... 15
3.2.4 Bluetooth ................................................................................................... 16
3.3 Selection of images: Picture loading options ............................................... 16
3.4 Instant prints and retouch: What do you prefer? .......................................... 17
3.4.1 Instant prints: 1 copy of all and 2 copies of all ......................................... 18
3.4.2 Additional services: Would you like to burn a dvd or cd? ........................ 18
3.4.3 Additional services: Would you like to add an indexprint? ....................... 19
3.4.4 Additional services: select the print finish. ............................................... 20
3.4.5 Order summary ......................................................................................... 20
3.4.6 Retouch: View and adjust my pictures ..................................................... 22
3.4.6.1 Red eyes removal .......................................................................... 23
3.4.6.2 Brightness and contrast ................................................................. 23
3.4.6.3 Sepia and black/white .................................................................... 25
3.4.6.4 Automatic levels ............................................................................. 25
2/84
Page 3

Operator user‟s manual
3.4.6.5 Zoom and crop. .............................................................................. 26
3.5 Burning DVD/CD ......................................................................................... 27
3.5.1 Selecting photos ....................................................................................... 27
3.6 Compositions............................................................................................... 28
3.7 Photo ID (Optional) ...................................................................................... 29
3.7.1 Taking the pictures ................................................................................... 29
3.7.2 Selecting the service ................................................................................ 29
3.7.3 Selecting the picture source ..................................................................... 30
3.7.4 Selecting the layout .................................................................................. 31
3.7.5 Selecting and working with the pictures ................................................... 32
3.7.6 Printing ..................................................................................................... 33
3.7.7 Automatic biometrics detection ................................................................ 34
3.8 Calendars (Optional) ................................................................................... 35
3.8.1 Monthly calendars .................................................................................... 35
3.8.2 Full year calendars ................................................................................... 37
3.9 Collage (Optional) ....................................................................................... 38
3.10 Frames & Greetings (Optional) .................................................................... 40
3.11 Mosaic poster (Optional) ............................................................................. 41
3.12 ONLINE Kioskgifts (Optional) ................................ ...................................... 42
4 ADMINISTRATION ................................................................................... 45
4.1 System Status ............................................................................................. 46
4.2 Settings ....................................................................................................... 48
4.2.1 Main .......................................................................................................... 49
4.2.1.1 Installing the system as an Order Terminal ................................... 51
4.2.1.2 Select Kiosk Languages ................................................................ 55
4.2.1.3 Select Country ............................................................................... 55
4.2.1.4 Date / Time .................................................................................... 56
4.2.2 User’s administration ................................................................................ 56
4.2.3 Devices ..................................................................................................... 57
4.2.3.1 Devices. Photo printer .............................................................................. 58
4.2.3.2 Devices. DVD/CD burner ......................................................................... 59
4.2.3.3 Devices. Ticket printer .............................................................................. 60
4.2.3.3.1. Product barcode settings ............................................................... 60
4.2.3.3.2. Order barcode settings .................................................................. 61
4.2.4 Services .................................................................................................... 62
4.2.4.1 Prints. ............................................................................................. 63
4.2.4.2 Index Print. ..................................................................................... 64
4.2.4.3 Photo ID. ........................................................................................ 65
4.2.4.4 Calendars....................................................................................... 66
4.2.4.5 Collage. .......................................................................................... 67
4.2.4.6 Frames & Greetings. ...................................................................... 68
4.2.4.7 Mosaic Poster. ............................................................................... 69
4.2.4.8 ONLINE Kioskgifts. ........................................................................ 69
4.2.5 Statistics ................................................................................................... 70
4.2.6 Import / export settings ............................................................................. 71
4.2.7 Screenshots .............................................................................................. 72
5 MT1-ID ...................................................................................................... 73
5.1 Available services ........................................................................................ 73
5.2 Working modes ........................................................................................... 73
5.3 Printer model ............................................................................................... 73
6 Recovery USB and easyphoto backups ................................................ 74
6.1 Creation of the recovery tool in a USB drive ................................................ 74
3/84
Page 4

Operator user‟s manual
6.2 Using the recovery tool ............................................................................... 77
6.2.1 Software update........................................................................................ 78
6.2.2 Create Partial backup ............................................................................... 78
6.2.3 Create Total Backup ................................................................................. 78
6.2.4 Restore Partial Backup ............................................................................. 79
6.2.5 Restore Total Backup ............................................................................... 79
6.2.6 Shutdown .................................................................................................. 79
7 ACTIVATING ADDITIONAL LICENSES ................................................... 80
7.1 Register and Getting the Activation KEY ..................................................... 80
7.2 Activating licenses in the easyphoto application. ......................................... 81
8 TICKET PRINTER INSTALLATION (OPTIONAL) .................................... 83
9 CONTACT ................................................................................................. 84
4/84
Page 5

Operator user‟s manual
NOTE
The MT1-ID system is an easyphoto system with reduced functionalities. The complete
information about this system can be found at chapter „MT1-ID‟ of this manual
1 INTRODUCTION
1.1 The best choice
Easyphoto is the most suitable photographic equipment for the specific necessities of every
professional.
It has a flexible system of software which allows to set it in function of the real purposes and
necessities of each business.
It‟s a compact equipment and it is very easy to use. Easyphoto is supplied with an independent high
quality printer which allows the professional to take the control of printing.
Easyphoto has been developed to provide an easy handling in every respect.
For starting to use Easyphoto, it is only necessary to plug in the terminal.
The software is very simple, Easyphoto can be used by any user with the touch screen.
Easyphoto can be located in any place due the compact design.
The printer can be placed next to the equipment or separately.
1.2 Description
Easyphoto is an “easy to use” system, providing instant digital prints and other services. It is used
directly by the customer, who can input and manage photographs and pay for all the requested
services.
Easyphoto enables customers to input their images in the device (using memory card, USB,
CD/DVD), see, select, retouch and print the desired photographs. It is therefore a confidential and a
simple self-service system, which the user can order prints, pay for it and obtain them immediately.
The main advantage of this system is the possibility of seeing all the pictures, and printing only the
desired.
The MT1 systems are compatible with 3 different MITSUBISHI ELECTRIC dyesub printers:
- MT1E. These systems are obsolete and no longer marketed. They formerly supported the
CP9550DWS.
- MT1E-EVO. This system supports the old CP9550DWS model and the new CPK60DWS
printer.
- MT1-ID. This system only supports the CPD70DW-U model.
Easyphoto is not only able to develop digital pictures; it also provides a range of services and
functions related to the world of digital photography, which are described below:
1.2.1 Services
Copies: instant printing of the photographs brought by the customer to the shop in a digital
format.
DVD/CD Burning: storage of the client's photographs on a CD-ROM or DVD-ROM.
Compositions: easy way to print ID pictures or wallet pictures using special layouts.
Index print: provides the client with future copies thanks to an index print with all the
photographs in miniature.
Photo ID (OPTIONAL): to offer professional Photo ID service. This option needs the purchase of
an additional license to be activated.
5/84
Page 6

Operator user‟s manual
NOTE
Order Terminal is an additional licence. Contact with your dealer to acquire this licence. See
also „ACTIVATING ADDITIONAL LICENSES‟ chapter. The MT1-EVO system already includes
this licence from the 2.4. software version.
Calendars (OPTIONAL): to offer customized calendars. This option needs the purchase of an
additional license to be activated.
Collage (OPTIONAL): to offer collage compositions with different images. This option needs the
purchase of an additional license to be activated.
Frames and greetings (OPTIONAL): to offer decorated frames and greeting cards. This option
needs the purchase of an additional license to be activated.
ONLINE Kioskgifts: end customers can print out orders prepared at home using the online
application available at www.kioskgifts.com
1.2.2 Functions
Zoom and Crop: Allows the picture to be trimmed in a portrait and landscape format.
Rotation: Allows the picture to be rotated.
Red eyes effect: Allows removing the red eyes effect.
Black/ white and sepia effects: Allows including these effects.
Brightness and contrast: Allows increasing or decreasing these picture properties.
1.3 Working Modes
(In order to see how to activate any of the modes explained below, please see the „Settings‟ chapter)
1.3.1 Kiosk Mode
Kiosk mode is the mode intended to be used by the end user who wants to purchase services. The
orders done when working with this mode need to be validated by the shop assistant with an
operator password.
1.3.2 Operator Mode
Operator mode is the mode intended to be used by the shop assistant. The main difference between
both kiosk and operator mode is that the orders in the second one do not need to be validated with
an operator password.
1.3.3 Order Terminal Mode (Optional)
Order Terminal Mode is the mode intended to be used by the end user, like in Kiosk mode, but in
this case the easyphoto system doesn‟t use a local printer. The easyphoto is connected to a Flexilab
system (Click5000): this means that many of the printing sizes of the Flexilab system are available
for the end user.
The MT1 terminal needs to be connected to the Click5000 through a network cable.
1.4 System Users
Easyphoto is characterized for the possibility to be operated by 3 types of users which are listed
below:
1.4.1 End user
The end user or shop customer uses the system by himself when it is set in both Kiosk or Order
terminal modes.
6/84
Page 7

Operator user‟s manual
1.4.2 Operator user
Operator is any of the photo shop staff using the system when is set to work in Operator Mode. The
Operator user is responsible for the maintenance and operation of the machine. Easyphoto can have
a maximum of 5 operator users.
1.4.3 Supervisor user
One of the five operator users is the supervisor user. Supervisor user can modify critical options like
passwords, available services, prices, etc… because he/she has access to the settings.
7/84
Page 8

Operator user‟s manual
2 SYSTEM FUNCTIONS
2.1 Input of images
It is necessary to input images in Easyphoto to perform any service.
There are many ways of transferring images which are listed below:
2.1.1 Input images from a memory card
Easyphoto accepts images from all normal memory cards, like SD, MMC, Compact Flash, xD,
MemoryStick…
For transferring images from a memory card:
1. Press the indicated button.
2. Insert the memory card and press the “Next” button.
The system detects it automatically.
2.1.2 Input images from a USB device
Easyphoto accepts images from USB devices.
For transferring images from a USB pendrive:
1. Press the indicated button.
2. Insert the USB device and press the “Next” button.
The system detects it automatically.
2.1.3 Input images from CD/DVD
Easyphoto accepts images from CD and DVD.
For transferring images from a CD/DVD:
Press the indicated button.
The reader opens automatically.
Insert the CD/DVD and push the tray or press the “Next” button.
The system detects it automatically.
2.1.4 Input images via Bluetooth
Photographs which are saved in mobile telephones and PDAs can be transferred to easyphoto via
Bluetooth.
For transferring images via Bluetooth:
1. Select the images of the Bluetooth device.
2. Send the images to “Easyphoto”. [“MT1”]
Sometimes the Bluetooth devices ask for a password. Requested password is “1234”. The
system receives the images and shows them.
8/84
Page 9

Operator user‟s manual
Media Size
Formats
10x15 cm (4x6”)
10x15 cm (4x6”) The most frequently used format for standard prints.
13x18 cm (5x7”)
13x18 cm (5x7)This is used in some countries as a standard print size or
for enlargements.
15x20 cm (6x8”)
15x20 cm (6x8”) Used for enlargements. -> ONLY CPD70DWS
15x23 cm (6x9”)
10x15 x2 cm (4x6 x2 “) The printer cuts the paper in 2 parts
-> ONLY CP9550DWS
15x23 cm (6x9”)
11.5x15 x2 cm (4,4x6 x2 “) This is a nice option that fits with digital
cameras pictures aspect ratio. The printer cuts the paper in 2 parts.
-> ONLY CP9550DWS
15x23 cm (6x9”)
15x20 cm (6x8”) Used for enlargements.
15x23 cm (6x9”)
15x21 cm (6x8,5”) Used for enlargements. -> ONLY CP9550DWS
15x23 cm (6x9”)
15x23 cm (6x9”) Used for enlargements.
NOTE
The available formats depend on the formats selected in settings, and they are based in the
detected media size.
Not all the printer models support all the printing sizes. The CPK60DWS printer uses the special
ink roller rewinding technique to produce the 10x15 with the same consumable that is used to
print the 15x20. Ask your dealer for more information about this.
In Order Terminal mode, the list of available formats depends on the Flexilab system
NOTE
Photo ID is an additional licence. Contact with your dealer to acquire this licence. See also
„ACTIVATING ADDITIONAL LICENSES‟ chapter.
2.2 Photography services
2.2.1 Instant Prints
The pictures which have previously been inserted in Easyphoto can be printed in different formats
according to the client‟s choice.
The possible paper formats offered by Easyphoto are as follows:
2.2.2 DVD/CD Burning
The client's images can be burned on a CD-ROM or DVD-ROM. The images are always copied in
their original format so that their resolution does not change, except when they are changed through
Crop/zoom option.
2.2.3 Compositions
The customer can prepare a composition of pictures using only one picture. It‟s possible to choose
the layout from a maximum of 4 different layouts available, and those depending on printer media
size. The MT1-ID system does not have this service.
2.2.4 Photo ID (Optional)
This service allows printing a composition of photos for identity cards, passports, wallet size
portraits, etc… and it‟s only available for the operator. Even in Kiosk mode, this service is protected
under password, and needs to be used by the shop-staff. Easyphoto offers different compositions
among which the operator may choose one.
9/84
Page 10
Operator user‟s manual
NOTE
Calendars is an additional licence. Contact with your dealer to acquire this licence. See also
„ACTIVATING ADDITIONAL LICENSES‟ chapter. The MT1-EVO system already has this
licence.
NOTE
Collage is an additional licence. Contact with your dealer to acquire this licence. See also
„ACTIVATING ADDITIONAL LICENSES‟ chapter. The MT1-EVO system already has this
licence.
NOTE
Frames and greetings is an additional licence. Contact with your dealer to acquire this licence.
See also „ACTIVATING ADDITIONAL LICENSES‟ chapter. The MT1-EVO system already has
this licence.
NOTE
Mosaic Poster is an additional licence. Contact with your dealer to acquire this licence. See also
„ACTIVATING ADDITIONAL LICENSES‟ chapter. The MT1-EVO system already has this
The advantage of using this service instead of basic Compositions service for ID purposes is the
fastest way (express workflow) to get the pictures from the source, the possibility to mix 2 different
pictures in the same print, the use of biometrics masks, the direct print button, the refresh button for
continuous shooting and printing, the better accessibility to different tools to adjust zooming,
cropping and pan of the picture, and the automatic biometrics detection.
The automatic biometrics detection processes the picture of the customer and helps the operator to
fit the face inside the biometrics mask that follows each country regulations. This saves time to the
operator to get the right ID print.
2.2.5 Calendars (Optional)
This service allows printing a customized calendar of the whole year in separate prints (one per
month) or the whole year in one print.
This service is available in all working modes.
2.2.6 Collage (Optional)
This service allows printing a composition of several pictures of the customer (in a decorative
manner) over a selected a background.
This service is available in all working modes.
2.2.7 Frames and greetings (Optional)
This service allows printing a picture into a decorated frame with some additional editable text.
This service is available in all working modes.
2.2.8 Mosaic Poster (Optional)
10/84
Page 11

Operator user‟s manual
licence.
NOTE
ONLINE Kioskgifts is an additional licence. Contact with your dealer to acquire this licence. See
also „ACTIVATING ADDITIONAL LICENSES‟ chapter. The MT1-EVO system already has this
licence.
This service allows printing a poster composed by several sheets of paper. There are different
mosaic poster sizes depending on the available printing sizes.
This service is available in all working modes.
2.2.9 ONLINE Kioskgifts (Optional)
The end customer can print orders prepared at home using the online application found at
www.kioskgifts.com.
At www.kioskgifts.com customers can order different types of products such as calendars, greetings
cards or albums from any PC or MAC, save the order on a digital card or USB drive and take it to the
Kiosk where it will be printed.
2.3 Picture Retouch
This is a range of tools offered to the customer in order to be able to make adjustments to the
pictures in the development services.
Black and white: Transforms colour images to black and white.
Sepia: Transforms colour or black and white images to sepia.
Brightness and contrast: To increase or decrease the brightness and contrast in order to
improve the quality of the image.
Zoom and crop: Uses the "+" and "-" icons to decrease or increase the cropping area. Use the
arrows to move the image.
Automatic: Automatic adjustments to improve the quality of the image. Very useful for pictures
taken by non professional photographers.
Red eyes removal: Allows to remove the red eyes effect from the images.
Rotate: Allows the image to be rotated.
Restore: Restores the original image as it was before the changes.
11/84
Page 12
Operator user‟s manual
NOTE
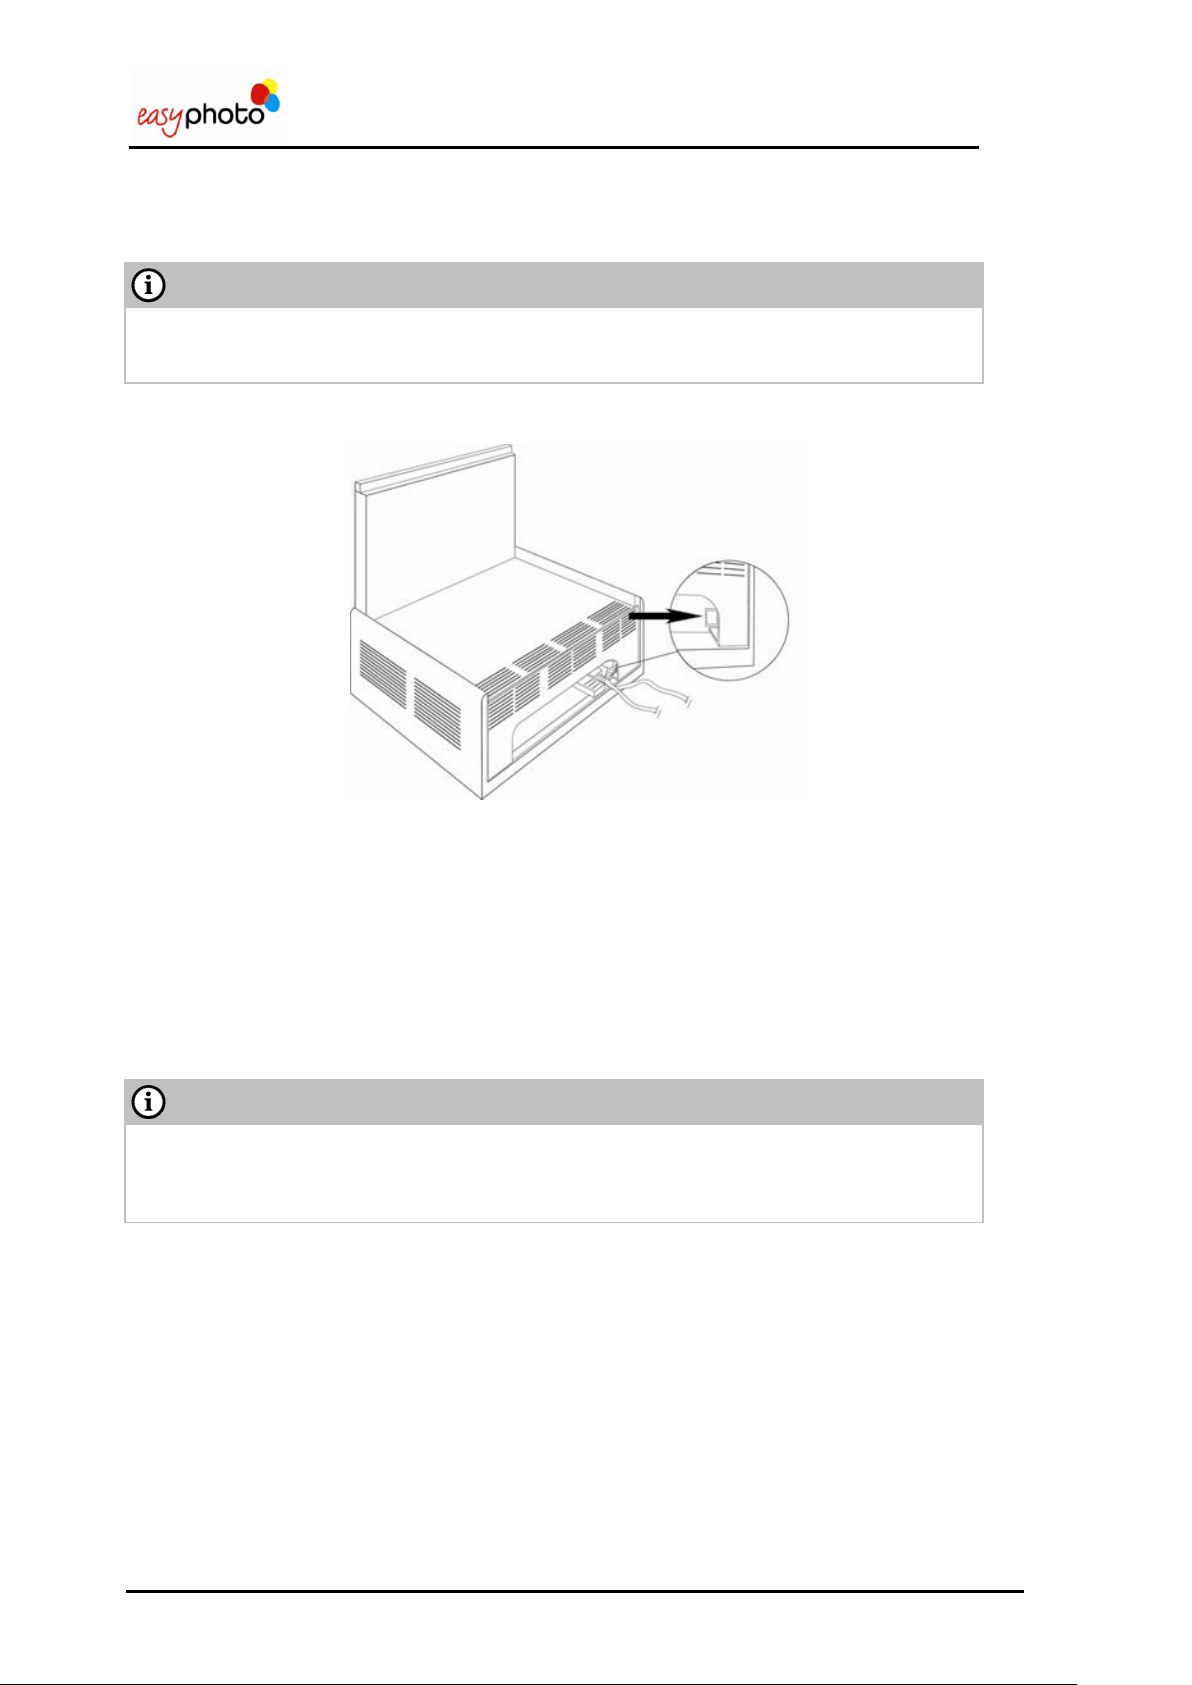
Before switching on the equipment, make sure that there is no additional USB storage
devices connected. It may cause problems when detecting the different devices later.
NOTE
PLEASE ALWAYS SWITCH OFF THE SYSTEM USING SHUTDOWN SOFTWARE
FUNCTION, AVAILABLE AT ADMINISTRATION SCREEN. USING BACK PANEL RED
BUTTON TO SHUTDOWN THE SYSTEM IS NOT RECOMMENDED.
3 SCREEN FLOW
For accessing to the services of Easyphoto:
1. Touch the red button to switch on the Easyphoto terminal.
Access to services by touching the screen with your finger.
The flow of the screens and the meaning of each one are explained on this chapter.
When the system is inactive for 60 seconds in the main screen, appears a screensaver on the
monitor.
When the monitor is touched, Easyphoto can be used again.
In Kiosk mode, if the system is left at any point of the workflow, after 100 seconds it appears a
message asking for confirmation. If the message is not answered, the system closes the current
session and goes back to main screen.
12/84
Page 13
Operator user‟s manual
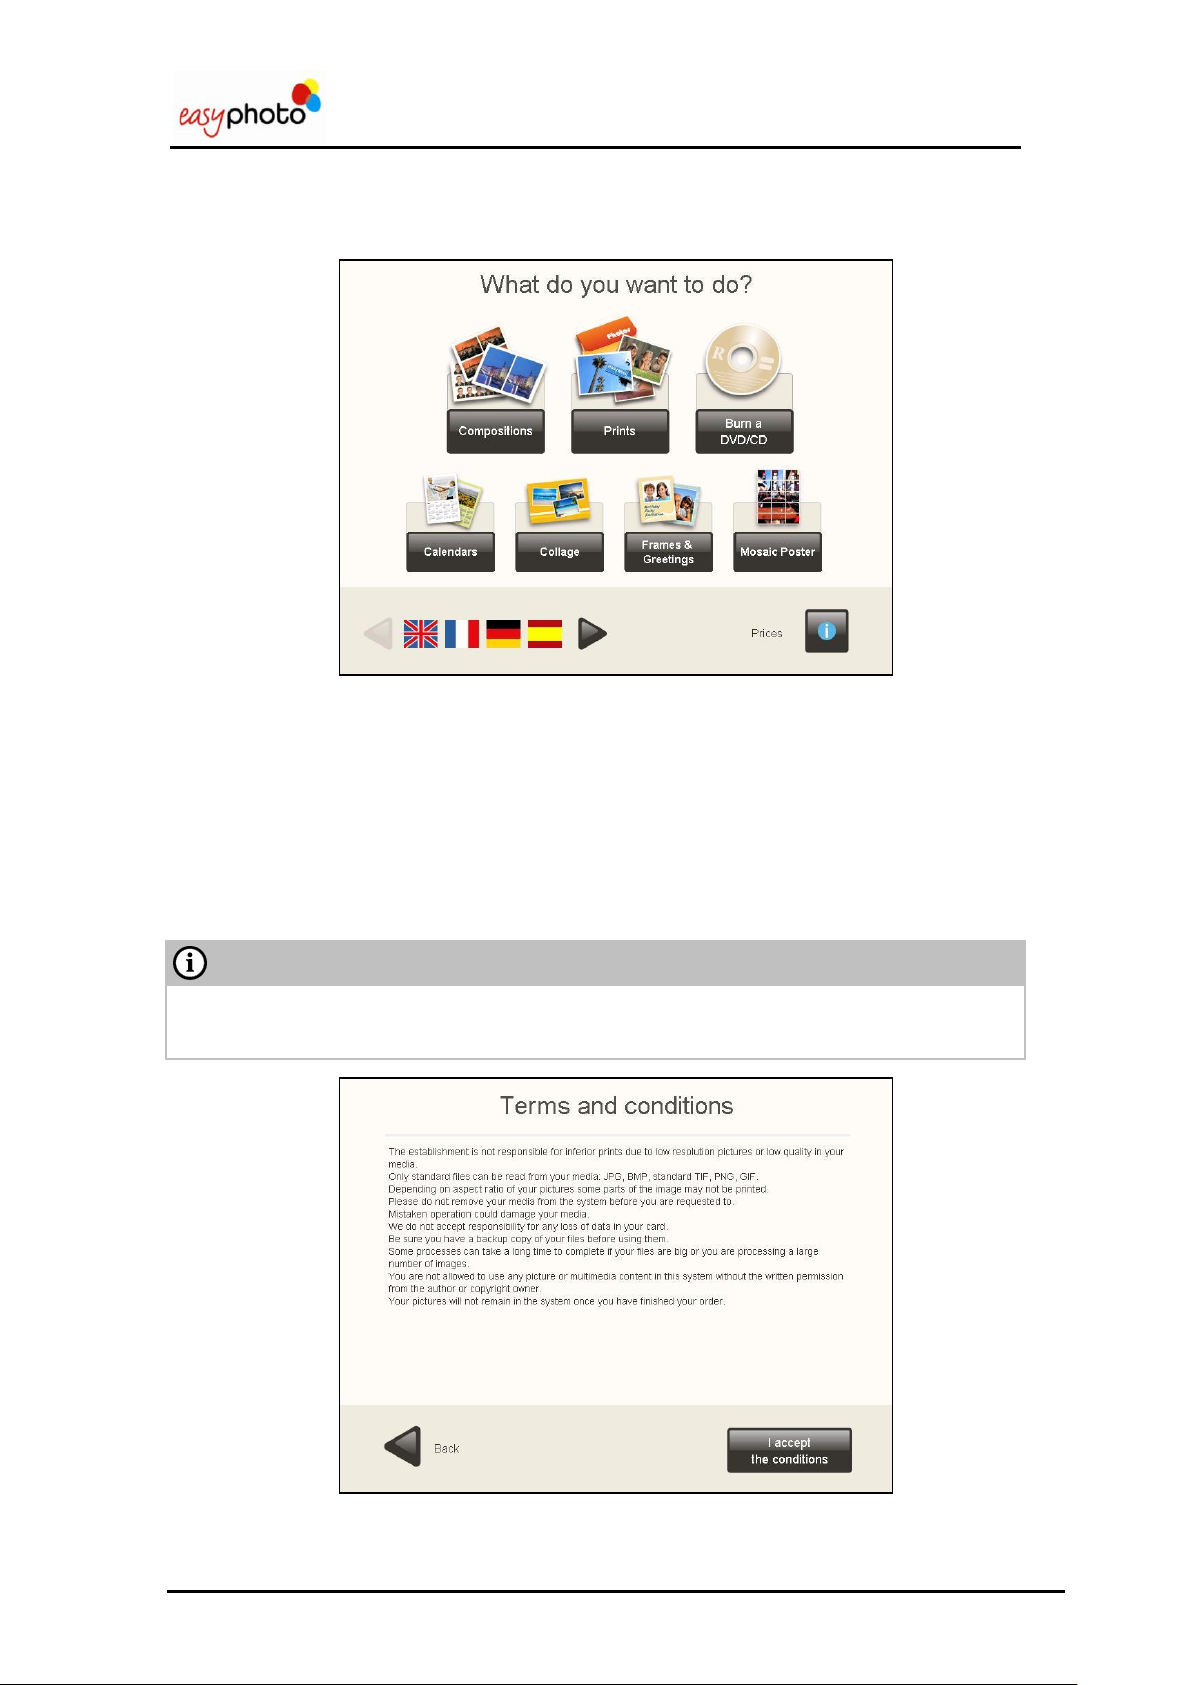
NOTE
It is strongly recommended to keep enabled the “Terms and conditions” screen when the
system works in Kiosk mode and is being used by end customers.
3.1 Services: What do you want to do?
Once the Easyphoto has been switched on, you can see the first screen:
On this screen you can:
Use the arrows to select the desired language.
Press the “Price list” button to display the price list.
Access to the services of Easyphoto.
For accessing to any service:
1. Press the required Easyphoto service (Copies, DVD/ CD burning, Compositions, Photo ID…).
Photo ID software is only visible in Operator mode. See Photo ID chapter for more details.
2. Press “I accept the conditions”.
13/84
Page 14
Operator user‟s manual
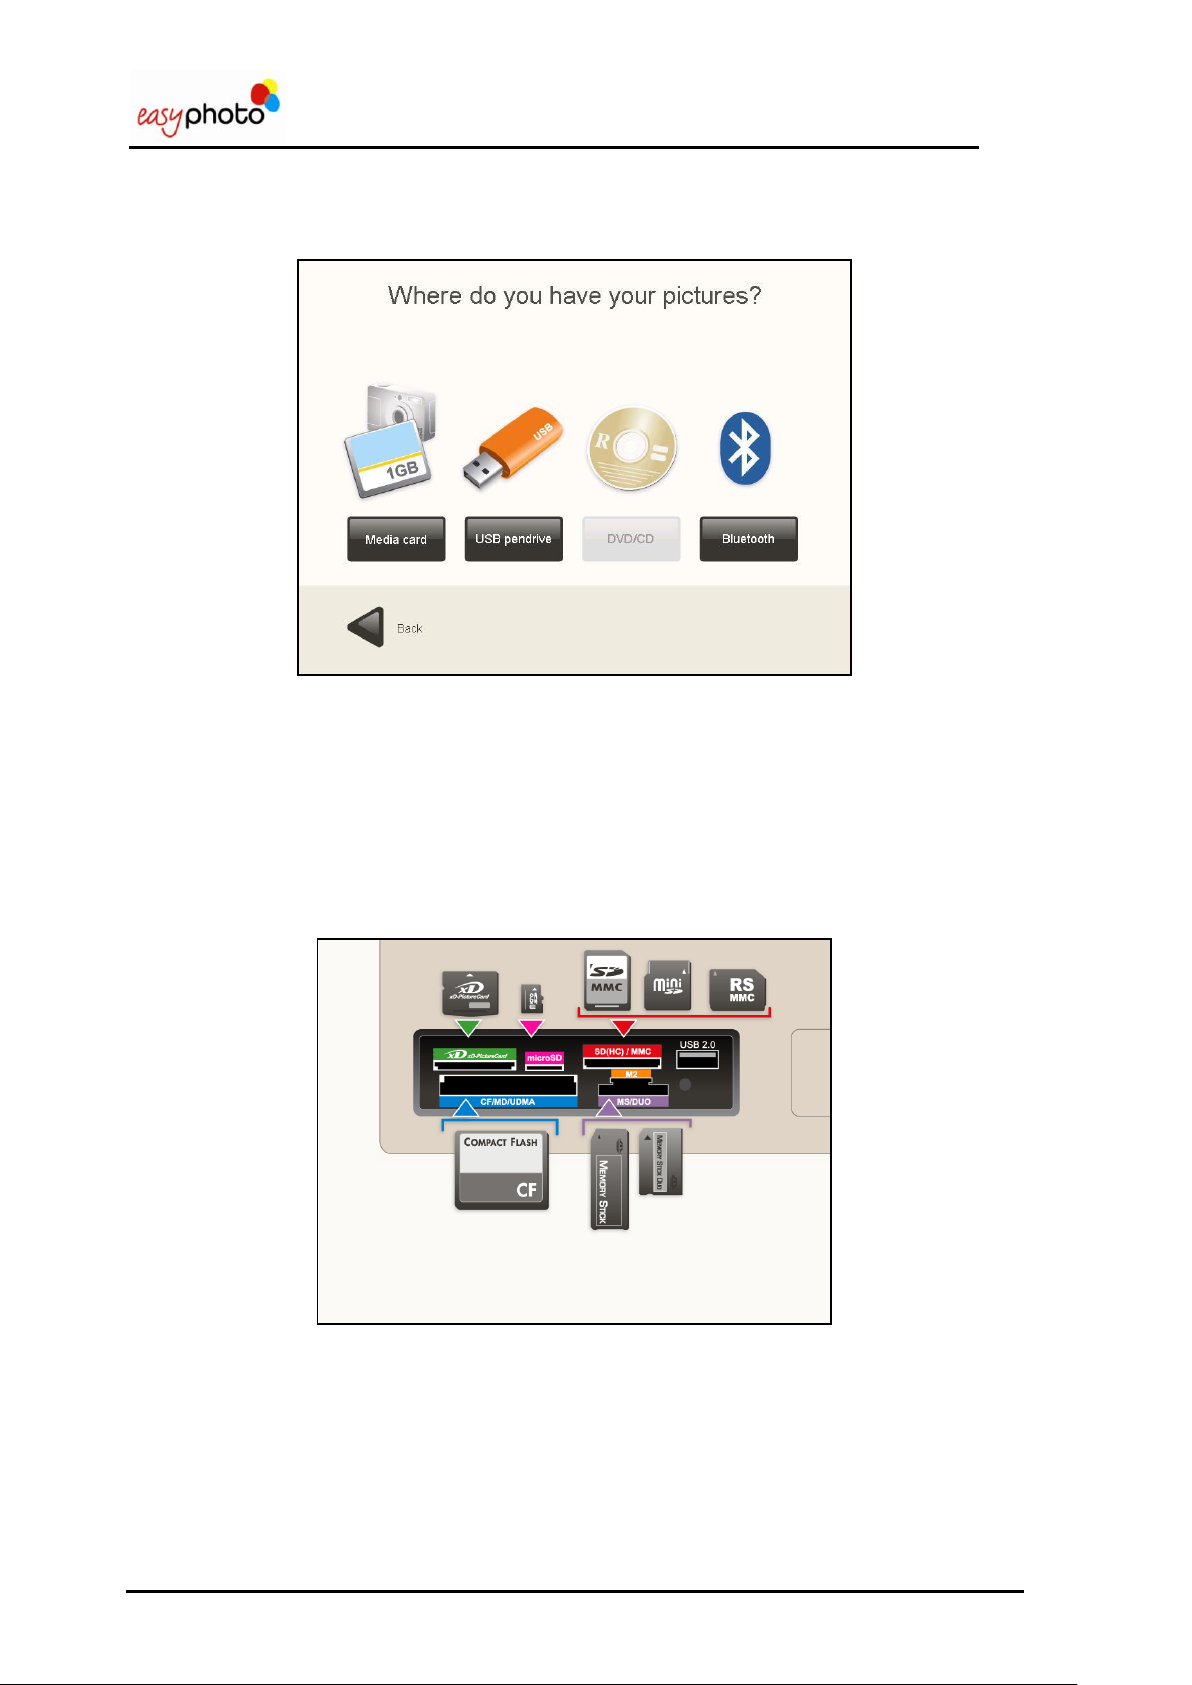
3.2 Input of images: Where do you have your pictures?
Once any service has been selected, the following screen is displayed:
Choose the option in which your images are saved.
The system can open only these kinds of picture files: JPG, BMP, TIF, PNG and GIF.
3.2.1 Memory Card
If your images are saved in a memory card:
1. Press the “Media card” button.
The following screen appears, indicating how and where to introduce the memory card.
Introduce the memory card as indicated on the screen.
Press “Next”.
14/84
Page 15

Operator user‟s manual
3.2.2 USB pendrive
If your images are saved in a USB pendrive:
1. Press the “USB pendrive” button.
The following screen appears, indicating how and where to introduce the USB pendrive.
Introduce the USB pendrive as indicated on the screen.
Press “Next”.
3.2.3 DVD/CD
If your images are saved in a DVD/CD:
1. Press the “DVD/CD” button.
The device opens automatically.
The following screen appears, indicating how and where to introduce the CD/DVD.
Insert the DVD/CD as indicated on the screen.
Press “Next” or push the tray.
15/84
Page 16
Operator user‟s manual
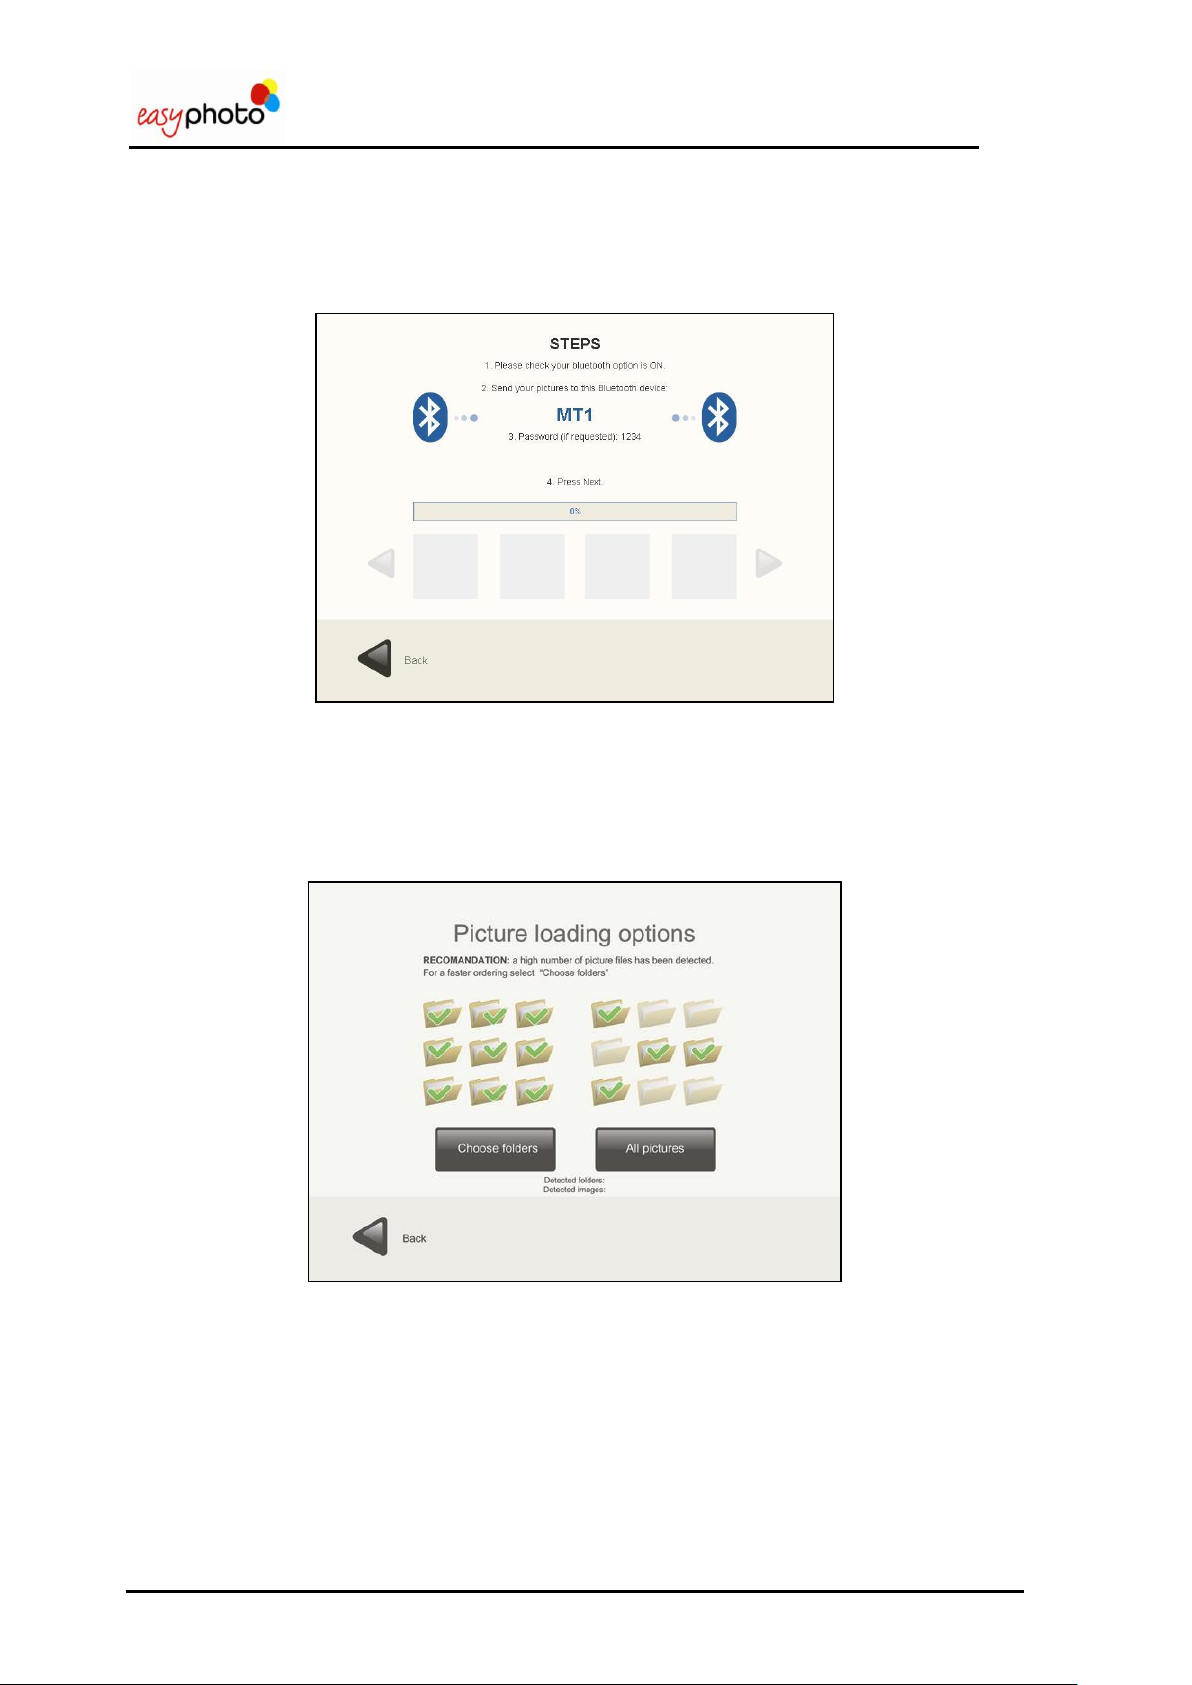
3.2.4 Bluetooth
If your images are saved in a Bluetooth device:
1. Press the “Bluetooth” button.
The following screen appears, indicating how to transfer the images.
Transfer the images as indicated on the screen.
Press “Next”.
3.3 Selection of images: Picture loading options
Once the pictures from the source have been correctly detected, a new screen is displayed:
You can choose:
“Choose folders” to select the folders where you have the pictures that you want to use. This
option is useful to avoid spending too much time loading hundreds of pictures.
“All pictures” to select all the folders and images detected.
If “Choose folders” is selected, a new screen is displayed:
16/84
Page 17
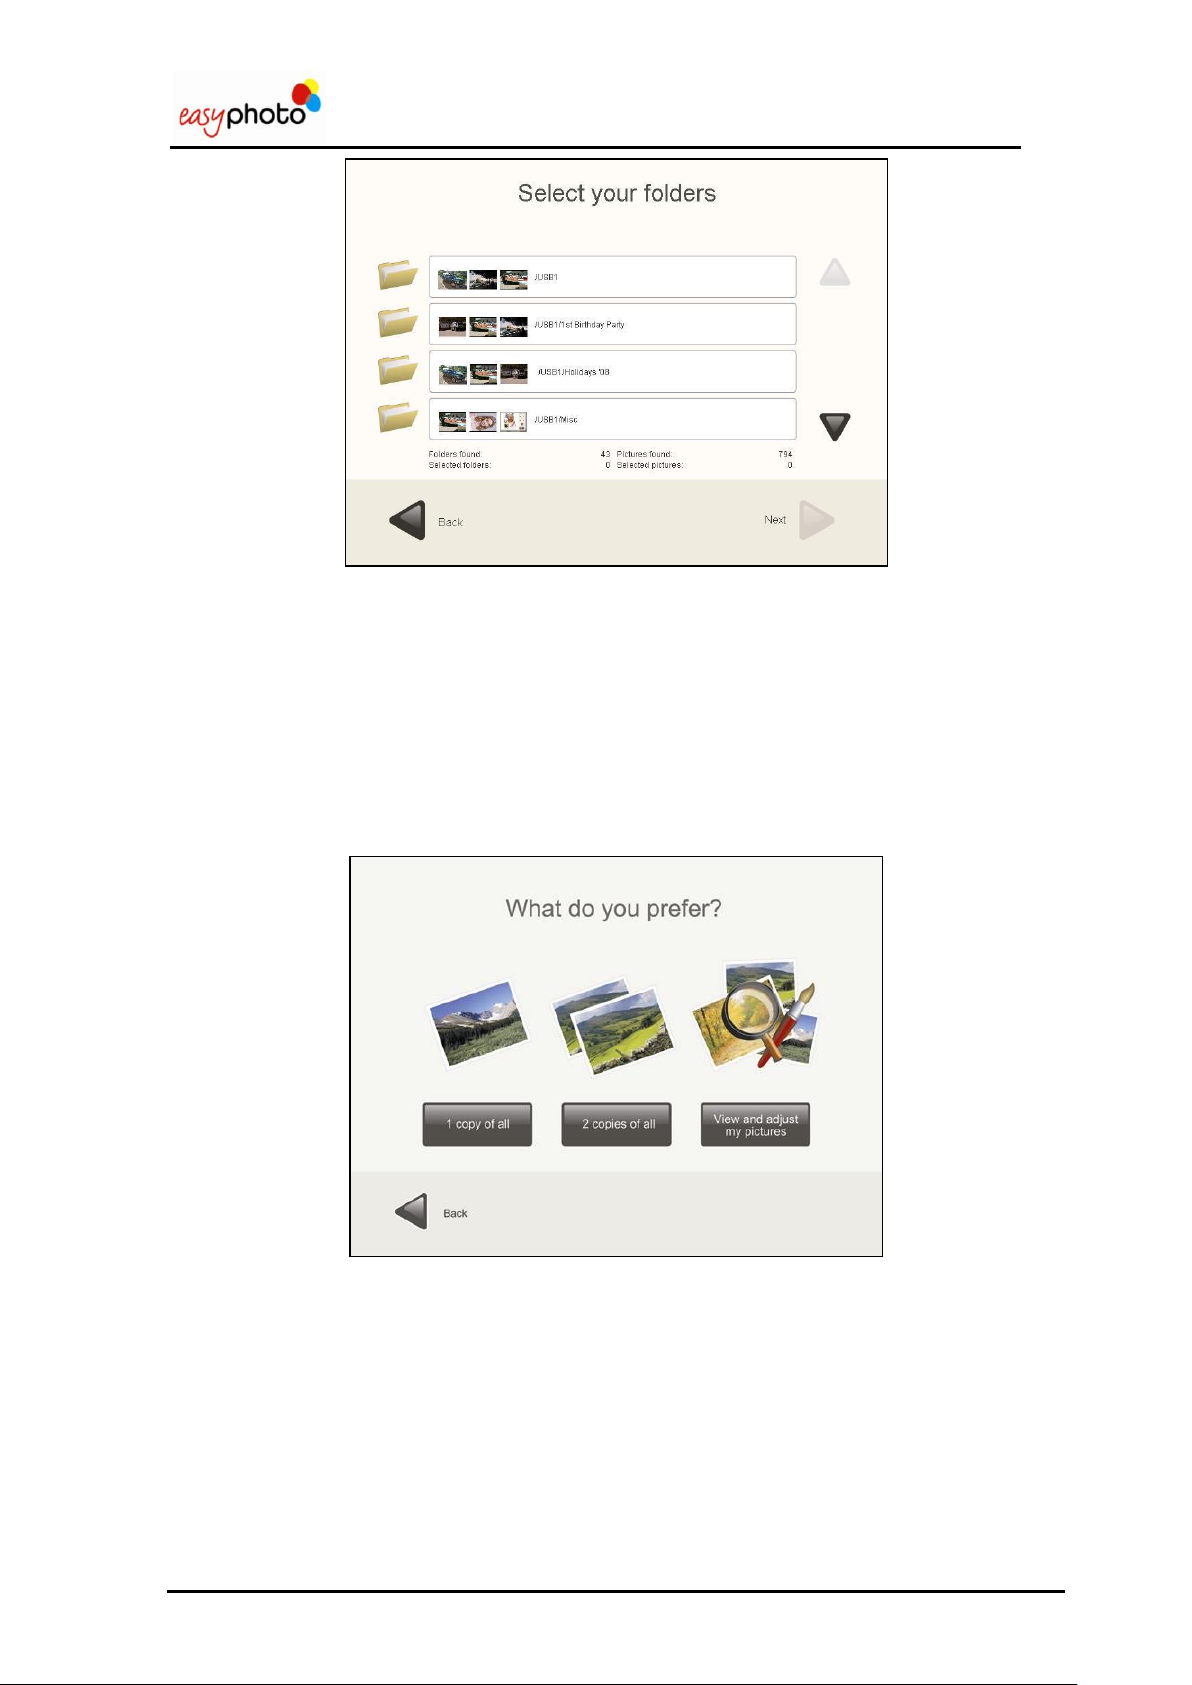
Operator user‟s manual
1. Use the arrows to navigate through all the folders. Every folder shows a sample of pictures
contained in the folder.
2. Press the desired folder or folders to select them.
For deselecting folders:
Press the selected folders for deselecting.
Press “Continue”.
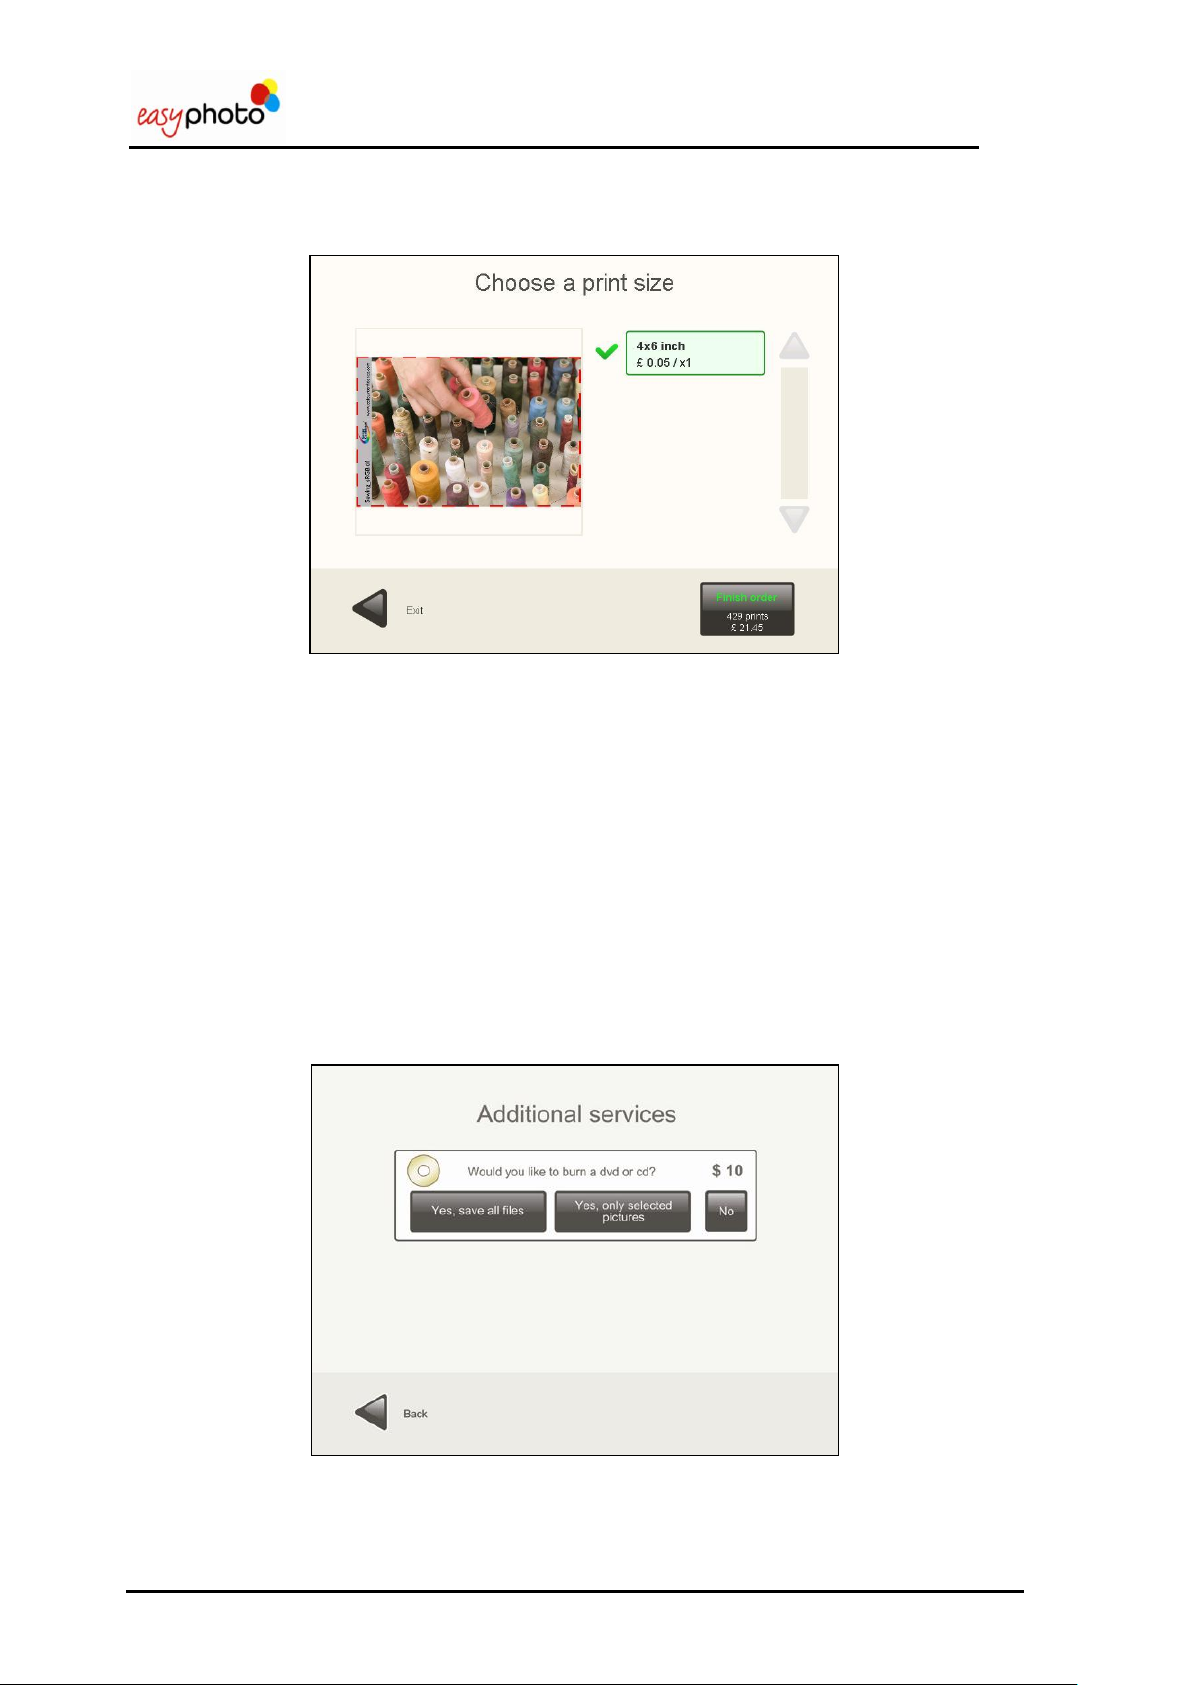
3.4 Instant prints and retouch: What do you prefer?
Once the folders containing pictures have been selected, you have the following possibilities:
On this screen, you can choose:
1 copy of all: Select it to print one copy of all detected pictures in the selected folders. This is
the fastest option when there is no intention of retouching or previewing the pictures. Many
customers want to print all the pictures contained in the source, and this option saves time for
them.
2 copies of all: Same than before but printing 2 copies per each picture.
View and adjust my pictures: Select it to view, select and retouch the detected pictures.
17/84
Page 18
Operator user‟s manual
3.4.1 Instant prints: 1 copy of all and 2 copies of all
Once the “1 copy of all” or “2 copies of all” buttons have been selected, a new screen is displayed:
1. Press the button/ buttons which indicates the desired sizes to select them. Also these buttons
shows the prices.
The green tic indicates the selected print size.
Press the “Finish order” button for printing the order. This button also indicates the number of copies
and the total price of the order.
For changing the size:
1. Press the selected size for deselecting.
Press the button with the new required size.
The screen shows a sample of the customer pictures. The real print area is shown over the picture,
changing each time the customer selects a different print format.
3.4.2 Additional services: Would you like to burn a dvd or cd?
This option appears after pressing the “Finish order” button. Choose this option if you want to burn a
DVD or CD. On this screen you can see the price of burning a DVD/CD.
Select “Yes, save all files” if you want to save all files.
18/84
Page 19
Operator user‟s manual
NOTE
If “save all files” is selected:
All the files (movies, mp3, etc…) included in the device will be burned on the CD/DVD.
The original images will be burned on the CD/DVD and not the edited ones.
NOTE
If “Yes, only selected pictures” is selected, the edited images will be burned on the CD/DVD in
the root of the DVD/CD, and also the original ones (keeping file structure). For the edited
pictures, the original filename will be changed and the picture will be saved as BMP.
NOTE
Only one sheet of paper is used to print an indexprint. When there is not enough space to show
all selected pictures in the indexprint, a summary of all pictures is shown.
NOTE
If the “Burning DVD/CD services is disabled this additional service won‟t be available.
Select “Yes, only selected pictures” if you want to save only the selected pictures.
Select “No” if you do not want to burn a CD/DVD.
.
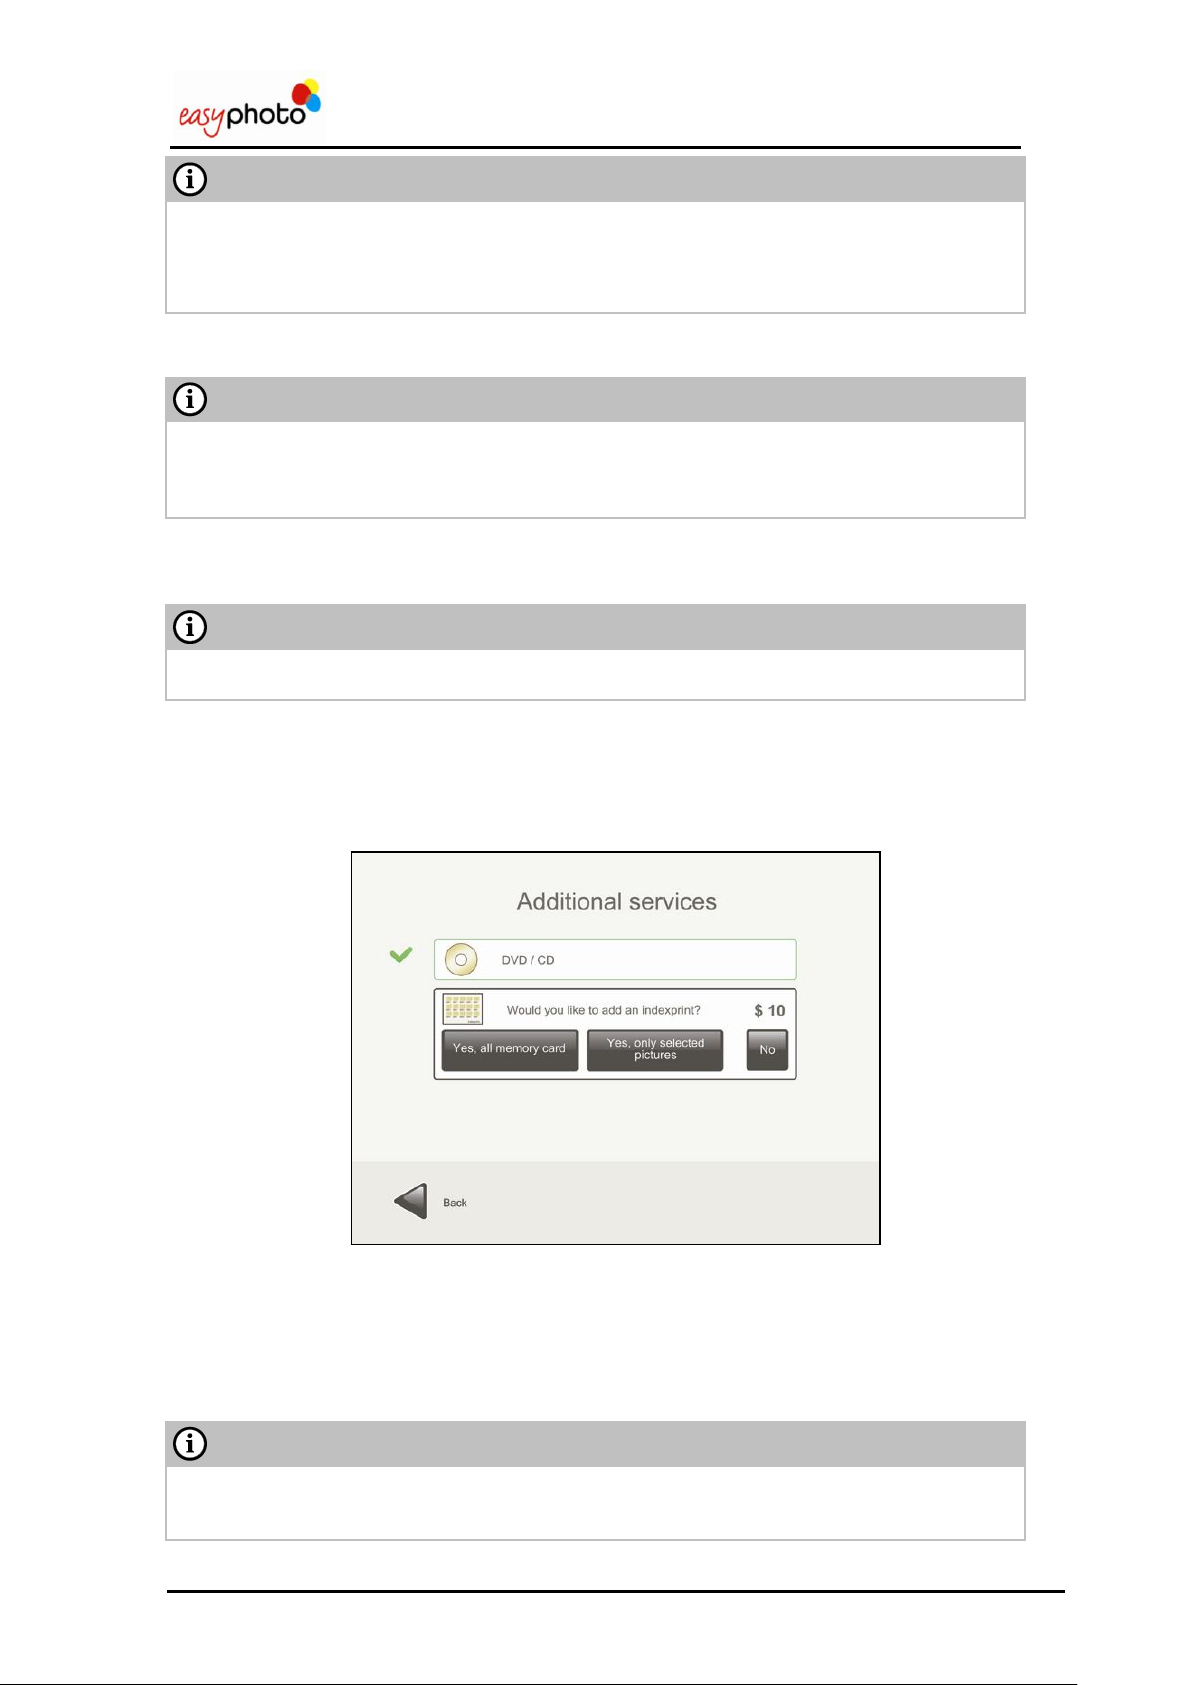
3.4.3 Additional services: Would you like to add an indexprint?
This option appears after answering “Would you like to burn a dvd or cd?”
On this screen you can see the price of adding an indexprint and DVD/CD burning services, and the
customer choice.
Choose “Would you like to add an indexprint?” if you want to add an indexprint.
Select “Yes, all memory card” if you want to add an indexprint with all the images.
Select “Yes, only selected pictures” if you want to add an indexprint with only the selected
images.
Select “No” if you do not want to add an indexprint.
19/84
Page 20
Operator user‟s manual
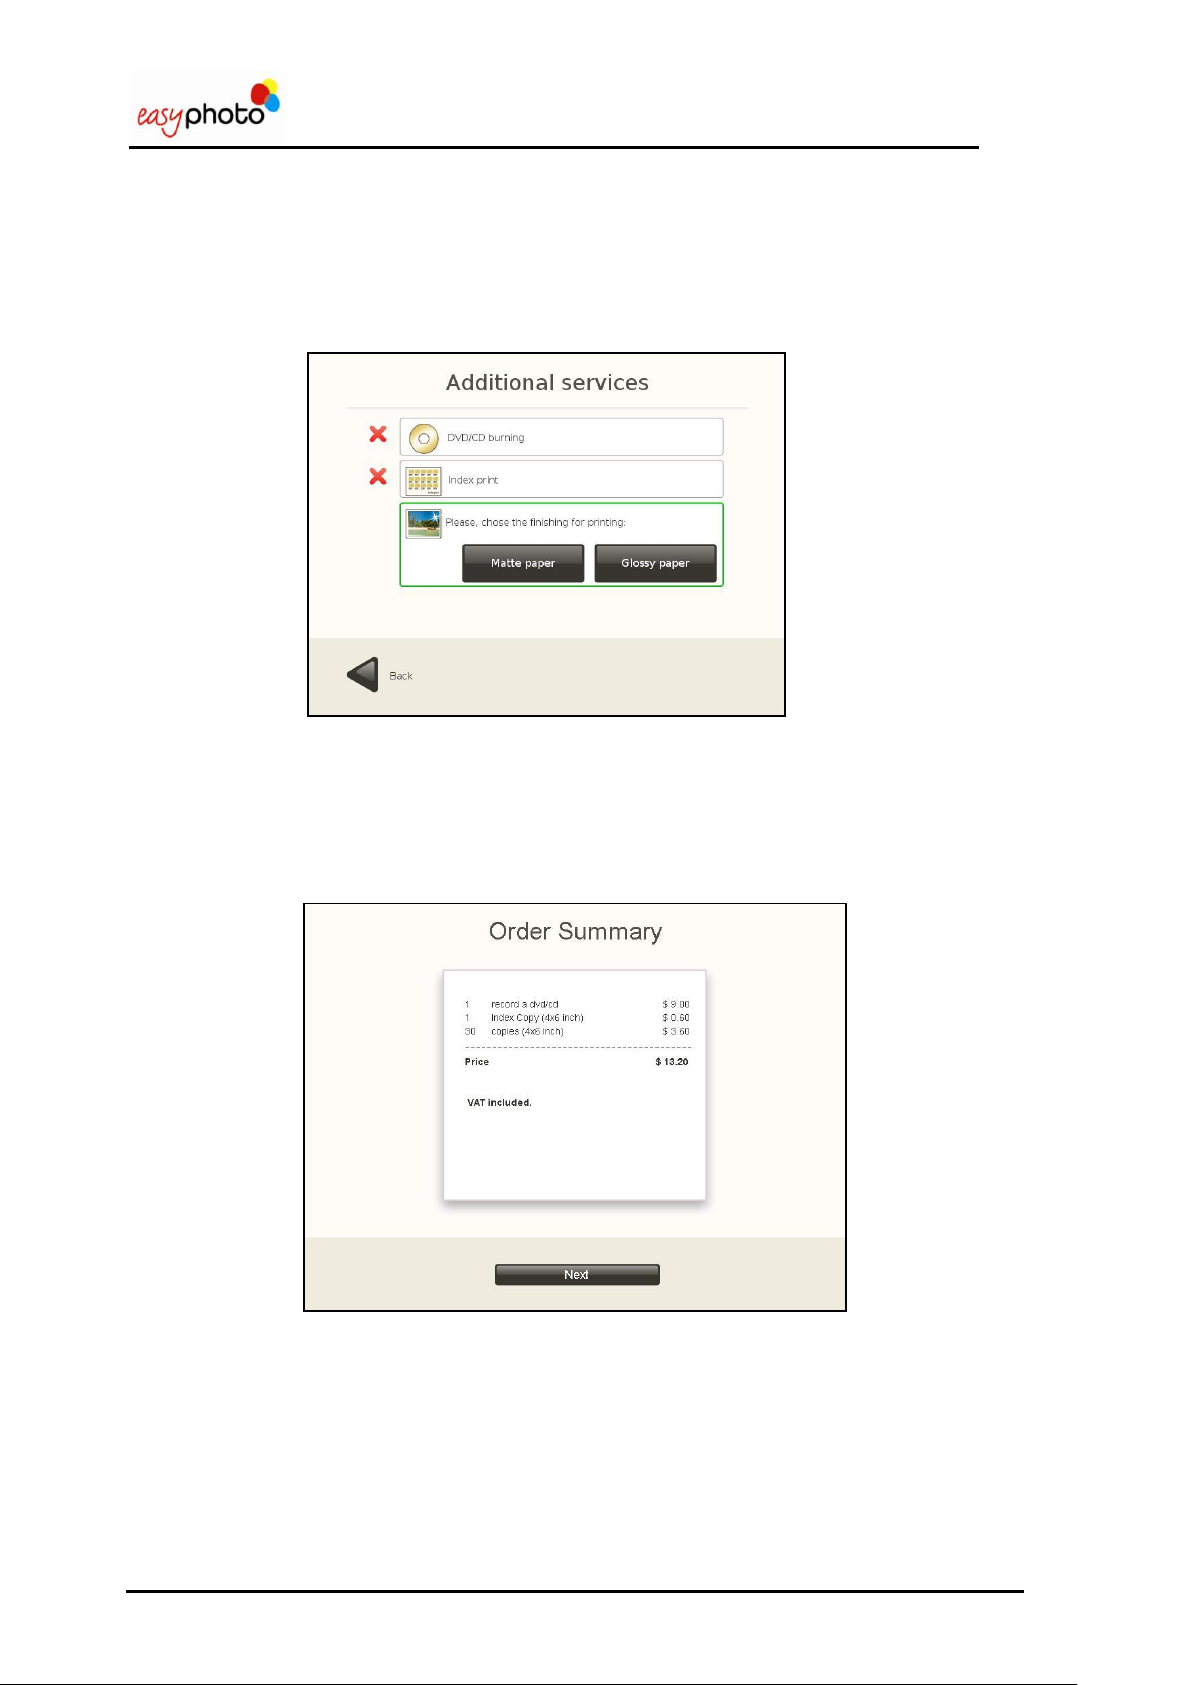
3.4.4 Additional services: select the print finish.
This option is shown after responding to the question "Do you want to add an indexprint?".
In this screen, customers are asked whether they want a glossy or a satin paper print finish.
This will only be shown when the printed installed is a CPD70 or a K60, if the equipment is
configured to show that option.
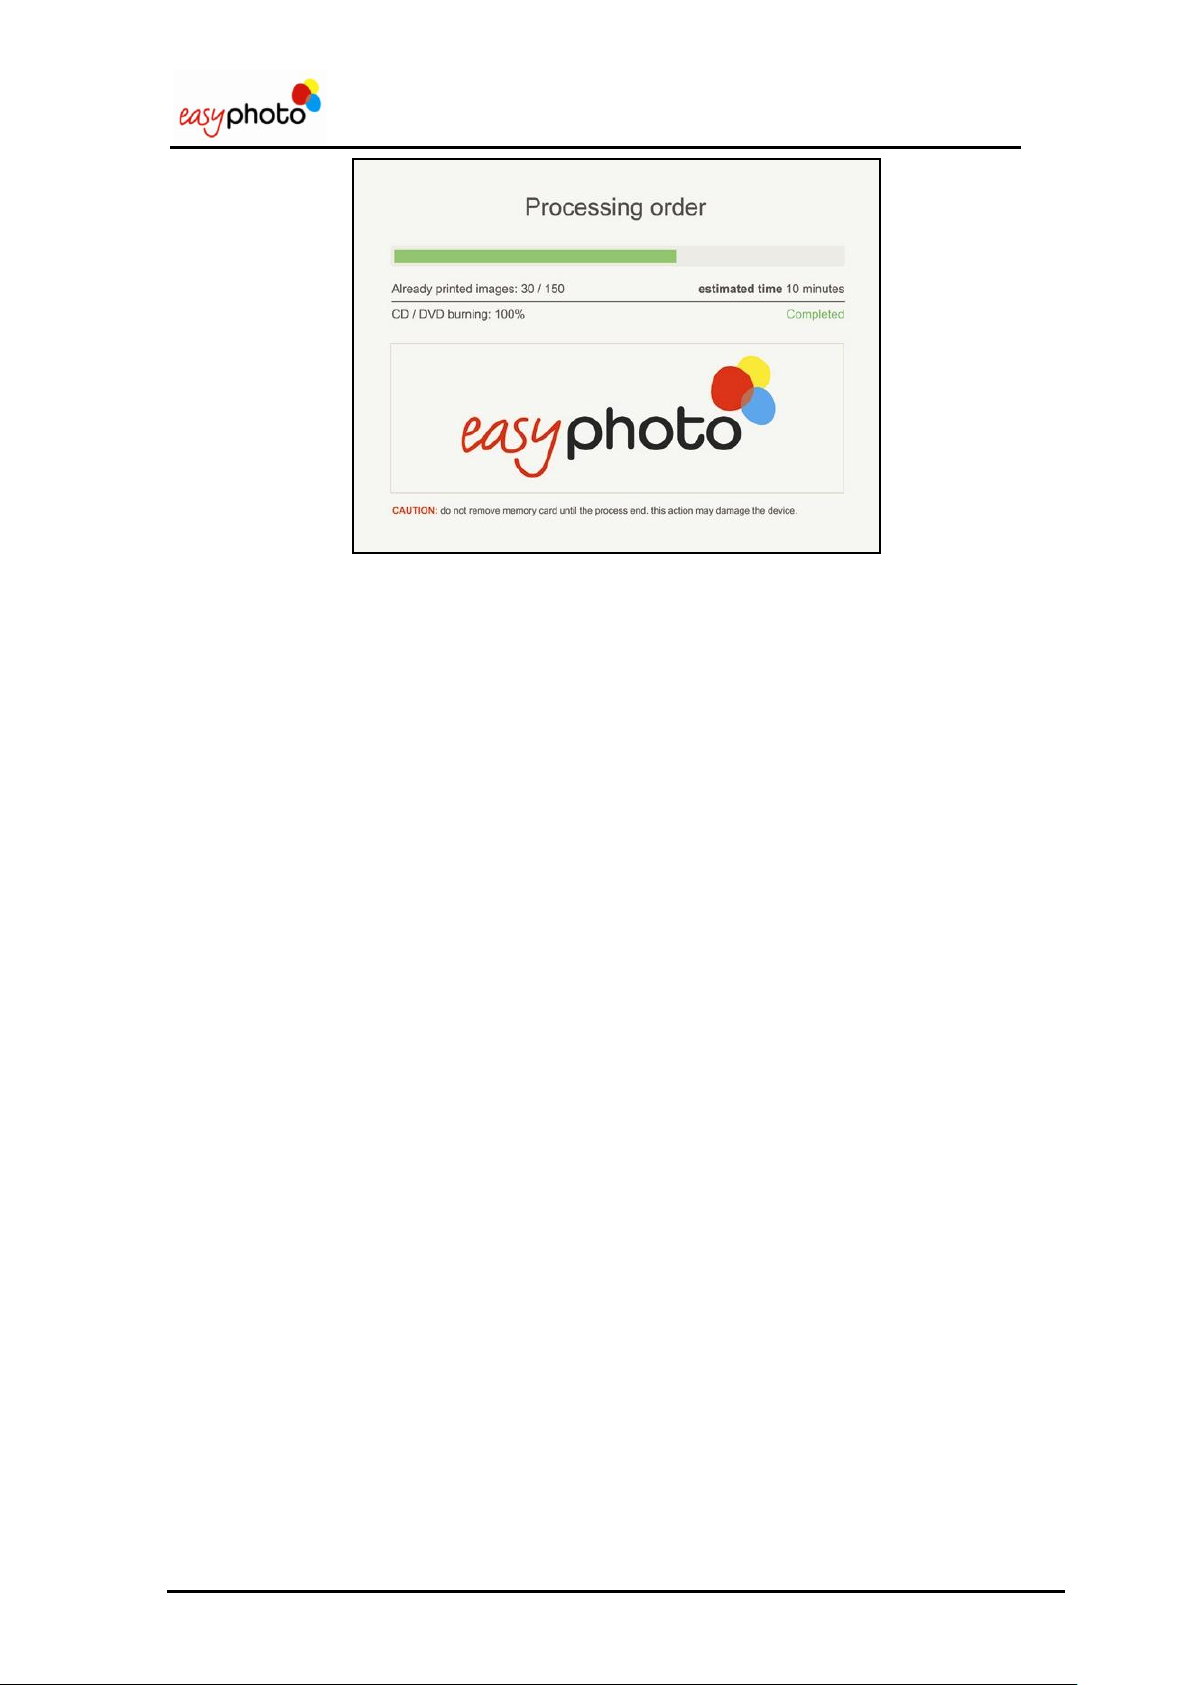
3.4.5 Order summary
After answering “Would you like to add an indexprint?” the following screen is showed:
This screen lists all the services requested up to this moment and their cost.
Press “Next” to confirm the order summary. In Kiosk mode an screen keypad is shown: it‟s
necessary to validate the order by entering the operator password.
It starts the process of printing and the following screen is showed:
20/84
Page 21
Operator user‟s manual
In this screen is possible to see the progress of several services execution. There is a possibility of
pausing the printing service (not the DVD burning) by pressing both top corners and entering the
operator password. Then, a new screen is shown where you can choose between cancel the order
or retry (continue). This order status screen is also automatically shown when a critical error occurs:
if the operator can recover the system from the error (when the systems runs out of media, or the
printer is accidentally disconnected, as instance), he can try to press „retry‟ button to allow the order
execution going on.
21/84
Page 22
Operator user‟s manual
NOTE
The original picture is not rotated; this is only a „preview‟ rotation. Even when the rotated picture
is used for Retouch operations, the original picture won‟t be rotated. This is noticeable when
you rotate a picture, retouch it and then burn it into a DVD. The picture in the DVD shows
retouch operations, but preserves original rotation.
NOTE
There is a limitation in the number of images allowed to be changed by retouch functions,
depending on the size of the picture. When the limit is reached, the customer sees a warning
message under the main picture of the Ordering screen.
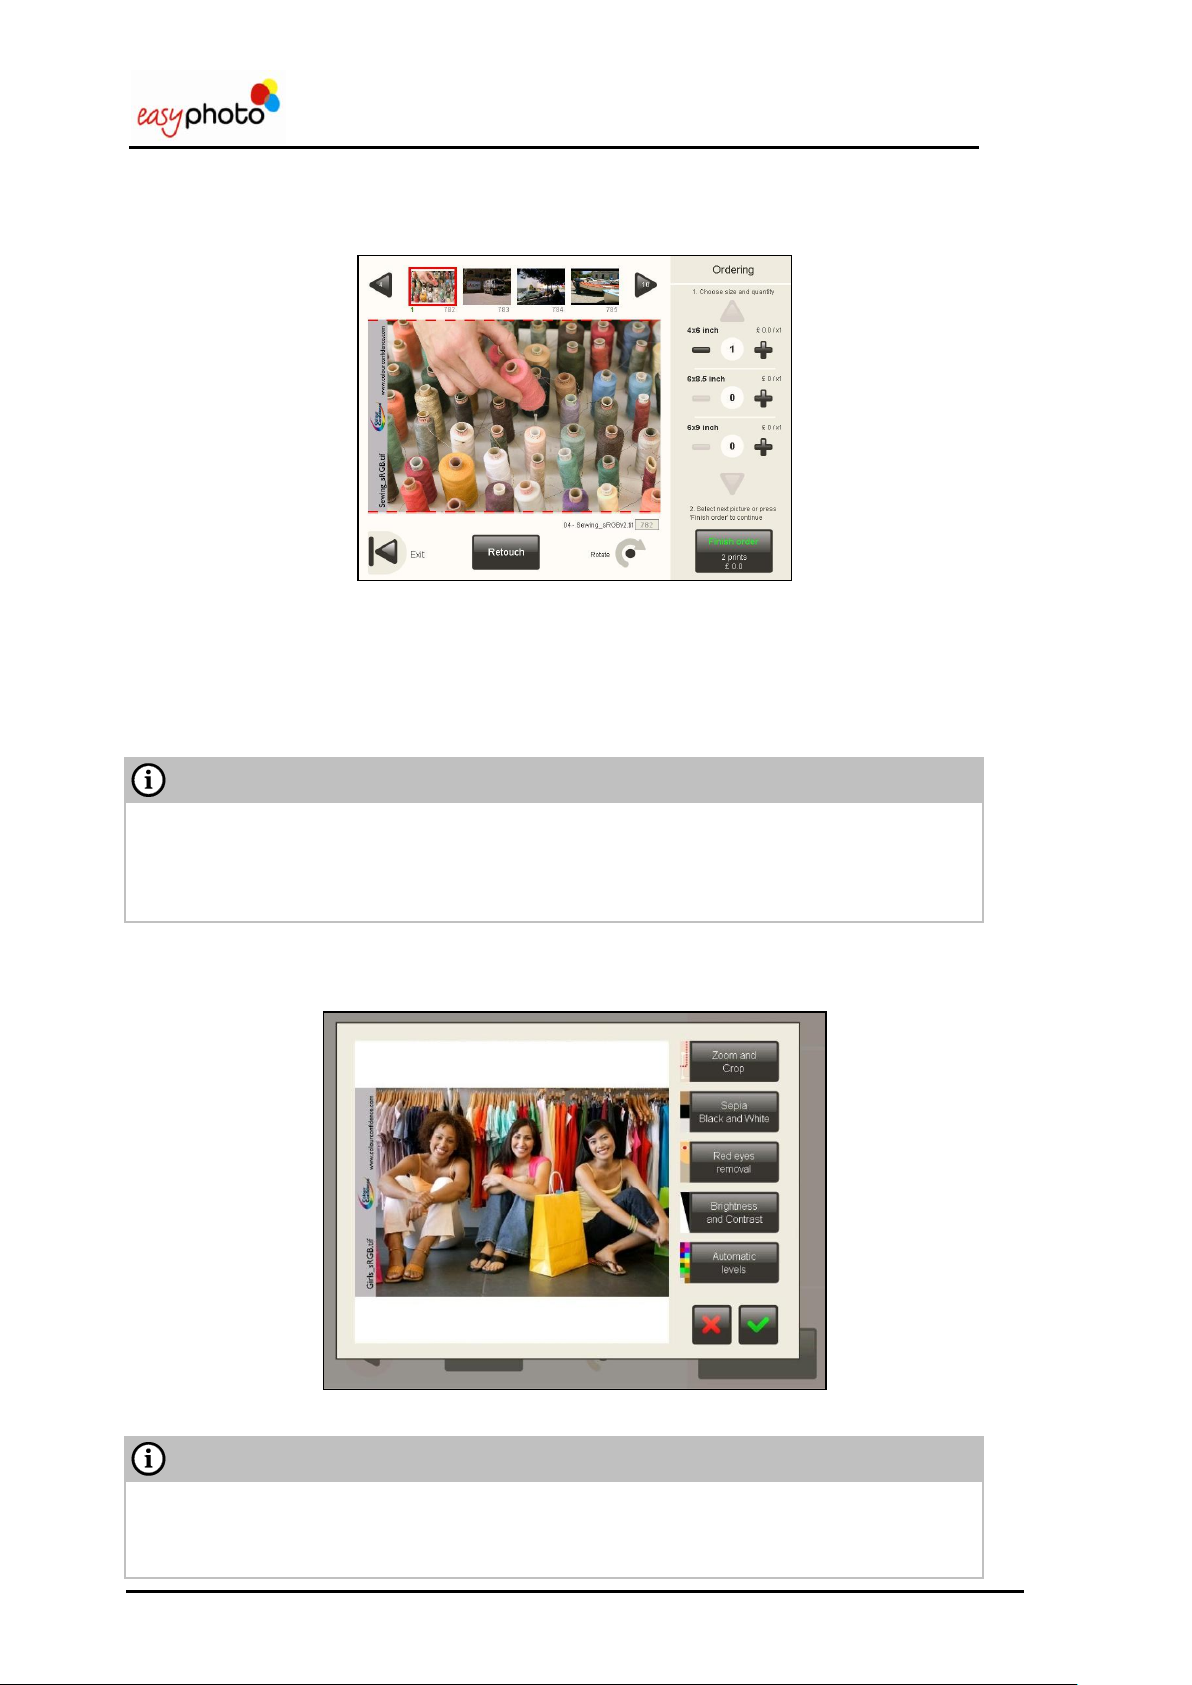
3.4.6 Retouch: View and adjust my pictures
Once the “View and adjust my pictures” button has been selected, a new screen is showed:
Choose this option to retouch the selected image before printing.
1. Use the arrows which are on the top of the screen to select the image.
Choose the size and quantity.
You can see the price.
Press “Rotate” if you need to rotate the picture view.
Press “Retouch” to retouch the image.
Once is pressed “Retouch”, you can see the following screen where you can select the different
options of retouching.
The function of each option is explained in point 2.3 („Picture retouch‟).
22/84
Page 23
Operator user‟s manual
Press “Finish order” to print.
In this moment the screens explained from point 3.4.2 (Additional services: Would you like to
burn a dvd or cd?) will be displayed.
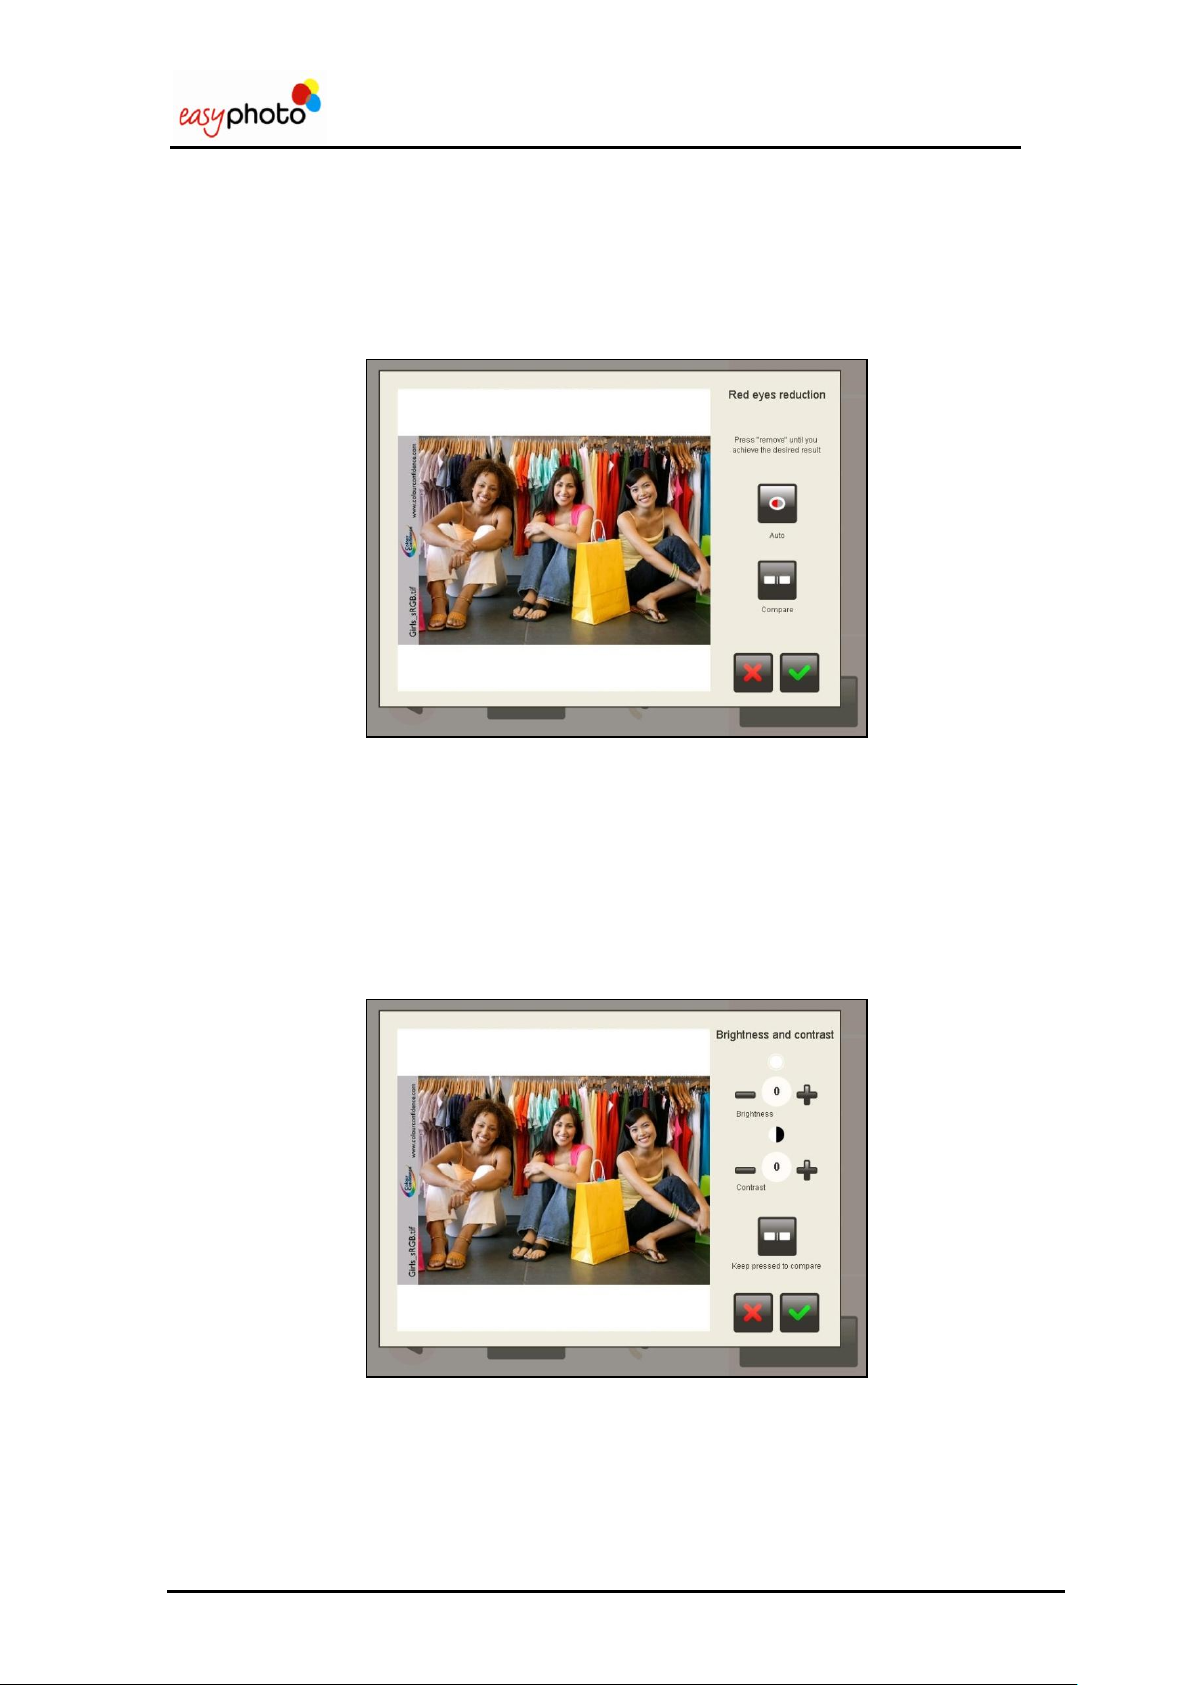
3.4.6.1 Red eyes removal
Once the “Red eyes removal“ button is pressed, the following screen is showed:
For removing the red eyes effect:
1. Press the “Remove” button, as many times as you need until you see a nice result.
Press the “Keep press to compare” button to display the original image without changes.
Press the green tic to save the changes.
Press the red cross to not remove the red eyes effect and escape this screen.
3.4.6.2 Brightness and contrast
Once the “Brightness and contrast “button is pressed, the following screen is showed:
For increase or decrease brightness and contrast effects:
1. Press the “-/+ brightness” button.
2. Press the “-/+ contrast” button.
Press the “Keep press to compare” button to display the original image without changes.
Press the green tic to save the changes.
Press the red cross to not save the changes and escape this screen.
23/84
Page 24

Operator user‟s manual
24/84
Page 25
Operator user‟s manual
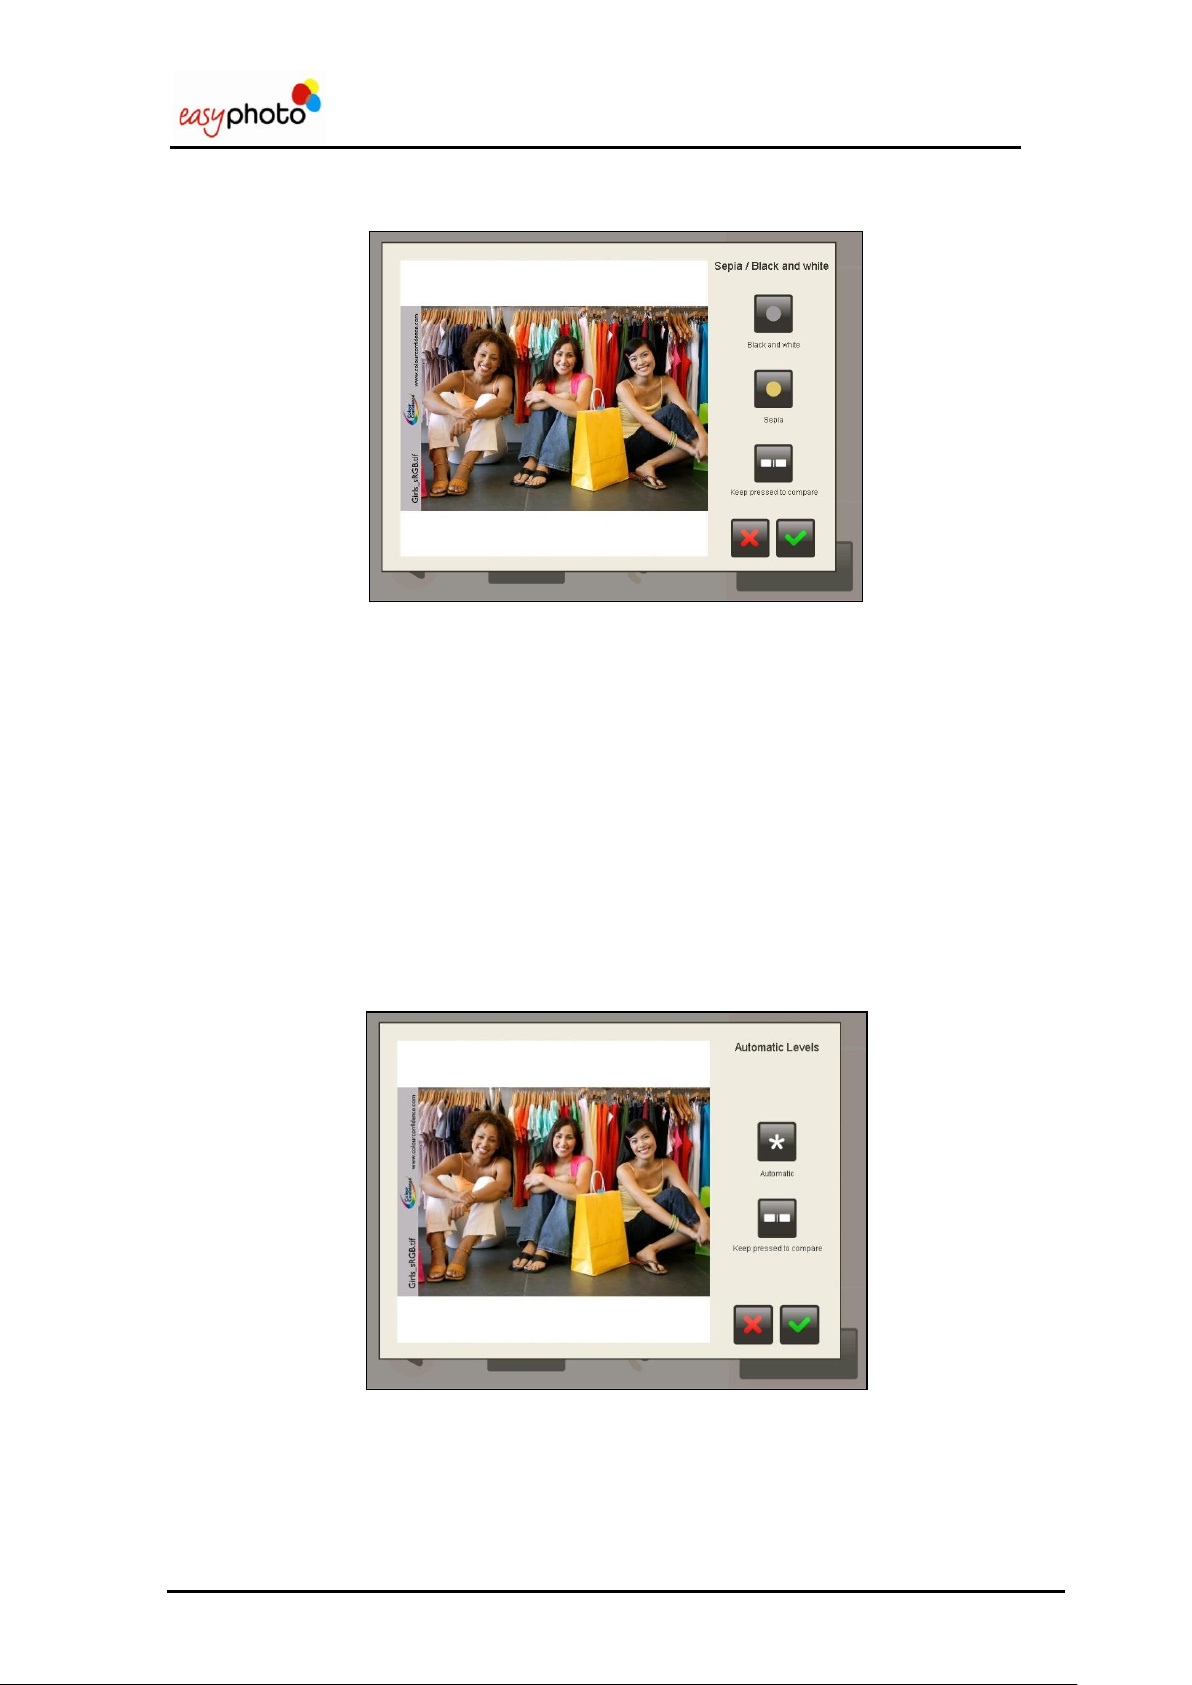
3.4.6.3 Sepia and black/white
Once the “Sepia, black and white” button is pressed, the following screen is showed:
For changing the image to black and white:
1. Press the “Black and white” button.
Press the “Keep press to compare” button to display the original image without changes.
Press the green tic to save the changes.
Press the red cross to not save the changes and escape this screen.
For changing the image to sepia:
1. Press the “Sepia” button.
Press the “Keep press to compare” button to display the original image without changes.
Press the green tic to save the changes.
Press the red cross to not save the changes and escape this screen.
3.4.6.4 Automatic levels
Once the “Automatic levels” button is pressed, the following screen is showed:
For improving the image automatically:
1. Press “Auto” button
Press the “Keep press to compare” button to display the original image without changes.
Press the green tic to save the changes.
Press the red cross to not save the changes and escape this screen.
25/84
Page 26
Operator user‟s manual
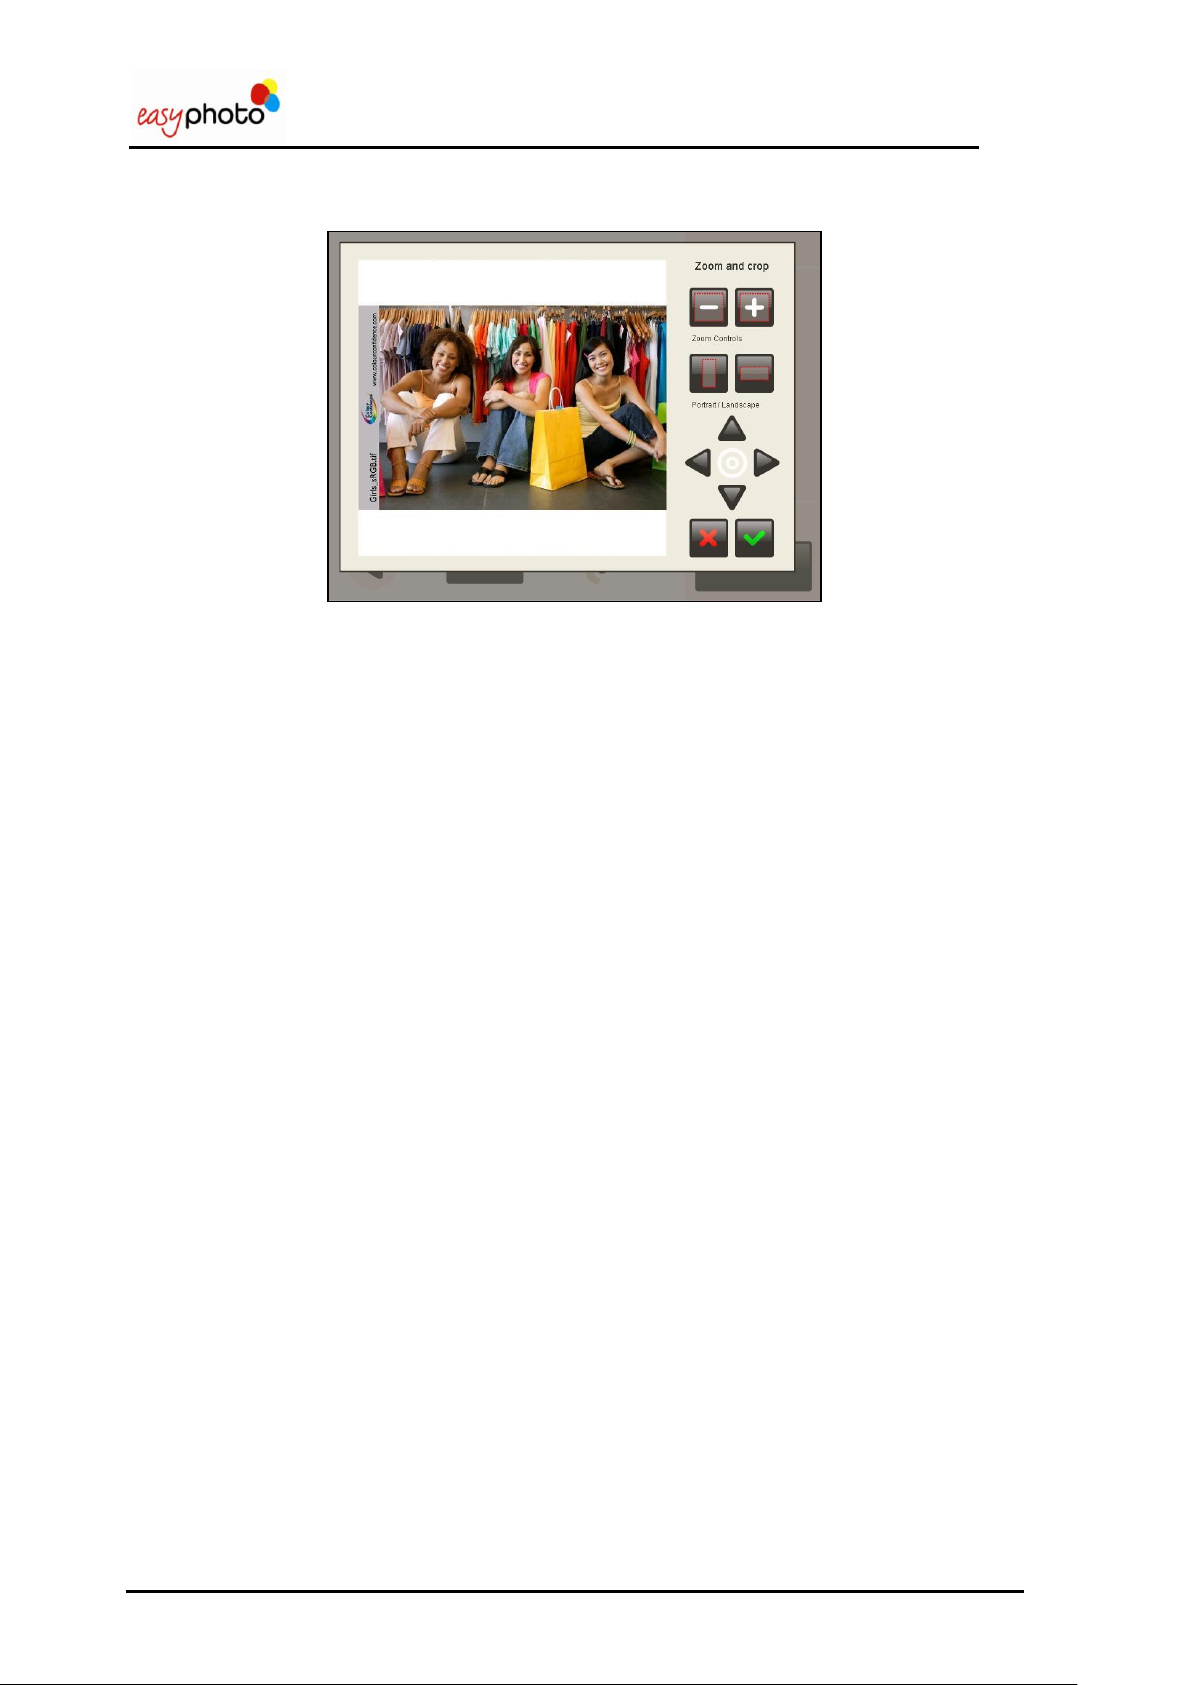
3.4.6.5 Zoom and crop.
Once the “Zoom and crop” button is pressed, the following screen is showed:
For increasing or decreasing the image:
1. Use the arrows to select the part of the image you are interested in.
Press “-/+ zoom controls” buttons.
Press the green tic to save the changes.
The images can be cropped in two formats:
Portrait.
Landscape.
For cropping the image:
1. Use the arrows to select the part of the image you want to crop.
2. Press “Portrait/Landscape” buttons.
3. Press the green tic to save the changes.
Press the red cross to not save the changes and escape this screen.
26/84
Page 27

Operator user‟s manual
NOTE
The DVD/CD burning service doesn‟t allow using a DVD/CD as a picture source. This one is
disabled.
3.5 Burning DVD/CD
Once the “DVD/CD burning” service button is pressed, the following screen is showed:
Press “Burn all” button if you want to burn not only pictures but also all the files found in the
original media.
In this moment the screens explained from point 3.4.2 (Additional services: Would you like to
burn a dvd or cd?) will be displayed.
Press “Select photos” if you want to burn it with the selected pictures.
3.5.1 Selecting photos
Once the “Select photos” button is pressed, the following screen is showed:
For selecting the images:
1. Use the arrows to display all the images.
2. Press the desired image to select it.
Press “Yes” to copy it and “No” to deselect it.
Press “Back” button to escape this screen.
Press “Finish order” to burn it.
In this moment the screens explained from point 3.4.3 (Additional services: Would you like to add
an indexprint?) will be displayed.
27/84
Page 28

Operator user‟s manual
3.6 Compositions
Once the “Compositions” button is pressed, the Compositions service is started. The customer is
asked to insert the picture source and after following the usual workflow, the pictures can be seen at
the Ordering screen.
In the right panel of the screen a maximum of 4 different layouts can be shown. The available
layouts depend on the selected country (in settings of the system) and the paper size of the printer.
Only one picture can be selected, and also only one layout can be chosen by the end customer.
When the picture is selected, it‟s automatically allocated in the selected layout to the right panel.
In the center area is possible to check the cutting area of the layout rectangle. In order to fit better
the picture inside every frame or rectangle, sometimes is better to rotate the picture.
After pressing the “Finish order” button, a pop-up will appear in order to determine the amount of
copies desired
28/84
Page 29

Operator user‟s manual
NOTE
The behaviour of the camera when the USB cable is connected or disconnected may vary
depending on the camera brand/model used. Also, the use of an USB switch is not always
necessary. Please ask for more information to your dealer or installer.
3.7 Photo ID (Optional)
It‟s highly recommended to follow the next steps to make an ID service.
3.7.1 Taking the pictures
Before selecting the PhotoID service at the main screen, the operator should take the pictures to the
customer.
When using a digital camera with an USB cable connected to easyphoto:
If an USB switch is being used between the camera and the easyphoto, this must be
switched to the position where the connection between both devices is disabled, in order to
allow the camera to take pictures.
When an USB switch is not being used, the digital camera USB cable should be
disconnected from the easyphoto.
3.7.2 Selecting the service
Once the “Photo ID” button (in operator mode) is pressed, or the hidden area between language
selection (flags) and prices is pressed, the Photo ID service is started.
29/84
Page 30

Operator user‟s manual
NOTE
The most common USB modes used by the digital cameras are Mass Storage and PTP
connection.
PTP connection works better when there are only a few pictures into the camera memory: it‟s
recommended to empty the camera memory after every session when using the PTP
connection. There must be at least 1 picture in the camera in order to be able to read pictures
from it, too.
In order to know about each camera brand/model PTP compatibility, please check the camera
specifications.
3.7.3 Selecting the picture source
After this, depending on the system setup, it‟s necessary to follow the source selection workflow or it
can be avoided if the operator is using always the same digital picture files source (see the
Administration and Settings chapter for more information). As instance, if the operator is using
always the same digital camera connected through USB cable to the easyphoto, this can be
indicated in settings and the application won‟t ask the operator where the pictures must be read
from. It will search the pictures from the camera directly.
There are several picture sources available: Digital Memory Card, USB memory device (both using
the media card reader of the easyphoto system) and USB connection with digital cameras.
30/84
Page 31

Operator user‟s manual
NOTE
Please plug the camera in the rear USB port from your MT1 system.
When using a PTP or Mass Storage mode compatible Digital Camera, the operator is requested to
connect it as it‟s shown in the next picture.
If an USB switch is being used between the camera and the easyphoto, now it must be switched to
the position where the connection between both devices is active. When an USB switch is not being
used, the digital camera USB cable should be connected to the easyphoto.
When using a PTP camera, this will detect now the connection with the easyphoto system and will
change to picture source mode.
In most of the cameras using the Mass Storage mode, they have to be manually switched to this
mode at this time.
3.7.4 Selecting the layout
Afterwards, the layout must be chosen. There are two kind of layouts, standard and split. Split
layouts (using two different colours) allow mixing two different pictures.
After choosing the layout, the Photo ID screen is shown.
31/84
Page 32

Operator user‟s manual
3.7.5 Selecting and working with the pictures
In the top area, the pictures read from the source are shown. When selecting any of them, the
picture will be loaded to be shown in the central area.
In this screen, it‟s also possible to change the layout by clicking on the preview placed on the topright corner.
The select layout screen will appear again to restart the workflow.
32/84
Page 33

Operator user‟s manual
Once in the Photo ID screen again, it‟s possible to select another picture.
3.7.6 Printing
After pressing the “Print” button, a pop-up will appear in order to determine the amount of copies
desired.
When pressing the refresh button, the latest images from the picture source are reloaded.
When using a camera with PTP connection, only the latest 8 images from the device are loaded.
33/84
Page 34

Operator user‟s manual
3.7.7 Automatic biometrics detection
When automatic biometrics detection is active in the settings (see Administration chapter), it will take
some more time and the picture could appear centred and zoomed.
The easyphoto system is applying innovative imaging processing tools to detect the face of the
customer and helping the operator of the system to center the picture in the biometrics mask shown
in the centre of the screen.
If a picture can not be correctly centred it appears a message under the picture just warning about it.
The cause can be any of the following:
The eyes of the customer are not clearly visible in the picture
The top part of the head of the customer is too near the top egde of the picture.
Depending on the print rectangle dimensions or aspect ratio, and also on the
biometrics mask being used, this distance can vary.
The customer brings glasses and there is a shiny spot of light over them.
Some part of the face of the customer is not clearly visible
The face of the customer in the picture is rotated 90º or more.
The picture has poor vertical resolution (less than 500 pixel)
Anyway, after automatic detection the picture can be manually adjusted.
In some cases, even if there is not any error message in the screen, the face of the customer is not
being centred correctly. If the current layout is not using the official ID or Passport dimensions and
aspect ratio, and a biometrics mask is shown, this could be normal. In this case please make final
adjustments manually.
You can use several buttons to change:
Rotation. The picture can be rotated in small amounts in both directions by pressing quickly the
rotate button. To change the orientation of the picture (and changing the aspect ratio) to
landscape or portrait, please keep pressed the rotate button for a couple of seconds.
Refresh. This is useful when a compatible USB camera (working as a mass storage device) is
connected to the system and the photographer wants to stay working permanently in the
PhotoID screen. By pressing the refresh button, the pictures are reloaded from the camera and
the last picture taken is shown.
Zoom.
Position.
Steps:
1. Select the picture in the top area.
Adjust the picture position to the biometric mask (when available) using the controls.
For split layouts, use the group selector button at the top right of the screen before selecting the
second picture to be included in current composition.
2. Press “Finish order” each time you want to print a copy of current Photo ID composition.
Press “Back” button to escape this screen.
In this moment you will see the same screens explained in point 3.4.2. (Additional services:
Would you like to burn a dvd or cd?).
34/84
Page 35

Operator user‟s manual
3.8 Calendars (Optional)
Once the “Calendar” button is pressed, the Calendar service is started.
First, is required to select the year to make the calendar. In the same screen, also the type of
calendar (“Full year” or “Monthly”) can be chosen.
3.8.1 Monthly calendars
This option makes it possible to create a 12-month calendar using a sheet for each month and
including more than one year.
First it‟s selected the desired year and then the initial month of that year. The system then will
automatically calculate the following 11 months.
e.g. A calendar starting with December-2009 will have December-2009 in the first sheet and
November-2010 in the last one.
Pressing „Next‟, the theme and the design of the calendar can be chosen among several types. Each
theme can show several designs to be chosen, too.
35/84
Page 36

Operator user‟s manual
Pressing „Start calendar creation‟ and the Monthly calendar workflow is started. There is a help guide
shown in the right part of the screen.
It‟s required to select a picture in the top section of the screen in order to combine it with the
calendar shown in the central area.
Monthly option uses twelve different photos, one for each month. After selecting the picture for the
first month of the year, it‟s required to use the arrow buttons shown in the part 3 of the help guide, in
order to move to the next month, and select later the next picture to be combined.
It is recommended to follow the process in order, month after month, so there won‟t be any „empty‟
month when the operator is about to complete the whole year calendar (it‟s not possible to use the
same photo in two different months). Anyway, a warning will be displayed if one month does not
have a picture when pressing „Next‟ button in order to proceed with the following steps. Afterwards,
the standard workflow is followed.
Before confirming the order, the user is asked to choose the print size and the number of copies per
each print size.
36/84
Page 37

Operator user‟s manual
3.8.2 Full year calendars
This option makes it possible to create a calendar of a specific year and using only one sheet. To do
so, both the “Full year” option and the desired year will be selected.
Pressing „Next‟, the thematic and design of the calendar can be chosen among several types.
Pressing „Start calendar creation‟ the „Full year‟ calendar making is started.
It‟s required to select a picture in the top section of the screen in order to combine it with the
calendar shown in the center.
37/84
Page 38

Operator user‟s manual
„Full year calendar‟ option uses only one picture for the whole year (only 1 sheet of paper).
After selecting the picture and adjusting the position in the calendar, „Next‟ button must be pressed
to go on. Before confirming the order, the user is asked to choose the print size and the number of
copies per each print size.
3.9 Collage (Optional)
Once the “Collage” button is pressed, the Collage service is started.
First of all, the printsize is required to be chosen.
After this, the browser screen is shown.
To select a picture in order to include it in the collage, the right panel buttons are being used. There
is a minimum and a maximum amount of pictures to be selected. Both figures depend on the
previously selected printsize.
After that, is required to select the layout among the different displayed.
The photos of the collage can be rotated by selecting them one by one and pressing the “rotate”
button. The colour of the background can be selected in the same screen.
38/84
Page 39

Operator user‟s manual
After that, is required to select size and number of prints to follow the standard workflow.
39/84
Page 40

Operator user‟s manual
3.10 Frames & Greetings (Optional)
Once the “Frames & greetings” button is pressed, the Frames & greetings service is started.
The theme and design selection screen appears. Once the design is selected, the photo must be
chosen and the resultant greeting will be displayed.
Some designs can show an specific text like „Happy christmas‟, „Happy holidays‟ and so on, or a
default text like „Enter your text here‟. Whatever the text is, it always can be changed by the end
user.
In the text edit menu, it‟s possible to change the font type, font size and font color.
After that, the number of copies can be chosen in order to end the process.
40/84
Page 41

Operator user‟s manual
NOTE
The pictures used for this service must be carefully selected in order to avoid
undesirable results. The subtle separation between the pieces of the mosaic can hide
important parts of the picture, as instance in people portrait photos, hiding part of the
face. The zoom and pan adjustments, together with the poster size, have a great
influence in the final result.
3.11 Mosaic poster (Optional)
Once the “Mosaic Poster” button is pressed, the service is started.
Depending on the paper sizes configured there will appear different mosaic sizes.
After choosing the mosaic size, a picture browser appears just showing a preview of the mosaic
using the selected picture.
41/84
Page 42

Operator user‟s manual
NOTES
Many different products can be created at www.kioskgifts.com. The shop staff must explain
how the tool is used to the customers and what the shop‟s production capacities are.
When new products that are compatible with easyphoto appear on the website, the system
must be updated with an internal list of compatible products.
3.12 ONLINE Kioskgifts (Optional)
This service offers the possibility of printing the orders created at www.kioskgifts.com. The Kiosk
doesn‟t require an Internet connection for this service: the website allows the user to create a
product anywhere using a PC or MAC and an Internet access and take the order saved on a
memory card, USB or DVD/CD to the store.
42/84
Page 43

Operator user‟s manual
When the customer selects the pricing information, the list of all the available products is shown.
Although some of these products may be similar or identical to other products created with local
easyphoto services, such as greetings cards or calendars, the price must be set again, as the
products are actually different ones.
The www.kioskgifts.com products that are compatible with easyphoto are:
- Easyalbum
- Greetings cards
- Calendars
Once the “ONLINE Kioskgifts” button is pressed in the main screen, the service is started.
After choosing the digital media support where the customer brings the order files (encrypted files
with .tar extension) and the desired folders, the next screen appears.
It shows the different orders found in the device. Only one order can be selected from all the orders
found.
43/84
Page 44

Operator user‟s manual
CODE
Description
Solution
2
Unknown product ID
Probably product is not supported or has new settings. Software
update is recommended.
3
Product is disabled
Product must be enabled at settings area
7
No related
consumables
The printsize should be enabled at „sizes‟ area of settings
9
Wrong amount of
pages
Order is damaged and can‟t be processed.
11
Incomplete order
information
Order is damaged and can‟t be processed.
12
No pictures at order
Order is damaged and can‟t be processed.
13
No picture thumbnail at
order
Order is damaged and can‟t be processed.
Every order shows:
The name of the product
The name of the .tar file
The date when the order was created
The number of sheets of paper required for printing
The price
The amount of copies of the same order. The user can change the number of copies.
When an order can not be processed by the system, an error code is shown inside the order area.
This is the list of possible error codes.
After pressing the “Finish Order” button, the summary is shown and the order must be validated to
be executed.
44/84
Page 45

Operator user‟s manual
4 ADMINISTRATION
In this section, the operator and supervisor can check the system status, while the supervisor can
configure all the system parameters.
Touch twice at the top right of the principal screen to enter “Administration”.
Once you have entered to administration, the following screen is showed:
The date and the System ID are shown. The System ID is unique information from the system that
allows identifying it for new software licenses purchasing. In order to avoid confusions, the letters are
shown in black and the numbers in green.
45/84
Page 46

Operator user‟s manual
For acceding to “Settings”:
Introduce the supervisor password.
The default password from factory is empty. It is highly recommended to change supervisor
password once the system is installed.
4.1 System Status
In this option operators and supervisor can access to technical information of the equipment. This
information is useful for service or remote support purposes.
The information is divided into 3 different areas:
Printers: the information about the MITSUBISHI photo printer and ticket printer is shown in
this area. Device proper connection or available media information is available.
Sources: all information about picture source hardware devices is shown. Device
manufacturer/model and other information like memory card inserted or CD/DVD inserted is
also available. When using a PTP compatible Digital Camera, the identification provided by
the camera is also shown here.
General: general hardware & software information is shown, like MT1 hardware model,
available memory, total free space in disk, network information, and O.S version and build
date.
46/84
Page 47

Operator user‟s manual
47/84
Page 48

Operator user‟s manual
4.2 Settings
Once the “Settings” button is pressed, the supervisor password is requested and the following
screen is showed:
Supervisor can enter to the following options:
Main.
User‟s administration.
Devices.
Services.
Statistics.
Import/ export settings.
Screenshots.
Orders
In some parts of “Settings” it is necessary to enter a text. The on-screen keyboard can then be used.
It‟s composed by two layers: The first one shows the alphanumeric keyboard and the second one
appears when pressing “Others” button showing a keyboard with special characters.
With the second layer alphabets with more than 26 letters such as Hebrew or Russian are
supported.
48/84
Page 49

Operator user‟s manual
NOTE
Please choose:
„Operator‟ mode when Easyphoto has to be used by operators and the supervisor.
„Kiosk‟ mode when Easyphoto has to be used by end users (end customers) as a semi-
attended photo system.
„Order Terminal‟ mode when Easyphoto is attached to a Flexilab system. THIS ONE
REQUIRES AN ADDITIONAL LICENSE.
4.2.1 Main
Once the “Main” button is pressed, the following screen is showed:
On this section you can choose:
Workflow mode: Kiosk mode / Operator mode / Order Terminal mode
Available languages for the end customer in mode Kiosk („Kiosk language‟)
Current country
Date and time setting (for ticket printer)
Enable/disable ticket printer (if available)
Once the Kiosk mode, Order Terminal or Operator mode have been selected:
Press the “Show available languages at first screen” button to show the available languages at
fist screen.
Press the “Show disclaimer” button to show the legal disclaimer at the beginning of the operation
of Easyphoto.
Press the “Use password for order validation” to introduce the password at the “Order summary”
screen.
In Operator mode the main screen should be shown like this (with default values): no language
selection is available. There is no need for the operator to choose a different language than default
one, and also prices list and disclaimer have no sense to be shown.
49/84
Page 50

Operator user‟s manual
In both Kiosk Mode and Order Terminal Mode the main screen should be shown like this when
default values are not changed:
50/84
Page 51

Operator user‟s manual
NOTE
The Click5000 of the Flexilab system needs to run software version 2.4.0 or above in order to
support an attached easyphoto working as an Order Terminal. The shared resources of
Click5000 must allow file writing operations to the client machines:
D:\APPLICATIONS\ORDER_TERMINAL shared as „OTFOLDER‟
D:\KERNEL\SERVICE_MODULES\DPSLAB_LISTENER\INCOMING_ORDERS shared
as „ERequest‟
4.2.1.1 Installing the system as an Order Terminal
In order to use the easyphoto as an Order Terminal, it‟s necessary to change the working mode and
set the network parameters after activating the license, in the equipment in which this is necessary.
This can be done in 2 different ways: Basic and Advanced Mode.
For a basic lan connection (using a crossover network cable or ethernet hub), it‟s recommended to
use the Basic Mode, because of the easier setup. When the system is attached to a corporate lan,
it‟s better to use the Advanced Mode.
Steps to follow for installing the easyphoto as Order Terminal (Basic mode)
a) Please connect both Click5000 and easyphoto systems with a crossover network cable or
Ethernet hub, and switch on both systems.
b) If the easyphoto system was never activated as an Order Terminal before, please be sure
that you have your Activation Key, and proceed to next step. See chapter 6 for more
information about licensing. If you are not sure if the system was already activated in the
past, please proceed to next step anyway.
c) Go to Settings Main and select the „Order Terminal Mode‟. If any Activation Key is asked,
please enter it now. For more information please see chapter 6 of this manual.
d) Now it‟s necessary to configure Network settings. Please go to Settings Devices
Network.
51/84
Page 52

Operator user‟s manual
e) Once “Network” button is pressed, please choose the „Basic mode‟ option. Set the „O.T
number‟ using the „+‟ and „-„ buttons as „1‟ if there is only one Order Terminal connected to
Click5000. (Change this number only if you are installing multiple easyphoto systems
working as O.T. together with the same Click5000.)
f) Even if you didn‟t change anything on this screen, please press the „Apply‟ button. There is a
„Check connectivity‟ button in this screen. Please DO NOT CHECK CONNECTIVITY YET!
Please use it after restarting the system if you need to check.
g) Restart the system.
h) After restarting the system, please set the rest of settings of the system like the printing
sizes, product prices and so on.
52/84
Page 53

Operator user‟s manual
NOTE
Pressing “apply” button will reboot the system. Do not attempt to test connectivity before
applying the changes
i) Once the system has completely been configured, it‟s recommended to export the settings.
When working as an O.T., the settings are not exported to an external device: Click5000 will
keep the easyphoto settings. See the „Import/ Export settings‟ chapter of this manual. This
way of work is useful when installing additional O.T‟s: all the previous steps are required for
every O.T., except the h) step, that can be avoided just importing the settings from
Click5000.
Basic and Advanced mode. A deeper view.
Basic mode: the Order Terminal (O.T.) number can be changed. This is useful, when using a
basic lan installation, to identify each easyphoto connected to a Flexilab system. In this way,
the basic connection parameters are changed automatically.
In this mode, Click5000 is supposed to be working with these parameters:
IP: 192.168.0.100
IP mask: 255.255.255.0
Gateway: 192.168.0.1
And the easyphoto with these ones (when O.T. number is „1‟):
IP: 192.168.0.201
IP mask: 255.255.255.0
Gateway: 192.168.0.1
Machine Name & Bluetooth ID: MT1-1
Initial order number: 1000
If O.T. number is changed, as instance, to „2‟, these parameters will be changed
automatically to these new ones, and so on:
IP: 192.168.0.202
IP mask: 255.255.255.0
Gateway: 192.168.0.1
Machine Name & Bluetooth ID: MT1-2
Initial order number: 2000
Advanced mode: manual configuration of all the net parameters such as machine name, IP,
Mask, Gateway IP, etc.
53/84
Page 54

Operator user‟s manual
NOTE
Pressing “apply” button will reboot the system. Do not attempt to test connectivity before
applying the changes
By pressing check connectivity button, a connection test is performed to ensure that the
parameters are valid.
The Machine Name parameter (visible in the Advanced Mode section) is also used to set the
Bluetooth Name (ID). Even using the Basic mode, if the Bluetooth ID needs to be changed,
it‟s possible to select Advanced Mode and change this parameter. This is useful when there
is more than one easyphoto (even working as standalone system) in the same place, in
order to avoid duplicated Bluetooth ID.
54/84
Page 55

Operator user‟s manual
NOTE
When changing the country, the application is automatically restarted with the new country
parameters already set.
Selecting a country means that the following parameters are changed:
Default easyphoto language.
Currency (symbol and symbol position).
Measurement units (cm or inches).
VAT information message (needs to be entered in the text box).
4.2.1.2 Select Kiosk Languages
1. Use the arrows to display all the languages.
2. Press the languages to select them.
4.2.1.3 Select Country
1. Use the arrows to display all the countries.
2. Press the country to select it (only one can be selected at the same time).
55/84
Page 56

Operator user‟s manual
4.2.1.4 Date / Time
Date and time configuration.
In order to advance or take the date back, „hour‟ setting must be changed. Only 1 day shifting can be
applied.
4.2.2 User’s administration
Once the “User‟s administration” button is pressed, the following screen is showed:
On this screen:
Press the “Change name” button to modify the name of the operator and the supervisor.
Press the “Change password” button to modify the supervisor or operator passwords.
Press the “Clear button” to restore the modified names of operators and supervisor.
56/84
Page 57

Operator user‟s manual
NOTE
In order to setup the Bluetooth configuration (Bluetooth name for the easyphoto) see
chapter „Network Settings‟.
4.2.3 Devices
Once the “Devices” button is pressed, the following screen is showed:
Press the “PhotoPrinter” button to modify the MITSUBISHI photo printer default printing quality
settings.
Press the “DVD/ CD Burner” button to increase or decrease the recording speed.
Press the “Printer ticket” button to change the receipt ticket messages, like shop name, address,
phone number, etc...
Press the “Touch panel calibration” button to calibrate the screen.
Press the “Network” button to setup network parameters when the system is working as an O.T.
Also to setup Bluetooth communication.
57/84
Page 58

Operator user‟s manual
4.2.3.1 Devices. Photo printer
Once the “Photoprinter” button is pressed, the following screen is showed. Depending on the printer
model used, some of these parameters won‟t be shown:
Change “Sharpness” value to enhance the sharpness of the printed pictures.
“Noise reduction” value can help to reduce grain or noise in flat color areas. Default
value is “off”.
“Quality”. Printing speed can be changed. While “Fine” value means faster printing
speed, “Super Fine” means slower printing speed but better quality. Default value is
“Fine”.
“Auto-adjustments”. This is an automatic brightness and contrast functionality,
based in the content of each picture. It‟s very useful for amateur pictures, and the
result can be very impressive on dark or poor contrast pictures.
“ICC Profiles”. In the CPD70 and K60 models only the colour management function
can be activated or deactivated through the ICC profiles. In the case of the
CP9550DWS, the ICC profile menu is accessed. This menu is for advanced users or
technical staff. It allows to manage the ICC profiles for every printing size and
speed.
58/84
Page 59

Operator user‟s manual
Activate virtual printer. This allows you to work with the equipment without the
printer connected. It simulates the connection of a printer with a 15x32 size
consumable.
Print finish options. Only for the CPD70 and K60. This is configured if the print finish
is glossy or satin by default, or if the end customer is asked to choose one of the two
options.
4.2.3.2 Devices. DVD/CD burner
Once the “DVD/CD Burner” button is pressed, the following screen is showed:
Press “-/+” button to increase or decrease the burning speed.
59/84
Page 60

Operator user‟s manual
4.2.3.3 Devices. Ticket printer
Once the “Ticket Printer” button is pressed, the following screen is showed:
In this one, it‟s possible to edit the contents shown in the ticket. The barcodes shown are formatted
in EAN13 standard.
A screen keyboard is available to fill this data:
Shop name
Address (2 lines)
Phone number
4.2.3.3.1. Product barcode settings
This is the barcode that identifies the product among the different available products in the
easyphoto machine.
Print product barcode: When it‟s enabled, a barcode will be printed for each product.
Print product reference: When it‟s enabled, a different number will be printed per each
product reference, instead of using a barcode.
60/84
Page 61

Operator user‟s manual
Length: It allows setting the length of each part that composes the barcode.
o Reference: Number of digits used to show the product reference.
o Amount: Number of digits used to show the product price.
Position: It specifies which field (Reference or Amount) is placed first in the barcode.
The product reference is filled in the screen where prices are set.
(See chapter 4.2.4.1(3) “Prices settings”)
4.2.3.3.2. Order barcode settings
This is a unique barcode being printed for the whole order, including the total price and global
reference to the easyphoto service for the shop accounting.
Print order barcode: When it‟s enabled, a barcode will be printed for every order
generated in the machine.
Length: it allows setting the length of each part that composes the barcode.
o Reference: Number of digits used to show the order reference.
o Amount: Number of digits used to show the order price.
Reference: This is the code that identifies an easyphoto order.
Position: It specifies which field (Reference or Amount) is placed first in the barcode.
61/84
Page 62
Operator user‟s manual
NOTE
It is highly recommended to enter this screen with the printer CONNECTED and the
consumable already installed. Otherwise, certain configurations may be lost later.
4.2.4 Services
In “Services” it is possible to enable or disable services and set their prices and options when
available.
By pressing the button „Sizes‟ the different print sizes can be defined for the selected service. When
the system is set up as an Order Terminal, the list will be longer than if it is set up as an autonomous
terminal.
To check the available options per each different service, just press “Settings” button when the
desired service is selected (rounded with the green square).
62/84
Page 63

Operator user‟s manual
NOTE
You can select a maximum of 4 sizes (when the system is not working as O.T.)
When working as an O.T., it‟s necessary to previously check that the selected printsizes are
available at Flexilab size, otherwise the orders will never be printed out.
If there is no printer attached to the system, the default print media size is 6x9 inches
(15x23cm).
4.2.4.1 Prints.
By pressing the „Sizes‟ button the available printing formats can be set.
1. Use the arrows to display all the sizes.
2. Press the desired sizes to select them.
3. Press the “Prices settings” button to display all the prices and/or modify them. The following
screen is showed:
4. Use the arrows to move across all available services.
5. Press the price you want to modify.
6. Once the price is selected, write the new one.
7. Insert the product reference (it will be used in the ticket printing. See chapter 4.2.3.1)
8. Activate/deactivate price ranges by pressing the green circles.
9. Enter the amount of copies of the range when activating a new one.
63/84
Page 64

Operator user‟s manual
NOTE
It‟s highly recommended to enter this screen with the printer POWERED ON and the media
already installed. Otherwise some configurations can be lost later.
After pressing the button “back”, the next screen will appear in order to apply the changes or not.
4.2.4.2 Index Print.
By configuring this service, it is possible to set the print size, depending on the media size detected.
In the example, 6x9 inch media size is installed in the printer, and up to 6 different print sizes can be
printed with this media size, by cutting the paper automatically in the printer itself.
64/84
Page 65

Operator user‟s manual
4.2.4.3 Photo ID.
When configuring this service, it is possible to set a default picture source. This helps to increase the
workflow speed and avoids asking the operator where the system will find the pictures every time.
The professional photographer is used to take ID pictures with the same camera and digital media.
So, it‟s not necessary to select picture source on every order and loose time to make the service.
The available options are USB, MMC (digital media card) and PTP.
The option of printing this type of service on satin or glossy paper is also shown. This option is only
shown for certain printer models: CPD70 and K60.
The PhotoID rotation angle allows setting an automatic rotation angle for every picture that the
photographer takes. This helps to save time, too.
It‟s also possible to enable or disable in this screen the auto biometric detection every time that a
picture is selected in the thumbnails array of PhotoID. Default value is „enabled‟ (checked).
In the Advanced PhotoID settings is possible to adjust some picture properties corrections in order to
be applied automatically every time an ID picture is being printed. Brightness, contrast and color
balance can be set. This function can be enabled or disabled, too.
A sample picture can be loaded (either from the USB or memory card source) in order to adjust the
parameters.
65/84
Page 66

Operator user‟s manual
4.2.4.4 Calendars.
The purpose of these settings is to maintain the library of available calendar designs per every year.
Every item of the list shown in the screen belongs to a different language, showing the first and the
last of the available years.
By configuring this service, depicted on the image below, it is possible to change the following
settings:
1. Delete all calendars. This option will delete all the installed calendars, regardless of the
selected language.
2. Delete until the previous year. This option will delete all the calendars of the previous years,
leaving the current year and the following years, regardless of the selected language..
3. Import designs. This option allows importing designs of calendars from the distributed
Calendars Designs CD.
4. Default language selection. The ticked language will be set as default language. In the case
that the system language or the language selected by the end user does not match with any of
the installed calendar languages, the calendars on the language ticked as default will be shown.
5. Storage Space Available. It shows the information about the free disk space in the system.
66/84
Page 67

Operator user‟s manual
NOTE
In order to import new designs, as shown on the following screen, it is needed to select the
calendars languages that will be installed on the system from the distribution CD.
Please do not install more than 4 different calendar collections in the system.
Consider the available storage space before installing new calendar collections. Old
calendar collections can be deleted in case of more space is needed.
NOTE
In order to import new backgrounds an usb pendrive has to be plugged in, and the system
won‟t ask for confirmation.
4.2.4.5 Collage.
By configuring this service, depicted on the image below, it is possible to change the following
settings:
1. Import Backgrounds: . This option allows to import new different background..
2. Restore backgrounds:. This option allows to restore the originally included backgrounds..
3. Select border color and thickness: This option allows to set different styles of the border in the
collage pictures.
67/84
Page 68

Operator user‟s manual
NOTE
In order to import new designs it is needed to press „Import designs‟ and then follow the
same workflow as when importing calendars
4.2.4.6 Frames & Greetings.
By configuring this service, depicted on the image below, it is possible to change the following
settings:
1. Delete All. This option allows deleting every frame&greeting design available in the system.
2. Delete by theme. This option allows deleting the frames&greetings selecting by theme.
3. Import designs. This option allows importing designs of frames&greetings.
4. Change font. There are five different text fonts selected by default. The final user will be able to
choose among these five text fonts. It‟s possible to change them by selecting the one to replace
and then click Change font. It will appear the picture shown below with a list of available the
fonts and there the desired font has to be chosen.
68/84
Page 69

Operator user‟s manual
NOTE
The available formats may differ from picture above, according to the available print sizes in
the system.
4.2.4.7 Mosaic Poster.
It‟s possible to select which mosaic poster formats will be available at Mosaic Poster service.
4.2.4.8 ONLINE Kioskgifts.
In the settings section, the list of all the available products is shown.
All the different products (easyalbum, greetings, calendars…) are together in the same list.
The sole purpose of this screen is to permit each product to be enabled or disabled.
69/84
Page 70

Operator user‟s manual
NOTE
STATISTICS ARE DISABLED by default. It‟s necessary to “Enable” them if Statistics
registration is needed.
4.2.5 Statistics
When this option is enabled in Statistics menu you can see all the orders done in the easyphoto..
It‟s also possible to export statistics in xml format in order to keep them saved and study them. .
Today: You can see all the orders done in the current day.
Previous day: You can see all the orders done in earlier days.
Month: You can see the accumulated statistics in a month, up to 2 years.
Years: You can see the accumulated statistics in a year, up to 3 years.
Print a ticket with the selected statistics using the ticket printer.
Reset statistics,
When exporting data to an external storage device, please do the following:
1- Insert the storage device. Wait for a few seconds to allow the system recognize the device. If
the device is coming with an indicator light, please wait this light to stop flashing.
2- Press “Export statistics” and follow the instructions.
When exporting on an external device, several xml files will be shown on it with the statistics, along
with the activity records.
The xml files are „stats-day-yyyymmdd.xml‟, „stats-months-yyyy.xml‟ and „stats-year-yyyy.xml‟, where
yyyymmdd is the period.
Two copies or periods are saved from the first and second xml types and three copies from the third
type.
The individual data of each order are shown in the activity files: „statistics.log and „statistics.log.1‟.
The second is the one that records the oldest data, in the same way as a backup. The operating
mode is as follows:
When the „statistics.log‟ files occupies about 2.5MB on the disk, it is renamed „statistics.log.1‟ (if this
file already exists, it is overwritten) and a new „statistics.log‟ is created.
70/84
Page 71

Operator user‟s manual
NOTE
When importing settings from a different easyphoto system, LOCAL ADDITIONAL
LICENSES (like PhotoID) AND STATISTICS WILL BE OVERWRITTEN AND LOST.
When working as O.T., when pressing the „Export‟ button, the settings are stored in the
Click5000 system. They can be imported later in any additional O.T.
The importation files may not be compatible among different software versions
4.2.6 Import / export settings
Use this option for importing settings from another system or export settings to another one.
When exporting data to an external USB storage device, please do the following:
1- Insert the storage device. Wait for a few seconds to allow the system recognize the device. If
the device is coming with an indicator light, please wait this light to stop flashing.
2- Press “Export settings” and follow the instructions.
Network parameters will be only exported when the easyphoto is working in any mode (Kiosk,
Operator, O.T.) and an USB device is used to save the data.
Network parameters will be only imported when the system is not working as O.T. and an USB
pendrive is used to import the data.
71/84
Page 72

Operator user‟s manual
NOTE
For saving the screenshots correctly the USB devices and memory cards should be inserted
before this function is enabled, and wait for some seconds to allow the operating system to
recognize the storage device
NOTE
To extract successfully the storage device where the screenshots are saved, it is highly
recommended to access again to the menu “Settings” and disable this function. This action
causes the system ejecting the USB storage device properly.
4.2.7 Screenshots
It‟s possible to take screenshots of the application and save them into a USB memory device or
digital media card. A keyboard attached to the system is needed.
Once the “Screenshots” button is pressed, the following screen is showed:
For enabling this option:
1. Press the “Enable” button.
2. Choose the destination device.
Press the “Destination device: USB” button if you want to save the screenshots in the USB.
Press “Destination device: MC” button if you want to save the screenshots in the memory card.
Now it‟s possible to take screenshots from any screen. Press „F12‟ in the keyboard every time you
need to take an screenshot.
Before taking out the storage device:
72/84
Page 73

Operator user‟s manual
5 MT1-ID
The MT1-ID is a limited edition of the standard easyphoto with reduced functionalities. The main use
of the system is for PhotoID purposes.
5.1 Available services
The MT1-ID offers the following services.
• Prints service
• CD/DVD burn service
• Photo ID service (license is included)
As an option:
• Decopack: Calendar, Mosaic, Greetings, Collage
The Composition service available in the standard easyphoto product is not available in the MT1-ID.
5.2 Working modes
The MT1-ID can only work in operator mode. Both Kiosk mode and Order Terminal mode are not
supported.
5.3 Printer model
Supported printer model is the CPD70DW-U.
73/84
Page 74

Operator user‟s manual
NOTE
If the computer (PC) cannot be botted correctly through the DVD, check that the equipment
allows you to boot it from the DVD. Another possibility is that the PC is not compatible with the
DVD operating system. Use another PC that can be booted through the DVD.
NOTE
All the information in the USB drive will be deleted during the creation of the recovery tool.
6 Recovery USB and easyphoto backups
It‟s strongly recommended to make a safe copy of the system after a first setup and also periodically.
In the event of a system malfunction, it could be very helpful in recovering normal operation.
For that purpose, the equipment includes a DVD, the „Recovery USB creator‟ which is used to
generate a recovery tool in a USB drive.
A USB drive with a capacity of 4GB is required, together with a PC with a DVD reader and inputs
compatible with USB devices. In some cases, the MT1 equipment can be used if it has an internal or
external DVD reader.
After executing the process described below, the USB drive will be converted into the system
recovery tool and maintenance tool for installing software updates.
6.1 Creation of the recovery tool in a USB drive
To use the USB device as a recovery tool proceed as follows:
1. Switch on the computer (PC) and insert the DVD immediately, so that the system is booted
exceptionally from the DVD itself. Do not connect the USB drive yet.
2. Once the boot process has ended, the equipment calibration screen will be displayed. If the
PC is not an MT1 and has a keyboard and mouse, the ESC key can be used to exit the
process. If it is an MT1 and the touch screen must be used, press with your finger on each of
the green zones that appear in succession until the process has been completed.
74/84
Page 75

Operator user‟s manual
3. The language selection screen will then appear, like the one shown in the illustration.
4. After selecting the language the following screen will appear. Press the button in the centre
to create the recovery tool in the USB drive.
5. The next step is a confirmation question. Accept in order to proceed to the next screen
where you will be asked to insert the USB device in any available connector.
75/84
Page 76

Operator user‟s manual
6. Then the USB drive writing process will start. This may last for several minutes.
7. When the process has ended press the button in the bottom right-hand corner of the screen
to return the equipment to the initial screen.
8. To switch off the equipment press the off button on the right side of the initial menu.
IMPORTANT: DO NOT REMOVE THE DVD UNTIL THE EQUIPMENT HAS BEEN SWITCHED OFF.
If you do this by mistake, ignore the messages that appear on screen and switch the equipment off
completely. At any event the process will have been completed correctly.
76/84
Page 77

Operator user‟s manual
NOTE
IMPORTANT: After configuring the software for the first time, be sure to create a total
backup. The default backup copy supplied with the Recovery USB may be an older release
than the content of the MT1 equipment supplied by the factory.
It is advisable to make partial backups after making updates to the equipment or at certain
time intervals.
Two USB drives can be used simultaneously in the equipment, one as a booting and
recovery tool and the other as a storage device or as the source of the update data.
6.2 Using the recovery tool
The USB tool created in accordance with the above section can be used to carry out maintenance
tasks. Insert the USB drive, preferably at the rear part of the MT1 equipment, and it will start up.
After a few seconds the system will be booted from the USB and the touch screen calibration tool will
be displayed. Press the different points that appear at the corners of the screen with your finger to
complete this process correctly.
Then the main menu of the recovery tool will appear.
There is a choice of various options:
Software update.
Create partial backup.
Create total backup.
Restore partial backup.
Restore total backup.
Shutdown (button located at the bottom on the right)
77/84
Page 78

Operator user‟s manual
NOTE
It is very important to create a backup before updating the process to avoid losing parameters of
the configuration, if any backup was not performed before.
NOTE
To make partial backup copies, it is advisable to use a USB drive that is different from the one
used as the recovery device, due to the memory space required for the saved file. It is best to
use a USB drive with a free space of 4GB.
NOTE
If using the same USB as the recovery tool, the default backup copy supplied with it will
be overwritten.
After installing and setting up the system or after any Software Update operation, it is
highly recommended to create a Total Backup.
It is advisable to store the backup files in a safe place.
6.2.1 Software update
This option allows updating the software of easyphoto to a new software version, or installing special
update packages.
When this option is chosen, the user is requested to insert an USB memory device, and the system
detects if there is an available software update in the memory unit, showing the name of the file and
requesting confirmation for the update.
Once the update is finished correctly, the system informs about the success of the operation.
6.2.2 Create Partial backup
This option allows creating a Partial Backup of the software in the memory device. The partial
backup saves everything of the system except the operating system files. It‟s faster than creating a
Total Backup, and the resulting file takes less storage space than the one created after a Total
Backup, also.
Once the backup is finished correctly, the system informs about the success of the operation.
6.2.3 Create Total Backup
This option allows creating a Total Backup of the software in the memory device. It‟s needed a high
capacity USB storage device, with a minimum of 4GB free memory.
Once the backup is finished correctly, the system informs about the success of the operation.
If the total backup has not been successful, it will be notified.
78/84
Page 79

Operator user‟s manual
NOTE
Before initiating the restore the user is informed, that this option will cause the losing of current
system information.
NOTE
Before initiating the restore the user is informed, that this will cause the losing of current system
information.
6.2.4 Restore Partial Backup
This option allows restoring a Partial Backup of the software. An USB device with the required
backup file is needed.
After confirming the restore partial backup, the system detects the restoring file in the USB device,
showing the name of the file and requesting confirmation to continue with the process.
The restore partial backup starts once the process has been confirmed previously.
Once the process is finished correctly, the system informs about the success of the operation.
If the restore partial backup has not been successful, it will be notified.
6.2.5 Restore Total Backup
This option allows restoring a Total Backup of the software. An USB device with the required backup
file is needed.
After confirming the restore total backup, the system detects the restoring file in the USB device,
showing the name of the installation file and requesting confirmation for continuing with the process.
The restore total backup starts once the process has been confirmed previously.
Once the process is finished correctly, the system informs about the success of the operation.
If the restore total backup has not been successful, it will be notified.
6.2.6 Shutdown
This option shuts down the system properly. Please use always this option to shut down the system
after performing any of the previous options of the menu. Do not remove the USB recovery device
before the equipment is switched off.
79/84
Page 80

Operator user‟s manual
7 ACTIVATING ADDITIONAL LICENSES
It‟s required to activate additional licenses (like PhotoID) in order to access the whole functionalities
of the system. While the license is not active, the service will be visible in the main screen but not
accessible, with the button disabled.
7.1 Register and Getting the Activation KEY
You need to be a registered user to activate your licenses. Please connect to
http://www.mitsubishiphoto.com/cardcode and follow the instructions to register
and activate the licenses.
A CardCode is supplied when a new license (service) is purchased. Please ask your dealer for a
CardCode in order to activate additional licenses.
You will need the CardCode number and also your SYSTEM_ID during the activation.
The SYSTEM_ID is a unique code that identifies your system. It‟s shown in the Administration
screen of the easyphoto application.
80/84
Page 81

Operator user‟s manual
Once you have your Activation KEY, you can proceed to activate your additional license.
7.2 Activating licenses in the easyphoto application.
It‟s necessary to go to Services screen in settings of easyphoto in order to enter the Activation KEY.
Once in the screen, the desired service should be chosen.
As the service is not licensed, this message is shown in the screen.
81/84
Page 82

Operator user‟s manual
When accepted, the user is requested to enter the activation KEY. In order to enter the values,
screen keyboard must be used. It‟s necessary to select the destination case before pressing
keyboard button.
Once the Activation Key has been entered correctly, the service will be activated.
82/84
Page 83

Operator user‟s manual
NOTE
Please follow only these steps if you have connected correctly the Star TSP100 ticket printer
and it‟s not printing any ticket when the system should do.
8 TICKET PRINTER INSTALLATION (OPTIONAL)
Before connecting the USB cable of the ticket printer to the Easyphoto terminal, please follow these
steps:
1. Switch your ticket printer off and open the paper cover.
2. Switch the printer on, keeping the “FEED” button pressed until the LED starts to flash rapidly (for
about 10 seconds).
3. Close the cover and release the “FEED” button.
4. One of these LED starts flashing:
Power (yellow-LED)
Error (red-LED)
5. Push the “FEED” button in order that ERROR LED keeps flashing.
6. Open the cover and press once the “FEED” button to confirm the change.
7. The ticket printer LED starts to cycle slowly to confirm that the printer has been modified.
8. Switch the ticket printer off and on again.
If after doing this, the printer is working but the paper is not being cut, please add the following
steps:
1. Switch off the ticket printer.
2. Open the cover and press FEED button while Power ON
2. Press FEED button approx. 5 sec. and wait for both LED (FEED and ERROR) blinking by
return.
3. Depress FEED then POWER LED ON, and ERROR LED OFF
4. Press FEED then, POWER LED OFF, and ERROR LED ON
5. Close cover then POWER ON blinking and ERROR LED ON
6. Switch OFF
83/84
Page 84

Operator user‟s manual
French Branch
Mitsubishi Electric Europe B.V.
25 Boulevard des Bouvets, 92741
Nanterre Cedex,
France
Tel (+33) 1 55 68 55 00
Fax. (+33) 1 55 68 57 31
German Branch
Mitsubishi Electric Europe B.V.
Gothaer Str. 8, Ratingen / P.O.
Box 1548
40835 Ratingen
Germany
Tel (+49) 2120 486 9250
Fax. (+49) 2102 486 7320
Irish Branch
Mitsubishi Electric Ireland
Westgate Business Park,
Ballymount Dublin 24
Ireland
Tel (+353) 14198844
Fax. (+353) 14564422
Italian Branch
Mitsubishi Electric Europe B.V.
Centro Dir. Colleoni, Pal. Perseo –
Ingr.2 Via Paracelso 12,
20041 Agrate B. (Milano)
Italy
Tel (+39) 039 60531
Fax. (+39) 0396053214
Benelux Branch
Mitsubishi Electric Benelux
Nijverheidsweg 23A, 3641 RP
Mijdrecht / Postbus 222
3640 AE Mijdrecht
Netherlands
Tel (+31) 297 282461
Fax. (+31) 297 283936
Spanish Branch (Barcelona)
Mitsubishi Electric Europe B.V.
Carretera de Rubi 76-80, Apartado
de correos 420,
08190 Sant Cugat del Valles
(Barcelona) Spain
Tel (+34) 93 565 31 54
Fax. (+34) 93 589 43 88
Scandinavian Branch
Mitsubishi Electric Scandinavia
Hammarbacken 14, P.O. Box 750
SE-191 27 Sollentuna,
Sweden
Tel (+46) 8 625 10 00
Fax. (+46) 8 625 10 36
UK Branch
Mitsubishi Electric Europe B.V.
Travellers Lane, Hatfield Herts
AL10 8XB,
U.K.
Tel (+44) 1707 278684
Fax. (+44) 1707 278541
Russian Branch
Mitsubishi Electric Europe B.V.
Moscow Representative Office 52,
bldg. 5, Kosmodamianskaya Nab.
113054, Moscow,
Russia
Tel (+7) 095 721-2070
Fax. (+7) 095 721- 2071
American Branch
Mitsubishi Digital Electronics
America, Inc.
9351 Jeronimo Road
Irvine, CA 92618,
U.S.A.
Phone 949-465-6000
Fax 949-465-6338
9 CONTACT
84/84
 Loading...