

Page 1
MITSUBISHI
TV
n "q
Owner's
Guide
_. MITSUBISHI
Page 2
RISK OF ELECTRIC SHOCK
[30 NOT OPEN \
CAUTION: TO REDUCE THE RISK OF ELECTRIC SHOCK,
DO NOT REMOVE COVER (OR BACK).
NO USER-SERVICEABLE PARTS INSIDE.
REFER SERVICING TO QUALIFIED SERVICE PERSONNEl_.
The lightning flash with arrowhead symbol, w [thin
an equilateral triangle, is intended to alert the user
to the presence of uninsulated "dangerous voltage"
within the product's enclosure that may be of
sufficient magnitude to constitute a risk of electric
shock.
The exclamation point within an equilateral
triangle is intended to alert the user to the presence
of important operating and maintenance (se_wicing)
instructions in the literature accompanying the
appliance.
WARNING:
TO PREVENT FIRE OR SHOCK HAZARD, DO NOT EXPOSE THIS APPLIANCE TO RAIN OR
MOISTURE.
CAUTION:
TO PREVENT ELECTRIC SHOCK HAZARD, DO NOT USE THIS UNIT'S (POL&RIZED) PLUG
WITH AN EXTENSION CORD, RECEPTACLE OR OTHER OUTLET UNLESS _2HE BLADES
CAN BE FULLY INSERTED TO PREVENT BLADE EXPOSURE.
NOTE TO CATV SYSTEM INSTALLER:
THIS REMINDER IS PROVIDED TO CALL THE CATV SYSTEM INSTALLER'S ATTENTION
TO ARTICLE 820-40 OF THE NEC THAT PROVIDES GUIDELINES FOR PROPER
GROUNDING AND, IN PARTICULAR, SPECIFIES THAT THE CABLE GROUND SHALL BE
CONNECTED TO THE GROUNDING SYSTEM OF THE BUILDLNG, AS CLOSE TO THE
POINT OF CABLE ENTRY AS PRACTICAL.
Page 3
MITSUBISHI OWNER'S GUIDE
A
Table of Contents
Important Safeguards .......................................................................................................................... 3
Preface: Welcome to Mitsubishi ....................................................................................................... 9
Summary of Special Features ...................................................................................................... 10
Unpacking Your TV ..................................................................................................................... 11
What you will find ................................................................................................................... 11
A few suggestions .................................................................................................................... 11
What's in Each Chapter ............................................................................................................... 12
Some Conventions Used in this Guide ......................................................................................... 13
Chapter 1: Getting to Know Your TV ............................................................................................... 15
Overview of the Front Panel .......................................................................................................... 16
Overview of the Remote Control .................................................................................................. 17
Getting ready to use the remote control ................................................................................. 17
Remote control buttons and functions .................................................................................... 19
Chapter 2: Connecting Your TV ....................................................................................................... 23
Overview of the Back Panel ......................................................................................................... 24
Basic Connections .......................................................................................................................... 25
TV+antenna or cable without a decoder box .......................................................................... 26
TV+cable with a decoder box ................................................................................................... 27
TV+separate UHF and VHF antennas ................................................................................... 28
TV+VCR+antenna or cable without a decoder box ............................................................... 29
TV+VCR+cable with a decoder box ......................................................................................... 32
Chapter 3: Operating Your TV ............................................. ............................................................ 35
Getting Started ............................................................................................................................. 36
Setting up and using the remote control (CS-27305 only) ..................................................... 37
Turning the TV on/off .............................................................................................................. 40
Selecting the input source ...................................................................................................... 41
Changing channels .................................................................................................................. 42
Page 4
GettingStarted(cont.)
Understandingtheon-screenmenus.......................................................................................45
Settingtheclock......................................................................................................................46
Memorizingchannels...............................................................................................................48
Addinganddeletingchannels...................................................................................................49
Renamingtheinput.................................................................................................................50
Selectingthemenulanguage...................................................................................................51
Usingvideomute.....................................................................................................................52
Usingthepowerrestorefeature..............................................................................................53
SelectingtheadvancedPIPfunctions(CS-27305only).........................................................54
Adjustingthesound.................................................................................................................55
Adjustingthepicture...............................................................................................................57
Usingtheclosedcaptiondecoder..............................................................................................58
UsingtheAdvancedFeatures.......................................................................................................59
Settingthetimer......................................................................................................................60
Usingtheparentallock............................................................................................................61
UsingtheSuperQuickViewtuning........................................................................................63
Chapter 4: Using the Special Features ............................................................................................ 65
Understanding the On-Screen Displays ....................................................................................... 66
Using the Off-Timer ...................................................................................................................... 67
Setting the off-timer ................................................................................................................ 68
Changing or canceling the off-timer ........................................................................................ 69
Using the Picture-in-Picture (PIP) Mode (CS-27305 only) ......................................................... 70
Selecting the PIP image ........................................................................................................... 71
Selecting the PIP source ........................................................................................................... 72
Exchanging the PIP image and the main image .................................................................... 72
Moving the PIP image ............................................................................................................. 73
Freezing the PIP image ........................................................................................................... 74
Using the Snap-shot feature ..................................................................................................... 75
Using the Replay feature .......................................................................................................... 76
Chapter 5: Troubleshooting .............................................................................................................. 77
Caution and Care .......................................................................................................................... 80
Calling for Service ........................................................................................................................ 81
Appendix: Automatic Procedure for the Parental Lock ............................................................. 83
Index .................................................................................................................................................... 85
Warranty ........................................................................................................................ Inside back cover
2 Table of Contents
Page 5
IMPORTANT SAFEGUARDS
PLEASE READ ALL THESE INSTRUCTIONS
REGARDING YOUR TELEVISION SET AND RETAIN
FOR FUTURE REFERENCES. FOLLOW .A]_L WARNINGS
AND INSTRUCTIONS MARKED ON THE I_V RECEIVER.
.
Read Instructions
All the safety and operating instructions ,should be read
before the appliance is operated.
. Retain Instructions
The safety and operating instructions should be retained for
future reference.
.
Heed Warnings
All warnings on the appliance and in the operating
instructions should be adhered to.
• Warning:
. Follow Instructions
All operating and use instructions should be followed.
.
Cleaning
Unplug this TV receiver from the wall outlet before cleaning.
Do not use liquid or aerosol cleaners. Use a damp cloth fi)r
cleaning.
o
Attachment and Equipment
Never add any attachments and/or equipraent without
approval of the manufacturer as such additions may result in
the risk of fire, electric shock or other personal injury.
.
Water and Moisture
Do not use this TV receiver where contact with or immersion
in water is a possibility. Do not use near: bath tubs, wash
bowls, kitchen sinks, laundry tubs, or swimming pools, el_c.
Don't leave stationary images, such as those generated from
stock market reports or video games, on-screen fi:r more than
10 minutes. Still patterns can scar the TV causing permanent
damage to the picture tube.
Page 6
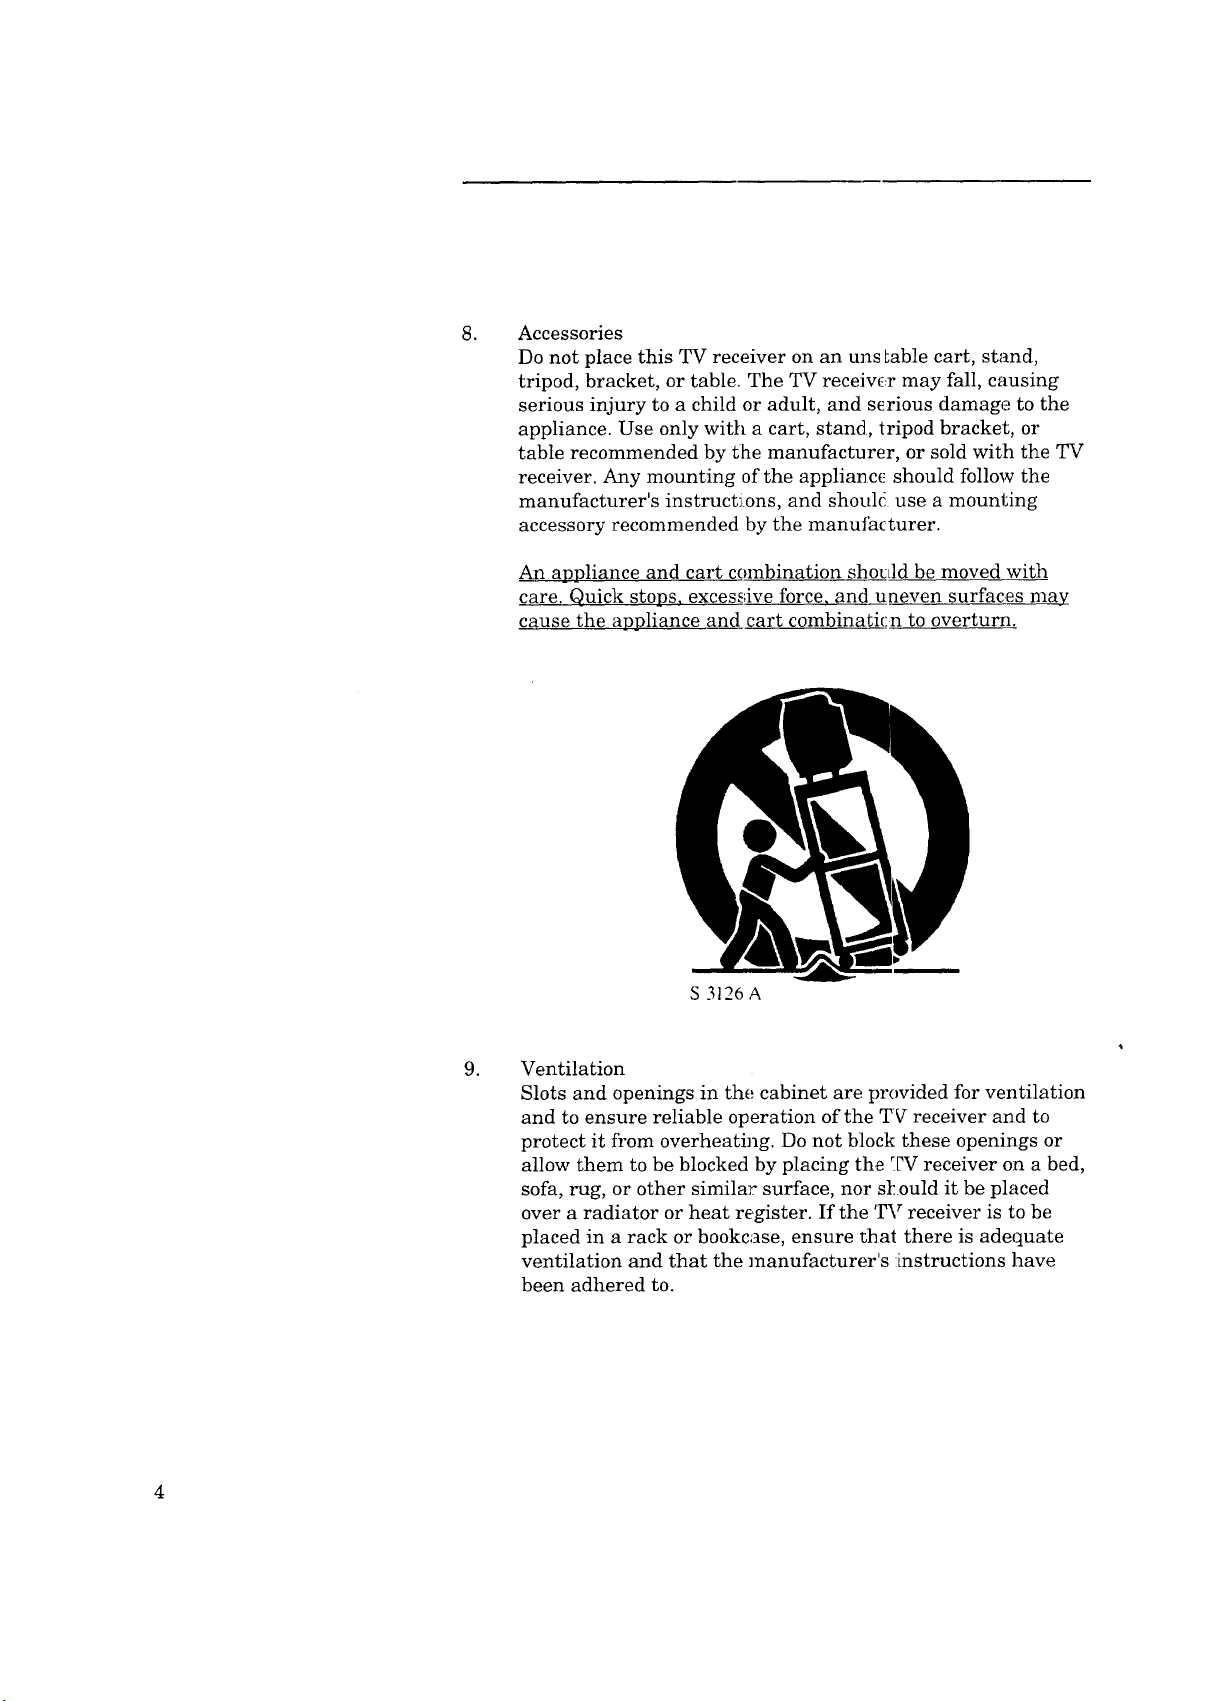
Accessories
.
Do not place this TV receiver on an uns Lable cart, stand,
tripod, bracket, or table. The TV receiw_r may fall, causing
serious injury to a child or adult, and serious damage to the
appliance. Use only with a cart, stand, tripod bracket, or
table recommended by tlhe manufacturer, or sold wit:h the TV
receiver. Any mounting of the appliance should follow the
manufacturer's instructions, and shouk! use a mounting
accessory recommended by the manufacturer.
An appliance and cart combination should be moved with
care. Quick stops, excessive force, and_u_neven surfaces may
cause the appliance and cart combinaeicn to overturn.
S 3126 A
.
Ventilation
Slots and openings in the. cabinet are provided for ventilation
and to ensure reliable operation of the TV receiver and to
protect it from overheating. Do not block these openings or
allow them to be blocked by placing the [_V receiver on a bed,
sofa, rug, or other similar surface, nor s[ould it be placed
over a radiator or heat register. If the TV receiver is to be
placed in a rack or bookcase, ensure _hat there is adequate
ventilation and that the manufacturer's :instructions have
been adhered to.
Page 7
PowerSources
10.
ThisTVreceivershouldbeoperatedonlyfromthetypeof
powersourceindicatedonthemarkinglabel.If youarenot
sureofthetypeofpowersuppliedtoyour]_ome,consultyour
appliancedealerorlocalpowercompany.
11.
Grounding or Polarization
For your safety, this TV receiver is equipped with a polarized
alternating current line plug having one blade wider than
the other. This plug will fit into the power outlet only one
way. If you are unable to insert the plug fully into the outlet,
try reversing the plug. If the plug should still fail to fit,
contact your electrician to replace your obsolete outlet. Do
not defeat the safety purpose of polarized ph:tg.
Power-Cord Protection
12.
Power-supply cords should be routed so that they are not
likely to be walked on or pinched by items placed upon or
against them, paying particular attention to cords at plugs,
convenience receptacles, and the point where they exit from
the appliance.
13.
Lightning
For added protection for this TV receiver du ring a lightning
storm, or when it is left unattended and unused for long
periods of time, unplug it from the wall outlet and disconnect
the antenna or cable system. This will prevent damage to the
video product due to lightning and power-line surges.
14.
Power Lines
An outside antenna system should not be lo_ated in the
vicinity of overhead power lines or other electric light or
power circuits, or where it can fall into such power lines or
circuits. When installing an outside antenna system, extreme
care should be taken to keep from touching such power lines
or circuits as contact with them might be fatal.
Page 8
15.
Overloading
Donotoverloadwall outletandextensioncordsasthiscan
resultin ariskoffireorelectricshock.
16.
ObjectandLiquidEntry
Neverpushobjectsofanykindintothis[Tv"receiverthrough
openingsastheymaytouchdangerousvoltagepointsor
short-outpartsthatcouldresultin afireorelectricshock.
NeverspillliquidofanytdndontheTVreceiver.
17.
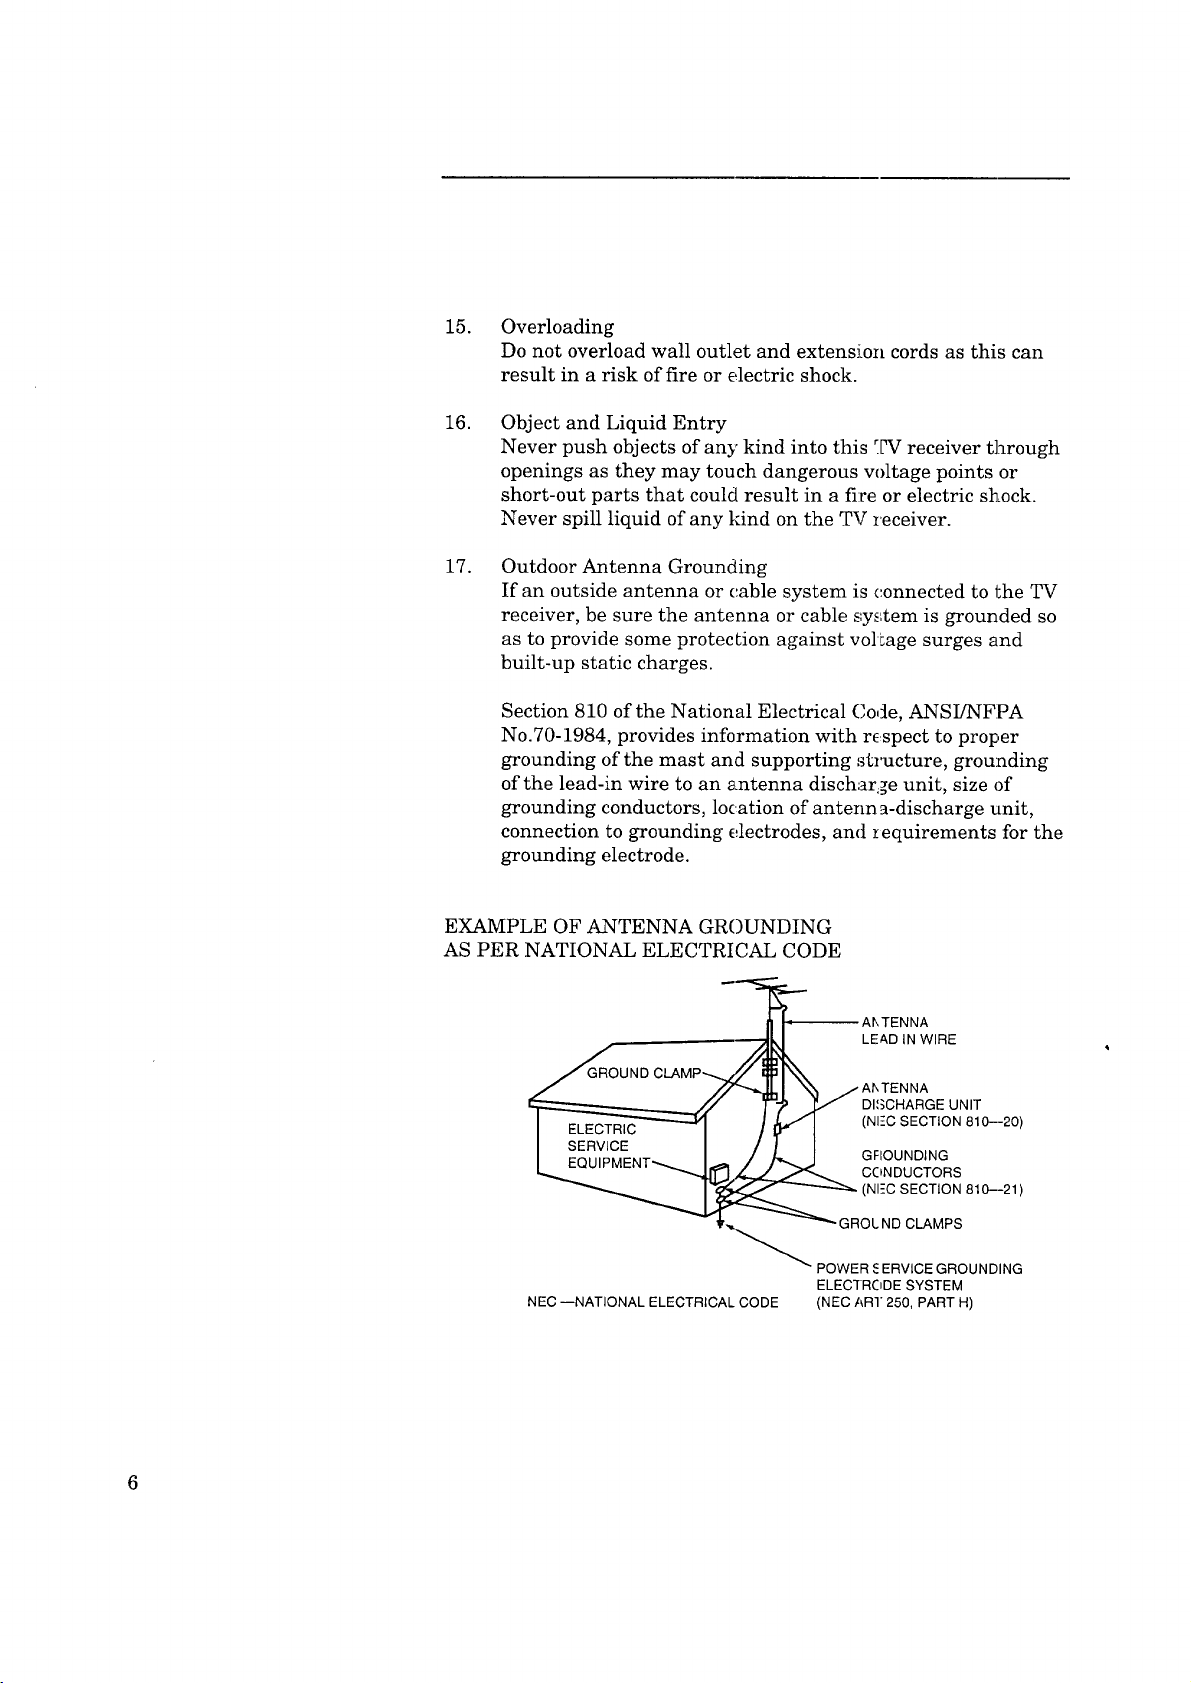
OutdoorAntennaGrounding
If anoutsideantennaor('.ablesystemisconnectedtotheTV
receiver,besuretheantennaorcablesystemis groundedso
astoprovidesomeprotectionagainstvoltagesurgesand
built-upstaticcharges.
Section810oftheNationalElectricalCode,ANSUNFPA
No.70-1984,providesinformationwith respecttoproper
groundingofthemastandsupportingstructure,grounding
ofthelead-inwiretoanantennadischar,geunit,sizeof
groundingconductors,locationofantenna-dischargeunit,
connectiontogroundingelectrodes,andrequirementsforthe
groundingelectrode.
EXAMPLEOFANTENNAGROUNDING
ASPERNATIONALELECTRICALCODE
_'_" AIkTENNA
2"_1 _ jAhTENNA
]_ y DISCHARGE UNIT
__ LE&D IN WIRE
NEC --NATIONAL ELECTRICAL CODE (NEC AR]" 250, PART H)
],_ CONDUCTORS
___ POWER _ERVICE GROUNDING
ELECTRODE SYSTEM
':?oSeC;
Page 9
18.
Servicing
Do not attempt to service this TV receiw_r yourself as
opening or removing cowers may expose :_ou to dangerous
voltage or other hazards. Refer all ser_icing to qualified
service personnel.
19.
Damage Requiring Service
Unplug this TV receiver from the wall olltlet and refer
servicing to qualified service personnel under the following
conditions:
(a) When the power-supply cord or plug :isdamaged.
(b) If liquid has been spilled, or objects tTave fallen in'to the
TV receiver.
(c) If the TV receiver has been exposed to rain or water.
(d) If the TV receiver does not operate normally by following
the operating instructions. Adjust only those controls that
are covered by the operating instructions as an improper
adjustment of other controls may result in damage and
will often require extensive work by _ qualified technician
to restore the TV receiver to its norn°Lal operation.
(e) If the TV receiver has been dropped ,)r the cabinet has
been damaged.
(f) When the TV receiver exhibits a d:istinct change in
performance - this indicates a need _or service.
20.
Replacement Parts
When replacement parts are required, be sure the service
technician has used replacement parts specified by the
manufacturer or have the same characteristics as the
original part. Unauthorized substitutio as may result in fire,
electric shock or other _._azards.
21.
Safety Check
Upon completion of any service or repa:Lrs to this TV receiver
ask the service technician to perform safety checks to
determine that the TV receiver is in a .,_afeoperating condi-
tion.
Page 10
PREFACE
Welcome to Mitsubishi
Congratulations on your purchase of a Mitsubishi TV. Your TV is
designed for superb viewing pleasure as well as continued
reliability.
To familiarize you with your TV and owner's guide, we suggest
that you read through the preface, which provides the following
important information:
Summary of Special Features
Unpacking Your TV
What's in Each Chapter
Some Conventions Used in this Guide
Mitsubishi has strived to create your TV so that it will bring you
years of viewing enjoyment. Similarly, your owner's guide is de-
signed with a "user friendly" philosophy that will help you take
advantage of all of your equipment's features
Once again, thank you for selecting our product and welcome to
Mitsubishi!
Page 11
Summary of Special Features
Your top rated Mitsubishi TV delivers::
• 181-Channel Capacity --- programs up to 181 channels,
ensuring your continued viewing pleasure as cable services
continue to expand.
• Two-Speaker Sound System ..... a special speaker system
that produces clear stereo sound.
In addition to the standard features found on most advanced TVs,
Mitsubishi is proud to offer the following distinctive features:
Remote Control with TVNCR]AUX Function
(CS-27305) --- uses a single remote control transmitter for
the television, certain Mitsubishi VCRs, and also some VCRs
and cable boxes made by other raanufacturers.
Remote Control with VCR]TV ]_'unction (CS-27205) ---
uses a single remote control transmitter for both the
television and select Mitsubishi V,aRs.
The function of the remote control is changed by simply
flipping a switch.
• On-Screen Displays --- appeal" whenever you adjust your
TV, showing you tlhe status ofyouc TV's various functions.
• On-Screen Menu --- simplifies tile television's features with
easy to follow instructions.
• Closed Caption Decoder --- supplies you the text informa-
tion along with the regular broadcasts.
Extended Data Services --- (als_ known as "XDS,") allows
broadcasters to supply you with the time of day, channel
information, and program information. You can display this
information on-screen.
• Picture-in-Picture Mode (CS-27305 only)--- allows you to
view two different sources at the _ame time.
Each of these features _ill be explained in more detail in Chapter
3, "Operating Your TV," and Chapter 4, "Using the Special
Features."
10 Preface
Page 12
. Unpacking Your TV
What you will find
As you unpack your new TV, please check to b_ sure that along with
the TV, the following items are included:
• an owner's guide containing a warranty,
• a registration card,
• a remote control transmitter, and
• a set of two AAA size batteries for the remote control.
A few suggestions
Before you hook up your new _I_, please take a few minutes to:
0 Complete the registration card. The registration card asks for
the TV's serial number, which you'll find orLthe back of the unit.
O Keep the box and packing materials for i_atare use.
O File your sales receipt.
O Place the TV on a stable surface with sufficient lighting to
do the hook-up.
Unpacking Your TV 11
Page 13
* What's in Each Chapter
Here's what you will find in this owner's guide:
Chapter 1, "Getting to Know Your TV," introduces you to the
location and functions of the buttons and controls of your TV.
Chapter 2, "Connecting Your TV," explains how to connect a
VCR, antenna, decoder and other equipment to your TV.
Chapter 3, "Operating Your TV," provides the step-by-step
instructions you need in order to use your TV.
Chapter 4, 'qJsing the Special Features," explains how to use
some of the special features of the TV.
Chapter 5, I'l_roubleshooting, '1summarizes the problems you
may have along with the suggestions for s_lving these problems.
The appendix explains an automatic procedure for the parental
lock.
You'll also find a detailed index at the back of the book.
12 Preface
Page 14
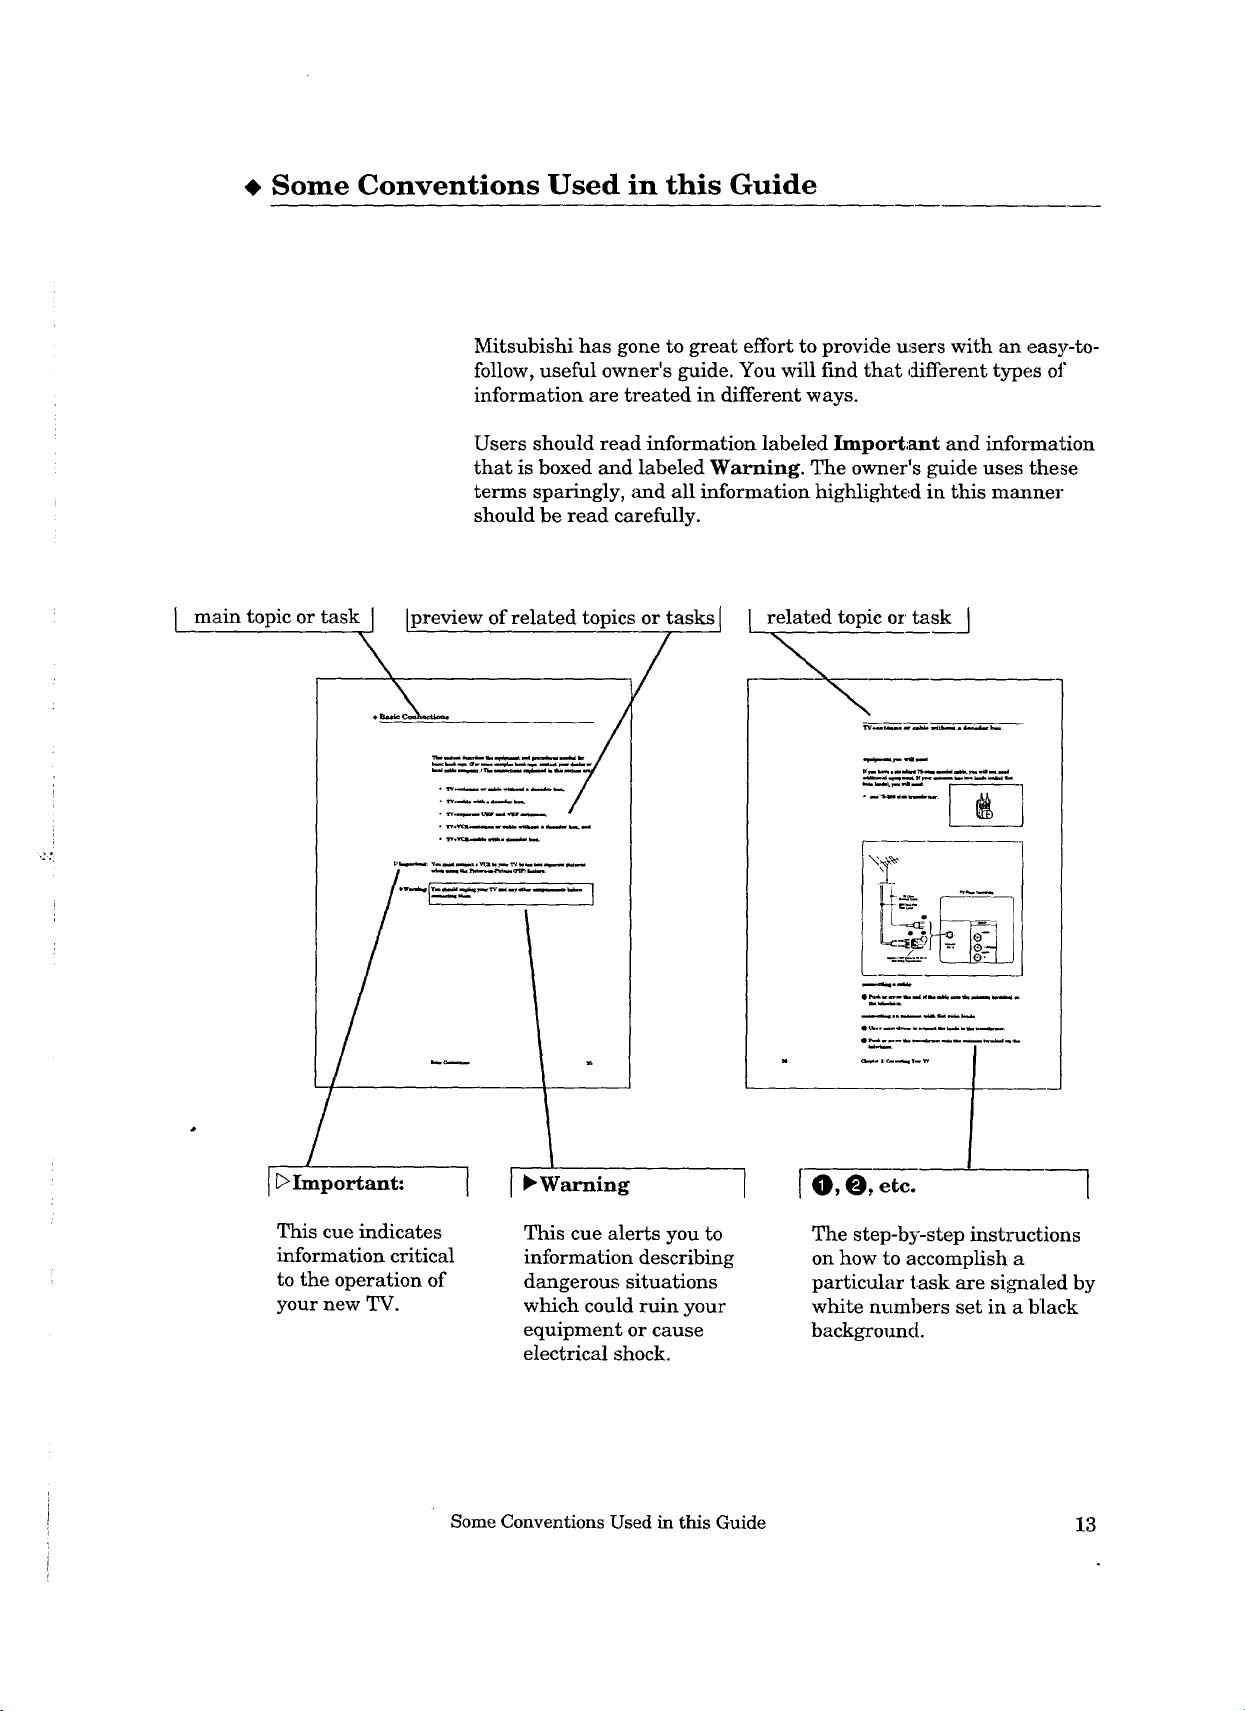
• Some Conventions Used in this Guide
Mitsubishi has gone to great effort to provide users with an easy-to-
follow, useful owner's guide. You will find that different types of
information are treated in different ways.
Users should read information labeled Important and information
that is boxed and labeled Warning. The owner's guide uses these
terms sparingly, and all information highlighted in this manner
should be read carefully•
I main topic or task I Ipreview of related topics or tasks I
I_>Important: I [ • Warning
related topic or task ]
o
I
This cue indicates
information critical
to the operation of
your new TV.
This cue alerts you to
information describing
dangerous situations
which could ruin your
equipment or cause
electrical shock.
Some Conventions Used in this Guide 13
The step-by-step instructions
on how to accomplish a
particular task are sil_aled by
white numbers set in a black
backgro_md.
Page 15
_CHAPTER1
Getting to Know Your TV
Now that you've unpacked your TV, read through the safety
information, and glanced at the overview explaining how this
owner's guide is organized, it's time to become £_miliar with the
buttons and controls you'll be using when you operate the TV. This
chapter will introduce the range of options available when using
the buttons on the remote control or on the front panel of the TV. It
also offers some general guidelines for using the remote control.
Most functions can be controlled by using either the front panel or
the remote control, but certain specialized functions require the
use of one or the other. This chapter, which will familiarize you
with the full range of button functions, contains the following
sections:
• Overview of the Front Panel
• Overview of the Remote Control
15
Page 16
• Overview of the Front Panel
,_ MITSUBISHI
/VVRESET INPUT • CH
)
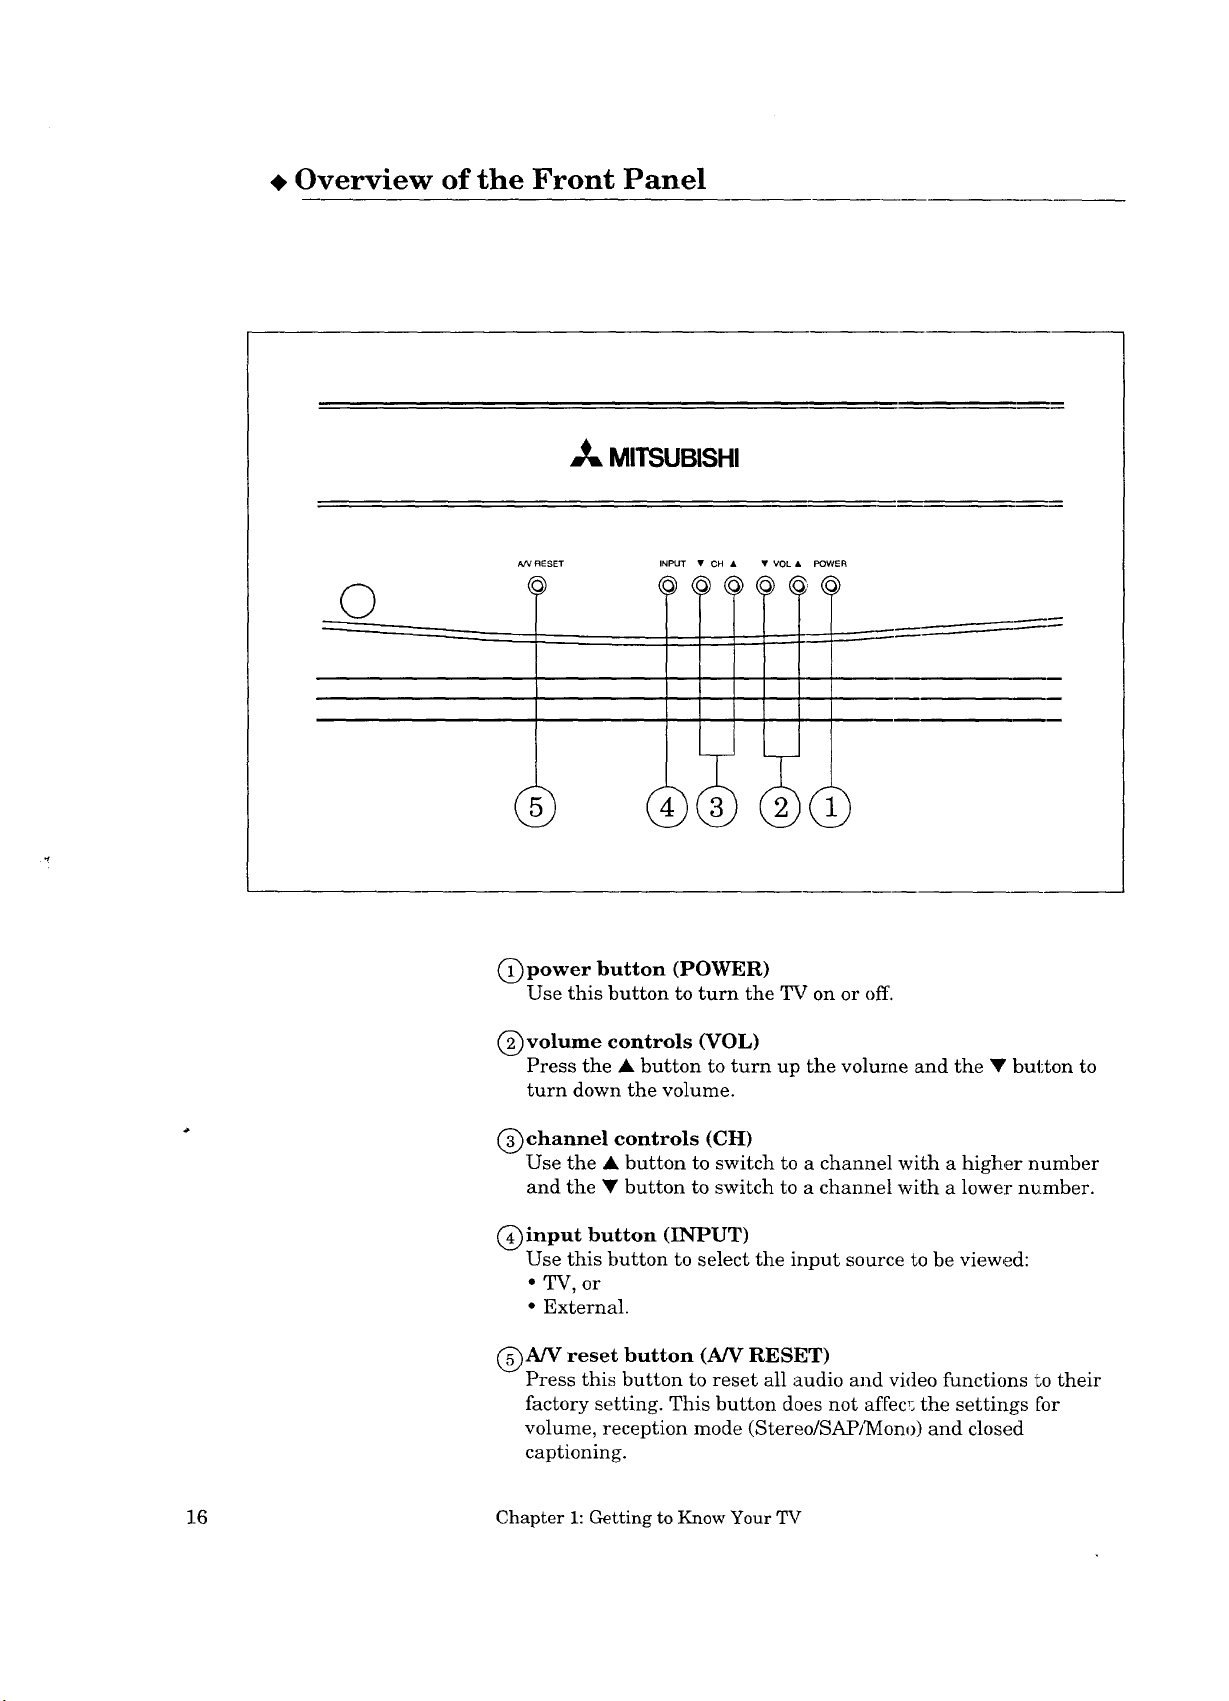
(j) power button (POWER)
Use this button to turn the TV on or off.
(_)volume controls (VOL)
Press the • button to turn up the volume and the • button to
turn down the volume.
• VOL POWER
_.......------
.)
(_)channel controls (CH)
Use the • button to switch to a channel with a higher number
and the • button to switch to a channel with a lower number.
C)input button (INPUT)
Use this button to select the input source to be viewed:
• TV, or
• External.
@A/V reset button (A/V RESET)
Press this button to reset all audio and video functions "Lotheir
factory setting. This button does not affec,; the settings for
volume, reception mode (Stereo/SAPJ]YIono) and closed
captioning.
16 Chapter 1: Getting to Know Your TV
Page 17
Overview of the Remote Control
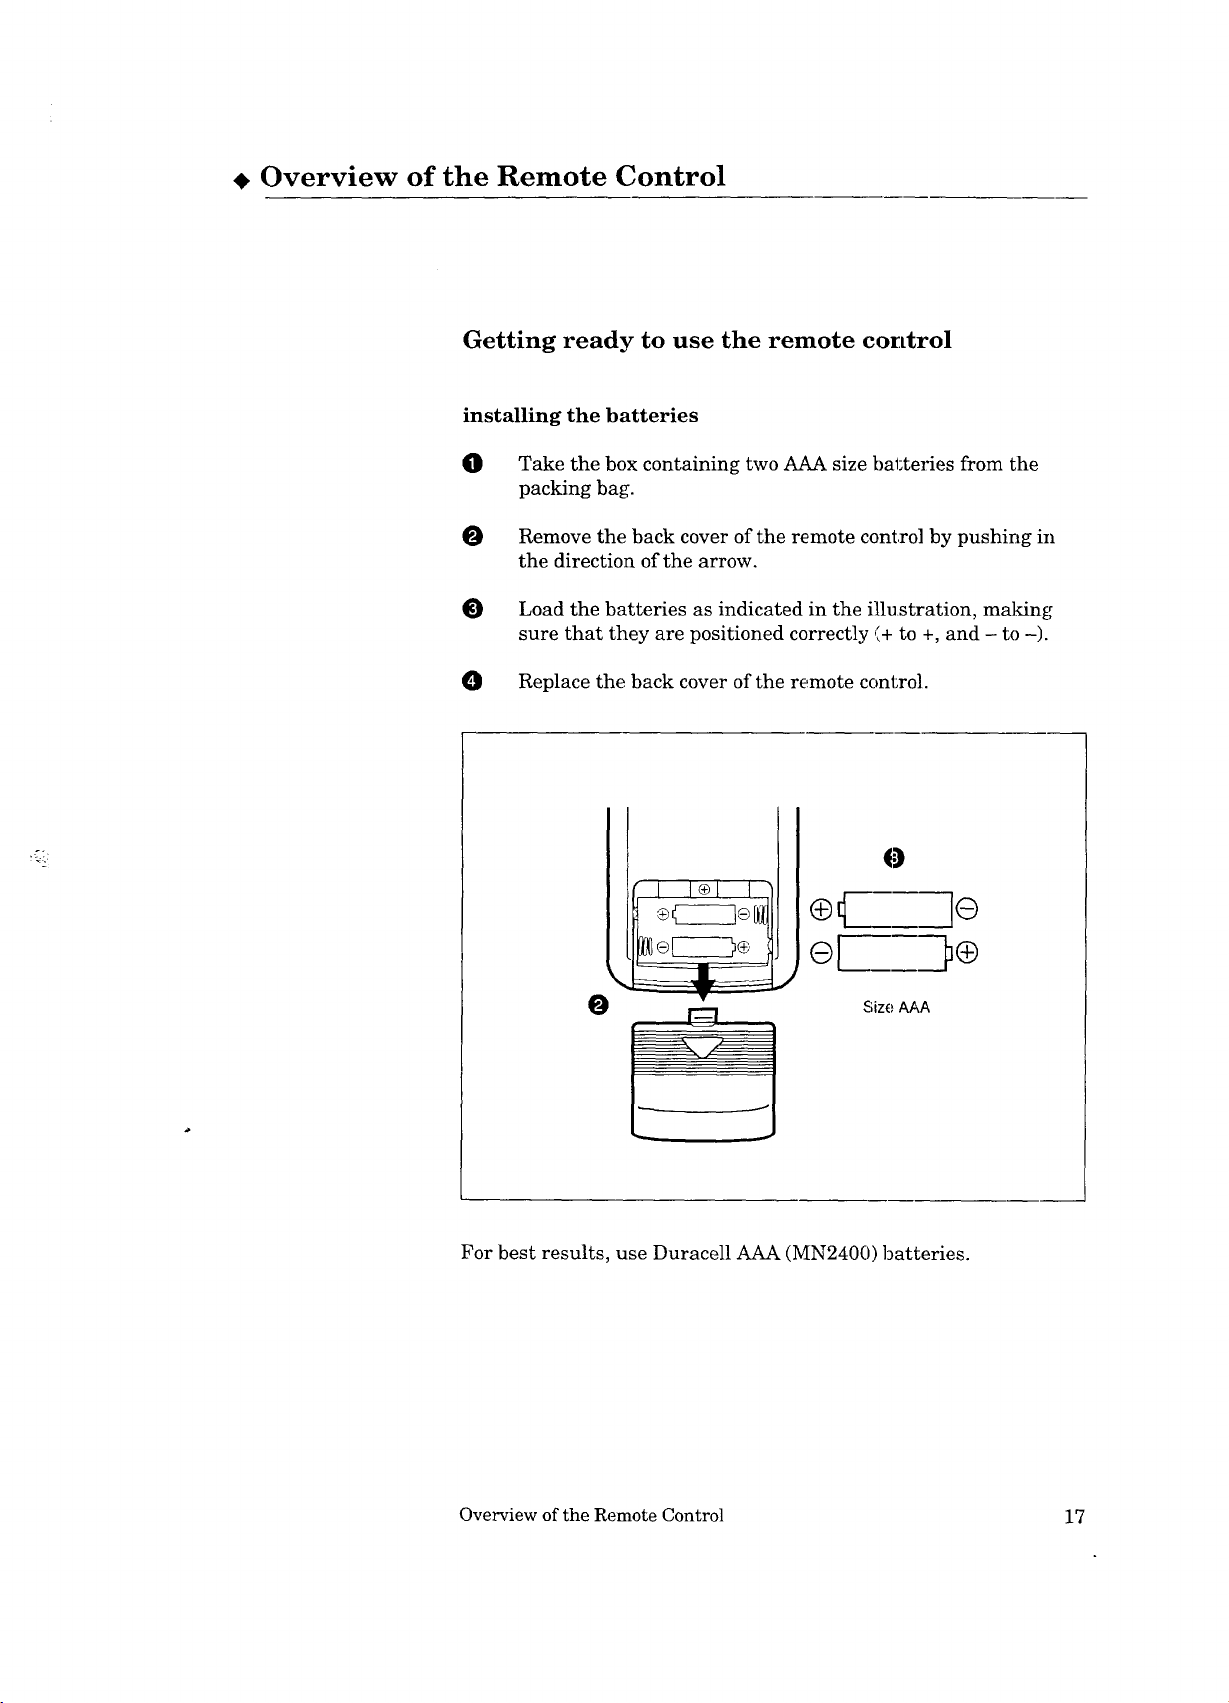
Getting ready to use the remote control
installing the batteries
0
Take the box containing two AAA size batteries from the
packing bag.
O Remove the back cover of the remote control by pushing in
the direction of the arrow.
O
Load the batteries as indicated in the illustration, making
sure that they are positioned correctly ,',+to +, and - to -).
O Replace the back cover of the remote control.
0
el
J
Size AAA
For best results, use Duracell AAA (MN2400) batteries.
Overview of the Remote Control 17
Page 18
some do's and don'ts
To ensure that your remote control wi]] continue working properly,
follow these guidelines:
• Don't press two or more buttons at the same time, unless
specifically instructed to do so in this owner'._ guiLde.
• Don't allow the remote control to get wet or become heated.
• Avoid dropping the remote control on a hard surface.
• When cleaning the remote control, don't use any harsh chemi-
cals. Use only a soft, slightly moistened cloth.
general instructions
When using the remote control to operate the TV, VCR, or cable box,
follow these procedures:
0 Be within 20 feet of the desired equipment.
Point the tip of the remote control toward the equipment.
O Press the appropriate button or sequence of buttons.
guidelines for using batteries
• Don't use a new battery with a:a old one.
• Don't heat, take apart, or throw batteries into a fire.
The following section explains more about the range of options
available when using the remote conl_roL
18 Chapter 1: Getting to Know Your TV
Page 19
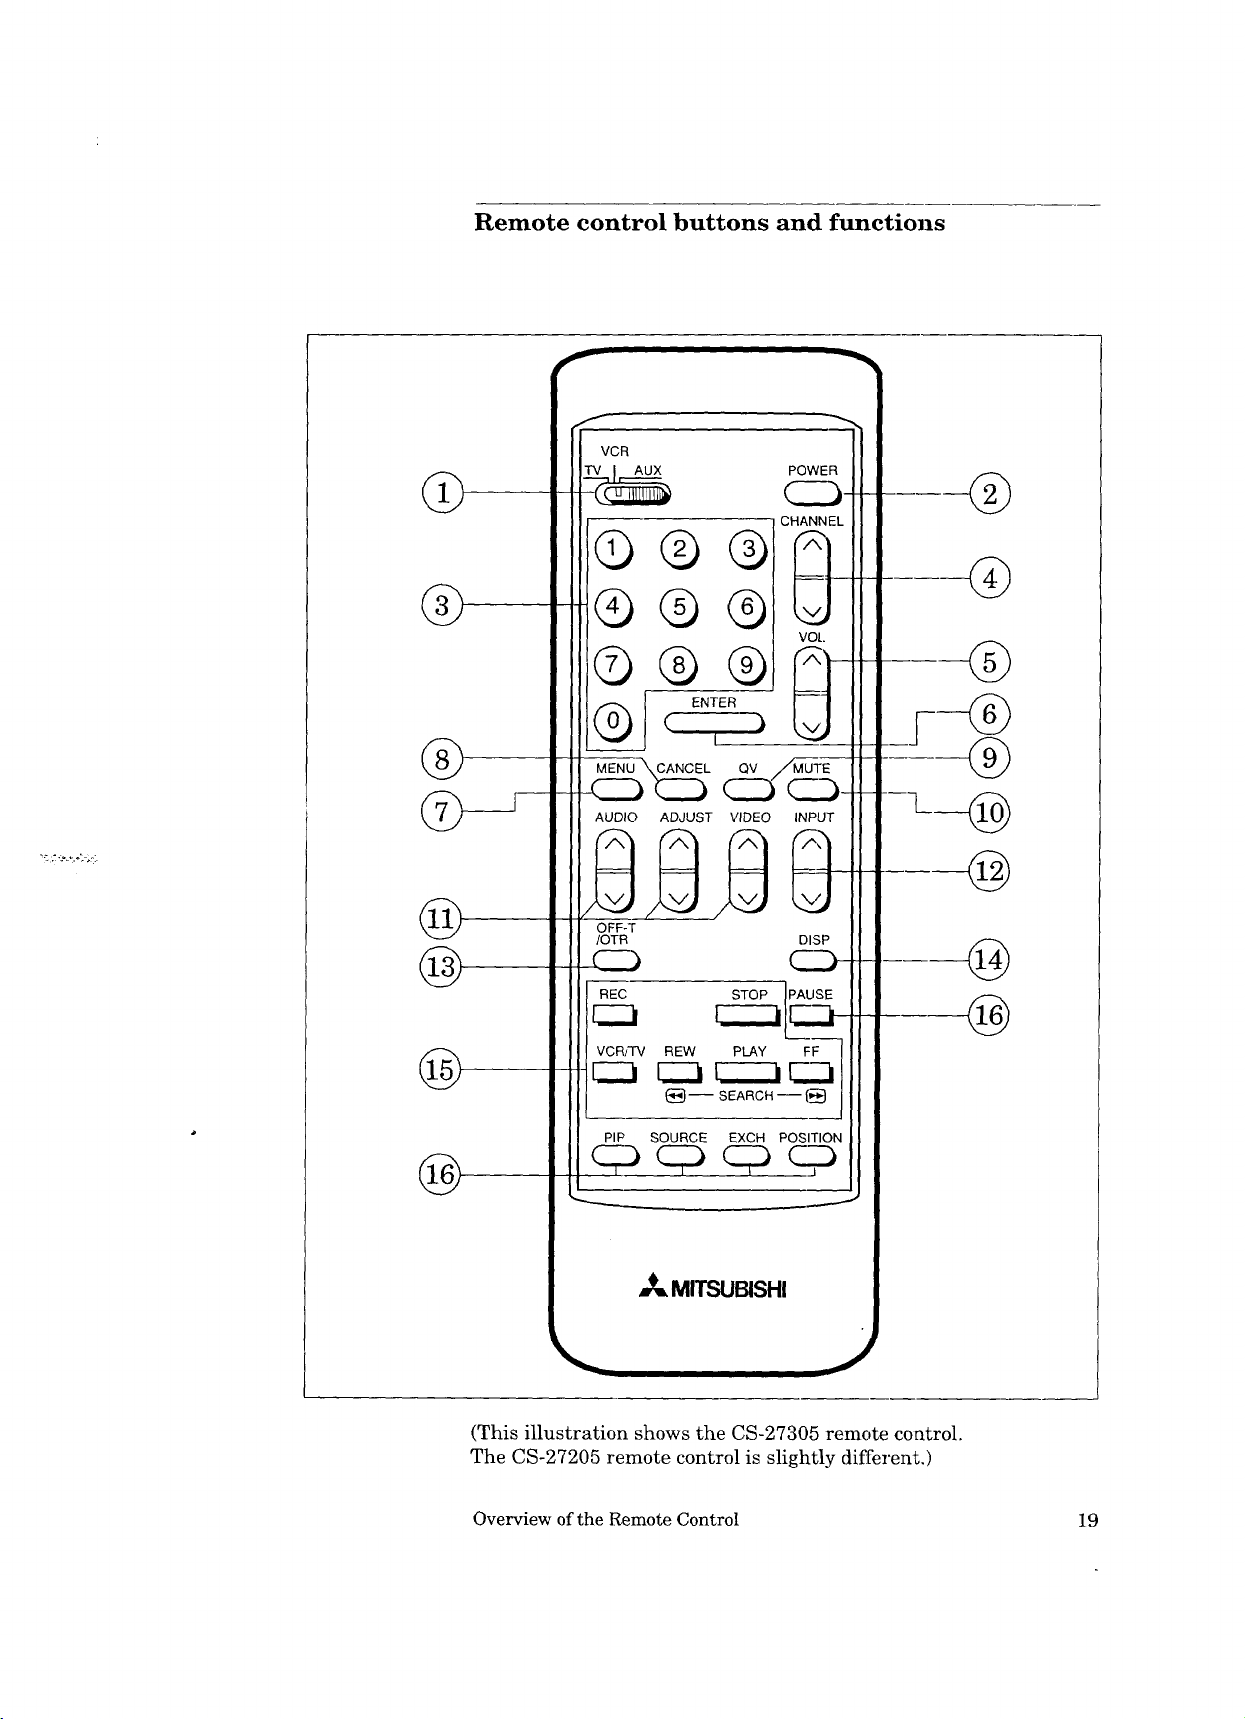
Remote control buttons and functions
f
VCR
POWER
Cl \NNE
QQ®
®
®
®
®
@
®
®®G
©®®
ENTER
I
ME UN C_ ANOEL aM .,/-Z/'M_'-_ "-
I
CC3 CZb CZ_ C_.._3-
AUDIO ADJUST VIDEO INPUT
OFF-T
/OTR DISP
_ C..D--
REC
VCR;TV
C23
i
i q:D qb qD %D
REW PLAY FF
(_- SEARCH -- (5
PIP SOURCE EXCH POSITION
@
---L_
@
@
®
MITSUBISHI
(This illustration shows the CS-27305 remote control.
The CS-27205 remote control is slightly different.)
Overview of the Remote Control 19
Page 20
Remote control buttons and functions (cont.)
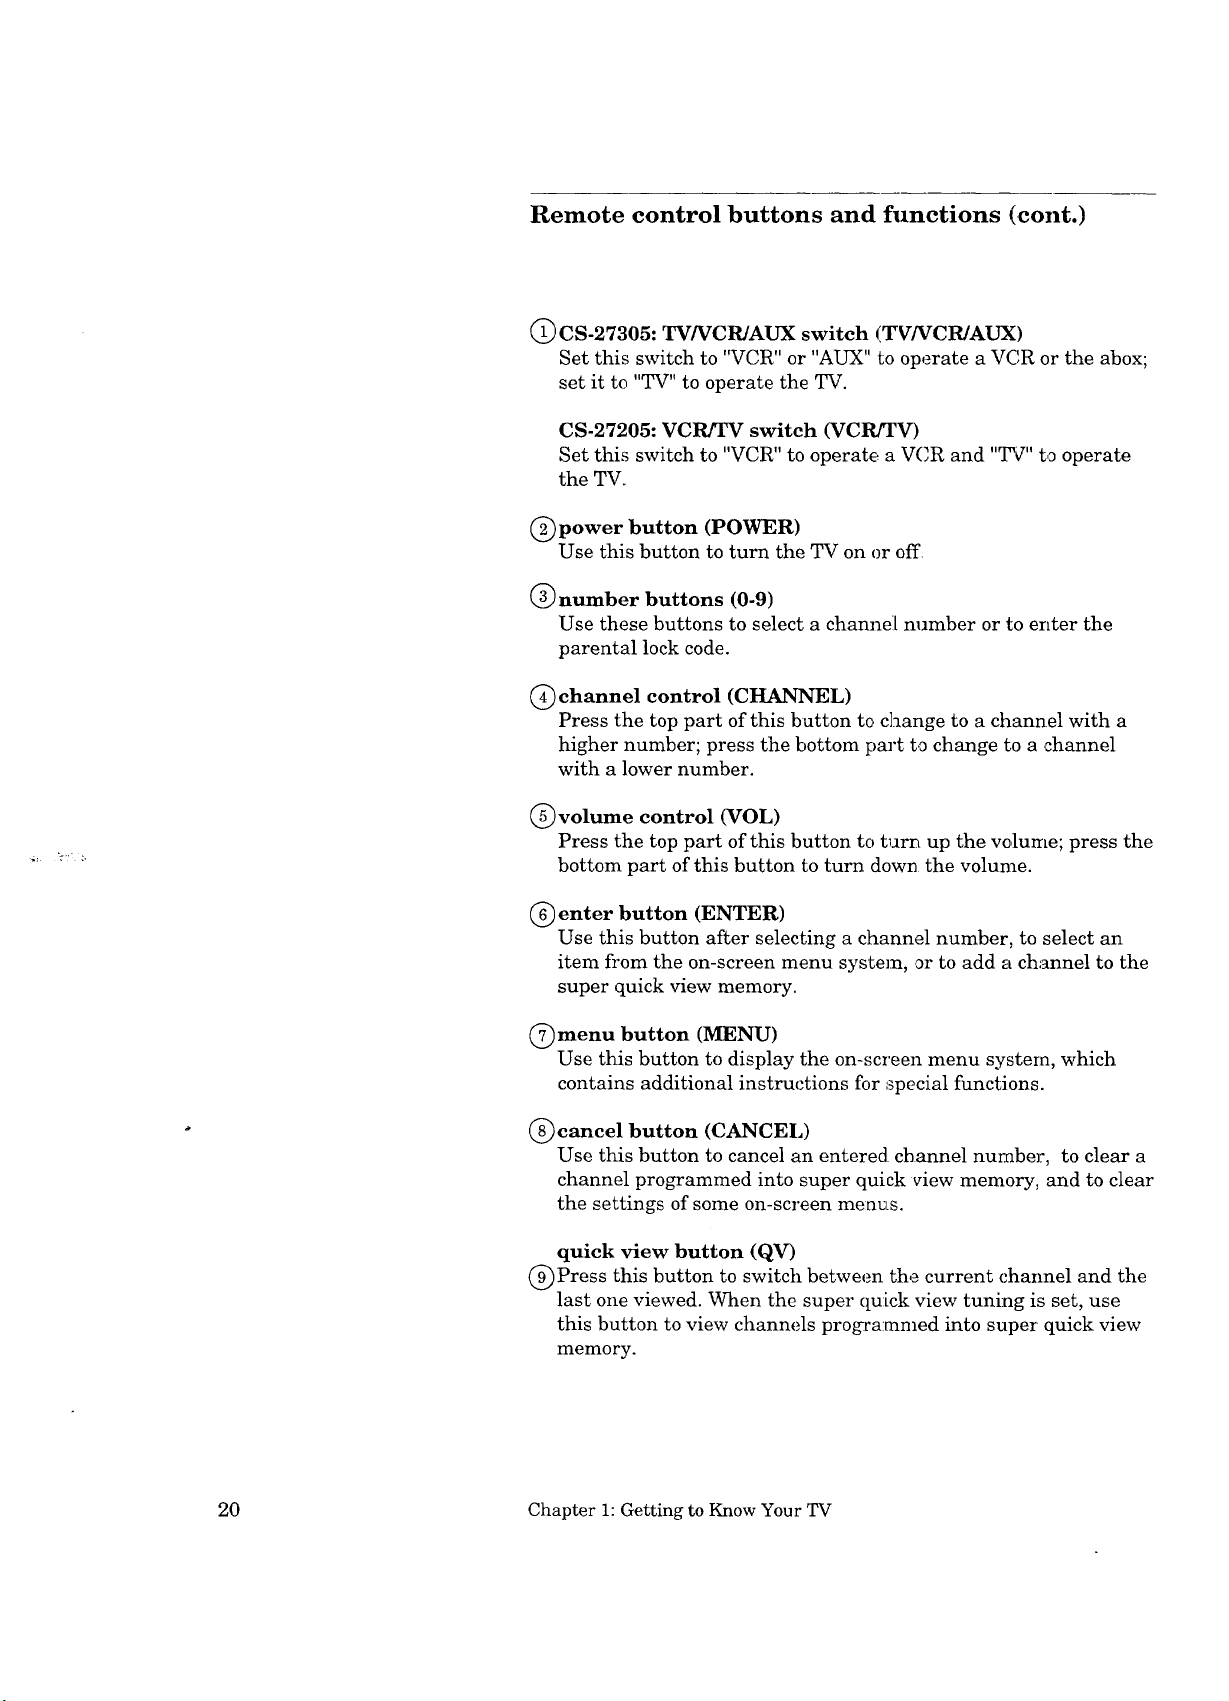
@CS-27305: TV/VCR/AUX switch (TWVCR/AUX)
Set this switch to "VCR" or "AUX" to operate a VC,R or the abox;
set it to "TV" to operate the TV.
CS-27205: VCRfI_ switch (VCRITV)
Set this switch to "VCR" to operate a VCR and "qTv'"to operate
the TV.
@power button (POWER)
Use this button to turn the TV on or off
@number buttons (0-9)
Use these buttons to select a channel number or to enter the
parental lock code.
@ channel control (CHANNEL)
Press the top part of this button to change to a channel with a
higher number; press the bottom part to change to a channel
with a lower number.
(5_volume control (VOL)
Press the top part of this button to turn up the volume; press the
bottom part of this button to turn down the volume.
(_) enter button (ENTER)
Use this button after selecting a channel number, to select an
item from the on-screen menu system, or to add a channel to the
super quick view memory.
(_)menu button (MENU)
Use this button to display the on-screen menu systera, which
contains additional instructions for special functions.
@cancel button (CANCEL)
Use this button to cancel an entered channel nuraber, to clear a
channel programmed into super quick view memory, and to clear
the settings of some on-screen menus.
quick view button (QV)
(_)Press this button to switch between the current channel and the
last one viewed. When the super quick view tuning is set, use
this button to view channels programmed into super quick view
memory.
20 Chapter 1: Getting to Know Your TV
Page 21
(_mute control (MUTE)
Use this button to turn the sound off completely or restore it to
its original volume. This button works for the TV even if the
TV/VCR/AUX switch (or VCRITV switch) is not set to "TV."
@ audio and video controls
These buttons are used in pairs to adjust features of the iraage
or sound (other than volume) with a two-step process: use the
AUDIO or VIDEO buttons to select a function, then use the
ADJUST button to adjust the function.
audio function button (AUDIO) --- Use to select one of Lhe
following audio functions:
stereo/SAiP/mono,
bass,
treble,
- balance, or
audio expansion on/off.
video function button (VIDEO) -- -Use to select one of the
following video functions:
- tint,
- color,
- contrast,
- brightness,
- sharpness, or
- closed captioning.
adjust button (ADJUST) --- After selecting an audio or
video function, use the ADJUST button to adjust the function
you've selected. These buttons can be used to:
- turn the function on or off (e.g., audio expansion),
- increase or decrease the function (e.g, color),
- shift from one end of a scale to the other (e.g., balance), or
- select a position (e.g., stereo).
You will also use the adjust buttons to select items on the
on-screen menus.
(_input button (INPUT)
Use this button to select the input source you wish to watch:
• TV, or
• External.
_) off-timer button (OFF-T/OTR)
Use this button to program the TV to turn eft automatically at a
later time.
Overview of the Remote Control 21
Page 22
Remote control buttons and functions (cont.)
(_) display button (DISP)
Use this button to view an on-screen summary of the current TV
settings and the display related to Extended Data Services
(XDS).
(_)VCR buttons
Use these buttons to control most Mitsubishi VCRs. (See your
VCR's owner's guide for additiona], information). These buttons
work with the VCR even when the TVNCR/AUX switch (or
VCR/TV switch) is set to "TV."
@picture-in-picture controls (CS-27305 only)
Use these buttons to control the special picture-in-picture (PIP)
function.
• PIP button (PIP) --- Press this button to see the reduced
PIP image, to change the size of the image, or cancel it.
• source button (SOURCE) --- Press this button repeatedly
to change the source of the reduced PIP image.
• exchange button (EXCH) -- Press this button to exchange
the sources of the reduc.ed PIP image and the main image.
• position button (POSITION) .... Press this button to move
the position of the reduced PIP image.
• pause button (PAUSE) --- Press this button to fceeze the
reduced PIP image or to return it to a "live" picture. You can
also use this button with the advanced PIP functions.
22 Chapter 1: Getting to Know Your TV
Page 23
CHAPTER 2
Al_Co--n--necting Your TV
This chapter offers step-by-step instructions ibr completing the
most common hook-ups. It contains the following sections:
• Overview of the Back Panel
• Basic Connections
2;3
Page 24
_ Overview of the Back Panel
7
VHF/UHF
(75 _)
INPUT
VIDEO
L (MONO)
AUDIO
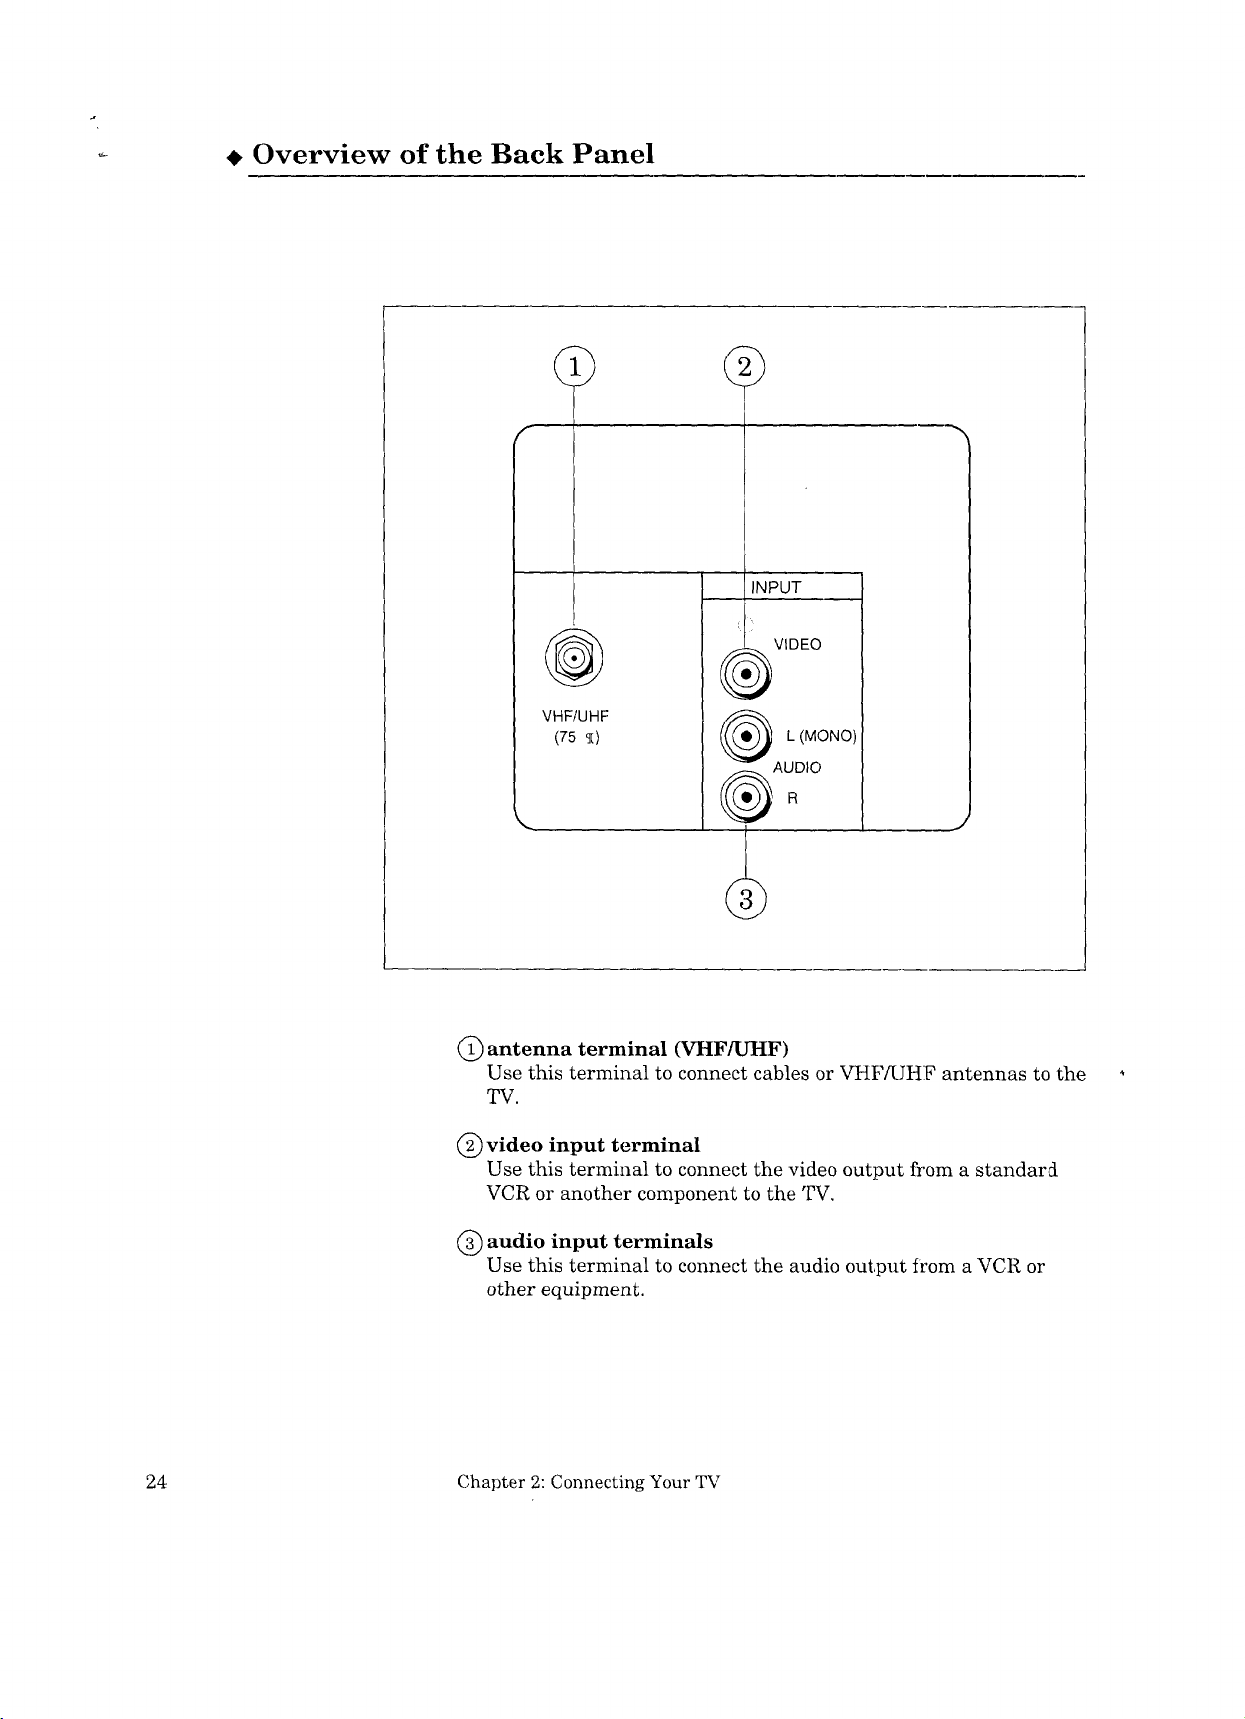
C) antenna terminal (VHF/UI-IF)
Use this terminal to connect cables or VHF/UHF antennas to the
TV.
(_ video input terminal
Use this terminal to connect the video output from a standard
VCR or another component to the TV.
(_) audio input terminals
Use this terminal to connect the audio output from a VCR or
other equipment.
24 Chapter 2: Connecting Your TV
Page 25
• Basic Connections
_>Important: You must connect a VCR to your TV to see two separate pictures
This section describes the equipment and procedures needed for
basic hook-ups. (For more complex hook-ups, co:atact your dealer or
local cable company.) The connections explained in this section are:
• TV+antenna or cable without a decoder box,
• TV+cable with a decoder box,
• TV+separate UHF and VI-IF antennas,
• TV+VCR+antenna or cable without a decoder box, and
• TV+VCR+cable with a decoder box.
when using the Picture-in-Picture (PIP) feature.
I
_Warning: I You should unplug your TV and any other components before
connecting them.
I
I
Basic Connections 25
Page 26
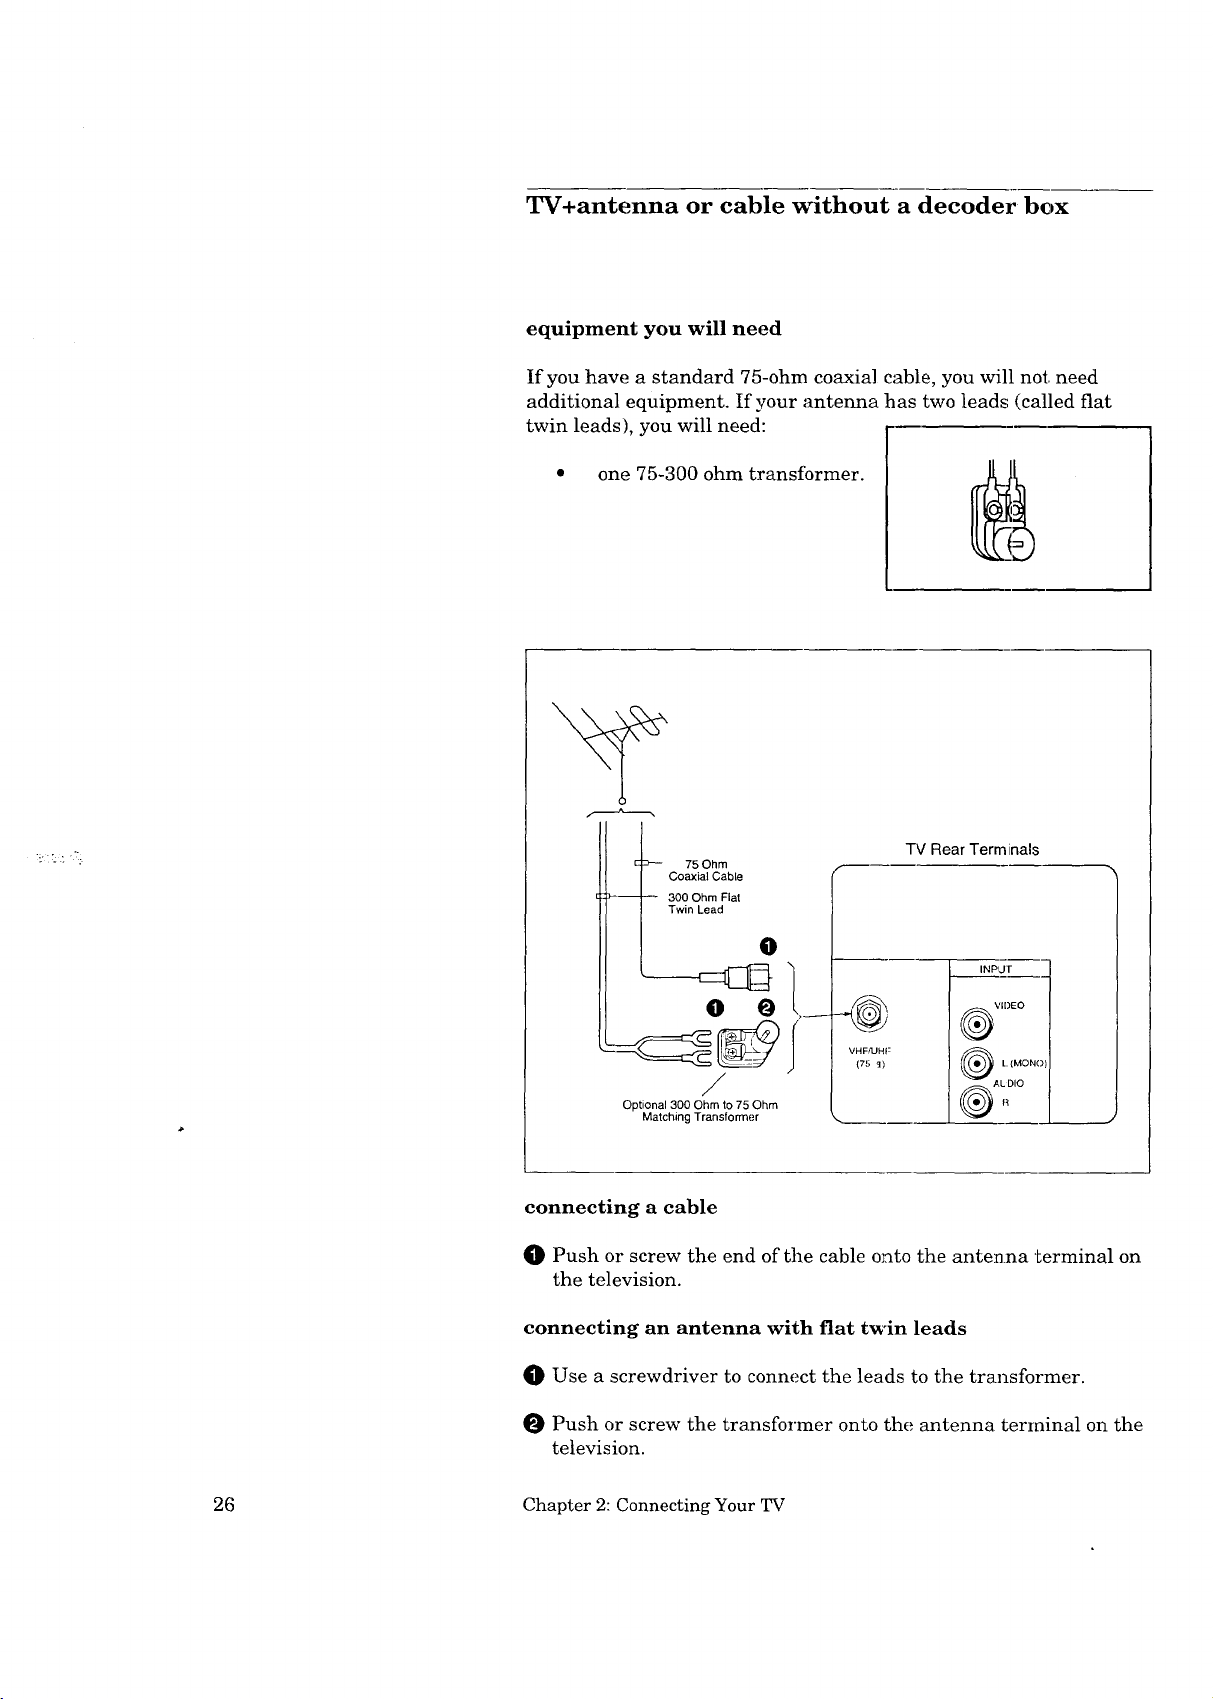
TV+antenna or cable without a decoder box
equipment you will need
If you have a standard 75-ohm coaxial cable, you will not need
additional equipment. If your anteima has two leads (called fiat
twin leads), you will need:
one 75-300 ohm transformer.
75 Ohm
Coaxial Cable
:_-- -- 300 Ohm Flat
Twin Lead
TV Rear Terminals
O
INPLIF
o O
VIDEO
VHF/UHF
{75 _)
L (MONO)
/
Optional 300 Ohm to 75 Ohm
Matching Transformer
connecting a cable
O Push or screw the end of the cable onto the antenna terminal on
the television.
connecting an antenna with flat twin leads
Use a screwdriver to connect the leads to the transformer.
Push or screw the transformer onto the antenna terrainal on the
television.
®A=o
26 Chapter 2: Connecting Your TV
Page 27
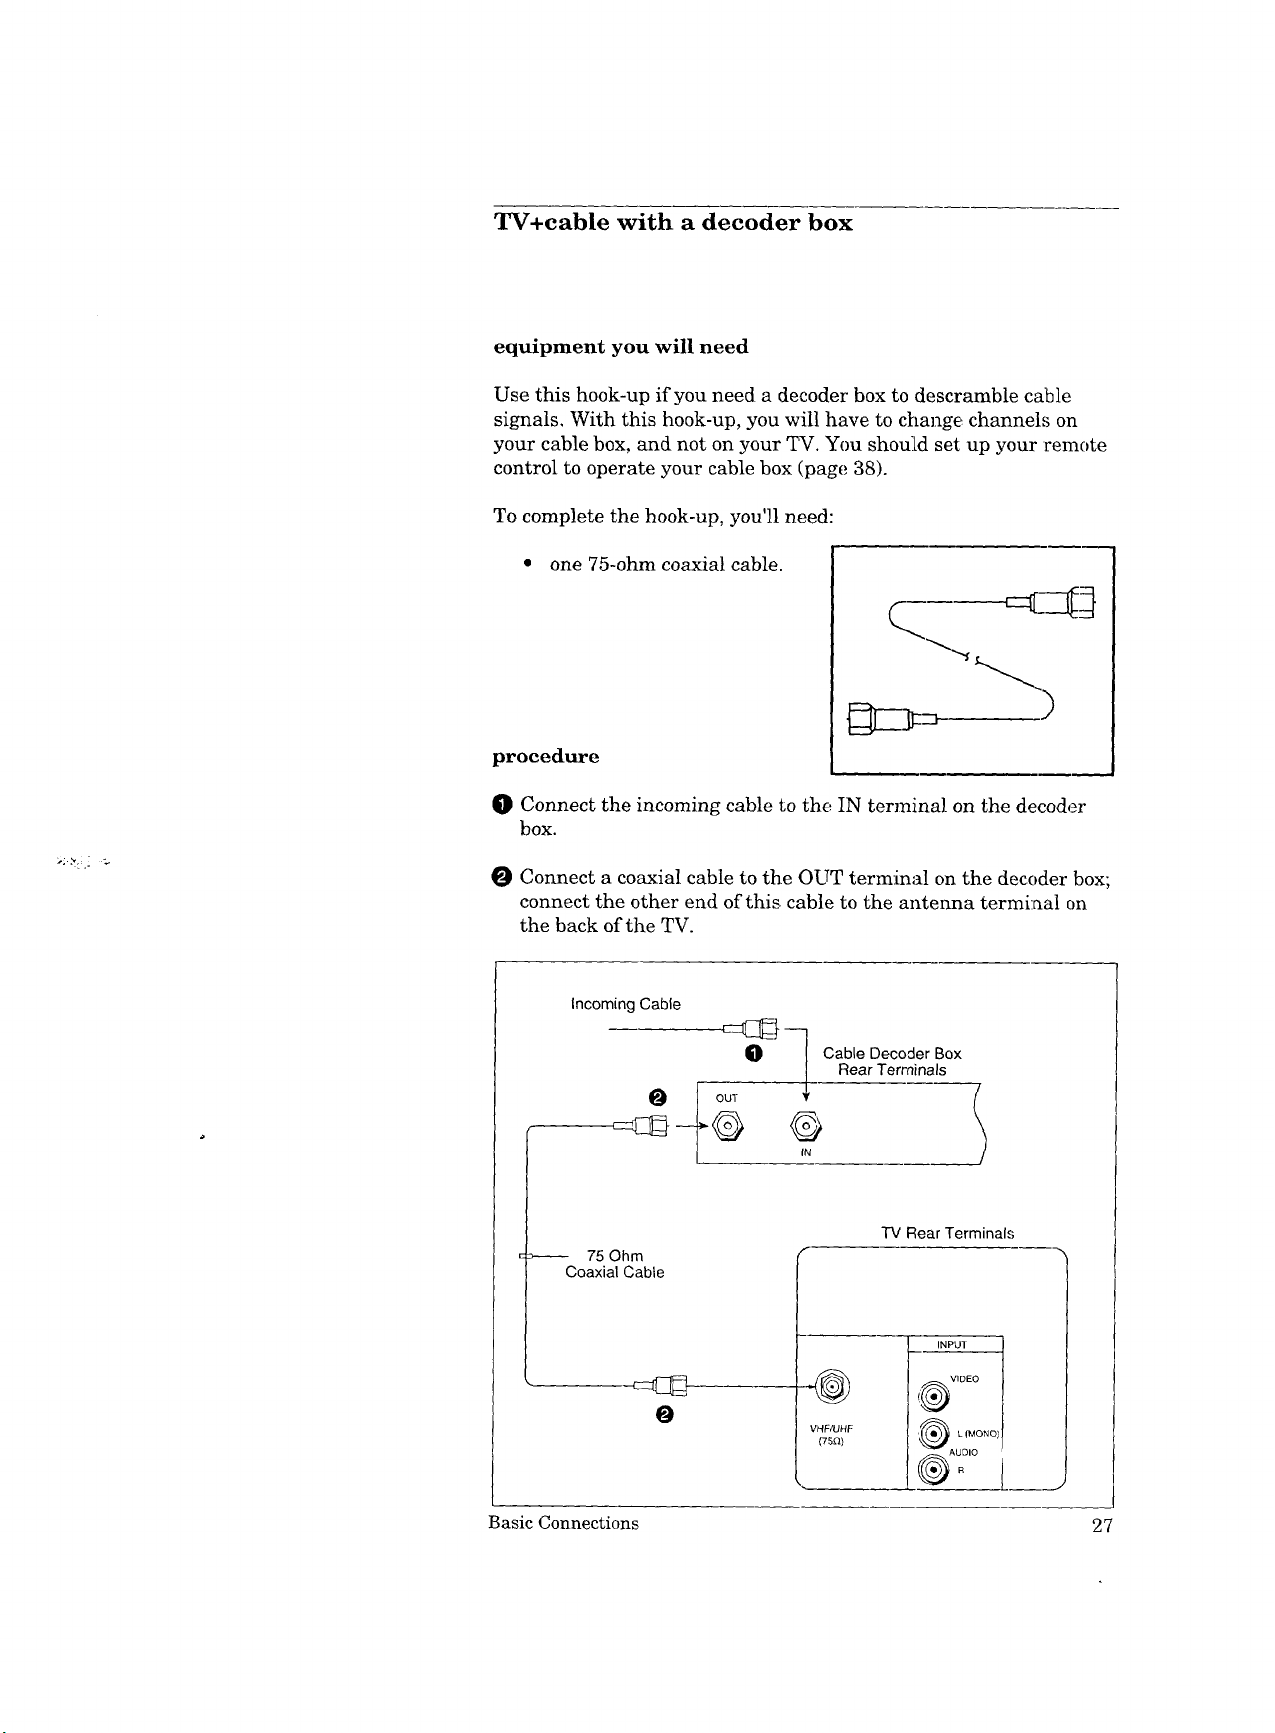
TV+cable with a decoder box
equipment you will need
Use this hook-up if you need a decoder box to descramble cable
signals. With this hook-up, you will have to change channels on
your cable box, and not on your _[_. You should set: up your remote
control to operate your cable box (page 38).
To complete the hook-up, you'll need:
• one 75-ohm coaxial cable.
procedure
O Connect the incoming cable to the IN terminal on the decoder
box.
O Connect a coaxial cable to the OUT terminal on the decoder box;
connect the other end of this cable to the antenna terminal on
the back of the TV.
Incoming Cable
czar} q Cable Decoder Box
_ Rear Terminals
-rv Rear Terminals
>------- 75 Ohm
Coaxial Cable
@
O
Basic Connections 27
VHF/UHF
{75n)
!_ VIDEO
INPUT I
Page 28

TV+ separate UHF and VHF antennas
equipment you will need
If UHF and VHF signals are brought into your home witlh two
separate antennas, you'll need to combine the antennas before
connecting them to the TV. To do this you will need a UHF/VHF
combiner. (There are different combiners for different kinds of
leads. Check with your local electronics store for the kind of
combiner you need.)
Pictured below is a standard combiner.
To connect separate UHF and VHF antennas to your television:
O Connect the UHF and VHF antenna leads to the appropriate
terminals on the UHF/VHF combiner.
Press the combiner onto the antenna terminal on the television.
VHF Antenna UHF Antenna
(Channels 2-13) (Channels 14-69)
o/// .......
\\ I\_
#7//
-_ 300 D Flat Twin Lead
External
Antenna
or Cable
rh
\
300 Ohm to
75 Ohm Combiner
VHF I_
\\\\\\\_I
300D Flat -
Twin Lead
TV Rear "£errninals
28 Chapter 2: Connecting Your TV
Back Side
/fS,,oi.
Page 29

TV+VCR+antenna or cable without a decoder box
equipment you will need
You may want to connect a VCR along with your antenaas or cable.
To complete this hook-up, you may need the following equipment.
one 75-ohm coaxial cable,
one set of RCA pin-type
audio cables,
one RCA pin-type video cable.
Basic Connections 29
Page 30

TV+VCR+antenna or cable without a decoder box
(cont.)
procedure
O Connect the incoming cable or antenna to the ANTENNA IN
terminal on the VCR.
Connect one end of a coaxial cable to the ANTENNA OUT
terminal on the VCR.
Connect the other end of the coaxial cable to the antenna termi-
nal on the TV.
Connect an RCA pin-type video cable to the VIDEO OUT termi-
nal on the back of the VCR. Connect the other end of this cable
to the VIDEO INPUT terminal on the back of the television.
O
Connect a set of RCA pin-type audio cables to the AUDIO OUT
terminals on the back of the VCR. Use the red cable to connect
the right (R) channel and the white cable for connecting the left
(L) channel.
L>Important:
L>Important:
Connect the other ends of this cable to the AUDIO INPUT
terminals on the back of the television.
If your VCR is monaural (non-stereo), you will only connect a single
RCA pin-type audio cable. Connect the cable to the VCR, then
connect the other end to the L (LEFT) audio input on the back of
the television.
If your VCR has a video channel switch, set it to "OFF/AV." See
your VCR's owner's guide for details.
Begin playing a tape on the VCR.
To view the VCR, select the external input source by using the
INPUT button on the front control or on the remote control.
30 Chapter 2: Connecting Your TV
Page 31

Incoming cable
Coaxial Cable
O
75 Ohm
VCR Antenna
terminals
75 Ohm
Coaxial Cable
O
O
IN
Antenna
OUT
VCR Rear Terminals
,_WhiteLead I _ AUO,OOUT _l;_-"-_
f-- YeLlow t.ead
@
VHF/UHF
(Ts ,_)
f
TV Rear Terminals
_1 INPUT
I
VIDEO
_ L(MONO)
AUDIO
White Lead --
Red Lead --
0
Basic Connections 31
Page 32

TV+VCR+cable with a decoder box
equipment you will need
This hook-up will allow you to record scrambled channel,_. However,
because your cable box controls the channels you can view, you will
not be able to record one channel while you are watching another.
To complete the hook-up, you will
need:
• two 75-ohm coaxial, cables,
• one set of RCA pin-type
audio cables, and
• one RCA pin-type video
cable.
32 Chapter 2: Connecting Your TV
Page 33

procedure
(Please see the illustration on the following page.)
I_ Connect the incoming cable to the IN terminal on the decoder
box.
O Connect a coaxial cable to the OUT terminal on the back of the
decoder box; connect the other end of this cable to the
ANTENNA-IN terminal on the back of the VCR.
Connect the second coaxial cable to the ANTENNA-OUT termi
hal on the back of the VCR. Connect lobe other end of this cable
to the antenna terminal on the back of the TV.
O Connect an RCA pin-type video cable to the VIDEO OUT termi-
nal on the back of the VCR. Connect the other end of this cable
to the VIDEO INPUT terminal on the back of the television.
O Connect a set of RCA pin-type audio cables to the AUDIO OUT
terminals on the back of the VCR. Use the red cable to connect
the right (R) channel and the white cable for connecting the left
(L) channel.
Connect the other ends of this cable to the AUDIO INPUT
terminals on the back of the television.
Important:
Important:
If your VCR is monaural (non-stereo), you will only connect a single
RCA pin-type audio cable. Connect the cable to the VCR, then
connect the other end to the L (LEFT) audio input on the back of
the television.
If your VCR has a video channel switch, set it to "OFF/AV." See
your VCR's owner's guide for details.
Begin playing a tape on your VCR.
To view the VCR, select the external input source by using the
INPUT button on the front control or on the remote control.
Basic Connections 33
Page 34

TV+VCR+ cable with a decoder box: (cont.)
Incoming Cable _l_
_Oh_----_ _:_--1 O_'_r_eC°der's_°X
Coaxial Cable O / N-_IT--I--- ---/
VCR Rear
AUDIO OUI* "_
VCR Rear
Terminals
75 Ohm
Coaxial Cable
IN
Antenna
OUT
White Lead --
[_- Yellow Lead
O
.@
VHFIUHF
(75_) ---
0
TV Rear Terminals
m
4_ v'°E°
®coN°,
O"
Red Lead --
34 Chapter 2: Connecting Your TV
O
Page 35

Operating Your TV
Now that your TV is connected to the cable, _mtennas, or external
components, it's time to enjoy your equipment. This chapter will
explain how to operate the TV, first focusing on hmctions that are
basic and easy and then explaining some advw._ced features.
This chapter explains:
Getting Started
Using the Advanced Features
". _ :% .:
35
Page 36

• Getting Started
This section is designed to get you started, enjoying your new TV. If
you follow these procedures one by one, you will soon have a picture
and can begin discovering everything your television can do.
You'll find information on:
• Setting up and using the remote control
(CS-27305 only),
• Turning the TV on]off,
• Selecting the input source,
• Changing channels,
• Understanding the on-screen menus,
• Setting the clock,
• Memorizing channels,
• Adding / deleting channels,
• Renaming the input,
• Selecting the menu language,
• Using video mute,
• Using the power restore feature,
• Selecting the advanced PIP functions (CS-27305 only),
• Adjusting the sound,
• Adjusting the picture, and
• Using the closed caption decoder.
36 Chapter 3: Operating Your TV
Page 37

Setting up and using the remote control
(CS-27305 only)
Your TV comes with a remote control that not only operates your
TV, but can operate many of the functions of your VCR and cable
box as well.
The remote control is pre-set to operate Mitsubishi VCRs, but it can
also operate VCRs from other manufacturers. If you have a VCR
from another manufacturer, or if you have a cable box, you need to
"set up" the remote control.
Important:
Each layer (VCR or AUX) can be set for either a cable box or a VCR.
setting up the remote control to operate :your VCR
Turn off your VCR.
Set the TWVCR/AUX switch on the remote control to "VCR" or
"AUX."
O While holding in the POWER button on the remote control,
enter the code number listed in the chart below for your brand of
VCR. Be sure to enter both digits of the code number. (If more
than one code number is listed, try the first one. If that code
does not work, try the next one until you find the correct code.)
If your VCR is this
brand...
Mitsubishi (A)
Mitsubishi (B)
Canon
Emerson
Funai
GE
Goldstar
Hitachi
JVC
Magnavox
Multitech
NEC
Panasonic
Philco
...enter this code ...enter
01
O2
03
04, 05
06
03
07
08
09
03, 10,11
06
12
03
03, 10
If your VCR is this
brand...
Philips 03, 10, 11
Quasar 03
RCA 08, 13, 20
Sanyc 14
Scot 15
Sharp 16
Sony 17, 18
Sylvania
Symphonic
Teknika
Toshiba
Totevision
Zenith
this code
03, 10, 11
06
04, '06
15
07
19
Release the POWER button.
Getting Started 37
Page 38

Setting up and using the remote control
(CS-27305 only) (cont.)
O Press the POWER button again. Your VCR should turn on. If
the VCR turns on, your remote control is now set to operate your
VCR.
If your VCR does not turn on, repeat the instructions, trying each
code number listed for your brand of VCR. If those numbers don't
work, try each number listed in the chart, 01 through 20.
setting up the remote control to operate your cable box
O Turn offyour cable box.
Set the TWVCR/AUX switch on the remote control to "AUX" or
"VCR."
O
While holding in the POWER button on the remote control,
enter the code number listed in the chart below for your brand of
cable box. (If more than one code number is listed, try the first
one. If that code does not work, try the next one until you find
the correct code.)
If your cable box is
this brand...
Zenith
Hamlin
Jerrold
G.I.
Oak
Pioneer
Scientific Atlanta
_Important:
...enter this code
51
52,53,69
54,57,58,59,60,85,87
55,56
61,62,82
64,65,84
66,86,88,89,91,92
If your cable box is ]
this brand...
Toeom
Panasonic
Macom
Philips
Regency
...enter this code
67.,68,72
_;3,70
71
73,74,75,76,77,
93,94,95,96,97,98,99
79
O Release the POWER button.
Press the POWER button again. Your cable box should turn on.
If the cable box turns on, your remote control is now set to
operate your cable box:.
If your cable box does not; turn on, repeat the instructions above,
trying each number listed for your cable box brand. If those num-
bers don't work, try each number listed in the chart, 51 through 99.
Sometimes manufacturers will change their products, or they may
use more than one code. If this is the case, your remote may not be
able to operate your VCR or cable box.
38 Chapter 3: Operating Your TV
Page 39

[:>Important: When you replace the batteries in your remote control, the remote
will return to its initial setting. The VCR layer will be set r,o control
Mitsubishi VCRs that have their remote switches set to "A"; the
AUX layer will be set to control Mitsubishi VCRs that have their
remote switches set to "B". Follow the steps above to re,_et your
remote control.
using your remote control to operate your VCR
After you have set up your remote control for your particular brand
of VCR, you can use the remote to operate your VCR.
O Set the TV/VCR/AUX switch on the remote control to "VCR"
or "AUX."
O Point the remote control at the VCR and press the desired
buttons.
If you are using a Mitsubishi VCR, you will be able to use all of the
buttons on the remote control to operate your VCR except for
MUTE, VOLUME and the PIP function buttons, which will always
operate the TV.
If you are using another brand of VCR, you can use tile POWER,
CHANNEL, REC, STOP, PAUSE, REW, PLAY and FF buttons to
operate your VCR.
using your remote control to operate your cable box
After you have set up your remote control for your particular brand
of cable box, you can use tlhe remote to operate your cable box.
Set the TV/VCR/AUX switch on the remote control to "VCR"
or "AUX."
Point the remote control at the cable box and press tlhe desired
buttons.
Only the POWER and CHANNEL buttons can be used when oper-
ating your cable box.
Getting Started 39
Page 40

Turning the TV on/off
Important:
Important:
Before using the remote control to operate the TV, set the
TV/VCR/AUX switch (or VCR/TV switch) on the remote control
to "TV."
Use the POWER button on either the front control or the remote
control to turn the TV on and off.
Even when the power is turned off, there is a small current that
continues to flow into the TV. This maintains any changes to the
settings as well as operates the built-in clock and timing functions.
Unplugging the set will erase these settings, requiring that you set
them again. Unplug the TV only when it won't be used for a long
time.
I_ m
o-6oQ
OOOU
0 0 0 J_
0 C--3
CZ) C) C_ CZ_
0
@
40 Chapter 3: Operating Your TV
8 8
r-'-', _:_ r_____-i
C_ C_ C_ CZ)
Page 41

Selecting the input source
Press the input button (INPUT) on the front panel or on the remote
control to select the input source you wish to view: TV or External
(Ext).
C.3,
000@
000
0000
©c==_
_.C::D (::D C:_
cz_ _
c221 r----5 _
O @
CD _ CD CD
@@@@@
Getting Started 41
Page 42

Changing channels
Your TV offers you four ways of changing channels once their
numbers have been programrned into channel memory:
• selecting a channel sequentially using the automatic channel
scan feature,
• directly accessing a channel by pressing the number buttons,
• using the quick view option to return immediately to the last
channel viewed, and
• using the Super Quick View func_ion to switch bel_ween
channels on a user-chosen list.
To change channels faster, use either of the followin_,_ procedures:
• Enter three digits for every channel number, using zeros
where needed. (For example, enter "004" to view channel 4
and "028" to view channel 28.)
Important:
• Press the ENTER button after ,_electing the number of the
channeh (For example, press "4" and "ENTER." to view
channel 4.)
Cable stations channel numbers 0 and _Teater than 126 are
unassigned. TV stations 0, 1 and 70 through 999 are unassigned. If
these channel numbers are pressed, the channel will not chang.
42 Chapter 3: Operating Your TV
Page 43

automatically scanning to the
next available channel
To change channels:
O Press one of the channel controls
(CH, C]_uNNEL) on the fi'ont
panel or cn the remote control.
The TV will automatically tune
to the next broadcasting station.
_>Important:
The channel controls (CHANNEL) will work only after available
channels have been programmed into memory. (See "Memorizing
channels," page 48.)
changing c:hannels directly
To move directly to a particular
channel without going through the
programmed channels:
-oo@
O00U
Use the remote control to select
the number of the channel you
88@8
cD _
want to view.
Press t:he ENTER button.
Getting Started 43
Page 44

Changing channels (cont.)
using l;he quick view option
To alternate between the current
• c_ c_J
OQO_l
O00UI
DImportant: Quick View (QV) is not available when you have programmed
channels into the Super Quick View (SQV) memory.
channe:[ and the last one viewed:
O Press the QV buULon on the
remote control to switch to the
last channel viewed.
Press the QV button again to
return to the original channel.
000_1_
OOOW,
ooo1_
O_U
C21 _21C.._
C:::I__._ C::221C_ I
_ C_ C2_C2_
using the Super Quick View
option
To view selected channels pro-
grammed into Super Quick View
memory:
Enter the desired channels into
O
Super Quick View memory. (See
"Using the Super Quick View
tuning," page 63.)
Press the QV button repeatedly
to view the desired channels in
sequence.
44 Chapter 3: Operating Your TV
Page 45

Understanding the on-screen menus
One of the distinctive features of this TV is an on-screen menu
system that provides step-by-step instructions for using some of the
TV's special capabilities.
When using any of the on-screen menus, please keep the ibllowing
in mind:
• The on-screen menus will clear if no item is selected within 5
minutes.
• Unavailable menu items are indicated in light blue instead of
the normal white letters.
• Some on-screen menu items :must be set before other items
are available. For example, "Set the timer" will only be
available if "Set the clock" has been set.
• You can exit the on-screen menus any time by pressing the
MENU button repeatedly. You will then return to regular TV
viewing.
Getting Started 45
Page 46

Setting the clock
Your TV contains an internal clock to indicate the current time. If
there is a broadcaster in your area that is sending the current time
along with its regular broadcast sigaal, then your TV can automati-
cally set its clock with this signal. Otherwise, you (',an set the clock
yourself.
T'V Main Menu
Your choices are:
• First Time Set-Up
Customize Viewing
Advanced Features
Use ADJUST to select.
Then press ENTER.
Press MENU to exit menus.
First Time Set-Up
• Set the clock
Memorize charmers
Add/delete channels
Set A/V Network
Use ADJUST to select.
Then press ENTER.
Press MENU to return to
TV Main Menu.
Set the clock
• Auto clock On
Day - -
Clock - -
Time zone Atlantic
Daylight savings On
Use ADJUST to select.
Then press ENTER.
Press MENU to return to
First Time Set-Up Menu.
0 Press the MENU button on the
remote control. The TV Main
Menu will appear or.Lthe screen.
O Select "First Time Set-Up" using
the ADJUST button_:: press the
EN[['ER button.
You will see the "First Time
O
Set-Up" screen. Select "Set the
clock" using the ADJUST button;
press the ENTER° button.
O
If you want your TV Loset its
clock automatically, use the
ADJUST button to set "Auto
clock" to "On"; if you want to set
the clock yourselfl set "Auto
clock:" to "Off."
using automatic clock setting
• Set "Auto clock" to "On" using
the A_DJUST button and press
the ENTER button.
Set the clock
Auto clock On
Day Monday
Clock 10:00 am
• Time zone Atlantic
Daylight savings On
Use ADJUST to select.
Then press ENTER.
Press MENU to return to
First Time Set-Up Menu.
46 Chapter 3: Operating Your TV
• Select the "Time zone" you are in
using the ADJUST button; press
the ENTER button.. The avail-
able time zones are: Atlantic,
Eastern, Central, Mountain,
Pacific, Alaska and[ Hawaii.
Page 47

D Important:
Set the clock
Auto clock On
Day Monday
Clock 10:00 am
Time zone Eastern
• Daylight savings On
Use ADJUST 1o select.
Then press ENTER.
Press MENU to return "lo
First Time Set-Up Menu.
If you follow daylight savings
time, set, "Daylight savings" to
"On" with Lhe ADJUST button.
Your TV's clock will automati-
cally adjust itself at the appro-
priate time. If you do not follow
daylight savings, set it, to ",Off."
Then, press tTne ENTER button.
The automatic setting is com-
pleted, and tile clock will start
automatically. The screen will
return to the "First Time Set-
Up" menu.
The TV can only set the clock automatically ("Auto clock") when
there is a broadcaster in your area that is sending the current time
via Extended Data Services (XDS). The clock will start just afl,er
the TV receives the time data.
Set the clock
• Auto clock Off
Day - -
Clock - -
Time zone - -
Daylight savings --
Use ADJUST to select,
Then press ENTER.
Press MENU to return to
First Time Set-Up Menu.
setting the clock yourself
• Set "Auto clock" to "Off' using
the ADJUST button and press
the ENTER button.
Set the clock
• Select the "Day" using the
ADJUST button; press the
• Day Monday
Clock - -
Use ADJUST to select.
Then press ENTER.
Press MENU to return to
First Time Set-Up Menu.
Set the clock
Day Monday
• Clock 10:00 am
ENTER button.
• Set the "Clock" using the
ADJUST button.
• After setting 'Day" & "(;lock,"
press the FNTER button te start
Use ADJUST to select.
Then press ENTER.
Press MENU to return to
First Time Set-Up Menu.
Getting Started 47
the clock.
Page 48

Memorizing channels
Your TV automatically memorizes the channels you can receive.
Once channels are memorized, you can scan through them using
the channel control on the remote control and front panel.
To memorize channels:
First Time Set-Up
Set the clock
Memorize channels
Add/delete channels
Use ADJUST to select.
Then press ENTER.
Press MENU to return to
TV Main Menu.
Memonze channels
What is connected to
your TV?
), Cable antenna
Indoor/outdoor antenna
Use ADJUST to select.
Then press ENTER.
Press MENU to return to
First Time Set-Up Menu.
Memorize channels
Now memorizing all the
stations you can receive.
Channel 004
Not in memory
Please stane-by.
To cancel memorization,
press CANCEL.
in) Press the MENU button on the
remol;e control. The TV Main
Menu will appear on the screen.
O
Select "First Time Set-Up" using
the ADJUST button; press the
ENTER button.
Select "Memorize chmmels"
O
using the ADJUST button; press
the ENTER button.
The instructions for memorizing
channels will appear.
Use the ADJUST button to
choose the type of antenna you
connected: Cable antenna or
Indoor/outdoor antenna. Press
the ENTER button.
O You will see a message that
states that channel memoriza-
tion is in progress,. A channel
being added to memory will be
labeled "In memory." Channels
not being added are labeled "Not
in memory." You can stop
channel memorization at any
time by pressing CANCEL.
C>Important:
The channel controls (CHANNEL) will work only after channels
have been programmed into memory. After memorizing, use the
channel controls on the control panel or on the remote control to
automatically advance to the next memorized channel. U,;e the
number buttons to select individual channels.
48 Chapter 3: Operating Your TV
Page 49

Adding and deleting channels
After all available channels have been programmed automatically,
channels with weaker signals can be added or deleted with the
following procedure.
Either "In memory" or
"Not in memory" will
appear.
First Time Set-Up
Set the clock
Memorize channels
• Add/delete channels
Use ADJUST to select.
Then press ENTER.
Press MENU to return to
"IV Main Menu.
Add/delete channels
Channel 006
In memory
Use ADJUST to select
another channel.
Press CANCEL to delete.
Press MENU to return to
First Time Set-Up Menu.
O Press the MENU button on the
remote con_;ro]. The TV Main
Menu will appear on the screen.
O Select "First Time Set-Up" using
the ADJUST button; then, press
the ENT]51_,button.
Select "Add/delete channels"
using the ADJUST button; then,
press the ENTER button.
The "Add/deler, e channels" screen
O
will appear. Select the channel
you would like to add or delete
using the ADJUST button. (You
can also use the CHANNEL
buttons to select a channel.)
If a channel is labeled "In
O
memory," use _he CANCEL
button to remove it from
memory. If a clhannel is labeled
"Not in memory," use the ENTER
button to add _t to memory.
O
When you are finished adding
and deleting channels, press the
menu button repeatedly to exit
the menus and return to normal
TV viewing.
Getting Started 49
Page 50

Renaming the input
This feature allows you to rename the external input. For exampl
you might want to rename the input "VCR" or "DISC." After renal
ing, the new name will appear cn the on-screen display.
TV Main Menu
Your choices ere:
First 33me Set-Up
Customize Viewing
Advanced Features
Use ADJUST to select.
Then press ENTER.
Press MENU to exit menus.
Customize Viewinq
ib Rename the inputs
Select Language
Use Video mute
Use Power restore
Use Advanced PIP
Use ADJUST to select.
Then press ENTER.
Press MENU to return to
TV Main Menu.
Rename the inputs
hput label New name
Ext - ....
Use ADJUST to select.
Then press ENTER.
Press MENU to return to
Customize Viewing Menu.
O Press the IVIENU button on the
remote cor,,troL The TV Main
Menu will appear on the screen
{'_ Select "Cu,_tomize Viewing"
using the fd)JUST button; then
press the ENTER button.
You will see the "Customize
Viewing" sc.reen. Select "Renam_
the inputs" using the ADJUST
button; then, press the ENTER
button.
O!
Set the new name using the
ADJUST button and the ENTER
button.
You can rename the inputs using
ler_ters (A-Z), numbers (0-9), or
symbols (:/., ( )1 " # $ % &'
blank + ; < =: > ? blank -).
When you press the CANCEL
button while setting the name,
the cursor will move one position
to the left. You can clear the
entire name by pressing
CANCEL when 1:he cursor is at
the left-most position.
50 Chapter 3: Operating Your _IW
O
After naming, press the MENU
button; the screen will return
Lo the "Customize Viewing"
:menu.
Page 51

Selecting the menu language
This TV allows you to display the on-screen menus in one of three
languages: English, Spanish and French.
Press the MENU button on the
Customize Viewinq
Rename the inputs
_. Select Language
Use Video mute
Use Power restore
Use Advanced PIP
Use ADJUST to select.
Then press ENTER.
Press MENU to return to
TV Main Menu.
O
remote conLrol. The TV :Main
Menu will appear on the screen.
O
Select "Customize Viewing"
using the ADJUST button; then,
press the ENTER button.
O
Select "Select Language" using
the ADJUST button; then, press
the ENTER button.
Select Lanqua.qe
I_ English
Spanish
French
Use ADJUST to select.
Then press ENTER.
Press MENU to return to
Customize Viewing Menu.
O Use the ADJUST button to select
the langT_age you want.
Press the ENTER or MENU
button to return to the
"Customize Viewing" menu.
Getting Started 51
Page 52

Using video mute
When you use the video mute function, your TV will: display a blue
screen whenever it is receiving a vei:y weak TV signal or a weak
signal from a VCR. If there is a time when you mig:ht wish to try
viewing a weak signal, you can turn the video mute off.
Customize Viewing
Rename the inputs
Select Language
• Use Video mute
Use Power restore
Use Advanced PIP
Use ADJUST to select.
Then press ENTER.
Press MENU to return to
TV Main Menu.
Use Video mute
• Automatic
Off
Use ADJUST to select.
Then press ENTER.
Press MENU to return to
Customize Viewing Menu.
O Press the MENU button on the
remote control. T:he TV Main
Menu will appear' on the screen.
O Select "Customize Viewing"
using the ADJUST button; then,
press tile ENTER. bul;ton.
Select "Use Video mute" using
the tLDJUST button; then, press
the ENTER button.
O Using the ADJUST button, select
"Automatic" to turn video mute
on or "OiT' to turn video mute off.
Press the ENTER, or MENU
button to return to the "Custom-
ize Viewing" menu.
52 Chapter 3: Operating Your TV
Page 53

Using the power restore feature
When this feature is used, the TV will automatically turn on when
electric current is supplied. This feature is useful when, for
example, your TV is plugged into an outlet that you control with a
wall switch.
To use the power restore feature:
Press the MENU button on the
O
Customize Viewing
Rename the inputs
Select Language
Use Video mute
Use Power restore
Use Advanced PIP
Use ADJUST to select.
Then press ENTER.
Press MENU to return to
TV Main Menu.
Use Power restore
On
Off
Use ADJUST to select.
Then press ENTER,
Press MENU to return to
Customize Viewing Menu.
remote control. The Main Menu
will appear on the screen.
O
Select "Customize Viewing"
using the ?_DjUST button; then,
press the F,NTER button.
Select "Use Power restore" using
O
the ADJUST "button; then, :press
the ENTER button.
The "Use Power restore" screen
O
will appear.
Use the AI)JUST button to turn
the power restore feature on or
off.
Press the ENTER or MENU
O
button to return to the "Custom-
ize Viewing" menu.
_Important: In order for this feature to work, you must leave your TV turned on
when you switch off the electric current.
DImportant: Even when the power restore feature is used, turning off power to
the set will require you to reset functions such as the built-in clock
and timer functions.
Getting Started 53
Page 54

Selecting the advanced PIP functions
(CS-27305 only)
When you are using the PIP feature, there are special functions you
can use. Before using these advanced functions, you need to select
one in the menu. These advanced functions are:
• TV Still,
• Snap-shot, or
• Replay.
In "TV Still," the PIP image switches between still and moving. In
"Snap-shot," you can view and move several frozen PIP images. In
"Replay," you can view still PIP images in sequence for a "strobe"
animation effect. (See "Using the Picture-in-Picture (PIP) Mode,"
pages 74-76.
Customize Viewing
Rename tileinputs
Select Language
Use Video mute
Use Power restore
• Use Advar'ced PIP
Use ADJUST to select.
Then press ENTER.
Press MENU lo return to
TV Main Menu.
Use Advanced PIP
• Current setting :
TV Still
Use ADJUST to select.
Then press ENTER.
Press MENU to return to
Customize Viewing Menu.
Use Advanced PIP
Current setting:
Replay
I_ Replay speed : 1
Use ADJUST te select.
Then press ENTER.
Press MENU to return to
Customize Viewing Menu.
O Press 1;he MENU button on the
remote control. The TV Main
Menu 'will appear on the screen.
Select "Customize Viewing"
using the ADJUST button; then,
press the ENTER button.
Select "Use Advanced P'IP" using
the ADJUST button; then, press
the F,NTER button.
Use the ADJUST buttons to
O
selecl_ tlhe advanced :feature you
would like to use: TV Still,
Snap-shot, or Replay. Then,
press ENTER.
When you select "Replay," the
next option will be "Replay
speed." Use the ADJUST button
to set the replay speed from 1 to
9. (1=short interval and 9=long
interval.) Press ENTER. The
main image will replay in sets of
three in a "strobe" animation
effect at the speed you selected.
54 Chapter 3: Operating Your TV
Press the MENU button to
return to the "Customize View-
ing" menu.
Page 55

Adjusting the sound
You can customize all of your television's sound functions using a
pair of buttons: you select a function with the AUDIO button, then
you adjust the function with the ADJUST button. You use the
ADJUST button to:
• select a position (e.g., stereo),
• increase or decrease the function (e.g., bass), or
• shift from one end of a scale to the other (e.g., balance).
When you adjust a function, an on-screen display will indicate the
function and level you've selected.
what you will adjust
"Listen to: Stereo/SAP/Mono" allows you to change the audio recep-
tion mode to stereo, separate audio programming (S.A.P.), or mon-
aural (mono), depending on the type of broadcast you are receiving.
As you select the reception mode, remember the following:
• The "Stereo" setting allows you to receive both mono and stereo
broadcasts.
_>Important:
The separate audio programming ("S.A.P.") setting offers you the
option of listening to either of two separa_;e audio programs. For
example, a station may broadcast news, weather, or a foreign
language soundtrack on the S.A.P. pro_Fam (in addition to its
standard soundtrack).
The "Mono" setting reduces unwanted background noise when a
stereo broadcast is coming in weak. When you use the "Mono"
setting, you will hear the broadcast in monaural even when the
broadcast signal is in stereo.
An on-screen display appears when programs are broadcast in
stereo or when separate audio programming (S.A.P.) is available.
"Bass" controls the volume of low fkequency sound.
"Treble" controls the volume of high frequency sound.
"Balance" adjusts the level of sound between the left and right
speakers.
"Audio expansion: On/Off' creates a stereo effect with non-stereo
stations or non-stereo external sources.
Getting Started 55
Page 56

Adjusting the sound (cont.)
adjusting the audio functions
O Use the AUDIO bu%on on the
IOO o1_
!O00U
ooo_
(_ (=] <_ {=:)
O Use the ADJUST button on the
1108
C3 C_ C_ _
_1.wraJaDi
remote control to select one of the
functions.
remote control to adjust the
function.
56 Chapter 3: Operating Your TV
Page 57

Adjusting the picture
You can customize all of your television's picture functions using a
pair of buttons: you select a function with the VIDEO button, then
you adjust the function with the ADJUST button. You use the.
ADJUST button to:
• shift from one end of a scale to the other (e.g., tint),
• increase or decrease the function (e.g., color),
• select a position (e.g., closed captioning).
When you adjust a function, an on-screen display will indicate the
function and level you've selected.
what you will adjust
"Tint" adjusts the proportion of red to green that determines the
delicate tones of color.
"Color" determines the intensity of the color.
"Contrast" controls the level of white-to-black in the picture.
"Brightness" controls the light level of the image on screen.
"Sharpness" adjusts the detail and clarity of the picture.
"[_ (closed captioning): 1]2/3/4/Text i/Text 2fFext 3/Text 4]V_en
muting/Off' is used to display the text information on the TV screen.
For details, see "Using the closed caption decoder," page 58.
adjusting the "video functions
Use the VIDEO button on the
remote control to select one of the
fm_ctions.
Use the ADJUST button on the
remote control to adjust the
function.
Getting Started 57
Page 58

Using the closed caption decoder
Many broadcasters now supply closed captioning information along
with their regular broadcasts.
There are two types of captioning that broadcasters can send:
"standard" and "text." Standard captioning is related to the
program that is being shown and usually follows the dialogue of the
characters on-.screen. Text captioning does _._otrelate to the pro-
gram being shown, often containing information such as weather or
news, and it can block your view of the program you are watching.
Your TV can decode four different "standard captioning" signals
and four different "text captioning" signals on each TV channel.
To
use the closed caption decoder:
\
I
I0 0 0 r_/
, tg %..I t..J _y..,
'00 Of')
I0 c:::z:_ U
; 116
Press the VIDEO button on the
0
remote control until the closed
captioning ([c--¢D)display appears
on the screen.
Press the ADJUST button on the
0
remote co_trol to select the
I
captioning signal you wish to
display.
You can choose to display one of four "standard captioning" signals
(indicated by [_ and a number), to display one of four "text
captioning" signals (indicated by the word "Text" and a number), to
display captions "when muting," or to turn tlhe captions off.
If you select "When muting," the standard captioning signal ([_ 1)
will appear whenever you use the MUTE button.
uses for closed captioning
Closed captioning can be used in many ways, such as:
• helping children learn to read,
• learning a foreign language, and
• using the television without disturbing others.
DImportant:
If you cannot display any captions on the screen, please keep Jn
mind that not all broadcasters, video tapes, or laserdiscs supply
closed caption signals.
Closed captions might not appear if you are playing a video tape
that is worn or old.
58 Chapter 3: Operating Your TV
Page 59

• Using the Advanced Features
This section explains how to use some of the more advanced
functions. You'll learn:
• Setting the timer,
• Using the parental lock, and
• Using the Super Quick View tuning.
Using the Advanced Features 59
Page 60

Setting the timer
This special feature allows you to program the TV to turn on
automatically at a preset time. To set the timer:
Press the MENU button on the
TV Main Menu
Your choices are:
First Time Set-Up
Customize Viewing
b' Advanced Features
Use ADJUST to select.
Then press ENTER.
Press MENU to exit menus.
O
remote control The Main Menu
will appear on the screen..
O
Select "Advanced Features" asing
the ADJUST button; then, press
the ENTER button.
Advanced Features
b' Set the timer
Use parental lock
Use Super Quick View
Use ADJUST to select.
Then press ENTER.
Press MENU to return to
TV Main Menu.
Set the timer
I_ Day --
Start time - -
Channel - - -
Use ADJUST to select.
Then press ENTER.
Press MENU to return to
Advanced Features Menu.
O You will see the "Advanced
Features" screen. Select "Set the
timer" using the ADJUST button;
then, press 1;he ENTER button.
O Use the ADJUST and ENTER
buttons to set the "Day," "Start
time," and _nanne[.
I I _"_1 1 II
When you press the CANCEL
button while setting the timer,
the cursor will move to the
previous item. To clear the timer,
press the CtCqCEL button with
the cursor at the "Day" posit!ion.
[:>Important:
When the timer turns the TV on, the display will flash as a
warning. If you do not press any TV function button for about 5
minutes, the TV will automatically turn off. Pres,; a TV function
button (such as the display button) to keep the TV on and turn off
the flashing display.
60 Chapter 3: Operating Your TV
Page 61

Using the parental lock
This special feature locks the entire TV or one parti.cular channel
to prevent others from watching it.
Press the MENU button on the
Advanced Features
Set the timer
• Use parental lock
Use Super Quick View
Use ADJUST to select.
Then press ENTER.
Press MENU to return to
Main Menu.
Use Parental ;ock
O
remote control. The Main Menu
will appear on the screen.
O
Select "Advanced Features" using
the ADJUST button; then, press
the ENTER button.
O
Select "Use parental lock" uSirLg
the ADJUST button; then, press
the ENTER button.
• Lock the TV
Lock the channel
Select "Lock the TV" or "Lock the
O
channel" using the ADJUST
button; the:a, press the ENTE!_
Use ADJUST to select.
Then press ENTER.
Press MENU to return to
Advanced Features Menu.
button.
DImportant: If you turn the parental lock on, you cannot use the timer, and :you
will see a lock message when you try to use a locked TV or locked
channel.
Use Parentallock _FV)
Now, the lock is off.
Enter your personal code
using NUMBER buttons.
Then press ENTER to turn
the lock on.
Press MENU to return to
Advanced Features Menu.
Parental lock 0-V)
locking the r_r
• The message, for locking the qTV
will appear.
• Enter a four-digit secret code
using the number buttons (0-9);
then, press the ENTER button.
• When you set "Lock the TV" to
"on," you will see a message Lhe
This TV is locked.
Enter your personal code
using NUMBER buttons.
Then press ENTER to view
this TV.
next time you turn the television
on, asking you to enter your
secret code. If you don't enter the
correct code within five minutes,
the TV will turn off.
Using the Advanced Features 61
Page 62

Using the parental lock (con_.)
locking the channel
Use Parental lock (Channel)
Now, the lock is off.
Enter your personal code
using NUMBER buttons.
Then press ENTER to turn
the lock on.
Press MENU to return to
Advanced Features Menu.
Parental lock (Channel)
This Channel is locked.
Enter your personal code
using NUMBER buttons.
Then press ENTER to view
this channel.
Use Parental lock (TV)
Now, the lock is on.
Enter your personal code
using NUMBER buttons.
Then press ENTER to turn
the lock off.
Press MENU to return to
Advanced Features Menu.
• The :message for locking the
channel will appear.
• Enter a four-digit secret code
using the number buttons (0-9);
then, press the ENTER button.
• The rLext time you try to select a
locked channel, you will see a
message asking you to enter your
secret code.
• To view an unlocked c]aannel,
press the; channel buttons.
canceling parental ][ock
O
Press th_ MENU buttc,n on the
remote control. The Main Menu
will appear on the screen.
Select "Advanced Features"
O
using 1:heADJUST butLon; then,
press the ENTER button.
O
Select "Use parental lock" using
the ADJUST butto:_L; then, press
the E1NTF,R button.
62
_>Important:
Use Parental lock (Channel)
O
Using the ADJUST button, select
the lock you want to, cancel; then,
Now, the lock is on.
Enter your personal code
using NUMBER buttons.
Then press ENTER to turn
the lock off.
Press MENU ta return to
Advanced Features Menu.
press the ENTER button.
O
Enter the four digits of your
secret code using the number
buttons (0-9); then, press EN-
TER.
Press the MENU button to
O
return to the "Advanced Fea-
tures" menu.
If you forget your four-digit code, please see page 83.
Chapter 3: Operating Your TV
Page 63

Using the Super Quick View tuning
Super-Quick-View allows you to cycle through a list of up to ten
channels with the QV button. You can add ctlannels to and remove
channels from the list using the menus system or by using the
ENTER]CANCEL buttons.
using the menus to change the Super Quick View memory
Press the MENU button on the
Advanced Features
Set the timer
Use parental lock
• Use Super Quick View
Use ADJUST to select.
Then press ENTER.
Press MENU to return to
TV Main Menu.
O
remote control. The Main Merm
will appear on the screen.
Select ' "Adv anced Features
O
using the ADJUST button; then,
press the ENTER button.
O
Select "Use Super Quick View"
using the ADJUST button; then,
press the F,NTER button.
Use Super Quick View
Use ADJUST to select
Then press ENTER.
Press MENU to return to
Advanced Features Menu.
Use Super Quick View
)' Channel 003
Use ADJUST to se}ect.
Then press ENTER.
Press MENU to return to
Advanced Features Menu.
O Select a position to store a TV
channel using the ADJUST
button; then_ press the ENTli',R
button.
O
Use the ADJ-UST button, channel
control, or number buttons to
select the channel you want to
add; then, p:ress the ENTER
button.
Repeat steps O and _ to add up
to ten channels to the Super
Quick View memory. You can
clear each setting by pressing the
CANCEL button.
Press the MENU button to
return to the "Advanced Fea-
tures" menu.
Using the Advanced Features 63
Page 64

Using the Super Quick View tuning (cont.)
using the ENTER/CANCEL buttons to change the Super
Quick View memory
To enter a channel into the Super Quick View memory:
O Use the channel control (CHANNEL) to se]iect the channel you
want to add to the Super Quick View memory.
O While the channel number is still displayed on the screen, press
ENTER. Hold down the ENTER button until the letters "SQV"
appear on the screen.
Repeat steps O - _ until to add up to ten channels to the Super
Quick View memory.
0 Press the quick view (QV) button to cycle through the channels
you have memorized.
[_Important:
[_Important:
> Important:
[_Important:
You can only memorize up to ten channels in the Super Quick "View
memory. If you try to memorize more than ten, the letters "SQV"
will flash, indicating that the memory is ful]. You must delete a
channel from memory before adding a new one.
To remove a channel from the super quick view tuning:
O Use the channel control (CHANNEL) to select the channel you
want to remove from the Super Quick View memory.
O
While the channel number is still displayed on the screen, press
CANCEL. Hold down the CANCEL button uracil the letters
"SQV" disappear from under the channel number. The c]hannel
will be removed from the Super Quick View memory.
When there are channels programmed into the Super Quick View
(SQV) memory, the Quick View (QV) feature is not available.
You can display the present channel number by pressing the
DISPLAY button. This will allow you to add or remove a channel
from Super Quick View memory.
You cannot use the ENTER and CANCEL buttons to change the
SQV memory when you are watching an external source (such as
VCR.)
64 Chapter 3: Operating Your TV
Page 65

CHAPTER 4
Using the Special Features
In addition to the basic and advanced functions explained in the
previous chapter, this TV offers the user several special features
not generally available on other brand TVs. This chapter will
explain how to use these distinctive features. It contains the
following topics:
• Understanding the On-Screen Displays
• Using the Off-Timer
• Using the Picture-in-Picture (PIP) Mode
(CS-27305 only)
65
Page 66

Understanding the On-Screen Displays
Your TV provides an on-screen summary of the current settings for
the TV or cable channels, as well as the information related to
Extended Data Services (XDS). XDS allows broadcasters to supply
you with the current time, channel information (such as call letters
and the network name), and program information (such as the
program name and program description). To view this information,
press the display button (DISP) on the remote control to cycle
through all the information.
The first time
you press DISP
(if the antenna
terminal is the
TV_s main
source), you will
see:
The first time
you press DISP
(if the external
input is the TV's
main source),
you will see:
The second time
you press DISP,
you will see:
023 ESPN
Stereo & SAP SQV
O23
Thursday 10:23 am
Ext
S-VIDEO
023
Thursday 10:23 am
network name
This screen can show:
• the channel number 23,
• the call letters for this channel,
• that this channel is broadcasting
a stereo and SAP signal
• that this channel is programmed
into Super Quick View memory,
• the PIP input source (available
only on the CS-27305),
• the current day of the week, and
• the time.
This screen can show:
• the external input source (or
input name),
• the PIP input source (available
only on the CS-27305),
• the curre_.t day of the week, and
• the time.
This screen can show:
• the network name and proi_am
name, if the broadcaster is
supplying that information via
XDS.
66
program name
The third time
you press DISP,
you will see:
This screen can show:
• the program description, if the
broadcaster is supplying that
information via XDS.
program description
_Important: If the broadcaster is not supplying information via XDS, then an
error message will appear ("No name available', "No description
available"). Also, the "call letters" will not appear.
Chapter 4: Using the Special Features
Page 67

Using the Off-Timer
This special function allows you to set the TV to turn off automati-
cally. You can set the TV to turn off after a period of time ranging
from 10 to 120 minutes (in 10 minutes intervals). In this section
you'll learn:
• Setting the off-timer, and
• Changing or canceling the off-timer.
Using the Off-Timer 67
Page 68

Setting the off-timer
ooob
ooo
ooo
O Press the off-timer button
(OFF-T/O_?R) on the remote
control.
_>Important:
TV Off timer 120 min. 0
Select how long you want the
TV to stay on by repeatedly
pressing the off-timer button
(OFF-T/OTR). The time will
decrease in 10 minute intervals
each time you press the button.
O
When you've reached the time
you want. stop pressing the off-
timer button. After a few ,_ec-
onds, the timer will disappear
from the screen.
O If you later want to view the
amount of timer left in the timer,
press the off:timer button (OFF-
T/OTR) once. The on-screen
display will read "off-timer" and
show the remaining time.
During the last minute before the TV is set to turn off, "C_ "
min." will flash in red to remind you that tLe off-timer is set.
TV Off timer 1 min.
.m-_:_mer 1
68 Chapter 4: Using the Special Features
Page 69

Changing or canceling the off-timer
TV Offtimer 10 min.
O Press the off-t:[mer button
(OFF-T/OTR) on the remote
control. An on-screen display will
indicate the amount of time
remaining unl:il the TV will turn
off.
O Continue pressing the off-timer
button (OFF-T/OTR) repeated[y
to change the remaining time or
cancel the off-timer. The off-
timer is canc_fled when "-- -"
appears instead of the remaining
time.
Using the Off-Timer 69
Page 70

• Using the Picture-in-Picture (PIP) Mode (CS-27305 only)
One of the special features of this TV is the picture-in-picture (PIP)
mode, which allows you to view two different so_rces at the same
time. In this section you'll learn:
• Selecting the PIP image,
• Selecting the PIP source,
• Exchanging the PIP image and tlhe main image,
• Moving the PIP image,
• Freezing the PIP image,
• Using the Snap-shot feature, and
• Using the Replay feature.
DImportant: You must have a VCR connected to the TV to see two different live
action pictures when using PIP.
70 Chapter 4: Using the Special Features
Page 71

Selecting the PIP image
O Select the number of the TV
channel you wan_ to view by
using the channel control
(CHANNEL).
Press the PIP button. A reduced
image will appear in the bottom
right cornel" oCthe screen.
023 ESPN
Stereo & SAP SQV
023
l
Press PIP again:, the PIP i:mage
will become smaller.
023 ESPN
Stereo & SAP SQV
023
O Press the PIP button once again
to cancel the PIP image.
_>Important: When the main image is black and white, the PIP image will also
appear in black and white even if the PIP source is in color.
Using the Picture-in-Picture (PIP) Mode 71
Page 72

Selecting the PIP source
O Turn your VCR on and select a
channel o11the VCR that is
different thin.1 the channel you
see on your 2_ screen.
O Press the source button
(SOURCE) oa the remote control
repeatedly to select the source of
the PIP image: TV or External.
The PIP image will change as
follows.
---* TV--, External -]
_Important:
To change the main image while you are in PIP mode, press the
input button (INPUT) on the control panel or on the remote control.
Exchanging the PIP image and t:he main image
Press the exchange (EXCH) button
ooo@
ooo_
ooo_
©c=_U
to exchange the sources of the main
image and the :reduced in:age.
8888
023 ESPN
Stereo & SAP SQV
ffxt
41
72 Chapter 4: Using the Special Features
Page 73

Moving the PIP image
Press the POSITION button repeat-
edly. The reduced image will move
from corner to corner in a counter--
_-J ',.J %J i I:
clockwise order.
] T
[:>Important: If you change the position of the PIP image, then turn off PIP, the
PIP image will reappear in the new position the next time you turn
on PIP.
Using the Picture-in-Picture (PIP) Mode 73
Page 74

Freezing the PIP image
Use Advanced PIP
Current setting :
TV Still
Select "Use Advanced PIP" in the
O
"Customize Viewing" menu; then,
set the current setting to "2_
Still." (See "Selecting the ad-
vanced HP functions," page 54.)
Use ADJUST to select.
Then press ENTER.
Press MENU to return to
Customize Viewing Menu.
Use the MENU button to return
O
to the norraal picture.
O Press the pause button (PAUSE)
to freeze the PIP image on the
screen.
Press the PAUSE button again
ooo_
ooo_
© c::::=_U
c:_ c2_ _ c2;3
to return the image to a "live"
picture.
DImportant: When you press the pause button while viewing the normal picture,
the PIP image will appear and be t¥ozen.
disappears after a
few seconds
74 Chapter 4: Using the Special Features
TV Still
Page 75

Using the Snap-shot feature
0
Use Advanced PiP
_. Current setting :
Snap-shot
Select "Use Advanced PIP" in the
"Customize Viewing" menu; then,
set the current setting to "Snap-
shot." (See "Selecting the ad-
vanced PIP fhnctions," page 54.)
if PIP is off
Use ADJUST to select.
Then press ENTER.
Press MENU to return to
Customize Viewing Menu,
ooo£1
ooo_
ooo_
© c==_ _
Use the MENU button to retur:a
0
to the normal picture.
0
Press the pause button (PAUSE)
once; one frozen PIP image and
one moving PIP image will
appear.
0
Press the PAUSE button again;
the third PIP image will appear,
moving. The previous two PIP
images will be frozen.
0
Each time you press the PAUSE
button, the PIP images will shift
upwards one by one. The top
image will disappear and a new
frozen image appears when you
press PAUSE.
To cancel the PIP image, pre,_s
the PIP button twice.
PAUSE
A
if PIP is on
PAUSE
[]
[]
[]
B
[]
[]
B
*A, B, C, D : the moving images
*a, b, c, d : the frozen image of A, B, C, D at the instant the
Using the Picture-in-Picture (PIP) Mode 75
PAUSE
[]
[]
[]
PAUSE
[]
[]
[]
PAUSE button is pressed.
PAUSE•
PAUSE
[]
[]
[]
D
Page 76

Using the Replay feature
Use Advanced PIP
_" Current setting :
Replay
Replay speed : 1
0
Select "Use Advanced :PIP" in the
"Customize 'viewing" menu; then,
set the current setting to "Re-
play." (See "Selecting the ad-
vanced P]:P _unctions," page 54.)
Use ADJUST to select.
Then press ENTER.
Press MENU to return to
Customize Viewing Menu.
Use Advanced PIP
Current setting:
Replay
Replay speed : 1
Use ADJUST to select.
Then press ENTER.
Press MENU to return to
Customize Viewing Menu.
ooo_
OOOU
ooo_
0
Set the replay speed between 1
(short interval) and 9 (long
interval).
0
Use the MENU button to return
to the normal picture.
0
Press t:he pause button (PAUSE).
The TV will memorize seven
frames of video from the main
image and display the first three
of these frames as PIP images.
The inteI_cai{ between the frames
is determined by the replay
speed set in step _.)
E_
_N
Each time you press the PAUSE
button, the memorized frames
will shift, upwards.
PAUSE PAUSE PAUSE PAUSE
C2_
[]
76 Chapter 4: Using the Special Features
To cancel the PIP image, press
the PIP button twice.
PAUSE
F.._.j
[a_
[] • []
[] []
Page 77

_C_HAPT__E_R5
Troubleshooting
Even though you're now familiar with the basic and advanced
operations of the TV, you may run into trouble from time to time as
you become accustomed to the TV. This chapter offers solutions Lo
some of the common problems you may encounter. We suggest that
you consult this chart before contacti_lg a Mits_bishi service repre-
sentative.
77
Page 78

Troubleshooting (cont.)
Problems
The remote control doesn't
work.
• The TV takes several sec-
onds to respond to button
commands.
Possible Solutions For More Information
• Check that the batteries are
installed correctly.
Check that the TVNCR/
AUX switch (CS-27305) or
VCRTrV switch (CS-27205)
is set to TV.
Be sure that you are point-
ing the front of the remote
control toward the TV from
a distance of no more than
20 feet.
Use the ENTER button to
avoid delays.
See "Getting ready' to 'ase
the remote control" in
ChapLer i for an explana-
tion of how to install batter-
ies in the remote control.
See "Remote control but-
tons and functions." in
Chapter 1, which explains
where the TVNCR/AUX (or
VCI_TV) switch is located.
See "Getting ready to use
the remote central[" in
Chapter 1, which contains
pointers for using the
remote control.
See "Changing channels" in
Chapter 3, which explains
the fhnction of the ENTER
button.
You can't;access a channel. • Be sure that the channel
you want to view is pro-
grammed into memory.
• Check that the TV is tuned
to the correct input source
(antenna) for that channel.
78 Chapter 5: Troubleshooting
See "Memorizing channels"
in Chapter 3, which explains
hew to program channels
into the TV's memory.
See "Selecting the input
source '_in Chapter 3, which
explains how to change the
input source.
Page 79

Problems Possible Solutions For More Information
On-screen displays appear
each time you adjust a
function.
2_ere's no sound even when
the volume is turned up.
• You forget the code you used
to set the parental lock.
You can't program the TV to
turn on automatically.
• This is part of the normal
operation of the TV.
Check that the MUTE
button isn't on.
The TV's reception mode
may be set to "separate
audio program (SAP)."
• Use the alternate procedure
that doesn't require the use
of the code.
• The TV may be locked,
See "Understanding the On-
Screen Displays" in Chapter
4 for a full explanation of
the on-screen displays.
See "Remote control but-
tons and functions" in
Chapter 1, which explains
the location and function of
the MUTE button.
See ".Adjusting the sound"
in Chapter 3, which explains
how to select the appropri-
ate reception mode.
• See the Appendix "Auto-
matic :Procedure for' the
Parental Lock."
See "Using the parental
lock" of "Using the Ad-
vanced l_'eatures" in Chapter
3.
The sound doesn't match the
linage on screen.
There is a large black
rectangle on the screen.
• The TV's reception mode
may be set to "separate
audio program (SAP)."
The TV has been set to
"text" mode, but there is no
text information being
broadcast.
Troubleshooting 79
See "Adjusting the sound"
in Chap_:er 3, which explains
how to select the appropri-
ate reception mode.
See "Using the closed
caption decoder" under
"Getting Started" in
Chapte r 3.
Page 80

Caution and Care
_Warning:
[:>Important: If you plan to place speakers next to the TV, make sure t]_ey are
Don't leave stationary images, such as those generated from stock
market reports or video games, on-screen fi)r more than 10 rain- I
utes. Still patterns can scar the TV, causing permanent damage to I
the picture tube.
magnetically shielded. Ordinary speakers will cause distortion in
the picture due to their strong magnets. This distortion, however,
will not harm the picture tube.
For maximum enjoyment and safe operation of your MITSUBISHI
Color TV, please read the "IMPORTANT SAFE',GUARDS" carefully
and apply them properly.
80 Chapter 5: Troubleshooting
Page 81

Calling for service
If you have a problem that you cannot correct, consult your
MITSUBISHI dealer or MITSUBISHI Authorized Warranty
Service Center.
Do not adjust any controls not described in this owner's guide.
Do not remove the protective back cover of this unit.
If you see one of the following displays on your ._creen, you should
not change any settings. These are special displays used by the
factory.
_, Initial
E2RESET CCD : On
Hotel : Off Auto clock : On
PIP : Net name :On
When mute : On Prog name : On
Call letr. : On
Prog descr : On
Sub Tint I I_a_ I
If the lef_ display appears, turn the TV off. If the right display
appears, make sure that all of the on/off settings are the same as
the illustration above and then turn the TV off. If any of the set.-
tings are different from the illustration above, turn the TV off and
consult your MITSUBISHI dealer or MITSUBISHI Authorized
Warranty Service Center.
Troubleshooting 81
Page 82

APPENDIX
7kutoma-t c Procedure for the Parental Lock
Cut along dotted line and file after reading.
After you lock the TV, you will need the secret code in order to:
• view the locked TV, or
• cancel the lock.
If you forget the code, you can view the locked TV without enteIing
the code. To do this, simply press the buttons on your remote
labeled "QV" and "9" at the same time.
DImportant: Unlocking with this procedure is only temporm_. To cancel the lock
completely, follow the procedure below:
O Press the "QV" button and the "9" button on the remote control
at the same time. This will allow you to turn on a locked TV.
O Press the MENU button to view the main menu. Use the
ADJUST button to select "Advanced Features." Press ENTER.
Use the ADJUST button to select "Use Parental Lock." Press
ENTER.
0 Use the ADJUST button to select "Lock the TV" or "Lock tile
channel." Press ENTER.
83
O Press the "QV" button and the "9" button on the remoto control
at the same time. This will turn off the lock.
Page 83

Index
A
A/V reset button .................. 16
adding channels .................. 49
adjust button ....................... 21
advanced features ............... 59
advanced PIP functions ...... 54
antenna terminal ................ 24
audio controls ...................... 20
audio expansion .................. 55
audio input terminal ........... 24
audio, adjusting ................... 55
AUX switch ......................... 20
B
back panel ........................... 24
balance ................................. 55
bass ...................................... 55
batteries, installing ............. 17
brightness ............................ 57
buttons, remote control ....... 19
C
cable box, codes ................... 38
calling for service ................ 81
cancel button ....................... 20
caution and care .................. 80
CC ........................................ 58
changing channels .............. 42
channels
adding ............................... 49
changing ........................... 42
controls ....................... 16, 20
deleting ............................. 49
Icrk ................................... 62
memorizing ...................... 48
clock:, setting ........................ 46
closed captions .................... 58
color. .................................... 57
connecting your TV ............. 23
connections
antenna ...................... 26, 29
basic .................................. 25
cable ........................... 26, 29
cable box ..................... 27, 32
VCR ............................ 29, 32
VHF/UHF ......................... 28
contrast ................................ 57
control panel ........................ 16
D
deleting channels ................ 49
display button ..................... 22
displays, on-screen .............. 66
E
enter button ......................... 20
espafiol ................................. 51
exchange button ............ 22, 72
Extended Data Services ...... 66
F
features
advanced .......................... 59
special ......................... 10, 65
fran¢ais ................................ 51
front panel ........................... 16
I
Important Safeguards ........... 3
input button .................. 16, 21
input, renaming .................. 50
input, selecting .................... 41
installing the batteries ....... 17
L
language, selecting .............. 51
lock ................................. 61, 83
M
memorizing channels .......... 48
menu button ........................ 20
menus .................................. 45
mono .................................... 55
mute control ........................ 20
mute, video .......................... 52
N
number buttons ................... 20
O
OFF-T .................................. 67
off-timer ............................... 67
off-timer button ................... 21
on-screen displays ............... 66
on-screen menus ................. 45
on/off ..................................... 40
operating your TV ............... 35
overview
back panel ......................... 24
front panel ........................ 16
remote control ................... 17
P
panel, front .......................... 16
parental lock ................. 61, 83
pause button ......................... 22
picture, adjusting ................ 57
picture-in-picture (PIP)
advanced functions .......... 54
buttons ............................. 22
exchanging ....................... 72
freezing ............................. '74
mode ................................. 70
moving .............................. 73
replay ................................ 76
selecting ........................... 71
snap-shot ........................... 75
source ................................ 72
position bul_ton .............. 22, 73
power button ................ 16, 20
power re,_tore ....................... 53
preface .................................... 9
programming channels ....... 48
Q
quick view .............................. 44
quick view button ................ 20
R
rear panel ............................ 24
remote control ..................... 17
buttons .............................. 19
codes ........................... 37, 38
setting up .......................... 37
using ................................... 37
renaming the input ............. 50
replay ................................... 76
restore, power ...................... 53
85
Page 84

S
safeguards, important ........... 3
SAP ...................................... 55
selecting the
menu language ................. 51
service, calling for ............... 81
setting the clock .................. 46
setting the timer ................. 60
sharpness ............................ 57
snap-shot ............................. 75
sound, adjusting .................. 55
source button ................. 22, 72
special features ............. 10, 65
stereo ................................... 55
super quick view ........... 44, 63
T
time, setting ........................ 46
timer, setting ....................... 60
tint ....................................... 57
treble ................................... 55
troubleshooting ................... 77
TV
lock ................................... 61
operating .......................... 35
turning orL/off ................... 40
unpacking ......................... 11
TV/VCR/AUX switch ........... 20
V
VCR
buttons ............................. 22
codes ................................. 37
VCR/TV switch ..................... 20
video controls ....................... 20
video input terminal ............ 24
video mute ............................ 52
video, adjusting ..................... 57
volume controls ............. 16, 20
W
wake-.up timer ..................... 60
X
XDS ...................................... 66
U
unpacking your TV ............. 11
86 Index
Page 85

MEMO
Page 86

MEMO
Page 87

MITSUBISHI COLOR TELEVISION OR COLOR MONITOR
LIMITED WARRANTY
M1TSUBISHI ELECTRONICS AMERICA, INC. ("MELA") warrants to the original purchaser of this tele,,ision or monitor if purchased from an authorized
MITSUBISHI Audlo/Video Dealer that, should it prove defective by reason of improper workmanship and!or material:
a.Picture Tube. For two years from the date of purchase at retail, we will repair or replace, at our option, any defective picture tube without charge for the tube.
b.Other Parts. For one year from the date of original purchase at retail, we will repair or replace, at our option, any detective part without charge for the part.
c. All parts u,._edfor replacement are warranted for the remainder of the original warranty period.
d. Labor. For one year from the date of original purchase at retail, we will provide the labor for a warranty repair by an authorized M1TSUBISHI service center
without charge.
e. Notice. To obtain warranty service, you must notify an authorized MITSUBISHI service center of any defect within the applicable warranty time period.
1. TO OBTAIN WARRANTY SERVICE DURING THE FIRST YEAR:
a. Contact your nearest authorized MITSUBISHI service center, whose name and address can he obtained frora your MITSUBIS HI dealer or by writing or calling
MELA at the address and telephone number provided below.
b. Warranty service will be provided in your home or, if required, at an authorized service shop, provided that your televL,:ion is located within the geographic
territory customarily covered hy an authorized MITSUBISHI service center. If not, you must either deliver your television _:oanauthorized service location at your
own expense, o:: pay for any travel and/or transportation costs the service center may charge to and from your home. Actual service labor will be provided without
charge.
c. Proof of purchase date from an authorized MITSUBISHI Dealer is required when requesting warranty service, Present your sales receipt or other document
which establishes proof and date of purchase. THE RETURN OF THE OWNER REGISTRATION CARD IS NOT A CONDITION OF WARRANTY
COVERAGE. However, please return the Owner Registration Card so that we can contact you should a question of safety _xise which could affect you.
2. AFTER THE FIRST YEAR, to obtain warranty service for a defective picture tube, you are responsible for delivering the tele_ ision or monitor to an authorized
MITSUBISHI service center at your own expense.
3. THIS WARRANTY DOES NOT COVER damage caused by: modification, alteration, repair or service of this producl: by anyone other than an authorized
MITSUBISHI service center; physical abuse to, or misuse of, the product; operation in a manner contrary to the instruction,s which accompany the product; freight
damage; or any damage caused by acts of God such as lightning or fluctuation in electrical power. This warranty also excludes all costs arising; from installation,
adjustment of user controls, external antenna systems, service of products purchased or serviced outside the U,S.A., initial technical adjustments (set-up) and user-
required maintenance. Consult the operating instructions furnished with the product for information regarding user control:_.
4. ANY EXPRESS WARRANTY NOT PROVIDED HEREIN, AND ANY REMEDY WHICH, BUT FOR THIS PROVISION, MIGHT ARISE BY
IMPLICATION OR OPERATION OF LAW, IS HEREBY EXCLUDED AND DISCLAIMED. THE IMPLIED WARRANTIES OFMERCHANTABILITY AND
OF FITNESS FOR ANY PARTICULAR PURPOSE ARE EXPRESSLY LIMITED TO A TERM OF ONE YEAR.
5. UNDER NO CIRCUMSTANCES SHALL MELA BE LIABLE TO PURCHASER OR ANY OTHER PERSON FOR ANY INCIDENTAL, SPECIAL OR
CONSEQUENTIAL DAMAGES, WHETHER ARISING OUT OF BREACH OF WARRANTY. BREACH OF CONTRAC'I', OR OTHERWISE.
6. Some states do not allow limitations on how long an implied warranty lasts, or the exclusion or limitation of incidental, special, or consequential damages, so
the above limitations or exclusions may not apply to you.
7. This warr_,nty gives you specific legal rights and you may also have other rights which vary from state to state.
8. BEFORE REQUESTING SERVICE, please review the instruction booklet to insure proper installation and correct customer control adjustment. Ifthe problem
persists, contact your nearest MITSUBISHI Dealer for name(s) of authorized MITSUBISHI Service Center(s). If you are unable to obtain this information, please
call 1-800-332-2119, or write us at the address below.
MITSUBISHI ELECTRONICS AMERICA, INC.
P.O. Box 5025
Norcross,. GA 30091-5025
RETAIN ]HIS PORTION FOR YOUR RECORDS
CUSTOMER NAME
STREET ADDRESS
CITY
STATE ZIP
PHONE ( )
PLACE OF PURCHASE
MITSUBISHI
SERIAL NO.
PURCHASE DATE / /
MO DAY YR
Page 88

_,=MITSUBISHI
MITSUBISHI ELECTRONICS AMERICA, INC.
6100 Atlantic Boulevard
Norcross, GA 30071-1305
© 1995 Mitsubishi Electronics America, Inc.
871C908A0
Printed in U.S.A
 Loading...