

Page 1

PCKN-0IL738-A
1
MITSUBISHI
ELECTRIC
Mitsubishi Digital Protection Relay
MELPRO
TM
– D Series
CBV2 – A01D1 VOLTAGE RELAY
INSTRUCTION MANUAL
MITSUBISHI ELECTRIC CORPORATION
Changed : Jan. 2005
Changes for the Better
Page 2

PCKN-OIL738
2
- Introduction -
Thank for your purchasing MITSUBISHI ELECTRIC MELPRO
TM
– D Series Digital Protection Relay.
Please read this manual carefully to be familiar with the functions and performances enough to use the
product properly.
Please note end users are required to be provided with this instruction manual.
For operation of the product, this manual should be used in conjunction with the following materials:
Title of document Document No.
MELPRO – D Series Protection Relay General Operation Manual PCKN-OIL750
When the protection relay is used together with a communication card, use the following documents too:
(For CC-Link)
Title of document Document No.
MELPRO – D Series Protection Relay CC-COM Communication Card (CC-Link)
Operation Manual (General information)
PCKN-OIL751
MELPRO – D Series Protection Relay CC-COM Communication Card (CC-Link)
Operation Manual (Model-specific information)
PCKN-OIL752
(For MODBUS)
Title of document Document No.
MELPRO–D Series Protection Relay RS-COM Communication Card (MODBUS)
Operation Manual (General information)
PCKN-OIL703
MELPRO–D Series Protection Relay RS-COM Communication Card (MODBUS)
Register Map (For CBV2-A01D1 Voltage Relay)
PCKN-OIL716
Page 3

PCKN-OIL738
3
– CONTENTS –
1
Features .......................................................................................................................................................4
1.1 General description ......................................................................................................................4
1.2 Features........................................................................................................................................4
2 Rating and specifications.............................................................................................................................6
2.1 General information ......................................................................................................................6
2.2 Protective elements ......................................................................................................................7
2.3 Measurement elements ................................................................................................................7
3 Characteristics .............................................................................................................................................8
3.1 Protective elements ......................................................................................................................8
3.2 Measurement elements ................................................................................................................8
3.3 Common technical data................................................................................................................9
4 Functions....................................................................................................................................................10
4.1 Protection....................................................................................................................................10
4.2 Measurement..............................................................................................................................13
4.3 Self-diagnosis .............................................................................................................................14
4.4 Communication...........................................................................................................................15
5 Configuration..............................................................................................................................................17
5.1 Internal configuration ..................................................................................................................17
5.2 External connection ....................................................................................................................20
6 Handling .....................................................................................................................................................25
6.1 Unpacking...................................................................................................................................25
6.2 Transportation and storage ........................................................................................................25
6.3 Appearance and how to pull sub unit out ...................................................................................25
6.4 How to use front control panel....................................................................................................28
7 Mounting ....................................................................................................................................................35
7.1 Mounting dimension ...................................................................................................................35
7.2 Standard operating environment ................................................................................................35
8 Test ............................................................................................................................................................36
8.1 Appearance inspection...............................................................................................................36
8.2 Characteristic test.......................................................................................................................37
9 Maintenance ..............................................................................................................................................39
9.1 Daily inspection ..........................................................................................................................39
9.2 Periodical inspection...................................................................................................................39
10 Ordering ..................................................................................................................................................... 40
Page 4

PCKN-OIL738
4
1 Features
1.1 General description
Mitsubishi Electric MELPRO-D Series is a digital protection relay product with a microprocessor for
protecting high/extra-high-voltage electric power system.
With its improved functions, including operation support using the advanced communication networks,
data saving at the power system faults and power system voltage/current measurement, this series of
protection relay will allow stable and effective control and monitoring of electric power systems as well as
provide high-reliable protection.
1.2 Features
(1) High-reliable protection
The product includes a three-phase undervoltage and a three-phase overvoltage element.
It is used to detect abnormal voltage between lines.
(2) Communication Network
- With an open field bus system, the relays can be used to build a high-speed, high-performance
network system. In addition, the relay’s multi-drop serial wiring reduces the amount of labor
required for communication wiring.
- Control of measurement values, operation status, as well as setting changes, etc., can be
performed from a remote location.
- In consideration of future network system variations and compatibility with communication
networks, communication features are mounted in the relay using a replaceable card.
(3) Measurement & Recording Functions
- Real time monitor of relay input data
The relay can measure steady state relay input values, supporting energy management.
- Fault Data Monitor
When a fault occurs, the relay saves the past 5 effective input values and harmonics data to
assist with fault analysis.
(4) Programmable Output Configuration
The operating output contacts (DO) can be set by combining the outputs of the protection relay
element using ‘OR’ logic, thereby simplifying sequence design.
(5) High Accurate Digital Computation
The digital computation using high-speed sampling minimizes the effect of high harmonics, etc., and
results in highly accurate protection.
(6) Self-diagnosis
The relay continuously monitors electronic circuits from input to output so that it can detect internal
failure before that failure causes damage on the power system, thereby improving reliability.
(7) Easy Replacement
The dimensions of the panel cutout are the same as the prior MULTICAP series. Changing from an
existing relay type to this new type is easy.
Page 5

PCKN-OIL738
5
(8) Easy Maintenance
The relays are adopted as draw-out unit mechanisms with automatic CT shorting at drawing, thereby
making maintenance easy.
(9) Easy wiring check
It is possible to carry out forced operation of the output contacts individually. This will allow an easy
wiring check.
Page 6
PCKN-OIL738
6
2 Rating and specifications
2.1 General information
Type name CBV2-A01D1
Relay without RS232C I/F 354PMB 355PMB
Style
Relay with RS232C I/F 541PMB 542PMB
Undervoltage element ×31
Protection
Overvoltage element × 3
Element
Measurement Voltage
Frequency 50 Hz 60 Hz
Voltage 57 ~ 120 V
Voltage Common use for 100 ~ 220VDC / 100 ~ 220VAC
Rating
Auxiliary
power supply
*21
Operative range
DC : 85 ~ 242 V (Range of 80 ~ 286VDC is allowable temporarily.)
AC : 85 ~ 242 V (Range of 80 ~ 253VAC is allowable temporarily.)
RUN
Indicate the result of
self-diagnosis. The lamp is lit for normal conditions
and off for abnormal.
Unit Indicate the unit symbol for measurements.
Item No., Item data
Display measurement, status, setting and option data selected with an item
number.
Display
Communication
With a communication card installed: the lamp is lit for normal conditions,
blinking during communication and off for abnormal.
With a communication card not installed: the lamp is off.
Self-diagnosis
Monitor the electronic circuit and internal power supply to output signal to
the RUN LED and
self-diagnosis output (ALARM).
For trip 2 make contacts: X4 and X5 (programmable output)
For signaling 4 make contacts: X0 to X3 (programmable output)
Configurations
For self-diagnosis
output
1 break contact: Y (open for normal result of self-diagnosis with power on)
Make
110VDC, 15A, 0.5 s (L/R = 0 s)
220VDC, 10A, 0.5 s (L/R = 0 s)
Break
110VDC, 0.3A (L/R<
40 ms)
220VDC, 0.15A (L/R<
40 ms)
For trip
Carry
1.5 A, continuously
Make and Break
500 VA (cosφ= 0.4),
60W (L/R = 0.007 s)
Max. current 5 A
Output
contacts
Capacity
For signaling and
self-diagnosis
output
Max. voltage 380VAC, 125VDC
Voltage circuit 1 VA or less (with rated current)
Zero-phase voltage circuit 0.15 VA or less (with rated current)
Burden
Auxiliary power supply circuit
For 100VDC: approx. 5 W (approx. 7W including communication card)
For 100VAC : approx. 7 VA (approx. 9VA including communication card)
For 220VDC: approx. 6 W (approx. 8W including communication card)
For 220VAC : approx. 12 VA(approx. 14VA including communication card)
Mass
Net weight of relay unit : approx. 2.3 kg
Including case : approx. 3.0 kg
Case/cover
Size : D1 type
Color : N1.5
*21 When an uninterruptible AC power source is not provided in your system for the auxiliary supply voltage, use the
type CPS1 AC/DC converter or commercially available uninterruptible power supply (UPS).
Power supply product of 24VDC or 48VDC is also available if ordered (non-standard product).
In addition, the power supply duration of the type CPS1 AC/DC converter is confirmed about 2 seconds in
combination with one MELPRO-D series relay. Therefore, in the case that the required power supply duration after
power source loss exceeds 2 seconds, please use a suitable commercial uninterruptible power supply.
When the power supply back up for the control power supply of a circuit breaker is required, it is necessary to
prepare the backup power supply different from the type CPS1 AC/DC converter.
Page 7
PCKN-OIL738
7
2.2 Protective elements
Relay without RS232C I/F 354PMB 355PMB
Style
Relay with RS232C I/F 541PMB 542PMB
Operation voltage LOCK - 10 ~ 110V (1V step)
Operation time INST - 0.1 ~ 10 s (0.1 s step)
Undervoltage
UV test
OFF
– AB phase test – BC phase test – CA phase test
When execute the relay test, enable to use the selected input
phase only. “UV test” LED turn on during selecting "UV TEST".
Operation voltage LOCK – 60 ~ 155V (1V step)
Setting
*24
Overvoltage
Operation time INST - 0.1 ~ 10 s (0.1 s step)
Forced operation Forced operation is available for any trip or signaling contact individually.
Operation indication Operation indicator LED (red) comes on when the relay operates.
2.3 Measurement elements
Relay without RS232C I/F 354PMB 355PMB
Style
Relay with RS232C I/F 541PMB 542PMB
VT primary voltage
100 ~ 999V (1V step)
1000 ~ 9990V (10V step)
10.0k ~ 99.9kV (0.1kV step)
100k ~300kV (1kV step)
Option *24
VT secondary voltage
100/√3 -110/√3 -115/√3 -120/√3 -100-110-115-120[V]
(57.7) (63.5) (66.4) (69.3)
Conversion
Indication value = Relay input value
×VT primary setting / VT secondary setting
Range *22 0.00 ~ VT primary setting / VT secondary setting ×165 [V]
Real time
Update Approx. 200 ms
Conversion
Indication value = Relay input value
×VT primary setting / VT secondary setting
Max. record
Range *22 0.00 ~ VT primary setting / VT secondary setting ×165 [V]
Conversion
Indication value = Relay input value
×VT primary setting / VT secondary setting
Display
Voltage
Fault record
*23
Range *22 0.00 ~ VT primary setting / VT secondary setting ×165 [V]
*22 The form of display depends on value range as shown in the tables below:
VT primary setting value determines the minimum number of digits to be displayed on each measurement display.
When a value to be displayed exceeds the max. value of the display range, the max. value will blink.
VT primary setting 100 ~ 500[V] 501 ~ 10000[V] 11 ~ 300[kV]
0 ~ 999[V] □□□[V] □.□□[kV] □.□[kV]
1.00 ~ 9.99[kV] □.□□[kV] □.□□[kV] □.□[kV]
10.0 ~ 99.9[kV] □□.□[kV] □□.□[kV] □□.□[kV]
Form of
display
100 ~ 999[kV] □□□[kV] □□□[kV] □□□[kV]
*23 When a communication card is connected, waveform data in the event of system fault can be read.
(See the section 4 “Function”).
*24 When the product is shipped from the factory, each setting value is “Lock” (With lock setting element) or “minimum
setting value“ (Without lock setting element).
Page 8
PCKN-OIL738
8
3 Characteristics
Common conditions
(1) Rated frequency: ±1%
(2) Ambient temperature: 20°C±10°C
(3) Aux. supply voltage: Rated voltage±2%
The conditions shown on the left
should be applied unless otherwise
specified.
3.1 Protective elements
Items Conditions Guaranteed performance
Undervoltage
element
Operation
value
Overvoltage
element
(Common conditions) Setting value ±5%
Undervoltage
element
Operation value × 105% or
less
Reset value
Overvoltage
element
(Common conditions)
Operation value × 95% or
more
Undervoltage
element
Rated voltage Æ Setting×70%
- For setting of INST
40ms or less
- For setting of 0.4s or less
Setting value ± 25ms
- For setting of 0.5s or more
Setting value ± 5%
Operation
time
Overvoltage
element
0 Æ Setting×120%
- For setting of INST
50ms or less
- For setting of 0.4s or less
Setting value ± 25ms
- For setting of 0.5s or more
Setting value ± 5%
Undervoltage
element
Setting×70% Æ Rated voltage
Reset time
Overvoltage
element
Setting×120% Æ 0
60ms or less
3.2 Measurement elements
Items Condition Guaranteed performance
Real time and max. records ±1%
Fault record
VT primary setting /
VT secondary setting ×165
±1%
Page 9

PCKN-OIL738
9
3.3 Common technical data
ITEM DESCRIPTION CONDITION STANDARD
Ambient operating
temperature
-10°C to +55°C IEC60255-6
Ambient storage and
transport temperature
-25°C to +70°C IEC60255-6
Environment
Damp heat +40°C, 95%RH, 4 days IEC60068-2-3
VT 1.15Vn, 3h Thermal
withstand
CT 40In, 1s
Circuit of 60V or below 500VAC, 1min.
Circuit of more than
60V and 500v or below
2000VAC 1min.
1) Between each circuit
and the exposed
conductive parts, the
terminals of each
independent circuit
being connected
together
2) Between independent
circuits, the terminals of
each independent circuit
being connected together
Dielectric test
Open contact 1000VAC, 1min. Between open contact poles
IEC60255-5
Impulse voltage test 5kV, 1.2µs/50µs
1) Between each circuit
and the exposed
conductive parts, the
terminals of each
independent circuit
being connected
together
2) Between independent
circuits, the terminals of
each independent circuit
being connected together
IEC60255-5
Common mode
2.5kV peak, 1MHz with 200Ω
source impedance for 2s
Between independent
circuits, and between
independent circuit and earth
High-frequency
disturbance test
Differential mode
1.0kV peak, 1MHz with 200Ω
source impedance for 2s
Across terminals of the same
circuit
IEC60255-22-1
class 3
8kV Contact discharge
Electrostatic discharge test
15kV Air discharge
IEC60255-22-2
Class 4
Radiated electromagnetic field
disturbance test
68 to 87Mhz
146 to 174MHz
420 to 470MHz
IEC60255-22-3
class 3
Fast transient disturbance test 2.0kV, 5ns/50ns, 1min IEC60255-22-4
Vibration test Refer to class 1
IEC60255-21-1
Class 1
Shock response Refer to class 2
IEC60255-21-2
Class 2
Shock withstand Refer to class 1
IEC60255-21-2
Class 1
Bump Refer to class 1
IEC60255-21-2
Class 1
Enclosure protection IP51 IEC60529
Vn: Rated voltage, In: Rated current
Page 10
PCKN-OIL738
10
4 Functions
4.1 Protection
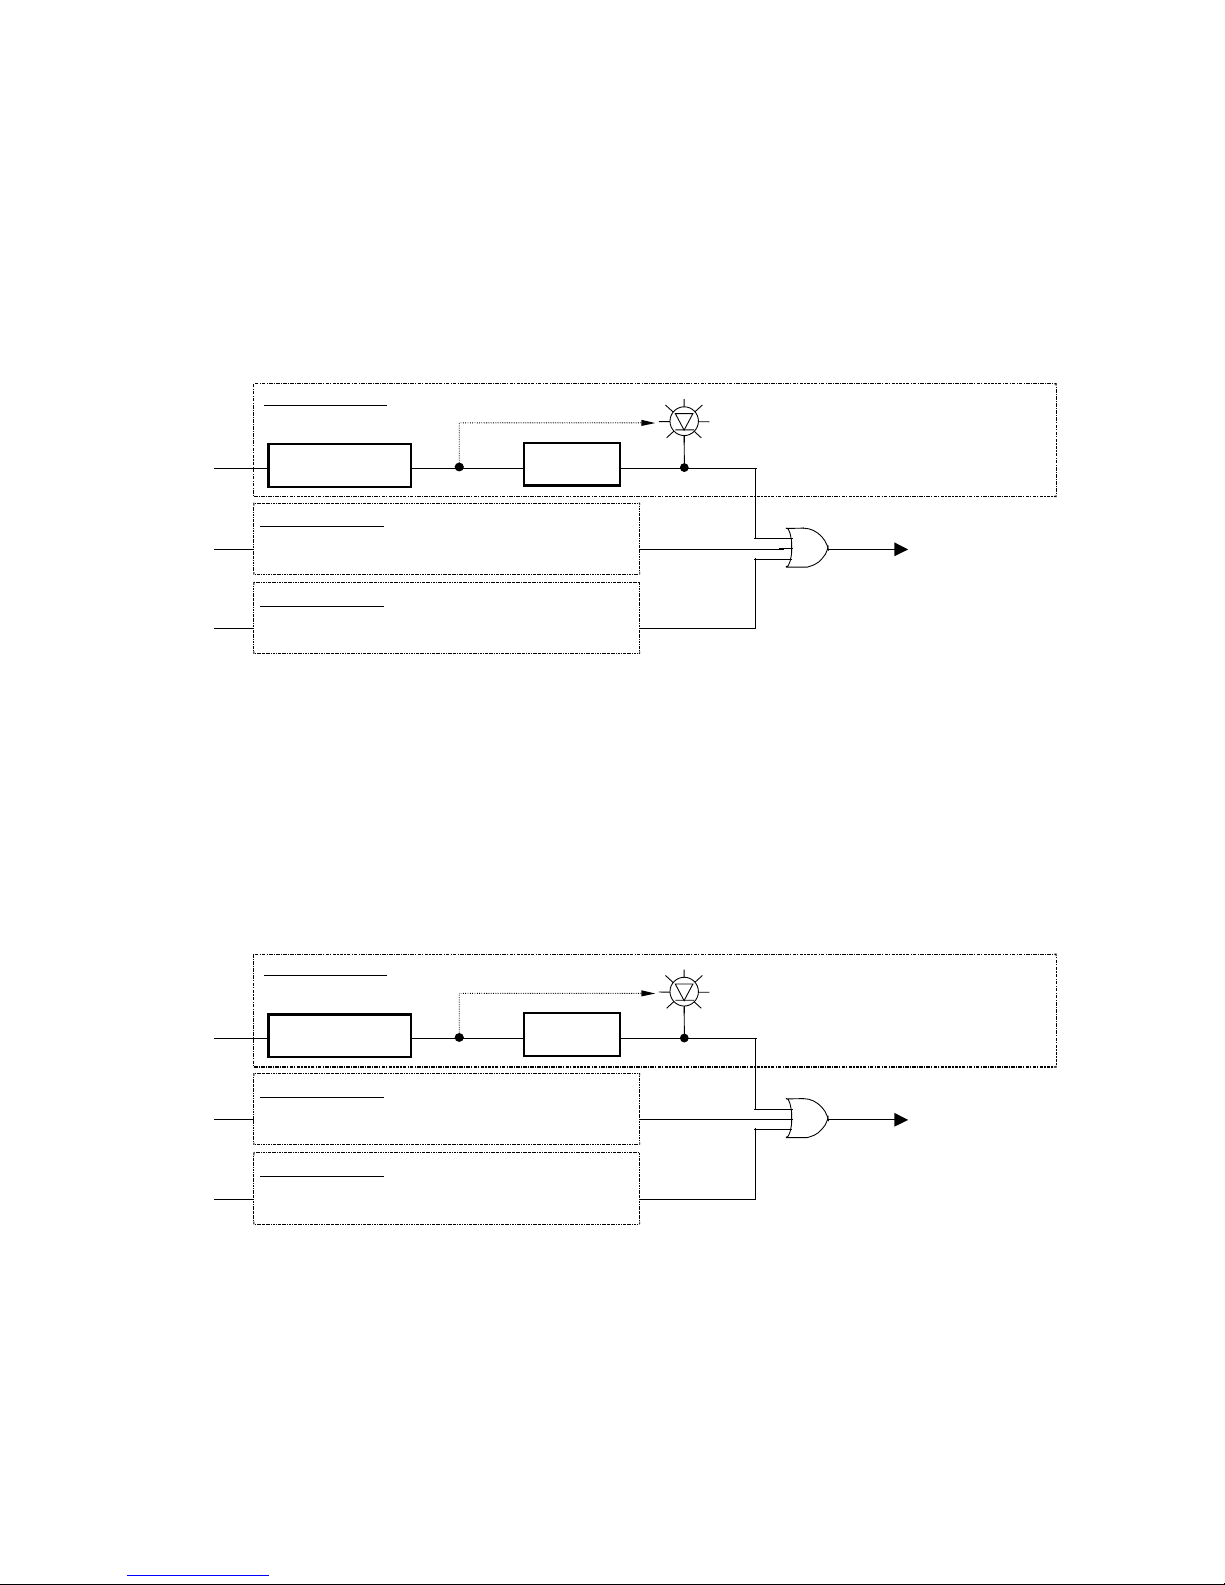
4.1.1. Undervoltage elements
Fig. 4.1 “Undervoltage element internal function block diagram” shows operation of the undervoltage
elements.
Undervoltage element compares input voltages of voltage circuit with the operation setting. If an input
voltage is less than the specified operation level, the element outputs an operation signal when the timer
expires.
Undervoltage elem ent detected
(Operation indicator LED blinking)
Undervoltage elem ent detected
(Operation indicator LED lit)
Operation signal
(Undervoltage element)
V
AB
Undervoltage element
Voltage comparison
Timer
(trip/reset)
A
B-phase processing
BC-phase processing
Same as processing in AB-phase
V
BC
V
CA
CA-phase processing
Same as processing in AB-phase
Figure 4.1 Undervoltage element internal function diagram
4.1.2. Overvoltage elements
Fig. 4.2 “Overvoltage element internal function block diagram” shows operation of the overvoltage
elements.
Overvoltage element compares input voltages of voltage circuit with the operation setting. If an input
voltage is larger than the specified operation level, the element outputs an operation signal when the timer
expires.
Overvoltage element detected
(Operation indicator LED blinking)
Overvoltage element detected
(Operation indicator LED lit)
Operation signal
(Overvoltage element)
V
AB
Overvoltage element
Voltage comparison
Timer
(trip/reset)
A
B-phase processing
BC-phase processing
Same as processing in AB-phase
V
BC
V
CA
CA-phase processing
Same as processing in AB-phase
Figure 4.2 Overvoltage element internal function diagram
Page 11

PCKN-OIL738
11
4.1.3 General functions
(1) Setting of operation voltage
The operation voltage settings for undervoltage and overvoltage elements are indicated with voltage
values [V].
When the setting “Lock”, the elements selected are locked for operation.
(2) Setting of operation timer
The operation time settings for undervoltage and overvoltage elements are indicated with second [s].
(3) Operation display
For undervoltage element, when the input voltage becomes less than the operation setting, the
corresponding operation indicator LED will blink to allow you check the starting value.
For overvoltage element, when the input voltage becomes larger than the operation setting, the
corresponding operation indicator LED will blink to allow you check the starting value.
The LED lamp will come on as soon as an operation output is made when a period of operation time
has elapsed.
The operation indicator LED has been set to “self-hold” in the factory. This setting can be freely
changed to “auto reset”.
With the “self-hold” setting, data of the latest operation indication will be stored in the internal memory
even if the auxiliary power supply runs down.
The data stored will be cleared when the “indicator reset” switch is pressed.
Up to latest five phenomena can be stored and displayed as a history record. (Older data than the
latest five phenomena will automatically be cleared).
Item No. History Sequence of recording
311 1st phenomena
312 2nd phenomena
313 3rd phenomena
314 4th phenomena
315 5th phenomena
Latest fault record data
↓
↓
↓
Oldest fault record data
Page 12
PCKN-OIL738
12
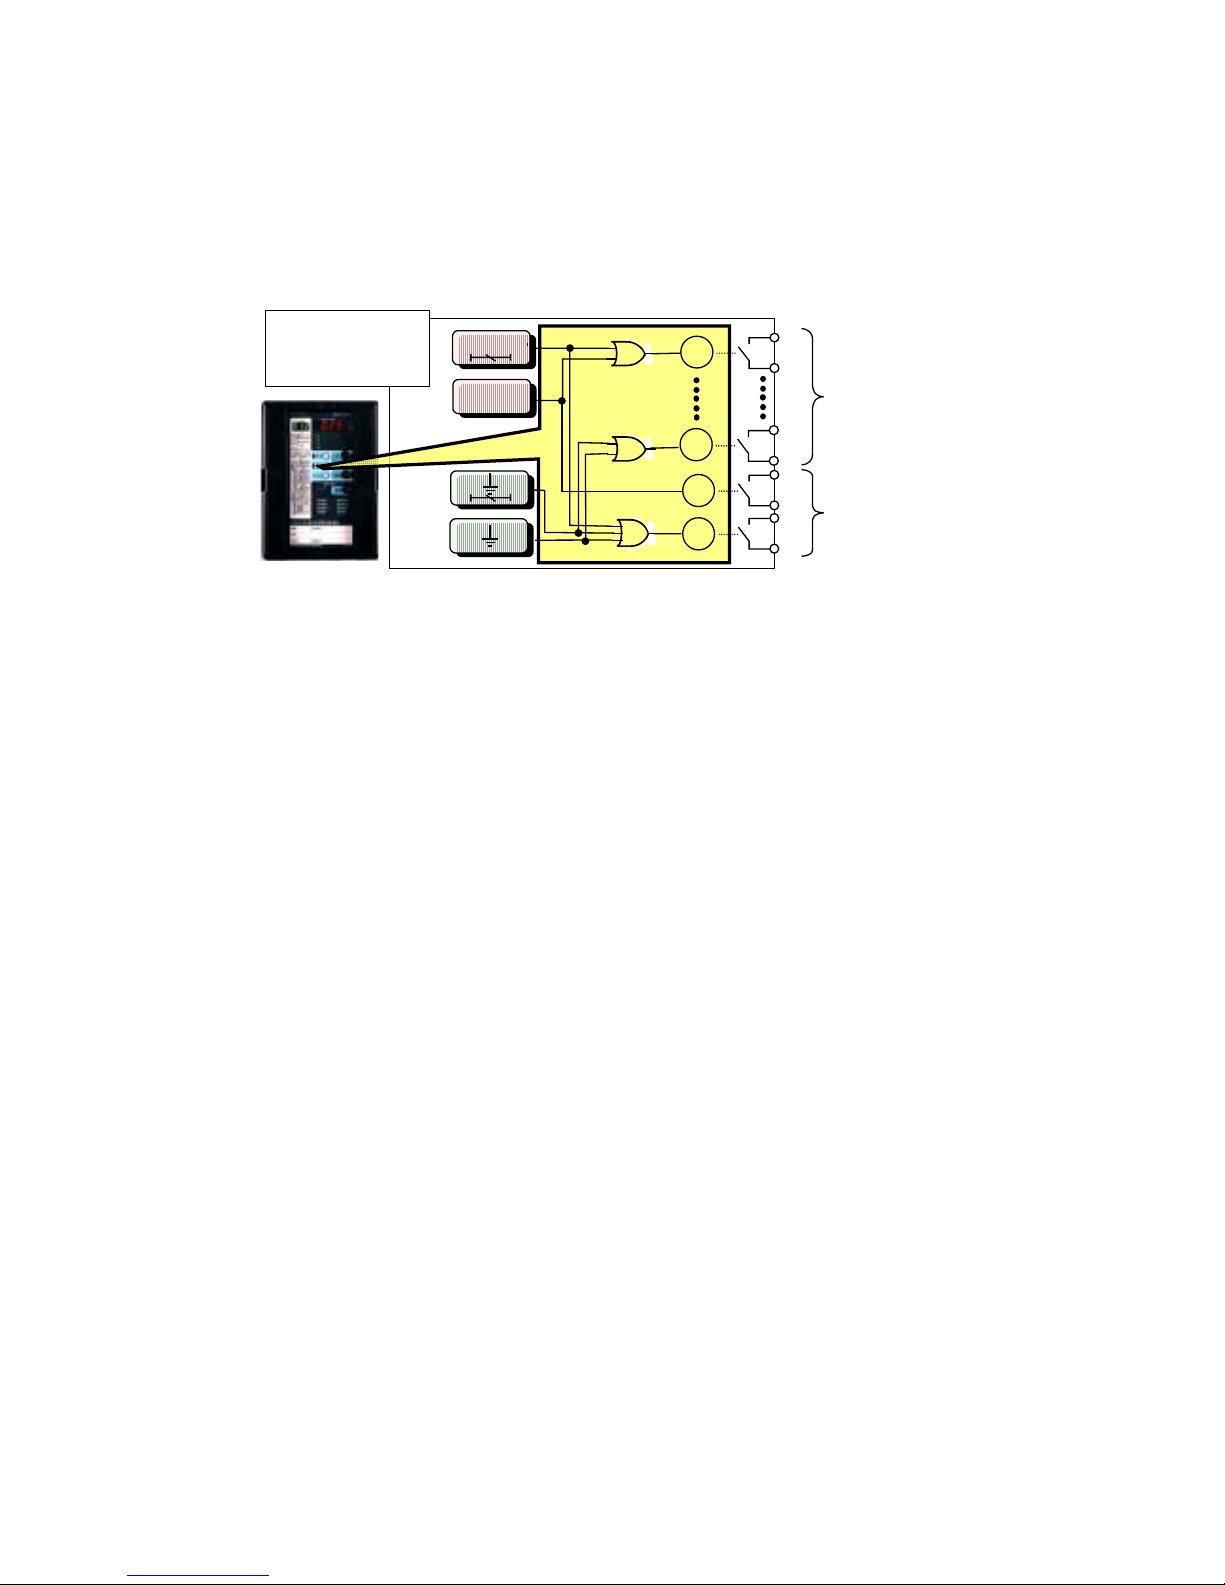
(4) Output contacts
The signaling outputs X
0
to X3 and trip outputs X4 and X5 are all programmable type.
The factory default setting of the arrangement of these outputs is as shown in the internal function
block diagram of Figure 5.2. This setting can be freely changed by specifying outputs of the internal
elements based on the OR logic.
All the outputs have been set to “auto reset” in the factory. Any of them can be changed to “self hold”.
X
0
X
5
X
3
X4
I >>
I
>
I
>>
I >
Signaling
(4 circuits)
Trip
(2 circuits)
Set output logic as
desired by using
OR logic.
Figure 4.3 Schematic image of Programmable Outputs (example: COC4-A01)
(5) Forced operation
It is possible to carry out forced operation of any of the signaling outputs X
0
to X3 and trip outputs X4
and X
5
independently. Forced operation is useful for checking the wiring.
When forced operation is carried out, the corresponding LED lamps will come on to show the current
status of the programmable outputs. Checking the lamp status will be useful not only for wiring check
but also to check the programmable outputs arrangement.
Page 13

PCKN-OIL738
13
4.2 Measurement
Voltages input to the relay are measured and converted into freely set VT primary voltages, then indicated
in the display.
(1) Real time measurement
The effective voltage input to the relay under steady state is displayed.
(2) Max. record
The maximum effective voltage is recorded and stored.
The max. record will be all cleared when “aux. power supply OFF” or “max. record reset” operation is
made.
(3) Fault record
In the event of system fault, the effective voltage and waveform data that have been measured at the
time when one of the protection elements operates to issue an output signal are stored. Data of up to
five phenomena can be stored and displayed for each phase.
With “aux. power supply OFF”, only the waveform data will be cleared and the effective voltage data
will remain. With “fault record reset” operation, however, both of the data items will be all cleared.
(Records older than the 5
th
phenomenon will automatically be cleared.)
Item No. History Sequence of recording
211 1st phenomena
212 2nd phenomena
213 3rd phenomena
214 4th phenomena
215 5th phenomena
Latest fault record data
↓
↓
↓
Oldest fault record data
The following fault waveform data can be collected if a communication card is installed:
Item Specification
Data sampling cycle Fixed to the electric angle of 30° of rated frequency
Data storing capacity (for
a phenomenon)
224 cycles of rated frequency
(Data point: 224×360°/30° = 2688 points)
Permissible setting range 224 cycles before trip ~ 224 cycles after trip
Collected data
The range for data collection can be set by cycle within the
“data storing capacity” in the “permissible set range”.
224 cycles after t rip→
←224 cycles before trip
Collected data
Up to 224 cycles
Data sampling cycle
Trip occu rs!
Output contact
ON
OFF
Permissible set
Figure 4.4 Concept of recording fault waveform
Page 14

PCKN-OIL738
14
4.3 Self-diagnosis
The self-diagnosis function monitors the electronic circuit and built-in power source continuously. If an
abnormal condition occurs, the protection elements will be locked for operation. Also, the RUN LED lamp
will go off and the self-diagnosis output contact (break contact) will be closed.
(1) Checking defect code at failure detection
When a failure is detected, the defect code will be recorded. This defect code can be checked
through the self-diagnosis (ALARM) status indication.
(2) Resetting self-diagnosis output
If a failure is detected, the failure status may be reset by turning off/on the power
.
In this case, be sure to lock the trip circuit on the external wiring of the relay
before resetting. (If
the failure persists, an erroneous output may be caused).
(3) Clearing the defect code
The defect code data stored at failure detection can not be cleared only by carrying out the power
on/off procedure in the item (2) above. All the defect code numbers that have been detected since
the previous “self-diagnosis reset” (RESET ALARM) operation was made are accumulated in the
memory. To clear the record data, carry out “self-diagnosis reset” (RESET ALARM) operation.
Table 4.1 Output for protection relay failures
Output
Display
Status Detected items
RUN
Defect
code
ALARM
(break
contact)
Operation
output lock
Normal
−
On Open Not locked
Power circuit
failure
−
Locked
CPU failure
−
No
display
Not locked
ROM check 0001
RAM check 0002
A/D accuracy check 0003
A/I check 0004
A/D check 0005
SRAM check 0006
D/O status check 0008
D/O operation check 0009
Analog filter check 0010
A/I double check 0011
D/I check *41
0012
E2PROM check 0013
Computing function check 0014
WDT check 0015
Data transfer check *42
0016
Differential current check *43
Off
0017
Closed
Locked
Communication card check *44
0028
Communication card channel No. switch setting error *44
0029
Communication card portrait switch setting error *44
0030
Communication card channel No. switch change error *44
0031
Monitor
error
Communication card portrait switch change error *44
On
0032
Open Not locked
*41 Monitored only in the models with built-in D/I function.
*42 Monitored only in the models with D2 unit.
*43 Monitored only the biased differential relay.
*44 Monitored only when the relay is installed with communication card.
Page 15

PCKN-OIL738
15
4.4 Communication
Figure 4.5 shows an example of network system configuration.
For more information on the communication facilities, see the materials shown in the introduction (page
2).
Figure 4.5 Example of communication network system configuration
Central Control System
The network system enables the central control system to full
y
access to the protection relays, and achieve remote monitoring o
f
the measurement values, operational status etc as well as
remote operation such as change of settings. Thereby efficien
t
operation and maintenance are realized.
- ModBus
(RS485)
- CC-Link
RTU
Remote Operation and Monitorin
g
By connecting PC with relay via the RS232C port located on the
relay panel, local operation and monitoring are enabled as same
as the remote operation and monitoring. Thereby the
maintenance work at site is strongly supported.
RS232C
Local Operation and Monitoring for Site Maintenance
- Measurement value
- Relay settings
- Relay operation status
- Fault Record
- Monitoring status
- Time
- Measurement setting
- Relay setting
- Time Adjustment
Remote Operation
Remote Monitoring
Local Operation Local Monitoring
Page 16

PCKN-OIL738
16
Using the communication facilitates, it is possible to perform Remote Monitoring and Remote Operation
with the various useful functions shown in Table 4.2.
Table 4.2 Outline of functions enabled by communication network
Direction of
communication
Item Description
Setting Read the settings stored in the protection relay.
Measurement Read the measurements stored in the protection relay.
Max. value Read the max. values stored in the protection relay.
Fault record Read the measurements at the time of trip.
Self-diagnosis (ALARM) Read the result of self-diagnosis.
Operation element Read the elements that operated at the time of trip.
Operation time Read the time at the time of trip.
Current time Read the internal time of the communication card.
Remote
Monitoring
RTU
Protection
relay
Waveform record Read the wave form at the time of trip.
Setting Change the setting of the protection relay.
Indicator reset Reset the LED lamp that came on at the time of trip.
Self-diagnosis (ALARM) reset Clear the result of self-diagnosis.
Fault record reset Clear the fault record, operation elements and
operation time data.
Max. record reset Clear the max. record.
Forced operation Carry out forced operation of output contact.
Remote
Operation
RTU
Protection
relay
Time Set time of communicate card.
Page 17

PCKN-OIL738
17
5 Configuration
5.1 Internal configuration
(1) I/O and CPU circuits
Fig. 5.1 shows the internal block diagram of the model CBV2-A01D1.
Voltage input is converted into AC signals at the electronic circuit level via the auxiliary transformer
and filter circuits. These signals are retained as a form of DC signal in the sample hold circuit on each
channel sharing a same time. The multiplexer selects a channel to take the signal and sends it to an
A/D converter. The signals are converted to digital signals sequentially in the converter to be sent to
the CPU.
The setting circuit is used to input setting data into the CPU.
These inputs will be used to carry out the functions shown in Fig. 5.2 “Internal function block diagram”,
and then issue output signals to the display and output relay.
(2) Self-diagnosis circuit
When the self-diagnosis function detects that the electronic and power circuits are normal, the output
relay will be energized to open the self-diagnosis output contact (break contact).
The self-diagnosis output contact (break contact) will be closed when a failure occurs in the circuits
above or when the built-in power fuse burns.
Page 18

18 PCKN-OIL738
Undervoltage CA phase Ind.
Undervoltage AB phase Ind.
Undervoltage BC phase Ind.
Overvoltage CA phase Ind.
Overvoltage AB phase Ind.
Overvoltage BC phase Ind.
U >
Setting
switches
A/D
Numerical display
A-07
VAB
A-0
8
S/HFilter
Trip
X5
X4
X3
X2
X1
X0
Communication indication
Unit indication
Trip indication
Power circuit
monitoring
A-01
AC/DC
DC/DC
Power
source
Auxiliary
power supply
A-03
+
Y
X
5
B-19
B-20
X4
B-17
B-18
Tri
p
contacts
Programmable output
B-07
B-08
X0
B-09
B-10
X1
B-11
B-12
X2
B-13
B-14
X3
Signaling
Self-diagnosis output
Y
Self-diagnosis output
B-05
B-06
Serial
communication
bus
D
A
B-01
DB
B-02
DG
B-03
SLD
B-04
E
A-02
Run indication
Self-diagnosis
(Except comm. card)
Communication card
Self-diagnosis (only comm. card)
Reception circuit
Transmission circuit
MPX
CPU
Overvoltage
element
A-09
VBC
A-10
S/HFilter
A-11
VCA
A-12
S/HFilter
UV Test indication
Undervoltage
element
U <
Figure 5.1 Internal block diagram of Type CBV2-A01D1 relay
Page 19

19 PCKN-OIL738
Signaling
Undervoltage AB phase Ind.
A
-07
Undervoltage BC phase Ind.
Power circuit
monitoring
Self-diagnosis
(Except comm. card)
A
-01
A
-03
+
Programmable output
V
AB
A-08
Undervoltage CA phase Ind.
Trip indication
X1
X0
X2
X3
Trip
X4
X5
Self-diagnosis output
Y
B-0
5
B-06
YX5
B-19
B-20
X
4
B-17
B-1
8
Trip
X
3
B-13
B-14
X
2
B-11
B-12
X1
B-09
B-10
X
0
B-07
B-0
8
DA
B-01
DB
B-02
DG
B-03
SLD
B-04
E
A
-02
Run indication
Communication indication
Auxiliary
power supply
AC/DC
DC/DC
Power
sourse
Communication card
Self-diagnosis (only comm. card)
Reception circuit
Transmission circuit
Serial
communication
bus
Self-diagnosis output
Programmable
output
U >
Overvoltage
element
A
-09
VBC
A
-10
A
-11
VCA
A
-12
Undervoltage
Undervoltage
Undervoltage
Overvoltage
Overvoltage
Overvoltage
Overvoltage AB phase Ind.
Overvoltage BC phase Ind.
Overvoltage CA phase Ind.
Undervoltage
element
U <
Figure 5.2 Internal function block diagram of Type CBV2-A01D1 relay
Page 20

PCKN-OIL738
20
5.2 External connection
(1) Connection diagram
Figures 5.4 to 5.5 show examples of input circuit (AC circuit) connection, Figure 5.6 an example of
control circuit (DC circuit) connection and Figure 5.7 a terminal arrangement.
In the terminals, M3.5 screws should be used and wires of 2 mm
2
or less are recommended to be
used.
(2) Precautions for wiring work
a. Important facilities should be provided with fail safe measures such as dual system to improve
reliability of the facilities.
b. Effects of external surge
Some type of surge with a certain condition may inversely affect the relay. If so, take it into account
to install MF type surge absorbers made by TM T&D.
c. Guarantee of AC auxiliary power supply against power interruption
The AC auxiliary power supply of the relay is not guaranteed against power interruption. When
you do not have an
uninterruptible AC power source, use an AC/DC converter of CPS1 type
manufactured by TM T&D or
uninterruptible power source (UPS) that is commercially available.
d. Inrush current of auxiliary supply
Since inrush current may flow in the relay when the auxiliary power supply is turned on as shown
in the figure below, make consideration of this point when selecting the breaker for the auxiliary
power supply circuit.
Input voltage Inrush current Ip
110V
Approx. 20A
DC
220V
Approx. 55A
100V
Approx. 25A
AC
220V
Approx. 65A
Figure 5.3 Inrush current of auxiliary power supply
e. Trip circuit
Only the contacts X
4
and X5 can be used for the trip circuit. Please keep in mind that the contacts X0
to X
3
can not be used for the trip circuit. (If used, the contact may burn).
Connect the pallet contact (52a) of the circuit breaker to the trip circuit.
f. Self-diagnosis output circuit
The self-diagnosis output contact is so configured that the auxiliary relay can be energized (break
contact) with normal result of monitoring, in order to be able to continue monitoring even if the
Ip
A
pprox.
2ms
Inputting
Input voltage
Input current
0V
0V
Page 21

PCKN-OIL738
21
built-in power fuse burns. Therefore, connect the timer to the external wiring. (See Fig. 5.6 “DC
circuit connection diagram”)
g. Earth circuit
Be sure to earth the earth terminal located on the back of the relay according to the Class D earth
wiring method.
Page 22

PCKN-OIL738
22
E
DA
DB
SLD
DG
B-06
B-05
B-07
B-08
B-09
B-10
B-11
B-12
B-13
B-14
B-17
B-18
B-19
B-20
B-01
B-02
B-03
B-04
A
-02
+
A
-01
A
-03
Y
X
0
X
1
X
3
X
4
X
5
X
2
Auxiliary
power supply
Serial
communication
bus
Comm. card
A
-07
A
-08
A
-09
A
-10
A
-11
A
-12
A B
C
V
CA
VT
VAB
V
BC
U >
Self-diagnosis output
Signaling
Trip
Programmable output
U <
Figure 5.4 External connection diagram for CBV2-A01D1 relay (Phase-to-phase voltage detection)
E
DA
DB
SLD
DG
B-06
B-05
B-07
B-08
B-09
B-10
B-11
B-12
B-13
B-14
B-17
B-18
B-19
B-20
B-01
B-02
B-03
B-04
A
-02
+
A
-01
A
-03
Y
X
0
X
1
X
3
X
4
X
5
X
2
Auxiliary
power supply
Serial
communication
bus
Comm. card
A
-07
A
-08
A
-09
A
-10
A
-11
A
-12
A B
C
V
C
VT
VA
V
B
U >
Self-diagnosis output
Signaling
Trip
Programmable output
U <
Figure 5.5 External connection diagram for CBV2-A01D1 relay (Phase-to-earth voltage detection)
Page 23

PCKN-OIL738
23
Self-diagnosis
output
Trip
DA
DB
SLD
DG
B-06
B-05
B-07
B-08
B-09
B-10
B-11
B-12
B-13
B-14
B-17
B-18
B-19
B-20
B-01
B-02
B-03
B-04
Serial communication
bus
E
A-02
+
Auxiliary
power
supply
A-01
A-03
Programmable
output
Signaling
U>
Overvoltage
U<
Undervoltage
Y
X
0
X
1
X
3
X
4
X
5
X
2
CPS1 type
AC/DC
converter
or
UPS
To control
system (alarm
and other
signals)
52a
Time-delayed
operation
contact
(make contact)
Approx. 1 s
100VDC ~ 220VDC
100VAC ~ 220VAC
TL
TC
To master
station (when
communication
card installed)
Note 1) The self-diagnosis output contact is so configured that the auxiliary relay can be energized (“break contact” opened) when normal result of self-diagnosis is rec eived.
This type of contact will allow the relay to continue automatic self-check even after the built- in power fuse burns. Therefore, the “break contact” is closed when the power
is applied and will be opened after about 50ms. If the auxiliary power supply of the relay and the self-diagnosis output contact shares a same power source, the “break
contact” will be closed temporarily after the auxiliary power supply is turned on. In the case where the phenomenon stated in the above would conflict with your
system requirement, it is recommended that the self-diagnosis output contact should be connected via the time-delayed timer as shown in the left of the figure.
Note 2) Regarding to the type CPS1 AC/DC converter or commercially available uninterruptible power supply (UPS), refer to the note *21 in the section 2.1 General information.
Figure 5.6 Auxiliary power supply circuit connection example of type CBV2-A01D1 relay
Page 24

PCKN-OIL738
24
02
04
06
08
10
12
01
03
05
07
09
11
02
04
06
08
10
12
14
16
18
20
01
03
05
07
09
11
13
15
17
19
A B
A
uxiliary
power supply
+
Earth circuit
E
D
32-M3.5 screws
Figure 5.6 Rear view of type CBV2-A01D1 relay
Page 25

PCKN-OIL738
25
6 Handling
6.1 Unpacking
Usually this relay is packed in a D1 case for transportation. However, it may occur that only the sub unit is
transported independently for the convenience at repair. In such a case, fully brush off the dust, dirt, etc.
adhered to the sub unit after completion of unpacking, and further visually check that the parts mounted
on the front panel or built in the sub unit are not damaged.
6.2 Transportation and storage
To carry the equipment within the place of use, handle it carefully so that the parts installed on the front
panel of the sub unit or built-in parts cannot be deformed or broken.
6.3 Appearance and how to pull sub unit out
The relay is so constructed that the sub unit can be drawn out, in order to facilitate inspection or test. It is
possible to pull the sub unit out without disconnecting the external wiring.
Note that the sub unit should not be drawn out with the line hot. Before drawing out, be sure to take the
following actions.
- Lock the tripping circuit including breakers.
- Stop the main circuit.
- Open the auxiliary power supply circuit.
Bear in mind that careless opening of circuits may result in opening the other control circuits too to impair
the protective function. Be sure to only shut off the concerned circuit.
Communication card
Case
Sub unit
Cover
Lock levers
Draw-out handles
Cover operating buttons
Figure 6.1 Outside view of type CBV2-A01D1 relay
Page 26

PCKN-OIL738
26
6.3.1 How to draw sub unit out
(1) Removing the cover
Hold the lock levers, which are located at both
sides of the cover, on their front sections. Take off
the cover straight toward you
while pushing the
levers inwards
.
(2) Drawing the sub unit
Grip the draw-out handles (located at both sides of
the front of the sub unit). Press the locking pieces
installed in the upper portion of the draw-out
handles with your thumbs to pull the sub unit
towards you.
Note) The sub unit is so designed that it can not be
removed unless it is pulled out with a
relatively strong force, in consideration of
quake-proof measures. When the relay unit
is to be removed independently, it is
recommended to draw it out with the case
held by other operator.
When about a half portion of the sub unit is pulled
out of the case, just stop the drawing motion. Then,
hold the top and bottom of the sub unit to pull it
out completely, in order to prevent the unit from
falling.
Note) Be careful not to touch the printed circuit
board and parts inside the sub unit.
Page 27

PCKN-OIL738
27
6.3.2 Housing the sub unit
(1) Housing the sub unit
Hold the sub unit on the top and bottom to push the
unit into the case approx. a half of the unit.
Note)
- Be careful not to touch the PCB and parts inside
the sub unit.
- The sub unit is so constructed that it can not be
housed in the case upside down.
Fully insert the sub unit into the case until you
hear a click while pressing the handles located on
both sides of the front of the sub unit.
Note) Please note that inserting the sub-unit
incompletely may only establish a poor
contact of the terminals located on the back
of the unit, which may cause operational
failure or heating.
(2) Attaching the cover
Fit the cover straight to the case. Hold the cover
frame to fully push the cover until it is clicked
and locked.
Note) After setting the cover, check if the buttons
can be smoothly pressed from over the
cover.
Page 28

PCKN-OIL738
28
6.4 How to use front control panel
6.4.1 Front control panel layout
U
BC
(
U
B
)
>
U
A
B
(UA)
>
U
CA
(
U
C
)
>
〜
50
FORCED OPERATION
CONTACT X
5
OP.
CONTACT X
0
OP.
7
〜
00
VOLTAGE.
(V)
15
〜
11
ITEM DATA
MITSUBISHI
MELPRO
TM
- D
U
BC
(
U
B
)
<
U
A
B
(
U
A
)
<
COMM
.
RUN
ITEM No.
VkV
2
0
MEASUREMENT
FAULT-RECORD
MAX.-RECORD
11
REAL-TIME
10
15
11
STATUS
3
OP.-ELEMENT
〜
ALARM
4
00
SETTING
5
22
21
20
12
11
10
TIME.
(s)
U <
VOLTAGE
(V)
TIME (s
)
IND.
END
IND.
TRIP
SET.END
SET
SELECT
CANCEL
SETTING
DOWN
UP
MADE IN JAPAN
TM T&D CORPORATION
YEAR:
SERIAL:
RATING:
A
ux. V:STYLE:
VOLTAGE RELAY
CBV2-A01D1
RESET
TRIP
OPERATION INDICATOR
VT-SECONDARY(V
)
02
03
04
RESET MAX.-REC.
05
RESET
06
RESET ALARM
TEST LED
VT-PRIMARY
(V)
60
〜
50
00
OPTION
(
REF.MANUAL
)
OP.IND.-HOLD
01 9
8
(
REF.MANUAL
)
CONT. X
0
〜
X
5
OP.
13
UV-TEST
UV-TEST
U
CA
(
U
C
)
<
CA
-PHASE
BC
-PHASE
A
B
-PHASE
U>
1.Setting/Cancel switch
16.Operation indicator LEDs
7.Operation Indicator Reset
switch
6.Indication/Indication End
switch
11.Communication LED
15.Setting End/Trip LED
3.Setting End/Trip switch
14.Setting/Cancel indicator LED
8.Item No. indicator LED
2.Select/Set switch
4.UP switch
5.Down switch
12.Unit LED
13.Phase LED
9.Item Data LED
10.RUN LED
Figure 6.2 Front view of type CBV2-A01D1 relay
Page 29

PCKN-OIL738
29
Table 6.1 Front control panel guide
No. Designation Symbol Description
1 Setting / Cancel
SETTING/CANCEL
Pressing this switch will start the procedure for setting,
forced operation or option.
When this switch is pressed again instead of the
SET.END/TRIP
switch, data that has been programmed
will be all cleared to terminate the selected procedure.
The SETTING/CANCEL indicator LED is lit during the
procedure.
2 Select / Set
SELECT/SET
This switch is used to select an item number and to program
item data during setting, forced operation or option
procedure.
When data is programmed to be ready for replacing the
currently used setting, the SET.END/TRIP LED will blink.
3 Setting End / Trip
SET. END/TRIP
When the SET.END/TRIP switch is pressed with its LED
blinking during setting, forced operation or option procedure,
the currently enabled setting will be replaced by data given
by programming. The new setting will be thus enabled.
4 UP select
UP
5 DOWN select
DOWN
These switches are used for selecting data elements.
Pressing these switches for a while will allow fast forwarding.
With the cover operating buttons, you can use the switches
without removing the cover.
6 Indication / Indication End
IND./IND.END
Pressing this switch will start or end the display of settings
and measurements.
With the cover operating button, you can use the switch
without removing the cover.
7
Operational key switches
Reset
RESET
Pressing this switch will reset output contacts after the relay
operated and extinguish the operation indicator LEDs.
With the cover operating button, you can use the switch
without removing the cover.
8 Item No. Green
‑
A number allocated to the selected setting, forced operation
or option item is indicated here.
9 Item Data Red
‑
Data that corresponds to the item number selected is
displayed here.
For the indication of individual letters, see Table 6.2.
10 RUN Green
‑
Indicate the result of the automatic self-check. The lamp will
be lit for normal results while off for abnormal.
11 Communication Green
‑
Indicate the operational status of the communication card.
- With a communication card installed: the lamp will be lit for
normal conditions, blinking during communication and off
for abnormal conditions.
- With a communication card not installed: the lamp will be
off.
12 Unit Yellow
‑
Indicate the unit used for the item data.
13 Phase Yellow
‑
Indicate the phase that corresponds to the item data.
14 Setting / Cancel Yellow
‑
This lamp will be lit during setting, forced operation or option
procedure.
15 Setting End / Trip Yellow
‑
This lamp will blink when new data is programmed to be
ready for replacing the currently enabled setting.
16
Indicator LEDs
Operation Red
‑
Indicate the corresponding operation elements and phases
of the relay.
Page 30

PCKN-OIL738
30
Table 6.2 Letter representation of item data indicator LEDs
Item
Item
Designation Letters
Display in item data
box
Designation Letters
Display in item data
box
On ON
USE OFF
Off OFF
AB-
phase
AB
Yes YES
BC-
phase
BC
No NO
UV Test
CA-
phase
CA
Operation
lock
LOCK
Instantaneou
s
INST
Page 31

PCKN-OIL738
31
6.4.2 Operational procedure
For more information about the operational procedure shown below, see the MELPRO-D Series General
Operation Manual (PCKN-OIL750).
6.4.2.1 Relay without RS232C communication I/F
Table 6.3 Operational procedure
Item
Corresponding section of
general operation manual
No. Designation Description
Indication
mode
Setting / forced
operation /
option mode
010 Real time
Measure and display effective value voltages input
to the relay all the time.
A-1
011 Max. record Display the max. effective value voltage.
A-2
211 1st phenomena
212 2
nd
phenomena
213 3rd phenomena
214 4th phenomena
215
Measurement
Fault
record
5th phenomena
Keep in record and display effective value currents
for up to five latest phenomena of relay trip caused
by system fault.
The 1
st
phenomena is the latest trip and the 5th the
oldest.
A-3
311 1st phenomena
312 2
nd
phenomena
313 3rd phenomena
314 4th phenomena
315
Operation
elements
5th phenomena
Keep in record and display the status of the
operation indicator LEDs for up to five latest
phenomena of relay trip caused by system fault.
The 1
st
phenomena is the latest trip and the 5th the
oldest.
A-4
400
Status
Self-diagnosis (ALARM)
Keep in record and display defect codes in the
case where an abnormal condition is detected by
the
self-diagnosis.
A-6
511 Operation voltage [V]
512 Operation time [s]
513
Undervoltage
UV TEST
521 Operation voltage [V]
522
Setting
Overvoltage
Operation time [s]
Set and display settings.
A-7 B-1
700 Contact X0 operation
710 Contact X1 operation
720 Contact X2 operation
730 Contact X3 operation
740 Contact X4 operation
750
Forced
operation
Contact X5 operation
Carry out forced operation of output contacts
individually.
The setting of the programmable outputs can be
checked through the operation indicator LEDs.
C-1
800 Contact X0
810 Contact X1
820 Contact X2
830 Contact X3
840 Contact X4
850
Contact
arrangement
Contact X
5
Configure the programmable outputs. Also, set
and display self-hold/reset setting of the
programmable outputs.
For the guide for setting, see the section 6.4.2.3
(1) below.
D-1
860 Operation indicator LED hold
Set and display self-hold/auto reset setting of the
operation indicator LEDs. For the guide for setting,
see the section 6.4.2.3 (2) below.
D-2
901 VT primary side [V]
Set the VT primary voltage of voltage circuit
connected to the relay.
902 VT secondary side [V]
Set the VT secondary voltage of voltage circuit
connected to the relay.
A-7
D-3
903 Max. record reset Clear data of the max. record.
904 Fault record reset Clear data of the fault record.
905
Self-diagnosis (ALARM) reset Clear data of the self-diagnosis record.
D-4
906
Option
LED lamp test
Carry out forced illumination of all the LED lamps
on the front of the relay unit.
D-5
Page 32

PCKN-OIL738
32
6.4.2.2 Relay with RS232C communication I/F
Item
Corresponding section of
general operation manual
No. Designation Description
Indication
mode
Setting / forced
operation /
option mode
As the same as Table 6.3 described in item 6.4.2.1 about the No. 010〜860.
901 VT primary side [V]
Set the VT primary voltage of the voltage circuit
connected to the relay.
902 VT secondary side [V]
Set the VT secondary voltage of the voltage circuit
connected to the relay.
D-3
903 Relay password enable/disable option Set relay password enable or disable for setting.
A-7
D-9
904 Max. record reset Clear data of the max. record.
905 Fault record reset Clear data of the fault record.
906
Self-diagnosis (ALARM) reset Clear data of the self-diagnosis record.
D-4
907
LED lamp test
Carry out forced illumination of all the LED lamps
on the front of the relay unit.
D-5
Page 33

PCKN-OIL738
33
6.4.2.3 Guide for option function
(1) Specifying contact arrangement data of output contacts
The table below shows the setting guide table. See the section D-1
of the general operation
manual for the detailed procedure.
Input
Digit
No.
Setting item
0 1
0 Self hold / auto reset upon reset
judgement
Reset Hold
1 Undervoltage AB-phase Off On
2 Undervoltage BC-phase Off On
3 Undervoltage CA-phase Off On
4 Not used X
5 Overvoltage AB-phase Off On
6 Overvoltage BC-phase Off On
7 Overvoltage CA-phase Off On
8 Not used X
9 Not used X
10 Not used X
11 Not used X
12 Not used X
13 Not used X
14 Not used X
15
OR element combination
Not used X
00000 0 00 0
ditto.
ditto.
0
Contact arrangement data
0
Conversion from binary number to hexadecimal
Binary Æ Hexadecimal Binary Æ Hexadecimal Binary Æ Hexadecimal
0 0 0 0 Æ 0 0 1 1 0 Æ 6 1100Æ C
0 0 0 1 Æ 1 0 1 1 1 Æ 7 1101Æ D
0 0 1 0 Æ 2 1 0 0 0 Æ 8 1110Æ E
0 0 1 1 Æ 3 1 0 0 1 Æ 9 1111Æ F
0 1 0 0 Æ 4 1 0 1 0 Æ A
0 1 0 1 Æ 5 1 0 1 1 Æ B
ditto.
When the product is shipped from the factory, contact arrangement data are set as follows..
Contact
Item
number
Contact
arrangement
data
Setting of the element Contact
Item
number
Contact
arrangement
data
Setting of the element
X0 800 000E Undervoltage X3 830 00E0 Overvoltage
X1 810 000E Undervoltage X4 840 00EE OR of all the elements
X2 820 00E0 Overvoltage X5 850 00EE OR of all the elements
*The “Self hold/auto reset” setting are “Reset” (auto reset) for all contacts.
Page 34

PCKN-OIL738
34
(2) Specifying operation indicator LED hold data
The table below shows the setting guide table. See the section D-2
in the general operation
manual for the detailed procedure.
Input
Digit
No.
Setting item
0 1
0 Trip Reset Hold
1 Undervoltage AB-phase Reset Hold
2 Undervoltage BC-phase Reset Hold
3 Undervoltage CA-phase Reset Hold
4 Not used X
5 Overvoltage AB-phase Reset Hold
6 Overvoltage BC-phase Reset Hold
7 Overvoltage CA-phase Reset Hold
8 Not used X
9 Not used X
10 Not used X
11 Not used X
12 Not used X
13 Not used X
14 Not used X
15 Not used X
00000 0 00 0
ditto.
ditto.
0
Operation indicator LED hold data
0
Conversion from binary number to hexadecimal
Binary Æ Hexadecimal Binary Æ Hexadecimal Binary Æ Hexadecimal
0 0 0 0 Æ 0 0 1 1 0 Æ 6 1100Æ C
0 0 0 1 Æ 1 0 1 1 1 Æ 7 1101Æ D
0 0 1 0 Æ 2 1 0 0 0 Æ 8 1110Æ E
0 0 1 1 Æ 3 1 0 0 1 Æ 9 1111Æ F
0 1 0 0 Æ 4 1 0 1 0 Æ A
0 1 0 1 Æ 5 1 0 1 1 Æ B
ditto.
When the product is shipped from the factory, all LEDs are set to self-hold.
Item number
Operation indicator LED hold data
860 00EF
Page 35

PCKN-OIL738
35
7 Mounting
7.1 Mounting dimension
Mount the case to the panel according to Fig. 7.1 “Mounting dimension”.
205
184
130151 203
(18)
35
114 (185)
4-M5 screws (for mounting)
M3.5 screw (for terminals)
194
150
4-φ6 holes
Figure 7.1 Outside dimension /drilling drawing
7.2 Standard operating environment
Install the relay in the environment described in section 3.3 Common technical data. In addition, the
following conditions should be kept:
- Abnormal vibration, shock, inclination or magnetic field should be avoided.
- Harmful smoke or gas, salt gas, excessive humidity, water drop or vapor, excessive dust or
fine powder, rain and wind should be avoided.
Page 36

PCKN-OIL738
36
8 Test
The relay has been fully tested prior to shipment. However, it is recommended to carry out a test again by
referring to the following test guide before use.
8.1 Appearance inspection
Check the relay for appearance according to the following procedure:
Objects Check points
Coil/conductor (1) Discoloring and burning due to overheat.
(2) Abnormal conditions including loosened screws.
Printed card (1) Discoloring of the printed card due to overheated parts.
(2) Contact between the printed card and connector
Unit
Mechanism (1) Deformation
(2) Operation of the operating key switches.
(3) Damage of the draw-out lever of the sub unit.
(4) Discoloring and deformation of the name plate on the front panel.
(5) Damage of the terminal section.
Case/cover (1) Damage of the cover.
(2) Stain of the cover.
(3) Clouding of the cover.
(4) Damage of the lock lever of the cover.
(5) Damage of the operating buttons of the cover.
(6) Operation of the operating buttons of the cover.
(7) Damage of the terminal section.
Others Invasion of foreign matters including dust and iron chips.
Page 37

PCKN-OIL738
37
8.2 Characteristic test
8.2.1 Precautions in testing
(1) Standard test conditions
Ensure the following test conditions whenever possible:
Note that carrying out a test under an environment that significantly differs from the following
conditions may produce an incorrect result.
- Ambient temperature : 20°C±10°C
- Rated frequency : ± 5%
- Waveform (AC) : 2% (distortion ratio)
- Auxiliary power supply voltage : rated voltage ±2%
(2) Characteristic control point
See the section 3 “Characteristics”.
The characteristic control point refers to the characteristic of a relay unit only. Note that, when a
characteristic test is carried out on a relay system connected with external equipment such as CT
and ZCT, the result obtained would be a combined characteristic added with the fluctuation of the
external equipment.
For special control in terms of a specific control point (for instance, using the operation setting), first
carry out a test at “Characteristic control point” at the time when the relay is received or put in service
to determine the acceptance/rejection. Thereafter, perform another test at each control point, so that
the data obtained can be used for future reference.
(3) Changing setting
Change the setting according to the section 6 “Handling”.
(4) Operation judgment
Determine the operation currents and time and other values of the relay unit basically by turning on
and off the corresponding output relay contact of each element.
To determine the starting value of the time-delayed elements of overcurrent relay, which cannot be
checked through the output contact, read the display of “elapsed time of time-delayed timer”.
(5) Communication card
Whatever the communication card is inside or not, for the test of withstand voltage and lightning
impulse withstand voltage, please avoid inputting test voltage to the serial communication network
circuit (DA, DB, DG, SLD terminals).
Note: it is not necessary to take the communication card out when test if the communication card was
inside unit.
Page 38

PCKN-OIL738
38
8.2.2 Characteristic test
(1) Test circuit
Connect the external wiring referring to the AC input circuit diagram shown below:
A-07
Voltage
CBV2-A01D1
A-08
~
V
~
Test Phase Teraminal No.
AB-phase A-07~A-08
BC-phase A-09~A-10
CA-phase A-11~A-12
Show the Ex. AB-phase
(2) Test items and characteristic control point
a. Forced operation test
See “Front control panel operational procedure” in the section 6 “Handling”.
b. Operation value test
See “Operation and reset values” in the” 3 “Characteristic”.
c. Operation time test
See “Operation time” in the” 3 “Characteristic”.
d. Reset time test
See “Reset time” in the”3 “Characteristic”.
Page 39

PCKN-OIL738
39
9 Maintenance
9.1 Daily inspection
Take every opportunity to carry out the following inspection:
- Check that the cover is not damaged and is attached properly.
- Check that no dust or iron chips have invaded into the unit.
- Check that the cover is not clouded notably.
- Check that abnormal noise is not generated.
- Check that the RUN LED lamp is lit.
9.2 Periodical inspection
It is recommended to carry out periodic inspections to check the relay for proper function.
For periodical inspections, perform the appearance inspection and characteristic test in accordance with
the section 8 “Test”.
Page 40

PCKN-OIL738
40
10 Ordering
The product and specification shown in this manual may subject to changes (including specification
change and production suspend) without notice. It is advisory to inquire the nearest TM T&D’s branch or
sales office, if required, to confirm that the latest information is given in the manual, prior to placing an
order.
Notify the following items when placing an order.
Item Example of order Remarks
Model CBV2-A01D1 For more information, see the section
2 “Rating and specification”.
Frequency 50 Hz Select 50Hz or 60Hz.
Rating Voltage : 57 ~ 120V For more information, see the section
2 “Rating and specification”.
Setting range Undervoltage element (27): 10 ~ 110V
0vervoltage element (59) : 60 ~ 155V
For more information, see the section
2 “Rating and specification”.
Communication
card
One of the followings can be selected:
a. MODBUS communication card (Manual
No.: PCKN-OIL703)
b. CC-Link communication card (Manual No.:
PCKN-OIL751, PCKN-OIL752)
c. No communication card
Only purchasing a communication
card separately will allow customer to
add the communication facilities.
If customer does not need the
communication facilitates at the time
of introducing the system, just
purchase the relay unit without
communication card. Customer can
add the communication facilities
whenever he/she needs to introduce
them. This will help decrease the
initial cost and upgrade the system in
stages.
 Loading...