

Page 1

Poste A6863i
Systèmes de communications A5000
MiVoice 6940 IP phone with MiVoice 5000
08/2017
AMT/PUD/TR/0151/0/2/EN
User’s Guide
Page 2

Notice
The information contained in this document is believed to be accurate in all respects but is not warranted by
Mitel Networks™ Corporation (MITEL®).
The information is subject to change without notice and should not be construed in any way as a commitment
by Mitel or any of its affiliates or subsidiaries.
Mitel and its affiliates and subsidiaries assume no responsibility for any errors or omissions in this document.
Revisions of this document or new editions of it may be issued to incorporate such changes.
No part of this document can be reproduced or transmitted in any fo rm or b y any me ans - electr onic or mecha nical - for any purpose without written permission from Mitel Networks Corporation.
©Copyright 2015, Mitel Networks Corporation. All rights reserved.
Mitel® is a registered trademark of Mitel Networks Corporation.
Any reference to third party trademarks is for reference only and Mitel makes no representation of ownership
of these trademarks.
Page 3

Page 4

Page 5

Contents
Description of the terminal . . . . . . . . . . . . . . . . . . . . . . . . . . . 1
The Menu/Ident key . . . . . . . . . . . . . . . . . . . . . . . . . . . . . . . . . . . . . . . . . . . .3
Touchscreen: . . . . . . . . . . . . . . . . . . . . . . . . . . . . . . . . . . . . . . . . . . . . . . . . .4
The context-sensitive alphabetic and numeric keypad . . . . . . . . . . . . . . . . . .6
Extension modules . . . . . . . . . . . . . . . . . . . . . . . . . . . . . . . . . . . . . . . . . . . . . 8
Position of the stand . . . . . . . . . . . . . . . . . . . . . . . . . . . . . . . . . . . . . . . . . . . .8
Standard codes . . . . . . . . . . . . . . . . . . . . . . . . . . . . . . . . . . . . . . . . . . . . . . . .8
Call modes . . . . . . . . . . . . . . . . . . . . . . . . . . . . . . . . . . . . . . . . 9
Using the hands-free mode . . . . . . . . . . . . . . . . . . . . . . . . . . . . . . . . . . . . . . .9
Adjusting the listening volume level . . . . . . . . . . . . . . . . . . . . . . . . . . . . . . .10
Making a call. . . . . . . . . . . . . . . . . . . . . . . . . . . . . . . . . . . . . . 11
Dialling the number . . . . . . . . . . . . . . . . . . . . . . . . . . . . . . . . . . . . . . . . . . . .11
Using speed dial keys . . . . . . . . . . . . . . . . . . . . . . . . . . . . . . . . . . . . . . . . . .11
Calling from call logs . . . . . . . . . . . . . . . . . . . . . . . . . . . . . . . . . . . . . . . . . . .11
Calling an operator (switchboard) . . . . . . . . . . . . . . . . . . . . . . . . . . . . . . . . . 12
Calling an internal party by name . . . . . . . . . . . . . . . . . . . . . . . . . . . . . . . . .12
Using the automatic callback function . . . . . . . . . . . . . . . . . . . . . . . . . . . . . .13
Receiving a call . . . . . . . . . . . . . . . . . . . . . . . . . . . . . . . . . . . 14
Adjusting the ringer volume . . . . . . . . . . . . . . . . . . . . . . . . . . . . . . . . . . . . . .14
Answering a call . . . . . . . . . . . . . . . . . . . . . . . . . . . . . . . . . . . . . . . . . . . . . .14
During a call . . . . . . . . . . . . . . . . . . . . . . . . . . . . . . . . . . . . . . 15
Using the mute function . . . . . . . . . . . . . . . . . . . . . . . . . . . . . . . . . . . . . . . .15
Putting a correspondent on hold . . . . . . . . . . . . . . . . . . . . . . . . . . . . . . . . . .15
Putting a party on hold and resuming the call on another terminal . . . . . . . .15
Switching a call between two terminals of the same association . . . . . . . . .17
Transferring a call . . . . . . . . . . . . . . . . . . . . . . . . . . . . . . . . . . . . . . . . . . . . .18
Transferring a call and searching for a correspondent . . . . . . . . . . . . . . . . . 18
Calling a second correspondent . . . . . . . . . . . . . . . . . . . . . . . . . . . . . . . . . .19
Switching between two parties . . . . . . . . . . . . . . . . . . . . . . . . . . . . . . . . . . .19
Releasing one of the correspondents . . . . . . . . . . . . . . . . . . . . . . . . . . . . . .19
Making a transfer during an enquiry call . . . . . . . . . . . . . . . . . . . . . . . . . . . .20
Answering a second call . . . . . . . . . . . . . . . . . . . . . . . . . . . . . . . . . . . . . . . .20
Setting up a conference call . . . . . . . . . . . . . . . . . . . . . . . . . . . . . . . . . . . . .20
Setting up a conference during an enquiry call . . . . . . . . . . . . . . . . . . . . . . .21
Using the trace function . . . . . . . . . . . . . . . . . . . . . . . . . . . . . . . . . . . . . . . .21
Call logs . . . . . . . . . . . . . . . . . . . . . . . . . . . . . . . . . . . . . . . . . 23
I
Page 6

Contents
Quick access . . . . . . . . . . . . . . . . . . . . . . . . . . . . . . . . . . . . . . . . . . . . . . . . 23
Viewing a call log . . . . . . . . . . . . . . . . . . . . . . . . . . . . . . . . . . . . . . . . . . . . . 23
The missed calls log . . . . . . . . . . . . . . . . . . . . . . . . . . . . . . . . . . . . . . . . . . . 23
Calling a party from the logs . . . . . . . . . . . . . . . . . . . . . . . . . . . . . . . . . . . . . 24
Deleting a record from a log . . . . . . . . . . . . . . . . . . . . . . . . . . . . . . . . . . . . . 24
Deleting all the records in a log . . . . . . . . . . . . . . . . . . . . . . . . . . . . . . . . . . 24
Speed dial . . . . . . . . . . . . . . . . . . . . . . . . . . . . . . . . . . . . . . . . 25
Saving a number on a keypad key . . . . . . . . . . . . . . . . . . . . . . . . . . . . . . . . 25
Calling through speed dial . . . . . . . . . . . . . . . . . . . . . . . . . . . . . . . . . . . . . . 25
Changing or deleting the programming on a key . . . . . . . . . . . . . . . . . . . . . 26
Call forwarding . . . . . . . . . . . . . . . . . . . . . . . . . . . . . . . . . . . . 27
Forwarding a call . . . . . . . . . . . . . . . . . . . . . . . . . . . . . . . . . . . . . . . . . . . . . 27
Cancelling all forwarding operations . . . . . . . . . . . . . . . . . . . . . . . . . . . . . . 29
Cancel a forward . . . . . . . . . . . . . . . . . . . . . . . . . . . . . . . . . . . . . . . . . . . . . 29
Forwarding your calls through feature codes . . . . . . . . . . . . . . . . . . . . . . . . 29
Overriding call forwarding* . . . . . . . . . . . . . . . . . . . . . . . . . . . . . . . . . . . . . . 30
Directory . . . . . . . . . . . . . . . . . . . . . . . . . . . . . . . . . . . . . . . . . 31
General directory functions . . . . . . . . . . . . . . . . . . . . . . . . . . . . . . . . . . . . . 31
Identification for access to Microsoft Exchange contacts . . . . . . . . . . . . . . . 33
Internal directory management . . . . . . . . . . . . . . . . . . . . . . . . . . . . . . . . . . . 34
Voicemail. . . . . . . . . . . . . . . . . . . . . . . . . . . . . . . . . . . . . . . . . 36
Configuring and personalising your voice mailbox* . . . . . . . . . . . . . . . . . . . 36
Activating call forwarding to your voicemail . . . . . . . . . . . . . . . . . . . . . . . . . 37
Consulting new messages . . . . . . . . . . . . . . . . . . . . . . . . . . . . . . . . . . . . . . 37
Multi-key function . . . . . . . . . . . . . . . . . . . . . . . . . . . . . . . . . . 38
Communicating with the multi-key function . . . . . . . . . . . . . . . . . . . . . . . . . 38
The multi-line function . . . . . . . . . . . . . . . . . . . . . . . . . . . . . . 40
Communicating with the multi-line function . . . . . . . . . . . . . . . . . . . . . . . . . 41
The supervision function . . . . . . . . . . . . . . . . . . . . . . . . . . . . 42
Communicating with the supervision function . . . . . . . . . . . . . . . . . . . . . . . 42
The filter function . . . . . . . . . . . . . . . . . . . . . . . . . . . . . . . . . . 44
Communicating with the filter function . . . . . . . . . . . . . . . . . . . . . . . . . . . . . 44
II
Page 7

Contents
Mobile Intégration . . . . . . . . . . . . . . . . . . . . . . . . . . . . . . . . . 48
Pairing a mobile phone using Bluetooth . . . . . . . . . . . . . . . . . . . . . . . . . . . . 48
Syncing mobile contacts . . . . . . . . . . . . . . . . . . . . . . . . . . . . . . . . . . . . . . . .49
Answering an incoming mobile call using your Mitel 6940 SIP Phone . . . . . 49
Login / Logout function . . . . . . . . . . . . . . . . . . . . . . . . . . . . . 51
Restoring your subscriber rights on a general-purpose terminal . . . . . . . . . 51
Releasing a terminal* . . . . . . . . . . . . . . . . . . . . . . . . . . . . . . . . . . . . . . . . . . 51
Configuration options . . . . . . . . . . . . . . . . . . . . . . . . . . . . . . 52
Call settings . . . . . . . . . . . . . . . . . . . . . . . . . . . . . . . . . . . . . . . . . . . . . . . . . .52
General settings . . . . . . . . . . . . . . . . . . . . . . . . . . . . . . . . . . . . . . . . . . . . . .55
Changing the language . . . . . . . . . . . . . . . . . . . . . . . . . . . . . . . . . . . . . . . . . 56
Terminal settings . . . . . . . . . . . . . . . . . . . . . . . . . . . . . . . . . . 57
Accessing settings options . . . . . . . . . . . . . . . . . . . . . . . . . . . . . . . . . . . . . .57
Setting the audio . . . . . . . . . . . . . . . . . . . . . . . . . . . . . . . . . . . . . . . . . . . . . . 57
Setting the display . . . . . . . . . . . . . . . . . . . . . . . . . . . . . . . . . . . . . . . . . . . . .59
Setting the keypad . . . . . . . . . . . . . . . . . . . . . . . . . . . . . . . . . . . . . . . . . . . .59
Other options . . . . . . . . . . . . . . . . . . . . . . . . . . . . . . . . . . . . . . . . . . . . . . . . .60
Appendices. . . . . . . . . . . . . . . . . . . . . . . . . . . . . . . . . . . . . . . 61
Menu options . . . . . . . . . . . . . . . . . . . . . . . . . . . . . . . . . . . . . . . . . . . . . . . . .61
Glossary (terms you need to know) . . . . . . . . . . . . . . . . . . . . . . . . . . . . . . .63
Troubleshooting Check... . . . . . . . . . . . . . . . . . . . . . . . . . . . . . . . . . . . . . . .64
III
Page 8

Description of the terminal
q
w
e
r
t
y
u
o
a
s
d
f
g
i
h
j
k
l
Handset
q
Speaker
w
• Message indicator light: it
e
flashes to indicate an incoming
call, a correspondent on hold, or a
waiting message.
1
Goodbye key: Ends an active call.
The Goodbye key also exits an
open list (such as Call History)
a
s
d
and menus (such as the Static
Settings menu) without saving
changes.
Redial key: Displays a list of your
previously outgoing dialed calls.
Hold key : Places an active call on
hold. To retrieve a held call, press
the applicable Line key
Page 9

Description of the terminal
Directory Key: Display a list of
r
your contacts
Call history key: Displays a list of
t
your missed answered calls.
Voicemail key: Provides access to
your voicemail service (if
y
configured).
Options key: Provides services
and static settings that allow you to
u
customize your phone.
Volume controls:
• Adjusts the volume for the ringer,
i
o
handset, headset, and
speakerphone.
Dialpad
Mute key: Mutes the microphone
so that your caller cannot hear you
f
(the LED beside the key turns on
when the microphone is on mute).
Speaker/Headset key: Transfers
the active call to the speaker or
g
headset, allowing handsfree use of
the phone.
State-Sensitive Bottom
Softkeys:
5 system keys
h
Pre-programmed non-editable
keys
Top softkeys:12 programmable
touchscreen softkeys,
j
that support up to 48 functions.
LCD Touchscreen
k
2
Page 10

Description of the terminal
The Menu/Ident key
This key gives access to the functions offered by the operating system. They differ according to the terminal status.
• Terminal idle: see the summary in “Menu options”, page 61.
• Terminal busy: whether the terminal is busy, waiting for an answer or the correspondent
is already on line, pressing the Menu key displays the available functions.
Note: if the Menu key is not proposed, some functions may be deployed in a different
manner, using feature codes. These functions are then described in two ways, via the
Menu/Ident key and feature code.
3
Page 11
Description of the terminal
Touchscreen:
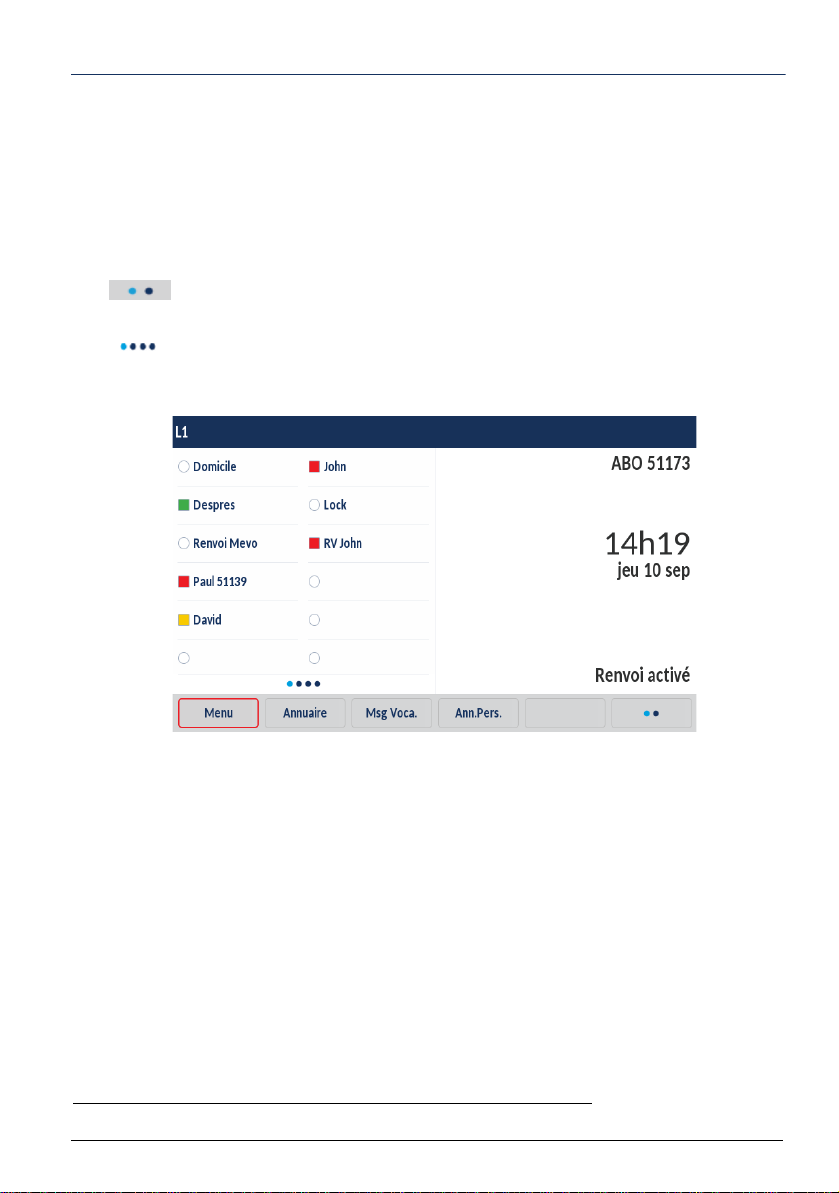
The content of the screen varies according to the terminal and guides you in your searches
by displaying the context-sensitive keys. Follow the instructions.
To navigate through the different pages of the screen, scroll from right to left (and vice versa) or from top to bottom (and vice versa) with your finger on the area concerned.
To select an item, press it with your finger.
The key may appear in the menu area. Pressing this key will display other func-
tions.
The key also appears on screen, indicating that the other pages may be viewed
by touching the screen with your finger.
In idle mode, the screen indicates:
• The terminal ID
• The name assigned to the programmable keys. These keys can be programmed using
MiVoice 5000 User Portal. Ask your system operator for advice.
• Date and time
• A message line: if several messages concern the terminal status, each message is
displayed alternately. These messages indicate:
• That immediate call forwarding is active
• The calls missed since the last time the log was accessed
• That fallback mode is active (backup)
• That the Do Not Disturb function is active
• A parked call
• A password renewal request *
• A password expiration notification *.
• The label for the context-sensitive keys on the interior panel.
* According to the password policy programmed by the system operator
4
Page 12
Description of the terminal
Note: after input timeout in the terminal configuration menu (Voir “Setting the display”,
page 59., the screen changes to power-saving mode. In this case, a frame moves on the
screen, showing time and date only. Pressing any key reactivates the full screen display.
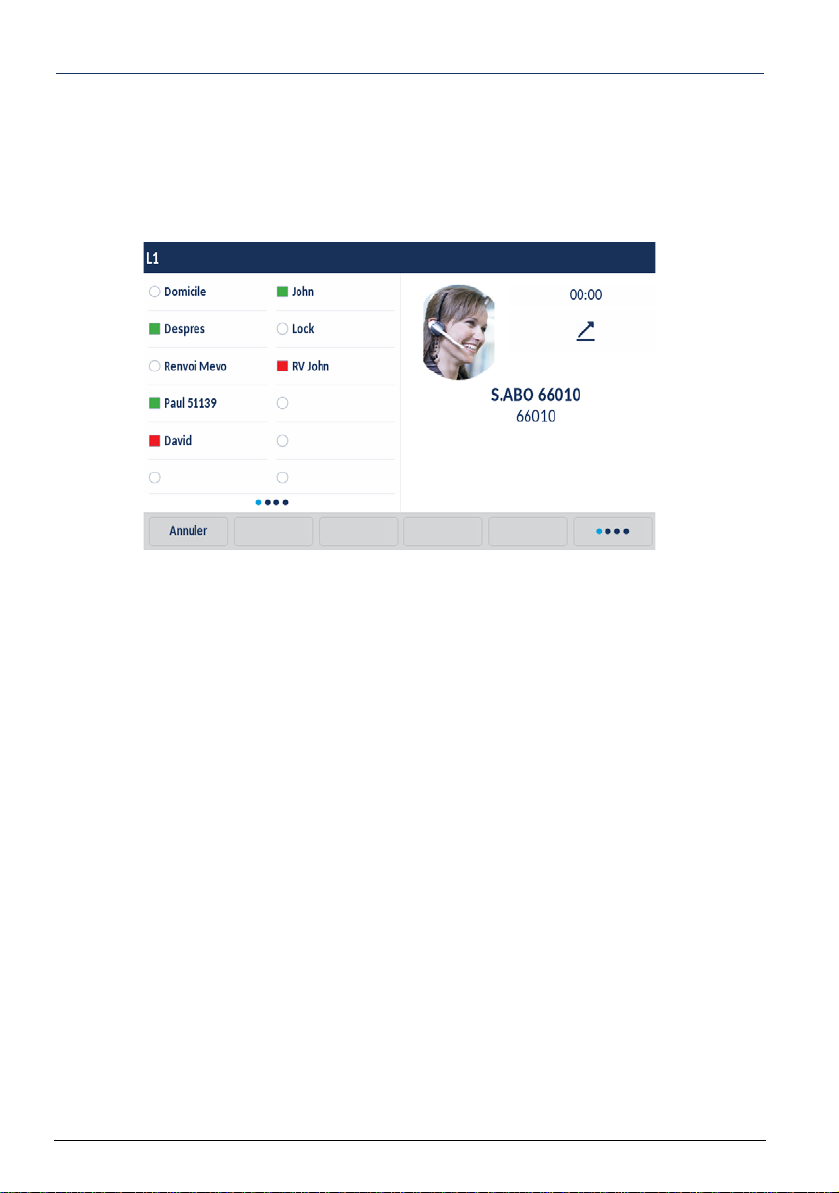
During a call, the screen also indicates:
• The correspondent’s name and/or number
• His/her picture if applicable
• The time that has passed since the call was started
• If applicable, the audio quality level and/or a small padlock, meaning that the call is
encrypted
• The name of the functions accessible through context-sensitive keys. A series of dots
associated with a context-sensitive key indicate that other functions are available by
pressing this key.
5
Page 13
Description of the terminal
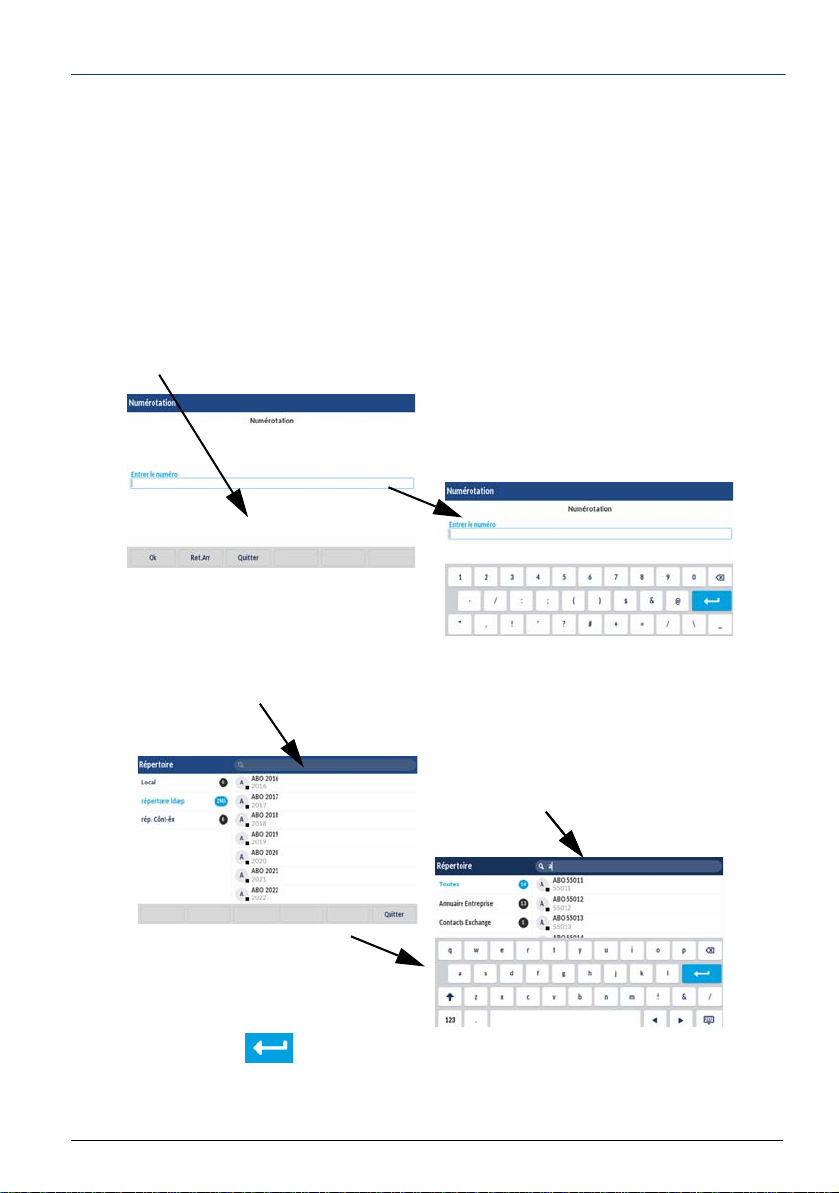
The context-sensitive keypad is displayed.
Enter the value then validate.
Enter the character string.
The context-sensitive alphabetic and numeric keypad
This keypad is displayed when it is necessary to enter an alphabetic and/or numeric value
in a field.
Press the field in question to display this keypad.
This keypad is either displayed automatically on certain contexts or by clicking on the field
in question.
Examples:
During dialling :
Press the search area with your finger.
During a search :
Press the search area with your finger.
Validate by pressing
6
Page 14
Description of the terminal
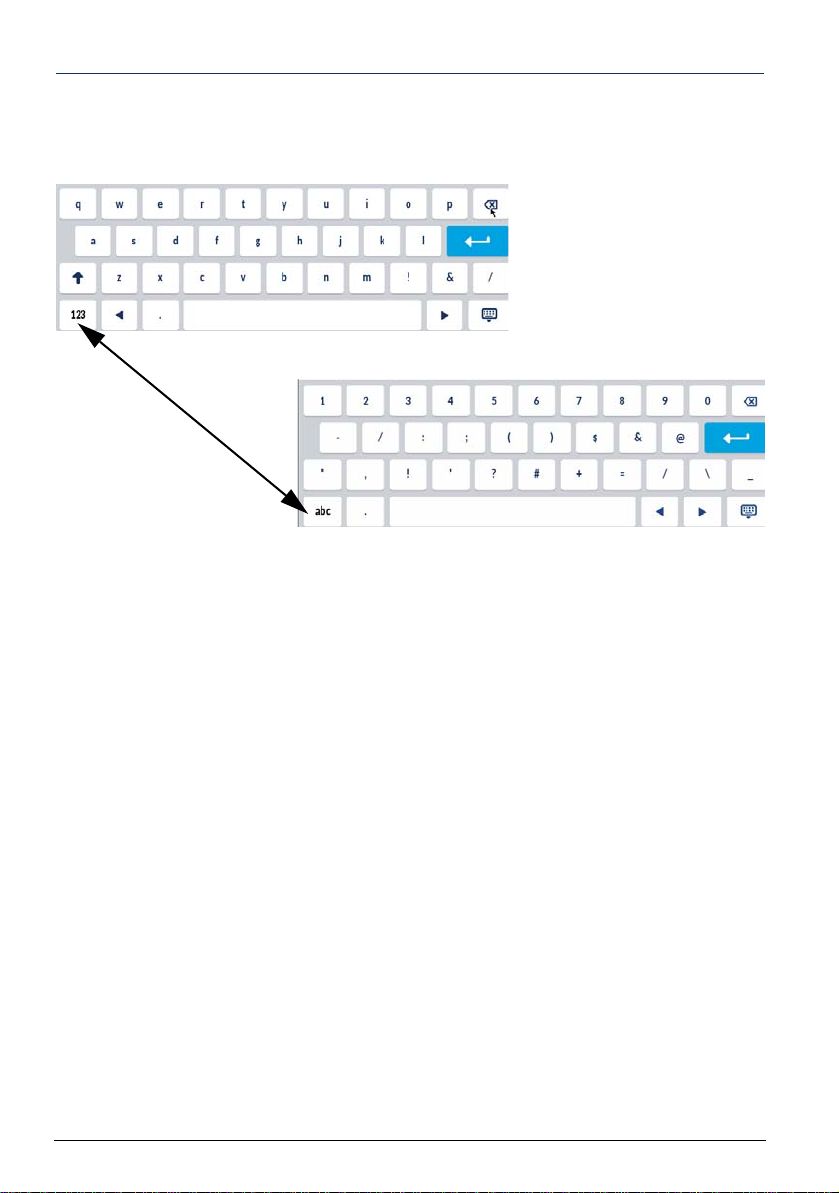
To change from alphabetic mode to numeric mode, successively press the key on the bottom left side:
7
Page 15
Description of the terminal
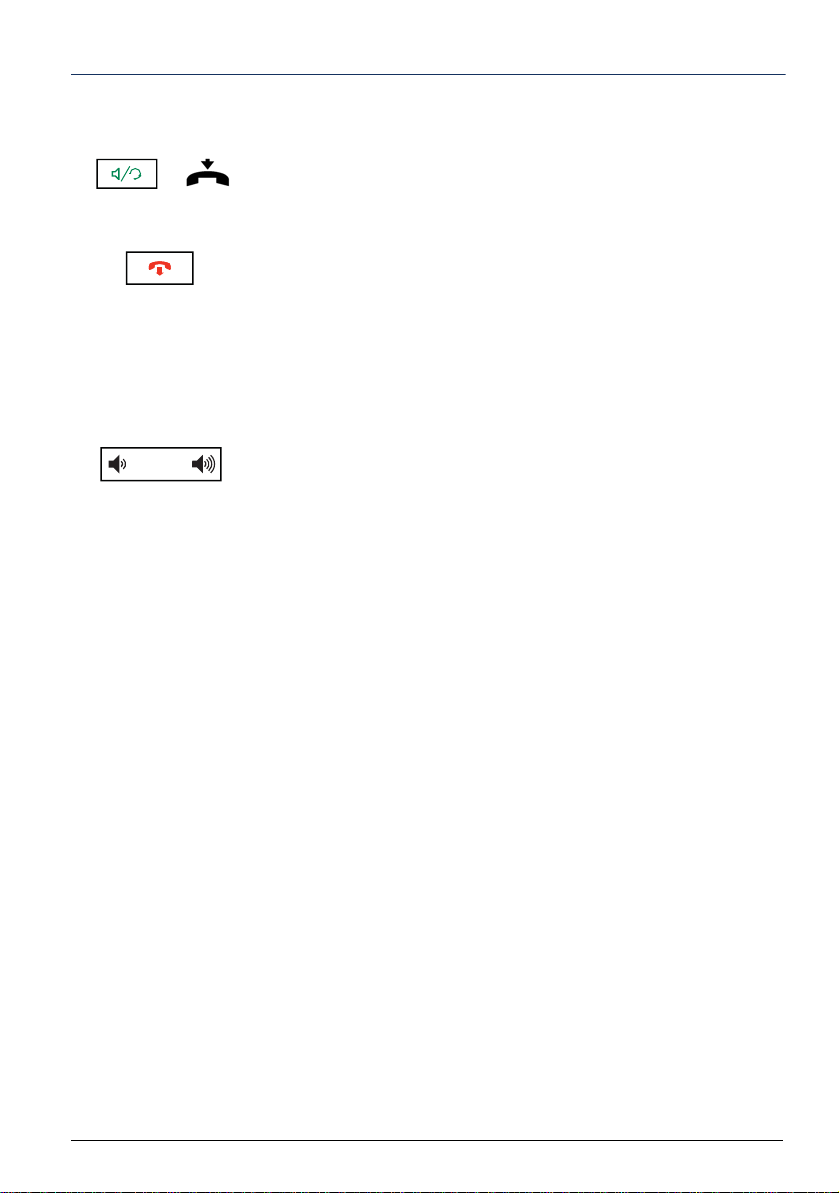
The stand may be slid in two ways into the slot meant for it
in the terminal housing. Depending on the direction of insertion, the stand forms an angle of 60° or 35°, thus offering a
more or less vertical position on the desktop.
35º
60º
35º
60º
35º
60º
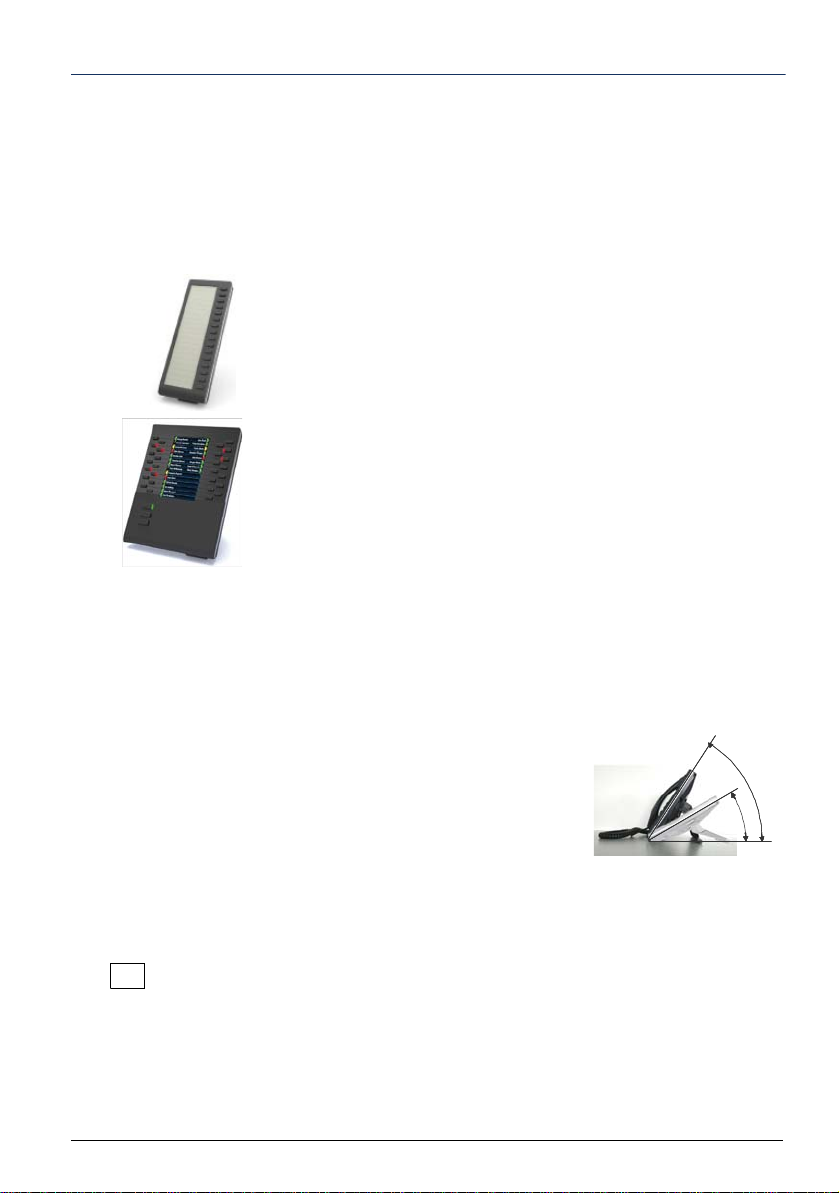
Extension modules
Your terminal features some extension modules which complete your terminal with a number of programmable keys that vary according to model.
Using an expansion module gives an immediate view of the programmed keys (supervision, multi-key, multi-line, filtering, etc.), regardless of whether the terminal is idle or communicating." Ask your system operator for advice.
M680i adds 16 keys with LED, programmable using
the MiVoice 5000 User Portal which also also allows
the printing of labels..
Your terminal can be completed with up to 3
modules.
M685i with an LCD screen adds 3 pages with 28
LED keys, which can be programmed with the
MiVoice 5000 User Portal. The key labels are
displayed on the LCD screen.
Your terminal can be completed with up to 3
modules.
Important note: These extension modules are powered by the terminal and do
not require the use of a separate mains power pack.
When there are several extension modules, they must be of the same type
(M680i or M685i). The combination is not compatible.
Position of the stand
Standard codes
This document contains some standard access codes for the various functions, possibly
personalised by the operator. If this is the case, the operator will indicate to you the specific
access codes to enter in the spaces reserved for this (for example: external access code
0 or ; enter the personal code in the frame).
8
Page 16

Call modes
Your telephone proposes various call modes suited to your activities.
These features complete the classical handset mode (or discreet mode): lifting the handset
to answer or make a call and on-hooking to end a call.
Using the hands-free mode
Handsfree mode lets you make or answer a call without lifting the handset. You can switch
from handsfree mode to handset mode and vice versa during a call.
Answering a call in handsfree mode
• Press the blinking line key.
-> Without lifting the handset, you can discuss directly in
handsfree mode. The indicator light associated with the
handsfree key goes on.
Making a call in handsfree mode
• Dial your correspondent's number directly on the keypad.
-> The dialled number is displayed as it is entered. Your
terminal changes automatically to handsfree mode.
Ending a call
• Press .
Switching from handsfree mode to handset mode
You are discussing in handsfree mode:
• Just pick up the handset.
-> The conversation continues in handset mode (or discreet
mode).
The indicator light associated with the handsfree key goes
off. On-hooking the handset ends the call.
9
Page 17
Call modes
Switching from handset mode to hands-free mode
You are discussing in handset mode:
• Press the handsfree key then hang up.
-> The conversation continues in handsfree mode. The
handsfree key indicator light goes on.
At the end of the conversation, press the End key.
Adjusting the listening volume level
No matter the mode used (handset mode, handsfree mode, or
headset mode), the listening volume is adjustable (8 levels). The
setting is memorised.
To reduce the volume:
• Press the left volume-adjustment key.
To increase the volume:
• Press the right volume-adjustment key.
10
Page 18

Making a call
0
1
to 9
There are several ways to make a call, depending on whether the called party's number is
new or has already been stored by the terminal.
The procedures for calling the parties whose numbers have been stored in the logs are explained in the chapters dedicated to these features.
When the called party answers, you may use any of the previously described modes.
Dialling the number
You will use the keys on the numeric keypad to dial the correspondent's number.
Remarque : For more information on how to dial numbers, see Section “Other options”,
page 60 .
To call an internal correspondent:
Dial the correspondent's extension number.
-> The display shows the name of the correspondent*.
To call an external correspondent:
1 - Dial the outside line access code (0) or .
2 - Dial the correspondent's number.
-> The display shows the number dialled or called party's
name, if available in the directory.
Using speed dial keys
You can assign nine keypad keys to the numbers of the parties you call regularly (internal
or external).
Press and hold down any of the keypad keys (1 to 9).
-> The terminal automatically dials the number of the
correspondent to whom this key had been previously
assigned. The display shows the name of the correspondent
if available.
Remarque : To program a speed dial key, see Chapter “Saving
a number on a keypad key”, page 25 .
Calling from call logs
You can call a correspondent whose details have been stored in any of the call logs: The
call logs are described in Chapter “Call logs”, page 23
11
Page 19

Making a call
9
Dial
Directory
Select.
Call
Calling an operator* (switchboard)
To reach the person in charge of call distribution:
Dial 9 or on the keypad.
Press Dial to confirm.
Calling an internal party by name
You can search in the system directory for the name of the person whose number you do
not know.
IMPORTANT: the Directory key should not appear when an external source is available.
Contact the system operator because the call must the be made from the
Pers. Dir. key, available as the other context-sensitive key. (Voir “Direc-
tory”, page 31).
Terminal idle:
1 - Press the context-sensitive Directory key.
2 - Enter the first character(s) of the surname and/or first name
using the alphanumeric keypad.
3 - Press Enter to display the first search result.
4 - If there are several search results, use the touch screen to find
the correspondent in question.
5 - Select the correspondent.
6 - Then (if you wish) select the type of number to be called
(Office, Home, GSM).
7 - Press the Call. key to call the correspondent.
To call from the secondary line of a multi-line terminal, press
the line key corresponding to this line.
To return to the idle screen:
• Press the End key or the context-sensitive Exit key.
* Selon programmation effectuée par l’exploitant système
12
Page 20

Making a call
Callback
Menu
Using the automatic callback function
You are calling an internal correspondent but he is busy and does not answer. You can ask
that he be called back automatically.
Enabling automatic callback
1 - Press the context-sensitive More key in the lower panel of the
menus.
2 - Press the context-sensitive Callback key.
Automatic callback is saved and may be viewed by selecting
Menu > Active functions.
As soon as the called party in question is free (if the line had been
busy) or has enabled his telephone (if absent), your terminal
rings. At this stage you can:
• Off-hook or press Answer: your correspondent is then called
back.
• Press Ignore or the End key to cancel automatic callback.
Disabling the automatic callback function
If you wish to cancel a saved automatic callback:
1 - Press the context-sensitive Menu key.
2 - Select Active functions then press Select to confirm.
3 - Select Callback then press Delete. To display the number of
the terminal concerned, press Select before deleting.
-> The saved automatic callback is deleted.
13
Page 21

Receiving a call
Answer
During an incoming call, the terminal rings and the message indicator light blinks.
If the caller is stored in any of the directories (internal or external
the associated name.
Adjusting the ringer volume
You can adjust the ringer volume during the ringing phase.
Press the left volume key to reduce the volume, or the right
volume key to increase the volume.
-> The terminal stores the last setting.
Answering a call
• Lift the handset.
-> The conversation with the correspondent takes place in
discreet mode.
or
• Press the blinking line key.
-> Without lifting the handset, you can discuss directly in
handsfree mode.
or
• Press the context-sensitive Answer key.
-> Without lifting the handset, you can discuss directly in
handsfree mode.
Remarque : An external call you have not answered within a giv-
en time is transferred to the operator.
*
), the display indicates
* Selon programmation effectuée par l’exploitant système
14
Page 22
During a call
Park
Using the mute function
A call has been set up with a correspondent and you wish to have a confidential conversation without the correspondent hearing you:
Deactivate the microphone:
Press Mute.
-> The handset microphone is deactivated; the indicator light
associated with the key blinks. Y our correspondent does not
hear you.
Reactivating the microphone:
Press Mute again.
-> The handset microphone is in service; the indicator light
associated with the key goes off indicating that your
correspondent hears you again.
Putting a correspondent on hold
A call has been set up with a correspondent and you want to put it on hold to resume it later
on the same terminal:
1 - Press Hold.
-> Your correspondent is put on hold and hears beeps or musicon-hold.
2 - Press Hold again to resume your conversation with the
correspondent.
Putting a party on hold and resuming the call on another terminal
You are communicating with a correspondent and you wish to continue the conversation
on another terminal.
Press the context-sensitive More key in the lower panel of the
menus.
Press the context-sensitive Parking key.
-> The terminal returns to idle mode with the "Parked call"
status. Y our correspondent is put on hold and hears beeps or
music-on-hold.
15
Page 23

During a call
Remarque : The message disappears once the call is resumed
on the other terminal or if the correspondent ends the call.
16
Page 24

During a call
Menu
Retrieve parking
Menu
Retrieve parking
# 7 0
On the second, idle terminal (Mitel 6000 SIP Phone):
1 - Press the context-sensitive Menu key.
2 - Press the key to display Retrieve parking then press
Select to confirm.
3 - Dial the number of the terminal on which you have executed
the Parking function then click OK to confirm.
-> Communication with your correspondent has been restored.
Remarque : If an external parked call is not resumed within a giv-
en time, it is routed to the operator. An internal call is released.
Via feature code:
Recovering a parked call: # 7 0 + extension number
On the same terminal:
If you change your mind and wish to recover the call on the
terminal where it has been parked:
1 - Press the context-sensitive Menu key.
Press the key to display Retrieve parking then press Select
to confirm.
-> Communication with your correspondent has been restored.
Via feature code:
Recover the parked call: # 7 0 + extension number
Switching a call between two terminals of the same association
Your subscription has several associated terminals: one fixed terminal and one DECT terminal, for instance. In this example, you wish to resume on the DECT terminal a call already set up on the fixed terminal.
1 - From the associated terminal on which you wish to resume
the call (the DECT terminal in our example); enter the code #
7 0.
-> An acknowledgement message is transmitted.
2 - On the first terminal, release the call by on-hooking or by
pressing the End key.
-> The call is now set up on the second terminal.
* Selon programmation effectuée par l’exploitant système
17
*
Page 25

During a call
Transfer
Dial
Transfer
Call
Transferring a call
You are communicating with a correspondent and you wish to transfer the call to another
terminal:
1 - Press the context-sensitive Transfer key.
2 - Dial the extension number.
3 - Press Dial.
You can wait for the called party to answer or hang up
immediately.
Remarque : Information about how to transfer an ongoing en-
quiry call is given in page 20.
Transferring a call and searching for a correspondent
You wish to transfer a call to another terminal but you do not know the correspondent's
number. You can make a search by name, or search in any of the call lists or in the personal directory.
1 - Press the context-sensitive Transfer key.
-> Your correspondent is put on hold and hears some beeps or
music-on-hold.
2 - Press
3 - Press the context-sensitive Directory key to call using search
by name (Voir “Calling an internal party by name”, page 12).
or
Search for your correspondent in the call log (see Voir “Call
logs”, page 23).
or
Call from the terminal directory (Voir “Modifying a record in the
internal directory”, page 34).
4 - Press the context-sensitive Call key again before or after the
correspondent answers.
18
Page 26

During a call
Calling a second correspondent
You are in the middle of a call with a party and you want to call a second party, inside or
outside the company.
1 - Press the second line key.
-> Your first correspondent is put on hold.
2 - Dial the number of the second correspondent.
Remarque : Y ou can also access a number stored in the directo-
ry or phone book.
If the called party does not answer, press the blinking line key to
return to the correspondent on hold.
Switching between two parties
You are online with a second correspondent and you wish to switch successively from one
correspondent to the other.
• Press the blinking line key to resume the conversation with the
correspondent on hold.
-> You talk alternately with each of the two correspondents, but
they cannot communicate with one another. The display shows
the number or name of the party you are talking to.
Releasing one of the correspondents
To release one of the correspondents (the one with whom you are talking):
• Press End to release the call in progress then the blinking line
key to resume the call on hold.
19
Page 27

During a call
Transfer
Conf.
Dial
Conf.
Making a transfer during an enquiry call
You are engaged in an enquiry call (with one correspondent on line and another on hold).
You wish to link up your two correspondents then hang up.
1 - Press the context-sensitive Transfer key.
2 - Press the key of the blinking line then press Transfer. This is
the correspondent who has been on hold.
-> The call has been transferred.
Answering a second call
You are on line with a correspondent and receive a second call (a new line key flashes).
• Press the flashing line key to take the second call (the first
correspondent is put on hold).
You can switch from one ca ll to the oth er or set up a three-way
conference.
Setting up a conference call
You are engaged in a call with a correspondent and you wish to set up a three-way conference with another correspondent.
1 - Press the context-sensitive Conf. key.
-> The other party is put on hold.
2 - Dial the number of the other party.
3 - Press Dial.
4 - When the second correspondent is on line, press Conf. again
to confirm (the first correspondent is kept on hold until the
conference is validated).
-> The numbers of your two correspondents are displayed on
screen. You are holding a conference call.
If you cannot reach the second correspondent, press the blinking
line key to resume the call with the correspondent on hold.
20
Page 28

During a call
Leave
Conf.
Menu
Trace
Select
Releasing one of the correspondents
1 - Select the correspondent to be released.
2 - Press the context-sensitive Leave key to release the selected
correspondent.
Ending the conference
• Press End or hang up.
Setting up a conference during an enquiry call
You are engaged in an enquiry call (with one correspondent on line and another on hold).
You wish to set up a three-way conference.
1 - Press the context-sensitive Conf. key.
2 - Press the key of the blinking line then press Conference. This
is the correspondent who has been on hold.
-> The numbers of your two correspondents are displayed on
screen. You are holding a conference call.
Using the trace function
You want the number of the called or calling party (internal or external party) to be written
in the logbook, for example, to identify a malicious call.
1 - Press the context-sensitive More key in the lower panel of the
1 - Press the context-sensitive Menu key.
2 - Select Trace with .
3 - Press Select to confirm.
-> A message confirms that your request has been taken into
The number is stored in the logbook, which can be consulted by
the system operator.
Remarque : When a call comes in and if the caller has on-
hooked first , the Trace function remains accessible for 10 seconds.
* Selon programmation effectuée par l’exploitant système
21
*
menus.
account.
Page 29

During a call
22
Page 30

Call logs
Four lists are available in the Call logs menu:
• Missed calls log: unanswered calls
• Incoming calls log: answered calls
• Outgoing calls log: calls made
• All calls: all incoming and outgoing calls.
You can automatically call back a stored number while viewing a log. You can delete a record or all the records stored.
When the log is full, a new call will erase the oldest. When a call is repeated several times,
only the last one is stored.
Quick access
• Press this key to directly access the Outgoing calls log.
• Press this key to directly access the Missed calls log.
Viewing a call log
Press the context-sensitive Menu key then select Calls log by pressing Select.
• Select the log to view then press Select to confirm.
In the complete log, calls are identified by any of these symbols:
• Outgoing call
• Incoming call
• Missed call.
The following is displayed in each of them:
• Time of call (HH:MM), for calls made on the same day
• Date of call (JJ MM), for previous calls
• Caller or called-party ID
You can see the details of the record by pressing Details.
Remarque : On a multi-line terminal, the line concerned by the
call is indicated in the details.
The missed calls log
23
Page 31

Call logs
Menu
Call logs
When you fail to answer your calls, a message on the screen informs you about the number
of missed calls. To see the missed call(s), press the quick-access missed-calls-log key
.
Remarque : When you answer a call from a number saved in the missed calls log, this
number is deleted from the list.
Calling a party from the logs
Remarque : correspondents with a hidden number cannot be called back.
You have selected a record,
• Press the context-sensitive Call key.
-> The terminal automatically calls the correspondent.
The record remains stored in the log.
Deleting a record from a log
You have selected a record,
• Press the context-sensitive Delete key.
Deleting all the records in a log
1 - Press the context-sensitive Menu key.
2 - Select Call logs then press Select to confirm.
3 - Select the log you wish to delete then press Delete.
4 - Press Confirm to confirm the log deletion.
24
Page 32

Speed dial
Dial
Modif Speeddialnum
Keypad
This function is used to save a number on a programmable key. You can call your correspondent by pressing the programmed key.
Saving a number on a keypad key
On the keypad:
1 to 9 1 - Press and hold down (for 3 seconds) a key not yet
programmed on the numeric keypad.
2 - Enter the number to be stored.
-> Use the context-sensitive keypad.
3 - For a multi-line terminal, select the call line.
4 - Press Save.
From the terminal options menu:
1 - Press the Options key.
2 - Select the Dial menu.
3 - Select the option Modif Speeddialnum.
4 - Select Keypad as type of key to be programmed:
5 - Press Select to confirm.
1 to 9 6 - Search for the key number to be programmed on the list by
swiping the touchscreen.
7 - Validate by pressing Enter.
8 - Enter the number to be stored on this key.
-> Use the context-sensitive keypad.
9 - Press Save.
Calling through speed dial
1 to 9 Press and hold down the numeric key corresponding to the saved
number.
25
Page 33

Speed dial
Dial
Modif Speeddialnum
Changing or deleting the programming on a key
1 - Press the Options key.
2 - Select the Dial menu.
3 - Select the option Modif Speeddialnum.
4 - Press Select to confirm.
5 - Select type then the key to modify or delete.
6 - Use the context-sensitive Backspace key to delete a number
or to modify the programming. You can use the key to
place the cursor after the character to be deleted.
7 - Press
Remarque : To exit without modifying, select Cancel.
Save to confirm.
26
Page 34

Call forwarding
Menu
Forward
Immediate forwar
If absent or busy, you can forward your calls* to another terminal, an external number
(GSM number, for instance) or to your voice mailbox*.
This function can also be programmed through feature codes. They are described in Section “Forwarding your calls through feature codes”, page 29.
Forwarding a call
1 - Press the context-sensitive Menu key.
2 - Select Forward then press Select.
Remarque : If forwarding has already been programmed, it is
preceded a tick.
Choose the forwarding type.
The following forwarding types are proposed:
• Immediate forward : the call is immediately forwarded to the
terminal indicated.
• Forward on busy : the call is forwarded to the terminal
indicated if your terminal is busy (or unavailable).
• Forward on no answer : the call is forwarded to the terminal
indicated when you do not answer.
• Predefined: the call is forwarded to a terminal whose number is
programmed by the operator.
3 - Select the option you want (Immediate forward, for example)
then press Select to confirm.
* Selon programmation effectuée par l’exploitant système
27
Page 35

Call forwarding
All origins
To subscriber
OK
Choose the origin of calls.
You have chosen the origi n of the calls to be forwarded.
• All origins: for forwarding all calls.
• Internal origin: for forwarding calls from internal extensions.
• External origin: for forwarding calls from external extensions.
4 - Select the option you want (All origins, for example) then
press Select to confirm.
Choose the forward destination.
You will now choose the forward destination.
• To forward calls to a subscriber:
5 - Select the option To subscriber then press Select to confirm.
6 - Dial the extension number.
In case of error, correct it by pressing Backspace.
7 - Press OK to confirm.
• To forward calls to voicemail:
• Select the option To voicemail.
* Selon programmation effectuée par l’exploitant système
*
• To forward calls to an external line
• Select the option To external line.
• Dial the external number preceded by the outside line
access code. In case of error, correct it by pressing
Backspace.
• Press OK to confirm.
After the request is taken into account, the terminal returns to the
Forward menu where the forwarding type is preceded by a tick.
Callback: press the context-sensitive Return key to exit the
sequence and return to the previous screen.
:
28
Page 36

Call forwarding
Menu
Forward
Cancel all forwards
Menu
Active functions
Cancelling all forwarding operations
1 - Press the context-sensitive Menu key.
2 - Select Forward then press Select to confirm.
3 - Select Cancel all forwards to cancel all the previously
programmed forwarding operations.
Cancel a forward
1 - Press the context-sensitive Menu key.
2 - Select successively Active functions, Forward, Select and
confirm each time by pressing Select or .
3 - Select the forwarding type to be deleted by pressing Delete.
Forwarding your calls through feature codes
If the context-sensitive Menu key is not proposed, you can forward your calls to another
terminal or to your voicemail, using some feature codes.
Immediate forward to another terminal
* 2 1 1 - Press successively the keys * 2 1 or
2 - Dial the extension number you want.
3 - Confirm with Comp.
-> All calls are immediately forwarded to the chosen terminal.
• To cancel this forward: # 2 1 or
Forward on no answer to another terminal
* 2 2 1 - Press successively the keys * 2 2 or
2 - Dial the extension number you want.
-> All calls are forwarded to the chosen terminal after a few
rings.
• To cancel this forward: # 2 2 or
29
Page 37

Call forwarding
Forward on busy to another terminal
* 2 3 1 - Press successively the keys * 2 3 or
2 - Dial the extension number you want.
-> All incoming calls to your terminal are forwarded to the
chosen terminal.
• To cancel this forward: # 2 3 or
Immediate forward to voicemail
* 2 5 • Press successively the keys * 2 5 or
Forward on no answer to voicemail
* 2 6 • Press successively the keys * 2 6 or
Forward on busy to voicemail
* 2 7 • Press successively the keys * 2 7 or
Cancelling all forwarding operations
*
-> All calls are immediately forwarded to voicemail.
-> All calls are forwarded to voicemail after a few rings.
-> All incoming calls to your busy terminal are forwarded to
voicemail.
# 2 0 or
Overriding call forwarding*
You are trying to reach a party and you know that their terminal is forwarded. You can force
this forwarding and ring the desired set.
* 2 9 1 - Press successively the keys * 2 9 or .
2 - Dial the extension number you want.
Note: this function is subject to a right; contact the system
operator.
* Selon programmation effectuée par l’exploitant système
30
Page 38

Directory
Pers.Dir.
The context-sensitive Pers. Dir key (Voir “Description of the terminal”, page 1) can be
used to access the internal directory stored on the terminal, and the external contacts defined either in the corporate directory or in the personal contacts (from Outlook Exchange).
Note: Contact the system operator for information on how to activate this context-sensitive
key, the available external resources and the required identification information.
The internal directory is always available whereas access to some directory data from ex-
ternal sources (Enterprise Directory or Microsoft Exchange) depends on the configuration
made by the operator. If these accesses are available, they require some identification information.
IMPORTANT: W hen the Pers. Dir key is available as context-sensitive key; the context-
sensitive Directory key should not appear (depending on system configuration).
The call is made exclusively from the internal directory of the terminal and/
or from external directories as described in this chapter.
General directory functions
Checking or calling from the personal directory (no external directory configured)
1 - Press the Pers. dir. key. (Voir “Description of the terminal”,
page 1)
-> The existing recordings are displayed in form of a list on the
right side of the screen.
2 - For a quick search in the search area (on the top
right side), use the displayed alphabetic keypad to enter the
character string on which you wish to make the search.
3 - Select the subscriber to call from the touchscreen.
4 - To call the correspondent, lift the handset or press the Dial
key .
5 - If the record contains several phone numbers, select the
corresponding label and lift the handset or press
Dial.
31
Page 39

Directory
Pers.Dir.
Checking or calling from the personal directory (with external directories configured
and activated)
Press the Pers. dir. key. (Voir “Description of the terminal”,
page 1)
-> the list of available directories (internal and external) is
displayed on the left side, together with the number of
recordings per directory.
-> On the right side, use the arrows to scroll through the
recordings for each directory.
-> For a quick search,
1 - For a quick search in the search area (on the top
right side), use the displayed alphabetic keypad to enter the
character string on which you wish to make the search.
As you enter the letters, the corresponding names are
displayed in the upper part of the screen.
The search is applied to all the directories (internal and
external).
2 - Select the subscriber to call
3 - If the record contains several phone numbers, select the
corresponding label up till the number to call then lift the
handset or press Dial.
.
-> For a search by directory,
1 - Select the directory concerned (on the left side of the screen).
2 - Select the subscriber concerned by this directory (list by the
right).
3 - Select the subscriber to call
.
4 - If the record contains several phone numbers, select the
corresponding label up till the number to call then lift the
handset or press
Dial.
32
Page 40

Directory
Pers.Dir.
Directory Directory Directory
Settings
Name display
Sorting preference
Identifiers
Copying a contact from an external directory to the internal directory
This procedure applies when the external directory sources are confi gured.
1 - Press the Pers. dir. key. (Voir “Description of the terminal”,
page 1).
2 - Select the external directory concerned.
3 - Search for the contact to copy.
4 - Press to see the detailed record of this contact then press
Copy.
5 - A message appears, confirming that the contact has been
successfully copied to the internal directory.
Modifying directory sorting
These preferences will be applied to all the directories (internal and external).
1 - Press the Options key to access the services and options on
the terminal.
2 - Select Directory.
3 - Select Settings.
4 - Select ( ) Name display.
5 - Choose the name display order then confirm by pressing
Save.
6 - Select ( ) Sorting preferences.
7 - Choose the sorting preferences then confirm by pressing
Save.
Identification for access to Microsoft Exchange contacts
1 - Press the Options key.
2 - Select the Identifiers menu.
33
3 - Select (
4 - Select the User name field then enter the applicable value (in
principle, your e-mail address).
5 - Select the Passwd field then enter the applicable value
(password associated with your Microsoft Exchange account).
6 - Press Save.
) the Microsoft Exchange directory.
Page 41

Internal directory management
Pers.Dir.
Add
Pers.Dir.
Modify
You can save in your internal directory your most frequently used internal or external numbers (up to 200 names). The records are displayed according to a configuration made in
the terminal menu Voir “Other options”, page 60.
However, since these numbers are saved on the terminal, they are not accessible from another terminal: case of moving a subscription (login/logout) or associated terminals.
Creating a record in the internal directory
1 - Press the context-sensitive Pers. dir. key (Voir “Description
of the terminal”, page 1).
2 - Press the context-sensitive Add key.
3 - On the Name screen, browse through the areas to be filled in.
Y ou can enter capital letters, small letters or figures, using the
displayed alphabetic keypad.
4 - Place the cursor again on Name, press
Numbers screen.
5 - Enter the phone number(s) from the record, as well as the line
number on which the call must be made (Line keys).
6 - You can complete the record by filling in the following screens meant for
addresses (press
after placing the cursor over the screen
name).
7 - Press Save.
to display the
Adding a call number to an internal directory record
You wish to fill in a record with a new phone number.
1 - Press the Pers. dir. key. (Voir “Description of the terminal”,
page 1)
-> the existing recordings are displayed in form of a list on the
left side of the screen.
2 - Select the record to be completed.
3 - Press the context-sensitive Modify key.
Using the browser ( ), go to the number input screen.
4 5 - Fill in the areas meant for a new phone number.
6 - Press the context-sensitive Save key. The new number is
displayed on the list.
Modifying a record in the internal directory
You have selected a record from your directory.
1 - Press the context-sensitive Modify key.
34
Page 42

Directory
Delete
Delete item
Delete all
Delete
2 - Select ( ) the line to correct.
3 - Enter the correction.
4 - Use the context-sensitive Backspace key to delete incorrect
characters.
Reminder: you can use the key to place the cursor behind
the character to be deleted.
5 - Press the context-sensitive Save key to save the correction.
Deleting one record or all records from the internal directory
You have selected a record from your directory (Voir “Modifying a record in the internal di-
rectory”, page 34).
• To delete the selected record:
1 - Press the context-sensitive Delete key.
2 - Then press the context-sensitive Delete item key.
-> The record is deleted from the local directory.
• To delete all the records:
1 - Press the context-sensitive Delete key.
2 - Press the context-sensitive Del all key.
-> All the records are deleted from the internal directory.
35
Page 43

Voicemail
Voicemail
The voicemail helps you to manage your calls when you are absent or simply when you do
not want to be disturbed.
For the voicemail system to be able to record your messages, you must configure and personalize your voice mailbox, then forward your calls.
You must activate call forwarding to voicemail so your calls can be forwarded to it.
*
Configuring and personalising your voice mailbox*
You must call the voicemail system to access the menus to configure and personalise your
voice mailbox.
Press the context-sensitive Voicemail key.
or
Dial the voicemail number .
You can also successively press the keys
* 53.
-> A voice prompt welcomes you and gives the different
commands to access the main menu.
We recommend that you do the following straight away:
• Personalise your password.
• Record your name.
• Record your greeting message.
If required, contact your system operator for additional
information on using the voicemail system.
* Selon programmation effectuée par l’exploitant système
36
Page 44

Voicemail
Voicemail
Activating call forwarding to your voicemail
To activate call forwarding to your voicemail, see Chapter “Call forwarding”, page 27.
Consulting new messages
Terminal idle: the message indicator blinks and displays a magnetic tape symbol, informing
you that you have one or more unread messages in your voicemail box.
You want to consult your voicemail:
Press the context-sensitive Voicemail key.
or
* 53 to access your voicemail box.
Dial
Depending on the programming performed by the system
administrator, or voicemail type, there may be various ways to
access your voice messages:
• Entering an access code first
• Broadcasting from a welcome menu
• Or accessing directly the messages left in the order defined by
the administrator.
37
-> Follow the instructions provided by the voice prompt.
Page 45

Multi-key function
Key 1
Key 2
Key 1
A multi-key programmed terminal has only one directory number, but has personalised
keys to enable it to process several calls at the same time. Therefore, you can answer your
parties as the calls arrive and display the calls on hold.
The number of personalised keys must be equal to the number of calls you wish to have
at the same time. Example: for three simultaneous calls, the multi-key function will be programmed on three keys.
Remarque : this function will be programmed by your system operator. Using an expan-
sion module gives an immediate view of the programmed keys, regardless of whether the
terminal is idle or communicating.
*
Communicating with the multi-key function
The multi-key function has been programmed on at least three keys.
Answering a call:
When a call arrives on your terminal set to multi-key, the first
programmed key blinks, and the caller ID is displayed on the
screen.
• Press this key to talk to the correspondent.
-> The indicator light associated with this key goes steady on.
Remarque : For this first call, you can also lift the handset or use
the handsfree key. The programmed key goes on steady in the
same way.
Answering a second call
If another correspondent is trying to reach you, you will hear a
beep; the indicator light of a second key blinks rapidly and the
caller's ID is displayed on screen.
1 - Press the blinking programmed key.
-> This key lights up steady, and you are connected to the
second caller.
-> The first correspondent is put on hold, and the key
associated with this call blinks slowly.
2 - T o resume the call with the correspondent put on hold, press
the blinking key.
Remarque : A multi-key terminal is seen as free as long as at
least one position is available, that is one free programmed key.
Switching from one party to the other
* Selon programmation effectuée par l’exploitant système
38
Page 46

Multi-key function
Leave
Off-hook
To change from one correspondent to the other, just press
successively the blinking programmed key.
Releasing a correspondent:
T o release one of the correspondents (the one with whom you are
talking):
• Press End to release the ongoing call then the line key of the
correspondent with whom you wish to resume the call.
39
Page 47

The multi-line function
A multi-line terminal has several directory numbers*. Each directory number is stored on a
programmable key.
This function is mainly used to program on the same set:
- A standard number that you give to everyone.
- A private number that you only give to some people; this can also be a backup number.
Examples:
For a manager, - an unfiltered private number
- A number filtered by his assistant.
For an assistant, - a private number for her personal calls
- A number for receiving the manager's filtered calls.
Remarque : this function will be programmed by your system operator. Using an expan-
sion module gives an immediate view of the programmed keys, regardless of whether the
terminal is idle or communicating.
When your terminal is set to multi-line, you can assign at will to each of your directory numbers the features you wish to use. Each directory number can also be set to multi-key
(managing enquiry calls).
You have a voice mailbox associated with each directory number. Forwarding is programmed independently and with secret access codes that may be different.
*
Note that some procedures described in this guide differ when your terminal is set to multiline. An additional operation is required when certain features are programmed, for instance:
- Selecting the line to connect in multiple calls
- Selecting the line to connect in the recording of a speed dial key
- Or selecting the line to be forwarded (Forward menu).
In all cases, follow the instructions displayed on screen.
* Selon programmation effectuée par l’exploitant système
40
Page 48

The multi-line function
Public No
Private N
Communicating with the multi-line function
The multi-line function has been stored on at least two programmable keys on your terminal (one key per line).
Answering a call:
When a call arrives on your terminal set to multi-line, the indicator
light associated with the personalised key blinks, and the caller ID
appears on screen.
• Press this programmed key to talk with the correspondent.
-> The indicator light associated with this key goes steady on.
Answering a second call
If another correspondent is trying to reach you on the second line,
you will hear a beep; the indicator light of a second key blinks
rapidly and the caller's ID is displayed on screen.
1 - Press the blinking programmed key.
-> The indicator light associated with this key goes steady on.
-> The first correspondent is put on hold, and the indicator light
of the key associated with this call blinks slowly.
2 - T o resume the call with the correspondent put on hold, press
the blinking key.
Switching from one party to the other
To change from one correspondent to the other, just press
successively the blinking programmed key. The screen displays
the identity of the party that you are talking to.
41
Page 49

The supervision function
Privileged
Programming on your terminal the supervision of a set of terminals enables you to:
• Know the status of supervised terminals (free, called, busy)
• Quickly pick up calls on these terminals
• Call these terminals directly.
Remarque : this function will be programmed by your system operator. Using an expan-
sion module gives an immediate view of the programmed keys, regardless of whether the
terminal is idle or communicating.
*
Communicating with the supervision function
When the terminal supervision function has been programmed on a key of your terminal,
the status of the indicator light associated with the programmed key varies according to the
status of the supervised terminal.
• When the supervised terminal is in standby mode, the indicator
light is green.
• When the line of the supervised terminal is busy, the indicator
light is red.
• When a call arrives on the supervised terminal, the associated
indicator light turns yellow and, depending on the programming,
an audible signal* is emitted on your terminal.
Picking up a call when your terminal is idle:
Two possibilities are offered, depending on the programming
carried out by the system operator:
• Picking up a call directly when your terminal is idle:
• Check the identifier of the intercom group and pick up or do not
pick the call.
Remarque : If required, contact your system operator for addi-
tional information on these two possibilities.
Option "Pick up a call directly":
Picking up a call when your terminal is idle:
The supervised terminal is called and the indicator light turns
yellow:
• Press the supervised programmed key to pick up the call.
* Selon programmation effectuée par l’exploitant système
42
Page 50

The supervision function
Privileged
Transfer
Superv.
Superv.
Intercepting an ongoing call:
The supervised terminal is called, and the indicator light turns
yellow (visible on the extension module):
• Press the Hold key to put the ongoing call on hold (or a free line
key).
• Press the supervised programmed key to pick up the call.
You can change from one correspondent to the other, or release
any of the correspondents.
Option "Check identifier before picking up":
When your terminal is idle:
The supervised terminal is called and the indicator light turns
yellow:
1 - Press the supervised programmed key to check the identifier.
2 - Press the supervised programmed key again to pick up the
call.
During a call:
At the moment this function is not available during a call.
Transferring an incoming call to the supervised terminal
Calling the supervised terminal
43
You are in communication on the line key with a party and you
want to transfer the call to the supervised terminal:
1 - Press the context-sensitive Transfer key.
2 - Press the supervised programmed key then hang up.
-> The indicator light associated with the programmed key
turns yellow.
To call the owner of the supervised terminal:
• Press the supervised programmed key.
The indicator light associated with the programmed key turns red.
When the called party answers, pick up the handset to talk.
Page 51

The filter function
filtering
Filterer superv.
The filter function
Filtering enables a "filtered" terminal to forward calls to a "filtering" terminal while monitoring the forwarded calls. It requires using two programmable keys on the Filtering terminal
and two programmable keys on the Filtered terminal:
• One key for activating or deactivating filtering
• One key for supervising the calls.
Remarque : this function will be programmed by your system operator. Using an expan-
sion module gives an immediate view of the programmed keys, regardless of whether the
terminal is idle or communicating.
*
Communicating with the filter function
Activating the filter function:
The key programmed with the filter function is used to activate
this function from the filtered terminal or filtering terminal.
• Press the forward activation/deactivation key.
-> The indicator light associated with the key goes on on the
two terminals. On the filtered terminal, the menu key lights up
and the terminal status (Forwarding activated) is displayed
on screen.
Remarque : The activation (or deactivation) of the filter function
on any of the terminals (example, filtered terminal) is automatically recorded on the other terminal (example, filtering terminal).
Yo u are FILTERING:
* Selon programmation effectuée par l’exploitant système
Call the filtered set:
You want to call the designated user of the filtered terminal:
• Press the supervision key corresponding to the filtered terminal.
-> The indicator light associated with the programmed key goes
on.
Answer the filtered calls:
A call meant for the filtered terminal arrives:
-> The display indicates that the call was intended for the
filtered terminal (Via..).
44
Page 52

The filter function
Filterer super
Transfer
Filterer super
Filterer super
• Press the blinking line key. Y ou can also press the line key or lift
the handset.
If you are already on line, the same message appears and you
hear a beep:
• Press the new blinking line key.
Transfer the inbound call to the filtered set:
You wish to transfer the intercepted call to the filtered terminal.
1 - Press a free line key.
2 - Press the supervision key corresponding to the filtered
terminal.
-> The indicator light associated with the programmed key goes
on.
3 - Once you are communicating with the filtered terminal, press
the context-sensitive Transfer key.
4 - Press the key of the blinking line then press Transfer. This is
the correspondent who has been on hold.
Before the transfer you can change from one call to the other by
pressing the line keys.
You are filtered.
45
Calling the filtering terminal:
You want to call the desi gnated user of the filte r i n g se t:
• Press the supervision key corresponding to the filtering
terminal.
-> The indicator light associated with the programmed key goes
on.
Picking up a call meant for you:
A call meant for you arrives on the filtering terminal. On your
terminal, the indicator light associated with the supervision key of
the filtering terminal blinks rapidly.
• Press the supervision key then lift the handset to talk to your
correspondent.
Page 53

The filter function
Filterer supe
Transfer
Filtering
Transfer the incoming call to the filtering terminal:
You have intercepted a call meant for you and you wish to
transfer it to the filtering terminal.
1 - Press a free line key.
2 - Press the supervision key corresponding to the filtering
terminal.
-> The indicator light associated with the programmed key goes
3 - Once you are communicating with the filtered terminal, press
the context-sensitive Transfer key.
4 - Press the key of the blinking line then press Transfer. This is
the correspondent who has been on hold.
Before the transfer you can change from one call to the other by
pressing the line keys.
Deactivating the filter function:
The key programmed with the filter function is used to disable
filtering from the filtered terminal or from the filtering terminal.
• Press the forward activation/deactivation key.
-> The indicator light associated with the key goes off on the
on.
two terminals. On the filtered termina l, the Menu key indicator
goes off and the terminal status (Forwarding activated)
disappears from the screen.
46
Page 54

The filter function
47
Page 55

Mobile Intégration
The Mitel 6940 SIP Phone supports mobile integration, a feature that provides seamlessmobile integration using Bluetooth wireless technology. Mobile integration highlights include the ability to:
• Sync your mobile phone’s contact list with your 6940 SIP Phone.
• Answer a mobile phone call using your 6940 SIP Phone.
• Move active calls between the 6940 SIP Phone and your mobile phone.
Remarque : Mobile Integration features are available only if your Administrator has en-
abled them. Contact your Administrator for details on how to enable mobile integration on
your phone.
Pairing a mobile phone using Bluetooth
• Press the key and tap the Bluetoothicon,
• Swip the toggle switch to the right to enable Bluetooth functionality . Ensure your
mobile phone is discoverable as the Mitel 6940 SIP Phone automatically scans for
available Bluetooth devices.
•
Remarque : For information on how to make your mobile phone Bluetooth discoverable,
refer to the documentation provided with your respective mobile phone.
• When your mobile phone has been discovered, use the navigation keys to highlight the
respective entry in the list of available devices and press the Select button or Pair soft-
key.
A Bluetooth pairing request displays on both the Mitel 6940 SIP Phone and your mobile
device.
48
Page 56

• Ensure the pairing code matches on both devices and press Yes on the Mitel 6940 SIP
Phone and acknowledge the pairing request on your mobile phone.
The Mitel 6940 SIP Phone attempts to pair the mobile phone and if successful, automatically attempts to connect to the mobile phone.
Remarque : If pairing or connecting fails, a failed error message displays on screen. Press
Retry to attempt to pair or connect again, or Cancel to cancel the attempt.
• Press OK to acknowledge the successful connection.The connected mobile phone is
added to the list of Paired Devices and is ready to use.
Syncing mobile contacts
The Mitel 6940 SIP Phone automatically attempts to sync your mobile contacts to the Directory application upon pairing and connection.
To manually update your mobile contacts:
• Press the key to access the Directory application.
• Navigate to the Mobile contacts folder.
• Press the Reload softkey.
The Mitel 6940 SIP Phone attempts to re-synchronize and update your mobile contacts.
Remarque : If the update fails, a failed to retrieve contacts message displays on screen.
Press Retry to attempt to update again, or Cancel to cancel the attempt..
Answering an incoming mobile call using your Mitel 6940 SIP Phone
When your mobile phone is paired and connected to your Mitel 6940 SIP Phone,incoming
calls on your mobile phone will be indicated on your 6940 SIP Phone as well.
Remarque : A Mobile softkey must be configured to answer an incoming mobile call using
your Mitel 6940 SIP phone.
49
Page 57

Mobile Intégration
Lift the handset or press the ,key, blinking Bluetooth Line key, or
Answer softkey for handsfree operation.
Press the Push call softkey to push the mobile call’s audio from your Mitel 69406940 SIP
Phone to your mobile phone
or
Press the Mobile softkey to pull the mobile call’s audio from your mobile phone to the Mitel
6940 SIP Phone.
50
Page 58

Login / Logout function
Ident
Menu
Logout
At the moment, you are occupying an office equipped with a general-purpose terminal (not
assigned to a subscriber). You can take your calls, programmed forwards as well as the
language associated with your subscriber number from there.
When you get back to your office, you will use the same procedure to retrieve your calls on
your own terminal, as well as its configuration (forwards, programmable keys, terminal settings, etc.).
If, however, you no longer want your subscription to be associated with the temporary terminal when you leave your office, you can release your terminal by carrying out a logout
procedure on this terminal. The temporary user terminal again becomes a general-purpose
terminal, though calls can be made on it. You can later retrieve your subscriber number
and the associated rights on your own terminal by logging on again.
Restoring your subscriber rights on a general-purpose
terminal
The terminal status is indicated by the message "No subscriber", displayed on the screen.
The system key Ident is displayed.
1 - Press the Ident system key.
2 - Enter your subscriber number then press OK to confirm.
3 - Enter your password.
-> To define a password, see Section “Changing the
subscription password”, page 55.
4 - Press OK to confirm.
*
Releasing a terminal*
* Selon programmation effectuée par l’exploitant système
51
1 - Press the system Menu key .
2 - Swipe the touchscreen and select Logout.
3 - Press the context-sensitive Select key to confirm.
4 - Your re quest is taken into account.
Remarque : We advise you to program a forward on busy (to
voicemail, for example) to ensure that your calls are taken into
account.
However, some system configurations allow automatic forwarding to voicemail; seek advice from your system manager.
Page 59

Configuration options
Alarm
You will find in the appendix the list of all the options offered by the system (Voir “Menu
options”, page 61), as well as links to the chapters handling the item.
For terminals without Menu/Ident key, the feature code allowing the use of these options
is also described.
Call settings
To access these options, first press the system Menu key and select Settings then Calls.
Each selection can be confirmed using the Select key.
Setting an alarm
1 - Select Settings then Calls.
2 - Select Alarm.
Remarque : If some alarms have already been set, they are list-
ed in the order of setting. In this case, press New to add a new
one.
3 - Enter the time you want your terminal to ring (format: hhmm).
4 - Press OK to confirm.
You can delete a set alarm:
1 - Select the alarm to delete
2 - Press Delete.
You can also delete the programmed alarm(s) by accessing the
active functions (Menu > Active functions).
.
Lock the phone
* Selon programmation effectuée par l’exploitant système
Via feature code:
Set an alarm * 5 5 + hhmm
Delete an alarm: # 5 5 + hhmm
*
This option allows you to prohibit access to your phone, for
instance while you are away (menu , cal l lo g, personal directory,
external calls).
1 - Select Settings then Calls.
52
Page 60

Configuration options
Lock
Menu
Do not disturb
2 - Select Lock and press Select to confirm.
Note: the request is immediately taken into account.
-> The idle screen displays the message "Tel. locked".
The terminal is locked, but you can call an internal
correspondent.
Remarque : To lock your terminal, you must first enter a personal
password, for it will be required to unlock it (Voir “Changing the
subscription password”, page 55).
Via feature code: * 0 5
Unlocking the terminal*
1 - Press Menu.
• Enter your subscription password (4 characters) then press OK
to confirm.
-> The terminal is unlocked.
Via feature code: # 0 5 + password
The Do Not Disturb function
When this function is active, the terminal no longer receives any calls.
*
1 - Select Settings then Calls.
2 - From the list, select Do Not Disturb then press Select to
confirm.
-> The request is accepted and, on the list, the option is
preceded by an asterisk.
Remarque : The idle screen displays a terminal status message.
To start receiving calls again on your terminal, on the list, just
select the function then click Select to confirm.
Y ou can also delete the function by accessing the active functions
(Menu > Active functions).
* Selon programmation effectuée par l’exploitant système
53
Via feature code:
Enabled: * 4 5
Disable: # 4 5
Page 61

Configuration options
General standby
Deact. Group
Remote forwardin
Standby mode*
You wish to step out whereas some colleagues have activated call forwarding or filtering
to your terminal. This function allows these calls to be temporarily forwarded to the owners
so callers are not penalised. If you are part of a hunt group, your terminal will be excluded
from this.
1 - Select Settings then Calls.
2 - Select General standby then press Select to confirm.
A message on the screen confirms the activation of this function.
You only receive your own cal ls.
You can cancel th e func tion for the same operation.
You can also cancel the function by accessing the active
functions (Menu Active functions).
Deactivating a hunt group
*
Your termi nal is part of a call group and you wish to temporarily
remove this terminal from the group.
1 - Select Settings then Calls.
2 - Select Deac. group then press Select to confirm.
You can return to the group using this same procedure. You can
also do so by accessing the active functions (Menu > Active
functions).
Via feature code:
Enabled: * 4 8
Remote forwarding
* Selon programmation effectuée par l’exploitant système
Disable: # 4 8
*
From your terminal, you have the possibility to forward calls from
another terminal to your terminal.
1 - Select Settings then Calls.
1 - Select Remote forwarding.
2 - Enter the number of the terminal whose calls must be
forwarded to your terminal.
3 - Click OK to confirm.
54
Page 62

Configuration options
My number
Password
Via feature code:
Enabled: * 2 4 + extension number
Disable: # 2 4 + extension number
General settings
The general settings are accessible by successively selecting Menu>Settings>General.
Viewing the terminal ID
This option displays the subscriber's directory number and
identity. It also indicates the system to which the terminal is
attached.
Changing the subscription password
This option is used to modify the password saved in the system.
This is the one to be used in the options of the menu in which a
password is required. This is also the password for your
voicemail.
Since it is associated with your subscription, you will find it if you
log on to a general-purpose terminal.
1 - Select Password.
2 - Enter the old password (the default password given to you by
the system operator) then press OK to confirm.
3 - Enter the new password twice (4 numeric characters) then
press OK to confirm each time.
Via feature code:
* 0 6 + previous password + 2 times the new password.
When your password has expired, press Menu to access directly
to the changing subscription password menu *.
* According to the password policy programmed by the system operator
55
Page 63

Changing the language
Language
The language menu is accessible by pressing successively Menu>*Language (the asterisk is used to identify the option even if the current language is not known to the user
1 - Select Language.
-> Inside the same menu, the currently used language is
preceded by an asterisk.
2 - Select the language you want and press Select.
).
56
Page 64

Terminal settings
Terminal settings
Your terminal offers some settings options which you can use to personalise it.
Accessing settings options
1 - Press the Options key to access the terminal options.
2 - Use the touchscreen for navigation and press the icon
concerned.
Setting the audio
1 - Select the Audio icon then enter the column in question.
Audio mode
Depending on the selected audio mode:
-> Loudspeaker: the call can be set up from the handset or in
handsfree mode. In audio mode via the handset, press
to change to handsfree mode. In handsfree mode, lift
the handset to enable audio on the handset.
-> Headset: the call can be set up from the handset or headset.
In audio mode via the handset, press to change to
audio mode on the headset. In audio mode on the headset,
lift the handset to enable audio on the handset.
-> LSpeaker/headset: Pressing sets up the call first in
handsfree mode. Press to change to audio mode on
the headset. Lift the handset to enable audio on the handset.
-> Headset/Handsfree: Pressing sets up the call first
on the headset. Press to change to handsfree mode.
Lift the handset to enable audio on the handset.
Headset
Ring tones
57
The key indicator light goes steady on in handsfree mode.
The handsfree key indicator light blinks slowly on in headset mode.
Select the audio mode you wish to use.
-> Headset volume adjustment: select Low, Medium or High,
depending on what you want.
-> DHSG: to be activated according to headset model.
Select any of the 15 ring tones or the Mute option.
Page 65

Terminal settings
Tones
Define the type of tones according to your country.
58
Page 66

Terminal settings
Setting the display
Go to the Display menu.
Welcome screen:
-> Select any of the modes displayed (using the arrows).
-> Enter the timeout before changeover to display in powersaving mode (use the context-sensitive keypad).
Brightness:
-> Adjust the brightness using the horizontal browser keys.
-> Enter in seconds the screen backlight timeout (use the
context-sensitive keypad).
Setting the keypad
Go to the Dial menu.
1 - Select an Interactive keypad sub-menu.
This option is used to correct the phone number being entered:
• Deactivate: for correcting the number being entered using the
• Activated: does not allow the number to be corrected. The call
is automatically started at the end of the input.
key. You have to press Dial to start the call.
Speed dial keys
59
This option is used to save a phone number on a digital key on
the keypad (see “Speed dial”, page 25) or on a programmabl e
key. However, since the programmed keys are not visible from
MiVoice 5000 User Portal in this way, there may be a clash
between these two programming types.
On the other hand, these keys are programmed on the terminal
and their programming is lost if the subscription is moved (login/
logout). They are not accessible from an associated terminal.
Page 67

Other options
In the terminal options, other menus can be used to obtain some information or to change
the terminal status.
Telephone status
The Status menu gives information about the terminal's computer
configuration.
The Syst.info. key is reserved for the administrator.
Choosing a language
If the Menu/Ident key is available on your terminal, it is better to
use the menu option (Voir “Changing the language”, page 56).
Date and time
Different parameters are used to define the time and date format,
the use of summer time, time zone, and time and date update or
the use of a date server.
Remarque : the values entered for time and date can be over-
written through system update.
User password (terminal password)
The Lock>Password menu is used to modify the password
saved in the terminal. This is the one to be used in the setting
options of the terminal on which a password is required. It
consists of 5 numeric characters (default password: 11111).
Lock phone
Restart phone
Since it is not associated with your subscription, you will not find
it if you log on to a general-purpose terminal.
Y ou can use the Lock>Phone lock menu to lock your terminal; it
is preferable to use the Lock option of call settings (see page 52).
The Reboot menu is used to restart the phone.
60
Page 68

Appendices
Appendices
Menu options
The table below shows the menu tree structure, accessible via the system key Menu when
the terminal is idle. The available options are used to deploy the functions offered by the
system.
All the functions are described in the table below: Some of them are not accessible from
your terminal. Ask your system operator for advice.
Remarque : During a call the Menu key only gives access to the functions available during
a call.
The last column takes you to the pages on which the function is described in detail.
Call logs • Missed calls
• Incoming calls
• Outgoing calls
• All
Active functions • Forward
• Do not disturb
• Deactivating a hunt
group
• General deactivation /
global standby
• Alarm
• Callback
Forward • Cancel all forwards
(appears if a
forwarding operation
is active)
• Immediate forward
• Forward on busy
• Forward on no answer
• Predefined forward
“Call logs”, page 23
Only the active
functions are
displayed.
“Call forwarding”,
page 27
61
Page 69

Appendices
Settings • Calls • Forward
• Alarm
• Lock
• Do not disturb
• General deactivation /
global standby
• Deactivating a hunt
group
• Remote forwarding
• General • My number
• Password
• Language “Configuration
Voicemail “Voicemail”, page 36
Resume parked
call
Language
even if the current language is not known to the user)
Logout * “Login / Logout
(the asterisk is used to identify the option
Same as forwarding
“Configuration
options”, page 52
“Configuration
options”, page 52
options”, page 52
“Putting a party on
hold and resuming the
call on another
terminal”, page 15
“Changing the
language”, page 56
function”, page 51
* Selon programmation effectuée par l’exploitant système
Reminder: to browse through the menu, use the touchscreen swipe features.
62
Page 70

Appendices
Glossary (terms you need to know)
Conference call Three-way call from a call with two parties.
Filtering Used to forward calls meant for a "filtered" terminal to a "filterer"
terminal.
Intercept group Group of sets associated to the same group and authorised to
intercept calls intended for this group.
Call log Lists summarising the calls received on and made from the
terminal.
Login / Logout Function used to relocate the characteristics associated with a
subscriber number to a network terminal.
Handsfree T elephony mode used to make and receive calls without lifting the
handset.
Password • subscription/IVB password: saved on the terminal, it consists of
4 numeric characters.
• terminal password: saved on the terminal, it consists of 5
numeric characters. It is used in the terminal settings.
General purpose
set
63
Terminal without any subscriber number. T o find his subscription
characteristics, a user must log on.
Page 71

Appendices
Troubleshooting Check...
Fault detected Possible causes
No display Check that the set is connected to the line (dial tone in the
earpiece).
Check the cord to connect to the line.
Check that the other sets in the installation are working.
Check the screen contrast setting.
No dial tone Check that the set is connected to the line (display).
Check the cord to connect the handset.
Check that the other sets in the installation are working.
Check the handset, loudspeaker or headset volume settings.
No sound Check the handset, loudspeaker or headset volume settings.
Check audio mode (menu: Terminal audio setting).
No outside access Check that you have the right to make outside calls.
Check that your terminal is not locked or that your have entered
the right password.
Messages
displayed in a
foreign language
No reception of
voice messages
Check the chosen display language.
Check your connection to a voicemail system.
Check the recording of your voice signature or greeting message.
Check that call forwarding to your voice mailbox is enabled.
In case of particular problem, we recommend that you contact your system op erator.
64
Page 72

Appendices
65
Page 73

 Loading...