

Mitek Y HSB X User Manual
INSTALLATION INSTRUCTIONS
ROAD THUNDER SOUND BAR PLUS BY MTX, SATIN BLACK 2720
THANK YOU FOR CHOOSING KURYAKYN!
Protect your self and other s from possible injury and property damage or los s. Pay close attention to all instructions, warnings , cautions, and notices r egarding the ins tallat ion, use, and care of t his product.
THIS INDICATION ALERTS YOU TO THE FACT THAT IGNORING THE CONTENTS DESCRIBED HEREIN CAN RESULT IN POTENTIAL DEATH OR SERIOUS INJURY.
THIS INDICATION ALERTS YOU TO THE FACT THAT IGNORING THE CONTENTS DESCRIBED HEREIN CAN RESULT IN MINOR OR MODERATE POTENTIAL INJURY.
THIS INDICATION ALERTS YOU TO THE FACT THAT IGNORING THE CONTENTS DESCRIBED HEREIN MAY NEGATIVELY AFFECT PRODUCT PERFORMANCE AND FUNCTIONALITY OR
DAMAGE THE PRODUCT ITSELF OR THE PRODUCT TO WHICH IT IS BEING ATTACHED.
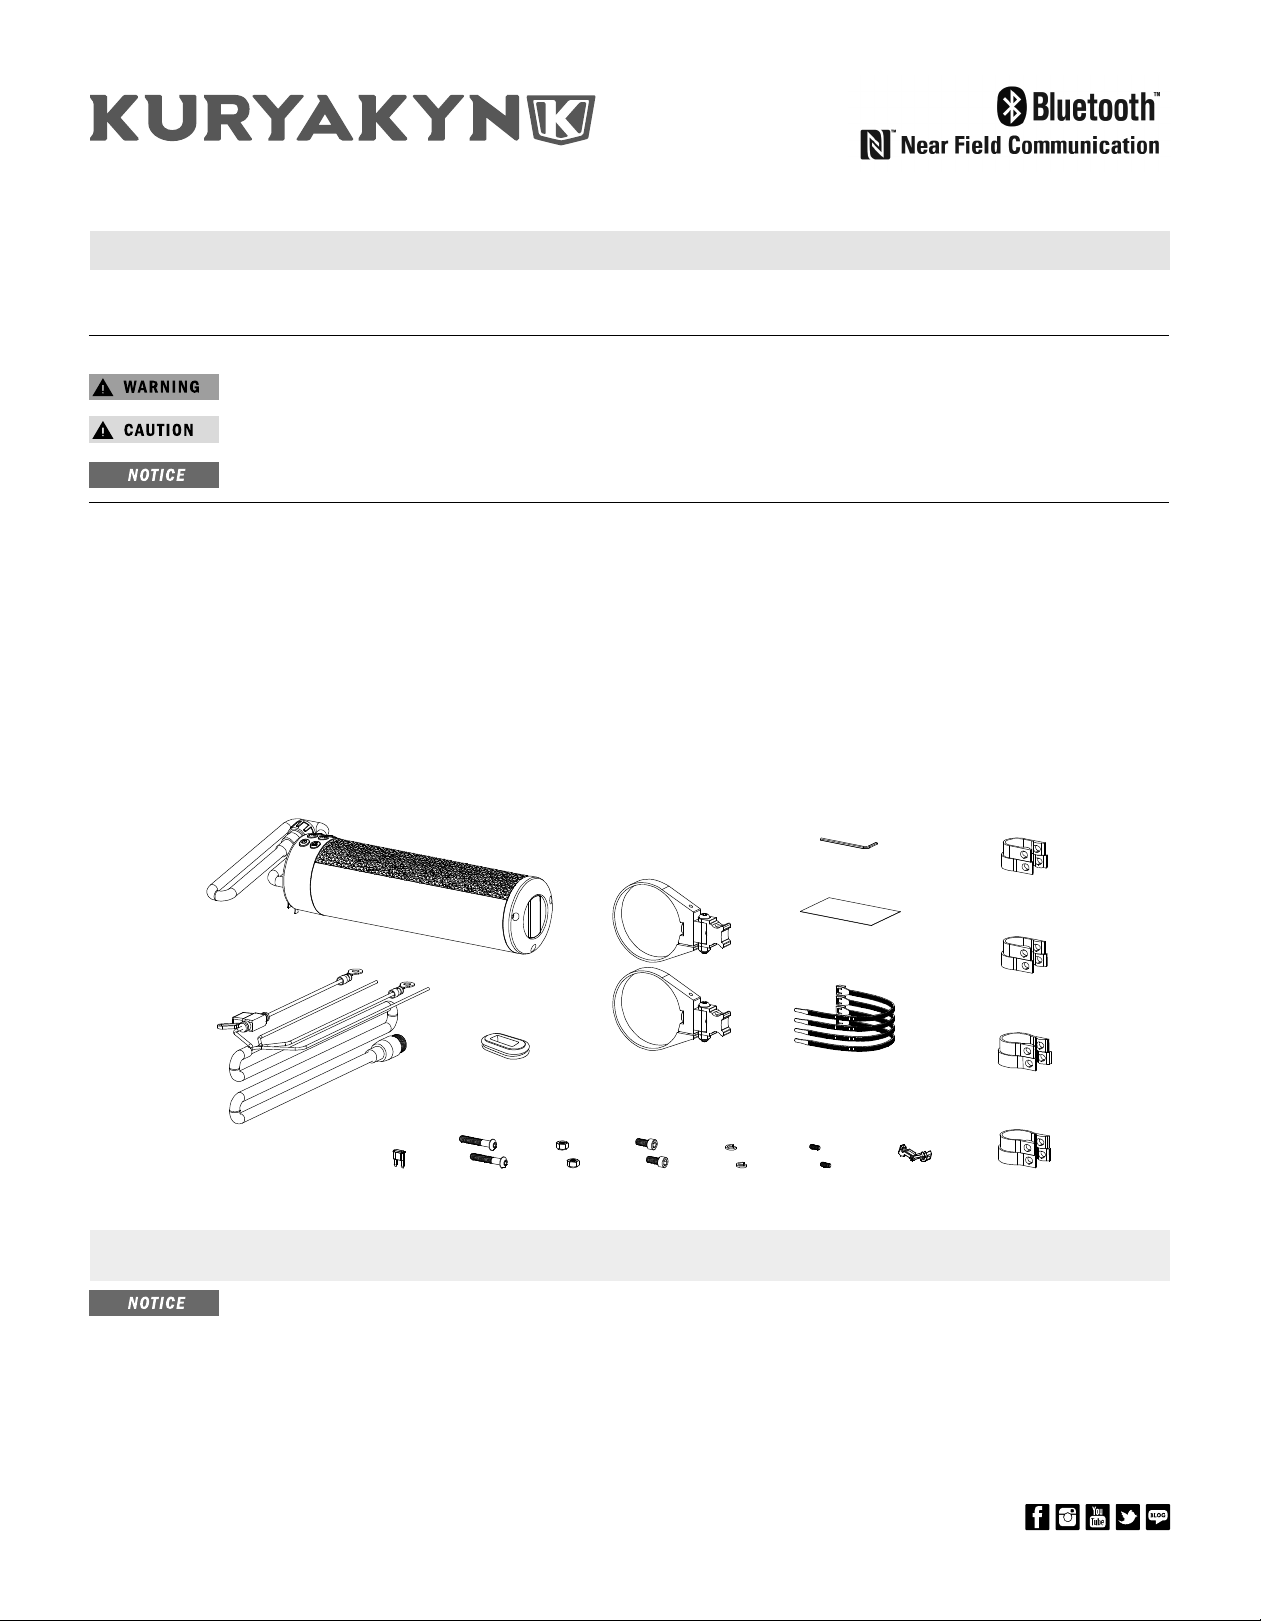
ENSURE THAT THE FOLLOWING PARTS HAVE BEEN INCLUDED IN THE KIT:
1 Road Thunder Sound Bar Plus with
Wire Harness
2 Sound Bar Mounting Clamps 2 M6-1.0 Lock Nut w/Washers
2 7/8” Clamps 2 M6-1.0 X 11MM Cap Screw Hex Drive
2 1” Clamps 2 M6 Split Washers
2 1-1/8” Clamps 2 M4-0.7 X 10MM Set Screws
2 1-1/4” Clamps 1 2MM Allen Wrench
1 USB Rubber Plug Seal 1 10 Amp Mini Fuse
1 Transparent Film 1 T-Tap Quick Connect Female
ROAD THUNDER
SOUND BAR PLUS
1 Hardware Kit, containing:
2 M6-1.0 X 35MM Button Head Hex Screws
4 Cable Ties
2MM ALLEN WRENCH
SOUND BAR
MOUNTING CLAMPS
TRASNPARENT FILM
7/8” CLAMP
WIRE HARNESS
10 AMP
FUSE
USB RUBBER
PLUG SEAL
M6-1 X
35MM BHHS
M6-1
LOCK NUT
M6-1 X
11MM CSHD
SPLIT
WASHERS
CABLE TIES
SET
SCREWS
T-TAP QUICK
CONNECTS
YOU WILL ALSO NEED:
Metric Hex, Allen wrenches, pliers
CHANGES OR MODIFICATIONS TO THIS UNIT NOT EXPRESSLY APPROVED BY THE PARTY RESPONSIBLE FOR COMPLIANCE COULD VOID THE USER’S
AUTHORITY TO OPERATE THE EQUIPMENT.
THESE INSTALLATION INSTRUCTIONS CONTAIN IMPORTANT INFORMATION. ENSURE THE END USER RECEIVES THIS COPY AND IS AWARE
OF ITS IMPORTANCE FOR FUTURE USE.
WHEN CONNECTING POWER AND GROUND WIRES ENSURE THAT THE RED POWER WIRE IS FUSED AT THE POINT WHERE IT IS
CONNECTED TO THE VEHICLE’S BATTERY. FAILURE TO DO SO CAN RESULT IN DAMAGE TO THE VEHICLE IF A SHORT CIRCUIT DEVELOPS
BETWEEN THE VEHICLE CONNECTION POINT AND THE PRODUCT.
KU RYA KY N.C OM
PAGE 1
302720
DPF-MRK-003 REV B 8/10/18
866 277 9598 | INFO@KURYAKYN.COM
454 COUNTY ROAD VV SOMERSET, WI 54025
1” CLAMP
1-1/8” CLAMP
1-1/4” CLAMP
INSTALLATION INSTRUCTIONS
ROAD THUNDER SOUND BAR PLUS BY MTX, SATIN BLACK 2720
-CONTINUED-
INTRODUCTION
Thank you for purchasing this Kuryakyn Road Thunder Sound Bar Plus by MTX that is designed to work with most Bluetooth enabled devices including
iPhone® and Android® smartphones and tablets. This easy to install and use, all in one unit is capable of transforming your Bluetooth enabled mobile
device into the center of your vehicle’s audio system. It is designed to mount on a variety of bars between 7⁄ 8” and 1-1⁄4”. Congratulations and enjoy
the ultimate audio experience!
FEATURES
• Two 2” x 3” full range speakers and four 1” high frequency tweeters
• All-weather construction for use in almost any environment
• Integrated Bluetooth receiver
• Auxiliary input for connecting devices via 3.5mm cable
• Auxiliary output for connecting an external amplifier or additional
sound bar via 3.5mm cable
INSTALLATION
The Road Thunder Sound Bar Plus can be used with any 12-volt batter y and can be mounted to a variety of bars using the included hardware. The unit
has four wires in its wiring pigtail. The red wire, hot, should be directly connected to the vehicles positive battery terminal. The black wire, ground,
should be connected directly to the vehicle’s chassis where paint has been removed or the negative terminal on the battery. Use the included T-Tap
Quick Connect Female connector and install directly onto the ACC/Key ignition wire on the motorcycle using a pair of pliers. Connect the Quick Connect Male connector, located on the orange wire, and the T-Tap Quick Connect Female together. The blue wire, optional output, can be used to turn on
additional amplifiers.
The unit features fully adjustable clamps for mounting to bars bet ween 7⁄ 8” and 1-1⁄4”. The clamps can be used to mount to many styles of handlebar
and roll bar systems. The included brackets are versatile, so mounting to angled bars is possible.
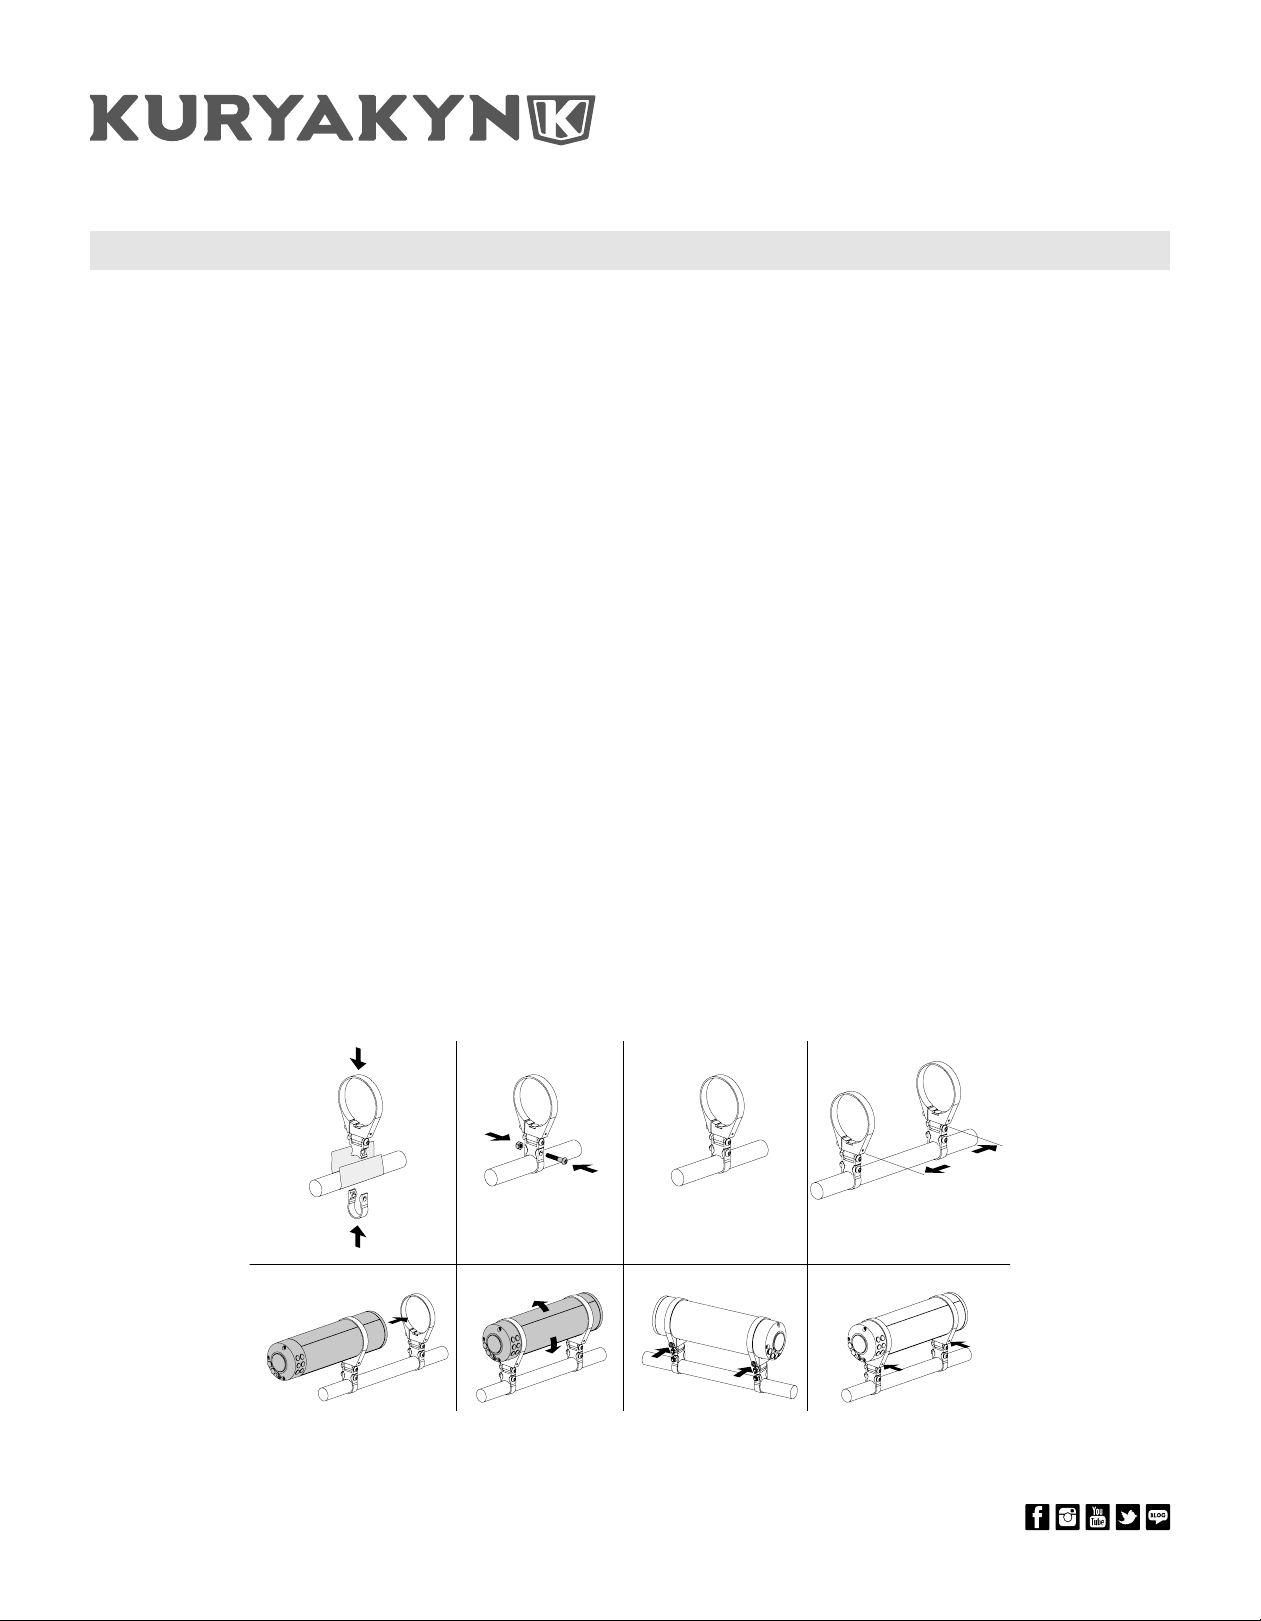
SCENARIO 1 - MOUNT CLAMPS TO HANDLEBAR FIRST, THEN INSTALL SOUND BAR.
• Universal mounting clamps fit bars between 7⁄8” and 1-1 ⁄4”
• Power, ground, ignition wire, and 12v trigger output included for
easy installation
• Automated Bluetooth pairing via NFC
• 1.0 Amp USB charging port
• Choose the correct size strap clamp for the handlebars.
Note: placing the transparent film between the strap clamp and handlebar will reduce the possibility of scratching the handlebars during installation.
• Assemble mid-section to bottom bracket using included 5mm Allen screw and 10mm hex nut.
• Ensure that the spacing between the brackets is between 3” and 6.75”.
• Slide the sound bar into the brackets from the left side, so the brackets can clear the buttons without damaging them.
• Rotate the sound bar so the speakers are directed at the rider’s head.
• Tighten the 5mm Allen screws to lock the sound bar in place.
• Tighten the 2mm set screws.
• Connect wires to power, ground, and ignition.
PAGE 2
302720
DPF-MRK-003 REV B 8/10/18
KU RYA KY N.C OM
866 277 9598 | INFO@KURYAKYN.COM
454 COUNTY ROAD VV SOMERSET, WI 54025
 Loading...