


Mitchell & Johnson WLD+211T User Manual

WLD+211T
Lossless Network Audio Player
with internet/DAB+/FM Stereo Tuner
User Guide

Dear Valued Customer
Thank you for deciding to purchase this Mitchell & Johnson product. This instruction manual will give you a general idea of
how this device operates, as well as providing you with information on safety procedures and cleaning. In order to maintain
this product in good condition, and to ensure it’s safe operation, please take a few minutes to read and carefully follow all
the safety and operating instructions found in this manual.
Please retain this instruction manual for future reference and pass it along with the device if handed over to a third party.
Should you have any additional questions regarding the operation or installation of this device, or should any problems arise
from its use, then please contact a specialized dealer or our service team for further information.
We assume no liability for any damage incurred as a result of improper use resulting from failure to comply with the safety
instructions found in this manual. Under such circumstances all claims under warranty will become null & void. We assume no
liability for any consequential damage!
This product is EMV-certified and complies with all European and National guideline requirements. A declaration of CE
conformity has been established for this product. Certification has been documented and entrusted to the manufacturer

Table of Contents
1. INTENDED USE ................................................................................................................................................ 5
EXPLANATION OF SYMBOLS ................................................................................................................................................ 5
2. SAFETY INFORMATION .................................................................................................................................. 6
3. ACCESSORIES ................................................................................................................................................... 7
4. DESCRIPTION OF PARTS ................................................................................................................................ 8
FRONT PANEL .................................................................................................................................................................... 8
MITCHELL & JOHNSON RM201 REMOTE CONTROL HANDSET ........................................................................................... 9
REAR PANEL .................................................................................................................................................................... 10
5. CONNECTION ................................................................................................................................................. 12
POWER SUPPLY ................................................................................................................................................................ 12
RADIO AERIALS ................................................................................................................................................................ 12
ETHERNET NETWORK CONNECTION ................................................................................................................................. 12
WIRELESS LAN ................................................................................................................................................................ 12
6. BEFORE GETTING STARTED .......................................................................................................................... 13
SCREENS.......................................................................................................................................................................... 13
MENUS ............................................................................................................................................................................. 14
MODES & MENUS OVERVIEW MAP ......................................................................................................................................... 15
7. GETTING STARTED ......................................................................................................................................... 16
SETUP WIZARD ................................................................................................................................................................. 16
MANUAL SET ................................................................................................................................................................... 17
NETWORK ....................................................................................................................................................................... 17
COMPLETION ................................................................................................................................................................... 18
SETTING UP A MUSIC SERVER ............................................................................................................................................ 19
8. INTERNET RADIO MODE ............................................................................................................................... 20
LAST LISTENED ................................................................................................................................................................. 20
PRESETS .......................................................................................................................................................................... 21
FAVOURITES .................................................................................................................................................................... 21
BROWSE .......................................................................................................................................................................... 22
SEARCH ........................................................................................................................................................................... 23
NOW PLAYING INFORMATION ........................................................................................................................................... 23
INTERNET RADIO PORTAL REGISTRATION ........................................................................................................................... 24
MY ADDED STATIONS ....................................................................................................................................................... 24
9. MUSIC PLAYER MODE ................................................................................................................................... 25
SHARED MEDIA (FROM UPNP MEDIA SERVER)................................................................................................................... 25
USB PLAYBACK................................................................................................................................................................ 26
VIEWING TRACK METADATA .............................................................................................................................................. 26
PLAYLISTS ........................................................................................................................................................................ 27
REPEAT/SHUFFLE ............................................................................................................................................................. 27
NOW PLAYING INFORMATION ........................................................................................................................................... 27
10. USING THE “PLAY TO” FEATURE IN WINDOWS 7 ................................................................................ 28
USE “PLAY TO” IN WINDOWS MEDIA PLAYER ................................................................................................................... 28
USE “PLAY TO” ELSEWHERE IN WINDOWS 7 ..................................................................................................................... 28

11. USING THE WLD+211 WITH AN APPLE MACINTOSH COMPUTER.................................................... 29
12. SPOTIFY CONNECT MODE ....................................................................................................................... 30
USING THE SPOTIFY APP WITH THE WLD+211 ................................................................................................................ 30
13. DAB RADIO MODE ..................................................................................................................................... 32
SCANNING FOR STATIONS ................................................................................................................................................ 32
SELECTING STATIONS ....................................................................................................................................................... 32
PRESETS ........................................................................................................................................................................... 32
NOW PLAYING INFORMATION ........................................................................................................................................... 32
SETTINGS......................................................................................................................................................................... 33
14. FM RADIO MODE ....................................................................................................................................... 34
SELECTING STATIONS ....................................................................................................................................................... 34
NOW PLAYING INFORMATION ........................................................................................................................................... 34
SETTINGS......................................................................................................................................................................... 34
15. SOFTWARE UPDATE AND FACTORY RESET .......................................................................................................... 41
SOFTWARE UPDATE ............................................................................................................................................................. 41
FACTORY RESET................................................................................................................................................................... 41
16. TROUBLESHOOTING AND ERROR MESSAGES ...................................................................................................... 42
ERROR MESSAGES ............................................................................................................................................................... 44
17. MAINTENANCE AND HANDLING ......................................................................................................................... 45
TRANSPORTING OR SENDING THE DEVICE ................................................................................................................................. 45
KEEPING THE EXTERNAL CASE CLEAN ....................................................................................................................................... 45
CLEANING THE DEVICE .......................................................................................................................................................... 45
18. GLOSSARY .......................................................................................................................................................... 47
19. SPECIFICATIONS.................................................................................................................................................. 47
Spotify
The Spotify software is subject to third party licenses found here:
www.spotify.com/connect/third-party-licenses
Before use
Please read this instruction manual thoroughly before operating this device and retain it for further reference. Following and heeding all the
information found in this instruction manual will maintain this product in good condition and ensure its safe operation. This instruction manual
contains information on how to operate and maintain this device. Should a component require maintenance, servicing or repair, then please consult
a qualified dealer or service technician.
1. Intended Use
This device is an FM/DAB/DAB+ stereo tuner with internet radio. It can be used for internet radio station reception by means
of internet access either via a broadband high-speed Ethernet cable or wireless LAN (Wi-Fi). FM & DAB radio reception are also
possible with an antenna. Music files stored on a network can also be accessed.
Please adhere to all of the safety information and instructions found in this instruction manual.
Explanation of symbols
An exclamation mark is intended to inform the
user of important information, operation or
maintenance instructions, or that special
attention is required.
This symbol is intended to alert you to the
presence of unprotected live parts or
components found within the product’s
enclosure, or of dangerous connections that
upon contact may be of sufficient magnitude to
constitute a risk of electric shock. Cables
intended for such connections should only be
connected by qualified personnel or you should
only use ready to connect cables. There are no
user-serviceable parts found inside the device,
therefore the device need never be opened.
Page | 5 © Mitchell & Johnson UK 2015 WLD+211 IB Ver 1.0 Rev 0.0
2. Safety Information
The following safety and hazard warnings are not only
for the protection of your device, but also serve as a
protection against potential health hazards. Please take
time to read the following instructions carefully.
We assume no liability for personal or
property damage resulting from the failure to
comply with the safety instructions, or from
improper operation or handling. Under such
circumstances, all claims under warranty will
become void
- For safety and licensing (CE) reasons any
unauthorized modification and/or changes to the
device is prohibited and will void the warranty and
all warranty claims.
- Any persons operating, installing, setting up, or
servicing this device must be trained and qualified
accordingly, and observe these operating
instructions.
- Ensure that the device has been set up correctly by
following all the instructions found in the
instruction manual
- This is a protection class II device. Make sure that
the voltage supply of the power outlet used meets
the required voltage specifications 230V/~50 Hz.
- Power supply cables should be routed so that they
are not likely to be walked on, squashed or
pinched by items placed upon or against them.
Pay particular attention to cords at plugs, power
outlets, and at the point at which they exit from
the device. Avoid exposing the cable to extreme
heat or cold. Ignoring the above mentioned
instructions could result in cable damage and
present the danger of an electric shock.
- Should any obvious damage be seen on the device
or on the connection cables, do not contact them
in any way. Switch of the corresponding circuit
breaker in the power distribution panel first,
before carefully unplugging the power plug from
the wall outlet. Do not operate the device further!
Please contact or take it to a qualified service
technician or specialty workshop.
- In order to completely cut off the power supply to
the device, unplug the power plug from the wall
outlet. Merely turning the device off with the
ON/OFF button is not sufficient. Also make sure
that power outlets are easily accessible.
- Always pull on the plug’s grips and never on the
cable to remove it from a wall outlet. Unplug the
device from the power outlet if not in use for a
longer period of time.
- For safety reasons, always unplug the device from
the power outlet during thunder storms.
- Eliminate potential tripping hazards by routing
cables in such a way that no one can trip or
stumble over them.
- Never use the device, if the power cable or device
is damaged.
- Keep packaging and protective foil away from
children at all times to avoid the danger of
suffocation.
- The device should never come into contact with
water or moisture.
- To prevent the risk of fire or electric shock make
sure that liquids, such as dripping or splashing
water, rain or moisture, do not come in contact
with the device and power supply plug
- Operate this device in a moderate climate and
never expose it to extreme temperatures, such as
high humidity.
- Condensation can build up suddenly if the device
is brought from a colder area into a warmer area
(e.g. when transporting). Should this happen, allow
the device to warm up to room temperature first
before using.
- Care should be taken so that liquids do not come
in contact with the interior, this is why containers
containing liquids, e.g. buckets, vases or plants
should never be placed anywhere near this
product, including the power supply plug. This
could not only damage the device, but also present
a fire hazard.
- It is imperative to avoid contact with moisture, e.g.
never operate in the bathroom.
- Make sure the device is properly ventilated during
operation and never operate it in constricted
areas, such as for example in a bookcase or shelf.
Never block ventilation openings with magazines,
tablecloths, curtains or similar.
- Make sure the device is placed on a firm and
stable surface.
- Never place any sources of fire on top of or near
the device and power supply plug (e.g. lighted
candle).
- Please note that excessive sound pressure created
when listening to loud volume levels with
earphones or headphones can lead to permanent
hearing damage.
- Please adhere to the additional safety information
found in the individual chapters of this instruction
manual.
- When connecting other devices, please refer to the
safety and operating instructions found in the
literature accompanying the device.
- Please contact our technical hotline or a service
technician for further information, should you be
in doubt about device operation, safety or when
making connections, or if any questions arise that
are not explained within this manual.
- Contribute to a better environment by using a
designated recycling site for the disposal of
packaging material.
Page | 6 © Mitchell & Johnson UK 2015 WLD+211 IB Ver 1.0 Rev 0.0
3. Accessories
The following accessories are supplied with the system. Please
check all these parts are present before proceeding. Please
inform your dealer if any part is missing or damaged.
1 x Remote control handset
2 x AAA batteries for the remote control handset
1 x DAB radio antenna cable
1 x screw-in Wi-Fi antenna
1 x stereo left and right Phono to Phono cable for
connecting to amplifier
Page | 7 © Mitchell & Johnson UK 2015 WLD+211 IB Ver 1.0 Rev 0.0

4. Description of parts
Front Panel
1 USB Port
2 When operating mode is FM Radio press to auto scan for previous station
When operating mode is Music Player, press to skip to previous track.
3 When operating mode is FM Radio press to auto scan for next station.
When operating mode is Music Player press to skip to next track.
4 When operating mode is FM Radio or DAB Radio press to see information on FM, RDS, or DAB station
When operating mode is Music Player or Spotify press to play, press again to pause.
5 When using in FM Radio mode use this button to switch between mono and stereo reception in case of interference
6 Change operating mode. Press to select modes either DAB Radio, FM Radio, Internet Radio, Spotify or Music Player.
7 Press to go to Previous Menu screen
8 Press to go to Menu screen.
9 Control selector. When in Menu mode, turn left or right to scroll through menu items. Press to confirm the selection. When in
Playback mode, the volume output can be increased or decreased with a visual reference on the display screen when the
control selector is turned to the left (decrease) or the right (increase).
10 Power switch
Page | 8 © Mitchell & Johnson UK 2013 WLD+211 IB Ver 1.0 Rev 0.0

Mitchell & Johnson RM201 Remote Control Handset
Buttons 1-6 are for controlling the Mitchell &
Johnson SAP201V amplifier
1 Reset all tone controls to factory default
2 Instantly Mute all sound
3 Switch amp power to Standby or power on
from Standby
4 VL- to reduce amp volume VL+ to increase
5 Scroll through the tone functions on amp
6 Amplifier input controls
Buttons 7-19 are for controlling the Mitchell &
Johnson WLD+211 Network Player
7 Toggles between DAB Radio, Internet Radio,
Music Player and FM Radio functions
8 When operating mode is FM Radio press to
auto scan for next station. When
operation mode is DAB press to auto scan
in full frequency range.
9 Menu navigation control, Up, Down,
Forward, Back and Enter
10 Display track info or radio station info
11 Return to Main Menu
12 Play/Pause Button
13 In DAB Radio, FM Radio and Internet Radio
mode press to tune up to next station
14 In Music Player mode press to skip to next
or previous track
15 In Music Player mode press to Stop
playback
16 In DAB Radio, FM Radio and Internet Radio
mode press to tune up to previous station
17 Switch Network Player power to Standby
or power on from Standby
18 Pressing P button will browse tuner preset
station by list in display
Pressing STR/MON will switch between
Mono and Stereo mode when listening in
FM Radio mode
19 Numeric Keys
Buttons 20-29 are for controlling the Mitchell &
Johnson CDD201V CD Player
20 Open CD tray
21 Press to stop CD playback
22 Switch CD player power to Standby or power on from Standby
23 Press to fast rewind or fast forward through a CD track. Press again return to normal play.
24 Play button
25 Press to skip to previous track or next track
26 Press to Pause CD playback
27 Press to switch on Repeat CD track
28 Press to hear 10 second intro of each CD track
29 Press to play all CD tracks in Random order
Page | 9 © Mitchell & Johnson UK 2015 WLD+211 IB Ver 1.0 Rev 0.0
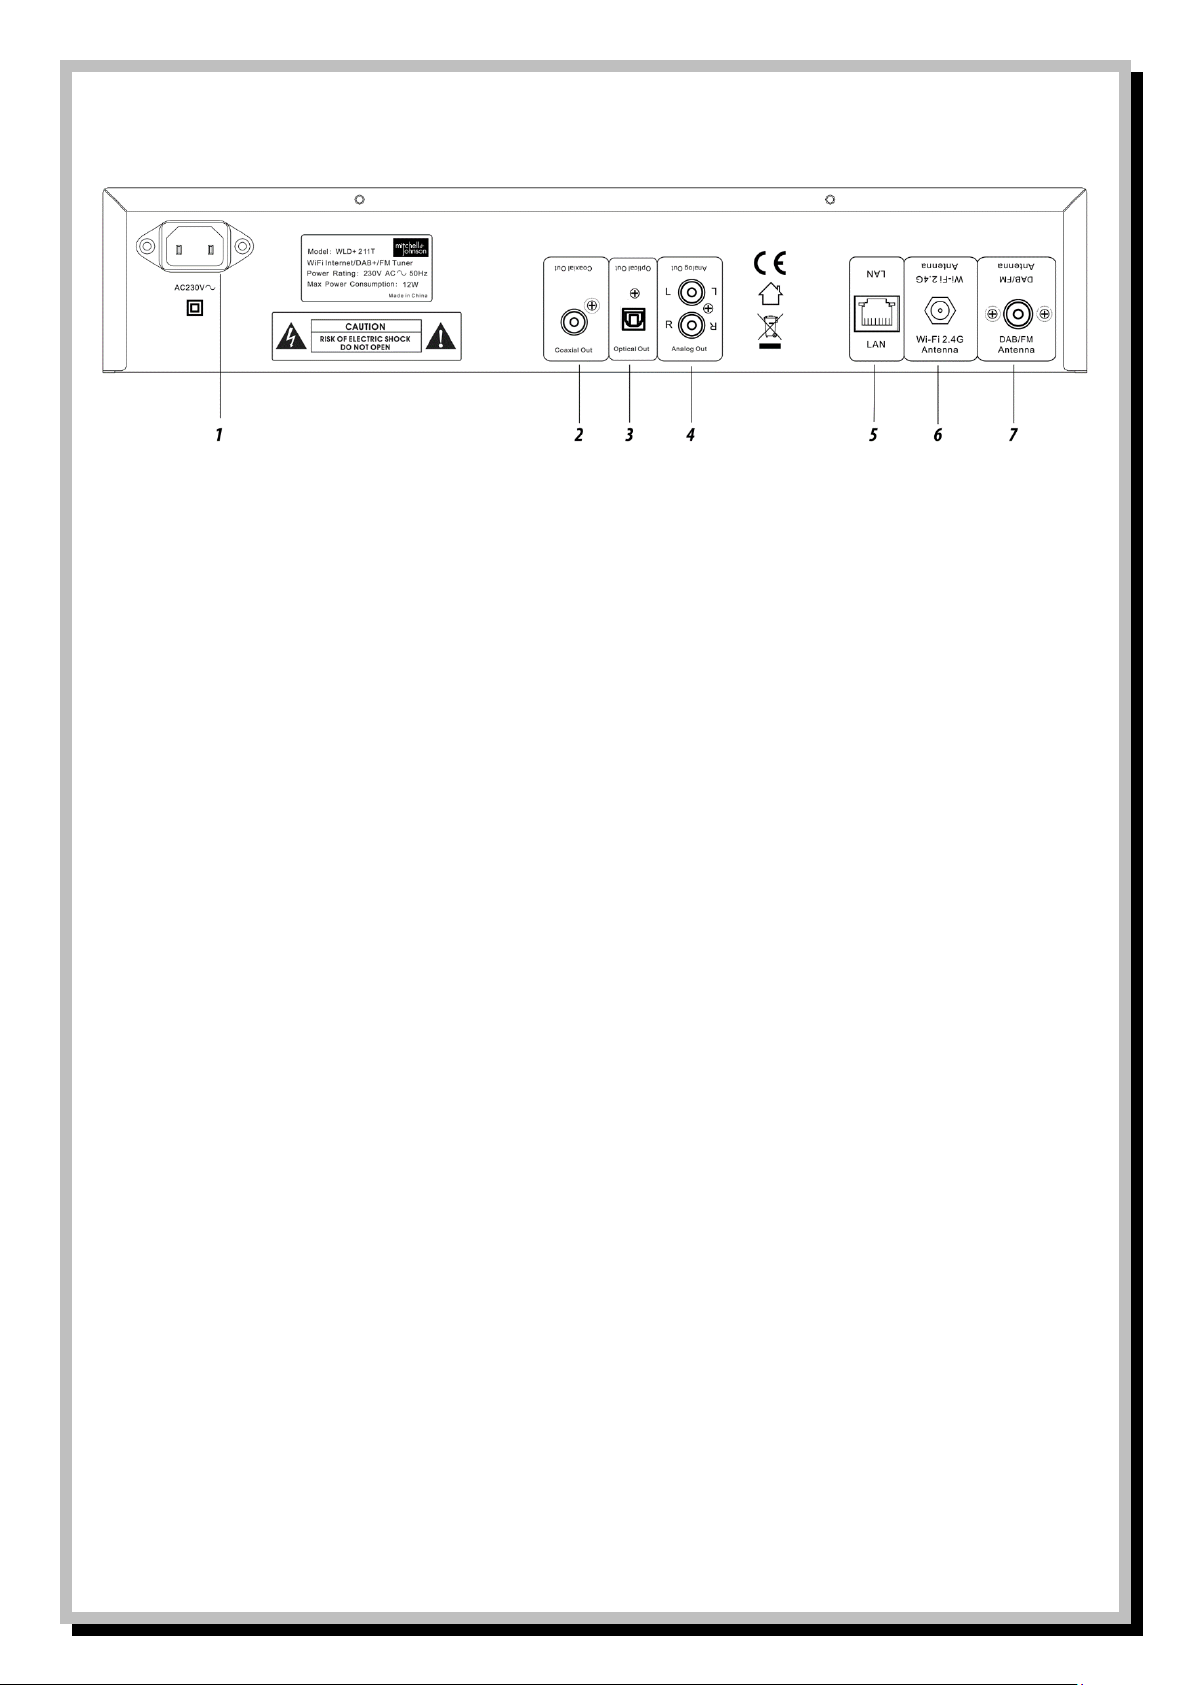
Rear Panel
1. Power cord inlet: Plug in the supplied power cord here.
2. Digital Optical output. Connect an optical cable (not supplied) to connect to a digital input such as the optical input on the
Mitchell & Johnson SAP201V or SAP601 amplifiers.
3. RCA /phono stereo output connections. Connect supplied RCA to RCA stereo pair cable ensuring the red connector on the cable
is connected to the red connector on both the WLD+211 and your amplifier.
4. Ethernet cable connection for connecting an Ethernet network cable between the WLD+211 and a router.
5. 2.4 Ghz wi-fi antenna input jack (for internet radio) (supplied)
6. 75 ohm tuner antenna (supplied)
Page | 10 © Mitchell & Johnson UK 2013 WLD+211 IB Ver 1.0 Rev 0.0
Inserting/changing batteries
The remote control requires two “AAA” batteries to operate.
Remove the battery compartment lid carefully. Remove the
used batteries. Insert new batteries, observing the correct
polarity as displayed inside the remote. Replace the battery
lid carefully.
Information on handling batteries and rechargeable
batteries
Please adhere to the following information when handling
batteries and rechargeable batteries.
- Keep batteries out of children’s reach.
- Batteries are hazardous and do not belong
in household waste.
- Ensure correct polarity when inserting
batteries.
- Always remove batteries when the remote
control is not in use for long periods of time.
- Never leave batteries lying around
unsupervised. If swallowed these could pose
a choking hazard to children and pets. Seek
emergency medical care immediately,
should this happen.
- Never expose batteries to extreme
temperatures, such as sunlight, fire, ovens,
etc. there is a risk of explosion!
- Make sure that batteries are not dismantled,
short-circuited or are thrown into fire. Never
re-charge non-rechargeable batteries. There
is a risk of explosion!
- Always follow the manufacturer's
instructions when recharging rechargeable
batteries.
- Touching leaking or damaged batteries
could cause skin burns. Use protective
gloves suitable for handling such batteries.
- Always ensure that the device has been
turned off after use.
- Always change/replace all batteries at the
same time.
- If required clean battery and device contacts
before inserting,
Page | 11 © Mitchell & Johnson UK 2013 WLD+211 IB Ver 1.0 Rev 0.0

5. Connection
Power supply
- Plug the power cable into a correctly
installed power outlet of your home power
system.
Radio Aerials
- In order to receive DAB or FM radio
broadcasts it is necessary to connect either
the supplied wire aerial to the screw socket
marked DAB/FM Antenna or alternatively if
you have an external aerial you can connect
a cable from the socket to your aerial,
sometimes via a wall socket. Either of these
methods will work for both DAB and FM
signals.
Ethernet Network Connection
- For best results when receiving internet
radio stations or playing music files from
your network, use an Ethernet cable (not
supplied) to connect to a spare Ethernet
port on your router.
Wireless LAN
- For wireless operation, attach the antenna
to the “Wi-Fi 2.4G Antenna“ connection. This
screws in clockwise.
Page | 12 © Mitchell & Johnson UK 2013 WLD+211 IB Ver 1.0 Rev 0.0

6. Before Getting Started
Screens
The screen shows various menus, dialogues and
displays, as described below.
There are basically six types of screen:
• Standby
• Splash / temporary (e.g. changing modes)
• Now playing
• Dialogue
• Error/Information
• Menu
When text is too long to fit on the screen, it is first
shown truncated, then, after a few seconds, slowly
scrolls so that you can read it all. The Standby screen
shows the time, date and any active alarm times. As you
cycle through the play modes by pressing the Mode
button the WLD+211T shows a splash screen for each
mode.
After one second, the WLD+211T enters the selected
mode and tries to start playing the last station or track
that was playing in that mode. If this is not possible, the
WLD+211T tries to connect to the selected source by
scanning for stations, networks, or prompting for user
input as appropriate.
Now playing screens show information about the
audio source and track now playing, where available.
Dialogue screens are shown to allow the user to
change settings. They vary in complexity from simple
Yes/No options up to the scrollable network password
input screen. As with menus, the selected item is shown
with a white background.
Dialogue screens mark the current setting with an
asterisk (*).
Page | 13 © Mitchell & Johnson UK 2015 WLD+211 IB Ver 1.0 Rev 0.0