

Page 1
User's Manual
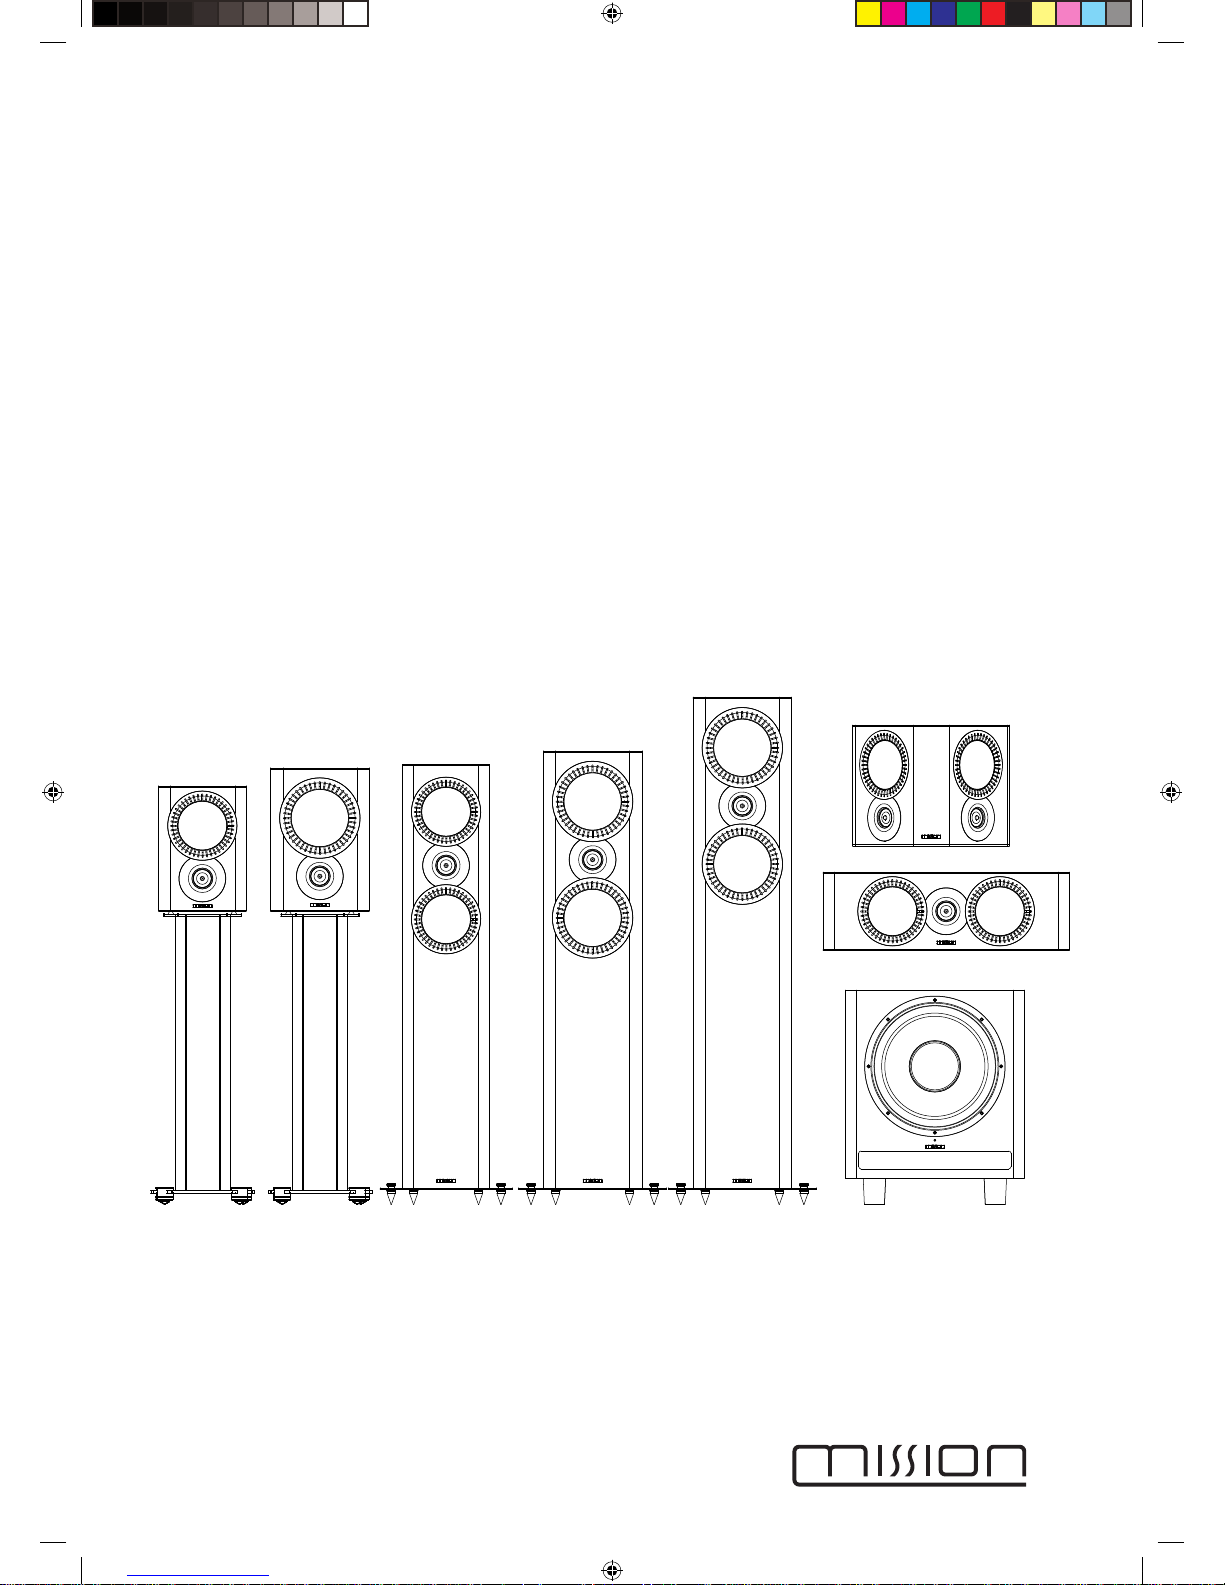
QX-1
QX-2
QX-3
QX-4
QX-5
QX-C
QX-S
QX-12SUB
MH QX Series manual.indd 1 2017-9-1 11:48:43
Page 2
1
IMPORTANT SAFETY INSTRUCTIONS
Read these instructions.
Keep these instructions.
Heed all warnings.
Follow all instructions.
DO NOT use this apparatus near water.
Clean only with a dry cloth.
DO NOT install near any head sources such as radiators, heat
registers, stoves, or other apparatus (including amplifiers) that
produce head.
Protect the powe r co rd from be ing walked on or pinche d
particularly at plugs, convenience receptacles, and the point
where they exit from the apparatus.
Unplug this apparatus during lightning storms or when unused
for long periods of time.
Refer all servicing to qualified service personnel. Servicing is
required when the apparatus has been damaged in any way, such
as the power-supply cord or plug is damaged, liquid has been
spilled or objects have fallen into the apparatus, the apparatus
has been exposed to rain or moisture, does not operate normally,
or has been dropped.
Install in accordance with the manufacturer’s instructions.
WARNING: If using spikes make sure that they do not pierce
mains cables etc under / above the carpet.
When making any connections, switch the amplifier o.
When you switch on your system or change sources, set the
volume control at minimum and turn the level up gradually.
DO NOT use your amplifier at full volume.
Avoid extreme settings of tone controls or graphic equalisers.
DO NOT place heavy objects on top of loudspeaker cabinets.
Ensure that all loudspeakers in the system are correctly wired
and are in phase.
Do not connect your loudspeakers to the mains supply, except
for subwoofers.
DO NOT attempt to dismantle the dismantle the loudspeaker.
There are no user serviceable parts inside and you will render the
warranty void.
Site hi-fi electronics away from the loudspeakers on a rigid stand
or cabinet.
Loudspeakers should not be placed directly facing other hi-fi
units, or share the same shelf or cabinet.
Site unscreened speakers and subwoofers at least 0.5m away
from TV set s, com pu ter s etc. So me manufacturers forbi d
the placing of objects ontop of their TV sets. Check your TV
handbook before installing he centre speaker directly on your TV
sets. Consult your TV dealer if you are in any doubt.
Use on l y att a chm e nt s / acc ess o ri e s s pe ci fie d by the
manufacturer.
DO NOT subject loudspeakers to excessive cold, heat, humidity
or sunlight.
DO NOT block any ventilation openings.
DO NOT defeat the safety purpose of the polarized or grounding-
type plug. A polarized plug has two blades with one wider than
the other. A grounding type plug has two blades and a third
grounding prong. The wide blade or the third prong are provided
for your safety. If the provided plug does not fit into your outlet,
consult an electrician for replacement of the obsolete outlet.
The apparatus must not be exposed to dripping or splashing
objects filled with liquids, such as vases, should be placed on the
apparatus.
Use only with a card, stand, tripod, bracket or table
sp ec if ie d by th e man uf ac tu rer, or sold with th e
app aratus. When a card is used, use caution when
moving the cart / apparatus combination to avoid
injury from tip-over.
CAUTION: The m ains power switch for electronic equipment
should be located in an open area without any obstructions. The
mains power plug must remain freely operable at all times.
CAUTION: Changes or modifications not expressly approved by
the manufacturer could void the user’s authority to operate this
device.
This symbol indicates that there are important
operating and maintenance instructions in the
literature accompanying this unit.
Th is sy mb ol indic ates th at da ng er ou s that
dangerous voltage constituting a risk of electric
shock is present within this unit.
WARNING: TO REDUCE THE RISK OF FIRE OR ELECTRIC SHOCK,
DO NOT EXPOSE THIS APPARATUS TO RAIN OR MOISTURE.
MH QX Series manual.indd 1 2017-9-1 11:48:44
Page 3
2
WARNING:
When an amplifier is driven beyond its power output capabilities it will produce output
capabilities it will produce distorted results which will quickly damage your speakers by overheating.
Make sure that your amplifier is not left unattended when playing, for example at parties, and turn the
volume control down at the first sign of audible distortion,
Warranty Conditions
The warranty card enclosed should be completed and returned to Mission or its Distributor within 8 days of
purchase.
No dealer or distributor may vary the terms of this warranty which is personal to the original purchaser and is not
transferable.
Please retain the sales receipt as proof of purchase.
Warranty claims must wherever possible be made through the Dealer from whom the equipment was purchased.
This warranty excludes:
Damage caused through neglect, accident, misuse, wear and tear, or through incorrect installation, adjustment or
repair by unauthorised personnel. Any unauthorised servicing will result in loss of warranty.
Liability for damage or loss occurring in the transit to or from the purchaser.
Consequent damage, loss or injury, arising from or in conjunction with this equipment.
Equipment for attention under warranty should be considered return carriage paid. If equipment is found to
comply with the published specification, Mission reserves the right to raise a charge.
MH QX Series manual.indd 2 2017-9-1 11:48:44
Page 4
3
Welcome to Mission!
The QX Series is the latest in a long line of distinguished Mission loudspeakers. These technologically advanced
loudspeakers will complement the finest electronics and décor. This series incorporates purpose – designed bass
driver cones, precision engineered motor systems and advanced tweeters. All our loudspeaker drive units are
manufactured in our factory using the latest precision tooling. High quality binding posts feature on all models. Your
Mission QX speakers will bring you great pleasure for many years.
General Information
Please read these instructions carefully before installing your loudspeakers. A few minutes studying this manual will
ensure a superb performance from your loudspeaker for many years. Please attention to all cautions printed on the
pages marked with this symbol
Preparing Your Loudspeakers
The Mission QX-3, QX-4 and QX-5 floorstanding models require fitting with the included plinth and spikes before
use. Use the screw provided to secure the plinths to the base of the speakers. Make sure that the screws are fully
tightened.
After unpacking, the other loudspeakers need no further preparation.
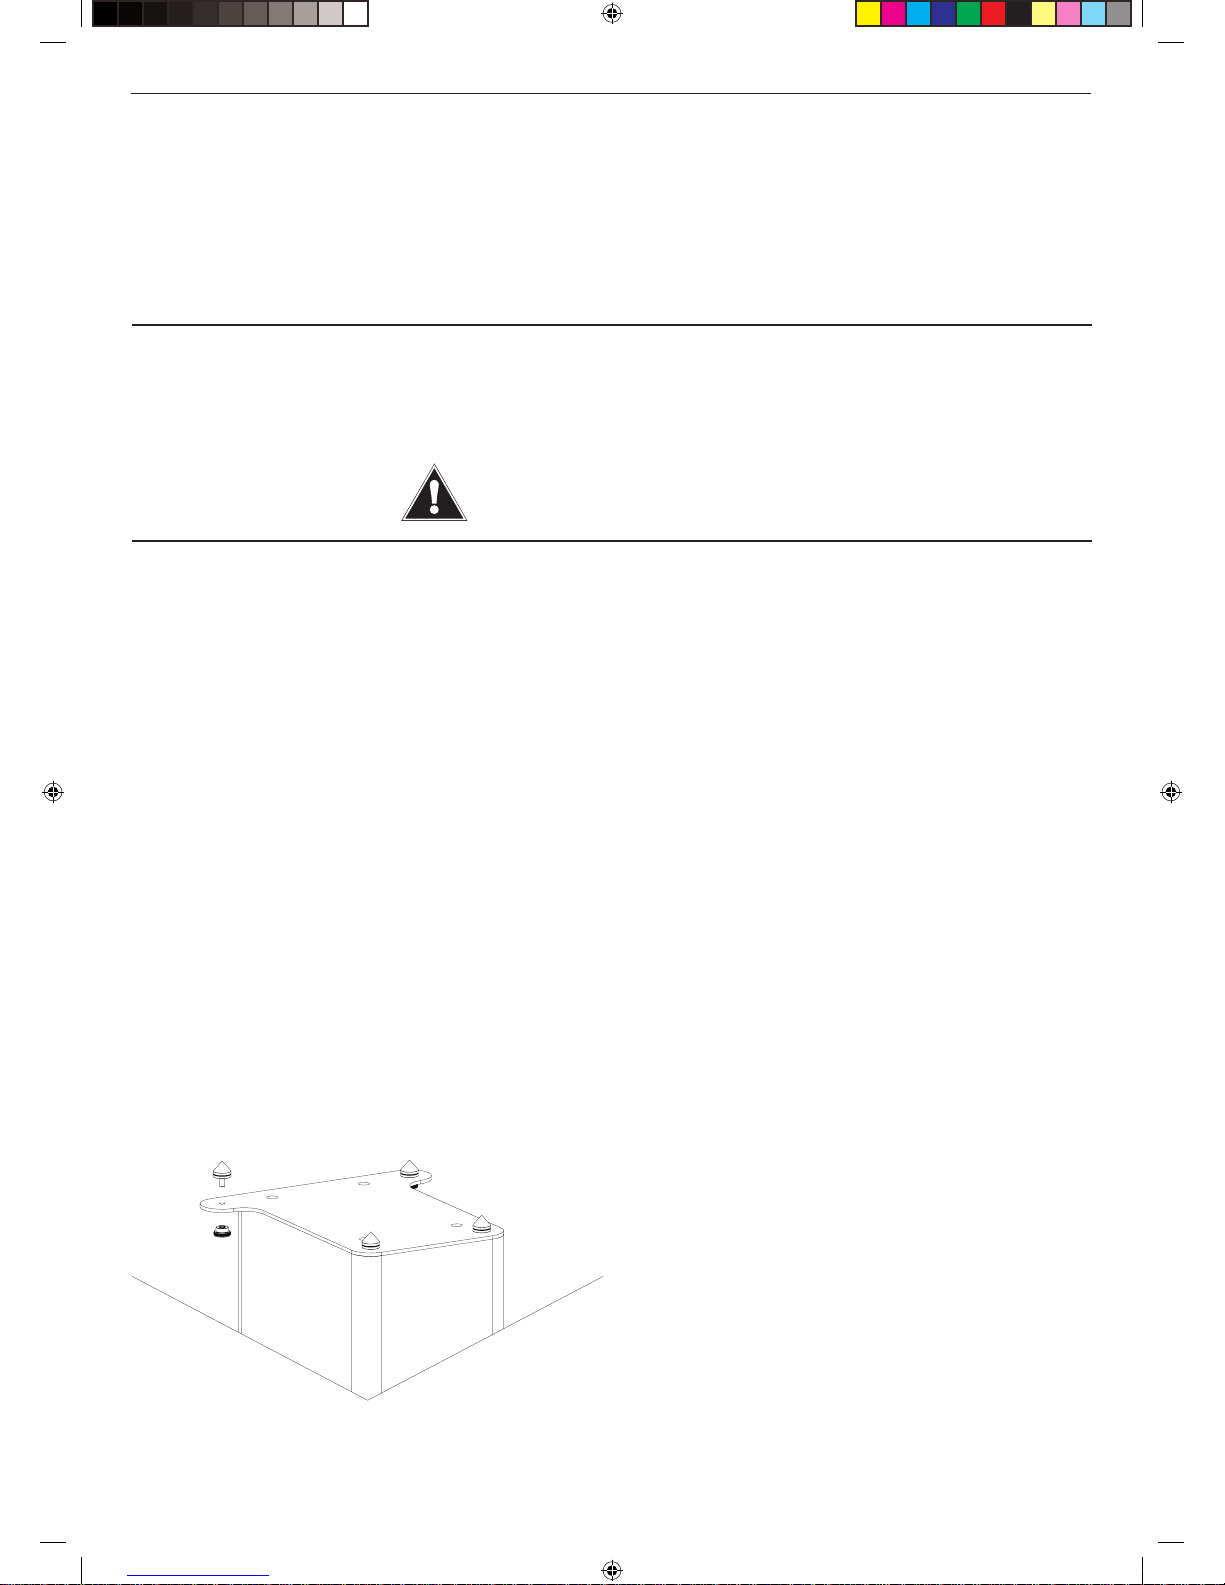
Preparing the Floorstanding Loudspeakers (QX-3, QX-4, QX-5)
ATTA CHING THE SPIKES
CAUTION: SPIKES ARE SHARP.
Make sure that there are no wires or hidden obstacles that could be damaged by the spikes
in the immediate operational area of the speakers.
NEVER drag a loudspeaker on its spikes. alway
s lift it. lf the item is heavy get assistance.
A mounting hole is located at each corner of the plinth. Thread a spike through each hole.
Tighten the collar finger tight so that the spike is secure but not locked inplace.
After all the spikes are attached, invert the loudspeaker and place it carefully on the floor.
MH QX Series manual.indd 3 2017-9-1 11:48:44
Page 5
4
Connecting your loudspeakers
Conventional Loudspeaker Connections
Loudspeaker cable is polarity coded along one edge. Split the cable to a depth of about 25mm and strip 8mm of
insulation from each wire. If the cable is stranded, twist the strand together.
Terminal Panels
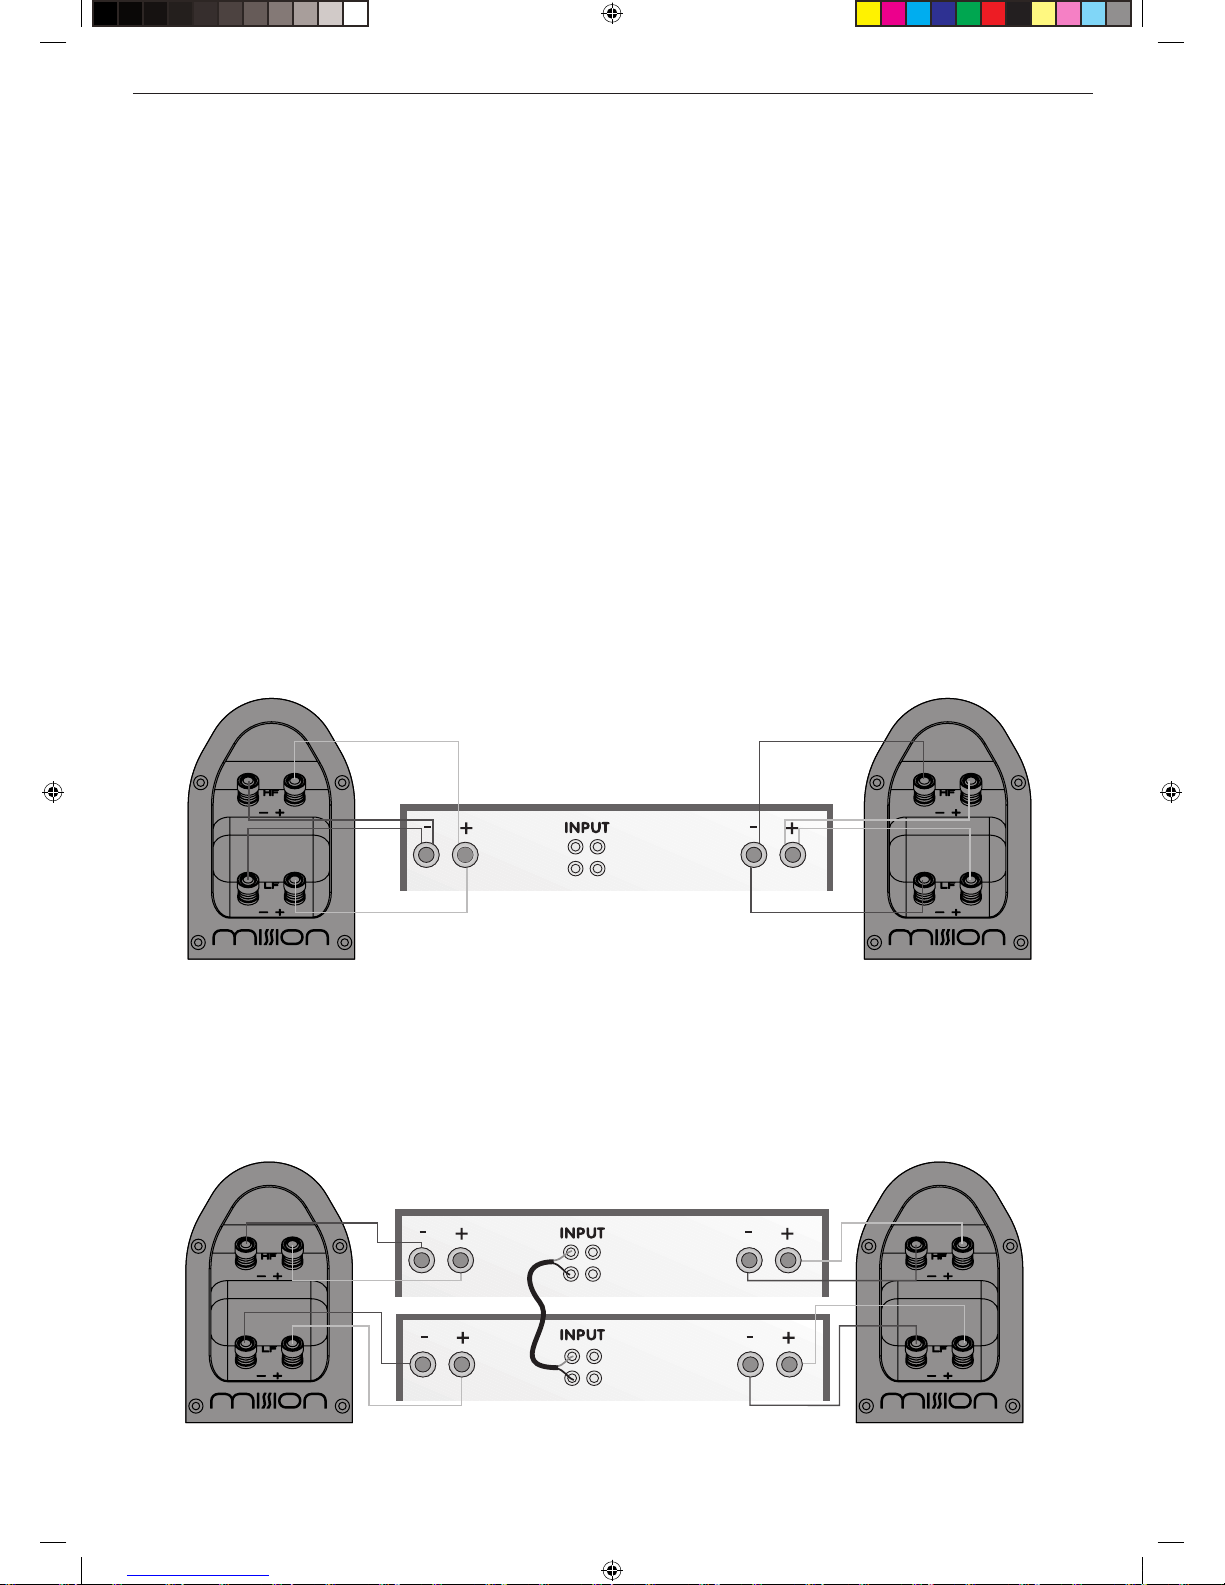
Your loudspeakers use two or four terminals. When single wiring speakers use the connecting links as shown opposite.
Unscrew the terminal. Thread the bare end of the cable through the cross-hole ensuring there are n
o loose strands.
Tighten securely. Connect the red, positive (+) terminal of the left loudspeaker to the corresponding red, positive (+)
amplifier
terminal. Connect the black, negative (-) terminals similarly. Repeat for the right channel.
Bi-Wiring
All floorspeaker models in the Mission QX Series can be bi-wired for improved performance.
Remove both pairs of shorting links and connect a cable to each pair of terminals, running them to a common
connection at the amplifier output terminals.
In the figure to the right, the terminal panel on the left is bi-wired; the panel on the right is conventionally wired. Note
the shorting links.
Bi-Amping
By using separate amplifiers for LF and HF drive units you can further improve performance. This is known as bi-
amping. Note that the amplifier inputs are linked.
MH QX Series manual.indd 4 2017-9-1 11:48:45
Page 6

5
Positioning Your Loudspeakers
Floor Standing and Bookshelf Loudspeakers
Mission QX-3, QX-4 and QX-5 loudspeakers should be placed on the floor (ideally on spikes). Mission QX-1 and QX-2
should be mounted on rigid stands, ideally spike coupled to the floor.
Height is important: A stand should place the top of a speaker at ear level to a seated listener. Shelf or bracket
mounting is second best. The distance from the wall can profoundly aect loudspeakers’ sonic performance. If
your speakers are too close to the wall the bass will boom and sound will be coloured. Moving them into the room
may increase
clarity but tends to reduce the bass output. When positioned correctly, the high frequency response
is smooth with well-defined, powerful bass. Start with the speakers about 300m from the wall and 1.8m apart. The
distance from each loudspeaker to the side wall should be at least 500mm. Vary the distance between the two
loudspeakers and the distance from the wall until you get a perfect stereo stage. If your loudspeakers are wired
correctly, the sound should be full with a clean treble and a deep, rich bass.
Centre and surround speaker
Your QX-C centre loudspeakers should be positioned
ontop
of the TV monitor or on a shelf in a console below
the TV set. If you place the unit directly on top of the
TV, ensure that the cabinet can stand the weight and the
assembly is stable. Place the stand on a stable surface
and place the QX-C on the stand. Ensure the stand is
central to the speaker cabinet. Check your TV handbook
or consult your TV dealer if you are in any doubt.
The surround speakers should be placed above head
height and behind the listening seat. They may be stand
or bracket mounted on the side walls or
on the rear walls
but always behind the listener. Do not operate them
within 450mm of a TV screen.
Tuning and Phase
Phase:
To check the loudspeaker phase, check the polarity of your speaker wire at the terminals of the loudspeakers
and at the loudspeaker terminals of the amplifier. The conductor colour should always be connected the same way
round. If your loudspeakers are connected correctly, you will hear a full sound with clean midrange and a deep,
powerful bass.
MH QX Series manual.indd 5 2017-9-1 11:48:46
Page 7

6
Positioning Surround Loudspeakers
QX-S Surround Loudspeakers
The speakers should ideally be sited 600 mm-1.5 metres above the listening
position and 2.5-3.5 metres apart, central to the listener and behind the
listening position, preferably on a rear wall. If the listening position is some
distance from a rear wall, the speakers may be mounted on opposite side
walls but always behind the listening position.
Ensure that the wall is sound and can support the product. Drill two 5mm
holes in the wall 180mm apart. Fix a suitable No 8 round head screw firmly
into each hole using appro
priate wall plugs. Leave a stub of 5mm protruding
from the wall.
Connect the loudspeakers. Align the holes in the mounting brackets over the
screw and carefully lower the unit onto the screws.The speaker should now
be securely attached with the spacers resting against the wall. Now connect
the speakers to the amplifier.
5.1 System connections
The front left and front right channels are bi-wired to provide the best fidelity.
Setting Speaker Sizes
When used with a subwoofer, digital AV processors usually require you to set the size of the loudspeakers for good
bass management. This is usually ‘Large’ or ‘Small’. With the exception of the QX-1 and QX-2 all the loudspeakers
should set to ‘Large’. Depending on the performance of your subwoofer you may set the QX-3 to ‘Large’ or ‘Small’.
Loudspeaker maintenance
Use a cloth to clean your cabinet and very occasionally a slightly damped cloth to remove finger marks, etc. Although
the grilles m
ay be removed, these speakers.
have been voiced to sound at their best with grilles on. We do not advocate removal of the grilles: if necessary clean
the grilles carefully in place with a soft brush.
MH QX Series manual.indd 6 2017-9-1 11:48:46
Page 8

7
Home Theatre Topics
Fr
ont
Left Fr
ont Right
Surround Left Surround Right
Back Left Back Right
(Single Back channel f
or 6.1)
Loudspeaker Positioning
Front Loudspeakers: The front loudspeakers are placed
on either side of the TV monitor, 2 to 3 metres apart. The
speakers should be angled slightly so they are aimed
towards the listeners.
Rear Surround Channels
We recommend pla cing t he surround s pe aker in a
high pos ition , behind the listene rs hea d. If the rear
wall is more than 1 metre behind the listening seat, an
alternative posi tion is on the side walls. If th e wa lls
are a long way from the listening seat, consider stand
mounting the loudspeakers.
Centre Channel
Most of the dialogue comes from the centre loudspeaker.
Sp eech shoul d a ppear to orig inate from the acto rs
mouths. Operating height is important. Ideally the front
and ce ntre chan nel speakers shoul d be at the same
height. The front of the cabinet should be level with the
TV screen.
CONNECTING THE SUBWOOFER TO THE SYSTEM
Control Panel of the QX-12SUB Subwoofer
1 Auto Sense Switch
2 Phase Switch
3 Crossover Frequency Control
4 Volume Control
5 Line Level Input/LFE Input
6 Mains Power Fuse
7 IEC Mains Input Socket
8 Mains Power Switch
MH QX Series manual.indd 7 2017-9-1 11:48:47
Page 9

8
A/V Processor Connections
Your s ubw oof er ha s bee n d esi gne d for op tim um
pe rforman ce with a dig it al processor. If you r A/V
processor has a line level or LFE subwoofer output you
should use this connection. You will need to purchase
a singl e screened RCA phono lead from your dealer.
Connect this lead to the LFE input of the subwoofer as
shown.
Alternatively, you may use a split mono lead from the
processor to Line Inputs of the subwoofer. In this case
the input level at the subwoofer will be slightly higher.
Stereo Line Output Connections
If your amplifier has a spare preamplifer output or a
ste reo subwoofer output, conn ect the su bwoofer as
shown. You will need a ste reo screened RCA phono
cable.
Pre Out – Main in Connections
If yo u use a stereo pre a nd power a mp li fi er, or an
am plifier where the pre and ma in am pl ifier c ab be
separated, connect the subwoofer as shown. There are
two alternative methods.
You will need two screened RCA ‘Y’ adaptors and two
single RCA phono cables.
Remove the Pre-Main links on your amplifier. Connect
the socket (common) of an RCA ‘Y’ adaptor to the Left
Channel Pre Out socket on the amplifier and the other
leg to the Left Chann el Main In socket. Connect the
remaining plug on this combination to the Left Channel
Line Level input on the subwoofer. Repeat this for the
Right Channel.
MH QX Series manual.indd 8 2017-9-1 11:48:50
Page 10

9
OPERATING YOUR SUBWOOFER
Check that all connections to the subwoofer have been properly made and that the main volume control is at
minimum. Plug the supplied power cord into the mains socket on the rear panel.
Initial Settings
Volume Control: Set the subwoofer volume control to the minimum before proceeding.
Crossover Control: Adjust frequency to integrate QX-12SUB subwoofer with your system requirement.
Phase Switch: The Phase switch should be initially set to 0°.
Switching On
Plug in the mains plug and switch the power on. Now switch the subwoofer on with the rest of your system.
When switched on, the power indicator light will glow and
the subwoofer will be operational.
Basic Tuning
Volume Setting: Play a programme with extended bass and set the system volume to a resonal level. Adjust the
subwoofer volume control to produce the desired level of bass. The bass should be even and an extension of the
main loudspeakers. Do not set the control too high or you will swamp the sound with too much bass and clarity and
Phase Switch: If the bass is indistinct or lacks depth, the Phase switch may need adjustment. Set the switch to 0°
Phase switch to 180°. Select the position which produces the most natural, extended bass.
Crossover Adjustment: This adjusts the blend between the subwoofer and the main speakers and enables the system
to be set up for optimum bass performance. The higher settings are for use with small bookshelf loudspeakers, the
lower setting for large floorstanding models. If you choose too low a setting with small speakers, there will be a ‘hole’
in the bass response; too high a setting with large speakers will result in the upper bass becoming bloated. Again the
subwoofer should be an
extension of the main loudspeakers.
Auto-Sense Switch: This feature reduces the power consumption when there is no music signal. When the Auto-Sense
Switch is on, the amplifier will be activated immediately once an audio signal is detected at the inputs, and it will
turn into the mute status when no signal is detected for about 20 minutes, which lowers the power consumption. This
Mains Operation
When the system is not in use for extended periods, we suggest you switch o the subwoofer to protect it from
MH QX Series manual.indd 9 2017-9-1 11:48:51
Page 11

10
General description
Design philosophy and core technology
Enclosure type
Transducer complement
ABR
Bass driver
Midrange driver
Treble driver
Full-range driver
AV shield
Sensitivity (2.0V @ 1m)
Recommended amplifier power
Peak power handling
Peak SPL
Nominal impedance
Minimum impedance
Frequency response(+/-3dB)
Bass extension(-6dB)
Crossover frequency
Cabinet Volume (in litres)
Dimensions (mm)
Height (on plinth)
Width
Depth (with terminals)
Carton size
Net weight
Gross weight
2-way floorstanding speaker
bass reflex
`
5"(135mm) Long Fiber Composite Cone x2
1.5"(38mm) Textile Ring Dome
No
88dB
25-120W
95dB
3.8
Ω
42Hz ~ 24kHz
36Hz
2.0kHz
35L
(950+20)mm
195mm
(300+10)mm
435*325*1100mm
20.0kg/pcs
23kg/ctn
2-way floorstanding speaker
bass reflex
`
6.5"(165mm) Long Fiber Composite Cone x2
1.5"(38mm) Textile Ring Dome
No
88dB
25-150W
95dB
3.8
Ω
36Hz ~ 24kHz
32Hz
2.2kHz
48L
(980+20)mm
220mm
(335+10)mm
470*350*1130mm
23.8kg/pcs
27.4kg/ctn
Model QX-3 QX-4
Specification
General description
Design philosophy and core technology
Enclosure type
Transducer complement
ABR
Bass driver
Midrange driver
Treble driver
Full-range driver
AV shield
Sensitivity (2.0V @ 1m)
Recommended amplifier power
Peak power handling
Peak SPL
Nominal impedance
Minimum impedance
Frequency response(+/-3dB)
Bass extension(-6dB)
Crossover frequency
Cabinet Volume (in litres)
Dimensions (mm)
Height (on plinth)
Width
Depth (with terminals)
Carton size
Net weight
Gross weight
2-way bookshelf speaker
bass reflex
2-way
5"(135mm) Long Fiber Composite Cone
1.5"(38mm) Textile Ring Dome
No
87dB
25-100W
95dB
4Ω (Compatible 8Ω)
3.9
Ω
55Hz ~ 24kHz
48
2.4kHz
8.1L
280mm
195mm
(250+10)mm
520*345*380mm
6.2kg/pcs
14.2kg/ctn
2-way bookshelf speaker
bass reflex
2-way
6.5"(165mm) Long Fiber Composite Cone
1.5"(38mm) Textile Ring Dome
No
88dB
25-120W
95dB
3.6
Ω
44Hz ~ 24kHz
38Hz
2.2kHz
13.5L
320mm
220mm
(300+10)mm
570*395*420mm
8.5kg/pcs
19.0kg/ctn
Model QX-1 QX-2
MH QX Series manual.indd 10 2017-9-1 11:48:51
4Ω (Compatible 8Ω)
4Ω (Compatible 8Ω)
4Ω (Compatible 8Ω)
Page 12

11
General description
Design philosophy and core technology
Enclosure type
Transducer complement
ABR
Bass driver
Midrange driver
Treble driver
Full-range driver
AV shield
Sensitivity (2.0V @ 1m)
Recommended amplifier power
Peak power handling
Peak SPL
Nominal impedance
Minimum impedance
Frequency response(+/-3dB)
Bass extension(-6dB)
Crossover frequency
Cabinet Volume (in litres)
Dimensions (mm)
Height (on plinth)
Width
Depth (with terminals)
Carton size
Net weight
Gross weight
3-way floorstanding speaker
bass reflex
`
12"(300mm) cone long-throw x1
6.5"(165mm) Long Fiber Composite Cone x2
1.5"(38mm) Textile Ring Dome
No
90dB
30-200W
96dB
3.5
Ω
32Hz ~ 24kHz
27Hz
180Hz,1.8kHz
16L/48L
(1100+20)mm
220mm
(400+10)mm
535*350*1250mm
34kg/pcs
38.0kg/ctn
2-way centre speaker
bass reflex
2-way
5"(135mm) Long Fiber Composite Cone X2
1.5"(38mm) Textile Ring Dome
No
88dB
25-120W
95dB
3.9
Ω
58Hz ~ 24kHz
50Hz
1.6kHz
8.1L
175mm
550mm
(170+10)mm
640*265*280mm
8.6kg/pcs
9.7kg/ctn
General description
Design philosophy and core technology
Enclosure type
Transducer complement
ABR
Bass driver
Midrange driver
Treble driver
Full-range driver
AV shield
Sensitivity (2.0V @ 1m)
Recommended amplifier power
Peak power handling
Peak SPL
Nominal impedance
Minimum impedance
Frequency response(+/-3dB)
Bass extension(-6dB)
Crossover frequency
Cabinet Volume (in litres)
Dimensions (mm)
Height (on plinth)
Width
Depth (with
terminals)
Carton size
Net weight
Gross weight
2-way surround speaker
closed-box system
2-way
5"(135mm) Long Fiber Composite Cone X2
1.5"(38mm) Textile Ring Dome X2
No
88dB
25-120W
95dB
3.9
Ω
110Hz ~ 24kHz
90Hz
1.8kHz
7.2L
270mm
350mm
(180+5)mm
415*415*370mm
6.5kg/pcs
15.2kg/ctn
Model QX-S
Model QX-5 QX-C
Specification
MH QX Series manual.indd 11 2017-9-1 11:48:51
4Ω (Compatible 8Ω)
4Ω (Compatible 8Ω)
4Ω (Compatible 8Ω)
Page 13

12
Active Dynamic-Drive IB subwoofer system
1 x (12")300mm cone long-throw
35- 120Hz ±3dB
300W
450W
200mv for maximum output
30 - 150Hz
Stereo Line In (2 x RCA Phono)
Mono (LFE) Line In (RCA Phono)
Line Input 10k
Ω
LFE 5k
Ω
≥
85dB
118dB
Height: (420+58)mm(with feet)
Width: 400mm
Depth: (450+15)mm "
23.0kg
IEC power cord
QX-12SUB
Description/Format
Drive Units
Frequency Response
Amplifier Power Output
Peak Power Output
Line Input Sensitivity
Crossover Range
Inputs
Input Impedance
Signal-to-noise ratio (S/N)
Avg. Max Output @1m
Features
Dimensions
Net weight
Accessories
Model
Specification
MH QX Series manual.indd 12 2017-9-1 11:48:51
Page 14

13
MH QX Series manual.indd 13 2017-9-1 11:48:51
Page 15

14
MH QX Series manual.indd 14 2017-9-1 11:48:51
Page 16

IAG House, 13/14 Glebe Road, Huntingdon, Cambridgeshire, PE29 7DL, UK
Tel: +44 (0) 148 0 4 525 61 F ax: +44(0)1480 413403 www.mission.co .uk
IAG reserves the right to alter the design and specications without notice. All rights reserved © IAG Group Ltd.
Mission is a member of the Inter nationa l Audio G roup. CODE: MH14-MNL005a
MH QX Series manual.indd 15 2017-9-1 11:48:51
 Loading...