

Mission Elegante e80, Elegante e8aS1, Elegante e81, Elegante e8aS2, Elegante e82 User Manual
...
International Audio Group
Huntingdon
PE29 6XU
England
T: +44 (0) 1480 447700
F: +44 (0) 1480 431767
info@mission.co.uk
www.mission.co.uk
www.mission.co.uk
e

Cautions & Warranty conditions 2
Introduction to
elegante 3
Room setup 4-5
System setup 6-7
General information 8
Specifications 9
Précautions et conditions de la garantie 10
Présentation de
elegante 11
Configuration de la salle 12-13
Configuration du système 14-15
Renseignements généraux 16
Spécifications 17
Bitte unbedingt beachten & Garantiebedingungen 18
elegante stellt sich vor 19
Zimmereinrichtung 20-21
Systemeinrichtung 22-23
Allgemeine Informationen 24
Technische Daten 25
Precauciones y Condiciones de Garantía 26
Introducción a
elegante 27
Preparación del recinto 28-29
Preparación del sistema 30-31
Información general 32
Datos técnicos 33
English
Deutsch
Español
Français
3
Cautions
Warranty conditions
The warranty card enclosed should be completed and returned to Mission or
its Distributor within 8 days of purchase.
No Dealer or Distributor may vary the terms of this warranty which is personal
to the original purchaser and is not transferable.
Please retain the sales receipt as proof of purchase.
Warranty claims must wherever possible be made through the Dealer from
whom the equipment was purchased.
This warranty excludes:
Damage caused through neglect, accident, misuse, wear and tear, or through
incorrect installation, adjustment or repair by unauthorised personnel.
Any unauthorised servicing will result in loss of warranty.
Liability for damage or loss occurring in transit to or from the purchaser.
Consequent damage, loss or injury, arising from or in conjunction with this
equipment.
Equipment for attention under warranty should be considered return carriage
paid. If equipment is found to comply with the published specification, Mission
reserves the right to raise a charge.
The above conditions do not affect your statutory rights as a consumer.
2
IMPORTANT SAFETY INSTRUCTIONS
When this symbol is shown there is a risk of electrical
shock.
When this symbol is shown extreme caution should be observed.
WARNING: TO REDUCE THE RISK OF FIRE OR ELECTRIC SHOCK, DO NOT EXPOSE
THIS APPARATUS TO RAIN OR MOISTURE.
Read these instructions.
Keep these instructions.
Heed all warnings.
Follow all instructions.
DO NOT use this apparatus near water.
Clean only with dry cloth.
DO NOT install near any heat sources such as radiators, heat registers, stoves,
or other apparatus (including amplifiers) that produce heat.
Protect the power cord from being walked on or pinched particularly at plugs,
convenience receptacles, and the point where they exit from the apparatus.
Unplug this apparatus during lightning storms or when unused for long
periods of time.
Refer all servicing to qualified service personnel. Servicing is required when
the apparatus has been damaged in any way, such as power-supply cord or
plug is damaged, liquid has been spilled or objects have fallen into the
apparatus, the apparatus has been exposed to rain or moisture, does not
operate normally, or has been dropped.
Install in accordance with the manufacturer’s instructions.
WARNING: If using spikes make sure that they do not pierce mains cable etc.
under /above the carpet.
When making any connections, switch the amplifier off.
When you switch on your system or change sources, set the volume control at
minimum and turn the level up gradually.
DO NOT use your amplifier at full volume.
Avoid extreme settings of tone controls or graphic equalisers. Ideally, they
should be set ‘flat’ or, if possible, bypassed.
DO NOT place heavy objects on top of loudspeaker cabinets.
Ensure that all loudspeakers in the system are correctly wired and are in
phase.
DO NOT connect your loudspeakers to the mains supply, except for
subwoofers.
DO NOT attempt to dismantle the loudspeaker. There are no user serviceable
parts inside and you will render the warranty void.
Site hi-fi electronics away from the loudspeakers on a rigid stand or cabinet.
Loudspeakers should not be placed directly facing other hi-fi units, or share
the same shelf or cabinet.
Site unscreened speakers and subwoofers at least 0.5m away from TV sets,
computers etc. Some manufacturers forbid the placing of objects on top of
their TV sets. Check your TV handbook before installing the centre speaker
directly on your TV set. Consult your TV dealer if you are in any doubt.
Use only attachments / accessories specified by the manufacturer.
DO NOT subject loudspeakers to excessive cold, heat, humidity or sunlight.
DO NOT block any ventilation openings.
DO NOT defeat the safety purpose of the polarized or grounding-type plug. A
polarized plug has two blades with one wider than the other. A grounding
type plug has two blades and a third grounding prong. The wide blade or the
third prong are provided for your safety. If the provided plug does not fit into
your outlet, consult an electrician for replacement of the obsolete outlet.
The apparatus must not be exposed to dripping or splashing and no objects
filled with liquids, such as vases, should be placed on the apparatus.
Use only with a cart, stand, tripod, bracket or table specified by the
manufacturer, or sold with the apparatus. When a cart is used,
use caution when moving the cart / apparatus combination to
avoid injury from tip-over.
CAUTION:
e8as1, e8as2
The mains power switch for this appliance is located on the rear panel. To
permit free access to this switch the apparatus must be located in an open
area without any obstructions. The mains power plug must remain freely
operable at all times.
CAUTION: Changes or modifications not expressly approved by the
manufacturer could void the user’s authority to operate this device.
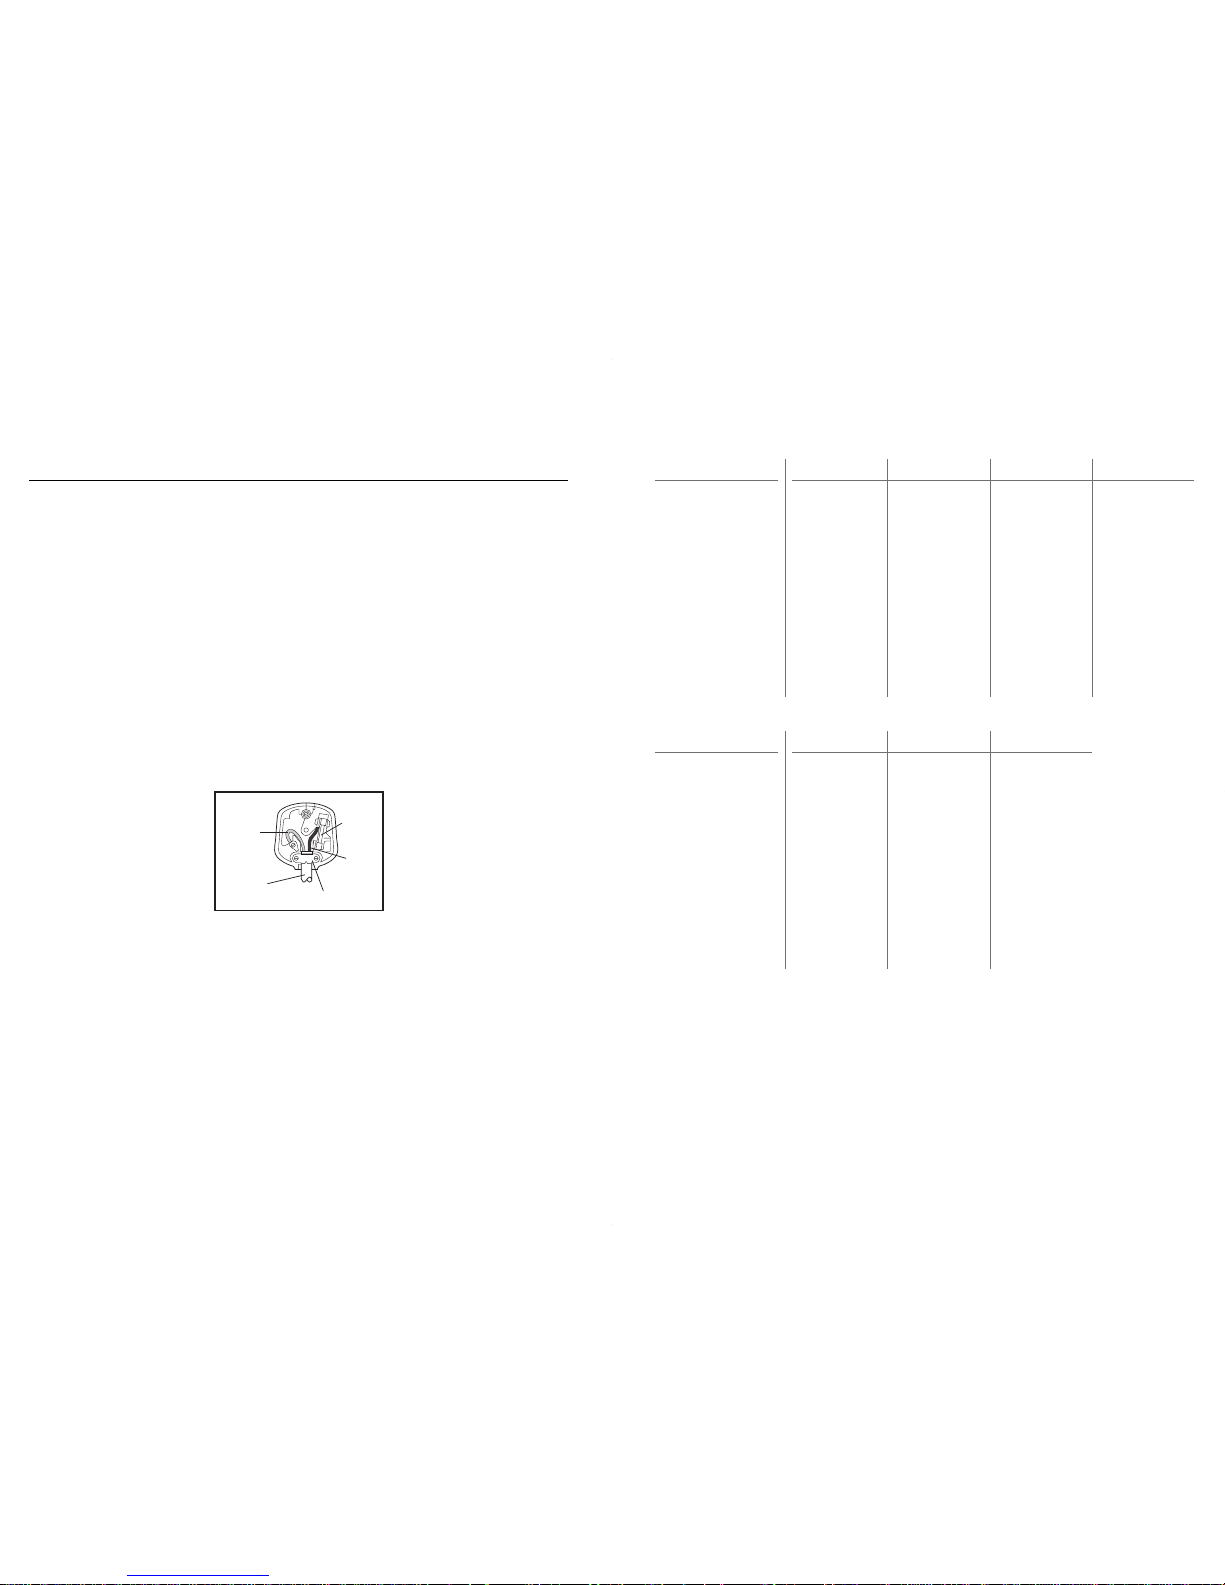
IMPORTANT NOTICE TO UK USERS. The subwoofer is supplied with a plug
incorporating a fuse, the value of which is indicated on the pin face of the plug.
Should the fuse or plug need to be replaced refer to the instructions on Page 8.
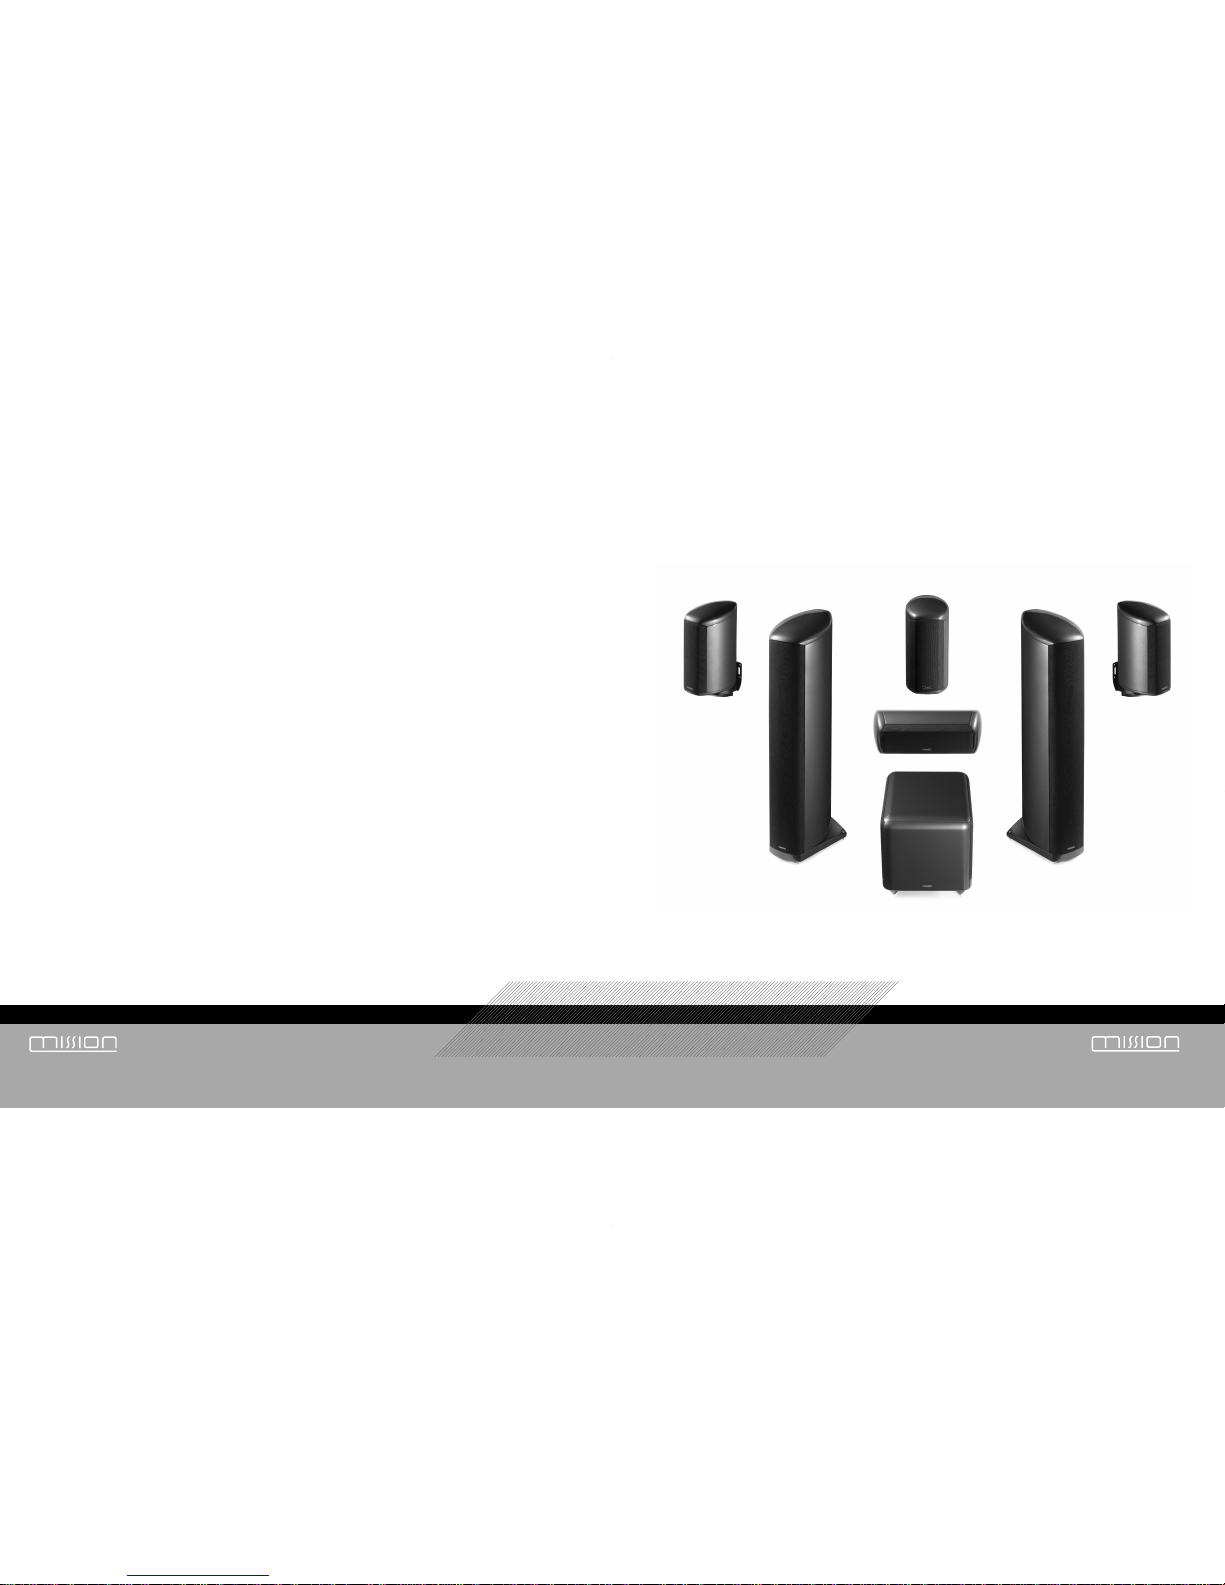
Introduction to elegante
Thank you for purchasing Mission
loudspeakers. The
elegante series is the
latest in a long line of distinguished Mission
loudspeakers. These technologically
advanced loudspeakers will complement the
finest electronics and decor. Mission
engineers and craftsmen have designed
and manufactured each speaker in the
range to bring you the utmost enjoyment
and listening pleasure over many years of
use.
Please read these instructions carefully
before installing your loudspeakers. A few
minutes studying this manual will ensure
that the superb performance of
elegante
will be fully achieved.
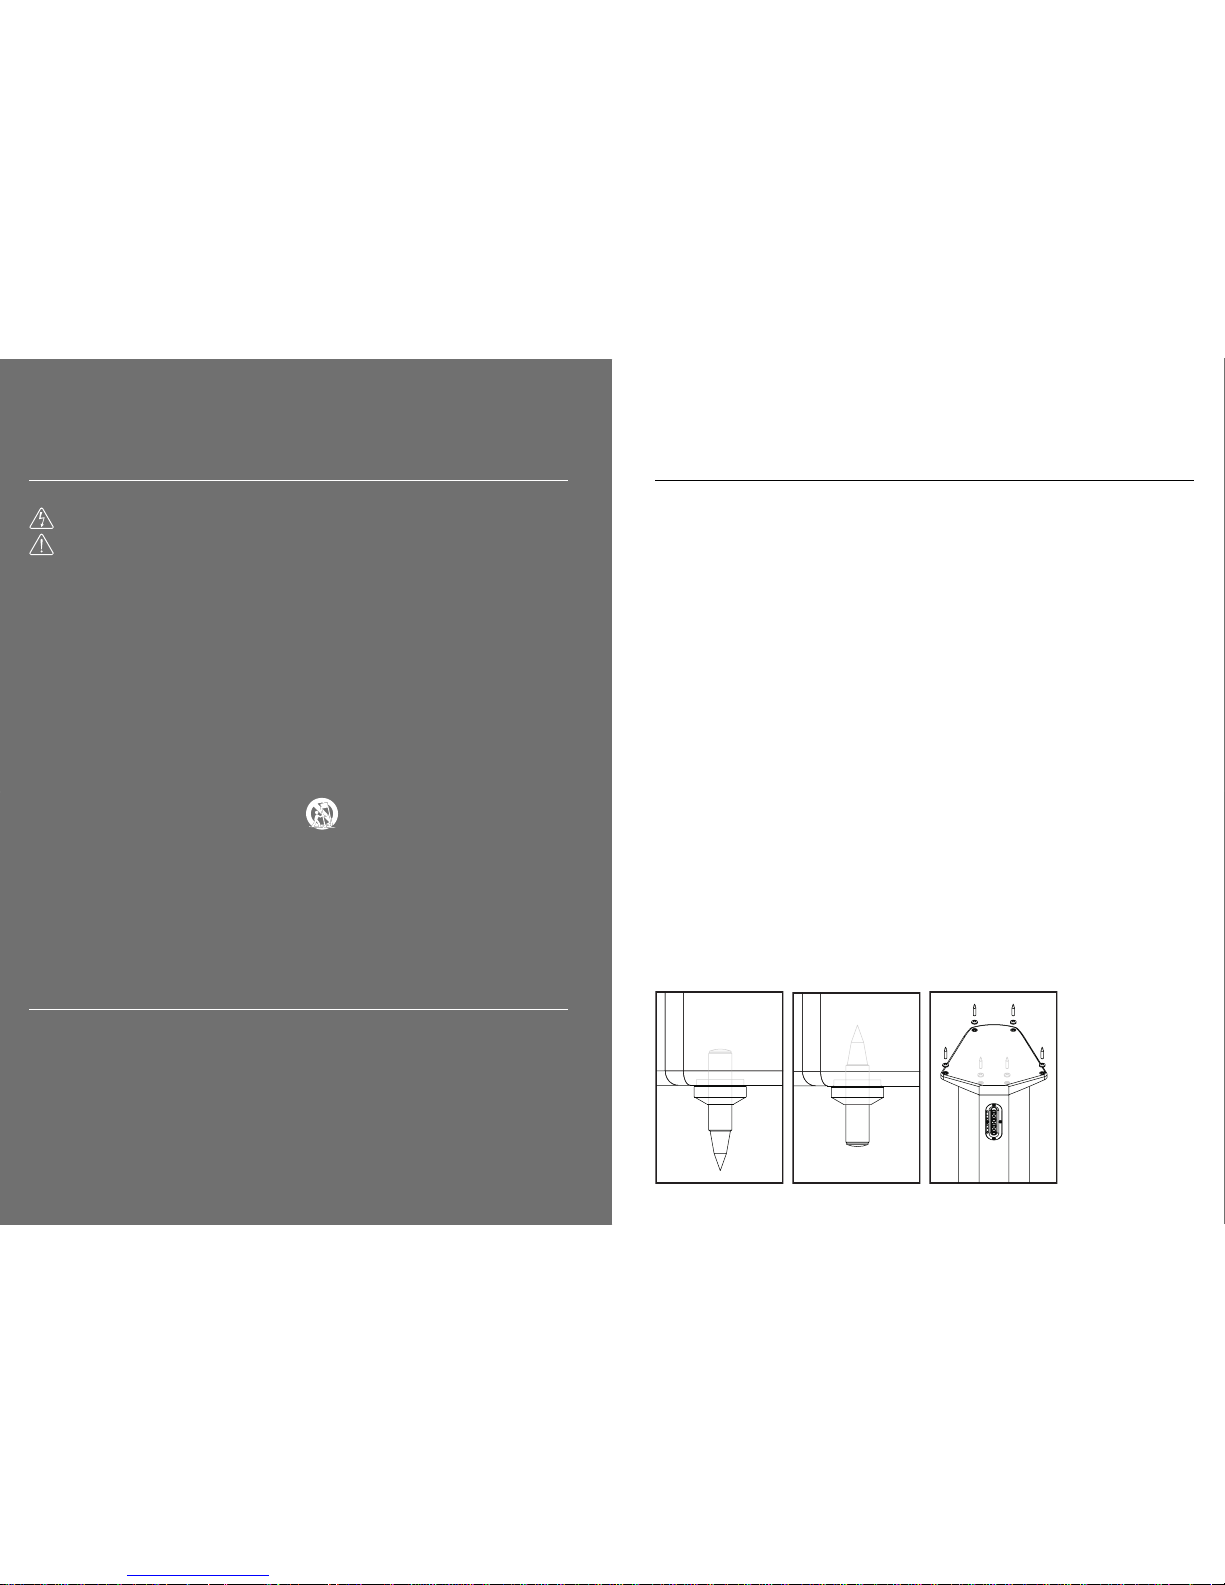
Fitting spikes
Use floor spikes on the floorstanding
speakers, subwoofer and speaker stands,
for an improvement in clarity of sound. The
spikes can be used with pointed ends
downward on carpets (fig 1), or domed end
downwards on hard floors (fig 2). After
levelling, make sure that the speakers are
stable on their spikes, then tighten all lock
nuts firmly.
Note that where more than four spikes are
provided you may regard the extra spikes as
an aid to stabilisation. Adjust the four main
spikes first and then lower the extra spikes
until they just touch the floor (fig 3).
fig 1
fig 2 fig 3
54
>0.3 m
1.8 - 2.2 m
1
1
3
4
2
2
4
5
3
or
fig 2 fig 3 fig 4 fig 5
fig 1
above head height
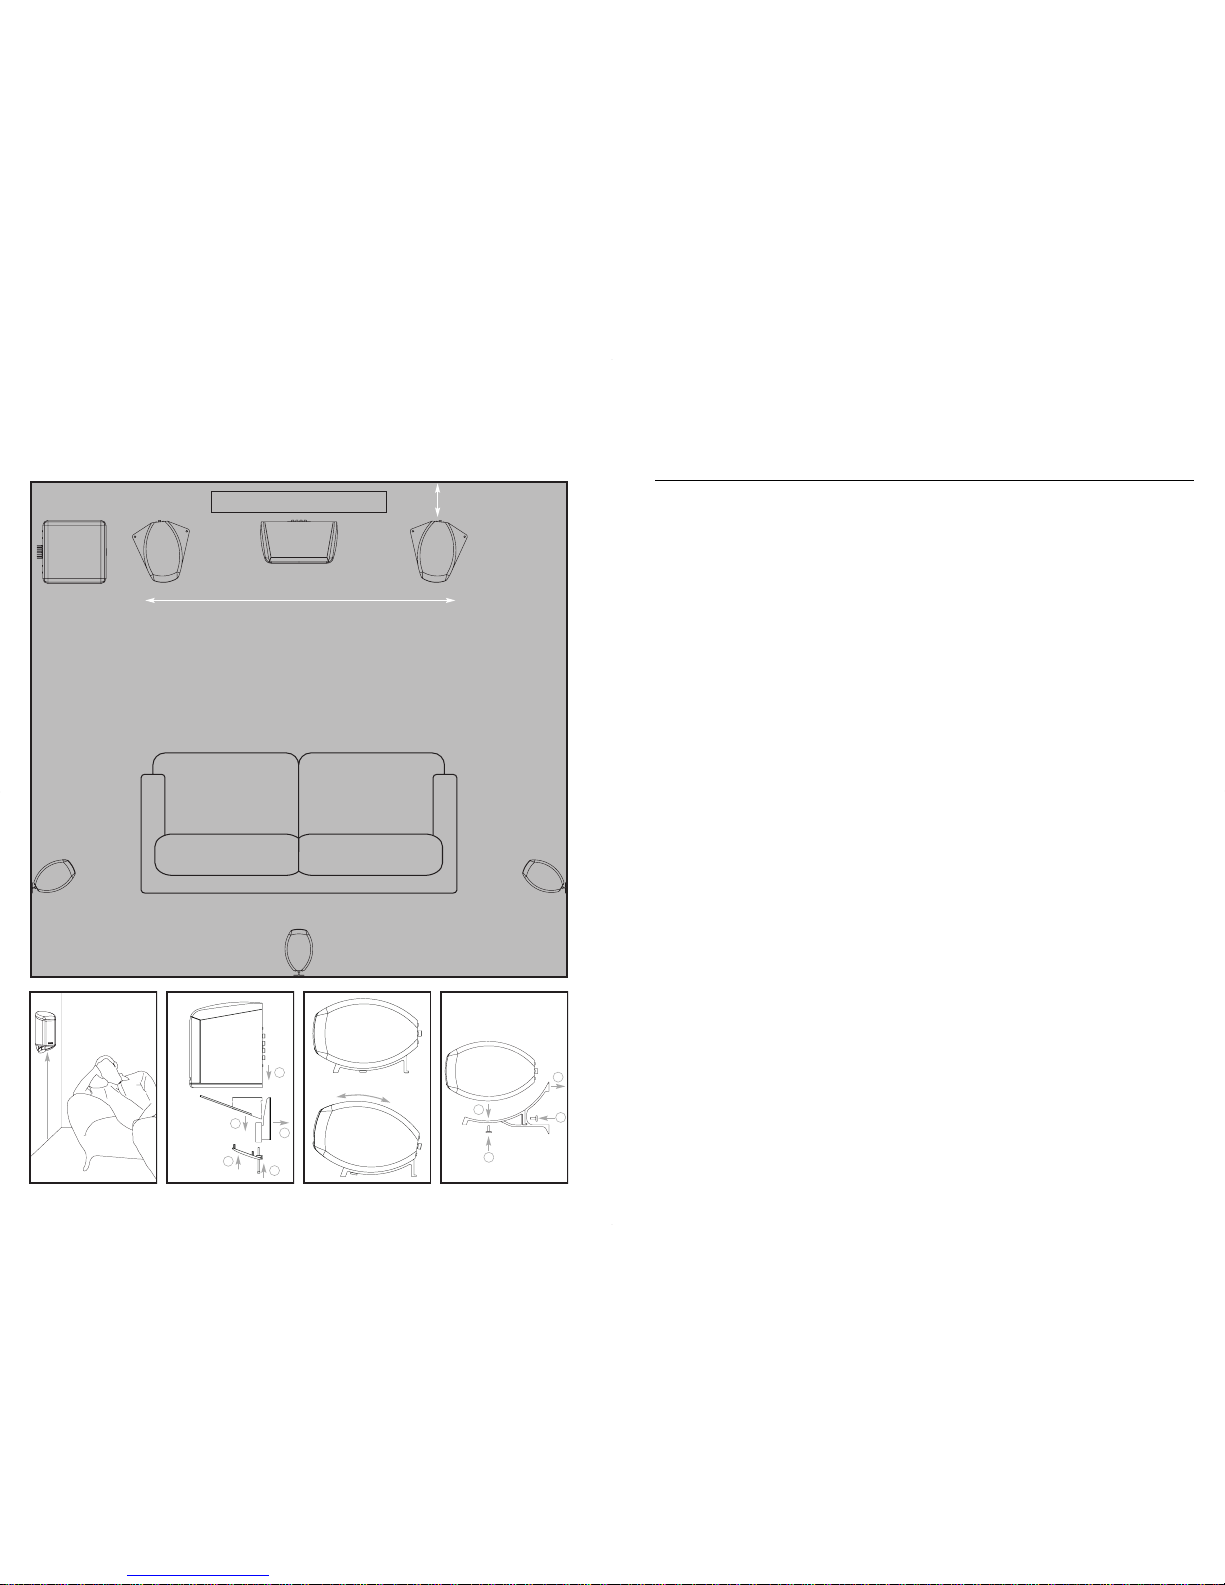
Room setup
e8c
The e8c loudspeaker is designed to be
placed underneath or above your TV screen
to centre dialogue to the visuals on the
screen. You can place it on a shelf above
the screen, or use the included wall bracket
to fix it to the wall. Alternatively you can
place it on a shelf below the screen and tilt it
upwards to face the listener if required.
shelf mount
The e8c is supplied fitted to a shelf stand.
You may loosen the fixing screw and rotate
the speaker on the stand to tilt it towards the
head of the seated listener if required.
Tighten the screw once the speaker is in the
optimum position (fig 4).
wall mount
(fig 5)
Remove the e8c from its stand. Slide the
stand onto the wall bracket and secure it
with the locking screw.
Using the rear plate of the wall bracket as a
template, mark positions on the wall for four
screw fixings. Screw the bracket to the wall
using wall plugs and screws suitable for the
wall construction and the weight of the
loudspeaker.
Make the connections to the terminals on
the rear of the e8c through the elongated
hole provided.
Carefully place the e8c speaker onto the
speaker support arm. Secure the speaker
onto the arm using the fixing screw
provided.
e80 / e81
e80 and e81 speakers are designed to be
used close to rear walls, either on the
included wall brackets or
elegante floor
stands. When used as rear speakers on a
wall the optimum performance for surround
sound will occur when the speakers are
raised above head height (fig 2).
stand mount
If using the Mission elegante stands, slide
the speaker support arm onto the stand
upright and secure it with the fixing screw.
Carefully place the e80 or e81 speaker onto
the speaker support arm, making sure that
the front extensions of the arm slot into the
recesses in the base of the speaker. Secure
the speaker onto the arm using the fixing
screw provided.
Make the connections to the terminals on
the rear of the speaker, as explained on
page 7.
wall mount
(fig 3)
Using the rear plate of the wall bracket as a
template, mark positions on the wall for four
screw fixings. Screw the bracket to the wall
using wall plugs and screws suitable for the
wall construction and the weight of the
loudspeaker.
Slide the speaker support arm onto the
bracket and attach the base plate.
Make the connections to the terminals on
the rear of the speaker, as explained on
page 7.
Carefully place the speaker onto the
speaker support arm, making sure that the
front extensions of the arm slot into the
recesses in the base of the speaker. Secure
the speaker onto the arm using the fixing
screw provided.
e82 / e83
e82 and e83 floorstanding speakers
perform best when positioned more than
0.3m from a rear wall and away from
corners (fig 1). Moving the speakers towards
a wall or corner will increase the amount of
bass, conversely moving the speakers away
from a wall or corner will increase the clarity,
articulation and tautness of bass. For good
two-channel performance the speakers
should be around 1.8 - 2.2m apart (fig 1).
Where speakers are used as part of a multichannel system this distance can be altered
to suit your room furnishings. Spend some
time moving the speakers and listening for
the optimum performance.
e8as1 / e8as2
e8as1 and e8as2 subwoofers give clean
and articulate bass when positioned at least
0.3m from a corner. However if a higher
level of bass output is demanded, a corner
position may provide this at the possible
expense of some clarity. Again it is
beneficial to spend time moving the
subwoofer and listening for the optimum
performance.
The e8as1 and e8as2 subwoofers are
designed to provide the low frequency
foundation and reproduction of low
frequency effects in a music or home theatre
system. The method of connection and
setup will depend on the electronics that
you connect to the subwoofer. Please read
through the instructions to determine how
best to use your subwoofer.
76
fig 1
fig 2
fig 3
1
2
3
1
2
3
or
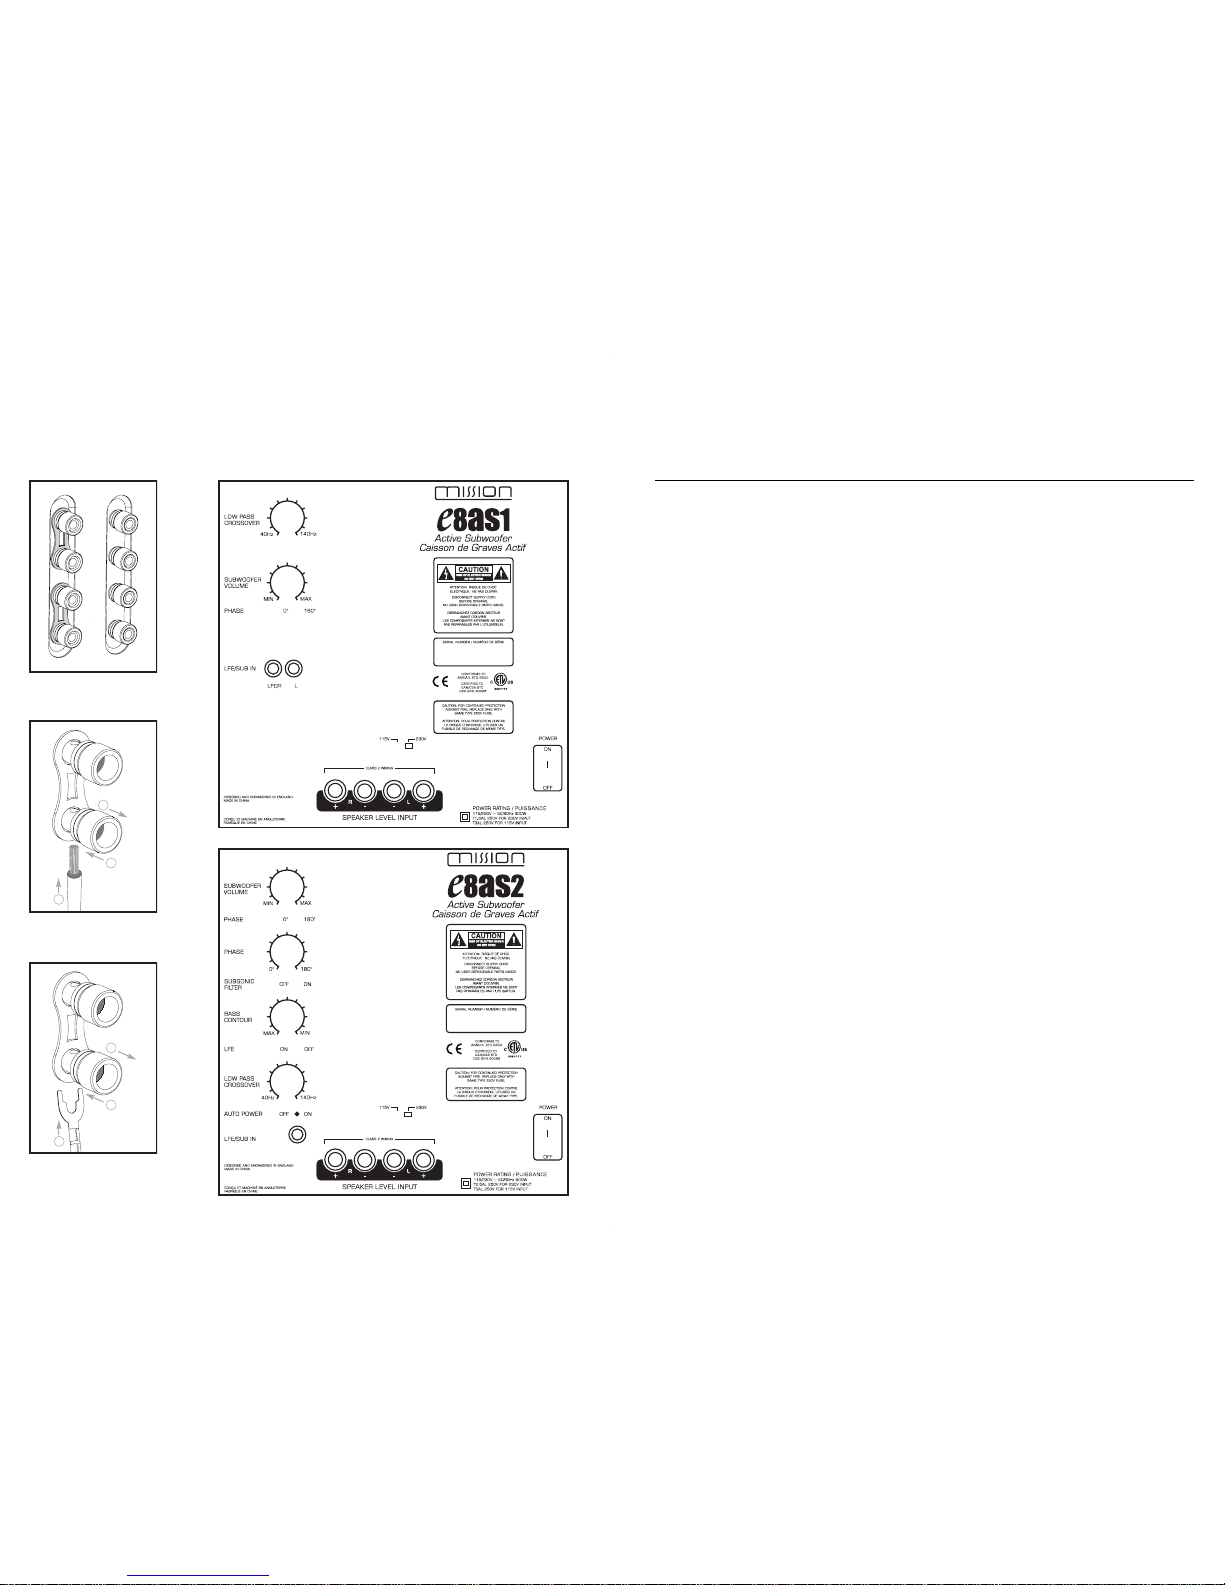
System setup
Connecting to your amplifier
The e series speakers are suitable for
bi-wiring and will benefit from careful
selection of partnering cables from your
amplifier. When bi-wiring, or bi-amping (fig 1),
remove the connecting links from between
the terminals at the rear of the speaker.
To connect using bare wires (fig 2), strip
10mm (1/2 inch) of insulation from each
cable. Loosen the terminal caps on the
speaker terminals to reveal the cross holes.
Twist the bared conductors together and
pass through the cross hole in the speaker
terminal, securing by screwing down the
terminal cap.
To connect using spade terminals (fig 3),
loosen the terminal caps on the speaker
terminals enough to locate the spades.
Tighten the terminal caps onto the spades
so that they are held securely.
Connect the positive speaker outlets on the
rear of your amplifier to the positive (red)
terminals on the rear of the speakers.
Similarly connect the negative speaker
outputs to the negative (black) terminals on
the speakers. Note that speaker cables
usually identify the positive conductor by
marking it with a stripe or raised ridge or
coloured band.
e8
as1/ e8as2
To connect a stereo hi-fi amplifier it is
recommended that you connect the speaker
outputs of your amplifier to the speaker level
inputs of the subwoofer in parallel to the
connections made to your speakers.
To connect an AV multi-channel amplifier it
is recommended that you connect the LFE
line level input on the subwoofer to the
subwoofer output on your amplifier using an
RCA phono lead (not supplied).
Power —
Set the subwoofer’s ON/OFF switch
to "Off." Then plug the power cord into an
AC outlet. You can turn the power on and off
manually using the switch, or you can leave
the mains power turned on and set the Auto
Power switch to "On," which will turn the
subwoofer on automatically when a signal
is detected at one of the inputs and off after
a period of inactivity.
AV setup
In a multi-channel system it is
recommended that you use the bass
management facilities on your AV amplifier.
As the subwoofer is best employed to
reproduce bass, all low frequency
information should be directed to the
subwoofer enabling the main speakers to
reproduce upper bass, midrange and treble
with optimum clarity.
If you are using the bass management of an
AV amplifier, set all speakers to SMALL in
your amplifier's speaker configuration and
set SUBWOOFER to ON. Where the crossover
frequency can be chosen set it to 80Hz.
Alternatively choose the preset configuration
for THX.
Set the Low Pass Crossover Frequency
control on the subwoofer to 140Hz (on the
e8as2 set the LFE switch to ON). Adjust the
volume control to its mid position.
Use the distance parameters in your AV
amplifier speaker setup to set the distance
from each set of speakers to your listening
position.
Use the channel level adjustment in your AV
amplifier speaker setup to set the individual
output from each speaker. If you have a
sound level meter adjust the individual level
of each channel for a reading of 75dB at the
listening position. If you do not have access
to a sound level meter, set the channel
levels so that they sound equally loud at the
listening position.
Stereo setup
In a hi-fi system without bass management
you must adjust the LOW PASS CROSSOVER
control on the subwoofer in conjunction with
the SUBWOOFER VOLUME control to achieve
a blend to your main speakers. The e8as1
and e8as2 subwoofers can be used with
the e82 and e83 floorstanding speakers in a
hi-fi system. (Note that the e80 is not
suitable for use in a hi-fi system without
bass management).
For the e82 speakers, start by setting the
LOW PASS CROSSOVER control to midway
and adjust the SUBWOOFER volume level to
provide a natural level of bass support
when playing music discs. For the e83
speakers, start by setting the LOW PASS
CROSSOVER control to between the 40Hz
and the midway position.
Adjusting the controls
Once you have completed the settings you
should prepare to fine-tune the subwoofer
controls. Choose a multi-channel disc with
natural bass qualities - a music disc is best.
Adjust the control on the subwoofer's rear
panel marked PHASE to tune the blend
between the subwoofer and speakers.
Depending on your room acoustics the
sound will be fuller and more coherent with
the switch in the 0° or 180° position. Use
your judgement to set the switch to the best
sounding position.
On the e8as2 you also have fine control
over phase. Use the variable PHASE control
to achieve the fullest and clearest bass
response. In conjunction with the PHASE
switch, the phase can be varied over 180°.
Adjust the SUBWOOFER VOLUME control to
give bass output that is in balance with your
main speakers. Initially you may prefer the
subwoofer output at a relatively high level,
but this can become tiring, with an overemphasis on bass on extended listening.
Turn the volume down by degrees until the
subwoofer is not heard individually but
rather as an extension to the main
speakers.
On the e8as2 you can fine tune the bass
performance to suit your room. If the bass is
boomy, or appears uncontrolled at very low
frequencies, switch the SUBSONIC FILTER to
ON. Adjust the BASS CONTOUR to control
output at the very low frequencies.
8 9
General information
Loudspeaker maintenance
Use the supplied cloth to polish dust and
fingermarks from the speakers. Rub the
surface to be cleaned with the inner cloth.
Remove tarnish and buff to a high shine with
the dark outer cloth. Do not use spray
polishes or solvent cleaners as these may
damage the highly polished multi-layer
lacquer finish. If necessary clean the speaker
grilles carefully with a soft brush.
Product service
Should a fault occur with your loudspeakers
please pack them correctly, using the
original packaging.
Product for service should be returned to the
appointed dealer from whom you
purchased the product. If you experience
difficulties or there is no Mission dealer in
your area, contact the Mission distributor for
your country or the main service centre for
your region.
Important Notice to UK Users –
e8as1, e8as2
The power cord on your Mission powered
subwoofer is supplied with a plug
incorporating a fuse, the value of which is
indicated on the pin face of the plug. Should
the fuse need to be replaced, an ASTA or BSI
approved BS1362 fuse must be used of the
same rating. If the plug is cut off it must NOT
be re-used. Dispose of any such plug safely.
There is a danger of electric shock if a cut-off
plug is inserted into a mains socket.
The wires in the mains lead are coloured in
accordance with the following code:
Blue - Neutral: Brown - Live.
As the colours of the wires in the mains lead
may not correspond with the markings
identifying the terminals in the replacement
mains plug, proceed as follows:
The wire coloured Blue must be connected
to the terminal marked with the letter "N" or
coloured Black. The wire coloured Brown
must be connected to the terminal marked
with the letter "L" or coloured Red.
Recommended Amplifier:
50 - 150 W 50 - 150 W 50 - 150 W 50 - 200 W
Enclosure: 2-way sealed box 2-way sealed box 3-way reflex loaded 2-way ABR loaded
Frequency Response ±3dB: 80 Hz - 30 kHz 80 Hz - 30 kHz 48 Hz - 30 kHz 44 Hz - 30 kHz
Sensitivity SPL/M @ 2.83V: 85 dB 90 dB 90 dB 90 dB
Impedance: 8 Ohms compatible 8 Ohms compatible 8 Ohms compatible 8 Ohms compatible
(minimum 4.0 Ohms) (minimum 4.6 Ohms) (minimum 4.0 Ohms) (minimum 4.0 Ohms)
Bass: 110 mm Paramid-S Twin 110 mm Paramid-S 4 x 110 mm Paramid-S Twin 165 mm Paramid-S
Mid: - - 110 mm Paramid-S -
Treble: 25 mm Viotex-S 25 mm Viotex-S 25 mm Viotex-S 25 mm Viotex-S
Effective Volume: 3.75 litres 5.75 litres 23 litres 40 litres
Dimensions (H x W x D): 284 x 160 x 250 mm 403 x 160 x 250 mm 956 x 300 x 334 mm 1108 x 330 x 360 mm
11.2 x 6.3 x 9.8 inches 15.9 x 6.3 x 9.8 inches 37.6 x 11.8 x 13.2 inches 43.6 x 13 x 14.2 inches
Weight: 6 kg 8.7 kg 19.7 kg 22.1 kg
13.2 lbs 19.2 lbs 43.4 lbs 48.7 lbs
e80 e81 e82 e83
Specifications
Recommended Amplifier: 50 - 150 W Integrated 350 W Integrated 500 W
Enclosure: 2-way sealed box ABR loaded sealed box
Frequency Response ±3dB: 80 Hz - 30 kHz 36 Hz - 150 Hz 28 Hz - 280 Hz
Sensitivity SPL/M @ 2.83V:
90 dB - -
Impedance: 8 Ohms compatible
(minimum 4.6 Ohms)
Bass: Twin 110 mm Paramid-S 250 mm + twin ABR 4 x 210 mm
Mid: ---
Treble: 25 mm Viotex-S - -
Effective Volume: 6.5 litres 30 litres 46 litres
Dimensions (H x W x D): 172 x 443 x 250 mm 415 x 365 x 400 mm 430 x 400 x 560 mm
6.8 x 17.4 x 9.8 inches 16.3 x 14.4 x 15.7 inches 16.9 x 15.7 x 22 inches
Weight: 9.1 kg 17.3 kg 32 kg
20.1 lbs 38.1 lbs 70.5 lbs
e8c e8as1 e8as2
Specifications
Mission reserves the right to change specifications without notice. E & OE
Warning:
When an amplifier is driven beyond its power output capabilities it will produce distorted results which will
quickly damage your speakers by overheating. Make sure that your amplifier is not left unattended when playing, for
example at parties, and turn the volume control down at the first sign of audible distortion.
CORD GRIP
FUSE
BROWN
(LIVE)
OUTER
SLEEVE
BLUE
(NEUTRAL)

11
Précautions
Conditions de garantie
Le bon de garantie ci-joint doit être rempli et envoyé à la société Mission ou à
son distributeur dans un délai de 8 jours à compter de la date d'achat. Aucun
revendeur ou distributeur n'est habilité à modifier les termes de cette garantie,
qui s'adresse uniquement à l'acheteur d'origine et qui n'est pas
transférable.Veuillez conserver la facture comme preuve d'achat. Toute
réclamation relative à la garantie doit être effectuée, si possible, par
l'intermédiaire du revendeur d'où provient l'équipement.
Cette garantie exclut :
Les dommages résultant d'une négligence, d'un accident, d'une mauvaise
utilisation, d'une usure, ainsi que d'une installation, d'un réglage ou de
réparations incorrects effectués par du personnel non autorisé. Toute
réparation non autorisée entraîne une perte de la garantie ;
La responsabilité relative aux dommages ou pertes se produisant pendant le
transport du produit chez l'acheteur ou depuis celui-ci ;
Les dommages consécutifs, les pertes ou blessures corporelles, découlant de
ou associés à cet équipement.
En cas de retour, l'équipement sous garantie bénéficie du port payé. Si
l'équipement retourné est conforme aux spécifications publiées, Mission se
réserve le droit de facturer les frais de réparation.
Les conditions susmentionnées n'affectent en aucune manière vos droits
statutaires en tant que consommateur.
CONSIGNES DE SÉCURITÉ IMPORTANTES
Ce symbole indique un risque d'électrocution.
Ce symbole indique la nécessité d'observer des précautions extrêmes.
AVERTISSEMENT: POUR RÉDUIRE LE RISQUE D’INCENDIE OU D’ÉLECTROCUTION,
N’EXPOSEZ PAS CET APPAREIL À LA PLUIE NI À L’HUMIDITÉ.
Veuillez lire ces consignes.
Conservez ces instructions.
Tenez compte de tous les avertissements.
Observez toutes les instructions.
N'UTILISEZ PAS cet appareil près de l'eau.
Nettoyez l'appareil uniquement avec un chiffon sec.
N'INSTALLEZ PAS le matériel près de sources de chaleur telles que des
radiateurs, des bouches de chaleur, des poêles ou autres appareils (y
compris les amplificateurs) générant de la chaleur.
Protégez le cordon d'alimentation pour ne pas marcher dessus ni le pincer,
en particulier au niveau des fiches, des prises de courant, et du point où il sort
de l'appareil.
Débranchez l'appareil lors des orages ou lors de longues périodes d'inactivité.
Toute révision doit être confiée à un personnel qualifié en la matière. La
révision est nécessaire lorsque l'appareil a été endommagé d'une
quelconque façon, par exemple si le cordon ou la fiche d'alimentation a été
endommagé, si du liquide a été renversé ou si des objets sont tombés sur
l'appareil, si l'appareil a été exposé à la pluie ou l'humidité, si l'appareil ne
fonctionne pas normalement ou si celui-ci est tombé.
Effectuez l'installation conformément aux instructions fournies par le fabricant.
AVERTISSEMENT: Si vous utilisez des pointes, veillez à ne pas percer le câble
de secteur, etc. sous/au-dessus de la moquette.
Avant de procéder à un raccordment quelconque, arrêtez l’amplificateur.
Lors de la mise en marche du système ou d’un changement des sources, réglez
la commande de volume au minimum et augmentez graduellement le volume.
N’UTILISEZ PAS votre amplificateur avec le volume à fond.
Évitez les réglages extrêmes des commandes de tonalité ou des égaliseurs
graphiques. De manière idéale, celles-ci devraient être équilibrées ou
dérivées. Vérifiez que tous les haut-parleurs du système sont correctement
câblés et en phase.
NE PLACEZ PAS d’objects lourds sur les enceintes des haut-parleurs.
NE BRANCHEZ PAS les haut-parleurs à l’alimentation secteur.
N’ESSAYEZ PAS de démonter les haut-parleurs. Ceux-ci ne comportent aucune
pièce réparable et leur démontage annule la garantie.
Placez les appareils électroniques de haute fidélité à l’écart des haut-parleurs
et sur un socle ou un meuble rigide.
Les haut-parleurs ne doivent pas être placés directement en face d’autres
unités de haute fidélité, ni partager le méme meuble.
Écartez les haut-parleurs d’au moins 0.5m du caisson des graves des postes
de télévision, ordinateurs, etc. Certains fabricants interdisent la pose d'objets
sur leurs postes de télévision. Vérifiez votre manuel de télévision avant
d'installer le haut-parleur central directement sur votre poste de télévision.
Dans le doute, contactez votre revendeur télé.
Utilisez uniquement les accessoires/éléments auxiliaires spécifiés par le
fabricant.
N’EXPOSEZ PAS vos haut-parleurs à un froid, une chaleur ou une humidité
excessive et conservez-les à l’abri des rayons solaires.
N'OBSTRUEZ AUCUNE ouverture d'aération.
NE CONTOURNEZ PAS le dispositif de sécurité de la fiche polarisée ou de la
fiche de type mise à la terre. Une fiche polarisée possède deux lames dont
l'une est plus large que l'autre. Une fiche du type mise à la terre possède deux
lames et une troisième broche de mise à la terre. La lame large ou la
troisième broche sont destinées à assurer votre sécurité. Si la fiche fournie ne
s'adapte pas à votre prise de courant, consultez un électricien pour le
remplacement de la prise obsolète.
L'appareil ne doit pas être exposé à l'égouttement ni à l'éclaboussement, et
aucun objet rempli de liquide, tel qu'un vase, ne doit être placé sur l'appareil.
Utiliser exclusivement avec le chariot, le socle, le trépied, la
console ou la table spécifiés par le constructeur ou vendus avec
l'appareil. Avec un chariot, on doit faire preuve de prudence lors
de l'utilisation de l'ensemble chariot / appareil, afin d'éviter toute
blessure provoquée par son renversement.
ATTENTION:
e8as1, e8as2
Avertissement: L'interrupteur d'alimentation électrique de cet appareil est situé
en face arrière. Pour un libre accès à cet interrupteur, l'appareil doit être placé
dans une zone libre sans aucun obstacle.
Placer l’équipement à proximité d’une prise de courant et veiller à faciliter
l’accès au disjoncteur.
ATTENTION: Tout changement ou modification non expressément approuvé
par le fabricant peut invalider le droit de l'utilisateur à utiliser cet appareil.
Présentation de elegante
Vous êtes maintenant propriétaire de hautparleurs Mission. Le modèle
elegante est le
tout dernier d'une longue série de hautparleurs prestigieux Mission. Ces hautparleurs à la pointe de la technologie
s'harmonisent avec l'électronique et le décor
les plus évolués. Les ingénieurs et les
concepteurs de Mission ont créé et fabriqué
chacun des haut-parleurs de la gamme
elegante pour vous offrir des heures
d'écoute à la fois agréables et
sophistiquées.
Vous êtes priés de lire les présentes
instructions attentivement avant d'installer
vos haut-parleurs et de consacrer quelques
minutes à la lecture du présent manuel pour
obtenir, avec les modèles
elegante, les
performances sensationnelles dont ils sont
capables.
Montage des crampons
Pour optimiser la limpidité du son, utilisez
des crampons sur les socles des hautparleurs montés au sol, du sub-woofer et
des haut-parleurs. Les crampons peuvent
être utilisés la pointe en bas, pour les
applications sur la moquette (fig. 1), ou la
face bombée vers le bas, sur les planchers
durs (fig. 2). Après la mise à niveau, vérifiez
que les haut-parleurs sont stables sur leurs
crampons, puis serrez à fond tous les
contre-écrous.
A préciser que lorsque plus de quatre
crampons sont fournis, les crampons
additionnels peuvent être considérés
comme des dispositifs destinés à maximiser
la stabilité. Ajustez tout d'abord les quatre
crampons principaux, puis baissez les
crampons supplémentaires jusqu'à ce qu'ils
touchent tout juste le plancher (fig. 3).
fig 1
fig 2 fig 3
10

1312
>0.3 m
1.8 - 2.2 m
1
1
3
4
2
2
4
5
3
or
fig 2 fig 3 fig 4 fig 5
fig 1
Au-dessus de la hauteur
de la tete
Configuration de la salle
e80 / e81
Les haut-parleurs e80 et e81 sont conçus
pour être utilisés à proximité des murs du
fond de la salle, et placés soit sur les
consoles murales prévues, soit sur socle
elegante Lorsqu'on les utilise comme haut-
parleur arrière, sur un mur, on maximise le
rendement de ces haut-parleurs en les
plaçant en hauteur (surélevés par rapport à
l'auditoire (fig. 2).
Montage sur socle
Si l'on utilise des socles elegante Mission,
glisser le bras de support du haut-parleur
sur le montant du support, puis fixer avec la
vis de fixation.
Placer soigneusement le haut-parleur e80
ou e81 sur le bras de support du hautparleur, en vérifiant que les extensions
antérieures du bras s'emmanchent dans les
évidements à la base du haut-parleur. Fixer
le haut-parleur sur le bras au moyen de la
vis de fixation à cet effet.
Effectuer les raccordements sur les bornes à
l'arrière du haut-parleur, explique a la page
15.
Montage sur un mur
(fig. 3)
En utilisant la plaque postérieure de la
console murale comme gabarit, marquer
sur le mur l'emplacement des quatre vis de
fixation. Visser la console sur le mur au
moyen de fiches et de vis convenant à la
structure du mur et au poids du hautparleur.
Glisser le bras de support du haut-parleur
sur le support, puis fixer le socle.
Effectuez les raccordements sur les bornes à
l'arrière du haut-parleur, explique a la page
15.
Ensuite, placer soigneusement le hautparleur sur le bras de support du hautparleur, en vérifiant que les extensions
antérieures du bras s'emmanchent dans les
évidements à la base du haut-parleur. Enfin,
fixer le haut-parleur sur le bras au moyen
de la vis de fixation à cet effet.
e8c
Le haut-parleur e8c est conçu pour être
placé au-dessous ou au-dessus de votre
écran de télévision pour centrer le dialogue
avec les images sur l'écran. Vous pouvez le
placer sur une étagère au-dessus de
l'écran, ou utiliser la console murale fournie
pour le fixer au mur. Si nécessaire, vous
pouvez également le placer sur une étagère
sous l'écran, puis l'incliner pour l'orienter
vers le spectateur.
Montage sur une étagère
L'e8c est fourni monté sur un support
d'étagère. Vous pouvez desserrer la vis de
fixation et pivoter le haut-parleur sur le
support pour l'orienter vers les spectateurs
assis, si nécessaire. Lorsque le haut-parleur
se trouve dans sa position optimale (fig. 4),
serrer la vis.
Support mural
(fig. 5)
Enlevez l'e8c de son support, puis glissez le
socle sur le support mural en le fixant avec
la vis de serrage.
En vous servant de la plaque postérieure
sur la console murale comme d'un gabarit,
marquez sur le mur l'emplacement des
quatre vis de fixation. Vissez le support sur
le mur au moyen de fiches et de vis
appropriées pour la structure du mur et le
poids du haut-parleur.
Effectuez les branchements sur les bornes à
l'arrière du haut-parleur e8c, à travers
l'orifice allongé prévu.
Placez soigneusement le haut-parleur e8c
sur le bras de support du haut-parleur, et
fixez le haut-parleur sur le bras au moyen
de la vis de fixation à cet effet.
e82 / e83
Les haut-parleurs e82 / e83 montés au sol
offrent un rendement optimal lorsqu'on les
place à plus de 0,3 m d'un mur de fond et
loin des coins (fig. 1). Plus on tourne les hautparleurs vers un mur ou un coin, plus on
augmente les graves ; au contraire, plus on
les éloigne d'un mur ou d'un coin, plus on
en augmente la clarté, ainsi que l'articulation
et la netteté des graves. Pour obtenir un bon
rendement des systèmes à deux voies, on
doit placer les haut-parleurs à environ 1,8 à
2,2 m l'un de l'autre (fig. 1). Lorsqu'on utilise
les haut-parleurs dans le cadre d'un
système multiplex, cette distance peut être
modifiée en fonction de l'aménagement de
la salle. Pour optimiser la qualité du son,
consacrez un peu de temps à déplacer les
haut-parleur et à écouter les résultats.
e8as
1 /
e8as
2
Les sub-woofers e8as1 / e8as2 produisent
une tonalité grave nette lorsqu'ils sont
placés au moins à 0.3 m d'un coin de la
pièce. Le cas échéant, il est possible
d'accentuer les graves en positionnant les
sub-woofers dans un coin, même si cela
limite la clarté du son. Ici aussi, il pourrait
être utile de consacrer un peu de temps à
déplacer le sub-woofer et à écouter les
résultats jusqu'à ce qu'on obtienne un
rendement optimal.
Les sub-woofers e8as1 / e8as2 sont conçus
pour fournir les basses fréquences de base
et reproduire les basse fréquences dans un
système musical ou théâtral. La méthode de
raccordement et la configuration sont
fonction de l'électronique que l'on branche
sur le sub-woofer. Vous êtes prié de lire les
instructions pour déterminer le mode
d'utilisation optimal de votre sub-woofer.

1514
Configuration du système
Branchement sur votre amplificateur
TLes haut-parleurs modèle e sont
conçus pour un double câblage, et nous
vous conseillons de sélectionner soigneusement les câbles correspondants provenant
de votre amplificateur. En cas de double
câblage, ou de double puissance (fig. 1),
enlever les membres intermédiaires des
bornes de l'arrière du haut-parleur.
Pour effectuer le raccordement avec des fils
nus (fig. 2), dénuder 10 mm de la gaine
isolante de chaque câble, puis desserrer les
culots de borne sur les bornes du haut-parleur,
pour découvrir les orifices transversaux. Tordre
les conducteurs dénudés ensemble, pour les
introduire ensuite dans l'orifice transversal de la
borne du haut-parleur, et fixer en revissant le
culot de la borne.
Pour effectuer le raccordement avec des
cosses (fig. 3), desserrer les culots des bornes
du haut-parleur de façon suffisante pour
positionner les cosses. Serrer les culots sur les
cosses pour les maintenir fixement en place.
Raccordez les sorties positives du haut-parleur,
à l'arrière de votre amplificateur, aux bornes
positives (rouges) à l'arrière des haut-parleurs.
De la même façon, raccordez les sorties
négatives du haut-parleur, à l'arrière de votre
amplificateur, aux bornes négatives (noires)
des haut-parleur. Il convient de préciser que les
câbles des haut-parleurs identifient généralement le conducteur positif en le marquant avec
une bande ou une arête ou bien avec une
bande de couleur.
e8as1/ e8as2
Pour brancher un ampli stéréo, il est conseiller de
raccorder les sorties de haut-parleur de votre
ampli aux entrées de niveau de haut-parleur du
sub-woofer parallèlement aux connexions de vos
haut-parleur.
Pour brancher un ampli multiplex AV, nous
vous conseillons de brancher l'entrée de
niveau de ligne LFE de votre sub-woofer à la
sortie de sub-woofer de votre ampli au moyen
d'un câble phono RCA (exclu de la fourniture)
Alimentation
—
Mettez l’interrupteur principal
d’alimentation du caisson de graves sur "Off".
Puis branchez le cordon d’alimentation dans
une prise de courant. Vous pouvez soit mettre
manuellement sous tension et hors tension à
l’aide de l’interrupteur principal d’alimentation,
soit laisser celui-ci en position de marche et
mettre l’interrupteur d’alimentation
automatique en position "On", ce qui permet la
mise sous tension automatique du caisson de
graves lorsqu’un signal est détecté sur l’une
des entrées et la mise hors tension après un
certain temps d’inactivité.
Configuration A.V.
Dans un système multiplex, nous vous
conseillons d'utiliser les dispositifs de
gestion des graves sur votre amplificateur
A.V. Le sub-woofer étant le dispositif optimal
de la reproduction des graves, toutes les
informations de basse fréquence doivent lui
être transmises, en permettant ainsi aux
haut-parleur principaux de reproduire les
fréquences graves, moyennes et aiguës
avec une clarté optimale.
Si vous utilisez la gestion des fréquences
graves sur un amplificateur A.V., réglez tous les
haut-parleur sur SMALL dans la configuration
des haut-parleurs de votre amplificateur, et
SUBWOOFER sur ON (marche). Si vous pouvez
choisir la fréquence de chevauchement,
réglez-la sur 80 Hz. : autrement, choisissez la
configuration préréglée pour THX.
Réglez la commande de fréquence de
chevauchement passe-bas sur le subwoofer sur 140 Hz (sur l'e8as2, réglez le
commutateur LFE sur ON), et le régulateur
du volume dans sa position intermédiaire.
Avec les paramètres de distance, dans la
configuration des haut-parleurs de votre
amplificateur A.V., réglez la distance entre
chaque ensemble de haut-parleur et votre
position d'écoute.
En utilisant le dispositif de réglage du niveau
des canaux, dans la configuration des hautparleurs de votre amplificateur A.V., réglez
la sortie individuelle de chaque hautparleur. Si vous disposez d'un phonomètre,
ajustez le niveau individuel de chaque canal
pour une fréquence de 75 dB à chaque
position d'écoute. Si vous ne disposez pas
d'un phonomètre, ajustez les niveaux des
canaux de sorte qu'ils produisent le même
volume à la position d'écoute.
Configuration stéréo
Dans un système Hi-Fi sans gestion des
graves, vous devez ajuster la commande
LOW PASS CROSSOVER sur le sub-woofer
conjointement avec la commande
SUBWOOFER VOLUME pour obtenir un
mélange sur vos haut-parleurs principaux.
Dans un système Hi-Fi, les sub-woofers
e8as1 et e8as2 peuvent être utilisés avec les
haut-parleurs montés au sol (il convient de
préciser que l'e80 ne peut être utilisé dans
une enceinte Hi-Fi sans gestion des graves).
Pour les haut-parleurs e82, commencez par
régler la commande LOW PASS CROSSOVER
(chevauchement passe-bas) entre 40 Hz et
la position intermédiaire.
Ajustage des commandes
Lorsque vous avez terminé les réglages,
vous devez préparer l'exécution de l'accord
précis des commandes du sub-woofer.
Choisissez un disque multiplex présentant
des qualités de graves naturelles - de
préférence un disque musical.
Ajustez la commande sur le panneau postérieur
du sub-woofer marquée PHASE, pour accorder le
mélange entre le sub-woofer et les haut-parleurs.
En fonction de l'acoustique de votre salle, vous
obtiendrez un son plus riche et plus régulier
lorsque le régulateur se trouve dans la position 0º
ou 180º. C'est à vous de régler le régulateur de
façon à obtenir la meilleure acoustique possible.
Avec l'e8as2, vous pouvez également effectuer
l'accord fin de la phase. Déterminez la réponse
des graves la plus riche et la plus claire au
moyen de la commande PHASE.
Conjointement avec le commutateur PHASE, il
est possible de varier la phase sur 180º.
Ajuster la commande SUBWOOFER VOLUME pour
obtenir des graves en accord avec vos hautparleur principaux. Au départ, on pourra régler le
niveau du sub-woofer sur un niveau relativement
élevé, mais ce réglage risque de lasser, l'accent
étant mis excessivement sur les graves pendant
de longues périodes d'écoute. Diminuer alors le
volume progressivement jusqu'à ce que l'on
n'entende le sub-woofer non plus
individuellement, mais plutôt comme une
extension des haut-parleurs principaux.
Sur l'e8as2, vous pouvez effectuer l'accord
fin des graves en fonction de la salle. Si les
graves sont "mugissantes", ou
apparemment non contrôlées, avec de très
basses fréquences, on doit régler le filtre
subsonique (SUBSONIC FILTER) en les plaçant
sur ON (marche), puis ajuster BASS
CONTOUR pour régler le son avec de très
basses fréquences.
fig 1
fig 2
fig 3
1
2
3
1
2
3
or

1716
Renseignements généraux
Entretien des haut-pparleurs
Utiliser le chiffon fourni pour éliminer la
poussière et effacer les traces de doigt des
haut-parleurs. Frotter la surface à nettoyer
avec le chiffon interne. Éliminer les
ternissures et polir avec le chiffon externe
foncé. Ne pas utiliser de vernis au
vaporisateur ou des produits à base de
solvant qui risquent d'endommager la laque
multicouche polie. Si nécessaire, nettoyer
soigneusement les grilles de haut-parleur
avec une brosse douce.
Service après-vvente
En cas de défaillance des haut-parleurs,
emballez-les correctement en utilisant
l'emballage d'origine.
Renvoyez les articles défaillants au
revendeur désigné auquel vous les avez
achetés. Si vous éprouvez des difficultés, ou
s'il n'y a pas de fournisseur Mission dans
votre région, veuillez contacter le distributeur
Mission dans votre pays ou le centre
d'assistance principal desservant votre
région.
Amplificateur recommandé:
50 - 150 W 50 - 150 W 50 - 150 W 50 - 200 W
Enceinte: Boîtier hermétique 2 voies Boîtier hermétique 2 voies Reflex 3 vois chargé ABR 2 voies chargé
Réponse en fréquence ±3dB: 80 Hz - 30 kHz 80 Hz - 30 kHz 48 Hz - 30 kHz 44 Hz - 30 kHz
Sensibilité SPL/M @ 2,83V: 85 dB 90 dB 90 dB 90 dB
Impédance: Compatibilité 8 ohms Compatibilité 8 ohms Compatibilité 8 ohms Compatibilité 8 ohms
(minimum : 4 ohms) (minimum : 4.6 ohms) (minimum : 4 ohms) (minimum : 4 ohms)
Graves: Paramid-S 110 mm Paramid-S 110 mm double 4 x Paramid-S 110 mm Paramid-S 165 mm double
Moyennes: - - Paramid-S 110 mm -
Aiguës: Viotex-S 25 mm Viotex-S 25 mm Viotex-S 25 mm Viotex-S 25 mm
Volume effectif: 3,75 litres 5,75 litres 23 litres 40 litres
Dimensions (h x l x p): 284 x 160 x 250 mm 403 x 160 x 250 mm 956 x 300 x 334 mm 1108 x 330 x 360 mm
11,2 x 6,3 x 9,8 pouces 15,9 x 6,3 x 9,8 pouces 37,6 x 11,8 x 13,2 pouces 43,6 x 13 x 14,2 pouces
Poids: 6 kg 8,7 kg 9,7 kg 22,1 kg
13,2 lbs 19,2 lbs 43,4 lbs 48,7 lbs
e80 e81 e82 e83
Spécifications
Amplificateur recommandé: 50 - 150 W Integrated 350 W Integrated 500 W
Enceinte: Boîtier hermétique 2 voies ABR chargé Boîtier hermétique
Réponse en fréquence ±3dB: 80 Hz - 30 kHz 36 Hz - 150 Hz 28 Hz - 280 Hz
Sensibilité SPL/M @ 2,83V:
90 dB - -
Impédance: Compatibilité 8 ohms
(minimum : 4.6 ohms)
Graves: Paramid-S 110 mm double 250 mm + ABR a deux 4 x 210 mm
Moyennes: ---
Aiguës: Viotex-S 25 mm - -
Volume effectif: 6,5 litres 30 litres 46 litres
Dimensions (h x l x p): 172 x 443 x 250 mm 415 x 365 x 400 mm 430 x 400 x 560 mm
6,8 x 17,4 x 9,8 pouces 16,3 x 14,4 x 15,7 pouces 16,9 x 15,7 x 22 pouces
Poids: 9,1 kg 17,3 kg 32 kg
20,1 lbs 38,1 lbs 70,5 lbs
e8c e8as
1
e8as
2
Spécifications
Mission se réserve le droit de modifier toutes les spécifications sans préavis. E & OE
Avertissement:
Lorsqu'un amplificateur est poussé au-delà de ses limites de puissance de sortie, ceci va générer des
distorsions qui vont rapidement endommager vos haut-parleurs, à cause de la surchauffe. Veillez à ne pas laisser
votre amplificateur sans surveillance lorsque vous utilisez votre système, par exemple lors de soirées, et baissez le
volume au premier signe de distorsion audible.

19
Bitte unbedingt beachten
Garantie-bedingungen
Sie sollten die beiliegende Garantiekarte ausfüllen und innerhalb von acht
Tagen ab Kaufdatum an Mission bzw. einen V ertreiber schicken. Kein Händler
oder Vertreiber darf die Bedingungen dieser Garantie ändern, die nur für den
ursprünglichen Käufer gilt und nicht übertragbar ist.
Bewahren Sie die Quittung als Kaufbeleg auf.
Etwaige Garantieansprüche müssen möglichst über den Händler geltend
gemacht werden, von dem das Gerät erworben wurde.
Diese Garantie schließt Folgendes aus:
Schäden, die durch Nachlässigkeit, Zufall, Missbrauch, Verschleiß oder durch
falsche Installation, Einstellung oder Reparatur durch unbefugte Personen
entstanden sind.
Wartung durch unbefugte Personen führt zu einem Verlust der Garantie.
Haftung für Schäden oder Verlust während des Transports zum oder vom
Käufer.
Folgeschäden, Verluste oder Verletzungen, die in Zusammenhang mit
diesem Gerät auftreten.
Im Garantiefall eingesandte Geräte sollten als frachtfrei angesehen werden.
Wird festgestellt, dass das Gerät den veröffentlichten Eigenschaften entspricht,
behält sich Mission das Recht vor, eine Gebühr zu erheben.
Die oben genannten Bedingungen haben keinen Einfluss auf Ihre Rechte als
Verbraucher.
WICHTIGE SICHERHEITSHINWEISE
Dieses Symbol kennzeichnet die Gefahr eines elektrischen Schlags.
Dieses Symbol weist darauf hin, dass äußerste Vorsicht geboten ist.
WARNUNG: UM DIE GEFAHR VON FEUER ODER ELEKTRISCHEM SCHLAG ZU
VERMINDERN, DARF DIESES GERÄT WEDER REGEN NOCH NÄSSE AUSGESETZT
WERDEN.
Lesen Sie diese Anleitung.
Diese Anleitung aufbewahren.
Alle Warnhinweise befolgen.
Allen Anweisungen folgen.
Das Gerät NICHT in Wassernähe benutzen.
Nur mit einem trockenen Tuch reinigen.
NICHT in der Nähe von Wärmequellen wie Heizkörpern, Heizungen, Öfen
oder anderen Geräten (einschließlich Verstärkern), die Wärme produzieren,
installieren.
Das Stromkabel vor Begehen oder Knicken schützen, besonders in der Nähe
des Steckers und der Steckdose und am Ausgang vom Gerät.
Bei Gewitter oder wenn das Gerät längere Zeit nicht benutzt wird, den Stecker
aus der Steckdose ziehen.
Sämtliche Reparaturarbeiten sind qualifizierten Technikern vorbehalten.
Reparaturen sind erforderlich, wenn das Gerät auf irgendeine Weise
beschädigt wurde, d. h. wenn das Stromkabel oder der Stecker beschädigt ist,
wenn Flüssigkeit darauf verschüttet wurde oder wenn Gegenstände in das
Gerät gefallen sind, wenn das Gerät Regen oder Nässe ausgesetzt wurde
oder wenn es nicht ordnungsgemäß funktioniert oder fallen gelassen wurde.
Gebrauch nur entsprechend den Herstellerangaben genehmigt.
WARNUNG: Wenn Spikes verwendet werden, ist darauf zu achten, dass diese
nicht das Netzkabel o. ä. unter oder über dem Teppich durchbohren.
Den Verstärker ausschalten, wenn Sie Anschlüsse vornehmem.
Wenn Sie das System einschalten oder eine andere Klangquelle wählen,
stellen Sie die Lautstärke auf, minimal und drehen sie allmählich auf.
Betreiben Sie Ihren Verstärker NICHT bei voller Lautstärke.
Vermeiden Sie extreme Einstellungen der Tonhöhenregler oder Graphic-
Equalizer-Regler. Diese sollten im idealfall auf 0 eingestellt oder wenn möglich
umgangen werden. Stellen Sie sicher, dass alle Lautsprecher im System
phasenrichtig und korrekt angeschlossen sind.
Stellen Sie KEINE schweren Gegenstände auf die Lautsprecherboxen.
Schließen Sie Ihre Lautsprecher NICHT an eine Netzsteckdose an.
Versuchen Sie NICHT, den Lautsprecher auseinander zu nehmen. Er enthält
keine vom Benutzer zu wartenden Teile, und Ihre Garantie wird hinfällig.
Hi-Fi-Elektronikgeräte sind in einiger Entfernung von den Lautsprechern auf
einem fasten Ständer oder Schrank aufzustellen.
Die Lautsprecher sollten nicht direkt gegenüber von anderen Hi-Fi-Geräten
oder auf dem gleichen Regal oder Schrank aufgestellt werden.
Stellen Sie herkömmliche Lautsprecher und Subwoofer mindestens 0.5m von
Fernsehern, Computern usw. auf. Manche Hersteller verbieten die Aufstellung
von Gegenständen auf ihren Fernsehgeräten. Prüfen Sie die Angaben im
Handbuch für Ihren Fernseher nach, bevor Sie den Mittenlautsprecher direkt
auf Ihrem Fernsehgerät installieren. Falls Sie unsicher sind, wenden Sie sich
an den für Ihren Fernseher zuständigen Händler.
Nur die vom Hersteller angegebenen Zusatzgeräte/ Zubehörteile verwenden.
Setzen Sie Ihre Lautsprecher NICHT extremer Kälte, Wärme, Feuchtigkeit oder
Sonneneinstrahlung aus.
Die Ventilationsöffnungen NICHT blockieren.
Die Sicherheitsfunktion des polarisierten oder geerdeten Steckers NICHT
umgehen. Ein polarisierter Stecker hat zwei Stifte, von denen einer breiter als der
andere ist. Ein Erdungsstecker besitzt zwei Stifte und einen dritten Erdungsstift.
Der breite Stift oder der dritte Stift sind zu Ihrer Sicherheit vorgesehen. Wenn der
mitgelieferte Stecker nicht in Ihre Steckdose passt, wenden Sie sich an einen
Elektriker, um die veraltete Steckdose auswechseln zu lassen.
Das Gerät ist vor Wassertropfen oder -spritzern zu schützen. Mit Flüssigkeit
gefüllte Gegenstände wie zum Beispiel Vasen dürfen nicht auf das Gerät
gestellt werden.
Ausschließlich mit einem Wagen, Ständer, Dreifuß, Träger oder
Tisch, der vom Hersteller vorgeschrieben ist oder mit dem Gerät
verkauft wird, benutzen. Bei Benutzung eines Wagens ist Vorsicht
geboten, wenn die Wagen/Gerät-Kombination bewegt wird, um
durch Umkippen verursachte Verletzungen zu vermeiden.
WICHTIG:
e8as
1
, e8as
2
WARNUNG: Der Netzstecker sollte so platziert sein, dass er vom Benutzer
leicht erreichbar ist.
WARNUNG: Änderungen oder Modifikationen,die nicht ausdrücklich vom
Hersteller genehmigt sind,könnten des Recht des Benutzers zum Betrieb des
Geräts ungültig werden lassen.
Wir gratulieren Ihnen zum Kauf von MissionLautsprechern Die
elegante serie ist das
aktuellste, auf zahlreiche hervorragende
Mission-Lautsprecher zurückgehende
Konzept. Diese technologisch fortschrittlichen
Lautsprecher harmonieren mit vorzüglicher
Elektronik und Dekor. Ingenieure und
Facharbeiter von Mission achten bei der
Konstruktion und Fertigung jedes
Lautsprechers im e Sortiment darauf, Ihnen
ein unvergleichliches, langjähriges
Hörerlebnis und -vergnügen zu bieten.
Bitte lesen die vorliegende Anleitung vor
Installation Ihrer Lautsprecher aufmerksam
durch. Indem Sie einige Minuten auf die
Lektüre dieses Handbuchs verwenden,
können Sie sicher sein, dass die vorzügliche
Leistung der
elegante Modelle voll genutzt
wird.
Einbau von Spikes
Benutzen Sie Boden-Spikes an auf dem
Boden aufgestellten Lautsprechern,
Subwoofer- und Lautsprecherständern, für
einen durchsichtigeren Klang. Die Spikes
können mit den spitzen Enden nach unten
auf Teppichen (Abb. 1) oder dem gewölbten
Ende nach unten auf harten Böden (Abb. 2)
benutzt werden. Nach dem Nivellieren ist
sicherzustellen, dass die Lautsprecher auf
ihren Spikes stabil sind; anschließend sind
alle Sicherungsmuttern fest anzuziehen.
Bitte beachten: wo mehr als vier Spikes
bereitgestellt werden, können Sie die
zusätzlichen Spikes für Stabilisierungszwecke
benutzen. Stellen Sie die vier Haupt-Spikes
zuerst ein und lassen Sie daraufhin die
zusätzlichen Spikes herab, bis sie gerade
eben den Boden berühren (Abb. 3).
Abb. 1
Abb. 2 Abb. 3
18
elegante stellt sich vor

2120
>0.3 m
1.8 - 2.2 m
1
1
3
4
2
2
4
5
3
or
Abb. 2 Abb. 3 Abb. 4 Abb. 5
Abb. 1
über Kopf
Zimmereinrichtung
e8c
Der Lautsprecher e8c ist so ausgelegt, dass
er unter- oder oberhalb Ihres
Fernsehbildschirms positioniert wird, um
den Dialog zentral auf das
Bildschirmgeschehen auszurichten. Sie
können ihn auf einem Regal über dem
Bildschirm positionieren oder den
mitgelieferten Wandträger benutzen, um ihn
an der Wand zu befestigen. Alternativ
können Sie ihn auf ein Regal unter dem
Bildschirm stellen und ihn nach oben
neigen, um zum Hörer zu zeigen, falls dies
erforderlich ist.
Regalmontage
Der e8c wird an einen Regalständer
montiert geliefert. Sie können die
Befestigungsschraube lockern und den
Lautsprecher auf dem Ständer drehen, um
ihn erforderlichenfalls zum Kopf des
sitzenden Hörers hin zu neigen. Ziehen Sie
die Schraube an, sobald sich der
Lautsprecher in der optimalen Position
befindet (Abb. 4).
Wandmontage
(Abb. 5)
Entfernen Sie den e8c von seinem Ständer.
Schieben Sie den Ständer auf den
Wandträger und sichern Sie ihn mit der
Sicherungsschraube.
Die hintere Platte des Wandträgers als
Schablone benutzend markieren Sie
Positionen für vier Schraubbefestigungen an
der Wand. Schrauben Sie den Träger an die
Wand, unter Zuhilfenahme von Dübeln und
Schrauben, die für die Wandbauweise und
das Gewicht des Lautsprechers geeignet
sind.
Nehmen Sie die Anschlüsse an die
Klemmen auf der Rückseite des
Lautsprechers e8c durch das vorhandene
Langloch vor.
Setzen Sie den Lautsprecher e8c vorsichtig
auf den Lautsprecher-Tragarm. Sichern Sie
den Lautsprecher mit der mitgelieferten
Befestigungsschraube am Arm.
e80 / e81
Die Lautsprecher e80 und e81 sind für die
Benutzung in der Nähe von Rückwänden,
entweder auf den inbegriffenen
Wandträgern oder e
Bodenständern, konstruiert. Bei Benutzung
als hintere Lautsprecher an einer Wand wird
die optimale Surround Sound-Leistung
erzielt, wenn die Lautsprecher auf „über
Kopf"-Höhe angehoben werden (Abb. 2).
Ständermontage
Bei Benutzung der e Ständer von
Mission schieben Sie den LautsprecherTragarm auf die Ständer-Senkrechte und
sichern Sie dies mit der Befestigungsschraube.
Setzen Sie den Lautsprecher e80 oder e81
vorsichtig auf den Lautsprecher-Tragarm
und achten Sie darauf, dass sich die
vorderen Verlängerungen des Arms in die
Aussparungen in der Basis des
Lautsprechers einfügen. Sichern Sie den
Lautsprecher mit der mitgelieferten
Befestigungsschraube am Arm.
Nehmen Sie die Anschlüsse an die Klemmen
auf der Rückseite des Lautsprechers vor,
Erklart an der Seite 23.
Wandmontage
(Abb. 3)
Die hintere Platte des Wandträgers als
Schablone benutzend markieren Sie
Positionen für vier Schraubbefestigungen an
der Wand. Schrauben Sie den Träger an die
Wand, unter Zuhilfenahme von Dübeln und
Schrauben, die für die Wandbauweise und
das Gewicht des Lautsprechers geeignet sind.
Schieben Sie den Lautsprecher-Tragarm auf
den Träger und bringen Sie die Grundplatte an.
Nehmen Sie die Anschlüsse an die Klemmen
auf der Rückseite des Lautsprechers vor,
Erklart an der Seite 23.
Setzen Sie den Lautsprecher vorsichtig auf den
Lautsprecher-Tragarm und achten Sie darauf,
dass sich die vorderen Verlängerungen des
Arms in die Aussparungen in der Basis des
Lautsprechers einfügen. Sichern Sie den
Lautsprecher mit der mitgelieferten
Befestigungsschraube am Arm.
e82 / e83
Auf dem Boden aufgestellte Lautsprecher e82
und e83 arbeiten am besten, wenn sie mehr
als 0,3 m von einer Rückwand und von Ecken
weg positioniert werden (Abb. 1). Wenn die
Lautsprecher einer Wand oder Ecke näher
gebracht werden, dann wird die Bassmenge
erhöht. Umgekehrt gilt: wenn der Lautsprecher
von einer Wand oder Ecke weg bewegt wird,
dann werden die Durchsichtigkeit,
Verständlichkeit und Straffheit der Tiefen
erhöht. Für gute Zwei-Kanal-Leistung sollten
die Lautsprecher etwa 1,8 - 2,2 m voneinander
entfernt sein (Abb. 1). Wo Lautsprecher als
Bestandteil eines Mehrkanalssystems benutzt
werden, kann dieser Abstand Ihrer
Zimmermöblierung entsprechend geändert
werden. Verwenden Sie etwas Zeit darauf, die
Lautsprecher umherzubewegen und die
optimale Leistung durch Hören zu ermitteln.
e8as
1 /
e8as
2
Subwoofer e8as1 und e8as2 ergeben
saubere und verständliche Tiefen, wenn sie
mindestens 0,3 m von einer Ecke entfernt
sind. Wenn jedoch ein höherer
Bassausgangspegel verlangt wird, kann
eine Eckposition dies bieten, aber womöglich
zu Lasten der Durchsichtigkeit. Es ist
abermals sinnvoll, Zeit darauf zu verwenden,
die Subwoofer umherzubewegen und die
optimale Leistung durch Hören zu ermitteln.
Die Subwoofer e8as1 und e8as2 sind so
ausgelegt, dass sie für die niederfrequente
Grundlage und Wiedergabe von
niederfrequenten Effekten bei einem Musikoder Heimtheater-System sorgen. Das
Anschluss- und Einrichtverfahren hängt von
der Elektronik, die Sie an den Subwoofer
anschließen, ab. Bitte lesen Sie die
Anleitung, um festzustellen, wie Ihr
Subwoofer am besten benutzt wird.

2322
Systemeinrichtung
Anschluss an Ihren Verstärker
Die Lautsprecher der e series sind
für Bi-Wiring geeignet und profitieren von
sorgfältiger Auswahl der „Partner"kabel von
Ihrem Verstärker. Beim Bi-Wiring, oder BiAmping (Abb. 1), entfernen Sie die
Bindeglieder zwischen den Klemmen hinten
am Lautsprecher.
Für den Anschluss mittels blanker Drähte (Abb.
2) isolieren Sie 10 mm (1/2 Zoll) Isolierung von
jedem Kabel ab. Lockern Sie die Klemmenkappen an den Lautsprecher-klemmen, um die
Kreuzlöcher freizulegen. Verdrehen Sie die
nunmehr blanken Leiter miteinander und
führen Sie sie durch das Kreuzloch in der
Lautsprecherklemme, wobei das Sichern durch
Festschrauben der Klemmenkappe erfolgt.
Für den Anschluss mittels Gabelklemmen
(Abb. 3) lockern Sie die Klemmenkappen an
den Lautsprecherklemmen genug, um die
Gabeln aufzunehmen. Ziehen Sie die
Klemmenkappen an den Gabeln fest, damit
sie sicher gehalten werden.
Schließen Sie die positiven Lautsprecherausgänge auf der Rückseite Ihres Verstärkers
an die positiven (roten) Klemmen auf der
Rückseite des Lautsprechers an. Ähnlich
schließen Sie die negativen Lautsprecherausgänge an die negativen (schwarzen)
Klemmen an den Lautsprechern an. Zu
beachten ist, dass Lautsprecherkabel in der
Regel den positiven Leiter identifizieren,
indem er mit einem Streifen, erhabenen
„Rücken" oder farbigen Band markiert wird.
e8
as1/ e8as2
Für den Anschluss eines Stereo Verstärkers
wird empfohlen, dass Sie die Lautsprecherausgänge Ihres Verstärkers an die
Lautsprecherpegeleingänge des Sub-woofers
parallel zu den an Ihren Laut-sprechern
erfolgten Anschlüssen anschließen.
Für den Anschluss eines AV-Mehrkanalverstärkers wird empfohlen, dass Sie den
LFE-Leitungspegeleingang am Subwoofer an
den Subwoofer-Ausgang Ihres Verstärkers
anhand eines RCA-Phonokabels (nicht
mitgeliefert) anschließen.
Netzschalter
— Stellen Sie den Hauptschalter
des Subwoofers auf „Off" (Aus).Stecken Sie
dann das Netzkabel in eine Steckdose.Sie
können den Strom manuell mit dem Schalter
einund aus-schalten,oder Sie können den
Hauptschalter eingeschaltet lassen und die
automatische Einschaltung auf „On" (Ein)
einstellen,wodurch der Subwoofer sich
einschaltet, sobald an einem der Eingänge ein
Signal entdeckt wird,und sich nach einer
gewissen Zeit der Inaktivität ausschaltet.
AV-EEinrichtung
Bei einem Mehrkanalsystem wird
empfohlen, dass Sie die Bass ManagementFunktionen Ihres AV-Verstärkers benutzen.
Da der Subwoofer am besten zur
Wiedergabe von Bass eingesetzt wird,
sollten alle niederfrequenten Informationen
dem Subwoofer zugeführt werden, was es
dem Hauptlautsprecher ermöglicht, obere
Tiefen, den Mittelbereich und Höhen mit
optimaler Durchsichtigkeit wiederzugeben.
Wenn Sie das Bass Management eines AVVerstärkers benutzen, stellen Sie bei der
Lautsprecherkonfiguration Ihres Verstärkers
alle Lautsprecher auf SMALL und stellen Sie
SUBWOOFER auf ON [EIN]. Wo die
Übergangsfrequenz gewählt werden kann,
stellen Sie sie auf 80 Hz ein. Alternativ
wählen Sie die Vorwahlkonfiguration für THX.
Stellen Sie den „Low Pass Crossover
Frequency"-Regler am Subwoofer auf 140 Hz
ein (am e8as2 stellen Sie den LFE-Schalter
auf ON [EIN]). Stellen Sie den
Lautstärkeregler in seine Mittelposition.
Benutzen Sie die Abstandsparameter Ihrer
AV-Verstärker-Lautsprechereinrichtung, um
den Abstand von jedem Satz Lautsprecher
auf Ihre Hörposition einzustellen.
Benutzen Sie die Kanalpegeleinstellung Ihrer
AV-Verstärker-Lautsprechereinrichtung, um den
individuellen Ausgang von jedem Lautsprecher
einzustellen. Wenn Sie ein SchallpegelMessgerät haben, stellen Sie den individuellen
Pegel jedes Kanals auf einen Wert von 75 dB in
der Hörposition ein. Wenn Ihnen ein
Schallpegel-Messgerät nicht zugänglich ist,
stellen Sie die Kanalpegel so ein, dass sie sich
in der Hörposition gleichlaut anhören.
Stereo-EEinrichtung
Bei einem HiFi-System ohne Bass
Management müssen Sie den Regler LOW
PASS CROSSOVER am Subwoofer in
Verbindung mit den Regler SUBWOOFER
VOLUME einstellen, um einen Mix in Ihren
Hauptlautsprechern zu erreichen. Die
Subwoofer e8as1 und e8as2 können mit auf
dem Boden aufgestellten Lautsprechern e82
und e83 in einem HiFi-System benutzt
werden. (Zu beachten ist, dass der e80 nicht
für die Verwendung in einem HiFi-System
ohne Bass Management geeignet ist.)
Bei den Lautsprechern e82 beginnen Sie durch
Einstellen des Reglers LOW PASS CROSSOVER in
die Mittelposition und Einstellen des SUBWOOFER Lautstärkepegels, um beim Abspielen
von Musik-Disks für einen natürlichen Bass
Support-Pegel zu sorgen. Bei den Lautsprechern e83 beginnen Sie durch Einstellen
des Reglers LOW PASS CROSSOVER auf einen
Wert zwischen 40 Hz und der Mittelposition.
Einstellen der Regler
Sobald Sie die Einstellungen abgeschlossen
haben, sollten Sie sich auf den Feinabgleich
der Subwoofer-Regler vorbereiten.Wählen Sie
eine Mehrkanal-Disk mit natürlichen BassEigenschaften - eine Musik-Disk ist am besten.
Stellen Sie den Regler auf der Rückwand des
Subwoofers mit der Bezeichnung PHASE ein,
um die Mischung zwischen dem Subwoofer
und den Lautsprechern abzugleichen. Je nach
Ihrer Zimmerakustik wird der Klang - mit dem
Schalter in der Stellung 0° oder 180° - voller
und kohärenter. Verlassen Sie sich beim
Einstellen des Schalters in die am besten
klingende Position auf Ihr Urteilsvermögen.
Am e8as2 üben Sie auch Feinkontrolle über
die Phase aus. Benutzen Sie den variablen
PHASE-Regler zur Erzielung der vollsten und
klarsten Basswiedergabe. Gemeinsam mit
dem PHASE Schalter kann die Phase über
180° verändert werden.
Stellen Sie den Regler SUBWOOFER VOLUME
ein, um Bassausgang zu ergeben, der mit
Ihrem Hauptlautsprecher „in Balance" ist.
Anfänglich könnten Sie den SubwooferAusgang auf einem relativ hohen Pegel
bevorzugen, allerdings kann dies angesichts
einer Überbetonung der Tiefen beim längeren
Zuhören lästig werden. Drehen Sie die
Lautstärke gradweise herunter, bis der Subwoofer nicht individuell, sondern als Erweiterung der Hauptlautsprecher zu hören ist.
Am e8as2 können Sie die Bassleistung
Ihrem Zimmer entsprechend exakt
abgleichen. Wenn der Bass dröhnt oder bei
sehr niedrigen Frequenzen unkontrolliert
erscheint, schalten Sie den SUBSONIC FILTER
auf ON [EIN]. Stellen Sie die BASS CONTOUR
ein, um den Ausgang bei sehr niedrigen
Frequenzen zu kontrollieren.
abb. 1
abb. 2
abb. 3
1
2
3
1
2
3
or

2524
Allgemeine Informationen
Lautsprecher-PPflege
Benutzen Sie das mitgelieferte Tuch, um
Staub und Fingerabdrücke vom Lautsprecher
zu beseitigen. Reiben Sie die zu reinigende
Oberfläche mit dem inneren Tuch. Mit dem
dunklen äußeren Tuch entfernen Sie Flecken
und polieren Sie auf Hochglanz. Nicht etwa
Sprühpolituren oder Lösungsmittelreiniger
benutzen, weil diese die hochgradig
polierte, mehrschichtig lackierte Oberfläche
beschädigen könnten. Ggf. reinigen Sie die
Lautsprechergitter vorsichtig mit einer
weichen Bürste.
Produkt-SService
Sollte Ihr Lautsprecher eine Störung erleiden,
verpacken Sie ihn bitte - anhand der
Originalverpackung - richtig.
Zu wartende Produkte sollten dem offiziellen
Händler, bei dem Sie das Produkt kauften,
zurückgegeben werden. Wenn Sie
Schwierigkeiten haben oder kein MissionHändler in Ihrer Region befindlich ist,
wenden Sie sich an den MissionVertriebspartner für Ihr Land bzw. das
Hauptservicezentrum für Ihre Region.
Empfohlener Verstärker:
50 - 150 W 50 - 150 W 50 - 150 W 50 - 200 W
Gehäuse: 2-Wege, geschlossene Box 2-Wege, geschlossene Box 3-Wege, reflexbelastet 2-Wege, ABR-belastet
Frequenzgang ±3dB: 80 Hz - 30 kHz 80 Hz - 30 kHz 48 Hz - 30 kHz 44 Hz - 30 kHz
Empfindlichkeit SPL/M @ 2,83V: 85 dB 90 dB 90 dB 90 dB
Impedanz: 8 Ohm-kompatibel 8 Ohm-kompatibel 8 Ohm-kompatibel 8 Ohm-kompatibel
(mindestens 4,0 Ohm) (mindestens 4,6 Ohm) (mindestens 4,0 Ohm) (mindestens 4,0 Ohm)
Bass: 110 mm Paramid-S Doppelt 110 mm Paramid-S 4 x 110 mm Paramid-S Doppelt 165 mm Paramid-S
Mittel: - - 110 mm Paramid-S -
Höhen: 25 mm Viotex-S 25 mm Viotex-S 25 mm Viotex-S 25 mm Viotex-S
Effektives Volumen: 3,75 Liter 5,75 Liter 23 Liter 40 Liter
Abmessungen (H x B x T): 284 x 160 x 250 mm 403 x 160 x 250 mm 956 x 300 x 334 mm 1108 x 330 x 360 mm
11,2 x 6,3 x 9,8 zoll 15,9 x 6,3 x 9,8 zoll 37,6 x 11,8 x 13,2 zoll 43,6 x 13 x 14,2 zoll
Gewicht: 6 kg 8,7 kg 19,7 kg 22,1 kg
13,2 lbs 19,2 lbs 43,4 lbs 48,7 lbs
e80 e81 e82 e83
Technische Daten
Empfohlener Verstärker:
50 - 150 W Integrated 350 W Integrated 500 W
Gehäuse: 2-Wege, geschlossene Box ABR-belastet Geschlossene Box
Frequenzgang ±3dB: 80 Hz - 30 kHz 36 Hz - 150 Hz 28 Hz - 280 Hz
Empfindlichkeit SPL/M @ 2,83V:
90 dB - -
Impedanz: 8 Ohm-kompatibel
(mindestens 4,6 Ohm)
Bass: Doppelt 110 mm Paramid-S 250 mm + doppel ABR 4 x 210 mm
Mittel: ---
Höhen: 25 mm Viotex-S - -
Effektives Volumen: 6,5 Liter 30 Liter 46 Liter
Abmessungen (H x B x T): 172 x 443 x 250 mm 415 x 365 x 400 mm 430 x 400 x 560 mm
6,8 x 17,4 x 9,8 zoll 16,3 x 14,4 x 15,7 zoll 16,9 x 15,7 x 22 zoll
Gewicht: 9,1 kg 17,3 kg 32 kg
20,1 lbs 38,1 lbs 70,5 lbs
e8c e8as
1
e8as
2
Technische Daten
Mission behält sich das Recht vor, alle technischen Spezfikationen ohne vorherige Ankündigung zu ändern. E & OE
Warnung:
Wenn ein Verstärker über seine Leistungsausgabefähigkeit hinaus beansprucht wird, produziert er verzerrte
Ergebnisse, die durch Überhitzung schnell zu Schäden an Ihren Lautsprechern führen. Sorgen Sie dafür, dass Ihr
Verstärker beim Abspielen nicht unbeaufsichtigt bleibt, zum Beispiel bei Partys, und vermindern Sie die Lautstärke beim
ersten Anzeichen einer hörbaren Verzerrung.

27
Precauciones
Condiciones de garantía
Debe completar y enviar la tarjeta de garantía incluida a Mission o a su
distribuidor durante los 8 días posteriores a la adquisición del producto.
Ningún representante o distribuidor podrá modificar los términos de la
garantía, que es personal e intransferible.
Conserve el recibo como prueba de compra.
Las reclamaciones de productos que se encuentran bajo garantía deben
realizarse, siempre que sea posible, a través del distribuidor al que compró
el equipo.
Esta garantía excluye:
Daños causados por negligencia, accidente, uso indebido, desgaste o una
instalación, ajuste o reparación incorrectas por personal no autorizado. Las
reparaciones realizadas por personal no autorizado conllevarán a la pérdida
de la garantía.
Responsabilidad por daño o pérdida derivados del tránsito entre comprador
y vendedor.
Daño, pérdida o lesión resultantes derivados de este equipo o conjuntamente
con él.
El equipo que requiera asistencia técnica que se encuentre bajo garantía se
devolverá con portes pagados. Si el equipo cumple con la especificación
publicada, Mission se reserva el derecho a cobrar una cantidad.
Las condiciones citadas anteriormente no afectan a sus derechos como
consumidor.
INSTRUCCIONES DE SUGURIDAD IMPORTANTES
Cuando se muestra este símbolo existe peligro de descarga
eléctrica.
Cuando se muestra este símbolo se debe proceder con precaución.
ADVERTENCIA: PARA EVITAR DESCARGAS ELÉCTRICAS O PELIGRO DE INCENDIO,
NO EXPONGA ESTE APARATO A LLUVIA NI HUMEDAD.
Lea estas instrucciones.
Conserve estas instrucciones.
Preste atención a todas las advertencias.
Siga todas las instrucciones.
NO utilice este aparato cerca del agua.
Limpie sólo con un trapo seco.
NO instale este aparato cerca de fuentes de calor como radiadores,
calentadores, hornos u otros aparatos (incluidos amplificadores) que generan
calor.
Proteja el cable de alimentación de ser pisado o aplastado, en particular
cerca de los enchufes, tomas de corriente múltiples y del punto donde salen
del aparato.
Desenchúfelo de la red durante tormentas o cuando deje de usarlo durante
un tiempo prolongado.
Todo servicio técnico debe ser realizado por personal técnico cualificado.
Acuda a su servicio técnico cuando el aparato haya sufrido daños de
cualquier clase, tales como daños en el cable o el enchufe, cuando se haya
vertido líquido o hayan caído objetos en el aparato, después de exponerlo a
lluvia o humedad, cuando no funcione correctamente o haya caído al suelo.
Instale de acuerdo con las instrucciones del fabricante.
ADVERTENCIA: Si emplea las púas, asegúrese de que no perforen el cable de
alimentación, etc. debajo/sobre la alfombra.
Cuando efectúe una conexión, desconecte el amplificador.
Cuando conecte el sistema o cambie las fuentes, ajuste el control de volumen
al mínimo y aumente el nivel poco a poco.
NO use el amplificador a todo volumen.
Evite ajustes extremos de controles de tono o ecualizadores de gráficos.
Preferentemente deberían ajustarse como ‘plano’ o si es posible, pasarse por
alto. Asegúrese de que todos los altavoces del sistema están conectados
correctamente y en fase.
NO coloque ningún objecto pesado encima de las cajas del altavoz.
NO conecte el altavoz a la red de alimentación.
NO intente desmontar el altavoz. En su interior no hay piezas que pueda
reparar a el usuario y se invalidaría la garantía.
Coloque los equipos electrónicos de alta fidelidad lejos de los altavoces en un
soporte rígido o armario.
Los altavoces no se pondrán directamente de cara a otras unidades hi-fi, ni
compartirán el mismo estante o armario.
Coloque los altavoces convencionales y subwoofer al menos a 0,5m de
distancia de TVs, ordenadores, etc. Algunos fabricantes prohiben colocar
objetos encima de sus televisores. Compruebe el manual de su TV antes de
instalar el altavoz central directamente encima de su TV. En caso de duda,
consulte con el distrbuidor de su TV.
Emplee únicamente accesorios especificados por el fabricante.
NO exponga los altavoces a temperaturas demasiado frías, calientes,
excesiva humedad o luz directa del sol.
NO cubra ni bloquee las aberturas de ventilación.
NO anule el dispositivo de seguridad del enchufe polarizado o con toma de
tierra. Los enchufes polarizados tienen dos contactos, uno más ancho que el
otro. Los enchufes con toma de tierra tienen dos patas y una tercera para la
toma de tierra. El contacto más ancho / la tercera pata está instalada a
efectos de seguridad. Si la clavija suministrada no cabe en el enchufe,
consulte a un electricista para sustituir el enchufe anticuado.
NO exponga el aparato a goteos ni salpicaduras y evite depositar recipientes
con líquidos (jarrones, etc.) sobre el aparato.
Utilícense únicamente los carritos, pedestales, trípodes, soportes
o mesas que indique el fabricante o que se vendan
conjuntamente con los aparatos. Cuando se utilicen carritos,
tenga cuidado de que al mover el conjunto de carrito y aparato
no se produzcan lesiones si se vuelca.
NOTA DE ATENCION:
e8as1, e8as2
El interruptor de alimentación del aparato está en el panel trasero. Para
acceder al mismo, el emplazamiento del subwoofer tiene que quedar libre
de obstáculos.
La clavija de red siempre debe tener el acceso libre.
PRECAUCION: Cambios o modificaciones no aprobadas expresamente por el
fabricante pueden invalidar la autorización de uso de este aparato.
Introducción a elegante
Le agradecemos su compra de los altavoces
Mission. La serie
elegante es la última de
una larga producción de prestigiosos
altavoces Mission. Estos altavoces,
técnicamente muy avanzados, servirán de
complemento a los mejores sistemas
electrónicos y a la decoración. Los técnicos y
artesanos de Mission han proyectado y
fabricado cada uno de los altavoces de la
serie
elegante para brindar a usted la
máxima satisfacción y placer de escucha
durante muchos años de uso.
Sírvase leer atentamente estas instrucciones
para instalar los altavoces. Los pocos
minutos que dedique a estudiar este
manual le garantizarán un magnífico
rendimiento de los modelos
elegante en
grado máximo.
Alcayatas de montaje
Para mejorar la claridad del sonido, ponga
las alcayatas en los altavoces que se
depositen sobre el suelo y en los pedestales
de altavoces principales y de graves. Las
alcayatas pueden montarse con las puntas
hacia abajo sobre alfombras (Fig. 1) o con
las bovedillas hacia abajo sobre suelos
duros (Fig. 2). Tras nivelarlos, cerciórese de
que los altavoces quedan bien estabilizados
sobre las alcayatas y entonces apriete a
fondo las tuercas inmovilizadoras.
Advierta que cuando haya más de cuatro
alcayatas, las restantes se destinan a la
estabilización. Ajuste primero las cuatro
alcayatas principales y luego baje las
alcayatas suplementarias hasta que queden
justo en contacto con el suelo (Fig. 3).
fig 1
fig 2 fig 3
26

2928
>0.3 m
1.8 - 2.2 m
1
1
3
4
2
2
4
5
3
or
fig 2 fig 3 fig 4 fig 5
fig 1
Sobre el nivel de la cabeza
Preparación del recinto
e8c
El altavoz e8c está proyectado para ir
debajo o encima de la pantalla de TV para
centrarel sonido de los diálogos con lo que
se ve en la pantalla. Se podrá colocar en
una repisa sobre la pantalla o utilizar el
soporte de pared que se suministra para
adosarlo a la pared. De otro modo se
podrá poner en una repisa bajo la pantalla,
inclinándolo si hace falta para que enfoque
al oyente.
Montaje en repisa
El e8c se suministra montado en una
plataforma de repisa. Si fuese necesario se
podrá aflojar el tornillo de sujeción para
girar el altavoz en su plataforma hacia la
cabeza del oyente sentado. Una vez que el
altavoz esté bien orientado, apriete de
nuevo el tornillo (Fig. 4).
Montaje en pared
(Fig. 5)
Quite el e8c de su plataforma. Meta la
plataforma en el soporte de pared y sujételo
apretando el tornillo.
Utilizando como plantilla la placa trasera
del soporte de pared, marque las
posiciones de los cuatro tornillos de
montaje. Atornille el soporte a la pared
empleando tacos y tornillos adecuados a la
construcción de la pared y al peso del
altavoz.
Haga las conexiones a los bornes traseros
del e8c empleando los orificios alargados
existentes al efecto.
Coloque cuidadosamente el altavoz e8c en
su brazo de sustentación. Sujete al altavoz
al brazo con el tornillo de sujeción que se
suministra.
e80 / e81
Los altavoces e80 y e81 están proyectados
para montarlos cerca de una pared trasera,
bien con los soportes de pared que se
suministran o sobre pedestales ede
suelo. Cuando se utilicen como altavoces de
fondo en una pared, se obtendrá óptimo
rendimiento para sonido ambiental si se
montan a una altura superior a la cabeza
de los oyentes (Fig. 2).
Montaje en pedestal
Si utilizase los pedestales Mission e,
introduzca la espiga sustentadora del
altavoz en la columna del pedestal y apriete
el tornillo de sujeción.
Coloque cuidadosamente el altavoz e80 ó
e81 en el brazo de soporte del mismo,
asegurándose de que las prolongaciones
delanteras del brazo entran en los entrantes
de la base del altavoz. Sujete el altavoz al
brazo con el tornillo de sujeción que se
suministra.
Haga las conexiones necesarias a los
bornes traseros del altavoz, explicado en
pagina 31.
Montaje en pared
(Fig. 3)
Empleando como plantilla la placa trasera
del soporte de pared, marque en la pared
las posiciones de los cuatro tornillos.
Atornille el soporte a la pared utilizando
tacos adecuados a la construcción de la
pared y el peso del altavoz.
Introduzca el brazo sustentador del altavoz
en el soporte y únale la placa de base.
Haga las conexiones con los bornes
traseros del altavoz, explicado en pagina
31.
Coloque con cuidado el altavoz en su brazo
sustentador, asegurándose de que las
prolongaciones delanteras del brazo
encajan en los entrantes de la base del
altavoz. Sujete el altavoz al brazo con el
tornillo de sujeción que se suministra.
e82 / e83
Los altavoces de suelo e82 y e83 funcionan
mejor cuando se colocan a más de 0.3 m
de los rincones del recinto (Fig. 1). Cuando
se acercan los altavoces a las paredes o los
rincones aumentará el efecto de graves, y,
por el contrario, si se separan de la pared o
del rincón, aumentará la claridad,
articulación y tensión de los graves. Para
mejor rendimiento con dos canales de
sonido, los altavoces deberán colocarse
separados unos 1,8 a 2,2 metros entre sí
(Fig. 1). Cuando los altavoces formen parte
de un sistema multicanal, la distancia podrá
cambiarse, acomodándose al mobiliario del
recinto. Lo mejor es dedicar algún tiempo a
mover los altavoces y escuchar el sonido
hasta obtener el mejor rendimiento.
e8as
1 /
e8as
2
Los altavoces de graves e8as1 y e8as2
funcionarán con mayor nitidez y articulación
si se colocan por lo menos a 0.3 m de los
rincones. Por otra parte, si se requiriese
mayor potencia de los graves, se
conseguirá en los rincones a expensas
cierta claridad del sonido. También en este
caso será mejor dedicar algún tiempo a
mover los altavoces de graves y escuchar el
sonido hasta obtener su mejor rendimiento.
Los altavoces de graves e8as1 y e8as2
están proyectados para dar la base y
producción de efectos de baja frecuencia
en un sistema musical o auditorio
doméstico. El método de conexión y
colocación dependerá del sistema
electrónico que usted conecte al altavoz de
graves. Sírvase leer las instrucciones para
determinar el mejor empleo que se pueda
dar al altavoz de graves.

3130
Preparación del sistema
Conexión al amplificador
Los altavoces de la serie e se prestan
a conexiones bifilares y funcionarán mejor si
se seleccionan bien los cables de conexión
con el amplificador. Al hacer dobles
conexiones o utilizar dos amplifi-cadores
(Fig. 1), quite los enlaces de conexión entre
los bornes traseros del altavoz.
Para conectar cables (Fig. 2), desnude 10 mm
(1/2 pulgada) del aislamiento de cada
cable. Afloje las caperuzas de los bornes
del altavoz hasta que se vean los agujeros
transversales. Retuerza entre sí los hilos
desnudos y páselos a través del agujero
transversal del borne del altavoz y sujételos
atornillando la caperuza.
Para hacer la conexión con terminales de
horquilla (Fig. 3), afloje las caperuzas de los
bornes del altavoz lo suficiente para poder
meter las horquillas. Apriete las caperuzas
sobre las horquillas hasta que queden bien
sujetas.
Conecte las salidas positivas para el
altavoz, situadas detrás del amplificador, a
los bornes positivos (rojos) situados tras los
altavoces. De igual manera, conecte las
salidas negativas para altavoces a los
bornes negativos (negros) de los altavoces.
Advierta que los cables de los altavoces
suelen identificar el conductor positivo
marcándolo con una banda, una cresta
resaltada o un encintado de color.
e8as1/ e8as2
Para conectar un amplificador de alta
fidelidad se recomienda conectar las salidas
de altavoz del amplificador a las entradas de
nivel del altavoz de bajos en paralelo con las
conexiones que se hagan a los altavoces.
Para conectar un amplificador multicanales
AV se recomienda conectar la entrada de
nivel de línea LFE del altavoz de graves a la
salida de graves del amplificador, utilizando
un cable fono RCA (no se suministra).
Energia
— Configure o interruptor Main
Power (Liga/Desliga) para Off.Em
seguida,conecte o cabo de energia a uma
tomada. Você pode ligar e desligar a
energia manualmente,usando o interruptor,
ou pode deixar o Main Power ligado e
configurar o interruptor Auto Power (liga e
desliga automático) como On.Isto ligará
automaticamente o subwoofer quando for
detectado um sinal em uma das entradas e
o desligará automaticamente após um
período de inatividade.
Preparación de AV
En un sistema multicanales se recomienda
emplear los medios de gestión de graves
del amplificador AV. Como el altavoz de
graves es el más adecuado para reproducir
bajas frecuencias, toda la información para
bajas frecuencias se deberá dirigir al
altavoz de graves, habilitando así a los
altavoces principales para que reproduzcan
los graves superiores y las frecuencias
medias y agudas con óptima nitidez.
Si se utiliza la gestión de graves de un
amplificador AV, ajuste todos los altavoces a
pequeño (SMALL) en la configuración de
altavoces del amplificador y encienda los
graves poniendo SUBWOOFER en ON.
Cuando se pueda elegir la frecuencia de
cruce, ajústela a 80Hz. De otro modo, elija
la configuración preajustada para THX.
Ajuste el mando de la frecuencia de cruce
de pasabajos (Low Pass Crossover
Frequency) para el altavoz de graves a
140Hz (en el altavoz e8as2, ponga el
conmutador LFE en ON). Ponga el mando de
volumen en su posición intermedia.
Haga uso de los parámetros de distancia de
preparación de altavoces del amplificador
AV para ajustar la distancia desde cada uno
de los altavoces hasta el oyente.
Utilice el ajuste de potencia de canales de la
preparación de altavoces del amplificador AV
para ajustar la salida de sonido de cada
altavoz. Si dispone de un sonómetro, ajuste la
potencia de cada uno de los canales hasta
que lea 75dB en la posición del oyente. Si no
dispone de sonómetro, ajuste las potencias de
los canales hasta que suenen con igual
potencia en la posición del oyente.
Preparación estereofónica
En sistemas de alta fidelidad sin gestión de
graves, se deberá ajustar el mando del
cruce de pasabajos LOW PASS CROSSOVER
del altavoz de graves junto con el mando
del volumen de graves SUBWOOFER
VOLUME para obtener una combinación de
los altavoces principales. En un sistema de
alta fidelidad, los altavoces de graves e8as1
y e8as2 podrán utilizarse con los altavoces
para suelo e82 y e83. (Advierta que el e80
no es adecuado para sistemas de alta
fidelidad sin gestión de graves).
Para los altavoces e82, comience poniendo
el mando de cruce de pasabajos LOW PASS
CROSSOVER en su posición intermedia y
ajuste el volumen del altavoz de graves
SUBWOOFER a una potencia que suministre
el fondo natural de graves al poner discos
musicales. Para los altavoces e83,
comience poniendo el mando de cruce de
pasabajos LOW PASS CROSSOVER entre
40Hz y la posición intermedia.
Ajuste de los mandos
Una vez que haya hecho los ajustes
antedichos, deberá afinar las posiciones de
los mandos de los altavoces de graves. Utilice
un disco multicanales con graves naturales.
Lo mejor será poner un disco musical.
Ajuste el mando de PHASE que se
encuentra en la cara trasera del altavoz de
graves para afinar la combinación entre los
altavoces de graves y los principales. Según
sean las condiciones acústicas del recinto,
el sonido deberá ser más pleno y coherente
con el conmutador en las posiciones de 0°
ó 180°. Haga uso de su propio criterio para
ajustar el conmutador a la posición que
proporcione mejor sonido.
En el e8as2 también podrá afinar la fase.
Con el mando variable de PHASE, podrá
obtener el sonido de graves más pleno y
nítido. Junto con el conmutador de PHASE,
la fase podrá variarse sobre 180°.
Ajuste el mando de volumen SUBWOOFER
VOLUME para obtener el que ofrezca mejor
equilibrio con los altavoces principales. En
principio, quizá prefiera que el volumen del
altavoz de graves sea relativamente alto,
pero a la larga puede cansar la
preponderancia de los graves. Vaya
disminuyendo gradualmente el volumen del
altavoz de graves hasta que no pueda
distinguirlo de los altavoces principales sino
como una mera ampliación de los mismos.
En el e8as2 podrá afinarse la producción de
graves en armonía con el recinto. Si los
graves resuenan o parece que no quedan
bien controlados en las frecuencias más
bajas, encienda el filtro subsónico
SUBSONIC FILTER poniéndolo en ON. Para
controlar la salida de las frecuencias más
bajas, ajuste la ambientación de graves
BASS CONTOUR.
fig 1
fig 2
fig 3
1
2
3
1
2
3
or

3332
Información general
Mantenimiento de los altavoces
Con el paño que se suministra podrá quitar
el polvo y las huellas dactilares de los
altavoces. Frote la superficie a limpiar con el
interior del paño. Con el exterior del paño,
de color oscuro, podrá quitar las manchas y
pelusas hasta que brille la superficie. No
utilice aerosoles ni sustancias disolventes,
pues podrían estropear el lacado multicapa,
altamente pulimentado. Si fuese necesario,
limpie las rejillas de los altavoces
cuidadosamente con un cepillo suave.
Servicio de los productos
Si se averiasen los altavoces, embálelos
bien en sus embalajes originales.
Los productos que deban repararse
deberán devolverse al comercio donde se
hubiesen adquirido. Si tuviese dificultades o
no hubiese vendedores de Mission en sus
proximidades, diríjase al distribuidor de
Mission para su país o al principal centro de
servicio para su región.
Amplificador recomendado:
50 - 150 W 50 - 150 W 50 - 150 W 50 - 200 W
Caja: Caja precintada de Caja precintada de Reflex de tres ABR de dos
dos direcciones dos direcciones direcciones cargado direcciones cargado
Respuesta de frecuencia ±3dB: 80 Hz - 30 kHz 80 Hz - 30 kHz 48 Hz - 30 kHz 44 Hz - 30 kHz
Sensibilidad SPL/M @ 2,83V: 85 dB 90 dB 90 dB 90 dB
Impedancia: 8 Ohmios compatible 8 Ohmios compatible 8 Ohmios compatible 8 Ohmios compatible
(mínimo 4,0 Ohmios) (mínimo 4,6 Ohmios) (mínimo 4,0 Ohmios) (mínimo 4,0 Ohmios)
Graves: 110 mm Paramid-S 110 mm Paramid-S gemelo 4 x 110 mm Paramid-S 165 mm Paramid-S gemelo
Medios: - - 110 mm Paramid-S -
Agudos: 25 mm Viotex-S 25 mm Viotex-S 25 mm Viotex-S 25 mm Viotex-S
Volumen eficaz: 3,75 litros 5,75 litros 23 litros 40 litros
Dimensiones (A x A x P): 284 x 160 x 250 mm 403 x 160 x 250 mm 956 x 300 x 334 mm 1108 x 330 x 360 mm
11,2 x 6,3 x 9,8 pulgadas 15,9 x 6,3 x 9,8 pulgadas 37,6 x 11,8 x 13,2 pulgadas 43,6 x 13 x 14,2 pulgadas
Peso: 6 kg 8,7 kg 19,7 kg 22,1 kg
13,2 lbs 19,2 lbs 43,4 lbs 48,7 lbs
e80 e81 e82 e83
Datos técnicos
Amplificador recomendado: 50 - 150 W Integrated 350 W Integrated 500 W
Caja: Caja precintada de ABR cargado Caja precintada
dos direcciones
Respuesta de frecuencia ±3dB: 80 Hz - 30 kHz 36 Hz - 150 Hz 28 Hz - 280 Hz
Sensibilidad SPL/M @ 2,83V:
90 dB - -
Impedancia: 8 Ohmios compatible
(mínimo 4,6 Ohmios)
Graves: 110 mm Paramid-S gemelo 250 mm + ABR gemelo 4 x 210 mm
Medios: ---
Agudos: 25 mm Viotex-S - -
Volumen eficaz: 6,5 litros 30 litros 46 litros
Dimensiones (Al x An x P): 172 x 443 x 250 mm 415 x 365 x 400 mm 430 x 400 x 560 mm
6.8 x 17.4 x 9.8 pulgadas 16.3 x 14.4 x 15.7 pulgadas 16.9 x 15.7 x 22 pulgadas
Peso: 9,1 kg 17,3 kg 32 kg
20,1 lbs 38,1 lbs 70,5 lbs
e8c e8as
1
e8as
2
Datos técnicos
Mission reserva el derecho de cambiar las eespecificaciones sin previo aviso. E & OE
Aviso:
Cuando un amplificador se excita más allá de su capacidad de salida de potencia, se producirán resultados
distorsionados que dañarán rápidamente los altavoces por recalentamiento. Asegúrese de no dejar solo el
amplificador cuando funciona, por ejemplo en fiestas, y baje el control de volumen al primer síntoma de distorsión
audible.
 Loading...