

Page 1

Smart+ User Manual
Content:
1. Content of the Package
2. Charging and Operation
3. First Use
4. Camera and Flash Connection
5. Mobile Application
6. Connecting to MIOPS Smart+
7. Firmware Upgrade
8. Using the Mobile Application
9. FEATURES
9.1. CABLE RELEASE MODES
9.1.a. Cable Release
9.1.b. Press & Hold
9.1.c. Press & Lock
9.1.d. Timed Release
9.1.e. Self Timer
9.1.f. Timed Release & Self Timer
9.2. TIMELAPSE MODES
9.2.a. Basic Timelapse
9.2.b. Long Exposure Timelapse
9.2.c. Bulb Ramping Timelapse
9.2.d. Road Lapse
9.2.e. HDR Timelapse
9.2.f. HDR
9.2.g. Stormlapse
9.2.h. Timewarper
9.3. SMARTPHONE SENSOR MODES
9.3.a. Sound
9.3.b. Vibration
Page 2

9.3.c. Motion
9.4. DEVICE SENSOR MODES
9.4.a. Lightning
9.4.b. Sound
9.4.c. Laser
10. SETTINGS
1. Content of the Package
When you purchase a MIOPS Smart+, it will be delivered with the following items.
1 x MIOPS Smart+
1 x Rechargeable Battery
1 x Flash Connection Cable (PC SYNC)
1 x USB Charge Cable
2. Charging and Operation
MIOPS Smart+ comes with a rechargeable and replaceable battery which lasts up to 4 days
with a single charge. The battery will be charged when you connect MIOPS Smart+ to a USB
power source. You can use your computer USB port for this purpose.
You can power MIOPS Smart+ directly from the USB port even if the battery is not attached into
the device.
Warning: Using MIOPS Smart+ with other type of battery and power source may harm your
device.
3. First Use
Page 3
Your MIOPS Smart+ may not be delivered with the latest firmware. If a new firmware has been
released, before you have used it for the first time, you should update the firmware first. To get
detailed information about the firmware upgrade, see the Firmware Upgrade Section.
The rechargeable battery comes partially charged. You can use it right out of the box but you
may need to charge to get it fully loaded. You can charge the battery using any USB charger
(500 mA min.) or the USB port of your computer. MIOPS Smart will be delivered with a MiniUSB cable. You can use this cable to charge it. The mini end of the USB cable will be plugged
into the USB port. It is located on the left side of the device under the protective cover.
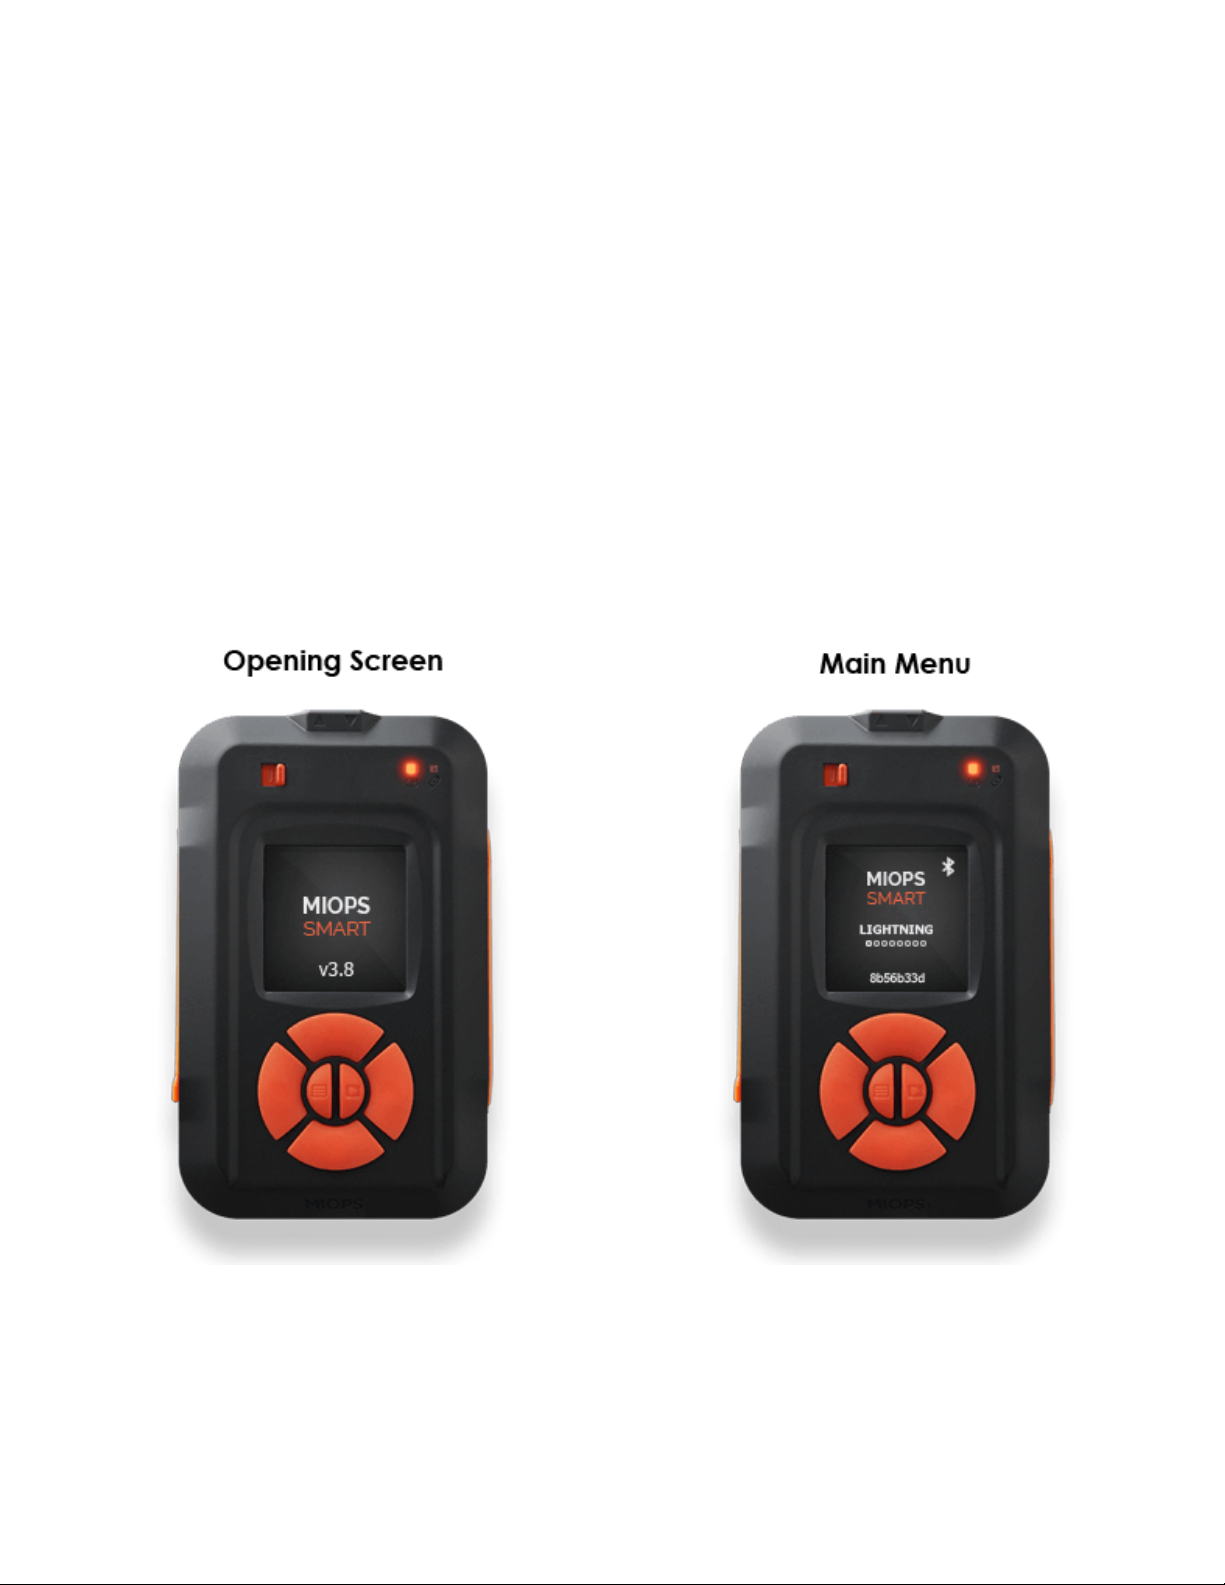
Opening screen of MIOPS Smart+ will appear on the device showing the MIOPS logo and the
device firmware information at the bottom of the screen. It will switch to main menu automatically
in three seconds.
4. Camera and Flash Connection
The MIOPS Smart+ uses connection cables to trigger your camera or flash unit. Your unit will be
Page 4
shipped with the proper camera and flash connection cables. The MIOPS Smart is a versatile
device, which is compatible with many brand and models. You can use the same device with
many different cameras by just changing the connection cable.
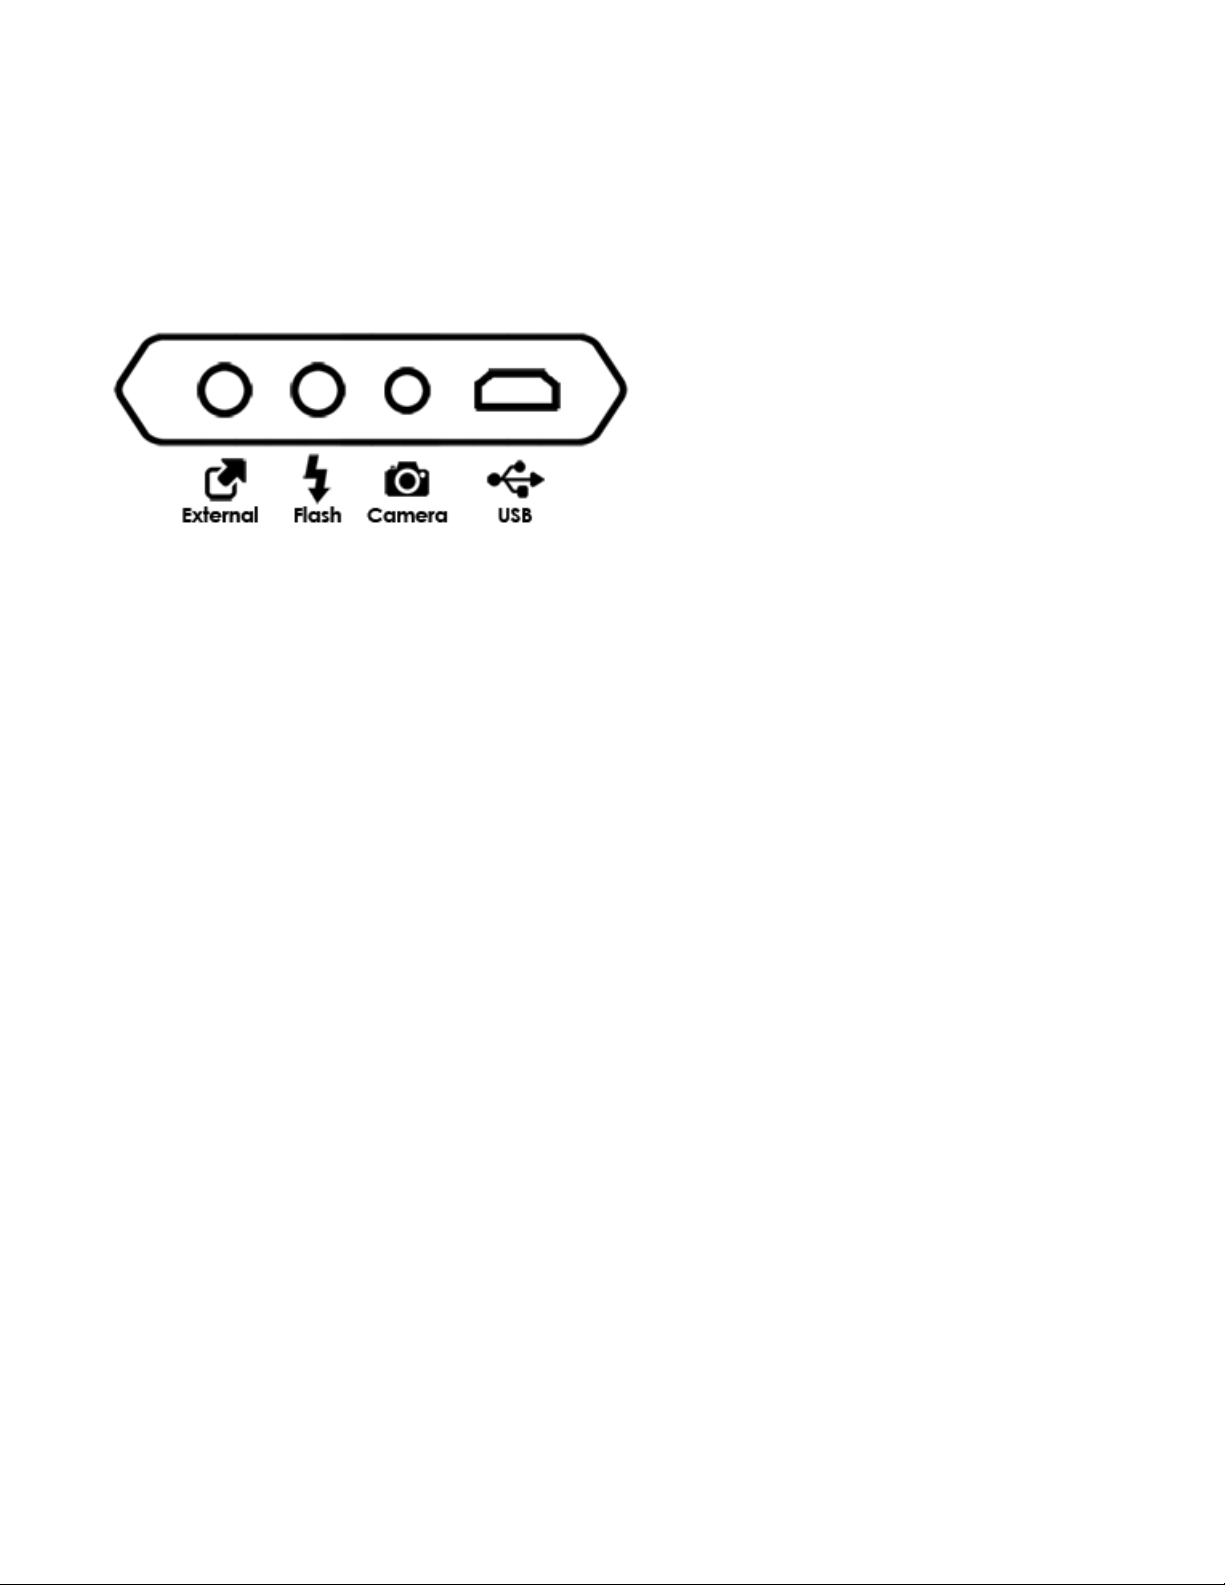
The MIOPS Smart+ has separate outputs for the camera and flash cables. Both of the output
ports are located on the left side of the device under the protective cover.
The camera cable port is a 2.5 mm stereo female jack. The camera cables have the male 2.5
mm stereo jack on one end. This end is plugged into the camera connection port. The other end
changes depending on the camera
make and model. This end is plugged in the shutter release port of your camera.
The flash cable port is a 3.5 mm mono female jack. There is only one type of the flashconnection
cable. It has a 3.5 mm male jack on one end. This end is plugged into the flash connection port.
The other end of the cable is a standard PC Sync port. This end is connected to the PC Sync
port of the flash unit. If your flash does not have a PC Sync port, you can use a hot shoe adapter
with a PC Sync port.
You can use both of the outputs at the same time. They are electrically isolated from each other.
They trigger the connected device synchronously. Some older flash units require high voltages
(~50 V) to be triggered. These flash units are not compatible with the MIOPS Smart+. Using
such a high voltage flash unit can damage your device.
The camera and flash cables are designed to trigger the cameras and flash units only. Do not
use them for any other purpose. Doing so may damage the cable or the device.
5. Mobile Application
You can use your MIOPS Smart+ as a standalone device without the involvement of your
smartphone or tablet. However, we also offer a mobile app which has been designed as an
Page 5
interface to configure and control your MIOPS Smart+ easily. The communication between the
smartphone and MIOPS Smart is done over Bluetooth connection. So, your smartphone has to
be compatible with Bluetooth 4.0.
MIOPS MOBILE app is available on iOS and Android platforms. Search for MIOPS MOBILE in
your app store, or use the following buttons to download the app.
6. Connecting to MIOPS Smart+
Warning: Please make sure that your Bluetooth is turned ON in the connection preferences of
your smartphone or tablet.
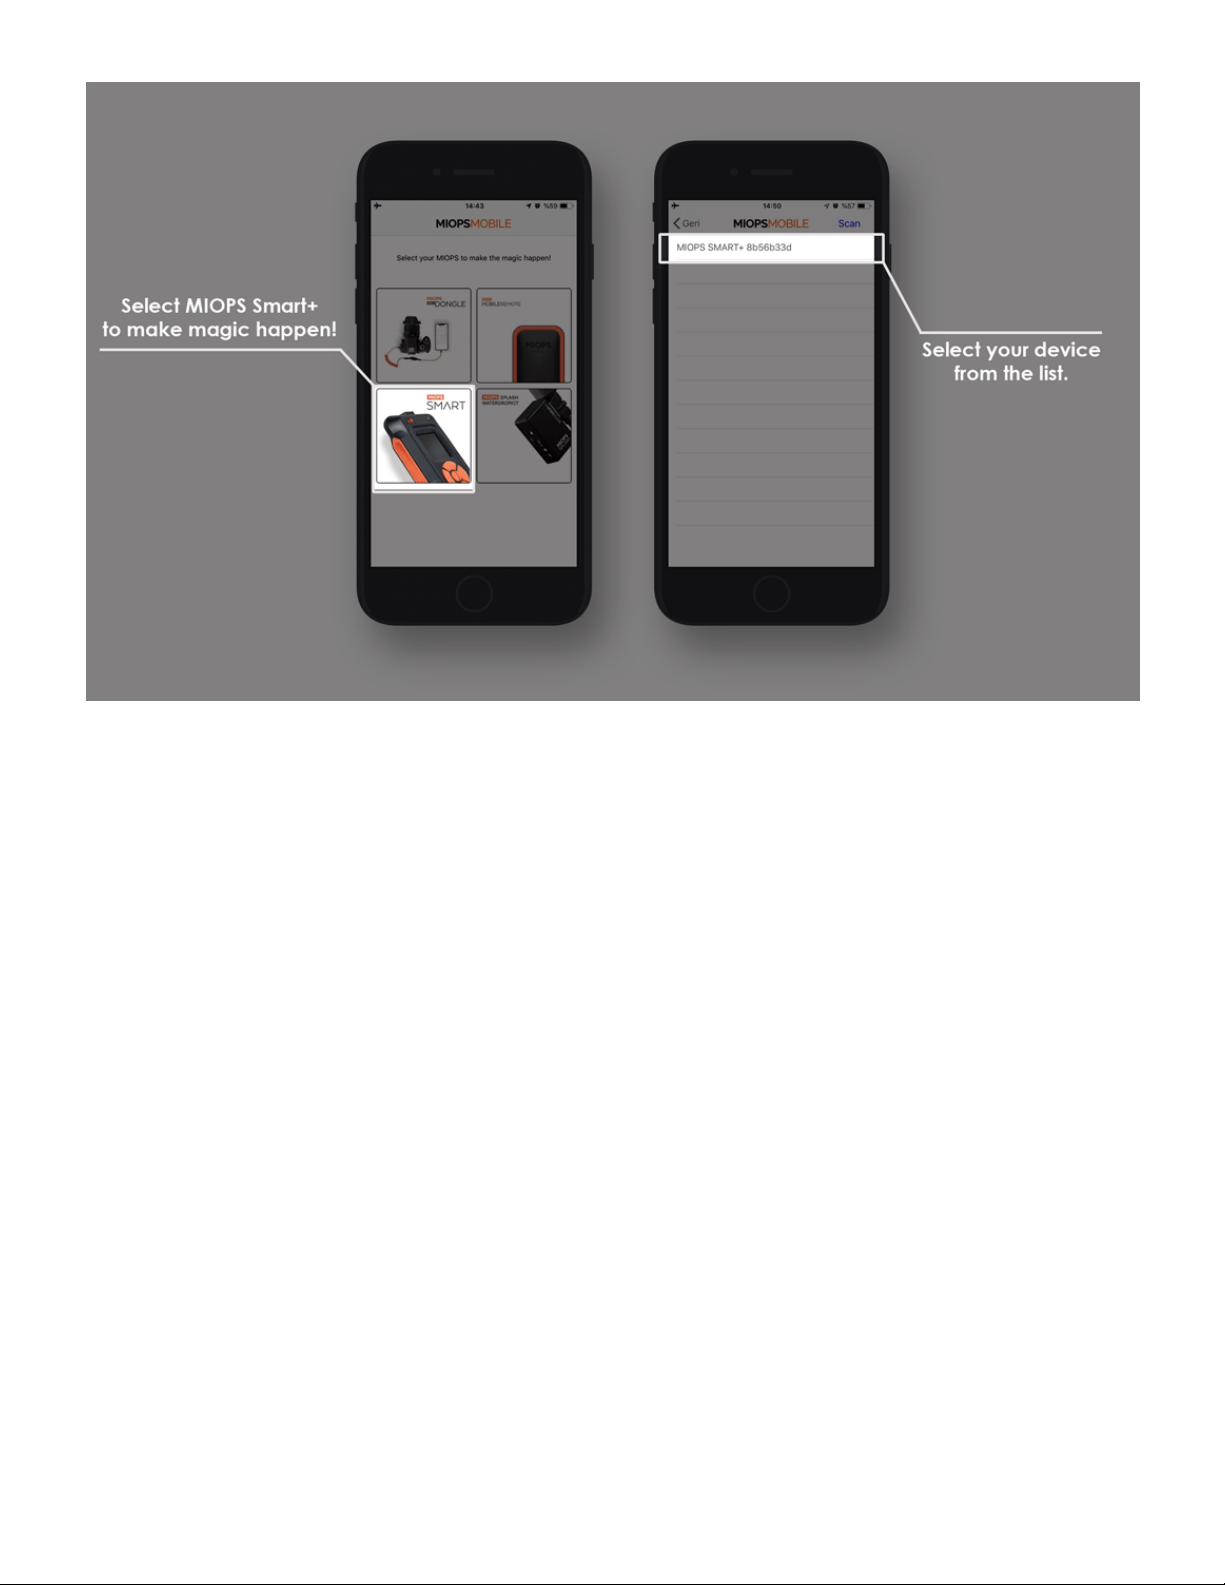
After opening the mobile app, you will be asked for selecting your MIOPS product. After
selecting MIOPS Smart+ from the list, you will be listed all available Smart+ devices around. In
case your device is not shown in the list, make sure that your Smart+ is turned ON and click the
Scan button again.
Page 6
7. Firmware Upgrade
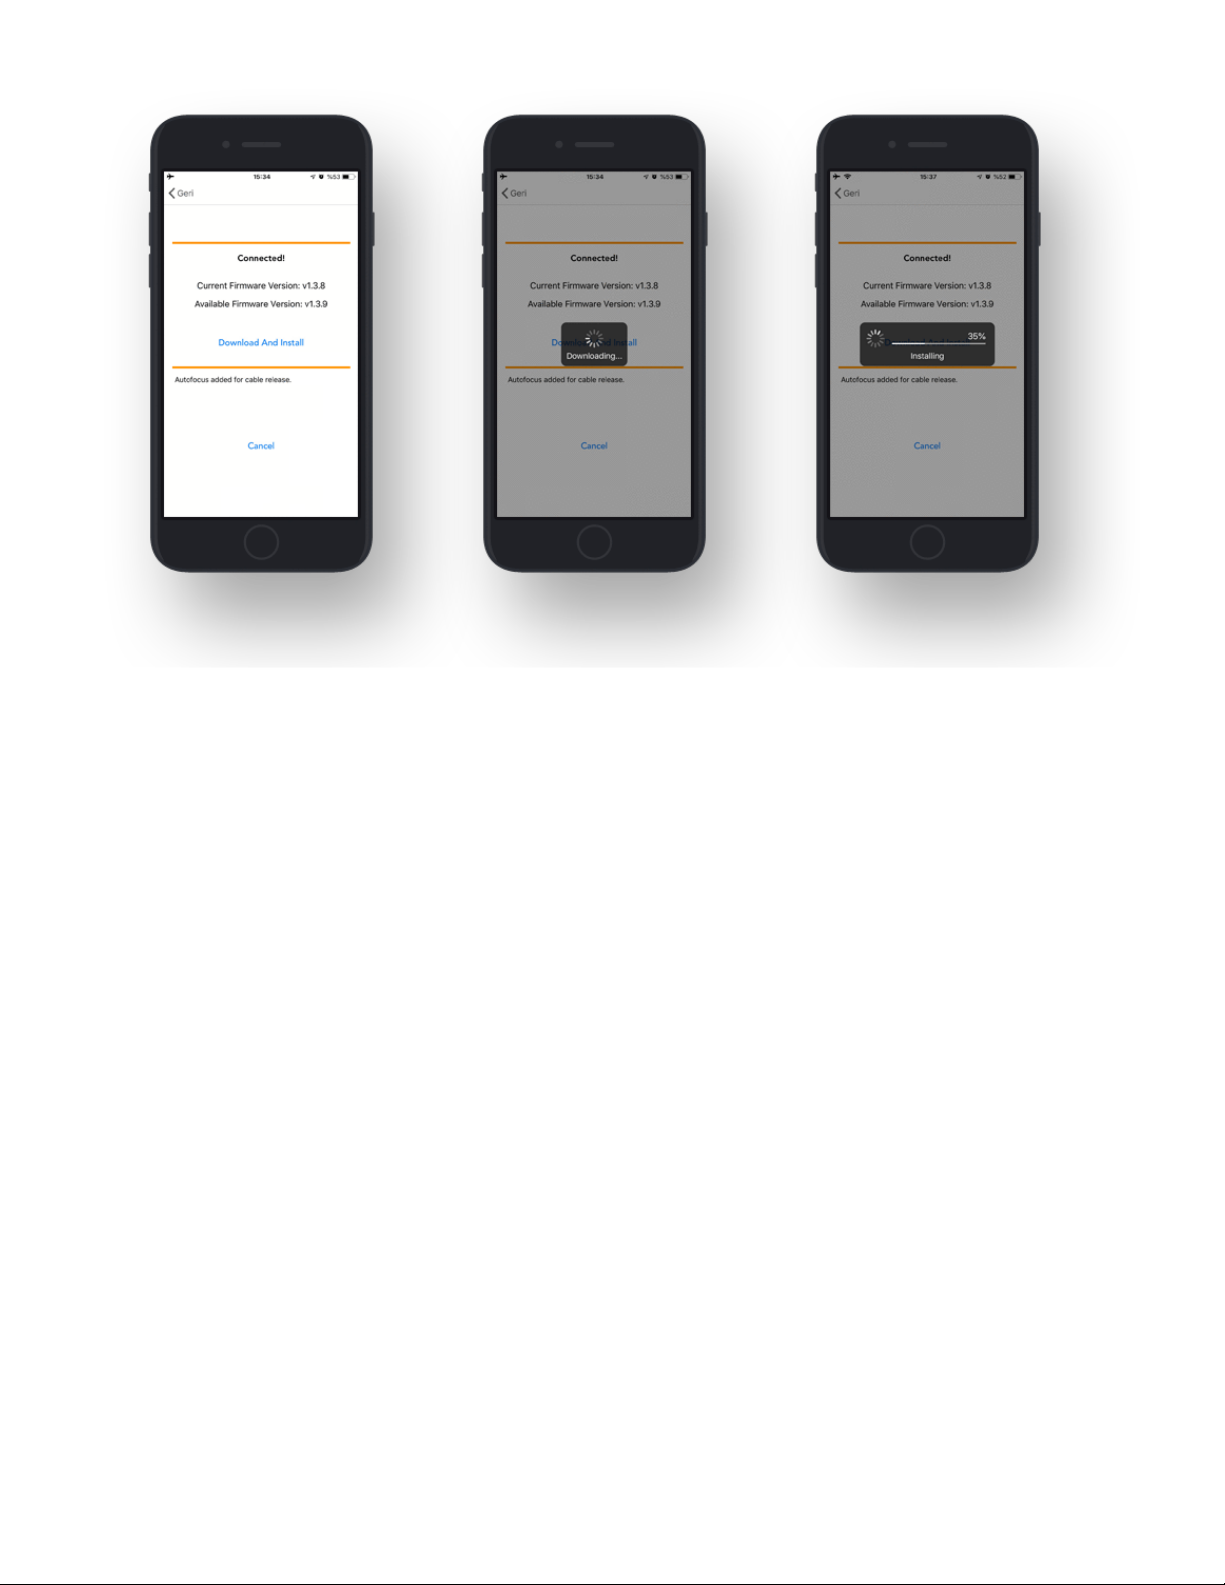
MIOPS Smart+ has the capability of updating its firmware without needing any cable connection
to a computer. You can use the mobile app to check for new firmware version and then update
the device with a single click.
When you connect your device through MIOPS MOBILE app, it automatically checks your
device's firmware version and prompts a pop-up message if a new firmware is available.
Page 7
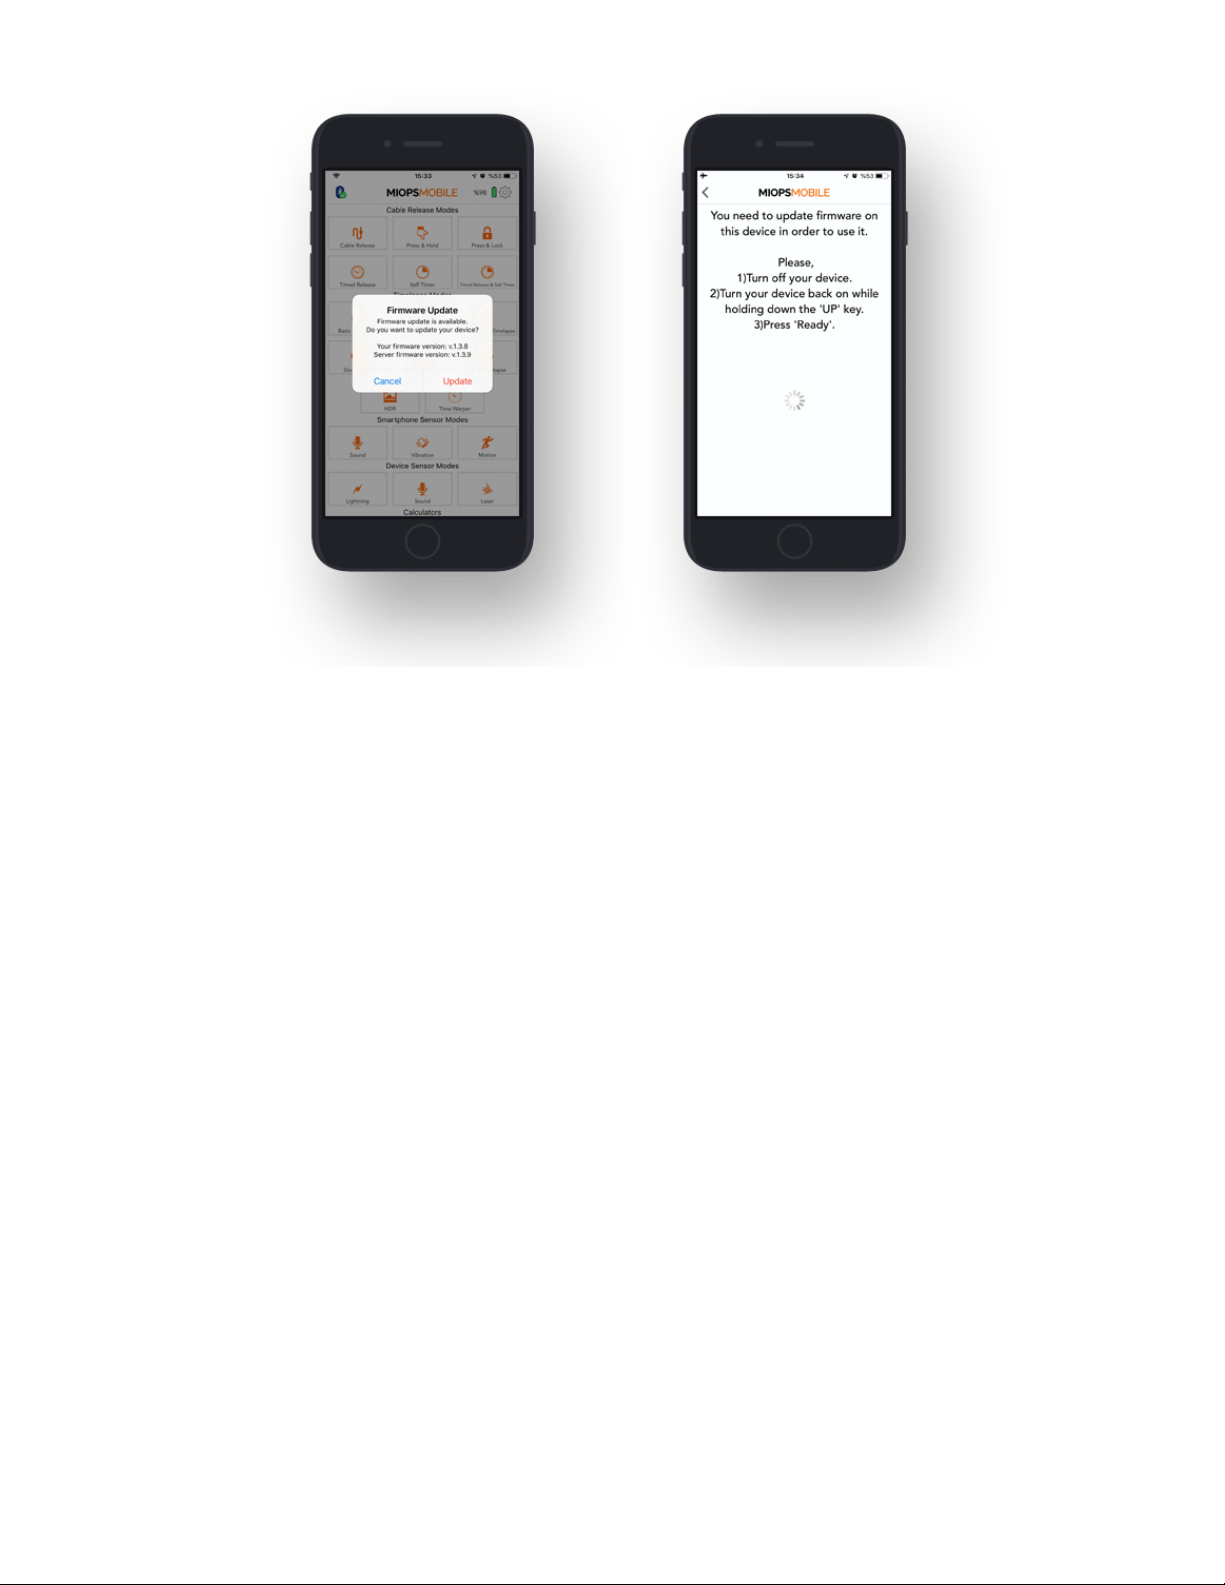
When you click "Update" button, you will be asked to put your device to upgrade mode. In order
to put your device to upgrade mode, you should turn your device off, then turn it back on
while holding down the UP button.
After clicking to Ready button, the firmware upgrade process will start immediately.
Page 8
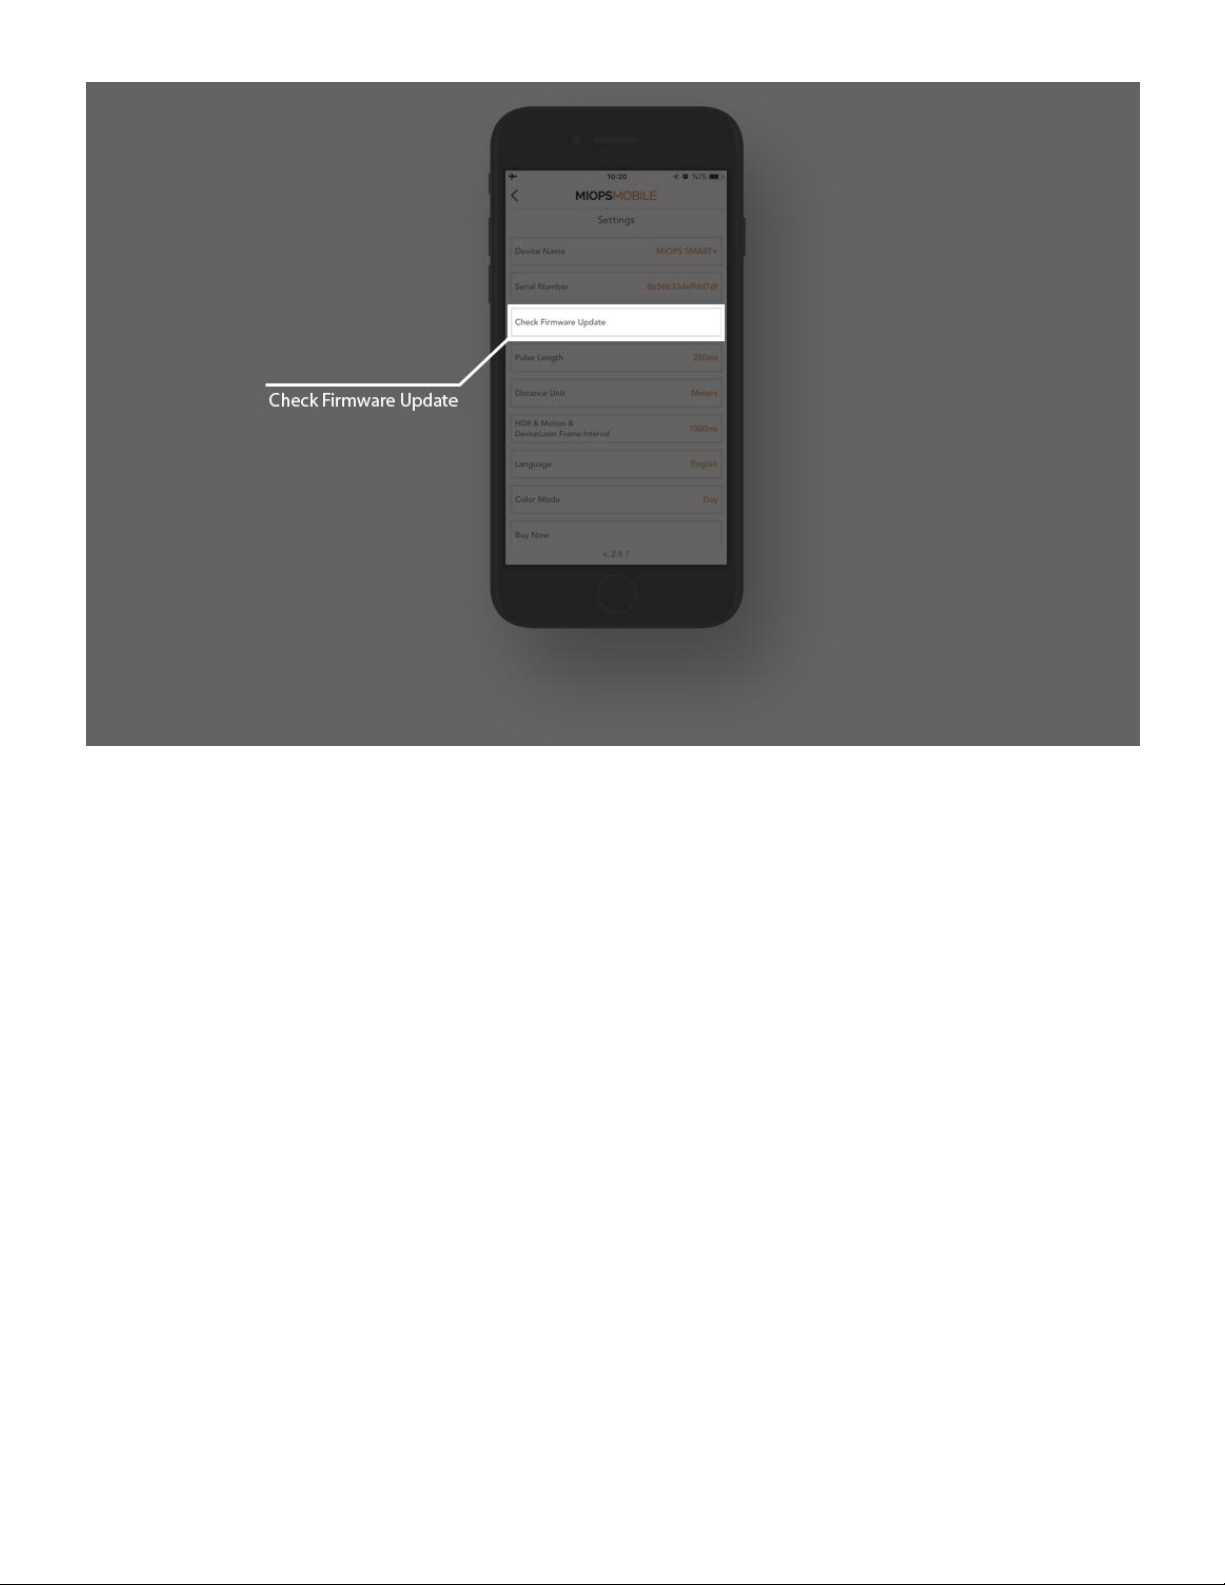
You can also use "Check Firmware Update" option in the Settings menu to check manually if
there is a new firmware available.
Page 9
8. Using the Mobile Application
The mobile app has a main menu to switch between different modes which are listed from top
to the bottom. You can select the mode you want to use by touching the icon. The menu will
scroll down to show additional modes that do not fit into the screen. The main menu will
disappear once you select any mode and the app will enter into the configuration page of that
particular mode. You can switch between different modes anytime. In order to do that, you just
need to click the arrow icon on the top left-hand side of the screen. When you switch back and
forth between different modes, the settings will not change.
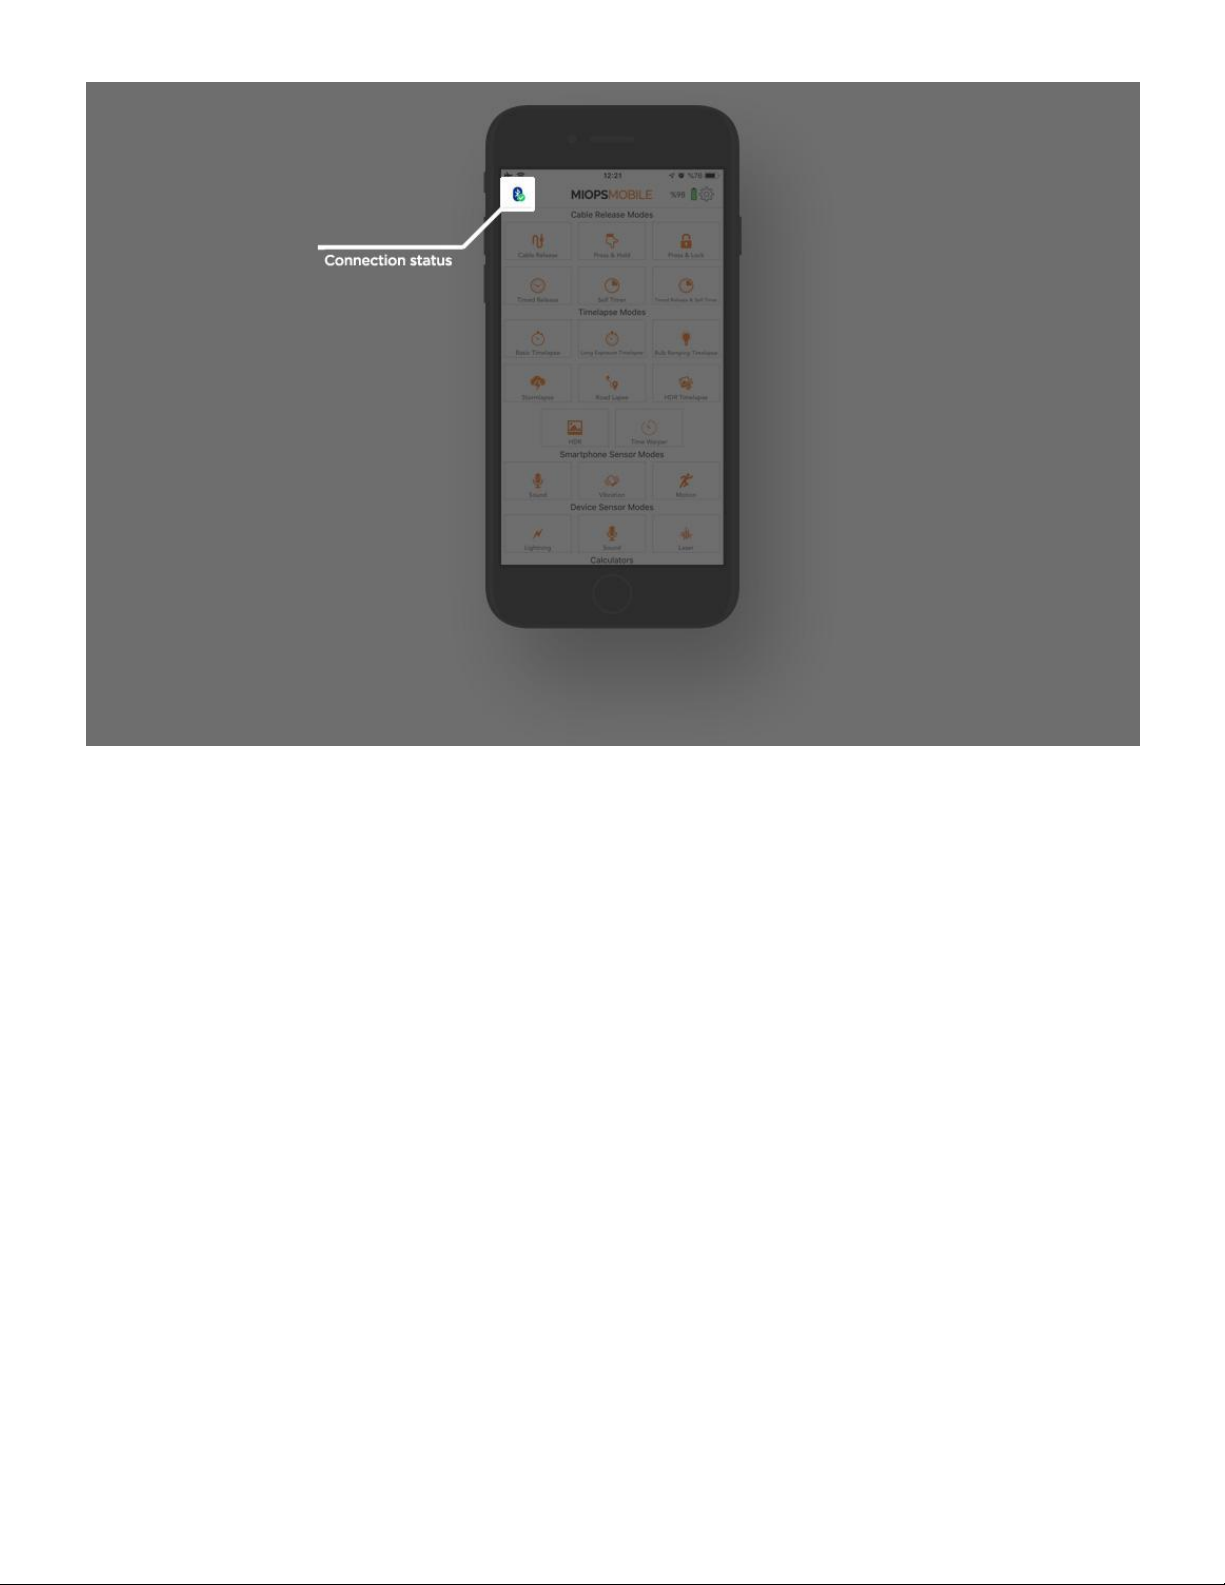
When you connect your MIOPS Smart+ through the MIOPS MOBILE app, you will notice a
Bluetooth icon with a green tick on the top left-hand side of the screen. This shows that you
connected your device successfully. If you click the same icon, you will notice a warning asking if
you really want to disconnect from Smart+. You can click "Yes" if you want to disconnect and
search for other devices.
Page 10
9. FEATURES
9.1. CABLE RELEASE MODES:
In this section, you will find information about different cable release modes.
9.1.a. Cable Release:
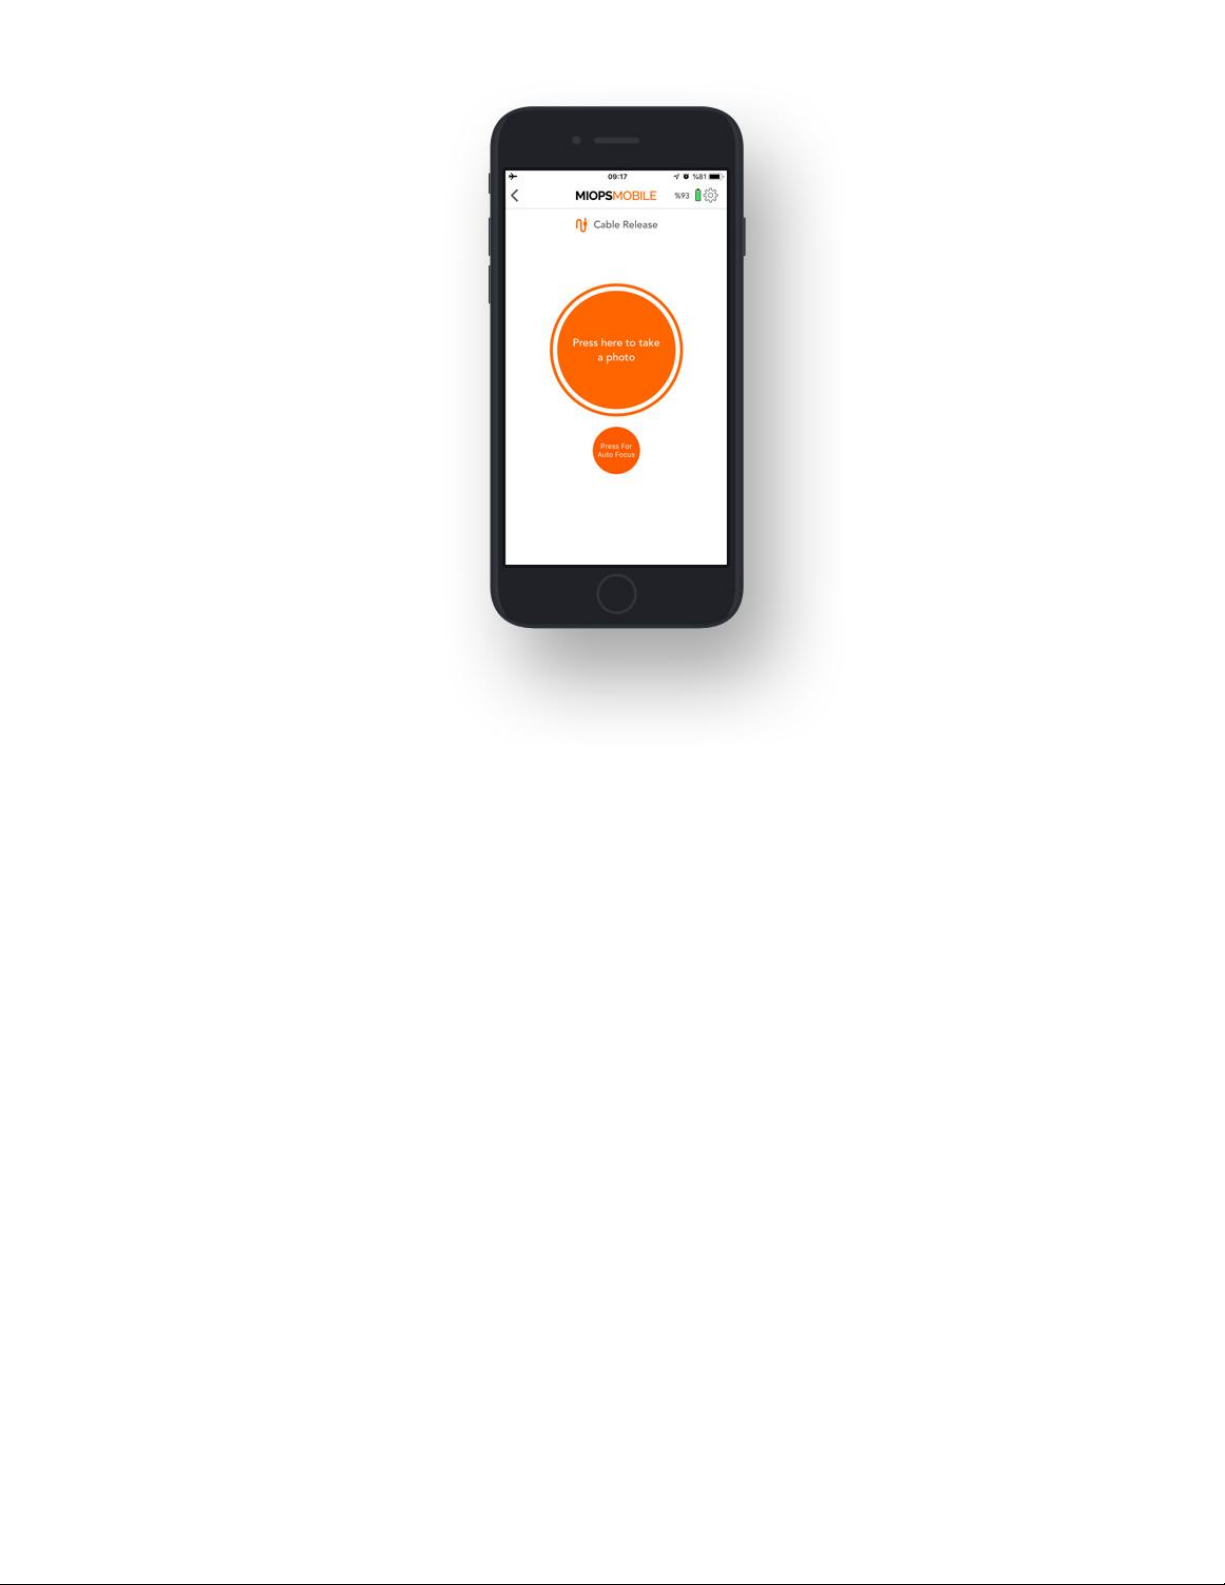
The Cable Release mode is the basic mode to trigger your camera or flash. It does not have
any parameter. The moment you touch the orange button, MIOPS Smart+ will trigger your
camera for the duration of the pulse length. If your camera is in bulb mode, the shutter will stay
open as long as the duration of the pulse. Otherwise, the exposure of the camera settings will be
valid.
Also, you can focus your camera by pressing the small button. It will keep your camera focusing
as long as you press the button.
Page 11
9.1.b. Press & Hold:
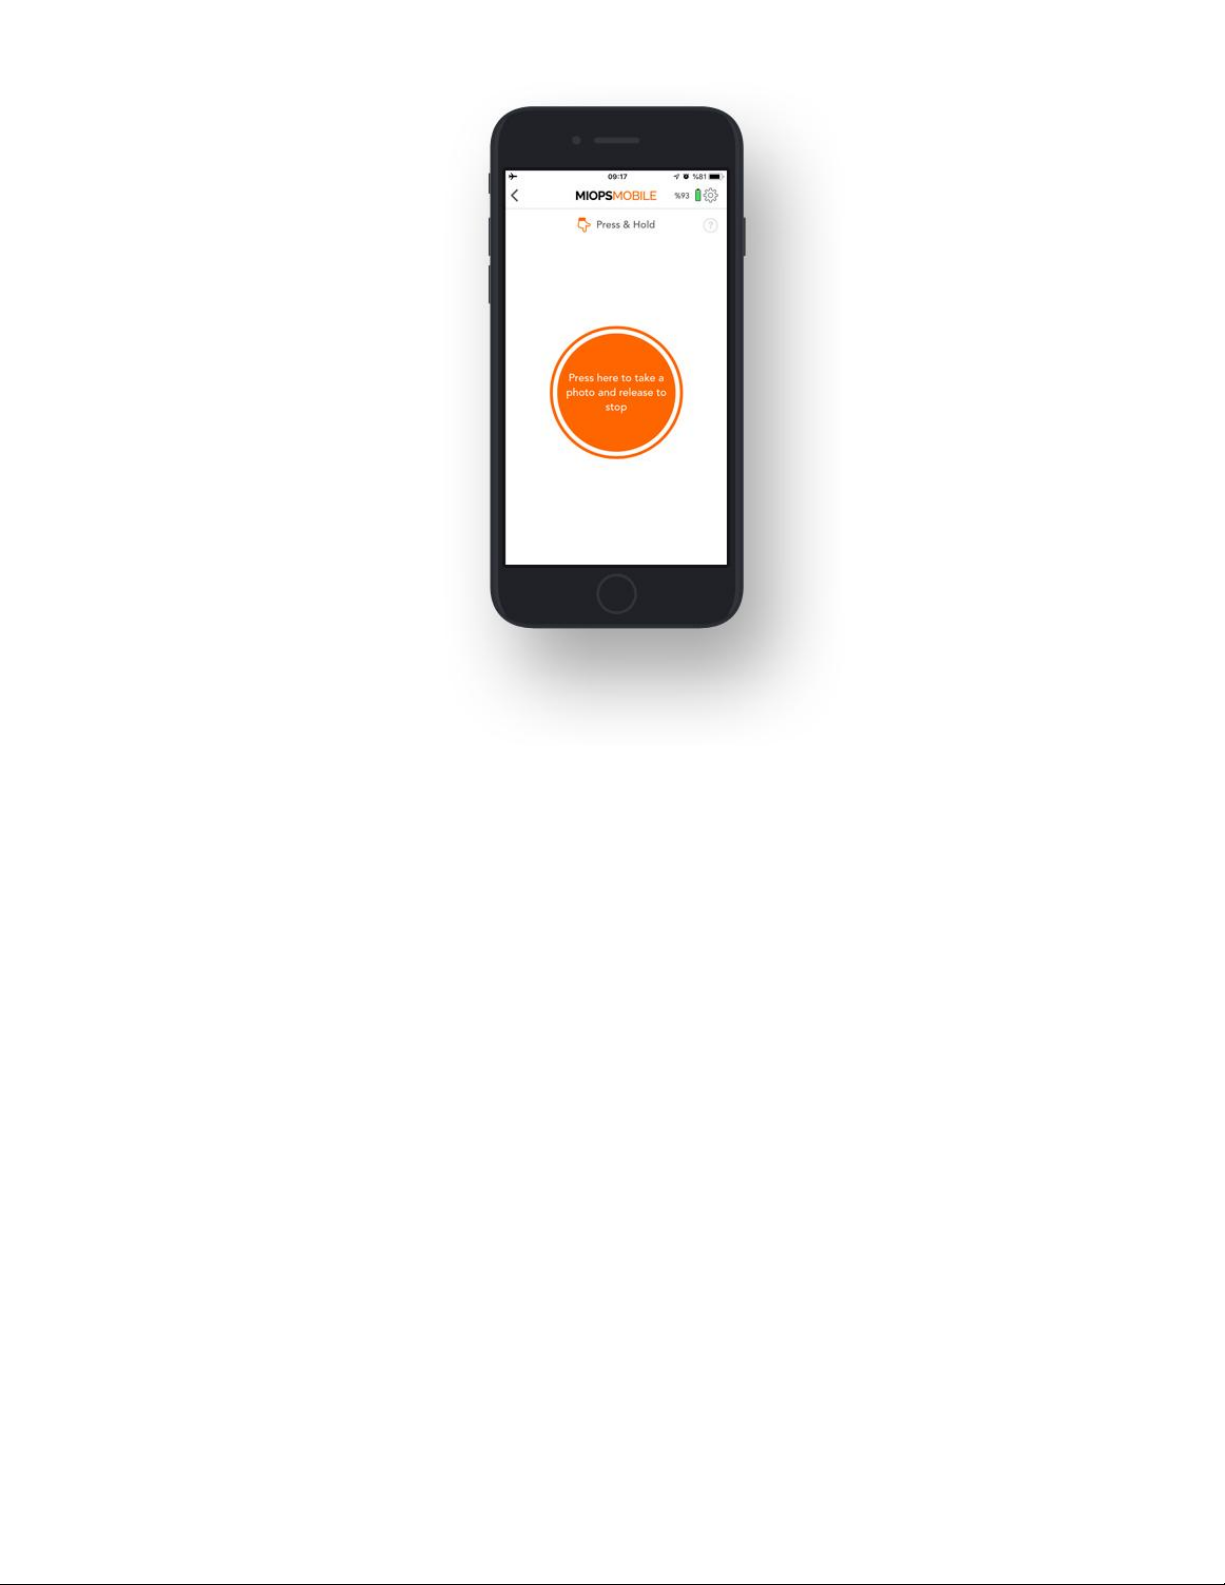
The Press & Hold mode has a level of flexibility by keeping the shutter open as long as you
keep your finger on the button. This way, you are not limited to the pulse length. When you touch
the button, a counter will start at the bottom of the screen. You can count how many
seconds/milliseconds have passed. The shutter will close when you release the button. Again, in
order to control the shutter with this mode, the camera must be in BULB mode.
Page 12
9.1.c. Press & Lock:
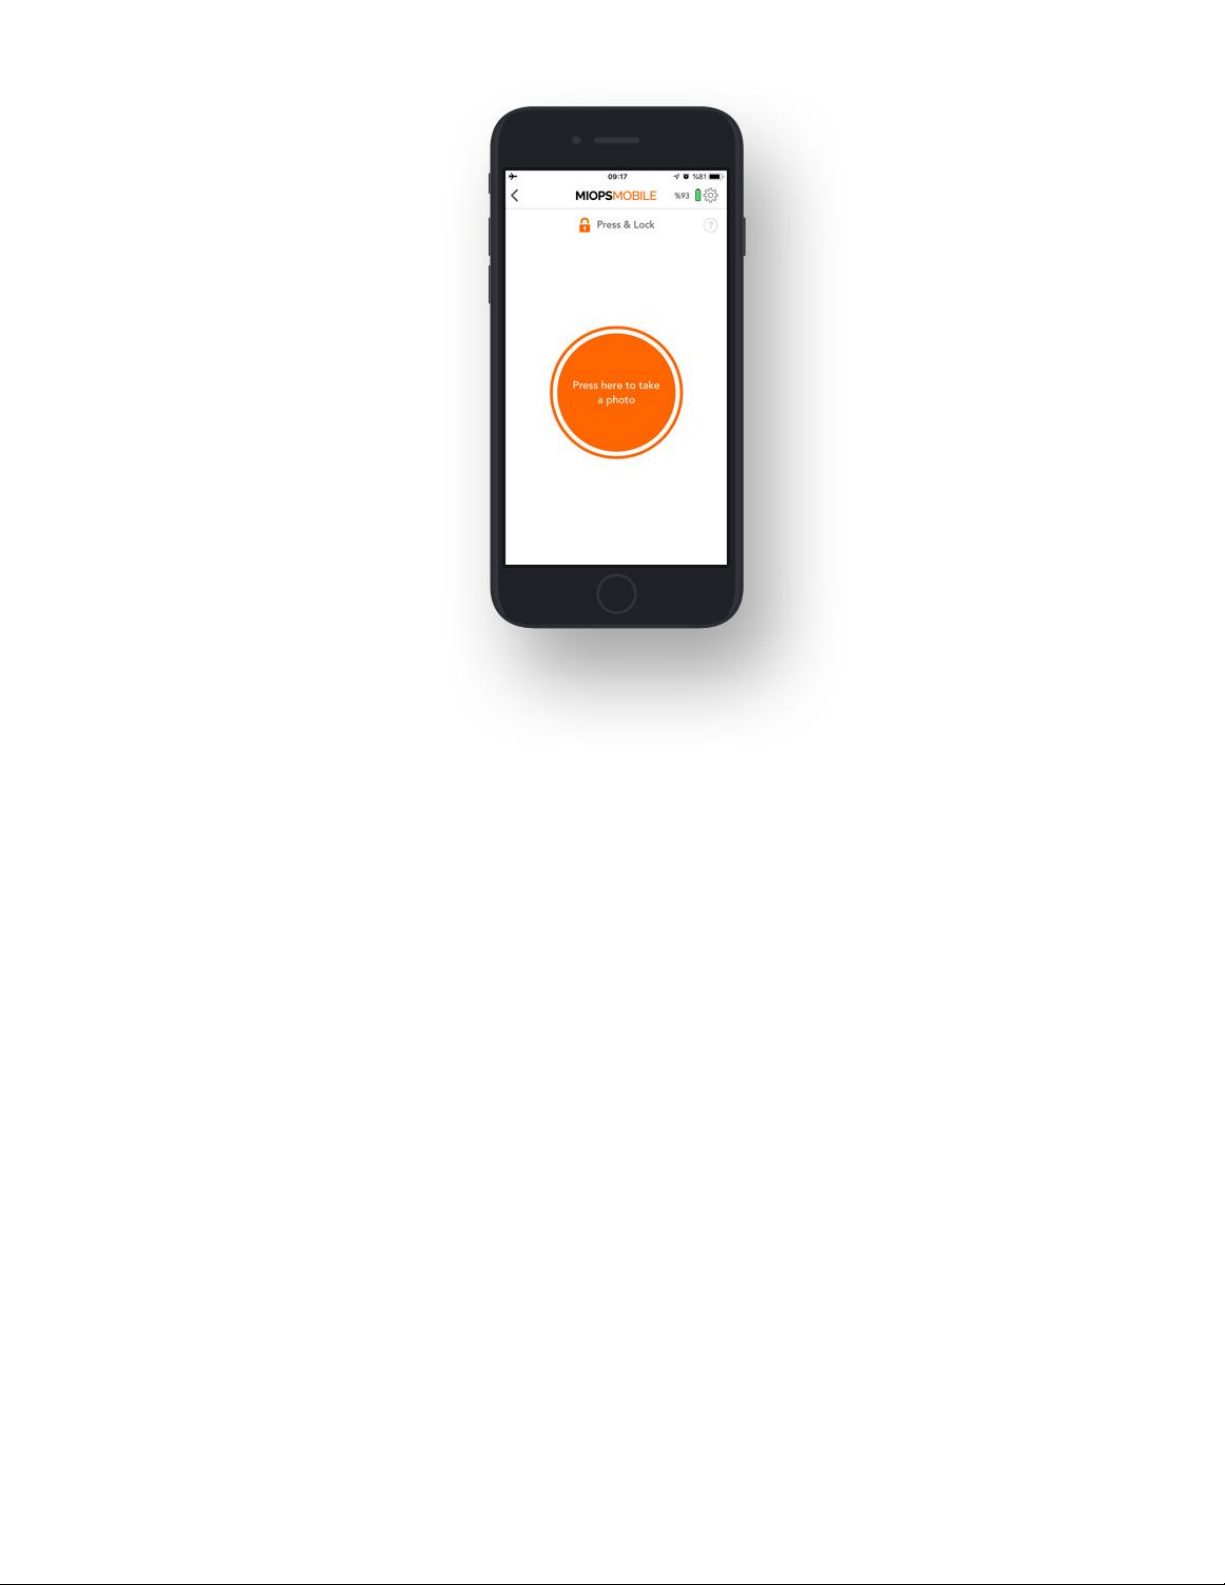
The Press & Lock mode is designed for long exposures. If you do not want to keep your finger
on the screen all the time, you can use this mode. The shutter will open with a touch on the
button and it will stay open until the next touch. When you touch the button, a counter will start at
the bottom of the screen. The camera must be in BULB mode to have flexible exposure.
Page 13
9.1.d. Timed Release:
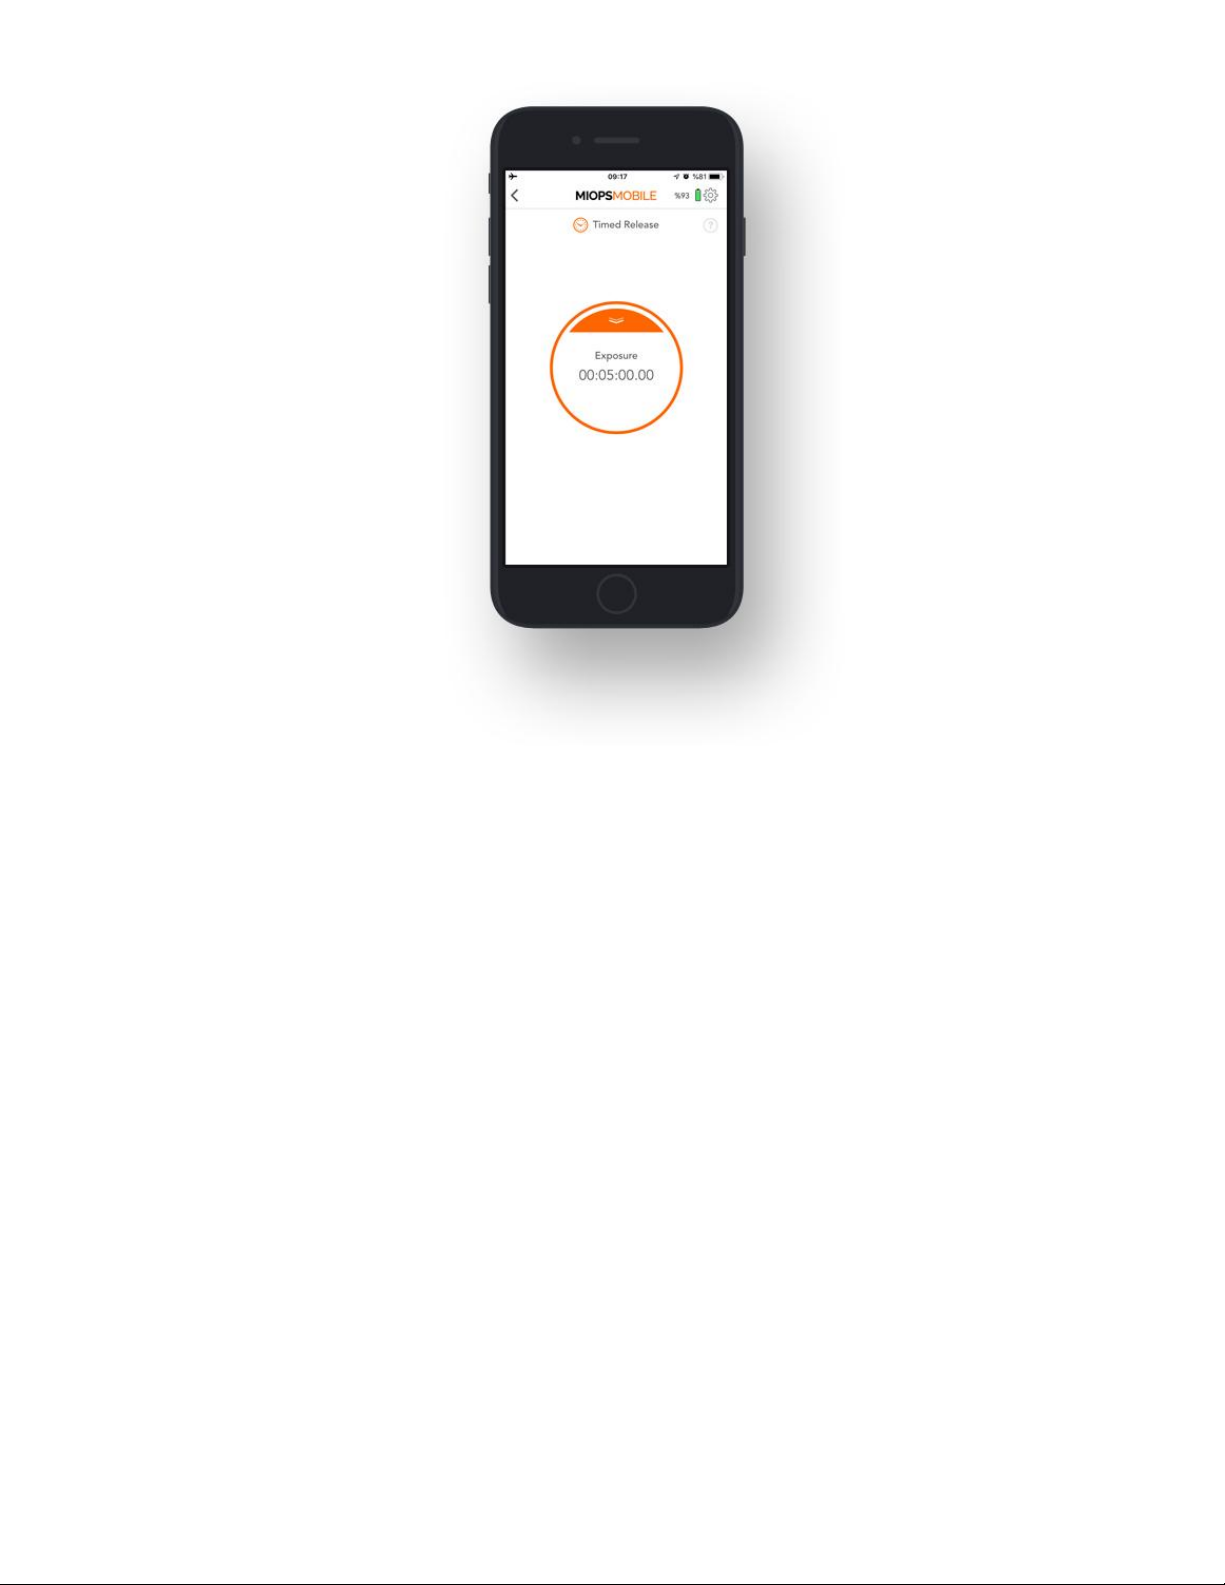
The Timed Release mode is the perfect solution if you want to control the shutter with great
precision. This mode has a single parameter:
Exposure: This parameter controls the exposure in hours, minutes, seconds and milliseconds.
In order to change the parameter, touch the exposure value and a numeric keypad will appear.
You can type in the desired exposure value and then touch anywhere outside of the circle. The
new exposure value will be shown in the circle. Touch the notch on top of the circle and then pull
the curtain down. You can start the exposure by touching the orange button again.
Page 14
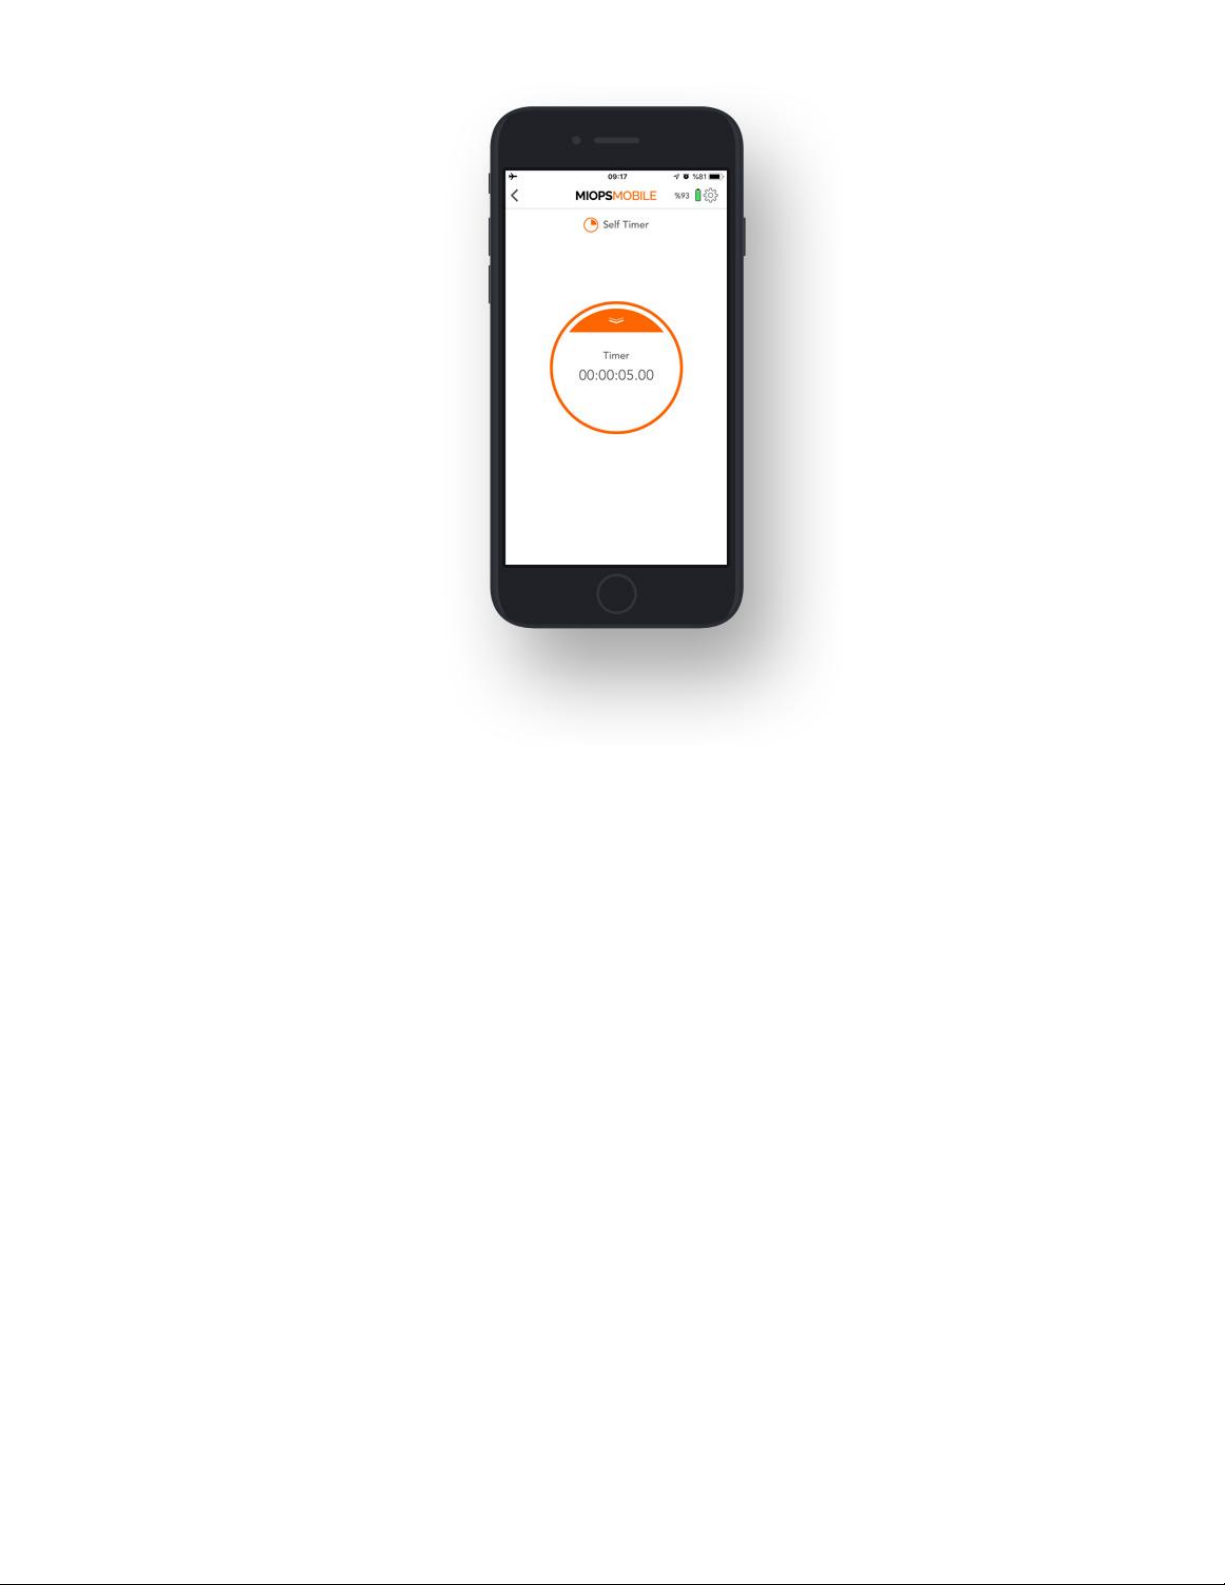
9.1.e. Self Timer:
The Self Timer mode enables you to trigger the camera after the timer goes off. It has a single
parameter:
Timer: This parameter is used to set a timer up to 100 hours in milliseconds. When the timer
goes off, the camera will be triggered once.
The Self Timer mode does not have any exposure parameter. It will only trigger the camera for
pulse length duration. When you start the timer, a circle will appear at the bottom of the screen.
The circle will show the progress of the time and it will count down from the timer value.
Page 15
9.1.f. Timed Release & Self Timer:
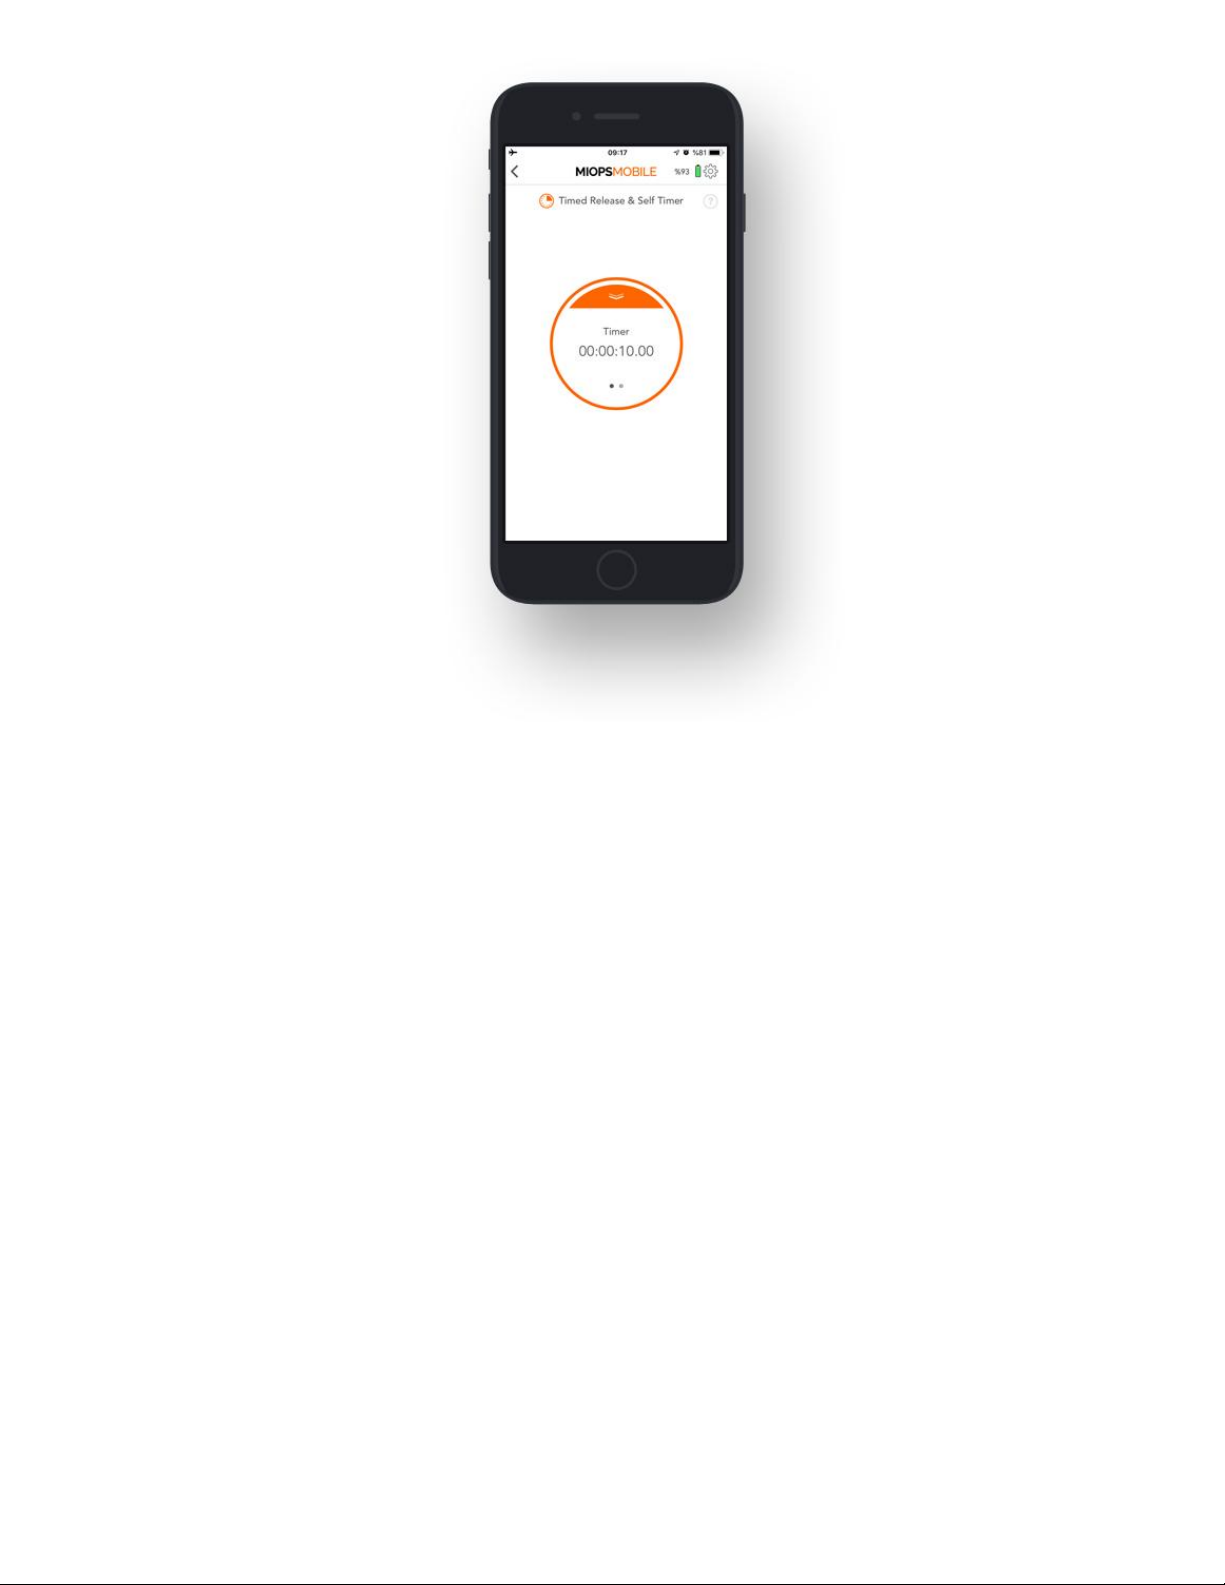
If you want to have a custom exposure after the timer goes off, you can use the Timed Release
and Self Timer mode. This mode combines the Self Timer with the capability of keeping the
shutter open for a certain time. It has two parameters: Timer and Exposure.
Timer: This parameter defines when to trigger the camera.
Exposure: This parameter defines how long to keep the shutter open.
Once you set the parameters, you will see to counters at the bottom of the screen. The counter
on the left displays the timer. It will count down from the timer value and when it goes off, the
second counter will start showing how long the shutter has been kept open. The shutter will close
when the custom exposure value is reached. The camera must be in BULB mode to have
flexible exposure.
Page 16
9.2. TIMELAPSE MODES:
In this section, you will find information about various timelapse modes.
9.2.a. Basic Timelapse:
The Basic Timelapse mode offers to take time-lapse photos automatically without changing the
exposure. It has two parameters; Interval and Frame.
Interval: This parameter defines the duration between each frame. The Interval can have a
value from 13 milliseconds up to 100 hours.
Frame: This parameter defines how many pictures are to be taken. You can set the frame
number up to 99999. If you set the frame number to 0, this will mean that the time-lapse will
continue until you stop it.
Page 17
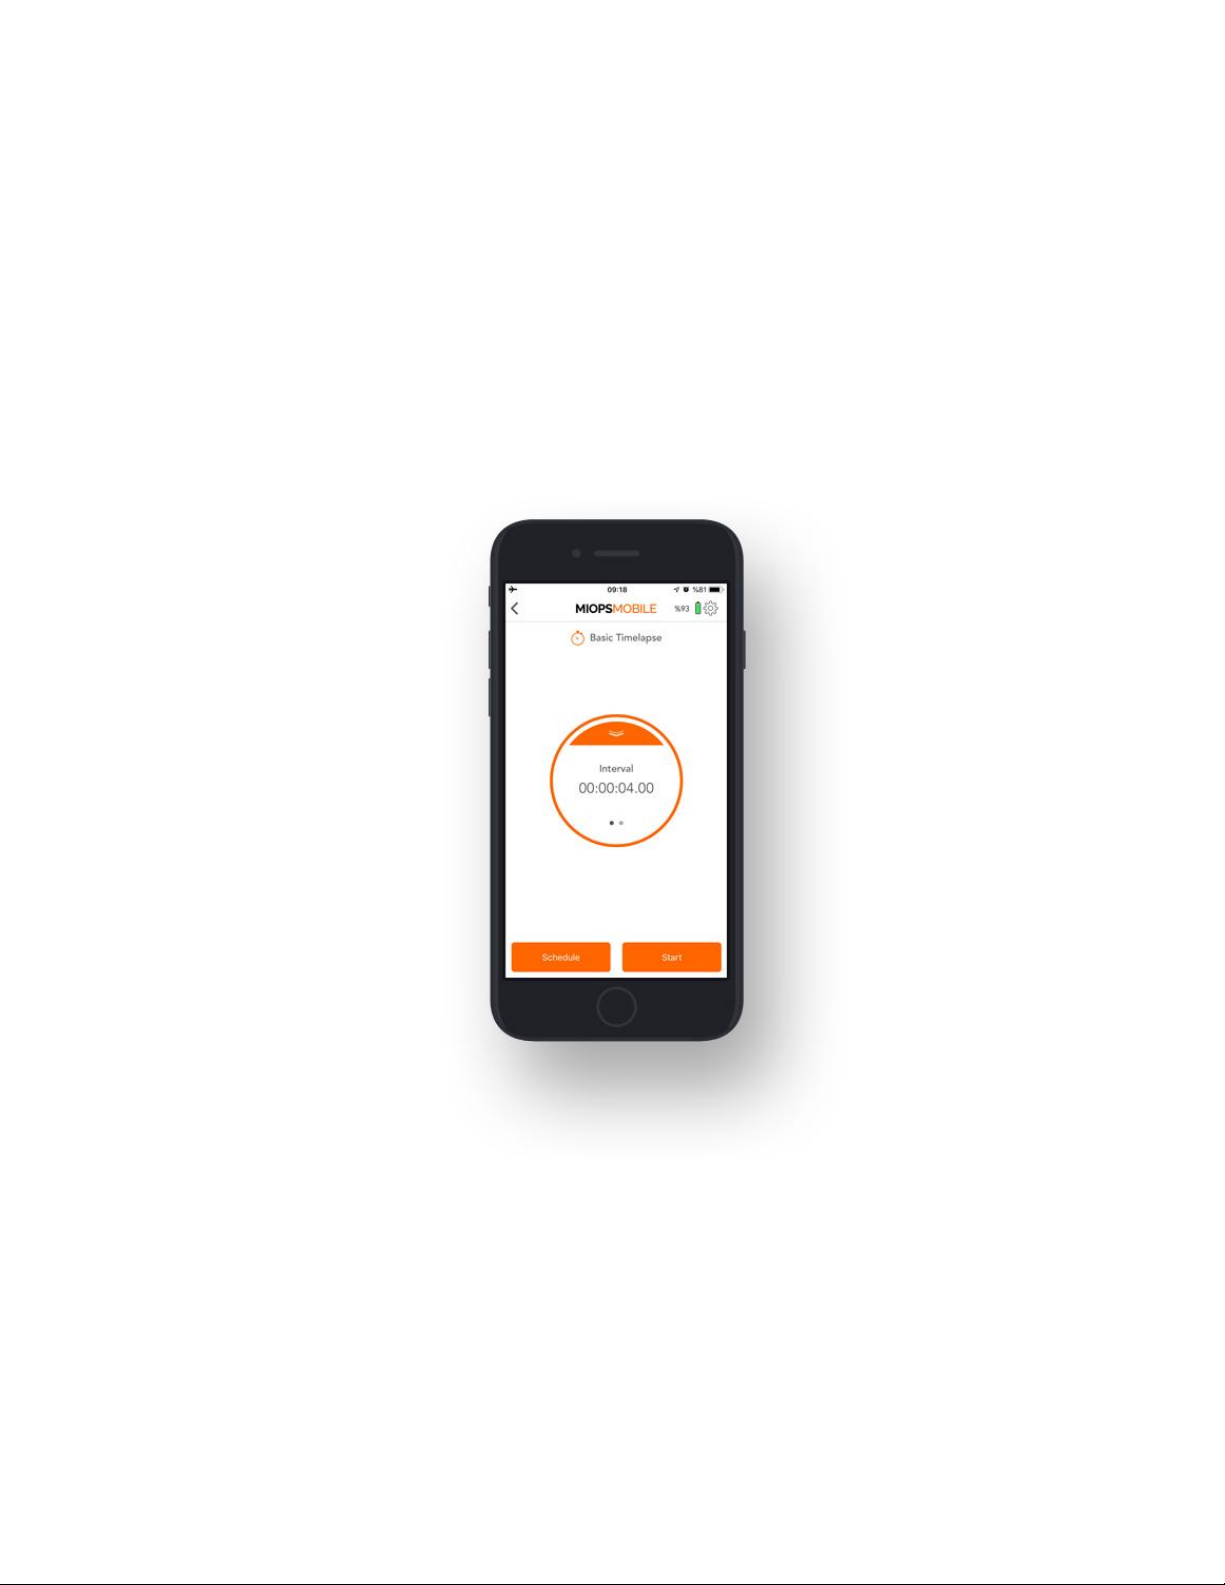
The Basic Timelapse mode does not offer any control over the exposure. The exposure settings
of your camera will be valid.
Once you start the mode, you can see the progress on the status screen. The counter on the top
will show the interval status. When the circle completes, the interval period is over and the next
picture will be taken. On the left-bottom, you will see another counter which shows the number of
pictures already taken. With each frame, the counter will be increased by 1. Please note that, if
the exposure setting of your camera is greater than the interval value, the time lapse process will
not function properly. The exposure of your camera must be greater than the interval value.
Otherwise, the number of taken pictures will be less than shown on the screen.
9.2.b. Long Exposure Timelapse:
In this mode, you can define a custom exposure for the time-lapse photos. It has three
parameters:
Interval: This parameter defines the duration between each frame. The Interval can have a
value from 13 milliseconds up to 100 hours.
Page 18
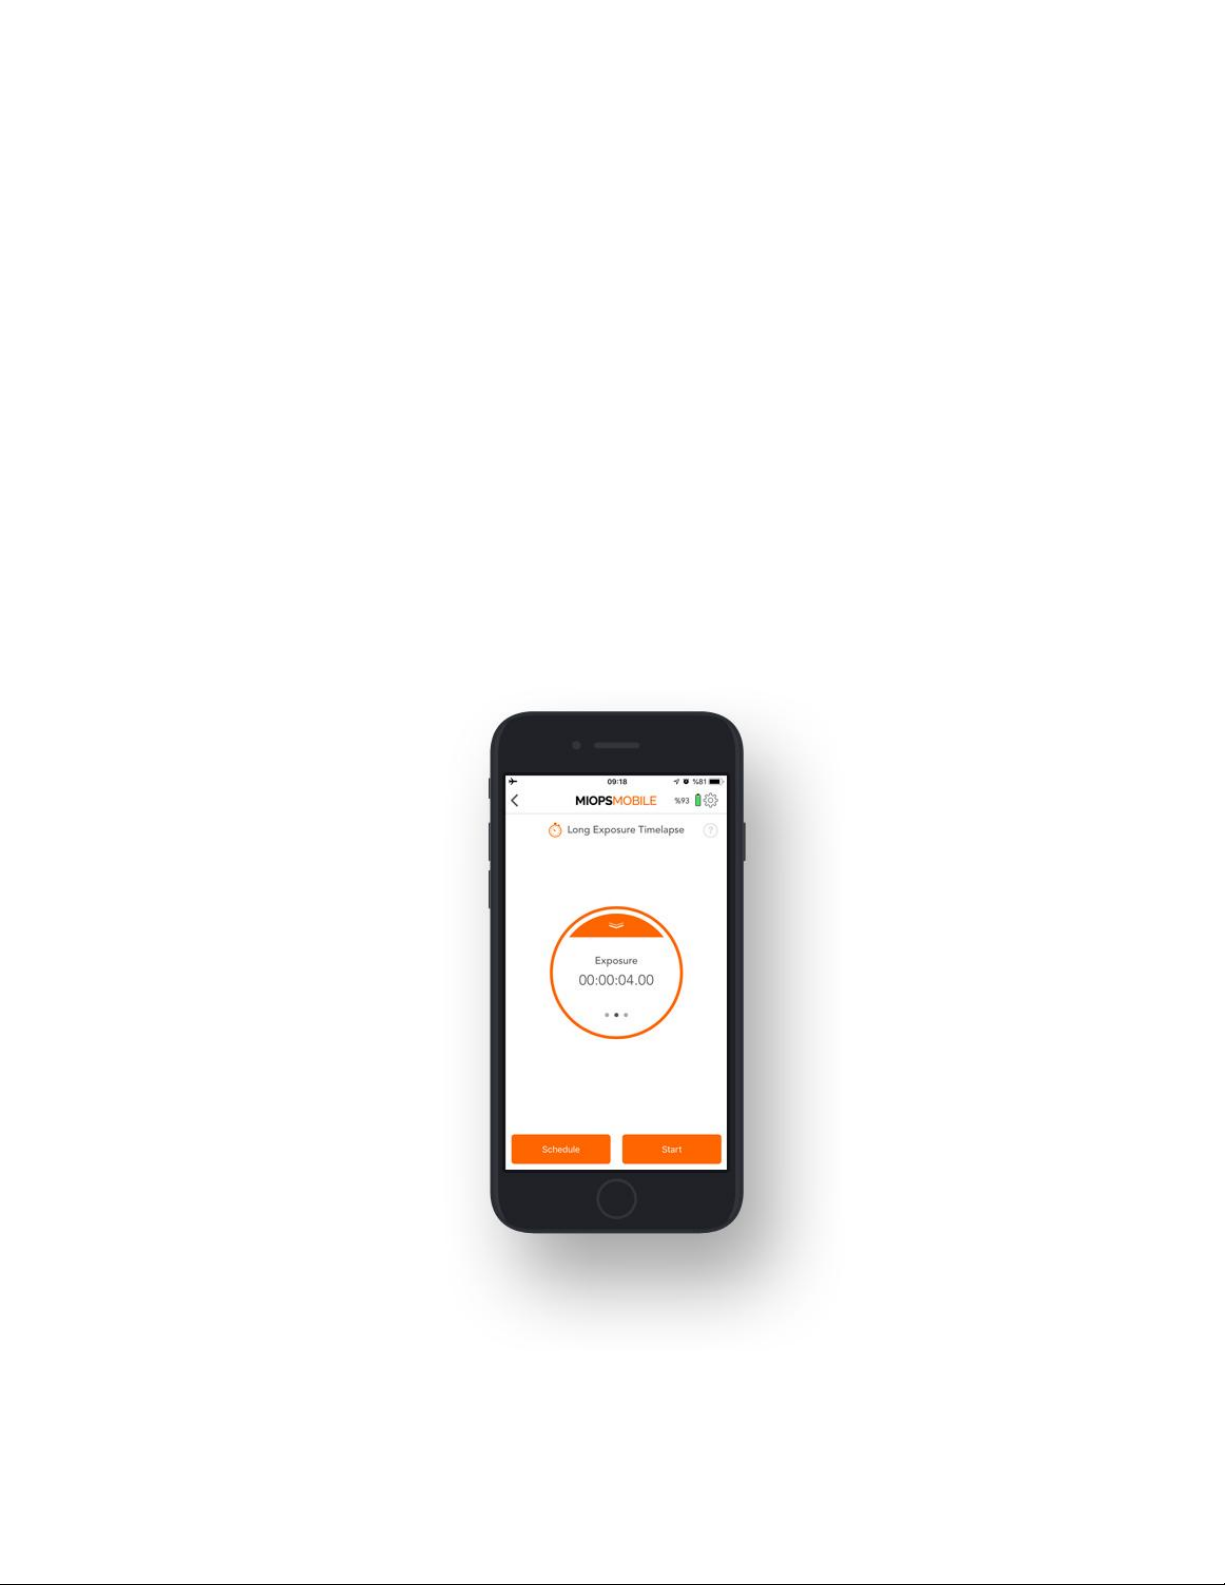
Exposure: This value defines the exposure value for each photo. You can set a custom
exposure up to 100 hours in milliseconds.
Frame: This parameter defines how many pictures are to be taken. You can set the frame
number up to 99999. If you set the frame number to 0, this will mean that the time-lapse will
continue until you stop it.
When you start the Long Exposure Timelapse mode, you can see the progress on the status
screen. The first counter will show the interval. Each time timer of the interval goes off, a photo
with the custom exposure will be taken. After the exposure is over the frame counter will be
increased by 1 and the interval counter will start again. This will continue until the targeted
number of frames is achieved. The Long Exposure Timelapse mode requires that your camera
is set to BULB mode. This is the only way of achieving custom exposures. If you do not set your
camera to BULB mode, the exposure value of your camera will be valid and you will not get
pictures with the exposure set on the MIOPS MOBILE app.
9.2.c Bulb Ramping Timelapse:
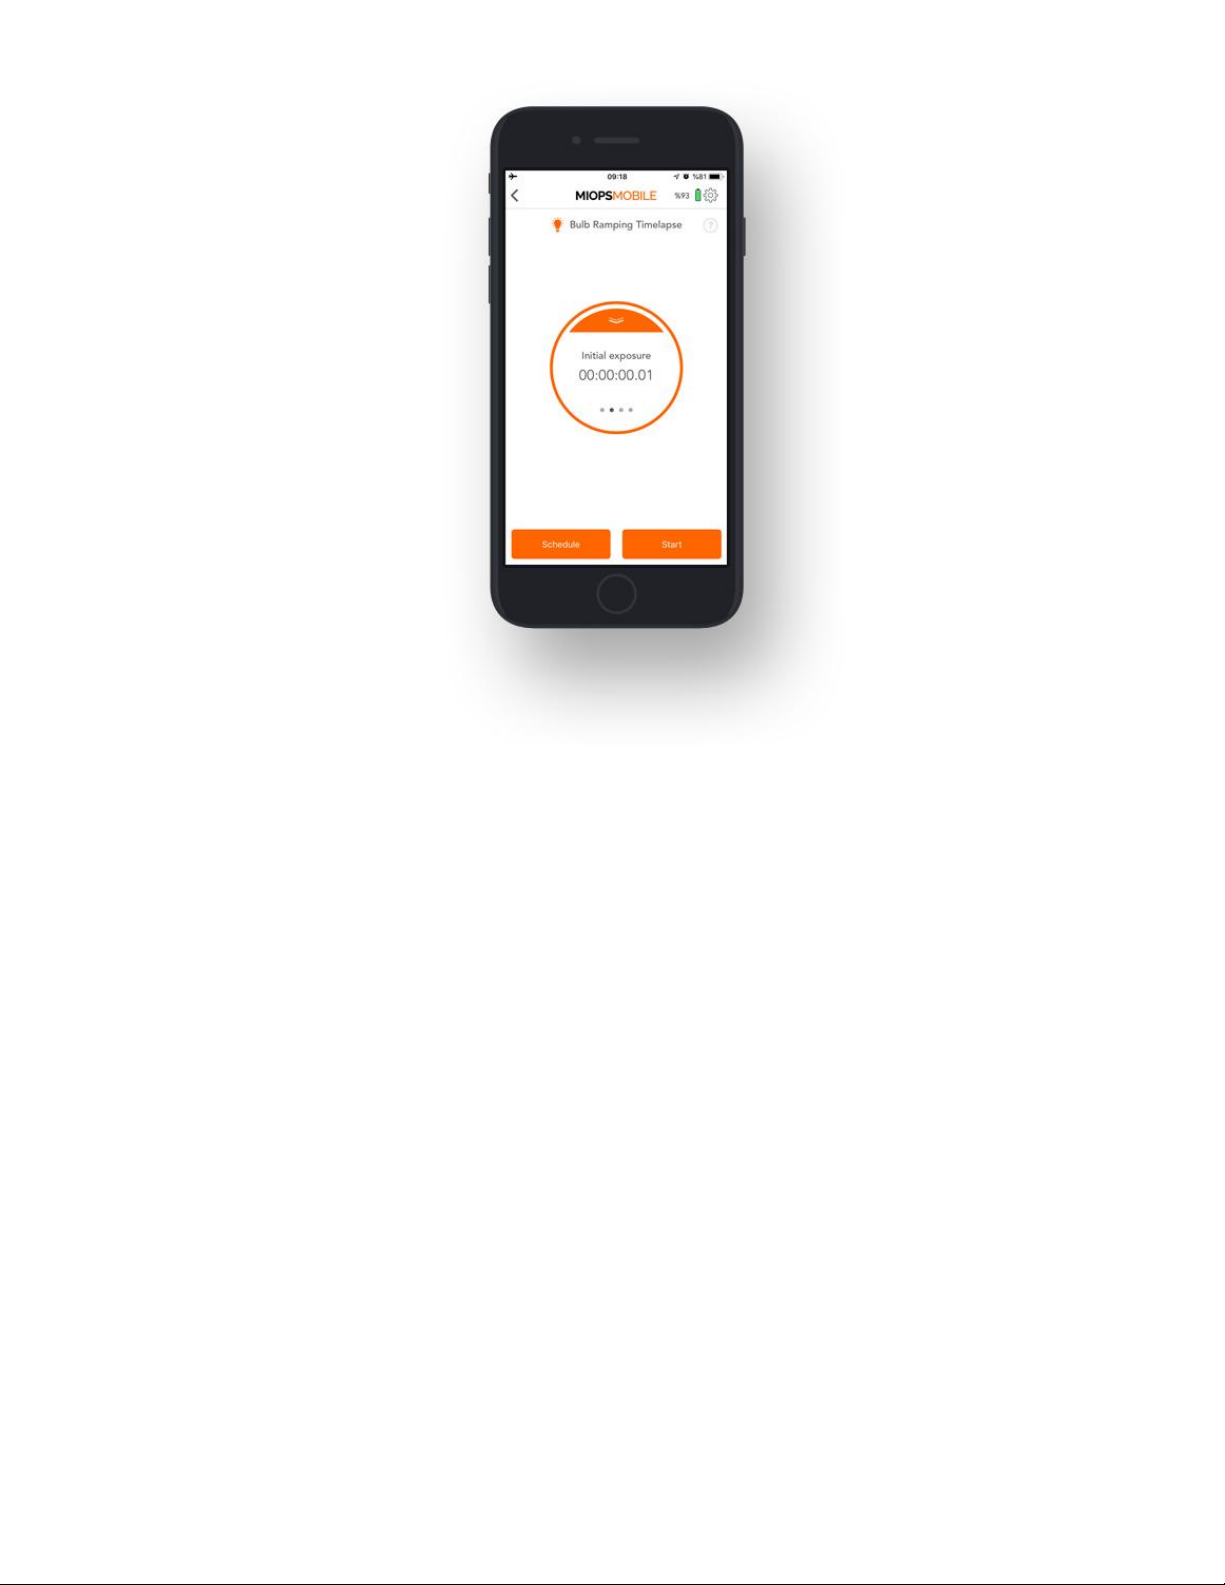
The Bulb Ramping Timelapse mode gives you the opportunity to take time-lapse photos with
Page 19

changing exposures. In regular time-lapse modes, all of the pictures will have the same
exposure. This can be enough for some cases, but sometimes the light changes throughout the
whole photo taking process. The exposure needs to be adjusted accordingly to avoid too dark
or too bright pictures. Bulb Ramping Timelapse mode takes care of that.
Interval: This parameter defines the duration between each frame. The Interval can have a
value from 13 milliseconds up to 100 hours.
Initial Exposure: This value defines the initial exposure value for each photo. You can set a
custom exposure up to 100 hours in milliseconds.
Final Exposure: This value defines the final exposure value for each photo. You can set a
custom exposure up to 100 hours in milliseconds.
Frame: This parameter defines how many pictures are to be taken. You can set the frame
number up to 99999. If you set the frame number to 0, this will mean that the time-lapse will
continue until you stop it.
The process starts with Initial Exposure. With each frame, the exposure will be changed towards
the final exposure linearly. At the final frame, the picture will have the final exposure. In order to
be able to create custom exposure, the camera must be in BULB mode; otherwise, all of the
pictures will have the same exposure.
The exposure value can have an ascending or descending change. This depends on the initial
and final exposure values. The change of exposure will be the same
between each frame.
After you have set all parameters, you can start the process by pulling the notch on the button
down and then touching the orange button.
Page 20
9.2.d. Road Lapse:
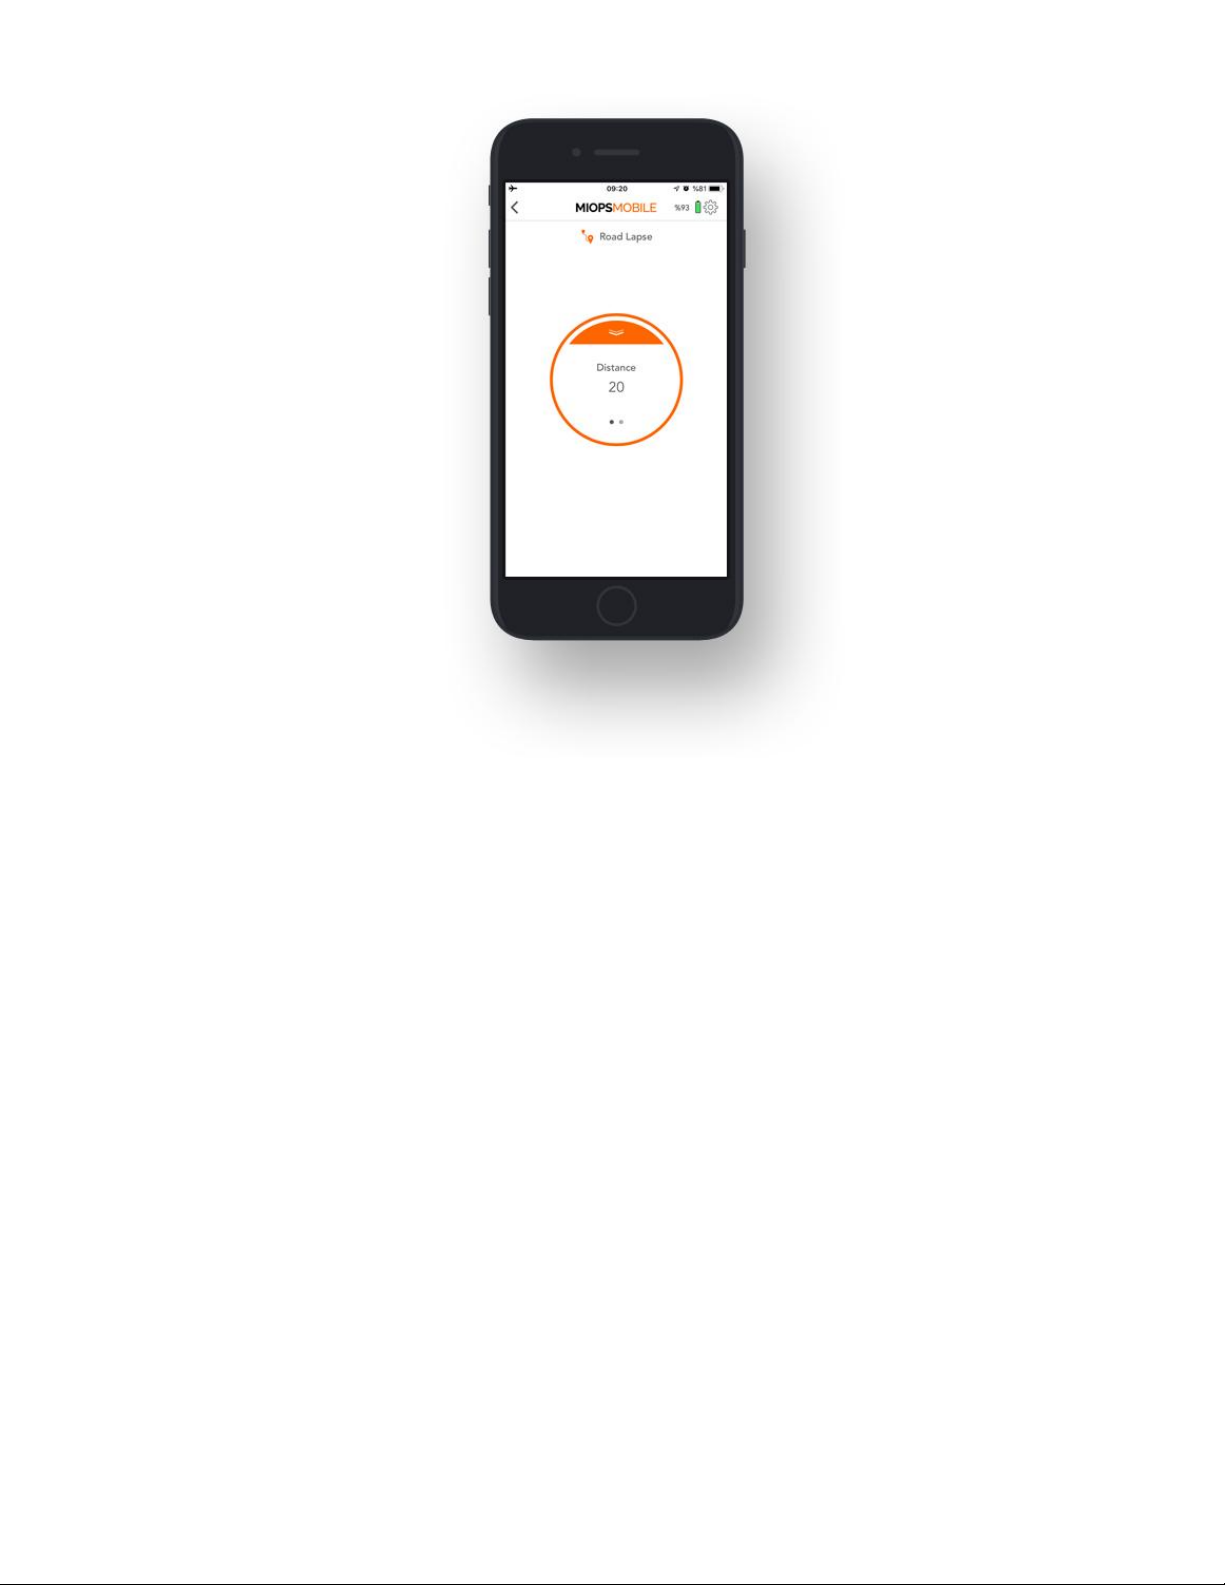
The Road Lapse mode uses GPS data from your smartphone. It takes a picture automatically
each time you pass the set distance with your vehicle. The distance unit can be either Meters or
Feet. You can set the distance unit under the Settings menu. This mode has two parameters,
Distance and Frame.
Distance: This parameter specifies how much you need to travel before triggering the camera
gain. You can set any value from 1 to 99999 in meters or feet. Please note that the GPS data of
smartphones have a certain level of accuracy. This usually ranges about 10 to 20 meters. This
can also change from phone to phone. So, if you set this value to a very low distance, the mode
might not work as expected. The distance must be coordinated with the accuracy of your
smartphone and the speed of your vehicle.
Frame: This parameter specifies how many pictures need to be taken. You can set the value
anywhere between 1 and 99999.
After you have set the parameters, you can pull the notch on the button and then touch the button
to start the process.
Page 21
9.2.e. HDR Timelapse:
The HDR Timelapse mode combines the time-lapse with HDR (High Dynamic Range) mode. In
other words, each frame of the time-lapse video will be an HDR photo.
This can be a complex goal to achieve, but the HDR Timelapse mode takes care of it very
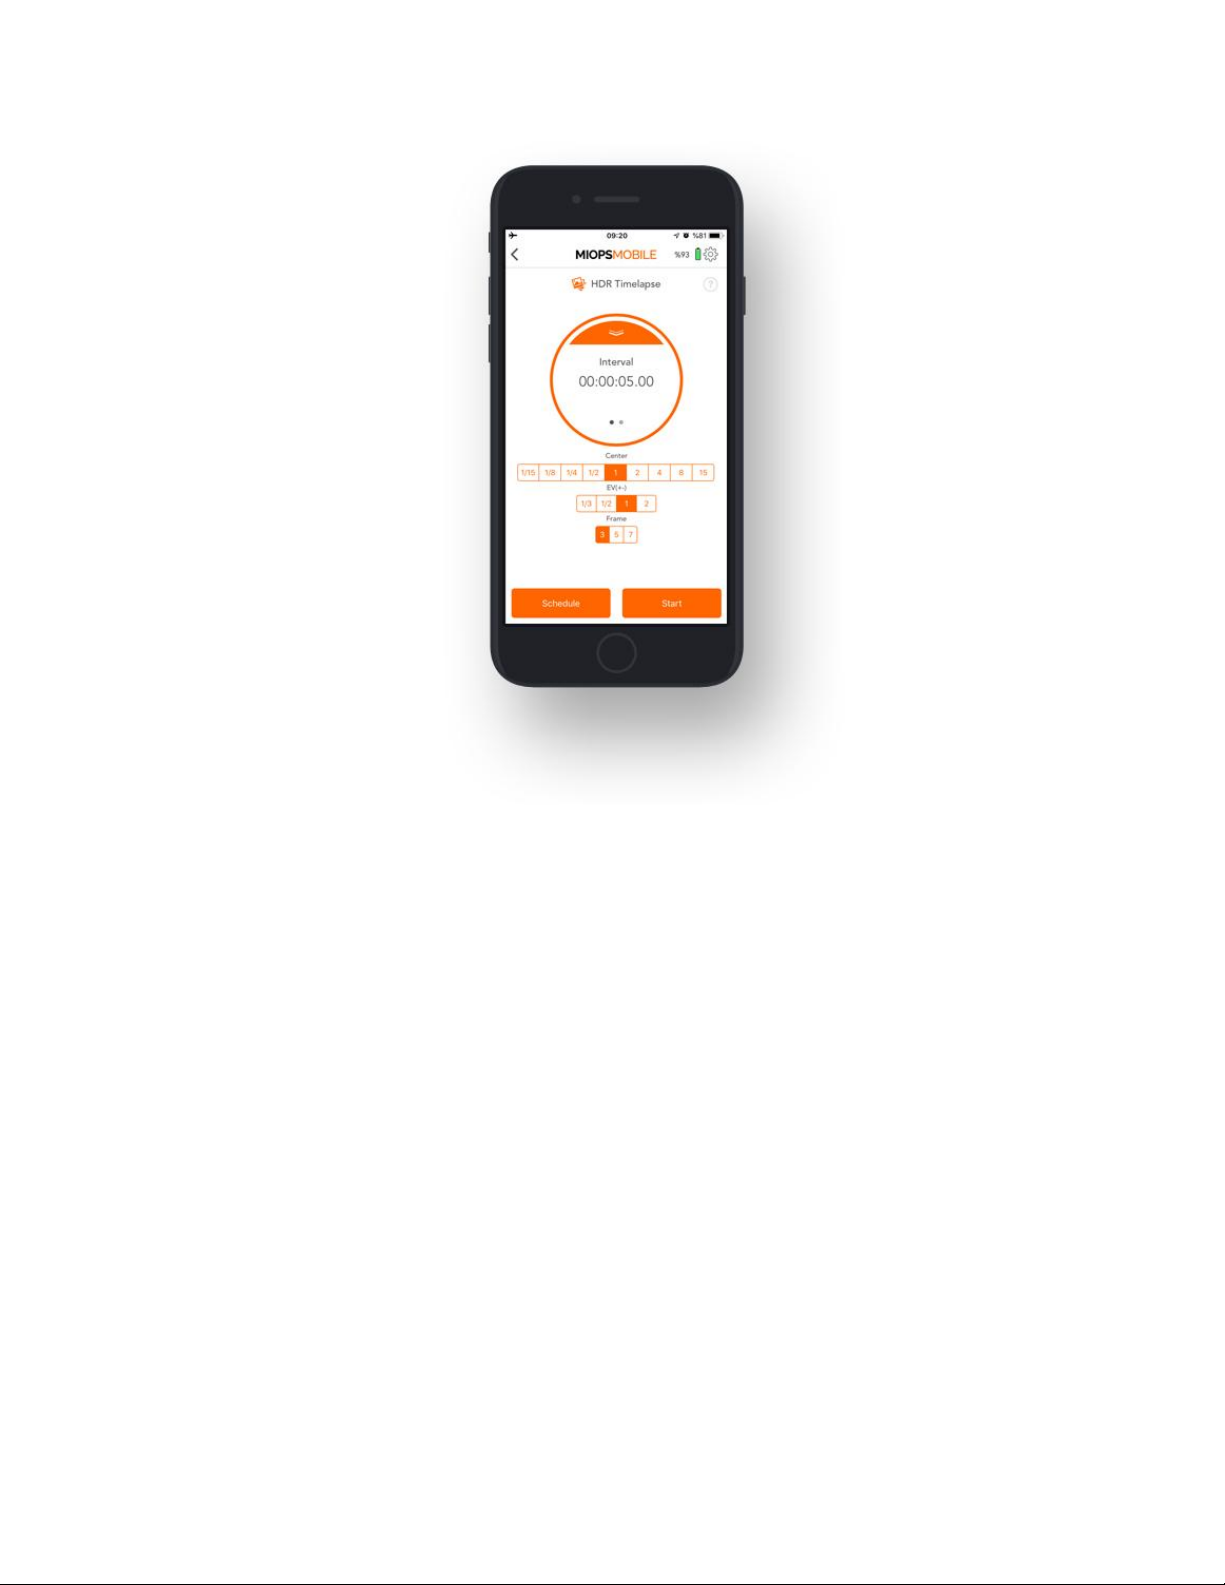
easily. This mode divides the screen into two parts. The upper part of the screen is about the
time-lapse parameters. You can set the Interval value and the number of photos required for the
time lapse video. The lower part of the screen shows the HDR settings The HDR part has three
parameters to be adjusted, Center, EV(+-), and Frame.
Center: This parameter shows the exposure value that will sit in the middle of the sequence.
EV(+-): This parameter shows how many stops each change will be.
Frame: This parameter shows how many pictures are to be taken for an HDR photo.
For the limitations of the HDR Timelapse mode, please see the warning in the HDR Mode
Page 22
section.
9.2.f. HDR:
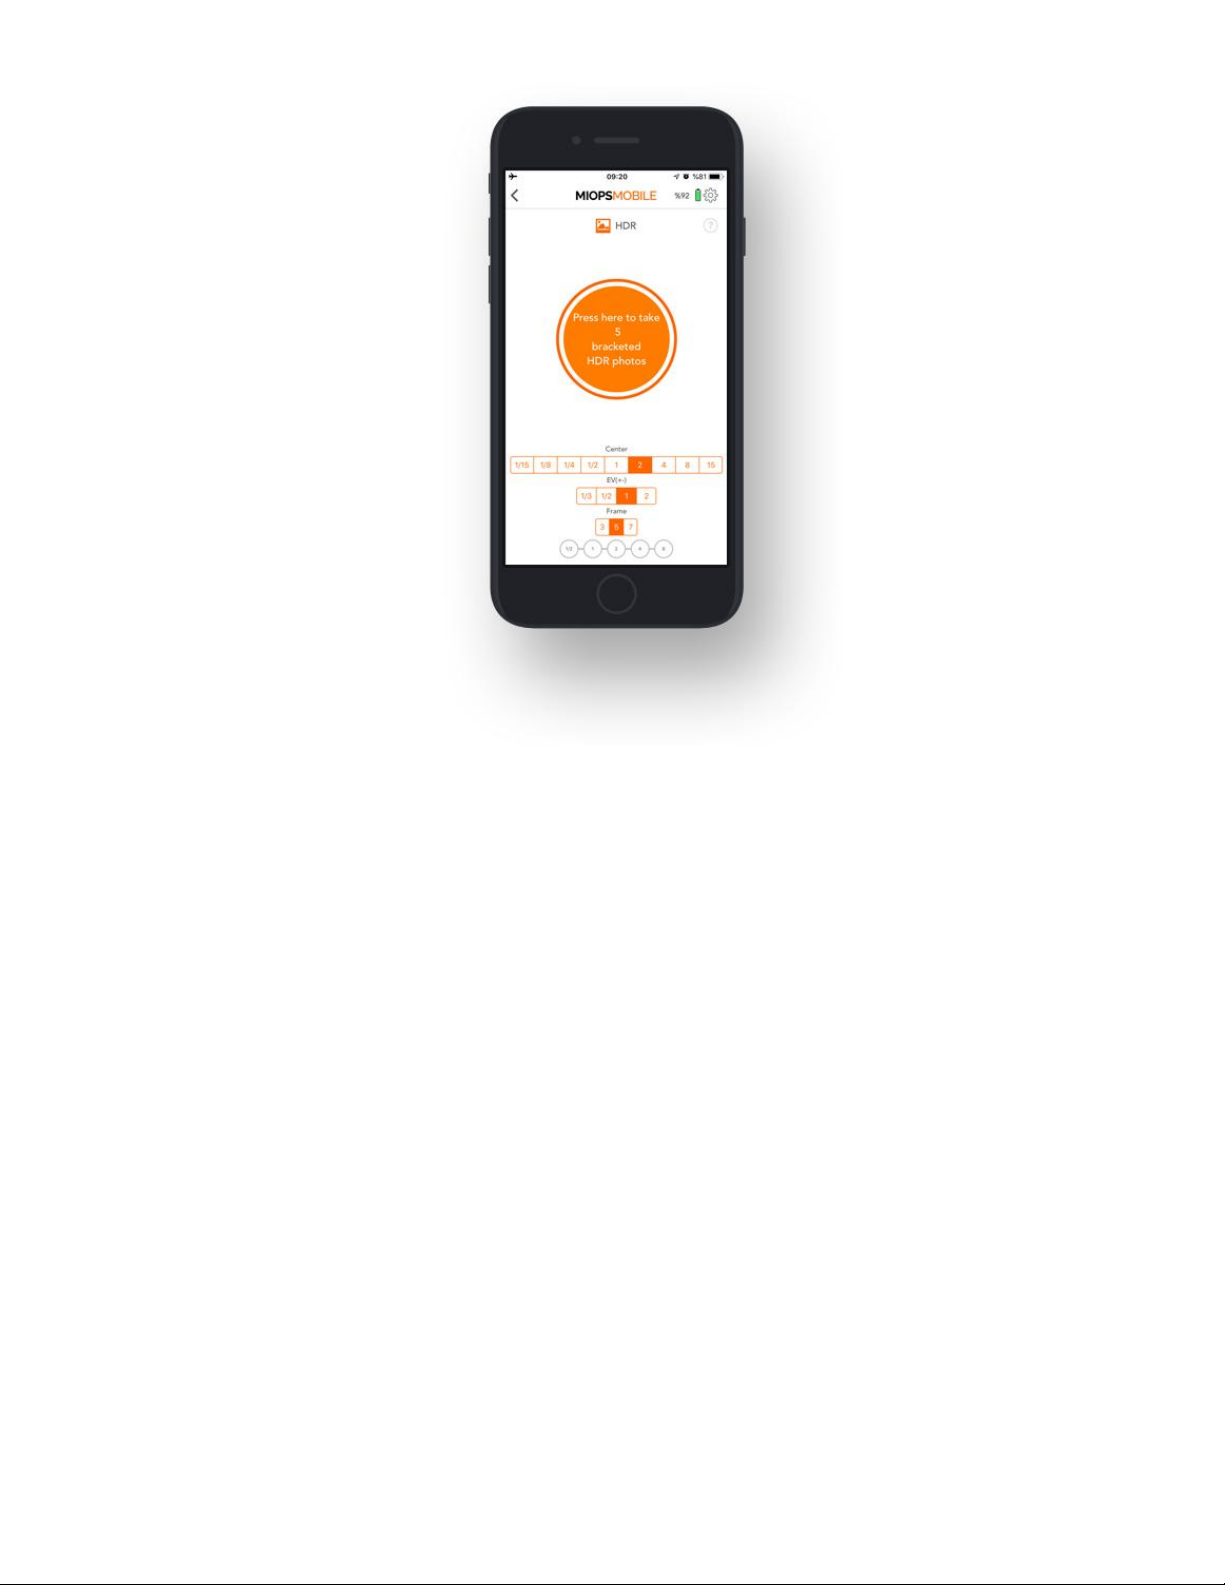
The HDR mode will take pictures with different exposures automatically, so you can later
combine them to make an HDR photo. This mode is based on three parameters. These are
Center, EV(+-) and Frame. HDR mode takes pictures in odd numbers (3, 5 and 7). The photo in
the middle of the sequence (respectively 2nd, 3rd, and 4th) will have the center exposure value.
The other photos will have changing exposures starting from the lower end up to the higher end.
The other exposure values are calculated with the number of stops between each frame per the
total frame number.
Warning: The HDR functionality is provided with the BULB mode of the camera. The camera
must be in BULB mode; otherwise, all of the photos will have the same exposure. The shutter
speed you can achieve over the shutter release port is limited. In most cameras, you cannot get
faster than 1/30th of a second from the cable release port. Because of this limitation, some
EV(+-) and Frame values will be disabled for some Center values.
Page 23
9.2.g. Stormlapse:
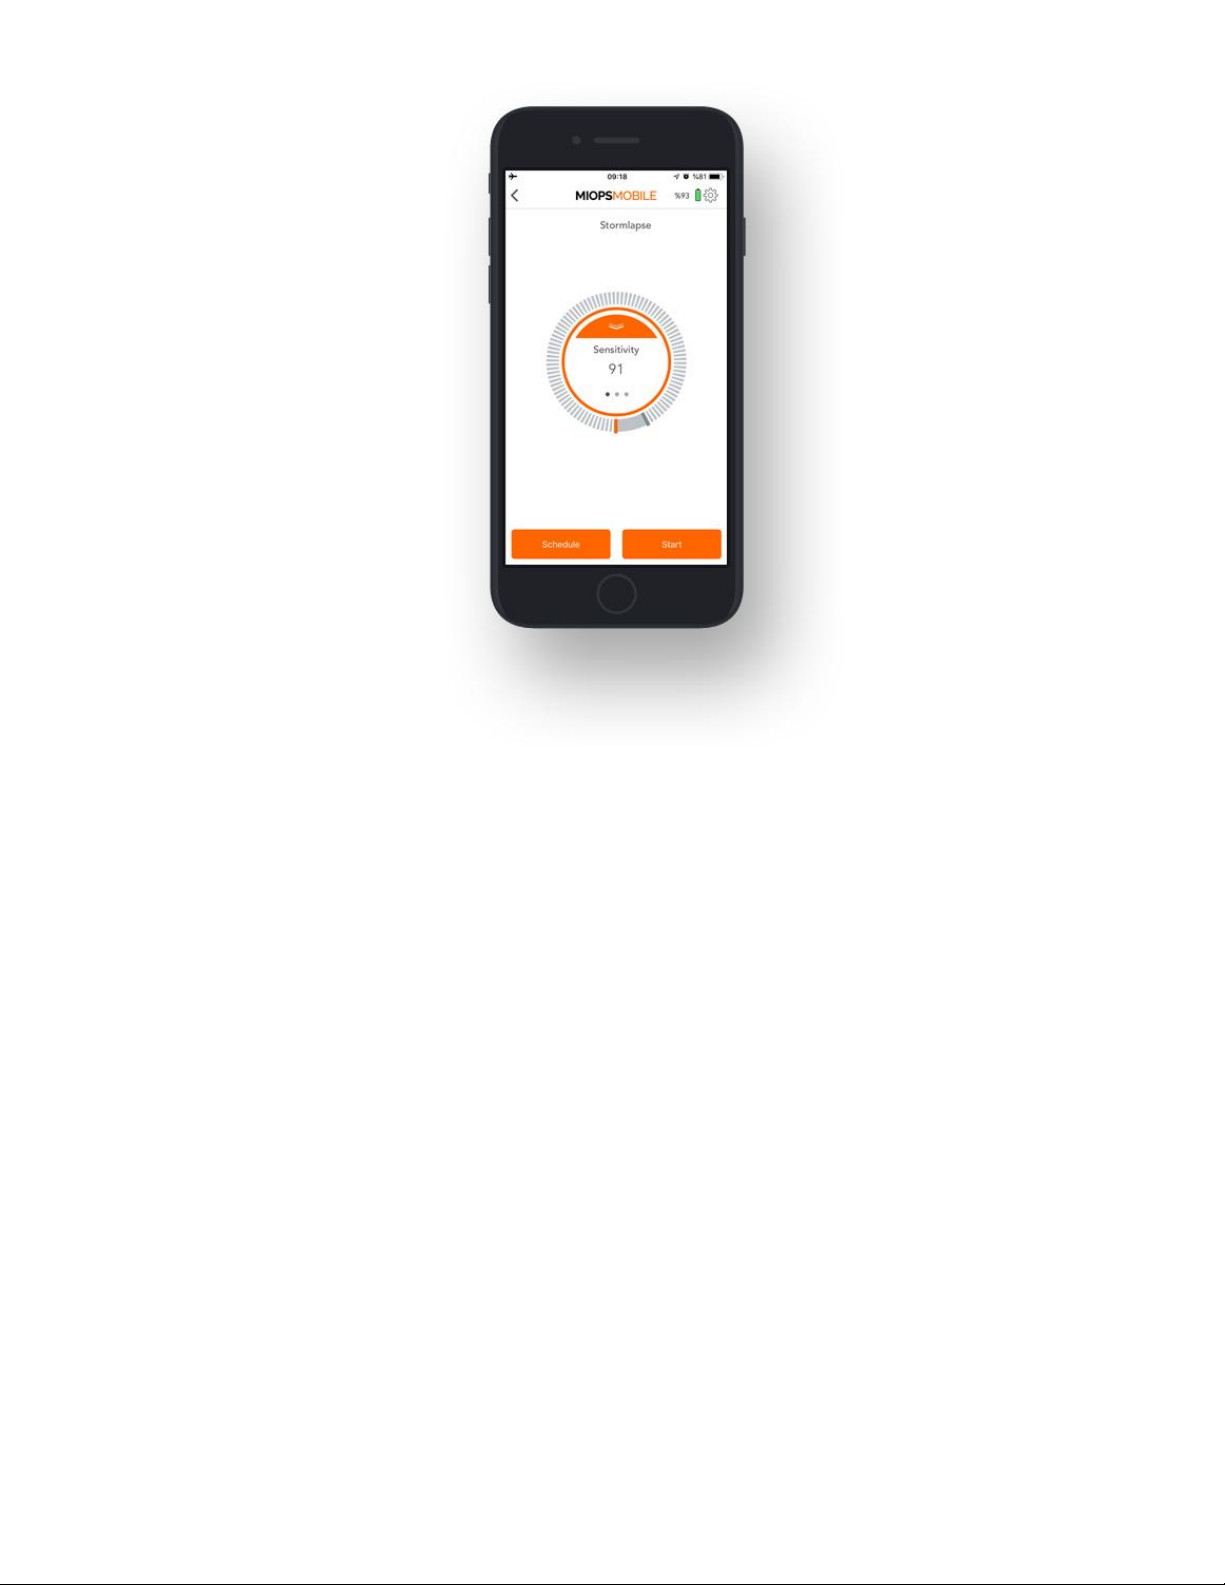
This mode is a combination of Timelapse and Lightning modes. You can take lightning photos
while timelapse is in progress without disturbing your time-lapse sequence. This mode has 3
parameters:
Sensitivity: This value determines the sensitivity level of your device for lightning. The higher
the value you set, the more sensitive it will be. You can move the threshold bar around the button
by touching the grey bar.
Interval: This parameter defines the duration between each frame for timelapse. The Interval
can have a value from 13 milliseconds up to 100 hours.
Frame: This parameter defines how many pictures are to be taken for timelapse. You can set
the frame number up to 99999. If you set the frame number to 0, this will mean that the timelapse will continue until you stop it.
Page 24
9.2.h. Timewarper:
The Timewarper is very similar to the Bulb Ramping mode. Different than Bulb Ramping mode,
this mode changes the interval between each frame rather than changing the exposure. So that
you can speed up or down some parts of your time-lapse video. This mode has 3 parameters
and a warper setting.
Interval: This parameter defines the duration between each frame. The Interval can have a
value from 13 milliseconds up to 100 hours.
Exposure: This value defines the exposure value for each photo. You can set a custom
exposure up to 100 hours in milliseconds.
Frame: This parameter defines how many pictures are to be taken. You can set the frame
number up to 99999. If you set the frame number to 0, this will mean that the time-lapse will
continue until you stop it.
Warper Setting: This area allows you to change the speed of the timelapse by changing the
Page 25
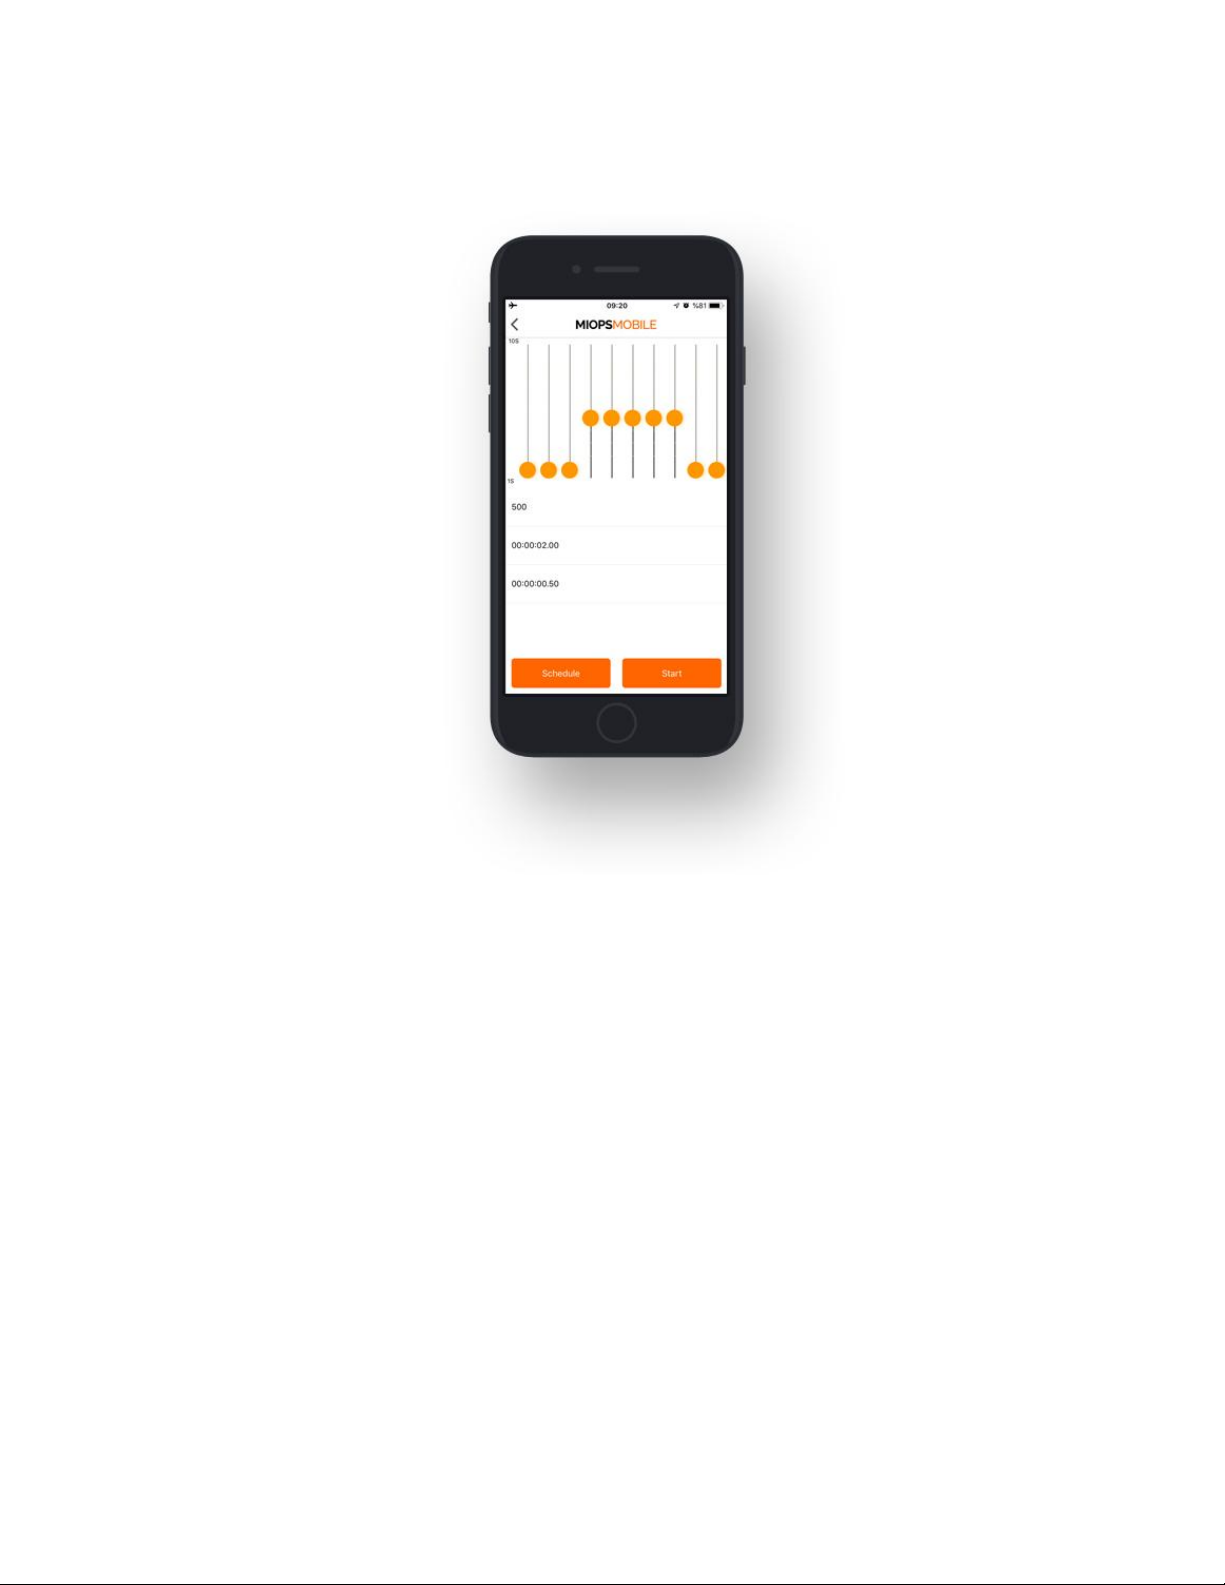
interval for the specified area. The whole timelapse process is divided into 10 equivalent range
by default. You can change the speed of each area by changing the interval. The longer the
interval you set, the faster the video in this range.
9.3. SMARTPHONE SENSOR MODES
These modes use the smartphone's sensors to detect the events and trigger your camera or
flash.
9.3.a. Sound:
The Sound Mode uses the microphone of your smartphone to detect sound events. It has three
parameters:
Threshold: This value determines the level of the sound that must be exceeded to trigger. The
measured sound level will we displayed in real time with orange bars. This will help you to
understand where to set the threshold approximately to filter out the environment noise. You can
move the threshold bar around the button by touching the grey bar.
Page 26
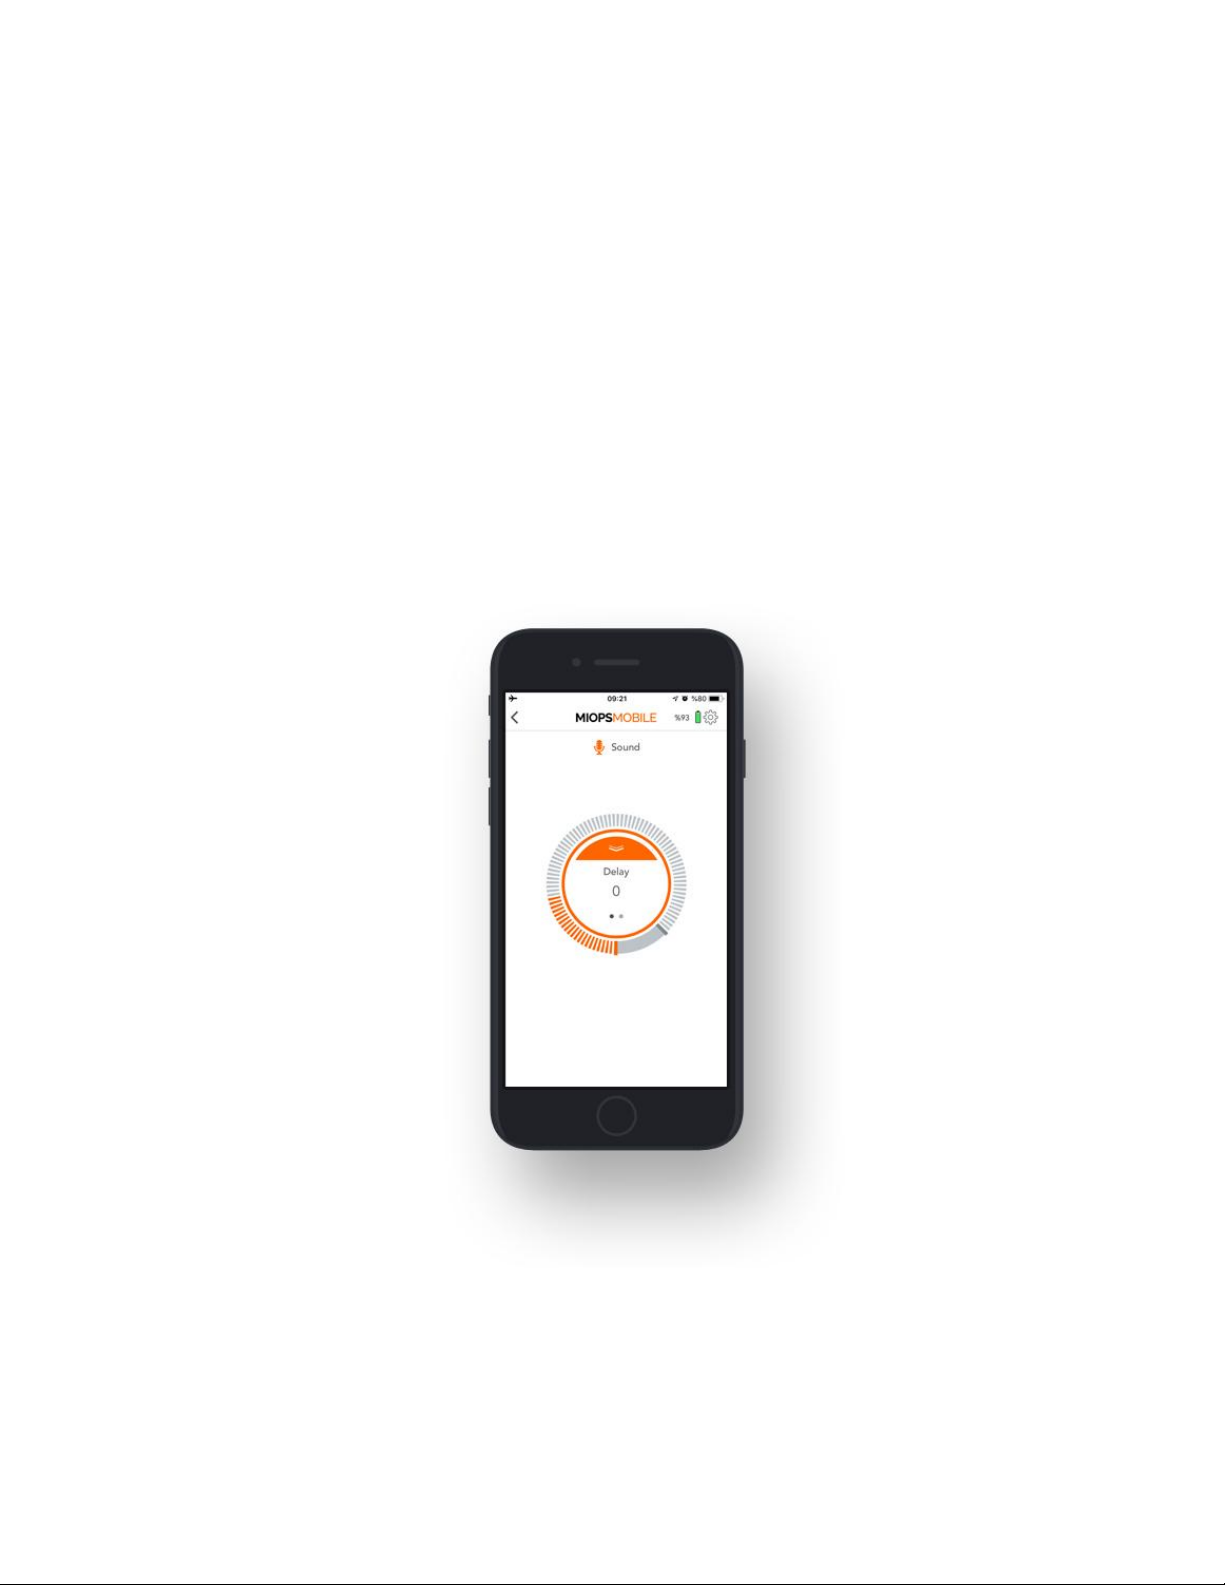
Delay: This parameter defines the duration between the detection of the sound and the
triggering of the camera. You can define the delay anywhere from 0 up to 999 milliseconds.
Mode: You can select one of the two possible modes. The modes are the “Continuous Shot”
and the “Single Shot”. In the “Continuous Shot” mode, it will trigger the camera each time a
sound event is detected. This can cause multiple pictures to be taken or multiple triggering of
the flash. If you don’t want this to happen, you can select the “Single Shot” mode. In this mode, it
will trigger the camera only once, and then it will stop. You will need to start the sound mode
running again to take another picture.
In the sound mode, the distance between your sound source and the smartphone can make a
difference. Due to the propagation speed of the sound, you may want to bring the smartphone
closer to the sound source.
9.3.b. Vibration:
The Vibration mode is very similar to the Sound mode. The only difference is that vibration
events are detected to trigger the camera or the flash.
Page 27
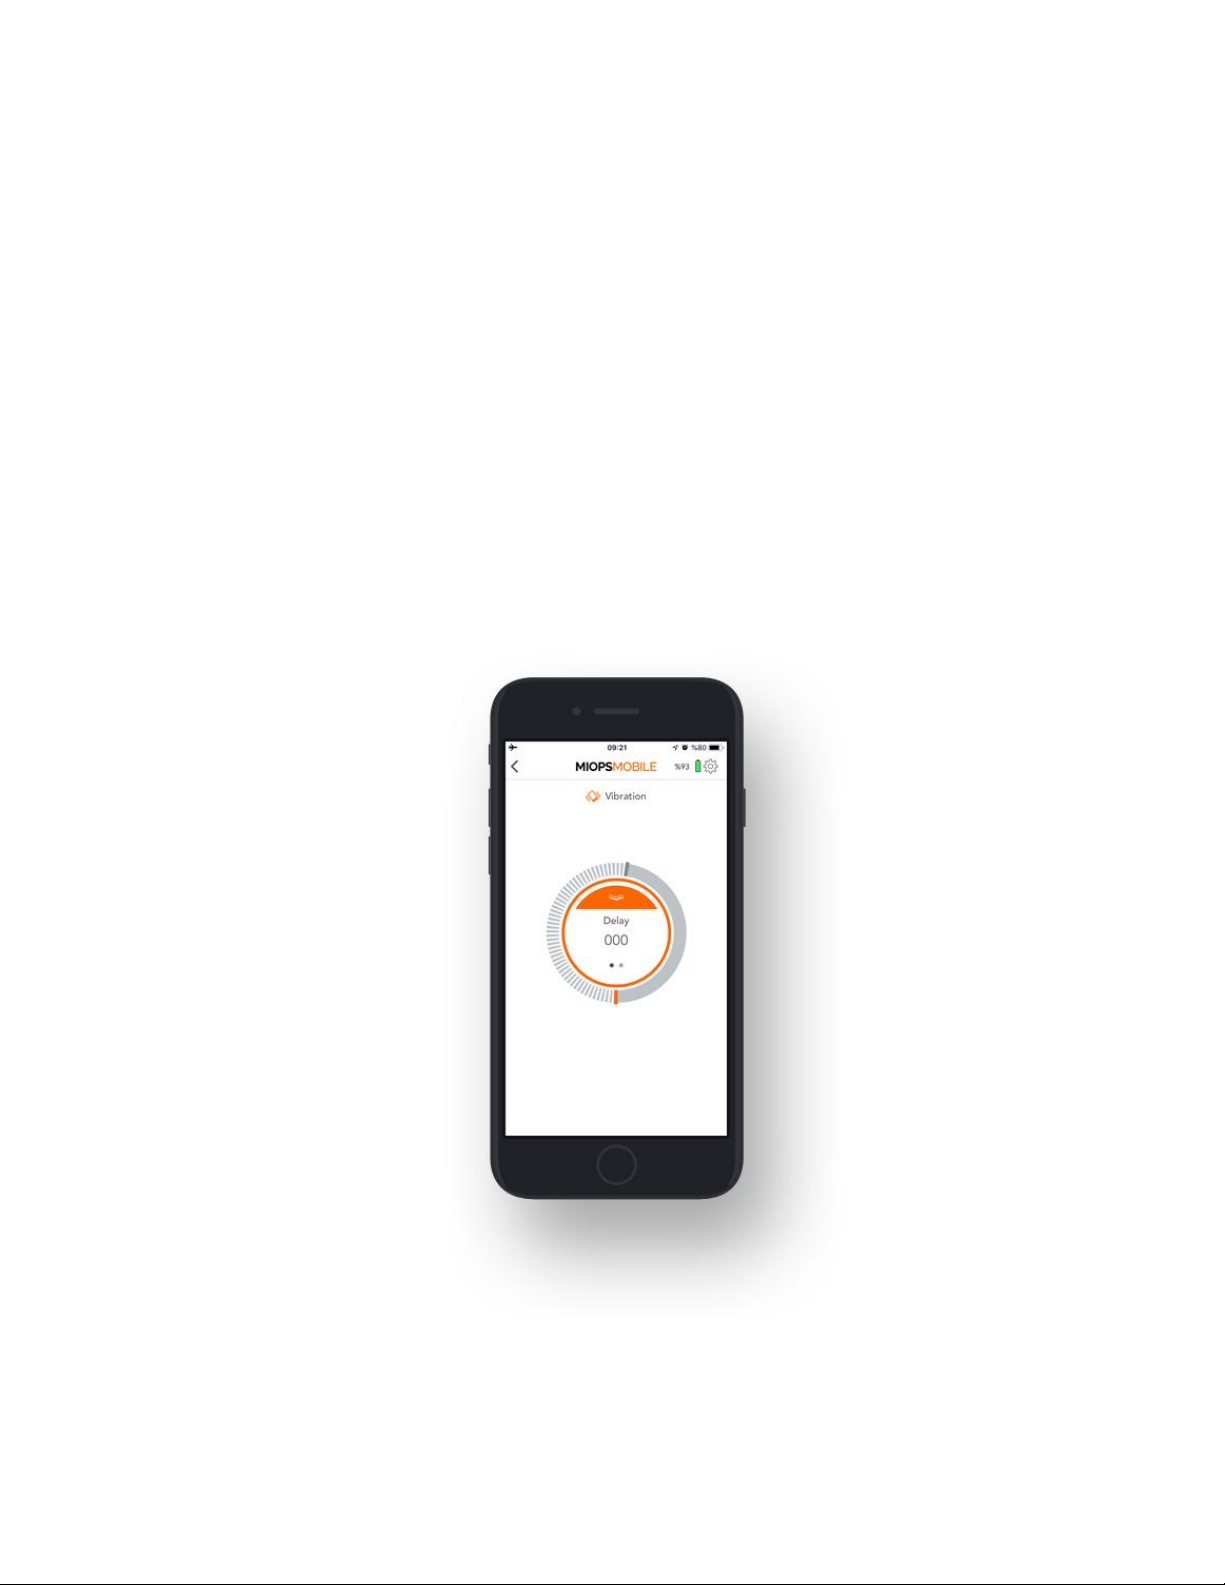
Threshold: This value determines the level of the vibration that must be exceeded to trigger.
The measured vibration level will be displayed in real time with orange bars. This will help you to
understand where to set the threshold approximately to filter out the environment vibration. You
can move the threshold bar around the button by touching the grey bar.
Delay: This parameter defines the duration between the detection of the vibration and the
triggering of the camera. You can define the delay anywhere from 0 up to 999 milliseconds.
Mode: You can select one of the two possible modes. The modes are the “Continuous Shot”
and the “Single Shot”. In the “Continuous Shot” mode, the MIOPS Mobile will trigger the camera
each time vibration is detected. This can cause multiple pictures to be taken or multiple
triggering of the flash. If you don’t want this to happen, you can select the “Single Shot” mode. In
this mode, it will trigger the camera only once, and then it will stop. You will need to start the
vibration mode running again to take another picture.
9.3.c. Motion:
The Motion Mode uses the camera of your smartphone to detect motion in the view area. You
can aim the camera to the area that you want to observe. When a motion is detected, it will
Page 28
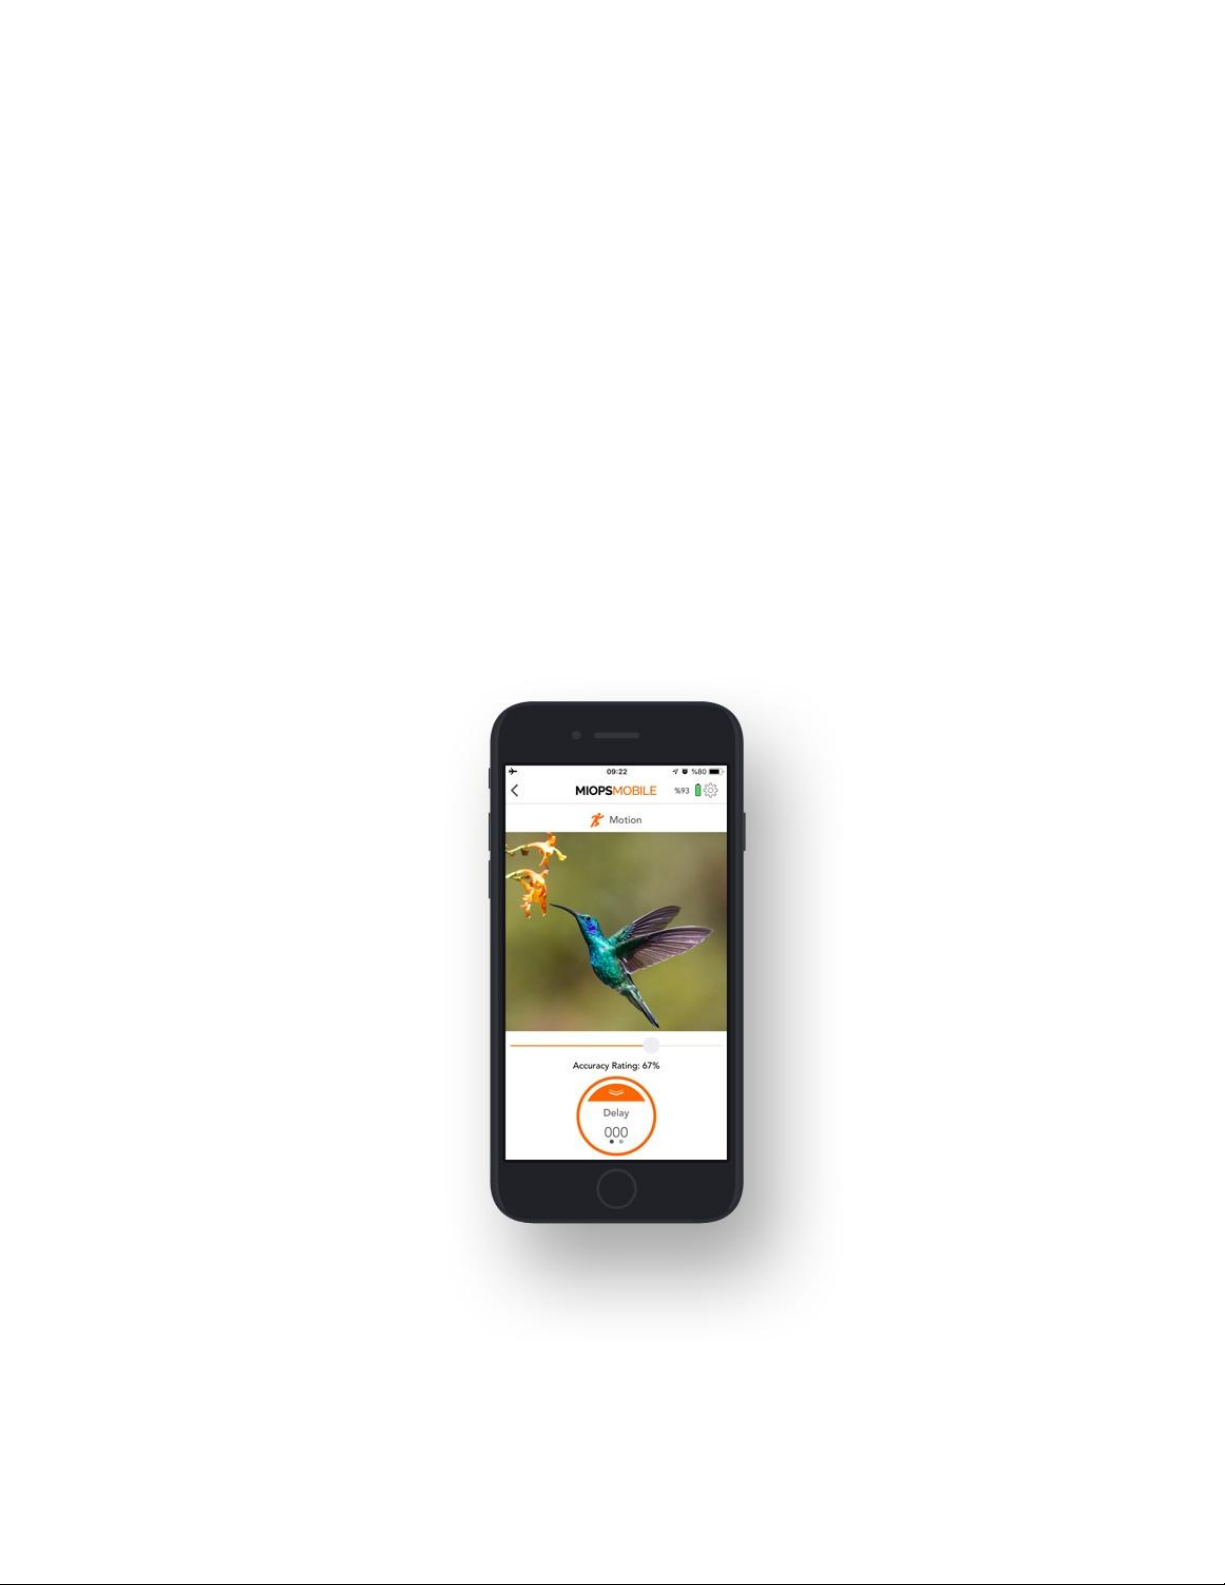
trigger your camera or flash. This mode has three different parameters.
Accuracy (Sensitivity): Just below the video screen, you will see horizontal adjustment scale.
You can move the grey bar on the scale to the right or left to determine the sensitivity. If you
move the bar to the right, the sensitivity will be increased. In this case, you will be able to detect
motion events that are further away from the smartphone. If you move the bar to the left, the
sensitivity will be decreased. If you do this, you will be able to detect motions that happen in an
area which is relatively closer to the smartphone.
Delay: It determines the duration between the motion and the triggering of your camera.You can
define the delay anywhere from 0 up to 999 milliseconds.
Frame: This parameter defines how many pictures to be taken in case motion is detected.
Once a motion is detected, it will trigger the camera for so many times defined with the Frame
parameter. You can set the frame the number all the way up to 99999.
9.4. DEVICE SENSOR MODES
These modes use the internal sensors to detect the events and trigger your camera or flash.
Page 29
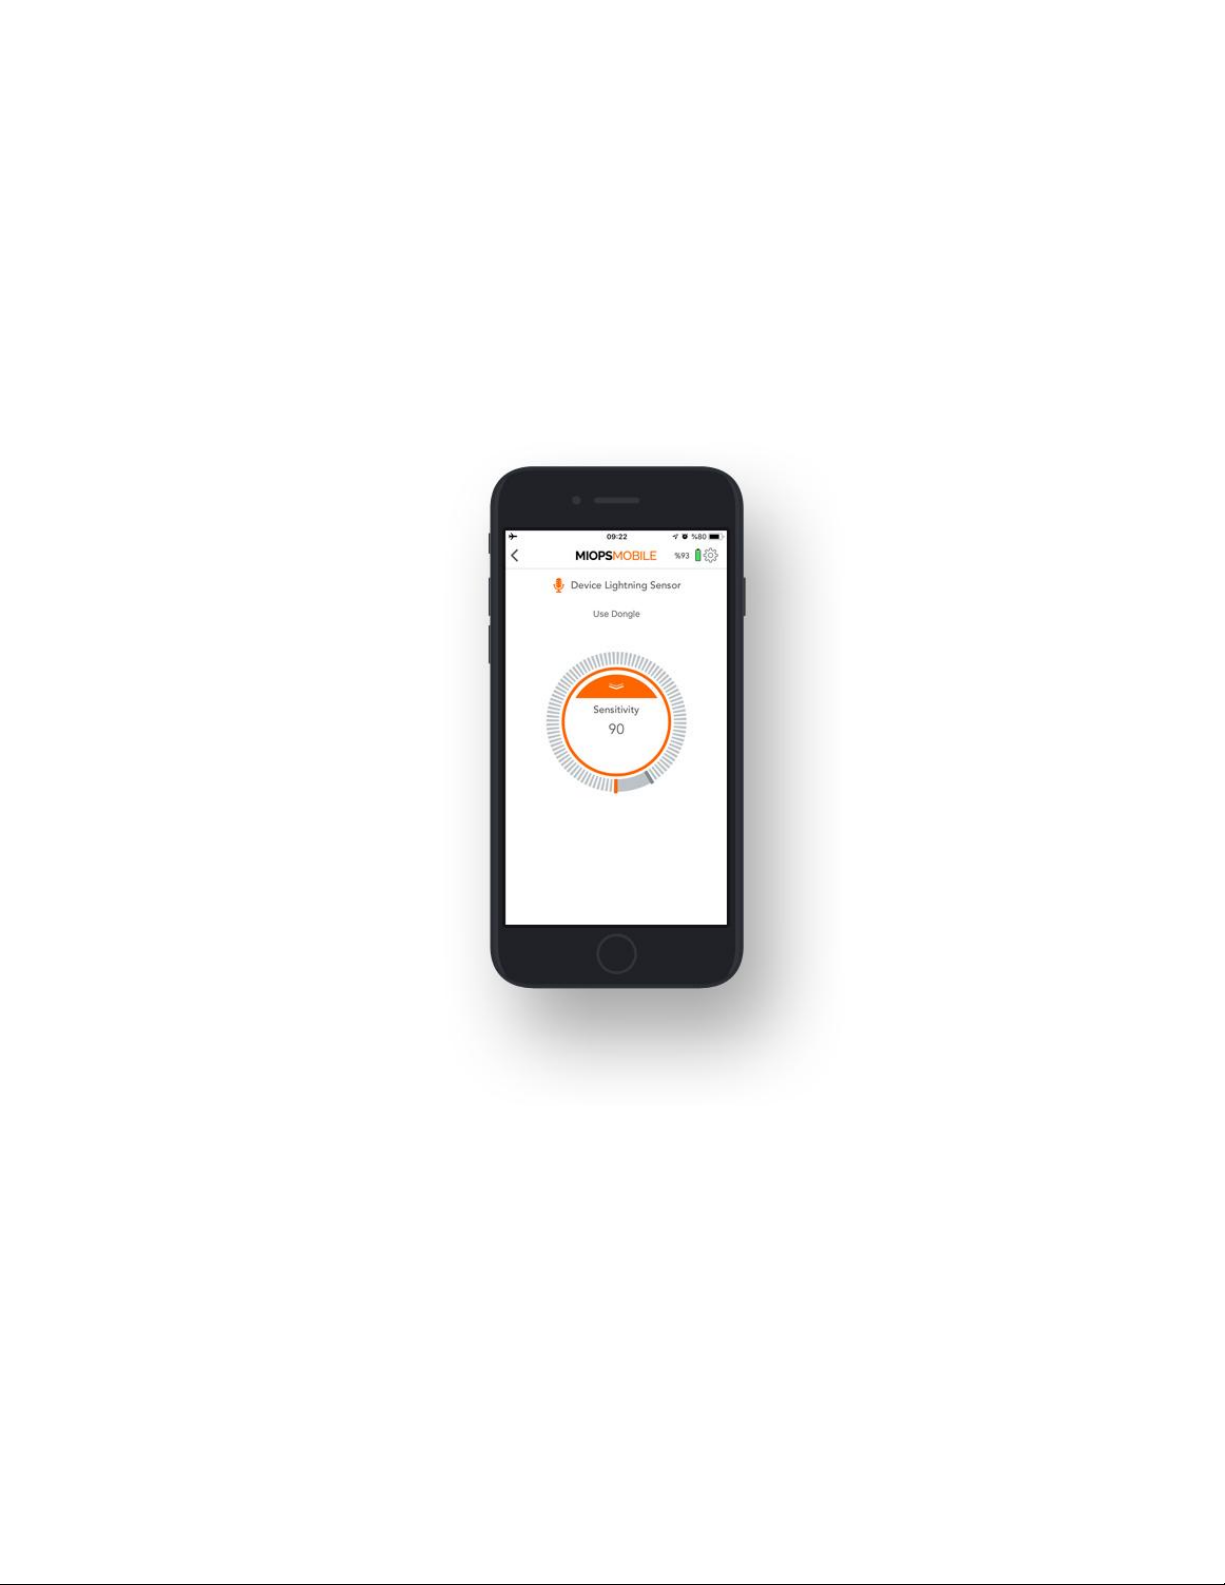
9.4.a. Lightning:
The Lightning Mode uses the internal light sensor to detect lightning events. It has a single
parameter:
Sensitivity: This value determines the sensitivity level of your device. The higher the value you
set, the more sensitive it will be. You can move the threshold bar around the button by touching
the grey bar.
9.4.b. Sound:
The Sound Mode uses the internal microphone to detect sound events. It has three parameters:
Sensitivity: This value determines the sensitivity of the device. The higher the value you set, the
more sensitive it will be. You can move the threshold bar around the button by touching the grey
bar.
Delay: This parameter defines the duration between the detection of the sound and the
Page 30
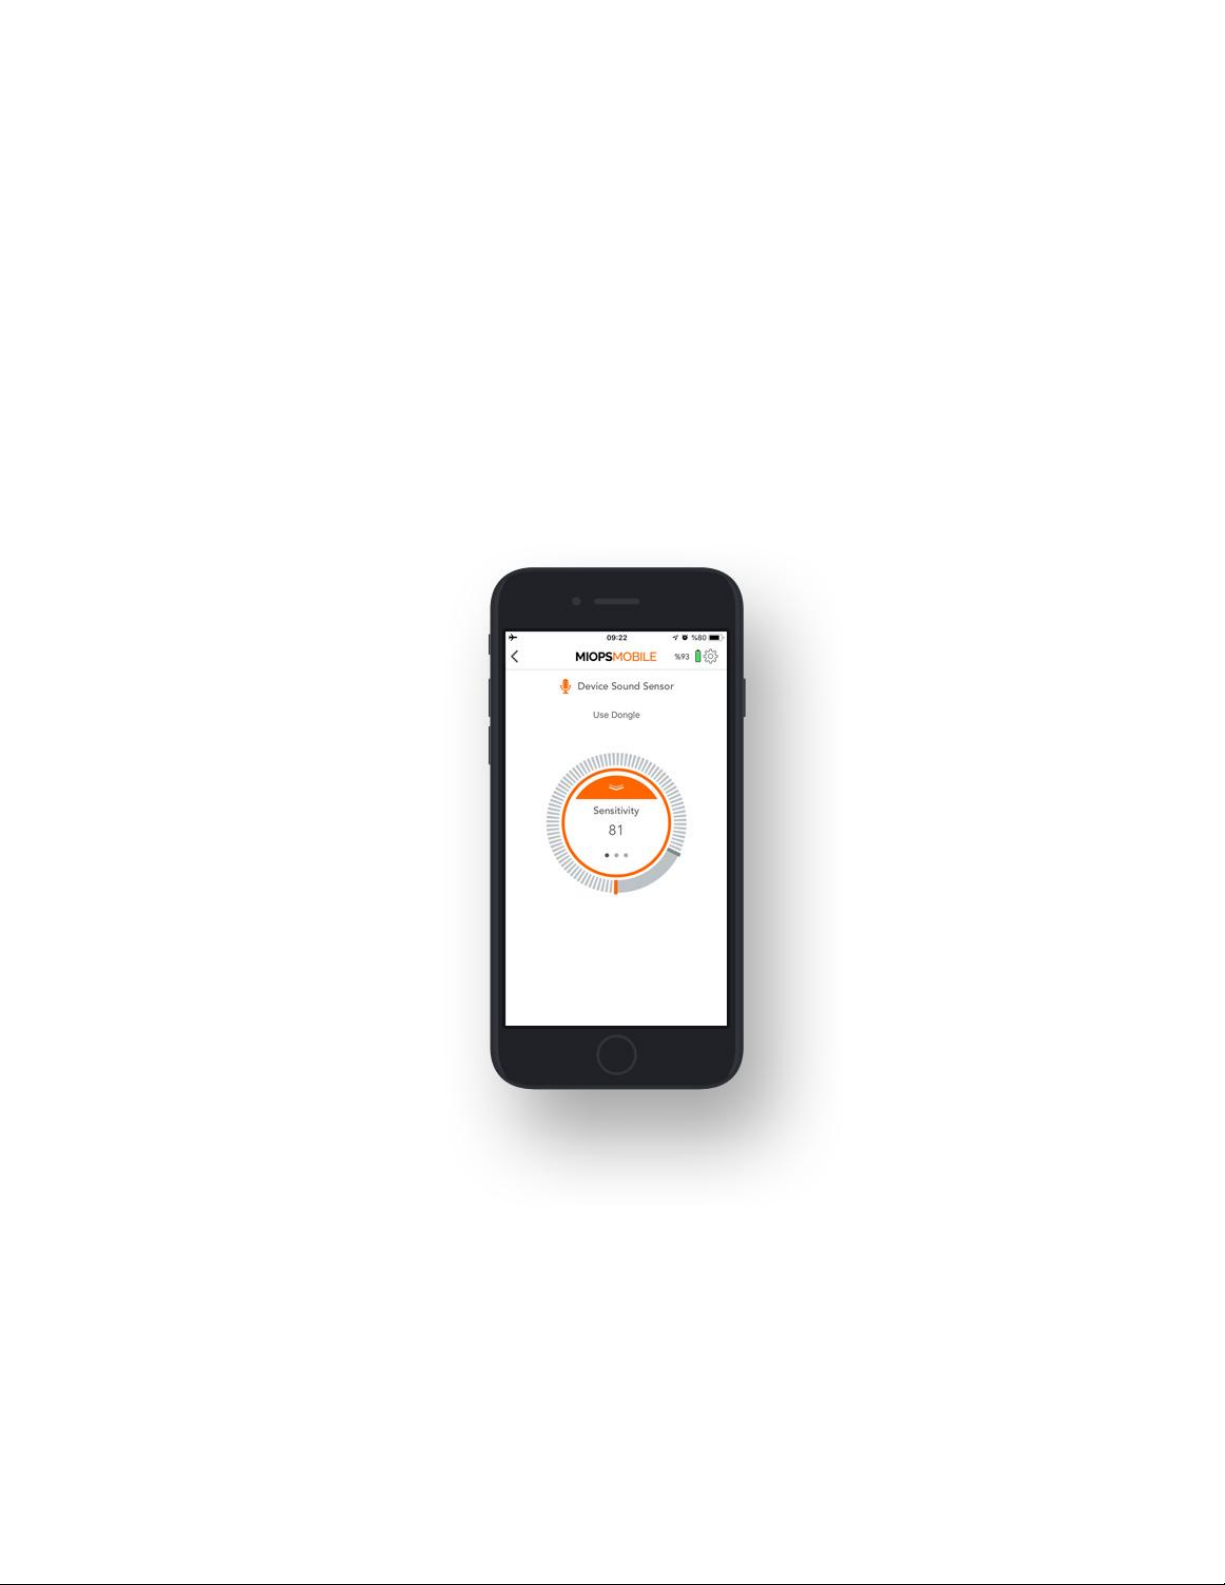
triggering of the camera. You can define the delay anywhere from 0 up to 999 milliseconds.
Mode: You can select one of the two possible modes. The modes are the “Continuous Shot”
and the “Single Shot”. In the “Continuous Shot” mode, it will trigger the camera each time a
sound event is detected. This can cause multiple pictures to be taken or multiple triggering of
the flash. If you don’t want this to happen, you can select the “Single Shot” mode. In this mode, it
will trigger the camera only once, and then it will stop. You will need to start the sound mode
running again to take another picture.
In the sound mode, the distance between your sound source and the device can make a
difference. Due to the propagation speed of the sound, you may want to bring the device closer
to the sound source.
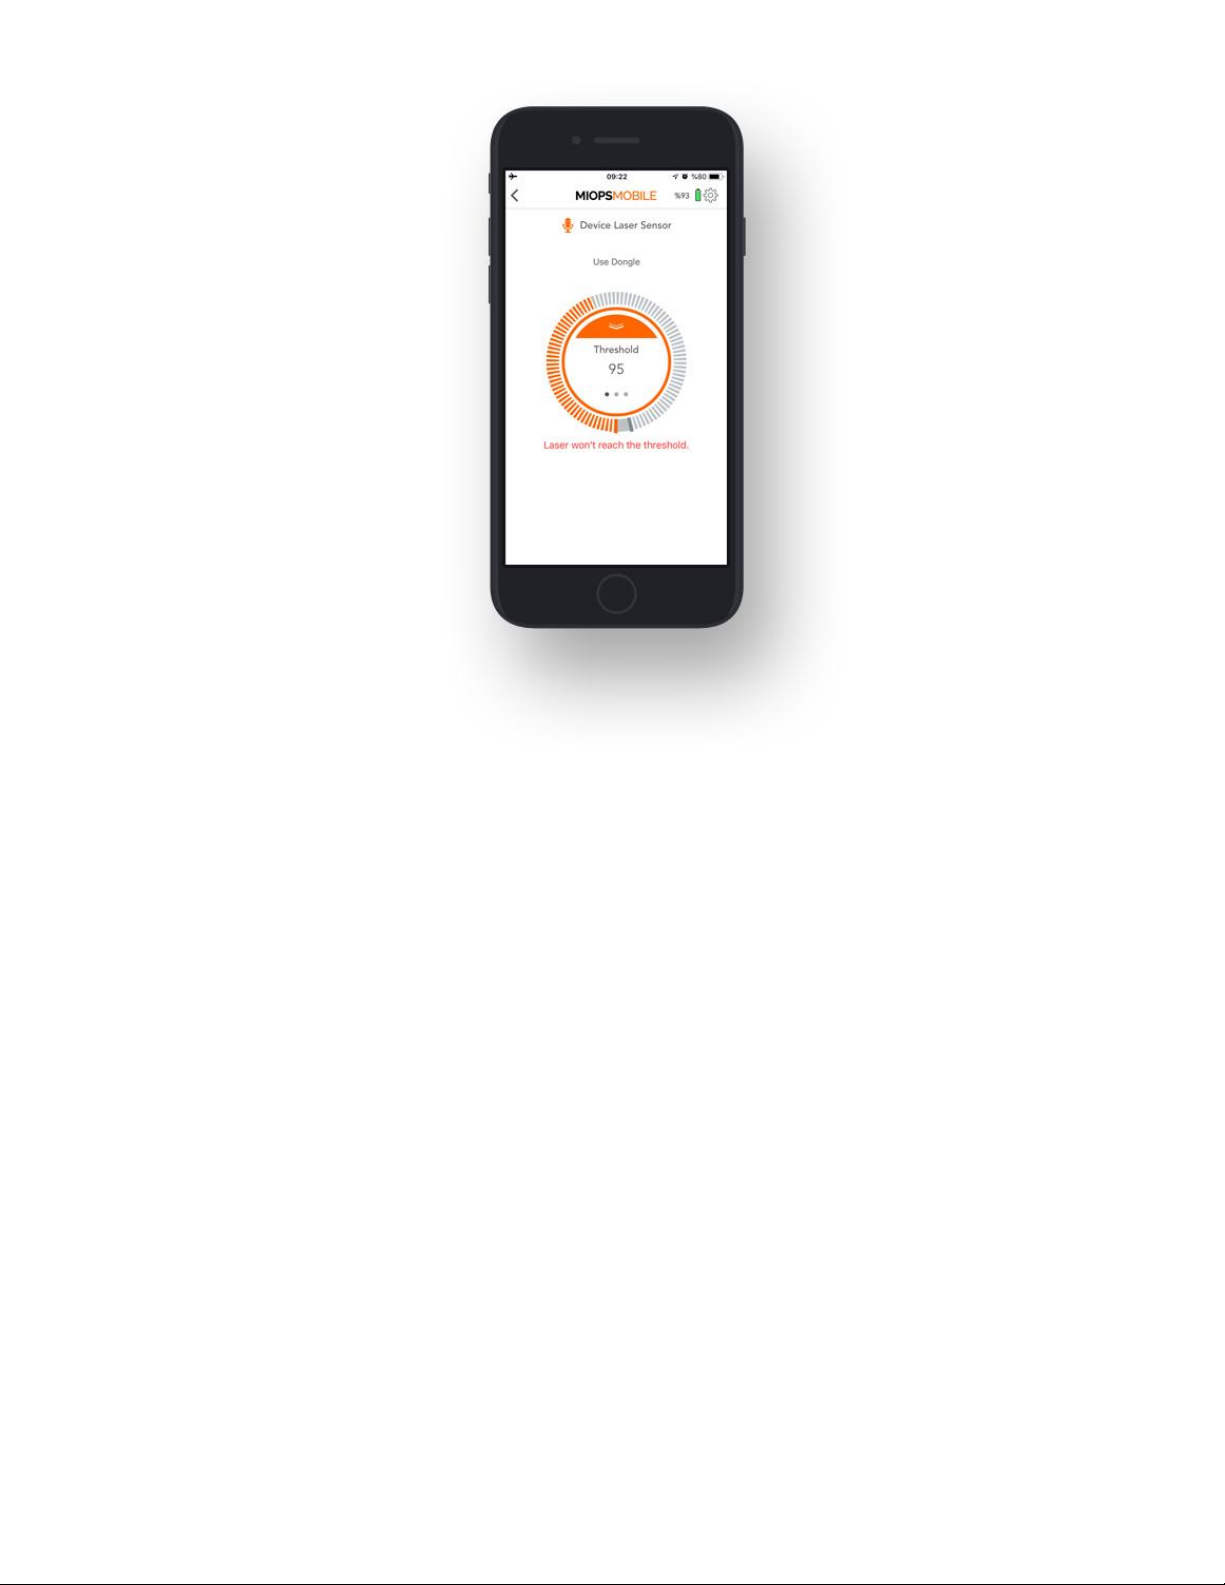
9.4.c. Laser:
The laser mode requires an external laser pointer (should be purchased separately). This mode
is based on the existence of a laser beam fed to the optical receiver of the device. It will trigger
your camera or flash unit whenever the beam is broken. You can use a regular laser pen or
pointer as the laser source. The color of the laser does not make any difference. The Laser
Mode has three parameters:
Page 31

Threshold: This value determines the level of the light that will be considered as a laser. The
measured light level will be displayed in real time with orange bars. This will help you to
understand where to set the threshold approximately to filter out the environment light. You can
move the threshold bar around the button by touching the grey bar.
Delay: This parameter defines the duration between the detection of the laser break and the
triggering of the camera. You can define the delay anywhere from 0 up to 999 milliseconds.
Frame: This parameter defines how many pictures to be taken in case the laser beam is
broken. Once the laser beam is broken, it will trigger the camera for so many times defined with
the Frame parameter. You can set the frame the number all the way up to 99999.
The laser mode requires a consistent laser beam to be fed to the optical receiver of the
device. The receiver is located on the front face of the device. The receiver is behind a
transparent window and there is an optical lens on the window. The lens will help to focus the
laser beam to the receiver.
The laser beam must hit the lens on the window. A slight movement of the laser source can
move the beam away from the receiver, so make sure that both the laser source and the device
are firmly mounted on a steady stand. After you have firmly mounted the laser source and the
device, if the laser beam is correctly aligned to the receiver, the message on the screen will turn
from "Laser won't reach the threshold" to "Laser trap ready". Seeing a constant "Laser trap
ready" message on the screen is the first condition of the laser mode.
WARNING: Please take every possible safety caution while you are working with a laser. Never
point the laser to your eyes, other people and animals.
Page 32
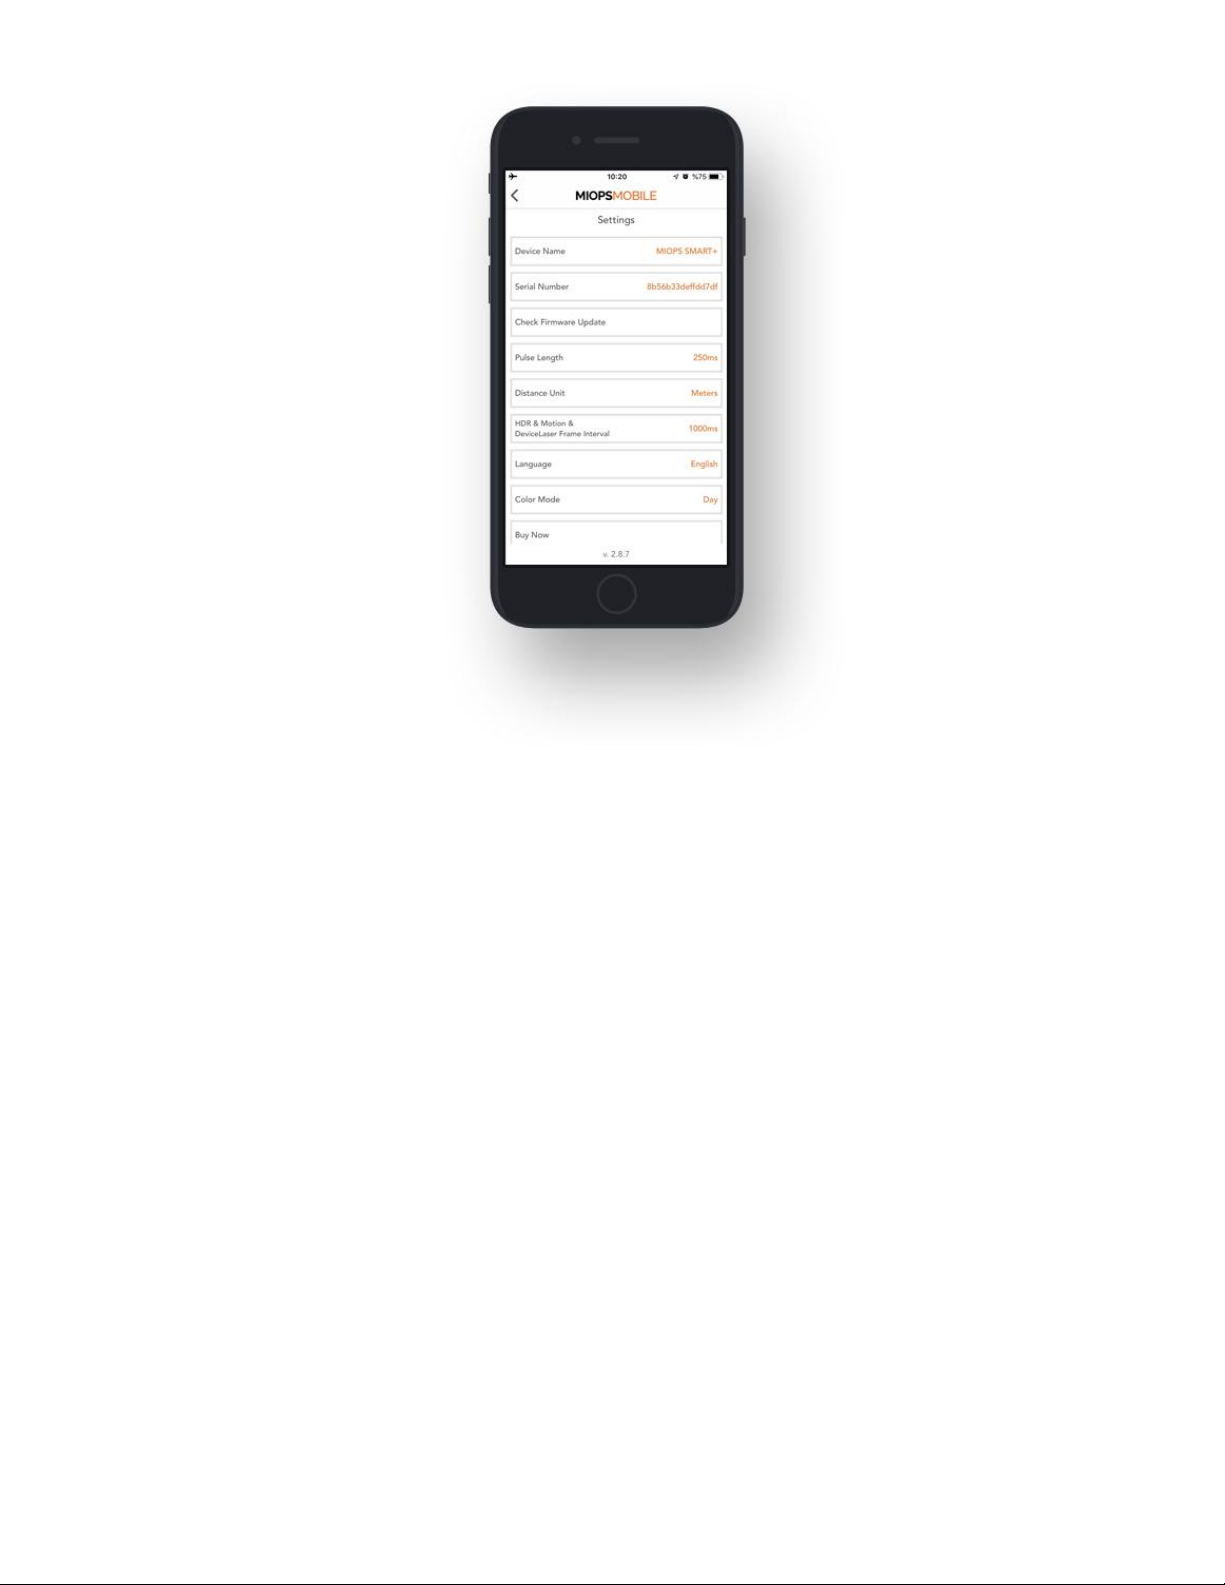
10. SETTINGS:
You can use Settings menu to change application related or device related settings or to get
information.
Device Name: This parameter shows the name of your device. Default name is MIOPS Smart+
for all devices. You can assign a different name to your device by clicking this parameter.
Serial Number: This parameter shows the serial number of your device.
Check Firmware Upgrade: This button is used to check if there is a firmware available.
Pulse Length: This parameter is used to determine the pulse length of each trigger signal for
those modes which don't have an exposure parameter.
Distance Unit: This parameter is used to determine the distance unit for Roadlapse mode. It
can be either "Meters" or "Feets".
Page 33

HDR & Motion & Laser Frame Interval: This parameter is used to determine the interval
between each frame for HDR, Motion and Laser modes.
Language: This parameter is used to change the language of the mobile application.
Color Mode: This parameter is used to change the color of the mobile application. It can be
switched between "Day" and "Night".
Buy Now: This button is used to visit the store for purchasing the product.
Feedback: This screen is used to give feedback about the mobile application to the
developers.
PIN Code: You can assign a PIN to your device to prevent others from connecting to your
device.
IR Settings: MIOPS Smart+ has IR triggering capabilities. You can select your camera brand
between Canon, Nikon and Sony to trigger your camera if it has IR triggering capabilities.
Smart+ Screen Saver: This parameter is used to define the timeout value to turn the screen of
Smart+ off for energy saving.
Shutter Settings: This parameter is used to set the behavior of Smart+ camera and flash
outputs. You can select between "Sync", "Bulb" and "Mirror Lockup".
Sync: Flash and camera is triggered at the same time.
Bulb: Camera is triggered to start long exposure as soon as the mode is started. Flash is
triggered once an event is detected.
Mirror Lockup: Camera is triggered once to lock up the mirror as soon as the mode is
started. Camera is triggered again once an event is detected.
Page 34
 Loading...