

Page 1
USER MANUAL
Page 2

Welcome
Thank you for your purchase of Nerotrigger. This manual
was written to help you use Nerotrigger with all of the
features it offers. Please keep it available to all who will be
using Nerotrigger. Read it thoroughly before use.
Modes of Operation
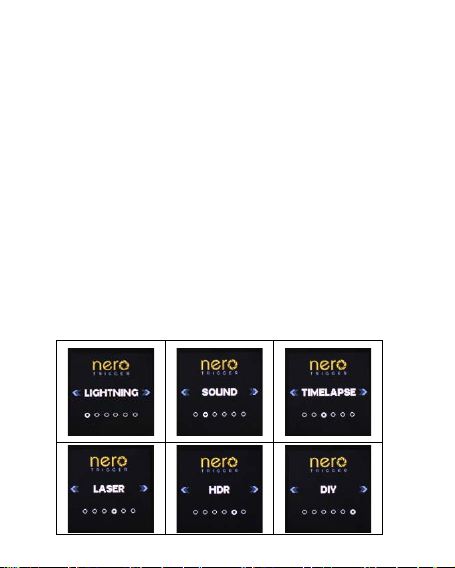
Nerotrigger offers 6 different modes of operation. They are:
Lightning, Sound, Time Lapse, Laser, HDR (High Dynamic
Range) and DIY (Do It Yourself). Lightning mode is the
default mode. When you switch Nerotrigger on, it will start
working in Lightning mode.
Power Saving
Nerotrigger is an energy efficient device. LCD screen will be
turned off to save battery if you don’t press any button for
30 seconds. You can turn it back on by pressing any key.
Page 3
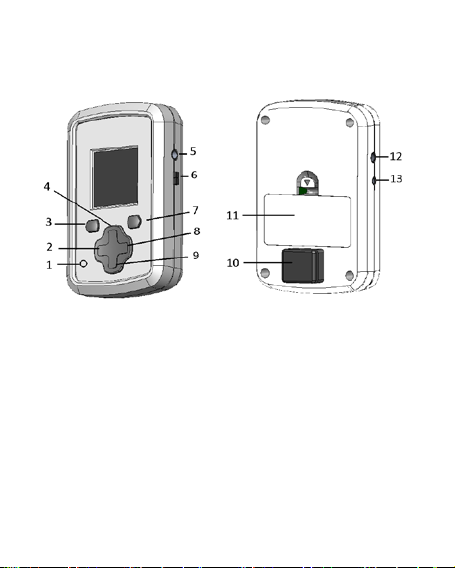
Getting to Know the Nerotrigger
1.LED
7.Start Button
8.Right Scroll Button
Nerotrigger Device Layout
2.Left Scroll Button
3.Menu Button
4.Up Scroll Button
5.DIY Port
6.On/Off Switch
9.Down Scroll Button
10.Hot Shoe
11.Battery Cover
12.Flash Cable Port
13.Camera Cable Port
Page 4

Package Content
The package of a Nerotrigger will include the following
items: 1xNerotrigger, 2xAAA 1.5 Volt Batteries, 1xUser
Manual. If the package content is not as described, please
contact Nerotrigger customer support immediately.
Features
Nerotrigger has been redesigned to meet the demand of all
photographers. It is based on a full digital design, there is no
analog component used. Every single Nerotrigger is ready to
offer the same accuracy level. The battery compartment is
easily accessible, so you can replace the batteries just by
opening the cover and putting the fresh batteries in. The
remaining battery power is always displayed on the screen.
It has a color LCD screen which provides you all the
information you need right on the spot. With the clean and
sharp menus, you will be ready to go in a few minutes.
On top of well-known Lightning, Sound, Time Lapse and
Laser modes, there are new mode of operations such as HDR
Page 5

(High Dynamic Range) and DIY (Do It Yourself). All of the
modes can be fine-tuned to fit your needs.
The interchangeable camera connection cable is also
another standard feature of Nerotrigger. You can also use
the flash unit triggering port to trigger your flash. The
external input source port is used in DIY mode.
First Use
Nerotrigger operates with two AAA Batteries. Take the
batteries from the box. Open the battery cover of
Nerotrigger and put in the batteries. Please make sure you
are putting them with the correct polarity. You can see the
polarity signs on the board of Nerotrigger. Use only 1.5 V
AAA alkaline batteries. Rechargeable batteries are not
supported by Nerotrigger. After you put the batteries in,
close the battery cover. Turn the power switch on and
Nerotrigger will start working.
Page 6
Menu System of Nerotrigger
Nerotrigger features a device menu system which enables
you to use the device very easily. The menu has two levels:
Main Menu and Sub-menus. The Main Menu lets you to
switch between different modes of operation. You can
navigate on modes by using the right and left scroll buttons.
To operate in a certain mode you need to enter the Submenu of that mode by pressing the Start button. Each mode
of operation has its own Sub-Menu where you can adjust the
settings of that mode as mentioned in the following
sections. You can always switch back to the Main Menu from
Sub-menus by pressing the Menu button.
Page 7
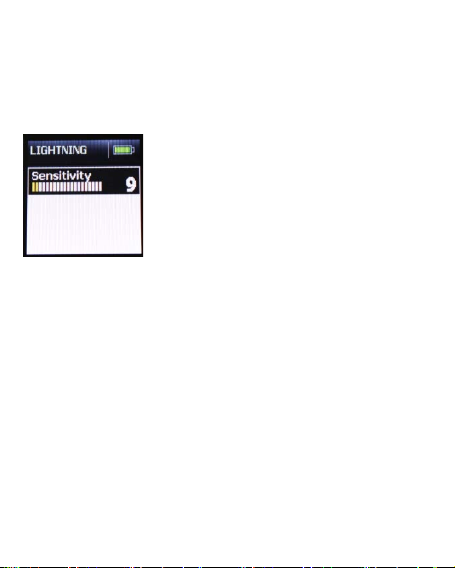
LIGHTNING
Usage Examples: Triggers your camera to catch light events
like lightning, bolts, sparks, fireworks etc.
Camera Setup: Manual Focus, Fixed Exposure Time
•Adjust the sensitivity between 1 and 99
per your needs by pressing Left and
Right Scroll buttons. The higher the
number the more sensitive will be
Nerotrigger.
• Press the Start button. Nerotrigger will
count down for 3 seconds, go to Economy Mode for battery
saving and start to operate.
If you feel that Nerotrigger makes a lot of false triggering,
decrease the sensitivity level and try again. Similarly increase
the sensitivity level, if you want Nerotrigger to catch light
events with smaller differences in light level.
Page 8
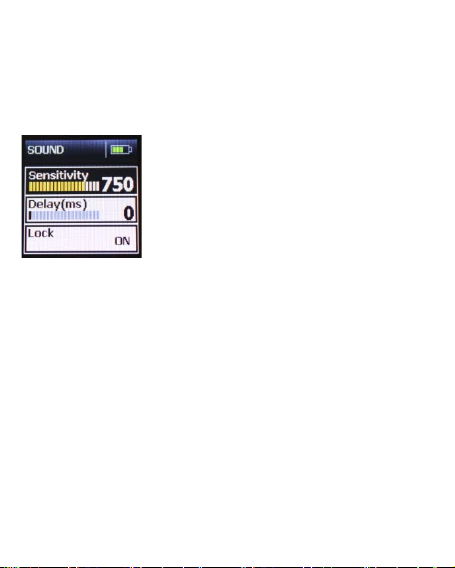
SOUND
Usage Examples: Triggers your flash unit in case of a sound
event like popping balloon, breaking glass, water etc.
Camera Setup: Manual Focus, Long Exposure Time
• Adjust the sensitivity between 1 and
99 per your needs. The higher the
number the more sensitive will be
Nerotrigger.
• Adjust the delay between 0 and 999
ms per your needs. This is the delay
between Nerotrigger detects the sound event and triggers
the flash unit.
• Adjust the Lock property between ON and OFF. If Lock is
set to OFF, Nerotrigger will keep triggering the flash unit if it
detects sound events until you quit sound mode. You can set
the Lock to ON, if you want to capture a single frame only. In
this case, you will need to press start button again to make
Nerotrigger ready for another triggering.
• Press the Start button. Nerotrigger will count down for 3
seconds, go to Economy Mode for battery saving and start to
operate.
Page 9
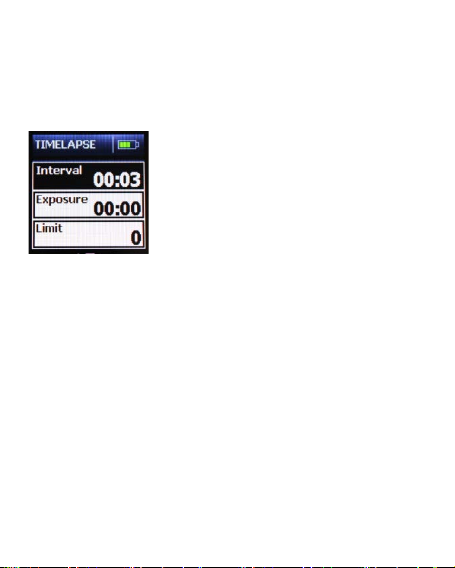
TIMELAPSE
Usage Examples: Triggers your camera with a certain time
interval between each frame & with a certain exposure time
Camera Setup: Manual Focus
• Adjust the interval between each
frame anywhere starting from 1 second
up to 59 minutes and 59 seconds.
• Adjust the exposure anywhere
between 0 seconds up to 59 minutes
and 59 seconds. You should set to 0
seconds if you don’t need a long exposure time.
• Adjust the number of frames with the limit parameter, so
you don’t fill up your memory card with unnecessary
pictures. You can set it up to 9999. If you set it to 0, this
means there is no limit.
• Press the Start button. Nerotrigger will start to operate.
Page 10
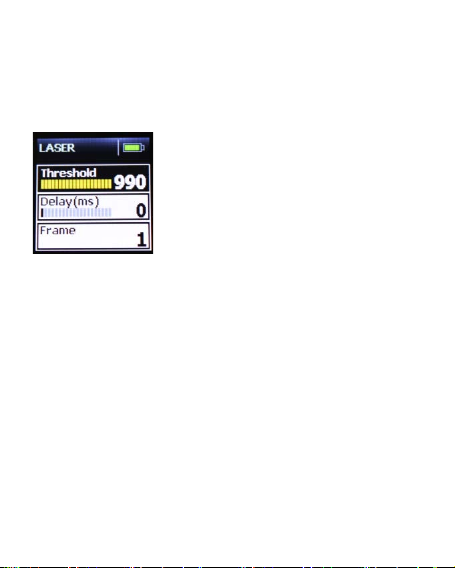
LASER
Usage Examples: Triggers your camera or flash unit once the
laser beam is broken to take water drops, wildlife photos etc
Camera Setup: Manual Focus, Fixed Exposure Time
• Set the threshold value to a high
level such as 990 and align the laser
beam with the receiver. When the
laser beam hits the receiver you will
see LM sign on top of the LCD screen.
• If you don’t see the LM sign, either
the laser beam is off the receiver or it is no strong enough. In
such a case, align the laser beam with the receiver and if this
does not help decrease the threshold value.
• Adjust the delay between 0 and 999 ms per your needs.
This is the delay between Nerotrigger detects that the laser
beam is broken and triggers the flash unit.
•Adjust the frame parameter which determines the number
of photos to be taken each time the laser beam is broken
• Press the Start button. Nerotrigger will count down for 3
seconds, go to Economy Mode for battery saving and start to
operate.
Page 11
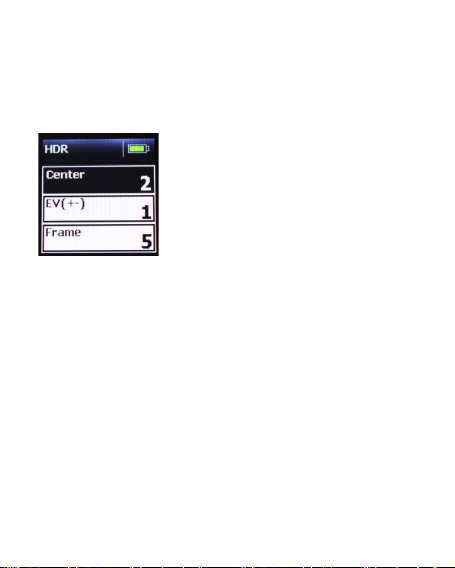
HDR (High Dynamic Range)
Usage Examples: Triggers your camera to capture the same
frame multiple times with different exposures
Camera Setup: Manual Focus, Bulb Mode
• Set the center value to the optimum
exposure time between 1/15seconds
to 15 seconds to capture the frame
•Adjust the EV (Exposure Value) to
1/3, 1/2, 1 or 2 to set the exposure
value steps between each frame.
•Adjust the frame parameter which determines the number
of photos to be taken.
• Press the Start button. Nerotrigger will start to operate.
Example Usage:
Setting1: Center: 1 sec, EV: 1, Frame: 5
Exposure: 1/4, 1/2, 1, 2, 4
Setting2: Center: 1 sec, EV: 1, Frame: 7
Exposure: 1/8, 1/4, 1/2, 1, 2, 4, 8
Setting3: Center: 1 sec, EV: 2, Frame: 5
Exposure: 1/16, 1/8, 1, 4, 16
Page 12
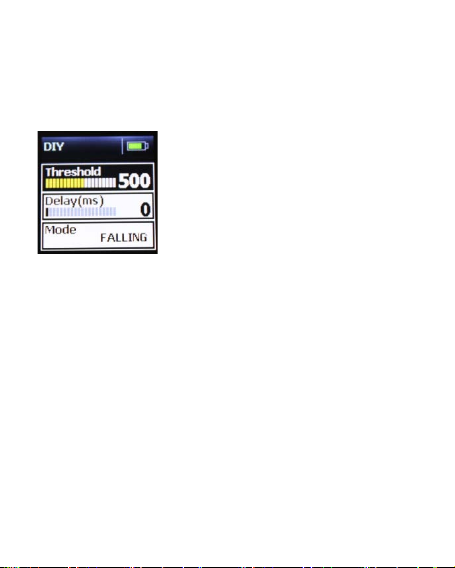
DIY (Do It Yourself)
Usage Examples: Triggers your camera by receiving any type
of external signal as a triggering event.
Camera Setup: Manual Focus, Fixed Exposure Time
• Adjust the threshold between 1 and
999 per your needs. 999 corresponds
to “3V” where 1 corresponds to “0V”
• Adjust the delay between 0 and 999
ms per your needs. This is the delay
between Nerotrigger detects the
signal level change and triggers the camera.
• Adjust the mode parameter which determines which type
of change will be considered as a triggering event. It has
three different options: Rising, Falling, and Change. If you set
it to Rising, the camera will be triggered only if the signal is
changed in a rising manner. Similarly, Falling mode will
consider only a falling signal as a triggering event. The third
option Change, accepts both of the changes, rising and
falling as triggering events.
P.S.: Please refer to Appendix A prior to use DIY mode.
Page 13
APPENDIX A
when there is no conne
WARNING 1: DIY mode is for advanced users only. Use it at
your own risk. If you don’t know what you’re doing, you risk
damaging your Nerotrigger.
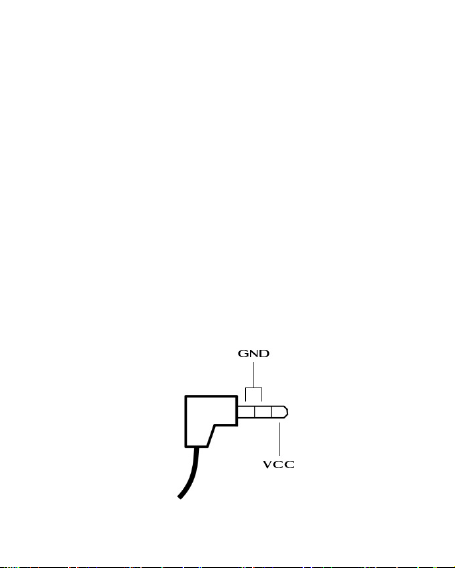
WARNING 2: This port is already powered. This means that it
reads “999 ″
sleeve and the tip. When the two are shorted, it reads “1 ″.
You can use this to create simple touch sensors, pressure
sensors, tilt sensors, etc. If you are planning to use external
sensors, you must keep DIY port voltage under a maximum
of 3V.
WARNING 3: You must use the following schematic to use
Nerotrigger at DIY mode.
n between the
Page 14

DISCLAIMER
• Lightning Photography is a dangerous activity. We are
not liable for any damage or personal injury associated
with the use of Nerotrigger.
• Nerotrigger is intended for use as a camera shutter
release device only and no other purpose.
• Nerotrigger is not waterproof. It should be treated and
handled with the care of a camera and should not be
dropped and/or exposed to extreme heat or moisture.
• Do not dissemble Nerotrigger. Doing this will void your
warranty. Using a dissembled Nerotrigger can damage
your camera and other equipment.
• We are not responsible for any kind of damage caused
by the use of Nerotrigger.
 Loading...