

Page 1

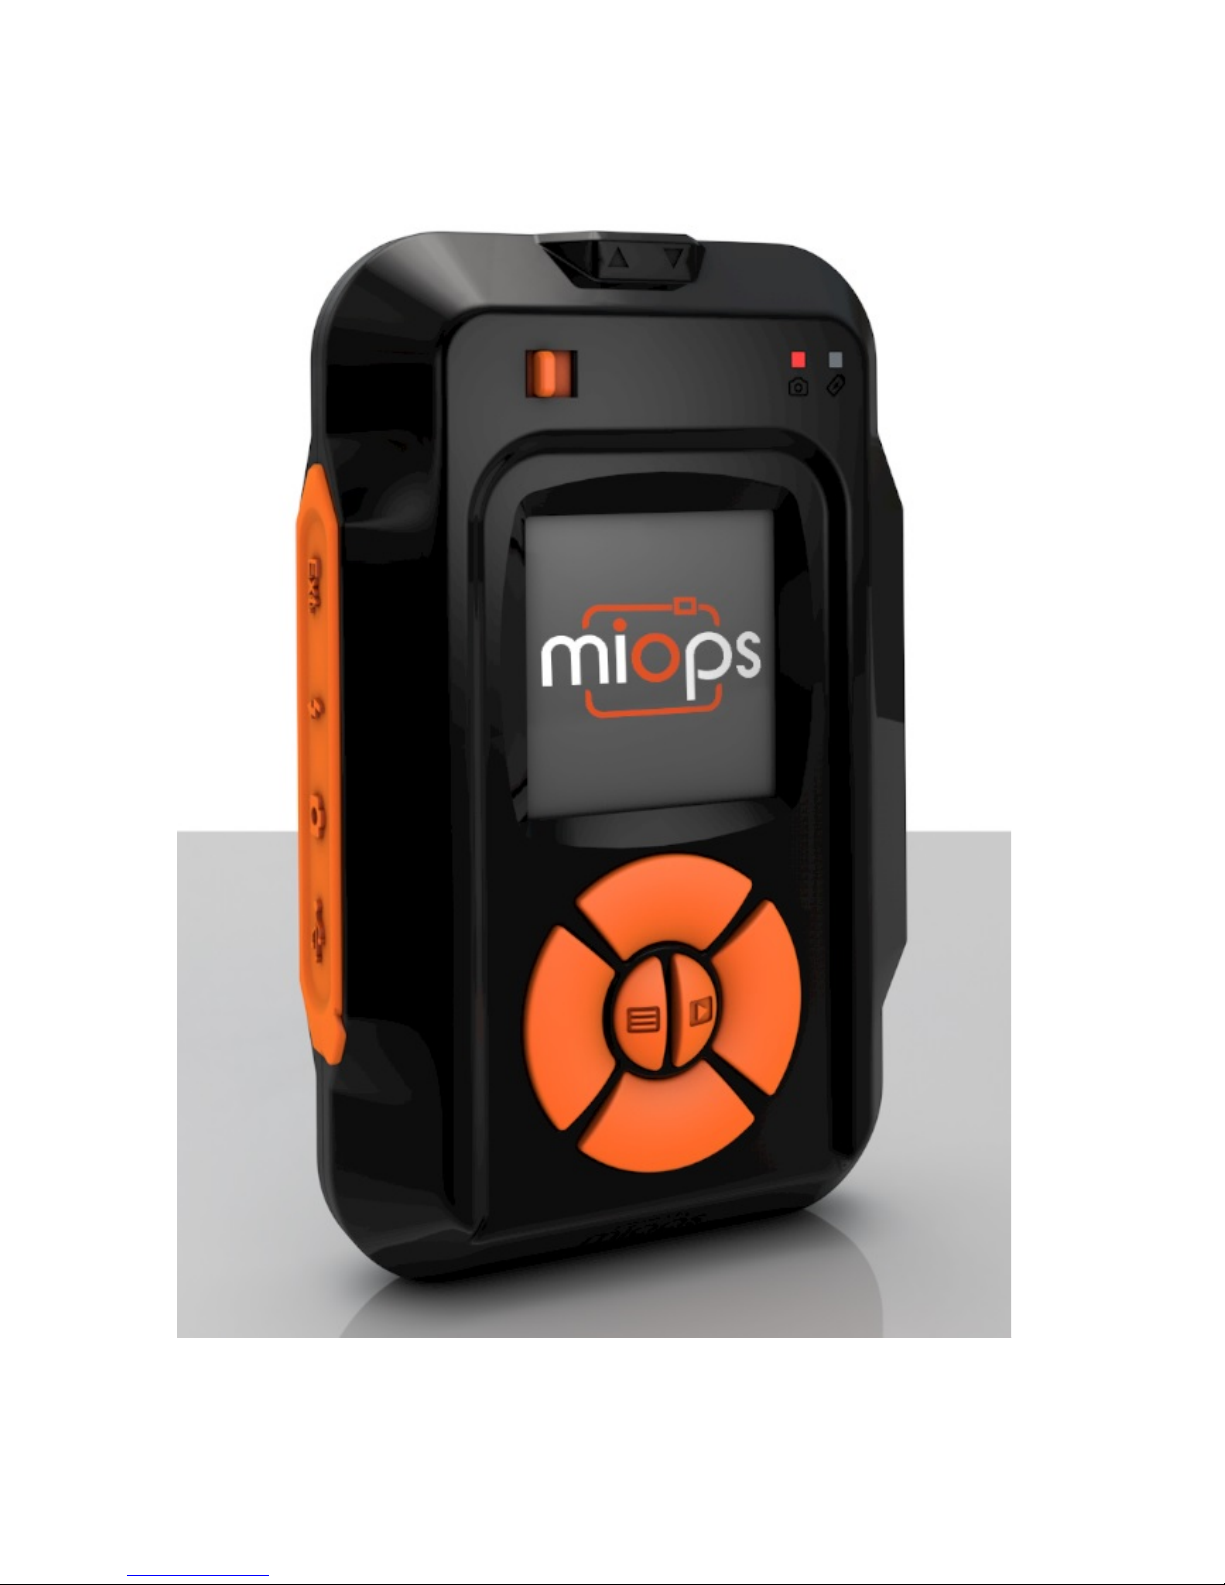
MIOPS Smart
USER MANUAL
Release Date: December 5 th, 2015
Page 2
Page 3

Contents'
1.! Introduction ........................................................................................................................... 4!
2.! Specifications ......................................................................................................................... 6!
3.! Charging and Operation .................................................................................................... 6!
4.! Content of the Package ..................................................................................................... 7!
5.! First Use ................................................................................................................................... 7!
6.! Camera and Flash Cable Connections ......................................................................... 9!
7.! Standalone, Smartphone App and Mobile Dongle ................................................ 11!
8.! Standalone Mode ............................................................................................................... 13!
a.! User Interface of MIOPS Smart ......................................................................... 13!
b.! Lightning Mode ......................................................................................................... 15!
c.! Sound Mode ............................................................................................................... 16!
d.! Time Lapse Mode ..................................................................................................... 18!
e.! Laser Mode ................................................................................................................. 20!
f.! HDR (High Dynamic Range) Mode ........................................................................ 23!
g.! DIY (Do It Yourself) Mode .................................................................................... 25!
h.! Scenario Mode (Execution Only) ....................................................................... 27!
9.! Smartphone App Mode .................................................................................................... 28!
a.! Installing the Application ...................................................................................... 28!
b.! App Requirements ................................................................................................... 28!
c.! Using the Application ............................................................................................. 30!
d.! Scenario Mode .......................................................................................................... 31!
e.! Lightning Mode ......................................................................................................... 34!
f.! Sound Mode ................................................................................................................... 34!
g.! Laser Mode ................................................................................................................. 36!
h.! Time Lapse Mode ..................................................................................................... 37!
i.! DIY (Do It Yourself) Mode ........................................................................................ 37!
j.! HDR (High Dynamic Range) .................................................................................... 38!
k.! Press & Hold .............................................................................................................. 38!
l.! Press & Lock .................................................................................................................. 38!
m.! Timed Release ........................................................................................................... 38!
10.! Mobile Dongle Mode .......................................................................................................... 39!
11.! Firmware Upgrade ............................................................................................................. 41!
a.! MIOPS Smart v2.0 and above ........................................................................................ 41!
b.! MIOPS Smart v1.9 and before ....................................................................................... 42!
Windows Systems ............................................................................................................ 42!
MAC Systems .................................................................................................................. 49!
12.! Warranty ................................................................................................................................ 51!
13.! Disclaimer ............................................................................................................................. 51!
14.! FCC Approval ....................................................................................................................... 52!
Page 4

1. Introduction
Thank you for choosing MIOPS Smart Camera and Flash Trigger for Highspeed Photography. Miops Smart is revolutionary photography equipment,
which combines power of electronics with the flexibility of smartphone
platform. It will deliver high performance with reliable and easy operation.
MIOPS is always open to new features with the upgradeable firmware. On
top of that, the dedicated smartphone application is open to unlimited
options. With every version of the app, you will get new features. In other
words, Miops Smart is a platform for high-speed photography rather than a
gadget with firm capabilities.
This document will be your reference for the overall operation of Miops
Smart including the app. Please note that the document can be out of date
with the release of new app and firmware version. You can get the latest
version of this manual from our website www.miops.com. You can see the
version of the firmware and app this document refers to, in the cover page
of the document.
This manual includes the information you need to use Miops Smart with all
features, so please read it carefully before using Miops Smart. You can
check the FAQ section to find answers of some common questions. If your
question is not listed, please contact us.
Miops Smart combines different functions in a single unit. You can use it
either as a standalone device or as a smartphone controllable device. If you
use Miops Smart as a standalone device, it will offer six different modes:
Lightning, Sound, Laser, Time Lapse, HDR and DIY. You can fully configure
these modes, using the buttons on the device. If you configure Miops Smart
using your smartphone, you can use advanced functions on top of basic
modes as well. The advanced features are but not limited to: Scenario
mode, Cable Release, Press and Hold, Press and Lock, Timed Release. With
the new versions of the app, other functions may be available.
Thank you very much again for choosing Miops Smart. We hope that Miops
Smart will help you to bring your photography skills to the next level.
Page 5
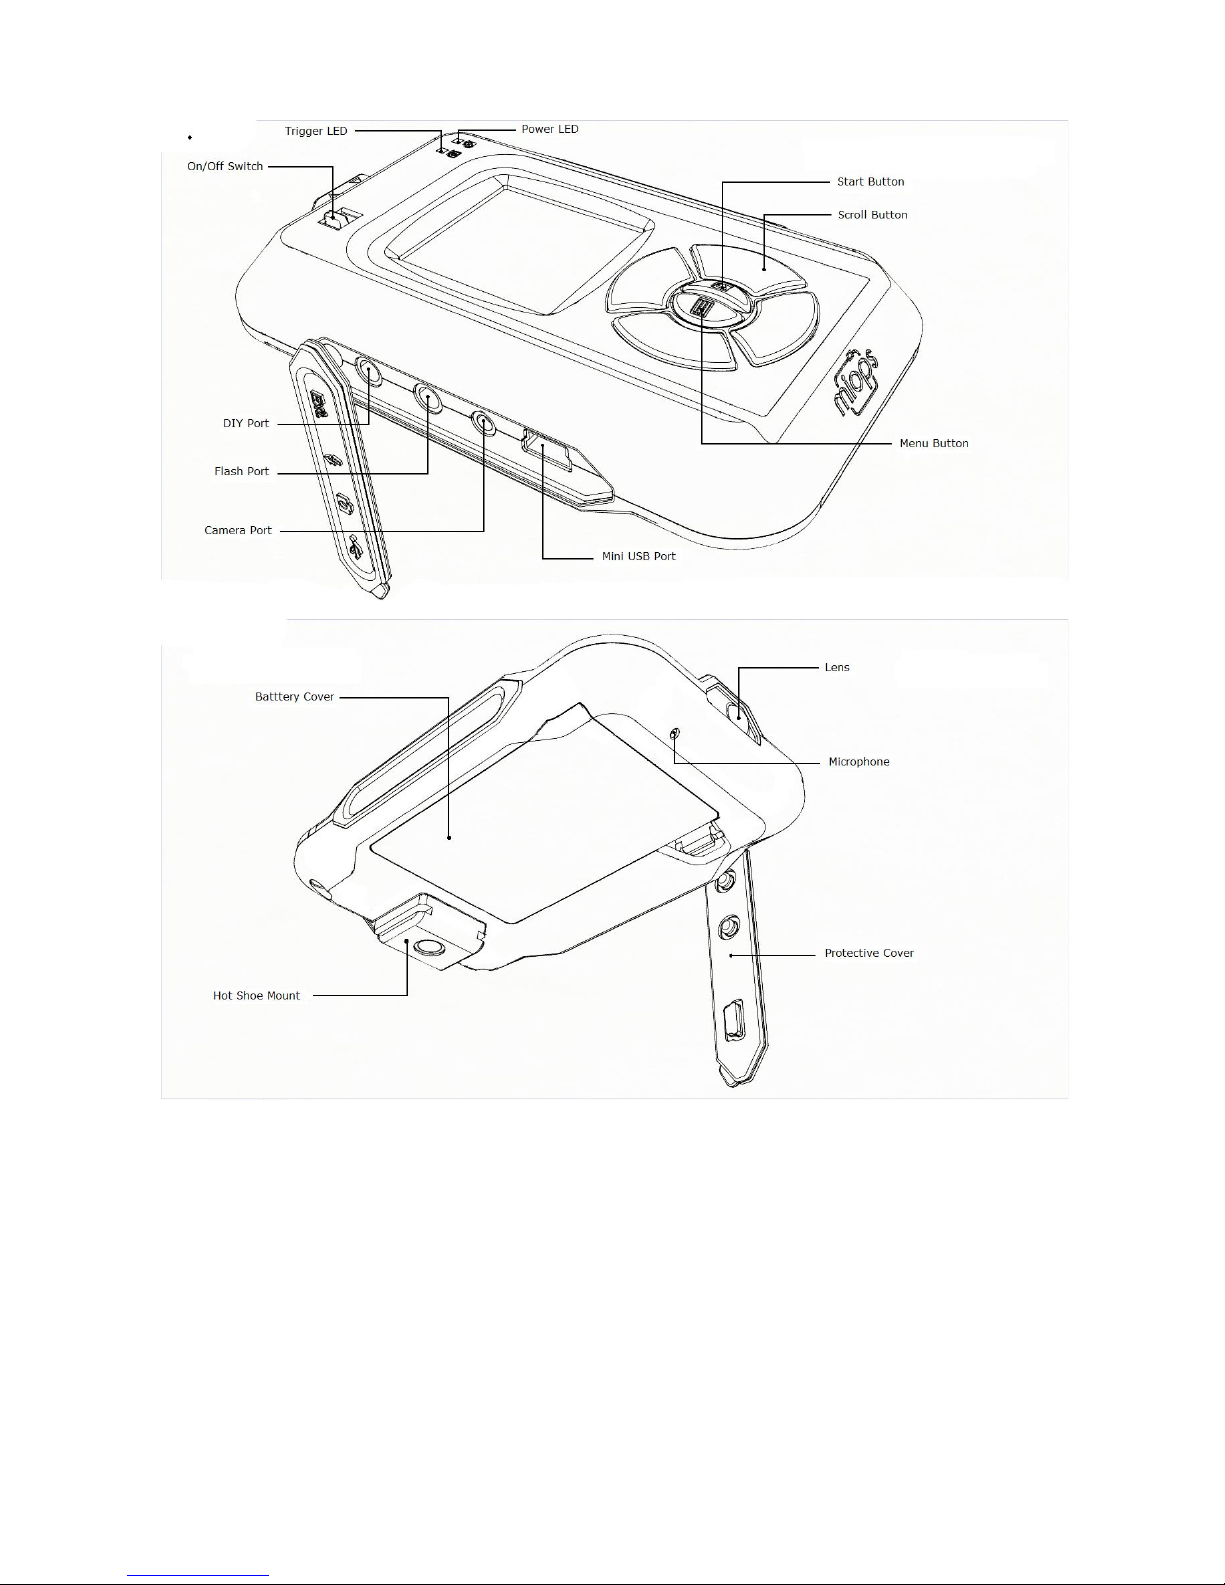
Figure 1 Buttons, Ports and LEDs
Page 6

2. Specifications
In this section you can find the technical specifications of Miops Smart.
LCD Screen: 128 x 128 pixels
Battery: 3.7 Vdc, 1020 mAh, 3.8 Wh
Bluetooth: Bluetooth 4.0 (Low Power)
USB Interface: 5 Vdc
Weight: 176 gr (Batteries included)
3. Charging and Operation
Miops Smart can only be used with the provided rechargeable battery and USB
connection. The battery will be charged when you connect Miops Smart to a
USB power source. You can use your computer USB port for this purpose. You
can power Miops Smart directly from the USB port if the battery is not in the
device. Using Miops Smart with other type of battery and power source may
harm your device.
When you connect your Miops Smart to a USB power source, it will start to
charge the battery automatically. The power led will light up when the battery
is charging. When the battery is full, the Power LED will dim. You can see the
remaining battery percentage on the screen of Miops Smart in any mode.
Page 7
4. Content of the Package
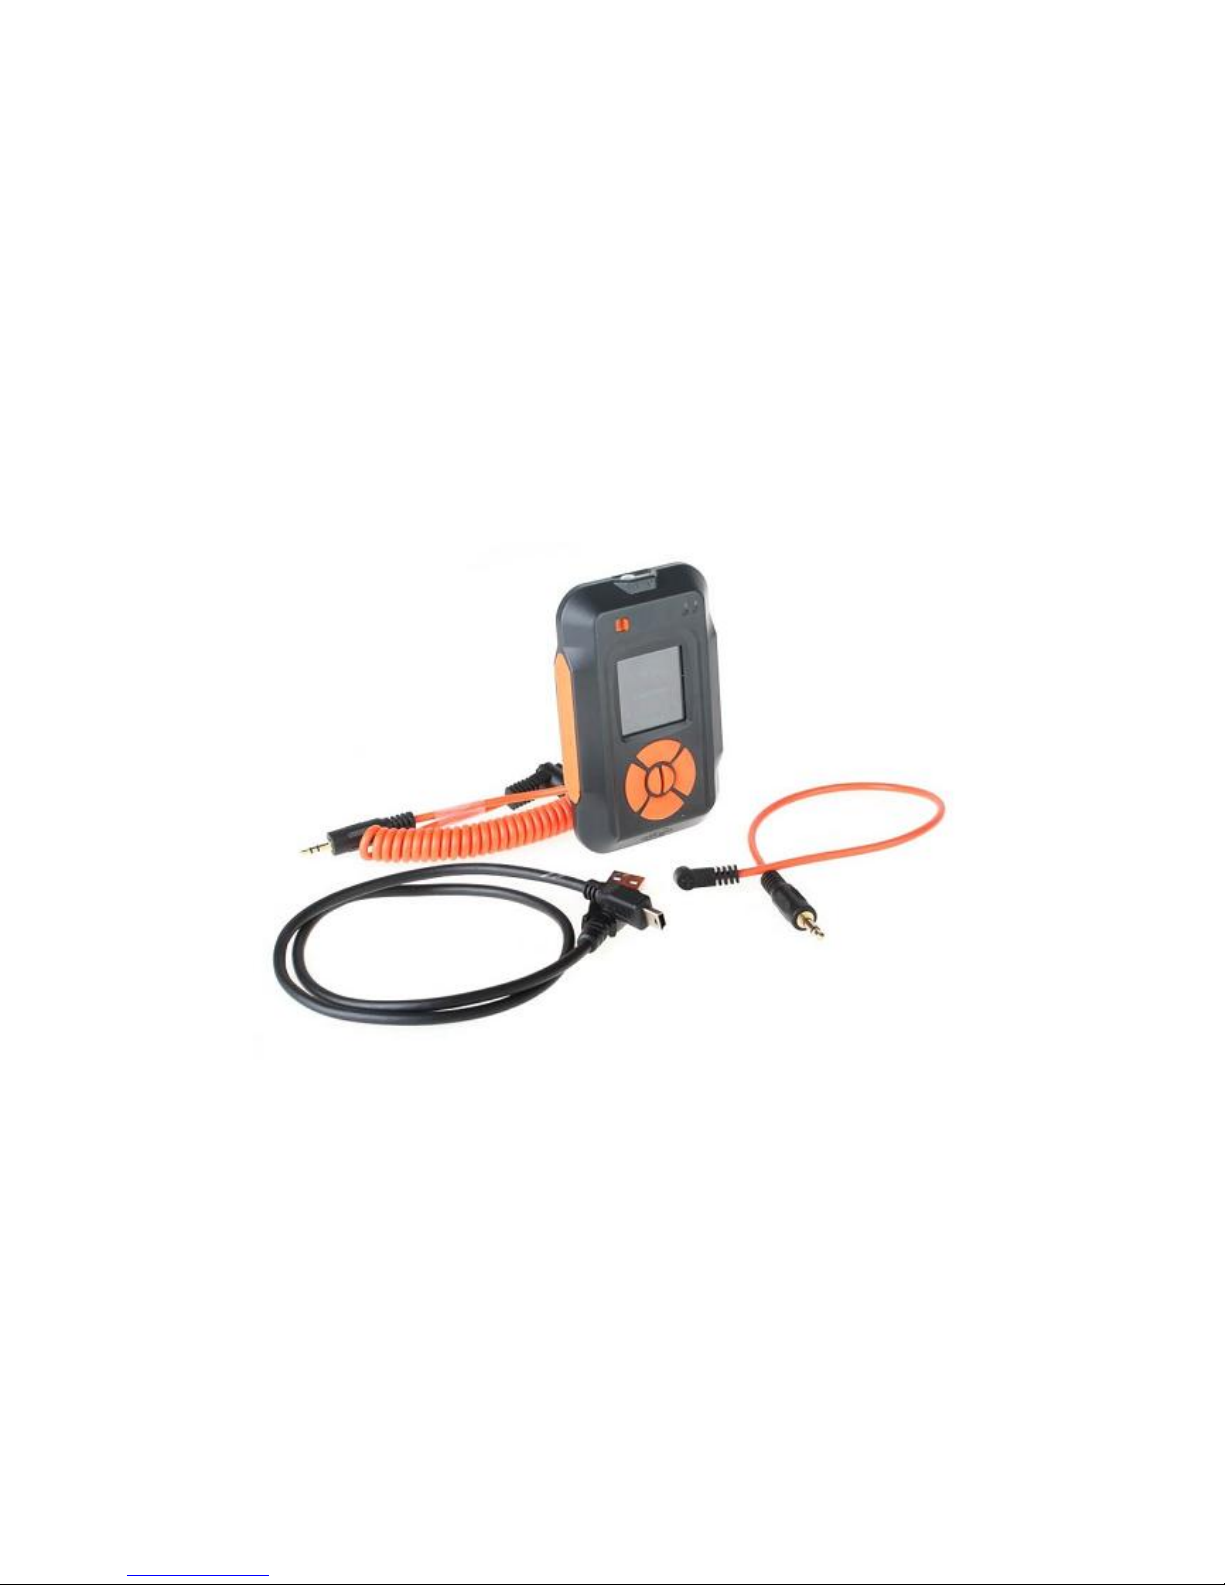
When you purchase a MIOPS Smart, it will be delivered with the following
items:
• 1x MIOPS Smart Unit
• 1x Rechargeable Battery
• 1x USB Connection Cable
• 1x Flash Connection Cable (PC Sync)
You have to buy a suitable Camera Connection Cable for your unit. If the
delivery is missing one of these items, please contact your supplier
immediately. You may receive extra items if you have purchased them
additionally (extra cable, spare battery, etc.).
5. First Use
Your MIOPS Smart will be delivered with the latest firmware at the date of your
purchase. If a new firmware has been released, before you have used it for the
first time, you can update the firmware using the firmware upgrade tool. To
get detailed information about the firmware upgrade, see the Firmware
Upgrade Section.
The rechargeable battery comes partially charged. You can use it right out of
the box but you may need to charge to get it fully loaded. You can charge the
Page 8
battery using any USB charger (500 mA min.) or the USB port of your
computer. It will take about two hours to charge the battery from 0% to
100%. MIOPS Smart will be delivered with a Mini-USB cable. You can use this
cable to charge it. The mini end of the USB cable will be plugged into the USB
port. It is located on the left side of the device under the protective cover.
Please see Figure 1 to see the location of the USB port.
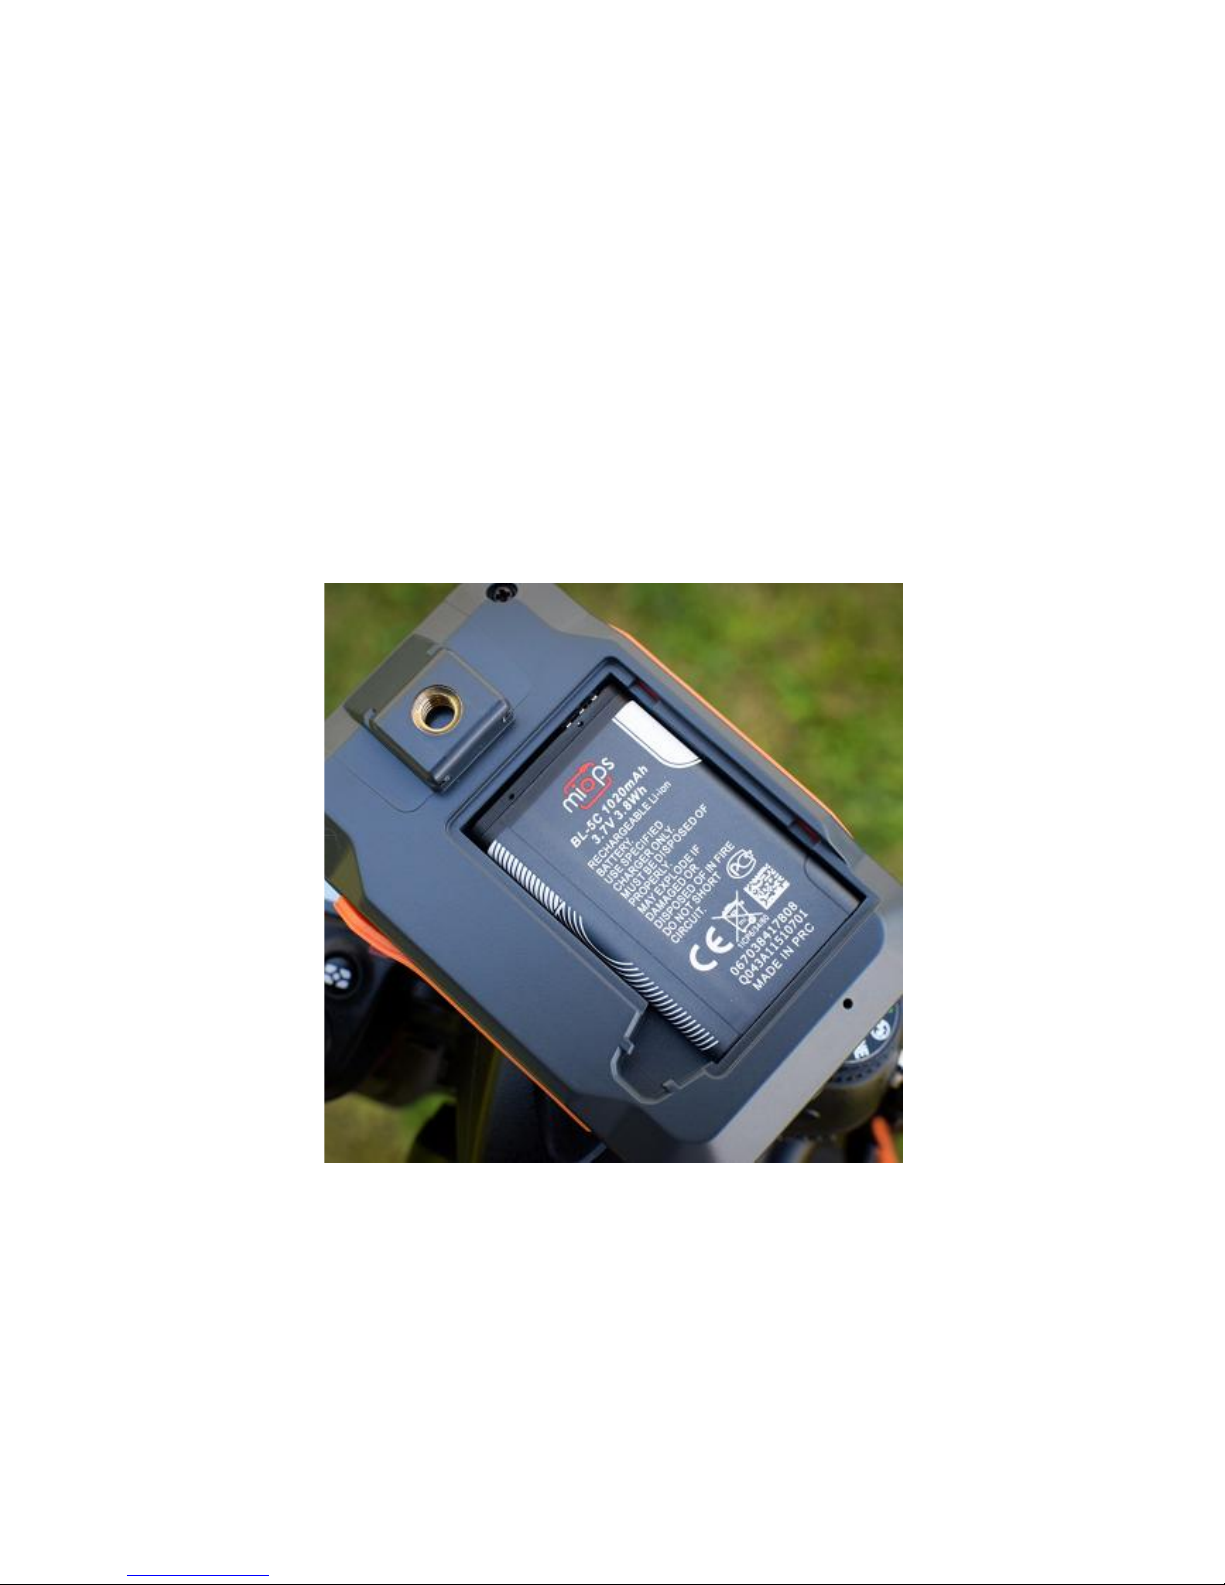
To use the MIOPS Smart for the first time, take the rechargeable battery and
remove the protective plastics. Open the battery cover of the device and align
the battery with the power terminals of the device. Put the battery in with the
correct alignment and put the battery cover back. Turn the device on using the
On/Off switch.
Initial screen of Miops Smart will appear on the device showing the Miops logo
and the device firmware information at the bottom of the screen. It will switch
to Lightning Mode automatically in three seconds.
Warning: Never use any other type of battery to power Miops Smart.
This can damage the unit and may cause fire and electrical shock!
Page 9
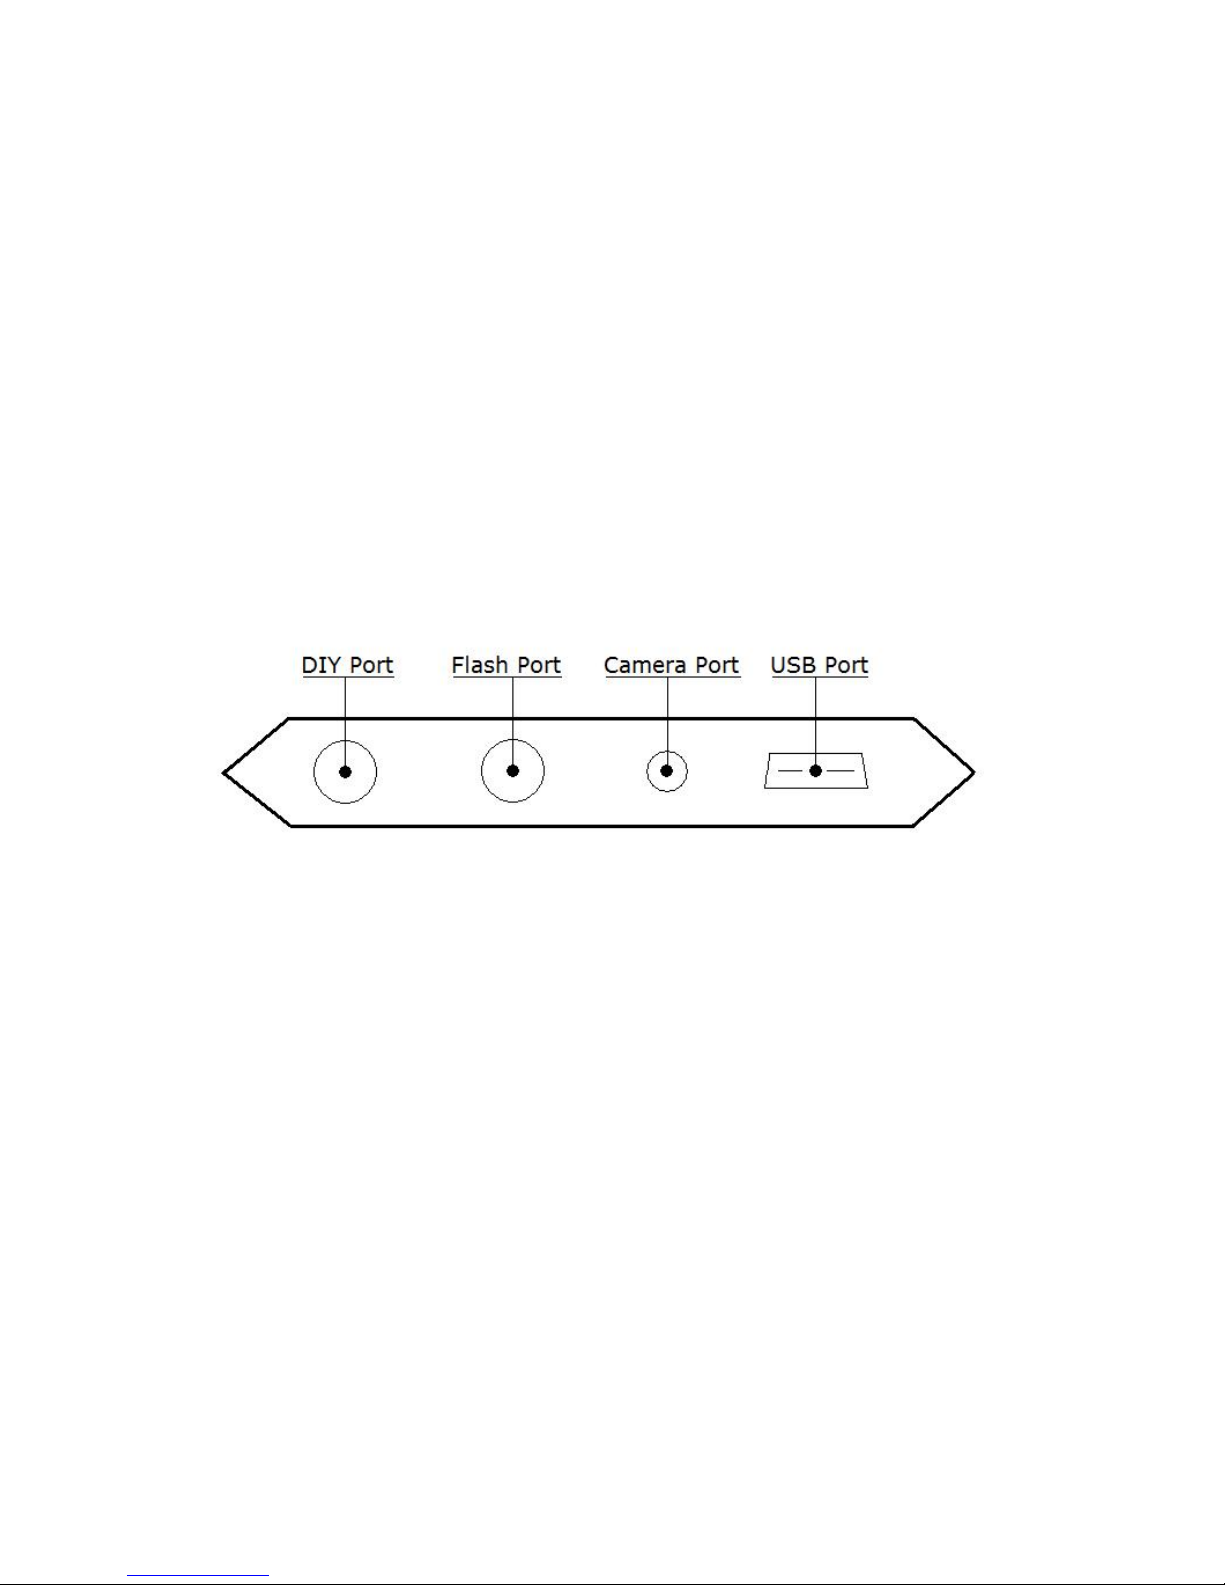
6. Camera and Flash Cable Connections
The Miops Smart uses connection cables to trigger your camera or flash unit.
Your unit will be shipped with the proper camera and flash connection cables.
The Miops Smart is a versatile device, which is compatible with many makes
and models. You can use the same device with many different cameras by just
changing the connection cable. If you consider buying a new camera, you can
check the compatibility list to see whether you need to buy a new connection
cable. You can visit the following list to see the compatibility list:
http://miops.com/cablelist/
The Miops Smart has separate outputs for the camera and flash cables. Both of
the output ports are located on the left side of the device under the protective
cover.
The camera cable port is a 2.5 mm stereo female jack. The camera cables
have the male 2.5 mm stereo jack on one end. This end is plugged into the
camera connection port. The other end changes depending on the camera
make and model. This end is plugged in the shutter release port of your
camera.
The flash cable port is a 3.5 mm mono female jack. There is only one type of
the flash connection cable. It has a 3.5 mm male jack on one end. This end is
plugged into the flash connection port. The other end of the cable is a standard
PC Sync port. This end is connected to the PC Sync port of the flash unit. If
your flash does not have a PC Sync port, you can use a hot shoe adapter with
a PC Sync port.
Page 10

You can use both of the outputs at the same time. They are electrically isolated
from each other. They trigger the connected device synchronously. Some older
flash units require high voltages (~50 V) to be triggered. These flash units are
not compatible with the Miops Smart. Using such a high voltage flash unit can
damage the Miops Smart.
The camera and flash cables are designed to trigger the cameras and flash
units only. Do not use them for any other purpose. Doing so can damage the
cable. If you lose or break the connection cable, please contact us. We will
help you to get a new cable.
Page 11
7. Standalone, Smartphone App and Mobile
Dongle
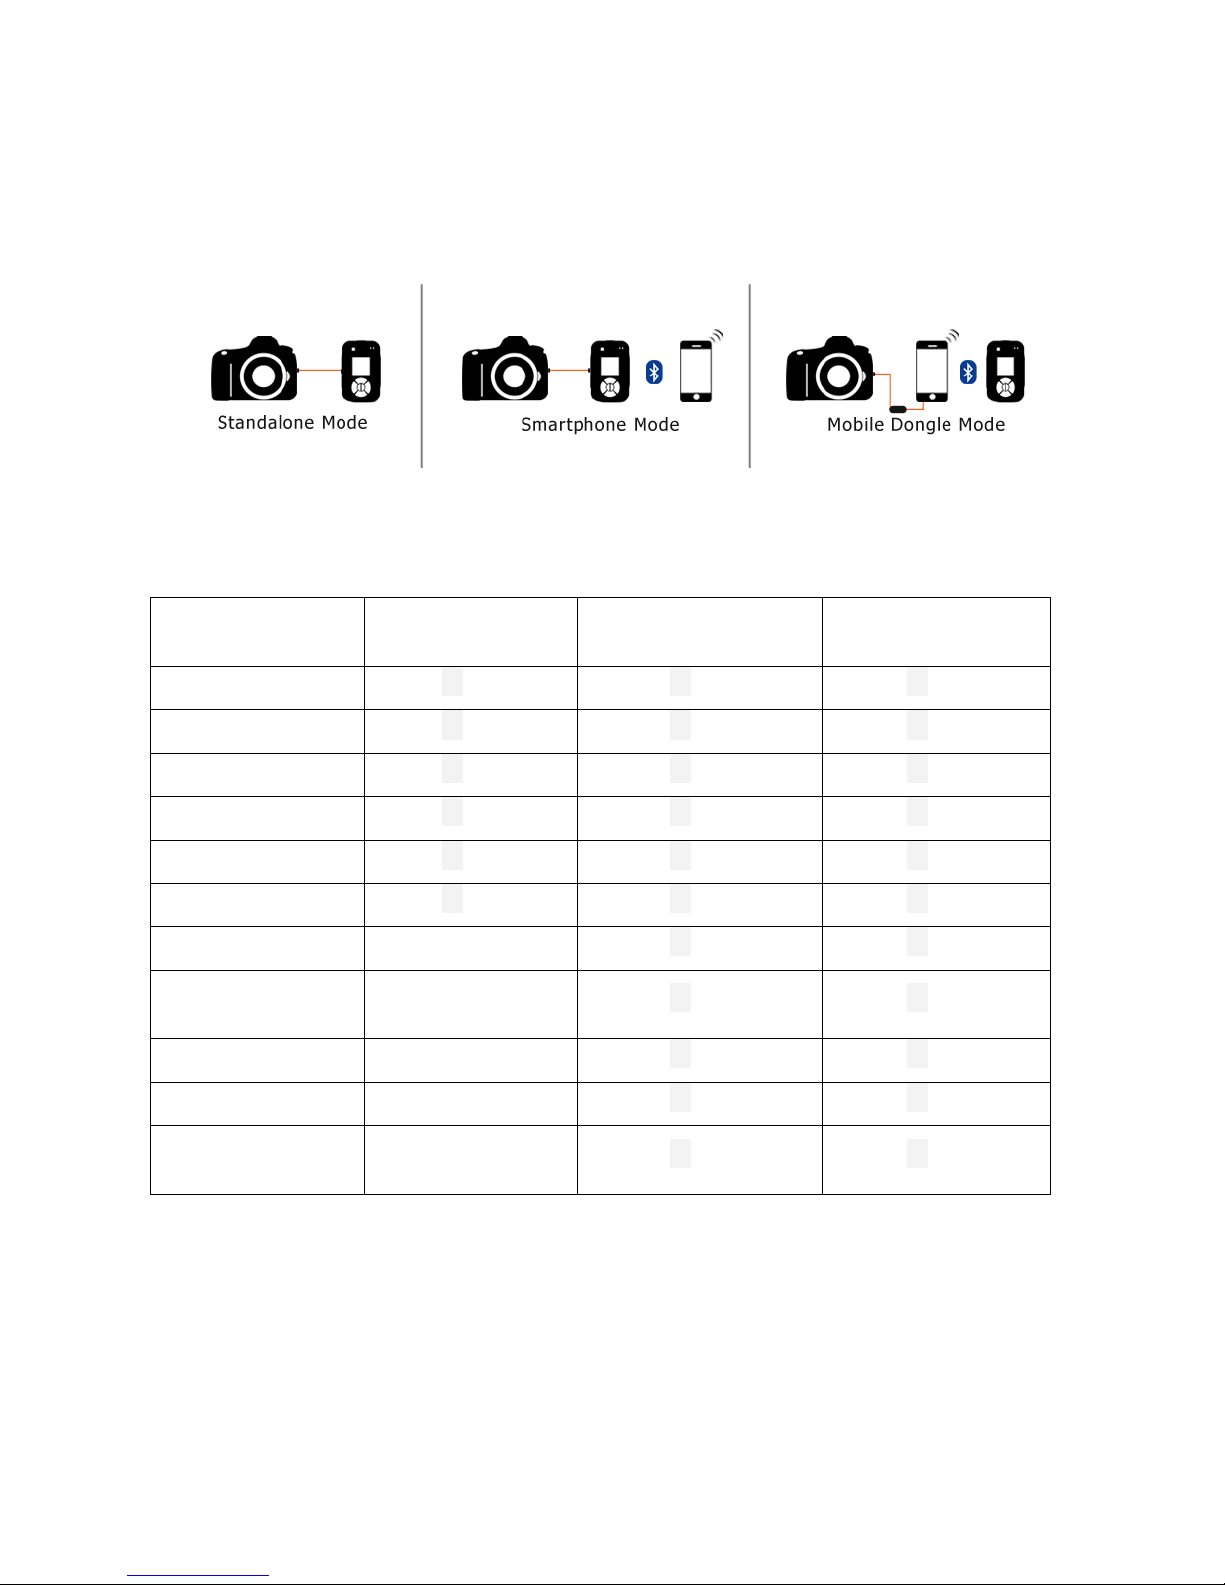
There are three different methods of using Miops Smart. These are:
Standalone, Smart phone app and with Mobile Dongle.
Some functions are enabled with the smartphone app and mobile dongle
only. The table below shows the availability of each mode during
standalone, smart app, and mobile done method of operation.
MODE
Standalone
Smart Phone
Mobile
Dongle
Lightning
ü ü ü
Sound
ü ü ü
Laser
ü ü ü
Time Lapse
ü ü ü
HDR
ü ü ü
DIY
ü ü ü
Scenario
Execution Only
ü
ü
Cable
Release
ý
ü
ü
Press & Hold
ý
ü
ü
Press & Lock
ý
ü
ü
Timed
Release
ý
ü
ü
The standalone mode offers you to control the Miops Smart with the buttons
on the device only. You use the six basic modes of Miops Smart as a
standalone device. They are: Lightning, Sound, Time Lapse, Laser, HDR and
DIY. You can also use predefined scenarios, but you cannot modify or delete
them. This mode of operation also does not require any Bluetooth connection.
Page 12

The cable connections to the camera and flash unit will be done over the unit
itself.
The smartphone app offers all of the standalone modes, plus three advanced
shutter release modes. They are: Press & Hold, Press & Lock, and Timed
Release. The three shutter release modes require continuous Bluetooth
connection between the Miops Smart and the smartphone. If the connection is
lost, they will not work. The basic modes require Bluetooth connection during
the setup phase only. Once the parameters are set and the operations starts,
you can end the Bluetooth connection. Miops Smart will continue working
without interruption.
The mobile dongle is enabled for all modes of the smartphone app. You can
use the mobile dongle for all modes after you have connected your
smartphone to your camera using the mobile dongle. In this case, there will be
no cable connection to the camera or flash unit from the Miops Smart.
Page 13

8. Standalone Mode
You can use your Miops Smart as a standalone device without the involvement
of your smartphone. If you use Miops Smart as a standalone device, you can
set it to six basic modes: Lightning, Sound, Time Lapse, Laser, HDR and DIY
modes. The advanced modes are available with the smartphone application
only. The scenario mode will be enabled for the previously saved scenarios
only. If you have previously used Miops Smart is scenario mode, the latest
versions of them will be available in Miops Smart as a standalone device. You
can reuse them, but you cannot make any changes on them.
a. User Interface of MIOPS Smart
Miops Smart features a device menu system which enables you to use the
device very easily. The menu has two levels: Main Menu and Sub-menus. The
Main Menu lets you to switch between different modes of operation. You can
navigate on modes by using the right and left scroll buttons. To operate in a
certain mode you need to enter the Sub-menu of that mode by pressing the
Start button. Each mode of operation has its own Sub-Menu where you can
adjust the settings of that mode as mentioned in the following sections. You
can always switch back to the Main Menu from Sub-menus by pressing the
Menu button.
The modes of Miops Smart are as follows: Lightning, Sound, Time Lapse,
Laser, HDR, DIY, Scenario. Each of these modes has their parameters in the
submenus. You can use the up and down scroll buttons to select the
parameters. In order to change the value of a parameter, you can use the right
and left scroll buttons.
Example: We want to work in Sound Mode with a sensitivity of 80,
delay of 5 ms and LOCK OFF.
1) Turn the Miops Smart on. The device will start in Lightning mode.
2) Press the right scroll button once and the device will get into Sound
Mode.
3) Press the Start button. You will see the parameters of the Sound mode.
4) The first parameter is the sensitivity. Bring the sensitivity to 80 using the
right and left scroll buttons.
5) Press the down scroll button and then bring the delay to 10 ms.
Page 14

6) Press the down scroll button one more time and then bring the lock
parameter to LOCK OFF.
7) You have just adjusted the parameters of the SOUND mode.
8) Press the Start button to start capturing sound events.
Notice: Miops Smart will store the settings whenever you change them. You
will not lose your settings, when you turn the device off.
Miops Smart will get into the sleep mode if you don’t press any key in 30
seconds. You can press any key to get it out of sleep mode and it will have no
other affect. After that, the buttons will start working normally. If the Miops
Smart gets into sleep mode while actively working in a mode, the operation
will not be interrupted. Only the screen will be turned off to save the battery.
In such a case, you can just press a key to get the device out of the sleep
mode.
Page 15

b. Lightning Mode
The lightning mode is used to capture light events like lightning, fireworks,
sparks etc. The MIOPS Smart has a high-quality optical sensor and it is located
in the front face of the device. If you are working in the lightning mode, please
make sure that the window of the optical sensor is not covered by anything.
Align the device toward the light event.
The lightning mode has a single parameter and it is the sensitivity. You can set
the sensitivity anywhere between 1 and 99. If you want to capture even the
smallest lightning, you can set the sensitivity to a higher value. A high
sensitivity will also increase the chance of false triggering. If you want to
capture the big bolts only, you can set the sensitivity to a lower value. There is
no recommended setting for the sensitivity; it all depends on the environment.
If you are shooting during daytime, a higher sensitivity will be useful. Please
note that artificial lights (light bulbs, projectors, etc.) can cause false
triggering. If there is too much artificial light in the environment, either turn
them off or move the MIOPS Smart to another spot.
Camera settings: The camera must be in manual focus mode. Otherwise,
MIOPS Smart will not be able to trigger your camera. You can set the focus to
infinity. You can set the aperture and exposure per the environment. Please
note that the lightning will be visible for about 200~300 ms. depending on the
power of the bolt.
The optical sensor of MIOPS Smart is also sensitive against Infrared (IR) light.
You can notice that Miops Smart triggers your camera even if there is no
lightning. This can be due to lightning bolts, which are not visible to the human
eye. MIOPS Smart can also detect lightning which are behind the clouds.
WARNING: Lightning is very dangerous. Please make sure that you keep a
safe distance between yourself and the lightning. For more information please
visit: http://www.lightningsafety.noaa.gov/
Page 16

c. Sound Mode
The sound mode is commonly used for high speed photography. In this mode
Miops Smart will detect sound events like popping balloons, breaking glasses
or exploding items. The microphone of Miops Smart is inside the unit. You
don’t need any extra microphone to detect the sound events.
The common scenario for the sound mode is triggering the flash unit in a
completely dark room. This is a simple trick to take high speed pictures with
your regular DSLR camera. Prepare your setup in a room where you can make
it completely dark. The event must make a sound which is loud enough to
trigger the Miops Smart. Run a few dry-runs to find the correct sensitivity. In
this manner you have two options. You can either adjust the distance between
the setup and the Miops Smart or you can adjust the sensitivity of the sound
mode. The closer to the setup the better will be performance. You can use an
extension cable if you want to put the flash away from the Miops Smart. In this
scenario, the camera is completely independent from the flash unit and Miops
Smart.
After you have placed everything into place, bring your camera to bulb mode
and turn off the lights. While it is completely dark, press the shutter button of
your camera, start the event and let Miops Smart trigger the flash unit per the
event (like a popping balloon). Then close the shutter of your camera and turn
on the lights. Check the picture to examine the final picture.
If there is blurring on the image, this means that the flash duration is longer
than required. You can lower the output power of your flash; this will give you
a shorter flash duration. If you have photographing a moving object, check the
location of the object in the picture as well. If the object has still way to go
before it is where you want it to be, you can give some delay in milliseconds
using the sound menu “delay” parameter. If the object is further away, then
you can either lower the delay or if there is no delay, you can place the Miops
Smart further away from the setup. Moving it 3 meters (~10 feet) from the
event, will delay the triggering for about 9 milliseconds. Every single meter
away from the setup, will add about 3 milliseconds of delay to the trigger
event. Please note that you might have to increase the sensitivity as you are
putting distance between the setup and Miops Smart.
Page 17

The sound mode has the lock parameter to avoid continuous triggering. If the
lock parameter is off, it is possible that the flash unit will be triggered more
than once and this will ruin the high-speed picture. You can switch the lock
parameter to “ON” to enable single triggering only. You will need to press the
start key again, after the sound mode has triggered once with the lock “ON”.
You don’t need to do that, if you are working as lock is “OFF”.
There might be scenarios where you don’t want to trigger the flash at the first
sound event, but maybe at the second or later ones. In such a case, you can
use the Miops Smart App Scenario mode. Please refer to the Scenario Mode
section of the user manual to get detailed information.
You can also trigger the camera in the sound mode. If you want to do so, just
connect your camera to the Miops Smart with the camera connection cable.
Both of the outputs, the camera and flash connection ports are triggered
synchronously. The DSLR cameras have a certain shutter lag which is quite
high compared to the propagation delay of the sound. The average shutter lag
of a DSLR camera is about 300 milliseconds. You may consider this if you
trigger your camera per a sound event.
Page 18

d. Time Lapse Mode
The time lapse mode enables you to take pictures with a certain interval
between each other until you reach a certain number of pictures. You can also
define the exposure of the pictures in seconds, if your camera is in bulb mode.
If your camera is not in bulb mode, Miops Smart cannot override the exposure
settings of your camera.
The time lapse mode has three parameters. The first one is the interval. This is
the duration between each triggering. You can set it anywhere between 1 sec
and 1 hour with 1 second increments. Miops Smart will wait so long, before it
initiates another triggering. You can see the counter counting down for each
cycle, so you can see how much time is left before the next cycle.
The second parameter is the exposure. Again, you can set the exposure
anywhere between 1 sec and 1 hour with 1 second increments. The specified
exposure will only be applied if the camera is in bulb mode, otherwise the
camera will take the pictures per its settings. If the exposure is set to 0, the
Miops Smart will trigger your camera for about 500 milliseconds. After this it
will start the next cycle. In this configuration, every cycle will last for the
duration of the interval plus 500 milliseconds. This will be the total duration for
every cycle. If the exposure value of your camera is higher than this, the next
triggering will be missed and you will get a lower number of pictures in total.
In order to avoid this you need to adjust the interval value so that it will cover
the exposure duration of your camera.
Example: The exposure of the camera is set to 3 seconds and you want
to take a picture in every 30 seconds. In this case the interval must be at
least 33 seconds, because otherwise the second triggering will be missed and
you will not get as much pictures as you wish.
Example: The camera is aperture mode and the expected exposure is
less than 500 milliseconds and you want to take a picture in every 10
seconds. In this case, you can set the interval to 10 seconds as the cycle of
the camera for each picture will be shorter than the cycle of Miops Smart for
every picture.
Page 19

The diagram on the right shows an
explanation of the cycles for Miops
Smart and the camera. You need to
make sure that the cycle of the
MIOPS Smart is always equal or
greater than the cycle of the
camera.
You can also set the number of total pictures to be taken in the time lapse
mode. Miops Smart will stop triggering your camera after the number has been
achieved. The total number of the pictures will only be equal to the set frame
number, if the cycle duration of Miops Smart is longer than the cycle of the
camera as explained above. If you get a lower number of pictures in total,
check your camera and Miops Smart settings and change them per the
requirements.
If you want to start a new round of the time lapse with the same settings, you
can just the start key again and Miops Smart will start taking pictures again.
The scenario mode of the Miops Smart app enables you to combine different
rounds of time lapse with different parameters. Please refer to the Scenario
Mode section of the user manual to get detailed information.
Page 20

e. Laser Mode
The laser mode requires an external laser source (sold separately). This mode
is based on the existence of a laser beam fed to the optical receiver of the
Miops Smart. It will trigger your camera or flash unit whenever the beam is
broken. You can use a regular laser pen or pointer as the laser source. The
color of the laser does not make any difference.
WARNING: Please take every possible safety caution while you are working
with a laser. Wear a safety goggle all the time. Never point the laser to your
eyes, other people and animals.
The laser mode requires a consistent laser beam to be fed to the optical
receiver of the MIOPS Smart. It is located on the front face of the device. The
receiver is behind a transparent window and there is an optical lens on the
window. The lens will help to focus the laser beam to the receiver. The laser
beam must hit the lens on the window. A slight movement of the laser source
can move the beam away from the receiver, so make sure that both the laser
source and the Miops Smart are firmly mounted on a steady stand.
After you have firmly mounted the laser source and the Miops Smart, turn the
device on and switch to the laser mode. If the laser beam is correctly aligned
to the receiver, you should see the “LM” sign at the top right corner of the
screen. LM stands for Laser Matched. Seeing a constant LM sign on the screen
is the first condition of the laser mode. If you see the LM sign blinking, this
may have two reasons:
• The power of the laser beam might be just about the threshold
value. You can try to lower the “threshold” value from the
parameters of the laser mode. You can also try to shorten the
distance between the laser source and the Miops Smart. The
density of the laser beam will decrease due to scattering, as the
beam reaches further away from the source. Moving the laser
source closer to the Miops Smart can solve the problem. Please
note that, decreasing the threshold value may cause false
triggering because of environment light. If you are working
outdoors and during day time, a certain threshold value would be
Page 21

mandatory due to IR light. In such a situation, you can try a laser
source with more output power.
• The second reason of the blinking LM sign can be the shaking of the
laser source and the Miops Smart. A small misalignment can cause
the laser beam to miss the receiver. If you are working outdoors,
wind can be the reason for this. In such a case, you can try adding
some balance weight to your tripod or decreasing the distance
between the laser source and Miops Smart. A laser source which
can stay on all the time with a switch will be easier to work with.
You can look for such a laser from your local suppliers.
After you see the LM sign on the screen, you can press the start key to
get the laser mode running. You can go ahead and make some dry runs
by cutting the beam. The Miops Smart will trigger whenever you cut the
beam with your hand or something else. Again, you can use both of the
output simultaneously.
You can add some delay to the triggering with the delay parameter. You
can specify any value in milliseconds between 0 and 999. Different from
the sound mode, the distance between the laser source and the Miops
Smart does not make any difference in terms of delay. You just need to
provide a consistent alignment between the laser and the Miops Smart.
The third parameter for the laser mode is the frame number. You can
specify how many pictures to be taken after the laser beam has been cut.
The Miops Smart will trigger your camera so many times equal to the
frame number. You can set the number anywhere between 1 and 999.
Miops Smart can trigger your camera at a maximum rate of 2 times per
second. This means your camera has about 500ms for every picture. Your
camera may need longer than this due to the camera settings. In such a
situation, you will get a lower number of triggering. If your camera is in
burst mode, it is also possible that you get a higher number of pictures
than specified. You will get the exact number of frames, if your camera
needs less than 500ms for every picture and it must be in single shot
mode.
The laser mode does not have a LOCK parameter. It will keep triggering if
Page 22

the laser beam is fed and then cut again. If you want the laser mode to
stop working for good after a certain number of frames, you can create a
custom scenario using the Miops Smart app on your smartphone. Please
refer to the Scenario Mode section of the user manual to get detailed
information.
Page 23

f. HDR (High Dynamic Range) Mode
HDR mode enables you to take the same picture with different exposures, so
you can combine them later with image processing software to get a final
image. The final image will be closer to what human eye can see. The theory
behind the HDR photography is very simple. The human eye can see the light
in 20 different stops. This is approximately about 1000000:1 contrast ratio. A
high quality DSLR camera can capture about 14 stops at maximum. If you
sweep through all possible exposure values by taking multiple images, you will
get as close as possible to what human eye can see.
The HDR photos are usually taken in odd numbers as there will be an image at
the center exposure and equal number of images with the higher and lower
exposures. The exposure values will be calculated depending on the center
value. This parameter is shown as “Center” in the HDR menu. You will also
need to specify how much you want to increase or decrease the exposure at
each step. The higher the ratio, the wider will be the dynamic range. This
parameter is shown as “EV(+-)”. The final parameter is how many pictures you
want in total. This is shown as “Frame”. If you want three pictures for example,
there will be one at the center exposure, one at the high exposure and one at
the low exposure. If you want five pictures starting from the same center
value, the exposure will get high and down one step more. If you set EV(+-) to
2, the highest possible value for the frame value is limited to 5. This is due to
the technical limitations of the DSLR cameras. It is technically not possible that
a DSLR camera would be that fast in bulb mode.
The calculation of the exposure steps is pure mathematics. The formula is very
simple.
𝑛 − 1 𝑡ℎ&𝐸𝑥𝑝𝑜𝑠𝑢𝑟𝑒 =
𝐶𝑒𝑛𝑡𝑒𝑟
2
(34)
𝐶𝑒𝑛𝑡𝑒𝑟&𝐸𝑥𝑝𝑜𝑠𝑢𝑟𝑒 = 𝐶𝑒𝑛𝑡𝑒𝑟
𝑛 + 1 𝑡ℎ&𝐸𝑥𝑝𝑜𝑠𝑢𝑟𝑒 = 𝐶𝑒𝑛𝑡𝑒𝑟 ∗&2
(34)
If you set the EV(+-) to 1, the exposure will be multiplied or divided by 2. If
you set it to ½, the factor will be 1.41. If you set the EV(+-) to 1/3 the factor
will be 1.25 The exposure values will be calculated by multiplying or dividing
Page 24

the center value with or by the factor.
Example: I want the center exposure to be 2 seconds. I want to take 3
pictures with EV(+-) equal to ½. What will be the exposure values?
As the EV(+-) is set ½, the factor is 1.41. The center exposure will be 2
seconds. The high exposure will be (2 *1.41) which will be rounded to 3
seconds. The lower exposure will be (2/1.41) which will be rounded to 1.5
seconds.
Example: I want to take seven pictures in total but the lowest exposure
is faster than my camera can go in bulb mode. What will happen?
In such a case the speed of your camera will be the lower limit for the
exposure. It is possible that you get two pictures with the same exposures for
the lower values.
IMPORTANT: Your camera must be in BULB mode to take HDR pictures.
Otherwise, all of the pictures will have the same exposure.
After you have all the three parameters set, you can press the start key. After
this, a time line will appear on the screen with the calculated exposure values
and stops. You will also see the current index of the picture to be taken along
with the total number of the pictures to be taken.
Page 25

g. DIY (Do It Yourself) Mode
The DIY mode is used to connect external sensors to your MIOPS Smart. The
external sensor can be of any type if it meets some technical specifications.
The DIY mode enables you to trigger your camera or flash unit based on a
signal coming from an external sensor.
WARNING: The DIY mode is designed for expert only. If you are not
sure whether your sensor would work or not, do not connect it to the
MIOPS. You can damage the device and your sensor. Please make sure
that your sensor meets the criteria.
The DIY port is located on the left hand side of the device. It is under the
protective cover. It is a 3.5 mm stereo jack. The external sensor should be
connected to the DIY port only. You can damage your sensor and Miops Smart
if you connect it to the flash connection port.
The DIY port has three terminals. The first terminal is the ground terminal. The
ground of the sensor must be connected to this terminal. The second terminal
is the signal output terminal. The output signal from your sensor must be
connected to this one. Please refer to the diagram below to see the signal,
power and ground pins of the sensor connection jack. The third terminal is the
power input terminal. If your sensor requires an external power source to
work, MIOPS Smart can provide 3Volts to it through this port. You can feed
your sensor from this port by observing the polarity. If the sensor is already
powered from another source, you don’t need to make any connection through
this terminal.
Figure 2: 3.5 mm Sensor Output Jack
Please note that, Miops Smart
provides 3Volts to the sensor from
this jack. The terminal in the front is
where Miops Smart will feed the
voltage. The output signal of the
sensor must be connected to the
first terminal of the jack.
The output signal can have a maximum value of 3.3 Volts. Using a sensor with
higher voltage can damage the Miops Smart. Please make sure that the output
Page 26

jack of your sensor is compatible with the diagram shown above.
After you have made sure, that your sensor has the correct terminal
connections, you can connect the jack to the DIY port of the MIOPS Smart. The
DIY mode has three different parameters. The first one is the threshold value.
It is given in percentage and it reflects the required change in the signal level
to initiate a triggering. As the input signal can be anywhere between 0 and 3.3
Volts, one percent change is equal to 0.033 Volts. You can set the threshold
value per this calculation. The second parameter is the delay. As in the other
modes, you can add some delay to the triggering event. The delay can be set
to any value between 0 and 999 milliseconds.
The third parameter is called the “mode”. This parameter specifies how the
output signal of the sensor should change to qualify as a trigger event. There
are three options: Change, Rising, Falling. If you set the mode to change, it
will not matter whether the voltage is going up or down. Any value above the
threshold will qualify as a triggering event. If you want to detect increasing
voltage only, the mode should be set to rising. And finally, if you set the mode
to falling, you will only detect decreasing voltage changes.
Page 27

h. Scenario Mode (Execution Only)
The scenario mode works in combination with the smartphone app. You can
store up to three different scenarios to the Miops Smart to be executed later
any time. Please refer to the Scenario Mode section of the user manual to see
how to create new scenarios using the app.
When you create a new scenario and run it, it will be also stored to the Miops
Smart. You can run them later, but you cannot modify them without the
smartphone app. The scenario mode screen lets you choose one of three
previously stored scenarios. You can select the scenario you want to run using
the up and down scroll buttons. When you are ready, press the start button
and the scenario will be executed. Each scenario can have up to five different
steps. The screen will display which step is currently running and when the
scenario ends, the Miops Smart will return to the selection screen. If you have
defined less than three scenarios, empty setup rows will be disabled.
If you modify a scenario from the smartphone app while it is running, it will be
stopped on the Miops Smart and you will get back to the setup selection menu.
You can quit from a running scenario by pressing any key. If the scenario ends
with a single frame final step, like sound mode with lock on, you will be taken
back to the setup selection menu after the triggering. The last step can also be
a multiple frames step like lightning mode. In such a case, Miops Smart will
continue running the scenario until it is ended by the user.
Once you have defined or modified a scenario using the smartphone app, you
have to start it at least once from the app, so it will be sent and stored to the
Miops Smart. If you just save the scenario but don’t start it, it will not be
saved. Once the scenario starts running on the Miops Smart, you don’t need to
keep the app running. You can also disconnect the smartphone and the
operation of Miops Smart will continue.
The operation of defining and storing new scenarios has been explained in the
Smart Phone App section of the user manual. Please refer to that section to
get detailed information about the smartphone app scenario mode.
Page 28

9. Smartphone App Mode
The smartphone app has been designed as an interface to configure and
control your MIOPS Smart. It is available on iOS and Android platforms. You
will receive software updates over Apple AppStore and Google Play. The iOS
version must be 7.0 or higher. The Android version must be 4.3 or higher.
The communication between the smartphone and MIOPS Smart is done
over Bluetooth connection. Your smartphone has to be compatible with
Bluetooth 4.0. The interface of the application is very similar for most of the
functions. They have only a few minor differences in some of the modes.
The difference will not change the user experience.
a. Installing the Application
The app name is “MIOPS” on AppStore and Android Market. You can
download and install it from the repositories just like any free app. There is
no registration needed to use the application. If your smartphone version is
compatible, you can install it to your phone by following the regular app
install procedure.
b. App Requirements
You will see the MIOPS logo on the screen of your phone. You can start the
application by touching the MIOPS icon. Make sure that your phone is not in
Airplane mode. Otherwise, MIOPS Smart cannot communicate with your
phone. Bluetooth must set to “ON” in your smartphone as well.
Please note that, your smartphone must have Bluetooth 4.0 capability.
Otherwise MIOPS Smart will not be able to connect to it. Miops Smart
features a Bluetooth 4.0 module which offers lower energy consumption
and better range compared to the previous versions.
Page 29
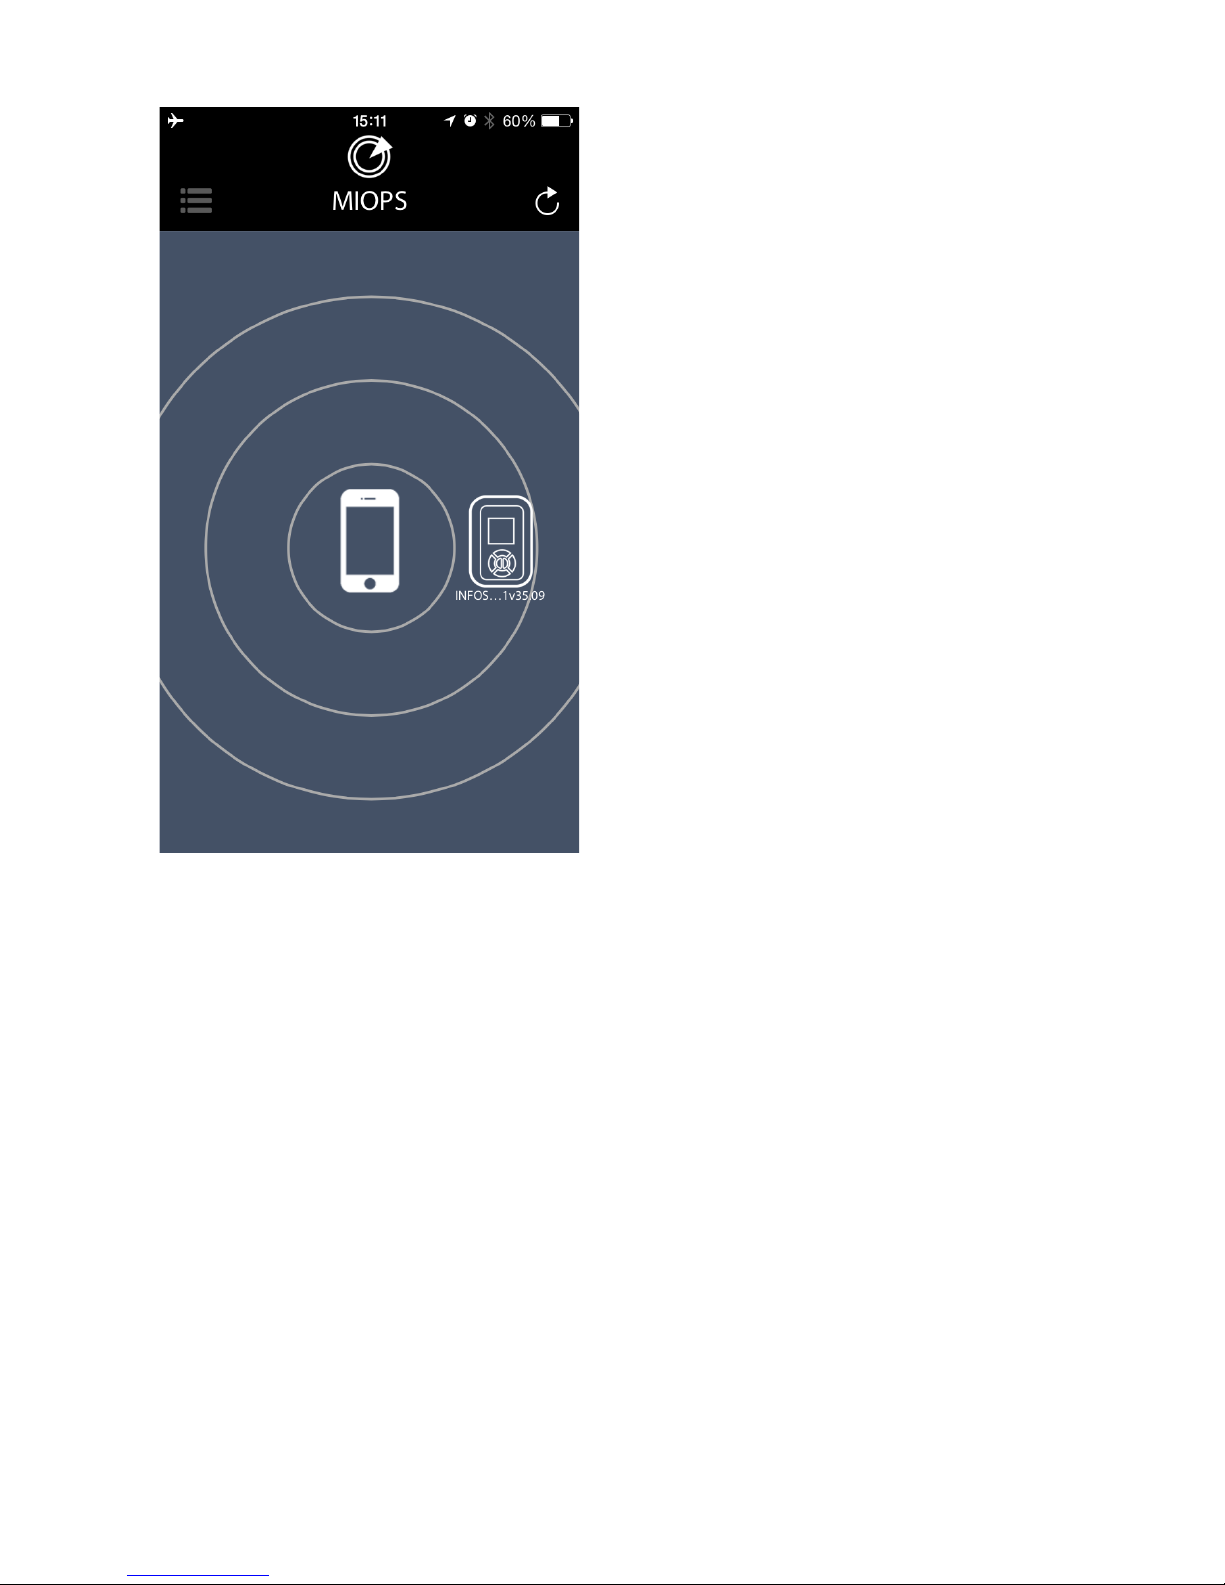
The initial screen of the app will
show your smartphone and the
nearby discovered MIOPS Smart
units. You can pair your MIOPS
Smart with the smartphone by
touching the MIOPS icon. The
logo will move onto the
smartphone logo and the mode
selection menu will show up on
the left hand side of the screen.
If you want pair the smartphone
with another MIOPS Smart, you
can touch the refresh icon on
left-top section of the screen.
The app will discover all available
MIOPS Smart units in the
Bluetooth cover range. You can
choose which one to connect just
by touching the MIOPS icon.
Page 30
c. Using the Application
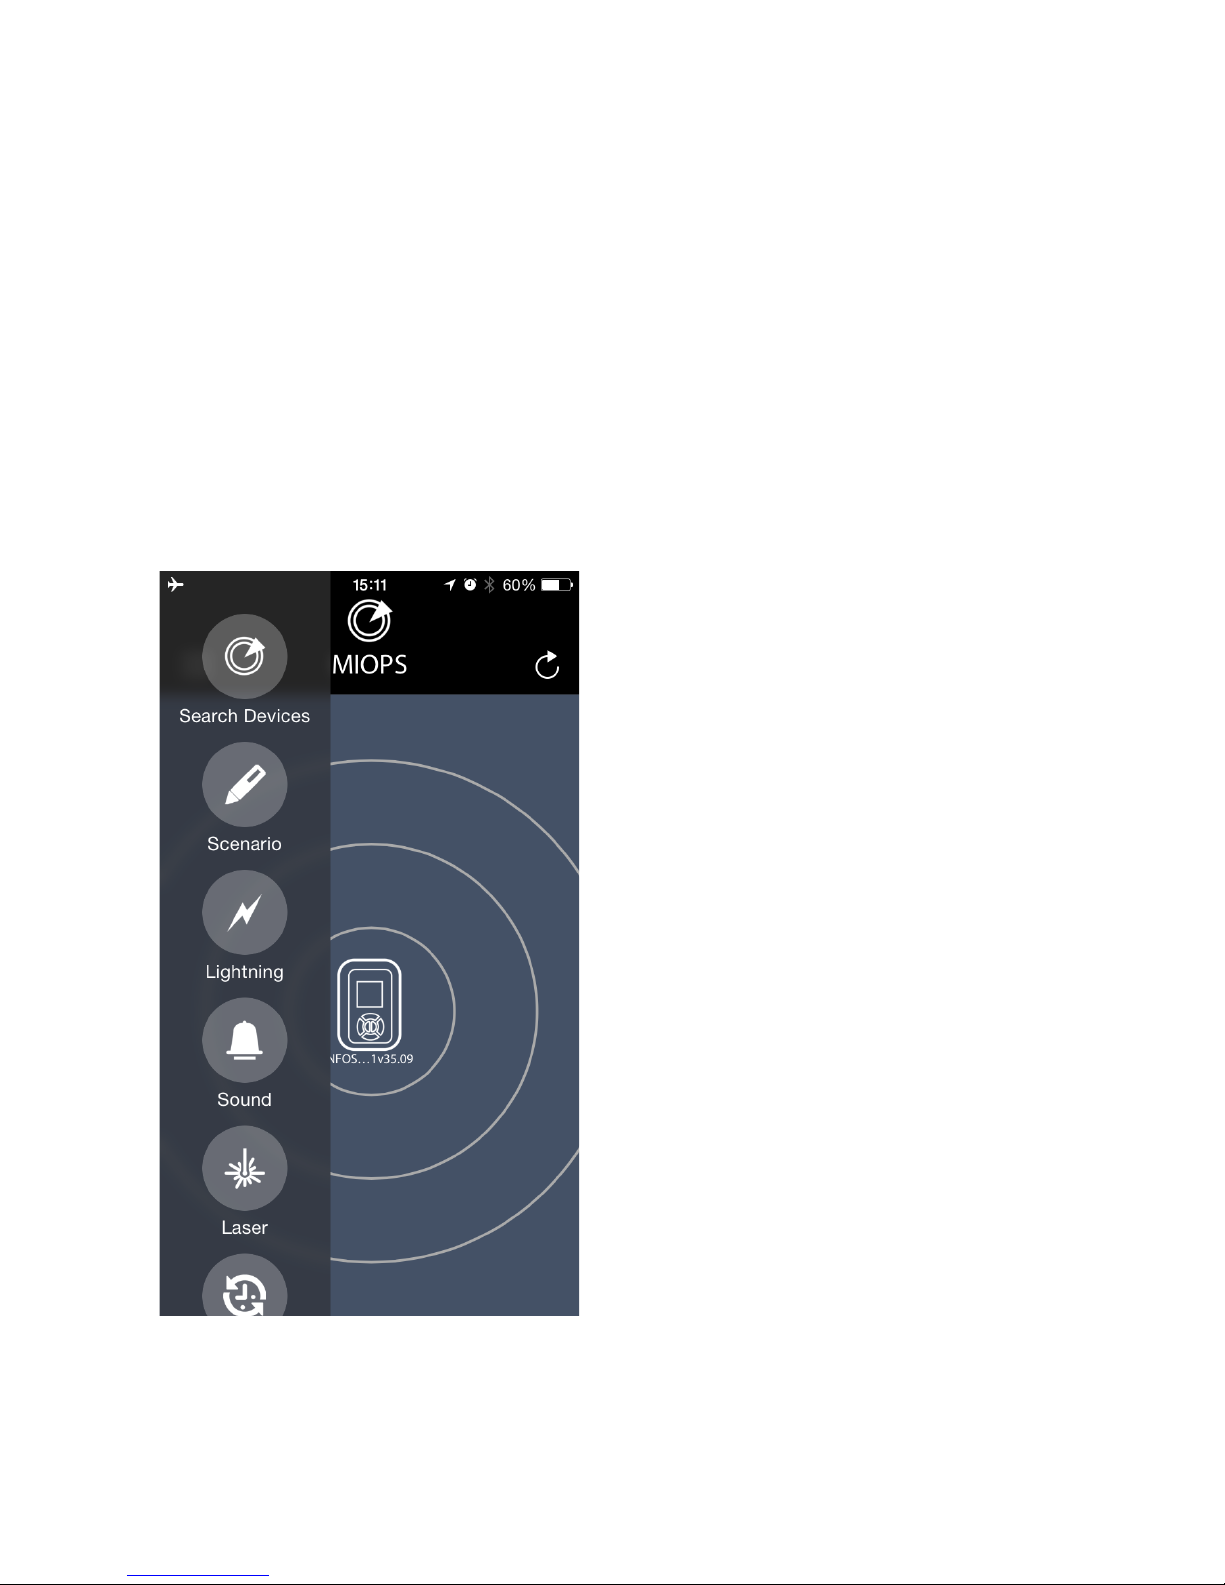
The app has a menu style interface to switch between different modes. The
initial menu will appear on the left hand side of the screen. Different modes
will be listed from top to the bottom. You can select the mode you want to
use by touching the icon. The menu will scroll down to show additional
modes that do not fit into the screen. The menu will disappear once you
select any mode and the app will enter in to the configuration page of that
particular mode. You can switch between different modes anytime. In order
to do that, you just need to touch the menu icon on the top-right hand side
of the screen. When you switch back and forth between different modes,
the settings will not change.
The first button on the menu is
Search Devices button. This
button is used if you haven't
connected to your MIOPS Smart
as you have started the app. You
can use the same button if your
MIOPS Smart has disconnected
for some reason. The range, in
which a MIOPS unit can be
discovered, depends on different
factors. If your device is not
discovered by the app, get closer
to the MIOPS Smart. If there is
too much interference in the
environment, it may take longer
to connect. If you have multiple
MIOPS Smart units in the area,
you will see all of them on the
screen. You can connect to a
single MIOPS Smart at a time.
The Bluetooth connection is only needed until you have configured your
MIOPS Smart. Once you have successfully configured your MIOPS Smart,
Page 31

you don't need keep the app running. If you want to switch to another
mode or change settings, you will need to start the application again. In
that case, you can use the Search Devices button to discover and connect
to your MIOPS Smart again. A continuous connection is needed when you
are going to use the four release modes: Cable Release, Press & Hold, Press
& lock, Timed Release. These modes will only function properly if there is
an active Bluetooth connection between MIOPS Smart and your
smartphone.
In each mode you will have different parameters. The parameters are
consistent among both the standalone operation and smartphone app. You
can set the parameters per your need. In order to send your configuration,
to MIOPS Smart, you need to touch the start button on the bottom of the
screen. MIOPS Smart will not start to function until you touch the
“start” key.
You can verify if the configuration has been successfully sent, by reading
the notification “Data is sent successfully!” at the bottom of the screen.
When the configuration is successfully sent, you will see that the screen of
MIOPS Smart changes to that mode if it is another mode. If MIOPS Smart
was in the same mode, the screen will refresh with the new adjusted
parameters.
d. Scenario Mode
The scenario mode is most powerful mode of the smartphone app. It is a
revolutionary function, which enables you to combine different sensor and
factors to create a custom scenario to be executed by Miops Smart.
You can define up to three different scenarios and you can save them to use
later. Each scenario can have up to five different steps. Each step can be either
one of six basic modes of Miops Smart (Lightning, Sound, Time Lapse, Laser,
HDR, and DIY) or a certain amount of delay. Each step is fully configurable per
the parameters of that particular mode. The last step of a scenario cannot be a
delay; otherwise there are no restrictions about the order of the steps. The
delay can be up to 59 minutes 59 seconds with one second increments.
You can start adding scenario steps by touching the “plus” sign on the first
Page 32

row. You will see a horizontal list of available options. You can scroll left or
right to find the desired mode for that step. When you find the desired mode,
you can touch the check mark on the right side of the bar. This will take you to
the parameter settings of that mode. You can adjust the parameters as you
would do in the stand alone mode of operation. Once you are finish you can
touch the “save’ button and this will add this step to the scenario. If you press
the “cancel” button at that time, this step will not be added to the scenario. At
each row you can see the mode of that step and the parameters as well.
You can change the order of the steps by touching the particular row. The row
will be highlighted and you can swipe it up or down to change the order. The
delay cannot be the last step of a scenario. Other than that, there are no
restrictions on the scenario steps. If you want to delete a step you can swipe
the row to the right. A pop up window will appear to ask if you really want to
delete that step. You can touch “No” to keep the step, or just touch “Yes” to
delete it.
In order to start the execution of a scenario, you need to touch the “start”
button at the bottom of the screen. This will also transfer the scenario to the
Miops Smart and save it to the device. You can use the saved scenarios later
without the smartphone app. The Bluetooth connection must exist between the
Miops Smart and the smartphone to transfer the scenario. Otherwise, it will not
be saved to the device. To get detailed information about using the saved
scenarios in the stand alone mode, please refer to the Chapter 8.h of the user
manual.
When the execution of the scenario starts you can follow it both on the device
and smartphone. When a step is complete, a check mark will appear on that
row and the next step will be executed. You can also follow the progress on the
screen of the Miops Smart. Once the scenario is over, Miops Smart will return
the scenario mode screen again. You can stop the execution of the scenario by
touching the “stop” button at the bottom of the screen. Miops Smart must be
connected to the smartphone, to be able to stop the execution remotely.
Otherwise, you can stop it only by pressing any key on the device.
You can define three different scenarios. You can switch between the scenarios
by touching the scenario name. A notch will move to that scenario and you will
Page 33
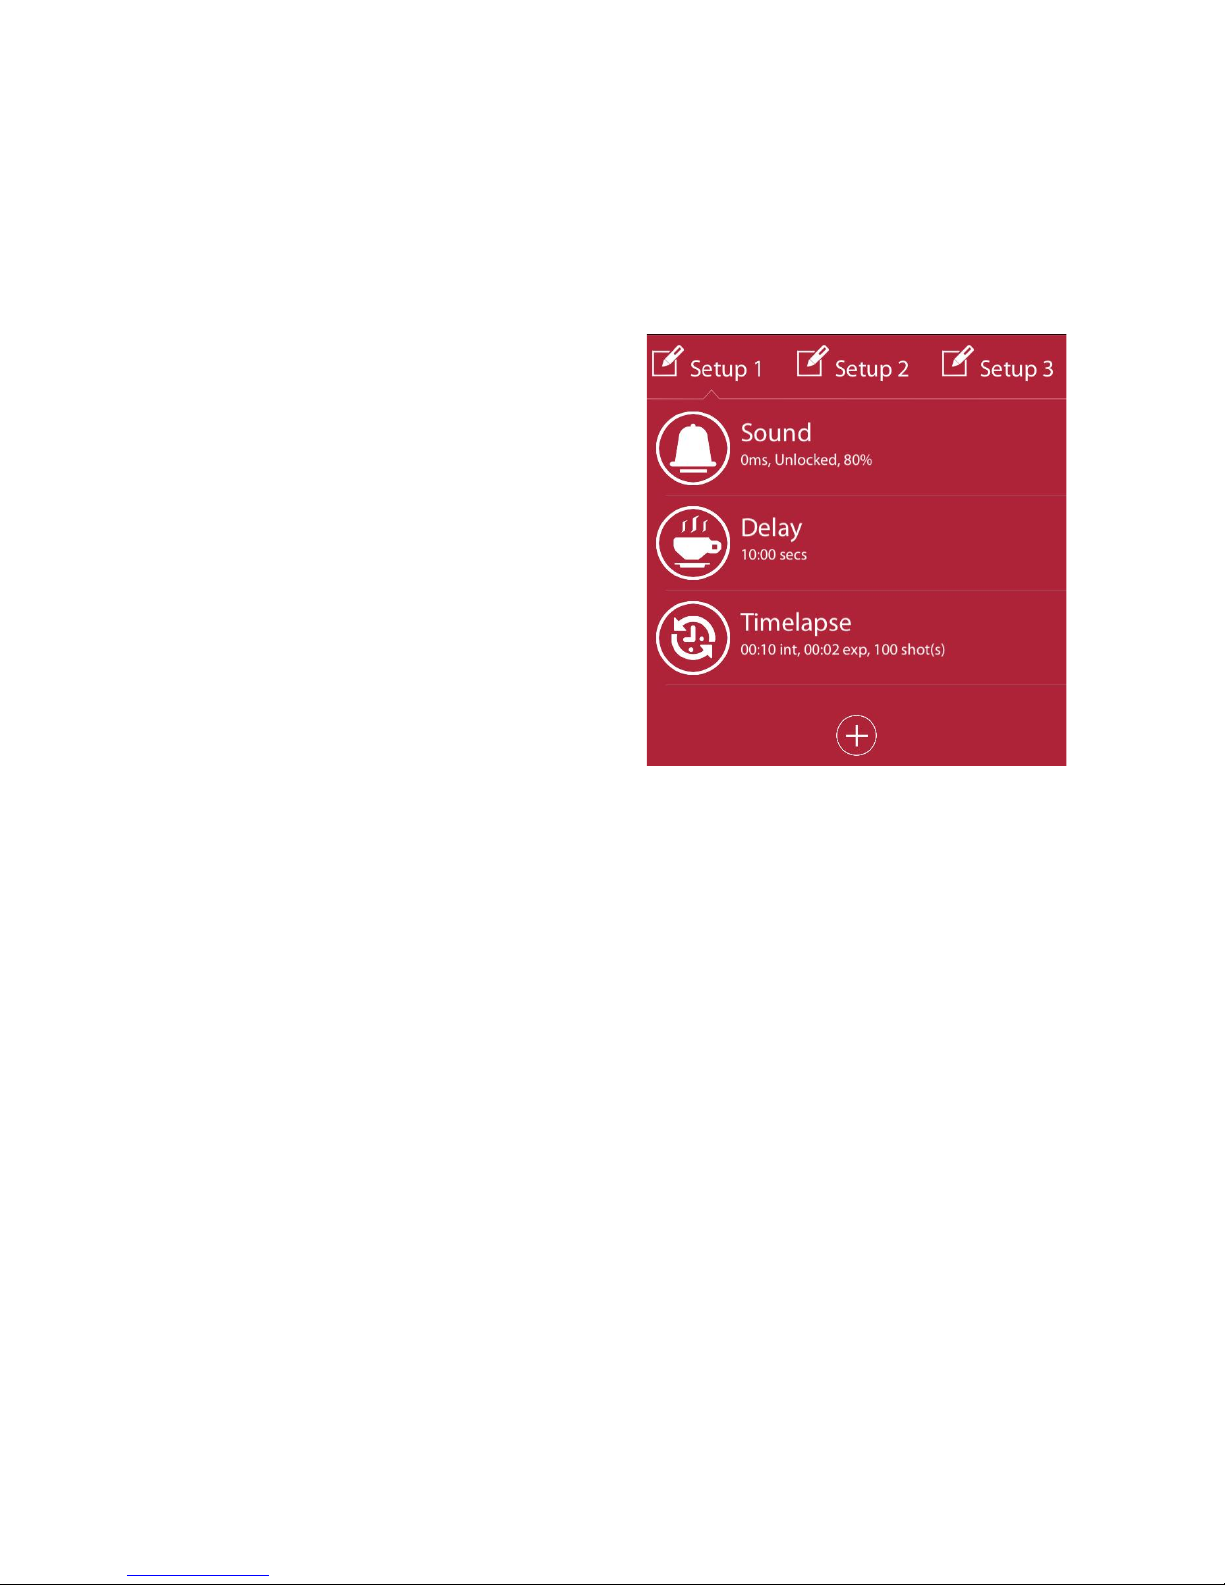
see the steps of that scenario on the screen.
You can also use the mobile dongle with the scenario mode. To know how to
use the mobile dongle in the lightning mode, please refer to the Mobile
Dongle section of the user manual.
Example: I want to start a time
lapse 10 minutes after a sound
event. How many steps do I
need?
You will need three steps in a
scenario. The first step will be the
sound mode. You will add the first
step in the sound mode with your
desired parameters. The second
step will be a delay of 10 minutes.
And finally, you will need to add a
step in time lapse mode with the
interval, exposure and frame
parameters.
Page 34
e. Lightning Mode
The lightning mode in the smartphone app has the same parameter with
the standalone mode. The only available parameter is the sensitivity. To get
detailed information about the parameters and the usage of the lightning
mode, please refer to the Lightning Mode section in Standalone Mode
Operation of Miops Smart (Chapter 8.b).
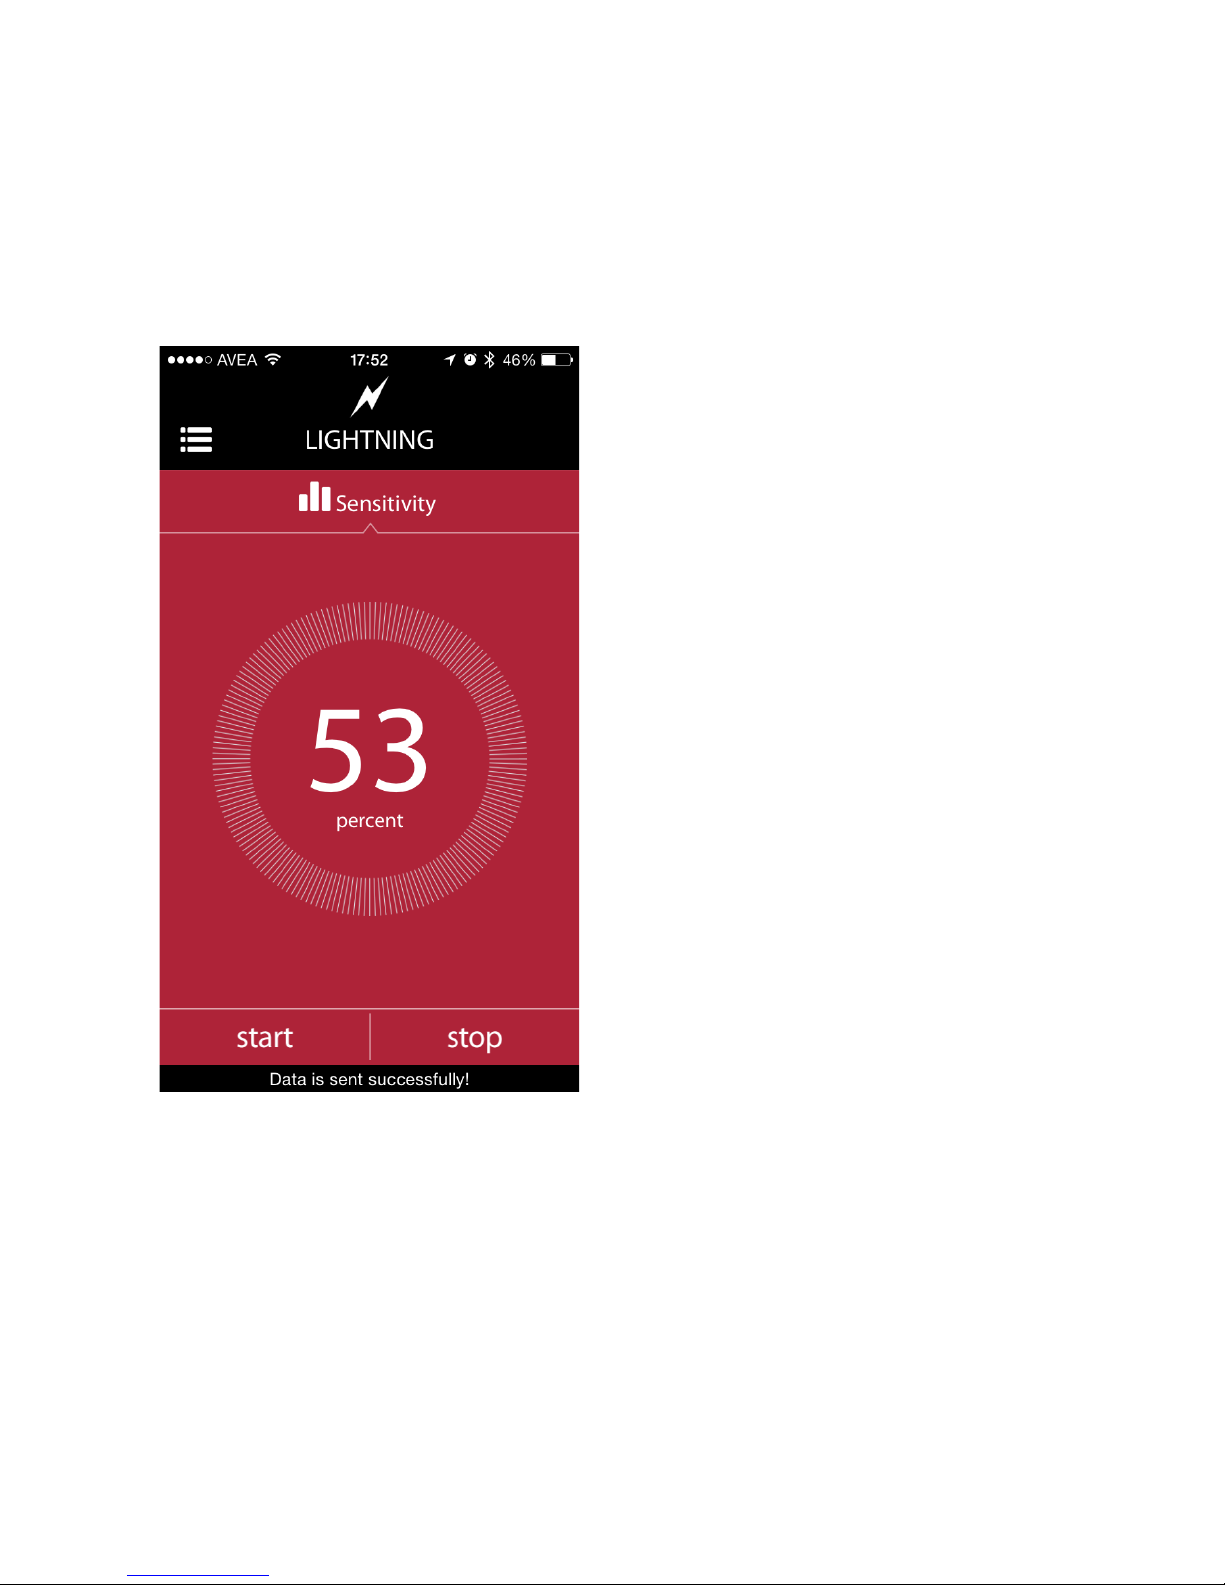
The sensitivity of the lightning
mode can be adjusted, using the
touch dial on the screen. Turning
the dial clockwise will increase
the sensitivity and vice versa.
The faster you turn the dial, the
faster will change the sensitivity.
The current level can be read in
the middle of the dial. If you
want to fine tune the sensitivity
level, you need to turn dial really
slow. You can change the level
by +/- 1 percent if you do so.
You can change the sensitivity
anytime, by using the buttons on
MIOPS Smart as well. But the
settings on the smartphone app
will override the settings on
MIOPS Smart, whenever data is
sent from the app to MIOPS
Smart
As it is the case in all modes, do not forget to touch the “start” button.
Verify that data has been successfully sent to MIOPS Smart to ensure a
proper operation. To know how to use the mobile dongle in the lightning
mode, please refer to the Mobile Dongle section of the user manual.
f. Sound Mode
The sound mode in the smartphone app has the same parameters with the
Page 35
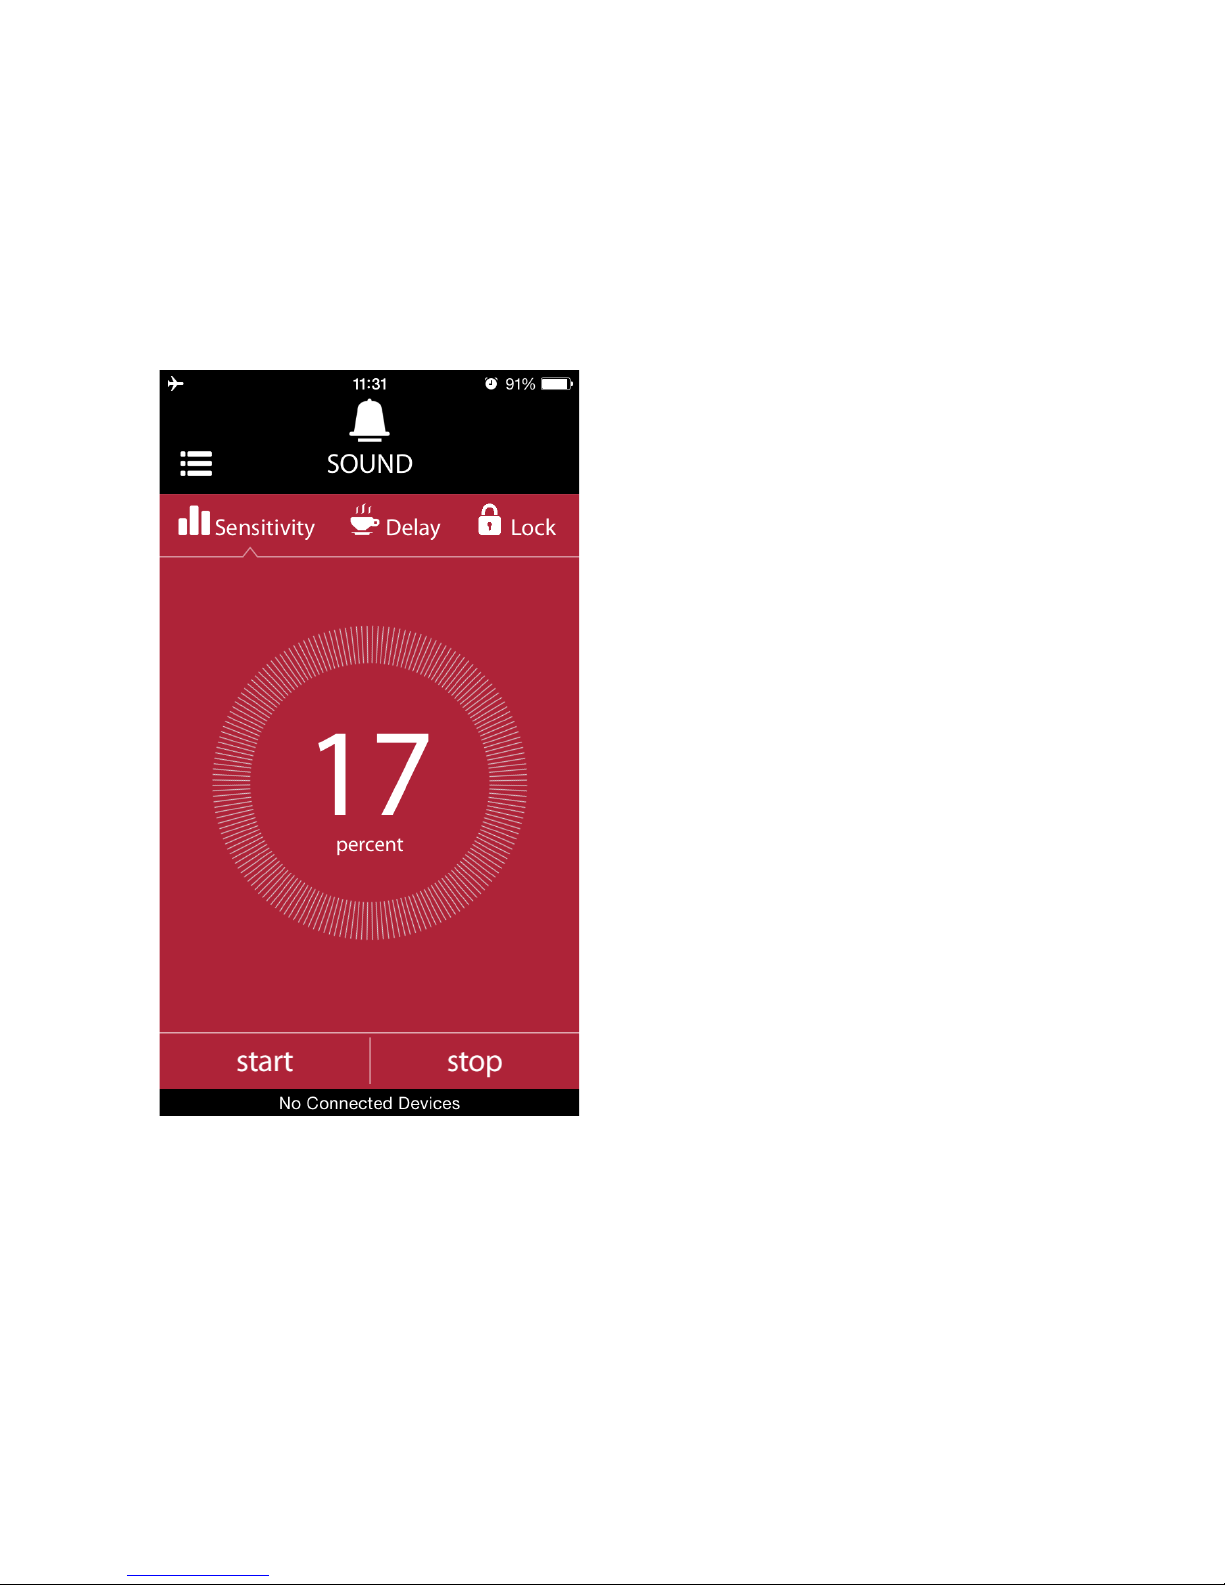
standalone operation. They are the sensitivity, delay and lock. You can set
all of them using the sound mode screen of the app. To switch from one
parameter to the next one, just touch the icon at the top of the screen. You
will see a notch moving to that parameter and the screen will show the
available parameter setting menu. To get detailed information about the
parameters and the usage of the sound mode, please refer to the Sound
Mode section in Standalone Mode Operation of Miops Smart (Chapter 8.c).
The parameters work the same
way as they do in the standalone
mode. The smartphone app just
provides an interface to them. It
also enables to use the mobile
dongle. To know how to use the
mobile dongle in the sound
mode, please refer to the Mobile
Dongle section of the user
manual.
Page 36
g. Laser Mode
The laser mode works consistently with the standalone operation as well. It
has the same parameters in the smartphone app. To get detailed
information about the parameters and the usage of the laser mode, please
refer to the Laser Mode section in Standalone Mode Operation of Miops
Smart (Chapter 8.e).
Attention: Laser beam can be dangerous. Avoid eye contact. Use the
laser source at your own risk. We strongly recommend that you use
a protective goggle.
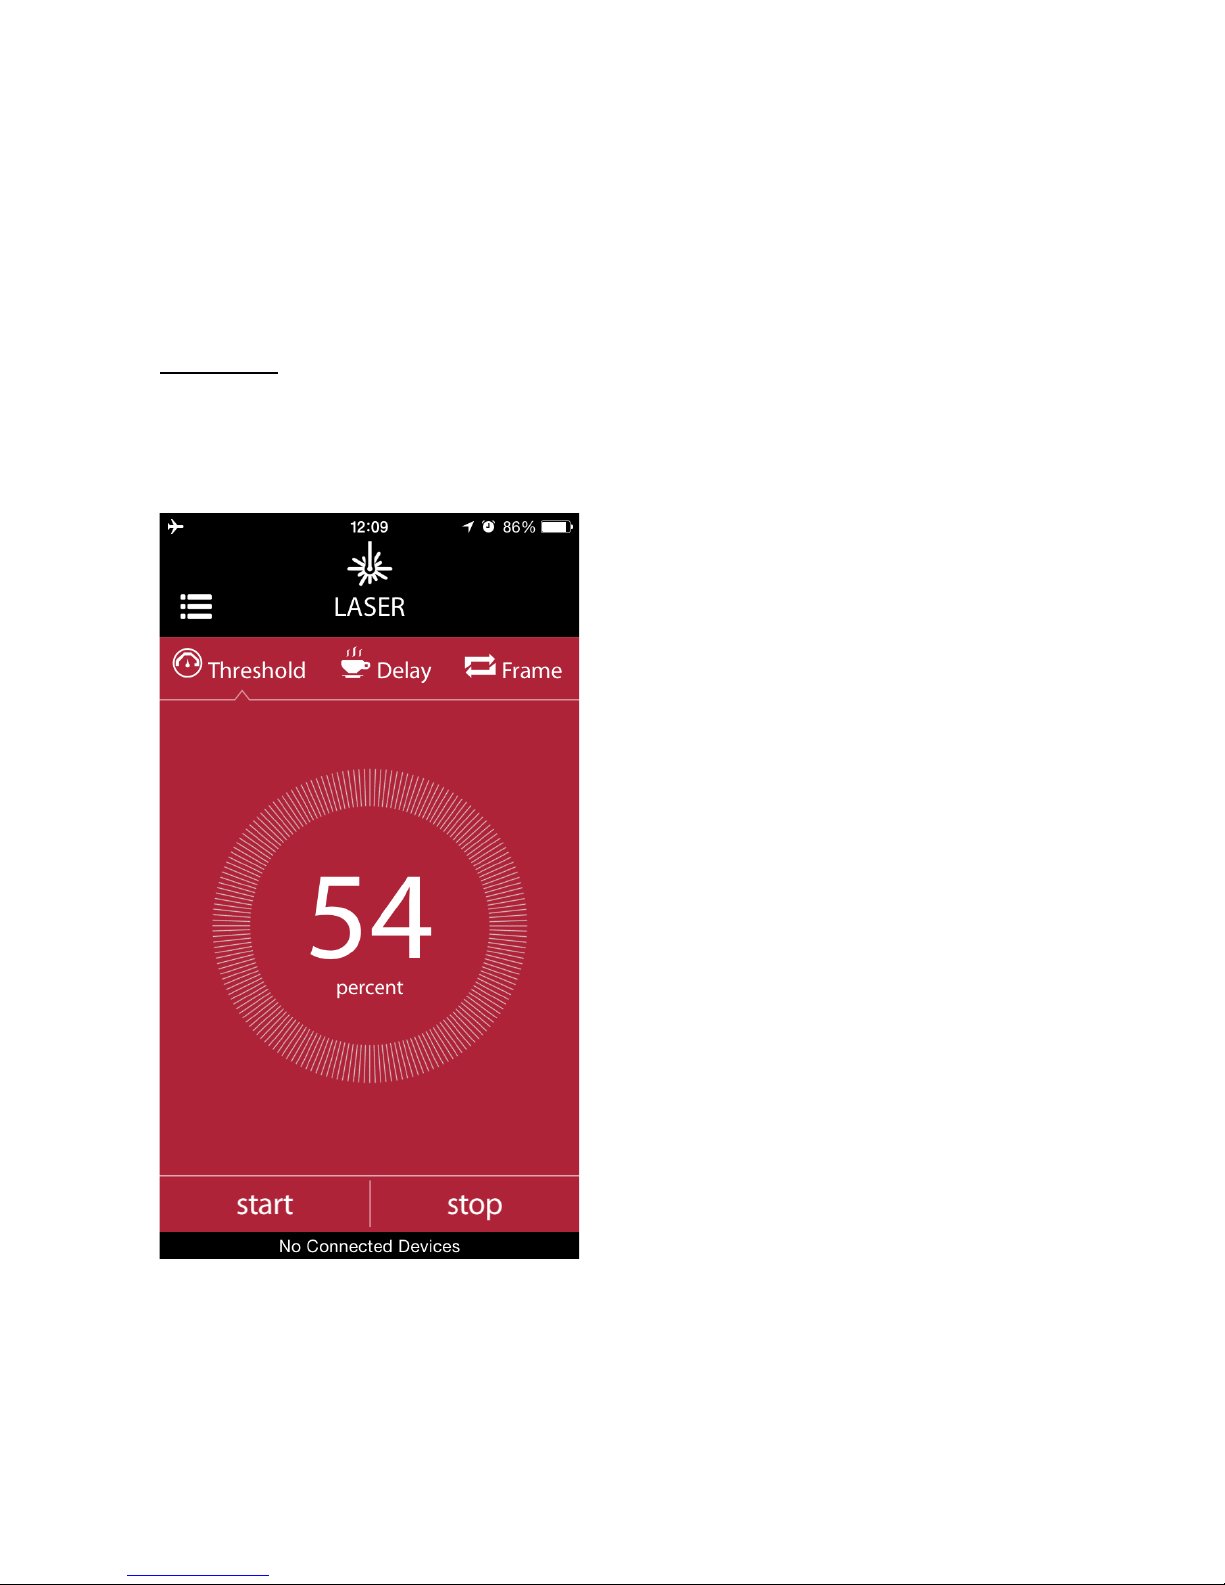
You can set the parameters of
the laser mode by using the dials
on the screen. To switch between
different modes, just touch the
icon of that parameter. A notch
will move to the parameter and
you can change the parameter
value by using the dial. You can
also enable the mobile dongle
from this screen. To know how to
use the mobile dongle in the
laser mode, please refer to the
Mobile Dongle section of the user
manual.
Page 37
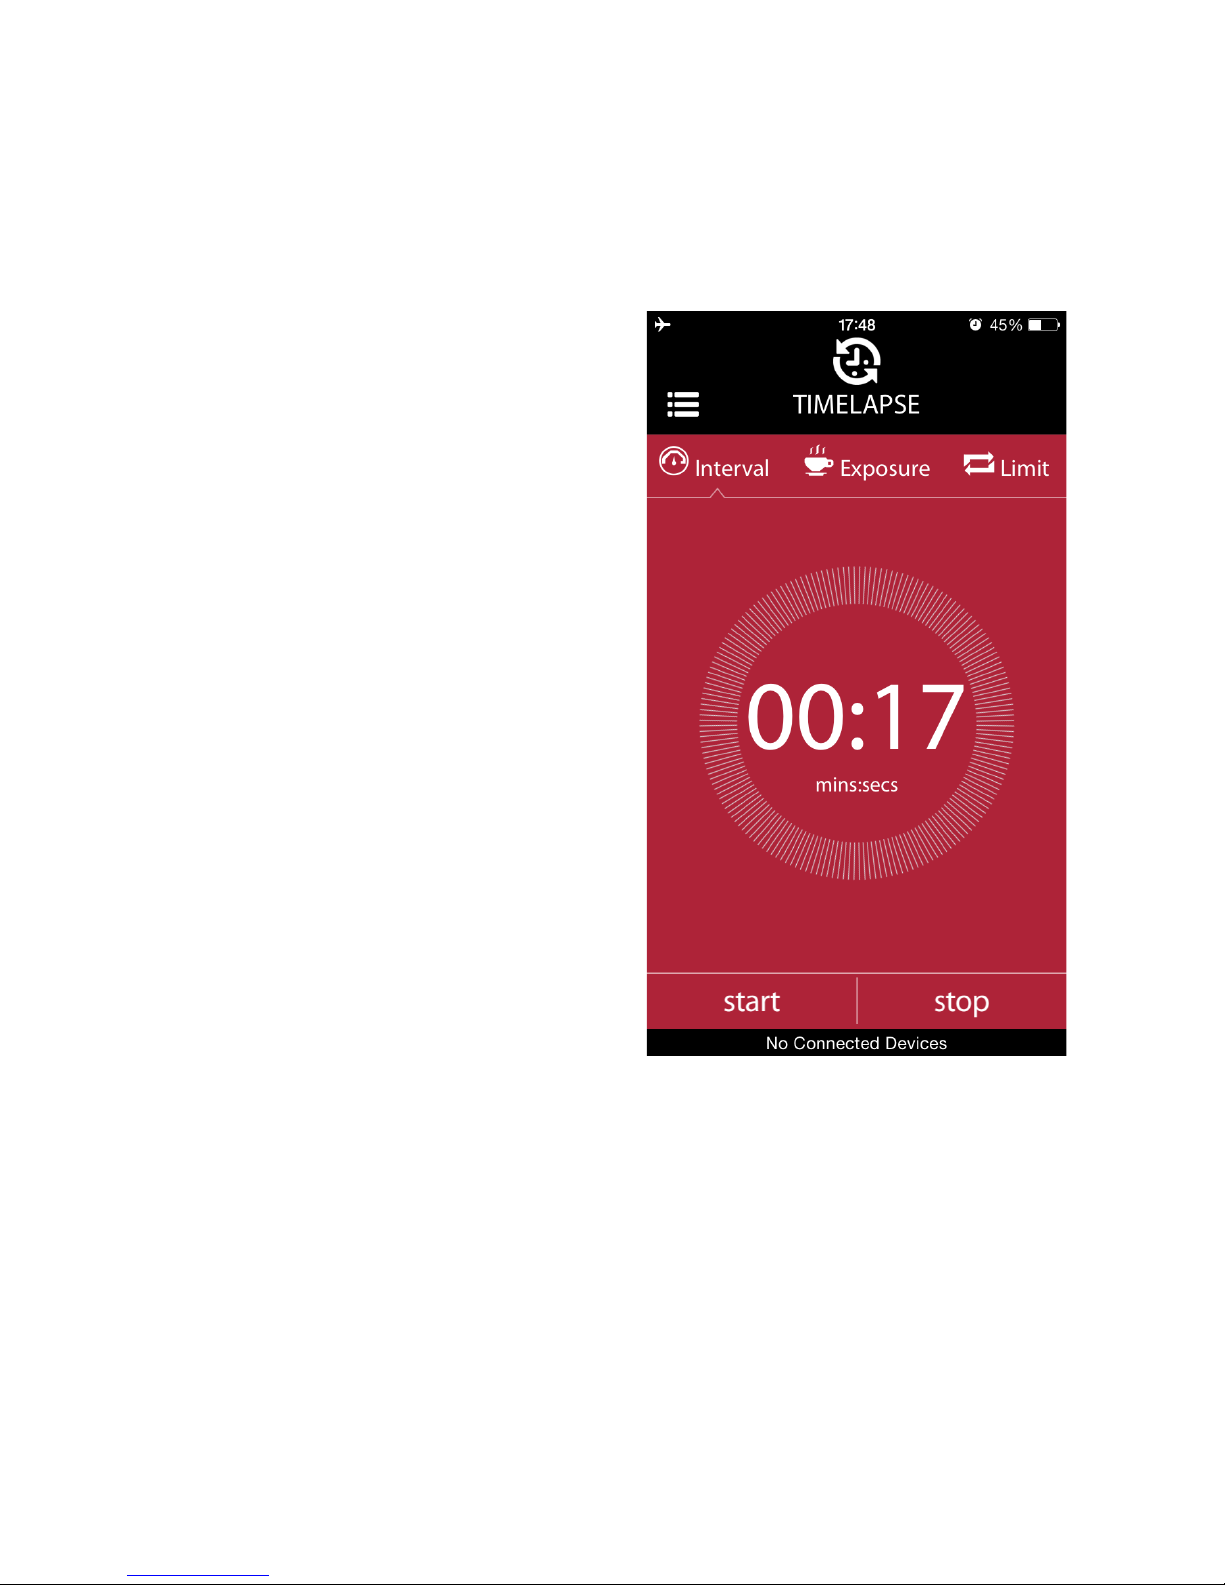
h. Time Lapse Mode
The Time Lapse mode has also
the same parameters with the
standalone mode. They are the
interval, exposure and the limit.
To get detailed information about
the parameters and the usage of
the time lapse mode, please
refer to the Time Lapse Mode
section in Standalone Mode
Operation of Miops Smart
(Chapter 8.d).You can set all of
the parameters using the Time
Lapse mode screen of the app.
To switch from one parameter to
the next one, just touch the icon
at the top of the screen. You will
see a notch moving to that
parameter and the screen will
show the available parameter
setting menu.
To know how to use the mobile
dongle in the laser mode, please
refer to the Mobile Dongle
section of the user manual.
i. DIY (Do It Yourself) Mode
The DIY mode has also the same parameters with the standalone mode.
They are the threshold, delay and the mode. To get detailed information
about the parameters and the usage of the DIY mode, please refer to the
DIY Mode section in Standalone Mode Operation of Miops Smart (Chapter
8.g).You can set all of the parameters using the DIY mode screen of the
app. To switch from one parameter to the next one, just touch the icon at
the top of the screen. You will see a notch moving to that parameter and
the screen will show the available parameter setting menu. To know how to
Page 38

use the mobile dongle in the laser mode, please refer to the Mobile Dongle
section of the user manual.
j. HDR (High Dynamic Range)
The HDR mode has also the same parameters with the standalone mode.
They are the threshold, delay and the mode. To get detailed information
about the parameters and the usage of the DIY mode, please refer to the
DIY Mode section in Standalone Mode Operation of Miops Smart (Chapter
8.g).You can set all of the parameters using the DIY mode screen of the
app. To switch from one parameter to the next one, just touch the icon at
the top of the screen. You will see a notch moving to that parameter and
the screen will show the available parameter setting menu. To know how to
use the mobile dongle in the laser mode, please refer to the Mobile Dongle
section of the user manual.
k. Press & Hold
Using Press & hold mode you can keep the shutter open as long as you want.
The shutter will open when you press the circle and it will close whenever you
release it.
l. Press & Lock
Press & Lock mode will open the shutter with a tap on the screen. The shutter
will remain open until you tap the screen again.
m. Timed Release
In this mode you can keep the shutter open for a certain period of time. You
can specify the time period in seconds. You can go up to 1 hour.
Page 39

10. Mobile Dongle Mode
The mobile dongle enables you to trigger your camera with a cable connection
from your smartphone. In this mode, you don’t need to have a cable
connection from Miops Smart to your camera. You have to plug the mobile
dongle to the earphone jack of your smartphone. The camera connection cable
will be connected to the mobile dongle and to your camera. Miops Smart will
have a Bluetooth connection to your smartphone. If you are working in the
lightning, sound and laser modes, Miops Smart will detect the events using the
internal sensors and when a triggering event happens, it will command the
smartphone to trigger your camera. In the remaining modes, the smartphone
app does not need the Miops Smart.
The mobile dongle is available in every mode rather than being a standalone
mode. In each mode, on the right top of the screen you will see the mobile
dongle icon. It lets you to switch to the mobile dongle mode of operation.
Before you switch to that mode, you have to plug in the mobile dongle to the
earphone jack of the smartphone. If you touch the mobile dongle icon before
you plug the earphone, a pop-up message will appear. You cannot switch to
mobile dongle mode unless you plug the earphone. You will also need to set
the volume to max level. You will get another warning about that, if the volume
is not set to max.
The mobile dongle requires an active Bluetooth connection between the Miops
Smart and your smartphone for the lightning, sound and laser modes. Please
note that the mobile dongle adds a certain delay to the triggering. This might
affect your setup. If you switch to mobile dongle mode from the cable
connection, you might need to adjust the parameters of that mode.
The mobile dongle is designed to be used with Miops app and a camera only.
Do not use it with other applications or devices. This may cause malfunction
and damage your Miops Smart and device.
Page 40
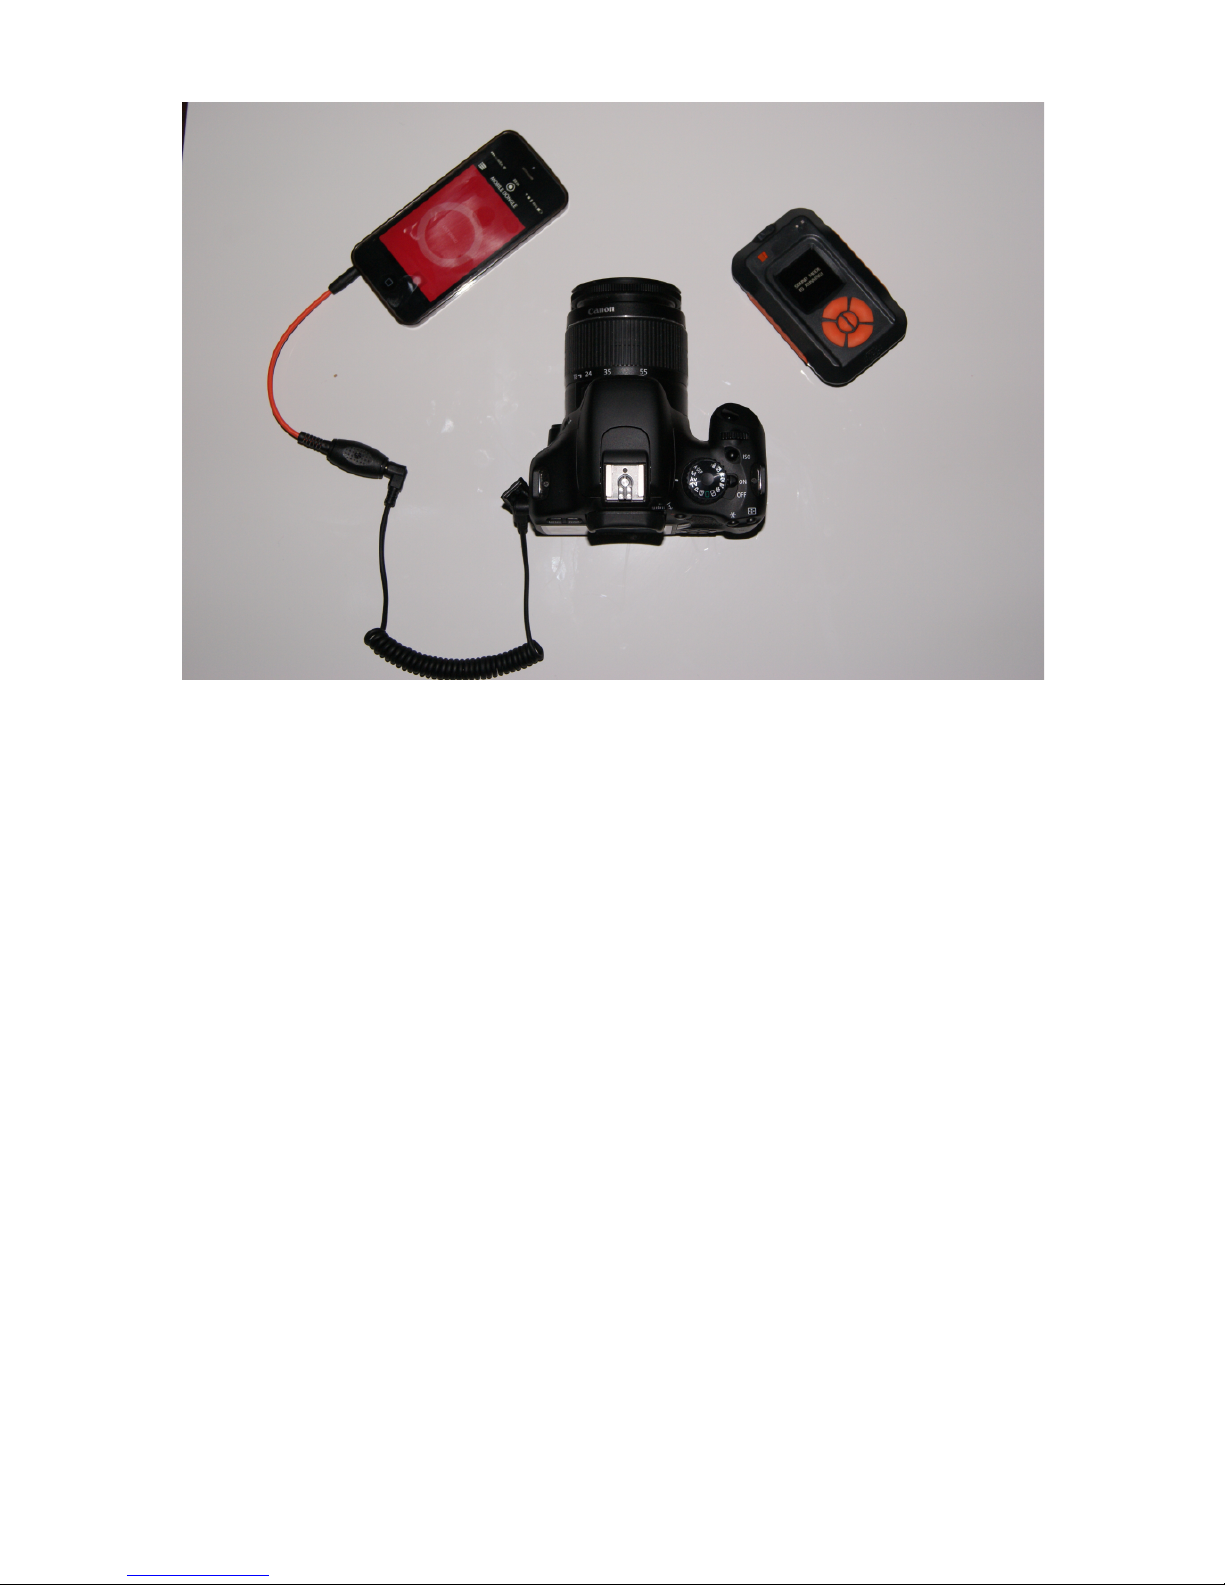
Figure 3 Mobile Dongle Cable Connection
Page 41
11. Firmware Upgrade
.The firmware upgrade process is different for MIOPS Smart devices with V2.0
and above. They have the capability to upgrade the device firmware using the
smartphone app without having any cable connection to a computer. So,
depending on the version of your MIOPS, you need to follow one of the
methods to upgrade the device firmware.
a. MIOPS Smart v2.0 and above
If you own a MIOPS Smart v2.0 and above your device has the capability to
update its firmware without needing any cable connection to a computer. You
can use the smartphone app to check for new firmware version and then
update the device with a single click. In order to upgrade the firmware, follow
these steps:
• Start the MIOPS Smart app and connect to your MIOPS.
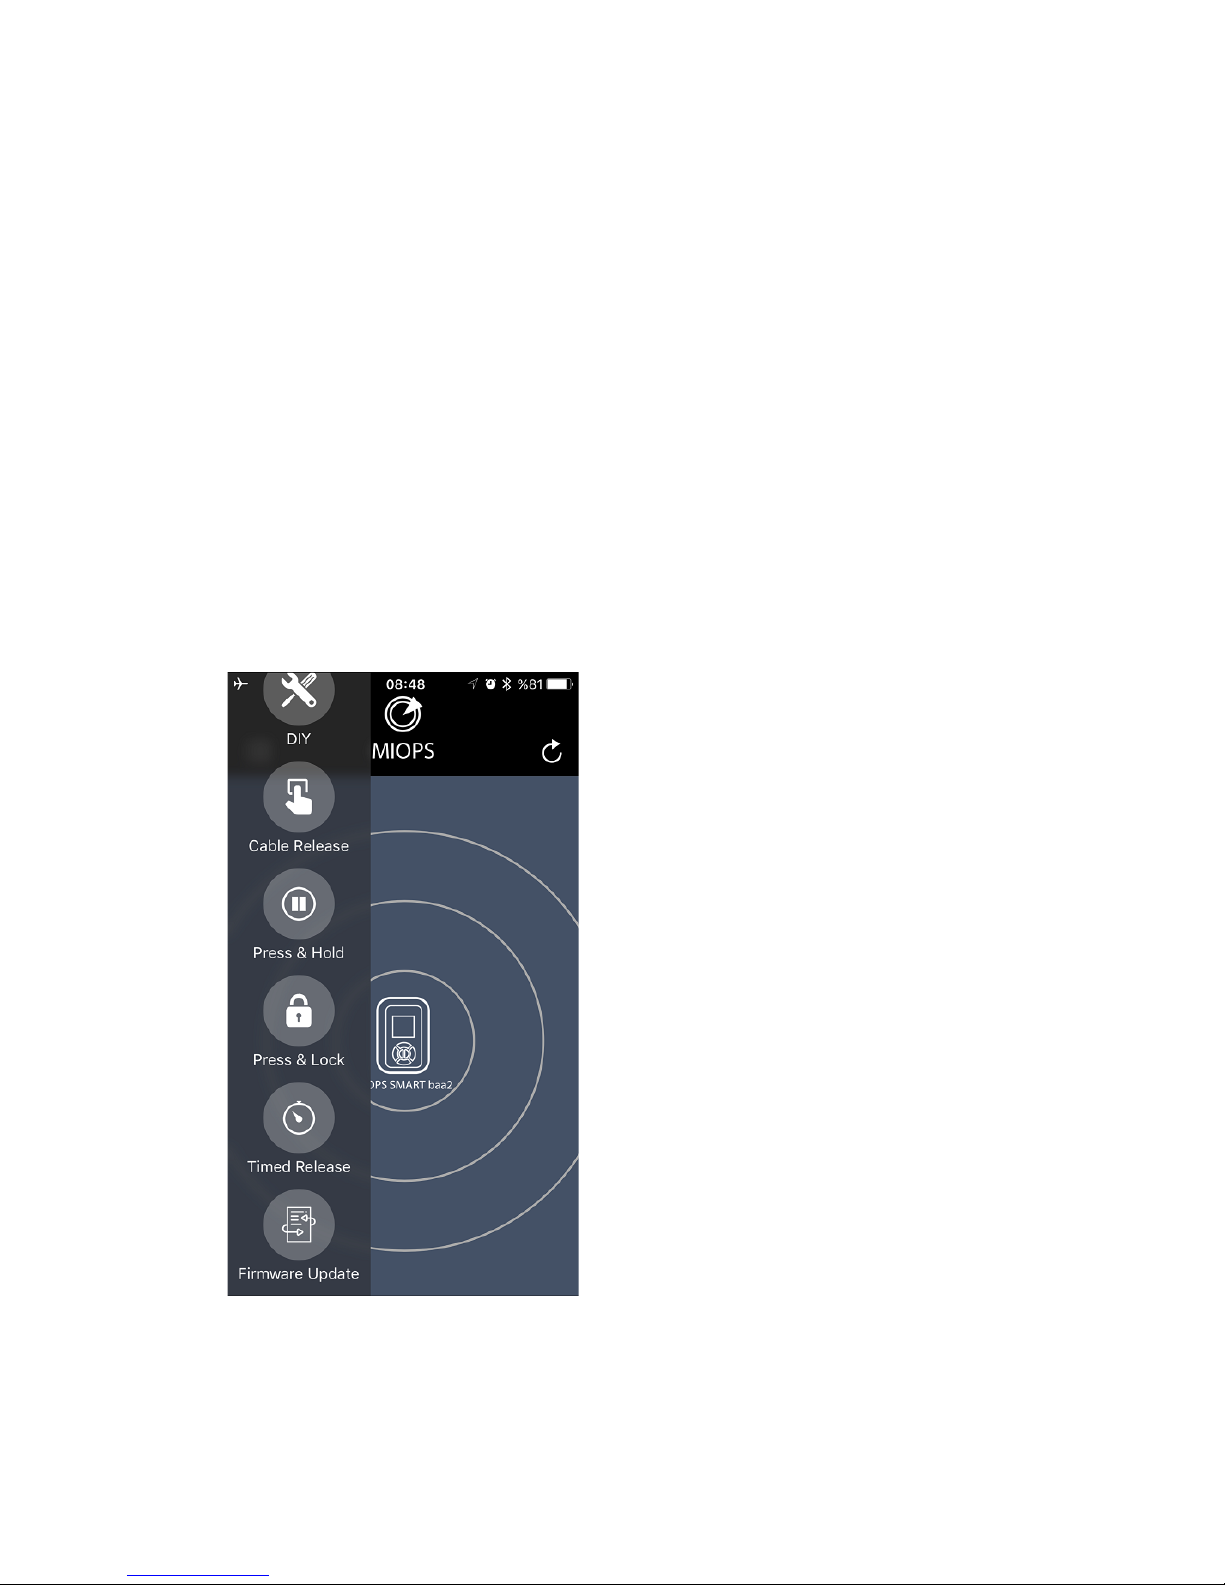
• Select the “Firmware Upgrade” mode
from the selection menu on the left.
• Then touch the circle where it says
“Check for Update”.
• At this step, the app will connect to
the server and check if a new version of the
firmware is available.
• If a new version of the firmware is
available, this will be displayed in a pop-up
message. You will see the version of the new
firmware and current firmware.
• If you want to upgrade the firmware,
press the “Upgrade” button.
• At this point, you need to make MIOPS
Smart ready for the firmware upgrade. To
do this, first turn MIOPS Smart off. Press
and hold down the “UP” button while
switching MIOPS Smart on.
• The smartphone app will automatically
detect the MIOPS Smart which is ready for
the firmware upgrade.
• It will download and prepare the firmware from the server.
Page 42
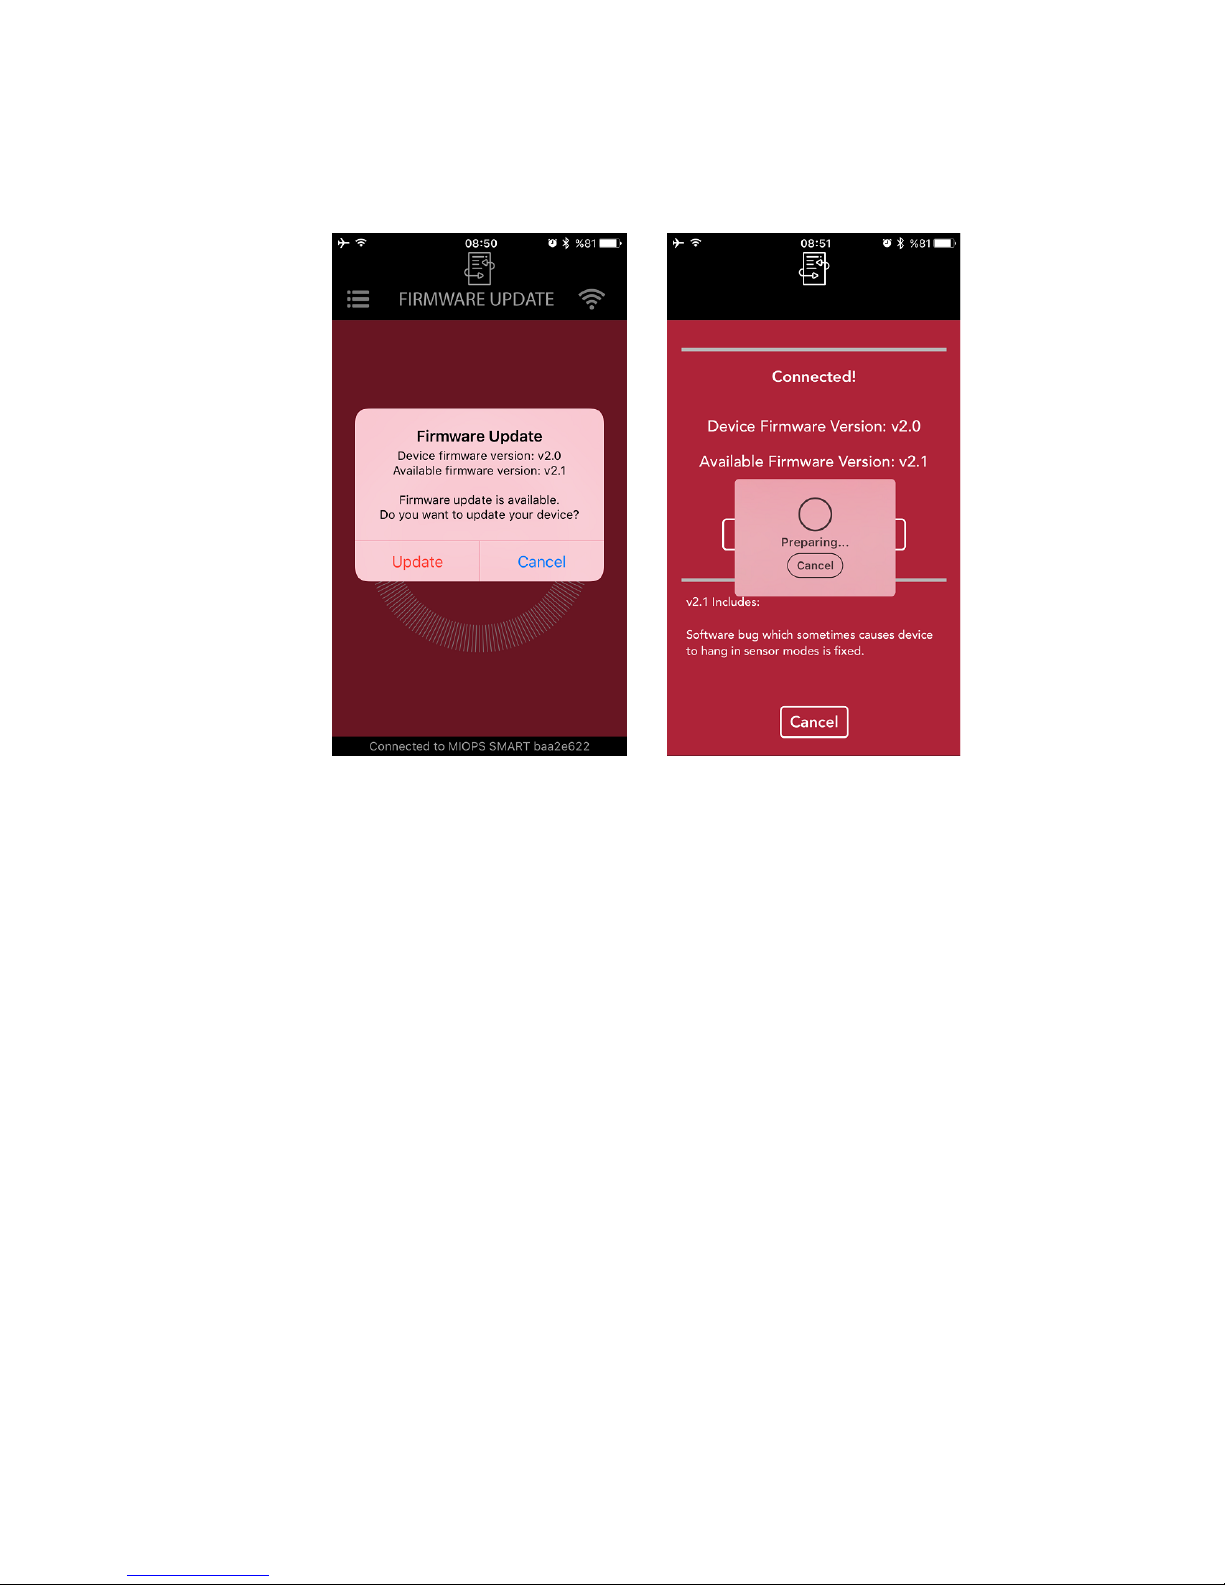
• The app will install the new firmware automatically. You can track the progress
on the screen.
• Once the process is complete, MIOPS Smart will start running again, but this
time it will have the new firmware.
b. MIOPS Smart v1.9 and before
Windows Systems
In order to complete the upgrade you will need to download the following
items: Firmware Upgrade Software, Device Drivers and Firmware File. Create a
folder called MIOPS Smart in your computer to store the required files. Note
the folder location as you will save all of the required files to that folder.
The Firmware Upgrade Software is the dedicated program that you will use to
put the new firmware to your MIOPS Smart. It transfers the firmware from
your computer to MIOPS Smart using the USB connection. You will also need to
introduce MIOPS Smart to your computer using the device drivers. You will
need to do this once. Once this step is complete, your computer will recognize
MIOPS Smart automatically.
For your convenience, we have bundled all of the required files into a single
compressed file. You just need to download the file and extract it to the MIOPS
Smart folder that you have created for the upgrade. You can download the
Page 43

upgrade kit from the following link:
http://www.miops.com/firmware/firmwareUpgrade.zip
The content of the folder should be looking as shown in the picture below.
Page 44
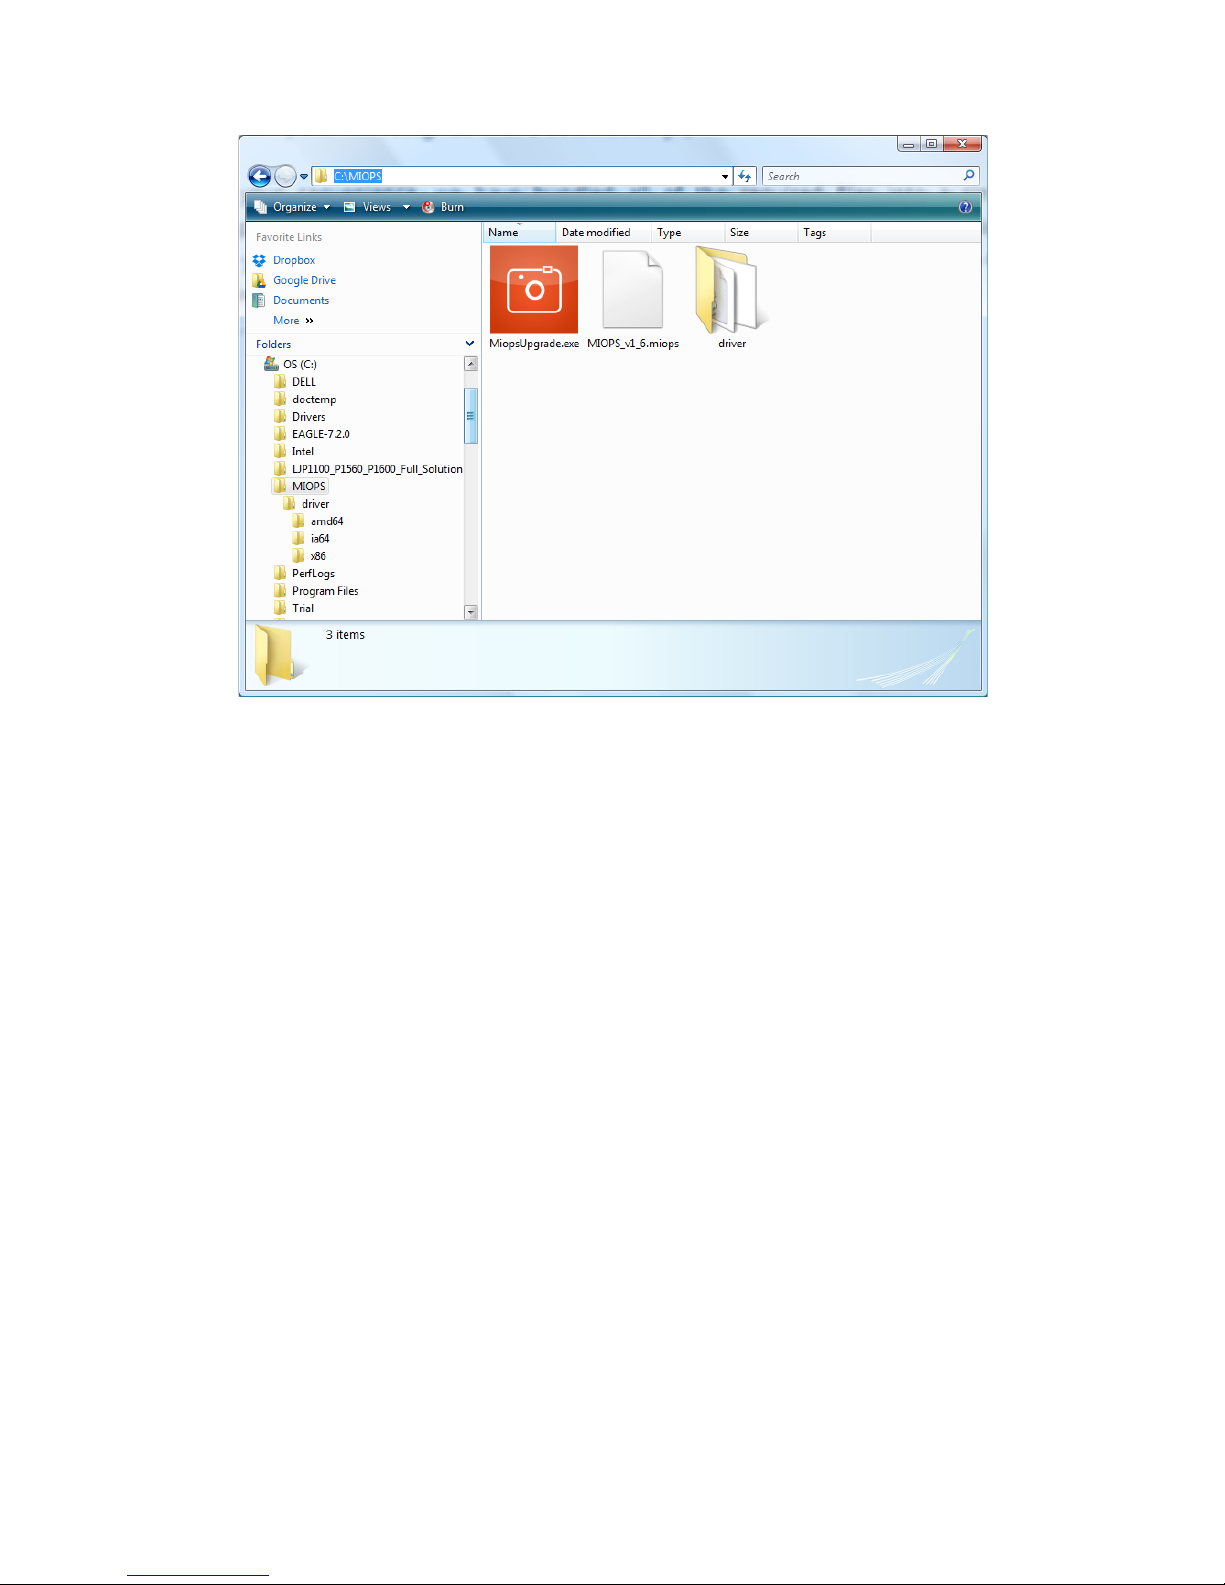
Figure 4 Firmware Upgrade Folder
In order to start the firmware upgrade, you need to connect MIOPS Smart to
your computer with the provided USB connection cable. Connect MIOPS Smart
to your computer as it is still turned off. Start the MiopsUpgrade.exe software.
This software will start automatically. In order to put MIOPS Smart to
firmware upgrade state, you need to turn it on while pressing the UP
scroll button. This is important. If you cannot do this, MIOPS Smart will not
be in the firmware upgrade state and you will not be able to upgrade it.
Press and hold the UP scroll button and turn MIOPS Smart on. Then connect it
to one of the USB ports of your computer. As this is the first time that MIOPS
Smart is connected to your computer, you will need to install the required
drivers. After you have done this once, you don’t need to do it again. Next time
your computer will recognize MIOPS Smart which is put to “Firmware Upgrade”
state. If you connect MIOPS Smart to your computer without putting it to
“Firmware Upgrade” state, it will not communicate with your computer so
nothing will happen.
Page 45
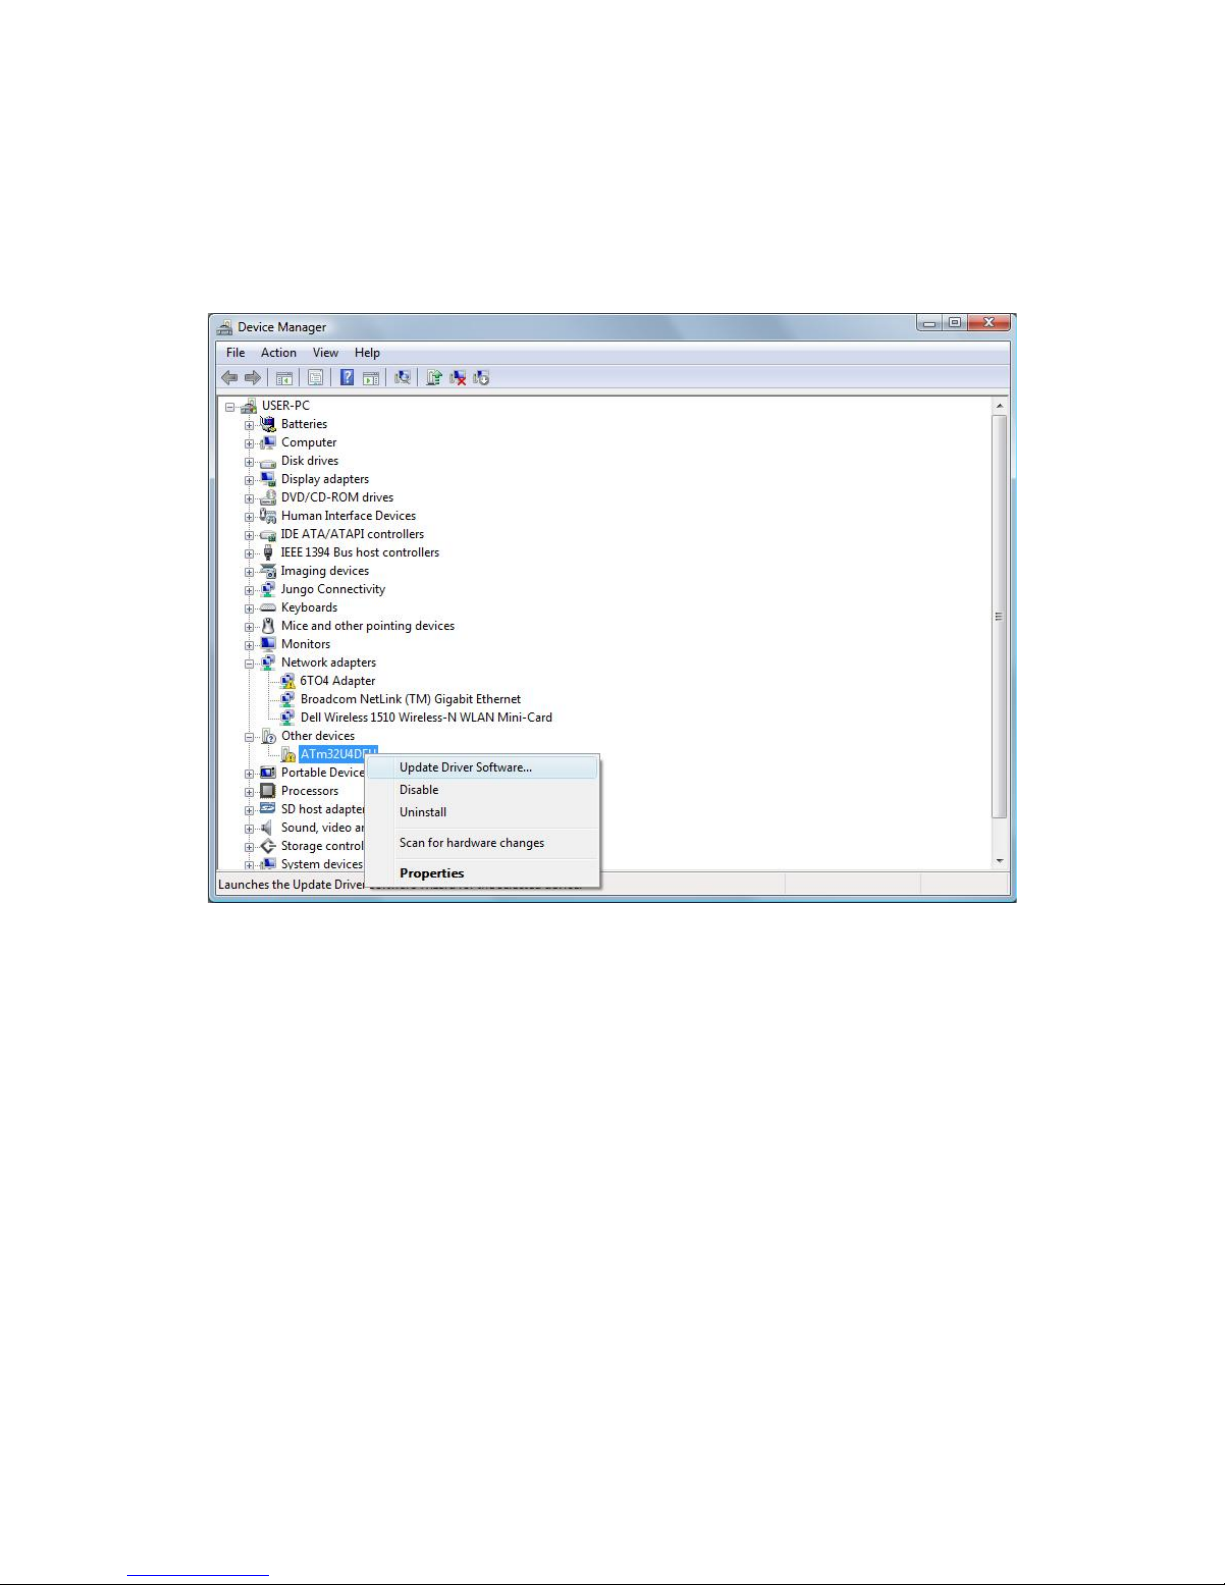
After you have connected MIOPS Smart to your computer, open the “Control
Panel” in Windows operating systems. Click “System” and choose “Device
Manager”. You will see an unknown device under other devices section with
exclamation point on it. Right click on this device and select Update Driver
Software.
Figure 5 Device Manager
At this point you will be prompted if you want your computer search for the
driver or you will be browsing for them. Choose “Browse my computer for
driver software” and point the “driver” folder.
Page 46
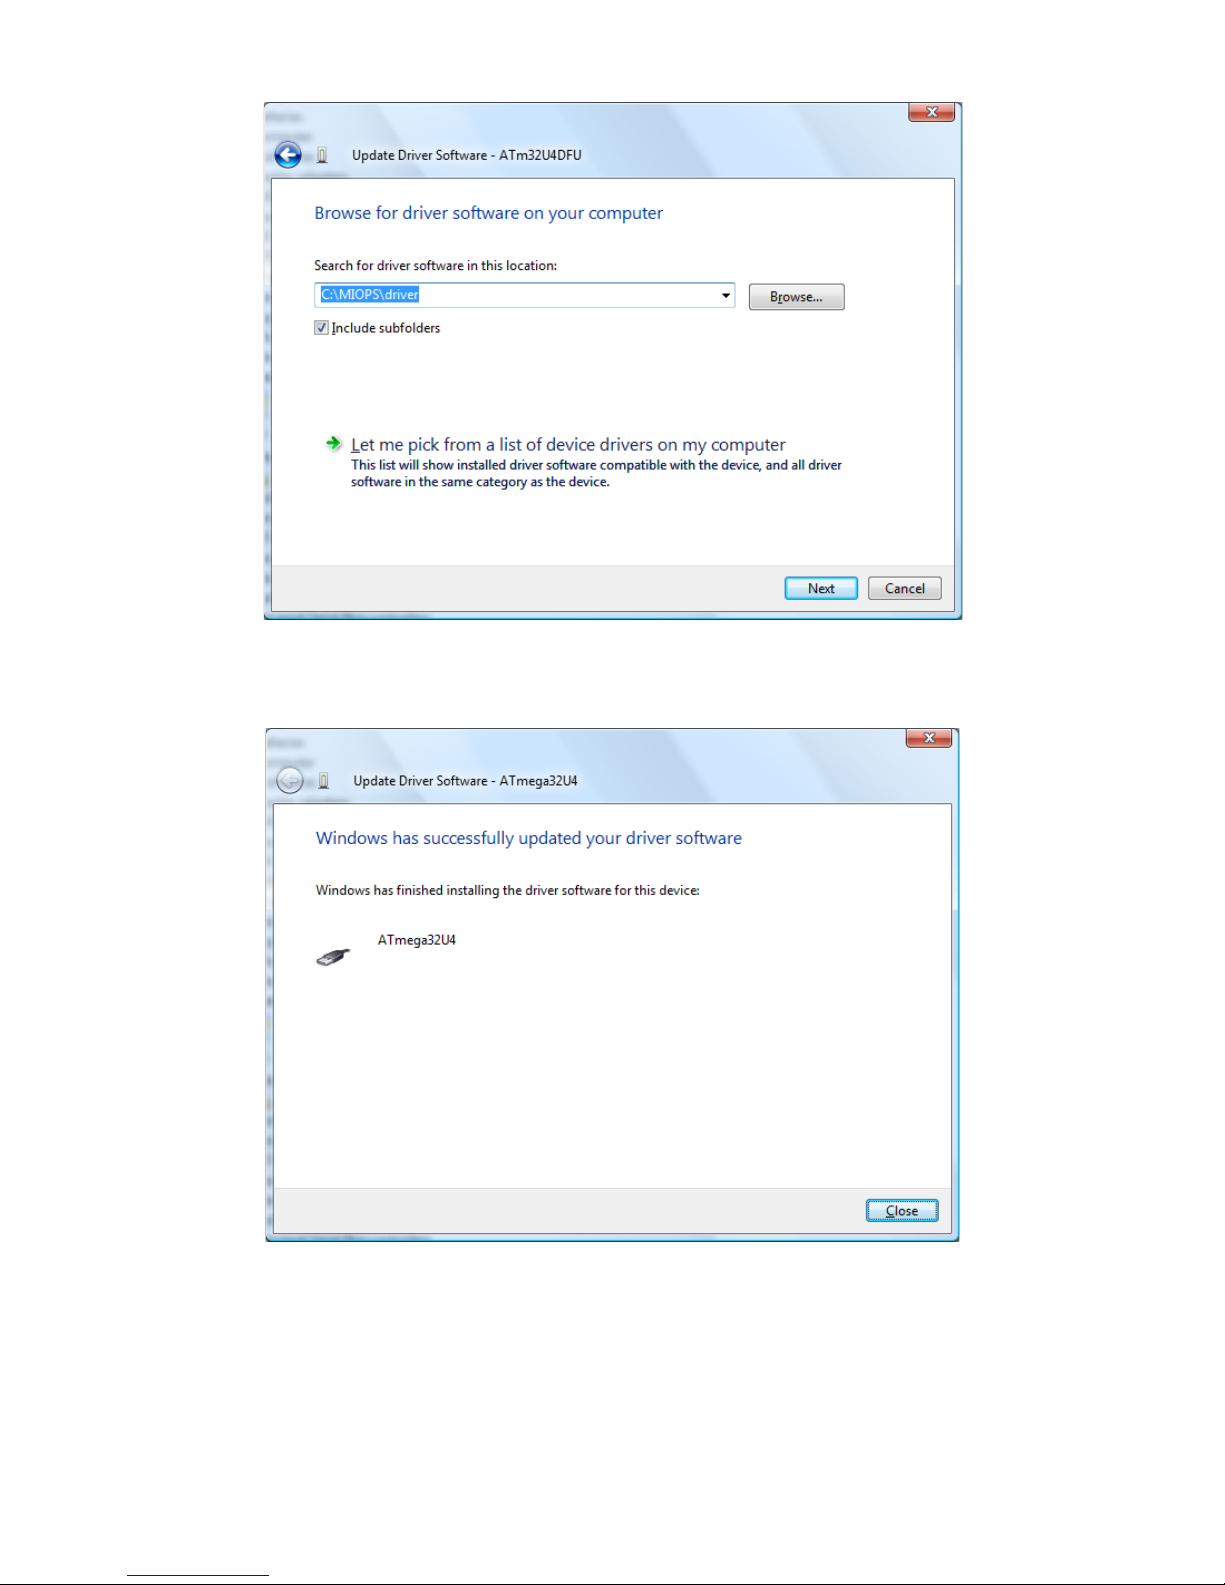
Figure 6 Locate Driver Folder
The driver files will be copied and you should see the following screen.
Figure 7 Driver Installed
After that step you are ready to install the firmware. Switch off MIOPS
Smart again and switch it back on as you press and hold down the Up
Scroll button. At this point, when you start MiopsUpgrade.exe, the program
should recognize MIOPS Smart and it will show a green check sign on MIOPS
Page 47
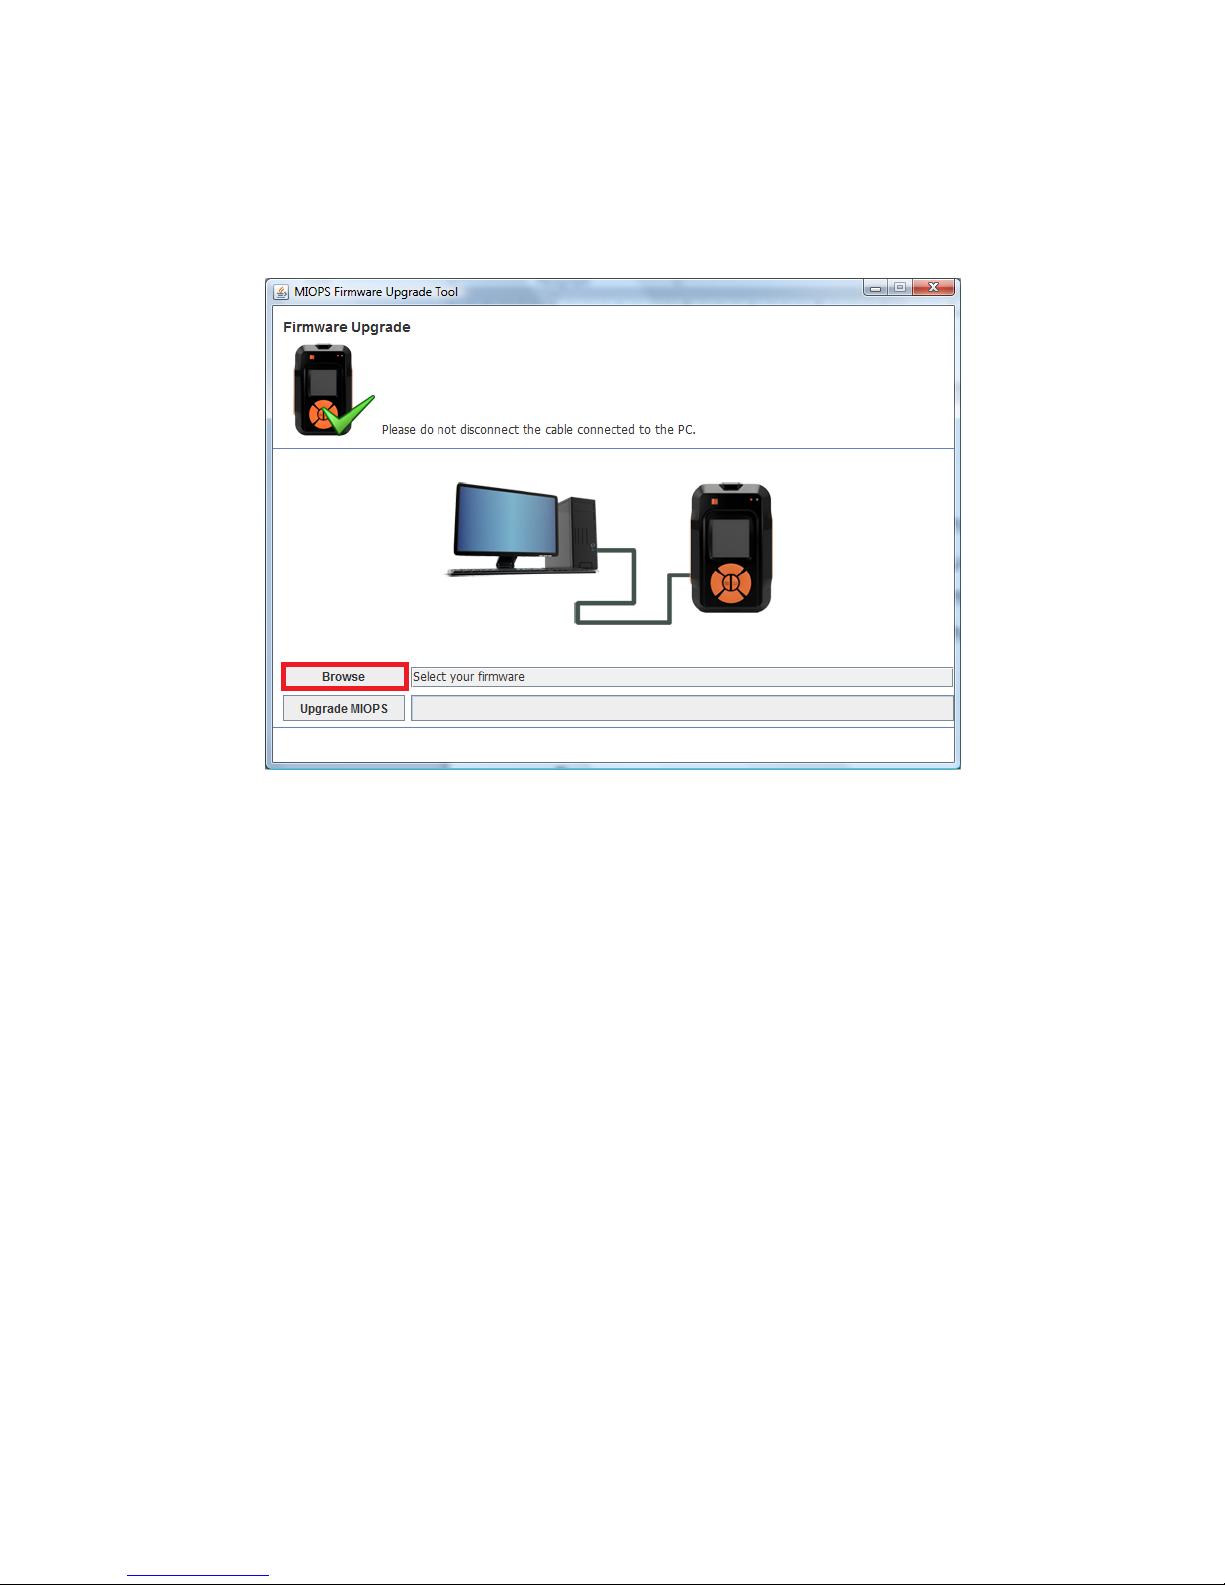
Smart. This means the software is ready to put the new firmware to MIOPS
Smart. The only thing you need to do is to locate the firmware file. Click the
browse button (see highlighted with red below) and locate the firmware file
you stored in the MIOPS Smart folder.
Figure 8 Browse for the Firmware File
Page 48
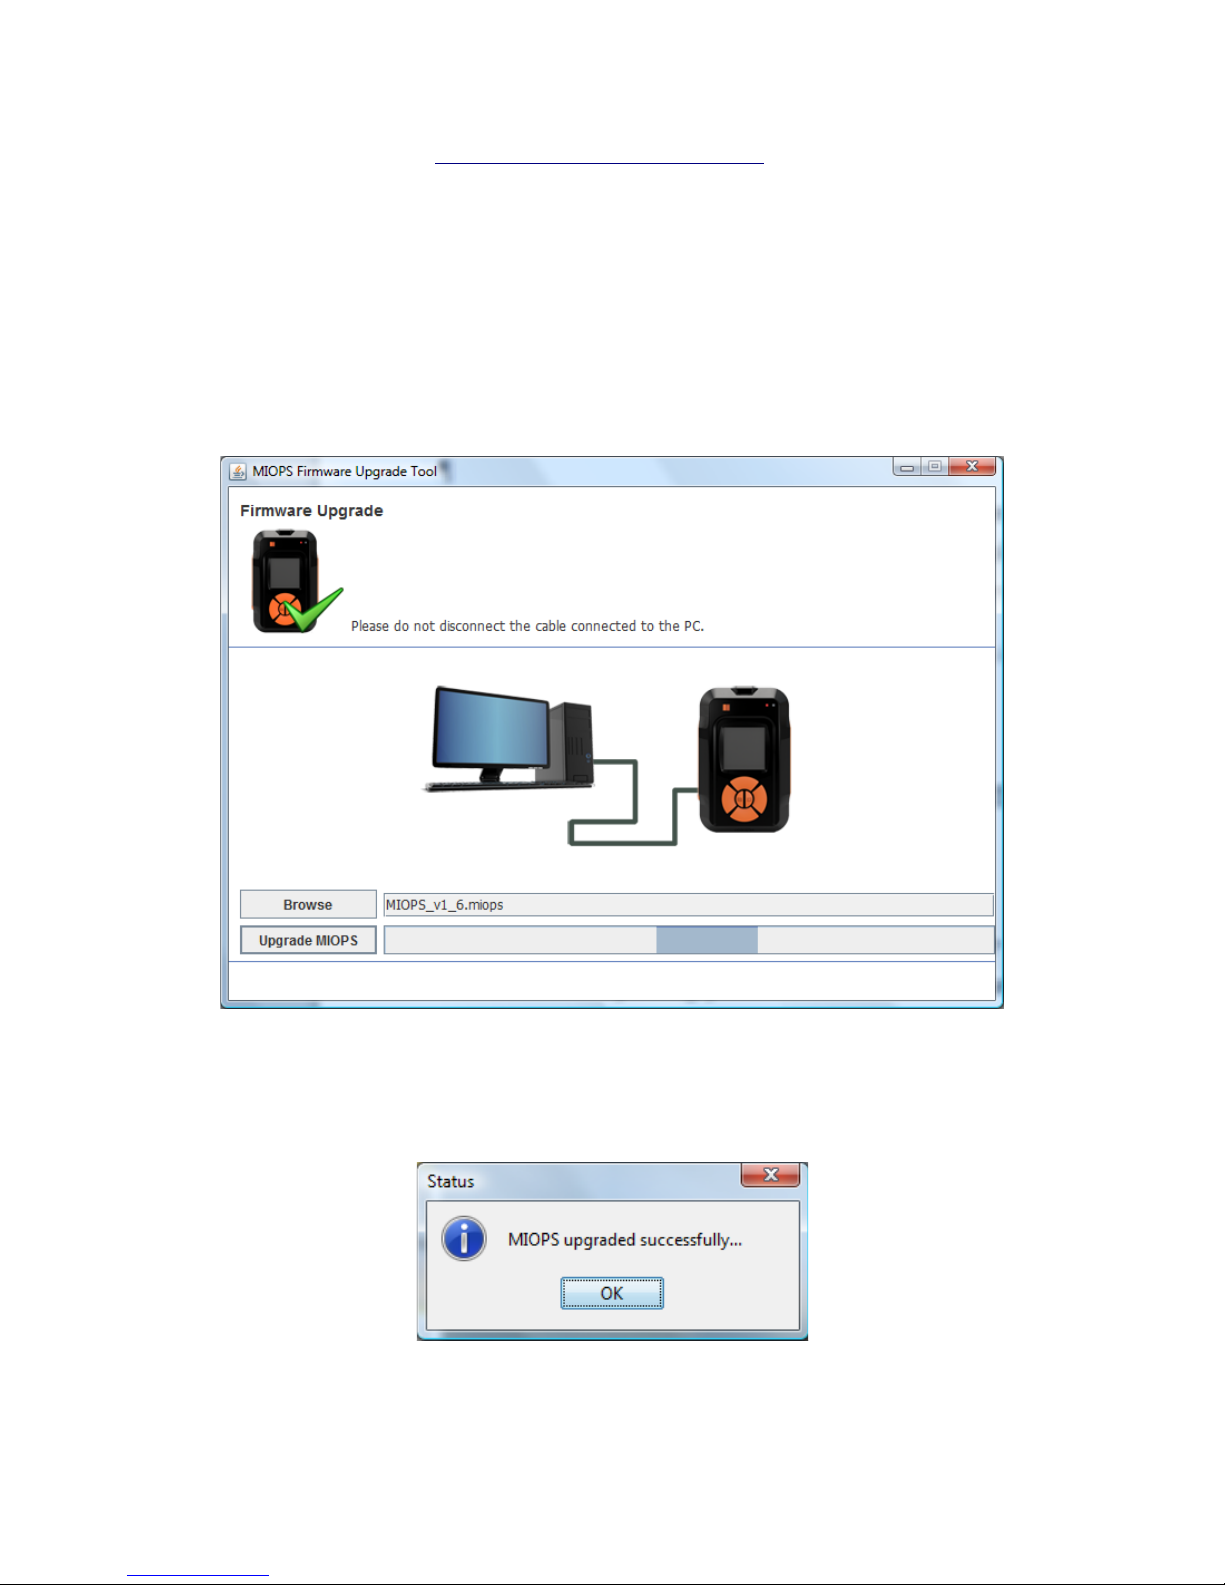
The latest firmware file is MIOPS_v1_7.miops. You can download the latest file
from the following link: http://miops.com/download/ The file name can change
for the future versions to reflect the version changes. After this click the
Upgrade MIOPS button. It should take about 15 seconds to upgrade the
firmware. Then MIOPS Smart will restart again and you will have your MIOPS
Smart with the new firmware updated. If anything goes during the firmware
upgrade you can start over. Repeat the same of putting MIOPS Smart to
firmware upgrade mode locate the firmware file and then complete the
upgrade.
Figure 9 Firmware Upgrade Process
When the firmware upgrade is completed, you should see the following
confirmation message.
Figure 10 Firmware Upgrade Complete
Page 49
MAC Systems
You can upgrade your MIOPS Smart on a MAC computer with the special
software upgrade tool. You can download the firmware upgrade tool from the
following link: http://miops.com/download/ Download the zip file and extract it
to a folder. Download the latest firmware file as well. Please note that Windows
and MAC systems use the same firmware file, they just have different upgrade
tools.
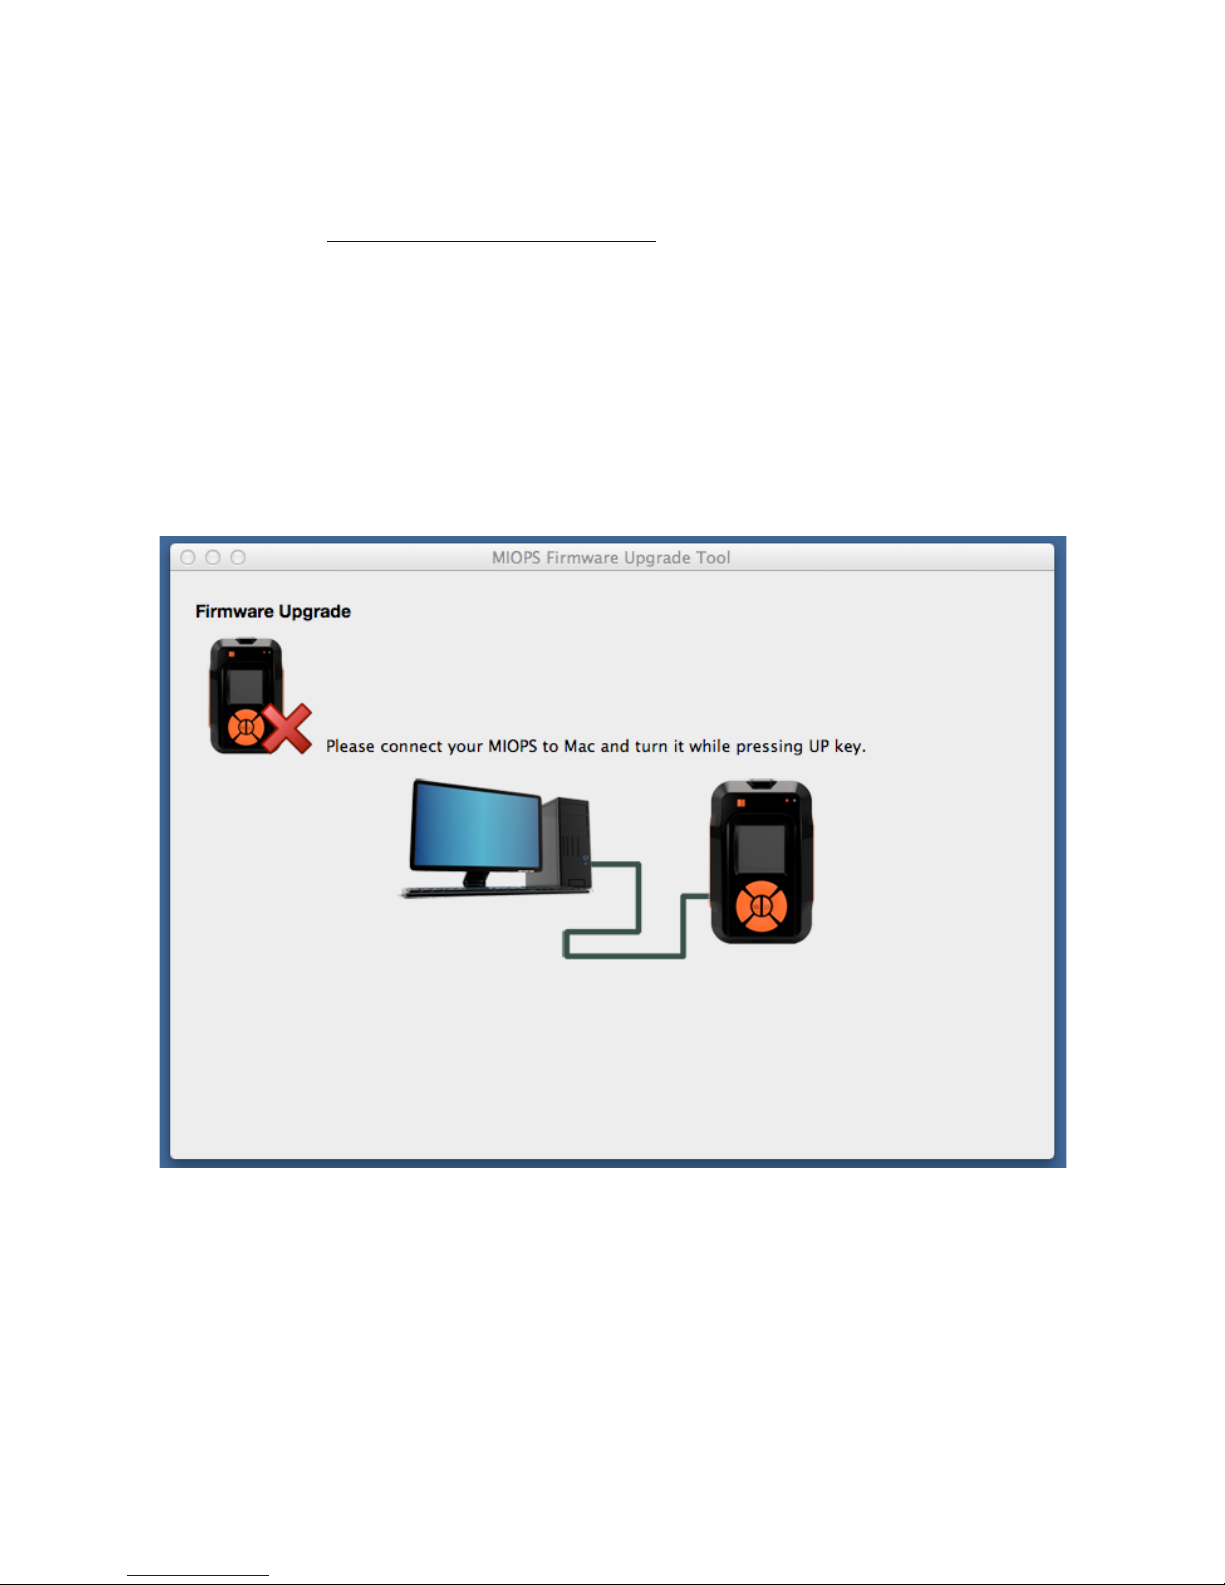
Connect your Miops Smart to the computer with the USB cable, but do not turn
it on at this time. Open the firmware upgrade tool. You will see the initial
screen of the upgrade tool.
Figure 11: MAC Firmware Upgrade Tool
Before you start the firmware upgrade process, you need to put Miops Smart
into the Firmware Upgrade state. Turn the Miops Smart on as you keep
pressing the “Up” scroll button. This will put it into Firmware Upgrade status.
You should see that there is a green check mark on the Miops icon. This means
you have successfully put it into the Firmware Upgrade state. If you cannot do
Page 50
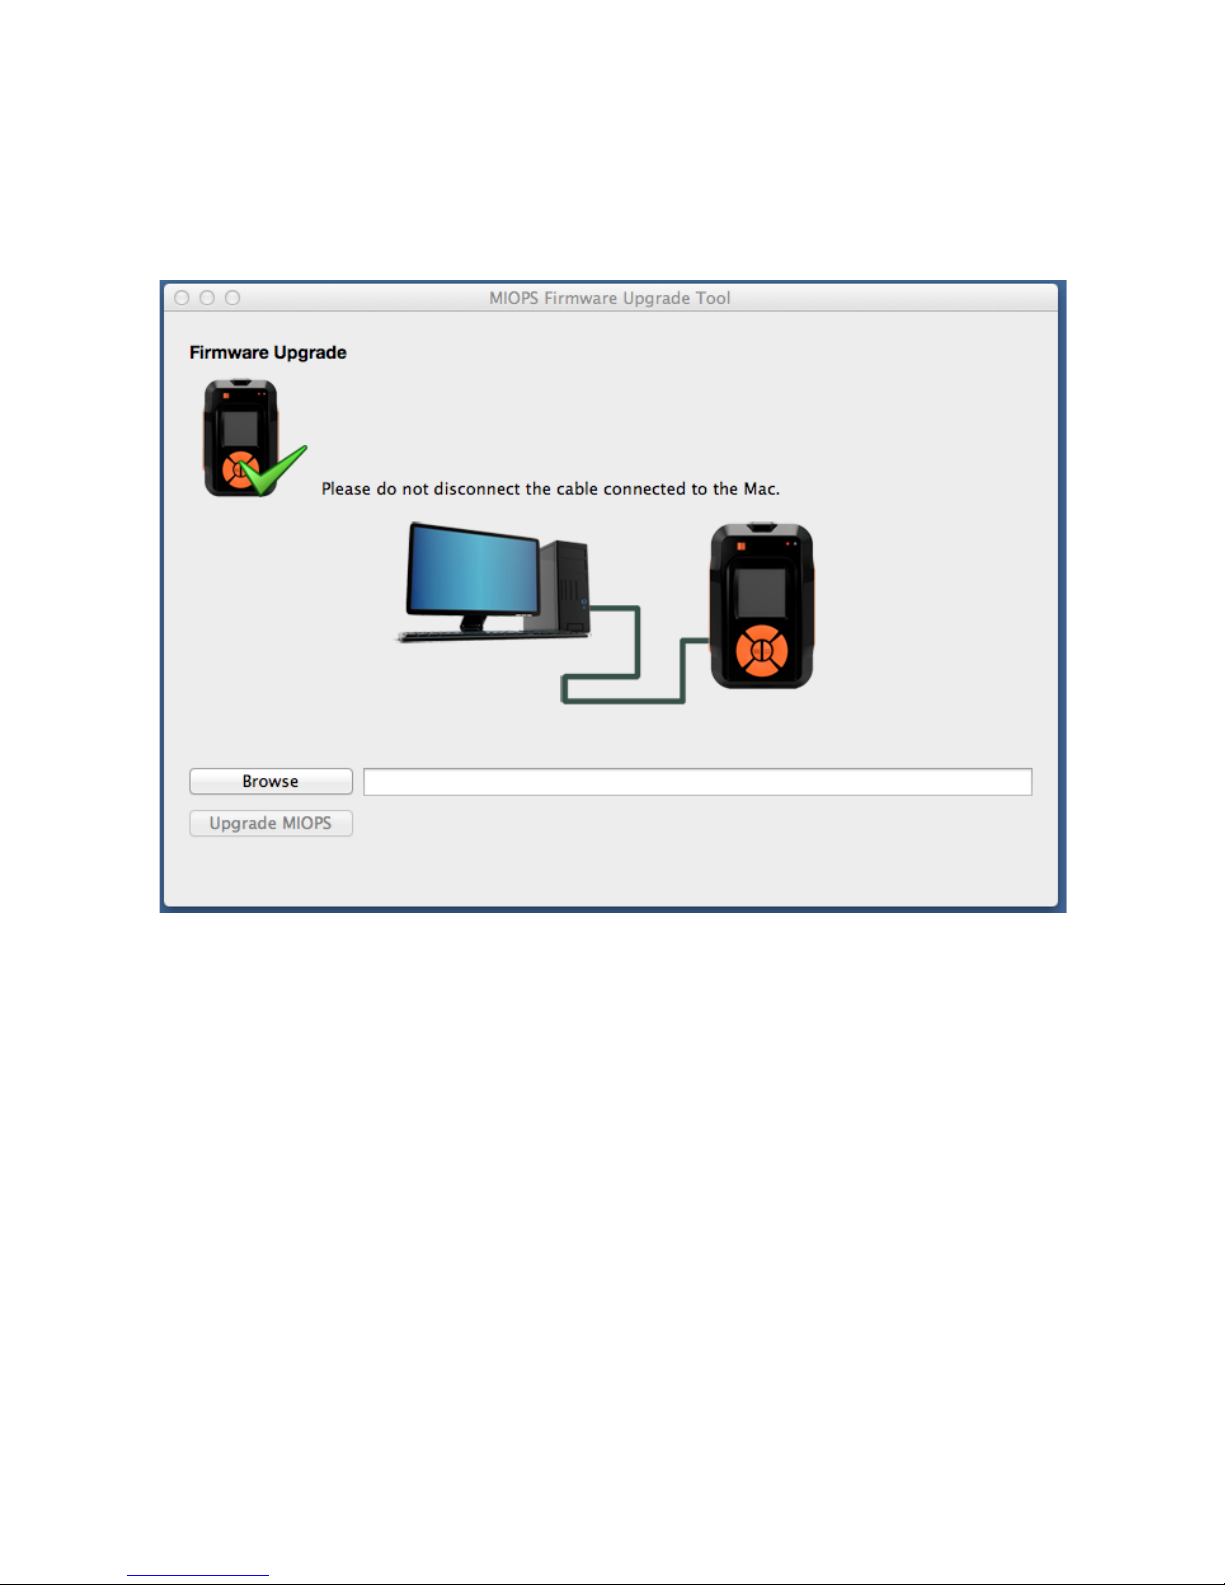
this at the first time, you can try again. You don’t need to restart the app. Just
turn it on as you keep pressing the Up scroll button. In this state, the screen of
the Miops Smart will be just black. The screen of the app should be as shown
below.
Figure 12: MIOPS in Firmware Upgrade Status
You can continue the upgrade process by pressing the Browse button. You will
need to locate the firmware file. Select the firmware file you have downloaded
from the download page. The path of the file will appear next to the Browse
button. You can then press the “Upgrade MIOPS” button. You will see a
progress bar on the screen and the upgrade should be complete in about 10
seconds. MIOPS Smart will start after this in regular mode with the new
firmware. You can disconnect it from the computer.
Page 51

12. Warranty
MIOPS Smart comes with a 2-Year warranty against manufacturing defects. If
you think that your unit is not working as it should, please contact us at
[email protected] with your purchase details.
The device is not water proof, so water damages are not covered. If you are
using MIOPS Smart outside, make sure that you protect it from water. Do not
drop MIOPS Smart as this can damage the PCB and electronics components
inside. There are no user serviceable parts inside, so please do not
disassemble the device.
13. Disclaimer
Lightning Photography is a dangerous activity. We are not liable for any
damage or personal injury associated with the use of MIOPS Smart. MIOPS
Smart is intended for use as a camera shutter release device only and no other
purpose. MIOPS Smart is not waterproof. It should be treated and handled with
the care of a camera and should not be dropped and/or exposed to extreme
heat or moisture.
Page 52

14. FCC Approval
Federal Communications Commission (FCC) Radio Frequency Interference Statement
This equipment has been tested and found to comply with the limits for a Class B digital
device, pursuant to Part 15 of the FCC Rules. These limits are designed to provide reasonable
protection against harmful interference in a residential installation.
This equipment generates, uses, and can radiate radio frequency energy and, if not installed
and used in accordance with the instructions, may cause harmful interference to radio
communications. However, there is no guarantee that interference will not occur in a particular
installation. If this equipment does cause harmful interference to radio or television reception,
which can be determined by turning the equipment off and on, the user is encouraged to try to
correct the interference by one or more of the following measures:
• Reorient or relocate the receiving antenna.
• Increase the separation between the equipment and receiver.
• Connect the equipment to an outlet on a circuit different from that to which the receiver
is connected.
• Consult the dealer or an experienced radio/TV technician for help.
FCC Caution: To assur e conti n u e d com p l i a nc e, a n y chan g e s o r mod i f i c at io n s not ex p re ss ly
approved by the party responsible for compliance could void the user’s authority to operate
this equipment. (Example – use only shielded interface cables when connecting to computer or
peripheral devices.)
FCC Radiation Statement
This equipment complies with FCC RF radiation exposure limits set forth for an uncontrolled
environment.
This transmitter must not be co-located or operating in conjunction with any other antenna or
transmitter.
This device complies with Part 15 of the FCC Rules. Operation is subject to the following two
conditions:
(1) This device may not cause harmful interference, and (2) This device must accept any
interference received, including interference that may cause undesired operation.
 Loading...