

Page 1
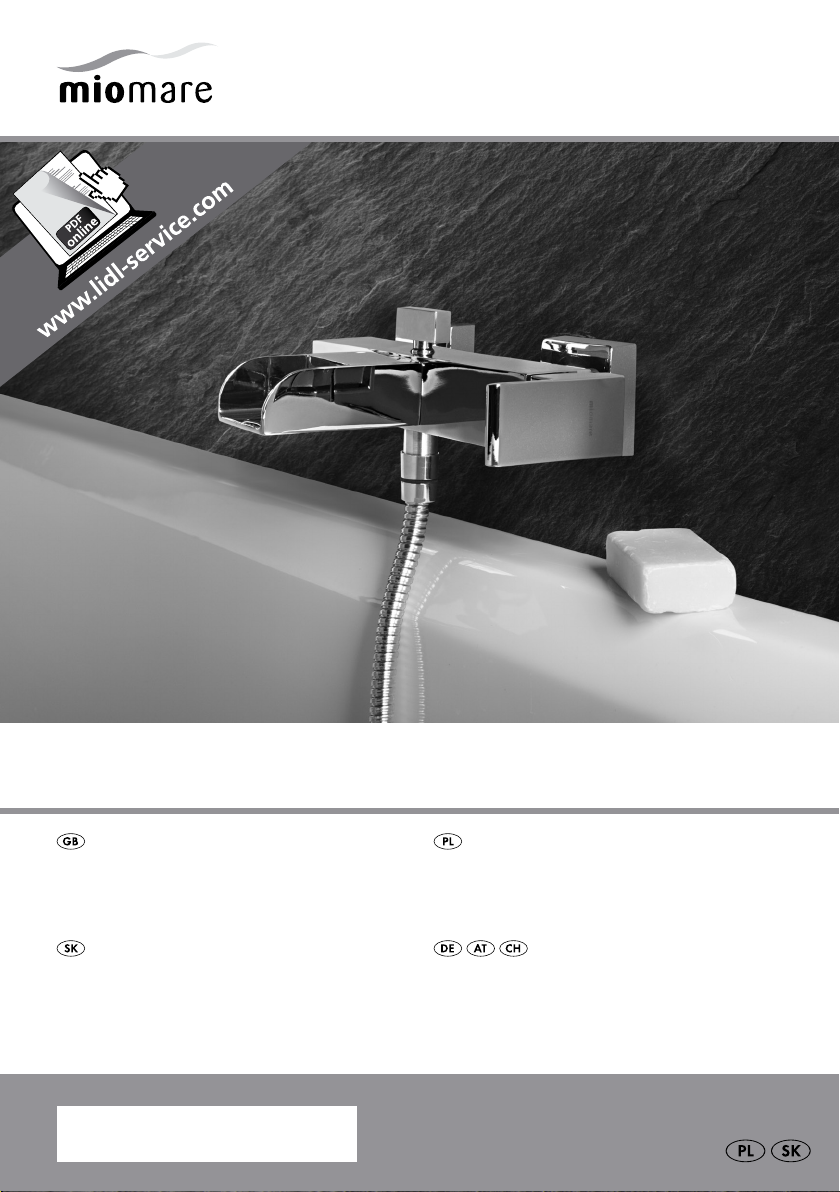
LED BATH / SHOWER FITTING
LED BATH / SHOWER FITTING
Assembly, operating and safety instructions
LED ARMATÚRA NA VAŇU/
DO SPRCHY
Pokyny pre montáž, obsluhu a bezpečnostné pokyny
IAN 60 1 0 1
BATERIA WANNOWA LED/
BATERIA PRYSZNICOWA LED
Wskazówki montażu, obsługi i bezpieczeństwa
LED-WANNENFÜLL- /
BRAUSE-ARMATUR
Montage-, Bedienungs- und Sicherheitshinweise
Page 2

Before reading, unfold the page containing the illustrations and familiarise yourself with all functions of the
device.
Przed przeczytaniem proszę rozłożyć stronę z ilustracjami, a następnie proszę zapoznać się z wszystkimi
funkcjami urządzenia.
Pred čítaním si odklopte stranu s obrázkami a potom sa oboznámte so všetkými funkciami prístroja.
Klappen Sie vor dem Lesen die Seite mit den Abbildungen aus und machen Sie sich anschließend mit allen
Funktionen des Produkts vertraut.
GB Assembly, operating and safety instructions Page 5
PL Wskazówki montażu, obsługi i bezpieczeństwa Strona 13
SK Pokyny pre montáž, obsluhu a bezpečnostné pokyny Strana 21
DE / AT / CH Montage-, Bedienungs- und Sicherheitshinweise Seite 29
Page 3
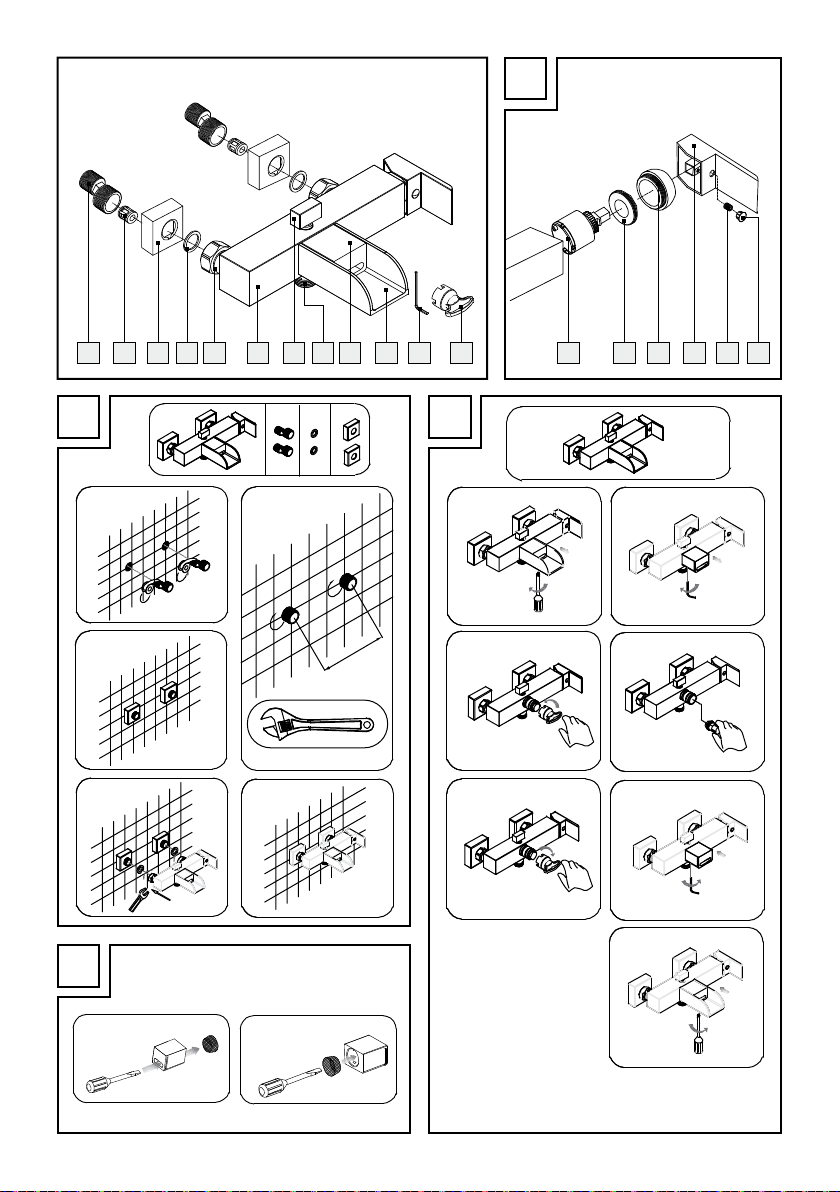
A
B1
B3
B4
B5
150mm
B2
C1
C2
C3
C4
C5
C6
C7
1 2 3 4 5 6 7 8 9 10 1211 13 1817161514
B
D
C
D1 D2
Page 4

Page 5

Table of Contents
Introduction
Intended use ........................................................................................................................................ Page 6
Parts description .................................................................................................................................. Page 6
Technical Data ....................................................................................................................................Page 6
Scope of delivery ................................................................................................................................ Page 6
Safety information .................................................................................................................. Page 7
Installation
Connecting the fitting .......................................................................................................................... Page 7
Connecting accessories (shower hose and shower head) ............................................................... Page 7
Operation
Start-up ................................................................................................................................................. Page 8
Tub filler / shower diverter ..................................................................................................................Page 8
Maintenance and Cleaning
Maintaining and cleaning the tap .....................................................................................................Page 8
Replacing the LED insert .....................................................................................................................Page 8
Replacing the screen ........................................................................................................................... Page 9
Replacing the cartridge ......................................................................................................................Page 9
Disposal ............................................................................................................................................ Page 10
Information
Potability of tap water ......................................................................................................................... Page 10
Warranty and Service .......................................................................................................... Page 10
5 GB
Page 6

Introduction
LED Bath / Shower Fitting
Introduction
Congratulations on the purchase of your
new product. You have selected a high
quality product. The assembly and operating instructions are part of this product. Please
carefully read these assembly instructions / instructions for use before use and observe all instructions.
These assembly instructions and instructions for use
contains important assembly, set-up and care information. Please retain these assembly instructions /
instructions for use and hand them on to any future
owner.
Intended use
The product is only designed to regulate the hot and
cold water flow. For tub installation only. Suitable
for use with all pressure-resistant hot water systems
such as central heating, continuous-flow water heater,
pressure boiler etc. This product is not suitable for
low pressure water heaters or pressure-free small
storage reservoirs, e.g. wood- or coal-burning domestic hot water heaters, oil or gas-fired hot water
heaters, or open electrically heated cylinders. When
in doubt please consult a plumber or heating specialist. Any use not specified or product modification
is prohibited and will result in damage. Any form of
use other than the stipulated intended purpose can
cause danger to life and cause injury. The product is
for private use only and is not intended for medical
or commercial use. The manufacturer accepts no
responsibility if the intended purpose of this unit is
not adhered to.
6
Fitting body
7
Diverter*
8
Shower connection*
9
LED cover*
10
Tub mixer*
11
Socket head wrench
12
LED installation wrench
13
Cartridge*
14
Cartridge lock nut*
15
Cartridge cover ring*
16
Handle*
17
Locking screw*
18
Hot / cold plaque*
* prefitted
Technical Data
Swivel nut
(water connections): G ¾“
Shower hose
connection: G ½“
Flow rate at 3 bar:
Shower connection: approx. 17.7 to 18.8 L / min
Tub mixer: approx. 8.5 to 9.2 L / min
LED light: approx. < 33°C blue,
approx. 33–43°C green,
approx. > 43°C red
approx. > 53°C flashing red
LED life: approx. 10,000 operating
hours
Temperature sensor
tolerance: +/- 2°C
Scope of delivery
Parts description
1
2 S-connectors
2
2 Silencers*
3
2 Covers
4
2 Seals (S-connectors)
5
2 Swivel nuts*
6 GB
1 LED tub filling / shower mixer (5 – 10, 13 – 18)
2 Caps
3
2 S-connectors with silencer (1 – 2)
2 Seals
1 Socket head wrench
1 LED installation spanner
4
11
12
1 Instructions for assembly / operation
Page 7
Safety information
DANGER TO
LIFE AND RISK OF ACCIDENTS
FOR INFANTS AND CHILDREN!
Never leave children unattended with the packaging material. Danger of suffocation. Keep this
product well away from children. This product
is not a toy.
BEWARE OF ELECTRIC SHOCK!
Leaking or water discharge can lead
to life-threatening danger due to
electric shock. Carefully check that all connections are watertight. Also ensure that all wires
of electric appliances are correct and have
been securely installed.
CAUTION! RISK OF INJURY! Please ensure
that no parts are damaged and that all parts
are correctly assembled. Incorrect assembly
could lead to injury. Please note that washers
and gaskets are wear parts and therefore will
need to be replaced from time to time. Damaged parts could impact safety and function.
CAUTION! DAMAGE TO THE ARTICLE!
Please have all installations performed by skilled
individuals.
Be sure all seals are correctly seated.
SCALDING RISK! When adjusting the hot
water temperature be sure the water temperature is not too high.
CAUTION! Be careful not to revere the hot /
cold water plaque
left = red (hot),
right = blue (cold).
Please note all seals are wear items and will
therefore need to be replaced over time.
Any leakage or sudden escape of water can
cause considerable damage to buildings and
property. All connections must therefore be
checked carefully to ensure that they are tight.
Familiarise yourself prior to installation with all
local conditions, e.g. water connections and
shut-off device.
The product is only suitable for use in rooms
with a temperature above 0 °C.
18
. The correct placement is:
Safety information / Installation
Installation
Note: Familiarise yourself with the product prior to
assembly. Carefully read the following assembly
instructions and safety advice. In the event of incorrect installation, all warranty claims – particularly
in relation to subsequent damage – are excluded.
CAUTION! Before you start installation turn
off the water supply at the mains. Otherwise
injuries and / or property damage may occur.
Connecting the fitting
Note: this step requires an SW 30 mm open-end
spanner and sealing tape.
Note: cover any parts which will be screwed with
a damp cloth or plastic clamps. This will prevent
scratches.
Follow these steps:
Wrap sealing tape around the roughened
threaded part (½“ thread) of the S-connectors
1
(see Fig. B1).
Note: sealing tape not included.
Screw the S-connectors 1 with the sealed
threaded parts into the wall connectors.
Horizontally align the screwed in S-connectors
1
with the spacing guide for the fitting (see
Fig. B2).
Screw the caps 3 hand tight onto the S-con-
1
nectors
Insert the seals 4 into the swivel nuts 5 and
screw the fitting body
onto the S-connectors
Connecting accessories (shower
hose and shower head)
Note: Shower hose and shower head are not
included in delivery.
Note: cover each of the parts which are to be
screw connected with a damp cloth or plastic clips.
This will prevent scratches.
to the wall (see Fig. B3).
6
with swivel nuts 5
1
(see Fig. B4-B5).
7 GB
Page 8

Installation / Operation / Maintenance and Cleaning
Connect a standard shower hose to the shower
connector
Connect a standard shower head to the
shower hose.
Note: Also refer to the assembly instructions for
the accessories.
8
.
Operation
Start-up
After the initial commissioning, carefully check all
connections for leaks.
Check the operation of the fitting. To do so,
swing the handle
tions.
Note: the fitting features an LED light. The LED is lit
through an integrated turbine (without batteries). The
LED colour changes automatically based on the water
temperature through an integrated temperature
sensor:
· up to approx. 33°C blue,
· from approx. 33-43°C green,
· over approx. 43°C red.
Note: over approx. 53°C the LED light will begin
to flash red to warn of potential scalding.
Note: when starting the fitting for the first time the
LEDs will first flash blue, green and red before indicating the temperature based on the temperature
(self-test).
Note: If the tap has not been used for a long period, flush the pipes thoroughly to avoid stagnation
and build-up of residue.
Open the main water supply.
Lift the handle 16 and swing it to the right or
left in order to regulate the speed or temperature of the water.
Hot water:
Swing the handle
16
into all permissible posi-
16
to the left.
Cold water:
Swing the handle
16
to the right.
Tub filler / shower diverter
Manually switch between the tub filler 10 to shower
function by lifting and lowering the diverter
Tub mixer:
Lower diverter
Shower function:
Lift diverter
Note: switching manually means: when turning
the water off with the shower function activated, the
shower function will remain on. When starting the
water again, the shower function will remain active
until it is switched to tub filler.
7
.
7
.
7
.
Maintenance and Cleaning
Maintaining and
cleaning the tap
Please note that sanitary taps require special care
and attention. Therefore, please follow the instructions:
When cleaning, never use petrol, solvents,
aggressive cleansers or hard cleaning brushes
etc. These could damage the surface of the
product.
Dry your fitting with a cloth after every use to
prevent any lime deposits.
Clean the product with a damp, soft cloth and
a mild cleaning agent if required.
Non-observance of the above care advice can be
expected to result in damage to the surfaces of the
product. This will inevitably invalidate the guarantee.
Replacing the LED insert
If the LED lamps fail to light, the LED insert may be
replaced.
8 GB
Page 9

Maintenance and Cleaning
LED life: approx. 10,000 operating hours.
A new LED insert (ET-WCRL-LED) can be obtained
from the specified service address.
To do so, follow these steps:
Unscrew the tub mixer 10 from the fitting body
6
(see Fig. C1), which requires a cross-tip
screwdriver.
Unscrew the LED cover 9 from the fitting
6
body
using the socket head wrench 11
(see Fig. C2).
Remove the plastic LED insert (see Fig. C3–C4)
using the LED installation wrench
12
.
Install the new LED insert, the LED cover 9
and the tub mixer
10
to the fitting body 6
similar to disassembly (see Fig. C5–C7).
Replacing the screen
If the screen inside the LED cover is severely clogged
it must be cleaned or replaced.
To do so, follow these steps:
Unscrew the tub mixer 10 from the fitting body
6
(see Fig. C1), which requires a cross-tip
screwdriver.
Unscrew the LED cover 9 from the fitting body
6
using the socket head wrench 11 (see Fig. C2).
Push the screen out of the LED cover 9 from
the outside, using a flat object (see Fig. D1).
CAUTION RISK OF INJURY! The outer
edge of the screen fabric may be pointy.
Remove any limescale deposits or foreign bodies.
Replace the screen if severely clogged or dam-
aged. A new screen (ET-WCRL-WBS) can be
obtained from the specified service address.
Press the cleaned / new screen into the LED cover
9
from the inside (see Fig. D2).
Note: be sure the screen is properly seated in
the LED cover
Install the LED cover 9 and the tub mixer 10
in the fitting body
(see Fig. C6–C7).
9
.
6
similar to disassembly
Replacing the cartridge
A cartridge 13 is a wear part that needs replacing
according to the hardness and / or degree of contamination of the water. This becomes evident
when the handle
new cartridges
service office.
Note: this step requires an open-end spanner
SW 27 mm or fitting pliers.
Proceed as follows to replace the cartridge
Shut off the main water supply. Allow any
remaining water in the pipework to drain.
Remove the hot / cold plaque 18 by inserting a
flat object between the edge of the hot / cold
plaque
Note: use light pressure to carefully push the
hot / cold plaque
scratch the surface.
Loosen the locking screw 17 with the socket
head wrench
CAUTION! Do not completely unscrew the
locking screw
necessary to remove the handle
Remove the handle 16.
Unscrew the cartridge covering ring 15, do not
use pliers or a spanner. Otherwise the product
could be damaged.
Loosen the cartridge locknut 14 below with
fitting pliers or an open-end spanner SW 27 mm
and remove the entire cartridge
fitting body
Insert the new cartridge 13 (model 35 M LED)
into the fitting body
Note: be sure the seal under the cartridge
is correctly seated. Make sure that the guides
are in the corresponding holes.
Reassemble all the above parts. Tighten the
cartridge lock nut
open-end spanner SW 27 mm while simultane-
ously securing the fitting from twisting. This will
achieve tightness and ensure the handle is not
difficult to move.
CAUTION! Be careful not to revere the hot/
cold water plaque
16
becomes difficult to move. A
13
can be obtained from the listed
18
and the outside of the handle 16.
18
outward so as not to
11
by turning it counter-clockwise.
17
. Only loosen this as far as is
16
.
13
from the
6
.
6
in the same manner.
14
using fitting pliers or an
18
. The correct placement is:
13
:
13
9 GB
Page 10

Maintenance and Cleaning / Disposal / Information / Warranty and Service
left = red (hot water),
right = blue (cold).
Disposal
The packaging is made of environmentally friendly materials, which may be
disposed of through your local recycling
facilities.
Contact your local refuse disposal authority for
more details of how to dispose of your worn-out
product.
Information
Potability of tap water
Please consult your local authorities on the
potability of water in your town / municipality.
The following general recommendations apply to
the potability of tap water:
Let the water run freely for a short time if it has
been stagnating in the pipework for more than
four hours. Do not use any of this stagnant
water in the preparation of food or for drinking.
This applies particularly as far as babies and
infants are concerned. Otherwise health concerns can arise. Fresh water can be readily distinguished from stagnant water as fresh water
is noticeably cooler as it leaves the pipe.
Do not use stagnant water from chromium-plated
pipework to prepare food, for drinking, or for
personal hygiene if you are allergic to nickel.
This water may contain high quantities of nickel
and trigger an allergic reaction.
Do not use water from lead pipework for
preparing food baby food and / or to prepare
foods during pregnancy. Lead dissolves in
drinking water and is particularly damaging to
the health of babies and young children.
Warranty and Service
The warranty period is three years and begins on
the day of purchase. Please keep your receipt as
proof of purchase.
However, if defects do occur during the warranty
period, after first contacting service the defective
fitting may be returned freight forward to the service
address specified. You will then receive a new or
repaired fitting free of charge.
After the warranty period has expired you may also
send the defective fitting to the address specified
for repair. Repairs made after the expiration of the
warranty period are subject to payment.
Note: Eisl Sanitär GmbH will replace defective
fittings or supply the respective replacement parts
free of charge within the warranty period. Eisl
Sanitär GmbH is unable to refund the purchase
price for defective fittings.
This warranty does not limit your legal rights.
The warranty period will not be extended by repairs
made under warranty. This applies also to replaced
and exchanged parts. Complaints are often initiated
by difficulties encountered during use. Many of
these complaints can be resolved by telephone or
email. Please contact the service address set up for
you before filing a warranty claim for the fitting
with the manufacturer:
GB:
Eisl Sanitär GmbH
Mattseer Landesstraße 8
A-5101 Bergheim
Tel.: 00800-87934629*
Tel.: 0043-662-879346-29
Fax: 00800-87934650*
Fax : 0043-662-879346-50
E-Mail: [email protected]
* Free of charge number
IAN 60101
10 GB
Page 11

Warranty and Service
Please have the receipt and item number, e.g.
IAN 12345 ready as your proof of purchase when
making an enquiry.
Product description:
LED Bath / Shower Fitting
Eisl Sanitär no.
NI023WCRL-LIDL2
11 GB
Page 12

12
Page 13

Spis zawartości
Instrukcja
Użycie zgodne z przeznaczeniem ................................................................................................. Strona 14
Opis części ....................................................................................................................................... Strona 14
Dane techniczne .............................................................................................................................. Strona 14
Zakres dostawy ................................................................................................................................ Strona 15
Wskazówki bezpieczeństwa ...................................................................................... Strona 15
Montaż ........................................................................................................................................... Strona 15
Podłączenie baterii .......................................................................................................................... Strona 16
Przyłączanie akcesoriów (wąż i słuchawka prysznicowa) ........................................................... Strona 16
Obsługa
Uruchomienie ................................................................................................................................... Strona 16
Przełącznik wylewka wannowa / funkcja natrysku ........................................................................ Strona 17
Konserwacja i czyszczenie
Pielęgnacja i czyszczenie baterii .................................................................................................... Strona 17
Wymiana wkładki LED.....................................................................................................................Strona 17
Wymiana sitka ................................................................................................................................. Strona 17
Wymiana głowicy ............................................................................................................................Strona 18
Utylizacja .....................................................................................................................................Strona 18
Informacje
Zdatność do picia wody wodociągowej .......................................................................................Strona 18
Gwarancja i serwis ..............................................................................................................Strona 19
13 PL
Page 14
Instrukcja
Bateria wannowa LED/
bateria prysznicowa LED
Instrukcja
Gratulujemy Państwu zakupu nowego
produktu. Zdecydowali się Państwo na
zakup produktu najwyższej jakości. Instrukcja montażu / obsługi jest częścią składową
tego produktu. Przed pierwszą instalacją prosimy
przeczytać w całości instrukcję montażu/obsługi i
przestrzegać zawartych w niej wskazówek. Instrukcja ta zawiera ważne informacje dotyczące montażu, regulacji i pielęgnacji. Dlatego należy dobrze
przechowywać instrukcję montażu/obsługi i przekazać ją ewentualnym nowych właścicielom.
Użycie zgodne z
przeznaczeniem
Niniejszy produkt jest przeznaczony wyłącznie do
regulacji dopływu wody ciepłej izimnej. Można
go instalować wyłącznie przy wannach. Niniejszy
produkt nadaje się do wszystkich wytrzymałych na
ciśnienie systemόw ciepłej wody, jak centralne
ogrzewanie, podgrzewacze, bojlery ciśnieniowe
oraz podobne. Produkt nie jest przeznaczony natomiast do montażu w instalacjach z niskociśnieniowymi termami wody lub podgrzewaczami
bezciśnieniowym, jak np. piece kąpielowe opalane
drewnem, węglem, olejem opałowym lub gazem,
nie nadaje się też do współpracy z otwartymi bojlerami elektrycznymi. W razie wątpliwości proszę
zwrócić się do instalatora lub o poradę fachowca.
Zastosowanie inne niż wyżej opisane lub wprowadzanie zmian do produktu jest niedozwolone i
prowadzi do jego uszkodzenia. Poza tym mogą
jeszcze wystąpić dalsze niebezpieczeństwa zagrażające życiu oraz obrażenia. Produkt przeznaczony
jest do użytku domowego, nie do użytku medycznego lub komercyjnego. Za szkody powstałe wskutek zastosowania niezgodnego z przeznaczeniem,
producent nie przejmuje odpowiedzialności.
Opis części
1
2 przyłącza typu S
2
2 tłumiki szumów*
3
2 osłony
4
2 uszczelki (przyłącza typu S)
5
2 nakrętki złączkowe*
6
Korpus baterii
7
Przełącznik*
8
Przyłącze prysznica*
9
Osłona LED*
10
Wylewka wannowa*
11
Klucz imbusowy
12
Klucz montażowy LED
13
Głowica*
14
Nakrętka zabezpieczająca głowicę*
15
Pierścień osłaniający głowicę*
16
Dźwignia*
17
Śruba ustalacjąca*
18
Oznaczenie wody ciepłej/zimnej*
* w stanie wstępnie zmontowanym
Dane techniczne
Nakrętki złączkowe
(przyłącza wody): G ¾“
Przyłącze węża natrysku: G ½“
Przepływ przy 3 bar:
Przyłącze prysznica: ok. 17,7 do 18,8 l/min
Wylewka wannowa: ok. 8,5 do 9,2 l/min
Diody LED: ok. < 33°C niebieskie,
ok. 33-43°C zielone,
ok. > 43°C czerwone
ok. > 53°C migające
czerwone
Żywotność diod LED: ok. 10.000 godzin
pracy
Tolerancja czujnika
temperatury: +/- 2°C
14 PL
Page 15
Instrukcja / Wskazówki bezpieczeństwa / Montaż
Zakres dostawy
1 bateria wannowo-natryskowa LED
5–10, 13–18
(
2 osłony
2 przyłącza typu S z tłumikiem szumów (1–2)
2 uszczelki
1 klucz imbusowy
1 klucz montażowy LED
1 instrukcja montażu/obsługi
3
)
4
11
12
Wskazówki
bezpieczeństwa
NIEBEZPIE-
CZEŃSTWO UTRATY ŻYCIA I
ODNEISIENIA OBRAŻEŃ W
WYPADKU PRZEZ DZIECI! Nigdy nie na-
leży pozostawiać bez nadzoru dzieci z materiałem opakowaniowym. Niebezpieczeństwo
uduszenia. Produkt należy trzymać z dala od
dzieci. Produkt nie jest zabawką.
UWAGA! MOŻLIWOŚĆ
PORAŻENIA PRĄDEM ELEKTRYCZNYM! Nieszczelności oraz
wyciek wody mogą doprowadzić do zagrożenia życia, spowodowanego porażeniem
prądem elektrycznym. Należy dokładanie
sprawdzić wszystkie połączenia pod kątem
szczelności. Należy rόwnież się upewnić, że
wszystkie przewody urządzeń elektrycznych
zostały właściwie oraz bezpiecznie zainstalowane.
OSTROŻNIE! NIEBEZPIECZEŃSTWO
OBRAŻEŃ CIAŁA! Należy upewnić się, że
wszystkie części zostały zamontowane w należyty sposób oraz że nie są uszkodzone. Nieprawidłowy montaż grozi niebezpieczeństwem
zranienia się. Należy mieć na uwadze, że
wszystkie uszczelki są częściami zużywającymi
się i należy od czasu do czasu dokonać ich
wymiany. Uszkodzone elementy mogą obniżać
bezpieczeństwo i pogarszać funkcjonowanie.
OSTROŻNIE! SZKODY RZECZOWE!
Montaż należy powierzać tylko osobom
dysponującym odpowiednimi kwalifikacjami.
Zwrócić uwagę na to, aby wszystkie uszczelki
były prawidłowo osadzone.
NIEBEZPIECZEŃSTWO OPARZENIA
SIĘ! Podczas regulacji ciepłej wody należy
zwrócić uwagę, aby temperaura wody nie
została nastawiona na zbyt wysoką.
OSTROŻNIE! Upewnić się, że oznaczenia
wody ciepłej/zimnej
żone. Prawidłowy układ wygląda następująco:
u góry = kolor czerwony (woda ciepła),
u dołu = kolor niebieski (woda zimna).
Należy mieć na uwadze, że uszczelki są czę-
ściami zużywającymi się i należy od czasu do
czasu dokonać ich wymiany.
Nieszczelności lub wylew wody mogą prowa-
dzić do poważnych szkód rzeczowych w
budynku lub sprzętach domowych. Dlatego
należy dokładanie sprawdzić wszystkie połączenia pod kątem szczelności.
Przed zainstalowaniem należy zapoznać się z
warunkami wmiejscu instalacji, np. przyłącze
wody iurządzenie odcinające.
Produkt nadaje się do użytku wyłącznie wpo-
mieszczeniach, wktórych panuje temperatura
powyżej 0°C.
18
są prawidłowo zało-
Montaż
Wskazówka: przed rozpoczęciem montażu
należy zapoznać się z produktem. Wtym celu
należy uważnie przeczytać instrukcję montażu
iwskazówki dotyczące bezpieczeństwa. W
przypadku nieprawidłowego montażu gwarancja
ulega unieważnieniu. W szczególności dotyczy to
odpowiedzialności za szkody pośrednie.
OSTROŻNIE! Przed instalacją należy zakrę-
cić główny zawór na dopływie wody. Wprzeciwnym wypadku występuje ryzyko
odniesienia obrażeń i/lub powstania szkód
materialnych.
15 PL
Page 16

Montaż / Obsługa
Podłączenie baterii
Wskazówka: Do wykonania tej czynności
niezbędny jest śrubokręt krzyżakowy, śrubokręt
płaski oraz klucz płaski orozwartości 30 mm.
Wskazόwka: Części przeznaczone do śrubowania należy okryć wilgotną ścierką lub klamerką
z tworzywa sztucznego. W ten sposόb zabiegnie
się zadrapaniom.
Należy postąpić następująco:
Proszę owinąć taśmą uszczelniającą opiło-
wane części gwintów (½“ gwintu) złączek
1
typu S
Wskazówka: Taśma uszczelniająca nie jest
zawarta w zestawie.
Przykręcić przyłącza typu S 1 z uszczelnio-
nymi częściami gwintu do przyłączy ściennych.
Ustawić przyśrubowane złączki typu S 1 po-
ziomo na średnicόwce baterii (patrz rys. B2).
Przykręcić osłony 3 do złączek typu S 1
mocno dociskając do ściany (patrz rys. B3).
Włożyć uszczelki 4 do nakrętek złączkowych
5
nakrętek złączkowych
S
(patrz rys. B1).
i przykręcić korpus baterii 6 za pomocą
5
do przyłączy typu
1
(patrz rys. B4-B5).
Przyłączanie akcesoriów
(wąż i słuchawka prysznicowa)
Wskazόwka: Wąż i słuchawka prysznicowa nie
są dołączone do zestawu.
Wskazόwka: Części przeznaczone do śrubowania należy przykryć wilgotną szmatką lub
klamrami z tworzywa sztucznego. W ten sposόb
zabiegnie się zadrapaniom.
Przykręcić standardowy wąż prysznicowy do
przyłącza prysznica
Przymocować standardową słuchawkę
prysznicową do węża prysznicowego.
8
.
Obsługa
Uruchomienie
Po pierwszym uruchomieniu koniecznie dokładnie
sprawdzić szczelność wszystkich połączeń.
Sprawdzić działanie baterii. Wtym celu prze-
kręcić dźwignię
pozycje.
Wskazówka: Bateria wyposażona jest w diody
LED. Podświetlenie diodami LED następuje poprzez
zintegrowaną turbinę (bez baterii). Zmiana kolorów
diod LED następuje automatycznie w zależności
od ustawionej temperatury wody dzięki zintegrowanemu czujnikowi temperatury:
· do ok. 33°C kolor niebieski,
· między ok. 33–43°C kolor zielony,
· ponad ok.. 43°C kolor czerwony.
Wskazówka: Przy ponad ok. 53°C diody LED
zaczynają migać na czerwono, aby ostrzec przez
możliwymi poparzeniami.
Wskazówka: Przy uruchomieniu baterii diody
LED najpierw świecą na niebiesko, zielono i czerwono, zanim wskazany zostanie kolor odpowiedni
do temperatury (test samosprawdzający).
Wskazówka: W przypadku długiego nieużywania najpierw należy dokładnie przepłukać łączenia, aby usunąć stagnację wody pitnej i osady.
Otworzyć główny dopływ wody.
Otworzyć dźwignię 16 i przesunąć ją w górę
lub w dół, aby uregulować moc i temperaturę
przepływu wody.
Woda ciepła:
Przekręcić dźwignię
Woda zimna:
Przekręcić dźwignię
16
na wszystkie dozwolone
16
w górę.
16
w dół.
Wskazówka: Należy dodatkowo zastosować
się do wskazówek montażu akcesoriów.
16 PL
Page 17

Obsługa / Konserwacja i czyszczenie
Przełącznik wylewka
wannowa/ funkcja natrysku
Przełączenie wylewki wannowej 10 na funkcję natrysku odbywa się manualnie poprzez podniesienie
i opuszczenie przełącznika
Wylewka wannowa:
Opuszczenie przełącznika
Funkcja natrysku:
Podniesienie przełącznika
Wskazówka: Manualne przełączenie oznacza,
że jeśli przy aktywowanej funkcji natrysku woda
zostanie zakręcona, funkcja natrysku pozostanie
aktywna. Przy ponownym uruchomieniu funkcja natrysku nadal jest aktywna, dopóki manualnie nie
zostanie przestawiona na wylewkę wannową.
7
.
7
.
7
.
Konserwacja i czyszczenie
Pielęgnacja i
czyszczenie baterii
Należy pamiętać o tym, że armatury sanitarne wymagają szczególnej pielęgnacji. Dlatego prosimy
o przestrzeganie następujących zaleceń:
Do czyszczenia produktu w żadnym wypadku
nie używać benzyny, rozpuszczalników ani
agresywnych środków czyszczących wzgl.
twardych szczotek itp., ponieważ mogą one
uszkodzić powierzchnię produktu.
Po każdym zastosowaniu należy osuszyć
baterię za pomocą ściereczki, aby uniknąć
tworzenia się ewentualnych osadów wapnia.
Baterię należy czyścić miękką, zwilżoną ście-
reczką, a w razie potrzeby łagodnym środkiem
czyszczącym.
W razie nieprzestrzegania instrukcji pielęgnacji
należy liczyć się z uszkodzeniami powierzchni.
Szkody takie nie podlegają gwarancji.
Wymiana wkładki LED
W razie stwierdzenia braku funkcji świecenia diod
LED można wymienić wkładkę LED.
Żywotność diod LED: ok. 10.000 godzin pracy.
Nową wkładkę LED (ET-WCRL-LED) można nabyć
w podanym punkcie serwisowym.
W tym celu należy postąpić następująco:
Odkręcić wylewkę wannową 10 od korpusu
6
baterii
do tego śrubokręt krzyżakowy.
Odkręcić osłonę diod LED 9 za pomocą
klucza imbusowego
(patrz rys. C2).
Usunąć wkładkę LED z tworzywa sztucznego
(patrz rys. C3–C4) przy użyciu klucza montażowego LED
Zamontować nową wkładkę LED, osłonę diod
LED
baterii
rys. C5–C7).
(patrz rys. C1), potrzebny będzie
11
od korpusu baterii 6
12
.
9
i wylewkę wannową 10 do korpusu
6
analogicznie do demontażu (patrz
Wymiana sitka
Jeśli sitko wewnątrz osłony LED jest mocno zanieczyszczone, należy je oczyścić lub wymienić.
W tym celu należy postąpić następująco:
Odkręcić wylewkę wannową 10 od korpusu
6
baterii
do tego śrubokręt krzyżakowy.
Odkręcić osłonę diod LED 9 za pomocą klu-
cza imbusowego
(patrz rys. C2).
Wycisnąć sitko za pomocą płaskiego przed-
miotu od zewnątrz z osłony diod LED
(patrz rys. D1).
UWAGA NIEBEZPIECZEŃSTWO OBRA-
ŻEŃ CIAŁA! Zewnętrzna krawędź siatki sitka
może być miejcami ostra.
Usunąć osady wapnia lub ciał obcych.
W przyparku bardzo silnego zanieczyszczenia lub uszkodzenia wymienić sitko na nowe.
Nowe sitko (ET-WCRL-WBS) można nabyć w
podanym punkcie serwisowym.
(patrz rys. C1), potrzebny będzie
11
od korpusu baterii 6
9
17 PL
Page 18

Konserwacja i czyszczenie / Utylizacja / Informacje
Wcisnąć oczyszczone/nowe sitko od we-
wnątrz w osłonę diod LED
9
(patrz rys. D2).
Wskazówka: Należy zwrócić uwagę na to,
aby sitko było właściwie umieszczone w osłonie LED
9
.
Zamontować osłonę diod LED 9 i wylewkę
wannową
10
do korpusu baterii 6 analogicz-
nie do demontażu (patrz rys. C6–C7).
Wymiana głowicy
Głowica 13 jest częścią ulegającą zużyciu imusi
być wymieniana wzależności twardości wzgl. zanieczyszczenia wody. Oznaką zużycia są trudności wprzesuwaniu dźwigni
można nabyć wpodanym punkcie serwisowym.
Wskazówka: Do wykonania tej czynności niezbędny jest klucz płaski SW orozwartości 27 mm.
Aby wymienić głowicę
następujący sposób:
Zamknąć główny dopływ wody. Spuścić
pozostałą wodę zprzewodów.
Usunąć oznaczenie wody ciepłej/zimnej 18,
wsuwając płaski przedmiot między krawędź
oznaczenia wody ciepłej/zimnej
zewnętrzną stronę dźwigni
Wskazówka: Ostrożnie lekko wycisnąć
oznaczenie wody ciepłej/zimnej
nie zarysować powierzchni.
Poluzować śrubę ustalacjącą 17 za pomocą
klucza imbusowego
kierunku odwrotnym do ruchu wskazówek zegara.
OSTROŻNIE! Nie wykręcać śruby ustalają-
17
cej
całkowicie. Poluzować ją jedynie na
tyle, aby dźwignię
zdjąć.
Zdjąć dźwignię 16.
Odkręcić pierścień osłaniający głowicę 15, nie
używać do tego celu ani obcęgów, ani śrubokrętu. Wprzeciwnym razie produkt może zostać uszkodzony.
Odkręcić znajdującą się poniżej śrubę zabez-
pieczającą głowicę
do baterii lub klucza płaskiego SW 27 mm i
16
. Nową głowicę 13
13
, należy postępować w
18
a
16
.
18
tak, aby
11
przekręcając go w
16
można było łatwo
14
za pomocą szczypców
wyciągnąć całą głowicę 13 z korpusu
6
baterii
.
Wtaki sam sposób włożyć nową głowicę 13
(typ 35 M LED) wkorpus baterii
6
.
Wskazówka: Należy uważać na to, aby
uszczelka była właściwie umieszczona pod
głowicą
13
. Dopilnować, by prowadnice zna-
lazły się wprzewidzianych dla nich otworach.
Ponownie zmontować wszystkie części. Odkrę-
cić śrubę zabezpieczającą głowicę
14
za
pomocą szczypców do baterii lub klucza płaskiego SW 27 mm, jednocześnie przytrzymać
baterię, aby się nie obróciła. Dzięki temu uzyska się szczelność i zatroszczy o to, aby ruch
dźwigni nie był trudny.
OSTROŻNIE! Upewnić się, że oznaczenia
wody ciepłej/zimnej
18
są prawidłowo założone. Prawidłowy układ wygląda następująco:
u góry = kolor czerwony (woda ciepła),
u dołu = kolor niebieski (woda zimna).
Utylizacja
Opakowanie wykonane jest z materiałów przyjaznych dla środowiska, które
można przekazać do utylizacji wlokalnym punkcie przetwarzania surowców
wtórnych.
Informacje o możliwościach dotyczących wyrzucania otrzymać można w urzędzie miejskim lub
gminnym.
Informacje
Zdatność do picia wody
wodociągowej
W urzędzie gminy lub miasta zasięgnąć
informacji na temat zdatności do picia wody
wodociągowej.
Obowiązuje następujące ogólne zalecenie dotyczące zdatności do picia wody wodociągowej:
18 PL
Page 19

Informacje / Gwarancja i serwis
Odkręcić kurek wypływu wody na pewien
krótki okres czasu, jeśli wodociąg nie był używany przez okres dłuższy niż cztery godziny.
Nie należy używać wody pochodzącej z zastoju do przygotowania posiłków i napojów,
szczególnie do karmienia niemowląt. W przeciwnym razie mogą wystąpić dolegliwości
zdrowotne. Świeżą wodę można rozpoznać
po tym, iż podczas wypływu z kranu jest odczuwalnie zimniejsza niż woda zastojowa.
Osoby mające uczulenie alergiczne na nikiel
nie powinny używać wody zastojowej pochodzącej zprzewodów chromowanych do konsumpcji i / lub mycia ciała. Woda taka może
zawierać nikiel i wywołać reakcję alergiczną.
Nie należy używać wody pitnej pochodzącej
zprzewodów ołowianych do przyrządzania
pokarmu dla niemowląt i / lub przyrządzania
posiłków dla kobiet wciąży. Ołów rozpuszcza
się w wodzie i jest szczególnie niebezpieczny
dla zdrowia niemowląt i małych dzieci.
Gwarancja i serwis
Okres gwarancyjny wynosi trzy lata i rozpoczyna
się w dniu zakupu. Paragon należy zachować jako
dowód dokonania zakupu.
uszkodzonych baterii ze strony Eisl Sanitär GmbH
nie jest możliwy.
Niniejsza gwarancja nie ogranicza ustawowych
praw nabywcy.
Okres gwarancji nie ulega wydłużeniu o czas trwania usługi gwarancyjnej. Dotyczy to także części
zamiennych iwymienionych. W wielu przypadkach
przyczyną reklamacji jest błędna obsługa. Tego rodzaju problemy można rozwiązać telefonicznie lub
za pośrednictwem poczty elektronicznej. Proszę
skontaktować się znami za pośrednictwem stworzonego specjalnie dla Państwa punktu serwisowego, zanim zareklamuje się baterię uproducenta.
PL:
Eisl Sanitär GmbH
Mattseer Landesstraße 8
A-5101 Bergheim
Tel.: 00800-87934629*
Tel.: 0043-662-879346-29
Fax : 0043-662-879346-50
E-Mail: [email protected]
* Połączenie bezpłatne
IAN 60101
Jeśli mimo to w czasie trwania gwarancji baterie
okażą się uszkodzone, mogą zostać nadesłane na
podany adres serwisu, po uprzednim skontaktowaniem się z działem serwisowym. Wówczas otrzymają Państwo bezpłatnie nowe lub naprawione
baterie.
Po upływie okresu gwarancyjnego mają Państwo
również możliwość przesłania uszkodzonej baterii
na poniższy adres w celu dokonania naprawy. Po
upływie okresu gwarancyjnego wszystkie naprawy
będą wykonywane za opłatą.
Wskazówka: Eisl Sanitär GmbH w czasie
trwania gwarancji wymienia uszkodzone baterie
bezpłatnie lub udostępnia odpowiednie części
wymienne. Zwrot pieniężny ceny zakupu
Przed skontaktowaniem się z działem serwisowym
należy przygotować paragon i numer artykułu,
np/ IAN 12345 jako dowód zakupu.
Nazwa produktu:
Bateria wannowa LED/bateria prysznicowa LED
Nr Eisl Sanitär
NI023WCRL-LIDL2
19 PL
Page 20

20
Page 21

Obsah
Úvod
Používanie v súlade s určeným účelom .......................................................................................... Strana 22
Popis častí ......................................................................................................................................... Strana 22
Technické údaje ............................................................................................................................... Strana 22
Rozsah dodávky ..............................................................................................................................Strana 22
Bezpečnostné upozornenia .......................................................................................... Strana 23
Montáž
Pripojenie armatúry .......................................................................................................................... Strana 23
Pripojenie príslušenstva (sprchová hadica a sprchovacia hlavica) .............................................. Strana 24
Obsluha
Uvedenie do prevádzky .................................................................................................................. Strana 24
Prepínač výpustu vane / funkcia sprchy .......................................................................................... Strana 24
Údržba a čistenie
Ošetrovanie a čistenie vodovodnej armatúry ................................................................................ Strana 24
Výmena LED diód .............................................................................................................................Strana 25
Výmena sita ...................................................................................................................................... Strana 25
Výmena kartuše ................................................................................................................................Strana 25
Likvidácia ..................................................................................................................................... Strana 26
Informácie
Pitnosť vody z vodovodu ................................................................................................................. Strana 26
Záruka a servis ....................................................................................................................... Strana 26
21 SK
Page 22
Úvod
LED armatúra na vaňu/do sprchy
Úvod
Blahoželáme Vám ku kúpe Vášho nového výrobku. Rozhodli ste sa tým pre
veľmi kvalitný výrobok. Návod na montáž a obsluhu je súčasťou tohto výrobku. Pred inštaláciou si prosím kompletne prečítajte tento návod
na montáž a obsluhu a rešpektujte jeho pokyny. V
tomto návode sú uvedené informácie týkajúce sa
montáže, nastavenia a údržby. Návod na montáž
a obsluhu si preto dobre uschovajte a odovzdajte
ho i prípadnému ďalšiemu majiteľovi.
Používanie v súlade
s určeným účelom
Výrobok je určený výlučne na reguláciu prúdu teplej a studenej vody. Výrobok je určený len na inštaláciu na vane. Tento výrobok je vhodný pre všetky
systémy teplej vody odolné voči tlaku, ako je
ústredné kúrenie, prietokový ohrievač, tlakový
bojler a pod. Tento produkt nie je vhodný pre
nízkotlakové ohrievače vody alebo beztlakové
malé nádrže ako napr. kúpeľňové kachle na drevo
alebo uhlie, olejové alebo plynové kúpeľňové
kachle, ako aj otvorené elektrické zásobníky. V prípade pochybností sa obráťte na inštalatéra alebo
odborného poradcu. Iné použitie ako vyššie uvedené alebo úpravy výrobku nie sú povolené a
vedú k poškodeniam. Dôsledkom môžu byť i ďalšie
životunebezpečné riziká a poranenia. Produkt je určený len na súkromné používanie, nie na medicínske
alebo komerčné účely. Výrobca nepreberá ručenie
za škody vzniknuté v dôsledku neprimeraného
používania.
5
2 prevlečné matice s tesnením*
6
Teleso armatúry
7
Prepínač*
8
Prípojka sprchy*
9
LED kryt*
10
Výpust vane*
11
Kľúč na vnútorný šesťhran
12
Montážny LED kľúč
13
Kartuša*
14
Poistná matica kartuše*
15
Krycí krúžok kartuše*
16
Páčka*
17
Aretačná skrutka*
18
Označenie teplej / studenej vody*
* vopred namontované
Technické údaje
Prevlečná matica
(prípojky vody): G ¾“
Prípojka
sprchovej hadice: G ½“
Prietok pri: 3 baroch
Prípojka sprchy: cca 17,7 až 18,8 l/min.
Výpust vane: cca 8,5 až 9,2 l/min.
LED svetlo: cca < 33°C modré,
cca 33-43°C zelené,
cca > 43°C červené
cca > 53°C červené
blikajúce
Životnosť LED diód: cca 10.000 prevádzkových
hodín
Tolerancia
snímača teploty: +/- 2°C
Popis častí
1
2 prípojky v tvare S
2
2 tlmiče hluku*
3
2 kryty
4
2 tesnenia (prípojky v tvare S)
22 SK
Rozsah dodávky
1 LED armatúra na vaňu/do sprchy
5–10, 13–18
(
3
2 kryty
2 prípojky v tvare S (1–2)
2 tesnenia
)
4
Page 23
Úvod / Bezpečnostné upozornenia / Montáž
1 šesťhranný imbusový kľúč
1 montážny LED kľúč
1 návod na montáž a obsluhu
11
12
Bezpečnostné
upozornenia
NEBEZPE-
ČENSTVO OHROZENIA ŽIVOTA A NEBEZPEČENSTVO
ÚRAZU PRE MALÉ I STARŠIE DETI! Nikdy
nenechávajte deti bez dozoru s obalovým materiálom. Hrozí nebezpečenstvo zadusenia.
Výrobok držte v bezpečnej vzdialenosti od
detí. Výrobok nie je určený na hranie.
POZOR NA ZÁSAH ELEKTRIC-
KÝM PRÚDOM! Netesnosti
alebo únik vody môžu viesť k ohrozeniu života skrze zásah elektrickým prúdom.
Dôkladne skontrolujte tesnenia všetkých spojov.
Okrem toho zabezpečte, aby boli všetky vedenia elektrických zariadení nainštalované
správne a bezpečne.
POZOR! NEBEZPEČENSTVO PORANE-
NIA! Zabezpečte, aby boli všetky diely
nepoškodené a odborne namontované. Pri neodbornej montáži vzniká nebezpečenstvo poranenia sa. Nezabúdajte prosím, že tesnenia
sú diely podliehajúce opotrebovaniu, ktoré sa
z času na čas musia vymeniť. Poškodené diely
môžu ovplyvniť bezpečnosť a funkčnosť.
POZOR! VECNÉ ŠKODY! Montáž prene-
chajte len odborníkom.
Dbajte na to, aby boli všetky tesnenia správne
osadené.
NEBEZPEČENSTVO OBARENIA! Pri nasta-
vovaní teplej vody dbajte na to, aby teplota
vody nebola nastavená príliš vysoko.
POZOR! Dajte pozor, aby ste správne označili
teplú/studenú vodu
hore = červená (teplá voda),
dole = modrá (studená voda).
Nezabúdajte prosím, že tesnenia sú diely
podliehajúce opotrebovaniu, ktoré sa z času
na čas musia vymeniť.
18
. Správne umiestnenie je:
Netesnosti alebo úniky vody môžu spôsobiť
značné hmotné škody na budovách alebo na
vybavení domácností. Preto dôkladne kontrolujte tesnenia všetkých spojov.
Pred inštaláciou sa priamo na mieste oboz-
námte so všetkými danosťami, napr. sprípojkami vody a uzáverom.
Produkt je vhodný výhradne na používanie v
priestoroch s teplotou nad 0° C.
Montáž
Upozornenie: Pred montážou sa oboznámte s
výrobkom. Prečítajte si k tomu pozorne nasledujúci
montážny návod a bezpečnostné pokyny. Pri chybnej montáži je záruka – predovšetkým za následné
škody - vylúčená.
POZOR! Pred inštaláciou uzatvorte hlavný
prívod vody. Inak hrozí nebezpečenstvo poranenia a/ alebo vecných poškodení.
Pripojenie armatúry
Upozornenie: Na tento úkon budete potrebovať
otvorený kľúč 30 mm a tesniacu pásku.
Upozornenie: Skrutkované časti vždy prikryte
vlhkou handrou alebo plastovými svorkami. Tak
zabránite ich poškriabaniu.
Postupujte nasledujúco:
Tesniacu pásku oviňte okolo zdrsnených častí
závitu (½“ závit) prípojok v tvare S
obr. B1).
Upozornenie: Tesniaca páska nie je
súčasťou balenia.
Prípojky v tvare S 1 priskrutkujte s utesnenými
časťami závitov do prípojok v stene.
Zaskrutkované prípojky v tvare S 1 prispô-
sobte vo vodorovnom smere na šírku armatúry
(pozri obr. B2).
Na prípojky v tvare S 1 naskrutkujte kryty 3
až k stene, pevne ich dotiahnite (pozri obr. B3).
Tesnenia 4 vložte do prevlečných matíc 5 a
prevlečnými maticami
5
priskrutkujte telo
1
(pozri
23 SK
Page 24

Montáž / Obsluha / Údržba a čistenie
armatúry 6 na prípojky v tvare S 1 (pozri
obr. B4-B5).
Pripojenie príslušenstva
(sprchová hadica a
sprchovacia hlavica)
Poznámka: sprchovacia hadica a sprchovacia
hlavica nie sú predmetom dodávky.
Poznámka: časť, ktorú budete skrutkovať, vždy
prikryte vlhkou handrou alebo plastovými svorkami.
Tak zabránite ich poškriabaniu.
Na sprchovú prípojku 8 priskrutkujte bežnú
sprchovú hadicu.
Na sprchovú hadicu pripevnite bežnú sprchovú
hlavicu.
Upozornenie: Dodatočne sa riaďte montážnymi
pokynmi pre príslušenstvo..
Obsluha
Uvedenie do prevádzky
Dôkladne skontrolujte tesnosť všetkých spojov po
prvom uvedení do prevádzky.
Armatúru skontrolujte v činnosti. Vychýľte preto
16
páčku
Upozornenie: Armatúra je vybavená LED svetlom. LED-osvetlenie je realizované prostredníctvom
integrovanej turbíny (bez batérií). Zmena farieb
prebieha automaticky pomocou integrovaného
snímača teploty v závislosti od nastavenej teploty
vody.
· do cca 33°C modré svetlo,
. medzi cca 33–43°C zelené svetlo,
· nad cca 43°C červené svetlo.
Upozornenie: Nad cca 53°C začína LED svetlo
blikať červeným svetlom a upozorňuje Vás na
možné riziko obarenia.
do všetkých možných pozícií.
Upozornenie: Pri používaní armatúry svietia
LED diódy najskôr modrým svetlom, zeleným a červeným, pokiaľ farba neindikuje príslušnú teplotu
(samokontrola).
Upozornenie: Po dlhšom nepoužívaní armatúry
najskôr dôkladne prepláchnite vedenia, aby sa
uvoľnila stagnácia pitnej vody a zvyšky.
Otvorte hlavný prívod vody.
Otvorte páku 16 a pohybujte ňou nahor alebo
nadol, tak môžete regulovať intenzitu príp.
teplotu prúdu vody.
Teplá voda:
16
Páku
posuňte nahor.
Studená voda:
16
Páku
posuňte nadol.
Prepínač výpustu vane/
funkcia sprchy
Prepnutie výpustu vane 10 na funkciu sprchy sa robí
manuálne nadvihnutím a sklopením prepínača
Výpust vane:
Sklopenie prepínača
Funkcia sprchy:
Nadvihnutie prepínača
Upozornenie: Manuálne prepnutie znamená:
Ak sa pri zaktivovanej funkcii sprchy odstaví voda,
funkcia sprchy zostane aktívna. Funkcia sprchy je
pri opätovnej činnosti ďalej aktívna, pokiaľ sa
manuálne nezmení na výpuste vane.
7
.
7
.
7
Údržba a čistenie
Ošetrovanie a čistenie
vodovodnej armatúry
Nezabúdajte, že sanitárne armatúry si vyžadujú
osobitnú starostlivosť. Dodržiavajte preto nasledujúce pokyny:
.
24 SK
Page 25

Údržba a čistenie
Na čistenie v žiadnom prípade nepoužívajte
benzín, rozpúšťadlá alebo agresívne čistiace
prostriedky, príp. tvrdé kefy na čistenie atď.
Tieto by mohli poškodiť povrch výrobku.
Armatúru utrite po každom použití utierkou,
predídete tak eventuálnemu usadzovaniu
vápnika na povrchu armatúry.
Armatúru čistite vlhkou, mäkkou handričkou a
príp. jemným čistiacim prostriedkom.
Pri nedodržiavaní návodu na ošetrovanie je potrebné počítať s poškodením povrchu. V takom prípade nie je možné uplatniť nároky na poskytnutie
záruky.
Výmena LED diód
Ak LED svetlo už nesvieti, LED diódy vymeňte.
Životnosť LED diód: cca 10.000 prevádzkových
hodín.
Novú LED vložku (ET-WCRL-LED) môžete získať na
uvedenom servisnom mieste.
Pritom postupujte takto.
Výpust vane 10 odskrutkujte z telesa armatúry
6
(pozri obr. C1), potrebovať budete krížový
skrutkovač.
Z telesa armatúry 6 kľúčom na vnútorný
šesťhran
11
odskrutkujte LED kryt 9 (pozri
obr. C2).
Z plastu odstráňte LED vložku (pozri obr.
C3–C4), použite montážny LED kľúč
12
.
Namontujte novú LED vložku, LED kryt 9 a
výpust vane
10
na telese armatúry 6 analo-
gicky k demontáži (pozri obr. C5–C7).
Výmena sita
Keď sa sito vo vnútri LED krytu výrazne znečistí,
treba ho vyčistiť alebo vymeniť.
Pritom postupujte takto.
Z telesa armatúry 6 odskrutkujte výpust vane
10
(pozri obr. C1), budete potrebovať krížový
skrutkovač.
Z telesa armatúry 6 odskrutkujte kľúčom na
vnútorný šesťhran
11
LED kryt 9 (pozri
obr. C2).
Sito vytlačte zvonka z LED krytu 9 plochým
predmetom (pozri obr. D1).
POZOR! NEBEZPEČENSTVO ZRANE-
NIA! Na vonkajšom okraji spleti sita môžu byť
špicaté miesta.
Reziduá vápnika alebo cudzie telesá odstráňte.
Ak je sito výrazne znečistené alebo poškodené,
vymeňte ho. Nové sito (ET-WCRL-WBS) si môžete zakúpiť v uvedenom servisnom stredisku.
Vyčistené/nové sito vytlačte zvnútra do
LED krytu
9
(pozri obr. D2).
Upozornenie: Dajte pozor, aby sito v
LED kryte
9
riadne priliehalo.
Namontujte LED kryt 9 a výpust vane 10 na
tele armatúry
6
analogicky k demontáži
(pozri obr. C6–C7).
Výmena kartuše
Kartuša 13 je opotrebovateľným dielom, ktorý sa
musí vymeniť závisle od obsahu vápnika, resp. od
18
vsuniete
16
znečistenia vody. Toto zistíte, ak sa páčka
ovláda ťažko. Novú kartušu
13
je možné zakúpiť
na uvedenom servisnom mieste.
Upozornenie: Pre tento pracovný krok potrebujete otvorený kľúč veľkosti 27 mm alebo kliešte na
armatúry.
Pri výmene kartuše
13
postupujte nasledovne:
Uzatvorte hlavný prívod vody. Zvyšnú vodu
nechajte z potrubia vytiecť.
Odstráňte označenie teplá/studená voda 18,
označenie odstránite tak, že medzi okraj označenia pre teplú/studenú vodu
plochý predmet a posuniete vonkajšiu stranu
16
páky
.
Upozornenie: Označenie teplá-/studená
18
voda
opatrne vytlačte ľahkým tlakom
smerom von, aby ste nepoškriabali povrch.
Uvoľnite aretačnú skrutku 17 pomocou kľúča s
vnútorným šesťhranom
11
otáčaním proti
smeru hodinových ručičiek.
25 SK
Page 26

Údržba a čistenie / Likvidácia / Informácie / Záruka a servis
POZOR! Aretačnú skrutku 17 nevytočte
úplne. Skrutku uvoľnite iba natoľko, aby bolo
možné ľahko odobrať páčku
Odoberte páčku 16.
Odskrutkujte krycí krúžok kartuše 15, nepouží-
vajte pritom kliešte alebo skrutkové kľúče. Inak
môže dôjsť k poškodeniu výrobku.
Uvoľnite pod tým sa nachádzajúcu poistnú
maticu kartuše
alebo otvoreného kľúča veľkosti 27 mm a
vytiahnite celú kartušu
Novú kartušu 13 (typ 35 M LED) nasaďte
presne tak do telesa armatúry
Poznámka: Dbajte na to, aby tesnenie pod
kartušou
aby vedenia sedeli v určených otvoroch.
Znova namontujte všetky vyššie uvedené diely.
Zatiahnite poistnú maticu kartuše
klieští na armatúry alebo otvoreným kľúčom
veľkosti 27 mm, armatúru pritom súčasne
pevne držte armatúru proti smeru otáčania.
Tým dosiahnete potrebnú tesnosť a zabezpečíte ľahké otáčanie páky.Tým dosiahnete potrebnú tesnosť a zabezpečíte ľahké otáčanie
páky.
POZOR! Zabezpečte, aby sa správne nasa-
dilo označenie strany teplej / studenej vody
Správne umiestnenie je:
hore = červená (teplá voda),
dole = modrá (studená voda).
14
pomocou klieští na armatúry
13
správne priliehalo. Zabezpečte,
16
.
13
z tela armatúry 6.
6
.
14
pomocou
18
Informácie
Pitnosť vody z vodovodu
O pitnosti vody vo Vašom meste / obci sa
informujte na Vašich miestnych úradoch.
Pre pitnosť vody z vodovodu všeobecne platí
nasledujúce odporúčanie:
Vodu z potrubí nechajte chvíľu odtiecť, pokiaľ v
potrubiach stála dlhšie ako štyri hodiny. Vodu,
ktorá stála v potrubí, nepoužívajte na prípravu
jedál a nápojov, najmä ak ide o výživu dojčiat.
V opačnom prípade sa môžu vyskytnúť zdravotné ťažkosti. Čerstvú vodu rozoznáte podľa
toho, že je po vypustení z potrubia citeľne
chladnejšia ako voda, ktorá v ňom stála.
Nepoužívajte vodu, ktorá stála vpochrómova-
ných potrubiach, na výživu a / alebo na
osobnú hygienu, ak ste alergický na nikel. Táto
voda môže obsahovať zvýšené množstvo niklu
a vyvolať alergickú reakciu.
Nepoužívajte pitnú vodu zolovených potrubí
na prípravu výživy pre dojčatá a / alebo počas
tehotenstva na prípravu potravín. Olovo prechádza do pitnej vody a je obzvlášť škodlivé
.
pre zdravie dojčiat a malých detí.
Záruka a servis
Likvidácia
Obal pozostáva z ekologických materiálov, ktoré môžete odovzdať na miestnych recyklačných zberných miestach.
Informácie o možnostiach likvidácie opotrebovaného výrobku získate na Vašej správe obce alebo
mesta.
26 SK
Doba záruky začína plynúť dňom kúpy. Uschovajte
si prosím pokladničný doklad ako dôkaz o kúpe.
Ak sa počas záručnej doby predsalen objavia nedostatky, môžete defektnú armatúru po kontaktovaní servisnej služby na vlastné náklady odoslať
na uvedenú servisnú adresu. Následne dostanete
bezplatne naspäť novú alebo opravenú armatúru.
Po uplynutí doby záruky máte taktiež možnosť
odoslať defektnú armatúru na uvedenú adresu za
účelom opravy. V prípade opráv spadajúcich do
obdobia po uplynutí záručnej doby ste povinný
uhradiť vzniknuté náklady.
Page 27

Upozornenie: Spoločnosť Eisl Sanitär GmbH
vrámci záručnej doby bezplatne vymení defektné
armatúry alebo poskytne príslušné náhradné diely.
Finančné vrátenie nákupnej ceny defektných armatúr nie je zo strany Eisl Sanitär GmbH možné.
Práva vyplývajúce zo zákona nie sú touto zárukou
obmedzené.
Záručná doba sa poskytnutím záruky nepredlžuje.
To platí aj pre nahradené a vymenené diely. V
mnohých prípadoch je dôvodom reklamácie nesprávna manipulácia. Túto možno bez problémov
odstrániť telefonicky alebo e-mailom. Skôr, ako
budete armatúru reklamovať u výrobcu, obráťte
sa prosím na zriadené servisné pracovisko:
SK:
Eisl Sanitär GmbH
Martin Bednar
Mattseer Landesstraße 8
A-5101 Bergheim
Tel.: 00420-602306113
Tel.: 0800-606892*
Fax : 0043-662-879346-50
E-Mail: [email protected]
* Bezplatné telefónne číslo
Záruka a servis
IAN 60101
Pre všetky otázky majte prosím pripravený pokladničný doklad a číslo výrobku napr. IAN 12345 ako
dôkaz o kúpe.
Označenie výrobku:
LED armatúra na vaňu/do sprchy
Eisl Sanitär č.
NI023WCRL-LIDL2
27 SK
Page 28

28
Page 29

Inhaltsverzeichnis
Einleitung
Bestimmungsgemäße Verwendung .................................................................................................... Seite 30
Teilebeschreibung ............................................................................................................................... Seite 30
Technische Daten ................................................................................................................................ Seite 30
Lieferumfang ........................................................................................................................................ Seite 30
Sicherheitshinweise ................................................................................................................ Seite 31
Montage
Armatur anschließen ........................................................................................................................... Seite 31
Zubehör (Brauseschlauch und Duschkopf) anschließen ...................................................................Seite 32
Bedienung
Inbetriebnahme ...................................................................................................................................Seite 32
Umsteller Wannenauslauf / Brausefunktion ....................................................................................... Seite 32
Wartung und Reinigung
Armatur pflegen und reinigen ............................................................................................................Seite 33
LED-Einsatz tauschen ........................................................................................................................... Seite 33
Sieb austauschen ................................................................................................................................Seite 33
Kartusche austauschen .......................................................................................................................Seite 33
Entsorgung ..................................................................................................................................... Seite 34
Informationen
Trinkbarkeit von Leitungswasser ......................................................................................................... Seite 34
Garantie und Service ............................................................................................................Seite 35
29 DE/AT/CH
Page 30
Einleitung
LED-Wannenfüll-/Brause-Armatur
Einleitung
Wir beglückwünschen Sie zum Kauf Ihres
neuen Produkts. Sie haben sich damit für
ein hochwertiges Produkt entschieden.
Die Montage-/Bedienungsanleitung ist Bestandteil
dieses Produkts. Bitte lesen Sie vor der Installation
diese Montage-/Bedienungsanleitung vollständig
durch und beachten Sie die Hinweise. Diese Anleitung enthält wichtige Montage-, Einstell- und
Pflegeinformationen. Bewahren Sie die Montage-/
Bedienungsanleitung deshalb gut auf und geben
Sie diese auch an eventuelle Nachbesitzer weiter.
Bestimmungsgemäße
Verwendung
Das Produkt ist ausschließlich zur Regulierung des
Warm- und Kaltwasserzuflusses bestimmt. Es ist nur
zur Installation an Wannen vorgesehen. Dieses Produkt ist für alle druckfesten Warmwassersysteme
wie Zentralheizung, Durchlauferhitzer, Druckboiler
o.ä. geeignet. Das Produkt ist nicht geeignet für
Niederdruck-Warmwasserbereiter, oder drucklose
Kleinspeicher, wie z.B. Holz- oder Kohlebadeöfen,
Öl- oder Gasbadeöfen, sowie offene Elektrospeicher.
Im Zweifelsfall wenden Sie sich bitte an einen Installateur oder Fachberater. Eine andere Verwendung als zuvor beschrieben oder eine Veränderung
des Produkts ist nicht zulässig und führt zur Beschädigung. Darüber hinaus können weitere lebensgefährliche Gefahren und Verletzungen die Folgen
sein. Das Produkt ist nur zur Eigenanwendung, nicht
für den medizinischen oder kommerziellen Gebrauch vorgesehen. Für durch unsachgemäße Verwendung entstandene Schäden übernimmt der
Hersteller keine Haftung.
3
2 Abdeckkappen
4
2 Dichtungen (S-Anschlüsse)
5
2 Überwurfmuttern*
6
Armaturenkörper
7
Umsteller*
8
Brauseanschluss*
9
LED-Abdeckung*
10
Wannenauslauf*
11
Innensechskantschlüssel
12
LED-Montageschlüssel
13
Kartusche*
14
Kartuschensicherungsmutter*
15
Kartuschenabdeckring*
16
Hebel*
17
Arretierungsschraube*
18
Warm-/Kaltplakette*
* vormontiert
Technische Daten
Überwurfmutter
(Wasseranschlüsse): G ¾“
BrauseschlauchAnschluss: G ½“
Durchfluss bei 3 bar:
Brauseanschluss: ca. 17,7 bis 18,8 L/min
Wannenauslauf: ca. 8,5 bis 9,2 L/min
LED-Beleuchtung: ca. < 33°C Blau,
ca. 33-43°C Grün,
ca. > 43°C Rot
ca. > 53°C Rot blinkend
Lebensdauer LED: ca. 10.000 Betriebsstunden
Toleranz
Temperaturfühler: +/- 2°C
Lieferumfang
Teilebeschreibung
1
2 S-Anschlüsse
2
2 Geräuschdämpfer*
30 DE/AT/CH
1 LED-Wannenfüll-/Brause-Armatur
5–10, 13–18
(
2 Abdeckkappen
)
3
2 S-Anschlüsse mit Geräuschdämpfer (1–2)
2 Dichtungen
4
Page 31
Einleitung / Sicherheitshinweise / Montage
1 Innensechskantschlüssel
1 LED-Montageschlüssel
1 Montage-/Bedienungsanleitung
11
12
Sicherheitshinweise
LEBENS-
UND UNFALLGEFAHR FÜR
KLEINKINDER UND KINDER!
Lassen Sie Kinder niemals unbeaufsichtigt mit
dem Verpackungsmaterial. Es besteht Erstickungsgefahr. Halten Sie das Produkt von Kindern
fern. Das Produkt ist kein Spielzeug.
VORSICHT VOR ELEKTRISCHEM
SCHLAG! Undichtigkeiten oder
Wasseraustritt können zu Lebensgefahr durch elektrischen Schlag führen. Prüfen
Sie alle Verbindungen sorgfältig auf Dichtigkeit.
Stellen Sie zudem sicher, dass alle Leitungen
von elektrischen Geräten korrekt und sicher
installiert sind.
VORSICHT! VERLETZUNGSGEFAHR!
Stellen Sie sicher, dass alle Teile unbeschädigt
und sachgerecht montiert sind. Bei unsachgemäßer Montage besteht Verletzungsgefahr.
Bitte beachten Sie, dass Dichtungen Verschleißteile sind, welche von Zeit zu Zeit ausgetauscht
werden müssen. Beschädigte Teile können die
Sicherheit und Funktion beeinflussen.
VORSICHT! SACHSCHÄDEN! Bitte lassen
Sie die Montage nur durch fachkundige Personen durchführen.
Achten Sie darauf, dass alle Dichtungen den
korrekten Sitz haben.
VERBRÜHUNGSGEFAHR! Achten Sie bei
der Warmwassereinstellung darauf, dass die
Temperatur des Wassers nicht zu heiß eingestellt ist.
VORSICHT! Stellen Sie sicher, dass die
Warm-/Kaltplakette
setzt ist. Die korrekte Anordnung lautet:
oben = rot (Warmwasser),
unten = blau (Kaltwasser).
Bitte beachten Sie, dass die Dichtungen Ver-
schleißteile sind, welche von Zeit zu Zeit ausgetauscht werden müssen.
18
richtig herum einge-
Undichtigkeiten oder Wasseraustritt können zu
erheblichen Sachschäden an Gebäude oder
Hausrat führen. Prüfen Sie daher alle Verbindungen sorgfältig auf Dichtigkeit.
Machen Sie sich vor der Installation mit allen
Gegebenheiten vor Ort vertraut, z.B. Wasseranschluss und Absperrvorrichtung.
Das Produkt ist ausschließlich zur Verwendung
in Räumen mit einer Temperatur über 0°C
geeignet.
Montage
Hinweis: Machen Sie sich vor der Montage mit
dem Produkt vertraut. Lesen Sie hierzu aufmerksam
die nachfolgende Montageanleitung und die Sicherheitshinweise. Bei fehlerhafter Montage ist die
Gewährleistung – insbesondere für Folgeschäden
– ausgeschlossen.
VORSICHT! Drehen Sie vor der Installation
die Haupt-Wasserzufuhr ab. Ansonsten drohen
Verletzungsgefahr und/oder Sachbeschädigungen.
Armatur anschließen
Hinweis: Für diesen Arbeitsschritt benötigen Sie
einen Maulschlüssel SW 30 mm und ein Dichtungsband.
Hinweis: Decken Sie zu schraubende Teile jeweils
mit einem feuchten Tuch oder mit Kunststoffklammern ab. So verhindern Sie ein Verkratzen.
Gehen Sie wie folgt vor:
Wickeln Sie ein Dichtungsband um die aufge-
rauten Gewindeteile (½“ Gewinde) der
S-Anschlüsse
Hinweis: Dichtungsband nicht im Lieferumfang enthalten.
Schrauben Sie die S-Anschlüsse 1 mit den
abgedichteten Gewindeteilen in die Wandanschlüsse ein.
Richten Sie die eingeschraubten S-Anschlüsse
1
waagerecht auf das Abstandsmaß der
Armatur aus (siehe Abb. B2).
1
(siehe Abb. B1).
31 DE/AT/CH
Page 32

Montage / Bedienung
Schrauben Sie die Abdeckkappen 3 handfest
auf die S-Anschlüsse
(siehe Abb. B3).
Legen Sie die Dichtungen 4 in die Überwurf-
muttern
körper
S-Anschlüsse
5
und schrauben Sie den Armaturen-
6
mit den Überwurfmuttern 5 auf die
1
bis gegen die Wand
1
(siehe Abb. B4-B5).
Zubehör (Brauseschlauch
und Duschkopf) anschließen
Hinweis: Brauseschlauch und Duschkopf sind
nicht im Lieferumfang enthalten.
Hinweis: Decken Sie zu schraubende Teile jeweils
mit einem feuchten Tuch oder mit Kunststoffklammern ab. So verhindern Sie ein Verkratzen.
Schrauben Sie einen handelsüblichen
Brauseschlauch am Brauseanschluss
Befestigen Sie einen handelsüblichen
Duschkopf am Brauseschlauch.
Hinweis: Richten Sie sich zusätzlich nach den
Montagehinweisen des Zubehörs.
8
fest.
Bedienung
Inbetriebnahme
Prüfen Sie alle Verbindungen nach der ersten
Inbetriebnahme unbedingt sorgfältig auf Dichtigkeit.
Prüfen Sie den Betrieb der Armatur. Schwenken
Sie dafür den Hebel
onen.
Hinweis: Die Armatur ist mit einer LED-Beleuchtung ausgestattet. Die LED-Beleuchtung erfolgt
durch eine integrierte Turbine (ohne Batterien). Der
LED-Farbwechsel erfolgt automatisch, je nach eingestellter Wassertemperatur, durch einen integrierten Temperaturfühler:
· bis ca. 33°C Blau,
· zwischen ca. 33–43°C Grün,
· über ca. 43°C Rot.
16
in alle erlaubten Positi-
Hinweis: Über ca. 53°C beginnt die LED-Beleuchtung rot zu blinken, um vor möglichen
Verbrühungen zu warnen.
Hinweis: Bei Inbetriebnahme der Armatur leuchten die LEDs zunächst blau, grün und rot, bevor die
Farbe entsprechend der Temperatur angezeigt wird
(Selbsttest).
Hinweis: Spülen Sie nach längerem Nichtgebrauch
der Armatur die Leitungen zunächst gründlich, um
Trinkwasser-Stagnation und Rückstände aufzulösen.
Öffnen Sie die Haupt-Wasserzufuhr.
Öffnen Sie den Hebel 16 und schwenken Sie
ihn nach oben oder unten, um die Stärke bzw.
Temperatur des Wasserflusses zu regulieren.
Warmwasser:
Schwenken Sie den Hebel
Kaltwasser:
Schwenken Sie den Hebel
16
nach oben.
16
nach unten.
Umsteller Wannenauslauf /
Brausefunktion
Die Umstellung von Wannenauslauf 10 auf
Brausefunktion erfolgt manuell durch Anheben und
Senken des Umstellers
Wannenauslauf:
Senken des Umstellers
Brausefunktion:
Anheben des Umstellers
Hinweis: Manuelle Umstellung bedeutet: Wird
bei aktivierter Brausefunktion das Wasser abgestellt,
bleibt die Brausefunktion aktiv. Bei erneuter Inbetriebnahme ist die Brausefunktion weiterhin aktiv,
bis manuell auf Wannenauslauf umgestellt wird.
7
.
7
.
7
.
32 DE/AT/CH
Page 33

Wartung und Reinigung
Wartung und Reinigung
Armatur pflegen und reinigen
Beachten Sie, dass Sanitärarmaturen einer besonderen Pflege bedürfen. Beachten Sie daher die
folgenden Anweisungen:
Verwenden Sie zur Reinigung keinesfalls
Benzin, Lösungsmittel oder aggressive Reiniger,
bzw. harte Reinigungsbürsten, etc. Diese könnten die Oberfläche des Produkts beschädigen.
Trocknen Sie Ihre Armatur nach jeder Nutzung
mit einem Tuch, um eventuelle Kalkablagerungen zu vermeiden.
Reinigen Sie die Armatur mit einem feuchten,
weichen Tuch und ggf. mit einem milden Reinigungsmittel.
Bei Nichtbeachtung der Pflegeanleitung muss mit
Schäden an der Oberfläche gerechnet werden.
Garantieansprüche können dann nicht geltend
gemacht werden.
LED-Einsatz tauschen
Wenn keine Leuchtfunktion der LED-Lampen festzustellen ist, kann der LED-Einsatz ausgetauscht werden.
Lebensdauer LED: ca. 10.000 Betriebsstunden.
Einen neuen LED-Einsatz (ET-WCRL-LED) können Sie
bei der angegebenen Servicestelle beziehen.
Gehen Sie dabei wie folgt vor:
Schrauben Sie den Wannenauslauf 10 vom
Armaturenkörper
benötigen Sie einen Kreuzschlitzschraubendreher.
Schrauben Sie die LED-Abdeckung 9 mit
Hilfe des Innensechskantschlüssels
Armaturenkörper
Entfernen Sie den LED-Einsatz aus Kunststoff
(siehe Abb. C3–C4), verwenden Sie dazu den
LED-Montageschlüssel
Montieren Sie den neuen LED-Einsatz, die LED-
Abdeckung
am Armaturenkörper
tage (siehe Abb. C5–C7).
6
ab (siehe Abb. C1), dazu
11
vom
6
ab (siehe Abb. C2).
12
.
9
und den Wannenauslauf 10
6
analog zur Demon-
Sieb austauschen
Wenn das Sieb im Inneren der LED-Abdeckung
stark verschmutzt ist, muss es gereinigt oder ausgetauscht werden.
Gehen Sie dabei wie folgt vor:
Schrauben Sie den Wannenauslauf 10 vom
Armaturenkörper
6
ab (siehe Abb. C1), dazu
benötigen Sie einen Kreuzschlitzschraubendreher.
Schrauben Sie die LED-Abdeckung 9 mit
Hilfe des Innensechskantschlüssels
Armaturenkörper
6
ab (siehe Abb. C2).
11
vom
Drücken Sie das Sieb mit einem flachen Ge-
genstand von außen aus der LED-Abdeckung
9
(siehe Abb. D1).
ACHTUNG VERLETZUNGSGEFAHR! Der
äußere Rand des Siebgeflechts kann spitze
Stellen aufweisen.
Entfernen Sie kalkhaltige Rückstände oder
Fremdkörper.
Ersetzen Sie das Sieb bei sehr starker Verschmutzung oder Beschädigung durch ein neues. Ein
neues Sieb (ET-WCRL-WBS) können Sie bei
der angegebenen Servicestelle beziehen.
Drücken Sie das gereinigte/neue Sieb von
innen in die LED-Abdeckung
9
(siehe Abb. D2).
Hinweis: Achten Sie darauf, dass das Sieb
ordnungsgemäß in der LED-Abdeckung
9
sitzt.
Montieren Sie die LED-Abdeckung 9 und den
Wannenauslauf
10
am Armaturenkörper 6
analog zur Demontage (siehe Abb. C6–C7).
Kartusche austauschen
Eine Kartusche 13 ist ein Verschleißteil, das je nach
Kalkgehalt bzw. Verschmutzung des Wassers ausgetauscht werden muss. Dies stellen Sie fest, wenn
sich der Hebel
Eine neue Kartusche
gebenen Servicestelle beziehen.
Hinweis: Für diesen Arbeitsschritt benötigen Sie
einen Maulschlüssel SW 27 mm oder eine Armaturenzange.
16
schwergängig betätigen lässt.
13
können Sie bei der ange-
33 DE/AT/CH
Page 34

Wartung und Reinigung / Entsorgung / Informationen
Um die Kartusche 13 auszutauschen, gehen Sie
wie folgt vor:
Stellen Sie die Haupt-Wasserzufuhr ab. Lassen
Sie das restliche Leitungswasser ablaufen.
Entfernen Sie die Warm-/Kaltplakette 18,
indem Sie einen flachen Gegenstand zwischen
schieben.
18
und die
den Rand der Warm-/Kaltplakette
Außenseite des Hebels
16
Hinweis: Drücken Sie die Warm-/Kaltpla-
18
kette
vorsichtig mit leichtem Druck nach
außen um die Oberfläche nicht zu zerkratzen.
Lösen Sie die Arretierungsschraube 17 mit
dem Innensechskantschlüssel
11
durch Drehen
gegen den Uhrzeigersinn.
VORSICHT! Drehen Sie die Arretierungs-
schraube
Sie diese nur so weit, bis sich der Hebel
17
nicht vollständig heraus. Lösen
16
leicht abnehmen lässt.
Nehmen Sie den Hebel 16 ab.
Schrauben Sie den Kartuschenabdeckring 15
ab, verwenden Sie dazu keine Zange oder
Schraubenschlüssel. Andernfalls kann es zu
Beschädigungen am Produkt kommen.
Lösen Sie die darunter liegende Kartuschensiche-
rungsmutter
14
mit einer Armaturenzange oder
einem Maulschlüssel SW 27 mm und ziehen
Sie die komplette Kartusche
turenkörper
Setzen Sie die neue Kartusche 13 (Typ 35 M LED)
6
.
13
aus dem Arma-
wieder genauso in den Armaturenkörper 6 ein.
Hinweis: Achten Sie darauf, dass die Dich-
tung unter der Kartusche
13
korrekt sitzt. Stellen Sie sicher, dass die Führungen in den dafür
vorgesehenen Löchern sitzen.
Montieren Sie alle zuvor genannten Teile wieder.
Ziehen Sie die Kartuschensicherungsmutter
mit einer Armaturenzange oder einem Maulschlüssel SW 27 mm an, während Sie gleichzeitig die Armatur gegen die Drehbewegung
festhalten. Dadurch erreichen Sie die Dichtigkeit und sorgen dafür, dass die Hebelbewegung nicht schwergängig wird.
VORSICHT! Stellen Sie sicher, dass die
Warm-/Kalt-Plakette
18
richtig herum eingesetzt ist. Die korrekte Anordnung lautet:
oben = rot (Warmwasser),
unten = blau (Kaltwasser).
Entsorgung
Die Verpackung besteht aus umweltfreundlichen Materialien, die Sie über
die örtlichen Recyclingstellen entsorgen
können.
Möglichkeiten zur Entsorgung des ausgedienten
Produkts erfahren Sie bei Ihrer Gemeinde oder
Stadtverwaltung.
Informationen
Trinkbarkeit von
Leitungswasser
Informieren Sie sich bei Ihren örtlichen Behör-
den über die Trinkbarkeit des Wassers in Ihrer
Stadt / Gemeinde.
Generell gilt für die Trinkbarkeit von Leitungswasser
folgende Empfehlung:
Lassen Sie Wasser aus Leitungen eine kurze
Zeit laufen, wenn es länger als vier Stunden in
den Leitungen stagniert hat. Verwenden Sie
kein Stagnationswasser zur Zubereitung von
Speisen und Getränken, besonders nicht bei
der Ernährung von Säuglingen. Andernfalls
können gesundheitliche Beschwerden auftreten.
Frisches Wasser können Sie daran erkennen,
dass es spürbar kühler die Leitung verlässt, als
Stagnationswasser.
Verwenden Sie kein Stagnationswasser aus
verchromten Leitungen zur Ernährung und / oder
14
zur Körperpflege, wenn Sie gegen Nickel allergisch sind. Solches Wasser kann stark nickelhaltig sein und eine allergische Reaktion
hervorrufen.
Nutzen Sie kein Trinkwasser aus Bleileitungen
für die Zubereitung von Säuglingsnahrung
und / oder während der Schwangerschaft für
die Zubereitung von Lebensmitteln. Blei wird ins
Trinkwasser abgegeben und ist für Säuglinge
und Kleinkinder besonders gesundheitsschädlich.
34 DE/AT/CH
Page 35

Garantie und Service
Garantie und Service
Die Garantiezeit beträgt drei Jahre und beginnt am
Tag des Kaufs. Bitte bewahren Sie den Kassenbon
als Nachweis für den Kauf auf.
Sollten sich dennoch während der Garantiezeit
Mängel herausstellen, können defekte Armaturen
nach Kontaktaufnahme mit dem Servicedienst
unfrei an die angegebene Serviceadresse gesandt
werden. Sie erhalten dann eine neue oder eine
reparierte Armatur kostenlos zurück.
Nach Ablauf der Garantiezeit haben Sie ebenfalls
die Möglichkeit, die defekte Armatur zwecks Reparatur an die angegebene Adresse zu senden.
Nach Ablauf der Garantiezeit anfallende Reparaturen sind kostenpflichtig.
Hinweis: Die Eisl Sanitär GmbH ersetzt innerhalb
der Garantiezeit defekte Armaturen kostenfrei,
oder stellt entsprechende Ersatzteile zur Verfügung.
Eine finanzielle Rückerstattung des Kaufpreises
defekter Armaturen ist seitens der Eisl Sanitär
GmbH nicht möglich.
Ihre gesetzlichen Rechte werden durch diese
Garantie nicht eingeschränkt.
AT:
Eisl Sanitär GmbH
Mattseer Landesstraße 8
A-5101 Bergheim
Tel.: 00800-87934629*
Tel.: 0043-662-879346-29
Fax : 0043-662-879346-50
E-Mail: [email protected]
* Kostenfreie Nummer
CH:
Eisl Sanitär GmbH
Ingo Felsch Mattseer Landesstraße 8
A-5101 Bergheim Tel.: 00800 - 87 93 46 29*
Fax.: 0043 662 - 87 93 46 - 3370
eMail: [email protected]
* Kostenfreie Nummer
IAN 60101
Bitte halten Sie für alle Anfragen den Kassenbon
und die Art.Nr. zB. IAN 12345 als Nachweis für
den Kauf bereit.
Produktbezeichnung:
LED-Wannenfüll-/Brause-Armatur
Die Garantiezeit wird durch die Gewährleistung
nicht verlängert. Das gilt auch für ersetzte und ausgetauschte Teile. In vielen Fällen liegt der Grund für
Reklamationen in Bedienungsfehlern. Diese könnten ohne Weiteres telefonisch oder per E-Mail behoben werden. Bitte wenden Sie sich an die für Sie
eingerichtete Servicestelle, bevor Sie die Armatur
beim Hersteller reklamieren:
DE:
Eisl Handels GmbH
Schlossplatz 1
D-83410 Laufen
Tel: 00800-87934629*
Fax: 00800-87934650*
E-Mail: [email protected]
* Kostenfreie Nummer
Eisl Sanitär-Nr.
NI023WCRL-LIDL2
35 DE/AT/CH
Page 36

36
Page 37

Eisl Sanitär GmbH
Mattseer Landesstraße 8
A-5101 Bergheim
Last Information Update · Stan informacji · Stav
informácií · Stand der Informationen: 06 / 2014
Ident.-No.: NI023WCRL-LIDL2062014-PL/SK
IAN 60 1 0 1
4
 Loading...