

Mio Sport SD Instruction Manual
English 1
ENGLISH ..................... 1
FRANÇAIS .................24

CONTENTS
ACTIVATING YOUR MIO ....................................................................................... 1
QUICK START ........................................................................................................ 1
BEFORE USING YOUR MIO .................................................................................. 2
BASIC OPERATION BUTTONS ............................................................................. 3
YOUR MIO’S SCREEN ........................................................................................... 4
MODES OF OPERATION ...................................................................................... 5
Time Mode ...................................................................................................... 5
Pedometer ...................................................................................................... 5
Exercise Timer ................................................................................................ 5
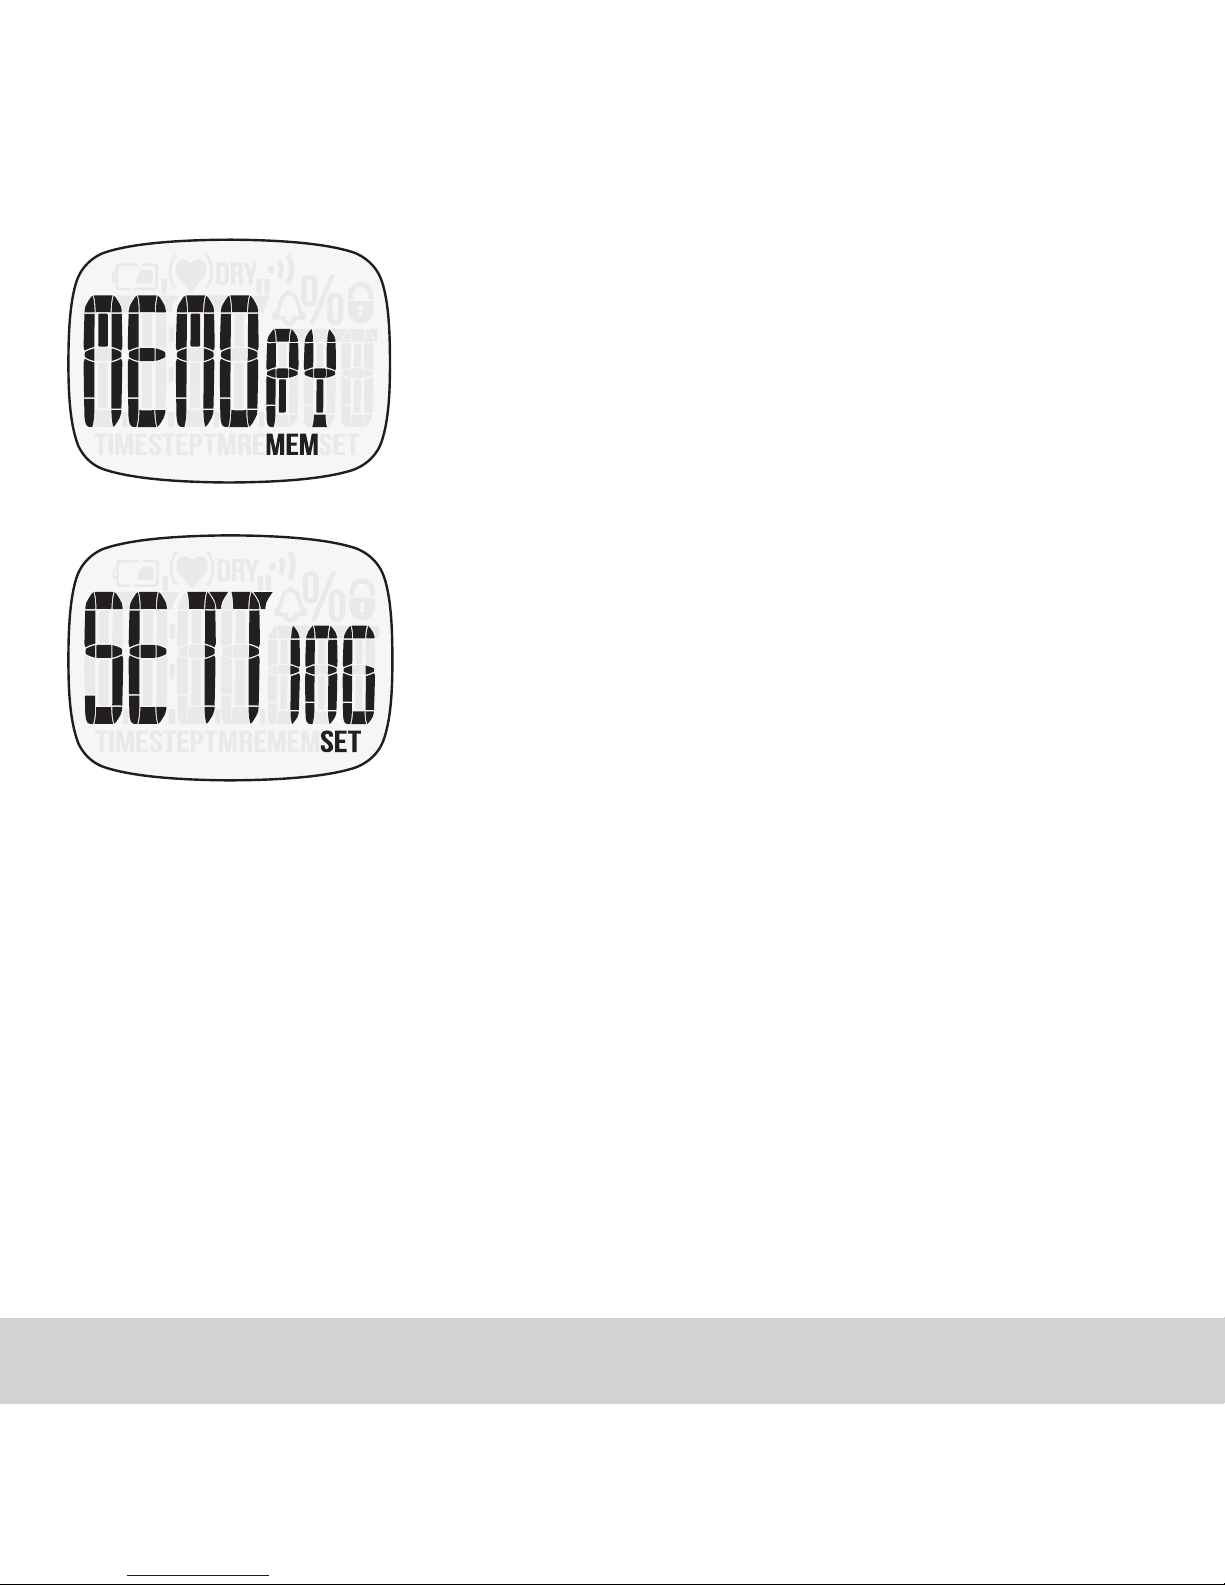
Memory ........................................................................................................... 6
Settings ........................................................................................................... 6
TAKING YOUR HEART RATE ................................................................................ 7
Smart Touch Technology .............................................................................. 8
Troubleshooting Pointers ............................................................................. 8
MANUAL HEART RATE LOCK .............................................................................. 9
AUTOMATIC HEART RATE LOCK ...................................................................... 10
TIME MODE ......................................................................................................... 11

PEDOMETER MODE ........................................................................................... 11
EXERCISE TIMER MODE .................................................................................... 12
Operating In Timer Mode ............................................................................ 13
MEMORY MODE ................................................................................................. 16
CHANGING SETTINGS ........................................................................................ 17
Alarm ............................................................................................................. 17
Time ............................................................................................................... 17
Watch Sounds and Display (Watch) .......................................................... 18
User Information (User) .............................................................................. 18
Maximum Heart Rate (MHR) ...................................................................... 18
BACKLIGHT ......................................................................................................... 19
REPLACING THE BATTERY ................................................................................ 19
SPECIFICATIONS ................................................................................................ 19
CARE AND MAINTENANCE ............................................................................... 20
LIMITED ONE YEAR WARRANTY ..................................................................... 21
DISCLAIMER ....................................................................................................... 22
WARRANTY AND REPAIRS CONTACT.............................................................. 23

1 English
01. ACTIVATING YOUR MIO
1. Remove your MIO from the packaging and peel off the protective film
on the display.
2. Press and hold the START button (the upper right button) to wake up
the watch. The display will be switched on.
02. QUICK START
To get started, your MIO will ask you to set several parameters.
» Press + or – to increase and decrease the values
» Holding + or – will rapidly change the values
» Press SET to confirm the value and move to the next parameter
For detailed information on setting up your MIO, please see Section 14.
MIO Tip: Locking the heart rate sensor will prevent unwanted heart rate
readings while setting up the watch. See Section 8 for more information.
TIME
» Hour (12 hour format)
» Minute
» Second (whenever + or – is pressed the second will be reset to zero)
» Hour format (12 hour or 24 hour format)

English 2
DATE
» Date format (Month-Day or Day-Month)
» Year
» Month
» Day
PERSONAL INFORMATION
» Unit Format (KG/CM or LB/IN)
» Body Weight
» Height
» Gender (Female or Male)
» Birth Year
After finishing the quick first time setup, the watch will go to TIME mode.
You can switch the display between time and date/weekday in TIME mode
by pressing + or – button.
For daily usage, you don’t need to fasten your watch too tightly on your
wrist. During intensive exercise, we recommend that you tighten the
watch band for better heart rate readings.
03. BEFORE USING YOUR MIO
MIO’s Smart Touch Heart Rate (HR) measurement is EKG-accurate,
however this product is not a medical device. You should always consult
your doctor before starting any new fitness regime, if you are planning to
use the product while pregnant, or if you have a pacemaker fitted.
3 English
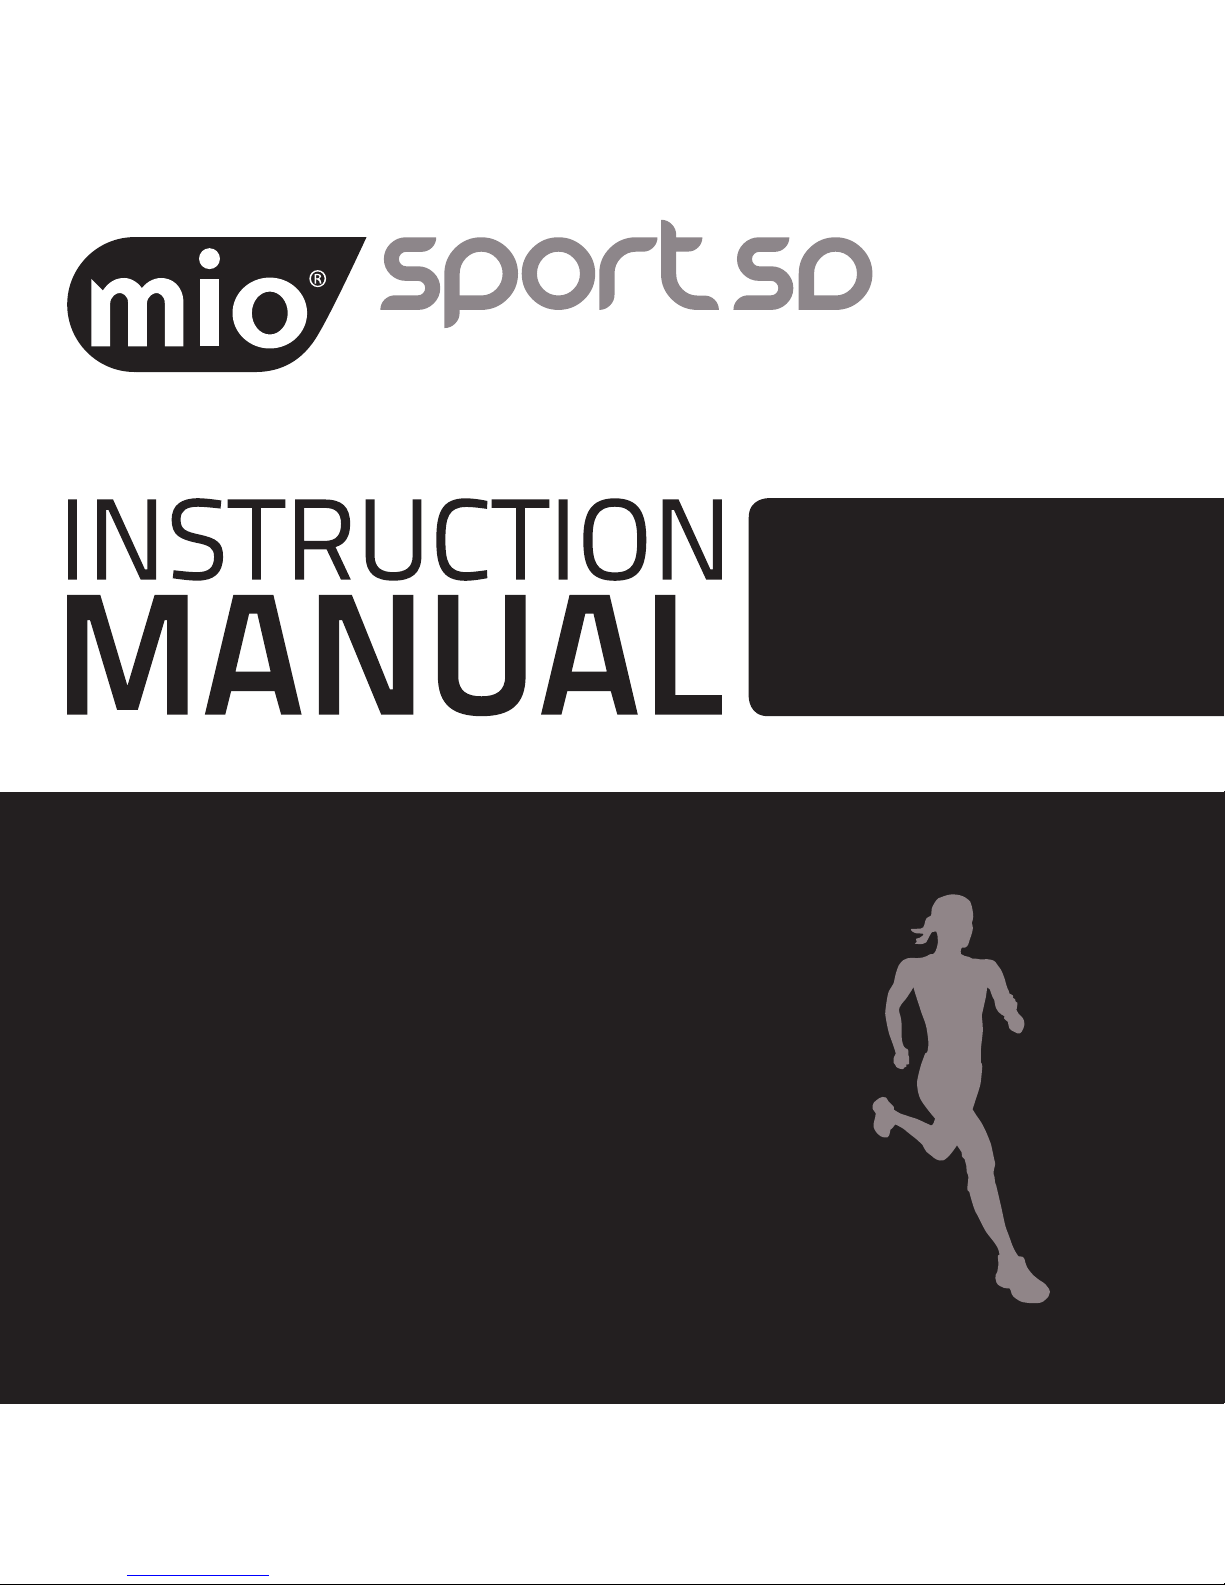
04. BASIC OPERATION BUTTONS
MODE/SET BUTTON
Switches MAIN modes.
In SETTING mode:
Press & hold to edit
the settings
SMART TOUCH SENSOR
Touch anywhere on sensor
to take your heart rate
LIGHT/CLEAR BUTTON
Turns light on for 5sec. In
TIMER mode press and
hold to reset TIMER
START/STOP/ SUB MODE
FORWARD/+ BUTTON
In TIMER mode: Starts or
Stops timer. Switches SUB
modes (FORWARD) In SETTING mode: Increases values
(press & hold to fast forward
value selection). Hold to turn
Heart Rate Lock ON/OFF
SUB MODE BACKWARD/BUTTON
Switches SUB modes (BACKWARD) In SETTING mode:
Decreases values (press &
hold to fast backward value
selection)
English 4
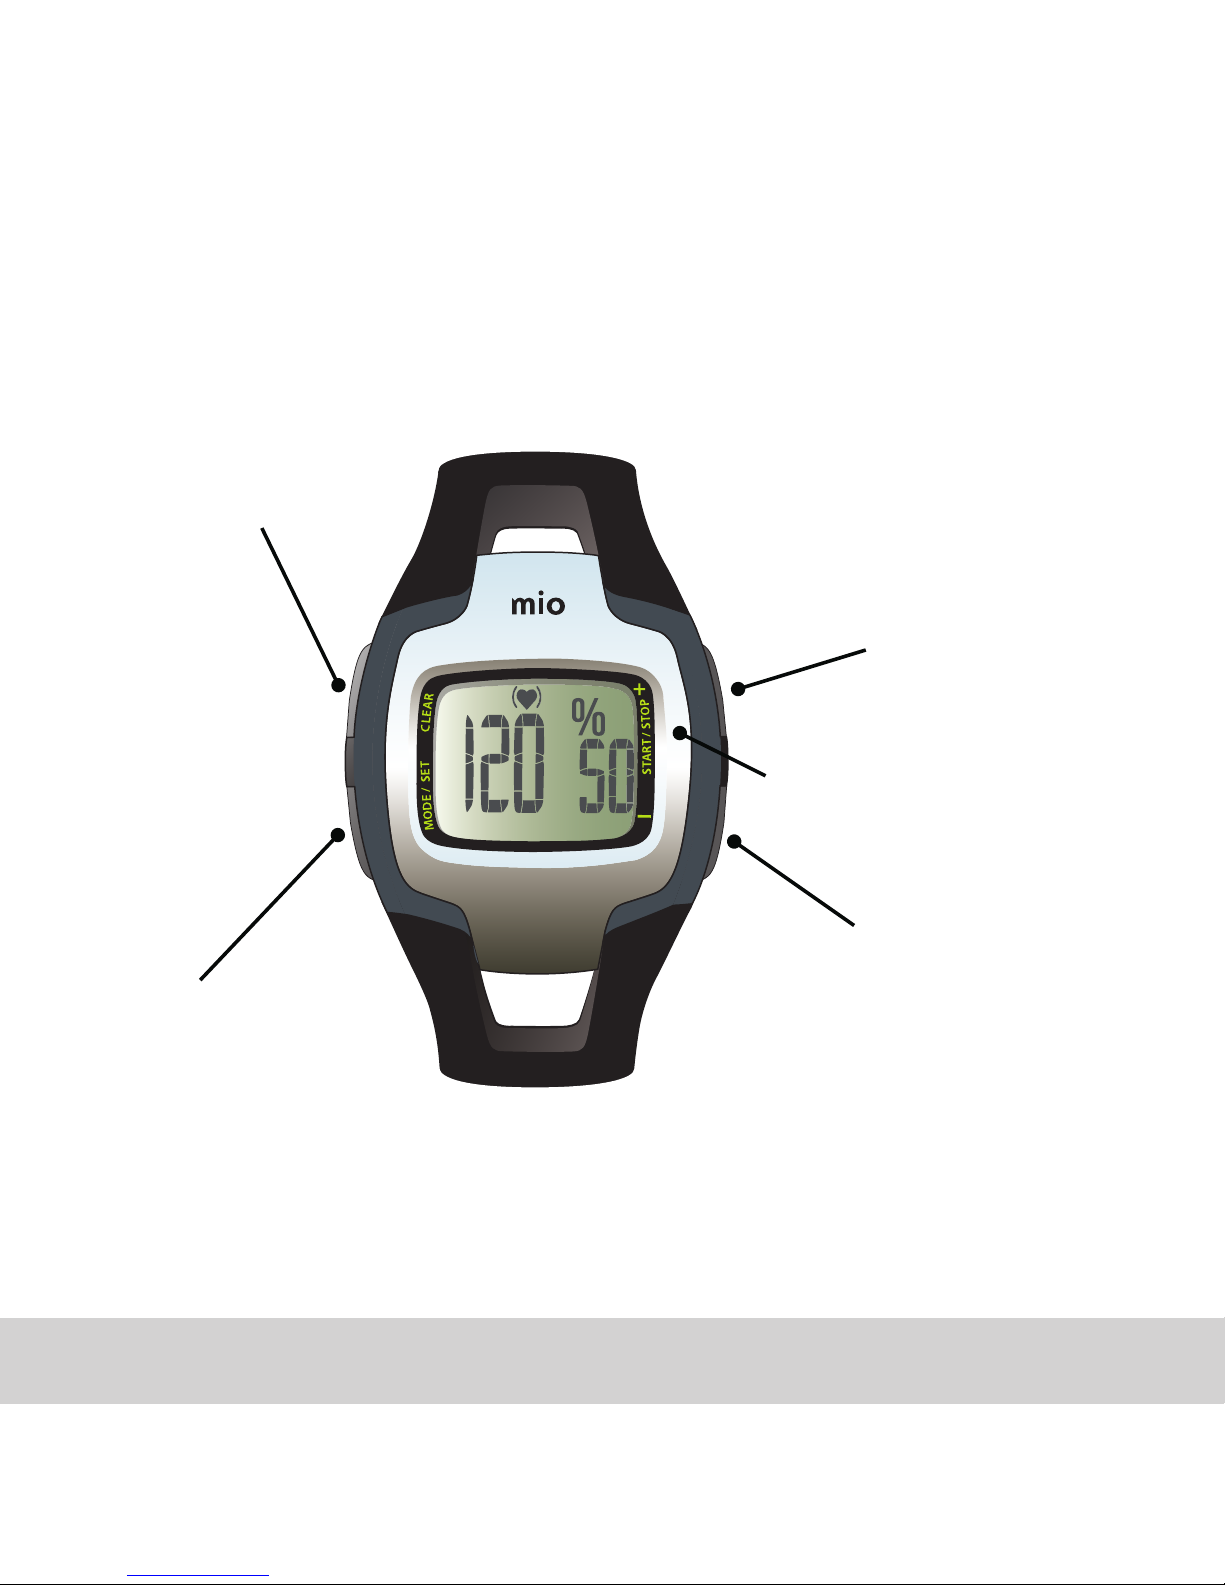
05. YOUR MIO’S SCREEN
Low Battery
Time Mode
Exercise Timer
Pedometer Mode Memory Mode
Settings
Heart Rate
Hourly Chime
Alarm
% of Maximum
Heart Rate
Heart Rate
Lock
(Section 8)
Sensor needs to
be dried (Section 9)
5 English
06. MODES OF OPERATION
Your MIO has 5 main modes. You can press the MODE button to move to
the next mode. You can take your Heart Rate from any mode (except while
changing settings).
TIME MODE
Displays 12/24 hour time,
date, and weekday
PEDOMETER
Displays Steps, Activity
Calories, Distance, Active
Time and Pace
EXERCISE TIMER
Displays exercise time for 3
types of counters
English 6
MEMORY
Displays Total Steps, Calories burned,
Distance, and Active Time for Today, This
Week, Last Week, and each of the last 7 days
SETTINGS
Set clock alarm, time, hourly chime, button
tone, display scroll, user information (units
of measure, weight, height, gender, birth
year), and Maximum Heart Rate (MHR)
7 English
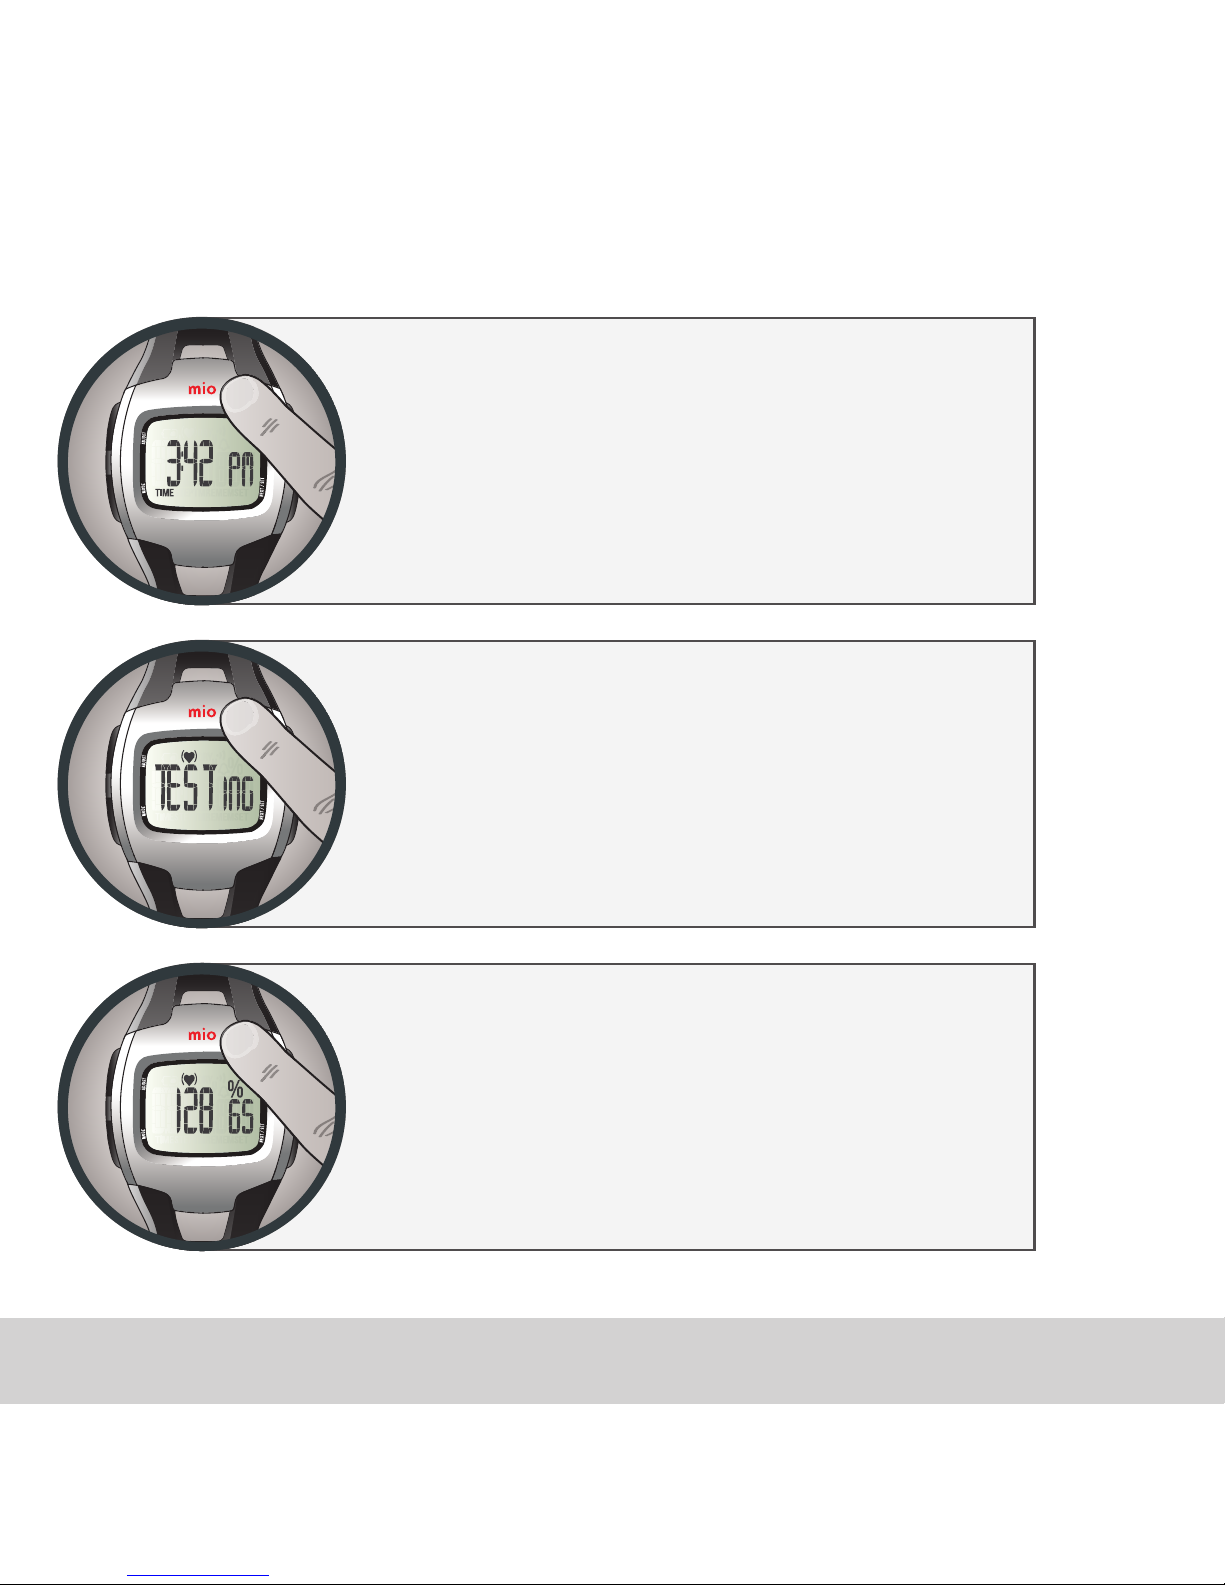
07. TAKING YOUR HEART RATE
1. Place any finger or your
palm anywhere on the
Smart Touch sensor.
2. Hold to activate Smart Touch
sensor. Make sure the back
plate is in contact with
your wrist. Heart icon and
‘TESTING’ will flash.
3. Wait for EKG-accurate heart rate
readout (3 – 8 seconds). MIO will beep
when the reading is ready. Your heart
rate and % of max heart rate will remain
displayed for 5 seconds after you
remove you finger from the sensor.

English 8
SMART TOUCH TECHNOLOGY
With MIO Smart Touch Technology, obtaining your on demand heart rate
has never been easier. You can get a reading by placing your finger tips,
palms or just about any part of your hand on the stainless steel sensor.
Experiment to find your own preference.
A one-time read out of your Heart Rate (HR) in beats per minute (BPM) will
display. The small digits at the right of the display show the percentage of
your maximum heart rate (up to 99%).
» For continuous reading, keep pressing the sensor.
» For best accuracy, left and right hands should not be in contact during
the test.
» You can take your Heart Rate from any mode (except while changing
settings).
TROUBLESHOOTING POINTERS
If you don’t get your heart rate (HR) within 10 seconds, moisten your
finger(s) and watch caseback and try again. It helps to wear your MIO for a
little while to allow a layer of moisture to build up between the back of the
watch and your arm/wrist.
Exercising vigorously with a lot of arm movement or body motion can
cause muscle noise” that may prevent proper detection of a HR signal.
You should tighten the watch to your wrist and apply a stronger force to
the top metal plate in order to reduce the movement of the watch during
the exercise. Also relax your watch arm when taking the reading.
9 English
If your HR varies, note that fluctuations are normal in a healthy heart;
in fact, the healthier your heart is, the more variation you could see.
However, if MIO’s calculations start to vary significantly from what you
have come to expect, replace MIO’s battery (see Section 16).
To optimize readings, occasionally clean the back of your MIO case and the
Sensor Ring with a clean, soft cloth.
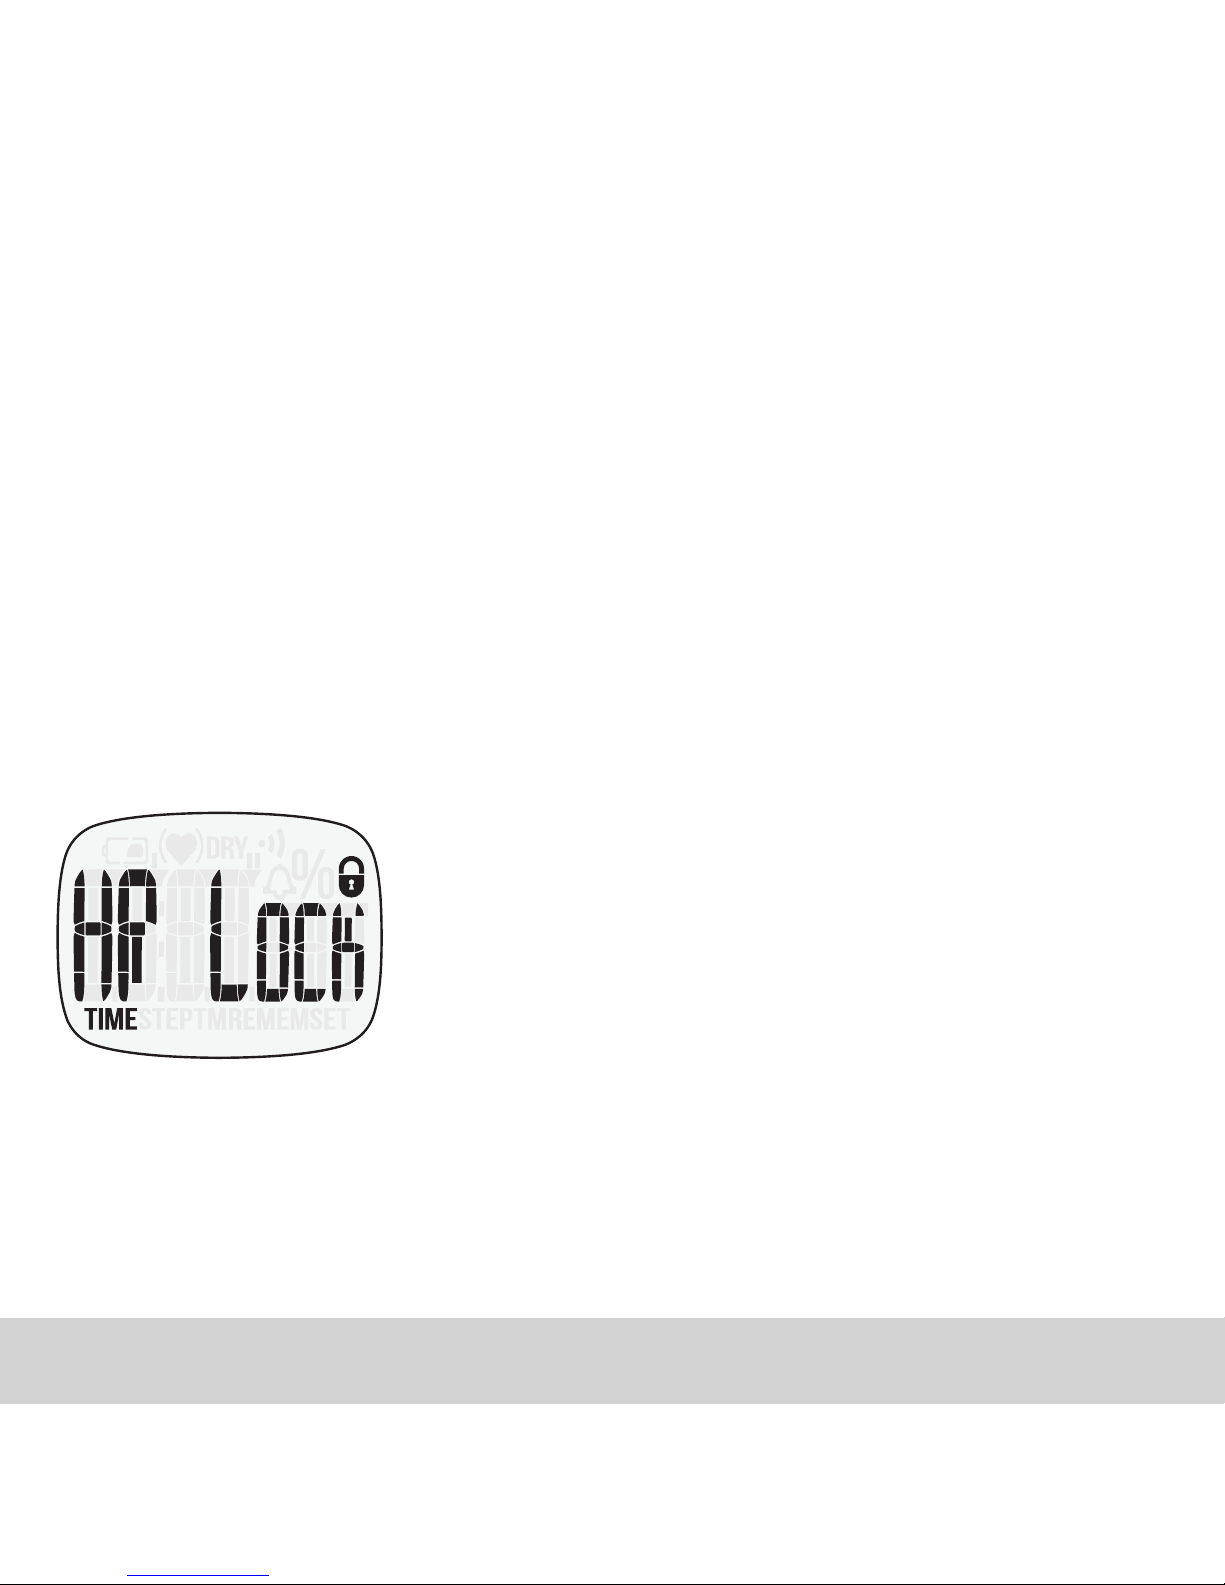
08. MANUAL HEART RATE LOCK
To prevent the Smart Touch Heart Rate sensor from accidentally reading
your heart rate (e.g. the sensor comes into contact with clothing or skin),
you can use the Heart Rate Lock feature. This will also help to prolong
your MIO’s battery life.
» To turn the HR Lock ON, in any mode (except
while changing settings), press and hold the
START button. The HR lock icon will display.
» To turn HR Lock OFF, press and hold START
button.
Note: If you try to measure your heart rate when this lock is activated, the
‘HR Lock’ screen will display to remind you to unlock manually.

English 10
09. AUTOMATIC HEART RATE LOCK
Your MIO is not suitable for heart rate measurement during any
underwater activity (such as swimming or showering). The watch will
automatically shut down the Smart Touch sensor during these kinds
of activities in order to preserve the battery life. That means you can
still wear and use your MIO as a regular watch while underwater (see
Specifications & Limited Warranty details), but HR measurement function
will not be available until you dry your watch.
Once your MIO is locked due to contact with water,
the DRY icon will flash to remind you to dry your
watch. This lock will be disabled automatically
once the watch is thoroughly dry. Use a towel to
gently dry the watch; do not put it into contact
with any extreme heat (such as a hair dryer).
Note: The watch will show the ‘PLEASE DRY’ screen every 10 seconds to
remind you to dry the watch.

11 English
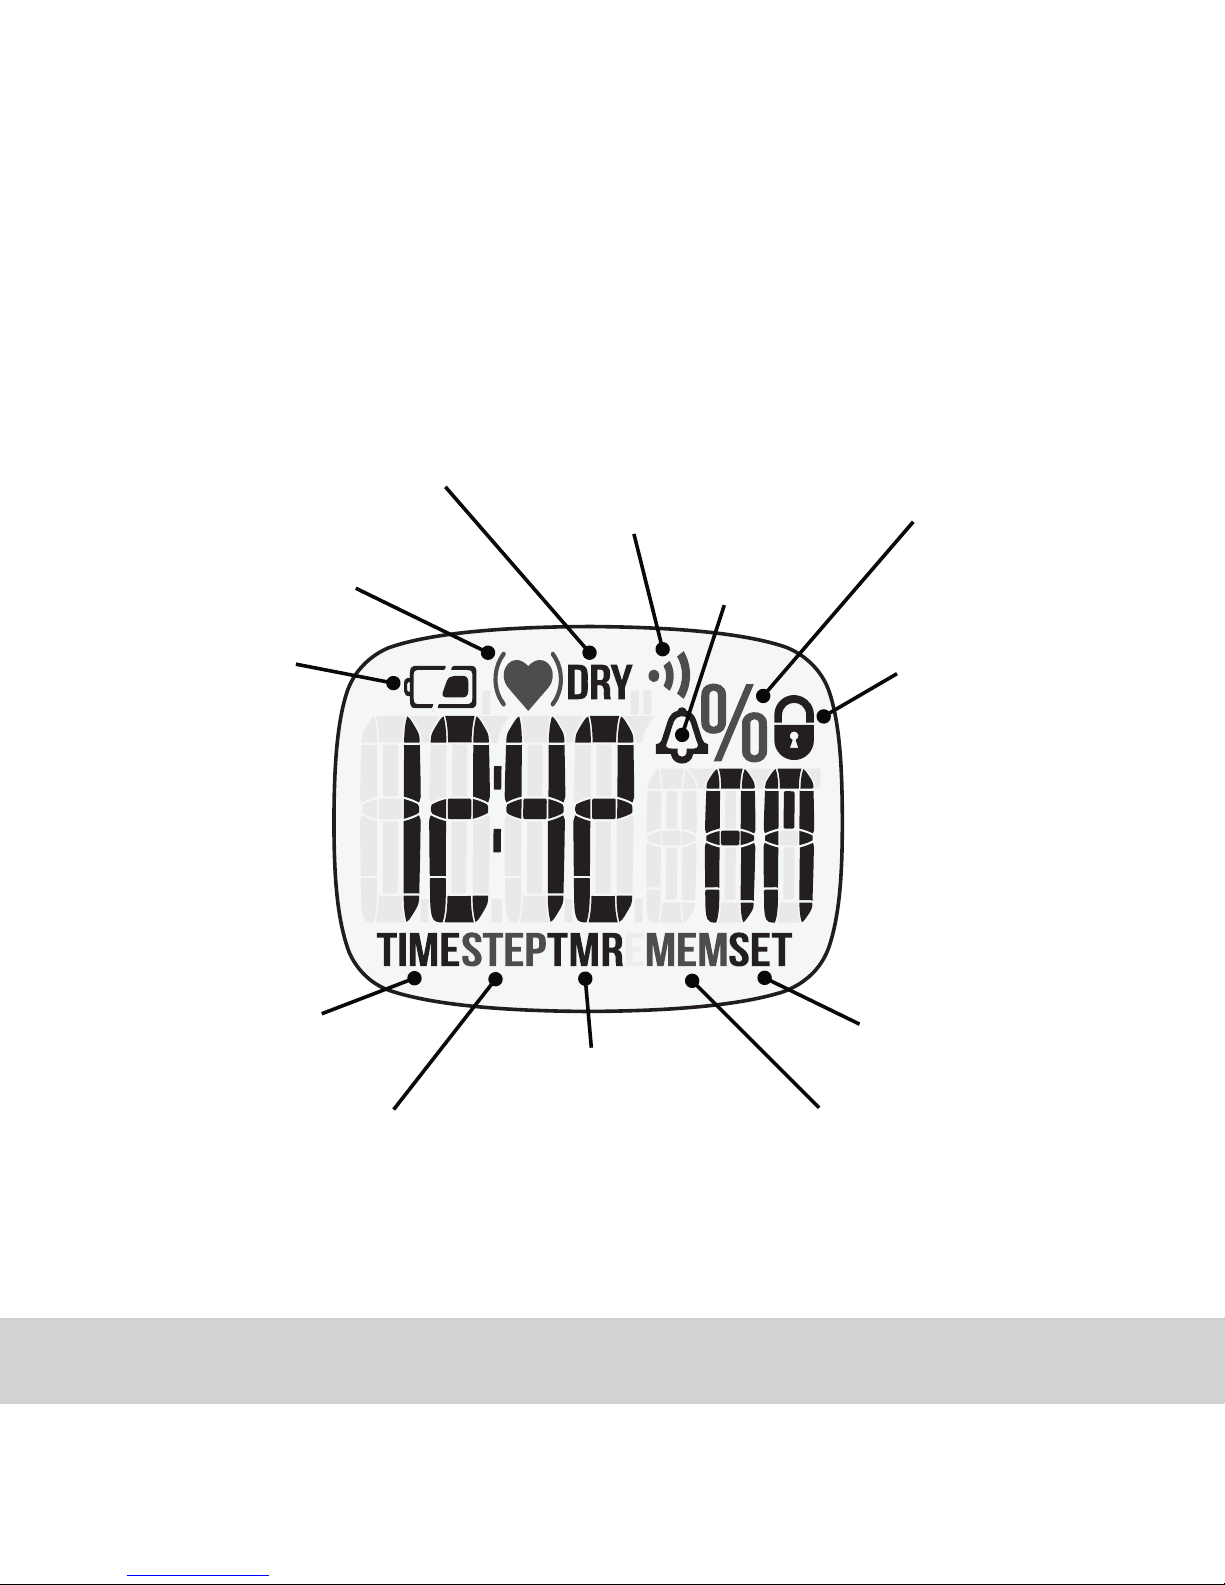
10. TIME MODE
TIME mode is the default mode. Press SET to rotate back to TIME mode
from other modes.
» TIME mode displays current values for: Time and Date (Day, Month, and
Day of the Week).
» Press + or – to alternate display from Time to Date.
11. PEDOMETER MODE
Your MIO features an advanced sensor that detects your steps. The
pedometer automatically begins when it detects movement.
Using your personalized information for height and weight, it calculates
and displays distance, pace, active time, steps, and calories burned. MIO
calculates your calories burned based on your pace and body weight.
Distance is calculated using a stride length estimated by your height.
Current pedometer information is displayed in PEDOMETER Mode. See
MEMORY Mode instructions for viewing saved pedometer information.
GO TO PEDOMETER MODE
» Press SET once from TIME mode to enter PEDOMETER mode.
» PEDOMETER mode displays current values for: Distance, Pace, Active
Time, Steps, and Calories burned.
» Press + or – to move from value to value faster or if you have turned
Scroll OFF (see SETTING mode, Watch sub-mode in Section 14).

English 12
TO CLEAR PEDOMETER INFORMATION
» In PEDOMETER mode, hold the CLEAR button for 2 seconds. "HOLD
rst
"
will display.
Pedometer values are automatically reset to zero at midnight.
Pedometer values are saved for Today, This Week, and Last Week. View in
MEMORY Mode (Section 13).
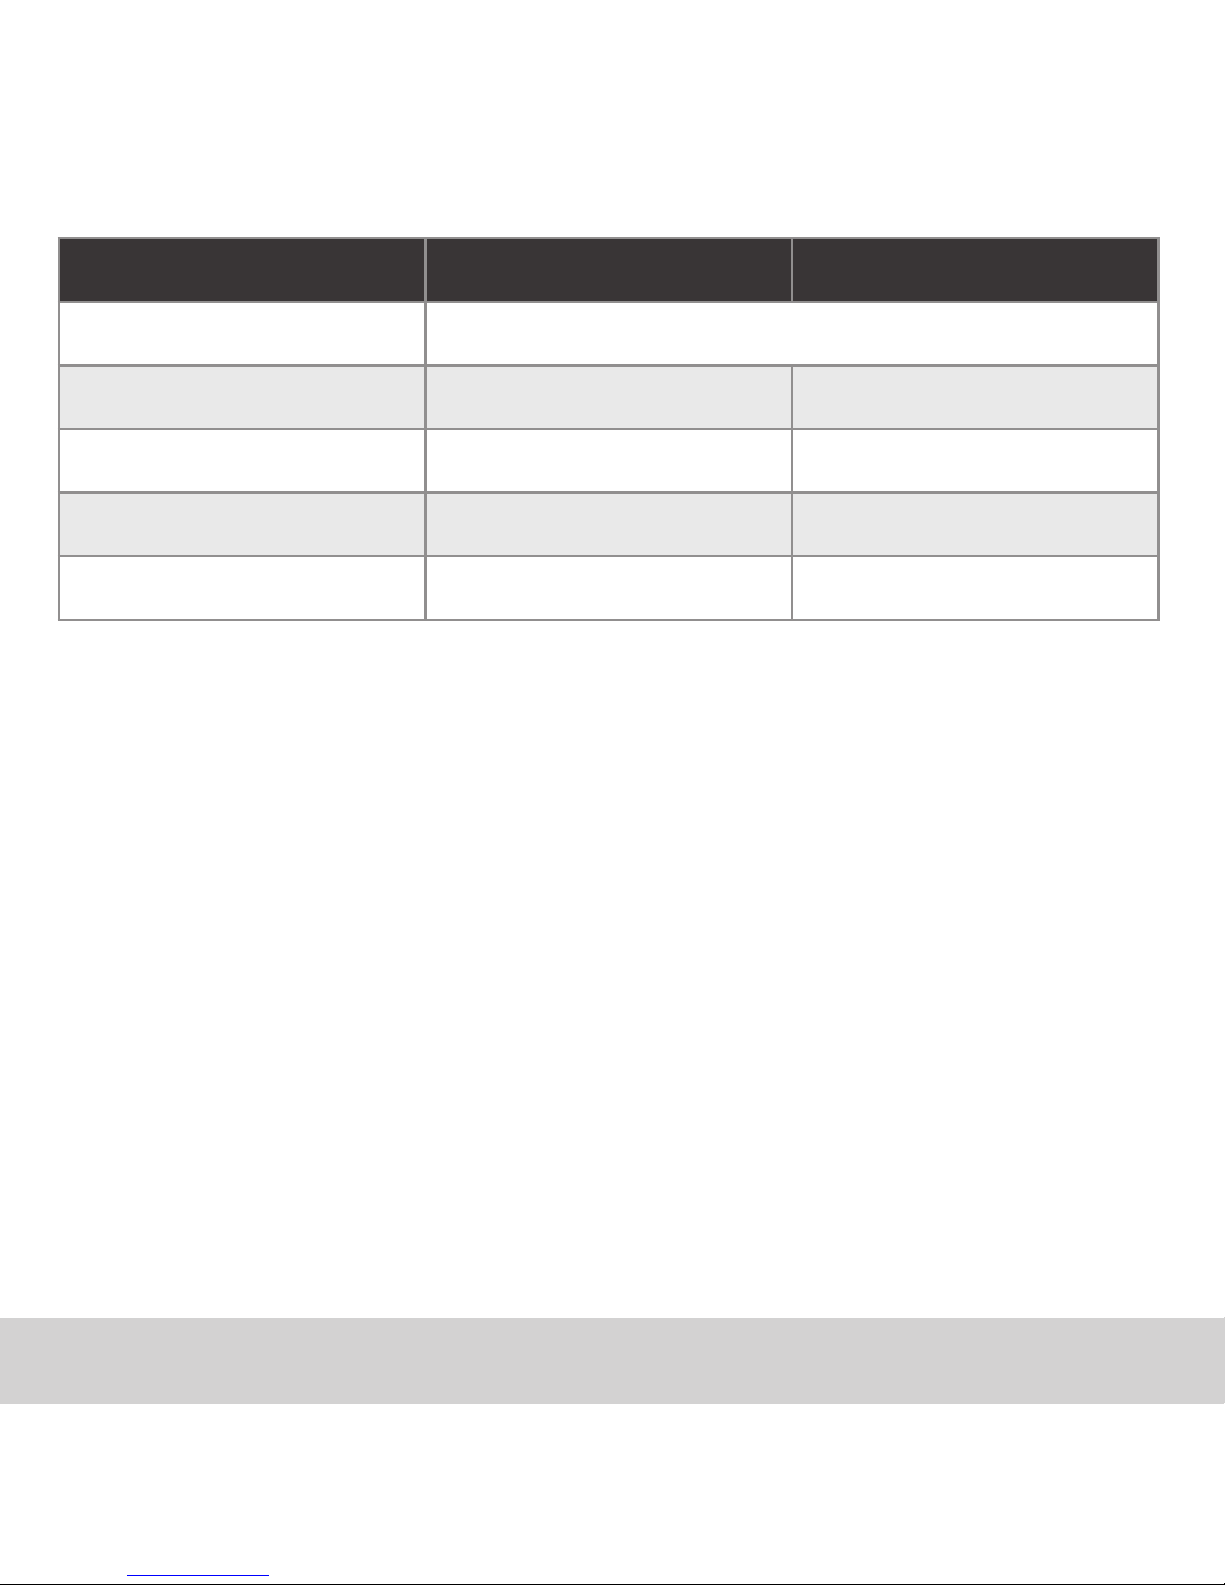
12. EXERCISE TIMER MODE
Your MIO has an easy-to-use exercise timer that helps you to manage
your exercise sessions and monitor your heart rate.
There are 3 types of timer. Choose the one that is suitable for your exercise:
» Count up from zero
» Count down to zero and stop
» Count down to zero and repeat (up to 99 times)
There are 5 options for Exercise Type: None, Warm Up, Burn Fat, Fitness,
and Training.
The timer will determine a HR zone (upper and lower limit) for you
based on your Exercise Type setting. You can disable the HR zone alert
by selecting None in Exercise Type. If you wish to override the predetermined upper limit and lower limit, you can use the + or – buttons
to adjust the values. If your HR is out of the HR zone, audio & visual
warnings will alert you.
13 English
TYPES HR LOWER LIMIT HR UPPER LIMIT
None (Default) Disable alert
Warm Up 50% of MHR 60% of MHR
Burn Fat 60% of MHR 70% of MHR
Fitness 70% of MHR 80% of MHR
Training 80% of MHR 90% of MHR
OPERATING IN TIMER MODE
» Press SET twice from TIME mode to enter TIMER mode
» Press START button to start the timer
» Press the STOP button (the same button as START) to stop/pause the
timer
» You can resume the timer by pressing the START button again
» To reset the timer to zero, press and hold CLEAR button for 2 seconds
(all digits will become zero)
» The timer will also be reset to zero at midnight daily
Note: When the time is under one hour, it will show 1/100th of a second.
Once the time reaches one hour, it will show HOUR:MIN.SEC instead. Timer
default is 5 min. Maximum is 9 hr, 59 min, 59 sec.

English 14
TO COUNT UP FROM ZERO
(suitable for walking or exercises that require timing)
» The timer must be stopped.
» Hold SET until beep (2 seconds).
» Press + or – to adjust the TIMER TYPE to UP. Press SET.
» Press + or – to adjust the EXERCISE TYPE. Press SET.
» If you want to adjust the HR LOWER and UPPER LIMIT, press + or – to
adjust; otherwise press SET.
» Press START to start the timer.
» To pause, press STOP. Press START to resume.
» To reset timer to zero, hold CLEAR until beep (2 seconds).
TO COUNT DOWN TO ZERO AND STOP
(suitable for walking with time limit)
» The timer must be stopped.
» Hold SET until beep (2 seconds).
» Press + or – to adjust the TIMER TYPE to DOWN. Press SET.
» Press + or – to adjust the HOURS. Press SET.
» Repeat for MINUTES and SECONDS.
» Press + or – to adjust the EXERCISE TYPE. Press SET.
» If you want to adjust the HR LOWER and UPPER LIMIT, press + or – to
adjust; otherwise press SET.
» Press START to start the timer.
 Loading...