

Page 1
www.mio-tech.be
Page 2

Revision: R00
Trademarks
Microsoft, Windows, the Windows logo, Windows Media, Outlook and
ActiveSync are registered trademarks or trademarks of Microsoft Corporation
in the United States and/or other countries. Microsoft products are licensed to
OEMs by Microsoft Licensing, Inc., a wholly owned subsidiary of Microsoft
Corporation. All other brand and product names are trademarks or registered
trademarks of their respective companies.
Note
The information in this manual is subject to change without notice.
Page 3

Table of Contents
Preface .................................................................................................. v
1 Getting Started .............................................................................. 1
1.1 Identifying Hardware Components ......................................................1
Front Components ...............................................................................1
Back Components ...............................................................................3
Left-Side Components .........................................................................4
Right-Side Components.......................................................................5
Bottom Components ............................................................................5
1.2 Getting Your Device Ready for Use ....................................................6
Performing Initial Startup .....................................................................6
Connecting to AC Power and Charging the Battery ............................7
1.3 Using Your Device in a Vehicle ...........................................................8
Using the Car Holder ...........................................................................8
Connecting the Car Charger................................................................8
1.4 Turning Your Pocket PC On and Off ...................................................9
Turning Off to Suspend........................................................................9
Turning On to Resume ........................................................................9
1.5 Installing Microsoft ActiveSync ............................................................9
1.6 Expanding Your Pocket PC ...............................................................10
Using a SD/MMC Card ......................................................................10
Accessories .......................................................................................11
2 Basic Skills .................................................................................. 12
2.1 Using the Stylus.................................................................................12
2.2 Using the Navigation Stick.................................................................13
2.3 Today Screen ....................................................................................13
Landscape View ................................................................................14
2.4 Navigation Bar and Toolbar...............................................................14
2.5 Running Programs.............................................................................15
2.6 Shortcut Menus..................................................................................15
2.7 Notifications .......................................................................................16
i
Page 4

2.8 Entering Information.......................................................................... 16
Entering Text Using the Input Panel ................................................. 17
Writing on the Screen ....................................................................... 19
Drawing on the Screen ..................................................................... 21
Recording a Message ....................................................................... 23
Using My Text ................................................................................... 24
2.9 Locking Your Pocket PC ................................................................... 25
3 Managing Your Pocket PC ..........................................................27
3.1 Managing Power ............................................................................... 27
Low Battery Signals and Actions ...................................................... 27
Power Management.......................................................................... 28
Power-Saving Tips............................................................................ 29
3.2 Managing Memory ............................................................................ 30
Storage and Program Memory ......................................................... 30
Additional Memory ............................................................................ 30
3.3 Customizing Your Pocket PC............................................................ 31
3.4 Searching and Organizing Information ............................................. 33
3.5 Backing Up Data ............................................................................... 34
3.6 Adding or Removing Programs......................................................... 34
Adding Programs .............................................................................. 34
Removing Programs ......................................................................... 36
4 Microsoft Pocket Outlook ...........................................................37
4.1 Calendar: Scheduling Appointments and Meetings.......................... 37
Creating an Appointment .................................................................. 38
Using the Calendar Summary Screen .............................................. 39
4.2 Contacts: Tracking Friends and Colleagues..................................... 40
Creating a Contact ............................................................................ 40
Using the Contacts Summary Screen............................................... 42
4.3 Tasks: Keeping a To Do List............................................................. 43
Creating a Task................................................................................. 43
Using the Tasks Summary Screen ................................................... 44
4.4 Notes: Capturing Thoughts and Ideas .............................................. 45
Creating a Note................................................................................. 45
4.5 Messaging: Sending and Receiving E-mail Messages..................... 47
Synchronizing E-mail Messages....................................................... 47
Connecting Directly to an E-mail Server........................................... 48
Using the Message List..................................................................... 48
Composing and Sending Messages ................................................. 50
Managing Email Messages and Folders........................................... 51
ii
Page 5

5 More Programs ............................................................................ 53
5.1 Microsoft ActiveSync .........................................................................53
Synchronizing Data............................................................................54
5.2 Word Mobile.......................................................................................56
Creating a Document.........................................................................56
Opening a Document.........................................................................57
5.3 Excel Mobile ......................................................................................58
Creating a Workbook .........................................................................58
Opening a Workbook .........................................................................59
5.4 PowerPoint Mobile.............................................................................60
5.5 Pocket MSN.......................................................................................61
5.6 Windows Media Player for Pocket PC...............................................62
5.7 Pictures & Videos ..............................................................................63
5.8 Additional Programs ..........................................................................64
Dialer..................................................................................................64
eConverter .........................................................................................69
Picture Viewer....................................................................................71
6 Getting Connected ...................................................................... 73
6.1 Connection Settings...........................................................................73
Modem Connection............................................................................73
Network (Ethernet) Card Connection ................................................74
6.2 Using Bluetooth .................................................................................76
Enabling Bluetooth.............................................................................76
Exploring Bluetooth Devices..............................................................77
Dialing up to Internet..........................................................................78
Transferring Files via Bluetooth.........................................................80
Using ActiveSync via Bluetooth.........................................................81
Using Intercom via Bluetooth.............................................................82
Exchanging Personal Information......................................................83
Accessing Personal Area Network ....................................................85
Using a Voice Gateway .....................................................................86
Configuring Bluetooth Settings ..........................................................87
Using My Shortcuts............................................................................90
Viewing Active Connections ..............................................................91
6.3 Using Internet Explorer Mobile ..........................................................93
Viewing Mobile Favorites and Channels ...........................................93
Browsing the Internet.........................................................................94
The Mobile Favorites Folder ..............................................................94
7 Troubleshooting and Maintenance.......................................... 97
7.1 Resetting Your Pocket PC .................................................................97
7.2 Restoring Last State ..........................................................................98
iii
Page 6

7.3 Power Problems................................................................................ 99
7.4 Memory Problems............................................................................. 99
7.5 Screen Problems ............................................................................ 100
7.6 Connection Problems...................................................................... 101
Cable Connection Problems ........................................................... 101
Modem Connection Problems ........................................................ 102
Network Connection Problems ....................................................... 102
7.7 Taking Care of Your Pocket PC...................................................... 104
General Guidelines ......................................................................... 104
Travel Guidelines ............................................................................ 105
A Regulatory Information .............................................................107
A.1 Regulations Statements .................................................................. 107
European Notice ............................................................................. 107
A.2 Safety Precautions.......................................................................... 108
About Charging ............................................................................... 108
About the AC Adapter ..................................................................... 108
About the Battery ............................................................................ 109
Index ....................................................................................................I-1
iv
Page 7

Preface
Welcome
Congratulations on purchasing this Windows® Mobile ™ for Pocket PC with
built-in GPS function. Due to the size and capabilities of the device, you can
keep your most important business and personal information up-to-date and
®
close at hand. Microsoft
by allowing you to synchronize the information on your desktop or Microsoft
Exchange Server with your Pocket PC.
About this Manual
This manual contains comprehensive information of your Pocket PC to help you
operate the device.
Throughout the manual, the following conventions are used to distinguish
elements of text.
ActiveSync® increases the power of your Pocket PC
NOTE: provides additional hints or information that requires special attention.
CAUTION: identifies important information which, if not followed, may result in loss of data
or damage to your device.
Any name of menu, command, icon or button that you can see on the screen is
shown in a bold typeset. For example:
On the
Start menu, tap Settings.
v
Page 8

Where to Find Information
For information on See this source
GPS navigation operation The manual supplied with the GPS software
Programs on your Pocket PC
Connecting to and synchronizing
with a desktop computer
The latest on Windows Powered
Pocket PCs
This User’s Manual or online Help on your
Pocket PC
Chapter 6 of this manual or ActiveSync
Help on your desktop computer
The Microsoft Mobile Devices Web site:
www.pocketpc.com
vi
Page 9
1 Getting Started
This chapter introduces you to the external components of your Pocket PC and
guides you through the process of setting up your Pocket PC for use.
NTOE: Depending on the model you purchased, the cabinet color and the look of the
accessories may be different from the ones shown in this manual.
1.1 Identifying Hardware Components
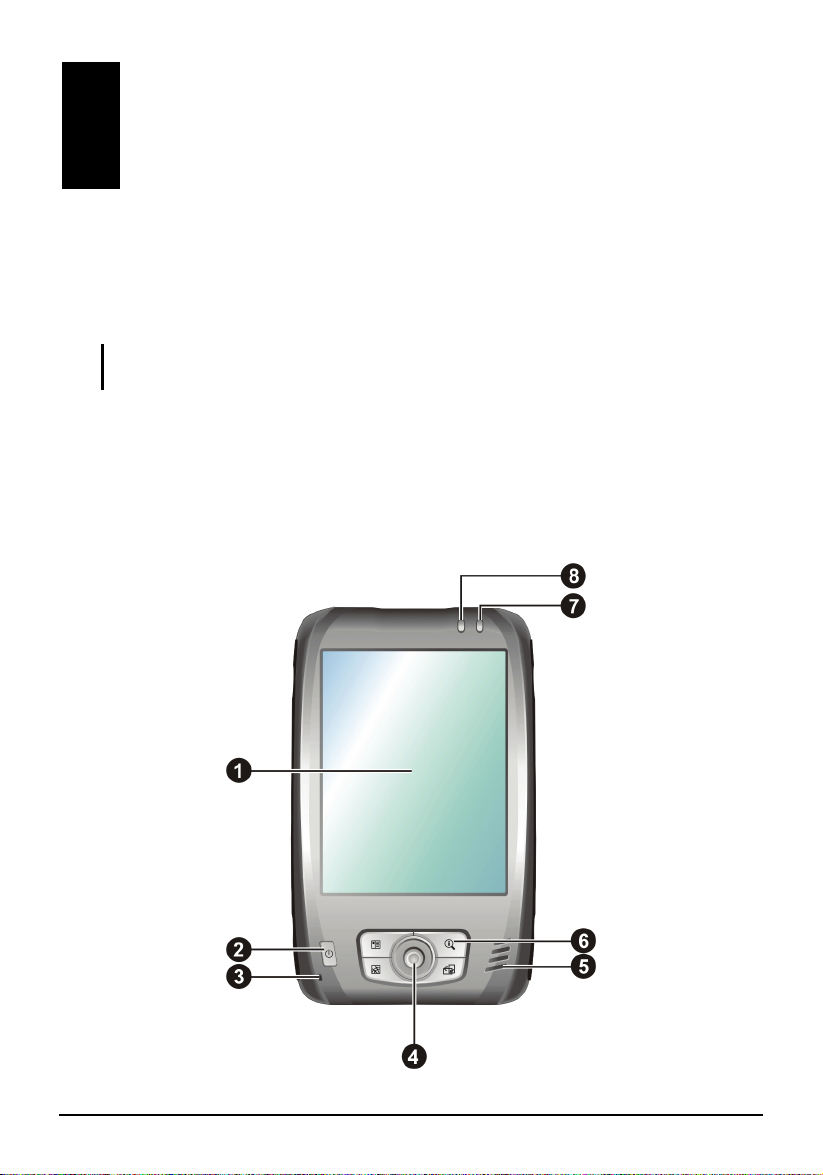
Front Components
1
Page 10

Ref Component Description
Touch Screen
Power Button
Microphone
Navigation Stick
Displays the output of your Pocket PC. Tap the screen with
the stylus to select menu commands or enter information.
Turns your Pocket PC on or off by pressing briefly.
Turns the screen backlight off by pressing and holding.
Receives sound and voice to record voice.
Moves up, down, left or right by pushing the button toward
the corresponding direction.
Selects by pressing.
Speaker
Program Buttons
Notification
Indicator
Charge Indicator
Sends out music, sounds and voice.
Each of the four buttons provides a quick way to use a
program or function. The buttons are customizable. The
icons on the buttons indicate the default functions:
Calendar
Map*
Quick Find*
Rotate
* The button works only if Mio Map (an optional program)
is installed in your system.
Flashes in red to inform you of scheduled appointments,
alarms and reminders.
Glows in amber to indicate that battery charging is in
progress and in green when the battery is fully charged.
2
Page 11
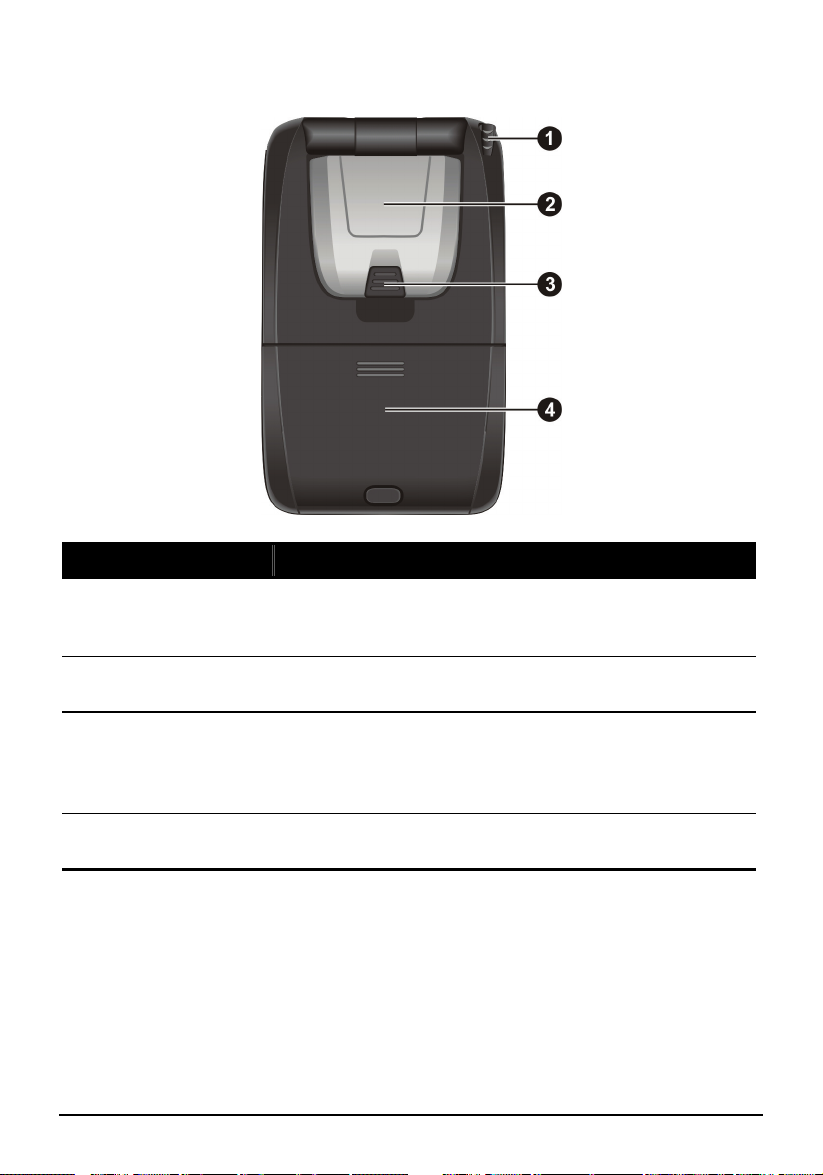
Back Components
Ref Component Description
Stylus
GPS Antenna
Car Antenna
Connector
Rechargeable
Battery
Tap on the touch screen to make selections and enter
information. Pull the stylus out of its slot to use and store it
in the slot when not in use.
Receives signals from the GPS satellites overhead when
lifted up to the horizontal position.
This connector (under rubber dust cover) allows use of an
optional external antenna with magnetic mount, which
may be positioned on top of the car for better signal
reception in areas with poor reception.
Supplies power when external power is not available.
3
Page 12
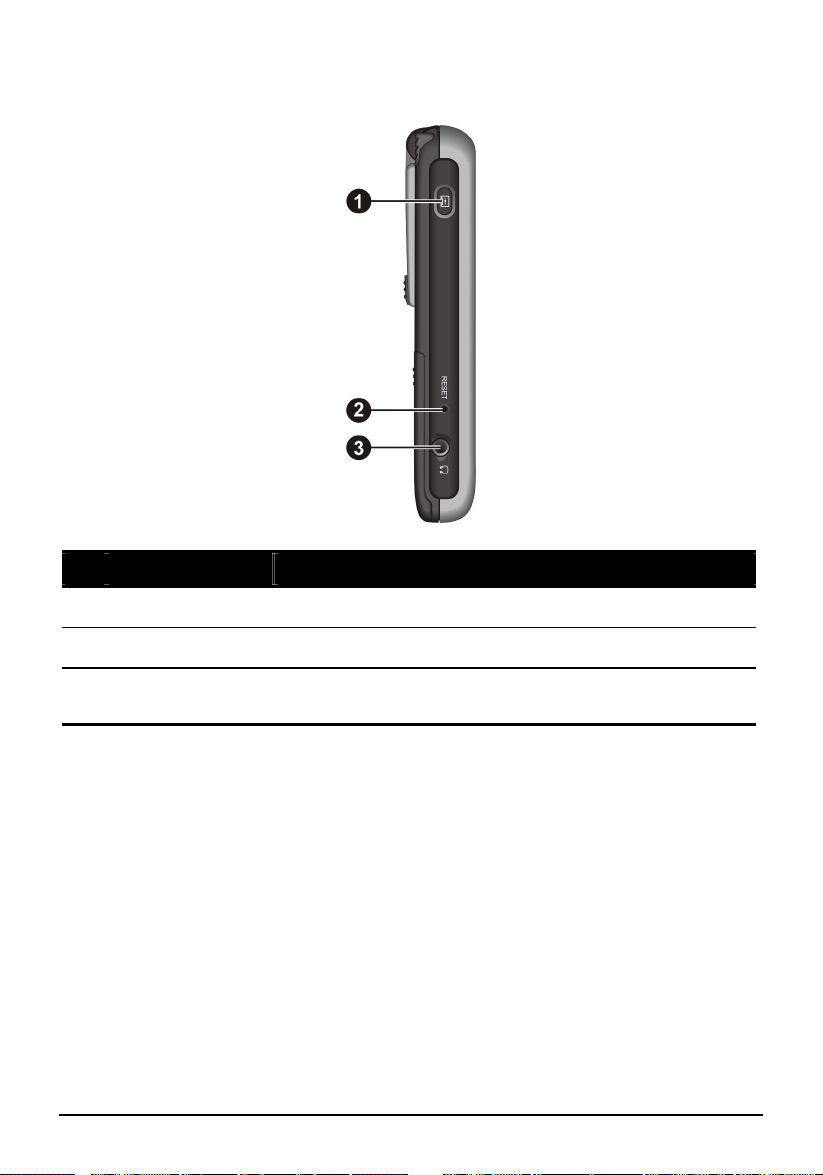
Left-Side Components
Ref Component Description
Record Button
Reset Button
Headphone
Connector
Records voice notes by pressing and holding.
Restarts your Pocket PC.
Connects to a pair of stereo headphones.
4
Page 13
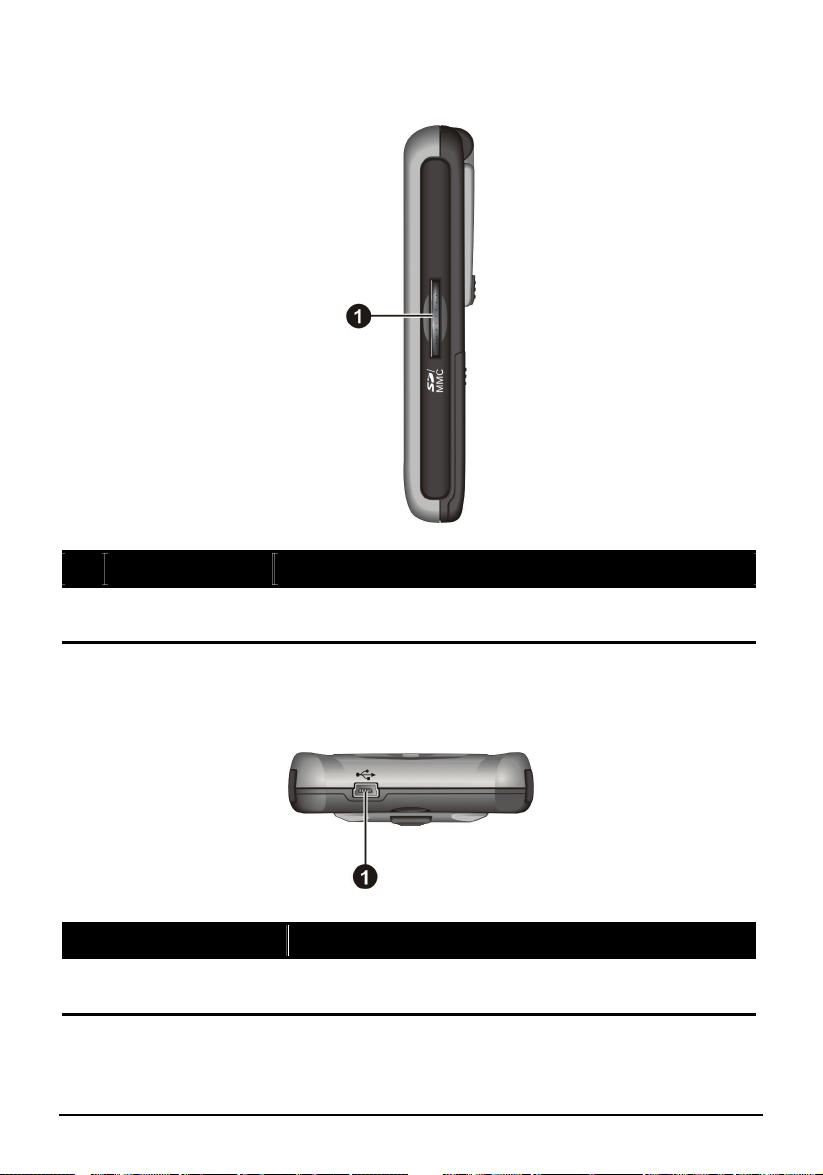
Right-Side Components
Ref Component Description
SD/MMC Slot
Accepts an optional SD (Secure Digital) or MMC
(MultiMediaCard) card for removable storage.
Bottom Components
Ref Component Description
Mini-USB
Connector
5
Connects to the AC adapter or ActiveSync cable.
Page 14
1.2 Getting Your Device Ready for Use
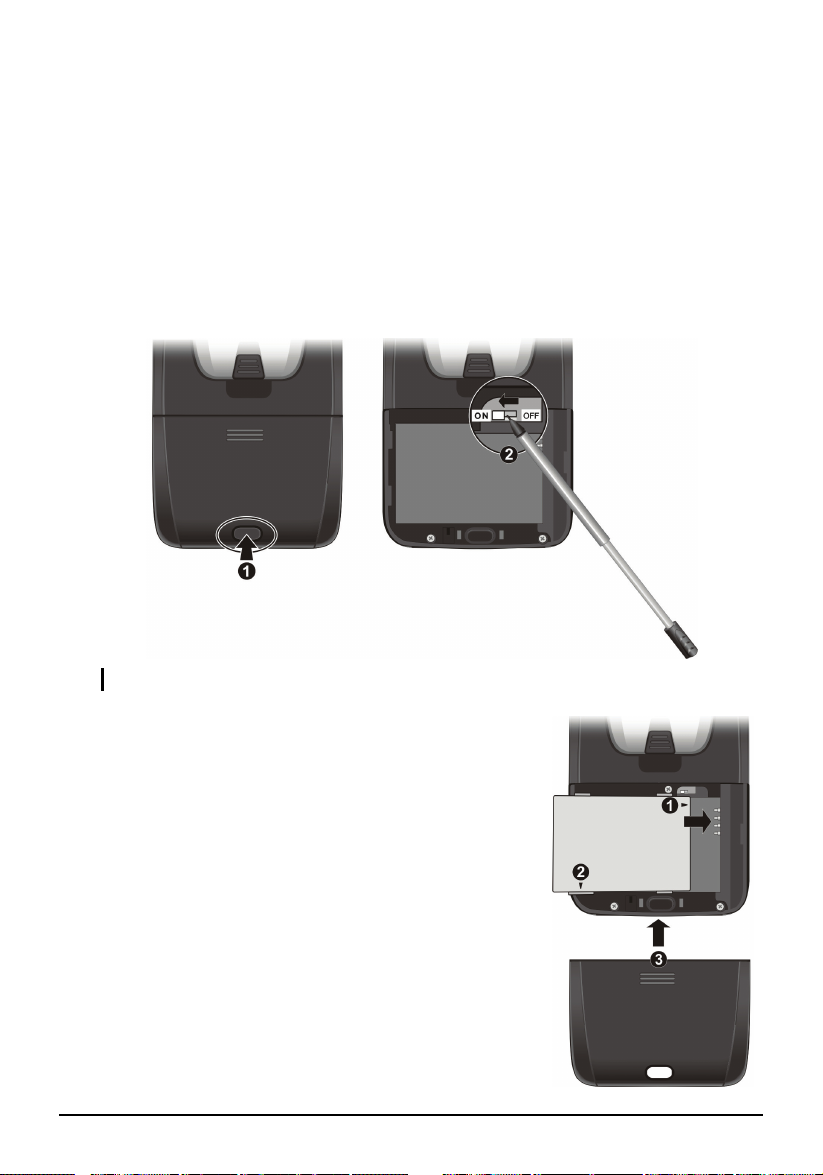
Performing Initial Startup
Initial startup includes setting the ON/OFF switch, installing the battery, and
completing the setup wizard.
1. Remove the battery cover by pressing the release latch () and then sliding
the cover off. Pull out the stylus and use it to slide the ON/OFF switch to the
ON (left) position ().
CAUTION: Always leave the ON/OFF switch in the ON position for normal operation.
2. Install the battery by first inserting the terminal
end of the battery () at an angle and then pushing
down the other end (). Replace the battery cover
().
3. Your device will automatically turn on. Connect
the AC adapter as described in the next
sub-section.
4. Follow the onscreen instructions to complete the
setup wizard. You will then see the Today screen.
6
Page 15
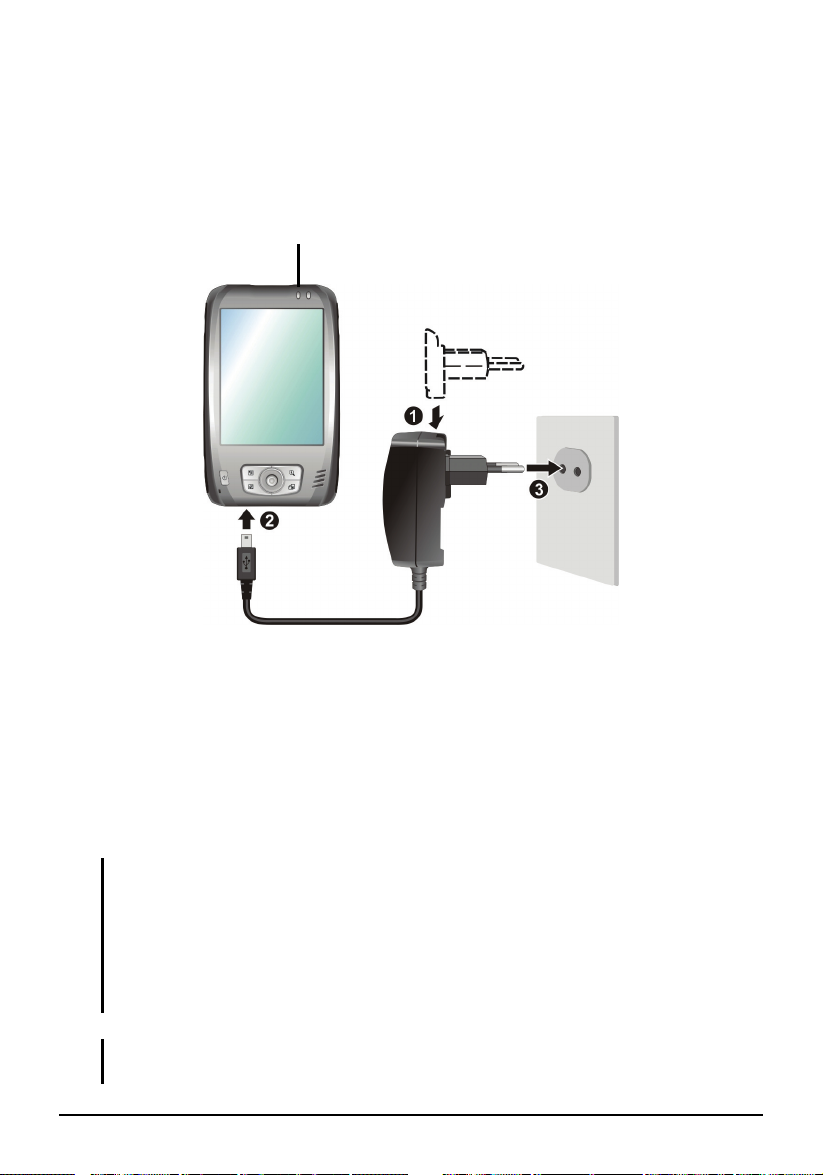
Connecting to AC Power and Charging the Battery
r
Fully charge the battery before starting to use your Pocket PC for the first time.
1. Fit the converter plug to the AC adapter (). Connect the mini-USB end of
the AC adapter to your device () and the other end to a wall outlet ().
Charge Indicato
Converter Plug
2. The charge indicator glows amber when charging is in progress. Do not
disconnect your Pocket PC from AC power until the battery is fully
charged, as indicated by the amber indicator turning into green. This will
take a couple of hours. When charging the battery for the very first time,
charge it for at least 8 hours.
Whenever possible, keep your Pocket PC connected to the AC adapter and a
power source. Doing so keeps the battery charged.
CAUTION: For optimal performance of the lithium battery, take note of the following:
Do not charge the battery where the temperature is high (e.g. in direct sunlight).
There is no need to fully discharge the battery before charging. You can charge the
battery before it is discharged.
If you will not use the product for a long period of time, be sure to fully charge the
battery at least once every two weeks. Over discharge of the battery can affect the
charging performance.
NOTE: Your Pocket PC can also be charged when it is connected to a desktop computer
via the ActiveSync cable.
7
Page 16
1.3 Using Your Device in a Vehicle
Using the Car Holder
CAUTION:
When placing the car holder, make sure that the device does not obstruct the driver’s
view, or interfere with the operation of vehicle airbags and safety devices.
If the car’s windshield is tinted with a reflective coating, an external antenna (optional)
may be needed to route the antenna to the top of the car through a window.
The car holder consists of a bracket and a flexible window mount. Use the car
holder to fix your device in a vehicle. (See a separate document for installation
instructions.) Make sure that the GPS antenna has a clear view of the sky.
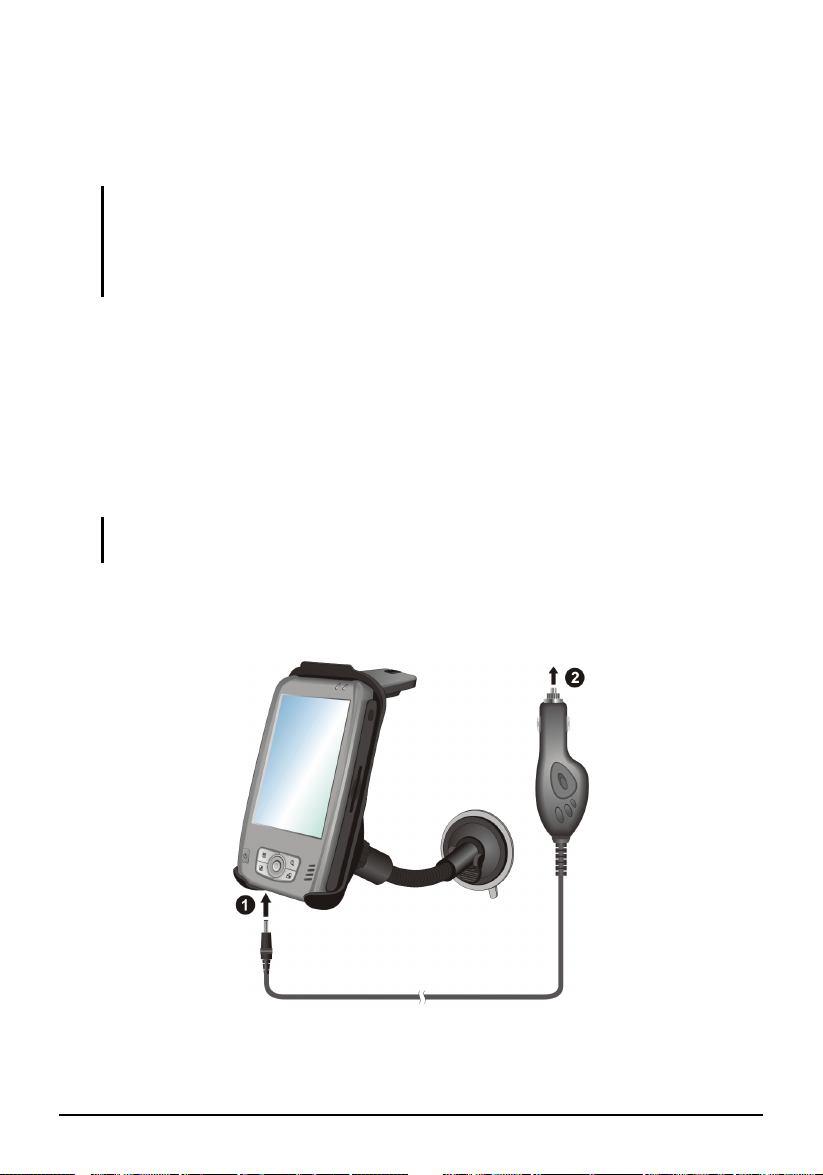
Connecting the Car Charger
The car charger supplies power to your Pocket PC when you are using it in a car.
CAUTION: To protect your device against sudden surges in current, connect the car
charger only after the car engine has been started.
Connect one end of the car charger to the power connector of your device and
the other end to the cigarette lighter in the car.
8
To Cigarette Lighter
Page 17

1.4 Turning Your Pocket PC On and Off
After the initial startup, your Pocket PC enters a suspend state when you turn it
off and resumes when you turn it on.
Turning Off to Suspend
You suspend your Pocket PC by briefly pressing the power button.
By default, your Pocket PC will also automatically suspend after 3 minutes of
inactivity when operating on battery power. (To change these settings, tap
Settings System Power Advanced.)
Turning On to Resume
You resume your Pocket PC by briefly pressing the power button. You may also
press one of the program buttons to resume.
1.5 Installing Microsoft ActiveSync
You can use Microsoft ActiveSync technology to synchronize information on
your desktop computer and/or a Microsoft Exchange Server with the
information on your Pocket PC. ActiveSync compares the information on your
Pocket PC with the information on the desktop computer and/or the server and
updates all locations, keeping you up-to-date with the most recent information.
ActiveSync is already installed on your Pocket PC. You need to install
ActiveSync on your desktop computer. Follow the procedure below:
CAUTION:
Before installation, make sure that you have Microsoft Outlook installed on your desktop
computer.
Do not connect your Pocket PC to your desktop computer before ActiveSync is
installed.
1. Turn on your desktop computer.
2. Insert the Getting Started CD into the CD-ROM drive of your desktop
computer.
3. Click
Next to continue.
9
Page 18
4. The setup wizard will install Microsoft ActiveSync. Follow the onscreen
instructions to install ActiveSync.
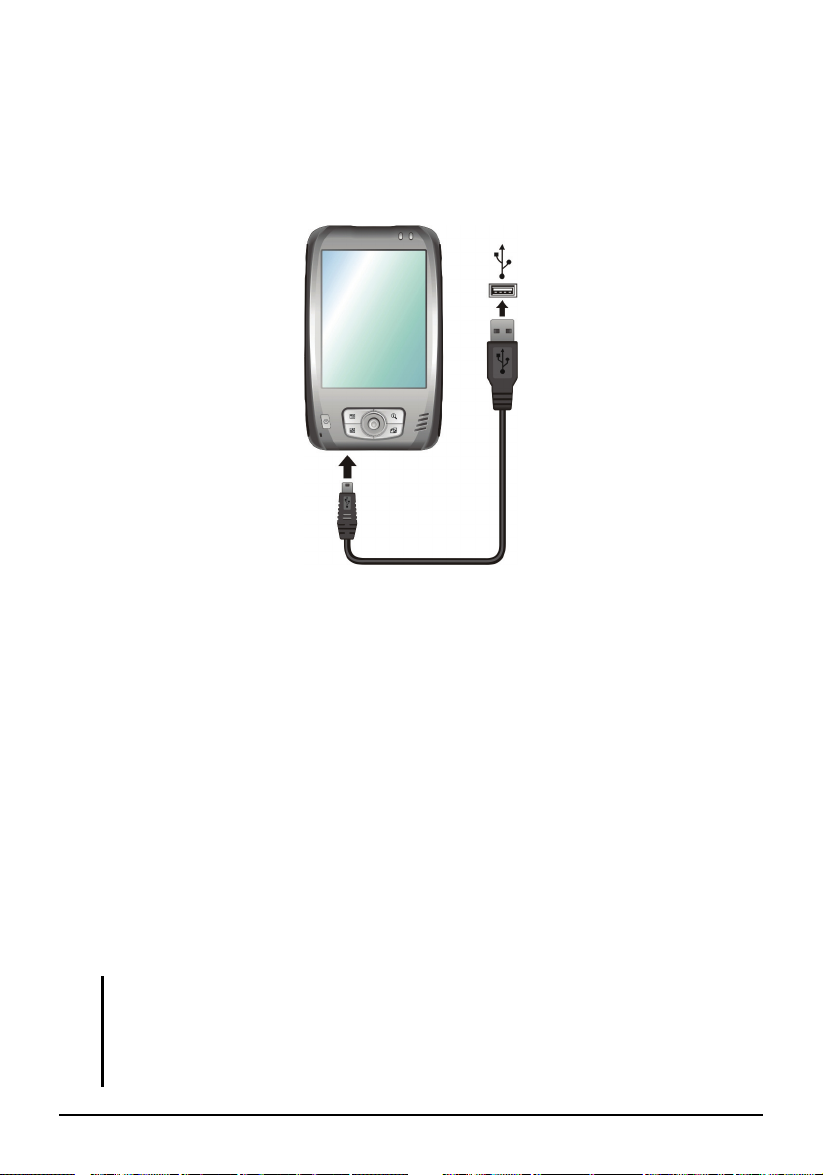
5. When prompted, connect the mini-USB end of the ActiveSync cable to the
bottom of your Pocket PC and the other end to a USB port on your desktop
computer.
6. Follow the onscreen instructions to establish a synchronization relationship
and synchronize your Pocket PC with your desktop computer.
After your first synchronization, the data you have stored on your desktop
computer such as Calendar, Contacts and Tasks is copied to your Pocket PC.
You are now ready to take it along with you when you go.
1.6 Expanding Your Pocket PC
Using a SD/MMC Card
Your Pocket PC has a SD/MMC slot where you can insert an optional Secure
Digital or MultiMediaCard storage card. With the removable memory, you can
store or backup your data and exchange data with other devices.
NOTE:
A storage card is also called a memory card.
Make sure that no foreign objects enter the slot.
Keep a SD or MMC card in a well-protected box to avoid dust and humidity when you
are not using it.
10
Page 19
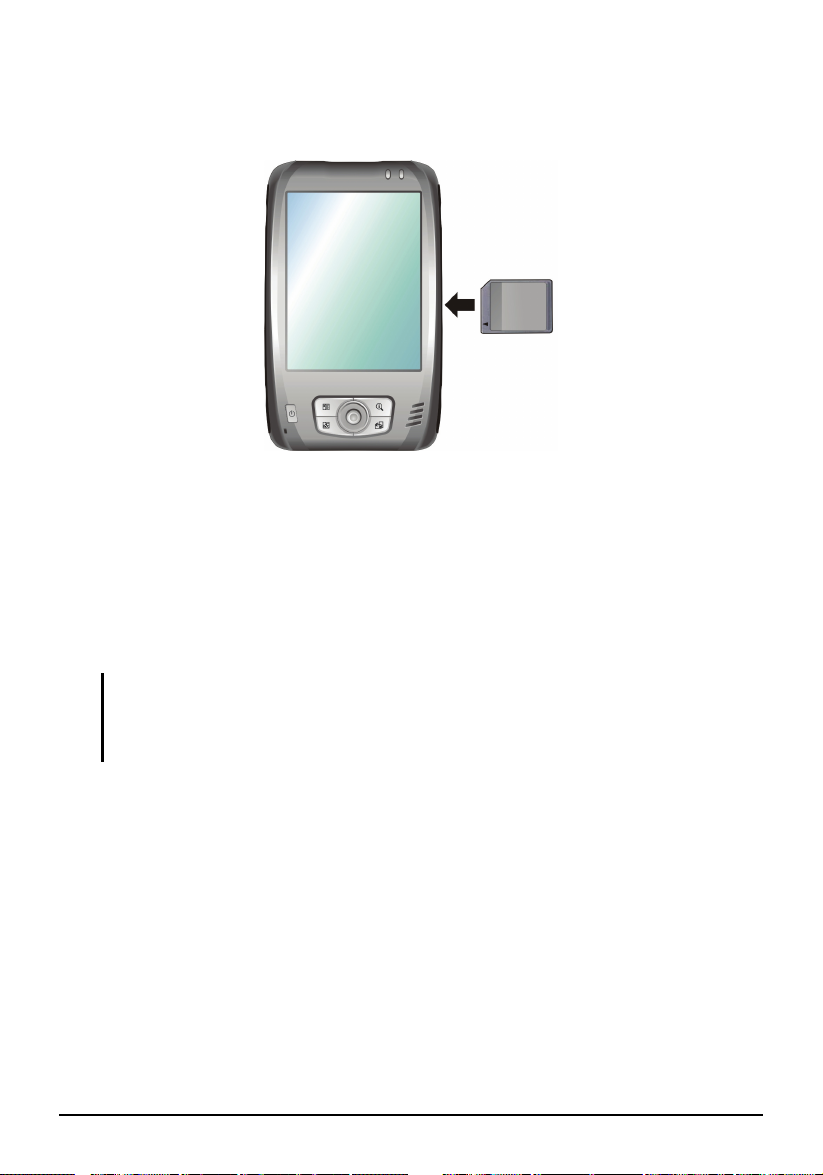
To use a SD/MMC card, insert it into the slot, with the connector pointing to the
slot and its label facing the front of the Pocket PC. Follow the instructions
supplied with the card for more information.
To remove a card, first make sure that no application is accessing the card, then
slightly push the top edge of the card to release it and pull it out of the slot.
Accessories
By purchasing accessories designed for your Pocket PC, you can expand the
capabilities of your Pocket PC, replace lost parts or facilitate your operation.
NOTE:
Please contact your dealer for the availability of accessories from your Pocket PC
manufacturer.
The use of unauthorized accessories will void your Warranty.
For detailed information on using the accessories, see the instructions supplied
with the accessories.
11
Page 20
2 Basic Skills
This chapter familiarizes you with the basic operations of your Pocket PC such
as using the stylus, navigation stick, Today screen, menus, and programs. You
will also know how to enter information and lock your Pocket PC.
2.1 Using the Stylus
Use the stylus to navigate and select objects on the screen.
Pull the stylus out of the slot and extend it for ease of use. Store it in the slot
when not in use.
Tap
Touch the screen once with the stylus to
open items and select options.
Drag
Hold the stylus on the screen and drag
across the screen to select text and images.
Drag in a list to select multiple items.
Tap and hold
Tap and hold the stylus on an item to see a
list of actions available for that item. On the
shortcut menu that appears, tap the action
you want to perform.
12
Page 21
2.2 Using the Navigation Stick
y
With the navigation stick, you can move up, down, left
Up
and right within a menu. This is particularly useful for
one-hand operation.
To move in a direction, simply push the button toward
Left
Right
the corresponding direction.
To activate the selected item, press the button.
Down
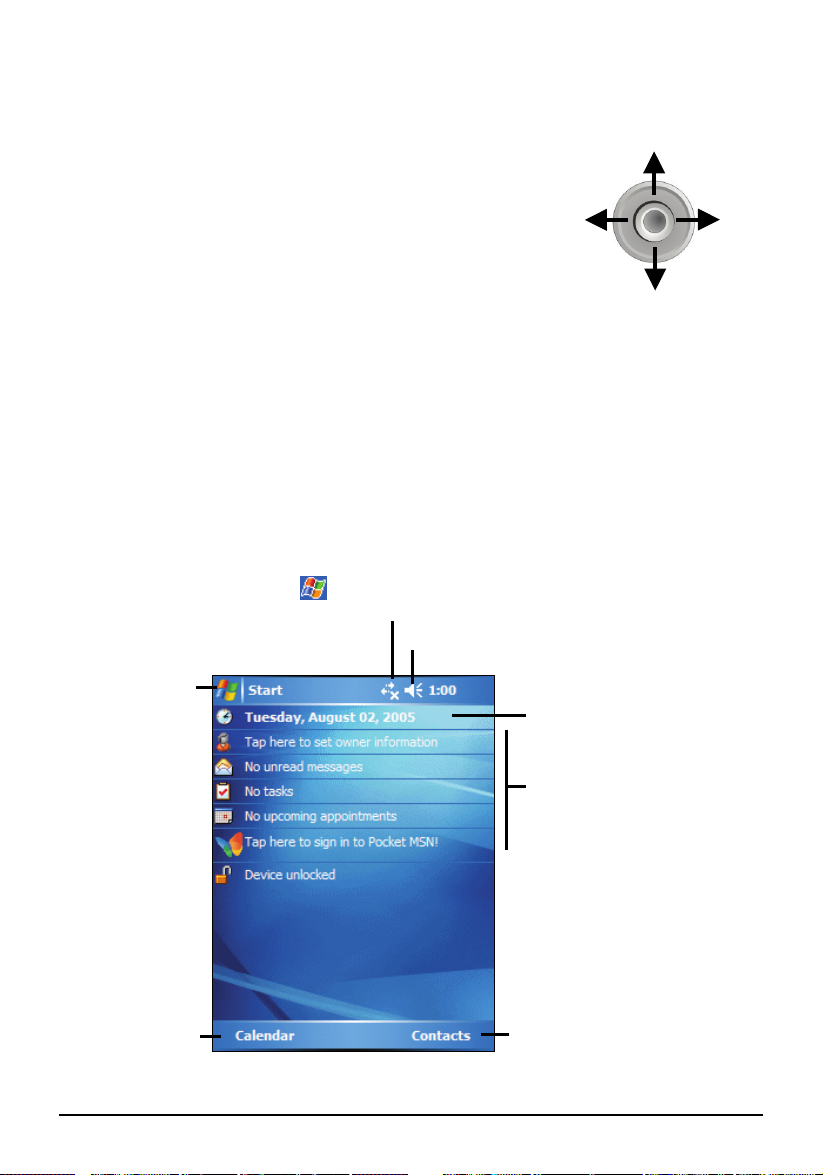
2.3 Today Screen
When you turn on your Pocket PC for the first time each day (or after 4 hours of
inactivity), you will see the Today screen. The Today screen shows your
upcoming appointments, active tasks, and information about e-mail messages.
Along the top of the Today screen you will see the volume icon, the clock, and
connectivity indicators. You can tap a section of the Today screen to open the
program that is associated with that section. The Today screen is accessible
from anywhere by tapping
Tap to switch to a
program.
and then
Today.
Tap to connect.
Tap to change volume or mute all sounds.
Tap to change date and time.
Your day at a glance.
Tap an item to access associated
program so that you can view or
change information.
Left Soft Ke
Right Soft Key
13
Page 22
Landscape View
You can use your Pocket PC in a landscape manner. There are three ways to
change the screen view:
Tap Settings System Screen Landscape or Portrait.
Press the Rotate button ( ).
Lift the GPS antenna and rotate it by 90 degrees.
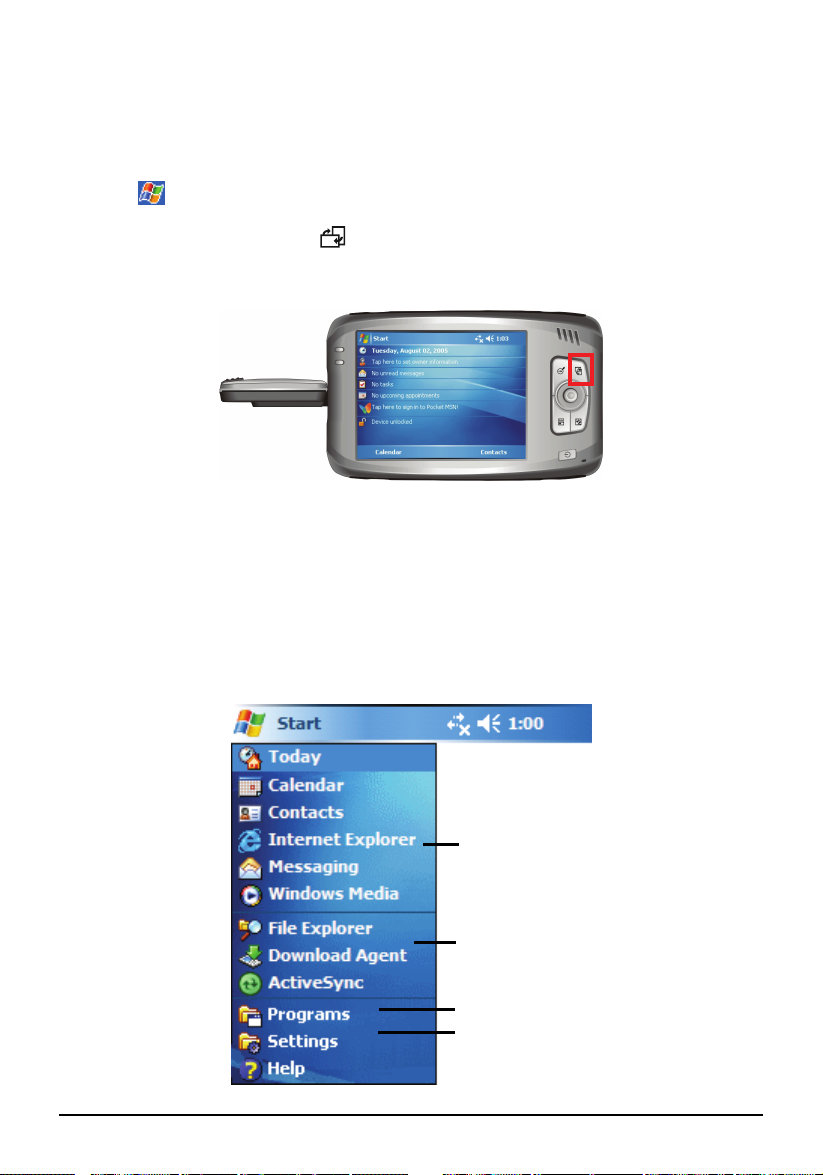
2.4 Navigation Bar and Toolbar
The Navigation bar is located at the top of the screen. It displays the active
program and current time and allows you to switch programs and close screens.
The Navigation bar and Start menu:
14
Tap to select a program.
Tap to quickly select a program you
have recently used.
Tap to see additional programs.
Tap to customize the Pocket PC.
Page 23

Use the toolbar at the bottom of the screen to perform tasks in programs. The
y
toolbar includes a left soft key, a right soft key, and the Input panel button in
between. The right soft key is usually
Menu while the left soft key varies with
programs.
An example of the toolbar:
Left Soft Ke
Input panel
button
Right Soft Key
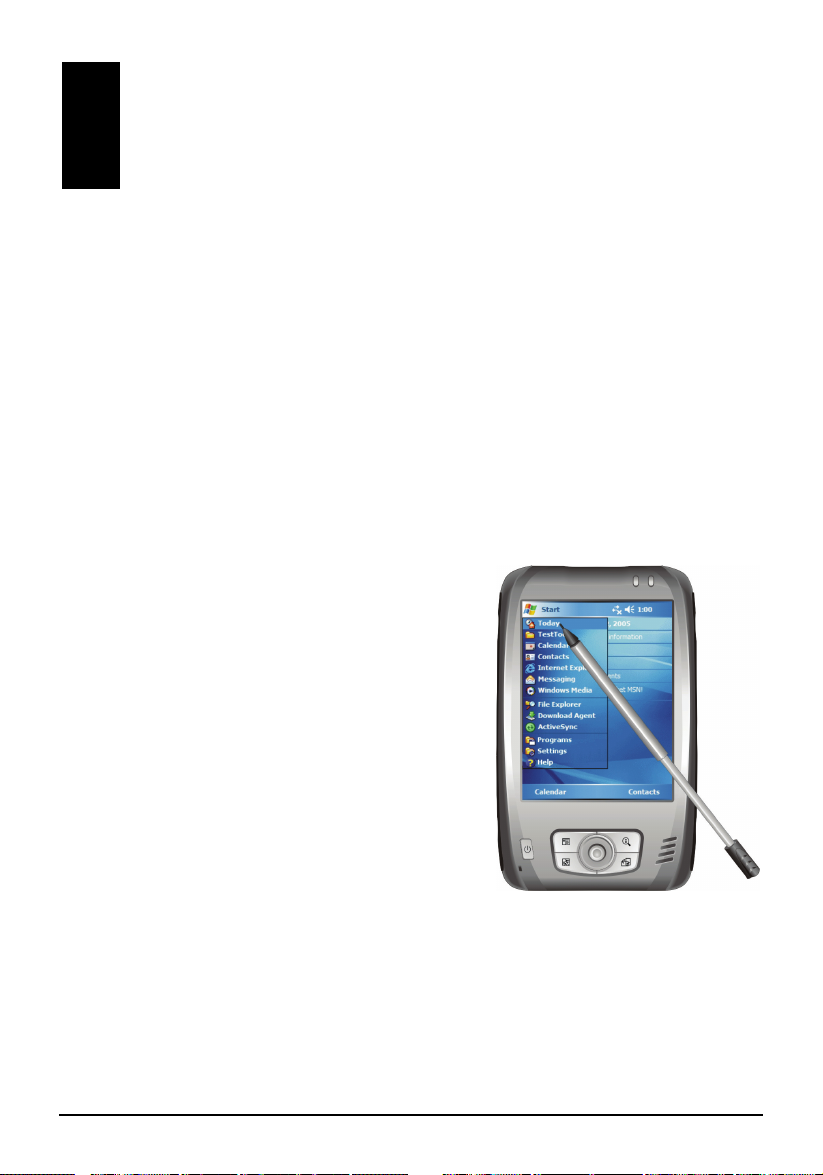
2.5 Running Programs
You can switch from one program to another without closing any program.
To run a program, tap
at the left-top corner of the screen and select from
the Start menu.
To access additional programs, tap
Programs and tap the program
icon.
You can press a program button on the front of your Pocket PC. The icons
on the buttons identify the default programs they are associated with.
2.6 Shortcut Menus
With shortcut menus, you can quickly choose an action for an item. For
example, you can use the shortcut menu in the contact list to quickly delete a
contact, make a copy of a contact or send an email message to a contact. The
actions in the shortcut menus vary from program to program. To access a
shortcut menu, tap and hold the stylus on the name of the item that you want to
perform the action on. When the menu appears, lift the stylus and tap the action
you want to perform. Or tap anywhere outside the menu to close the menu
without performing an action.
15
Page 24
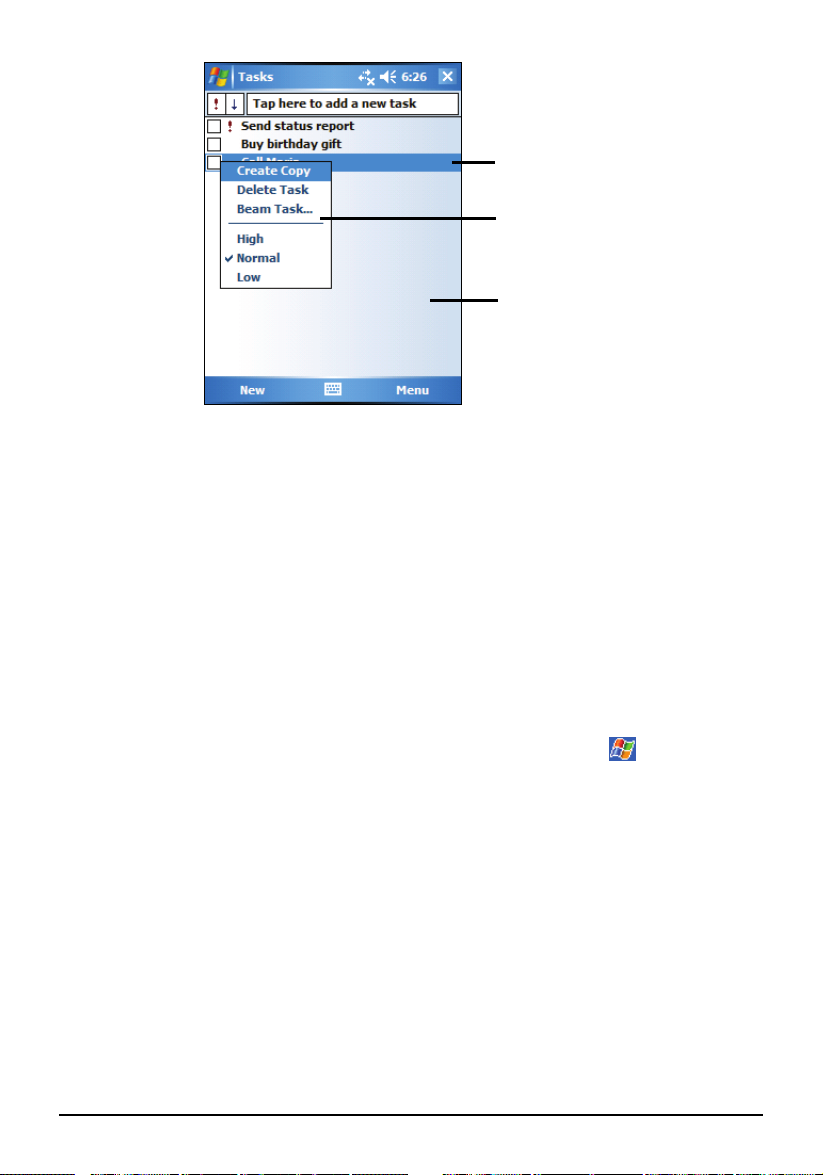
Tap and hold to display the
shortcut menu.
Lift the stylus and tap the action
you want.
Tap outside the menu to close it
without performing an action.
2.7 Notifications
Your Pocket PC reminds you in a variety of ways when you have something to
do. For example, if you have set up an appointment in Calendar, a task with a
due date in Tasks or an alarm in Clock, you will be notified in any of the
following ways:
A message appears on the screen.
A sound, which you can specify, is played.
The notification indicator flashes in red.
To choose reminder types and sounds for your Pocket PC, tap
Settings
Personal Sounds & Notifications.
2.8 Entering Information
You have several options for entering new information:
Use the Input panel to enter typed text, either by using the soft keyboard or
other input methods.
Write directly on the screen.
Draw pictures on the screen.
Speak into the microphone to record a message.
16
Page 25
Entering Text Using the Input Panel
Use the Input panel to enter information in any program on your Pocket PC.
You can either type using the soft keyboard or write using the soft keyboard,
Block Recognizer, Letter Recognizer or Transcriber. In any case, the characters
appear as typed text on the screen.
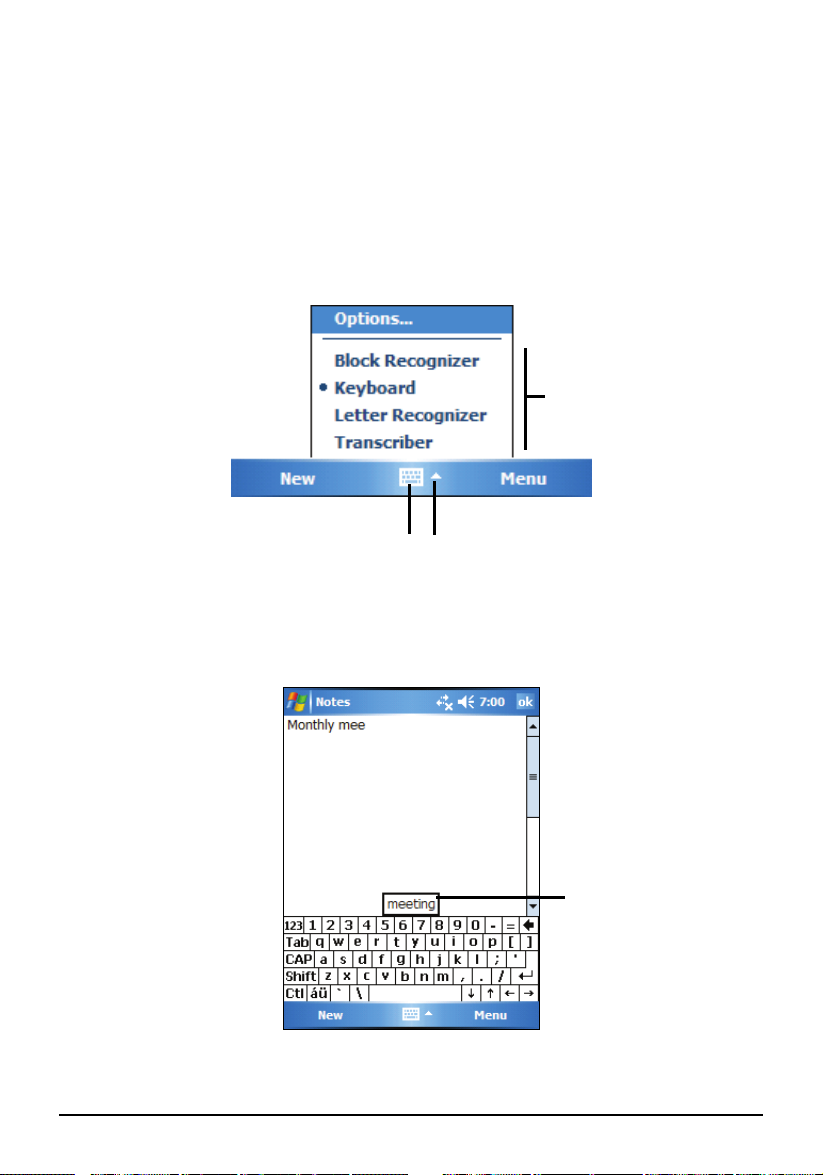
To show or hide the Input panel, tap the
Input panel button. Tap the arrow next to
the Input panel button to see your choices.
Select an input method.
Input panel button.
Tap to see your choices.
When you use the Input panel, your Pocket PC anticipates the word you are
typing or writing and displays it above the Input panel. When you tap the
displayed word, it is inserted into your text at the insertion point. The more you
use your Pocket PC, the more words it learns to anticipate.
Tap here if this is
the right word.
17
Page 26

NOTE: To change word suggestion options, such as the number of words suggested at
one time, tap
Settings Personal Input Word Completion.
Block Recognizer
With Block Recognizer, you can use the stylus to input characters using strokes
that are similar to the Palm™ Graffiti® method.
To type with Block Recognizer:
1. Tap the arrow next to the Input panel button and then tap
2. Write a letter in the box.
When you write a letter, it is converted to typed text that appears on the screen.
For specific instructions on using Block Recognizer, open Block Recognizer
and then tap the question mark next to the writing area.
Block Recognizer.
Letter Recognizer
With Letter Recognizer, you can write letters using the stylus just as you would
use a pen on paper.
To type with Letter Recognizer:
1. Tap the arrow next to the Input panel button and then tap
2. Write a letter in the box.
When you write a letter, it is converted to typed text that appears on the screen.
For specific instructions on using Letter Recognizer, open Letter Recognizer
and then tap the question mark next to the writing area.
Letter Recognizer.
Transcriber
With Transcriber you can write anywhere on the screen using the stylus just as
you would on paper. Unlike Letter Recognizer and Block Recognizer, you can
write a sentence or more of information; then, you pause and let Transcriber
change the written characters to typed characters.
To type with Transcriber:
1. Tap the arrow next to the Input panel button then tap
2. Write anywhere on the screen.
18
Transcriber.
Page 27
For specific instructions on using Transcriber, open Transcriber and then tap the
question mark in the lower-right corner of the screen.
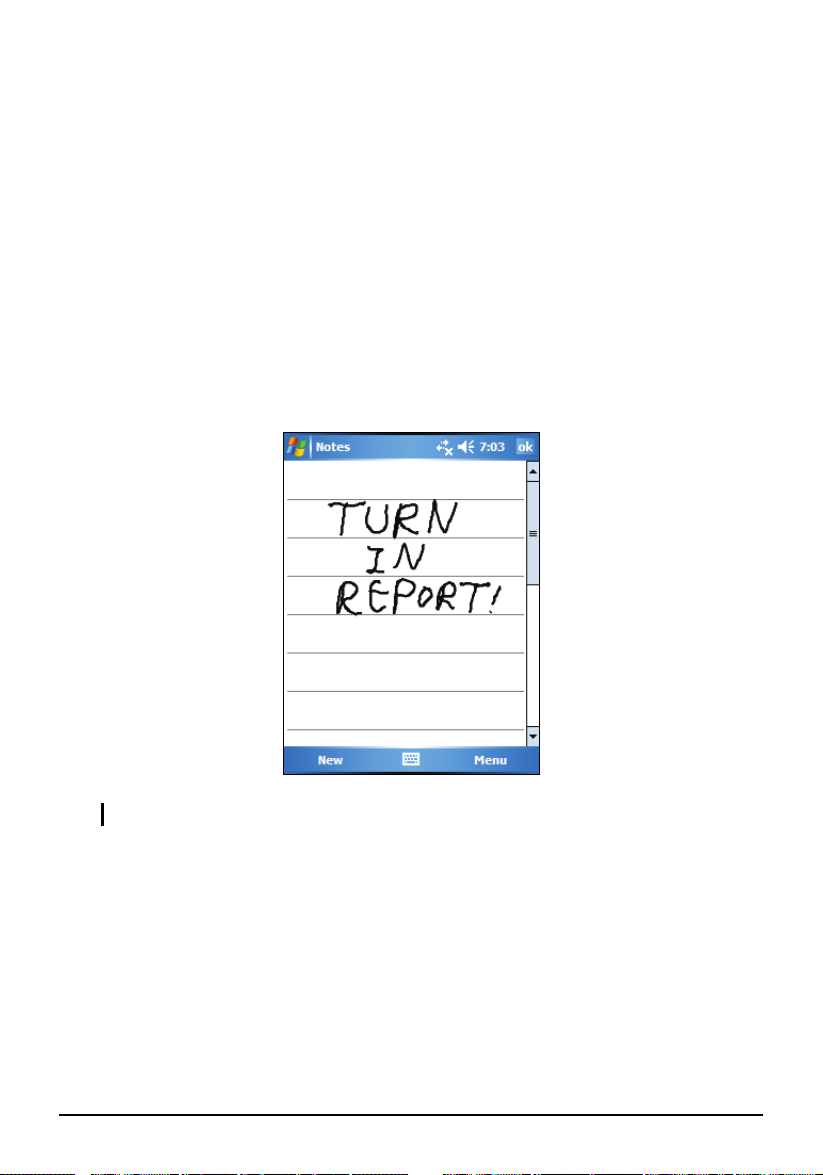
Writing on the Screen
In any program that accepts writing, such as the Notes program, you can use
your stylus to write directly on the screen. Write the way you do on paper. You
can edit and format what you have written and convert the information to text
later.
Writing
To write on the screen, tap Menu Draw to switch to drawing mode. This action
displays lines on the screen to help you write.
NOTE: Not all program support the drawing mode.
Editing Your Writing
If you want to edit or format writing, you must first select the writing and then
edit it.
1. Tap and hold the stylus next to the text you want to select until the insertion
point appears. Without lifting, drag the stylus across the text you want to
select.
19
Page 28
2. Tap and hold the selected words and then tap an editing command (cut, copy
or paste) on the shortcut menu or tap the command on the
Menu Edit menu.
If you accidentally write on the screen, tap
Menu Undo Ink and try again.
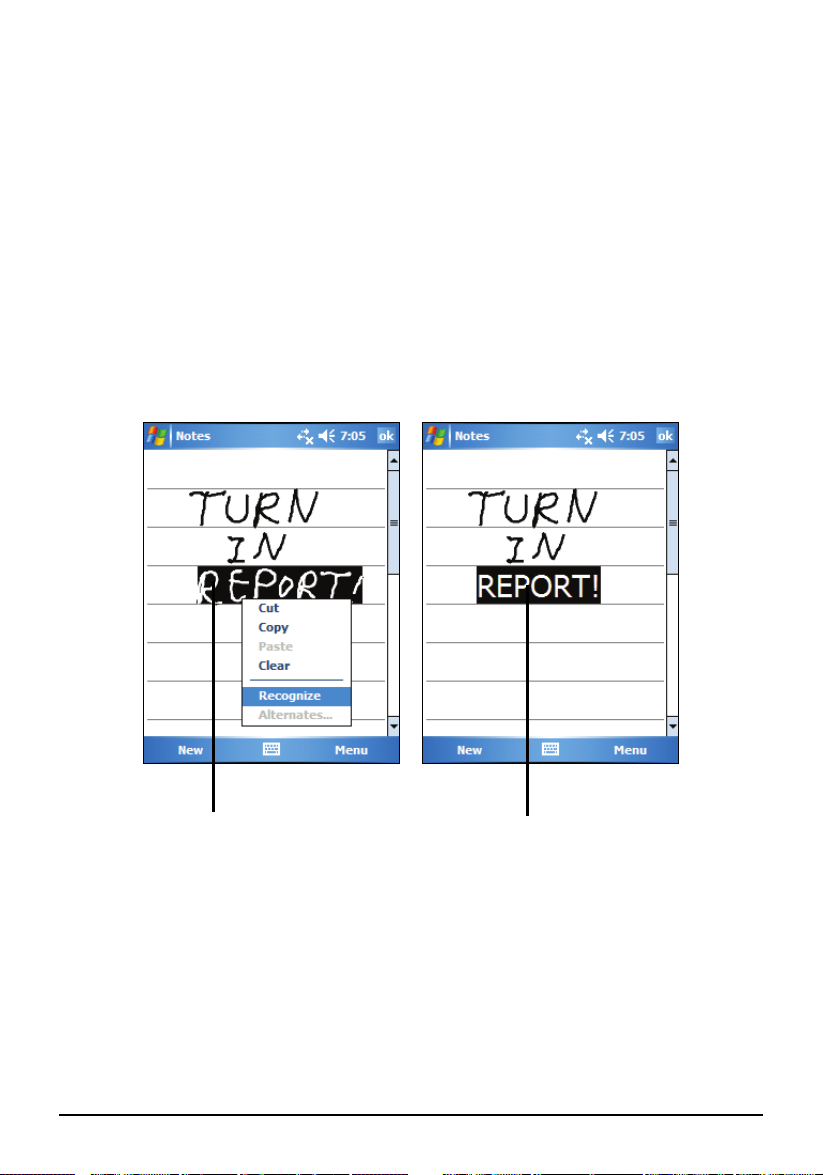
Converting Your Writing to Text
1. If you want to convert only certain words, select them before going to the
next step.
2. To convert writing to text, tap
selected words and then tap
turned into text.
If a word is not recognized, it is left as writing.
Menu Tools Recognize or tap and hold the
Recognize on the shortcut menu. Your writing is
Select the text you want to
convert and tap Recognize
on the shortcut menu.
The writing is turned into
text.
If the conversion is incorrect, you can select different words from a list of
alternates or return to the original writing.
1. Tap and hold the incorrect word (tap one word at a time).
2. On the shortcut menu, tap
Alternates. A menu with a list of alternate words
appears.
3. Tap the word you want to use or tap the writing at the top of the menu to
return to the original writing.
20
Page 29
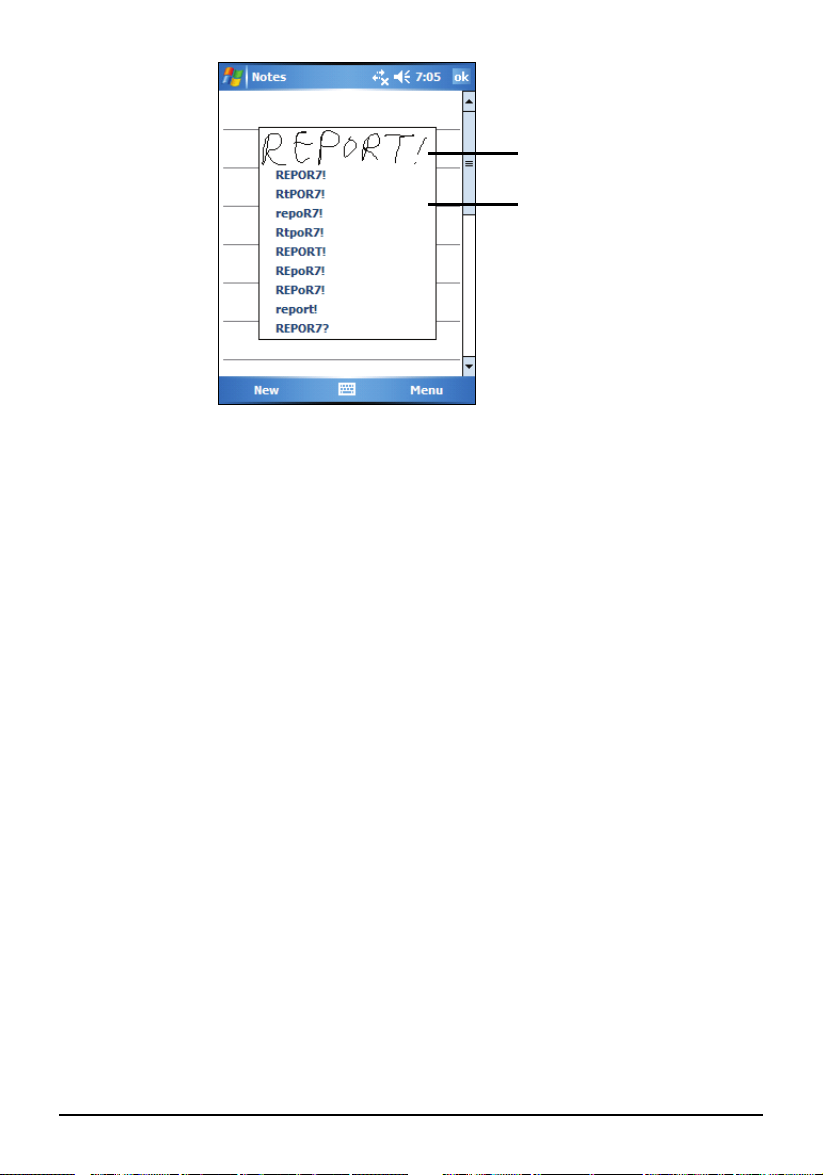
Tap to return to your original
writing.
Or, tap the word you want to use.
Some tips for getting good recognition are listed below:
Write neatly.
Write on the lines and draw descenders below the line. Write the cross of the
“t” and apostrophes below the top line so that they are not confused with the
word above. Write periods and commas above the line.
For better recognition, use Menu Zoom to increase the zoom level to
300%.
Write the letters of a word close together and leave big gaps between words.
Hyphenated words, foreign words that use special characters such as
accents some punctuation cannot be converted.
If you add writing to a word to change it (such as changing a “3” to an “8”)
after you attempt to recognize the word, the writing you add will not be
included if you attempt to recognize the writing again.
Drawing on the Screen
You can draw on the screen in the same way that you write on the screen. The
difference between writing and drawing on the screen is how you select items
and how they can be edited. For example, selected drawings can be resized,
while writing cannot.
21
Page 30
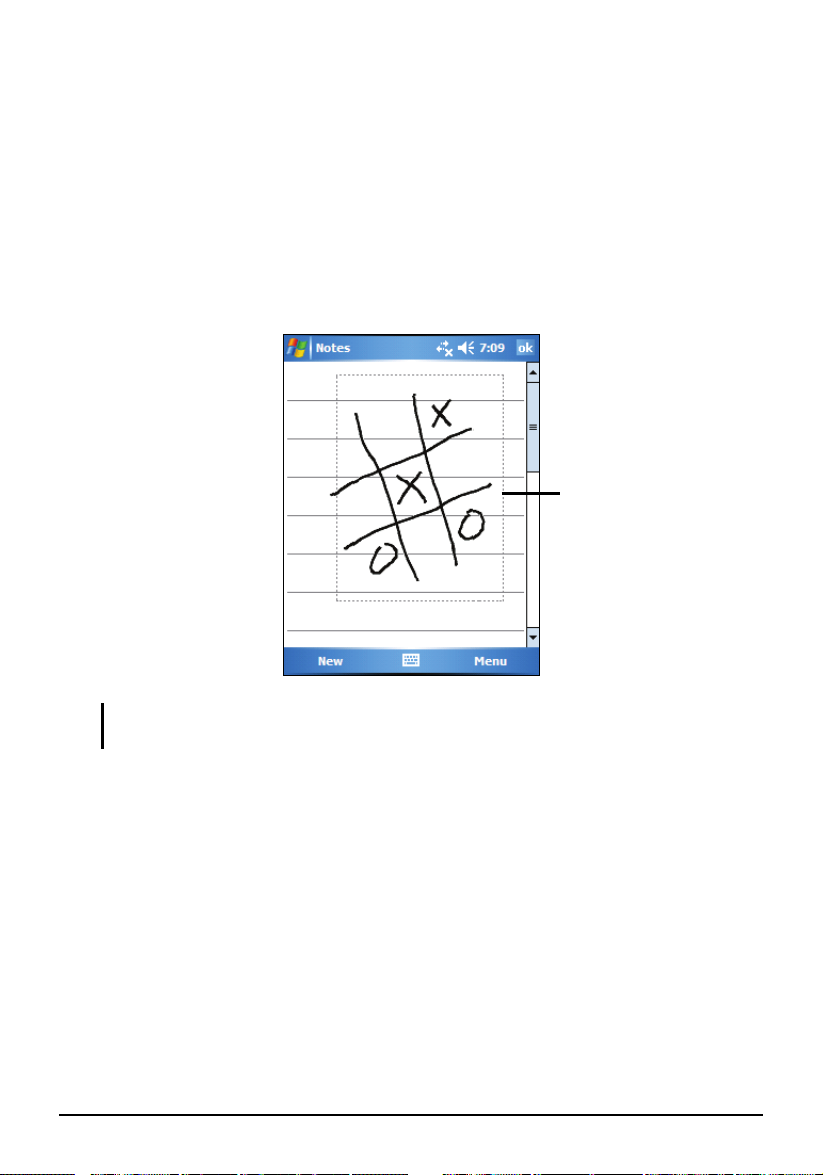
Creating a Drawing
1. Tap Menu Draw to enable drawing mode. A check (√) appears before the
command.
2. To create a drawing, cross three ruled lines on your first stroke. A drawing
box appears.
3. Subsequent strokes in or touching the drawing box become part of the
drawing. Drawings that do not cross three ruled lines will be treated as
writing.
The drawing box indicates
the boundaries of the
drawing.
NOTE: You may want to change the zoom level so that you can more easily work on or
view your drawing. Tap Menu Zoom and then choose a zoom level.
Editing Your Drawing
If you want to edit or format a drawing, you must select it first.
1. Tap
2. Tap and hold the stylus on the drawing until the selection handle appears.
3. Tap and hold the selected drawing and then tap an editing command (cut,
4. To resize a drawing, drag a selection handle.
22
Menu Draw to disable drawing mode. The check (√) before the
command should disappear.
copy or paste) on the shortcut menu.
Page 31

Recording a Message
In any program where you can write or draw on the screen, you can also quickly
capture thoughts, reminders and phone numbers by recording a message. In the
Notes program, you can either create a stand-alone recording or include a
recording in a written note. If you want to include the recording in a note, open
the note first. In the Messaging program, you can add a recording to an email
message.
To create a recording:
1. Hold the Pocket PC’s microphone near your mouth or other source of
sound.
2. Press and hold the record button on the side of your Pocket PC. If the
speaker is not muted, a beep indicates that your Pocket PC is recording. The
Notification indicator glows red while recording is in progress.
3. While holding down the record button, speak into the microphone.
4. To stop recording, release the Record button. Two beeps will sound. The
new recording appears in the note list or as an embedded icon.
NOTE: You can also make a recording by tapping the Record button on the Recording
toolbar. (Tap Menu View Recording Toolbar to show the toolbar.)
To play a recording, tap it in the list or tap its icon in the note.
embedded recording.
Indicates an
Recording toolbar
23
Page 32

Recording Formats
Your Pocket PC supports several formats for voice notes. The formats vary in
both the quality of the recording and the size of the sound file. When selecting a
recording format, you should consider the quality you need as well as how much
storage memory the recording will use on your Pocket PC.
Not all recording formats are compatible with other software or computers. If
you will share your recordings with others or transfer a recording to your
desktop computer, be sure to choose a recording format that is supported by the
software used to play recordings on the other computer.
The PCM format offers the highest quality recording and is compatible with all
Pocket PC models, other Windows-powered mobile devices and desktop
computers that use Windows operating systems. The GSM 6.10 format is
compatible with all Pocket PC models and other Windows-powered mobile
devices, but may not work with desktop computers.
To select a recording format:
1.
Tap
Settings Input.
2. On the
from the drop-down list.
The list of recording formats on your Pocket PC indicates the sample rate,
whether the format is stereo or mono and how much storage memory is required
per second of recording. You may need to experiment with different sample
rates and formats to determine which format best suits your voice.
Options tab in the Input control panel, select a voice recording format
Using My Text
When using Messaging or MSN Messenger, use My Text to quickly insert
preset or frequently used messages into the text entry area. To insert a message,
tap
Menu My Text and then tap a message.
24
Page 33

Tap to select a
prewritten message.
NOTE: After inserting a My Text message, you can add text to it before you send the
message.
To edit a My Text message, tap
Menu My Text Edit My Text Messages. Select
the message you wish to edit and make desired changes.
2.9 Locking Your Pocket PC
When not using your Pocket PC, you can use the lock function so that accidental
touching of the device does not cause your Pocket PC to operate.
To lock your Pocket PC, tap
PC will not respond to any tapping of the screen (except the left soft key
Device unlocked on the Today screen. Your Pocket
Unlock)
or pressing of the buttons (except the power button).
25
Page 34

Tap to lock
the device.
To unlock, tap
Tap to unlock
Unlock (left soft key) and tap Unlock.
26
Page 35

3 Managing Your Pocket PC
This chapter tells you how to effectively manage power, memory, settings, data
and programs of your Pocket PC.
3.1 Managing Power
A fully charged battery should provide power for up to 8 hours of use. The
operating time of a fully charged battery depends on how you are using the
Pocket PC. Some functions, such as using multimedia or operating a SD/MMC
card, may consume the battery power considerably.
Low Battery Signals and Actions
CAUTION: When you recharge the battery upon a warning of low power, you should
charge for at least 30 minutes. If you unplug the AC adapter soon, you may not have
sufficient battery power for your operation.
You can monitor the battery power by tapping
Power. The remaining power is displayed on a status bar in the Power control
panel.
Settings System
When the battery is low, your Pocket PC will pop up a warning message. You
should save your data and recharge the battery immediately upon a warning of
low power; otherwise your Pocket PC will turn off automatically. You need to
connect the Pocket PC to external AC power for charging before you can use it
again.
27
Page 36

Power Management
Supplied with your Pocket PC is a tool called “eUtility.” This tool helps you
effectively manage power to prolong the battery’s operating time.
Tap
Settings System eUtility. The tool consists of four tabs: System,
Performance, Power, and USB. They are described as below.
System
This page shows the program information. It does not contain any adjustable
items.
Performance
Select a mode from the following four options.
Auto Pocket PC will automatically adjust the CPU speed according to the
need of the current operation.
Low Performance The CPU always runs at a lower speed, thus extending
the battery life.
High Performance The CPU always runs at normal speed, thus providing
standard battery life.
Superior Performance The CPU always runs at a high speed, thus
shortening the battery life.
Power
The following item is enabled by default. You can change the setting if you
want.
SD slot powered off during sleep mode
Sets if the Pocket PC will stop the power supply to the SD/MMC slot when
the Pocket PC is suspended. (The default setting is unchecked.)
You can also select the events for waking up your Pocket PC. Check the desired
item(s). (The default settings are all enabled.)
Application buttons
Record Button
28
Page 37

SD/MMC Card insertion/removal
USB Plug-In
USB
You can select one of the following two modes for the USB connection:
ActiveSync mode
Select this mode for using your Pocket PC as a standard Pocket PC that can
synchronize with your desktop computer through ActiveSync.
Card Reader mode
Select this mode only if you want your Pocket PC to function as a card
reader for your desktop computer. Otherwise, do not select this mode.
Power-Saving Tips
Follow these suggestions to maximize the battery’s operating time, particularly
when you are relying solely on the battery power for extended time periods.
Suspend frequently.
By default, the screen backlight will automatically turn off and the Pocket
PC will also turn off when it has been idle for a period of time. You can
shorten the length of the idle time using
Advanced
to set up.
Press the power button to turn off your Pocket PC when it is not in use, even
for a short time. You can also manually turn off the backlight by pressing
and holding the power button.
Settings System Power
Turn off functions not needed or adjust settings.
Lower the volume.
Do not enable sounds or light flashing except for the most necessary
notifications. (Tap
Settings Personal Sounds & Notifications to
set up.)
Remove the SD/MMC card, if installed, from the slot if you are not
using it.
29
Page 38

Avoid power-consuming situations such as:
When using a modem or other peripheral
When playing sound or music
When recording.
When using or monitoring wireless signals
3.2 Managing Memory
Storage and Program Memory
Files, settings and data that you add to your Pocket PC are stored in RAM
(Random Access Memory). The RAM on your Pocket PC is shared between
storage memory and program memory.
Storage memory
Storage memory is used to store the data you create and additional programs
you install.
Program memory
Program memory is used to run programs on your Pocket PC.
Your Pocket PC automatically manages the allocation between storage and
program memory. However, in some situations, such as when the memory is
running out, your Pocket PC may not be able to automatically adjust the
allocation. (For information on solving memory problems, see section 7.4.)
Additional Memory
You can buy a SD/MMC storage card for backup, storage, archives or to
transfer large files to other devices. Files stored on a storage card appear in a
folder called
30
Storage Card, listed under My Device in the File Explorer application.
Page 39

3.3 Customizing Your Pocket PC
NOTE: Incorrect settings may cause your system to malfunction. Make sure that you fully
understand the function of a certain item before any adjustment.
You can customize the settings of the Pocket PC to your own preferences. Tap
Settings. You can tap any of the icons on the Personal, System or
Connections tabs for the options. The items you can customize are described as
follows:
Tab Items Descriptions
Personal
Buttons
Input
Menus To customize what appear on the Start menu.
MSN Options To manage your MSN settings.
Owner
Information
Password To set a password for security.
Sounds &
Notifications
Today
To assigns programs to the hardware buttons and set
the repeat rate of the up/down control.
To set up items related to the input methods and voice
recording format.
To enter your personal information.
To set the conditions and types of the sounds, system
volume and ways of notifications.
To select the information you want displayed on the
Today screen and to select a desired theme for the
background.
31
Page 40

Tab Items Descriptions
System
About
Backlight
Certificates
Clock &
Alarms
Error
Reporting
GPS
Memory
Power
Regional
Settings
Remove
Programs
Screen
To show the hardware information of the Pocket PC and
to define the device name that your Pocket PC uses for
identifying itself to other computers.
To adjust the brightness level of the display and to set
the automatic turnoff for power saving purposes.
To establish your identify or the identify of other
computers. Certificates help establish your identity
when you are logging onto a secured network, such as a
corporate network. Certificates also help establish the
identity of other computers, such as servers, with which
you connect. This helps prevent unauthorized users
from accessing your Pocket PC and information.
To change the time and date and to set alarms.
To enable or disable error reporting. Error Reporting
sends information needed by technical support groups to
diagnose a program error for a device running Windows
Mobile software.
To configure the GPS hardware settings and manage
GPS.
To view the memory on the storage card (if installed) and
to manually stop a program if it becomes unstable or
program memory is low.
To show the remaining battery power and to set the time
for the Pocket PC to turn off automatically.
To specify the region of your location and the formats of
the number, currency, time and date.
To remove programs you added to the RAM of your
Pocket PC.
To set the orientation of the screen to portrait or
landscape.
To adjust the touch screen for accurate screen taps.
To enable ClearType feature for easier reading of text in
programs that support ClearType.
To adjust the text size to see more content or increase
the readability in many programs.
32
Page 41

Tab Items Descriptions
Connections
Beam Your device hardware does not support this function.
Connections
To set up or change connection information. (See
Section 6.1 for more information.)
Network
Cards
To configure the network card, if installed. (See Section
6.1 for more information.)
3.4 Searching and Organizing Information
The Search feature on your Pocket PC helps you quickly locate information.
To search a file, tap
select a data type and then tap
Programs
Search. Enter the text you want to find,
Search to start the search.
You can also use the File Explorer to find files on your Pocket PC and to
organize these files into folders. Tap
Tap to change folders.
Programs File Explorer.
Select the sort order for the list.
Tap the folder name to open it.
Tap and hold to create a new folder.
NOTE: You can move files in File Explorer by tapping and holding the item you want to
move, tapping Cut or Copy on the shortcut menu, browsing to the new location and then
tapping Paste.
33
Page 42

3.5 Backing Up Data
To prevent loss of data, you should back up your Pocket PC frequently.
ActiveSync enables you to back up data to your desktop computer. You can
back up all data on your Pocket PC or only your PIM databases (Calendar,
Contacts and Tasks). You can set ActiveSync to back up automatically each
time you connect or you can back up manually, whenever you choose. For more
information, see ActiveSync Help on your desktop computer.
3.6 Adding or Removing Programs
You can install any program created for your Pocket PC as long as your Pocket
PC has enough memory. The most popular place to find software for your
Pocket PC is on the Pocket PC Web site (http://www.pocketpc.com).
Adding Programs
To Add Programs Using ActiveSync
You will need to install the appropriate software for your Pocket PC on your
desktop computer before installing it on your Pocket PC.
1. Determine your Pocket PC and processor type so that you know which
version of the software to install. Tap
Version and make a note of the information in Processor.
Settings System About
2. Download the program to your desktop computer or, if you have a CD or disk
containing the program, insert the CD or disk into your desktop computer.
You might see a single *.xip, *.exe *.zip file, a Setup.exe file or several
versions of files for different device types and processors. Be sure to select the
program designed for the Pocket PC and your Pocket PC processor type.
3. Read any installation instructions, Read Me files or documentation that
comes with the program. Many programs provide special installation
instructions.
4. Connect your Pocket PC and desktop computer.
5. Double-click on the *.exe file.
34
Page 43

If the file is an installer, the installation wizard begins. Follow the
directions on the screen. Once the software has been installed on your
computer, the installer automatically transfers the software to your
Pocket PC.
If the file is not an installer, you will see an error message stating that
the program is valid but it is designed for a different type of computer.
You will need to move this file to your Pocket PC. If you cannot find
any installation instructions for the program in the Read Me file or
documentation, use ActiveSync Explore to copy the program file to the
Program Files folder on your Pocket PC. For more information on
copying files using ActiveSync, see ActiveSync Help.
NOTE: You can also use Pocket Internet Explorer to download some programs from the
Internet directly to your Pocket PC if your Pocket PC is connected to Internet.
Once installation is complete, tap
Programs and tap the program icon to
switch to it.
To Add a Program to the Start Menu
Use one of the following methods to add a program to the Start menu.
Tap
Settings Menu and tap the check box for the program. If you do
not see the program listed, use any of the following two methods.
If you are using File Explorer on the Pocket PC:
Tap
labelled
on the Pocket PC). Tap and hold the program and tap
Program File Explorer and locate the program (tap the folder list,
My Documents by default and tap My Device to see a list of all folders
Cut on the shortcut
menu. Open the Start Menu folder located in the Windows folder, tap and
hold a blank area of the window and tap
Paste on the shortcut menu. The
program appears on the Start menu.
If you are using ActiveSync on the desktop computer:
Use the Explorer in ActiveSync to explore your Pocket PC files and locate
the program. Right-click on the program and then click on
Create Shortcut.
Move the shortcut to the Start Menu folder in the Windows folder. The
shortcut appears on the Start menu.
35
Page 44

Removing Programs
To remove a program from your Pocket PC:
1. Tap
2. Select the program in the list then tap
If the program does not appear in the list of installed programs, use File
Explorer on your Pocket PC to locate the program, tap and hold the program and
then tap
Settings System Remove Programs.
Delete on the shortcut menu.
Remove.
36
Page 45

4 Microsoft Pocket Outlook
This chapter tells you how to use Microsoft Pocket Outlook that includes
Calendar, Contacts, Tasks, Notes, and Messaging. You can use these programs
individually or together. For example, e-mail addresses stored in Contacts can
be used to address e-mail messages in Messaging.
4.1 Calendar: Scheduling Appointments and
Meetings
Use Calendar to schedule appointments, including meetings and other events.
You can check your appointments in one of several views (Agenda, Day, Week,
Month and Year) and set Calendar to remind you of appointments with a sound or
other method. Appointments for the day can be displayed on the Today screen.
Tap
Calendar to switch to the program.
Tap to switch to another view.
Tap to go to today.
Tap to display or edit the
appointment details.
37
Page 46

Creating an Appointment
1. In Day or Week view, tap the desired date and time for the appointment.
2. Tap
Menu New Appointment.
Tap to return to the calendar (the
appointment is saved automatically).
Tap to choose from predefined text.
Tap to choose from previously entered
locations.
Tap to select a time.
Tap to select a date.
3. Using the Input panel, tap first to select the field, and then enter a
description and a location.
4. If needed, tap the date and time to change them.
5. Enter other desired information. You will need to hide the Input panel to see
all available fields.
6. Tap
OK to save and return to Calendar.
NOTE: For more information, tap Help.
38
Page 47

Using the Calendar Summary Screen
When you tap an appointment in Calendar, a summary screen is displayed. To
change the appointment, tap
Edit.
View appointment details.
View notes.
Tap to change appointment.
39
Page 48

4.2 Contacts: Tracking Friends and Colleagues
Contacts maintains a list of your friends and colleagues so that you can easily
find the information you are looking for, whether you are at home or on the
road.
Tap
Tap an alphabet group
to scroll the contact list.
Contacts to switch to the program.
Creating a Contact
1. In Contacts, tap New.
Tap to create a new contact.
Tap and enter part of a name or
number to quickly find a contact
in the list.
Tap to display or edit the contact
details.
Tap and hold to display the
shortcut menu.
40
Page 49

Tap to return to the contact list (the
contact is saved automatically).
2. Using the Input panel, enter a name and other contact information. You will
need to scroll down to see all available fields.
3. Tap
OK to save and return to the contact list.
NOTE: For more information, tap Help.
41
Page 50

Using the Contacts Summary Screen
When you tap a contact in the contact list, a summary screen is displayed. To
change the contact information, tap
Edit.
Tap to view notes.
Tap to change contact information.
42
Page 51

4.3 Tasks: Keeping a To Do List
Use Tasks to keep track of what you have to do.
Tap
Tasks to switch to the program.
Tap to quickly create a task with
only a subject
Tap to display or edit the task
details.
Tap and hold to display the
shortcut men.
Creating a Task
1. In Task, tap New.
Tap to create a new task.
Tap to return to the task list (the
task is saved automatically).
Tap to choose from predefined
subjects.
43
Page 52

2. Using the Input panel, enter a description.
3. You can enter a start date and due date or enter other information by first
tapping the field. If the Input panel is open, you will need to hide it to see all
available fields.
4. Tap
OK to save and return to the task list.
NOTE: For more information, tap Help.
Using the Tasks Summary Screen
When you tap a task in the task list, a summary screen is displayed. To change
the task, tap
Edit.
Tap to show and hide additional
summary information.
View notes.
44
Tap to change task information.
Page 53

4.4 Notes: Capturing Thoughts and Ideas
Quickly capture thoughts, reminders, ideas, drawings and phone numbers with
Notes. You can create a written note or a recording. You can also include a
recording in a note. If a note is open when you create the recording, it will be
included in the note as an icon. If the note list is displayed, it will be created as a
stand-alone recording.
Tap
Programs Notes to switch to the program.
Tap to create a new note.
Tap to change the sort order of
the list.
Tap to open a note or play a
recording.
Tap and hold to display the
shortcut menu
Creating a Note
1. In Notes, tap New.
2. Create your note by writing, drawing, typing, or recording. For more
information about using the Input panel, writing, and drawing on the screen
and creating recordings, see section 2.8.
45
Page 54

Tap to return to the note list (the
note is saved automatically)
3. Tap
OK to save and return to the note list.
NOTE: For more information, tap
Help.
46
Page 55

4.5 Messaging: Sending and Receiving E-mail
Messages
You can use Messaging to send and receive email messages in two ways:
By synchronizing email messages with Microsoft Exchange or Microsoft
Outlook on your desktop computer.
By connecting directly to an e-mail server through an ISP (Internet Service
Provider) or a network. This method requires an optional modem or
network card.
Tap
Messaging to switch to the program.
Synchronizing E-mail Messages
E-mail messages can be synchronized as part of the general synchronization
process. To do this, you need to enable Inbox synchronization in ActiveSync
For information on enabling Inbox synchronization, see ActiveSync Help on the
desktop computer.
During synchronization, the following occurs:
Messages are copied from the mail folders of Exchange or Outlook on your
desktop computer to the ActiveSync folder in Inbox on your Pocket PC. By
default, you receive messages from the past three days only, the first 100
lines of each message file attachments of less than 100 KB in size.
Email messages in the Outbox folder on your Pocket PC are transferred to
Exchange or Outlook and then sent from those programs.
The messages on the two computers are linked. When you delete a message
on your Pocket PC, it is deleted from your desktop computer the next time
you synchronize.
Email messages in subfolders in other e-mail folders in Outlook are
synchronized only if they have been selected for synchronization in
ActiveSync.
47
Page 56

Connecting Directly to an E-mail Server
You can send and receive email messages by connecting to a POP3 or IMAP4
e-mail server if you can connect to your ISP or local area network. (For
information on connection, see Section 6.1.)
Setting up an Email Service
You can use multiple email services to receive your messages. For each email
service you intend to use, first set up and name the email service. If you use the
same service to connect to different mailboxes, set up and name each mailbox
connection.
In Messaging, tap
New Service Wizard. For an explanation of a screen, tap
corner of the screen.
When you connect to the email server, new messages are downloaded to the
Inbox folder on your Pocket PC, messages in the Pocket PC Outbox folder are
sent messages that have been deleted on the email server are removed from the
Inbox folder on your Pocket PC.
Messages that you receive directly from an email server are linked to your email
server rather than your desktop computer. When you delete a message on your
Pocket PC, it is also deleted from the email server the next time you connect
based on the settings you selected in ActiveSync.
You can work online or offline. When working online, you read and respond to
messages while connected to the email server. Messages are sent as soon as you
Send, which saves space on your Pocket PC.
tap
When working offline, once you have downloaded new message headers or
partial messages, you can disconnect from the email server and then decide
which messages to download completely. The next time you connect, Inbox
downloads the complete messages you have marked for retrieval and sends the
messages you have composed.
Menu Tools New Account. Follow the directions in the
at the upper right
Using the Message List
Messages you receive are displayed in the message list. By default, the most
recently received messages are displayed first in the list.
48
Page 57

r
Select the service and folde
you want to display.
Select the sort order for messages.
Tap to open a message.
Tap and hold to display the shortcut
menu.
When you receive a message, tap it to open it.
Tap to return to the message list.
When you connect to your email server or synchronize with your desktop
computer or server, by default, you will receive messages from the last three
days only, the first 100 lines of each new message file attachments of less than
100KB in size. The original messages remain on the server or your desktop
computer.
49
Page 58

You can mark the messages that you want to retrieve in full during your next
synchronization or email server connection. In the message list, tap and hold the
message you want to retrieve. On the shortcut menu, tap
Mark for Download. The
icons in the Inbox message list give you visual indications of message status.
You specify your downloading preferences when you set up the service or select
your synchronization options. You can change them at any time.
Change options for Inbox synchronization using ActiveSync options. For
more information, see ActiveSync Help.
Change options for direct email server connections in Messaging on your
Pocket PC. Tap
Tap and hold the account and tap
Menu Options and tap the account you want to change.
Delete to remove an account.
Composing and Sending Messages
1. In the message list, tap Menu Switch Accounts and select the account.
2. Tap
3. In the
New.
To field, enter an email address of one or more recipients, separating
them with a semicolon. If the address is already in your contact list, you can
tap
To to select the e-mail address.
4. Enter your message. To quickly enter common messages, tap
Text
and select the desired message.
Menu My
50
Page 59

5. To check spelling, tap Menu Spell Check.
6. If you want to attach a file to the message, tap
Menu Insert and select the
desired file.
NOTE: OLE objects cannot be attached to Inbox messages.
7. Tap
Send when you have finished the message. If you are working offline,
the message is moved to the Outbox folder and is sent the next time you
connect.
The message is placed in the Outbox folder on your Pocket PC and will be
delivered in one of two ways:
The message is transferred to the Outbox folder in Exchange or Outlook on
your desktop computer and sent the next time you synchronize.
The message is transferred to your email server the next time you connect.
Managing Email Messages and Folders
Each e-mail service account has its own folder hierarchy with five default
folders: Inbox, Outbox, Deleted Items, Drafts and Sent Items. The messages you
receive and send through the mail service are stored in these folders. You can
also create additional folders within each hierarchy.
The Deleted Items folder contains messages that have been deleted on your
Pocket PC. The behaviour of the Deleted and Sent Items folders depends on the
options you have chosen.
Folder Behavior
The behavior of the folders you create depends on whether you are using
ActiveSync, POP3 or IMAP4.
If you use ActiveSync, email messages in the Inbox folder in Outlook are
automatically synchronized with your Pocket PC. You can select to
synchronize additional folders by designating them for ActiveSync. The
folders you create and the messages you move are mirrored on the server.
For example, if you move two messages from the Inbox folder to a folder
named Family and you have designated Family for synchronization, the
server creates a copy of the Family folder and copies the messages into that
51
Page 60

folder. You can then read the messages while away from your desktop
computer.
If you use POP3 and you move email messages to a folder you created, the
link is broken between the messages on the Pocket PC and their copies on
the mail server. The next time you connect, the mail server sees that the
messages are missing from the Pocket PC Inbox and deletes them from the
server. This prevents you from having duplicate copies of a message, but it
also means that you no longer have access to messages that you move to
folders created from anywhere except the Pocket PC.
If you use IMAP4, the folders you create and the email messages you move
are mirrored on the server. Therefore, messages are available to you
anytime you connect to your mail server, whether it is from your Pocket PC
or desktop computer. This synchronization of folders occurs whenever you
connect to your mail server, create new folders or rename/delete folders
when connected.
For all services except ActiveSync, you can access folder options by tapping
Menu Tools Manage Folders in the message list.
52
Page 61

5 More Programs
In addition to Microsoft Pocket Outlook, there are other programs built into
your Pocket PC. This chapter tells you how to use these programs.
5.1 Microsoft ActiveSync
NOTE: ActiveSync is already installed on your Pocket PC. You need to install ActiveSync
on your desktop computer. (For information on installing ActiveSync, see section 1.4.)
When you have established the connection between your Pocket PC and your
desktop computer, you can synchronize the information between the two with
ActiveSync. Synchronization compares the data on the two sides and updates
both computers with the most recent information. For example, you can:
Keep your Pocket Outlook Contacts, Calendar and Tasks databases
up-to-date by synchronizing your Pocket PC with Microsoft Outlook data
on your desktop computer.
Synchronize email messages in your Pocket PC Inbox with email messages
in Microsoft Outlook on your desktop computer.
Synchronize Microsoft Word and Microsoft Excel files between your
Pocket PC and desktop computer. Your files are automatically converted to
the correct format.
With ActiveSync, you can also:
Back up and restore your Pocket PC data.
Copy (rather than synchronize) files between your Pocket PC and desktop
computer.
Add and remove programs on your Pocket PC.
53
Page 62

Pass through your desktop computer to a network or the Internet to perform
tasks such as downloading IMAP4 e-mail messages or browsing the
Internet on your Pocket PC.
Synchronizing Data
Once you have created a synchronization relationship and completed the first
synchronization, you can initiate synchronization from your Pocket PC.
From Your Pocket PC
1. Connect your Pocket PC to your desktop computer.
2. On your Pocket PC, tap
3. Tap
By default, ActiveSync does not automatically synchronize all types of
information. Use ActiveSync options to turn synchronization on and off for
specific information types. You can:
Control when synchronization occurs by selecting a synchronization mode.
Sync to begin synchronization.
For example, you can synchronize continually while the Pocket PC is
connected or only when you choose the synchronize command.
Programs ActiveSync.
54
Page 63

Select which information types are synchronized and control how much
data is synchronized. For example, you can choose how many weeks of past
appointments you want synchronized.
For information on setting ActiveSync options and using ActiveSync on your
desktop computer, see ActiveSync Help on the desktop computer. For
information on using ActiveSync on your Pocket PC, see ActiveSync Help on
the Pocket PC.
From a Remote Location
You can also synchronize by dialing in to your desktop computer or connecting
over a network. This can be useful if you need to synchronize files or PIM
information while traveling. Before you leave, you must configure both your
Pocket PC and your desktop computer.
For more information, see ActiveSync Help on your desktop computer.
55
Page 64

5.2 Word Mobile
Microsoft Word Mobile works with Microsoft Word on your desktop computer to
give you easy access to copies of your documents. You can create new documents
on your Pocket PC or you can copy documents from your desktop computer.
Tap
Programs Word Mobile to switch to the program.
Creating a Document
1. In Word Mobile, tap New.
Select the type of folder you
want displayed in the list.
Tap to create a new document.
Tap to change the sort
order of the list.
Tap to open a document.
Tap and hold an item to see
a shortcut menu of actions.
NOTE: To open a template rather than a blank document, select a template for new
documents. Tap Menu Options and select the desired template. When you tap New,
the template appears with appropriate text and formatting already provided.
2. Enter the information. (For more information on using the input panel, see
section 2.8 or Pocket PC Help.)
56
Page 65

Tap to format text.
Tap and hold to see a
shortcut menu of actions.
Tap to return to the document
list (changes are saved
automatically).
3. When you have finished entering the information and tap
OK, the document
is automatically saved and named according to the first characters of text
entered in the document.
NOTE: For more information, tap
Help.
Opening a Document
Whenever you switch to Word Mobile, you will see the document list. Tap the
desired document to open it. You can open only one document at a time; when
you open a second document, you will be asked to save the first.
57
Page 66

5.3 Excel Mobile
Microsoft Excel Mobile works with Microsoft Excel on your desktop computer
to give you easy access to copies of your workbooks. You can create new
workbooks on your Pocket PC or you can copy workbooks from your desktop
computer to your Pocket PC. Excel Mobile provides fundamental spreadsheet
tools, such as formulas, functions, sorting and filtering, which enable you to
create simple workbooks, such as expense reports and mileage logs.
Tap
Programs Excel Mobile to switch to the program.
Creating a Workbook
NOTE: To open a template rather than a blank workbook, select a template for new
workbooks. Tap Menu Options and select the desired template. When you tap New,
the template appears with appropriate text and formatting already provided.
1. In Excel Mobile, tap
2. To use Excel toolbar, tap
3. You can use Excel Mobile much the same way you use Excel on your
desktop computer. You can enter formulas and functions and then filter data
to see the subset of information you want. (For more information on
entering information, see section 2.8 or Pocket PC Help.)
New.
View Toolbar.
Cell contents appear
here as you enter them.
58
Excel Toolbar
Page 67

4. When you have finished entering the information and tap OK, the workbook
is automatically saved and named according to the first characters of text
entered in the workbook.
NOTE: For more information, tap
Help.
Opening a Workbook
Whenever you switch to Excel Mobile, you will see the workbook list. Tap the
desired workbook to open it. You can open only one workbook at a time; when
you open a second workbook, you will be asked to save the first.
59
Page 68

5.4 PowerPoint Mobile
With PowerPoint Mobile, you can open and view slide show presentations
created on your desktop computer. Slide shows created in *.ppt and *.pps
format with PowerPoint ’97 and later can be viewed on your Pocket PC.
1. Tap
Programs PowerPoint Mobile to switch to the program.
2. In the presentation list, tap the slide show you want to view.
Select the type of folder you
want displayed in the list.
Tap to change the sort
order of the list.
Tap to open a slide show.
3. Tap the current slide to advance to the next slide.
If the presentation is set up as a timed slide show, slides will advance
automatically.
NOTE: For more information, tap
60
Help.
Page 69

5.5 Pocket MSN
Pocket MSN provides practically instant access to your up-to-date MSN
Hotmail Inbox, your MSN Messenger Contacts list, and options for customizing
your Pocket MSN experience.
With Pocket MSN, you get:
MSN Hotmail
Read, write and send e-mail. Delete e-mail and manage your Hotmail
folders.
MSN Messenger
See who’s online. Send and receive instant messages. Subscribe to status
updates for selected contacts so you’re notified when they’re online.
Options and settings you can use to create a custom Pocket MSN
experience.
Tap
Programs Pocket MSN to switch to the program.
NOTE: For more information, tap
Help.
61
Page 70

5.6 Windows Media Player for Pocket PC
Use Microsoft Windows Media Player for Pocket PC to play digital audio and
video files that are stored on your Pocket PC or on a network, such as on a Web site.
Tap
Windows Media to switch to the program.
Library Screen Playback Screen
You can play files in either Windows Media or MP3 format (this include files
with the extension.asf,.wma,.wmv and.mp3). To find content in Windows
Media Format, see the WindowsMedia.com Web site
(http://www.windowsmedia.com).
Use Microsoft Windows Media Player on your desktop computer to copy digital
audio and video files to your Pocket PC.
NOTE: For more information, tap
62
Help.
Page 71

5.7 Pictures & Videos
Use Pictures & Videos to view and edit pictures as well as launch video clips
stored on your Pocket PC or on a storage card. You can also send pictures and
video clips to others, or set a picture as the background on the Today screen.
You can see your pictures individual, as thumbnails, or as part of a slide show.
You can edit your pictures by cropping, rotating, and adjusting the brightness
and contrast.
Tap
Programs Pictures and Videos to switch to the program.
NOTE: For more information, tap
Select the type of folder you
want displayed in the list.
Help.
Tap to change the sort
order of the list.
Tap to view a picture in full
screen.
63
Page 72

5.8 Additional Programs
In addition to Microsoft software, your Pocket PC manufacturer may provide
additional programs to enhance your Pocket PC or facilitate your operation.
NOTE: Depending on the continuing developments of the product, the software supplied
with your Pocket PC may be changed or updated. If there is any difference between the
information in this manual and your product, the operation should be based on the product
you have.
Dialer
The Dialer program allows you to use your Pocket PC as a hands-free device for
a Bluetooth-enabled mobile phone. You can tap your Pocket PC to place and
receive calls instead of pressing the phone’s keypad.
Connecting a Bluetooth Mobile Phone
NOTE: For faster connection, you can pair your Pocket PC and mobile phone before using
the Dialer program. (See “Using a Voice Gateway” in section 6.3 for instructions.)
1. Tap
2. By default, your Pocket PC will switch to Pair
Mode and wait for the pairing action from your
mobile phone for 60 seconds. The connection will
be established as long as you initiate the pairing
process on your mobile phone within this period.
Programs Dialer to switch to the program.
Your Pocket PC will also connect the Bluetooth
headset service, if available.
3. You will see the Dialer main screen after the
pairing is completed. The status bar at the bottom
shows the name of the mobile phone connected.
When you next run the Dialer program, your Pocket PC will automatically pair
with the available one of the last connected mobile phones.
64
Page 73

NOTE:
Your Pocket PC must be in Pair Mode for the mobile phone to discover. If you need to
manually set your Pocket PC to Pair Mode, tap Pair Mode in the main screen.
Up to 8 sets of paired mobile phones can be stored. A 9th paired mobile phone will
replace the oldest one.
Placing a Call
After pairing with your mobile phone, you can place a call using any of the four
buttons (
Tap the Keypad button on the main screen and you can
enter the telephone number with the onscreen keypad.
Keypad, Contacts, Call History, and Redial) on the main screen.
Keypad
After entering the telephone number, tap
to place
the call.
NOTE:
To delete the last digit entered, tap the Backspace
button.
The other two buttons allow you to switch to Contacts
and Call History screens.
Contacts
Tap the Contacts button on the main screen and you can
access the phone numbers (including mobile
telephone, work telephone, and home telephone)
stored in Microsoft Contacts from the Dialer program.
To call the default telephone number of a contact, tap
the contact in the list and tap
You can scroll up and down in the list with the arrow
buttons or directly scroll to a group with the
alphabetical index.
to place the call.
65
Page 74

If there is more than one telephone number for a
contact, tapping the contact opens the detailed screen
where you can select a number.
Call History
Tap the Call History button on the main screen to display
the recent incoming, outgoing, or missed calls together
with information such as date, time, and duration of
each call.
Tap the respective button (incoming
outgoing
20 calls of the selected type.
With an item selected, you can tap
number,
phone number to Microsoft Contacts.
To clear all items in the current list, tap
, or missed ) to view the last
to delete the item, or to save the
,
to dial the
.
66
Page 75

Redial
Tap the Redial button on the main screen to dial the last
number you called or received.
Operations During a Call
During a call, four functions are available:
If you need to input other numbers, such as an
extension number, tap
and tap the desired digits. The keypad will close
when you tap the button again or when there has
been no input for 5 seconds.
to open the keypad
Tap to mute your sound so that the other
party cannot hear you. To end the mute mode, tap
the same button again.
Tap to end the call.
Tap to switch the call to your mobile phone.
To switch back to your Pocket PC, tap the same
button again.
67
Page 76

Receiving a Call
When you have a call after pairing with your mobile
phone, you will see the “Incoming Call” screen.
To accept the call, tap
To reject the call, tap
To mute the ring tone before receiving or rejecting, tap
.
.
.
Miscellaneous Buttons
In addition to buttons for placing a call, there are Connect, Pair Mode, Others, and
Exit buttons on the main screen as described below.
Connect
By tapping the Connect button on the main screen, you
can manually search the last paired mobile phones for
an available connection.
68
Page 77
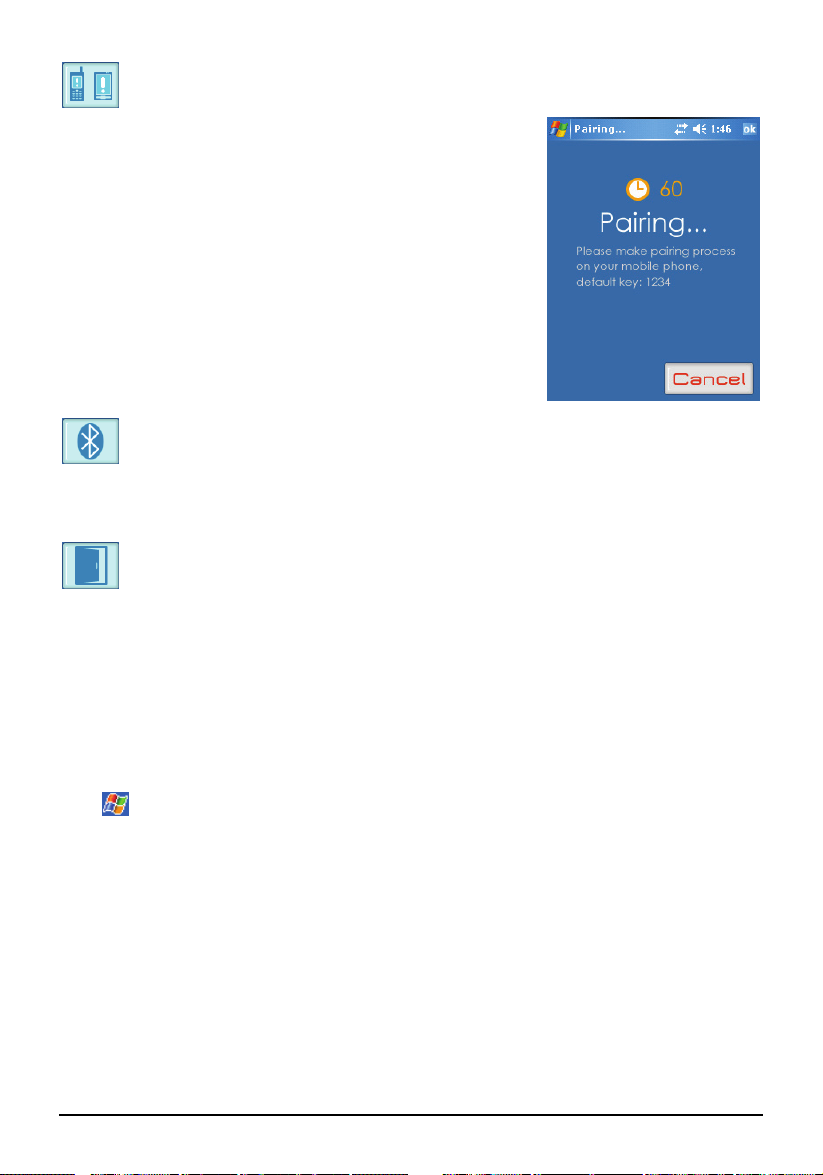
Pair Mode
By tapping the Pair Mode button on the main screen,
you can manually set your Pocket PC to Pair Mode.
Within the duration of 60 seconds, you can initiate the
pairing process on your mobile phone to discover your
Pocket PC as a car kit.
Others
By tapping the Others button on the main screen, you can run the BlueSoleil
program. (See section 6.3 for information on BlueSoleil.)
Exit
To close the Dialer screen, tap the Exit button on the main screen.
eConverter
eConverter provides three modes: Calculator, Currency, and Metrology. You
can use these modes to perform basic arithmetic and convert currency and
measure.
Tap
You will see the calculator screen. To switch to another mode, tap one of the
buttons at the top right corner of the screen.
Programs eConverter to switch to the program.
69
Page 78

Using Calculator Mode
Calculator mode allows you to perform any of the
standard operations for which you would normally
use a handheld calculator.
Using Currency Mode
Tap the
switch to Currency mode.
Tap the down arrow next to the input field to display
a list of currencies and select the currency to convert
from. Tap the down arrow next to the output field to
display a list of currencies and select the currency to
convert to.
Enter the currency value in the input field by tapping
the number buttons on the numeric keypad. The
converted currency immediately appears in the
output field.
button on the calculator screen to
70
Page 79

Before performing the currency conversion, you can
edit the exchange rate to the most up-to-date one. Tap
the
Edit button on the currency screen. Enter the
exchange rate and tap the √ button to save and go
back to the currency screen.
Using Metrology Mode
Tap the
switch to Metrology mode.
Tap the measure button on the metrology screen to
display a scroll list of measures and select the desired
measure from the list.
Tap the down arrow next to the input field to display
a list of units and select the unit to convert from. Tap
the down arrow next to the output field to display a
list of units and select the unit to convert to.
Enter the value in the input field by tapping the
number buttons on the numeric keypad. The
converted value immediately appears in the output
field.
button on the calculator screen to
Picture Viewer
Tap
This program provides an easy way to view image files in jpg and bmp formats.
You can:
Programs Picture Viewer to switch to the program.
View image files in thumbnail or list view.
Delete, rename, cut or copy an image file.
71
Page 80

Send the current image file via email
Edit an image file. You can crop an image, add text, write directly on the
image and add a frame.
Capture the screen.
Create a slide show.
Rotate an image.
72
Page 81

6 Getting Connected
To take full advantage of your Pocket PC, you will want to get connected. This
chapter tells you how you can get your Pocket PC connected through a variety
of ways including modem, network card, and Bluetooth. It also describes
Internet Explorer for Web browsing.
6.1 Connection Settings
Your Pocket PC has two groups of connection settings: “My ISP” and “My
Work Network.” My ISP settings are used to connect to the Internet, and My
Work Network settings can be used to connect to any private network, such as a
corporate network you use at work.
Connections can be made using a modem, wireless network, or network
(Ethernet) card.
After the connections, you can browse the Internet or intranet, send and receive
e-mail and instant messages, and synchronize information using ActiveSync.
Modem Connection
With a modem, you can dial in to your ISP or corporate network. Before
creating the connection, you need to:
Have a modem (SD IO or Bluetooth). (For installation information, see the
documentation supplied with the product.)
Obtain the following information from your ISP or network administrator:
server phone number, user name, password, domain name and TCP/IP
settings.
73
Page 82

Creating a Modem Connection
1. Tap Settings Connections Connections.
My ISP or My Work Network, tap Add a new modem connection. To view
2. In
additional settings, tap
NOTE: To change modem connection settings, in either My ISP or My Work Network, tap
Manage existing connections. Select the desired modem connection, tap Settings and
follow the instructions on the screen.
.
Starting and Ending a Modem Connection
To start the connection, install the modem and connect the modem cable. Then,
use the desired program. For example, switch to Pocket Internet Explorer and
browse to a Web page. Your Pocket PC will automatically connect.
To end the connection, tap the icon
Disconnect.
on the Navigation bar and then tap
Network (Ethernet) Card Connection
Use a network (Ethernet) card to connect directly to a network. You do not need
to create a new connection on your Pocket PC. Insert a network card and you
can create a connection.
Before creating the connection, you need to:
Have a network card (SD IO). (For installation information, see the
documentation supplied with the product.)
Obtain the following information from your network administrator: user
name, password and domain name.
Creating a Network Card Connection
1. Insert the network card into your Pocket PC.
2. The first time you insert the card, Network Settings appears automatically
so that you can configure the network card. If it does not appear or to change
settings later, tap
3. If you need to enter specific server information, on the
tap the appropriate adapter and then
Settings Connections Network Cards.
Network Adapters tab,
Name Servers. Most networks use
74
Page 83

DHCP, so you should not have to change these settings unless your network
administrator instructs you to do so.
4. If necessary, connect the network card to the network by using a network
cable.
NOTE: You may need proxy server and VPN connection settings. For more information,
see Pocket PC online help and your network administrator.
Starting and Ending a Network Card Connection
To start the connection, install the network card and connect the network cable.
Then, use the desired program. For example, switch to Pocket Internet Explorer
and browse to a Web page. Your Pocket PC will automatically connect.
To end the connection, remove the card from your Pocket PC.
75
Page 84

6.2 Using Bluetooth
Your Pocket PC incorporates Bluetooth capability. Bluetooth is a short-range
wireless communications technology. Devices with Bluetooth capabilities can
exchange information over a distance of about 10 meters (30 feet) without
requiring a physical connection.
A Bluetooth program called BlueSoleil is built into your Pocket PC. The
program includes eight Bluetooth application profiles: Headset, HandFree,
Intercom, PAN, DUN, SPP, OPP, and FTP.
Enabling Bluetooth
The
Bluetooth function is enabled. (If you don’t see the icon, tap
BlueSoleil to activate the Bluetooth program.)
Tap the Bluetooth icon
icon at the lower right corner of the Today screen indicates that the
to open the Bluetooth menu as shown below. From
Programs
this menu, you can turn Bluetooth radio on and off. When you turn off Bluetooth
radio, the icon changes to
. To manage Bluetooth, tap Bluetooth Manager.
NOTE:
To use the service of a remote Bluetooth device, make sure that the remote device is in
discoverable mode.
Tapping Bluetooth HF Phone in the Bluetooth menu starts the Dialer program. (See
section 5.8 for information.)
76
Page 85

Exploring Bluetooth Devices
1. On the Today screen, tap the Bluetooth icon
2. Tap
3. Tap the target device to browse the services of the remote device.
Explore a Bluetooth Device. You can tap the Refresh button
nearby devices.
and tap
Bluetooth Manager.
to search
77
Page 86

Dialing up to Internet
You can dial up to Internet and explore web sites with a Bluetooth-enabled
modem or telephone.
1. On the Today screen, tap the Bluetooth icon
2. Tap
3. Tap the target device that can act as a DUN (Dial-Up Networking) server to
4. Pair with the target device.
5. Enter the phone number (*99***1#) and tap
Dial-up to Internet. You can tap the Refresh button
devices.
establish a dial-up network connection.
and tap
OK.
Bluetooth Manager.
to search nearby
78
Page 87

6. A DUN shortcut is created. You can connect to the DUN server and browse
web sites using Internet Explorer.
7. If a dialog box pops up asking you to set up a new connection in Settings,
tap
Settings Connections and select IVT BT modem Vcom8 as the selected
modem.
8. Enter the ISP service phone number. For mobile phone’s GPRS, it is usually
*99***1#.
9. After connection, you can browse web sites using Internet Explorer.
79
Page 88

Transferring Files via Bluetooth
You can transfer files between your Pocket PC and a remote Bluetooth device.
1. On the Today screen, tap the Bluetooth icon
2. Tap
3. Tap the target device to establish a FTP (File Transfer Profile) connection.
4. The File Explorer window appears. To access the remote or local device,
5. Tap and hold on an item to display the shortcut menu. You can use
Transfer Files via Bluetooth. You can tap the Refresh button
nearby devices.
use the buttons at the bottom of the screen.
download/upload and delete operations.
and tap
Bluetooth Manager.
to search
80
Page 89

Local device Remote device
Using ActiveSync via Bluetooth
You can use ActiveSync via Bluetooth.
1. On the Today screen, tap the Bluetooth icon
2. Tap
ActiveSync via Bluetooth. You can tap the Refresh button
and tap
Bluetooth Manager.
to search
nearby devices.
3. Tap the target device to establish an SPP (Serial Port Profile) connection.
4. Select the serial port and tap
OK to start the ActiveSync connection.
81
Page 90

Using Intercom via Bluetooth
You can use your Pocket PC as an intercom to talk with other Bluetooth-enabled
intercoms.
1. On the Today screen, tap the Bluetooth icon
2. Tap
3. Tap the target device to establish an ICP connection.
Intercom via Bluetooth. You can tap the Refresh button
nearby devices.
and tap
82
Bluetooth Manager.
to search
Page 91

4. A dialog box will appear on your Pocket PC and the recipient’s device. The
recipient can choose to answer or ignore your call.
On your device On the recipient’s device
Exchanging Personal Information
You can exchange personal information such as contacts and appointments with
another device. The function is integrated into the shortcut menu of Contacts,
Calendar, and File Explorer.
From Shortcut Menu
1. Open the program containing the item you want to exchange.
2. Tap and hold the item and tap
Send by Bluetooth in the shortcut menu.
83
Page 92

From Bluetooth Manager
You can also use this method to exchange business cards.
1. On the Today screen, tap the Bluetooth icon
2. Tap
3. Tap the target device to establish an OPP (Object Push Profile) connection.
4. The default business card is sent to the target device if the default business
Exchange Personal Information. You can tap the Refresh button
search nearby devices.
card is set.
and tap
Bluetooth Manager.
to
84
Page 93
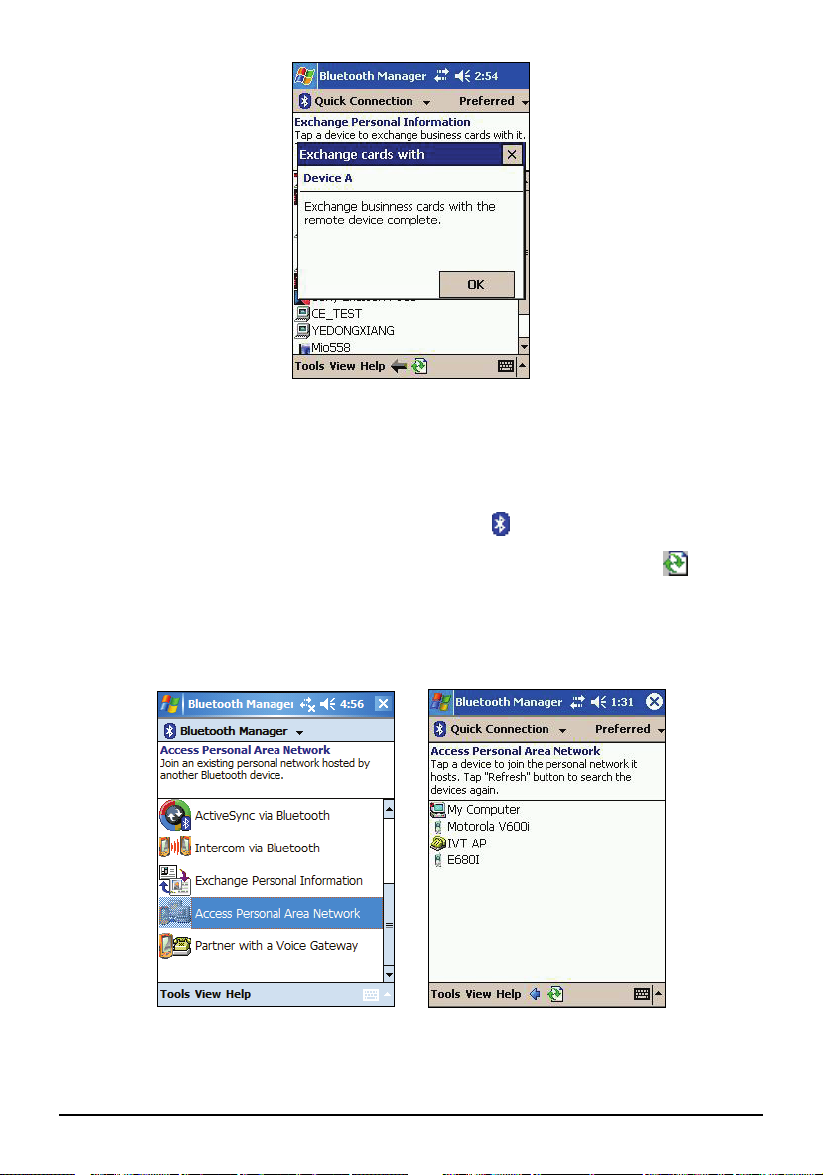
Accessing Personal Area Network
You can connect to Personal Area Network via Bluetooth.
1. On the Today screen, tap the Bluetooth icon
2. Tap
3. Tap the target device to establish a PAN (Personal Area Network)
Access Personal Area Network. You can tap the Refresh button
search nearby devices.
connection.
and tap
Bluetooth Manager.
to
85
Page 94

4. If the remote device provides Internet access service, you can browse web
sites.
Using a Voice Gateway
Your Pocket PC can work as a hands-free device after partnering with a voice
gateway.
1. On the Today screen, tap the Bluetooth icon
2. Tap
3. Tap the target device to partner with it.
4. Enter the passkey to create a bond between the two Bluetooth devices.
Partner with a Voice Gateway. You can tap the Refresh button
nearby devices.
and tap
Bluetooth Manager.
to search
86
Page 95

Configuring Bluetooth Settings
On the Today screen, tap the Bluetooth icon
Tools Bluetooth Settings
There is a total of eight pages to configure the Bluetooth server’s and client’s
attributes.
.
and tap
Bluetooth Manager
87
Page 96

Page Descriptions
General
This page lets you edit local device information.
Paired Device
This page lets you view paired devices.
88
Serial Port
This page lets you configure the SPP attributes such as
security and COM port.
Page 97

Page Descriptions
File Transfer
This page lets you configure the FTP attributes such as
security, shared folder, and read/write option.
Object Exchange
This page lets you configure the OPP attributes such as
security and business card location.
Dial-up Network
This page lets you configure the DUN attributes such as
security, COM port, and baud rate.
89
Page 98

Page Descriptions
Personal Network
This page lets you configure the PAN attributes such as
security.
Hands-free
This page lets you configure the hands-free device
attributes such as functionality and security.
Using My Shortcuts
Once you have established a Bluetooth connection with a remote device, it will
be saved as a shortcut. My Shortcuts allows you to conveniently use the same
service again by tapping the particular shortcut item.
1. On the Today screen, tap the Bluetooth icon
2. Tap
3. Tap and hold the desired item. Tap
My Shortcuts.
Connect to establish a connection again.
90
and tap
Bluetooth Manager.
Page 99

4. The color of a shortcut item will change to green after the connection is
established. To disconnect, tap and hold the item and tap
Disconnect.
Viewing Active Connections
To view active outgoing and incoming connections:
1. On the Today screen, tap the Bluetooth icon
2. Tap
3. When you tap and hold an item, you can disconnect it or view the status of
Tools Active Connections.
the connection.
and tap
Bluetooth Manager.
91
Page 100

92
 Loading...