

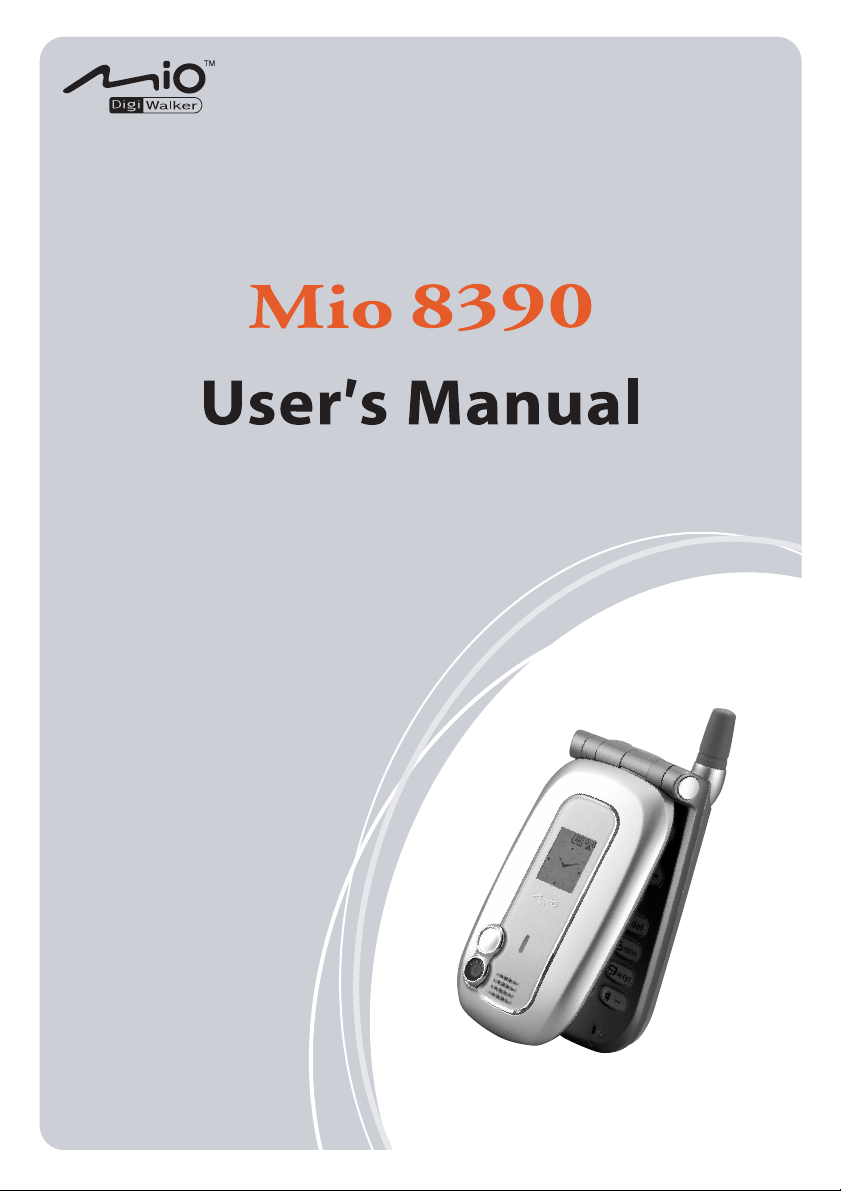
Page 1
Page 2

Revision: R03
June, 2004
Trademarks
All brand and product names are trademarks or registered trademarks of their respective companies.
Note
The information in this manual is subject to change without notice.
Page 3

Safety Precautions
General Guidelines for Your Smartphone
Avoid placing the Smartphone in a location subject to extreme temperatures, high humidity,
or heavy dust.
The Smartphone and its accessories are not waterproof. Please keep them in a dry place.
Do not knock, shake, or toss the Smartphone. Doing so may cause leakage, overheating, or
fire.
Do not disassemble the Smartphone or its accessories without authorized permission.
Do not place the Smartphone near the edge of a surface, especially when the vibration
function of the Smartphone is turned on. The Smartphone may move and drop due to the
vibration.
Keep the Smartphone in place when driving. Do not place it on the passenger seat or where it
can break loose in a collision or sudden stop.
Do not delete files in the Windows folder of the Smartphone. Doing so may cause
malfunction.
Guidelines for Using the Phone Feature
Use the Smartphone in a normal position. Do not cover the antenna unnecessarily; doing so
may affect the communication quality and consume more power.
Use a phone headset or pull over your car first if using the Smartphone when driving.
Your Smartphone produces the electromagnetic wave with the specific absorption rate (SAR)
of 1.02W/kg, lower than the standard value of 1.6W/kg. However, to reduce the effects of the
electromagnetic wave on the human body, please use the phone feature with care. For
example, make short calls as possible as you can.
Your Smartphone is a low-power RF (radio frequency) device. It receives and sends out RF
signals when the phone feature is turned on. Therefore, be careful of the following:
• Most RF devices are shielded from RF signals. However, your Smartphone may still
interfere with or get interfered by nearby devices, such as a TV set, radio, or computer.
• Turn off the phone feature where posted notices are set up to avoid interference or
danger.
• Turn off the phone feature near hospitals or medical equipment (such as pacemakers or
hearing aids) to avoid interference.
• Turn off the phone feature near gas stations, fuel depots, chemical factories, or blasting
areas.
• Turn off the phone feature on an aircraft to avoid interference with the flight instruments
for possible danger.
i
Page 4

Guidelines for Using the AC Adapter
Use only the AC adapter (PHIHONG, PSC05R-050) that comes with the Smartpnone. Using
other AC adapters may cause malfunction or danger.
This product is intended to be supplied by a LISTED Power Unit marked “LPS” and output
rated + 5 Vdc / 1.0A minimum.
Do not use the AC adapter in a humid environment. Do not touch the AC adapter with wet
limbs.
Place the AC adapter in a well-ventilated location.
Connect the AC adapter to a proper power source. The voltage and grounding requirements
are described on the device or its package.
Do not use the AC adapter when the power cord is damaged.
Guidelines for Using the Battery
Use only the AC adapter that comes with the Smartphone to charge the battery.
Store the battery where the temperature is between 0°C (32°F) and 40°C (104°F) to avoid
danger.
To avoid a short circuit, do not allow the contact of the battery’s + and – ends with the metal
objects, such as paper clips or power cords.
Keep the battery away from fire sources or heaters to avoid leakage, overheating, or fire.
Keep the battery from water, rain, or extreme humidity.
Do not disassemble or pierce the battery, or place it in fire. The battery may break, explode, or
release dangerous chemical materials.
All batteries have limited lives. The battery life will decrease after repeated discharging and
recharging. When the operating time is obviously decreasing and recharging the battery is not
useful, replace the battery with a new one.
Caution: Risk of explosion if battery is replaced by an incorrect type. Replace only with the
same or equivalent type recommended by the manufacturer. Dispose of used batteries
according to the instructions.
ii
Page 5

Preface
Welcome
Congratulations on purchasing this Windows Mobile™ Smartphone. Your Smartphone is more
than a mobile phone. It not only provides the full features of a GPRS mobile phone, but also allows
you to take photos, record videos, browse the Internet and WAP web pages, receive and send
messages (such as emails, instant messages and MMS multimedia messages), listen to music, play
JAVA games, and lots more. Whenever you need to communicate, capture images, search for
information, send messages or enjoy yourself, the Smartphone can help you get what you want any
time any place.
With the Windows Mobile™ for Smartphone operating system, you can always use Microsoft®
ActiveSync® to synchronize your personal Microsoft Outlook data between the Smartphone and
desktop computer, including Contacts, Calendar, Inbox, and Tasks.
About this Manual
This manual is composed of three parts.
Part I “System Manual” tells you how to use the Smartphone, including the basic
operations, core programs of Windows Mobile™ for Smartphone, and the system settings.
Part II “Software Manual” gives information on the “additional software” (in addition to
the core programs of Windows Mobile™ for Smartphone), including the add-on programs and
games provided by your Smartphone manufacturer.
Part III “References” provides the reference information, such as the product specifications.
_ NOTE`
When the commands are connected with an arrow ( ), select them in that order.
Depending on the model you purchased, the appearance of your Smartphone may not be
exactly the same as those shown in this manual.
Some of the features are provided by the wireless mobile network services and not described in
details in this manual. Please contact your service provider for further information.
Depending on the continuing developments of the product, the software supplied with your
Smartphone may be changed or updated. If there is any difference between the information in
this manual and your product, the operation should be based on the product you have.
iii
Page 6

Where to Find Information
If you cannot find information in this manual, refer to the following table to acquire the specific
information:
For information on See this source
First time startup Quick Start Guide
Chapter 7 of this manual More information on Microsoft ActiveSync
ActiveSync Help on your desktop computer
Last-minute updates and detailed technical
information
The readme files in the “Microsoft ActiveSync”
folder on your desktop computer or the
Smartphone Companion CD
The Mio series product Web site:
www.mio-tech.be
The Microsoft Web site:
www.microsoft.com
iv
Page 7

Table of Contents
Safety Precautions.............................................................................................. i
Preface ............................................................................................................. iii
Part I System Manual..............................................................................1
Chapter 1 Getting Started ..............................................................................3
1.1 Hardware Features ................................................................................. 4
Front Components .................................................................................. 4
Side Components ................................................................................... 4
Top and Bottom Components ................................................................. 5
Back Components................................................................................... 5
Cover-open Components........................................................................ 6
1.2 ActiveSync Cable and USB Cradle ......................................................... 7
1.3 Installing the SIM Card and Battery ........................................................ 8
1.4 Charging the Battery ............................................................................... 9
1.5 Turning Your Smartphone on and off.................................................... 10
Turning on............................................................................................. 10
Turning off............................................................................................. 10
Power Management.............................................................................. 10
1.6 Installing ActiveSync ............................................................................. 11
1.7 Expanding Your Smartphone................................................................ 13
Accessories........................................................................................... 13
Using the Phone Headset ..................................................................... 13
Using a SD/MMC Card.......................................................................... 14
Chapter 2 Basic Skills ..................................................................................15
2.1 Navigation Methods .............................................................................. 16
Navigation Pad...................................................................................... 16
Action Key............................................................................................. 16
Home Key ............................................................................................. 16
Back Key............................................................................................... 16
Soft Keys............................................................................................... 17
Numeric Keypad ................................................................................... 17
2.2 Home Screen and Screen Elements..................................................... 18
Home Screen ........................................................................................ 18
Status Indicators ................................................................................... 19
Start List................................................................................................ 20
Menus ................................................................................................... 20
Quick List .............................................................................................. 21
2.3 Entering Text and Numbers .................................................................. 22
Language Menu .................................................................................... 22
Entering Text......................................................................................... 22
Entering Numbers in the Numeric Mode ............................................... 24
Entering Symbols.................................................................................. 24
Miscellaneous Input Tasks.................................................................... 25
2.4 Securing the Smartphone ..................................................................... 26
Locking the Keypad .............................................................................. 26
Locking the Smartphone ....................................................................... 27
v
Page 8

Locking the SIM Card............................................................................ 28
Chapter 3 Using the Phone ..........................................................................29
3.1 Making a Call......................................................................................... 30
Dialing a Call .........................................................................................30
Making a Call from Contacts .................................................................30
Making a Call from Speed Dial .............................................................. 31
Making a Call Using a Recently Dialed Number.................................... 32
Making a Call from the Call History List................................................. 32
Making a Call from a Hyperlink.............................................................. 32
3.2 Responding to an Incoming Call............................................................ 33
Answering an Incoming Call.................................................................. 33
Rejecting an Incoming Call.................................................................... 33
3.3 Managing More than One Call............................................................... 34
Holding a Call to Take a Second Call.................................................... 34
Rejecting the Second Call ..................................................................... 34
Holding a Call to Make a Second Call ................................................... 34
Swapping between Calls ....................................................................... 34
Setting up a Conference Call................................................................. 34
3.4 In-call Options ....................................................................................... 35
Adjusting the Phone Volume ................................................................. 35
Speakerphone ....................................................................................... 35
In-call Options ....................................................................................... 35
3.5 Call History ............................................................................................ 36
Opening Call History ............................................................................. 36
Call History Menu Commands............................................................... 36
3.6 Speed Dial............................................................................................. 37
Creating a Speed Dial ...........................................................................37
Editing a Speed Dial.............................................................................. 37
Deleting a Speed Dial............................................................................ 38
Viewing Speed Dials You Have Created ............................................... 38
3.7 Voice Tag .............................................................................................. 39
Creating a Voice Tag............................................................................. 39
Using a Voice Tag ................................................................................. 39
Playing Back a Voice Tag ..................................................................... 39
Deleting a Voice Tag ............................................................................. 40
Viewing Voice Tags You Have Created ................................................40
3.8 Voice Mail.............................................................................................. 41
Setting up the Voice Mail Phone Number.............................................. 41
Checking Your Voice Mail .....................................................................41
3.9 International Call ................................................................................... 42
3.10 Turning off the Radio............................................................................. 43
Chapter 4 Setting up Your Smartphone .......................................................45
4.1 Settings (Page 1)................................................................................... 46
Sounds .................................................................................................. 47
Date and Time....................................................................................... 47
Profiles .................................................................................................. 47
Home Screen ........................................................................................ 48
Data Connections.................................................................................. 49
vi
Page 9

Owner Information ................................................................................ 52
Power Management.............................................................................. 52
Remove Programs ................................................................................ 52
4.2 Settings (Page 2) .................................................................................. 54
Beam..................................................................................................... 55
Phone.................................................................................................... 55
Accessibility .......................................................................................... 56
Regional Settings.................................................................................. 56
Security ................................................................................................. 56
Certificates ............................................................................................ 56
Bluetooth............................................................................................... 57
About..................................................................................................... 57
Chapter 5 Messaging Features ....................................................................59
5.1 Understanding Messaging Types.......................................................... 60
E-mail Messaging ................................................................................. 60
SMS Messaging.................................................................................... 60
Instant Messaging................................................................................. 60
5.2 Setting up Messaging Accounts............................................................ 61
Setting up Outlook Synchronization ...................................................... 61
Setting up an Internet E-mail Account................................................... 61
5.3 Working with Accounts.......................................................................... 63
Viewing the List of Accounts ................................................................. 63
Changing the Accounts Quickly ............................................................ 63
Changing E-mail Account Options ........................................................ 63
Deleting an Account.............................................................................. 63
5.4 Composing and Sending Messages ..................................................... 64
Composing an E-mail or SMS Message ............................................... 64
Inserting Predefined Text into Messages.............................................. 65
Inserting Voice Recordings into Messages ........................................... 65
Inserting Signatures into Messages ...................................................... 66
Sending Messages ............................................................................... 66
Requesting a Delivery Receipt.............................................................. 67
5.5 Receiving Messages ............................................................................. 68
Receiving SMS Messages .................................................................... 68
Receiving E-mail Messages.................................................................. 69
5.6 Viewing and Responding to Messages ................................................. 70
Working with the Message List ............................................................. 70
Inbox Menu ........................................................................................... 71
Downloading a Complete E-mail Message ........................................... 72
Downloading an Attachment ................................................................. 72
Accepting Meeting Requests ................................................................ 73
5.7 Managing Message Folders.................................................................. 74
Viewing the Message Folder Contents ................................................. 74
Marking a Folder for Synchronization ................................................... 74
Moving a Message to a Different Folder ............................................... 75
Emptying the Deleted Items Folder....................................................... 75
5.8 MSN Messenger ................................................................................... 76
Using MSN Messenger ......................................................................... 76
vii
Page 10

Chapter 6 Pocket Outlook ............................................................................79
6.1 Contacts ................................................................................................ 80
Viewing Contacts................................................................................... 80
Creating a New Contact ........................................................................82
Deleting a Contact................................................................................. 82
Finding a Contact ..................................................................................82
Editing a Contact ................................................................................... 83
Selecting a Ring Tone for a Contact...................................................... 83
Copying Phone Numbers from Your SIM Card to Contacts ..................83
Copying Phone Numbers from Contacts to Your SIM Card ..................84
Calling a Contact ................................................................................... 84
6.2 Calendar................................................................................................ 86
Creating a New Appointment................................................................. 86
Viewing an Appointment........................................................................ 86
Editing an Appointment .........................................................................86
Deleting an Appointment ....................................................................... 86
Viewing Your Schedule .........................................................................87
Importing Calendar Information ............................................................. 88
6.3 Tasks..................................................................................................... 89
Creating a New Task............................................................................. 89
Viewing the Task List ............................................................................ 89
6.4 Voice Notes ........................................................................................... 90
Creating a Voice Note ...........................................................................90
Listening to a Recording........................................................................ 90
6.5 Beaming Information .............................................................................91
Beaming a Contact or an Appointment.................................................. 91
Receiving Beamed Information .............................................................91
Chapter 7 ActiveSync...................................................................................93
7.1 ActiveSync Overview............................................................................. 94
7.2 Using ActiveSync .................................................................................. 95
Synchronizing information ..................................................................... 95
Results of Synchronization.................................................................... 96
7.3 Setting up Server ActiveSync ................................................................ 97
Setting up Server ActiveSync................................................................ 97
Stopping Synchronizing with a Server................................................... 97
7.4 Creating a Synchronization Schedule ................................................... 98
Creating a Synchronization Schedule with an Exchange Server .......... 98
7.5 Synchronizing Remotely........................................................................ 99
Synchronizing Remotely with a Desktop Computer .............................. 99
7.6 Synchronizing by Using an Infrared Connection ................................. 100
Chapter 8 Internet, Entertainment, and More .............................................101
8.1 Internet Explorer.................................................................................. 102
Browsing the Web ...............................................................................102
Using the Favorites List....................................................................... 103
Refreshing Web Pages ....................................................................... 103
Customizing Pocket Internet Explorer ................................................. 104
viii
Page 11

8.2 Media Player ....................................................................................... 105
Playing Files........................................................................................ 105
Using Menu Commands When Playing a File..................................... 106
Using Media Player Favorites ............................................................. 107
Licenses.............................................................................................. 107
Media Player Compatibility.................................................................. 108
8.3 Modem Link ........................................................................................ 109
Setting up an Infrared Connection ...................................................... 109
Setting up a USB Connection ............................................................. 109
8.4 Games ................................................................................................ 111
Solitaire ............................................................................................... 111
Jawbreaker ......................................................................................... 112
8.5 Calculator............................................................................................ 113
8.6 Band Selection.................................................................................... 114
Part II Software Manual........................................................................115
Chapter 9 Using the Digital Camera...........................................................117
9.1 PhoneCamera..................................................................................... 118
Taking Photos ..................................................................................... 118
Continues............................................................................................ 119
Recording Videos................................................................................ 119
PhoneCamera Settings....................................................................... 121
Notes on Using PhoneCamera ........................................................... 122
9.2 PhoneViewer....................................................................................... 123
Viewing Photos ................................................................................... 123
Adding Notes to a Photo ..................................................................... 124
Adding a Theme to a Photo ................................................................ 125
Slide Show .......................................................................................... 126
PhoneViewer Menu Commands ......................................................... 127
9.3 VideoPlayer......................................................................................... 128
Playing Videos .................................................................................... 128
Chapter 10 MMS Messages.........................................................................131
10.1 MMS Overview.................................................................................... 132
10.2 MMS Settings...................................................................................... 133
MMS Connection Settings................................................................... 133
10.3 Composing and Sending MMS Messages .......................................... 134
Composing a MMS ............................................................................. 134
Configuring Message Settings ............................................................ 136
Sending a MMS .................................................................................. 136
10.4 Receiving and Responding to MMS Messages .................................. 137
Opening a Message............................................................................ 137
Responding to an Opened Message................................................... 138
10.5 Managing Message Folders................................................................ 139
Changing the Message Folders .......................................................... 139
Sorting the Messages ......................................................................... 139
Moving a Message to a Different Folder ............................................. 140
Emptying a Folder............................................................................... 140
ix
Page 12

Chapter 11 PhotoID......................................................................................141
11.1 PhotoID Overview ............................................................................... 142
11.2 Assigning a Photo for a Contact .......................................................... 143
11.3 Managing Contacts ............................................................................. 144
Adding a Contact................................................................................. 144
Deleting a Contact............................................................................... 144
Editing a Contact ................................................................................. 145
Viewing Modes .................................................................................... 145
Managing Contact Groups .................................................................. 146
11.4 PhotoID Settings ................................................................................. 148
Chapter 12 Utility Programs .........................................................................149
12.1 Installing Utility Programs.................................................................... 150
12.2 TaskManager ...................................................................................... 151
12.3 PhoneExplorer..................................................................................... 152
Opening PhoneExplorer ...................................................................... 152
Browsing and Finding Files .................................................................152
Sorting Order....................................................................................... 153
Managing Files .................................................................................... 153
12.4 PhoneReader ......................................................................................154
Opening and Exiting PhoneReader ..................................................... 154
Book Folders and Book Lists............................................................... 154
Reading a Book................................................................................... 155
Using Bookmarks ................................................................................155
PhoneReader Favorites ...................................................................... 156
PhoneReader Settings ........................................................................156
Managing Book Folders ...................................................................... 156
12.5 PhoneCity............................................................................................ 157
Changing the Clock Style .................................................................... 157
Selecting Cities.................................................................................... 158
Adjusting the Time............................................................................... 159
Synchronizing GMT............................................................................. 160
12.6 MPEG4 Plug-in.................................................................................... 161
12.7 Mio Assistant ....................................................................................... 162
Using the Contacts Function ...............................................................163
Using the SMS Function...................................................................... 164
Using the Ring Function ...................................................................... 165
Using the Photo Function .................................................................... 166
Using the Video Function ....................................................................167
Mio Assistant Settings ......................................................................... 168
Chapter 13 Games .......................................................................................169
13.1 Java Game .......................................................................................... 170
Opening Java ......................................................................................170
Mio Burning Rush................................................................................ 170
x
Page 13

Part III References ................................................................................ 171
Chapter 14 References ................................................................................173
14.1 Product Specification .......................................................................... 174
14.2 Frequently-asked Questions ............................................................... 175
14.3 Restoring Factory Default State .......................................................... 176
14.4 Regulatory Information........................................................................ 177
European Notice ................................................................................. 177
Chapter 15 Index..........................................................................................179
xi
Page 14

Page 15

Part I
System Manual
1
Page 16

Page 17

1
Getting Started
This chapter introduces you to the external components of your Smartphone and guides you
through the process of setting up your Smartphone for use.
This chapter includes:
1.1 Hardware Features ........................................................4
1.2 ActiveSync Cable and USB Cradle...............................7
1.3 Installing the SIM Card and Battery .............................8
1.4 Charging the Battery .....................................................9
1.5 Turning Your Smartphone on and off.........................10
1.6 Installing ActiveSync..................................................11
1.7 Expanding Your Smartphone......................................13
3
Page 18
1.1
Hardware Features
Front Components
Side Components
Fixed
Antenna
Small
Status
Display
Notification
Indicator
Speaker
Camera
Lens
Viewing
Mirror
Volume
Control
Receives and transmits wireless radio
when you are using the phone.
Displays current time, battery power,
signal strength, number of missed
calls and messages.
Flashing in red indicates low battery
status.
Glowing in red indicates that battery
charging is in progress.
Glowing in green indicates that the
battery is fully charged.
Sends out voice, music, audible
reminders and alerts.
Take photos or record videos.
Allows you to adjust the distance and
angle when using the Smartphone to
take a photo of yourself.
When the Smartphone’s cover is
open:
Adjusts the volume by pressing the
upper or lower button. Pressing the
Volume control can immediately
silence the ring of an incoming call.
When the Smartphone’s cover is
closed:
Pressing the upper button changes the
clock mode in the small status
display; pressing the lower button
opens the backlight of the small status
display.
SD/MMC
Card Slot
Accepts an optional SD/MMC card
for extended memory capacity.
4
Page 19
Top and Bottom Components
Back Components
Headphone
Connector
IR Port Beams files to other mobile devices.
Lanyard
Eyelet
Power
Connector
ActiveSync
Connector
Battery Lock Secures the battery in place.
Battery
Connects to a pair of stereo headphones
or a hands-free phone headset.
Lanyard attaches to this opening.
Connects to the AC adapter.
Connects to your desktop computer for
data synchronization.
Serves as the internal power source for
your Smartphone. You can recharge the
battery by connecting to AC power.
5
Page 20
Cover-open Components
Earpiece Serves as the phone earpiece.
Screen
Navigation
Pad
Soft Key
Action Key
Back Key
End Key
Displays the Home screen, status icons,
active programs and soft key commands.
Moves up, down, left or right by pressing
the corresponding area of the pad.
Performs the command shown on the
display immediately above the keys.
Confirms your selection, similar to the
Enter key on a keyboard.
Navigates to the previous screen.
Backspaces over one or more characters
when you are in a text field.
Turns your Smartphone on or off.
Ends or rejects a call.
Press and hold to display the Quick List.
Numeric
Keypad
Microphone
Talk Key
Enters numbers and characters.
Serves as the mouthpiece during a call.
Receives sound and voice to record voice
notes.
Dials or answers a call.
Press and hold this key during a call to
switch to the speakerphone mode.
Press and hold this key on the Home
screen to use the voice tag.
Home Key
Displays the Home screen.
6
Page 21
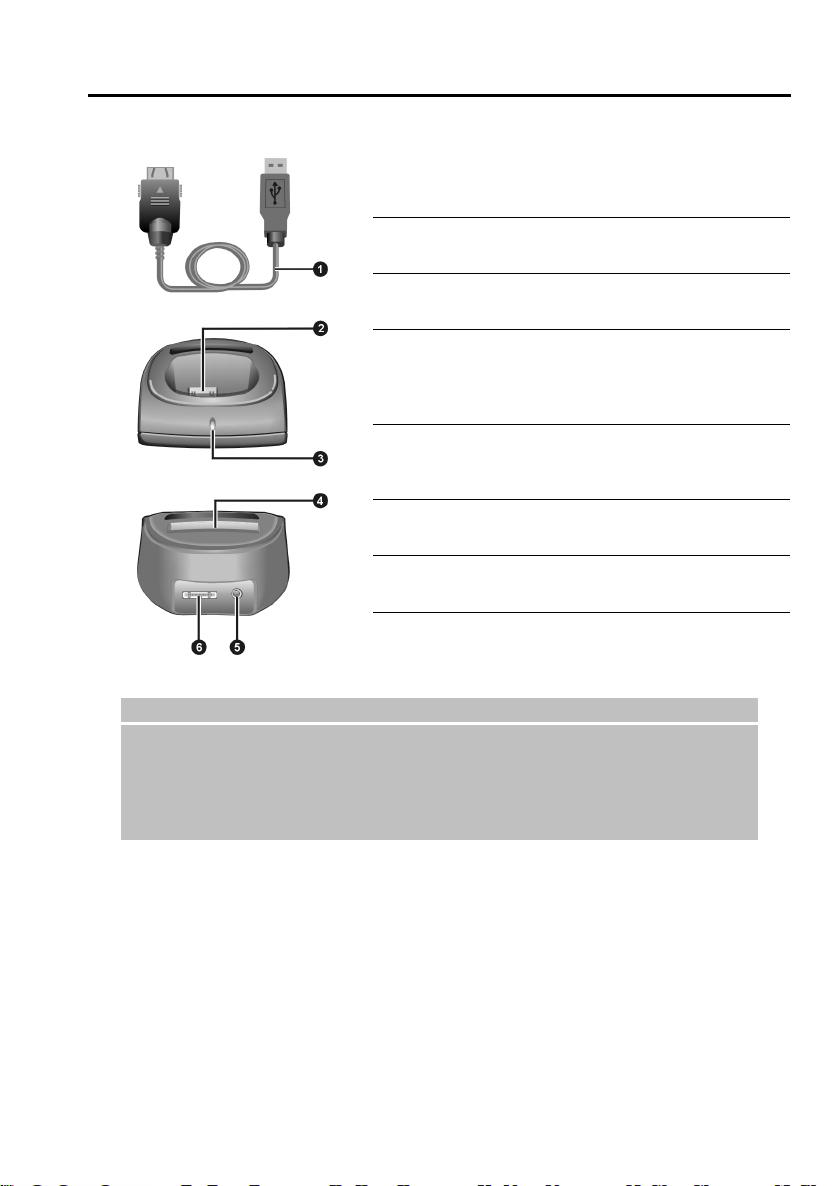
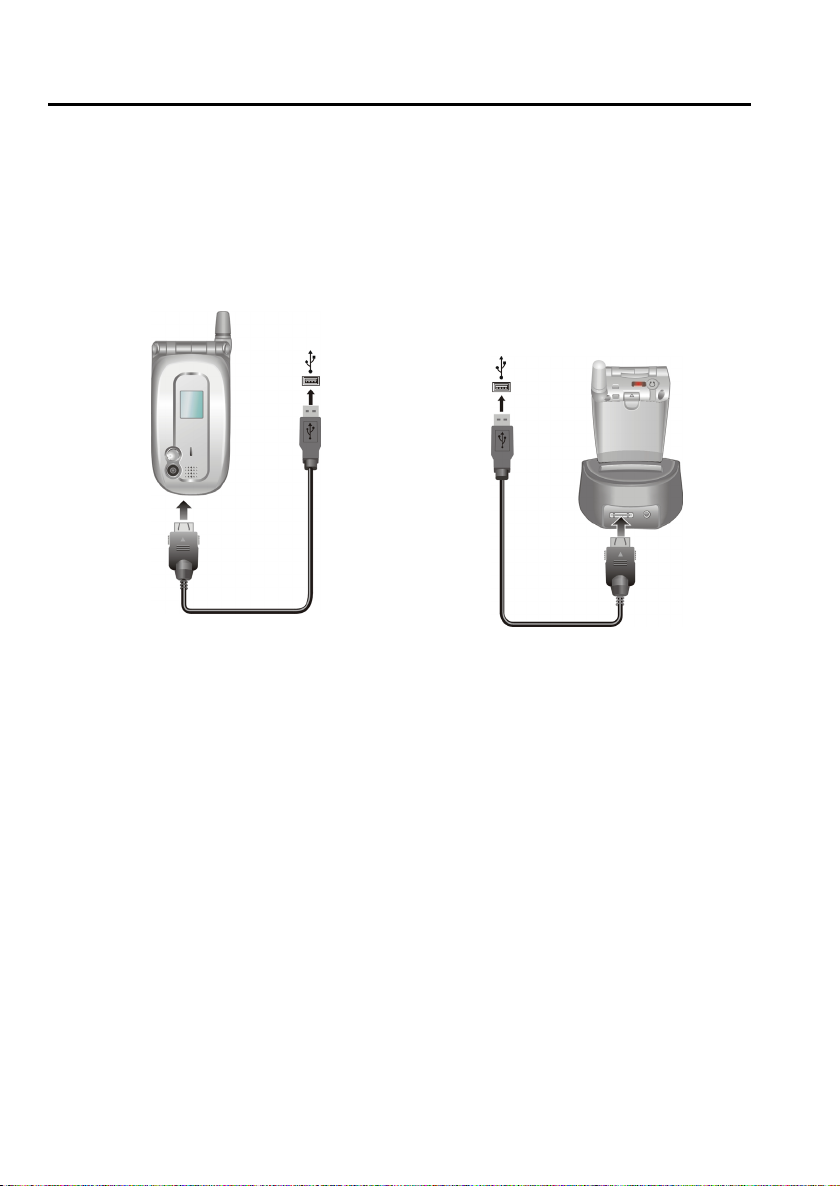
1.2
ActiveSync Cable and USB Cradle
Cradle front
Cradle back
_ NOTE`
ActiveSync
Cable
Smartphone
Connector
Battery Charge
Indicator
(optional)
Battery
Connector
(optional)
Power
Connector
ActiveSync
Connector
Connects your Smartphone to a
desktop computer.
Connects your Smartphone.
Glows red when the battery away
from the Smartphone is being
charged and glows green when the
battery is fully charged.
Connects an additional battery.
Connects the AC adapter.
Connects the ActiveSync cable.
Depending on the model you purchased, the cradle may not be included as a standard
accessory.
There are two kinds of cradle: one with the battery connector, and the other without the battery
connector. The battery connector allows you to charge the battery removed from the
Smartphone, or the optional second battery.
7
Page 22
1.3
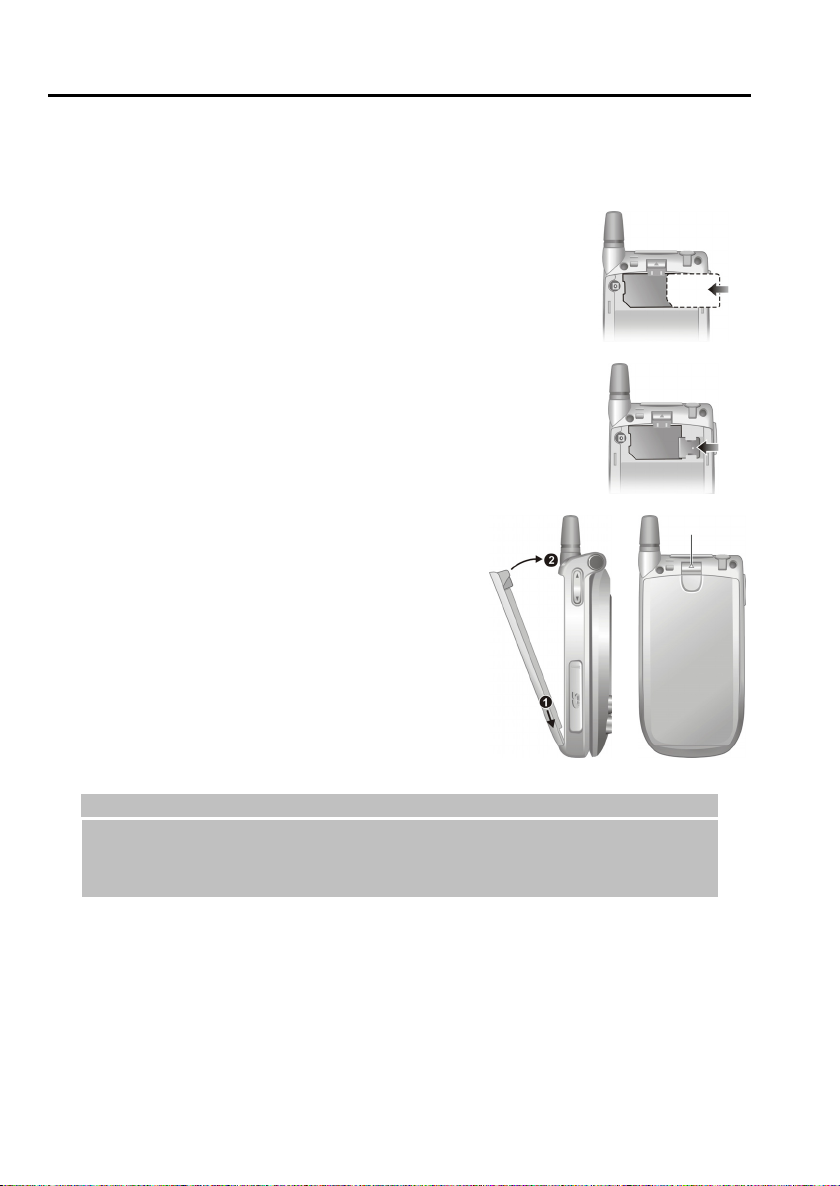
Installing the SIM Card and Battery
After applying for an account with a mobile phone service provider, you will be provided a SIM
(Subscriber Identification Module) card. This card contains your mobile phone account details,
contacts that can be stored and any additional services to which you have subscribed. You must
install a SIM card before you can make or receive phone calls or use wireless data services.
1.
Insert the SIM card with the contact area facing downward (the
angled corner is in the bottom-left position). Make sure that the
SIM card should be engaged below the two metal holders in the top
and left directions.
2.
Press the SIM card and push the SIM card lock toward the left to
cover the SIM card.
3. To install the battery, insert the two projecting parts
on the battery into the holes in the battery
compartment, and then press to close the battery.
You should hear a “click” sound indicating that the
battery is locked.
_ NOTE`
To remove the battery, push the battery lock upward. The battery will pop out slightly for
removal.
Insert and remove the SIM card with care. Do not bend the SIM card or scratch the contact area.
Battery lock
8
Page 23
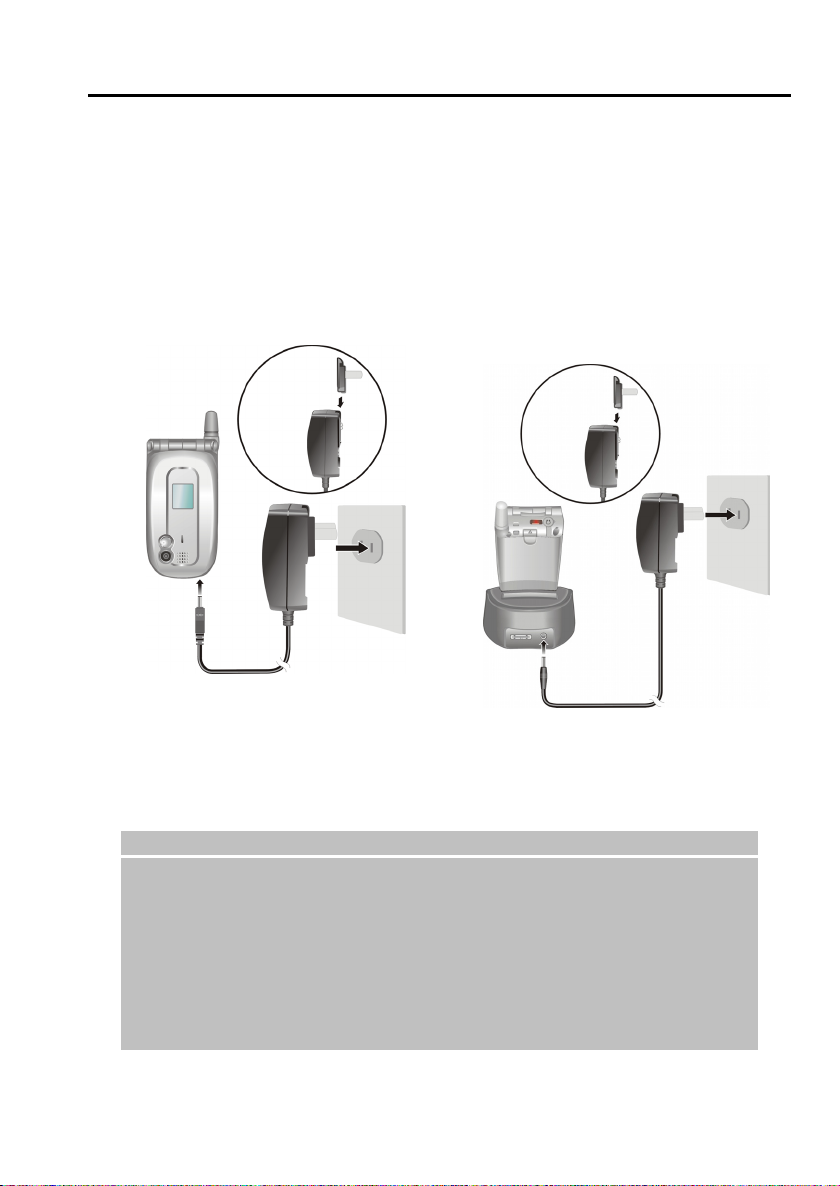
1.4
Charging the Battery
You must fully charge the battery before starting to use your Smartphone for the first time.
1. Attach the converter to the AC adapter.
2.
If you have the cradle, you can place the Smartphone on the cradle to charge the battery.
Not using the cradle
Connect the DC end of the AC adapter
to the power connector on the bottom of
the Smartphone, and the other end to the
electrical outlet on the wall.
Using the cradle
Slide the Smartphone into the cradle.
Connect the DC end of the AC adapter to
the power connector on the rear of the
cradle, and the other end to the electrical
outlet on the wall.
Converter
Converter
3. The notification indicator on the Smartphone’s top cover glows in red to indicate that battery
charging is in progress. Do not disconnect the AC adapter until the battery is fully charged.
The indicator will change to green when the battery is fully charged.
_ NOTE`
When charging the battery for the very first time, you should charge it for at least eight hours.
A discharged battery can be fully charged after two hours. The charging time may vary in
different conditions.
When a fully discharged battery is being charged, you can turn on the Smartphone only after it
connects to the AC power for at least five minutes.
You can use your Smartphone during charging.
If your cradle has a battery connector, you can charge the battery removed from the
Smartphone.
9
Page 24
1.5
Turning Your Smartphone on and off
Turning on
1. Open the top cover. Press and hold the End key . The backlight of the keypad will
glow, and your Smartphone will display startup screens and then the Home screen.
2. If the service provider (or you) has set the PIN, you will be prompted to enter the PIN. Enter
the PIN and press the Done soft key. (For details on PIN, see “Locking the SIM Card” in
section 2.4.)
3. Your Smartphone starts to search the mobile network and the service provider’s name will be
displayed on the screen. You can now use your Smartphone.
_ NOTE`
You can turn off the radio (phone function) and use other functions of your Smartphone without
installing the SIM card. (To turn off the radio, see section 3.10.)
Turning off
1. Press and hold the End key
2. The first option is Power off. Press the Action key or Select soft key to turn off your
Smartphone.
until the Quick List appears.
Power Management
By default, your Smartphone will automatically turn off the screen’s and keypad’s backlight after
being idle for 60 seconds. In addition, your Smartphone may enter the sleep mode, causing the
screen to blank, after being idle for a specific period of time. To end the sleep mode, press and hold
any key, or open the top cover. The screen will restore. (For information on Power Management,
see “Power Management” in section 4.1.)
_ NOTE`
The battery’s operating time relies on the mobile network status, the way you use your
Smartphone and the ambient environment. The power consumption is higher under the
following conditions:
Your Smartphone has to frequently search mobile network because of weak signals,
•
moving in high speed or being out of the range of the mobile network.
You use the vibration function, hands-free solution, alarm, or play games.
•
The backlight is on.
•
The phone’s volume is set to maximum.
•
You use the camera.
•
The operating time is shorter in low temperatures.
•
10
Page 25

1.6
Installing ActiveSync
You can use Microsoft ActiveSync technology to synchronize information on your desktop
computer or a Microsoft Exchange® Server with the information on your Smartphone. ActiveSync
compares the information on the Smartphone with the information on the desktop computer or the
server and updates all locations, keeping you up-to-date with the most recent information.
_ NOTE`
Before the installation, make sure that you have Microsoft Outlook installed on your desktop
computer. If you do not have Outlook or your version of Outlook is earlier than the version
provided on the Companion CD, install Outlook from the Companion CD.
Do not connect your Smartphone to your desktop computer before ActiveSync is installed.
During the New Partnership setup, select “Synchronize with this desktop computer.” Do not
select “Synchronize with Microsoft Exchange Server and/or this desktop computer” unless you
are sure that your company is running Microsoft Exchange Server and Exchange ActiveSync.
Contact your network administrator or ISP for detailed information.
ActiveSync is already installed on your Smartphone. You need to install ActiveSync on your
desktop computer. Follow the procedure below:
1. Turn on your desktop computer.
2.
Insert the Companion CD into the CD-ROM drive of your desktop computer.
3. Click the arrow on the first screen to enter the main screen and click Start Here.
4. In the following screen, click Install ActiveSync on the left column.
5. In the following screen, click Install to start the installation.
6.
If you use Windows XP, select Open when the “File Download” window appears on the
screen; if you use Windows 2000/Me/98, select Run this program from its current location
and click OK.
7.
Follow the on-screen instructions to install ActiveSync.
11
Page 26
8.
When prompted, connect your Smartphone to your desktop computer. If you have the cradle,
you can use it to connect.
Not using the cradle
Connect the appropriate end of the
ActiveSync cable to the bottom of the
Smartphone and the other end to a USB
port on your desktop computer.
Using the cradle
Slide the Smartphone into the cradle.
Connect the appropriate end of the
ActiveSync cable to the connector on the
rear of the cradle, and the other end to a
USB port on your desktop computer.
9. The “Add New Hardware Wizard” should automatically install the USB driver. (If you need
to specify the location of the driver, click Browse and select the CD-ROM drive containing
the Companion CD.)
10. Follow the on-screen instructions to establish a partnership and synchronize your Smartphone
with your desktop computer.
11.
You will see the data saved in your Outlook (such as the Calendar, Contacts, and Tasks)
appears on your Smartphone. (For more information on ActiveSync, see Chapter 7.)
12
Page 27
1.7
Expanding Your Smartphone
_ NOTE`
The availability of accessories from the Smartphone manufacturer may vary by regions. For the
latest information, please contact your local dealer.
The use of unauthorized accessories will void your warranty.
Depending on the model you purchased, the phone headset may be included as a standard
accessory.
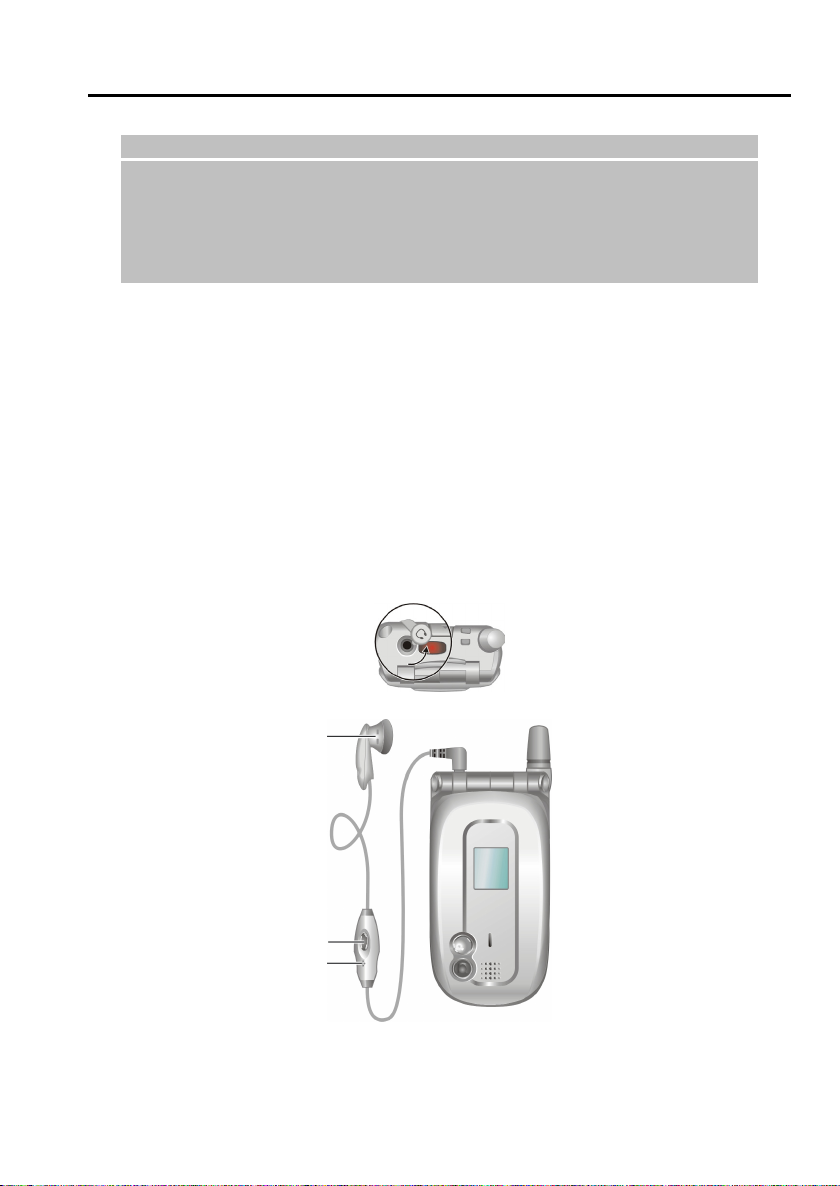
Accessories
You can expand the capabilities of your Smartphone or facilitate your operation by purchasing
accessories designed for your Smartphone. For example, you can use the cradle, phone headset,
SD/MMC card, and car charger.
Using the Phone Headset
The phone headset includes a microphone, an answer button and an earphone, allowing you to talk
conveniently using a hands-free solution.
Your Smartphone has an earphone connector on its top. You can plug the phone headset after
opening the protective cover on the connector.
Earphone
Answer button
Microphone
13
Page 28
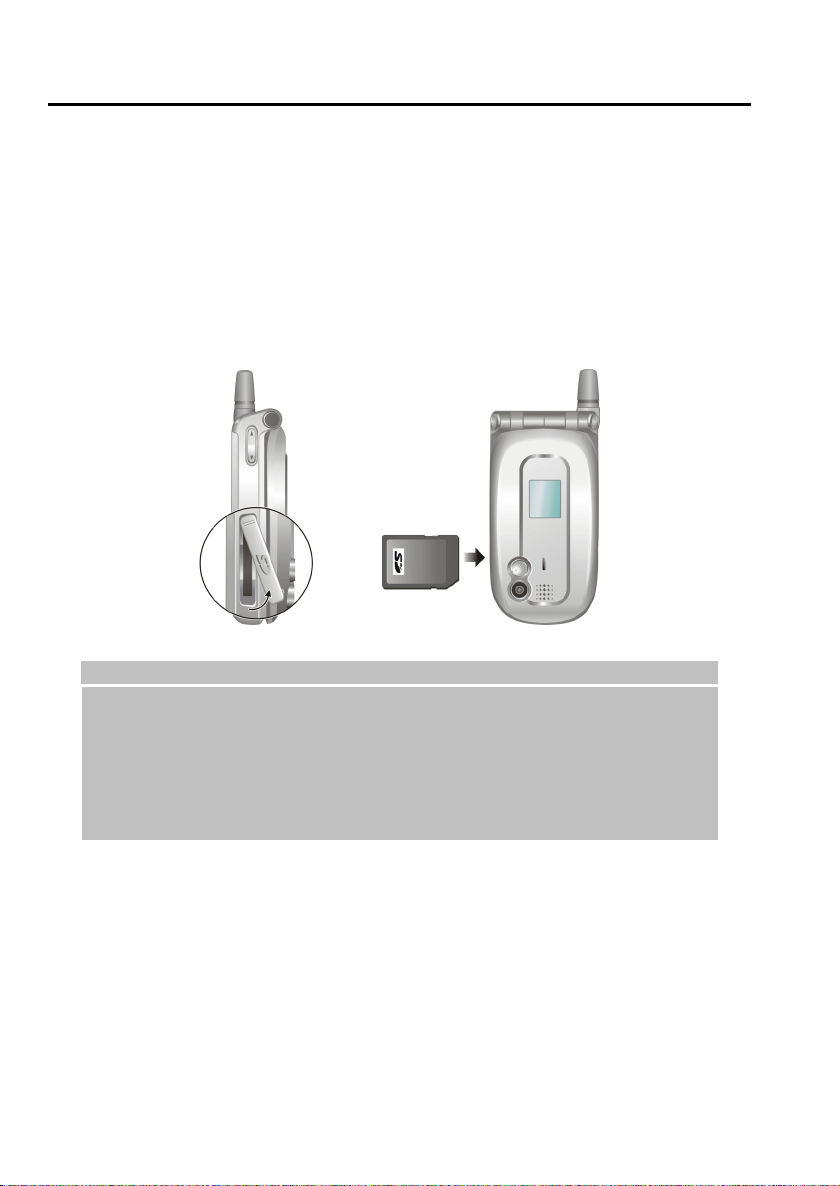
Using a SD/MMC Card
Your Smartphone has a SD/MMC card slot that accepts a SD (Secure Digital) or MMC
(MultiMediaCard) storage card.
To insert a SD/MMC card, first open the protective cover. Insert the card with its label facing the
front and the connector pointing to the slot of the Smartphone, as shown in the diagram. Then push
it into the slot until it clicks into place.
To remove a card, first make sure that no application is accessing the card, then slightly push the top
edge of the card to release it and pull it out of the slot. Close the protective cover.
_ NOTE`
A storage card is also called as a memory card.
Your Smartphone does not support SD/MMC I/O cards.
For more information, please refer to the document of the SD/MMC card.
Make sure that no foreign objects enter the SD/MMC card slot.
Keep a SD or MMC card in a well-protected box to avoid dust and humidity when you are not
using it.
14
Page 29

2
Basic Skills
This chapter familiarizes you with the basic operations of your Smartphone, such as using the
navigation pad, understanding the Home screen and screen elements, entering text and numbers
and taking care of your Smartphone.
This chapter includes:
2.1 Navigation Methods....................................................16
2.2 Home Screen and Screen Elements.............................18
2.3 Entering Text and Numbers ........................................22
2.4 Securing the Smartphone ............................................26
15
Page 30
2.1
t
Navigation Methods
Your Smartphone has various keys that allow you to move around and select. This is particularly
useful for one-hand operation.
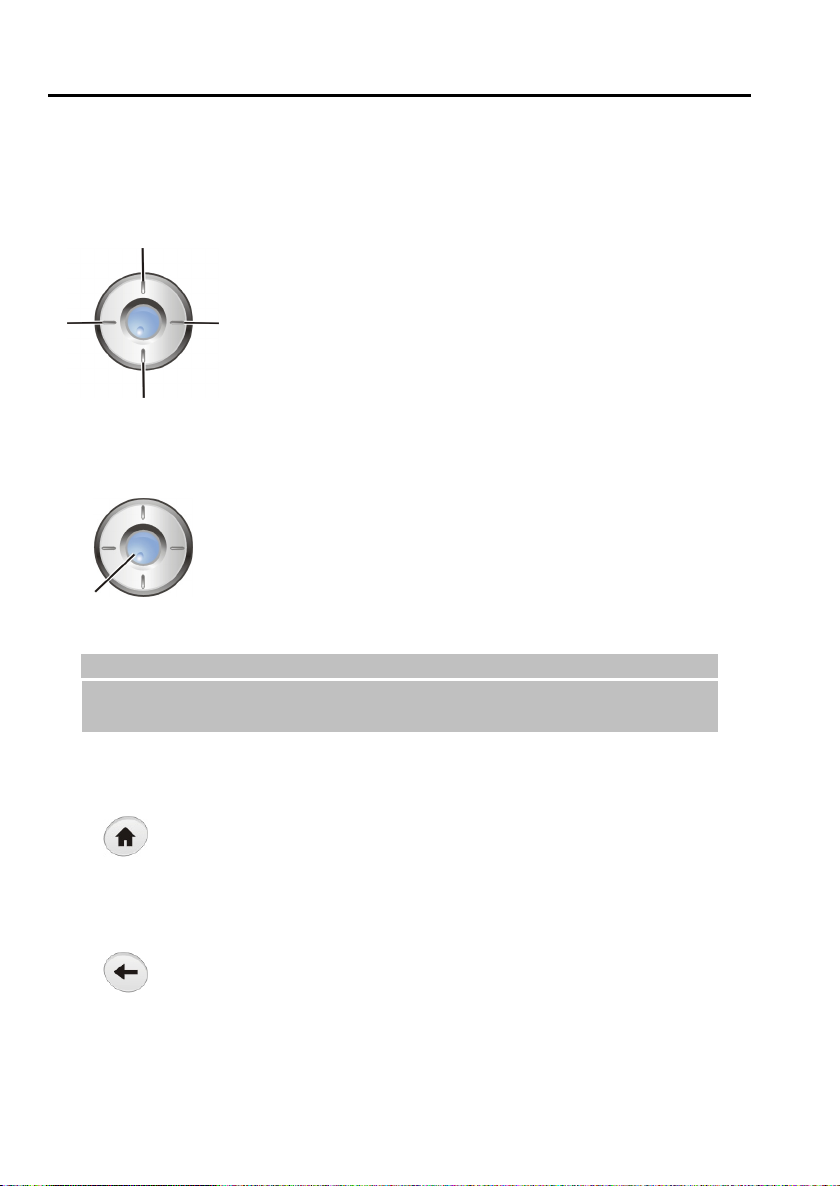
Navigation Pad
Lef
Up
The navigation pad consists of four keys. You can use them to move
horizontally and vertically on the screen for selecting the item you
want. This is called “scrolling.”
In a text field, use the navigation pad to move the cursor right or left,
Right
character by character.
Down
Action Key
Action key
_ NOTE`
In the procedures in this document, “select” means scrolling to an item and pressing the
key.
Home Key
Back Key
The Action key confirms your selection.
In many cases, scrolling to an item and pressing the Action key (in
other words, “selecting” the item) takes you to a program or setting.
The Home key takes you to the Home screen, the main screen of the Smartphone.
When you scroll to a check box, pressing the Action key selects or
clears the check box.
Action
The Back key navigates to the previous screen.
When you are typing text, the Back key moves the cursor back to delete the
character in a text field. Pressing and holding the Back key deletes multiple
characters.
16
Page 31

Soft Keys
There are two soft keys on the two sides of your Smartphone,
located directly below the display screen.
Each soft key performs the command displayed immediately
above it on the screen, making it easy to navigate around the
Smartphone and to perform common commands.
Left soft key
Numeric Keypad
Right soft key
You can use numbers to navigate quickly to programs and settings on
your Smartphone. Just press the number on the keypad that corresponds
to the number shown next to the program or setting you want.
Though commands in a menu are normally not labeled with numbers, you
can still use numbers to select menu commands by pressing the number
that corresponds to the menu commands in top-down order.
17
Page 32

2.2
r
Home Screen and Screen Elements
Home Screen
Select and press the Action
Your current service provide
Your current profile
Number of unread messages
The Home screen is your starting place for most tasks. The screen automatically displays when you
turn your Smartphone on or leave it idle. You can navigate to the Home screen at any time by
pressing the Home key.
The top of the Home screen displays the five programs you have most recently used. It also
displays your current service provider, the current time, your next appointment, your current
profile, and the number of new messages.
You can open an associated program quickly by using the navigation pad to move around and then
pressing the Action key.
To… Do this…
key to access your most
recently-used programs.
Next appointment
Open a program
Open Calendar and view your
appointments for the day
Open Inbox and read your
SMS/MMS messages
Open Contacts and view your contact
list
Open Profiles and view or change
your profile settings
18
Scroll to the top of the screen, and then select the
program by scrolling (right) to its icon and pressing the
Action key.
Scroll to your next appointment and press the Action
key.
(For information on Calendar, see section 6.2.)
Scroll to the status area of the messaging account for
which you want to read messages and press the Action
key.
(For information on Inbox, see sections 5.1 ~ 5.7.)
Select the right soft key (if Contacts appears on the
screen).
(For information on Contacts, see section 6.1.)
Scroll to your current profile and press the Action key.
(For information on Profiles, see section 4.1.)
Page 33

Status Indicators
Status indicators appear at the top of the Smartphone screen. The following table lists common
status indicators and their meanings.
Indicator Meaning Indicator Meaning
New e-mail
New voice mail on line 1
New voice mail on line 2
New voice mail on line 1 and line 2
New instant message
Voice call in progress
Data call in progress
Incoming voice calls are being
forwarded to another number
Call on hold
Missed call
Line 1
Line 2
Battery level
Low battery
Battery charging
Signal strength
No signal
General Packet Radio Services
(GPRS) available
General Packet Radio Services
(GPRS) in use
Roaming
Sync error
Radio off
Ringer off
19
Page 34

Start List
Smartphone includes many pre-installed programs that you can open and start using right away.
On the Home screen, press the Start soft key to access the Start list. Select a program by scrolling
to it and pressing the Action key.
The More option in the list indicates that you can select More to access the next page of the list.
Press the number key
Press to access
the Start list.
_ NOTE`
If your SIM card supports the STK (SIM Tool Kit) function, you can also run the program(s) in the
SIM card.
to open a program, or
select More to go to
the next page.
Menus
20
On many screens, the right soft key is labeled Menu. The Menu soft
key displays a list of menu commands that are relevant to the screen
you are viewing. Selecting a menu command will either perform the
command or take you to another part of the user interface where you
can perform the command.
Page 35

Quick List
The Quick List provides a list of commands that you can use to
quickly perform common actions, such as turning off the Smartphone,
locking the Smartphone, turning off the phone capability, and
changing the profile type.
Press and hold the End key
press the number to perform the command; or, press the Up/Down key
to select an option and the press the Action key or OK soft key.
until the Quick List appears. Then,
21
Page 36

2.3
Entering Text and Numbers
Language Menu
You can use the language menu to change to the input mode you want.
Press and hold and Asterisk key (
in the language menu are:
123 changes to the Numeric mode.
ABC changes to the Multipress mode.
Symbols opens the symbol list.
English changes to the T9 mode. (The displayed name of this item
depends on the Languages item.)
Languages opens the language selection list.
) to open the language menu. The items
*
Entering Text
You can enter text on your Smartphone using the keypad. You Smartphone supports two input
modes for enter text: Multipress and T9.
When you select a field that requires text entry, your Smartphone will automatically default to the
appropriate input mode. The status icon on the top-right corner of the screen shows the input mode
you are currently using. To change the input mode, press and hold the Asterisk key (
the input mode you want from the language menu. The status icon for the input mode you want is
shown on the screen.
The following table shows the complete list of input mode status icons.
Indicator Input mode Indicator Input mode
) and select
*
Multipress text input mode,
lowercase
Multipress text input mode,
uppercase
Multipress text input mode,
caps lock
T9 text input mode, lowercase
T9 text input mode, uppercase
T9 text input mode, caps lock
Entering Text in the Multipress Mode
Press and hold the Asterisk key (*), and select ABC from the language menu. To enter a letter in the
Multipress mode, press the number key on which the letter appears. To enter the first letter on the
number key, press the key once. To enter the second letter, press the key twice, and so on.
22
Page 37

For example:
To enter the letter “s,” press 7777.
To enter the word “hat,” press 44, 2, 8.
The letter entered most recently is underlined until you have completed the keypresses for the letter
and moved on to the next letter. When you enter letters that are on the same number key, you must
pause after entering the first letter and wait until the underline disappears before entering the next
letter so that the first letter can be processed. For example:
To enter the word “cat,” press 222, pause, press 2, pause, and press 8.
The pause between keypresses is called the Multipress time out, and you can adjust the length of the
pause. (You can adjust the Multipress time out. See “Accessibility” in section 4.2.)
Entering Text in the T9 Mode
To form a word in the T9 mode, press the number keys that contain the letters you want. As you
enter letters, T9 analyzes your keypresses and attempts to complete the word.
For example:
To enter the word “shoe,” press 7, 4, 6, 3.
The following steps provide the detailed instructions on using the T9 mode:
1. Press and hold the Asterisk key (
from the language menu. The T9 indicator appears at the top of the display.
2. Enter letters by pressing the keys on which the letters appear. Press a key only once for each
letter.
3.
Press the Action key to accept the word and enter a space after it, or press the Up/Down key to
scroll through the available words.
4.
You can change the language for T9 to find the word you want in the dictionary of the selected
language. Press and hold the Asterisk key (*) and select Language your desired dictionary
from the language selection list. To view the dictionary you are using now, press and hold the
Asterisk key (
5.
If you do not see the correct word, erase the word. Then press and hold the Asterisk key (*),
select ABC from the language menu to change to the Multipress mode, and manually enter the
word.
) and view item 4 from the language menu.
*
), and select item 4 (displaying English or other languages)
*
23
Page 38

_ NOTE`
T9 cannot always find the word you want in the T9 dictionary; in these cases, change to the
Multipress mode. After you have entered the word in the Multipress mode, the word will be
added to the T9 dictionary.
End User is granted no rights of ownership or any other proprietary rights in or to the
Documentation and Tegic Product or any other software or technology of Tegic. End User
acknowledges that all ownership of and proprietary rights in and to the Documentation and
Tegic Product are vested in Tegic. End User shall not modify, reverse engineer, decompile or
disassemble the Tegic Product, or otherwise attempt to obtain source code for the Tegic
Product. The Documentation and Tegic Product are protected by the copyright laws of the
United States and international copyright treaties.
Entering Numbers in the Numeric Mode
You can enter numbers by using the Numeric mode. When you select a field that requires a numeric
entry, your Smartphone will automatically default to the appropriate input mode.
If you need to enter a number within a line of text, you can change to the Numeric mode (
pressing and holding the Asterisk key (*), and then selecting 123 from the language menu to enter
the number, and then change back to the Multipress or T9 mode to finish entering the text.
_ NOTE`
If a field permits a numeric entry only, such as the Work phone field in Contacts, the input mode
automatically defaults to the Numeric mode.
) by
Entering Symbols
Press and hold the Asterisk key (*), and select Symbols from the language menu. Or, when you are
in the following mode:
Multipress mode press and hold the Pound key (#) to open the symbol list. Or, repeatedly
press the number key 1 until the symbol appears.
T9 mode press the Pound key (#) to open the symbol list.
24
Page 39

Miscellaneous Input Tasks
To… Do this…
Enter a space In the Multipress or T9 mode, press the Pound key (#).
Start a new line Press the Action key.
Change between uppercase and
lowercase
Lock caps
Enter a number, an asterisk (
pound sign (#)
Delete characters
Enter the plus sign (+) for
international calls
), or a
*
Press the Asterisk key (
the first letter of a sentence is automatically capitalized.
Press the Asterisk key (
Asterisk key (
Change to the Numeric mode, and press the
corresponding key on the keypad.
Press the Back key to backspace over a single
character. Or press and hold the Back key to backspace
and delete an entire text field.
Press and hold 0 on the Home screen until the plus sign
appears.
) again to return to lowercase.
*
). When you are in text mode,
*
) twice to lock caps. Press the
*
25
Page 40

2.4
Securing the Smartphone
You can customize the level of security you want to have on the Smartphone by locking the keypad,
the entire Smartphone, or the SIM card.
Locking the Keypad
The keypad lock turns off the keypad functionality. This is a helpful feature if, for example, the
Smartphone is turned on and in your pocket, and you want to prevent accidental keypresses.
To lock the keypad:
1. Press and hold the End key
2. Select Key lock from the list and press the Action key or Select
soft key. The left soft key will display Unlock, indicating that the
keypad is locked.
To unlock the keypad, press the Unlock soft key on the Home screen, and press the Pound key (#).
until the Quick List appears.
Then press the Pound key.
Press the Unlock soft key.
_ NOTE`
You can still receive calls and make emergency calls when the keypad is locked.
26
Page 41

Locking the Smartphone
Locking your Smartphone prevents access to personal data. When you enable this feature, the
Smartphone will automatically lock after a specified time of inactivity. A screen will be displayed
requiring your Smartphone lock password before access is granted.
To turn on the device lock:
1. Press and hold the End key
Select Device lock from the list and press the Action key or
Select soft key.
2. Under Lock phone after, select the amount of time the
Smartphone is inactive before the Smartphone automatically
locks by pressing the Left/Right key.
3. Scroll to Password by pressing the Down key. Enter the
password you want to use to access the Smartphone when it is
locked. Then, scroll to Confirm password by pressing the
Down key and enter the password again.
4. Press the Done soft key to save your settings.
To lock the Smartphone:
After you turn on the device lock, your Smartphone will automatically lock after a specified time of
inactivity. You can also directly lock your Smartphone by selecting Device lock from the Quick
List. The left soft key on the screen will display Unlock to indicate that your Smartphone is locked.
_ NOTE`
You can still receive calls and make emergency calls when the Smartphone is locked.
To unlock the Smartphone:
When the Smartphone is locked, press the Unlock soft key, enter your
password, and then press the Unlock soft key again.
until the Quick List appears.
27
Page 42

To turn off the device lock:
1.
On the Home screen, press the Start soft key, select Settings Security.
2. Select Disable phone lock.
3. Enter the password.
4. Press the Done soft key. The time and password you have set will be cleared.
Locking the SIM Card
Locking the SIM card prevents you and others from using the Smartphone that contains the SIM
card until the correct password is entered. To turn on the phone, you have to enter the PIN.
To lock the SIM card and set the PIN:
1.
On the Home screen, press the Start soft key, select Settings Security.
2. Select Enable SIM Lock.
3. Enter the password (SIM card’s PIN1), and press the Done soft key.
Once the PIN is enabled, your Smartphone will ask you to enter the PIN whenever you turn it on.
To unlock the SIM card:
1. On the Home screen, press the Start soft key, select Settings Security.
2.
Select Disable SIM Lock.
3. Enter the password (SIM card’s PIN1), and press the Done soft key.
To change the PIN:
1. On the Home screen, press the Start soft key, select Settings Security.
2.
Select Change SIM Lock.
3.
Enter the original PIN1 code. Scroll to the next field by pressing the Down key and enter a
new password. Then, press the Down key and enter the new password again.
4.
Press the Done soft key.
_ NOTE`
You can still receive calls and make emergency calls when the SIM card is locked.
28
Page 43

3
Using the Phone
This chapter explains how to make and receive phone calls, track your calls, and manage your calls
and phone numbers more efficiently.
This chapter includes:
3.1 Making a Call..............................................................30
3.2 Responding to an Incoming Call .................................33
3.3 Managing More than One Call....................................34
3.4 In-call Options.............................................................35
3.5 Call History .................................................................36
3.6 Speed Dial ...................................................................37
3.7 Voice Tag....................................................................39
3.8 Voice Mail...................................................................41
3.9 International Call.........................................................42
3.10 Turning off the Radio..................................................43
29
Page 44

3.1
Making a Call
There are several ways to make a call. The easiest way is to dial the phone number. Alternately, you
can dial a phone number from the numbers existing in your Smartphone; for example, the numbers
you have saved, the calls you dialed or received recently, etc.
Dialing a Call
1. On the Home screen, press the numbers on the keypad to enter the phone number. If you enter
a wrong number, you can press the Back key to erase the number.
2. Press the Talk key .
AutoFilter matches
number to a contact.
AutoFilter matches
number from Call History.
3. You can talk when the other party takes the call.
4. To end the call, press the End key . Alternately, you can press the Menu soft key and
select End.
_ NOTE`
As you enter a phone number, the Smartphone searches Contacts, Call History, and the Speed
Dial lists to find a matching name and/or number. When you see the name of the person to call
listed, select it, and press the
If you have a long list of contacts, and you don’t see the contact you want, enter the first few
letters of the contact’s name. When you do this, the device searches through the contact list and
displays the name. To call the contact, press the
To redial the last number called, press the
key to dial the call.
Talk
Talk
key twice on the
Talk
key.
Home
screen.
Making a Call from Contacts
Contacts is a Microsoft program for storing your contacts information in the Smartphone’s
memory. To call someone from the contact list, just select the person’s name and press the Talk key
.
30
Page 45

If you have more than one phone number for a contact, such as a Work phone number, a Home
phone number, and a Mobile phone number. The Work phone number is set as the default number.
Pressing the Talk key
number at any time.
To make a call by contact name:
1.
On the Home screen, press the Start soft key, and select Contacts.
Select Contacts
from the Start list.
2. Select the contact name to call by pressing the Up/Down key. If you have a long list of
contacts, you can enter the first few letters of the contact’s name, and the Smartphone will
search through the entire contact list and display the name.
3. Press the Talk key to dial the default number of the selected contact. If you are not
dialing the default number, change the number by pressing the Left/Right key, and then press
the Talk key
_ NOTE`
When a contact is selected, you can press the Action key to open the Contacts card and select
a number from there.
For detailed information on the Contacts program, see section 6.1.
will always dial the default number, but you can change the default
Select a contact name
from the contact list.
.
Making a Call from Speed Dial
Speed Dial enables you to quickly place a call without having to actually enter the number.
On the Home screen, press and hold the number on the keypad that you have assigned as a speed
dial for a number. If the keypad assignment is two digits, press the first digit and press and hold the
second digit.
_ NOTE`
For detailed information on Speed Dial, see section 3.6.
31
Page 46

Making a Call Using a Recently Dialed Number
You can display a list of phone numbers you have recently dialed, and
select a name or number from the list to call the person again.
1. Press the Talk key . A list of recently dialed phone
numbers appears on the screen.
2. Select the number or name for the person to call by pressing the
Up/Down key, and press the Talk key
Making a Call from the Call History List
The Call History list displays the last 25 calls you made, received, and
missed. Select a name or number to call someone from the list.
1. On the Home screen, press the Start soft key, and select Call
History.
2. Select the number or name for the person to call by pressing the
Up/Down key, and press the Talk key
_ NOTE`
For detailed information on Call History, see section 3.5.
.
.
Making a Call from a Hyperlink
When you see an underlined phone number presented as a hyperlink in
an e-mail message, just select the hyperlink phone number, and then
press the Talk key
32
to make the call.
Page 47

3.2
r
Responding to an Incoming Call
When you receive a call on your Smartphone, the device rings, and the name and number of the
caller are displayed on the screen. If the name of the caller is not in your contact list, only the
caller’s phone number is displayed.
Only the caller’s phone numbe
is displayed if the caller’s name
is not in the contact list.
Answer the call.
_ NOTE`
There may be situations where you want to immediately silence the ring of an incoming call.
Simply press the Volume control, and then proceed to answer the call.
You can customize the phone ring. (See "Sounds” in section 4.1 or Chapter 0.)
You can change the profile. (See "Profiles” in section 4.1.)
You can customize the displayed photo. (See Chapter 0.)
Answering an Incoming Call
Press the Talk key or Accept soft key.
Rejecting an Incoming Call
Press the End key
or Reject soft key.
Reject the call.
33
Page 48

3.3
Managing More than One Call
During a call, you can make or take a second call while putting the current call on hold. Then, you
can choose to swap between the two callers or set up a conference call between all three parties.
_ NOTE`
You may need to register for the “call waiting” service with your service provider and set your
Smartphone accordingly.
Holding a Call to Take a Second Call
If there is another incoming call when you are talking on the Smartphone, press the Talk key
or Accept soft key to place the first call on hold, and answer the second call.
To end the first call and answer the second call, press the End key
key
or Accept soft key.
, and then press the Talk
Rejecting the Second Call
Press the Reject soft key to reject the second call and keep your current call in progress.
Holding a Call to Make a Second Call
When you are talking on the Smartphone, you can press the Menu soft key and select Hold to place
the first call on hold and dial a second call. When you have finished the second call, press the End
key
to go back to the first call.
Swapping between Calls
When you have put a call on hold and made or taken another call as described earlier, you can
change between the calls by pressing the Swap soft key.
Setting up a Conference Call
When multiple calls are in progress, you can press the Menu soft key and select Conference to set
up a conference call.
34
Page 49

3.4
In-call Options
Adjusting the Phone Volume
To adjust the volume during a call, simply press the Volume control on the side of your
Smartphone.
Speakerphone
To use the speakerphone function as a hands-free solution, press and hold the Talk key . The
other party’s voice will be magnified and sent out through the speaker. You can then talk without
having to hold the Smartphone against your cheek.
_ NOTE`
When using the speakerphone function, always talk in turns. If you talk when the other party is
still talking, the other party cannot hear you clearly.
In-call Options
While a call is in progress, you can press the Menu soft key to access menu commands for common
tasks. The following table shows the commands available when a call is in progress. Some of these
commands are available only when multiple calls are in progress or during a conference call.
In-call option Function
End Disconnects the call.
Hold Puts the active call on hold.
Unhold Activates the call on hold.
Swap Switches between two calls.
Save to Contacts Creates a contact card for the caller.
Conference
Private
Mute
Unmute Turns the microphone back on for the active call.
Joins together all existing calls, if you have subscribed to this
service.
Breaks one call out of a conference and make it active while the rest
of the conference is on hold.
Mutes the microphone for the active call; the other party will not
hear anything you say, but you can still hear the other party.
35
Page 50

3.5
Call History
Call History displays the last 25 calls you have made, received, and missed. Each entry in Call
History contains the start time of the call, the duration, and the caller’s name, if available, and the
caller’s number.
Opening Call History
On the Home screen, press the Start soft key and select Call History.
Call History Menu Commands
In Call History, press the Menu soft key to access the command list.
Call History menu
command
Function
Find Contact
E-mail
View Timers
Delete Deletes the selected entry in Call History.
Delete List Deletes all entries in Call History.
Save to Contacts
Filter Allows you to filter Missed Calls, Incoming Calls, or Outgoing Calls.
Opens the contact card of the selected entry in Call History (if the contact
is already in the contact list).
Opens Inbox to send an e-mail message to the selected entry in Call
History (if the contact is already in the contact list and contains an e-mail
address).
Displays detailed information regarding the length of your last call, the
total number of calls made and received, calls by type, and a lifetime
counter. Call Timers is useful when you want to keep track of your
calling patterns, for example to determine what type of calling plan to
subscribe to and help you estimate your monthly billing.
Stores the selected entry in Call History to Contacts.
When you select Save to Contacts, the Select Contact screen appears.
In the <New Item> field, press the Action key, scroll to the desired field,
and press the Insert soft key to paste the number to the field. Enter the
information in the other fields, and press the Done soft key.
36
Page 51

3.6
Speed Dial
You can create one- or two-digit speed dials. When you press a speed dial, Smartphone
automatically dials the associated phone number, opens an e-mail message using the associated
address, or goes to the associated Web page. You can create speed dials from 2 to 99. Speed dial 1
is reserved for your voice-mail number, and is automatically configured in your speed dial settings.
_ NOTE`
You can create a speed dial only for a phone number, e-mail address, or Web page address that
is stored in Contacts. You cannot create a speed dial for a contact stored in the SIM card.
For information on voice mail, see section 3.8.
Creating a Speed Dial
1. On the Home screen, press the Start soft key and select Contacts.
2. Select the desired contact and open the contact card to create a speed dial.
3.
Select the phone number, Web page address or e-mail address to create a speed dial.
4. Press the Menu soft key and select Add Speed Dial.
5. Under Keypad assignment, enter the speed dial number to use.
6. Press the Done soft key.
On the Home screen, press and hold the number on the keypad that you have assigned as a speed
dial for the phone number, e-mail address, or Web page. If the speed dial is two digits, press the first
digit, and press and hold the second digit.
Editing a Speed Dial
1. On the Home screen, press the Start soft key and select Speed
Dial.
2.
Select an entry from the speed dial list.
3. Press the Edit soft key, or the Menu soft key then select Edit.
4.
Scroll to Keypad assignment, and press the Left/Right key to
select a new speed dial number to use.
5. Press the Done soft key.
37
Page 52

Deleting a Speed Dial
1.
On the Home screen, press the Start soft key and select Speed Dial.
2. Select an entry from the speed dial list.
3. Press the Menu soft key and select Delete.
_ NOTE`
When you delete a contact that is stored in Contacts, the speed dial you have set for this contact
still exists in the speed dial list. You need to delete the speed dial from Speed Dial as well.
Viewing Speed Dials You Have Created
On the Home screen, press the Start soft key and select Speed Dial.
When you select an entry in the speed dial list, you can press the Go soft key ors use the Menu
commands to dial the selected number, open a new e-mail message, go to the Web page, display the
contact card, or delete an entry.
_ NOTE`
To view speed dials only, press the Menu soft key and select Filter Speed Dial.
38
Page 53

3.7
Voice Tag
You can record voice tags. Then, when you speak the voice tag, the Smartphone automatically dials
the associated phone number, opens an e-mail message using the associated address, or goes to the
associated Web page.
_ NOTE`
You can create a voice tag only for a phone number, e-mail address, or Web page address that
is stored in Contacts. You cannot create a voice tag for a contact stored in the SIM card.
Creating a Voice Tag
1. On the Home screen, press the Start soft key and select Contacts.
2. Select the desired contact and open the contact card to create a voice tag.
3. Select the phone number, Web page address or e-mail address to create a voice tag.
4. Press the Menu soft key and select Add Voice Tag.
5. After the audio and visual prompt, begin recording the words for the voice tag. When
prompted, repeat the words. The Smartphone will play back the recording and notify you of
the successful recording.
6. Press the OK soft key to go to the Add Speed Dial screen. Scroll to Voice tag and press the
Action key to play back the voice tag you have created.
7.
Press the Done soft key to return to the contact card.
Using a Voice Tag
1.
On the Home screen, press and hold the Talk key for 2~3 seconds, and let go.
2.
Speak the words that you recorded as a voice tag.
3.
The Smartphone plays back the voice tag, recognizes it, and then dials the phone number,
opens a new e-mail message, or goes to the Web page.
4. If the Smartphone fails to recognize the voice tag, press the End key to repeat the
procedure.
Playing Back a Voice Tag
1.
On the Home screen, press the Start soft key and select Speed Dial.
2.
Select an entry from the speed dial list.
3.
Press the Menu soft key and select Play Voice Tag; or press the Edit soft key, scroll to
Playback voice tag and press the Action key.
39
Page 54

Deleting a Voice Tag
1.
On the Home screen, press the Start soft key and select Speed Dial.
2. Select an entry from the speed dial list.
3. Press the Menu soft key and select Delete.
_ NOTE`
When you delete a contact that is stored in Contacts, the voice tag you have set for this contact
still exists in the speed dial list. You need to delete the voice tag from Speed Dial as well.
Viewing Voice Tags You Have Created
On the Home screen, press the Start soft key and select Speed Dial.
In the speed dial list, the entry with the icon indicates that you
have created a voice tag for the contact. You can press the Go soft key
or use the Menu commands to dial the selected number, open a new
e-mail message, go to the Web page, display the contact card, or delete
an entry.
_ NOTE`
To view voice tags only, press the Menu soft key and select Filter Voice Tags.
40
Page 55

3.8
Voice Mail
Voice Mail is a service provided by your service provider. To use this service, you have to apply for
it and obtain the phone number used for accessing the voice mail. You can call your voice mailbox
by using speed dial 1, which is reserved for your voice-mail number.
Setting up the Voice Mail Phone Number
1. On the Home screen, press the Start soft key and select Settings Phone.
2. Select Call Options.
3. Under Voice mail number (L1), enter the number for voice mail. This number will be
automatically assigned Speed Dial 1.
Checking Your Voice Mail
On the Home screen, press and hold the number key 1 to call the voice mail of your service
provider.
41
Page 56

3.9
International Call
Entering an International Country Code
To make an international call, you must include a country code at the beginning of the dialing
sequence for the phone number. The country code appears first, followed by a plus (+) sign, and is
separated from the rest of the number sequence. If you are making an international call, press and
hold 0 on the Home screen until the plus sign appears.
Inserting a 3-second Pause in a Dialing Sequence
Some international calls require a three-second pause in the dialing sequence for the call to process
successfully.
When you are entering the phone number in Contacts, place the cursor where you want to insert a
three-second pause, press the Menu soft key, and select Insert Pause. The letter “p” will appear in
the number to show where the three-second pause will occur in the dialing sequence.
Inserting a Manually Pause in a Dialing Sequence
There may be phone numbers that require a pause longer than three seconds in the dialing sequence.
For these cases, you can pause as long as you want and manually continue the dialing sequence
using the Talk key
When you are entering the phone number in Contacts, place the cursor where you want the dialing
sequence to pause before proceeding, press the Menu soft key, and select Insert Wait. The letter
“w” will appear in the number to show where the pause will occur in the dialing sequence.
To resume dialing after reaching a manual pause, press the Talk key .
.
42
Page 57

3.10
Turning off the Radio
Under some situations (on the airplane, for example), you will need to turn off the radio of your
Smartphone. After turning off the radio, you cannot use the phone function of your Smartphone, but
you can still use other functions such as camera, Calendar, games, Media Player, etc.
To turn off the radio:
1. Press and hold the End key
2. Select Flight mode.
To turn on the radio:
1. Press and hold the End key
2. Select Flight mode off.
_ NOTE`
If you need to turn on the radio again after turning it off, please wait for 20 seconds before turning
it on.
until the Quick List appears.
until the Quick List appears.
43
Page 58

Page 59

4
Setting up Your Smartphone
You can easily view and change settings to personalize the Smartphone for the way you work. For
example, you can change the sounds or use your own sounds for ring tones, use your own image for
the Home screen background, set up Call Forwarding and Call Waiting to manage your calls more
efficiently, and more. This chapter tells you how to set up your Smartphone.
This chapter includes:
4.1 Settings (Page 1) .........................................................46
4.2 Settings (Page 2) .........................................................54
45
Page 60

4.1
Settings (Page 1)
On the Home screen, press the Start soft key and select Settings to access Settings, which contains
two setting pages.
To help you locate the item you want to set up, the following table shows the setting items and sub
items on page 1. The description of the items comes after the table in sequence.
Setting Items (Page 1)
1 Sounds
2 Date and
Time
Ring tone for line 1
Ring tone for line 2
Reminders
New e-mail
New SMS
New voice message
New instant message
New channel
message
Alarm clock
SIM toolkit
messages
Exclamation
Question
Warnings
Keypad control
Time zone
Date
Time
Alarm
Alarm time
3 Profiles
4 Home Screen
5 Data
Connections
6 Owner
Information
Management
8 Remove
Programs
Normal
Silent
Meeting
Outdoor
Automatic
Headset
Car
Speakerphone
Home screen layout
Color scheme
Background image
Time out
Name
Telephone number
E-mail address
Notes
Power Management 7 Power
Backlight Brightness
46
Page 61

Sounds
On the Home screen, press the Start soft key, and select Settings Sounds to access the Sounds
setting items.
Your Smartphone provides 20 ring tones (in .mid format) for you to select from. You can use your
own files by copying the sound files (in .wav, .mmf, .mid or .mp3 format) from your desktop
computer to the Storage\Application Data\Sounds folder in the Smartphone.
_ NOTE`
If PhoneExplorer is not installed in your Smartphone, use ActiveSync to copy files from the
desktop computer to your Smartphone.
Sounds settings are used to customize the sounds for the ring tones, notifications, reminders, alarm
clock, alert, and key tones. When you scroll to the event for which to specify a sound, press the
Left/Right key to select a sound, or press the Action key to select from a full list and then press the
Done soft key.
Date and Time
On the Home screen, press the Start soft key, and select Settings Date and Time to access the
Date and Time setting items.
Date and Time settings enable you to change the local time zone and the current date and time, and
to set the alarm.
Profiles
On the Home screen, press the Start soft key, and select Settings
Profiles to access the Profiles setting items.
Profiles settings are used to configure how the Smartphone notifies
you of events such as an incoming call, an approaching appointment,
or an arriving message. You can use Profiles to change quickly how
you receive notifications based on your situation. For example, you
may want the Smartphone to ring louder if a client is calling, or you
may not want the Smartphone to ring at all, but want to hear calendar
reminders.
The default profile used with your Smartphone is the Normal profile.
47
Page 62

The following table shows the list of profiles that come with the Smartphone and their attributes.
Profile Name Auto-
Normal -- Ring 3 Increasing 3 Play sound 3 3
Silent -- Vibrate Off Vibrate Off Vibrate Off Off
Meeting -- Vibrate 1 Play sound 1 Play sound 1 Off
Outdoor -- Ring Loud Increasing Loud Play sound Loud Loud
Automatic Toggles between Normal and Meeting, based on your calendar.
answer
Time
When you connect the hands-free phone headset, your Smartphone will automatically use this profile. Headset
Never Ring 3 Increasing 3 Play sound 3 3
When you connect the car kit, your Smartphone will automatically use this profile. Car
Never Ring 4 Increasing 4 Play sound 4 4
When you use the speakerphone function, your Smartphone will automatically use this profile. Speakerphone
-- Ring Loud Increasing Loud Play sound Loud Loud
Changing the Profile Quickly
Ring
Type
Ring
Volume
Alarm
Type
Alarm
Volume
Notification
Type
Notification
Volume
System
Sound
Volume
Press and hold the End key
four modes: Normal, Silent, Meeting and Outdoor. If you want to select from other modes, go to
until the Quick List appears. The list on the first screen contains
the next screen to select a mode. Then, press the Action key or the Select soft key.
Editing a Profile
If you want to change the settings of a profile, you can select a profile, press the Menu soft key, and
select Edit. Modify the settings and press the Done soft key.
_ NOTE`
When you use the phone headset and change the auto-answer time to 2, 4, 6, 8 or 10 seconds,
it may take some time for the change to take effect.
If you want to restore the default settings of a profile, press the Menu soft key and select Reset
to default.
Home Screen
On the Home screen, press the Start soft key, and select Settings Home Screen to access the
Home Screen setting items.
Home Screen settings are used to change the Home screen layout, the color scheme, the
background image, and the time delay before the Home screen appears when the Smartphone is
idle.
48
Page 63

Using Mio Home Screen Layout
Your Smartphone provides several Mio home screen layouts for you to use.
1. On the Home screen, press the Start soft key and select Settings Home Screen.
2. Under Home screen layout, press the Left/Right key to select a Mio home screen layout.
You can also press the Action key to select from the list.
3.
After your selection, press the Done soft key.
4. Press the Home key to return to the Home screen. The change has taken effect.
Customizing the Home Screen with Your Own Image
1. Go to where your image file is stored on your desktop computer, and the file should be saved
in .gif, .jpg, or .bmp format. For best effect, please adjust the image’s size to 176x200.
2. Copy the image file from your desktop computer to the Storage\Application Data\Home
folder in the Smartphone using ActiveSync.
3. On the Home screen, press the Start soft key and select Settings Home Screen.
4.
Scroll to Background image. Press the Left/Right key to select an image, or select from a
full list by pressing the Action key.
5. Press the Done soft key.
Data Connections
On the Home screen, press the Start soft key, and select Settings Data Connections to access
the Data Connections setting items.
Data Connections settings enable you to set up Dial-up, Virtual Private Network (VPN), Proxy, and
General Packet Radio Service (GPRS) connections so you can connect to the Internet or your
corporate network. With a data connection, you can browse the Web, download e-mail, chat using
MSN® Messenger, or synchronize wirelessly with the server. Check with your service provider to
see if a data connection has already been set up for you, and if over-the-air configuration is
supported.
Creating a GPRS Connection
GPRS is a high-speed transmission through the mobile phone network, which provides permanent
on-line connection.
To use GPRS to connect to the network, you need to apply for the GPRS service with your service
provider. The available services depend on what you have applied with your service provider. Such
services are charged.
49
Page 64

When you apply for the GPRS service, your service provider may have already set up a GPRS
connection for you. If you want to set up the GPRS connection, follow this procedure:
1. Obtain the following information from your service provider: the APN (Access Point Node)
name and DNS (Domain Name Servers) name (if required).
2. On the Home screen, press the Start soft key, and select Settings Data Connections.
3. Press the Menu soft key and select Edit Connections.
4.
Select GPRS Connections.
5. Press the Menu soft key and select Add. Enter your name under Description.
6. Under Connects to, select the appropriate option.
7. Under Access point, enter the APN provided by your service provider.
8. Enter the user name and password provided by your service provider.
9. If needed, enter the primary DNS, secondary DNS, and the IP address.
10. Press the Done soft key three times to return to the Data Connections screen.
11.
Under Internet connection, press the Left/Right key to change to the GPRS connection you
just created, and press the Done soft key.
Completing the GPRS Settings
On the Home screen, press the Start soft key, and select Settings Data Connections.
1.
2. Under Internet
connection, select
the Internet setting of
your mobile phone
network.
3. Under WAP
connection, select
the WAP setting of
your mobile phone
network.
4. Under MMS
Connection, select the
MMS setting of your
mobile phone
network.
50
5.
Press the Done soft key.
Page 65

The icon on the screen indicates that GPRS is available for use. The icon indicates that
GPRS is being used; you can press the End key
_ NOTE`
You can also use the Mio Assistant program to quickly install the GPRS settings. For more
information, see section 12.7.
Creating a Dial-up Connection
You need to set up a dial-up connection to connect directly to the Internet or to your corporate
network.
To create a dial-up connection to the Internet:
1. Obtain the following information from your ISP: the number to dial up, the domain name, the
user name and password.
2.
On the Home screen, press the Start soft key, and select Settings Data Connections.
3. Press the Menu soft key and select Edit Connections.
4. Select Dial-up Connections.
5.
Press the Menu soft key and select Add.
6.
Under Description, enter a name for the connection, such as “ISP.”
7. Under Connects to, select The Internet.
8. Enter the appropriate information for the remaining fields, including the phone number for
dialing-up, user name and password, and domain name.
9.
Press the Done soft key three times to return to the Data Connections screen.
10.
Under Internet connection, press the Left/Right key to change to the dial-up connection you
just created, and press the Done soft key.
To create a dial-up connection to your corporate network:
1. Obtain the following information from your corporate network administrator: the number to
dial up, the Domain name, the user name and password.
2.
On the Home screen, press the Start soft key, and select Settings Data Connections.
3.
Press the Menu soft key and select Edit Connections.
4.
Select Dial-up Connections.
5.
Press the Menu soft key and select Add.
to temporarily stop the GPRS connection.
51
Page 66

6.
Under Description, enter a name for the connection, such as “Corporate.”
7.
Under Connects to, select Works.
8. Enter the appropriate information for the remaining fields, including the phone number for
dialing-up, user name and password, and domain name.
9. Press the Done soft key three times to return to the Data Connections screen.
10. Under Work connection, press the Left/Right key to change to the dial-up connection you
just created, and press the Done soft key.
VPN Connection
A VPN connection is used to access your corporate network using an existing Internet connection.
Proxy Connection
A proxy connection is used to access the Internet using an existing connection to your corporate
network.
Owner Information
On the Home screen, press the Start soft key, and select Settings Owner Information to access
the Owner Information setting items.
Owner Information settings are used to enter and display personal information, such as your name,
phone number, and e-mail address. This is helpful, for example, in the event that you lose your
Smartphone so that you can be contacted if it is found.
Power Management
On the Home screen, press the Start soft key, and select Settings Power Management to
access the Power Management setting items. There are two sub-items: Power Management and
Backlight Brightness.
Power Management settings are used to check the battery level and display power-saving settings,
such as the backlight and display time-outs.
Backlight Brightness allows you to adjust the backlight of the display.
Remove Programs
_ NOTE`
Be careful when you remove programs.
You cannot remove Microsoft core programs such as Calendar, Tasks, Inbox, Internet Explorer,
etc.
52
Page 67

Remove Programs settings enable you to remove programs installed on the Smartphone.
1.
On the Home screen, press the Start soft key, and select Settings Remove Programs.
2. Select the program you want to remove by pressing the Up/Down key, and then press the
Action key. You can also press the Menu soft key to select Remove.
3. A message appears on the screen asking you to confirm. Press the Yes soft key to remove the
program.
53
Page 68

4.2
Settings (Page 2)
To help you locate the item you want to set up, the following table shows the setting items and sub
items on page 2. The description of the items comes after the table in sequence.
Setting Items (Page 2)
1 Beam
2 Phone
3 Accessibility
Call Barring
Call Forwarding
Call Options
Call Waiting
Caller ID
Channels
Fixed Dialing
Networks
Multipress time
out
Confirmation time
out
In-call alert
volume
Smartdial setting
4 Regional
Settings
5 Security
7 Bluetooth
8 About
Language
Locale
Short date style
Long date style
Time format
Positive number
Negative number
Positive currency
Negative currency
Enable Phone Lock
Enable SIM Lock
Change PIN2
Personal 6 Certificates
Root
54
Page 69

Beam
On the Home screen, press the Start soft key, and select Settings Beam to access the Beam
setting items.
The Beam setting allows you to receive data from another device using infrared. Select Receive
incoming beams before receiving data.
Phone
On the Home screen, press the Start soft key, and select Settings Phone to access the Phone
setting items.
Phone settings are primarily used to set options for calls you receive, such as Caller ID, Call
Waiting, and Call Forwarding. These settings are related to the services you applied with your
service provider.
Phone setting item Function
Call Barring Enables you to block incoming and/or outgoing calls.
Call Forwarding Enables you to forward all or selected calls to another number.
Call Options
Call Waiting Enables you to turn Call Waiting on or off.
Caller ID
Channels
Fixed Dialing
Networks
_ NOTE`
You need to enter the PIN2 code to set the fixed dialing settings. Afterwards, the PIN2 access
has been granted. To avoid unauthorized access to the settings, turn off your Smartphone and
then turn it on again, or turn off the radio and then turn it on again (see section 3.10).
Enables you to change phone numbers, such as your voice mail
and SMS service center, answer incoming calls by pressing any
key, and other advanced call options.
Enables you to let your identification be known to all callers,
only your contacts, or no callers.
Enables you to configure cell broadcast. The cell broadcast is an
add-on service provided by your service provider, which allows
you to receive a variety of information such as weather forecast,
stock, and traffic.
Enables you to limit your calling area to one or more specific
phone numbers and/or area codes.
Identifies your current network and changes your network
selection from Automatic to Manual.
55
Page 70

Accessibility
On the Home screen, press the Start soft key, and select Settings Accessibility to access the
Accessibility setting items.
Accessibility settings are used to configure the system font size, multipress time-out, confirmation
time-out, and in-call alert volume.
Regional Settings
On the Home screen, press the Start soft key, and select Settings Regional Settings to access
the Regional Settings setting items.
Regional Settings are used to change the Smartphone’s language, location, date and time style, as
well as number and currency formatting options.
Security
On the Home screen, press the Start soft key, and select Settings Security to access the
Security setting items.
Security settings are used to enable phone lock and SIM lock. (For details, see section 2.4.)
Certificates
Your Smartphone allows you to add and delete public key certificates. These certificates help
establish your identity when you log on to a secure network, such as a corporate network.
Certificates also help establish the identity of other computers, such as servers, with which you
connect. This helps prevent unauthorized users from accessing your device and its information.
You can store two types of certificates on the Smartphone:
Personal certificates establish your identity.
Root certificates establish the identity of servers with which you connect.
Your Smartphone may include a set of preinstalled certificates. To view and manage the
certificates, follow this procedure:
1.
On the Home screen, press the Start soft key and select Settings Certificates.
2.
Select Personal or Root to open the list of the certificates.
3.
To view the details about a certificate, select it in the list, press the Menu soft key, and select
View.
4.
To delete a certificate, scroll to it in the list, press the Menu soft key, and select Delete.
56
Page 71

Bluetooth
Your Smartphone does not support Bluetooth.
About
On the Home screen, press the Start soft key, and select Settings About to access the About
setting items.
About settings display information about the Smartphone’s operating system, including version
numbers and copyright information, and the available storage space, memory, etc.
57
Page 72

Page 73

5
Messaging Features
This chapter introduces the Smartphone’s basic messaging features, such as sending and receiving
e-mail, Short Message Service (SMS) messages, and using MSN® Messenger to communicate
with others.
This chapter includes:
5.1 Understanding Messaging Types ................................60
5.2 Setting up Messaging Accounts ..................................61
5.3 Working with Accounts ..............................................63
5.4 Composing and Sending Messages .............................64
5.5 Receiving Messages....................................................68
5.6 Viewing and Responding to Messages .......................70
5.7 Managing Message Folders.........................................74
5.8 MSN Messenger..........................................................76
59
Page 74

5.1
Understanding Messaging Types
Your Smartphone supports e-mail messaging, SMS messaging, and instant messaging. You can
work with e-mail and SMS messages from Inbox, and use instant messaging features from MSN
Messenger.
_ NOTE`
Your Smartphone also supports the MMS function. For more information, see Chapter 10.
E-mail Messaging
There are two ways to send and receive e-mail messages with the Smartphone:
By synchronizing Inbox with Microsoft® Outlook® on your desktop computer or your
Microsoft® Exchange server
By connecting to a POP3 or IMAP4 e-mail server to send and receive Internet e-mail
messages
SMS Messaging
You can send and receive SMS messages up to 160 characters in size over the Smartphone network
(this limitation does not apply in Europe). If an SMS message is longer, it will automatically be sent
in chunks as several small SMS messages, and will then be unified as one SMS message after all of
the small SMS messages have been received. If the receiver’s phone does not support this function,
the SMS message will be separated into several messages and appear on the receiver’s phone as
multiple messages.
The advantages of SMS messages include the following:
SMS messages are sent instantly.
SMS messages can be sent or received at any time, including during a voice or data call.
Most mobile phones support SMS, so most recipients can read SMS messages that you send.
_ NOTE`
You cannot synchronize SMS messages with your desktop computer, and you cannot use SMS
messages to send or receive attachments or voice notes.
Instant Messaging
You can use MSN® Messenger on the Smartphone to send and receive instant messages. MSN
Messenger on the Smartphone provides the same chat environment as MSN Messenger on your
desktop computer. For example, you can chat with a single MSN Messenger contact, or with
several contacts at once. You can switch between active chats, block contacts, and configure
display settings, such as your name and current status (Away, Online, and so on).
60
Page 75

5.2
Setting up Messaging Accounts
Your Smartphone is already set up for SMS text and voice mail messaging. For more information
on instant messaging, see section 5.8. This section describes the steps required for setting up the
Smartphone to send and receive e-mail messages. You can use up to eight different messaging
accounts with the Smartphone.
Setting up Outlook Synchronization
Your Smartphone includes an ActiveSync account. You can synchronize this account with Outlook
on your desktop computer or Exchange Server. When you do this, messages in the ActiveSync
Outbox on the Smartphone are sent, and messages you have received in Outlook are copied to the
ActiveSync account folders on your Smartphone. Only those folders that are marked for
synchronization on your Smartphone are synchronized in this manner. To set up the Smartphone for
synchronization, see section 5.7. For more information on synchronization, see Chapter 7.
_ NOTE`
To synchronize remotely, you must also configure a data connection. For more information, see
Chapter 4.
Setting up an Internet E-mail Account
Besides synchronization, you can also use Internet e-mail to send and receive e-mail. To do this,
you must:
Have an Internet e-mail account.
Configure a data connection on the Smartphone for connecting to the Internet. (For more
information, see Chapter 4.)
Set up an Internet e-mail account in Inbox.
To set up an Internet e-mail account, you need to know which type of e-mail server hosts your
mailbox: IMAP4 or POP3. You also need to know the name of your incoming and outgoing e-mail
servers. If you are not sure, ask your service provider or network administrator. In addition, you
need to know your e-mail user name and password, and if required, your domain name.
To set up an Internet e-mail account:
1.
On the Home screen, press the Start soft key and select Inbox.
2.
Press the Menu soft key and select Options.
3.
Select Account Setup, press the Menu soft key and select New.
4.
Under Your name, enter your display name for e-mail messages.
Under E-mail address, enter the e-mail address for this account.
Then press the Next soft key.
61
Page 76

5.
Enter the user name, password and domain name (if necessary), and then press the Next soft
key.
To save your password, so that you do not need to enter it each time you connect to your
e-mail server, select Save password.
_ NOTE`
If you save your password and then lose your Smartphone, someone finding your Smartphone
might be able to gain access to your e-mail.
6. Under Server type, press the Left/Right key to select the type of e-mail server that hosts your
mailbox: IMAP4 or POP3.
Under Account name, enter a name for this account. You must use a different name for each
account that you set up.
Under Network, press the Left/Right key to select the type of network that your e-mail server
runs on.
Then press the Next soft key.
7. Enter the information about your e-mail servers. If you are not sure what to enter, ask your
network administrator. Then press the Next soft key.
8. Select the message download options, and then press the Next soft key.
9.
Select a connection option, and then press the Next soft key.
10. Press the Finish soft key.
62
Page 77

5.3
Working with Accounts
You can use up to eight different messaging accounts with the Smartphone. For information on
setting up an account, see section 5.2. This section describes the features of using the accounts.
Viewing the List of Accounts
1.
On the Home screen, press the Start soft key and select Inbox.
2. Press the Menu soft key and select Accounts/Folders. The list of
accounts displays with the number of unread messages in the
Inbox of each account shown in parentheses.
Changing the Accounts Quickly
On the Home screen, press the Start soft key Inbox the Menu soft key
Accounts/Folders. Do one of the following to change the accounts:
Press the Up/Down key to select an account.
Scroll to an account, and press the Select soft key to open the Inbox of this account. Then you
can press the Left/Right key to quickly change to the Inbox of another account.
Changing E-mail Account Options
1. On the Home screen, press the Start soft key and select Inbox.
2.
If necessary, press the Left/Right key to change to the account you want.
3. Press the Menu soft key and select Options. Modify the settings and press the Done soft key.
Deleting an Account
1.
On the Home screen, press the Start soft key and select Inbox.
2. Press the Menu soft key and select Options.
3.
Select Account Setup.
4.
Scroll to the account to delete, press the Menu soft key, and select Delete.
63
Page 78

5.4
Composing and Sending Messages
Composing an E-mail or SMS Message
1. You can choose to send from Inbox or Contacts (if Contacts contains the e-mail address or
SMS number you want).
Sending from Inbox
On the Home screen, press the Start soft
key and select Inbox. Press the New soft
key. Select an account to use: SMS,
ActiveSync, or a POP3 or IMAP4 e-mail
account that you set up. Enter a recipient
e-mail address or SMS number in the To
field. If Contacts contains the e-mail address
or SMS number you want, you can press the
Action key directly in the input field to
select from the list.
_ NOTE`
You can only enter SMS numbers in an SMS message, and e-mail addresses in an e-mail
message.
To insert punctuation such as the “at” sign (@), a period (.), or a semicolon (;), repeatedly press
the number key 1 in the Multipress mode until the punctuation appears.
To add multiple recipients, separate each name with a semicolon (;) by repeatedly pressing the
number key 1 in the Multipress mode until the semicolon appears. You can also press and hold
the Pound key (#) to select a symbol from the symbol list.
2. In Cc, enter the e-mail address of the person to receive a copy.
(This field does not appear for SMS messages.)
3. In Subj, enter a subject (this field does not appear for SMS
messages), and your message. (For information on entering text,
see section 2.3.)
4.
Press the Send soft key.
5.
If you are sending an e-mail message, it will be stored in Outbox
and sent to the recipient the next time you synchronize or connect
to your e-mail server. If you are sending an SMS message, it will
be sent immediately through the mobile network.
Sending from a Contact Card
On the Home screen, press the Start soft
key and select Contacts. Select the contact
you want from the list to open the contact
card. Select the e-mail address or SMS
number you want, and press the Action key.
64
Page 79

_ NOTE`
If you want to abort, press the Menu soft key and select Cancel Compose.
To save a draft of a message that you are composing to finish and send later, press the Menu
soft key and select Postpone Message. To re-open and send a message draft, press the Menu
soft key on the main screen of Inbox and select Accounts/Folders. Scroll to the account whose
folders you want to view, and press the Folders soft key. Select Drafts and then the draft to
open, and press the Edit soft key to continue.
Inserting Predefined Text into Messages
To save time entering text, you can insert predefined text into messages. You can edit the predefined text
included with the Smartphone to create words or phrases that you frequently use in messages.
To insert predefined text into a message:
1. When composing your message, press the Menu soft key and select Insert Text.
2.
The predefined text appears on the screen. Scroll to the text to insert into your message and
press the Insert soft key.
To edit your predefined text messages:
1.
While in Inbox, press the Menu soft key and select Options Edit My Text.
2. Scroll to the text to edit, enter the new text, and press the Done soft key.
Inserting Voice Recordings into Messages
You can easily insert a voice recording into an e-mail message. Inserting a voice recording is useful
when you want to verbally explain information that is contained in the message.
To insert a voice recording into a message:
1.
When composing your message, press the Menu soft key and select Insert Recording.
2. The Voice Memo appears on the screen. Press the Record soft key to start recording.
3.
To end recording, press the Stop soft key.
4.
Press the Done soft key to insert the recording into your message.
_ NOTE`
You can send only one voice recording in a message. If you create a second voice recording in
a message, it replaces the first recording.
65
Page 80

Inserting Signatures into Messages
For each messaging account, you can specify a signature to be automatically inserted into messages
that you send.
1. While in Inbox, press the Menu soft key and select Options Signatures.
2.
Under Select an account, press the Left/Right key to change to the account for which to
specify a signature.
3. Select Use signature with this account.
4. To insert a signature in every message you send, select Include when replying and
forwarding. Otherwise, a signature is inserted only in new messages.
5.
Under Signature, replace the text in the box with a signature to insert.
6. Press the Done soft key. The signature is inserted into messages that you send from this
account.
_ NOTE`
To stop inserting a signature in messages, repeat the above procedure, but clear Use signature
with this account.
Sending Messages
There are several ways to send e-mail and SMS messages with your Smartphone. The most
common way to send messages is from Inbox or from a contact card.
The Smartphone immediately sends SMS messages when you press the Send soft key on the New
Message screen.
To send e-mail messages, you can connect to your desktop computer or Exchange Server, and
synchronize Inbox with Outlook. (For more information, see Chapter 7.)
You can also use the Send/Receive menu command from an Internet e-mail account to send e-mail
messages. Follow this procedure:
1.
Before you can send e-mail messages, your Smartphone must be properly configured. (For
more information, see the “Setting up an Internet E-mail Account” section earlier in this
chapter.)
2.
On the Home screen, press the Start soft key and select Inbox.
3.
If necessary, press the Left/Right key to change to the Internet e-mail account for which you
want to send messages.
66
Page 81

4.
Press the Menu soft key and select Send/Receive. The Smartphone connects to your Internet
e-mail server and sends your messages.
_ NOTE`
To stop this process, press the Menu soft key and select Stop Send/Receive.
Requesting a Delivery Receipt
You can request a delivery receipt for an SMS message. When you do this, you receive an SMS
message to confirm that your message was delivered to the recipient’s SMS service.
1. Before sending an SMS message, press the Menu soft key and select Message Options.
2.
Select Request SMS text message delivery notification.
3. Press the Done soft key.
67
Page 82

5.5
Receiving Messages
When new messages arrive, your Smartphone makes a sound to alert you and an envelope icon
appears at the top of the screen.
_ NOTE`
You can change the sound that is played when you receive a message. For more information,
see section 4.1.
When you receive a new voice mail message, the new voice mail icon appears at the top of
the display. You can call your voice mail service number and listen to new voice mail messages
by pressing the
Voice Mail
soft key, if it is displayed, or by dialing the number.
Receiving SMS Messages
The Smartphone automatically receives SMS messages whenever it is turned on.
Importing SMS Messages from the SIM Card to Inbox
Your SIM card may have been inserted in another mobile phone. Note that any SMS messages
received when the SIM card is in an ordinary mobile phone are stored in the SIM card, but SMS
messages received when the SIM card is in your Smartphone are stored in the Inbox of your
Smartphone. You can import the SMS messages existing in the SIM card following this procedure:
1. On the Home screen, press the Start soft key and select Inbox.
2.
Press the Menu soft key and select Options.
3. Select Import SIM Messages.
4. Press the Done soft key. The SMS messages are copied from the SIM card to the Inbox of the
SMS account.
_ NOTE`
You cannot export SMS messages from your Smartphone to a SIM card.
SMS messages are not removed from the SIM card after they are imported to Inbox.
When there is no more space for new SMS messages in your SIM card, then you cannot use this
SIM card to receive SMS messages in your Smartphone.
To view the space information of the SMS messages in your SIM card, press the
on the
space information of the SMS messages in your SIM card. To delete all SMS messages in your
SIM card, press the
screen, and select
Home
Delete
Accessories
soft key.
SIM Cleaner
. The screen will display the
Start
soft key
68
Page 83

Receiving E-mail Messages
To receive e-mail messages, you can connect to your desktop computer or Exchange Server, and
synchronize Inbox with Outlook. (For more information, see Chapter 7.)
You can also use the Send/Receive menu command from an Internet e-mail account to receive
e-mail messages. Follow this procedure:
1. Before you can receive e-mail messages, your Smartphone must be properly configured. (For
more information, see the “Setting up an Internet E-mail Account” section earlier in this
chapter.)
2.
On the Home screen, press the Start soft key and select Inbox.
3. If necessary, press the Left/Right key to change to the Internet e-mail account for which you
want to receive messages.
4. Press the Menu soft key and select Send/Receive. The Smartphone connects to your Internet
e-mail server and receives your messages.
_ NOTE`
To stop this process, press the Menu soft key and select Stop Send/Receive.
You must take additional steps to receive large messages and attachments. For more
information, see the “Downloading a Complete E-mail Message” and “Downloading an
Attachment” sections later in this chapter.
69
Page 84

5.6
Viewing and Responding to Messages
When you receive an e-mail message, the Smartphone plays a sound and displays an envelope icon
at the top of the screen. By default, the Home screen also displays the number of unopened e-mail
and SMS messages. To quickly view new messages, scroll to the message notification area on the
Home screen and press the Action key to enter the Inbox of the specified account.
Working with the Message List
Received messages are stored in the Inbox folder of the appropriate account. They are displayed in
the Inbox message list.
To view the Inbox message list, press the Start soft key on the Home screen and select Inbox. If
necessary, press the Left/Right key to change to the account for which to view messages.
New e-mail
Opened e-mail
By default, messages are displayed in the order received.
_ NOTE`
You can change the order in which messages are displayed and show the date and time that
messages were sent. While in Inbox, press the
Modify the settings and press the
Opening a Message
Done
soft key.
soft key and select
Menu
Options
Display
.
1. On the Home screen, press the Start soft key and select Inbox.
2.
If necessary, press the Left/Right key to change to the account you want.
3.
Select the message to open.
4.
To return to the message list, press the Back key.
70
Page 85

_ NOTE`
To create a contact card for the sender, press the Menu soft key and select Save to Contacts.
To open the next message in the list from within an open message, press the Right key; to open
the previous message in the list, press the Left key.
You can specify the language for reading a message. From an open message, press the Menu
soft key and select Options. Under E-mail message language, press the Left/Right key to
select a language, and press the Done soft key.
Inbox Menu
The following table lists Inbox menu commands and their functions.
Inbox menu command Function
Delete Deletes the selected message.
Reply Replies to an open or selected message.
Reply All
Forward Forwards the selected message.
Move Moves an open or selected message to a different folder.
Mark as Read
Mark as Unread
Mark for Download
Options
Send/Receive Connects to your e-mail server to send and receive messages.
Accounts/Folders Displays all accounts and message folders.
Replies to an open or selected message to the sender and all
copy recipients.
Displays the header text of a message in Inbox in lightface,
indicating that the message has been read.
Displays the header text of a message in Inbox in bold, indicating
that the message has not been read.
Retrieves the entire e-mail message from the e-mail server the next
time you connect.
Displays a list of Inbox options that you can customize (see the
next section).
71
Page 86

Downloading a Complete E-mail Message
When you receive large e-mail messages and attachments, the Smartphone downloads only a
portion of them. You can view the partial message or attachment and decide if you want to
download the rest of it.
When you synchronize Inbox with your desktop computer or Exchange Server, the Smartphone
downloads the first 0.5 KB of each new e-mail message by default. When you connect to an Internet
e-mail server, it downloads the amount (in KB) of each new message that you specified when you
set up the account. The message size includes its attachments. The original messages and
attachments remain on the server or your desktop computer.
To download a complete message, scroll to the message to download, press the Menu soft key, and
select Mark for Download. The complete message is retrieved the next time you synchronize or
connect to your e-mail server and receive e-mail.
_ NOTE`
When you delete a message on your Smartphone, it is also deleted from the e-mail server the
next time you connect.
Downloading an Attachment
In the message list, messages with an attachment display an envelope icon with a paperclip. Within
a message, attachments are displayed as a list of hyperlinks at the bottom of the message, and are
preceded by an attachment icon. The hyperlink includes the file name and size of the attachment.
_ NOTE`
On messages received from a POP3 e-mail server, the attachment size is omitted.
The attachment icon has the following three states:
Not downloaded
Downloaded
Marked for download
In an open message with an attachment to download, select the attachment. The attachment is
downloaded the next time you synchronize or connect to your e-mail server and receive e-mail.
To view the attachment, select the attachment in an open message containing a downloaded
attachment.
72
Page 87

To delete the attachment, scroll to the attachment in an open message containing a downloaded
attachment, press the Menu soft key, and select Delete. This deletes all of the attachments to this
message, not only the selected attachment.
_ NOTE`
You can view attachments only for file types that are supported by the Smartphone.
Accepting Meeting Requests
You can receive and respond to Outlook meeting requests on your Smartphone in a similar manner
as you do in Outlook on your desktop computer.
1. On the Home screen, press the Start soft key and select Inbox.
2. If necessary, press the Left/Right key to change to the account you want.
3.
Select the meeting request (preceded by an icon).
• To accept the meeting request and insert the meeting into your calendar, press the Menu
soft key and select Accept.
• To decline the meeting request, press the Menu soft key and select Decline.
• To tentatively accept the meeting request and insert a tentative meeting into your
calendar, press the Menu soft key and select Tentative.
Your response is sent back to the meeting organizer the next time that you synchronize.
_ NOTE`
For more information on synchronizing, see Chapter 7.
73
Page 88

5.7
Managing Message Folders
Each messaging account has a set of folders in which the Smartphone stores messages for that
account. The default folders are:
Deleted Items contains messages that you delete until you empty this folder.
Drafts contains messages that you save before sending.
Inbox contains messages that you receive.
Outbox contains sent e-mail messages until you synchronize or connect to your e-mail
server. SMS messages are sent immediately over the network and appear in your SMS Outbox
folder only for a few seconds.
Sent Items contains copies of messages that you send.
_ NOTE`
If your e-mail account supports folders, you can view multiple folders to reflect the folder
structure that you have created on your e-mail server. Messages you download from the server
will then be placed automatically in the appropriate folders on your Smartphone.
Viewing the Message Folder Contents
1. On the Home screen, press the Start soft key and select Inbox.
2. Press the Menu soft key and select Accounts/Folders.
3. Scroll to the account for which to view the contents of a message folder.
4.
Press the Folders soft key and select the folder to view. To view all ActiveSync folders, even
those not marked to synchronize, press the Menu soft key and select Show All Folders.
5. To return to Inbox, press the Menu soft key and select Accounts/Folders.
Marking a Folder for Synchronization
1. Synchronize Inbox with your desktop computer. This creates the same ActiveSync Inbox
folders on your Smartphone as in Outlook on your desktop computer.
2.
On the Home screen, press the Start soft key and select Inbox.
3.
Press the Menu soft key and select Accounts/Folders.
4.
Scroll to ActiveSync and press the Folders soft key.
5.
Press the Menu soft key and select Manage Folders.
6.
Scroll to a folder to synchronize.
7.
Press the Show soft key and then the Done soft key. The next time you synchronize, the
folder(s) that you marked on your Smartphone are synchronized with the corresponding
folders in Outlook on your desktop computer.
74
Page 89

Moving a Message to a Different Folder
1.
On the Home screen, press the Start soft key and select Inbox.
2. If necessary, press the Left/Right key to change to the account in which to move a message.
3. Scroll to the message to move.
4. Press the Menu soft key and select Move.
5.
Select the folder into which to move the message.
Emptying the Deleted Items Folder
1. On the Home screen, press the Start soft key and select Inbox.
2. Press the Menu soft key and select Accounts/Folders.
3. If necessary, press the Left/Right key to change to the account for which to empty the Deleted
Items folder.
4.
Press the Folders soft key and select Deleted Items.
5. Press the Menu soft key and select Empty Folder.
75
Page 90

5.8
MSN Messenger
You can use MSN® Messenger on your Smartphone to send and receive instant messages. MSN
Messenger on your Smartphone provides the same chat environment as MSN Messenger on your
desktop computer. Features of this environment include:
Sending and receiving instant messages
Seeing the status of others in your MSN Messenger contacts list, or changing your own status
(for example, available, busy, or out to lunch)
Inviting other people to a chat
Blocking contacts from seeing your status or sending you messages
Using MSN Messenger
Before you can use MSN Messenger, you must take steps to set it up. First, you need either a
Microsoft .NET Passport account or a Hotmail account. To set up a Microsoft .NET Passport
account, go to: http://www.passport.com. Once you have this account, you need to create a
connection on your Smartphone, such as a modem or wireless connection that allows you to
connect to the Internet. (For more information on creating connections, see “Data Connections” in
section 4.1.)
Signing in and Signing out
You can sign in to MSN Messenger using your Hotmail credentials or your .NET Passport. Once
you sign in, you can create contacts and exchange instant messages with them. This is called
“chatting.” Contacts must have a Hotmail or .NET Passport account and must have MSN
Messenger installed.
1. On the Home screen, press the Start soft key and select MSN Messenger.
2.
Press the Sign In soft key.
3. Enter your sign-in name (Example: name_123@hotmail.com) and password, and then press
the Sign In soft key.
4. To sign out, press the Menu soft key and select Sign out.
_ NOTE`
Signing out closes your data connection. Be sure to sign out when finished using MSN
Messenger or your connection will remain open. This might result in additional charges from
your service provider.
76
Page 91

Sending an Instant Message
1. Sign in to MSN Messenger.
2.
Scroll to the contact with whom you want to chat.
3. Press the Menu soft key and select Send Message.
4.
Enter your message. (For information on entering text, see section 2.3.) To quickly add
common messages, press the Menu soft key, select My Text, and then select the text to use.
5. Press the Send soft key. This starts a chat with the contact.
Available Options When Using MSN Messenger
To… Do this…
Add an MSN Messenger contact
Delete an MSN Messenger
contact
Invite a contact to an ongoing
chat
Change between chats
Return to the contact list Press the Menu soft key and select My Contacts.
End a chat Press the Menu soft key and select End Chat.
See who is already chatting Press the Menu soft key and select Chats.
Block or unblock an MSN
Messenger contact
Change your status
Change your display name
In the Messenger contact list, press the Menu soft key,
select Add Contact, and then follow the directions on the
screen.
In the Messenger contact list, select the contact’s name,
press the Menu soft key, and select Delete Contact.
Press the Menu soft key, select Invite, and then select a
contact.
Press the Menu soft key, select Chats, and then select the
contact to begin chatting.
In the Messenger contact list, select the contact’s name,
press the Menu soft key, and select Block or Unblock.
In the Messenger contact list, select your name. Select a
status description, such as Away.
In the Messenger contact list, press the Menu soft key and
select Options Passport Account. In My display
name, enter your name as you want it to display in the
contact lists of your contacts.
NOTE: You must sign in to MSN Messenger to change
your display name.
77
Page 92

Page 93

6
Pocket Outlook
Your Smartphone provides three Microsoft Pocket Outlook programs: Contacts, Calendar and
Tasks. They help you manage and keep track of your personal information and tasks. These
programs are compatible with your desktop’s Microsoft Outlook. Using ActiveSync, you can easily
keep your data on your Smartphone and desktop computer consistent.
This chapter includes:
6.1 Contacts.......................................................................80
6.2 Calendar ......................................................................86
6.3 Tasks ...........................................................................89
6.4 Voice Notes.................................................................90
6.5 Beaming Information ..................................................91
79
Page 94

6.1
Contacts
You can think of Contacts as an address book, where you store information about people and
businesses with whom you communicate. You can specify a special ring tone for the Smartphone to
use when the contact calls. You can use Contacts to dial phone numbers and compose e-mail and
SMS messages directly from a contact card.
_ NOTE`
On your Smartphone, there can be two kinds of independent contact lists. One is stored in the
Smartphone’s memory by Microsoft Contacts; the other is stored in the SIM card.
Your Smartphone needs time to read the data stored in the SIM card. Therefore, it may take 1~2
minutes for data refreshing to finish after the
on or the SIM card unlocks.
screen displays when the Smartphone turns
Home
Viewing Contacts
Contact List
On the Home screen, press the Start soft key and select Contacts to
access the contact list. If the right soft key is Contacts, you can press
the soft key to access the contact list.
The contact list displays the names of your contacts alphabetically.
Beside each name in the contact list is an abbreviation for the default
communication method, such as the person’s work phone number (w)
or home phone number (h). If the contact information includes a work
phone number, your Smartphone automatically set it as the default
number.
If there are phone numbers stored in your SIM card, the entries will be
displayed at the end of the list, with a SIM card icon
name.
The following table shows the possible abbreviations in the contact list and their meanings.
following the
Abbreviation Meaning Abbreviation Meaning
w Work phone hfx Home fax
w2 Second work phone ast Assistant phone
h Home phone rdo Radio phone
h2 Second home phone e E-mail address
m Mobile phone e2 Second e-mail address
pgr Pager e3 Third e-mail address
car Car phone sms SMS address
wfx Work fax
80
Web page
Page 95

Contact Cards
When you scroll to a contact and press the Action key from the contact list, a contact card appears
and displays all of the information that you have entered for the contact, such as the name of the
person or business, phone numbers, e-mail addresses, and more.
Number in bold denotes
default number.
Work number
Mobile number
E-mail address
SMS message number
From a contact card, press the Menu soft key to access the following commands:
Contact card
menu command
Add Speed Dial
Send SMS
Add Voice Tag
Save to SIM Saves a selected phone number to the SIM card.
Set As Default
Beam Contact
Description
Enables you to create a shortcut to a selected phone number or e-mail
address. (See section 3.6 for more information.)
Sends an SMS message to a selected phone number or e-mail address.
(See section 5.4 for more information.)
Records a voice tag for a selected phone number or e-mail address.
(See section 3.7 for more information.)
Makes the selected phone number or e-mail address the default
communication method for the contact.
Sends the contact card to another mobile device or a desktop computer
using infrared.
Delete Removes the contact card from the contact list.
Edit Enables you to modify information in the contact card.
81
Page 96

Creating a New Contact
1.
On the Home screen, press the Start soft key and select Contacts. If the right soft key on the
Home screen is Contacts, you can also press the soft key.
2.
Press the New soft key; or, press the Menu soft key and select New Contact. To create a new
contact in the SIM card, press the Menu soft key and select New SIM Contact.
3. Enter the information for the new contact. (For information on entering text, see section 2.3.)
4. When completed, press the Done soft key.
_ NOTE`
Unlike regular contact cards, you can store only one phone number for each SIM contact.
When you create a new contact on your Smartphone, you can synchronize Contacts with your
desktop computer or a server to keep your contact information up-to-date in all locations.
Deleting a Contact
1. On the Home screen, press the Start soft key and select Contacts. If the right soft key on the
Home screen is Contacts, you can also press the soft key.
2.
Scroll to the contact to delete.
3. Press the Menu soft key and select Delete.
4. A message appears on the screen asking you to confirm. Press the Yes soft key.
Finding a Contact
1. On the Home screen, press the Start soft key and select Contacts. If the right soft key on the
Home screen is Contacts, you can also press the soft key.
2.
Entering the name to search is a convenient method to find a contact. When you press the
number key to enter the letters, the matched contact will appear on the screen. If you have set
up the contact category, you can filter the contacts by pressing the Menu soft key, and
selecting Filter, then Business, Miscellaneous or Personal.
_ NOTE`
While in the contact list, you can press the Up/Down key to scroll to a contact, but you cannot
press the Left/Right key to go to the previous/next page.
82
Page 97

Editing a Contact
When you open a contact card, press the Edit soft key to edit the contact’s information. When the
editing is completed, press the Done soft key.
Selecting a Ring Tone for a Contact
You can select different ring tones for different contacts to easily identify the callers.
1.
On the Home screen, press the Start soft key and select Contacts. If the right soft key on the
Home screen is Contacts, you can also press the soft key.
2. Select the contact for which to select a ring tone.
3. Press the Edit soft key.
4. Scroll to Custom ring tone, and press the Left/Right key to select a ring tone. You can also
select from a full list by pressing the Action key.
5. Press the Done soft key.
Copying Phone Numbers from Your SIM Card to Contacts
Copying one SIM Card Contact
1.
On the Home screen, press the Start soft key and select Contacts. If the right soft key on the
Home screen is Contacts, you can also press the soft key.
2. Select the SIM card contact to copy.
3. In the contact card, press the Menu soft key and select Save to Contacts. The contact list
appears on the screen with New Item highlighted. Press the Select soft key.
4. Scroll to the field to place your number (e.g. business phone, mobile phone, or home phone).
Press the Insert soft key to paste the number in the field.
5.
Enter the information into the other fields as necessary.
6. Press the Done soft key, then the Back key to return to the contact list.
Copying All SIM Card Contacts
1.
On the Home screen, press the Start soft key and select Contacts. If the right soft key on the
Home screen is Contacts, you can also press the soft key.
2.
Press the Menu soft key and select Copy SIM to Contacts.
3.
A message appears on the screen asking you to confirm. Press the Yes soft key.
83
Page 98

Copying Phone Numbers from Contacts to Your SIM Card
1.
On the Home screen, press the Start soft key and select Contacts. If the right soft key on the
Home screen is Contacts, you can also press the soft key.
2.
Select the contact to copy.
3. In the contact card, press the Menu soft key and select Save to SIM. The SIM Contact screen
appears.
4. If necessary, modify the name of the contact.
5. Press the Done soft key, then the Back key to return to the contact list.
Calling a Contact
Using the Default Number
1. On the Home screen, press the Start soft key and select Contacts. If the right soft key on the
Home screen is Contacts, you can also press the soft key.
2. Select the contact to call.
3.
Press the Talk key
_ NOTE`
If you have a long list of contacts and you don’t see the contact you want to call on the first
screen, enter the first few letters of the contact’s name. The Smartphone will search through the
entire contact list and display the name.
Using a Number Other Than the Default Number
.
1. On the Home screen, press the Start soft key and select Contacts. If the right soft key on the
Home screen is Contacts, you can also press the soft key.
2.
Select the contact to call, and change the abbreviation for the number by pressing the
Left/Right key.
3.
Press the Talk key
_ NOTE`
Selecting another abbreviation changes the default number of this contact.
.
84
Page 99

Calling a Contact from a Contact Card
When you open a contact card, select the phone number you want and press the Talk key
dial the number.
Sending an E-mail/SMS Message from a Contact Card
When you open a contact card, select the e-mail address or SMS number you want and press the
Action key to open Inbox and enter your message.
to
85
Page 100

6.2
Calendar
Calendar is the scheduling program on your Smartphone, where you can create and view
appointments, and view your calendar by day, week, or month.
Creating a New Appointment
1.
On the Home screen, press the Start soft key and select
Calendar.
2. Press the Menu soft key and select New.
3. Enter information in the fields displayed. (For information on
entering text, see section 2.3.)
4.
To set a reminder for the appointment, under Reminder, select
the amount of time before the appointment that you want the
_ NOTE`
When you create a new appointment on your Smartphone, you can synchronize Calendar with
your desktop computer or a server to keep your schedule information up-to-date in all locations.
reminder to appear.
5. When completed, press the Done soft key.
Viewing an Appointment
1. On the Home screen, press the Start soft key and select Calendar.
2. Scroll to the appointment to open and press the Action key. The screen displays the
appointment details.
Editing an Appointment
1. On the Home screen, press the Start soft key and select Calendar.
2.
Select the appointment to edit.
3.
Press the Edit soft key.
4.
Make the changes, and press the Done soft key.
Deleting an Appointment
1.
On the Home screen, press the Start soft key and select Calendar.
2.
Scroll to the appointment to delete, press the Menu soft key, and select Delete.
86
 Loading...