

Page 1
POCKET REFERENCE GUIDE
GUIDE DE RÉFÉRENCE DE POCHE
GUÍA DE REFERENCIA DE BOLSILLO
E
F
S
Important Note
For Windows 98/98SE:
• The Windows 98/98SE driver software supplied with the product must be installed before initially connecting the camera to
the computer.
All later Windows versions and Mac OS:
• No special driver is required to access the camera from the
computer.
Note importante
Avec Windows 98/98SE :
• Le pilote Windows 98/98SE fourni avec l’appareil doit être
installé avant de connecter l’appareil au micro-ordinateur.
Toutes autres versions Windows et Mac OS :
• Aucun pilote n’est nécessaire pour accéder à l’appareil depuis
le micro-ordinateur.
Nota Importante
Para Windows 98 / 98SE:
• El software controlador de Windows 98 / 98SE proporcionado
con el producto se debe instalar antes de conectar por
primera vez la cámara al ordenador.
Todas las versiones posteriores de Windows y de Mac OS:
• No requieren un controlador especial para acceder a la
cámara desde el ordenador.
©2004 Konica Minolta Photo Imaging, Inc.
under the Berne Convention
and the Universal Copyright Convention.
Printed in Malaysia
9222-2181-19 MY-A409
Page 2
1
2
1.
2.
3.
4.
5.
6.
7.
8.
9.
10.
11.
12.
13.
14.
15.
16.
17.
18.
19.
20.
21.
22.
23.
24.
25.
26.
27.
28.
29.
30.
31.
32.
33.
34.
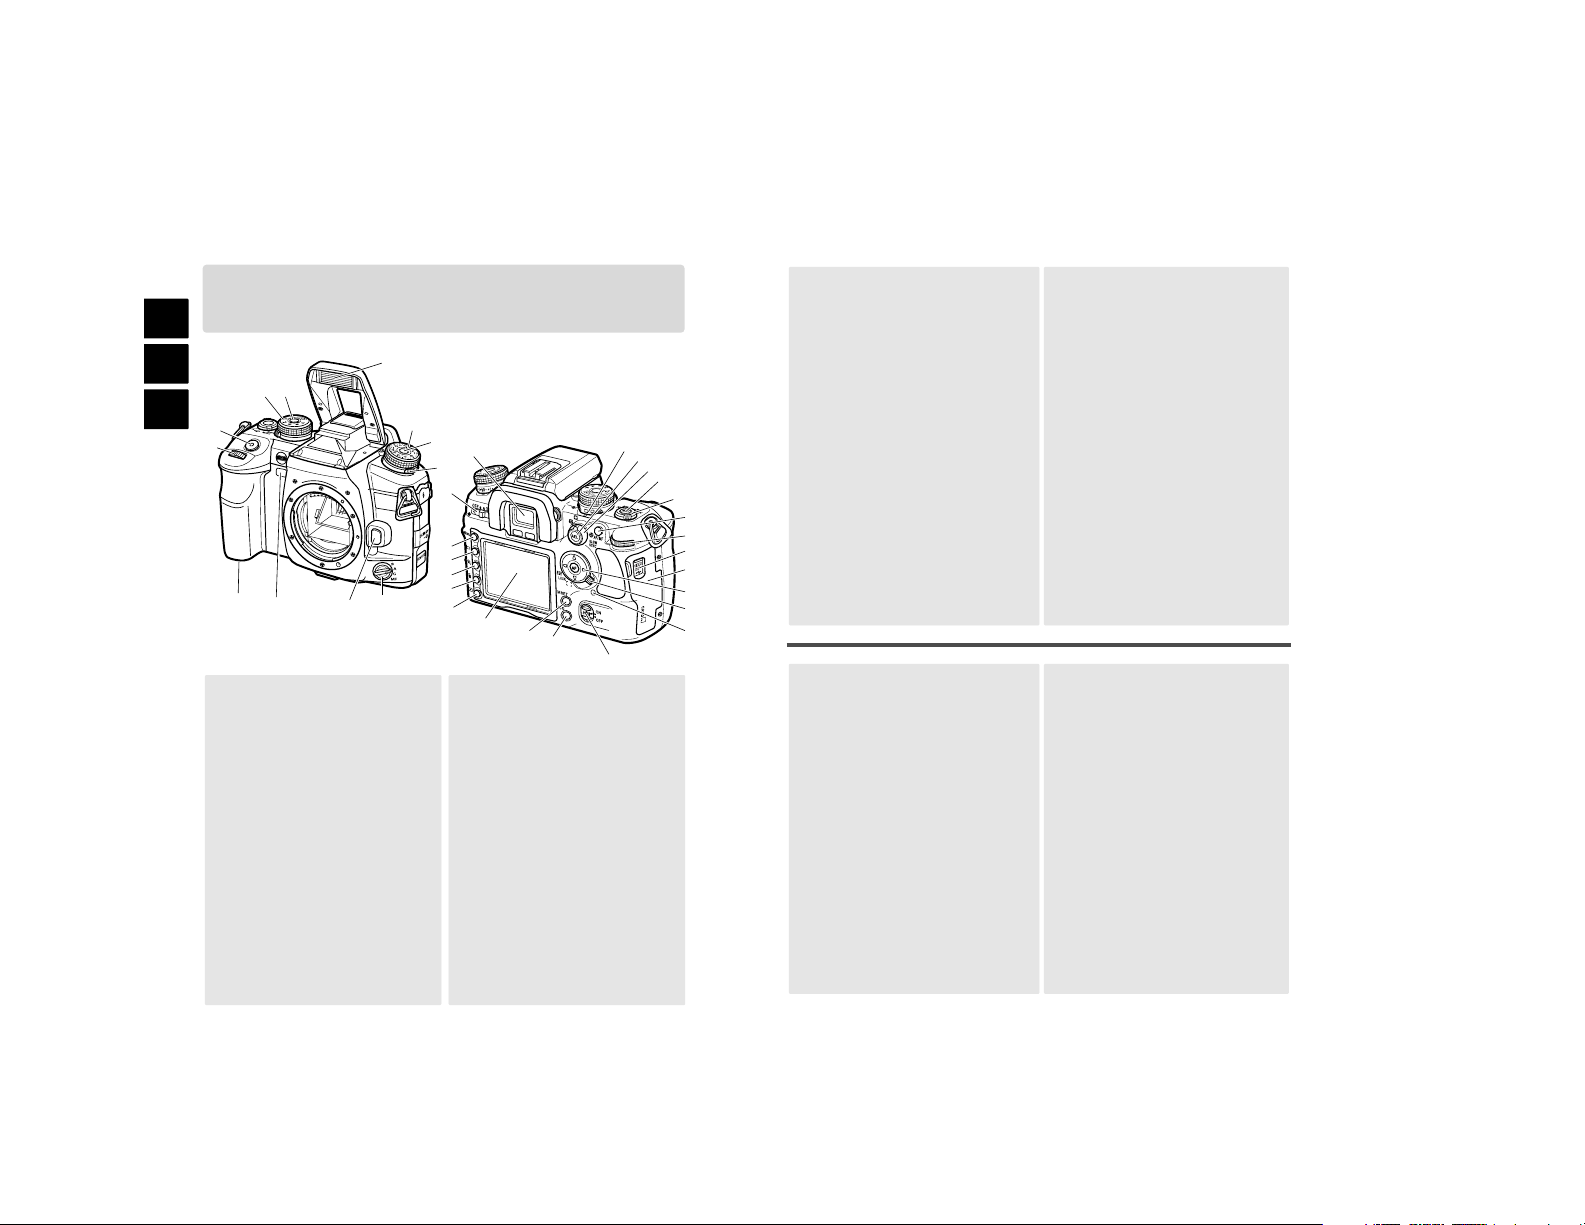
Front control dial
Shutter-release button
Exposure-mode dial
Dial release
Flash
Exposure-compensation
dial
Flash-compensation dial
Focus-mode dial
Lens release
Self-timer lamp
Battery-chamber door
Main switch
Viewfinder*
Drive mode dial
AE lock button
Metering-mode dial
White-balance button
White-balance dial
AF/MF button
Rear control dial
USB port/Video-out
terminal
Card-slot door
Controller & Spot-AF
button
Focus-area switch
Access lamp
Anti-Shake switch
Camera-sensitivity (ISO)
button
Memory set button
LCD monitor*
Playback button
Delete button
Magnification button
Display button
Menu button
NAMES OF PARTS
NOMENCLATURE
NOMBRES DE LAS PARTES
3
4
5
4
7
9
10
6
8
11
13
12
14
15
16
17
18
19
20
21
22
23
24
25
26
27
28
29
30
31
32
33
34
* Do not touch
Sintonizador de control delantero
Disparador
Sintonizador modo de exposición
Disparador del sintonizador
Flash
Sintonizador compens. exposición
Sintonizador compensación flash
Sintonizador modo de enfoque
Enganche del objetivo
Luz del temporizador automático
Puerta del compartimento de pilas
Interruptor principal
Visor *
Sintonizador modo
funcionamiento
Botón bloqueo AE
Sintonizador modo medición
Botón del balance de blancos
Sintonizador balance de blancos
Botón de AF/MF
Sintonizador de control trasero
Puerto USB / Terminal salida
vídeo
Puerta de la ranura para tarjetas
Controlador y Botón de AF
Puntual
Cambio del área de enfoque
Luz de acceso
Interruptor de Anti-Vibración
Botón sensibilidad cámara (ISO)
Botón de establecer memoria
Monitor LCD *
Botón de reproducción
Botón de eliminar
Botón de ampliación
Botón de visualización
Botón del menú
Molette de sélection avant
Déclencheur
Sélecteur de mode d’exposition
Touche du sélecteur (verrou)
Flash
Sélecteur de correction
d’exposition
Sélecteur de correction
d’expo au flash
Sélecteur de mode
de mise au point
Déverrouillage de l’objectif
Lampe témoin du retardateur
Porte du logement batterie
Interrupteur principal
Viseur*
Sélecteur de mode d’entraînement
Touche de mémorisation
d’expo. (AEL)
Sélecteur de mode de mesure
Touche de balance des blancs
Sélecteur de balance des blancs
Touche AF/MF
Molette de sélection arrière
Connecteur USB/sortie vidéo
Porte du logement carte mémoire
Touche centrale du
contrôleur/AF spot
Curseur de sélection de zone AF
Lampe témoin d’accès
Commutateur d’Anti-Vibration
Touche de sensibilité (ISO)
Touche de réglage mémoire
Écran ACL*
Touche Lecture
Touche d’effacement
Touche d’agrandissement
Touche d’affichage
Touche Menu
1.
2.
3.
4.
5.
6.
7.
8.
9.
10.
11.
12.
13.
14.
15.
16.
17.
1.
2.
3.
4.
5.
6.
7.
8.
9.
10.
11.
12.
13.
14.
15.
16.
17.
18.
19.
20.
21.
22.
23.
24.
25.
26.
27.
28.
29.
30.
31.
32.
33.
34.
18.
19.
20.
21.
22.
23.
24.
25.
26.
27.
28.
29.
30.
31.
32.
33.
34.
* Ne pas toucher
* No tocar
(Continued on the next page./Suite page suivante./Continúa en la página siguiente)
E
F
S
Page 3
1.
2.
3.
4.
5.
6.
7.
8.
9.
10.
11.
12.
13.
14.
15.
16.
17.
18.
19.
20.
21.
22.
23.
24.
25.
26.
27.
Modo memoria / exposición /
panel de exposición
Panel del flash
Panel de Efectos Digitales
Panel de Medición/Área AF/
Modo AF/Prioridad/
Modo funcionamiento
Panel de bloqueo AE / estado pila
Escala de Ev.
Panel del modo color/sensibilidad
Panel de tamaño / calidad imagen
Panel del balance de blancos
Contador de fotogramas
Escala de la Anti-Vibración
Indicador compensación de flash
Señal del flash
Indicador de sincronización de
alta velocidad
Indicador flash inalámbrico/
remoto
Indicador de enfoque manual
Indicador de bloqueo del AE
Señal de enfoque
Visor de la velocidad
de obturador
Visor de la apertura
Escala de Ev.
Advertencia de cámara movida
Contador de fotos que faltan
Marco de enfoque amplio
Área de AF puntual
Áreas de enfoque locales
Área de medición puntual
1.
2.
3.
4.
5.
6.
7.
8.
9.
10.
11.
12.
13.
14.
15.
16.
17.
18.
19.
20.
21.
22.
23.
24.
25.
26.
27.
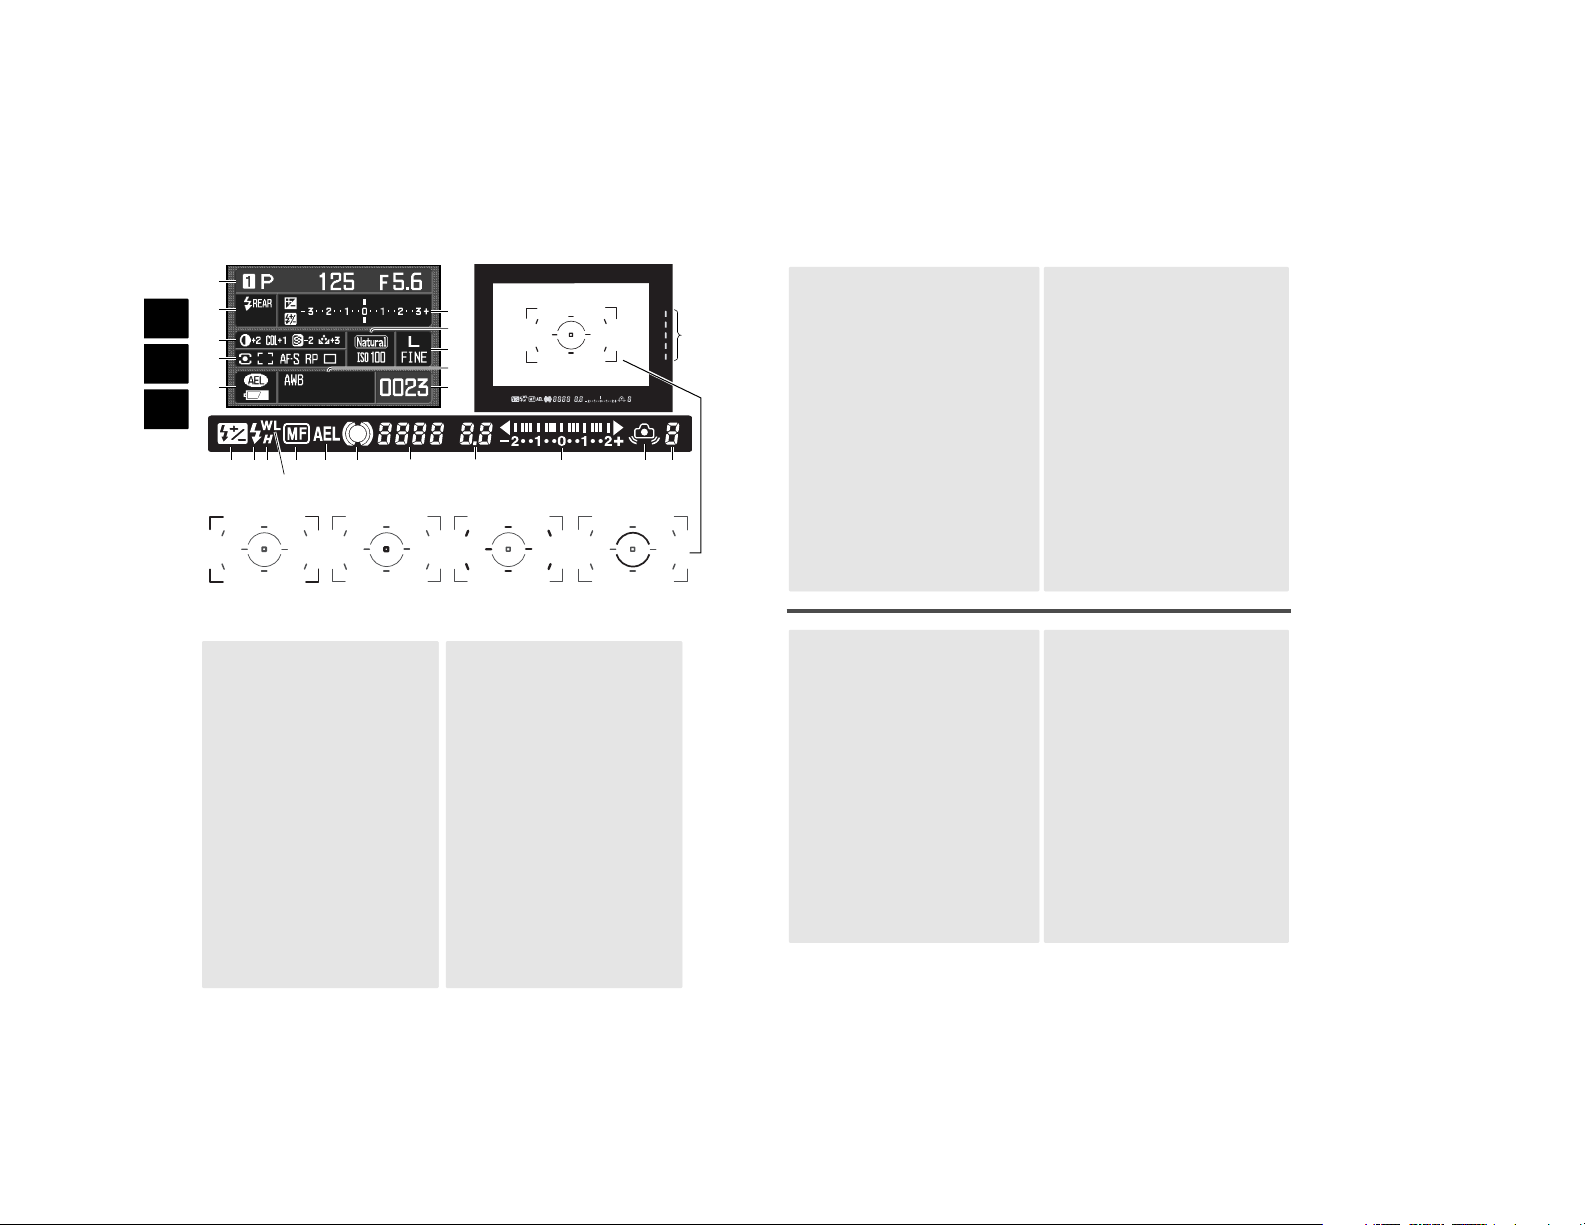
Memory/exposure mode/
exposure panel
Flash panel
Digital Effects panel
Metering/AF area/AF mode /
Release priority/Drive mode
panel
AE lock/battery condition
panel
EV scale
Color mode/camera-sensitivity panel
Image size / quality panel
White-balance panel
Frame counter
Anti-shake scale
Flash-compensation indicator
Flash signal
High-speed sync. indicator
Wireless/Remote flash indicator
Manual focus indicatior
AE lock indicator
Focus signal
Shutter-speed display
Aperture display
Ev scale
Camera-shake warning
Frames-remaining counter
Wide focus frame
Spot AF area
Local Focus areas
Spot-metering area
1
2
3
4
5
7
9
10
6
8
11
13
12
14
15
16 17 18 19 20 21 22 23
24 25 26 27
1.
2.
3.
4.
5.
6.
7.
8.
9.
10.
11.
12.
Afficheur de mémoire/
mode d’exposition/Exposition
Afficheur de flash
Afficheur d’effets numériques
Afficheur de mesure/zone AF/
mode AF /priorité déclenchement/
mode d’entraînement
Afficheur de mémo d’expo./d’état
de la batterie
Échelle IL
Afficheur de mode couleur/
sensibilité
Afficheur de définition/
qualité d’image
Afficheur de balance des blancs
Compteur de vues
Échelle d’Anti-Vibration
Indicateur de correction d’expo
flash
Témoin de flash
Indicateur de synchro
haute-vitesse
Indicateur de flash sans
cordon/flash détaché
Indicateur de mise au point
manuelle
Indicateur de mémorisation
d’expo
Témoin de mise au point
Vitesse d’obturation
Ouverture
Échelle IL
Signal de bougé de l’appareil
Compteur de vues restantes
Zone AF large
Zone AF spot
Zones AF ponctuelles
Zone de mesure spot
13.
14.
15.
16.
17.
18.
19.
20.
21.
22.
23.
24.
25.
26.
27.
E
F
S
Page 4
E
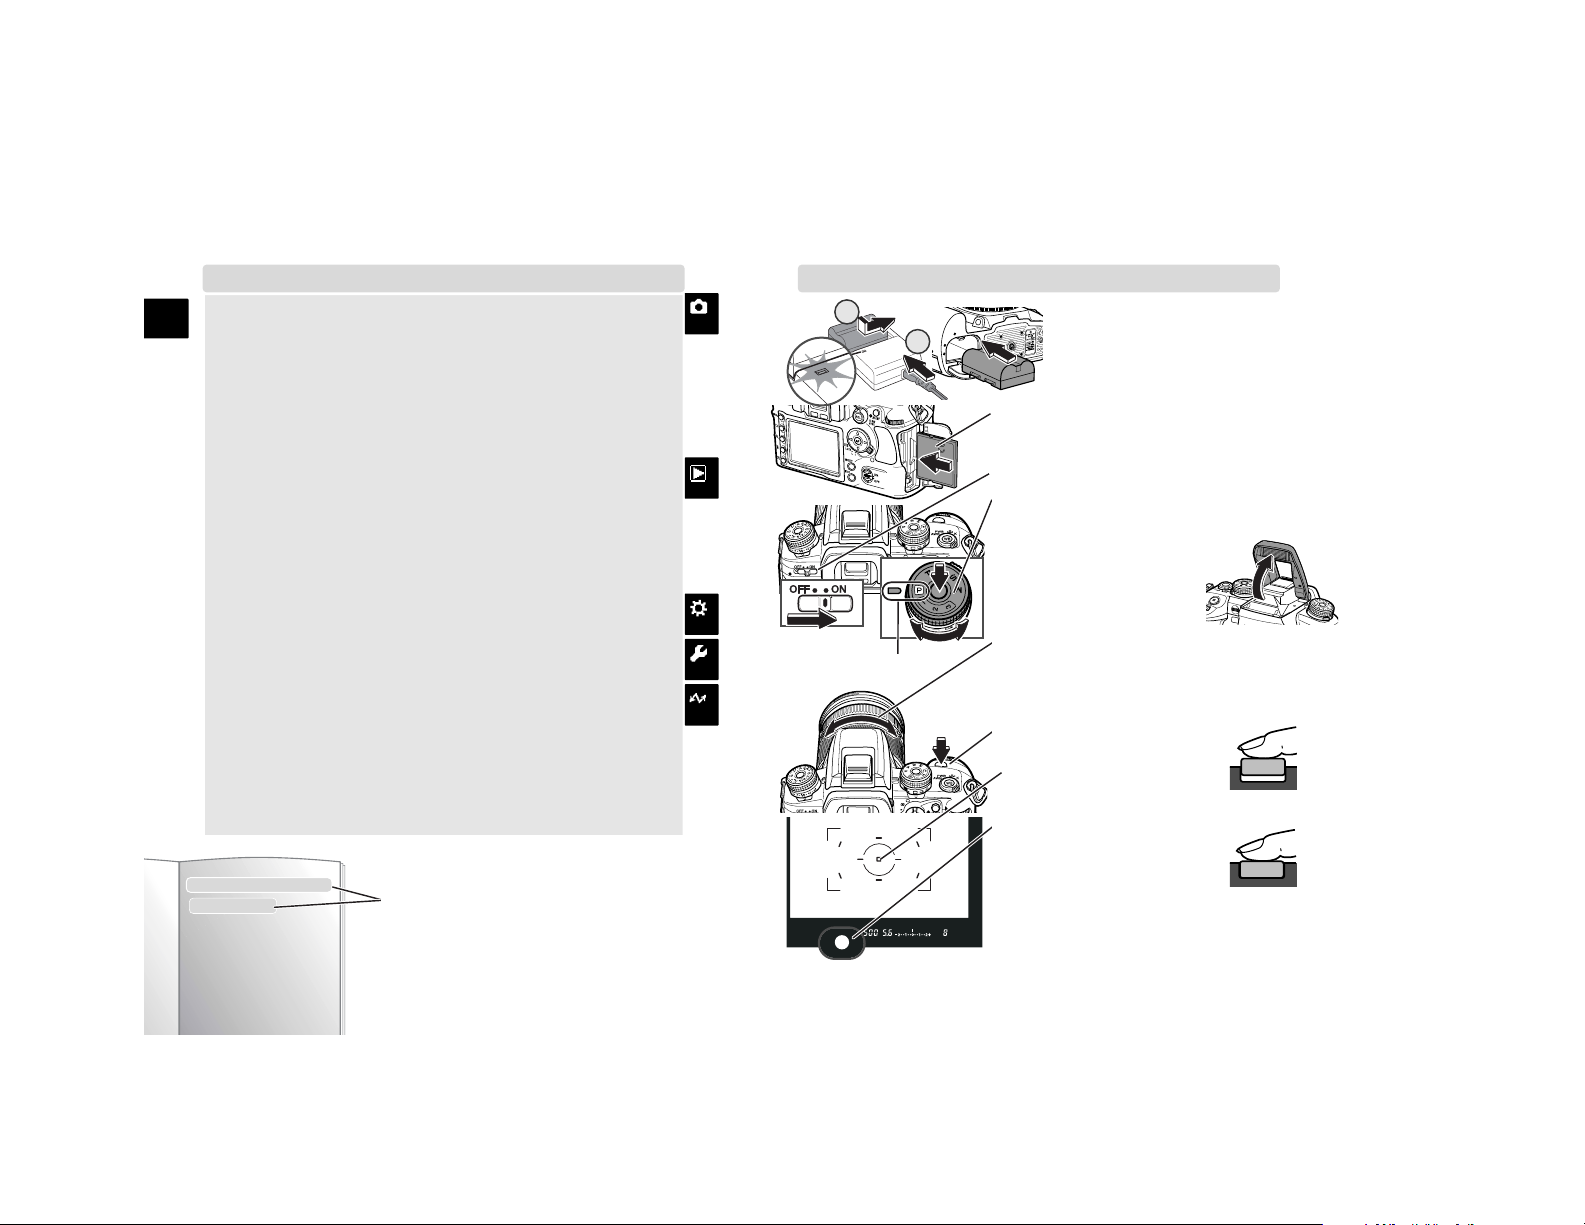
A-1Quick Start
TABLE OF CONTENTS QUICK START
1. Attach a lens, and charge
the battery. Load the battery
into the camera.
• Charging time is approx.150
minutes.
Full-auto program
2. Insert a memory card.
• Insert the card so the face is toward
the front of camera.
3. Slide the main switch on.
4. While pressing the dial release, set
the exposure-mode dial to full-auto
program.
5. Raise the flash if necessary.
• The flash always fires
while up.
6. If using a zoom lens,
rotate the zoom ring to frame the
subject.
7. Center the subject in the wide focus
frame.
8. Press the shutter-release button partway down.
• An audio signal confirms
focus and the AF area used
is briefly illuminated.
9. When focus signal appears in
the viewfinder, press the
shutter-release button all the
way down to take a picture.
• The recorded image is played back
on the monitor for 2 seconds.
QUICK START...............................A-1
Full-auto program default settings/
Focus signal/Flash signal/
Camera-shake warning ...............A-2
How to operate the menu .........A-3
Monitor display .........................A-4
RECORDING .................................A-5
Basic ..........................................A-5
Lens notes/Flash range/
Flash modes/Slow sync./Image size
& quality/
Instant playback period..............A-5
Exposure....................................A-6
Combination in PASM modes/
Program shift/
Exposure warning/
Metering in M mode...................A-6
Manual shift/Exposure & flash com-
pensation...................................A-7
Metering ....................................A-8
Exposure lock (AEL)
Focus modes .............................A-8
MF mode....................................A-8
Focus area switch/
AF/MF button.............................A-9
Drive modes.............................A-10
Self-timer/Bracketing...............A-10
Interval.....................................A-11
Color modes ............................A-12
Digital FX .................................A-12
Camera-sensitivity (ISO).........A-12
White balance..........................A-13
Preset/Custom .........................A-13
Color temperature....................A-14
Memory....................................A-14
Settings stored/
Store memory..........................A-14
Recall memory.........................A-15
Recording mode reset.............A-15
PLAYBACK.................................A-16
Basic playback........................A-16
Enlarged playback....................A-16
Deleting single images/
Delete/Lock/
Index playback or file browser/
View folder/Format/
Slide show...............................A-17
CUSTOM.....................................A-18
Custom menu ..........................A-18
SETUP ........................................A-20
Setup menu .............................A-20
Reset default ...........................A-22
DATA TRANSFER........................A-24
PictBridge ................................A-24
Connecting to computer .........A-25
Download images ....................A-26
Disconnecting from
computer .................................A-27
TROUBLESHOOTING...................A-28
(p. 19, 21, 22, 24, 27, 28)
FOCUS
MF mode (p. 52)
(p. 52-54)
Instruction manual page reference
1
2
Page 5

A-2 Quick Start
E
A-3Quick Start
Focus signal (p. 29)
Single AF - focus is confirmed and locked.
Continuous AF - focus is
confirmed.
Continuous AF - focusing.
Shutter is locked.
(Blinks) Cannot focus - shutter is locked.
Image may be blurred
because of camera shake.
Use the flash or a tripod.
Full-auto program default settings (p. 40)
The following settings are reset automatically when the exposuremode dial is turned to full-auto program:
Flash signal (p. 31)
Flash is charged and ready.
(Blinks after exposure) Flash
exposure was sufficient.
Camera-shake warning (p. 30)
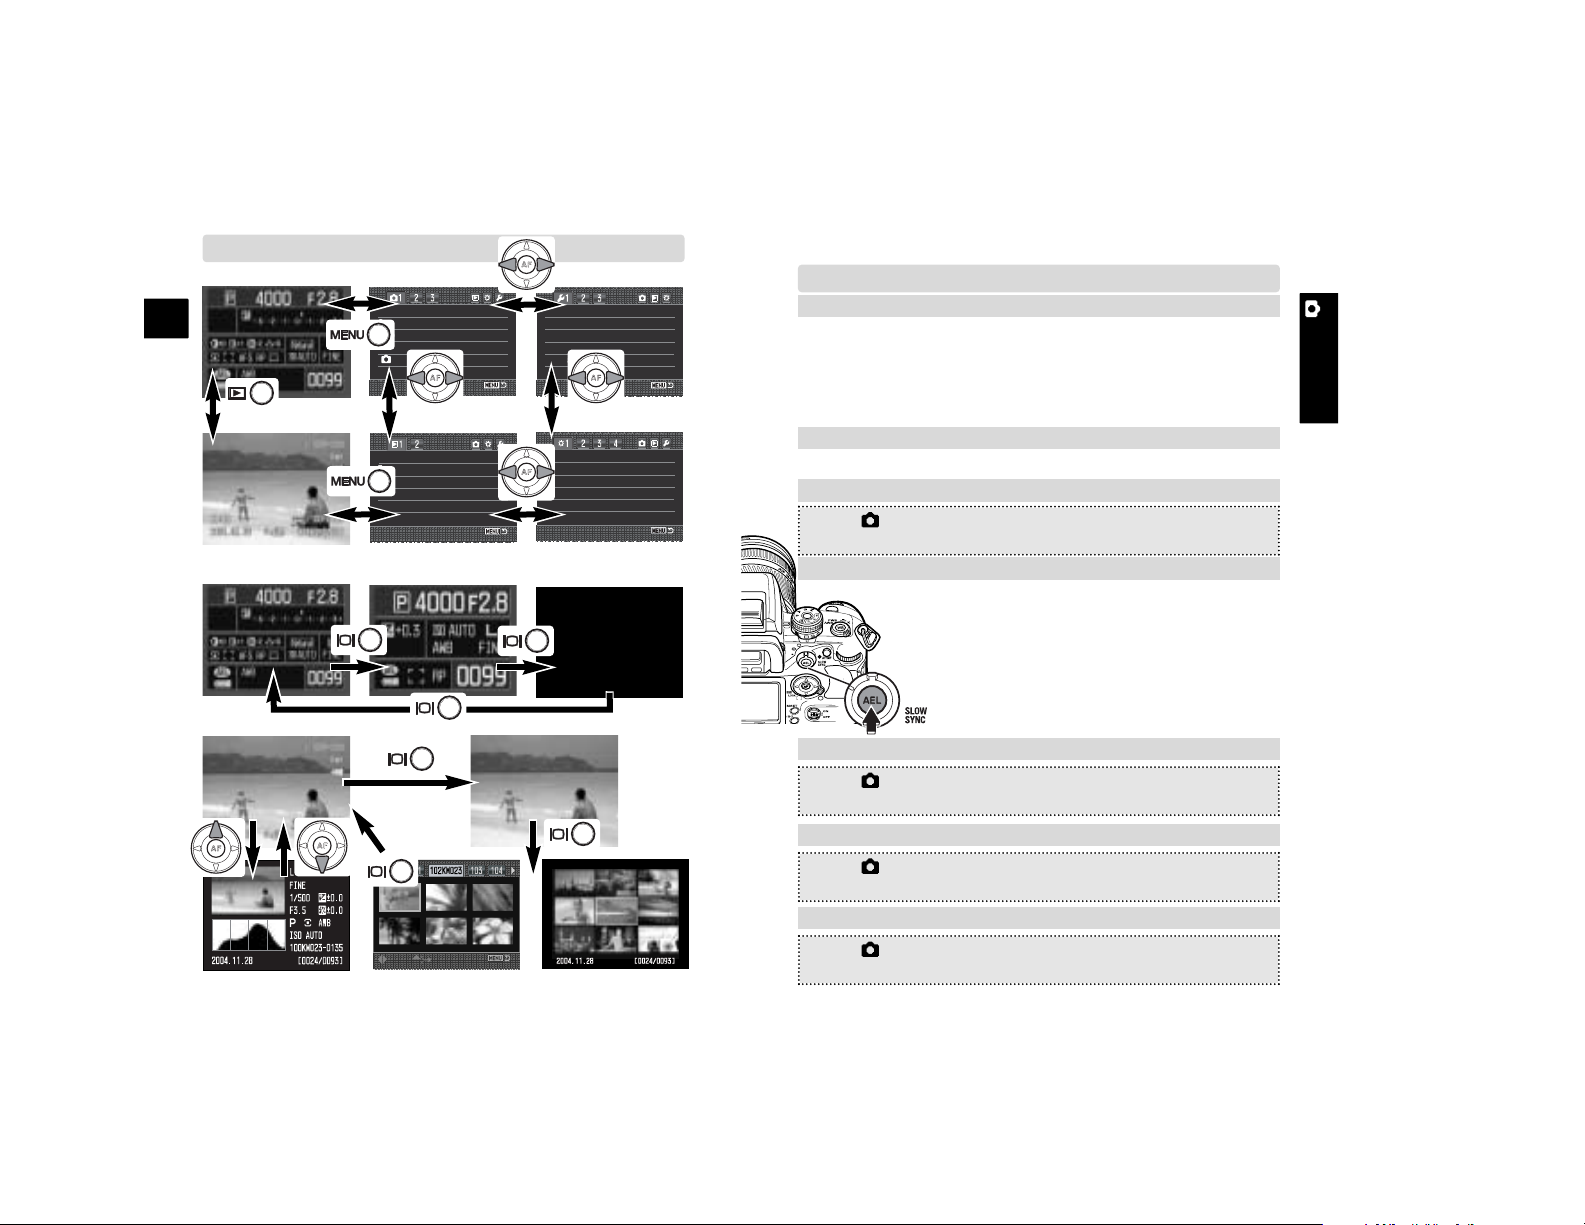
HOW TO OPERATE THE MENU
The following notation is used for menu guidance. The example below
refers to the description above. “MENU” indicates pressing menu button,
“>” indicates the next operation or position, and “•:enter” for pressing the
central button of the controller. The list of options in parentheses show the
default in bold.
* Whichever of the two flash modes was last set.
Focus mode Automatic AF(A)
Drive mode Single-frame advance
Flash compensation 0.0Ev
White Balance Auto
Image size L: 3008x2000
Color mode Natural: sRGB
Bracket setup 0.3Ev/3 frames
Flash mode Fill flash or Red-eye reduction*
Metering mode 14-segment honeycomb-pattern
AF area Wide focus area
Exposure compensation 0.0Ev
Flash control ADI
ISO 100
Image quality Fine
Digital FX 0
Noise reduction On
1. Press the menu button to open the
menu.
2. Use the left/right keys to select the
menu section.
•To change between menus, highlight
the menu tab and press the central
button to open the menu.
3. Use the up/down keys to select the
item to be changed.
4. Use the right key to display the
options.
5. Use the up/down keys to highlight
the option and press the central button to select it.
• If “Enter” is displayed, press the
central button to open the setting
screen.
6. To close the menu, press the menu
button.
MENU > 1 > Audio signals > Select option*> •:enter > MENU (* On, Off)
Image size L: 3008x2000
Quality Fine
Color mode Natural: sRGB
Digital FX -
Reset -
LCDBrightness Transfer mode Data storage
Video output NTSC
Audio signals On
Language English
Date/Time set -
LCDBrightness Transfer mode Data storage
Video output NTSC
Audio signals On
Language English
Date/Time set -
: Playback
: Setup
:Recording
:Custom
Audio signals On
Off
(p. 64, 82, 92, 102)
Page 6
A-5Recording
RECORDING
Quick Start
E
MONITOR DISPLAY
Playback display
:select :folders
A-4
BASIC
Flash range of built-in flash at ISO100 (p. 31)
f/2.8:1.0 ~ 4.3m (3.3 ~ 14.1 ft.), f/5.6:1.0 ~ 2.1m (3.3 ~ 6.9 ft.)
Changing the flash mode (p. 71)
MENU > 2 > Flash mode > Select option* > •:enter > MENU
(*
Fill-flash
, Red-eye reduction, Rear sync, Wireless)
Slow-shutter sync (p. 47)
Available in full-auto program, P and A
exposure modes. Used to balance the ambient
and flash exposures.
1. Raise the built-in flash or turn the accessory
flash on.
2. While pressing the AE lock button, press the
shutter-release button all the way down to
take the picture.
Changing image size (p. 66)
MENU > 1 > Image size > Select option* > •:enter > MENU
(*
L:3008x2000
, M: 2256x1496, S: 1504x1000)
Changing image quality (p. 66)
MENU > 1 > Quality > Select option* > •:enter > MENU
(*RAW, RAW&JPEG, Extra fine,
Fine
, Standard)
Changing the instant playback period (p. 77)
MENU > 3 > Inst.Playback > Select period* > •:enter > MENU
(*10 sec., 5 sec.,
2 sec.
, off)
Image size L: 3008x2000
Quality Fine
Color mode Natural: sRGB
Digital FX -
Reset -
Delete Format View folder All folders
Mark folders
Lock Index format 9 frames
LCDBrightness Transfer mode Data storage
Video output NTSC
Audio signals On
Language English
Date/Time set -
Priority setup AF
FocusHoldButt. Focus hold
AF/MF button Hold
AEL button AE hold
AF w/shutter On
Auto AF setup Auto AF
Recording menu
Playback menu
Custom menu
Setup menu
Recording mode
Full recording display
Basic recording display
Recording display off
Playback histogram
Or
Index
playback
File
browser
Image only
Full playback display
Lens notes
All Konica Minolta AF lenses and Minolta AF lenses are
compatible. Because the camera uses an APS-size CCD, multiply
the focal length of the lens by 1.5 to calculate the approximate
equivalent focal length in 35mm. For example, a 17-35mm lens
will have a similar angle of view as a 25-52mm lens on a 35mm
camera.
(p. 33, 34, 35, 37)
Page 7
0.5Ev more than the scale limit
1Ev or more than the scale limit
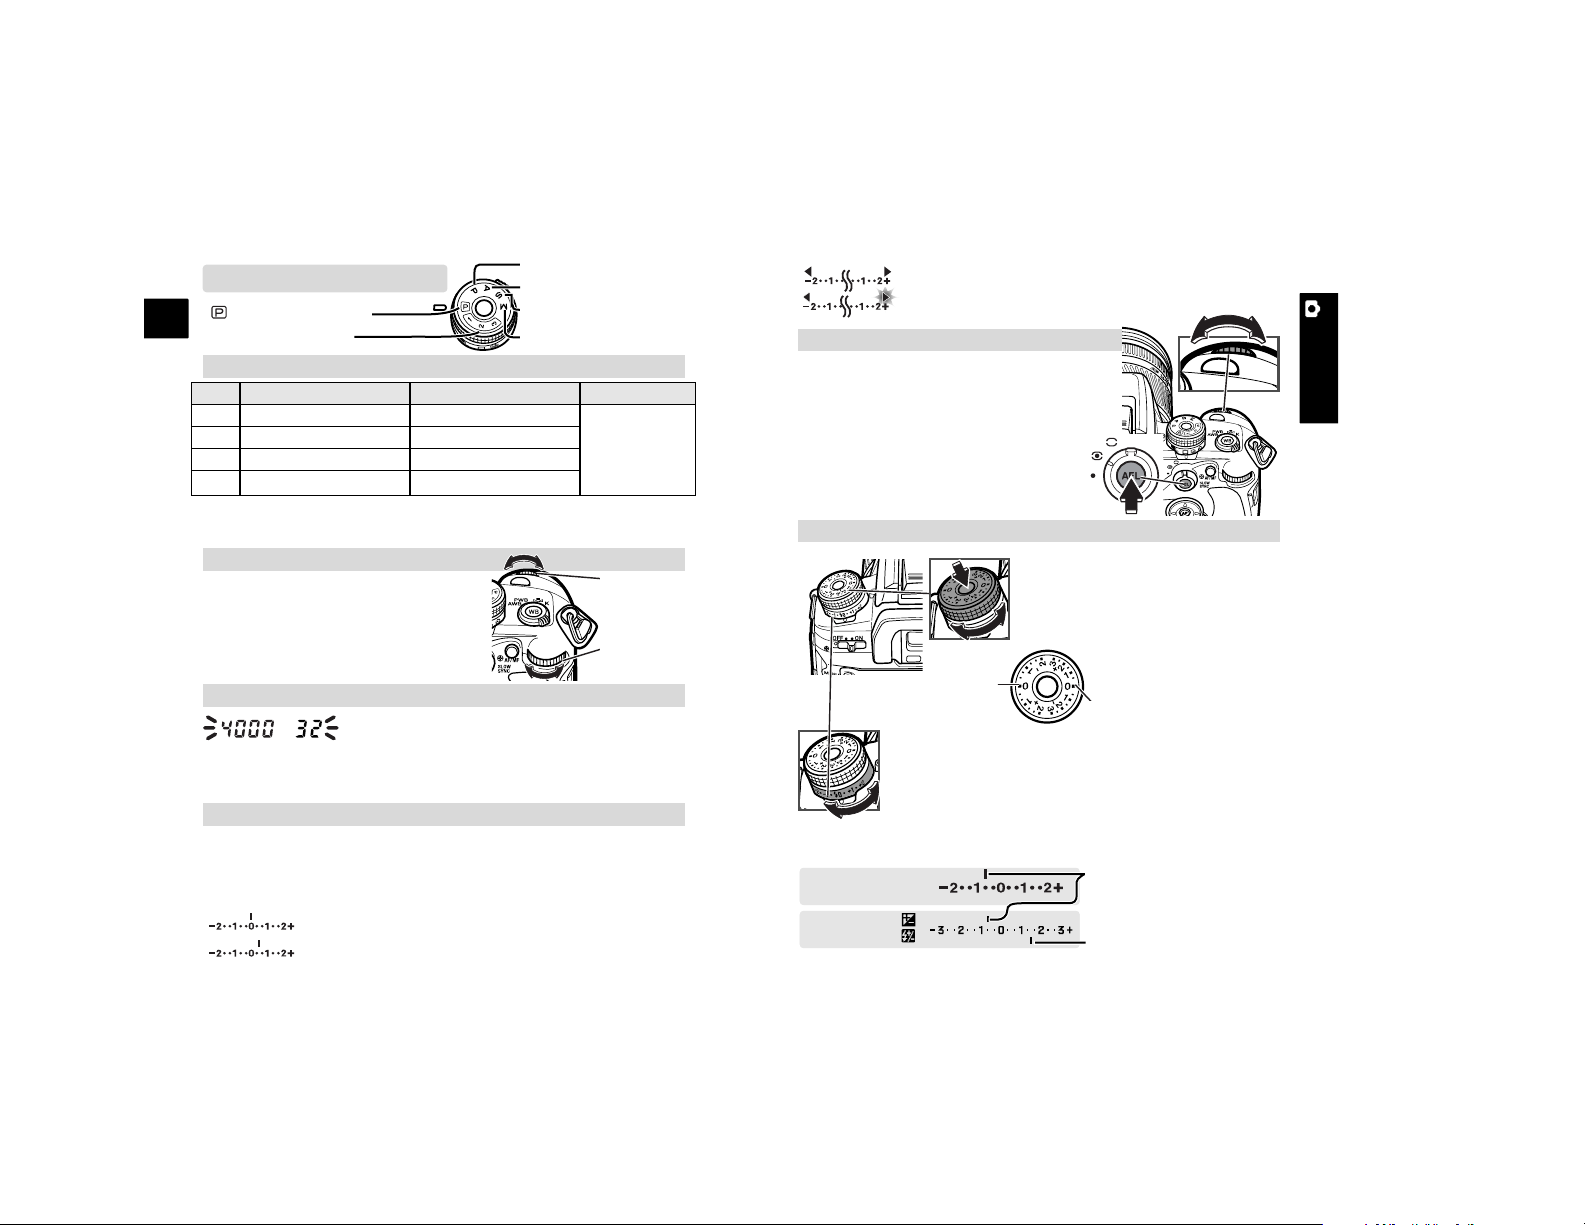
Manual shift (p. 44)
A-6 Recording
E
A-7Recording
RECORDING
To manually adjust the metered
exposure +/– 3Evs in 1/2Ev or +/–
2Evs in 1/3 Ev increments.
Viewfinder
Monitor
EXPOSURE
Combination in P/A/S/M modes (p. 40, 42-44)
Faster shutter speed can be used with high-speed sync with the Program
flash 5600HS(D) or 3600HS(D).
The set and metered exposures are equal.
0.5Ev more than the metered exposure.
In the manual exposure mode, press
and hold the AEL button and turn
either control dial to shift the aperture
and shutter-speed combination
without affecting the total exposure.
Exposure warning (p. 40, 42-44)
If either or both the aperture and shutter-
speed displays blink, the exposure is beyond
the exposure control range of the camera and lens. Adjust the
exposure until the blinking stops.
Program shift (PA/PS) (p. 41)
In P mode, the control dials shift the
aperture/shutter speed combination.
The front dial shifts the shutter speed
and the rear dial the aperture.
Exposure compensation
Compensation display
To manually adjust the output of the built-in or an
attached accessory flash up to +/- 2 Ev in 1/2 Ev
increments.
Flash compensation
Flash compensation value
(Example: +1.5Ev)
Metering in M mode (p. 44)
The Ev scale displays the Ev difference between the set exposure
and the metered exposure. The increments on the scale depend
on the exposure-compensation dial position. The examples below
are based on a 0.5 Ev increment.
Front control
dial: Ps
Rear control
dial: PA
(A) Aperture priority
Exposure compensation value
(Example: –0.7Ev)
1/2Ev increment
1/3Ev increment
(Continued on the next page.)
Aperture
Automatic
by control dials
Automatic
by rear control dial
Flash sync.
1/125s or
slower. 1/160s
or slower when
Anti-Shake is
off.
Shutter
Automatic
Automatic
by control dials
by front control dial
Mode
P
A
S
M
Full-auto program
(1~3) Memory registers
(S) Shutter priority
(M) Manual exposure
(P) Program
Exposure and flash compensation (p. 48)
Page 8

A-8 Recording
E
A-9Recording
RECORDING
METERING
FOCUS
14-Segment Honeycomb-Pattern Metering: for
most photographic situation.
Spot Metering: uses the spot-metering area in
the viewfinder to metering specific portions
of the scene.
Center-weighted Metering: measures the entire
image area with emphasis given the central
region.
Exposure lock (AEL) (p. 46)
The AEL button locks a metered exposure without locking
the focus.
1. With the area to be metered framed, press and hold the
AEL button (1).
2. Frame the subject (2).
3. Press the shutter-release button partway
down to focus (3) and then all the way
down to take the picture.
Turn the dial to the appropriate position: A: Automatic AF (for
most situations), C: Continuous AF (for moving subjects), S:
Single-shot AF (for stationary subjects), or MF: Manual focus.
1. Turn the focus-mode dial to MF.
2. Turn the focusing ring until the subject appears
sharp.
1. Select the focus area.
2. Turn the focus-area switch to the lock position to fix
the area.
AF/MF button (p. 53)
The AF/MF button switches between autofocus and
manual focus without changing the focus-mode dial.
Locked exposure
Difference between the metered and
locked exposure.
Focus-area switch (p. 54)
The AF area can be specified.
2. Press the controller’s eight-way keys to
select one of the eight local focus areas.
Press the central controller button to
select the center spot AF area. The camera focuses when the controller is pressed.
3. While pressing the controller, press the
shutter-release button to take the picture.
3. While pressing the controller, press the shutter-release button to
take the picture.
1. Turn the focus-area switch to focus-area selection.
2. Press the controller’s eight-way keys to focus using
the wide focus area.
Press the central button of the controller to use the
spot AF area.
Spot and Wide AF
Spot and local focus areas
Focus area lock
1. Turn the focus-area switch to wide.
(p. 46, 50)
(p. 52-54)
1
2 3
MF mode (p. 52)
Page 9
A-10 Recording
E
A-11Recording
RECORDING
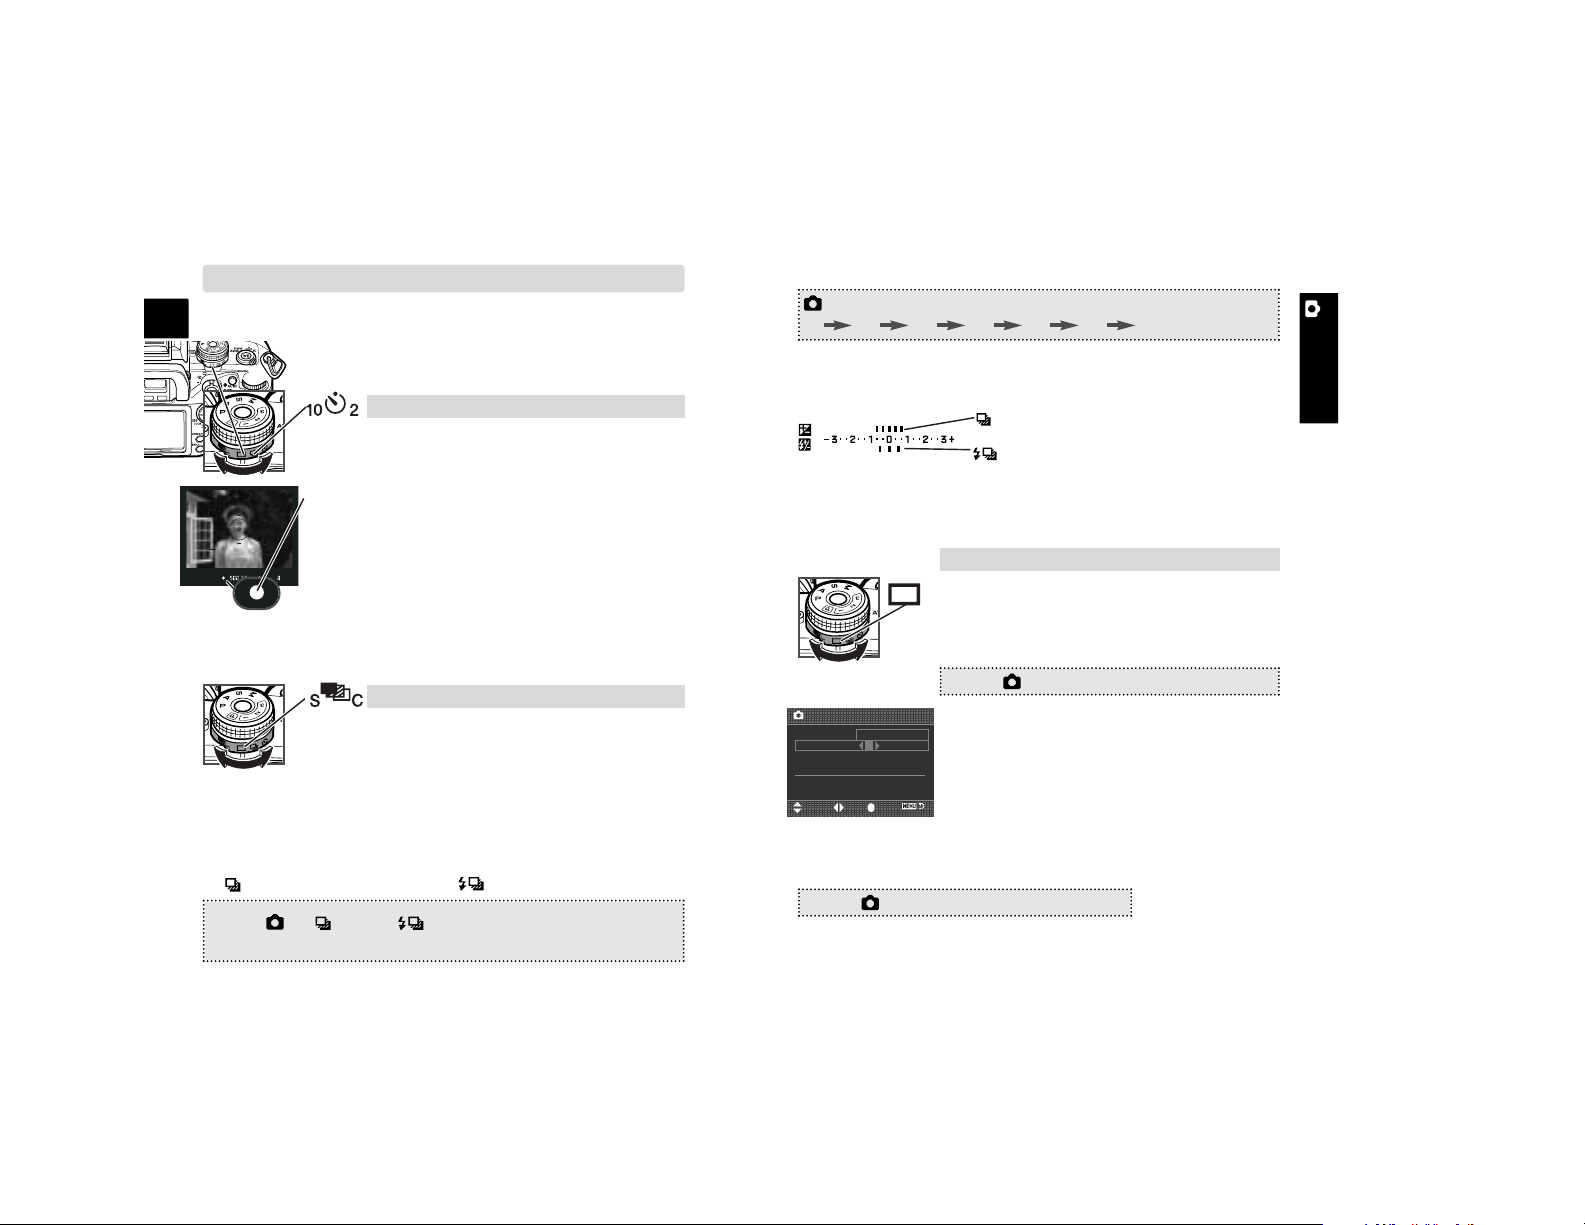
DRIVE MODES
Single-frame advance, continuous advance,
bracketing (both single-frame and continuous
advance), and a 10 sec. and 2 sec. self-timer can be
selected by rotating the drive-mode dial.
Self-timer (p. 57)
1. Place the camera on a tripod, then turn the
drive-mode dial to the 10s or 2s self-timer position.
2. Center the subject in the focus frame, and press
the shutter-release button partway down to confirm the focus.
3. Press the shutter-release button all the way
down to start the timer.
•Turn the camera off or select another drive mode
to cancel 10-second self-timer countdown. The 2
second self-timer countdown cannot be canceled.
Bracketing (p. 58)
Interval (p. 78)
1. Turn the drive-mode dial to the singleframe advance position.
4. Press the shutter-release button to start bracketing.
• The corresponding index disappears as the images are taken.
Flash bracketing: 0.5Ev/3frames
Exposure bracketing: 0.3Ev/5frames
(Example)
1. Turn the drive-mode dial to single-frame advance
(S) or continuous advance (C) bracketing.
• When the flash is raised, a flash bracket is made.
2 > Bracket order > Select option* > •:enter > MENU
(*0 – +, or – 0 +)
3. Select the bracket order.
(Continued on the next page.)
• The Ev scale displays the number of frames and bracketing
increment.
2. Setup the interval parameters.
MENU > 3 > Interval > Setup > •:enter
3. Use the up/down keys to select the parameter to be set among the interval period,
number of frames, and start time.
4. Use the left/right keys to set the parameter.
MENU > 3 > Interval > Start > •:enter > MENU
7. Confirm focus and press the shutter-release button to start the
interval recording.
:move :sel. :enter
Interval
5. Press the central button to complete the operation.
6. To start the interval series, execute the following:
No. of frames 2
Start time No delay
Interval 1 min
30s - 60min
MENU > 2 > setup or setup > Select option* > •:enter
(
*0.3Ev/3frames
, 0.3Ev/5frames, 0.5Ev/3frames, 0.5Ev/5frames)
2. Set the bracketing increment and number of frames for the
bracket on the menu.
exposure bracket flash bracket
(p. 56-58)
Page 10
A-12 Recording
E
A-13Recording
RECORDING
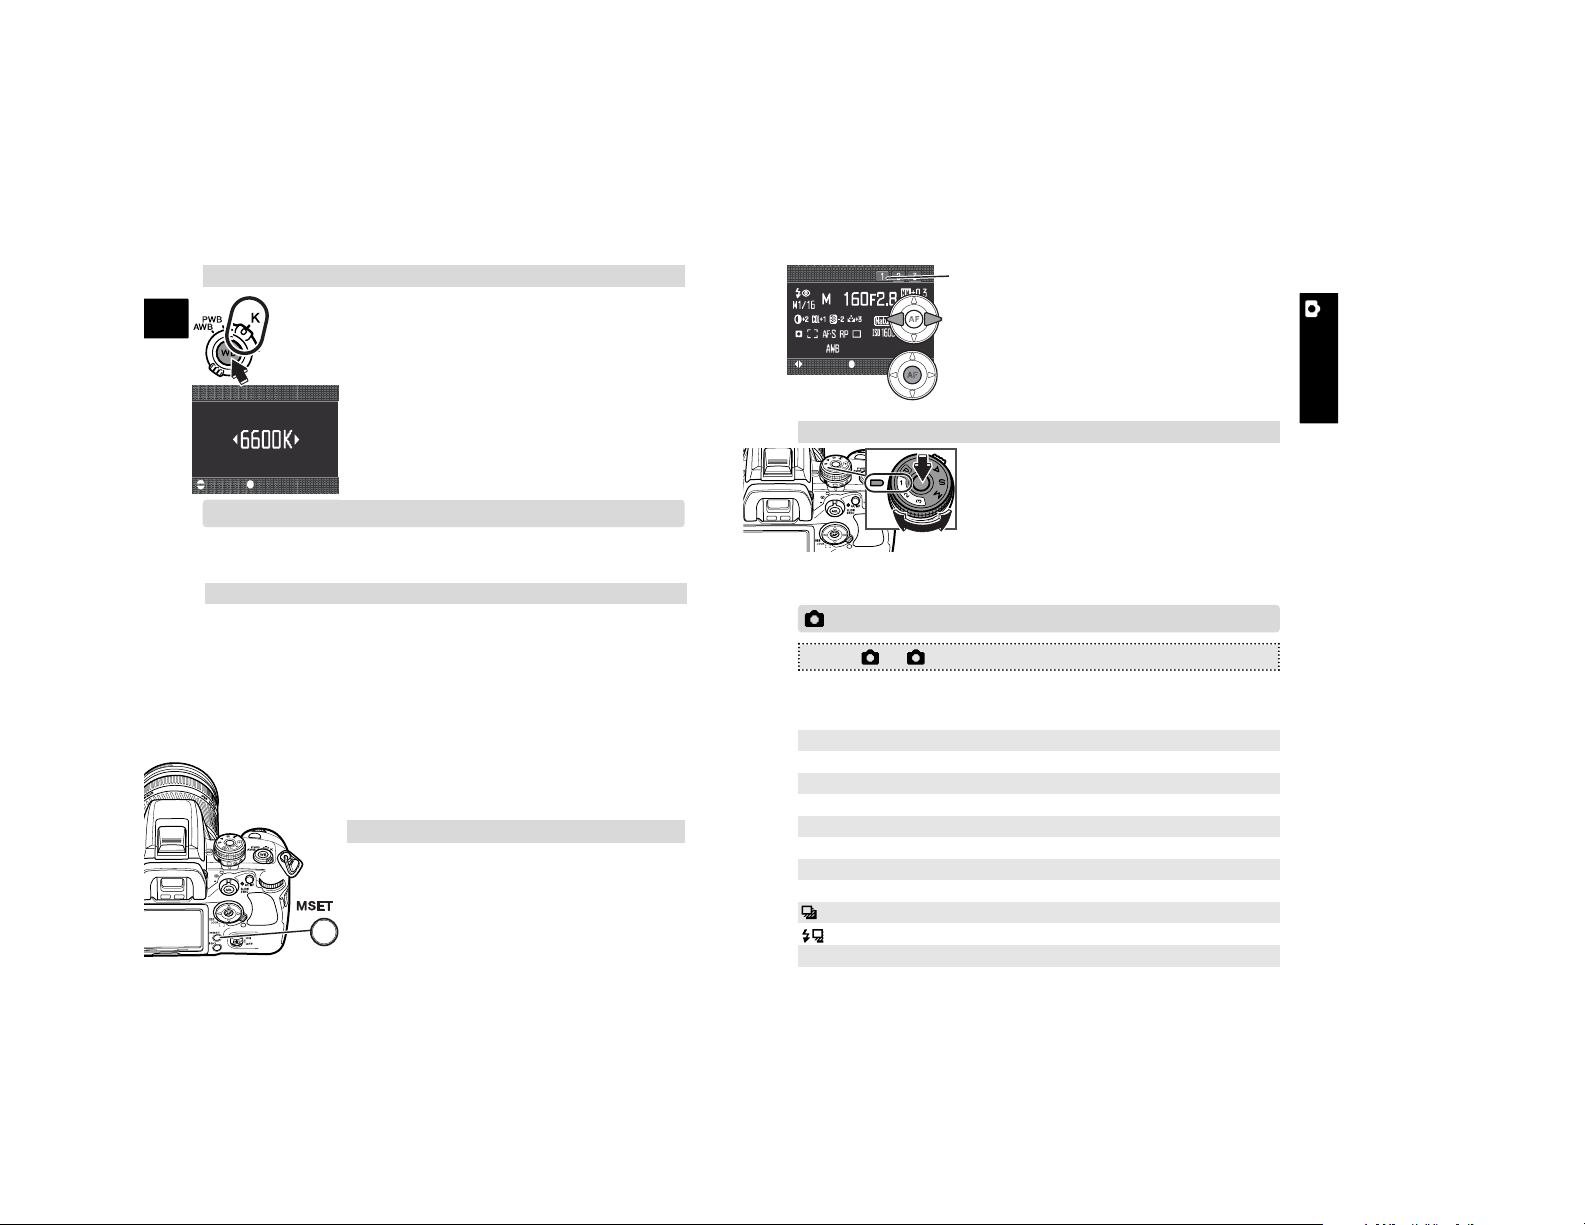
1. Turn the white-balance dial to the preset
white balance position, and press the
white-balance button.
2. Turn the front control dial to select the
preset white balance and turn the rear
control dial to adjust the selected preset
white balance.
3. Press the central button to complete the
operation.
1. Turn the white-balance dial to the custom white balance position, and press the white-balance button.
2. Use the control dials to select “Set”, and
press the central button.
3. Place a white object in the spot-metering area
and press the shutter-release button to calibrate in camera.
• Auto white balance: for automatic setting. Preset white balance: to
set the white balance to a specific light. Custom white-balance: to
calibrate the camera to a specific lighting condition. Color temperature: to set the white balance to a specific color temperature.
COLOR MODES
MENU > 1 > Color mode > Select option* > •:enter > MENU
*(Natural: sRGB...natural color reproduction for most purposes.
Natural+:sRGB...increased contrast.
Embed Adobe RGB...similar to Natural Color, but uses the
extended gamut of the Adobe RGB color space and is embed
ded in the image file.)
DIGITAL FX
MENU > 1 > Digital FX > Enter > •:enter > select the parameter with the
up/down keys > change the parameter with left/right keys > •:enter > MENU
– ... 0 ... +
– ... 0 ... +
– ... 0 ... +
– ... 0 ... +
Increase
Accentuates colors
Accentuates details
Shifts color space
Decrease
Subdues colors
Softens details
Shifts color space
Contrast :
Saturation :
Sharpness :
Hue :
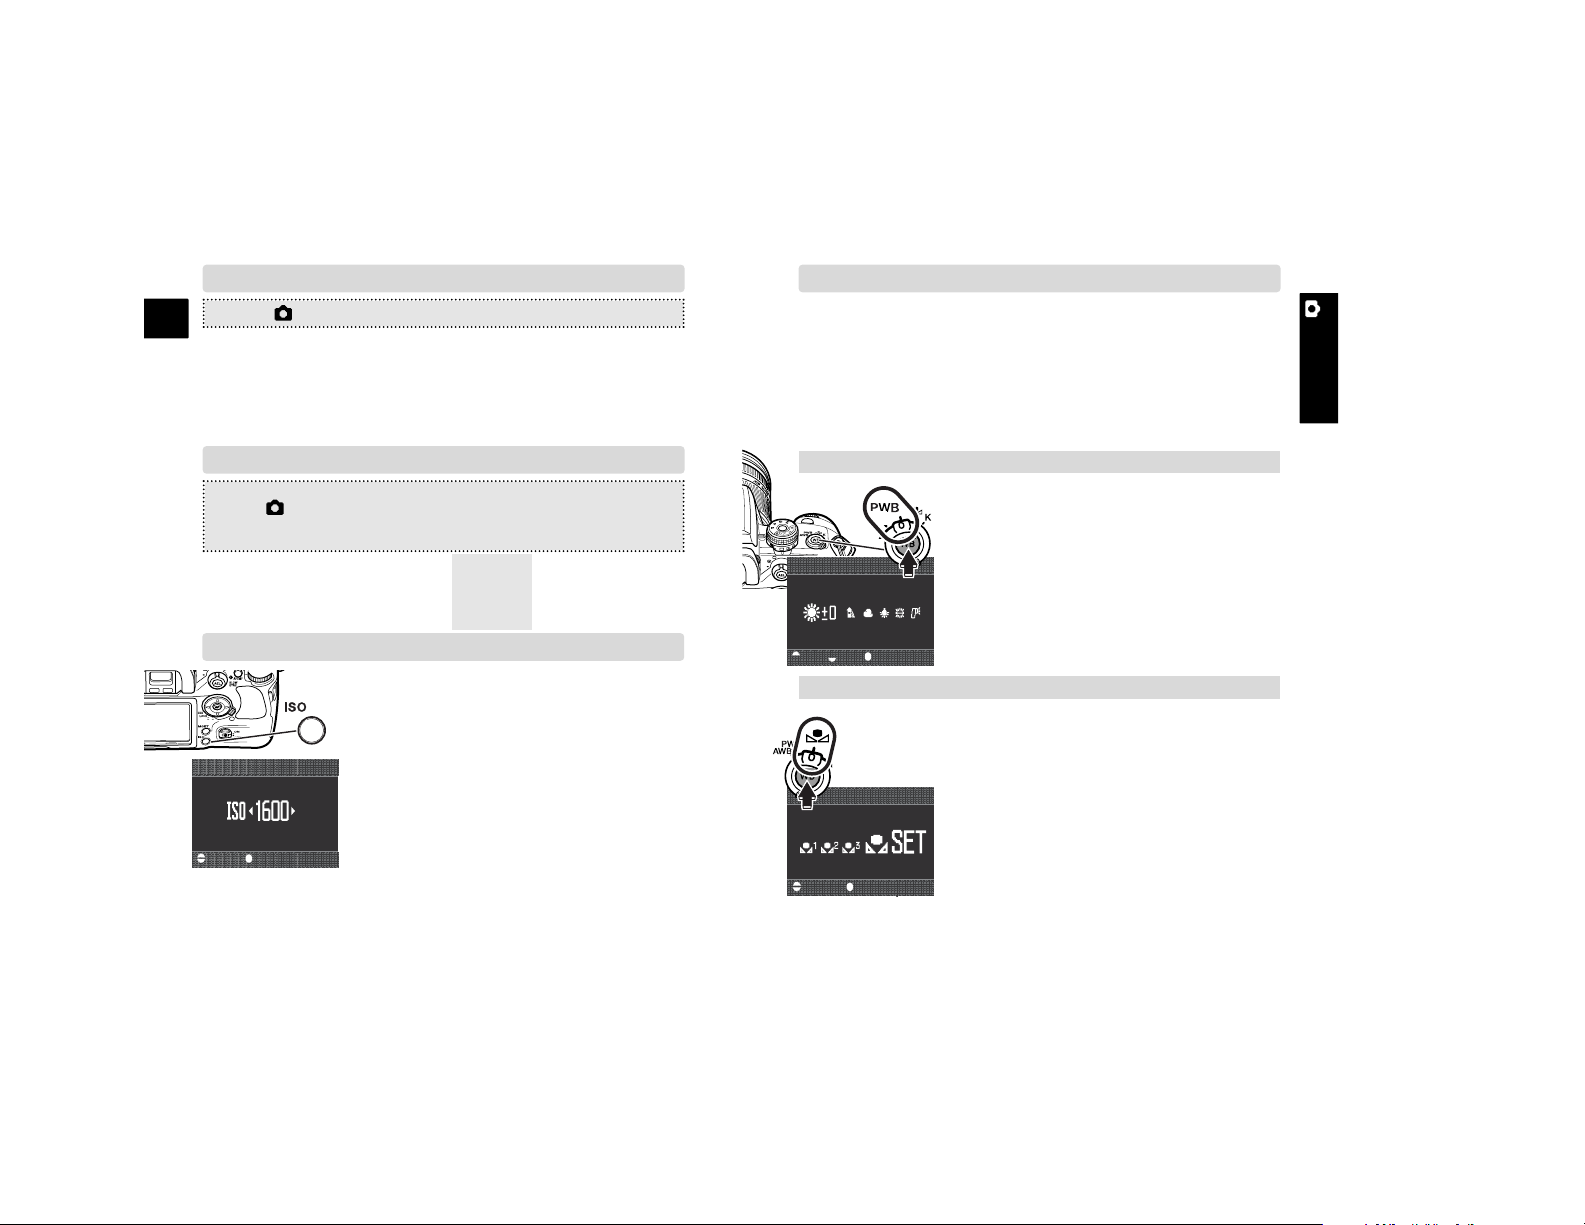
CAMERA-SENSITIVITY(ISO) SETTING
Seven settings can be selected for camera
sensitivity (ISO); Auto, 100, 200, 400, 800,
1600, and 3200. 3200 is activated with “ISO
menu set” in custom section 4).
• The higher the ISO setting, the higher the
sensitivity and the longer the flash range,
but noise is increased at the same time.
1. Press the camera-sensitivity (ISO) button.
:select :enter
Sensitivity
2. Use the control dials or left/right keys to change the ISO.
3. Press the central button to set the ISO.
• Zone matching can be activated in “ISO button set” in custom
section 4. Zone matching improves reproduction of high-key or
low-key scenes.
WHITE BALANCE
Auto white balance is used when the white-balance dial is set to
AWB. Other dial positions give different controls.
Custom white-balance calibration (p. 61)
:sel. :adj. :enter
Preset white balance
4. Use the control dials or left/right keys to select the white-balance
register, 1, 2 or 3.
5. Press the central button to complete the operation.
(Continued on the next page.)
:select :enter
Custom white balance
Selecting preset white balance (p. 60)
(p. 68)
(p. 69)
(p. 51)
(p. 60-62)
Page 11
A-14 Recording
E
A-15Recording
RECORDING
RESET (RECORDING MODE RESET)
While pressing the dial release, turn the
exposure-mode dial to the appropriate
memory register, 1, 2, or 3.
Recall memory
MEMORY
Settings stored:
The memory function allows you to store the current camera
setting and recall them.
• Exposure mode
(P, A, S, M)
• Shutter speed in
S/M
• Aperture in A/M
• Focus mode (A, C,
S, Manual)
• Focus area (Wide,
Local)
• Bracket setup
• Exposure compensation value
• Flash compensation value
• Drive mode
• Flash mode
• AF/Release priority
• Digital FX
• Metering mode
• Flash-metering
mode
• Auto AF setup
• Color mode
• ISO setting
• Image size
• Image quality
• White balance
: select : save
Select register
MENU > 1 > Reset > Enter > •:enter > MENU
Recording settings are reset as follows.
(Continued on the next page.)
3. Use the left/right keys to select the memory register, 1, 2, or 3.
4. Press the central button to save the settings.
• All setting in the selected register are
replaced with the new settings.
Color temperature setting (p. 62)
1. Turn the white-balance dial to the color
temperature position, and press the
white-balance button.
2. Use the control dials to set the color temperature.
• The front dial adjust the temperature in
thousands and the rear in hundreds.
3. Press the central button to complete the
operation.
:adjust :enter
Color temperature
• The settings are displayed on the monitor.
1. Confirm the settings to be saved on the
camera.
2. Press the memory set button.
• Memory screen shows the settings to be
saved.
Store memory
Custom white balance: Register 1
Digital FX: 0
Flash control: ADI
Manual flash: 1/1
setup: 0.3Ev/3 frames
Focus area selection: Spot AF area
Preset-white balance: Daylight: 0
Color temperature: 5500K
Flash mode: Fill flash or Red-eye reduction*
setup: 0.3Ev/3 frames
Exp. compensation by control dial: 0.0
* Whichever of the two flash modes was last set.
(p. 63)
(p. 70)
Page 12
A-16 Playback
E
A-17Playback
PLAYBACK
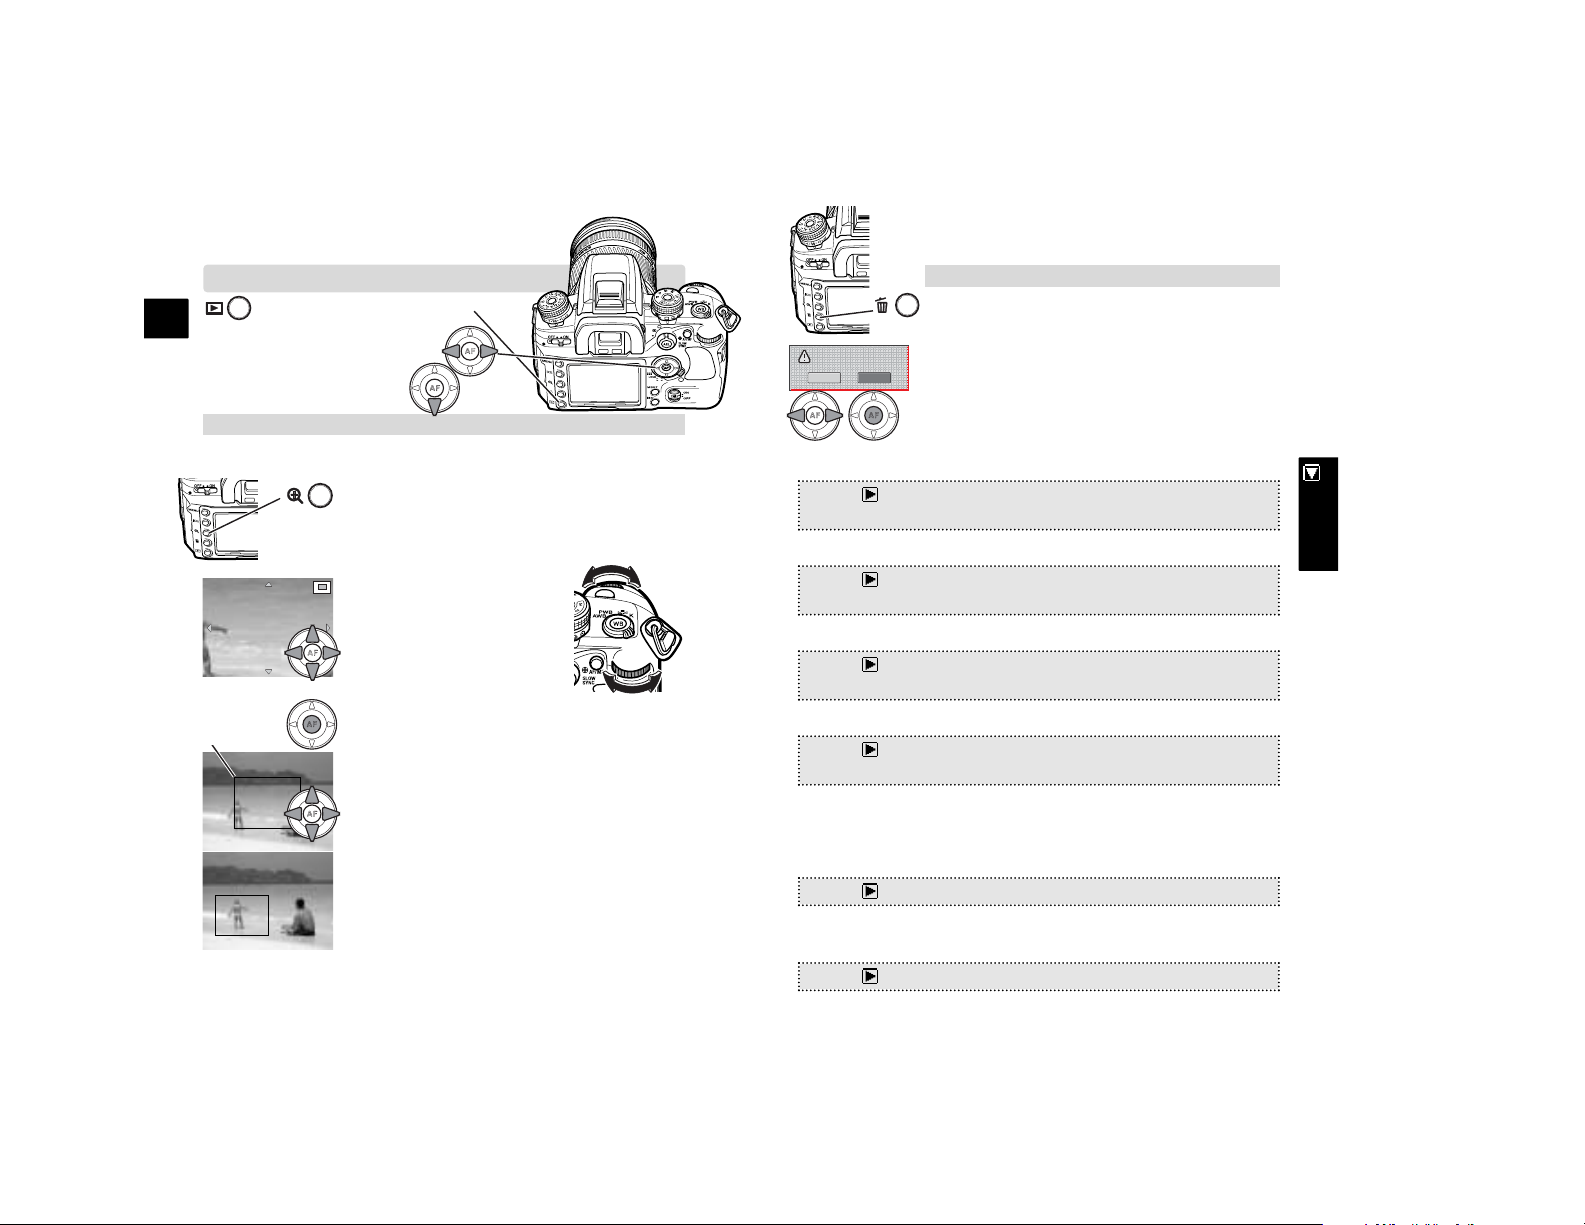
Press the playback button.
Deleting single images (p. 36)
1. With the image to be deleted displayed,
press the delete button.
2. Use the left/right keys of the controller to highlight “Yes.”, and press the central button to
execute the command on the confirmation
screen.
Enlarged playback (p. 38)
• Images can be viewed with enlarged playback except RAW
files.
1. With the image to be enlarged displayed,
press the magnification button.
• The image is shown at maximum magnification.
2. Turn the front control dial to
display other images, and
the rear control dial to
change the magnification.
•Press the four-way key of
the controller to scroll the
enlarged image.
3. Press the central button to
display the entire image with the area magnified indicated by a frame.
•Turn the front control dial to display other
images, and the rear control dial to change
the size of the magnification area.
•Press the four-way key of controller to
scroll the magnification area.
•Press the central button to enlarge the
magnification area.
• Exit enlarged playback by pressing the
magnification button.
BASIC PLAYBACK
To rotate images
To search images
MENU > 1 > Delete > Select option* > •:enter > MENU
(*Marked frames, All in folder, All on card)
Lock (p. 86): prevents images from being deleted.
MENU > 1 > Lock > Select option* > •:enter > MENU
(*Marked frames, All in folder, All on card, Unlock folder, Unlock card)
Index playback or File browser (p. 87): selects the index format.
MENU > 1 > Index format > Select option* > •:enter > MENU
(*16 frames,
9 frames
, 4 frames, File browser)
View folder (p. 85): selects the folder to be viewed.
MENU > 1 > View folder > Single folder > •:enter > Folder name > Select
folder > •:enter > MENU
• “Folder name” option is below the “View folder” option.
• The “All in folder” option in the delete and lock functions refer
to the folder specified here.
Format (p. 85): initializes the card. Locked images are deleted.
MENU > 1 > Format > Enter > •:enter > MENU
Slide show (p. 88): display images automatically. Select the folder
with the view-folder option.
MENU > 2 > Slide show > Enter > •:enter > MENU
Magnification
area
Delete this frame?
Yes
No
(p. 34-36, 38, 84-88)
Delete (p. 84): erases single or multiple images.
Page 13

A-18 Custom
E
A-19Custom
CUSTOM
CUSTOM MENU
1
Priority setup •AF(shutter releases when focus is confirmed.)
• Release (shutter releases regardless focus.)
FocusHoldButton •
Focus Hold
(Press the lens’ focus hold button to
lock focus.)
• D.O.F preview (Press the lens’ focus hold
button to stop down the aperture.)
AF/MF button •
Hold
(Press and hold the button to switch
between AF and MF.)
•Toggle (Press the button and release to switch
between AF and MF. Press again to return to
the original focus mode.)
AEL button •
AE hold
(Press and hold to lock exposure.)
• AE toggle (Press once to lock, press again to
unlock.)
• Spot AE hold (Press and hold to lock
exposure.)
• Spot AE toggle (Press once to lock, press
again to unlock.)
AF w/shutter •
On
(AF activated with shutter-release button.)
•Off (AF not activated with shutter-release
button.)
Auto AF setup •
Auto AF
(Automatically switch between
continuous and single-shot AF.)
•DMF (Direct Manual Focus.)
Camera can be customized. Default settings are in bold.
2
Ctrl dial lock • On (Control dials are functional only when
shutter speed and aperture are displayed.)
•
Off
(Control dials are always functional.)
Exp.comp.set •
Ambient & flash
/ Ambient only
AF illuminator •
On
/ Off
3
Shutter lock •On(Shutter is locked when no lens is
mounted.)
•Off (Shutter can be release without lens
mounted.)
AF area setup •
0.3s. display
/0.6s. display / Display off
Monitor Disp. •
Automatic
(Monitor off when using viewfinder.)
• Manual (Monitor is always on.)
Rec. display •
Auto rotate
(Images are oriented for viewing.)
• Horizontal (Image are not rotated.)
AS finder disp. •
On
(Anti-shake scale visible)
•Off (Anti-shake scale off)
4
ISO button set •
ISO
(Camera sensitivity can be changed.)
• Zone Matching (To use Zone Matching with
high and low-key scenes.)
ISO menu set •
100-1600
/100-3200
M set button •
Memory
(To save camera settings.)
• Menu shortcut (To jump to a specified menu
section.)
Custom reset • Enter (To reset the custom menu.)
Ctrl dial set
SS
F/No.
F/No.
(Control dial setup)
(Control dial setup)SS
•
•
Exp.Comp. •
•
•
Off
Front dial (For exposure compensation)
Rear dial (For exposure compensation)
(p. 94-101)
Page 14

A-20 Setup
E
A-21Setup
SETUP
SETUP MENU
1
Default settings are in bold.
LCD Brightness Enter > adjust with left/right keys.
Transfer mode •
Data storage
(To transfer data to a computer)
• PTP (For PictBridge compatible printers)
Video output • NTSC / PAL (The default differs with region.)
Audio signals •
On
/ Off
Language Japanese /
English
/ German / French /
Spanish / Chinese / Italian / Swedish
Date/Time set Enter > Select with left/right keys > Adjust with
up/down keys > •:enter > MENU
2
File # memory • On /
Off
(Memorizes the file number of the last
image saved.)
Folder name •
Std. form
(Numerical: 100KM023)
• Date form (By date: 100YMMDD)
Select folder Select folder > •:enter > MENU (To select
existing folders.)
New folder Enter > •:enter > MENU
(To create new folders.)
3
LCD backlight • 1 minute/30 seconds/10 seconds/
5 seconds
(To specify the monitor illumination
period.)
Power save • 30 minutes/10 minutes/5 minutes/3 minutes/1
minute (To specify the auto-power-save
period.)
MenuSec.Memory •
Off
/On (To activate menu section memory.)
Delete conf. “Yes”/“No” (To specify which button is
highlighted when a confirmation screen opens.)
Clean CCD Enter > •:enter > Yes > •:enter > detach the
lens > clean CCD (see instruction manual) >
attach lens > turn off the camera. (To allow the
CCD to be cleaned.)
Reset default Enter > •:enter > Yes > MENU. (To reset the
camera to its initial settings (see page A-22).
(p. 104-112)
Page 15
A-22 Setup
E
A-23Setup
SETUP
RESET DEFAULT
Recording mode
Recording menu
Playback mode
Custom menu
Setup menu
The reset-default function resets the following settings:
Preset white balance Daylight 0
Color temperature 5500K
Memory Canceled
Image size L: 3008 x 2000
Color mode Natural: sRGB
Flash mode Fill flash
Manual flash 1/1
setup 0.3Ev/3 frames
Instant playback 2 seconds, Image & Info.
Interval set 1 minute, 2 frames, no delay
Recording display Full display
Focus area selection Spot AF area
Custom white balance Custom white balance 1 (Daylight)
Camera sensitivity (ISO) 100
Image quality Fine
Digital FX 0
Flash control ADI
setup 0.3Ev/3 frames
Bracket order 0 > – > +
Noise reduction On
View folder All folders
Playback display Single-frame playback
Index format 9 frames
Date imprint Off
AF/MF button Hold
AF with shutter On
Control dial set SS F/No.
Control dial lock Off
AF illuminator On
AF area setup 0.3s display
Recording display Auto rotate
ISO button set ISO
ISO menu set 100-1600
Priority setup AF
Focus Hold Button Focus hold
AEL button AE hold
Auto AF setup Auto AF
Exposure Comp. Off
Exposure Comp. set Ambient & flash
Shutter lock On
Monitor display Automatic
AS finder display On
Zone matching High key
Memory set button Memory
LCD Brightness Reset
Audio signals On
Folder name Standard form
Power save 3 minutes
Delete confirmation “No”
Transfer mode Data storage
File # memory Off
LCD backlight 5 seconds
Menu Sec. Memory Off
(p. 112)
Page 16
A-24 Data Transfer
E
A-25Data Transfer
TRANSFER
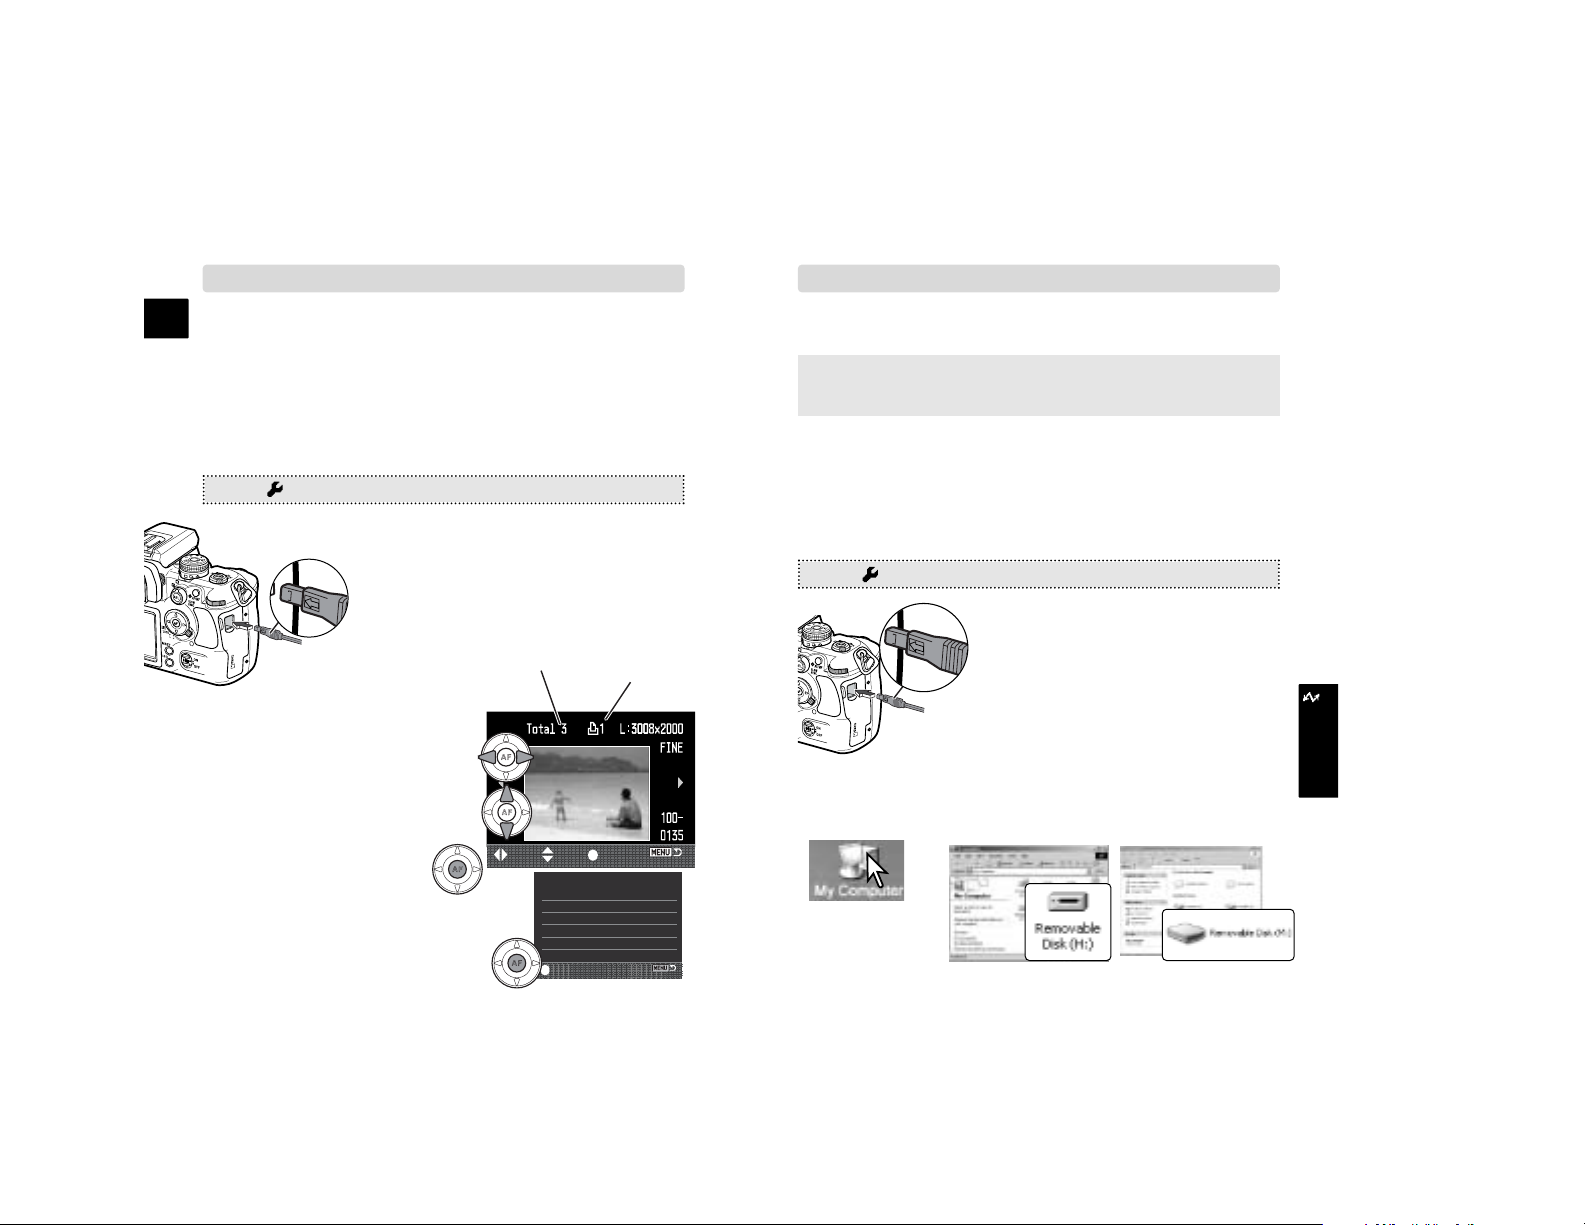
5. Use the left/right keys to dis-
play the image to be printed.
6. Use the up/down keys to
select the number of copies to
be printed.
7. Repeat the previous steps for
all images to be printed, and
press the central button.
PICTBRIDGE
Images from the camera can be printed directly from a PictBridge
compatible printer.
• Neither RAW nor Adobe RGB-embedded images can be printed in PictBridge.
:move :sel. :print
Total number of prints
Number of copies
No. of prints: 3
Print Size: Printer setup
Layout: Printer setup
Print quality: Printer setup
Data print: Printer setup
: start
CONNECTING TO COMPUTER
These instructions explain how to connect the camera to the
computer with Windows XP/2000/Me or Mac OS X/9.
Refer to the camera’s instruction manual on how to install the
Windows 98/98SE driver as well as connecting and
disconnecting to a computer using Windows 98.
When the camera’s memory card is full, transfer the data to a
computer. The data can then be deleted from the card so more
images can be recorded.
1. Set the transfer mode to data storage, and turn off the camera.
MENU > 1 > Transfer mode > Data storage > •:enter > MENU
2. Start up the computer.
3. Connect the camera and computer
with the USB cable.
4. Turn on the camera.
Double click on “My
computer”.
Windows 2000: Windows XP:
1. Turn on the printer.
2. Insert the card to the camera and turn on the camera.
3. Set the transfer mode to PTP.
4. Slide open the USB/Video out terminal
cover, and connect the camera and
printer with the USB cable.
• Insert the smaller plug with its arrow
facing the camera back.
8. Confirm the setup and press
the central button to start
printing.
MENU > 1 > Transfer mode > PTP > •:enter > MENU
(p. 132) (p. 121)
5. When the camera is properly connected to the computer, a
drive icon, or volume, appears in My Computer or on the
Desktop.
Page 17
A-26 Data Transfer
E
A-27Data Transfer
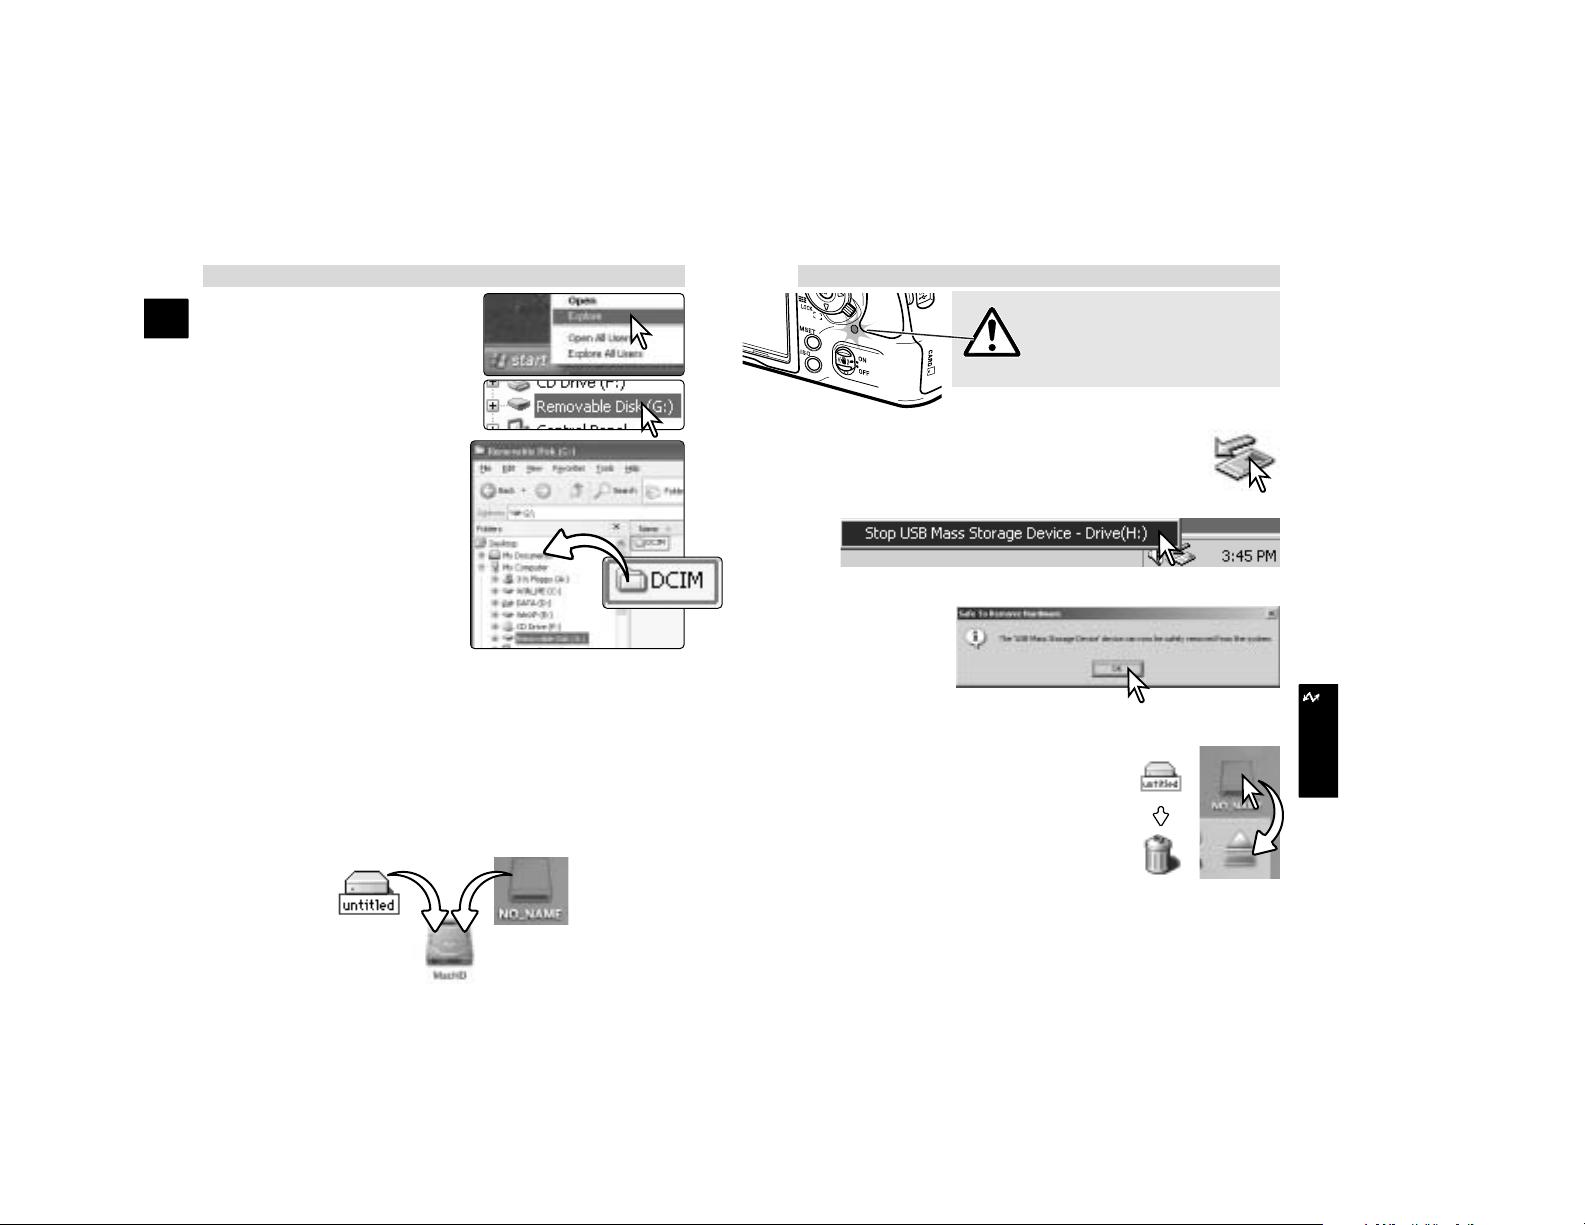
Download images from the camera to the computer
Windows
1. Right click on the “Start” button
-> “Explore.”
• The screenshots can vary depending on the operating system.
2. When the My-computer window is
opened, a “removable disk” icon is
displayed.
3. Double click on the icon to
access the camera’s memory
card.
• The DCIM folder is displayed.
4. Simply drag and drop the folder
from the card to a location on the
computer’s hard drive.
Mac OS
1. A removable disk Icon appears
on the desktop after connecting
the camera to the computer.
2. On Mac OS X, the iPhoto Application may open.
3. Drag and drop the DCIM folder to your hard drive.
Disconnecting from computer (p. 128)
Never disconnect the camera when
the access lamp is lit - the data or
memory card may permanently be
damaged.
Windows
1. Click once on the unplug-or-eject-hardware icon
located on the task bar.
2. Click on the small window to stop the device.
3. The safe-to-remove-hardware window opens. Click OK.
4. Turn the camera off. Disconnect the USB cable.
Mac OS
1. Confirm that the access lamp is not lit.
2. Drag the mass-storage device icon and
drop it into the trash.
3. Turn the camera off, and then disconnect
the USB cable.
Use DiMAGE Viewer to edit your images. Install DiMAGE
Viewer from the DiMAGE Viewer CD-ROM.
TRANSFER
Page 18

A-28 Troubleshooting
E
A-29Troubleshooting
TROUBLESHOOTING
Nothing
displayed on
monitor.
Problem Cause Solution
The LCD backlight
is off or power save
is active.
Press any button to activate
the camera. The length of the
LCD backlight and autopower-save period can be
changed.
The battery is dead. Recharge the battery.
“Err” is
displayed on
monitor and
camera
doesn’t work.
The camera is hot
or it has been left in
a very hot
environment.
Turn off the camera and allow
it to cool. If “Err” is still
displayed after it cools,
remove and replace the battery
or power cord.
Use the preset or custom
white balance.
Auto white balance
could not
compensate for a
special lighting
condition.
The recorded
images were
greenish or
yellowish.
The AC Adapter is
not connected
properly.
Check the adapter is
connected to the camera and
a live electrical outlet.
Problem
Cause Solution
Set the monitor’s color
temperature to 6500K and the
gamma to 2.2.
The computer
monitor is not
calibrated
properly.
The color of
image differs
when viewing it
on the computer.
Select the proper folder where
the images are stored.
The wrong folder
is selected.
Unable to play
back a recorded
image.
In dark conditions, use the
camera flash. Under bright light,
use a neutral density filter on the
lens.
The scene is
outside the
metering range.
Inaccurate
exposures. The
arrows on each
side of the Ev
scale blink.
Shutter will not
release.
Cannot focus
because the
subject is too
close.
The subject must be within the
focus range of the lens.
Pictures are not
sharp.
A special
situation is
preventing the
autofocus
system from
focusing.
Use the focus-lock function to
focus on an object at the same
distances as the subject or use
manual focus.
Use Anti-shake or a tripod,
change the camera sensitivity to
a higher setting, or use the flash.
Pictures were
taken in lowlight situations
without flash.
The monitor is
turned off.
Press the display button to
turn the monitor on.
This camera does
not display a live
image on the
monitor.
Use the viewfinder to compose the
picture.
Insert a new memory card,
delete some images, or change
the image-quality and/or image
size setting.
Card is full.
“0000” is
displayed and
shutter will not
release.
 Loading...