

Page 1
1
BEFORE YOU BEGIN
Thank you for purchasing the Minolta DiMAGE 7 upgrade. This manual contains information specific
to the upgraded model. To make full use of the camera’s advanced features, read both the DiMAGE 7
manual and this upgrade manual.
TABLE OF CONTENTS
Upgrade list ....................................................................................................................................... 2
Real-time histogram .............................................................................................................................. 5
Image-file size and CompactFlash card capacity ................................................................................. 6
Manual exposure - M ............................................................................................................................ 6
Continuous advance.............................................................................................................................. 7
Interval time-lapse movies .................................................................................................................... 7
UHS continuous advance...................................................................................................................... 8
UHS continuous-advance movies ......................................................................................................... 8
Flash metering ...................................................................................................................................... 9
Flash compensation .............................................................................................................................. 9
Electronic keyboard............................................................................................................................. 10
Enlarged playback............................................................................................................................... 11
Night movie ..................................................................................................................................... 12
Date-format folder ............................................................................................................................... 13
Display mode .................................................................................................................................... 14
Direct manual focus............................................................................................................................. 14
Menu list ..................................................................................................................................... 15
DiMAGE 7
UPGRADE
SOFTWARE
9224-6766-11 H-A206
Page 2
2
UPGRADE LIST
UPGRADED PERFORMANCE
Autofocus
performance
Autofocus speed and sensitivity is increased up to approximately 1.5 times depending on the subject and focal length in
use. Continuous AF performance in the movie recording
mode is improved.
––
Item
Contents
D
iM
A
G
E
7
m
a
n
u
a
l p
a
g
e
U
p
g
ra
d
e
m
a
n
u
a
l p
a
g
e
Image quality
Image quality in playback is improved.
––
RECORDING MODE
Real-time
histogram*
Real-time histogram is displayed by pressing the display-information button.
533
* New feature
Quick View
Enlarged playback and scrolling between histogram displays
(left/right controller keys) are added to Quick View.
–34
File size and
card capacity
Image-file size and CompactFlash card capacity is changed.
645
Manual
exposure
Monitor image can be amplified so that image evaluation is
easier in low light.
650
Drive modes
Drive mode remains selected when the camera is turned off
and on (except for the self-timer and interval modes).
–51
Continuous
advance
The maximum rate of capture is improved. The maximum
number of images that can be captured is changed.
752
Exposure
bracketing
The exposure bracket can be adjusted between 1/2 or 1 stop
increments in the basic section of the recording-mode menu.
–
54
80
Interval timelapse movies*
A movie file can be created in the interval drive mode. The
movie is played back at 4 frames per second.
756
UHS
continuous
advance*
A series of 1280 X 960 images can be captured at a rate of
approximate 5 frames per second.
8–
UHS continuous-advance
movies*
A movie can be created from images captured in the UHS
continuous-advance drive mode. The movie is played back at
5 frames per second.
8–
Page 3
3
Item
Contents
D
iM
A
G
E
7
m
a
n
u
a
l
U
p
g
ra
g
e
m
a
n
u
a
l
Manual focus
Focus position is stored during auto power save as long as
the lens zoom position is not changed.
–71
Camera
sensitivity
Noise-reduction for bulb exposures.
–61
Bulb
exposures
The monitors will be blank for a period equal to the exposure
time while noise-reduction processing is applied to the image.
–92
Flash metering
Manual flash control for the built-in flash is added.
975
Flash
compensation
Set by the Digital Effects Controller instead of the recordingmode menu.
978
Electronic
keyboard
Characters with European accents are added.
1088
Instant
playback
Pressing the display-information button during instant playback hides the upper and lower guidance bars in the display;
pressing the button again shows the bars.
–89
Shutterrelease button
operation in
single-frame
advance.
After pressing the shutter-release button all the way down to
take a picture, the focus and exposure will remain locked if
the shutter button is returned to the partway down position
and not released. The next picture can then be taken with the
same settings.
––
PLAYBACK MODE
Histogram
display
The left/right keys of the controller can be used to scroll
between histogram displays.
–94
Enlarged
playback
Images can be magnified in 0.4X increments. Images are
enlarged with the up/down key of the controller.
11100
Compatibility
with a nonupgraded
model
Images captured with an upgraded model cannot be played
back using a non-upgraded DiMAGE 7.
––
Movie
recording
The approximate total recording time with a 16MB
CompactFlash card is 73 seconds. The capacity of other size
cards changes accordingly.
–91
Page 4
4
File format
Movie files are saved in the motion JPEG MOV format instead
of the AVI format. The MOV file extension is used.
–130
Item
Contents
D
iM
A
G
E
7
m
a
n
u
a
l
U
p
g
ra
d
e
m
a
n
u
a
l
Night movie*
Black and white movies can be recorded under low light levels.
12–
MOVIE MODE
SETUP MODE
Folder
organization
The standard folder names on a CompactFlash card are
changed from “xxxMLT03” to “xxxMLT14”.
–130
Date format
folder*
Images can be placed in a folder indicated by the date of
recording.
13–
Display
mode*
The displays controlled by the display-information button can
be changed. Six displays are available.
14–
Direct manual
focus*
Manual adjustments can be made after the AF system has
locked onto the subject.
14–
* New feature
DATA -TRANSFER MODE
USB connection system
requirements
Expanded to include the following operating systems:
Windows XP
Mac OS 9.1 - 9.2.2, Mac OS X 10.1 - 10.1.4
–123
DiMAGE
Image Viewer
Utility
Images captured with upgraded model cannot be opened
using the DiMAGE Image Viewer Utility ver.1.11 or earlier.
Ver. 1.20 or the DiMAGE Viewer can be used.
–123
OTHERS
Scrolling on
the menus
Scrolling is continuous on the menus. (ex. If down key is
pressed when the lowest menu option is highlighted, the cursor moves to the top of the menu.)
––
PC Flash
Adapter
PCT-100
The camera does not need to be updated with the PC Flash
Adapter CD-ROM to use this accessory.
––
Page 5
5
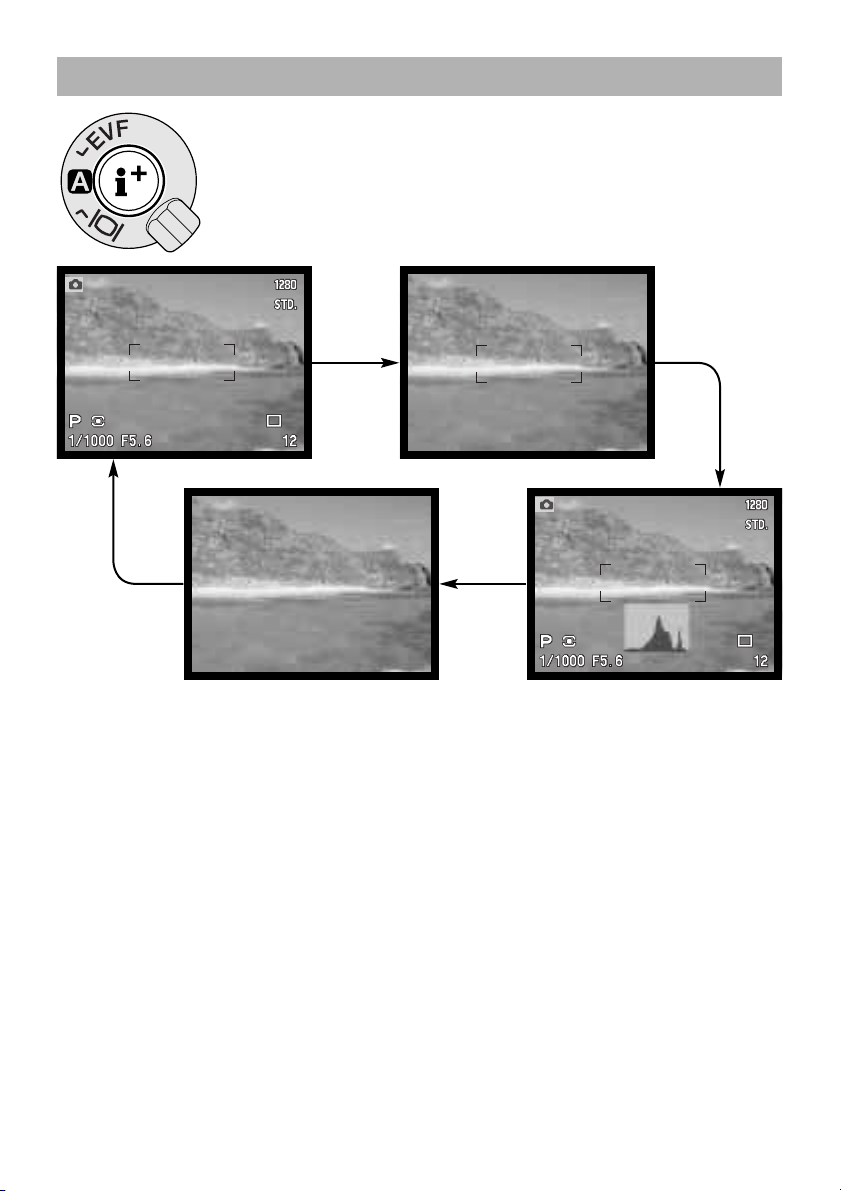
REAL-TIME HISTOGRAM
In the center of the display switch, the display-information button controls what
information is displayed with the live image. Each time the button is pressed,
the display cycles to the next format: standard display, focus frame, real-time
histogram, and live image only. The number of screens and their formats can
be changed in the custom 1 section of the setup menu (p. 14 of this manual).
Standard display Focus frame
Live image only Real-time histogram
The real-time histogram shows the approximate luminance distribution of the live image. This histogram will not be accurate when the monitor image is amplified (p. 6 of this manual and p. 72 of the
DiMAGE 7 manual), or the built-in or a compatible Minolta flash unit is used.The histogram of a
recorded image may not have the same distribution as the real-time histogram.
Page 6

6
Image
quality
Image
size
2560 X 1920 1600 X 1200 1280 X 960 640 X 480
RAW
Super fine
Fine
Standard
Economy
1 – – –
1 2 4 15
6 14 22 50
10 24 34 67
17 37 48 83
Approximate number of images that can be stored on a 16MB CompactFlash card.
Image
quality
Image
size
2560 X 1920 1600 X 1200 1280 X 960 640 X 480
RAW
Super fine
Fine
Standard
Economy
9.6MB
– – –
14.2MB
5.6MB 3.6MB 1.0MB
2.1MB 1.0MB 0.66MB 0.27MB
1.1MB 0.6MB 0.41MB 0.2MB
0.65MB 0.38MB 0.29MB 0.15MB
Approximate file sizes.
The number of images that can be stored on a CompactFlash card is determined by the size of the
card and the file size of the images. The following chart amends the information in the DiMAGE 7
manual.
IMAGE-FILE SIZE AND COMPACTFLASH CARD CAPACITY
If the monitor image is too dark because of the exposure setting, press the function button and display-information button (i+) at the same time to amplify the image; the M on the monitor will turn red.
The AE system will maintain a bright image on the monitors, however, the image nor the real-time
histogram will reflect the final exposure. Repeat the procedure to cancel the amplified display. When
using the built-in flash, the monitor image is also amplified and does not reflect the ambient light
exposure.
MANUAL EXPOSURE - M
Page 7

7
The maximum rate of capture has been improved from 1.1 fps to 1.5 fps with full-size images with
manual focus in manual-exposure mode.
The maximum number of images that can be captured with different image-quality and image-size
combinations is changed as listed below:
Image
quality
Image
size
2560 X 1920 1600 X 1200 1280 X 960 640 X 480
Fine
Standard
Economy
5 8 11 25
7 12 17 34
11 18 23 42
CONTINUOUS ADVANCE
INTERVAL TIME-LAPSE MOVIES
The interval mode (page 56 of the DiMAGE 7 manual) makes a series of still or moving images over
a period of time. The parameters of the interval series and the interval-mode options are set up in the
custom 1 section of the recording-mode menu. Refer to page 80 of the DiMAGE 7 manual on how to
use the menu. Settings for the length of each interval and the number of images in the series are the
same for the movie and still-image modes.
Still image - to create a series of still images specified within the parameters
set on the recording-mode menu. Image size and quality can be changed.
Time-lapse movie - to create a movie specified within the parameters set on
the recording-mode menu. The movie file is played back at four frames per second. Image size can be changed.
Time-lapse movies cannot be taken with the RAW or super fine image-quality settings. If image quality is set to RAW or super fine before selecting time-lapse movies, it is reset to standard.
When viewing time-lapse movies on a computer, the computer performance is important. On slower
computers, frames may be dropped during the playback of movies recorded at 2560 X 1920 and
1600 X 1200.
Number of frames in the interval series
Frame counter
Page 8

UHS continuous-advance mode allows
a series of 1280 X 960 images to be
captured at a rate of approximately 5
frames per second: image size is
changed to 640 X 480 when the digital
zoom is used. The number of images
that can be captured at one time
depends on the image-quality setting
and the use of the digital zoom; see
the attached table. This mode cannot be used with super-fine or RAW image quality, flash illumination, or Digital Subject Programs. If image quality is set to RAW or super fine before selecting the
drive mode, image quality is reset to standard. Shutter speeds slower than 1/8th of a second cannot
be used. If the low battery power indicator appears, the shutter cannot be released.
The UHS continuous-advance mode is set with the same procedure as the
other drive mode with the function dial, function button, and control dial. Refer
to page 40 of the DiMAGE 7 manual.
When the shutter-release button is pressed and held, the camera will begin
recording images until the maximum number has been taken or the shutter button is released.
Compose the picture and press the shutter-release button partway down (1) to
lock the exposure and focus for the series. Press and hold the shutter-release
button all the way down (2) to begin taking pictures. Very bright light sources in
the image may cause streaking. A recorded image may show black areas
caused by a loss of data. After the series is captured, the monitor will remain
blank while the images are saved.
8
UHS CONTINUOUS ADVANCE
1
2
UHS CONTINUOUS ADVANCE MOVIES
By turning on the UHS movie function in the custom 1 section of the recordingmode menu (page 80 of the DiMAGE 7 manual), a separate VGA (640 X 480)
movie file will be created automatically from the captured still images. When the
function is active, the movie camera icon is displayed next to the UHS continuous-advance indicator on the monitors. The time required to make the movie file
is approximately equal to the recording time, the monitor will be blank and the
access lamp will glow during that period.
The movie file is played back at five frames per second.
Image
quality
Image
size
1280 X 960
640 X 480
(Digital zoom)
Fine
Standard
Economy
16 41
32 70
40 80
Page 9

9
FLASH METERING
Manual flash control with the built-in flash is added to flash metering. With manual flash control, the
flash output can be set in three levels: full power, 1/4 power, and 1/16 power.
Manual flash is selected with the power level in the basic section of the recording-mode menu (p. 80 of the DiMAGE 7 manual). Manual flash control is indicated on the monitors by M and the power level. Because no pre-flash is used,
manual flash control can be used to fire slave flash units.
The chart lists approximate guide numbers for manual flash calculations. The
following equations are useful in determining the guide number, aperture (ƒn),
or flash-to-subject distance required for exposure.
Guide no. (for distance in meters / feet)
Manual
flash
Full
1/4
1/16
100
200 400 800
Camera sensitivity (ISO)
8 / 26
4 / 13
2 / 6.6
11 / 36
5.6 / 18 8 / 26
5.6 / 184 / 13
16 / 52
11 / 36
22 / 72
Guide no. = ƒn. X distance
Guide no.
ƒn.
= distance
Guide no.
distance
= ƒn.
2.8 / 9.2
FLASH COMPENSATION
Flash compensation is set with the Digital Effects Controller instead of the
recording-mode menu.
Set the digital-effects switch to the exposure-compensation position.
1
2
Press and hold the digital-effects button
(1) in the center of the switch and adjust
the flash compensation by using the
up/down key of the controller (2).
Release the digital-effects button (1) to
set the adjustment.
Page 10

10
ELECTRONIC KEYBOARD
Characters with European accents
are added to the keyboard and a
new case key switches between
upper and lower case.The electronic keyboard operation is the same
as with the non-upgraded model.
Te xt block Delete key Case key
Enter key
Rec.
Text input
select enter
Page 11

11
In single-frame playback, a still image can be
enlarged for closer examination. Images can be
magnified between 2.0X and 4.0X in 0.4X increments. 640 X 480 size images can only be magnified by 2.0X. RAW and super fine images cannot be
enlarged.
With the image to be enlarged displayed, press the
magnification button (1).
• The degree of magnification is displayed on the
monitors.
1
Use the up/down keys of the controller to adjust the magnification.
Press the center of the controller to switch between the
magnification and scroll functions.
• The scroll arrows or magnification display will turn blue to
indicate the active function.
When the scroll arrows are blue, use the four way key to
scroll the image.
• Press the magnification button to exit the enlarged playback
mode.
ENLARGED PLAYBACK
Page 12

12
NIGHT MOVIE
The movie mode, standard movie, night movie, and auto select, is selected in a new movie-mode
menu. The following describes how to navigate the menu.
Once a setting is made, the cursor returns to the menu options and the new setting is displayed. To
return to the movie mode, press the menu button.
The movie mode option selects the type of movie recorded. Standard movie produces a color image. Night Movie
can record under low light levels and produces a black
and white movie file. Auto select automatically switches
between the two movie modes depending on the lighting
conditions. When recording, the mode is fixed. While Night
Movies can be recorded under normal conditions, bright
outdoor lighting may be beyond the exposure control
range.
While recording standard or night movies, “rEC” appears in the frame counter on the data panel. The
countdown in seconds is only displayed on the monitors.
Use the up/down key to highlight the option whose
setting needs to be changed.
Press the right controller key to display the settings;
the current setting is indicated by an arrow.
•To return to the menu options, press the left key.
Use the up/down keys to highlight the new setting.
Press the controller to select the highlighted setting.
Movie
Basic
Movie mode Auto select
Press the menu button to activate the menu.
Movie mode
STD. movie
Basic
Auto select
Night movie
Page 13

13
DATE FORMAT FOLDER
All recorded images are stored in folders on the memory card. Folder names come
in two formats: standard and date.These are selected in the custom 1 section of
the setup-mode menu (page 114 of the DiMAGE 7 manual).
Standard folders have an eight character name. The initial folder is named
100MLT14. The first three digits are the folder’s serial number, which will increase
by one each time a new folder is created. The next three letters refer to Minolta,
and the last two numbers indicate the camera used; 14 indicates an upgraded
DiMAGE 7.
A date folder name also starts with the three digit serial number and is followed by
one register for the year, two register for the month, and two registers for the day:
100YMMDD. The folder 10120720 was created in 2002 on July 20th.
With the date folder format selected, when an image is recorded a new folder with
the day’s date will be created. All images recorded that day will be placed in that
folder. Images recorded on a different day will placed in a new folder with the corresponding date. To playback the images in a different folder, that folder must be selected. When a
new folder is created, the serial number in the image-file name is reset to 0001 unless file number
memory is active. For more information on folder organization and file names, see page 118 of the
DiMAGE 7 manual.
100MLT14
10120720
(Standard)
(Date)
Page 14

DISPLAY MODE
Standard display Focus frame only
Live image only
Real-time histogram
ScaleGrid
Setup
Basic
Custom1
Custom2
File # memory
Folder name
Select folder
New folder
Display mode
Std. display
Focus frame
Histogram
Grid
Scale
Direct MF
Image only
The recording mode displays activated by the display-information button (i+)
can be selected in the custom 1 section of the setup
menu (page 114 of the
DiMAGE 7 manual). The
display cycle is the same as
the order shown on the
menu.
Display-mode settings with a check mark are included in the display cycle. To change displays used, highlight the setting using
the controller, and then press the right key (1) to check or
uncheck the box.
1
DIRECT MANUAL FOCUS
Direct manual focus allows manual adjustments to be made after the AF system has locked onto the
subjects. Direct manual focus is activated in the custom 1 section of the setup menu (p. 114 of the
DiMAGE 7 manual). Direct manual focus is canceled when continuous AF or manual focus is in use.
1
After composing the image, press the shutter-release
button partway down to lock the focus and exposure (1);
the shutter speed and aperture display will turn black and
the focus signal will turn white. “DMF” will be displayed
next to the drive-mode indicator.
While pressing the shutter-release button partway down, the
camera can be manually focused until the shutter button is
released. The approximate focusing distance is displayed next
to the frame counter. Electronic magnification can be used
while direct manual focus is active. If AF/AE toggle is the selected setting for the AF/AE lock button operation, pressing the lock
button once will lock the focus and the focusing ring can then
be used without the need to continually hold the shutter-release
button.
2
14
Page 15

15
MENU LIST
Same as the non-upgraded DiMAGE 7
Upgraded DiMAGE 7 only
AF mode
Multi-segment
Center weighted
Spot
Fill-flash
Red-eye
Rear flash sync.
Metering mode
Flash mode
Basic
AF Single
AF Continuous
ADI flash
Pre-flash TTL
Full power
1/4 power
Flash metering
1/16 power
Recording-mode menu
(page 81 of the DiMAGE 7 manual)
Exposure bracket 1.0, 0.5, 0.3 Ev
UHS movie On
Off
Interval
2 - 99 frames
Still image
Movie
2
3
Store memory
Fram es
Interval mode
Custom 1
1 - 10, 15, 20, 30,
45, 60 min.
1Memory
AF/AE toggle
AE hold
AE toggle
AF/AE holdAF/AEL button
Digital zoom
Elec. mag.
Magnification button
Color
B&W
Normal
Soft (–)
Color mode
Custom 2
Hard (+)Sharpness
Off / 2 sec / 10 secInstant playback
Data imprint Off
MM/DD/hr:min
YYYY/MM/DD
Te xt
Te xt + ID#
Playback-mode menu
(page 103 of the DiMAGE 7 manual)
Same as the non-upgraded DiMAGE 7.
Page 16

16
Setup-mode menu
(page 115 of the DiMAGE 7 manual)
LCD brightness
Basic
1 (low) - 5 (high)
Deutsch
Français
Language English
EVF brightness 1 (low) - 5 (high)
Español
Format Enter
Beep High tone
Off
Low tone
Powe r save 1, 3, 5, or 10 min.
File # memory
Custom 1
Yes / No
Focus frame
Histogram
Display mode Std. display
Folder name Std. form
Grid
Date form
New folder Enter
Select folder (Folder names)
Scale
Image only
Direct MF On
Off
Video output
Reset default
Custom 2
Date/Time set
Enter
Enter
MM/DD/YYYY
NTSC / PAL
DD/MM/YYYY
Date format YYYY/MM/DD
Auto EVF/LCDEVF autoSwtch
EVF auto on
Transfer-mode menu
(page 125 of the DiMAGE 7 manual)
Same as the non-upgraded DiMAGE 7.
Movie-mode menu
Movie mode
Basic
Auto select
Night movie
STD. movie
 Loading...