

• Parts name .......•........................... 3
• Features...... 5
• Specifications...... 7
• Before using your Minolla Autopck-B K7............... 9
1. Check the bottery condition 9
2. Check exposure meter...... 9
3. Set the motor 9
4. After loading the corner o 10
• A quick guide to filming.................................... 10
1. Install batteries , 10
2. Focus the eyepiece : 11
3. Set the focus 11
4. Zooming 11
5. Check the light..... 12
6. Being filming............................................. 12
• About Super-S film 13
• How to hold your Minolla Autop ok-B K7............... 14
• Loading and unloading the film 15
1. Open the film chamber 15
2. Insert the film 15
3. Close the film chomber 16
4. To unload film 16
• Fo'otage scale 17
• Filming 18
• Use -of filter with various film 19
• Focusing 20
:. Exposure worning signal 21
• Shutter release 22
• Batteries 23
How to insert the batteries 23
Ballery check 25
• Hints for better movies 25
Zooming 26
Panoramic filming 27
Titles...... . 29
•. Accessories for the Minolta Autopok-B K7 3.1
• Preserving the batteries 36
• Maintenance and care....................................... 36
2
or
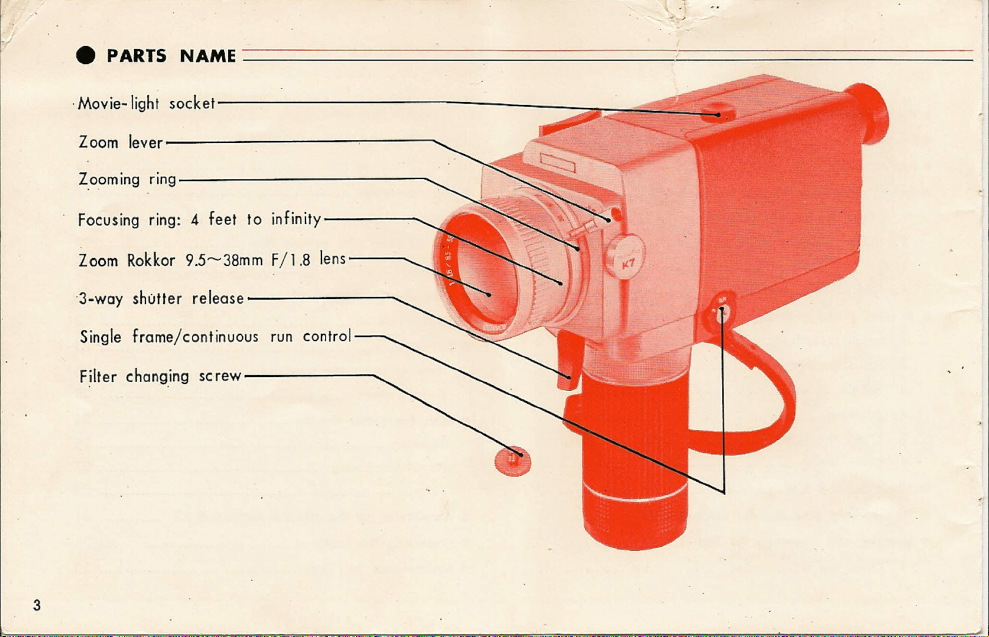
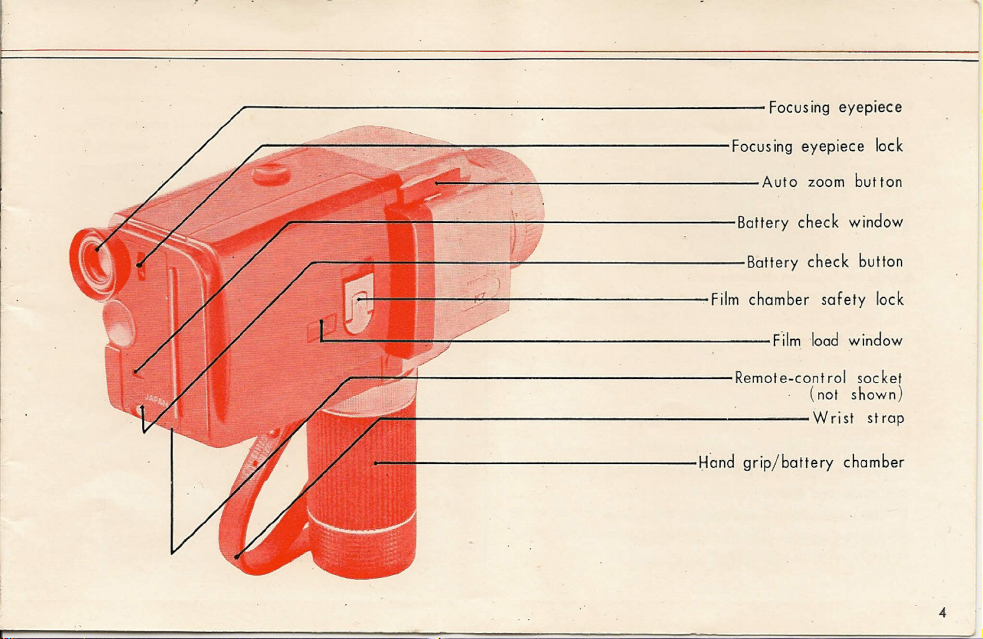
• PARTS
Movie-lightsocket----------------_-::::_~,.......;;~~~~_
Zoom
Zoomingring-----------~
Focusingring: 4 feet to infinity----_
ZoomRokkor9.5~38mmF/l.8 lens----.....
·3-way shutter release-------__....
Singleframe/continuous run control
Filter chang.ingscrew--------.....
3
NAME=====================================================
lever------------- .....
I
r----------------.:...-------------
Focusingeyepiece
r-:::::-~~-:----....:....::::..:"_;;=_=::__-----------
~:.;~!!~~~~
:.. 9----'------1:..-.:c..;----------Battery check window
....•••_11"'7
r-:::;t::;;~r----------------
~=:---=---':------------
fH----.,,,L-----------Battery check button
H--+--~--'--------...,.Film chamber safety lock
r.:i-:i"'------------------
r-------------'--------
f---------------Hand grip/battery chamber
Focusingeyepiece lock
Aut0zoombutton
F'ilm-Ioodwindow
Remote-control socket
(not shown)
Wrist strop
4
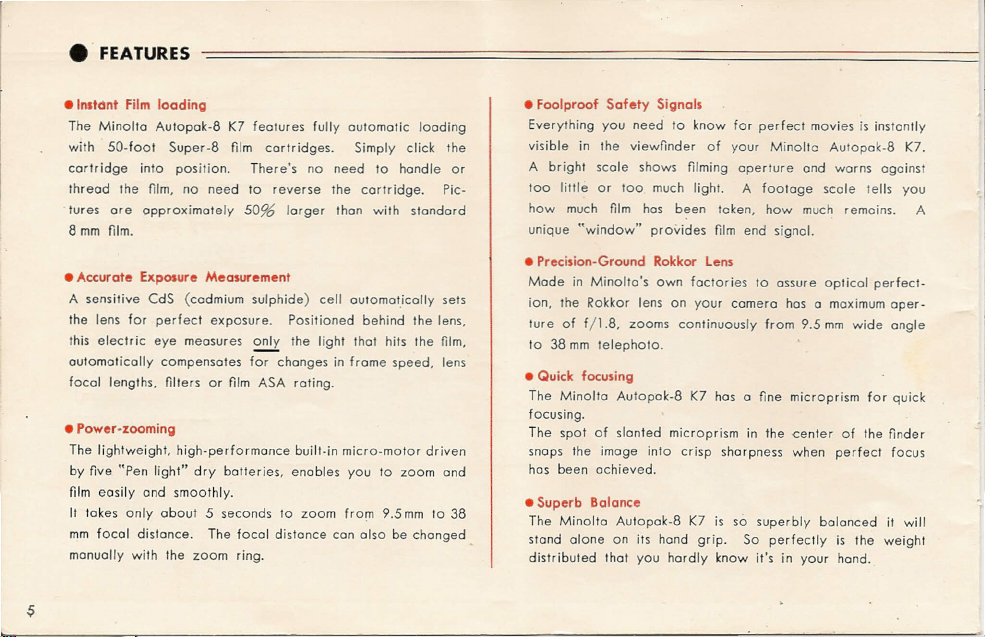
• FEATURES
• Inslclnl Film loading
The Minolla Autapak-8 K7 features fully automatic loading
with 50-foot Super-8 film cartridges. Simply click the
cartridge into position. There's no need to handle or
thread the film, no need to reverse the cartridge. Pic-
"tur
es are approximately 5096 larger than with standard
8mm film.
• Accurate Exposure Measurement
A sensitive CdS (cadmium sulphide) cell automatically sets
the lens for perfect exposure. Positioned behind the lens.
this electric eye measures only the light that hits the film.
automatically compensates for changes in frame speed. lens
focal lengths. filters or film ASA rating.
• Power-zooming
The lightweight. high-performance built-in micro-motor driven
by five "Pen light" dry batteries, enables you to zoom and
film easily and smoothly.
It tokes only about 5 seconds to zoom from 9.5 mm to 38
mm focal distance. The focal distance can also be changed
manually with the ZOOm ring.
• Foolproof Safety Signals
Everything you need to know for perfect movies is instantly
visible in the viewfinder of your Minolta Autopak-8 K7.
A bright scale shows filming aperture and warns against
too little or too much light. A footage scale tells you
how much film has been token. how much remains. A
unique "window" provides film end signal.
• Precisian-Ground Rokkor Lens
Mode in Minolta's own factories to assure optical perfect-
ion, the Rokkor lens on your camero has a maximum aper-
ture of f
to 38 mm telephoto.
• Quick focusing
The Minolla Autopak-8 K7 has a fine microprism for quick
focusing.
The spot of slanted microprism in the center of the finder
snaps the image into crisp sharpness when perfect focus
has been achieved.
• Superb Balance
The Minolta Autopak-8 K7 is so superbly balanced it will
stand alone on its hand grip. So perfectly is the weight
distributed that you hardly know it's in your hand.
11.8.
ZOOms continuously from 9.5 mm wide angle
I·
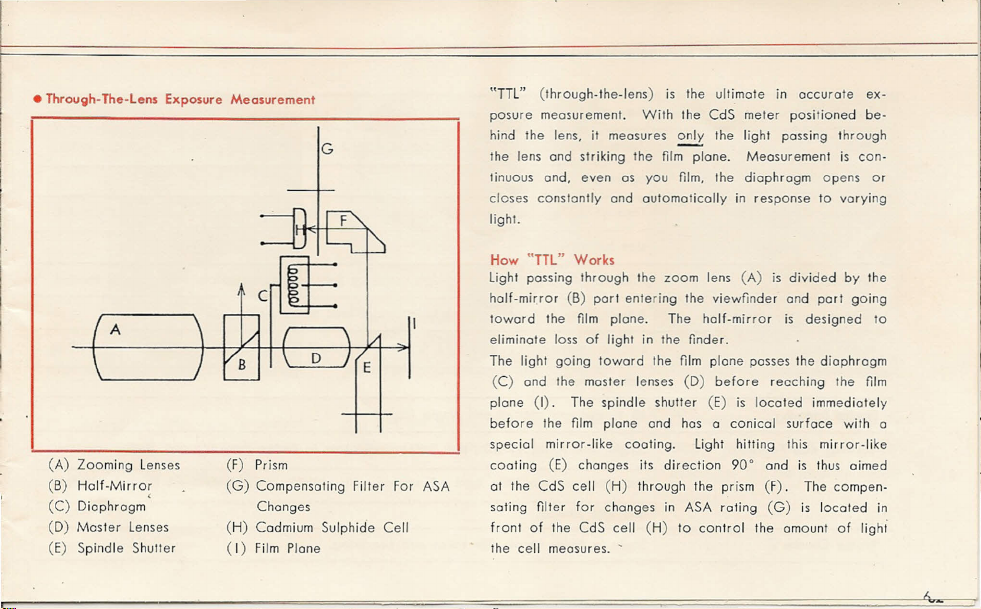
• Through- The-Lens Exposure Measurement
(A)
Zooming lenses
(6)
Half-Mirror
(C)
Diaphragm
Moster lenses
(D)
(E)
Spindle Shutter
,
(F) Prism
(G) Compensating Filter For ASA
Changes
(H) Codmium Sulphide Cell
(I) Film Plane
"TTl" (through-the-Iens) is the ultimate in accurote ex-
posure measurement. With the CdS meter positioned be-
G
hind the lens, it meosures only the light passing through
the lens and striking the film plene. Measurement is con-
tinuous and, even as you film, the diaphragm opens or
closes constantly and automatically in response to varying
light.
How "TTL" Works
light passing through the zoom lens (A) is divided by the
half-mirror (6) port entering the viewfinder and port going
toward the film plane. The half-mirror is designed to
eliminate loss of light in the finder.
The light going toward the film plane posses the diaphragm
(C) and the master lenses (D) before recching the film
plane (I). The spindle shutter (E) is located immediately
before the film plane and has a conical surface with a
special mirror-like coating. light hitting this mirror-like
coating (E) changes its direction 90· and is thus aimed
at the CdS cell (H) through the prism (F). The compen-
sating filter for changes in ASA rating (G) is located in
front of the CdS cell (H) to control the amount of lighi
the cell measures. '

• SPECIFICATIONS OF MINOLTA AUTOPAK-8 K7
Camera Type:
Lens:
Exposure Control: Through-the-lens automatic CdS exposure meter powered by five standard penlight AA-
A$A Range: ASA 10-64, daylight, ASA 25-1 DO, artificial light, set automatically when film is loaded.
Filter:
Motor Drum:
Frome Speeds:
Viewing end Focusing:
Frome Counter:
8 mm movie camera for use with 50-foot Super-8 cartridge.
Zoom Rokkor F/1.8 9.5 to 38 mm zoom, 13 elements in 10 groups. Electric zooming
operation.
size batteries.
Built-in Type A filter, coupled to cartridge and movie light.
Electric micro-motor powered by five standard penlight AA-size batteries. Built-in
battery checker.
18 frames per second and single frame.
Single lens reflex viewfinder. Safety indicators in finder show film end, filming aperture,
too much or too little light. Eyepiece with visibility adjustment(+1 to - 4 diopter)
and lock device.
Scale in finder shows film token and remaining.
~~v~------------------------------ ~ ~~====================~ _
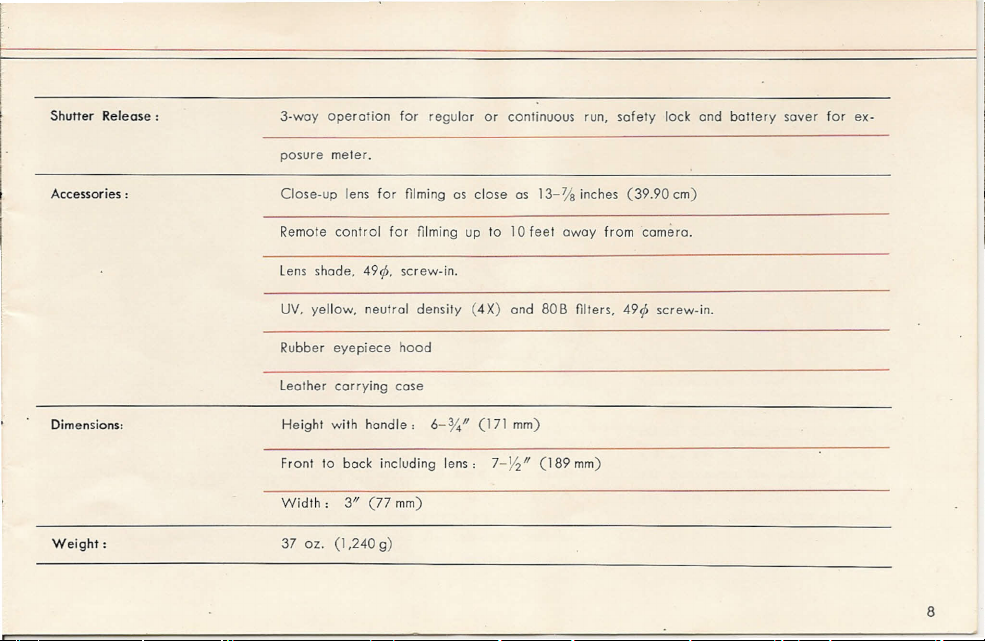
Shutter Release:
3·way operation for regular Or continuous run, safety lock and battery saver for ex-
I.
I
Accessories:
Dimensions:
Weight: 37 oz. (1,240
posure meter.
Close-up lens for filming as close as 13-~ inches (39.90 cm)
Remote control for filming up to 10 feet away from camera.
lens shade, 49¢, screw-ln.
UV,
yellow, neutral density
Rubber eyepiece hood
leather carrying case
Height with handle,
Front to back including lens,
Width:
3/1
(77 mm)
6-*/1
(4X)
and 80B filters, 49¢ screw-in.
(171 mm)
7-Y2/1
(189 mm)
g)
8
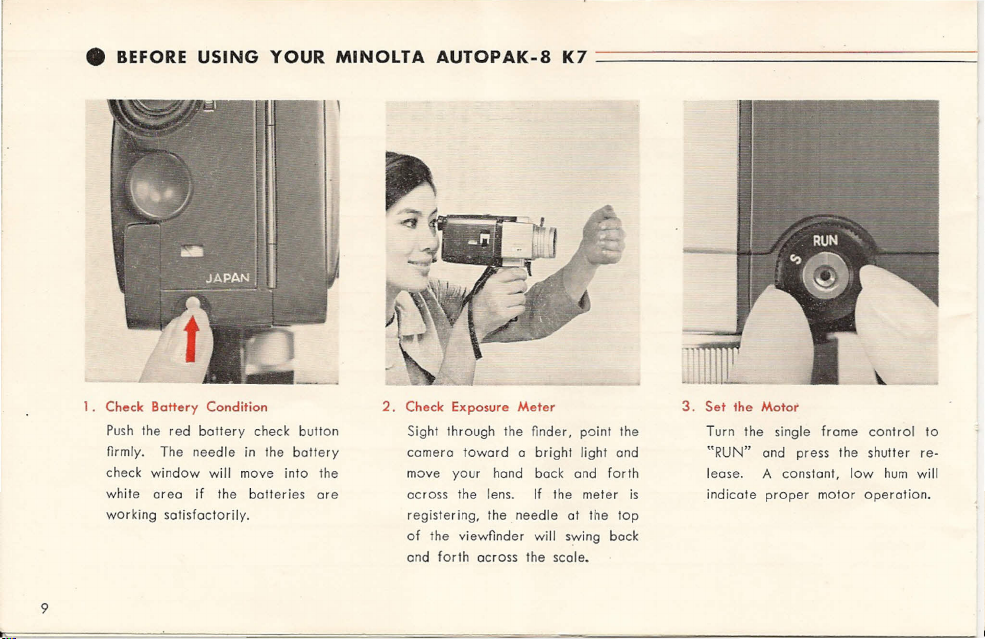
• BEFORE USING YOUR MINOlTA AUTOPAK-8 K7
1.
Check Battery Condition
Push the red battery check button
flr mly. The needle in the battery
check window will move into the
white area if the batteries are
working satisfactorily.
9
2.
Check Exposure Meter
Sight through the flnder , paint the
camera toward a bright light and
move your hand back and forth
across the lens. If the meter is
registering, the needle at the top
of the viewfinder will swing back
and forth across the scale.
=============================:
3. Set the Motor
Turn the single frame control to
"RUN" and press the shutter re-
lease. A constant, low hum will
indicate proper motor operation.
I
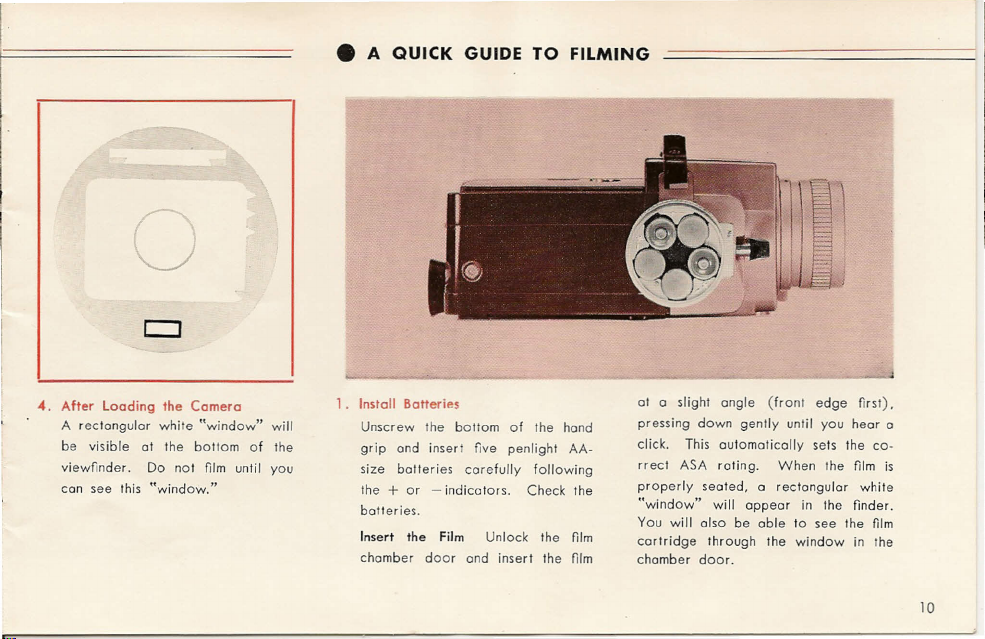
• A QUICK GUIDE TO FILMING
I
I·
I
I
I
o
.•. Aft
er Loading the Camero
A rectangular white "window" will
be visible at the bottom of the
viewfinder. Do not film until you
can see this "window."
1. Install Batteries
Unscrew the bottom of the hand
grip and insert flve penlight AA-
size batteries carefully following
the+or - indicators. Check the
batteries.
Insert the Film Unlock the [llm
chamber door and insert the fllrn
at a slight angle (front edge flr st},
pressing down gently until you hear a
click. This automatically sets the co-
rrect ASA rating. When the film is
properly seated. a rectangular white
"window" will appear in the finder.
You will also be able to see the fllrn
cartridge through the window in the
chamber door.
10
. ·'1: .
.
,
-I
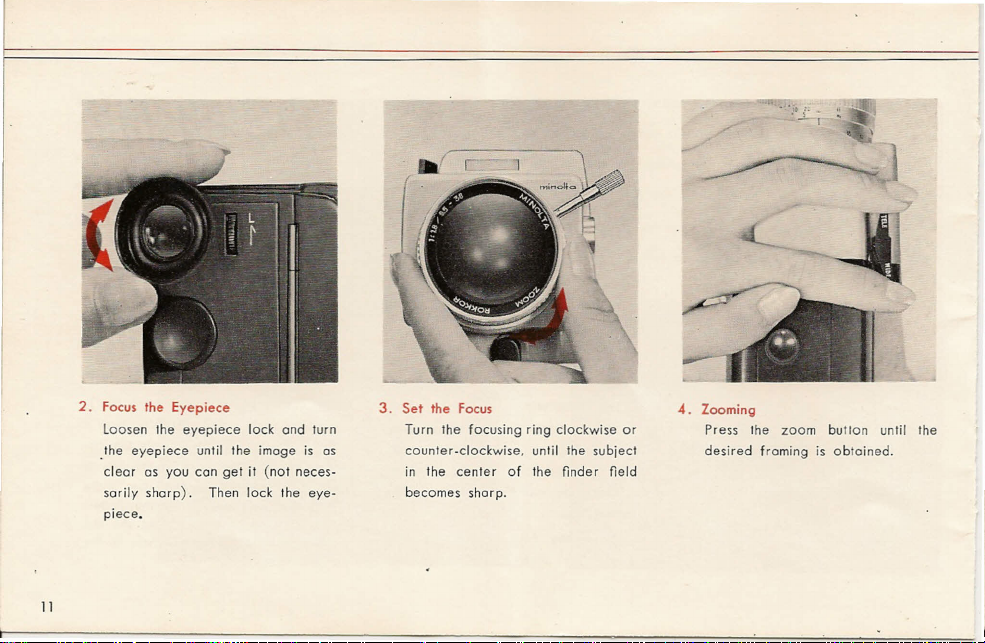
2. Focus the Eyepiece
Loosen the eyepiece lock and turn
.the eyepiece until the image is as
clear as you can get it (not neces-
sarily sharp). Then lock the eye-
piece.
11
3.
Set the Focus
Turn the focusing ring clockwise or
counter-clockwise. until the subject
in the center of the finder fleld
becomes sharp.
4.
Zooming
Press the zoom button until the
desired framing is obtained.

1-
o
5. Check the Light
When the needle at the top of the
viewfinder is for left or right (in a
red area), there is too little Or too
much light for good filming.
5. Begin Filming
Simply press the release firmly while
aiming the camero at your subject.
As you look through the finder. the
footage scale moves up. At film
end. the white
appear.
"window"
will
dis-
*
After Filming
Turn the shutter release lever to
left .or right without depressing it
down. This will lock the release
and turn off the exposure meter.
12

• ABOUT SUPER-8 FILM
13
Your Minolta Autopak-8 K7 uses Super-8 film cartridges. thus giving you several major advan-
tages,
1. Loading is Quick. Easy and Foolproof
i:I
Simply drop the cartridge into the camero.
i:I
It is impossible to expose the film while loading ... even in bright.
i:I
You get a full 50-feet of nlming without reversing the cartridge.
2. Forget about ASA Numbers
i:I
Films are sold with diRerent "speeds," which indicate diRerent sensitivities to light. Your
Minolto Autopak-8 K7 sets itself automatically for these diRerent "speeds" (ASA ratings)
when the film is loaded.
3. Better Movie Qualitv
i:I
Each frame of Super-8 111mis approximately 50% larger than on regular 8 mm film.
i:I
As a result. pictures are sharper and brighter.
i:I
Super-8 111malso lends itself more easily to the addition of sound.

• HOW TO HOLD YOUR MINOLTA AUTOPAK-8 K7
The Minolta Autopak-8 K7 is designed
for precise balance and handling ease.
To use
your
camero most comfortably,
slip
your
right or left hand through
the hand strop and grasp the handle
firmly, keeping the forefinger of the
some hand over the shutter release.
This leaves one hand free for zoom-
ing. When not zooming,
find in helpful to use that free hand
to grasp the camero firmly at the top.
you may
14

• LOADING AND UNLOADING THE FILM
.! (
~
1. Open the Film Chamber
Turn the chamber safety lock in the direction of the arrow.
15
2. Insert the Film
Seat the Super-B cartridge by holding it at a slight angle
with the center hole down and the film label up. Then
press down until you hear a click.

I·
3. Close the Film Chamber
Set the chamber door firmly against
the camero and turn the lock clock-
wise. You are now ready to toke
pictures.
4. To
Unload Film
Open the film chamber, li.! car-
tridge from bock and slide out at
a slight angle.
*
The ASA rating of your film is
set automatically when camero
is loaded.
'*
A white
the bottom of the vlewflnder
when film is locr'ed.
"window"
appears ot
*
The window in the chamber door
shows what kind of film is loaded.
CAUTION: Do not touch the spring
on the hinge side of the
film chamber.
16

• FOOTAGE SCALE
As you continue filming, the film (frame) counter indicates
the length of film exposed. It is very convenient, because
you can ascertain the length of film both exposed and un-
exposed.
You can see a triangular indicator on the right of the view
field of the viewfinder. As the film is advanced, the indi-
color moves up accordingly.
When the film COmes to the end, the film end signal (the
long bright window below the viewfinder eyepiece) dis-
appears.
Be sure to toke out the cartridge only after confirming that
Ihe signal has disappeared.
The three notches on the upper right of the viewfinder eye-
piece indicate from top to bottom, (1) the film comes to
the end. (2) 10 feel remain unexposed, and (3) 20 feet
remain unexposed.
17
o
'-----..,..".----'
,-50
, (end position)
----,
-- - - -Abt.
- __ "\(10
,
'-Abt.
(20 ft. unexposed)
----,
"
'. Starting
ft.
40
ft.
unexposed)
30
ft.
ft.
position

• FILMING
Normal photography
When setting the frame control to "RUN" frame speed is
18 f.p.s. (shutter speed, 1/40 sec.) for normal photography.
Single Frame Photography
Simply set the single frame control to "S." Each push of
the shutter r.eleose will then expose just one frame. This is
valuable in preparing cartoons and time-lapse photography
where. for example, you wish to record plant growth over
a period of time. Ideally to prevent excessive jar, a coble
release should be screwed into the single frame control
and used in place of the shutter reiease.
18

I
Use of Filter with Various Film
Your Minolta Autopak-8 K7 is built-in Type A filter coupled
with cartridge and movie light.
1.
Indoor Type Color Film
a) Using Indoor Type Color Film in Artificial light
*
When using indoor type color film with movie light,
built-in Type A filter is removed automatically.
*
When using indoor type color fllm with other arti-
ficial lights, insert niter changing screw into movie
light socket.
(Filter changing screw is packed with camera)
b) Using Indoor Type Color Film in Daylight
*
When using indoor type color film in daylight (not
using artificial light) built-in Type A filter is set in
19
your camera, viewfinder will appear to be light
2. Daylight Type Color Film
3, Monochrome Film
brown,
0)
Using Daylight Type Color Film in Day light
*
When using daylight type calor film in daylight,
Type A niter is removed. automatically.
b) Using Daylight Type C610r Film in Artificial light
*
When using daylight. type color film in artificial light,
a Minolta '80 B color filter is recommended. This
filter' is available as on optional accessory to the'
Minolta Autopak-8 K7.
*
Use of the conversion filter is not necessary when
block-and-white fllm is utilized.

• FOCUSING
Focus the .Eyepiece for Your Own Eyesight
Loosen the eyepiece by turning .the eyepiece lock
in a downward direction. After the eyepiece is
unlocked. turn it while sighting through the finder
until you see the clearest possible image (not
necessarily sharp). Then lock the eyepiece into
position by turning the lock in the direction of the
arrow. Unless your eyesight changes. you will
have no reason to re-focus the eyepiece.·
Focusing
In order to focus turn=the focus.ring clockwise. or counter-clockwise.
The viewfinder .consist of a group of slanted microprism which are
concentrated at the center of the viewing area. At tlie. sharpest
point you are in focus. This should be done with the lens set at
full telephoto-38 mm.
20

• EXPOSURE WARNING SIGNAL
2 • 4
The scale at the top of the view-
finder tells you the aperture at which
you are filming and warns against too
lillie or too much light.
As you film. you will notice the needle
swinging constantly ocr oss the scale.
moving automatically to the aperture
number at which the picture is being
taken. The needle must be in the
white area of the scale for correct
exposure.
21
8
·16 ~
o
"*
When the needle appears in the
extreme left. red area of the scale.
the subject is too dark for proper
exposure.
o
"*
When the needle stays in the red
area at the extreme right the sub-
'[ect is too bright for proper ex-
posure. This occurs with snow or
beach scenes and may be corrected
with a neutral density filter (see
accessories) .

• SHUTTER RELEASE
The shutter release on the Minolta Autopok-B
K7 con be moved to three different positions
for· regular filming. continuous run. lock and
battery saver. For regular filming the release
should be parallel to the hand grip. Hold the
camero securely and film by pressing the relea-
SB.
For continuous. run. depress the release and
turn it right (facing the comer
main depressed and the motor will continue to
run. To lock the release. save battery life
and prevent occidental filming. turn it left or
right without depressing it.
c),
It will re-
For single frame photography and on those
occasions when you are unable to hold the
camero steady enough. you may activate the
shutter with a coble release threaded into the
single frame control. Note, When using a
cable release. the shutter release should be
parallel to the hand grip.
22

I
.BMllR~=======~~~=======~==~~~====
Five standard penlight AA-size botter ies provide power for
the motor and CdS cell.
How To Insert The Batteries
Open the' ballery chamber by turning the bottom of
the hand grip counterclockwise.
23
2 Insert each ballery according to the+or - sign
shown in the chamber.
the ballery. "-:" equals the not end.
Caution, Do not allempt to operate camera un iI you
are sure balleries are correctly seated.
"+"
equals the raised end of

3 After you have inserted the bolleries. replace the
handle bottom by filling the triangular "key" into the
corresponding opening. .
Remove the bolleries of the camero if it is to be left
unused for rnor e than a monJh.
About 10 rolls of film may be exposed with each set
of bolleries.
Caution, Do not touch the spring on the bollom of
the hond grip.
,
24

I
• HINTS FOR BETTER
MOVIES
BA TTERY
Since all dry batteries gradually lose
their 'power in time. whether used or
not, the Minolta Autopak-8K7is equip-
ped with a battery check. It is wise
to check battery condition each time
you use the corner o. thereby avoiding
film waste.
How To Use The Battery Check
2
3 The battery check indicates condi-
CHECK
Press the red bottery check button.
The needle in the ballery check
window will swing into the white
areo.
If the battery check needle remains
in the red area while the bullon is
depressed, replace all five batteri-
es.
tion of both motor and CdS cell.
Caution: Do not run motor while
checking balleries. Do
not depress battery check
SCENE LENG
About 5 seconds is the right Iength for
each scene. although some variation is
advisable to ovoid monotony.5se-
conds equals about1foot.3inches
of film. For moving obiects. 8
are beller.
button any longer than necessary
as this drains the balleries.
TH
seconds
25

• ZOOMING
}~ -c
•••1/; ~
... 1-~
~o>,
o.--~oo1.
•
ZOOMING:
The Zoom Rokkor ' lens on your camero will move conti-
nuously from 9.5 mm wide angle to 38 mm telephoto by
pressing the auto zoom bullons while looking through the
viewfinder.
As you zoom, the subject will becomes lorger or smaller
in the viewfinder. Thus you can use the zoom lens to frame
your subject precisely as you wont it. then shooting as with
on ordinaly flxed focal length lens. This zooming technique
helps obtain dynamic effects.
Zooming can also be done manually.
Zoom oction is provided by turning the extension zoom
lever. which may be screwed into the lens at either of
two positions. enabling right or left hand operation,
26

PANORAMIC F.lLMING
With movie cameras (unlike still cameras) you can obtain
spectacular panoramic shots by moving the camera while
flIming. This is called "panning" and results in pictures
that appear much wider than they would be from a single,
fixed position.
'P:
Pan slowly
'P:
Pan smoothly without wovering
.*
Pan in0straight line, either vertically or horizontatly
*
Lead the camera into the subject so that the main point
of interest will appear at the end of the pan
1;(
If possible, use a tripod for steadier panning
27

28

TITlES
Even with sound movies, titles are important. In silent films
titles are imperative since they tie the picture together.
The Minolta Autopak-8 K7 is a single lens reflex camero
that shows you exactly the area you dre photographing.
Therefore titles are very easy to make because there is
29
no parallax correction problem. In addition. you can use
zoom effects when moking titles as well as when filming.
The Minolla Autopak-8 K7 can be focused as close as 4
feel. But, with the zoom lever set at 38 mm, you can
frame as small on area as 4%x6Vain. (116X155 em).
If you wish to fllrn a smaller area, use a title cord and

the accessory close-up lens. This lens permits focusing os
close os 1'-3 'l8 " inches from the subject. When used with
the zoom lens ot 38 mm. the subject oreo is only
inches.
Focusing distonces ond subject oreo with close-up lens,
l:U6xl
Distonce
Scale- of
Comera
%
00
1.2 m
00
4'
Actual Focal
Focusing
Distance
SO.12cm
39.90 cm
Distonce
9.Smm
9.Smm
9.S mm
I'
70/4/1
9·.Smm
.1'3'l8
H
of Lens
38mm
38 mm
38mm
38 mm
Size of
Subject
174X233mm
43.3X57.7mm
123X16Smm
30.6X40.9mm
11
6'l8
10/4/1x2Y4/1
4'l8/1x6Y211
I%Hxl%H
I
x 9
Yell
r---------------------.~------------------------------~r
30

• ACCESSORIES FOR THE MINOlTA AUTOPAK-8 K7
REMOTE CONTROL
The remote control accessory is valua-
ble in shooting situations where it is
impractical to hold the camera Or
where your presence might distract
the subject. These include candid
scientific research and self-filming.
How 10 Use Ihe Remole
a) Unscrew the hand grip at the top.
Then secure the camera body to
a tripod, using the tripod socket
on the bottom of the camera.
31
Control
b:, Connect one terminal of the re-
mote control cord to Ihe battery
socket on top of the hand grip.

c) Connect the other remote control
terminal to the remote control
socket on the camera body.
d) Turn the shutter release10conti-
nuous run position.
e) Operate the motor by pressing the
button on the hand grip. This
substitutes for the regular shutter
release.
32

FILTElS
The following accessory filters are
available for use with the Minolta
Autopak-8
K7,
UV
Used to absorb excessive ultra-violet
light when shooting mountain, snow,
sea and other distant scenes. Tends
to cut through haze.
33
Y·48:
This yellow niter renders red and
yellow objects lighter thon the eye
sees hem. Also used to darken skies,
emphasize clouds. This filter is for
Block&White film.
NDX4:
This is c, neutral gray niter used to
adjust the amount of· exposure. It is
especially useful when there is a possi-
bility of over-exposure at the smallest
lens aperture (e.g. when filming summer
beach or brilliont snow scenes). Filter
Factor-4X.

[
80B:
Permits the use of daylight fllrn indoors.
Filter Factor-l.5X.
"*
The through-the-lens exposure sys-
tem of the Minolta Autopak-8 K7
eliminates the need to compensate
for' fllter s, as light is, measured
after it posses through the niter.
Eyepiece Hood
Eyepiece hood is recommended to pre-
vent harmful light from entering the
eyepiece.
lens
Shade
A lens shade is recommended to pre-
vent any stray light from entering the
lens.
The hood is specially designed to func-
tion perfectly with any lens angle, in-
cluding telephoto or wide angle.
A lens hood is especially valuable for
movie light photography, beach cod'
snow photography.
34

CLOSE-UP LENS
A close-up lens is available far title shooting and close-ups.
With this lens. you can shoot subjects as close as
Zooming is also possible. .
Use of the close-up lens causes the following changes in
focusing distances,
35
1'-3~/I
Distance on
Lens (m)
Actual Focusing
Dislance (cm)
Distance on
Lens
(ft)
Actual Focusing
Dislance (It)
*
"Actuol focusing distance" indicales the distance betwee.n
the 111mplane and the subject.
The following table indicates the r elotionship between
the photographic distance from the camera (the dis-
tance between the 111mplane and the subject) and the-
size of the real subject,
Distance Actual
Scale of Focusing
Camera Distance
Close up
Lens
00
1.2
00
4'
00
50.12 49.36
00
1 -
. 7~/I
50.12
39.90
1'-7~/I
1'-3~/I
20 10
30
I- I-
7U6/1
cm
cm
5 3
48.63 47.23 45.48 43.46 41.60 39.90
20
61M6/151X6/1
Focal Length of Lens Used
9.5
174
233 mm 115mm
123 x 61.3x
165mm81.9 mm 40.9
61~
418"
7
10
1 -
I- I- I- I-
5Y4/1 4~/I
mm
X
86.4
3j'a"
X
9Ya"
X
:<7'a
6lf:!" . 3
19
mm
4Y2"
Y4"
2
11.5
6 5 4
4%/1 3~/I
X
57.7
x
x
38
mm
43.3x
30.6 x
1
3
)1/'
2Y4"
17\p x
1%"
1.2
mm
mm
x

• PRESERVING THE BAnERIES
.• MAINTENANCE AND CARE
==============
-(:( If the camera is to be unused for a month. remove the
batteries.
-(:( Never touch the battery contact spring on the bottom
of the battery chamber or the contact spring inside the
film chamber.
-(:( Use the battery check button for only a few seconds.
Over a period of time. dirt or dust may accumulate in the
'camera. Keeping the camera and lens clean are essential
to proper performance.
• When storing the camero for extended periods of time.
keep it in a
• . Clean lens. finder window with soft clean cloth only.
or brush gently with lens brush.
• The film gate should .always be clean. When inserting
a new reel of film. dust it with a soft brush.
dry
and. cool place.
. I
36

MEMO
37
Minolta Camera
Co.,
Ltd .."
MEMO
.--~ ~-.---""'---L----------i
Minolta Camera Co.,
\
~
Ltd.
38

UAK7-6121E
.
,
.}. '" r :
Minolta masters photography
Minolta/
·MINOL TA CAMERA CO., LTD ....
P.':nled H1
.'
•••• !.
j,,~t""
·-,.'r.
.',
"",.
.~.;
'-
 Loading...