

Page 1

- 1 -
Thank you for purchasing the Minolta Dimâge 2300.
Please take the time to read through this instruction manual so you can enjoy all its
features.
For information on installing and operating the included application software, please
read the accompanying software instruction manual.
This manual contains information regarding products introduced before Jan., 2000.
To obtain compatibility information for products released after this date, contact a
Minolta Service Facility listed on the back cover of this manual.
This mark on your camera certifies that this camera
meets the requirements of the EU (European Union)
concerning interference causing equipment
regulations.
CE stands for Conformité Européenne (European
Conformity).
This device complies with Part 15 of the FCC Rules.
Operation is subject to the following two conditions:
(1) This device may not cause harmful interference,
and (2) this device must accept any interference
received, including interference that may cause
undesired operation.
Tested by the Minolta Corporation
101 Williams Drive, Ramsey, New Jersey 07446,
U.S.A.
This Class B digital apparatus complies with Canadian ICES-003.
Cet appareil numérique de la classe B est conforme à la norme NMB-003 du Canada.
Do not remove the ferrite cores from the cables.
Digital Camera:
FOR HOME OR OFFICE USE
2300
Tested To Comply
With FCC Standards
Page 2

- 3 -
BEFORE YOU BEGIN
FOR PROPER AND SAFE USE
- 2 -
Read and understand all warnings and cautions before using this product.
WARNING
Batteries may become hot or explode due to improper use.
• Use only the batteries specified in this instruction manual.
• Do not install the batteries with the polarity (+/-) reversed.
• Do not subject batteries to fire or high temperatures.
• Do not attempt to recharge, short, or disassemble.
• Do not mix batteries of different types, brands, or ages.
• Follow local regulations for battery disposal.
Use caution, accidents may occur when using this product near young children.
Keep batteries or things that could be swallowed away from young children. Contact
a doctor immediately if an object is swallowed.
Immediately remove the batteries and discontinue use if...
• the camera is dropped or subjected to an impact in which the interior is exposed.
• the product emits a strange smell, heat, or smoke.
Do not walk while looking at the monitor.
Do not disassemble. Electric shock may occur if a high voltage circuit inside the
camera is touched.
Take your camera to a Minolta Service Facility when repairs are required.
CAUTION
The heat of the camera rises with extended periods of use. Use caution when
handling the camera or removing the batteries and compact flash card.
Check the packing list before you begin. If some parts are missing, contact your
camera dealer or a Minolta Service Facility listed on the back cover of this manual.
• Minolta Dimâge 2300 camera (x 1)
• AA-size Alkaline Batteries (x 4)
• Quest
®
8 HOUR NiMH BATTERY CHARGER and NiMH BATTERIES
Quest
®
AA-size rechargeable NiMH batteries (x 4)
Size AA& size AAANiMH battery charger (x 1)
• Video Cable (x 1)
• Hand Strap (x 1)
• Camera Case (x 1)
• USB Cable (x 1)
• 8MB CompactFlash Card (x 1)
• CD-ROM (x 2)
Driver software/Utility software for Dimâge 2300 (Windows
®
/Macintosh)
MGI PhotoSuite SE (Windows
®
/Macintosh)
• Documentation
Camera Instruction Manual (this manual) (x 1)
Software Instruction Manual (x 1)
Warranty (x 1)
Page 3

TABLE OF CONTENTS
- 5 -
BUILT-IN FLASH .................................................................................33
FLASH LAMP ...............................................................................33
FLASH RANGE ............................................................................34
CHANGING THE FLASH MODE.................................................34
BURST IMAGE CAPTURE..................................................................36
SELF-TIMER/REMOTE CONTROL
SELF-TIMER................................................................................38
REMOTE CONTROL (SOLD SEPARATELY)..............................40
DIGITAL ZOOM [REC MODE].............................................................42
MACRO...............................................................................................44
EXPOSURE COMPENSATION...........................................................46
RECORD MODE MENUS
RECORD MODE MENUS
RECORD MODE MENUS (LCD Monitor)....................................49
RECORD MODE MENU ITEMS AND EACH SETTING..............49
To Display the Record Mode Menus............................................50
SELECTING IMAGE QUALITY....................................................51
SELECTING IMAGE SIZE...........................................................54
FILE SIZE.............................................................................56
CARD CAPACITY.................................................................57
SELECTING WHITE BALANCE..................................................58
SELECTING SHARPNESS..........................................................60
CHANGING ISO SENSITIVITY ...................................................62
TABLE OF CONTENTS
- 4 -
FOR PROPER AND SAFE USE...........................................................2
BEFORE YOU BEGIN ..........................................................................3
TABLE OF CONTENTS........................................................................4
NAMES OF PARTS
CAMERA BODY.............................................................................8
BOTTOM OF BODY.....................................................................10
VIEWFINFER...............................................................................10
DATAPANEL................................................................................11
GETTING STARTED RIGHT AWAY
PREPARATION............................................................................12
RECORDING...............................................................................12
PLAY ............................................................................................14
DELETING IMAGES....................................................................15
PREPARATION
ATTACHING THE HAND STRAP........................................................17
INSERTING BATTERIES ....................................................................18
Low Battery Warning....................................................................20
Auto Power Off.............................................................................21
Using the AC Adapter (Sold Separately)......................................22
COMPACT FLASH CARD
Inserting the Compact Flash Card...............................................23
Removing the Compact Flash Card.............................................24
TAKING PICTURES
BASIC RECORDING PROCEDURE...................................................27
To Turn Off the Camera in REC Mode.........................................28
REC (Record) Mode Screen (LCD monitor)................................29
FOCUS
FOCUS LAMP/NO FOCUS INDICATOR.....................................30
FOCUS RANGE ...........................................................................30
SPECIAL FOCUSING SITUATIONS............................................31
FOCUS HOLD..............................................................................32
Continued on Next Page
Page 4

TABLE OF CONTENTS - CONT’D
- 7 -
TABLE OF CONTENTS - CONT’D
- 6 -
PLAYING BACK IMAGES (PLAY MODE)
PLAY MODE SCREENS
Play Mode Screen (LCD monitor) - Single-frame Play................65
Play Mode Screen (LCD monitor) - Index Play............................65
SINGLE-FRAME PLAY........................................................................66
INDEX PLAY........................................................................................67
To Turn Off The Camera in PLAY Mode ......................................68
DIGITAL ZOOM [PLAY MODE] ...........................................................69
AUTO-PLAY (SLIDE SHOW)
Auto-Play (Slide show) Screen (LCD monitor) ............................71
To Stop Auto-Play (Slide show) ...................................................73
To Change Auto-Play (Slide show) Settings................................74
DELETING IMAGES (PLAY MODE)
DELETING A SINGLE IMAGE ............................................................78
LOCKING (PROTECTING) IMAGES ..................................................81
UNLOCKING (UNPROTECTING) IMAGES ................................83
PLAY MODE MENUS
PLAY MODE MENUS
PLAY MODE MENUS (LCD Monitor) ...........................................85
PLAY MODE MENU ITEMS AND EACH SETTING ....................85
DELETING ALL IMAGES.............................................................86
LOCKING (PROTECTING) ALL IMAGES....................................88
UNLOCKING (UNPROTECYING) ALL IMAGES .........................90
SELECTING THE PRINT METHOD (DPOF™)...........................92
SELECTING THE PRINT TYPE...........................................92
SELECTING THE IMAGES TO BE PRINTED ......................94
PRINTING ALL IMAGES ......................................................96
CANCELING ALL IMAGES...................................................98
SETUP MODE
SETUP MODE MENUS
SETUP MODE MENUS (LCD Monitor)......................................101
SETUP MODE MENU ITEMS AND EACH SETTING...............101
To Display the Setup Mode Menus............................................102
SETTING THE BRIGHTNESS OF THE LCD MONITOR..........103
FORMA TTING ACOMPACT FLASH CARD..............................105
SETTING THE AUTO POWER-OFF TIME................................107
SETTING THE DATE/TIME.......................................................109
RETURNING TO THE DEFAULT SETTINGS............................114
VIDEO OUT.......................................................................................116
APPENDIX
TROUBLESHOOTING.......................................................................118
CARE AND STORAGE......................................................................122
TECHNICAL DETAILS.......................................................................125
Page 5
NAMES OF PARTS
- 9 -
NAMES OF PARTS
- 8 -
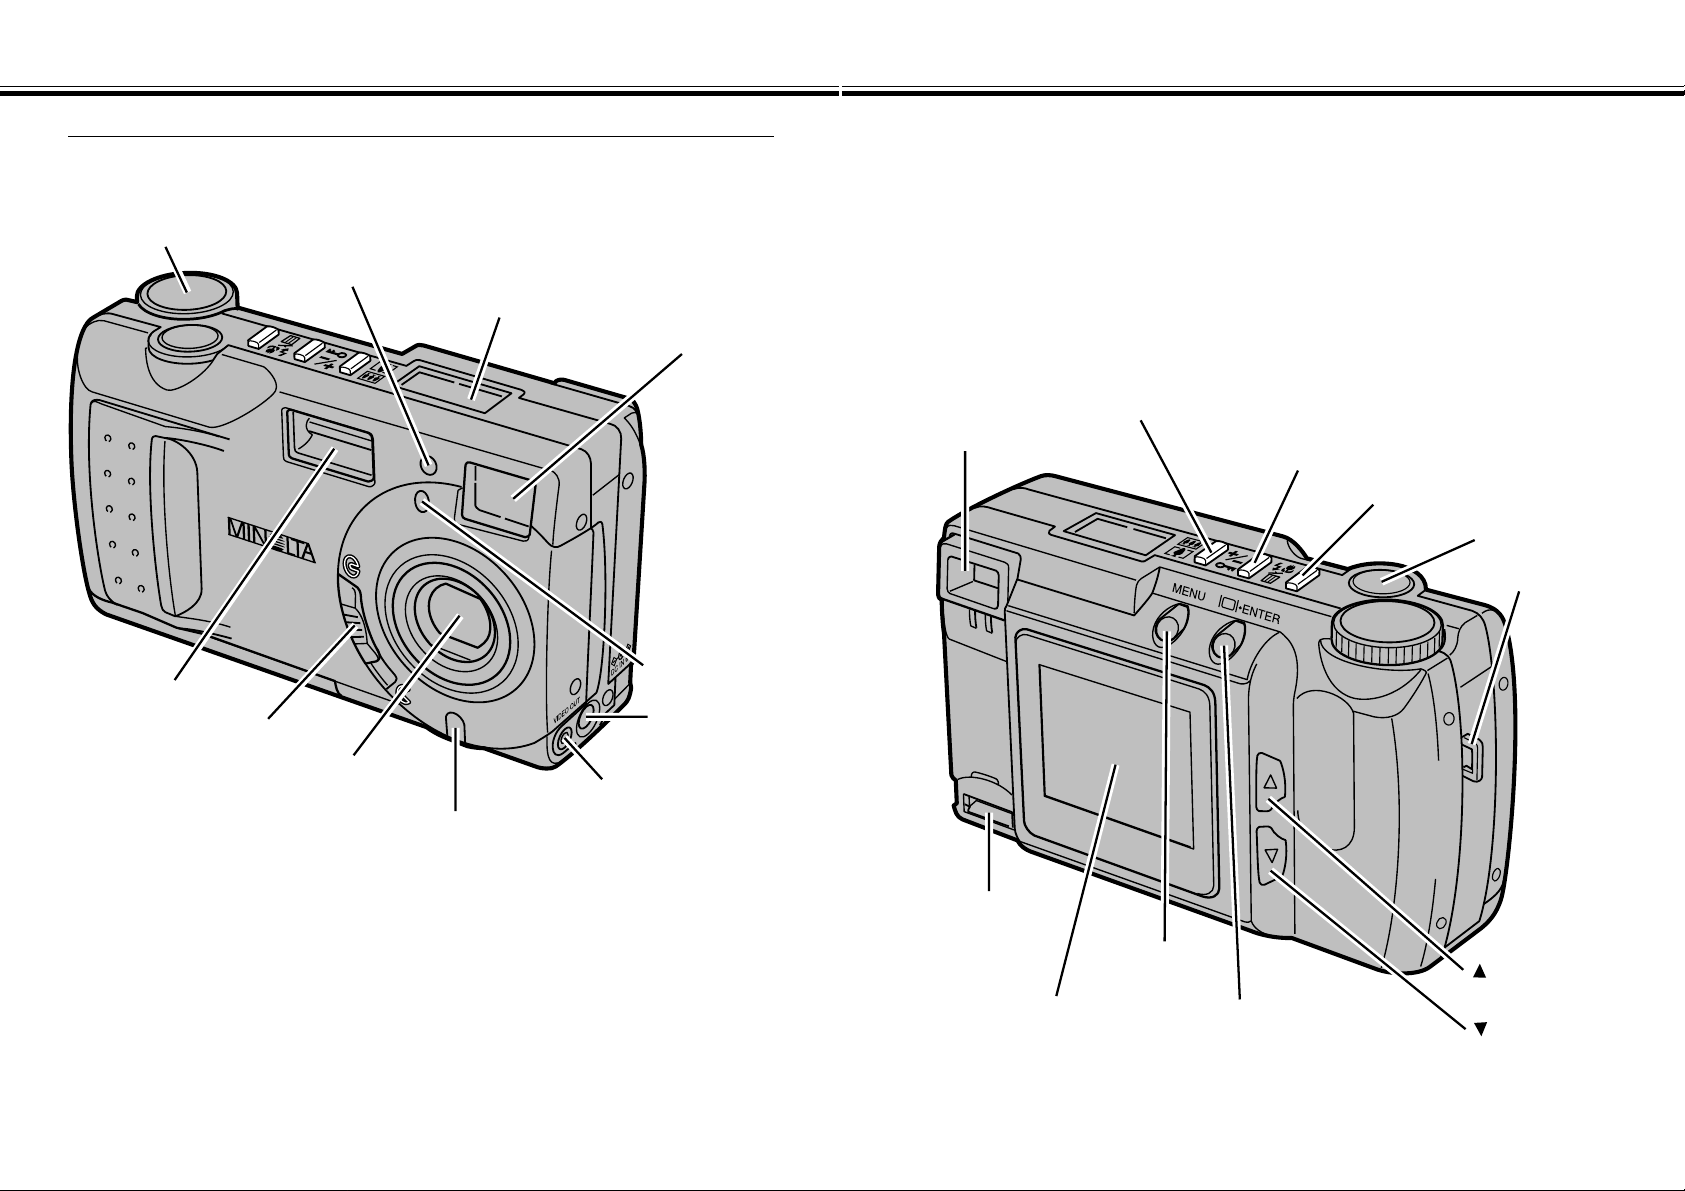
CAMERA BODY
* Do not touch.
Function dial
Self-timer lamp
Data panel
Viewfinder window *
Digital zoom button
Viewfinder *
Exposure-compensation/Lock button
Flash-mode/Delete button
Shutter-release button
Strap eyelet
Flash *
Lens cover slide
Lens *
Remote-control receiver *
Flash sensor *
DC terminal
Video-out terminal
USB/Serial
connector *
LCD Monitor *
MENU button
Display/ENTER button
button
button
Page 6

NAMES OF PARTS - CONT’D
- 11 -
NAMES OF PARTS - CONT’D
- 10 -
DATA PANEL
VIEWFINDER
BOTTOM OF BODY
The following diagram shows all items displayed to aid the explanation.
Tripod socketBattery/card-chamber door
Exposure-compensation indicator
Battery-condition indicator
Sharpness indicator
Image quality indicators
Focus frame
Focus lamp (green)
Glows: Focus confirmed
Blinks quickly: Contrast is too low
Blinks slowly: Image is being written to
Flash lamp (orange)
Glows: Flash charged and will fire
Blinks: Flash is now charging and shutter locked
or Subject is too close
the compact flash card or
Image is being loaded from
the compact flash card
Flash-mode indicators
Self-timer indicator
Manual white-balance indicator
Frame counter/
Exposure-compensation display
(No card indicator)
Page 7

GETTING STARTED RIGHT AWAY
- 13 -
GETTING STARTED RIGHT AWAY
- 12 -
PREPARATION - See pages 18 - 25 for detailed information
Insert the compact flash card.
Insert the batteries.
RECORDING - See pages 27 - 35 for detailed information
Move the lens cover slide to
to open the lens cover.
• The camera will be turned on and be set to
REC (Record) mode.
• Press the display/ENTER button to turn on
the LCD monitor if desired.
Turn the Function dial to .
Press the shutter-release button
part-way down.
• The green focus lamp will glow if focus is
confirmed.
• The orange flash lamp will glow if the flash is
charged and ready.
Frame the image in either the
LCD monitor or viewfinder.
• Place the viewfinder’s focus frame on the
subject or center the subject in the LCD
monitor.
Press the shutter-release button
all the way down to take the
picture.
• The captured image will appear in the LCD
monitor.
• The green focus lamp will blink slowly while
the recorded image is being written to the
compact flash card.
Page 8
GETTING STARTED RIGHT AWAY - CONT’D
- 15 -
GETTING STARTED RIGHT AWAY - CONT’D
- 14 -
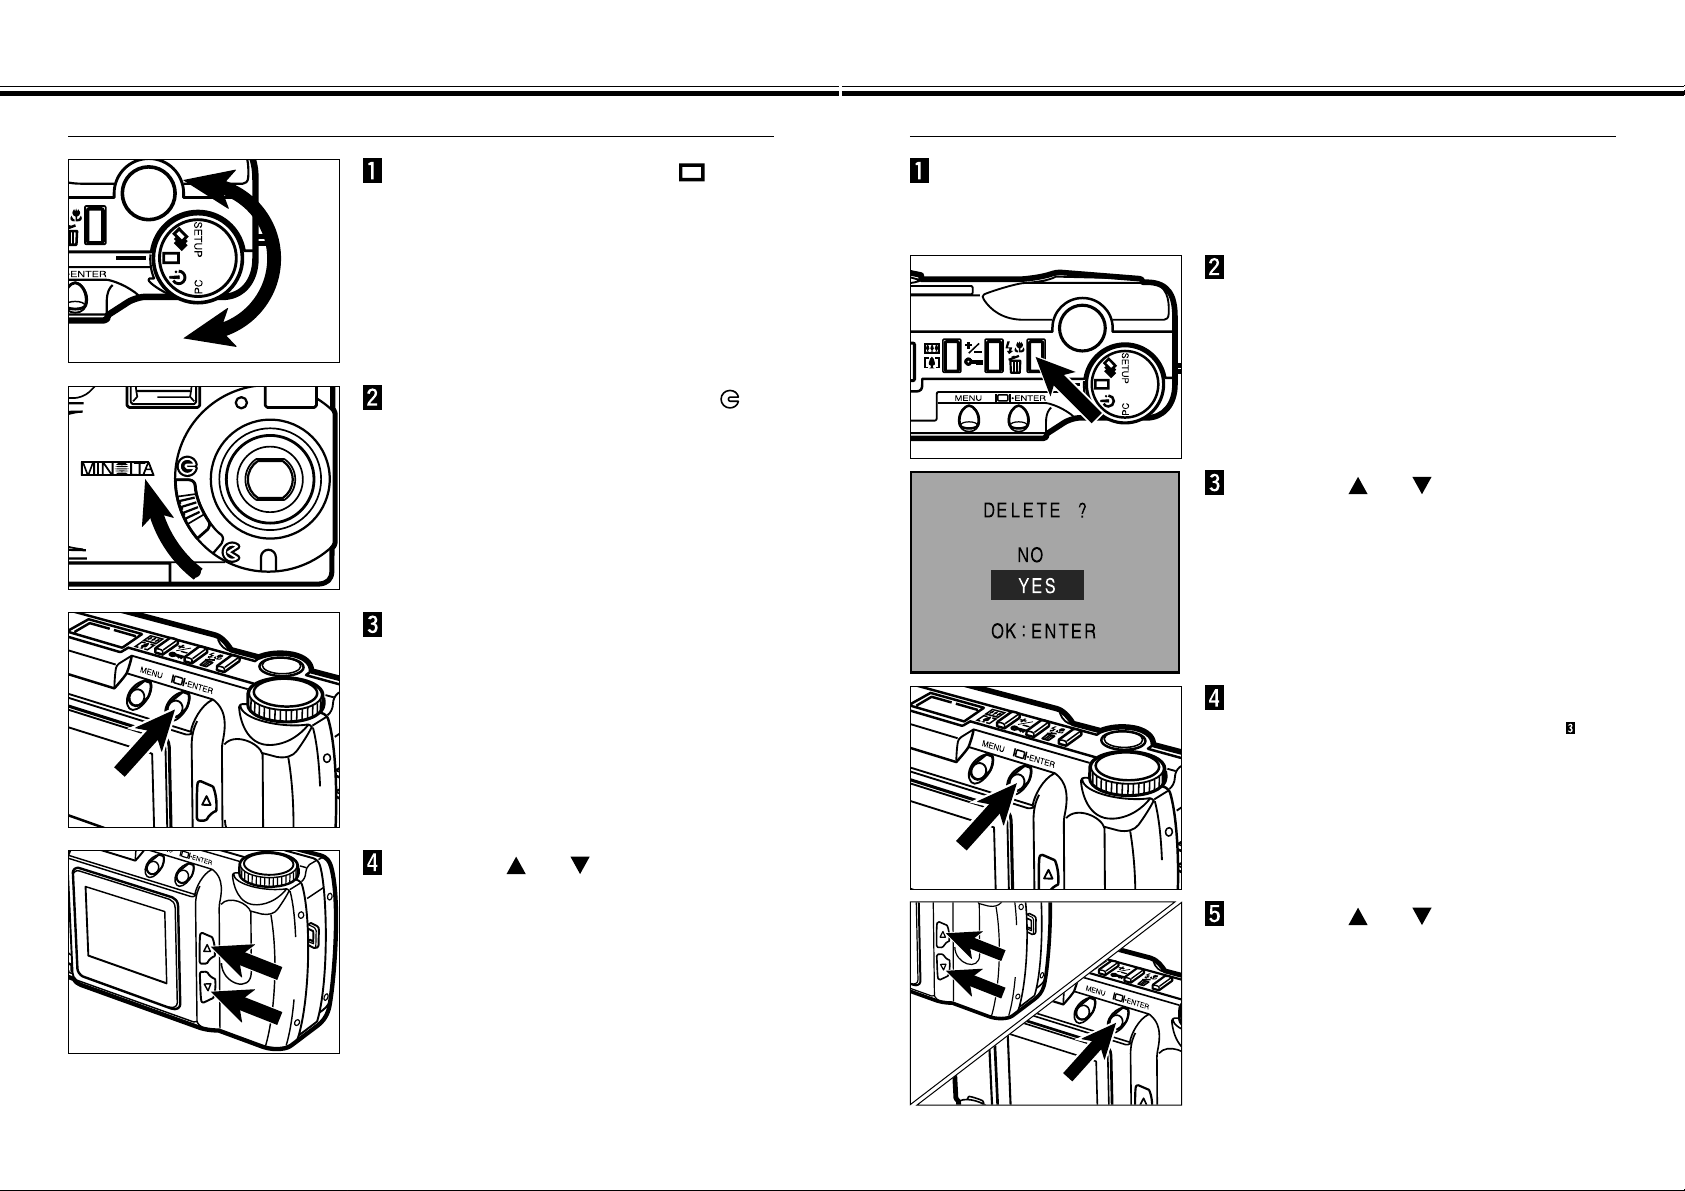
PLAY - See pages 65 - 70 for detailed information
Press the or button to
scroll through the images.
Turn the Function dial to .
DELETING IMAGES - See pages 78 - 83 for detailed information
Press the or button to
highlight “YES”.
According to the operations between step 1 and step 4
shown at the left, display the desired image in the LCD
monitor.
Press the display/ENTER button.
• The LCD monitor will return to the step
shown above after the image is deleted.
Press and hold the
display/ENTER button about 1
second.
Press the flash-mode/delete
button.
• A confirmation screen will appear.
Move the lens cover slide to .
Press the or button to
highlight “NO”, then press the
display/ENTER button.
• The LCD monitor will return to the PLAY
screen.
Page 9
- 17 -
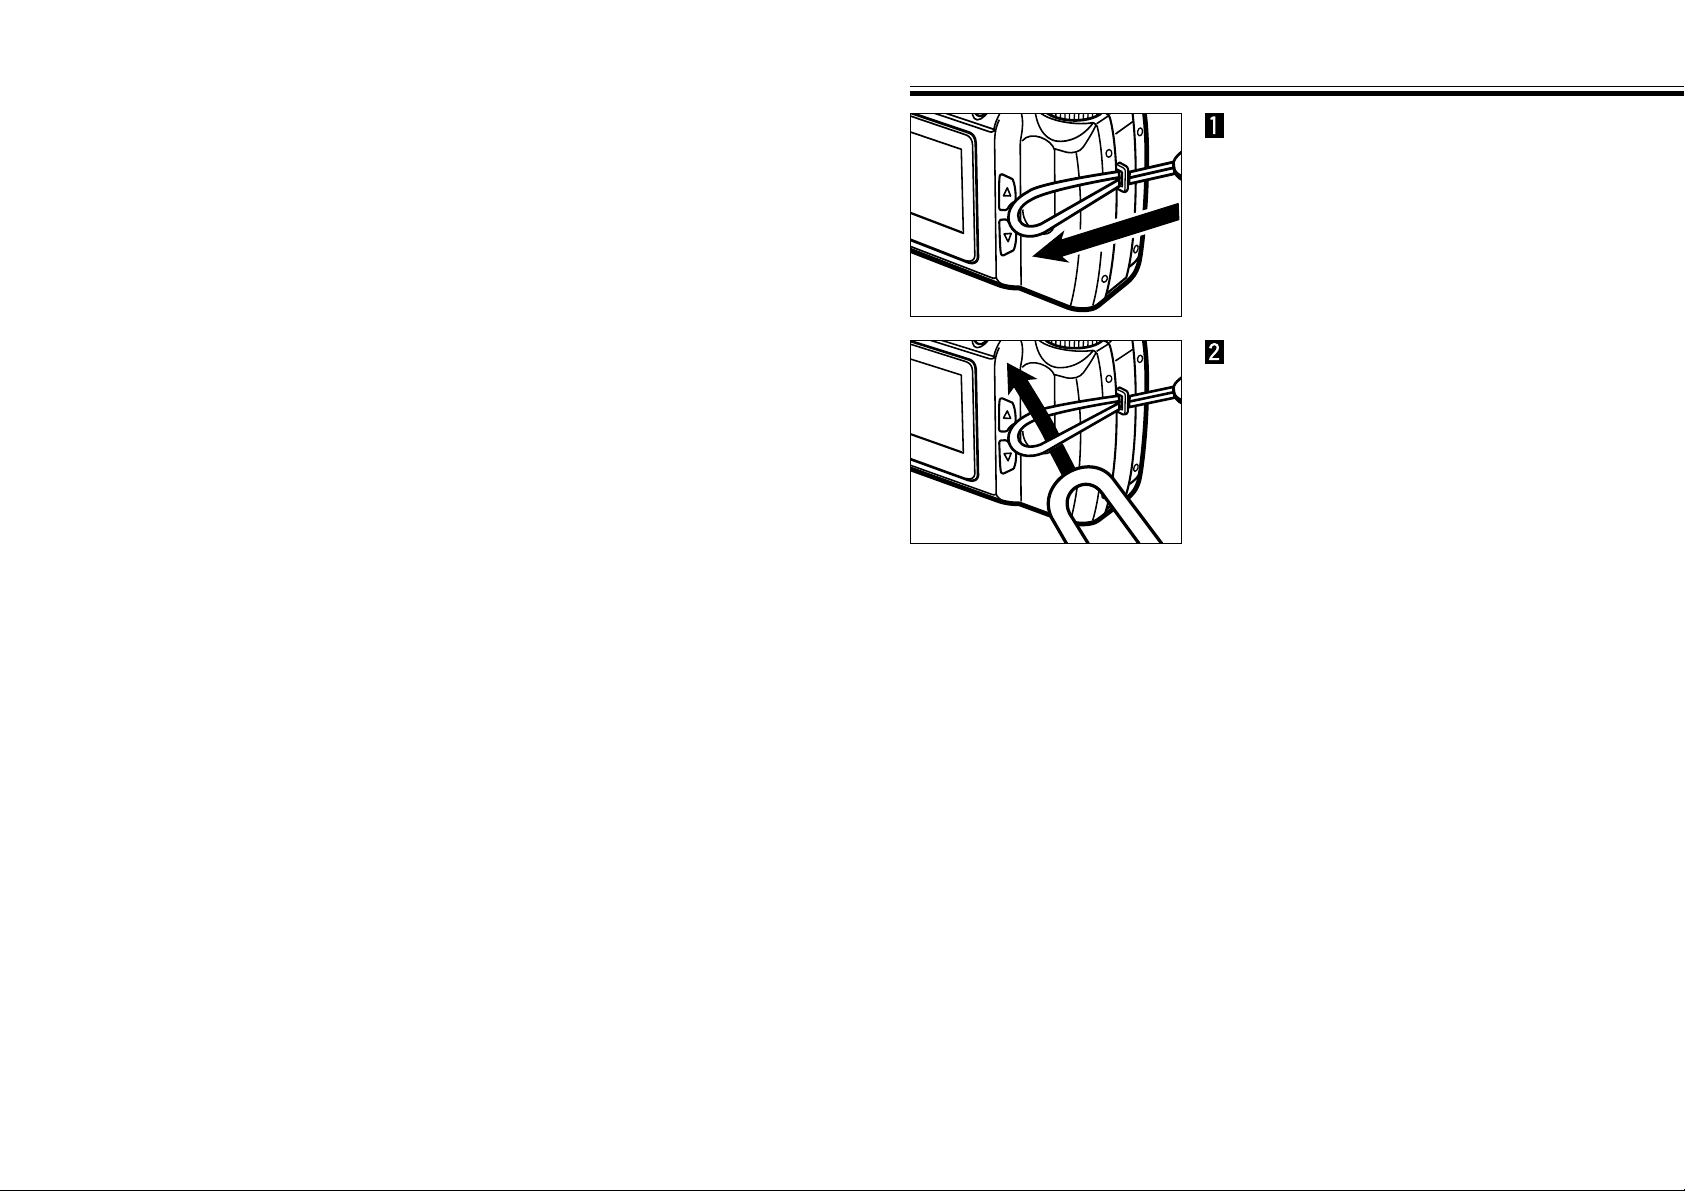
ATTACHING THE HAND STRAP
- 16 -
PREPARATION
Put the other end of the strap
through the small loop.
Insert the smaller loop of the
strap through the strap eyelet.
Page 10
INSERTING BATTERIES
- 19 -
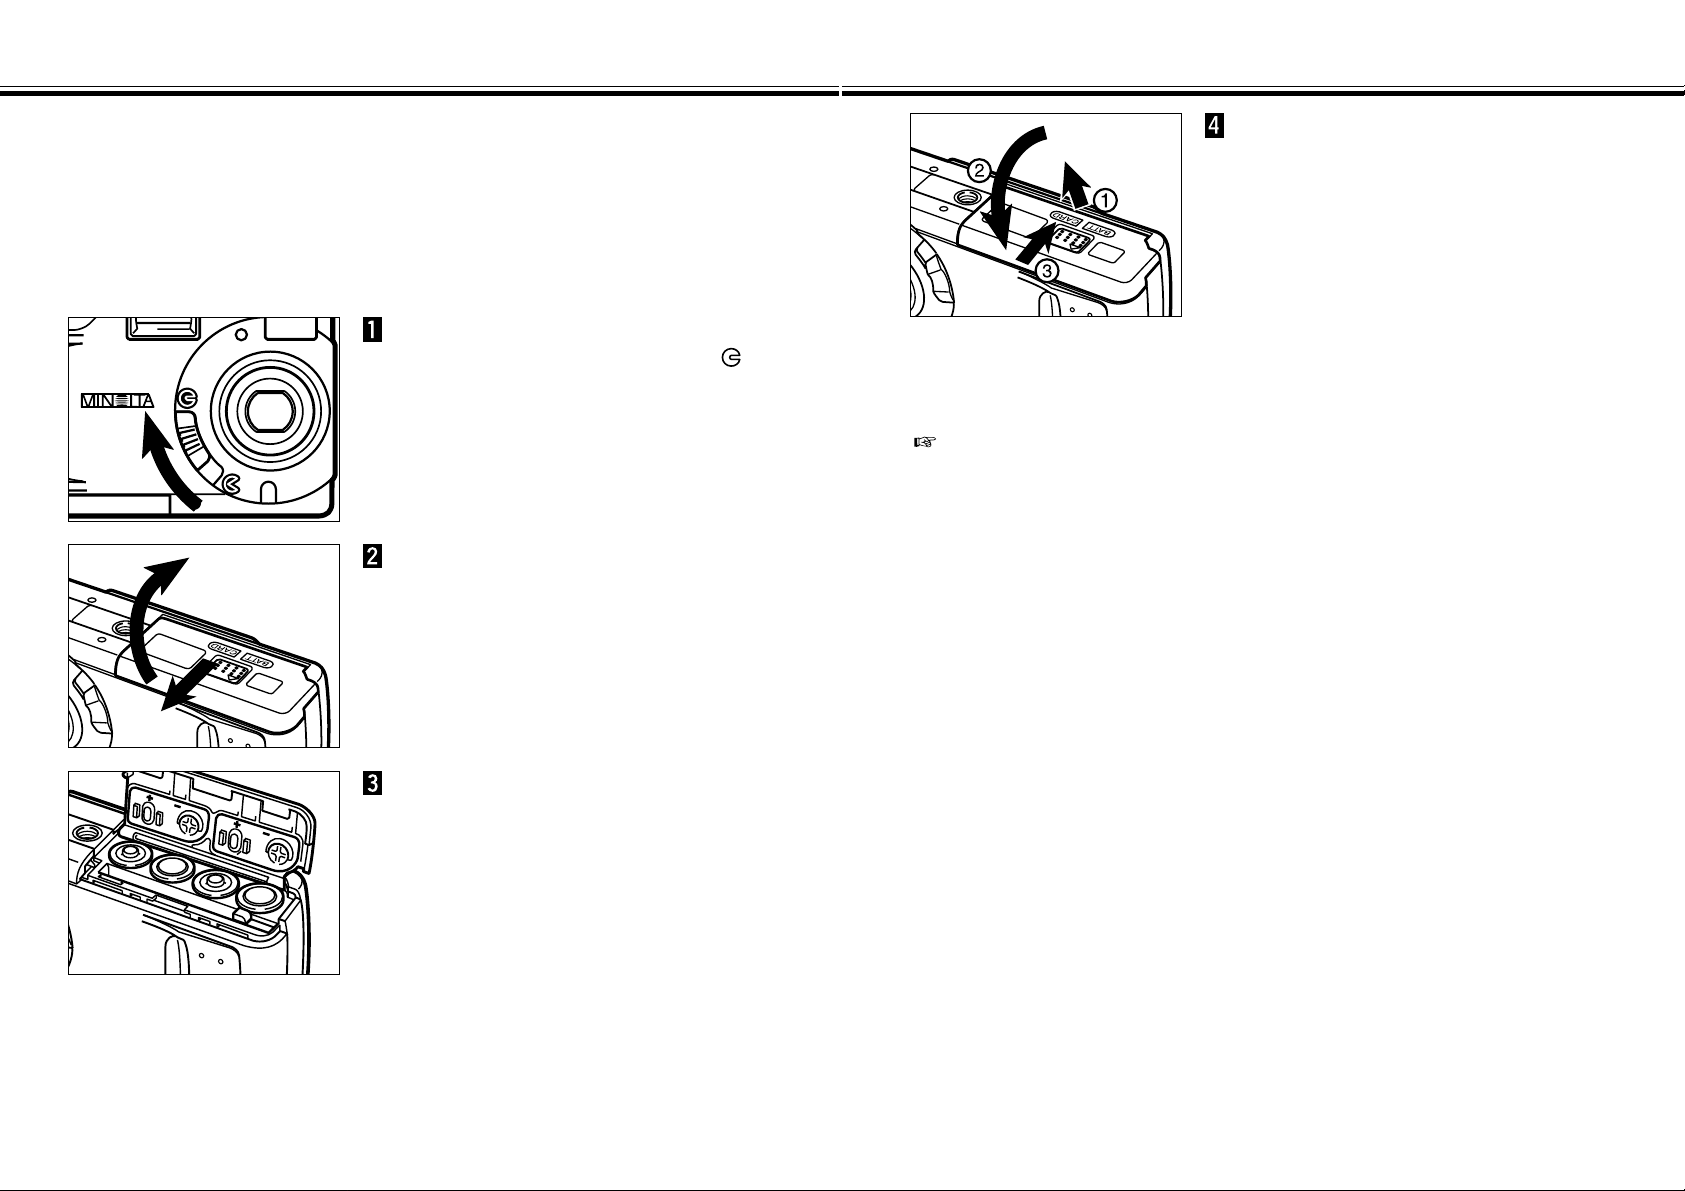
INSERTING BATTERIES
- 18 -
Open the battery/card-chamber
door by sliding it in the direction
indicated, then open the door.
When replacing the batteries,
move the lens cover slide to
to turn the camera off.
• You may skip this step when inserting the
batteries for the first time after purchase.
Insert the batteries as indicated
by the +/- diagram on the back of
the battery/card-chamber door.
While pulling up the battery/cardchamber door slightly, fold it
down and slide it slightly toward
the front of the camera.
Then, while using a downward
pressure, slide it back to the rear
of the camera until it clicks.
The Minolta Dimâge 2300 uses four AA-sized alkaline batteries.
• You may also use AA-sized Ni-Cd or Ni-MH batteries.
• When using Ni-Cd or Ni-MH batteries, fully recharge them with a vendor-endorsed
battery charger.
After replacing the batteries, check that the clock in the camera (date and time) is
correct (see pages 109 - 113).
Especially, when the AC adapter is unused and the battery/card-chamber door
remains opened more than 10 minutes, the clock in the camera may delay or be
reset to the default setting. If this occured, set the date and time accurately
according to the directions described on pages 109 - 113.
Page 11
INSERTING BATTERIES - CONT’D
- 21 -
INSERTING BATTERIES - CONT’D
- 20 -
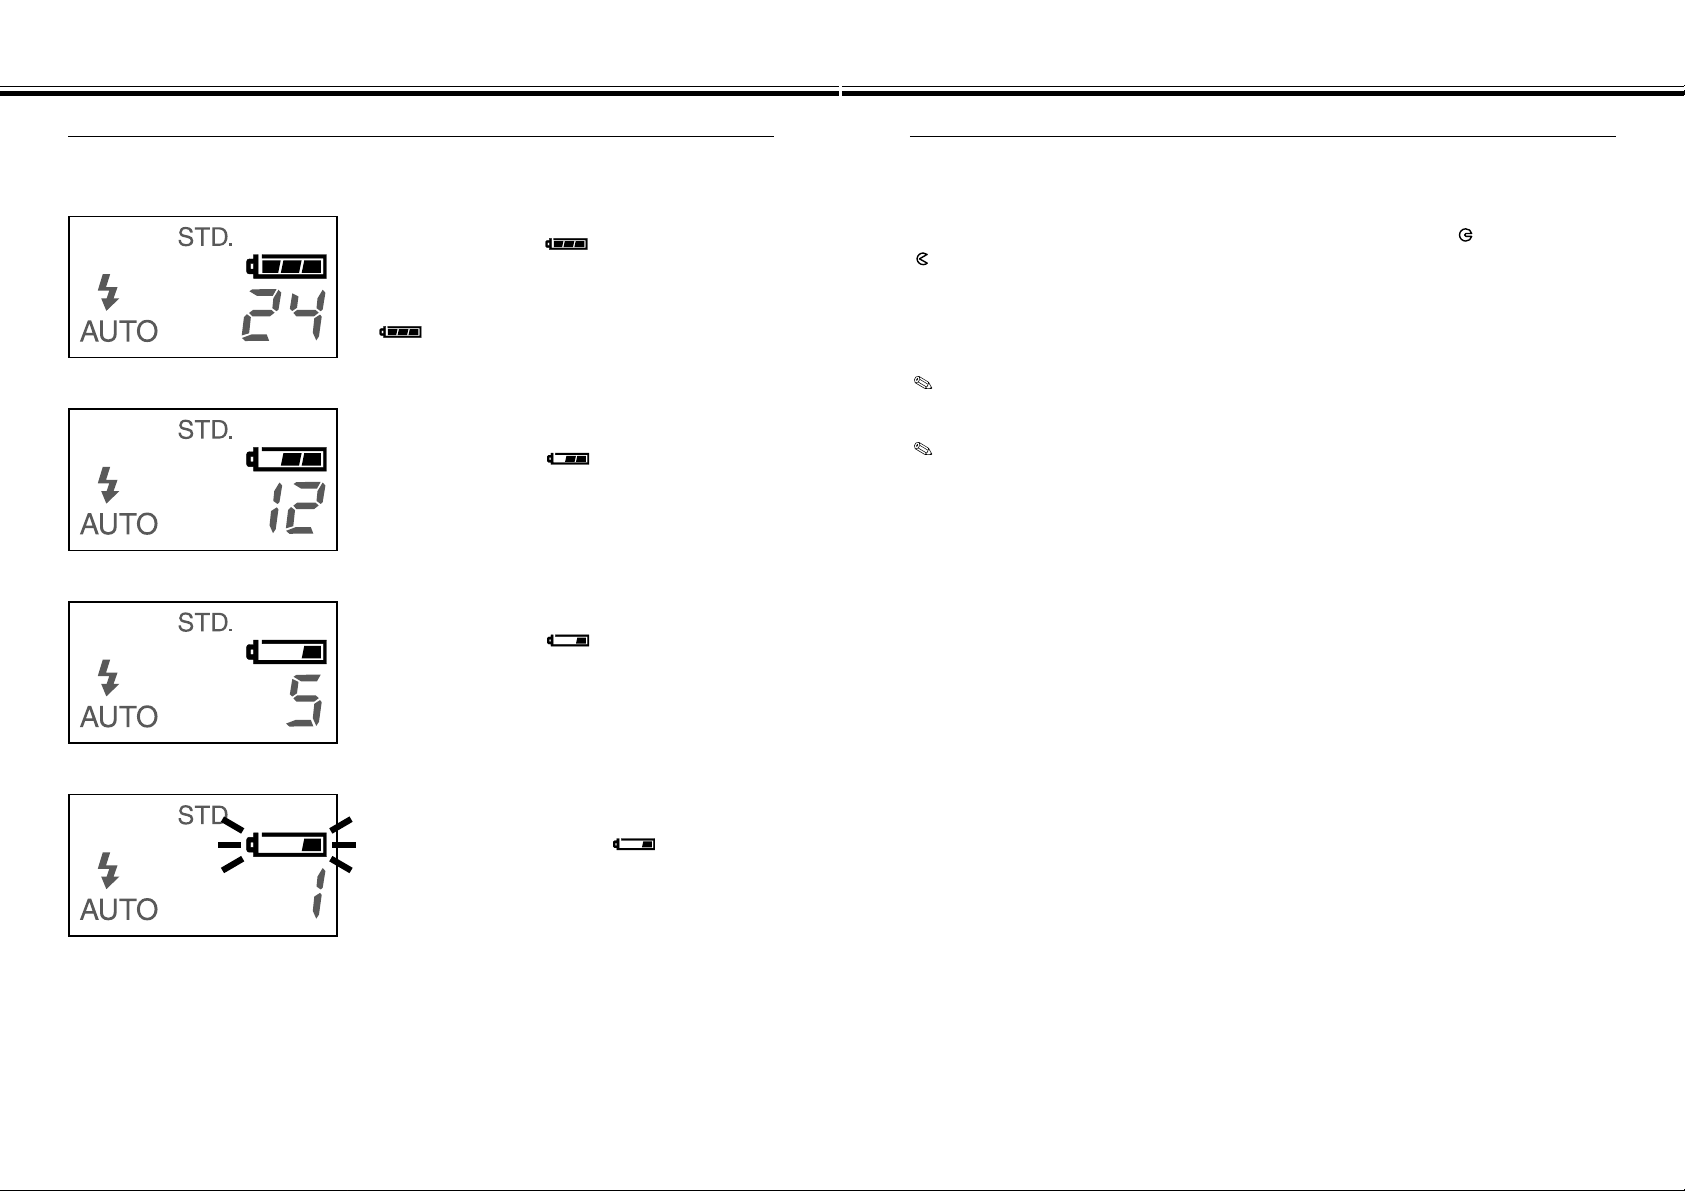
Full-Battery symbol --When the camera power is on, the batterycondition indicator always appears in the data
panel.
indicates the battery power is full.
Low Battery Warning
Low battery symbol --Battery power is not full, but all functions are
operational.
Auto Power Off
To save battery power, this camera will shut down if it is not operated for more than 3
minutes.
To restore power in REC mode, move the lens cover slide to , then re-set to
.
To restore power in PLAY mode, press and hold display/Enter button about 1
second.
When you are using the batteries, you can change the time that the Auto Power
Off feature will activate in the SETUP mode. See pages 107 - 108 of this manual.
When you are using the AC adapter, the Auto Power Off feature will be activated
and camera power is automatically shut off if you take no action for approximately
30 minutes or longer.
• If no display appears, replace the batteries or check that they are inserted correctly.
This camera is equipped with an automatic battery-condition indicator.
Blinking low battery symbol and shutter
locks --Power is insufficient for camera operation.
Low battery symbol --Power is very low, but all functions are
operational.
The battery will have to be replaced soon.
Page 12
- 23 -
COMPACT FLASH CARD
INSERTING BATTERIES - CONT’D
- 22 -
Using the AC Adapter (Sold Separately)
Use the AC Adapter (optional accessory) allows the camera to receive power from an
electrical outlet. Use of the AC Adapter is recommended to conserve batteries during
periods of heavy use. It is also recommended when interfacing the camera with the
computer.
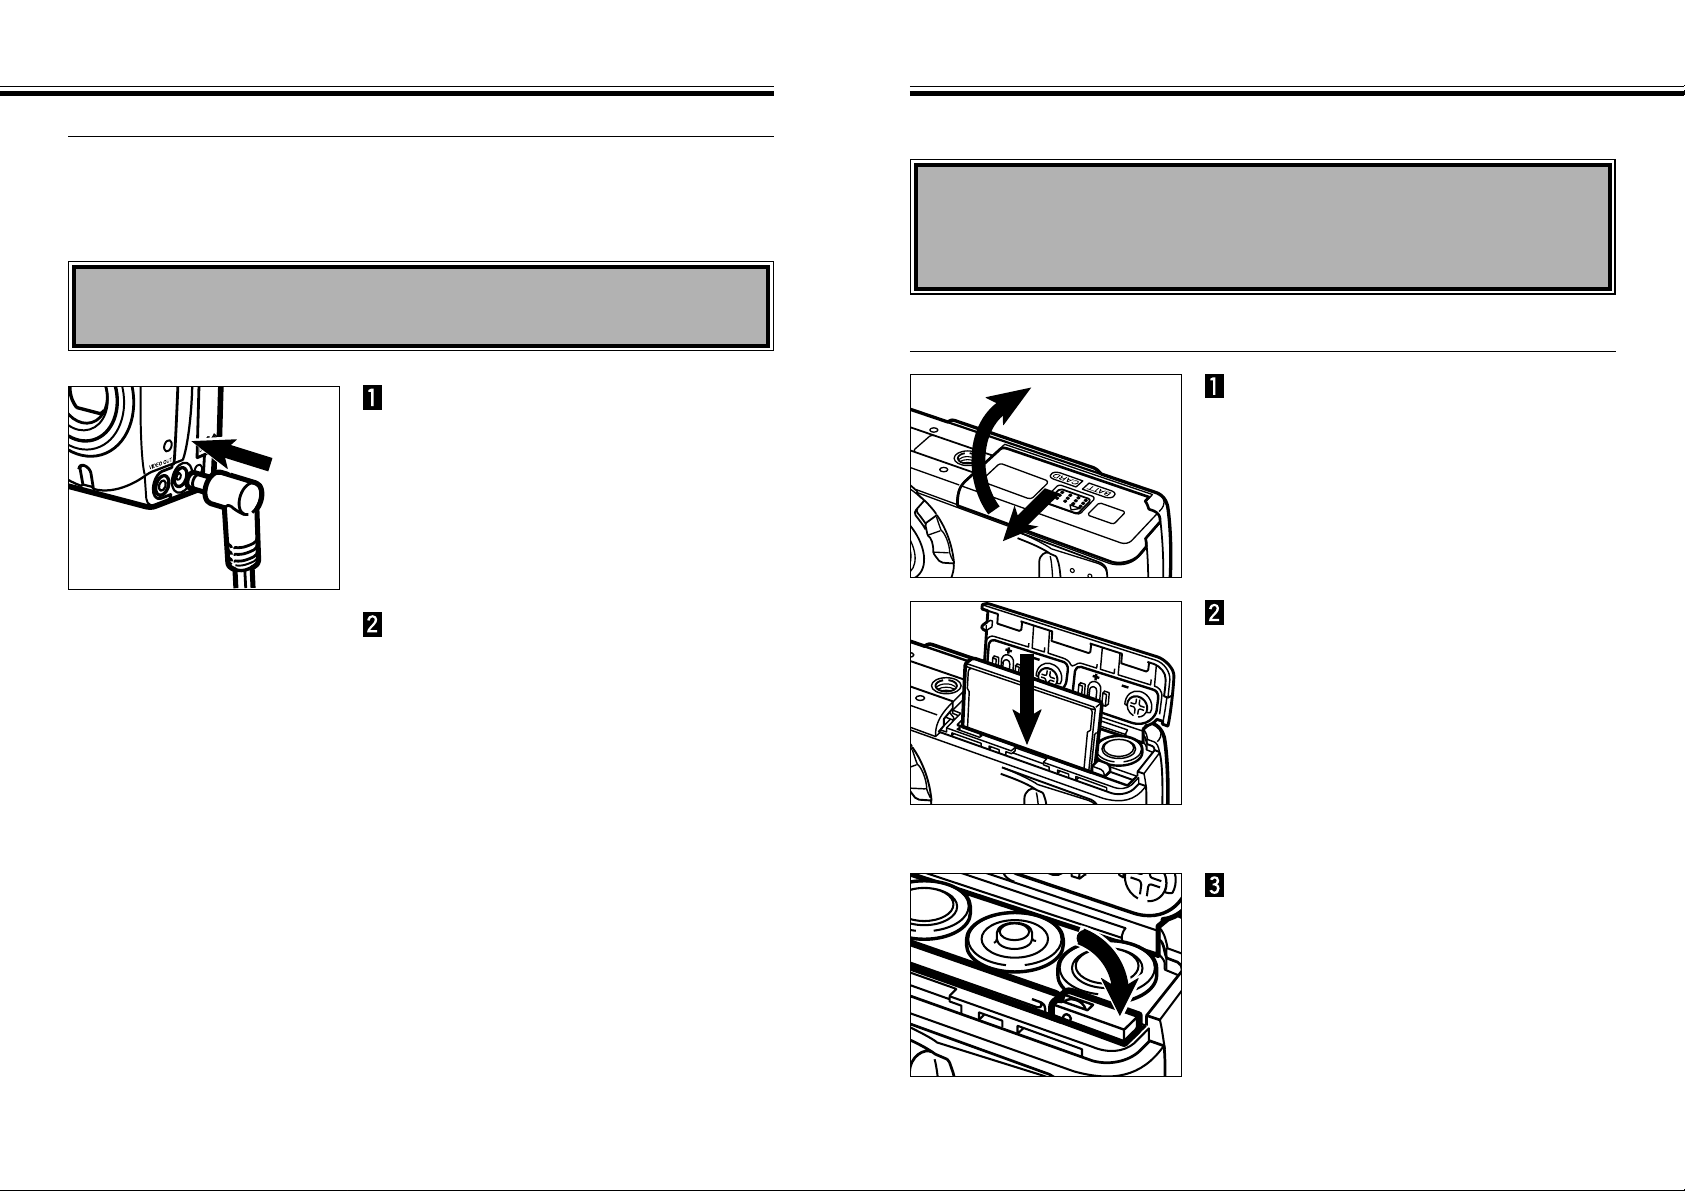
Insert the mini plug into the
camera’s DC terminal.
• The shape of the mini plug varies depending
on the AC adapter.
Insert the AC plug into an
electrical outlet.
Your camera requires a compact flash card to be inserted before capturing images.
Always turn off the camera before inserting or removing the compact flash
card into or from the camera.
The data in the card will be lost, or the card itself may be damaged, if the compact
flash card is inserted or removed while the camera is on.
Open the battery/card-chamber
door by sliding it in the direction
indicated, then open the door.
Insert the compact flash card
into the card slot, pushing it in
until the card-release lever pops
out.
• Insert the card so the back label is on the
lens side of the camera.
• Push the card in straight, not at an angle.
• Wrong direction: If the card stops mid-way,
confirm the direction of the card. Do not
force the card.
Fold the card-release lever down
as shown.
Inserting the Compact Flash Card
Continued on Next Page
Always turn off the camera before changing from batteries to AC adapter
or vice versa. Do not change the power supply while the camera is on.
Page 13

COMPACT FLASH CARD - CONT’D
- 25 -
COMPACT FLASH CARD - CONT’D
- 24 -
While pulling up the battery/cardchamber door slightly, fold it
down and slide it slightly toward
the front of the camera.
Then, while using a downward
pressure, slide it back to the rear
of the camera until it clicks.
Make sure the camera is off.
Removing the Compact Flash Card
While pulling up the battery/cardchamber door slightly, fold it
down and slide it slightly toward
the front of the camera.
Then, while using a downward
pressure, slide it back to the rear
of the camera until it clicks.
Open the battery/card-chamber
door by sliding it in the direction
indicated, then open the door.
Lift the card-release lever until it
is straight out.
Press the card-release lever to
eject the card.
Pull the compact flash card
straight out.
Be careful not to open the card slot/battery chamber cover or disconnect the AC
adapter cable while the camera is in use. The CF card can sustain damage if
the camera loses power while data is being written to the card (while the green
focus lamp blinks slowly). In such a case, re-format the CF card on a personal
computer after transferring the image data from the CF card to the personal
computer.
When the AC adapter is unused and the battery/card-chamber door remains
opened more than 10 minutes, the clock in the camera may delay or be reset to
the default setting. If this occured, set the date and time accurately according to
the directions described on pages 109 - 113.
Page 14
- 27 -
BASIC RECORDING PROCEDURE
- 26 -
TAKING PICTURES
Turn the Function dial to .
Press the display/ENTER button
to turn on the LCD monitor if
desired.
Continued on Next Page
Center the subject in the LCD
monitor or place the viewfinder’s
focus frame on the subject.
• Use Focus Hold for off-center subjects (See
page 32).
• When holding the camera, make sure your
fingers do not cover the lens.
Move the lens cover slide to
to open the lens cover.
• The camera will be turned on and be set to
REC (Record) mode.
Page 15
BASIC RECORDING PROCEDURE - CONT’D
- 29 -
BASIC RECORDING PROCEDURE - CONT’D
- 28 -
Press the shutter-release button
part-way down.
• Focus and exposure will be determined and
locked.
• The green focus lamp will glow if focus is
determined. Repeat steps 4 and 5 if the focus
lamp (green) blinks.
• The orange flash lamp will blink if the flash is
charging and will glow if the flash is charged
and ready. When the flash lamp (orange)
blinks, the shutter will not be released.
Press the shutter-release button
the rest of the way down to take
the picture.
• The captured image will briefly appear in the
LCD monitor and is saved to the compact
flash card.
• While the image is being saved to the
compact flash card, the focus lamp (green)
blinks slowly. To prevent loss of image data,
do not remove the compact flash card from
the camera, or remove the AC adapter plug
from the DC terminal of the camera, until the
image has been saved.
• When the image has been saved to the
compact flash card, the focus lamp (green) is
extinguished.
REC (Record) Mode Screen (LCD monitor)
To Turn Off The Camera in REC Mode
Move the lens cover slide to .
(No Display)
REC :
Single-frame advance
BURST :
Continuous drive
TIMER :
Self-timer/Remote-control
Flash-modeDrive-mode
REC
Live View
+1.5
: Autoflash
: Fill-flash
: Flash cancel
: Autoflash with red-eye reduction
: Fill-flash with red-eye reduction
: Macro (flash cancel)
X1.4
13
Frame counter
Exposure-compensation value
-2.0 to +2.0, 0.5 step
Digital zoom
X1.0 / X1.4 / X2.0
Page 16
FOCUS
- 31 -
FOCUS
- 30 -
This digital camera has a precise, high-speed autofocusing system.
FOCUS LAMP/NO FOCUS INDICATOR
When the shutter-release button is pressed
part-way down, the autofocus system locks
focus at the subject distance. The focus lamp
(green) will indicate the focus status when the
shutter-release button is pressed part-way
down.
Glows
Focus is OK and confirmed.
Blinks
The subject is too close (See Focus Range below).
The subject contrast is too low. One of the Special Focusing
Situations applies (See next page).
FOCUS RANGE
The green focus lamp will blink if your subject is closer than the minimum focus
distance.
Normal mode
0.6m - ∞ (1.97 ft. - ∞)
Macro mode
(See page 44)
0.3m - 0.6m (0.98 ft. - 1.97 ft.)
Continued on Next Page
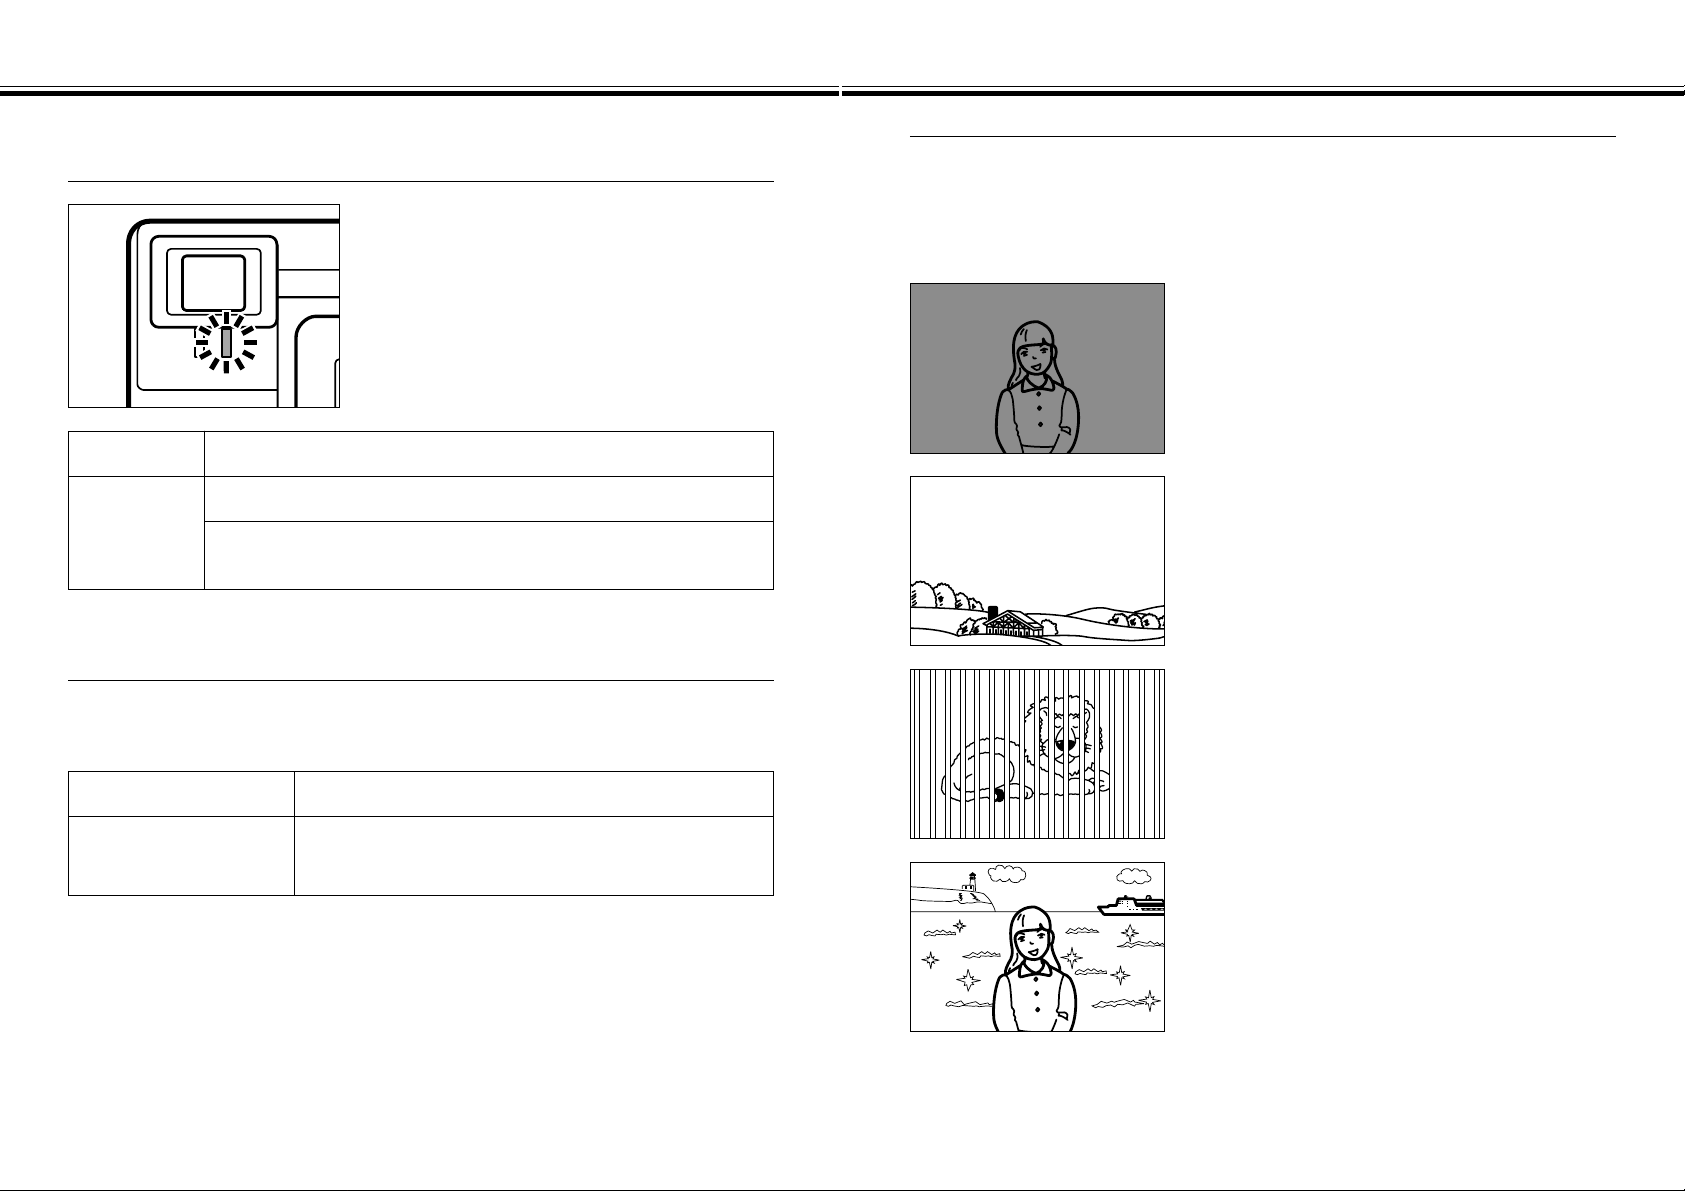
SPECIAL FOCUSING SITUATIONS
Some scenes or subjects are difficult for the autofocus system to lock on to. When
the focus will not lock, FOCUS HOLD on another object the same distance from
you as your main subject, recompose, then press the shutter-release button allthe-way down to take the picture.
The subject within the focus frame is low in
contrast.
The subject is too dark.
Two subjects at different distances overlap in the
focus frame.
The subjects is near a very bright object or area.
Page 17
- 33 -
BUILT-IN FLASH
FOCUS - CONT’D
- 32 -
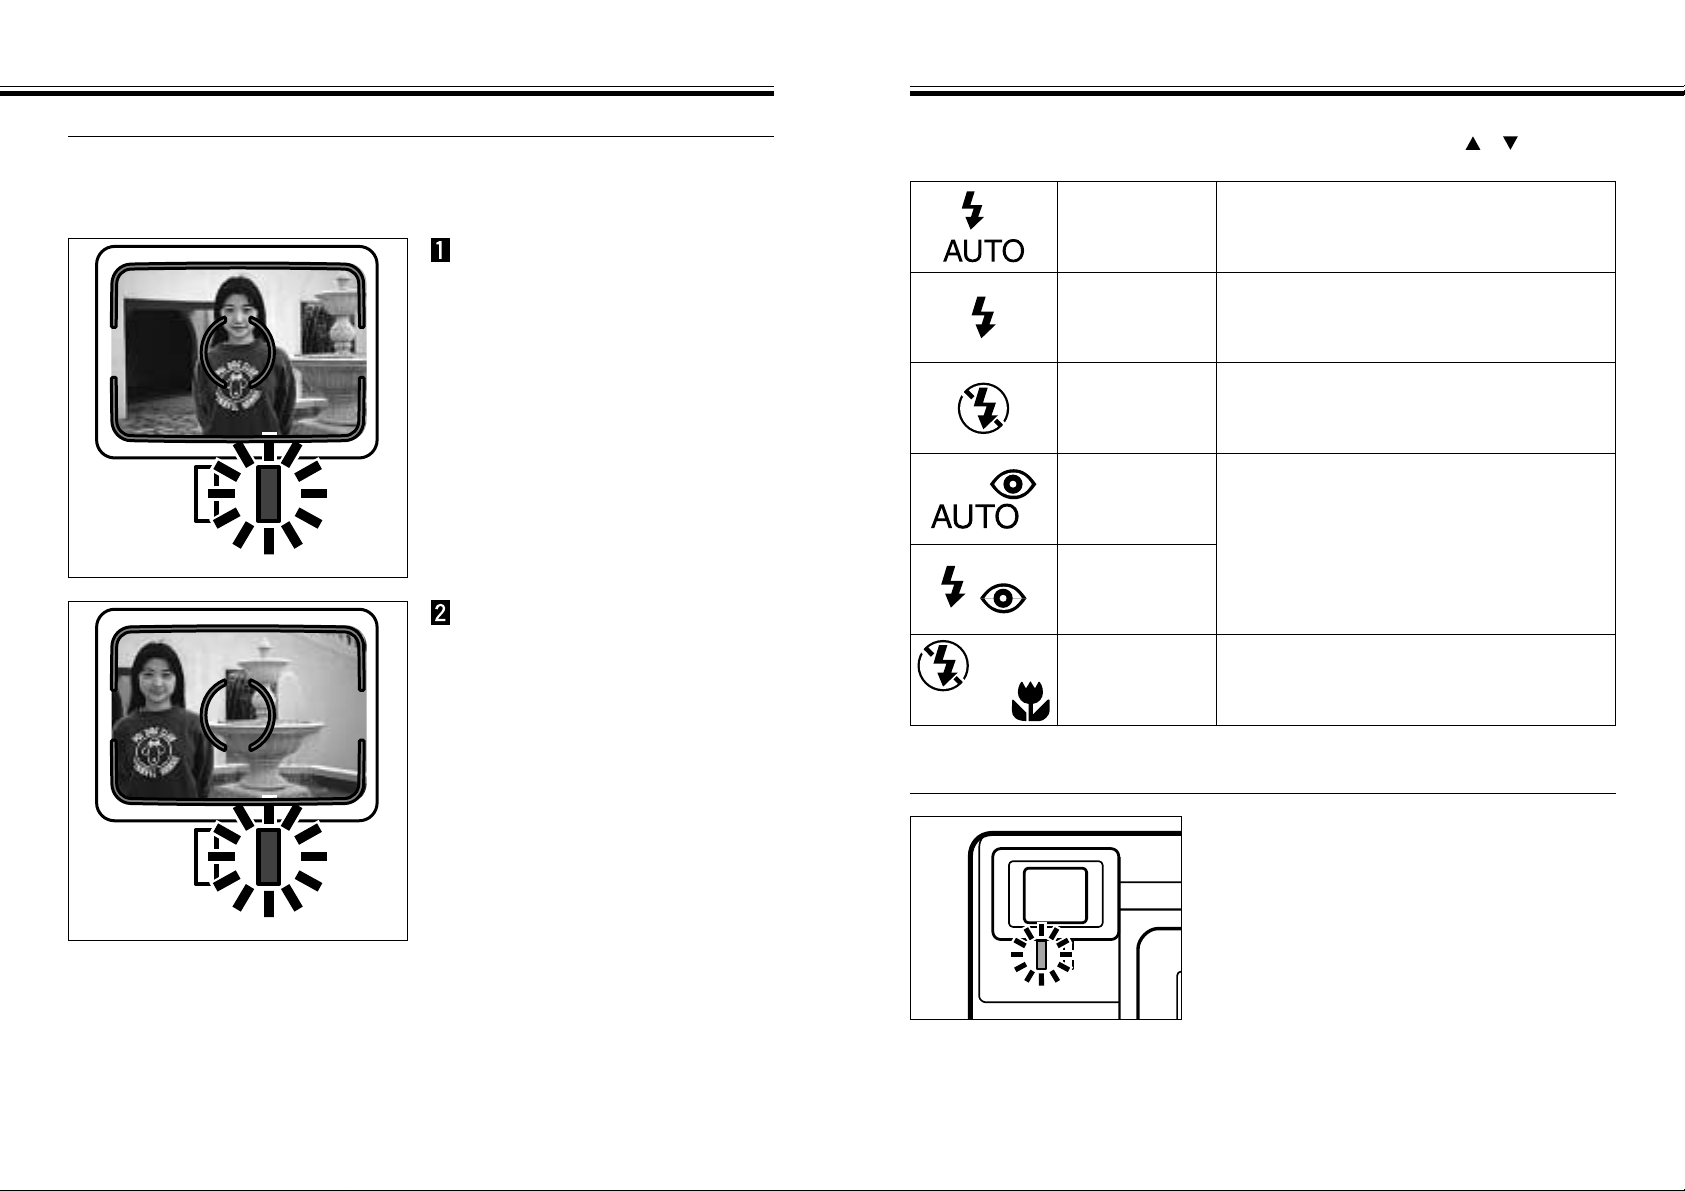
FOCUS HOLD
Subjects outside the focus frame or LCD monitor center may not be in focus. Use
focus hold to ensure accurate focusing.
Place the focus frame on
your subject or center the
subject in the LCD monitor,
then press and hold the
shutter-release button
partway down so the green
focus lamp glows.
Without lifting your finger,
recompose the picture,
then press the shutterrelease button all-the-way
down to take the picture.
Continued on Next Page
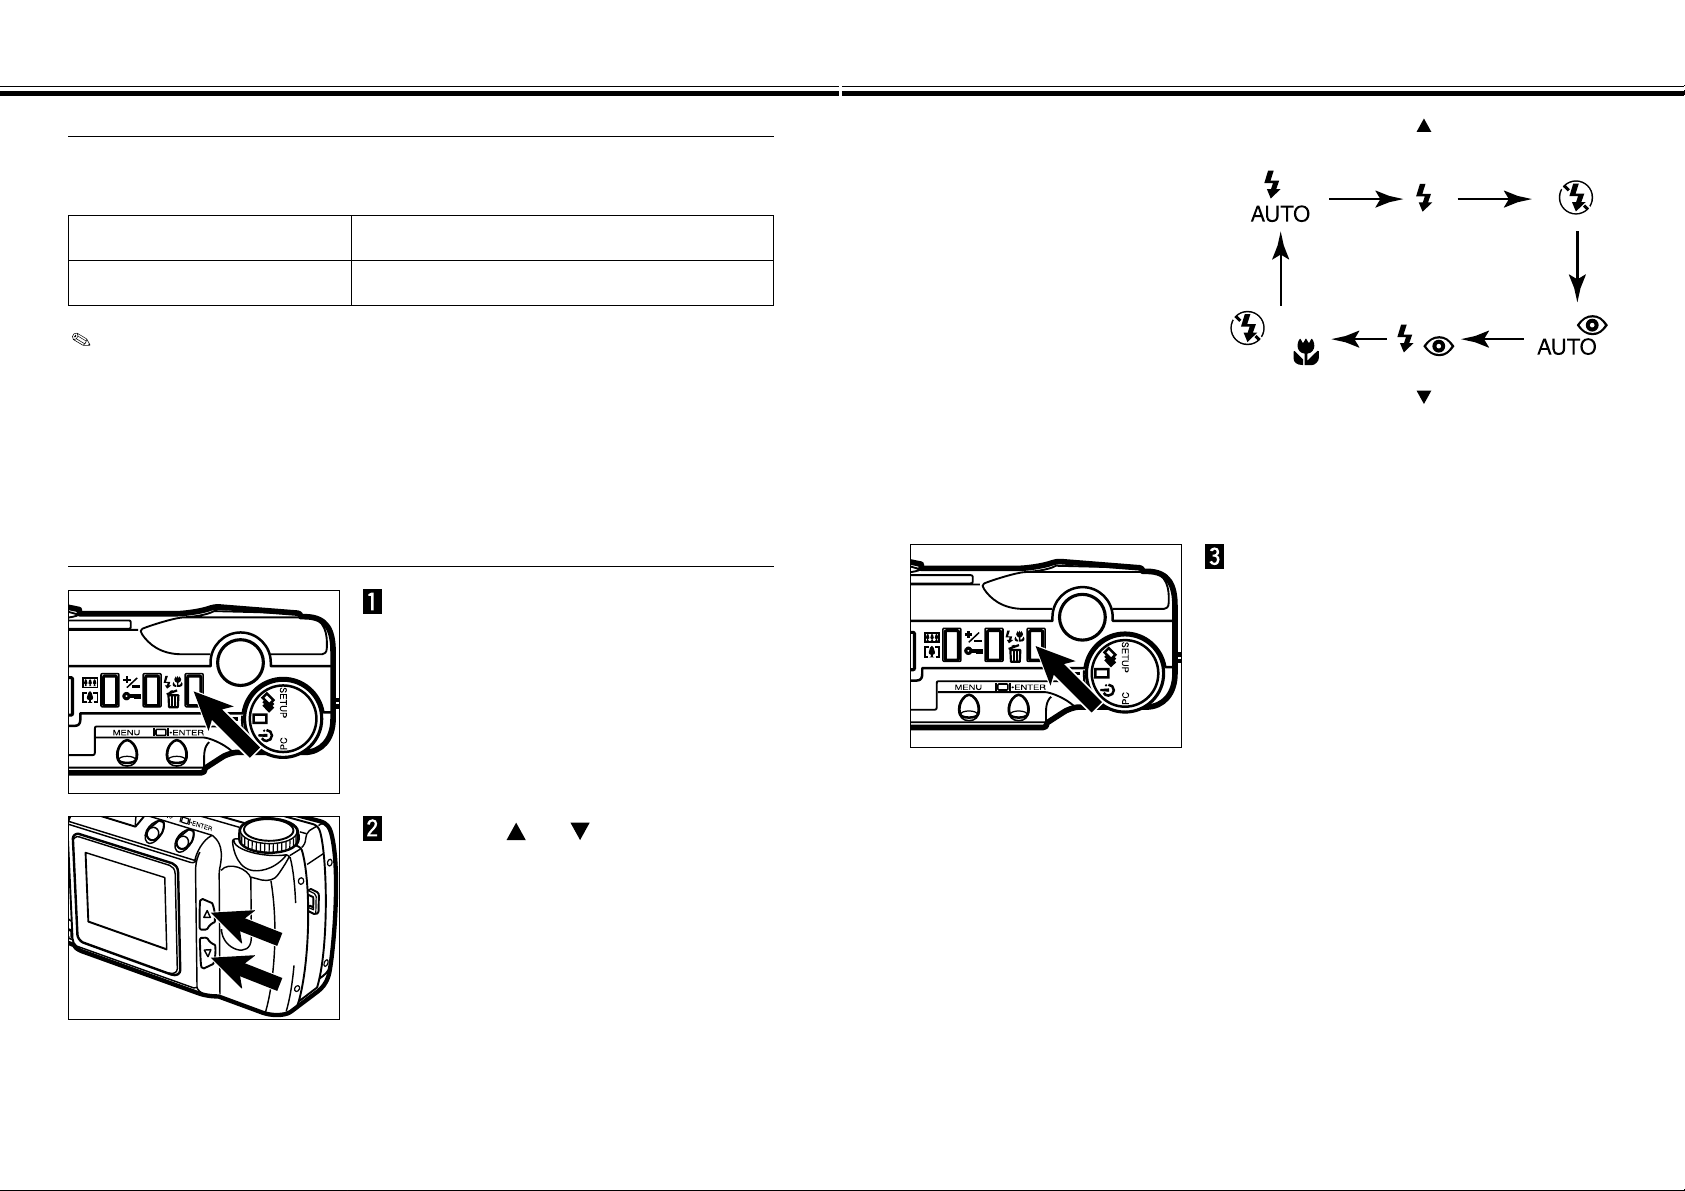
When the camera is turned on, the flash is automatically set to autoflash. The other
flash modes can be set by using the flash-mode/delete button and or button.
AUTOFLASH
In autoflash, the flash will fire automatically
when the light level is low or your subject is
backlit.
FILL-FLASH
The flash will fire every time a picture is taken,
regardless of lighting. Use fill-flash to reduce
harsh shadows on your subject’s face.
FLASH CANCEL
Use flash cancel when photographing subjects
that are beyond the flash range or when flash
photography is prohibited.
AUTOFLASH
WITH RED-EYE
REDUCTION
Use the red-eye reduction feature to reduce
the red-eye effect when photographing people
or animals in low light situations.
The flash will fire a few short bursts before the
main flash burst. Use of a tripod is
recommended.
FILL-FLASH
WITH RED-EYE
REDUCTION
MACRO (WITH
FLASH
CANCEL)
When in macro mode, flash cancel is
automatically set. See page 44 for more
information.
FLASH LAMP
The orange flash lamp will indicate the flash
status when the shutter-release button is
pressed partway down.
Glows : Flash is charged and ready.
Blinks : The flash is now charging.
Page 18
BUILT-IN FLASH - CONT’D
- 35 -
BUILT-IN FLASH - CONT’D
- 34 -
FLASH RANGE
To ensure proper exposure, make sure your subject is positioned within the flash
range.
ISO - Normal setting
0.6m - 2.2m (1.97 ft. - 7.2 ft.)
ISO - High setting
0.6m - 4.4m (1.97 ft. - 14.4 ft.)
See page 62 for detail about ISO sensitivity changing.
CHANGING THE FLASH MODE
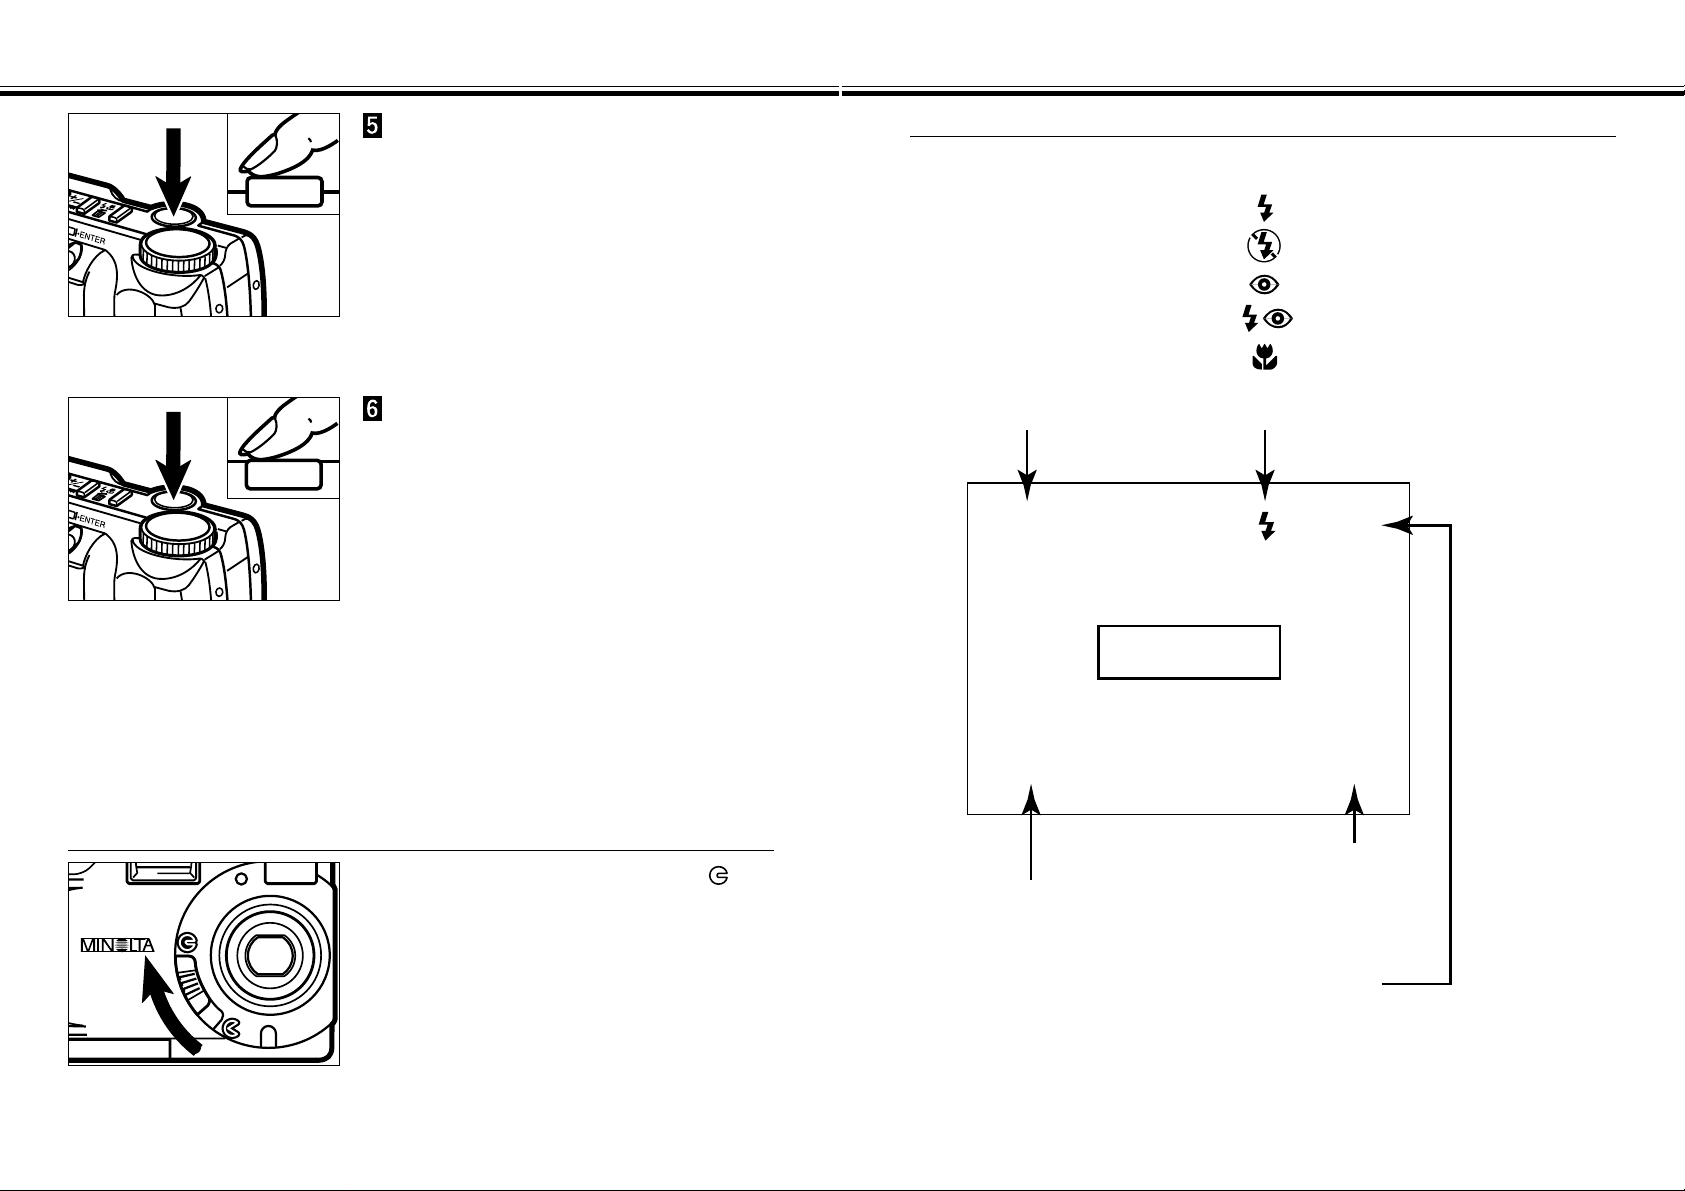
In REC mode, press the flashmode/delete button.
• The currently set flash mode appears on the
data panel.
• You do not have to press and hold the flash-
mode/delete button, just press.
Press the or button until
the desired indicator is displayed
in the data panel.
• When you press the button, the flash
modes will change as follows:
• When you press the button, the flash
modes will change in reverse order.
• When the LCD monitor is ON, the selected
flash mode icons are also displayed (see
page 29).
Press the flash-mode/delete
button or press the shutterrelease button part-way down.
• The selected flash mode is set.
• If you select macro (with flash cancel), the
LCD monitor will be turned on automatically.
Page 19
BURST IMAGE CAPTURE
- 37 -
BURST IMAGE CAPTURE
- 36 -
Burst image capture is similar to the continuous-drive mode on the conventional
cameras. This digital camera will continuously take pictures while the shutter-release
button is held down.
The maximum number of images that can be captured at a time is follows:
Image Quality The Maximum Number of Images
S.FINE (Super Fine) 1
FINE (Fine) 4
STD. (Standard) 8
ECON. (Economy) 12
With no relation to the Image Size (see page 54), the maximum number of images
captured at a time is same.
Turn the Function dial to .
Move the lens cover slide to
to open the lens cover.
• The camera will be turned on and be set to
REC (Record) mode.
Press the display/ENTER button
to turn on the LCD monitor if
desired.
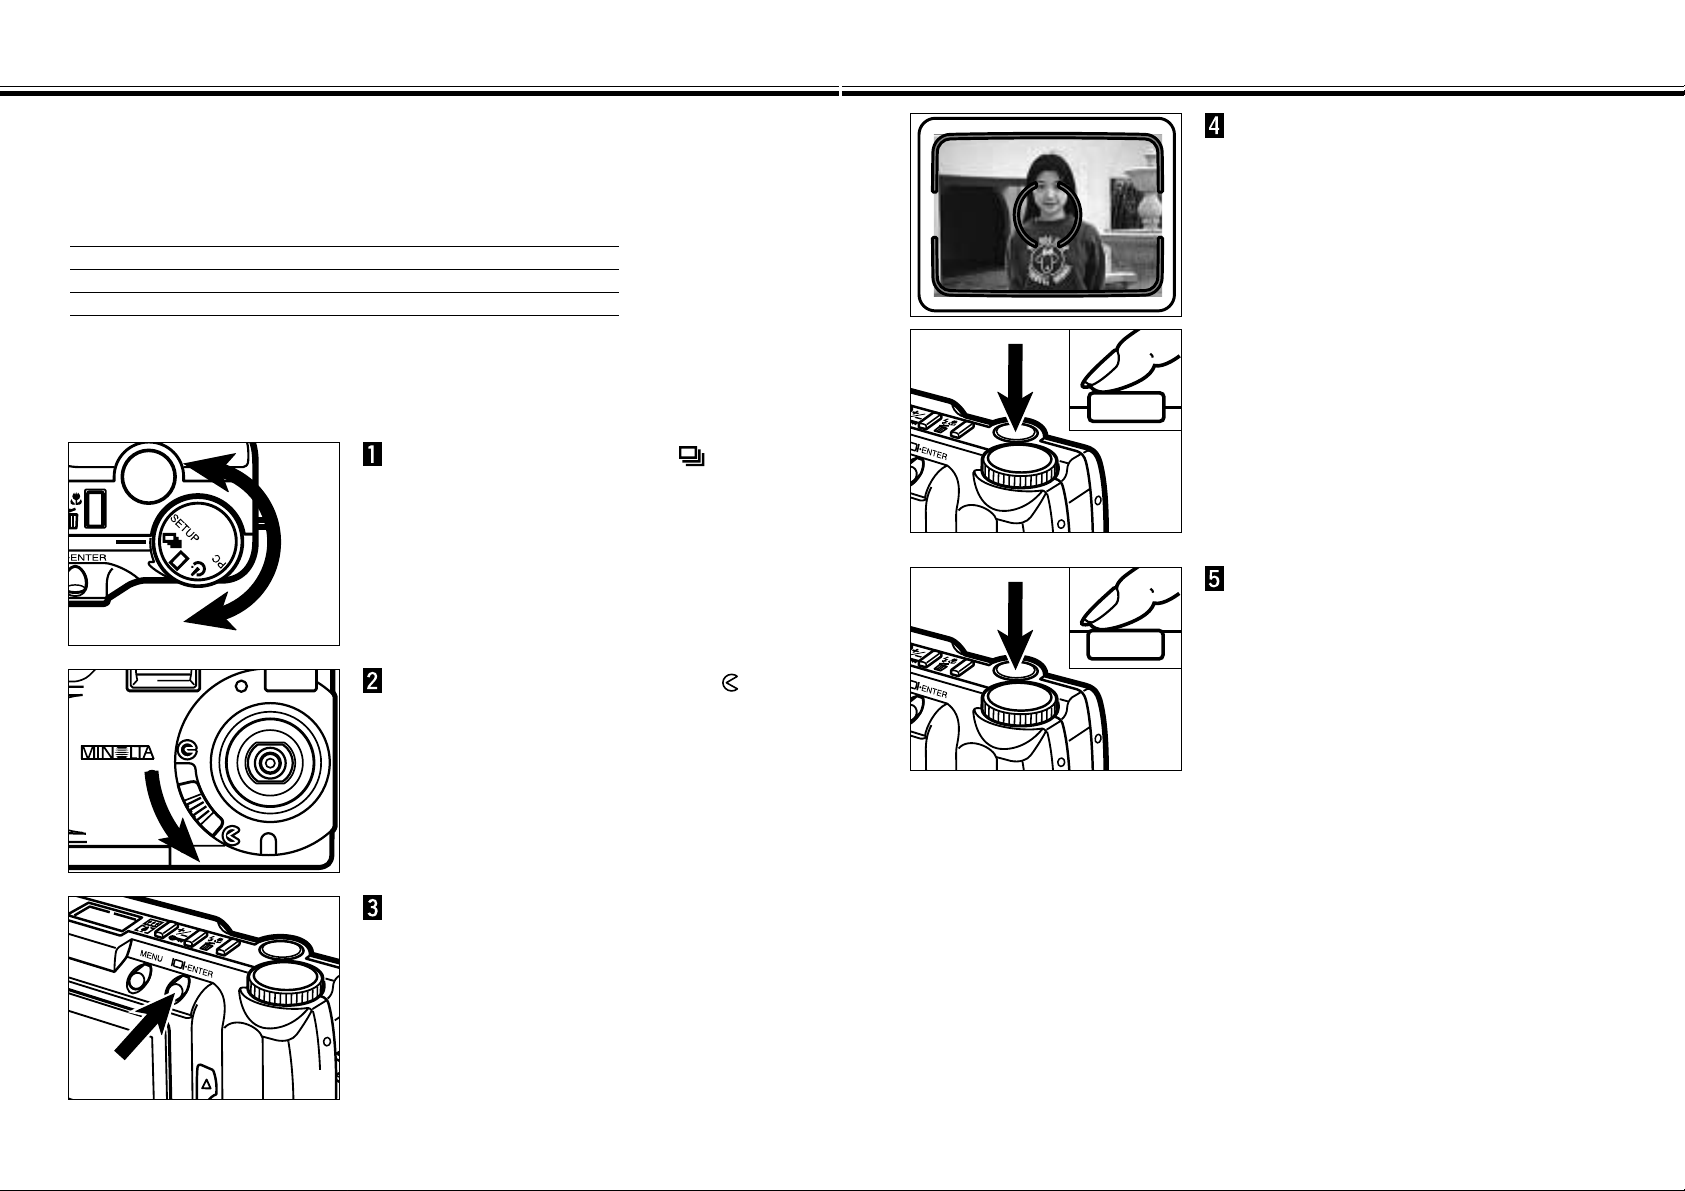
Frame the picture as instructed
in “BASIC RECORDING
PROCEDURE”, steps 4 and 5.
• The built-in flash does not operate in Burst
image capture.
Press and hold the shutter-
release button all the way down.
• The shutter will continuously release until
your finger is lifted from the shutter-release
button, or the maximum number of images
has been captured.
• The focus and exposure for the series are
determined when the shutter-release button
is pressed part-way down before the pictures
are taken.
Page 20
SELF-TIMER / REMOTE CONTROL
- 39 -
SELF-TIMER / REMOTE CONTROL
- 38 -
The self-timer will delay the release of the shutter for approximately 10 seconds after
you press the shutter-release button.
SELF-TIMER
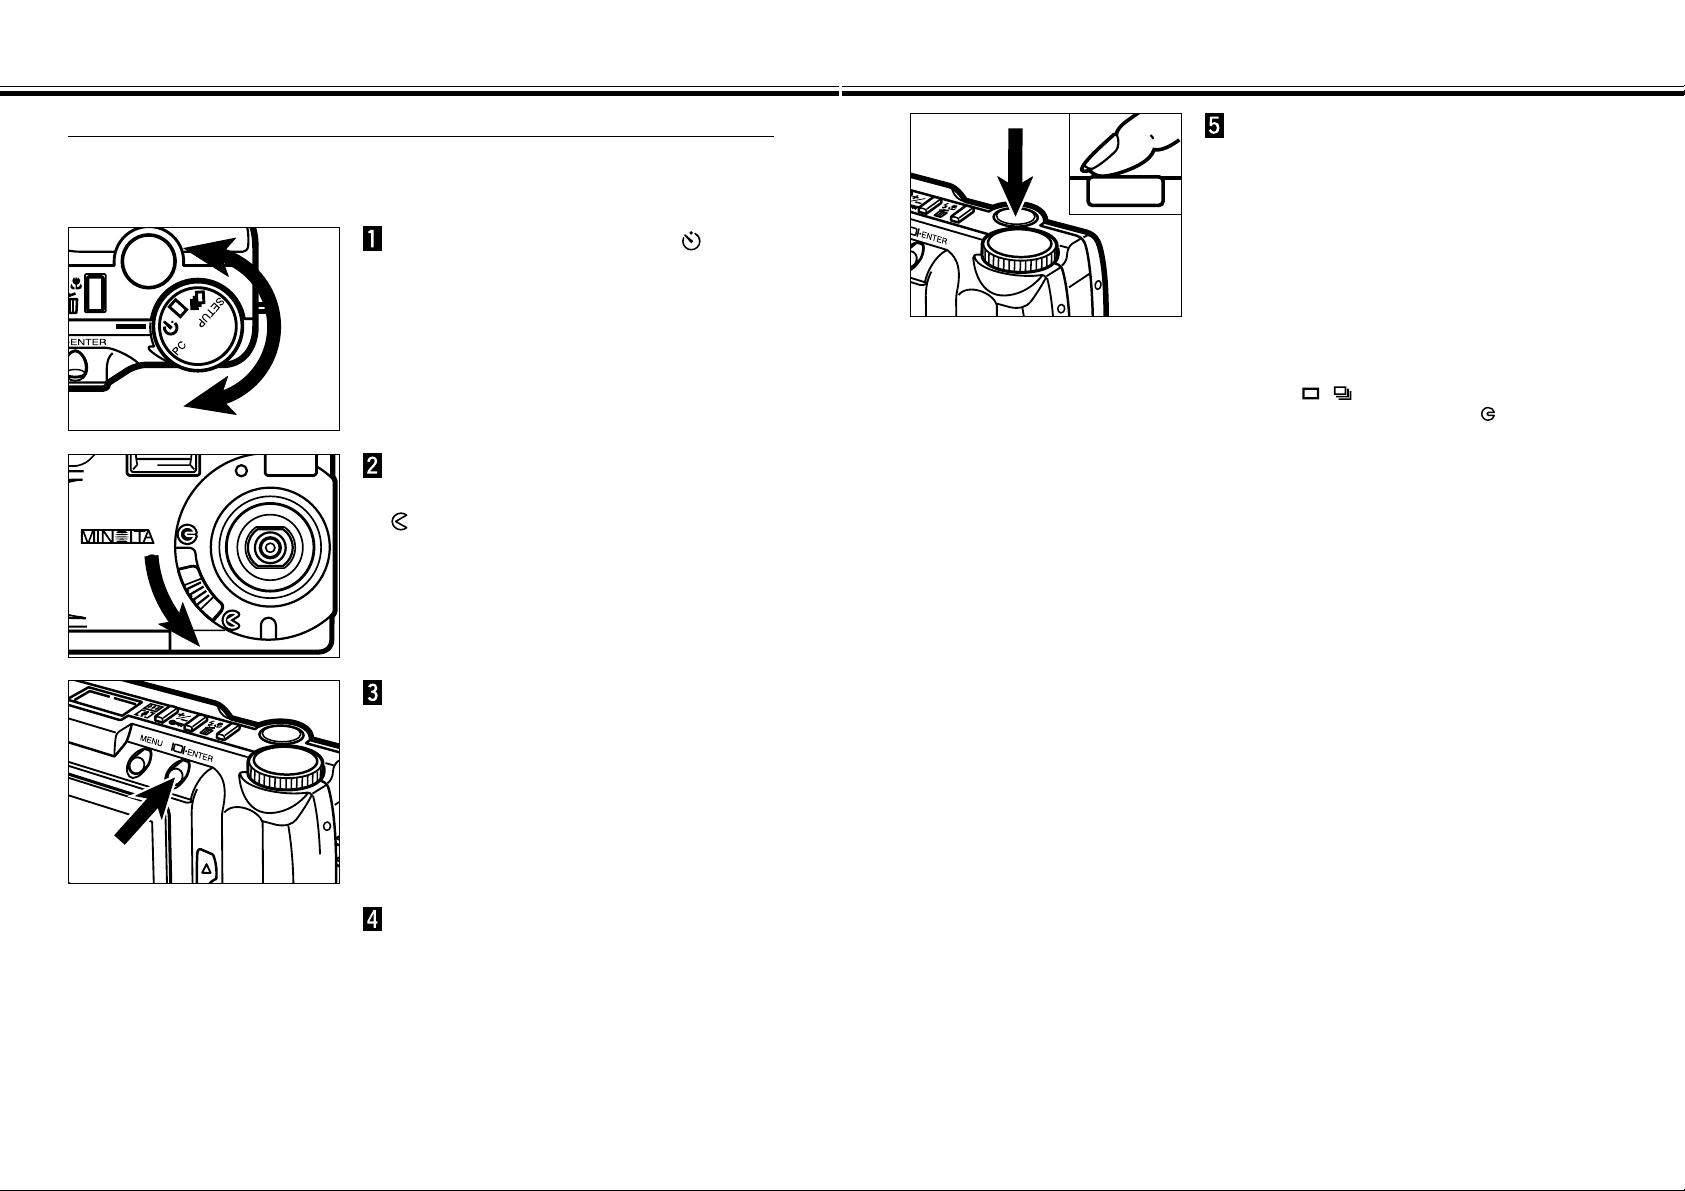
Turn the Function dial to .
Place the camera on a tripod,
then move the lens cover slide to
to open the lens cover.
• The camera will be turned on and be set to
REC (Record) mode.
Press the display/ENTER button
to turn on the LCD monitor if
desired.
Arrange the camera and subject
positions, and compose your
picture.
Press the shutter-release button
all-the-way down to start timer.
• The self-timer lamp on the front of the
camera will blink rapidly before the shutter is
released.
• Do not press the shutter-release button while
standing in front of the camera.
• If you want to take a picture with your subject
outside of the focus frame, use focus hold.
See Page 32.
• To cancel the countdown, turn the function
dial to , , SETUP, or PC. Otherwise
move the lens cover slide to to close the
lens cover.
Page 21

SELF-TIMER / REMOTE CONTROL - CONT’D
- 41 -
SELF-TIMER / REMOTE CONTROL - CONT’D
- 40 -
The IR Remote Control RC-3 (optional accessory) allows remote camera operation
up to 5m (3.28 ft.) away.
REMOTE CONTROL (SOLD SEPARATELY)
Turn the Function dial to .
Place the camera on a tripod,
then move the lens cover slide to
to open the lens cover.
• The camera will be turned on and be set to
REC (Record) mode.
Press the display/ENTER button
to turn on the LCD monitor if
desired.
Arrange the camera and subject
positions, and compose your
picture.
Point the emitter window toward
the remote-control receiver on
the front of the camera.
Press the release button or the
delay button.
• If the release button is pressed, the lamp on
the front of the camera will blink once and
take the picture.
• If the delay button is pressed, the lamp on
the front of the camera will blink for two
seconds before the picture is taken.
• The remote control will not operate with
backlit subjects or under fluorescent light.
• To cancel the countdown, turn the function
dial to , , SETUP, or PC. Otherwise
move the lens cover slide to to close the
lens cover.
Emitter window
Delay button
Release button
Page 22

DIGITAL ZOOM [REC MODE]
- 43 -
DIGITAL ZOOM [REC MODE]
- 42 -
In REC mode, press the digital
zoom button.
• When the digital zoom button is pressed, the
LCD monitor automatically turns on.
• The currently set zoom magnification appears
in the upper-right corner of the LCD monitor
(see page 29).
• The digital zoom feature will be disabled
when the HALF image size (see pages 54 -
55) is selected.
Press the or button until
the desired magnification is
displayed in the LCD monitor.
• The zoom magnification will change as
follows:
X2.0
X1.4
X1.0
• The zoom magnification change is visible in
the LCD monitor.
Press the shutter-release button
all-the-way down to take picture.
• The digital zoom still remains after the picture
is taken.
• The digital zoom will return to X 1.0 when you
turn the camera off and turn it on again.
• The larger the zoom magnification is, the
smaller is the file size of the captured image.
Press the digital zoom button.
• If you want to change the zoom
magnification, repeat steps 2 and 3.
• The viewfinder image does not change. Use
the LCD monitor to compose your picture.
The digital zoom will increase the magnification of the live image on the LCD monitor
and recorded image up to two times of the normal screen.
REC
0.0
X1.0
27
LCD Monitor
(Live View)
REC
0.0
X2.0
27
LCD Monitor
(Live View)
Magnification Trimmed area (Displayed area), W X H
X1.4 1280 X 856 pixels
X2.0 896 X 600 pixels
Images recorded from the digitally magnified area are trimmed in the horizontal
and vertical directions shown below and are not interpolated to 1792 x 1200
pixels.
Page 23

MACRO
- 45 -
MACRO
- 44 -
The Macro Photography function allows you to fill the frame with a business-card
size object. The minimum focus distance in Macro is 0.3m (0.98 ft.).
In REC mode, press the flashmode/delete button.
• The currently set flash mode appears on the
data panel.
Press the or button until
the is displayed in the data
panel.
• The LCD monitor will be turned on
automatically.
Press the flash-mode/delete
button or press the shutterrelease button part-way down.
• The camera will be set to the Macro mode.
• The flash-mode will be set to “flash cancel”
and can not be changed while the camera is
in the macro mode.
While looking at the LCD
monitor, frame your picture.
• For best results, steady the camera on a
stable surface or use a tripod.
Press the shutter-release button
part-way down.
• If the green focus lamp blinks, check that
your subject is within the macro focus range.
The focus range in Macro is from 0.3m to
0.6m (0.98 ft. to 1.97 ft.).
Press the shutter-release button
all-the-way down to take the
picture.
• The macro mode still remains after the
picture is taken.
• The macro mode will be canceled when you
turn the camera off and turn it on again.
Page 24

EXPOSURE COMPENSATION
- 47 -
EXPOSURE COMPENSATION
- 46 -
In REC mode, press the
exposure-compensation/lock
button.
• The currently set exposure compensation
value appears in the body data panel.
When the LCD monitor is on, exposure
compensation value also appears in the
lower-left corner of the LCD monitor (see
page 29).
The exposure can be adjusted to make the final image lighter or darker. Exposure
can be adjusted as much as ± 2 EVs in 1/2 EV increments.
REC
0.0
X 1.0
28
LCD Monitor
(Live View)
Press the or button to
select the exposurecompensation value.
• The exposure can be biased as much as ± 2
EVs in 1/2 EV increments.
• The exposure change is visible in the LCD
monitor.
REC
+1.5
X 1.0
28
LCD Monitor
(Live View)
Press the exposurecompensation/lock button or
press the shutter-release button
part-way down.
• will remain in the data panel as a
reminder that exposure compensation is set.
Frame the image, then press the
shutter-release button all-theway down to take picture.
• The exposure compensation value still
remains active after the picture is taken.
• To cancel exposure compensation, perform
the above procedure and select 0.0.
• The exposure compensation value will return
to 0.0 when you turn the camera off and turn
it on again.
Page 25

- 49 -
RECORD MODE MENUS
- 48 -
RECORD MODE MENUS
The Record Mode Menus allow you to change the default settings for image
capturing, like Image Quality and Image Size settings.
RECORD MODE MENU ITEMS AND EACH SETTING
QUALITY S.FINE (Super Fine)
FINE
STD. (Standard)
ECON. (Economy)
IMAGE SIZE FULL
HALF
SHARPNESS HARD
NORMAL
SOFT
WB AUTO
(Daylight)
(Fluorescent)
(Tungsten)
ISO HIGH
NORMAL
RECORD MODE MENUS (LCD Monitor)
Continued on Next Page
Page 26

- 51 -
SELECTING IMAGE QUALITY
RECORD MODE MENUS
- 50 -
To Display the Record Mode Menus
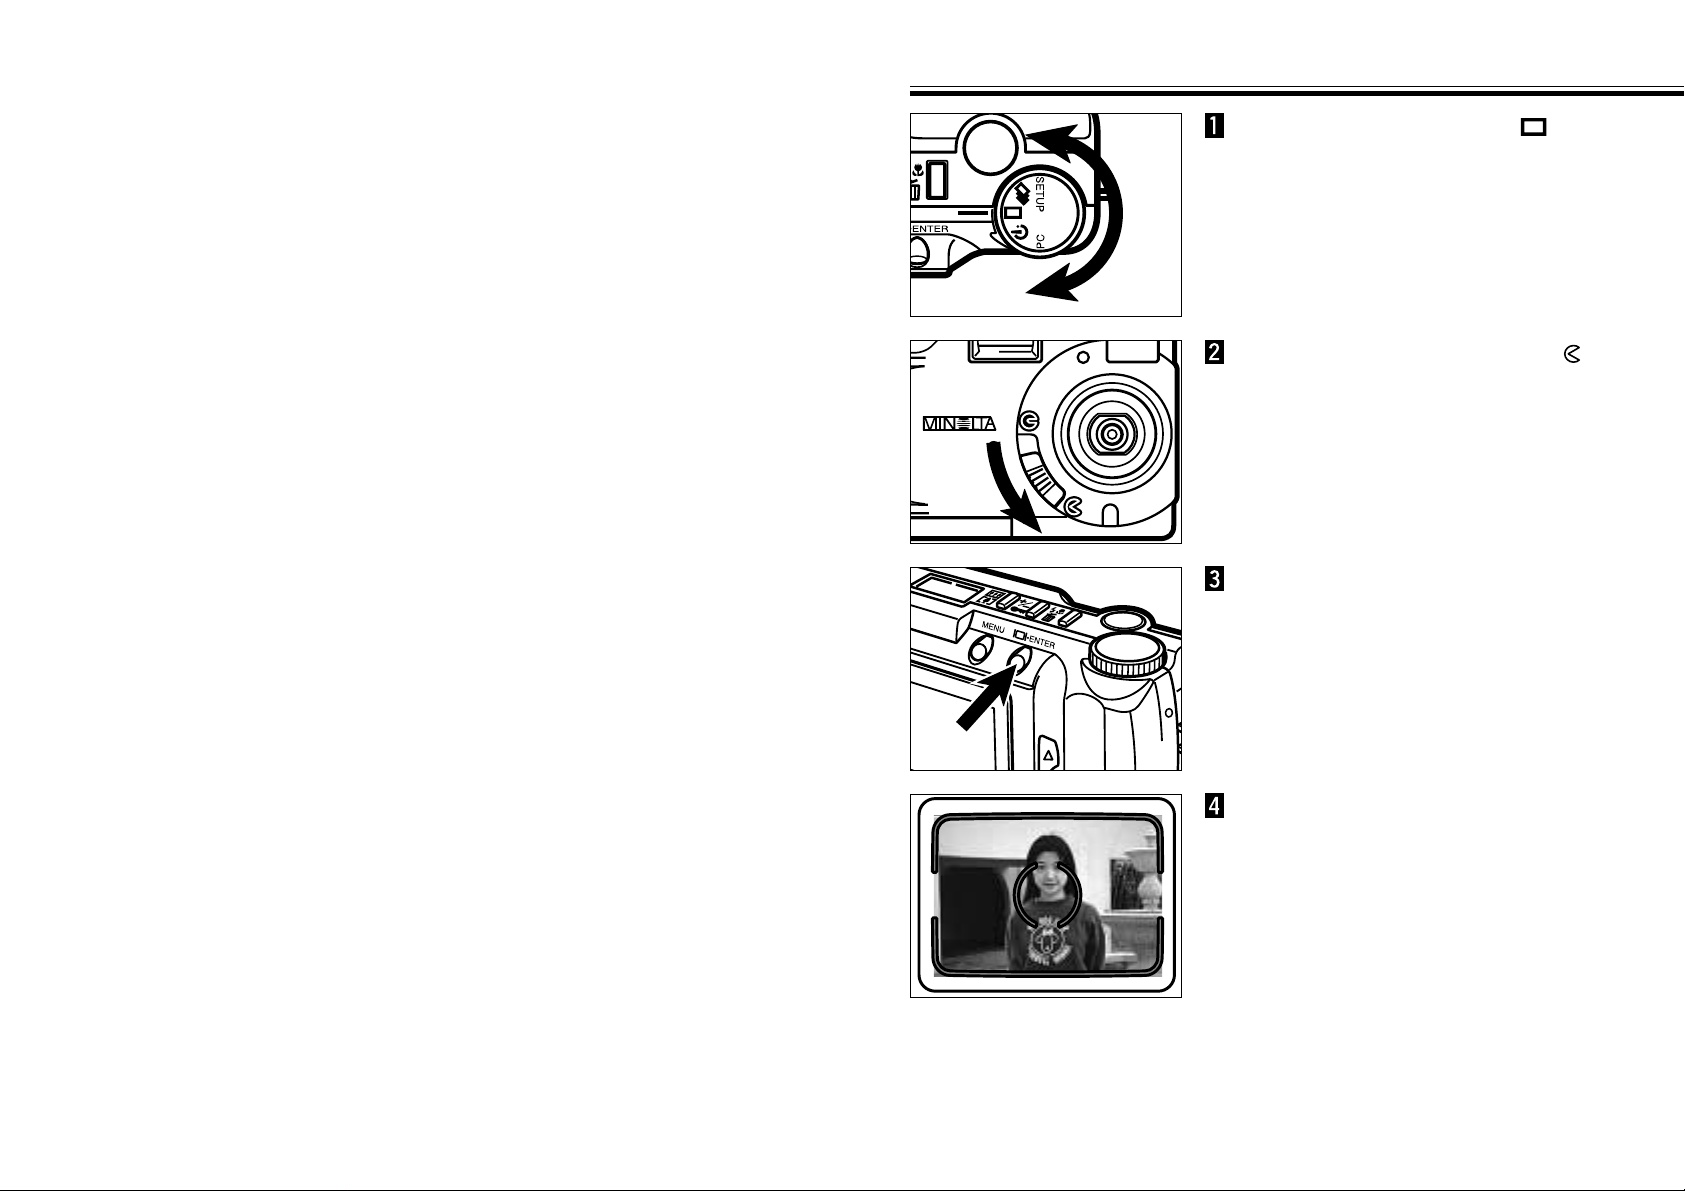
Turn the Function dial to , ,
or .
Move the lens cover slide to
to open the lens cover.
• The camera will be turned on and be set to
REC mode.
• Press the display/ENTER button to turn the
LCD monitor on if desired.
Press the MENU button.
• The Record mode menus will appear on the
LCD monitor.
• Press the MENU button again to clear the
Record mode menus and the LCD monitor
will return to the live view.
Select the image quality before recording the image. This digital camera supports
four image quality modes, super-fine (S.FINE), fine (FINE), standard (STD.), and
economy (ECON.).
Image quality is related to the rate of compression of the image. The rate of
compression increases, and image quality decreases, in order super-fine fine
standard economy.
The lower the rate of compression of the image, the higher its quality. If image
quality is important, use the super-fine or fine modes. Note, however, that as the rate
of image compression is low (no compression in the super-fine mode), the number of
images able to be saved in the compact flash card will be less than in the economy
or standard modes.
If economic use of the compact flash card is important (the need to save as many
images as possible in it), use the economy or standard modes. Note, however, that
as the rate of image compression is high, the quality of the images will be lower than
in the super-fine or fine modes.
Quality Rate of Compression
Super Fine 1 : 1 (No compression)
Fine Approx. 1 : 5
Standard Approx. 1 : 13
Economy Approx. 1 : 26
Continued on Next Page
In Record mode, press the MENU
button.
• The Record mode menus will appear.
Press the or button to
highlight “QUALITY”.
Page 27

SELECTING IMAGE QUALITY
- 53 -
SELECTING IMAGE QUALITY
- 52 -
Press the display/ENTER button.
• The currently set image quality will be
highlighted.
Press the or button to
highlight desired image quality.
• The image quality will change as follows:
S.FINE
FINE
STD.
ECON.
Press the display/ENTER button.
• The image quality you have highlighted at the
previous step will be selected and set to the
camera.
• The image quality will also appear on the
body data panel.
• Press the MENU button to clear the Record
mode menus and the LCD monitor will return
to the live view.
Image quality may be changed while the capacity of compact flash card remains.
One compact flash card may contain images of various image qualities.
The image quality setting is maintained when the camera is turned off.
Changing the image quality will affect the remaining number of images which may
be stored in the card. Selecting the super-fine or fine modes, in particular, will
dramatically reduce this number. Check the remaining number of images which
may be stored in the card by the frame counter on the body data panel.
Page 28

SELECTING IMAGE SIZE
- 55 -
SELECTING IMAGE SIZE
- 54 -
Select the image size before recording the image. The image size is a factor in
determining how many images fit onto a compact flash card. There are two image
size options; FULL and HALF.
Image Size Number of Pixels taken (H x V)
FULL 1792 x 1200
HALF 800 x 600
In Record mode, press the MENU
button.
• The Record mode menus will appear.
Press the or button to
highlight “IMAGE SIZE”.
Press the display/ENTER button.
• The currently set image size will be
highlighted.
Press the or button to
highlight desired image size.
• The image quality will change as follows:
FULL
HALF
Press the display/ENTER button.
• The image size you have highlighted at the
previous step will be selected and set to the
camera.
• The image size will also appear on the body
data panel.
• Press the MENU button to clear the Record
mode menus and the LCD monitor will return
to the live view.
Page 29

- 57 -
CARD CAPACITY
FILE SIZE
- 56 -
The file size of the image is determined by the selected Image Quality and Image
Size.
There are four Image Quality (Rate of compression) options; Super Fine (1:1), Fine
(1:5), Standard (1:13), and Economy (1:26). See page 51.
There are two options for Image Size; FULL (1792 x 1200 pixels) and HALF (800 x
600 pixels). See page 54.
The actual file size will be determined by the scene. Some images will be able to
compress further than others. The table below is a list of average file sizes.
Super
Fine
Fine Standard Economy
FULL size 6380KB 850KB 330KB 170KB
HALF size 1430KB 190KB 70KB 40KB
Approximate File Sizes
The number of images that can fit on a compact flash card is determined by the size
of the card (such as 8MB, 16MB, 32MB or 64MB) and the file size of the images.
The actual file size will be determined by the scene. Some images will be able to
compress further than others. The table below is an approximated list of the number
of average images that can fit on a compact flash card.
Super
Fine
Fine Standard Economy
FULL size 1 9 24 47
HALF size 5 41 116 178
Approximate Card Capacity using 8MB CompactFlash Card
Page 30

SELECTING WHITE BALANCE
- 59 -
SELECTING WHITE BALANCE
- 58 -
White Balance is the camera’s ability to make different types of lighting appear
neutral. The effect is similar to selecting daylight film or tungsten film. The default
white balance setting is AUTO.
AUTO: The AUTO setting will detect the type of light and adjust the white
balance accordingly.
Daylight: For outdoor/sunlight illuminated subjects.
Fluorescent: For fluorescent lighting.
Tungsten: For incandescent lighting, such as the filament light bulbs in
household lamps.
In Record mode, press the MENU
button.
• The Record mode menus will appear.
Press the or button to
highlight “WB”.
Press the display/ENTER button.
• The currently set white-balance will be
highlighted.
Press the or button to
highlight desired white balance.
• The white-balanve will change as follows:
AUTO
Press the display/ENTER button.
• The white-balance you have highlighted at
the previous step will be selected and set to
the camera.
• When you select Daylight, Fluorescent, or
Tungsten, the manual white-balance indicator
MWB will appear on the body data panel.
• When you select Daylight, Fluorescent, or
Tungsten for the white-balance, set the flash
mode to “flash cancel” (see page 34).
• Press the MENU button to clear the Record
mode menus and the LCD monitor will return
to the live view.
(Daylight)
(Fluorescent)
(Tungsten)
Page 31

SELECTING SHARPNESS
- 61 -
SELECTING SHARPNESS
- 60 -
There are three sharpness options; HARD, NORMAL, and SOFT.
HARD: This option increases the sharpness of the image to be taken.
NORMAL: No additional sharpening will be done.
SOFT: This option creates a soft-focus effect. Small details in the image are
diffused.
In Record mode, press the MENU
button.
• The Record mode menus will appear.
Press the or button to
highlight “SHARPNESS”.
Press the display/ENTER button.
• The currently set sharpness will be
highlighted.
Press the or button to
highlight desired sharpness.
• The sharpness will change as follows:
HARD
NORMAL
Press the display/ENTER button.
• The sharpness you have highlighted at the
previous step will be selected and set to the
camera.
• When you select HARD or SOFT, the
sharpness indicator
SHARP will appear on
the body data panel.
SOFT
• Press the MENU button to clear the Record
mode menus and the LCD monitor will return
to the live view.
Page 32
CHANGING ISO SENSITIVITY (GAIN UP MODE)
- 63 -
CHANGING ISO SENSITIVITY (GAIN UP MODE)
- 62 -
The CCD used in this camera has a sensitivity of ISO 85 equivalent when shipped
from the factory. By setting this camera to the Gain Up mode, it may be set to ISO
340 equivalent.
This will improve camera performance by letting you use it in dark, indoor locations.
NORMAL: ISO 85 equivalent.
HIGH: ISO 340 equivalent.
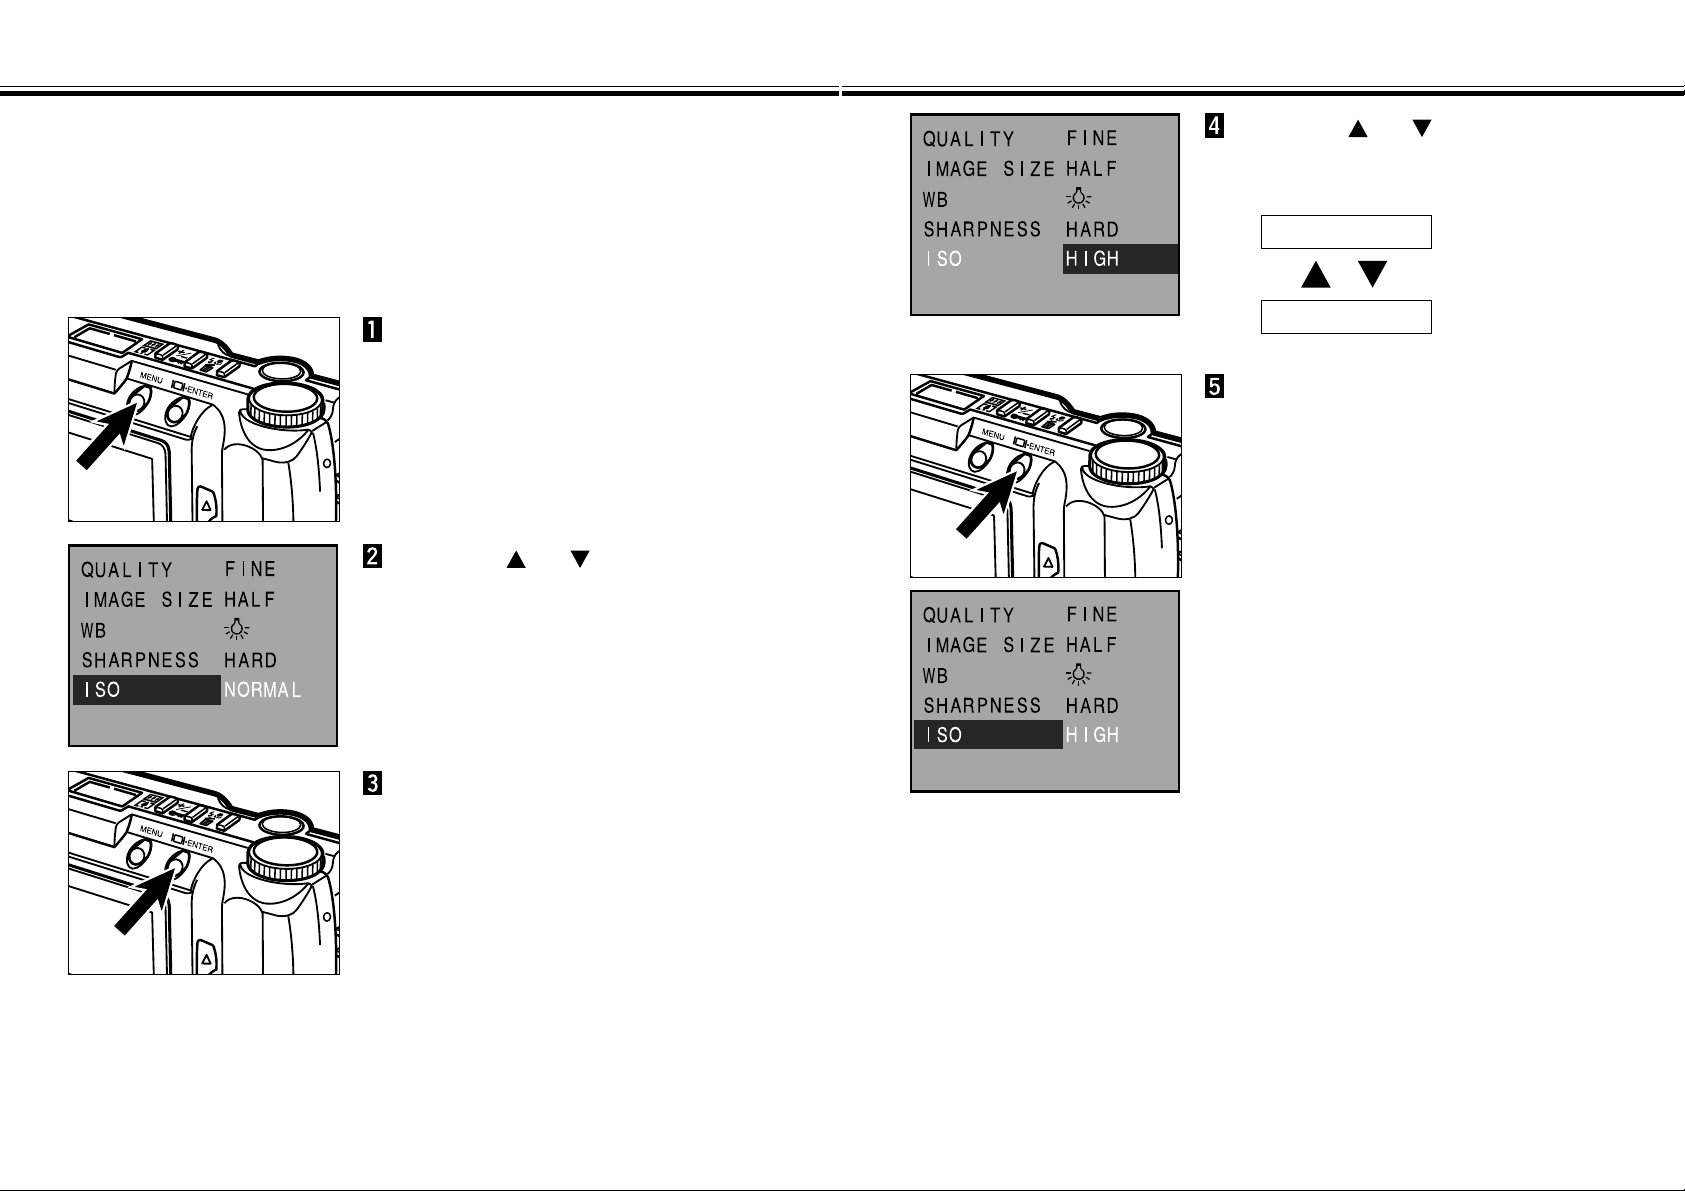
In Record mode, press the MENU
button.
• The Record mode menus will appear.
Press the or button to
highlight “ISO”.
Press the display/ENTER button.
• The currently set ISO sensitivity will be
highlighted.
Press the or button to
highlight desired ISO sensitivity.
• The ISO sensitinity will change as follows:
HIGH
NORMAL
Press the display/ENTER button.
• The ISO sensitivity you have highlighted at
the previous step will be selected and set to
the camera.
• Press the MENU button to clear the Record
mode menus and the LCD monitor will return
to the live view.
Page 33

- 65 -
PLAY MODE SCREENS
- 64 -
PLAYING BACK IMAGES
(PLAY MODE)
Play Mode Screen (LCD monitor) - Single-frame Play
Play Mode Screen (LCD monitor) - Index Play
Play Mode Indicator
PLAY
Frame counter / Total number of Images taken
Digital zoom
X1.0 / X2.0 / X3.0
X3.0
13 / 25
Protect icon
123
456
789
Frame counter
Page 34
- 67 -
INDEX PLAY
SINGLE-FRAME PLAY
- 66 -
Press the or button to
scroll through the images.
• The button scrolls forward, the button
scrolls backward.
Move the lens cover slide to ,
then press and hold the
display/ENTER button about 1
second.
• After a short wait, the last image recorded is
displayed on the LCD monitor.
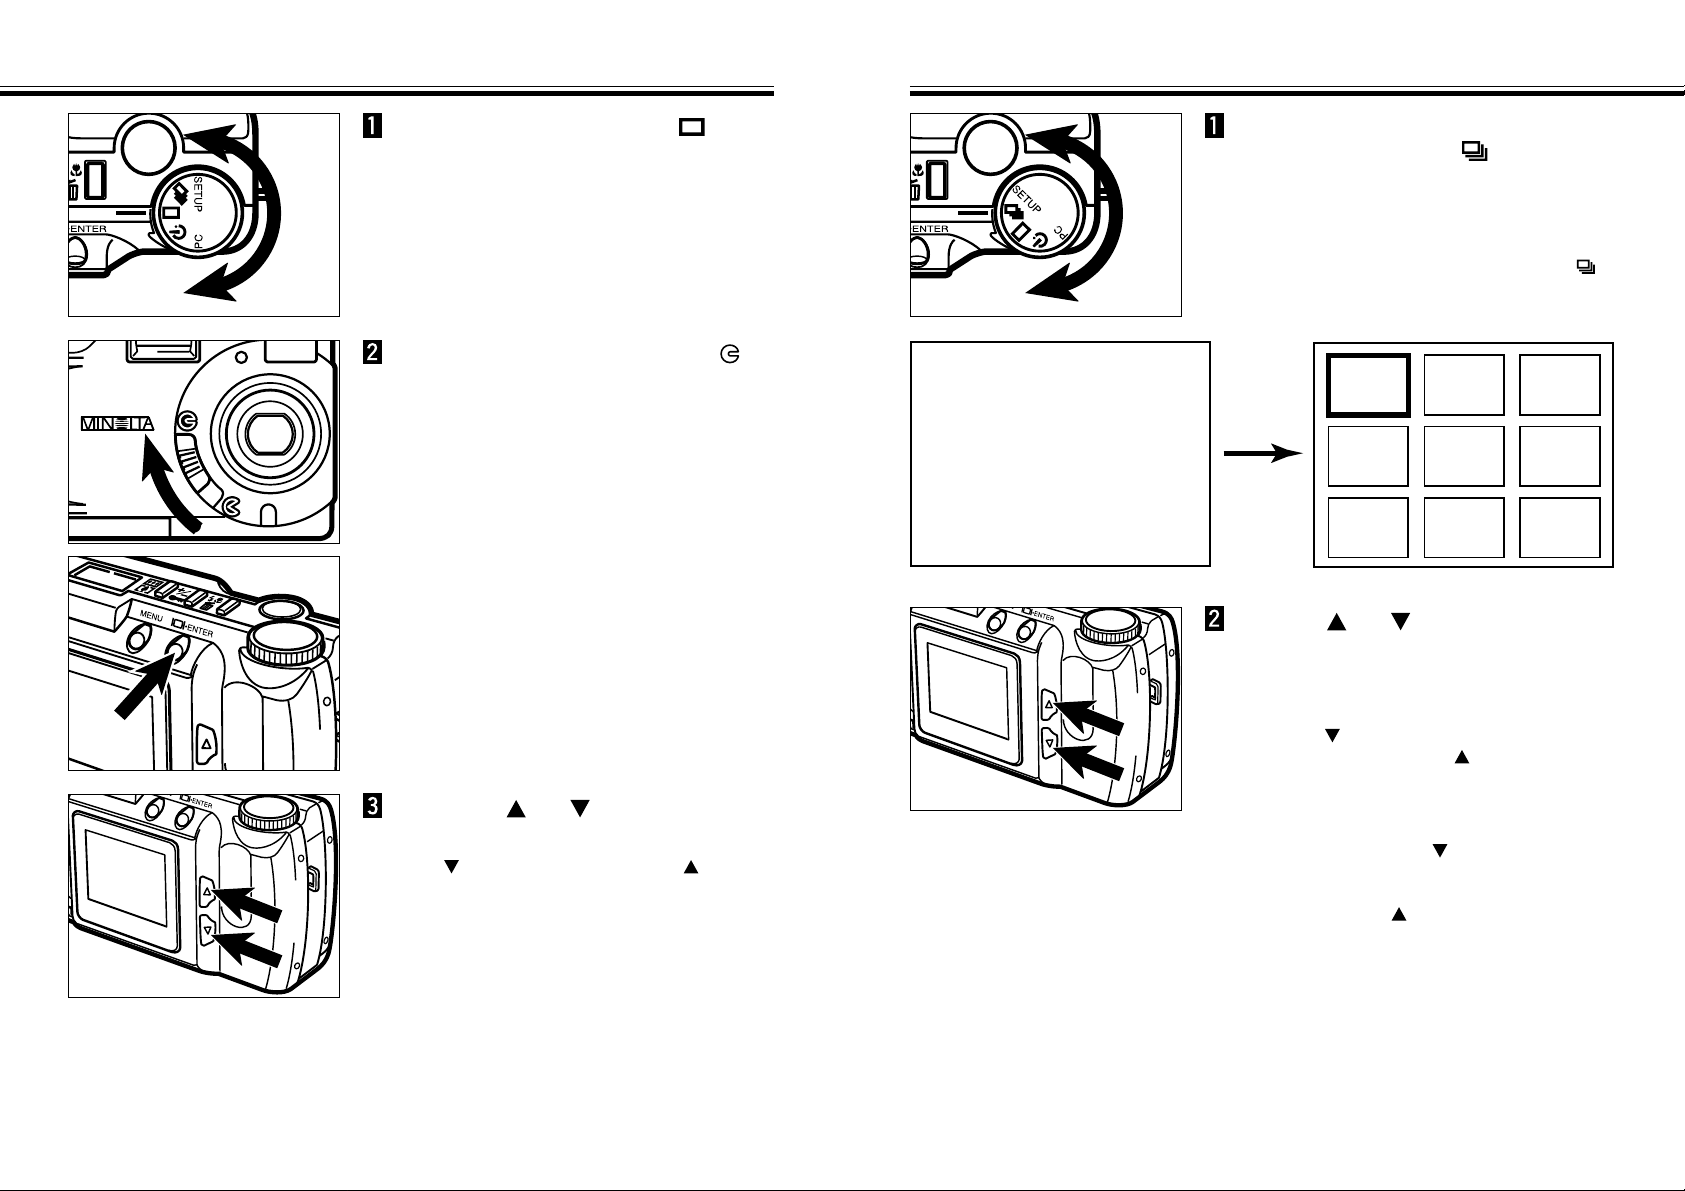
Turn the Function dial to .
In single-frame Play mode, turn
the Function dial to .
• The LCD monitor changes from single-frame
play to index play. The monitor is divided into
a nine-image index.
• The white border appears around the image
displayed when the function dial is set to .
Continued on Next Page
Use the or button on the
back of the camera to move the
border to the image to be
viewed.
• Pressing button moves the border to the
next image. Pressing the button moves
the border to the previous image.
• When the border is on the image at bottom-right, pressing the button displays the
next nine frames so that the next image is positioned at the center of the nine-image
index.
• When the border is on the image at top-left, pressing the button displays the
previous nine frames so that the previous image is positioned at the center of the
nine-image index.
PLAY
X1.0
1 / 25
123
456
789
Page 35

- 69 -
DIGITAL ZOOM [PLAY MODE]
INDEX PLAY - CONT’D
- 68 -
Turn the Function dial to .
• The LCD monitor changes from index play to
single-frame play.
• The image enclosed in the white border
appears on the LCD monitor.
Continued on Next Page
In single-frame Play mode, press
the digital zoom button.
• The currently set zoom magnification appears
in the upper-right corner of the LCD monitor
(see page 65).
Press the or button until
the desired magnification is
displayed in the LCD monitor.
• The zoom magnification will change as
follows:
X3.0
X2.0
X1.0
• The magnification change is visible in the
LCD monitor.
The digital zoom will increase the magnification of the image displayed on the LCD
monitor up to three times of the normal screen.
PLAY X1.0
5 / 27
Play Back Image
To Turn Off The Camera in PLAY Mode
Press the display/ENTER button.
11 12 13
14 15 16
17 18 19
PLAY
X1.0
15 / 25
Page 36

- 71 -
AUTO-PLAY (SLIDE SHOW)
DIGITAL ZOOM [PLAY MODE] - CONT’D
- 70 -
Press the digital zoom button.
• If you want to change the zoom
magnification, repeat steps 2 and 3.
• The digital zoom will return to X1.0 when you
turn the camera off and back on again.
PLAY X3.0
5 / 27
Play Back Image
The images can be played back like an automatic slide show.
Auto-Play (Slide show) Screen (LCD monitor)
In PLAY mode, turn the Function
dial to .
Press the MENU button.
• The Auto-Play (Slide show) menus will
appear.
Continued on Next Page
FULL size
X1.0
Digital zoom magnification selected when the image was taken
X1.4 X2.0
HALF size
X1.0/X2.0/X3.0 X1.0/X2.0/X3.0 X1.0/X2.0
X1.0/X2.0 Not available Not available
Image size when
the image was
taken
Digital zoom in PLAY mode have limitations shown below, depending on the
image size and the digital zoom magnification selected when the image was
taken.
For example, a FULL-sized image captured with X2.0 digital zoom magnification
can not be magnified to X3.0 in PLAY mode.
4 / 25
Frame counter that is now being played
/ Total number of Images taken
Page 37

AUTO-PLAY (SLIDE SHOW) - CONT’D
- 73 -
AUTO-PLAY (SLIDE SHOW) - CONT’D
- 72 -
Press the or button to
highlight “START”.
Press the display/ENTER button.
• Auto-Play will start according to the
INTERVAL and the DIRECTION settings in
the Auto-Play (Slide show) menus.
To Stop Auto-Play (Slide show)
While performing Auto-Play
(Slide show), press the MENU
button.
• The Auto-Play (Slide show) menus will
appear.
Press the or button to
highlight “EXIT”.
Press the display/ENTER button.
• Auto-Play (Slide show) will stop.
Auto-Play (Slide show) also can be stopped by turning the function dial to , ,
PC, or SETUP.
Page 38

AUTO-PLAY (SLIDE SHOW) - CONT’D
- 75 -
AUTO-PLAY (SLIDE SHOW) - CONT’D
- 74 -
To Change Auto-Play (Slide show) Settings
Check that the Function dial is
set to , press the MENU
button.
• The Auto-Play (Slide show) menus will
appear.
Press the or button to
highlight “INTERVAL”.
Press the display/ENTER button.
• The currently set interval time will be
highlighted.
Press the or button to
highlight desired interval time.
• The interval time can be set between 3 - 60
seconds.
• The interval time in this setting means the
image display time before showing the next
picture.
Press the display/ENTER button.
• The interval time you have highlighted at the
previous step will be selected and set to the
camera.
Press the or button to
highlight “DIRECTION”.
Press the display/ENTER button.
• The currently set direction will be highlighted.
Press the or button to
highlight desired direction.
• FORWARD : Images are displayed in the
ascending numerical order.
• REVERSE : Images are displayed in the
reverse order.
• RANDOM : Images are displayed at random.
Continued on Next Page
Page 39

- 77 -
AUTO-PLAY (SLIDE SHOW) - CONT’D
- 76 -
Press the display/ENTER button.
• The direction you have highlighted at the
previous step will be selected and set to the
camera.
DELETING IMAGES
(PLAY MODE)
Page 40

DELETING A SINGLE IMAGE
- 79 -
DELETING A SINGLE IMAGE
- 78 -
Delete a single, unprotected image from the compact flash card in the camera.
As a deleted image cannot be recovered, care is required when deleting images.
Important images can be locked (write-protected) to prevent accidental deletion
(see page 81).
Press the or button until
the desired image appears in the
LCD monitor.
• The button scrolls forward, the button
scrolls backward.
Move the lens cover slide to ,
then press and hold the
display/ENTER button about 1
second.
• After a short wait, the last image recorded is
displayed on the LCD monitor.
Turn the Function dial to .
Press the or button to
highlight “YES”.
• To cancel the delete operation, select
(highlight) “NO”.
Press the display/ENTER button.
• The LCD monitor will return to the step 5
shown above after the image is deleted.
Press the flash-mode/delete
button.
• A confirmation screen will appear.
Continued on Next Page
Page 41

- 81 -
LOCKING (PROTECTING) IMAGES
DELETING A SINGLE IMAGE - CONT’D
- 80 -
Repeat to if you have other
images to be deleted.
If you want to delete all of the images except the locked (write-protected) ones,
select “DELETE ALL” in the Play mode menus. See page 86 for details.
Important images can be locked (write-protected) to guard them from accidental
deletion. Locked (protected) images cannot be removed from the CF card in the
camera by using the Delete function.
LOCKING (PROTECTING) IMAGES
Locked (protected) images will be removed when the FORMAT function (see
page 105) is performed.
Continued on Next Page
Move the lens cover slide to ,
then press and hold the
display/ENTER button about 1
second.
• After a short wait, the last image recorded is
displayed on the LCD monitor.
Turn the Function dial to .
Press the or button to
highlight “NO”, then press the
display/ENTER button.
• The LCD monitor will return to the PLAY
screen.
Page 42

LOCKING (PROTECTING) IMAGES - CONT’D
- 83 -
LOCKING (PROTECTING) IMAGES - CONT’D
- 82 -
Press the or button until
the desired image appears in the
LCD monitor.
• The button scrolls forward, the button
scrolls backward.
Repeat to for any other
images to be locked (writeprotected).
Press the exposurecompensation/lock button.
• A Lock icon will appear in the LCD
monitor, showing that the image is locked
(write-protected).
If you want to lock (protect) all of the images, select “LOCK ALL” in the Play
mode menus. See page 88 for details.
UNLOCKING (UNPROTECTING) IMAGES
Display the images for which
lock (write-protect) is to be
cleared with steps to on
pages 81 - 82.
Press the exposurecompensation/lock button.
• This clears lock (write-protect) for the
displayed image.
• A Lock icon in the LCD monitor
disappears.
Repeat to for any other
images for which lock (writeprotect) is to be cleared.
When an attempt is made to
delete a locked (write-protected)
image, CAN’T ERASE appears
on the LCD monitor as shown left
to indicate that the image cannot
be deleted.
If you want to unlock (unprotect) all of the images, select “UNLOCK ALL” in the
Play mode menus. See page 90 for details.
PLAY
1.0X
8 / 16
Page 43

- 85 -
PLAY MODE MENUS
- 84 -
PLAY MODE MENUS
The Play Mode Menus allow you to lock (write-protect)/unlock (unprotect) all images,
delete all images, and select the printing method (DPOF).
PLAY MODE MENU ITEMS AND EACH SETTING
DELETE ALL NO
YES
LOCK ALL NO
YES
PRINT STD
INDEX
PLAY MODE MENUS (LCD Monitor)
SET ORDER
PRINT ALL
UNLOCK ALL NO
YES
CANCEL ALL
[*] IMAGES
*Number of images selected to be printed.
Page 44
DELETING ALL IMAGES
- 87 -
DELETING ALL IMAGES
- 86 -
Delete all recorded images from the compact flash card in the camera.
As a deleted image cannot be recovered, care is required when deleting images.
Important images can be locked (write-protected) to prevent accidental deletion
(see page 81).
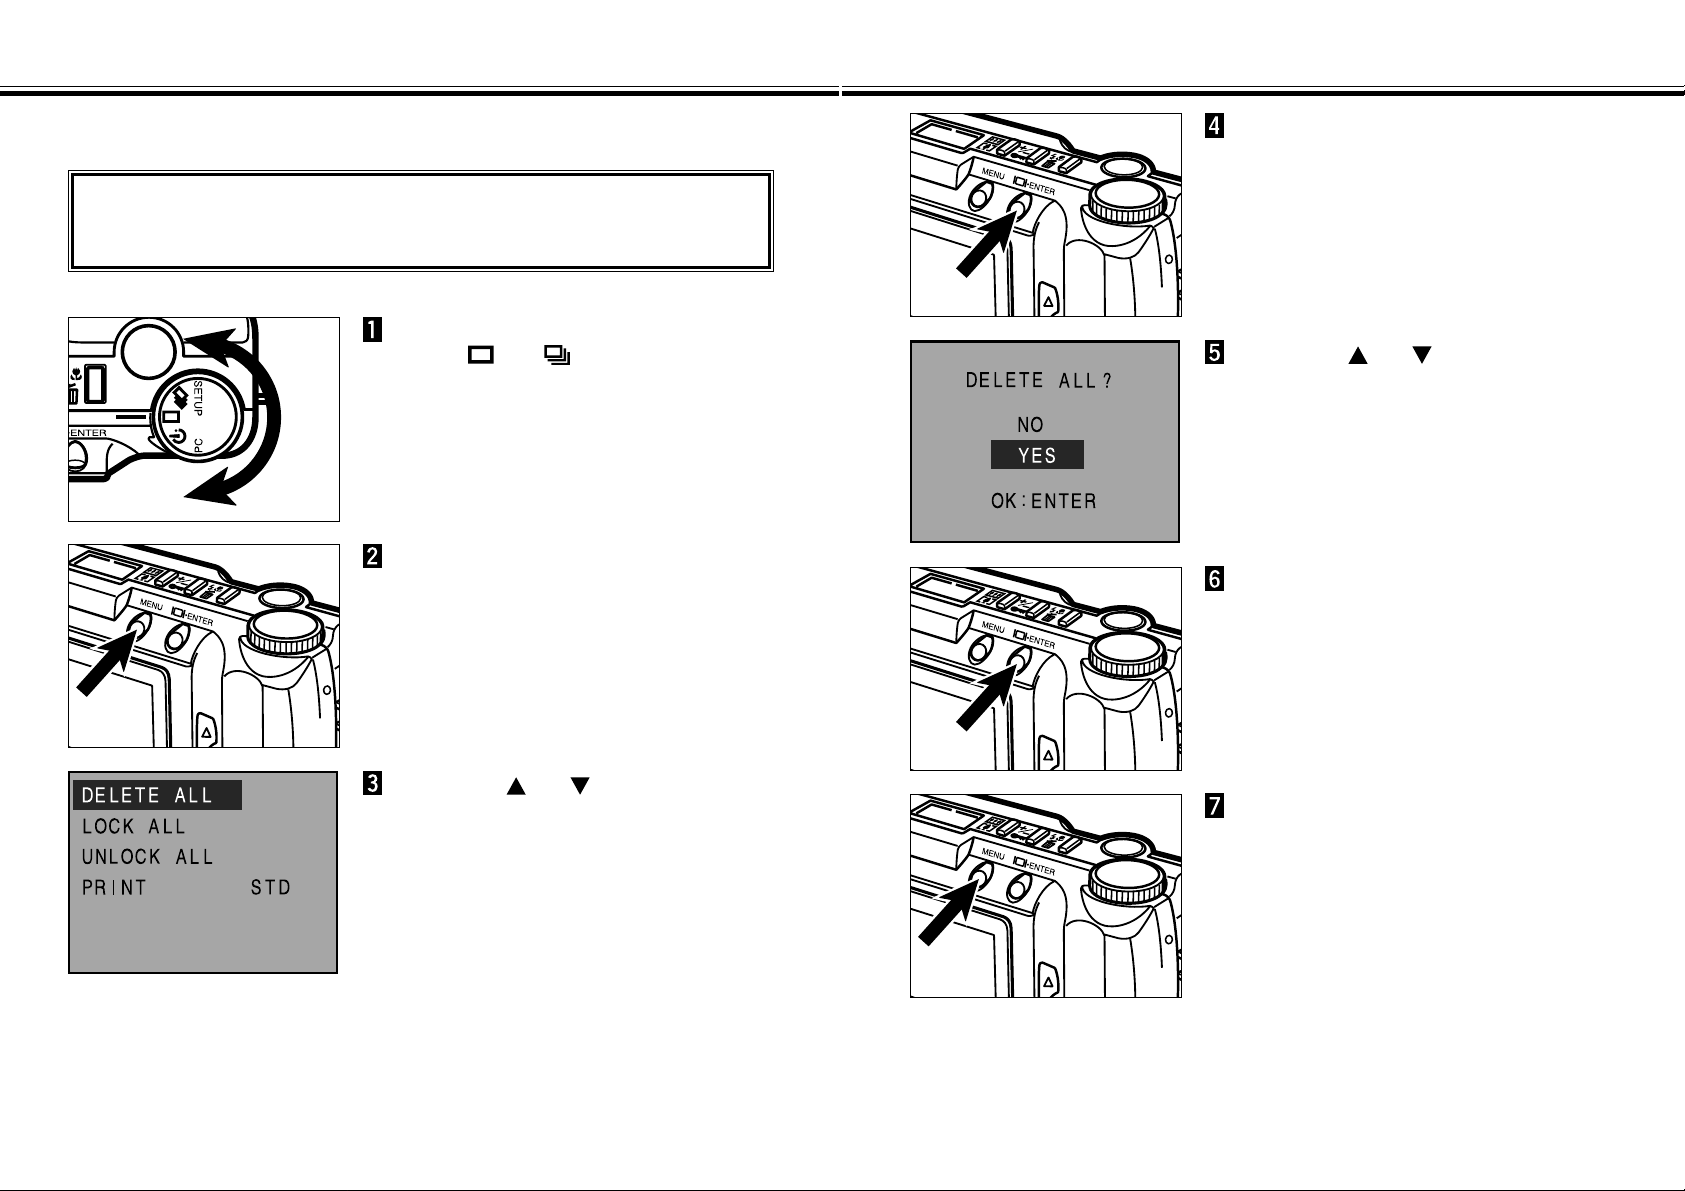
In PLAY mode, turn the Function
dial to , or .
Press the MENU button.
• The Play mode menus will appear.
Press the or button to
highlight “DELETE ALL”.
Press the display/ENTER button.
• A confirmation screen will appear.
Press the or button to
highlight “YES”.
• To cancel this operation, select (highlight)
“NO”.
Press the display/ENTER button.
• The LCD monitor will return to the PLAY
mode menus after the images are deleted.
Press the MENU button.
• The LCD monitor will return to the PLAY
screen.
Page 45

LOCKING (PROTECTING) ALL IMAGES
- 89 -
LOCKING (PROTECTING) ALL IMAGES
- 88 -
This function locks (protects) all captured images. Stored images that are locked
(protected) using this function cannot be deleted either the single image delete function or the all-image delete function.
Locked (Protected) images will be removed when the FORMAT function (see
page 105) is performed.
In PLAY mode, turn the Function
dial to , or .
Press the MENU button.
• The Play mode menus will appear.
Press the or button to
highlight “LOCK ALL”.
Press the display/ENTER button.
• A confirmation screen will appear.
Press the or button to
highlight “YES”.
• To cancel this operation, select (highlight)
“NO”.
Press the display/ENTER button.
• The LCD monitor will return to the PLAY
mode menus after the images are locked
(write-protected).
Press the MENU button.
• The LCD monitor will return to the PLAY
screen.
Page 46
UNLOCKING (UNPROTECTING) ALL IMAGES
- 91 -
UNLOCKING (UNPROTECTING) ALL IMAGES
- 90 -
This function unlocks (unprotects) all locked (write-protected) images.
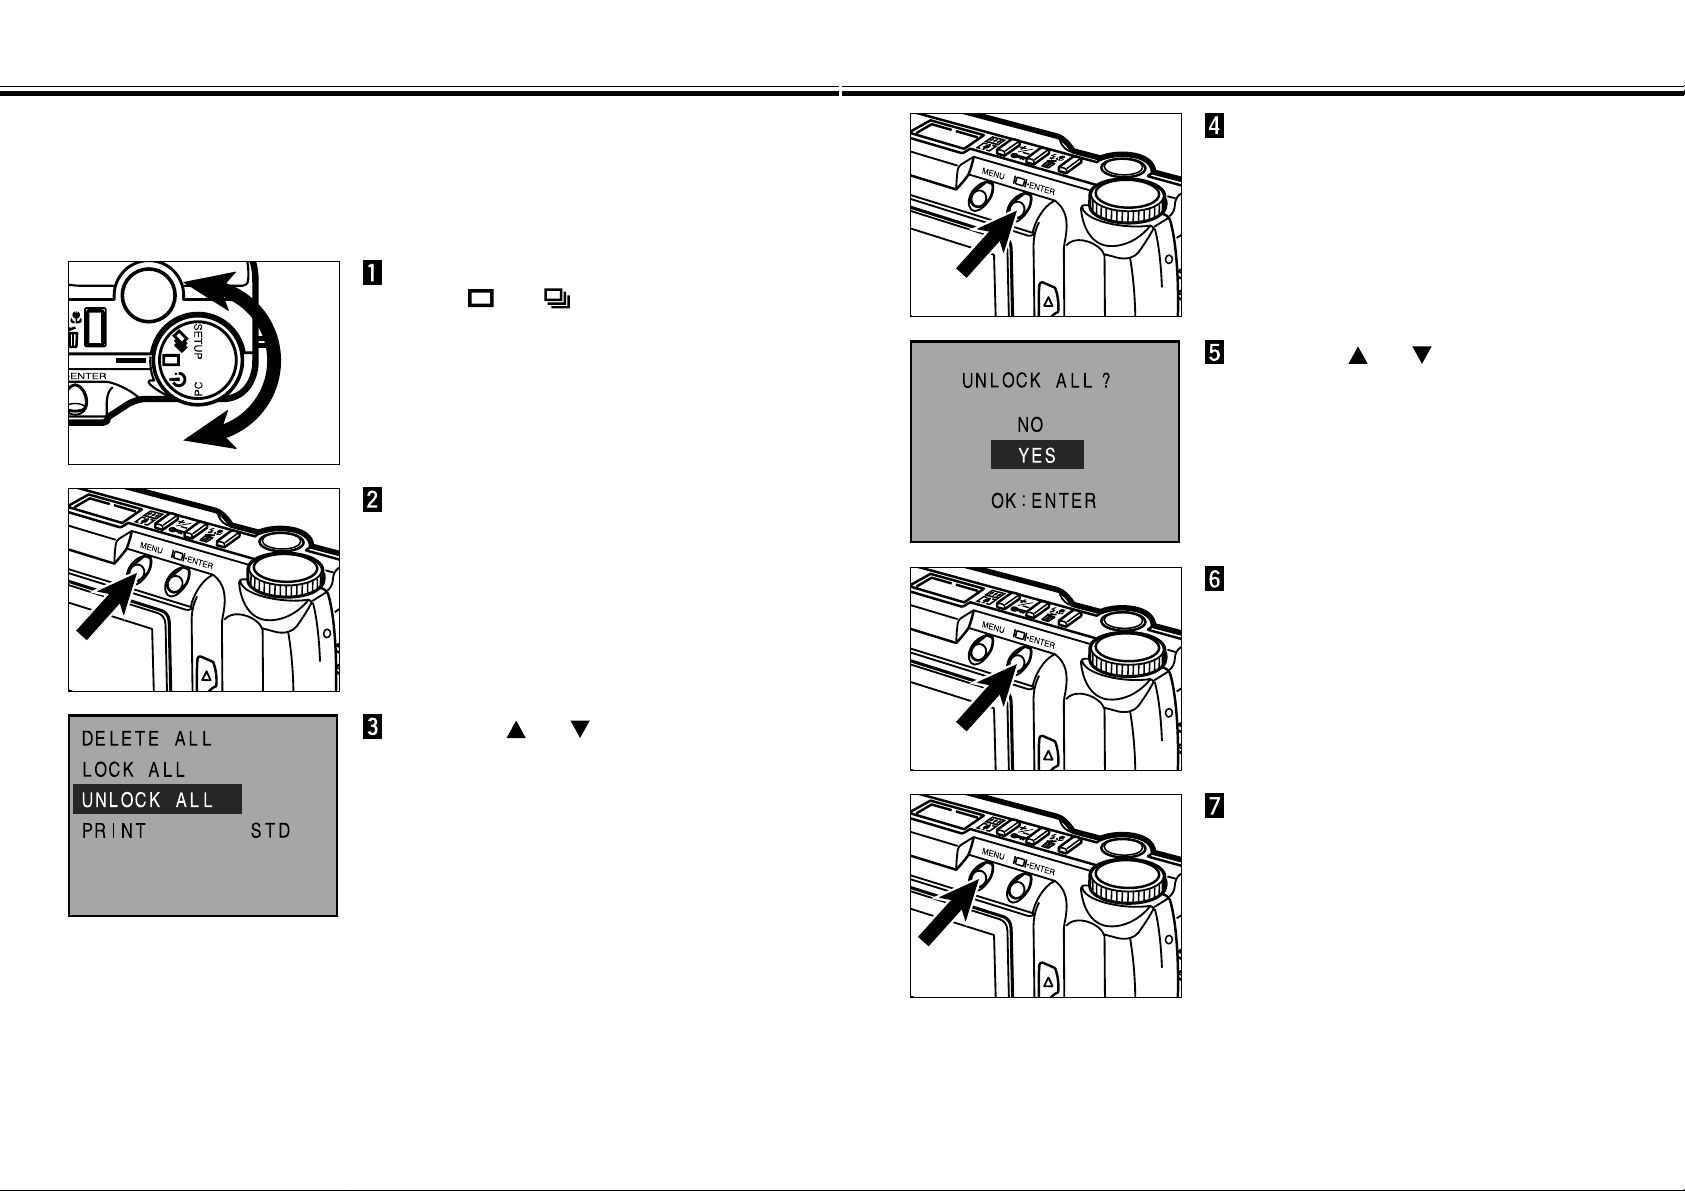
In PLAY mode, turn the Function
dial to , or .
Press the MENU button.
• The Play mode menus will appear.
Press the or button to
highlight “UNLOCK ALL”.
Press the display/ENTER button.
• A confirmation screen will appear.
Press the or button to
highlight “YES”.
• To cancel this operation, select (highlight)
“NO”.
Press the display/ENTER button.
• The LCD monitor will return to the PLAY
mode menus after the images are unlocked
(unprotected).
Press the MENU button.
• The LCD monitor will return to the PLAY
screen.
Page 47
SELECTING THE PRINT METHOD (DPOF)
- 93 -
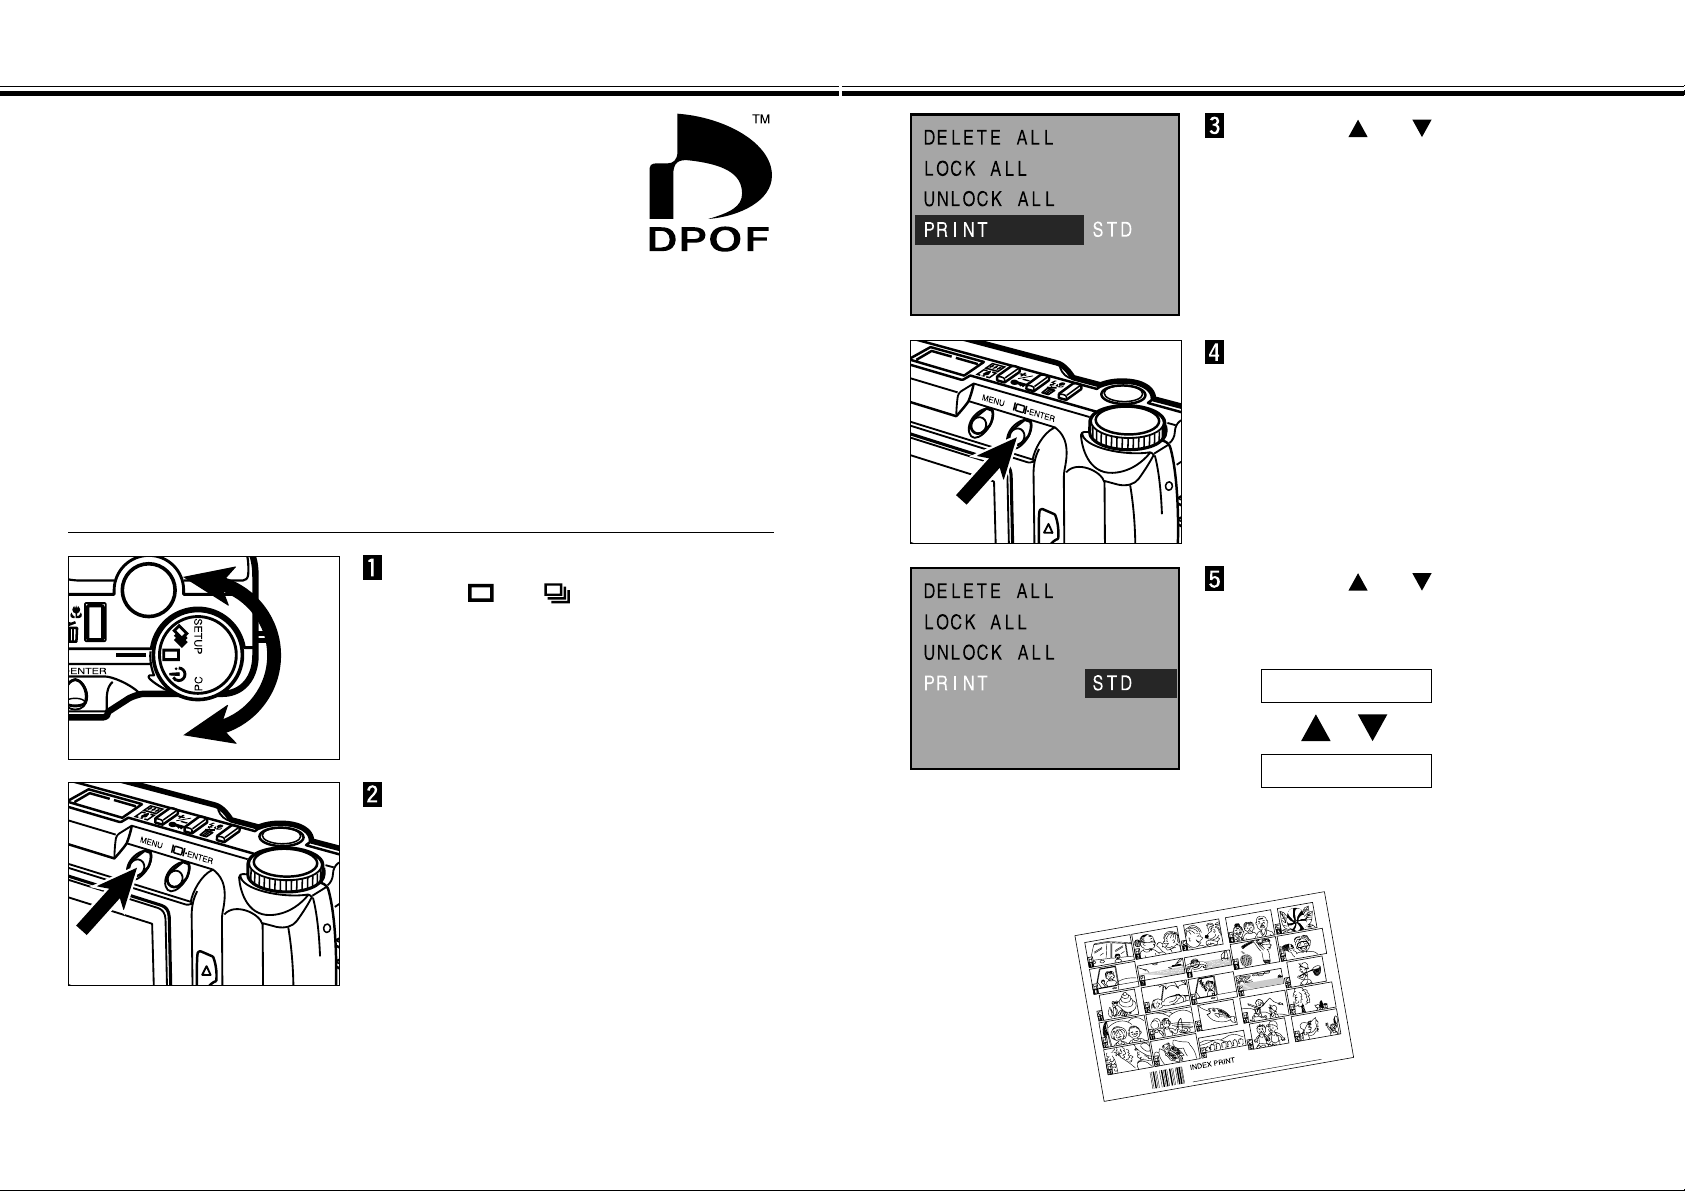
SELECTING THE PRINT METHOD (DPOF™)
- 92 -
This camera supports DPOF™ so that you can select the images
you want to print and the printing mode to be used.
The DPOF (Digital Print Order Format) is jointly developed by
Eastman Kodak Company, Canon Inc., Fuji Photo Film Co., Ltd.,
and Matsushita Electric Industrial Co., Ltd. for direct printing from
digital cameras.
This format will record the information allowing images captured
by digital cameras to be automatically printed through
photofinishing print services or personal printers.
The DPOF enables you to order prints of specific pictures from all the files on the
camera’s storage card such as CompactFlash™, SmartMedia™, and floppy disk.
The DPOF records the information for the specific images and number of each
image that you want to print.
In PLAY mode, turn the Function
dial to , or .
Press the MENU button.
• The Play mode menus will appear.
Press the or button to
highlight “PRINT”.
Press the display/ENTER button.
Press the or button to
highlight desired print type.
• The print type will change as follows:
INDEX
STD
Continued on Next Page
SELECTING THE PRINT TYPE
STD (Standard): Prints the selected images normally.
INDEX: Prints thumbnail of the selected images on one sheet, such as
an index print of APS (Advanced Photo System).
Page 48

SELECTING THE PRINT METHOD (DPOF) - CONT’D
- 95 -
SELECTING THE PRINT METHOD (DPOF) - CONT’D
- 94 -
SELECTING THE IMAGES TO BE PRINTED
Select the Print Type according to the steps to on
pages 92 - 93.
Press the display/ENTER button.
• The Print order menu will appear.
Press the or button to
highlight “SET ORDER” and
press the display/ENTER button.
• The thumbnail of the images (6 images at a
time) in the CF card will be displayed. Awhite
border will appear around a thumbnail.
Press the or button to
move the white border around
the thumbnail to be printed, then
press the display/ENTER button.
• A cursor appears under the selected
thumbnail.
• Pressing the display/ENTER button again
disappears a cursor to cancel the selection.
Thumbnail of the images in the CF card
White border
Repeat the step until all of the
images you want to print have
been selected.
Press the MENU button.
• The print order selection performed in the
steps 4 and 5 will be confirmed and the LCD
monitor will return to the print order menu.
• The number of images you have selected will
be displayed in the LCD monitor (in this
example, 7 images have been selected to
print).
Press the MENU button again.
• The LCD monitor will return to the Play mode
menus.
The number of images selected
to be printed
Page 49

SELECTING THE PRINT METHOD (DPOF) - CONT’D
- 97 -
SELECTING THE PRINT METHOD (DPOF) - CONT’D
- 96 -
PRINTING ALL IMAGES
Select the Print Type according to the steps to on
pages 92 - 93.
Press the display/ENTER button.
• The Print order menu will appear.
Press the or button to
highlight “PRINT ALL”.
Press the display/ENTER button.
• A confirmation screen will appear.
Press the or button to
highlight “YES” and press the
display/ENTER button.
• The print order (print all images) will be
confirmed and the LCD monitor will return to
the print order menu.
• The number of images saved in the CF card
will be displayed in the LCD monitor (in this
example, 36 images have been saved in the
CF card and will be printed).
The number of images saved in
the compact flash (CF) card
Press the MENU button again.
• The LCD monitor will return to the Play mode
menus.
Page 50

SELECTING THE PRINT METHOD (DPOF) - CONT’D
- 99 -
SELECTING THE PRINT METHOD (DPOF) - CONT’D
- 98 -
CANCELING ALL IMAGES
Select the Print Type according to the steps to on
pages 92 - 93.
Press the display/ENTER button.
• The Print order menu will appear.
Press the or button to
highlight “CANCEL ALL”.
Press the display/ENTER button.
• A confirmation screen will appear.
Press the or button to
highlight “YES” and press the
display/ENTER button.
• The print order cancel will be confirmed and
the LCD monitor will return to the print order
menu.
• The number of images to be printed that are
displayed in the LCD monitor reset to 0
(zero).
Press the MENU button again.
• The LCD monitor will return to the Play mode
menus.
The number of images to be
printed that are displayed in the
LCD monitor reset to 0 (zero).
Page 51

- 101 -
SETUP MODE MENUS
- 100 -
SETUP MODE
The SETUP Mode Menus allow you to initialize a CF card and to set the brightness
of the LCD monitor, time that an Auto Power Off feature will activate, date, and time.
SETUP MODE MENU ITEMS AND EACH SETTING
LCD BRIGHT BRIGHT
NORMAL
DARK
POWER SAVE 3MIN
5MIN
TIME
DATE STYLE
DATE
TIME
DEFAULT
SETUP MODE MENUS (LCD Monitor)
Continued on Next Page
10MIN
30MIN
YYYY/MM/DD
DD/MM/YYYY
MM/DD/YYYY
00/01/24
15: 37
FORMAT NO
YES
Page 52

- 103 -
SETTING THE BRIGHTNESS OF THE LCD MONITOR
SETUP MODE MENUS - CONT’D
- 102 -
To Display the Setup Mode Menus
Turn the Function dial to SETUP.
Move the lens cover slide to
to open the lens cover.
Or, move the lens cover slide to
, then press and hold the
display/ENTER button about 1
second.
• The Setup mode menus will appear.
Set the brightness of the LCD monitor.
This setting is applicable both REC mode and PLAY mode.
Turn the Function dial to SETUP.
Move the lens cover slide to
to open the lens cover.
Or, move the lens cover slide to
, then press and hold the
display/ENTER button about 1
second.
• The Setup mode menus will appear.
Press the or button to
highlight “LCD BRIGHT”.
Continued on Next Page
Press the display/ENTER button.
• The currently set brightness will be
highlighted.
Page 53

- 105 -
FORMATTING A COMPACT FLASH CARD
SETTING THE BRIGHTNESS OF THE LCD MONITOR
- 104 -
Press the or button to
highlight desired brightness.
• The brightness will change as follows:
BRIGHT
NORMAL
DARK
Press the display/ENTER button.
• The brightness of thr LCD monitor you have
highlighted at the previous step will be
selected and set to the camera.
• The LCD monitor will return to the Setup
mode menus.
Formatting a compact flash card removes all protected and unprotected images from
the card.
The standard accessory card is pre-formatted. Compact flash cards purchased
separately may need formatting.
This deletes all write-protected images. Take extreme care when formatting.
Turn the Function dial to SETUP.
Move the lens cover slide to
to open the lens cover.
Or, move the lens cover slide to
, then press and hold the
display/ENTER button about 1
second.
• The Setup mode menus will appear.
Press the or button to
highlight “FORMAT”.
Continued on Next Page
Page 54

- 107 -
SETTING THE AUTO POWER-OFF TIME
FORMATTING A COMPACT FLASH CARD - CONT’D
- 106 -
Press the display/ENTER button.
• A confirmation screen will appear.
Press the or button to
highlight “YES”.
• To cancel this operation, select (highlight)
“NO”.
Press the display/ENTER button.
• The LCD monitor will return to the Setup
mode menus after the card is formatted.
Set the Auto power-off time - time that an Auto power-off feature will activate.
If no action is taken (no buttons are pressed) during the period you have set, the
camera power will be turned off automatically.
Turn the Function dial to SETUP.
Move the lens cover slide to
to open the lens cover.
Or, move the lens cover slide to
, then press and hold the
display/ENTER button about 1
second.
• The Setup mode menus will appear.
Press the or button to
highlight “POWER SAVE”.
Continued on Next Page
Press the display/ENTER button.
• The currently set auto power-off time will be
highlighted.
Page 55

- 109 -
SETTING THE DATE/TIME
SETTING THE AUTO POWER-OFF TIME - CONT’D
- 108 -
Press the or button to
highlight desired time.
• The auto power-off time will change as
follows:
30MIN (30 minutes)
10MIN (10 minutes)
5MIN (5 minutes)
Press the display/ENTER button.
• The auto power-off time you have highlighted
at the previous step will be selected and set
to the camera.
• The LCD monitor will return to the Setup
mode menus.
• The selected auto power-off time shown
above is available when using the camera
with batteries. When using the AC adapter,
auto power-off time is 30 minutes and fixed.
3MIN (3 minutes)
This camera records the date and time an image was captured. For your reference,
set the date and time accurately.
Turn the Function dial to SETUP.
Move the lens cover slide to
to open the lens cover.
Or, move the lens cover slide to
, then press and hold the
display/ENTER button about 1
second.
• The Setup mode menus will appear.
Press the or button to
highlight “DATE”.
Continued on Next Page
Press the display/ENTER button.
• The Date and Time setting screen will
appear.
Page 56

SETTING THE DATE/TIME - CONT’D
- 111 -
SETTING THE DATE/TIME - CONT’D
- 110 -
Press the or button to
highlight desired style.
• The style (the order of year, month, and day)
will change as follows:
YYYY/MM/DD
(Year - Month - Day)
MM/DD/YYYY
(Month - Day - Year)
DD/MM/YYYY
(Day - Month - Year)
<Date and Time setting screen>
Press the display/ENTER button.
• The value for “Year” will be highlighted.
• Skip to step 6 if the style does not need to be
changed.
Press the display/ENTER button
as many times as required to
highlight the value to be
changed.
• Press the display/ENTER button repeatedly
to move the highlight to Year
Month Day Hour Minute.
Press the or button to
change the value.
• The value for ”Year” can be set up to 2098.
• Repeat step 7 and step 8 if other values
need to be changed.
Continued on Next Page
Page 57

SETTING THE DATE/TIME - CONT’D
- 113 -
SETTING THE DATE/TIME - CONT’D
- 112 -
When the Minute value has been
changed, press the
display/ENTER button.
• The internal clock begins operation and the
LCD monitor will return to the Setup mode
menus.
When the DATE (Year, Month, Day, and
their Order) do not need to be changed,
highlight “TIME” at the step 3 and press
the display/ENTER button.
The value for “Hour” will be highlighted.
The following operations are as same as
those from step 8.
After replacing the batteries, check that the clock in the camera (date and time) is
correct.
Especially, when the AC adapter is unused and the battery/card-chamber door
remains opened more than 10 minutes, the clock in the camera may be reset to
the default setting. If this occured, set the date and time accurately according to
the directions described on pages 109 - 113.
Page 58

RETURNING TO THE DEFAULT SETTINGS
- 115 -
RETURNING TO THE DEFAULT SETTINGS
- 114 -
Returns the each setting of the camera to the default ones as follows.
Default setting
Image Quality (P. 51) STD. (Standard)
Image Size (P. 54) FULL
White Balance (P. 58) AUTO
Sharpness (P. 60) NORMAL
ISO (P. 62) NORMAL
INTERVAL (Auto-Play, P. 74) 3 seconds
DIRECTION (Auto-Play, P. 75) FORWARD
Print Type (DPOF, P. 93) STD
Brightness of the LCD monitor (P. 103) NORMAL
Power Save time (P. 107) 3MIN (3 minutes)
Date Style (P. 110) MM/DD/YYYY
Turn the Function dial to SETUP.
Move the lens cover slide to
to open the lens cover.
Or, move the lens cover slide to
, then press and hold the
display/ENTER button about 1
second.
• The Setup mode menus will appear.
Press the or button to
highlight “DEFAULT”.
Press the display/ENTER button.
• The every setting shown at the left will be
returned to the default settings.
• The LCD monitor will return to the Setup
mode menus.
Press the or button to
highlight “YES”.
• To cancel this operation, select (highlight)
“NO”.
Press the display/ENTER button.
• A confirmation screen will appear.
Page 59

- 117 -
VIDEO OUT
- 116 -
It is possible to view images in the camera on your television. This camera has a
video out terminal which allows you to connect the camera to your television using
the video cable.
Turn off the television and the camera.
Insert the mini plug end of the video cable into the
camera’s video out terminal.
Plug the other end of the video cable into the video input
terminal on the television.
Turn the television on.
Turn the camera’s Function dial to , , or .
Change the television to the video channel.
• The camera’s PLAY mode display will appear on the television screen.
Move the lens cover slide to , then press and hold the
display/ENTER button about 1 second.
Scroll through the images as instructed in the Playing
Back Images section (see pages 66 - 68) or play back
images automatically as instructed in the Auto-Play (Slide
Show) section (see pages 71 - 76).
• The camera’s LCD monitor turns off when the camera is attached to the television.
APPENDIX
Page 60

TROUBLESHOOTING
- 119 -
TROUBLESHOOTING
- 118 -
Problem Cause Solution
The camera will not take a
picture.
The camera is off.
Move the lens cover slide
to .
When the camera is in
PLAY mode, press the
display/ENTER button to
exit PLAY mode, then
move the lens cover slide
to .
The camera is not in REC
(Record) mode.
The camera is processing,
WAITING appears in the
LCD monitor and the green
focus lamp nearby the
viewfinder blinks slowly.
Wait until WAITING
disappears in the LCD
monitor and the green
focus lamp stops blinking.
The compact flash card is
full, CARD FULL!!!
appears in the LCD
monitor.
Delete unwanted images,
transfer card contents to
the personal computer
then delete all images, or
use a new compact flash
card.
Problem Cause Solution
No image appears on the
LCD monitor.
The camera is not turned
on.
Move the lens cover slide
to , then press and hold
the display/ENTER button
about 1 second.
Pictures are out of focus.
The subject has low
contrast or other
characteristic that is
difficult for the autofocus
system.
Use Focus Hold on
another object that is
similar distance to you as
your subject (P. 32). Read
Focus section (P. 30, 31).
The subject is too close to
the camera.
Be aware of the minimum
focus distance of your
camera, listed on page 30.
The camera is not in PLAY
mode.
The batteries are
exhausted.
Replace all four batteries
or use the AC adapter.
The batteries are inserted
incorrectly.
Remove the batteries and
replace in the correct
orientation (P. 18).
There is no compact flash
card in the camera (
appears in the data panel).
Insert a compact flash card
in the camera (P. 23).
The compact flash card is
not inserted properly in the
camera.
Remove the compact flash
card temporarily and
reinsert it (P. 23 - 25).
No action was taken on the
camera for longer than
approximately 3 minutes
after the camera was
turned on (Auto Power Off
feature has activated).
To restore power in REC
mode, move the lens cover
slide to , then re-set to
.
To restore power in PLAY
mode, press and hold
display/ENTER button
about 1 second.
Continued on Next Page
Page 61

TROUBLSHOOTING - CONT’D
- 121 -
TROUBLESHOOTING - CONT’D
- 120 -
Problem Cause Solution
Using flash, the picture is
too dark.
The subject is beyond the
flash range.
Be aware of the flash
range of your camera,
listed on page 34.
The flash is not charged.
The orange flash lamp
blinks when the shutterrelease button is pressed
partway down while the
flash is charging. Wait until
the flash lamp glows.
All the images are too dark
or too light.
Exposure-compensation is
not set to 0.
Set the exposurecompensation value to 0
(P. 46, 47).
The image file is corrupt.
The compact flash card
was removed while the
camera was accessing the
card.
Never remove a compact
flash card when the green
focus lamp is blinking
slowly after taking a
picture.
Problem Cause Solution
The camera will not
function normally.
Remove the batteries after opening the card slot/batterychamber cover on the bottom plate of the camera body
and reinsert them. If the camera got out of order while it
was being powered by the AC adapter, unplug the AC
adapter cable from the DC terminal and reconnect the
cable. Subsequently, press the main switch to turn on
the camera again.
The CF card is likely to be damaged if you fail to
shut off the camera power normally. In such a case,
re-format the CF card on a personal computer after
transferring the image data from the CF card to the
personal computer.
Page 62

CARE AND STORAGE
- 123 -
CARE AND STORAGE
- 122 -
Operating Temperatures and Conditions
• This camera has been designed for use from 0°C to 40°C (32°F to 104°F).
• Never leave the camera where it may be subjected to extreme temperatures, such as
the glove compartment of a car.
• Do not subject the camera to extreme humidity.
• To prevent condensation from forming, place the camera in a sealed, plastic bag
when bringing it from the cold exterior to a warm building. Allow it to come to room
temperature before removing it from the bag.
• Battery performance decreases with lower operating temperatures. When
photographing in cold weather, it is recommended that you keep the camera and
spare batteries inside your coat to keep them warm when you are not shooting. Cold
batteries will regain some of their charge when they warm up.
• Occasionally, when using alkaline batteries the low-battery symbol may appear even
if there is enough charge. Continue to use the camera. The low-battery symbol will
disappear.
Handling Care
• This camera is neither waterproof nor splashproof.
- Inserting/removing batteries or CompactFlash cards with wet hands may damage
the camera.
- Take care when using the camera at the beach or near water. Costly or irreparable
damage may occur.
• Do not subject the camera to shock or impact.
• Do not leave the camera in direct sunlight. Do not point the lens at direct sunlight.
CCD damage may occur.
• Turn the camera off or remove the batteries when transporting.
Lcd Monitor Care
• The LCD monitor is a precision device with a pixel efficiency of 99.98%. Less than
0.02% of the pixels are dysfunctional.
• Do not apply pressure on the surface of the LCD monitor. Permanent damage may
occur.
• In low temperatures, the LCD monitor will temporarily darken. When the camera
warms-up, normal display will be restored.
• If the + or – buttons are pressed rapidly during playback, images may appear to
overlap. This is normal and the image data is not changed.
• If the LCD monitor surface is dirty, first blow away dust or sand, then gently wipe it
with a soft, clean, dry cloth.
• If the LCD display blinks continuously or no longer works at all, it is time to replace
the monitor. Take the camera to your dealer or a Minolta Service Facility listed on the
back cover of this manual.
Safety and Handling for Compact Flash Cards
• Read and follow the instructions that accompanied the compact flash card.
• The following may cause data loss or damage:
- Improper use of card.
- Static electrical discharge near card or electric noise.
- Removing the card or interrupting power supply while camera or drive is accessing
the card (reading, deleting, etc.).
- Non-use of card for an extended period. Data stored on compact flash cards will
degrade over time. Data left on a card for extensive periods may not be
recoverable.
- Wear from ordinary use.
• The storage capability of compact flash cards will diminish with extended use. When
this occurs, please purchase a new card.
• Do not bend, drop, or subject the card to impact.
• Keep away from static electricity and electric noise.
• When not in use, return the card to its protective case.
• All data on the card is permanently erased when the card is formatted.
• Do not touch the electrical contacts of the card with your fingers or a metal object.
• Keep away from heat, moisture, and direct sunlight.
• Keep away from small children.
Continued on Next Page
Page 63

- 125 -
TECHNICAL DETAILS
CARE AND STORAGE - CONT’D
- 124 -
Cleaning
• If the camera or lens is dirty, gently wipe it with a soft, clean, dry cloth. If the camera
or lens comes in contact with sand, gently blow away loose particles, wiping may
scratch the surface.
• To clean the lens surface, first brush away any dust or blow away sand, then, if
necessary, moisten a lens tissue with lens cleaning fluid and gently wipe the lens.
• Never use organic solvents to clean the camera.
• Never touch the lens surface with your fingers.
Storage
• Remove the batteries from the camera when not in use for an extended period.
Damage may result if battery leakage occurs.
• Store in a cool, dry, and well-ventilated area away from dust and chemicals (such as
mothballs). For very long periods, place the camera in an airtight container with a
silica gel drying agent.
• Before using after prolonged storage, check the camera’s operation to make sure it is
functioning properly.
Before Important Events
• Always check the camera’s operation carefully or take test photographs.
• Minolta is not responsible for damages incurred by equipment malfunction.
Questions and Service
• If you have questions about your camera, contact your local camera dealer or write to
the Minolta distributor in you area.
• Before shipping your camera for repair, please contact a Minolta Service Facility for
details.
Continued on Next Page
Camera Type
Fixed focal length, removable recording media type digital camera with LCD
monitor, built-in flash
CCD
1/1.75 inch-type inter line CCD
Total number of pixels: Approx. 2,300,000 pixels
Number of effective pixels: Approx. 2,190,000 pixels
Lens Unit
Focal length: 8.2mm (38mm in the 35mm film equivalent scale)
Aperture: FNo. 3.0 to 13 (4 steps)
Construction: 5 elements in 2 groups including 4 aspheric surfaces
Focusing range: 0.6m to infinity (Macro mode: 0.3m to 0.6m)
Image Storage
Recording medium: CompactFlash card (Type I)
Image file format: Exif 2.1 (JPEG), TIFF
Number of pixels: 1792 x 1200 / 800 x 600 pixels
Image quality modes: SUPER FINE, FINE, STANDARD, ECONOMY.
Image compression ratio: SUPER FINE (1:1), FINE (1:5) , STANDARD (1:13),
ECONOMY. (1:26)
Storage capacity* (approximate): SUPER FINE: 1 image, FINE: 9 images,
STANDARD: 24 images, ECONOMY: 47 images (* Using a 8MB compact
flash card in Full Size; 1792 x 1200 pixels)
Delete function: Single image, All images
Autofocusing
System: AF system by CCD
Sensitivity range: BV 0 to 11
Focus locked when the shutter-release button is pressed partway down
White Balance
Automatic, Manual setting available (daylight, tungsten, fluorescent)
Page 64

TECHNICAL DETAILS - CONT’D
- 127 -
TECHNICAL DETAILS - CONT’D
- 126 -
Exposure Control
Programmed AE
Metering: Center weighted TTL metering by CCD
Metering range: EV 2 to 16
Shutter speed: 1/500 sec. - 2 sec., Mechanical shutter control
Exposure compensation: Up to ±2EV in 1/2 EV increments
ISO sensitivity: approx. 85 equivalent / approx. 340 equivalent
Built-in Flash
Guide number: 6.8 (ISO 100)
Coverage: 38mm angle of view (35mm format equivalent)
Flash modes: Autoflash, Fill-flash, Flash cancel, Autoflash with red-eye
reduction, Fill-flash with red-eye reduction (Flash cancel in Macro mode)
Viewfinder
Type: Reversed galilean finder
Field of view: Approx. 85%
Eye-relief: 18mm
Magnification: x 0.35
LCD Monitor
Type: 46mm (1.8-inch) low temperature poly-silicon color TFT-LCD module
Pixels: Approx. 110,000
Play Back
Number of display images: Single-frame Play: 1 image, Index Play: 9 images
Digital zoom:REC mode: X1.4, X2.0, PLAY mode: X2.0, X3.0
Drive mode
Still capture:
Burst capture: SUPER FINE: 1 image, FINE: 4 images, STANDARD: 8
images, ECONOMY: 12 images
Self-timer: Approx. 10 seconds delayed release
Remote release: Available with an IR Remote Control RC-3
Interface
USB (Universal Serial Bus) for Windows®98/Macintosh
Video output: Composite video signal
Power source
Power: AA-sized alkaline battery x 4 (AA-sized Ni-Cd or AA-sized Ni-MH
batteries are also available).
External power: AC adapter (a DC terminal is provided on the camera body.)
Battery Performance (as determined by Minolta tests)
[REC mode] Approx. 120 frames
LCD monitor : ON
Camera Settings : Default Settings at Setup mode
Temperature : Normal (20°C/68°F)
Batteries : 4 AA-size alkaline batteries (Standard accessory)
Taking pictures at 30-seconds intervals with 50% flash use
[PLAY mode] Approx. 120 minutes
LCD monitor : ON (continue to display an image)
Temperature : Normal (20°C/68°F)
Batteries : 4 AA-size alkaline batteries (Standard accessory)
• The battery performance may differ considerably from the values given above
depending upon the brand/grade of battery used, the interval between manufacture
and use, and internal resistance etc.
Operating Ambient Temperature and Humidity Ranges
0 to 40°C (32 to 104°F), 85% maximum (noncondensing)
Dimensions (W x H x D)
114 x 65 x 40mm (4.48 x 2.56 x 1.57 inches)
Weight (without batteries and recording media)
Approx. 210g (7.41 oz.)
Specifications are based on the latest information available at the time of printing
and are subject to change without notice.
Page 65

- 128 -
MEMO
Page 66

Minolta Co., Ltd. 3-13, 2-Chome, Azuchi-Machi, Chuo-Ku, Osaka 541-8556, Japan
© 2000 Minolta Co., Ltd. under the Berne
Convention and Universal Copyright Convention
9222-2769-11 P-A004 Printed in Japan
E
Camera Instruction Manual
Minolta Corporation
Head Office 101 Williams Drive, Ramsey, New Jersey 07446, U.S.A.
Los Angeles Branch 11150 Hope Street Cypress, CA 90630, U.S.A.
Minolta Canada Inc.
Head Office 369 Britannia Road East, Mississauga, Ontario L4Z 2H5, Canada
Minolta Europe Kurt-Fischer-Strasse 50, D-22923 Ahrensburg, Germany
Minolta France S.A. 365 Route de Saint-Germain, F-78420 Carrieres-Sur-Seine, France
Minolta (UK) Limited 7 Tanners Drive, Blakelands, Milton Keynes, MK14 5BU, England
Minolta Austria Ges. m.b.H. Amalienstrasse 59-61, A-1131 Wien, Austria
Minolta Camera Benelux B.V. Zonnebaan 39, P.O. Box 6000, NL-3600 HA Maarssen, The Netherlands
Belgium Branch Prins Boudewijnlaan 1, B-2550 Kontich, Belgium
Minolta (Schweiz) AG Riedstrasse 6, CH-8953 Dietikon, Switzerland
Minolta Svenska AB Albygatan 114, S-171 54 Solna, Sweden
Finland Branch Niittykatu 6 PL 37, SF-02201 Espoo, Finland
Minolta Portugal Limitada Av. do Brasil 33-A, P-1700 Lisboa, Portugal
Minolta Hong Kong Limited Room 208, 2/F, Eastern Center, 1065 King’s Road, Quarry Bay, Hong Kong
Minolta Singapore (Pte) Ltd. 10, Teban Gardens Crescent, Singapore 608923
 Loading...