

Page 1
MINOLTAFAX
1600
Operator’s Manual
4503-7704-02
4503U000
Page 2

Using the Machine Properly
To ensure the optimum performance of the machine, follow the precautions listed below.
• Never place a heavy object on the machine.
• Never subject the machine to shocks.
• Never open any doors or turn the machine off while the machine is making prints.
• Never bring any magnetized object near the machine.
• Never use flammable sprays, liquids or gases near the machine.
• Never modify the machine, as a fire or electrical shock could result.
• Never remove any panel or cover which is secured. The machine contains high voltage components
which can cause electrical shock.
• Never tamper with the laser mechanism on laser-equipped models, as blindness or other injury may
result.
• Never drop paper clips, staples or other small pieces of metal through the vents or other openings in
the machine, as a fire or electrical shock can result.
• Never place containers of liquid on the machine. If liquids get inside the machine, they can cause fire
or electrical shock. If a piece of metal or any liquid gets inside the machine, immediately turn the
machine off, unplug the power cord and call your technical representative. A fire or electrical shock
can result if the machine remains plugged in or is operated after metal or liquid gets ins ide.
• Never leave the machine running if it becomes unusually hot, or if smoke or an unusual odor or noise
is detected. Should any of these conditions occur , immedi ately turn the machine of f, un plug the power
cord and call your technical representative. A fire or electrical shock can result if the machine remains
plugged in under any of these conditions.
• Always insert the power plug all the way into the outlet.
• Always make sure that the outlet is visible, clear of the machine or machine cabinet.
• Always provide good ventilation when making a large number of continuous prints.
• Never pull on the pow er cor d, an d al wa ys hold the plug when unpl ugg ing the power cord. A damaged
cord could result in a fire or cause an electrical shock.
• Never unplug the power cord with a wet hand, as it could cause an electrical shock.
• Always unplug the power cord before moving the machine. Moving the machine with the power cord
plugged in can damage the cord resulting in a fire or causing an electrical shock.
• Always unplug the power cord when the machine is not going to be used for a long time.
• Never place a heavy object on the po wer co rd, or pu ll or ben d it, as a fire or electrical shock can result.
i
• Always ensure that the machine does not sit on or move onto the po wer cord or co mmunications cable
of other electrical equipment, as malfunctioning equipment or a fire could result.
• Always ensure that the power cord or communications cable of other electrical equipment does not
become wedged into the machine mechanism, as malfunctioning equipment or a fire could result.
• Always use the correct power voltage, as improper voltage can cause a fire or electrical shock.
• Never use a multiple outlet adapter, as a fire or electrical shock can result.
• Should the power cord become damaged, immediately turn the machine off, unplug the power cord
and call your technical representative. A damaged cord can result in a fire or cause an electric shock.
• If an extension cord is needed, use one with a greater rated cap acity than th e maximu m po wer requ irements of the machine. The use of an extension cord that falls shor t of su ppo rting th e maximum power
requirements can result in overheating or a fire.
• Always unplug the machine whenever anything unusual is observed during operation. Make sure that
the outlet is nearby and clear of the machine and furniture.
Note: =Locate the Machine in a Well Ventilated Room=
Page 3
ii
Using the Machine Properly
A negligible amount of ozone is generated during normal operation of this machine. An unpleasant
odor may , however, be created in poorly v entilated rooms during extens ive machine oper ations. For a
comfortable, healthy and safe operating environment, it is recommended that the room be well ventilated.
Remarque:= Placer l’appareil dans une pièce largement ventilée=
Une quanti té d’ozone né gligeble e s t dégagée pendant le fo nctionnement de l’appareil quand celui-ci
est utilisé normalement. Cependant, une odeur désagréable peut être ressentie dans les pièces dont
l’aération est insuffisante et lorsq’une utilisation prolongée de l’appareil est effectuée. Pour avoir la
certitude de travailler dans un environnement réunissant des conditions de confort, santé et de sécurité, il est préférable de bien aérer la pièce ou se trouve l’appareil.
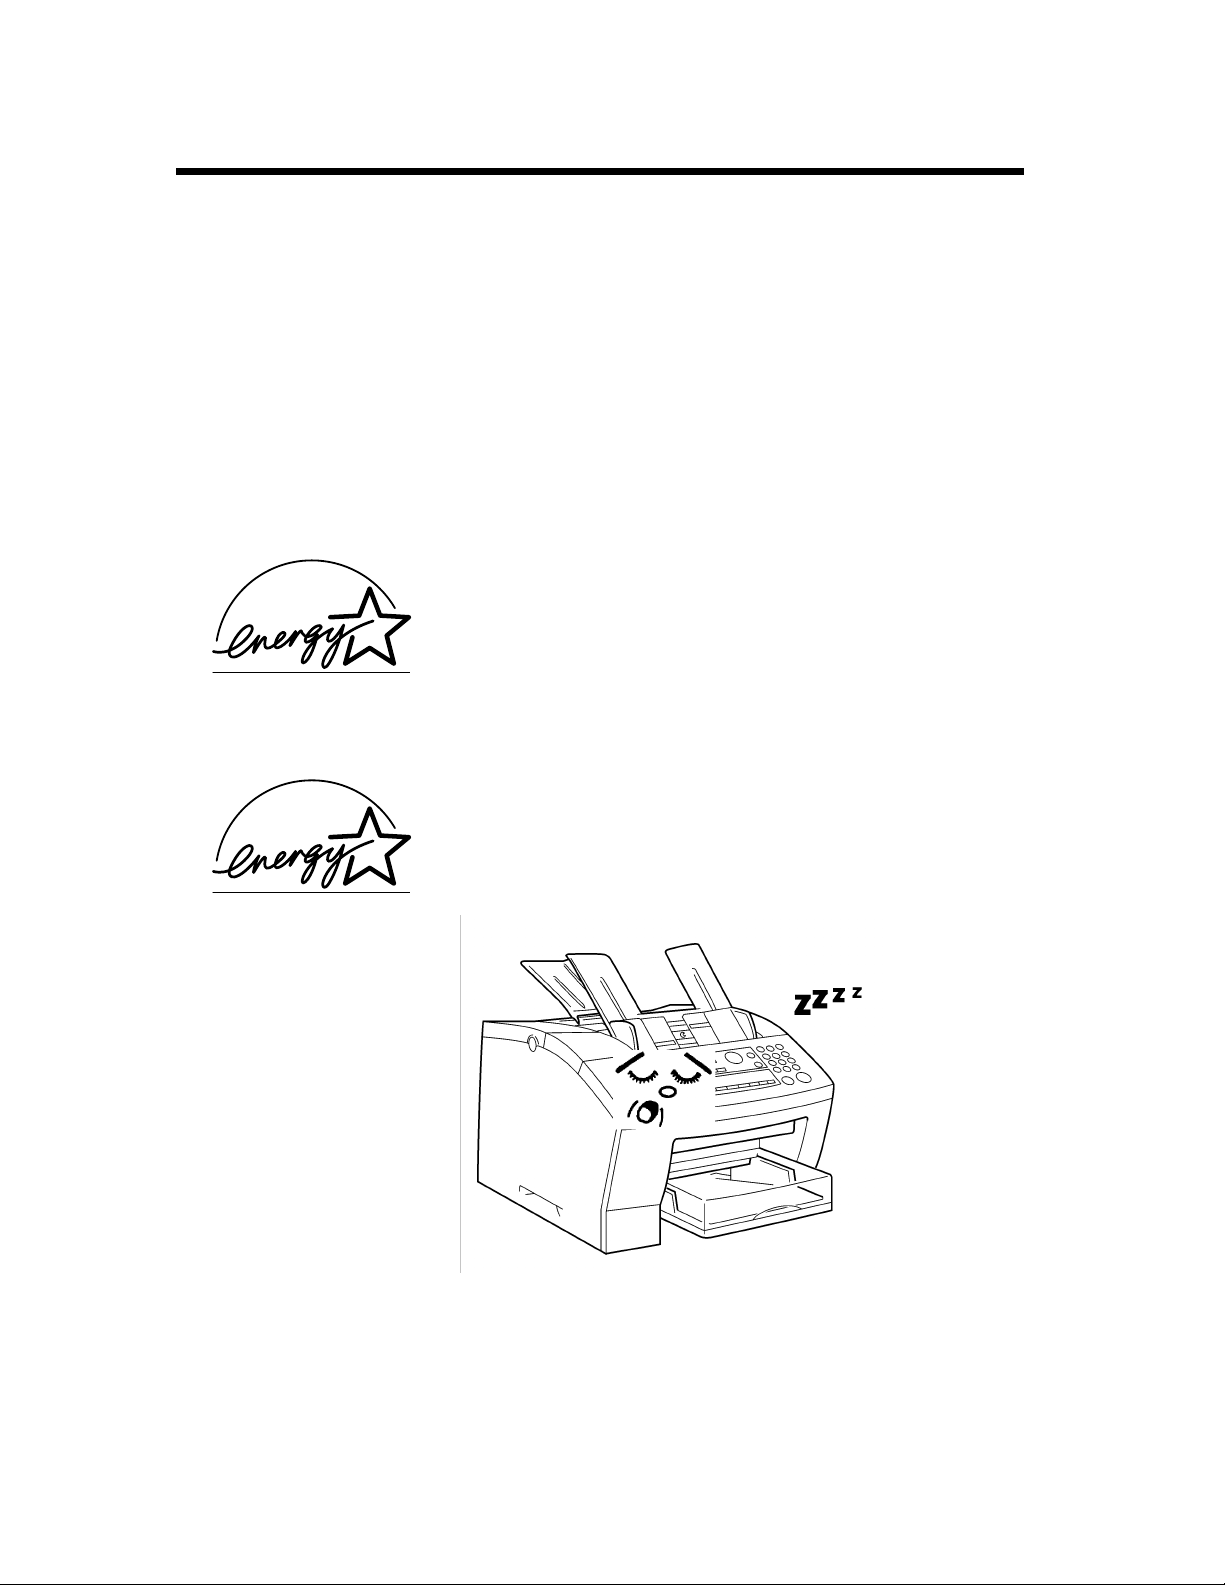
For U. S. A. / Canadian Users
As an Energy Star Partner, this fax has determined that this machine
meets the Energy Star Guidelines for Energy Efficiency.
For Other Country Users
This machine meets the *EPA’s Energy Star Guidelines for Energy
Efficiency.
*The U. S. Environmental Protection Agency
4503U001
What is an Energy Star Machine ?
Energy Star Machines have a feature that allows them to automatically turn off or "go to sleep" after a
period of inactivity, ensuring night and weekend shut off.
Page 4

iii
Using the Machine Properly
MINOLTAFAX 1600
This manual explains the functions and operation of the MINOLTAFAX 1600 machine. It also gives
some troubleshooting tips as well as general precautions to be observed when operating this fax
machine.
To ensure the best performance and effective use of your fax machine, please read this manual carefully from cover to cover. After you have read through the manual, keep it near your fax machine for
handy reference. It should help in solving any operational questions you may have.
Trademark acknowledgments
Microsoft, MS-DOS, Excel and Windows are registered trademarks of Microsoft Corporation.
IBM, PC/AT and PS/2 are registered trademarks of International Business Machines Corporation.
Please follow the instructions given in this manual when handling your fax machine and do not
touch any part of the machine which the manual does not cover . NEVER attempt to disassemble
or remodel the fax machine.
Page 5

iv
É
É
Safety Information
IMPORTANT SAFETY INSTRUCTIONS
• Make sure that the electrical outlet that you use is located near the facsimile.
• Only connect the facsimile to a grounded outlet.
IMPORTANT SAFETY I NSTRUCTIONS
When using your telephone equipment, basic
safety precautions should always be followed
to reduce the risk of fire, electric shock and
injury to persons, including the following:
1. Do not use this product near water, for example,
near a bath tub, wash bowl , kitch en si nk or l aundry tub, in a wet basement or near a swimming
pool.
2. Avoid using a telephone (other than a cordless
type) during an electrical storm. There may be a
remote risk of electric shock from lightning.
3. Do not use the telephone to report a gas leak in
the vicinity of the leak.
4. Use only the power cord and batteries indicated
in this manual. Do not dispose of batteries in a
fire. They may explode. Check with local codes
for possible special disposal instructions.
IMPORTANTES MESURES DE S
Certaines mesures de sécurité doivent être prises
pendant l’utilisation de matérial téléphonique
afin de réduire les risques d’incendie, de choc
électrique et de blessures. En voici quelquesunes:
1. Ne pas utiliser l’appareil près de l’eau, p.ex.,
près d’une baignoire, d’un lavabo , d’un évier de
cuisine, d’un bac à laver, dans un sous-sol
humide ou près d’une piscine.
2. Éviter d’utiliser le téléphone (sauf s’il s’agit
d’un appareil sans fil) pendant un orage électrique. Ceci peut presenter un risque de choc
électrique causé par la foudre.
3. Ne pas utiliser l’appareol téléphonique pour signaler une fuite de gaz s’il est situe prèes de la
fuite.
4. Utiliser suelement le cordin d’alimentation et le
type piles dans indiqués dans ce manuel. Ne pas
jeter les piles dans le feu: elles peuvent
exploser. Se con frmer aux règlements pertlnents
quant à l’élimination de poles.
CURIT
SAVE THESE INSTRUCTIONS
CONSERVER CES INSTRUCTIONS
Page 6

Safety Information
LASER SAFETY
This fax contains a page printer which operates by means of a laser. There is no possibility of danger
from the laser, provided the fax is operated according to the instructions in this manual provided.
Since radiation emitted by the laser is completely confined within protective housing, the laser beam
cannot escape from the machine during any phase of user operation.
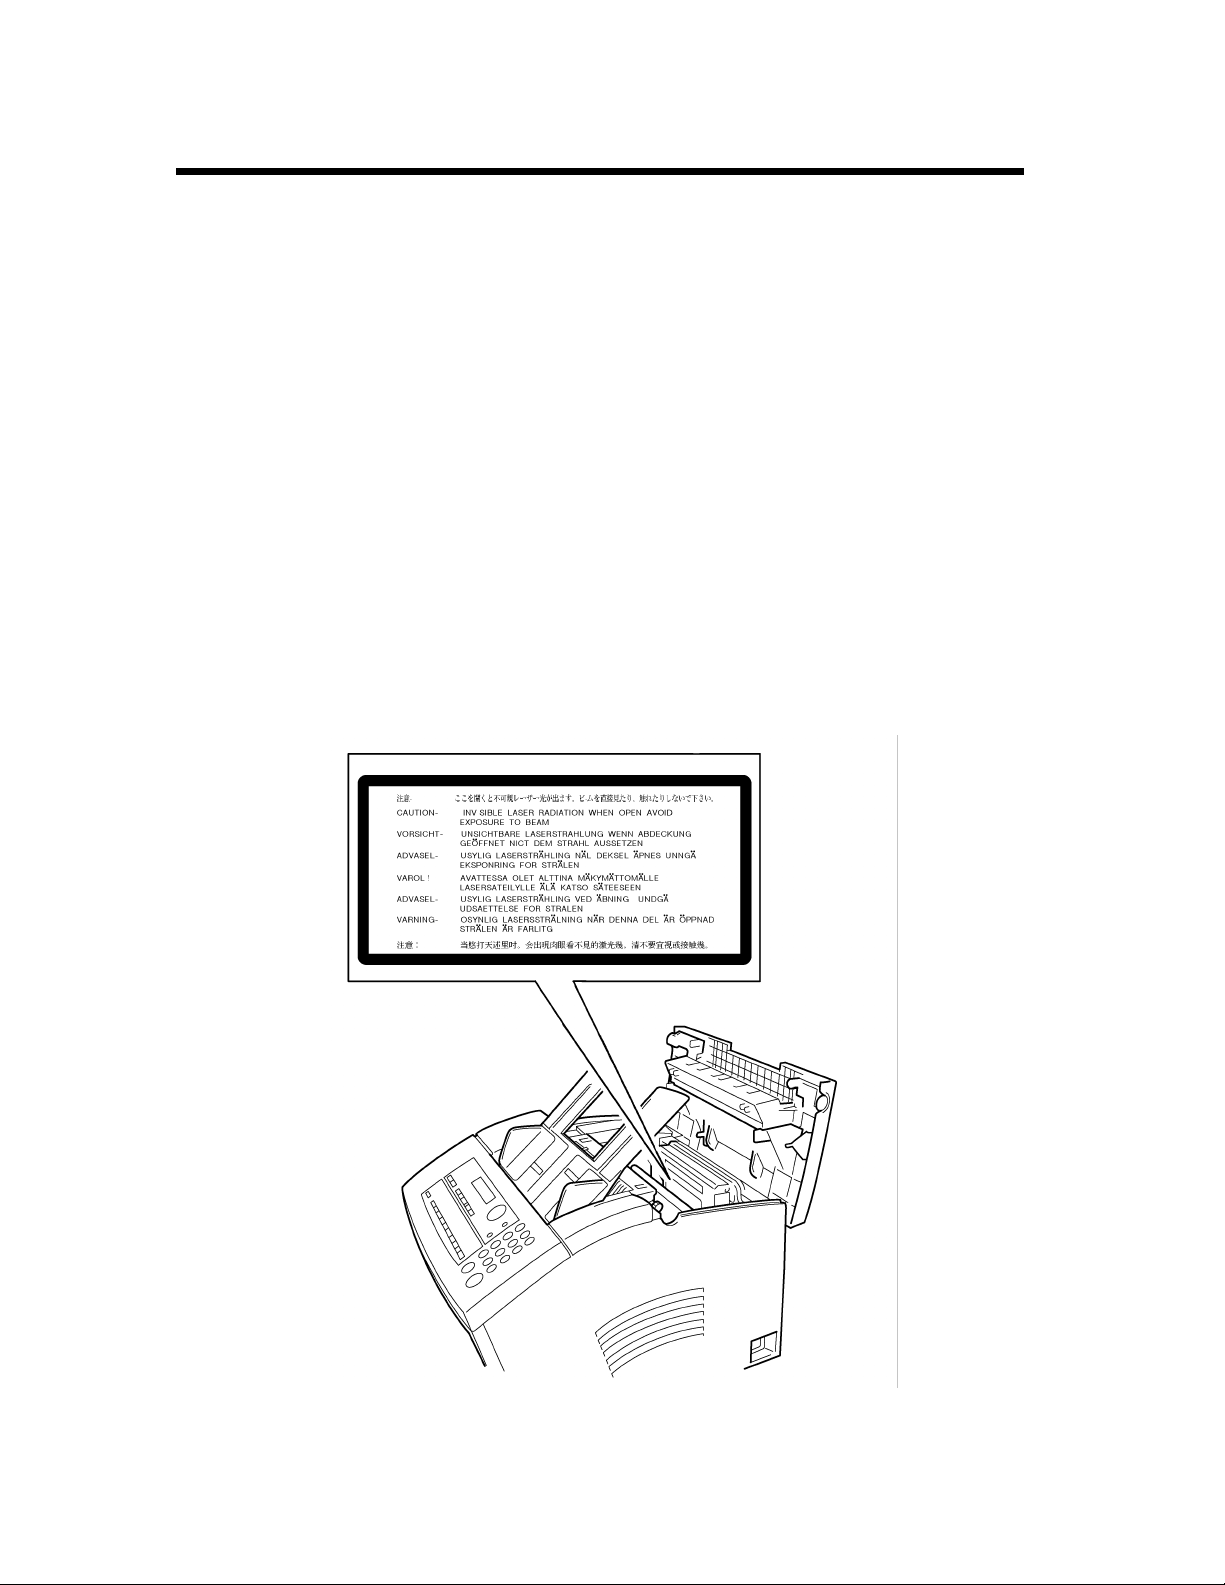
INTERNAL LASER RADIATION (For all Users)
Maximum Radiation power: 7.3 x 10⁻⁴ (W) Wave Length: 770-810 (nm)
This is a Class lllb Laser Diode Assy . that has an invisible laser beam. T he printer head unit is NOT A
FIELD SERVICE ITEM. Therefore, the printer head unit should not be opened under any circumstances.
For United States Users
Laser Safety
This fax is certified as a Class 1 Laser product under the U.S. Department of Health and Human Services (DHHS) Radiation Performance Standard according to the Food, Drug and Cosmetic Act of
1990. This means that the fax does not produce hazardous laser radiation.
v
CDRH Regulations
The Center for Devices and Radiological Health (CDRH) of the U.S. food and Drug Administration
implemented regulations for l aser product s on August 2, 19 76. Complian ce is mandatory for products
marketed in the United States. The label shown below indicates compliance with the CDRH regulations and must be attached to laser products marketed in the United States.
WARNING:
Use of controls, adjustments or performance of procedures other than those specified
in this manual may result in hazardous radiation exposure.
For Other Countries Users
WARNING:
This is a semiconductor laser. The maximum power of the laser diode is 7.3 x 10
length is 770-810 nm.
For Denmark Users
ADVARSEL:
Klass 1 laser produkt der opfylder IEC825 sikkerheds kravene.
Use of controls, adjustments or performance of procedures other than those specified
in this manual may result in hazardous radiation exposure.
-4
W and the wave-
Usynlig laserstråling ved åbning, når sikkerhedsafbrydere er ude af funktion. Undgå
udsættelse for stråing.
Page 7
vi
Safety Information
For Finland, Sweden Users
VAROITUS: Laitteen Käyttäminen muulla kuin tässä käyttöohjeessa mainitulla tavalla saattaa
altistaa käyttäjän turvallisuusluokan 1 ylittävälle näkymättömälle lasersäteiylle.
VARNNING: O m apparaten använd s på annat sätt än i denna bruksa nvisning specificerats, kan
användaren utsättas för osynlig laserstrålning som överskrider gränsen för laser klass 1.
VARO!: A v attaessa ja suojalukitus ohitettaessa olet alttiina näkymättömälle lasersäteilylle. Äjä
katso säteeseen.
VARNING!: Osynlig laserstråining när denna del är öppnad och spärren är urkopplad. Betrakta ej
stråien.
For Norway Users
ADVARSEL:Dersom apparatet brukes på annen måte enn spesifisert i denne bruksanvisning, kan
brukeren utsettes for unsynlig laserstråling som overskrider grensen for laser klasse 1.
Dette er en halvleder laser. Maksimal effeckt til laserdiode er 7.3 x 10
WARNING LABELS
-4
W og bølgelengde er 770-810 nm.
4503U002
Page 8

Safety Information
USER INSTRUCTIONS (For U.S.A. Users)
FCC PART 15 - RADIO FREQUENCY DEVICES WARNING
The following applies to the Facsimile Unit (MINOLTAFAX 1600).
FCC : Declaration of Conformity
Product Type Facsimile
Product Name MINOLTAFAX 1600
Accessories Expansion Memory (Max 4MB)
This Device complies with Part 15 of the FCC Rules. Operation is subject to the following condi tions:
(1) this device may not cause harmful interference, and
(2) this device must accept any interference received, including interference that may cause undesired
operation
Minolta Corporation
101 Williams Drive Ramsey, New Jersey 07446
T e le ph one num ber : 201- 825 -4000
vii
WARNING
NOTE
This equipment has been tested and found to comply with the limits for a Class B digital device, pursuant to Part 15 of the FCC Rules. These limits are des ign ed to pro vide
reasonable protection against harmful interference in a residential installation. This
equipment generates, uses, and can radiat e radio frequ ency ener gy and, i f not inst alled
and used in accordance with the instructions, may cause harmful interference to radio
communications. However, there is no guarantee that interference will not occur in a
particular installation. If this equipment does cause harmful interference to radio or
television reception, which can be determined by one or more of the following measures:
•Reorient or relocate the receiving antenna.
•Increase the separation between the equipment and the receiver.
•Connect the equipment to an outlet on a circuit different from that to which the
receiver is connected.
Consult the dealer or an experienced radio-TV technician for help.
This device must be used with shielded interface cables. The use of non-shielded
cables is likely to result in interference with radio communications and is prohibited
under FCC rules.
The design and production of this unit conform to FCC regulations, and any changes
or modifications must be registered with the FCC and are subject to FCC control. Any
changes made by the purchaser or user without first contacting the manufacturer will
be subject to penalty under FCC regulations.
Page 9

viii
Safety Information
FCC PART 68 - TELECOMUNICATION DEVICES
This equipment complies with Part 68 of the FCC rules. On the rear panel of this equipment is a label
that contains, among other inf ormation the F CC registrati on number and Ringer Equiv alence Number
(REN) for this equipment. If requested, provide this information to your telephone company.
This equipment uses THE FOLLOWING USOC JACKS: RJ11C.
The REN is useful to determine the quantity of devices you may connect to your telephone line and
still have all of those devices ring when your number is called. In most, but not all areas, the sum of
the RENs of all devices should not exceed five (5. 0). To be certain of the number of devices you may
connect to your line, as determined by the REN, you should call your local telephone company to
determine the maximum REN for your calling area.
If your telephone equipment causes harm to the tel epho ne net work, the Telephone Company may discontinue your service temporarily. If possible, they will notify you in advance. But if advance notice
isn’t practical, you will be notified as soon as possible. Y ou will be advised of your right to file a complaint with the FCC.
Your telephone company may m ake changes to its facilities, equipment, operations, or procedures
that could affect the proper operation of your equipment. If they do, you will be given advance no tice
so as to give you an opportunity to maintain uninterrupted service.
If you experience trouble with this equipment, please contact:
Minolta Corporation
101 Williams Drive Ramsey,
New Jersey 07446
U.S.A.
Free Tole Fax No. 800-237-8087
The telephone company may ask you to disconnect this equipment from the network until the problem has been corrected or you are sure that the equipment is not malfunctioning.
This equipment may not be used with a coin service pro vided by th e telephon e comp any. Connection
to party lines is subject to state tariffs. (Contact your state public utility commission or corporatio n
commission for information. )
CUSTOMER INFORMATION FOR PRIVATELY OWNED COIN PHONES
To comply with state tariffs, the telephone company must be given notification prior to connection.
In some states, prior approval of connection must be obtained from the state Public Utility Commis-
sion, Public Service Commission or st ate Corporation Commission.
WARNING FOR THE SETTING OF HEADER AND FOOTER
The Telephone Consumer Protection Act of 1991 makes it u nla wful f or an y p ers on to us e a co mpu ter
or other electronic device to send any message via a telephone fax machine unless such message
clearly contains in a margin at the top or bottom of each transmitted page or on the first page of the
transmission, the date and time it is sent and an identification of the business or other entity, or other
individual sending the message and the telephone number of the sending machine or such business,
other entity, or individual.
In order to program this information into your fax machine, you should complete the following steps.
Refer to Chapter 2 "First Things to Know About Your Fax", page 2-14 to 2-18 in this manual.
Page 10

Safety Information
USER INSTRUCTIONS (For Canadian Users)
INTERFERENCE-CAUSING EQUIPMENT STANDARD
(ICES-003 ISSUE 2) WARNING
The following applies to the Facsimile Unit (MINOLTAFAX 1600).
This Class B digital apparatus meets all requirements of the Canadian Interference-Causing Equip-
ment Regulations.
Cet appareil numérique de la classe B respecte toutes les exigences du Règlement sur le matériel
brouilleur du Canada.
IC CS-03-TELECOMUNICATION DEVICE
NOTICE:
The Industry Canada (IC) label identifies certified equipment. This certification means that the equipment meets certain telecommunications network protective, operational and safety requir ements. The
Department does not guarantee the equipment will operate to the user’s satisfaction.
Before installing this equipment, users should ensure that it is permissible to be connected to the facilities of the local telecommunications company. The equipment must also be installed using an acceptable method of connection. The customer should be aware that compliance with the above conditions
may not prevent degradation of service in some situations.
ix
Repairs to certified equipment should be coordinated by a representative designated by the supplier.
Any repairs or alterations made by the user to this equipment, or equipment malfunctions, may give
the telecommunications company cause to request the user to disconnect the equipment.
Users should ensure for their own protection that the electrical ground connections of the power utility, telephone lines and internal metallic water pipe system, if present, are connected together. This
precaution may be particularly important in rural areas.
CAUTION:
Users should not attempt to make such connections themselves, but should contact the appropriate
electric inspection authority or electrician, as appropriate.
NOTICE:
The
Ringer Equivalence Number (REN)
the maximum number of terminals allowed to be connected to a telephone interface. The termination
on an interface may consist of any combination of devices subject only to the requirement that the
sum of the Ringer Equivalence Numbers of all the devices does not exceed 5.
If you experience trouble with this equipment, please contact:
Minolta Business Equipment (Canada), Ltd.
369 Britannia Road E.
Mississauga, Ontario L4Z 2H5
Tel: (905) 890-6600
assigned to each terminal device prov ides an in dication of
Page 11

x
Safety Information
HEARING AID COMPATIBILITY (For U.S.A. / Canadian Users)
Only a registered handset should be used with this MINOLTAFAX 1600.
Page 12

Safety Information
CE Marking (Declaration of Conformity)
We declare under our sole responsibility that the Facsimile Unit to which this declaration relates is in
conformity with the specifications below. This declaration is valid for the area of the European Union
(EU) only.
Declaration of Conformity for CE Marking
Product Type Facsimile
Product Name MINOLTAFAX 1600
Accessories Expansion Memory (Max 4MB)
Standard Safety: EN60 950 /1992 with amendment 1, 2 and 3 (1995)
Safety of information technology equipment, including electrical Business
equipment
En 60 825-1 / 1994 with A1 /1996
Radiation safety of laser products, equipment classification, requirements and
user ’s guide
EMC:
En55 022 (
Limits and method for measurement of radio disturbance characteristic of
information technology equipment (ITE)
Class B
) / 1994 with A1/1995
xi
EN61000-3-2 (Class A) / 1995
Electromagnetic compatibility (EMC) - Part 3 : Limits, Section 2:
Limits for harmonic currents emissions (equipment input current ≤ 16A per
phase)
Electromagnetic compatibility (EMC) - Part 3 : Limits, Section 3:
Limitation of voltage fluctuations and flicker in low-voltage supply systems
for equipment with reated current ≤ 16A
EN50 082-1 / 1992
Electromagnetic compatibility - Generic immunity standard
Part 1: Residential, commercial and light industry
EC Directive Safety: 73/23/EEC
EMC: 89/336/EEC and 93/68/EEC
Compliance (Australia and New Zealand Only)
WARNING
This is a Class A product. In a domestic environment this product may cause radio
interference in which case the user may be required to take adequate measures.
Page 13

xii
Safety Information
USER INSTRUCTIONS (For U.K. Users)
These facsimiles are approved for connection to the British Telecom public switched telecommunication
systems in accordance with the British telecommunication Act of 1984. The usage should be subject
to the condition set out in these instructions. Any other usage will INVALIDATE this approval.
1. The approval of this facsimile for connection to the public switched telephone networ k (PSTN) is
invalidated if the facsimile is used with or connected to:
(i) internal software that has not been formally accepted by BABT
(ii) external control software or external control apparatus which causes the operation of the facsimiles to contravene BABT requirement.
2. This facsimile is approved for the use of the following facilities: Tone Dialing (DTMF).
Automatic Clearing.
Automatic answering (Facsimile with auto answer to ITU-T T. 30).
Last Number Redial
Automatic call initiation.
Automatic dialing facilities.
Automatic multiple repeat dial attempts.
Series connection for ‘Off Hook’ detection.
Memory dialing.
Any other usage will INVALIDATE the approval of the apparatus if as a result it then ceases to conform to the standard against which approval was granted.
3. This facsimile is suitable for connection to exchange lines on PSTN directly or via a compatible private branch exchange.
4. It cannot be guaranteed that the facsimile will operate under all possible conditions of connection to
compatible PBXs. Any cases of difficulty should be referred in the first instance to the supplier of the
apparatus.
5. Connection to PSTN must not be hardwired.
The connection to PSTN must be disconnected before the mains plug is removed.
6. The facsimile may be used on PSTN employing Loop disconnect or MF signalling. However, please
note as follows:
Although the facsimile can use either Loop disconnect or DTMF signaling, only the performance of
the DTMF signaling is subject to regulatory requirements for correct operation. It is therefore
strongly recommended that the facsimile is set to use DTMF signaling for access to public or private
emergency services if it is used with a telephone. DTMF signaling also provides faster call set up.
7. Ringer Equivalent Number (REN) for the facsimile is 3.
The REN relates to the performance of the facsimile when used in parallel with other items of terminal equipment. The REN is a customer guide indicating approximately the maximum number of
equipment that should be connected in parallel simultaneously to the line.
To determine the maximum number of items that can be connected in parallel simultaneously to an
exclusive line, please add the REN values of each item connected to the exclusive line. The sum
should not exceed the maximum REN value of 4. For the purposes of the calculation, the REN of a
terminal equipment rented or b rou ght fr om B T pl c. s hou l d be as sumed to be REN of 3.0 unless ot her wise specif ie d.
8. When other telephone apparatus is connected in parallel with the facsimile, it must be set on Tone
dialing (DTMF) mode only.
9. When connecting a telephone onto the same line or PBX extension as this facsimile, the serial socket
on the LJU unit (on the unit cord) must be used.
Page 14

xiii
Safety Information
10. Please be advised that should another telephone device be used connected to the PSTN via the serial
socket on the LJU unit, then problems may be experienced in the following ways.
(1) Difficulty making calls.
(2) Problems in telephone conversation sometimes experienced by both parties. Should difficulties as
described above be experienced, then the supplier of the facsimile should be contacted for assistance
and not the network operator.
11. The facsimile is not suitable as an extension to a pay phone or as a 1 + 1 carrier system.
12. To this machine on a private exchange (PABX) extension, insert a pause or pauses in the autodial
sequence to allow your P ABX unit time to connect with the public service telephone network (an outside line) before dialing continues. For example you may require a sequence of 9 "PAUSE" 0908
214315 to transmit a fax message to our Keynes Office.
To insert pause, press the "PAUSE" key. One key operation causes a pause of 3.5 seconds in the dialing sequence.
13. Use of the facsimile to make overseas fax transmissions, it may be necessary to insert a pause in the
autodial sequence when sending trans missions overseas in order that the inter national exchanges have
time to interconnect. Fo r ex ampl e y ou may require a sequence of 01 0 "PAUSE" 1555677899 to trans mit a fax message to your New York office.
To insert a pause, press the "PAUSE" key. One key operation causes a pause of 3.5 seconds in the
dialing sequence.
MAINS PLUG WIRING INSTRUCTIONS
This equipment is fitted with a moulded type mains plug incorporating a detachable fuse cover; under
no circumstances should the plug be used without the fuse cover fitted. In the unlikely event of the
socket outlet in your home not being compatible with the plug supplied, cut off the main plug and fit
an appropriate type observing the wiring code blow.
DANGER: The fuse from the cut-off plug should be removed and the plug should be disposed of
in a safe manner. Under no circumstances should the cut-off plug be inserted into a
socket outlet as a serious electric shock may occur.
If you are not sure how to do this, get help from a qualified electrician.
IMPORTANT
The wires in this mains lead are coloured in accordance with the following code:
GREEN-AND-YELLOW: Earth
BLUE: Neutral
BROWN: Live
As the colours of the wires in the mains lead of this apparatus may not correspond with the coloured
markings identifying the terminals in your plug, proceed as follows. The wire which is coloured
GREEN-AND-YELLOW must be connected to the terminal in the plug which is marked by the letter
E, or by the safety earth symbol, or coloured green or green and yellow.
The wire which is coloured BLUE must be connected to the terminal which is marked with the letter
N or coloured black.
The wire which is coloured BROWN must be connected to the terminal which is marked with the letter L or coloured red.
This apparatus must be protected by a 13A fuse in the mains plug or distribution board.
"WARNING: THIS EQUIPMENT MUST BE EARTHED."
Page 15

xiv
Safety Information
USER INSTRUCTIONS (For New Zealand)
Warnings
• Immediately disconnect the equipment should it become physically damaged, and arrange for its disposal or repair before reconnecting.
• Disconnect the Telecom Network connection before disconnecting the Power conn ection pr ior to relo cating the equipment, and reconnect the Power first.
• This equipment may not necessarily provide for the effective hand-over of a call to or from a telephone connected to the same line.
• Not all Standard telephones will respond to incoming ringing when connected to the extension socket
at the rear of the equipment.
• As there is no audio moni toring o f d ialing or calling procedures, please doub le ch eck th at yo u are dialing a valid fax number, especially in the event of no response to redials.
WARNING NOTICE:
No ‘111’ or other calls can be made from this device during a mains power failure
Use of pulse dialing, when this equipment is connected to the same line as other equipment, may
give rise to bell tinkle or noise and may also cause a false answer condition. Should such problems occur, the user should not contact the telecom faults service.
OZONE RELEASE (For all Users)
During printer operation, a small quantity of ozone is released. This amount is not large enough to
harm being adversely. However, be sure the room where the fax is being used has adequate ventilation, especially if you are printing a high volume of ma terials, or if t he fax is being us ed continu ously
over a long period.
Page 16
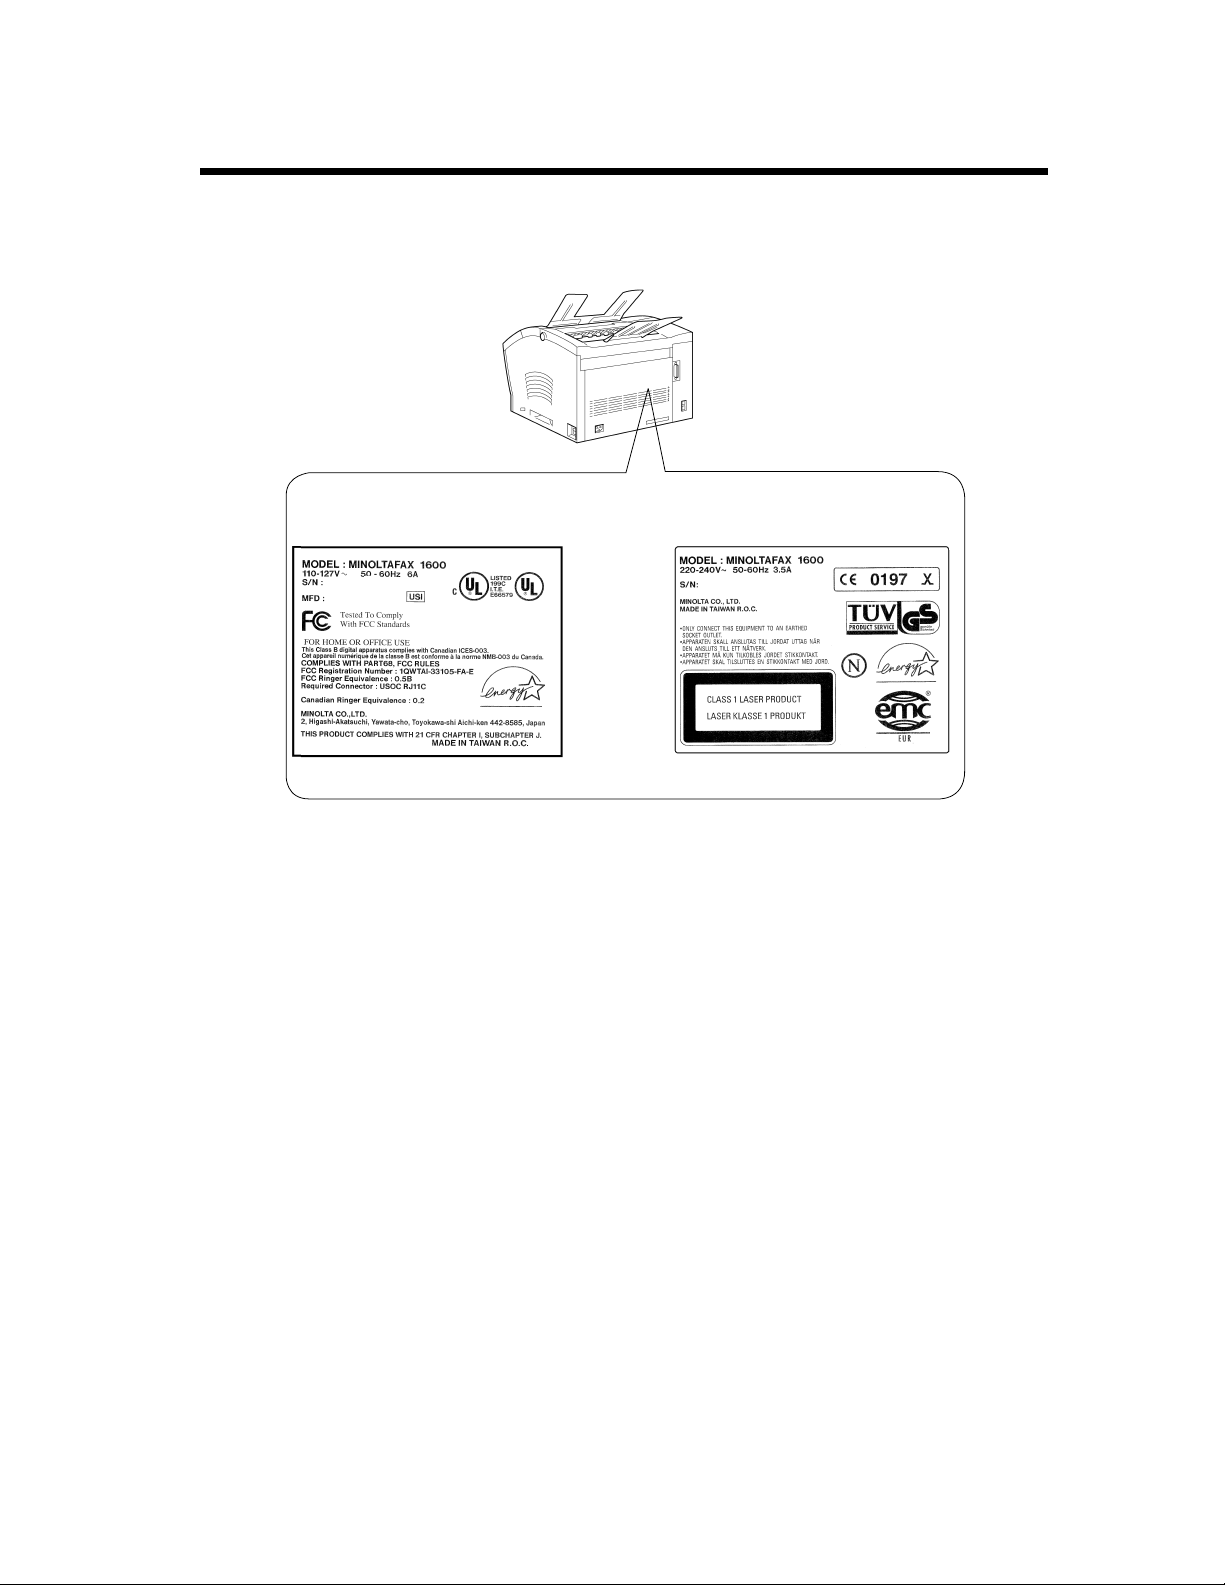
WARNING LABELS
For U.S.A. / Canadian Users For European Users
xv
Safety Information
Page 17
xvi
Stop
1
4
7
Speed Dial
Redial/Pause
GHI
PQRS
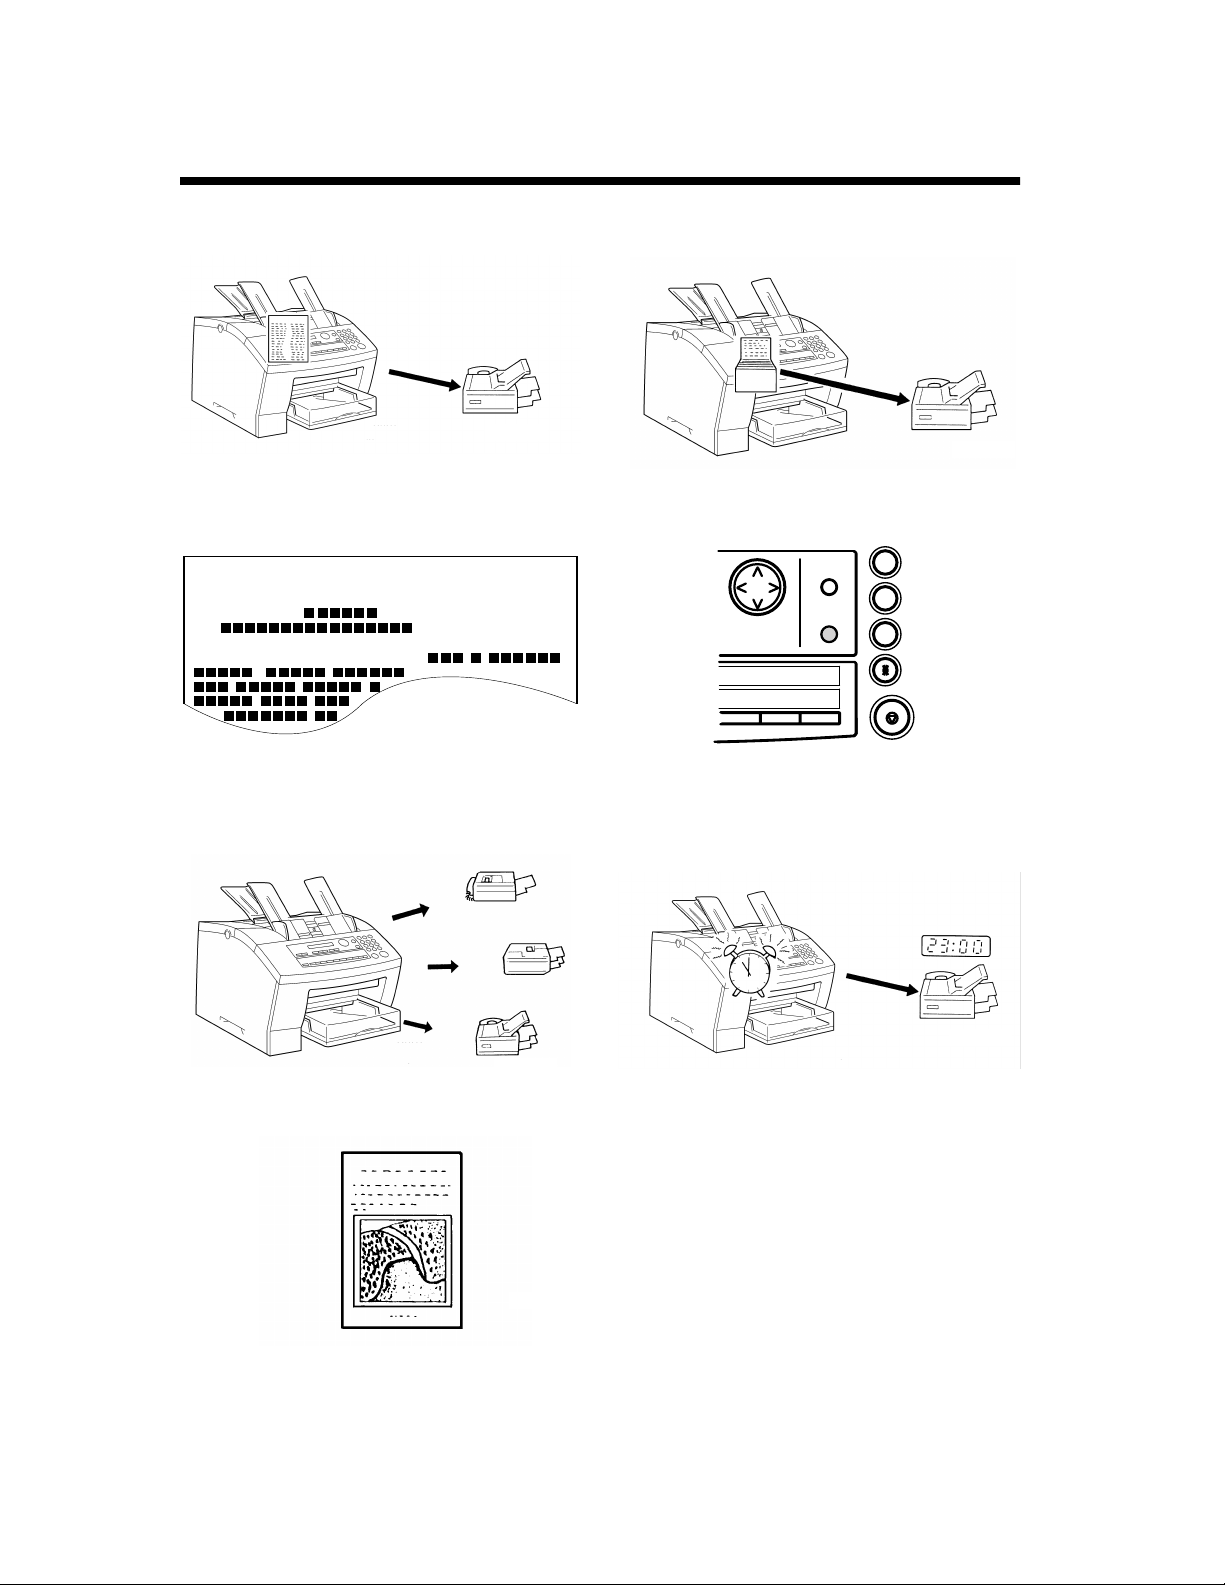
Illustrated Fax Function Index
Doing it simply
Basic transmitting procedure ➮ pp. 3-1, 3-5
4503U004
Registering sender ID
Using the Header ➮ p. 5-17
JUN. 08 '96 (MON) 15:38 TOKYO 03 - 5423 - 7801 002 P 01
ATTENTION : MR. .
RE :
FROM :
,
.
4503U005
To multiple destinations
Transmitting a document to two or more destinations ➮ p. 4-3
Time saver
Using the memory function ➮ p. 6-1
4503U006
To same destination again
Retrying the Same Party ➮ p. 6-3
4503U008
At a specific time
Transmitting a document at a specified time
➮ p. 4-11
Transmitting clear photos
Setting resolution ➮ p. 3-2
4503U007
4258U405
4503U009
Page 18
xvii
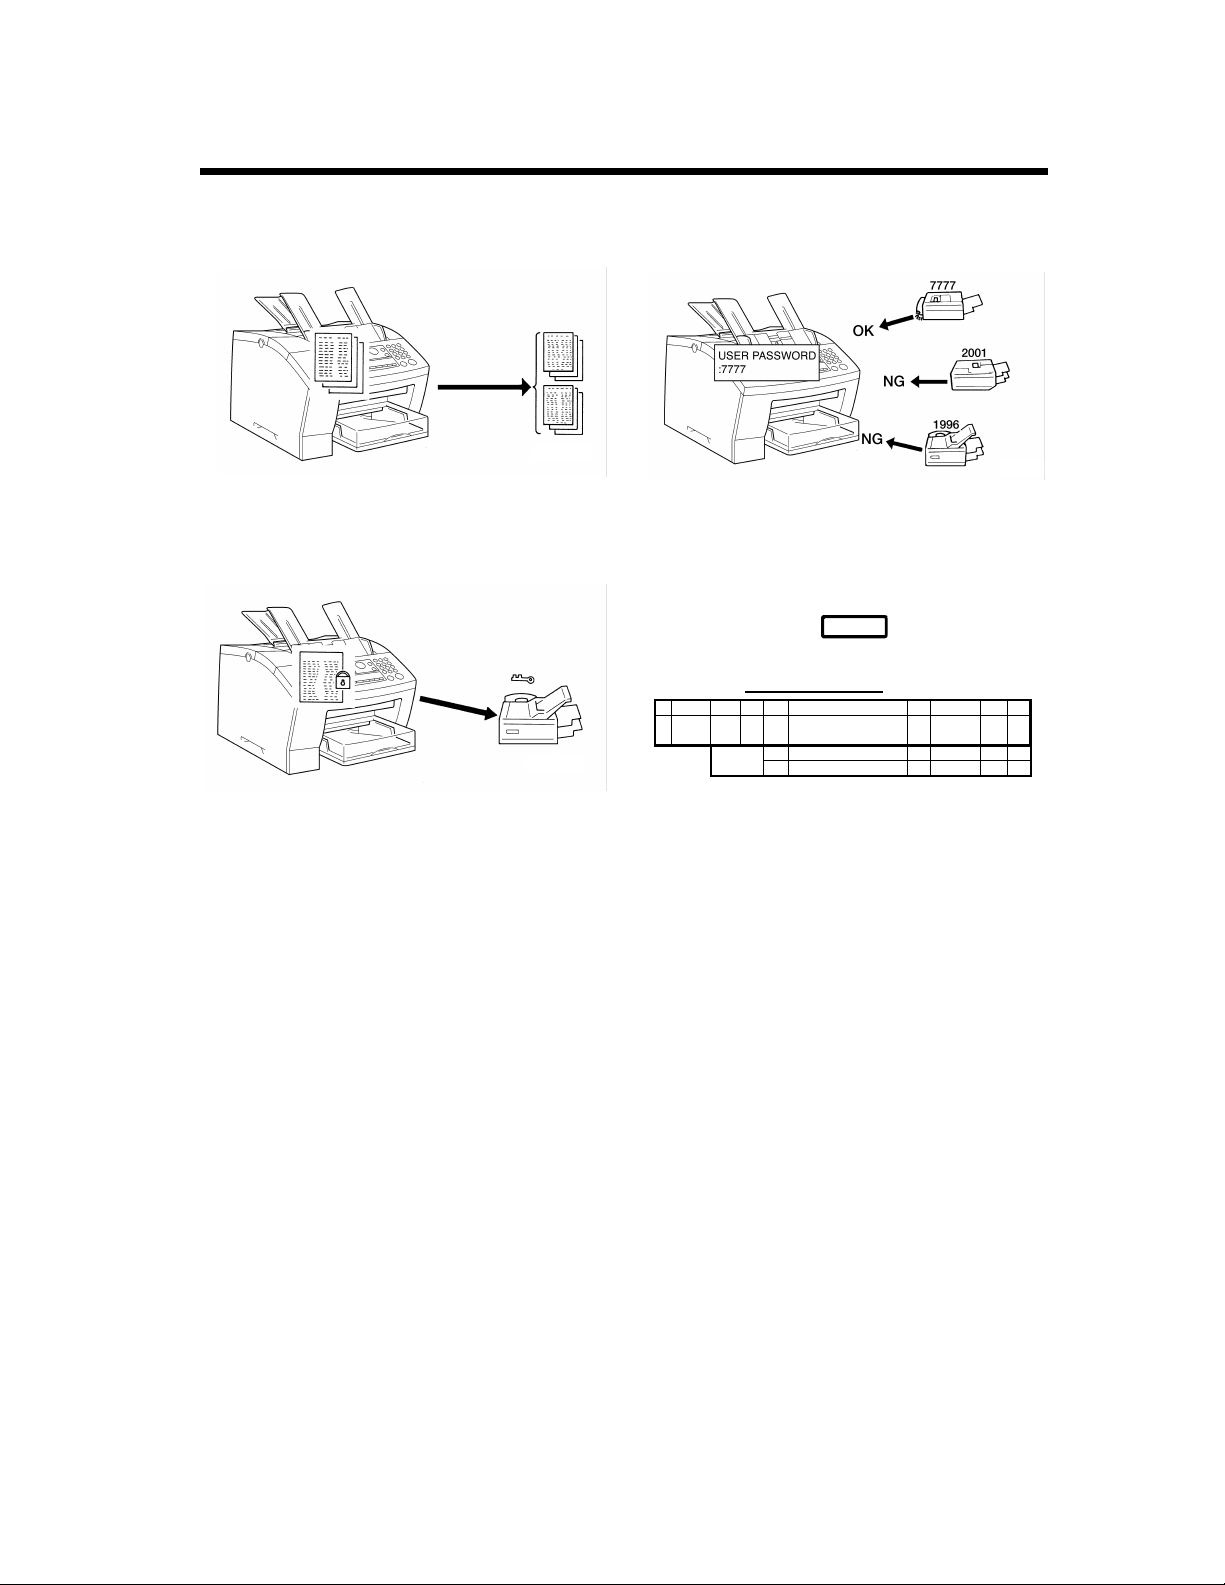
Illustrated Fax Function Index
Wanting to make copies
Making copies ➮ p. 7-1
4503U012
To a particular person
Transmitting a document confidentially to a particular person ➮ p. 4-14
Protecting you from reception of junk mail
Receiving a document only when the password
matches ➮ p. 5-25
4503U011
Wanting communication results
• Confirm ➮ p. 6-6
• Activity report ➮ pp. 9-1, 9-6
ConfirmConfirm
ACTIVITY REPORT
NO. COUNTER DATE TIME TX/RX DESTINATION STATION PAGE COMM. TIME MODE RELT
1 T/ 000001 SEP.17 09 : 30 TX OSAKA 1 0 H 01' 25" STD OK
TOTAL
03 532 3276 ECM
TX
RX
100 H 01' 25"
0 H 00' 00"
4503U010
4503U013
Page 19

xviii
Illustrated Fax Function Index
Page 20

xix
Using This Manual
Organization
This manual consists of 13 chapters. Chapters 1 and 2 give the basic info rmation ab out the f ax, chap ter 3
introduces the basic functions of the fax operation, chapters 4 through 10 detail the various advanced
functions the machine offers, and chapters 1 1 thro ugh 13 cover maintenance of the fax machine and s ome
troubleshooting tips.
Please read chapters 1 through 3 before attempting to use your fax.
Reading these chapters will help you understand the installation and bas ic operation of y our fax machine.
Read chapters 4 through 10 as necessary when you want to use the more advanced functions the machine
offers. An individual explanation is given o f each function, allowing you to read only tho se pages pe rtaining to the function you want to use.
Chapters 11 and 12 are to be read when you need to add paper, service or troubleshoot the machine. An
explanation is given of each operation, allowing you to read only those pages dealing with the operation
to be performed.
Chapter 13 contains a quick reference overview of the basic operating procedure, specifications, and
index.
Locating the Information You Need
Using the Illustrated Fax Function Index
The most basic fax functions are given in easy-to-understand illustrations.
Using the Table of Contents
Many headings are operationally-oriented so that you can easily and quickly locate the information you
need as long as you know what you want to do. A particular function name is also given in parentheses
following each of these headings. The name is helpful when you have in mind such function names as
Redial and Mailbox Transmission.
Using the Index
At the back of the book is an alphabetical index which is function-, item-, or term-oriented; i.e., if you
know the name of a particul ar fun ction o r item, use this section t o find a reference t o the ap propriat e page
number.
Page 21
xx
Using This Manual
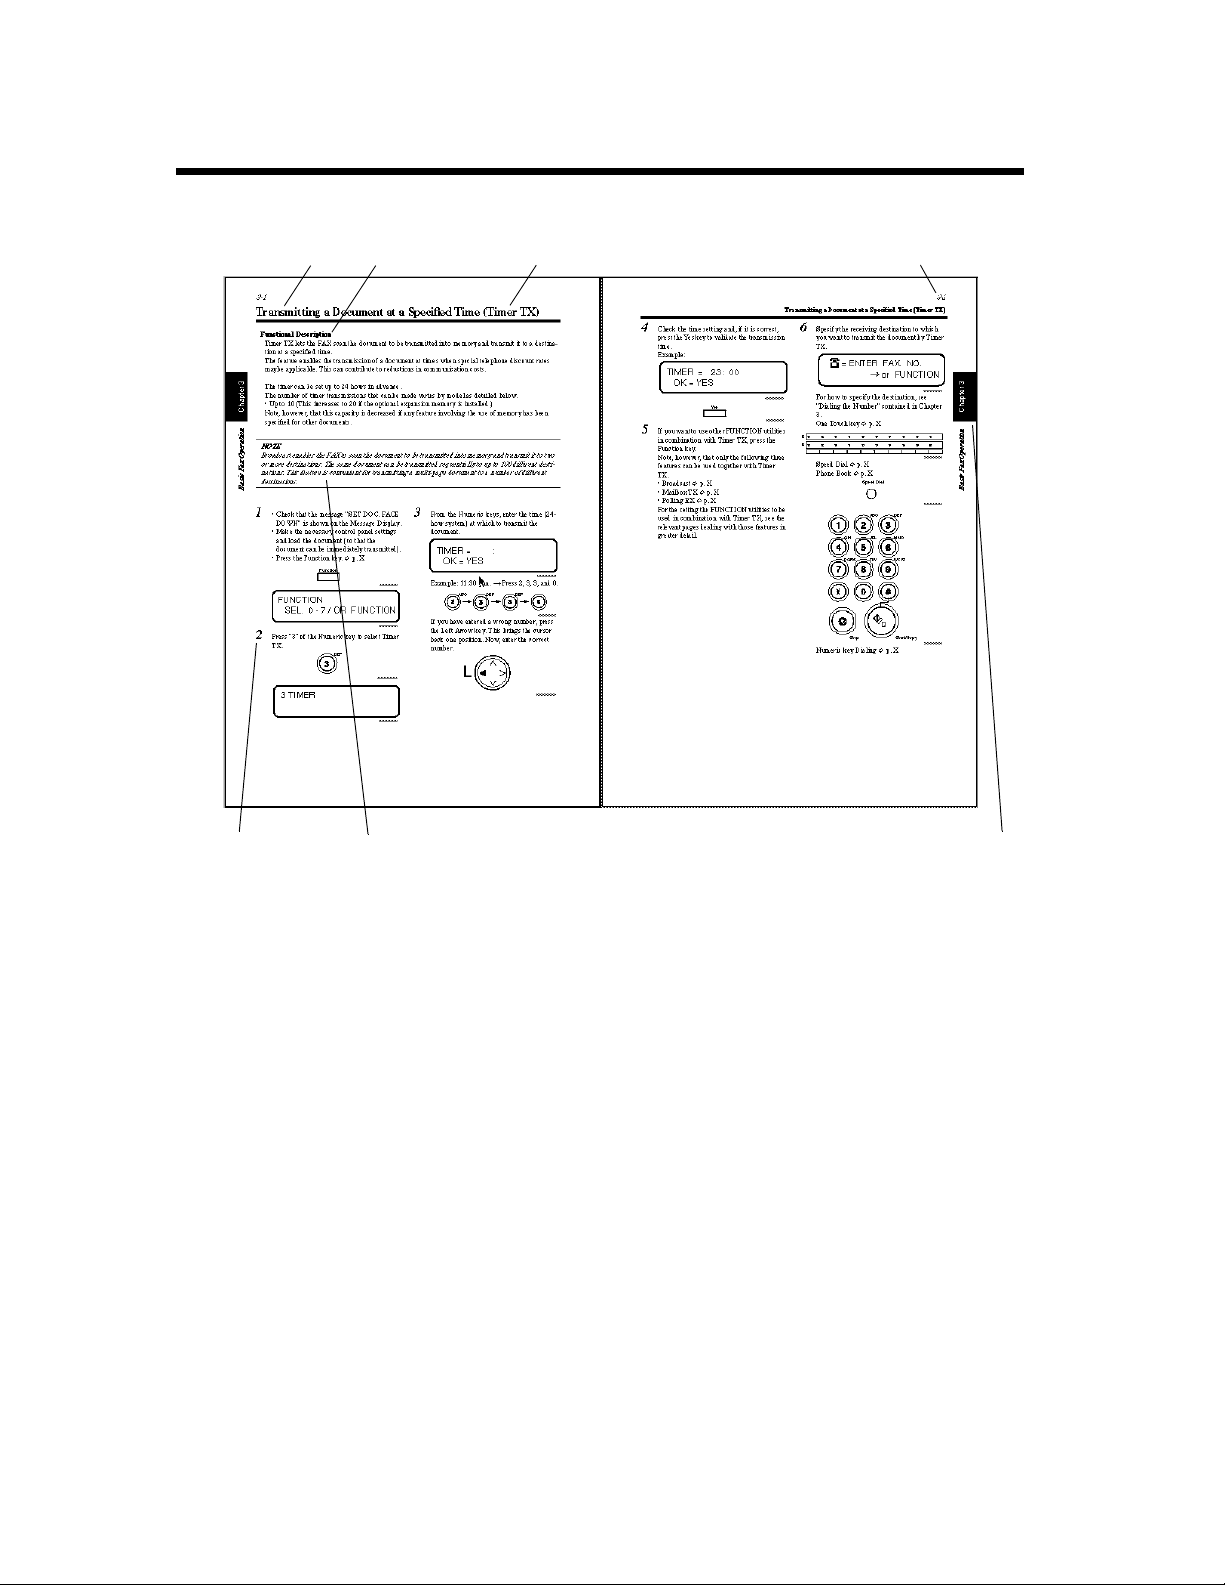
Page Layout
1 2
3 4
65 7
1
Operational heading
2
Function description:
Gives an overview of the function operation
covered herein.
3
Function name:
The descriptive name used to identify a particular
fax operation .
4
Page number:
Used to locate your page.
5
Step number:
Sequential number to follow in performing the
procedure.
6
Note:
Calls your attention to a particul ar po int in t he pr ocedure.
7
Index:
Used to locate your chapter quickly.
Page 22

xxi
Highlights
This FAX is a laser plain paper facsimile being equipped with h i gh speed 14.4 kbps modem, 8 ppm print ing mechanism, quick scanning and dual access capability, you’ve got high productivity for office job.
High Productivity
14.4 kbps High-Speed modem
• This FAX’s high speed 14.4 kbps modem transmits documents at an impressive 6seconds per page.
Quick Scanning
• With Quick Scanning, once the text is r ead into memory, you can go back to your seat with documents
without waiting for completion of transmission.
Full Dual Access Function
• The time-saving Full Dual Access Function, let you scan documents into memory for transmission
even as faxes are being sent from or received into me mory, or printed out on paper. And you can print
out without hindering the reception of faxes into memory. This helps you spend less wasted time in
front of the fax and more work time elsewhere.
0.75 MB Memory (2 MB/4 MB optional)
• A standard 0.75MB of memory can store up to 45 pages*. Capacity is up gradable to a maximum of
4.75 MB(285pages) with optional memory.
*ITU No.1 Chart at a standard mode.
250-Sheet Paper Tray & 200-Sheet Output Tray
• High-Volume Paper capacity- Store a generous 250 sheets of paper in the paper feeding tray for heavy
office use. Also up to 200 sheets can be accommodated when receiving.
One-Touch Dialing (20 numbers) & Speed Dialing (100 numbers)
• To cut down on dialing time, use 20 one touch key s or 100 two- digit speed dialing codes for the numbers you most frequently call.
Easy Operation
Two-Component Cartridge
• Replacing an old cartridge for a new one is easy. The toner and drum cartridge are separate, so the
more durable drum cartridge can fully used to its maximum life span.
High Image Quality
Super Fine Micro-Toning (Super Fine-MT) System
• With Minolta’s unique Super Fine Micro-Toning (Super Fine-MT) developing system, the
Minoltafax1600 assures printout with surprisingly distinct characters and detailed imaging composed
of fine 7-micron toner particles.
64-Level Halftone
• For vivid, detailed reprodu ctions of pictur es, illus tration s or other g raphi c information, achi eve breath taking result with 64 natural halftone levels that accommodate the lig htest and darkest of tones.
PC Connectivity
Standard RS-232C Serial Interface & Class 1 Compatible for PC Fax
• The standard RS-232C Serial interface is equipped and Class1 standard is supported. Once recommended application software is installed, PC fax, PC Printing, PC Scanning and more advanced applications like SUB (Sub addressing), PWD (Passwor d), SE P (Selective Polling) -ITU standard- become
available.
Page 23

xxii
Highlights
Office-and Environment-Friendly
Energy Star Compliant
• With power save mode, unnecessary energy consumption is cut off.
Page 24

Table of Contents
Using the Machine Properly............................................................ i
Safety Information......................................................................... iv
Illustrated Fax Function Index..................................................... xvi
Using This Manual...................................................................... xix
Highlights.................................................................................... xxi
Chapter 1 Installation
Preparation for Installation.......................................................... 1-1
Installation Site................................................................................ 1-1
Power Source................................................................................... 1-1
Grounding........................................................................................ 1-1
Space Requirements......................................................................... 1-2
Precautions for Use...................................................................... 1-3
Operating Environment.................................................................... 1-3
Using the Fax Properly.................................................................... 1-3
Care of Fax Supplies........................................................................ 1-4
Setting-Up.................................................................................... 1-5
Setting up the Fax.................................................................................... 1-5
Connecting to the Telephone Line.......................................................... 1-8
Basic Connection Procedure.......................................................................... 1-8
xxiii
Chapter 2 First Things to Know About Your Fax
Fax Parts and Accessories ........................................................... 2-1
Control Panel Keys...................................................................... 2-3
Numeric Keys.......................................................................................... 2-4
One Touch Keys...................................................................................... 2-5
Turning ON and OFF the Fax ..................................................... 2-6
Turning the Fax ON................................................................................ 2-6
Turning the Fax OFF............................................................................... 2-7
Message Display.......................................................................... 2-8
How the Screen is Organized.................................................................. 2-8
Initial Screen.................................................................................................. 2-8
Selection Screen............................................................................................. 2-9
Icons.................. ... .... ............................................... ..................................... 2-11
Adjusting Brightness of the Message Display...................................... 2-12
What to Do First Before Making Any Communications
(Initial User Data)...................................................................... 2-13
Setting the Machine Operation (Telephone Line: Tone/Pulse)............. 2-13
When Pulse is selected................................................................................. 2-13
Setting the Initial User Data.................................................................. 2-14
Opening the Initial User Data Screen........................................................... 2-14
Setting Date & Time.................................................................................... 2-14
Setting Your Fax Number (User Fax Number)............................. .... ........... 2-15
Setting Your Name (User Name)................................................................. 2-17
Setting Your Password (User Password) ..................................................... 2-18
Registering One Touch Dial and Speed Dial Stations............... 2-19
Page 25

xxiv
Table of Contents
Dial Registration Mode......................................................................... 2-19
Fax No.................................... ...... ......................................................... 2-22
When a Private Branch Exchange (PBX) is Being Used...................... 2-22
Name..................................................................................................... 2-23
Modem Speed ....................................................................................... 2-24
Telephone Number List ........................................................................ 2-25
Chapter 3 Basic Fax Operation
How to Transmit a Document - Basics........................................ 3-1
Overview of the Basic Transmission Procedure..................................... 3-1
Direct Communication and Memory Communication............................ 3-1
Selecting the Resolution.......................................................................... 3-2
Loading the Document............................................................................ 3-3
Documents Suitable for Transmission........................................................... 3-3
Loading the Document .................................................................................. 3-4
Dialing the Number (Transmitting the Document)................................. 3-5
Using the Numeric keys (Manua l Dialin g)............................................. ... .... 3-5
When a PBX is Being Used............................ ... .... ......................... ............... 3-6
If the Line is Busy......................................................................................... 3-7
If the Transmission Fails ............................................................................... 3-7
Using the One Touch Dial Function.............................................................. 3-7
If the Line is Busy......................................................................................... 3-8
If the Transmission Fails ............................................................................... 3-9
Using the Speed Dial Function...................................................................... 3-9
If the Line is Busy .................................. ..................................................... 3-10
If the Transmission Fails ............................................................................. 3-11
Using the Combination Dial Function......................................................... 3-11
Using the Phone Book Function.................................................................. 3-13
Phone Book (List)........................................................................................ 3-13
If the Line is Busy .................................. ..................................................... 3-14
If the Transmission Fails ............................................................................. 3-15
Phone Book (Search)................................................................................... 3-15
If the Line is Busy .................................. ..................................................... 3-17
If the Transmission Fails ............................................................................. 3-17
How to Receive a Document - Basics....................................... 3-18
Overview of the Basic Reception Procedure........................................ 3-18
Reception Mode Overview ................................................................... 3-18
Direct Communication and Memory Communication................................ 3-18
Print Mode Overview............................................................................ 3-19
Full Size Priority mode................................................................................ 3-19
Reduction Priority mode...................... ........................................................ 3-20
100% Reception mode................................................................................. 3-20
*Divide-and-Print Func tio n............................... .... ......................... ............. 3-20
Selecting the Reception Mode .............................................................. 3-21
Selecting the Print Mode....................................................................... 3-21
Operation at Reception.......................................................................... 3-22
Receiving a Document in the Fax Mode..................................................... 3-22
Receiving a Document in the Tel Mode (Manual RX mode)...................... 3-23
How to Use Your Fax as a Telephone Set................................. 3-24
Making a Telephone Call...................................................................... 3-24
Receiving a Telephone Call.................................................................. 3-25
Page 26

Table of Contents
Chapter 4 Using the Enhanced Utilities 1 (FUNCTION Utilities)
Using the FUNCTION Utilities ...................................................4-1
Overview of the FUNCTION Utilities .................................................... 4-1
Setting the FUNCTION Utilities............................................................. 4-2
Transmitting a Document to Two or More
Destinations (Broadcast) .............................................................4-3
Specifying the Destinations Using One Touch Keys..................................... 4-4
Selecting Destinations Using Speed Dial....................................................... 4-5
Selecting Destinations Using Phone Book (List)........................................... 4-5
Selecting Destinations Using Phone Book (Search)...................................... 4-6
Specifying the Destination with the Numeric keys........................................ 4-8
Checking the Selected Destinations............................................................... 4-9
Transmitting a Document at a Specified Time (Timer TX)...... 4-11
Transmitting a Document Confidentially to a Particular
Person (Mailbox TX)................................................................. 4-14
Printing the Document Transmitted by Mailbox TX
(Print Mailbox RX).................................................................... 4-17
Programming a Mailbox ID.................................................................. 4-17
Deleting a Mailbox ID........................................................................... 4-19
Printing the Mailbox Document........................................... ................. 4-20
Letting the Other Party Execute the Transmission of Your Document
(Polling TX)............................................................................... 4-21
For Single Mode............................................... .... ... ..................................... 4-22
For Multi Mode.......................... .... .............................................................. 4-23
Controlling the Transmission of a Document from Another Party
(Polling RX) .............................................................................. 4-24
Specifying the Parties Using One Touch Keys............................................ 4-25
Specifying the Parties Using Speed Dial...................................................... 4-25
Specifying the Parties Using Phone Book (List).......................................... 4-26
Specifying the Parties Using Phone Book (Search)..................................... 4-27
Specifying the Destination with the Numeric keys...................................... 4-28
Checking the Specified Parties You Poll..................................................... 4-29
Canceling A Transmission Reservation (Cancel Reservation) . 4-31
Checking the Documents Reserved for Transmission .......................... 4-31
Canceling the Document Reserved for Transmission........................... 4-32
If CONF. is Shown....................................................................................... 4-33
xxv
Chapter 5 Using the Enhanced Utilities 2(SET Utilities for Dialing and
Transmission/Reception)
Using the SET Utilities................................................................ 5-1
Overview of the SET Utilities................................................................. 5-1
List of SET Utilities....................................................................................... 5-1
Setting the SET Utilities.......................................................................... 5-3
Transmitting a Document to Parties in a Group (Group Dial)................ 5-4
Registering for Group Dial............................................................................. 5-5
Transmitting a Document Using Group Dial............................................... 5-11
If the Line is Busy:............................ .... .... ......................... .......................... 5-12
If the Transmission was Unsuccessful:........................................................ 5-12
Page 27

xxvi
Table of Contents
Transmitting a Document Using a Preset Transmission
Function (Program Dial)............................................................ 5-13
Programming for Program Dial................................. ... ............................... 5-13
Transmitting a Document using Program Dial............................................ 5-15
Setting of TX Operations........................................................... 5-16
Transmitting to Password-Secured Destinations (Password TX)......... 5-16
Printing Sender Information for the Receiving End (Header).............. 5-17
Setting of RX Operations .......................................................... 5-19
Storing the Document Received in Memory (Memory RX Mode) ...... 5-19
Programming for Memory RX Mode............................... ... ........................ 5-19
Printing the Document Received by Memory RX Mode............................ 5-21
Memory Substitution Recep tio n................................ ... .... ........................... 5-22
Storing the Document Received in Memory (Multi Page Print) .......... 5-23
When Multi Print or Sort Print is Selected.................................................. 5-24
Reception from Password-Secured Parties (Password RX).................. 5-25
Printing Reception Data for Your End (Footer).................................... 5-26
Chapter 6 Using the Enhanced Utilities 3
Transmitting a Document Using Memory (Memory TX)........... 6-1
Retrying the Same Destination (Redial TX)................................ 6-3
Using Manual Redial .............................................................................. 6-3
Verifying Audible Signal for Connection Before Transmitting a
Document (Manual Communication).......................................... 6-4
Manual Transmission.............................................................................. 6-4
Manual Reception................................................................................... 6-5
Checking the Last 60 Communication Results (Confirm).......... 6-6
Transmitting a Document Using External Extensions
(External)..................................................................................... 6-8
Chapter 7 Making Copies
Making a Single Copy (Single Copy).......................................... 7-1
Using the Convenient Copy Function (Convenient Copy).......... 7-3
Selecting a Zoom Ratio ................................................................................. 7-4
Setting the No. of Copies to be Made............................................................ 7-5
Setting Multi Copy.................................................................................. 7-5
Setting Multi Sort Copy................................................................................. 7-6
Chapter 8 Setting the SET Utilities
List of the SET Utilities............................................................... 8-1
Setting the SET Utilities.............................................................. 8-2
Outline of the SET Utilities......................................................... 8-3
1. Dial Registration................................................................................. 8-3
1. One Touch Dial......................................................................................... 8-3
2. Speed Dial.................................................................................................. 8-3
3. Group Dial................................................................................................. 8-3
4. Program Dial.............................................................................................. 8-3
2. Scanning & Printing............................................................................ 8-3
Page 28

xxvii
Table of Contents
1. Resolution .................................. ................................................................ 8-3
2. Scan Contrast.............................................................................................. 8-3
3. I/T Sep. (Image/Text Separation)................. .... ... ....................................... 8-3
4. Print Density............................................................................................... 8-4
5. Rec. Paper Size........................................................................................... 8-4
3. TX Operation....................................................................................... 8-4
1. Page Count TX........................................................................................... 8-4
2. Password TX.............................................................................................. 8-4
3. Header......................... ............................................................................... 8-4
4. RX Operation ...................................................................................... 8-4
1. Memory RX Mode..................................................................................... 8-4
2. No. of Rings.................... ... .... ................................................................. ... 8-4
3. Multi Page Print......................................................................................... 8-4
4. Reduction RX............................................................................................. 8-5
5. Confidential Mailbox ................................................................................. 8-5
6. Password RX.............................................................................................. 8-5
7. Footer .......................... .... ........................................................................... 8-5
5. Machine Operation . ............................................................................. 8-5
1. Power Save Mode........ .... ........................................................................... 8-5
2. LCD Contrast............................................................................................. 8-5
3. Tone/Pulse.............................. .................................................................... 8-5
4. Buzzer Volume........................................................................................... 8-6
5. G3 ECM..................................................................................................... 8-6
6. Reporting ............................................................................................. 8-6
1. Activity Rep............................................................................................... 8-6
2. Reserv. Rep................................................................................................ 8-6
3. TX/RX Result Rep..................................................................................... 8-6
7. Initial User Data.................................................................................. 8-6
1. Date & Time............................................................................................... 8-6
2. User Fax No............................................................................................... 8-6
3. User Name.................................................................................................. 8-6
4. User Password............................................................................................ 8-6
8. PC I/F .................................................................................................. 8-7
Chapter 9 Printing Reports
Outline of Reports ....................................................................... 9-1
List of Reports......................................................................................... 9-1
Printing a Report ..................................................................................... 9-1
Auto Printing.................................................................................................. 9-1
4503UAIManual Printing............................................................................... 9-2
Description of Each Report ......................................................... 9-3
TX Result Report .................................................................................... 9-3
TX Result Report .................................................................................... 9-4
RX Result Report.................................................................................... 9-5
Telephone No. List.................................................................................. 9-6
Activity Report................................... ..................................................... 9-6
Memory Data List ................................................................................... 9-7
Memory Image Print............................................................................... 9-8
Mailbox List............................................................................................ 9-9
Key Setting List....................................................................................... 9-9
Broadcast Reservation Report............................................................... 9-10
Polling Reservation Report................................................................... 9-10
Page 29

xxviii
Table of Contents
Machine Status List............................................................................... 9-11
Power Failure Report............................................................................ 9-13
Backup RAM Error Report................................................................... 9-14
Chapter 10 Functions Performed Using a PC
Outline of Functions Performed Using a PC............................. 10-1
Printer Function..................................................................................... 10-1
Scanner Function................................................................................... 10-1
PC Fax Function.................................................................................... 10-1
PC mode setting items........................................................................... 10-1
System Requirements.................................................................................. 10-2
Chapter 11 Maintaining your Fax
Replenishing Supplies and Changing Cartridges...................... 11-1
Loading Paper....................................................................................... 11-1
Types of Paper.......................... ... .... ...................... .... ... ............................... 11-1
Loading Paper on the Paper Feeding Tra y..................................... .... .... ..... 11-1
Setting the Paper Size.................................................................................. 11-2
Changing the Toner Cartridge............................................................... 11-3
Changing the Drum Cartridge............................................................... 11-5
Cleaning the Fax........................................................................ 11-8
Cleaning the Outside............................................................................. 11-8
Cleaning the Inside................................................................................ 11-8
Chapter 12 Troubleshooting
When a Message Appears.......................................................... 12-1
LED Indication................................................... ................................... 12-1
Alarm .................................................................................................... 12-1
Typical Messages.................................................................................. 12-1
When a Document or Paper Misfeed Has Occurred.................. 12-4
Clearing a Document Misfeed .............................................................. 12-4
Clearing a Paper Misfeed...................................................................... 12-5
When an Unclear Print is Produced........................................... 12-9
Some Troubleshooting Tips..................................................... 12-10
Chapter 13 Appendices
Quick Reference Guide ............................................................. 13-1
Manual Dialing: Using the Numeric Keys............................................ 13-1
One Touch Dialing ................................................................................ 13-1
Speed Dialing........................................................................................ 13-2
Manual Redialing.................................................................................. 13-2
FUNCTION Utilities............................................................................. 13-3
CONFIRM Function............................................................................. 13-4
SET Utilities.......................................................................................... 13-5
Initial User Data.................................................................................... 13-7
Dial Registration ................................................................................... 13-9
Page 30

Table of Contents
2. Specifications ...................................................................... 13-11
MINOLTA FAX 1600............................................................................... 13-11
System requirements.................................................................................. 13-12
Index........................................................................................ 13-13
xxix
Page 31

Page 32

Chapter 1
Installation
This chapter covers site preparation, conditions, precautions for use,
and set-up procedures.
Installation Chapter 1
Page 33

1-1
Preparation for Instal lation
Installation Site
To ensure a longer life for the fax, it is highly important to select an appropriate installatio n si te.
Choose a site that meets the following requirements.
• A well-ventilated place.
• An area which will not generate ammonia or other organic gas.
• A place which is near a power outlet so that the power cord can be easily plugged in and unplugged.
Installation Chapter 1
• An area free from direct sunlight.
• A place which is out of the direct air stream of an air conditioner, heater, or ventilator and is not subject to extremely high or low temperature or humidity.
• A stable and level location not subject to undue vibration.
• A place free from an object that could block the heat exhausting duct of the fax.
• A place away from a curtain or the like that may catch fire and burn easily.
• An area where there is no possibility of being splashed with water or other types of liquid.
• A dust-free location.
Power Source
The power source voltage requirements are as follows.
• Power source: Voltage fluctuation: Within ±10% (+6%, -10% for 127V power supply)
• Frequency fluctuation: Within ±3Hz
NOTE
• Use a power source with little voltage and frequency fluctuation.
• Use an outlet with the specified voltage capacity only.
• Be sure to plug the power cord all the way into the outlet. The outlet should also be located near the
fax and easily accessible so that the power cord can be unplugged immediately if fax trouble occurs.
• Make sure that the outlet is visible, without being hidden behind this fax or any other office equipment.
• If any other electrical equipment is sourced from the same outlet, make sure that the capacity of the
outlet is not exceeded.
• If an extension cord is needed, use one with a capacity more than the power consumption of the fax.
A cord which falls short of the capacity requirements could lead to a fire.
• Never connect any other appliances or machines by means of a multiple socket to the outlet being
used for the fax.
Grounding
To prevent receiving electrical shocks in the case of electrical leakage, always ground the fax.
Consult your Tech. Rep. if you are unable to make grounding connections.
Connect the grounding wire to:
• The ground terminal of the outlet.
• A grounding contact which complies with the local electrical standards.
*Never connect the grounding wire to a gas pipe, the grounding wire for a telephone, or a water pipe.
Page 34

1-2
Preparation for Installation
Space Requirements
To ensure easy fax operation, supply replacement, and service maintenance, adhere to the recommended
space requirements detailed below.
418 mm
(16.5")
Installation Chapter 1
612 mm
(24.1")
395 mm
(15.6")
4503U101
Page 35

1-3
Precautions for Use
Operating Environment
The operating environmental requirements of the fax are as follows.
• Temperature: 10°C (50°F) to 35°C (86°F) with a fluctuation of 10°C (50°F) per hour
• Humidity: 15% to 85% RH with a fluctuation of 20% per hour
Installation Chapter 1
Using the Fax Properly
To ensure the optimum performance of the fax, follow the precautions listed below.
• NEVER install telephone wiring during a lightning storm.
• NEVER install telephone jacks in wet locations unless the jack is specifically designed for wet locations.
• NEVER touch uninstalled telephone wires or terminals unless the telephone line has been disconnected at the network interface.
• USE caution when installing or modifying telephone lines.
• A void u sing a telephon e (other th an a cord less type) during an e lectrical stor m. There ma y be a rem ote
risk of electric shock from lightning.
• DO NOT USE the telephone to report a gas leak in the vicinity of the leak.
• NEVER open any door, or turn OFF the fax during operation.
• NEVER bring any magnetized object or flammable gas or liquid near the fax.
• NEVER pull on the cord and ALWAYS hold the plug, when unplugging the power cord. A damaged
cord could result in a fire or cause an electrical shock.
• NEVER attempt to unplug the power cord with a wet hand, as it could cause an electrical shock.
• ALWAYS unplug the power cord whenever attempting to move the fax. Moving the fax with the
power cord plugged in can damage the cord, resulting in a fire or causing an electrical shock.
• ALWAYS unplug the power cord when the fax is not to be used for a long time.
• NEVER remove any panel or cover which is secured. The fax contains a high-voltage component
inside which can cause an electrical shock.
• NEVER remodel the fax, as a fire or electrical shock could result.
• NEVER place a heavy object on the power cord, or pull or bend it, as a fire or electrical shock could
result.
• ALWAYS ensure that the fax does not ride on the power cord or communications cable of other electrical equipment, and it does not get such a cord or cable wedged into its own mechanism, as malfunctioning equipment or fire could result.
• NEVER drop paper clips, staples, or other small pieces of metal through the vents or other openings in
the fax, as a fire or electrical shock could result.
• NEVER place a vase or vessel containing water on the fax. If fluid gets inside, it can cause a fire or
electrical shock. In case a piece of metal or fluid gets inside the fax, immediately turn it OFF, unplug
the power cord, and call your technical representative.
A fire or electrical shock could result if the fax is run without taking necessary action.
• NEVER leave the fax running when it becomes inordinately hot, or emits smoke, unusual smell, or
noise. If that happens, immediately turn OFF the fax, un plug it, and call your tech nical rep resentativ e.
A fire or electrical shock could result if the fax is run without taking necessary action.
NOTE
= Locate the Fax in a Well Ventilated Room =
A negligible amount of ozone is generated during normal operation of this fax. An unpleasant odor
may, however, be created in poorly ventilated rooms during extensive fax operations. For a comfortable, healthy, and safe operating environment, it is recommended that the room be well ventilated.
Page 36

Precautions for Use
Remarque
= Placer l’appareil dans une pièce largement ventilée=
Une quantité d’ozone négligeble est dégagée pendant le fonctionnement de l’appareil quand celui-ci
est utilisé normalement. Cependant, une odeur désagréable peut être ressentie dans les pièces dont
l’aération est insuffisante et lorsq’une utilisat ion prolongée de l’appareil est effectuée. Pour avoir la
certitude de travailler dans un environnement réunissant des conditions de confort, santé et de sécurité, il est préférable de bien aérer la pièce ou se trouve l’appareil.
Care of Fax Supplies
Use the following precautions when handling the fax supplies (Toner Cartridge, Drum Cartridge, and
paper).
• Avoid storing the supplies at any of the following places:
A place subject to direct sunlight. (The Drum Cartridge should not be exposed to a fluorescent light,
either.)
A hot place with an open flame.
A humid place.
A dusty place.
• Store paper, which has been removed from its wrapper but not loaded in the fax tray, in a sealed plastic
bag in a cool, dark place.
• Use only the Toner Cartridge and toner for the exclusive use of this fax.
• Keep supplies out of the reach of children.
• If your hands become soiled with toner, wash them with soap and water immediately.
1-4
Installati on Chapter 1
NOTE
Whenever the Drum Cartridge has been removed from the fax, immediately wrap it in a cloth to protect it from light.
Page 37

1-5
Setting-Up
Set up your fax by following the procedure given below. For the parts that come with the fax, see the
UNPACKING/SETTING-UP INSTRUCTIONS.
Functional description
• Do not throw away the box in which the fax was shipped. It is to be used when transporting the fax.
• Whether your fax contains the Handset or not differs with each country. For details, please contact
your Technical Representative.
Installation Chapter 1
Setting up the Fax
1
• T ake the fax machine and accessories out
of the box.
• Remove the plastic bag and shipping tape
from the fax.
4
Install the Drum Cartridge in the printer,
aligning its projections with the slots inside
the printer frame.
4503U103
2
Holding down the Upper Unit Lock Release
Button, swing open the Upper Unit.
4503U104
3
Take the Drum Cartridge out of the box.
4503U124
NOTE
Whenever the Drum Cartridge has been take
from its box, be sure to cover it with a cloth to
prevent light from striking it.
Right Side
4503U105
4503U106
Left Side
4503U107
Page 38

5
Take the Toner Cartridge out of the box.
6
Holding the Toner Cartridge with both
hands, shake it well it in the direction of the
arrows.
4503U125
Setting-Up
NOTE
Setting marks showing the direction and order
of installation of the Drum Cartridge and
Toner Cartridge are stuck to the FAX body, the
Drum Cartridge and Toner Cartridge.
Install the cartridges as shown by them.
Distinction of direction by color:
Right: Yellowish green
Left: Blue
Distinction of order by number (Stuck on the
right side):
1: Drum Cartri dge
2: Toner Cartridge
Right Side
1-6
Installation Chapter 1
7
Install the Toner Cartridge in the fax,
making sure that the four pins of the Toner
Cartridge (two each at the front and rear
sides) fit in the slots inside the fax frame.
4503U126
4503U127
Left Side
8
Push the handle of the Toner Cartridge to fix
the Toner Cartridge.
4503U111
4503U112
4503U110
4503UB20
Page 39

1-7
Setting-Up
Installation Chapter 1
9
Swing down the Printer Cover and press the
portion of t he Printer Cover shown below
down to lock the Printer Cover into position.
10
Install the Document Feeding Tray.
11
Install the Print Tray.
4503UB14
4503U116
13
Connect the plug of the Handset cord to the
TEL connection port on the backside of the
fax.
14
When using a telephone, connect the other
plug of the telephone line to the connection
of the telephone.
15
Make sure that the Power Switch of the
printer is placed in the (OFF) position.
4503U118
4258U479
12
Install the Document Exit Tray in the front
side.
4503U117
4503UE01
16
Connect one end of the power cord furnished
with the printer to the power cord socket of
the printer and plug the other end of the
power cord into the power outlet.
4503U119
4503U120
Page 40

Connecting to the Telephone Line
NOTE
1. Connection should be done by a service technician.
2. Telephone cord accessories will vary: Type A, Type B, Type C, Type D, depending on the
requirements of the country.
3. The ground wire (E) is available in a version intended for a specific country. (EX. Germany)
4. A standard telephone can be connected, if necessary.
5. See the user instructions for the UK (U.K. version), p. x.
1-8
Setting-Up
Installation Chapter 1
4503U121
Basic Connection Procedure
1
Connect the plug of the cord to the telephone
jack of the telephone line.
2
Connect the other plug of the cord to the line
connection on the backside of the fax.
4258U482
4503U122
3
Connect the currently used telephone cord to
the TEL connection on the backside of the
fax.
4503U123
4
Connection is completed. Load the paper
according to "LOADING PAPER".
➮ p. 11-1
NOTE
When changing the paper s ize, b e s ure to enter
it. ➮ p. 1 1-2
Page 41

Installation Chapter 1
1-9
Setting-Up
Page 42

Chapter 2
First Things to Know About Your Fax
This chapter identifies different fax parts and control panel keys and
explains about the initial settings to be
and registering of data of the destination.
made for fax communications
First Things to Know About Your Fax Chapter 2
Page 43

2-1
1
2
3
4
5
6
7
Fax Parts and Accessories
First Things to Know About Your Fax Chapter 2
4503U201
Printer Cover Lock Release Button
1
Press to unlock the Printer Cover.
Printer Cover
2
Swing open to change the Toner Cartridge or clear
a paper misfeed.
Print Tray
3
The printed paper is fed out face down onto this
tray. The tray can hold up to 200 sheets of printed
paper.
Document Feeding Tray
4
Load the documents to be faxed face down. Up to
10 pages can be stacked. ➮ p. 3-3
Control Panel
5
The main control panel for communications and
function setting. For details, see "Control Panel
Keys." ➮ p. 2-3
Scanner Cov e r
6
Open when cleaning the inside o f th e machine or
removing misfed paper. ➮ p. 11-8
Paper Feeding Tray
7
Holds up to 250 sheets of paper. ➮ p. 11-1
Page 44

2-2
Fax Parts and Accessories
9
10
8
13
14
8
Power Switch
Use to turn the fax ON and OFF. ➮ p. 2-6
9
Interface Connector
Provides connection be tween the fax and a host
computer. ➮ p. 10-1
10
Telephone Line Connection
LINE: Connect the telephone line to this port.
TEL: Connect the Handset cord or the currently
used telephone cord to this port.
p. 1-5
➮
11
12
11
Power Cord Socket
Connect the power cord of the fax to this socket. ➮
p. 1-5
12
Fusing Section
Fixes a toner image on the paper.
13
Toner Cartridge
Replace this cartridge with a new one when it runs
out of toner . ➮ p. 11-3
14
Drum Cartridge
An important part to form an image.
Handle with utmost care. ➮ p. 11-5
4503U202
First Things to Know About Your Fax Chapter 2
4503U294
Page 45

2-3
Control Panel Keys
First Things to Know About Your Fax Chapter 2
6 12
Confirm
1 Broadcast
2 Convenient Copy
3 Timer TX
4 Mailbox TX
5 Print Mailbox RX
6 Polling TX
7 Polling RX
0 Cancel Reserv.
Function
1
Memory TX Indicator
3
2
1
23
22
21
20
4
Manual RX Error
PC
Standard
Fine
Half Tone
Resolution
Memory TX
01110212031304140515061607170818091910
Lights up when the Memory Transmission mode
is selected. ➮ p. 6-1
2
PC Indicator
Lights up when the PC mode is selected.
3
Error Indicator
Lights up when a communication error or ot her
failure occurs. ➮ p. 12-1
4
RX Mode Indicator
Lights up when the TEL mode is selected.
pp. 3-18, 3-23
➮
5
Resolution Indicator
The transmission image quality mode currently
selected will be lit. ➮ p. 3-2
6
Message Di splay
Shows the various messages and data including
the date, time of day, memory volume still available for use, and fax numbers. ➮ p. 2-8
7
Confirm Key
Press to show on the Message Display the journal
of the last 60 communications to and from the fax.
This Key is also used to activate the printer to
print various lists and reports. ➮ p. 6-6
8
Set Key
Press to select an item from the Set utilities.
p. 8-1
➮
9
Function Key
Press to enable access to the FUNCTION utilities.
p. 4-1
➮
10
Yes Key
Press to select a function or validate a selection
made.
11
No Key
Press to select a function or undo an operation.
13 145 7 8 9 10 11
ABC DEF
Speed Dial
Set
Function
No
Yes
Redial/Pause
20
1 2 3
JKLGHI MNO
4 5 6
TUV
PQRS WXYZ
7 8 9
0 #
Stop
15
Start/Copy
16171819
4503U204
12
Arrow Keys
Use to select or set a function. The Arrow key can
also function as the Tone key.
Although a pulse dial line is used, when you want
to receive service information from a touch line,
use this key. If using a touch tone li ne, you can
receive various service information without using
the T o ne ke y.
Use to enter sub address, selective polling.
13
Speed Dial Key
Press to select the Speed Dial mode. ➮ p. 3-9
Use the Phonebook function to access numbers
from an electronic phonebook. ➮ p. 3-13
14
Redial Key / Pause Key
Press to redial the party you communicated with
last or to enter a pause in a fax number. ➮ p. 6-3
15
Numeric Keys
Use to enter fax numbers. ➮ pp. 2-19, 3-5
These keys can be used as the name entry keys
when registering for One Touch Dial and Speed
Dial. ➮ pp. 2-19, 3-7, 3-9
16
Start/Copy Key
Press to start the transmission of a document or a
copy cycle.
17
Stop Key
Press to stop the transmission of a document or a
copy cycle.
18
One Touch Keys
Press to let the fax automatically dial the destination registered in that particular key and start
transmitting documents. Also used to enter spaces
and delete charac ters during name entry.
19
Shift Key
Alternately enables the upper One Touch group
(OT 01 - 10) or the lower One Touch group
(OT 11 - 20).
Page 46

2-4
Control Panel Keys
20
Lights up when OT Group 2 is selected.
21
Lights up when OT Group 1 is selected.
22
Resolution Key
23
Memory TX Key
Press to select the Memory Transmission mode.
➮
p. 6-1
Press to select the transmission image quality
mode. ➮ p. 3-2
Numeric Keys
The Numeric Keys can be used to enter n umerals, characters and symbo ls when registering names f or Initial User Data, One Touch Dial and Speed Dial.
Press the Arrow Key to set the numeral, character or symbol displayed.
The One Touch Keys can also be used to enter spaces or delete characters when entering names.
For details on entering names, follow the procedure for each registration method.
• Initial user Data ➮ p. 2-12
• One Touch Dial ➮ p. 2-19
• Speed Dial ➮ p. 2-19
ABC DEF
1 2 3
JKLGHI MNO
4 5 6
TUVPQRS WXYZ
7 8 9
First Things to Know About Your Fax Chapter 2
Numerals, Characters
Numeric Key
Push Once
Twice
3 Times
4 Times
5 Times
Symbols
(press the # key the specified number of times to display the symbol)
Numeric Key #
Push Once
Twice
3 Times
4 "
5 "
6 "
7 "
8 "
1
12
Push 9 Times
&
10 "
#
11 "
*
12 "
13 "
/
14 "
(
15 "
)
16 "
"
0 #
2 3 4 5 6 7 8 9 0
3
4
5
6
7
8
9
A
D
G
J
M
P
T
W
B
E
H
K
N
Q
U
X
C
F
I
L
O
R
V
Y
Numeric Key #
Push 17 Times
.
18 "
,
19 "
!
20 "
+
21 "
=
22 "
<
23 "
>
24 "
?
S
Numeric Key #
Z
4503U15I
0
4503U240
$
:
;
@
%
[
]
’
4503U241
Page 47

2-5
Control Panel Keys
One Touch Keys
The One Touch Keys have the following two functions.
• One Touch Dial function: Press the key to dial the registered destination and start transmitting the
document.
• During name entry: Use OT9 or OT19 to enter a space;
Use OT10 or OT20 to delete a numeral, character or symbol.
SPACE
OT Group 1
OT Group 2
SPACE
First Things to Know About Your Fax Chapter 2
NOTE
Press the Shift key beside the One Touch keys to enable either the upper (for keys 1-10) or lower (for
keys 11-20) group and enter the data at any available position.
DELETE
DELETE
4503U205
4503U208
Each press of the Shift key alternately enables the upper One Touch group (OT 01 - 10) or the lower
One Touch group (OT 11 - 20). The indicator lights where character entry is enabled.
Page 48

Turning ON and OFF the Fax
Keep the Power Switch in the | (ON) position to maintain constant communication. If it is in the O
(OFF) position, the fax is neither able to receive a document nor store the contents of th e docu ment in
its memory. Communication is also interrupted if the Power Switch is pressed to the O (OFF) position
during communication.
Turning the Fax ON
Press the Power Switch to the | (ON) position.
4503U209
When the fax is turned ON:
2-6
PC
Memory TX
PC
Memory TX
Manual RX Error
Standard
Fine
Half Tone
Resolution
Manual RX Error
Standard
Fine
Half Tone
Resolution
PLEASE WAIT
Set
Confirm
Confirm
Function
JAN. 1 0:00 100%
- SET DOC. FACE DOWN -
Set
Function
No
Yes
No
Yes
The message "PLEASE WAIT" appears on the
Message Display.
The fax is now ready for transmitting or receiving
documents.
The Resolution indicator lights when the message
display changes.
The fax completes warming up approx. 25 sec.
after the Power Switch has been pressed to the |
(ON) positi on.
4503U210
NOTE
• While the fax is warming up, it can receive or transmit a document, but not print a document
received.
• After completing warm-up, the fax enters the Power Save mode automatically.
• You can set the time it takes to enter the Power Save mode, or turn the mode OFF through the Set
function. For details, see Chapter 8 "Setting the Set Utilities" ➮ p. 8-1
First Things to Know About Your Fax Chapter 2
Page 49

2-7
Turning ON and OFF th e Fax
Turning the Fax OFF
First Things to Know About Your Fax Chapter 2
1
Check that the memory volume display on
the Message Display shows 100%.
JAN. 1 15:38 100%
- SET DOC. FACE DOWN -
If the percentage shown is less than 100%, it
means that there are documents stored in
memory which have not been transmitted. In
this case, perform the following steps to
retain these documents.
When the memory contains a document to
be transmitted
Output the Memory Image Print. ➮ pp. 9-1,
9-8
Retransmit at another time.
When the memory contains a document
received
Let the fax print the document received
according to the specific procedure as
follows.
Memory reception ➮ p. 5-21
Mailbox reception ➮ p. 4-20
4503U211
2
Press the Power Switch to the O (OFF)
position.
4503U295
Page 50

Message Display
When the Power Switch is pressed to the ON position, the Message Display (LCD screen) lights up.
The Message Display shows the date, time of day, memory volume still available for use, fax numbers,
fax conditions, and other information by means of either a message or graphics. Follow the instructions given on this disp lay to make correct fax co mmunication.
JAN. 1 15:38 100%
- SET DOC. FACE DOWN -
2-8
Confirm
Set
Function
Yes
No
4503U213
How the Screen is Organized
Initial Screen
When the fax completes warming up, the initial screen appears on the Message Display. This initial
screen serves as the basis for all later operations.
1
JAN. 1 15:38 100%
- SET DOC. FACE DOWN -
4
Date
1
Time of Day
2
Memory Volume Display
3
Shows the volume of the built-in memory still
available for use
e.g.: "100%" means that the memory contains no
data of documents either received or transmitted.
2 3
Message
4
Tells you what step to perform next.
4503U214
First Things to Know About Your Fax Chapter 2
Page 51

2-9
Message Di splay
Selection Screen
The selection screen is used when you set or change functions. Here we use typical selection screens to
explain about their different components.
1
MACHINE OPERATION
YES / OR 1 - 5
2 3
First Things to Know About Your Fax Chapter 2
Using the Arrow key to scroll throu gh the fu nction
1
settings:
Press the Up Arrow key or Down Arrow key to
scroll through the available functions and setting
modes.
Example: Press the Up Arrow key to select the Rx
Operation mode of the SET utilities.
Using the Yes key to make or confirm a selectio n:
2
Press the Yes key to select, or confirm the selection of, the item being shown.
Example: Press the Yes key to select the Machine
Operation mode.
Using the Numeric keys to select an item number:
3
Enter a number with the Numeric keys to select
the item.
Example: Press "3" to select the third function of
the Machine Operation mode.
4503U215
1
TONE PULSE
- SELECT & PUSH "YES" -
2 3
Making a selection from 2 choices:
1
The Right Arrow key and the Left Arrow key will
toggle between the two selections.
An asterisk on the screen will indicate which one
is currently selected.
The item with an asterisk (*) is currently selected.
Prompting a selection:
2
Use the Left Arrow key or the Right Arrow key to
make a selection.
Example: Press the Right Arrow key to select
Pulse.
Prompting selection with the Yes key:
3
Press the Yes key to validate the selection of the
item currently marked with *.
Example: Press the Yes key to validate the selection of Tone.
4503U216
Page 52

2-10
Message Display
First Things to Know About Your Fax Chapter 2
Page 53

2-11
Message Di splay
Icons
Here is a list of icons that appear on the Message Display.
First Things to Know About Your Fax Chapter 2
4258U083
4258U083A
4258U275
4258U319
4258U276
Signifies a fax or phone number.
Prompts you to enter a fax number.
Indicates when the Pause function is set into the destination's
fax number.
Example: 0P
41264126
Indicates when the Tone function
is set into the destination's fax
number.
Example: ^
41264126
Indicates when the External
function is set into the destination's fax number.
Example: @
41264126
Shown while the othe r party's
fax is being rung.
4258U085
Shown while the user’s fax is
being rung.
4258U086
Shows the number of documents.
Example: A single document
4258U084
Shown while a docume nt is
being transmitted to the other
party.
4258U087
Shown while a docume nt is
being received from the other
party.
4258U088
4258U272
4258U273
Indicates when the Sub Address
is set into the destination’s fax
number.
Example: 41264126 :
8108
Indicates when the Selective
Polling is set into the destination’s fax number by the Polling
reception function.
Example: 41264126 \ 8108
Indicates that a document to be
transmitted by the timer transmission function has been stored
in memory .
4258U089
Indicates that a document to be
transmitted by the polling transmission function has been stored
in memory .
4258U090
Page 54

Adjusting Brightness of the Message Display
• The brightness of the Message Display (LCD) can be adjusted to suit your needs.
2-12
1
Check that the initial screen is shown.
JAN. 1 0:00 100%
- SET DOC. FACE DOWN -
2
Press the Set key five times to select the
Machine Operation mode.
Set
X 5
MACHINE OPERATION
YES / OR 1 - 5
3
Enter "2" from the Numeric keys to show "2
LCD Contra st" on the display.
ABC
2
2 LCD CONTRAST?
4503U217
4503U085I
4503U219
4503UF2I
5
Press the Yes key to validate the brightness
setting.
Yes
MACHINE OPERATION
YES / OR 1 - 5
6
Press the No key to leave the Machine
Operation mode and return to the initial
screen.
No
JAN. 1 15:38 100%
- SET DOC. FACE DOWN -
4503UAI
4503U219
4503UBI
First Things to Know About Your Fax Chapter 2
4503U211
4
Using the Left Arrow key or the Right
Arrow key, adjust the brightness of the
display.
• Press R to make the display lighter.
• Press L to make the display darker.
DARK LIGHT
- SELECT & PUSH "YES" -
LR
4258U031
4258U009
4503UC7I
Page 55

2-13
LR
What to Do First Before Making Any Communications (Initial User Data)
What to Do First Before Making Any Communications
(Initial User Data)
• Before making the first communication after your fax has been installed, you must make the following
settings for Machine Operation and Initial User Data.
The data recorded through these operations is printed as the header in a document transmitted and
footer in a document received (Header Print and Footer Print functions). The data is also used for
timer communications, reports, and password communications.
• Machine Operation • Initial User Data
3. Tone/Pulse 1. Date & Time 2. User Fax No. 3. User Name 4. User Password
NOTE
If the telephone line settings are wrong, you cannot make a phone call or fax communication. Follow
the procedure given below to ensure that you make correct settings.
Setting the Machine Operation (Telephone Line: Tone/Pulse)
First Things to Know About Your Fax Chapter 2
1
Check that the initial screen is shown.
JAN. 1 15:38 100%
- SET DOC. FACE DOWN -
2
Press the Set key five times to set your fax
into the Machine Operation mode.
Set
X 5
MACHINE OPERATION
YES / OR 1 - 5
3
Press "3" of the Numeric keys to show "3
Tone/Pulse" on the display.
DEF
3
4503U211
4503U85I
4503U219
4
Press "3" of the Numeric keys to show "3
Tone/Pulse" on the display.
DEF
3
3 TONE / PULSE
5
Using the Left Arrow key or the Right
Arrow key, select the type of telephone line
you are currently using.
• the Left A rrow key: Tone (default setting)
• the Righ t Arrow key: Pulse
TONE PULSE
- SELECT & PUSH "YES" -
4503UF3I
4258U018
4503UC7I
When Pulse is selected
1
Select the number of pulses in current use.
4258U016
Page 56

What to Do First Before Making Any Communications (Initial User Data)
Set
X 7
6
9
MNOWXYZ
Setting the Initial User Data
Opening the Initial User Data Screen
2-14
1
Check that the initial screen is shown.
JAN. 1 15:38 100%
- SET DOC. FACE DOWN -
Setting Date & Time
1
Press "1" of the Numeric keys to show "1
Date & Time" on the display.
1
1 DATE & TIME
2
Set the current date with the Numeric keys.
Example: June 8th
01 JAN.
05 MAY.
09 SEP.
06 08
0
02 FEB.
06 JUN.
10 OCT.
6
03 MAR.
07 JUL.
11 NOV.
MNO TUV
0
’
- SET YEAR -
If a wrong date has been entered, press the
Left Arrow key. The cursor position moves
back one position. Enter the correct date
again.
4503U211
4503UF1I
4258U023
04 APR.
08 AUG.
12 DEC.
4258U021
8
4503U24I
4258U025
2
Press the Set key seven times t o se t your fax
into the Initial User Data mode.
4503U87I
INITIAL USER DATA?
YES / OR 1 - 4
4503U221
3
In the same way, enter the current year.
Example: 1996
4503U25I
06 08 '96 :
-- SET WEEK --
4258U026
NOTE
It is only necessary to enter the last two digits
even for the year 2000 and later.
4
In the same way, set the day of the week and
time of day (24-hour system).
Example: Monday
0 SUN.
4 THU.
1 MON.
5 FRI.
2 TUE.
6 SAT.
3 WED.
4258U020
1
4503UF1I
06 08 '96 MON :
- SET TIME -
First Things to Know About Your Fax Chapter 2
L
4258U027
4503UC4I
Page 57

2-15
L
What to Do First Before Making Any Communications (Initial User Data)
Example: 3:38 p.m.
TUVDEFJKL
1
5
3
8
4503U26I
06 08 '96 MON 15 38
OK=YES
4258U028
5
Check the settings you have made. If they
are correct, press the Yes key to validate the
date and time of day. (The press of the Yes
key will start the built-in clock.)
Yes
4503UAI
INITIAL USER DATA?
YES / OR 1 - 4
4503U221
First Things to Know About Your Fax Chapter 2
Setting Your Fax Number (User Fax Number)
6
If you find something wh ich needs to be
corrected, press the No key.
The message display returns to the previous
display to enter the date.
No
-- SET MONTH --
4503UBI
:
4258U024
1
Press 2 of the Numeric keys to show "2 User
Fax Number" on the display.
ABC
2
2 USER FAX NO.
2
Using the Numeric keys and One Touch Key
9 or 19, enter your fax number.
Up to 20 numbers can be entered for a fax
number.
Example: 03-5423-7801
0
JKL
5
OT9 OT19
0
or
DEF
3
GHI ABC
4
1
OT9 OT19
2
7
* One Touch Key 9 or 19: Space
4503U28I
= 03 5423 7801_
4503UF21
3
OK=YES
4258U033
If a wrong number has been entered, press
the Left Arrow key. The cursor position
4258U032
or
4503U27I
DEF
3
TUVPQRS
8
moves back one position. Enter the correct
number again.
4503UC4I
Page 58

What to Do First Before Making Any Communications (Initial User Data)
Useful Tips
The use of One Touch key 9 or 19 (Space) in
setting your fax num ber is no t mand atory; actually it does not affect your communications at
all. The only benefit of using it is to help make
your fax number more readily recognizable by
the destination.
Wherever feasible, use One Touch key 9 or 19
(Space) to put a space among the numbers of
your fax number.
Example:
Using One Touch key 9 or 19: 03 5423 7801
Not using One Touch key 9 or 19:
0354237801
4
Check your setting and press Yes if it is
correct. This validates the setting of your fax
number .
= 03 5423 7801_
OK=YES
2-16
First Things to Know About Your Fax Chapter 2
Yes
INITIAL USER DATA?
YES / OR 1 - 4
5
Press No to make a correction.
The message display returns to the previous
display to enter the fax number.
No
= _
OK=YES
4258U033
4503UAI
4503U221
4503UBI
4258U034
Page 59

2-17
What to Do First Before Making Any Communications (Initial User Data)
Setting Your Name (User Name)
1
Press "3" of the Numeric keys to show "3
User Name" on the display.
3 USER NAME
2
Using the One Touch keys and Numeric
keys, enter your name. A name can consist
of up to 32 characters and symbols.
Selecting Characters and Symbols
Using the following matrix, enter the
characters of your name by pressing the
corresponding Numeric keys and One Touch
First Things to Know About Your Fax Chapter 2
keys the required number of times.
Selecting Characters
Numeric Key
Push Once
Twice
3 Times
4 "
5 "
DEF
3
1
2 3 4 5 6 7 8 9 0
12
3
4
5
6
7
A
D
G
J
M
P
B
E
H
K
N
Q
C
F
I
L
O
R
S
4503UF3I
4258U037
8
T
U
V
4
If a wrong name has been entered, press One
Touch key 10 or 20. The cursor position
moves back one position. Enter the correct
name again.
OT10OT10 OT20OT20
or
5
Check your data entry and press the Yes key
DELETE
4503U227
to validate the name setting if it is correct.
NAME= TOKYO
_
OK=YES
Yes
4258U038
4503UAI
INITIAL USER DATA?
YES / OR 1 - 4
9
0
W
X
Y
Z
Press the No key to correct your name. The
message display returns to the previous
display to enter the name.
4503U221
Symbols
Numeric Key #
Push Once
Twice
3 Times
4 "
5 "
6 "
7 "
8 "
Numeric Key #
&
Push 9 Times
#
10 "
*
11 "
-
12 "
/
13 "
(
14 "
)
15 "
"
16 "
Space / Delete
One-Touch Key OT9 and OT19
SPACE
3
Example: TOKYO
NAME= TOKYO
OK=
Numeric Key #
.
Push 17 Times
,
18 "
!
19 "
+
20 "
=
21 "
<
22 "
>
23 "
?
24 "
OT10 and OT20
_
$
:
;
@
%
[
]
Õ
DELETE
4503U223
4503U220
Page 60

What to Do First Before Making Any Communications (Initial User Data)
L
Setting Your Password (User Password)
2-18
1
Press "4" of the Numeric keys to show "4
User Password" on the display.
GHI
4
4 USER PASSWORD
2
Using the Numeric keys and Right Arrow
key, enter your password.
A password i s a 4-digit number ranging
between 0000 and 9999.
Example: 0423
0
4
2
PASSWORD= 0423
OK=YES
3
4503F4I
4258U179
DEFABCGHI
4503U29I
4258U180
3
If a wrong number has been entered, press
the Left Arrow key. The cursor position
moves back one position. Enter the correct
number again.
4
Check your password setting and, if it is
correct, press the Yes key to validate it.
Yes
INITIAL USER DATA?
YES / OR 1 - 4
Press the No key to correct your password.
The initial screen reappears.
No
4503UC4I
4503UAI
4503U221
First Things to Know About Your Fax Chapter 2
JAN. 1 15:38 100%
- SET DOC. FACE DOWN -
4503U211
Page 61

2-19
Registering One Touch Dial and Speed Dial Stations
If you want to use the One Touch Dial or Speed Dial functions to transmit your documents, you must
register each destination’s information in the One Touch and Speed Dial Keys. Y ou need to set the f ollowing three data items for each destination you will register:
1. Fax number
2. Name
3. Modem spee d
Up to 20 different parties can be registered for One Touch Dial and up to 100 for Speed Dial.
One T ouch Dial transmission ➮ p. 3-7
Speed Dial transmission ➮ p. 3-9
Dial Registration Mode
First Things to Know About Your Fax Chapter 2
1
Check that the initial screen is shown.
JUN. 8 15:38 100%
- SET DOC. FACE DOWN -
2
Press the Set key to select the Dial
Registration mode.
Set
DIAL REGISTRATION ?
YES / OR 1 - 4
3
ONE TOUCH DIAL
To register data for One Touch Dial, press
"1" of the Numeric keys to select the One
Touch Dial registration mode.
1
1 ONE TOUCH DIAL
4503U229
4503U08I
4503U230
4503UF1I
4
SPEED DIA L
To register data for Speed Dial, press "2" of
the Numeric keys to select the Speed Dial
registration mode.
ABC
2
2 SPEED DIAL
Go to step 10 on the next page.
5
ONE TOUCH DIAL
T o regist er data for One Touch Dial, select a
One T ouch key to which yo u want to register
information by pressing it.
Example: Using One Touch key "15"
Check that the One Touch key indicator is
lit.
If not lit, press the Shift key to change the
status.
OT15
4503UF2I
4258U042
4503UO15
4503U225
- SELECT REGIST. KEY -
4258U282
= _
OK=YES
4258U034
Page 62

2-20
0
0
Registering One Touch Dial and Speed Dial Stations
6
ONE TOUCH DIAL
If One Touch Dial has already been
registered for the One Touch keys, the
following display is shown.
REGISTERED! KEEP?
OK = YES ( DEL = NO )
T o correct and delete the registered contents,
press the No key to select [EDIT/DELETE].
No
EDIT ALL DELETE
- SELECT & PUSH "YES" -
When you don’t want to change the
registered contents, press the Yes key to
select [KEEP].
The display returns to the display of step 3.
Yes
7
ONE TOUCH DIAL
To correct the registered contents, press the
Left Arrow key to select [EDIT] and press
the Ye s key.
Yes
+
4258U283
4503UBI
4258U284
4503UAI
8
The destination registered for One Touch
Dial is deleted and the display is changed.
- SELECT REGIST. KEY ( COMPLETE = NO )
9
ONE TOUCH DIAL
To correct the fax number, press the No key
to delete the fax number.
No
10
SPEED DIA L
To register for Speed Dial, enter the desired
number (2 digits) with the Numeric keys.
Select any 2 digit number from 00 to 99.
The data of the transmission party is
registered under the corresponding number.
(Example) the number 00 → Press 0 twice
= _
OK=YES
11
SPEED DIA L
If a fax number has already been registered
for Speed Dial, the following display is
shown.
4258U286
4503UBI
First Things to Know About Your Fax Chapter 2
4503U30I
4258U034
4503U232
REGISTERED! KEEP?
OK = YES ( DEL = NO )
= 06 532 3276
OK=YES ( DEL = NO )
When you want to change the registered
contents, press the Right Arrow key to select
[DELETE] and press the Yes key.
4258U285
Yes
+
4503U233
T o correct and delete the registered contents,
press the No key to select [EDIT/DELETE].
No
EDIT ALL DELETE
- SELECT & PUSH "YES" -
4258U283
4503UBI
4258U284
Page 63

2-21
Registering One Touch Dial and Speed Dial Stations
12
When you don’t want to change the
registered contents, press the Yes key to
select [KEEP].
The display returns to the display of step 4.
Yes
4503UAI
13
SPEED DIAL
To edit the setting, press the Left Arrow key
to select [EDIT] and press the Yes key .
Yes
+
NOTE
When changing the data of the destination registered for One Touch Dial and Speed Dial, be
careful of the following things.
• If you correct or delete the data of the destination registered for One Touch Dial and
Speed Dial, the changed destination is
deleted from the destination set of each function of Group, Program and Timer.
• When you want to transmit to the changed
destination with each function of Group, Program and Timer, you need to reset each function again.
First Things to Know About Your Fax Chapter 2
= 06 532 3276
OK=YES ( DEL = NO )
When you want to delete the registered
contents, press the Right Arrow key to select
[DELETE] and press the Yes key.
Yes
+
The destination registered for Speed Dial is
deleted and the display is changed over.
SPEED DIAL
( COMPLETE = NO )
14
SPEED DIAL
To the fax number is not correct, press the
No key to delete the fa x number.
No
4503U232
4258U285
4503U233
4258U287
Example:
1. To set Group by the Timer transmission
•Transmission party: Group 1
(One Touch Dial 01,
02, 03)
•Setting the transmission time: 23:00
•Registration time: 12:00
2. To change the data of One Touch Dial
(Transmission for One Touch Dial 01,
Changing the fax number of the destination.)
•Registration time: 15:00
•Transmission party: Group 1
(One Touch Dial 02,
03)
One Touch Dial 01 is automatically
deleted from th e Timer and Group
transmission.
3. To reset the Group and Timer transmission
•Reset a new One Touch Dial 01 to the
Group and Timer transmission again.
= _
OK=YES
4503UBI
4258U034
Page 64

Fax No.
2-22
Registering One Touch Dial and Speed Dial Stations
1
Using the Numeric keys and the One Touch
key [9] or [19], enter the fax number of the
destination.
Up to 32 numbers can be entered for a fax
number.
Example: 06-532-3276
MNO
OT9 OT19
0
5
3
JKL
DEF
6
DEF ABC
3
ABC PQRS
2
or
OT9 OT19
2
7
* One Touch key 9 or 19: Space
= 06 532 3276
OK=YES (SUB= )
2
COMBINATION DIAL
If you regist Combination Dial, press the
Speed Dial key to enter “+” following the
fax number .
Speed Dial
4503U13I
or
MNO
6
4503U31I
The fax number can contain up to 31 digits.
When registering a Sub Address press the
= 06 532 3276+
OK=YES
4258U166
Up Arrow key until “:” is displayed and
enter the PC access number of the
destination.
NOTE
1258U167
•The name of the destination and modem
speed can be r egis ter ed afte r Com bination
Dial.
First Things to Know About Your Fax Chapter 2
•Sub Address and Selective Polling cannot
be registered after Combination Dial has
been set.
3
When registering selective polling, press the
Up Arrow key until “\” is displayed and
enter the PC access number of the
destination.
When a Private Branch Exchange (PBX) is Being Used
When dialing an outside number via a PBX, it may take some time to be connected to the outside line
after dialing out.
In such a case, if you enter the numbers consecutively, a connection may not be achieved after dialing
(Dial Error).
To avoid such an error, enter a pause command at the beginning of the telephone number after entering
the number for accessing the outside line.
By entering a pause, you can avoid the dial error caused by the PBX system.
The number you dial to access the outside line differs for different PBX systems.
1
Enter the number used by your PBX.
Example: 0-06-532-3276
(When the number dialed to access the
outside line is 0.)
Redial/Pause
0
MNO
OT9 OT19
0
5
3
JKL
DEF
6
DEF ABC
3
ABC PQRS
2
or
2
7
4503U32I
OT9 OT19
or
MNO
6
4503U31I
Page 65

2-23
Registering One Touch Dial and Speed Dial Stations
= 0P06 532 3276_
OK=YES (SUB )
4258U168
2
If you have entered a wrong number, press
the Left Arrow key. The cursor position
moves back one position. Enter the correct
number again.
L
3
Check the entry , and if it is correct, press the
Yes key to validate the fax number of the
destination.
Yes
NAME=
_
OK=YES
To correct the entry, press the No key.
The message display returns to the previous
display to enter the fax number.
4503UAI
4258U039
First Things to Know About Your Fax Chapter 2
Name
1
Using the One Touch keys and Arrow keys,
enter the name of the destination.
A name can consist of up to 20 characters.
Selecting Characters
Using the following matrix, enter the
characters of the name of the other party by
pressing the corresponding Numeric keys
and One Touch keys the required number of
times.
4503UC4I
= _
OK=YES
Selecting Characters
Numeric Key
Push Once
Twice
3 Times
4 "
5 "
Symbols
Numeric Key #
Push Once
Twice
3 Times
4 "
5 "
6 "
7 "
8 "
1
2 3 4 5 6 7 8 9 0
12
A
B
C
Numeric Key #
&
Push 9 Times
#
10 "
*
11 "
-
12 "
/
13 "
(
14 "
)
15 "
"
16 "
4503U034
3
4
5
6
7
8
9
0
D
G
J
M
P
T
W
E
H
K
N
Q
U
X
F
I
L
O
R
V
Y
S
Z
Numeric Key #
.
Push 17 Times
,
18 "
!
19 "
+
20 "
=
21 "
<
22 "
>
23 "
?
24 "
$
:
;
@
%
[
]
Õ
Space / Delete
One-Touch Key OT9 and OT19
SPACE
OT10 and OT20
DELETE
4503U223
Page 66

2-24
Registering One Touch Dial and Speed Dial Stations
Example: OSAKA
MNO
6
X 4
R
Press the keys in the
same way
2
If a wrong name has been entered, press One
Touch key 10 or 20. The cursor position
moves back one position. Enter the correct
name again.
OT10OT10 OT20OT20
or
Modem Speed
DELETE
4503U237
4503U227
3
Check your data entry and press the Yes key
to validate the name setting if it is correct.
NAME= OSAKA
_
OK=YES
Yes
HIGH LOW
- SELECT & PUSH "YES" -
Press the No key to correct the name.
When you want to edit the setting contents,
press the No key.
The message display returns to the previous
display to enter the name.
Enter the correct name again.
4258U044
4503UAI
4258U047
First Things to Know About Your Fax Chapter 2
1
Normally, there is no need to change this
setting.
In some instances, where telephone line
connections are very poor quality, setting the
modem speed to low will increase the
chance of effective communication. In this
case, use the Right Arrow key to set the
modem speed to Low.
High Low
2
Check the setting and, if it is correct, press
Yes to validate the modem speed setting.
HIGH LOW
- SELECT & PUSH "YES" -
Yes
ONE TOUCH DIAL
- SELECT REGIST. KEY -
(COMPLETE=NO)
4258U048
4503UCBI
4258U047
4503UAI
Page 67

2-25
Confirm
X 2
Registering One Touch Dial and Speed Dial Stations
First Things to Know About Your Fax Chapter 2
SPEED DIAL
SPEED DIAL
_
(COMPLETE=NO)
To correct your setting, press No.
The Message Display now prompts you to
select either High or Low for the modem
speed. Start the procedure over, beginning
with step 1.
3
Registering for the tra nsmission par t y is
completed. To continue registering for
another transmission party, repeat the
operation for step 3 of “Dial Registration
Mode” below. ➮ p. 2-19
No
DIAL REGISTRATION ?
YES / OR 1 - 4
4258U049
4503UBI
4503U230
NOTE
When register ing the destination for One T ouch
Dial and for Speed Dial consecutively, complete and cancel One Touch Dial registration
mode and then do the registration for Speed
Dial registration mode.
4
Press the No key to leave the dial
registration mode and return to the initial
screen.
No
4503UBI
JUN. 8 15:38 100%
- SET DOC. FACE DOWN -
4503U229
Telephone Number List
1
When you completed programming other
parties for One Touch Dial and Speed Dial,
the machine can print a Telephone Number
List showing the results of programming.
Check t hat the message “SET DOC. FACE
DOWN” is shown on the screen.
Press the Confirm key.
LCD REPORT
- SELECT & PUSH "YES" -
2
Make sure that Report is selected.
If Report is not selected, press the Right
Arrow key to select Report.
R
4258U100
4503UC3I
3
Press the Yes key.
4
Press the Confirm key twice.
Yes
4503UAI
4503U72I
Page 68

5
Press the Yes key .
TELEPHONE NO. LIST
- SET DOC. FACE DOWN -
2-26
Registering One Touch Dial and Speed Dial Stations
Yes
4503UAI
[TELEPHONE Number List] is printed.
4503U227
Check that the contents of the registered
destinations are correct according to the
LIST.
For more details, see Chapter 9 “Printing
Reports”.
First Things to Know About Your Fax Chapter 2
Page 69

2-27
Registering One Touch Dial and Speed Dial Stations
First Things to Know About Your Fax Chapter 2
Page 70

Chapter 3
Basic Fax Operation
This chapter covers the basic operations of your fax, explaining how
to transmit and receive a document.
There are several different ways to send a document by fax. This
chapter explains the procedure by which you directly transmit a document directly from the document feeder without using the memory
function.
Basic Fax Operation Chapter 3
Page 71

3-1
How to Transmit a Document - Basics
You can transmit a document in several different ways. These pages explain how to transmit a document directly from the document feeder without using the memory function. For the procedure to use
the memory function (memory transmission), see "Using Enhanced Utilities." ➮ p. 6-1
Overview of the Basic Transmission Procedure
Here are the basic steps to follow when transmitting a document.
1. Select the resolution (transmission image quality) according to the document’s characteristics.
• Set the resolution for transmission. ➮ p. 3-2
2. Load the document.
• Insure the document is suitable for transmission. ➮ p. 3-3
• Place the document in the feeder. ➮ p. 3-4
3. Dial the number. (Transmit the document.)
• Use the Numeric keys to dial the number. (Manual Dialing) ➮ p. 3-5
• Use the One Touch Dial function. ➮ p. 3-7
• Use the Speed Dial function. ➮ p. 3-9
Basic Fax Operation Chapter 3
• Use the Combination Dial function. ➮ p. 3-11
• Use the Phone Book (List) function. ➮ p. 3-13
• Use the Phone Book (Search) function. ➮ p. 3-14
When the number is dialed, the fax starts scanning and transmitting the document.
Direct Communication and Memory Communication
A document can be transmitted or received through either direct or memory communication.
"Direct transmission" refers to the transmission of a document to the other party as the fax scans it.
"Direct reception" refers to printing the document while receiving it from the other party. Direct transmission and reception are collectively called direct communication.
Memory communication is the opposite of direct communication, in which the fax temporarily stores the
contents of the document being transmitted or received in its built-in memory prior to transmitting or
printing. ➮ p. 6-1
Features of direct communication
Y o u can transmit long documents without con cern about memory capacity. (In memory communication,
transmission or reception of a document is disabled when there is not enough memory for the document.)
Features of memory communication
• Since the fax scans the contents of all pages of a document at high speed before starting a transmission, you can bring that do cument back to y our desk qui ckly. The machine also allows you to make the
necessary settings for the transmission of another document even while transmitting or receiving the
current document.
• Memory substitute reception function: The fax will automatically switch from printing or direct reception to memory reception if the fax runs out of paper or misfeeds, insuring reception of important documents. The document received is printed as soon as paper is loaded or the misfeed is cleared.
➮ p. 5-22
Page 72

How to Transmit a Document - Basics
Selecting the Resolution
You can select the resolution for transmission based on the characteristics of the document to be transmitted so that the receiver gets a highly legible document. There are three types of resolution to choose
from.
3-2
Standard
Use this selection for transmitting a standard document containing characters of a
common size, either handwritten or word-processed. Standard resolution will result in
Standard
the fastest transmission times.
Fine
Half Tone
4503U301
Fine
Standard
Offering better resolution than Standard, Fine is suitable for newspapers and similar
documents which have small type or detailed illustrations, or when there is a willingness to trade speed for higher image quality.
Fine
Half Tone
4503U302
Half Tone
Standard
Fine
Suitable for documents with halftone photo illustration s and f or col ored doc umen ts.
The Half Tone setting is not mutually exclusive of Standard or Fine resolutions. Resolution can be set in addition to Half-Tone.
(Note: Half Tone significantly increases transmission time.)
Half Tone
4503U303
1
Selecting a resolution setting:
Check that the message "SET DOC. FACE
DOWN" is shown.
Example:
3
Standard
Fine
Half Tone
Resolution
Basic Fax Operation Chapter 3
Standard
Fine
Half Tone
Resolution
MEM. FULL / TX CANCEL
OK = YES (TX=START)
2
Press the Resolution key to select the desired
resolution. Each time the key is pressed a
new resolution is selected.
Example:
Standard
Fine
Half Tone
Resolution
4503U229
4503U304
Standard
Fine
Half Tone
Resolution
Standard
Fine
Half Tone
Resolution
4503U305
When the document has been transmitted,
the initial setting of Standard is
automatically reset.
The SET utilities function allows selection
of another resolution type as the default.
SET Utilities ➮ p. 8-3
Page 73

3-3
How to Transmit a Document - Basics
Loading the Document
Documents Suitable for Transmission
Type
Sheet (1-sided only)
Size
Standard: A4L, 8-1/2" x 1 1" (Lett er) L, 8- 1/2" x 14" (Legal) L, 8-1/2 " x 13" (Gov ernment Legal) L,
8" x 14"
Non-standard: Width - 148 mm to 216 mm (5-3/4" to 8-1/2");
Length - 100 mm to 500 mm (4" to 20"). (L: lengthwise; C: crosswise)
Effective Scanning Area
The fax will not transmit information contained in
the margins of 4 mm (0.16 inch) along the four
edges of the document .
When preparing a document, allow a blank margin
of this width along the four edges.
Basic Fax Operation Chapter 3
A4
4mm
Letter
4mm 4mm
Weight
2
50 g/m
No. of Pages That Can be Loaded
A4/Letter (60 g/m
A4/Letter (50 g/m
A4/Letter (90 g/m
to 120 g/m2 (13-1/4 lbs. to 32 lbs.)
2
to 90 g/m2 or 16 lbs. to 24 lbs.) : 10 sheets
2
to 60 g/m2) : 5 sheets
2
to 120 g/m2) : 5 sheets
NOTE
For any of the following types of documents, make a copy prior to tra nsmission or use the Carrier
Sheet for transmission.
• A page with a width or length smaller than the minimum permissible dimensions
• Minimum permissible dimensions: Width 148 mm or 5-3/4", Length 100 mm or (4")
• A lightweight page weighing 50 g/m
2
(13-1/4 lbs.) or less
• A creased, torn, wrinkled, or curled page
• OHP transparencies
• A page with a stamp on it A page with adhesive tape affixed to it
• Paper with a coated surface
• Heat- or pressure-sensitive paper
• Glossy pape r
4258U050
Useful Tips
In case your document is very imp ortant, confid ential or f or an emer gency, it is recommended that you
make a phone call to tell the other party that you are sending a document.
Page 74

How to Transmit a Document - Basics
5mm
Loading the Document
This fax scans the data on the front side of the document. This means that you should place the document face down on your fax.
You can transmit the document with the date printed at on the top of the document by the Header function. To use the Header function properly, load the document top edge down. ➮ p. 5-17
When sending a multi-page document, the fax scans from the top down. A document placed in the
feeder such as page 1, page 2, .... page X will be sent in the same order. Document ejecting style is
straight-ahead ejection. The same rule applies when placing your document for the copy or scanner
function.
➮ pp. 7-1, 10-1
1
Check that the message "SET DOC. FACE
DOWN" is shown.
JUN. 8 15:38 100%
- SET DOC. FACE DOWN -
4503U229
2
Adjust the Document Guide Plates to fit the
size of the document.
For multi-page documents, may sure to remove
any staples, paper clips, tape etc. Transmitting
documents without removing these items can
cause misfeeds or damage to machine.
3-4
Basic Fax Operation Chapter 3
4503U322
4503U320
3
• Place the document face down and turn the
top edge of the document down.
• Slide the document along the Document
Feeding Tray into the fax until it is stops.
4503U321
NOTE
Do not mix pages of assorted sizes together, as
a paper misfeed or skewing could result.
If multi-page documents are misfed or piggybacked (two or more sheets are stuck and fed
together), set the documents with each page
shifted and parted slightly from the beneath
page as if the forefront of them form a wedge
viewed from the side.
4
The Message Display now prompts you to
enter the fax number.
= ENTER FAX. NO.
or FUNCTION
4258U052
5403U324
4258U051
Page 75

3-5
6
0
5
2
3
3
7
2
6
MNO JKL
DEF
MNOPQRS
ABC
ABC
DEF
L
How to Transmit a Document - Basics
Dialing the Number (Transmitting the Document)
Using the Numeric keys (Manual Dialing)
Using the Numeric keys to dial is the most basic
method. Load your document, enter the fax number of the destination with the Numeric keys, and
press the Start key. It’s that simple.
ABC DEF
1 2 3
JKLGHI MNO
4 5 6
TUVPQRS WXYZ
7 8 9
0 #
Basic Fax Operation Chapter 3
1
Check that the message "SET DOC. FACE
DOWN" is shown.
Example:
JUN. 8 15:38 100%
- SET DOC. FACE DOWN -
Select the resolution based on the
characteristics of the document. ➮ p. 3-2
2
Place the document on the Document
Feeding Tray.
➮ p. 3-4
4503U00I
4503U229
4503U321
Stop
3
From the Numeric keys, enter the fax
Start/Copy
number of the other party. Up to 32
characters can be entered for a fax number.
Example: 06-532-3276
= OP06 532 3276_
(TX = START )
4
Gain access to the PC connected to the
destination inputted.
T o input "Sub A ddress, " press t he Up Arro w
Key once. Then, the display shows ";"
meaning that the input of "Sub Address" is
ready.
If you have entered a wrong number, press
the Left Arrow key, which will bring the
cursor back one position. Enter the correct
number.
4503U33I
4258U054
4503U12LI
Page 76

5
Press the Start Key.
The fax automatically starts dialing the
number and starts feeding the document.
3-6
How to Transmit a Document - Basics
Press the Stop key if you want to stop
transmitting the document.
Start/Copy
4503U16I
Stop
4503U17I
When a PBX is Being Used
When dialing a number to an outside line via a PBX, it may take some time to be con nected to the outside
line after dialing the access number ("0" for example).
In such a case, if you enter the numbers consecutively, a connection for the outside may not be achieved
after dialing (Dial Error).
To avoid such an error, enter a pause command at the beginning of the telephone number after entering
the number for accessing the outside line.
By entering a pause, you can avoid the dial error caused by the PBX system.
(Example) 0-06-532-3276
(When the number dialed to access the outside line is 0.)
Redial/Pause
0
0
JKL
5
DEF
3
* One Touch Key 9 or 19: Space
4503U32I
MNO
6
DEF ABC
3
ABC PQRS
2
OT9 OT19
or
OT9 OT19
2
7
or
MNO
6
4503U31I
Basic Fax Operation Chapter 3
= OP06 532 3276_
(TX = START )
4258U054
When the transmission is completed, a
buzzer sounds and the message "TX
COMPLETE" is shown for 2 sec., indicating
that the document has been successfully
transmitted to the other party.
TX COMPLETE
TOKYO
Then, the initial screen reappears.
To obtain detailed results of a transmission,
print the Activity Report. ➮ p. 9-1
1
4503U307
Page 77

3-7
How to Transmit a Document - Basics
If the Line is Busy
If the line is busy and the fax is unable to
transmit the document to the receiving party,
the Auto Redial function is automatically
activated and the fax repeats dialing the
number.
If the Transmission Fails
If the transmission fails, a buzzer sounds
intermittently for 2 sec. and the Error
Indicator l ights up.
For details, see "Redial Transmission."
➮ p. 6-3
REDIAL WAITING
TOKYO
4503U308
Press the Stop key.
Error
The fax then automatically prints a TX RX
Result Report. For more details, see "TX RX
Basic Fax Operation Chapter 3
Result Report." ➮ pp. 9-3, 9-5
REDIAL ALL FAILED
TOKYO
Using the One Touch Dial Function
The One Touch Dial function allows you to transmit a document to a particular party by pressing one
of the One Touch Keys which has previously been programmed with that party’s information.
T o us e t his function, you must previously program the fax number and other dat a for particular partie s
into different One Touch Keys.
You can also register the PC access number when the destination fax is connected to a PC.
Two fax numbers or telephone numbers can be registered to each One Touch key. Please note, however, that these cannot be registered to One Touch keys already assigned for external line connection.
01
02
03
11
12
13
4503U3AI
4503U309
04
14
Stop
4503U171
The document is fed out and the Error
Indicator will go out. Note the reason for
failure on the TX RX Result Report and
retry transmission or check to insure the fax
number is correct.
05
06
07
08
09
10
15
16
17
18
19
20
For more detailed programming procedures, see “Registering One Touch Dial and Speed Dial Sta-
4503U34I
tions”. ➮ p. 2-19
Page 78

1
Check that the message "SET DOC. FACE
DOWN" is shown.
MEM. FULL / TX CANCEL
OK = YES (TX=START)
3-8
How to Transmit a Document - Basics
The fax now starts dialing the fax number
and it starts feeding the document.
Press the Stop key if you want to stop the
transmission.
Select the resolution according to the
characteristics of the document. ➮ p. 3-2
2
Place the document on the Document
Feeding Tray.
➮ p. 3-4
3
Press the One Touch key in which the
desired party has been programmed.
Example: One Touch key "8"
→ OSAKA
OT08
4503U229
4503U321
4503Uo8
Stop
4
When the transmission is completed, a
buzzer sounds and the message "TX
COMPLETE" is shown for 2 sec., indicating
that the document has been successfully
transmitted to the other party.
TX COMPLETE
TOKYO
Then, the initial screen reappears.
JUN. 8 15:38 100%
- SET DOC. FACE DOWN -
To obtain detailed results of the
transmission, print the Activity Report.
➮ p. 9-1
4503U17I
1
4503U307
4503U229
Basic Fax Operation Chapter 3
If the Line is Busy
If the line is busy and the fax is unable to
transmit the document to the other party, the
Auto Redial function is automatically
activated and the fax repeats dialing the
number.
For details, see "Redial Transmission."
➮ p. 6-3
REDIAL WAITING
TOKYO
4503U308
Page 79

3-9
How to Transmit a Document - Basics
If the Transmission Fails
If the transmission fails, a buzzer sounds
intermittently for 2 sec. and the Error
Indicator l ights up.
Press the Stop key.
Error
The fax then automatically prints a TX RX
Result Report. For more details, see "TX RX
Result Report." ➮ pp. 9-3, 9-5
REDIAL ALL FAILED
TOKYO
Using the Speed Dial Function
Basic Fax Operation Chapter 3
The Speed Dial function allows you to transmit a document to a particular party by just entering a 2digit number assigned to th at party. To u se this f unction , howeve r , you mus t firs t program the fax number and other data for each party into the Speed Dial key.
You can also register the PC access number when the destination fax is connected to a PC.
Data for up to 100 different parties can be registered for Speed Dial.
Manual RX Error
PC
Standard
Fine
Half Tone
Memory TX
Resolution
Confirm
Set
4503U3AI
4503U309
Function
Stop
The Error Indicator will go out. Note the
reason for failure on the TX RX Result
Report and retry transmission or check to
insure the fax number is correct.
Yes
No
4503U17I
Speed Dial
Redial/Pause
For more detailed registering procedures, see "Registering One Touch Dial and Speed Dial Stations."
➮ p. 2-19
1
Check that the message "SET DOC. FACE
DOWN" is shown.
2
Place the document on the Document
Feeding Tray.
➮ p. 3-4
JUN. 8 15:38 100%
- SET DOC. FACE DOWN -
Select the resolution according to the
characteristics of the document. ➮ p. 2-19
4503U229
4503U323
4503U321
Page 80

3-10
How to Transmit a Document - Basics
3
Press the Speed Dial key.
Speed Dial
SPEED DIAL =
( PHONE BOOK = )
4
Using the Numeric keys, enter the 2-digit
number assigned to the other party to which
you are going to transmit a document.
Then, press the Start key.
Example: Code 38 → OSAKA
DEF
3
5
The fax now starts dialing the fax number
and starts feeding the document.
Press the Stop key if you want to stop the
transmission.
TUV
8
Start/CopyStart/Copy
4503U13I
4258U059
4503U36I
6
When transmission is completed, a buzzer
sounds and the message "TX COMPLETE"
is shown for 2 sec., indicating that the
document has been successfully transmitted
to the other party.
TX COMPLETE
OSAKA
Then, the initial screen reappears.
JUN. 8 15:38 100%
- SET DOC. FACE DOWN -
To obtain detailed results of a transmission,
print the TX Result Report. ➮ p. 9-1
FUNCTION No. DESTINATION STATION DATE TIME PAGE COMM.TIME MODE RESULT
TX 1 OSAKA OCT.17 17:19 8 0H05' 14" FINE ECM OK
TX RESULT REPORT
1
4503U311
4503U229
Basic Fax Operation Chapter 3
4503U903
Stop
If the Line is Busy
If the line is busy and the fax is unable to
transmit the document to the other party, the
Auto Redial function is automatically
activated and the fax repeats dialing the
number.
4503U17I
For details, see "Redial Transmission."
➮ p. 6-3
REDIAL WAITING
TOKYO
4503U308
Page 81

3-11
How to Transmit a Document - Basics
If the Transmission Fails
If the transmission fails, a buzzer sounds
intermittently for 2 sec. and the Error
Indicator l ights up.
Error
The fax then automatically prints a TX RX
Result Report. For more details, see "TX RX
Result Report." ➮ pp. 9-3, 9-5
REDIAL ALL FAILED
TOKYO
Using the Combination Dial Function
When a dial registered as a Combination Dial is used, you can enter the Dial No. following the Com-
Basic Fax Operation Chapter 3
bination Dial.
To register One Touch Dial No. or Speed Dial No. as a Combination Dial, enter "+" at the end of the
One Touch Dial No. or Speed Dial No.
In calling, enter the Combination Dial No. and Dial No. in this order.
How to use Combination Dial
Example: When the One Touch Dial 01 (OT1) has been registered as a Combination Dial,
1.OT1 + Dial No. (Numeric keys) + Start key
2.OT1 + One Touch Dial (which has not yet been registered as a Combination Dial)
3.OT1 + Speed Dial and Numeric keys + Start key
4.Redial (including Combination Dial)
5.OT1 + Start key
4503U3AI
Press the Stop key.
4503U309
Stop
4503U17I
The Error Indicator will go out. Note the
reason for failure on the TX RX Result
Report and retry transmission or check to
insure the fax number is correct.
NOTE
• Entry should be made before specifying the receiver.
Entry is not accepted after a numeric key, One Touch Dial not registered as a Combination Dial, or
Speed Dial.
• Plural Combination Dials cannot be used together.
Calling only with the Combination Dial is possible.
• When a One Touch Dial or Speed Dial key is used after a Combination Dial, the slower communication speed is applied.
• Batch processing is possible when Group Dial, Program Dial, Timer Transmission or Communication Function is registered by using One Touch Dial or Speed Dial as a Combination Dial.
• Any registered Dial No., when it is changed or deleted, is deleted from the registration of Transmission (Calling) Stand-by Job and Program Key.
• An error occurs and transmission b ecomes impossib le when co mbined numbers are registered to the
Combination Dial or when the total number of digits in a fax number exceeds 32.
For details about registering procedures, see “Registering One Touch Dial and Speed Dial”.
➮
p. 2-19
Page 82

3-12
Start/Copy
How to Transmit a Document - Basics
1
Check that the message "SET DOC. FACE
DOWN" is shown.
JUN. 8 15:38 100%
- SET DOC. FACE DOWN -
Select the resolution according to the
characteristics of the document. ➮ p. 2-19
2
Place the document on the Document
Feeding Tray.
➮ p. 3-4
3
Select the number to be registered as
Combination Dial.
Speed Dial
or
OT
0
0
4503U229
4503U321
5
Press the Start key.
4503U16I
NOTE
When you press One Touch Dial after pressing
Combination Dial, the fax number is automatically entered without pressing the Start key.
Basic Fax Operation Chapter 3
Speed Dial
or
4
Enter the fax number using the Numeric
WXYZ
9
keys, or select the fax number in One Touch
Dial or Speed Dial.
ABC DEF
1 2 3
JKLGHI MNO
4 5 6
TUVPQRS WXYZ
7 8 9
0 #
WXYZ
9
4503U336a
4503U15I
Page 83

3-13
U
How to Transmit a Document - Basics
Using the Phone Book Function
Phone Book is a list of locations you have programmed for One Touch Dial and Speed Dial.
This function offers you a directory list for locating a destination by yourself or by fax (Search) for
transmission of a document to that party.
PC
Memory TX
To use the Phone Book, you must first program the fax numbers and other data for the destinations to
whom you will transmit a document by One Touch Dial or Speed Dial. Please note, however, that
these cannot be registered to One Touch keys already assigned for external line connection.
Up to 20 different parties can be registered for One Touch Dial and up to 100 for Speed Dial.
For details about registering procedures, see "Registering One Touch Dial and Speed Dial Stations."
➮ p. 2-19
Basic Fax Operation Chapter 3
Phone Book (List)
1
Check that the message "SET DOC. FACE
DOWN" is shown.
JUN. 8 15:38 100%
- SET DOC. FACE DOWN -
Select the resolution according to the
characteristics of the document. ➮ p. 2-19
2
Place the document on the Document
Feeding Tray.
➮ p. 3-4
Manual RX Error
Standard
Fine
Half Tone
Resolution
Confirm
Set
Function
4503U229
Redial/Pause
Yes
3
No
Press the Speed Dial key.
Speed Dial
SPEED DIAL =
( PHONE BOOK = )
4
Press the Up Arrow key to call up the Phone
Book.
Speed Dial
4503U323
4503U13I
4258U030
4503U321
5
Make sure that List is selected. Then, press
the Yes key.
LIST SEARCH
- SELECT & PUSH "YES" -
Yes
4503UC1I
4258U092
4503U10I
Page 84

3-14
How to Transmit a Document - Basics
6
Using the Up and Down Arrow keys, search
for the party to whom you are going to
transmit a document.
Each press of the Arrow key shows a new
party name on the Message Display.
U
D
OSAKA
OK = START
7
Once the correct destination is displayed,
press the Start key.
Start/Copy
The fax now starts dialing the fax number
and it starts feeding the document.
Press the Stop key if you want to stop the
transmission.
4503UC33I
4503U310
4503U16I
8
When the transmission is completed, a
buzzer sounds and the message "TX
COMPLETE" is shown for 2 sec., indicating
that the document has been successfully
transmitted to the other party.
TX COMPLETE
OSAKA
Then, the initial screen reappears.
1
JUN. 8 15:38 100%
- SET DOC. FACE DOWN -
If you want to know the result of the
transmission, check it either by using the
Confirm function or by printing the Activity
Report. ➮ p. 9-1
NO. COUNTER DATE TIME TX/RX DESTINATION STATION PAGE COMM. TIME MODE RELT
1 T/ 000001 SEP.17 09 : 30 TX OSAKA 1 0 H 01' 25" STD OK
ACTIVITY REPORT
03 345 0987 ECM
TX
TOTAL
RX
100 H 01' 25"
0 H 00' 00"
4503U311
4503U299
Basic Fax Operation Chapter 3
4503U335
Stop
If the Line is Busy
If the line is busy and the fax is unable to
transmit the document to the other party, the
Auto Redial function is automatically
activated and the fax repeats dialing the
number.
For details, see "Redial Transmission."
➮ p. 6-3
4503U17I
Page 85

3-15
U
How to Transmit a Document - Basics
If the Transmission Fails
If the transmission fails, a buzzer sounds
intermittently for 2 sec. and the Error
Indicator l ights up.
Error
The fax then automatically prints a TX RX
Result Report. For more details, see "TX RX
Result Report." ➮ pp. 9-3, 9-5
REDIAL ALL FAILED
TOKYO
Phone Book (Search)
1
Basic Fax Operation Chapter 3
Check that the message "SET DOC. FACE
DOWN" is shown.
JUN. 8 15:38 100%
- SET DOC. FACE DOWN -
4503U3AI
4503U309
Press the Stop key.
Stop
The Error Indicator will go out. Note the
reason for failure on the TX / RX Result
Report and retry transmission or check to
insure the fax number is correct.
4
Press the Up Arrow key to call up the Phone
Book.
4503U17I
Select the resolution according to the
characteristics of the document. ➮ p. 3-2
2
Place the document on the Document
Feeding Tray.
➮ p. 3-4
3
Press the Speed Dial key.
Speed Dial
SPEED DIAL =
( PHONE BOOK = )
4503U229
4503U321
4503U13I
LIST SEARCH
- SELECT & PUSH "YES" -
5
Press the Right Arrow key to select Search.
Then, press the Yes key.
Yes
R
+
LIST SEARCH
- SELECT & PUSH "YES" -
4503UC1I
4258U092
4503U324
4258U094
4258U059
Page 86

3-16
U
D
Start/Copy
How to Transmit a Document - Basics
6
Using the Numeric keys and Arrow keys,
enter the name or beginning portion of the
name of the party you want to reach.
Selecting Characters
Using the following matrix, enter the
characters of the name or beginning of the
name by pressing the corresponding
Numeric keys and One Touch keys the
required number of times.
Selecting Characters
Numeric Key
Push Once
Twice
3 Times
4 "
5 "
1
2 3 4 5 6 7 8 9 0
12
3
4
5
6
A
D
G
J
M
B
E
H
K
N
C
F
I
L
O
Symbols
Numeric Key #
Push Once
Twice
3 Times
4 "
5 "
6 "
7 "
8 "
Numeric Key #
&
Push 9 Times
#
10 "
*
11 "
-
12 "
/
13 "
(
14 "
)
15 "
"
16 "
Numeric Key #
.
Push 17 Times
,
18 "
!
19 "
+
20 "
=
21 "
<
22 "
>
23 "
?
24 "
Space / Delete
One-Touch Key OT9 and OT19
SPACE
OT10 and OT20
DELETE
Example: JAPAN
JKL
5
X 2
7
Press the Yes key .
The fax now searches for the exact name or
possible names beginning with the letters
entered.
Yes
4503U10I
Example:Search for the destination name
having JAPAN at the beginning of
the name.
→ Searching ten destinations
7
8
9
0
P
T
W
Q
U
X
R
V
Y
S
Z
8
JAPAN (10)
SEARCH = YES (SEE = )
4503U313
Using the Up and Down Arrow keys, locate
the party to whom you are going to transmit
a document.
$
:
;
@
%
[
]
Õ
party name on the Message Display.
4503UC33
Each press of the arrow key shows a new
Basic Fax Operation Chapter 3
JAPAN
OK=START
4503U223
9
Once the correct destination is displayed,
press the Start key.
4503U326
ABC
2
X 2
R
Do the same for the destination you wish to
locate.
SEARCH - >> JAPAN
OK = YES
4503U325
4503U312
The fax now starts dialing the fax number
4503U16I
and it starts feeding the document. Press the
Stop key if you want to stop the
transmission.
Stop
4503I17I
Page 87

3-17
How to Transmit a Document - Basics
10
When the transmission is completed, a
buzzer sounds and the message "TX
COMPLETE" is shown for 2 sec., indicating
that the document has been successfully
transmitted to the other party.
TX COMPLETE
If the Line is Busy
If the line is busy and the fax is unable to
transmit the document to the other party, the
Auto Redial function is automatically
activated and the fax repeats dialing the
Basic Fax Operation Chapter 3
If the Transmission Fails
If the transmission fails, a buzzer sounds
intermittently for 2 sec. and the Error
Indicator l ights up.
1
4503U327
11
Then, the initial screen reappears.
JUN. 8 15:38 100%
- SET DOC. FACE DOWN -
If you want to know the result of the
transmission, check it either by using the
Confirm function or by printing the Activity
Report. ➮ p. 9-1
number.
For details, see "Redial Transmission."
➮ p. 6-3
4503U229
Error
The fax then automatically prints a TX RX
Result Report. For more details, see "TX RX
Result Report." ➮ pp. 9-3, 9-5
Press the Stop key.
4503U3AI
REDIAL ALL FAILED
TOKYO
The Error Indicator will go out. Note the
reason for failure on the TX RX Result
Report and retry transmission or check to
insure the fax number is correct.
Stop
4503U309
4503U17I
Page 88

How to Receive a Document - Basics
A document can be received in several different ways . These pages explain how to receive a document
and directly print it on your fax machine without using the memory function. For the procedure using
the memory function (memory reception), see "Using the Enhanced Utilities." ➮ p. 5-19
Overview of the Basic Reception Procedure
Before receiving a document, the following functions must first be set.
Reception Mode
• This determines the mode in which your fax should be set to receive a document from the other party.
3-18
Print Mode
• This determines the zoom ratio at which the document received from the other party is to be printed
through your fax printer.
➮ p. 3-19
Reception Mode Overview
Your fax may be in either one of the following two modes when receiving a document from the other
party. Select the appropriate mode according as how you are going to receive the document.
Fax mode
Select this mode when you use your fax mainly as a fax machine. When a document comes in, your fax
rings several times before starting an automatic recep tion. The n umber of rings can be set as required. Set
Utilities ➮ pp . 8-1, 8-4
TEL mode (Manual RX mode)
Select this mode when you use your fax mainly as a telephone. To receive a fax document, pick up the
Handset, if you hear a fax tone, press the Start Key and hang-up to receive it manually. Note that you cannot receive a document automatically.
Direct Communication and Memory Communication
A document can be transmitted or received through either direct or memory communication.
"Direct transmission" refers to the transmission of a document to the other party as the fax reads it.
"Direct reception" refers to printing the document while receiving it from the other party. Direct transmission and reception are collectively called direct communication.
Memory communication is the opposite of direct communication, in which the fax temporarily stores the
contents of the document being transmitted or received in its built-in memory, prior to transmitting or
printing. ➮ p. 6-1
Basic Fax Operation Chapter 3
Features of direct communication
You can transmit lo ng documents without concern about the memory capacity still available for use. (In
memory communication, transmission or reception of a document is disabled when there is not enough
memory for the document.)
Features of memory communication
• Since the fax scans the content of all pages of a document at high speed before starting a tran smission,
you can bring that document back to your des k quickly. The machine also allows you to make the necessary settings for the transmission of another document even while transmitting or receiving the current document.
• Memory substitute reception function: The fax will automatically switch from printing or direct reception to memory reception if the fax runs out of paper or misfeeds, insuring reception of important documents. The document received is printed as soon as the paper is loaded or the misfeed is cleared ➮ p. 522
Page 89

3-19
How to Receive a Document - Basics
Print Mode Overview
Your fax may be in either one of the following three modes when printing a document received from the
other party. Select the appropriate mode according to your needs.
Full Size Priority mode
When in this mode, your fax automatically selects the zoom ratio for printing (a reduction along the
longer axis of the page). Priority is, however, given to full size in this mode.
If the document is longer than the specifications, the Divide-and-Print function* is automatically activated and the fax prints the portion outside the length of the paper on the following page.
Basic Fax Operation Chapter 3
Document
Transmitted
A A A
B B B
C C C
D D D
Document
Transmitted
A A A A
B B B B
C C C C
D D D D
E E E E
F F F F
G G G G
Print
Magnifications
Document
Lengthwise
less than 10-3/4"
FAX
FAX
Letter L
100%
Full Size Printing
A A A
B B B
C C C
D D D
Document
Transmitted
A A A
B B B
C C C
Reduction Printing (along the
longer axis of the page)
A A A
B B B
C C C
D D D
D D D
FAX
4258U075
Divide-and-Print
A A A A
B B B B
F F F F
C C C C
G G G G
D D D D
E E E E
4258U071
Paper Size Paper Size
A4 L
100%
Legal
100%
Print
Magnifications
Document
Lengthwise
12" to 13-3/4"
Letter L
100% D&P
A4 L
100%
4258U073
Legal
100%
10-3/4" to 11"
11" to 11-1/4"
11-1/4" to 11-3/4"
11-3/4" to 12"
96.77%
94.12%
100% D&P
100% D&P
100%
100%
96.77%
94.12%
* D&P: Divide-and-Print Function
100%
100%
100%
100%
13-3/4" to 14"
14" to 14-1/2"
more than 14-1/2"
100% D&P
100% D&P
100% D&P
100% D&P
100% D&P
100% D&P
96.77%
94.12%
100% D&P
4258U069
Page 90

How to Receive a Document - Basics
Reduction Priority mode
When in this mode, your fax automatically selects the zoom ratio for printin g (a reduction along the
longer axis of the page). Priority is, however, given to reduction in this mode.
If the document is longer than the specifications, the Divide-and-Print function* is automatically activated and the fax prints the portion outside the length of the paper on the following page.
3-20
Document
Transmitted
A A A
B B B
C C C
D D D
Document
Lengthwise
Print
Magnifications
100%
96.77%
94.12%
90.12%
88.24%
Reduction Printing (along the
longer axis of the page)
A A A
B B B
C C C
D D D
FAX
Paper Size Paper Size
Letter L
less than 10-3/4"
10-3/4" to 11"
11" to 11-1/4"
11-1/4" to 11-3/4"
11-3/4" to 12"
A4 L
less than 11-1/4"
11-1/4" to 11-3/4"
11-3/4" to 12"
12" to 12-1/2"
12-1/2" to 12-3/4"
4258U073
Legal
less than
13-3/4"
13-3/4" to 14"
14" to 14-1/2"
14-1/2" to 15"
15" to 15-1/2"
Document
Lengthwise
Print
Magnifications
85.71%
75%
71.43%
100% D & P
Document
Transmitted
A A A A
B B B B
C C C C
D D D D
E E E E
F F F F
G G G G
Letter L
12" to 12-1/2"
12-1/2" to 14-1/4"
14-1/4" to 15"
more than 15"
FAX
A4 L
12-3/4" to 13-1/4"
13-1/4" to 15"
15" to 15-3/4"
more than 15-3/4"
Divide-and-Print
A A A A
B B B B
F F F F
C C C C
G G G G
D D D D
E E E E
Legal
15-1/2" to 16"
16" to 18-1/4"
18-1/4" to 19-1/4"
more than 19-1/4"
4258U071
4258U070
100% Reception mode
When in this mode, the fax prints the document received full-size without reducing it.
If the document is longer than the specifications, the Divide-and-Print function* is automatically activated and the fax prints the portion outside the length of the paper on the following page.
Basic Fax Operation Chapter 3
If you want to use this mode, call your Technical Representative.
*Divide-and-Print Function
This function divides a received page longer than the paper
loaded in your fax into two or more so that any information on
one full page received is not lost. The applicable zoom ratio is
100% in this case.
Document
Transmitted
A A A A
B B B B
C C C C
D D D D
E E E E
F F F F
G G G G
FAX
Divide-and-Print
A A A A
B B B B
F F F F
C C C C
G G G G
D D D D
E E E E
4258U071
Page 91

3-21
L
LR
How to Receive a Document - Basics
Selecting the Reception Mode
Basic Fax Operation Chapter 3
1
Check that the message "SET DOC. FACE
DOWN" is shown on the Message Display.
JUN. 8 15:38 100%
- SET DOC. FACE DOWN -
2
Press the Set key four times to set the fax
into the RX Operation mode.
Set
X 4
RX OPERATION?
YES / OR 1 -- 8
4503U229
4503U84I
4503U314
3
Press "8" of the Numeric keys to show "8
Manul RX" on the Message Display.
TUV
8
8 MANUAL RX
The fax is now ready to receive based on the
mode selected through the above steps.
4
Select the Left Arrow key to select ON.
ON OFF
- SELECT & PUSH "YES" -
4503UF8I
4503U334
4258U080
4503UC4I
Selecting the Print Mode
1
Check that the initial screen is shown.
JUN. 8 15:38 100%
- SET DOC. FACE DOWN -
2
Press the Set key four times to set the fax
into the RX Operation mode.
Set
X 4
RX OPERATION?
YES / OR 1 -- 8
4503U229
4503U84I
4503U314
3
Press "4" of the Numeric keys to show "4
Reduction RX" on the Message Display.
GHI
4
4 REDUCTION RX
4
Using the Left and Right Arrow keys, select
the desired print mode.
4503UF4I
4503U315
4503UC7I
Page 92

3-22
How to Receive a Document - Basics
Left Arrow key:
Turns ON Reduction RX, i.e., this
selects the Reduction Priority mode.
Right Arrow key:
Turns OFF Reduction RX, i.e., this
selects the Full Size Priority mode.
ON OFF
- SELECT & PUSH "YES" -
5
If you want to change the setting, press the
No key.
The Message Display now prompts you to
select whether you want to turn ON or OFF
Reduction RX. Now, start the procedure
over beginning with step 4.
No
ON OFF
- SELECT & PUSH "YES" -
4258U80
4503UBI
Once the desired selection is made, press the
Yes ke y to validate it.
Yes
RX OPERATION?
YES / OR 1 -- 8
6
Press the No key to exit from the RX
Operation mode. Then, check that the initial
screen reappears.
No
JUN. 8 15:38 100%
- SET DOC. FACE DOWN -
4503U10I
4503U314
4503UBI
Basic Fax Operation Chapter 3
4503U229
4258U080
Operation at Reception
Receiving a Document in the Fax Mode
1
When using a telephone, the telephone also
rings indicating that a fax call is coming in.
4503U328
NOTE
You cannot answer the call by picking up the
telephone.
4503U329
Page 93

3-23
Start/Copy
How to Receive a Document - Basics
2
The fax stops ringing and the document is
received and exits onto the Print Tray .
3
When all pages of the document are prin te d,
a buzzer sounds, notifying you that the
communication has been completed.
(TOKYO ) 90%
- SET DOC. FACE DOWN -
The number of rings before the fax answers i s programmable. ➮ pp. 8-1, 8-4
4503U316
RX COMPLETE
TOKYO
Receiving a Document in the Tel Mode (Manual RX mode)
Basic Fax Operation Chapter 3
1
When using a telephone unit, the telephone
also rings indicating that a fax call is coming
in.
3
If you hear a fax signal, press the Start key.
4503U330
4503U317
2
Pick up the telephone.
This stops the fax ringing.
4503U328
4503U331
4
Hang up th e telephone.
Then, the document is received and exits
onto the Print Tray.
When all pages of the document are prin te d,
a buzzer sounds, notifying that the
communication has been completed.
RX COMPLETE
TOKYO
4503U16I
4503U332
4503U317
Page 94

How to Use Your Fax as a Telephone Set
This fax can be used as a telephone set in addition to a fax machine.
Making a Telephone Call
1
Check that the initial screen is shown.
JUN. 8 15:38 100%
- SET DOC. FACE DOWN -
4503U229
2
Pick up the telephone.
3-24
Basic Fax Operation Chapter 3
3
Using the dial keys on the telephone unit or
the Numeric keys, enter the telephone
number of the receiving party.
4
The telephone unit now operates as a normal
telephone.
Once the voice call is completed, hang up
the telephone.
4503U331
4503U333
4503U332
Page 95

3-25
How to Use Your Fax as a Tele ph one Set
Receiving a Telephone Call
1
When using a telephone unit, the telephone
rings indicating that a fax call is coming in.
Pick up the telephone.
Now you can talk to the calling party over
the phone.
Basic Fax Operation Chapter 3
4503U328
4503U340
NOTE
• When you pick up the telephone with the fax
in the Tel mode and find that the call received
is a fax communication, press the Start key.
p. 3-23
• When the fax is in the Fax mode, the telephone is disabled to answer any call.
➮
p. 3-23
2
Once a voice call has been completed, hang
up the telephone.
4503U332
➮
Page 96

Chapter 4
Using the Enhanced Utilities 1
(FUNCTION Utilities)
This chapter covers using the enhanced utilities provided by your fax,
particularly the FUNCTION utilities.
Using the Enhanced Utilities 1 (FUNCTION Utilities) Chapter 4
Page 97

4-1
Using the FUNCTION Utilities
Overview of the FUNCTION Utilities
The FUNCTION utilities help make your fax more convenient to operate. The following eight FUNCTIONS are available.
1. Broadcast
2. Convenient Copy
3. Timer TX
4. Mailbox TX
5. Print Mailbox RX
6. Polling TX
7. Polling RX
0. Cancel Reservation
Transmits the same document to two or more parties with a single operation. ➮ p. 4-3
Permits making of enlarged or reduced copies, multiple copies, and
sorted multiple copies. For details, see Chapter 7 "Making Copies."
➮ p. 7-1
Scans a document into memory for transmission to the destination at a
specified time. ➮ p. 4-11
Transmits a confidential document to a particular person at the receiving
party. The document is stored in memory at the receiving end. The entry
of a password is necessary before the document can be printed. ➮ p. 4-14
Receives a confidential document from a particular person. The document will not be printed until a password is entered. ➮ p. 4-17
Scans the document into memory and, upon receiving a polling transmission command from the other party, transmits it to them. ➮ p. 4-21
Gives a polling transmission command to another fax which enables it to
transmit a document previously stored in memory. ➮ p. 4-24
Cancels a job which has been stored in memory for future transmission,
including that for Broadcast, Timer TX, Polling TX and deletes the document from memory. Only jobs which have not begun can be canceled.
➮ p. 4-31
Using the Enhanced Utilities 1 (FUNCTION Utilities) Chapter 4
Page 98

Setting the FUNCTION Utilities
Numeric keys for FUNCTION Selection
ABC DEF
1. Broadcast
2. Convenient Copy
3. Timer TX
4. Mailbox TX
5. Print Mailbox RX
6. Polling TX
7. Polling RX
0. Cancel Reservation
1
Check that the message "SET DOC. FACE
DOWN" is shown on the Message Display.
Example:
1 2 3
JKLGHI MNO
4 5 6
TUVPQRS WXYZ
7 8 9
0 #
Stop
4503U401
Start/Copy
Using the FUNCTION Utilities
3
Press the Function key.
The Message Display now prompts you to
select one of the FUNCTION utilities.
Function
FUNCTION
SEL. 0 - 7 / OR FUNCTION
4
Using the Numeric keys, select the desired
FUNCTION.
Example: To select Broadcast, press "1.":
1
4-2
4503U09I
4258U106
JUN. 8 15:38 100%
- SET DOC. FACE DOWN -
Select the resolution according to the
characteristics of the document. ➮ p. 3-2
2
Place the document on the Document
Feeding Tray. ➮ p. 3-4
4503U229
4503U321
4503UF1I
Numeric key
1
2
3
4
5
6
7
0
FUNCTIONAL TRANSMISSION
BROADCAST
ABC
CONVENIENT COPY
DEF
TIMER
GHI
MAILBOX TX
JKL
PRINT MAILBOX RX
MNO
POLLING TX
PQRS
POLLING RX
CANCEL RESERVATION
4503U402
Make the necessary settings for the
FUNCTION selected.
NOTE
If no documents are loaded in the feeder, the
FUNCTION utilities can be selected but they
cannot be executed.
In such a case, however, function of Print Mailbox RX, Polling RX and Cancel Reservation
are enabled execution.
Using the Enhanced Utilities 1 (FUNCTION Utilities) Chapter 4
Page 99

4-3
1 2 3
4 5 6
7 8 9
0 #
ABC DEF
JKLGHI MNO
TUVPQRS WXYZ
Transmitting a Document to Two or More Destinations
(Broadcast)
Broadcast enables the fax to scan the document to be transmitted into memory and transmit it to two or
more destinations. The same document can be transmitted sequentially to up to 100 different destinations. This feature is convenient for transmitting a multi-page document to a number of different destinations.
It eliminates the need to repeat procedures when performing a fax distribution, increasing productivity
and reducing the amount of time requi red to perf orm this activity. It also helps reduce wear on the document since the fax needs to scan it only once.
4503U440
Using the Enhanced Utilities 1 (FUNCTION Utilities) Chapter 4
1
• Check that the message "SET DOC. F ACE
DOWN" is shown on the Message Display.
• Make the necessary resolution settings and
load the document into the feeder (so that
the document can be immediately
transmitted).
• Press the Function key. ➮ p. 4-2
Function
FUNCTION
SEL. 0 - 7 / OR FUNCTION
2
Press "1" of the Numeric keys to select
Broadcast.
1
1 BROADCAST
4503U09I
4258U106
4503UF1I
3
Specify the receiving destinations.
NO. 001 =
OK = YES (Fin. = START)
One Touch Dial, Speed Dial, Combination
Dial, or Phone Book may be used to specify
the receiving destinations.
➮ pp. 3-7, 3-9, 3-11, 3-13
01110212031304140515061607170818091910
Speed Dial
A destination which has not been
programmed can be specified by entering its
fax number using the Numeric k eys. ➮ p. 3-5
Confirm
4258U308
20
4503U441
4503U403
4503U15I
Page 100

Transmitting a Document to Two or More Destinations (Broadcast)
Specifying the Destinations Using One Touch Keys
4-4
1
Press the One Touch key in which the
receiving destination has been programmed.
Example:
To select One Touch key 04 (Sapporo) for
Broadcast 001:
Press One Touch key 04.
OT04
The Message Display shows the party
programmed in One Touch key 04,
indicating that it has been selected for
Broadcast 001.
Example:
NO. 001 = SAPPORO
OK = YES (Fin. = START)
4503UO4I
4503U404
2
If you select an incorrect destination,
pressing the No key will cancel inclusion of
this destination in the broadcast.
The screen shown in step 3 on the previous
page will reappear.
No
NO. 001 =
OK = YES (Fin. = START)
Press the Yes key if the party has been
correctly selected.
The Message Display now prompts you to
select the next receiving destination.
Yes
NO. 002 =
OK = YES (Fin. = START)
If you want to continue selecting the
receiving destinations using the One Touch
keys, repeat steps 1 and 2.
4503UBI
4258U308
4503UAI
4258U307
Using the Enhanced Utilities 1 (FUNCTION Utilities) Chapter 4
 Loading...