

Page 1
Minipack-torre S.p.A.
Via Provinciale, 54 - 24044 Dalmine (BG) - Italy
Tel. (035) 563525 – Fax (035) 564945
E-mail: [email protected]
IT ISTRUZIONI PER L’INSTALLAZIONE, L’USO E LA MANUTENZIONE
EN INSTALLATION, OPERATION AND MAINTENANCE
DE INSTALLATIONS-, GEBRAUCHS- UND WARTUNGSANLEITUNG
FR INSTRUCTIONS POUR L’INSTALLATION, L’EMPLOI ET L’ENTRETIEN
ES INSTRUCCIONES PARA LA INSTALACION, USO Y MANTENIMENTO
SV BRUKSANVISNINGAR, MONTERINGSINSTRUKTIONER OCH UNDERHÅLLSFÖRESKRIFTER
PT INSTRUÇÕES PARA A INSTALAÇÃO, O USO E A MANUTENÇÃO
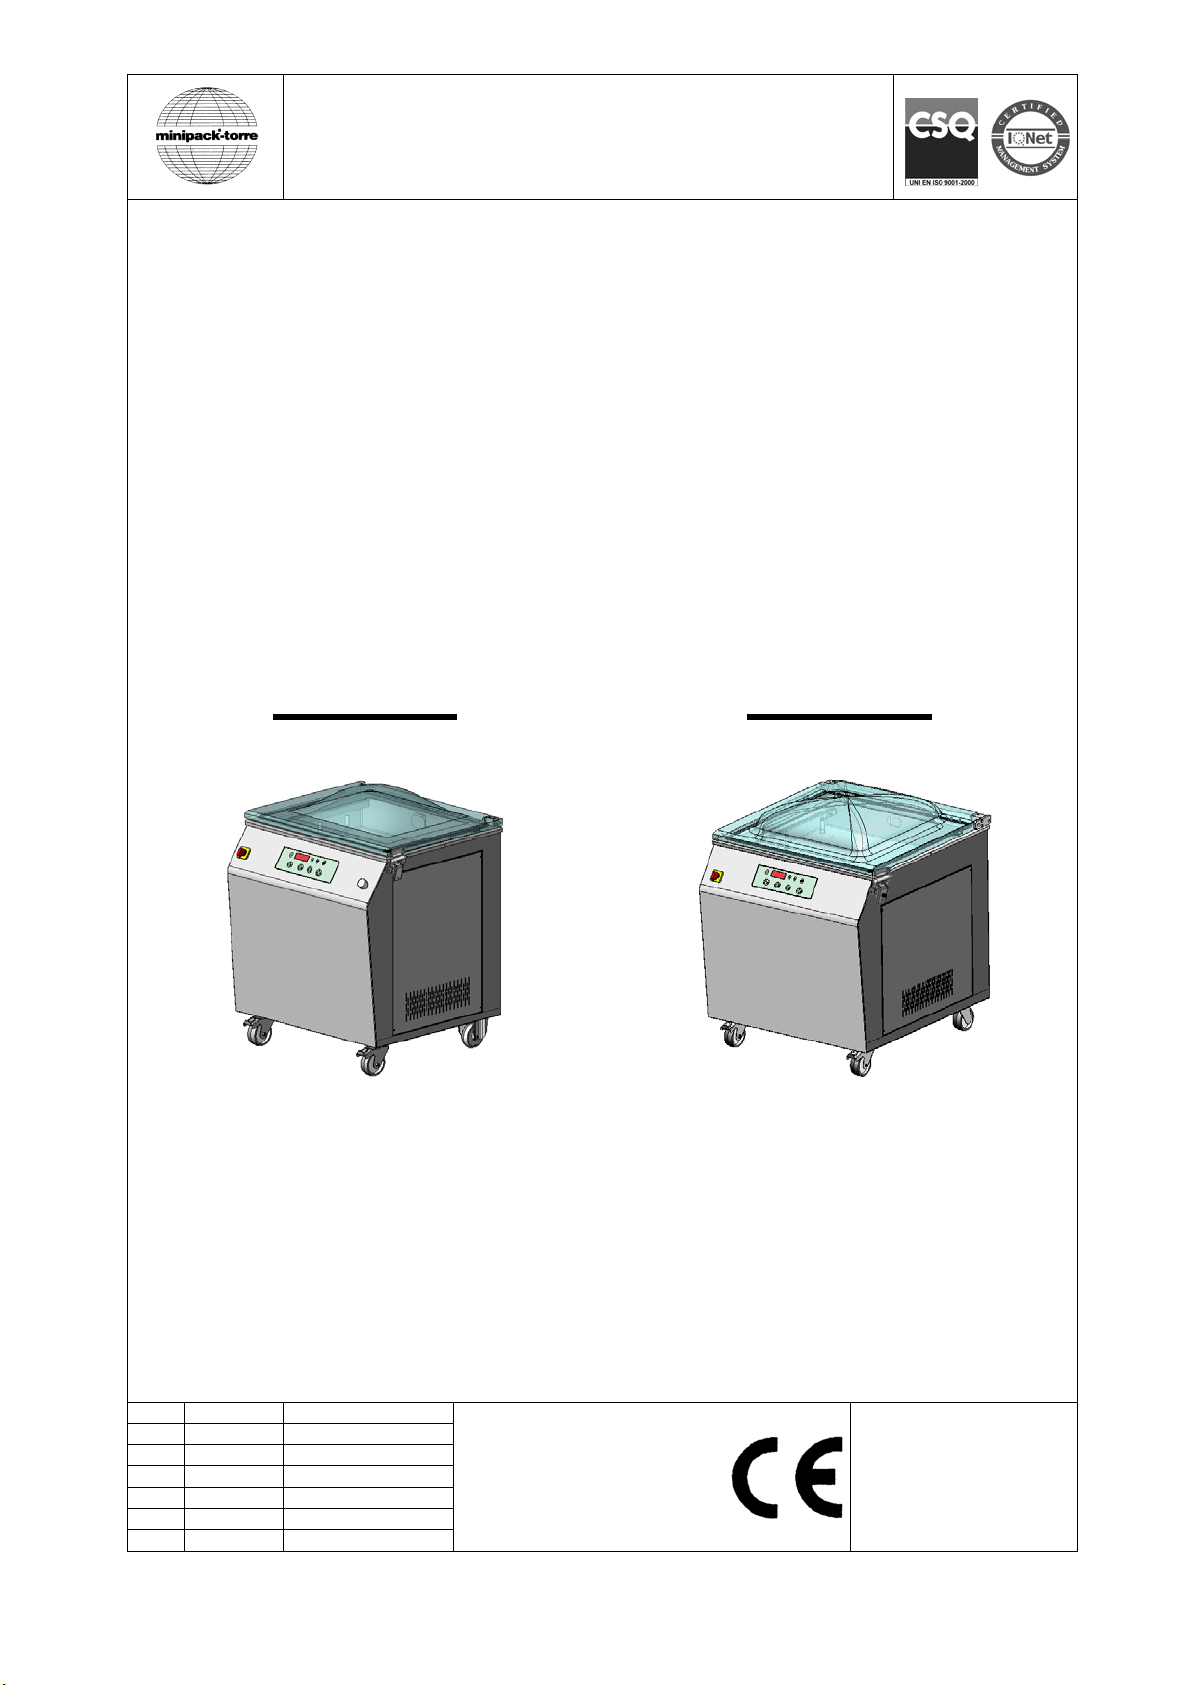
IT MACCHINA CONFEZIONATRICE SOTTOVUOTO
EN VACUUM PACKING MACHINE
DE VAKUUMMASCHINE
FR MACHINE CONFECTIONNEUSE SOUS-VIDE
ES MÁQUINA DE ENVASADO AL VACÍO
SV VAKUUMFÖRPACKNINGSMASKIN
PT MÁQUINA CONFECCIONADORA SOB VÁCUO
http://www.minipack-torre.it
MV50 X
IT LEGGERE ATTENTAMENTE QUESTE ISTRUZIONI PRIMA DI USARE LA MACCHINA
EN BEFORE USING THE MACHINE PLEASE CAREFULLY READ THE INSTRUCTIONS
DE BITTE LESEN SIE DIESE ANLEITUNG GENAU DURCH, BEVOR SIE DIE MASCHINE BENÜTZEN
FR PRIERE DE LIRE ATTENTIVEMENT CE MANUEL D’INSTRUCTIONS AVANT D’UTILISER LA MACHINE
ES LEER ATENTAMENTE ESTE MANUAL ANTES DE USAR LA MÁQUINA
SV DENNA HANDBOK SKA NOGA LÄSAS IGENOM INNAN MASKINEN TAS I BRUK
PT ANTES DE USAR A MÁQUINA LER CUIDADOSAMENTE ESTE MANUAL
IT Italiano Pagina 01
EN English Page 15
DE Deutsch Seite 29
FR Français Page 43
ES Español Página 57
SV Svenska Sida 71
PT Português Página 85
MV65 X
DOC. N.FM111156
REV. 02
ED. 10.2013
Page 2

…
…
…
…
.
…
…
TRANSLATION OF THE
ORIGINAL INSTRUCTIONS
Index EN
Chapter 1. Description Page
1.1. Preface..….….…………………….………………………………………………………16
1.2. Performances of packaging machine.........…….…………………………………… 16
1.3. Technical data of the machine……………………………....…………………………17
Chapter 2. Pouches features
2.1. Pouches to use…..................................………...……………………………………18
Chapter 3. Machine usage conditions
3.1. Items that may be packaged……………………………………………………………18
3.2. Items not to be packed……......................……..……………………………………
Chapter 4. Safety standards
4.1. Warnings…............................................………..…………………………………… 18
4.2. Description of safety stickers……………………………………………………………20
4.3. Individual protection devices…………………………………………………………
Chapter 5. Machine installation
5.1. Transport and positioning.................…….........…………………………………..… 21
5.2. Environmental conditions.........................…….………………………………………21
5.3. Users…………………..............................……..……………………………………
5.3.1. Electrical connections..............................……..………………………………21
5.3.2. Gas connections..............................…………...………………………….… 21
Chapter 6. Machine adjustment and setting up
6.1. Adjustment...............................................……..……………………………………
6.1.1. Control panel……………………………………………………………………. 22
6.1.2. Switching the machine on………………………………………………………22
6.1.3. Program selection and variable setting…………………………………………22
6.2. Packaging……………………………………………………………………………….
6.3. Alarm messages…..…………………………………………………………………… 24
Chapter 7. Ordinary maintenance
7.1. Precautions for ordinary maintenance interventions…………………………………25
7.2. Cleaning of the sealing bar….…………………………………………………………25
7.3. Replacement of the Teflon and the sealing blade..………………………………… 25
7.4. Replacement of the cover gasket………………………………………………………25
7.5. Cleaning machine…………..…………………………………………………………
7.6. Vacuum pump maintenance……………………………………………….…………. 26
7.6.1. Changing the oil and the pump filter…………………………………………. 26
7.7. Problem solving………………..………………………………………………..……... 27
7.8. Wiring diagram.………………………………………………………………………… 27
7.9. Pneumatic diagram..……………………………………………………………….……28
7.10. Disassembling, demolition and elimination of residuals…………………………… 28
Chapter 8. Guarantee
8.1. Certificate of guarantee…............................….………………………………….…
8.2. Guarantee conditions…...............................…………………………………….……28
CE declaration of conformity…...................……………………………………..……99
18
20
21
22
24
26
28
15
Page 3

Chapter 1. Description EN
1.1. Preface
This manual has been drawn up in compliance with the UNI 10893 standard dated July 2000. It is meant for all users in
order to enable them to use the machine correctly. Keep it in a place which can be easily accessed in the proximity of the
machine and which is known to all users. This manual is an integral part of the machine for safety reasons. We wish to
specify the symbols in use here below in order to improve their understanding.
All reproduction rights of this manual are reserved to the manufacturer. Partial or complete reproduction is forbidden as
provided by the law. Descriptions and pictures provided in this manual are not binding. Therefore the manufacturer,
reserves the right to make any change considered necessary. This manual cannot be transferred for viewing to third
parties without authorisation in writing from the manufacturing company.
1.2. Performances of packaging machine
This machine represents what the modern technology of vacuum-packing may express at its best. It is flexible, easily
programmable and cheap. It is intended to vacuum-pack foodstuffs by removing oxygen as well as any chemical and
biological pollutant present in the environment. To attain the vacuum level you wish, just program the machine in order to
remove almost all the air contained in the packet. Your product will preserve its organoleptic features, colour, taste,
flavour and nutritive value for a long time.
ATTENTION:
Accident prevention rules for the operator. This warning indicates the presence of dangers which can
injure the person operating on the machine.
ATTENTION:
Hot parts. Shows the danger of burning, thus involving the risk of a serious accident for the exposed
person.
WARNING:
It indicates the possibility of damaging the machine and/or its components.
16
Page 4
Chapter 1. Description EN
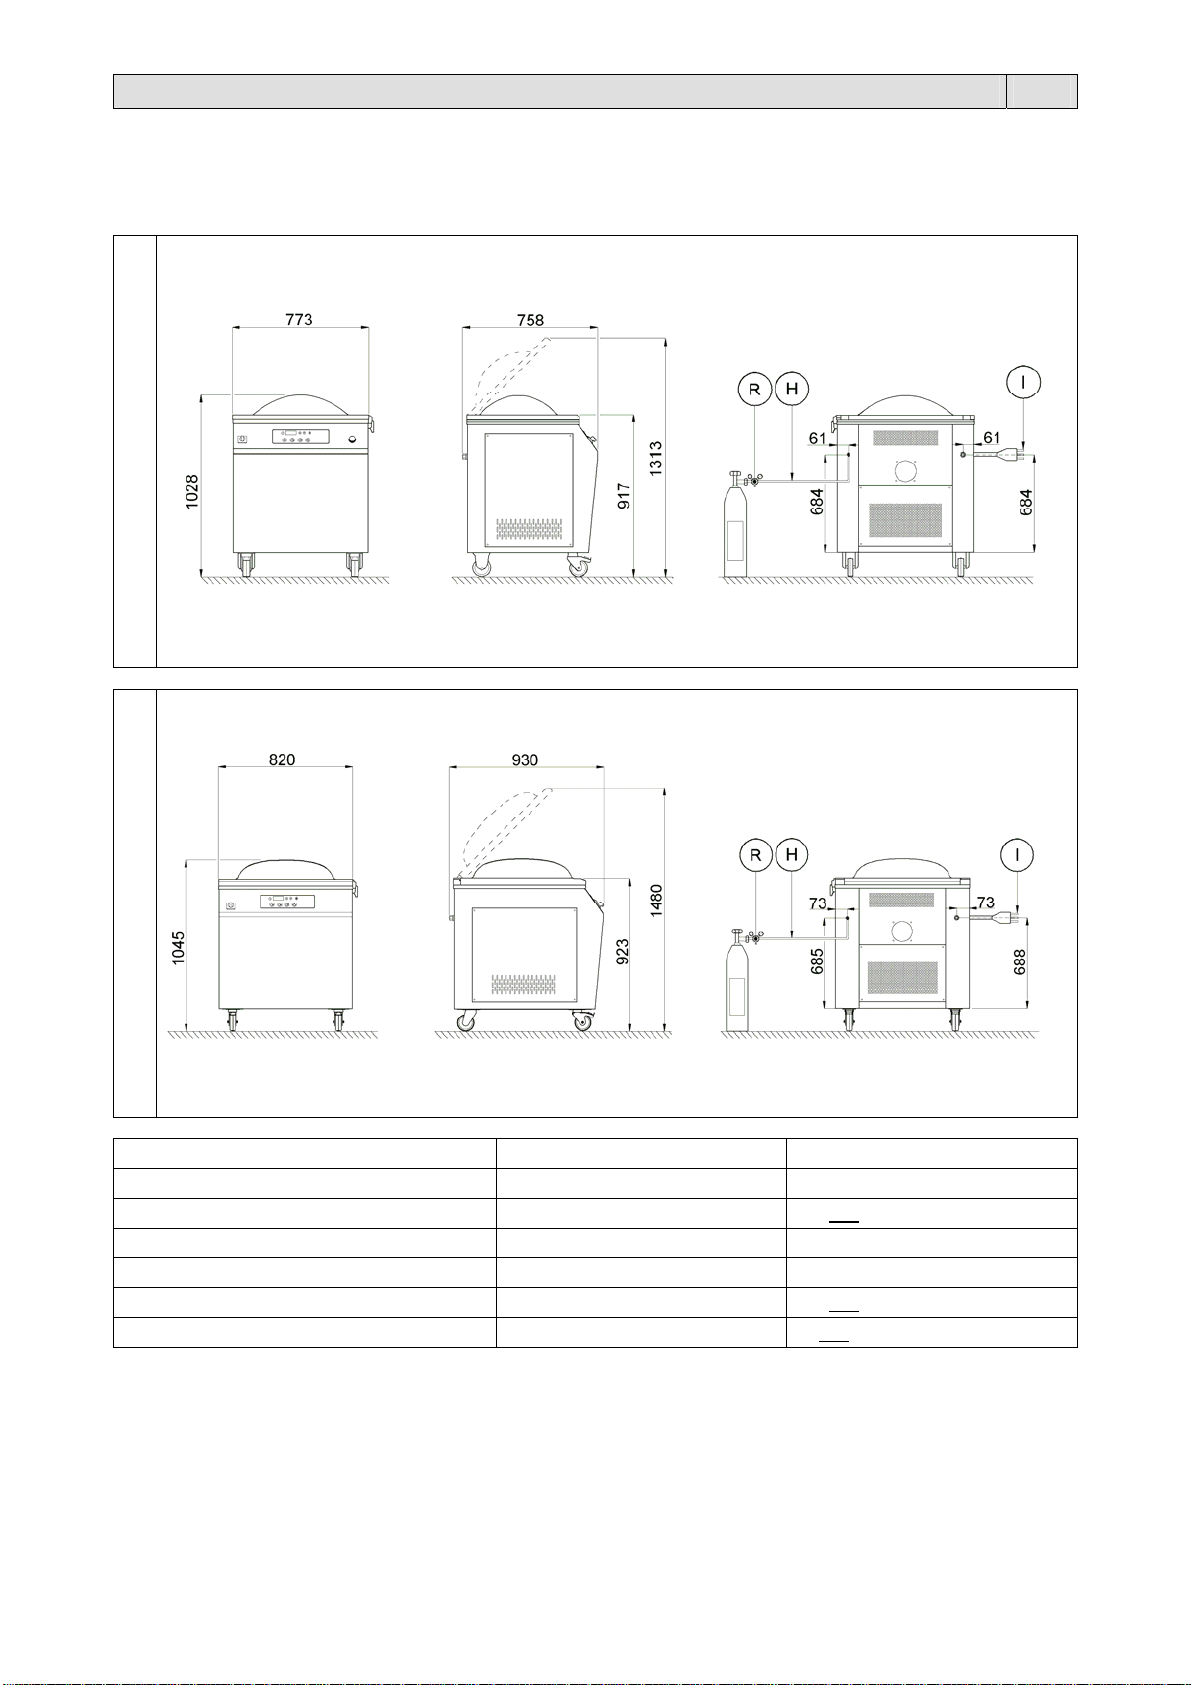
1.3. Technical data of the machine
I = Electrical connections;
H = Gas connection;
R = Gas pressure reducer.
MV50 X
MV65 X
Package sizes (mm) 770x860x1300 900x985x1300
Package weight (Kg) 205 263/281*
Machine sizes with closed cover (mm) 773x758x1028 820x930x1045
Machine sizes with open cover (mm) 773x758x1313 820x930x1480
Machine weight (Kg) 180 227/245*
Vacuum pump (m³) 40 63/100*
MV50 X MV65 X
17
Page 5
Chapter 2. Pouches features EN
2.1. Pouches to use
They may be of different thickness (85÷200µm) and shall be both airtight and gastight. Only food packaging pouches can
be used.
The following table indicates the maximum dimensions of the pouches that can be used with the various machine
models.
Machine Pouch width open side Pouch length closed side
MV50X 500mm 580mm
MV65 X 650mm 630mm
The following table indicates the min/max temperature limits the pouches can undergo to.
Type of pouch Minimum temperature Maximum temperature
for cooking
for storage
It is recommended to refer to the technical and safety sheets of the pouches in use and to observe
the corresponding instructions!
-15°C +120°C for 30 minutes
-20°C +70°C for 2 hours; +100°C for 15 minutes.
Chapter 3. Machine usage conditions EN
3.1. Items that may be packaged
This machine can be used to pack the majority of foodstuffs, including: fruit, fish products, dairy products, meat,
delicatessen, oven ready products, gastronomic products, dried products, etc.
3.2. Items not to be packed
It is absolutely forbidden to pack the following products which might permanently damage the machine and harm
operator:
Liquids of any type and density in fragile containers
Inflammable and explosive materials
Gas bottles under pressure or of any type
Bulk or volatile powders (unless a filter is assembled on the pump)
Any material and product which might in any way cause the user to be in a dangerous situation and
damage the machine.
Chapter 4. Safety standards EN
4.1. Warnings
It is extremely important to read this entire chapter as it contains important information regarding risks that personnel are
subject to in the event of incorrect use of the machine. These basic standards must be observed as well as specific
standards applicable in the country of installation.
The machine must be installed by trained and authorised technicians.
This machine is not intended for use by persons (including children) with reduced physical, sensory or mental
capabilities, or lack experience and knowledge, unless they have been given supervision or instruction concerning
use of the machine by a person responsible for their safety.
Children should be supervised to ensure that they do not play with the machine.
Keep children and animals away from the machine when running. Do not allow children to play with the pouches.
The machine must be used only for the purpose it was built for. Any other use shall be considered “improper” and
therefore dangerous.
Never allow unauthorised personnel to perform repairs or other operations on the machinery.
The operator must be familiar with all warnings related to the tasks in hand and always be informed by the head of
the site regarding risks.
Ensure that all clothing is tight fitting, with particular reference to cuffs or other loose clothing.
Ensure that all operating areas and transit zones are kept clear, clean and adequately lit at all times.
Eliminate all safety hazard conditions before using the machine and always notify the head personnel of any
malfunction.
18
Page 6
Chapter 4. Safety standards EN
Never use the machine in the event of fault.
Never tamper with safety devices or circuits.
Never perform modifications on the machine without prior authorisation from the manufacturer.
If the supply cord is damaged, it must be replaced by the manufacturer, its service agent or similarly qualified
persons in order to avoid a hazard.
The electrical enclosure must remain closed during operation.
Smoking is forbidden while the machine is operating!
Never performs maintenance and/or adjustments to the machine during operation. Guards may only be
disassembled by suitably trained and qualified maintenance engineers.
Never operate the machine without all guards fitted. Ensure correct position of all guards before resuming normal
operation.
If it is necessary to leave the machine unattended, switch it off by turning the main switch to the “0” (OFF) position!
The manufacturer declines all liability for damage or phisical injury caused by failure to observe safety standards.
THE MACHINE CAN NOT BE USED BY UNTRAINED PERSONNEL!
During work pay attention to all hot parts of the machine. The temperature they can reach is so high
that it can cause burns.
Never use gaseous mixtures in presence of oxygen in a percentage higher than the atmospheric one
(~ 19%).
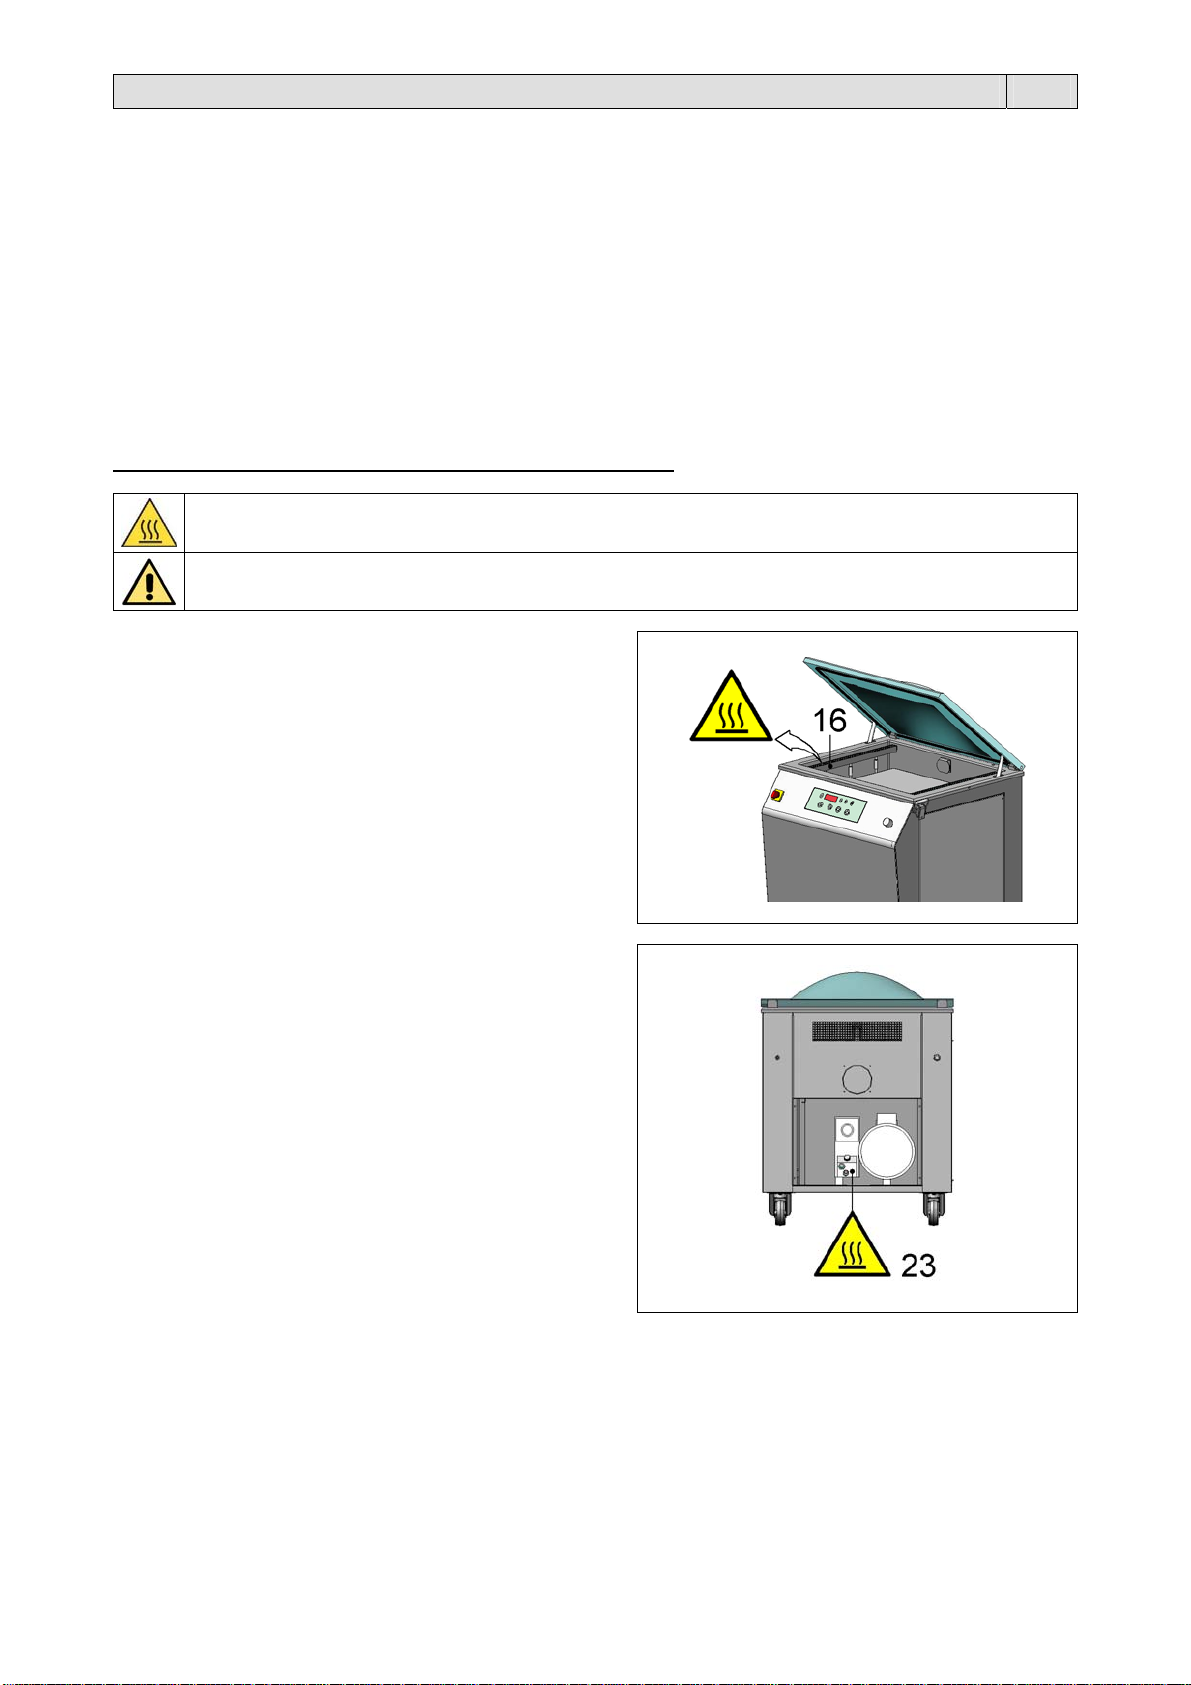
Do not touch the sealing blade (16) immediately after sealing.
Danger of burns due to hot blade.
Do not seal if the sealing wire is broken.
Replace it immediately.
Do not touch the vacuum pump (23) just after a working cycle.
Possibility of burning due to the high temperature the pump
may reach.
19
Page 7
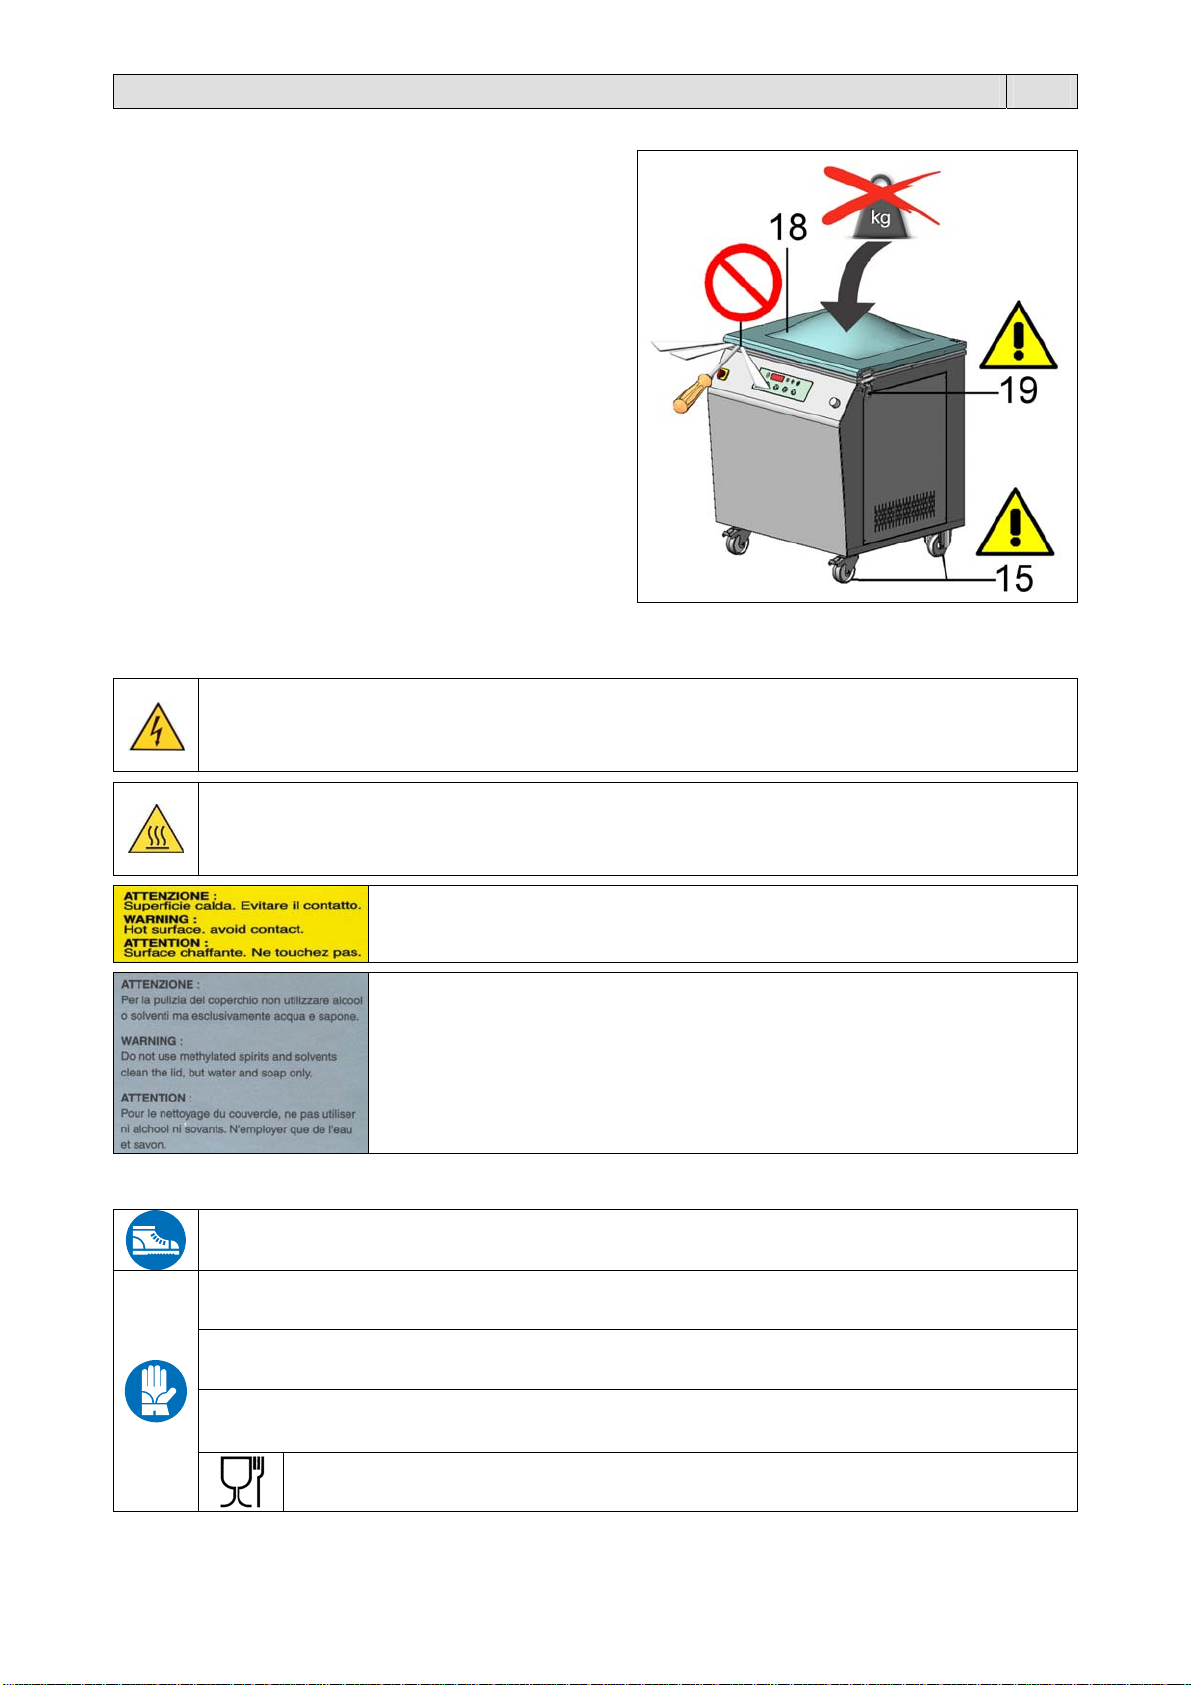
Chapter 4. Safety standards EN
In case of a power failure during a working cycle when the
cover is closed, do not use any tool in order to force its opening.
Wait for the power supply to be restored.
Do not place any weight on the cover (18)!
Prevent any object from falling on the cover!
This can compromise the integrity, causing cracks or damage.
Do not proceed with packaging if the cover has cracks or is
broken.
Replace it immediately.
Before any working cycle make sure that the closing hook (19)
will not prevent the operator from closing the cover correctly.
Possibility of breaking the cover.
The wheels (15) must be used only for moving the unit short
distances across smooth, horizontal floors.
4.2. Description of safety stickers
The following safety stickers feature on the machine:
4.3. Individual protection devices
On the power input.
ATTENTION! Periodically check the correct insulation of the power cable and the integrity of the
socket. During machine operation, the inspection panels to the electric system must be correctly
fitted.
On the sealing bars positioned inside the tank
On the vacuum pump positioned inside the machine.
ATTENTION! Hot members. It shows the danger of burning, thus involving the risk of a serious
accident for the exposed person.
On the sealing bars positioned inside the tank
ATTENTION! Indicates the danger of burns with risk of accident in case of
contact with the hot surface of the sealing bar.
On the Plexiglas lid.
ATTENTION! Indicates how to clean the lid to prevent damaging it and reducing
its transparency or strength.
Wear safety shoes that protect feet from impacts, crushing and compression while moving or handling the
machine.
Wear safety gloves that protect the hands from crushing and mechanical hazards and while moving or
handling the machine.
Wear safety gloves that protect the hands against cutting risks while changing the sealing blades.
Wear safety gloves that protect the hands against the specific risks associated with the materials to be
packed (mechanical, chemical) and against coming into contact with the high temperatures present on the
seals and/or sealing bars (up to 100°C).
Wear safety gloves that prevent the hands from coming into contact with foodstuffs when
packaging them.
20
Page 8
Chapter 5. Machine installation EN
5.1. Transport and positioning
When transporting and positioning the machine, it is recommended to handle it with great care!
Lift up the packing and machine with a forklift.
Cut the strap with scissors make sure you protect your eyes by wearing glasses and withdraw the cardboard. Cut the
strap fastening the machine to the pallet.
5.2. Environmental conditions
Lift the machine and place it on the working surface. Make sure the machine is placed in a proper environment
Leave a minimal space of 0,5m around the machine so that not to obstruct air outlets.
Once the correct position is achieved, lock the machine by means of the wheel brakes.
Working environmental conditions:
Temperature from + 5°C to + 40°C.
Relative humidity from 30% to 90%, without condensation.
The lighting of the operation room shall comply with the laws in force in the country where the machine is installed.
However, it shall be uniform and provide for good visibility in order to safeguard the operator’s safety and health.
MACHINE SAFETY FACTOR = IP20
THE AERIAL NOISE MADE BY THE MACHINE IS LOWER THAN 70 dB(A)
5.3. Users
5.3.1. Electrical connections
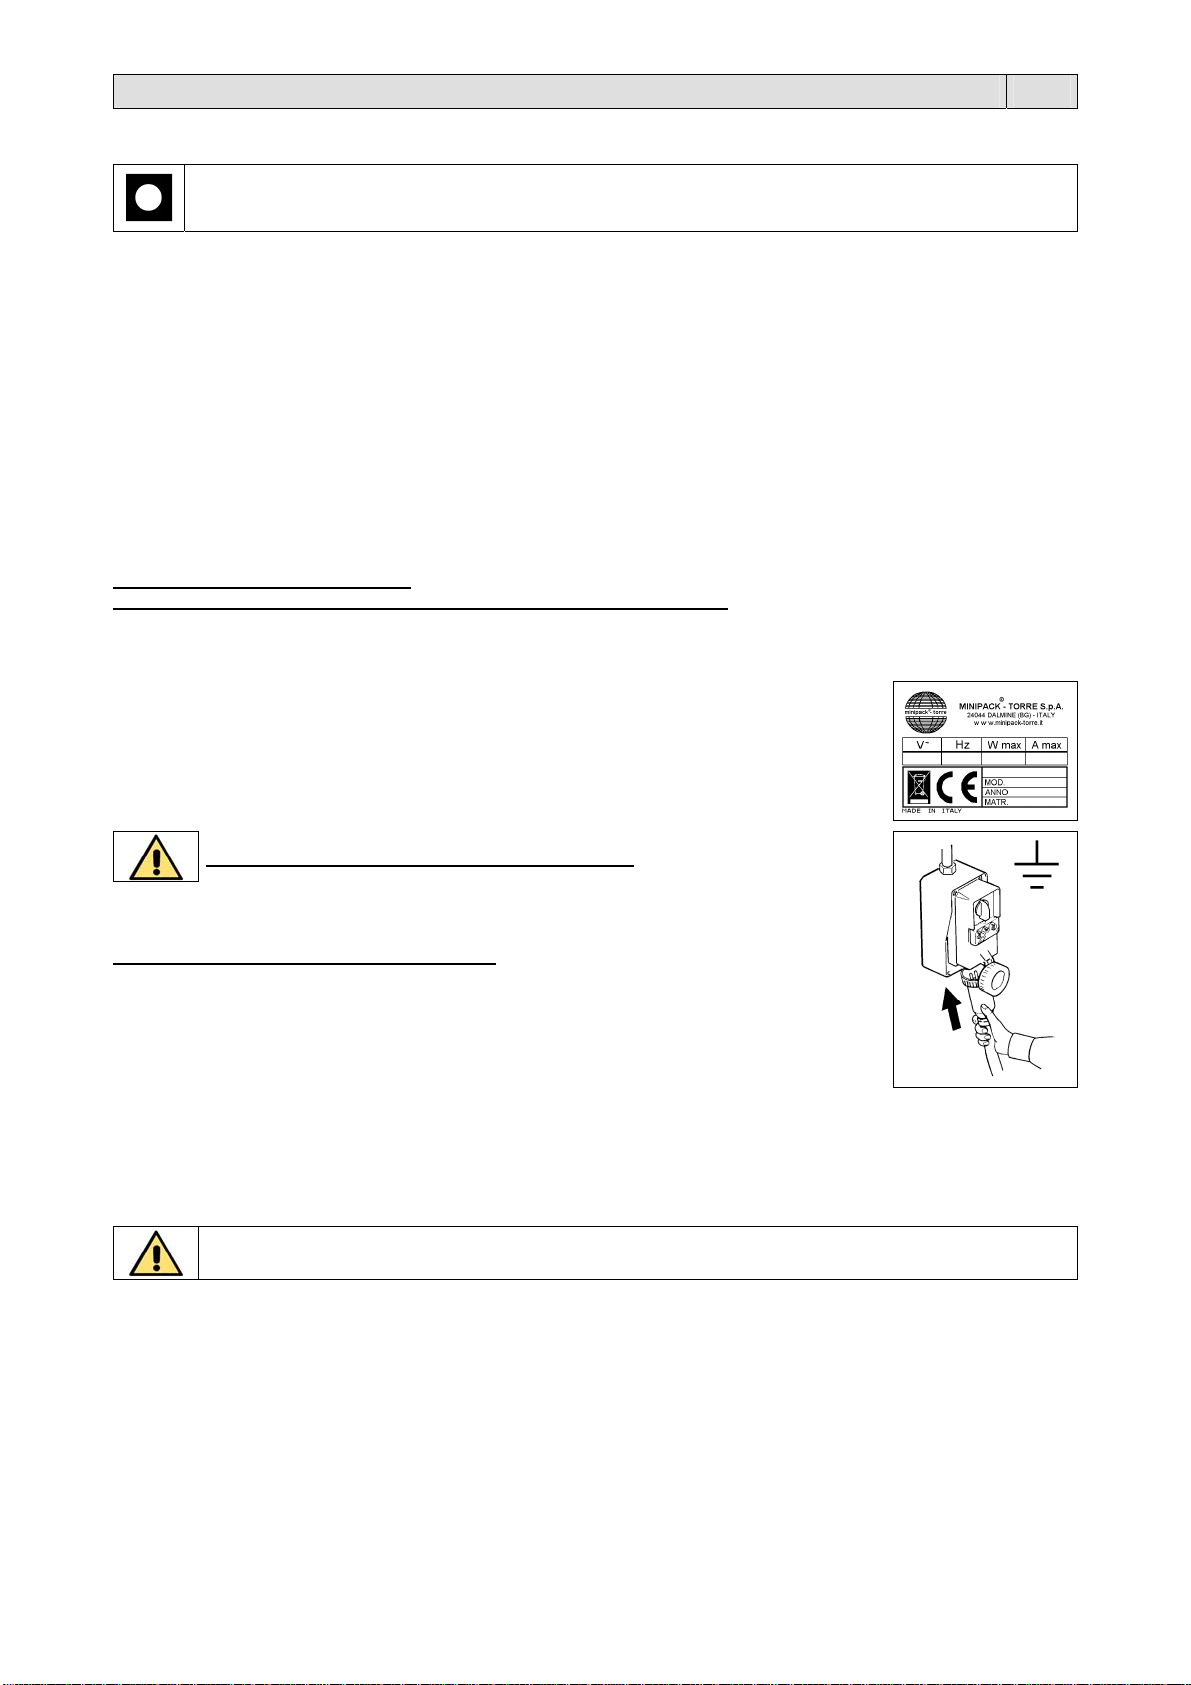
Voltage (V): see data on plate
Frequency (Hz): see data on plate
Maximum absorbed power (W): see data on plate
Maximum absorbed current (A): see data on plate
Note: When contacting the Manufacturer, always indicate the model and the serial number
specified on the plate on the rear part of the machine.
If the machine is not equipped with the power supply plug, use a plug that is suitable for the
voltage and amperage values described by the rating plate and that can comply with the rules in
force in the installation country.
GROUNDING OF THE UNIT IS OBLIGATORY!
Before executing electrical connections, make sure the mains voltage matches the one on the
plate on machine rear and that the ground contact complies with the safety rules in force. In
case of doubts about the mains voltage, contact the local public supply Company.
Insert the plug on the cable from machine electrical cabinet in a mains power supply socket that
can be reached easily by the operator.
5.3.2. Gas connections
When carrying out packaging operations in modified atmospheres, use specific gas for food package in compliance with
the rules in force about food additives in the country where the machine is used.
The gas, which consists of a mixture of nitrogen, carbon dioxide and, more rarely, oxygen and other gases, is a “made to
measure” gaseous mixture, depending on the product to be packaged.
Connect gas attachment, in case the machine is equipped with such a device, to the gas cylinder through the proper
tube (H) (see chapter 1.3.).
Pressure of gas plant has to be set on about 2 atm., bearing in mind the max. working pressure is 4 atm.
If the pressure is not correct, act on the knob of the pressure reducer (R) (see chapter 1.3.).
Neither overturn nor tilt the machine! Oil might come out of the pump and damage the machine.
without any inflammable and explosive materials or gas. The machine may only be installed on smooth, flat noninflammable surfaces.
OBSERVE HEALTH AND SAFETY REGULATIONS!
Never use gaseous mixtures in presence of oxygen in a percentage higher than the atmospheric
one (~ 19%).
21
Page 9
V
V
Chapter 6. Machine adjustment and setting up EN
6.1. Adjustment
6.1.1. Control panel
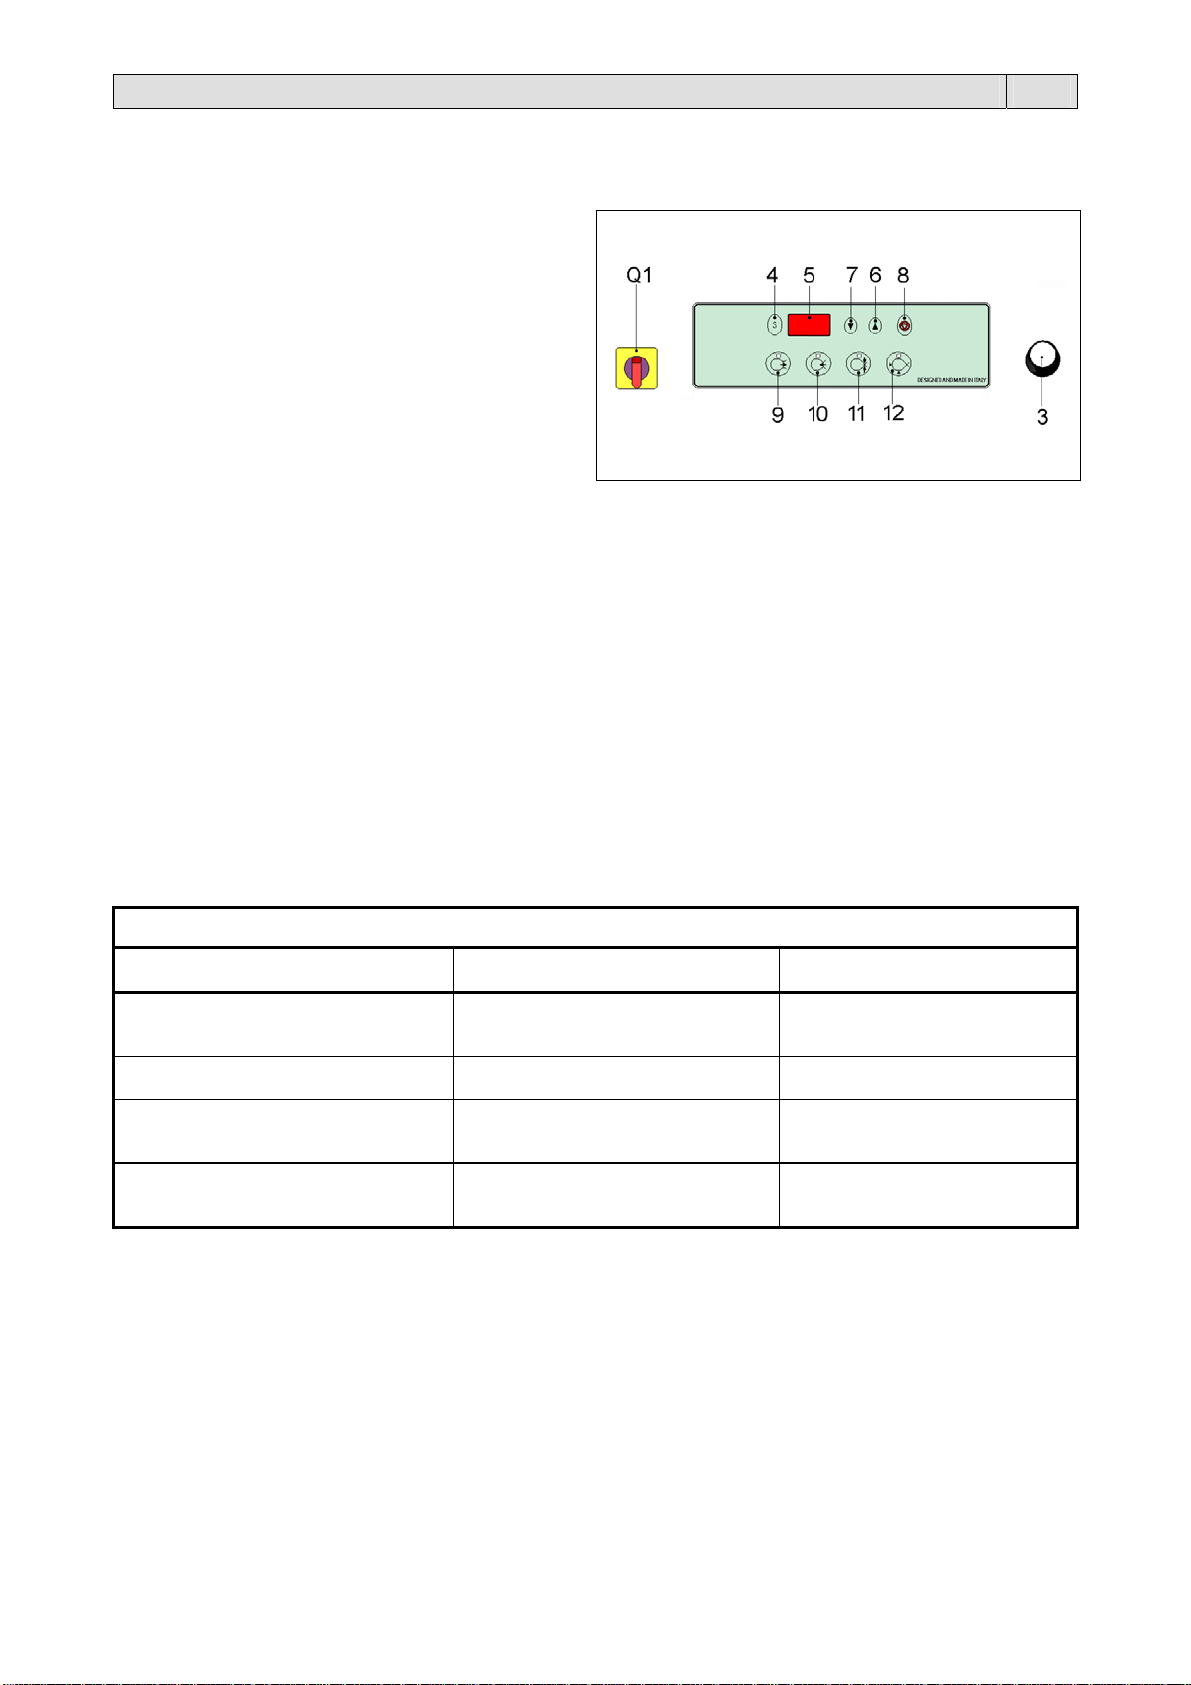
The machine is fitted with a control panel, from which all programming and operation functions can be set.
Q1 Main switch
3 Adjusting knob for air re-immission “SOFTAIR” (for
model MV50 X only)
4 Selection button
5 Display. Displays selected functions and relative
settings
6 Button “INCREASE”. Increases set function values
7 Button “DECREASE”. Reduces set function values
8 Stop button
9 Led for vacuum and extra vacuum function
10 Led for gas function
11 Led for sealing function
12 Led for air re-immission function
6.1.2. Switching the machine on
Turn the main switch (Q1) to position 1. As soon as the board has been switched on, display will show the software
version, then the last program being executed (P1÷P9).
6.1.3. Program selection and variable setting
To select the program number, just press the buttons (6) and (7).
Press button (4) to enter scheduling of the program shown at the moment. By pressing again button (4), all parameters fo
the selected program will appear one after the other. Push buttons (6) and (7) to increase or decrease the value of the
parameter shown. Parameters are stored when, while running a program, the number of the program itself will appear
on the display.
The machine has 9 selectable programs.
Programmes P1÷P8 are composed by 4 modifiable variables (vacuum, extravacuum, gas, sealing).
Program P9, “External Vacuum”, can be ran only on models equipped with a tank set for this type of packaging.
It consists of only 2 variables that can be modified (vacuum and extra-vacuum).
It is the program to be used for removing air from container surfaces that can be closed hermetically.
These containers must be connected using an intake tube to the pick-up fitting placed inside the tank.
To start the program, press Stop (8). The cover must always be open.
TABLE OF PARAMETERS ACCORDING TO PROGRAMMES
ariable P1÷P8
acuum
(values expressed in %)
Min. = 0,0
Max. = 99,9
Recommended = 99,9
Extravacuum
(values expressed in seconds)
Gas
(values expressed in %)
Min. = 0,0
Max. = 30,0
Min. = 0,0
Max. = 60,0
Recommended = never exceed 40%
Sealing
(values expressed in seconds)
Min. = 0,0
Max. = 4,0
Recommended = 2,0÷2,5
All packaging machines are tested at works. The parameters set at works generally prove to be fit for use.
P9
(External Vacuum)
Min. = 0,0
Max. = 99,9
Recommended = 99,9
Min. = 0,0
Max. = 30,0
not settable
not settable
22
Page 10
V
V
Chapter 6. Machine adjustment and setting up EN
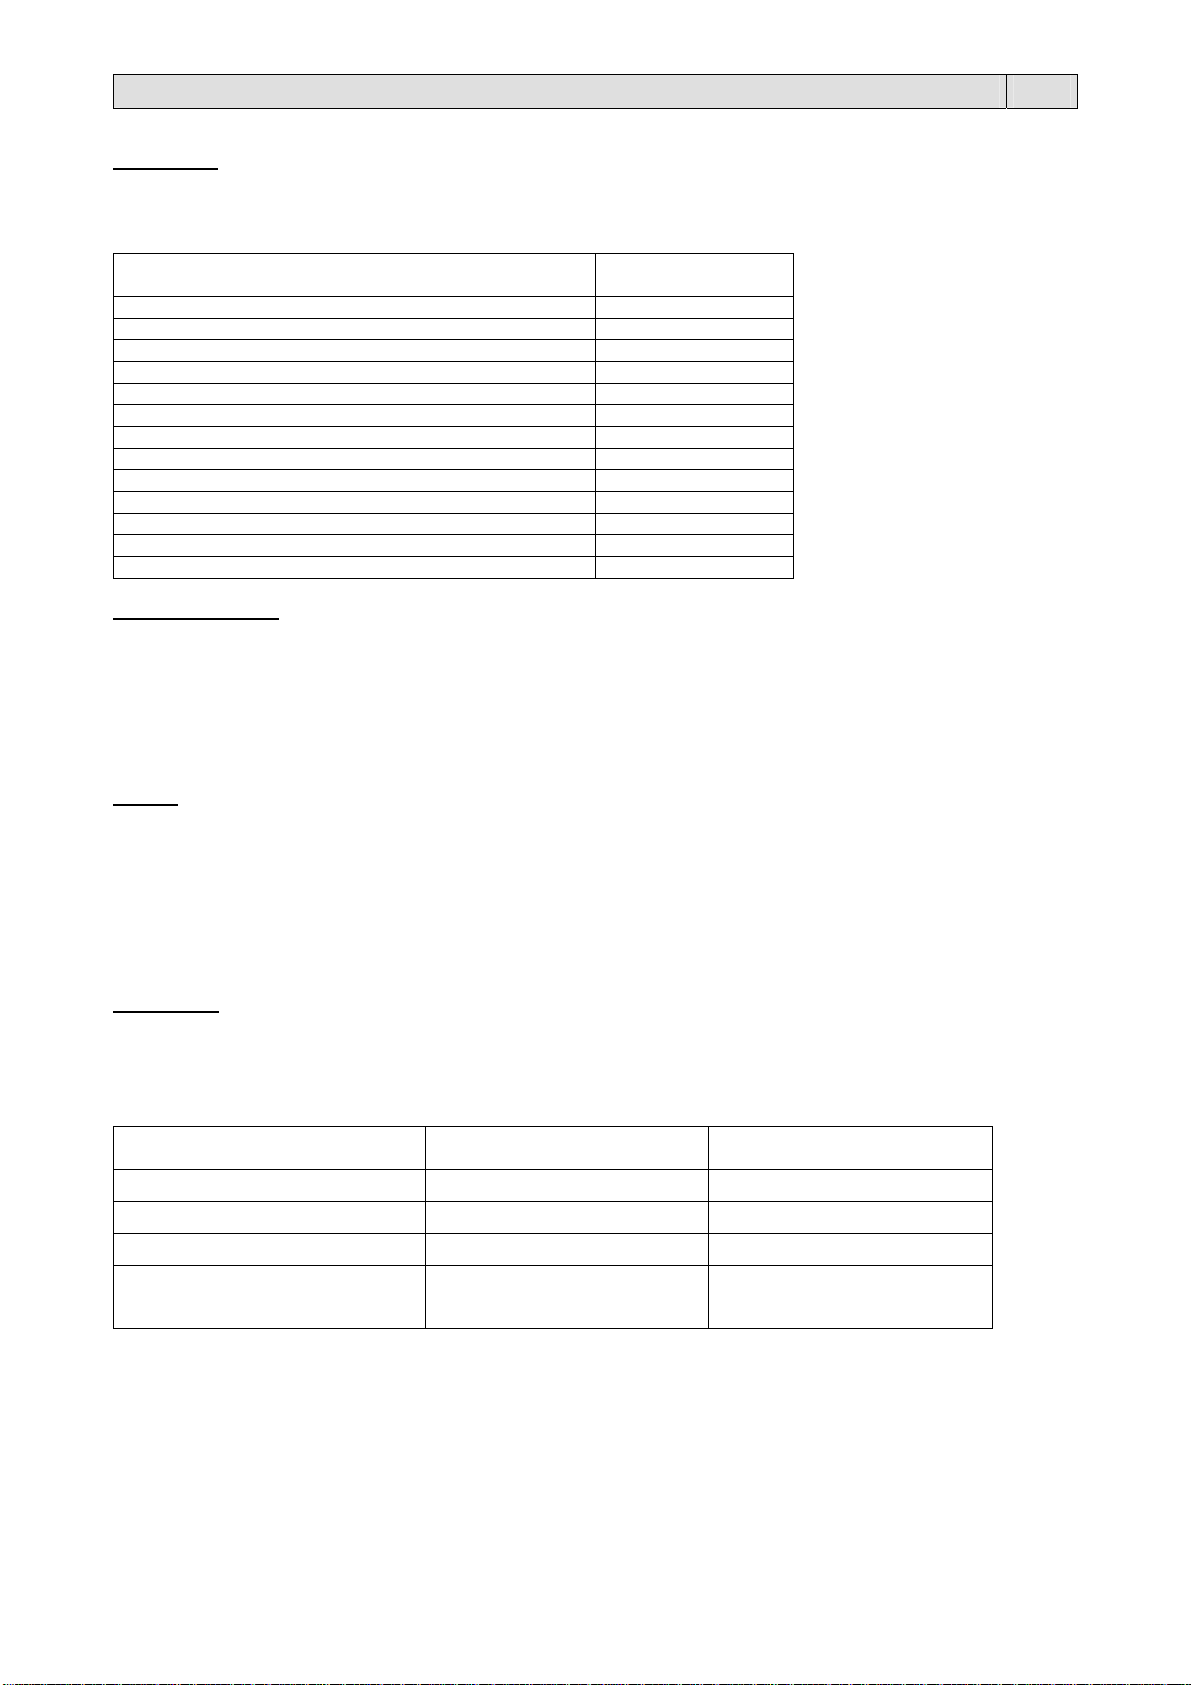
1) VACUUM
It is possible to set a value from 0 to 99,9%. The recommended vacuum percentage is 99,9%.
For other settings refer to the attached table.
Scheduling of vacuum parameter is signaled through LED (9).
Food
Meat
Cheese
Grated cheese
Fruit
Jam and cream
Soups
Sandwiches
Pasta
Fish, shellfish
Sausages
cured meats
egetables
Fresh vegetables (salad, tomatoes)
2) EXTRAVACUUM
If the vacuum value is set to 99.9%, press button (4) to program the EXTRAVACUUM parameter indicated by the letter E
in the last digit on the display.
This value can be set to between 0 and 30 seconds. This the length of time that the pump continues to extract air from
the hood after the machine has reached the programmed maximum vacuum level. This function is useful for porous
products where it is particularly difficult to extract the air (e.g. meat).
Note: if the programmed VACUUM value is less than 99.9%, the EXTRAVACUUM function is not displayed, and the
system proceeds to the subsequent parameter (GAS).
3) GAS
It is possible to set a value from 0 to 99%. Such a parameter cannot be higher than the vacuum one, otherwise you will
obtain an opposite function. Scheduling of gas parameter is signaled through LED (10). If the gas LED (10) is flashing, it
means the gas cylinder is not properly connected and machine will not start. Connect it properly.
Note: When scheduling a program “vac + gas”, the minimum residual vacuum percentage soon after gas immission
should be higher than 60%.
Example: VAC 99,9%
GAS 40%
Residual vacuum (99,9-40)= 59,9%
4) SEALING
It is possible to set a value from 0 to 4 seconds. For the first working cycles it is recommendable to set a sealing time of
about 2,5 seconds and then lower it to prevent the Teflon tape from burning. Scheduling of sealing time parameter is
signaled through LED (11).
The following table indicates the sealing time we recommend setting according to the type and thickness of the pouches.
Type of pouch Pouch thickness (µm) Sealing time (seconds)
acuum
Recommended
99.9%
99.9%
35 - 50%
99.9%
99.9%
99.9%
60 - 70%
99.9%
99.9%
99.9%
99.9%
99.9%
35 - 50%
Smooth for cooking
Smooth for storage
Smooth made of aluminium
85 – 95 2,0 – 2,5
85 – 95 2,0 – 2,5
120 – 140 2,5 – 3,0
Bellow made of aluminium
(it can be packed only with "sealing
120 – 140 2,3 – 2,9
counterbar"; optional)
23
Page 11
A
Chapter 6. Machine adjustment and setting up EN
6.2. Packaging
After selecting the program and setting the necessary variables, go ahead with packaging.
Place the product to be packaged inside the pouch.
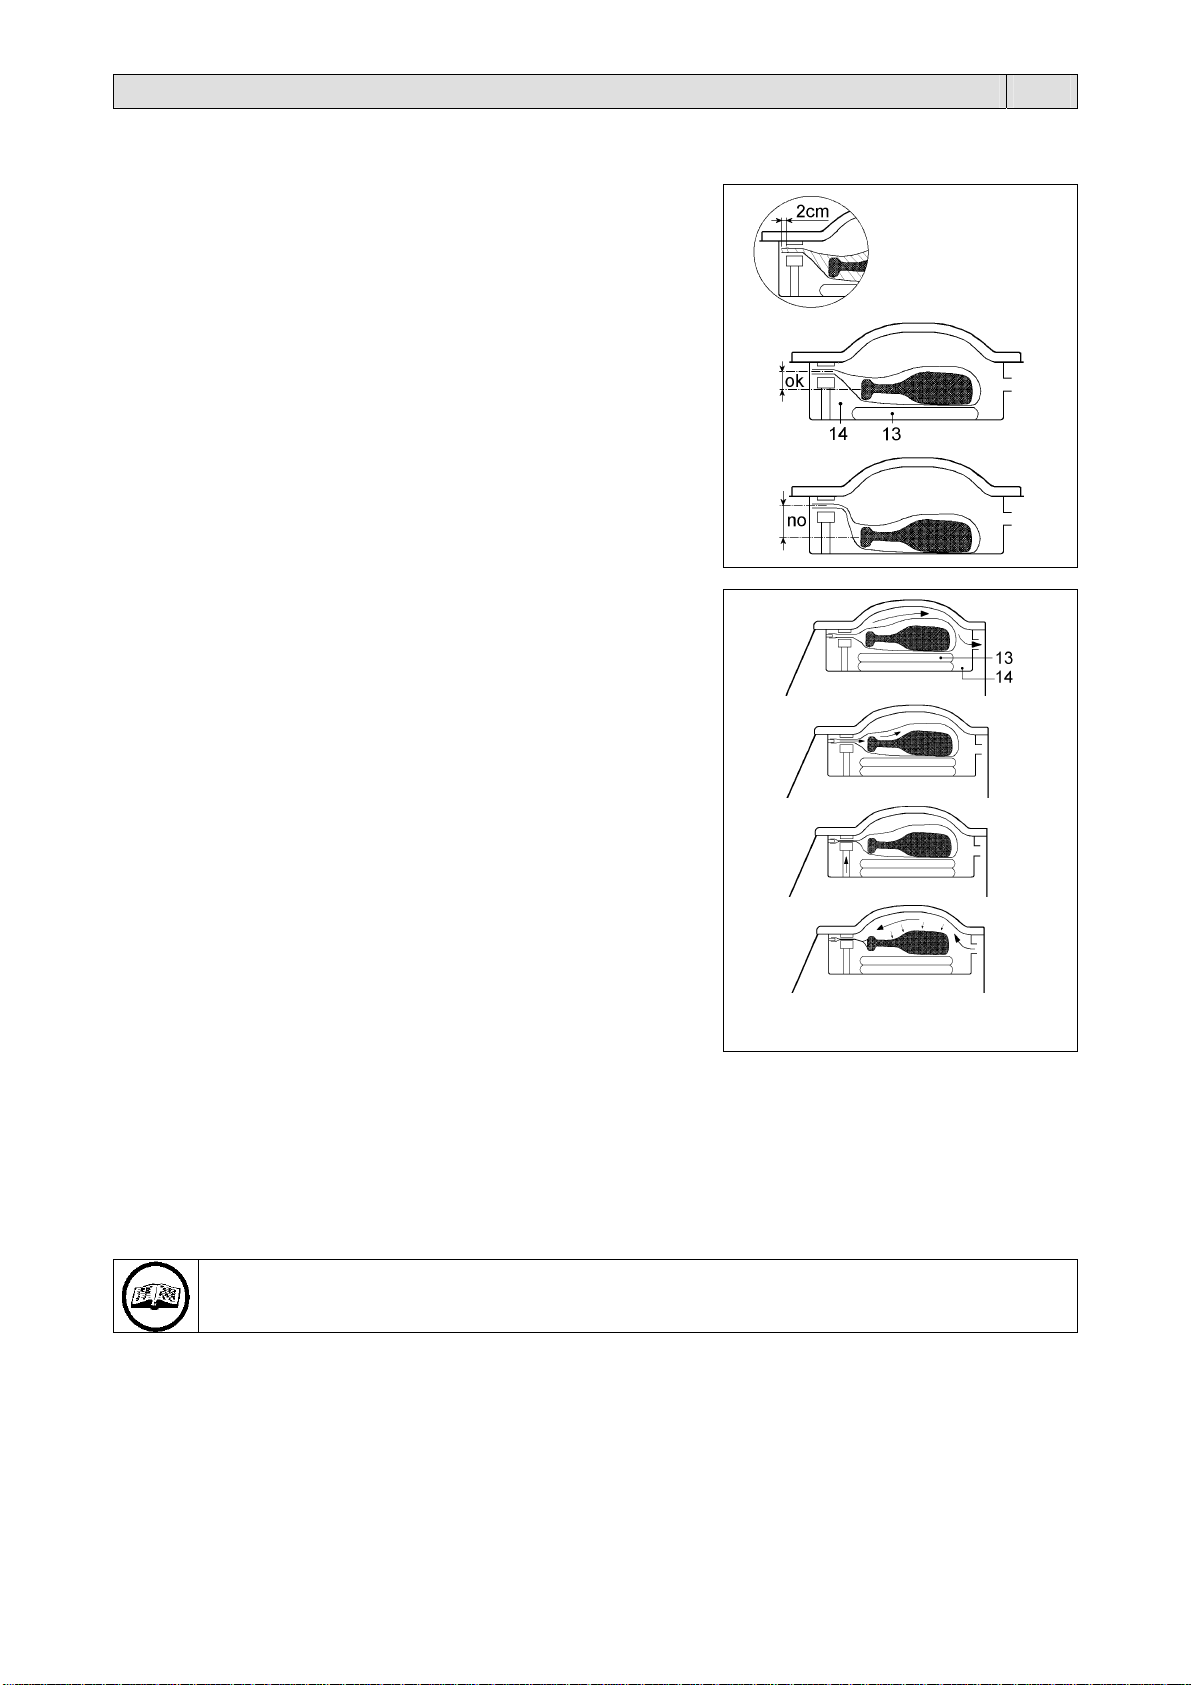
Place the pouch inside the tank and on the sealing bar in a way as linear
as possible.
Try to prevent the pouch from wrinkling. Wrinkles might negatively affect
the hermetic seal formed by sealing. Pouches shall be at least 2cm
beyond the sealing.
If the “GAS” function is on, the pouch must be positioned with the strip
open on the gas nozzle on one side of the sealing bar.
Close the upper Plexiglas cover.
The packaging cycle starts when the cover is closed.
Note: When the product dimensions allow, we recommend using some
tables (13) as shimming the product facilitates positioning the pouch in
relation to the sealing bar.
Moreover, it allows decreasing the volume of the tank (14) and, therefore,
the amount of air to be removed, speeding up the packaging cycle.
The packaging cycle is sub-divided into four phases:
1. Suction phase during which all the air contained inside the tank and
the pouch is sucked.
The LED is on (9).
2. Gas injection phase (if the machine is equipped with a gas plant).
The LED is on (10).
3. Sealing phase during which the packet is sealed.
The LED is on (11).
4. Air re-enter phase and subsequent opening of the cover.
The LED is on (12).
The tank will reach its atmospheric pressure and the upper cover will
open again.
Machine is ready for a new packing cycle.
fter every working cycle, on the display will appear a number showing the
total cycles being executed.
(*) SOFTAIR function (for model MV50 X only)
The slow air backflow into the vacuum tank after having sealed the pouch will enable the operator to pack delicate
products with sharp edges. This will avoid any damage to the pouches due to a too rapid decompression.
Turn knob (3) of “SOFTAIR” to symbol “-“ to make the air backflow slower.
Turn knob (3) of “SOFTAIR” to symbol “+“ to make the air backflow quicker.
The optimal value can be determined after some tests that shall be carried out before mass-packaging the product.
A particularly angular and sharp conformation may require a longer time
If you press the Stop button (8), the machine will immediately stop sucking and automatically start sealing
the pouch. This function will be used to pack liquid and hot products which may start boiling during the
vacuum cycle.
6.3. Alarm messages
The electronic board detects a series of alarms that are indicated by the following messages, which appear on the
display (5):
OIL: Check the level and colour of the oil, as described in the pump manual.
To reset this alarm, press buttons (6) and (7) simultaneously.
OFF: The electronic board is blocked.
Contact the technical service department.
24
Page 12
Chapter 7. Ordinary maintenance EN
7.1. Precautions for ordinary maintenance interventions
ORDINARY MAINTENANCE, MUST BE EXECUTED BY QUALIFIED STAFF APPROPRIATELY TRAINED.
7.2. Cleaning of the sealing bar
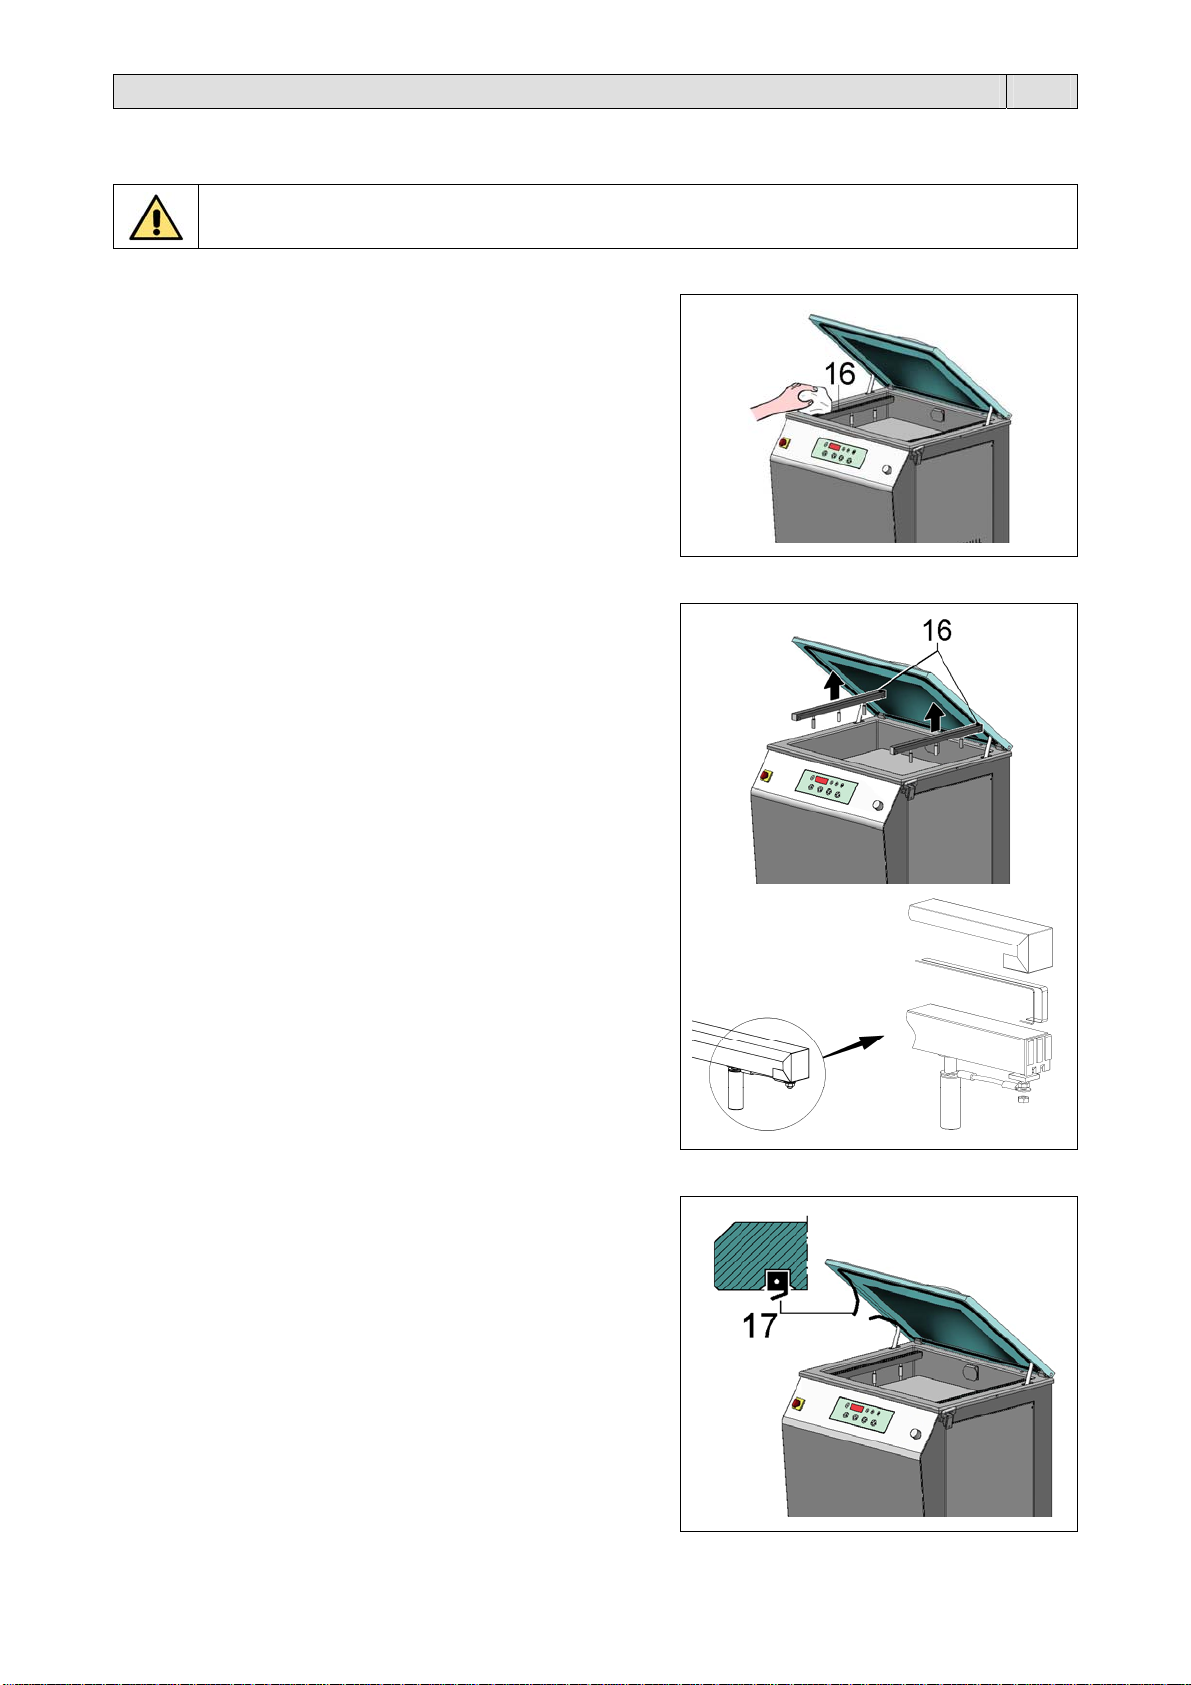
Use a dry cloth to remove any film residue on the sealing bar (16).
Before any routine maintenance switch the machine off by acting on the main switch and remove
the plug from the mains socket.
Disconnect gas plant.
7.3. Replacement of the Teflon and the sealing blade
Before replacing Teflon and the sealing blade wait for the machine
to be properly cooled.
Remove the sealing bar (16) from its seat
Remove the Teflon adhesive tape
Unscrew the nuts fastening the blades to each end of the
sealing bar
Tighten the new blades. Make sure they are taut enough before
blocking them
Use the Teflon adhesive tape to cover the sealing blades
Place the sealing bar into its seat.
7.4. Replacement of the cover gasket
When the cover gasket (17) is worn out, replace it.
This will improve the efficiency of the machine and increase its
speed rate. Replacement is very easy. After having removed the
gasket which has worn out, clean its seat and insert the new gasket
in a linear way. Make sure its ends are joined. Leave no opening
which might prevent the product from being properly vacuumpacked.
25
Page 13

Chapter 7. Ordinary maintenance EN
7.5. Cleaning machine
To clean the Plexiglas cover (18), clean both the outer
and the inner side with water and soap only.
Never use detergents or solvents which might damage
the cover (18) and reduce its transparency as well as its
resistance.
Check the state of the cover on a regular basis, it must in good
condition, completely clean, and must not display any yellowing
or increase in opacity.
If any of the above defects are observed, replace the cover.
The Plexiglas cover must be replaced ever 10 years!
Use normal detergents for stainless steel to clean the case and the internal tank.
Do not use chlorine-based detergents (hydrochloric acid, sodium hypochlorite, etc.), even if diluted.
Do not use abrasive agents, metal wool or any abrasive sponge to clean the surfaces.
Do not use detergents for silver.
Do not clean the machine using water jet or vapour.
7.6. Vacuum pump maintenance
It is very important to regularly service the pump to ensure extended and correct operation. The following activities are
essential for correct maintenance.
7.6.1. Changing the oil and the pump filter
The oil level and oil quality must be checked at least once a week. The oil inspection plug (22) serves this purpose. Fill
up the oil level if it is too low. Replace the oil if it is turbid.
Take care to replace the oil filter before adding the new oil.
Follow the instructions you can find on the pump manual in order to change the oil and the vacuum pump filter.
However, oils of the VG type shall be used in compliance with the DIN 51506 standards.
The oil you have replaced must be eliminated according to the procedures established by the laws in
force in the country the equipment has been installed.
mod. MV50 X mod. MV65 X
(20) Oil discharge plug
(21) Oil filling plug
(22) Oil inspection plug
26
Page 14

Chapter 7. Ordinary maintenance EN
7.7. Problem solving
PROBLEM CAUSE SOLUTION
The pouch is not
sealed correctly
Final vacuum is poor
The cover does not
open
If the machine does not work properly after the above-mentioned checks, contact the assistance service
describing the detected defect.
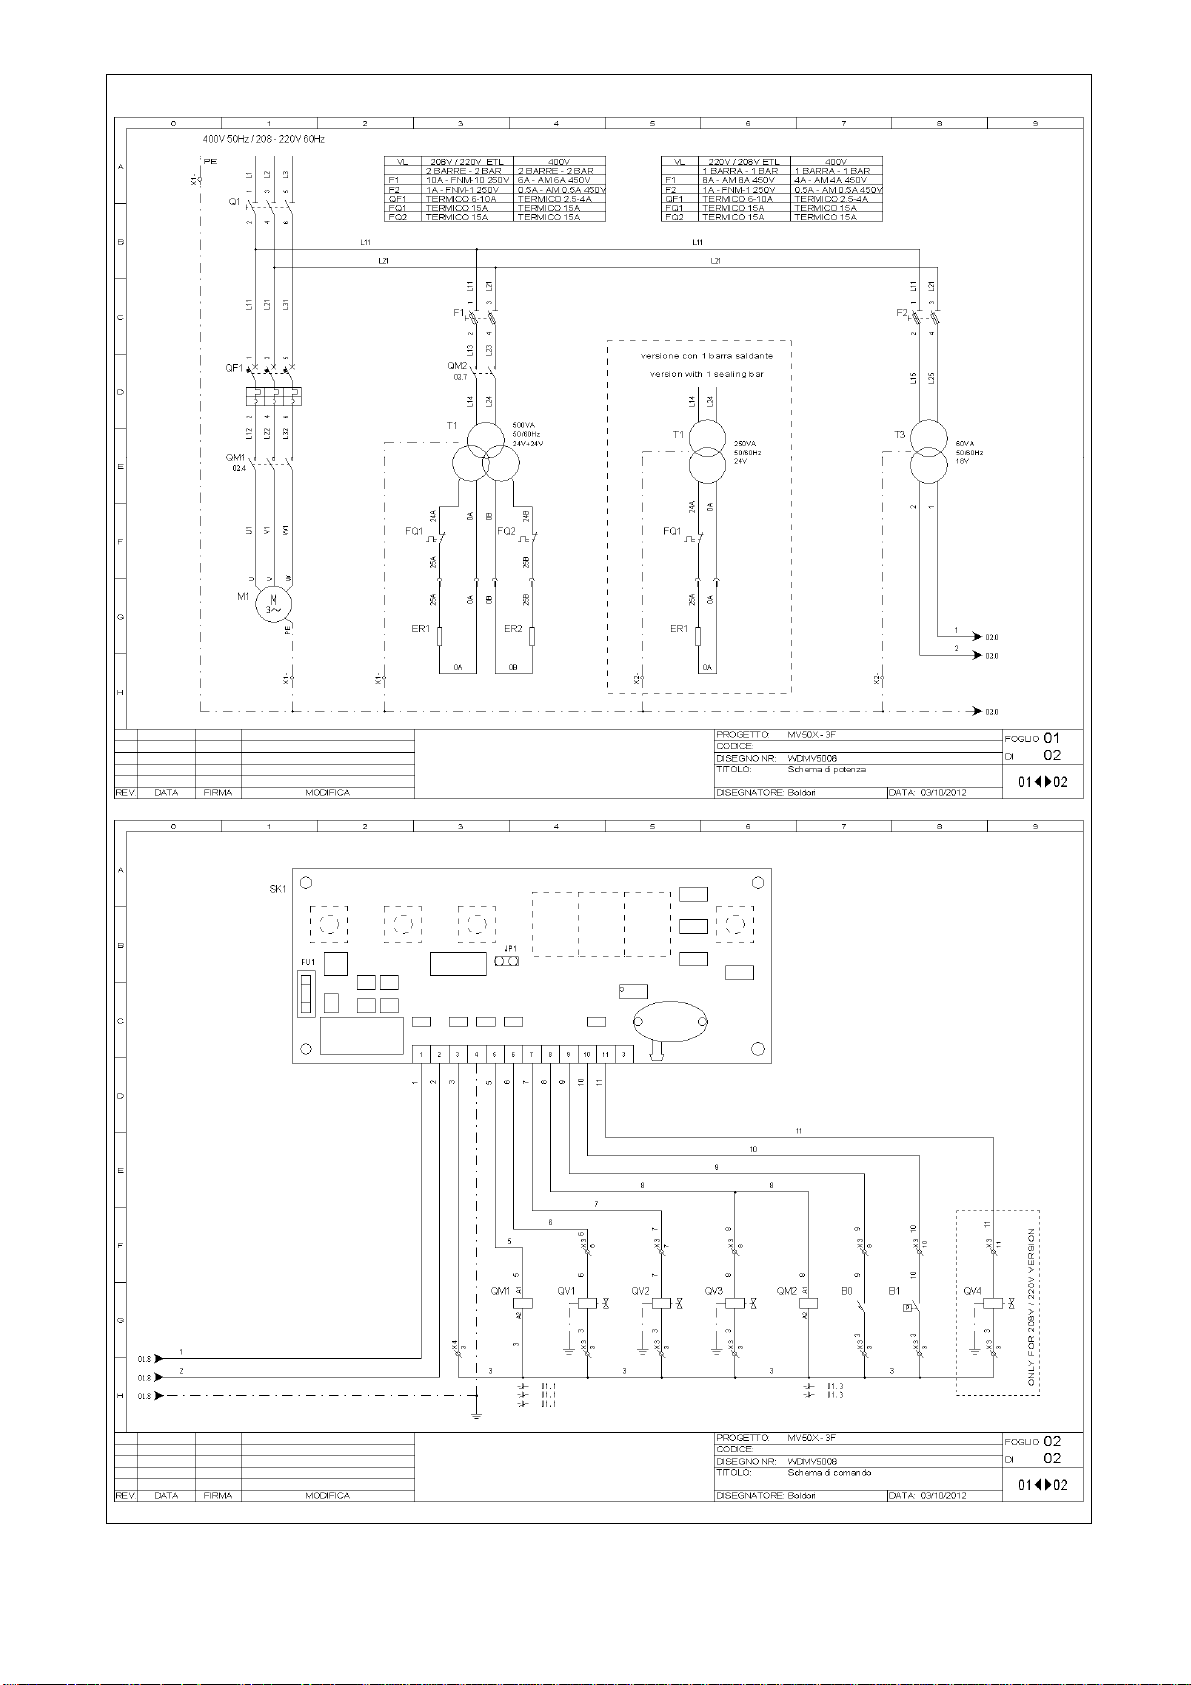
7.8. Wiring diagram
MV50 X (page 100, 101)
MV65 X (page 102, 103)
B0 Cycle start limit switch
B1 Gas pressure switch
C1 Vacuum pump condenser
ER1/2 Sealing blade
SK1 Control board
F1 Sealing transformer fuses
F2 Auxiliary transformer fuses
FQ1/2 Sealing blades thermal
M1 Vacuum pump motor
Q1 Main switch
QF1 Vacuum pump magneto-thermal switch
QM1 Motor contactor
QM2 Blade heater contactor
QV1 Air re-immission valve
QV2 Gas injection airvalve
QV3 Sealing airvalve
QV4 Vacuum airvalve
T1 Sealing transformer
T2 Sealing transformer (for model MV65 X only)
T3 Auxiliary transformer
The sealing time is not correct.
The cover gasket is dirty or worn.
The pouch is not placed correctly on the
sealing bar.
The sealing bar is worn (the Teflon
coating is burnt).
The blade placed under the Teflon of the
sealing bar is broken.
The set vacuum percentage is incorrect.
The cover gasket is dirty or worn.
The cover is not closed correctly.
No power supply.
Change the sealing time.
Clean or replace the cover gasket (contact
the Technical Assistance Service for a
replacement).
Position the pouch correctly.
Replace the sealing bar (contact the
Technical Assistance Service for a
replacement).
Replace the blade (contact the Technical
Assistance Service for a replacement).
Change the vacuum percentage.
Clean or replace the cover gasket (contact
the Technical Assistance Service for a
replacement).
Close the cover correctly.
Make sure that objects or dirt are not found
between the cover and tank.
Wait until the power supply is restored.
27
Page 15
Chapter 7. Ordinary maintenance EN
7.9. Pneumatic diagram (page 104)
CV Vacuum hood
UG Gas nozzles
BA Suction pipe union
QV1 Air re-immission valve
QV2 Gas injection airvalve
QV3 Sealing airvalve
QV4 Vacuum airvalve
B1 Gas pressure switch
BG Gas cylinder
MP Pneumatic membrane
M1 Vacuum pump motor
PV Vacuum pump
S Sensor
7.10. Disassembling, demolition and elimination of residuals
Proceed as follows:
disconnect machine from power mains
disconnect the machine from the gas system (if installed)
disassemble components
drain the oil from the pump.
All wastes must be treated, eliminated or recycled according to their classification and to the procedures in force
established by the laws in force in the country the equipment has been installed.
ATTENTION!
All operations about disassembling and demolition must be done by qualified personnel with mechanical and
electrical expertise required to work in security conditions.
The symbol indicates that this product shall not be treated as household waste.
By assuring that the product will be properly disposed of, you will facilitate the prevention of potential
negative effects for the environment and the man’s health, which might be otherwise caused by the improper
waste treatment of this product.
For more detailed information about the recycling of this product, please contact the product seller or, as an
alternative, the after-sales service or the corresponding waste treatment service.
Chapter 8. Guarantee EN
8.1. Certificate of guarantee
The guarantee runs for 12 months after the installation date under the conditions set forth on the instruction manual.
Fill in the card with all data requested, tear out along the perforations and send in.
8.2. Guarantee conditions
The guarantee runs for 12 months and goes into force on the installation date of the machine. The guarantee covers free
replacement or repair of any parts due to defects arising from faulty material. The repairs or replacement are usually
carried out at the manufactures, with transport or workmanship at buyer’s charge. If the repair or replacement is carried
out at the buyer’s place, he shall bear the travelling, transfer and workmanship charges. Work under guarantee can be
carried out exclusively by the manufacturer or by the authorised dealer. In order to be entitled to repairs under the
guarantee, the faulty part must be sent for repair or replacement to the manufacturer or his authorised dealer. The return
of such repaired or replaced part will be considered to be the performance of the guarantee.
The guarantee is voided:
in case of failure to mail the CERTIFICATE OF GUARANTEE, duly filled in and signed, with in 20 days after the date
of purchase
in case of inappropriate installation, power supply, misuse and mishandling by unauthorised persons
in case of changes made to the machine without prior agreement in writing by the manufacturers
if the machine is no longer the property of the first buyer.
The manufacturer decline any responsibility for damage to persons or things in case of inappropriate
installation or connection to the power mains or omission of connection to earth or in case of any mishandling
of the machine.
The manufacturer undertake to carry out any variations and changes made necessary by technical and
operating requirements.
IN THE EVENT OF DISPUTES THE COURT OF BERGAMO (ITALY)
SHALL HAVE SOLE JURISDICTION.
28
Page 16
7.8. mod. MV50 X (3Ph)
100
Page 17
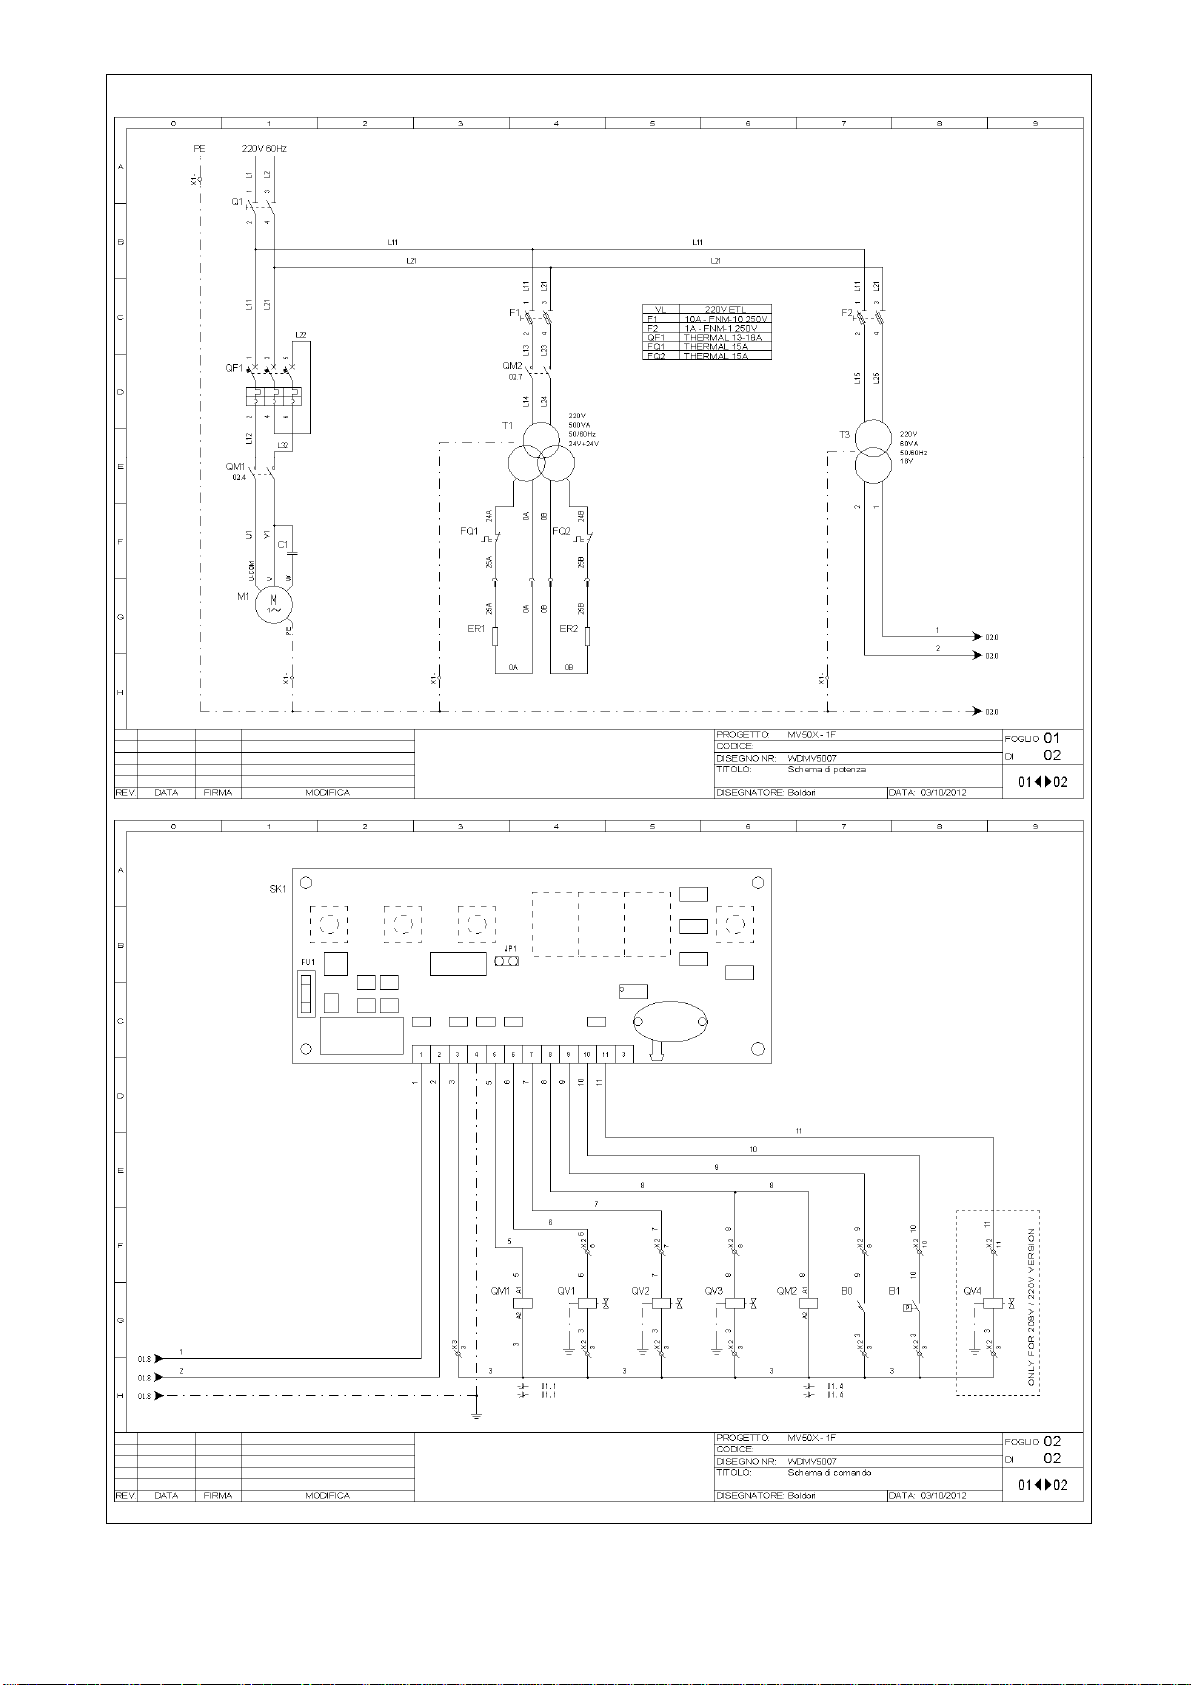
7.8. mod. MV50 X (1Ph)
101
Page 18
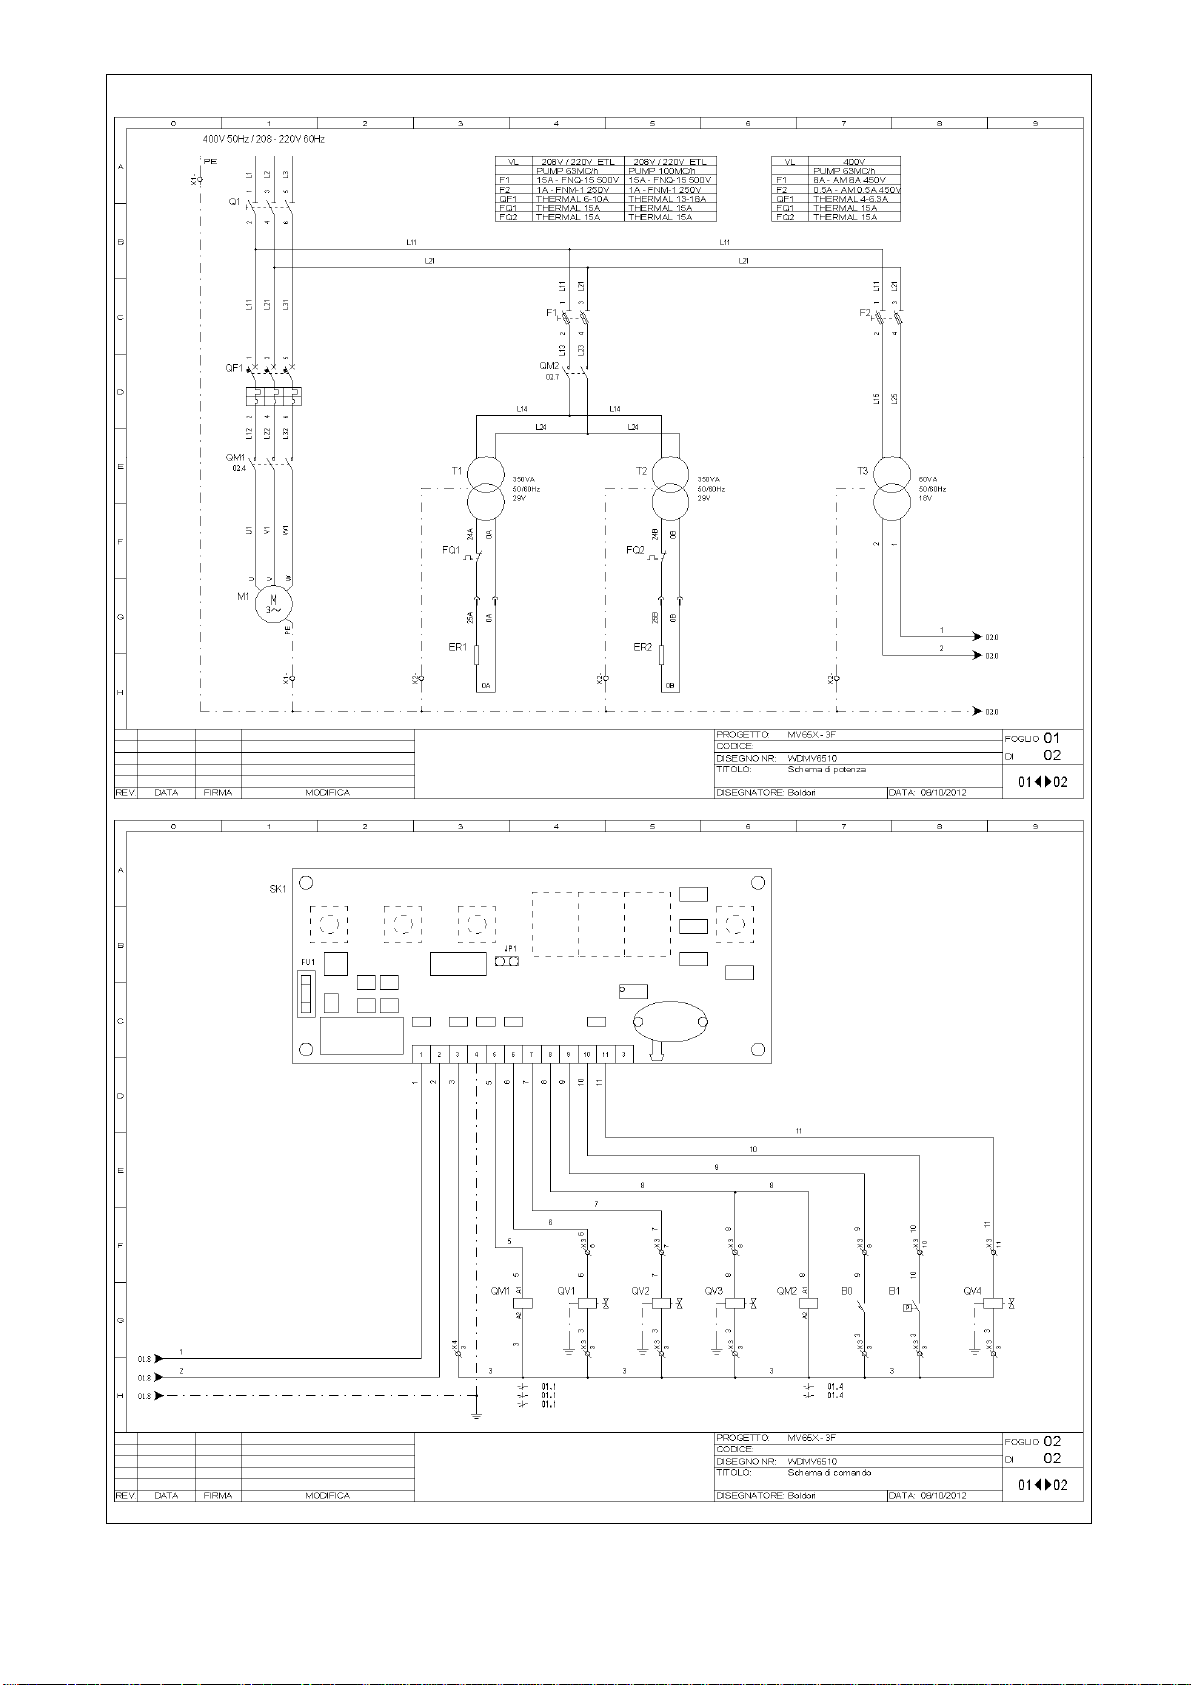
7.8. mod. MV65 X (3Ph)
102
Page 19
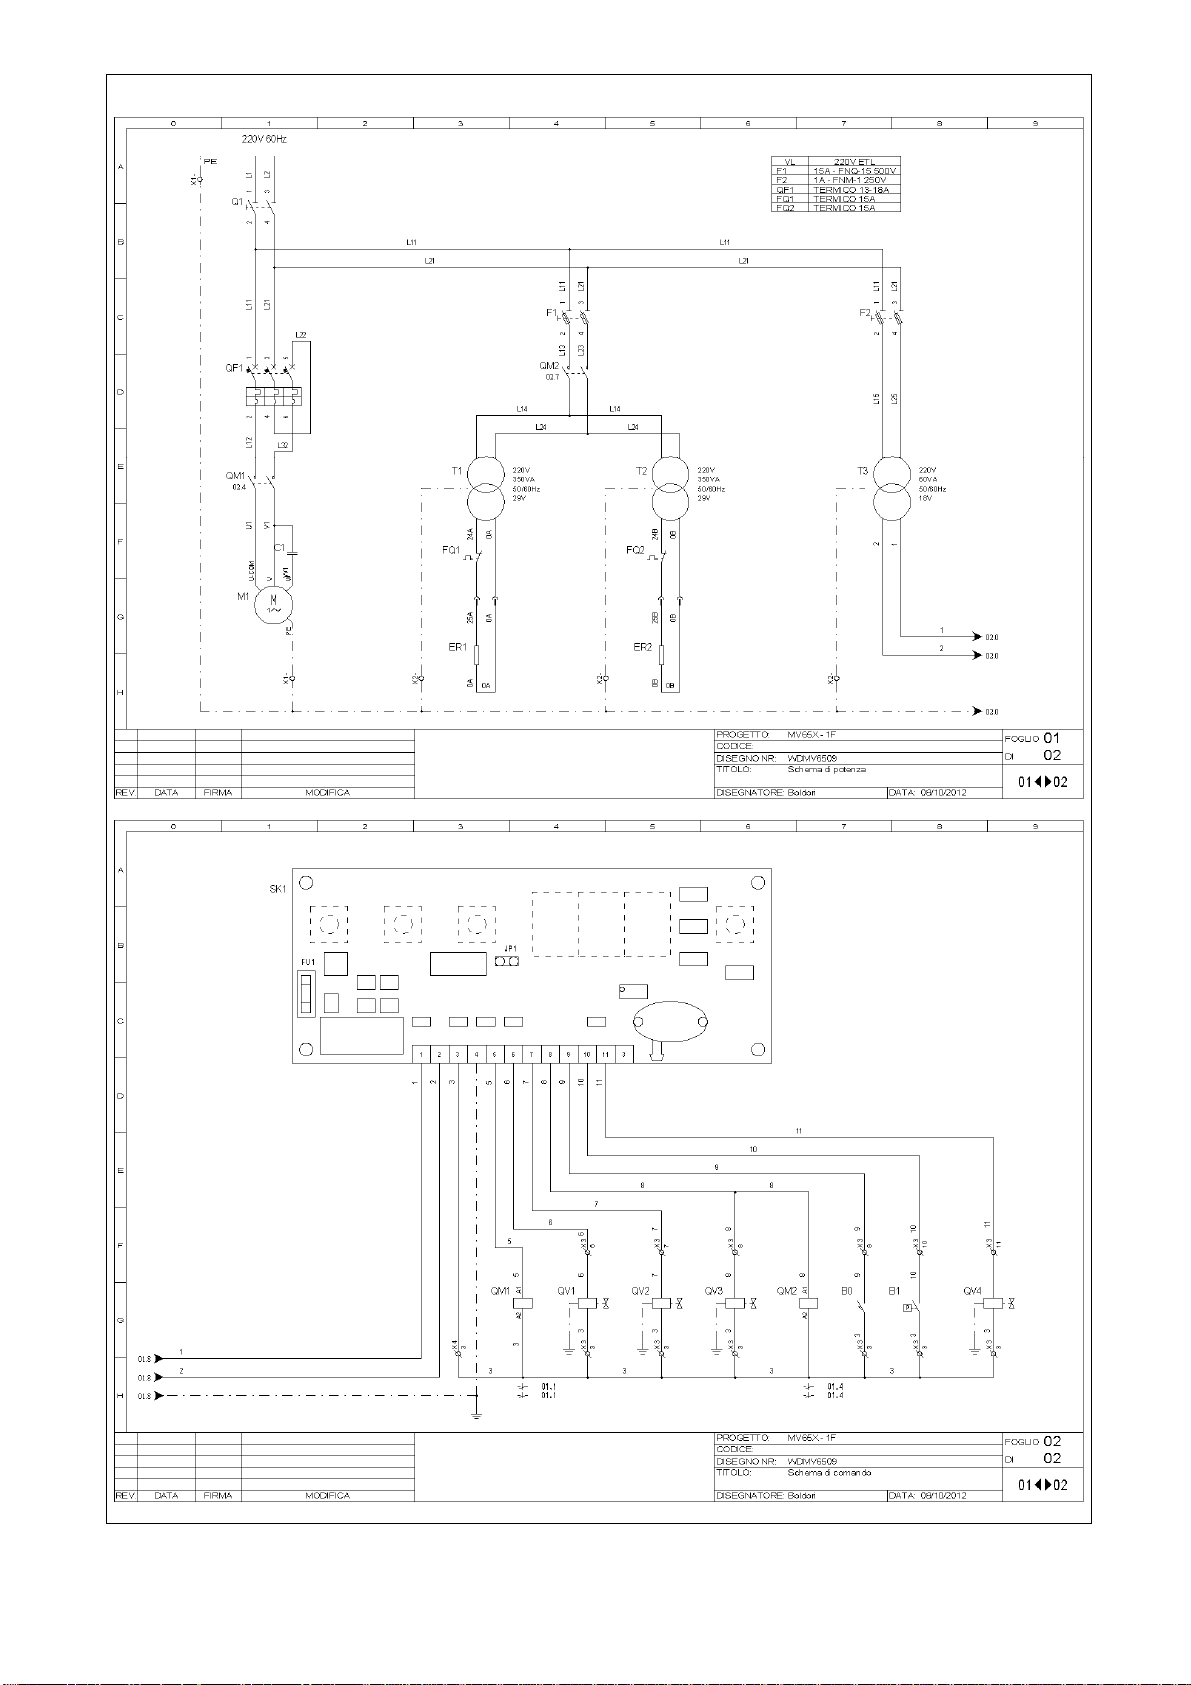
7.8. mod. MV65 X (1Ph)
103
Page 20
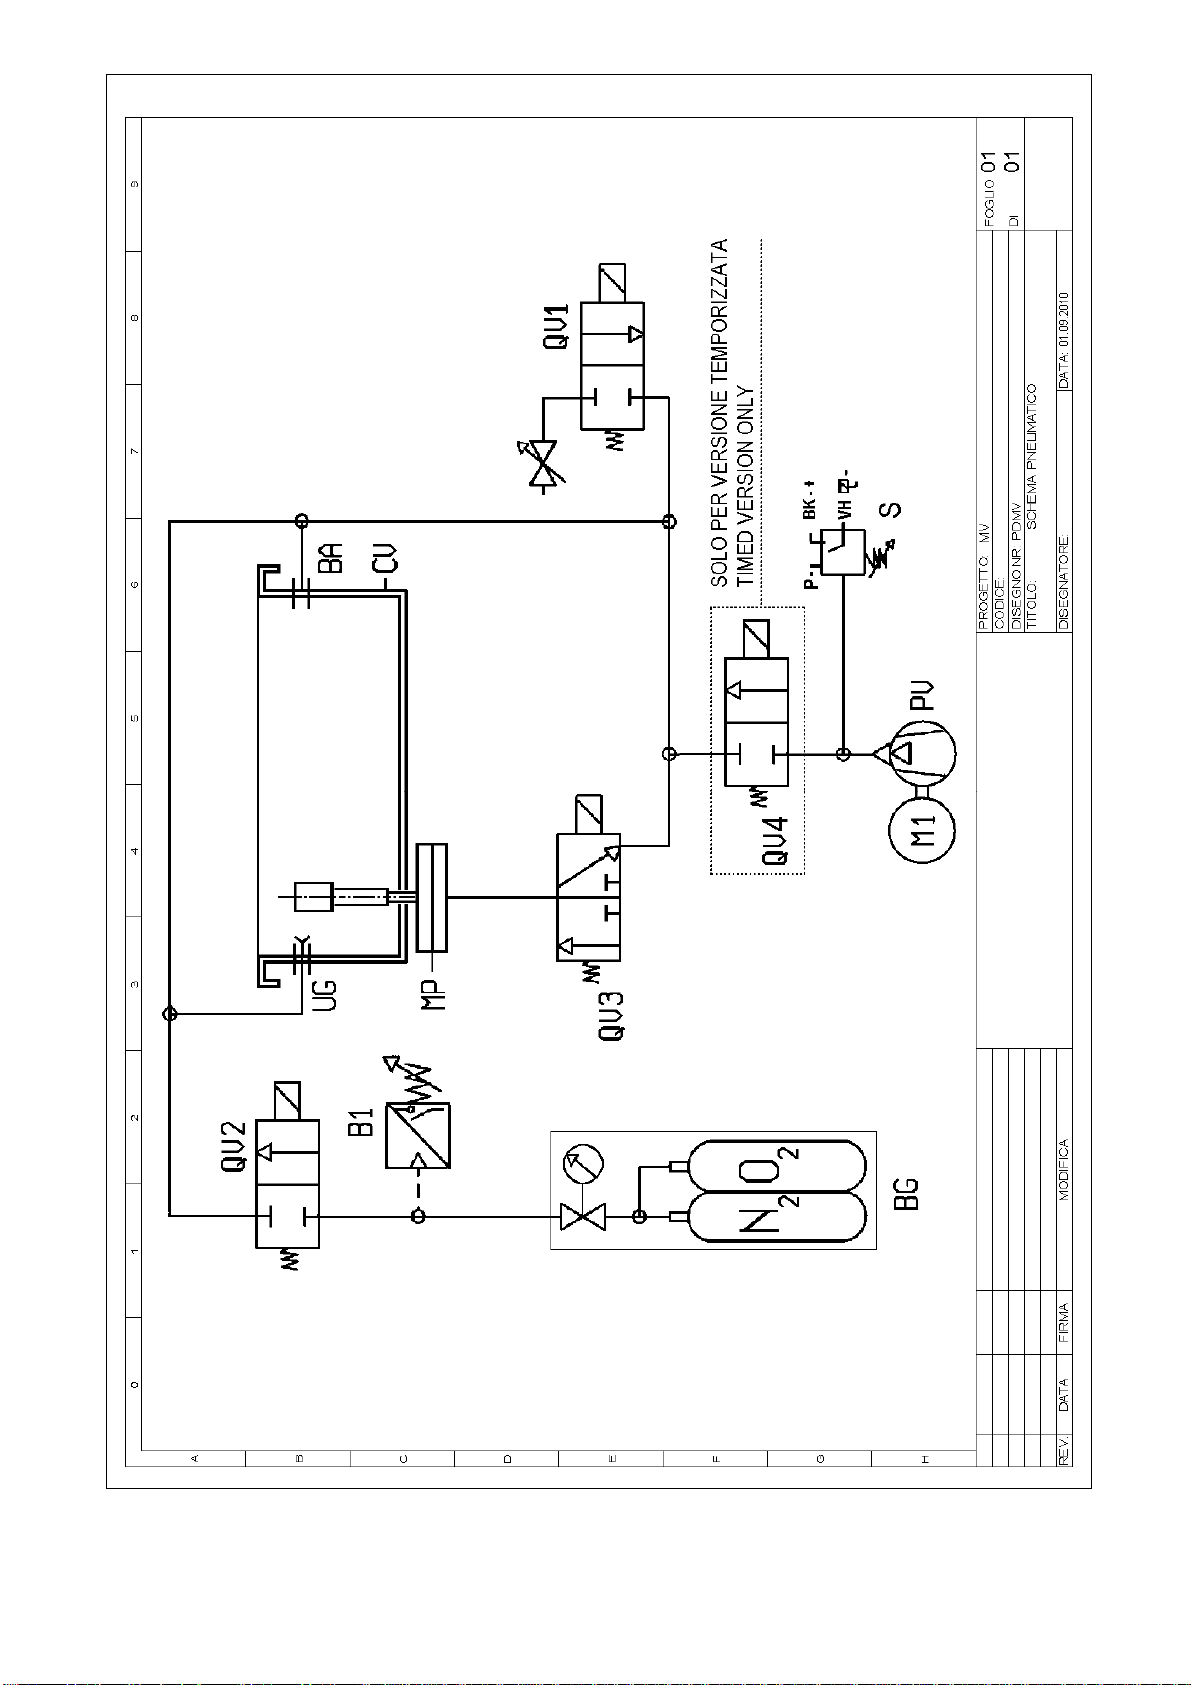
7.9.
104
 Loading...