

Page 1
miniDSP Ltd, Hong Kong / www.minidsp.com / Features and specifications subject to change without prior notice 1
SHD Series
STEREO HIGH-DEFINITION NETWORK STREAMER AND HIGH-
DEFINITION AUDIO PROCESSOR
WITH DIRAC LIVE® ROOM CORRECTION TECHNOLOGY
User Manual
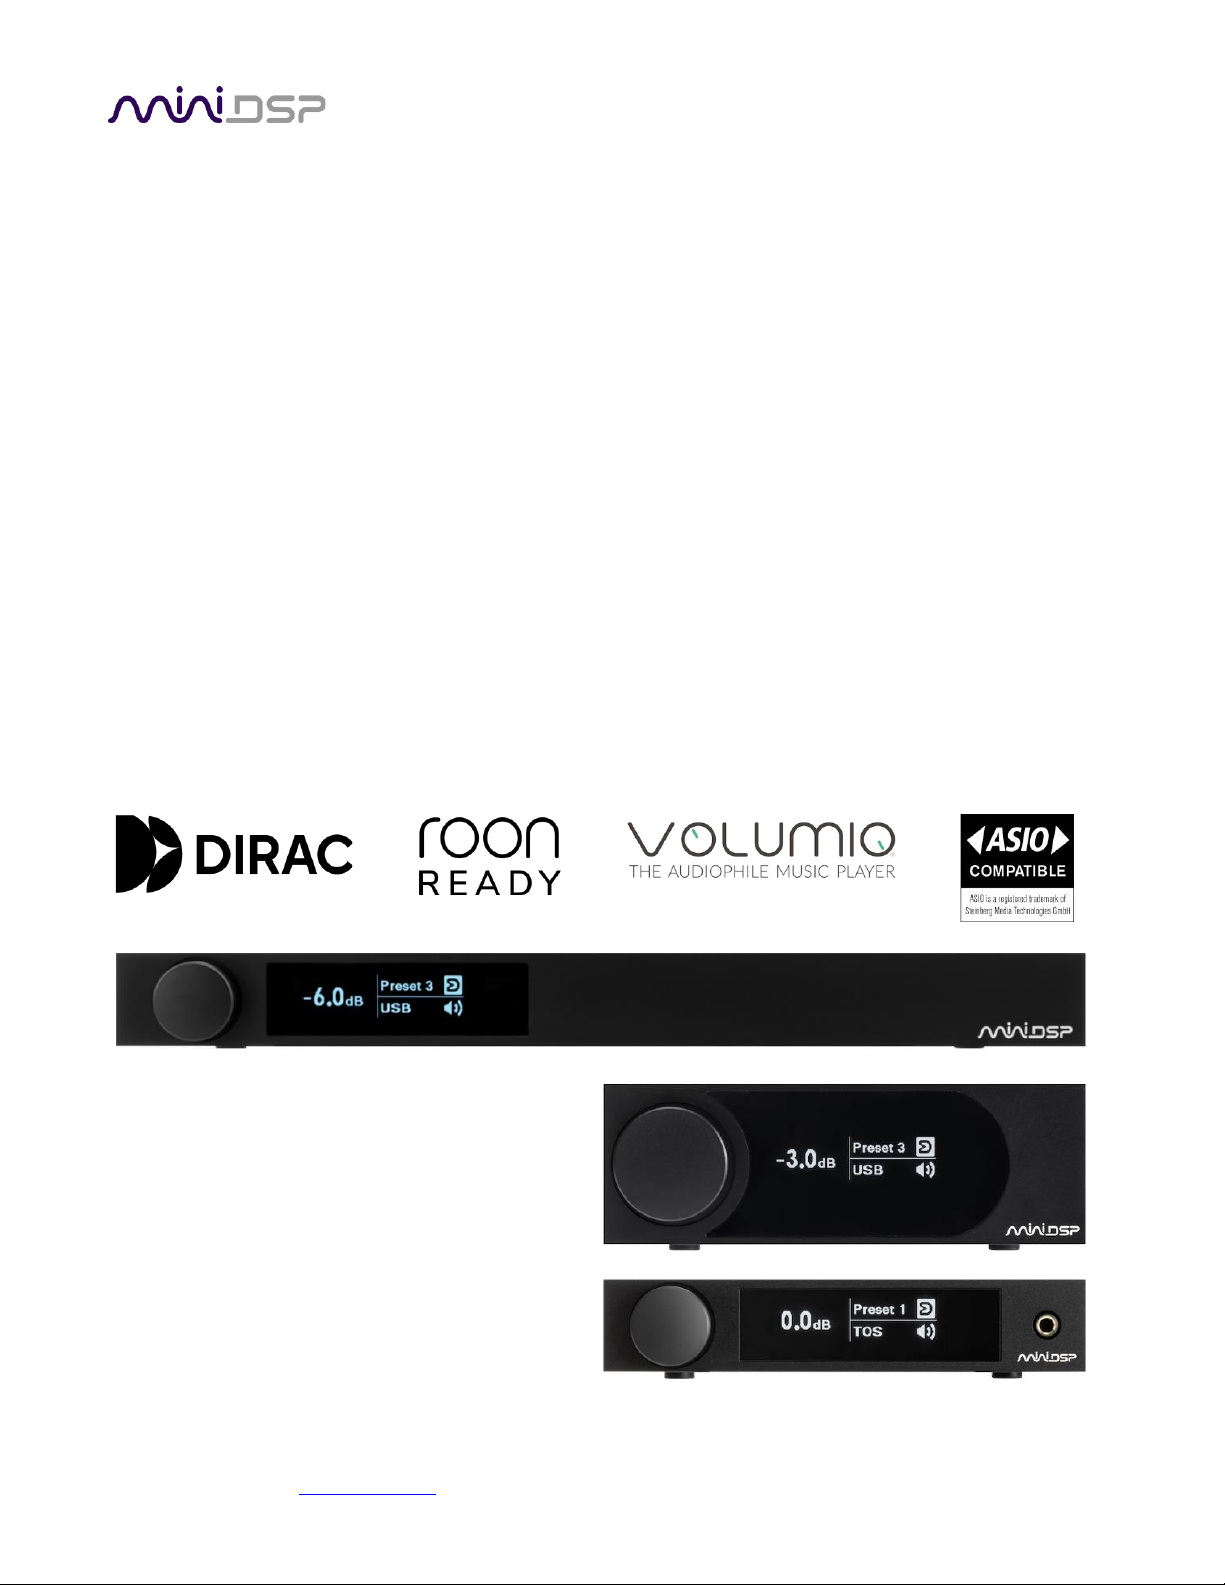
SHD
SHD Power
SHD Studio
Page 2
miniDSP Ltd, Hong Kong / www.minidsp.com / Features and specifications subject to change without prior notice 2
Revision history
Revision
Description
Date
2.0
Preliminary version of this manual that incorporates Dirac Live 2.
(See the SHD Series User Manual Legacy Support version for earlier
change history.)
12 December 2019
2.1
Catalina support. Corrections throughout. Still marked preliminary.
27 January 2020
2.3
Added user preferences.
15 April 2020
2.4
Corrections and updates for new firmware.
30 April 2020
2.5
Dirac Live documentation moved to separate miniDSP Dirac Live
User Manual.
30 June 2020
2.6
Remove legacy support (“Dirac Live 1”)
17 December 2020
2.7
Adobe AIR and Flash no longer needed
1 February 2021
2.8
Updates to Volumio UI
8 February 2021
2.10
Revisions to signal flow and sub integration for new app notes
11 June 2021
2.12
Added Volumio factory reset
7 Sept 2021
2.13
Roon ready
30 November 2021
2.14
Volumio and Roon update
28 Feb 2022
2.15
Link to analog recording app note
18 May 2022
SUPPORTED OS
or later
or later
Page 3

miniDSP Ltd, Hong Kong / www.minidsp.com / Features and specifications subject to change without prior notice 3
CONTENTS
Contents ........................................................................................................................................................3
IMPORTANT INFORMATION ...........................................................................................................................6
1 Product Overview ....................................................................................................................................9
1.1 Dirac Live ................................................................................................................................................. 10
1.2 Typical usage ........................................................................................................................................... 11
2 Hardware Overview ............................................................................................................................... 12
2.1 SHD .......................................................................................................................................................... 12
2.2 SHD Power ............................................................................................................................................... 13
2.3 SHD Studio ............................................................................................................................................... 14
2.4 Front panel .............................................................................................................................................. 15
3 Software Installation .............................................................................................................................. 16
3.1 Windows .................................................................................................................................................. 16
3.1.1 Download and install the Dirac Live application ............................................................................. 16
3.1.2 Download the miniDSP software ..................................................................................................... 16
3.1.3 Install the miniDSP software ........................................................................................................... 17
3.2 macOS ...................................................................................................................................................... 18
3.2.1 Download and install the Dirac Live application ............................................................................. 18
3.2.2 Download the miniDSP software ..................................................................................................... 18
3.2.3 Install the miniDSP software ........................................................................................................... 19
4 Playing Audio ......................................................................................................................................... 20
4.1 Digital sources ......................................................................................................................................... 20
4.2 Analog sources (SHD only) ....................................................................................................................... 20
4.3 Network audio ......................................................................................................................................... 21
4.3.1 Ethernet connection ........................................................................................................................ 21
4.3.2 Wi-Fi connection .............................................................................................................................. 22
4.3.3 The Volumio web interface ............................................................................................................. 24
4.3.4 Playing audio from USB stick ........................................................................................................... 26
4.3.5 Roon ................................................................................................................................................. 27
4.3.6 TIDAL and Qobuz ............................................................................................................................. 30
4.3.7 Spotify .............................................................................................................................................. 31
4.3.8 Accessing multiple processors ......................................................................................................... 32
4.4 USB Audio ................................................................................................................................................ 33
4.4.1 macOS .............................................................................................................................................. 33
4.4.2 Windows .......................................................................................................................................... 35
5 Remote control ...................................................................................................................................... 37
5.1 Using the miniDSP remote ...................................................................................................................... 37
5.2 Using the Volumio web interface ............................................................................................................ 38
5.3 Programming a Logitech Harmony remote ............................................................................................. 40
5.4 Android/iOS control app .......................................................................................................................... 40
5.5 Alexa voice control .................................................................................................................................. 41
5.6 Learning third-party remote codes ......................................................................................................... 41
5.7 Legacy miniDSP remote ........................................................................................................................... 42
Page 4

miniDSP Ltd, Hong Kong / www.minidsp.com / Features and specifications subject to change without prior notice 4
6 The SHD Plugin ...................................................................................................................................... 43
6.1 Plugin user interface ................................................................................................................................ 43
6.2 Connecting to the processor ................................................................................................................... 44
6.3 Key features ............................................................................................................................................. 45
6.3.1 Master control ................................................................................................................................. 45
6.3.2 Configuration/preset selection........................................................................................................ 46
6.3.3 Inputs ............................................................................................................................................... 46
6.3.4 Input selection ................................................................................................................................. 46
6.3.5 Routing matrix ................................................................................................................................. 47
6.3.6 Outputs ............................................................................................................................................ 47
6.4 Setting user preferences ......................................................................................................................... 48
6.4.1 Display Settings ................................................................................................................................ 48
6.4.2 Selectable Input Sources ................................................................................................................. 49
6.4.3 Speaker Impedance (SHD Power only) ............................................................................................ 49
6.5 Signal flow ............................................................................................................................................... 50
6.6 Configuration for subwoofer integration ................................................................................................ 51
6.6.1 Connect the subwoofer ................................................................................................................... 51
6.6.2 Configure the plugin ........................................................................................................................ 51
6.6.3 Check subwoofer integration (optional) ......................................................................................... 53
6.7 Other configurations ............................................................................................................................... 55
6.7.1 Dual subwoofers .............................................................................................................................. 55
6.7.2 Stereo supporting woofers .............................................................................................................. 56
6.7.3 Two-way active speaker .................................................................................................................. 57
7 Dirac Live Calibration ............................................................................................................................. 58
8 Plugin Reference .................................................................................................................................... 59
8.1 Input channel status ................................................................................................................................ 59
8.2 Routing .................................................................................................................................................... 59
8.3 Output channels ...................................................................................................................................... 60
8.3.1 Channel label ................................................................................................................................... 60
8.3.2 Level metering and gain adjustment ............................................................................................... 60
8.3.3 Parametric EQ .................................................................................................................................. 61
8.3.4 Crossover ......................................................................................................................................... 63
8.3.5 Compressor ...................................................................................................................................... 65
8.3.6 Invert and mute ............................................................................................................................... 65
8.3.7 Time delay ....................................................................................................................................... 66
8.4 Custom biquad programming .................................................................................................................. 66
8.4.1 What’s a biquad? ............................................................................................................................. 66
8.4.2 Using custom biquad programming ................................................................................................ 67
8.4.3 Biquad design software ................................................................................................................... 68
8.5 Working with configurations ................................................................................................................... 69
8.5.1 Online and offline mode .................................................................................................................. 69
8.5.2 Selecting a configuration ................................................................................................................. 69
8.5.3 Saving and loading configurations ................................................................................................... 70
8.5.4 Relationship with Dirac Live ............................................................................................................ 70
8.5.5 Restoring to defaults ....................................................................................................................... 71
8.6 Keyboard shortcuts ................................................................................................................................. 71
Page 5

miniDSP Ltd, Hong Kong / www.minidsp.com / Features and specifications subject to change without prior notice 5
9 Additional Information .......................................................................................................................... 72
9.1 Specifications ........................................................................................................................................... 72
9.1.1 All SHD Series processors ................................................................................................................ 72
9.1.2 SHD .................................................................................................................................................. 73
9.1.3 SHD Power ....................................................................................................................................... 74
9.1.4 SHD Studio ....................................................................................................................................... 75
9.2 Plugin and DSP upgrade .......................................................................................................................... 76
9.3 Volumio software update ........................................................................................................................ 77
9.4 Volumio settings/factory reset ................................................................................................................ 78
9.4.1 Factory reset (settings only) ............................................................................................................ 78
9.4.2 Factory reset (settings and installation) .......................................................................................... 78
9.5 Firmware upgrade ................................................................................................................................... 79
9.5.1 Windows .......................................................................................................................................... 79
9.5.2 macOS .............................................................................................................................................. 81
9.6 Finding the SHD’s IP address ................................................................................................................... 83
9.7 Solving connectivity issues ...................................................................................................................... 85
9.7.1 No Internet connection ................................................................................................................... 85
9.7.2 SHD Series processor not detected ................................................................................................. 85
9.8 Trouble-shooting audio issues ................................................................................................................. 86
9.9 Obtaining support .................................................................................................................................... 87
9.10 Open source licenses ............................................................................................................................... 87
Page 6

miniDSP Ltd, Hong Kong / www.minidsp.com / Features and specifications subject to change without prior notice 6
IMPORTANT INFORMATION
Please read the following information before use. In case of any questions, please contact miniDSP via the
support portal at support.minidsp.com.
System Requirements
To configure the miniDSP audio processor, you will require a Windows PC or Apple Mac computer with the
following minimum specification:
Windows
• Microsoft• ® Windows® 10 or 11, latest version with all updates
• At least a dual core i3, i5, or i7 processor
• At least 2 GB RAM (4 GB preferred)
• Two free USB 2.0 ports
• Internet connection
macOS
• macOS 10.14 Mojave or later, latest version with all updates
• At least a dual core i3, i5, or i7 processor, or an ARM processor (M1/Pro/Max)
• At least 2 GB RAM (4 GB preferred)
• Two free USB 2.0 ports
• Internet connection
Disclaimer/Warning
miniDSP cannot be held responsible for any damage that may result from the improper use of this product or
incorrect configuration of its settings. As with any other product, we recommend that you carefully read this
manual and other technical notes to ensure that you fully understand how to operate this product. The miniDSP
audio processor is a powerful tool, and misuse or misconfiguration, such as incorrectly set gains or excessive
boost, can produce signals that may damage your audio system.
As a general guideline, you should perform the initial configuration of the miniDSP audio processor before
enabling audio through any connected output device or amplification. Doing so will help ensure that the
software is correctly configured.
Finally, note that the miniDSP audio processor is a very flexible device, and many of the questions we receive at
the tech support department are already answered in this user manual and in the online application notes on
the miniDSP.com website. So please take the time to carefully read this user manual and the online technical
support. Thanks for your understanding!
Warranty Terms
miniDSP Ltd warrants this product to be free from defects in materials and workmanship for a period of one
year from the invoice date. Our warranty does not cover failure of the product due to incorrect connection or
installation, improper or undocumented use, unauthorized servicing, modification or alteration of the unit in any
way, or any usage outside of that recommended in this manual. If in doubt, contact miniDSP prior to use.
Page 7
miniDSP Ltd, Hong Kong / www.minidsp.com / Features and specifications subject to change without prior notice 7
FCC Class B Statement
This device complies with Part 15 of the FCC Rules. Operation is subject to the following two conditions:
• This device may not cause harmful interference.
• This device must accept any interference received, including interference that may cause undesired
operation.
Warning: This equipment has been tested and found to comply with the limits for a Class B digital device,
pursuant to Part 15 of the FCC Rules. These limits are designed to provide reasonable protection. This
equipment generates, uses and can radiate radio frequency energy and, if not installed and used in accordance
with the instructions, may cause interference to radio communications. However, there is no guarantee that
interference will not occur in a particular installation. If this equipment does cause harmful interference to radio
or television reception, which can be determined by turning the equipment off and on, the user is encouraged to
try to correct the interference by one or more of the following measures:
• Reorient or relocate the receiving antenna.
• Increase the separation between the equipment and receiver.
• Connect the equipment into an outlet on a circuit different from that to which the receiver is connected.
• Consult the dealer or an experienced radio/TV technician for help.
Notice: Shielded interface cable must be used in order to comply with emission limits.
Notice: Changes or modification not expressly approved by the party responsible for compliance could void the
user’s authority to operate the equipment.
CE Mark Statement
The miniDSP SHD Series processor has passed the test performed according to European Standard EN 55022
Class B.
A note on this manual
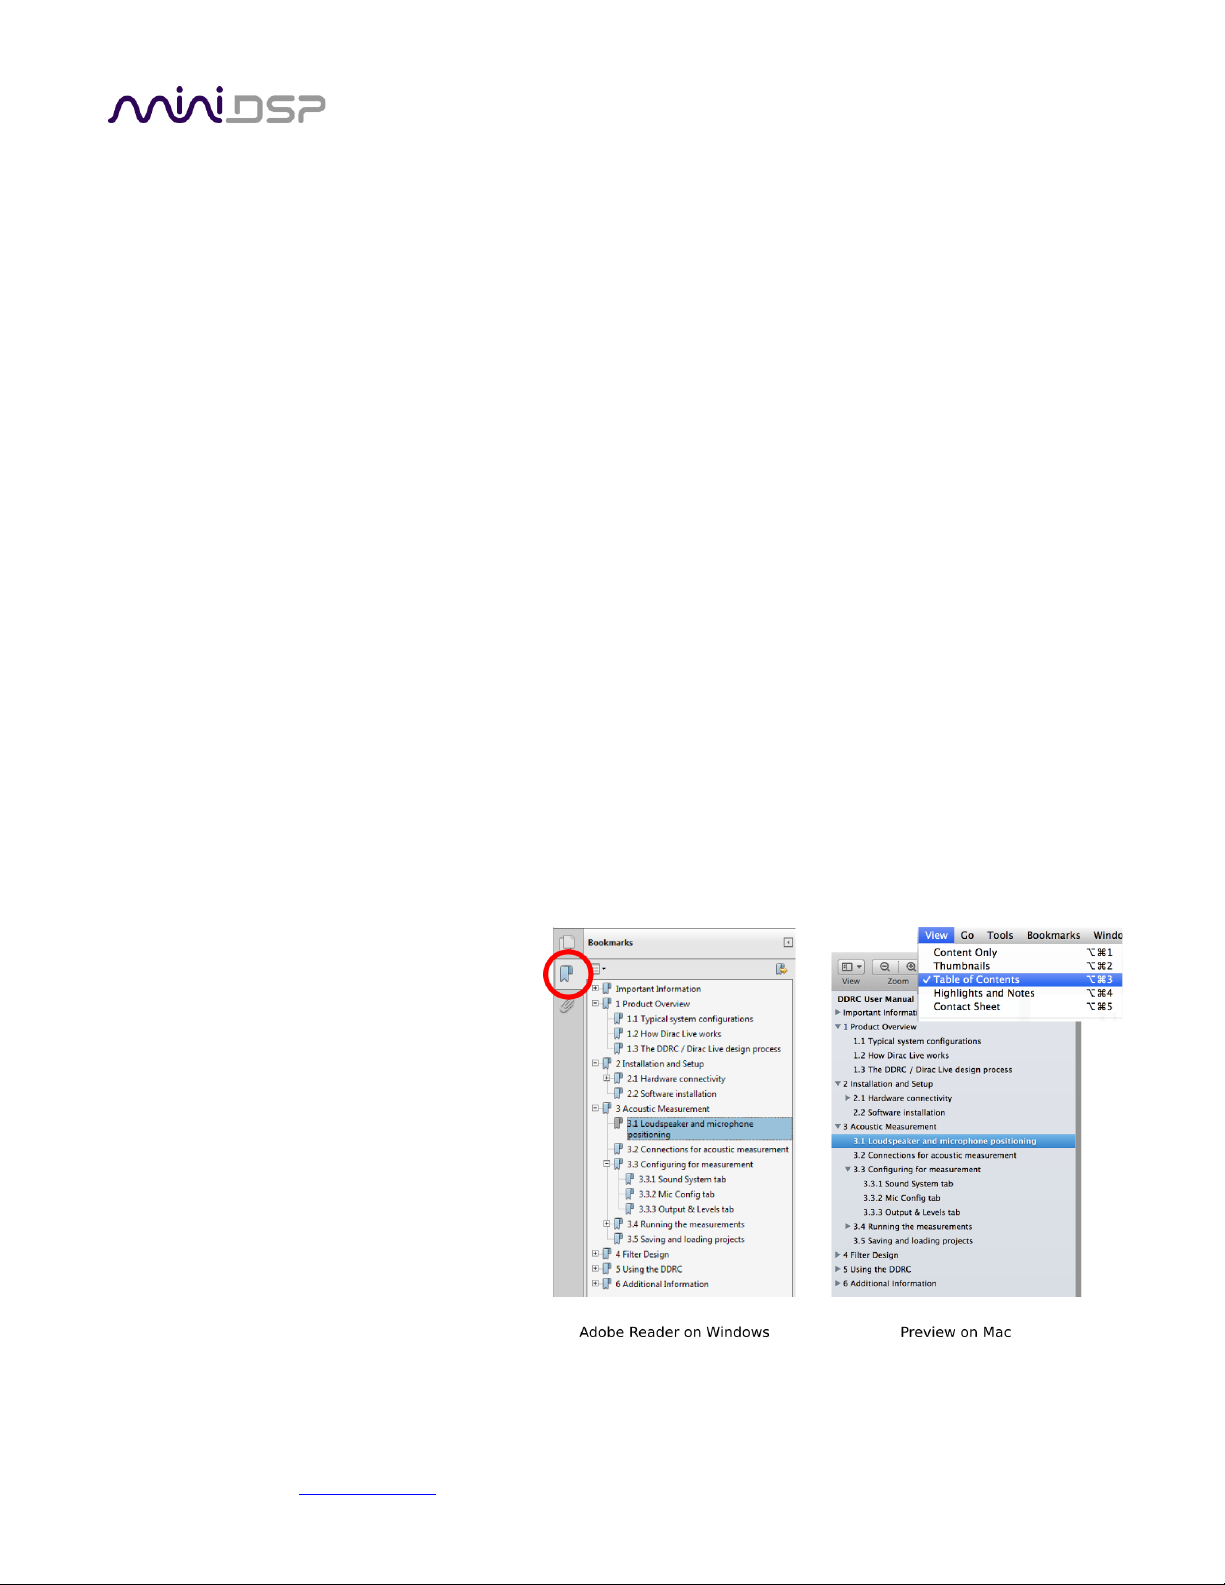
This User Manual is designed for reading in
both print and on the computer. If printing
the manual, please print double-sided. The
embedded page size is 8 ½” x 11”. Printing on
A4 paper will result in a slightly reduced size.
For reading on the computer, we have
included hyperlinked cross-references
throughout the manual. In addition, a table of
contents is embedded in the PDF file. Use the
View menu (Preview on Mac) or the
bookmarks sidebar (Adobe reader on Mac and
Windows) to view this table of contents.
Page 8

miniDSP Ltd, Hong Kong / www.minidsp.com / Features and specifications subject to change without prior notice 8
Acknowledgments
Dirac® and Dirac Live® are trademarks owned by Dirac Research AB.
ASIO® is a registered trademark of Steinberg Media Technologies GmbH.
Being Roon Ready means that miniDSP uses Roon streaming technology, for an incredible user interface, simple
setup, rock-solid daily reliability, and the highest levels of audio performance, without compromise.
Page 9
miniDSP Ltd, Hong Kong / www.minidsp.com / Features and specifications subject to change without prior notice 9
1 PRODUCT OVERVIEW
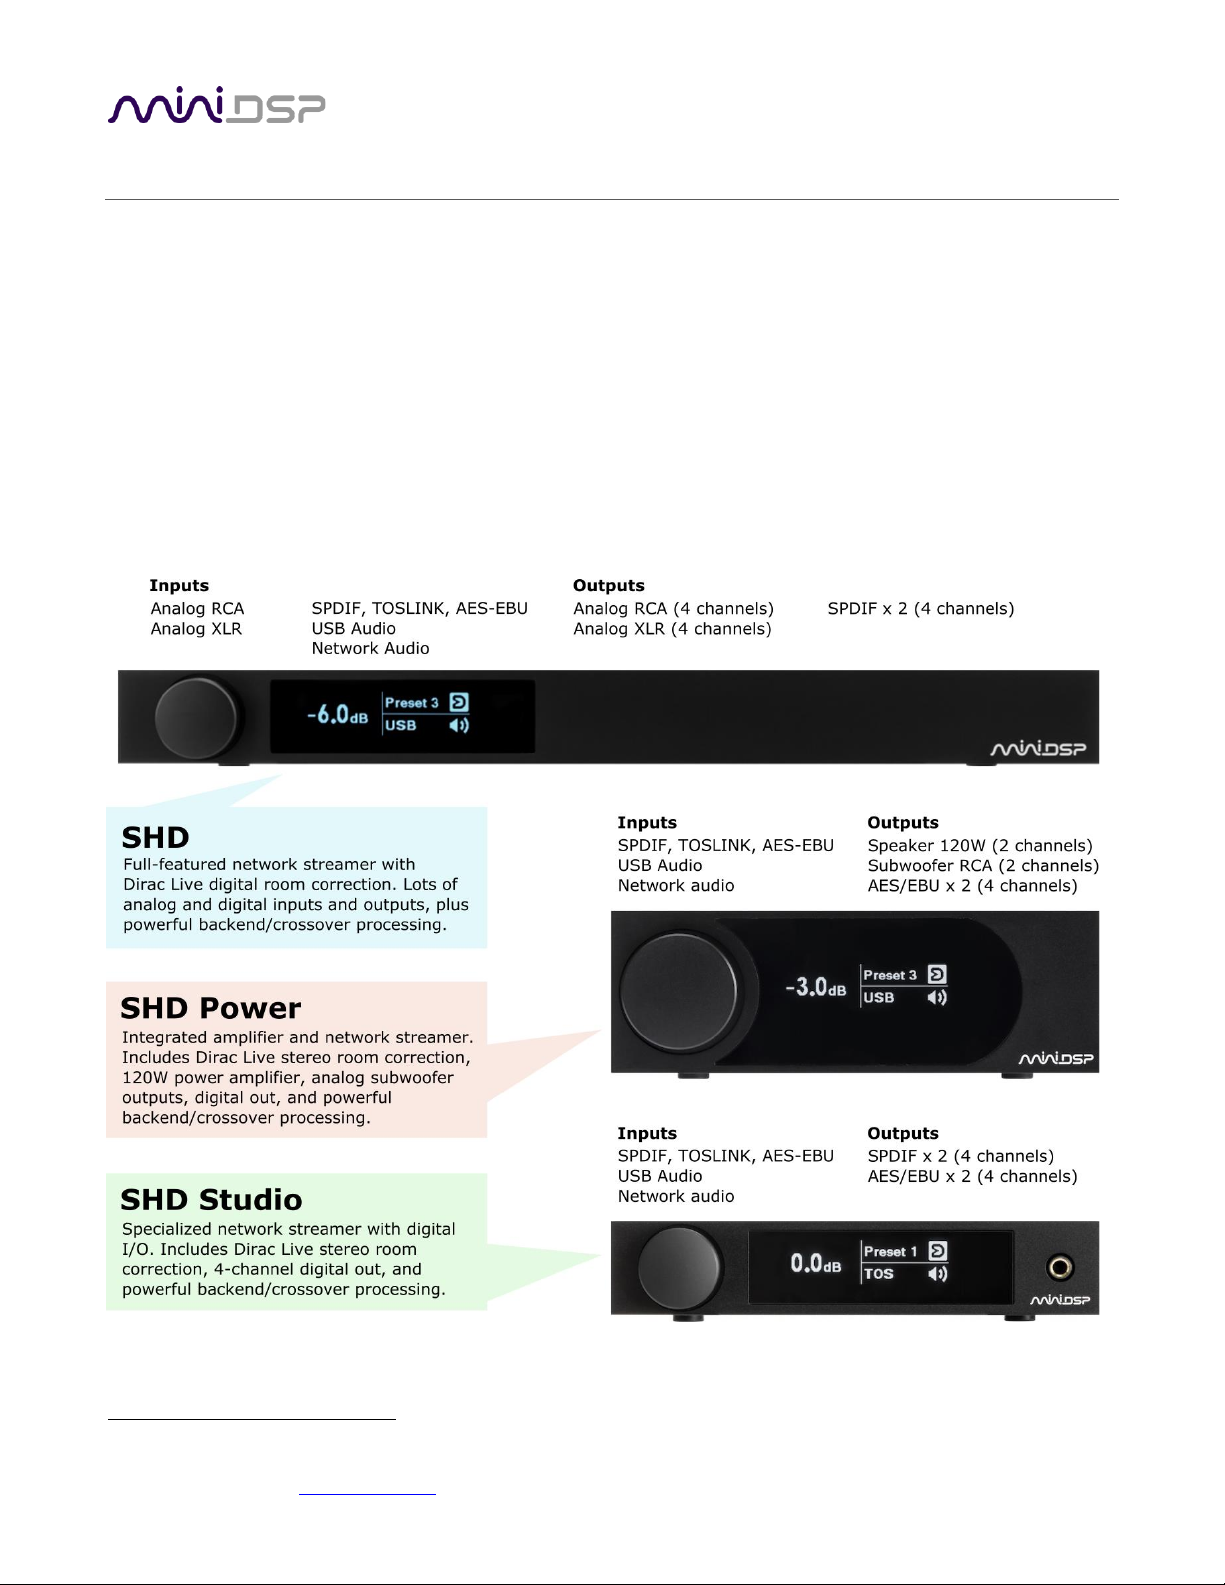
Thank you for purchasing a miniDSP SHD Series high-resolution1 room correction processor powered by
Dirac Live®, the world’s premier room correction solution. The new SHD Series offers a wealth of input-output
options, network streaming services including Tidal, Qobuz, and Spotify, network players such as Roon, powerful
back-end processing for subwoofer integration and active speakers and of course, Dirac Live.
The SHD Series encompasses a range of models for optimum matching to different user needs. The full-featured
SHD is perfect for use in a separates system, acting as network streamer and digital preamplifier with room
correction. The compact integrated SHD Power matches lifestyle systems, but with 120W of power on tap and
two subwoofer outputs. Finally, the SHD Studio is an all-digital I/O model that is perfect for use in modern alldigital systems, studios, and professional applications.
1
The miniDSP SHD Series processors operate with 32-bit 96 kHz resolution.
Page 10
miniDSP Ltd, Hong Kong / www.minidsp.com / Features and specifications subject to change without prior notice 10
1.1 DIRAC LIVE
Each SHD Series processor executes Dirac Live® digital room correction, from Dirac Research. Dirac Live’s mixed-
phase filtering technology will improve the imaging of your system, minimize the effects of room modes and
resonances, and improve dynamics and clarity.
To accomplish its remarkable improvement in listening quality, Dirac Live steps you through the procedure for
taking measurements around your listening area. Dirac Live® employs a sophisticated analysis algorithm to make
the optimal correction across the whole listening area, not just at a single point. The user has full control over
the target frequency response. Measurements are taken with a calibrated acoustic measurement microphone,
the miniDSP UMIK-1.2
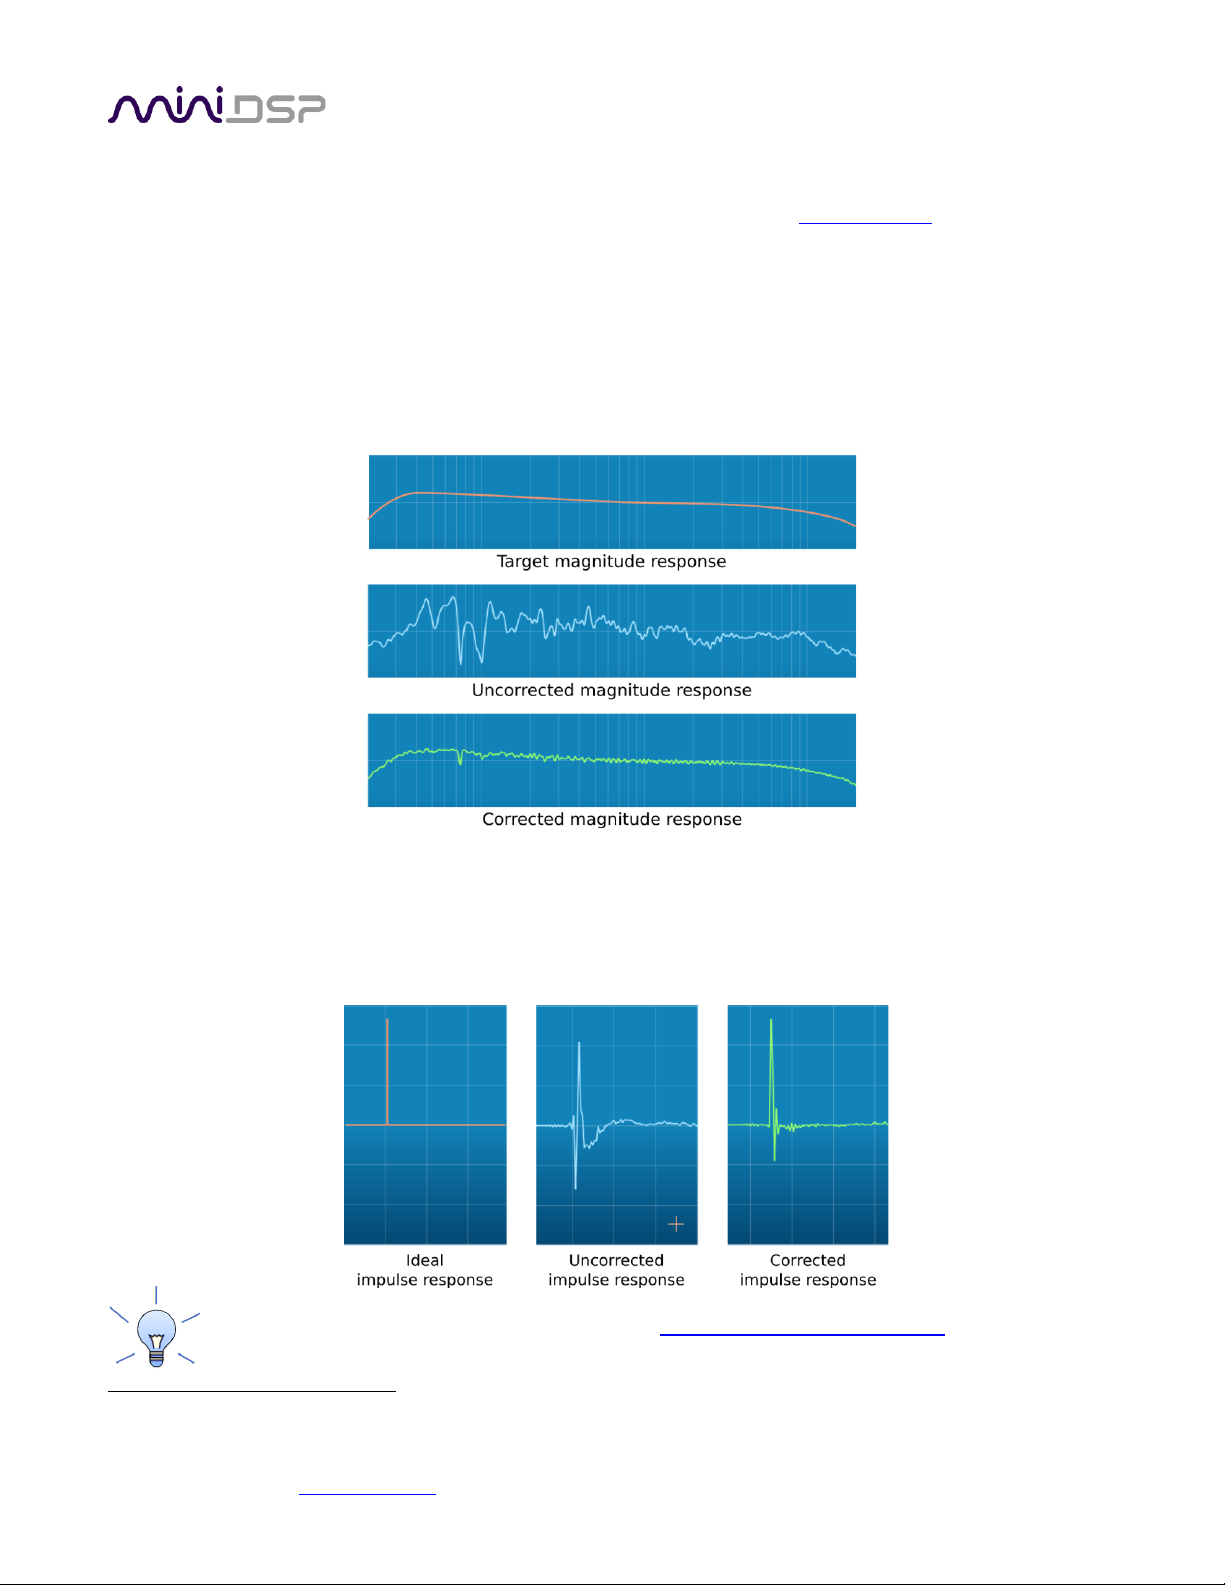
In addition to correcting magnitude response, Dirac Live® corrects the system’s impulse response, which reflects
how the system responds to a sharp transient such as a drumbeat. Reflections, diffraction, resonances,
misaligned drivers, and so on, all combine to smear out the transient. Correcting the impulse response makes
the speaker in the room behave much more like an ideal loudspeaker. The impulse response is a critical factor
for accurate sound-staging, clarity and bass reproduction.
Dirac Live calibration is described in the separate miniDSP Dirac Live User Manual.
2
A UMIK-1 is included in the standard purchase price of each SHD Series processor.
Page 11
miniDSP Ltd, Hong Kong / www.minidsp.com / Features and specifications subject to change without prior notice 11
Figure 2. Typical audio system configuration using the miniDSP SHD
1.2 TYPICAL USAGE
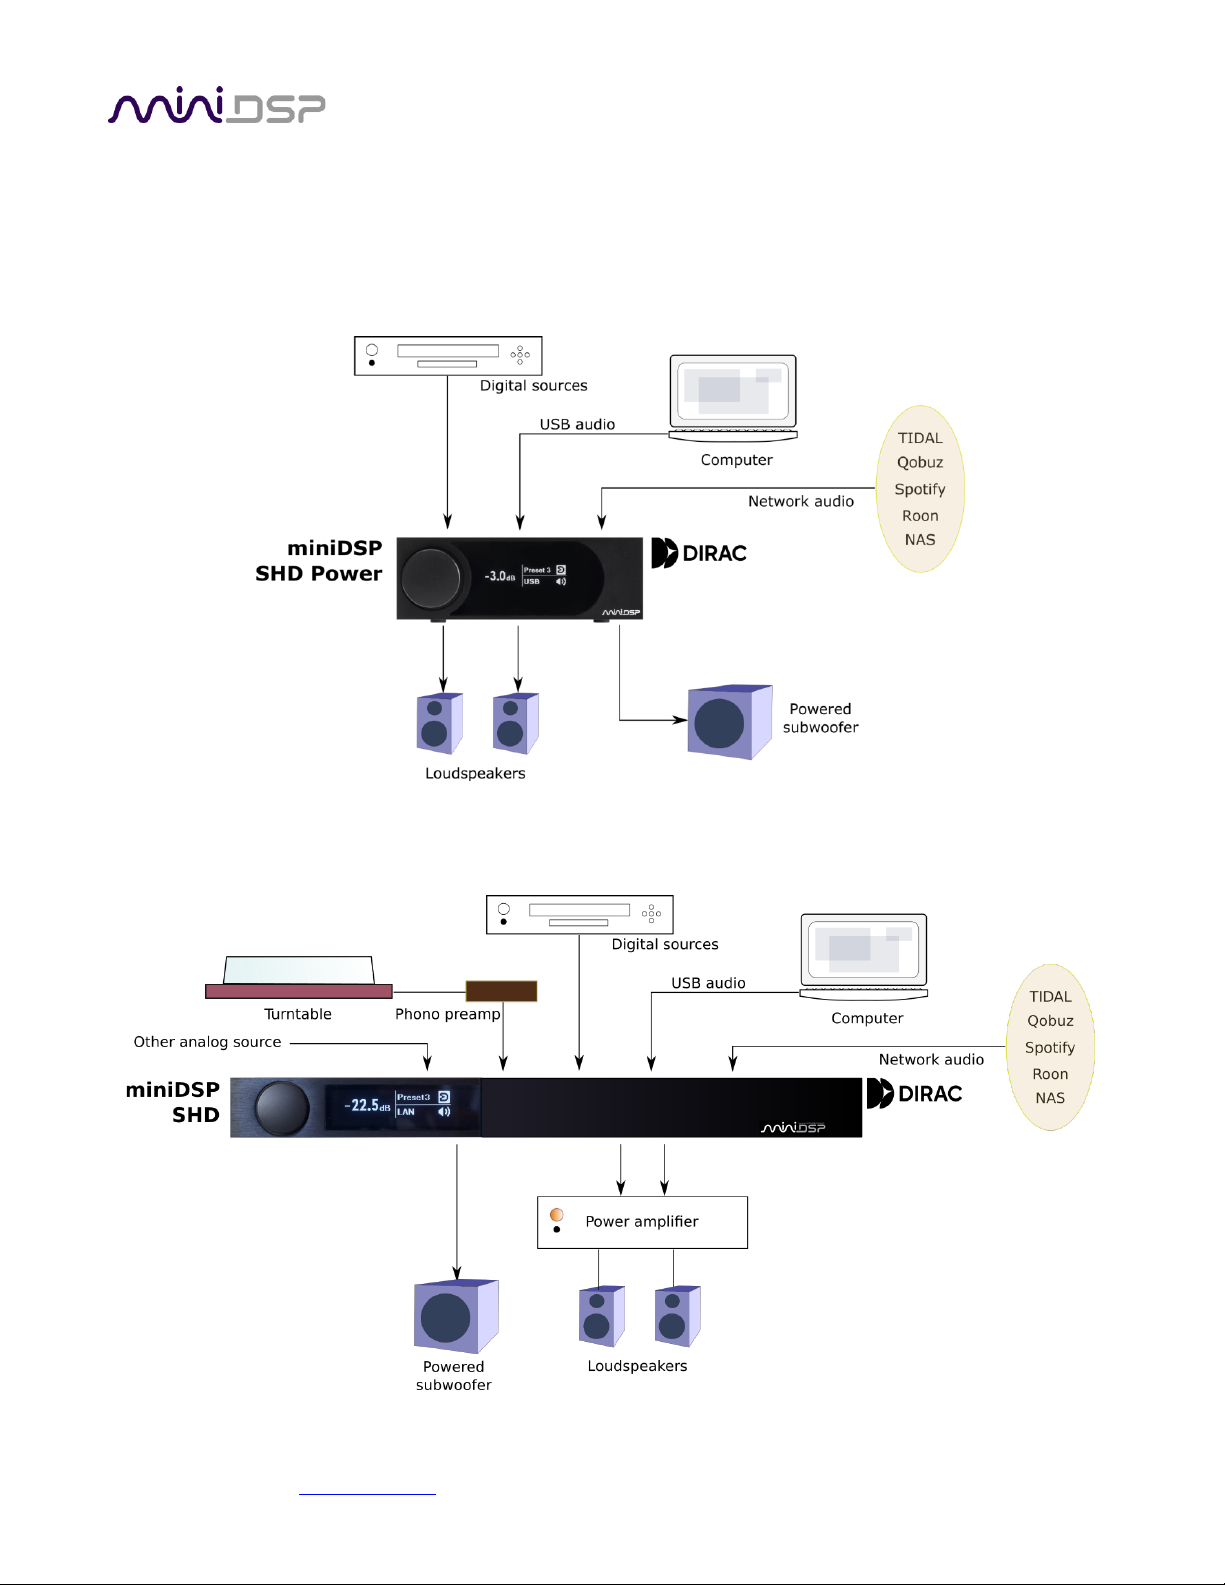
The SHD Series processors replace multiple components in a conventional audio system – preamplifier, network
streamer, DAC and room correction are all bundled into a single economical unit. Each also has its own unique
strengths: analog I/O (SHD), compact size (SHD Studio), and inbuilt power amplification (SHD Power). Figure 1
and Figure 2 illustrate how an SHD Series processor can simplify your audio system.
Figure 1. Typical audio system configuration using the miniDSP SHD Power
Page 12
miniDSP Ltd, Hong Kong / www.minidsp.com / Features and specifications subject to change without prior notice 12
2 HARDWARE OVERVIEW
2.1 SHD
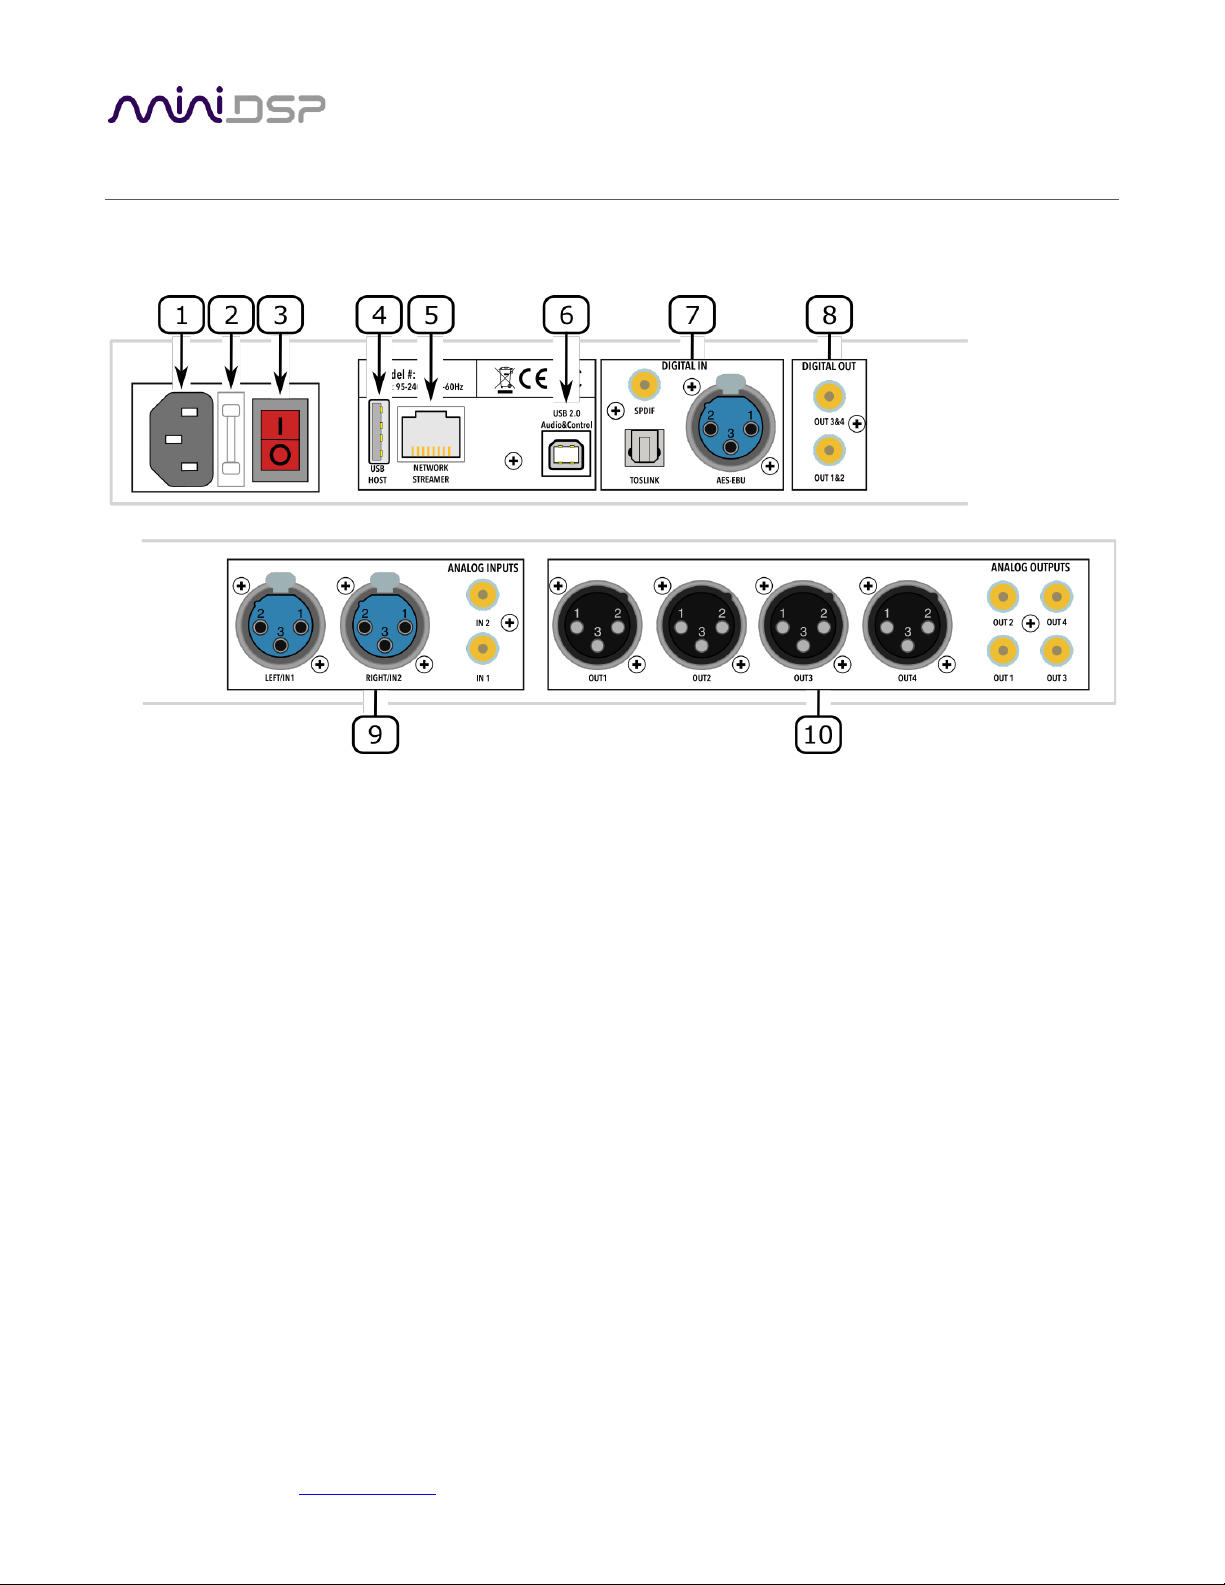
1. Power inlet. Connect a standard IEC C13 cable here. The mains supply voltage can be in the range 95 to 240
VAC, 50 to 60 Hz.
2. Fuse holder. If the fuse needs replacing, remove the power cable. Then use a small flat-bladed screwdriver
to lever out the fuse and fuse holder. Replace the fuse with a 250V rated 4A fuse and push the fuse holder
firmly back in.
3. Power switch. Turns power to the SHD on and off.
4. Host port for USB music stick or Wi-Fi adapter.
5. Ethernet port for network music streaming.
6. USB port for control and audio streaming. Connect to an available USB port on your computer.
7. Digital inputs. Connect digital sources here using optical (TOSLINK SPDIF), coax (RCA SPDIF), or AES/EBU
(XLR). Sample rates from 32 up to 216 kHz are supported. The three digital inputs can be individually
selected with the front panel encoder or the remote control.
8. Digital outputs. Connect external DACs or other digital equipment using RCA SPDIF. These outputs each
carry a stereo signal. The data format is 24-bit 96 kHz. Connected equipment must therefore be able to
accept a 24-bit 96 kHz input signal. Note: if using two different DACs, you may need to adjust the time
delay on the output channels accordingly.
9. Analog inputs. Connect one or two analog sources here, using balanced XLR or unbalanced RCA
connections. The two analog inputs can be individually selected with the front panel encoder or the remote
control. See Specifications for maximum input voltages.
10. Analog outputs. Connect power amplifiers here using balanced XLR or unbalanced RCA connections. See
Specifications for maximum output voltages.
Page 13
miniDSP Ltd, Hong Kong / www.minidsp.com / Features and specifications subject to change without prior notice 13
2.2 SHD POWER
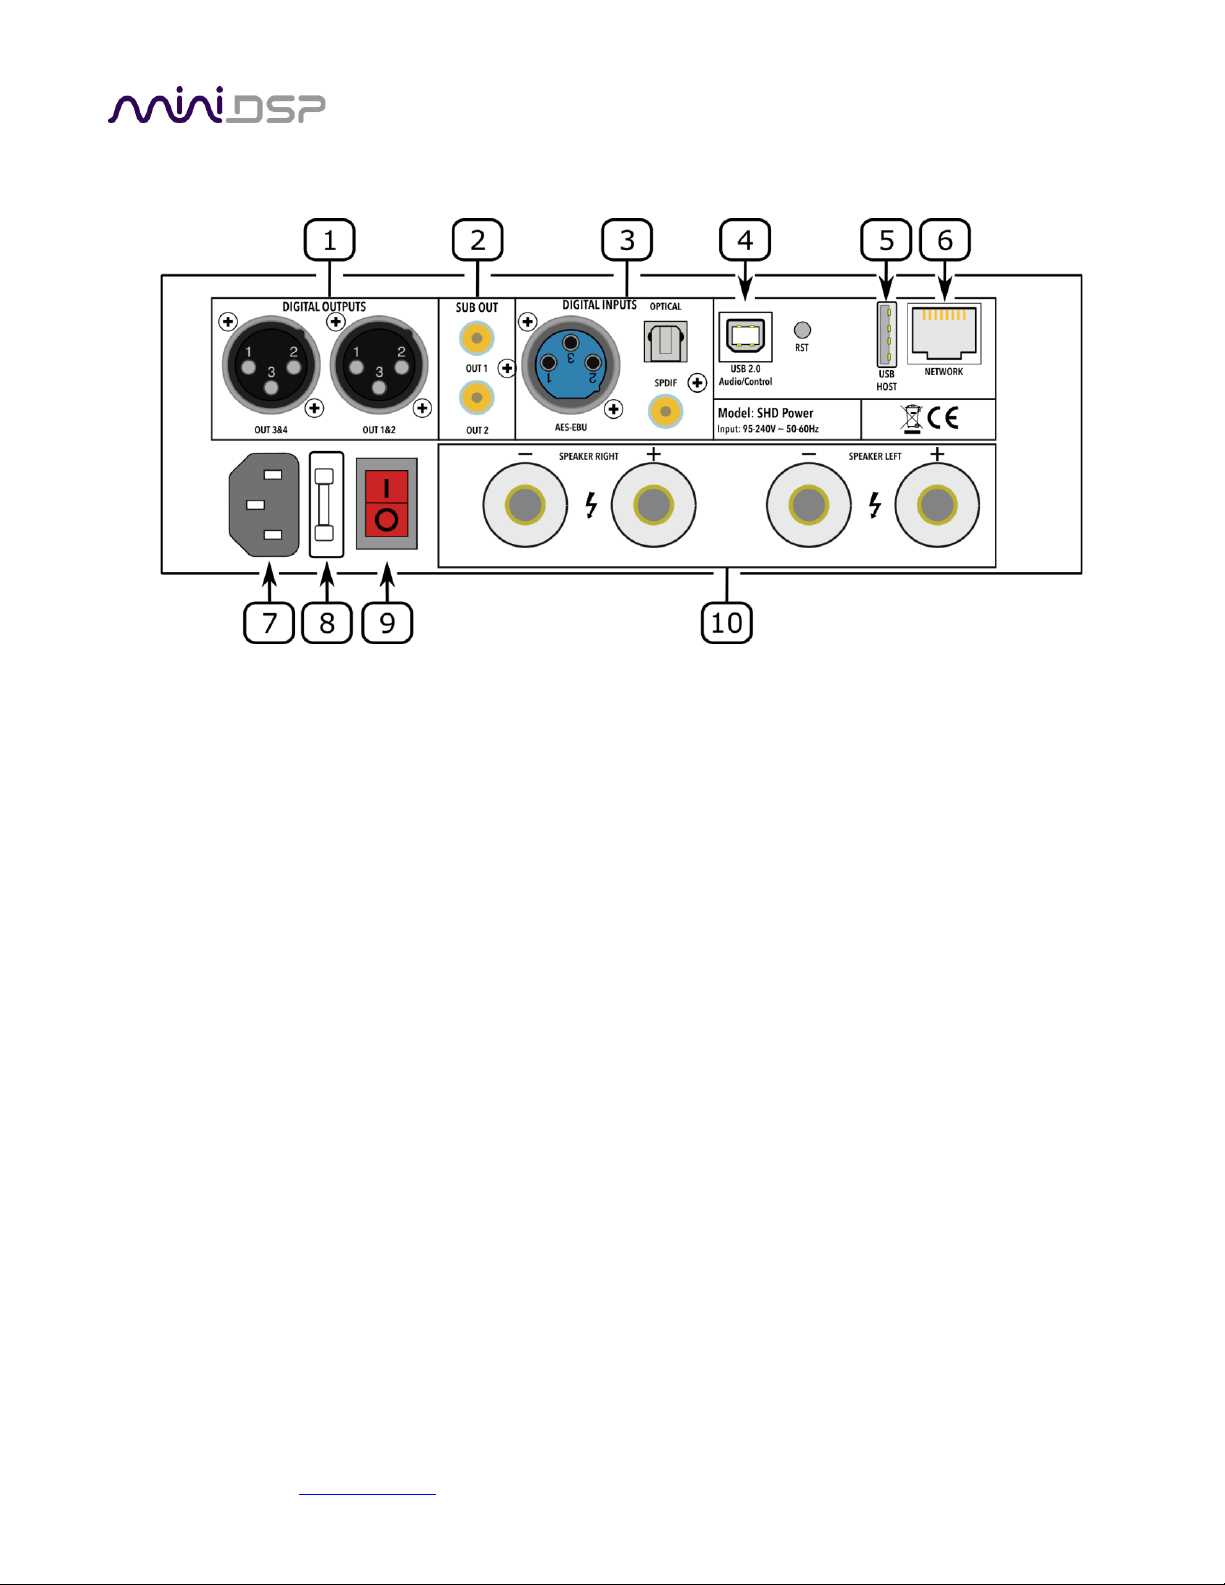
1. Digital outputs. Connect downstream digital equipment with AES-EBU cables. These outputs each carry
a stereo signal. The data format is 24-bit 96 kHz. Connected equipment must therefore be able to accept
a 24-bit 96 kHz input signal.
2. Subwoofer outputs. Connect one or two powered subwoofers here.
3. Digital inputs. Connect digital sources using optical (TOSLINK SPDIF), coax (RCA SPDIF), or AES/EBU
(XLR). Sample rates from 32 up to 216 kHz are supported. The three digital inputs can be individually
selected with the front panel encoder or the remote control.
4. USB port for control and audio streaming. Connect to an available USB port on your computer.
5. Host port for USB music stick or Wi-Fi adapter.
6. Ethernet port for network music streaming.
7. Power inlet. Connect a standard IEC C13 cable here. The mains supply voltage can be in the range 95 to
240 VAC, 50 to 60 Hz.
8. Fuse holder. If the fuse needs replacing, remove the power cable. Then use a small flat-bladed
screwdriver to lever out the fuse and fuse holder. Replace the fuse with a 250V rated 8A fuse and push
the fuse holder firmly back in.
9. Power switch. Turns main power to the SHD Power on and off.
10. Speaker outputs. Connect directly to speakers using conventional speaker cables with spade or banana
terminations.
Page 14
miniDSP Ltd, Hong Kong / www.minidsp.com / Features and specifications subject to change without prior notice 14
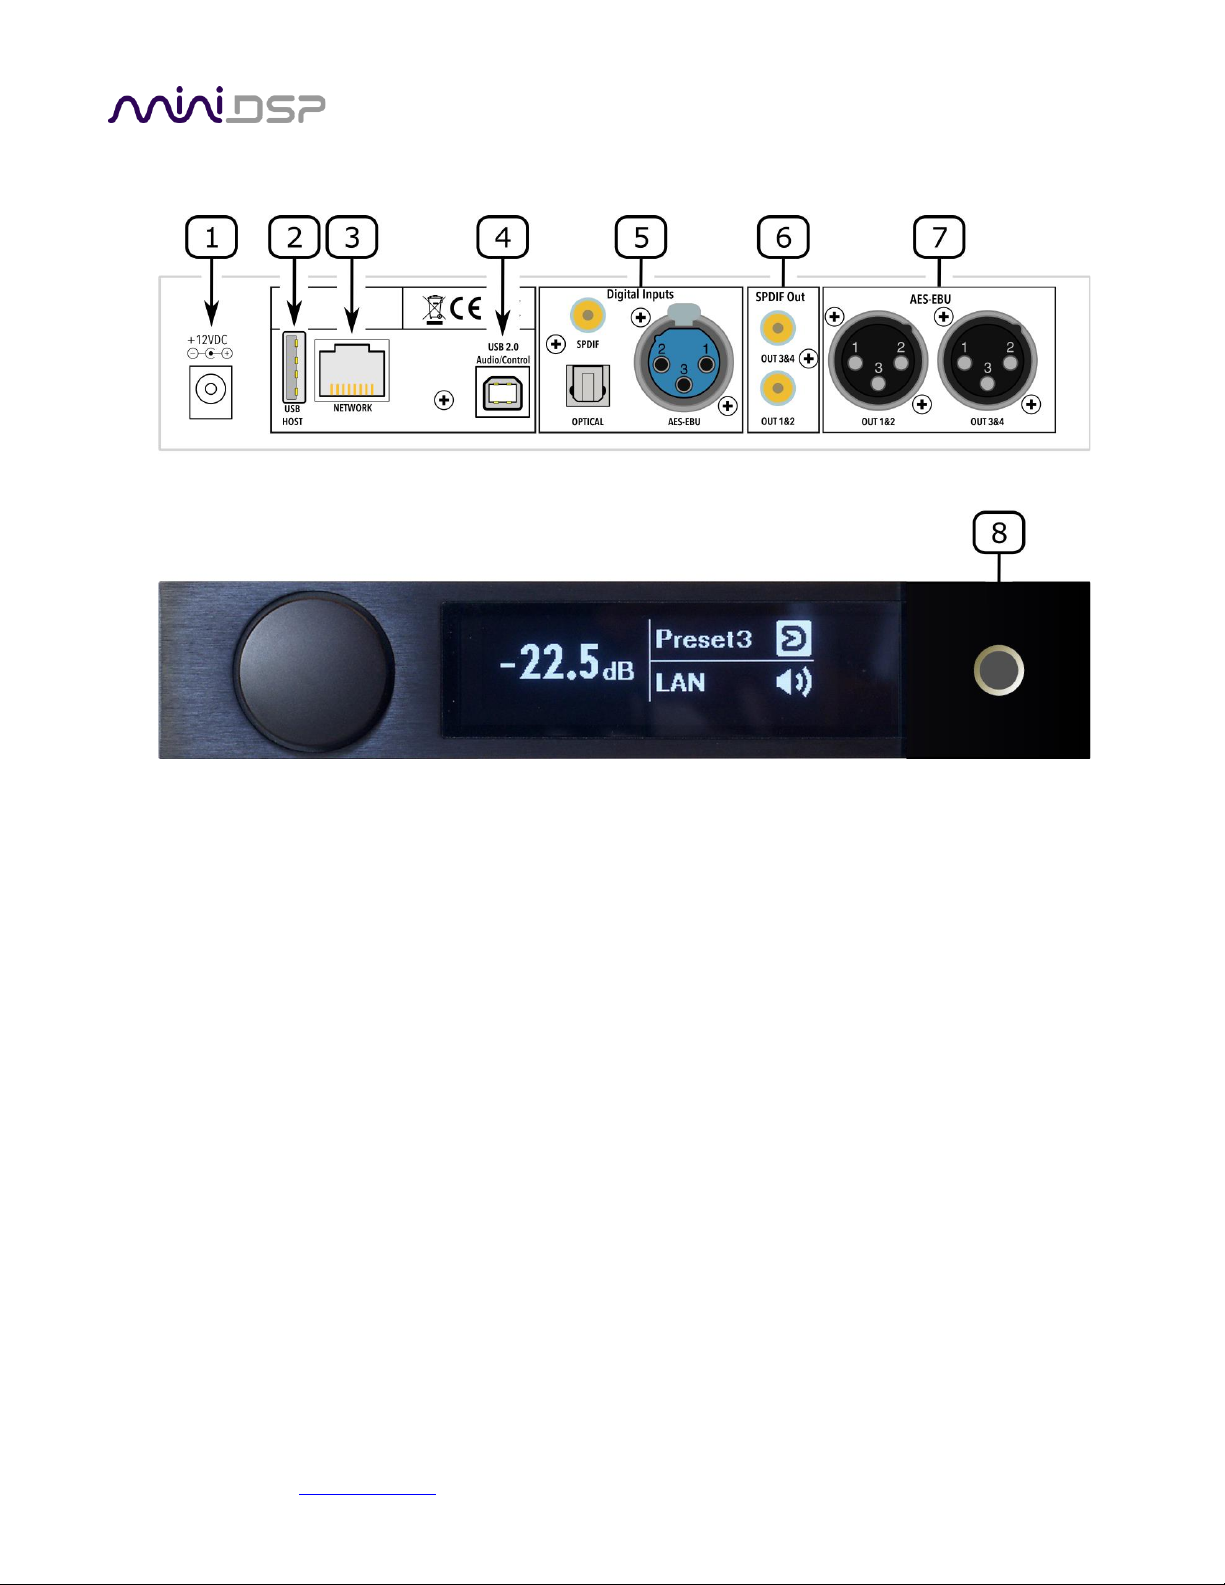
2.3 SHD STUDIO
1. DC power inlet. Connect the supplied 12 VDC power supply here.
2. Host port for USB music stick or Wi-Fi adapter.
3. Ethernet port for network music streaming.
4. USB port for control and audio streaming. Connect to an available USB port on your computer.
5. Digital inputs. Connect digital sources using optical (TOSLINK SPDIF), coax (RCA SPDIF), or AES/EBU
(XLR). Sample rates from 32 up to 216 kHz are supported. The three digital inputs can be individually
selected with the front panel encoder or the remote control.
6. SPDIF Out. Connect downstream digital equipment, such as DACs, active speakers with a digital input,
and A/V equipment with RCA cables. These outputs each carry a stereo signal. The data format is 24-bit
96 kHz. Connected equipment must therefore be able to accept a 24-bit 96 kHz input signal. Note: if
using two different DACs, you may need to adjust the time delay on the output channels accordingly.
7. AES-EBU. Connect downstream digital equipment with XLR AES-EBU cables. These outputs each carry a
stereo signal. The data format is 24-bit 96 kHz. Connected equipment must therefore be able to accept a
24-bit 96 kHz input signal.
8. Headphone output. The signal on this output jack follows output channels 1 and 2.
Page 15
miniDSP Ltd, Hong Kong / www.minidsp.com / Features and specifications subject to change without prior notice 15
2.4 FRONT PANEL
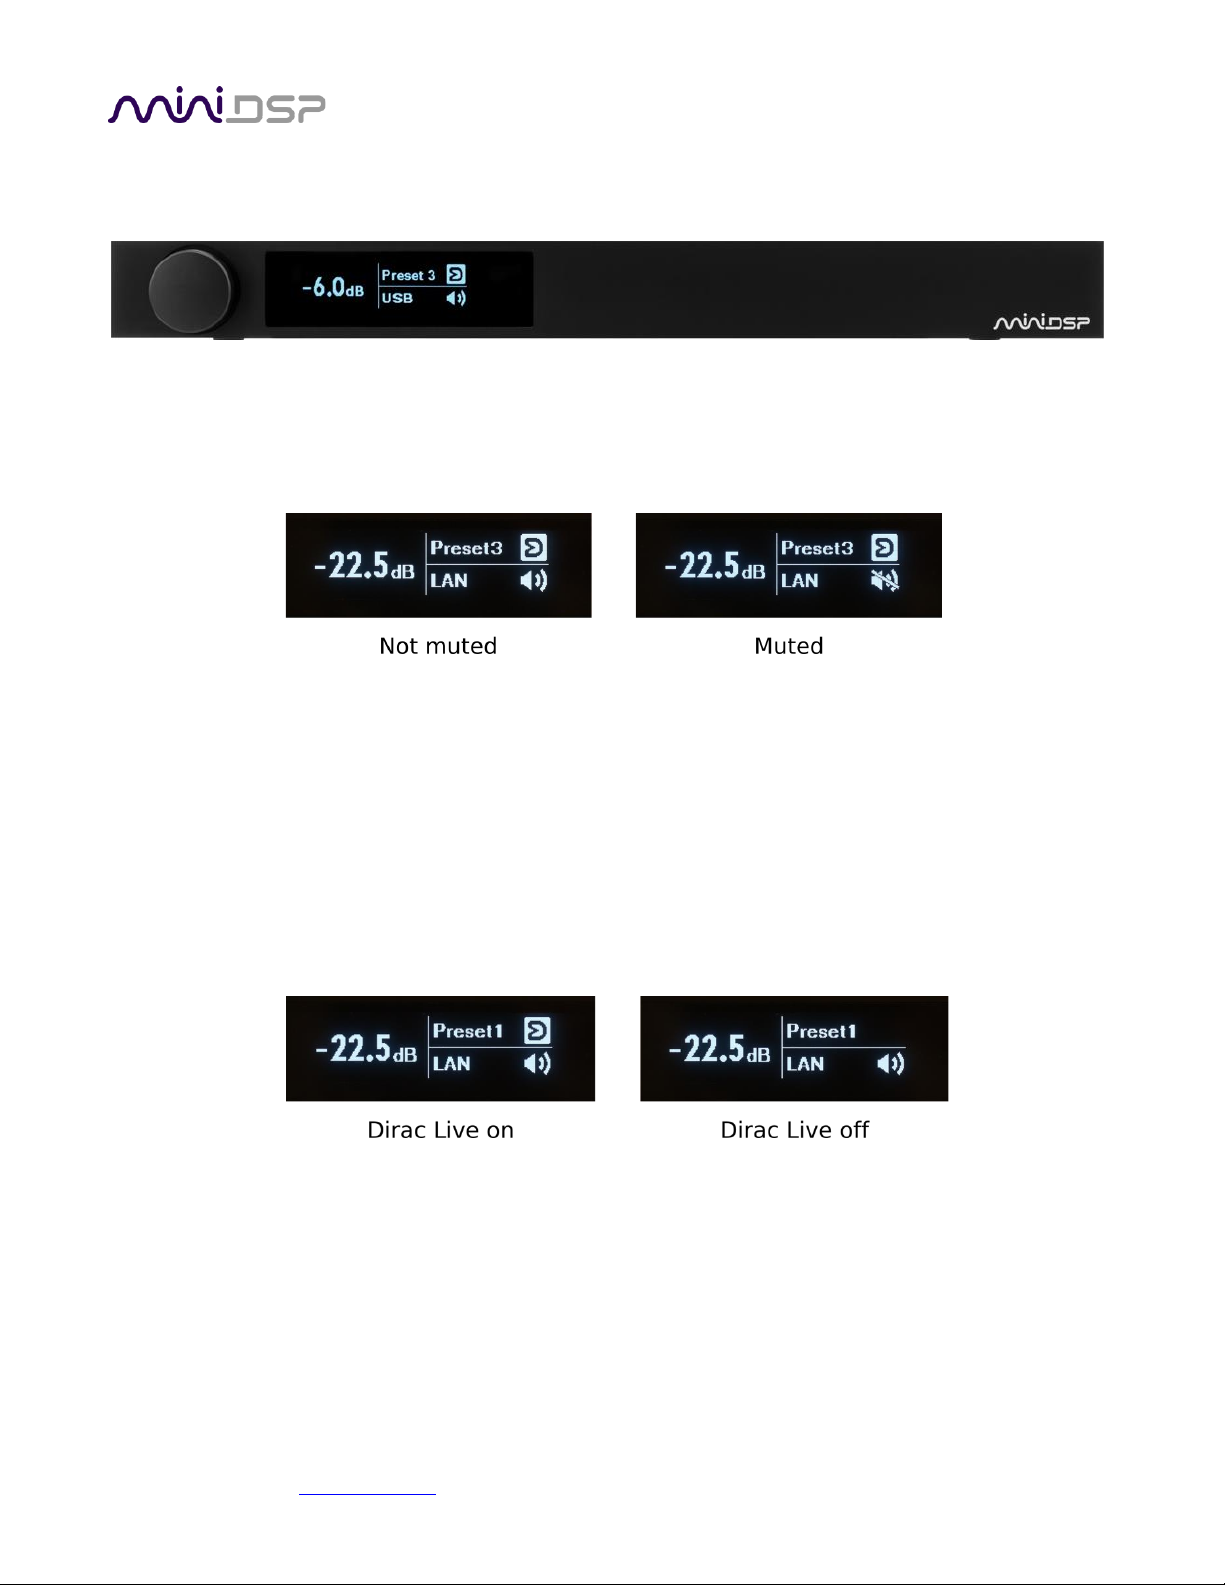
The front panel display shows current volume, selected preset, input source, mute, and Dirac Live status.
• To change the volume, rotate the encoder knob. Volume changes in 0.5 dB steps. Minimum volume is -127.5
dB and maximum volume is 0.0 dB.
• To mute output, press and hold the encoder knob. When the display changes to show “Mute?,” release the
knob. To unmute, repeat this process.
• To change the selected preset, press the encoder knob once, then rotate until the desired preset number is
displayed. Either press the encoder again or wait for a second. The display will show “Pls wait…” while the
new preset is being loaded. The display will return to normal with the new preset number.
• To change input source, press the encoder knob twice. The display will change to show the current input
source in large letters. Rotate the encoder knob until the desired input source is displayed, then press the
encoder knob or wait for a second. The display will return to normal with the new input displayed.
• To turn Dirac Live filtering on and off, press the encoder knob three times. The display will change to show
either “Dirac On” or “Dirac Off” in large letters. Rotate the encoder knob until the desired selection (on or
off) is displayed, then press the encoder knob or wait for a second. The display will return to normal with the
Dirac Live status:
• To put the SHD Series processor into standby, press and hold the encoder knob. When the display changes to
show “Standby?,” release the knob. To take it out of standby, press and hold the encoder knob briefly.
(Note: all these operations can also be performed with the remote control.)
Page 16
miniDSP Ltd, Hong Kong / www.minidsp.com / Features and specifications subject to change without prior notice 16
3 SOFTWARE INSTALLATION
The SHD Series processors are configured with software running on a PC or Mac. There are two sets of software
to download and install, from live.dirac.com and from miniDSP.com.
3.1 WINDOWS
This section describes software download and installation for Windows 10 and 11.
The software described in this section runs on the latest version of Windows 10 or Windows 11 only.
Other versions of Windows are not supported by the current version of Dirac Live.
3.1.1 Download and install the Dirac Live application
Download the Dirac Live application for Windows from https://live.dirac.com/download/.
Double-click on the downloaded installer to run it. It will be named diraclive-latest.exe. We recommend that
you accept the default installation settings. Do not run the application yet.
3.1.2 Download the miniDSP software
If you purchased your processor directly from miniDSP, your software will be available from the User Downloads
section of the miniDSP website when your order ships. To access the download, you will need to be logged into
the website with the account you created when purchasing.
If you purchased your processor from a miniDSP dealer, you will receive a coupon together with the product.
Redeem this coupon at the link below:
• https://www.minidsp.com/support/redeem-coupon
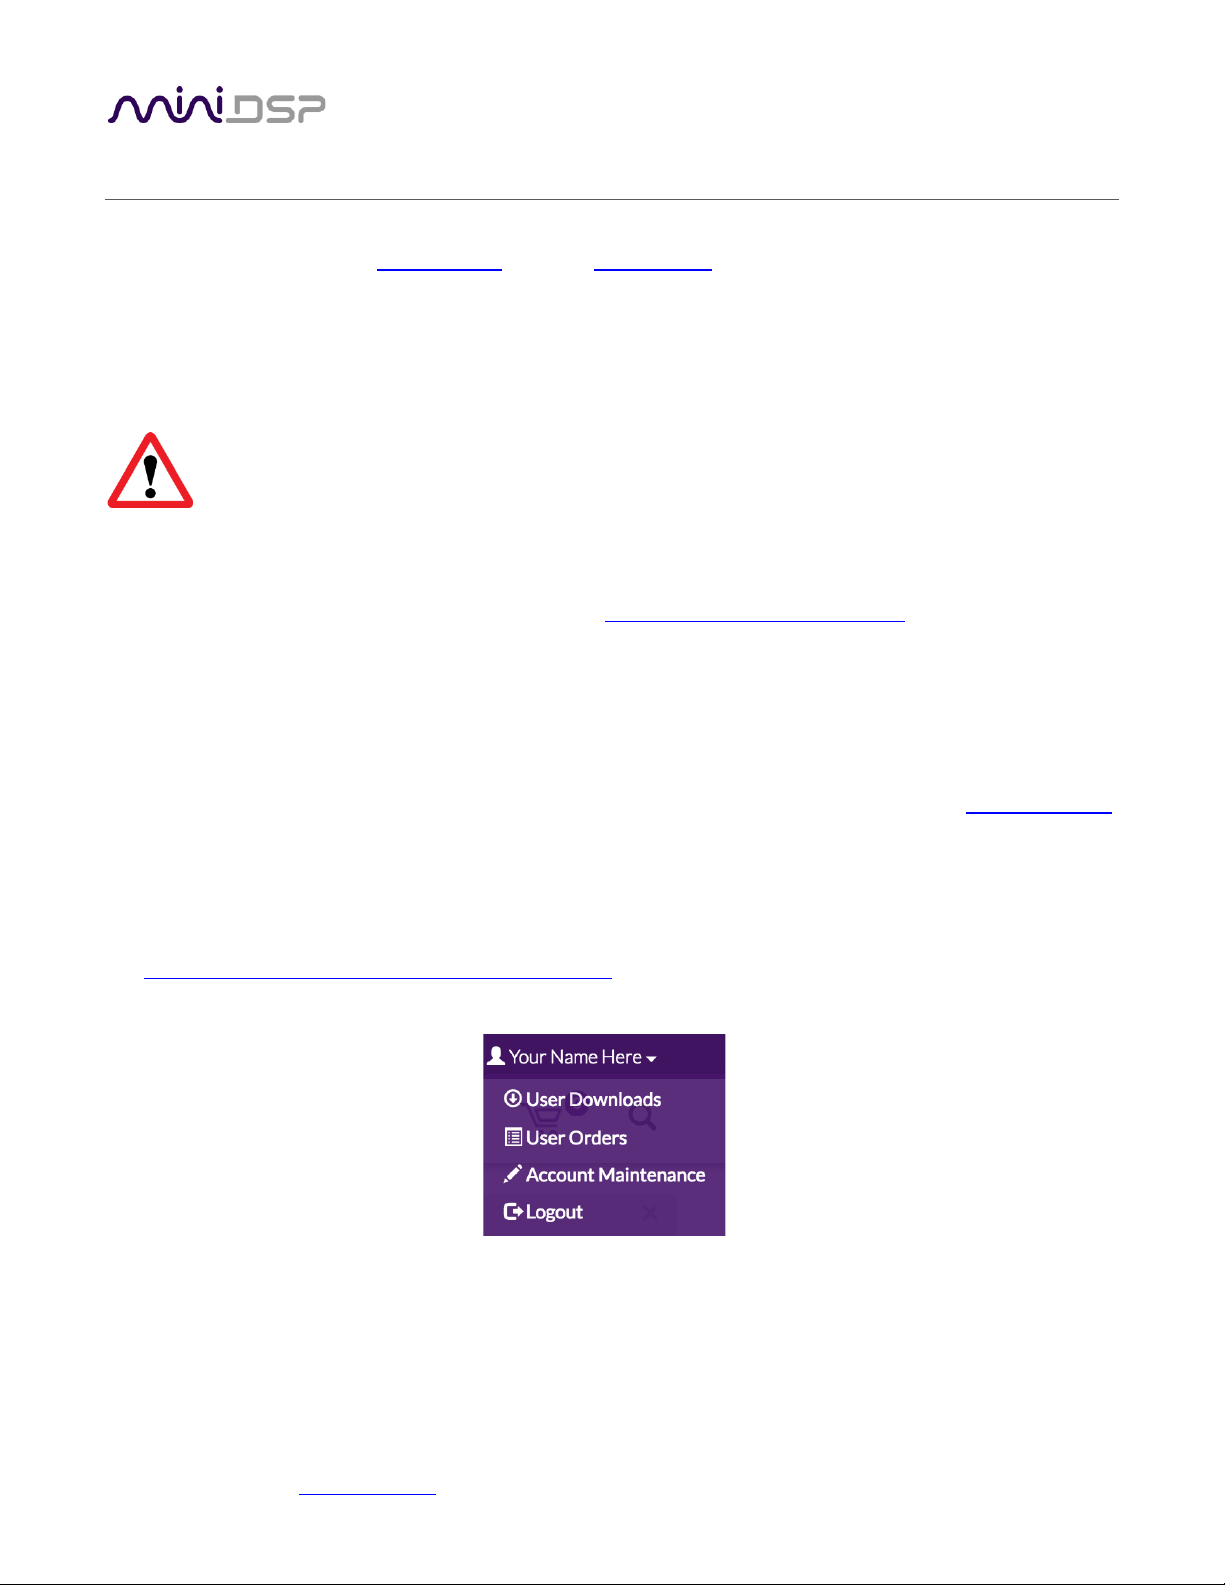
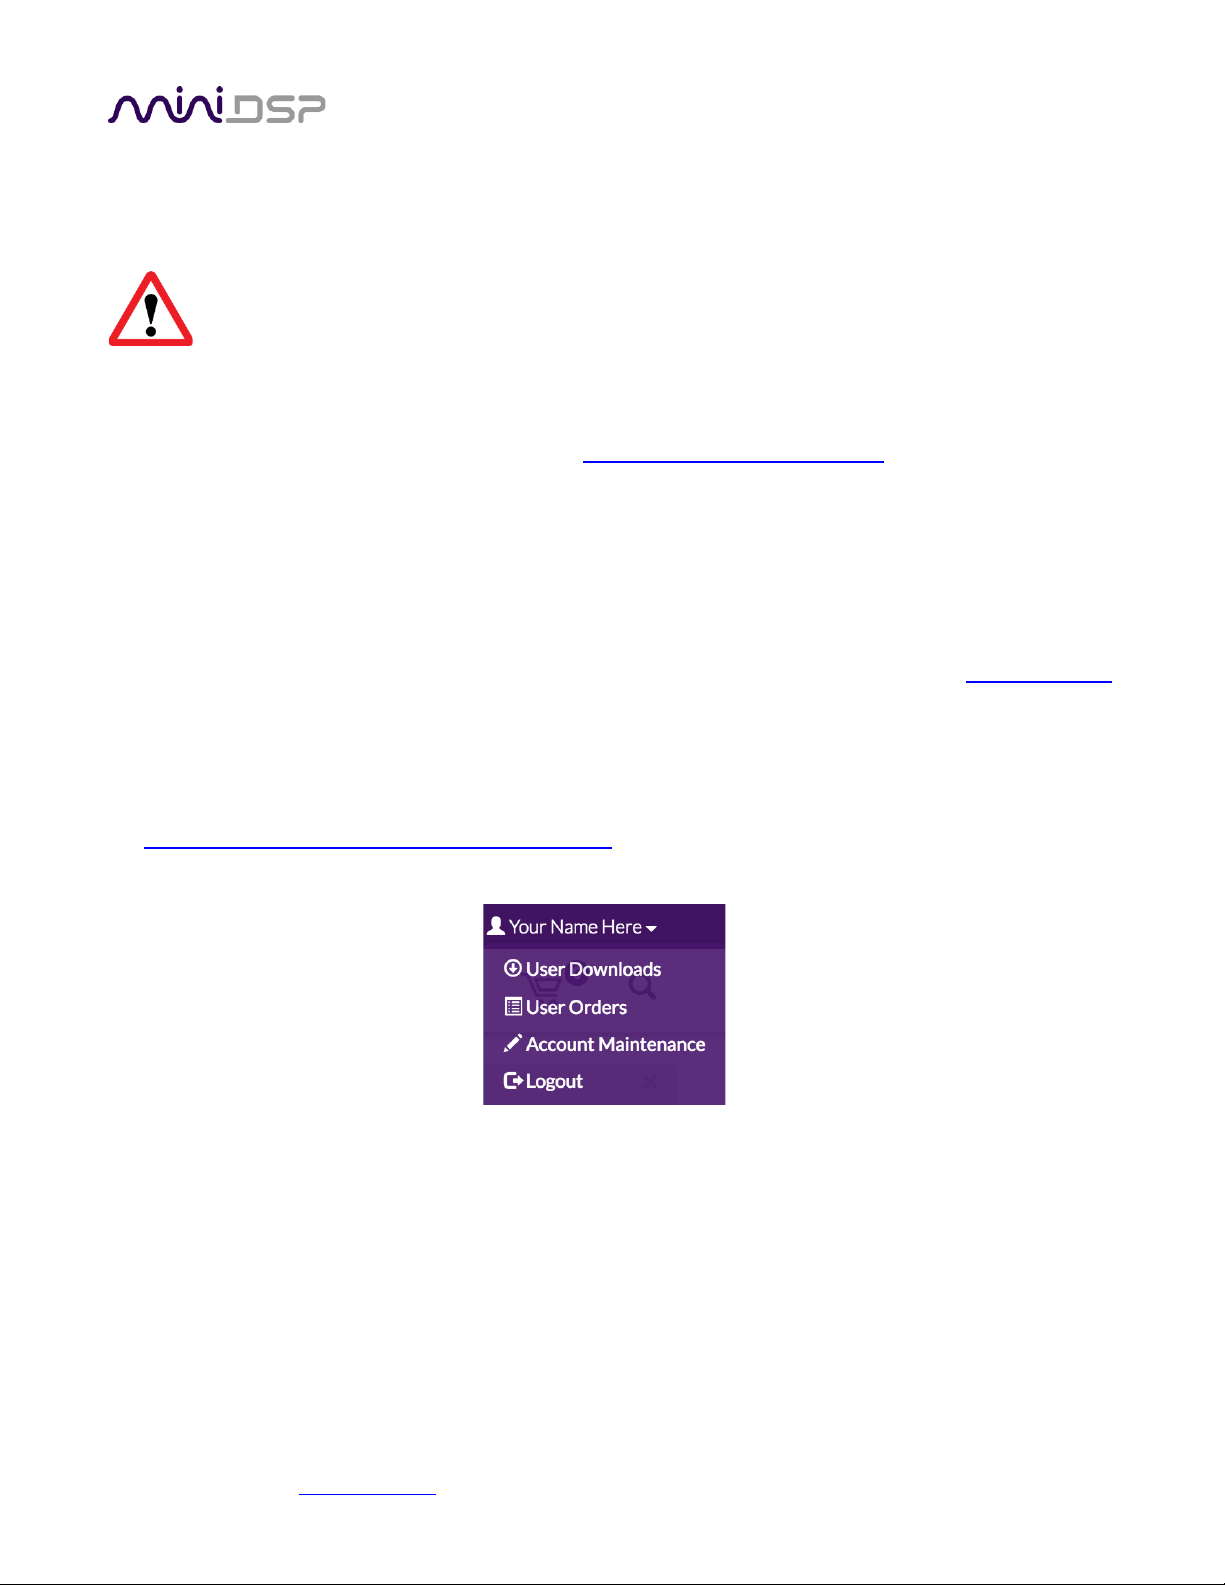
The User Downloads link is visible from the dropdown menu at the top right of the website:
Navigate to the SHD Series section. Download the zip file under the heading SHD software for Dirac 3.x.
After downloading, unzip the file (right-click and select “Extract All...”). The unzipped download has a name like
SHD_v1_15. (The version number embedded in the folder name may be different.)
Page 17
miniDSP Ltd, Hong Kong / www.minidsp.com / Features and specifications subject to change without prior notice 17
3.1.3 Install the miniDSP software
3.1.3.1 Possible Windows installation issues
The miniDSP software requires that a number of other frameworks be installed for it to work. These packages
should be installed automatically, but you can manually install them if you receive an error message that
required software is missing.
• Microsoft .NET framework (version 3.5 or later)
• Microsoft Visual C++ 2010 Redistributable Package: for x86 (32-bit Windows) or x64 (64-bit Windows).
3.1.3.2 Install the plugin
1. Navigate to the Plugins folder of the software download and then to the Windows folder.
2. Double-click on the plugin installer to run it. It will be named SHD.exe. We recommend that you accept the
default installation settings.
3.1.3.3 Install the UAC2 driver
1. Connect the processor to the computer using the supplied USB cable, and power it on.
2. Navigate to the WinDrivers folder of the software download and double-click on the driver installer:
• miniDSP_UAC2_v4.82.0_2020-06-09_setup.exe
(The version number and date embedded in the filename may be different.)
We recommend accepting the default installation location. Once driver installation completes, click Finish.
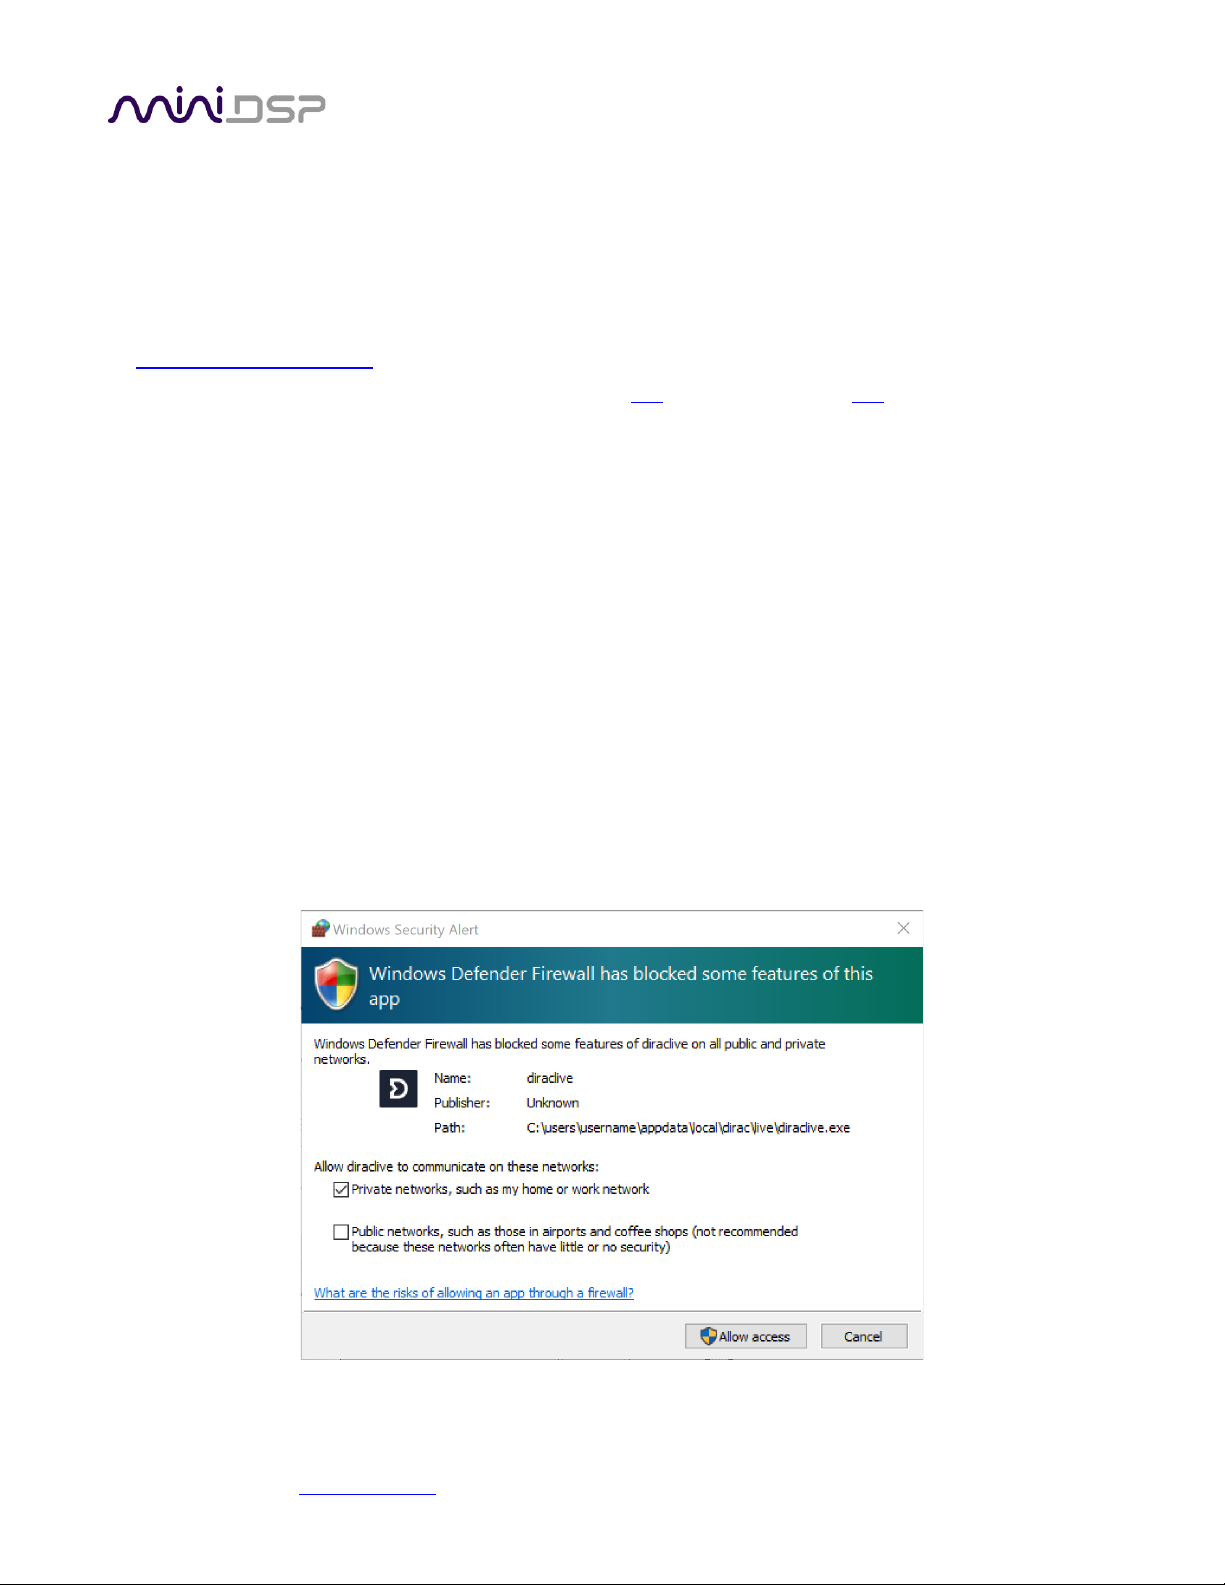
Note: the first time you run the SHD plugin and the Dirac Live application, you may see a Windows Firewall
warning such as the one below. Ensure that “Private networks...” is checked and “Public networks...” is not
checked. Then click on “Allow access.” This warning dialog may appear more than once.
Page 18
miniDSP Ltd, Hong Kong / www.minidsp.com / Features and specifications subject to change without prior notice 18
3.2 MACOS
This section describes software download and installation for macOS.
The software described in this section runs on macOS 10.14 Mojave or later only. Earlier versions of
macOS / OS X are not supported by the current version of Dirac Live.
3.2.1 Download and install the Dirac Live application
Download the Dirac Live application for macOS from https://live.dirac.com/download/.
Double-click on the downloaded file to unzip it. Then double-click on the unzipped installer file to run it. It will
have a name like DiracLive v3.1.2 Setup Darwin.app. We recommend that you accept the default installation
settings. Do not run the application yet.
3.2.2 Download the miniDSP software
If you purchased your processor directly from miniDSP, your software will be available from the User Downloads
section of the miniDSP website when your order ships. To access the download, you will need to be logged into
the website with the account you created when purchasing.
If you purchased your processor from a miniDSP dealer, you will receive a coupon together with the product.
Redeem this coupon at the link below:
• https://www.minidsp.com/support/redeem-coupon
The User Downloads link is visible from the dropdown menu at the top right of the website:
Navigate to the SHD Series section. Download the zip file under the heading SHD software for Dirac 3.x.
After downloading, unzip the file (double-click on it). The unzipped download has a name like SHD_v1_15. (The
version number embedded in the folder name may be different.)
Page 19
miniDSP Ltd, Hong Kong / www.minidsp.com / Features and specifications subject to change without prior notice 19
3.2.3 Install the miniDSP software
3.2.3.1 Possible Mac installation issues
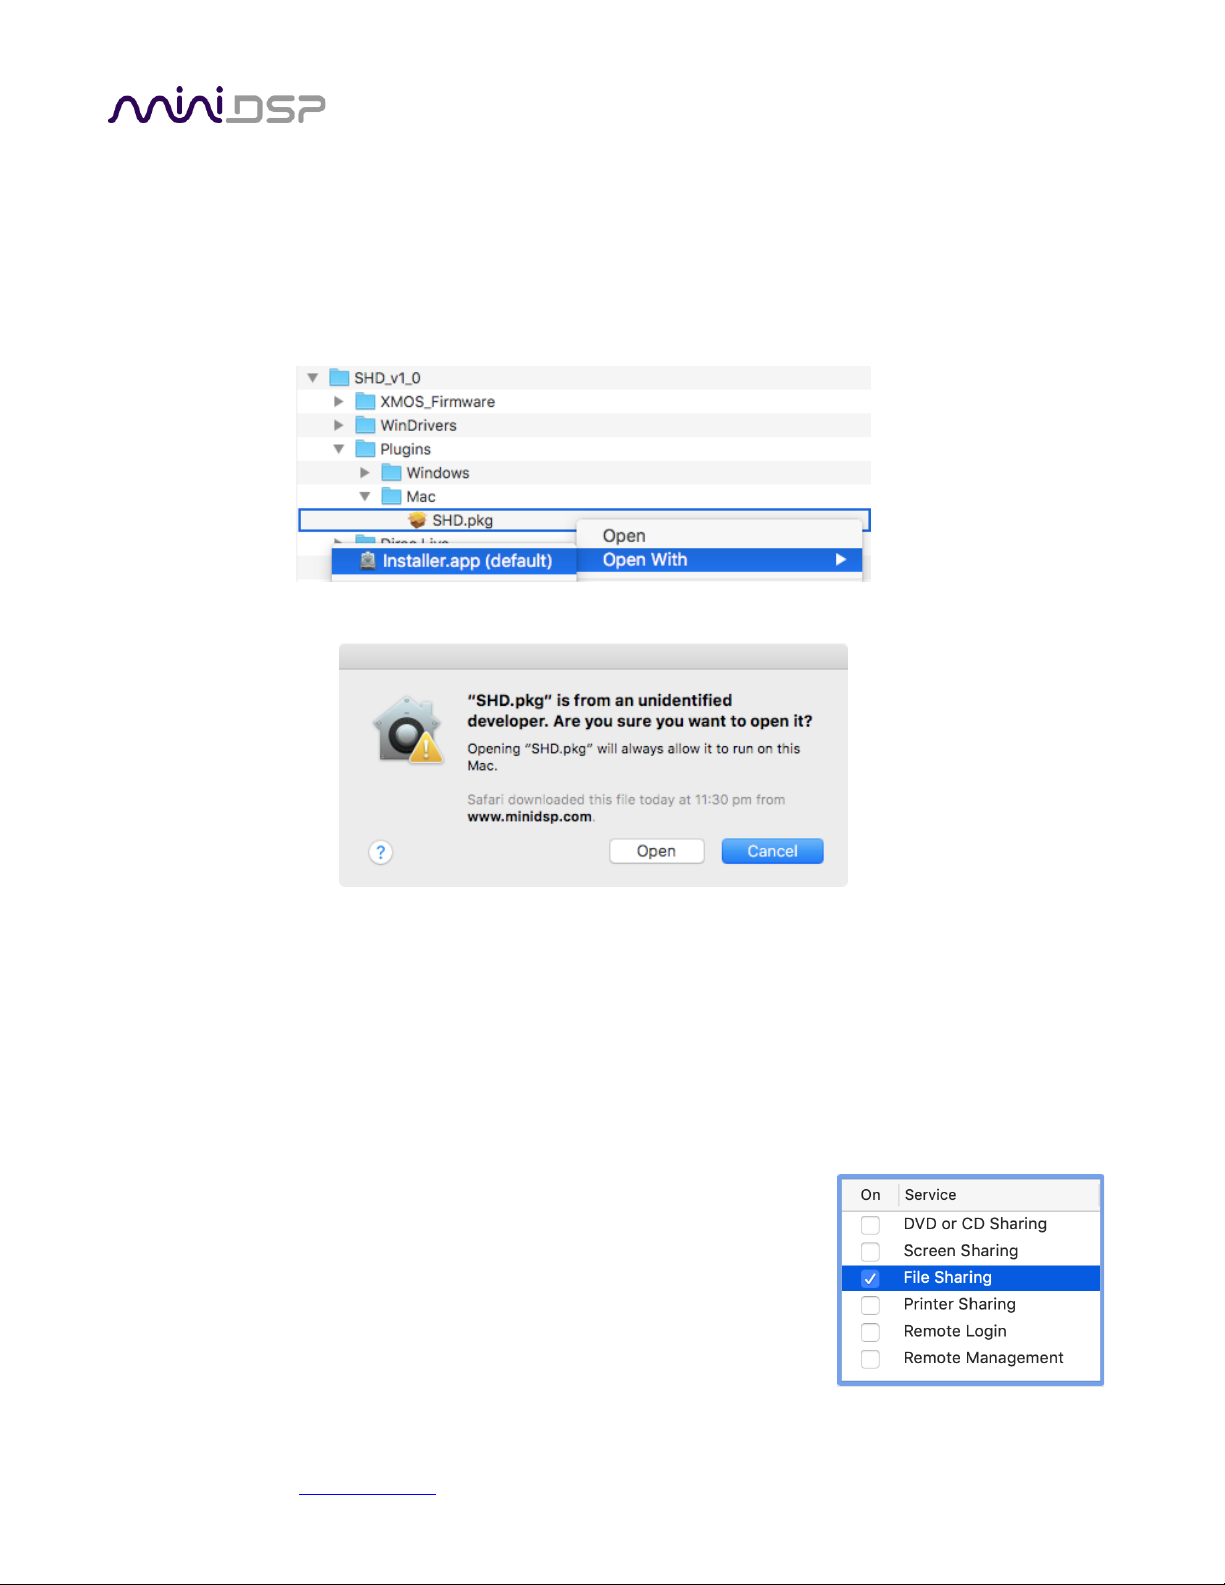
If double-clicking on the installer brings up a message that the installer cannot run, use this alternate method:
1. Right-click on the installer (or click while holding the Control key).
2. Move the mouse over the “Open With” item and then click on “Installer (default).”
3. The following window will appear. Click on “Open.”
3.2.3.2 Install the plugin
1. Navigate to the Plugins folder of the software download and then to the Mac folder.
2. The installer is named SHD.pkg. To run it, double-click on it, or right-click and open as described above. We
recommend that you accept the default installation settings.
3. To run the plugin, locate it in the Applications -> miniDSP folder and double-click on it. To make it easier to
run in future, right-click on its dock icon and select Options -> Keep in Dock.
3.2.3.3 Enable file sharing for device discovery
To enable device discovery, open System Preferences, go to Sharing, then
enable File Sharing as shown at right.
Notes:
a) This step is not always necessary and may depend on your Mac’s
configuration or your home network setup.
b) If you wish, you can turn File Sharing off again after completing your
Dirac Live calibration.
Page 20
miniDSP Ltd, Hong Kong / www.minidsp.com / Features and specifications subject to change without prior notice 20
4 PLAYING AUDIO
4.1 DIGITAL SOURCES
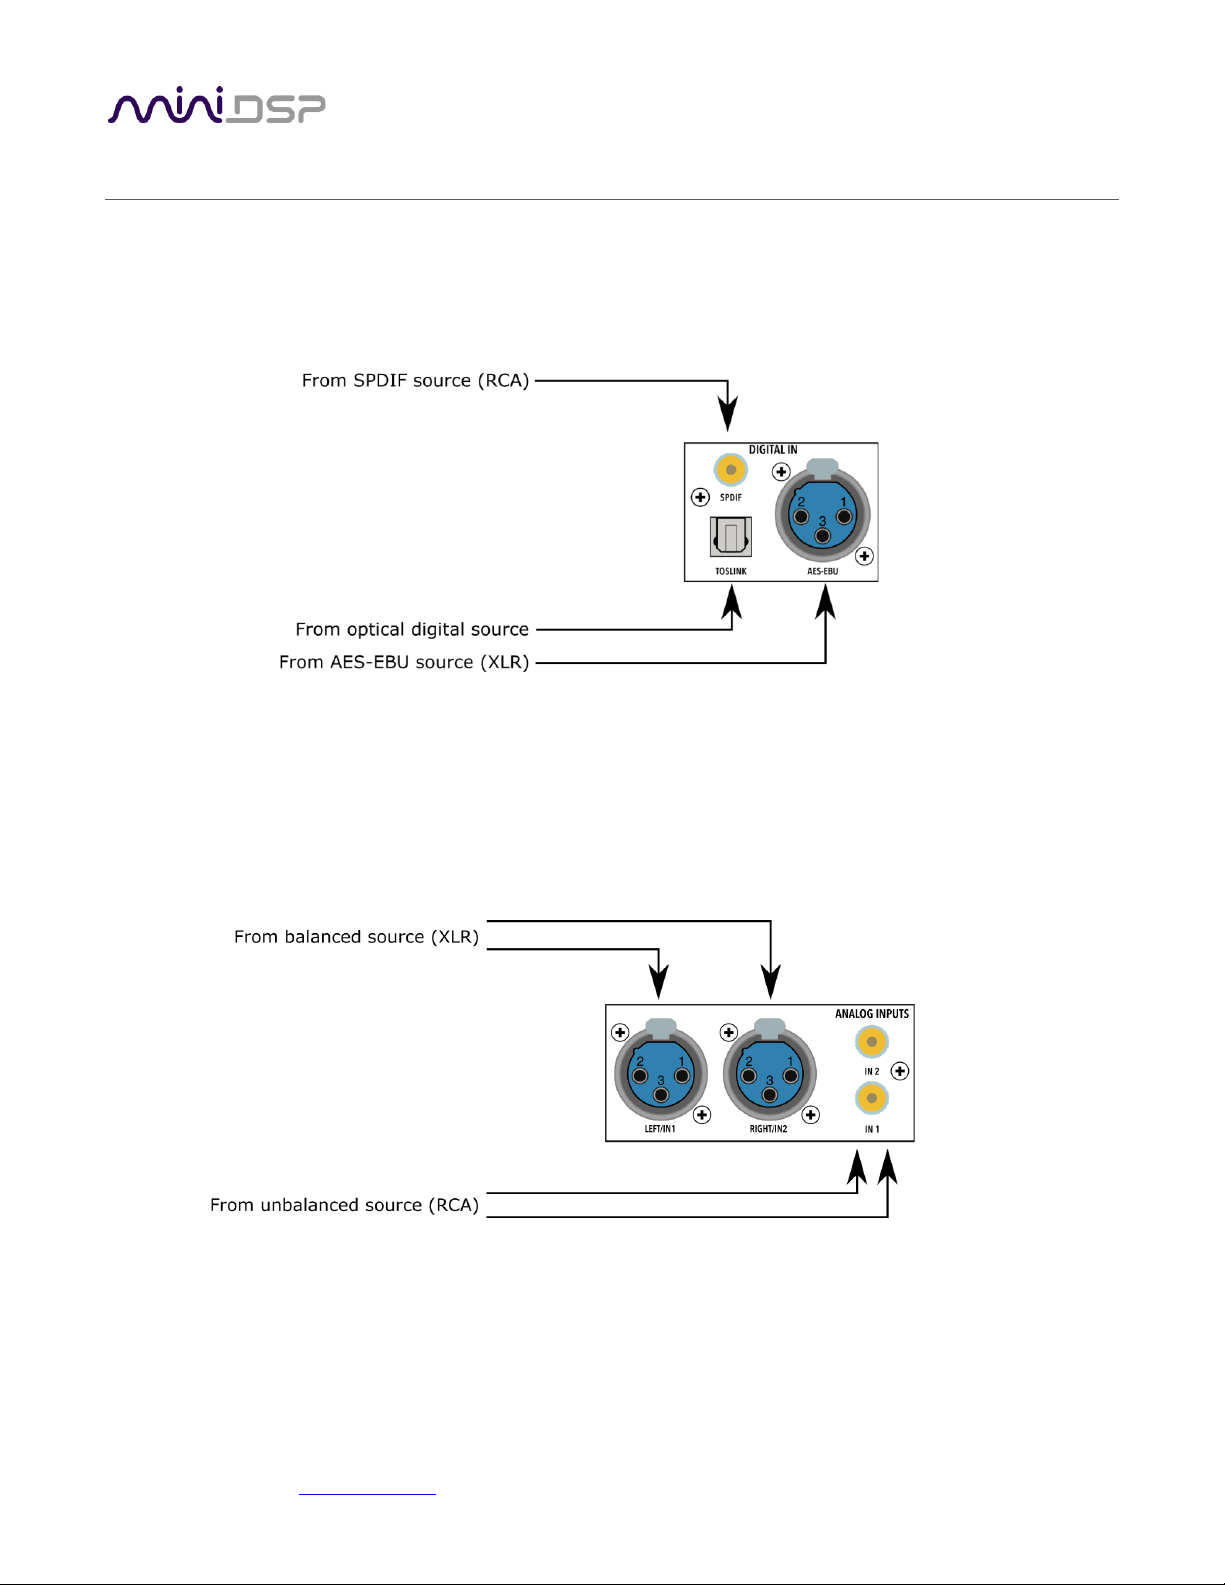
All SHD Series processors have three digital inputs in addition to USB and network audio: AES-EBU (XLR), SPDIF
(RCA), and TOSLINK optical.
To play from any of these sources, use the front panel knob or remote control to select AES-EBU, SPDIF, or
TOSLINK.
4.2 ANALOG SOURCES (SHD ONLY)
The SHD processor has two stereo analog inputs, one RCA and one balanced XLR.
To play from either analog input, use the front panel knob or remote control to select RCA or XLR.
Page 21
miniDSP Ltd, Hong Kong / www.minidsp.com / Features and specifications subject to change without prior notice 21
4.3 NETWORK AUDIO
The miniDSP SHD Series processors incorporate a custom version of the popular network audio endpoint
Volumio, running on its own ARM CPU inside the SHD Series processor chassis. Volumio has a wealth of
functions for controlling and delivering network audio at sample rates up to 192 kHz.
This section will provide a few pointers to get you started.
Please note however that since Volumio and the other software mentioned in this chapter is third-party
software, miniDSP support for this software is limited.
While the SHD Series processor contains an ARM processor running Linux for network streaming,
miniDSP does not support any additional software installation or custom Linux builds on this
processor.
4.3.1 Ethernet connection
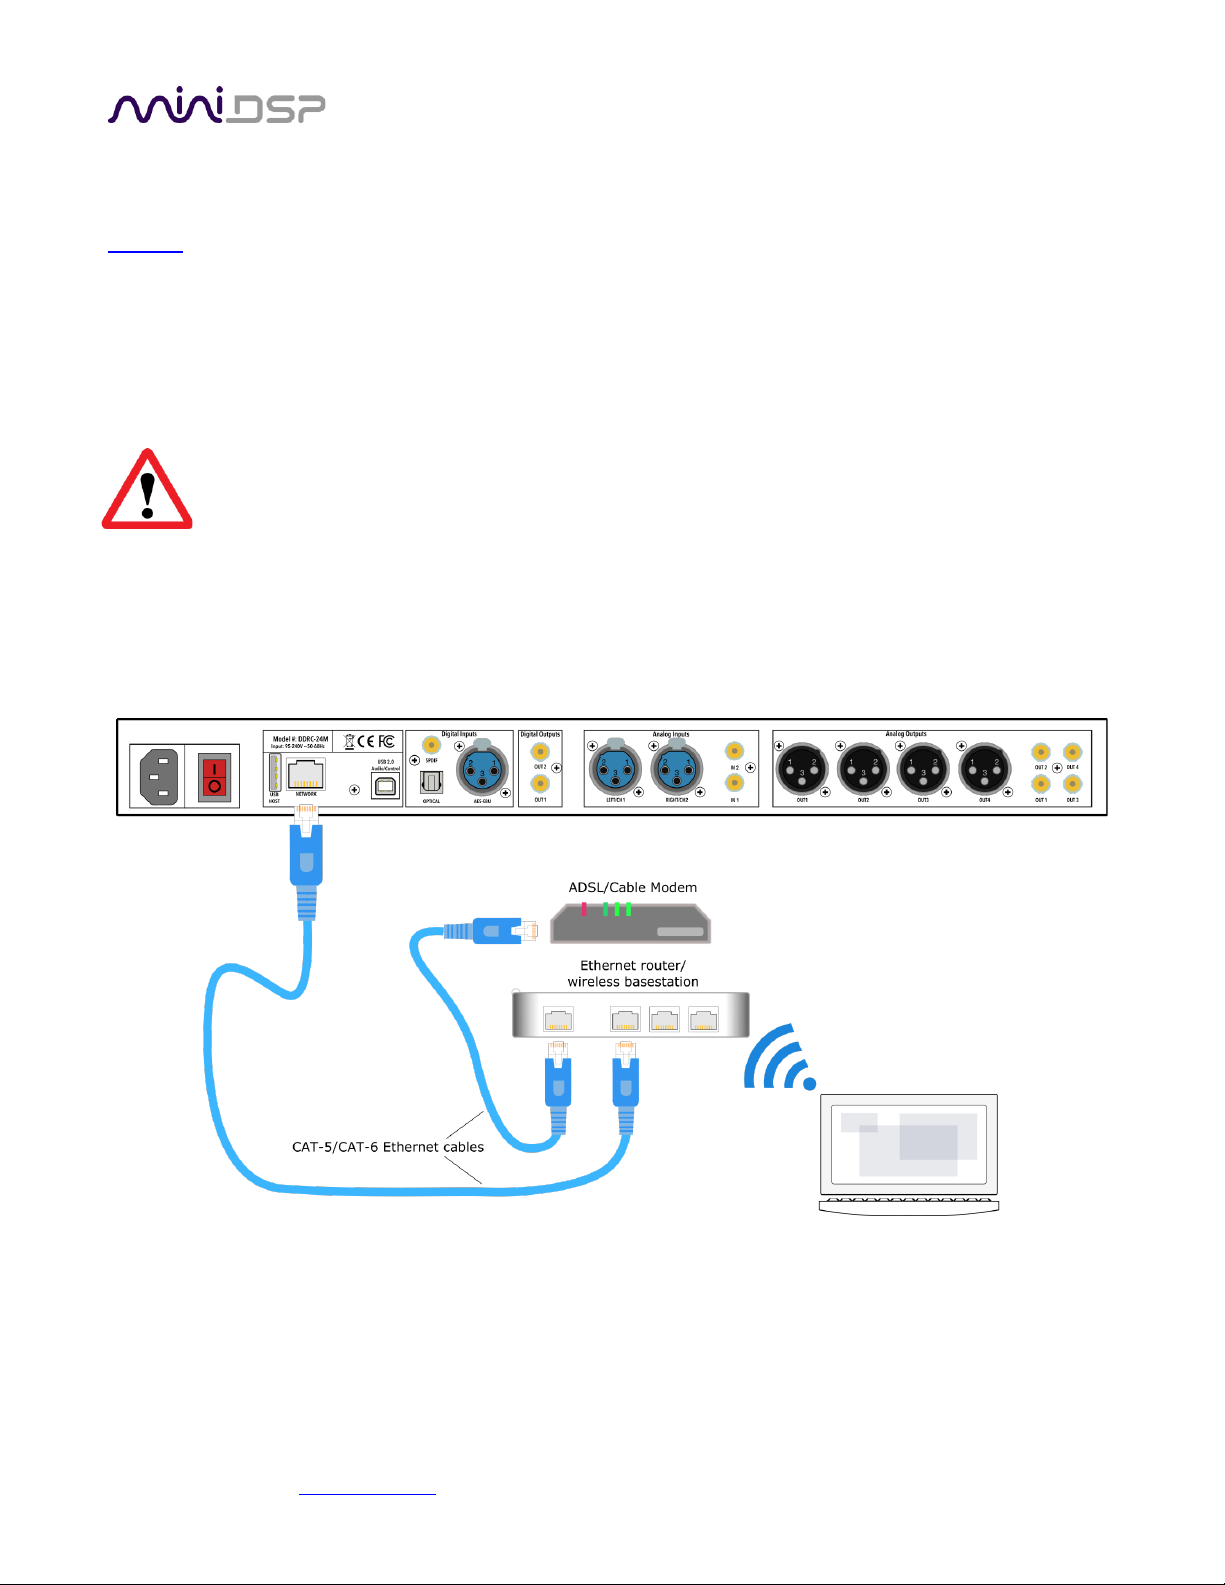
Connect an Ethernet cable from your home network router to the Ethernet port on the rear panel. This is a
typical example:
A short Ethernet cable is provided with the unit. If a longer cable is required, these are readily available from
computer stores and online. The recommended maximum length of Ethernet cables is 100 meters (330 feet).
Note that your router must be set to allow dynamic IP addresses i.e. DHCP. Most routers will have this function
enabled by default.
Page 22
miniDSP Ltd, Hong Kong / www.minidsp.com / Features and specifications subject to change without prior notice 22
4.3.2 Wi-Fi connection
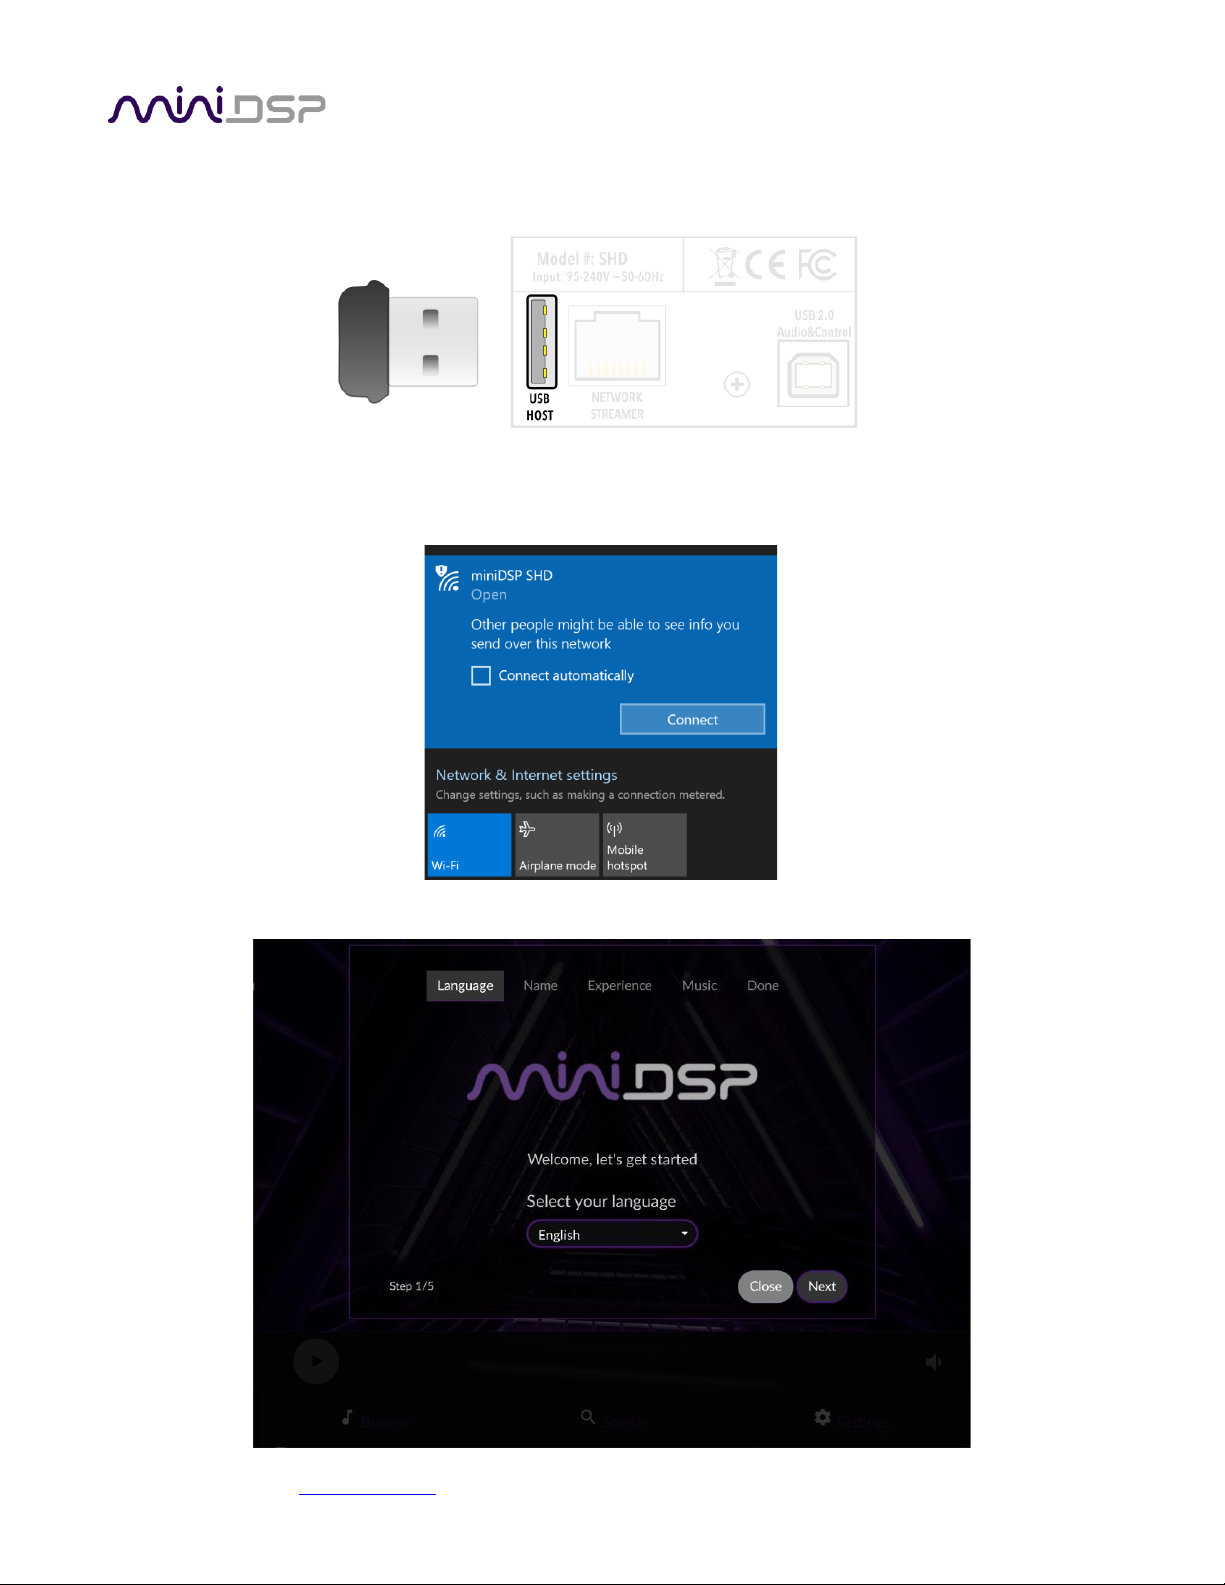
Insert the provided Wi-Fi adapter (aka “dongle”) into the USB Host port on the back of the SHD Series processor.
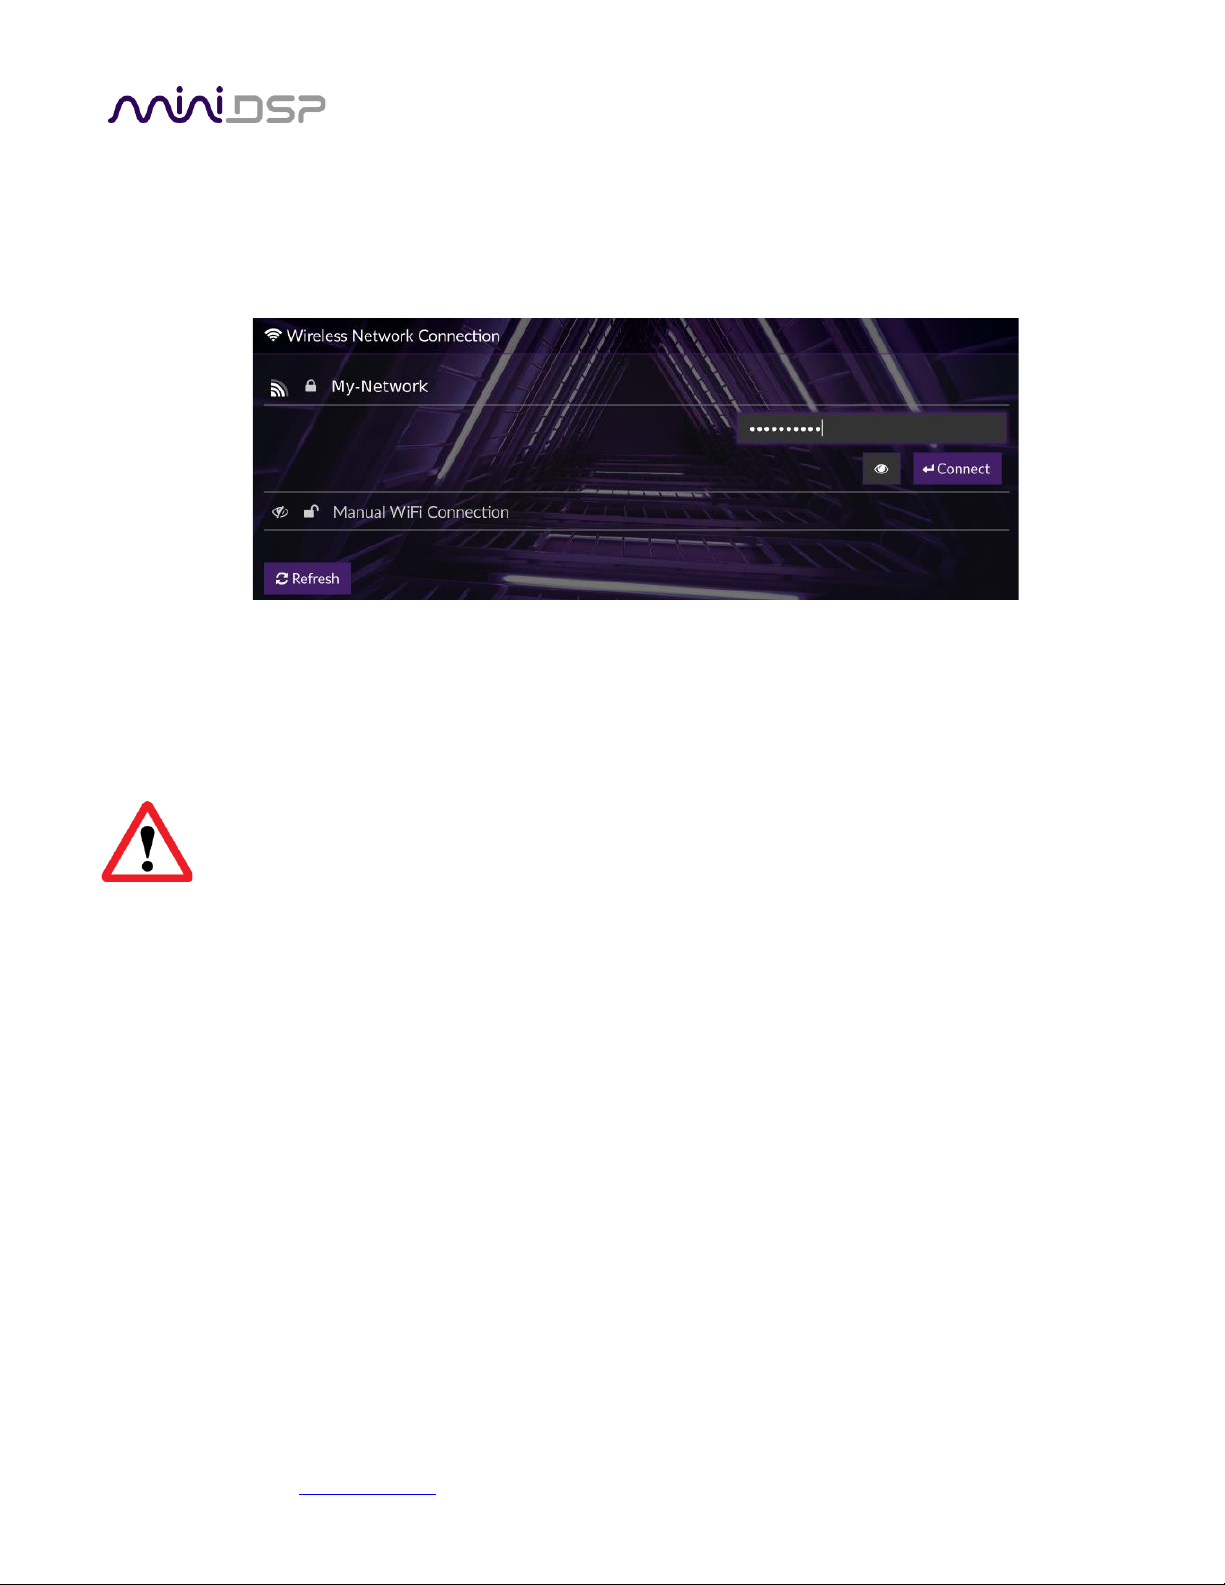
Use your computer's network manager to search for a wireless hotspot named miniDSP SHD. This is started
automatically by Volumio when it can't connect to a network. Select this hotspot and connect to it. No password
is needed.
When the hotspot connects, the Volumio interface will automatically open at the setup wizard:
Page 23
miniDSP Ltd, Hong Kong / www.minidsp.com / Features and specifications subject to change without prior notice 23
If you see a message saying that you have to log in here to access the Internet, ignore it. After completing the
initial setup wizard, locate the Volumio Settings page. Depending on your device, this may be accessed from the
sidebar on the left-hand side, or by clicking on the gear icon at the lower right.
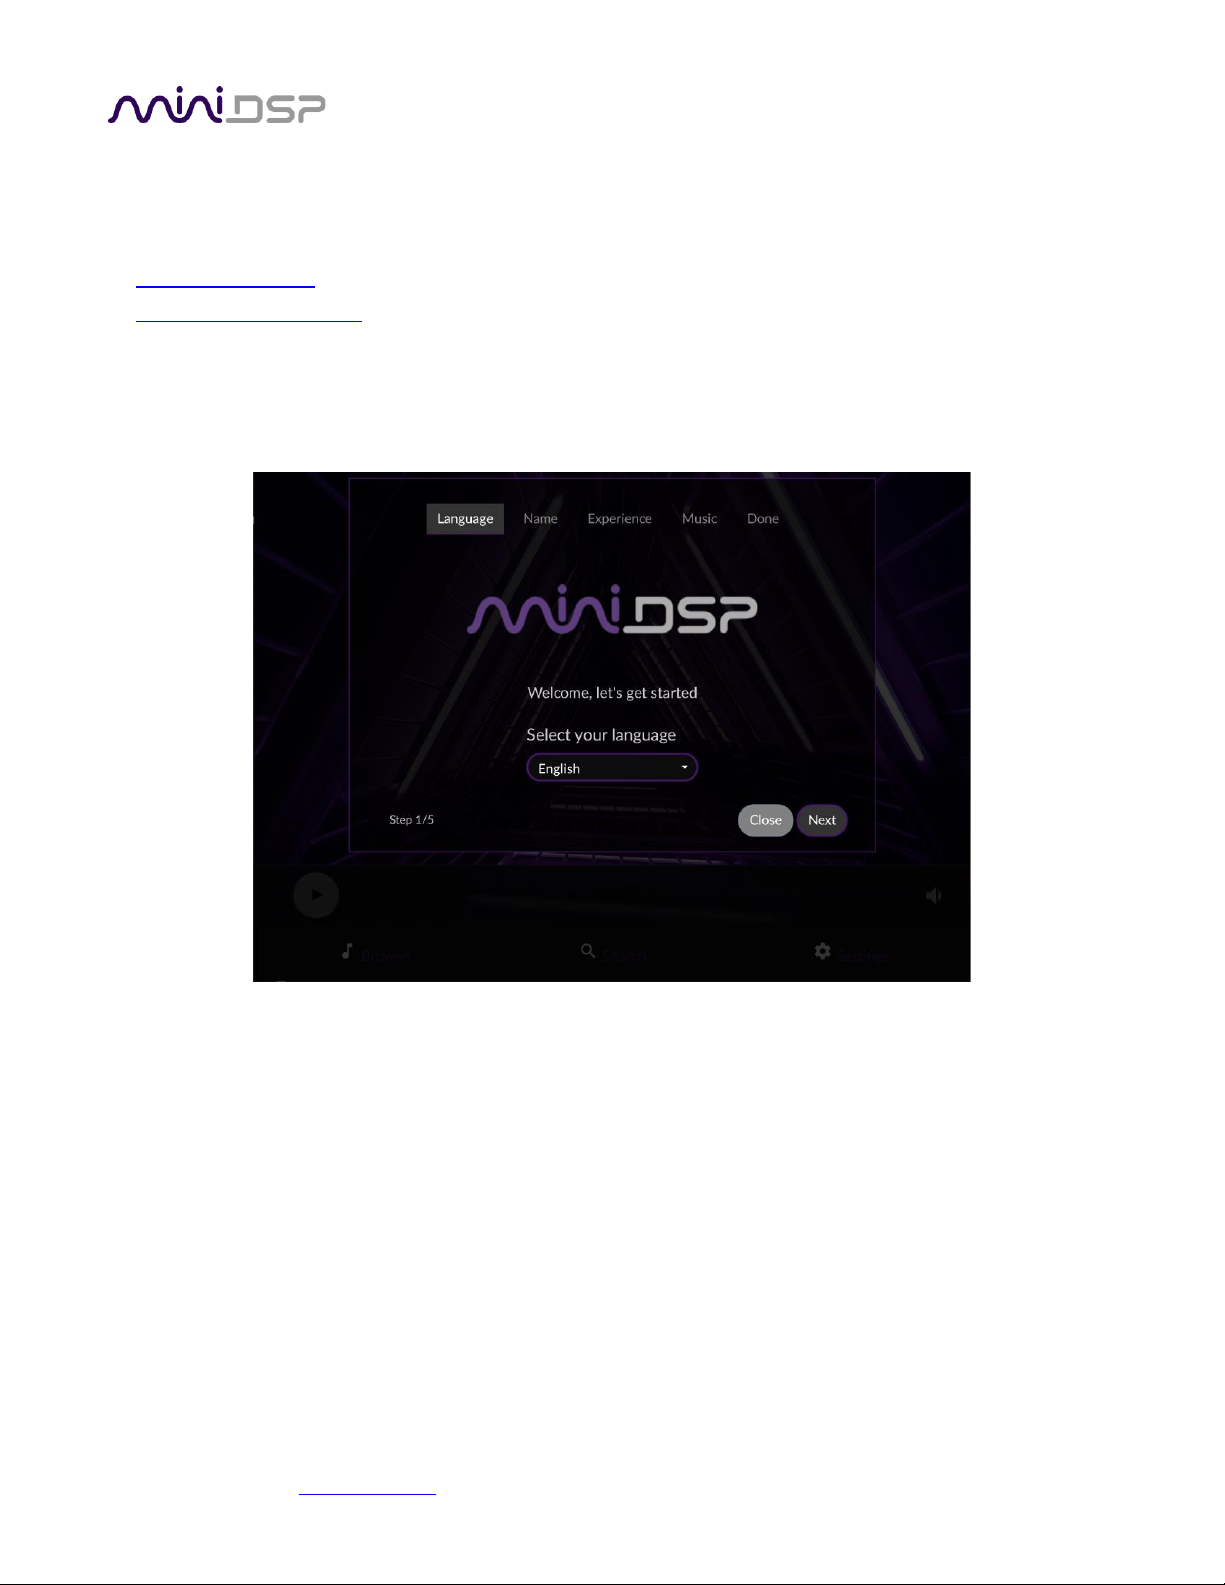
Select Network Settings and scroll down to the Wireless Network Connection section. Locate your network in
the list and click on it. Enter your Wi-Fi network’s password and click Connect:
If you have a hidden network, use the Manual WiFi Connection option.
After clicking on Connect, the SHD will close the hotspot. The SHD is now joined to your wireless network.
Disconnect your computer from the miniDSP SHD hotspot and reconnect it to your wireless network. Follow the
procedure on the next page to open the Volumio web interface.
After reconnecting to the Volumio web interface, we strongly recommend going back to Network
Settings and adding a password to the hotspot. This will ensure that your SHD does not broadcast an
open hotspot if it is unable to connect to your Wi-Fi network for some reason in the future.
Page 24
miniDSP Ltd, Hong Kong / www.minidsp.com / Features and specifications subject to change without prior notice 24
4.3.3 The Volumio web interface
To open the Volumio web interface, enter one of the following in your web browser window (or click on the
links embedded in this document):
• http://minidsp-shd/
• http://minidsp-shd.local/
Depending on your network setup, one may work while the other will not. If neither works, you will need to
connect to the web interface by IP address. In that case, see page 83.
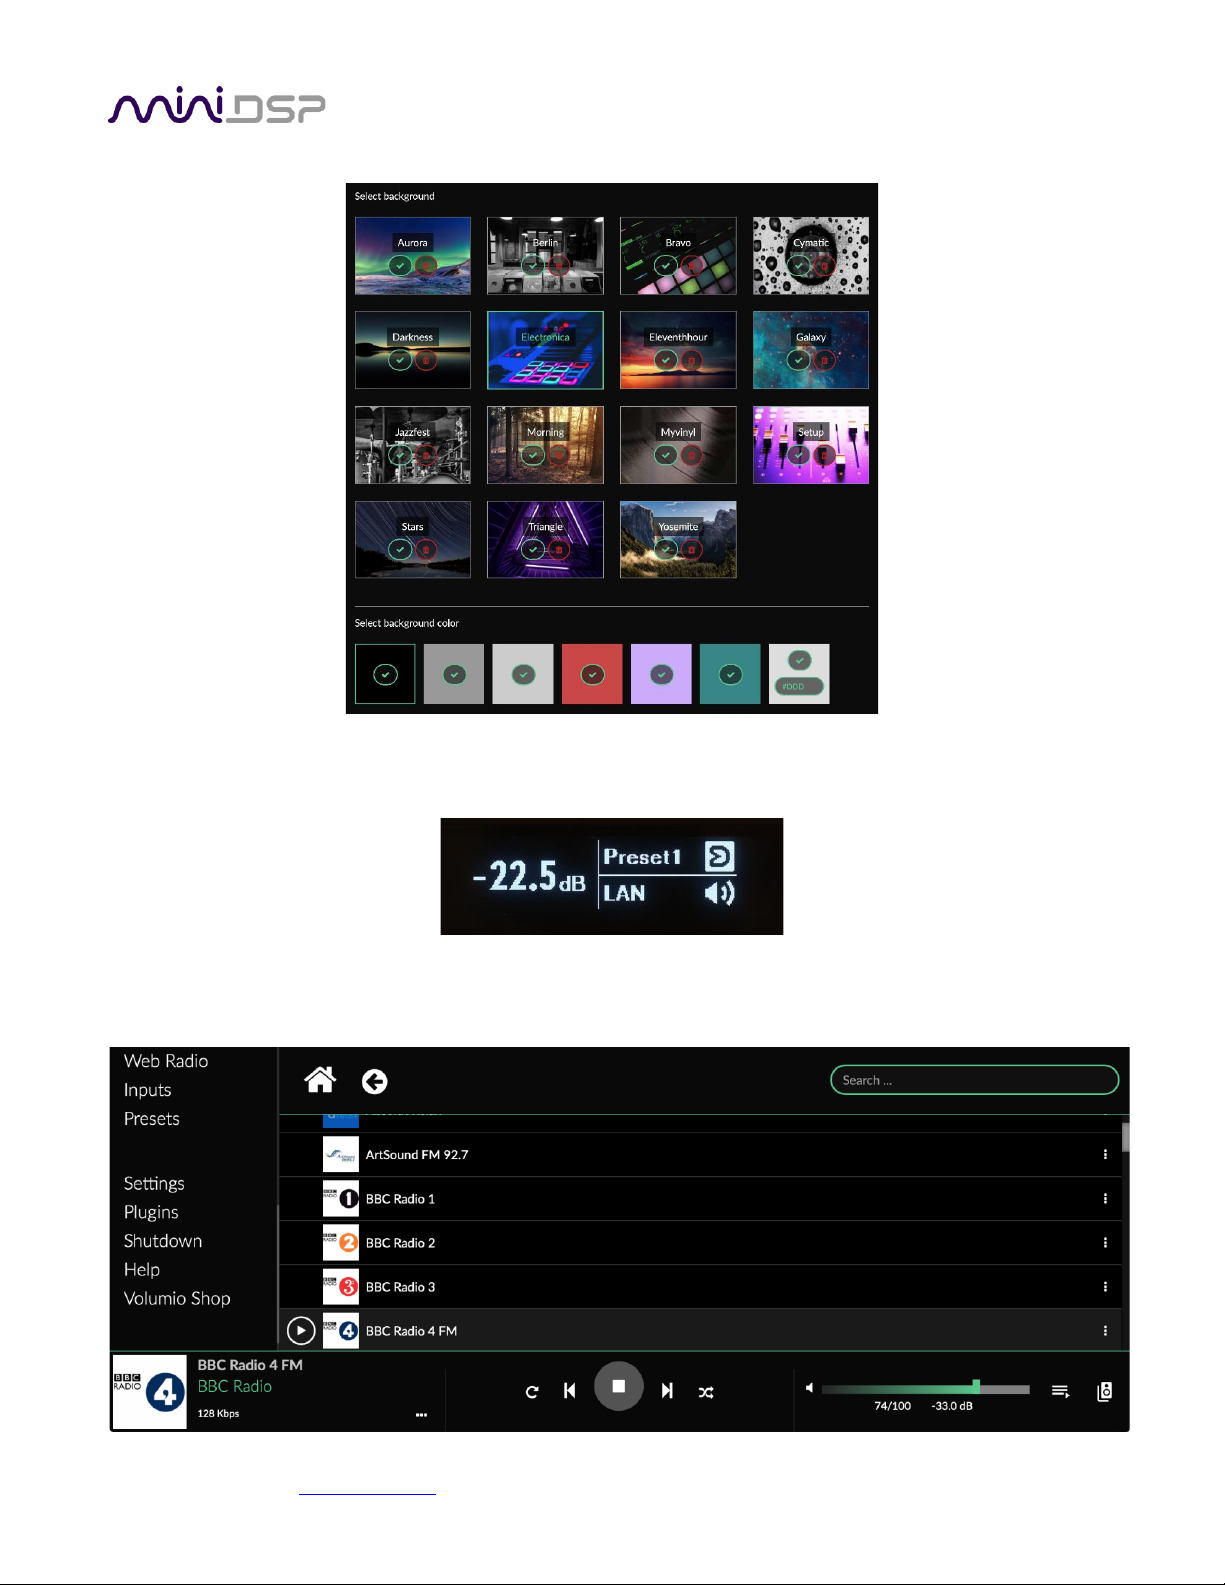
When you connect to the interface for the first time, you will enter a simple setup wizard. Just proceed through
the steps:
You can repeat the setup wizard at any later time by navigating to Settings then System, and clicking on “Run
First Config Wizard.”
Page 25
miniDSP Ltd, Hong Kong / www.minidsp.com / Features and specifications subject to change without prior notice 25
To change the background image or to set a solid color, navigate to Settings then Appearance:
Once done, get ready for audio playback by using the front panel encoder or the remote control to select the
LAN input source:
As a quick check of audio playback, go to the Web Radio section and select a radio station to play back. If all is
well, you will hear audio from your speakers.
Page 26
miniDSP Ltd, Hong Kong / www.minidsp.com / Features and specifications subject to change without prior notice 26
4.3.4 Playing audio from USB stick
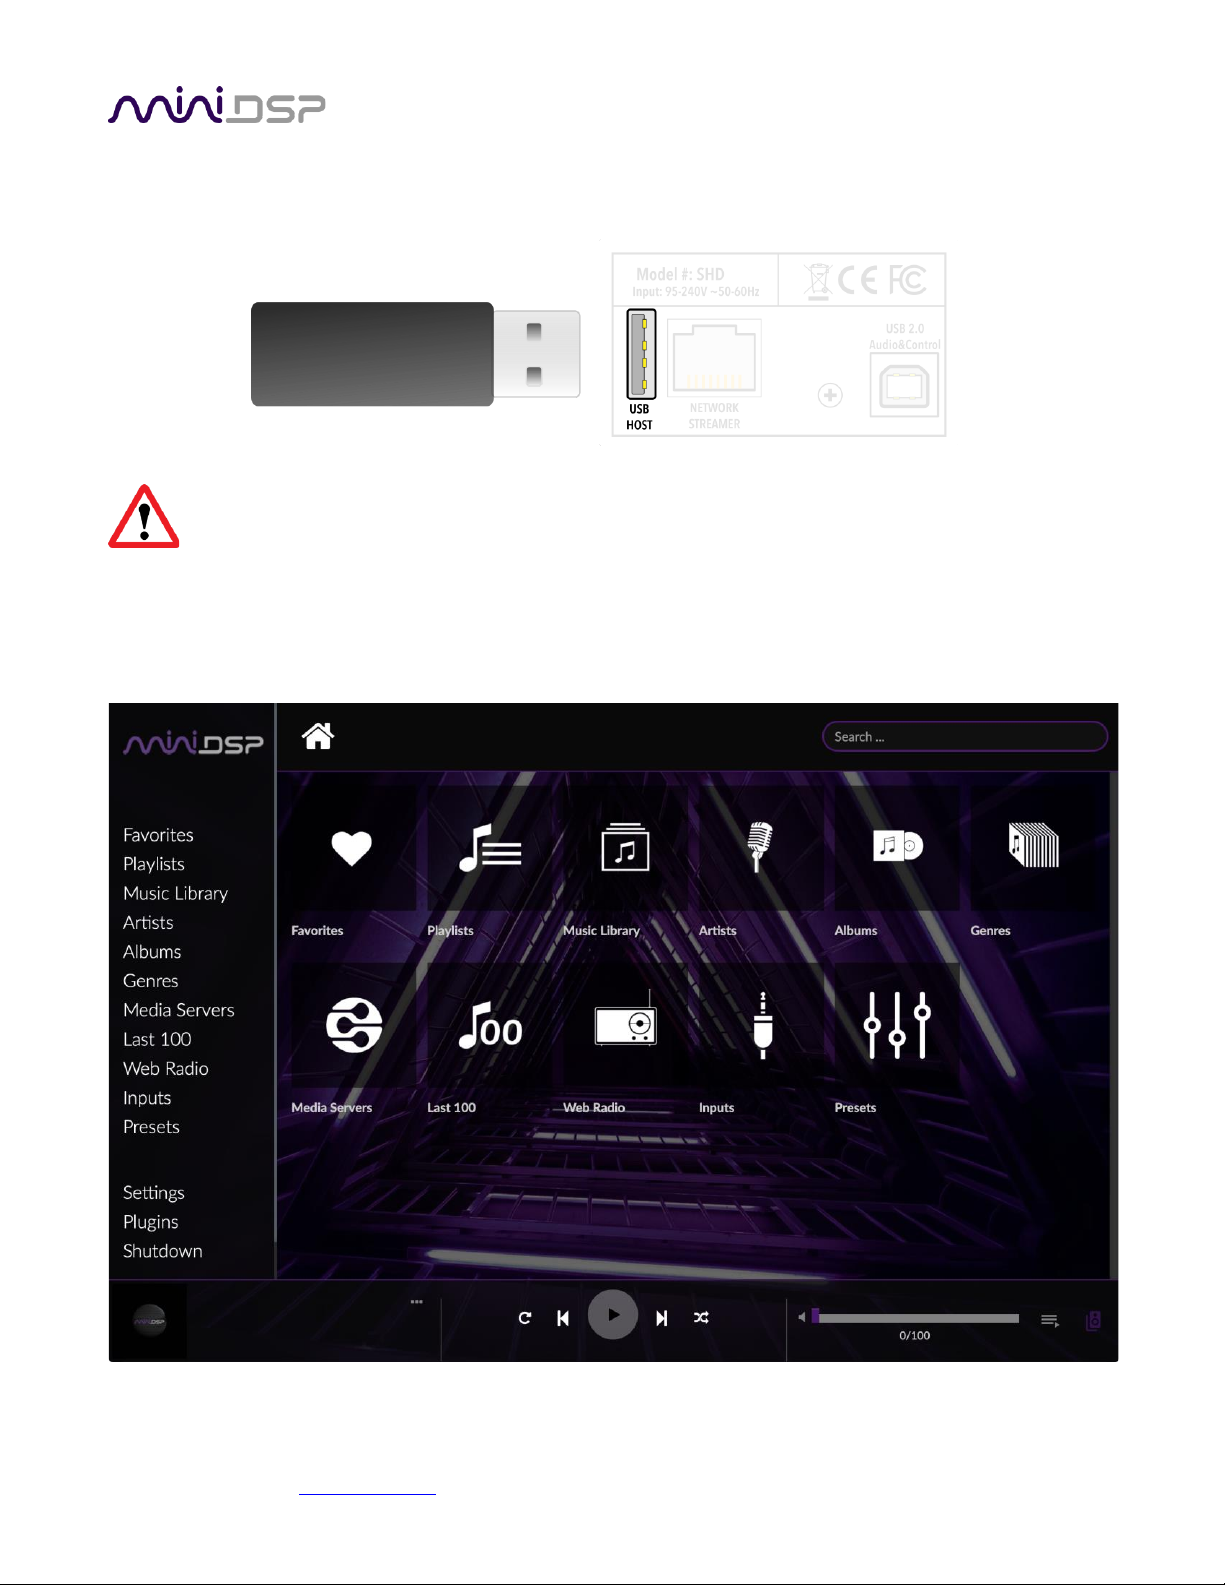
Insert a USB stick containing music files into the USB HOST port on the rear panel, next to the Ethernet port.
It is not possible to play audio from a USB stick if using the Wi-Fi dongle, as there is only one USB host
port.
Volumio will start indexing the USB stick. Navigate to the home screen. On a wide desktop window, you can click
on Music Library on the left sidebar and navigate to the USB stick, where you can select an album for playback.
On a narrow desktop screen or mobile device, navigate to the home screen and click on the Music Library icon.
You can also click on Albums or Artists to directly browse the USB stick.
Page 27
miniDSP Ltd, Hong Kong / www.minidsp.com / Features and specifications subject to change without prior notice 27
4.3.5 Roon
The miniDSP SHD Series processors are certified Roon Ready players. You will need a current Roon subscription
to use Roon with your miniDSP SHD Series processor.
A two-month Roon trial coupon is included in the box with every SHD Series processor.3
4.3.5.1 About Roon
Roon is an incredibly rich and engaging way to browse and organize your music. It runs on most Mac, Windows,
and Linux PCs, or on other products which include Roon Core.
Being Roon Ready means that miniDSP network players transparently discover and connect to Roon without any
configuration, and bit-perfect audio is delivered from Roon to your network player.
Together, Roon and miniDSP deliver the power, flexibility, and performance of networked audio, with the
easiest setup and highest reliability available.
Learn more about Roon partner programs.
4.3.5.2 Enabling Roon on the SHD Series processor
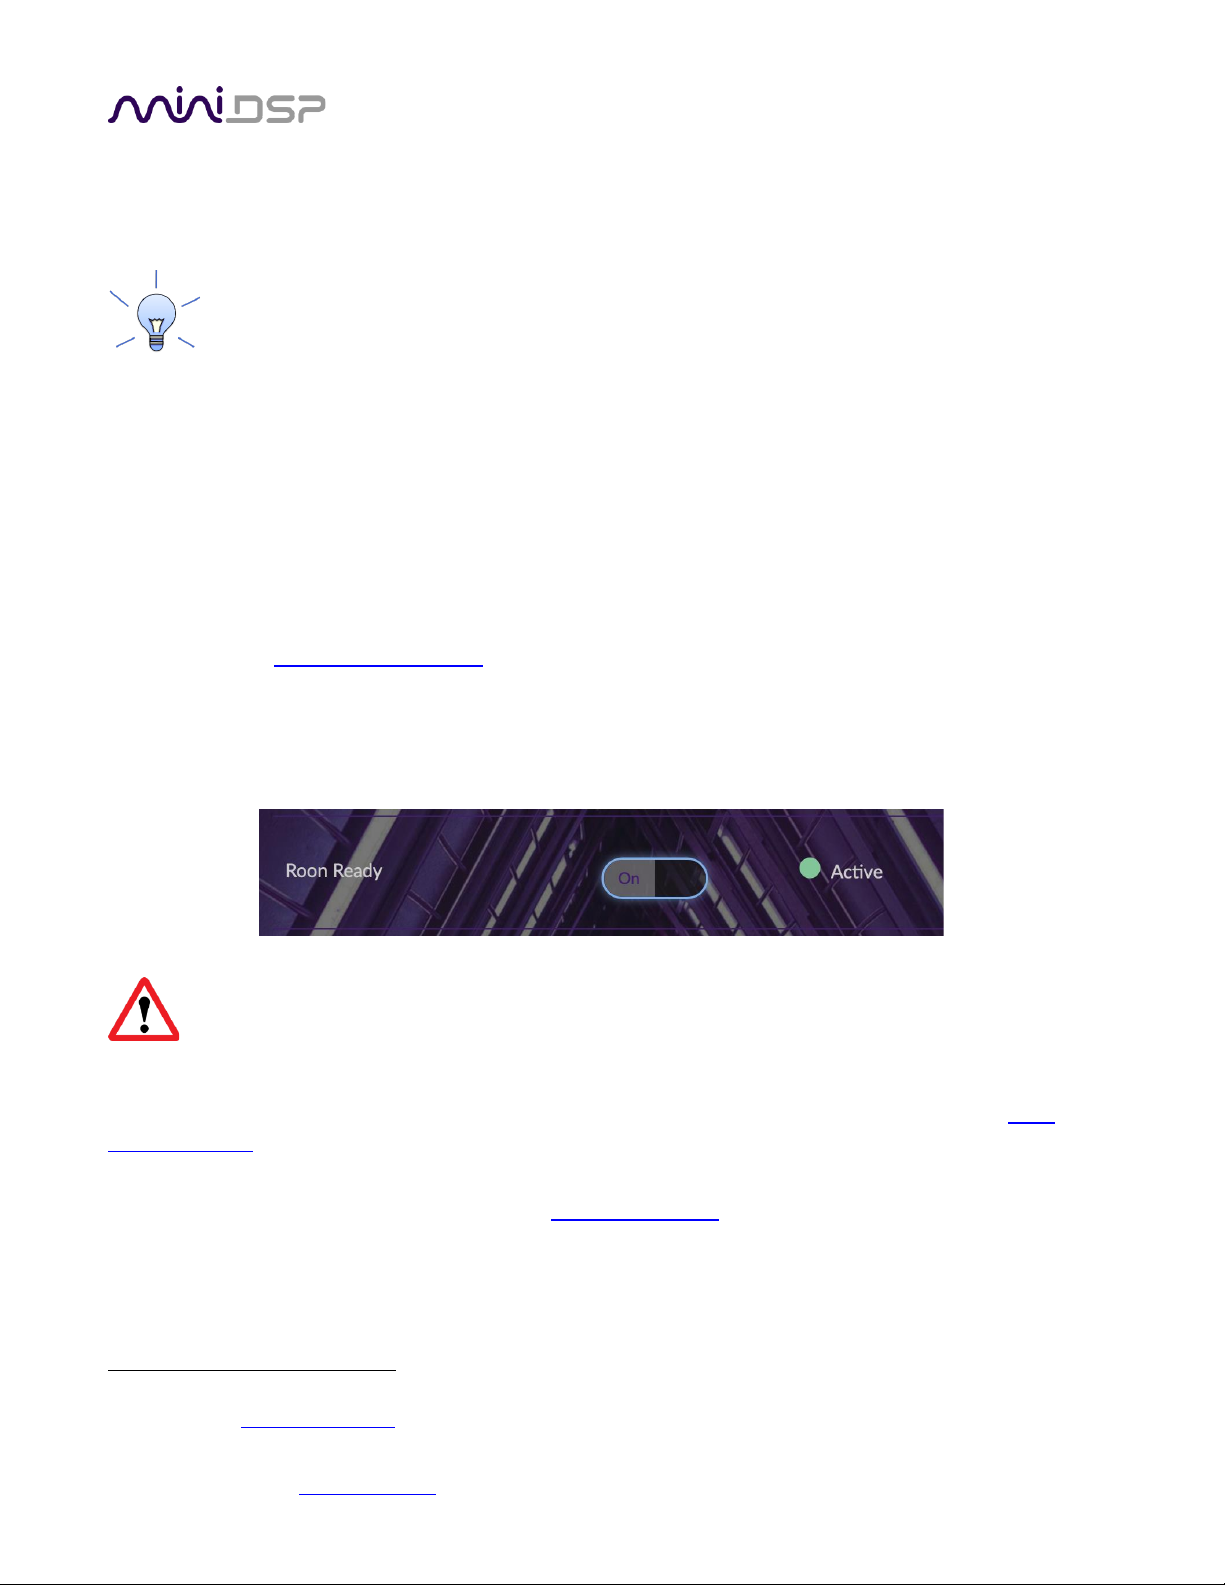
Before starting, check that Roon Ready is enabled on your SHD. Open the Volumio web interface and navigate to
Settings, then to My Music. Scroll down and confirm that Roon Ready is active:
If you have previously enabled Roon by installing a plugin in Volumio, make sure that you deactivate
and uninstall it now.
4.3.5.3 Setting up Roon on your PC
If you are already a Roon user, you can skip this section. Otherwise, this is a quick guide; refer to the Roon
knowledge base for detailed instructions.
There are various ways of setting up Roon. The simplest method is to install it on a computer that also has your
music files on an internal or attached drive. After downloading Roon for Mac or Windows, run the installer
program. You will need to log in to your Roon account.
3
If you purchased your SHD Series processor prior to January 2022 and did not receive a Roon trial coupon, you can obtain
one by emailing [email protected] with the subject line “REQUEST ROON TRIAL.” You will need to provide your SHD Series
serial number in the body of the email.
Page 28
miniDSP Ltd, Hong Kong / www.minidsp.com / Features and specifications subject to change without prior notice 28
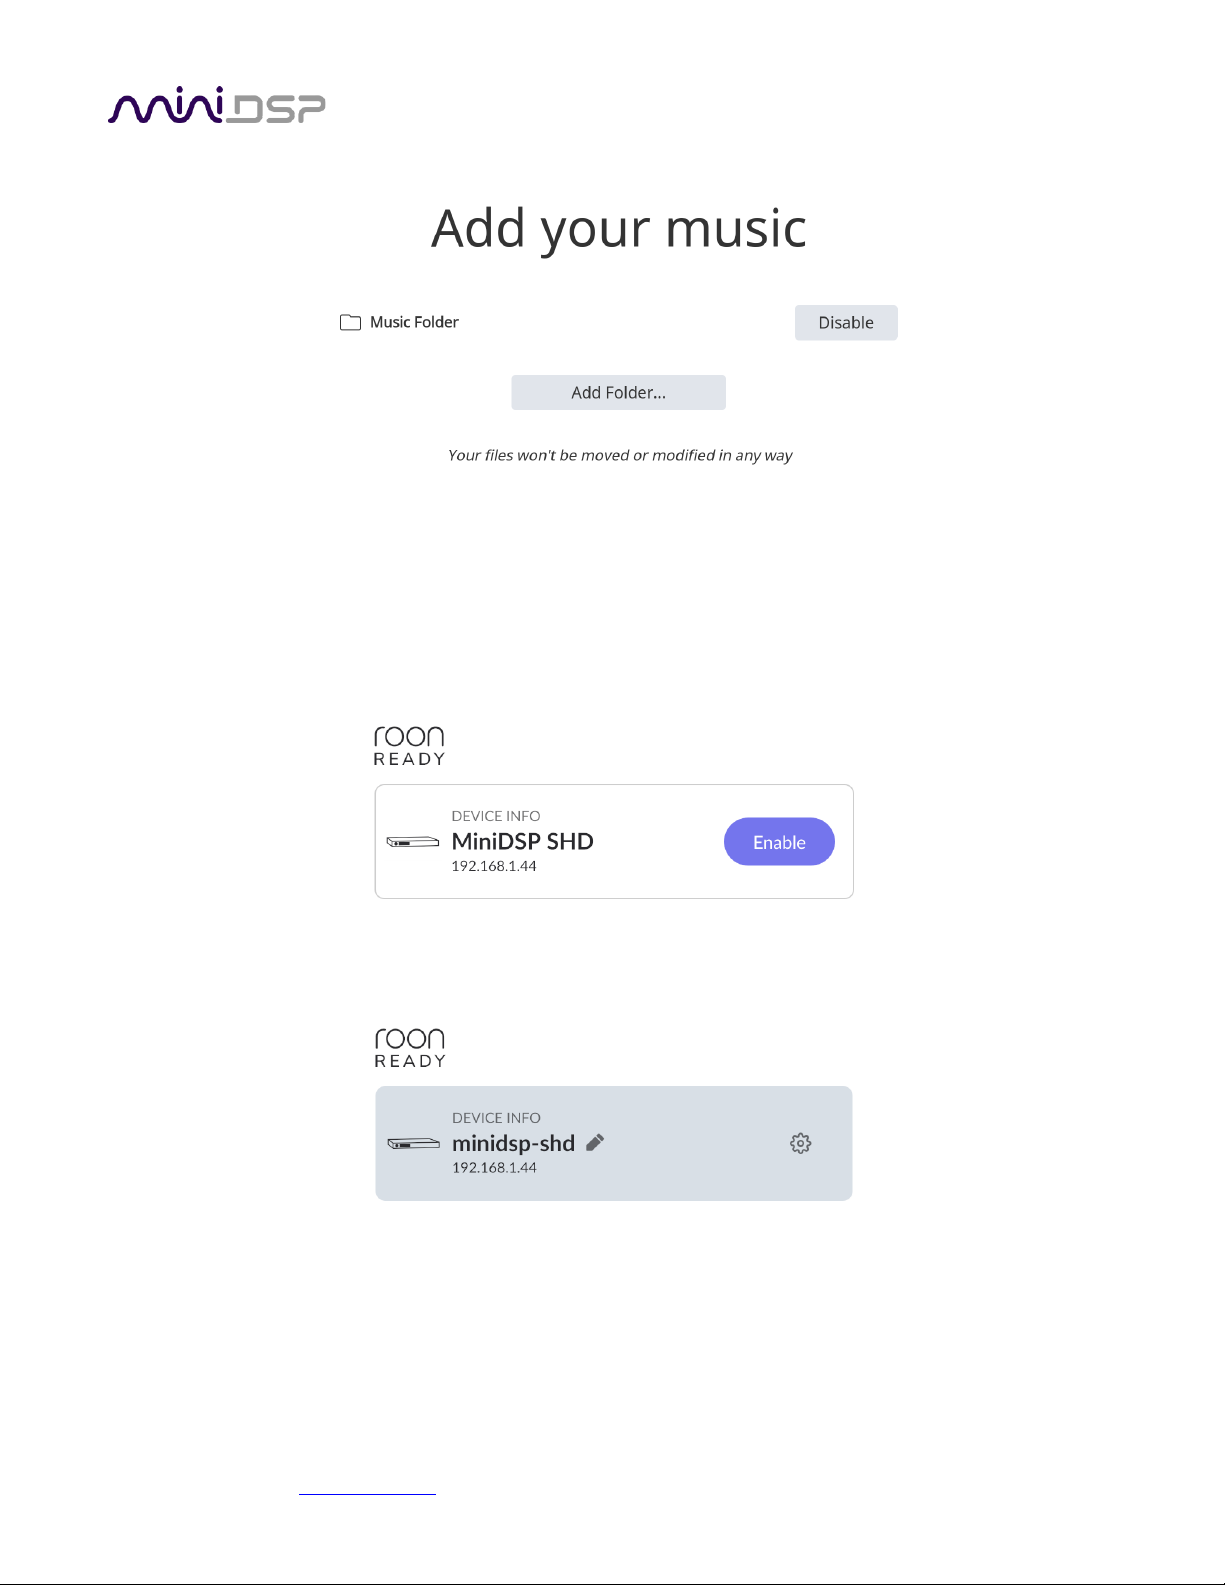
On the setup screen, click on “Add Folder…”:
Navigate to your music library folder and select it. You can change or add folders later on by using the Settings
screen in the Roon UI.
4.3.5.4 Enable the miniDSP processor
Each audio device needs to be enabled in Roon. In the setup wizard, or later on the Settings → Audio page,
locate the SHD Series processor in the Roon Ready category:
Click on its Enable button. The display will change to show the default name:
Click on the pencil icon to change the name, or on the gear icon to configure other settings.
Page 29
miniDSP Ltd, Hong Kong / www.minidsp.com / Features and specifications subject to change without prior notice 29
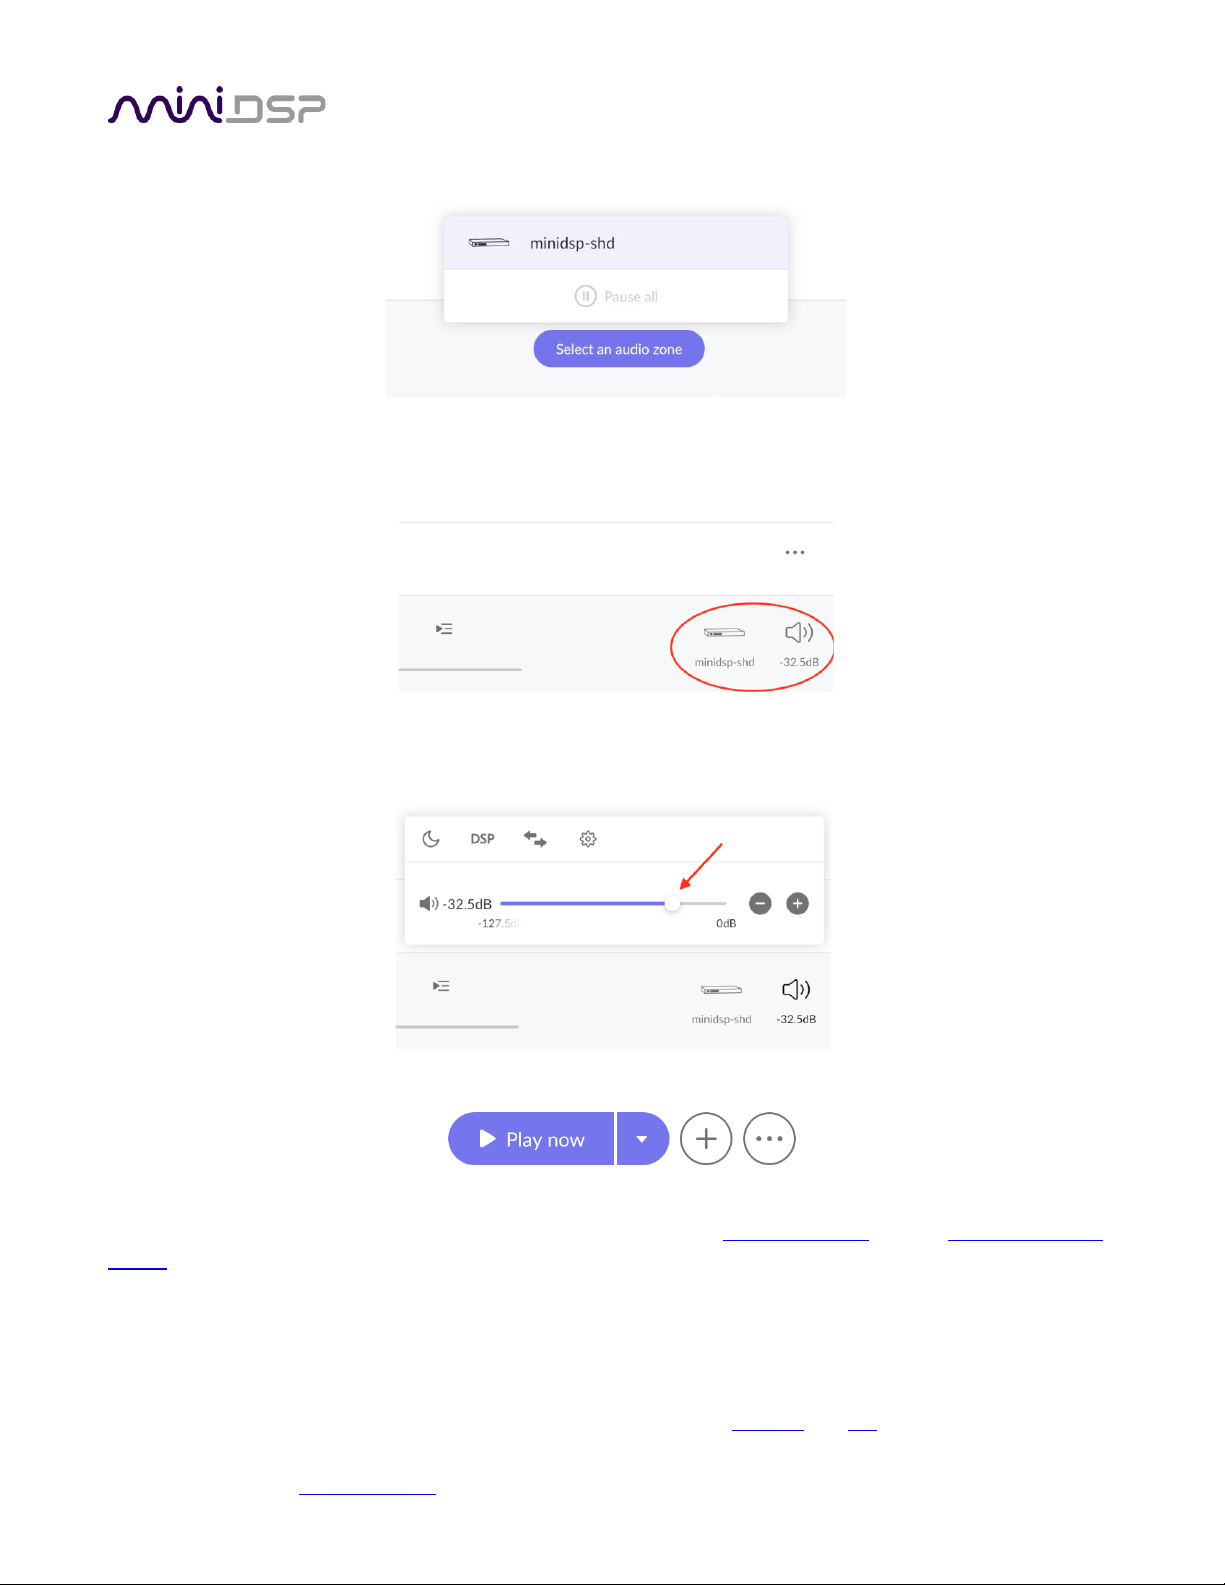
Return to the main screen in the Roon UI. Click on “Select an audio zone” and select the miniDSP SHD:
Alternatively, if another device is already selected, click on its icon at the lower right and then select your SHD
Series processor. In either case, the miniDSP SHD Series icon and name will appear at the bottom right of the
window, together with the current volume setting. The icon may vary depending on your SHD Series model.
Click on the speaker icon to change the volume or other settings. The displayed volume is the same as displayed
on the front panel OLED of the SHD Series processor:
Go to the Browse section in the Roon UI, navigate to an album, and click on “Play now”:
For additional resources on how to use Roon, refer to the Roon Labs Knowledge Base and the Roon Community
Forum.
4.3.5.5 Remote control of Roon playback
Use the miniDSP infrared remote to pause and resume playback, and to skip forward and backward in the
playlist.
For full remote control using a mobile device, install Roon Remote on Android and iOS phones and tablets.
Page 30
miniDSP Ltd, Hong Kong / www.minidsp.com / Features and specifications subject to change without prior notice 30
4.3.6 TIDAL and Qobuz
TIDAL is a streaming service for lossless CD-quality audio. It is currently available in 53 countries. For up-to-date
information on availability, see the Tidal article “TIDAL – where we’re available.”
Qobuz is a streaming service for lossless CD-quality and high-resolution audio up to 192 kHz. It is currently
available in the USA and 11 countries in Europe. For up-to-date information on availability, see the Qobuz article
“Where is Qobuz available?”
Both of these streaming services are supported by the SHD Series processors. You do not need a special Volumio
subscription to access them. You will, however, need to have an account with your choice of streaming service.
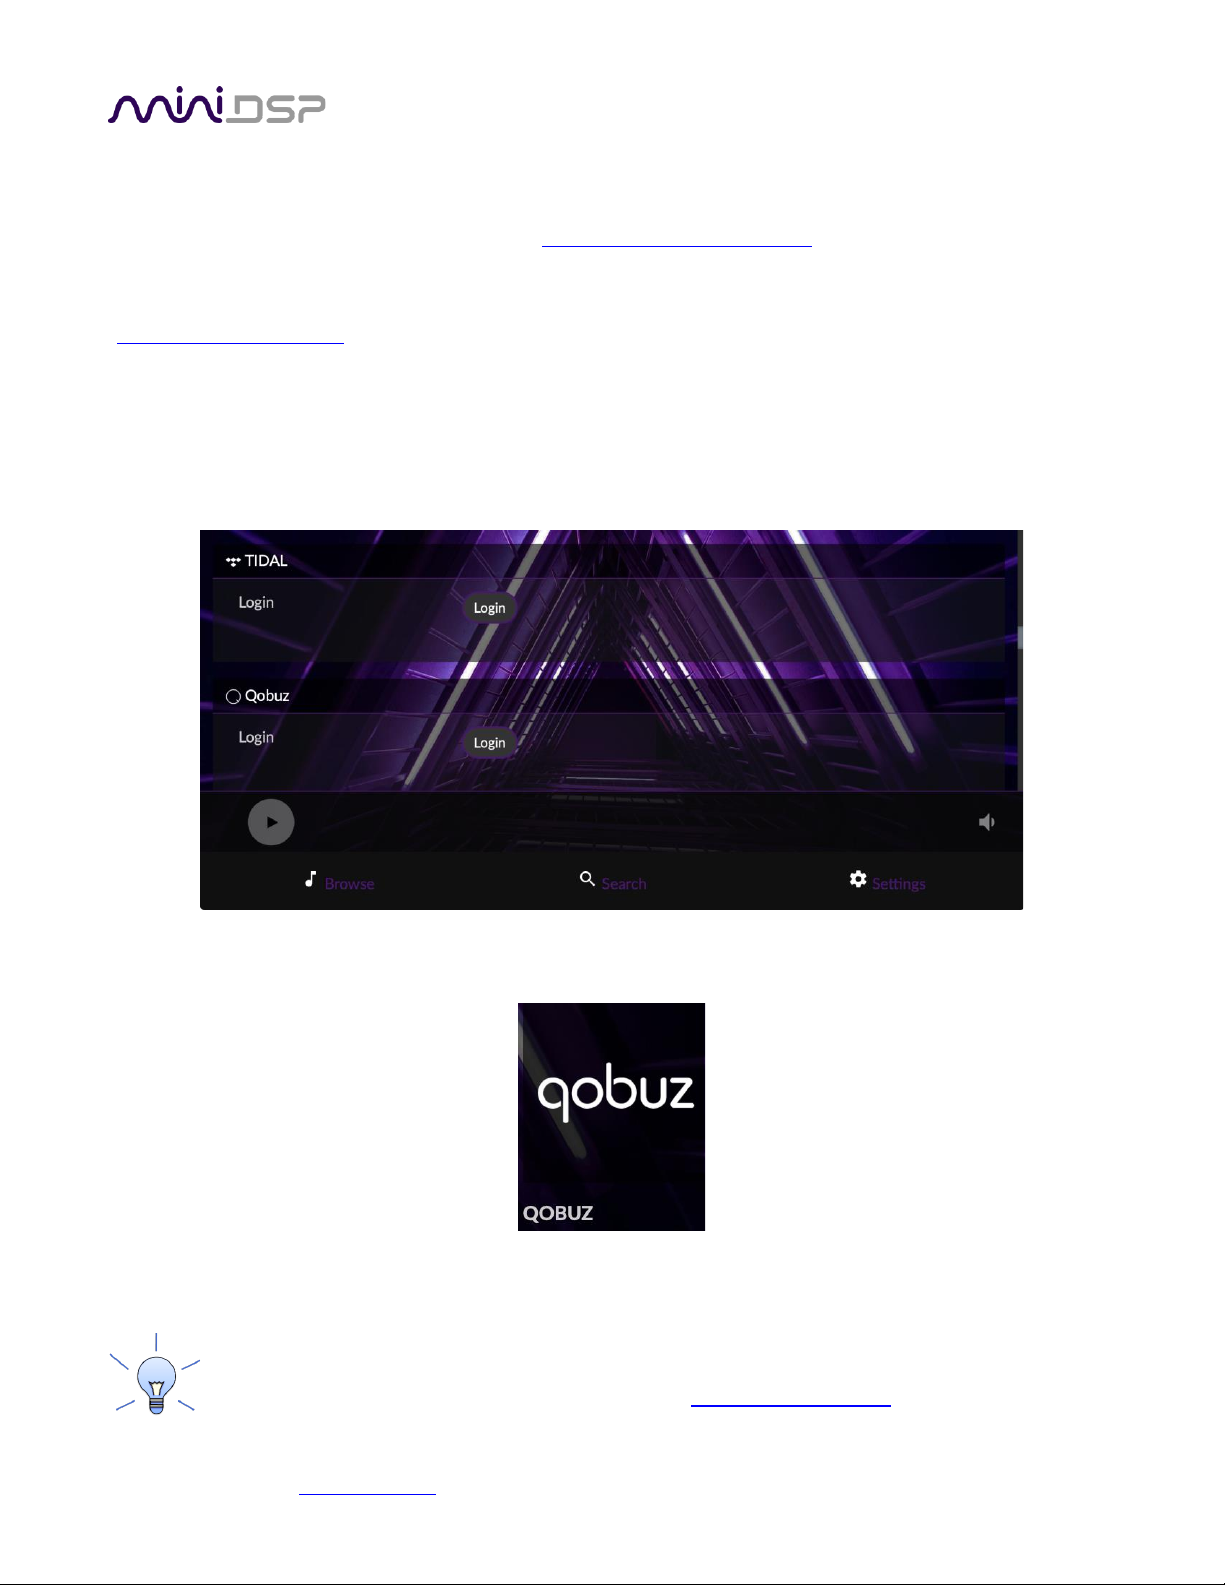
To enable your chosen streaming service, go to the Volumio settings. In the My Music page, scroll down and
locate the Tidal or Qobuz heading. Click on Login under your subscribed service then enter your username and
password for that service.
After logging in, the sidebar menu and the Home screen will show an entry for your selected service.
To obtain a free trial of Qobuz high-res streaming for use with your SHD Series processor, visit
miniDSP’s Qobuz partner page in your web browser: http://qob.uz/minidsp
Page 31
miniDSP Ltd, Hong Kong / www.minidsp.com / Features and specifications subject to change without prior notice 31
4.3.7 Spotify
The web interface can be used to stream from Spotify. This requires a Spotify premium account, which you must
first obtain on the Spotify website.
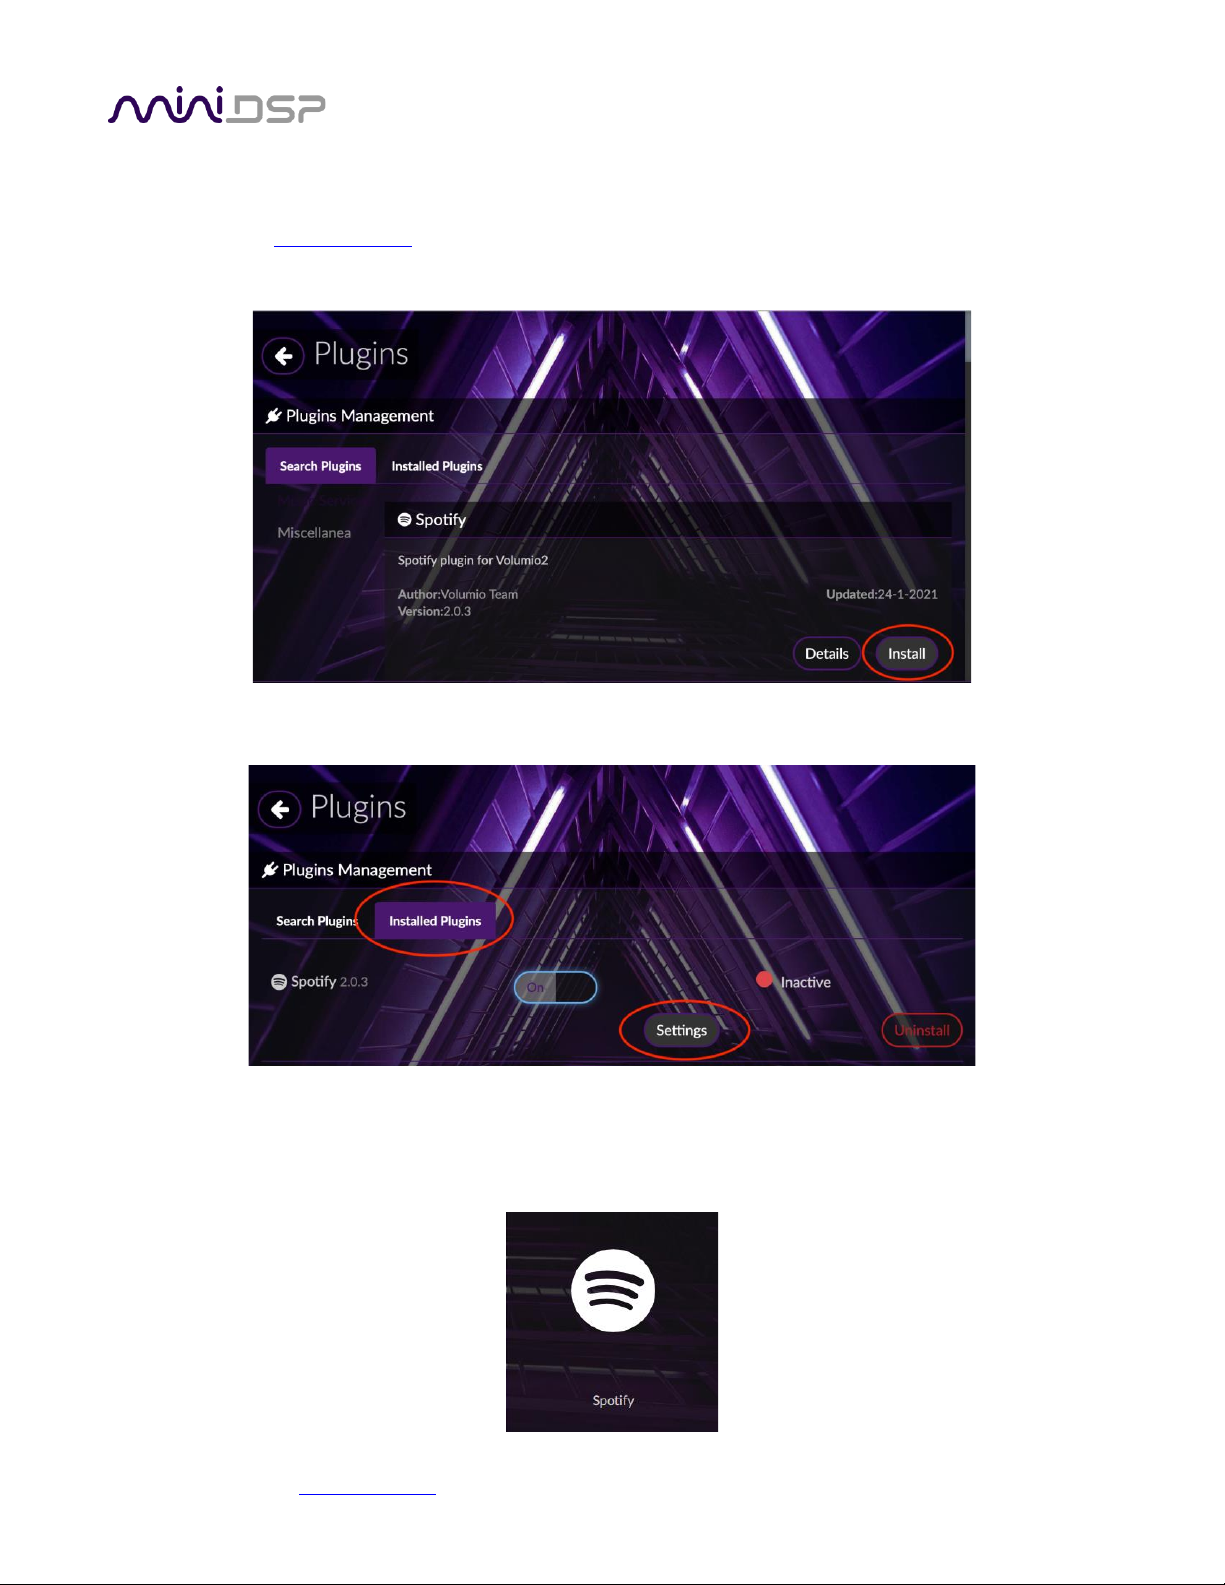
1. Navigate to Plugins in the Volumio settings. Locate the Spotify plugin and click Install.
2. When installation completes, click on Enable Plugin.
3. Click on the Installed Plugins tab.
4. Click on Settings.
5. Enter your Spotify username and password.
6. Go to the home screen and click on the Spotify icon.
Page 32
miniDSP Ltd, Hong Kong / www.minidsp.com / Features and specifications subject to change without prior notice 32
4.3.8 Accessing multiple processors
More than one SHD Series processor can be controlled from the same web interface screen. To do so, follow
these steps.
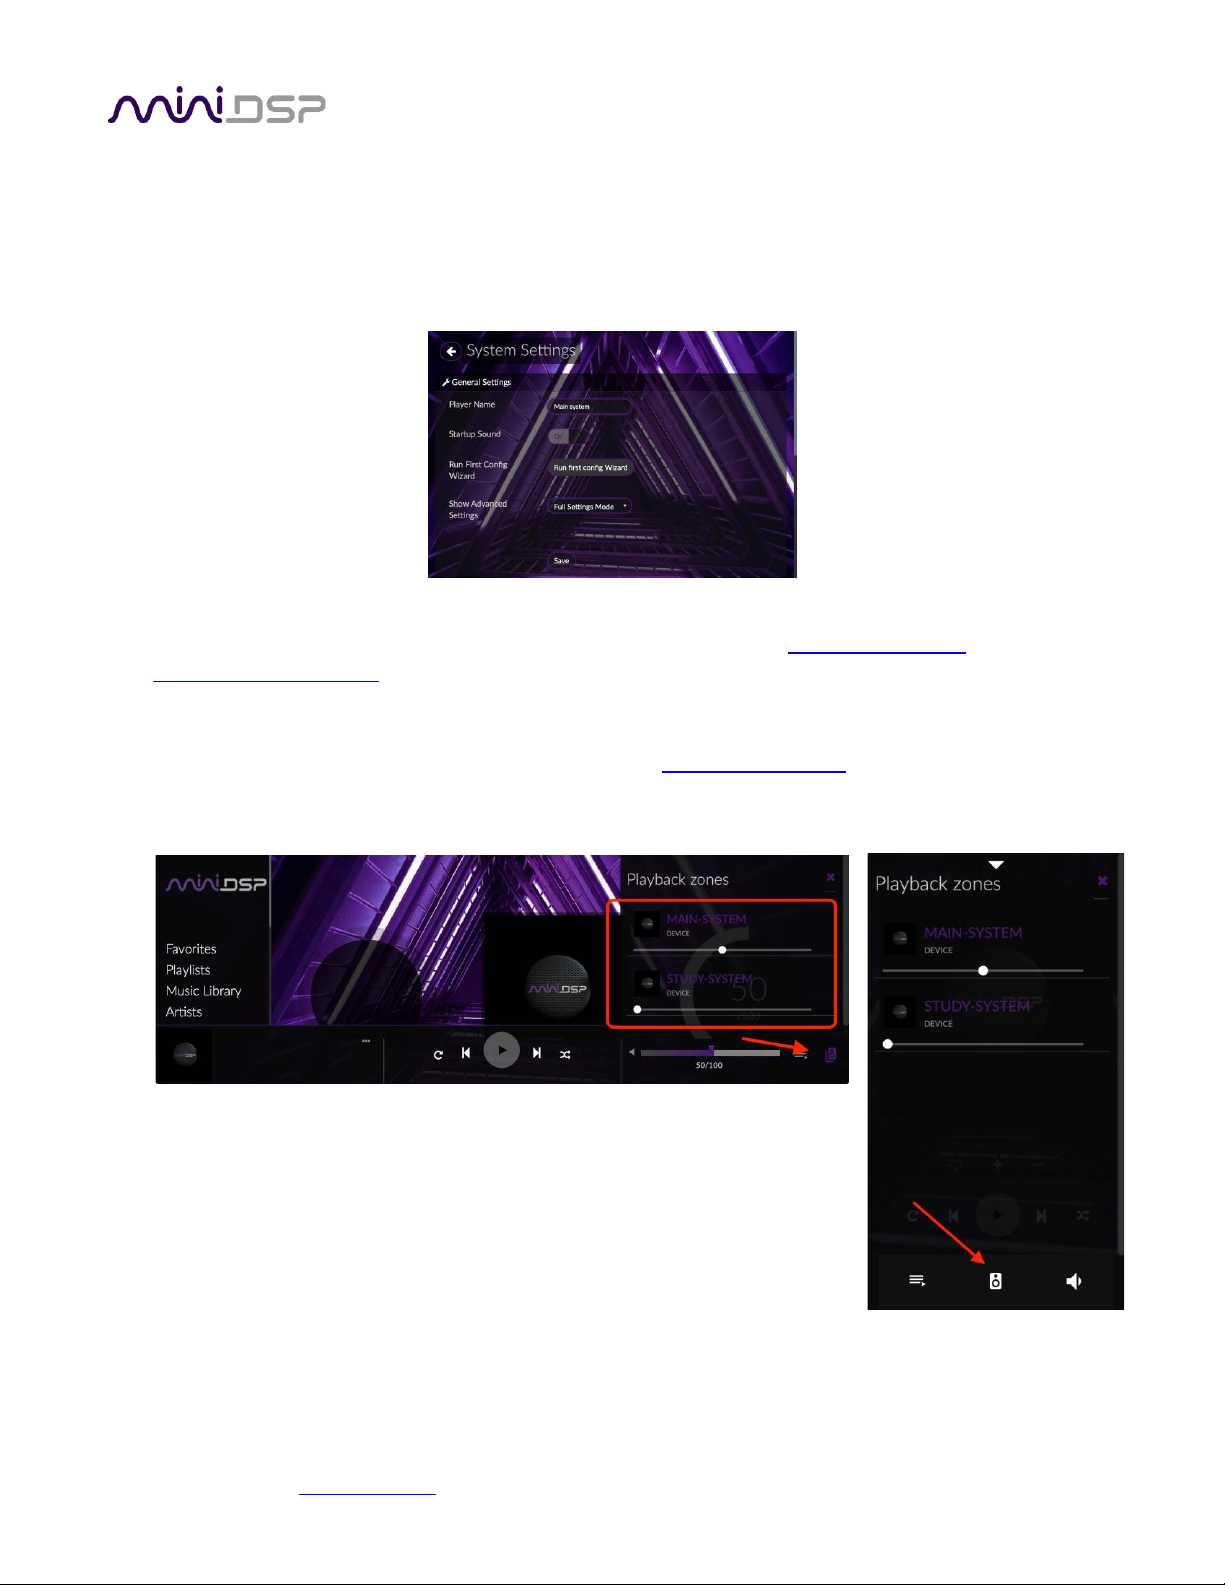
1. On the first SHD Series processor, navigate to Volumio settings and select System. Set Player Name to
something unique then click Save. In our example, we used “Main system”:
2. Select Shutdown and then Restart.
3. Connect and turn on the second SHD Series processor. Connect to it at http://minidsp-shd/ or
http://minidsp-shd.local/ and change its name away from the default as above. In our example, we used
“Study system” for the second SHD Series processor. Select Shutdown and then Restart.
4. Re-open the web interface using one of the new names. If you used spaces in the name, replace the spaces
with hyphens. For example, in our case we connected to http://main-system/. Click on the speaker icon to
display the list of active devices and click on the one that you want to control. The location of the icon will
depend on your device.
Note: clicking on the name of each processor gives you independent control of them. Synchronized playback to
multiple SHD Series processors is not supported.
Page 33
miniDSP Ltd, Hong Kong / www.minidsp.com / Features and specifications subject to change without prior notice 33
4.4 USB AUDIO
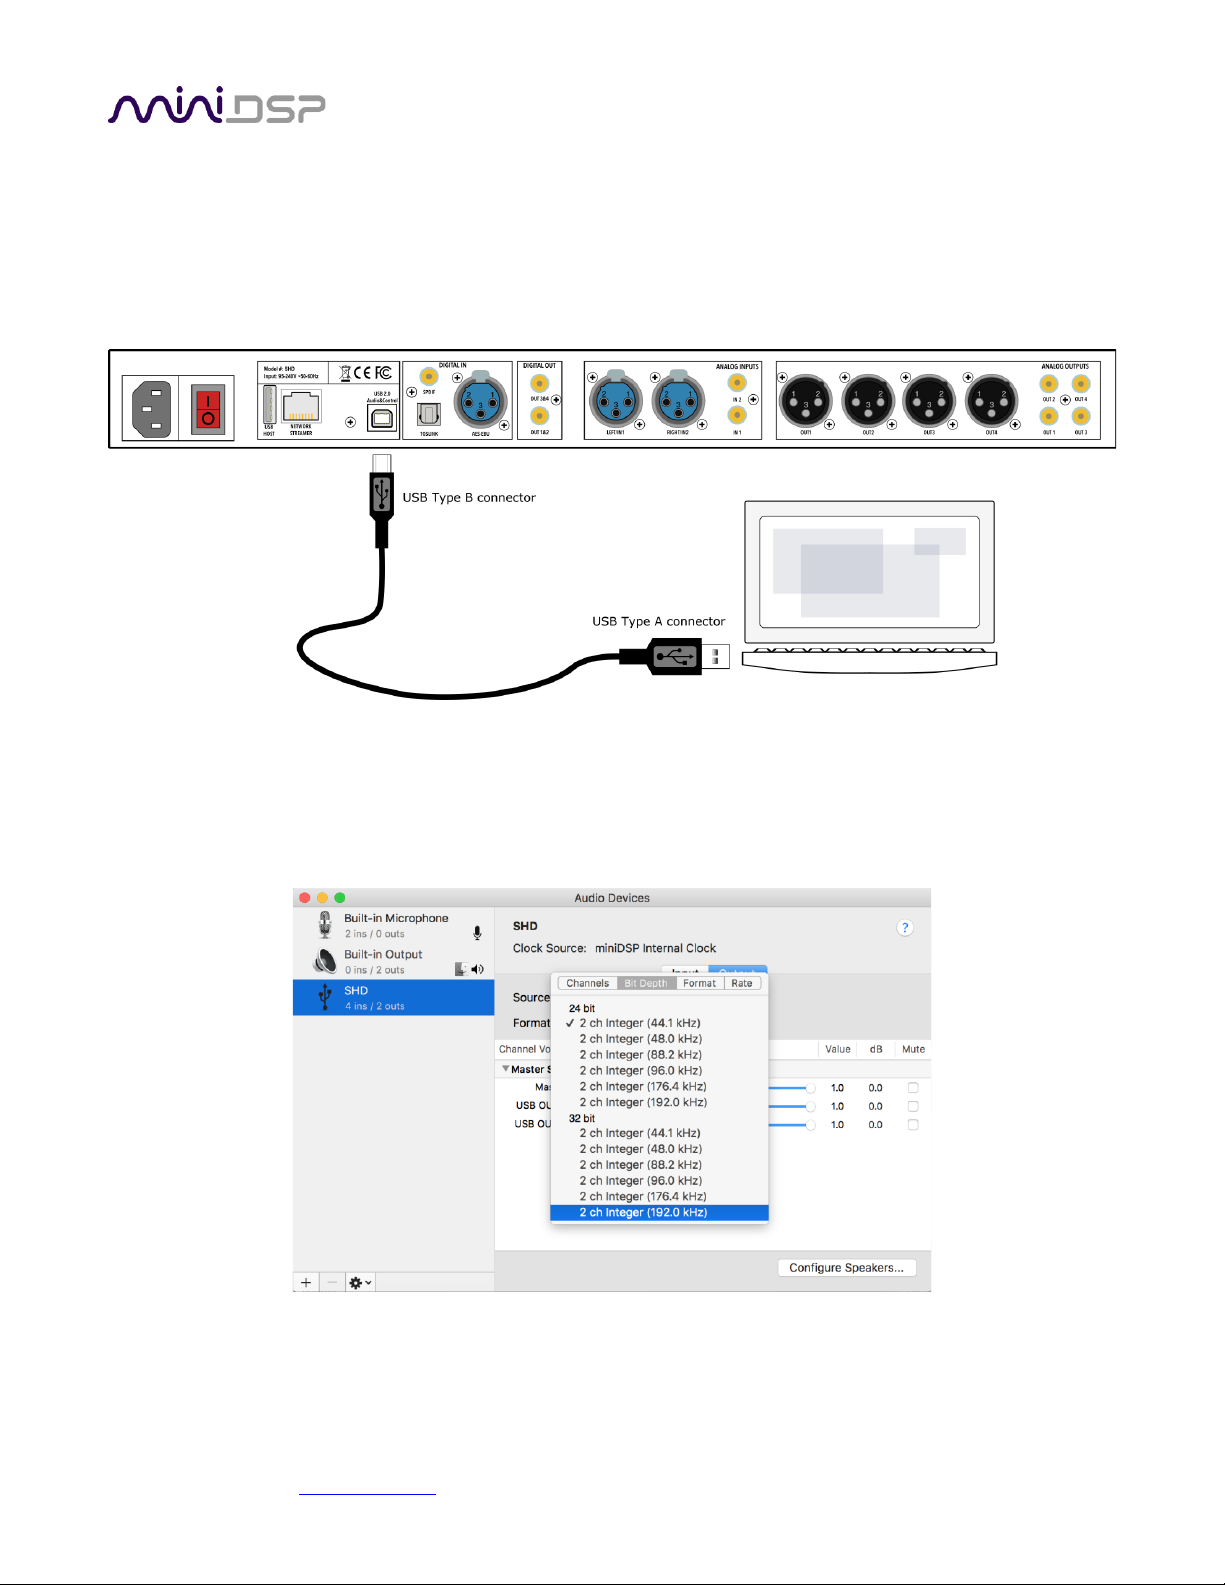
The SHD Series processors accept stereo PCM audio at sample rates of 44.1, 48, 88.2, 96, 176.4, and 192 kHz
over USB. The same USB connector is used for streaming USB audio, configuration and Dirac Live calibration.
Use the supplied cable to connect the USB 2.0 (Type B) port of the SHD Series processor to a free USB port on
your computer.
4.4.1 macOS
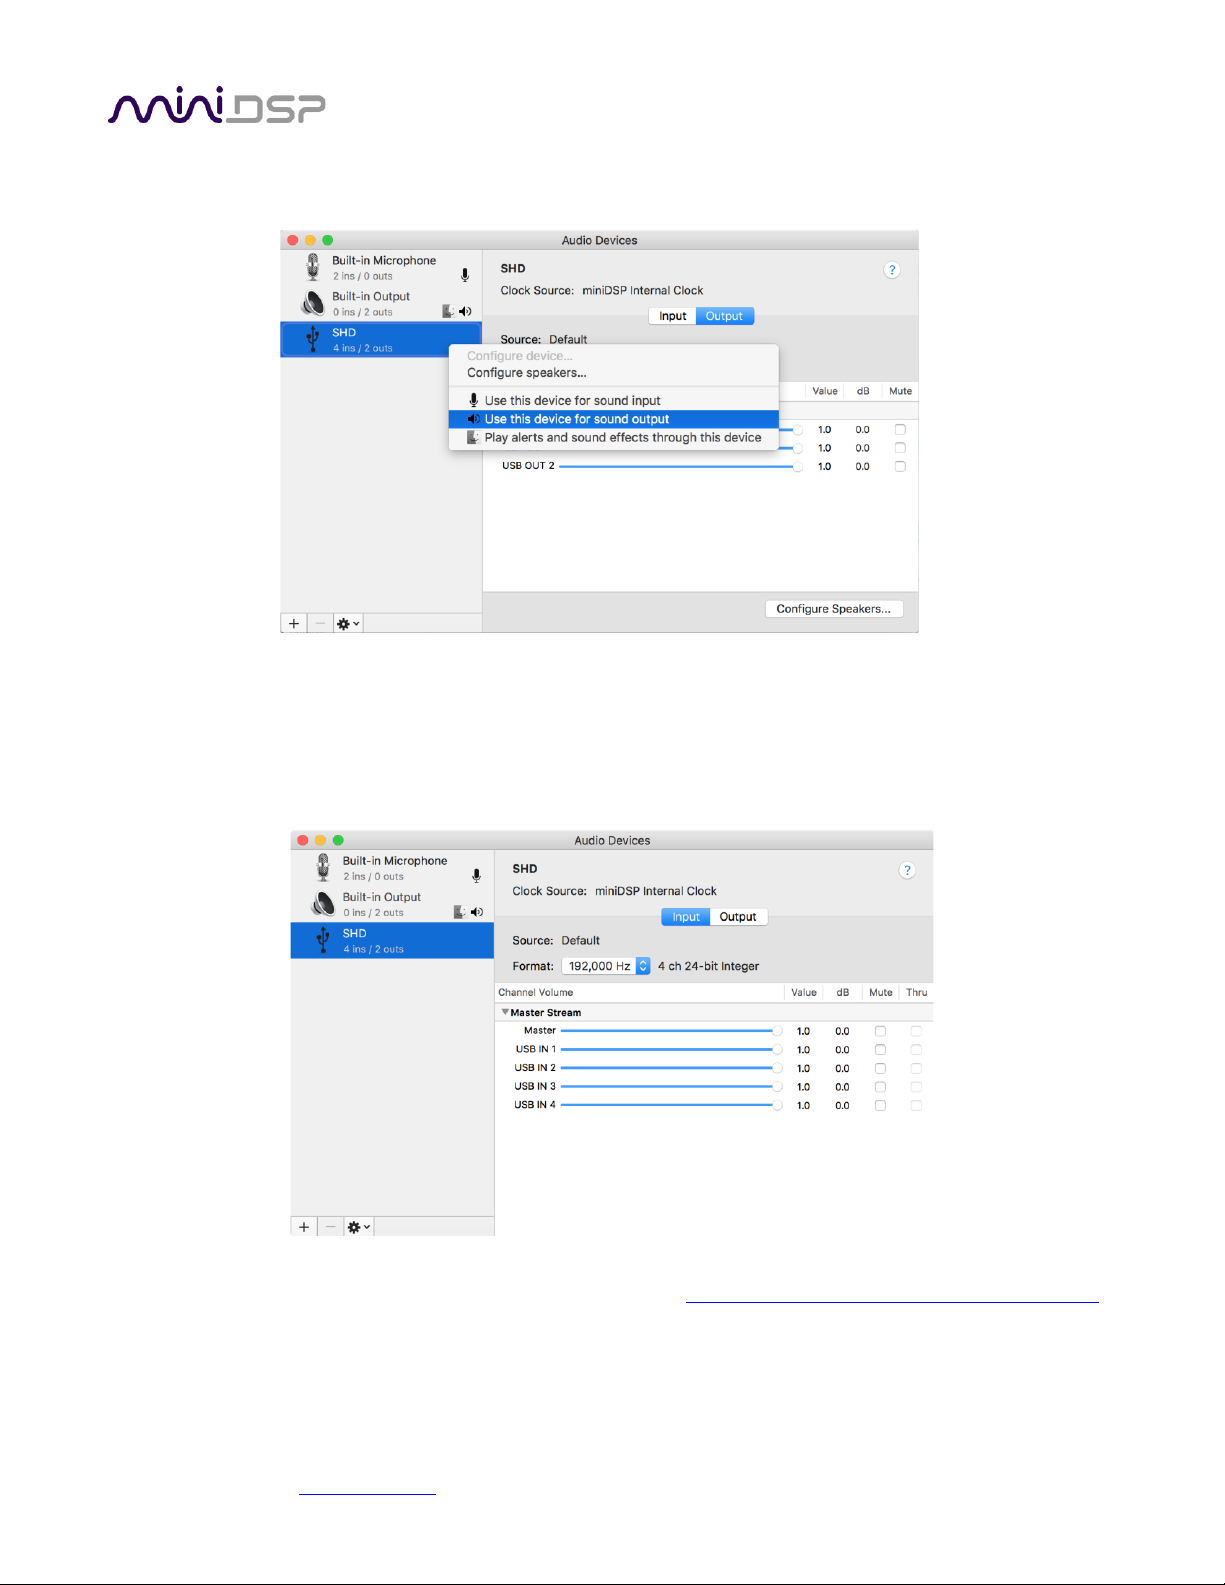
Open Audio MIDI Setup (in Applications->Utilities) and click on “SHD” in the list on the left-hand side. Sample
rates up to 192 kHz can be selected:
Page 34
miniDSP Ltd, Hong Kong / www.minidsp.com / Features and specifications subject to change without prior notice 34
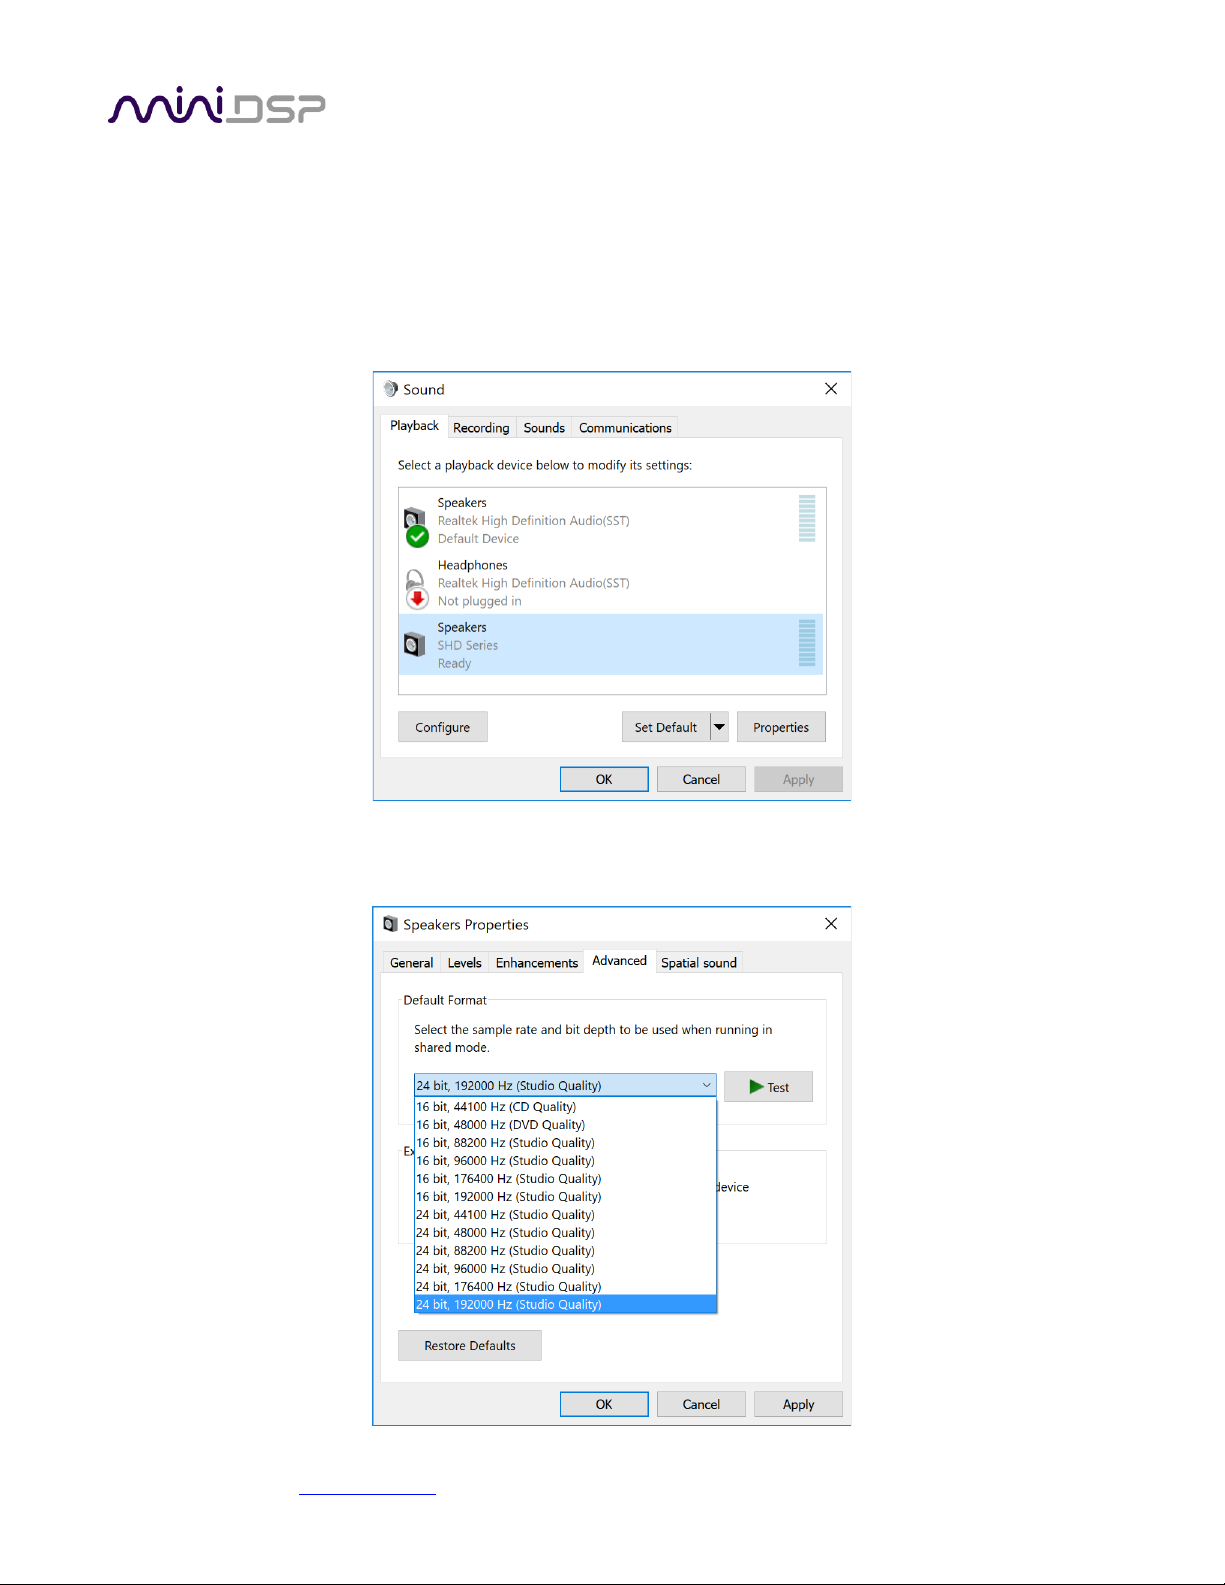
To set the SHD Series processor as the default audio output device, right-click and select “Use this device for
sound output”:
Note that individual audio playback apps may allow the SHD Series processor to be selected for audio output
independently of the system default. They may also control sample rate automatically.
The SHD Series processor sends its four output channels to the computer over USB. Click on the Input button in
Audio MIDI Setup to see them. These can be used to monitor or record the output channels of the processor:
For an example application using this feature, see the app note “Analog recording with miniDSP and ocenaudio”
on our website.
Page 35
miniDSP Ltd, Hong Kong / www.minidsp.com / Features and specifications subject to change without prior notice 35
4.4.2 Windows
Note: to play USB audio from Windows, the miniDSP UAC2 driver package must be installed first.
4.4.2.1 Default audio device
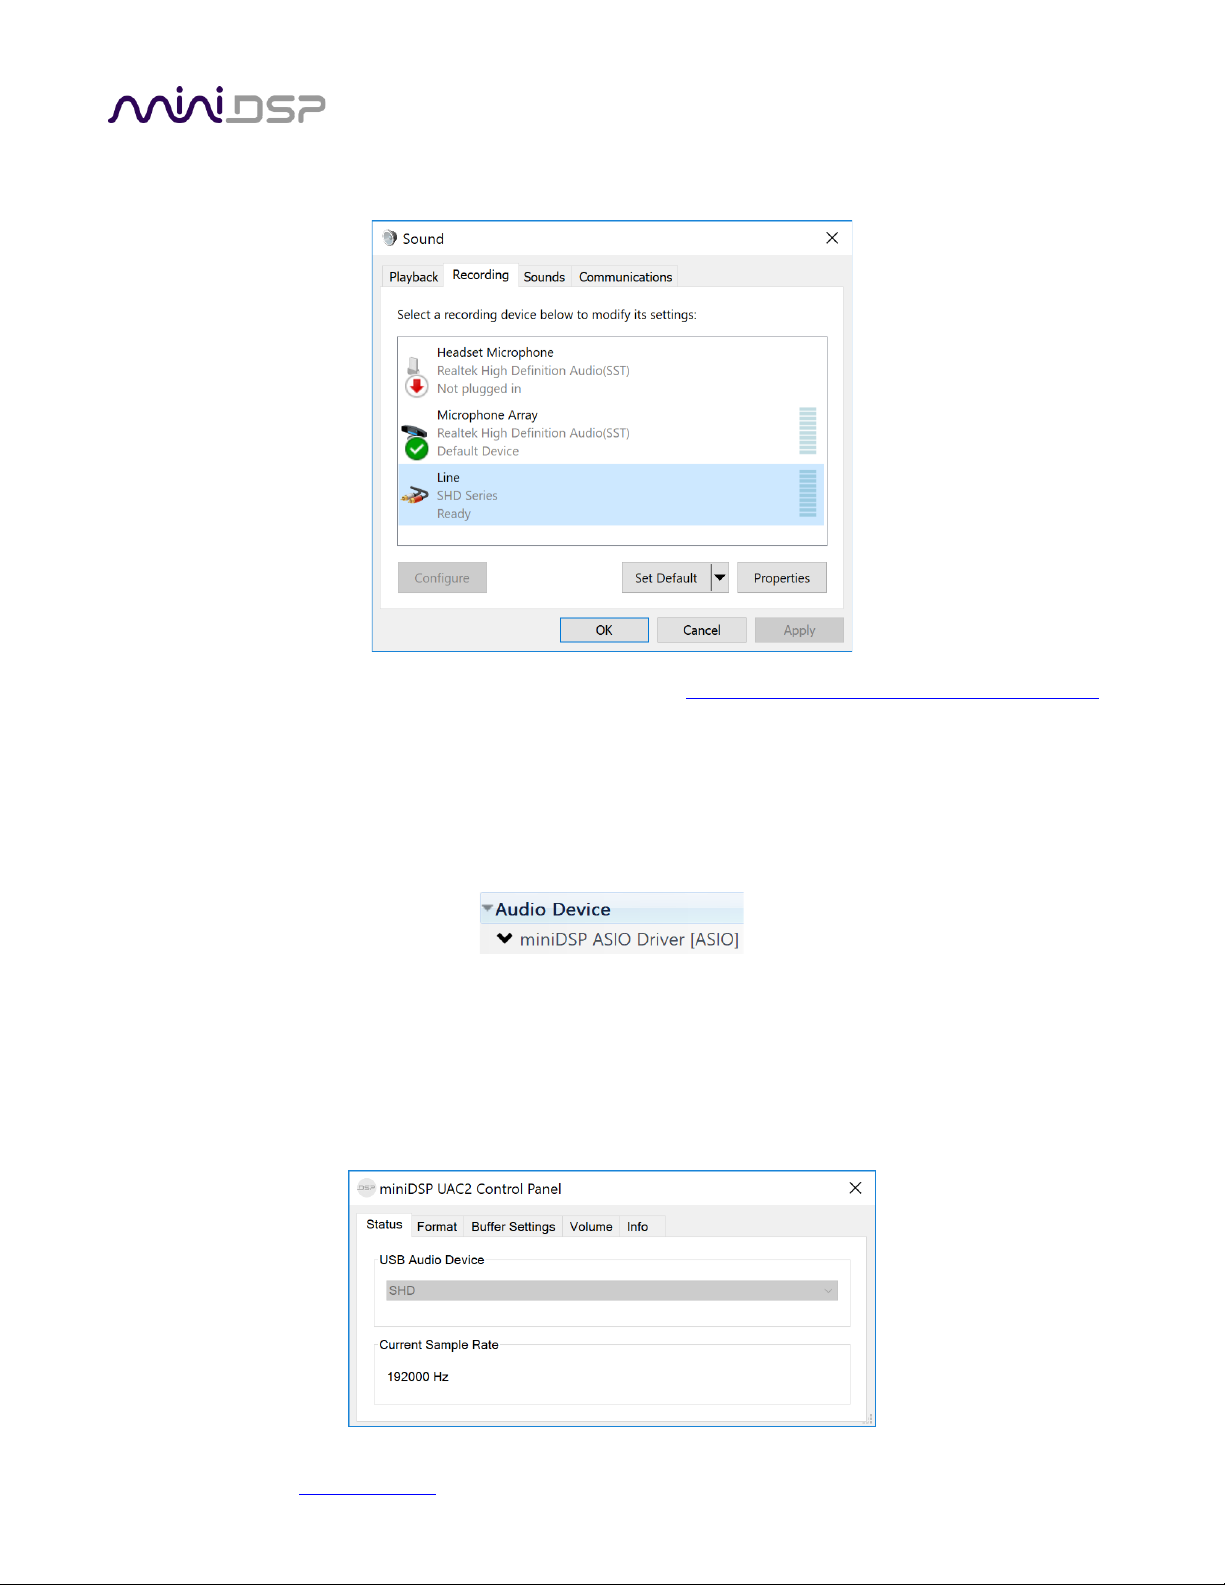
To set the SHD Series processor as the default audio output device, open the Windows Control Panel and
navigate to the Audio Devices section. On the Playback tab, select the device named “SHD Series” and click on
the “Set Default” button.
To change the bit depth and sample rate, click on the Properties button and select the Advanced tab. Drop down
the selection menu, choose the desired value and click OK. Sample rates up to 192 kHz can be selected:
Page 36
miniDSP Ltd, Hong Kong / www.minidsp.com / Features and specifications subject to change without prior notice 36
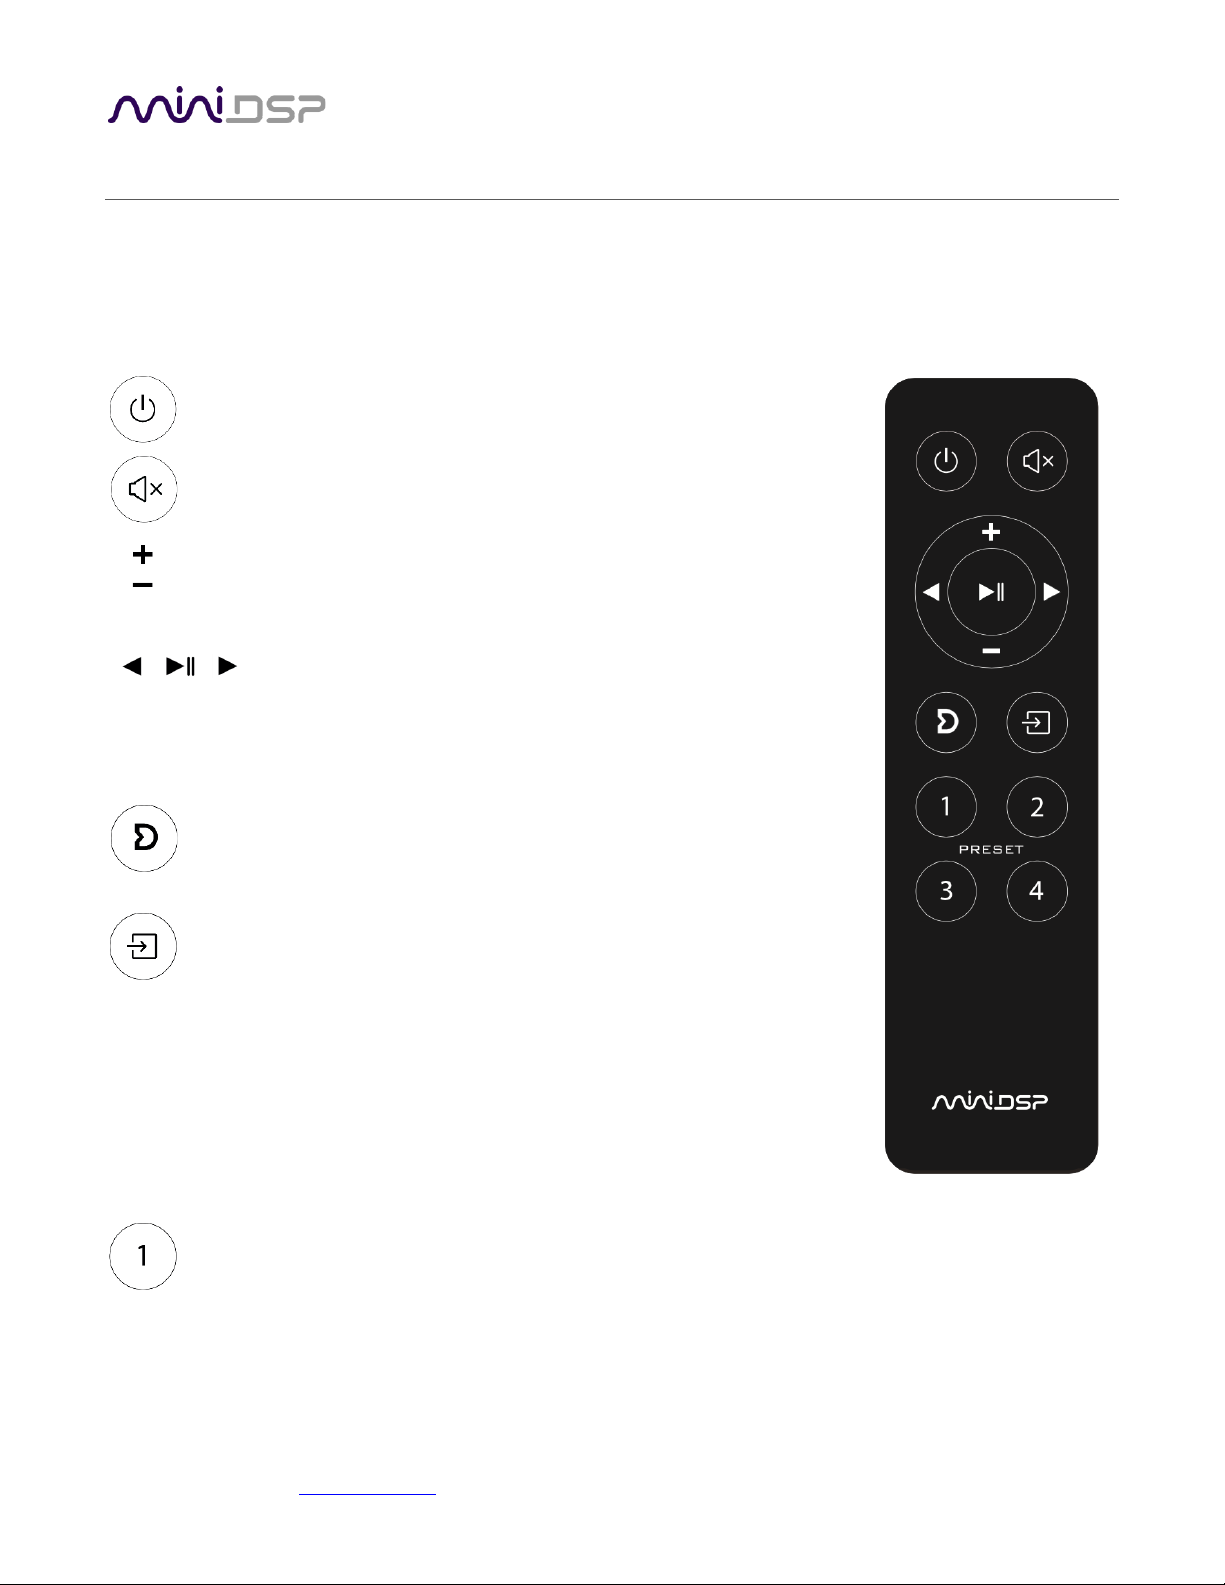
The SHD Series processor sends its four output channels to the computer over USB. These can be used to
monitor or record the output channels:
For an example application using this feature, see the app note “Analog recording with miniDSP and ocenaudio”
on our website.
4.4.2.2 ASIO
If your audio application supports ASIO audio drivers, we recommend selecting the miniDSP ASIO Driver in its
settings. This typically allows the application to automatically change sample rate. For example, in JRiver Media
Center:
4.4.2.3 miniDSP UAC2 control panel
The current settings of the SHD Series processor can be viewed by opening the miniDSP UAC2 Control Panel
from the Windows Start menu (under the miniDSP Ltd folder). This control panel allows you to view current
settings. In addition, it can be used to set buffer size, although we recommend that you leave this setting at the
default. If you are having an issue with inadequate output volume over USB playback, check the Volume tab.
Page 37
miniDSP Ltd, Hong Kong / www.minidsp.com / Features and specifications subject to change without prior notice 37
5 REMOTE CONTROL
The SHD Series processor has several options for remote control of key runtime functions.
5.1 USING THE MINIDSP REMOTE
The remote control provided with the processor controls all key runtime functions.
Standby
Put the processor into standby.
Mute
Mute and unmute audio output.
Volume
Reduce or increase the volume. Each press changes the volume in 0.5 dB.
Holding down a button will accelerate volume change to 3 dB steps.
Media control
Control Volumio audio playback. From left to right, the buttons skip back a
track, play or pause audio, and skip forward to the next track.
Dirac Live
Enable or disable Dirac Live filtering. Dirac Live filtering will be effective
only on presets for which Dirac Live filters have been loaded.
Source selection
Cycle through the input sources in order:
SHD
RCA (unbalanced analog), XLR (balanced analog), USB, LAN
(Ethernet), TOSLINK, SPDIF, AES-EBU
SHD Power and SHD Studio
USB, LAN (Ethernet), TOSLINK, SPDIF, AES-EBU
To avoid cycling through unconnected inputs, you can set valid inputs
in the User Preferences menu of the SHD plugin. See page 49.
Preset (1 through 4)
Switch to the selected preset. It takes a few seconds for the preset
selection to complete, while the processor loads the new filters from its
flash memory into the DSP.
Page 38
miniDSP Ltd, Hong Kong / www.minidsp.com / Features and specifications subject to change without prior notice 38
5.2 USING THE VOLUMIO WEB INTERFACE
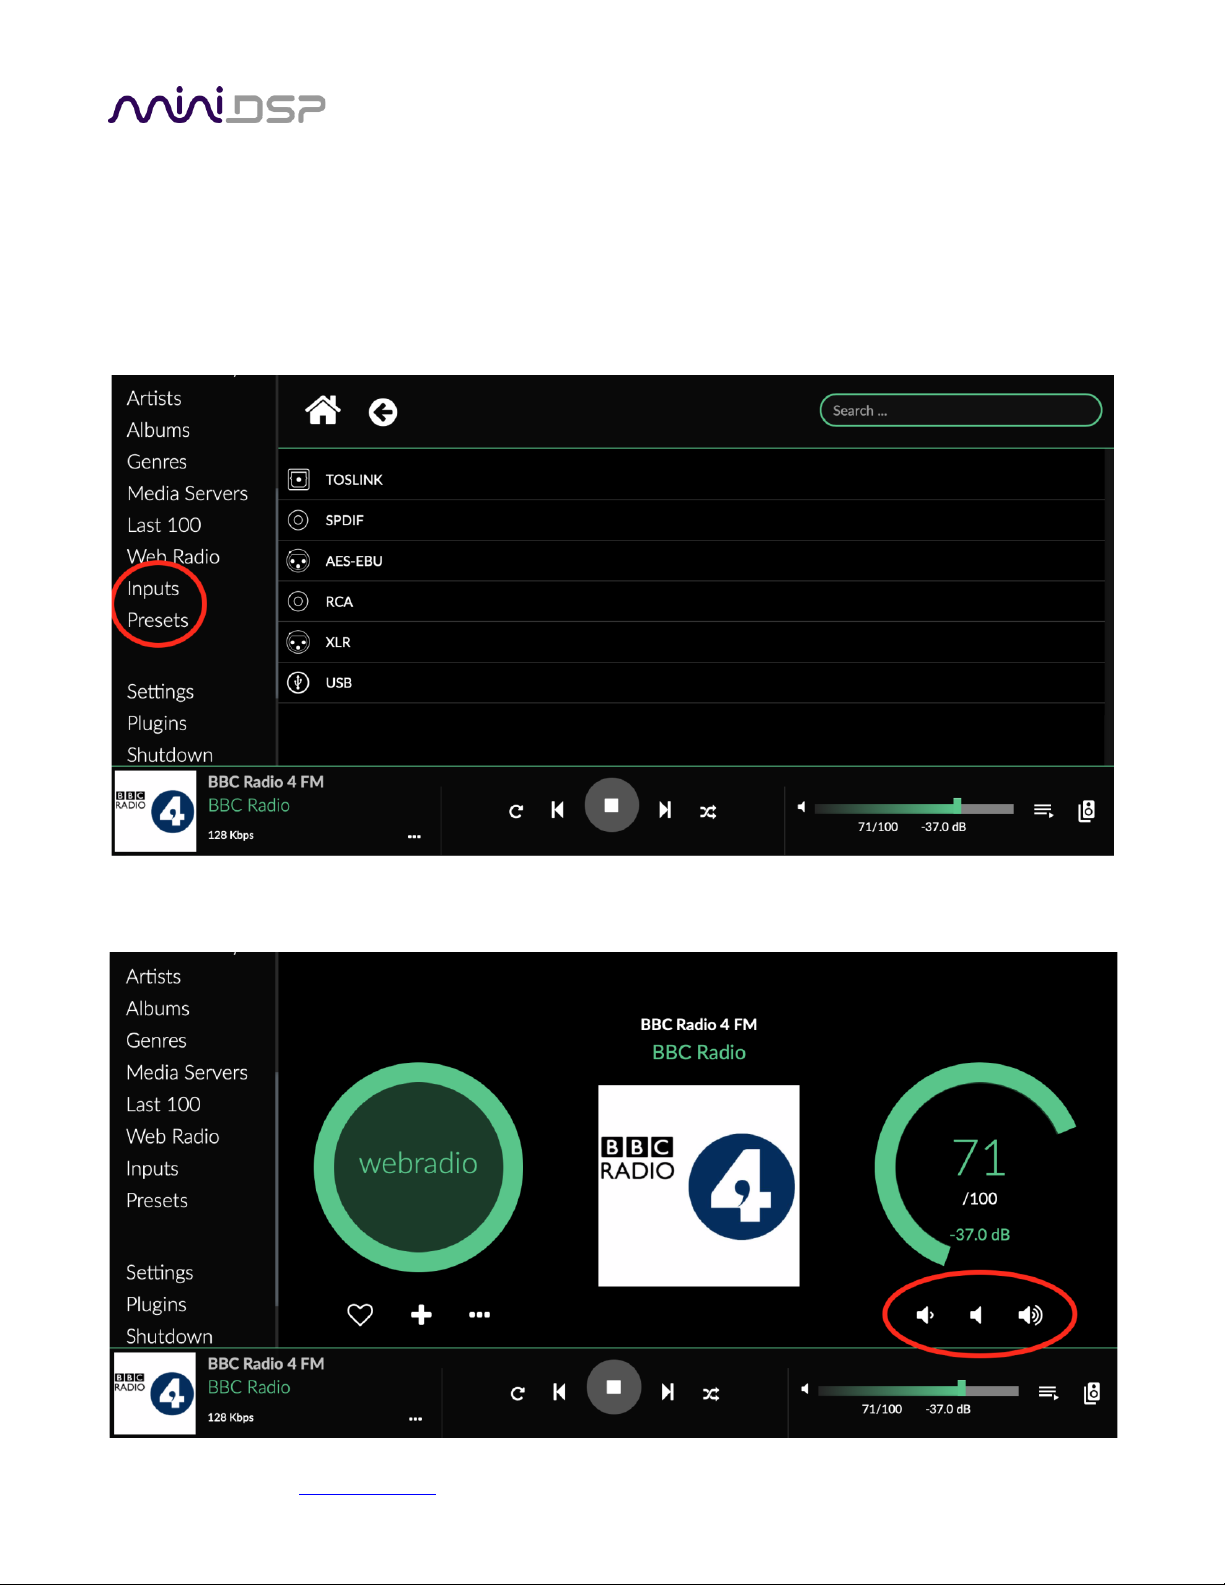
The Volumio web interface can be used to control volume, select input source, and select configuration preset.
5.2.1 Desktop device
The input source and configuration preset selection can be accessed either from the menu on the left side of the
window or from the icons on the home screen:
Volume control is always present at the lower right of the screen. By clicking on the currently playing item (BBC
Radio 4 FM in the example), a larger control is available:
Page 39
miniDSP Ltd, Hong Kong / www.minidsp.com / Features and specifications subject to change without prior notice 39
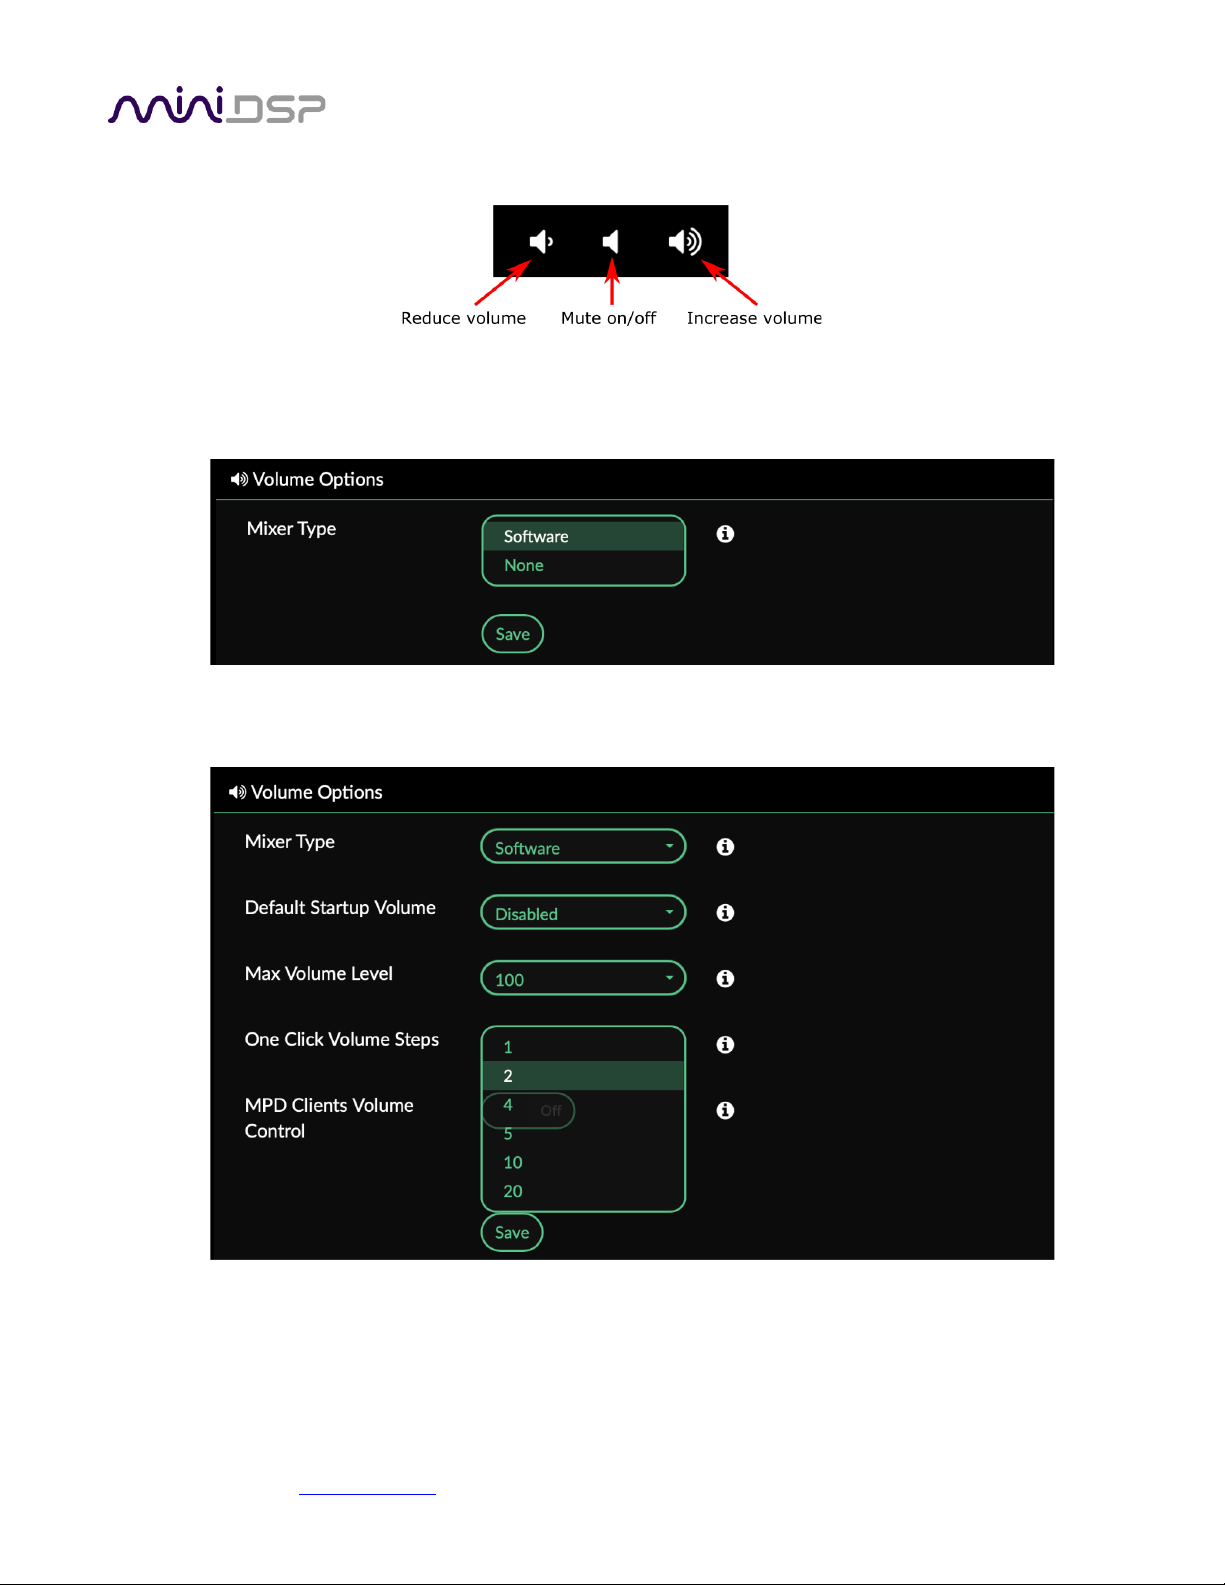
Clicking on the highlighted buttons controls the volume:
To set the size of the volume step when clicking on the buttons, go to Settings and then Playback Options. Scroll
down to the Volume Options section, set Mixer Type to “Software” and click Save.
The interface will update to show additional options. Here you can set the volume step size:
Page 40
miniDSP Ltd, Hong Kong / www.minidsp.com / Features and specifications subject to change without prior notice 40
5.3 PROGRAMMING A LOGITECH HARMONY REMOTE
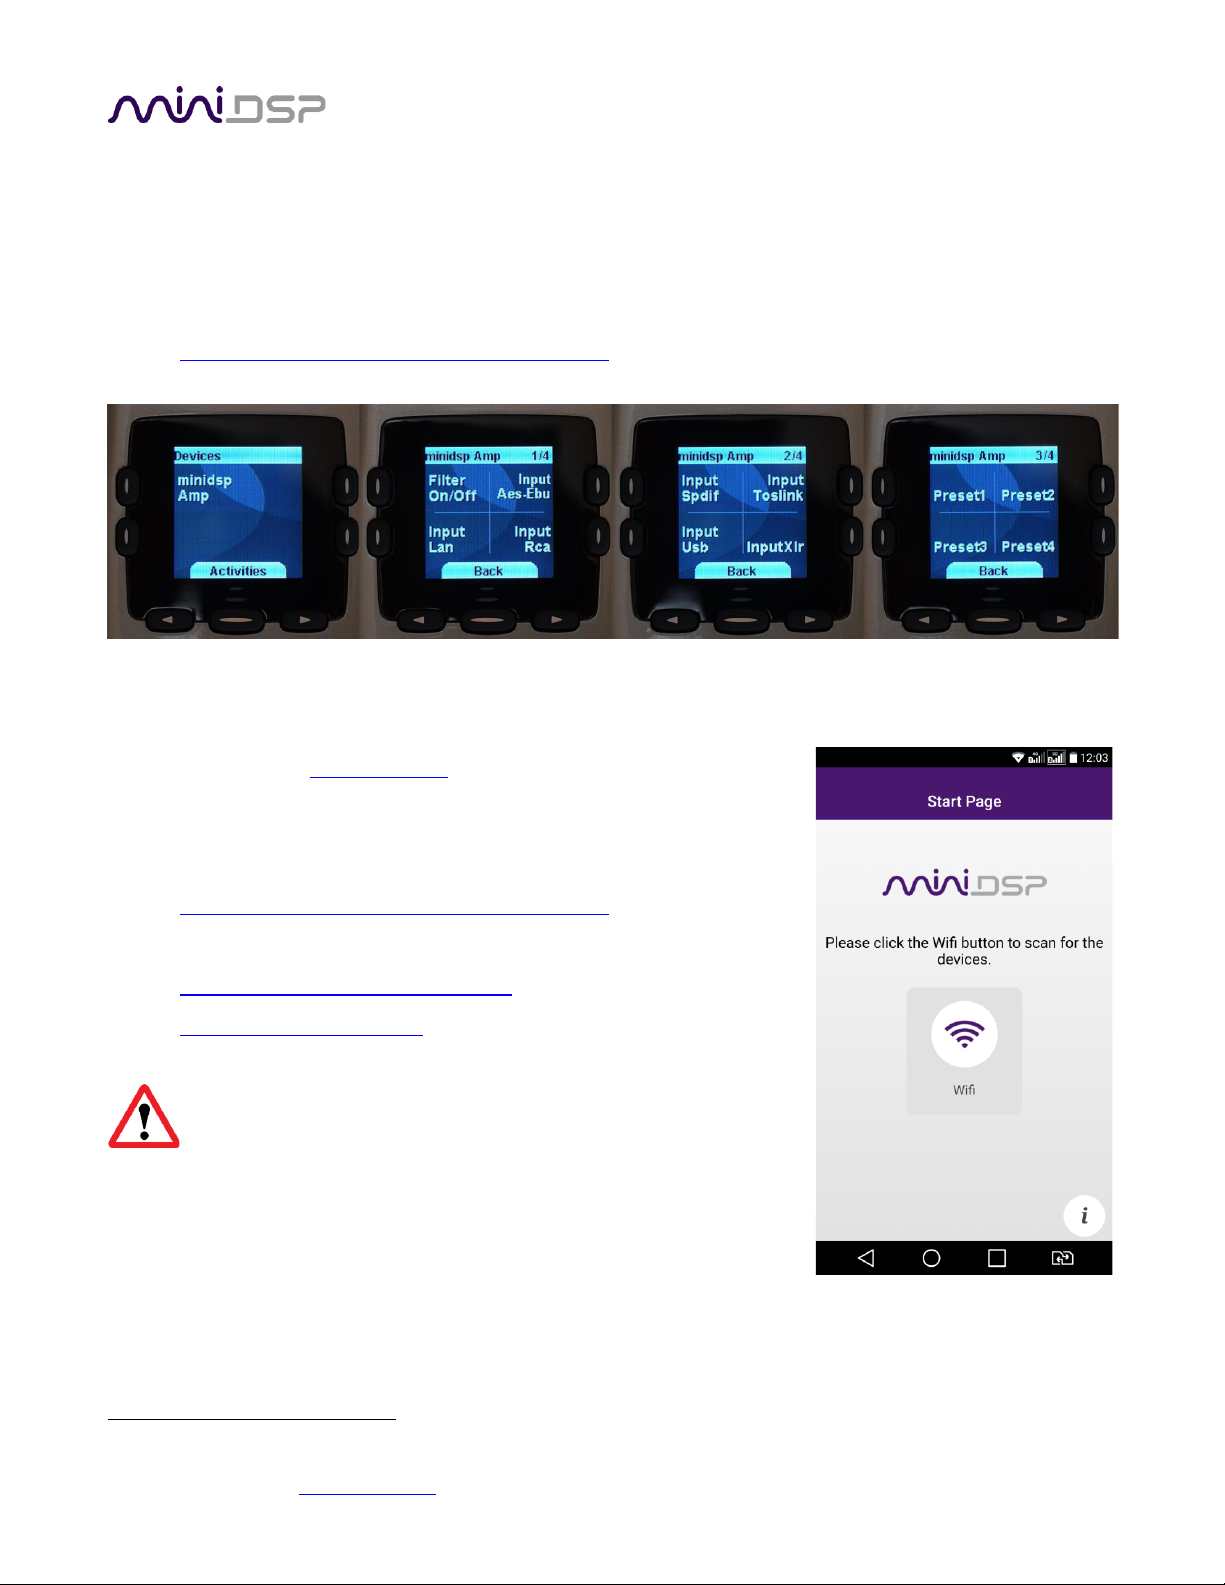
The SHD Series processor can be used with a Logitech® Harmony® remote4. The same functions as the stock
remote are programmed into the Harmony database. In addition, you can set up buttons for direct input source
selection (instead of cycling through input sources).
For more information, see this application note:
• Using a Harmony Remote with the miniDSP SHD
5.4 ANDROID/IOS CONTROL APP
With the addition of a miniDSP Wi-DG Wi-Fi to USB bridge, the SHD can be
remote-controlled from a phone or tablet running Android or iOS
(iPhone/iPad).
For more information, see this application note:
• Using Android / IoS app to control your miniDSP
If you’re keen to just get started, here are the direct links to the app:
• Android version on Google Play store
• iOS version on iTunes store
If the USB port is being used for iOS/Android app control via the
Wi-DG, it cannot be used for USB Audio streaming.
4
Logitech and Harmony are registered trademarks of Logitech.
Page 41
miniDSP Ltd, Hong Kong / www.minidsp.com / Features and specifications subject to change without prior notice 41
5.5 ALEXA VOICE CONTROL
With the addition of a miniDSP Wi-DG Wi-Fi to USB bridge and an Amazon Echo, the SHD can be remotecontrolled using voice control with Amazon Alexa.
For more information, see this application note:
• Using Amazon Alexa with miniDSP Wi-DG
If the USB port is being used for Alexa voice control via the Wi-DG, it cannot be used
for USB Audio streaming.
5.6 LEARNING THIRD-PARTY REMOTE CODES
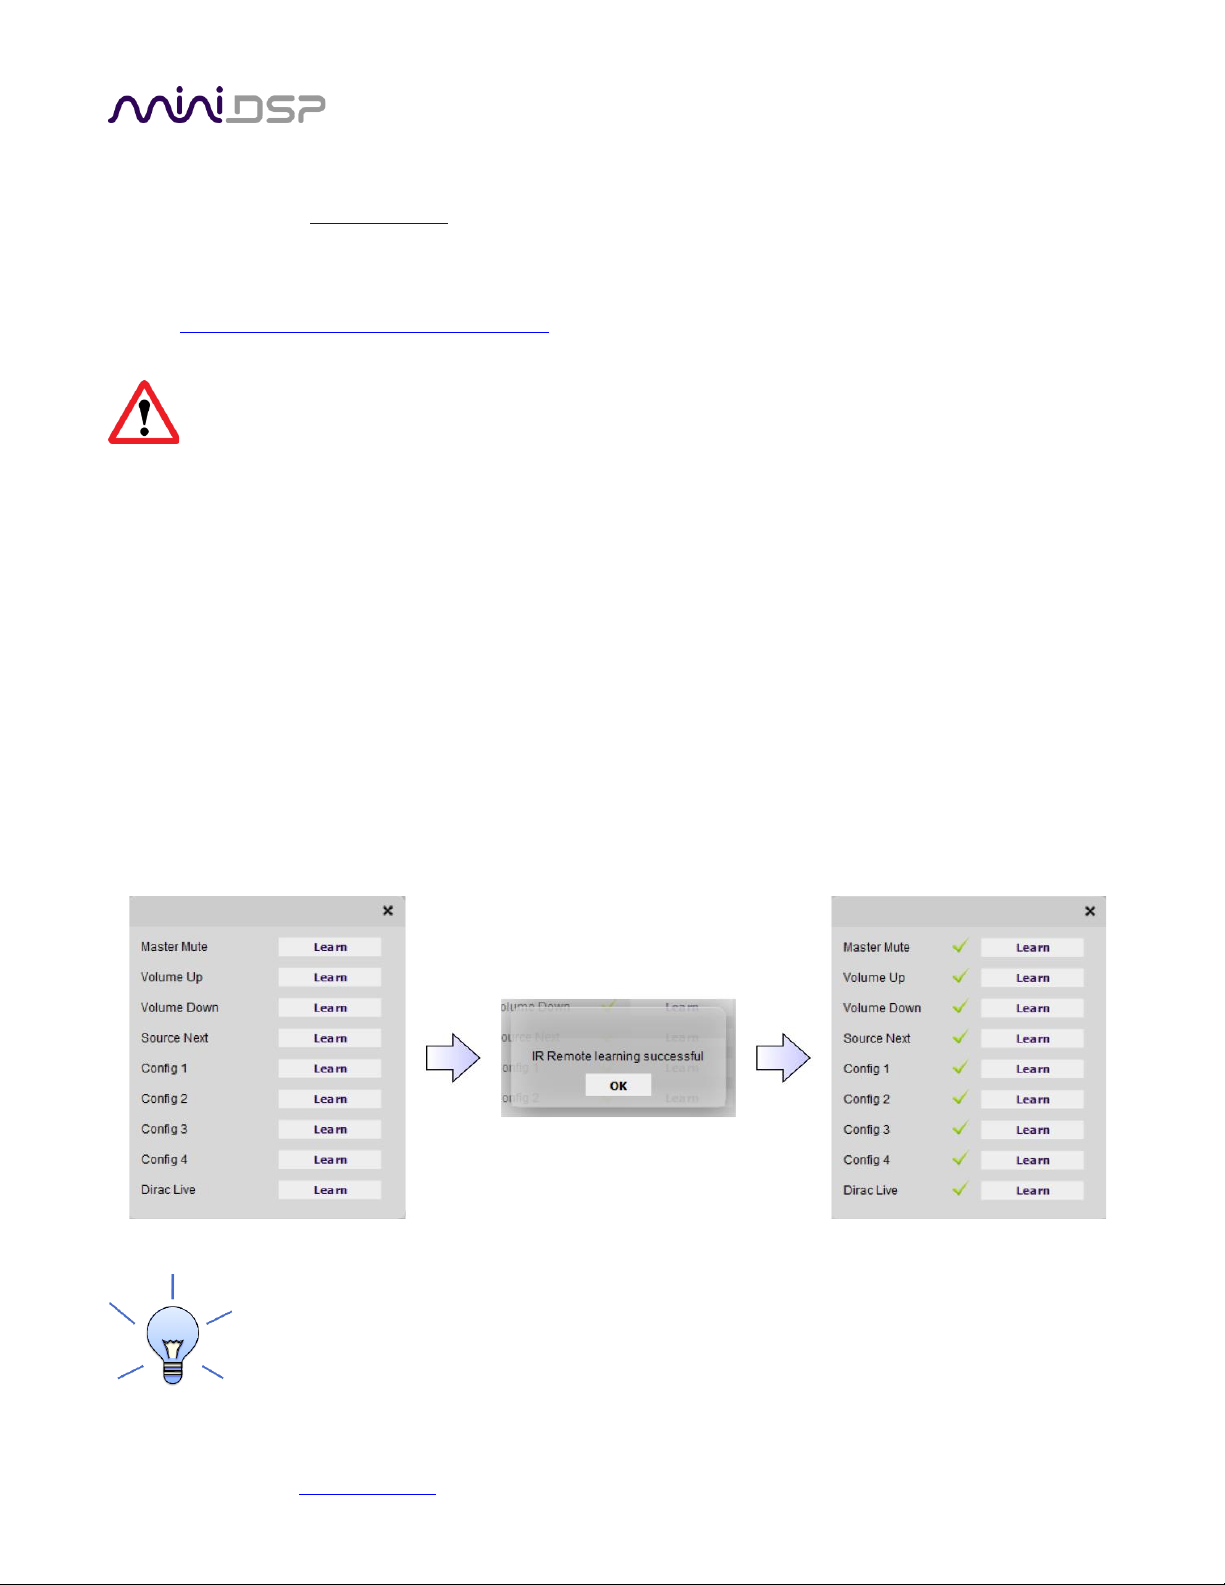
While each SHD Series processor is supplied with a basic miniDSP remote, it can also “learn” the control codes of
a third-party remote if it supports one of the following remote control codes:
• NEC
• Sony
• Philips RC6
• Apple (old silver remote only)
To initiate the learning process, start the SHD plugin and click on the Connect button. Once connected, drop
down the IR Remote menu and select IR learning. Click on the Learn button for an operation, and then press the
desired button on the remote control. If the code is accepted, the status will change to show a tick. Repeat for
all commands:
To "unlearn" a command, press the Learn button and wait for the plugin to time out. Note that
you cannot “learn” the miniDSP remote – if you program another remote and want to revert to
using the miniDSP remote, simply “unlearn” all codes. (Applies to firmware v1.18 and later.)
Page 42
miniDSP Ltd, Hong Kong / www.minidsp.com / Features and specifications subject to change without prior notice 42
5.7 LEGACY MINIDSP REMOTE
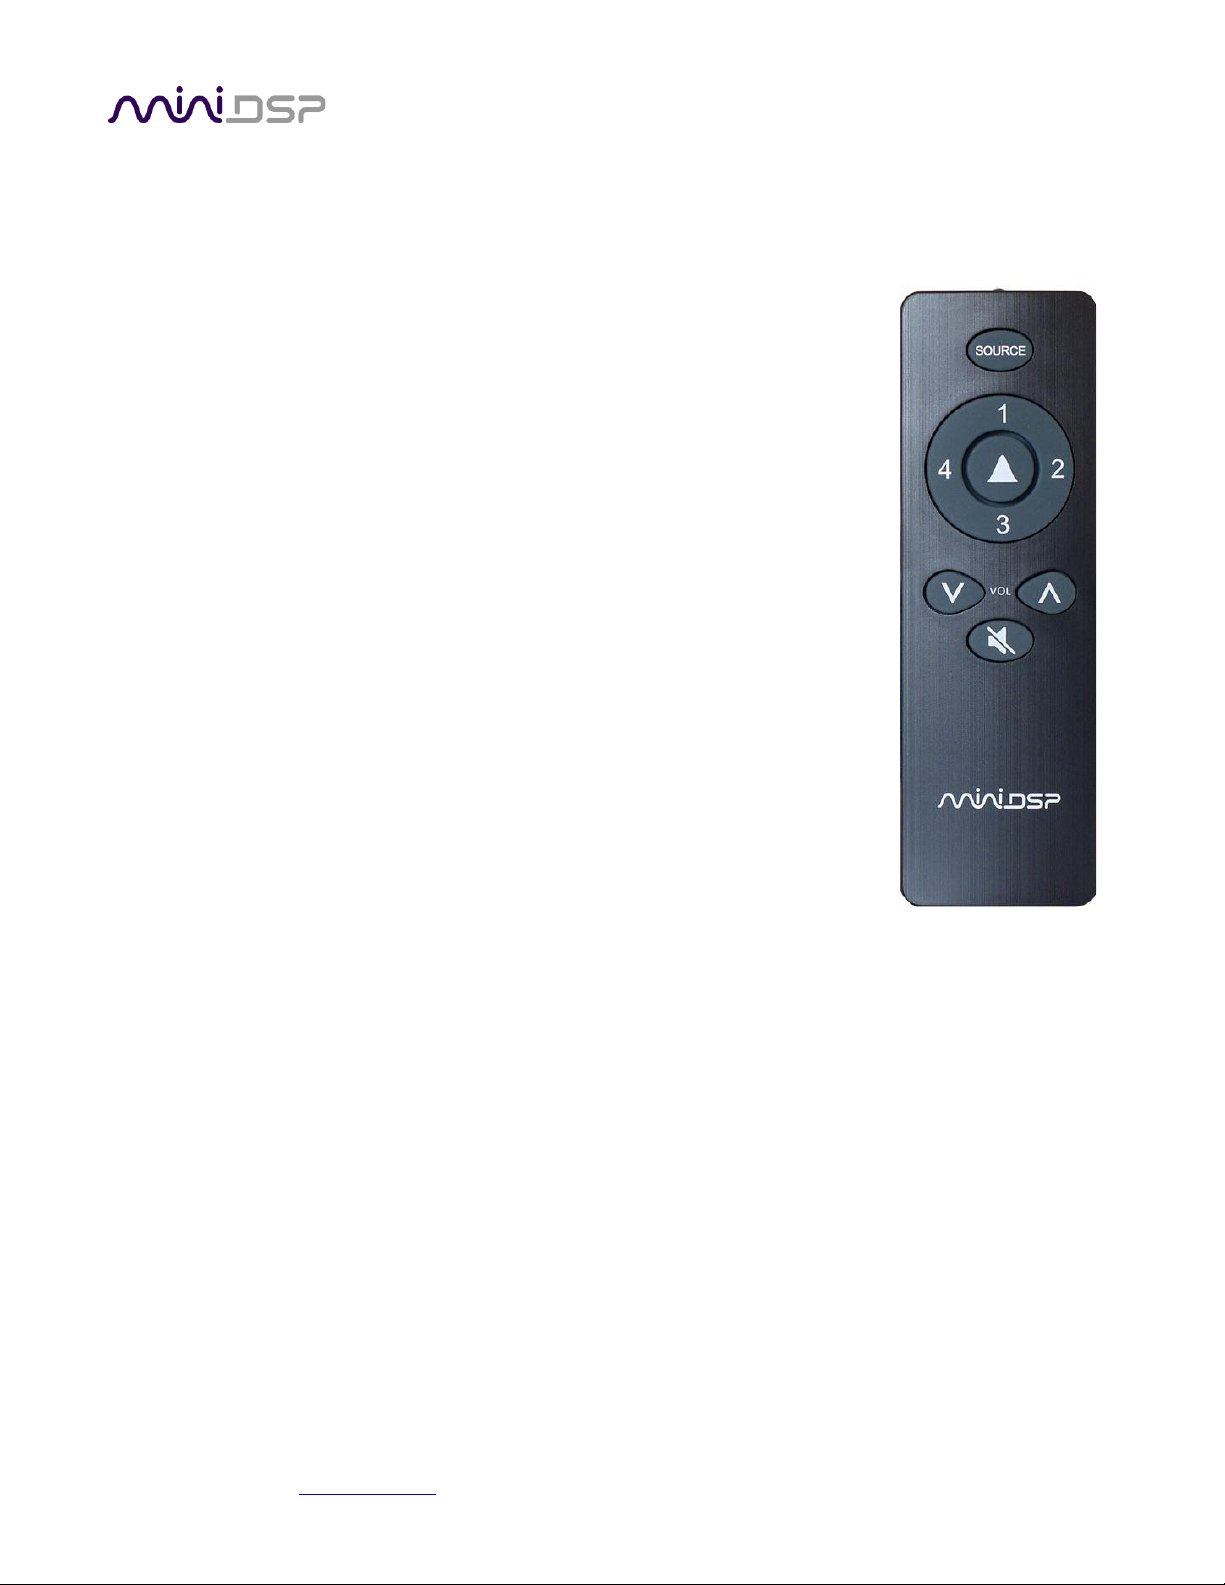
This page describes the miniDSP remote that shipped with SHD Series processors prior to June 2020.
Source
Cycle through the input sources in order:
SHD
RCA (unbalanced analog), XLR (balanced analog), USB, LAN (Ethernet),
TOSLINK, SPDIF, AES-EBU
SHD Power and SHD Studio
USB, LAN (Ethernet), TOSLINK, SPDIF, AES-EBU
To avoid cycling through unconnected inputs, you can set valid inputs in the
User Preferences menu of the SHD plugin. See page 49.
1, 2, 3, 4
Switch to the selected preset. Note that it takes a few seconds for the preset
selection to complete, while the processor loads the new filters from its flash
memory into the DSP.
[Bell]
Enable or disable Dirac Live filtering. Dirac Live filtering will be effective only on
presets for which Dirac Live filters have been loaded.
Vol
Reduce or increase the volume. Each press changes the volume in 0.5 dB.
Holding down a button will accelerate volume change to 3 dB steps.
Mute
Mute and unmute audio output.
Page 43
miniDSP Ltd, Hong Kong / www.minidsp.com / Features and specifications subject to change without prior notice 43
6 THE SHD PLUGIN
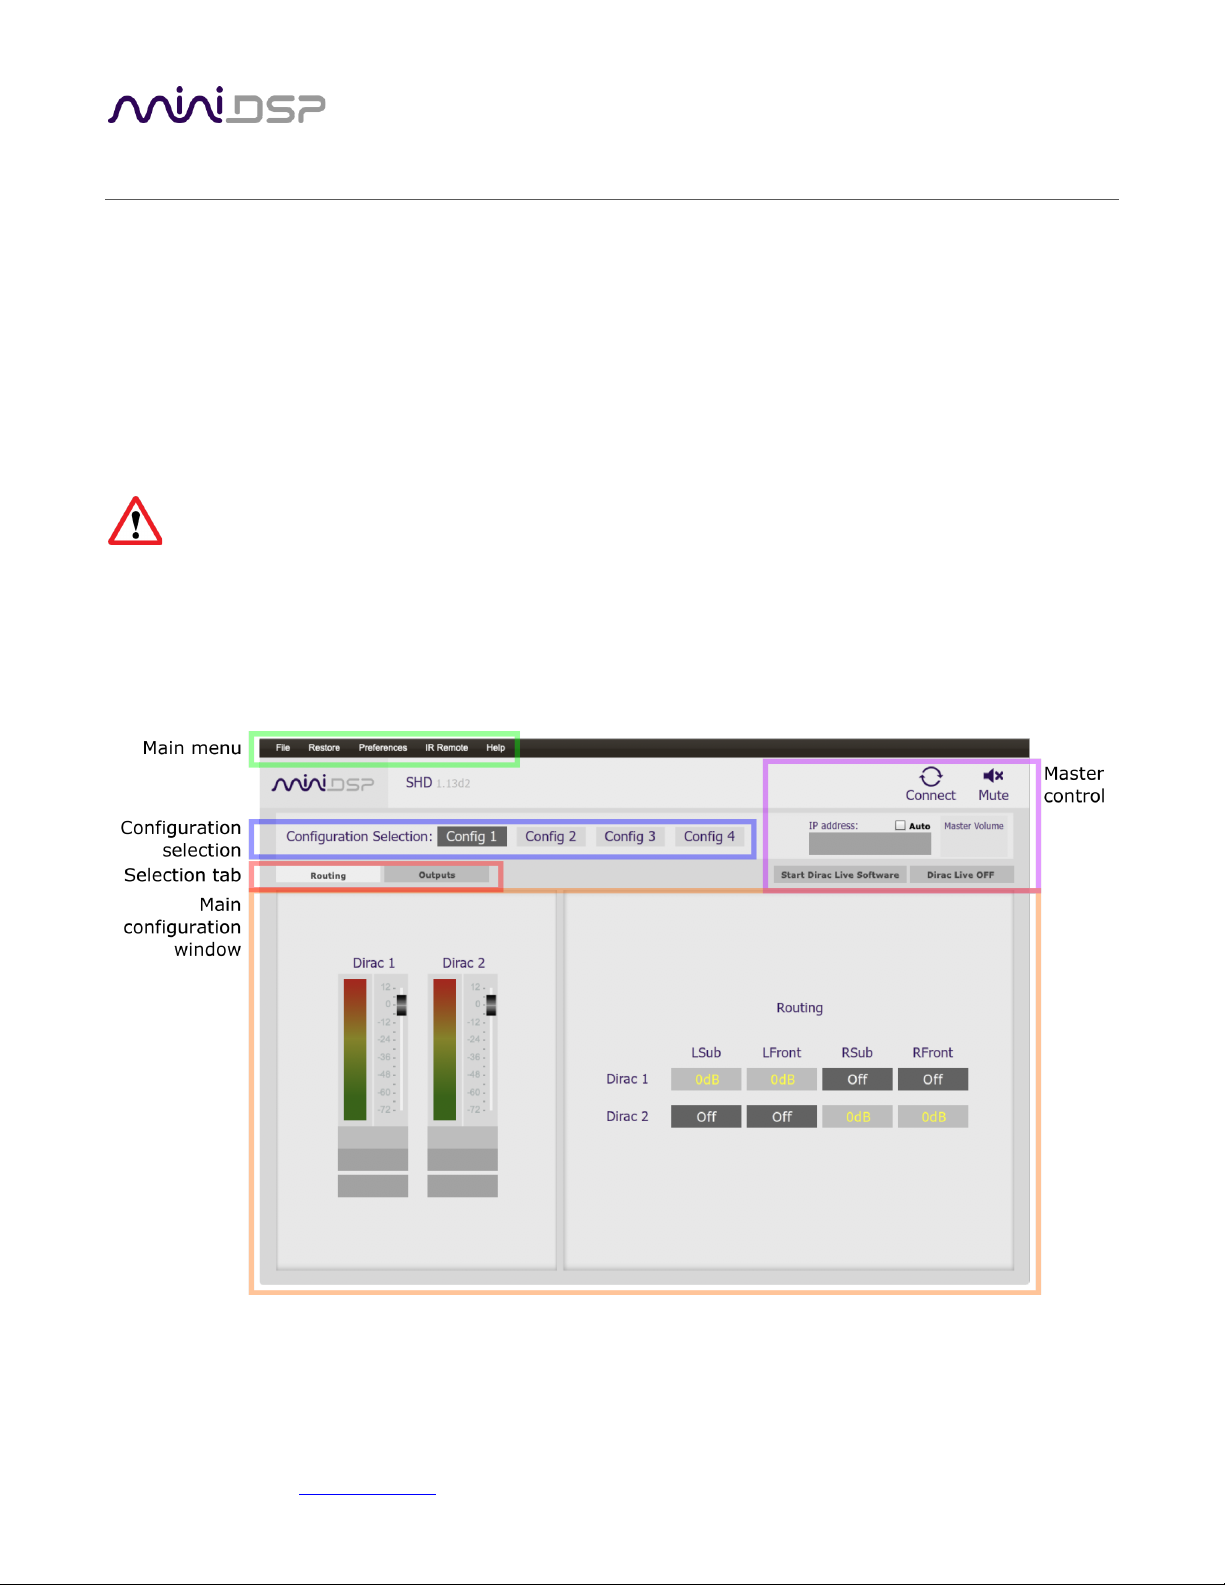
The SHD plugin user interface application is one of two software programs that are used to configure the SHD
Series processor. It is used to configure miniDSP’s powerful back-end processing and for maintenance functions
on the processor.
The SHD plugin is also used to start the separate Dirac Live application that does acoustic measurements and
generates the room correction filters.
This section provides a summary of the plugin and how to use it. For full details of the processing blocks
mentioned, see Section 8.
During initial configuration of the processor, it is strongly recommended that any connected
amplification be powered off.
6.1 PLUGIN USER INTERFACE
The main user interface of the plugin has several areas, indicated in this screenshot:
Page 44
miniDSP Ltd, Hong Kong / www.minidsp.com / Features and specifications subject to change without prior notice 44
6.2 CONNECTING TO THE PROCESSOR
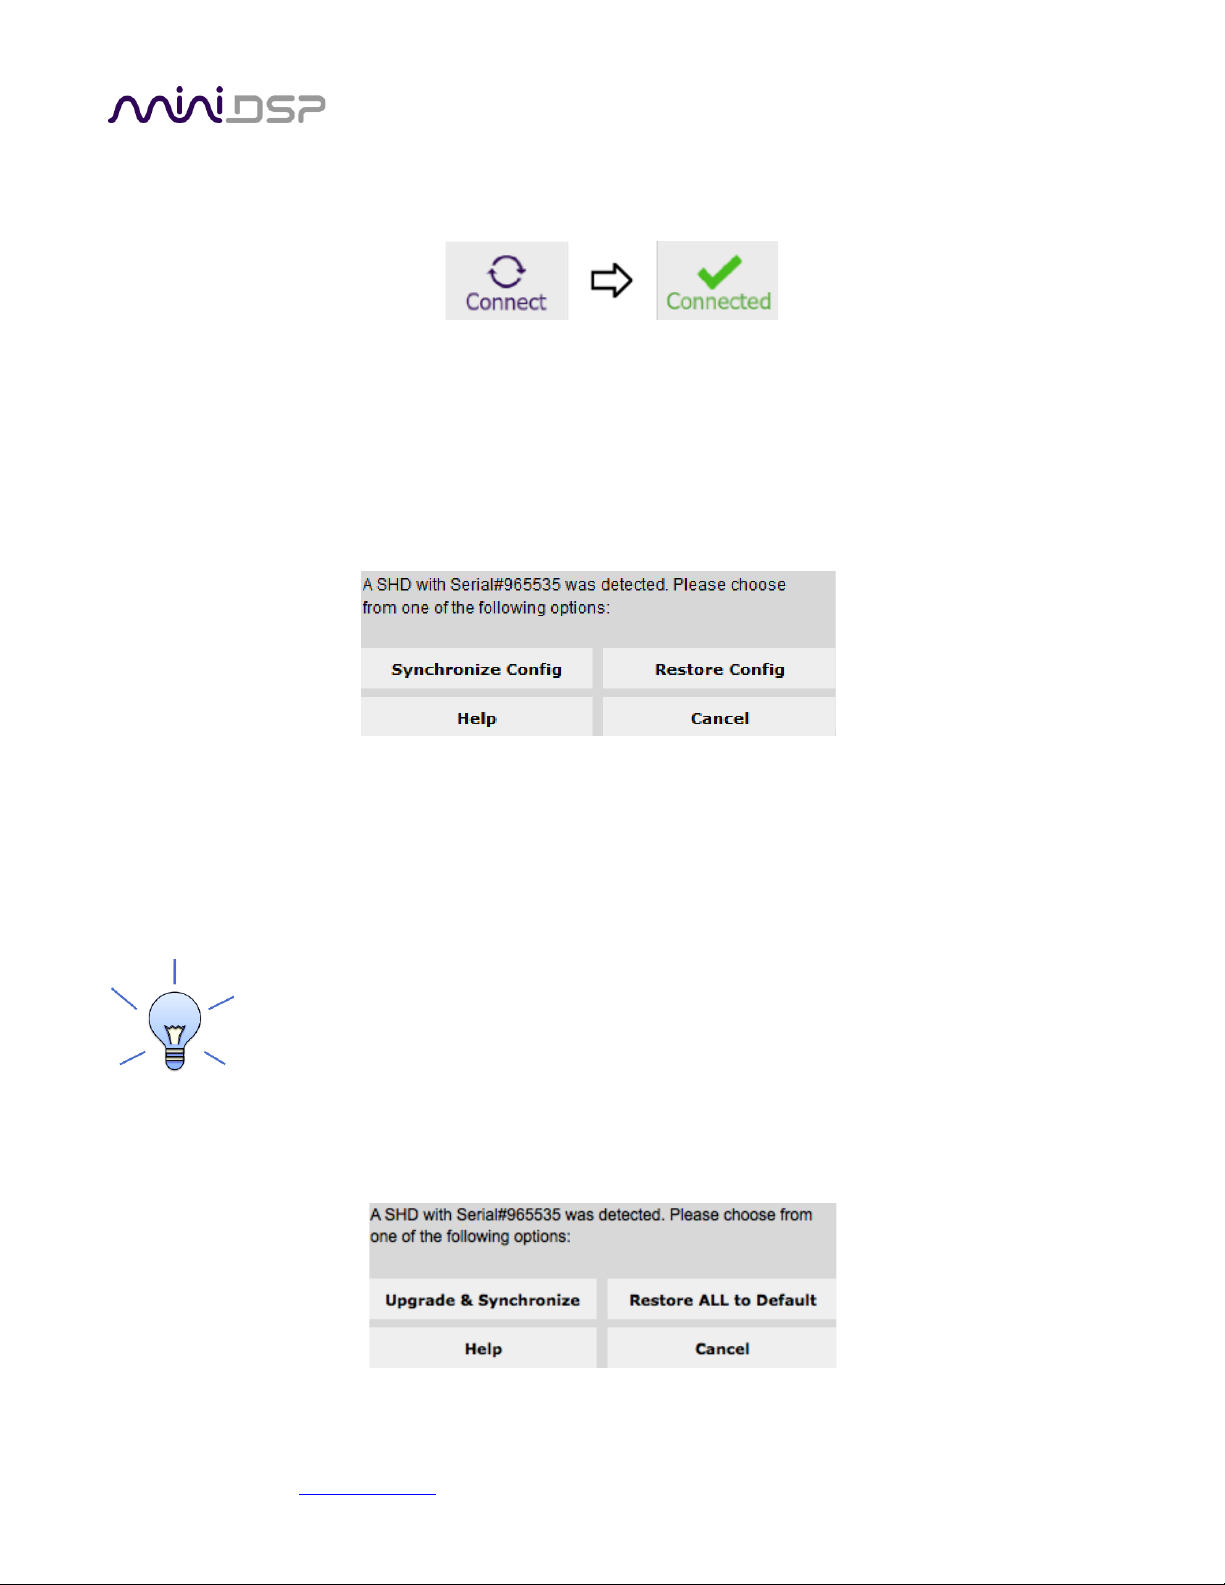
Connect the SHD Series processor to a USB 2.0 port on your computer. Then click on the Connect button:
Once connected, the button changes to a green tick. For the sake of brevity, this is referred to as “online”
whereas the disconnected state with the circular arrows is referred to as “offline.” When the plugin is online,
any changes made in the SHD plugin are immediately transferred to the processor and will be heard in the audio
signal. This is also referred to as “synchronized.”
If the processing parameters (routing, parametric EQ, crossovers and so on) stored on the computer do not
match those stored in the processor, the synchronization dialog box will appear. The first time you connect, click
on Restore Config. Thereafter, you will typically click on Synchronize Config.
Restore Config
Restore the parameters in the currently selected preset to factory defaults. Note that Dirac Live filters are
not reset. After restoring, the plugin is online.
Synchronize Config
Download all parameters from the SHD plugin to the processor. Note that Dirac Live filters are not
changed. After downloading the parameters, the plugin is online.
When getting started with the plugin, to save doing this for each of the four configuration slots,
drop down the Restore menu and select Restore all to Default.
If you have just upgraded the plugin, the following dialog box may appear. It is similar to the previous options,
but also upgrades the processor’s internal data and software. The Restore ALL to Default option will reset all
four presets to default.
Page 45
miniDSP Ltd, Hong Kong / www.minidsp.com / Features and specifications subject to change without prior notice 45
6.3 KEY FEATURES
This section summarizes the key features of the plugin.
6.3.1 Master control
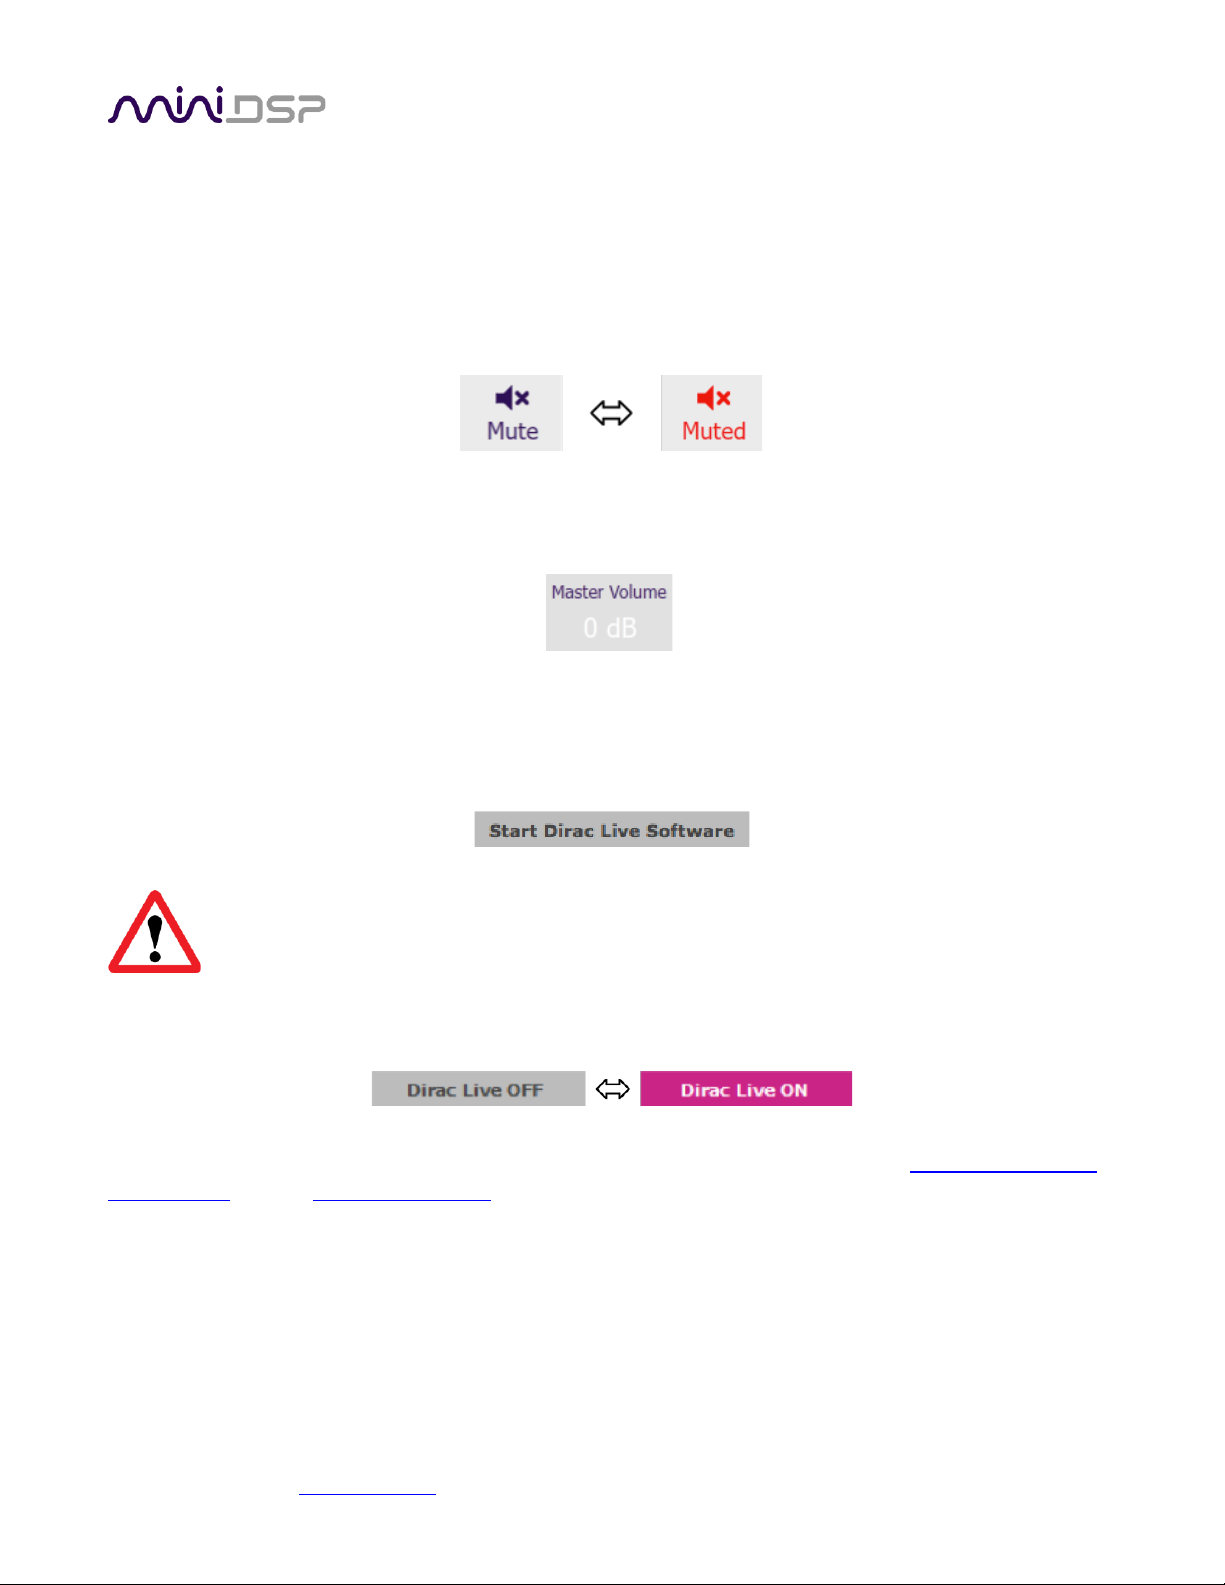
When the plugin is online, the items in the Master Control area are active. The Mute button disables all audio
output:
The Master Volume display shows the current volume setting. The master volume can be set by clicking here
and typing a new value:
The Start Dirac Live Software button starts the separate Dirac Live application. When this button is pressed, the
SHD plugin will disconnect from the SHD Series processor and then start up Dirac Live.
You must start the Dirac Live application from within the SHD plugin using the Start Dirac Live
Software button. If you open the Dirac Live application by itself, it will not be able to detect the SHD
Series processor.
The Dirac Live button turns Dirac Live processing on and off:
The IP Address and Auto fields are for networked control of the plugin using the miniDSP WI-DG Wifi/Ethernet
to USB bridge. See the Wi-DG User Manual for details.
Page 46
miniDSP Ltd, Hong Kong / www.minidsp.com / Features and specifications subject to change without prior notice 46
6.3.2 Configuration/preset selection
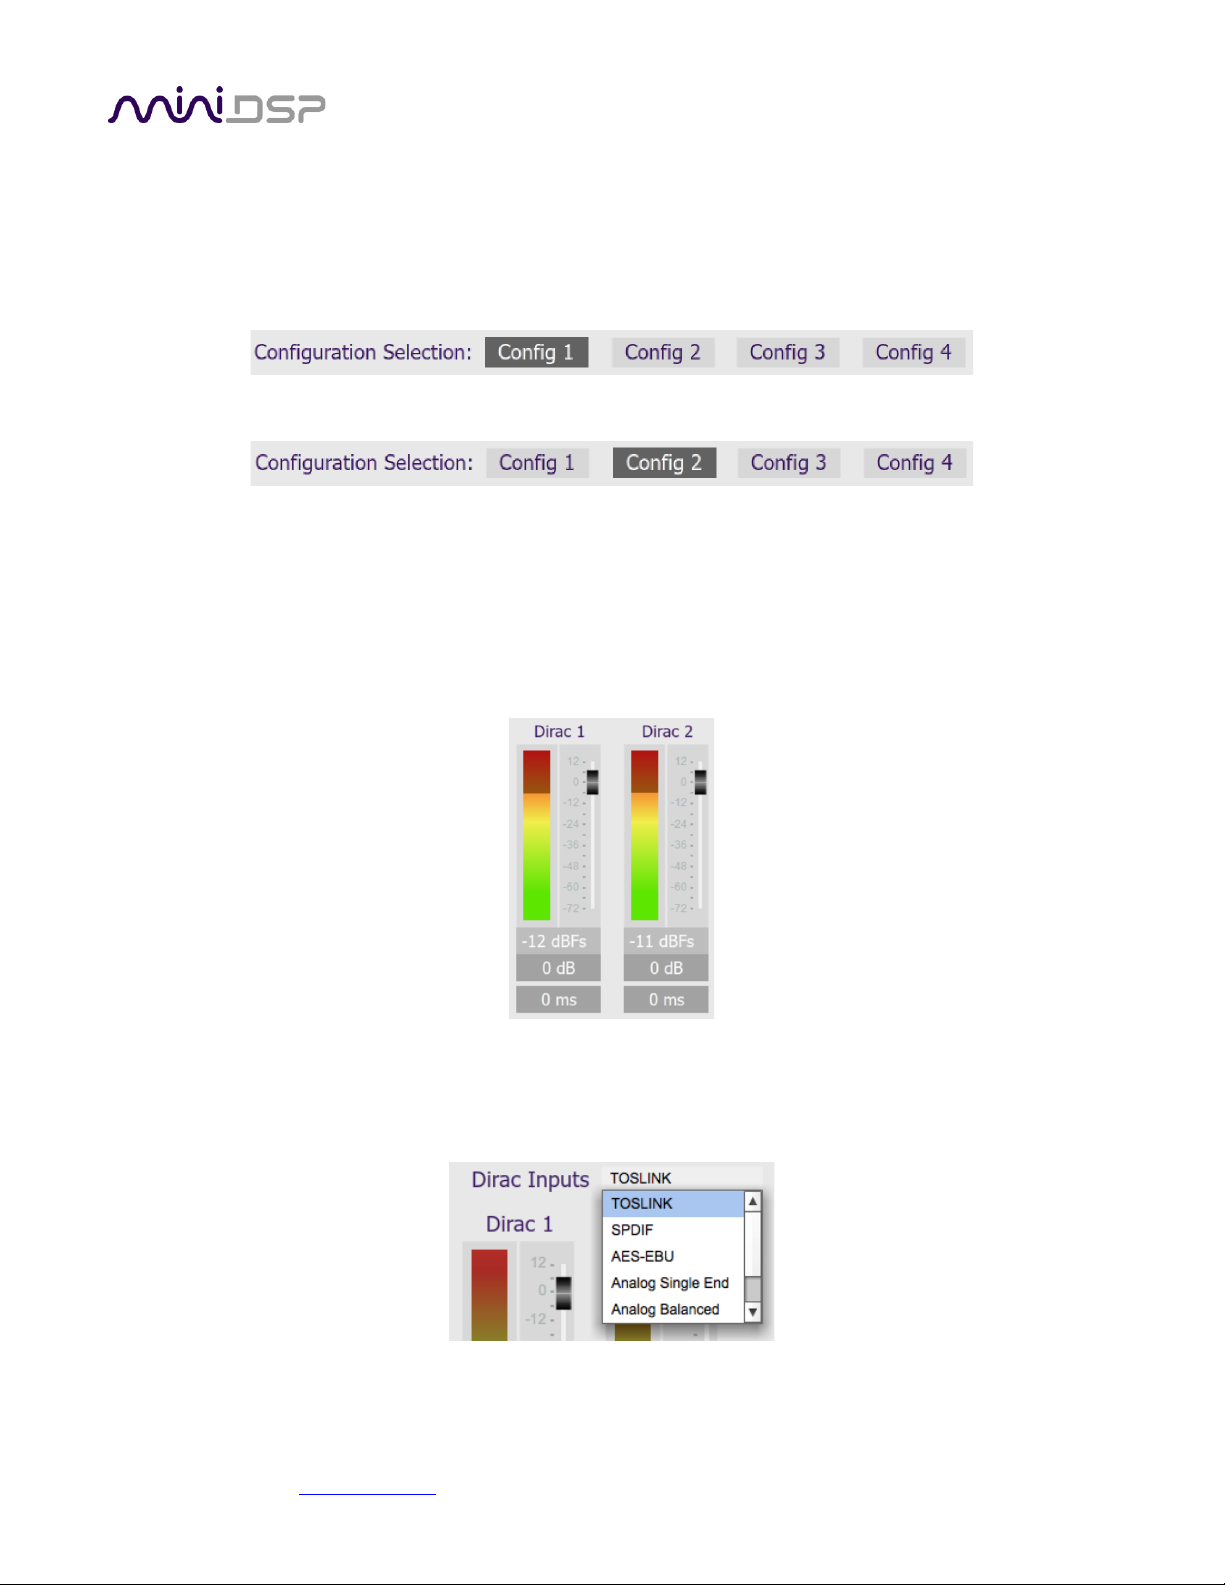
The data that controls the back-end audio processing of the SHD Series processor is called a configuration. This
includes crossovers, parametric EQ and routing. It does not include master volume or mute status.
Four configurations are stored onboard as presets. The currently selected configuration preset is indicated by a
dark background:
To switch to a different configuration preset, just click on the desired button:
When the configuration preset is changed, the corresponding Dirac Live filters are also loaded into the
processor’s memory.
6.3.3 Inputs
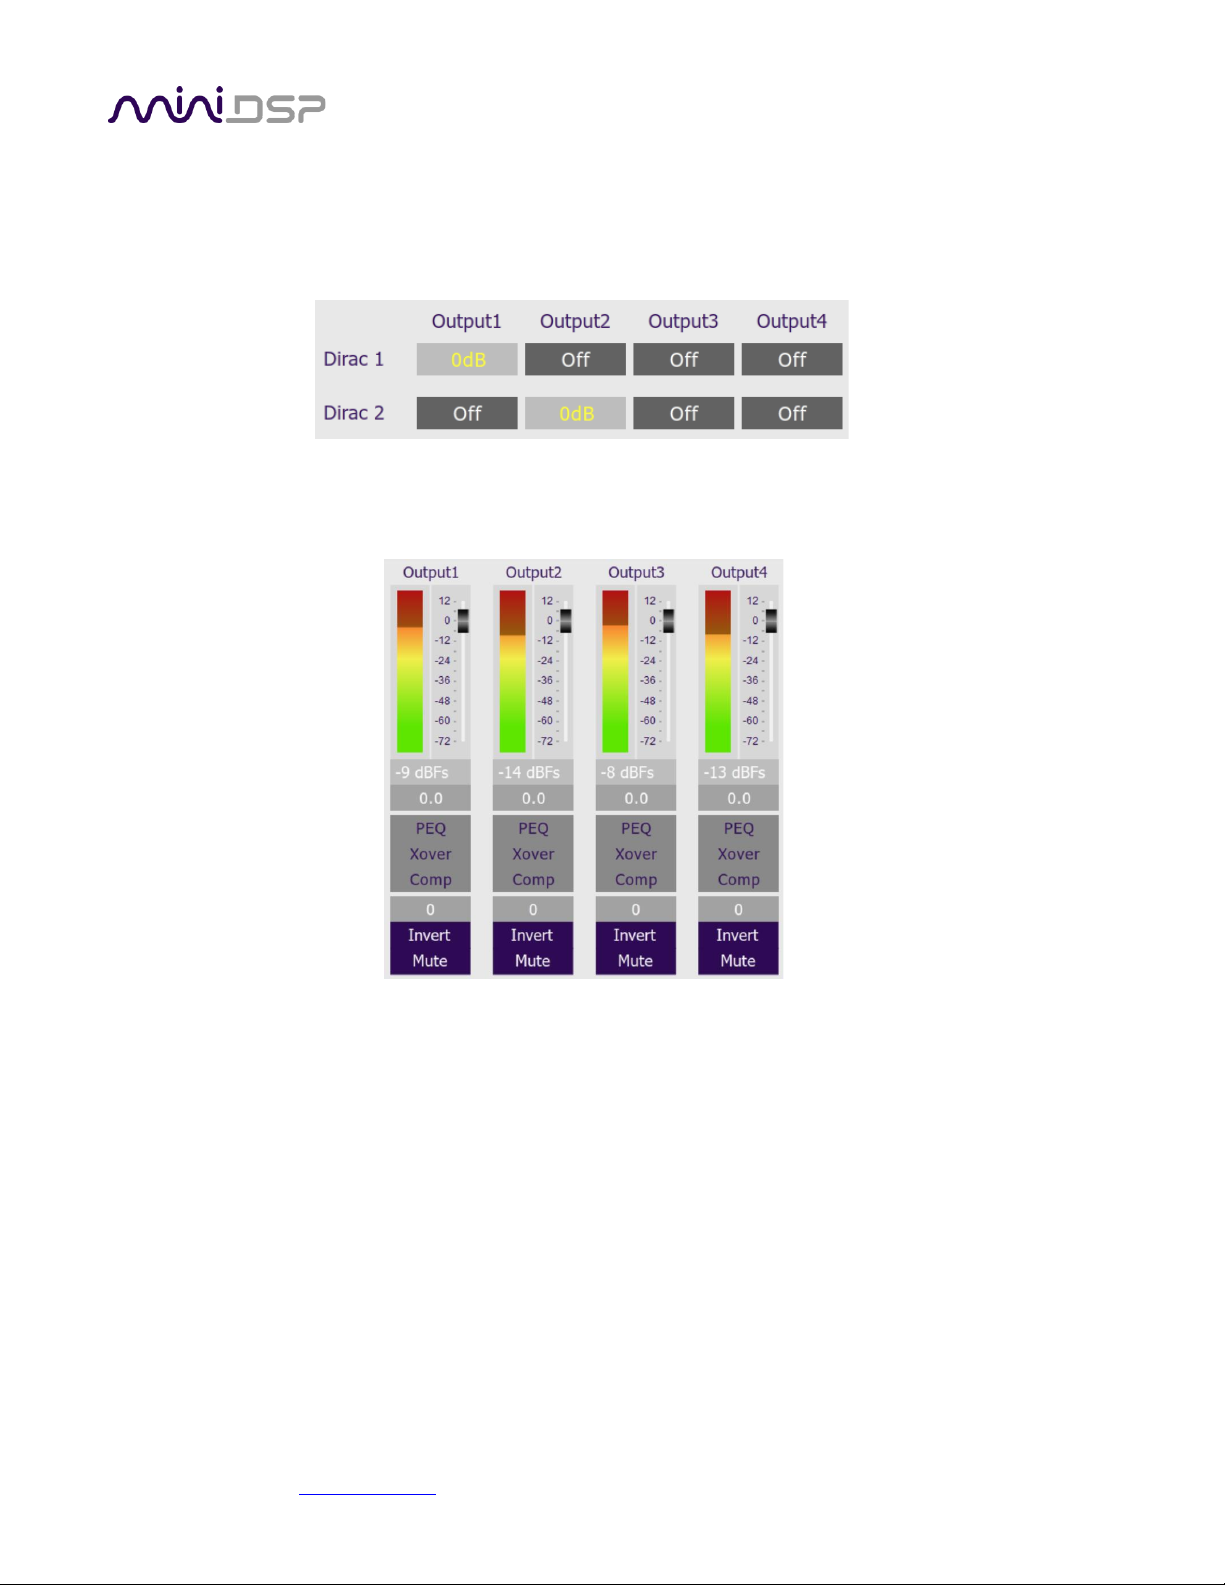
The Routing tab displays two input channel status strips. Note that these are status only – there are no useradjustable controls. They are active only when the plugin is online.
6.3.4 Input selection
When the plugin is online, the currently selected input appears next to the “Dirac Inputs” label. Click on the
current input name to drop down a selector menu, from which you can select a different input.
Page 47
miniDSP Ltd, Hong Kong / www.minidsp.com / Features and specifications subject to change without prior notice 47
6.3.5 Routing matrix
The Routing matrix directs input channels (along the left) to output channels (along the top). Click on the button
at a cross-point to enable or disable routing from the corresponding input to output. Both inputs can be mixed
to an output, with the mix level set individually for each input.
6.3.6 Outputs
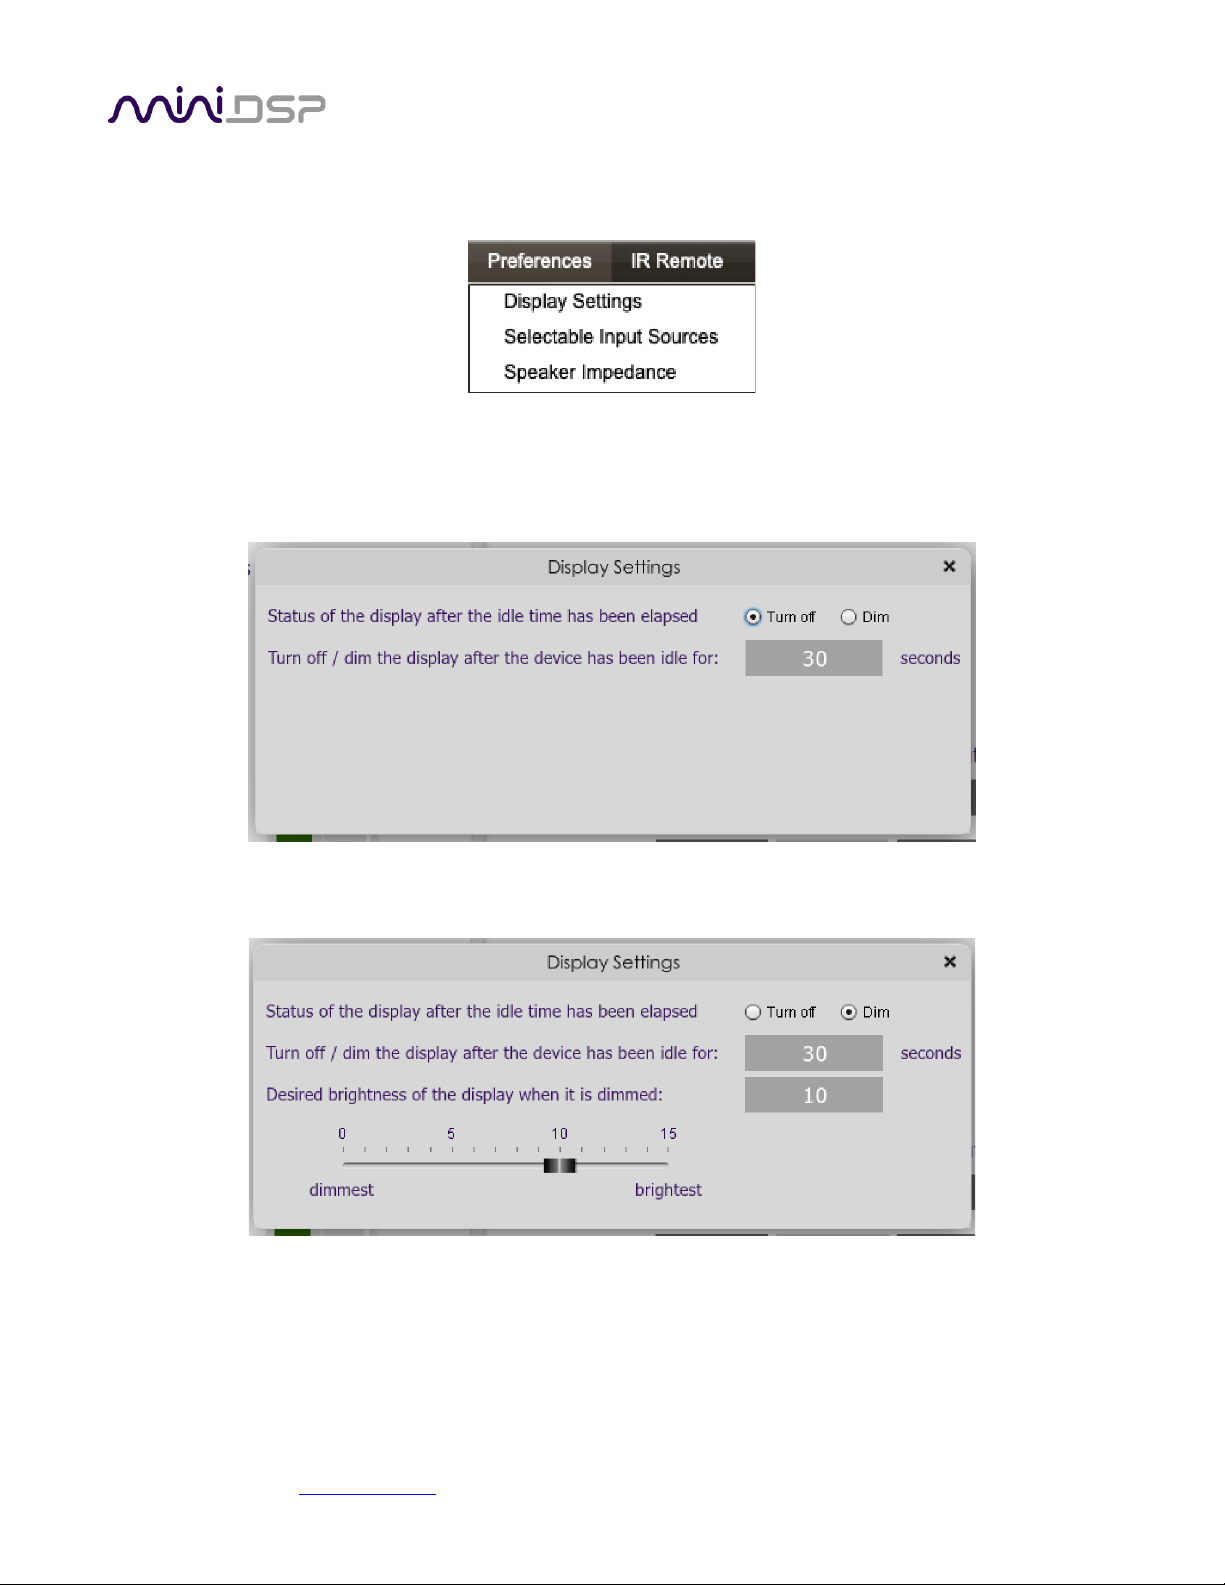
The Outputs tab displays a row of four output channel control strips. All output channels are identical.
Each channel has an individual gain adjustment slider and a graphical and numerical display of the current signal
level on that channel. A comprehensive set of signal processing functions is accessed with the buttons PEQ
(parametric EQ), Xover (crossover) and Comp (compressor/limiter). Each channel also has individual time delay,
invert, and mute.
Page 48
miniDSP Ltd, Hong Kong / www.minidsp.com / Features and specifications subject to change without prior notice 48
6.4 SETTING USER PREFERENCES
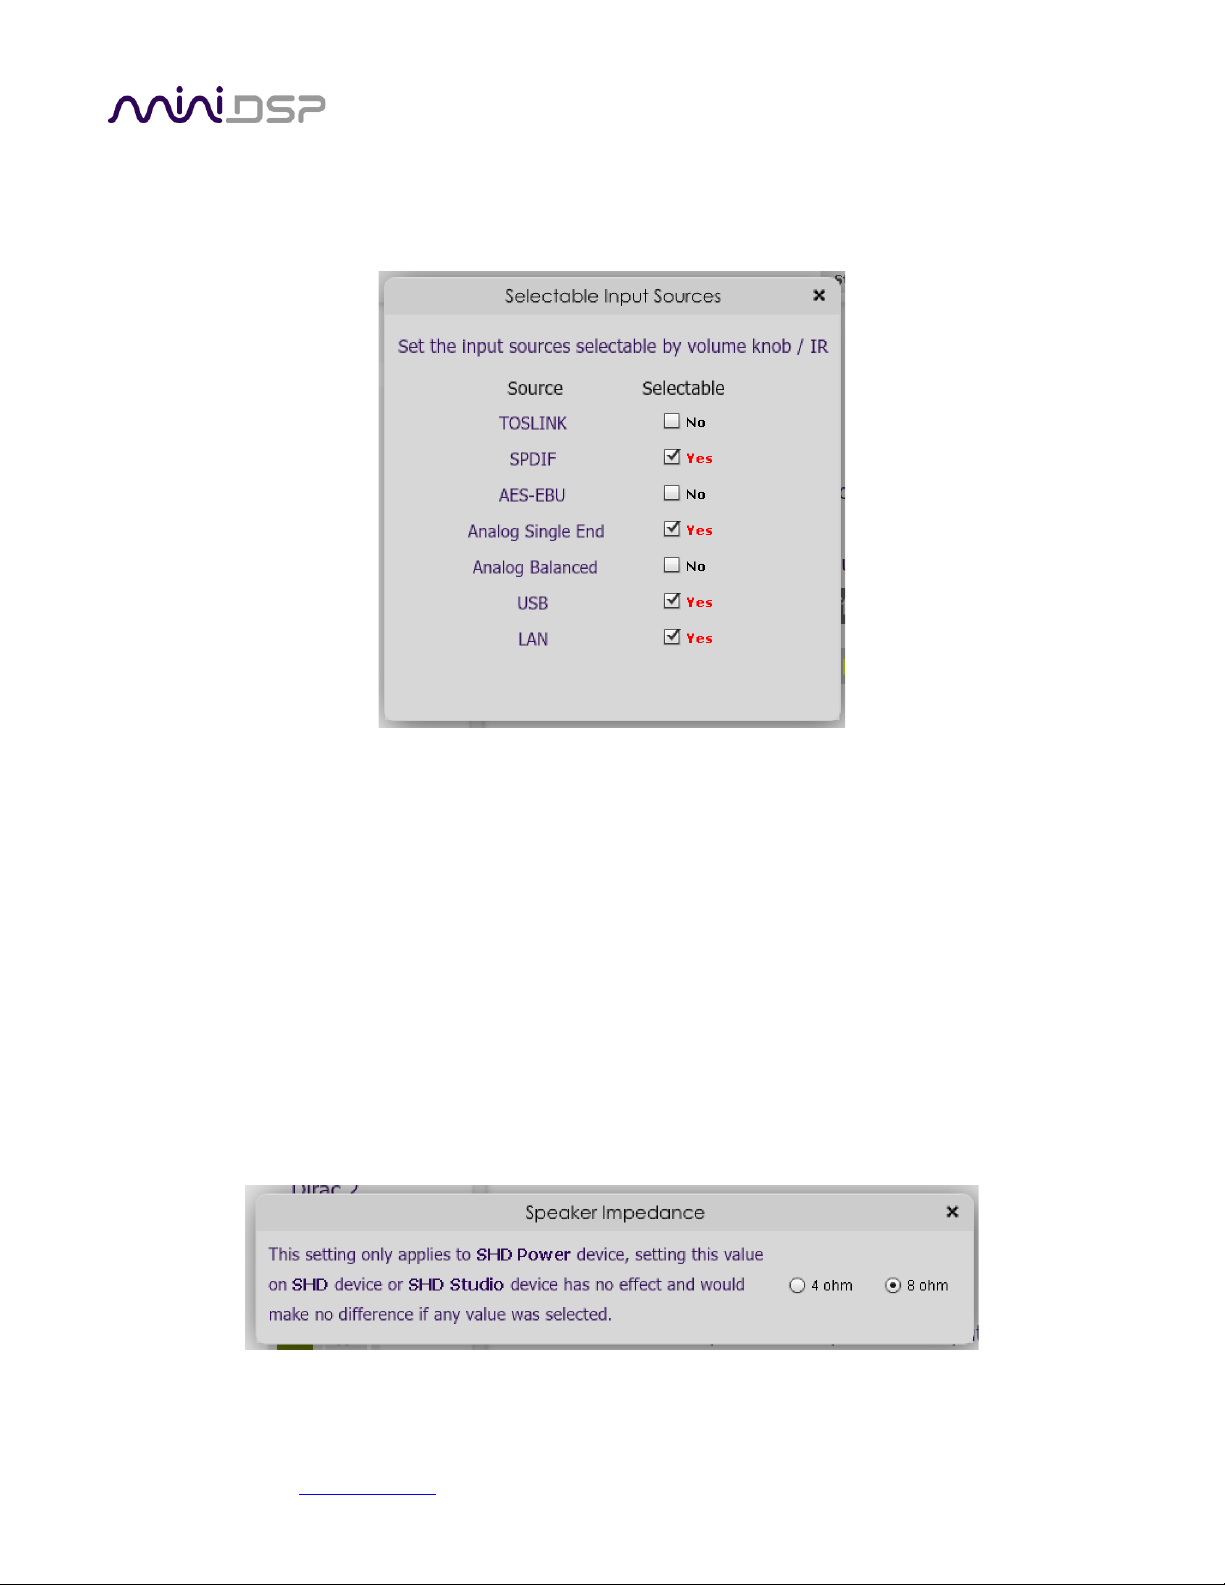
To access user preferences, drop down the Preferences Menu:
6.4.1 Display Settings
The front panel display can be automatically dimmed or turned off after a user-configurable timeout. To turn it
off, select Turn off and set the time delay:
To dim the display, select Dim and set the time delay and brightness.
To prevent the display from dimming, set the brightness to 15.
Page 49
miniDSP Ltd, Hong Kong / www.minidsp.com / Features and specifications subject to change without prior notice 49
6.4.2 Selectable Input Sources
Select the input sources that you want to cycle through with the remote control and the front panel encoder.
The choice of inputs depends on the specific processor model. For example, here is the screen for the SHD:
With the setting shown above, only SPDIF, RCA, USB and LAN will be cycled through when using the front panel
encoder knob or remote control.
Note that this setting has no effect on the input selection dropdown menu in the plugin.
6.4.3 Speaker Impedance (SHD Power only)
The Speaker Impedance setting activates over-current protection. By default, this is set to 8 ohm, meaning that
the amplifier does not have over-current protection enabled. Change the setting to 4 ohm to activate overcurrent protection.
Over-current protection limits output power to 120 Watts regardless of load impedance. Without it, low
impedance loads can cause the amplifier to shut down at high levels. It is recommended that over-current
protection always be enabled if testing the amplifier with low impedance loads. In some cases, such as driving
low-impedance speakers at high levels, this setting can be helpful to guard against amplifier shutdown.
Page 50
miniDSP Ltd, Hong Kong / www.minidsp.com / Features and specifications subject to change without prior notice 50
6.5 SIGNAL FLOW
If you intend to run a configuration that is more than straight stereo room correction processing, then you will
need to configure the back-end processing prior to running Dirac Live calibration. Typically, this applies to
applications such as subwoofer integration and two-way active speakers.
If you are using straightforward stereo room correction with a pair of speakers, you don’t need to
read the rest of this section. In that case, proceed to Dirac Live calibration as described in the
separate miniDSP Dirac Live User Manual.
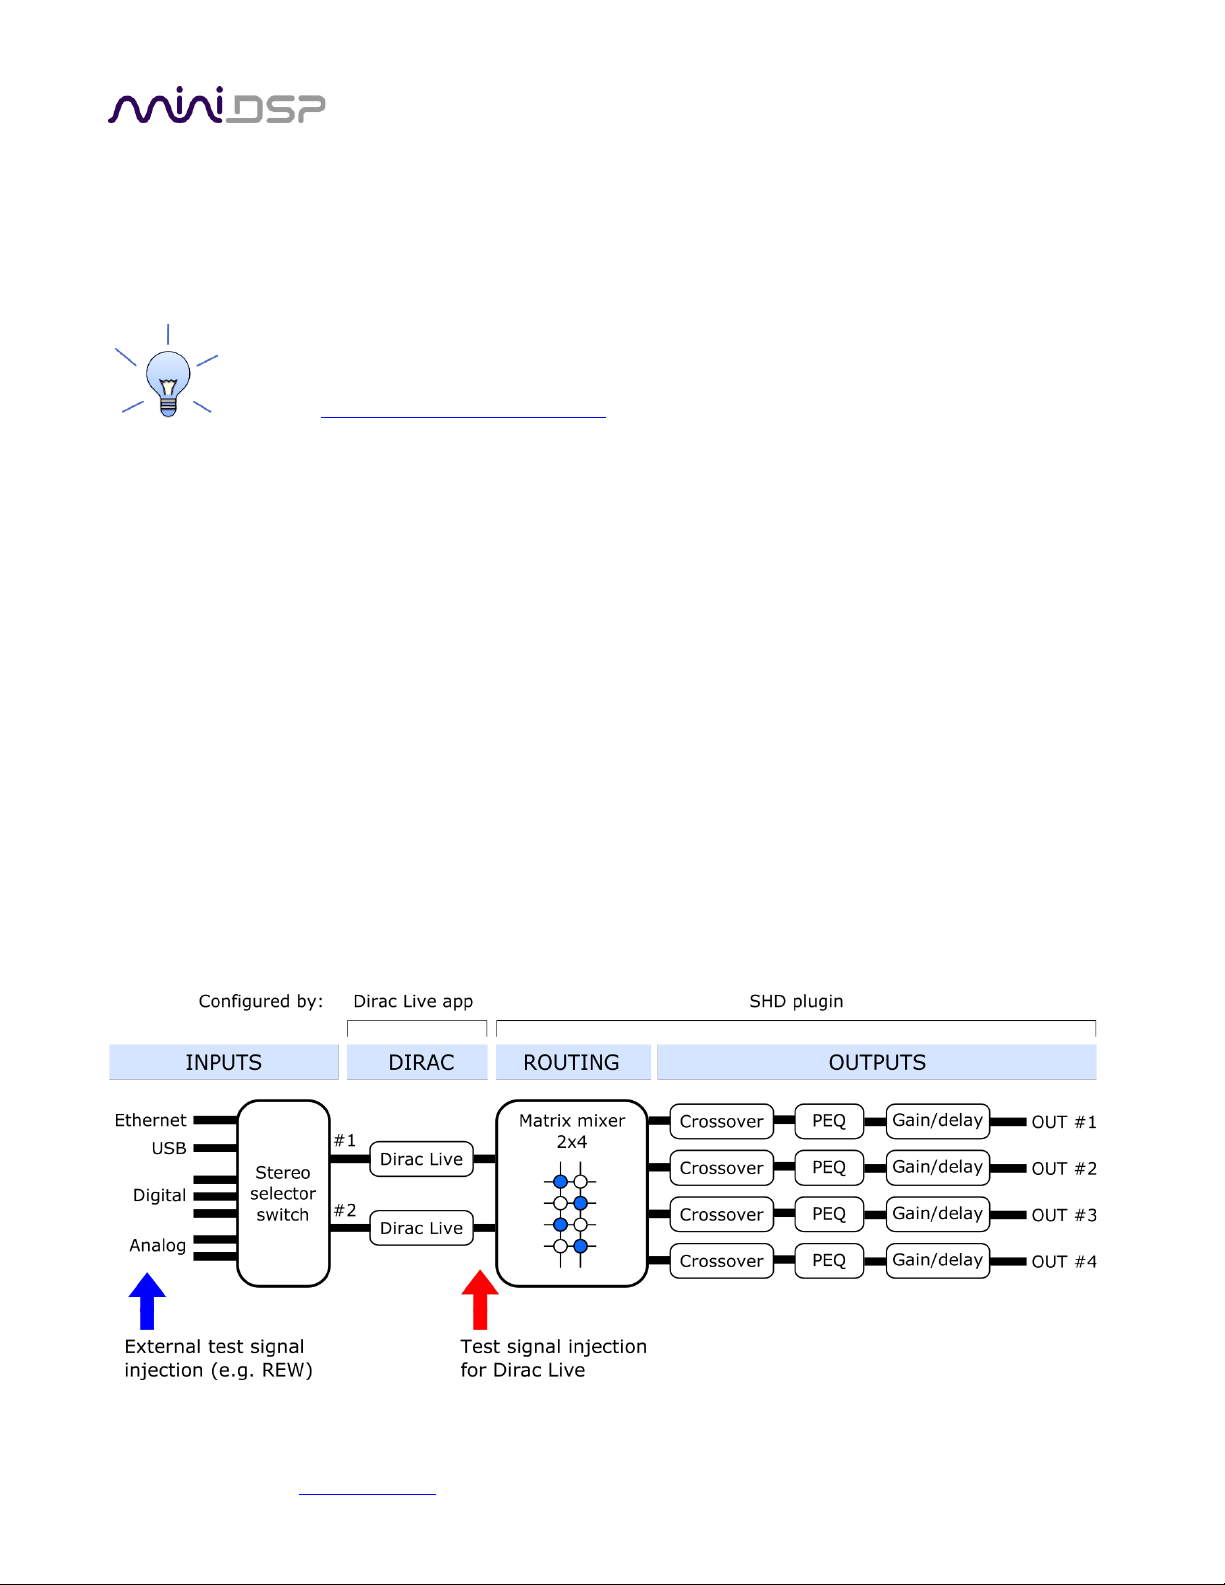
To understand how the SHD Series processor combines Dirac Live with miniDSP’s audio processing, refer to the
signal flow diagram in Figure 3:
• One of the stereo input sources is selected by the user and passed to two channels of Dirac Live processing
for digital room correction.
• The outputs from Dirac Live, labeled “Dirac 1” and “Dirac 2” in the plugin UI, are routed and mixed to the four
output channels.
• Each output channel has a comprehensive set of DSP functions. These are all optional – you can configure
them if you want to, according to your particular application.
As indicated in Figure 3, the processor is configured by two different software applications. The Dirac Live
application runs room measurements and loads correction filters into one of four presets. The SHD plugin
configures back-end processing for each of the four presets. When a preset is selected (e.g. with the front panel
or remote control), the corresponding Dirac Live filters and the SHD plugin configuration are loaded into the
working DSP memory.
While the description of the signal processing flow is from inputs to outputs (left to right in the diagram), the
order in which you configure the processor is usually the reverse. That is, configure the processing in the SHD
plugin first and run Dirac Live calibration second.
Figure 3. SHD Series signal flow diagram
Page 51
miniDSP Ltd, Hong Kong / www.minidsp.com / Features and specifications subject to change without prior notice 51
6.6 CONFIGURATION FOR SUBWOOFER INTEGRATION
The SHD Series processors easily support integration of a subwoofer into your audio system. This section
describes how. After configuring the processor to add the subwoofer, Dirac Live calibration will correct the
combined response of the speakers and sub.
6.6.1 Connect the subwoofer
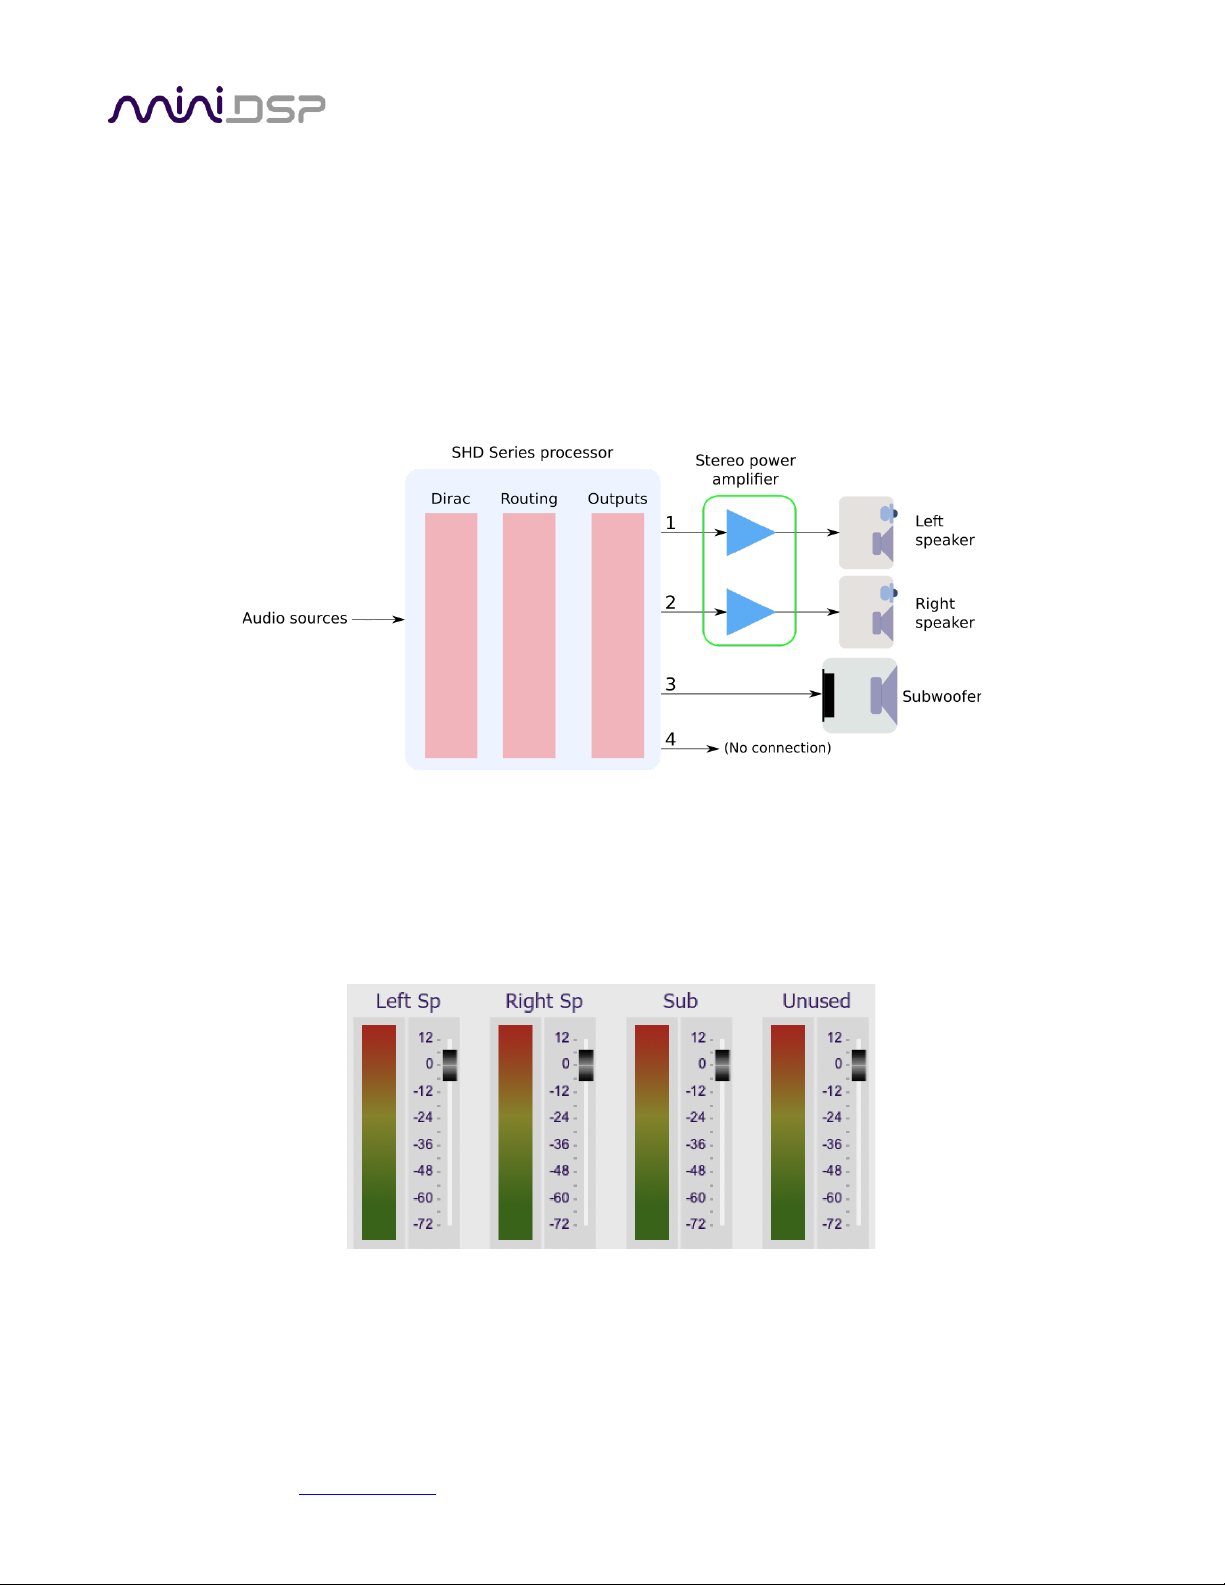
Connect the speakers to output channels 1 and 2 (via a power amplifier) and the subwoofer to output channel 3.
If you have the SHD Studio, you will need a second external DAC for the subwoofer.
6.6.2 Configure the plugin
Configure the Outputs tab:
1. Click on the label at the top of each output channel strip and rename them (from left to right) to “Left
Sp”, “Right Sp”, “Sub” and “Unused”. It’s not necessary to name the output channels, but it’s helpful
when configuring to avoid mistakes.
2. Mute channel 4 (“Unused”). Again, this is a useful and easily visible flag that this channel is not being
used.
Page 52
miniDSP Ltd, Hong Kong / www.minidsp.com / Features and specifications subject to change without prior notice 52
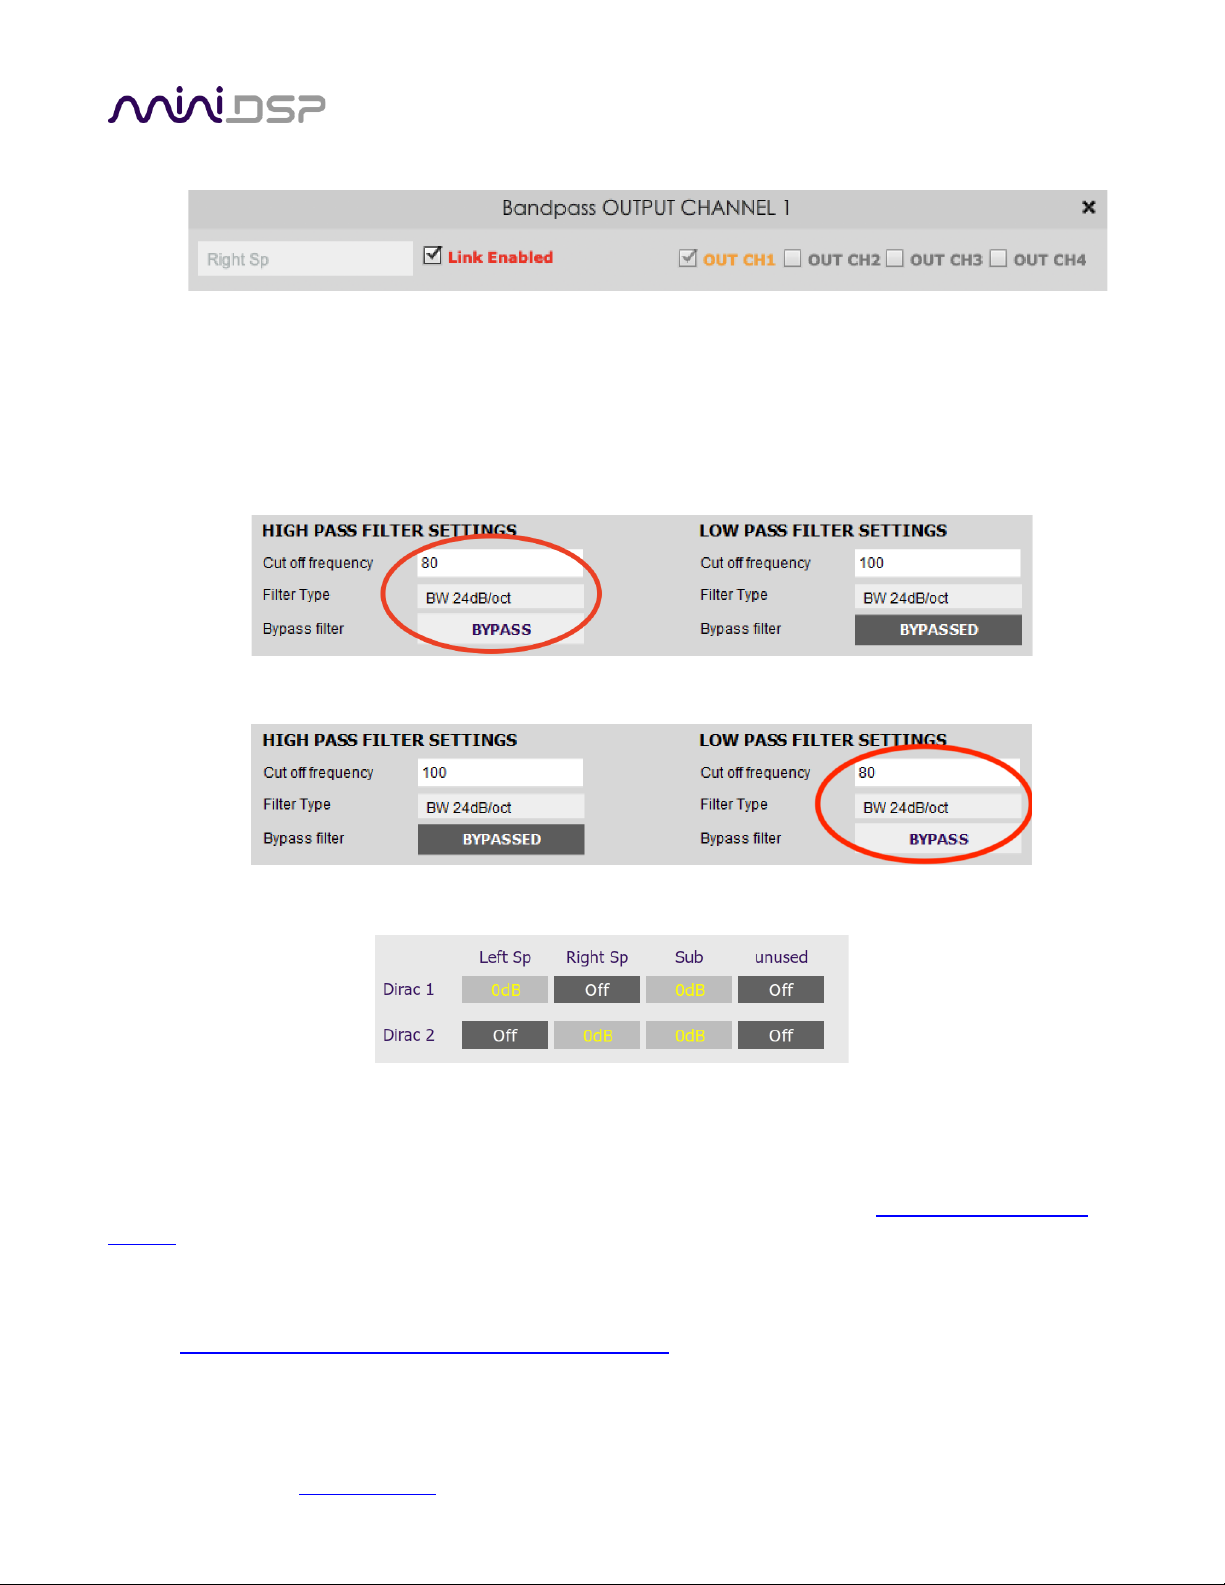
3. Click on the Xover button for channel 1 and link it to channel 2 (“Right Sp”).
4. Set up the crossover filters. On channels 1 and 2 (the speakers), enable the high pass filter. On channel 3
(the subwoofer), enable the low pass filter. A good starting point is to set these at 80 Hz, BW 24dB/oct
(Butterworth 24 dB/octave). For smaller or bookshelf speakers, you can set it higher at 100 Hz, or even
120 Hz if the subwoofer is located somewhere between the speakers.
This is the high pass filter for channels 1 and 2:
This is the low pass filter for channel 3:
On the Routing tab, set the matrix like this:
Play some music with heavy bass content and confirm that the subwoofer is operating as expected. If your
subwoofer has a volume control, adjust it so that the sub sounds a bit louder than it should. Or, adjust the level
of the subwoofer output channel in the plugin.
At this point, you can proceed with Dirac Live Calibration as described in the separate miniDSP Dirac Live User
Manual. Once you have measured the center position with Dirac Live, you can check for major integration issues
as described on the next two pages.
You can also use Room EQ Wizard (REW) as described in this application note on our website:
• Subwoofer Integration with the miniDSP SHD and REW
Page 53
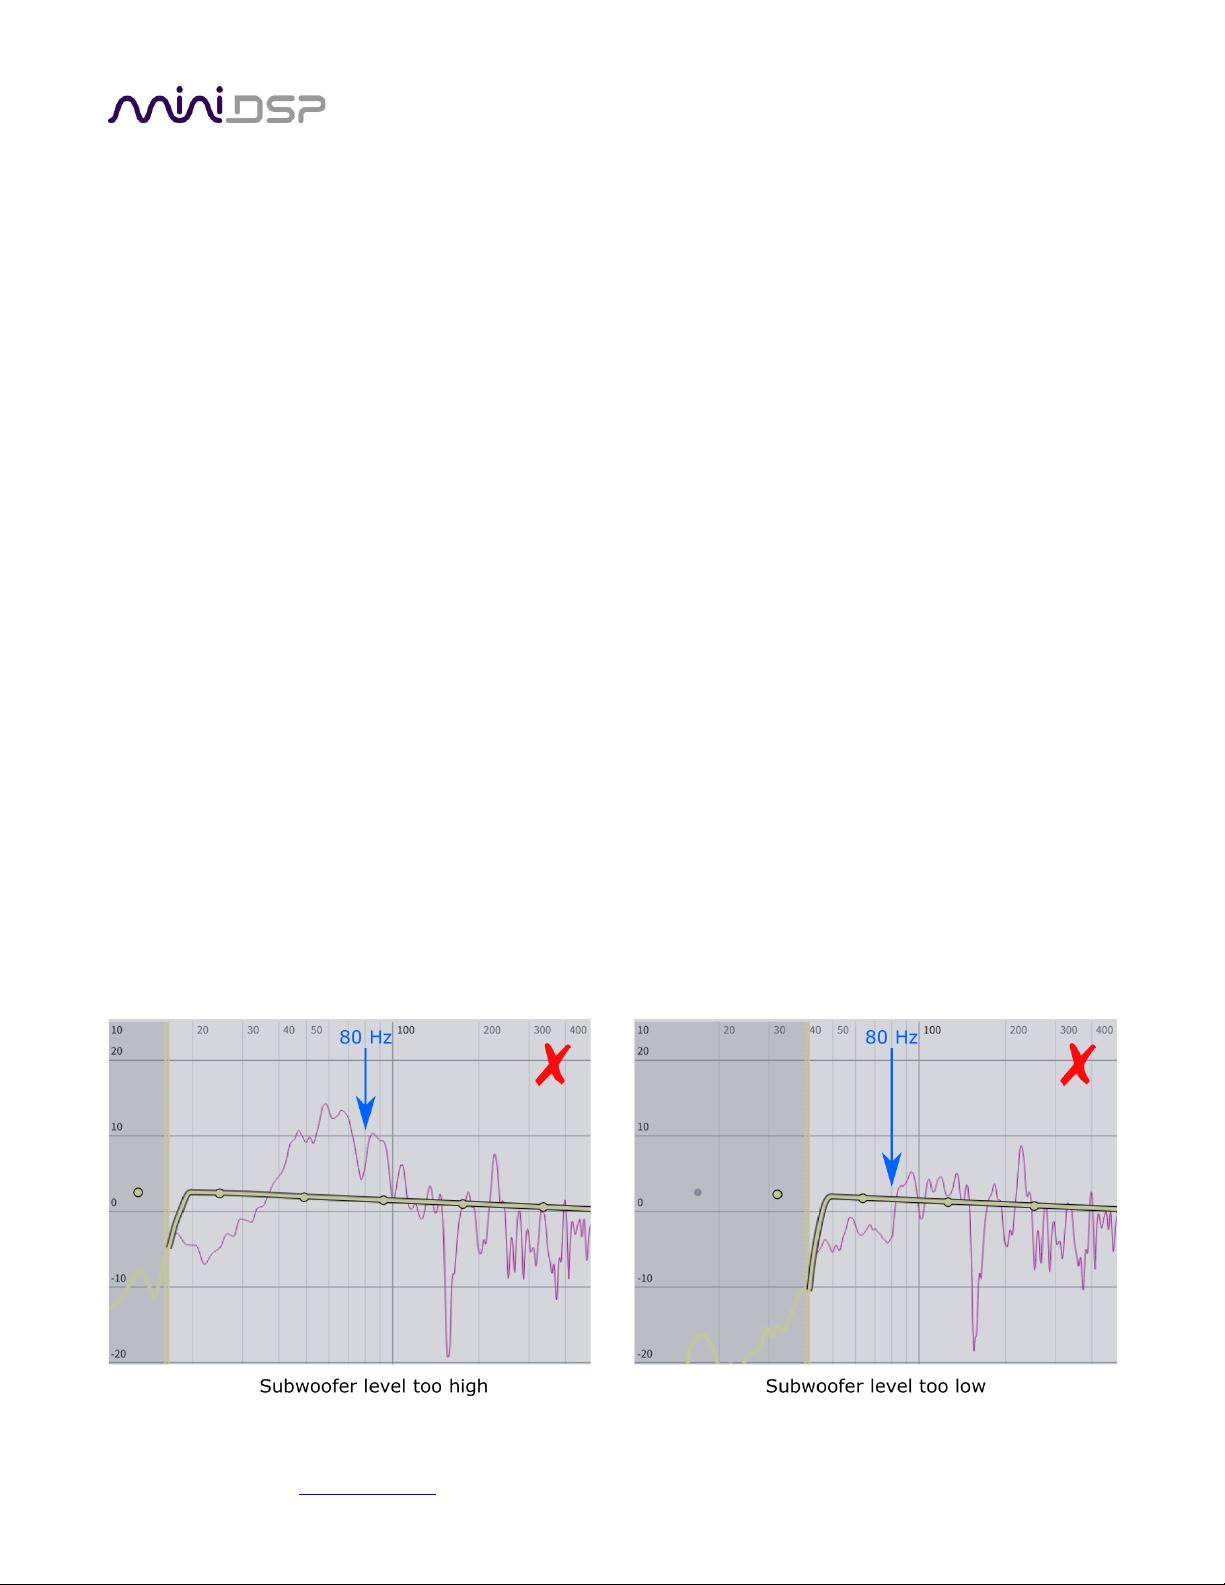
miniDSP Ltd, Hong Kong / www.minidsp.com / Features and specifications subject to change without prior notice 53
6.6.3 Check subwoofer integration (optional)
Once you have made a single measurement with Dirac Live, you can use this measurement to perform a
confidence check on your subwoofer integration. In general, while Dirac Live will correct for many irregularities
in the response, a poor integration can prevent this or cause other issues.
To check the frequency response based on the single measurement made so far:
1. Click on the Proceed to Filter Design button.
2. Dirac Live will warn you that you have only made one measurement. Click on “Proceed with 1
measurement.”
3. Examine the frequency response plots of the left and right channels.
If you decide to make a change in the plugin parameters:
4. Quit the Dirac Live application.
5. Click Connect in the SHD Plugin.
6. Make the change in the plugin.
7. Click on the Start Dirac Live Software button and start the calibration procedure again.
Level imbalance
While Dirac Live will correct the response If the subwoofer level is too high or too low, other issues can arise. For
example, in the graph on the left of Figure 4, the response at 80 Hz is about 10 dB too high due to the
subwoofer, causing the effective crossover frequency to be higher than expected (about 110 Hz in this example).
If the subwoofer level is too low as shown on the right of Figure 4, Dirac Live will need to apply additional boost
to the subwoofer. This will reduce boost available for correcting for room modes. In addition, the low roll-off
frequency of the system will tend to increase.
A level imbalance can be corrected by adjusting the volume control on your subwoofer if it has one, or by
changing the output level of the subwoofer channel in the plugin.
Figure 4. Examples of subwoofer level imbalance
Page 54
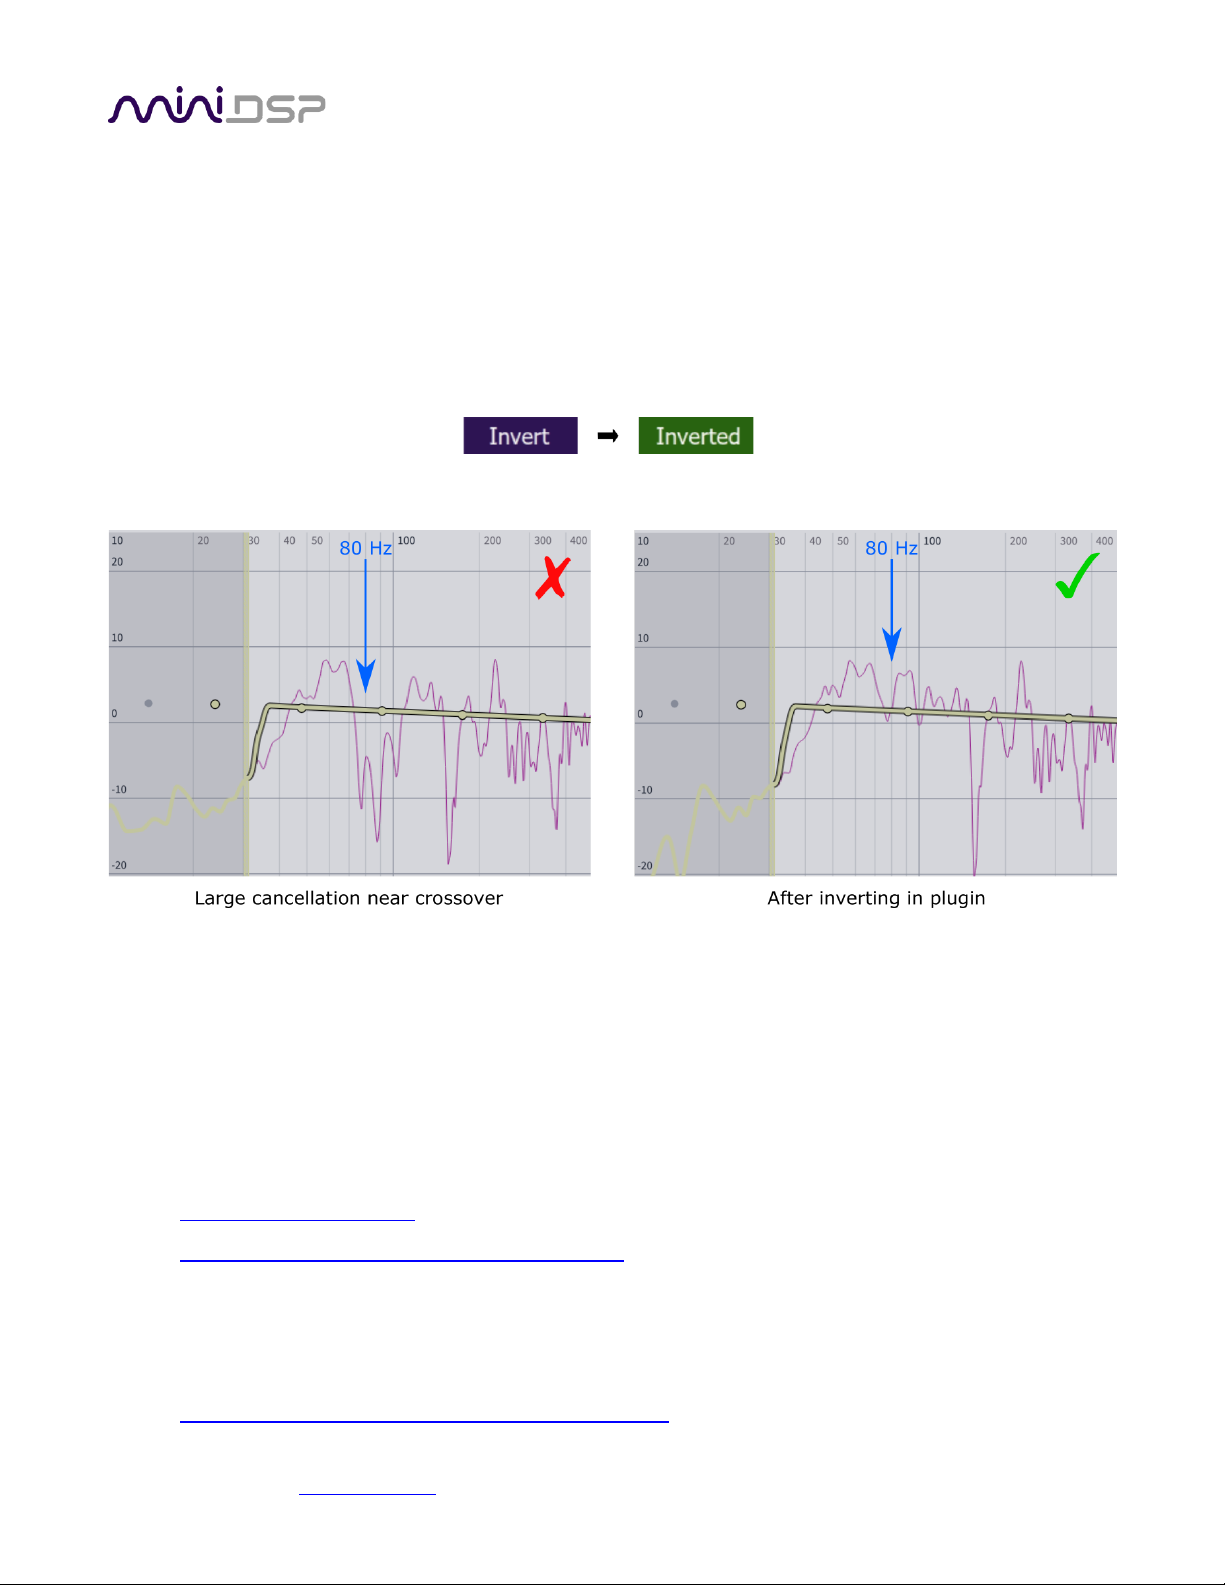
miniDSP Ltd, Hong Kong / www.minidsp.com / Features and specifications subject to change without prior notice 54
Energy dips around crossover
There is usually no need to worry about dips in the measured response, as these move around with different
measurement positions and Dirac Live will make the most sensible correction possible. If, however, you see a
deep wide “hole” near the crossover frequency, this may result in the speaker or subwoofer being driven harder
than really necessary after Dirac Live applies its correction. With a small speaker, this can also result in
significantly increased distortion.
The response on the left of Figure 5 shows a significant “hole” around the crossover frequency. A simple
technique that may correct this is to use the plugin to invert the phase of the subwoofer channel:
The result is shown on the right of Figure 5.
Subwoofer location
The measured frequency response of a subwoofer varies a lot depending on its location in the room. If you find
yourself unable to achieve satisfactory integration, try moving the subwoofer to a different location. You may
want to do this with the aid of Room EQ Wizard (REW) or a similar program. To get started with measurements
with REW, see these application notes on our website:
• UMIK-1/2 setup with REW
• Acoustic measurement with the UMIK-1 and REW
Advanced techniques
If level adjustment and/or inverting the subwoofer don’t produce a satisfactory integration, more advanced
adjustment in the plugin may be required. See this application note on our website:
• Subwoofer Integration with the miniDSP SHD and REW
Figure 5. Example showing effect of subwoofer inversion
Page 55
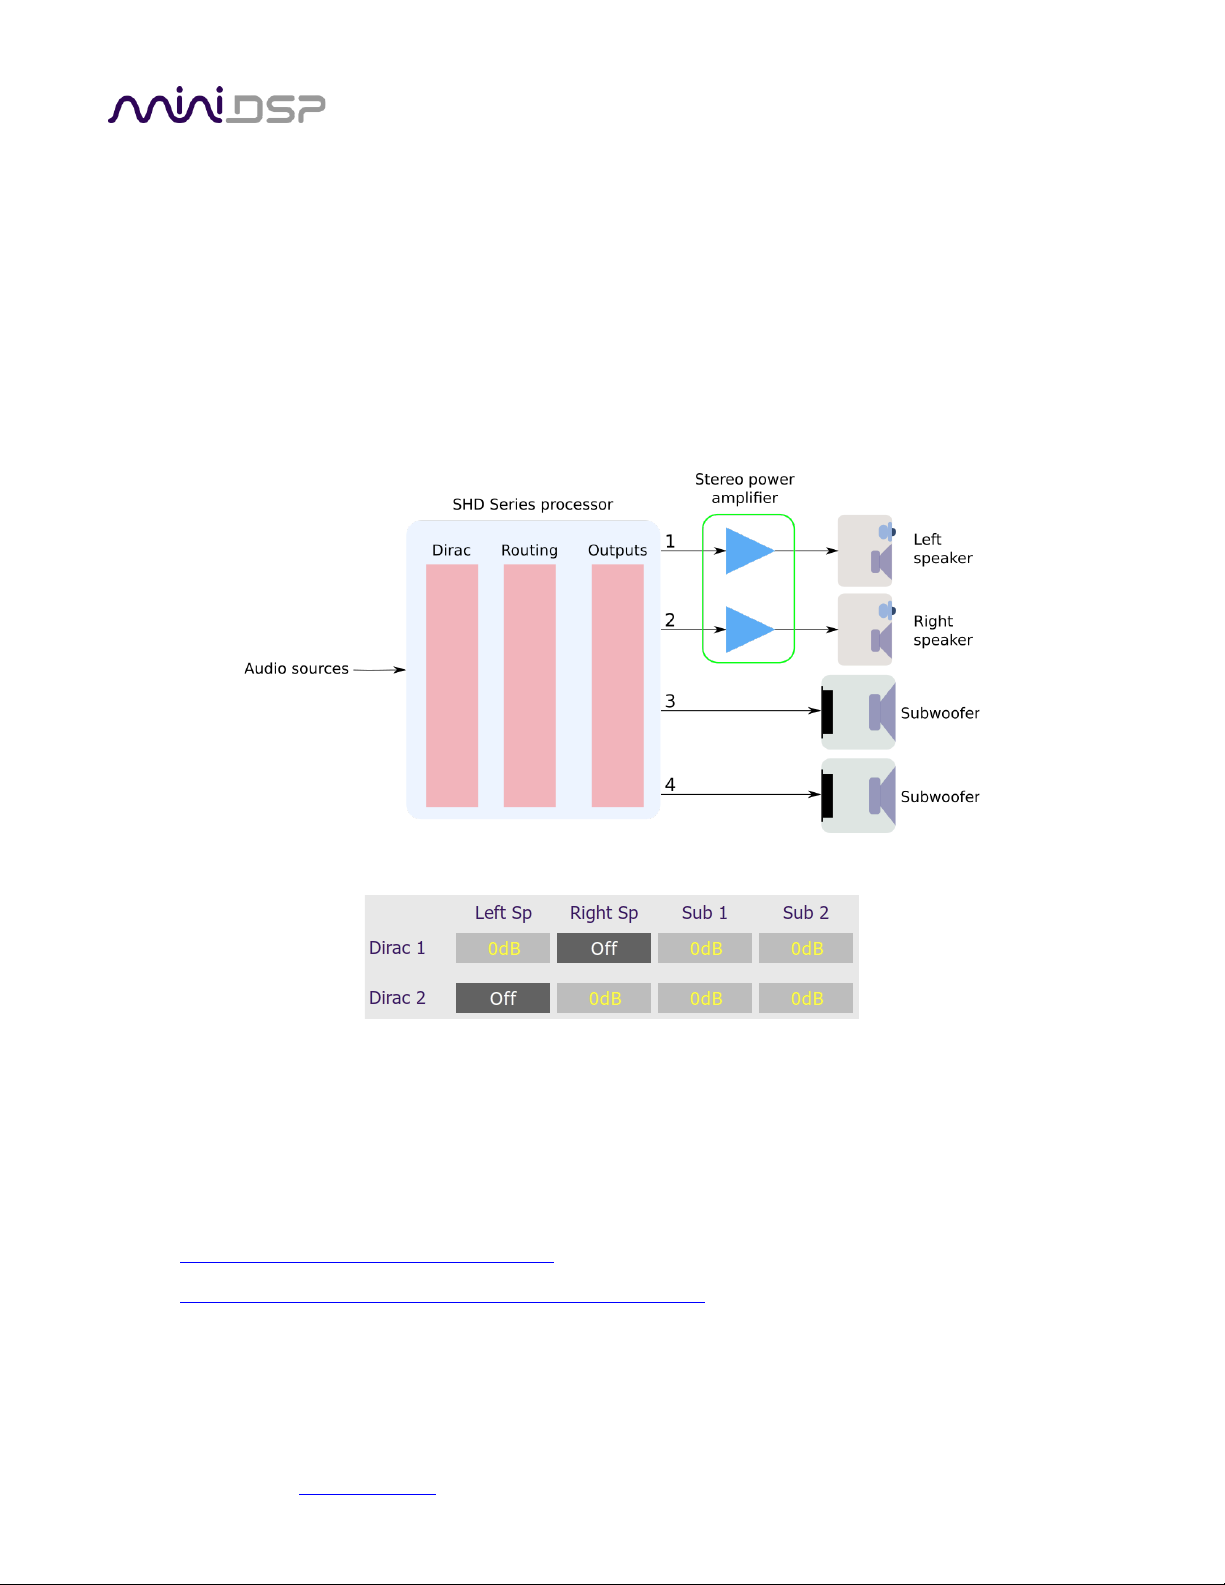
miniDSP Ltd, Hong Kong / www.minidsp.com / Features and specifications subject to change without prior notice 55
6.7 OTHER CONFIGURATIONS
This section provides a quick overview of other SHD configurations. In general, it is recommended that you take
acoustic measurements with Room EQ Wizard or a similar program to set up and fine-tune your configuration.
After you have set up the configuration, save it to a file. Then click on the Start Dirac Live Software button and
run a Dirac Live calibration.
6.7.1 Dual subwoofers
The configuration for dual subwoofers is a simple extension of that for a single subwoofer. Connect the
additional subwoofer to output 4:
The main change is to the Routing tab, which will now look like this:
That is, left and right channels are being summed together and sent to channels 3 and 4. You will also need to
set the low pass filter on output channel 4.
From there, proceed as described for the single subwoofer configuration.
A more advanced approach is to use the signal processing blocks on each output channel to change the signal
sent to each subwoofer. For guidance, see these application notes on our website:
• Tuning multiple subwoofers with miniDSP
• Dual-sub integration with miniDSP and MultiSub Optimizer
The first application note is focussed on home theater, but the techniques can be applied to a stereo system
with dual subwoofers. The second application note is more advanced and uses a program called Multi-sub
Optimizer to generate optimizations for the two subwoofers.
Note: If you intend to use “stereo subwoofers,” see Stereo supporting woofers below instead.
Page 56
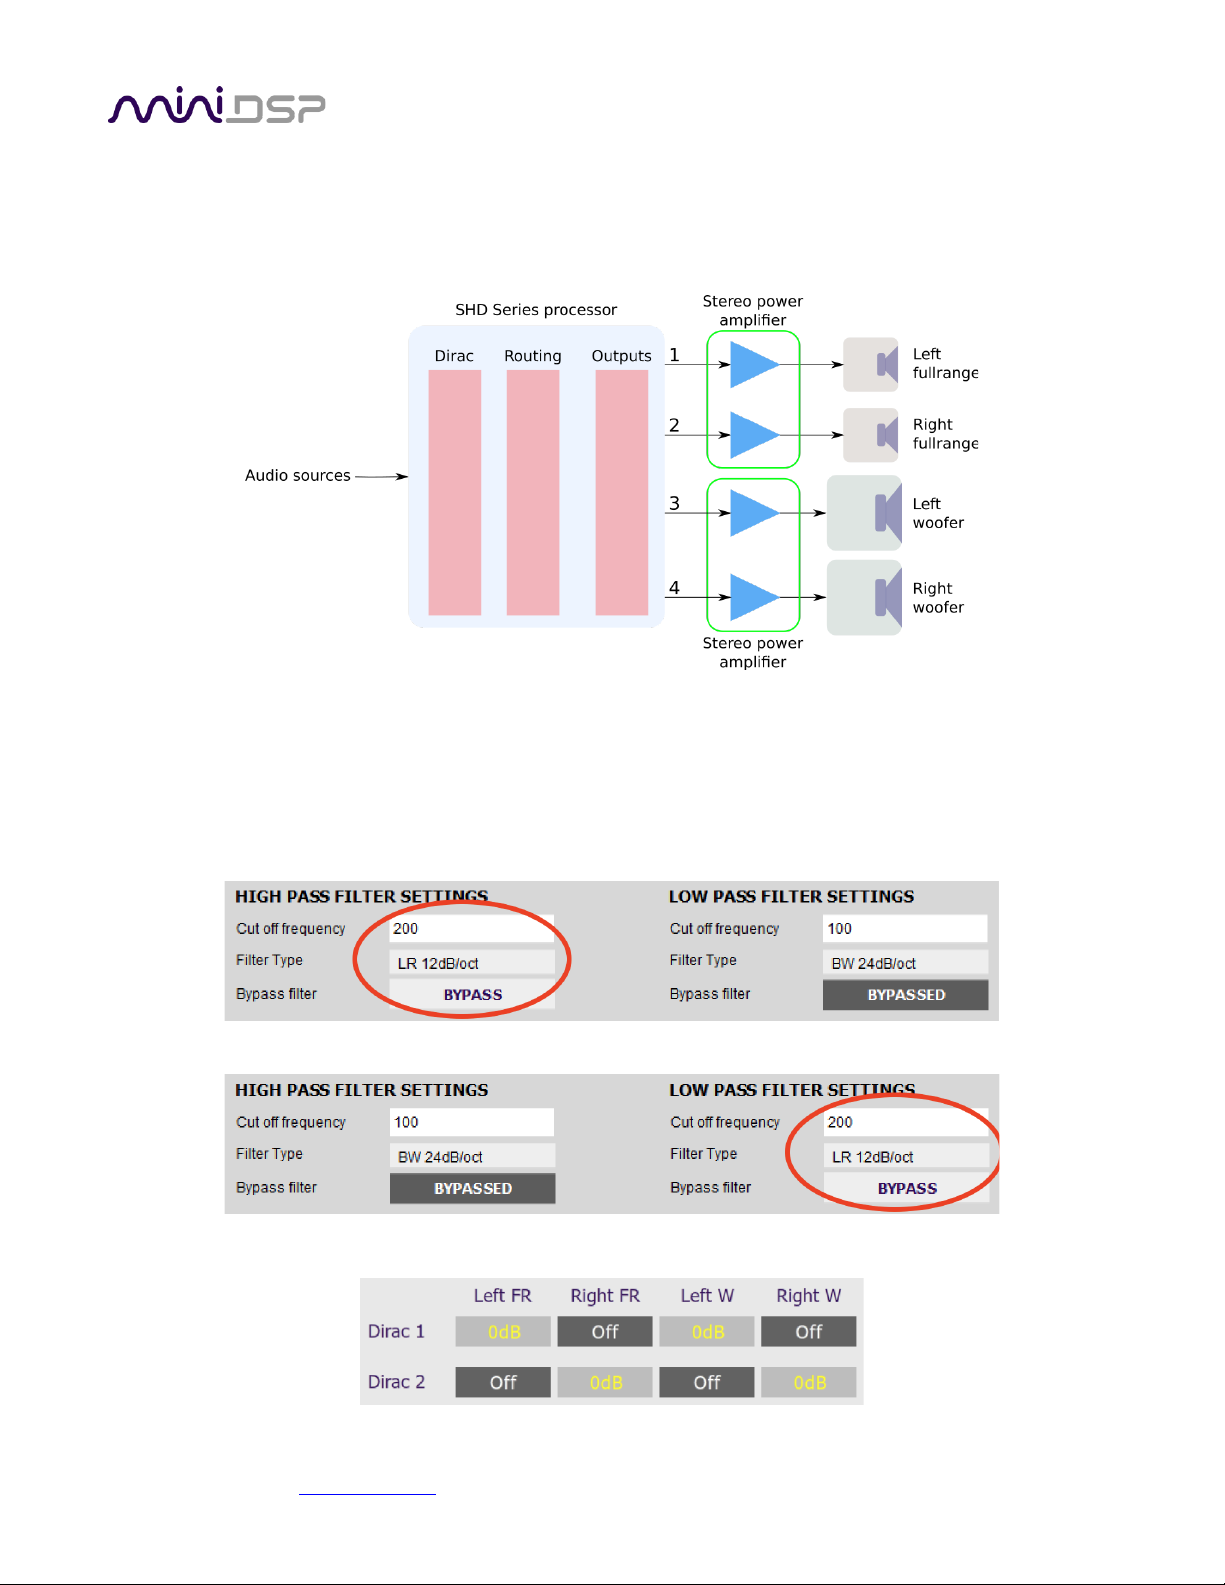
miniDSP Ltd, Hong Kong / www.minidsp.com / Features and specifications subject to change without prior notice 56
6.7.2 Stereo supporting woofers
An alternative approach to enhancing bass reproduction in a stereo system is to use two “supporting” woofers –
one under or near each speaker. They could be subwoofers capable of producing very deep and loud bass or
woofers of the type normally used in a three-way speaker.
In this type of configuration, use crossover filters to split the frequency range to the woofers and main speakers.
The crossover frequency may range from 80 Hz for true subwoofers up to perhaps 300 Hz for smaller woofers.
On the Outputs tab:
• Rename the output channels (from left to right) to “Left FR”, “Right FR”, “Left W” and “Right W”.
• Set a high pass crossover filter on channels 1 and 2 (“Left FR” and “Right FR”). For example:
• Set a low pass crossover filter on channels 3 and 4 (“Left W” and “Right W”). For example:
On the Routing tab, set the matrix like this:
Page 57
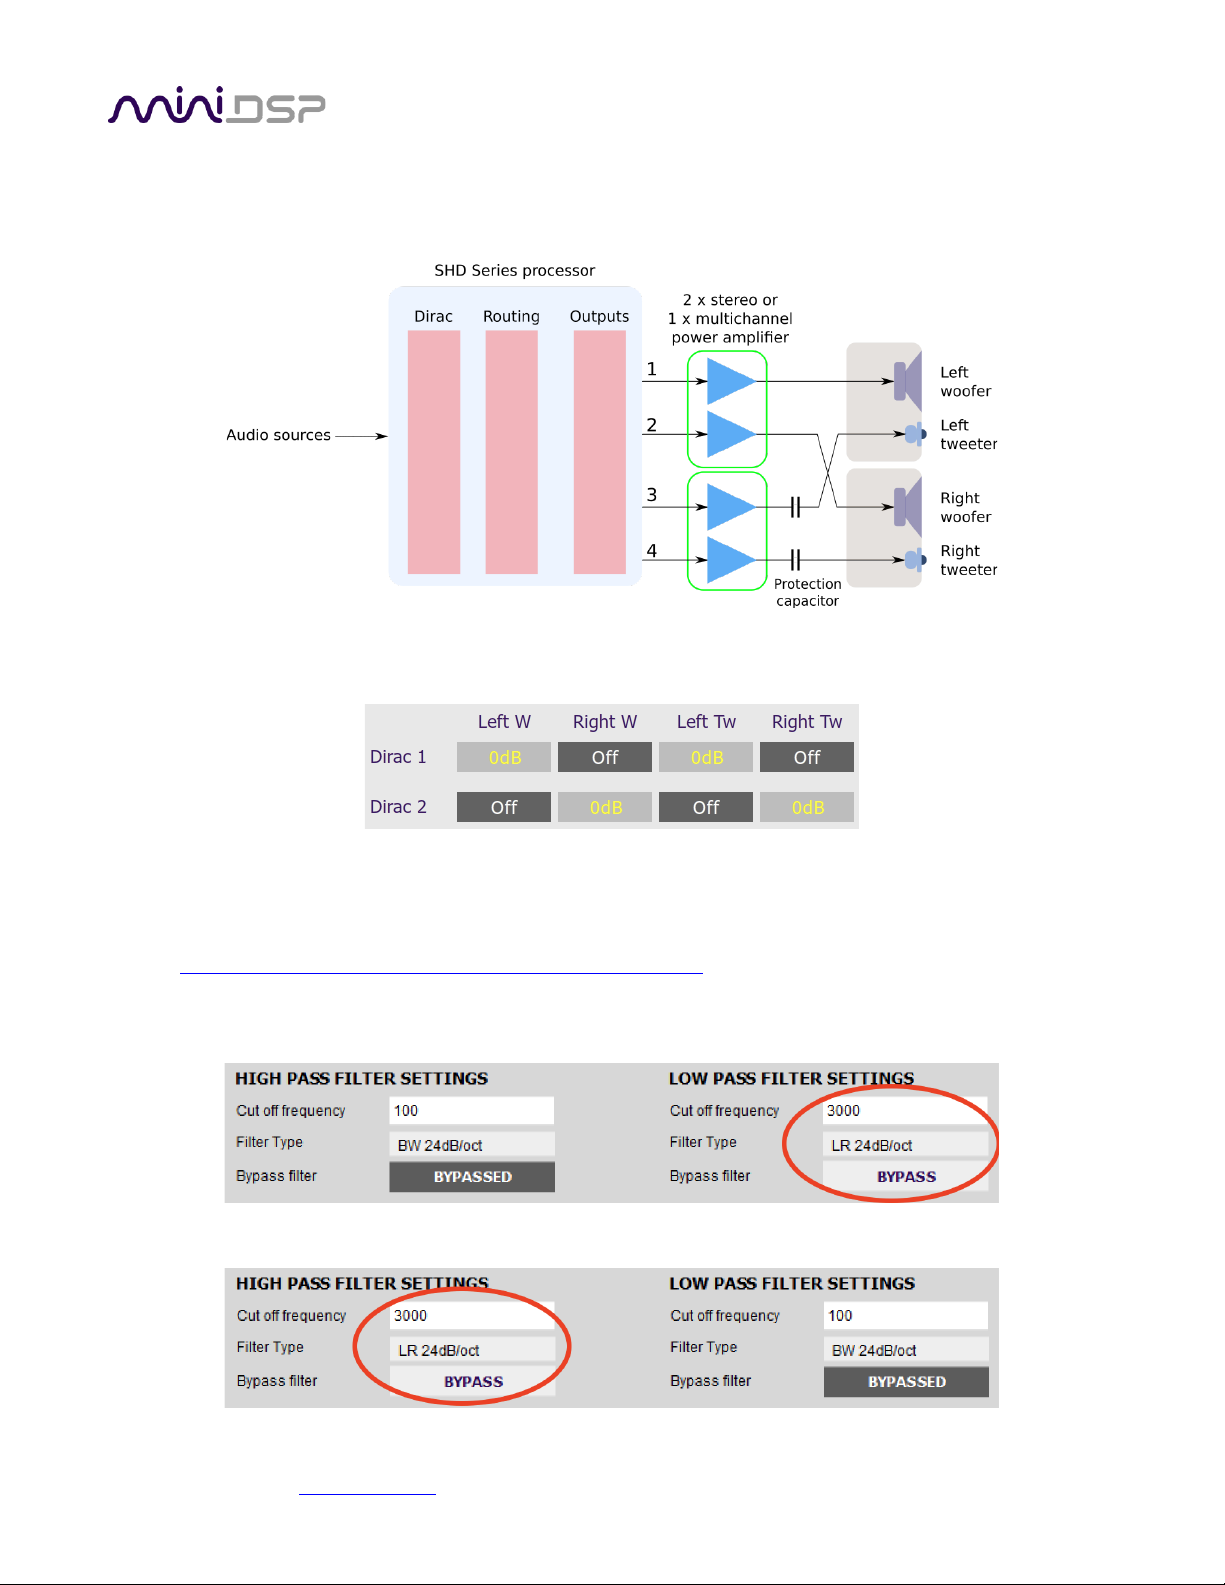
miniDSP Ltd, Hong Kong / www.minidsp.com / Features and specifications subject to change without prior notice 57
6.7.3 Two-way active speaker
An SHD Series processor can implement a two-way active speaker as well as provide room correction in the one
box. This diagram illustrates a typical set of connections:
On the Outputs tab, rename the output channels to “Left W”, “Right W”, “Left Tw”, and “Right Tw”.
On the Routing tab, set the matrix like this:
On the Outputs tab again:
• Use REW to measure each individual driver (woofer and tweeter) and equalize their response flat with
the PEQ blocks. This procedure is the same as for the 2x4 HD, as described in the application note
Designing a 2-way active speaker with the miniDSP 2x4 HD on our website.
• Set up your high pass and low pass crossover filters. This procedure is the same as for the 2x4 HD, as
described in the application note linked above. This is a typical low pass setting for the woofers:
This is a typical high pass setting for the tweeters:
Page 58
miniDSP Ltd, Hong Kong / www.minidsp.com / Features and specifications subject to change without prior notice 58
7 DIRAC LIVE CALIBRATION
Dirac Live calibration with the miniDSP SHD is described in the separate miniDSP Dirac Live User Manual. It can
be downloaded from the SHD Series product page on our website.
Be sure to start the Dirac Live application from within the SHD plugin using the Start Dirac Live
Software button. If you open the Dirac Live application by itself, it will not be able to detect the SHD
Series processor.
Page 59
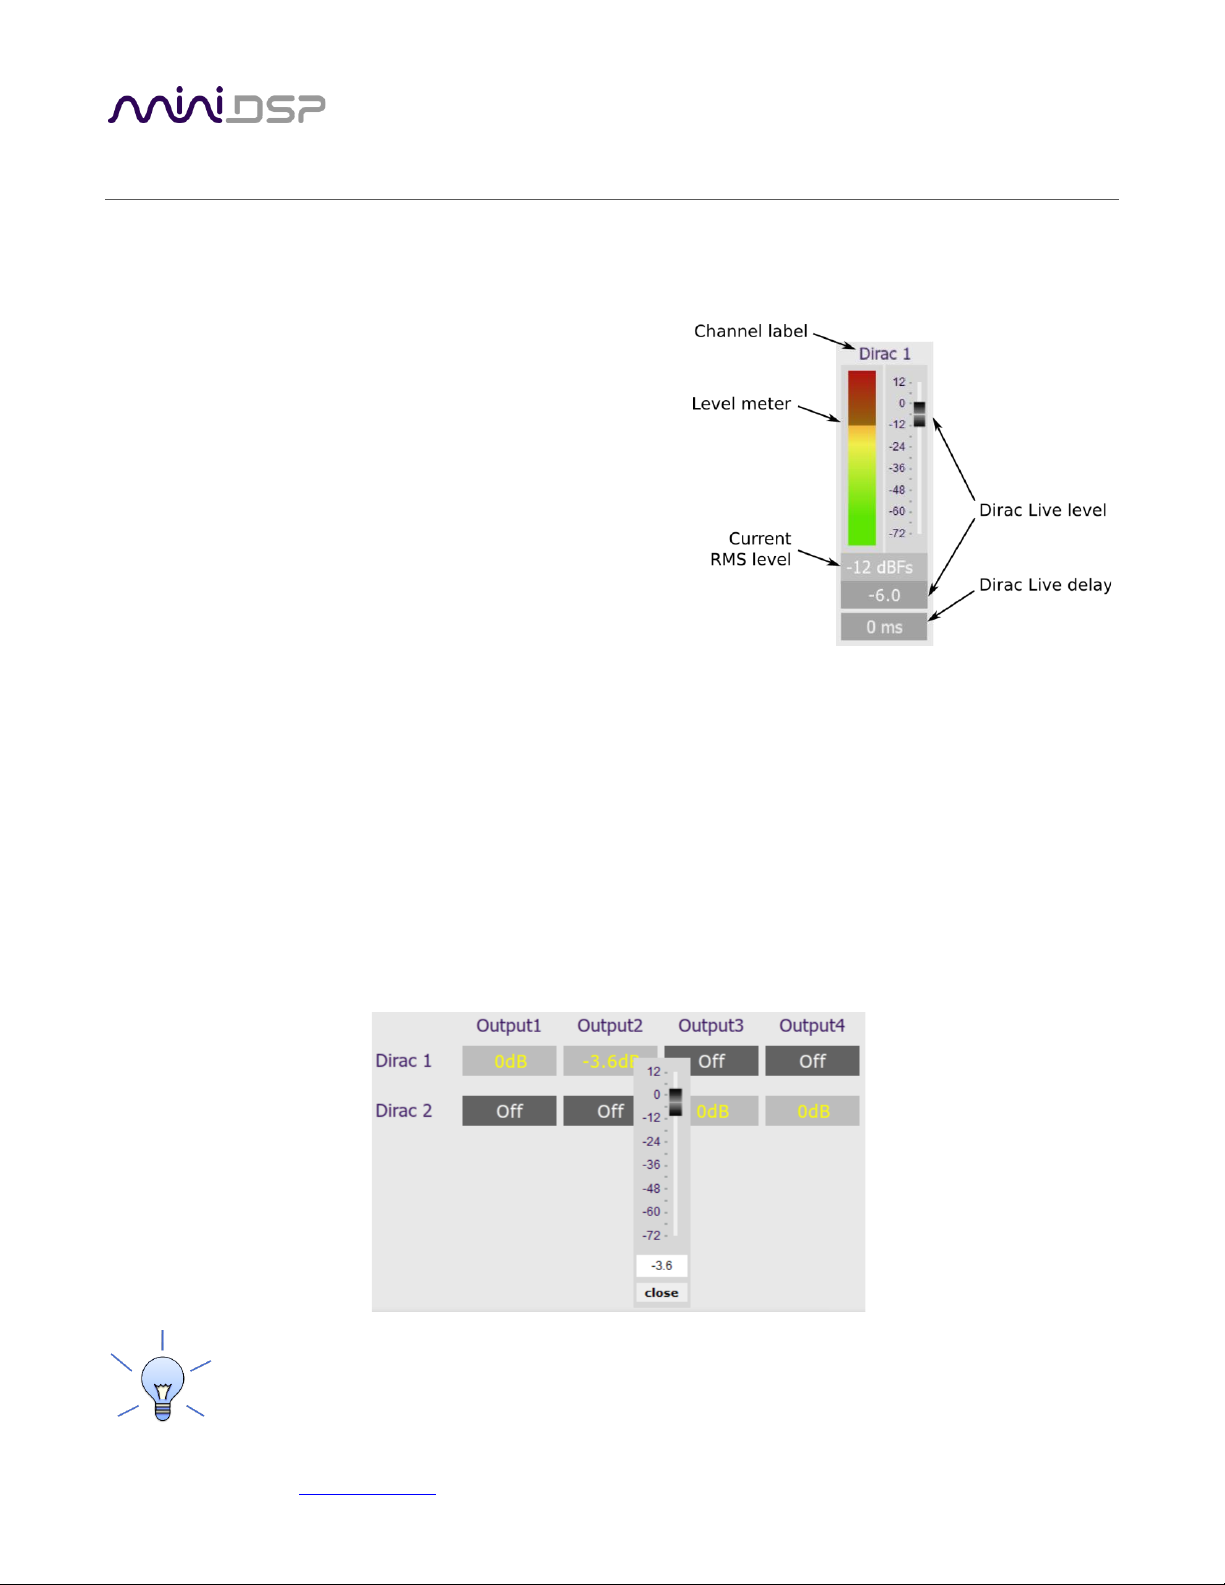
miniDSP Ltd, Hong Kong / www.minidsp.com / Features and specifications subject to change without prior notice 59
8 PLUGIN REFERENCE
This section provides full details on each of the plugin processing blocks.
8.1 INPUT CHANNEL STATUS
Each input channel strip displays useful information about the
levels and Dirac settings on that channel. The plugin must be
online to display this information.
Channel label
The name of the channel. These are set to “Dirac 1” and
“Dirac 2” and cannot be renamed.
Level meter, Current RMS level
Displays the current signal level in real time.
Dirac Live level
Graphical and numerical display of the gain (in dB) that Dirac Live has set for this channel.
Dirac Level delay
Numerical display of the delay (in milliseconds) that Dirac Live has set for this channel.
8.2 ROUTING
The Routing matrix mixer is used to direct input channels (along the left) to output channels (along the top).
Click on the button at a cross-point to enable or disable routing from the corresponding input to output.
The gain of the signal being mixed can be adjusted to a value between -72 and +12 dB. To adjust the gain, rightclick on the cross-point and a gain control will appear. Adjust the gain with the slider or by typing in the value
directly, then click close.
SHD Studio only. For headphone use, create a preset that routes Dirac 1 to Output1 and Dirac 2 to
Output2. This preset should not have Dirac Live room correction filters loaded.
Page 60
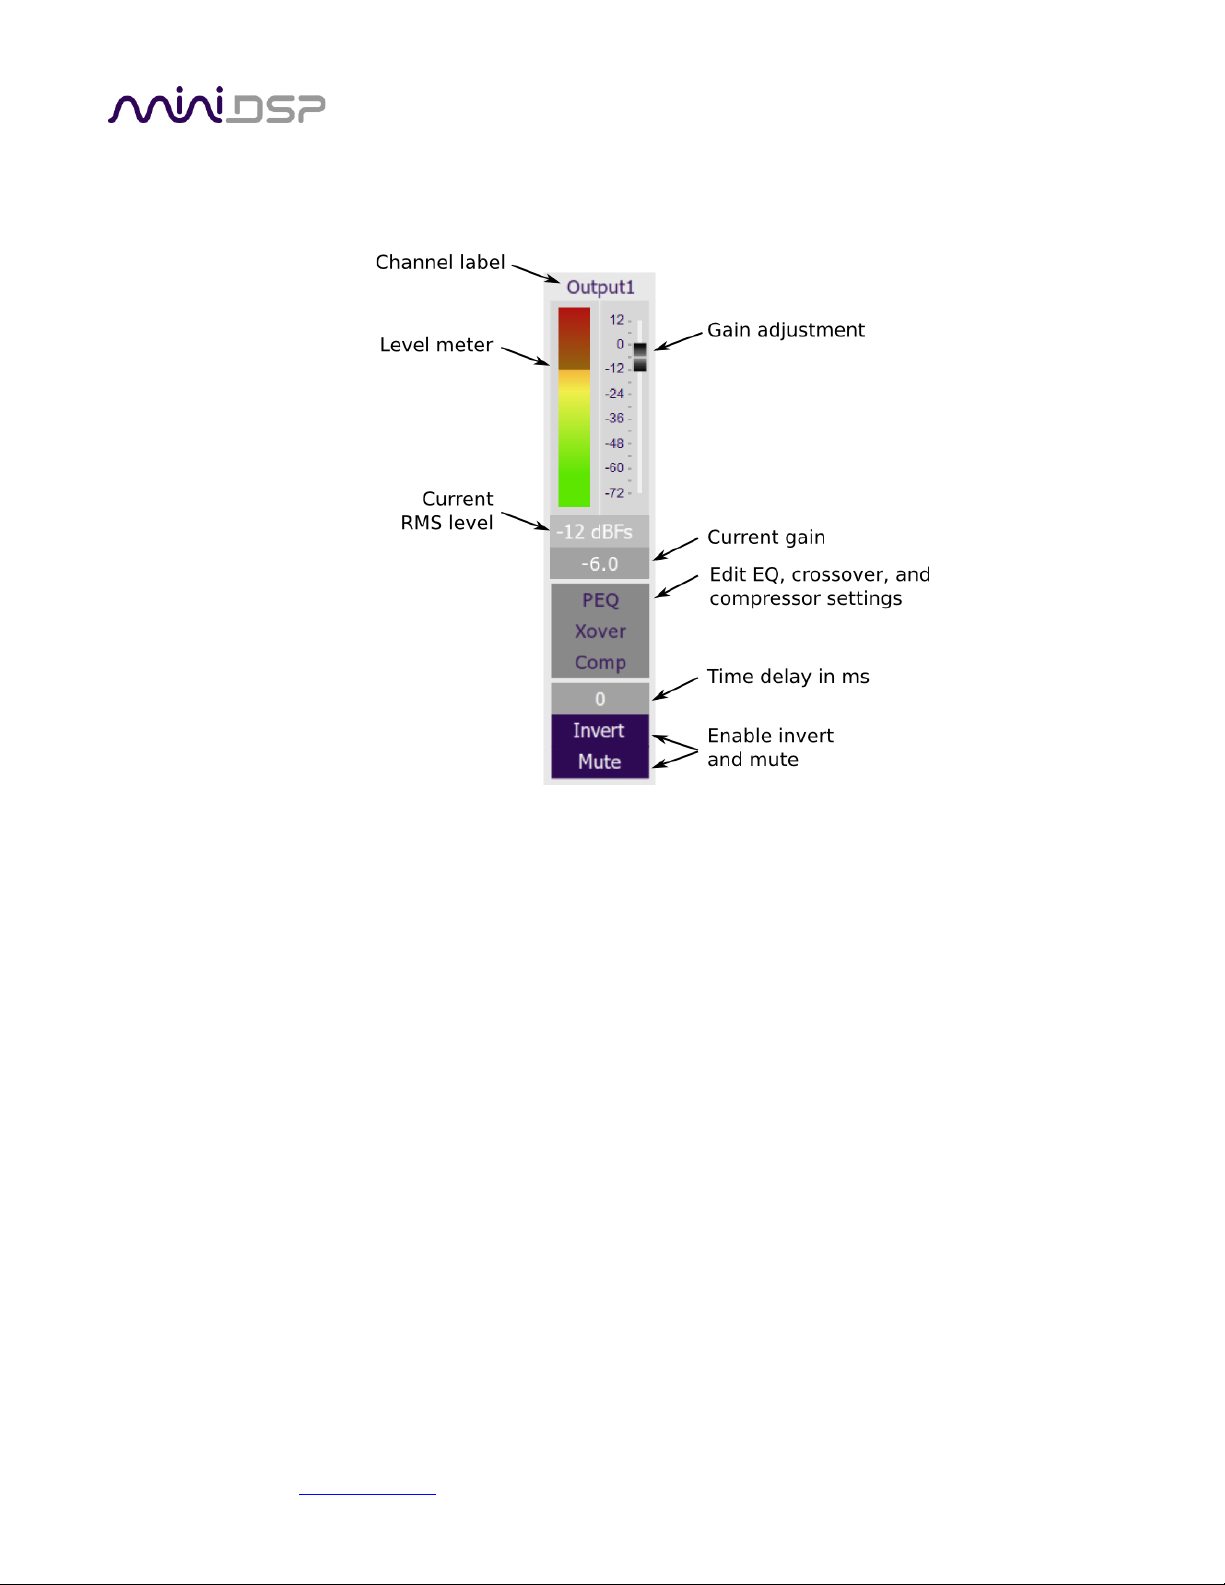
miniDSP Ltd, Hong Kong / www.minidsp.com / Features and specifications subject to change without prior notice 60
8.3 OUTPUT CHANNELS
Each output channel has its own control strip:
8.3.1 Channel label
Each output channel has a customizable label, which is shown at the top of the channel strip. This label also
appears on the Routing matrix. To change the label, click on it, type a new label (up to eight characters), and
press the Return key.
8.3.2 Level metering and gain adjustment
Level meter, Current RMS level
These display the current output signal level on the channel graphically and numerically in real time. The
plugin must be online to display signal levels.
Gain adjustment, Current gain
Change the gain of the output channel by moving the Gain Adjustment slider, or by typing the desired gain
into the Current Gain text box. The maximum gain setting is 12 dB, and the minimum gain setting is −72
dB. (0 dB, the default, is unity gain or no change in level.)
Page 61
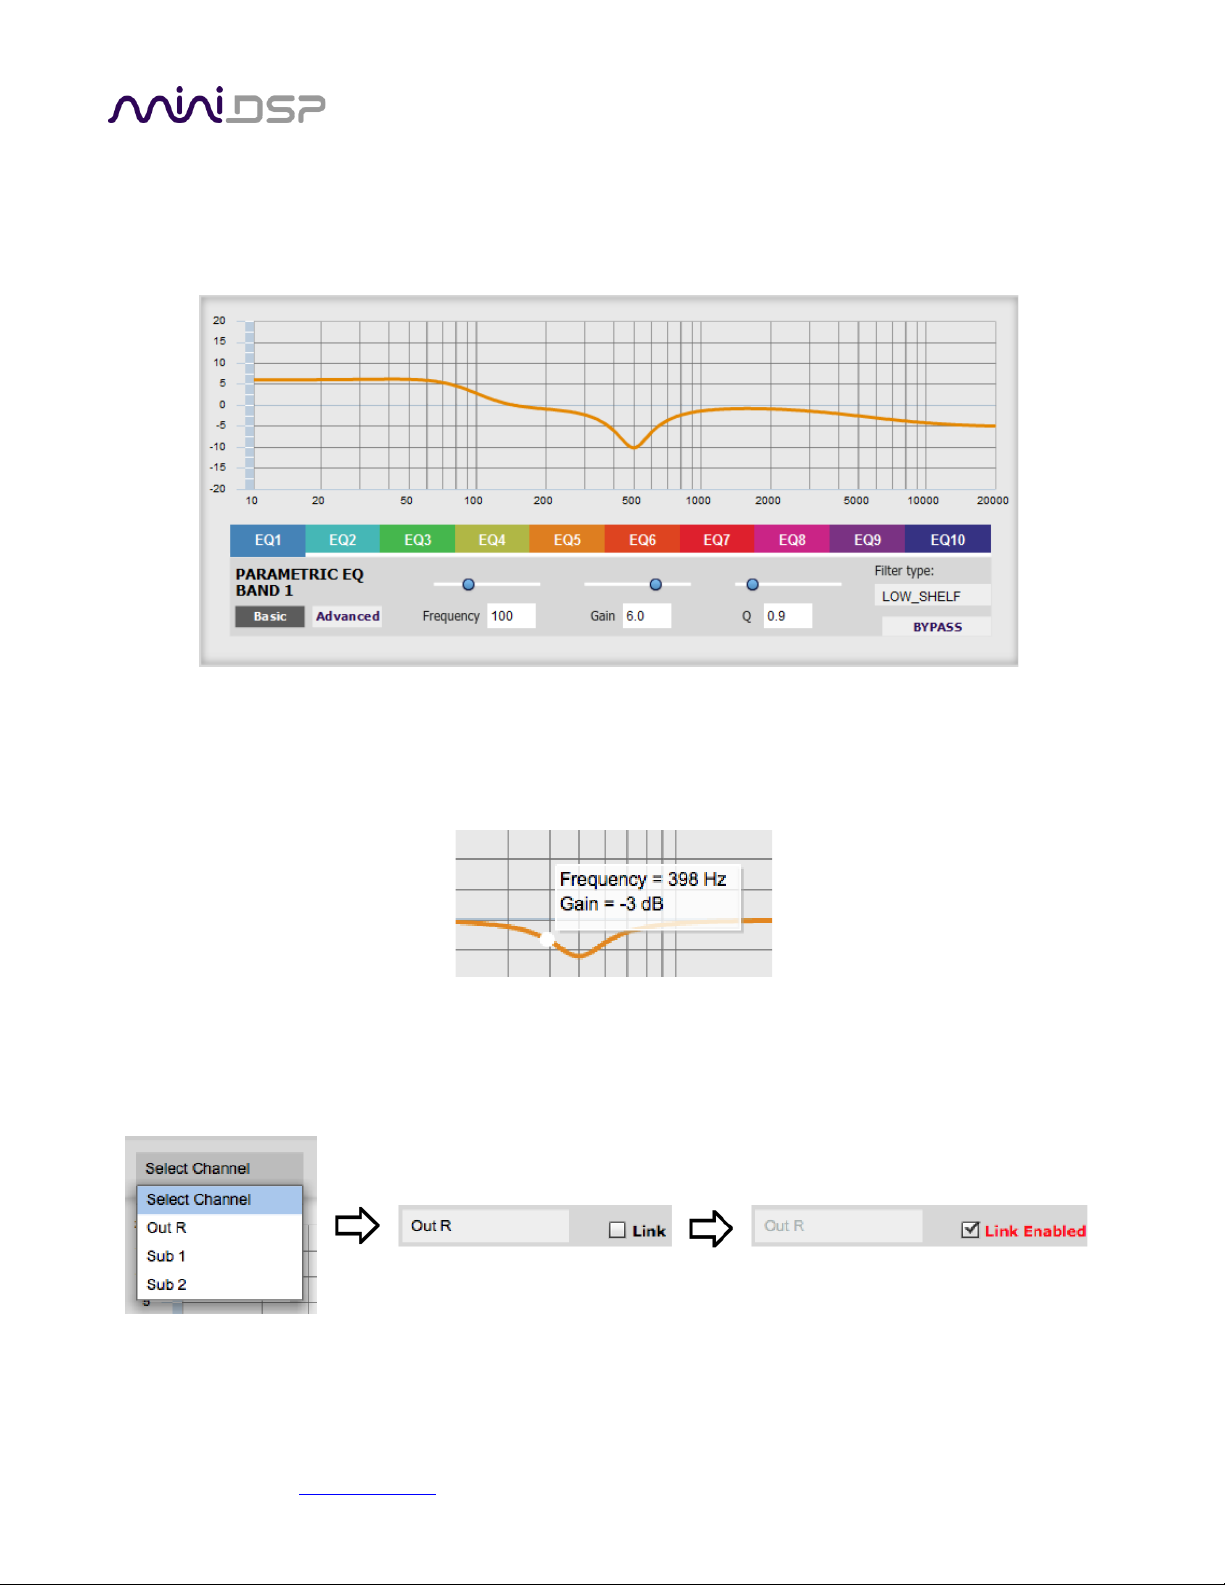
miniDSP Ltd, Hong Kong / www.minidsp.com / Features and specifications subject to change without prior notice 61
8.3.3 Parametric EQ
Parametric equalization (PEQ) is a flexible type of equalization filter. It can be used to correct for errors in
loudspeaker output, to compensate for acoustic room effects, and to tailor the overall system response for best
sound. Click on the PEQ button to open the parametric equalizer settings window:
There are ten parametric EQ filters on each output channel. The window displays a frequency response graph
showing the combined response of all enabled parametric filters on that channel. For example, the response
curve above has a low-shelf boost at 100 Hz, a dip at 500 Hz, and a high-shelf cut at 5000 Hz.
Hovering the mouse over the curve brings up an overlay showing the frequency and the gain at that frequency.
Each channel can be linked to one other channel. When a channel is linked to another, the PEQ settings of that
channel are mirrored to the other. Typically, corresponding channels on the left and right are linked: for
example, left and right tweeter and left and right woofer. To link a channel, select the other channel from the
drop-down menu at the top left of the PEQ display, and click the Link checkbox.
Page 62

miniDSP Ltd, Hong Kong / www.minidsp.com / Features and specifications subject to change without prior notice 62
EQ band selection
Click on the tabs EQ1, EQ2, etc. to display the parameters of that filter.
Basic/Advanced
By default, each filter is in basic mode, and shows the controls described below. Advanced mode enables
custom biquad programming for almost infinite flexibility in filter implementation. This is described in
Custom biquad programming on page 66.
Filter type
Selects the type of filter:
PEAK
Create a dip or a peak in the frequency response.
LOW_SHELF
Reduce or increase part of the frequency spectrum below a given frequency.
HIGH_SHELF
Reduce or increase part of the frequency spectrum above a given frequency.
SUB_EQ
Create a dip or a peak in the frequency response at low frequencies (10 to 50 Hz). This filter type is
similar to PEAK but gives more accurate results for low frequencies. Note that activating any
SUB_EQ filter reduces the number of available filters on that channel from ten to nine.
Frequency
For the PEAK and SUB_EQ filter types, this is the center frequency of the peak or dip. For the HIGH_SHELF
and LOW_SHELF filter types, this is the frequency at which the gain is half of the set value.
Gain
For the PEAK and SUB_EQ filter types, this is the gain in dB at the center frequency. For the HIGH_SHELF
and LOW_SHELF filter types, this is the gain in dB reached at high or low frequencies respectively. A filter
has no effect if its gain is set to 0 dB. Gain can be adjusted in increments of 0.1 dB up to +/- 16 dB.
Q
Q controls the “sharpness” of the filter. For the PEAK and SUB_EQ filter types, lower Q gives a broader
peak or dip, while higher Q gives a narrower peak or dip. For the HIGH_SHELF and LOW_SHELF filter types,
Q controls how quickly the filter transitions from no gain to maximum gain.
Bypass
The Bypass button enables or disables a filter. The filter is bypassed if the button is "lit". (Note that all
other filters are still operational unless individually bypassed.) A filter will also have no effect if its gain is
set to 0.0.
Page 63
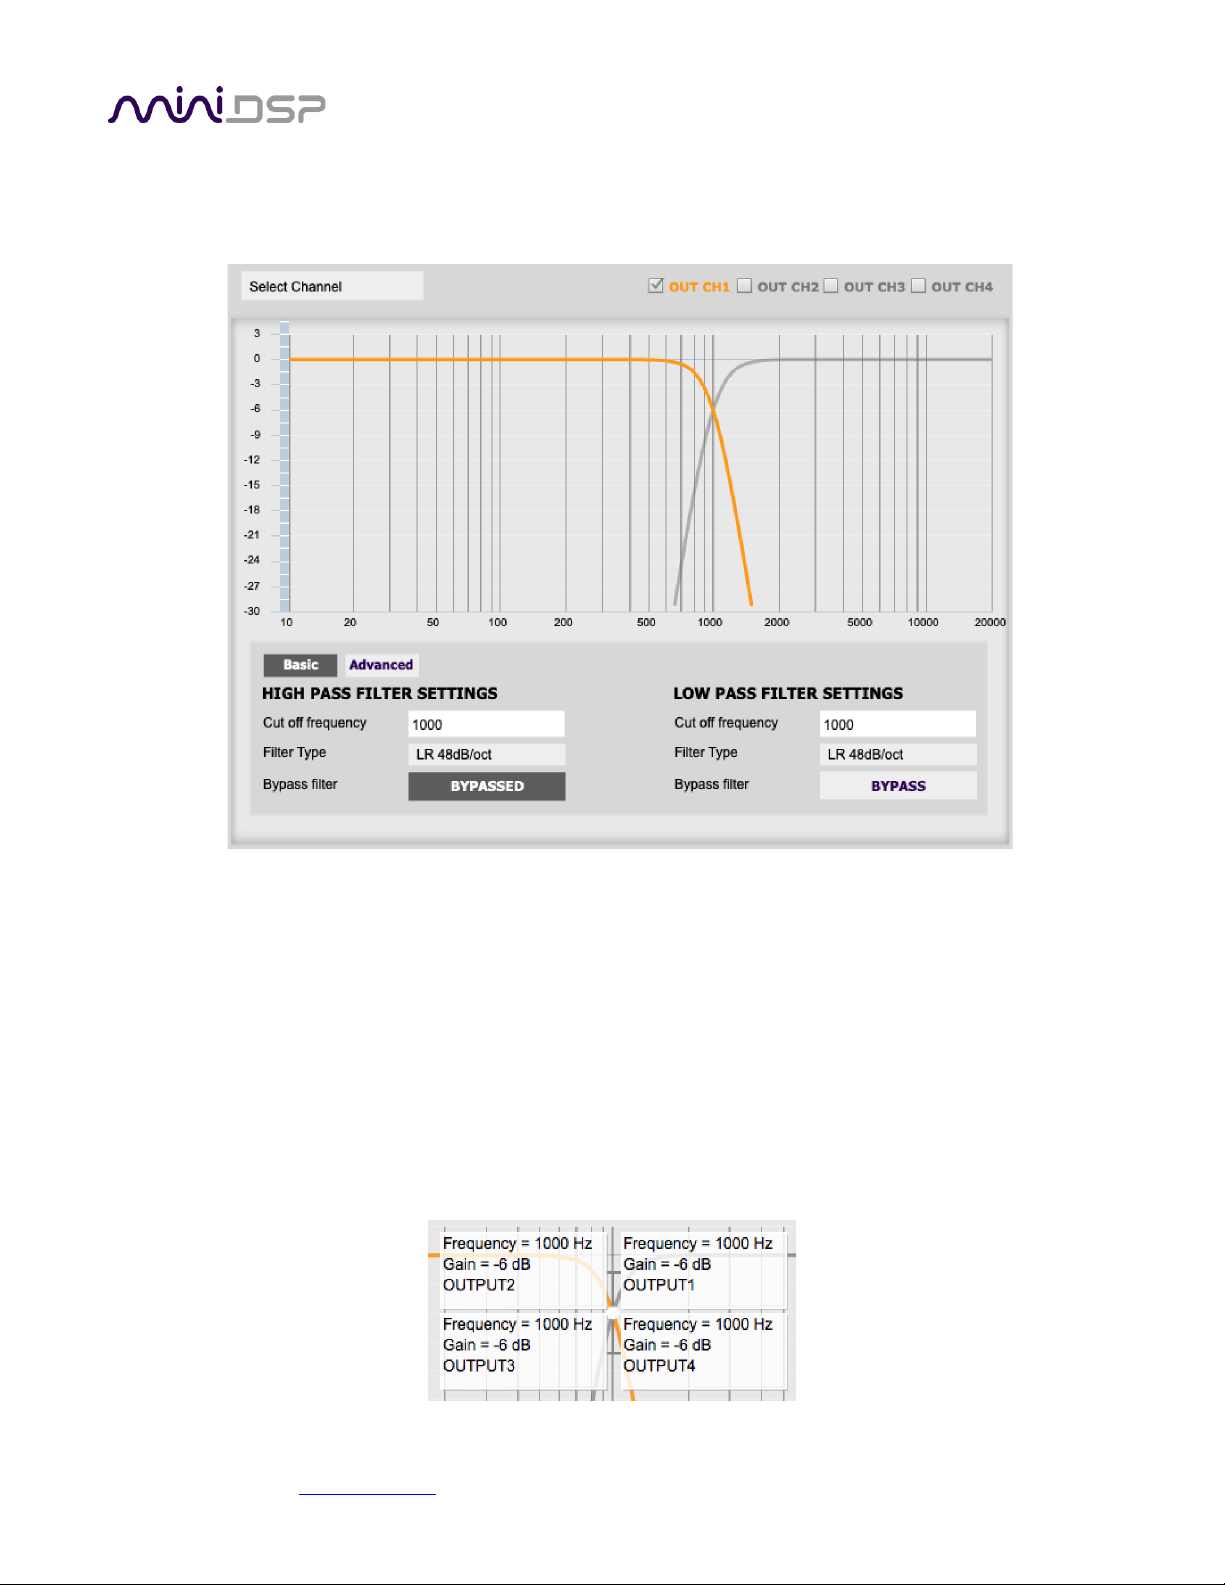
miniDSP Ltd, Hong Kong / www.minidsp.com / Features and specifications subject to change without prior notice 63
8.3.4 Crossover
Each output channel has independent high pass and low pass crossover filters. Click on the Xover button to open
the crossover settings window:
Crossovers “split” the frequency band to send to different drivers. In a two-way loudspeaker, a low pass filter is
used to remove high frequencies from the signal sent to the woofer, and a high pass filter is used to remove low
frequencies from the signal sent to the tweeter. When integrating a subwoofer, high pass filters are used on the
speakers and a low pass filter on the subwoofer. A crossover filter can also be used to limit low frequency
content delivered to a speaker or subwoofer, to help protect it from over-excursion.
Unlike conventional analog crossovers, the flexibility of DSP allows a completely arbitrary mix of different filter
slopes and types. Filters can be set at any frequency or disabled completely. This allows maximum flexibility in
matching your crossover to the acoustic characteristics of the loudspeaker drivers.
The current channel is displayed in orange, with the others displayed in grey. Hovering the mouse over the curve
brings up an overlay showing the frequency and the attenuation at that frequency.
Page 64
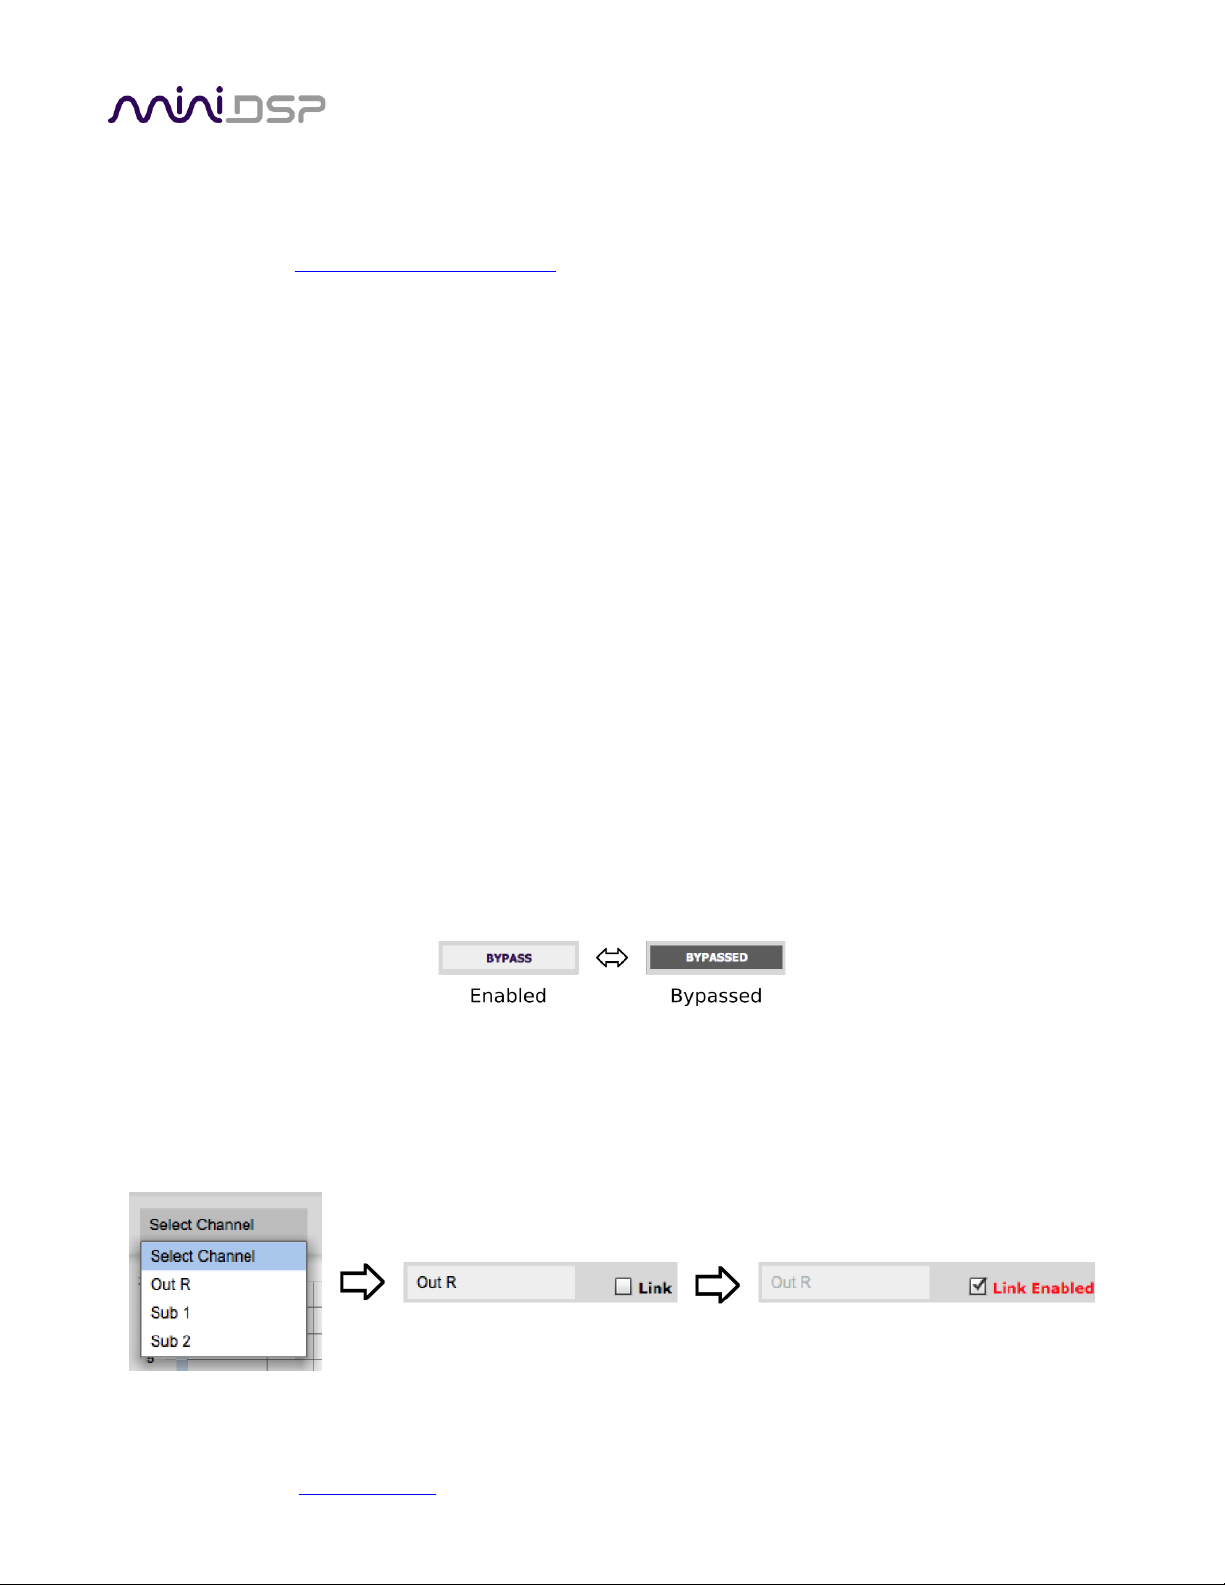
miniDSP Ltd, Hong Kong / www.minidsp.com / Features and specifications subject to change without prior notice 64
Basic/Advanced
By default, the crossover is in basic mode, and shows the controls described below. Advanced mode
enables custom biquad programming for almost infinite flexibility in crossover filter implementation. This
is described in Custom biquad programming on page 66.
Cutoff Frequency
Sets the nominal cutoff frequency of the crossover. In actual fact, the crossover has a more or less gradual
transition from “full on” to “full off,” as determined by the filter slope.
Filter type
Selects the type and slope of the filter. The steeper the slope, the more quickly frequencies above or
below the cutoff frequency are attenuated. There are three types of filter:
Butterworth (BW)
Available in 6, 12, 18, 24, 30, 36, 42, and 48 dB/octave, Butterworth crossover filters are 3 dB down
at the cutoff frequency.
Linkwitz-Riley (LR)
Available in 12, 24, and 48 dB/octave, Linkwitz-Riley crossover filters are 6 dB down at the cutoff
frequency.
Bessel
Available in 12 dB/octave only, a Bessel filter gives a more gradual roll-off through the crossover
region.
Bypass
Clicking on the Bypass button disables or enables that high pass or low pass filter. The filter is bypassed
when the button is "lit".
Each channel can be linked to one other channel. When a channel is linked to another, the crossover settings of
that channel are mirrored to the other. Typically, the corresponding drivers on the left and right channels are
linked: left and right tweeter, left and right woofer, and so on. To link a channel, select the other channel from
the drop-down menu at the top left of the Xover display, and click the Link checkbox.
Page 65
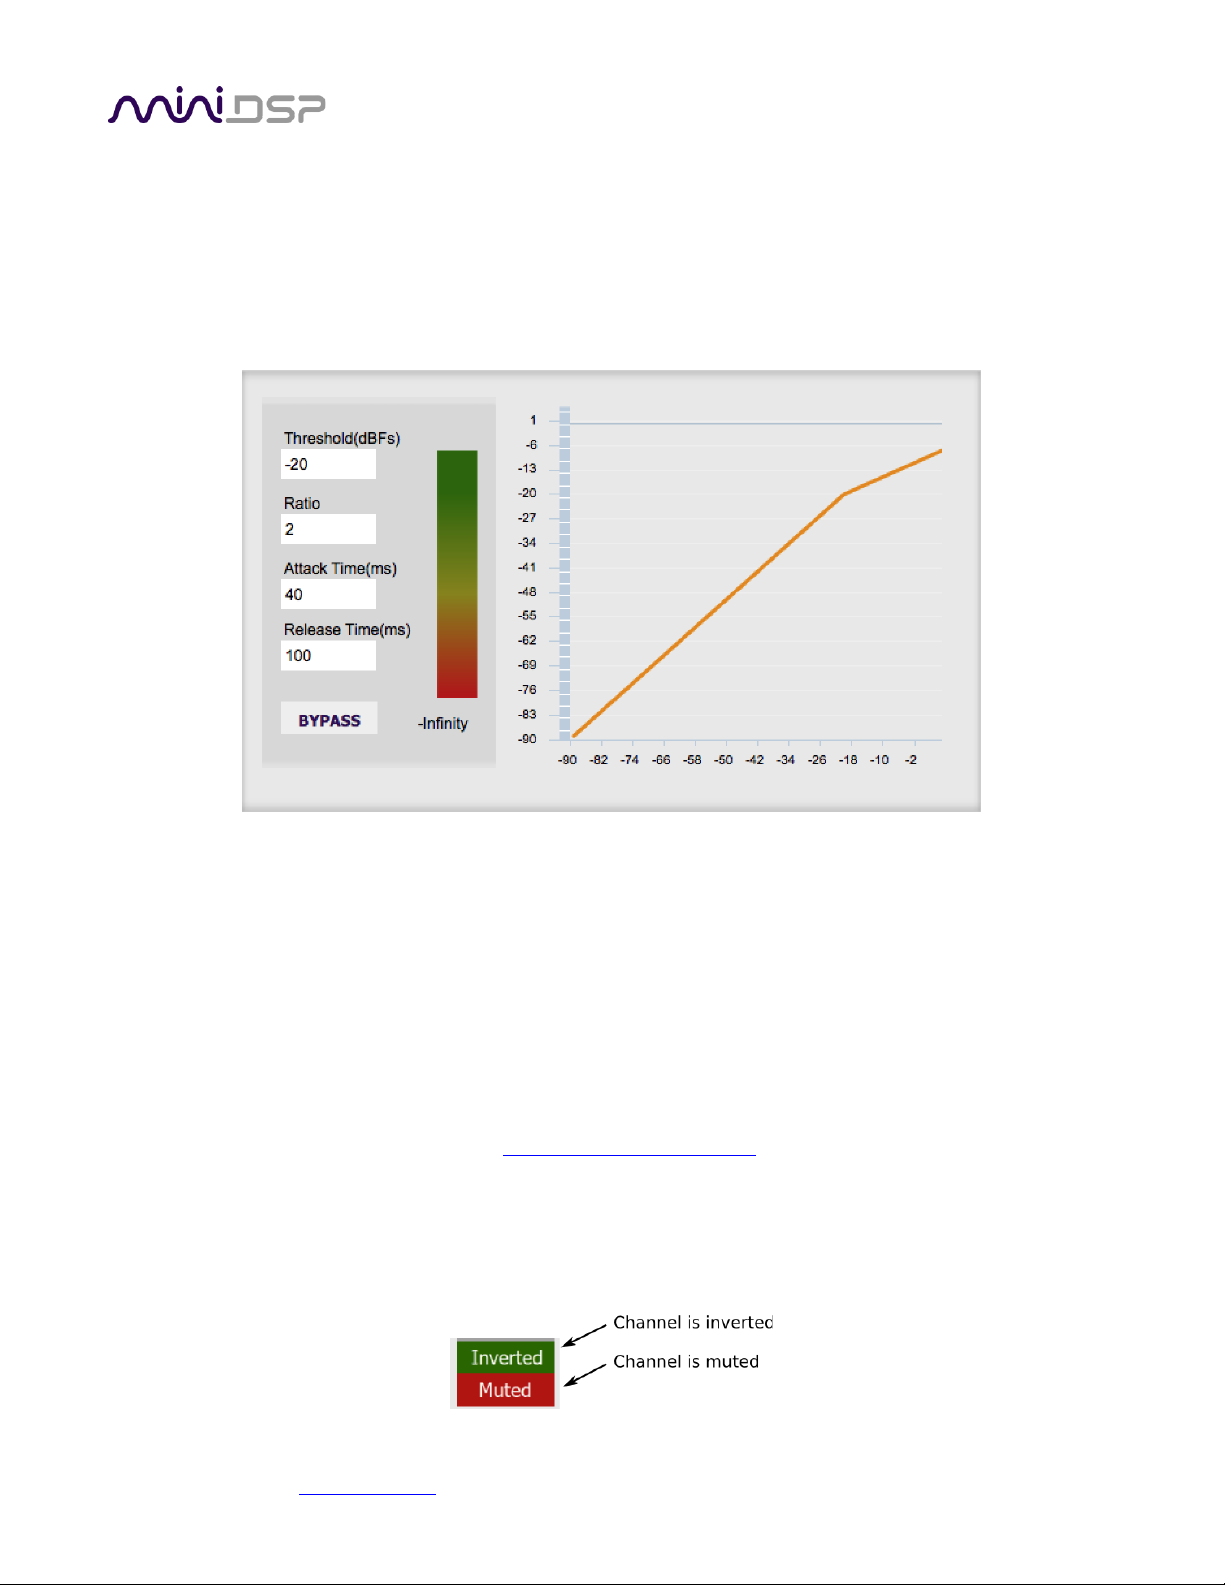
miniDSP Ltd, Hong Kong / www.minidsp.com / Features and specifications subject to change without prior notice 65
8.3.5 Compressor
The compressor reduces the gain of an output channel when the audio signal reaches the level specified by the
Threshold parameter. The gain of the channel will be progressively reduced as the signal increases above the
threshold, according to the Ratio parameter. This can be used to limit the power delivered to speakers and thus
reduce the risk of damage from overdriving.
This screenshot shows an example Compressor setting:
(Note that the compressor algorithm is bypassed by default, so click on the Bypass button to see the curve as
shown here.)
In this example, the threshold is set to −20 dB, so the compressor will activate when the signal on that channel
reaches −20 dB (relative to full output). The ratio is set to 2, so if the input signal level to the compressor then
increases by 10 dB, the output level will increase by only 5 dB. If the input signal level to the compressor is at full
scale (0 dB), then the output level will be limited to −10 dB.
Two additional parameters control the action of the compressor: the attack time and the release time. These
two parameters govern how quickly the compressor activates when the signal level exceeds the threshold, and
how quickly it deactivates when the signal level reduces. The optimum settings may need to be tuned by ear. For
more information, see the Wikipedia article Dynamic range compression.
8.3.6 Invert and mute
Each channel can be inverted in polarity and individually muted. When either of these options is selected, the
visual indicator on the button is "lit":
Page 66
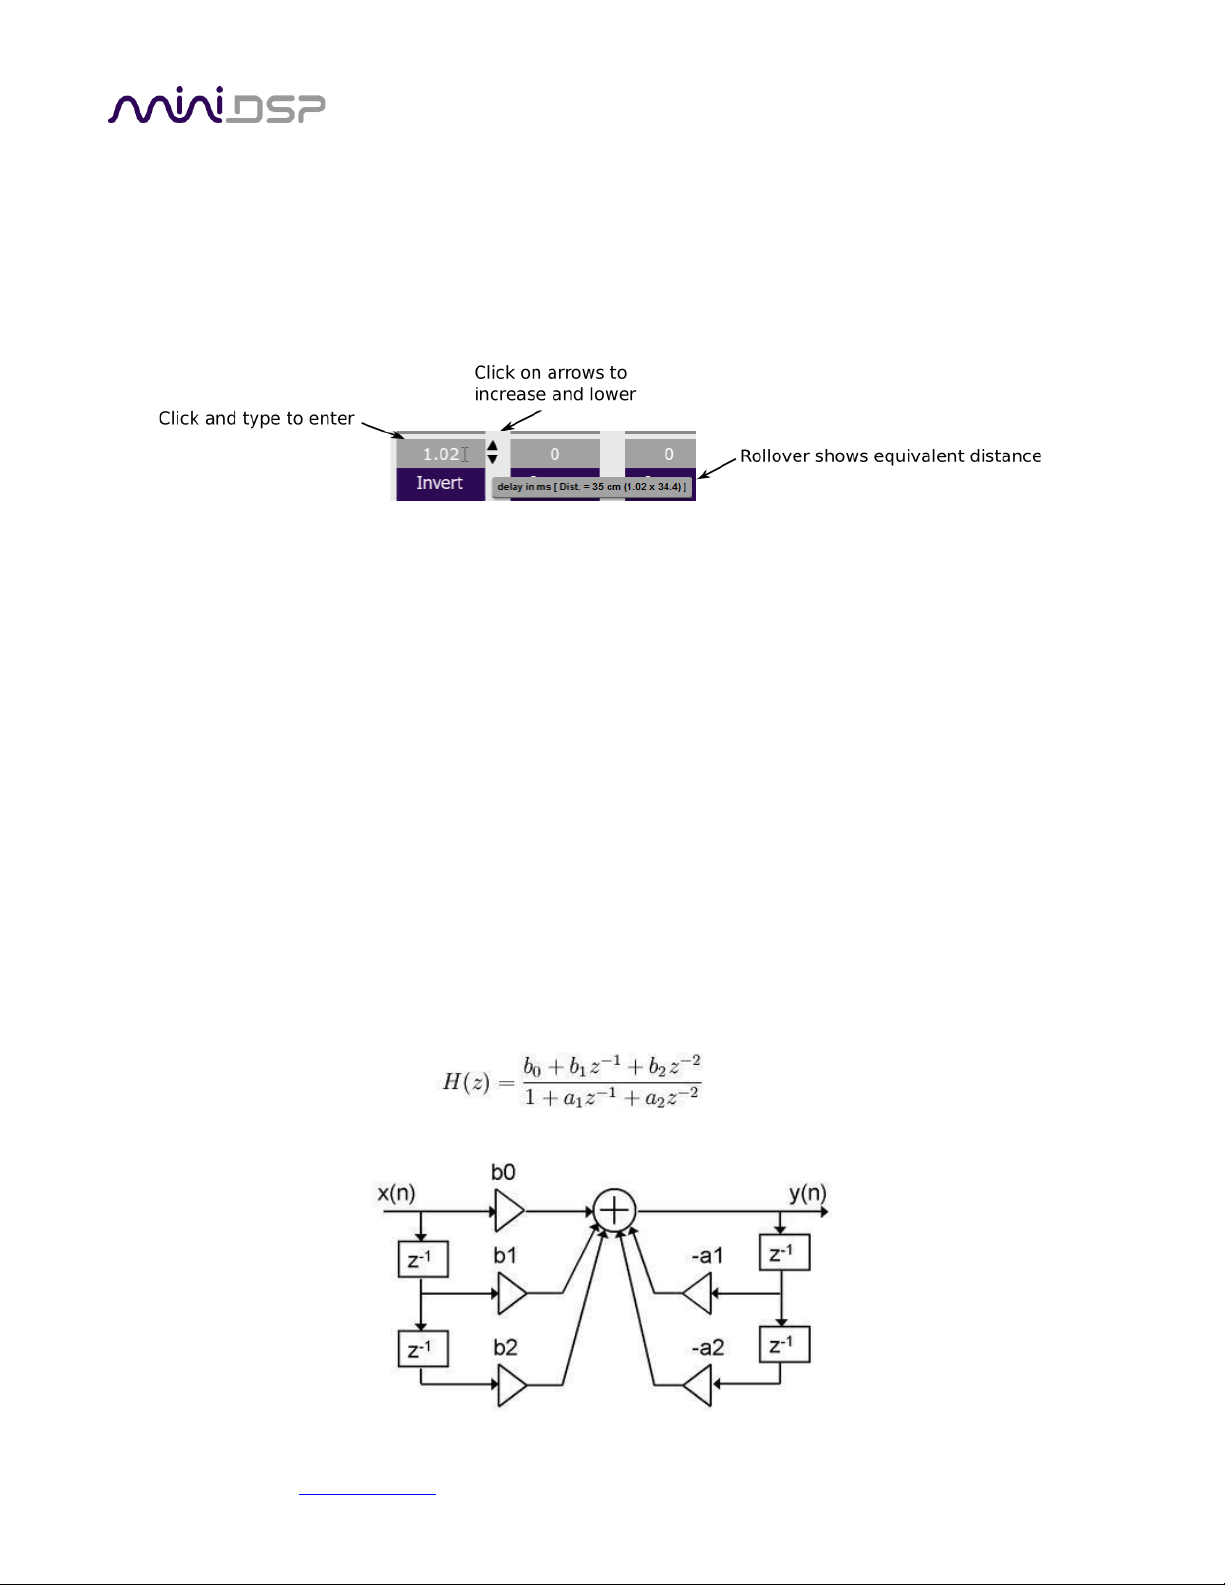
miniDSP Ltd, Hong Kong / www.minidsp.com / Features and specifications subject to change without prior notice 66
8.3.7 Time delay
A delay of up to 30 ms can be applied to each output channel. To set the delay, click in the delay entry box for a
channel. The delay value can be entered numerically, and the up and down arrows can be used to change the
delay in small (0.02 ms) increments.
The time delay corresponds to a distance. This distance is shown in centimeters below the entry box. The
maximum time delay of 30 ms corresponds to a distance of approximately 10.3 meters (about 35 feet).
Note: The Dirac Live analysis algorithm also sets a time delay on the left and right channel. The time delay on the
output channels should be used to time-align drivers for a two-way loudspeaker or to optimize subwoofer
integration before doing Dirac Live calibration.
8.4 CUSTOM BIQUAD PROGRAMMING
Custom biquad programming is available in the PEQ and Crossover blocks. Its purpose is to allow you to directly
provide the biquad coefficients that control the digital filters of the processor, thus providing an almost infinite
degree of flexibility.
For example, you can create hybrid crossovers with staggered cutoff frequencies, create parametric EQ filters
beyond those provided in the easy-to-use “basic” interface, implement a Linkwitz transform, or mix crossover
and EQ biquads in the same block.
8.4.1 What’s a biquad?
A biquad is the basic unit of processing that is used to create digital filters. It can be described either with an
equation or with a signal flow diagram, as shown here:
Page 67
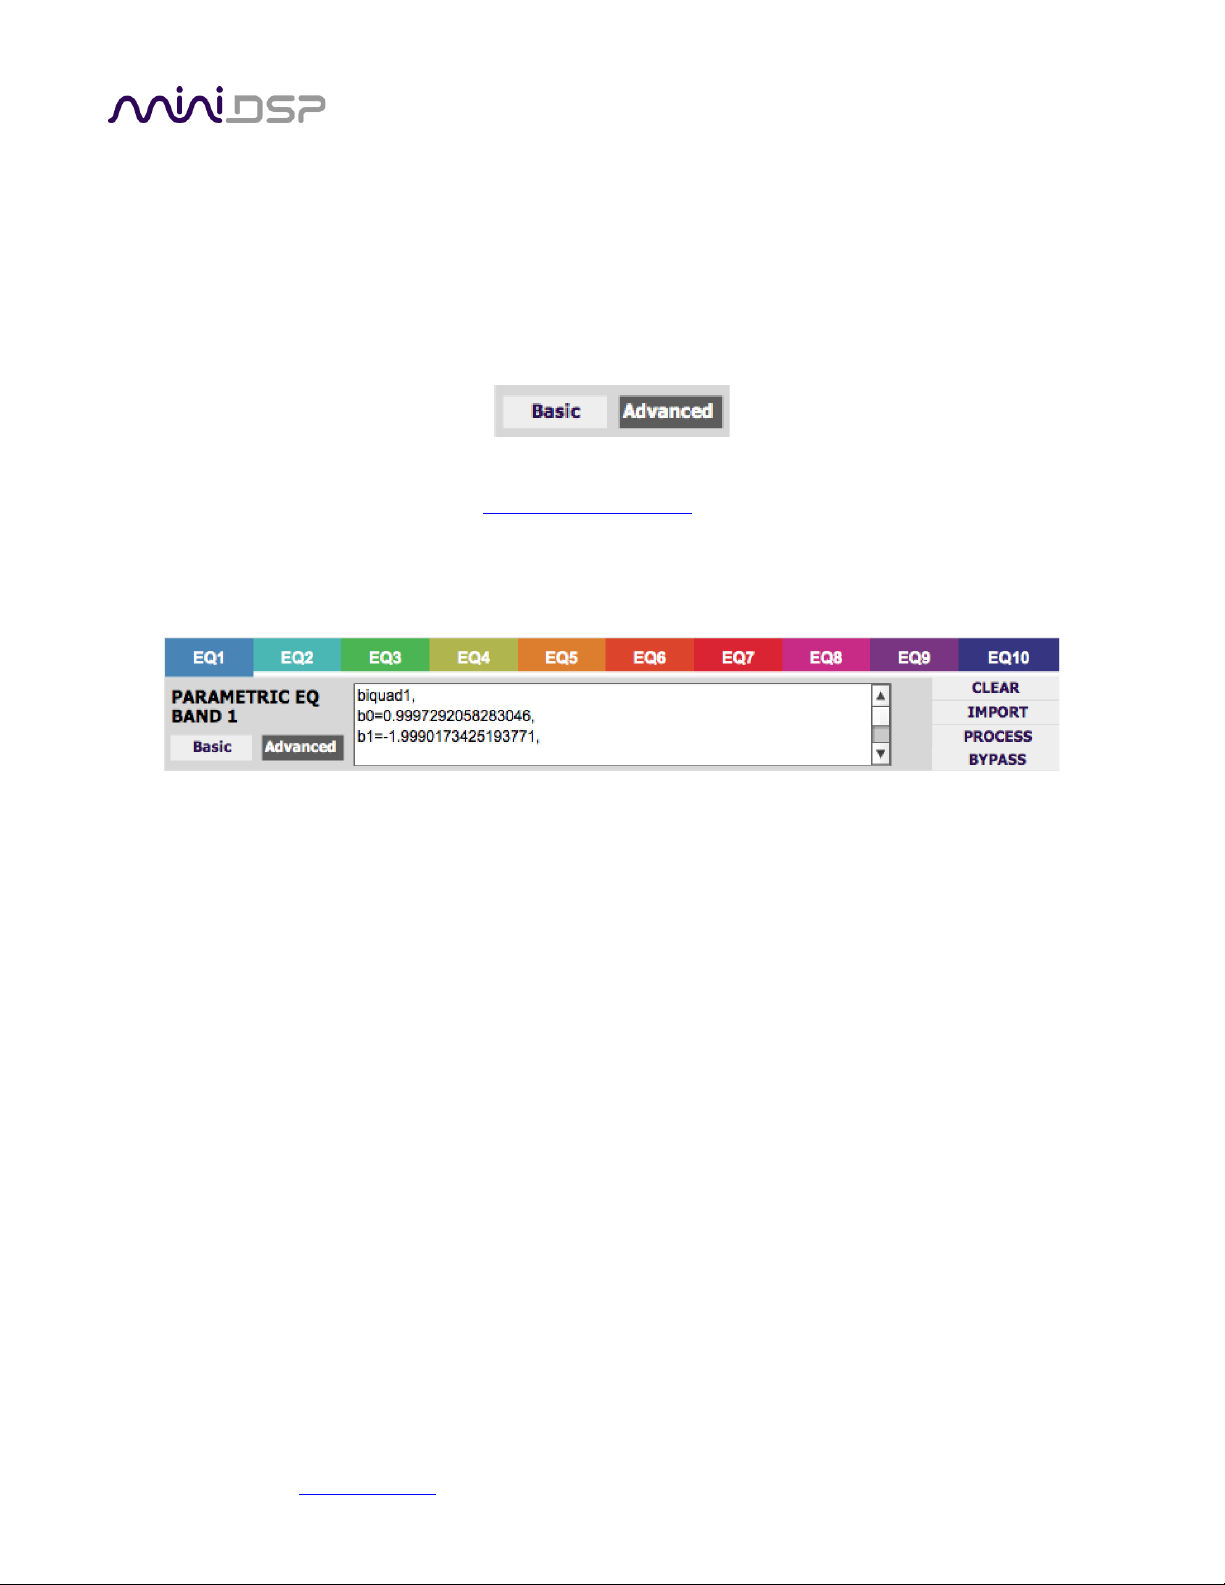
miniDSP Ltd, Hong Kong / www.minidsp.com / Features and specifications subject to change without prior notice 67
A single biquad like this can perform a great many functions, including all of the functions of a single parametric
EQ filter, one 6 or 12 dB/octave high pass or low pass crossover filter, and more. Biquads are combined in series
(cascaded) to create more complex filters. The function that each biquad performs is determined by just five
numbers: b0, b1, b2, a1, and a2. These numbers are called the coefficients.
8.4.2 Using custom biquad programming
Each crossover block and PEQ filter has a selector that switches it to advanced mode:
In advanced mode, the biquad coefficients can be pasted directly into the user interface. These coefficients must
be calculated using design software – see Biquad design software for suggestions.
Parametric EQ advanced mode
In the parametric EQ blocks, advanced mode allows each individual filter to be specified by its biquad
coefficients. After pasting in the coefficients, click on the Process button.
Parametric EQ file import (REW integration)
Multiple biquads in the parametric EQ block can be set at once by importing a coefficient file. This file can
be generated by Room EQ Wizard (REW) or other applications. The design software must be set for a
96 kHz sample rate. The number of filters is limited to a maximum of ten.
This example illustrates the correct file format:
biquad1,
b0=0.998191200483864,
b1=-1.9950521500467384,
b2=0.996920046761057,
a1=1.9950521500467384,
a2=-0.9951112472449212,
biquad2,
...
biquad3,
...
biquad4,
...
biquad10,
b0=1.0010192374642126,
b1=-1.9950555192569264,
b2=0.9940580112181501,
a1=1.995060938714333,
a2=-0.9950718292249559
Page 68
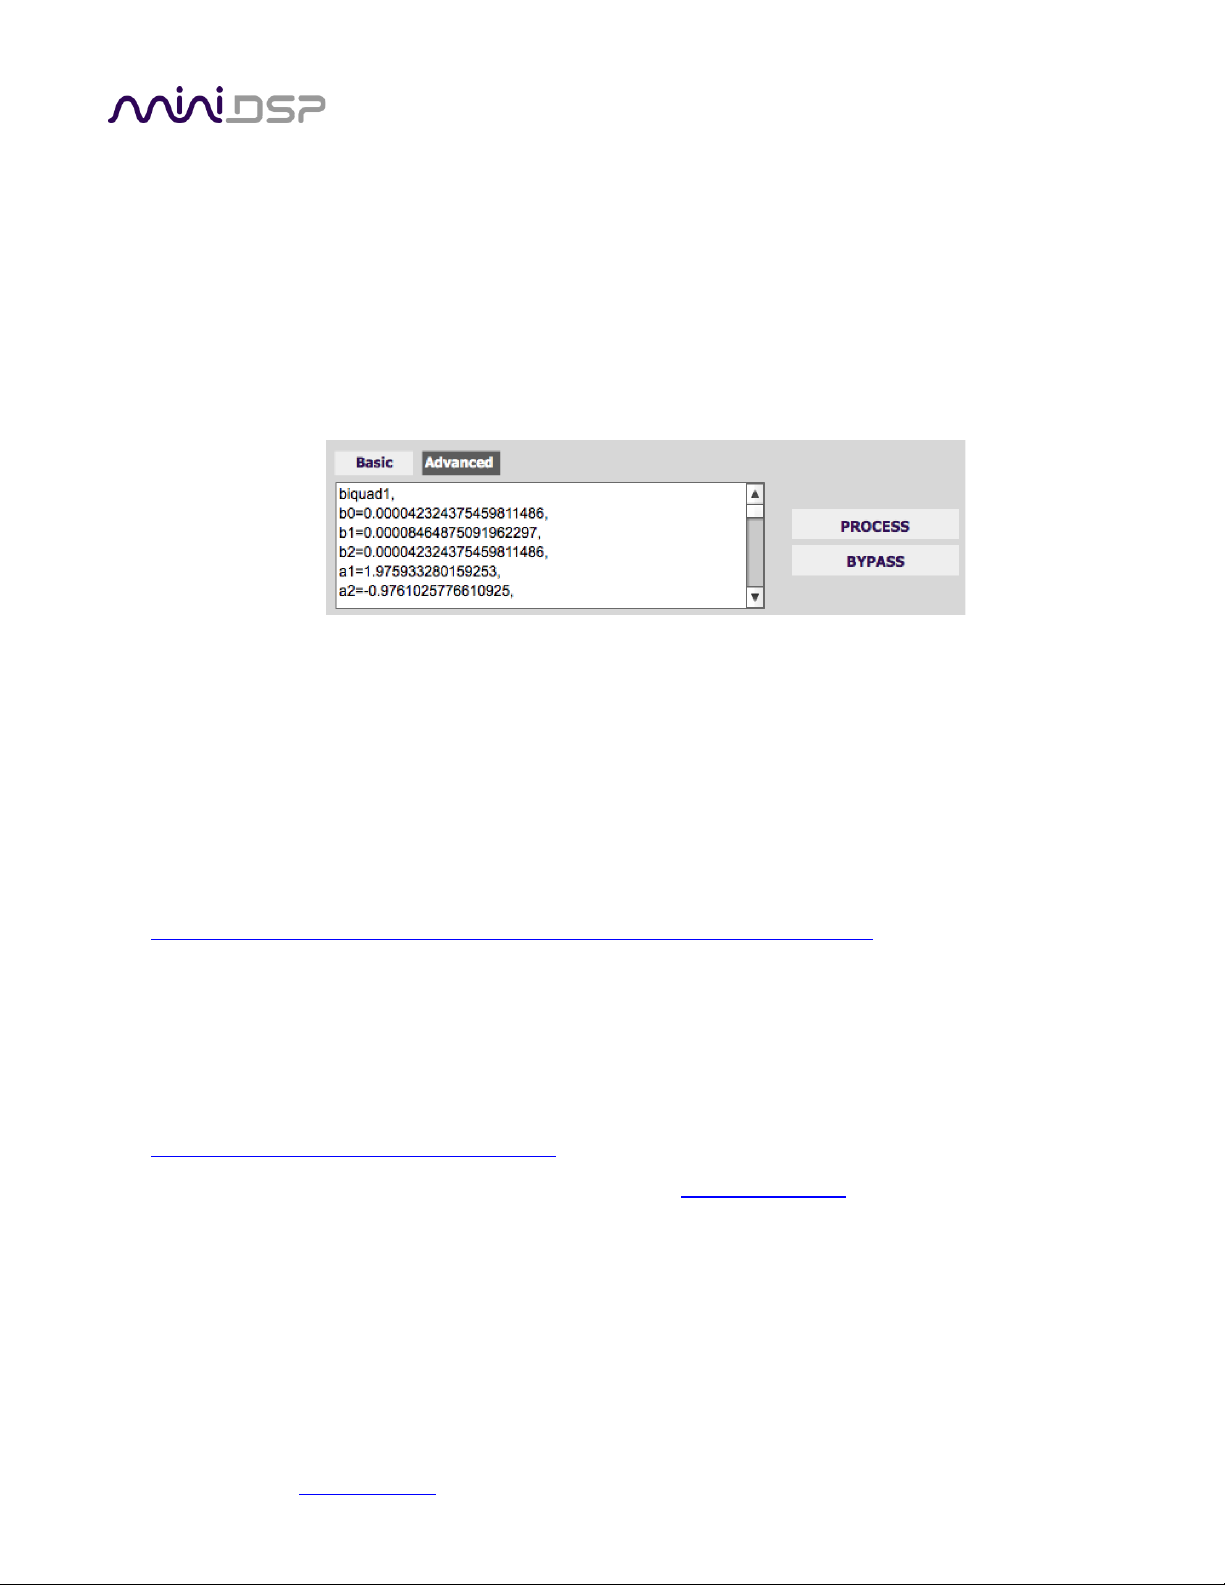
miniDSP Ltd, Hong Kong / www.minidsp.com / Features and specifications subject to change without prior notice 68
Note that the last line must not have a comma at the end. If the file has less than ten biquads, then only
that number of biquads will be imported. For example, if importing a file with six biquads, the first six
filters will be set, and the last four will not be changed. (Note: if the last line ends with a comma, that
counts as an extra biquad.)
If the file contains more than ten biquads, then an error will be reported and no filters will be changed.
Crossover advanced mode
The Crossover blocks have eight biquads for each output channel. In Advanced mode, all eight biquads
need to be specified. After pasting in the coefficients, click on the Process button for them to take effect.
8.4.3 Biquad design software
Here are some ways to design your biquad coefficients.
Biquad calculation spreadsheet
The community-developed biquad calculation spreadsheet allows many filter types to be calculated, including
notch filters, Linkwitz transforms, and filters with arbitrary Q-factor. Access this spreadsheet here (requires
Microsoft Excel):
• http://www.minidsp.com/images/fbfiles/files/All_digital_coefs_v1-20101026.zip
Room EQ Wizard (REW)
Room EQ Wizard is a free acoustic measurement and analysis tool, available for Windows, Mac and Linux
platforms. It includes the ability to automatically generate a bank of parametric EQ biquads based on a
measurement. These coefficients can be saved to a file from REW and then loaded into a PEQ block. Room EQ
Wizard can be downloaded here:
• http://www.roomeqwizard.com/#downloads
For guidance on using this feature, refer to the application note Auto EQ with REW.
Page 69
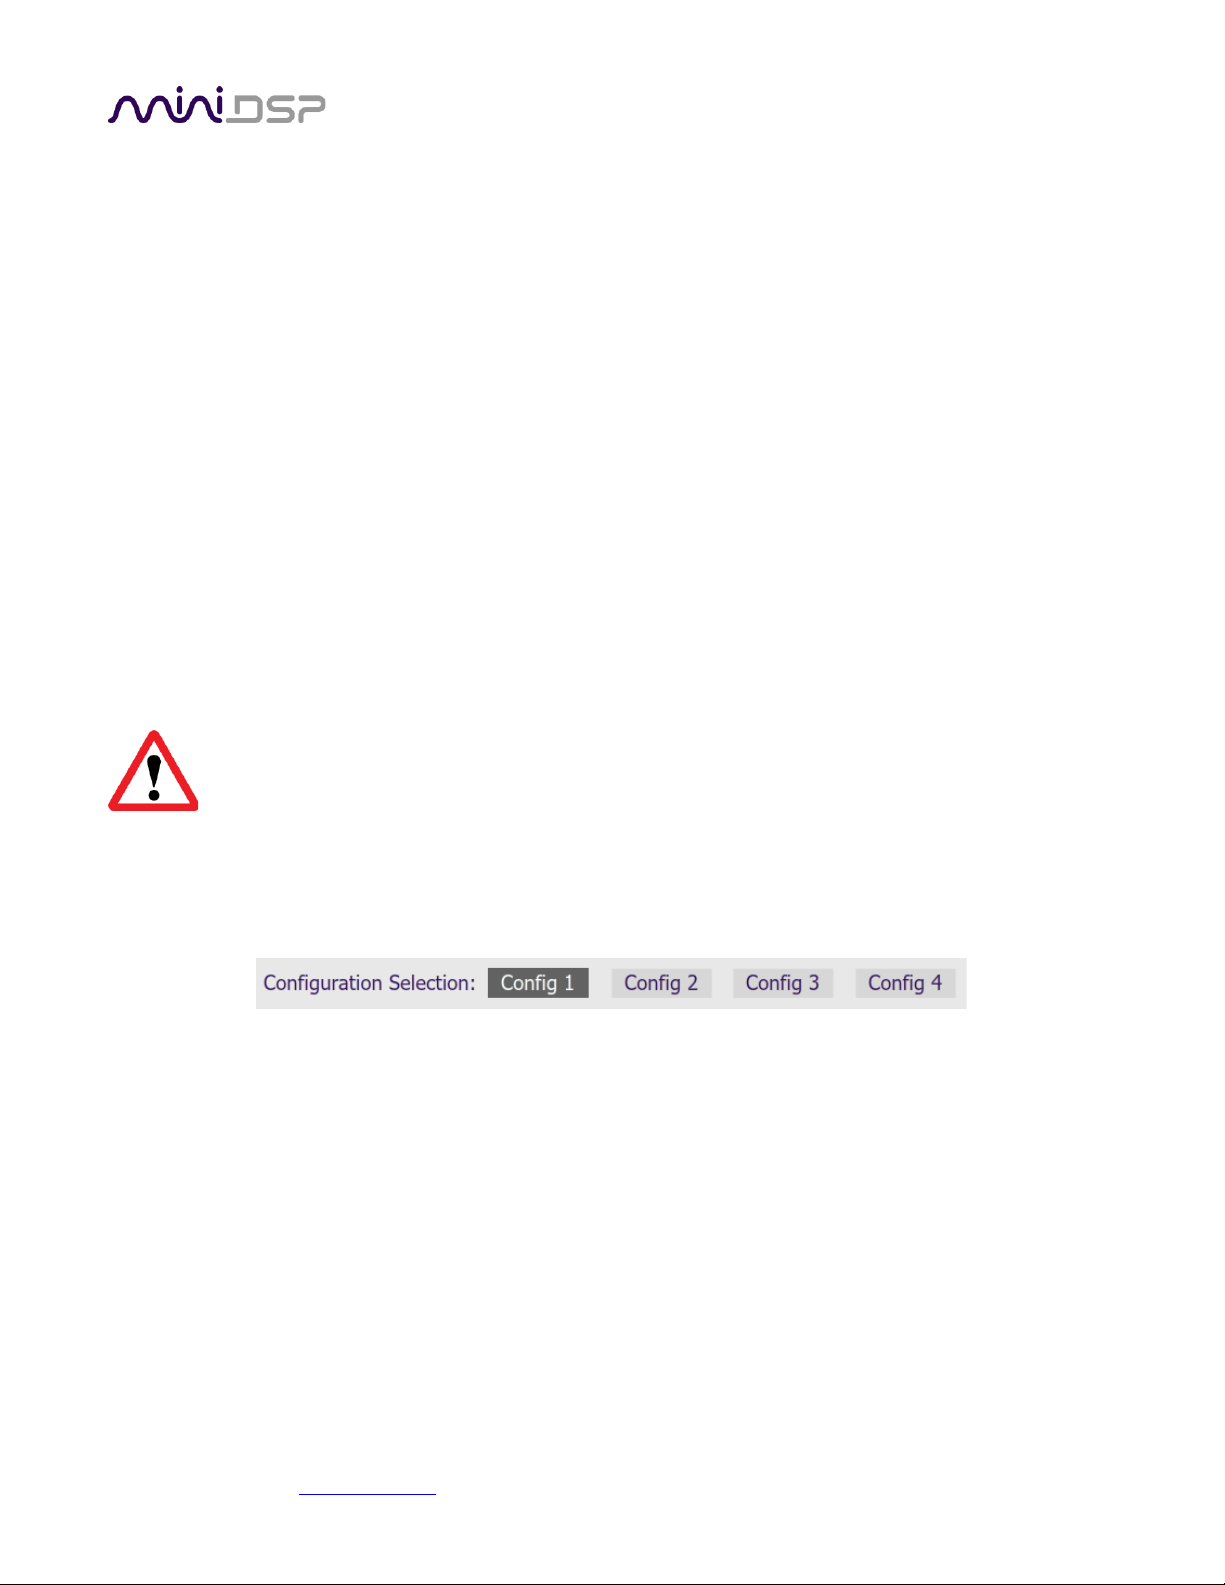
miniDSP Ltd, Hong Kong / www.minidsp.com / Features and specifications subject to change without prior notice 69
8.5 WORKING WITH CONFIGURATIONS
The data that controls the back-end audio processing is called a configuration. The processor stores four
configuration presets in its internal memory, which can be selected from the plugin or via remote control.
8.5.1 Online and offline mode
Initially, the plugin is offline. When the Connect&Synchronize button is used, the plugin downloads
configuration data into the processor and goes online. Changes made in the plugin user interface therefore fall
into two categories:
The plugin is online
The plugin user interface is “live” – that is, any changes made to the audio processing parameters in the
user interface are immediately downloaded to the processor. The effect of these changes will thus be
audible as the changes are made.
The plugin is offline
Changes made to audio processing parameters in the plugin user interface will be made locally in the
plugin only. The next time the plugin goes online, these parameters will be downloaded to the processor
(as long as the Synchronize Config button is pressed).
The configuration contained in the miniDSP hardware unit cannot be uploaded back to the
computer. Therefore, you must save your configuration to a file if you wish to be able to recover
from any changes you make while offline.
8.5.2 Selecting a configuration
The active configuration is selected by one of the four Configuration Selection buttons:
To switch to a different configuration, click on a different button. There are two cases:
The plugin is online
Audio processing will switch to the parameters of the selected configuration. If parameters of the selected
configuration have been changed since the last time that configuration was synchronized, then a dialog
will appear asking if you want to synchronize the configuration.
The plugin is offline
The user interface will update to show the parameters of the newly selected configuration. If this
configuration is changed in the user interface, it will be downloaded to the processor the next time it is
synchronized.
Page 70
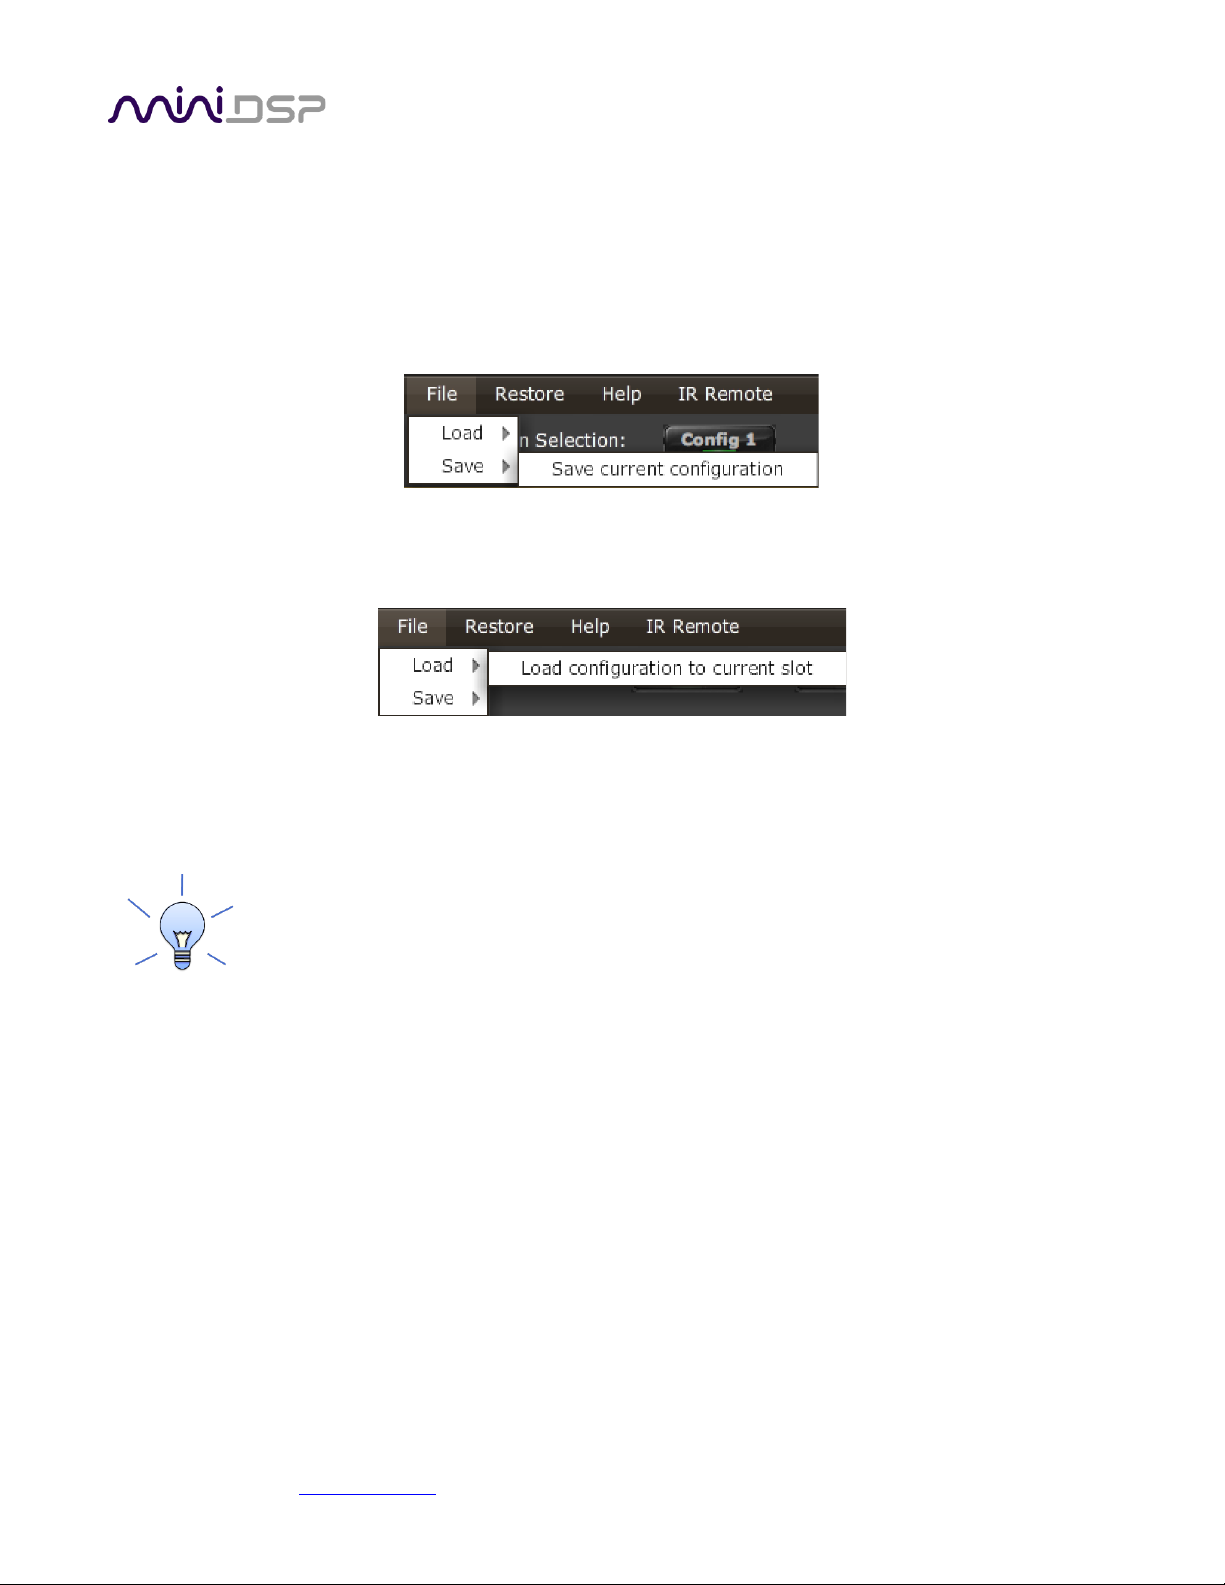
miniDSP Ltd, Hong Kong / www.minidsp.com / Features and specifications subject to change without prior notice 70
8.5.3 Saving and loading configurations
Configurations can be saved to and loaded from files. Each configuration is stored in a separate file. It is very
strongly recommended that each configuration programmed into the processor be saved to a file, to ensure that
the configuration is not lost if the processor is inadvertently reset.
To save the currently selected configuration to a file, drop down the File menu, then select Save and then Save
current configuration. Select a location and enter the name of the file, then save it.
To load a configuration, first select the configuration preset that you wish to load into. Then drop down the File
menu, select Load, and then Load configuration to current slot.
If the plugin is online, the new configuration data will be downloaded to the processor immediately. If the plugin
is offline, the data will be loaded into the user interface only and will be downloaded to the processor the next
time it is synchronized.
To copy a configuration from one preset to another, save the configuration to a file, then select
a different configuration preset and load the file you just saved.
8.5.4 Relationship with Dirac Live
Each configuration preset in the SHD plugin corresponds to the same-numbered filter set configured in Dirac
Live. For example, if the remote control or front panel is used to select preset 3, then both SHD configuration 3
and Dirac Live filter set 3 are loaded for audio processing.
The stored configuration file contains the data for the SHD plugin only. The Dirac Live filters must be loaded
separately using the Dirac Live application.
Page 71

miniDSP Ltd, Hong Kong / www.minidsp.com / Features and specifications subject to change without prior notice 71
8.5.5 Restoring to defaults
Configurations can be reset to the factory defaults from the Restore menu:
Restore All to Default
Reset all four configuration presets to the factory default settings.
• If the plugin is online, all configuration data on the processor will be reset to factory defaults
immediately. In addition, the Dirac Live filters are cleared from all four slots.
• If the plugin is not online, configuration data will be cleared in the user interface only. The new
configuration data will be downloaded to the processor next time it is synchronized. The Dirac Live
filters will not be cleared.
Current Configuration Only
Reset only the currently selected configuration preset to the factory default settings.
• If the plugin is online, the currently selected configuration on the processor will be reset to factory
defaults immediately. The Dirac Live filters will not be cleared.
• If the plugin is not online, configuration data will be cleared from the currently selected preset in the
user interface only. The new configuration data will be downloaded to the processor next time it is
synchronized. The Dirac Live filters will not be cleared.
8.6 KEYBOARD SHORTCUTS
The SHD plugin supports the use of the keyboard for many operations.
Tab
The Tab key moves the focus from the current user interface element to the next. A blue-grey surrounding
box usually indicates the user interface element with the focus. Shift-Tab moves the focus in the opposite
direction.
Up/down arrows
The up/down arrow keys (and in some cases, the left/right arrow keys) adjust the value of many
parameters, if they have the focus:
• Gain adjustment
• Crossover frequency and filter type
• PEQ filter frequency, gain, and Q
Space
The Space bar toggles buttons that have two states, such as Bypass, Invert, and Mute, if they have the
focus.
Page 72

miniDSP Ltd, Hong Kong / www.minidsp.com / Features and specifications subject to change without prior notice 72
9 ADDITIONAL INFORMATION
9.1 SPECIFICATIONS
9.1.1 All SHD Series processors
Computer connectivity
Driverless USB 2.0 control interface for Windows and macOS
USB audio input
XMOS asynchronous USB audio, 44.1 to 192 kHz stereo PCM, USB Audio Class 2
compliant. ASIO driver for Windows, driverless for macOS.
Digital audio inputs
Digital audio source selectable from IR remote or front panel:
• AES-EBU on Neutrik 3-pin female XLR / Isolated with digital audio transformer
• SPDIF on RCA connector / Isolated with digital audio transformer
• TOSLINK on Optical connector
The input signal is processed by a high quality onboard Asynchronous Sample Rate
Converter for compatibility with most common sample rates (20-216kHz).
Ethernet audio input
Audio streaming with Volumio, up to 192 kHz sample rate
Audio resolution
32-bit input and output resolution, 96 kHz internal sample rate
Audio processing
32-bit floating-point processor. Flexible routing matrix, Dirac Live® room
correction, user-programmable IIR filtering, individual delays and gains per
channel.
Filtering capabilities
Dirac Live mixed-phase filtering.
User-programmable IIR filters: high pass and low pass crossover filters up to 48
dB/octave per output channel; ten biquad filters (parametric) EQ per output
channel – peaking, low-shelf, and high-shelf types.
Storage/presets
All output channel settings controllable in real time from software user interface.
4 onboard presets stored in local flash memory.
Infrared remote
Basic remote supplied. Also supports “learning remote” capabilities (NEC, Philips,
Sony) for third-party remotes.
Page 73

miniDSP Ltd, Hong Kong / www.minidsp.com / Features and specifications subject to change without prior notice 73
9.1.2 SHD
Specifications as per “All SHD Series processors” on page 72, plus:
Analog audio inputs,
unbalanced
Unbalanced stereo (2 channels) analog audio on RCA connectors
- Max input: 2V RMS
- Input impedance: 47 kΩ
- THD+N @ 2Vrms: 0.0005% (RCA to USB)
- Dynamic range: 114 dB
- Frequency response linearity / 20 Hz to 20 kHz, –1 dBFS: +/-0.5 dB
Analog audio inputs,
balanced
Balanced stereo (2 channels) analog audio on XLR connectors
- Max input: 4V RMS
- Input impedance: 48 kΩ
- THD+N @ 2Vrms: 0.0003% (RCA to USB)
- Dynamic range: 120 dB
- Frequency response linearity, 20 Hz to 20 kHz, –1 dBFS: +/-0.5dB
Analog audio outputs,
unbalanced
Unbalanced analog audio (4 channels) on RCA connectors
- Full-scale output: 2V RMS
- Output impedance: 100Ω
- THD+N: 0.0005% (USB to RCA)
- Dynamic range: 114dB
- Frequency response linearity, 20 Hz to 20 kHz, –1 dBFS: +/-0.5dB
Analog audio outputs,
balanced
Balanced analog audio (4 channels) on XLR connectors
- Full-scale output: 4V RMS
- Output impedance: 200 Ω
- THD+N: 0.0003% (USB to RCA)
- Dynamic range: 120 dB
- Frequency response linearity, 20 Hz to 20 kHz, –1 dBFS: +/-0.5dB
Digital audio outputs
Four channels of digital audio (two stereo pairs, OUT 1&2 and OUT 3&4), available
as SPDIF on RCA connector / Isolated with digital audio transformer.
Power supply
Universal mains supply, 90 – 240 V AC
Dimensions (H x W x D)
41.5 x 429 x 236 mm
Page 74

miniDSP Ltd, Hong Kong / www.minidsp.com / Features and specifications subject to change without prior notice 74
9.1.3 SHD Power
Specifications as per “All SHD Series processors” on page 72, plus:
Analog power amplifier
Analog subwoofer outputs, unbalanced
Other
Max output power
2 X 120W RMS (RL=8 Ω and RL=4 Ω)
THD+N
< 0.005% (f=100Hz, 1W to 100 W, RL=8 Ω and RL=4 Ω)
< 0.03% (f = 20 Hz to 20 kHz, 60mW to 100 W, RL=4 Ω)
< 0.07% (f = 20 Hz to 20 kHz, 60mW to 100 W, RL=8 Ω)
Signal-to-Noise Ratio
> 110 dB (1kHz A-weighted, 120W into 8Ω)
Frequency response
20 Hz to 30 kHz +/-0.5dB
Crosstalk
< –95 dB (1 kHz)
Full-scale output
1.7V RMS
THD+N
< 0.0008% (f = 20 Hz to 20 kHz, digital in 0dB)
Signal-to-Noise Ratio
> 120 dB (1kHz A-weighted, digital in 0dB)
Frequency response
20 Hz to 30 kHz +/-0.2dB
Crosstalk
< –100 dB (1 kHz)
Digital audio outputs
Four channels of digital audio (two stereo pairs, OUT 1&2 and OUT 3&4), available
as AES-EBU on Neutrik 3-pin male XLR / Isolated with digital audio transformer.
Idle Power
Consumption
20 W
Standby Power
Consumption
0.7 W
Power supply
Universal mains supply, 90 – 240 V AC
Dimensions (H x W x D)
70 x 215 x 225 mm
Page 75

miniDSP Ltd, Hong Kong / www.minidsp.com / Features and specifications subject to change without prior notice 75
9.1.4 SHD Studio
Specifications as per “All SHD Series processors” on page 72, plus:
Digital audio outputs
Four channels of digital audio (two stereo pairs, OUT 1&2 and OUT 3&4), available
on two sets of outputs:
• AES-EBU on Neutrik 3-pin male XLR / Isolated with digital audio transformer
• SPDIF on RCA connector / Isolated with digital audio transformer
Headphone output
6.35 mm stereo jack.
Cirrus Logic CS43130 DAC/headphone driver, driven from the same signal as OUT
1&2.
Power supply
12V DC external supply, EU/US/AU/UK plug adaptors provided
Dimensions (H x W x D)
41.5 x 214.5 x 206 mm
Page 76
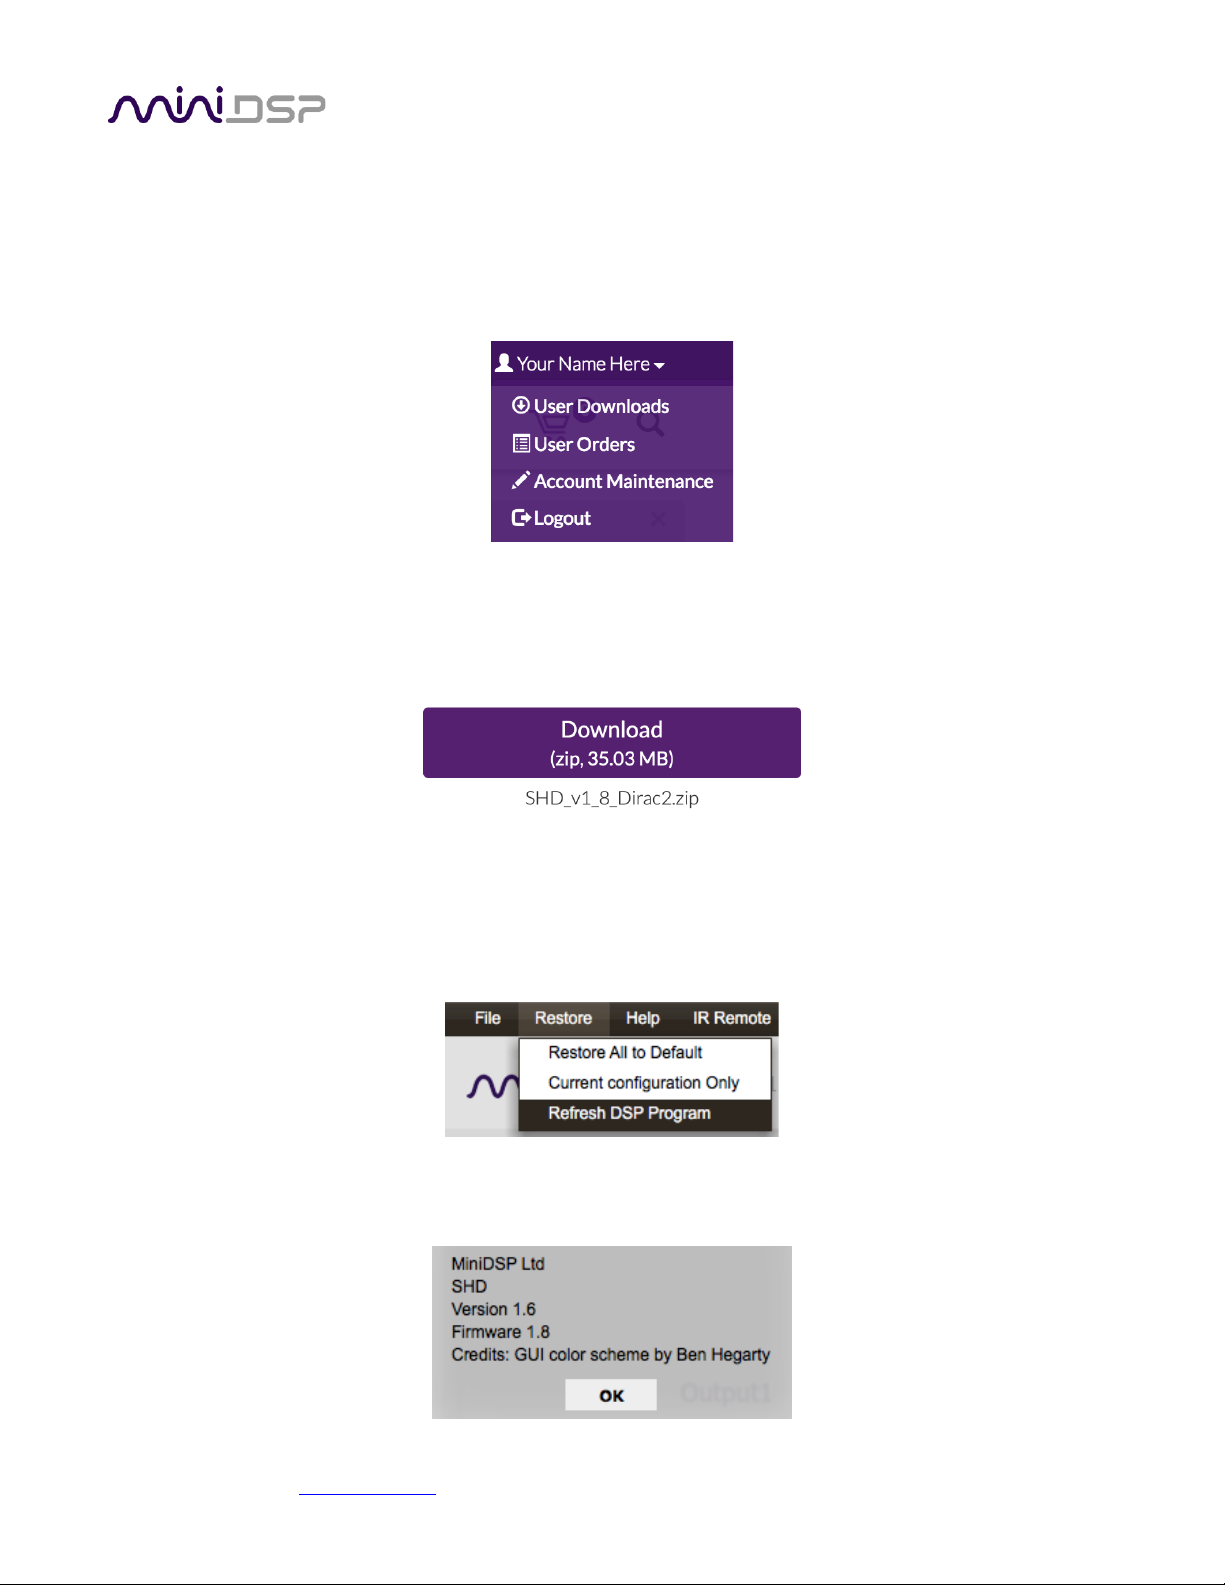
miniDSP Ltd, Hong Kong / www.minidsp.com / Features and specifications subject to change without prior notice 76
9.2 PLUGIN AND DSP UPGRADE
miniDSP occasionally provides an upgrade to the plugin, to improve stability or performance or to add new
features. The procedure is essentially the same as initial installation in Section 3, but with some additional points
to note.
To upgrade, log into the miniDSP website and drop down the menu at the top right. Click on User Downloads.
Click on the SHD series heading. First check the written instructions on the download webpage and note if there
is more to do than just upgrade the plugin – for example, if there is a firmware update, or if the DSP program
needs to be updated.
1. Click on the Download button at the right.
2. Unzip the downloaded file (on Windows, right-click and select “Extract All...”; on Mac, double-click).
3. Install the newly downloaded plugin as described in Section 3.
4. If the instructions on the download webpage say to update the DSP program, start the plugin, click the
Connect button, drop down the Restore menu and select Refresh DSP Program. (This is safe to do as a
matter of course after each plugin update. Your configuration data is not overwritten or reset.)
5. If the instructions on the download webpage say that there is a firmware update included, follow the
instructions in section 9.4.
6. Confirm the updated software versions from the Help -> About… menu:
Page 77
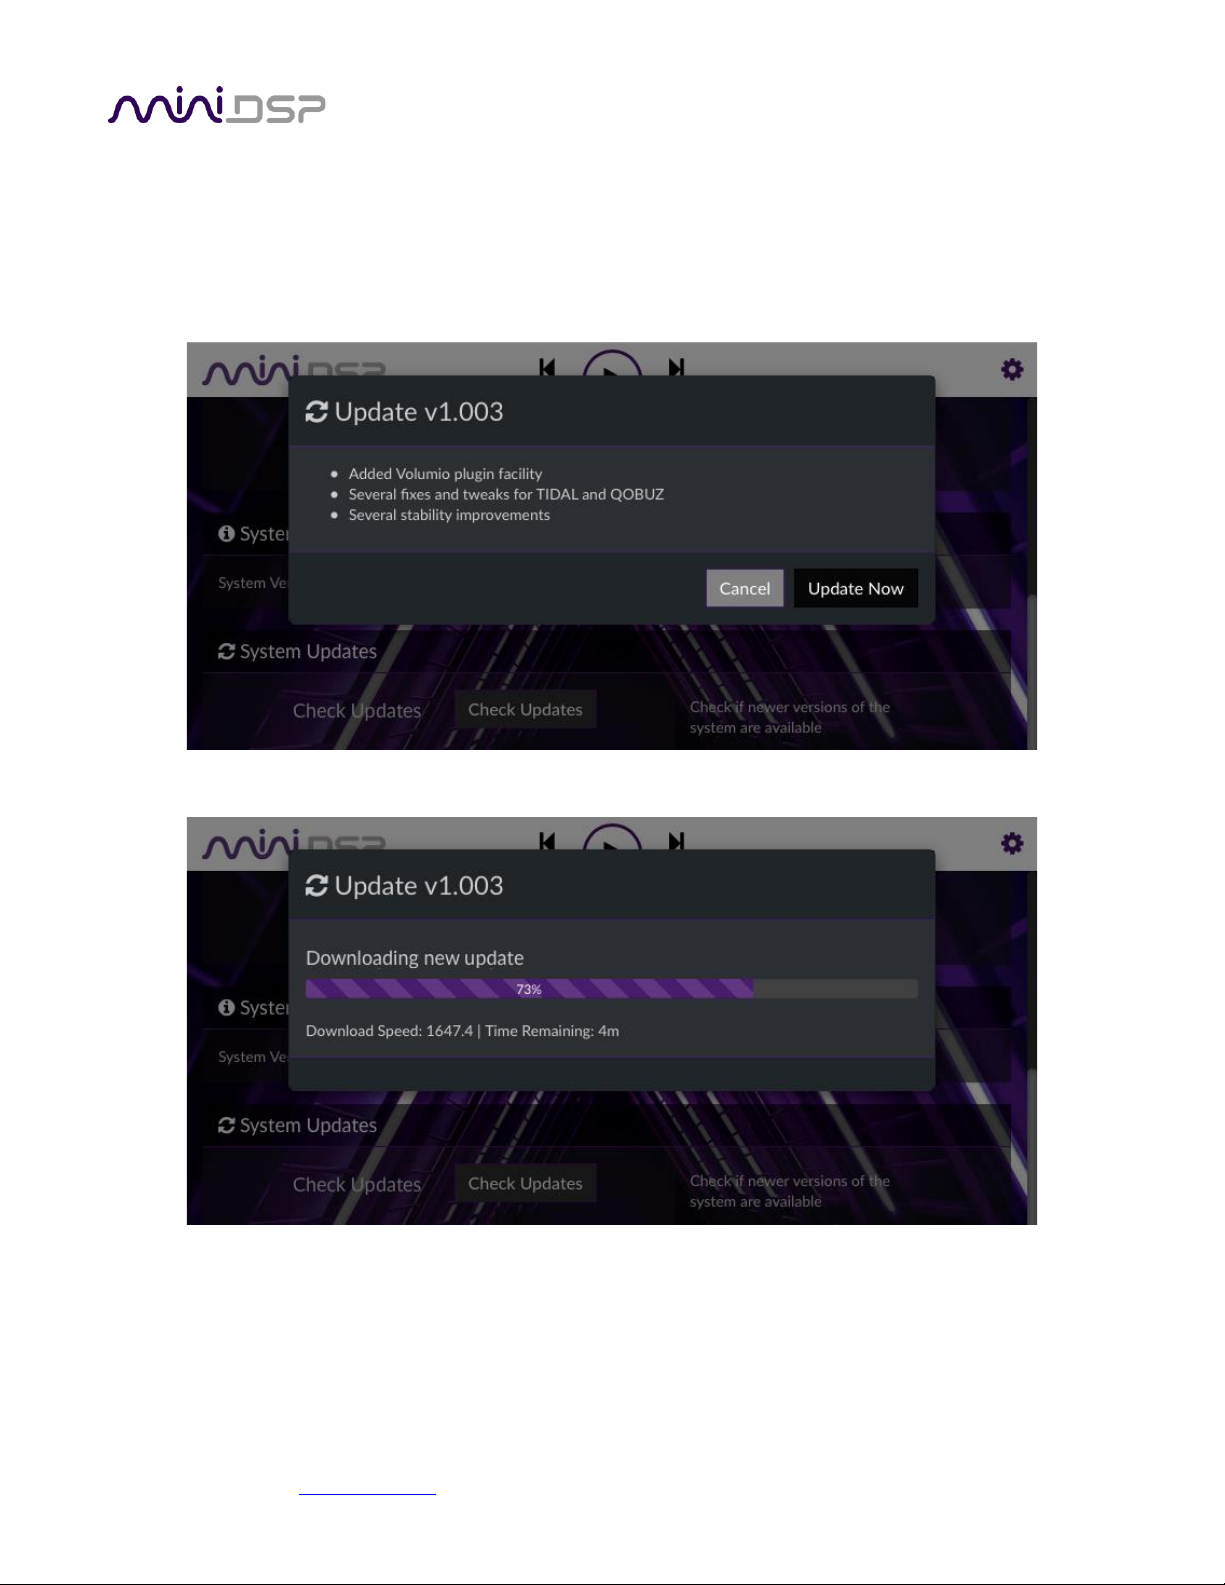
miniDSP Ltd, Hong Kong / www.minidsp.com / Features and specifications subject to change without prior notice 77
9.3 VOLUMIO SOFTWARE UPDATE
To check for an update to the Volumio software, open the web interface and drop down the gear menu at the
top right. Select the System entry.
On the System page, click on the Check Updates button. If an update is available, you will see the details of the
update, like this:
Click on Update Now. You will see a progress bar:
When the update completes, Volumio will automatically restart. After the webpage returns, it is important to
refresh the webpage in your browser. This ensures that any updates to the user interface itself are updated in
your browser.
Page 78
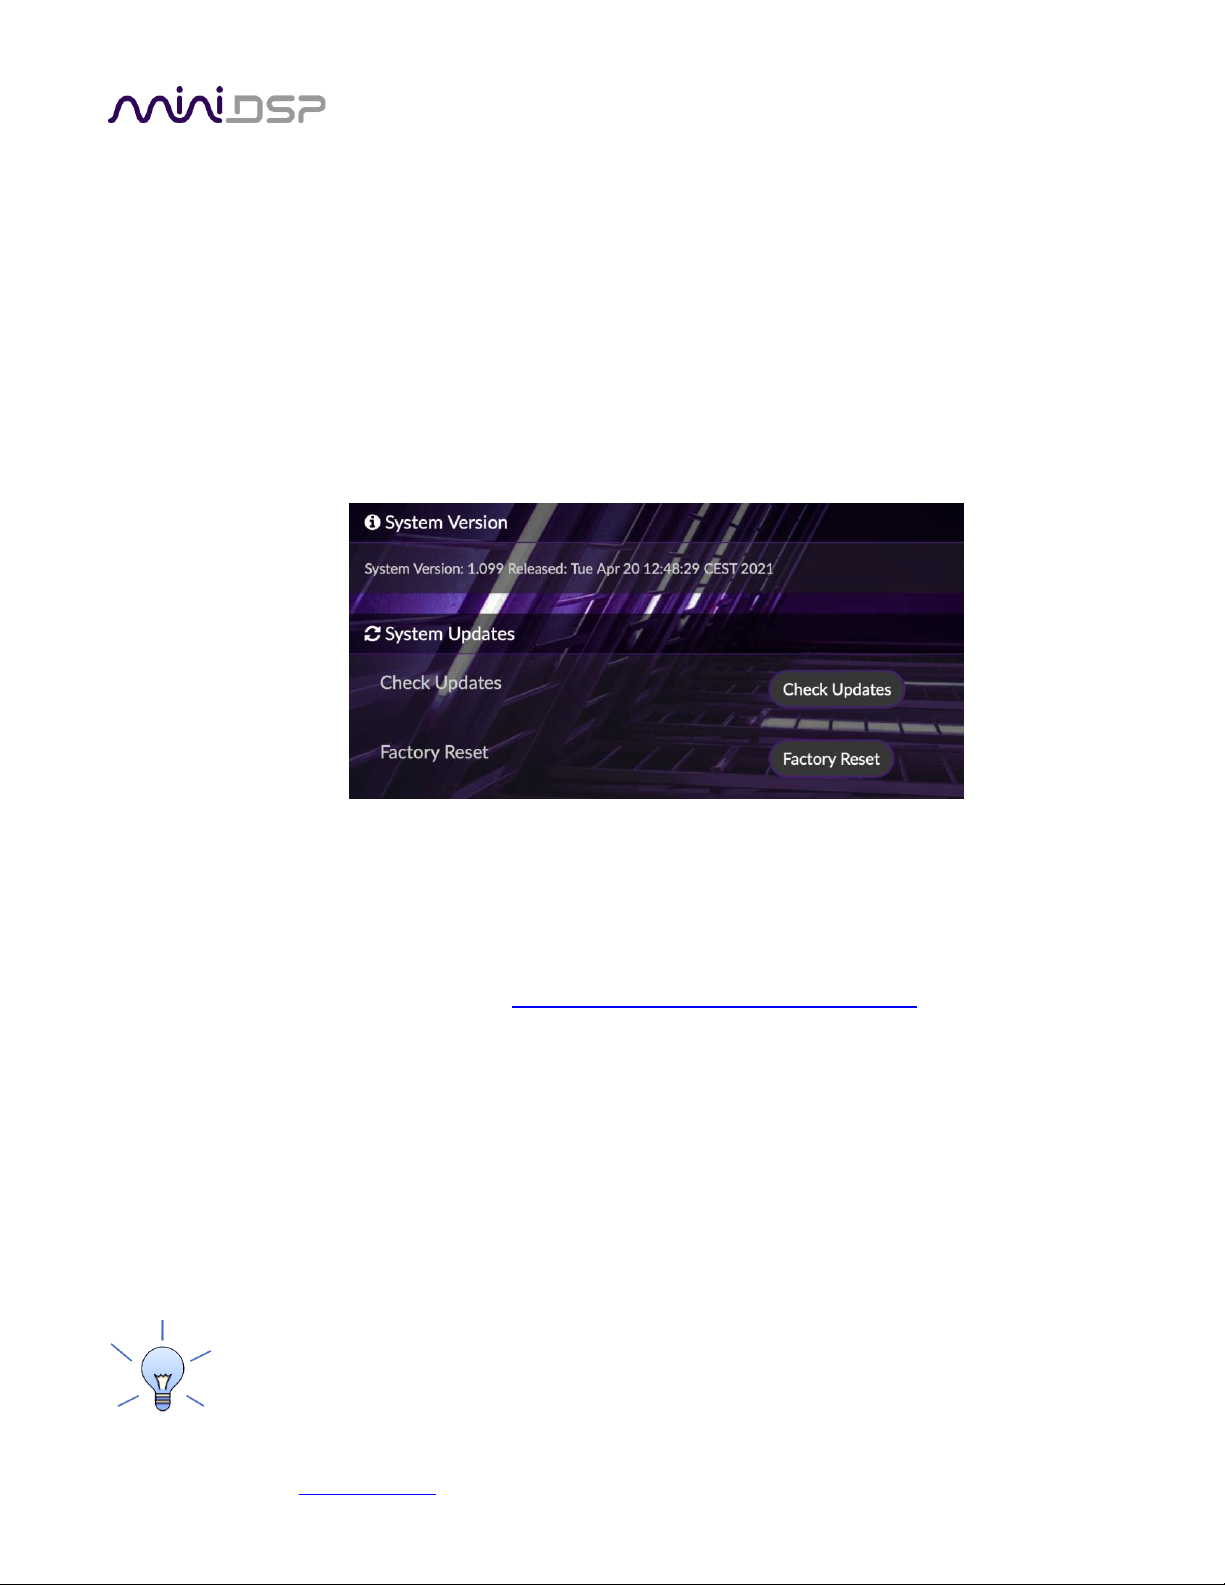
miniDSP Ltd, Hong Kong / www.minidsp.com / Features and specifications subject to change without prior notice 78
9.4 VOLUMIO SETTINGS/FACTORY RESET
There are two types of reset for Volumio. One reverts to the default settings, and one restores the complete
Volumio installation to the version that was delivered from the factory. Use the second version if your Volumio
installation has become corrupted and you are no longer able to access the Volumio web interface. Neither
version has any effect on the plugin settings or Dirac Live calibration.
9.4.1 Factory reset (settings only)
In the Volumio web interface, navigate to Settings then System. Scroll down to the System Version section and
click on the Factory Reset button. The Volumio web interface will become unresponsive for a minute or so while
the settings are reset. You will need to enter all your settings again.
9.4.2 Factory reset (settings and installation)
Use this method if Volumio has become corrupted and you are unable to access the Volumio web interface.
1. Insert a blank USB stick into your computer. Make sure it is formatted in FAT32 format.
2. In your web browser, go to the location http://repo.volumio.org/Primo/factory_reset. Save the file to the
USB stick and eject the stick from your computer. Do not rename or modify the file.
3. Power off your SHD and insert the USB stick. Power it on again.
4. Volumio will revert to the factory version. This can take up to ten minutes, during which time the Volumio
web interface will be unresponsive.
5. When the Volumio web interface responds again, proceed through the setup wizard. Go to Settings then
System. Scroll down to the System Version section and click on the Check Updates button. Update your
Volumio to the latest version.
6. Update any remaining settings to how you had it before the reset.
If you renamed your system in the Volumio settings, you will need to access the web interface
using the default name “minidsp-shd” (page 24).
The factory_reset file is removed from the USB stick during this process. If you want to do the
reset again, you will need to copy the file to the USB stick again.
Page 79
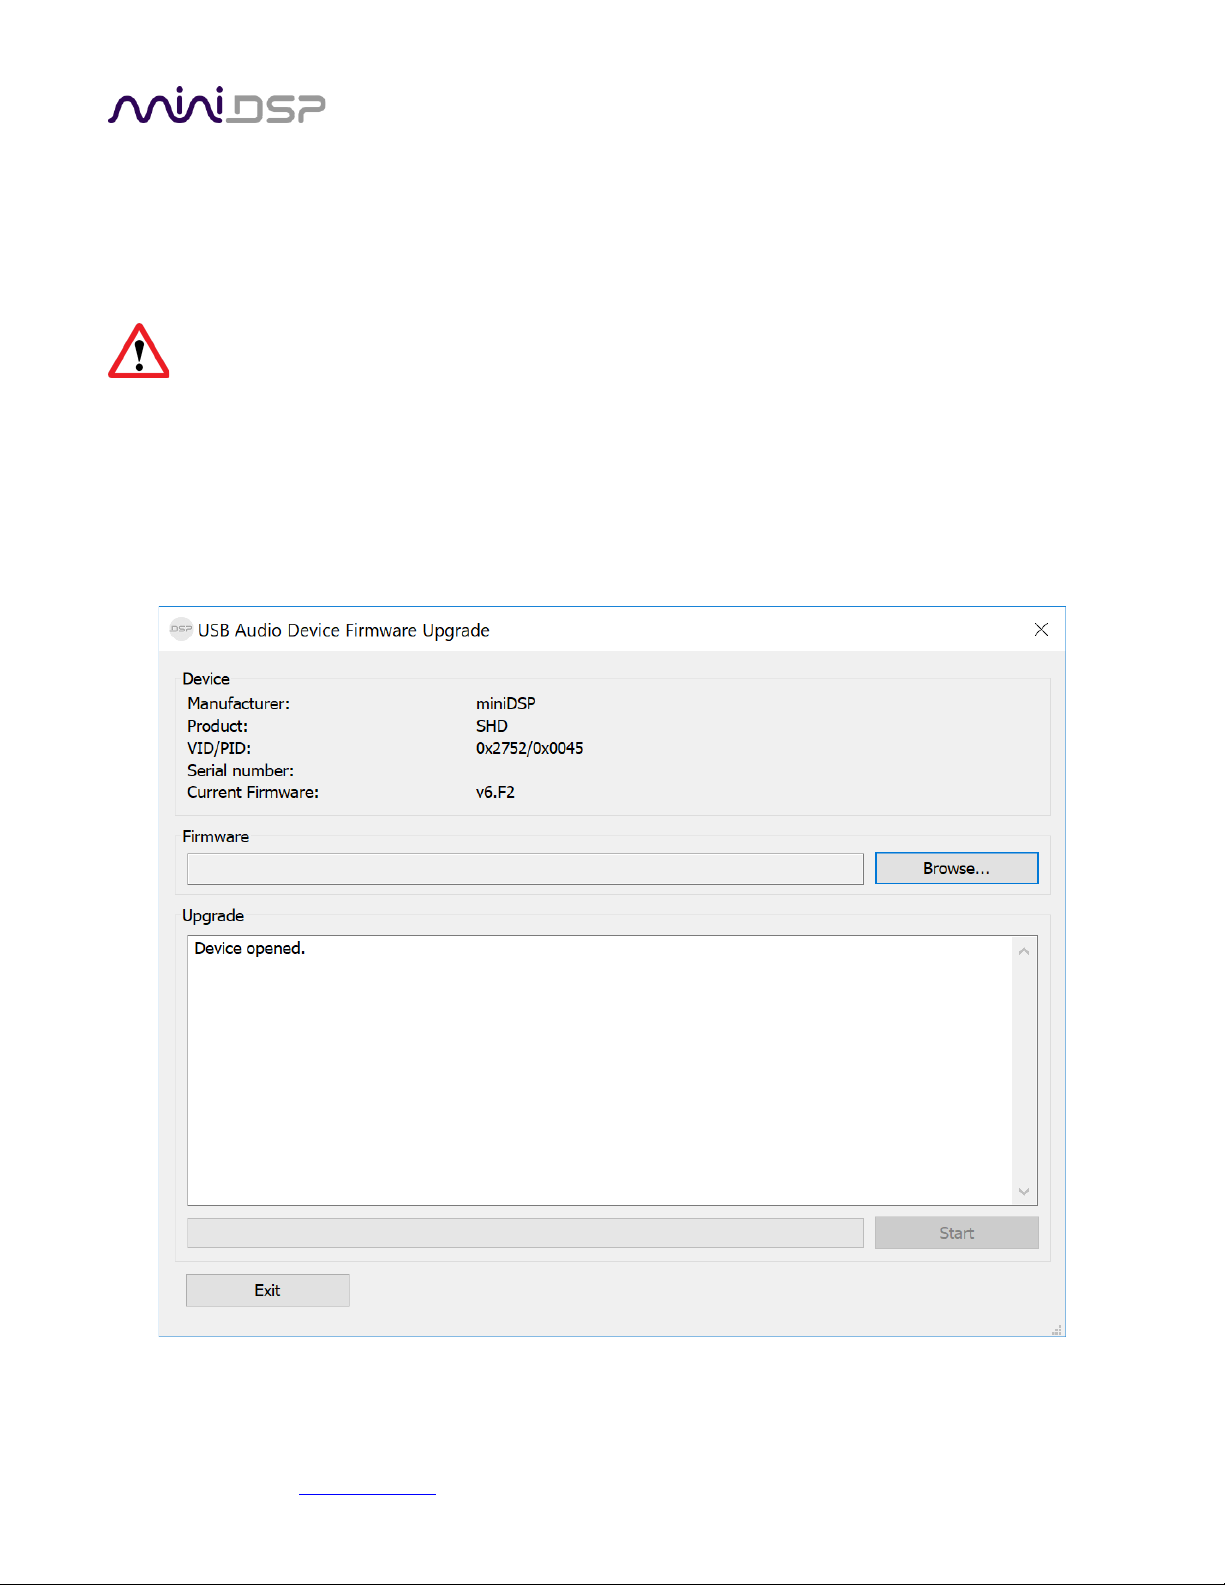
miniDSP Ltd, Hong Kong / www.minidsp.com / Features and specifications subject to change without prior notice 79
9.5 FIRMWARE UPGRADE
miniDSP may occasionally provide an upgrade to the processor’s MCU firmware to enable new features. To
upgrade the MCU firmware, first download the latest version of the SHD software package from the User
Downloads section of the miniDSP website, then extract it on your computer (on Windows, right-click and select
“Extract All...”; on Mac, double-click).
DO NOT DISCONNECT THE USB CABLE OR POWER FROM THE PROCESSOR WHILE FIRMWARE UPGRADE
IS IN PROGRESS. DOING SO MAY “BRICK” YOUR PROCESSOR.
9.5.1 Windows
1. Connect the SHD Series processor to your computer via USB (if not already connected) and power it on.
2. Navigate to the XMOS_Firmware\Firmware_Upgrade_Tools\Windows\miniDSPUAC2Dfu folder of the
software download.
3. Double-click on miniDSPUAC2Dfu.exe to run it. The application will start:
Page 80
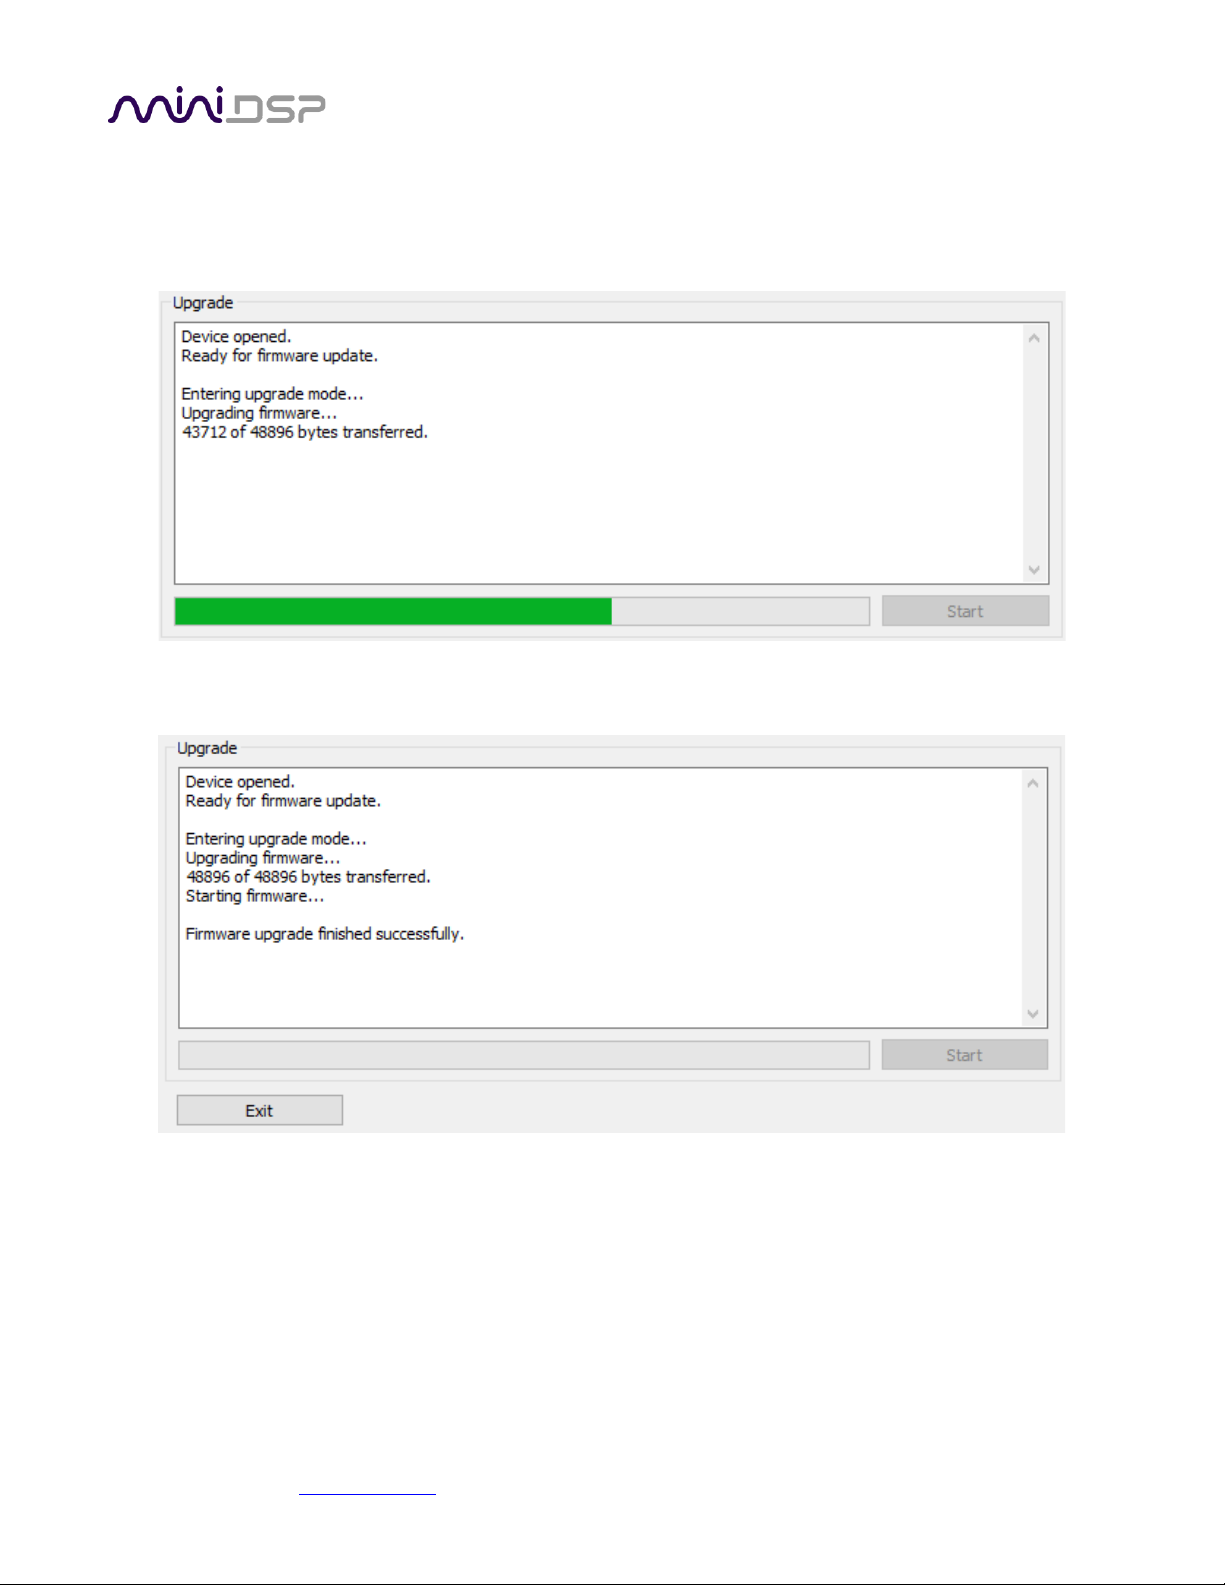
miniDSP Ltd, Hong Kong / www.minidsp.com / Features and specifications subject to change without prior notice 80
4. Click on the Browse button and select the firmware file from the XMOS_Firmware folder of the software
download. It will have a name like “SHD_ v1.10.bin.” (The version number “v1.10” may change.)
5. Click on the Start button.
6. You will get a progress bar as the upgrade proceeds:
7. Once the firmware upgrade completes, you will see a message that the upgrade completed successfully:
8. Click on Exit.
9. That’s it! You’re done. You can now use your SHD Series processor with the new functionality.
Page 81
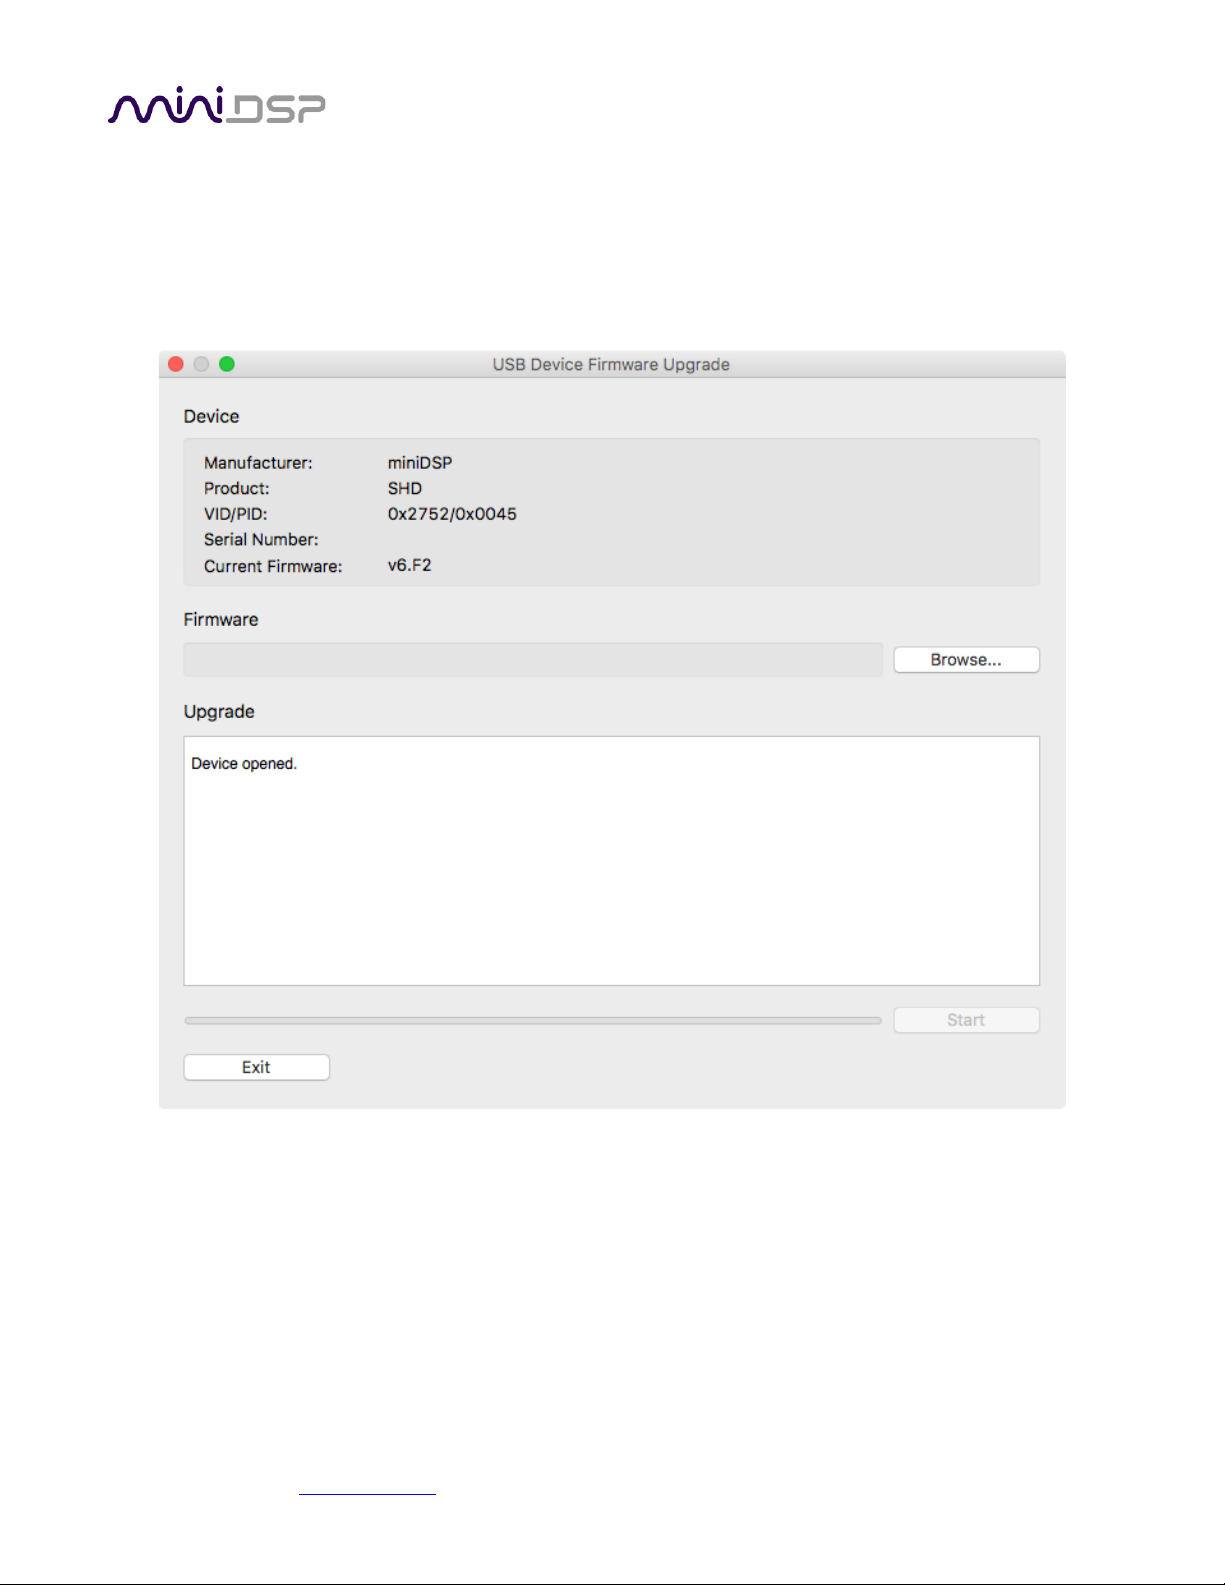
miniDSP Ltd, Hong Kong / www.minidsp.com / Features and specifications subject to change without prior notice 81
9.5.2 macOS
1. Connect the SHD Series processor to your computer via USB (if not already connected) and power it on.
2. Navigate to the XMOS_Firmware/Firmware_Upgrade_Tools/Mac folder of the software download.
3. Double-click on the .zip file to extract the firmware update software, then double-click on miniDSP USB
DFU.app to run it. The app will start:
Page 82
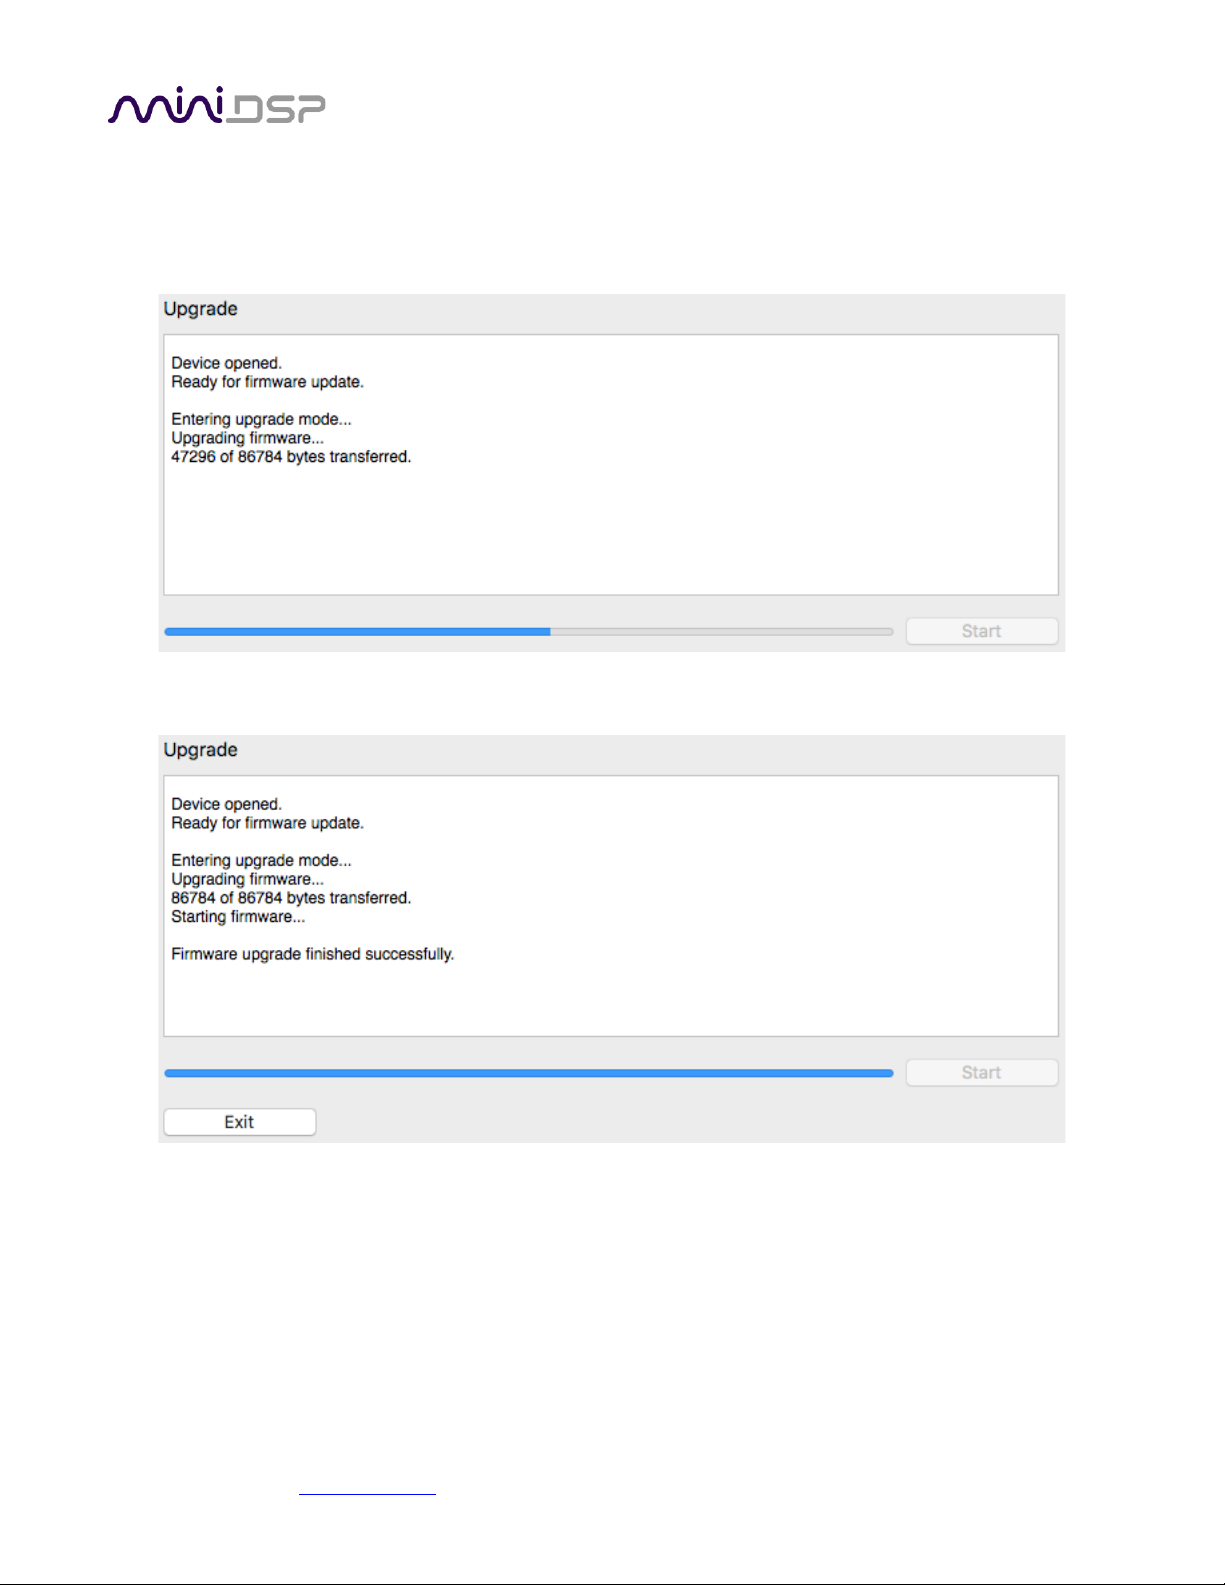
miniDSP Ltd, Hong Kong / www.minidsp.com / Features and specifications subject to change without prior notice 82
4. Click on the Browse button and select the firmware file from the XMOS_Firmware folder of the software
download. It will have a name like “SHD_ v1.10.bin.” (The version number “v1.10” may change.)
5. Click on the Start button.
6. You will get a progress bar as the upgrade proceeds:
7. Once the firmware upgrade completes, you will see a message that the upgrade completed successfully:
8. Click on Exit.
9. That’s it! You’re done. You can now use your SHD Series processor with the new functionality.
Page 83
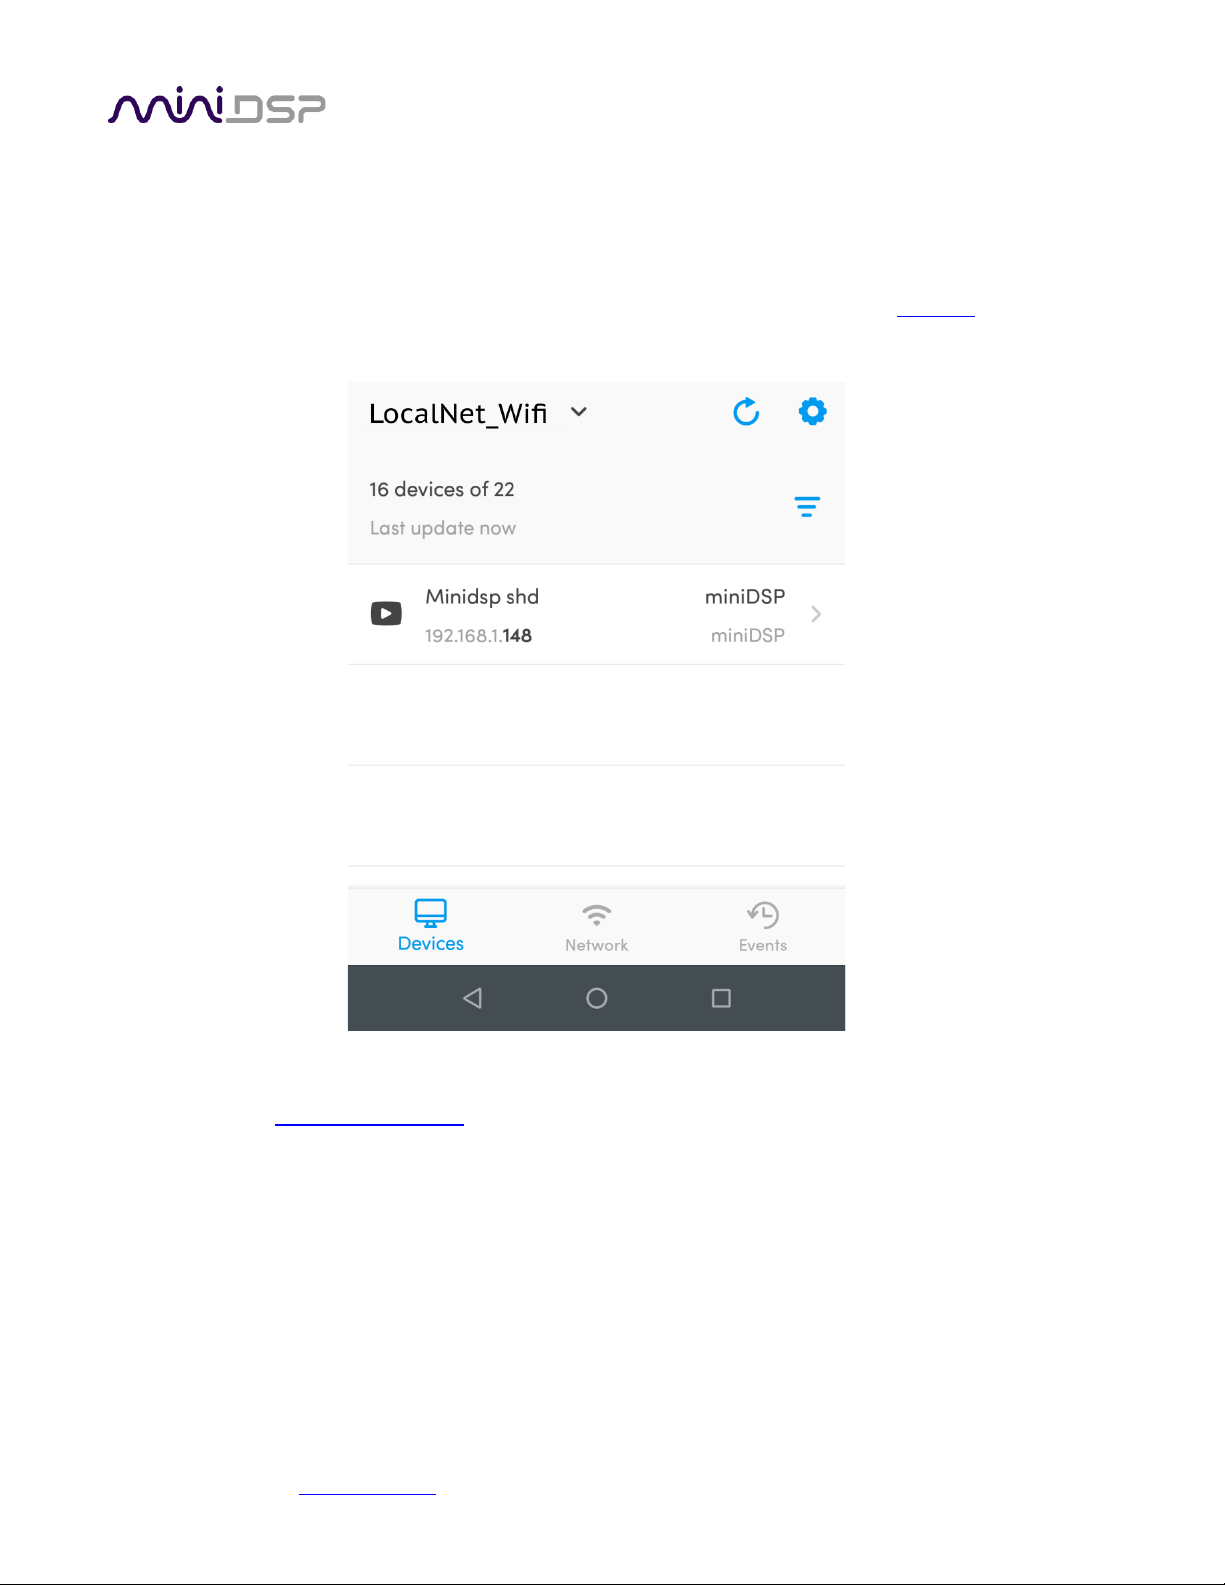
miniDSP Ltd, Hong Kong / www.minidsp.com / Features and specifications subject to change without prior notice 83
9.6 FINDING THE SHD’S IP ADDRESS
If the URLs given on page 22 don’t connect to the SHD web interface, you can connect using its IP address.
Locating the SHD with a network scanner
You can find the IP address of the SHD with a network scanner. A popular scanner is the Fing App, which is
available for Android and iOS.
Once you have found the IP address, enter the IP address instead of the name into the web browser address
bar. For example: http://192.168.1.148.
Page 84
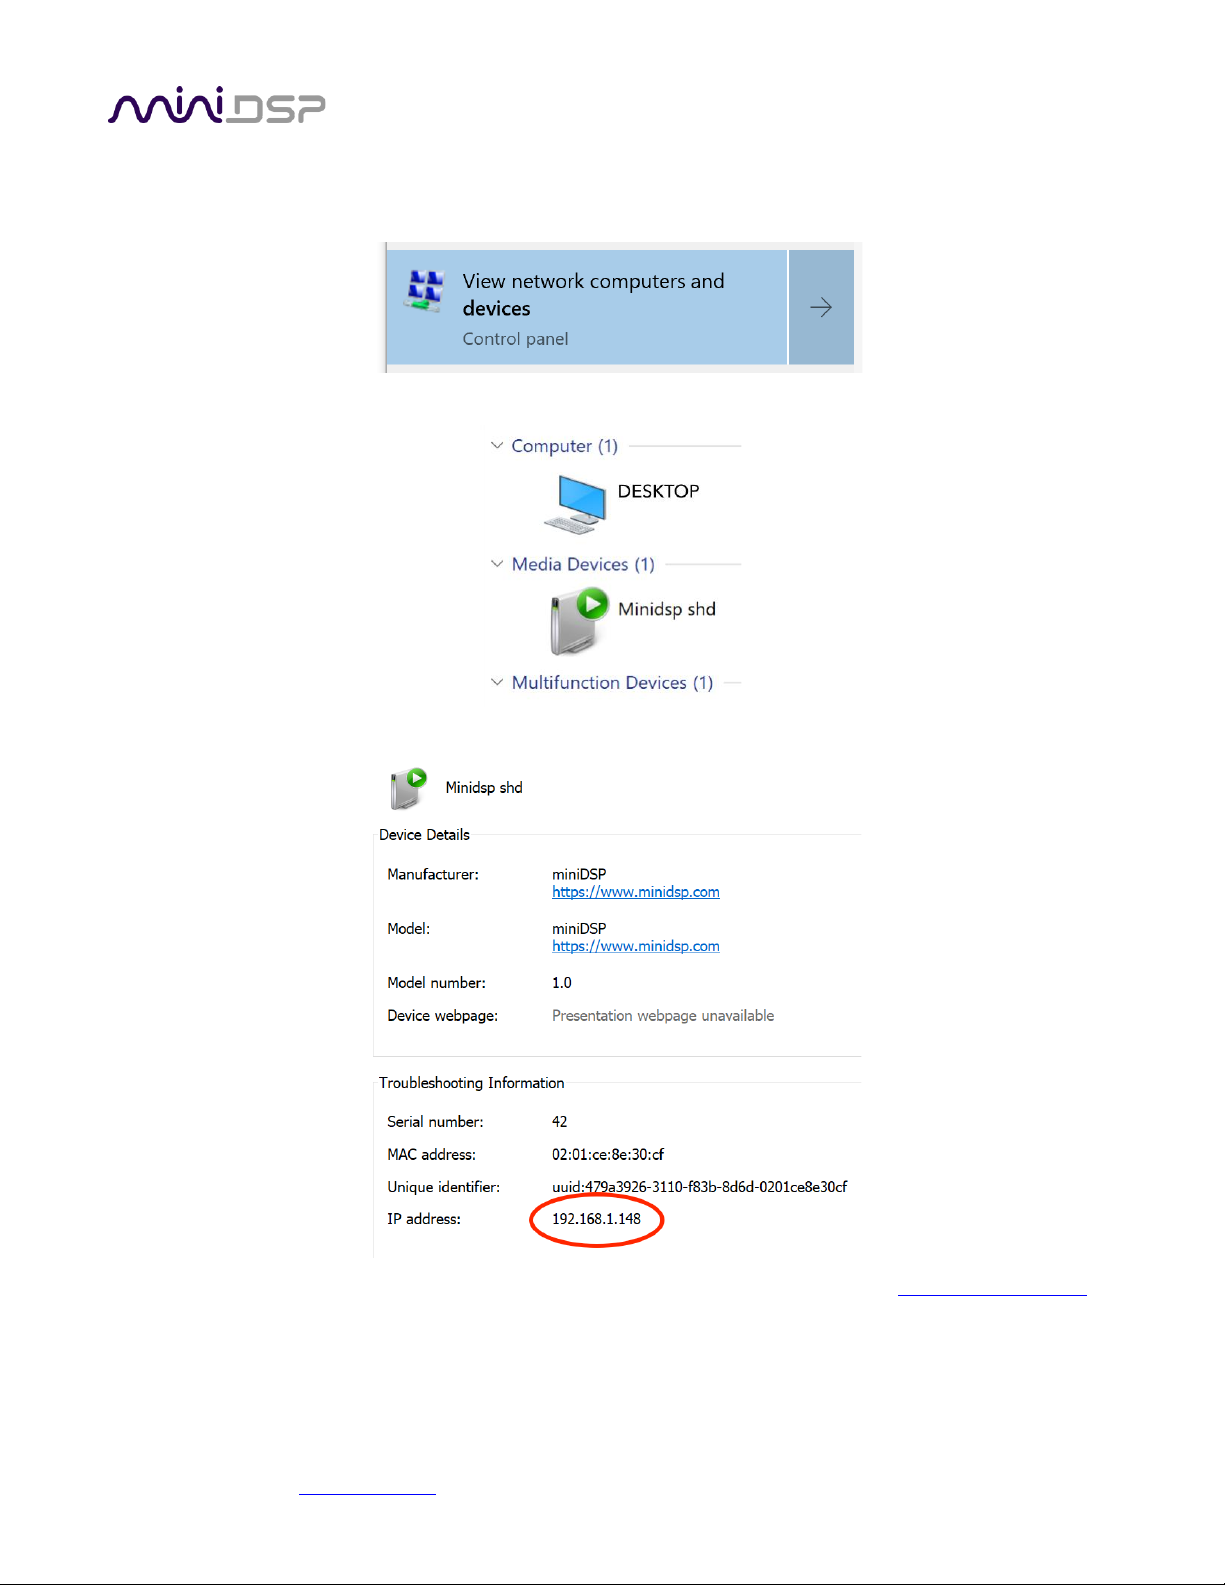
miniDSP Ltd, Hong Kong / www.minidsp.com / Features and specifications subject to change without prior notice 84
Locating the SHD in Windows 10
In Windows 10, click on the search button and type “devices”. Click on “View network computers and devices”:
The SHD will be visible in the Media Devices section:
Click on it to observe the Properties window. Locate the IP address near the bottom of the window:
In the web browser address bar, enter the IP address instead of the name. For example: http://192.168.1.148.
Page 85

miniDSP Ltd, Hong Kong / www.minidsp.com / Features and specifications subject to change without prior notice 85
9.7 SOLVING CONNECTIVITY ISSUES
If you are experiencing any connectivity issues, the first thing to do is double-check that your
processor’s plugin and firmware are up to date.
9.7.1 No Internet connection
Various components of the software require an Internet connection. In particular:
• The Dirac Live application may refuse to generate filters or reload saved projects if it cannot connect to
the Dirac Research servers.
In the event that the software is not operating correctly, check that your computer is connected to the
Internet and try again.
9.7.2 SHD Series processor not detected
The Dirac Live application use network ports 11113, 11115, 11117, 5000, and 8080. The last two in particular are
needed for the bridging app to communicate between Dirac Live and the miniDSP processor.
If the miniDSP processor is not detected:
1. Double-check the USB cabling from your computer to the processor. If you are using extenders or hubs,
remove them and make a short direct connection. Try different USB ports on your computer.
2. Check that your computer’s firewall isn’t blocking any of the ports listed above.
3. Check that other applications aren’t using these ports.
a. On Windows 10, open a command prompt and type the following commands:
netstat -ano | findstr 8080
netstat -ano | findstr 5000
b. On macOS, open Terminal and type the following commands:
sudo lsof -n -i4TCP:8080 | grep LISTEN
sudo lsof -n -i4TCP:5000 | grep LISTEN
If there is no output, the ports are not in use. If there is output, then try to close the application that is
using them. Typically, software that provides a local web server is likely to be the one blocking port
8080.
Page 86

miniDSP Ltd, Hong Kong / www.minidsp.com / Features and specifications subject to change without prior notice 86
9.8 TROUBLE-SHOOTING AUDIO ISSUES
No sound during volume calibration
If you get no sound while on the Volume Calibration tab of Dirac Live, first make sure that you increase the
volume slider in the UI (the leftmost one).
If there is still no sound, double-check that output cabling is connected to the right connectors on the rear panel
and to the correct inputs on downstream equipment. Make sure that downstream equipment (e.g. amplifiers) is
not muted, turned down, or turned off.
No sound during playback
If you get no sound while playing music, first quit Dirac Live if it is open, and start the SHD plugin.
If there is no signal on the input meters
1. Check which input source you have selected. If that doesn’t provide the solution, double-check the
connection and cabling between the source(s) and the SHD.
If there is signal on the input meters, but no signal on the output meters
1. Check the master volume setting.
2. Check that the SHD is not muted (Mute button at top right of the interface).
3. Check your Routing and make sure that you are routing inputs through to outputs.
4. Check your crossover settings.
If there is signal on the output meters, but still no sound
1. Check that output cabling is connected to the right connectors on the rear panel and to the correct inputs
on downstream equipment (e.g. amplifiers).
2. Check that downstream equipment (e.g. amplifiers) is not muted, turned down, or turned off.
Strange soundstage
If the soundstage width is very narrow, check that you have not summed left and right input channels and
routed the sum to the left and right speaker. This will result in a mono signal and hence a narrow soundstage.
If the soundstage is “weird”, check the routing and crossover settings, and make sure that left and right are
consistent. If you are implementing an active speaker, also double check the connections on the rear panel.
Distortion
If audio playback is distorted, you may have too much gain internal to the DSP. Dirac Live can apply up to 10 dB
of gain, so the output level should be kept lower than -10 dB to guarantee that there is no distortion with a fullscale input signal.
This issue typically occurs when volume control is being done downstream of the SHD Series processor. If so, set
the SHD Series processor at -10 dB, and then use the downstream equipment to control volume.
Page 87

miniDSP Ltd, Hong Kong / www.minidsp.com / Features and specifications subject to change without prior notice 87
9.9 OBTAINING SUPPORT
1. Check the forums on miniDSP.com to see if this issue has already been raised and a solution provided.
2. Contact miniDSP via the support portal at support.minidsp.com with:
a. The product information obtained from the SHD plugin’s About button and the Dirac Live application.
b. A clear explanation of the symptoms you are seeing.
c. A description of troubleshooting performed and your results.
9.10 OPEN SOURCE LICENSES
The Volumio portion of the SHD Series processors runs on a separate ARM CPU and is subject to various opensource licenses. To view the complete list of open source licenses and credits, connect to the web interface
using your web browser and select System from the menu, then “Credits and Open Source Licenses.”
If you would like a copy of the GPL v2.0 source code contained in this product shipped on a DVD, you may obtain
the complete corresponding source code from us for a period of three years after our last shipment of this
product for a charge of 20$ no more than the cost of preparing and mailing a DVD to you. Please contact
[email protected]. This offer is valid to anyone in receipt of this information.
 Loading...