

ML-4
INSTRUCTION
BOOK
FOREWORD
Many thanks for your
machine, ML type.
For
use of the machine,
instruction
elegant
chain
fabrics
You can
book.
edge
covering
stitch
whitch
- cotton, wool, rayon,
also
expect many
With
perchasing
please
your
machine
stitch
well
(Over Lock) and a double
become
years'
of MAMMY
read
tricot,
you
with
carefully
can
jersey,
LOCK
this
make an
thick
etc.
enjoyment from your
or
machine which was manufactured with up-to-date
technique and
has
a proud
history
of
its
own.
CONTENTS
00
I
FEATURES
1.
DESCRIPTION
2.
OPERATION
LUBRICATION
3.
THREADING
4.
THREAD
5.
REGULATING
6.
HOW
7.
FINISHING
8.
REGULATING
9.
PRESSE^R
10.
TO
YOUR
THE
CHAIN
THREAD
OPERATE
MACHINE
THE
YOUR
STITCH
FOOT
MACHINE
(Stitching)
TENSION
SEAM
LENGTH
PRESSURE
2
3
4
5
6-10
11
12-13
14
15
16
17
STITCHES
11.
NEEDLE
12.
KNIVES
13.
STITCH
14.
VARIATION
15.
THREADS
SPECIFICATION
16.
CONTENTS
SHIPPING
AND
TROUBLE
AND
OF
AND
IN
CONTAINER
OPERATIONS
ITS
REMEDY
WEIGHT
STITCH
FOR
MODEL
THE
OF
LENGTH
23-24
FABRIC,
ML-4
22
25
26
27
28
MAMMY
LOCK
MACHINE
OPERATING
INSTRUCTIONS
MAINTENANCE

FEATURES
Three
Easily
different
changed
1.
Over
2.
Interlock chainstitching
3.
Safety
Quiet running
Attractive
modern
Guaranteed
stitches
for:
lock stitching
stitching
and
vibrationless
appearance.
for
longer
available
life.
in
one
machine.
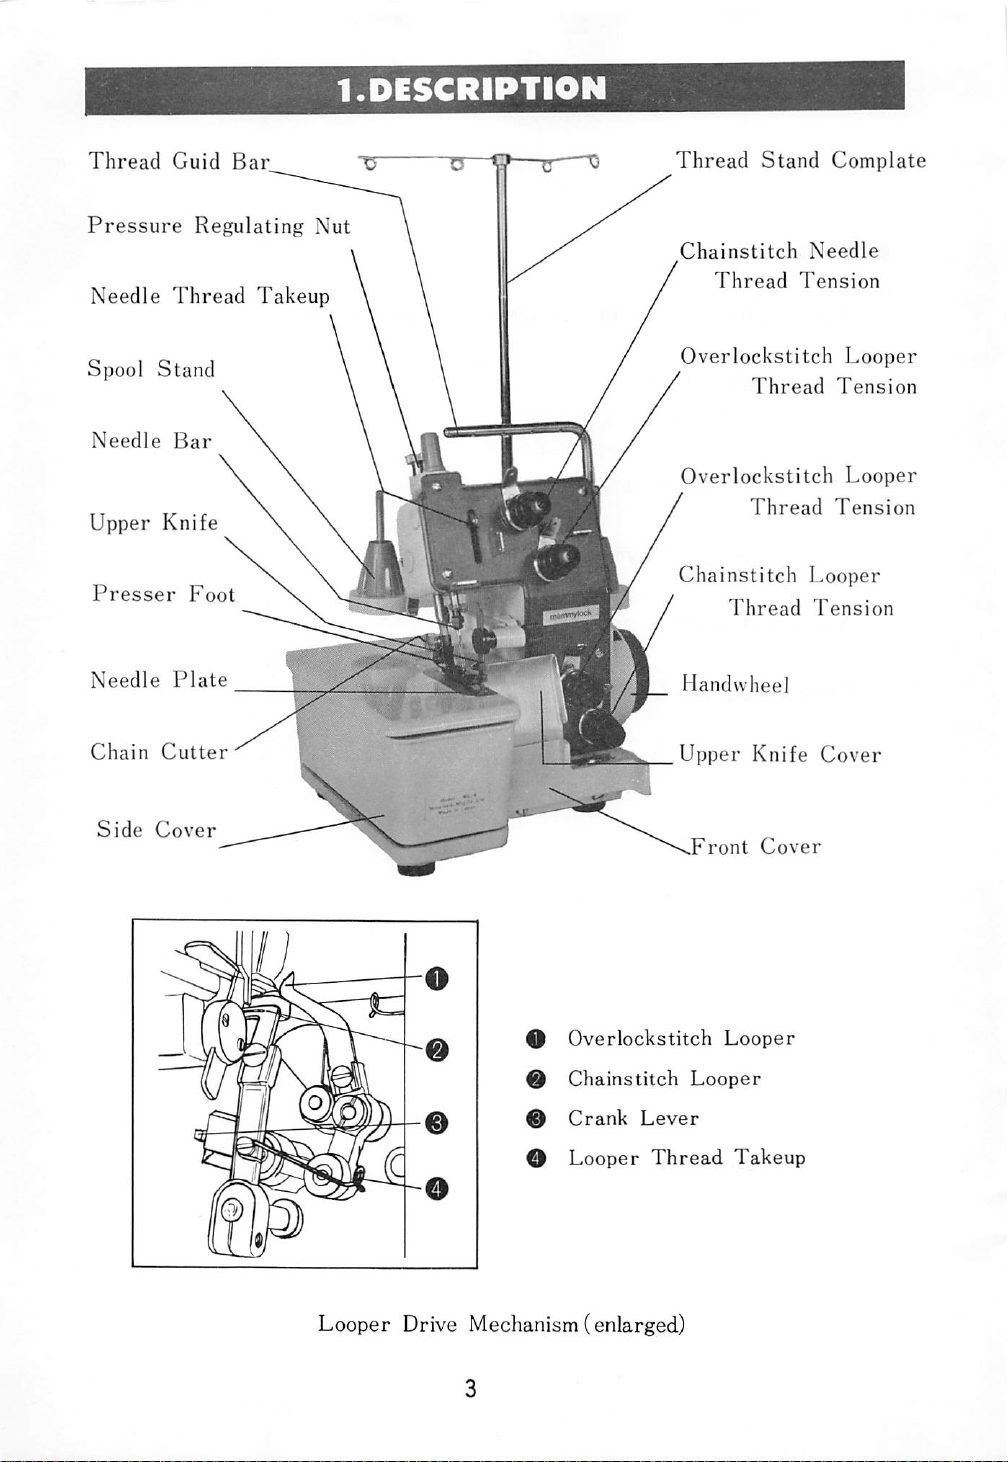
1.DESCRIPTION
Thread
Guid
Pressure
Needle
Spool
Needle
Thread
Stand
Bar
Upper Knife
Presser
Needle
Foot
Plate
Bar
Regulating
Takeup
Nut
Thread
Chainstitch
t
Stand
Thread
Overlockstitch
Thread
Overlockstitch
/
Thread
Chainstitch
Thread
Handvvheel
Complate
Needle
Tension
Looper
Tension
Looper
Tension
Looper
Tension
Chain
Side
Cutter
Cover
O
Overlockstitch
9
Chainstitch
0
O
Crank
Looper
Lever
Thread
Looper Drive Mechanism (enlarged)
Upper
.Front
Looper
Knife
Cover
Looper
Takeup
Cover

2-1
Getting
2.0PERATI0N
Set
Place
Connect
Connect the
the
machine
the
motor
cord
on
a
table.
controller
to
the
machine
by plugging into your house
(220 Volts)-
Pull up
thread
stand
center
post
extending it to
Eyelets should be over thread spool holders.
Ill
Motor
Controller,
as
shown.
current
full
Complete
receptacle
height
2-2
Controlling
your
Machine
The spead of the MAMMYLOCK machine is controlled by the
amount you
2-3
Motor
The
MAMMYLOCK
direction
depress
(note
arrow
the
foot
treadle.
machine
rotates
near handwheel).
inaclockwise
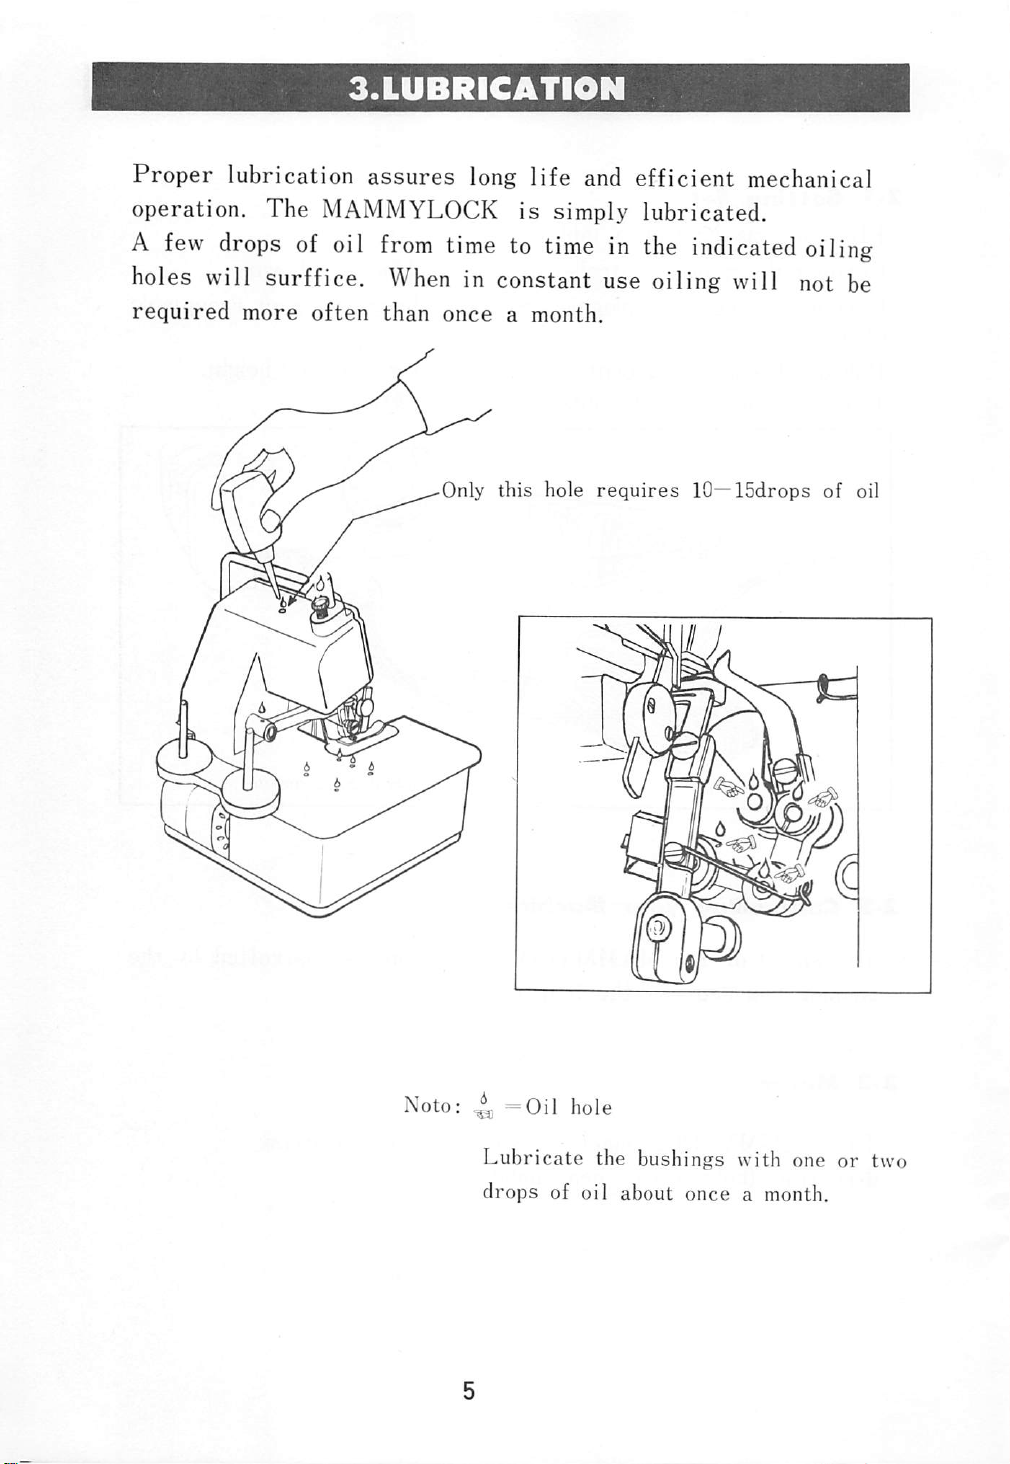
3.LUBRICATIOH
Proper
operation. The MAMMYLOCK
A
few
holes will surffice.
required
lubrication
drops
more
of
often
oil
assures
from
When
than
long
time
in constant use oiling will not be
once
Only
life
and
efficient
is
simply lubricated.
to
time
a month.
this
hole
in
requires
m
the
indicated
10—ISdrops
mechanical
oiling
of oil
Noto:
^ =Oil
Lubricate
drops
hole
the bushings with one
of
oil
about
once
a month.
or
two
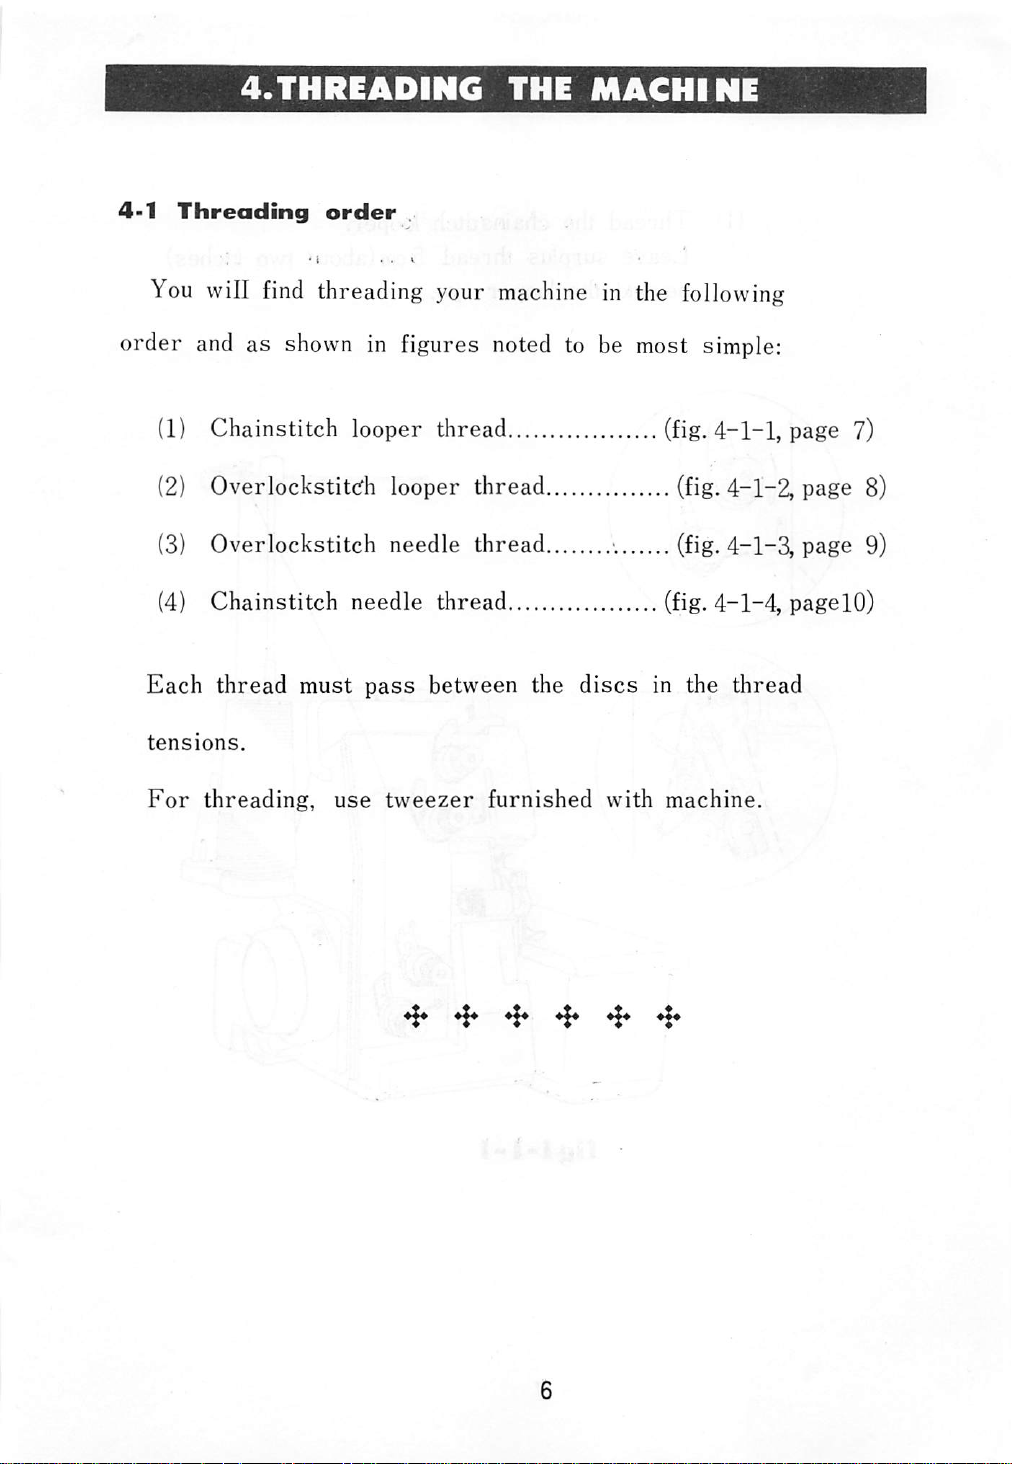
4-1
Threading
You
will
4.THREADING
order
• I K
find
threading your
THE
machine
MACHINE
in the following
order and as
(1)
Chainstitch looper thread (fig.4-1-1, page 7)
(2)
OverIockstit(^h looper thread (fig-4-1-2, page 8)
(3)
Overlockstitch needle thread v (fig.4-1-3, page 9)
(4)
Chainstitch needle thread (fig. 4-1-4, pagelO)
Each
tensions.
For
thread
threading,
shown
must
use
in figures noted to be most simple:
pass
between the
tweezer
furnished
discs
with
in the thread
machine.
aTa aTa
VT
V
•••
^ T V
aT^aTa.
www www
a
www
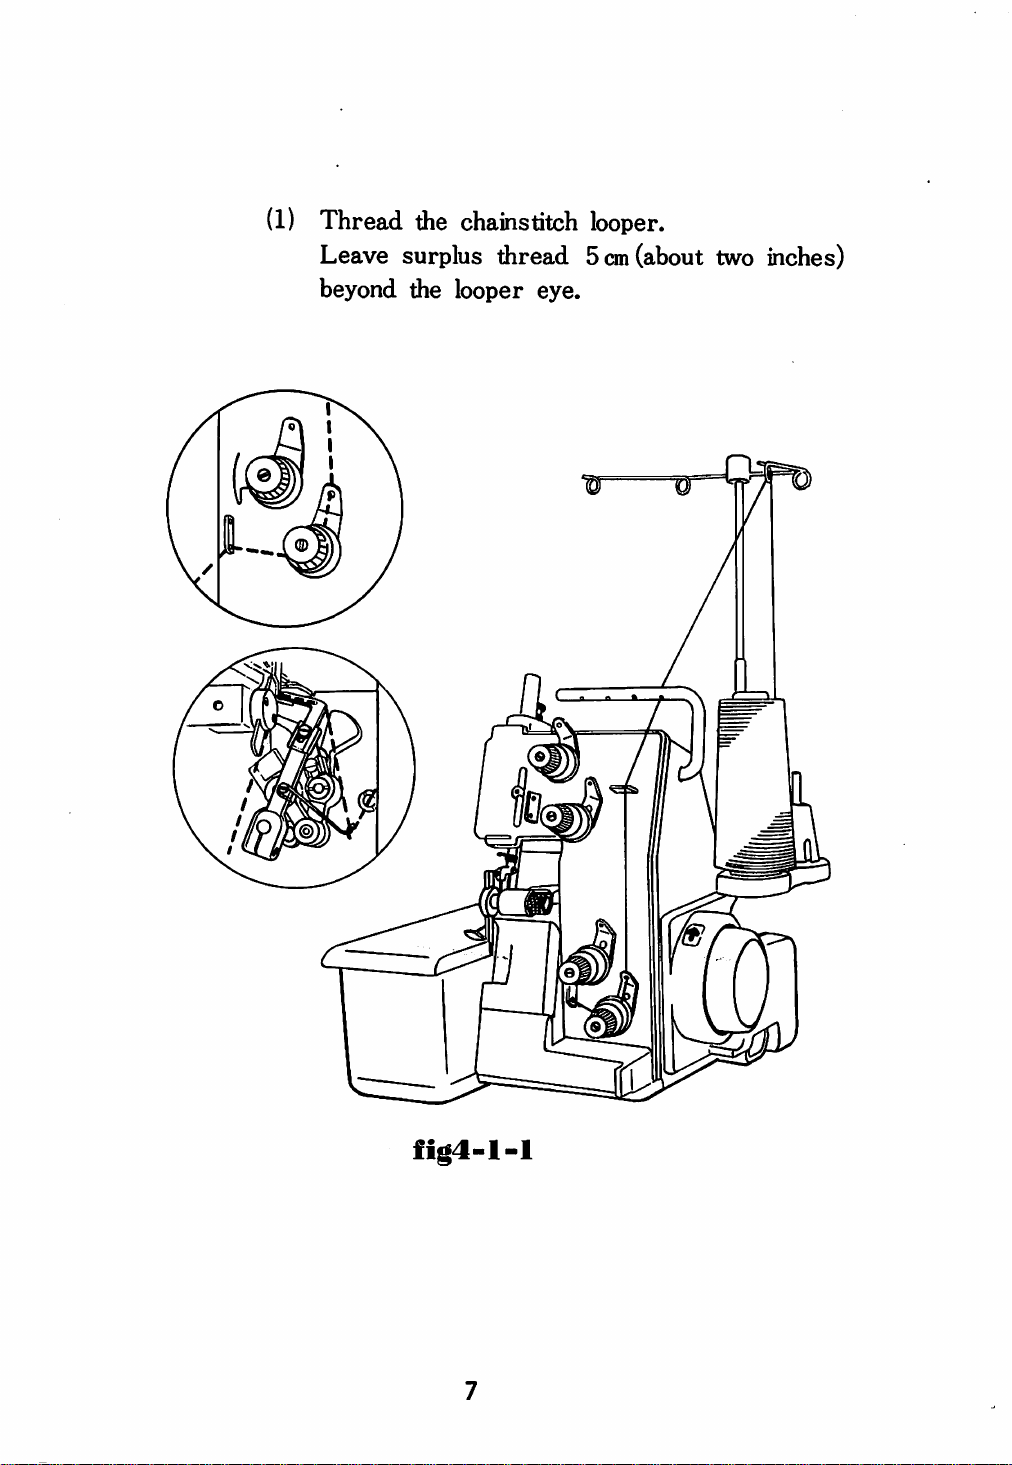
(1)
Thread the chainstiich looper.
Leave surplus thread 5cm(about two inches)
beyond the looper eye.
fig4-l-l

(2)
Treading the overlockslitch
looper.
Leave surplus thread 5cm(about
2")
beyond
^ / r
looper
eye.
fig4-l-2
8

(3) Threading the overlockstitch needle.
Leave surplus thread 5cm(about2 beyond needle eye.
/
fig4-l-3
For
to
wool
stretch,
or
synthetic thread, usually tending
threading the
thread
tension guide
wire (A) may be unnecessary since less tens
ion is
required
for
the
needle
thread.

(4)
Threading the chainstitch needle thread.
Leave surplus thread 5
cm
(about 2 beyond needle eye.
W
/
fig4-l-4
For
Remark:
It
is recommended to
on Spool
are
used.
Strays
wool
to
stretch,
wire(B)
ion is
when the small
or
synthetic
threading the
may be
required
put
Thread
thread,
thread
unnecessary
for the needle thread.
Stripping
diameter
10
Discs
thread
usually tending
tension guide
since
less
tens
provided
spools

5.THREAD
If the threading of the machine has been perfomed properly,
you will now be on your way to stitching.
This may be confirmed by the following:
(1)
Raise
(2)
Insert a
foot.
(3)
. Lower- the
(4)
Hold
a bit to the left of the stitching line. Pull the
gently and,
wise two or
A
(5)
After
1 inch beyond the
with
presser
the
thread
being
chain
foot
by
lifting the lift lever.
small
needle
piece
presser
of extra
foot.
threads
at
the same time,
three
chain will be produced.
times with your right hand.
certain the thread
inserted
cutter
or
scissors.
in
your
fabric
CHAIN
fabric
left
turn
chain
end
(Stitching)
beneath
hand
the handwheel clock
has been
and
and
cut
the
made
chain
presser
pull
thread
them
sew

6.REGULATING
THREAD
TENSION
Your
thread
stitching
tension.
will be
The
enhanced
tension
by some
required
care
varies
in
properly
with the
type of thread, the number of plies and the type of
number
to page 3
cation
the
Here
stitch
the
of
plies
and
for
of the four (4)
tension
are
nut
clockwise
examples of good stitching.
shows the needle
edge of
the
fabric.
the
the
description
type
thread
and
thread
of
fabric
of
tensions.
to
decrease
stitched
the
To
Observe
and the looper
machine
and
increase
counter-clockwise.
that
thread
size
thread,
Please
note
tension,
the
overlock
joined
setting
and
the
refer
the
lo
turn
at
Fine
chainstitching
Fine
overlockstitching

Regulating
thread
tension continued
When
appear
thread
like
tension is not
the
sketches
properly
below.
The
Increase
the
This
needle
where
is
needle
decrease
appearance
the
the
chainstitch
tension
may
thread
the
too
loose.
thread
tension
looper
regulated the stitching may
needle
the
thread
nut
clockwise.
occur
when
tension is too tight
overlook
Turn
counter-clockwise
the
thread
is
not
nut
clockwise
thread
tension.
thread
tension
the
looper
the
tension.
yet
satisfactory,
is
by
turning
overlockstitch
thread
tension
and
nut
If
increase
''loose''
or
tension
to
the
for
turn
Here
the
nut
increase
turn
thread
the
13
we
have
one
above.
for
the
needle
the
tension.
the
tension
counter-clockwise
looper
thread
the
First
nut
opposite
thread
If
for
tension.
condition to
turn
the
clockwise
necessary,
the
and
tension
and
looper
decrease

7.HOW
TO
OPERATE
YOUR
MACHINE
Operate your
(1) Raise the
(2)
back
Insert
of
so that the
foot. With a little
(3)
(4)
your
presser
Release
on
Depress
seam
the
Note:
machine
presser
the
the
foot.
the
fabric
the
When
the
seams
two or three
stitches
properly made. You will soon
your stitching by varying the
treadle.
machine.
fabric
edge
with
lift
to
treadle
starting
at
in the
following
foot by the lift lever located in the
to
be
sewn
manner:
beneath
of the fabric is
practice
feeding
lever
be
by
started without raising the
and
sewn,
of
the
to
sew,
turning
times
the beginning of the seam
you will be able to
the presser
controller
you
may
the
handwheel
to be certain that your
the
presser
under
the presser
foot
and
start to
wish
learn
pressure
start
will
by
to control
to
begin
hand
are
on the
rest
foot
sew.
(5)
(6)
Guide
Stitch
the fabric as the
about
three or
the fabric. Cut the thread
i
Note:
Hold
are
machine
four
inches
the
sewn
as
shown above when cutting.
about
fabric
feeds
beyond
2
so
it
from
that
forwardL
the
edge
the
edge.
the
of
chains

For
not
best
raveU
8.FINISHING
seam
the
end
following
finish and to
suggestions
THE
assure
SEAM
are
that
made:
your
stitches
will
1.
2.
3.
Knot
thread
Pull
chain
Pull
the
back
and
the
thread
the
stitch
a
smallhook
example a
or
latch
surplus
chain
surplus
back
needle.
the
thread
hand
through
by
using
as
chrochet
tack
for
Safety
stitch
Overlook
stitch
Chain
stitch

9.REGULATING
YOUR
STITCH
LENGTH
Your
^
will
for
This
B for most of your work.
Shold
or
C
stitches
mplished
steps:
(1) Open the side cover.
(2) Holding the handwheel with your
feed regulating screw
furnished.
(3)
Turn
with
For
and for
the regulating thumb nut (B) and line up the scale
the
indicator
longest stitch
shortest
(A)
(C).
set
stitch,
using the screw driver
scale
set
at
at
MAMMYLOCK
come
about 8
is
decrease
to
a good
you
stitches
wish
this
by
right
5
hand, loosen the
(5
stitches
1 (12stitches
you
the
is
the
factory
per
stitch
to
number
easily
following
per
per
machine
set
inch.
length
increase
of
acco
inch),
inch).
(4)
After obtaining proper stitch length, tighten screw (A).
(5)
Close
the
side
cover.

The
presser
weight
Should
pressure
10.PRESSER
foot
pressure
fabric.
you wish to
regulating
This
should
increase
nut
clockwise
FOOT
is
set
cover
or
PRESSURE
at
the
most
decrease
for
greater
factory
of
your
pressure,
for
medium
requirements.
turn
pressure;
the
counter-clockwise
the
more
seam,
pressure
the
less
increase
decrease
than
for
less
pressure
required
pressure.
is
required.
to
feed
Ordinarily,
the
material.
Do
the
not
thinner
use
any
Pressure
regulating
nut

11.STITCHES
AND
OPERATIONS
11-1
1
11-2
Safety
Chainstitch
Stitch
By using all four
sews
For
with
Safety
threading,
threads,
Stitch.
refer
to pages
Operation: Sleeve setting
General
Representative items:
the machine
Seaming
shirts,
dresses,
jackets,
6^10.
blouses,
slacks,
etc.
Threads
used
for
chainstitch
are
the
chainstitch needle and looper threads
only.
For
threading,
Operation:
Please
note
refer
General
fabrics
that
for
to pages 7, 10.
seaming on
or
jersey
chainstitching
knitted
the
overlook looper (see fig.ll~2-2 ) should be
disengaged and the overlook needle should
be removed. The upper knife (see fig.11-
2-1)
fabric
engaged
desired.
should be disengaged if trimming the
is
not
where
required;
trimming
it may be
the
fabric
left
is

11—2
Chainstitch
continued
11-2-1
11-2-2
Upper
m
figl
Overiockstitch
knife
1-2-1
iooper
To
disengage
disengage
the
Open the
Turn
the
position.
Pushing the upper knife to right
by finger,
clamp thumb
sketch. Cutting edge is to
the
the overiockstitch looper:
upper
front
the
handwheel by
needle
back
of
knife:
bar
turn
nut
the
cover.
hand
is
at
its
lowest
the upper knife
as
per
the
machine.
until
figl
1-2-2
Open the side
At
needle
turn
up the
that
it
is
cover.
bar* s
''V
released
lowest
position
shape pin so
from
the
groove in the bushing collar.
19

11-2-3
Cloth
gauge
plate
-
furnished
with
machine
Open
Pull
front
upward
the front cover.
front
/
Move
cover
cover.
to
in
to
remove
Insert
plate
side.
the
upper
knife
cover
the cloth gauge plate in the
of
the
Close
upper
both
knife
covers.
cover.
from
20

11-3
Overlockstitching
Threads
and
For
Operation:
Representative
Before
(1)
used
looper
threading,
for overlockstitching
threads.
refer
to
pages
Overedging, serging,
items:
dresses,
operation confirm the followings:
The'''V'' shape pin is in the groove of the bushing
collar and the overlockstitch looper is driving.
(2) The upper knife is properly
(3)
The
upper knife
cover
are
the overlock needle
8~9.
blouses,
set
to trim.
is fixed in the
slacks,
front
etc.
cover.

12.NEEDLE
12-1
Heedles
© o
required
Needle enlarged
Groove
The
following
MAMMYLOCK
System:
DBXl
needles
TEXI
—for
machine:
or
woolen
Size; #14 is standard
12-2
(1)
How
Turn
highest
to
replace
the
position.
handwheel
(2) Loosen the needle clamp
thdrawn
machine.
(3)
Insert
hole facing
scarf
(4)
Tighten the needle clamp
downward.
a new needle as
the
long
to the
rear.
are
available
DBX1(TEX1
for
use
—Standard
in
fabric, cotton fabric, etc.)
needles
by
Use
thread
See
(available
hand
screw
the
far
as it will go into the needle
groove
sketch
screw
in
#11-#16)
until
the
needle
and the needle can be wi
screw
driver
to
Needle
the
enlarged.
loosened.
the
bar
furnished
front
is
at
and
its
with
the

13.KNIVES
13-1
Hi
:e
the
upper
knife
m
Loosen
withdrawn
Insertanew
down
left.
Turn
est
Slide
the
upper
upward-
knife in the holder with the tang (tongue)
and
to
the
Lightly affix it
the
handwheel
position.
the
knife up
knife clamp
rear.
with
until
or
down
The
the
the
so
screw
cutting
clamp
knife
that
and
the
edge will be to
screw.
holder
the
is
front
ting edge overlaps the lower (fixed)knife by
Tighten
the
clamp
screw
securely.
knife
at
of
the
1/32".
its
can
be
the
low
cut

13-2
How
(1)
Loosen the lower knife clamp screw and the knife can
be
to
replace
withdrawn
the
downward.
lower
knife
(2)
Insert
is
a new knife in the
same
level
with
the
holder
needle
plate
until
top
its
(3) Tighten the clamp
24
cutting
surface.
screw
edge
securely.

14.
STITCH
TROUBLE
AND
ITS
REMEDY
Stitch
Machine
properly feed
trouble
does
not
Cause
Presser
ssure
suspected
foot
on the
pre-
material to be material too light.
1.
Frequent
breakage
needle
Frequent thread
breakage
Skip
stitching
Needle
needle point
2.
Bad
3. Pulling the
badly
1. Wrong
2.
Thread
3.
Too
tension
4.
Bad
5. Using
needle
1.
Needle
dle point
2.
Incorrect
setting
3.
Using
needle
4.
Wrong
5.
Too
of
the
6.
Using
stretchy
bent
needle
tight
needle
incorrect
incorrect
threading
weak
presser
material
woolen
or
breakage
setting
material
threading
knots
thread
setting
bent
or
breakage
needle
pressure
foot
yarn-
thread
nee
on
Turn
thumb
increase
material.
the
screw
Replace
new
needle.
Reset
Do
not
by
hands
Re-thread
See
page
Pull
knot
Get
appropriate
See
page
Reset
See
page
Use
specified
See
page
Replace
Reset
See
page
Use
specified
See
page
Re-thread
See
page q~]q
Turn
thumb
increase
material.
the
Releace
tension
See
page
Remedy
pressure
clockwise
pressure
Do
gradually.
the
bad
the
needle
pull
the
during
correctly.
6—10
through.
12-13
the needle
22
needle
22
with new
the needle
22
needle.
22
correctly
pressure
screw
clockwise
pressure
thread
guide
wires.
g-io
regulating
on
the
needle
correctly.
material
operation.
tension.
correctly.
needle.
correctly.
regulating
on
the
caught in
and
with
sewn
and
Get
Bad
stitching
Puckering
Bad
thread
1,
Too
tensions
2.
Wrong
threads
something
tight
threading
affected
tensions
thread
or
by
irregular
appropriate
See
page |2~13
When
decrease
as
much
still
stitch.
Re-thread
See
page
sewing
thread
as
correctly.
6-10
possible
tensions.
light
tensions
fabrics
and

15.VARIATION
OF
WEIGHT
OF
FABRIC,
Weight
of
fabric
Light
Medium
Heavy
THREADS
Type
of
fabric
Organdies, light
traffeta,
etc.
Cotton,
satin,
etc.
Tweed,
fabrics,
heavy
fabrics,
linings, silk,
tricot,
dress
outerwear
fabrics,
overcoat
denim,
etc.
tricots,
linen,
AND
STITCH
Operation
Chainstitch
Overlook
stitch
Chainstitch
Overlook
stitch
Chainstitch
Overlook
stitch
LENGTH
Threads
Cotton#80~
Silk
Cotton
Silk
Cotton
Silk
Cotton
Silk
Cotton
Silk
Tetlon,
Cotton
Silk
Tetlon,
#80-#100
#80-#100
#80-#100
# 60—# 100
#50-#100
# 60— # 100
#50-#100
#40—
#40-
Woolen
#40—
#40-
Woolen
# 100
#60
#60
yarn
#60
#60
yarn
Stitches
per
inch
12-8
8-6
12-8
8-6
12-6
8-5
Knitted
fabrics
Chainstitch
Overlook
stitch
Cotton
Silk
Tetlon,
Woolen
available
very
thin
looper
#40—
#30-
Woolen
yarn,
to
thread
thread
use
#50
#40
yarn
tetlon
in
12-6
8-5
26

16.SPECIFICATION
FOR
MODEL
ML-4
Overlook seam width
Needle gauge
Stitch
Maximum
capacity
Needle
VT
Number
Size
per
used
1 <•
of
of
machine
inch
sewing capacity
.1
threads
1 A
4mm
(Standard)
(S/IG'')
3mm(l/8'0
2~
5mm(12st/in—5
5mm(3/16'0
TEX
1 #14
/!•
4 (four) ^ ^
253mm
263 (10
275 (10
\
(10")
(Standard)
- Length
3/8'0
7/8'0
_
Width
_ Height
st/in)

CONTENTS
IN
THE
SHIPPING
CONTAINER
Content
(1)
(2)
(3)
(4)
of a shipping
Sewing Machine with
container:
Motor
Controller, complete 1
Operator
Accessories
containing:
Screw
Allen
Needles
Upper Knife,
Tweezers
Cleaning
Oiler(contain 50cc oil) 1
Detachable Cloth Gauge
Welt
Welt
Thread
Driver
Screw
Type;
Guide
Guide
s
instruction
box
book 1
Driver for Needle Clamp 1
TExi
spare
Brush
Screw
Stripping
Size;
#14
Plate
Disc 4
10
1
1
1
1
1
1
1
1
Packing
A
attachments
Weight
Weight
Measurement
case
containing1set
Net:
15.0kg
of machine:
of
Carrying
and
accessories.
Gross:
11.0kg
Case:
of
machine
3.5kg
17.0kg
including
machine
and
standard

MIMA
SEWING
MACHINE
CO.,
LTD.
MIMASEIKI
CO.,
LTD.
Osaka,
Japan.
 Loading...