

mammylock
MANUAL
for
Model
ML-303

MANUAL
FOR
INTRODUCTION
We
thank
you
very
LOCK
This
ML-303
booklet
machine.
contains
maintenanceofthe
which
should
become
use
from
This
machineisdesigned
materials
knit
fabrics
All
machines
ing
carefully
MAMMYLOCK
be usefultoyou
familiar
it.
with
suchaslighttoheavy
beautifully
are
shipped
one
machine
MAMMYOCK
much
for
your
some
notesonthe
buying
ML-303
our
MAMMY-
operations
MAMMYLOCK ML-303 machines,
and
the
should
machine
for
andtoderive
sewingonvarious
help
you
the
kind
weightorwoven
and
firmly.
from
our
by
one,
regularly
so we
factory
hope
and
after
you
forever.
inspect
will use a
and
to
best
of
and
CONTENTS
1.
Name
of parts 1
2. How to run a machine 2
3.
Oiling
4. Threading 5
5. Test
sewing
6. Howto regulatethe thread tensions 9
7. Howtooperate 19
8. Howtoregulate
and the pressure of presser
the
stitch
length
foot
11
9. How to replace the needle 12
10. How to change the upper and lower knives 13
11. How to replacethe carbon brush for the drive motor 15
12. Howtoadjust
13.
The
relation
14. Specifications 17
The
15.
16.
contents
Standard
for
incorrect
chartofmaterials
of packing 18
accessories
sewing
and
threads
16
17
^
8
18
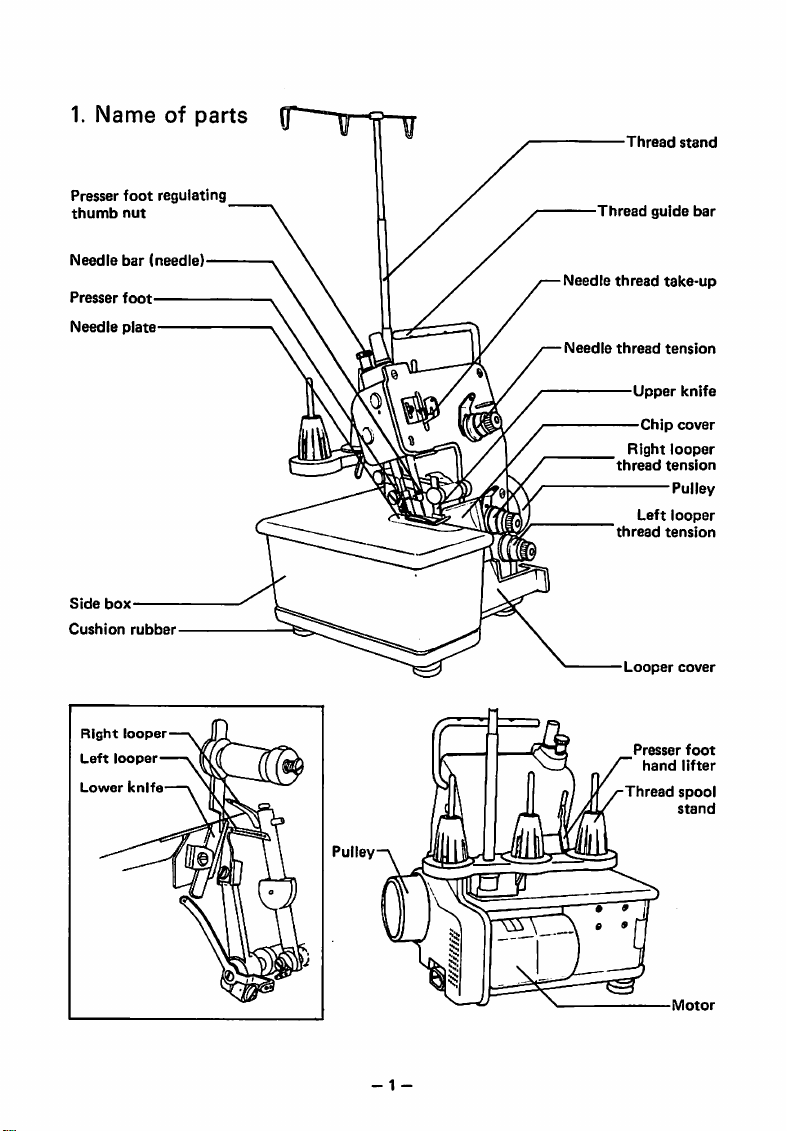
1.
Name
Presser
thumb
Needle
Presser
Needle
Side
Cushion
box
foot
nut
bar
foot
plate
rubber
of
regulating
(needle)
parts
Needle
Needle
Thread
Thread
thread
thread
thread
thread
Looper
stand
guide
take-up
tension
Upper
knife
Chip
cover
Rightlooper
tension
Pulley
Left
looper
tension
cover
bar
Right
Left
Lower
looper—V
looper—V
knife—\
ML
Pulley
- 1 -
Presser
hand
Thread
foot
lifter
spool
stand
Motor
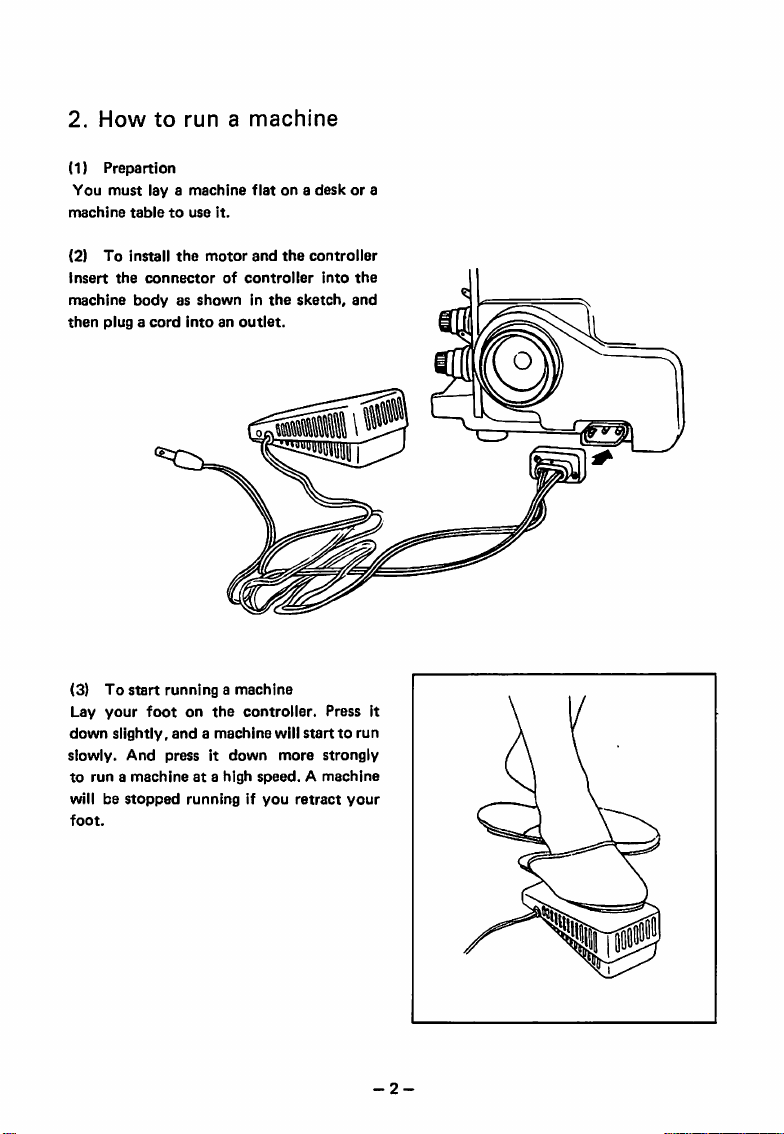
2.
How
(1)
Prepartion
You
machine
(2)
To
insert
machine
then
plugacord
to
runamachine
must
lay a
machine
tabletouse
install
the
connector
bodyasshownInthe
it.
the
motor
of
intoanoutlet.
flatona
and
the
controller
deskora
controller
sketch,
5*1]
into
the
and
(3)Tostart
Lay
down
slowly.
to
runamachineata high
will be
foot.
your
slightly,
And
stopped
footonthe
runningamachine
controller.
andamachine
pressitdown
speed.Amachine
runningifyou
will
starttorun
more
retract
Press It
strongly
your
-2-
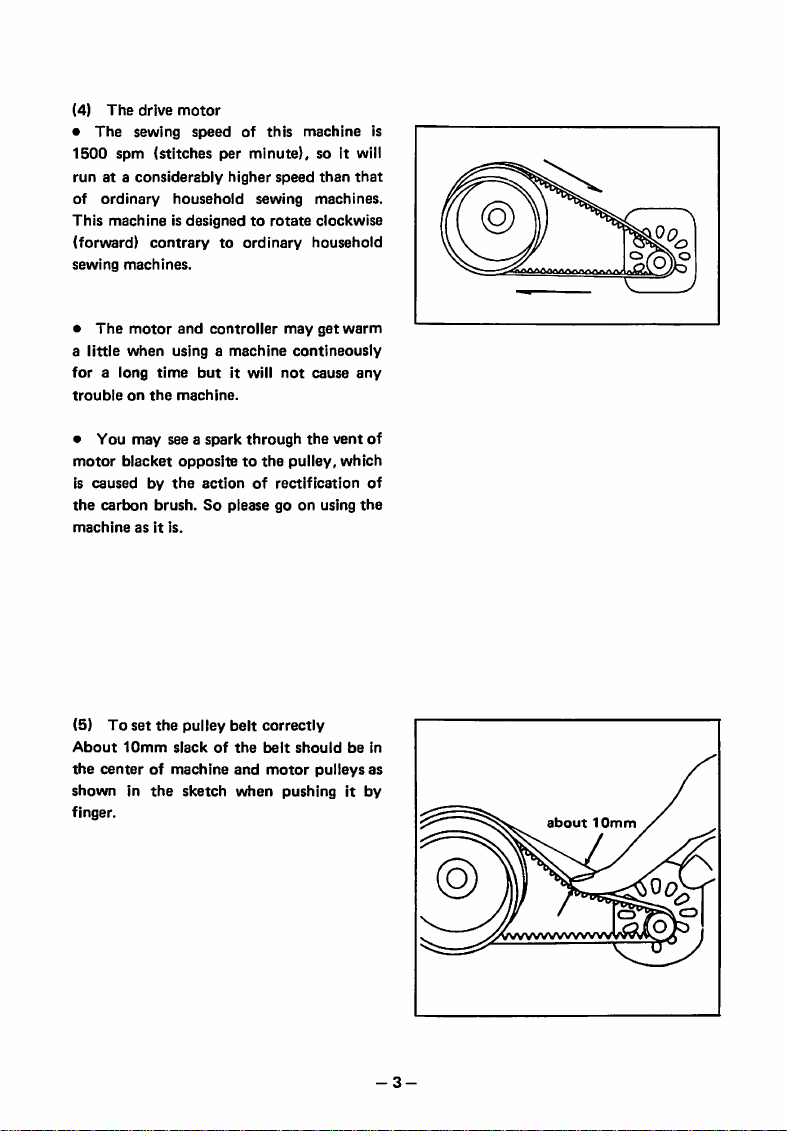
(4)
The
drive
motor
•
The
sewing
speedofthis
1500
spm
(stitches
runata
of
This
(forward)
sewing
•
a
foralong
troubleonthe
considerably
ordinary
machineisdesignedtorotate
household
contrarytoordinary
machines.
The
motor
and
controller
little
when
using a
time
butitwill
machine.
per
higher
machine
minute),
speed
sewing
may
not
machine
so it will
than
that
machines.
clockwise
household
get
warm
contineously
cause
any
is
• You may see a
motor
blacket
oppositetothe
is
causedbythe
the
carbon
brush.Sopleasegoon
machineasit
(5)Toset
About
the
centerofmachine
10mm
is.
the
slackofthe
showninthe
finger.
spark
through
pulley,
actionofrectification
pulley
belt
correctly
belt
shouldbein
and
motor
sketch
when
pushingitby
the
using
pulleys
vent
which
the
of
of
as
about
10mm
-3-
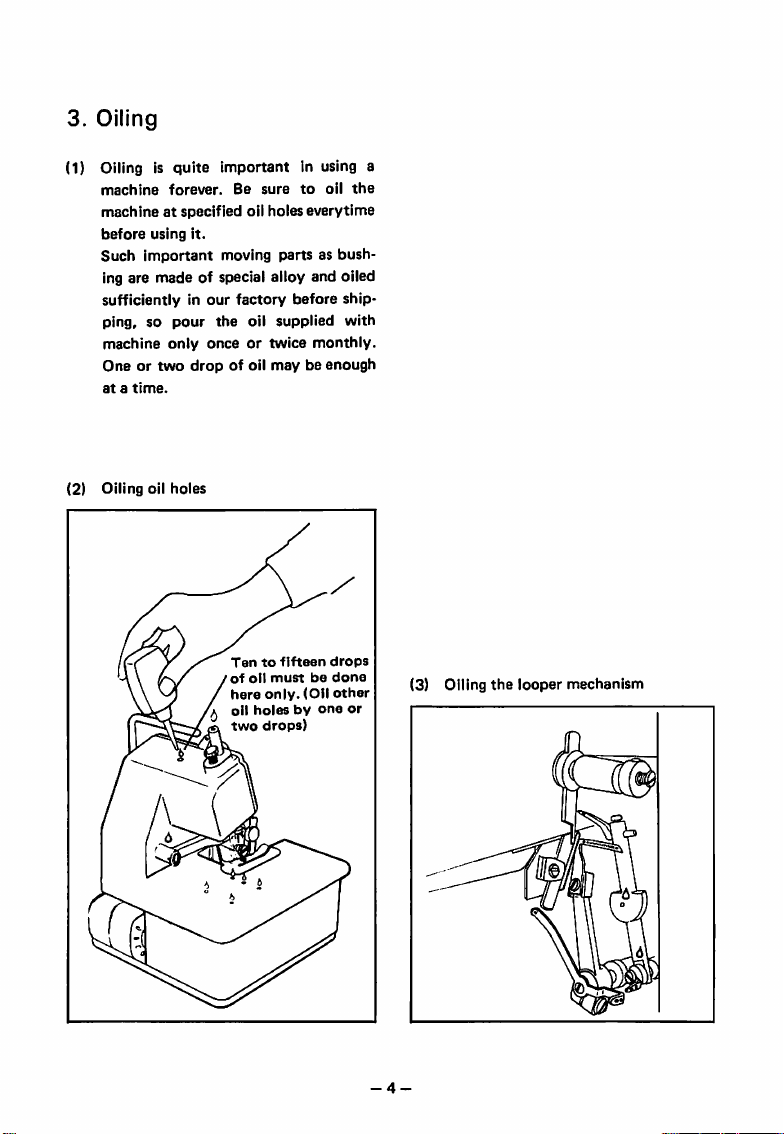
3.
Oiling
(1) Oiling is
machine
machineatspecified
before
Such
quite
forever.
using
it.
important
important in using a
Be
suretooil
oil holes
moving parts as bush
ing are made of special alloy and oiled
sufficiently in
ping, so
machine
Oneortwo
atatime.
(2)
Oiling
only
oil
our
pour
the
onceortwice
drop
holes
factory
oil
supplied
of oil may be
Tentofifteen
of
oil
mustbedone
here
only.
oil
holesbyone
drops)
everytime
before
monthly.
enough
drops
(Oil
ship
with
other
or
the
(3) Oiling
the
looper
mechanism
-4-

4.
Threading
(1)
Notes
•
The
machine do
not
sew if threading
incorrectly. Thread correctly as the following
thread
diagrams.
•
First,
thread
left
looper.
•
Insert
the
thread
between
discs.
• Use a pair of tweezers to
(2)
0
Threading
Thread
left
order
looper
first.
the
thread
tension
easily.
Thread
tension
disc
CautionI
(50mm)ofthread
Draw
about
through
two
inches
the
righ
looper
eye.
-5-

Thread
right
looper
secondly.
*
Caution!
(50mm)ofthread
er
eye.
Draw
about
through
two
the
left
Rightlooper
inches
loop
-6-
thread

Thread
needle lastly.
Needle threed |
*
Caution!
(50mm)ofthread
eye.
Draw
about
through
two
the
Inches
needle
*
01
^ '
~|
[
1r
L
-7-

5.
Test
sewing
CautionI
thread
(D
Put
foot.
(D Hold
left
hand
with
right
you
check
is
obtained.
Do test-sewing
.
a piece of
three
and
hand.
that
cloth
threads with your fingers of
turn
the
Starttosew
the
correct
after
under
pulley
stiteh
you
the
-clockwise
slowly
formation
finish
presser
to
after
Pulley
-8-

6.
Howtoregulate
the
thread
tensions
(1) To regulate
The
amount
dependingonthe
and
threadstobe
shouldbeonly
formation.
the
thread tensions
of tension
kind
and
used.
enoughtosecure
(2) Proper stitch formation
(The
top
side)
Rightlooper
Thread
thread
Left
tension
must
be regulated
sizeofmaterials
Tensiononthread
proper
Need
thread
(The
back
side)
looper
thread
(3) To adjust incorrect stitch formation
The proper stitch formation is obtained by
adjusting
sions.
Turn
to
it unti-clockwisetodecrease
tension.
the
increase
the
amountofthree
each
thread
the
amountoftension
tension
the
® The sketch shows the needle thread ten
sion
loosens
too
much.
e
The sketch shows the right looper thread
tension
loosens
too
much.
thread
nut
amount
ten
clockwise
and
trun
of
tension
-9-
The sketch shows
loosens
too
the
left looper thread
much.

7.
How
to
operate
•
Put
the
securely
•
Sew
slowly.
• Put
material
and
the
your
under
the
commencetosew.
first
and
second
fingers on
the
presser
foot
stitches
very
material only
enough to guide It as It Isfed automatically.
0
Take
away
the
material
from
the
machine
Run
the
machine
until
about5cmofchanining
obtained
cut
the chaining thread to remain 3 cm
ofItwith
contlneouslyata low
after
the
materialIssewn
the
material
sewn-up.
speed
thread
up.
Then
Is
0
When
the
backtackIsnecessary
Tie a chaining
material.Inthe
fabrics,
thread
materialbyusingacrochet.
insert
into
thread
caseofsewing
back
the
the
stitch
remaining
remained
formation
with
up
chaining
of
the
knit
the
-10-

8.
Howtoregulate
presser
(1)
To
0 Swing
Hold
the
screwdriver
foot
regulate
out
the
pulley imnnovably
supplied
the
side
stitch
covertothe
with
machine.
the
length
with
stitch
your
left.
hand
length
and
loosen
and
the
the
feed regulating
pressure
nut
of
by using a
(2) Move
grooveofthe
obtain
crease
and
(D Tighten
after
(2)
This
medium
it is
presser
weight
The
thumb
Increase
material
material.
the
feed
reguiating
feed
regulatorupand
the
desired
the
stitch
length,
moveitdownward
the
feed regulating
adjusting.
To
reguiate
foot
machineisadjusted
necessarytoreadjust
foot
materials.
pressure
nutasshowninthe
the
pressureofthe
weight
materialsinour
when
sewingoniightorheavy
canberegulatedbyturning
the
pressure
and
decreaseitfor
stitch
move
to
the
for
nutinthe
length.
the
nut
decrease.
nut
for
sewingonthe
factory.
pressureofthe
sketch.
the
heavy
the
light
down
To
upward
secureiy
presser
the
weight
weight
to
in
So
-11-
To
the
the
Increase
pressure
pressure
Feed
nut
Feed
regulating
regulator
Pressure
regulating
thumb
nut

9.
How
to
replace
the
needle
•
This
machine
DB X 1ofneedle
•
Generally
determinedbythe
nessorweightofmaterialtobe
Standard
No.9toNo.16ofneedles
®Toremove
Turn
pulley
needle
barIsat
the
needle
driver,
and
downward.
@Toset
At
the
needle
Insertafresh
far
as It will go,
front.
Tighten
securely.
Is designedtouse
whichIsmost
the
sizeofneedle
size of
setting
Is No. 11ofneedle
the
needle
clockwise
Its
highest
clamp
screwbyusingascrew
the
needle
the
needle
bar
beingatIts
needle
with
long
the
clamp
thread
are
also
by
hand
position.
willbewithdrawn
highest
Into
the
needle
groove
of Ittothe
screwinposition
the
popular.
should
and
thick
sewn.
available.
until
Loosen
position.
hole
type
and
the
be
as
Sketchofneedle
Long
groove
(frontofneedle)
Scarfofneedle
(backofneedle)
r
Needle
clamp
screw
-12-

10.
Howtochange
•
When
the
cutting
Caution:
(1)
®Toremove
Loosen
upper
out
@Toset
Push
position
of
the
in
Front
bottomofstoroke,
than
sketch.Inthis
knife
Lastly,
position,
needle
upper
Remove
To
change
the
upper
knife
guide
upperward.
the
the
upper
and
insert
upper
knife
left.
Tighten
position
slightly.
cutting
0.5mm
ciamp
screw
when
the
adjustitsoitcrosses
plateatright
knife
guide
the
the
knife
knife
holder
edgeofupper
—
position,
edgeofknife
the
plug
upper
upper
knife
screw,
holderupto
the
the
upper
should
1.0mm
again
upper
screw
cord
knife
knife
clamp
and
knife
into
with
cutting
knife
extend
as
tighten
securely.
knifeisat
angles.
securely.
the
upper
becomes
from
screw
and
pull
the
its
rightest
the
edge
clamp
knife,atits
not
shown
the
its
the
surface
Tighten
the
the
knife
groove
screw
less
in
the
upper
lowest
the
dull,
outlet,
to
of
and
lower
replace
and
Upper
Needle
knives
withafresh
then
commencetochange
Upper
Upper
knife
knife
plate
oneasfollows.
the
knife
clamp
screw
holder
knife.
Upper
knife
holder
0.5mm—I.Omm
-
13-

(2)
To
replace
(DToremove
Loosen
the
the
lower
the
lower
iower knife
knife
knife
screw
by using a screwdriver,
and
it will be
withdrawn
downward.
(DToset
the
Insertafresh
lower
knife
cutting
edgetothe
Then,
set
even
with
tighten
position
the
securely.
knife
knife
into
holder
from
right.
the
knifesoits
the
surfaceofneedle
lower
knife
the
the
clamp
guide
bottom,
cutting
groove
edge
plate,
screw
with
and
The
guide
groove
knife
screw
holder
of
of
lower
Lower
clamp
knife
is
in
Lower
knife
-14-

11.
How
to
replace
•
The
carbon
brushisoneofarticles
consumption,soexchange
worn-off.
To
catch
the
carbon
1.Tomakeanoise
2.
The
motor
will
not
run
3.Tosparkle
To
1.
Remove
body.
2.
Loosen
3.
Take
the
4.
Insertanew
as
5.
Install
replace
out
carbon
they
the
two
the
were,
the
motorasIt
too
the
brush
brush.
much
carbon
motor
carbon
carbon
and
caps.
set
the
withanew
brush
worn-off
brush
from
the
brush
brush
and
the
capInposition.
was.
carbon
one
machine
spring
its
spring
and
of
if
brush
for
the
drive
Brush
motor
cap
Spring
Carbon
brush
-15-

12.
Howtoadjust
•
Any
difficult
mainly
causedbymis-adjustment
for
adjustmentIsnot
incorrect
necessary
fundamentally,
sewing
for
this
so
machine.
re-adjusr
The
following
troubles
accordingtonecessities.
are
Trouble
MaterialIsnot
smoothly
NeedleIsbroken
ThreadIsbroken
Skip
stitch
occures
fed
The
pressureofpresser
footistoo
NeadleIsbentorIts
is
damaged.
NeedleIsset
Materialispull
To
thread
ThreadIscaughtonany
obstacle
Thread
tensionIstoo
NeedleIsset
To
use
any
be
specified
NeedleIsbentorIts
Is
damaged
To
set
needle
To
use
any
specified
To
thread
The
pressureofpresser
Is
too
weak
Cause
weak
Incorrectly
out
Incorrectly
inccorectly
needle
not
Incorrectly
needlenoto
Incorrectly
point
strongly
strong
to
point
foot
Turn
the
clockwisetoIncrease
To
change
To
set
Do
not
In
sewing
To
thread
To
checkIfthreadIscaugtonthread
stand
andsoon
See
page9(Howtoregulate
tension)
To
checkIfneedleisset
page
11)
To
use
To
change
To
set
be
To
use
To
thread
To
turn
nut
clockwisetoIncrease
Adjustment
pressure
needle
pushorpull
type
needle
typeDBx 1ofneedle
the
forafresh
correctly
again
properly
DB
forafresh
properly
again
properly
pressure
regulating
x 1
the
needle
(see
out
the
(see
correctly
needle
(see
(see
regulating
thumb
pressure.
page
material
page5to
the
page
page5to
the
pressure
nut
12)
7)
thread
(see
12)
7)
thumb
Proper
stitch
formationIsnot
obtained
Puckering
occures
Insufficient
be
thread
Thread
To
caughtonany
tensions
tensionIstoo
thread
adjustment
Inccorectlytobe
obstacle
of
strong
-16-
To
To
ably
page
To
re-adjust
loosen
when
9)
thread
thread
tensions
thread
tension
sewingonlight
properly
(page5to
(see
nuts
materials
page
consider
7)
9)
(see.

13.
Light
Organdie,
Tafta,
The
relation
Material
weight
Silk,
Fine
suit
materials
toricot,
lining.
chart
of
Cotton
Silk
materials
Thread
No.80—100
No.80-100
and
threads
Stitch
length
3.0mm—4.0mm
Medium
Cotton,
General
Heavy
Tweed,
Denim,
cloth
Knit
Knit
fabrics
14.
Specifications
Sewing
speed
Seam
width
Stitch
length
Presser
foot
Presser
foot
Needle
weight
Tricot,
dress
weight
Coat
Heavy
fabrics
lift
materials
Linen,
materials
materials
cloth.
weight
Cotton
Silk
Cotton
Polyester,
Woolly
No.60—100
No.50-100
No.40—60,
Wooly
nylon
nylon.
Polyester
Silk
No.40—60
1,500
stitches
4.0mm
(standard)
2.0mm—5.0mm
Hinged
Upto5.0mm
Type
DB x
No.
9 —16also
3.0mm—4.0mm
3.0mm—5.0mm
3.0mm—5.0mm
per
minute
l.size
No.11(standard)
available
Numberofthread
Oiling
Machine
Net
head
weight
-17-
3
Manual
253mmx263mmx275mm
10kg
(complete
set
with
motor)

15.
The
1.
Machine
2.
Foot
pedalofcontroller
3.
Manual
4.
Standard
16.
Standard
rnammyiock
contents
head
with
motor
for
MAMMYLOCKML-303
accessories
and
accessories
of
its
packing
box
4MI-
®
Machine
(D
Screwdriver
(D
Tweezers
head
cover
® Thread guide (three pieces)
(D Needle
(D
(7)
(D Brush
-18-
Upper
Oiler
(type
DB x 1, size No. 11)
knife
(contained
for
dusting
with
SOcc oil)
 Loading...