

Page 1
Inkjet Printer JV33 Series
Requests for Daily Care and Maintenance
Inkjet printer is a precision machine equipped with extremely fine mechanisms. Especially, the nozzle surface of the
heads from which the ink is discharged is affected even by a slightest attachment of dust or paper powder and the
proper drawing results could not be obtained. With a view to using this inkjet printer in a better condition, we would
like to recommend performing the following care and maintenance on daily basis.
CAUTION
When JV33 printer is used filling solvent ink, make sure to wear the attached goggles and gloves.
The solvent ink, if mixed with water or alcohol, generates condensed substances. Pay attention not to
deposit water or alcohol to the nozzle surface, surrounding area of the heads, caps and wipers.
To secure the stability of the ink discharge, when the printer is not used (output) for an extended
period of time, it could become necessary to discharge periodically a small amount of ink (flushing),
depending on the kinds of the ink.
When not using for an extended p eriod of time, exe cute the [CUST ODY WASH] function of this equipment, ("In case of no use for long term" P.4-16 of Operation Manual) and put off the power switch on
the front, only. Leave the main power switch at the side of the equipment on and keep the cable
socket inserted into the plug.
Never disassemble this equipment. It could cause electrical shock, fire and breakage.
Keep away the moisture from the inside of this equipment. If the inside is moistened, it could cause
electrical shock, fire and breakage.
Perform the maintenance and care after switching of f the power an d t aking of f the power cable. Otherwise, it could cause unexpected accidents.
Avoid using benzene, thinner, and chemicals containing abrasive compounds. The surface of the
cover could be degenerated or deformed.
Do not supply lubricant oil etc. to the inside this equipment.
It could cause the break of the printing mechanisms.
1. Installation environment
Use this printer as much as possible in a dust-free e nvironment. Fans and air-b lowers could cause the dust-
spewing.
When solvent inks are to be used, install the printer in a well-ventilated space.
The using environment of this printer is from 20 to 35
humidity. Avoid the use of this printer at a temperature and humidity higher or lower than the indicated
ranges.
o
C in temperature and from 35 to 65 % in re lative
1
Page 2
2. Daily care and maintenance
Q Tools required for Maintenance
Item Name Product No.
Cotton rod
Maintenance cleaning liquid MS2/ES3/HS Kit (for solvent ink) SPC-0369
Cleaning liquid bottle kit (for Aqueos inks) SPC-0137
Wiper kit 33S SPA-0134
Q Surroundings of the heads ("Cleaning the heads and their surrounding parts" P. 4-16
of the Operation Manual)
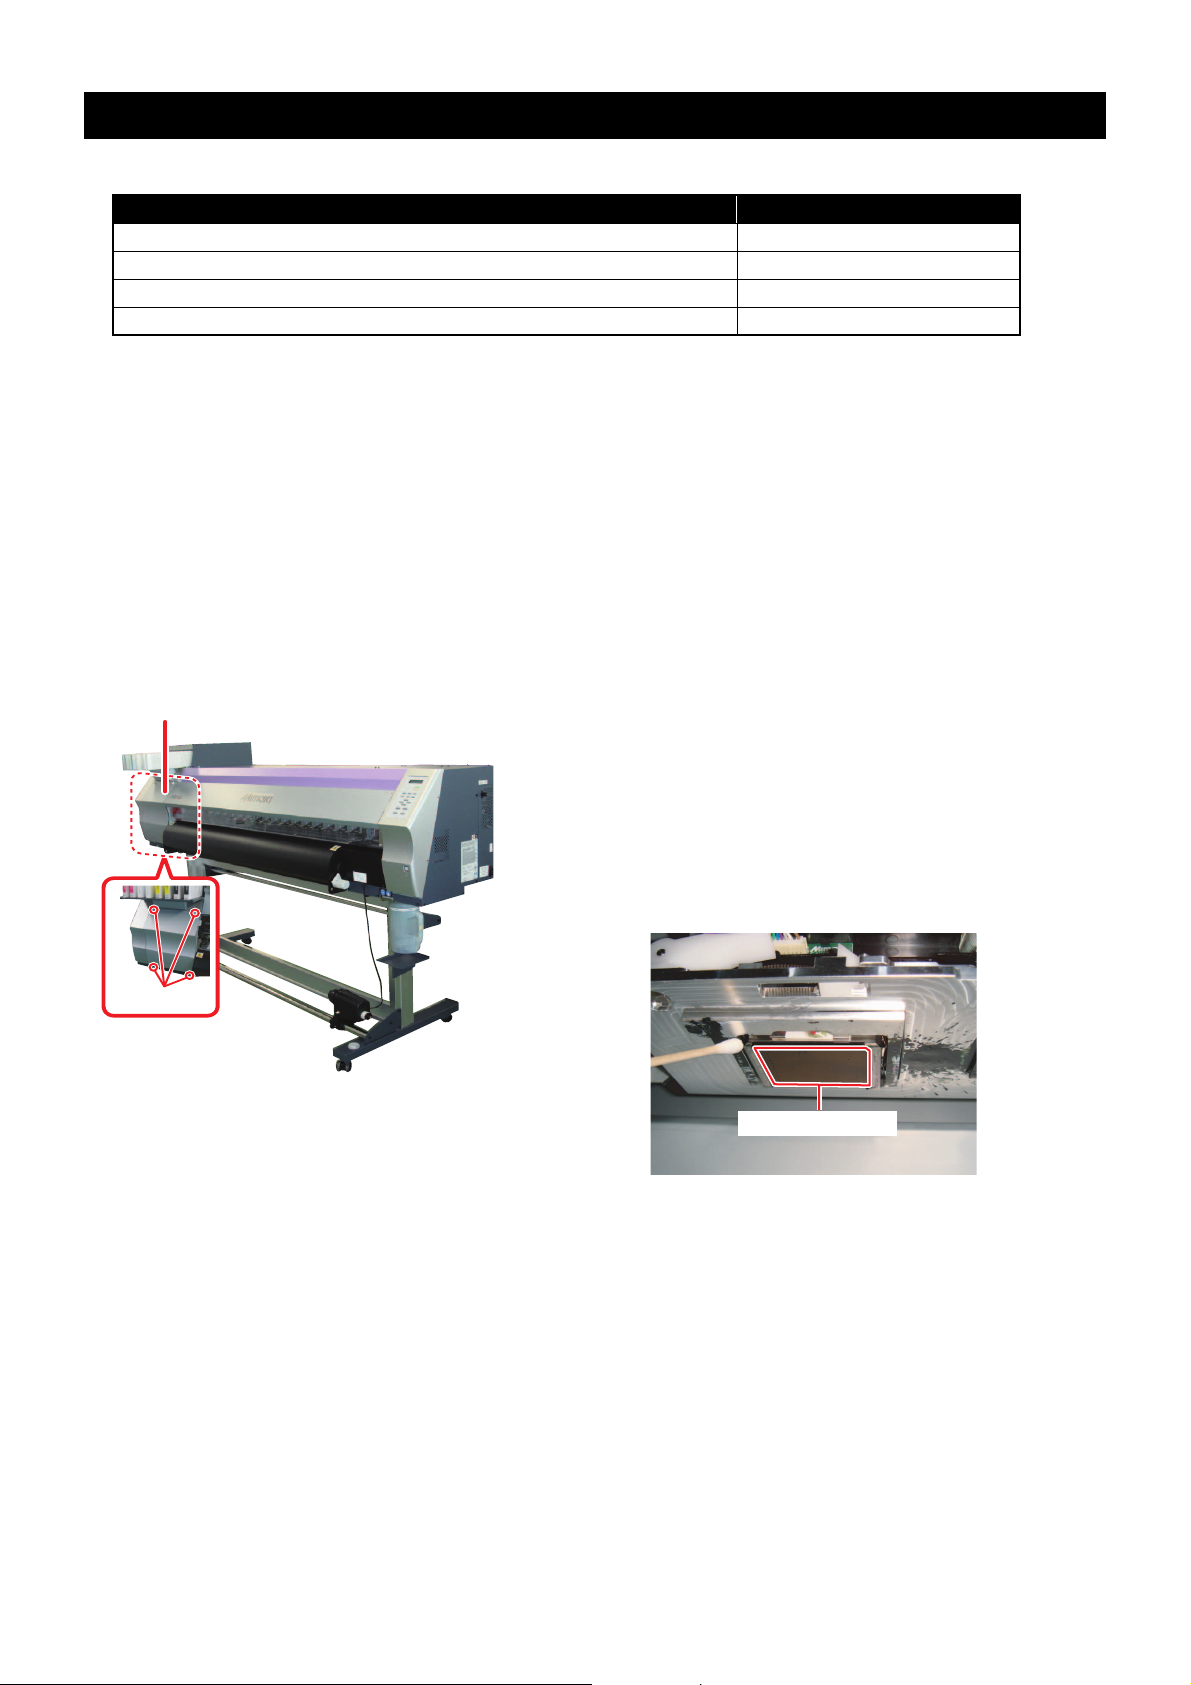
The heads and their surroundings are the parts most liable to be tainted in this printer and if tainted, it could
cause adverse effects to the functions of the equipment and the results of the drawings. Moreover, as the head
itself uses very fine mechanisms, sufficient precautions are required for the care and maintenances.
1 Move the carriage to the left.
• Move the carriage referring to S tep 1, P.4-16 of the Opera-
Maintenance
cover
tion Manual.
2 Open the maintenance cover.
• Remove the 4 screws and open the maintenance cover.
Screws
3 Clean the head and the surrounding area.
• Gelled ink and dust could stick under the slider and the surroundings of the head.
• Scrape them off with cotton rod etc. In this case, never rub
the nozzle portion of the head.
Nozzle portion
Clean with the cotton rod.
2
Page 3
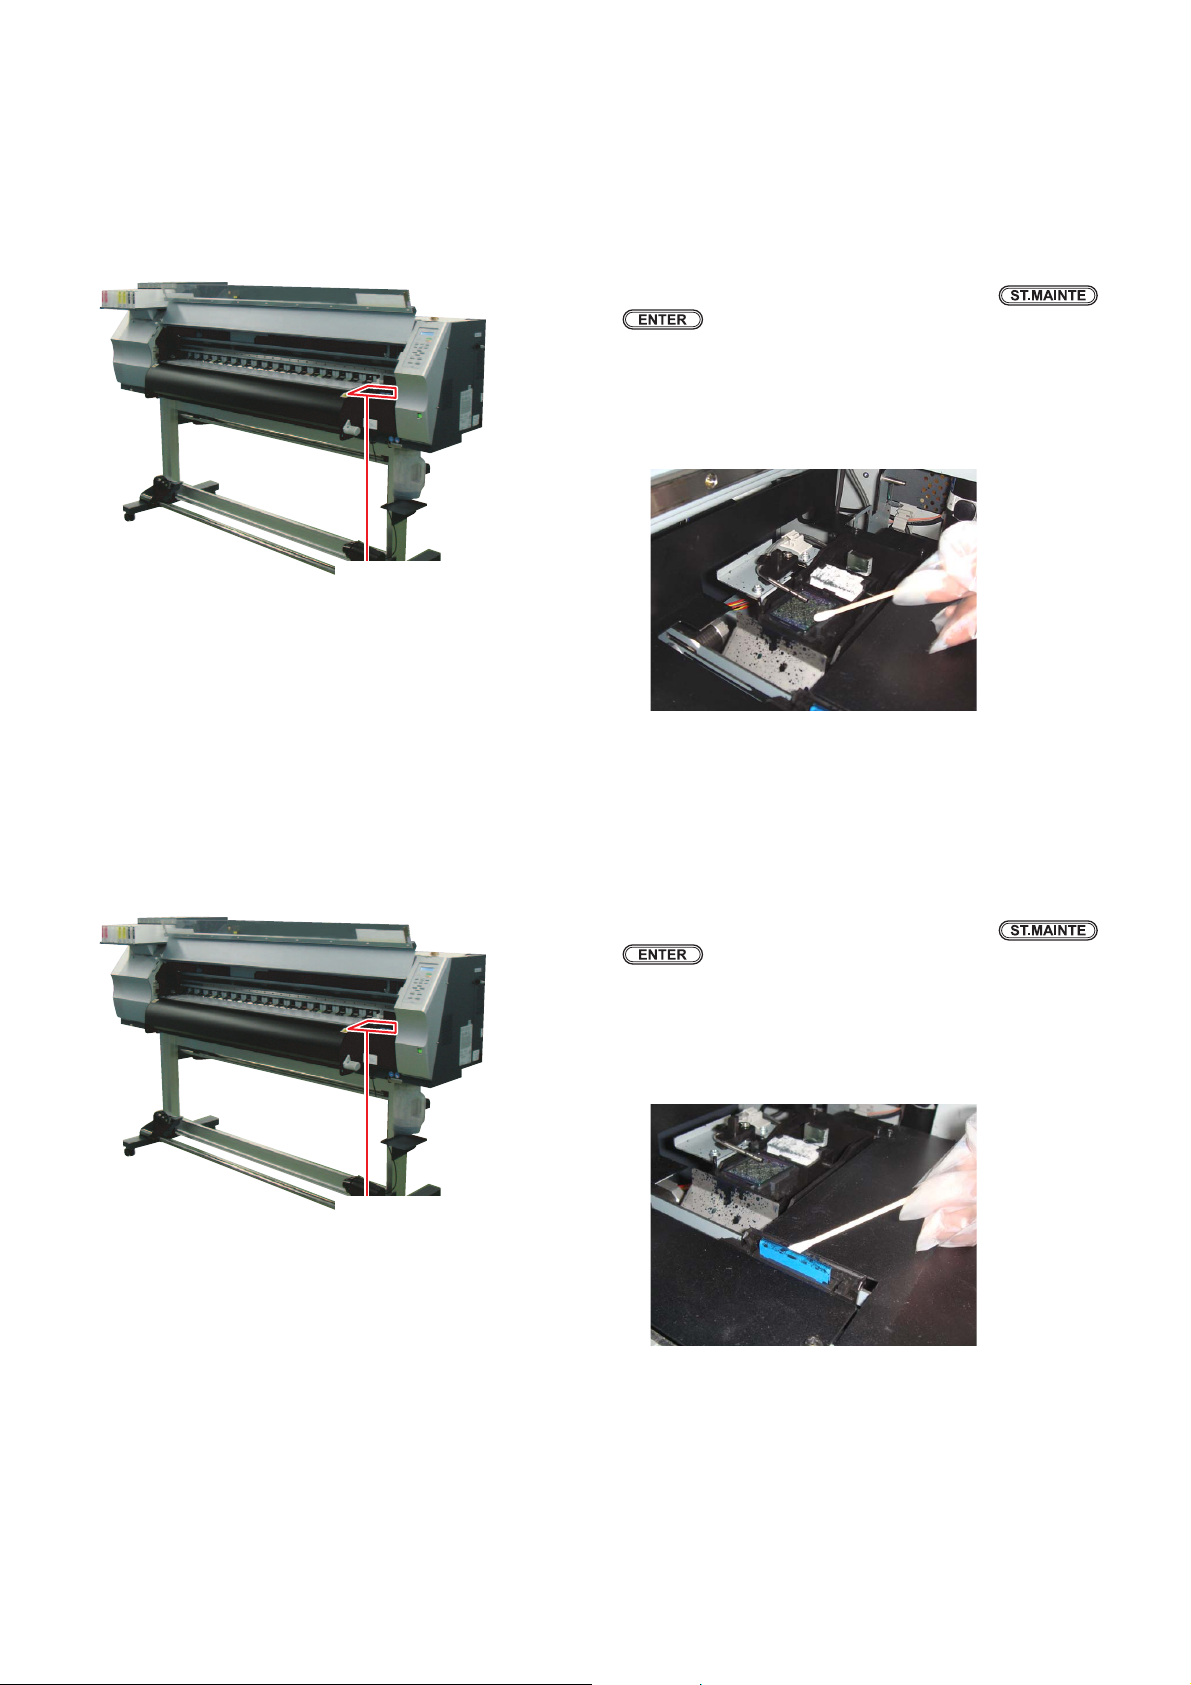
Q Capping station ("Cleaning the wiper and ink caps" P. 4-5 of the Operation Manual)
The surrounding area of the cap is also liable to be stained by the dust and ink. It is recommended to clean the
head frequently using the cleaning liquid for maintenance suitable for the ink used to avoid the stains on the
head.
When the solvent ink is used: Cleaning liquid for maintenance MS2/ES3/HS kit (Product No. SPC-0369)
When aqueous ink is used: Cleaning liquid bottle kit A29 (Product No. SPC-0137)
1 Move the carriage.
• Close the front cover, and press in order of the
and key to move the carriage.
(Station maintenance/ Carriage out)
2 Open the front cover and clean the cap.
• Dip the cotton rod into the cleaning liquid for maintenance
and wipe off the cap.
Capping
station
* Front cover is opened at the picture above.
Cap
Q Wiper ("Cleaning the wiper and ink caps" P. 4-5 of the OPeration Manual)
On the wiper, the ink, dust and paper powder are liable to accumulate. Chec k the state of the wiper and if it is
stained, clean it.
Wiper kit 33S: Product No. SPA-0134
1 Move the carriage.
• Close the front cover, and press in order of the
and key to move the carriage.
(Station maintenance/ Carriage out)
2 Open the front cover and clean the wiper.
• Dip the cotton rod into the cleaning liquid for maintenance
and wipe off the wiper.
Wiper
* Front cover is opened at the picture above.
Stained wiper
Further, in the cases as explained below, replace the wiper with the new one in accordance with "Replacing the
wiper" on P. 4-7 of the Operation Manual.
When the wiper is deformed
When the stuck ink can not be wiped off
When the warning for wiper replacement is indicated
(When the number of wiping exceeds the set level. Refer to P.4-34 of the Operation Manual)
3
Page 4
Q Media press
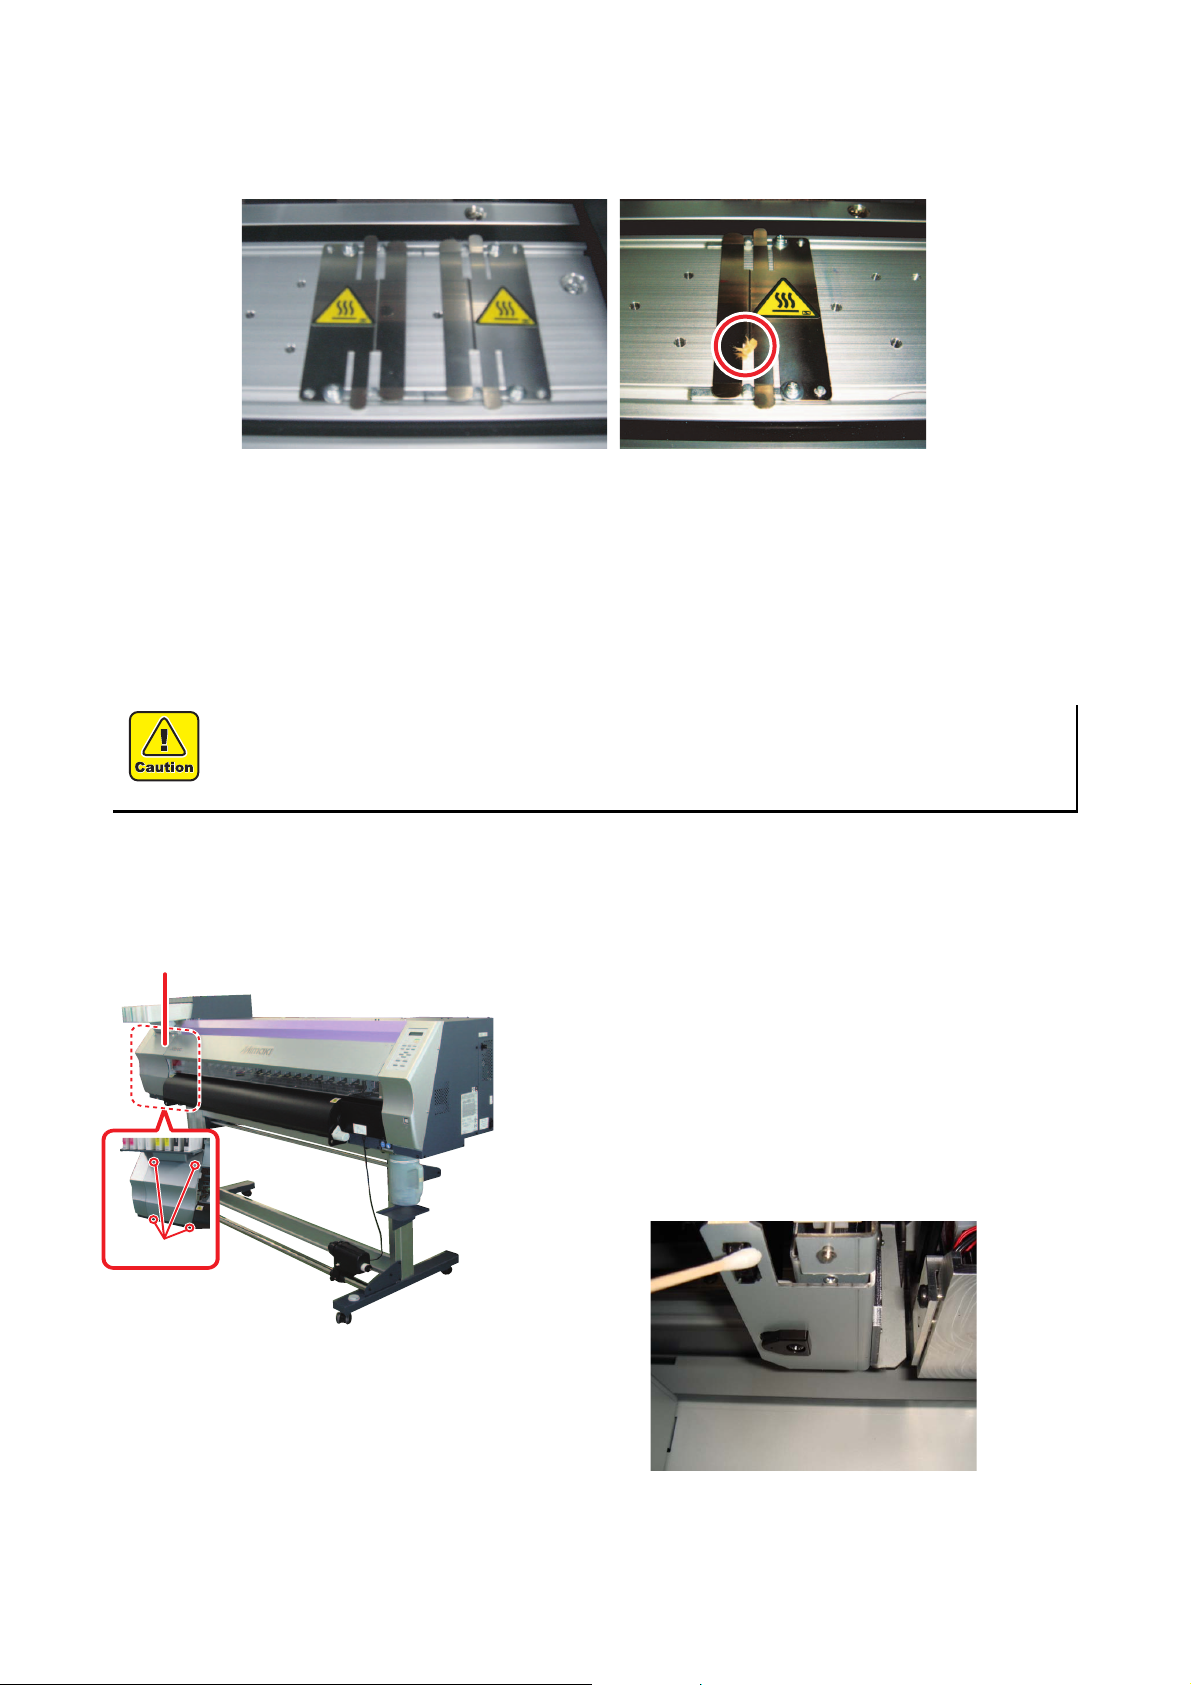
When the cut dust of the media and other dusts accumulate between the media holder and the platen, it could
cause the risks that the transfer of the media could not be performed properly or such dusts stick to the nozzles
and this could interfere the proper drawings. You are recommended to clean it frequently.
Media press Media press with dust
Q Media sensor ("Cleaning the media sensor" P. 4-4 of the Operation Manual)
Two media sensors are provided: one above the platen on the rear surface of the equipment and another on the
bottom surface of the head. If the dusts and ink accumulate on the media sensor, it could cause false detection
of the media. Wipe off the sensors with soft cloth or cotton rods.
Maintenance
cover
Screws
For the cleaning of the media sensors, never use the solvent.
When the sensor is heavily stained, wipe off with a cloth soaked in the water-
diluted neutral detergent.
Cleaning the media sensor at the bottom surface
of the heads.
1 Move the carriage to the left.
• Move it with reference to Step 1, P.4-16 of the Operation
Manual.
2 Open the maintenance cover.
• Remove the 4 screws and open the maintenance cover.
3 Clean the media sensor.
• Wipe off the dusts and stuck ink with soft cloth or cotton
rods.
4
Media sensor on the head
Page 5
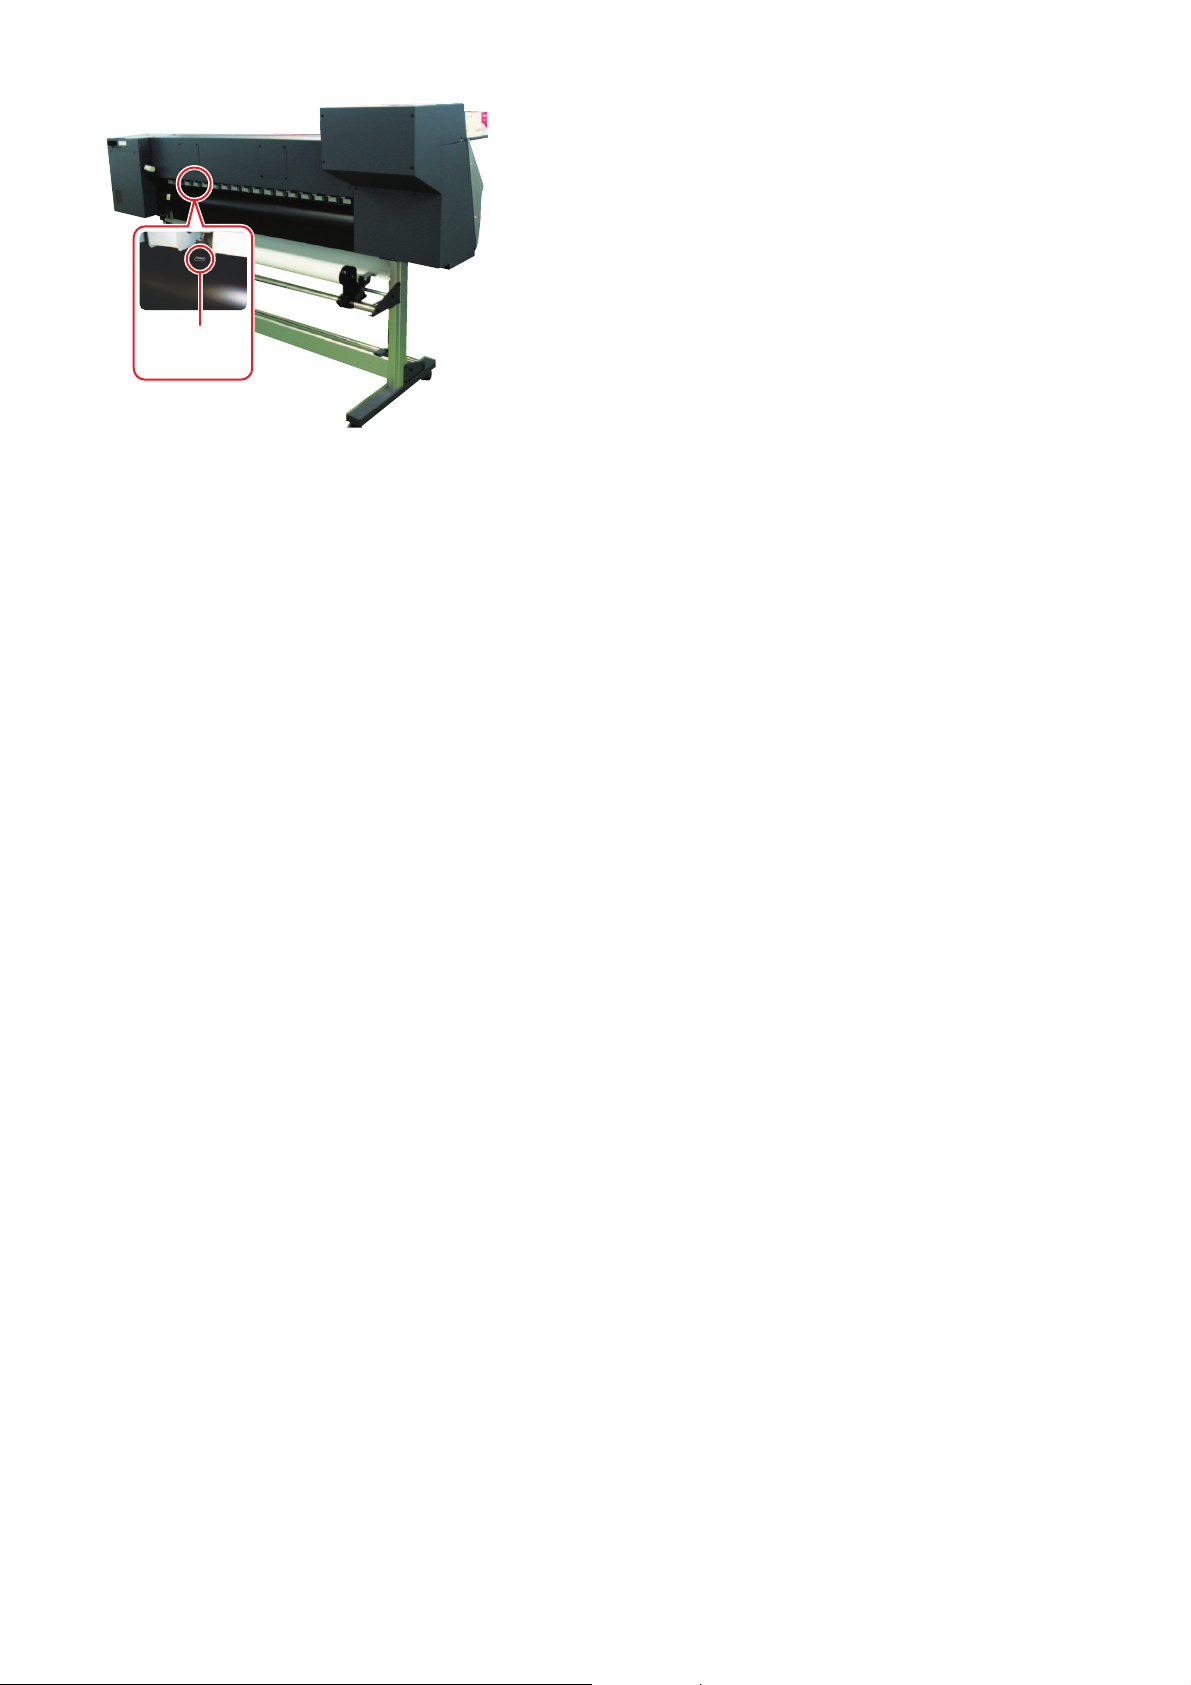
Cleaning of the media sensor at the rear surface
of the equipment
Media
sensor
Q Platen ("Cleaning the platen" P. 4-3 of the Operation Manual)
Platen is a place where dusts, paper powder, and ink a re liable to accumulate. It is therefore suggested to clean
it frequently. Wipe out the platen surface and the platen cover with a soft blush or cloth. The grooves for media
holder and for cutting the paper (cutter line) are the place where the dusts are especially liable to accumulate.
Clean them thoroughly.
Q Exterior ("Cleaning exterior surfaces" P. 4-3, Operation Manual)
Depending on the using environment, the dusts or sand powder could stick to the exterior of the main unit. To
avoid the entry of the dusts into the moving part of the head, wipe them off with soft cloth dipped into water and
squeezed tightly
Q Waste ink tank ("If Waste ink tank confirming message is displayed" P.4-36 of the
Operation Manual)
Check whether the waste ink tank is full or not. Take care so that the waste ink never overflows the tank.
5
Page 6
3. Storing of the media
Store the media in the location where the dusts are not liable to accumulate and away from direct su nlight. Avoid
storing the media in a place subjected to high temperature and high humidity, as the media abhors humidity, too.
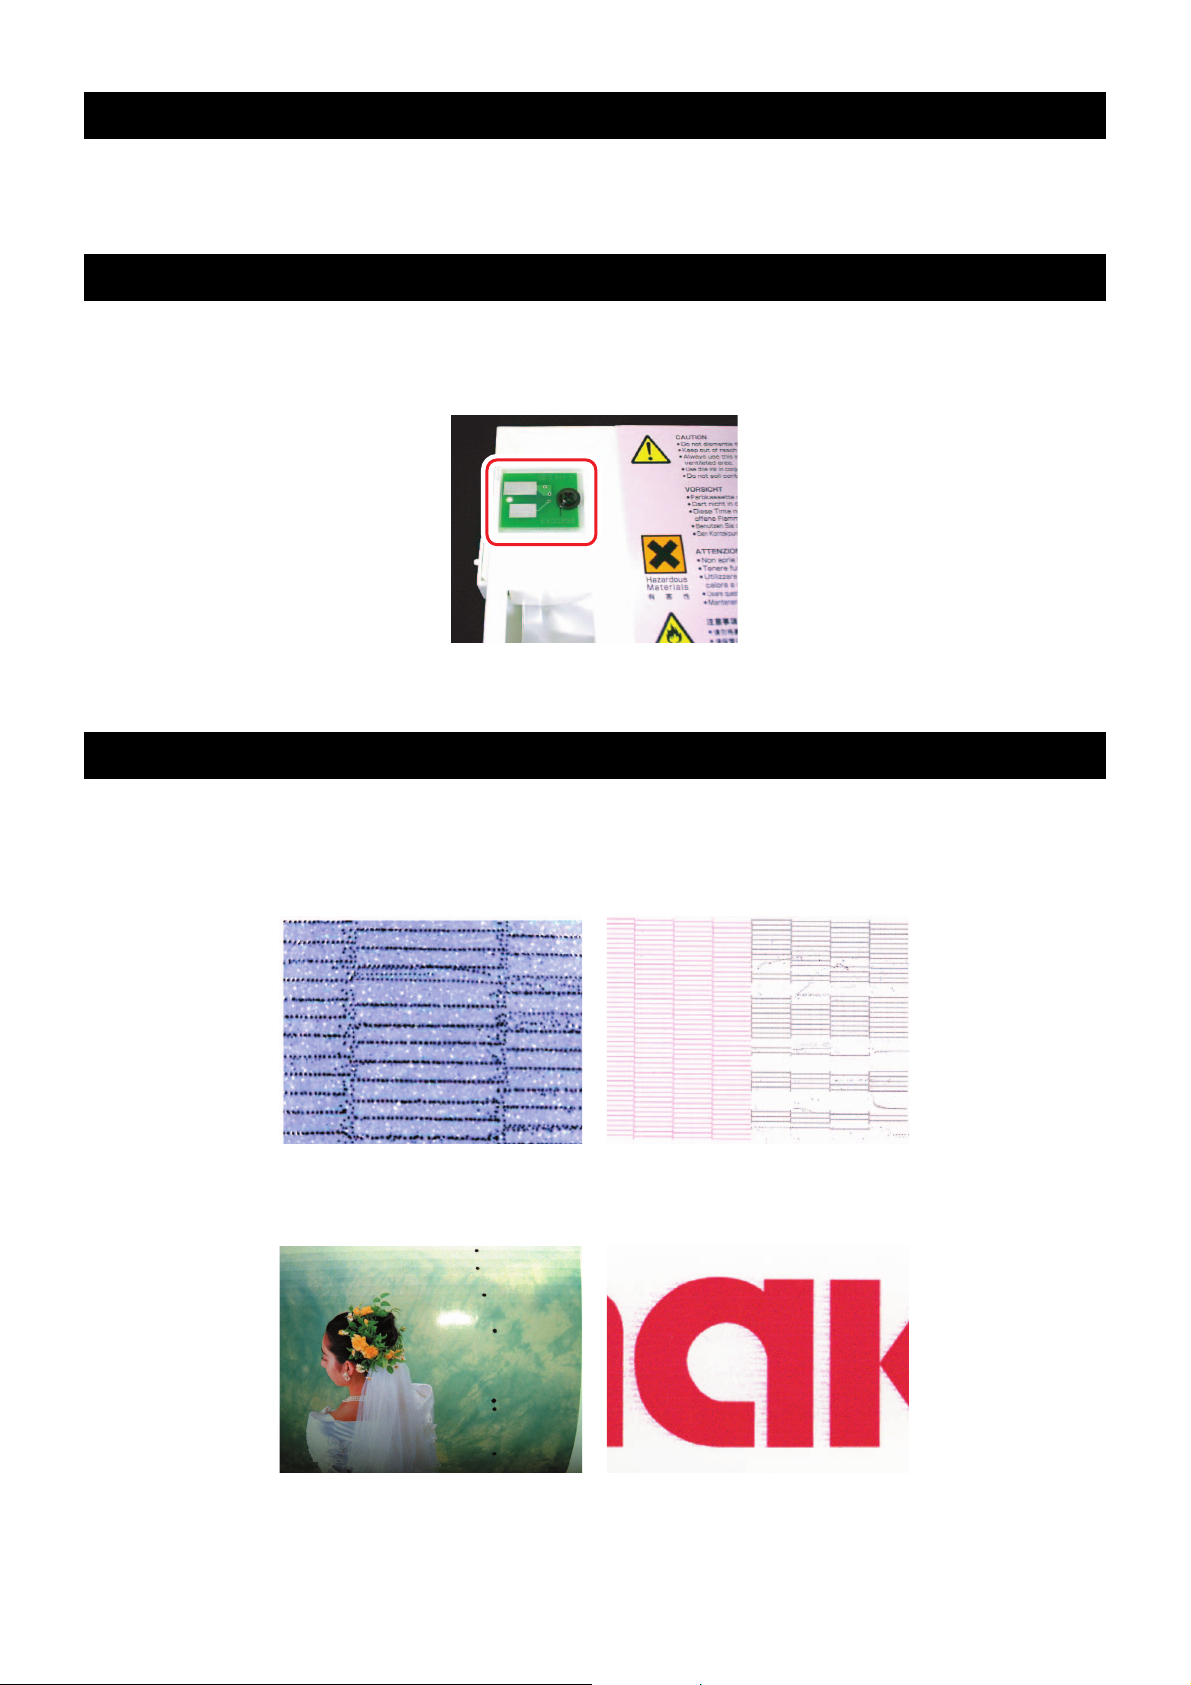
4. Storing of the cartridges
Store the cartridges in a place avoiding di rect s unligh t an d high humidity. As the cartridges are fine and precise articles, avoid dropping or crushing them. Do not make dirty touching or discharge static electricity to the board
mounted on the ink cartridges.
The board mounted on the ink cartridge
5. Examples of defective drawing
Typical examples of the defects created on the drawings by the defective discharge at the head (nozzle) caused by
the dusts etc. Check the status of the nozzles periodically before and during the outputting so that the printer is not
used under such conditions. The state of the nozzles can be checked by way of “Test drawing” of this printer. ("Head
cleaning" P.2-19 of the Operation Manual)
Deflection Nozzle out
Ink dropping Satellite
6
Page 7

6. Recovery method of defective nozzle discharge
When this printer has not been used for an extended period of time, or depending on the environmental temperature, the discharge at the nozzles could become unstable. In such a case, the following methods may be taken to
recover the status of the nozzles.
1. Daily maintenance and care
Perform the cleaning of the parts described in this document.
2. Perform head cleaning (normal). Refer to P2-19 of Operation Manual.
After having performed the care and maintenance stated in step 1, perform the
cleaning of the heads in accordance with the procedures stated in Operation
Manual.
In the event nozzle missing etc. have not been improved
3. Perform head cleaning (hard). Refer to P2-19 of Operation Manual.
If the nozzle missing does not disappear even after repeating the head cleaning
(normal) several times, reset the cleaning mode to "hard" and perform the
cleaning again.
In the event nozzle missing etc. have not been improved
4. Perform the cleaning of the head nozzles. Refer to P4-10 of Operation Manual.
Perform the cleaning of the head nozzles. In this case, leaving time of the
cleaning liquid for maintenance shall be made [1 minute].
In the event nozzle missing etc. have not been improved
5. Perform the cleaning of the head nozzles again. Refer to P4-10 of
Operation Manual
Reset the leaving time of the cleaning liquid for maintenance to [10 minutes],
and perform the cleaning of the head nozzles again.
In the event nozzle missing etc. have not been improved
6. Perform cleaning of the ink discharging route.. Refer to P4-12 of
Operation Manual
ÉCPerform the cleaning of the ink discharging route 3 to 5 times.
In the event nozzle missing etc. have not been improved
7. Perform the ink filling.. Refer to P4-21 of Operation Manual
Perform the ink filling once or twice.
Perform test drawing and
check
(P2-18 of Operation Manual)
Perform test drawing and
check
(P2-18 of Operation Manual)
Perform test drawing and
check
(P2-18 of Operation Manual)
Perform test drawing and
check
(P2-18 of Operation Manual)
Perform test drawing and
check
(P2-18 of Operation Manual)
Perform test drawing and
check
(P2-18 of Operation Manual)
If the nozzle missing has not been improved even with the above operations, please call us
or your sales agent from whom you purchased this printer.
7. When the printer is not used for a long period (P.4-16, Operation Manual)
When the printer is not to be used for a pe rio d o f one week or above, perform the cleaning of the heads and nozzles
and the ink discharging channel before storing this printer.
8. Supplies
Wiper kit 33S (Product No. SPA-0134)
When the solvent ink is used: Cleaning liquid for maintenance MS2/ES3/HS kit (Product No.: SPC-0369)
When aqueous ink is used: Cleaning liquid bottle kit A29 (Product No.: SPC-0137)
Waste ink tank 2 liters (Product No.: SPA-0117)
Cutter blades (Product No.: SPA-0107)
7
Page 8
© 2007 MIMAKI ENGINEERING CO., LTD.
D201683-11-20062007
NH
FW : 1.1
 Loading...