

SCS 65 Q
Instructions for use
Gebrauchsanleitung
Instruction d’utilisation
Istruzioni d’uso
Instrucciones de uso
Instruções de serviço
Gebruiksaanwijzing
Brugsanvisning
Bruksanvisning
Käyttöohje
ПдзгЯет чсЮуещт
Kullanım kılavuzu
Návod k používání
Návod na používanie
Instrukcja obsługi
Kezelési útmutató
Navodilo za uporabo
Upute o upotrebi
Lietošanas pamācība
Naudojimo instrukcija
Kasutamisjuhend
Инструкция по использованию
Упътване за експлоатация
Instrucţiuni de utilizare
Упатство за употреба
使用指南
2
3
ENGLISH
FRANÇAIS
ITALIANO
PORTUGUES
NEDERLANDS
DANSK
SVENSKA
SUOMI
TÜRKÇE
DEUTSCH
NORSK
POLSKI
MAGYAR
ČESKY
SLOVENSKY
HRVATSKI
LATVISKI
LIETUVIŠKAI
EESTI
РУССКИЙ
БЪЛГАРСКИ
26
28
30
32
34
36
38
40
42
44
46
48
50
52
54
56
58
ROMÂNIA
ESPAÑOL
ÅËËÇNÉÊÁ
Technische Daten, Sicherheitshinweise, Bestimmungsgemäße Verwendung,
CE-Konformitätserklärung, Netzanschluss, Wartung, Symbole
Bitte lesen und
aufbewahren!
Caractéristiques techniques, Instructions de sécurité, Utilisation conforme aux
prescriptions, Declaration CE de Conformité, Branchement secteur, Entretien, Symboles
Prière de lire et de
conserver!
Dati tecnici,Norme di sicurezza,Utilizzo conforme, Dicharazione di Conformità
CE, Collegamento alla rete, Manutenzione, Simboli
Si prega di leggere le
istruzioni e di conservarle!
Datos técnicos, Instrucciones de seguridad, Aplicación de acuerdo a la finalidad,
Declaracion de Conformidad CE, Conexión eléctrica, Mantenimiento, Símbolos
Lea y conserve estas
instrucciones por favor!
Características técnicas, Instruções de segurança, Utilização autorizada,
Declaração de Conformidade CE, Ligação à rede, Manutenção, Symbole
Por favor leia e conserve em
seu poder!
Technische gegevens, Veiligheidsadviezen, Voorgeschreven gebruik van het
systeem, EC-Konformiteitsverklaring, Netaansluiting,Onderhoud, Symbolen
Lees en let goed op
deze adviezen!
Tekniske data, Sikkerhedshenvisninger, Tiltænkt formål,
CE-Konformitetserklæring, Nettilslutning, Vedligeholdelse, Symboler
Vær venlig at læse og
opbevare!
Tekniska data, Säkerhetsutrustning, Använd maskinen Enligt anvisningarna, CEFörsäkran, Nätanslutning, Skötsel, Symboler
Var god läs och tag tillvara
dessa instruktioner!
Tekniset arvot, Turvallisuusohjeet, Tarkoituksenmukainen käyttö,
Todistus CE-standardinmukaisuudesta, Verkkoliitäntä, Huolto, Symbolit
Lue ja säilytö!
Technical Data,Safety Instructions, Specified Conditions of Use,
EC-Declaration of Conformity, Mains connection, Maintenance, Symbols
Please read and save
these instructions!
Tekniske data, Spesielle sikkerhetshenvisninger, Formålsmessig bruk,
CE-Samsvarserklæring, Nettilkopling, Vedlikehold, Symboler
Vennligst les og
oppbevar!
Фечнйкб уфпйчейб, Ейдйкеу хрпдейоейу буцблейбу, Чсзуз ухмцщнб ме фп укпрп рсппсйумпх,
Дзлщуз рйуфпфзфбу ек, Ухндеуз уфп злекфсйкп дйкфхп, Ухнфзсзуз,
Ухмвплб
Рбсбкблю дйбвЬуфе
фйт кбй цхлЬофе фйт!
Technická data, Speciální bezpečnostní upozornění, Oblast využití,
Ce-prohlášení o shodě, Připojení na sít, Údržba, Symboly
Po přečtení uschovejte
Dane techniczne, Specjalne zalecenia dotyczące bezpieczeństwa, Użytkowanie zgodne z
przeznaczeniem, Świadectwo zgodności ce, Podłączenie do sieci, Gwarancja, Symbole
Műszaki adatok, Különleges biztonsági tudnivalók, Rendeltetésszerű használat,
Ce-azonossági nyilatkozat, Hálózati csatlakoztatás, Karbantartás, Szimbólumok
Olvassa el és
őrizze meg
Prosimy o uważne przeczytanie i przestrzeganie
zaleceń zamie szczonych w tej instrukcji.
Teknik veriler, Güvenliğiniz için talimatlar, Kullanim, CE uygunluk beyanice, Şebeke
bağlantisi, Bakim, Semboller
Lütfen okuyun ve
saklayın
Technické údaje, Špeciálne bezpečnostné pokyny, Použitie podľa predpisov,
CE-Vyhlásenie konformity, Sieťová prípojka, Údrzba, Symboly
Prosím prečítať a
uschovať!
Tehnički podaci, Specijalne sigurnosne upute, Propisna upotreba,
CE-Izjava konformnosti, Priključak na mrežu, Održavanje, Simboli
Molimo pročitati i
sačuvati
Tehniskie dati, Speciālie drošības noteikumi, Noteikumiem atbilstošs izmantojums,
Atbilstība CE normām, Tīkla pieslēgums, Apkope, Simboli
Pielikums lietošanas
pamācībai
Techniniai duomenys, Ypatingos saugumo nuorodos, Naudojimas pagal paskirtį,
CE Atitikties pareiškimas, Elektros tinklo jungtis, Techninis aptarnavimas, Simboliai
Prašome perskaityti ir
neišmesti!
Tehnilised andmed, Spetsiaalsed turvajuhised, Kasutamine vastavalt otstarbele,
EÜ Vastavusavaldus, Võrku ühendamine, Hooldus, Sümbolid
Palun lugege läbi ja hoidke
alal!
Технические данные, Рекомендации по технике безопасности,
Использо- вание, Подключение к электросети, Обслуживание, Символы
Пожалуйста, прочтите и сохраните
настоящую! инструкцию
Технически данни, Специални указания за безопасност, Използване по предназначение,
СЕ-Декларация за съответствие, Свързване към мрежата, Поддръжка, Символи
Моля прочетете и
запазете!
Date tehnice, Instrucţiuni de securitate, Condiţii de utilizare specificate, Declaraţie
de conformitate, Alimentare de la reţea, Intreţinere, Simboluri
Va rugăm citiţi şi păstraţi
aceste instrucţiuni
SLOVENSKO
60
Tehnični podatki, Specialni varnostni napotki, Uporaba v skladu z namembnostjo,
Ce-izjava o konformnosti, Omrežni priključek, Vzdrževanje,Simboli
Prosimo preberite in
shranite!
62
64
66
68
70
72
74
中文
技术数据, 特殊安全指示, 正确地使用机器, 欧洲安全规定说明, 电源插头, 维
修, 符号
请详细阅读并妥善保存!
78
МАКЕДОНСКИ
Технички Податоци, Упатство За Употреба, Специфицирани Услови На
Употреба, Еу-декларација За Сообразност, Главни Врски, Одржување, Симболи
Ве мoлиме прочитаjте го и
чувајте го ова упатство!
76
4
5
14
10
20
19
6
16
13
21
18
12
8
11
90°
START
STOP
6
7
1
2
3
4
5
8 9
1
2
3
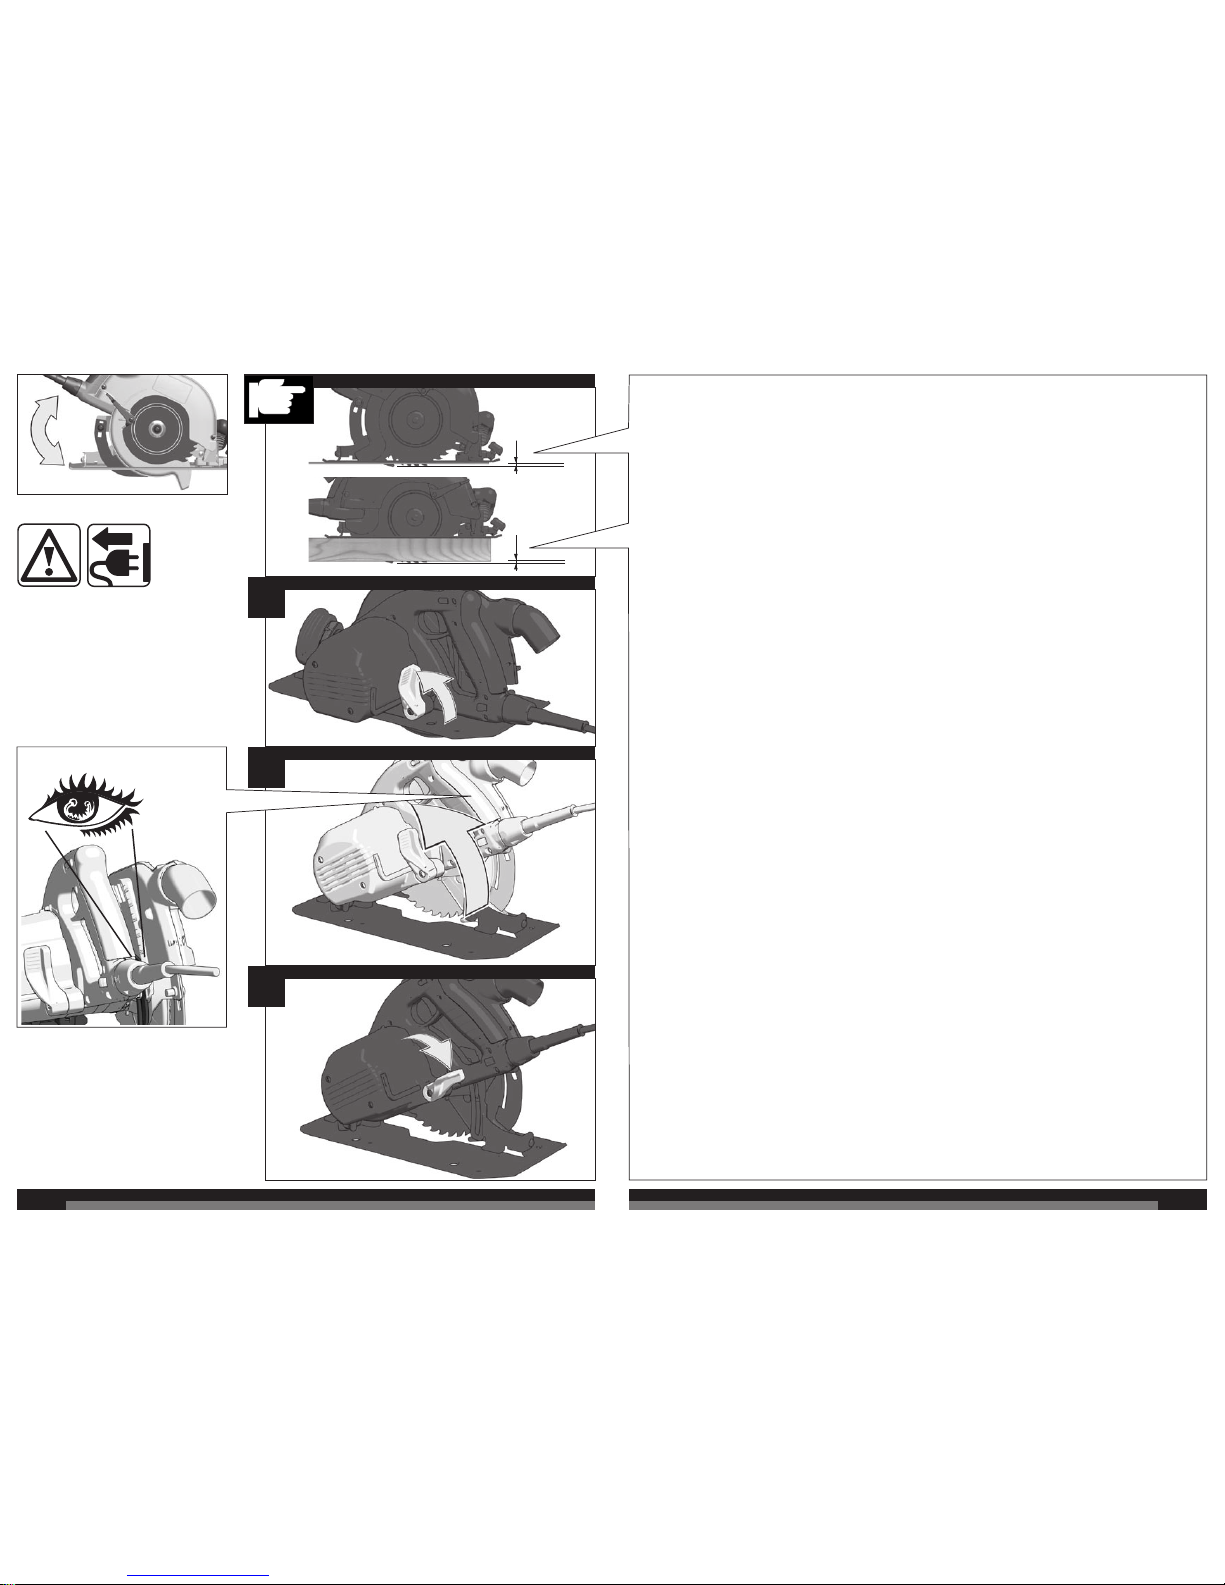
0 - 65 mm
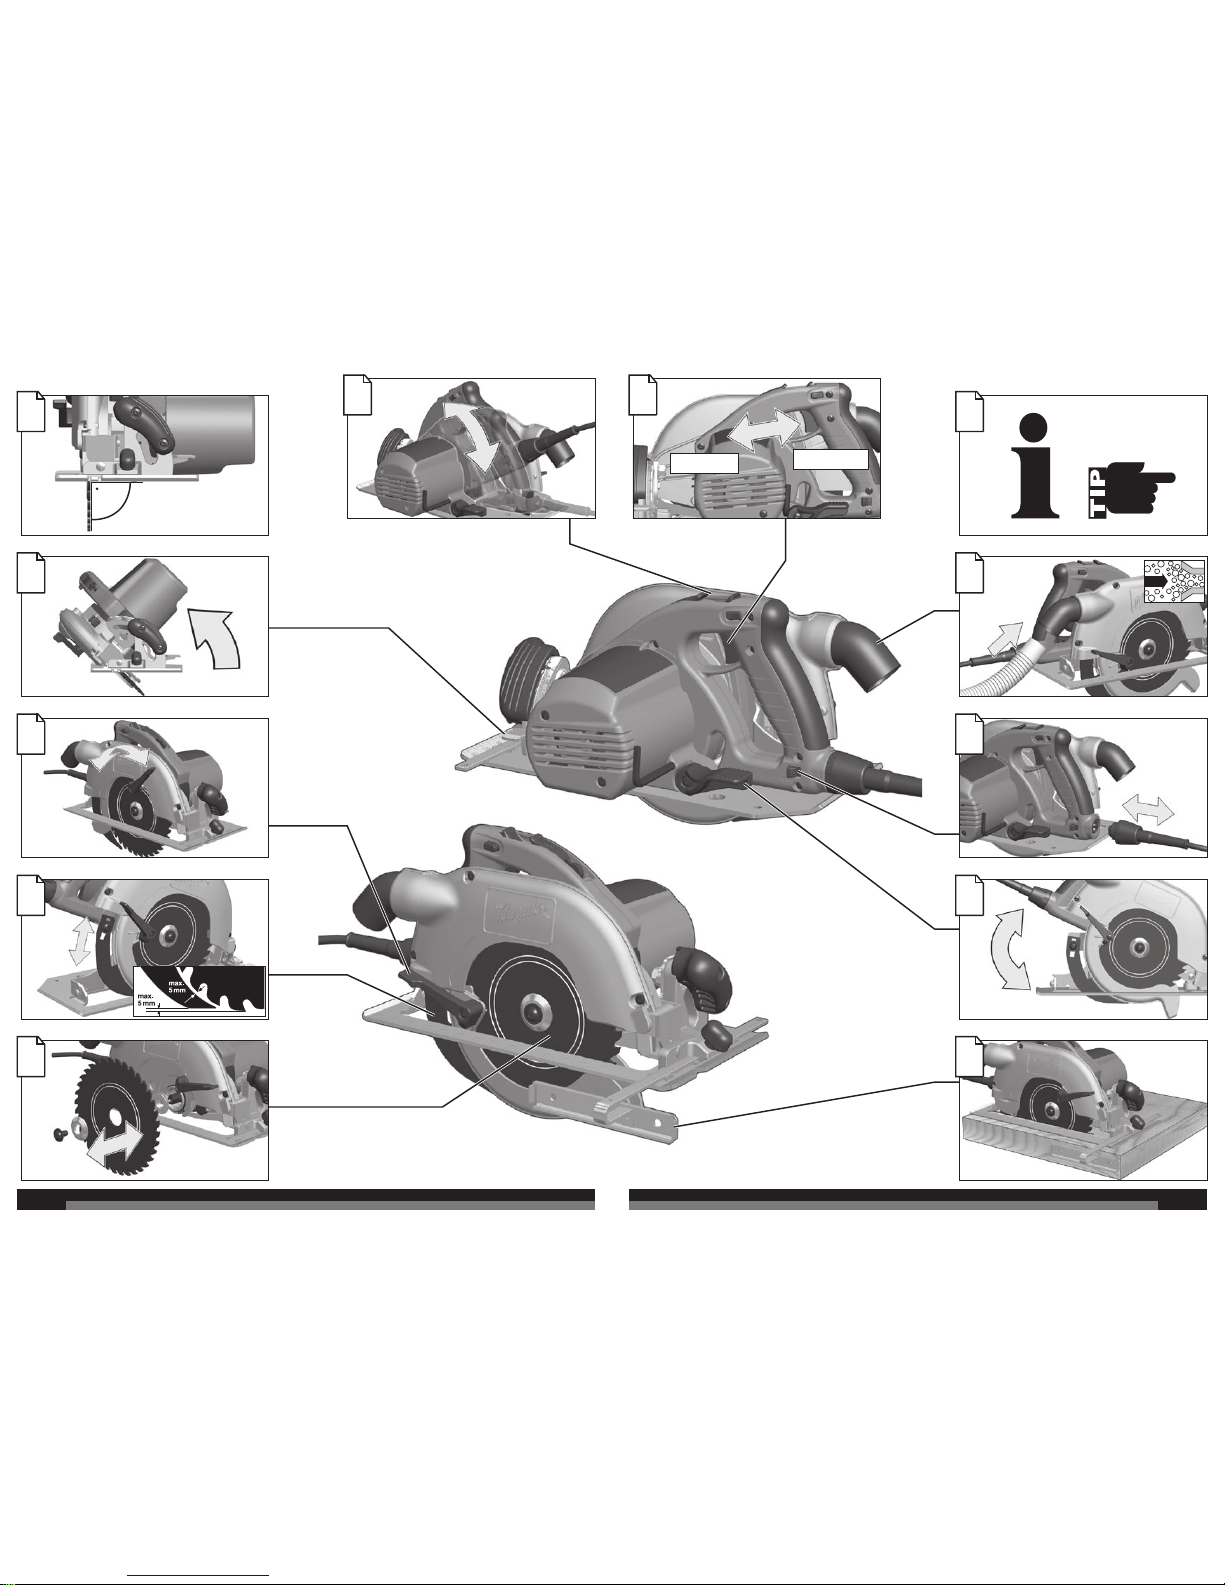
Adjust the cutting depth to the thickness of the workpiece. Less
than a full tooth of the blade teeth should be visible below the
workpiece.
Passen Sie die Schnitttiefe an die Dicke des Werkstücks an. Es
sollte weniger als eine volle Zahnhöhe unter dem Werkstück
sichtbar sein.
Adapter la profondeur de coupe à l’épaisseur de la pièce. Moins
d’une dent complète devrait apparaître sous la pièce.
Adattare la profondità di taglio allo spessore del pezzo in
lavorazione. Nella parte inferiore del pezzo in lavorazione dovrebbe
essere visibile meno della completa altezza del dente.
Adaptar la profundidad de corte al grosor de la pieza de trabajo. La
hoja de sierra no deberá sobresalir más de un diente de la pieza de
trabajo.
Adaptar a profundidade de corte à espessura da peça a ser
trabalhada. Deveria estar visível por aproximadamente menos do
que uma altura de dente abaixo da peça a ser trabalhada.
Pas de zaagdiepte aan de dikte van het werkstuk aan. Er dient
minder dan een volledige tandhoogte onder het werkstuk zichtbaar
te zijn.
Tilpas skæredybden efter arbejdsemnets tykkelse. Der må
maksimalt være en hel tandhøjde synlig under emnet.
Tilpass skjæredybden til tykkelsen på arbeidsstykket. Det skal være
mindre enn en full tannhøyde synlig under arbeidsstykket.
Anpassa sågdjupet till arbetsstyckets tjocklek. Den synliga delen av
en tand under arbetsstycket måste vara mindre än en hel tand.
Aseta leikkaussyvyys työkappaleen paksuuden mukaan.
Työkappaleen alla tulisi terää näkyä korkeintaan täysi
hammaskorkeus.
Προσαρμόστε το βάθος κοπής στο πάχος του υπό κατεργασία
τεμαχίου. Κάτω το υπό κατεργασία τεμάχιο πρέπει να φαίνεται
λιγότερο από ένα ολόκληρο δόντι του πριονόδισκου.
Kesme derinliğini iş parçasının kalınlığına göre ayarlayın. İş parçası
altında tam diş uzunluğunun daha azı görünmelidir.
Přizpůsobte hloubku řezu tloušťce obrobku. Pod obrobkem by měla
být viditelná méně než celá výška zubu.
Hrúbku rezu prispôsobte hrúbke obrobka. Pod obrobkom by malo
byť vidieť menej pílového listu ako plnú výšku zuba píly.
Głębokość cięcia należy dopasować do grubości obrabianego
przedmiotu. Powinno być widoczne mniej jak pełna wysokość
zębów pod obrabianym przedmioten.
A vágási mélységet a munkadarab vastagságának megfelelően kell
megválasztani. A fűrészlapból a munkadarab alatt kevesebb mind
egy teljes fogmagasságnyinak kell kilátszania.
Prosimo, da globino reza prilagodite debelini obdelovanca. Znaša
naj manj kot višina zoba, ki je vidna pod obdelovancem.
Prilagodite dubinu rezanja debljini izratka. Ispod izratka treba biti
vidljiv manje od jedan puni zub.
Izvçlieties zâìçðanas dziïumu, kas atbilst zâìçjamâ priekðmeta
biezumam. Zâìçðanas dziïumam jâbût tik lielam, lai zem zâìçjamâ
priekðmeta redzamâs asmens daïas augstums bûtu mazâks par
asmens zobu augstumu.
Pjovimo gylá tinkamai nustatykite pagal ruoðinio storá. Ruoðinio
apaèioje turi matytis ðiek tiek maþiau, nei per visà pjûklo danties
aukðtá, iðlindusi disko dalis.
Kohandage lõikesügavus tooriku paksusega. Saeketas võib tooriku
alt vähem kui ühe täishamba võrra välja ulatuda.
Устанавливайте глубину реза в соответствии с толщиной
детали. Под деталью пильное полотно не должно высовываться
более чем на один зуб.
Винаги настройвайте дълбочината на рязане съобразно
дебелината на стената на обработвания детайл. От обратната
страна на детайла дискът трябва да се подава на разстояние,
по-малко от една височина на зъба.
Adaptaţi adâncimea de tăiere la grosimea piesei de lucru. Sub
piesa de lucru ar trebui să se vadă mai puţin de înălţimea întreagă
a unui dinte.
Прилагодете ја длабочината на засекот во зависност од
густината на обработуваното парче. Нешто помалку од цел
забец од сечилото треба да биде видлив под работното парче.
根 据 工 件 的 厚 度 设 定 锯 深 。 不 可 以 让 锯 齿 完 全 突
出 於 工 件 之 外 。

10
11
1
2
3
0 - 45°
1
2
3
7 cm
1 ... 16 cm
Carry out a test cut
Probeschnitt durchführen
Effectuer une coupe d‘essai
Effettuare un taglio di prova
Efectuar corte de prueba
Efectuar experiências de corte
Proefsnede maken
Foretages et prøvesnit
Foreta prøvekutt
Gör ett provsnitt!
РсбгмбфпрпйЮуфе мЯб дпкймбуфйкЮ фпмЮ
Deneme kesmesi yapın
Proveďte zkušební řez.
Vykonať skušobný rez.
Wykonac próbę cięcia
Végezzen teszvágást
Opravite preizkusni rez!
Izvesti probno rezanje
Jāveic izmēģinājuma griezums!
Atlikite bandomąjį pjūvį!
Teha proovilõige!
Выполните пробный проход
Направете пробно рязане!
Efectuaţi un test de tăiere
Да се направи пробно сечење

12
13
1
2
1
2
1
2
click
START
STOP
For safety reasons this power tool is fitted with a switch lock and the
On-/Off switch cannot be locked in the "On" position.
Aus Sicherheitsgründen ist das Elektrowerkzeug mit einer
Einschaltsperre versehen und der Ein-/Ausschalter läßt sich nicht
arretieren.
Pour des raisons de sécurité, l'outil électrique est doté d'un
verrouillage de mise en marche et le commutateur de mise en
marche et d'arrêt ne peut pas s'enclencher.
Per motivi di sicurezza, questo utensile elettrico é dotato di pulsante
d'arresto.
Por razones de seguridad la herramienta electtricatiente un seguro
de arranque, el interruptor de arranque no tiene la posibilidad de de
enclaviemento.
Por razões de segurança a ferramenta eléctrica possui um
encravamento de ligação. Além disso, não é possível fixar o
interruptor.
Uit veiligheidsoverwegingen is de machine van een
inschakelvergrendeling voorzien en de aan-uitschakelaar is niet te
vergrendelen.
Maskinen er af sikkerhedshensysn forsysnet med en
indkoblingsspærre.
Av sikkerhetsgrunner er elektroverktøyet utstyrt med
innkoblingssperre, og av-/på-bryteren lar seg ikke låse.
För Din säkerhet är maskinen utrustad med låsknapp så
strömbrytaren ej kan tryckas in.
Turvallisuussyistä on ko. sähkötyökalu varustettu kytkemisen estolla
ja On-Ei-kytkintä ei voi lukita.
Фп злекфсйкь есгблеЯп еЯнбй еопрлйумЭнп гйб льгпхт буцблеЯбт ме
мЯб буцЬлейб енесгпрпЯзузт кбй п дйбкьрфзт енесгпрпЯзузт/
бренесгпрпЯзузт ден мрпсеЯ нб буцблйуфеЯ.
Güvenlik nedenleriyle bu alet bir kapama emniyeti ile donatılmış olup,
açma/kapama şalteri kilitlenmez.
Z bezpečnostních důvodů nelze zaaretovat vypínač v poloze
ZAPNUTO.
Z bezpečnostých dôvodov je toto elektrické náradie vybavené
blokovacím zariadením spúšťania a aretácia vypínača nie je možná.
Ze względów bezpieczeństwa to elektronarzędzie jest wyposażone w
blokadę wyłącznika, a wyłącznika On/Off nie można zablokować w
pozycji On (WŁ).
Biztonsági okokból ez a szerszám egy olyan KI/BE kapcsolóval van
szerelve, ami nem rögzíthető “BE” állásban.
Iz varnostnih razlogov je električno orodje opremljeno z zaporo
vklopa in stikalo za vklop/izklop se ne da kiksirati.
Iz sigurnosnih razloga električni alat je predviđen jednim zatvaračem
za uključivanje i prekidač za uključivanje i isključivanje se ne može
aretirati.
Drošības nolūkā elektriskie instrumenti ir aprīkoti ar slēdža bloķētāju
un slēdzi nevar nofiksēt.
Saugumo sumetimais elektros prietaise yra paleidimo blokavimo
mechanizmas, ir negalima užfiksuoti įjungimo/išjungimo jungiklio.
Turvakaalutlustel on elektritööriist varustatud sisselülitusblokeeringug
a ning sisse-välja lülitit pole võimalik fikseerida.
Из соображений безопасности этот электроинструмент
оснащенен блокиратором включения, который служит для
предотвращения самопроизвольного или случайного включения.
От съображения за безопасност електрическият инструмент има
блокировка на включването и бутонът за включване и
изключване не може да се блокира.
Din motive de securitate aceasta scula electrică este dotată cu un
blocaj pe comutator iar comutatorul Pornire / Oprire nu poate fi blocat
în poziţia „Pornit“
Од безбедносни причини оваа машина е обезбедена со
прекинувач кочница така што прекинувачот за вклучување не
може да се заклучи во вклучена позиција.
基于安全的理由本机器配备有开关锁,而且起停开关无法被锁定。
1
2

14
15
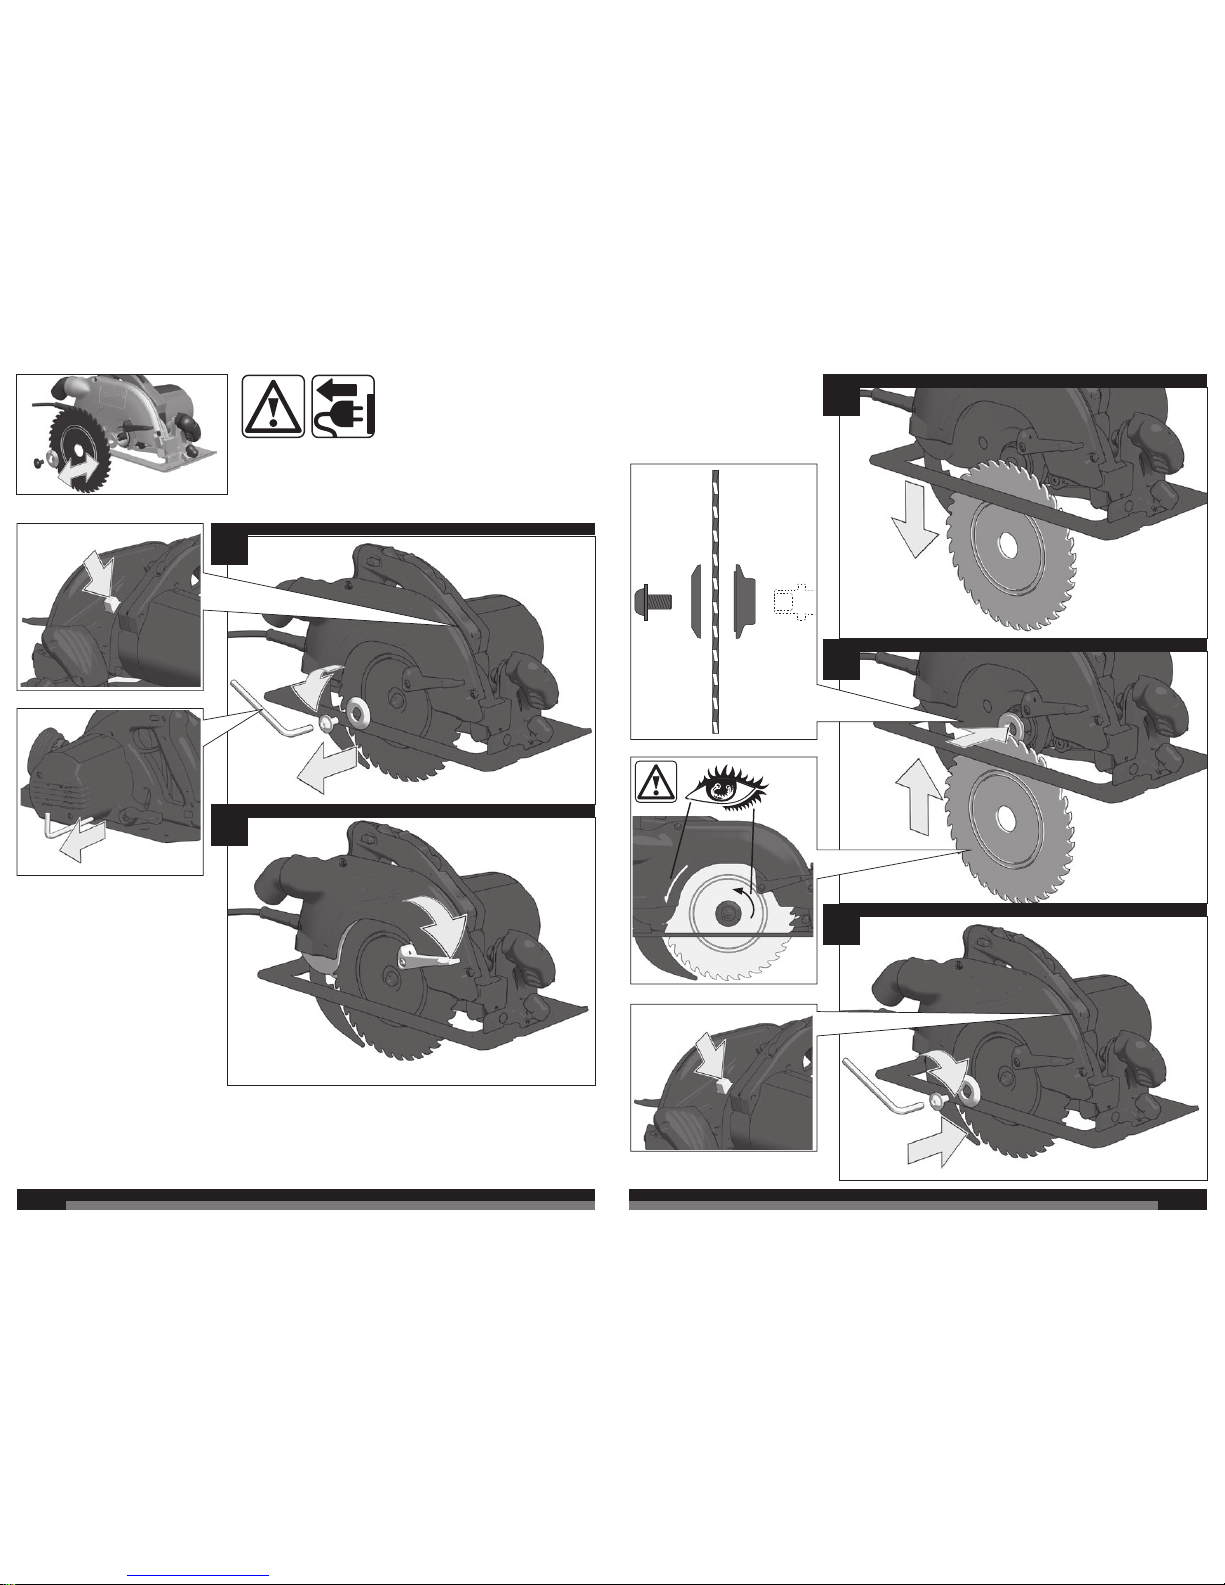
If a correction of the 90° angle of the guide-plate
to the saw blade is necessary, use the correction
screw.
Falls eine Korrektur des 90° Winkels der
Führungsplatte zum Sägeblatt nötig ist, diese mit
der Korrekturschraube durchführen
Si une correction de l'angle à 90° de la plaque de
base par rapport à la lame de scie s'avère
nécessaire, il convient alors d'avoir recours à la
vis de correction.
Nella caso in cui si rendesse necessaria una
correzione dell 'angolo di 90° della piastra di base
rispetto alla lama, questa potrà essere effettuata
agendo sulla vite di correzione.
Si es necesario un ajuste o corrección de
perpendicularidad (90°) del disco de sierra actuar
sobre el tornillo de ajuste.
Caso se torne necessário corrigir a esquadria da
base em relação ao disco de corte, agir sobre o
parafuso de afinação.
Indien een korrektie van de 90° hoek van de
bodemplaat ten opzichte van het zaagblad nodig
is kan deze worden gekorrigeerd met de
korrektieschroef.
Såfremt det er nødvendigt med en korrektion af
bundpladens 90° vinkel i forhold til savklingen,
gennemføres denne med korrektionsskruen.
Hvis det er nødvendig å foreta en justering av
90°-vinkelen på føringsplaten i forhold til
sagbladet, må dette gjøres med justeringsskruen.
Med ställskruv är det möjligt att justera 90°vinkeln, bottenplatta till sågklingan.
Mikäli pohjalevyn 90°-kulman oikaisu sahanterään
nähden on tarpeen, oikaisu suoritetaan
oikaisuruuvista.
Уе ресЯрфщуз рпх еЯнбй брбсбЯфзфз мЯб дйьсищуз
фзт гщнЯбт фщн 90° фзт рлЬкбт пдЮгзузт рспт
фп дЯукп рсйпнЯумбфпт, фьфе рсЭрей бхфЮ нб
рсбгмбфпрпйзиеЯ ме фпн кпчлЯб дйьсищузт
Kılavuz levhanın testere bıçağına 90°'lik
konumunda bir düzeltme gerekiyorsa, bunu
düzeltme vidası ile yapın.
Je-li nutná oprava kolmosti vodicí desky k
pilovému kotouči, proveďte to nastavovacím
šroubem.
Ak je potrebná korektúra 90° uhlu vodiacej platne
k pílovému listu, použite korekčnú skrutku.
Jeżeli konieczne jest skorygowanie kąta
ustawienia płytki prowadzącej 90° w stosunku do
brzeszczota, należy wykorzystać do tego celu
śrubę regulacyjną.
Ha az alaplap és a fűrészlap által bezárt 90 fokos
szög korrekcióra szorul, használja az állító
csavart.
Če je potrebna korektura 90° kota vodilne plošče
k žaginemu listu, to opravite s pomočjo
korekturnega vijaka.
Ako je potrebno korektura kuta vodeće ploče od
90° prema listu pile, ovu izvesti sa vijkom za
korekturu.
Gadījumā, ja nepieciešama atbalsta plāksnes 90°
leņķa korekcija attiecībā pret zāģa ripu,
izmantojiet korekcijas skrūvi.
Jei tarp kreipiamosios ir pjūklo reikalinga 90°
laipsnių pataisa, tai atlikite pataisos varžtu.
Juhul kui on vaja parandada juhtplaadi 90° nurka
saelehe suhtes, siis tehke seda korrigeeriva
kruviga.
Для регулировки угла 90 град направляющей
шины пильного полотна служит
регулировочный винт
Ако е необходима корекция на ъгъла от 90° на
водещата плоча спрямо режещия диск,
направете я с коригиращия винт.
Dacă este necesară o corecţie în unghi de 90° a
plăcii de ghidare faţă de lama ferăstraului, utilizaţi
şurubul de corecţie.
Доколку е потребно корегирање на аголот од
90° водечката површина кон сечилото на
пилата, користет го шрафот за корекција.
如果必须更改导引板和锯刀片之间的角度(90
度),则要调整校正螺丝。
90°
1
2
3
0°

16
17
1
2
3
1
2
Do not operate saw with handle lever release button pressed in
or with handle not locked into position.
If the Tilt-Lok handle moves with the handle release lever in the
locked position, do not operate saw. Return the circular saw to
a MILWAUKEE service facility for repair immediately.
Beim Sägen darauf achten, dass der Handgriff eingerastet ist
und der Arretierhebel nicht betätigt wird. Die Säge nicht
benutzen, wenn sich der Handgriff trotz gesichertem
Arretierhebel bewegen lässt. In diesem Fall die Säge sofort in
eine Milwaukee Werkstatt bringen.
Pendant le sciage, veiller à ce que la poignée soit enclenchée
et à ce que le levier d e blocage ne soit pas actionné. Ne pas
utiliser la scie s‘il est possible de bouger la poignée bien que le
levier de blocage soit assuré. Dans ce cas, remettre la scie
immédiatement à un atelier Miwaukee.
Mentre si utilizza, fare attenzione a che la maniglia sia inserita e
non si azioni la leva di bloccaggio. Non utilizzare la sega se si
riesce a muovere la maniglia nonostante che si sia arrestata la
leva di bloccaggio. In questo caso portare la sega
immediatamente in una officina Milwaukee.
Cuando sierre, compruebe que la empuñadura esté encajada y
no esté accionada la palanca de bloqueo. No use la sierra
cuando compruebe que la empuñadura se mueve a pesar de
estar asegurada la palanca de bloqueo. En tal caso, envíe
inmediatamente la sierra a un taller Milwaukee.
Observar, durante o funcionamento da serra, que a pega
manual esteja encaixada e que a alavanca de bloqueio não
seja accionada. Não utilizar a serra, quando a pega manual se
deixar mover apesar da alavanca de bloqueio ter sido
accionada. Neste caso levar imediatamente a serra para uma
oficina Milwaukee.
Let bij het zagen op dat de handgreep vastgeklikt is en dat de
vastzethendel niet bediend wordt. Gebruik de zaag niet
wanneer de handgreep ondanks beveiligde vastzethendel kan
worden bewogen. Breng de zaag in dit geval direct naar een
Milwaukee-reparatiedienst.
Vær ved savning opmærksom på, om håndtaget er gået
ordentligt i indgreb, og at låsearmen ikke aktiveres. Brug ikke
saven, hvis håndtaget kan bevæges, selv om låsearmen er
sikret. I så fald skal saven omgående indleveres til et
Milwaukee-værksted.
Pass på ved saging at håndtaket fasthektet og at låsespaken
ikke betjenes. Bruk ikke sagen, dersom håndtaket lar seg
bevege selv om låsespaken er sikret. I et slikt tilfell må sagen
bringes til et Milwaukee verkstad med en gang.
Se inför sågning till att handtaget har hakat fast ordentligt och
att låsspaken inte aktiveras under sågningen. Använd inte
sågen, om handtaget går att vicka på, trots att låsspaken är
säkrad. Lämna i så fall genast in sågen på en Milwaukeeverkstad.
Huolehdi sahatessasi siitä, että kahva on lukittunut paikalleen ja
että lukitusvipua ei käännetä. Älä käytä sahaa, jos kahvaa voi
liikuttaa siitä huolimatta, että lukitusvipu on varmistettu. Tässä
tapauksessa saha tulee toimittaa heti Milwaukee-korjaamoon.
Κατά την κοπή προσέχετε, η χειρολαβή να έχει ασφαλίσει και ο
μοχλός ασφάλισης να μην μετακινείται. Μην χρησιμοποιείτε το
πριόνι, όταν η χειρολαβή μπορεί να μετακινηθεί ενώ ο μοχλός
ασφάλισης είναι ασφαλισμένος. Στην περίπτωση αυτή φέρνετε
το πριόνι αμέσως σ’ ένα συνεργείο της Milwaukee.
Döner bıçkıda bıçkı işlemi yapılırken tutacağının yerine oturmuş
olmasına ve sabit tutucu kolun hareket etmemesine dikkat edin.
El tutacağının güvenli sabit tutacağa rağmen hareket etmesi
durumunda bıçkıyı çalıştırmayın. Bu durumda bıçkıyı derhal
Milwaukee atölyesine götürün.
Při řezání dbejte na to, aby rukojeť řádně zapadla a aby se s
aretační páčkou již nepohybovalo. Nepoužívejte elektrickou
pilku, pokud se rukojeť navzdory zajištěné aretační pačce i
nadále pohybuje. V uvedeném případě pak nástroj ihned
odneste do autorizovaného servisu Milwaukee.
Pri rezaní dbajte na to, aby rukoväť riadne zapadla a aby sa s
aretačnou páčkou už nepohybovalo. Nepoužívajte elektrickú
pílku, pokiaľ sa rukoväť navzdory zaistenej aretačnej páčke i
naďalej pohybuje. V uvedenom prípade potom nástroj ihneď
odneste do autorizovaného servisu Milwaukee.
Przy piłowaniu należy zwracać uwagę na to, żeby rękojeść była
wzębiona zapadkowo i żeby nie została uruchomiona dźwignia
aretowania. Nie należy używać piły, jeżeli rękojeść mimo
zabezpieczonej dźwigni aretowania daje się poruszyć. W takim
przypadku należy natychmiast dostarczyć piłę do warsztatu
firmy Milwaukee.
A fűrészelésnél arra kell ügyelni, hogy a markolat legyen
beakadva és a rögzítőkart nem szabad működtetni. A fűrészt
nem szabad használni, ha a markolat a biztosított rögzítőkar
ellenére mozgatható. Ebben az esetben a fűrészt azonnal el
kell vinni egy Milwaukee szervizbe.
Pri žaganju bodite pozorni na to, da bo ročaj v zaskočenem
stanju in da ne bo prihajalo do uporabe aretirne ročice. V kolikor
je mogoče ročaj kljub zavarovani aretirni ročici premikati, žage
ne uporabljajte. V tem primeru je potrebno žago nemudoma
prinesti v eno izmed Milwaukee delavnic.
Kod piljenja paziti na to, da je ručka uskočila i da se ne aktivira
poluga za aretiranje. Pilu nemojte koristiti ako se ručka unatoč
osiguranoj poluzi za aretiranje može pomicati. U tome slučaju
pilu odmah odnijeti u jednu od radionica Milwaukee.
Zāģēšanas laikā ievērojiet, lai rokturis ir nofiksējies un
fiksēšanas kloķis netiek darbināts. Neizmantojiet zāģi, ja
rokturis kustas, neskatoties uz to, ka fiksēšanas kloķis ir
nodrošināts. Šādos gadījumos zāģis nekavējoties ir jānogādā
Milwaukee darbnīcā.
Pjaudami atkreipkite dėmesį, kad rankena būtų tvirtai įstatyta ir
nelieskite fiksavimo svirtelės. Nenaudokite pjūklo, jei rankena
juda, nors svirtelė ir užfiksuota. Tokiu atveju pjūklą būtina tuoj
pat pristatyti į Milwaukee serviso centrą.
Saagimisel jälgida, et käepide oleks lukustatud ja lukustuskang
ei rakenduks. Saagi mitte kasutada, kui käepidet on rakendatud
lukustuskangile vaatamata võimalik liigutada. Sellisel juhul
toimetage saag koheselt mõnda Milwaukee töökotta.
При работе пилой следить за тем, чтобы рукоятка была
зафиксирована, и не прикасаться к стопорному рычагу. Не
использовать пилу, если рукоятка сохраняет подвижность
при зафиксированном стопорном рычаге. В этом случае
следует немедленно отправить пилу в фирменную
мастерскую Milwaukee.
При рязане да се внимава дръжката да е фиксирана и
лостът за фиксиране да не се задейства. Не използвайте
триона, когато дръжката се движи въпреки осигурения лост
за фиксиране. В такъв случай веднага занесете триона в
работилницата на Milwaukee.
Când tăiaţi cu ferăstrăul, aveţi grijă ca mânerul să fie înclichetat
şi ca pârghia de blocare să nu fie acţionată. Nu întrebuinţaţi
ferăstrăul dacă mânerul poate fi mişcat cu toate că pârghia de
blocare este asigurată. Într-un asemenea caz, duceţi imediat
ferăstrăul la un atelier Milwaukee.
При сечење со пила внимавајте на тоа, рачката да биде
позиционирана и подигачот за аретирање да не е притиснат.
Не употребувајте ја пилата, ако рачката се движи и покрај
осигурениот подигач за аретирање. Во таков случај веднаш
донесете ја пилата во некоја од работилниците на
Milwaukee.
锯割时必须特别小心,将把手啮合并不操作止动杆。尽管止动杆
在安全状态把手还可推动时,务必不使用圆锯。这种情况下,将
圆锯即刻送至米沃奇服务所維修。

18
19
1
2
3
4
Accessory
Zubehör
Accessoire
Accessorio
Accessorio
Acessório
Toebehoren
Tilbehør
Tilbehør
Tillbehör
Lisälaite
ЕобсфЮмбфб
Aksesuar
Příslušenství
Príslušenstvo
Element
wyposażenia
dodatkowego
Tartozék
Oprema
Pribor
Papildus aprīkojums
Priedas
Tarvikud
Дополнитель
Аксесоар
Accesorii
配件
ø 35 mm

20
21
1
2
1
2
3
4
START
STOP
1
2
45°
0°

22
23
4
Refi t the riving knife by all means after plunge
cutting before starting to work again.
Nach dem Tauchschnitt für weitere Arbeiten den
Spaltkeil unbedingt wieder einbauen.
Après les travaux avec scie plongeante, surtout ne
pas oublier de remettre le coin à refendre à sa place
pour les travaux ultérieurs.
Dopo aver effettuato un taglio ad immersione, ricollocare
assolutamente il separatore prima di effettuare altri tagli.
Después de los cortes de inmersión, para los siguentes trabajos, es
imprescindible volver a instalar la cuña de partir.
Depois de executar cotes interiore, voltar sempre a montar o
separador de corte.
Na de insteeksnede dient u het spouwmes beslist weer in te
bouwen voordat u verder werkt.
Efter dybdesnit monteres kløvkilen nødvendigvis igen med henblik
på yderligere arbejder.
Spaltekilen må alltid settes på plass igjen når du arbeider videre
etter et nedsenkingskutt.
Glöm ej att efter doppsågning återmontera klyvkniven.
Kiinnitä jakoveitsi aina esim. Upotussahausten jälkeen ennen kuin
alat tehdä tavallisia sahauksia.
МефЬ брь фзн фпмЮ емвЬрфйузт фпрпиефЮуфе прщудЮрпфе рЬлй фз
уцЮнб дйбкЭнпх гйб фзн рсбгмбфпрпЯзуз кбй Ьллщн есгбуйюн.
Malzeme içine dalarak kesme yapıldıktan sonra, diğer işler için
yarma kamasını mutlaka takın.
Po provedení ponorného řezu instalujte bezpodmínečně rozvorný
klín před započetím práce zpět na místo.
Rozovierací klín po ukončeni ponorneho rezu bezpodmienečne
opäť nasadiť pre ďalšie práce.
Przed wznowieniem pracy po cięciu wgłębnym zamontować
ponownie wszelkimi środkami klin rozszczepiający.
Helyezze be újra a hasítókést a bemerülő vágások után, mielőtt újra
dolgozni kezd.
Po potopnem rezanju za nadaljnja dela brezpogojno ponovno
montirajte kij za špranje.
Nakon reza uronjavanjem za daljnje radove obavezno ponovno
ugraditi klin za otvore.
Pēc iegremdēšanas turpmākajam darbam vajag noteikti atkal vajag
iestiprināt ķīli.
Pabaigę įleidžiamąjį pjovimą, būtinai vėl primontuokite pleištinį peilį.
Pärast sukelduslõiget seadke lõhestuskiil edasisteks töödeks uuesti
kohale.
После врезания перед дальнейшим продолжением работы во
что бы то ни стало заново устанавливайте расклинивающий
нож
Когато започвате друг вид работи след рязане с потъване,
непременно монтирайте отново разклинващия нож.
Repuneţi cuţitul de tăiere în stare bună, prin orice mijloc, după tăieri
inci, înainte de a reîncepe lucrul.
进行潜锯之后,如果必须继续使用机器,务必装回分离楔。
5
2
3
START
1
0°
24
25
x
x
Carry out a test cut
Probeschnitt durchführen
Effectuer une coupe d‘essai
Effettuare un taglio di prova
Efectuar corte de prueba
Efectuar experiências de corte
Proefsnede maken
Foretages et prøvesnit
Foreta prøvekutt
Gör ett provsnitt!
РсбгмбфпрпйЮуфе мЯб дпкймбуфйкЮ фпмЮ
Deneme kesmesi yapın
Proveďte zkušební řez.
Vykonať skušobný rez.
Wykonac próbę cięcia
Végezzen teszvágást
Opravite preizkusni rez!
Izvesti probno rezanje
Jāveic izmēģinājuma griezums!
Atlikite bandomąjį pjūvį!
Teha proovilõige!
Выполните пробный проход
Направете пробно рязане!
Efectuaţi un test de tăiere
Да се направи пробно сечење
26
27
220-240 V 110-120 V
.......................1900 W .........................1750 W
.......................6300 min-1 .....................6300 min
-1
...................190x30 mm ..................190x30 mm
........................0-65 mm .......................0-65 mm
........................0-52 mm .......................0-52 mm
..........................5,5 kg ............................5,5 kg
...........................93 dB(A) .......................93 dB(A)
.........................104 dB(A) .....................104 dB(A)
..........................3,1 m/s2 ........................2,6 m/s
2
..........................1,5 m/s2 ........................1,5 m/s
2
Lower guard may be retracted manually only for special cuts
such as “plunge cuts” and “compound cuts.” Raise lower
guard by retracting handle and as soon as blade enters the
material, the lower guard must be released. For all other
sawing, the lower guard should operate automatically.
Always observe that the lower guard is covering the blade
before placing saw down on bench or floor.
An unprotected,
coasting blade will cause the saw to walk backwards, cutting
whatever is in its path. Be aware of the time it takes for the blade
to stop after switch is released.
Use the appropriate riving knife for the blade being used. For
the riving knife to work, it must be thicker than the body of the
blade but thinner than the tooth set of the blade.
Adjust the riving knife as described in this instruction manual.
Incorrect spacing, positioning and alignment can make the riving
knife ineffective in preventing kickback.
Always use the riving knife except when plunge cutting. Riving
knife must be replaced after plunge cutting. Riving knife causes
interference during plunge cutting and can create kickback.
For the riving knife to work, it must be engaged in the
workpiece. The riving knife is ineffective in preventing kickback
during short cuts.
Do not operate the saw if riving knife is bent. Even a light
interference can slow the closing rate of a guard.
Do not use saw blades not corresponding to the key data given in
these instructions for use.
Wear ear protectors.
Exposure to noise can cause hearing loss.
Please do not use abrasion disks in this machine!
Appliances used at many different locations including open air
must be connected via a current surge preventing switch.
Always wear goggles when using the machine. It is recommended
to wear gloves, sturdy non slipping shoes and apron.
Always disconnect the plug from the socket before carrying out any
work on the machine.
Only plug-in when machine is switched off.
Keep mains lead clear from working range of the machine. Always
lead the cable away behind you.
Before use check machine, cable, and plug for any damages or
material fatigue. Repairs should only be carried out by authorised
Service Agents.
Do not fix the on/off switch in the “on” position when using the saw
hand-held.
The dust produced when using this tool may be harmful to health.
Do not inhale the dust. Wear a suitable dust protection mask.
SPECIFIED CONDITIONS OF USE
This electronic circular saw can cut lengthways and mitre
accurately in wood, plastic, and aluminium.
Do not use this product in any other way as stated for normal use.
EC-DECLARATION OF CONFORMITY
We declare under our sole responsibility that this product is in
conformity with the following standards or standardized
documents. EN 60745, EN 55014-1, EN 55014-2, EN 61000-3-2,
EN 61000-3-11, in accordance with the regulations 98/37/EC,
2004/108/EC
Rainer Kumpf
Manager Product Development
Winnenden, 2008-03-06
MAINS CONNECTION
Connect only to single-phase a.c. current and only to the system
voltage indicated on the rating plate. It is also possible to connect
to sockets without an earthing contact as the design conforms to
safety class II.
Inrush currents cause short-time voltage drops. Under
unfavourable power supply conditions, other equipment may be
affected. If the system impedance of the power supply is lower
than 0,2 Ohm, disturbances are unlikely to occur.
MAINTENANCE
The ventilation slots of the machine must be kept clear at all times.
Use only Milwaukee accessories and Milwaukee spare parts.
Should components need to be replaced which have not been
described, please contact one of our Milwaukee service agents
(see our list of guarantee/service addresses).
If needed, an exploded view of the tool can be ordered. Please
state the Article No. as well as the machine type printed on the
label and order the drawing at your local service agents or directly
at: Milwaukee Electric Tool, Max-Eyth-Straße 10,
D-71364 Winnenden, Germany.
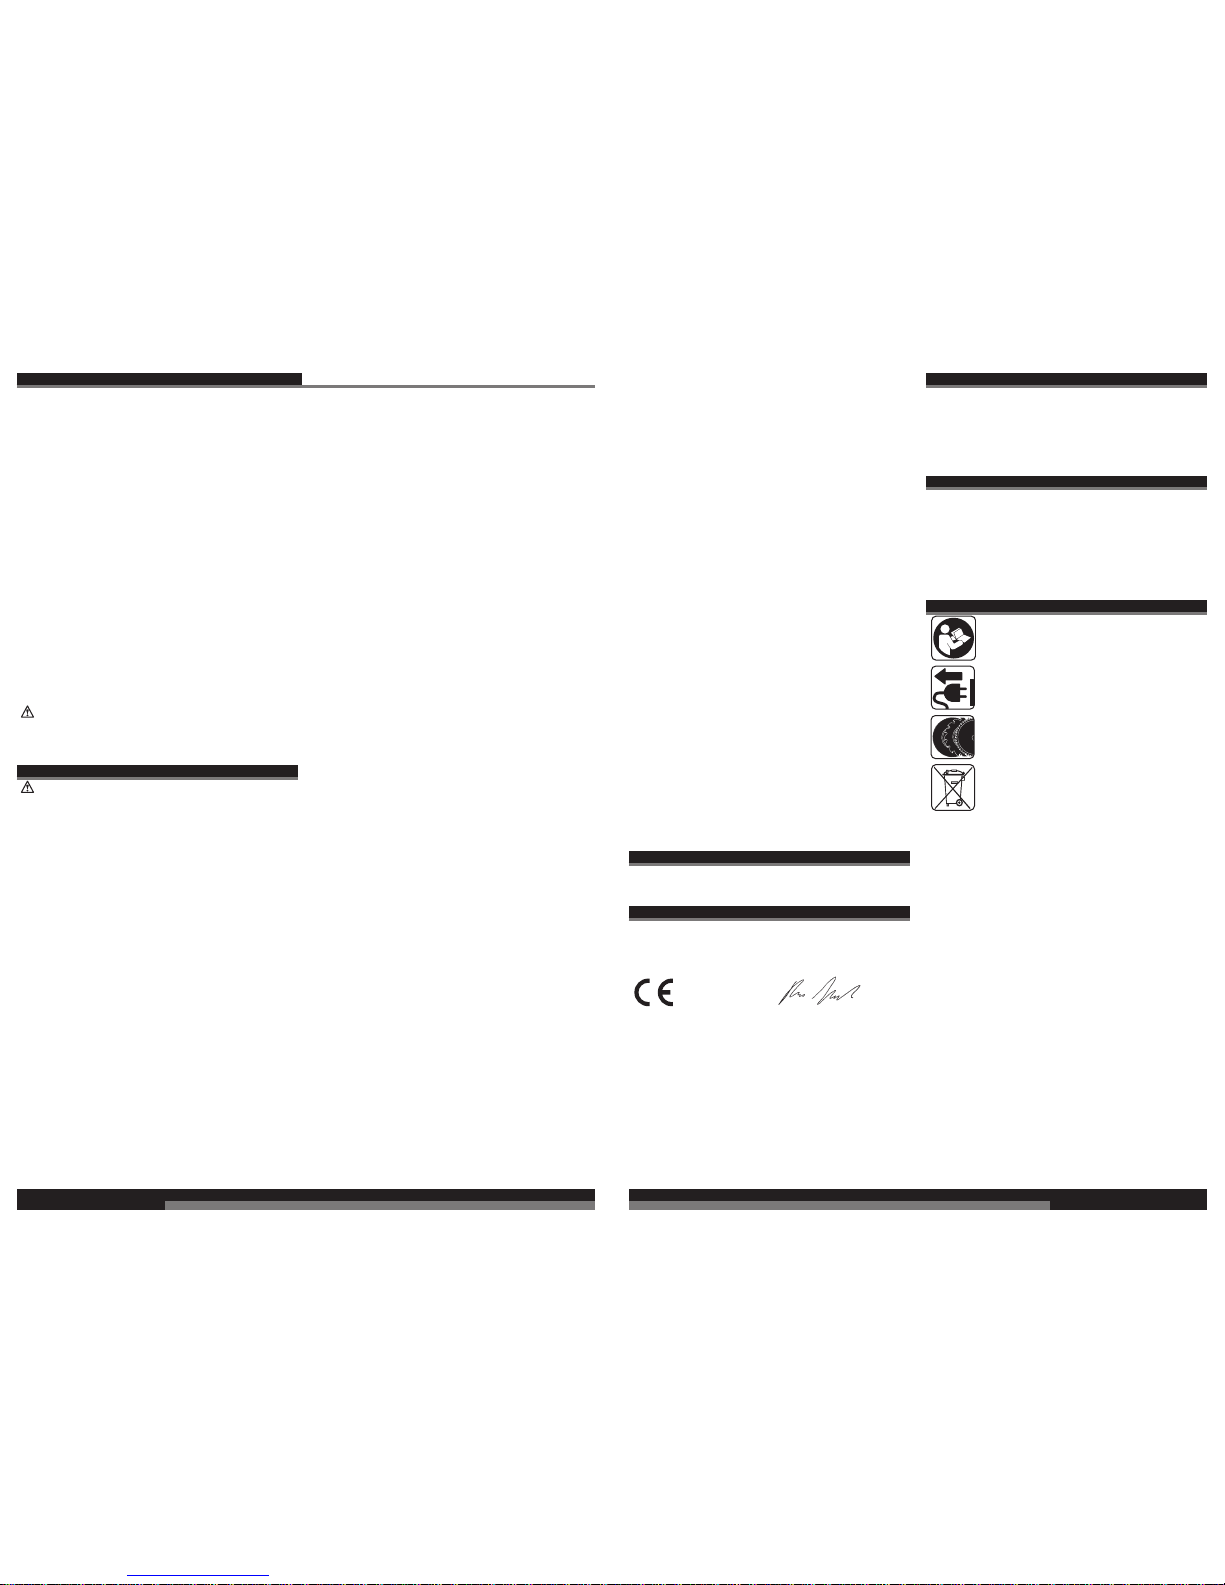
SYMBOLS
Please read the instructions carefully before
starting the machine.
Always disconnect the plug from the socket before
carrying out any work on the machine.
Accessory - Not included in standard equipment,
available as an accessory.
Do not dispose of electric tools together with
household waste material! In observance of
European Directive 2002/96/EC on waste electrical
and electronic equipment and its implementation in
accordance with national law, electric tools that
have reached the end of their life must be collected
separately and returned to an environmentally
compatible recycling facility.
ENGLISHENGLISH
TECHNICAL DATA
Rated input .............................................................................
No-load speed ........................................................................
Saw blade dia. x hole dia .......................................................
Cutting depth at 90° ................................................................
Cutting depth at 45° ................................................................
Weight without cable ..............................................................
Noise/vibration information
Measured values determined according to EN 60 745.
Typically, the A-weighted noise levels of the tool are:
Sound power level (K = 3 dB(A)) ...........................................
Sound pressure level (K = 3 dB(A)) ......................................
Wear ear protectors!
Total vibration values (vector sum in the three axes)
determined according to EN 60745.
Vibration emission value a
h
.................................................
Uncertainty K .......................................................................
WARNING! Read all safety warnings and all instructions,
including those given in the accompanying brochure. Failure
to follow the warnings and instructions may result in electric shock,
fire and/or serious injury.
Save all warnings and instructions for future reference.
SAFETY INSTRUCTIONS
Danger: Keep hands away from cutting area and the blade.
Keep your second hand on auxiliary handle, or motor
housing. If both hands are holding the saw, they cannot be cut by
the blade.
Do not reach underneath the workpiece. The guard cannot
protect you from the blade below the workpiece.
Adjust the cutting depth to the thickness of the workpiece.
Less than a full tooth of the blade teeth should be visible below the
workpiece.
Never hold piece being cut in your hands or across your leg.
Secure the workpiece to a stable platform. It is important to
support the work properly to minimize body exposure, blade
binding, or loss of control.
Hold power tool by insulated gripping surfaces, when
performing an operation where the cutting tool may contact
hidden wiring or its own cord. Contact with a “live“ wire will also
make exposed metal parts of the power tool “live“ and shock the
operator.
When ripping always use a rip fence or straight edge guide.
This improves the accuracy of cut and reduces the chance of blade
binding.
Always use blades with correct size and shape (diamond
versus round) of arbour holes. Blades that do not match the
mounting hardware of the saw will run eccentrically, causing loss of
control.
Never use damaged or incorrect blade washers or bolt. The
blade washers and bolt were specially designed for your saw, for
optimum performance and safety of operation.
Causes and operator prevention of kickback:
- kickback is a sudden reaction to a pinched, bound or misaligned
saw blade, causing an uncontrolled saw to lift up and out of the
workpiece toward the operator;
- when the blade is pinched or bound tightly by the kerf closing
down, the blade stalls and the motor reaction drives the unit rapidly
back toward the operator;
- if the blade becomes twisted or misaligned in the cut, the teeth at
the back edge of the blade can dig into the top surface of the wood
causing the blade to climb out of the kerf and jump back toward the
operator.
Kickback is the result of saw misuse and/or incorrect operating
procedures or conditions and can be avoided by taking proper
precautions as given below.
Maintain a firm grip with both hands on the saw and position
your arms to resist kickback forces. Position your body to
either side of the blade, but not in line with the blade. Kickback
could cause the saw to jump backwards, but kickback forces can
be controlled by the operator, if proper precautions are taken.
When blade is binding, or when interrupting a cut for any
reason, release the trigger and hold the saw motionless in the
material until the blade comes to a complete stop. Never
attempt to remove the saw from the work or pull the saw
backward while the blade is in motion or kickback may occur.
Investigate and take corrective actions to eliminate the cause of
blade binding.
When restarting a saw in the workpiece, centre the saw blade
in the kerf and check that saw teeth are not engaged into the
material. If saw blade is binding, it may walk up or kickback from
the workpiece as the saw is restarted.
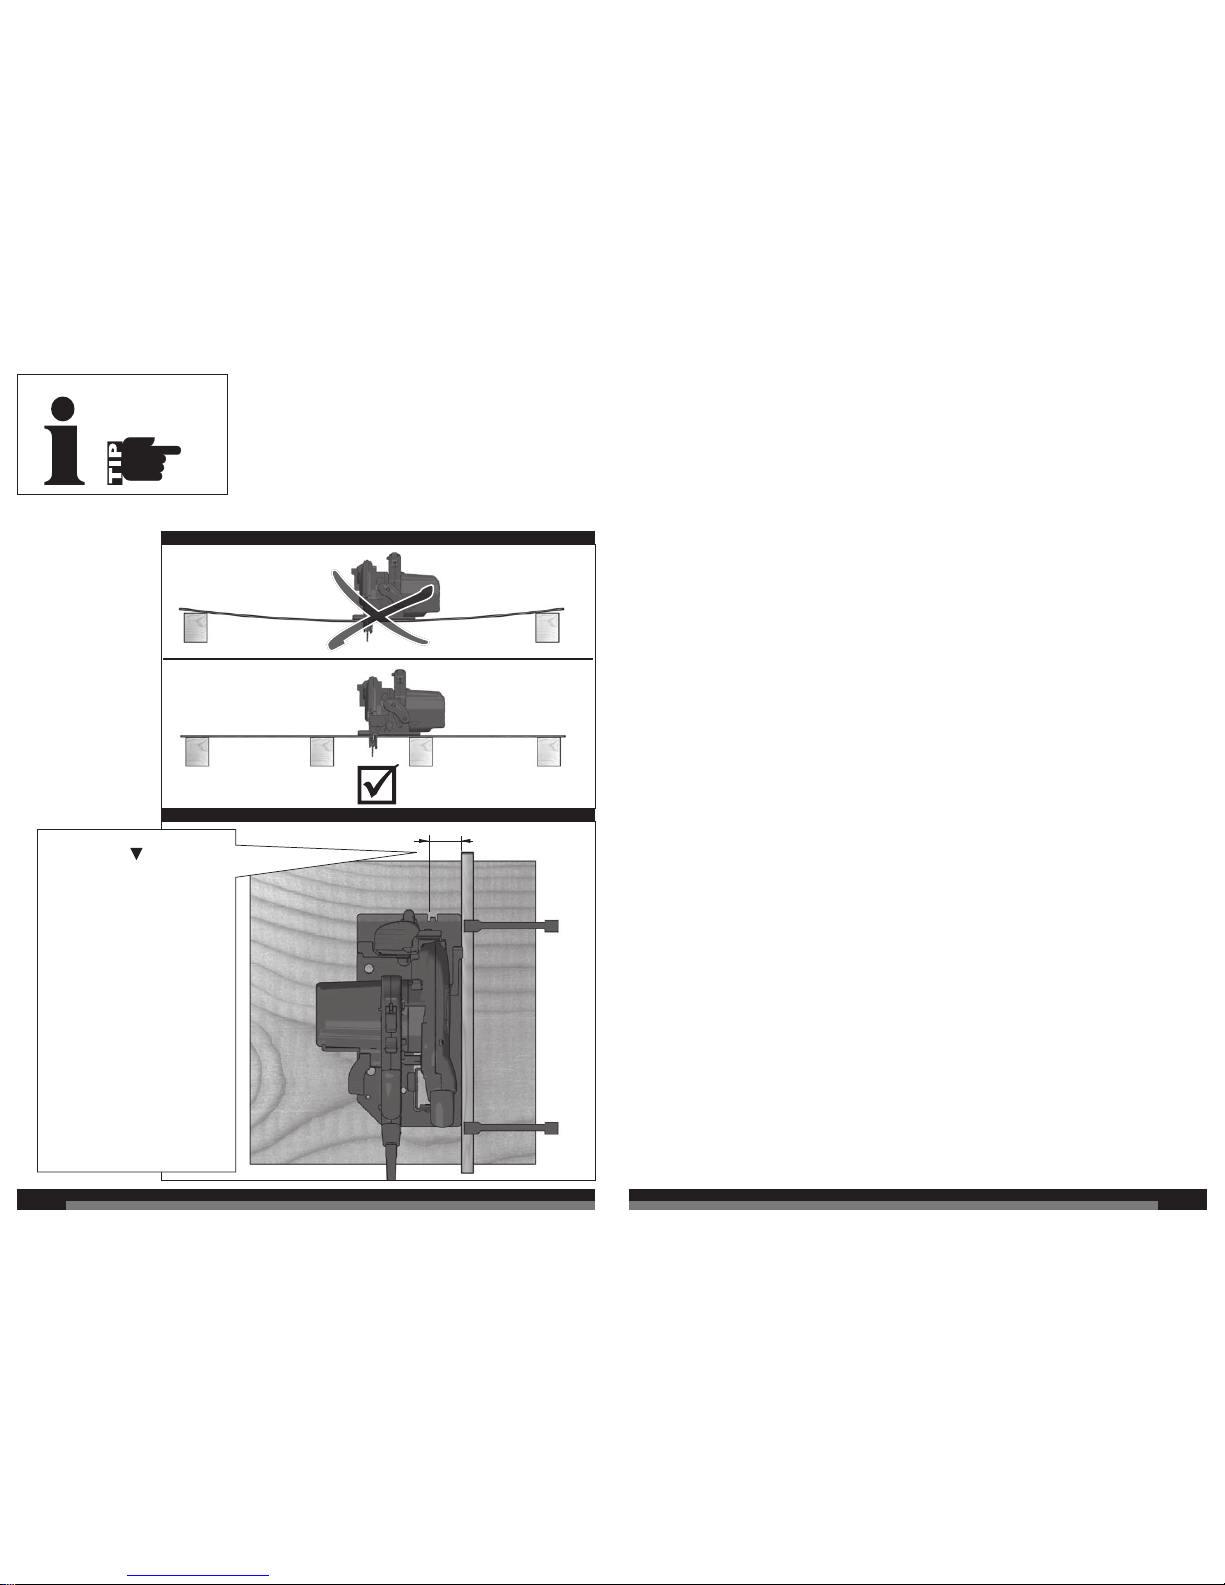
Support large panels to minimise the risk of blade pinching
and kickback. Large panels tend to sag under their own weight.
Supports must be placed under the panel on both sides, near the
line of cut and near the edge of the panel.
Do not use dull or damaged blades. Unsharpened or improperly
set blades produce narrow kerf causing excessive friction, blade
binding and kickback.
Blade depth and bevel adjusting locking levers must be tight
and secure before making cut. If blade adjustment shifts while
cutting, it may cause binding and kickback.
Use extra caution when making a “plunge cut” into existing
walls or other blind areas. The protruding blade may cut objects
that can cause kickback.
Check lower guard for proper closing before each use. Do not
operate the saw if lower guard does not move freely and close
instantly. Never clamp or tie the lower guard into the open
position. If saw is accidentally dropped, lower guard may be bent.
Raise the lower guard with the retracting handle and make sure it
moves freely and does not touch the blade or any other part, in all
angles and depths of cut.
Check the operation of the lower guard spring. If the guard
and the spring are not operating properly, they must be
serviced before use. Lower guard may operate sluggishly due to
damaged parts, gummy deposits, or a build-up of debris.
WARNING
The vibration emission level given in this information sheet has been measured in accordance with a standardised test given in EN 60745
and may be used to compare one tool with another. It may be used for a preliminary assessment of exposure.
The declared vibration emission level represents the main applications of the tool. However if the tool is used for different applications, with
different accessories or poorly maintained, the vibration emission may differ. This may significantly increase the exposure level over the total
working period.
An estimation of the level of exposure to vibration should also take into account the times when the tool is switched off or when it is running
but not actually doing the job. This may significantly reduce the exposure level over the total working period.
Identify additional safety measures to protect the operator from the effects of vibration such as: maintain the tool and the accessories, keep
the hands warm, organisation of work patterns.
 Loading...