

OPERATOR'S MANUAL
MANUEL DE L'UTILISATEUR
MANUAL DEL OPERADOR
Catalog No.
No de Cat.
Catálogo No.
0514-20
0516-20
SPECIAL NOTE: New battery packs are not fully charged. Charge
your battery pack before using it for the first time and follow the
charging instructions in your charger manual.
NOTE SPÉCIALE: Les batteries neuves ne sont pas entièrement
chargées. Chargez la batterie avant de vous en servir la première
fois en suivant les instructions de recharge dans le manuel qui
accompagne cet outil.
NOTA ESPECIAL: Las batterias, cuando son nuevas, no están
totalmente cargadas. Cargue su bateria antes de usarla por
primera vez siga las instrucciones de carga que vienen en el
manuel de la herramienta.
14.4V 1/2" HAMMER-DRILLS & DRIVER DRILLS
MARTEAU ROTATIF SURPUISSANT ET PERCUESES-TOURNEVIS 1/2"
(13mm) 14,4V
MARTILLO-PERFORADOR DE EMPUJE Y TALADRO-ATORNILLADORES
DE 14,4V 13mm (1/2")
TO REDUCE THE RISK OF INJURY, USER MUST READ AND UNDERSTAND OPERATOR'S MANUAL.
AFIN DE RÉDUIRE LE RISQUE DE BLESSURES, L'UTILISATEUR DOIT LIRE ET BIEN COMPRENDRE LE MANUEL
DE L'UTILISATEUR.
PARA REDUCIR EL RIESGO DE LESIONES, EL USUARIO DEBE LEER Y ENTENDER EL MANUAL DEL
OPERADOR.

GENERAL SAFETY RULES — FOR ALL BATTERY OPERATED TOOLS
WARNING!
READ AND UNDERSTAND ALL INSTRUCTIONS.
Failure to follow all instructions listed below, may result in electric shock,
fire and/or serious personal injury.
SA VE THESE INSTRUCTIONS
WORK AREA
1. Keep your work area clean and well lit. Cluttered benches and
dark areas invite accidents.
2. Do not operate power tools in explosive atmospheres, such
as in the presence of flammable liquids, gases, or dust. Power
tools create sparks which may ignite the dust or fumes.
3. Keep bystanders, children, and visitors away while operat-
ing a power tool. Distractions can cause you to lose control. Protect
others in the work area from debris such as chips and sparks. Provide barriers or shields as needed.
ELECTRICAL SAFETY
4. Do not abuse the cord. Never use the cord to carry the tool.
Keep cord away from heat, oil, sharp edges, or moving parts.
Replace damaged cords immediately. Damaged cords may cre-
ate a fire.
5. A battery operated tool with integral batteries or a separate
battery pack must be recharged only with the specified
charger for the battery. A charger that may be suitable for one type
of battery may create a risk of fire when used with another battery.
6. Use battery operated tool only with specifically designated
battery pack. Use of any other batteries may create a risk of fire.
PERSONAL SAFETY
7. Stay alert, watch what you are doing, and use common sense
when operating a power tool. Do not use tool while tired or
under the influence of drugs, alcohol, or medication. A mo-
ment of inattention while operating power tools may result in serious
personal injury.
8. Dress properly. Do not wear loose clothing or jewelry. Con-
tain long hair. Keep your hair, clothing, and gloves away from
moving parts. Loose clothes, jewelry, or long hair can be caught in
moving parts.
9. Avoid accidental starting. Be sure switch is in the locked or
off position before inserting battery pack. Carrying tools with
your finger on the switch or inserting the battery pack into a tool with
the switch on invites accidents.
10. Remove adjusting keys or wrenches before turning the tool
on. A wrench or a key that is left attached to a rotating part of the tool
may result in personal injury.
11. Do not overreach. Keep proper footing and balance at all times.
Proper footing and balance enable better control of the tool in unexpected situations.
12. Use safety equipment. Always wear eye protection. Dust mask,
non-skid safety shoes, hard hat, or hearing protection must be used
for appropriate conditions.
TOOL USE AND CARE
13. Use clamps or other practical way to secure and support the
workpiece to a stable platform. Holding the work by hand or
against your body is unstable and may lead to loss of control.
14. Do not force tool. Use the correct tool for your application.
The correct tool will do the job better and safer at the rate for which
it is designed.
15. Do not use tool if switch does not turn it on or off. A tool that
cannot be controlled with the switch is dangerous and must be repaired.
16. Disconnect battery pack from tool or place the switch in the
locked or off position before making any adjustments, changing accessories, or storing the tool. Such preventive safety
measures reduce the risk of starting the tool accidentally.
17. Store idle tools out of reach of children and other untrained
persons. Tools are dangerous in the hands of untrained users.
18. When battery pack is not in use, keep it away from other
metal objects like: paper clips, coins, keys, nails, screws, or
other small metal objects that can make a connection from
one terminal to another. Shorting the battery terminals together
may cause sparks, burns, or a fire.
19. Maintain tools with care. Keep cutting tools sharp and clean.
Properly maintained tools with sharp cutting edge are less likely to
bind and are easier to control.
20. Check for misalignment or binding of moving parts, break-
age of parts, and any other condition that may affect the tool’s
operation. If damaged, have the tool serviced before using.
Many accidents are caused by poorly maintained tools. Do not use a
damaged tool. Tag damaged tools “Do not use” until repaired.
21. Use only accessories that are recommended by the manu-
facturer for your model. Accessories that may be suitable for one
tool may create a risk of injury when used on another tool.
SERVICE
22. Tool service must be performed only by qualified repair personnel. Service or maintenance performed by unqualified personnel
may result in a risk of injury.
23. When servicing a tool, use only identical replacement parts.
Follow instructions in the Maintenance section of this manual.
Use of unauthorized parts or failure to follow Maintenance Instructions may create a risk of shock or injury.
1. Hold tool by insulated gripping surfaces when performing an operation where the cutting tool may contact hidden
wiring. Contact with a “live” wire will make exposed metal parts of the tool “live” and shock the operator.
2. Keep hands away from all cutting edges and moving parts.
3. Maintain labels and nameplates. These carry important information. If unreadable or missing, contact a
replacement.
4. Wear ear protectors when using the tool for extended periods. Prolonged exposure to high intensity noise can cause hearing loss.
page 2
SPECIFIC SAFETY RULES
MILWAUKEE
Service facility for a free
Symbology
Underwriters Laboratories, Inc.
Canadian Standards Association
Properly Recycle Nickel Cadmium
Batteries
Volts Direct Current
No Load Revolutions per Minute
(RPM)
Specifications
1/2"
1/2"
Capacities
Wood
1-1/2"
1-1/2"
Masonry
3/8"
N/A
Catalog
Number
0514-20
0516-20
Volts
14.4
14.4
No Load
RPM
L ow0-450
High 0-1450
L ow0-450
High 0-1450
No Load Blows
per Minute
Low0-5850
High 0-18850
N/A
Steel
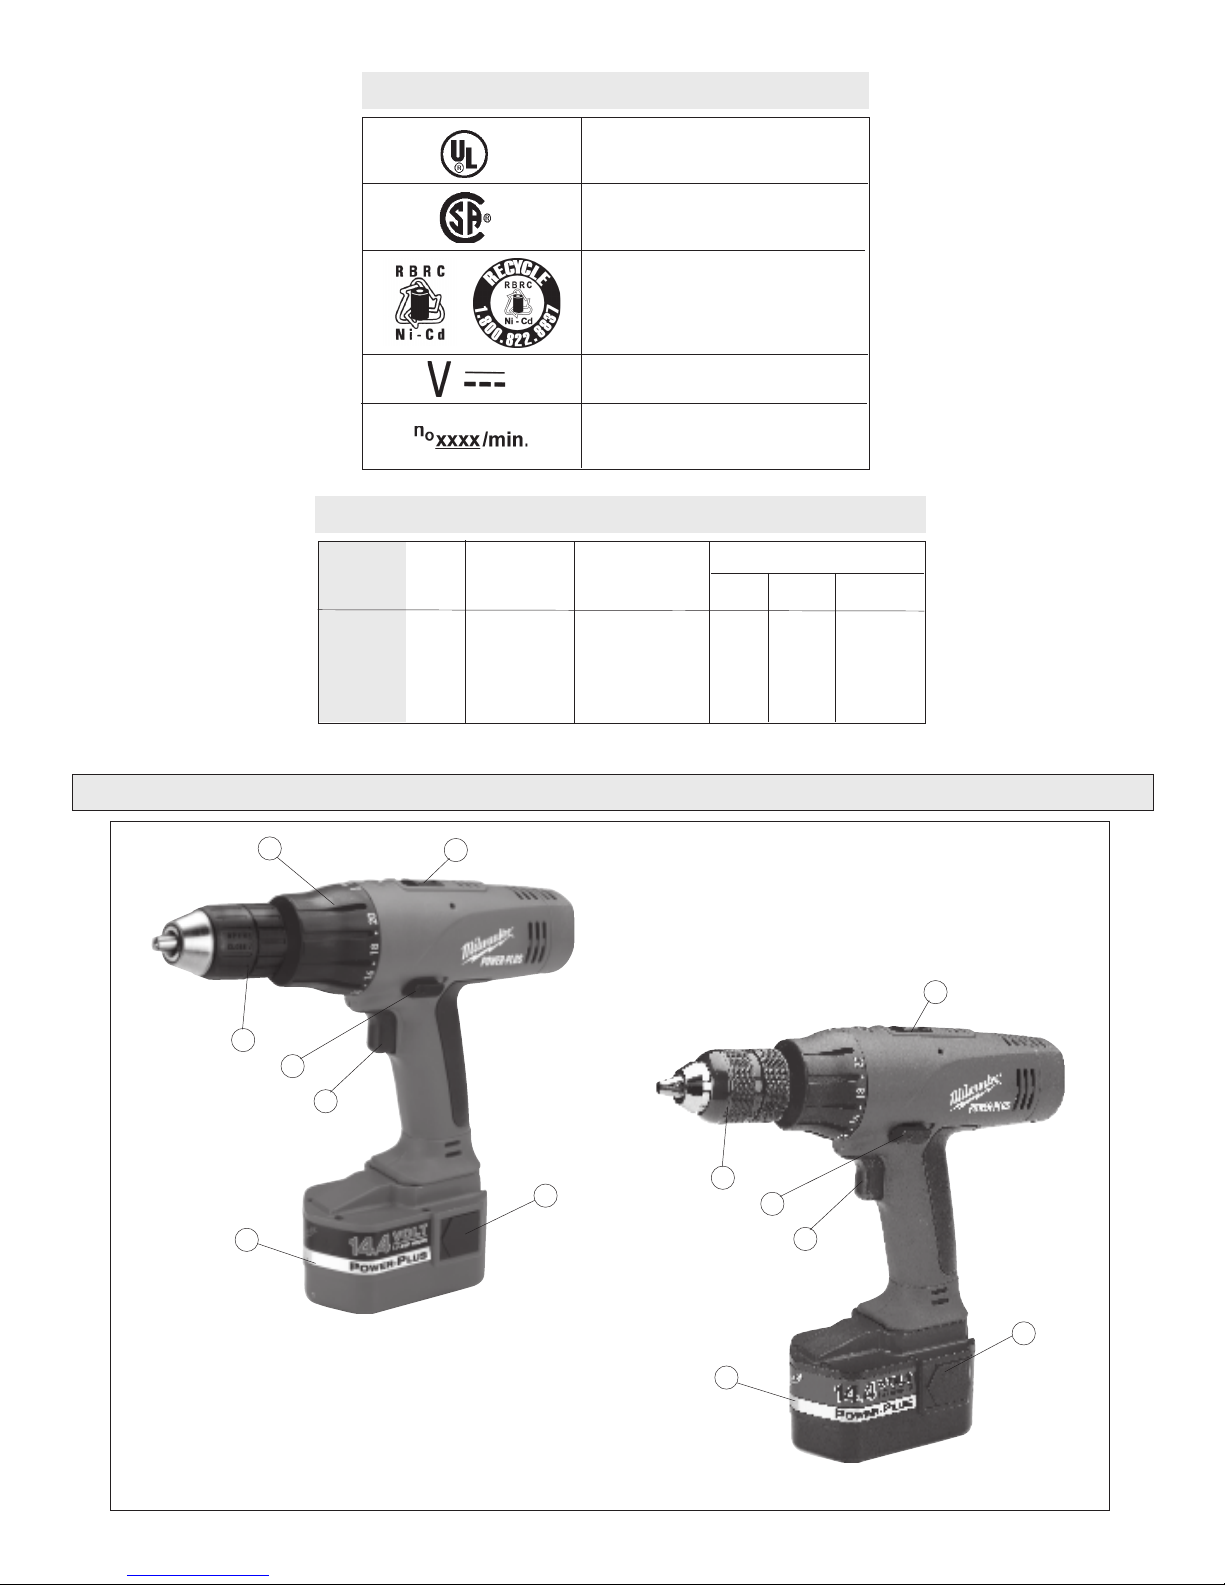
FUNCTIONAL DESCRIPTION
7
6
5
4
1
1
Cat. No. 0514-20
3
1. Speed selector
2. Release buttons
3. Battery pack
4. Trigger
5. Control switch
6. Keyless chuck
7. Clutch/Hammer-Drill selector collar (Cat. No. 0514-20 only)
2
Cat. No. 0516-20
6
5
4
2
3
page 3
CHARGING AND USING BATTERY PACK
WARNING!
Charge only
Volt Power Plus battery packs in Power
Plus chargers. Other types of batteries
may explode causing personal injury
and damage.
Charge your battery pack before using your tool for the first time and
when your tool no longer performs with the power and torque needed
for the job. Full loading capacity of battery pack is only reached after
4 - 5 chargings. Never completely discharge the battery pack. Standard
charging time will vary according to the type of charger you use. The
charging time will also vary depending on the supply voltage and charge
needed. For example, if your battery pack does not require a full charge,
charging time will be less.
FOR SPECIFIC CHARGING INSTRUCTIONS, PLEASE READ THE CHARGER
INSTRUCTION SHEET SUPPLIED WITH YOUR CHARGER.
Battery packs are affected by temperature. Your battery pack will
perform best and have longest life if it is charged when the temperature
is between 60°-80°F (15°-27°C). Do not charge in temperatures below
40°F (5°C) or above 105°F (40°C). Under these conditions, capacity will
be reduced. See “Maintenance”.
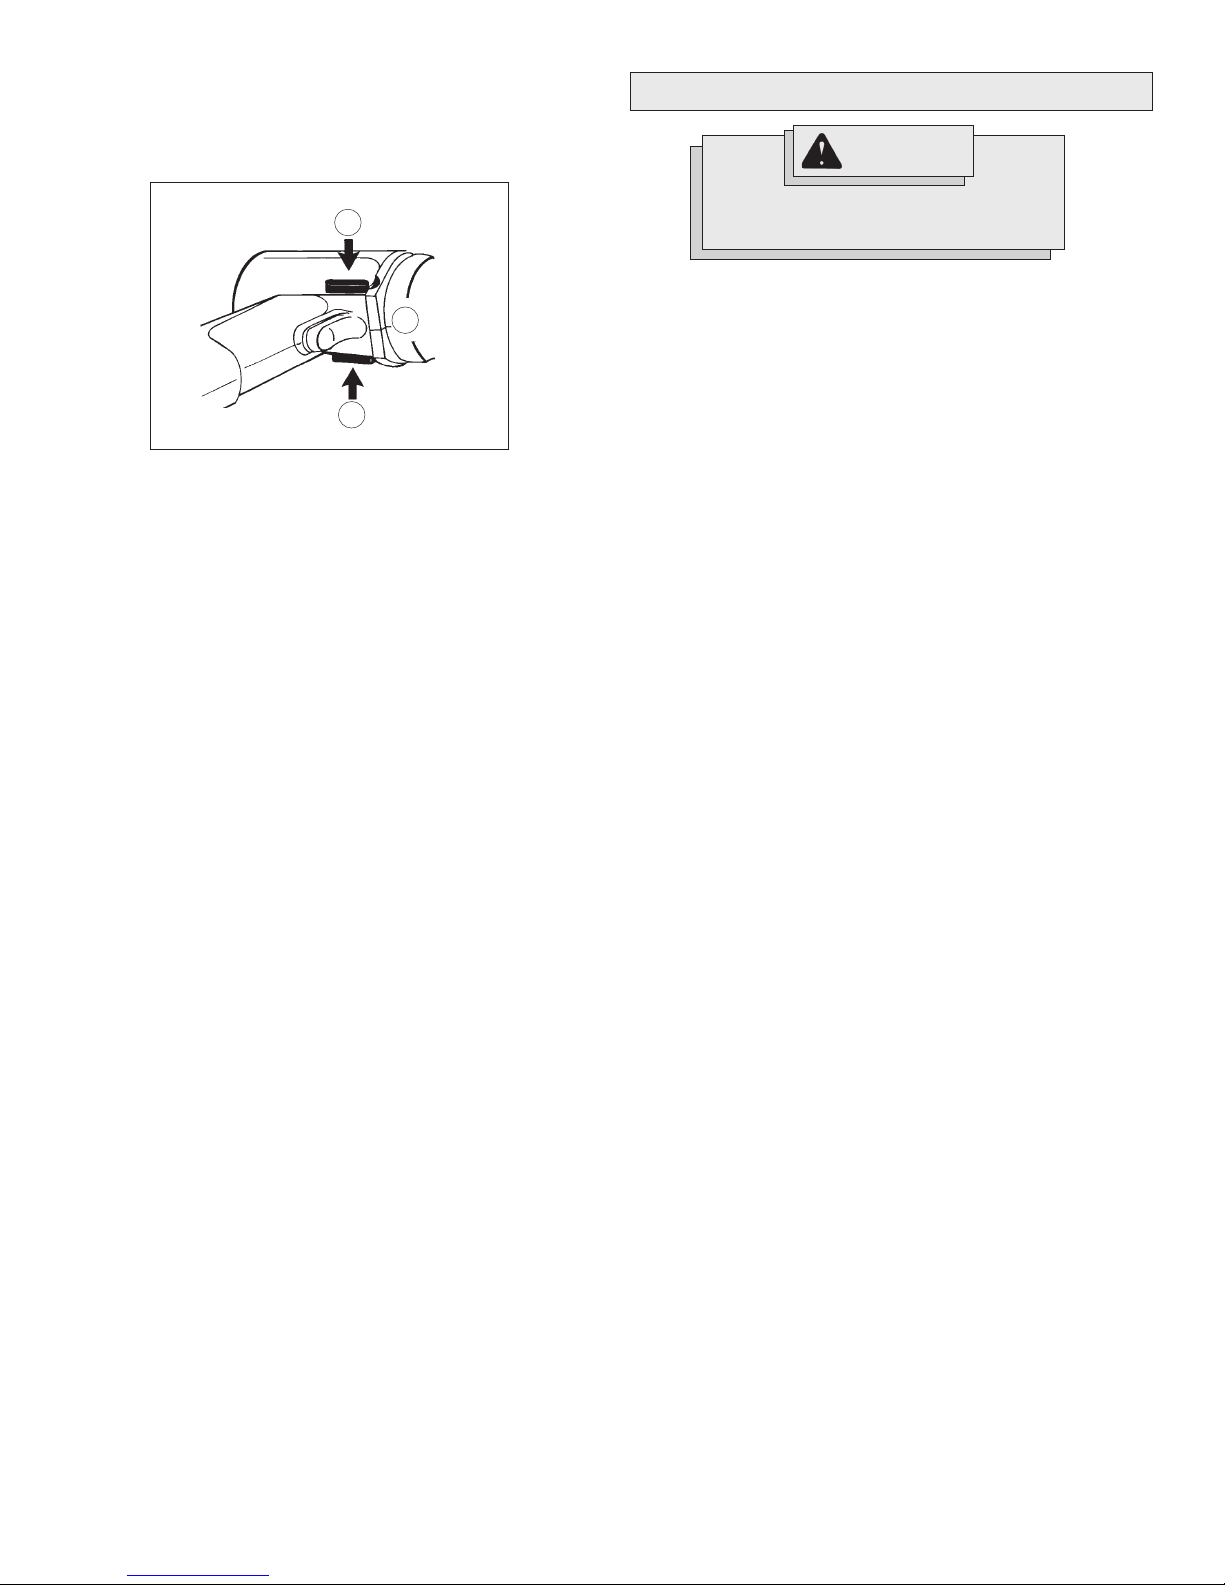
Removing Battery Pack from Tool
Push in the release buttons and remove the battery pack.
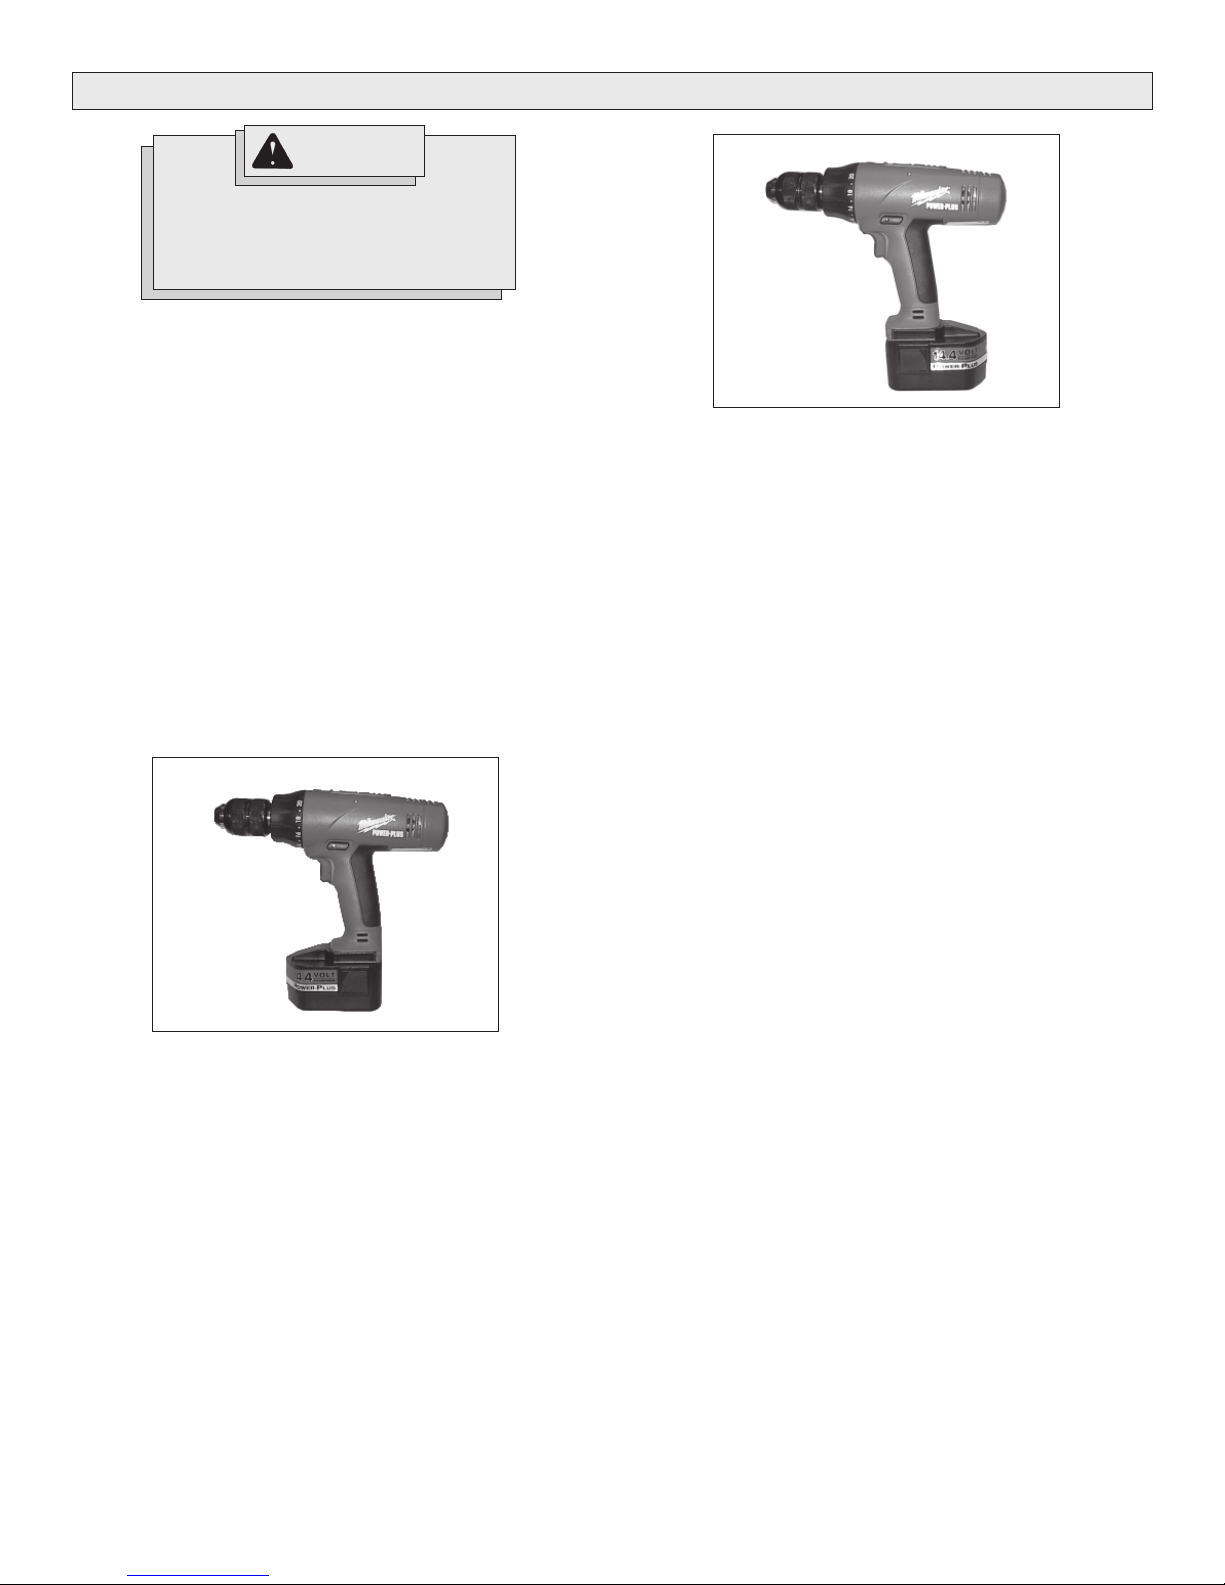
Inserting Battery Pack into Tool (Fig. 1 & 2)
Battery pack can be inserted into the tool in two ways.
Fig. 1
MILWAUKEE
12, 14.4 and 18
Fig. 2
Cat. No. 0516-20
2. For optimum weight distribution and balance.
Insert the battery pack from the back by pressing in the release
buttons and sliding the battery pack into the body of the tool. Insert the
battery pack until clamp engages.
Cat. No. 0516-20
1. For working in restricted spaces.
Insert the battery pack from the front by pressing in the release
buttons and sliding battery pack into the body of the tool. Insert the
battery pack until clamp engages.
page 4
OPERATION
WARNING!
To reduce the risk of personal injury,
always wear eye protection.
Using Keyless Chucks (Fig. 3)
Always remove the battery pack or lock the trigger before inserting or
removing bits.
Fig. 3
Sleeve
1. To open the chuck jaws, hold the collar while turning the sleeve in the
counterclockwise direction.
When using drill bits, allow the bit to strike the bottom of the chuck.
Center the bit in the chuck jaws and lift it about 1/16" off of the bottom.
When using screwdriver bits, insert the bit far enough for the chuck
jaws to grip the hex of the bit.
2. T o close the chuck jaws, hold the collar while turning the sleeve in the
clockwise direction. Tighten securely.
3. To remove the bit, hold the collar while turning the sleeve in the counterclockwise direction.
Collar
The torque specifications shown here are approximate values obtained
with a fully charged battery pack.
Torque
0514-20
Positions 1 - 5
Positions 6 - 10
Positions 11 - 15
Positions 16 - 20
Drill
Low
High
NOTE: Because the above settings are only a guide, use a piece of
scrap material to test the different clutch positions before driving screws
into the workpiece.
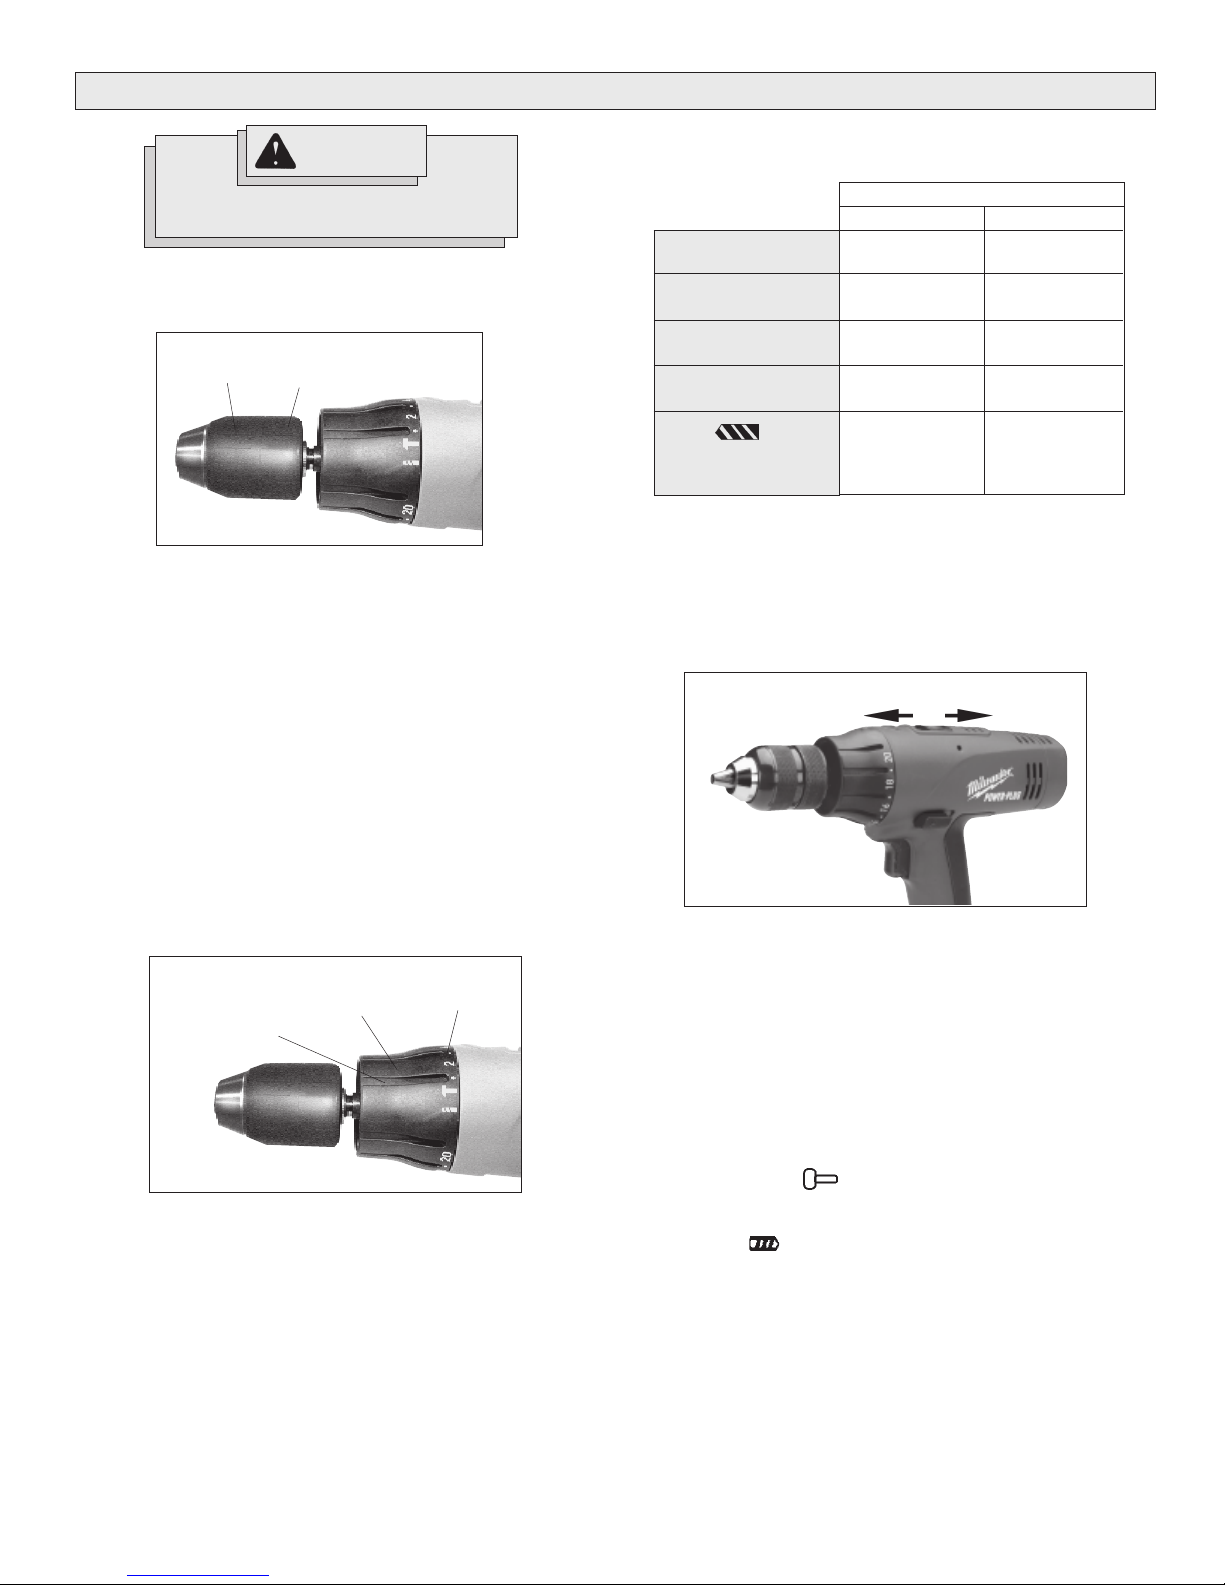
Selecting Speed (Fig. 5)
The speed selector is on top of the motor housing. Allow the tool to come
to a complete stop before changing speeds. See “Applications” for recommended speeds under various conditions.
Fig. 5
0 - 14 in. lbs.
20 - 41 in. lbs.
46 - 60 in. lbs.
65 - 85 in. lbs.
350 in. lbs.
110 in. lbs.
Low
High
0516-20
0 - 14 in. lbs.
20 - 41 in. lbs.
46 - 60 in. lbs.
65 - 85 in. lbs.
390 in. lbs.
130 in. lbs.
Using Clutch (Fig. 4)
This tool has an adjustable clutch for driving different types of screws
into different materials. When properly adjusted, the clutch will slip at a
preset torque to prevent driving the screw too deep and to prevent
damage to the screw or tool.
To adjust the clutch, turn the clutch adjusting ring to one of the twenty
positions shown on the adjusting ring.
Fig. 4
Clutch
Adjusting Ring
Hammer-drill
selector collar
Position
Numbers
1. For Low speed (up to 450 RPM), push the speed selector forward
(Position 1).
2. For High speed (up to 1450 RPM), push the speed selector back
(Position 2).
Selecting Hammer or Drill Action (Cat. No. 0514-20 only)
MILWAUKEE
ing with hammering action and drilling only. To set the operating mode,
rotate the Hammer-Drill selector collar to the desired symbol. A drill or
hammer symbol will appear at the top center of the collar to indicate
operating mode.
1. To use the hammer-drilling mode, rotate the selector collar until
the hammer symbol appears at the top center of the collar. Apply
pressure to the bit to engage the hammering mechanism.
2. To use the drilling only mode, rotate the selector collar until the
drill symbol appears at the top center of the collar.
NOTE: When using carbide bits, do not use water to settle dust. Do not
attempt to drill through steel reinforcing rods. Both actions will damage
the carbide bits.
Hammer-Drills are designed for two operating modes: drill-
page 5
Using Control Switch (Fig. 6)
The control switch may be set to three positions: forward, reverse and
lock. Due to a lockout mechanism, the control switch can only be adjusted when the ON/OFF switch is not depressed. Always allow the
motor to come to a complete stop before using the control switch.
Fig. 6
1
3
2
Forward (clockwise) rotation, push the control switch to the left
position (1).
Check the direction of rotation before use.
Reverse (counterclockwise) rotation, push the control switch to the right
position (2).
Check direction of rotation before use.
Locking the trigger, push the control switch to center position (3). The
trigger will not work while the control switch is in the center locked
position. Always lock the trigger or remove the battery pack before
performing maintenance, changing accessories, storing the tool and
any time the tool is not in use.
Starting, Stopping & Controlling Speed
1. To start the tool, pull the trigger.
2. To stop the tool, release the trigger and an electric brake stops the
tool instantly.
All models feature variable speed control. To vary the speed, simply
increase or decrease pressure on the trigger. The further the trigger is
pulled, the greater the speed.
Drilling
Set the clutch adjusting ring to the drill position (Cat. No. 0514-20 only).
Place the bit on the work surface and apply firm pressure before starting. Too much pressure will slow the bit and reduce drilling efficiency.
Too little pressure will cause the bit to slide over the work area and dull
the point of the bit.
If the tool begins to stall, reduce pressure slightly to allow the bit to
regain speed. If the bit binds, reverse the motor to free the bit from the
workpiece.
APPLICATIONS
WARNING!
To reduce the risk of electric shock,
check work area for hidden pipes and
wires before drilling or driving screws.
Drilling in Wood, Composition Materials and Plastic
When drilling in wood, composition materials and plastic, start the drill
slowly, gradually increasing speed as you drill. When drilling into wood,
use wood augers or twist drill bits. Always use sharp bits. When using
twist drill bits, pull the bit out of the hole frequently to clear chips from the
bit flutes. To reduce the chance of splintering, back work with a piece of
scrap wood. Select low speeds for plastics with a low melting point.
Drilling in Metal
When drilling in metal, use high speed steel twist drills or hole saws. Use
a center punch to start the hole. Lubricate drill bits with cutting oil when
drilling in iron or steel. Use a coolant when drilling in nonferrous metals
such as copper, brass or aluminum. Back the material to prevent binding
and distortion on breakthrough.
Drilling in Masonry
When drilling in masonry, select the hammer-drill operating mode
(Cat. No. 0514-20 only). Use high speed carbide-tipped bits. Drilling soft
masonry materials such as cinder block requires little pressure. Hard
materials like concrete require more pressure. A smooth, even flow of
dust indicates the proper drilling rate. Do not let the bit spin in the hole
without cutting. Do not use water to settle dust or to cool bit. Both actions
will damage the carbide.
Driving Screws and Nut Running
Drill a pilot hole when driving screws into thick or hard materials. Set the
clutch adjusting ring to the proper position and set the speed to low. Use
the proper style and size screwdriver bit for the type of screw you are
using.
With the screwdriver bit in the screw, place the tip of the screw on the
workpiece and apply firm pressure before pulling the trigger. Screws
can be removed by reversing the motor.
Overloading
Continuous overloading may cause permanent damage to tool or battery
pack.
page 6
MAINTENANCE
WARNING!
To reduce the risk of personal injury
always unplug the charger and remove
the battery pack from the charger or tool
before performing any maintenance.
Never disassemble the tool, battery pack
or charger. Contact a
vice facility for ALL repairs.
Keep your tool, battery pack and charger in good repair by adopting a
regular maintenance program. After six months to one year, depending
on use, return the tool, battery pack and charger to a
service facility for:
• Lubrication
• Brush inspection and replacement
• Mechanical inspection and cleaning (gears, spindles,
bearings, housing, etc.)
• Electrical inspection (battery pack, charger, motor)
• Testing to assure proper mechanical and electrical operation
Maintaining Tool
If the tool does not start or operate at full power with a fully charged
battery pack, clean the contacts on the battery pack. If the tool still does
not work properly, return the tool, charger and battery pack to a
MILWAUKEE
service facility for repairs.
MILWAUKEE
ser-
MILWAUKEE
WARNING!
To reduce the risk of explosion, never
burn a battery pack even if it is damaged,
dead or completely discharged.
Disposing of Nickel-Cadmium Battery Packs
Nickel-Cadmium battery packs are recyclable. Under various state and
local laws, it may be illegal to dispose of this battery into the municipal
waste stream. Dispose of your battery pack according to federal, state
and local regulations.
Repairs
For repairs, return the tool, battery pack and charger to the nearest
service center listed on the back cover of this operator's manual.
Maintaining Battery Pack
MILWAUKEE
and/or hundreds of cycles when they are maintained and used according to these instructions.
A battery pack that is stored for six months without being used will
discharge itself. Batteries discharge at a rate of about 1% per day.
Charge the battery every six months even if it is unused to maximize
battery life. Do not tape the trigger in the “ON” position and leave the tool
unattended as this may discharge the battery to a point where it will no
longer be able to recharge. Use a
no longer performs with the power and torque needed for your application.
Store your battery pack in a cool, dry place. Do not store it where the
temperature may exceed 120°F (50°C) such as in a vehicle or metal
building during the summer. High temperatures will overheat the battery
pack, reducing battery life. If it is stored for several months, the battery
pack will gradually lose its charge. One to three cycles of charging and
discharging through normal use will restore the capacity of the battery
pack. During the life of the battery pack, the operating time between
charges becomes shorter. If the operating time becomes extremely short
after a proper charge, the usable life of the battery pack has been
reached and it should be replaced.
Nickel-Cadmium battery packs will operate for many years
MILWAUKEE
battery pack only until it
WARNING!
To reduce the risk of personal injury and
damage, never immerse your tool, battery pack or charger in liquid or allow a
liquid to flow inside them.
Cleaning
Clean dust and debris from charger and tool vents. Keep tool handles
clean, dry and free of oil or grease. Use only mild soap and a damp cloth
to clean the tool, battery pack and charger since certain cleaning agents
and solvents are harmful to plastics and other insulated parts. Some of
these include gasoline, turpentine, lacquer thinner, paint thinner, chlorinated cleaning solvents, ammonia and household detergents containing
ammonia. Never use flammable or combustible solvents around tools.
WARRANTY
Battery Pack Warranty
Battery packs for cordless tools are warranted for one year from the
date of purchase.
Every
MILWAUKEE
ing our manufacturing facilities. Should any trouble develop, return the
complete tool prepaid to our Corporate Office, Branch Office/Service
Center or nearest Authorized
shows the trouble is caused by defective workmanship or material, all
repairs will be made without charge, and the tool will be returned, transportation prepaid. Battery packs for cordless tools are warranted for
one year from the date of purchase.
This warranty does not apply where: (1) repairs or attempted repairs
have been made by persons other than
thorized Service Station personnel; (2) repairs are required because of
normal wear; (3) the tool has been abused or involved in an accident; (4)
misuse is evident, such as caused by overloading the tool beyond its
rated capacity; (5) the tool has been used after partial failure or (6) the
tool has been used with an improper accessory. No other warranty,
written or verbal, is authorized.
tool is thoroughly inspected and tested before leav-
MILWAUKEE
Service Station. If inspection
MILWAUKEE
personnel or Au-
page 7
ACCESSORIES
WARNING!
Always remove battery pack and lock trigger
before changing or removing accessories. Only
use accessories specifically recommended for
this tool. Others may be hazardous.
For a complete listing of accessories, refer to your
center. Refer to the back cover of this operator's manual for the location nearest you.
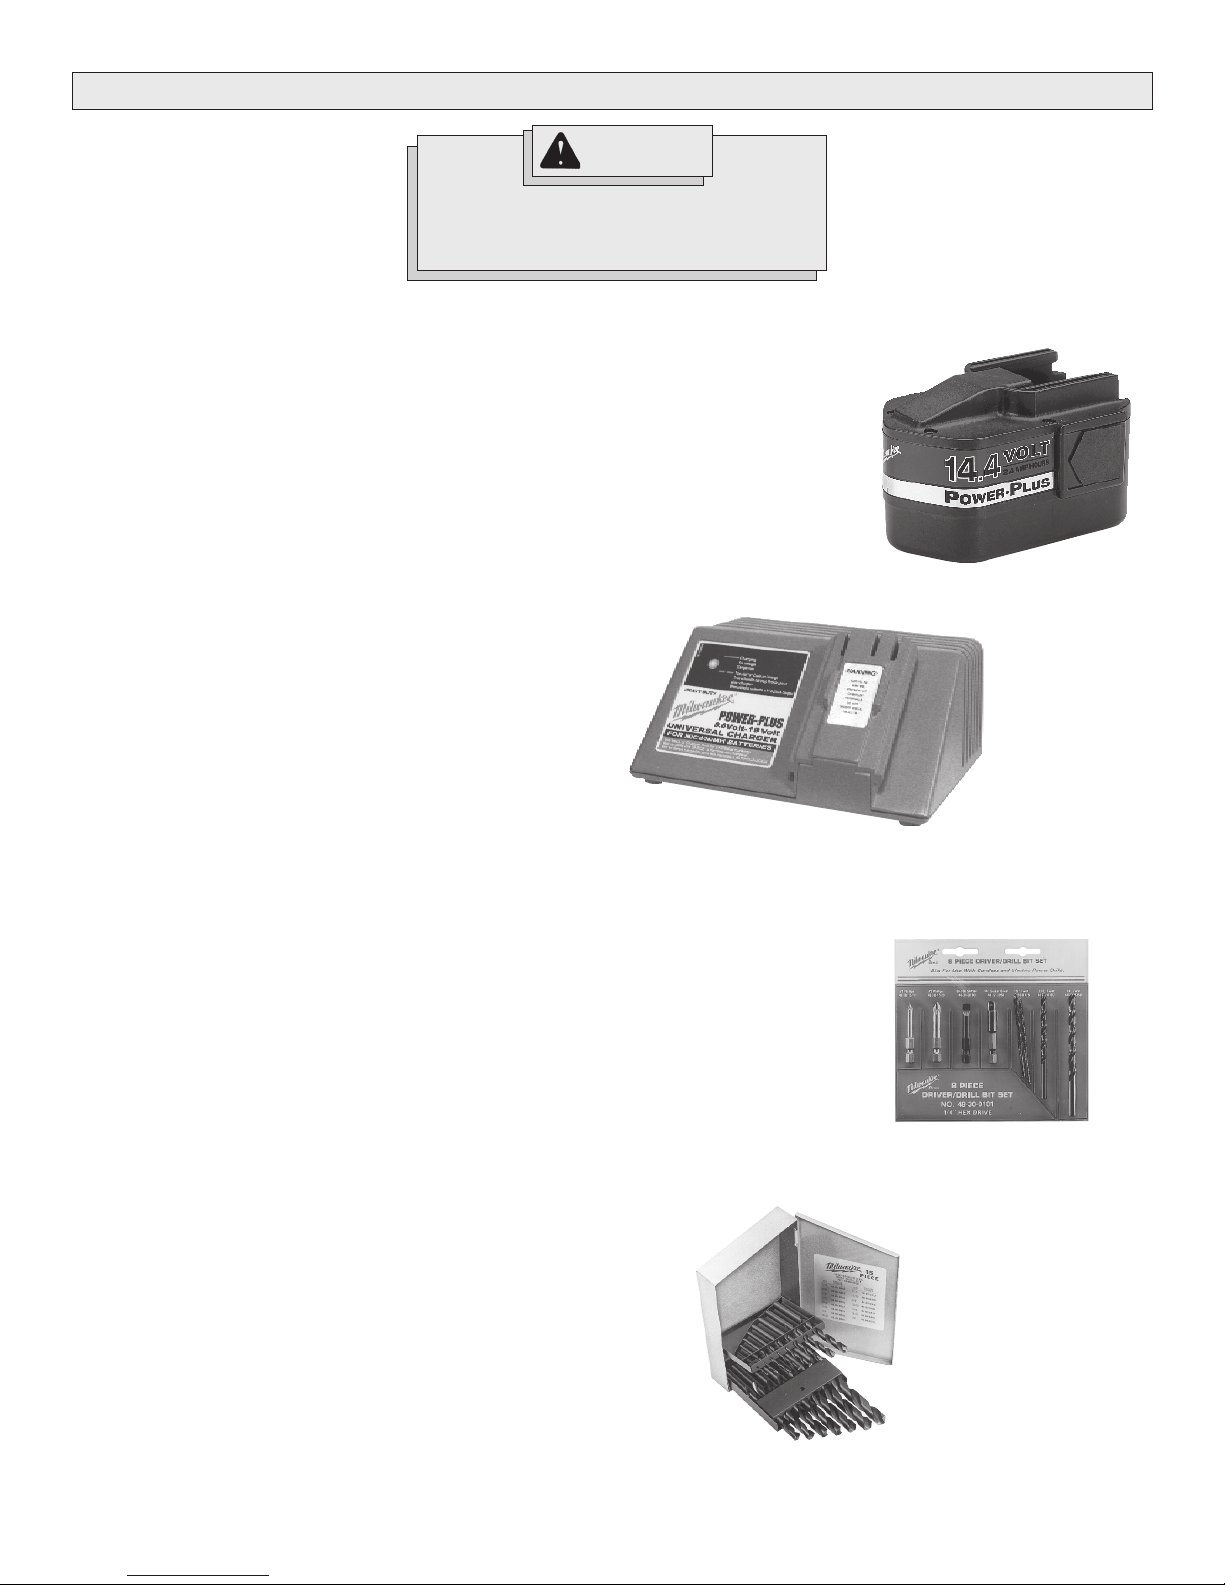
14.4 Volt Power Plus Battery Packs
MILWAUKEE
Fits
48-59-0245.
1.7 Amp-Hours
Catalog No. 48-11-1000
2.4 Amp-Hours
Catalog No. 48-11-1024
Power Plus Chargers 120 Volt
For charging 12-18 Volt Power Plus Battery Packs.
Fast Charger
Catalog No. 48-59-0241
1-Hour Charger
Catalog No. 48-59-0245
Jobbers Length Twist Drill Sets
13 Piece Set
Catalog No. 48-89-0030
Sizes 1/16" to 1/4" by 64ths.
15 Piece Set
Catalog No. 48-89-0020
Sizes 1/16" to 1/2" by 32nds.
Charger Cat. No. 48-59-0231, 48-59-0241 and
MILWAUKEE
Electric Tool catalog. To obtain a catalog, contact your local distributor or service
Cat. No. 48-11-1024
Cat. No. 48-59-0245
21 Piece Set
Catalog No. 48-89-0015
Sizes 1/16" to 3/8" by 64ths.
29 Piece Set
Catalog No. 48-89-0010
Sizes 1/16" to 1/2" by 64ths.
1/2" Keyless Chucks
Catalog No. 48-66-1400
Catalog No. 48-66-1375
Rugged nylon housing with rust resistant nickel plated jaws and body.
For cordless drills with 1/2" - 20 thread.
Hammer-Drill Accessory Kit
Catalog No. 48-30-0101
Includes 1/4" socket driver, 6F-7R slotted bit, #1 and #2 Phillips bit s, 1/4"
and 3/16" twist bits, and two 1/8" twist bits.
Plastic Carrying Case
Catalog No. 48-55-3015
page 8
Cat. No. 48-30-0101
Cat. No. 48-89-0020

RÈGLES DE SÉCURITÉ GÉNÉRALES POUR TOUS LES OUTILS À BATTERIE
AVERTISSEMENT!
VOUS DEVEZ LIRE ET COMPRENDRE TOUTES LES INSTRUCTIONS.
Le non-respect, même partiel, des instructions ci-après entraîne un risque de choc électrique,
d'incendie et/ou de blessures graves.
CONSERVEZ CES INSTRUCTIONS
AIRE DE TRAVAIL
1. Veillez à ce que l'aire de travail soit propre et bien éclairée. Le
désordre et le manque de lumière favorisent les accidents.
2. N'utilisez pas d'outils électriques dans une atmosphère ex-
plosive, par exemple en présence de liquides, de gaz ou de
poussières inflammables. Les outils électriques créent des
étincelles qui pourraient enflammer les poussières ou les vapeurs.
3. Tenez à distance les curieux, les enfants et les visiteurs
pendant que vous travaillez avec un outil électrique. Ils
pourraient vous distraire et vous faire faire une fausse manoeuvre.
SÉCURITÉ ÉLECTRIQUE
4. Ne maltraitez pas le cordon. Ne transportez pas l'outil par
son cordon. N'exposez pas le cordon à la chaleur, à des huiles,
à des arêtes vives ou à des pièces en mouvement. Remplacez
immédiatement un cordon endommagé. Un cordon endommagé
peut constituer un risque d'incendie.
5. Un outil à bloc-batterie amovible ou à batterie intégrée ne
doit être rechargé qu'avec le chargeur prévu pour la batterie.
Un chargeur qui convient à tel type de batterie peut présenter un
risque d'incendie avec tel autre type de batterie.
6. N'utilisez un outil qu'avec un bloc-batterie conçu
spécifiquement pour lui. L'emploi d'un autre bloc-batterie peut
créer un risque d'incendie.
SÉCURITÉ DES PERSONNES
7. Restez alerte, concentrez-vous sur votre travail et faites
preuve de jugement. N'utilisez pas un outil électrique si vous
êtes fatigué ou sous l'influence de drogues, d'alcool ou de
médicaments. Un instant d'inattention suffit pour entraîner des
blessures graves.
8. Habillez-vous convenablement. Ne portez ni vêtements
flottants ni bijoux. Confinez les cheveux longs. N'approchez
jamais les cheveux, les vêtements ou les gants des pièces
en mouvement. Des vêtements flottants, des bijoux ou des cheveux
longs risquent d'être happés par des pièces en mouvement.
9. Méfiez-vous d'un démarrage accidentel. Avant d'insérer un
bloc-batterie, assurez-vous que l'interrupteur de l'outil est
sur ARRÊT . Le fait de transporter un outil avec le doigt sur la détente
ou d'insérer un bloc-batterie alors que l'interrupteur est en position
MARCHE peut mener tout droit à un accident.
10. Enlevez les clés de réglage ou de serrage avant de démarrer
l'outil. Une clé laissée dans une pièce tournante de l'outil peut
provoquer des blessures.
11. Ne vous penchez pas trop en avant. Maintenez un bon appui
et restez en équilibre en tout temps. Un bonne stabilité vous
permet de mieux réagir à une situation inattendue.
12. Utilisez des accessoires de sécurité. Portez toujours des
lunettes ou une visière. Selon les conditions, portez aussi un
masque antipoussière, des bottes de sécurité antidérapantes, un
casque protecteur et/ou un appareil antibruit.
UTILISATION ET ENTRETIEN DES OUTILS
13. Immobilisez le matériau sur une surface stable au moyen
de brides ou de toute autre façon adéquate. Le fait de tenir la
pièce avec la main ou contre votre corps offre une stabilité insuffisante
et peut amener un dérapage de l'outil.
14. Ne forcez pas l'outil. Utilisez l'outil approprié à la tâche. L'outil
correct fonctionne mieux et de façon plus sécuritaire. Respectez
aussi la vitesse de travail qui lui est propre.
15. N'utilisez pas un outil si son interrupteur est bloqué. Un outil
que vous ne pouvez pas commander par son interrupteur est
dangereux et doit être réparé.
16. Retirez le bloc-batterie ou mettez l'interrupteur sur ARRÊT
ou en position verrouillée avant d'effectuer un réglage, de
changer d'accessoire ou de ranger l'outil. De telles mesures
préventives réduisent le risque de démarrage accidentel de l'outil.
17. Rangez les outils hors de la portée des enfants et d'autres
personnes inexpérimentées. Les outils sont dangereux dans
les mains d'utilisateurs novices.
18. Lorsque le bloc-batterie n'est pas en service, tenez-le à l'écart
d'autres objets métalliques (trombones, pièces de monnaie,
clés, clous, vis, etc.) susceptibles d'établir un contact
électrique entre les deux bornes. La mise en court-circuit des
bornes de la batterie peut produire des étincelles et constitue un
risque de brûlures ou d'incendie.
19. Prenez soin de bien entretenir les outils. Les outils de coupe
doivent être toujours bien affûtés et propres. Des outils bien
entretenus, dont les arêtes sont bien tranchantes, sont moins
susceptibles de coincer et plus faciles à diriger.
20. Soyez attentif à tout désalignement ou coincement des
pièces en mouvement, à tout bris ou à toute autre condition
préjudiciable au bon fonctionnement de l'outil. Si vous
constatez qu'un outil est endommagé, faites-le réparer avant
de vous en servir. De nombreux accidents sont causés par des
outils en mauvais état. Fixez-y une étiquette marquée « HORS
D'USAGE » jusqu'à ce qu'il soit réparé.
21. N'utilisez que des accessoires que le fabricant recommande
pour votre modèle d'outil. Certains accessoires peuvent convenir
à un outil, mais être dangereux avec un autre.
RÉPARATION
22. La réparation des outils électriques doit être confiée à un
réparateur qualifié. L'entretien ou la réparation d'un outil électrique
par un amateur peut avoir des conséquences graves.
23. Pour la réparation d'un outil, n'employez que des pièces de
rechange d'origine. Suivez les directives données à la section « Réparation » de ce manuel. L'emploi de pièces non autorisées
ou le non-respect des instructions d'entretien peut créer un risque de
choc électrique ou de blessures.
page 9

RÈGLE DE SÉCURITÉ PARTICULIÈRE SUPPLÉMENTAIRE
1. Tenez l'outil par ses surfaces de prise isolées pendant toute opération où l'outil de coupe pourrait venir en contact avec un
câblage dissimulé. En cas de contact avec un conducteur sous tension, les pièces métalliques à découvert de l'outil transmettraient un choc
électrique à l'utilisateur.
2. Tenez les mains à l'écart des arêtes tranchantes et des pièces en mouvement.
3. Entretenez les étiquettes et marqies di fabricant. Les indications qu'elles contiennent sont précieuses. Si elles deviennent illisibles ou se
détachent, faites-les remplacer gratuitement à un centre de service
4. Portez un appareil antibruit si vous devez utiliser l'outil pendant une période prolongée. Une exposition prolongée à un bruit de forte
intensité peut entraîner des lésions de l'ouïe.
MILWAUKEE
accrédité.
Pictographie
Underwriters Laboratories, Inc.
ACNOR Association Canadienne
de normalisation
Disposez correctement des
batteries au nickel-cadmium
Volts Courant Direct
Tours-minute à vide (RPM)
7
No de
Cat.
0514-20
0516-20
Volts
14,4
14,4
T-min à
vide
Basse 0-450
Haute 0-1 450
Basse 0-450
Haute 0-1 450
DESCRIPTION FONCTIONNELLE
1
Specifications
Coups./ Min.
à vide
Basse 0-5 850
Haute 0-18 850
N/A
Acier
1/2"
(13mm)
1/2"
(13mm)
Calibres
Bois
1-1/2"
(38mm)
1-1/2"
(38mm)
Maçonnerie
3/8"
(9,5mm)
N/A
6
5
4
No de Cat. 0514-20
3
1. Sélecteur de vitesse
2. Boutons de dégagement
3. Batterie
4. Détente
5. Commande d' interrupteur
6. Mandrin à serrage sans clé
7. Collet/Sélector rotation-percussion (No de Cat. 0514-20 seul.)
page 10
1
2
No de Cat. 0516-20
6
5
4
2
3

RECHARGE ET USAGE DE LA BATTERIE
AVERTISSEMENT!
Seule la batterie
12V, 14,4V et 18V doit être rechargée avec
chargeurs de Power Plus. D'autres types de
batteries pourraient exploser, occasionnate
dommages et blessures corporelles.
Rechargez la batterie avant de vous servir de l’outil la première fois, ou
lorsque l’outil n’offre plus la puissance et le couple nécessaire au travail
à accomplir. Ne laissez jamais la batterie s’épuiser complètement. Les
batteries neuves n’atteignent leur puissance maximale qu’après 4 ou 5
cycles de recharge-décharge. La durée normale de recharge est variable selon le type de chargeur utilisé. Elle peut aussi varier selon le
voltage à la source et la recharge nécessaire. Par exemple, si la batterie
n’a pas besoin d’une recharge complète, la durée de recharge sera
moindre.
VEUILLEZ CONSULTER LA FEUILLE D'INSTRUCTIONS QUI
ACCOMPAGNE LE CHARGEUR POUR CONNAÎTRE EN DÉTAIL LA
TECHNIQUE DE RECHARGE.
Les batteries sont affectées par la températured. La vôtre aura un meilleur
rendement et durera plus longtemps si la recharge est effectuée à une
température se situant entre 60°F à 80°F (15°-27°C). Ne procédez pas à
une recharge lorsque la température est inférieure à 40°F (5°C) ou
supérieure à 105°F (40°C), car à ces températures, la recharge sera
moins efficace. Voir « Maintenance ».
Retrait de la batterie de l’outil
Appuyez sur les boutons de dégagement et retirez la batterie.
MILWAUKEE
Power Plus de
Fig. 2
No de Cat. 0516-20
2. Pour une bonne répartition du poids et un bon équilibre.
Introduisez la batterie par l’arrière en appuyant sur les boutons de
dégagement et en la glissant dans le corps de l’outil pour qu’elle
s’enclenche.
Introduction de la batterie dans l’outil (Fig. 1 et 2)
La batterie peut être introduite dans l’outil de deux façons.
Fig. 1
No de Cat. 0516-20
1. Lorsque l’espace est restreint.
Introduisez la batterie par le devant en appuyant sur les boutons de
dégagement et en la glissant dans le corps de l’outil pour qu’elle
s’enclenche.
page 11

MANIEMENT
AVERTISSEMENT!
Pour minimiser les risques de
blessures, au yeux, portez toujours de
lunettes à coques latérales.
Utilisation du mandrin à serrage sans clé (Fig. 3)
Assurez-vous de toujours verrouiller la détente ou de retirer la batterie
avant d’installer des pièces ou d’en enlever.
Fig. 3
Douille
1. Pour écarter les mâchoires du mandrin, retenez le collet tandis que
vousfaites tourner la douille en sens inverse-horaire.
Lorsque vous utilisez un foret, insérez-le jusqu’au fond du mandrin.
Centrez le foret entre les mâchoires et retirez-le d’environ 1/16" (1,6mm)
avant de le verrouiller en place.
Si vous utilisez une pièce tournevis, insérez la pièce assez loin dans
le mandrin pour que les mâchoires du mandrin agrippent la partie
hexagonale de la tige.
2. Pour refermer les mâchoires du mandrin, retenez le collet tandis que
vous faites tourner la douille en sens horaire. Serrez à fond.
3. Pour retirer le foret, tenez le collet pendant que vous tournez la douille
en sens inverse-horaire.
Collet
Les spécifications relatives à la torsion indiquées ici ont la valeur
approximative du rendement d’une batterie à pleine charge.
Torsoin
0514-20
Positions 1 - 5
Positions 6 - 10
Positions 11 - 15
Positions 16 - 20
Percage
Basse
Haute
N.B. Les positions de réglage indiquées ci-dessus étant approximatives,
il est conseillé d’essayer l’outil à différentes positions sur une pièce de
rebut avant de l’utiliser sur le matériau à façonner.
Sélection de la vitesse de rotation (Fig. 5)
Le sélecteur de vitesse est placé sur le dessus du boîtier du moteur.
Laissez l’outil s’arrêter complètement avant de changer la vitesse. Voir
« Applications » pour le choix de la vitesse appropriée à divers usages.
Fig. 5
0 - 14 in. lbs./po.
(0 - 1,6Nm)
20 - 41 in. lbs./po.
(2,25 - 4,63Nm)
46 - 60 in. lbs./po.
(5,2 - 6,78Nm)
65 - 85 in. lbs./po.
(7,34 - 9,6Nm)
350 in. lbs./po.
(39,5Nm)
110 in. lbs./po.
(12,42Nm)
Basse
0516-20
0 - 14 in. lbs./po.
(0 - 1,6Nm)
20 - 41 in. lbs./po.
(2,25 - 4,63Nm)
46 - 60 in. lbs./po.
(5,2 - 6,78Nm)
65 - 85 in. lbs./po.
(7,34 - 9,6Nm)
390 in. lbs./po.
(44Nm)
130 in. lbs./po.
(14,69Nm)
Haute
Usage du démultiplicateur (Fig. 4)
Cet outil est pourvu d’un démultiplicateur réglable pour enfoncer des vis
de différents calibres dans des matériaux variés. Quand il est à la position de réglage appropriée, le démultiplicateur glisse à une charge de
torsion préréglée pour prévenir l’enfoncement trop profond des vis et la
détérioration des vis et de l’outil.
Pour régler l'accouplement, tournez l’anneau de réglage d’accouplement
à l'une des vingt positions de réglage de l'’anneau.
Fig. 4
Anneau de
reglage du
démultiplicateur
Collet sélecteur
rotation-percussion
Positions
numérotées
1. Pour la basse vitesse (450 t/min.), glissez le sélecteur vers l’avant.
2. Pour la haute vitesse (1 450 t/min.), glissez le sélecteur vers l’arrière.
Choix entre l'action « Perçage Seulement » et l'action
« Percussion » (No de Cat. 0514-20 seul.)
Les perceuses tournevis à percussion
pour combiner deux modes de fonctionnement et driller avec ou sans
percussion. Pour choisir le mode de fonctionnement, tournez le Colliér
Selecteur Rotation/Percussion jusqu'à ce que le symbole du mode désiré,
rotation ou percussion, apparaisse au centre du haut du collet pour
indiquer le mode de fonctionnement choisi.
1. Pour utiliser la rotation avec percussion tournez le colliér selecteur
jusqu'à ce que le symbole de percussion apparaisse au centre
du haut du collet. Appuyez sur le foret pour enclencher le mécanisme
de percussion.
2. Pour utiliser la rotation seulement, tournez le colliér selecteur
jusqu'à ce que le symbole de rotation seulement apparaisse au
centre du haut du collet.
N.B. Pour éviter d'en endommager la pointe, lorsque vous utilisez un
foret à pointe carburée, n'employez pas d'eau pour abattre la poussière
et n'essayez pas de driller dans les barres de renforcement du béton
armé.
MILWAUKEE
sont conçues
page 12

Utilisation de la commande d’interrupteur (Fig. 6)
La commande d’interrupteur peut être placée à trois positions: marche
avant, marche arrière et verrouillage. À cause d’un mécanisme qui
empêche l’inversion de la rotation lorsque l’outil est en marche. Il faut
toujours laisser le moteur s’arrêter complètement avant d’actionner la
commande d’interrupteur.
Fig. 6
1
3
2
Rotation avant (sens horaire), poussez la commande vers la gauche (1).
Vérifiez le sens de la rotation avant de vous servir de l'outil.
Rotation arriére (sens inverse-horaire), poussez la commande vers la
droite (2).
Vérifiez le sens de la rotation avant de vous servir de l'outil.
Verrouillage de la détente, poussez la commande à la position centrale
(3). La détente reste bloquée lorsque la commande d'interrupteur est
à la position centrale. Assurez-vous de toujours verrouiller la détente
ou de retirer la batyerie avant d'effectuer des taches de maintenance,
de changer les accessoires, de ranger l'outil ou de le laisser sans
surveillance.
Démarrage, arrêt et contrôle de vitesse
1. Pour mettre l’outil en marche, appuyez sur la détente.
2. Pour arrêter l’outil, relâchez la détente. Un frein électrique arrête
l’outil instantanément.
Tous les modèles sont pourvus d’une détente d’interrupteur à vitesse
variable. Pour varier la vitesse, il suffit d’augmenter ou de diminuer la
pression sur la détente. Plus la détente est enfoncée, plus la vitesse est
grande.
Perçage
Placez l’anneau de réglage du démultiplicateur à la position de perçage
(No de Cat. 0514-20 seul.). Placez le foret sur la surface à percer et
appuyez fermement sur l’outil avant de le mettre en marche. Une trop
grande pression pourra ralentir la rotation du foret et nuire au perçage.
Une pression trop faible occasionnera le glissement du foret sur la surface et pourra émousser la pointe du foret.
Si la perceuse ralentit à cause de l'effort, diminuez légèrement la pression
pour laisser le foret reprendre sa vitesse. Si le foret reste bloqué, inversez
la rotation et retirez le foret du matériau.
APPLICATIONS
AVERTISSEMENT!
Pour minimiser les risques de choc
électrique, inspectez l’aire de travail pour en
déceler les tuyaux et les câbles électriques
avant perçage ou de commencer à visser.
Perçage dans le bois, les agglomérés et le plastique
Lorsque vous percez dans le bois, les agglomérés et le plastique,
commencez à driller lentement pour augmenter graduellement la vitesse.
Lorsque vous drillez dans le bois, servez-vous d’une mèche à bois ou
d’un foret hélicoïdal. N'employez que des pièces bien aiguisées. Si vous
employez une mèche hélicoïdale, sortez fréquemment la mèche du trou
pour en débarrasser les cannelures des rognures. Pour minimiser les
risques d'écaillage, appuyez le matériau sur un morceau de bois de
rebut. Drillez à basse vitesse dans les plastiques dont le point de fusion
est peu élevé.
Perçage dans le métal
Pour percer le métal, employez des forets d’acier-rapide de forme
hélicoïdale ou des lames-scies du même métal. Lubrifiez le foret avec de
l’huile de coupe lorsque vous drillez dans l’acier ou le fer. Pour les
métaux non ferreux comme le cuivre, l’étain et l’aluminium, employez un
liquide refroidisseur. Appuyez la pièce à travailler sur une pièce rigide
pour éviter le grippage ou le gauchissement du foret à la phase finale du
perçage.
Forage dans la maçonnerie
Pour driller dans la maçonnerie, placez le collet sélecteur à la position
« Hammer-Drill » (No de Cat. 0514-20 seul.). Utilisez un foret de haute
vitesse à pointe carburée. Pour driller dans la maçonnerie molle comme
les blocs de cendre, par exemple, n’appliquez qu’une légère pression
sur l’outil. Pour les matériaux plus durs comme le béton, appliquez plus
de pression sur l’outil. Le perçage s’effectue correctement lorsqu’une
fine poussière s’échappe du trou. Ne laissez pas le foret tourner librement
dans le trou. N'employez pas d'eau pour abattre la poussière ou refroidir
le foret, car l'eau peut endommager la pointe carburée du foret.
Vissage des vis et serrage des écrous
Percez un trou-guide avant de poser des vis dans des matériaux épais
ou durs. Placez l’anneau de réglage du démultiplicateur de l’outil à la
position appropriée et réglez la vitesse à la position marquée “LOW” pour
obtenir une basse vitesse de rotation. Employez une pièce tournevis du
calibre et du type qui conviennent au type de vis que vous employez.
Posez la pièce tournevis sur la tête de la vis et placez la pointe de la vis
sur la pièce à visser. Exercez une pression ferme sur la vis avant de
presser la détente. Commencez à visser lentement pour ensuite
augmenter graduellement la vitesse de vissage. Pour dévisser, inversez
la rotation.
Surcharge
Si l’outil est constamment surchargé, la batterie et le moteur pourront
subir des dommages.
page 13

MAINTENANCE
AVERTISSEMENT!
Pour minimiser les risques de blessures
corporelles, débranchez le chargeur et
retirez la batterie du chargeur ou de l’outil
avant d’y effectuer des travaux d’entretien.
Ne démontez jamais l’outil, la batterie ou le
chargeur. Pour toute réparation, consultez
un centre de service
Gardez l’outil, la batterie et le chargeur en bon état en adoptant un
programme d’entretien ponctuel. Après une période de six mois à un an,
selon l’utilisation, renvoyez l’outil, la batterie et le chargeur à un centre de
MILWAUKEE
service
• Lubrification
• Inspection et remplacement des balais
• Inspection et nettoyage de la mécanique (engrenages, pivots,
coussinets, boîtier etc.)
• Inspection électrique (batterie, chargeur, moteur)
• Vérification du fonctionnement électromécanique
Entretien de l’outil
Si l’outil ne démarre pas ou ne fonctionne pas à pleine puissance alors
qu’il est branché sur une batterie complètement chargée, nettoyez les
points de contact entre la batterie et l’outil. Si l’outil ne fonctionne toujours
pas correctement, renvoyez l’outil, le chargeur et la batterie à un centre
de service
MILWAUKEE
accrédité pour les services suivants:
accrédité, afin qu’on en effectue la réparation.
MILWAUKEE
accrédité.
tels l’essence, la térébenthine, les diluants à laque ou à peinture, les
solvants chlorés, l’ammoniaque et les détergents d’usage domestique
qui en contiennent pourraient détériorer le plastique et l’isolation des
pièces. Ne laissez jamais de solvants inflammables ou combustibles
auprès de l’outil.
AVERTISSEMENT!
Pour minimiser les risques d’explosion
ne faites jamais brûler une batterie, même
si elle est avariée, âgée ou complètement
épuisée.
Disposition des Batteries au Nickel-Cadmium
Les batteries au nickel-cadmium doivent être traitées comme les déchets
dangereux. On doit en disposer conformément aux règlements fédéraux,
provinciaux et locaux.
Réparations
Pour les réparations, retournez outil,batterie et chargeur à un, retournezle en entier au centre-service le plus près selon la liste apparaissant à la
dernière page de ce manuel.
Entretien de la Batterie
Les batteries
plusieurs années et/ou des milliers de cycles lorsqu’elles sont bien
entretenues et utilisées selon les instructions de ce manuel.
Une batterie qui est rangée durant six mois perdra sa charge si elle n’est
pas utilisée. Les batteries se déchargent selon un taux d’environ 1% par
jour. Rechargez la batterie tous les six mois, même si elle n’est pas
utilisée, cela prolongera sa durée. Ne maintenez pas la détente
d’interrupteur à la positon « ON » à l’aide d’un ruban adhésif et ne laissez
pas l’outil sans surveillance car cela pourrait décharger la batterie0 à un
point tel qu’il deviendra impossible de la recharger. Employez une batterie
MILWAUKEE
Rangez la batterie dans un endroit frais et sec. Ne la rangez pas dans un
endroit où la température pourrait excéder 120°F (50°C),dans un véhicule
ou une structure d’acier, l’été par exemple. Les températures élevées
provoquent la surchauffe de la batterie et en réduisent la durée. Si la
batterie est rangée pour une période de plusieurs mois, elle perdra
graduellement sa charge. Cependant, après plusieurs cycles de recharge et de décharge en période d’utilisation normale, elle retrouvera
sa charge initiale. Avec le temp s, les intervalles entre les recharges de la
batterie deviendront de plus en plus courts. Lorsque ces intervalles,
devenus trop courts, rendront l’outil inutilisable, il faudra remplacer la
batterie.
MILWAUKEE
aussi longtemps qu’elle fournira la puissance requise.
au nickel-cadmium sont conçues pour durer
AVERTISSEMENT!
Pour minimiser les risques de blessures ou
de dommages à l'outil, n'immergez jamais
l'outil, la batterie ou le chargeur et ne laissez
pas de liquide s'y infiltrer.
Nettoyage
Débarrassez les évents du chargeur et de l’outil des débris et de la
poussière. Gardez les poignées de l’outil propres, à sec et exemptes
d’huile ou de graisse. Le nettoyage de l’outil, du chargeur et de la batterie
doit se faire avec un linge humide et un savon doux. Certains nettoyants
GARANTIE
Garantie des batteries
Les batteries pour outils sans cordon sont garanties pour un an à compter
de la date d’achat.
Chaque outil fabriqué par
de quitter l’usine. S’il survient un trouble, retournez l’outil port payé au
siège social de la compagnie ou à une succursale ou un centre de
MILWAUKEE
service
trouble est dû à un défaut de fabrication ou de matériaux, les réparations
seront effectuées gratuitement et l’outil vous sera retourné aux frais de
la compagnie. Les batteries servant aux outils sans cordon sont garanties
pour un an à compter de la date d’achat.
La présente garantie ne s’applique pas dans les cas suivants : (1) Des
réparations ont été effectuées ou tentées par d’autres personnes que
des techniciens mandatés par
accrédités. (2) Les réparations sont rendues nécessaires par l’usure
normale de l’outil. (3) L’outil a été employé abusivement ou a été endommagé
accidentellement. (4) L’usage anormal ou la surcharge de l’outil sont
évidents. (5) L’outil a été utilisé après une défaillance partielle. (6) L’outil
a été employé avec un accessoire non compatible. Nulle autre garantie,
tant écrite que verbale, n’est valable.
MILWAUKEE
accrédité. Si l’examen de l’outil démontre que le
est minutieusement vérifié avant
MILWAUKEE
ou ses centres de service
page 14

ACCESSOIRES
AVERTISSEMENT!
Il faut toujours retirer la batterie et verrouiller la
détente de l’outil avant de changer ou d’enlever
les accessoires. L’emploi d’accessoires autres
que ceux qui sont expressément recommandés
pour cet outil peut comporter des risques.
Consultez la liste complète des accessoires dans le catalogue d’outils électriques
MILWAUKEE
manuel pour connaître l’adresse du centre-service le plus près.
Batterie de Power Plus 14,4V
Convient aux chargeur
48-59-041 et 48-59-0245.
1,7 Amp - Heure
No de catalogue 48-11-1000
2,4 Amp - Heure
No de catalogue 48-11-1024
Chargeur de Power Plus 120V
Pour la recharge des batteries 12 et 18V de Power Plus.
Rapide Chargeur
No de catalogue 48-59-0241
Un Heure Chargeur
No de catalogue 48-59-0245
Jeux de forets hélicoïdaux courts
Jeu de 13 pièces
No de catalogue 48-89-0030
Calibres 1/16" à 1/4" (1,6mm à 6,4mm) par 64e.
Jeu de 15 pièces
No de catalogue 48-89-0020
Calibres 1/16" à 1/2" (1,6mm à 13mm) par 32e.
, adressez-vous à votre distributeur local ou à un centre-service
MILWAUKEE
No de catalogue 48-59-0231,
MILWAUKEE
No de Cat. 48-11-1024
MILWAUKEE
accrédité. Reportez-vous à la dernière page de ce
. Pour vous procurer le catalogue
No de Cat. 48-59-0245
Jeu de 21 pièces
No de catalogue 48-89-0015
Calibres 1/16" à 3/8" (1,6mm à 9,5mm) par 64e.
Jeu de 29 pièces
No de catalogue 48-89-0010
Calibres 1/16" à 1/2" (1,6mm à 13mm) par 64e.
Mandrin sans clé 13mm (1/2")
No de catalogue 48-66-1400
No de catalogue 48-66-1375
Pourvu d’un robuste boîtier en nylon. Mâchoires et corps plaqués nickel
antirouille. Employé avec les perceuses sans cordon 1/2" (13mm)filetage 20.
Kit d’accessoires de perceuse-tournevis
No de catalogue 48-30-0101
Contient tourne-douille 1/4" (6,4mm), tournevis à fente 6F-7R, pièces
tournevis Phillips #1 et #2, forets hélicoïdaux 1/4" et 3/16" (6,4mm et
5mm) et deux forets hélicoïdaux 1/8" (3,2mm).
Coffret d’plastique
No de catalogue 48-55-3015
No de Cat. 48-30-0101
No de Cat. 48-89-0020
page 15

INSTRUCCIONES GENERALES DE SEGURIDAD - PARA LAS HERRAMIENTAS A BATERIAS
¡ADVERTENCIA!
LEA Y ENTIENDA TODAS LAS INSTRUCCIONES
Se debe seguir todas las instrucciones a continuación para evitar una
descarga eléctrica, incendio y/o lesiones graves.
GUARDE ESTAS INSTRUCCIONES
AREA DE TRABAJO
1. Mantenga el área de trabajo limpia e iluminada. Las mesas de
trabajo desordenadas y las áreas con poca iluminación propician los
accidentes.
2. No opere las herramientas con motor en ambientes
explosivos, tales como los ambientes con líquidos, gases o
polvo inflamables. Las herramientas con motor producen chispas
que pueden inflamar el polvo o los gases.
3. Mantenga a las personas alejadas mientras esté utilizando
una herramienta con motor. Las distracciones pueden causar la
pérdida del control de la herramienta. Proteja a las demás personas
en el área de trabajo contra escombros, tales como astillas y chispas.
Instale barreras si se necesitan.
SEGURIDAD ELECTRICA
4. No utilice los cordones de manera inadecuada. Nunca
transporte la herramienta por el cordón. Mantenga el cordón
alejado del calor, aceite, bordes afilados o partes
en movimiento. Sustituya los cordones dañados
inmediatemente. Los cordones dañados pueden causar un
incendio.
5. Una herramienta con baterías incorporadas o con una batería
separada debe ser recargada solamente con el cargador
específico para este tipo de batería. Un cargador que es apropiado
para un tipo de batería puede producir riesgo de incendio si se usa
con otra batería.
6. Use la herramienta a batería solamente con la batería
especificamente designada para ella. El uso de cualquier otro
tipo de batería puede producir riesgo de incendio.
SEGURIDAD PERSONAL
7. Ponga mucha atención, fíjese en lo que hace y use su sentido
común al operar una herramienta con motor. No use la
herramienta cuando esté cansado o bajo la influencia del
alcohol, drogas o medicamentos. Descuidarse por sólo un
momento cuando se esté utilizando la herramienta, puede resultar en
lesiones graves.
8. Vístase apropiadamente. No lleve ropa o joyas sueltas.
Mantenga el pelo largo recogido. Mantenga el cabello, la ropa
y los guantes alejados de las partes en movibles. Las ropas
sueltas, las joyas, o el cabello largo pueden engancharse en las
partes movibles.
9. Evite el encendido accidental de la herramienta. Asegúrese
que el gatillo esté bloqueado o apagado antes de insertar la
batería. Llevar la herramienta con el dedo sobre el gatillo o insertar la
batería en una herramienta con el gatillo encendido, aumenta el riesgo
de accidentes.
10. Saque las llaves antes de encender la herramienta. Una llave
sujeta a una parte en movimiento puede causar lesiones.
11. No se aleje demasiado del material de trabajo. Siempre
mantenga el equilibrio. El equilibrio correcto permite el mejor control de la herramienta durante situaciones inesperadas.
12. Utilice el equipo de seguridad. Siempre utilice la protección
para los ojos. Se debe usar una máscara contra el polvo, zapatos
page 16
de seguridad antidelizantes, casco y protector para los oidos, cuando
las condiciones así lo requieran.
EL USO Y MANTENIMIENTO DE LA HERRAMIENTA
13. Utilice abrazaderas u otra manera práctica para sujetar y
apoyar el material en una plataforma estable. Tener el material
en la mano o contra el cuerpo es inestable y puede causar la pérdida
del control.
14. No fuerce la herramienta. Utilice la herramienta apropiada
para la aplicación. La herramienta realizará el trabajo de manera
más eficaz y segura, si la opera a la velocidad apropiada.
15. Si el gatillo no enciende o apaga la herramienta, no utilice la
herramienta. Una herramienta que no se puede controlar con el
gatillo es peligrosa y debe ser reparada.
16. Desconecte la batería de la herramienta o coloque el gatillo
en la posición de bloqueo o apagado antes de realizar un
ajuste, cambiar accesorios o almacenar la herramienta. Tales
medidas preventivas de seguridad reducen el riesgo de encender la
herramienta accidentalmente.
17. Almacene las herramientas que no se estén usando fuera
del alcance de los niños y de personas que no estén
capacitadas. Es peligroso permitir a los usuarios utilizar las
herramientas, si no están capacitados previamente.
18. Cuando la herramienta no esté en uso, manténgala alejada
de otros objetos metálicos tales como clips, moneda, llaves,
clavos, tornillos u otro objetos pequeños metálicos que
pueden realizar una conexión desde un terminal a otro. Hacer
un cortocircuito de los terminales de la batería, puede producir chispas,
quemaduras o un incendio.
19. Mantenga las herramientas en buenas condiciones. Las
herramientas cortadoras deben mantenerse afiladas y
limpias. Esto reduce el riesgo de que la herramienta se atasque y
facilita el control de la misma.
20. Verique que las partes en movimiento estén alineadas y no
estén atascadas. También debe verificarse que las partes no
estén rotas o tengan cualquier otra condición que pueda
afectar el funcionamiento de la herramienta. Si está dañada,
se debe reparar la herramienta antes de utilizarla. Muchos
accidentes se deben al mantenimiento incorrecto de la herramienta.
No utilice una herramienta dañada. Ponga una etiqueta que diga “No
utilizar” sobre la herramienta hasta que esté reparada.
21. Utilice solamente los accesorios recomendados por el
fabricante para ese modelo. Los accesorios que son apropiados
para una herramienta pueden aumentar el riesgo de lesiones cuando
se usan con otra herramienta.
SERVICIO
22. El servicio de mantenimiento debe ser realizado solamente
por personal técnico debidamente capacitado. El servicio o
mantenimiento realizado por personal no calificado puede aumentar el
riesgo de lesiones.
23. Cuando realice el servicio de mantenimiento, utilice
solamente repuestos idénticos. Siga las instrucciones en la
sección de mantenimiento de este manual. El uso de partes no
autorizadas o el incumplimiento de las instrucciones de mantenimiento
puede aumentar el riesgo de descarga eléctrica o lesiones.

REGLAS ESPECIFICAS DE SEGURIDAD
1. Tome la herramienta por la superficie de agarre con aislado, mientras realice una operación en que la herramienta cortadora
pueda tener contacto con alambres escondidos. El contacto de una herramienta con un alambre electrificado conectará las partes metálicas
expuestas de la herramienta y dará una descarga al usuario.
2. Mantenga las manos alejadas de todos los bordes cortadores y partes en movimiento.
3. Guarde las etiquetas y placas de especificaciones. Estas tienen información importante. Si son ilegibles o si no se pueden encontrar, póngase
en contacto con un centro de servicio de
4. Al emplear la herramienta durante períodos prolongados utilice protectores para los oídos. La exposición prolongada al ruido de alta
intensidad puede causar sordera.
MILWAUKEE
para una refacción gratis.
Simbología
Underwriters Laboratories, Inc.
Canadian Standards Association
Baterías de níquel cadmio
correctamente recicladas
Voltas Corriente Directa
No de revoluciones de carga por
minuto (RPM)
7
Catálog
Numero
0514-20
0516-20
Volts
14,4
14,4
DESCRIPCIÓN FUNCIONAL
1
RPM sin
Carga
Baja 0-450
Alta 0-1 450
Baja 0-450
Alta 0-1 450
Especificaciones
Golpes
sin carga
Baja 0-5 850
Alta 0-18 850
N/A
Acero
13mm
(1/2")
13mm
(1/2")
Capacidades
Madera
38mm
(1-1/2")
38mm
(1-1/2")
Concreto
9,5mm
(3/8")
N/A
6
5
4
Cat. No. 0514-20
3
1. Selector de velocidad
2. Seguro de botón
3. Batería
4. Gatillo
5. Interruptor de control
6. Mandril sin llave
7. Collar/Selector del martillo perforador (Cat. No. 0514-20 solamente)
2
1
6
5
4
Cat. No. 0516-20
2
3
page 17

USO Y CARGA DE LA BATERIA
¡ADVERTENCIA!
Cargue solamente las baterías
MILWAUKEE
14,4 voltios y 18 voltios en cargadors de
Power Plus. Otros tipos de baterías
pueden explotar y causar heridas
personales y daños.
Cargue su batería antes de usar su herramienta po primera vez o cuando
la misma no opera ya con el poder y torque necesario para la aplicación.
La capacidad total de carga de batería es alcanzada sólo después de 45 cargas. Nunca permita que la batería se descargue por completo. El
tiempo estándar de cargado variará dependiendo del voltaje en el
tomacorriente y de la carga que necesita la batería. Por ejemplo, si su
batería no requiere una carga completa, el tiempo para cargarla será
menor.
PARA CONOCER LAS INTRUCCIONES ESPECÍFICAS DE CARGADO, POR
FAVOR LEA LA HOJA DE INSTRUCCIONES QUE VIENE CON SU
CARGADOR.
Las baterías pueden ser afectadas por la temperatura. Su batería se
desempeñará mejor y tendrá una vida mas larga si se le carga donde la
temperatura sea entre 15° - 27°C (60°- 80°F). No cargue cuando la
temperatura está por debajo de 5°C (40°F) o por encima de 40°C
(105°F). Si lo hace en estas condiciones, reducirá la capacidad. Vea
“Mantenimiento”.
Como se quita la batería de la herramienta
Presione el botón de liberación y saque la batería.
de Power Plus de 12 voltios,
Fig. 2
Cat. No. 0516-20
2. Para una óptima distribución de peso y equilibrio.
Coloque la batería desde la parte posterior, presionando el botón de
liberación y deslizando la batería en el cuerpo de la herramienta.
Coloque la batería hasta que la grapa se accione.
Cómo se coloca la batería en la herramienta (Fig. 1 y 2)
La batería puede ser insertada en la herramienta de dos maneras.
Fig. 1
Cat. No. 0516-20
1. Para trabajar en espacios reducidos.
Coloque la batería desde el frente, presionando el botón de liberación,
deslizando la batería en la parte principal de la herramienta. Coloque la
batería hasta que la grapa se accione.
page 18

OPERACION
¡ADVERTENCIA!
Para reducir el riesgo de lesiónes, use
siempre lentes de proteccion.
Cómo utilizar el mandril sin llave (Fig. 3)
Siempre saque la batería o asegure el gatillo antes de insertar o sacar
las brocas.
Fig. 3
Camisa
1. Para abrir las garras del mandril, sostenga el collar mientras gira la
camisa en dirección contraria a las manecillas del reloj.
Cuando utilice las brocas para taladrar, deje que la broca toque el
fondo del mandril. Centre la broca en las garras del mandril y levántela
alrededor de 1,6mm (1/16") del fondo.
Cuando utilice las brocas para atornillar, inserte la broca lo
suficientemente lejos de las garras del mandril para tomar la parte
hexagonal de la broca.
2. Para cerrar las garras del mandril, sostenga el collar mientras gira la
camisa en la direción de las manecillas del reloj. Asegúrelas firmemente.
3. Para sacar la broca, sostenga el collar mientras gira la camisa en la
dirección opuesta a las manecillas del reloj.
Collar
Las especificaciones de torque aquí indicadas son valores aproximados
obtenidos con una batería cargada completamente.
Torque
0514-20
Posiciones 1 - 5
Posiciones 6 - 10
Posiciones 11 - 15
Posiciones 16 - 20
Taladro
Baja
Alta
NOTA: Debido a que los valores indicados arriba son sólo una guía,
utilice un pedazo de material de desecho para probar las diferentes
posiciones del embrague antes de colocar los tornillos en la pieza en que
va a trabajar.
Cómo seleccionar la velocidad (Fig. 5)
El selector de velocidad está en la parte superior de la carcasa del motor.
Deje que la herramienta se detenga completamente antes de cambiar de
velocidad. Ver “Aplicaciones” para las velocidades recomendadas bajo
distintas condiciones.
Fig. 5
0 - 1,6Nm
(0 - 14 plug. libra)
2,25 - 4,63Nm
(20 - 41 plug. libra)
5,2 - 6,78Nm
(46 - 60 plug. libra)
7,34 - 9,6Nm
(65 - 85 plug. libra)
39,5Nm
(350 plug. libra )
12,42Nm
(110 plug. libra)
Baja
Alta
0516-20
0 - 1,6Nm
(0 - 14 plug. libra)
2,25 - 4,63Nm
(20 - 41 plug. libra)
5,2 - 6,78Nm
(46 - 60 plug. libra)
7,34 - 9,6Nm
(65 - 85 plug. libra)
44Nm
(390 plug. libra )
14,69Nm
(130 plug. libra)
Uso del embrague (Fig. 4)
Esta herramienta tiene un embrague para atornillar los diferentes tipos
de tornillos en los diferentes tipos de materiales. Cuando es ajustado en
forma adecuada, el embrague se deslizará a un torque predeterminado
para prevenir el introducir el tornillo a mucha profundidad o evitar daños
al tornillo o a la herramienta.
Para ajustar el embrague, gire el anillo que ajusta el embrague a una de
las veinte posiciones indicadas en el anillo de ajuste.
Fig. 4
Anillo para ajustar el
embrague
Collar selector del
martillo perforador
Números de
positión
1. Para velocidad Baja (hasta 450 RPM), empuje el selector de velocidad
hacia atrás.Para velocidad.
2. Para velocida Alta (hasta 1 450 RPM), empuje el selector de velocidad
hacia adelante.
Selección dela acción de martillo o de solo taladro
(Cat. No. 0514-20 Solo.)
Los martillos-perforadores de empuje están disefiados para fucionar
con dos modos de operación: perforación con una acción de martillep y
perforación solamente. Para configurar el modo de operación, gire el
collarín de camio de modo al símbolo deseado. Un símbolo de un perforador
o un martillo aparecerá en la parte superior central del collar para indicar
el modo de operación.
1. Para utilzar el modo de perforación de martilleo, gire el
collarín de camio de modo hasta que aparezca el símbolo de un
martillo en la parte superior central del collar. Aplique presión en
la broca para activar el mecanismo de martilleo.
2. Para utilzar el modo de solemente perforación, gire el
collarín de camio de modo hasta que aparezca el símbolo
de un perforador en la parte superior central del collar.
NOTA: Si utiliza brocas de carburo, no utilice aqua para eliminar el polvo.
No utilice brocas de carburo para perforar varillas de refuerzo de acero.
Ambas acciones dafiarán el carburo.
page 19

Cómo utilizar el interruptor de control (Fig. 6)
El interruptor de control puede ser fijado en tres posiciones: adelante,
reversa y seguro. Debido al mecanismo de bloqueo, la palanca de reversa
sólo puede ser accionada cuando el interruputor ENCENDIDO/APAGADO
no está oprimido. Siempre espere a que el motor esté completamente
detenido antes de usar el interruptor de control.
Fig. 6
1
3
2
Rotación hacia adelante (en el sentido de las agujas del reloj), coloque
el interruptor de control en la posición izquierda (1).
Verifique la dirección de la rotación antes de usar la
herramienta.
Rotación opuesta (en el sentido contrario al de las agujas del reloj),
coloque el interruptor de control hacia la posición derecha (2).
Verifique la dirección de la rotación antes de usar la
herramienta.
Cómo trabar el gatillo, coloque el interruptor de control en el centro (3).
El gatillo no funcionará cuando el interruptor de control esté trabado
en el centro. Siempre trabe el gatillo o retire las pilas antes de realizar
mantenimiento, cambiar los accesorios, almacenar la herramienta o
cuando la herramienta no este en uso.
Cómo encender, detener y controlar la velocidad
1. Para encender la herramienta, tire el gatillo.
2. Para detener la herramienta suelte el gatillo y un freno eléctrico
detendrá la herramienta instantáneamente.
Todos los modelos se caracterizan por un gatillo de velocidad variable.
Para cambiar la velocidad, simplemente aumente o disminuya la presión
sobre el gatillo. Entre más presión en el gatillo, mayor será la velocidad.
Cómo taladrar
Coloque el anillo selector del embrague en la posición de taladro (Cat. No.
0514-20 solo.). Coloque la broca en la superficie del trabajo y aplique
una presión firme antes de iniciar. Si se aplica demasiada presión, se
frenará la broca y bajará la eficiencia del taladrado. Si se aplica muy
poca presión solo se logrará que la broca raspe la superficie del material, sin perforar, y se perderá el filo en la broca.
Si la herramienta se atasca, reduzca suavemente la presión para permitir
que la broca recupere velocidad. Si la broca se traba, invierta la marcha
del motor para liberar la broca del material en el cual se está trabajando.
APLICACIONES
¡ADVERTENCIA!
Para reducir el riesgo de una descarga
eléctrica, antes de empezar la
operación, inspeccione el area de
trabajo buscando tuberías o cables no
visibles.
Cómo taladrar en madera, materiales compuestos y plásticos
Al taladrar en madera, materiales compuestos o plásticos, comience
lentamente, aumentando gradualmente la velocidad, a medida que taladra.
Cuando taladre en madera, use brocas de de berbequí o brocas
convencionales. Siempre utilice brocas afiladas. Cuando utilice brocas
convencionales, saque frecuentemente la broca desde la perforación
para sacar la virutas desde las ranuras de la broca. Para reducir la
probabilidad de que la pieza se fragmente refuerce la pieza en que está
trabajando con un pedazo de madera. Cuando trabaje con plásticos,
seleccione una velocidad baja con un punto de fusión.
Perforando en metal
Cuando taladre en metal, use brocas de acero alta velocidad o brocas
sierras. Cuando taladre en metal, use una marca guía para iniciar la
perforación. Lubrique las brocas con aceite cuando taladre en acero o
hierro. Use un refrigerante cuando taladre metales no ferrosos como
cobre, latón o aluminio. Ponga un respaldo en el material para prevenir
que este se doble o distorsione al terminar el taladrado.
Cómo perforar el concreto
Cuando taladre en concreto, seleccione el modo de operación de martillo
perforador (Cat. No. 0514-20 solo.). Utilice una velocidad alta y brocas
con punta de carburo. Taladrar materiales suaves como bloques de
hormigón de escorias, requiere de muy poca presión. Materiales duros
como el concreto, requieren más presión. La forma de saber si se está
perforando a un ritmo adecuado viene dada por un flujo parejo y suave
de polvo. No permita que la borca gire en el agujero sin cortar. Ambas
acciones dañarán el carburo.
Colocando tornillos y tuercas
Taladre una perforación guía cuando vaya a atornillar tornillos dentro de
maderas o materiales duros. Coloque el anillo selector del embrague en
la posición correcta y ponga en Baja, el selector de velocidad. Use el tipo
y tamaño adecuado de punta para atornillar de acuerdo al tipo de tornillo
que se va a usar.
Con la punta colocada en el tornillo, coloque la punta de este en el
material y aplique una presión firme antes de jalar el gatillo. Los tornillos
pueden sacarse usando el motor en reversa.
Sobrecarga
Si se sobrecarga constantemente la herramienta, se le puede causar
daños permanentes a la misma o a la batería.
page 20

MANTENIMIENTO
¡ADVERTENCIA!
Para reducir el riesgo de una lesión,
desconecte siempre la herramienta antes de darle cualquier mantenimiento.
Nunca desarme la herramienta ni trate de
hacer modificaciones en el sistema
eléctrico de la misma. Acuda siempre a
un Centro de Servicio
todas las reparaciones.
Adopte un programa regular de mantenimiento y mantenga sus baterías
y cargador en buenas condiciones. Despues de 6 meses a un año,
dependiendo del uso dado, envíe su herramienta, batería y cargador, al
Centro de Servicio
• Lubricación
• Inspección y cambio de carbones
• Inspección mecánica y limpieza (engranes, flechas, baleros,
carcaza, etc.)
• Inspección eléctrica (batería, cargador, motor)
• Probarla para asegurar una adecuada operación mecánicay
eléctrica
Mantenimiento de la herramienta
Si la herramienta no arranca u opera a toda su potencia con una batería
completamente cargada, limpie, con una goma o borrador, los contactos
de la batería y de la herramienta. Si aun asi la herramienta no trabaja
correctamente, regrésela, con el cargador y la batería, a un centro de
servicio
MILWAUKEE
MILWAUKEE
para que sea reparada.
MILWAUKEE
mas cercano para que le hagan:
para
Limpieza
Limpie el polvo y suciedad de las ventilas del cargador y la herramienta.
Mantenga los mangos y empuñaduras limpios, secos y libres de aceite o
grasa. Use solo jabón neutro y un trapo húmedo para limpiar la herramienta,
batería y el cargador, ya que algunos substancias y solventes limpiadores
son dañinos a los plásticos y partes aislantes. Algunos de estos incluyen:
gasolina, turpentina,thíner, lacas, thíner para pinturas, solventes para
limpieza con cloro, amoníaco y detergentes caseros que tengan amonia.
Nunca usa solventes inflamables o combustibles cerca de una
herramienta.
¡ADVERTENCIA!
Para reducir el riesgo de una lesión,
descarga eléctrica o daño a la
herramienta, batería o cargador, nunca
los sumerja en líquidos ni permita que
estos fluyan dentro de los mismos.
Como Desechar las baterías de Níquel - Cadmio
Las baterías de Níquel - Cadmio son reciclables. Bajo ciertas leyes
estatales y locales, puede ser ilegal desechar las baterías en el drenaje
municipal. Deshágase de ellas de acuerdo a regulaciones federales,
estatales o locales.
Reparaciones
Si su herramienta, batería o cargador están dañados, envíela al centro
de servicio más cercano de los listados en la cubierta posterior de este
manual del operario.
Mantenimiento de las baterías
Las baterías
y / o cientos de ciclos, cuando son usadas y mantenidas de acuerdo a
las instrucciones.
Una batería que está guardada, sin usarse, por seis meses, se
descargará. Las baterías se descargan a razón de 1% por día. Con el
objeto de maximizar la vida de la batería, cárguela batería cada seis
meses aun si no la usa. No trabe el interruptor en la posición “ON”,
dejando la herramienta sin cuidados ya que se podría descargar la
batería a un grado tal que no podría volver a cargarse nunca mas. Use
una bateria
torque necesario para la aplicación requerida.
Almacene su batería en un sitio seco y fresco. No lo almcene donde las
temperaturas puedan exceder 50°C (120° F), como puede ser dentro de
un vehículo o un edificio metálico durante el verano. Las altas
temperaturas sobrecalentarán la batería, reduciendo la vida de la misma.
Si se le guarda por varios meses, la batería perderá su carga en forma
gradual. Se llevará entre uno y tres ciclos de carga y descarga con un
uso normal, para que se restablezca la capacidad total de la batería.
Durante la vida de la batería, el tiempo operativo de la misma se va
reduciendo. Si este tiempo operativo se vuelve demasiado corto luego
de una carga adecuada, significa que la vida útil de la batería ha sido
concluída y deberá cambiarse por una nueva.
MILWAUKEE
MILWAUKEE
de Níquel-Cadmio operarán por muchos años
hasta que ya no trabaje con la potencia y el
¡ADVERTENCIA!
Para reducir el riesgo de una explosión,
no queme nunca una batería, aun si está
dañada, “muerta” o completamente
descargada.
GARANTIA
Garantía de la batería
Las baterías para herramientas están garantizadas por un año a partir
de la fecha de compra.
Cada herramienta
y probada antes de ser empacada y despachada. En caso de que se
presente algún problema, favor de regresar la herramienta completa
(flete pagado) a nuestra oficina principal o a cualquiera de nuestros
centros de servicio autorizados. Si se encontrase que el problema es
causado por falla de orÍgen en alguna de sus partes o componentes, o
por fallas en la mano de obra al ser ensamblada, se reparará la
herramienta sin cargo y se le regresará (con flete pagado) a su
propietario.
Esta garantia pierde su validez cuando: (1) Las reparaciones o intentos
por reparar han sido realizados por personas ajenas a la Fábrica,
sucursal de Servicio o Taller Autorizado de Servicio
Requiere ser reparado por causas de uso y desgaste normal; (3) Se ha
abusado de la herramienta o esta ha sufrido algún accidente; (4) Hay un
mal uso evidente tal como el causado al sobrecargar la herramienta mas
alla de su capacidad mencionada; (5) La herramienta ha seguido siendo
usada luego de presentar fallas parciales; o (6) Se ha usado la herramienta
con un accesorio inadecuado. No se reconoce ninguna otra garantia ni
verbal ni escrita.
MILWAUKEE
ha sido minucionsamente inspeccionada
MILWAUKEE
; (2)
page 21

ACCESORIOS
¡ADVERTENCIA!
Cuando use herramientas eléctricas es
necesario siempre seguir ciertas
precauciones básicas de seguridad con el
objeto de reducir el riesgo de descargas
eléctricas o lesiones al operario.
Para una lista completa de accesorios, consulte el catálogo de Herramientas eléctricas
catálogo, sírvase ponerse en contacto con su distribuidor o centro de servicio local. Para saber la dirección de la localidad más cercana, consulte el
reverso de este manual del operario.
Batería de Power Plus de 14,4 Volt
Pueden usarse con los cargadores de
48-59-0231, 48-59-0241 y 48-59-0245.
1,7 Amps - Horas
Catálogo No. 48-11-1000
2,4 Amps - Horas
Catálogo No. 48-11-1024
Cargador de Power Plus de 120 Volt
Para cargar batería de 12 hasta 18 Volt de Power Plus.
Cargador Rápido
Catálogo No. 48-59-0241
Cargador 1 - Horas
Catálogo No. 48-59-0245
Juego de brocas convencionales
Juego de 13 Piezas
Catálogo No. 48-89-0030
Tamaños de 1,6mm hasta 6,4mm (1/16" hasta 1/4") en 64 avos.
MILWAUKEE
Catálogo No.
MILWAUKEE
Catálogo No.
48-11-1024
(Milwaukee Electric Tool). A fin de obtener un
Catálogo No.
48-59-0245
Juego de 15 Piezas
Catálogo No. 48-89-0020
Tamaños de 1,6mm hasta 13mm (1/16" hasta 1/2") en 32 avos.
Juego de 21 Piezas
Catálogo No. 48-89-0015
Tamaños de 1,6mm hasta 9,5mm (1/16" hasta 3/8") en 64 avos.
Juego de 29 Piezas
Catálogo No. 48-89-0010
Tamaños de 1,6mm hasta 13mm (1/16" hasta 1/2") en 64 avos.
Broqueros sin llave 13mm (1/2")
Catálogo No. 48-66-1400
Catálogo No. 48-66-1375
Con resistente caja, con uñas y cuerpo cubierto de níquel, resistentes al
polvo. Para taladros a batería de 13mm (1/2") - 20 hilos.
Juego de accesorios para taladro / atornillador
Catálogo No. 48-30-0101
Incluye un socket de 6,4mm (1/4"), una punta plana 6F-7R, una punta
Phillips #1 y una #2, brocas de 6,4mm y 5mm (1/4" y 3/16") y dos brocas
de 3,2mm (1/8").
Estuche plástico
Catálogo No. 48-55-3015
Catálogo No.
48-30-0101
Catálogo No.
48-89-0020
page 22

NOTES
NOTES
NOT AS
page 23

UNITED STATES
CANADA
MILWAUKEE Service
T o locate the
or authorized service station nearest you, call
factory
SERVICE CENTER
1-800-414-6527
TOLL FREE • NATIONWIDE
Monday-Friday • 8:00 AM - 4:30 PM • Local T ime
In addition, there is a worldwide network of distributors ready to
assist you. Check your “Yellow Pages” under “Tools—Electric”
for the names of those nearest you.
For further information on
or authorized service station locations,
visit our website at:
www.mil-electric-tool.com
factory
SERVICE CENTER
Service MILWAUKEE
Milwaukee Electric Tool (Canada) Ltd
755 Progress Avenue
Scarborough, Ontario M1H 2W7
Tel. (416) 439-4181
Fax: (416) 439-6210
En outre le réseau de distributeurs est à la disposition de la
clientèle d’un océan à l’autre. Consultez les pages jaunes de
l’annuaire téléphonique pour l’adresse du centre le plus près
de chez vous.
In addition, there is a worldwide network of distributors ready to
assist you. Check your “Yellow Pages”under “Tools—Electric”
for the names of those nearest you.
Corporate Product Service Support -
Warranty and Technical Information
Brookfield, Wisconsin USA
1-800-729-3878
WARNING! Some dust created by power sanding, sawing,
grinding, drilling, and other construction activities contains
chemicals known to cause cancer, birth defects or other reproductive harm. Some examples of these chemicals are:
• lead from lead-based paint
• crystalline silica from bricks and cement and other
masonry products, and
• arsenic and chromium from chemically-treated lumber.
Your risk from these exposures varies, depending on how
often you do this type of work. To reduce your exposure to
these chemicals: work in a well ventilated area, and work
with approved safety equipment, such as those dust masks
that are specially designed to filter out microscopic particles.
MEXICO
Servicios de MILWAUKEE
Milwaukee Electric T ool
División de : Atlas Copco Mexicana S.A. de C.V.
Blvd. Abraham Lincoln no. 13
Colonia Los Reyes Zona Industrial
Tlalnepantla, Edo. México C.P. 54073
Tels. 5565-1414 5565-4720 Fax: 5565-0925
Además se cuenta con una red nacional de distribuidores
listos para apoyarlo. V ea en las “Páginas Amarillas” sección
“Herramientas Eléctricas”.
MILWAUKEE ELECTRIC TOOL CORPORATION
A Company within the Atlas Copco Group
13135 West Lisbon Road • Brookfield, Wisconsin, U.S.A. 53005
58-14-1010d2 06/02 Printed in U.S.A.
 Loading...