

Milwaukee 6065, 6066, 6067, 6068, 6069 Operating Instructions Manual
...
Sanding Disc and Grinding Wheel Selection
Use sanding discs and grinding wheels that are:
• correct size as written on tool’s nameplate.
• correct wheel type and grit for the job.
• rated at or above the RPM on the tool’s nameplate.
Use backing pads, adapters, and other accessories that are:
• correct size for tool and for sanding disc or grinding
wheel.
• rated at or above the RPM listed in the “WARNING”
section on the tool’s nameplate.
• the proper accessory for the job.
Grit selection
The lower the grit number, the coarser the sanding disc or
grinding wheel is. Coarser sanding discs and grinding wheels
should be used for rough sanding and grinding and finer
sanding discs and grinding wheels should be used for finishing sanding and grinding.
Coarse grit sanding discs (grits of 60 and under) should be
used only on welds and hammer marks. Sanding discs of
80-grit should produce a suitable finish on most steel.
Sanding Disc and Grinding Wheel Material
Sanding discs and grinding wheels are made of various
materials and are designed for different jobs. Be sure that
you choose the proper sanding disc or grinding wheel for
the job you plan to do.
Care of Grinding Wheels
Grinding wheels should be protected from:
• wetness and extreme humidity.
• any type of solvent.
• extreme changes in temperature.
• dropping and bumping.
Grinding wheels should be stored:
• in an organized way so wheels can be removed with
out disturbing or damaging other wheels.
• with their safety information.
Grinding wheels should NOT be:
• dropped.
• rolled.
• bumped.
If any wheel is dropped, rolled, bumped, subjected to
extreme changes in temperature, or has come into contact
with solvents or wetness, discard wheel immediately.
Grinding Wheel Types
American National Standards Institute (ANSI) has developed a system of grinding wheel types. Each of these types
has its own guard style that should be used with the wheel.
Descriptions of the types that fit the MILWAUKEE grinders
follow below.
Milwaukee Tool
Heavy-Duty Sanders & Grinders
Model Numbers: 6065, 6066, 6067, 6068, 6069, 6070,
6095, 6096, 6098
Operating Instructions
Page 1
RenTrain INC
RenTrain INC
To reduce the risk of injury, always unplug tool
before attaching or removing accessories. Use
only specifically recommended accessories.
Others may be hazardous.
WARNING!
To reduce the risk of personal injury and damage to the
tool, use ONLY accessories rated at or above the RPM listed on the “WARNING” section of the tool’s nameplate.
WARNING!
To reduce the risk of injury, the operator should be
instructed in the use, care and protection of grinding
wheels.
WARNING!
ACCESSORY SELECTION
Grinding Wheel Types (Continued)
Type 27 grinding wheels are made with flat grinding surfaces
and are designed for side grinding (when held at a slight
angle to workpiece) as well as edge grinding (such as small
cutting-off or notching operations).
Type 27 grinding wheels can have a disposable hub where the
wheel is permanently attached to the threaded hub or they can
have a standard arbor hole which needs a hub adapter to fix it
to the spindle.
Type 28 grinding wheels are made with saucer-shaped grinding surfaces and are designed for side grinding (when held at a
slight angle to workpiece).
Type 11 grinding wheels are cup-shaped wheels made with flat
grinding surfaces (the rim of the cup) and are designed for side
grinding (when held at a slight angle to workpiece).
Installing Side Handle
Screw the side handle into gear case for right or left hand
operation.
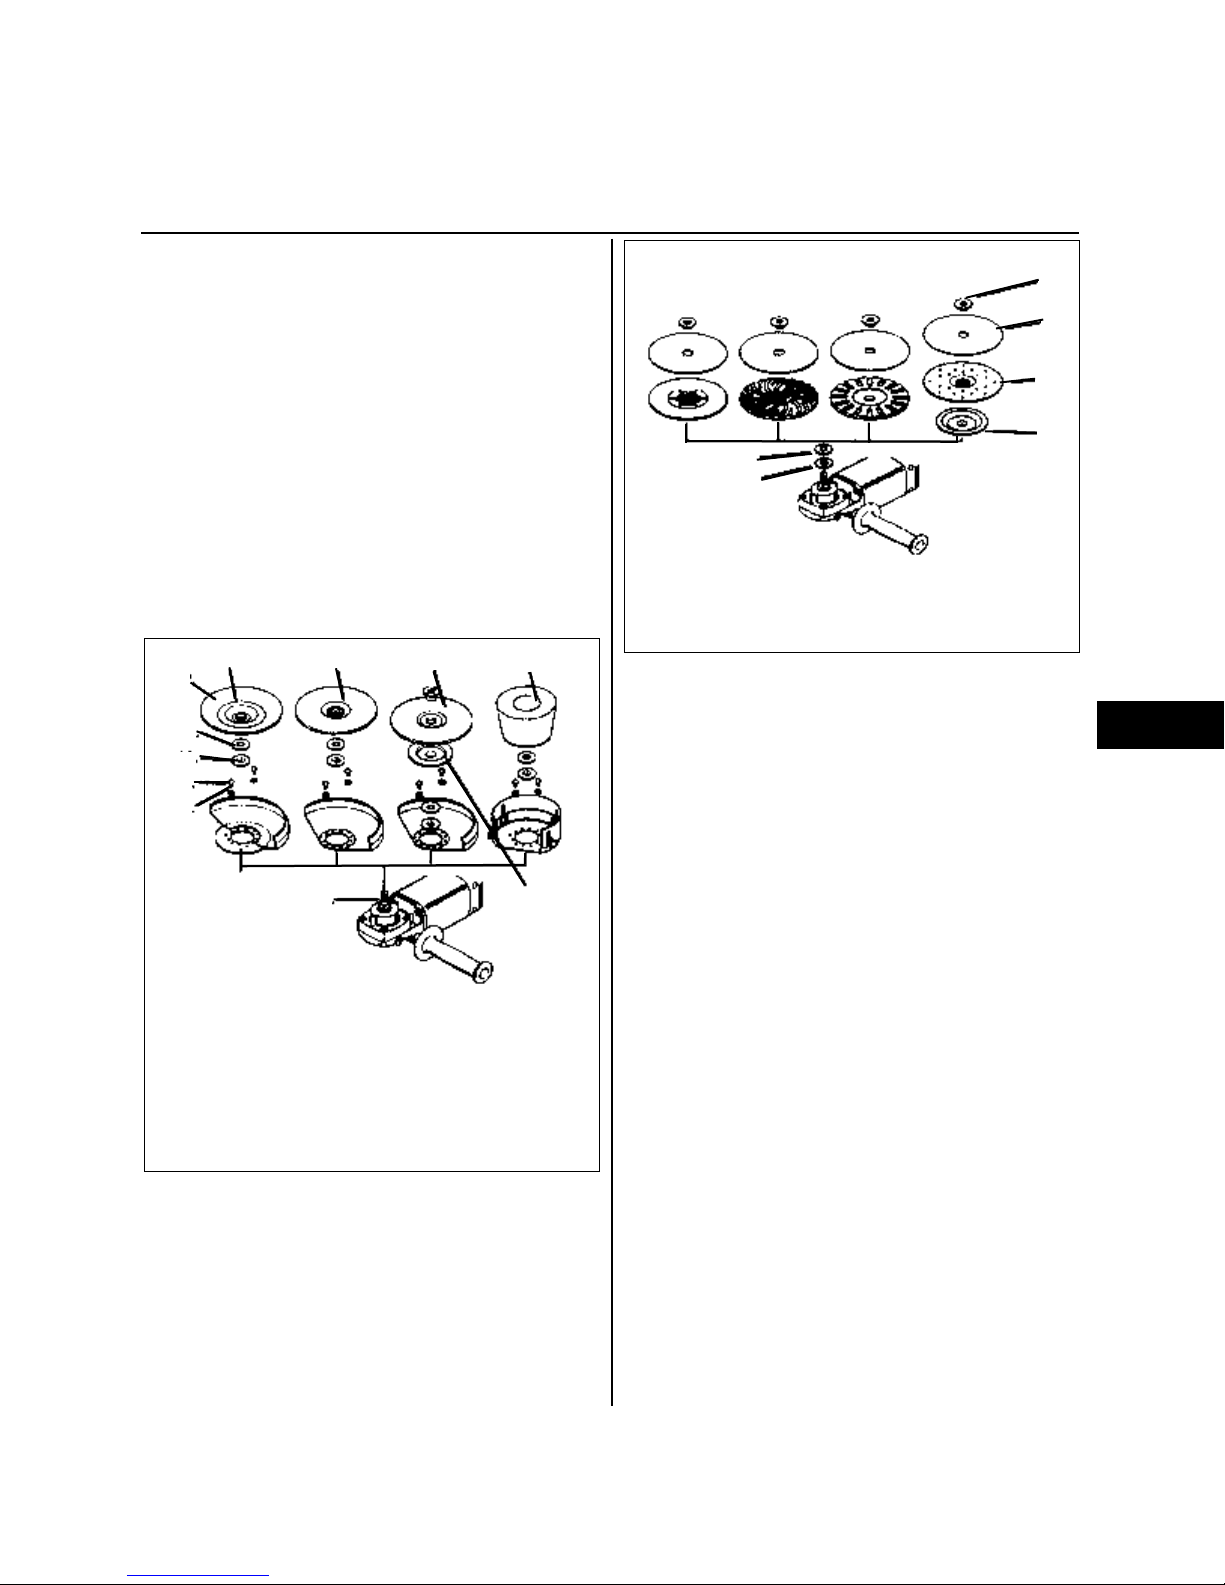
Installing Sanding Discs: (Fig. 2)
• Polypropylene Backing Pad Assembly,
• Spiral Design Backing Pad Assembly,
• Rubber Backing Pad Assembly, and
• Phenolic Disc Backing Pad Assembly
1. Unplug tool and lay it on its tool rest.
2. Slip flange over spindle with flat side up.
Make sure that it slides all the way down over the
squared off edges of the spindle.
3. Thread nylon washer all the way onto the spindle.
4. If installing the phenolic disc, slip smaller rubber pad
onto spindle.
5. Slip backing pad onto spindle.
6. Place sanding disc on backing pad so that the hole is
over the spindle.
7. Thread disc nut onto spindle threads.
8. Hold in spindle lock.
NOTE: You might have to rotate the baking pad and sanding
disc while holding in the spindle lock to engage
lock.
9. Hand-tighten backing pad, disc, and disc nut by hold-
ing outer edge of backing pad and disc and turning
them clockwise.
Installing Grinding Wheels (Fig 3.)
1. Unplug tool and lay it on its tool rest.
2. Place the grinding wheel guard over spindle and fasten
it to the lower half of the gear case with screws and
lock washers provided.
NOTE: Guard should be attached to the grinder so that the
operator is protected should the wheel break. The gray “operator zones” in Fig. 3 show the area protected by the guard.
See the diagram below.
3. Slip flange over spindle with flat side up.
Make sure that it slides all the way down over the
squared off edges of the spindle.
Operating Instructions (continued)
Page 2
RenTrain INC
RenTrain INC
1. Type 28 Wheel
2. Type 27 Wheel w/
disposable hub
3. Type 27 Wheel w/ tub adapter
4. Type 11Wheel
5. Hub Adapter
6. Spindle
7. Guard
8. Lock Washers
9. Screws
10. Flange
11. Nylon Washer
12. Grinding Wheel
1.
8.
9.
11.
10.
12.
2. 3.
4.
5.
6.
7.
Fig. 1
Fig. 2
1.
2.
3.
4.
5.
6.
1. Disc Nut
2. Sanding Disc
3. Backing Pad
4. Rubber Pad (for Phenolic Disc only)
5. Nylon Washer
6. Flange
 Loading...